iGo Pro JW200 - Smartwatch Forever - Free user manual and instructions
Find the device manual for free iGo Pro JW200 Forever in PDF.

| Product type | Smartwatch |
| Brand | Forever |
| Model | iGo Pro JW200 |
| Screen | 1.4-inch TFT touchscreen, 240x240 pixels |
| Water resistance | IP68 |
| Connectivity | Bluetooth 5.0 |
| Battery | Li-ion 3.7V / 160mAh |
| Battery life | Up to 10 days |
| Charging time | About 2 hours |
| Required operating system | Android 5.1+ / iOS 10.0+ |
| Sensors | Heart rate, temperature, accelerometer |
| Main functions | Pedometer, sleep, sports, notifications, music, stopwatch, relaxation, find phone |
| Sport modes | Walking, running, cycling, basketball, promenade |
| Companion app | Forever GoFit (Google Play / App Store) |
| Box contents | Watch, charging cable, manual |
| Care and cleaning | Clean with a soft dry cloth. Avoid solvents and chemicals. |
| Safety | Do not disassemble, do not expose to water temperatures >35°C, do not throw into fire. |
| Spare parts and repairability | Use only accessories provided by the manufacturer. Repair by authorized personnel. |
Frequently Asked Questions - iGo Pro JW200 Forever
User questions about iGo Pro JW200 Forever
0 question about this device. Answer the ones you know or ask your own.
Ask a new question about this device
Download the instructions for your Smartwatch in PDF format for free! Find your manual iGo Pro JW200 - Forever and take your electronic device back in hand. On this page are published all the documents necessary for the use of your device. iGo Pro JW200 by Forever.
USER MANUAL iGo Pro JW200 Forever
natural_image
Close-up of a black smartwatch with blue indicator lights and control buttons (no visible text or symbols)Thank you for buying the Forever brand product. Before use, read this instruction manual and keep it for future reference. Do not open the device on your own – any repairs should be carried out by a serviceman. Only use original parts and accessories supplied by the manufacturer. We hope that Forever will meet your expectations.
Description
- Touch interface
- Function button
- Temperature sensor
- Heart rate sensor
- Charging connector
Basic specification
Waterproofness: IP68
Battery capacity: 3.7V/160 mAh
Bluetooth: 5.0
Charging time: 2 hours
Standby time: up to 10 days
Display type: TFT
Display size: 1.4" 240*240 pixel
SAFETY NOTES:
- Avoid impacts between the device and hard objects since this may damage the device
- Avoid contact of the device with solvents or other chemicals
- Keep away from strong magnetic fields
- Avoid contact of the smartwatch with water if the water temperature exceeds 35°C
- Do not repair the device on your own
- Do not throw it into fire, there is a risk of explosion
First launching
When using the device for the first time, take it out of the package and charge it using the supplied charging cable. The device will turn on automatically after charging is completed. Date and time of the device will be automatically synchronized and set after establishing connection with a dedicated application via Bluetooth. Language of the device will be automatically adapted to the one set in the phone.
EN
To activate the smartwatch without connecting it to the charger, press and hold the touch button located below the display for 3 seconds.
Charging
Connect the device with the charging cable included in the kit. Make sure that the device and cable connectors are connected to each other, and then connect the USB cable to a power source.
After the charging process is complete, disconnect the smartwatch from the charging cable and disconnect the cable from the power source.
Turning the smartwatch on/off
Turning on: Press and hold the function button until the smartwatch turns on.
Turning off: Press and hold the function button until the device turns off. You can also go to the settings tab in the smartwatch menu and select the "Disable" option marked with the following symbol, and then confirm your choice.
„Forever GoFit" application installation
Find application called "Forever GoFit" in Google Play or App Store and install it.
NOTE: The operating system of the phone must have the following minimum specifications to run the application and support the smartwatch: Android 5.0 or higher / iOS 10.0 or higher
Connect the smartwatch with the phone
- Activate Bluetooth in your phone.
NOTE: To be able to use all functions of the application and the smartwatch, during the first launching, allow the application to access all required functions, and then also activate access to notifications.
-
Activate "Forever GoFit" in the phone. Start using the application as a "Guest" by clicking the upper right part of the screen or select "Register" and follow the steps below:
-
enter the email address you want to use to create an account
- press the button (obtain verification)
- a verification code, which must be entered in the indicated field, will be sent to your email
-
enter and remember your user password
-
After logging into the application, you will see the main screen, in which you should click button or select menu in the upper left corner.
-
Select the smartwatch model you want to connect with by clicking its picture:
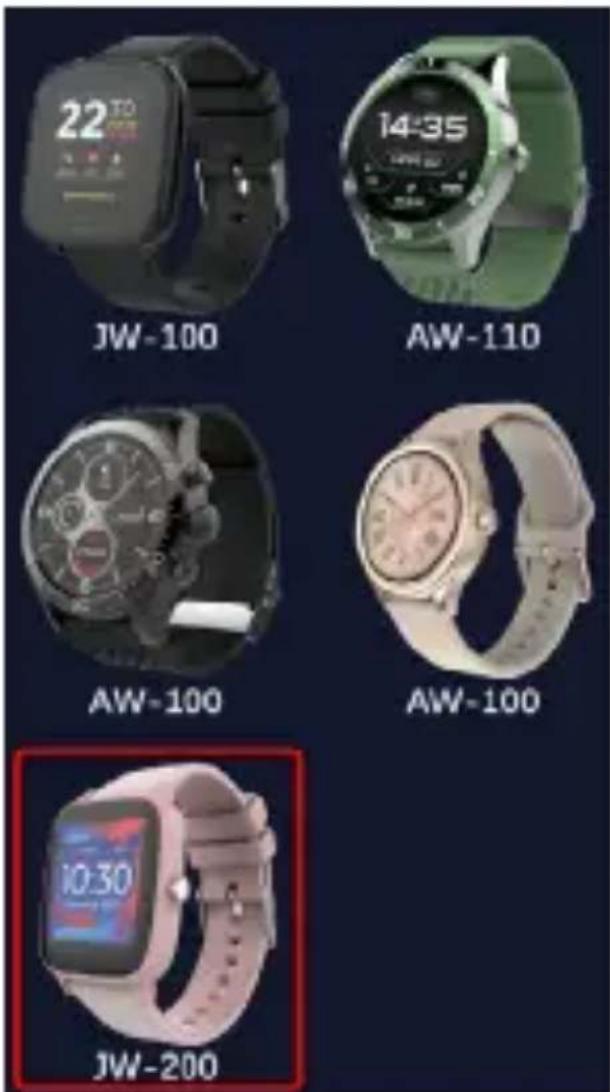
- Confirm the selected model by clicking "YES". If a wrong model has been selected, click "NO" and select the correct one.
- From the list of devices, select the Bluetooth name of your device and confirm the connection by selecting "YES". After a few seconds, it will connect and all data will be synced automatically. If automatic syn-
chronization does not take place, select the buton in the lower right corner of the screen to perform manual synchronization.
NOTE: To read the Bluetooth name of your device, go to the device settings and then choose the „System" tab.
Description of the application
User's profile information
After correct logging in and carrying out synchronization, press the menu button in the upper left corner, and then click the user name to enter the profile setting. Here, check whether all the data is correct. Providing actual data is necessary for correct operation of the algorithm that calculates your steps, calories and covered distance with the highest possible accuracy.
Description of the main panel
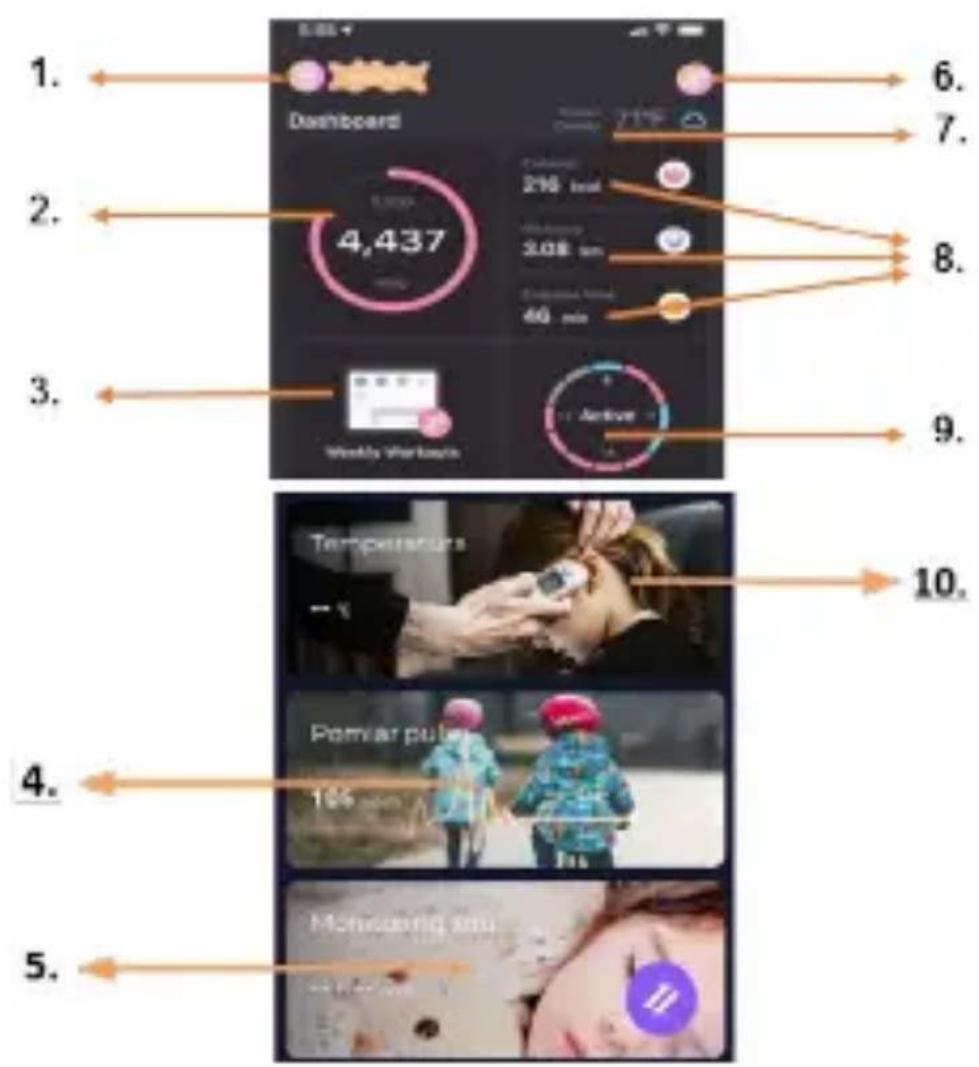
1. Menu button
Expands the user's panel that allows to carry out settings described in subsection 1.1
1.1 Settings
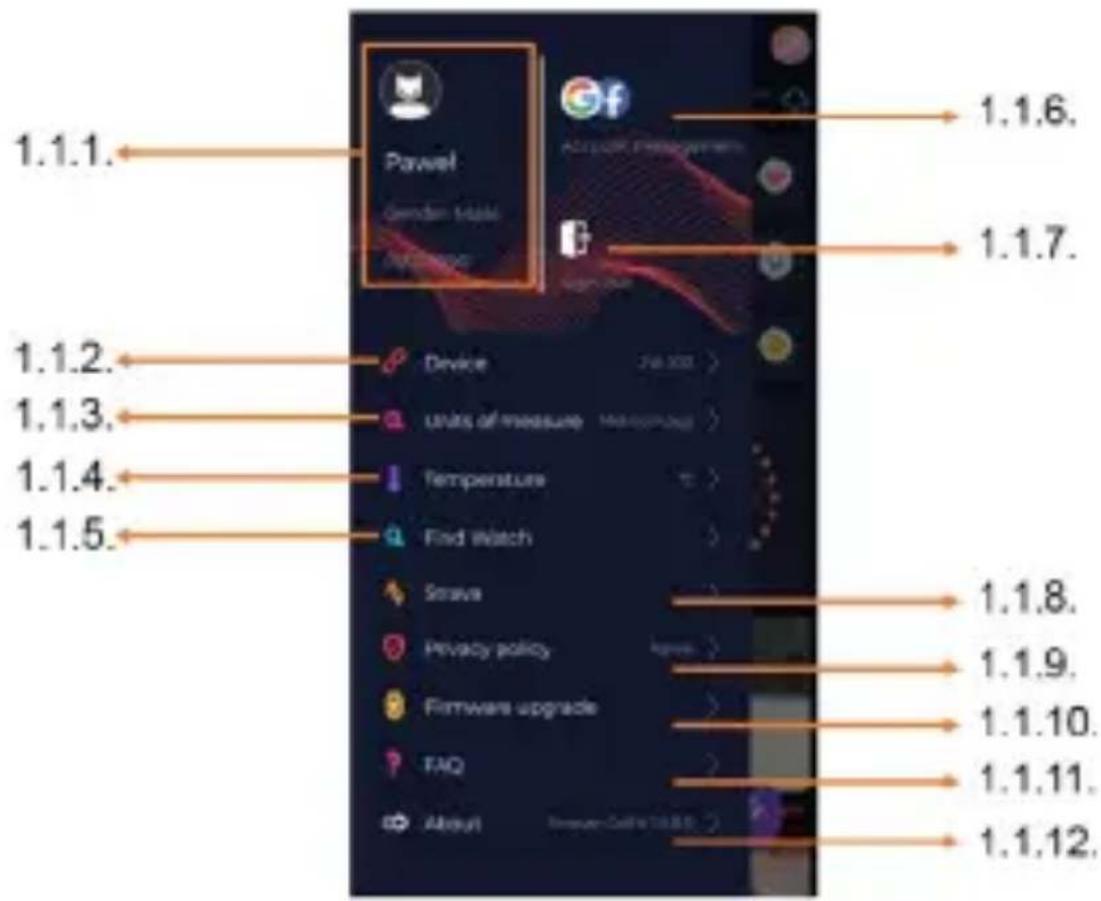
1.1.1. User's information
Click it to change settings, such as: profile photo, user name, sex, date of birth, height, weight, change password
1.1.2. Settings and functions of the device
Access to extended information, settings and functions of the smartwatch, such as: information regarding the date of last synchronization, information regarding the current version of the software, information regarding MAC number of the device, remote camera, alarm clock, schedule, notification regarding lack of exercise, do not disturb mode, automatic backlight of the screen via wrist movement, daily heart rate monitoring, time display system, notifications from the application, settings reset, disconnection of the smartwatch and the application
EN
1.1.3. Measurement units
Select the units of measurements you want to receive
1.1.4. Temperature
Select the temperature units used to show the current weather on the main screen
1.1.5. Find the smartwatch
Click to call the smartwatch, which will start to vibrate in order to notify you about its current location
1.1.6. Connection with Google and Facebook accounts
Connect the application with Google or Facebook account to enable sharing data gathered in the application
1.1.7. Logout
Click to logout from the currently used application account
1.1.8.Strava
It allows to connect with an account in Strava application and send information to the account from the smartwatch
1.1.9. Privacy policy
Read the privacy policy and accept it in order to protect your data
1.1.10. Update
Check if the smartwatch has the latest version of the software. If not, update you smartwatch to fully use all available functions.
1.1.11. FAQ
Most frequently asked questions and answers
1.1.12. Application information
Shows the current application version.
2. Number of steps
Shows the number of steps taken in a given day and the degree of completion of an assumed goal. Click to go to more detailed data or check its history.
3. Weekly trainings
Shows detailed data regarding trainings, broken down into particular
weeks.
4. Heart rate monitor
Readout of daily heart rate measurement and the dynamic heart rate.
The daily heart rate section is responsible for periodic measurements of the heart rate during the whole day. The smartwatch carries out automatic measurements after the user activates the function in the device settings.
5. Sleep monitoring
To carry out a measurement or sleep analysis, wear the smartwatch for the entire night. The device will prepare a sleep schedule based on the user's motions during sleep.
6. GPS sport mode
Measurement of the selected sports discipline, including recording of the route using the smartphone's built-in GPS module. Click the icon to go to the map, select the sport, and then press start to begin measurements.
7. Weather
Current weather in a given town
8. Calories, Distance, Exercise Time
Data collected from particular measurements from a given day. After clicking the requested measurement, we go to its history.
9. Activity
Shows activity during a given day, broken down into hours.
10. Temperature
Displays the latest body temperature measurement. After clicking, it shows the collected data from temperature measurements on individual days, distinguishing the highest and lowest temperature.
The smartwatch interface description
1. How to use

flowchart
graph LR
    A["Jigsaw"] --> B["2048"]
    B --> C["Basketball"]
    D["10:30"] --> E["Wednesday, 50:10"]
    E --> F["Home"]
    F --> G["AM 09:30"]
    G --> H["Sports"]
    H --> I["Heart rate"]
    H --> J["Temperature"]
- To turn the watch power on or off, press and hold the function button.
- You can raise your hand or press the function button to turn on the screen.
- Go to menu: Slide from right to left in the watch face interface.
- Select a function: Slide right and left in the menu and then tap the icon.
- Confirm: Tap the icon.
- Select game: Swipe the watch face interface from left to the right on mine screen.
- Undo: Swipe the watch interface from left to right.
- Return to the watch face: Briefly press the function button in any interface.
| Watch face interface | If you want to change the watch face of your smart watch, press and hold the current watch face, then slide left or right to go through the different watch faces and choose the one you like. |
Daily Activity | The device automatically calculates your daily activity data.Tap the „Daily Activity” icon to check the number of steps, distance traveled and calories burned for the day. |
Sport Select | the „Sports” icon to enter a selection of sports. The smartwatch offers 5 sports modes: walking, running, cycling, basketball. Select the sport you want and then start exercising. The smartwatch will record training data. |
Heart rate monitor | Select the „Heart rate” icon to start heart rate measurement. Once the interface is entered, the measurement will start. During the measurement, the interface value will be zero. After the measurement is completed, the value will be displayed. After the data is synchronized, you can check the measurement history in the app. |
Temperature | To start measuring skin and body temperature, press the „Thermometer” icon and wait for the device to take the measurement. The measurement time is 60 seconds, after which the smartwatch will vibrate and the results will appear on the screen. The data on the left side is the temperature of the skin surface, it is changed in real time. There is body temperature data on the right side, it will display „---” during the measurement, and the result will be shown on successful completion.NOTE: During testing body temperature, environment temperature requires within 18-30°C. |
Weather If the | smartwatch is connected to the “Fo-rever GoFit” app via Bluetooth, it will display the current weather forecast. |

Messages | If the device is connected with a smartphone, after selecting the "Messages" icon, the smartwatch will display the latest incoming messages and notifications. |
Sleep | The smartwatch automatically monitors sleep from 21:30 to 12:00. After waking up the next day, the smartwatch will display the total number of hours slept. If the smartwatch is connected to the "Forever GoFit" app via Bluetooth, you can check the more detailed sleep report in the app. |
Music | After connecting the device to your smart-phone, you can control music with it. You can select the previous / next song, adjust the volume and also play / stop music. |
Timer | Tap the „Timer” icon to start the stopwatch or timer function. |
Find phone | If the device is connected to the application, you can use the „Find phone” function. When you select the function, your phone will ring and activate vibrations. |
Relax | By clicking the „Relax” icon you will turn on the breathing exercise function. |
Setting | Language: Select the language for the device interface.Screen: Set the watch face, brightness, screen timeout, and smart wake up feature.Do not disturb mode: enable / disable the mode.Vibration intensity: Select a vibration intensity level.System: Display device information, shutdown and device reset function. |
| The maximum radiated radio frequency power in the frequency range | |
| Frequency range Bluetooth 2402 | -2480 MHz |
| Maximum emitted power 4 dBm | |
Proper disposal of used equipment
This device is marked with a crossed-out garbage container symbol, in accordance with the European Directive 2012/19/EU on Waste Electrical and Electronic Equipment (WEEE). Products marked with this symbol should not be disposed of or discarded with other household waste at the end of their service life. The user is obliged to dispose of waste electrical and electronic equipment by delivering it to a designated point, where such hazardous waste is recycled. The collection of this type of waste in separate locations and the proper recovery process contributes to the conservation of natural resources. Proper recycling of waste electrical and electronic equipment is beneficial to human health and environment. For information on where and how to dispose of used electronic equipment in an environmentally safe manner, the user should contact the relevant local authority, the collection point or the point of sale where the equipment was purchased.
Proper disposal of used battery

In accordance with EU Directive 2006/66/EC, as amended by Directive 2013/56/EU on the disposal of batteries, this product is marked with a crossed-out garbage container symbol. This symbol means that the batteries used in this product should not be disposed of with ordinary household waste, but handled in accordance with the directive and local regulations. Do not dispose of batteries with unsorted municipal waste. Battery users must use available collection network for these items, that allows for their return, recycling and disposal. Within the EU, the collection and recycling of batteries is governed by separate procedures. To learn more about existing battery recycling procedures in your area, contact your city hall, waste management agency or landfill.
Declaration of Conformity with European Union Directives

TelForceOne Sp. z o.o. hereby declares that the device JW-200 IGO PRO is in compliance with Directive 2014/53/EU. The full text of the EU Declaration of Conformity is available at the following web address: https://
www.manual.forever.eu/JW200
flowchart
graph LR
    A["Jigsaw"] --> B["2048"]
    B --> C["Basketball"]
    D["10:30 Wednesday, 30:10"] --> E["Home AM 09:10"]
    E --> F["Daily activity Sports"]
    E --> G["Heart rate Temperature"]
flowchart
graph LR
    A["Jigsaw"] --> B["2048"]
    B --> C["Basketball"]
    D["10:30"] --> E["Wednesday, 30:10"]
    E --> F["Home"]
    F --> G["AM 09:30"]
    G --> H["Daily activity"]
    G --> I["Sports"]
    G --> J["Heart rate"]
    G --> K["Temperature"]
Declaration of Conformity with European Union Directives

flowchart
graph LR
    A["Jigsaw 2048 Basketball"] <--> B["10:30 Wednesday 30.10"]
    B --> C["Home AM 09:30"]
    C --> D["Daily activity Sports Heart rate Temperature"]
flowchart
graph LR
    A["Jigsaw 2048 Basketball"] <--> B["10:30 Wednesday 50:10"]
    B --> C["Horse AM 09:10 Daily activity Sports Heart rate Temperature"]
flowchart
graph LR
    A["Jigsaw"] --> B["2048"]
    B --> C["Basketball"]
    D["15:00 - 8:00"] --> E["10:30 Wednesday, 30:10"]
    E --> F["Home AM 09:30"]
    F --> G["Daily activity Sports"]
    F --> H["Heart rate Temperature"]
flowchart
graph LR
    A["Jigsaw"] --> B["2048"]
    B --> C["Basketball"]
    D["10:30 Wednesday, 30:10"] --> E["Home AM 09:30"]
    E --> F["Daily activity Sports"]
    E --> G["Heart rate Temperature"]

flowchart
graph LR
    A["Jigsaw"] --> B["2048"]
    B --> C["Basketball"]
    D["15500 850"] --> E["10:30 Wednesday 30:10"]
    E --> F["Home AM 09:30"]
    G["Daily activity Sports"] --> H["Heart rate Temperature"]
flowchart
graph LR
    A["Jigsaw"] --> B["2048"]
    B --> C["Basketball"]
    D["10:30"] --> E["Wednesday, 30:10"]
    E --> F["Home AM 09:30"]
    G["Daily activity Sports"] --> H["Heart rate Temperature"]

flowchart
graph LR
    A["Jigsaw"] --> B["2048"]
    B --> C["Basketball"]
    D["10:30"] --> E["Wednesday, 30:10"]
    E --> F["Home AM 09:30"]
    F --> G["Daily activity Sports"]
    F --> H["Heart rate Temperature"]
APPLICATIE BESCHRIJVING
flowchart
graph LR
    A["Jigsaw"] --> B["2048"]
    B --> C["Basketball"]
    D["10:30\nWednesday, 30:10"] --> E["Home AM 09:30\nDaily activity Sports\nHeart rate Temperature"]
flowchart
graph LR
    A["Jigsaw"] --> B["2048"]
    B --> C["Basketball"]
    D["15:00"] --> E["10:30 Wednesday, 30:10"]
    E --> F["Heart rate"]
    E --> G["Temperature"]
    H["Daily activity"] --> I["Sports"]
    I --> F
flowchart
graph LR
    A["Jigsaw"] --> B["2048"]
    B --> C["Basketball"]
    D["15:00 - 8:50"] --> E["10:30 Wednesday, 50:10"]
    E --> F["Home AM 09:30"]
    G["Daily activity Sports"] --> H["Heart rate Temperature"]
flowchart
graph LR
    A["2048"] --> B["Wednesday, 30:10"]
    B --> C["10:30"]
    C --> D["Home, AM 09:30"]
This device is marked with a crossed-out garbage container symbol, in accordance with the European Directive 2012/19/EU on Waste Electrical and Electronic Equipment (WEEE). Products marked with this symbol should not be disposed of or discarded with other household waste at the end of their service life. The user is obliged to dispose of waste electrical and electronic equipment by delivering it to a designated point, where such hazardous waste is recycled. The collection of this type of waste in separate locations and the proper recovery process contributes to the conservation of natural resources. Proper recycling of waste electrical and electronic equipment is beneficial to human health and environment. For information on where and how to dispose of used electronic equipment in an environmentally safe manner, the user should contact the relevant
SK
local authority, the collection point or the point of sale where the equipment was purchased.