Spin 360 GTI - Car seat Joie - Free user manual and instructions
Find the device manual for free Spin 360 GTI Joie in PDF.
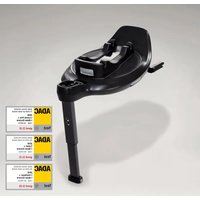
| Product Type | Car seat with ISOFIX base |
| Brand | Joie |
| Model | Spin 360 GTI |
| Standard | i-Size (R129) |
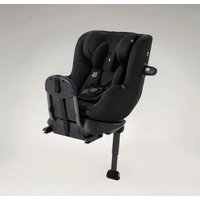
| Use | Rearward-facing and forward-facing |
| Child height (rear-facing) | 40-105 cm / max 19.5 kg |
| Child height (forward-facing) | 76-105 cm / max 19.5 kg |
| Recommended age (rear-facing) | From birth to approx. 4 years |
| Recommended age (forward-facing) | 15 months to approx. 4 years |
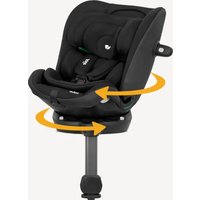
| Rotation | 360° |
| Recline | 5 positions in each direction |
| Side protection | Removable, to be placed on door side |
| Support leg | With lock indicator (green/red) |
| ISOFIX connectors | 2 connectors, 10 adjustable positions |
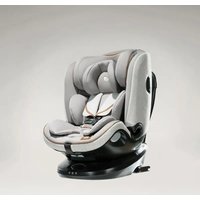
| Infant insert | Included, for children < 60 cm |
| Headrest | 6 adjustable positions |
| Power supply | None (mechanical device) |
| Care | Cold wash (< 30°C), dry in shade, do not iron or bleach |
| Materials | Plastic, metal, fabric |
| Storage compartment | Under the base for the manual |
| Warranty | See joiebaby.com |
Frequently Asked Questions - Spin 360 GTI Joie
User questions about Spin 360 GTI Joie
0 question about this device. Answer the ones you know or ask your own.
Ask a new question about this device
Download the instructions for your Car seat in PDF format for free! Find your manual Spin 360 GTI - Joie and take your electronic device back in hand. On this page are published all the documents necessary for the use of your device. Spin 360 GTI by Joie.
USER MANUAL Spin 360 GTI Joie
enhanced child restraint
GB Instruction Manual
FR Manuel d'instructions
DE Bedienungsanleitung
NL Instructiehandleiding
IT Manuale di istruzioni
ES Manual de instrucciones
PT Manual de instruções
PL Instrukcja obsługi
cz Návod k obsluze
SK Návod na použitie
SL Navodila za uporabo
RU Руководство по эксплуатации
DA Brugervejledning
HU Használati utasítás
RO Manual de instructiuni
EL Εγχειρίδιο οδηγιών χρήσης
TR Kullanım Kılavuzu
AR دليل التعليمات
HR Upute za uporabu
sv Bruksanvisning
NO Instruksjonsbok
Fl Käyttöopas
natural_image
Simple icon of a person relaxing with a child, enclosed in a rounded square frame (no text or symbols)ECE R129: i-Size
natural_image
Line drawing of a raincoat car seat assembly (no text or symbols)GB
Welcome to Joie™
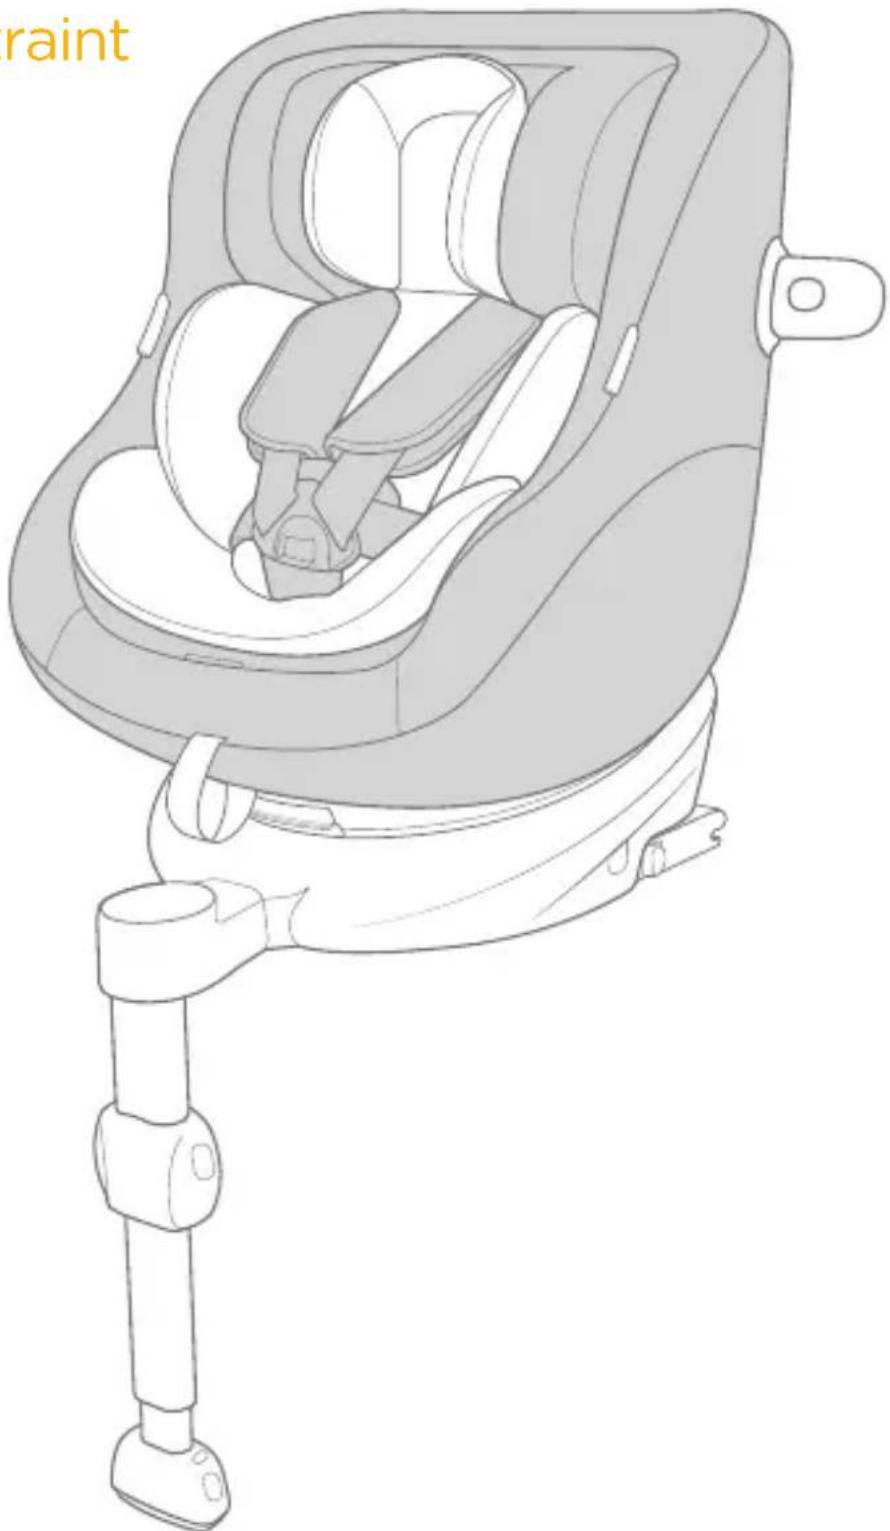
Congratulations on becoming part of the Joie family! We are so excited to be part of your journey with your little one. While traveling with the Joie spin 360™ GTi enhanced child restraint you are using a high quality, fully certified safety i-Size enhanced child restraint. Please carefully read this manual and follow each step to ensure a comfortable ride and best protection for your child.
To use this Joie enhanced child restraint with the i-Size ISOFIX connections according to the ECE R129 Regulation, your child must meet the following requirements.
Rearward Facing: Child height 40cm-105cm/ max. 19.5kg; Forward Facing: Child height 76cm-105cm/ max. 19.5kg;
Base
Please read all the instructions in this manual before installing and using the product.
IMPORTANT: KEEP FOR FUTURE REFERENCE, PLEASE READ CAREFULLY.
Please keep the instruction manual in the storage compartment at the bottom of the base as right figure.
For warranty information, please visit our website at joiebaby.com
natural_image
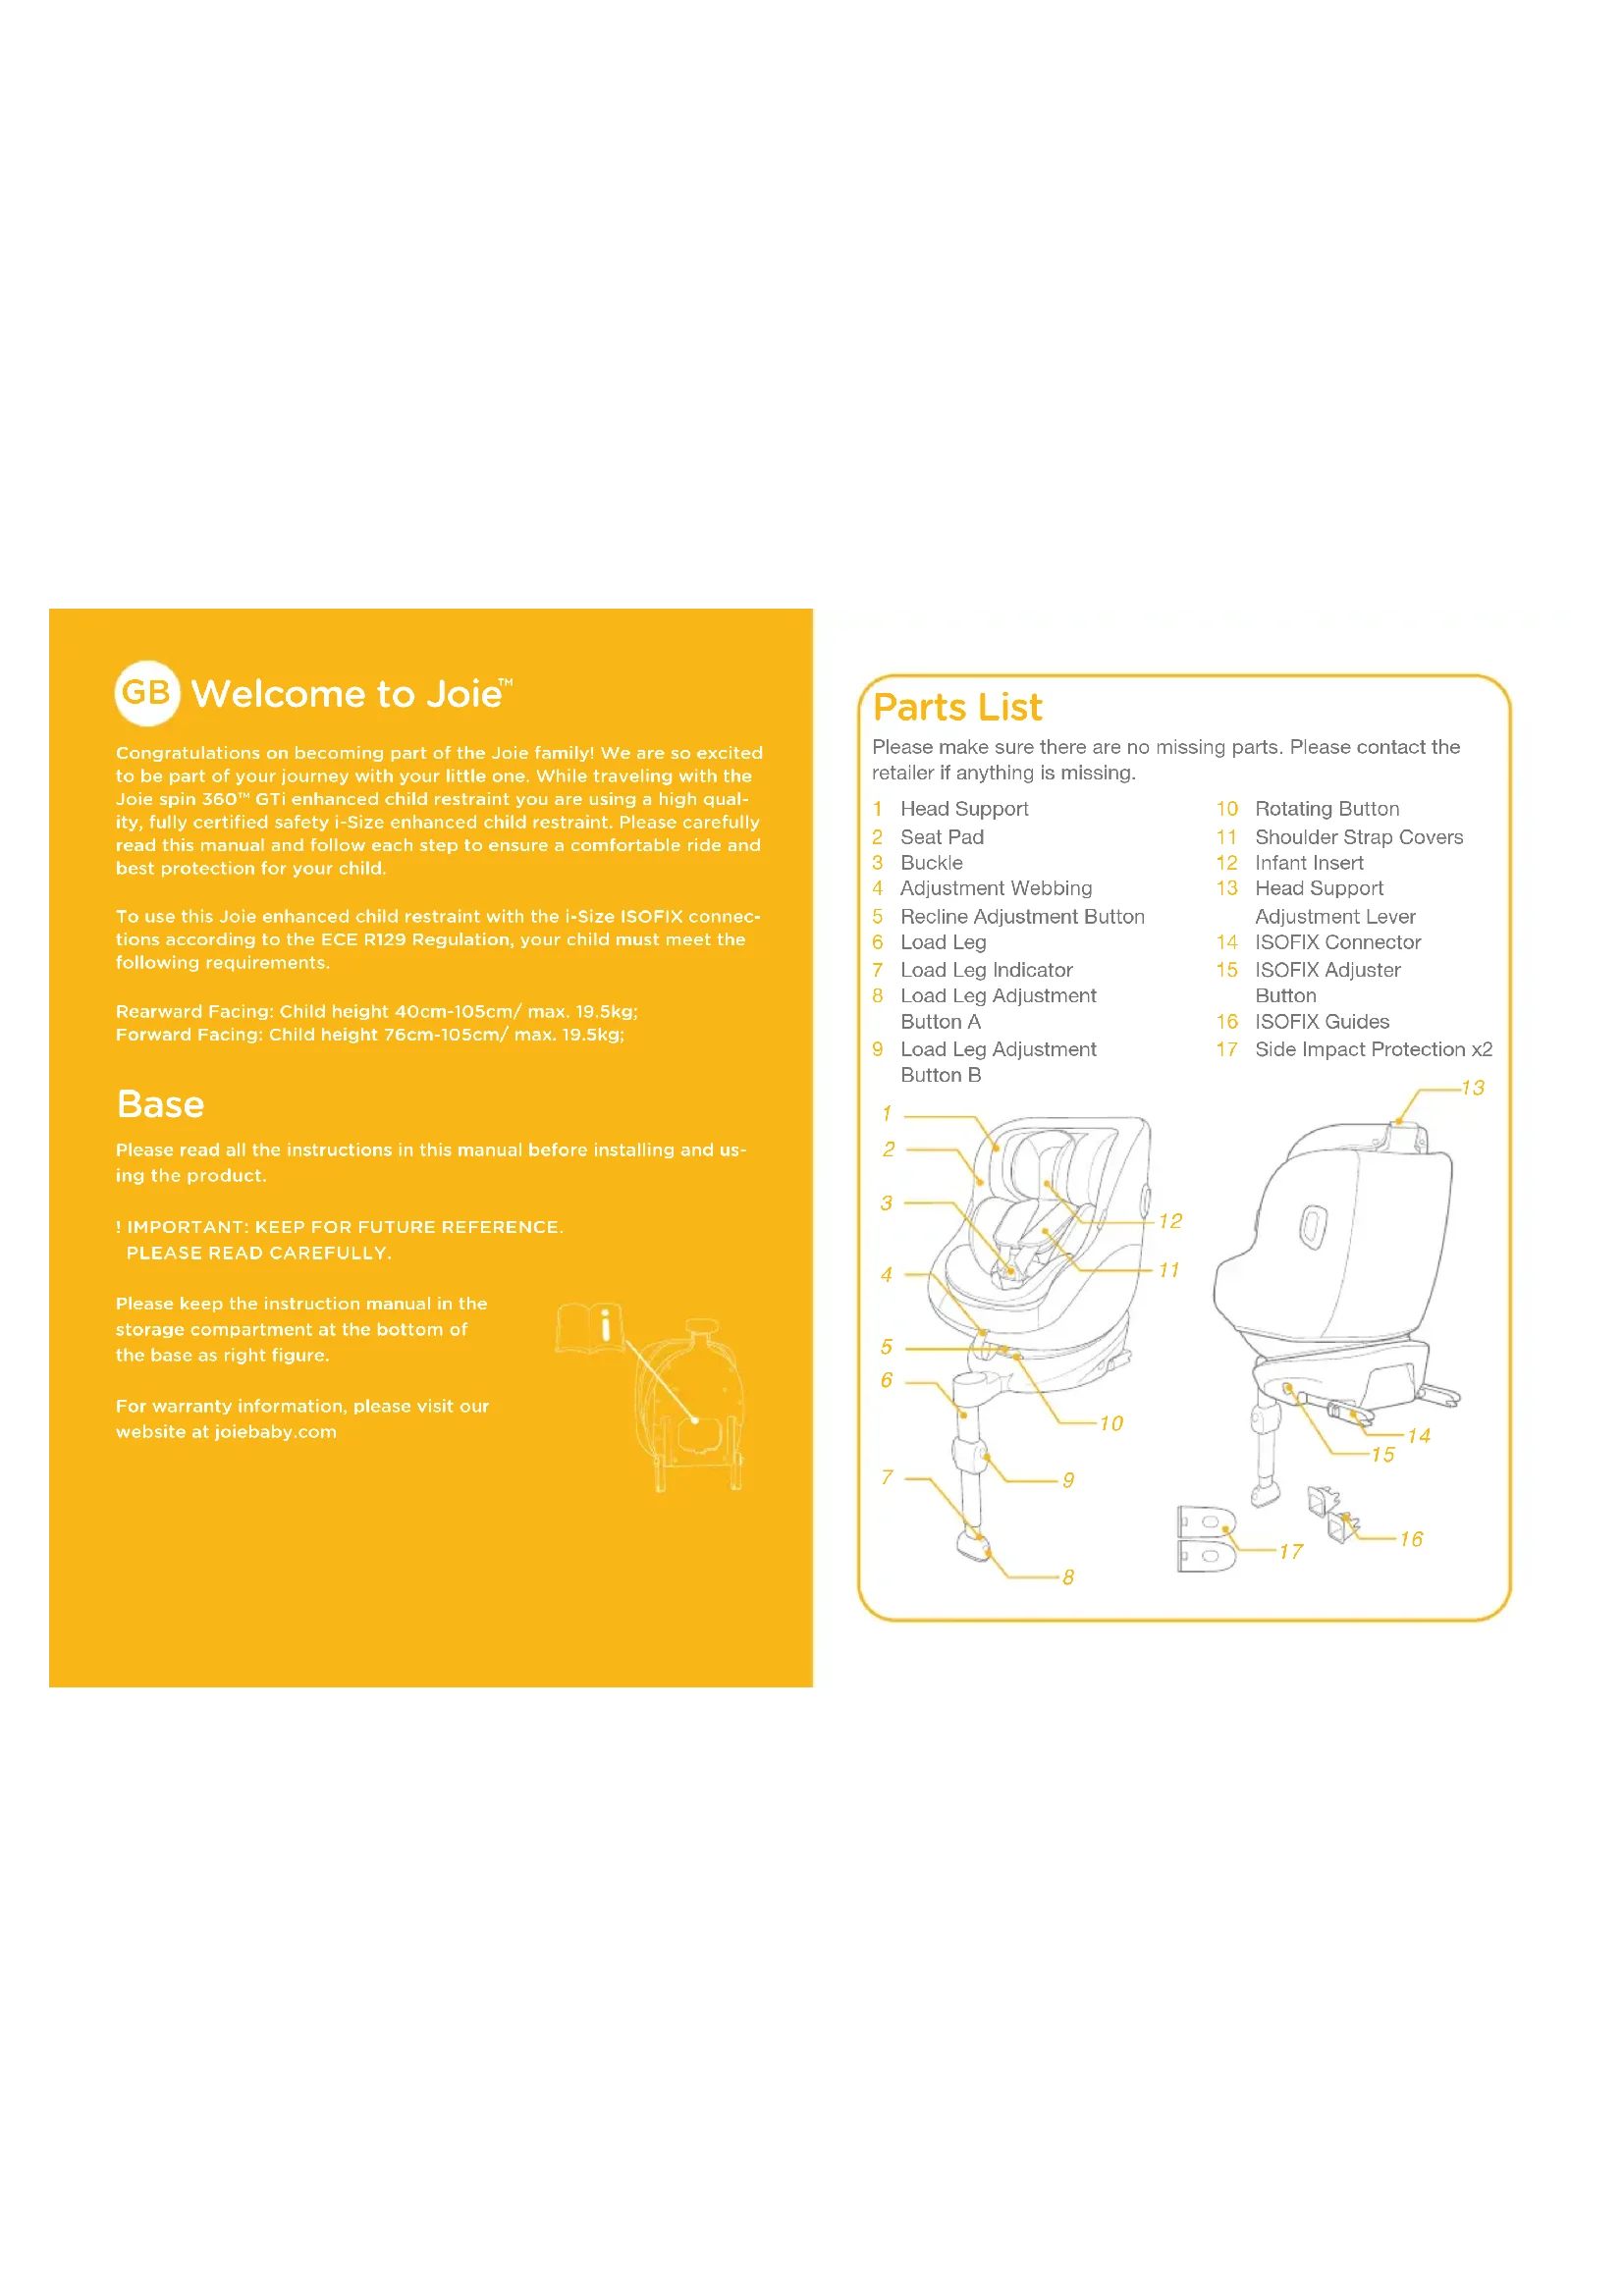
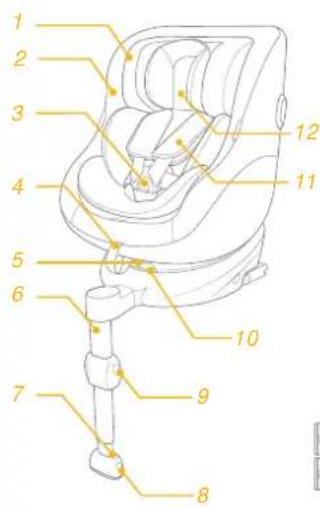
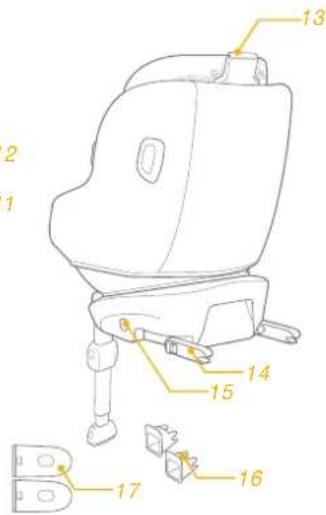
Simple line drawing of a book and a lamp on a chair against a solid orange background (no text or symbols)Parts List
Please make sure there are no missing parts. Please contact the retailer if anything is missing.
1 Head Support
2 Seat Pad
3 Buckle
4 Adjustment Webbing
5 Recline Adjustment Button
6 Load Leg
7 Load Leg Indicator
8 Load Leg Adjustment Button A
9 Load Leg Adjustment Button B
text_image
Labeled diagram of a car seat with numbered parts for identification10 Rotating Button
11 Shoulder Strap Covers
12 Infant Insert
13 Head Support Adjustment Lever
14 ISOFIX Connector
15 ISOFIX Adjuster Button
16 ISOFIX Guides
17 Side Impact Protection x2
text_image
Technical diagram of a device with numbered parts labeled 1 to 17, likely for assembly or labeling purposes.WARNING
! BE cautious that the rigid items and plastic parts of the enhanced child restraint system shall be so located and installed that they are not liable to become trapped by a movable seat or in the door of the vehicle.
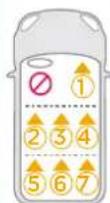
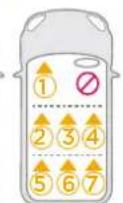
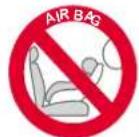
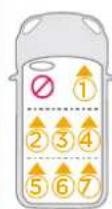
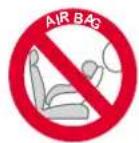
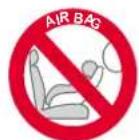
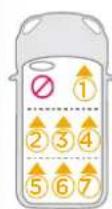
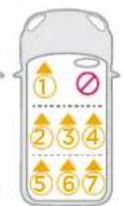
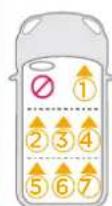
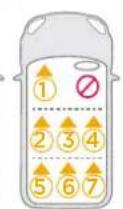
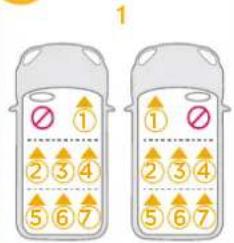
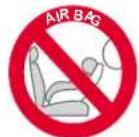
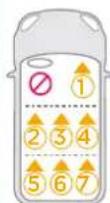
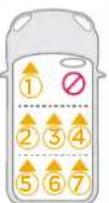
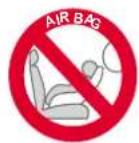
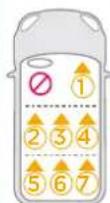
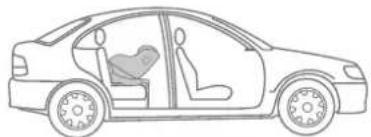
! DO NOT use the rearward facing enhanced child restraint systems in seating positions where there is an active frontal airbag installed.
! To use this enhanced child restraint according to the UN Regulation No.129, your child must meet the following requirements.
! Rearward Facing: Child height 40cm -105cm / max. 19.5kg
! Forward Facing: Child height 76cm - 105cm / max. 19.5kg
IMPORTANT - DO NOT USE FORWARD FACING BEFORE THE CHILD'S AGE EXCEEDS 15 MONTHS (Refer to instructions).
! The enhanced child restraint may not fit in all approved vehicles. Please refer to the fitting list included for more details.
! Any straps restraining the child should be adjusted to the child's body, and that straps should not be twisted.
WARNING
! After your child is placed in this enhanced child restraint, the safety belt must be used correctly. Ensure that any lap strap is worn low down, so that the pelvis is firmly engaged, shall be stressed.
This enhanced child restraint should be replaced when it has been subject to violent stresses in an accident. An accident can cause damage to it that you cannot see.
! Consider the danger of making any alterations or additions to the device without approval of the adequate authority, and the danger of not following closely to the installation instructions provided by the enhanced child restraint manufacturer.
Please keep this enhanced child restraint away from sunlight, otherwise it may be too hot for child's skin. Always touch the enhanced child restraint before placing child in it.
! NEVER leave your child unattended with this enhanced child restraint.
! Any luggage or other objects liable to cause injuries in the event of a collision shall be properly secured.
! The enhanced child restraint system shall NOT BE USED without the soft goods.
! The soft goods should not be replaced with any other than the one recommended by the manufacturer, because the soft goods constitutes an integral part of the restraint performance.
WARNING
! Please check if this enhanced child restraint can be installed properly in your vehicle before you purchase it.
NO enhanced child restraint can guarantee full protection from injury in an accident. However, proper use of this enhanced child restraint will reduce the risk of serious injury or death to your child.
! DO NOT install this enhanced child restraint without following the instructions in this manual or you may put your child at serious risk of injury or death. The user shall also be referred to the vehicle manufacturer's handbook.
! DO NOT use this enhanced child restraint if it has damaged or missing parts.
DO NOT have your child in large/oversized clothes because this may prevent your child from being, properly and securely fastened by the shoulder harness straps and the crotch strap between the legs.
Emergency
In case of emergency or accidents, it is most important to have your child taken care of with first aid and medical treatment immediately.
Product Information
- This is an i-Size Enhanced Child Restraint System. It is approved according to UN Regulation No.129, for use in, i-Size compatible vehicle seating positions as indicated by vehicle manufacturers in the vehicle users' manual.
- If in doubt, consult either the Enhanced Child Restraint System manufacturer or the retailer.
Materials Plastics, metal, fabrics
Patent No. Patents pending
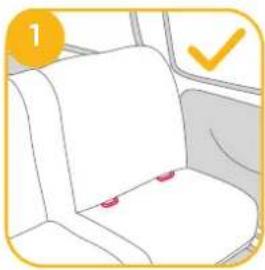
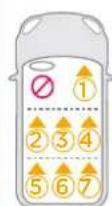
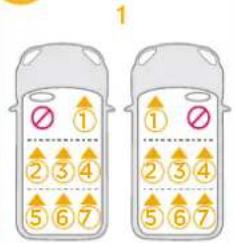
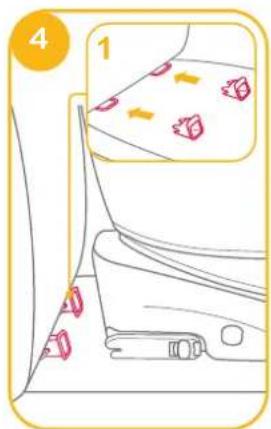
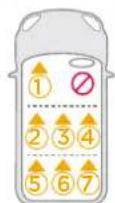
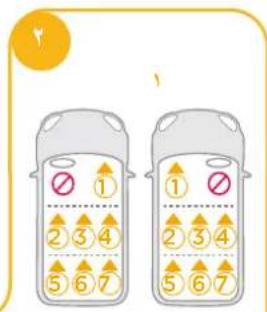
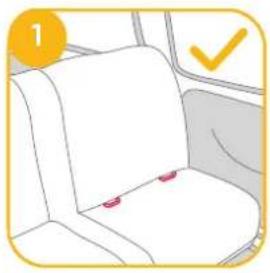
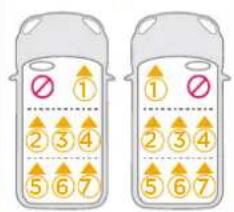
Concerns on Installation
see images 1 - 2
natural_image
Illustration of a car seat with red buttons and a checkmark (no text or symbols)2
1
3

natural_image
Line drawing of a car showing a person seated inside the dashboard and seatbelt (no text or symbols)2
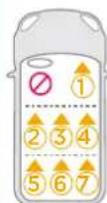
Choose the Installation Mode
| ECE R129 | Child's Size | Installation Mode | Installation | Reference Age | Recline Position |
| 40cm-105cm/≤19.5kg | Rear Facing mode | 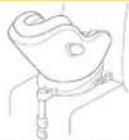 | Approx birth to 4 years | Position 1-5 | |
| 76cm-105cm/≤19.5kg | Forward Facing mode | 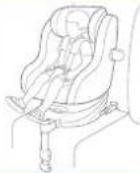 | 15 months to approx 4 years | Position 1-5 |
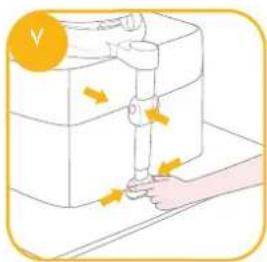
Installing the Base
see images ③ - ⑫
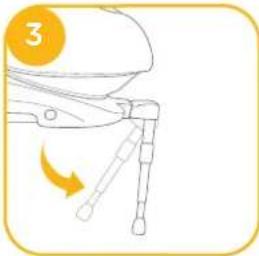
! After placing the base on the vehicle seat, pull the load leg downward to floor.
natural_image
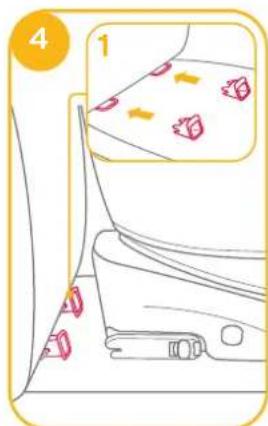
Illustration of a robotic arm with legs and limbs, showing motion direction (no text or symbols)! Insert ISOFIX guides to assist with installation. 4 -1
! There are 10 adjustable positions for ISOFIX. Press the ISOFIX adjuster button to extend the ISOFIX.
! Make sure that both ISOFIX connectors are securely attached to their ISOFIX anchor points. The colors of the indicators on both ISOFIX connectors should be completely green. 6-1
! If a tighter install or increased cabin space is required, then press the ISOFIX adjuster button 5 -1 and push to adjust.
text_image
4 1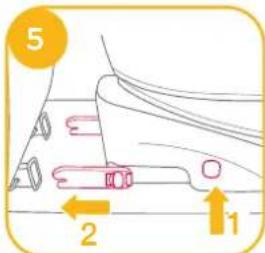
text_image
5 2 1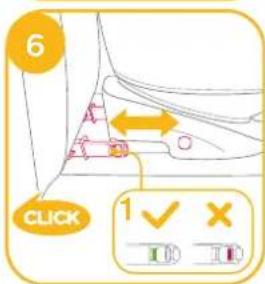
text_image
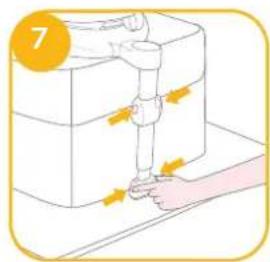
6 CLICK 1 ✓ ✗! After attaching the ISOFIX, pull the load leg downward to floor. When the load leg indicator shows green, the load leg is installed correctly.
! Squeeze the load leg releasing button, then adjust the load leg length.
! Always make sure the support load leg has direct contact with the floor and is in locked position even when the child is not in it.
! The load leg has multiple positions. When the load leg indicator shows red this means the load leg is in the wrong position.
! Make sure the load leg is in full contact with the vehicle floor pan. Red means it is installed incorrectly.
! Check to make sure the base is securely installed by pulling on both ISOFIX connectors.
! The ISOFIX connectors must be attached and locked onto the ISOFIX anchor points. 9-1
! The load leg must be installed correctly with green indicator. Ⓗ -2
Please refer to rear facing mode and recline positions mode in section to use the child restraint.
natural_image
Illustration of a hand using a tool to adjust or install a mechanical component (no text or symbols visible)
text_image
8
text_image
9 !1 !2Removing the base
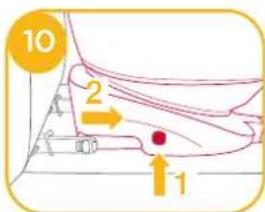
To remove from the vehicle press the ISOFIX adjuster button 10 -1 and pull the base back from the seat.

Then press and release the connectors from the vehicle's ISOFIX.
To prevent damage during transit, press the ISOFIX adjuster button 12 -1 and fold the connector completely. 12 -2
text_image
10 2 1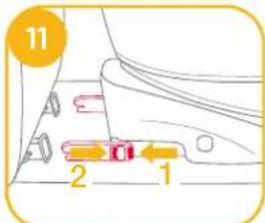
text_image
11 2 1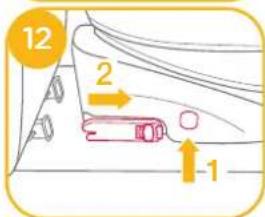
text_image
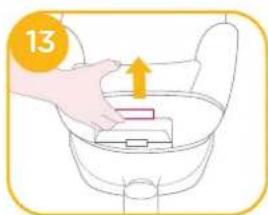
12 2 1Recline Adjustment
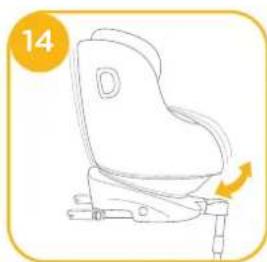
see images 13 - 14
Squeeze the recline adjustment button 13, to adjust the child restraint to the proper position. The recline angles are shown as 14
text_image
13Please recheck the load leg position after reclining.
There are 5 recline positions for rear facing mode and 5 recline positions for forward facing mode.

natural_image
Line drawing of a baby seat with a highlighted seat and arrow indicating rotation (no text or symbols)Use Side Impact Protection
see images 15 - 16
-
The enhanced child restraint is delivered with removable side impact protection. This side impact protection must be used on the door side of the vehicle for best protection. Installation shown in ①.
-
Press the release button to remove side impact protection.

text_image
15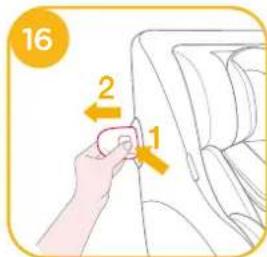
text_image
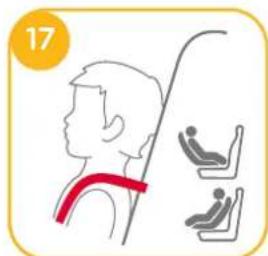
16 2 1Height Adjustment for Head Support and Shoulder Harnesses
see images 17 - 19
-
Please adjust the head support and check if the shoulder harnesses are at the correct height according to 17
When used rear facing, the shoulder harness height must be even with child's shoulders.
When used forward facing, the shoulder harness height must be even with child's shoulders. -
Lift up the head support adjustment lever ^18 , meanwhile pull up or push down on the head support until it snaps into one of the 6 positions. The head support positions are shown as ^19 .
text_image
17
natural_image
Illustration of a hand pressing down on a chair seat with an arrow indicating upward motion (no text or symbols)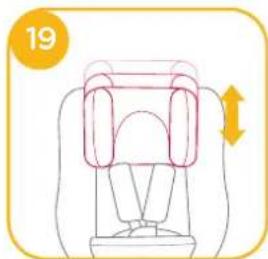
natural_image
Illustration of a car seatbelt with a highlighted seat and directional arrow (no text or symbols)Using in the Rear Facing Mode (Child height 40cm-105cm/Child weight 19.5kg/ infant - 4 years old)
see images ③ - ⑨
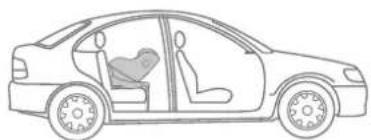
! Please install the child restraint on the rear vehicle seat, and then put the child in the child restraint.
see images 📞 - 🌘
- Press the ISOFIX adjuster button 20 -1 and pull the base back from the vehicle seat.
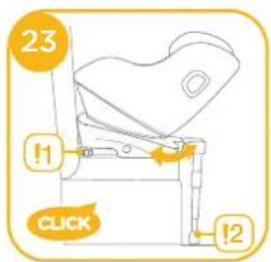
- Press the rotating button to rotate for easier side loading/unloading of the child, then rotate back to desired direction. 21&23
- If a tighter install or increased cabin space is required, then press the ISOFIX adjuster button -1 and push to adjust. -2

text_image
20 2 1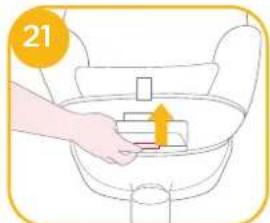
text_image
21
text_image
22 2 1! The ISOFIX connectors must be attached and locked onto the ISOFIX anchor points. 23-1
! The load leg must be installed correctly with green indicator.
! Always make sure the seat is in locked position (rearward facing / forward facing) even when the child is not in it.

Securing Child
After the child is placed into the seat, check whether the Shoulder Harness Straps are at proper height.
-
Press the webbing adjustment button, while pulling out the shoulder harnesses to the proper length.
-
Unlock the buckle of the harnesses by pressing the red button. 25
text_image
23 !1 CLICK !2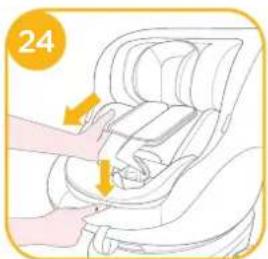
natural_image
Illustration of a baby car seat with hand placement and orange arrows indicating movement (no text or symbols)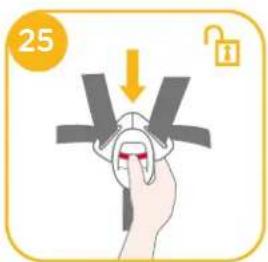
text_image
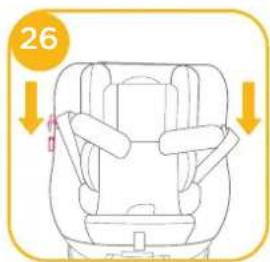
25-
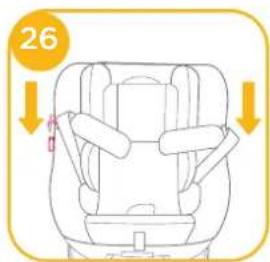
Fix the buckles on the both sides of seat to make placing the child in rear facing mode more convenient.
-
Use infant insert is for children's protection.
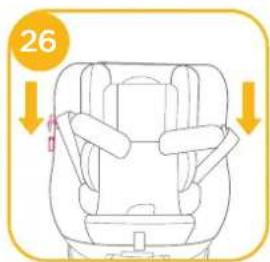
text_image
26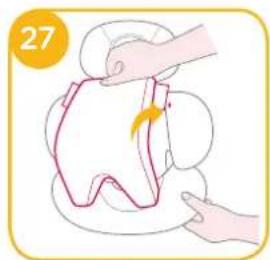
natural_image
Illustration of hands performing a sewing or sewing process on a white object (no text or symbols)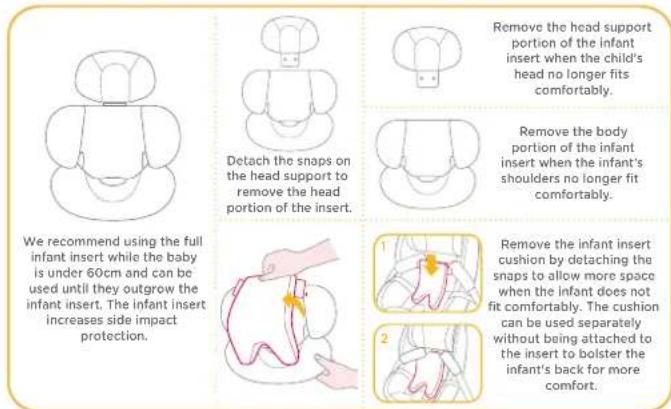
text_image
We recommend using the full infant insert while the baby is under 60cm and can be used until they outgrow the infant insert. The infant insert increases side impact protection. Detach the snaps on the head support to remove the head portion of the insert. Remove the head support portion of the infant insert when the child's head no longer fits comfortably. Remove the body portion of the infant insert when the infant's shoulders no longer fit comfortably. 1 Remove the infant insert cushion by detaching the snaps to allow more space when the infant does not fit comfortably. The cushion can be used separately without being attached to the insert to bolster the infant's back for more comfort.- Place the child into the child restraint and pass both arms through the harnesses.
After the child is seated, recheck whether the shoulder harnesses are at the proper height. - Engage the buckle. Please refer to 28
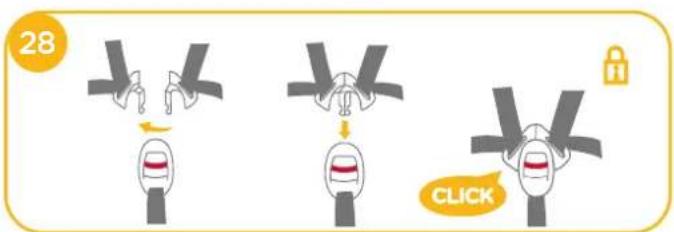
text_image
28 CLICK- Pull down the adjustment webbing and adjust it to the proper length to make sure your child is properly secured.
! Make sure the space between the child and the Shoulder Harness Straps is about the thickness of one hand. - If steps 24 & 25 & 26 are taken when arriving at your destination whilst removing the child, then the harness will be positioned so that it is out of the way and ready for loading upon your return to the vehicle.
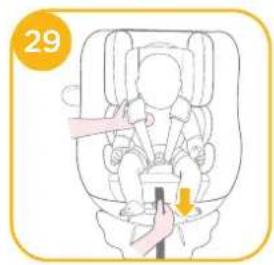
text_image
29Using in the Forward Facing Mode (Child height 76cm-105cm/Child weight 19.5kg/15 months - 4 years old)
see images ③ - ⑨
! Please install the child restraint on the vehicle seat, and then put the child in the child restraint.
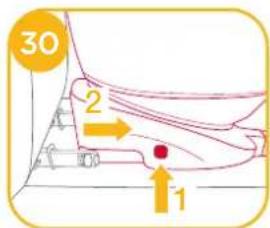
see images 30 - 37
- Press the ISOFIX adjuster button Ⓤ-1 and pull the base back from the vehicle seat. Ⓤ-2
- Press the rotating button to rotate for easier side loading/unloading of the child, then rotate forwards to desired direction. 31 & 33
- If a tighter install or increased cabin space is required, then press the ISOFIX adjuster button 😊-1 and push to adjust. 😊-2
text_image
30 2 1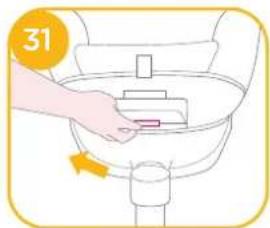
text_image
31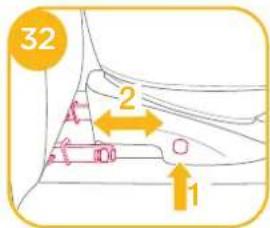
text_image
32 2 1! The ISOFIX connectors must be attached and locked onto the ISOFIX anchor points. Ⓤ3-1
! The load leg must be installed correctly with green indicator.
! Always make sure the seat is in locked position (rearward facing / forward facing) even when the child is not in it.

Securing Child
After the child is placed into the seat, check whether the shoulder harness straps are at proper height.
- Press the webbing adjustment button, while pulling out the shoulder harnesses to the proper length. 34
- Unlock the buckle of the harnesses by pressing the red button.
- Fix the buckles on the both sides of seat to make placing the child in forward facing mode more convenient. 36
- When installing the child restraint in the forward facing mode, do not use the infant insert.
- Place the child into the child restraint and pass both arms through the harnesses. Engage the buckle.

text_image
33 !1 CLICK !2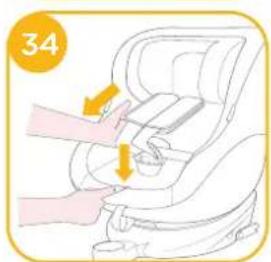
natural_image
Illustration of a hand adjusting a seatbelt inside a car seatbelt (no text or symbols)
text_image
35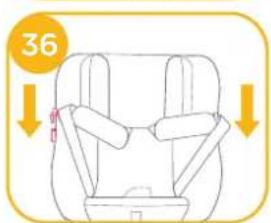
text_image
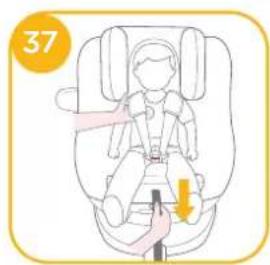
36! After the child is seated, recheck whether the shoulder harnesses are at the proper height.
- Pull down the adjustment webbing and adjust it to the proper length to make sure your child is properly secured. ^37
! Make sure the space between the child and the Shoulder Harness Straps is about the thickness of one hand.
- If steps 34 & 35 & 36 are taken when arriving at your destination whilst removing the child, then the harness will be positioned so that it is out of the way and ready for loading upon your return to the vehicle.
text_image
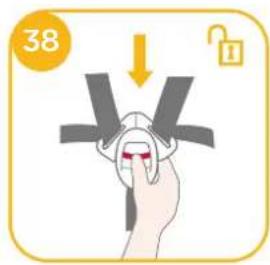
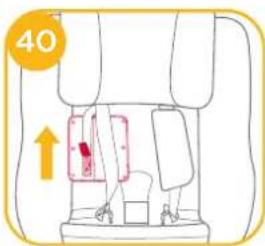
37Detach Soft Goods
see images 38 - 45
Press the red button to disengage the buckle.
Follow steps Ⓤ - 15 to detach soft goods.
To re-attach the soft goods please repeat the above steps in the reverse step.
text_image
38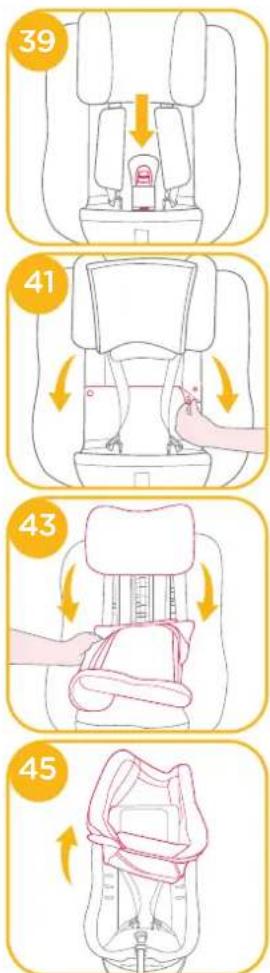
text_image
40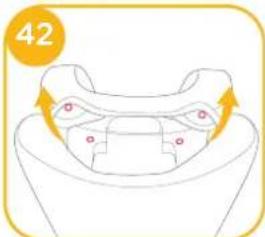
natural_image
Diagram of a car seat with arrows indicating direction (no text or symbols)
natural_image
Illustration of a person applying a bandage to a device (no text or symbols present)Care and Maintenance
After removing the wedge from the insert, please store it somewhere that the child cannot access it.
! Please wash the seat cover and inner padding with cold water under 30°C.
! Do not iron the soft goods.
! Do not bleach or dry clean the soft goods.
Do not use undiluted detergents, gasoline or other organic solvent to wash the child restraint or base. It may cause damage to the child restraint.
Do not wring out the seat cover and inner padding to dry. It may leave the seat cover and inner padding with wrinkles.
! Please hang dry the seat cover and inner padding in the shade.
! Please remove the child restraint and base from the vehicle seat if not in use for a long period of time. Put the child restraint in a cool, dry place where your child cannot access it.
! Do not tamper with the harness connectors during cleaning.

FR
natural_image
Simple line drawing of a bottle with a handle and a small object inside, against a solid yellow background (no text or symbols)Liste des pièces
text_image
Labeled diagram of a car seat with numbered parts for identification
text_image
Technical diagram of a device with numbered parts labeled 1 to 17, likely for assembly or labeling purposes.AVERTISSEMENT
natural_image
Illustration of a car seat with red buttons and a yellow checkmark (no text or symbols)2
1

3

natural_image
Line drawing of a car showing a person sitting in the seat and another seated in the back seat, enclosed in a larger window (no text or symbols)2

natural_image
Illustration of a robotic arm with a curved arrow indicating motion (no text or symbols)text_image
6 CLICK 1 ✓ ✗natural_image
Illustration of a hand using a tool to adjust or install a mechanical component (no text or symbols visible)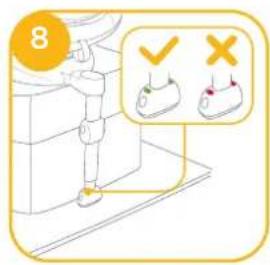
text_image
8
text_image
9 !1 !2Retrait de la base
natural_image
Illustration of a hand placing a small object into a toilet sink with an arrow indicating upward motion (no text or symbols)natural_image
Line drawing of a baby car seat with a directional arrow indicating motion (no text or symbols)natural_image
Illustration of a person with a red band and two seated individuals, no text or symbols present
natural_image
Illustration of a hand pressing down on a chair seat with an arrow indicating upward motion (no text or symbols)
natural_image
Illustration of a car seatbelt with a highlighted seat area and directional arrow (no text or symbols)natural_image
Illustration of a baby car seat with hand placement and orange arrows indicating movement (no text or symbols)
text_image
25natural_image
Illustration of hands performing a medical procedure on a patient's head (no text or symbols present)
natural_image
Illustration of a baby car seatbelt being adjusted for a hand (no text or symbols)
text_image
35
text_image
36natural_image
Diagram of a car seat with arrows indicating direction (no text or symbols)
natural_image
Illustration of a person applying a bandage to a device (no text or symbols present)natural_image
Simple line drawing of a stylized lamp with an open book and pointer (no text or symbols)Teileliste
text_image
Technical diagram of a car seat assembly with numbered parts for identification and assembly reference.WARNUNG
natural_image
Illustration of a robotic arm with a curved arrow indicating motion (no text or symbols)text_image
6 CLICK 1 ✓ ✗natural_image
Illustration of a hand using a tool to press or install a mechanical component, no text or symbols present
text_image
8
text_image
9 !1 !2Basis ausbauen
natural_image
Line drawing of a baby seat with a highlighted seat and arrow indicating rotation (no text or symbols)natural_image
Illustration of a person with a red band and two seated individuals on either side, no text or symbols present.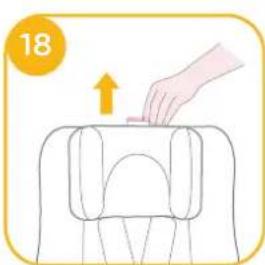
natural_image
Illustration of a hand pressing down on a chair seat with an arrow indicating upward motion (no text or symbols)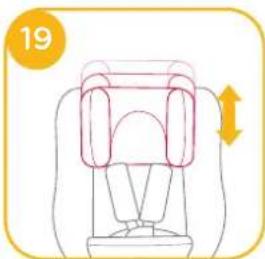
natural_image
Illustration of a car seatbelt with a highlighted seat area and directional arrow (no text or symbols)natural_image
Illustration of a hand placing a small object into a basin with an arrow indicating direction (no text or symbols)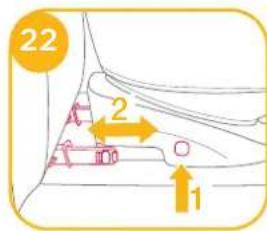
text_image
22 2 1natural_image
Illustration of a baby car seat with hand placement and orange arrows indicating movement (no text or symbols)
text_image
25The Ground Truth image displays a single, solid horizontal line. According to Rule 2 (UNDERSCORE & LINE RULES), this is a stylistic or background line, not a placeholder underscore. Therefore, the OCR result must ignore it and output nothing or only meaningful text. The provided OCR content is "____", which consists of four underscores. This is an incorrect interpretation of the line as a placeholder, violating the rule that stylistic lines must be ignored. The OCR has hallucinated underscores where none should exist based on the GT's visual context. Hence, the OCR result is inconsistent with the Ground Truth.
text_image
26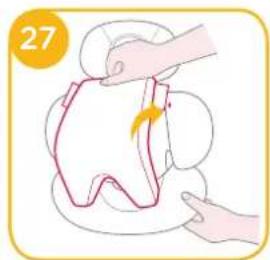
natural_image
Illustration of hands performing a sewing or sewing process on a white object (no text or symbols)
natural_image
Illustration of a baby car seatbelt being adjusted for a hand (no text or symbols)
text_image
35
text_image
36natural_image
Diagram of a car seat with arrows indicating direction (no text or symbols)
natural_image
Illustration of a person applying a bandage to a device (no text or symbols present)Pflege und Wartung
natural_image
Simple line drawing of a bottle with a glass inside, no text or symbols presentOnderdelenlijst
text_image
Technical diagram of a car seat assembly with numbered parts for identificationWAARSCHUWING
natural_image
Illustration of a car seat with red buttons and a yellow checkmark (no text or symbols)2
1
3

natural_image
Line drawing of a car showing a person seated inside the window and another person standing in the back seat (no text or symbols)2

natural_image
Illustration of a robotic insect with legs and antennae, showing a curved arrow indicating movement (no text or symbols)text_image
6 CLICK 1 ✓ Xnatural_image
Illustration of a hand using a tool to adjust or install a mechanical component (no text or symbols visible)
text_image
8
text_image
9 !1 !2De voet verwijderen
natural_image
Illustration of a hand placing a small object into a toilet sink with an arrow indicating upward motion (no text or symbols)natural_image
Line drawing of a baby car seat with a highlighted seat and arrow indicating rotation (no text or symbols)natural_image
Illustration of a person with a red band and two seated individuals on either side, no text or symbols present.
natural_image
Illustration of a hand pressing down on a chair seat with an arrow indicating upward motion (no text or symbols)
natural_image
Illustration of a car seatbelt with a highlighted seat area and directional arrow (no text or symbols)natural_image
Illustration of a baby car seat with hand placement and orange arrows indicating movement (no text or symbols)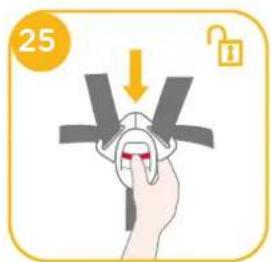
text_image
25natural_image
Illustration of a hand pressing down on a piece of bread with a yellow arrow indicating rotation (no text or symbols)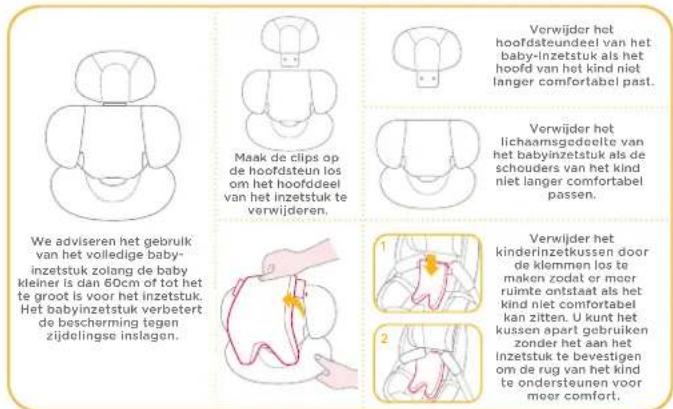
natural_image
Illustration of a baby car seatbelt being lifted by hand, no text or symbols present
text_image
35
text_image
36natural_image
Diagram of a car seat with arrows indicating direction (no text or symbols)
natural_image
Illustration of a person applying a bandage to a device (no text or symbols present)natural_image
Simple line drawing of a lamp with an open book and a small box, set against a solid orange background (no text or symbols)Elenco parti
text_image
Labeled diagram of a car seat with numbered parts for identificationtext_image
Technical diagram of a device with numbered parts labeled 1 to 17, likely for assembly or labeling purposes.AVVERTENZA
natural_image
Interior view of a car seat with a highlighted section and checkmark (no text or symbols)2

1

3

natural_image
Side-view line drawing of a car showing a person seated in the seat and another person standing, enclosed in a larger window (no text or symbols)2
natural_image
Illustration of a robotic arm with a curved arrow indicating motion (no text or symbols)text_image
6 CLICK 1 ✓ ✗natural_image
Illustration of a hand using a tool to adjust or install a mechanical component (no text or symbols visible)
text_image
8
text_image
9 !1 !2natural_image
Line drawing of a seat assembly with a yellow arrow indicating motion (no text or symbols)natural_image
Illustration of a person with a red band and two seated individuals, no text or symbols present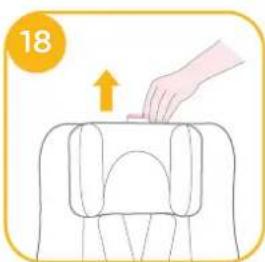
natural_image
Illustration of a hand pressing down on a chair seat with an arrow indicating upward motion (no text or symbols)
natural_image
Illustration of a car seatbelt device with a highlighted seat and directional arrow (no text or symbols)natural_image
Illustration of a car seatbelt being adjusted for a person's seatbelt (no text or symbols present)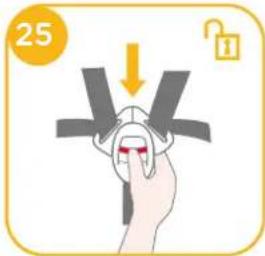
text_image
25natural_image
Illustration of a hand holding a white object with a yellow arrow indicating rotation (no text or symbols)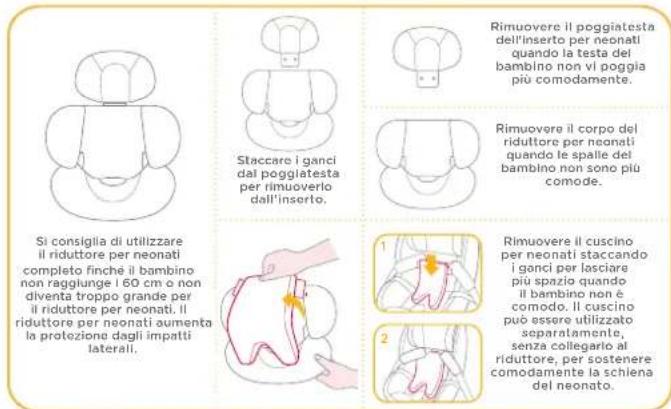
natural_image
Illustration of a baby car seat with hand placement and orange arrows indicating movement (no text or symbols)
text_image
35
text_image
36natural_image
Diagram of a car seat with arrows indicating direction (no text or symbols)
natural_image
Illustration of a person applying a bandage to a body, with a lightning bolt indicating pressure (no text or symbols)Cura e manutenzione
natural_image
Simple line drawing of a bottle with a glass inside, no text or symbols presentLista de piezas
text_image
Technical diagram of a car seat assembly with numbered parts and exploded viewADVERTENCIA
natural_image
Illustration of a robotic arm with articulated legs and motion arrows indicating movement (no text or symbols)text_image
6 CLICK 1 ✓ ✗natural_image
Illustration of a hand using a tool to adjust or install a mechanical component (no text or symbols visible)
text_image
8
text_image
9 !1 !2Quitar la base
natural_image
Line drawing of a baby car seat with a highlighted seat and arrow indicating rotation (no text or symbols)natural_image
Illustration of a person with a red arm and two seated individuals, no text or symbols present
natural_image
Illustration of a hand pressing down on a chair seat with an arrow indicating upward motion (no text or symbols)
natural_image
Illustration of a car seatbelt device with a highlighted section and directional arrow (no text or symbols)natural_image
Illustration of a hand placing a rectangular object into a basin, with an arrow indicating direction (no text or symbols)
text_image
22 2 1natural_image
Illustration of a baby car seat with hand placement and orange arrows indicating movement (no text or symbols)
text_image
25natural_image
Illustration of hands performing a sewing or sewing process on a white object (no text or symbols)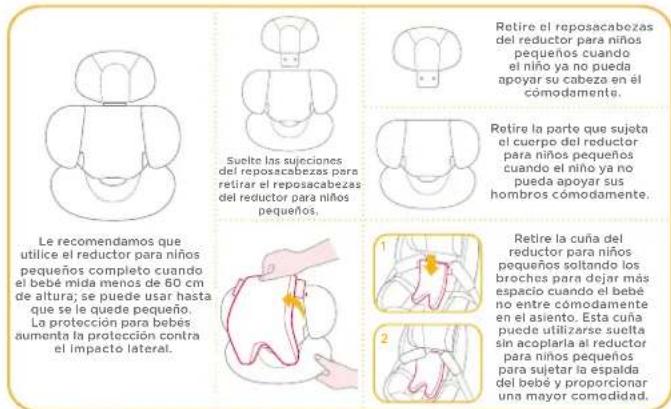
natural_image
Illustration of a baby car seatbelt being adjusted for a hand (no text or symbols)
text_image
35
text_image
36natural_image
Diagram of a car seat with arrows indicating direction (no text or symbols)
natural_image
Illustration of a person applying a bandage to a bag, with a lightning bolt indicating force (no text or symbols)natural_image
Simple line drawing of a mechanical device with a handle and base, no text or symbols present.Lista de componentes
text_image
Labeled diagram of a car seat with numbered parts for identification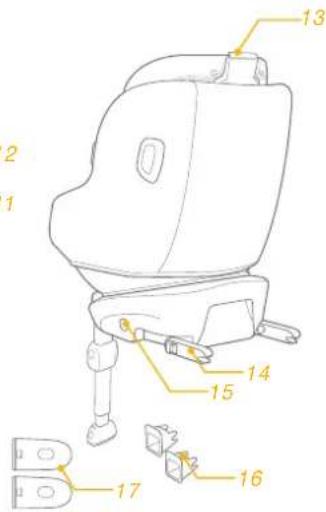
text_image
Technical diagram of a vehicle seat with numbered components for identificationAVISO
natural_image
Illustration of a car seat with red buttons and a yellow checkmark (no text or symbols)2
text_image
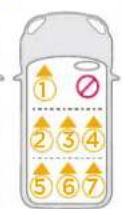
1 2 3 4 5 6 7 1 2 3 4 5 6 73

natural_image
Line drawing of a car showing a person sitting in the back seat and another seated in the front wheel, enclosed in a larger window (no text or symbols)2
natural_image
Illustration of a mechanical device with a handle and lever mechanism, no text or symbols presenttext_image
6 CLICK 1 ✓ ✗natural_image
Illustration of a hand using a tool to adjust or install a mechanical component (no text or symbols visible)
text_image
8
text_image
9 !1 !2Remover a base
natural_image
Line drawing of a seat assembly with a yellow arrow indicating motion (no text or symbols)natural_image
Illustration of a person with a red band and two seated individuals, no text or symbols present
natural_image
Illustration of a hand pressing down on a chair seat with an arrow indicating upward motion (no text or symbols)
natural_image
Illustration of a car seatbelt device with a highlighted section and directional arrow (no text or symbols)natural_image
Illustration of a hand placing a rectangular object into a basin with an arrow indicating direction (no text or symbols)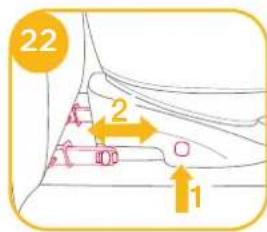
text_image
22 2 1natural_image
Illustration of a baby car seat with hand placement and orange arrows indicating movement (no text or symbols)
text_image
25natural_image
Illustration of a hand pressing down on a piece of bread with a yellow arrow indicating rotation (no text or symbols)
natural_image
Illustration of a hand adjusting a seatbelt inside a car seatbelt (no text or symbols)
text_image
35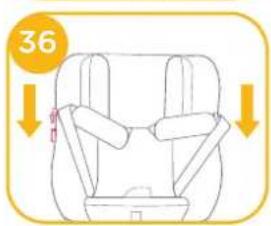
text_image
36natural_image
Diagram of a car seat with arrows indicating direction (no text or symbols)
natural_image
Illustration of a person applying a bandage to a device (no text or symbols present)natural_image
Simple line drawing of a mechanical device with a handle and base, no text or symbols present.text_image
Labeled diagram of a car seat with numbered parts for identificationtext_image
Technical diagram of a vehicle seat with numbered components for identificationOSTRZEŻENIE
natural_image
Illustration of a robotic arm with a curved arrow indicating motion (no text or symbols)text_image
6 CLICK 1 ✓ ✗natural_image
Illustration of a hand using a tool to adjust or install a mechanical component (no text or symbols visible)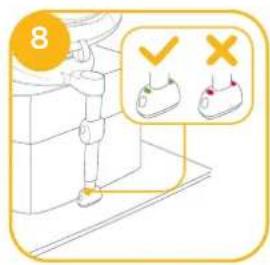
text_image
8
text_image
9 !1 !2Odłączanie podstawy
natural_image
Line drawing of a baby seat with a yellow arrow indicating motion (no text or symbols)natural_image
Illustration of a hand pressing down on a chair seat with an arrow indicating upward motion (no text or symbols)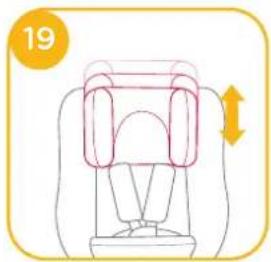
natural_image
Illustration of a car seatbelt with a highlighted seat area and directional arrow (no text or symbols)natural_image
Illustration of a hand adjusting a car seatbelt (no text or symbols)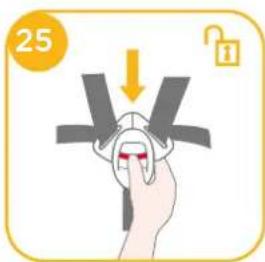
text_image
25natural_image
Illustration of hands performing a sewing or sewing process on a white object (no text or symbols)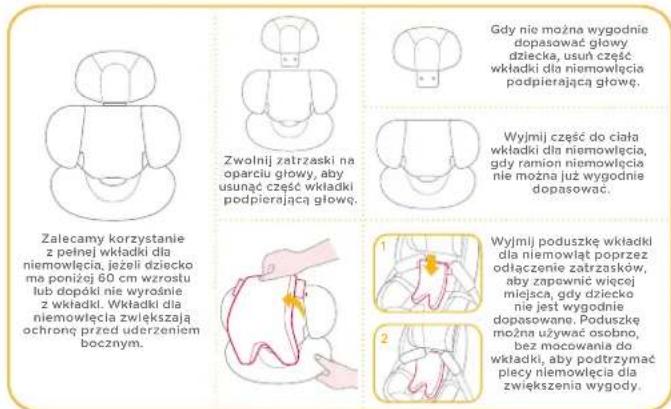
natural_image
Illustration of a hand placing a small object into a sink with a numbered label (31) and an arrow indicating rotation (no text or symbols on the diagram itself)
text_image
32 2 1natural_image
Illustration of a hand inserting a device into a car seatbelt (no text or symbols)
text_image
35
text_image
36natural_image
Diagram of a car seat with arrows indicating direction (no text or symbols)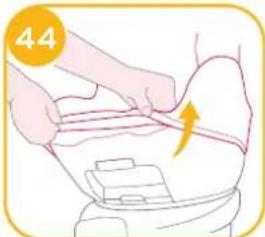
natural_image
Illustration of a person applying a bandage to a seated torso, with a numbered circle highlighting the number 44 (no text or symbols on the diagram itself)natural_image
Simple line drawing of a bottle with a handle and a small object inside, against a solid yellow background (no text or symbols)Seznam dílů
text_image
Labeled diagram of a car seat with numbered parts for identificationnatural_image
Illustration of a car seat with red buttons and a yellow checkmark (no text or symbols)2

1

23

natural_image
Line drawing of a car showing a person seated inside the window and another person standing in the back seat (no text or symbols)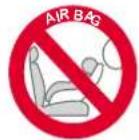
natural_image
Illustration of a robotic arm with a curved arrow indicating motion (no text or symbols)text_image
6 CLICK 1 ✓ ✗natural_image
Illustration of a hand using a tool to adjust or install a mechanical component (no text or symbols visible)
text_image
8
text_image
9 !1 !2Vyjmutí základny
natural_image
Illustration of a hand placing a small object into a toilet with an arrow indicating upward motion (no text or symbols)natural_image
Line drawing of a baby car seat with a highlighted seat and arrow indicating rotation (no text or symbols)natural_image
Illustration of a person with a red band and two seated individuals, no text or symbols present
natural_image
Illustration of a hand pressing down on a chair seat with an arrow indicating upward motion (no text or symbols)
natural_image
Illustration of a car seatbelt device with a highlighted seat area and directional arrow (no text or symbols)natural_image
Illustration of a baby car seat with hand placement and orange arrows indicating movement (no text or symbols)
text_image
25natural_image
Illustration of hands performing a sewing or sewing process on a white object (no text or symbols)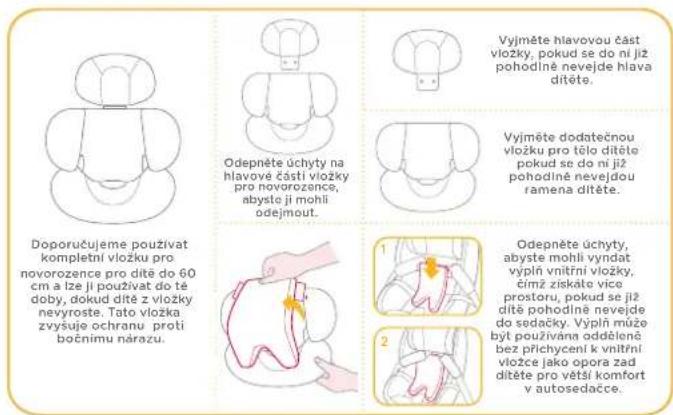
natural_image
Illustration of a hand adjusting a seatbelt inside a car seat (no text or symbols)
text_image
35
text_image
36natural_image
Diagram of a car seat with arrows indicating direction (no text or symbols)
natural_image
Illustration of a person applying a bandage to a device, with a numbered circle highlighting the number 44 (no text or symbols on the diagram itself)Péče a údržba
natural_image
Simple line drawing of a stylized object resembling a container or lamp with an open book, against a solid yellow background (no text or symbols)text_image
Labeled diagram of a car seat with numbered parts for identificationnatural_image
Illustration of a car seat with a yellow checkmark indicating selection (no text or symbols)2
1
23

natural_image
Line drawing of a car showing a person sitting in the back seat and another seated in the front wheel, with no text or symbols present.
natural_image
Illustration of a mechanical device with a handle and legs, showing a rotation arrow (no text or symbols)text_image
6 CLICK 1 ✓ ✗natural_image
Illustration of a hand using a tool to adjust or install a mechanical component (no text or symbols visible)
text_image
8
text_image
9 !1 !2Odmontovanie
základne
natural_image
Line drawing of a baby car seat with a highlighted seat and arrow indicating rotation (no text or symbols)natural_image
Illustration of a person with a red band and two seated individuals on chairs, no text or symbols present.
natural_image
Illustration of a hand pressing down on a chair seat with an arrow indicating upward motion (no text or symbols)
natural_image
Illustration of a car seatbelt with a highlighted seat area and directional arrow (no text or symbols)natural_image
Illustration of a car seatbelt being lifted by hand, no text or symbols present
text_image
25The Ground Truth image displays a single, solid horizontal line. According to Rule 2 (UNDERSCORE & LINE RULES), this is a stylistic or background line, not a placeholder underscore. Therefore, the OCR result must ignore it. The provided OCR content is "____", which consists of four underscores. This is an incorrect interpretation of the line as a placeholder, violating the rule that stylistic lines must be ignored. The OCR has hallucinated text (underscores) where none should exist, violating the rule to ignore such lines. Hence, the OCR result is inconsistent with the Ground Truth.

text_image
26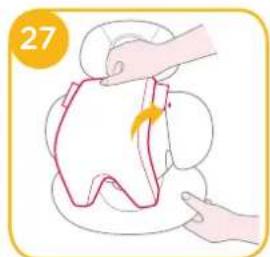
natural_image
Illustration of a hand placing a piece of hair on a circular object, with no text or symbols present.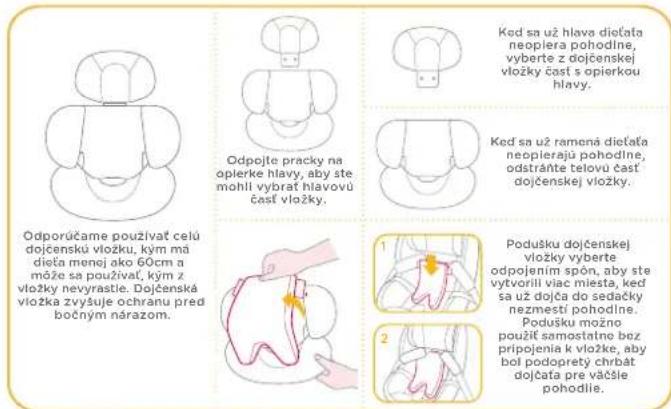
natural_image
Illustration of a baby car seatbelt being adjusted for a hand (no text or symbols)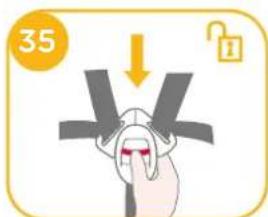
text_image
35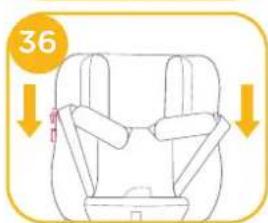
text_image
36natural_image
Diagram of a car seat with arrows indicating direction (no text or symbols)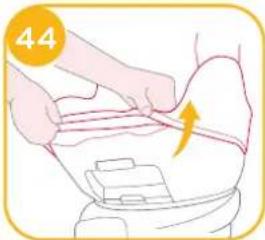
natural_image
Illustration of a person applying a bandage to a bag, with a lightning bolt indicating pressure (no text or symbols)natural_image
Simple line drawing of a lamp with an open book and a small object inside, set against a solid yellow background (no text or symbols)Seznam delov
Prepričajte se, da noben del ne manjka. Če kar koli manjka, se obrnite na prodajalca.
natural_image
Interior view of a car seat with a highlighted section and checkmark (no text or symbols)2

1

23

natural_image
Line drawing of a car showing a person seated in the back seat and another person standing on the side, enclosed in a larger window (no text or symbols)
natural_image
Illustration of a robotic arm with a curved arrow indicating rotation (no text or symbols)! Vstavite vodila ISOFIX za pomoč pri namestitvi. 4 -1
! ISOFIX ima na voljo 10 različnih položajev. Pritisnite gumb za nastavitev ISOFIX, će želite ISOFIX iztegniti.
! Zagotovite, da sta oba priključka ISOFIX dobro pritrjena v pritrdilni točki ISOFIX. Barve na obeh priključkih ISOFIX morajo biti popolnoma zelene. 6-1
! Če je treba namestiti čvrsteje ali će je potrebnega več prostora v kabini, potem pritisnite gumb za nastavitev ISOFIX 5 -1 in potisnite za prilagoditev. 6
text_image
4 1
text_image
5 2 1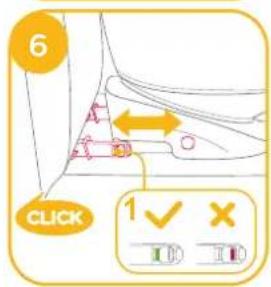
text_image
6 CLICK 1 ✓ ✗natural_image
Illustration of a hand using a tool to press or install a mechanical component, no text or symbols present
text_image
8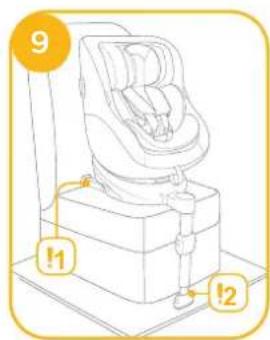
text_image
9 !1 !2natural_image
Illustration of a hand placing a component into a toilet with an arrow indicating upward motion (no text or symbols)Prosimo, da po nastavitvi naklona ponovno nastavite položaj podporne noge.
V načinu usmerjenosti nazaj in naprej je na voljo po pet položajev naklona.
natural_image
Line drawing of a car seat assembly with a directional arrow indicating motion (no text or symbols)natural_image
Illustration of a person with a red band and two seated individuals, no text or symbols present
natural_image
Illustration of a hand pressing down on a chair seat with an arrow indicating upward motion (no text or symbols)
natural_image
Illustration of a car seatbelt with a highlighted seat area and directional arrow (no text or symbols)natural_image
Illustration of a hand placing a rectangular object into a bathtub with an arrow indicating direction (no text or symbols)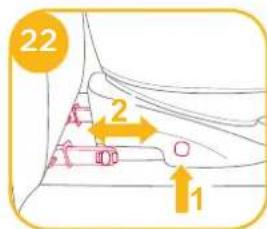
text_image
22 2 1natural_image
Illustration of a baby car seatbelt being adjusted for a hand (no text or symbols)
text_image
25natural_image
Illustration of hands holding a white object with a yellow arrow indicating rotation (no text or symbols)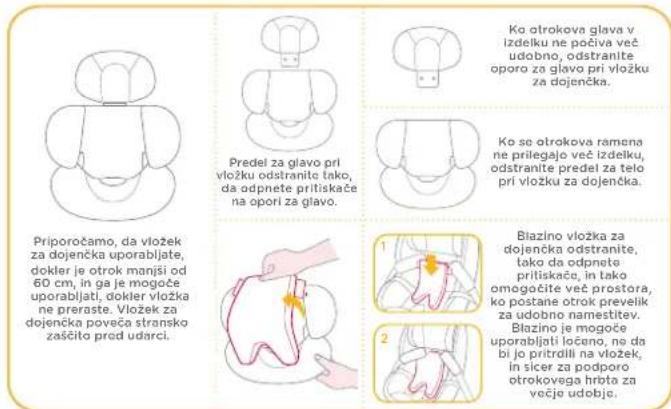
natural_image
Illustration of a baby car seatbelt being adjusted for a hand (no text or symbols)
text_image
35
text_image
36natural_image
Diagram of a car seat with arrows indicating direction (no text or symbols)
natural_image
Illustration of a person applying a bandage to a body, with a lightning bolt indicating pressure (no text or symbols)Nega in vzdrževanje
natural_image
Simple line drawing of a person holding an open book and a pointer, no text or symbols presenttext_image
Technical diagram of a car seat assembly with numbered parts for identificationПРЕДУПРЕЖДЕНИЯ
natural_image
Illustration of a car seat with a yellow checkmark indicating selection (no text or symbols)2
1
23
natural_image
Side-view line drawing of a car showing a person sitting in the seat and another seated in the dashboard (no text or symbols)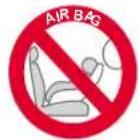
natural_image
Illustration of a robotic arm with a curved arrow indicating motion (no text or symbols)text_image
6 CLICK 1 ✓ ✗natural_image
Illustration of a hand using a tool to adjust or install a mechanical component (no text or symbols visible)
text_image
8
text_image
9 !1 !2Снятие основания
natural_image
Line drawing of a baby car seat with a directional arrow indicating motion (no text or symbols)natural_image
Illustration of a hand pressing down on a chair seat with an arrow indicating upward motion (no text or symbols)
natural_image
Illustration of a car seatbelt device with a highlighted seat and directional arrow (no text or symbols)natural_image
Illustration of a hand placing a rectangular object into a basin with an arrow indicating direction (no text or symbols)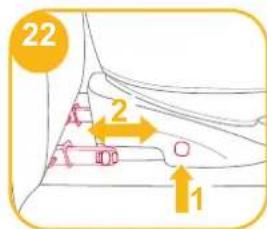
text_image
22 2 1natural_image
Illustration of a baby car seat with hand placement and orange arrows indicating movement (no text or symbols)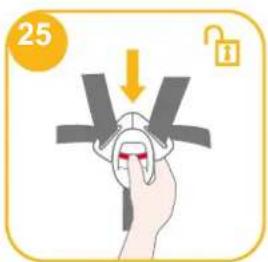
text_image
25natural_image
Illustration of hands performing a sewing or sewing process on a white fabric (no text or symbols)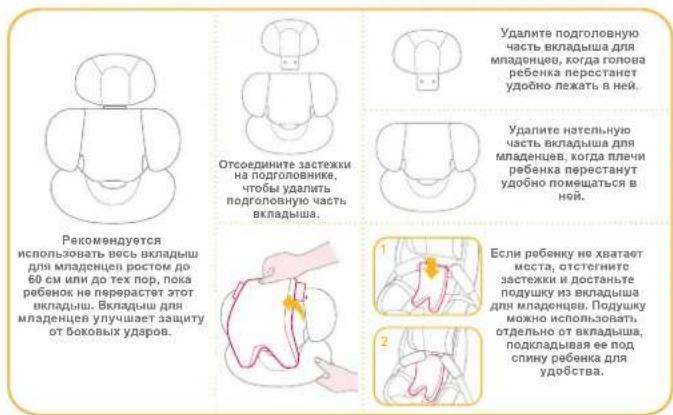
natural_image
Illustration of a baby car seatbelt being lifted by adult hands (no text or symbols)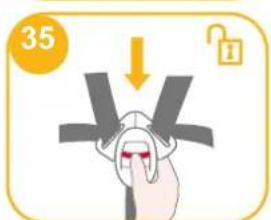
text_image
35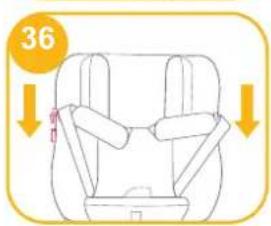
text_image
36natural_image
Diagram of a medical or anatomical structure with arrows indicating direction, no text or symbols present
natural_image
Illustration of a person applying a bandage to a device (no text or symbols present)Уход за изделием
natural_image
Simple line drawing of a book and a lamp on a chair against a solid orange background (no text or symbols)Liste over dele
Kontroller, at der ikke mangler nogen dele. Kontakt venligst din forhandler, hvis noget mangler.
text_image
Technical diagram of a car seat assembly with numbered parts for identificationADVARSEL
natural_image
Illustration of a car seat with red buttons and a checkmark (no text or symbols)2
text_image
1 2 3 4 5 6 7 1 2 3 4 5 6 73

natural_image
Line drawing of a car showing the interior seat and side arm (no text or symbols)2
natural_image
Illustration of a mechanical device with a numbered label (3) and an arrow indicating rotation or movement (no text or symbols present)text_image
6 CLICK 1 ✓ ✗natural_image
Illustration of a hand using a tool to adjust or install a mechanical component (no text or symbols visible)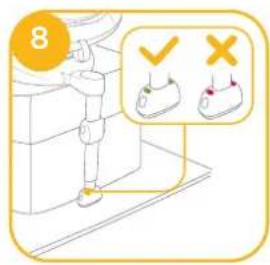
text_image
8
text_image
9 !1 !2Fjernelse af bunden
natural_image
Line drawing of a baby seat with a yellow arrow indicating rotation (no text or symbols)Brug sideskærmen
natural_image
Illustration of a person with a red arm and two seated individuals (no text or symbols)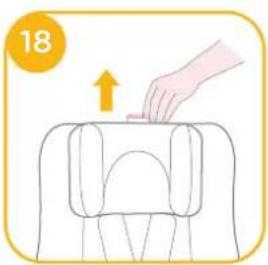
natural_image
Illustration of a hand pressing down on a chair seat with an arrow indicating upward motion (no text or symbols)
natural_image
Illustration of a car seatbelt device with a highlighted arrow indicating motion (no text or symbols)natural_image
Illustration of a baby car seat with hand placement and orange arrows indicating movement (no text or symbols)
text_image
25natural_image
Illustration of hands performing a sewing or sewing process on a white object (no text or symbols)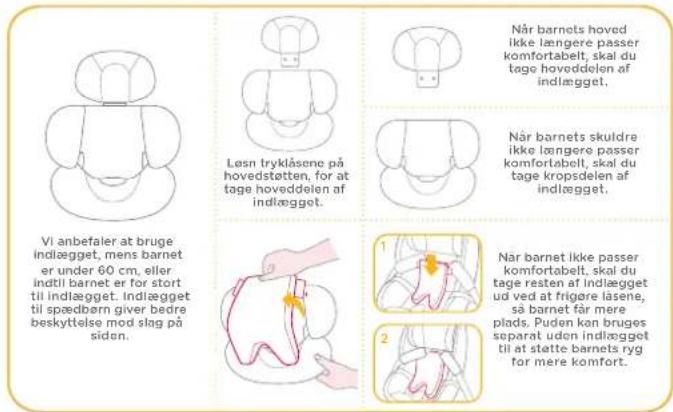
natural_image
Illustration of a baby car seat with hand placement and orange arrows indicating movement (no text or symbols)
text_image
35
text_image
36natural_image
Diagram of a car seat with arrows indicating direction (no text or symbols)
natural_image
Illustration of a person performing a medical or health procedure on a device (no text or symbols visible)natural_image
Simple line drawing of a bottle with a glass inside, no text or symbols presentAlkatrészek listája
text_image
Technical diagram of a car seat assembly with numbered parts for identificationFIGYELEM
natural_image
Illustration of a car seat with red buttons and a checkmark (no text or symbols)2
1
23

natural_image
Line drawing of a car showing a passenger seat and driver seat (no text or symbols)
natural_image
Illustration of a mechanical device with a numbered label (3) and an arrow indicating rotation or movement (no text or symbols present)text_image
6 CLICK 1 ✓ ✗natural_image
Illustration of a hand using a tool to adjust or install a mechanical component (no text or symbols visible)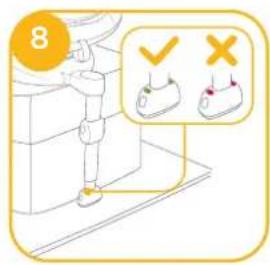
text_image
8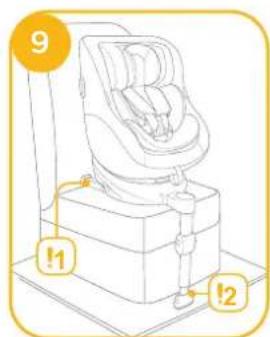
text_image
9 !1 !2natural_image
Illustration of a hand placing a component into a toilet with an arrow indicating upward motion (no text or symbols)natural_image
Line drawing of a baby car seat with a highlighted seat and arrow indicating rotation (no text or symbols)natural_image
Illustration of a person with a red band and two seated individuals, no text or symbols present
natural_image
Illustration of a hand pressing down on a chair seat with an arrow indicating upward motion (no text or symbols)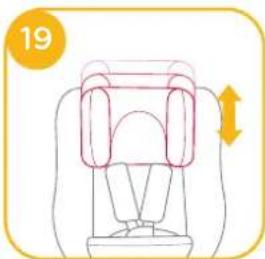
natural_image
Illustration of a car seatbelt device with a highlighted section and directional arrow (no text or symbols)natural_image
Illustration of a hand placing a rectangular object into a basin with an arrow indicating direction (no text or symbols)
text_image
22 2 1natural_image
Illustration of a baby car seat with hand placement and directional arrows indicating movement (no text or symbols)
text_image
25natural_image
Illustration of hands performing a sewing or sewing process on a circular object (no text or symbols)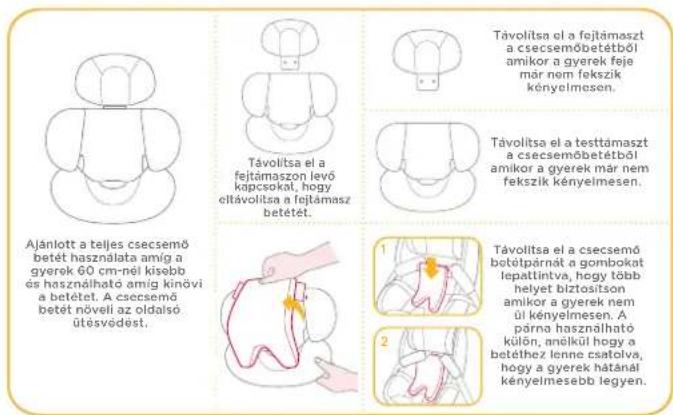
natural_image
Illustration of a baby car seatbelt being adjusted for a hand (no text or symbols)
text_image
35
text_image
36natural_image
Diagram of a car seat with arrows indicating direction (no text or symbols)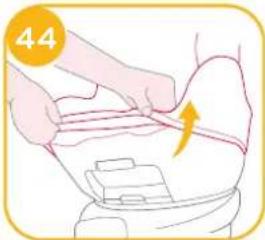
natural_image
Illustration of a person applying a bandage to a device (no text or symbols visible)natural_image
Simple line drawing of a bottle with a glass inside, no text or symbols presentLista componentelor
text_image
Technical diagram of a device with numbered parts labeled 1 to 17, likely for assembly or labeling purposes.AVERTISMENT
natural_image
Illustration of a robotic arm with a numbered label (3) and directional arrow indicating motion (no text or symbols present)text_image
6 CLICK 1 ✓ × I D I Dnatural_image
Illustration of a hand using a tool to adjust or install a mechanical component (no text or symbols visible)
text_image
8
text_image
9 !1 !2Scoaterea bazei
natural_image
Line drawing of a car seat assembly with an arrow indicating motion (no text or symbols)natural_image
Illustration of a hand pressing down on a chair seat with an arrow indicating upward motion (no text or symbols)
natural_image
Illustration of a car seatbelt device with a highlighted section and directional arrow (no text or symbols)natural_image
Illustration of a baby car seat with hand placement and orange arrows indicating movement (no text or symbols)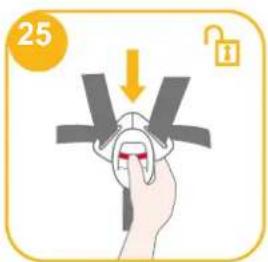
text_image
25natural_image
Illustration of hands performing a sewing or sewing process on a white object (no text or symbols)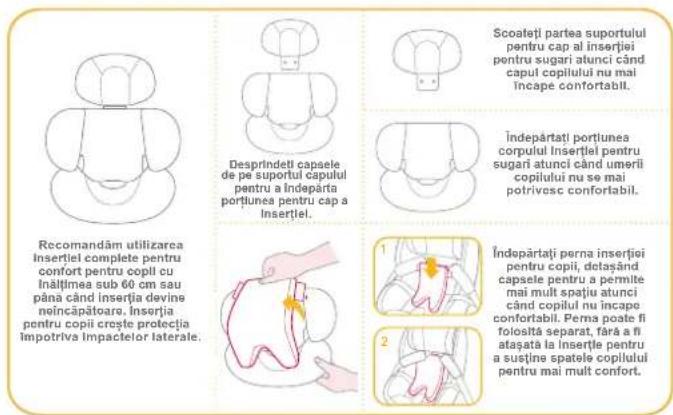
natural_image
Illustration of a baby car seatbelt being lifted by hand, no text or symbols present
text_image
35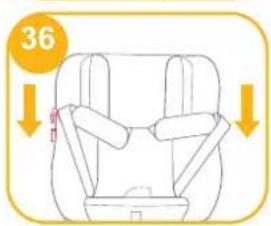
text_image
36natural_image
Diagram of a car seat with arrows indicating direction (no text or symbols)
natural_image
Illustration of a person applying a bandage to a device, with a numbered circle highlighting the number 44 (no text or symbols on the diagram itself)natural_image
Simple line drawing of a stylized object resembling a container with an open book and a pointer, set against a solid yellow background (no text or symbols)text_image
Labeled diagram of a car seat with numbered parts for identificationnatural_image
Illustration of a robotic arm with a numbered label (3) and directional arrow indicating motion (no text or symbols present)text_image
6 CLICK 1 ✓ ✗natural_image
Illustration of a hand using a tool to press or install a mechanical component (no text or symbols visible)
text_image
8
text_image
9 !1 !2Αφαιρέστε τη βάση
natural_image
Line drawing of a baby seat with a highlighted seat and arrow indicating rotation (no text or symbols)natural_image
Illustration of a person with a red band and two seated individuals (no text or symbols)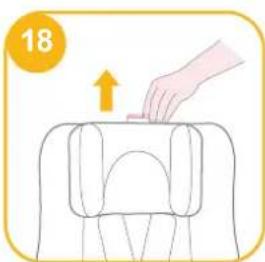
natural_image
Illustration of a hand pressing down on a chair seat with an arrow indicating upward motion (no text or symbols)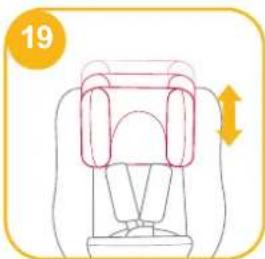
natural_image
Illustration of a car seatbelt device with a highlighted seat and directional arrow (no text or symbols)natural_image
Illustration of a car seatbelt being lifted by hand, showing seat and seat positioning (no text or symbols)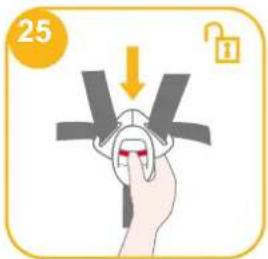
text_image
25natural_image
Illustration of hands holding a white object with a yellow arrow indicating rotation (no text or symbols)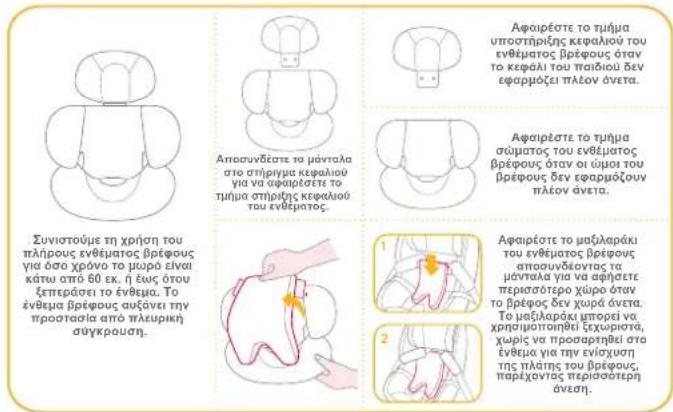
natural_image
Illustration of a baby car seatbelt being lifted by hand, no text or symbols present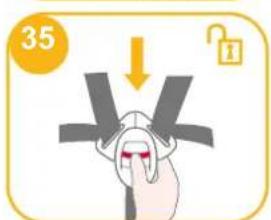
text_image
35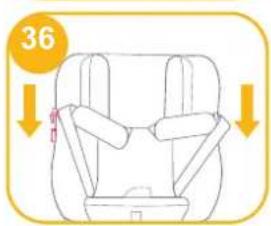
text_image
36natural_image
Diagram of a medical or anatomical structure with arrows indicating direction, no text or symbols present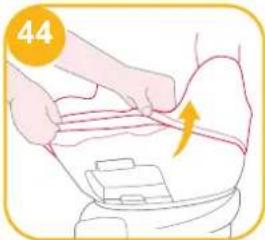
natural_image
Illustration of a person applying a bandage to a device (no text or symbols present)natural_image
Simple line drawing of a bottle with a handle and a small object inside, against a solid yellow background (no text or symbols)Parça Listesi
text_image
Technical diagram of a car seat assembly with numbered parts for identification and assembly reference.UYARI
natural_image
Illustration of a car seat with red buttons and a checkmark (no text or symbols)2
1
23

natural_image
Line drawing of a car showing a person sitting in the seat and another seated in the driver's seat (no text or symbols)
Montaj Modunu Seçin
natural_image
Illustration of a robotic leg with a curved arm and legs, showing motion direction (no text or symbols)text_image
6 CLICK 1 ✓ ✗natural_image
Illustration of a hand using a tool to adjust or install a mechanical component (no text or symbols visible)
text_image
8
text_image
9 !1 !2Tabanı çıkarma
natural_image
Line drawing of a car seat with a directional arrow indicating motion (no text or symbols)Yan Darbe Korumasini Kullanma
bkz. resim 15 - 16
natural_image
Illustration of a hand pressing down on a chair seat with an arrow indicating upward motion (no text or symbols)
natural_image
Illustration of a car seatbelt with a highlighted seat area and directional arrow (no text or symbols)Arkaya Dönük Modda Kullanma
natural_image
Illustration of a baby car seat with hand placement and orange arrows indicating movement (no text or symbols)
text_image
25The Ground Truth image displays a single, solid horizontal line. According to Rule 2 (UNDERSCORE & LINE RULES), this is a stylistic or background line, not a placeholder underscore. Therefore, the OCR result must ignore it. The provided OCR content is "____", which consists of four underscores. This is an incorrect interpretation of the line as a placeholder, violating the rule that stylistic lines must be ignored. The OCR has hallucinated underscores where none should exist based on the GT's visual context. Hence, the OCR result is inconsistent with the Ground Truth.
text_image
26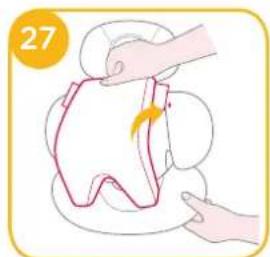
natural_image
Illustration of a hand pressing down on a piece of bread with a yellow arrow indicating rotation (no text or symbols)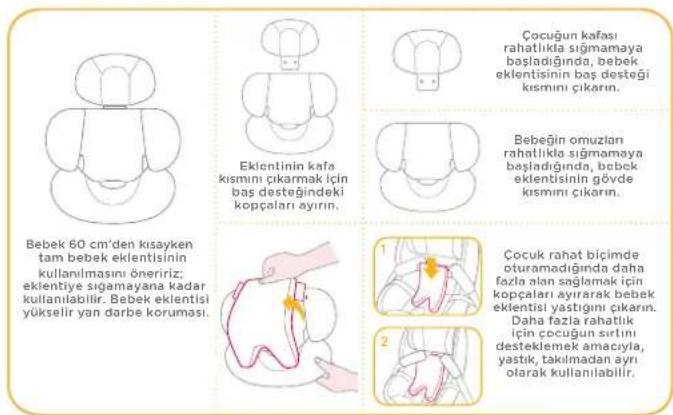
natural_image
Illustration of a baby car seatbelt being lifted by hand, no text or symbols present
text_image
35
text_image
36natural_image
Diagram of a car seat with arrows indicating direction (no text or symbols)
natural_image
Illustration of a person applying a bandage to a device (no text or symbols visible)Bakım ve Koruma
text_image
Diagram of a car seat with labeled parts in English and Chinese, showing anatomical positioning for measurement or assembly.natural_image
Simple line drawing of a vintage-style lamp with a lamp and base, no text or symbols present.تحذیر
بعد+( العَمْتَدُهِي )- العَمْتَدُهِي ( العَمْتَدُهِي )- العَمْتَدُهِي ( العَمْتَدُهِي )- العَمْتَدُهِي ( العَمْتَدُهِي )- الغَمْتَدُهِي ( الغَمْتَدُهِي )- الغَمْتَدُهِي ( الغَمْتَدُهِي )- الغَمْتَدُهِي ( الغَمْتَدُهِي )- الغَمْت·دُهِي ( الغَمْت·دُهِي )- الغَمْت·دُهِي ( الغَمْت·دُهِي )- الغَمْت·دُهِي ( الغَمْت·دُهِي )- الغَمْت·دُهِيم ( الغَمْت·دُهِيم )- الغَمْت·دُهِيم ( الغَمْت·دُهِيم )- الغَمْت·دُهِيم ( الغَمْت·دُهِيم )- الغَمْت·دُهِيم ( الغَمْت·دُهِيم - الغَمْت·دُهِيم )
تحذیر
natural_image
Illustration of a mechanical device with a yellow circular head and directional arrow indicating motion (no text or symbols)
natural_image
Illustration of a car seat with red buttons and a yellow checkmark (no text or symbols)
text_image
Illustration showing two car seats with numbered rows and symbols indicating absence or absence of a symbol.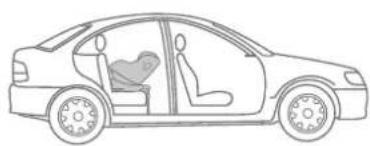
natural_image
Line drawing of a car showing a seat and passenger seat inside the window (no text or symbols)
natural_image
Illustration of a hand using a valve to adjust a component (no text or symbols present)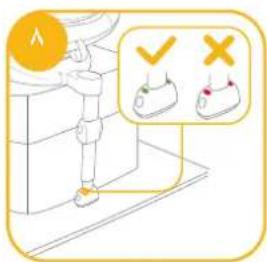
text_image
Diagram showing a person standing at a desk with a checkmark and X mark indicating incorrect or incorrect behavior, alongside a photo of a shoe.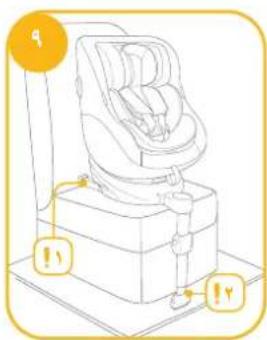
natural_image
Line drawing of a baby car seat with warning labels (no text or symbols on the diagram itself)natural_image
Line drawing of a car interior with handrails and decorative elements (no text or symbols)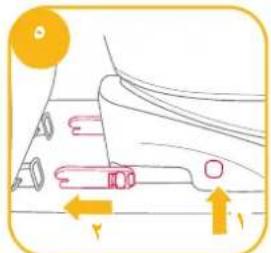
natural_image
Diagram of a mechanical component with arrows indicating motion or force direction (no text or symbols)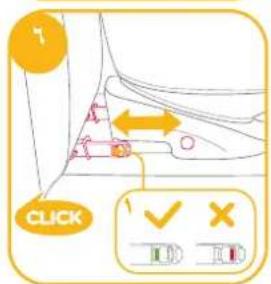
text_image
CLICK ✓ ×natural_image
Line drawing of a baby seat with a yellow arrow indicating motion (no text or symbols)natural_image
Illustration of a hand pressing down on a car seatbelt with directional arrows indicating motion (no text or symbols)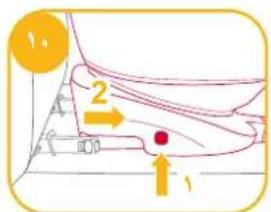
text_image
Diagram showing a mechanical or architectural component with numbered annotations and directional arrows, likely illustrating a process or assembly.إزالة NCAA
text_image
Diagram showing a device with labeled components and directional arrows indicating movement or flownatural_image
Diagram showing a car interior with directional arrows indicating movement or force (no text or symbols)natural_image
Diagram of a mechanical or fluid system with directional arrows and a circular component (no text or symbols)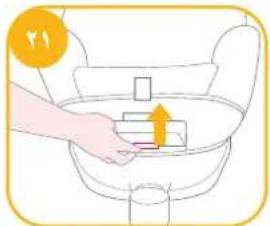
text_image
Diagram showing a hand placing a component into a bathtub with an arrow indicating direction, labeled with number 21.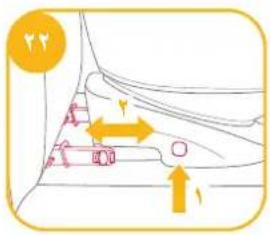
text_image
Diagram showing car interior with directional arrows and a yellow circle containing 'YY' symbol, likely indicating movement or flow.٤ - ٣ راجع الصور
natural_image
Illustration of a person with a red band and two seated individuals (no text or symbols)
natural_image
Illustration of a hand pressing down on a chair seat with an arrow indicating motion (no text or symbols)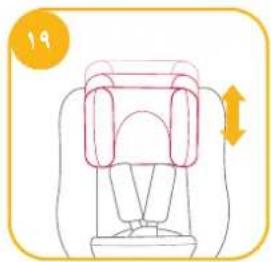
natural_image
Illustration of a car seatbelt with a highlighted seat area and directional arrow (no text or symbols)ضبط الارتفاع
text_image
Diagram showing car seatbelt usage with directional arrows and a yellow icon labeled 'Y/Y'natural_image
Illustration of hands holding a white object with a red arrow indicating motion (no text or symbols)natural_image
Illustration of a hand adjusting a car seatbelt with arrows indicating movement (no text or symbols)تامين الطفل
text_image
Illustration showing a hand holding a device with arrows indicating process steps, including a lock icon and 'Y0' label.natural_image
Diagram of a car's side profile with arrows indicating motion or movement, no text or symbols present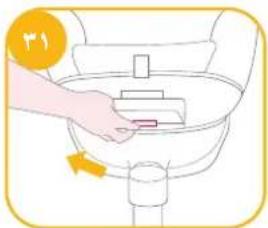
natural_image
Illustration of a hand placing a small object into a sink with an arrow indicating rotation (no text or symbols)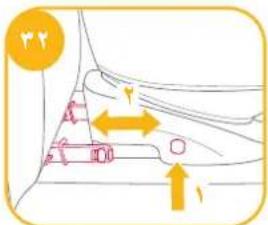
text_image
Diagram showing mechanical or structural components with directional arrows and symbols, possibly indicating movement or force directions.٤ - ٣ رراجع الصور
text_image
Illustration of a car seat with a hand adjusting the seatbelt, showing a finger placement and a downward arrow indicating pressure or adjustment.text_image
Diagram showing a child in a car seat with a hand holding the seat, indicating a downward pressure or adjustment.text_image
Illustration showing a hand holding a device with a lock icon, indicating a lock function or repair step.
natural_image
Illustration of a baby car seat with hands adjusting the seat (no text or symbols)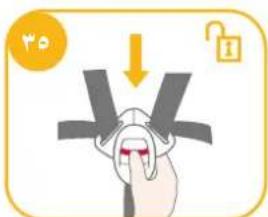
text_image
Illustration showing a hand holding a key with a lock icon, indicating a step to press or unlock a key.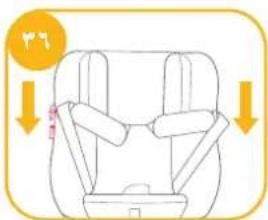
text_image
Diagram showing car seatbelt usage with directional arrows and a small icon labeled 'B' pointing to the seat.text_image
Diagram showing a device with a highlighted component and an upward arrow, likely indicating a step or direction of operation.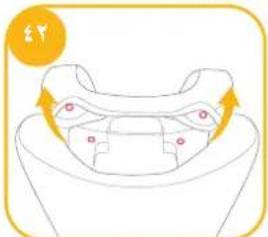
natural_image
Line drawing of a neck and shoulder with arrow indicating direction (no text or symbols)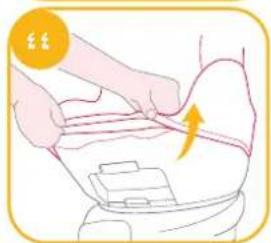
text_image
Illustration showing a person performing a medical or health procedure on a device, with an arrow indicating direction of movement.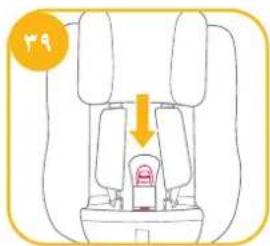
text_image
49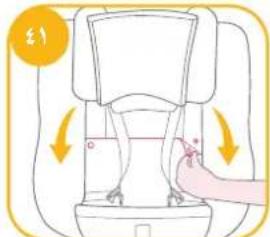
text_image
Diagram showing a hand pressing down on a seatbelt with directional arrows indicating motion or movement.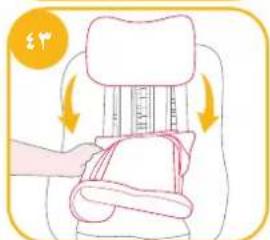
natural_image
Illustration of a hand pressing down on a chair seat with arrows indicating motion (no text or symbols)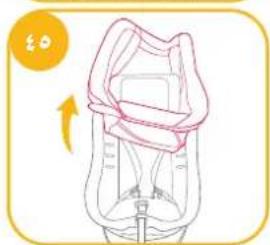
natural_image
Illustration of a baby bottle with a pink outline and arrow indicating rotation (no text or symbols)HR
Dobro došli u Joie™
natural_image
Simple line drawing of a bottle with a glass inside, no text or symbols presentPopis dijelova
text_image
Technical diagram of a car comfort seat with numbered parts for identification and assembly reference.UPOZORENJE
natural_image
Interior view of a car seat with a yellow checkmark indicating selection (no text or symbols on the seats)2

1

23

natural_image
Line drawing of a car showing a person sitting in the back seat and another seated in the front wheel, with no text or symbols present.
Odaberite način postavljanja
natural_image
Illustration of a mechanical device with a numbered label (3) and an arrow indicating rotation or movement (no text or symbols present)text_image
6 CLICK 1 ✓ ✗natural_image
Illustration of a hand using a tool to adjust or install a mechanical component (no text or symbols visible)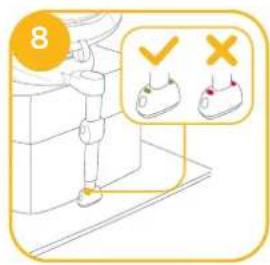
text_image
8
text_image
9 !1 !2Uklanjanje baze
natural_image
Illustration of a hand placing a small object into a toilet sink with an arrow indicating upward motion (no text or symbols)natural_image
Line drawing of a baby car seat with a directional arrow indicating motion (no text or symbols)Upotreba zaštite od bočnog udarca
natural_image
Illustration of a person with a red band and two seated individuals, no text or symbols present
natural_image
Illustration of a hand pressing down on a chair seat with an arrow indicating upward motion (no text or symbols)
natural_image
Illustration of a car seatbelt device with a highlighted seat area and directional arrow (no text or symbols)natural_image
Illustration of a hand placing a rectangular object into a basin with an arrow indicating direction (no text or symbols)
text_image
22 2 1natural_image
Illustration of a baby car seat with hand placement and orange arrows indicating movement (no text or symbols)
text_image
25The Ground Truth image displays a single, solid horizontal line. According to Rule 2 (UNDERSCORE & LINE RULES), this is a stylistic or background line, not a placeholder underscore. Therefore, the OCR result must ignore it and output nothing or only meaningful text. The provided OCR content is "____", which consists of four underscores. This is an incorrect interpretation of the line as a placeholder, violating the rule that stylistic lines must be ignored. The OCR has hallucinated placeholder underscores where none exist in the GT. Hence, the result is inconsistent with the Ground Truth.

text_image
26
natural_image
Illustration of hands performing a medical procedure on a patient's chest (no text or symbols present)
text_image
Uklonite dio s osloncem za glavu na umetku za bebu ako primijetite da je dijete preraslo i glava mu više ne leži udobno na njemu. Uklonite dio za tijelu na umetku za bebu ako primijetite da je dijete preraslo i ramena mu više ne leže udobno na njemu. 1 Uklonite jastuk umetka za bebu odvajanjem kopčica kako bi dijete imalo više prostora ako je preraslo umetak. Jastuk se može zasebno koristiti bez pričvršćivanja na umetak radi podupiranja leda dijetetu kako bi mu bilo udobnije. 2 Preporučujemo uporabu potpunog umetka za bebu sve dok je dijete manje od 60 cm, a može se koristiti dok ne preraste umetak. Umetak za bebu pobolišava zastitu od bočnog udarca.natural_image
Illustration of a hand placing a small object into a sink with a numbered label '31' (no text or symbols on the diagram itself)
text_image
32 2 1natural_image
Illustration of a baby car seat with hand placement and orange arrows indicating movement (no text or symbols)
text_image
35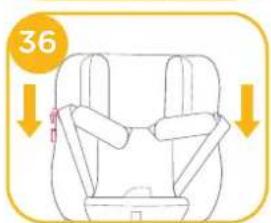
text_image
36natural_image
Diagram of a car seat with arrows indicating direction (no text or symbols)
natural_image
Illustration of a person applying a bandage to a bag, with a lightning bolt indicating pressure (no text or symbols)Briga i održavanje
natural_image
Simple line drawing of a bottle with a glass inside, no text or symbols presentLista över delar
text_image
Technical diagram of a car seat assembly with numbered parts for identificationWARNING
Angående installation
se bilder 1 - 2
natural_image
Illustration of a car seat with red buttons and a yellow checkmark (no text or symbols)2
text_image
1 2 3 4 5 6 7 1 2 3 4 5 6 73

natural_image
Line drawing of a car showing a person sitting in the seat and another person standing beside it (no text or symbols)2
natural_image
Illustration of a robotic arm with a curved arrow indicating motion (no text or symbols)text_image
6 CLICK 1 ✓ ✗natural_image
Illustration of a hand using a tool to adjust or install a mechanical component (no text or symbols visible)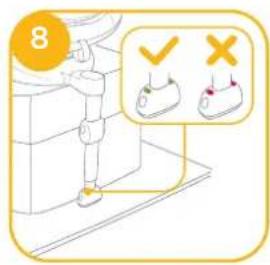
text_image
8
text_image
9 !1 !2Ta bort basen
natural_image
Illustration of a hand placing a rectangular object into a toilet with an arrow indicating upward motion (no text or symbols)natural_image
Line drawing of a car seat assembly with a directional arrow indicating motion (no text or symbols)natural_image
Illustration of a person with a red band and two seated individuals on chairs, no text or symbols present.
natural_image
Illustration of a hand pressing down on a chair seat with an arrow indicating upward motion (no text or symbols)
natural_image
Illustration of a car seatbelt with a highlighted seat area and directional arrow (no text or symbols)natural_image
Illustration of a hand placing a small object into a basin with an arrow indicating direction (no text or symbols)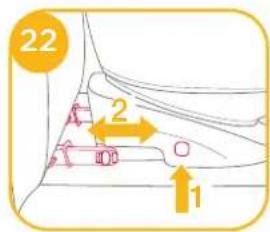
text_image
22 2 1natural_image
Illustration of a baby car seat with hand placement and orange arrows indicating movement (no text or symbols)
text_image
25natural_image
Illustration of a hand holding a small object with an arrow indicating motion (no text or symbols)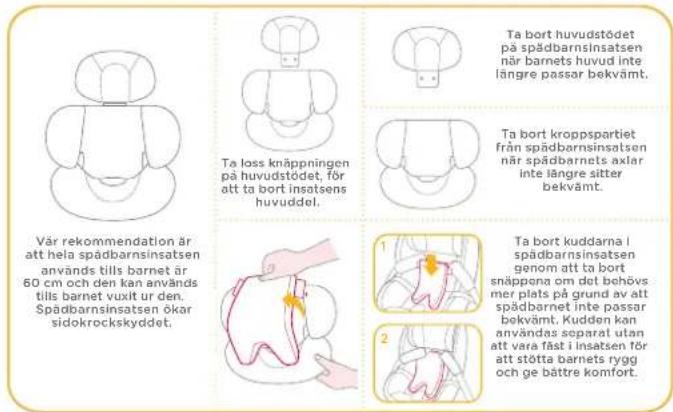
natural_image
Illustration of a baby car seat with hands adjusting the seatbelt (no text or symbols)
text_image
35
text_image
36natural_image
Diagram of a car seat with arrows indicating direction (no text or symbols)
natural_image
Illustration of a person applying a bandage to a bag, with a lightning bolt indicating pressure (no text or symbols)I VIKTIG: BEHOLD FOR FREMTIDIG OPPSLAG. LES NÖYE.
natural_image
Simple line drawing of a lamp with an open book on top, set against a solid yellow background (no text or symbols)Deleliste
text_image
Technical diagram of a car seat assembly with numbered parts for identificationADVARSEL
natural_image
Illustration of a car seat with red buttons and a yellow checkmark (no text or symbols)2

text_image
1 2 3 4 5 6 7 1 2 3 4 5 6 73

natural_image
Line drawing of a car showing a person sitting in the seat and another person standing beside it (no text or symbols)2

natural_image
Illustration of a robotic arm with articulated legs and a curved arrow indicating motion (no text or symbols)text_image
6 CLICK 1 ✓ ✗natural_image
Illustration of a hand using a tool to adjust or install a mechanical component (no text or symbols visible)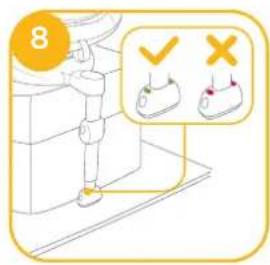
text_image
8
text_image
9 !1 !2Fjerne basen
natural_image
Illustration of a hand placing a component into a toilet with an arrow indicating upward motion (no text or symbols)natural_image
Line drawing of a baby car seat with a highlighted seat and arrow indicating rotation (no text or symbols)natural_image
Illustration of a person with a red band and two seated individuals, no text or symbols present
natural_image
Illustration of a hand pressing down on a chair seat with an arrow indicating upward motion (no text or symbols)
natural_image
Illustration of a car seatbelt device with a highlighted section and directional arrow (no text or symbols)Bakovervendt bruk
natural_image
Illustration of a baby car seat with hand placement and orange arrows indicating movement (no text or symbols)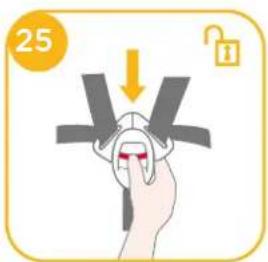
text_image
25natural_image
Illustration of a hand pressing down on a small object with a yellow arrow indicating motion (no text or symbols)
natural_image
Illustration of a hand placing a small object into a sink (no text or symbols)
text_image
32 2 1! ISOFIX-kontaktene må festes og låses på ISOFIX-ankerpunktene.
33 -1
! Lastbenet må monteres riktig med grønn indikator. 33 -2
! Sørg alltid for at det forbedrede barnesetet forblir låst i forovervendt eller bakovervendt modus, uansett om et barn sitter i det eller ikke.
Sikre barnet
natural_image
Illustration of a baby car seat with hand adjusting seatbelt (no text or symbols)
text_image
35
text_image
36natural_image
Diagram of a car seat with arrows indicating direction (no text or symbols)
natural_image
Illustration of a person applying a bandage to a bag, with a lightning bolt indicating pressure (no text or symbols)natural_image
Simple line drawing of a bottle with a handle and a small object inside, against a solid yellow background (no text or symbols)Osaluettelo
text_image
Technical diagram of a car seat assembly with numbered parts for identificationVAROITUS
natural_image
Illustration of a car seat with red buttons and a checkmark (no text or symbols)2
1

3
natural_image
Line drawing of a car showing a seatbelt and passenger seat (no text or symbols)2

Valitse asennustila
natural_image
Illustration of a robotic arm with motion arrows indicating movement (no text or symbols)text_image
6 CLICK 1 ✓ ✗natural_image
Illustration of a hand using a tool to adjust or install a mechanical component (no text or symbols visible)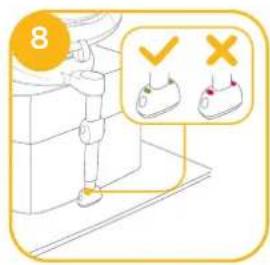
text_image
8
text_image
9 !1 !2Alustan poistaminen
natural_image
Illustration of a hand placing a small object into a toilet with an arrow indicating upward motion (no text or symbols)natural_image
Line drawing of a car seat assembly with a directional arrow indicating motion (no text or symbols)natural_image
Illustration of a person with a red band and two seated individuals on chairs, no text or symbols present.
natural_image
Illustration of a hand pressing down on a chair seat with an arrow indicating upward motion (no text or symbols)
natural_image
Illustration of a car seatbelt with a highlighted seat area and directional arrow (no text or symbols)natural_image
Illustration of a baby car seat with hand placement and orange arrows indicating movement (no text or symbols)
text_image
25The Ground Truth image displays a single, solid horizontal line. According to Rule 2 (UNDERSCORE & LINE RULES), this is a stylistic or background line, not a placeholder underscore. Therefore, the OCR result must ignore it. The provided OCR content is "____", which consists of four underscores. This is an incorrect interpretation of the line as a placeholder, violating the rule that stylistic lines must be ignored. The OCR has hallucinated text (underscores) where none should exist. Hence, the result is inconsistent with the Ground Truth.

text_image
26
natural_image
Illustration of hands performing a sewing or sewing process on a circular object (no text or symbols)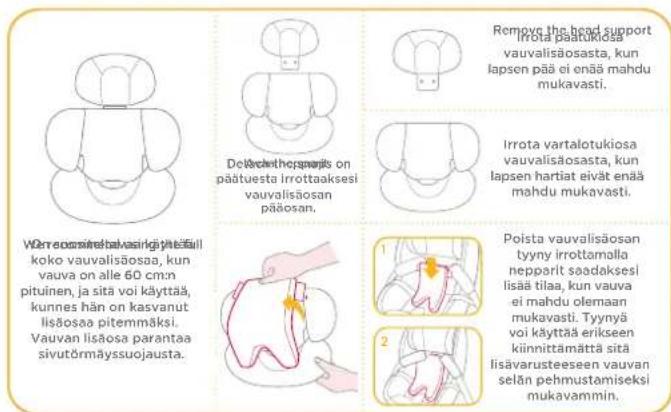
natural_image
Illustration of a baby car seatbelt being lifted by hand, no text or symbols present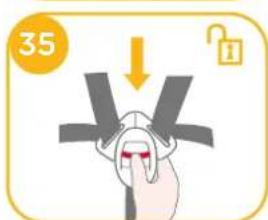
text_image
35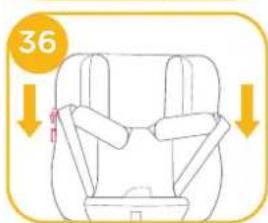
text_image
36natural_image
Diagram of a car seat with arrows indicating direction (no text or symbols)
natural_image
Illustration of a person applying a bandage to a bag, with a lightning bolt indicating force (no text or symbols)Allison Baby UK Ltd, Venture Point, Towers Business Park Rugeley, Staffordshire, WS15 1UZ
NUNA International B.V. Van der Valk Bourmanweg 178 C, 2352 JD Leiderdorp, The Netherlands