
58G013 - Multitools Graphite - Free user manual and instructions
Find the device manual for free 58G013 Graphite in PDF.
| Brand | Graphite |
| Model | 58G013 |
| Product Type | Cordless Multifunction Tool |
| Supply Voltage | 18 V DC |
| Battery Type | Lithium-Ion (Li-Ion) |
| Battery Capacity | 2000 mAh (battery 58G001) |
| No-Load Oscillations | 5000 - 20000 min⁻¹ |
| Oscillation Angle | 3° |
| Tool Fixing System | Tool-free (quick lever) |
| Weight | 1.8 kg |
| Sound Pressure Level (sanding) | 90.8 dB(A) |
| Sound Power Level (sanding) | 101.8 dB(A) |
| Vibration Acceleration Value (sanding main handle) | 8.813 m/s² |
| Protection Class | III (battery) |
| Charger | Model 58G002, 230 V~, 50 Hz |
| Main Functions | Sawing, sanding, scraping, cutting |
| Maintenance | Clean with a dry cloth, do not use water |
| Safety | Read the manual, wear protective equipment (goggles, mask, gloves) |
| Spare Parts | Battery, charger, work tools (blades, scrapers, etc.) |
| Manufacturer | Grupa Topex, Warsaw, Poland |
Frequently Asked Questions - 58G013 Graphite
User questions about 58G013 Graphite
0 question about this device. Answer the ones you know or ask your own.
Ask a new question about this device
Download the instructions for your Multitools in PDF format for free! Find your manual 58G013 - Graphite and take your electronic device back in hand. On this page are published all the documents necessary for the use of your device. 58G013 by Graphite.
USER MANUAL 58G013 Graphite
natural_image
Line drawing of a mechanical device with no visible text or symbols58G013

PL INSTRUKCJA OBSŁUGI 6
GB INSTRUCTION MANUAL 12
DE BETRIEBSANLEITUNG....16
RU РУКОВОДСТВО ПО ЭКСПЛУАТАЦИИ ..... 20
UA ІНСТРУКЦІЯ З ЕКСПЛУАТАЦІЇ ..... 25
HU HASZNÁLATI UTASÍTÁS. 30
RO INSTRUCTIUNI DE DESERVIRE ..... 35
© INSTRUKCE K OBSLUZE....39
SK NÁVOD NA OBSLUHU....44
SL NAVODILA ZA UPORABO 48
LT APTARNAVIMO INSTRUKCIJA. 52
LV LIETOŠANAS INSTRUKCIJA 57
EE KASUTUSJUHEND 61
BG ИНСТРУКЦИЯ ЗА ОБСЛУЖВАНЕ ..... 65
HR UPUTE ZA UPOTREBU....70
SR UPUTSTVO ZA UPOTREBU 75
GR OΔΗΓΙΕΣ ΧΡΗΣΗΣ 79
ES INSTRUCCIONES DE USO. 84
IT MANUALE PER L'USO 89
NL GEBRUIKSAANWIJZING 94
FR MANUEL D'INSTRUCTION 98

natural_image
Mechanical component diagram showing a pin-like assembly with shaded blades and central hub (no text or symbols)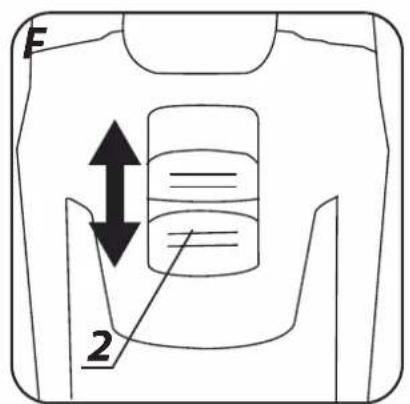

INSTRUKCJA ORYGINALNA (OBSŁUGI)
URZĄDZENIE WIELOFUNKCYJNE AKUMULATOROWE 58G013
UWAGA: PRZED PRZYSTĄPIENIEM DO UŻYTKOWANIA URZĄDZENIA NALEŻY UWAŻNIE PRZECZYTAĆ NINIEJSZĄ INSTRUKCJĘ I ZACHOWAĆ JĄ DO DALSZEGO WYKORZYSTANIA.
SZCZEGÓŁOWE PRZEPISY BEZPIECZEŃSTWA
SZCZEGÓŁOWE ZASADY BEZPIECZEŃSTWA (URZĄDZENIE WIELOFUNKCYJNE AKUMULATOROWE)
e-mail graphite@gtxservice.pl
GTX
SERVICE
CE
/EC Declaration of Conformity/
/The above listed product is in conformity with the following UE Directives:/
/and fulfils requirements of the following Standards:/
/Name and address of the person who established in the Community and authorized to compile the technical file:/
/GRUPA TOPEX Quality Agent/
CAUTION: BEFORE USING THE POWER TOOL READ THIS MANUAL CAREFULLY AND KEEP IT FOR FUTURE REFERENCE.
DETAILED SAFETY REGULATIONS
DETAIL SAFETY RULES (CORDLESS MULTI TOOL)
- During operation hold the tool firmly in closed hand.
- Before switching the tool on make sure it does not touch processed material.
- Before cutting floor, wall or other surface make sure the cut area is free from gas or electric installation. Cutting a live wire may cause electric shock and cutting a gas pipe may cause explosion.
- Do not touch moving parts of the tool.
- Do not put the tool aside before it stops completely.
- Hold the tool firmly in your hand before switching it on.
- Do not touch blade and processed material just after the work has been finished, the pieces may be very hot and may cause burns.
- To replace blade or sanding paper, first switch the tool off with the switch and wait until it stops working, then disconnect the tool from mains socket.
- Prior to operation make sure that there is enough space under processed material to avoid table or floor damage with the blade.
- Use anti-dust mask. Dust produced during operation is harmful to health.
- Do not eat, drink or smoke in a room, where paint with lead compounds is removed with this tool. There should be no bystanders in the room. Contact with or inhalation of dusts with lead compounds may be harmful to health.
- Before sanding connect dust extraction system to the tool.
- The tool is not designed for wet operation.
- When you experience unusual behaviour of the tool, see smoke or hear strange noises, immediately switch off the tool and remove the battery.
- To ensure proper cooling during tool operation keep the ventilation holes unobstructed.
SAFETY INSTRUCTIONS FOR BATTERY
- In case of battery damage and improper use it may produce gas. Ventilate room and seek medical attention in case of medical symptoms. Gas can damage respiratory tract.
- Improper operation conditions may lead to battery electrolyte leak, avoid contact with the substance. In case of accidental contact, flush the electrolyte abundantly with water. In case of contact with eyes, additionally seek medical attention. Leaked electrolyte may cause eye irritation or burns.
- Do not disassemble the battery – there is a risk of short circuiting.
- Do not use power tool battery in rain.
- Always keep the battery away from sources of heat. Do not leave the battery for a long time in high temperature (in direct sunlight, in proximity of heaters and wherever the temperature exceeds 50^ ).
SAFETY INSTRUCTIONS FOR BATTERY CHARGER
- This equipment is not intended for use by persons with restricted physical, sensory or mental capabilities (including children)
or persons who have no experience or are unfamiliar with the equipment, unless the use is supervised or carried out in accordance with equipment use instructions handed over by persons responsible for their safety.
- Pay attention to children so they don't play with the equipment.
- Do not expose the charger to humidity or water. Ingress of water into the charger increases risk of electric shock. Use the charger only in dry rooms.
- Disconnect the charger from power supply before starting any maintenance or cleaning.
- Do not use the charger when placed on flammable surface (e.g. paper, textiles) or in proximity of flammable substance. Greater charger temperature when charging increases risk of fire.
- Check condition of the charger, cable and plug before each use. Do not use the charger if any damage is found. Do not try to disassemble the charger. All repairs should be made at an authorized service workshop. Improper charger assembly may cause electric shock or fire.
• Children or persons who are physically, emotionally or mentally disabled and other persons, whose experience or knowledge is insufficient to use the charger while following all safety rules should not use the charger without supervision of person responsible for their safety. Otherwise there is a risk of improper use and injuries in consequence. - When the charger is not in use, it should be disconnected from the mains network.
CAUTION! This device is designed to operate indoors.
The design is assumed to be safe, protection measures and additional safety systems are used, nevertheless there is always a small risk of injuries at work.
Li-lon batteries may leak, set on fire or explode when heated to high temperature or short-circuited. Do not store the batteries in a car in hot and sunny days. Do not open the battery. Li-lon batteries contain electronic protection devices that, if damaged, may cause fire or explosion of the battery.
Explanation of used symbols


13

14

15
- CAUTION! Use precaution measures.
-
Read instruction manual, observe warnings and safety conditions therein!
-
Use personal protection equipment (protective goggles, earmuff protectors).
-
Use dust mask!
-
Use protective gloves.
-
Keep the tool away from children.
-
Use protective clothes.
-
Protect the tool from moisture.
-
Remove the battery from the device before starting any adjustments or cleaning related tasks.
-
This device is designed to operate indoors.
-
Maximum permissible cell temperature 45°C.
-
Do not throw cells into fire.
-
Recycling.
-
Charger protection class 2.
-
Do not throw cells into water.
CONSTRUCTION AND USE
The multi tool is a hand held battery-powered tool. The drive consists of DC commutator motor with permanent magnets, whose rotational movement is transformed to oscillations. Various working tools available for the tool allow for use in various types of tasks. This type of power tool is widely used for: cutting and sawing wood, wood-based materials, plastics, non-ferrous metals and joining parts (nails, bolts etc.), all using proper working tools.
It can also be used to process soft ceramic tiles, grinding and dry scraping small surfaces. Possibility of processing abovementioned materials in hard to reach areas and close to edges is a great advantage of the tool.
Range of use covers the following tasks: small model making, locksmith, woodworking and any work from the scope of individual, amateur activities (tinkering).

Use the power tool in accordance with the manufacturer's instructions only. Use the power tool only with original equipment.
DESCRIPTION OF DRAWING PAGES
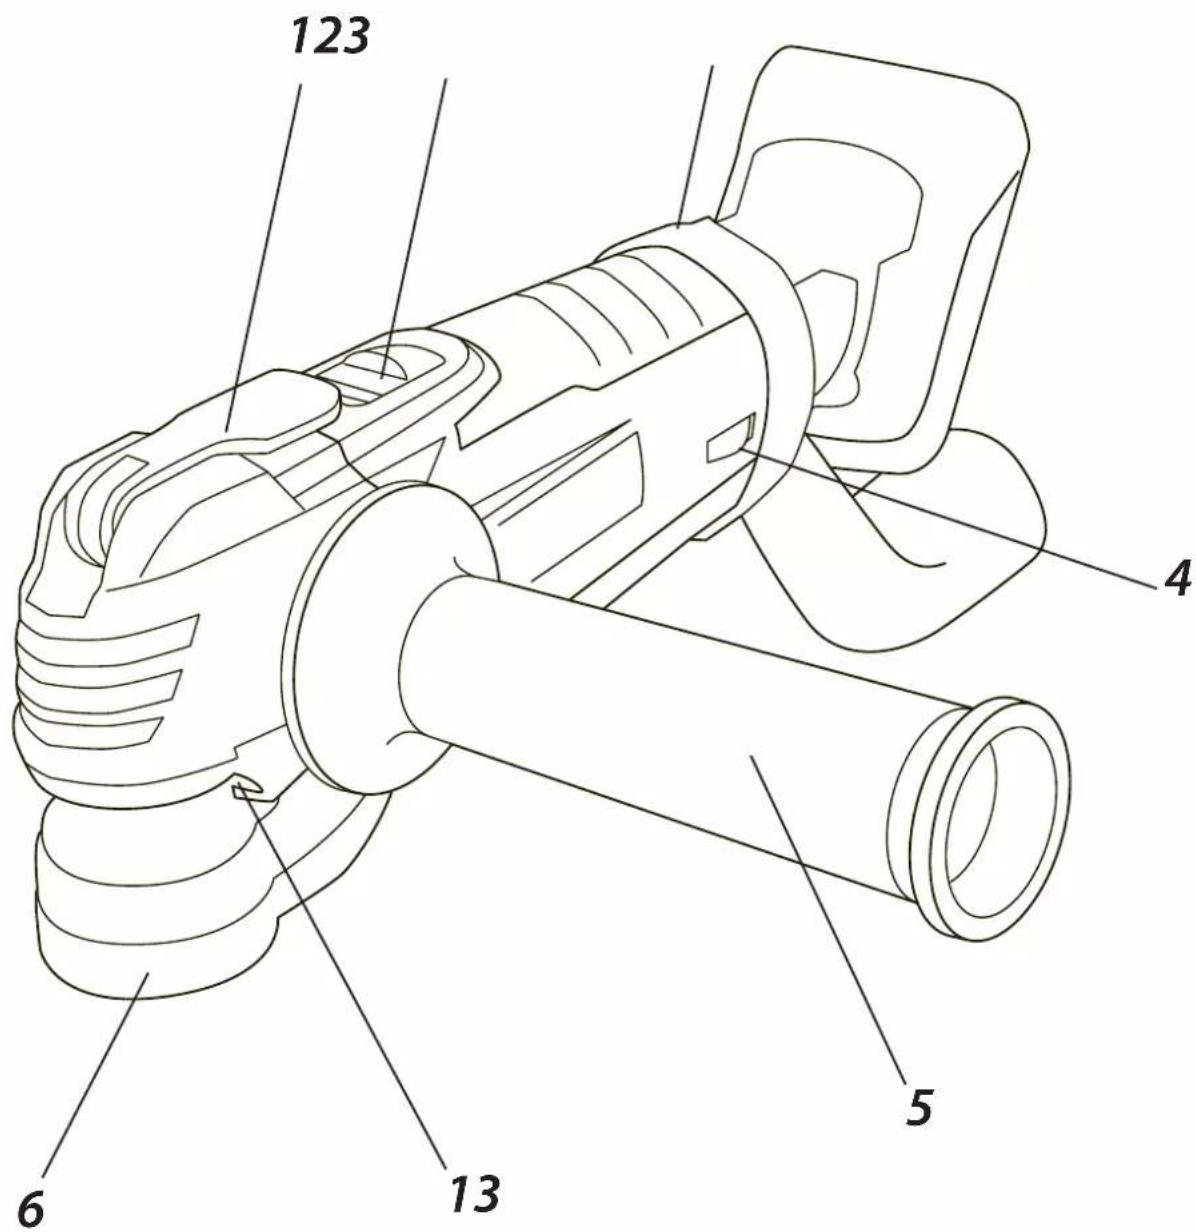
Below enumeration refers to the device elements depicted on the drawing pages of this manual.
-
Lever for quick working tool installation
-
Switch
-
Clamp
-
Wheel for rotational speed control
-
Additional handle
-
Dust extraction add-on
-
Battery
-
Battery lock button
-
Charger
-
LED diodes
-
Button for battery level indication
-
Battery level indicator (LED)
-
Illumination
* Differences may appear between the product and drawing.
MEANING OF SYMBOLS

CAUTION

WARNING

ASSEMBLY / SETTINGS

INFORMATION

EQUIPMENT AND ACCESSORIES
- Working attachment - 1 pce
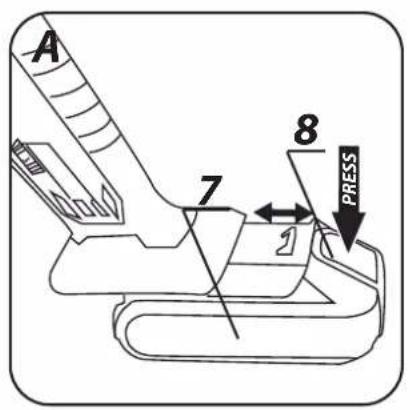
REMOVING AND INSERTING THE BATTERY
- Push the battery lock button (8) and slide out the battery (7) (fig. A).
- Insert charged battery (7) into the handle holder, you should hear when the battery lock button (8) snaps.
BATTERY CHARGING

The device is supplied with partially charged battery. The battery should be charged in ambient temperature between 4^ C and 40^ C. New battery, or one that has not been used for a long time, will reach full efficiency after approximately 3 to 5 charge/discharge cycles.
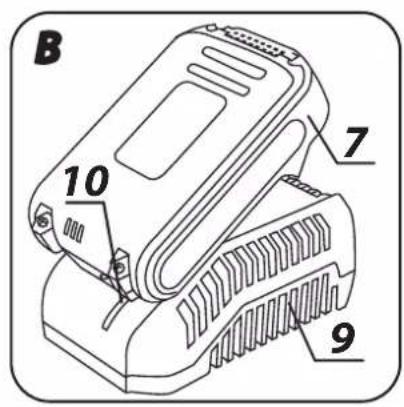
- Remove the battery (7) from the device (fig. A).
- Connect the charger (9) to mains socket (230V AC).
- Slide the battery (7) into the charger (9) (fig. B). Ensure the battery is properly fitted (pushed to the end).

When the charger is connected to a mains socket (230 V AC), the green diode (10) on the charger turns on to indicate connected supply.
When the battery (7) is placed in the charger (9), the red diode (10) on the charger turns on to indicate that the charging is in progress.
At the same time green diodes (12) of the battery level indication are flashing in different configurations, see description below.
- All diodes are flashing – the battery is empty and requires charging.
- 2 diodes are flashing – the battery is partially discharged.
- 1 diode is flashing – the battery level is high.

Once the battery is charged, the diode (10) on the charger lights green, and all battery level diodes (12) light continuously. After some time (approx. 15 s) the battery level indication diodes (12) turn off.

Do not charge the battery for more than 8 hours. Exceeding this time limit may cause damage to battery cells. The charger does not turn off automatically when the battery is full. Green diode on the charger will remain on. Battery level indication diodes turn off after some time. Disconnect power supply before removing the battery from the charger socket. Avoid consecutive short charging. Do not charge the battery after short use of the tool. Significant decrease of the period between charging indicates the battery is worn out and should be replaced.

Batteries heat up when charging. Do not operate just after charging – wait for the battery to cool down to room temperature. It will prevent battery damage.
BATTERY LEVEL INDICATION

The battery is equipped with signalisation of the battery level (3 LED diodes) (12). To check battery level status, press the button for battery level indication (11) (fig. C). When all diodes are lit, the battery level is high. When 2 diodes are on, the battery is partially discharged. When only one diode is lit, the battery is discharged and must be recharged.
INSTALLATION OF ADDITIONAL HANDLE

Due to safety reasons always use additional handle when operating the power tool.

Additional handle (5) can be installed in one of the holes on the tool head. We recommend using the power tool with the additional handle. When you hold the tool with your both hands during operation (using also the additional handle) you can have greater control over the kick back forces and counter torque on start up. This reduces risk of injuries at kick back.
SELECTION OF WORKING TOOL

With this cordless multi tool you can use working tools compatible with universal, open attachment system (with 9 holes). Holes, 2 mm in diameter, are located around 10 mm radius circle every 30° (some holes can also form an open cut out).
Below table presents examples of various working tools.

REMOVING THE DUST EXTRACTION ADD-ON
- Remove working tool if already installed.
- Disengage the clamp (3) and remove the dust extraction add-on (6).

Installation of the dust extraction add-on (6) is similar to deinstallation, only the sequence of actions is reversed.
| Name Type of material Intended use Example | ||||
 | HSS blade for metal | Metal (e.g. nails, bolts, small sections), non-ferrous metals | Small dividing and plunge cutting. | Cutting narrow sections short, cutting joining elements, e.g. clamps. |
 | Half-round HCS wheel for wood | Wood, wood-based materials, plastics | Dividing and plunge cutting in corners and hard to reach areas, near surfaces. | Narrow plunge cuts in solid wood, e.g. for air grates. |
 | HCS blade for wood | Wood, wood-based materials, plastics | Dividing and plunge cutting in corners and hard to reach areas, near surfaces. | Cut outs in furniture boards, cutting cove bases short, plunge cutting for fitting floor panels. |
 | Half-round wheel with tungsten grit | Cement joints, soft ceramic tiles, hard plastics and other materials. | Cutting short and cutting off close to edges, in corners and hardly accessible places. | Removal of joint, cutting holes in ceramic tiles and plastics. |
 | Delta sanding pad | Wood, wood-based materials, abrasive materials. | Sanding in hard to reach areas and in corners on a hard substrate. | Removal of mortar and glue for ceramic tiles, sanding solid wood, polishing. |
 | Stiff scraper | Linings, floors, ceramic tiles. | Scraping soft materials on a hard substrate. | Removal of mortar residues, glue for lining or ceramic tiles. |
INSTALLATION OF WORKING TOOLS
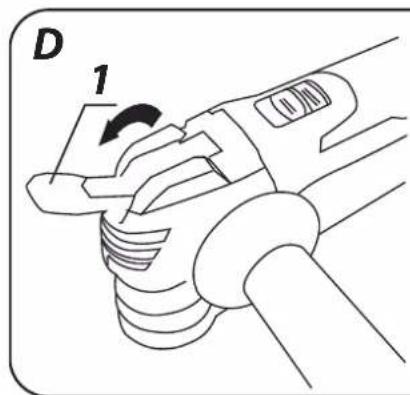
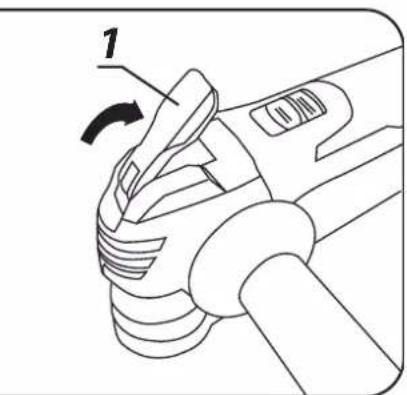
- Pull the lever for quick working tool installation (1) forward (fig. D).
- Slide working tool between two plates of the tool holder, make sure the holes are matched with pins of the upper washer.
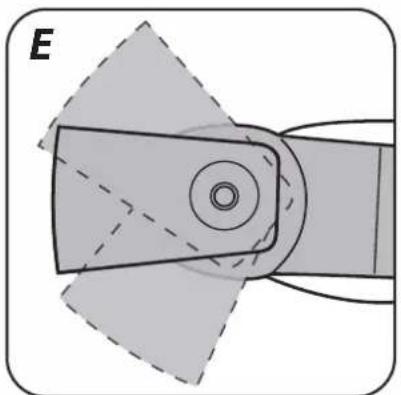
- In order to allow operation in the position that is most comfortable and safe for the operator, you can set up the working tool in the tool holder in a position of your choice, provided that the upper plate pins are matched with the holes (fig. E).
- Working tool should be installed with bend pointing down.
- Lower the lever for quick tool installation (1) to install the working tool in selected position (fig. D).

Check condition of the working tools before using the power tool. Do not use tools with dents, cracks or other damages. Replace worn out tools with new ones before operation. When the work is finished, always turn the device off and wait until the working tool comes to complete stop. Only then you can put the device away. Do not brake the working tool when it's moving by pressing it against processed material.
SWITCHING ON / OFF
Hold the device with both hands when starting up and during operation.
Switching on - slide the switch (2) forward to position I.
Switching off - slide the switch (2) backward to position O (fig. F).
Each time you press the switch button (2) two LED diodes (13) turn on. They are located on both sides of the head and illuminate the work place.

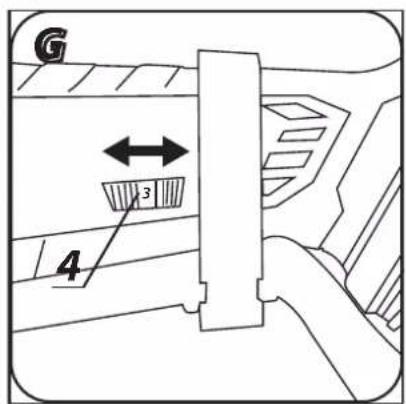
ROTATIONAL SPEED CONTROL

Wheel for rotational speed control (4) is located at the bottom part of the main handle (fig. G). Control range is 1 to 6. Rotational speed can be adjusted to the user's needs.

Do not cover holes for motor ventilation in the tool body.
PRINCIPLES OF OPERATION

Oscillation frequency 5 000 – 20 000 per minute at 3° angle allows to work precisely in small areas and corners with the power tool.
OSCILLATION FREQUENCY 5 000 - 20 000 PER MINUTE AT 3^ ANGLE ALLOWS TO WORK PRECISELY IN SMALL AREAS AND SAWING AND CUTTING

Use only undamaged working tools in good technical condition. When sawing or cutting wood, fibre board, wood-based materials etc. make sure they do not contain foreign objects like nails, bolts etc. before starting the task. Remove foreign objects or use proper blade for removal. You can make plunge cuts only in soft materials like wood, gypsum boards and alike. Cutting ceramic tiles causes faster wear of working tool.
Remove the battery from the device before commencing any activities related to installation, adjustment, repair or maintenance.
MAINTENANCE AND STORAGE

- Cleaning the device after each use is recommended.
- Do not use water or any other liquid for cleaning.
- Clean the device with a dry cloth or blow through with compressed air at low pressure.
- Do not use any cleaning agents or solvents, since they may damage plastic parts.
- Clean ventilation holes in the motor casing regularly to prevent device overheating.
• Always store the tool in a dry place, beyond reach of children. - Store the device with the battery removed.

All defects should be repaired by service workshop authorized by the manufacturer.


Check that the tool is installed properly. Improperly or inaccurately installed working tools can slip during operation and cause risk for the user.
DUST EXTRACTION
Dust of some materials may be hazardous to health, like paint coatings with lead additives, some types of wood e.g. oak or beech or materials with asbestos. Therefore, we recommend use of external dust extraction systems, good workplace ventilation and use of dust-mask with particle filter.
The tool is equipped with dust extraction add-on, which should be connected to external dust extractor, e.g. vacuum cleaner designed for the type of produced dust.
TECHNICAL PARAMETERS
RATED PARAMETERS
| Cordless Multi Tool 58G013 | |
| Parameter Value | |
| Supply voltage 18 V DC | |
| Idle oscillation speed 5000-20000 rpm | |
| Oscillation angle 3° | |
| Working tools attachment system tool free | |
| Protection class III | |
| Weight 1,8 kg | |
| Year of production 2019 | |
| 58G013 defines type and indication of the device | |
| Graphite Energy+ System Battery | ||
| Parameter Value | ||
| Battery 58G001 58G004 | ||
| Battery voltage 18 V DC 18 V DC | ||
| Battery type Li-Ion Li-Ion | ||
| Battery capacity | 2000 mAh | 4000 mAh |
| Ambient temperature range | 4^ - 40^ | 4^ - 40^ |
| Charging time for charger 58G002 | 1 h | 2 h |
| Weight | 0,400 kg | 0,650 kg |
| Year of production 2019 2019 | ||
| Graphite Energy+ System Charger | |
| Parameter Value | |
| Charger type | 58G002 |
| Supply voltage | 230 V AC |
| Power supply frequency | 50 Hz |
| Charging voltage | 22 V DC |
| Max. charging current | 2300 mA |
| Ambient temperature range | 4^ - 40^ |
| Charging time of the battery 58G001 | 1 h |
| Charging time of the battery 58G004 | 2 h |
| Protection class | II |
| Weight | 0,300 kg |
| Year of production | 2019 |
DANE DOTYCZĄCE HAŁASU I DRGAŃ
| Sound pressure (sanding) | Lp_A = 90,8 dB(A) K=3 dB(A) |
| Sound pressure (sawing) | Lp_A = 96,8 dB(A) K=3 dB(A) |
| Sound pressure (scraping) | Lp_A = 94,4 dB(A) K=3 dB(A) |
| Sound power (sanding) | Lw_A = 101,8 dB(A) K=3 dB(A) |
| Sound power (sawing) | Lw_A = 107,8 dB(A) K=3 dB(A) |
| Sound power (scraping) | Lw_A = 105,4 dB(A) K=3 dB(A) |
| Vibration acceleration (sanding - main handle) | a_h = 8,813 m/s^2 K=1,5 m/s^2 |
| Vibration acceleration (sanding – additional handle) | a_h = 12,161 m/s^2 K = 1,5 m/s^2 |
| Vibration acceleration (sawing – main handle) | a_h = 7,924 m/s^2 K = 1,5 m/s^2 |
| Vibration acceleration (sawing – additional handle) | a_h = 13,089 m/s^2 K = 1,5 m/s^2 |
| Vibration acceleration (scraping – main handle) | a_h = 11,925 m/s^2 K = 1,5 m/s^2 |
| Vibration acceleration (scraping – additional handle) | a_h = 15,258 m/s^2 K = 1,5 m/s^2 |

Noise and vibration information
Noise produced by the device is defined with: level of produced sound pressure Lp_A and level of sound power Lw_A (where K is measurement uncertainty). Vibrations produced by the device are defined with vibration acceleration value a_h (where K is measurement uncertainty).
Sound pressure Lp_A , sound power Lw_A and vibration acceleration ah specified in this manual have been measured in accordance with EN 60745-1. Specified vibration level a_h can be used to compare tools and for initial evaluation of exposition to vibrations.
Specified vibration level is representative for main applications of the device. When the device is used for other purposes or with different working tools, the vibration level may change. Insufficient or too rare maintenance may increase vibration level. The abovementioned factors may lead to higher exposure to vibrations during whole working time.
To precisely define exposure to vibrations, include periods when the device is switched off and when it is switched on but not used for working. Once all factors have been carefully considered, total exposition to vibrations may be significantly lower.
To protect the user from results of exposure to vibrations, use additional safety measures such as: device and working tool periodic maintenance, proper hand temperature conditions, good work organisation.
ENVIRONMENTAL PROTECTION

Electrical equipment must not be disposed off with household waste and, instead, should be utilized at appropriate facilities. Information on utilization can be provided by the product vendor or the local authorities. Waste electrical and electronic equipment contains substances that are not neutral to the natural environment. Equipment that is not recycled constitutes a potential hazard to the environment and to human health.

Storage batteries/batteries must not be disposed with domestic waste, put in a fire or into the water. Damaged or used up storage batteries must be properly recycled in compliance with the current directive pertaining to disposal of storage batteries and batteries.
Li-lon
* Right to introduce changes is reserved.
"Grupa Topex Spółka z ograniczoną odpowiedzialnością" Spółka komandytowa with seat in Warsaw at ul. Pograniczna 2/4 (hereinafter Grupa Topex) informs, that all copyrights to this instruction (hereinafter Instruction), including, but not limited to, text, photographies, schemes, drawings and layout of the instruction, belong to Grupa Topex exclusively and are protected by laws accordingly to Copyright and Related Rights Act of 4 February 2004 (ustawa o prawie autorskim i prawach pokrewnych, Dz. U. 2006 No 90 item 631 with later amendments). Copying, processing, publishing, modifications for commercial purposes of the entire Instruction or its parts without written permission of Grupa Topex are strictly forbidden and may cause civil and legal liability.

GRAFISKÄS DALAS APRAKSTS
AKUGA SEOTUD OHUTUSJUHISED
DETALJNI PROPISI O SIGURNOSTI
DETALJNI PROPISI O SIGURNOSTI (VIŠENAMJENSKI AKUMULATORSKI UREĐAJ)
AFVOEREN VAN HET STOF

- INSTRUKCJA ORYGINALNA (OBSŁUGI)
- URZĄDZENIE WIELOFUNKCYJNE AKUMULATOROWE 58G013
- SZCZEGÓŁOWE PRZEPISY BEZPIECZEŃSTWA
- SZCZEGÓŁOWE ZASADY BEZPIECZEŃSTWA (URZĄDZENIE WIELOFUNKCYJNE AKUMULATOROWE)
- CE
- DETAILED SAFETY REGULATIONS
- DETAIL SAFETY RULES (CORDLESS MULTI TOOL)
- SAFETY INSTRUCTIONS FOR BATTERY
- SAFETY INSTRUCTIONS FOR BATTERY CHARGER
- CAUTION! This device is designed to operate indoors.
- CONSTRUCTION AND USE
- Use the power tool in accordance with the manufacturer's instructions only. Use the power tool only with original equipment.
- DESCRIPTION OF DRAWING PAGES
- MEANING OF SYMBOLS
- EQUIPMENT AND ACCESSORIES
- REMOVING AND INSERTING THE BATTERY
- BATTERY CHARGING
- BATTERY LEVEL INDICATION
- INSTALLATION OF ADDITIONAL HANDLE
- SELECTION OF WORKING TOOL
- REMOVING THE DUST EXTRACTION ADD-ON
- INSTALLATION OF WORKING TOOLS
- SWITCHING ON / OFF
- ROTATIONAL SPEED CONTROL
- PRINCIPLES OF OPERATION
- MAINTENANCE AND STORAGE
- DUST EXTRACTION
- TECHNICAL PARAMETERS
- Noise and vibration information
- ENVIRONMENTAL PROTECTION
- Li-lon
- GRAFISKÄS DALAS APRAKSTS
- AKUGA SEOTUD OHUTUSJUHISED
- DETALJNI PROPISI O SIGURNOSTI
- DETALJNI PROPISI O SIGURNOSTI (VIŠENAMJENSKI AKUMULATORSKI UREĐAJ)
- AFVOEREN VAN HET STOF
Brand : Graphite
Model : 58G013
Category : Multitools