Antoon Plus - Car seat Lionelo - Free user manual and instructions
Find the device manual for free Antoon Plus Lionelo in PDF.

| Product type | Baby car seat |
| Brand | Lionelo |
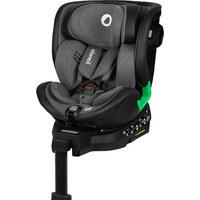
| Model | Antoon Plus |
| Safety standard | i-Size (UN Regulation No. 129) |
| Weight group | 0-18 kg |
| Child size | 40-105 cm |
| Approximate age | From birth to approx. 3 years |
| Dimensions (L x W x H) | 62 x 44 x 54 cm (approx.) |
| Seat weight | 12.5 kg (approx.) |
| Installation | ISOFIX + support leg |
| Rotation | 360° with rotation button |
| Recline positions | 5 positions (including lie-flat) |
| Installation direction | Rear-facing (40-105 cm) and forward-facing (76-105 cm) |
| Harness | 5-point, height-adjustable with headrest |
| Adjustable headrest | Yes, with adjustment lever |
| Infant insert | Included for children 40-75 cm |
| Side protection | Integrated, deployable on door side |
| Maintenance and cleaning | Cover washable at 30°C (no dryer, no bleach) |
| Materials | Plastic, fabric |
| Included accessories | ISOFIX guides, infant insert, instruction manual |
Frequently Asked Questions - Antoon Plus Lionelo
User questions about Antoon Plus Lionelo
0 question about this device. Answer the ones you know or ask your own.
Ask a new question about this device
Download the instructions for your Car seat in PDF format for free! Find your manual Antoon Plus - Lionelo and take your electronic device back in hand. On this page are published all the documents necessary for the use of your device. Antoon Plus by Lionelo.
USER MANUAL Antoon Plus Lionelo
natural_image
Line drawing of a lionelo car seat assembly (no text or symbols)
text_image
Technical diagram of a mechanical device with numbered components and an inset close-up view of the component.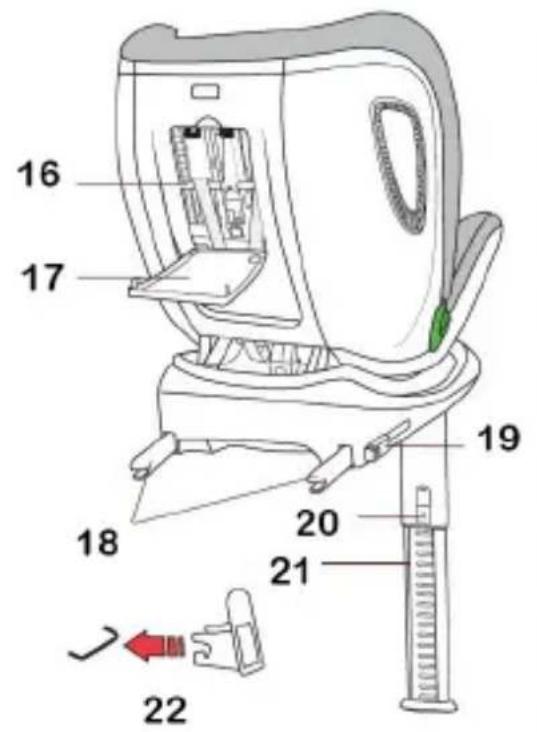
text_image
16 17 18 20 21 22 19
text_image
A 2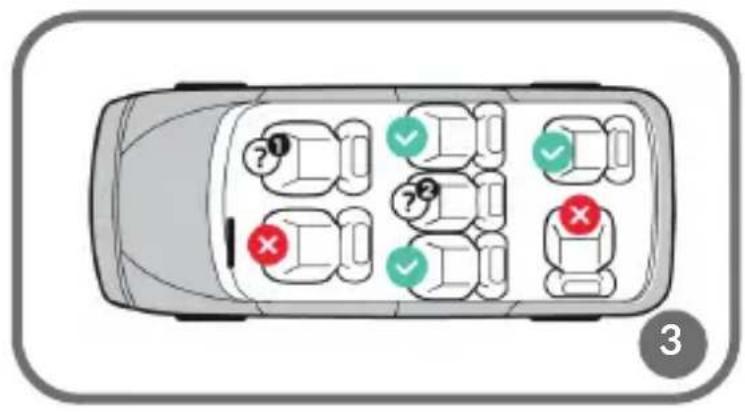
text_image
Diagram of a car with labeled vehicle positions and checkmarks indicating status or failure, marked with numbers 1, 2, and red/green checkmarks.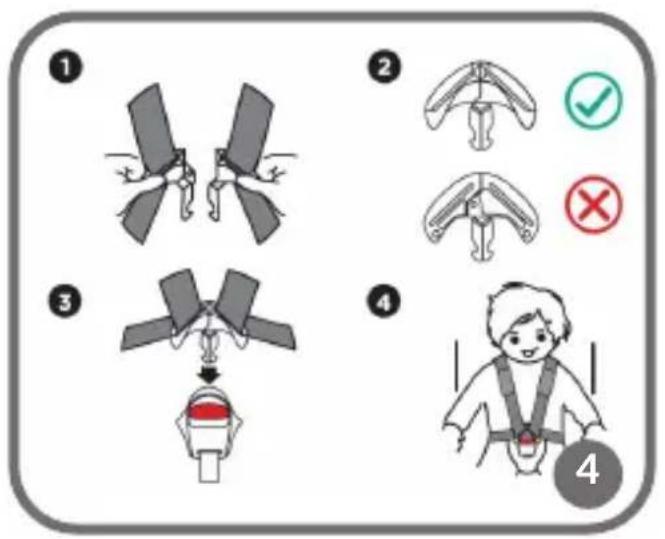
text_image
Medical procedure diagram showing steps to adjust a device with safety symbols and a patient in safety gear.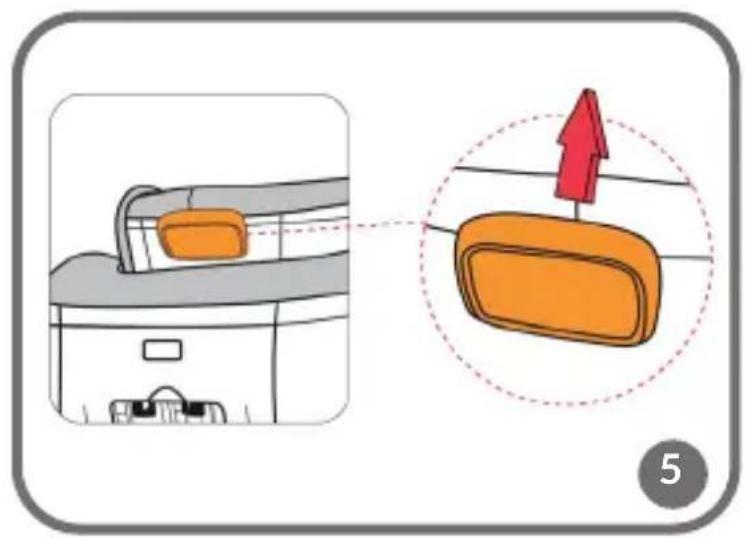
text_image
Diagram showing a printer's internal components with an orange package and a red arrow indicating direction, labeled with number 5.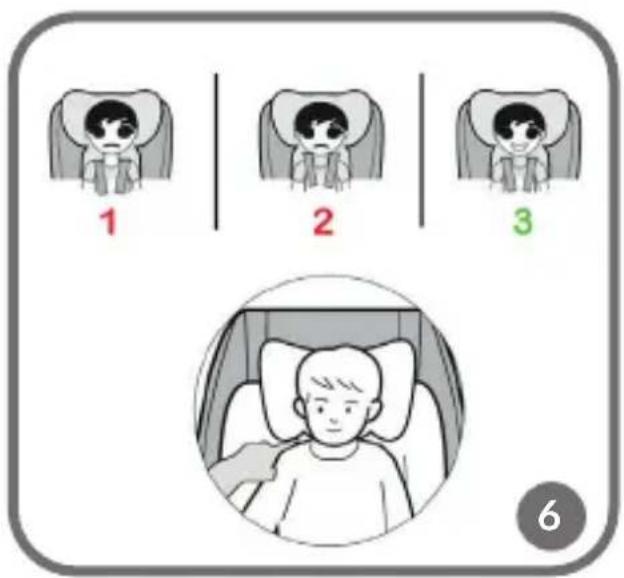
text_image
1 2 3 6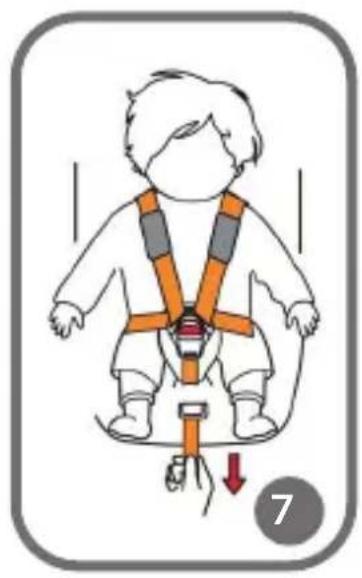
text_image
Illustration of a child wearing a safety harness with a red arrow indicating downward motion, labeled with number 7.
natural_image
Illustration of a child wearing an orange safety harness, with a hand adjusting the seat and a red arrow indicating a downward motion (no text or symbols)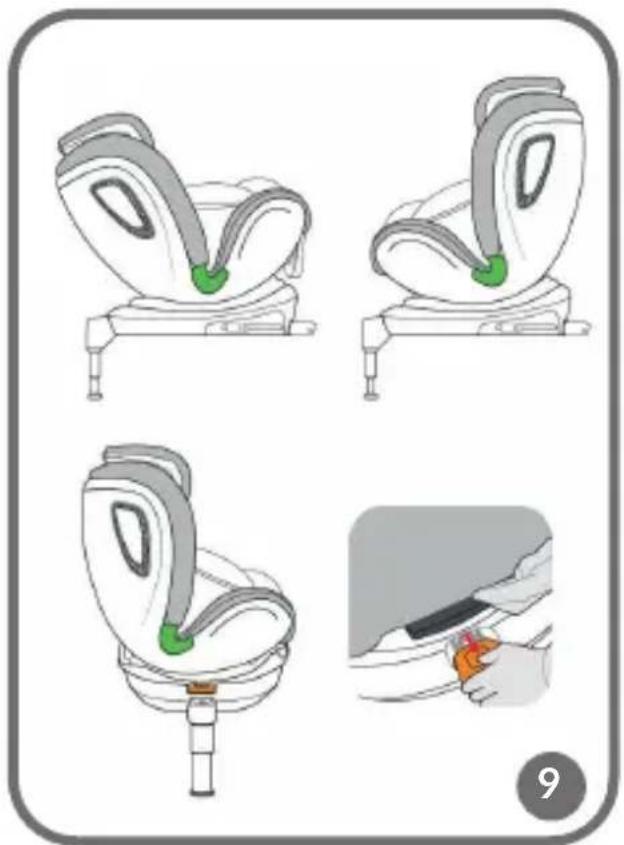
natural_image
Four-step illustration of a car seat assembly with a highlighted grip, showing step-by-step assembly and disassembly (no text or symbols)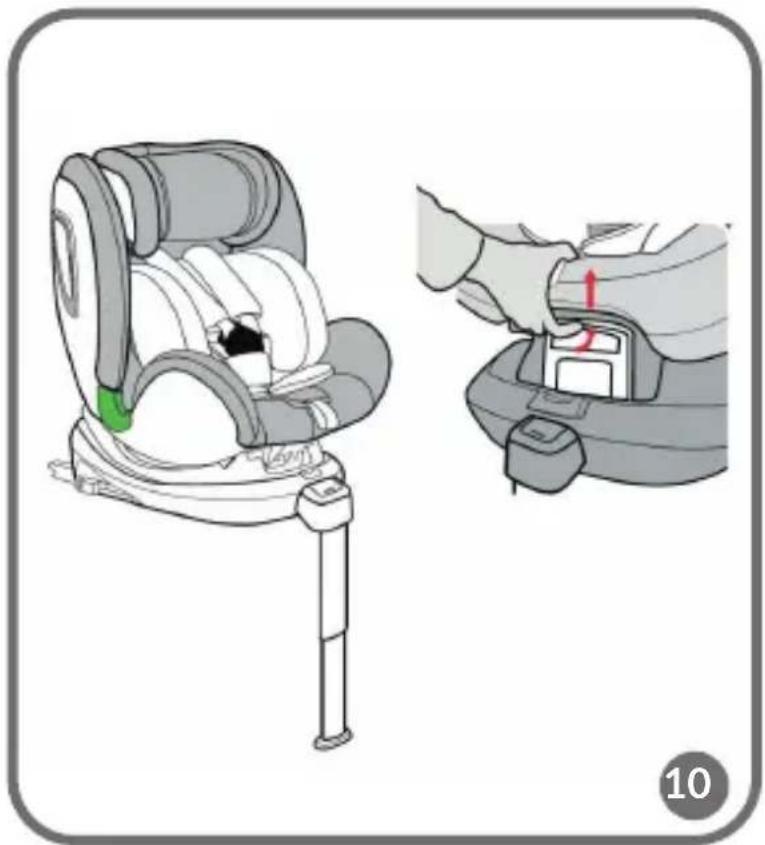
natural_image
Illustration of a car seatbelt device being adjusted for a hand, showing internal components and a red directional arrow (no text or symbols)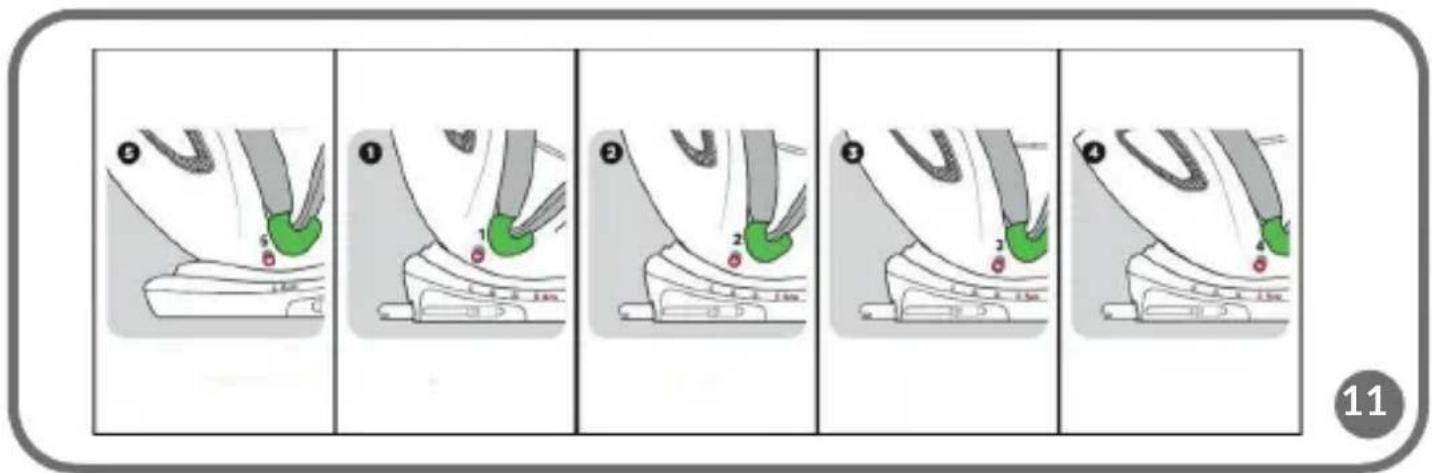
text_image
Sequence of five-step shoe tread pattern demonstrating foot positioning and movement, labeled with step numbers 1 to 5.
text_image
Diagram of a car seat with numbered labels indicating different seat positions or components.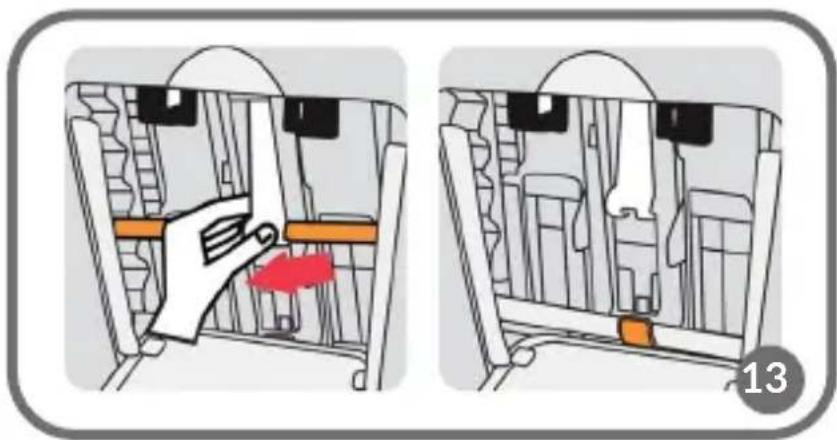
natural_image
Illustration of a car seatbelt mechanism showing hand placement and structural details (no text or symbols)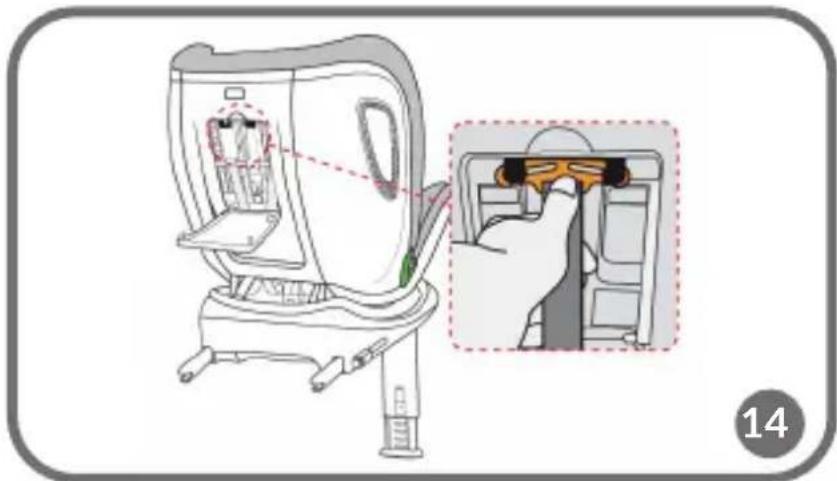
natural_image
Illustration of a computer washing machine with a hand inserting a component into the air gap (no text or symbols present)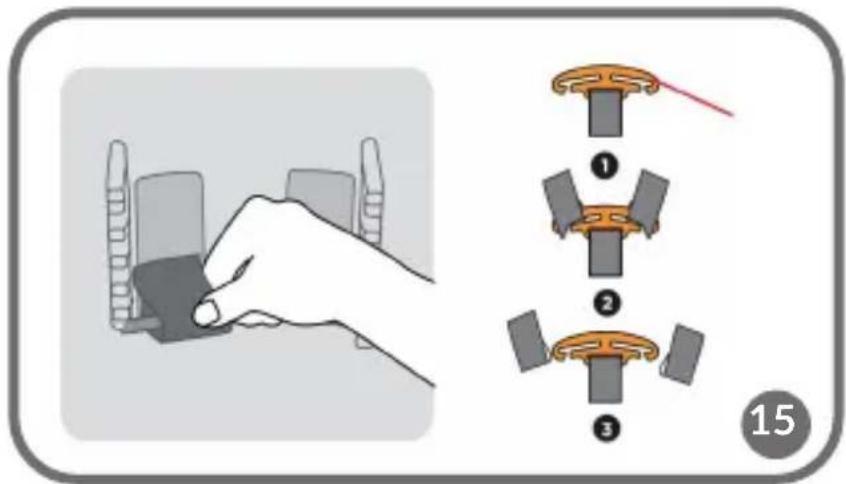
text_image
Diagram illustrating a hand holding a device with three labeled parts, showing step-by-step assembly.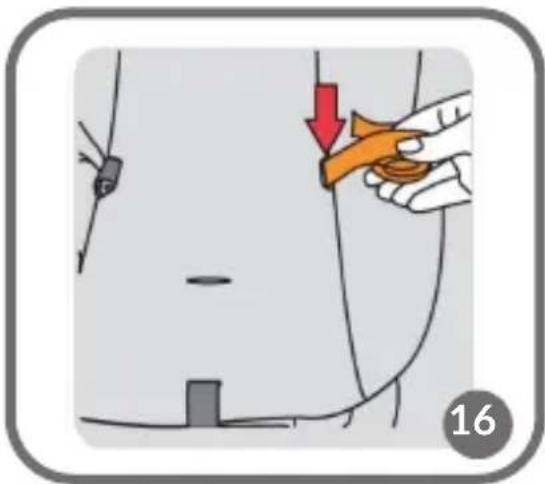
natural_image
Illustration of a hand holding a bandage tool near a body, with a red arrow indicating direction (no text or symbols)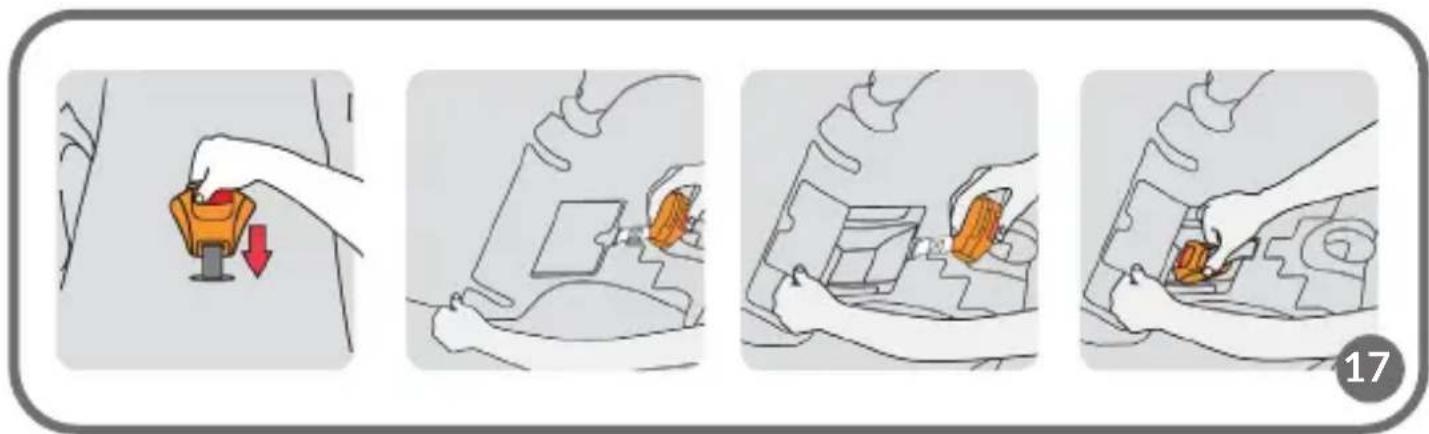
text_image
Illustration showing four steps of a car seatbelt replacement procedure, with a hand holding the seatbelt and a red downward arrow indicating the direction.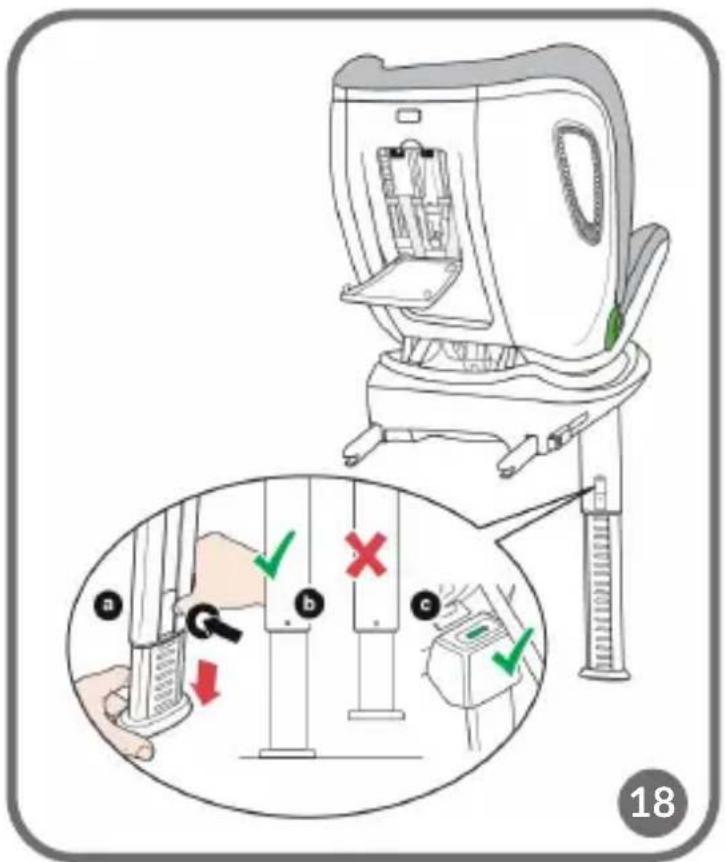
text_image
Medical procedure diagram showing step-by-step instructions for injection or dissection of a device, with labeled steps and check/cancel indicators.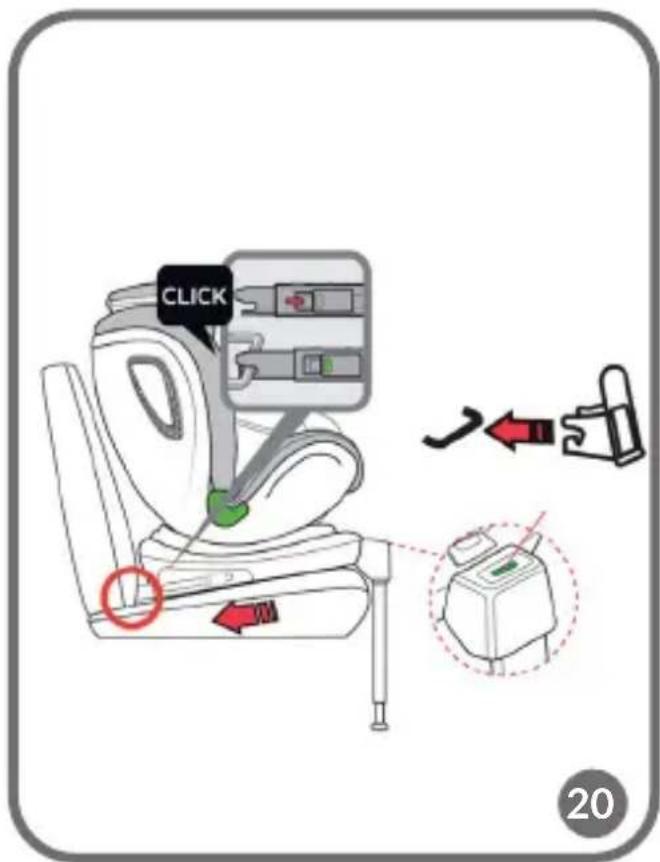
text_image
CLICK 20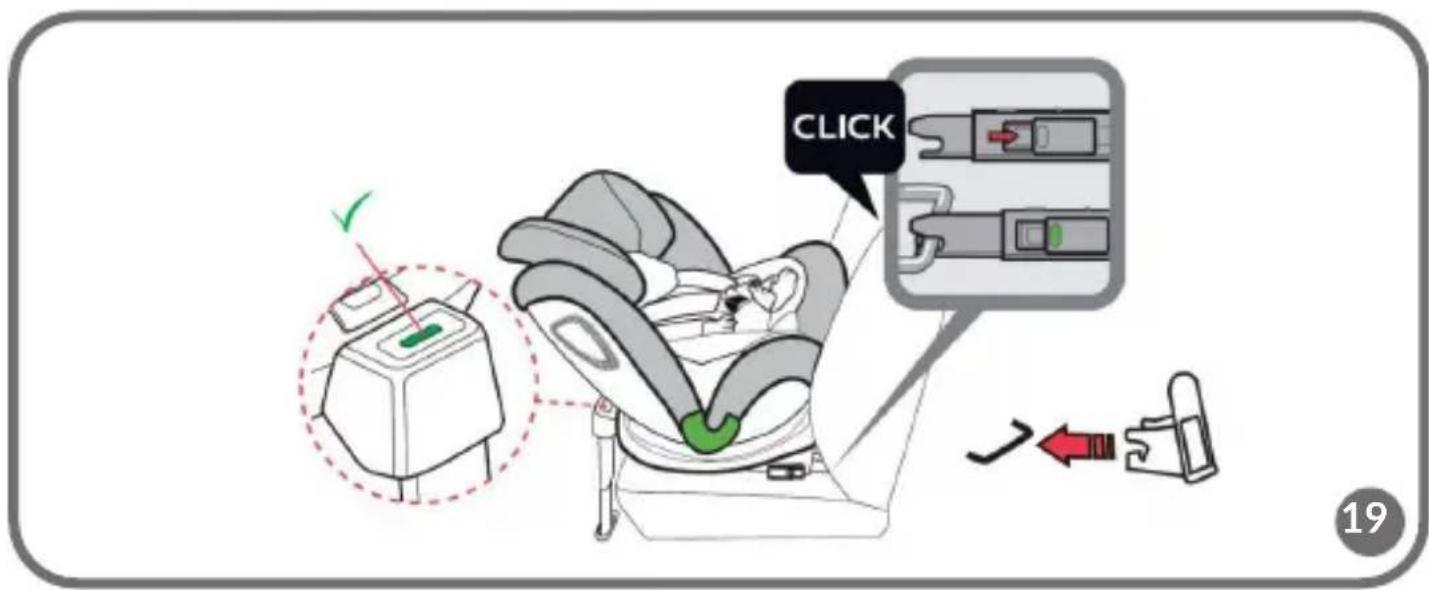
text_image
CLICK 19
natural_image
Two identical diagrams of a device with internal components and a red arrow indicating direction (no text or symbols)Dear customer!
Before you use the child safety seat for the first time, please read this manual carefully.
Should you have any remarks or questions concerning the product, please do not hesitate to contact us: help@lionelo.com
Notice
This is an i-Size Enhanced Child Restraint System. It is approved according to UN Regulation No. 129, for use in i-Size compatible vehicle seating positions as indicated by vehicle manufacturers in the vehicle users's manual.
If in doubt, consult either the Enhanced Child Restraint System manufacturer or the retailer.
Warnings
The product can be mounted only on seats equipped with ISOFIX handles (marked as A in fig. 2). For detailed tips on assembly of the child safety seat in the car, see fig. 3.
| [4www] Assembly in this place is allowed |  Assembly in this place is allowed only if the front airbag is not active Assembly in this place is allowed only if the front airbag is not active |
 Assembly in this place is forbidden Assembly in this place is forbidden |  Assembly in this place is allowed only if the seat is equipped with ISOFIX handles Assembly in this place is allowed only if the seat is equipped with ISOFIX handles |
Safety in the car:
To provide top safety to yourself and passengers during travel, make sure:
- Folding elbow rests are folded (vertical position).
- If the child safety seat is mounted on the front passenger seat, this seat is pushed backwards as far as possible.
● Any items which may cause damage in the car in case of collision have been properly secured. - All passengers have fastened their seat belts.
The child safety seat must not be secured with the car seat belt.
Warnings:
- The product is intended for children whose weight does not exceed 18 kg and height ranges from 40 to 105 cm.
-
If your child is younger than 15 months old, do not use the child safety seat in a forward-facing position!
-
Hard components and plastic parts of the child restraint system must be placed and installed in a way that they do not get trapped by sliding seat or vehicle door in regular conditions of use.
- In case you assemble the product in a rear-facing position, do not use the child safety seat in places in which front airbag is active.
- The support leg must contact the vehicle floor. Any child safety belts must be well-adapted to its size. The belts must not be twisted.
- Make sure the hip belts go low so that they can properly secure the pelvis.
- If the product has been subject to strong impact (e.g. hit), it must be replaced.
- Do not make any modifications to the child safety seat or add any new elements without the approval of the Type Approval Authority. To provide your child with top safety, the equipment must be fixed and used in accordance with guidelines included in the manual.
- Plastic components of this child safety seat may overheat in the sun and cause sunburns.
- Protect your child and child safety seat against sunlight (you can for example cover it with a bright piece of clothing). If the child safety seat is not covered, try to avoid exposure to sunlight. Otherwise the product may be too hot for your child's skin.
- Never leave your child in the car unattended.
● Luggage and other similar elements must be secured to avoid injuries in case of collision. - It is forbidden to use the child safety seat without its fabric covering.
- The covering must not be replaced with any other element. It is an integral part of the set and affects the operation of the restraint system.
• Always keep this manual at hand. - Read the vehicle manufacturer's manual.
- The product cannot be mounted with car seat belts.
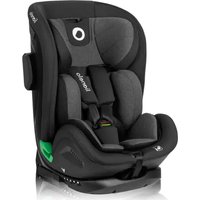
Description (fig. 1)
- Fabric headrest for babies
- Child safety seat covering
- Protective cushions of shoulder belt
- Shoulder belt
- Child safety seat belt buckle
- Belt unfastening button
- Buckle protective cushion
- Belts tension adjustment
- Support leg fastener indicator
- Base rotation button (360°)
-
Base
-
Seat inclination lever
- Newborn inlay
- Headrest
- Headrest height adjustment lever
- Upper belts connector
- Manual locker
- ISOFIX arms
- ISOFIX button
- Support leg adjustment button
- Support leg
- ISOFIX pads
How to use
HOW TO FASTEN CHILD SAFETY SEAT BELTS
To fasten the child safety seat belts (fig. 4):
- Connect belts buckles.
- Insert them into the buckle (5) until you can hear a distinctive „click”.
- Make sure the belt tension is proper and belts are not twisted.
To undo 5-point child safety seat belts: press red button (F) on the buckle and loosen the belts.
HOW TO ADJUST CHILD SAFETY SEAT BELTS TENSION
- To tighten the belts up, pull the tension adjustment strap (8) (fig. 7).
- To loosen the belts, press the adjustment belt (located just below the tension adjustment belt mouth) and pull the child safety seat shoulder belts (fig. 8).
Note! Make sure the child safety seat belts fit tight and are not twisted. Make sure the hip belts go low and protect the child's pelvis. The belts must be tightly fitted to child's body, yet should not be too tight and cause discomfort.
HOW TO DISASSEMBLE CHILD SAFETY SEAT BELTS
- Open the manual locker.
- Pull out the upper belts connector (16) from the plastic fastener and then remove the belts (fig. 13).
- Loosen the belts as much as you can (see chapter: HOW TO ADJUST CHILD SAFETY SEAT TENSION BELTS). It is important – do not skip this point!
- Slide the belts down from another belts connector (see: fig. 14 and 15).
- Roll up and insert the belts under the fabric covering (fig. 16)
- Pull the buckle through the fabric covering of the child safety seat and hide in the locker (fig. 17)
- Close the manual locker.
The belts can only be removed in order to take off the cover.
To assemble the belts, please carry out the steps in reversed order.
HOW TO ADJUST THE HEADREST
- Loosen the shoulder belts as much as you can.
- To change the headrest height, grab and pull the headrest height adjustment lever (15).
- Choose the desired height of the headrest (fig. 5).
Note! The height of shoulder belts is integrated with the headrest height.
The headrest must be adjusted in a way that shoulder belts are not too high (at ears level or higher) or too low (e.g. behind child's back). See: fig. 6.
- Headrest is too low.
- Headrest is too high.
- Headrest is correct.
HOW TO ROTATE THE CHILD SAFETY SEAT
-
In order to take the child out or put the child in the product comfortably:
-
Pull out the base rotation button 360^ (10).
- Next rotate the child safety seat in any direction (360°).
- When you can hear a distinctive „click”, it means the child safety seat has been secured in place. You can be sure the product has been properly secured.
See: fig. 9.
Make sure the base rotation button has been secured in its original place after changing the direction of the product.
- Proper position of the child safety seat in relation to child's height:
a. In a rear-facing position - 40 - 105 cm
b. In a forward-facing position - 76 - 105 cm
Note! The child safety seat rotated by 90 degrees in relation to the original position may only be used to put the child in or take the child out of the product. When traveling, it is forbidden to use the product if it is perpendicular to the traveling direction
HOW TO ADJUST THE SEAT INCLINATION ANGLE
Grab the seat inclination lever (12), pull up and change the child safety seat inclination angle (fig. 10). You can choose 5 inclination angle positions, depending on the child size (fig. 11)
| 0 - 18 kg | ||||
| Rear-facing position | Forward-facing position | |||
| 40 - 105 cm0 - 3 years of age | 76 - 105 cm15 months - 3 years of age | |||
| Position no. 5(lying) | Position no. 1 | Position no. 2 | Position no. 3 | Position no. 4 |
| It is forbidden to use the child safety seat in a forward-facing position until the child turns 15 months of age! | ||||
In order to set the child safety seat in the position 5:
- Set the child safety seat in the fourth position, in a forward-facing position.
- Press the base rotation button (10), rotate the product into a rear-facing position.
- Pull the seat inclination lever (12) and tilt the child safety seat to the position 5. It is a lying position intended for babies.
NEWBORN INLAY
The newborn inlay is intended for babies, improves their comfort and provides additional support (see: 1 in fig. 12). If the child needs more space in the child safety seat, remove the newborn inlay.
| ✓ 40-75cm | X >75cm |
HOW TO REMOVE THE COVERING
- Remove the 5-point belts of the child safety seat (see: HOW TO DISASSEMBLE CHILD SAFETY SEAT BELTS).
- Remove child safety seat covering from the backrest and base.
- Lift the headrest as high as you can.
- Remove covering from the headrest.
To put the cover back on, retake the aforesaid actions in reversed order.
HOW TO ADJUST THE SUPPORT LEG
- Press the support leg adjustment button (20), keep it pressed and pull out the leg with another hand at the same time (fig. 18).
- Release the adjustment button only when the support leg touches the floor.
- Make sure it has been positioned properly, try to move it.
The support leg fastener indicator (9) should be green. If it is not the case, repeat the procedure once again.
Note! If there is any floor locker in your car, contact the manufacturer!
Installation in the car
REAR-FACING POSITION (40 - 105 cm)
ISOFIX + support leg
See: fig. 19
- If necessary, put ISOFIX pads (22) on ISOFIX connectors in the car. They help you stick
ISOFIX connectors when car connectors are hard to access.
- Rotate the child safety seat to reach the rear-facing position (see: HOW TO ROTATE CHILD SAFETY SEAT). Set the fifth seat inclination position (see: HOW TO ADJUST SEAT INCLINATION ANGLE).
- Press ISOFIX button (19) to pull out both ISOFIX arms (18). Next grab the seat with both hands, slide both ISOFIX arms in the fasteners located in the car couch until the arms (18) engage and you can hear a distinctive „click”.
- Push the seat towards the car seat as much as you can.
- The ISOFIX button indicator must be green on both sides; then you can be sure the seat has been properly secured and placed.
- Press the support leg adjustment button (20) and then stretch out the leg and adjust its length so that it touches the vehicle floor (indicator 9 will turn green when the support leg is properly stretched).
- Put the child in the child safety seat and secure them with child safety seat belts.
FORWARD-FACING POSITION (76 - 105 cm)
ISOFIX + support leg
See: fig. 20
- If necessary, put ISOFIX pads (22) on ISOFIX connectors in the car. They help you stick ISOFIX fasteners when car connectors are hard to access.
- Rotate the child safety seat to reach the forward-facing position (see: HOW TO ROTATE CHILD SAFETY SEAT). Set one of four seat inclination positions (see: HOW TO ADJUST SEAT INCLINATION ANGLE).
- Press ISOFIX button (19) to pull out both ISOFIX arms (18). Next grab the seat with both hands, slide two ISOFIX arms (18) in fasteners located in the car seat until both arms engage and you can hear a distinctive „click”.
- Push the seat towards the car seat as much as you can.
- The ISOFIX button indicator (X) must be green on both sides; then you can be sure the seat has been properly secured and placed.
- Press the support leg adjustment button (Y), next stretch out the leg and adjust its length so that it touches the vehicle floor (the indicator will turn green when the support leg is properly stretched).
- Put the child in the child safety seat and secure them with child safety seat belts.
SIDE PROTECTION (fig. 21)
After mounting the car seat in the car, you should always pull out the side protection on the side of the car door.
Cleaning and maintenance
The child safety seat covering can be washed at the temperature of max. 30 degrees. When drying, do not use driers. Do not expose the covering to sunlight in order to dry it. Plastic components can be washed with warm water and soft detergent.
Note! Under no circumstances must you use strong detergents or bleaches!
The pictures are for reference only. The real design of the products may differ from the pictures presented.