
comBIND 500e - Binding machine LEITZ - Free user manual and instructions
Find the device manual for free comBIND 500e LEITZ in PDF.

User questions about comBIND 500e LEITZ
0 question about this device. Answer the ones you know or ask your own.
Ask a new question about this device
Download the instructions for your Binding machine in PDF format for free! Find your manual comBIND 500e - LEITZ and take your electronic device back in hand. On this page are published all the documents necessary for the use of your device. comBIND 500e by LEITZ.
USER MANUAL comBIND 500e LEITZ
natural_image
Line drawing of a vintage printer with open lid and internal circuit board (no text or symbols)comBIND 500e Operating Instructions
F Guide d'utilisation D Gebrauchsanweisung I Istruzioni per l'uso E Instrucciones
P Instruções de operação NL Gebruikershandleiding DK Brugsanvisning N Bruksanvisning
S Bruksanvisning FIN Käyttöohje EST Kasutusjuhend LV Lietošanas pamācība
LT Naudojimo instrukcija PL Instrukcja obsługi UKR Інструкція з експлуатації
RUS Инструкция по эксплуатации CZ Návod k použití SK Návod na použitie
H Használati útmutató RO Instructiuni de utilizare TR Kullanım Kilavuzu
⑧ Operating instructions ....5 Guarantee....9
Dear customer
Thank you for choosing a Leitz punching and binding machine. Please read this operation manual carefully in order to understand how to use the unit correctly. Keep this manual with the unit at all times.
Contents
Safety precautions....5
Recommended materials for punching ....5
Recommended comb size and punching depth....5
Functional parts of your comBIND 500e....6
Unpacking and installing the unit 6
Punching and binding with plastic combs 7
Two-hole punching 8
Troubleshooting 8
Maintenance and care 8
Specifications 8
Environmental information....9
3 year guarantee....9
Recommended materials for punching
Paper – The unit is designed for a maximum of 28 sheets of 80 g/m^2 paper to be punched at the same time (standard copying paper). When using thinner paper, more sheets can be punched at the same time. When using thicker paper, fewer sheets can be punched at the same time.
Transparent film (front covers) – You can punch at the same time up to two transparent films with a thickness of 0.2 mm each. Do not punch them together with paper or cardboard. Punch films individually.
Cardboard (rear covers) – Punch sheets of cardboard individually. Do not punch them together with your document sheets or transparent films.
Safety precautions
Intended use
- This unit has been designed for punching paper, cardboard and plastic films as well as binding such materials using plastic combs. Use the unit only for its intended use as described in these operating instructions.
To protect against electric shock:
- Make sure that your local mains voltage matches the rating indicated on the unit's type plate.
- Only connect to a properly earthed mains socket.
- Never operate the unit when mains outlet, wire or plug are defective.
- Protect the mains wire from being walked on or pinched, particularly at the plug and at the point where it exits from the unit.
- Protect unit from high humidity, water and other liquids.
- Unplug unit from mains socket when not in use and before cleaning.
- In case of defects: Do not attempt to repair the unit yourself. Contact the manufacturer for any required repairs. Read guarantee declaration for further information.
General precautions
- Place the unit on a flat, stable surface (e. g. table).
- Keep unit away from children – risk of injury.
- To prevent damage to the unit, remove all metal parts (staples etc.) from the document before punching and empty the cuttings tray regularly.
- Never use attachments not authorised by the manufacturer.
- Only use original Leitz accessories.
Recommended comb size and punching depth
The table shows the comb size and punching depth setting required for a certain number of sheets.
| 25 | 45 | 65 | 95 | 125 | 145 | 175 | 210 | 240 | 270 | 310 | 375 | 440 | 500 | |
| 6 | 8 | 10 | 12 | 14 | 16 | 19 | 22 | 25 | 28 | 32 | 38 | 44 | 51 | |
Functional parts of your comBIND 500e
Ⓐ Mains cable/plug – Connect to a properly-earthed mains socket.
⑧ On/Off switch (I/O) – Switch unit on and off. To save energy, always switch off the unit after use.
© Blow-out fuse – Safeguard against electrical malfunction. Only replace with same type and rating.
⑭ Lid/paper stand – When opened, the lid acts as a paper stand to ease punching.
⑤ Adjustable paper stop – Set to the paper format used: A4, US letter or A5.
⑤ Front slot for two-hole punching – Place sheets here for standard two-hole punching.
© Rear slot for punching (21 holes) – Place sheets here to punch for binding with plastic combs.
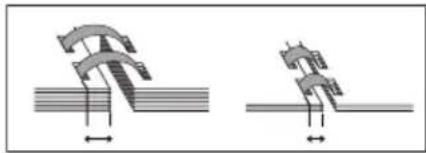
H Punching depth switch – Set to the comb diameter used. With the correct punching depth set, your sheets will turn with ease.
natural_image
Two mechanical diagrams showing a bent bracket and a flat surface, with no text or symbols present.① Punching button – Press to punch sheets placed in the front or rear punching slots.
⑤ Binding mechanism – Opens and closes the plastic combs with help of the binding lever Ⓗ.
® Comb size scale – Shows the comb size needed for the amount of sheets to be bound.
① Binding lever – Used to open and close the plastic comb inserted into the binding mechanism ②.
Cuttings tray – Empty regularly to avoid damage to the motor and punching dies.
1

Unpacking and installing the unit
1. Unpacking / scope of supply
- Carefully unpack the unit and inspect it for damage.

Warning! Risk of electrical shock. Do not connect to the mains supply if there is any damage to the unit (loose parts, broken chassis, defective or wrong mains cable etc.) or if the local mains voltage does not match the rating indicated on the type plate.
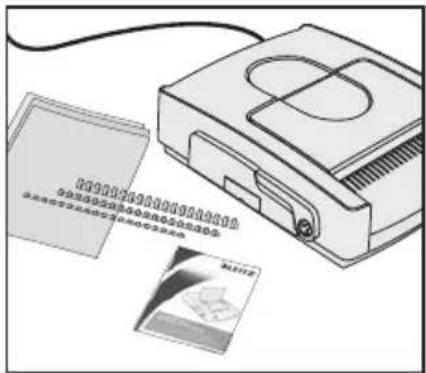
• The packaging should contain the following items:
- the comBIND 500e,
- a starter set (choice of plastic combs and front/rear covers),
- this operation manual.
- Keep the packaging material at least until the guarantee has expired.
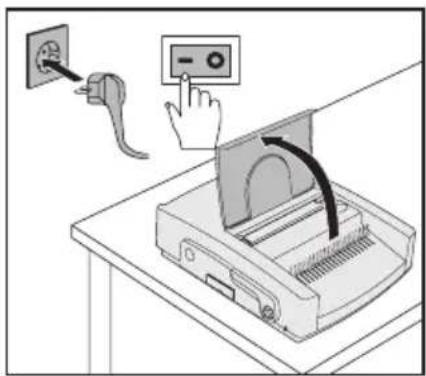
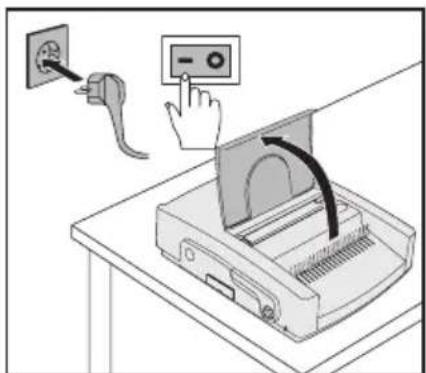
2. Installing and connecting the unit
- Place the unit on a stable, level surface (e. g. table) near a mains outlet.
- Connect the mains cable Ⓐ with the mains outlet in a way to avoid accidents (such as tripping over the cable).
- Fold back the lid (paper stand) Ⓓ.
- Press the power switch Ⓑ to switch the unit on.
The punching dies were coated with protecting oil during manufacture.
- Punch several sheets of scrap paper in order to clean the punching dies.
The unit is now ready for operation.
Punching and binding with plastic combs
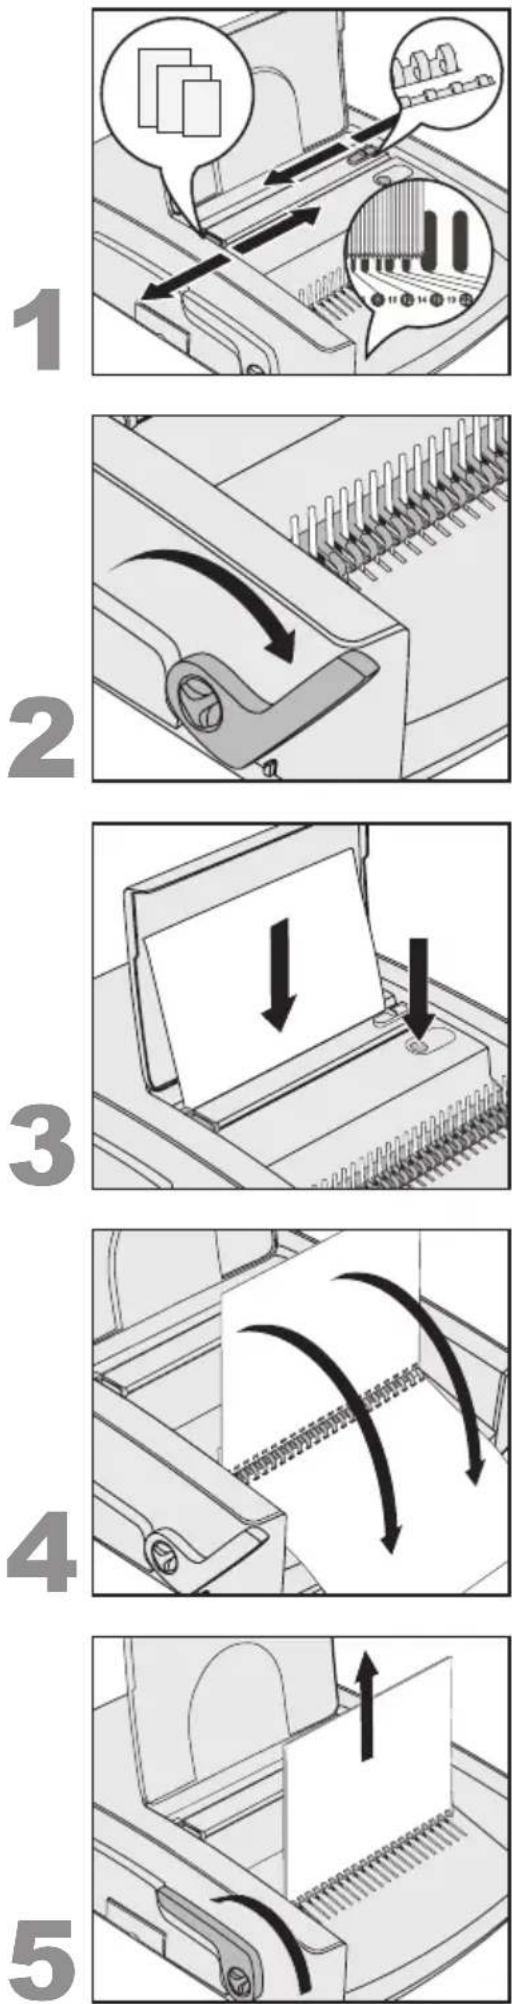
1. Preparations
- Set the paper stop Ⓔ to the paper format used.
- Determine the comb size needed by holding the document (including front and rear cover) in position on the comb size scale Ⓔ.
You may also use the table on page 5 for this purpose. - Set the punching depth Ⓗ according to the comb size determined.
2. Inserting and opening the comb
- Place the plastic comb with the side to be opened facing upwards into the binding mechanism Ⓙ.
- Pull the binding lever Ⓛ so far until the comb is opened enough so that the sheets can be easily inserted.
3. Punching the sheets
Tip: We recommend testing the punch setting using a blank sheet of paper before punching the original document.

Caution! To prevent damage to the motor and punching mechanism, remove all metal parts (staples etc.) from the document before punching. Do not punch more than 28 sheets of 80g / m^2 paper or two films of 0.2mm at the same time. Empty the cuttings tray M regularly.
- Insert the sheets into the rear slot Ⓖ.
- Press the punching button Ⓘ.
- Remove the punched sheets.
4. Inserting the sheets
- Insert the punched sheets into the opened comb. It is now possible to punch all remaining sheets (step 3) and insert them into the opened comb.
5. Removing the finished document
- Push the binding lever Ⓛ backwards to close the comb.
- Remove the finished document.
natural_image
Illustration of a printer with paper being inserted into a slot, showing two downward arrows indicating compression or disassembly (no text or symbols present)Two-hole punching
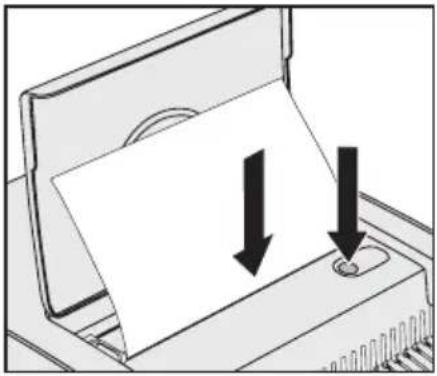
- Set the paper stop to the paper format used.

Caution! To prevent damage to the motor and punching mechanism, do not punch more than 28 sheets of 80g / m^2 paper or two films of 0.2mm at the same time. Also, empty the cuttings tray regularly.
- Insert the sheets into the front slot Ⓕ.
- Press the punching button ①.
- Remove the punched sheets.
Troubleshooting
| Problem Remedy | |
| Pages of bound document do not turn with ease. | Set the punching depth Ⓗ according to the comb size used. |
| You hear an alarm sound from the unit. | Empty the cuttings tray Ⓜ immediately to prevent damage to the motor and punching mechanism. |
| No response when pressing the punching button. | Is the cuttings tray Ⓜ full? Is the unit properly connected to a live mains socket and switched on Ⓑ? Is the fuse Ⓒ blown? If yes, go to next step. |
| The fuse Ⓓ is blown. | Replace fuse with same type and rating. If new fuse blows again, have the unit repaired by the manufacturer. Never attempt to operate the unit with a fuse other than specified. |
Maintenance and care
• To prevent damage to the punching mechanism, empty the cuttings tray Ⓜ regularly.
- In case of defects: Do not attempt to repair the unit yourself. Contact the manufacturer for any required repairs. Read guarantee declaration for further information.
• To clean the housing, unplug the unit and wipe the outside with a damp cloth. Do not use any chemicals for cleaning.
Specifications
Operating method Electrical
Paper size A4, US letter, A5
Punching dies 21 rectangular (US pitch), 2 round
Punching depth Adjustable in two steps (2.5 mm, 4.5 mm)
Punching capacity 28 sheets (80 g/m² paper) or 2 transparent 0.2-mm films
Plastic comb size 6–51 mm (up to 500 sheets)
Mains voltage 220–240 V AC, 50 Hz
Power consumption 370 W
Net weight 17 kg
Dimensions (W x D x H) 450 mm x 550 mm x 170 mm
Subject to technical changes without prior notice.


Environmental information
- The equipment that you bought has required the extraction and use of natural resources for its production. It may contain hazardous substances for the health and the environment.
- In order to avoid the dissemination of those substances in our environment and to diminish the pressure on the natural resources, we encourage you to use the appropriate take-back systems. Those systems will reuse or recycle most of the materials of your end life equipment in a sound way.
- The crossed-bin symbol marked in your device invites you to use those systems.
- If you need more information on the collection, reuse and recycling systems, please contact your local or regional waste administration.
- You can also contact us for more information on the environmental performance of our products.
3 year guarantee
To be returned with the unit if defective.
LEITZ units are sold with a 3 year guarantee.
The conditions of the guarantee period of 3 years are as follows:
- Each unit is guaranteed against all defects in material and/or workmanship for a period of 3 years from the date of purchase.
- No unit will be accepted without written notification from the customer giving details of the problem that has occurred, and proof of the date of purchase.
- All units for repair are to be returned to Esselte with adequate packaging. No liability will be accepted by Esselte for goods damaged in transit from the customer, due to inadequate attention to packaging.
- The supplier will be responsible for all parts and labour charges as necessary to the unit. The 3 year guarantee is subject to the following conditions:
a) That the unit has been used strictly in accordance with the operating instructions supplied with the unit.
b) That if the benefit of this guarantee is sought, the unit must be returned, carriage paid to Esselte. Esselte does not accept responsibility for loss or damage in transit.
c) That the guarantee is invalid if the defects are found to be caused by accident, misuse, alteration or neglect.
d) That no liability of Esselte is to be implied here for damage, loss or expense of any kind resulting from, consequence upon, or in any way due to any fault whatsoever in the instrument or its accessories.
e) That this guarantee does not affect you statutory rights as a consumer.
Date of Purchase:
Model No. Serial No.:
Company Name:
Contact person:
Address:
Telephone/Fax No:
UK & Ireland
ESSELTE UK Ltd.
Waterside House, Cowley Business Park, Uxbridge, Middlesex UB8 2HP
UNITED KINGDOM
Tel.: 0845 678 1801
Fax: 01895 878901
www.esselte.co.uk
Notes
Chère cliente, cher client,
natural_image
Two mechanical diagrams showing a curved bracket and a stepped component, both with dimension arrows (no text or symbols)1
natural_image
Illustration of a computer monitor with two arrows pointing to a blank sheet, no text or symbols presentPerforer
natural_image
Two mechanical diagrams showing a curved bracket and a stepped component, both with dimension arrows (no text or symbols)1
natural_image
Illustration of a printer with paper being inserted into a slot, showing two downward arrows indicating compression or disassembly (no text or symbols present)Lochen
natural_image
Two mechanical diagrams showing a curved component being inserted into a horizontal surface, with no visible text or symbols.1

natural_image
Illustration of a computer monitor with two arrows pointing to a blank sheet, no text or symbols presentForare
natural_image
Two mechanical diagrams showing a curved bracket and a stepped component, both with alignment arrows (no text or symbols)
natural_image
Illustration of a computer monitor with two arrows pointing to a blank sheet, no text or symbols presentPerforar (2 orificios)
4. Colocar as folhas perfuradas
natural_image
Illustration of a printer with paper being inserted into a slot, showing two downward arrows indicating compression or disassembly (no text or symbols present)Furar
natural_image
Two mechanical diagrams showing a curved bracket and a stepped component, both with alignment arrows (no text or symbols)natural_image
Illustration of a computer monitor with two arrows pointing to a blank sheet, no text or symbols presentPerforeren
natural_image
Two mechanical diagrams showing a curved bracket and a stepped component, both with dimension arrows (no text or symbols)1

natural_image
Illustration of a computer monitor with two arrows pointing to a blank sheet, no text or symbols presentHulning
natural_image
Two mechanical diagrams showing a curved component being inserted into a horizontal surface, with no visible text or symbols.① Stanseknapp – Utløser stanseprosessen.
1

natural_image
Illustration of a printer with paper being inserted into a slot, showing two downward arrows indicating compression or disassembly (no text or symbols present)Hulling
natural_image
Two mechanical diagrams showing a curved component and a stepped mechanism, both without any text or symbols.1

natural_image
Illustration of a printer with paper being inserted into a slot, showing two downward arrows indicating compression or disassembly (no text or symbols present)Slå hål
natural_image
Two mechanical diagrams showing a curved component and a stepped component, both with directional arrows indicating motion (no text or symbols)1

natural_image
Illustration of a printer with paper being inserted into a slot, showing two downward arrows indicating compression or disassembly (no text or symbols present)Rei'itys
natural_image
Two mechanical diagrams showing a curved component being inserted into a horizontal surface, with no visible text or symbols.1

Toote lahtipakkimine ja seadistamine
1. Lahtipakkimine
natural_image
Illustration of a computer monitor with two arrows pointing to a blank sheet, no text or symbols presentKahekordne augustamine
- Pange paberisahtlisse öige paber.

natural_image
Two mechanical diagrams showing a curved component being inserted into a horizontal surface, with no visible text or symbols.1

natural_image
Illustration of a printer with paper being inserted into a slot, showing two downward arrows indicating compression or disassembly (no text or symbols present)1

2
natural_image
Two mechanical diagrams showing a curved component and a stepped mechanism, both without any text or symbols.natural_image
Illustration of a computer monitor with two arrows pointing to a blank sheet, no text or symbols presentnatural_image
Two mechanical diagrams showing a bracketed joint with arrows indicating force or movement (no text or symbols present)1

natural_image
Illustration of a printer with paper being inserted into a slot, showing two downward arrows (no text or symbols present)Dziurkowanie
natural_image
Two mechanical diagrams showing a gear or cam mechanism with alignment arrows (no text or symbols)1

natural_image
Illustration of a computer monitor with two arrows pointing to a blank sheet, no text or symbols presentПерфорация
natural_image
Two mechanical diagrams showing a curved bracket and a stepped platform, both without any text or symbols.1

natural_image
Illustration of a printer with paper being inserted into a slot, showing two downward arrows indicating compression or disassembly (no text or symbols present)Děrování
natural_image
Two mechanical diagrams showing a curved bracket and a stepped component, both with dimension arrows (no text or symbols)1
2

natural_image
Illustration of a computer monitor with two arrows pointing to a blank sheet, no text or symbols presentDierovanie
natural_image
Two mechanical diagrams showing a bracket and a gear mechanism, both without any text or symbols.natural_image
Illustration of a computer monitor with two arrows pointing to a blank sheet, no text or symbols presentLyukasztás
Recommended comb size and punching depth.....119
Elementele functionale ale comBIND 500e....120
Environmental information.... 123
3 ani garanție 123
natural_image
Two mechanical diagrams showing a curved bracket and a stepped platform, both with alignment arrows (no text or symbols)2

natural_image
Illustration of a printer with paper being inserted into a slot, showing two downward arrows indicating compression or disassembly (no text or symbols present)natural_image
Two mechanical diagrams showing a curved bracket and a stepped component, both without any text or symbols.1
