DuPont 2415106 - Air purifier LEITZ - Free user manual and instructions
Find the device manual for free DuPont 2415106 LEITZ in PDF.

User questions about DuPont 2415106 LEITZ
0 question about this device. Answer the ones you know or ask your own.
Ask a new question about this device
Download the instructions for your Air purifier in PDF format for free! Find your manual DuPont 2415106 - LEITZ and take your electronic device back in hand. On this page are published all the documents necessary for the use of your device. DuPont 2415106 by LEITZ.
USER MANUAL DuPont 2415106 LEITZ
natural_image
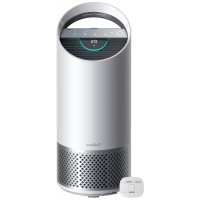
Abstract green and white graphic with a stylized 'U' shape and a dot (no text or symbols)Z-1000
OWNER'S MANUAL
TruSens™
Welcome to clean air with TruSens. Thank you for allowing us to join you on your journey towards wellness.
Enjoy cleaner air in your home with PureDirect™ Technology & DuPont™ Filtration that ensure the whole room benefits from cleaner air.
CONTENTS
SAFETY INFORMATION 4
FEATURE HIGHLIGHTS 5
CONTROL PANEL 6
PRODUCT OVERVIEW 7
GETTING STARTED 8
SPECIFICATIONS 10
PLEASE READ AND SAVE THESE INSTRUCTIONS
Unplug or disconnect the appliance from the power supply before replacing filters or UV-C emitter, or when appliance is not in use.

WARNING:
To reduce the risk of fire or electric shock, do not use this fan with any solid-state speed control device.
Do not operate any purifier with a damaged cord or plug, or if the wall socket is loose. If the supply cord is damaged, it must be replaced by the manufacturer, its service agent or similarly qualified persons in order to avoid a hazard.
Do not run cord under carpeting, throw rugs, runners, or similar coverings. Do not run cord under furniture or appliances. Arrange cord away from traffic area and where it will not be tripped over.

WARNING: Skin or eye damage may result from directly viewing the light produced by the UV-C emitter in this apparatus. Unintended use of the appliance or damage to the housing may result in the escape of dangerous UV-C radiation, UV-C radiation may, even in little doses, cause harm to the eyes and skin. Always disconnect power before relamping or servicing. Replace UV-C emitter with item 2415105, Manufactured by ACCO Brands.
- Remove all packaging, including the filter bag, before use.
- Appliances that are obviously damaged must not be operated.
- This appliance must only be connected to a wall socket outlet matching the supply plug type and rating stated on the rating plate.
- Locate air purifier near the outlet wall socket and do not use extension cords.
- This appliance can be used by children aged from 8 years and above and persons with reduced physical, sensory or mental capabilities or lack of experience and knowledge if they have been given supervision or instruction concerning use of the appliance in a safe way and understand the hazards involved.
- Children shall not play with, clean, or try to maintain the appliance.
- Replace the UV-C emitter with the model specified within this manual.
- Do not attempt to service or repair this product yourself.
- Only use the purifier with the power cable provided.
- Only clean this machine with a clamp cloth, do not use solvents or bleach.
- Ensure appliance is always placed on firm level surface before operation.
- Do not block or obstruct the air intake or outlet vents.
- Do not insert fingers or other items into the air intake or outlet vents.
FEATURE HIGHLIGHTS

PureDirect™ Technology
Independent lab testing confirms that two airflow streams are better than one, moving air effectively and more comfortably throughout the room.

360° Purification
DuPont™ HEPA filter captures pollutants and VOC gases/odours from all directions. UV light kills germs and bacteria that can get trapped in the filter.

Thoughtful Execution
Exceptional functionality wrapped in a contemporary design that fits any environment.
CONTROL PANEL

text_image
Z-1000 UV Reset
Power Button

Fan Speed Settings
Select fan speed: 1, 2, or Turbo.

UV Mode
UV bulb within the purifier's filter chamber is on when the symbol is white. The symbol will glow red when it is time to replace the UV bulb.
(See page 13 for replacement instructions)
Reset
Filter and UV Indicator Reset
HFPA, Carbon and UV indicators glow red when it is time for each to be replaced.
When 1 indicator is on, simply hold Reset button for 3 seconds to reset that indicator. When 2+ indicators are on, tap the Reset button to select the correct indicator (selected indicator will blink) before holding 3 seconds to reset that indicator.
(See pages 11-13 for replacement instructions. Follow above Reset button instructions after replacing filter.)
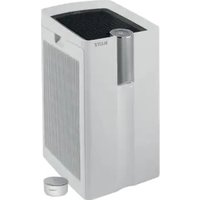
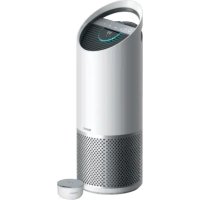
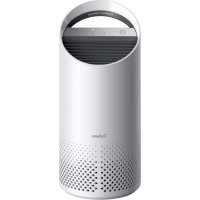
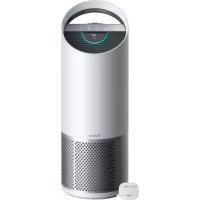
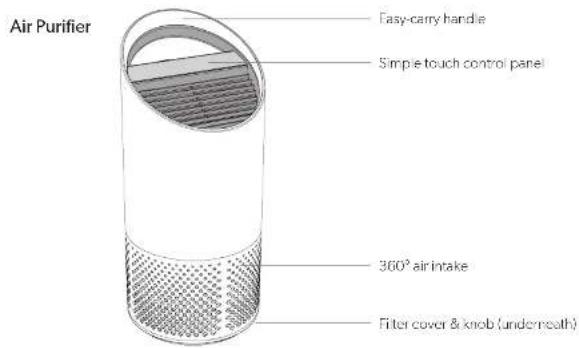
PRODUCT OVERVIEW
text_image
Air Purifier Easy-carry handle Simple touch control panel 360° air intake Filter cover & knob (underneath)Filter & Ultraviolet Sterilisation
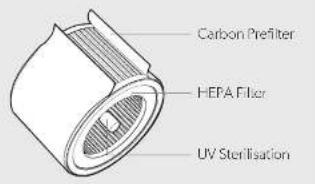
text_image
Carbon Prefilter HEPA Filter UV SterilisationGETTING STARTED

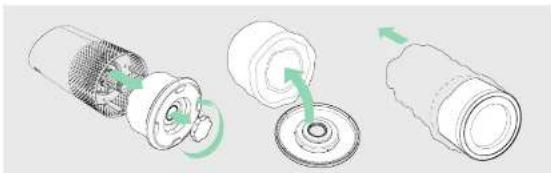
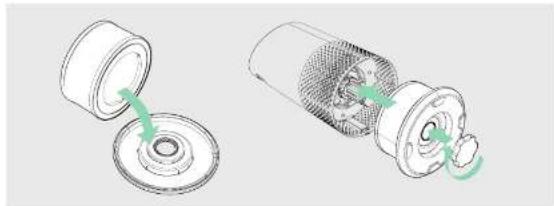
1. Remove plastic bag from filter
Unscrew the bottom cover and remove the plastic bag from the filter.
natural_image
Three-step diagram showing a mechanical assembly with green arrows indicating motion (no text or symbols)2. Re-attach filter
Secure filter on the bottom cover and replace inside the purifier.
natural_image
Two technical illustrations of a mechanical component with green arrows indicating parts of the opening and disassembly (no text or symbols present)3. Set up
Plug-in your air purifier unit and power on.
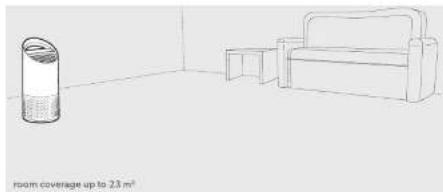
Place the purifier on a flat surface, free from obstructions: where air can flow freely into the purifier from all sides
- avoiding furnishings like bedding and curtains, as well as sources of heat or moisture
4. Start living with cleaner air!
Select your preferred fan speed and proprietary PureDirect™ technology will deliver purified air throughout the room!
natural_image
Simple line drawing of a room with a cylindrical container and armchair, no text or symbols present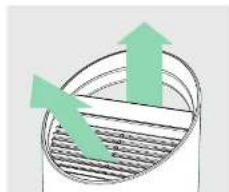
natural_image
Diagram of a cylindrical container with internal structure and upward arrows indicating flow or movement (no text or symbols)SPECIFICATIONS CARE & MAINTENANCE
| Air Inlet | 360 ^ |
| Air changed 2 times per hr | 23 m ^2 |
| Air Delivery Type | PureDirect ^TM |
| Fan Speed Settings | 1, 2, Turbo |
| Purification Levels | Carbon Prefilter, HEPA, UV |
| Filter Change Indicators | Carbon, HEPA, UV |
| Noise | 39-65 dB |
| Dimensions | 195 x 195 x 451 mm |
| Weight | 3.5 kg |
| Motor Type | AC motor |
| Power Requirements | 220-240v 50/60Hz 0.5A |
| Power Consumption | 40 W |
| Warranty | 2 years |
Replacement Filters & UV Bulb
| 2-in-1 HEPA drum filter | 2415104 |
| Carbon Prefilter (3-pack) | 2415103 |
| UV Bulb | 2415105 |
Accessing the filter chamber
- Always power off the purifier by pressing the Power Button and unplugging the power cord.
- Gently place the unit on its side on the floor so that the filter chamber cover and knob are exposed.
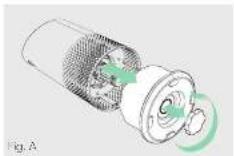
- Turn the knob counter-clockwise and remove the filter cover and 360° HEPA filter drum (Fig. A).
REPLACING OU PONT HEPA FILTER
- The HEPA indicator will glow red when it is time to change the entire HEPA drum filter.
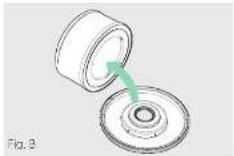
- Gently pull the HEPA drum filter away from its place secured to the filter cover (Fig. B).
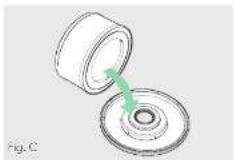
- Secure the replacement HEPA filter onto the filter cover (Fig. C).
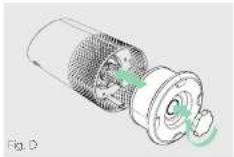
- Gently replace the filter cover with filter drum into the filter chamber and onto the threading, and turn the knob clockwise until the knob and filter chamber cover are securely tightened (Fig. D).
- Plug-in and power on your purifier, and hold the Reset button until the red HEPA indicator turns off. Note: HEPA drum filter (on page 10) will include 2 layers: Carbon Prefilter and HEPA
REPLACING OU PONT CARBON PREFILTER REPLACING UV BULB
- The Carbon indicator will glow red when it is time to replace the Carbon layer.
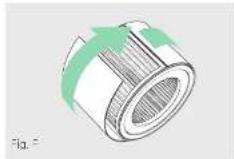
- Cently peel away the used Carbon layer from the fastener strips (Fig. F).
- Wrap a new Carbon layer around the filter drum and attach to the same fastener strips (Fig. F).
- Once the purifier is powered-on, hold the Reset button until the red Carbon indicator turns off.
Note: Carbon Prefilter 3 pack lon page 10l will cover 3 Carbon changes between replacing the entire I-EPA drum filter assembly (on page 11).
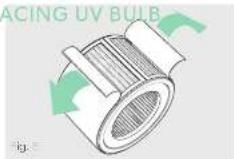
- The indicator will glow red when it is time to replace the UV bulb.
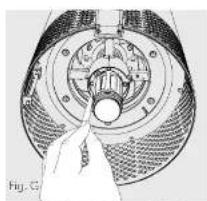
- Remove HEPA filter drum (Fig. A), and use a screwdriver to remove the screw securing the UV housing (Fig. G).
-
Gently remove the UV housing (Fig. H) and disconnect the UV bulb from the socket (Fig. I).
-
Release carriage from the UV bulb (Fig. J).
- Secure carriage to new UV bulb (on page 10) (Fig. K) and connect UV bulb into purifier (Fig L).
- Replace the UV housing and use a screwdriver to tighten the fastening screw.
- Once the purifier is powered-on, hold the Reset button until the ✅ indicator turns white.
natural_image
Close-up illustration of a mechanical component with a hand pointing to a central hole (no text or symbols visible)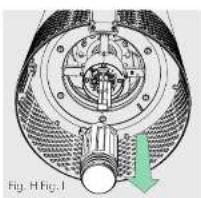
natural_image
Technical diagram of a mechanical assembly with internal components and a green arrow indicating direction (no text or symbols)
natural_image
Cross-sectional diagram of a mechanical device with internal components and no visible text or symbols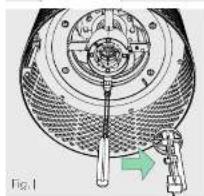
natural_image
Mechanical assembly diagram showing a circular component with internal components and a green arrow indicating a specific part (no text or symbols present)
natural_image
Technical diagram of a mechanical device with a green arrow indicating a specific component (no text or symbols present)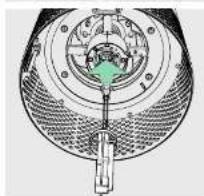
natural_image
Cross-sectional diagram of a mechanical device with internal components and a green component (no text or symbols)FAQ & TROUBLESHOOTING GUARANTEE
| How often do I need to change the filters? | That's easy. The purifier's replacement indicators will notify you when it is time to replace the Carbon or HEPA filters, or the UV bulb. Plan on replacing the Carbon every 3-4 months, HEPA every 12-15 months, and UV bulb every 1-3 years. |
| Purifier won't turn on. | Check that the power cord is connected securely to both the wall outlet and the purifier. Check if there is a power outage in the outlet by trying a nearby light or device, or by trying a working device in the same outlet. Check that the HEPA filter is fixed properly into filter chamber. Please contact us if you're still having a problem! (page 13) |
Operation of this machine is guaranteed for two years from date of purchase, subject to normal use. Within the guarantee period, ACCO Brands Europe will at its own discretion either repair or replace the defective machine free of charge. Defects due to misuse or use for inappropriate purposes are not covered under the guarantee. Proof of date of purchase will be required. Repairs or alterations made by persons not authorized by ACCO Brands Europe will invaicate the guarantee. It is our aim to ensure that our products perform to the specifications stated. This guarantee does not affect the legal rights which consumers have under applicable national legislation governing the sale of goods.
SUPPORT
Thank you for welcoming TruSens™ into your home. Our customers are at the heart of what we do, and we strive to design products that fit your lifestyle. If you have any questions or feedback, please reach out!
Visit our website at www.brusens.com
Email us at service.uk@acco.com
Call us at 0800 279 5102
©2019 ACCO Brands. All rights reserved. TruSens™, U™ & Design and PureDirect™ are trademarks of ACCO Brands. DuPont™ & the Oval logo are trademarks or registered trademarks of E.I. du Pont de Nemours and Company used under license.
21973P003