TruSens Z2000 - Air purifier LEITZ - Free user manual and instructions
Find the device manual for free TruSens Z2000 LEITZ in PDF.

Frequently Asked Questions - TruSens Z2000 LEITZ
User questions about TruSens Z2000 LEITZ
0 question about this device. Answer the ones you know or ask your own.
Ask a new question about this device
Download the instructions for your Air purifier in PDF format for free! Find your manual TruSens Z2000 - LEITZ and take your electronic device back in hand. On this page are published all the documents necessary for the use of your device. TruSens Z2000 by LEITZ.
USER MANUAL TruSens Z2000 LEITZ
Welcome to clean air with TruSens. Thank you for allowing us to join you on your journey towards wellness.
The air you breathe should be clean, no matter where you are in the room. TruSens SensorPod™, PureDirect™ Technology & 360 degree filtration ensure the whole room benefits from cleaner air.
SAFETY INFORMATION
PLEASE READ AND SAVE THESE INSTRUCTIONS
Unplug or disconnect the appliance from the power supply before replacing filters or UV-C emitter, or when appliance is not in use.

WARNING: To reduce the risk of fire or electric shock, do not use this fan with any solid-state speed control device.
Do not operate any purifier with a damaged cord or plug, or if the wall socket is loose. If the supply cord is damaged, it must be replaced by the manufacturer, its service agent or similarly qualified persons in order to avoid a hazard.
Do not run cord under carpeting, throw rugs, runners, or similar coverings. Do not run cord under furniture or appliances. Arrange cord away from traffic area and where it will not be tripped over.

WARNING: Skin or eye damage may result from directly viewing the light produced by the UV-C emitter in this apparatus. Unintended use of the appliance or damage to the housing may result in the escape of dangerous UV-C radiation. UV-C radiation may, even in little doses, cause harm to the eyes and skin. Always disconnect power before relamping or servicing. Replace UV-C emitter with 2415108 (for Z-2000), or 2415111 (for Z-3000), Manufactured by ACCO Brands.
- Remove all packaging, including the filter bag, before use.
- Appliances that are obviously damaged must not be operated.
- This appliance must only be connected to a wall socket outlet matching the supply plug type and rating stated on the rating plate.
- Locate air purifier near the outlet wall socket and do not use extension cords.
- This appliance can be used by children aged from 8 years and above and persons with reduced physical, sensory or mental capabilities or lack of experience and knowledge if they have been given supervision or instruction concerning use of the appliance in a safe way and understand the hazards involved.
- Children shall not play with, clean, or try to maintain the appliance.
- Replace the UV-C emitter with the model specified within this manual.
- Do not attempt to service or repair this product yourself.
- Only use the purifier and SensorPod™ with the power cable provided.
- Only clean this machine with a damp cloth, do not use solvents or bleach.
- Ensure appliance is always placed on firm level surface before operation.
- Do not block or obstruct the air intake or outlet vents.
- Do not insert fingers or other items into the air intake or outlet vents.
- When the air purifier is in standby mode the SensorPod™ is still transmitting a signal/data.
Operating Frequency
Wireless: 2462 MHz
Maximum Transmit Power (EIRP)
Wireless: 0 dBm
Antenna Gain
Wireless: 2 Dbi
Hereby, ACCO UK Ltd declares that the radio equipment types, Leitz TruSens Air Purifier Z-2000/Z-3000 are in compliance with Directive 2014/53/EU.
The full text of the EU declaration of conformity is available at the following internet address: https://declarations.accobrands.com/
A minimum separation distance of 0.2m must be maintained between the user's body and the device, to comply with RF exposure requirements.
Waste Electrical and Electronic Equipment (WEEE)
At the end of its useful life, your product is considered to be WEEE. As such, it is important to note that: WEEE is not to be disposed of as unsorted municipal waste. It is to be collected separately such that it can be disassembled so its components and materials can be recycled, reused, and recovered (burned for energy content in the production of electricity). Public collection points have been set up by municipalities for the collection of WEEE, free of charge to you. Please return your WEEE to the collection facility nearest your home or office. If you have difficulty locating a collection facility, the retailer that sold you the product should accept your WEEE. If you are no longer in contact with your retailer, please contact ACCO for assistance with this matter. Recycling of WEEE is geared toward protecting the environment, protecting human health, preserving raw materials, improving sustainable development, and ensuring a better supply of commodities in the European Union. This will be achieved by retrieving valuable secondary raw materials and reducing the disposal of waste. You can contribute to the success of these goals by returning your WEEE to a collection facility. Your product is marked with the WEEE symbol (wheelie bin with an X through it). This symbol is to inform you that the WEEE is not to be disposed of as unsorted municipal waste Leitz TruSens air purifiers also come equipped with a UV-C emitter. Upon replacement of this item (during the lifetime of the product), these must also be returned and disposed of at your local WEEE collection facility. Further information and installation guides / videos for the UV-C emitter can be found at www.leitz.com
FEATURE HIGHLIGHTS

SensorPod™
Remote air quality monitor that ensures cleaner air, right where you need it.

PureDirect™ Technology
Independent lab testing confirms that two airflow streams are better than one, moving air effectively and more comfortably throughout the room.

Informs and Adapts
Colour-coded illuminated ring provides additional information by communicating air quality in real-time.

360° Purification
A Particulate Air filter captures pollutants and VOC gases/odours from all directions. UV-C light kills germs and bacteria that can get trapped in the filter.

Thoughtful Execution
Exceptional functionality wrapped in a contemporary design that fits any environment.
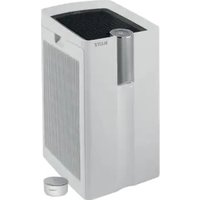
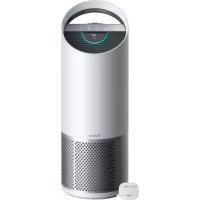
PRODUCT OVERVIEW
Air Purifier
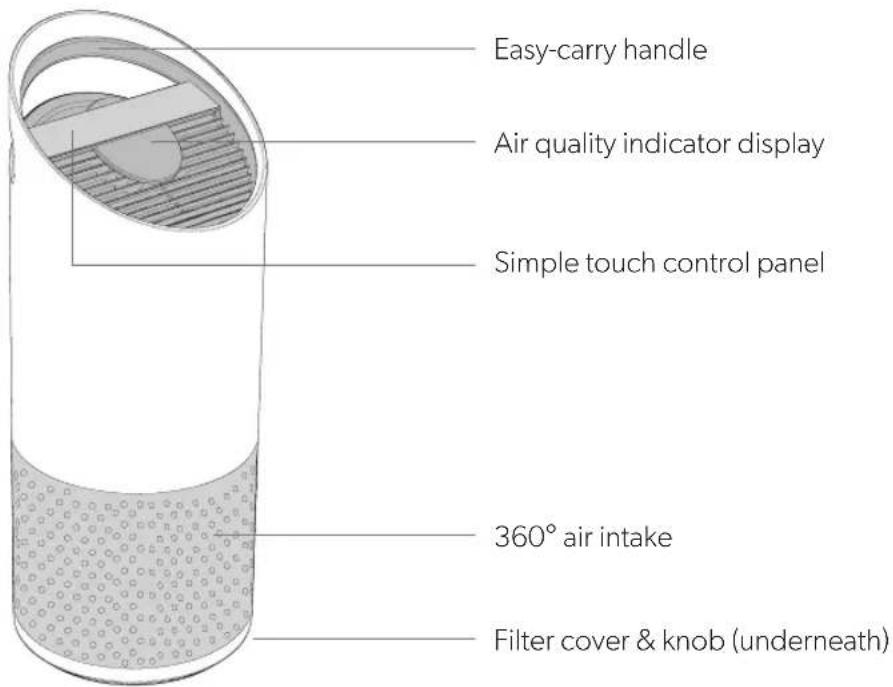
text_image
Easy-carry handle Air quality indicator display Simple touch control panel 360° air intake Filter cover & knob (underneath)SensorPod™
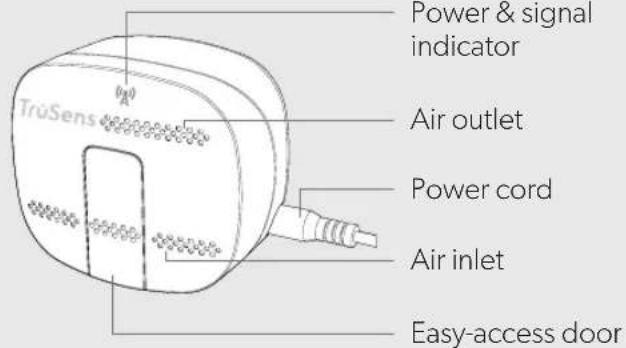
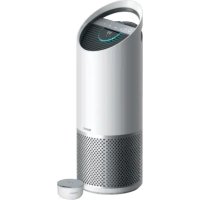
text_image
TruSens Power & signal indicator Air outlet Power cord Air inlet Easy-access doorFilter & UV-C Lamp
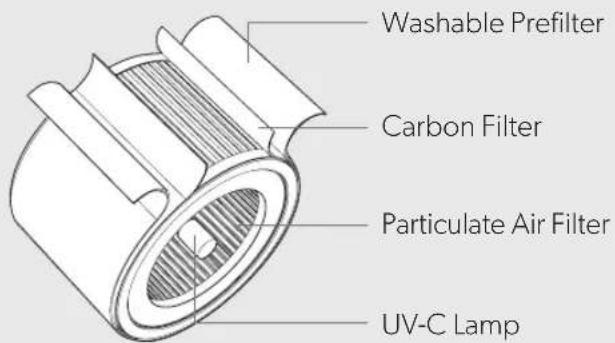
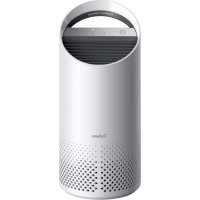
text_image
Washable Prefilter Carbon Filter Particulate Air Filter UV-C LampGETTING STARTED

1. Remove plastic bag from filter
Unscrew the bottom cover and remove the plastic bag from the filter.

natural_image
Three-step diagram showing a mechanical component being rotated, with green arrows indicating the motion direction (no text or symbols present)2. Re-attach filter
Secure filter on the bottom cover and replace inside the purifier.

natural_image
Two technical diagrams showing a cylindrical device being open and then closed, with green arrows indicating the process (no text or symbols present)3. Set up
Plug-in your SensorPod™, and place upright on tabletop or counter across the room, within line of sight of the purifier.
Plug-in your air purifier unit and power on. Place the purifier on a flat surface, free from obstructions.
Signal strength may vary by location. In the rare occasion that it doesn't work – see page 18.
4. Start living with cleaner air!
The purifier will automatically adjust fan speeds based on the air quality readings from SensorPod, and proprietary PureDirect™ technology will deliver purified air throughout the room!
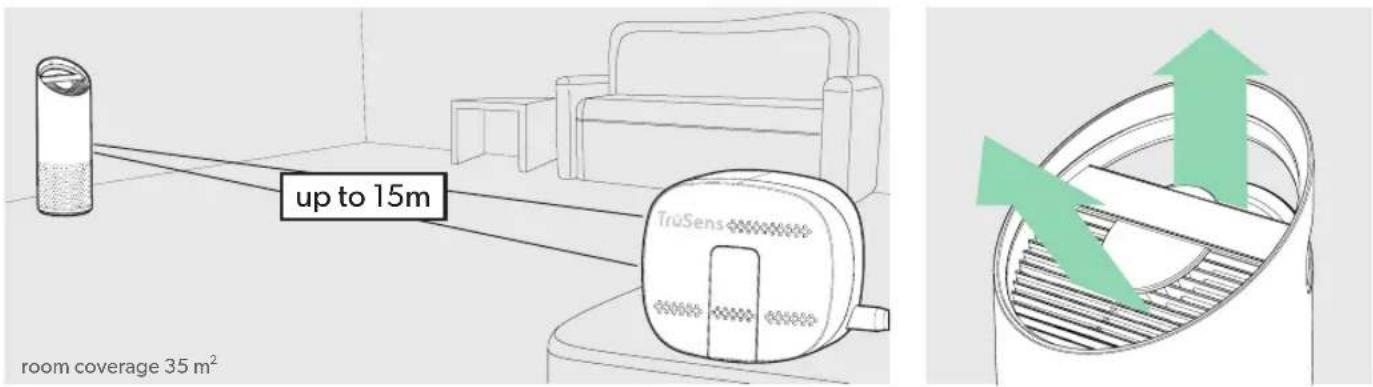
text_image
up to 15m TrüSens room coverage 35 m²CONTROL PANEL

text_image
Z-2000 + + + UV Reset
Power Button

Fan Speed Settings
Select fan speed or AUTO mode. In AUTO mode, purifier automatically adjusts fan speed based on air quality readings from SensorPod™.
(AUTO mode only available when purifier is paired with SensorPod and receiving signal)

Dimmer Mode
Display illumination turns off – for use while sleeping – without sacrificing the effectiveness of the purifier. Simply press the button again to bring back all display features.

Timer Mode
Purifier will automatically turn off after 2, 4, 8, or 12 hours. To cancel this countdown, simply press button until no timer setting is displayed.

UV Mode
UV-C lamp within the purifier's filter chamber is on when the symbol is white. The symbol will glow red when it is time to replace the UV-C lamp.
(See page 15 for replacement instructions)
Reset
Filter and UV Indicator Reset
HEPA, Carbon and UV indicators glow red when it is time for each to be replaced.
When 1 indicator is on, simply hold Reset button for 3 seconds to reset that indicator. When 2+ indicators are on, tap the Reset button to select the correct indicator (selected indicator will blink) before holding 3 seconds to reset that indicator.
(See pages 13-15 for replacement instructions. Follow above Reset button instructions after replacing filter.)
AIR QUALITY DISPLAY
Real-time Feedback
The revolutionary SensorPod™ evaluates the condition of your air by measuring both small (PM2.5) and larger (PM10) particulate matter. It calculates the overall air quality using a proprietary algorithm that is reactive to genuine increases in pollutants without overreacting to someone entering the room or settling into the couch.
The illuminated, colour-coded display communicates good, moderate or poor air quality and a numeric value provides a greater level of detail.
In AUTO mode, the purifier automatically adjusts the fan speed in response to these air quality readings.
GOOD
BLUE | 0 - 50

text_image
12 (A)MODERATE
YELLOW | 50 - 100

text_image
53 (A)POOR
RED | 100 - 500

text_image
128 (A)SPECIFICATIONS
| Air Inlet 360° | |
| Air changed 2 times per hr 35 m2 | |
| Air Delivery Type PureDirect | TM |
| Sensor SensorPod | TM, works up to 15 m from purifier |
| Fan Speed Settings Whisper, 1, 2, Turbo | |
| Purification Levels Washable Prefilter, Carbon, Particulate Air Filter, UV-C Lamp | |
| Timer Settings 2, 4, 8, 12 hr | |
| Filter Change Indicators Carbon, HEPA, UV | |
| Noise 33 - 64 dB | |
| Dimensions 223 x 223 x 567 mm | |
| Weight 4.1 kg | |
| Motor Type DC motor | |
| Power Requirements | 220-240v 50/60Hz 0.3A |
| Power Consumption | 28 W |
| Warranty | 2 years |
Replacement Filters & UV-C Lamp
| 3-in-1 Particulate Air drum filter | 2415107 |
| Carbon filter (3-pack) | 2415106 |
| UV-C Lamp | 2415108 |
CARE & MAINTENANCE
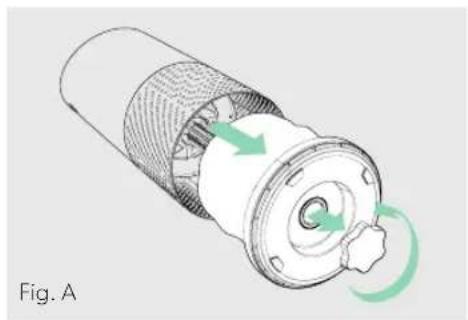
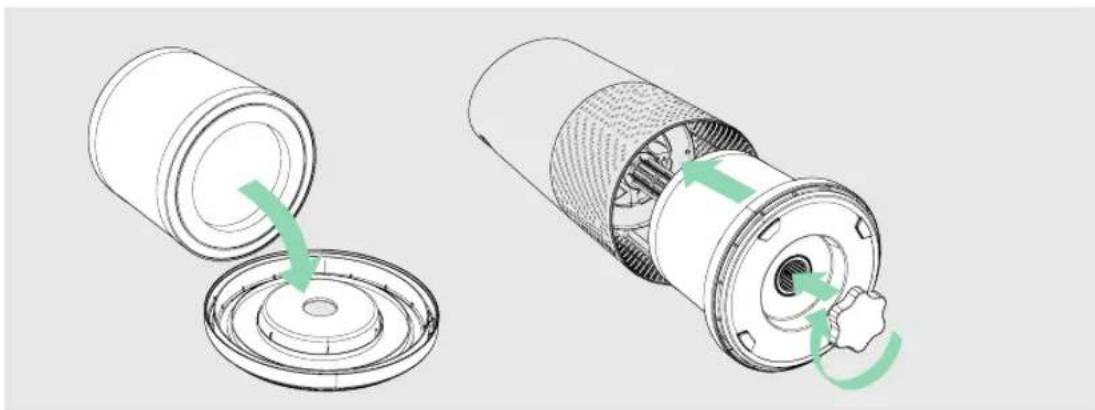
Accessing the filter chamber
- Always power off the purifier by pressing the Power Button and unplugging the power cord.
- Gently place the unit on its side on the floor so that the filter chamber cover and knob are exposed.
- Turn the knob counter-clockwise and remove the filter cover and 360^ filter drum (Fig. A).
REPLACING PARTICULATE AIR FILTER
- The HEPA indicator will glow red when it is time to change the entire drum filter.
- Gently pull the drum filter away from its place secured to the filter cover (Fig. B).
- Secure the replacement filter onto the filter cover (Fig. C).
- Gently replace the filter cover with filter drum into the filter chamber and onto the threading, and turn the knob clockwise until the knob and filter chamber cover are securely tightened (Fig. D).
- Plug-in and power on your purifier, and hold the Reset button until the red HEPA indicator turns off.
Note: Particulate air drum filter (on page 12) will include 3 layers: Washable Prefilter, Carbon and particulate layer
natural_image
Diagram of a mechanical component with green arrows indicating rotational motion (no text or symbols)
natural_image
Diagram showing a cylindrical container being inserted into a circular base with a green arrow indicating the process (no text or symbols)
natural_image
Diagram of a cylindrical container being inserted into a circular base, with a green arrow indicating the process (no text or symbols)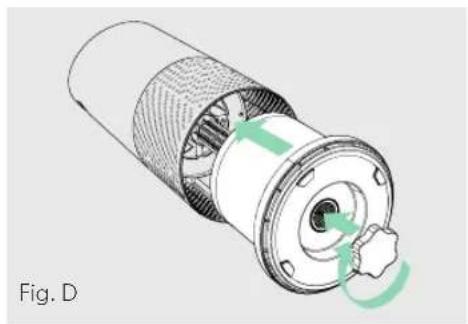
natural_image
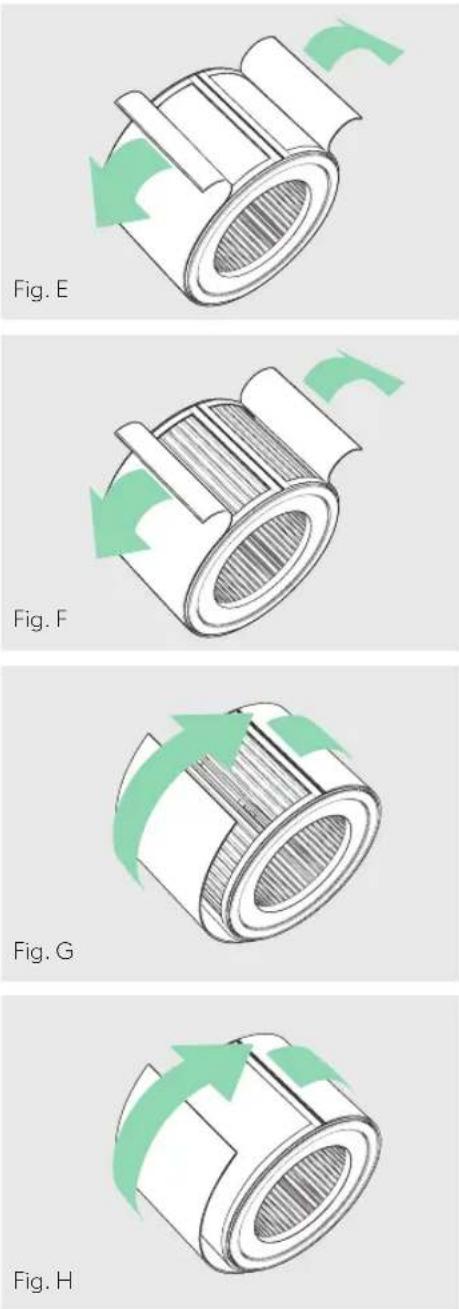
Cross-sectional diagram of a mechanical component with internal gear and a central hub, labeled Fig. D (no text or symbols on the diagram itself)REPLACING CARBON FILTER
- The Carbon indicator will glow red when it is time to replace the Carbon layer.
- Gently peel away the Prefilter from the fastener strips (Fig. E).
- Gently peel away the used Carbon layer from the fastener strips (Fig. F).
- Wrap a new Carbon layer around the filter drum and attach to the same fastener strips (Fig. G).
- Replace the Prefilter by wrapping it around the Carbon layer and attach to the fastener strips (Fig. H).
- Once the purifier is powered-on, hold the Reset button until the red Carbon indicator turns off.
Note: Carbon filter 3-pack (on page 12) will cover 3 Carbon changes between replacing the entire drum filter assembly (on page 13).
WASHING THE PREFILTER
- We recommend that you visually inspect the Prefilter every month, and clean as needed. At minimum, you should hand wash the Prefilter every time you change the Carbon filter.
- Gently peel away the Washable Prefilter from the fastener strips (Fig. E).
- Gently rinse with running water – allow Prefilter to air dry before re-installing.
- Replace the Prefilter by wrapping it around the filter drum and attach to the fastener strips (Fig. H).
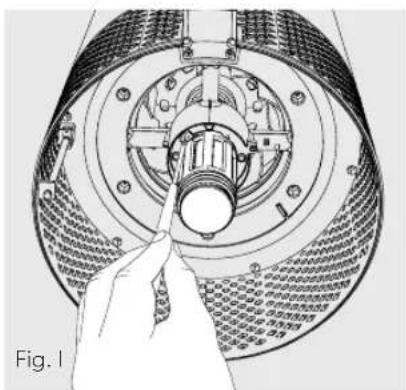
REPLACING UV-C LAMP
- The indicator will glow red when it is time to replace the UV-C lamp.
- Remove filter drum (Fig. A), and use a screwdriver to remove the screw securing the UV housing (Fig. I).
-
Gently remove the UV housing (Fig. J) and disconnect the UV-C lamp from the socket (Fig. K).
-
Release carriage from the UV-C lamp (Fig. L).
- Secure carriage to new UV-C lamp (on page 12) (Fig. M) and connect UV-C lamp into purifier (Fig N).
- Replace the UV housing and use a screwdriver to tighten the fastening screw.
- Once the purifier is powered-on, hold the Reset button until the indicator turns white.
Note: Upon replacement of the UV-C emitter please dispose of at your local WEEE collection facility.
natural_image
Technical illustration of a mechanical assembly with a hand pointing to a component (no text or symbols visible)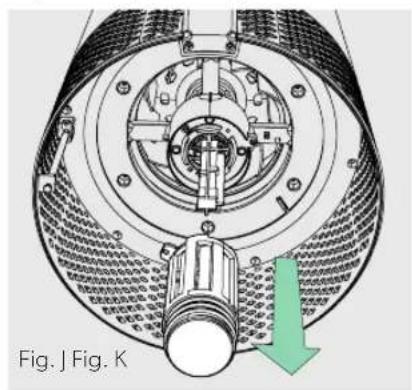
natural_image
Technical diagram of a mechanical device with internal components and a green arrow indicating direction (no text or symbols)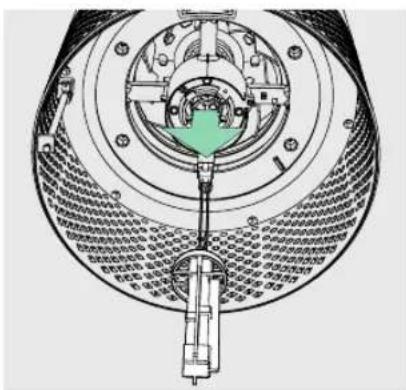
natural_image
Cross-sectional diagram of a mechanical device showing internal components and assembly (no text or labels)
natural_image
Technical diagram of a mechanical assembly with a tool inserted, showing internal components and a green arrow indicating direction (no text or symbols present)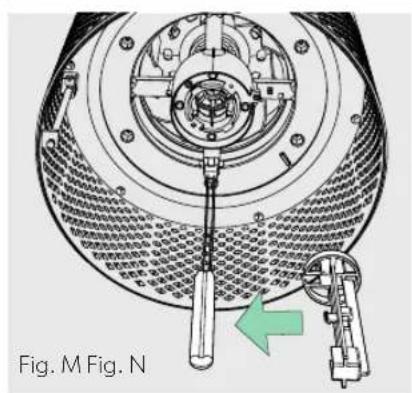
text_image
Fig. M Fig. N
natural_image
Technical diagram of a mechanical assembly with internal components and a green arrow indicating a specific part (no text or symbols present)CLEANING THE SENSORPOD™
Cleaning the air quality sensor
The SensorPod™ uses an infrared light to detect particulate matter, so it is important that you clean the viewing chamber every 1-2 months to remove any dust or particles that may affect the accuracy of the sensor's readings.
- Turn-off the SensorPod by unplugging the power cord.
- Open the easy-access door on the front side by pulling the door up at a 90° angle.
- Use a damp cotton swab to wipe the lens and intake area of the dust sensor (Fig. O).
- Use a dry cotton swab to wipe away any remaining moisture.
- Close the cover by rotating the door back down and sliding it back into place until you hear a click.

natural_image
Line drawing of a hand using a screwdriver to adjust or install a mechanical component (no text or symbols present)FAQ & TROUBLESHOOTING
| Where do I place the SensorPodTM? | Anywhere you want to measure the air quality within the room!For optimal results, place the SensorPodTM up to 15 m away from the air purifier on a counter or table, within line of sight of the purifier. In Auto Mode, the purifier will work to distribute clean air until the SensorPod reads an acceptable level of air quality. |
| How often do I need to change the filters? | That's easy! The purifier's replacement indicators will notify you when it is time to replace the filters, or the UV-C lamp.Plan on replacing the Carbon every 3-4 months, Particulate Air Filter every 12-15 months, and UV-C lamp every 1-3 years. |
| How often do I need to wash the Prefilter? | The Prefilter captures larger particles and preserves the efficiency of the other filters, so we recommend that you visually inspect the prefilter every month and wash as needed. Another good habit is to wash the prefilter every time you replace the Carbon filter. |
| How often do I need to clean the dust sensor within SensorPodTM? | For the most accurate measurement of your air quality, we'd recommend you clean the surface of the dust sensor every 1-2 months. |
| Purifier won't turn on. | Check that the power cord is connected securely to both the wall outlet and the purifier. Check if there is a power outage in the outlet by trying a nearby light or device, or by trying a working device in the same outlet.Check that the filter is fitted properly into filter chamber.Please contact us if you're still having a problem! (page 19) |
FAQ & TROUBLESHOOTING
| Purifier won’t go into Auto Mode.ORAir quality indicators are off.ORPurifier’s sensor signal indicator is blinking. | First, check that the SensorPod is plugged-in and that its light is solid.Next, check that the SensorPod is within range of the purifier (up to 15m).If both are true and the connection is still failing, see below instructions on repairing the SensorPod’s connection. |
| I’ve lost my SensorPodTM! | Don’t worry! Please contact our customer support team and you can order a replacement SensorPod. Follow the easy pairing instructions below to pair your replacement SensorPod with your existing air purifier! |
Pairing SensorPod™ and Purifier
The SensorPod communicates with the purifier using radio frequency signals, and will be paired on the production line and ready for use when you open the box. In the rare event that the signal is interrupted, the purifier's sensor indicator light (A) will blink. You can repair the connection in just a few easy steps.
- Unplug the SensorPod.
- HOLD the Power Button on the purifier for 3 seconds, when you should hear two chimes.
-
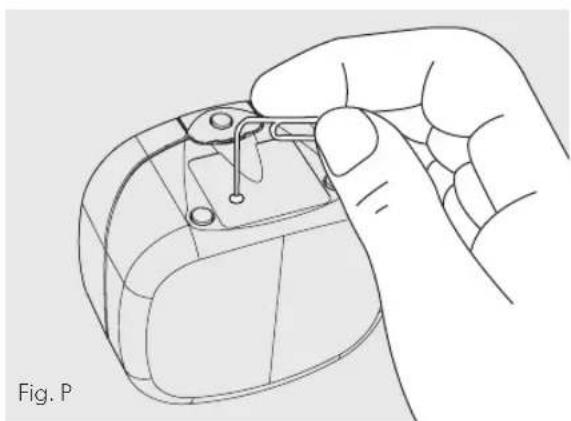
Plug-in the SensorPod and use an item with a small point (paper clip) to press and HOLD the pairing button underneath the SensorPod for 5-7 seconds (Fig. P).
-
The connection is established when the purifier's sensor indicator light is lit with no blinking, and the air quality indicators turn on.
natural_image
Line drawing of a hand holding a small object with a clip, labeled Fig. P (no text or symbols on the diagram itself)GUARANTEE
Operation of this machine is guaranteed for two years from date of purchase, subject to normal use. Within the guarantee period, ACCO will at its own discretion either repair or replace the defective machine free of charge. Defects due to misuse or use for inappropriate purposes are not covered under the guarantee. Proof of date of purchase will be required. Repairs or alterations made by persons not authorized by ACCO will invalidate the guarantee. It is our aim to ensure that our products perform to the specifications stated. This guarantee does not affect the legal rights which consumers have under applicable national legislation governing the sale of goods.
SUPPORT
Thank you for welcoming TruSens™ into your home. Our customers are at the heart of what we do, and we strive to design products that fit your lifestyle. If you have any questions or feedback, please reach out!
Visit our website at www.leitz.com/trusens
Email us at service.uk@acco.com
Call us at 0800 279 5102
To register and activate your warranty go to www.leitz.com/register
TruSens™
natural_image
Three-step diagram showing a mechanical component being rotated, with green arrows indicating the motion direction (no text or symbols present)natural_image
Two technical illustrations of a cylindrical mechanical component with green arrows indicating rotation or assembly (no text or symbols present)3. Einrichtung
natural_image
Diagram showing green arrows pointing upward through a circular container with striped pattern (no text or symbols)BEDIENFELD

text_image
Z-2000 UV Reset
Betriebsschalter

text_image
+ crescent 12 (A)natural_image
Diagram of a mechanical component with green arrows indicating rotational flow, labeled Abb. A (no text or symbols on the diagram itself)
natural_image
Diagram showing a cylindrical container being inserted into a circular base with a green arrow indicating the process (no text or symbols)
natural_image
Diagram of a cylindrical container being inserted into a circular base, with a green arrow indicating the process (no text or symbols)
natural_image
Cross-sectional diagram of a mechanical component with internal structure and green directional arrows indicating rotation (no text or symbols)AUSTAUSCH DES AKTIVKOHLEFILTERS
natural_image
Diagram of a mechanical component with green arrows indicating rotational motion (no text or symbols)
natural_image
Diagram of a mechanical component with green arrows indicating rotational motion (no text or symbols)
natural_image
Diagram of a cylindrical mechanical component with green arrows indicating direction (no text or symbols)
natural_image
Diagram of a cylindrical mechanical component with green arrows indicating direction, labeled 'Abb. H' (no other text or symbols)AUSTAUSCH DER UV-C-LAMPE
natural_image
Technical illustration of a mechanical assembly with a hand pointing to a component (no text or symbols visible)
text_image
Abb. J Abb. K
natural_image
Cross-sectional diagram of a mechanical device showing internal components and assembly (no text or labels)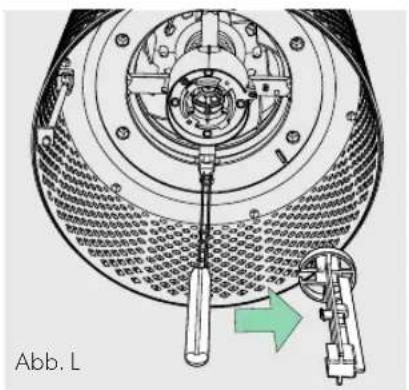
natural_image
Technical diagram of a mechanical assembly with a tool and component, no visible text or symbols
text_image
Abb. M Abb. N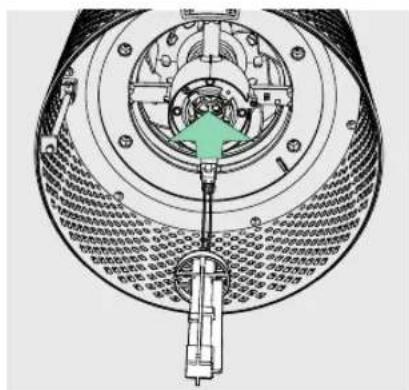
text_image
Technical diagram of a mechanical assembly with labeled components and directional arrow indicating rotation or movement.natural_image
Line drawing of a hand using a screwdriver to adjust or install a mechanical component (no text or symbols visible)natural_image
Line drawing of a hand holding a small object with pins, no text or symbols presentGARANTIE
Purification 360^
natural_image
Cross-sectional diagram of a cylindrical container with internal structure and dotted pattern (no text or symbols)natural_image
Technical line drawing of a mechanical component with threaded end and central bore (no text or symbols)Préfiltre lavable
natural_image
Three-step diagram showing a mechanical component being rotated, with green arrows indicating the motion direction (no text or symbols present)natural_image
Two technical illustrations of a cylindrical mechanical component with green arrows indicating rotation or assembly (no text or symbols present)natural_image
Diagram of a cylindrical container with internal structure and green arrows indicating upward motion (no text or symbols)PANNEAU DE COMMANDE

text_image
Z-2000 Power + cres @ UV Reset
Bouton marche/arrêt

natural_image
Diagram of a mechanical component with green arrows indicating rotation or movement, labeled Fig. A (no text or symbols on the diagram itself)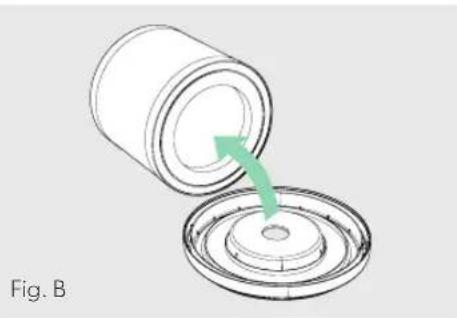
natural_image
Diagram showing a cylindrical container being inserted into a circular base with a green arrow indicating the process (no text or symbols)
natural_image
Diagram showing a cylindrical container being inserted into a circular component, with a green arrow indicating the process (no text or symbols)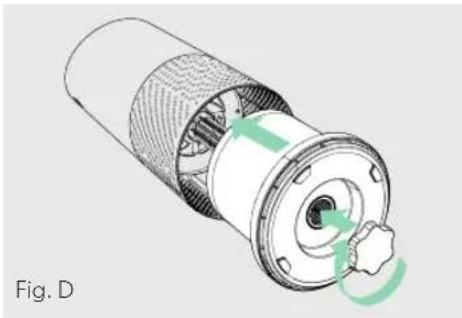
natural_image
Cross-sectional diagram of a mechanical component with internal structure and green directional arrows indicating rotation (no text or symbols)REPLACEMENT DU FILTRE À CHARBON ACTIF
natural_image
Diagram of a mechanical component with green arrows indicating rotational motion (no text or symbols)
natural_image
Diagram of a mechanical component with green arrows indicating rotational motion (no text or symbols)
natural_image
Diagram of a cylindrical mechanical component with green arrows indicating direction (no text or symbols)
natural_image
Diagram of a cylindrical mechanical component with green arrows indicating direction, labeled 'Fig. H' (no text or symbols on the diagram itself)REEMPLACEMENT DE LA LAMPE UV-C
natural_image
Technical illustration of a mechanical component with a finger pointing to a central shaft (no text or symbols present)
natural_image
Cross-sectional diagram of a mechanical device with internal components and a green arrow indicating direction (no text or symbols)
text_image
Technical diagram of a mechanical device with labeled components and Chinese annotations
natural_image
Technical diagram of a mechanical device with a central tool and green arrow indicating rotation (no text or symbols)
natural_image
Technical diagram of a mechanical assembly with a tool and component, no visible text or symbols
natural_image
Cross-sectional diagram of a mechanical device showing internal components and a green arrow indicating a specific part (no text or symbols present)NETTOYAGE DU SENSORPOD™
natural_image
Line drawing of a hand using a screwdriver to adjust or install a mechanical component (no text or symbols present)FAQ ET DÉPANNAGE
natural_image
Line drawing of a hand holding a small object with pins, labeled Fig. P (no text or symbols on the object itself)GARANTIE
natural_image
Three-step diagram showing a mechanical component being rotated, with green arrows indicating the motion direction (no text or symbols present)natural_image
Two technical diagrams showing a cylindrical device being open and then closed, with green arrows indicating the process (no text or symbols present)3. Instellen
natural_image
Diagram of a cylindrical container with internal blades and green arrows indicating upward motion (no text or symbols)BEDIENINGSPANEEEL

text_image
Z-2000 Power + + + UV Reset
Aan/uit-knop

natural_image
Diagram of a mechanical component with green arrows indicating rotational motion (no text or symbols)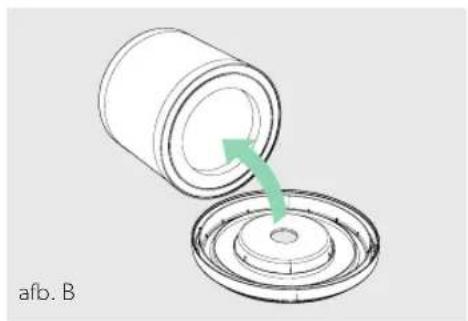
natural_image
Diagram showing a cylindrical container being inserted into a circular base with a green arrow indicating the process (no text or symbols)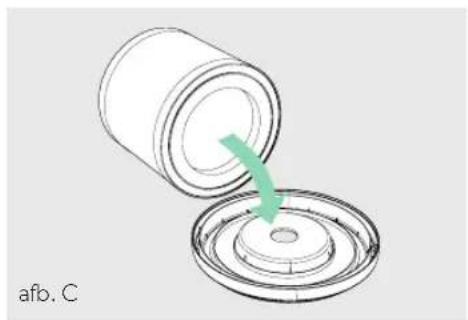
natural_image
Diagram of a cylindrical container being inserted into a circular component, with a green arrow indicating the process (no text or symbols)
natural_image
Cross-sectional diagram of a mechanical component with internal structure and green arrows indicating rotation (no text or symbols)HET ACTIEVE-KOOLFILTER VERVANGEN
natural_image
Diagram of a cylindrical mechanical component with green arrows indicating rotational motion (no text or symbols)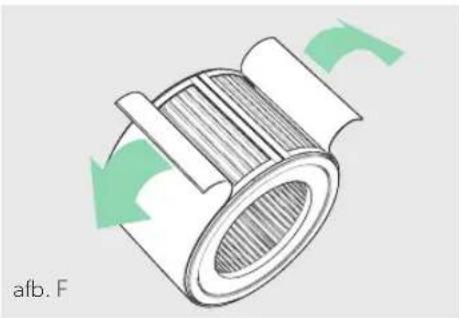
natural_image
Diagram of a mechanical component with green arrows indicating rotational motion (no text or symbols)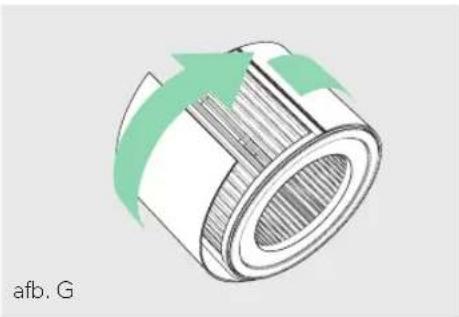
natural_image
3D diagram of a cylindrical mechanical component with green arrows indicating rotation or flow direction (no text or symbols)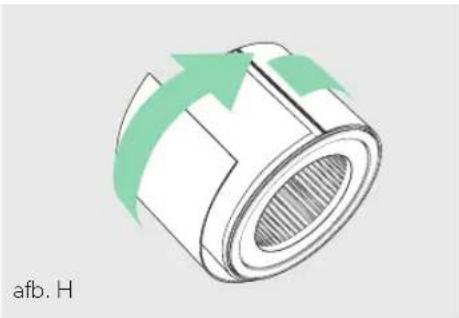
natural_image
Diagram of a cylindrical mechanical component with green arrows indicating direction, labeled 'afb. H' (no other text or symbols)DE UV-C-LAMP VERVANGEN
natural_image
Technical illustration of a mechanical assembly with a hand pointing to a central component (no text or symbols visible)
natural_image
Technical diagram of a mechanical device with internal components and a green arrow indicating direction (no text or symbols)
natural_image
Cross-sectional diagram of a mechanical device showing internal components and housing (no text or labels)
natural_image
Technical diagram of a mechanical assembly with a tool and directional arrow (no text or symbols)
text_image
afb. M afb. N
text_image
Technical diagram of a mechanical assembly with labeled components and directional arrow indicating motion or movement.DE SENSORPOD™ REINIGEN
natural_image
Line drawing of a hand using a tool to adjust or install a mechanical component (no text or symbols visible)VEELGESTELDE VRAGEN EN PROBLEEMOPLOSSING
natural_image
Line drawing of a hand holding a small object with a clip, no text or symbols presentGARANTIE
(EIRP) Wireless: 0 dBm
Guadagno antenna
Wireless: 2 Dbi
natural_image
Three-step diagram showing a mechanical component being rotated, with green arrows indicating the motion direction (no text or symbols present)natural_image
Two technical illustrations of a cylindrical mechanical component with green arrows indicating rotation or assembly (no text or symbols present)3. Preparazione
natural_image
Diagram of a mechanical component with green arrows indicating rotational flow, labeled Fig. A (no text or symbols on the diagram itself)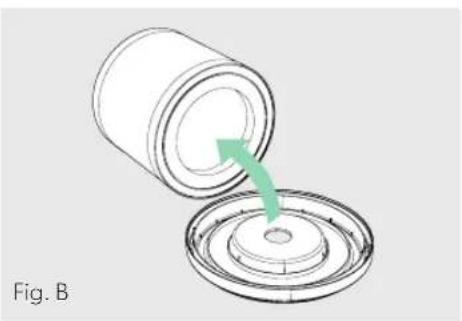
natural_image
Diagram showing a cylindrical container being inserted into a circular base with a green arrow indicating the process (no text or symbols)
natural_image
Diagram of a cylindrical container being inserted into a circular component, with a green arrow indicating the process (no text or symbols)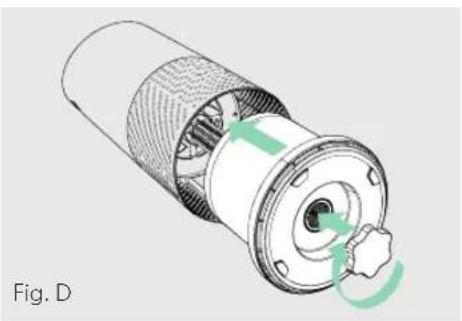
natural_image
Cross-sectional diagram of a mechanical component with internal structure and green directional arrows indicating motion (no text or symbols)SOSTITUZIONE DEL FILTRO A CARBONE ATTIVO
natural_image
Technical illustration of a mechanical assembly with a hand pointing to a central component (no text or symbols visible)
natural_image
Cross-sectional diagram of a mechanical device with internal components and a green arrow indicating direction (no text or symbols)
natural_image
Technical diagram of a mechanical assembly with concentric components and a central green component (no visible text or labels)
natural_image
Technical diagram of a mechanical device with a central tool and green arrow indicating rotation (no text or symbols)
natural_image
Technical diagram of a mechanical assembly with a tool inserted, showing internal components and a green arrow indicating direction (no text or symbols present)
text_image
Technical diagram of a mechanical assembly with labeled components and directional arrow indicating motion or forcePULIZIA DEL SENSORE SENSORPOD™
natural_image
Line drawing of a hand using a screwdriver to adjust or install a mechanical component (no text or symbols present)natural_image
Line drawing of a hand holding a small object with pins, labeled Fig. P (no text or symbols on the object itself)GARANZIA
natural_image
Three-step diagram showing a mechanical component being rotated, with green arrows indicating the motion direction (no text or symbols present)natural_image
Two technical illustrations of a cylindrical mechanical component with green arrows indicating rotation or assembly (no text or symbols present)3. Preparación
Enchufe su SensorPod™.
text_image
Z-2000 UV Reset
Botón de encendido

natural_image
Cross-sectional diagram of a mechanical component with green arrows indicating rotation or movement (no text or symbols)
natural_image
Diagram showing a cylindrical container being inserted into a circular component, with a green arrow indicating the process (no text or symbols)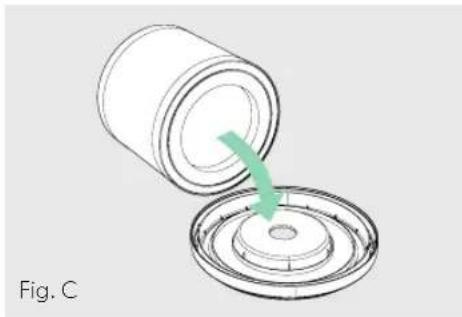
natural_image
Diagram of a cylindrical container pouring liquid into a circular tank (no text or symbols)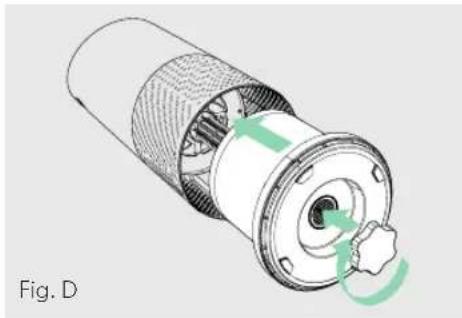
natural_image
Cross-sectional diagram of a mechanical component with internal structure and green directional arrows indicating motion (no text or symbols)natural_image
Diagram of a mechanical component with green arrows indicating rotational flow (no text or symbols)
natural_image
Diagram of a mechanical component with green arrows indicating rotational motion (no text or symbols)
natural_image
Diagram of a cylindrical mechanical component with green arrows indicating direction (no text or symbols)
natural_image
Diagram of a cylindrical mechanical component with green arrows indicating direction, labeled 'Fig. H' (no text or symbols on the diagram itself)natural_image
Technical illustration of a mechanical assembly with a hand pointing to a component (no text or symbols visible)
natural_image
Technical diagram of a mechanical device with internal components and a green arrow indicating direction (no text or symbols)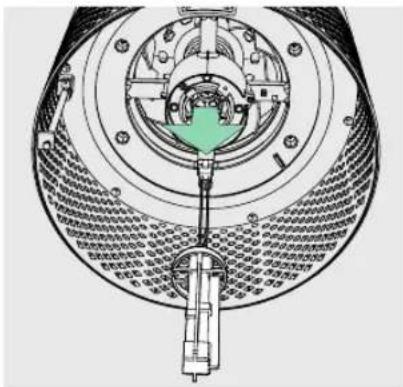
text_image
Technical diagram of a mechanical device with labeled components and internal structure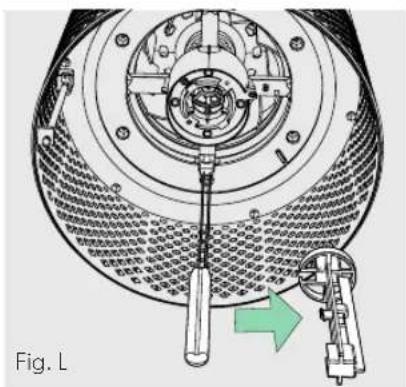
natural_image
Technical diagram of a mechanical device with internal components and a green arrow indicating direction (no text or symbols)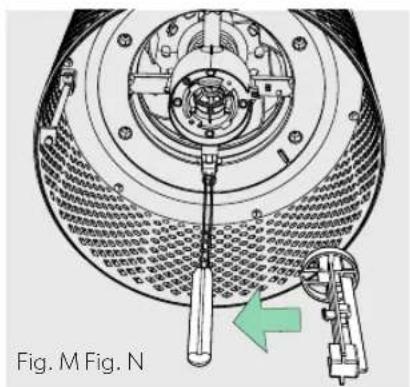
natural_image
Technical diagram of a mechanical device with a green arrow indicating a component, labeled Fig. M (no text or symbols on the diagram itself)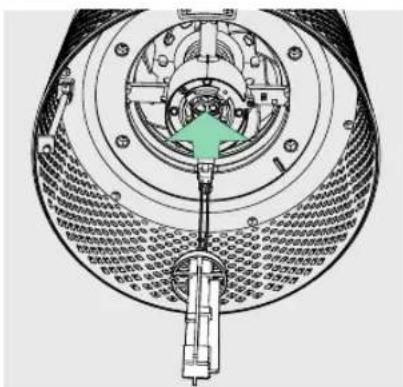
text_image
Technical diagram of a mechanical device with labeled components and a green arrow indicating a directional or process flow.LIMPIEZA DEL SENSORPOD™
natural_image
Line drawing of a hand using a screwdriver to adjust or install a mechanical component (no text or symbols present)natural_image
Line drawing of a hand holding a small object with pins, labeled 'Fig. P' (no other text or symbols)GARANTÍA
natural_image
Three-step diagram showing a mechanical component being rotated, with green arrows indicating the motion direction (no text or symbols present)2. Volte a prender o filtro
natural_image
Two technical illustrations of a cylindrical mechanical component with green arrows indicating rotation or assembly (no text or symbols present)3. Preparação
Ligue a ficha do seu SensorPod à tomada.
natural_image
Diagram of a container with green arrows indicating upward motion or flow, no text or symbols presentPAINEL DE CONTROLO

text_image
Z-2000 + + + UV Reset
natural_image
Diagram of a mechanical component with green arrows indicating rotational motion, labeled Fig. A (no text or symbols on the diagram itself)
natural_image
Diagram showing a cylindrical container being inserted into a circular base with a green arrow indicating the process (no text or symbols)
natural_image
Diagram of a cylindrical container being inserted into a circular base, with a green arrow indicating the process (no text or symbols)
natural_image
Cross-sectional diagram of a mechanical component with internal structure and green directional arrows indicating rotation (no text or symbols)natural_image
Diagram of a mechanical component with green arrows indicating rotational flow (no text or symbols)
natural_image
Diagram of a mechanical component with green arrows indicating rotational motion (no text or symbols)
natural_image
Diagram of a cylindrical mechanical component with green arrows indicating rotation or flow direction (no text or symbols)
natural_image
Diagram of a cylindrical mechanical component with green arrows indicating direction, labeled 'Fig. H' (no text or symbols on the diagram itself)natural_image
Technical illustration of a mechanical assembly with a hand pointing to a component (no text or symbols present)
natural_image
Technical diagram of a mechanical device with internal components and a green arrow indicating direction (no text or symbols)
natural_image
Cross-sectional diagram of a mechanical assembly with concentric rings and internal components (no visible text or labels)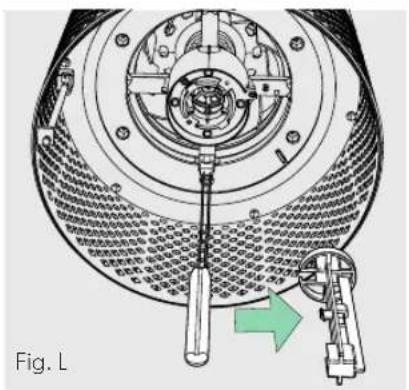
natural_image
Technical diagram of a mechanical assembly with a tool inserted, showing internal components and a green arrow indicating direction (no text or symbols present)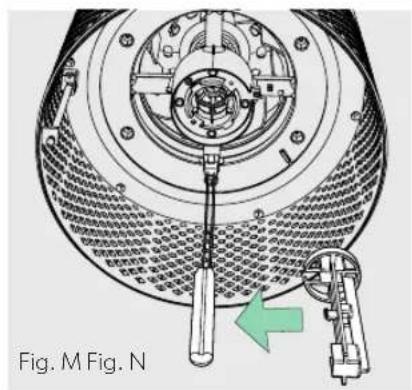
text_image
Fig. M Fig. N
text_image
Technical diagram of a mechanical assembly with labeled components and directional arrow indicating motion or forceLIMPEZA DO SENSORPOD™
natural_image
Line drawing of a hand using a screwdriver to adjust or install a mechanical component (no text or symbols present)natural_image
Line drawing of a hand holding a small mechanical component, labeled Fig. P (no text or symbols on the diagram itself)GARANTIA
natural_image
Three-step diagram showing a mechanical component being rotated, with green arrows indicating the motion direction (no text or symbols present)natural_image
Two technical illustrations of a cylindrical mechanical component with green arrows indicating rotation or assembly (no text or symbols present)3. Opsætning
natural_image
Diagram showing two green arrows pointing upward through a circular structure with a horizontal bar and diagonal stripe (no text or symbols)BETJENINGSPANEL

text_image
Z-2000 Power + + + UV Reset
Tænd/sluk-knap

Indstillinger for ventilatorhastighed
natural_image
Diagram of a mechanical component with green arrows indicating rotational motion, labeled Fig. A (no text or symbols on the diagram itself)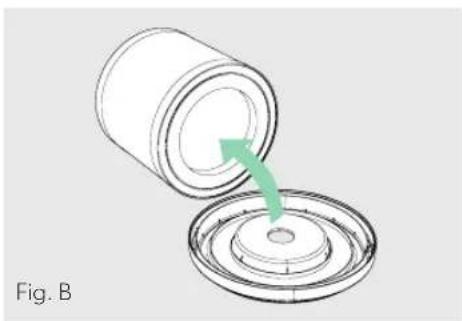
natural_image
Diagram of a cylindrical container being inserted into a circular base, with a green arrow indicating the process (no text or symbols)
natural_image
Diagram of a cylindrical container being inserted into a circular component, with a green arrow indicating the process (no text or symbols)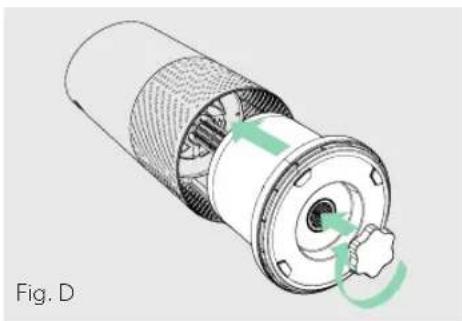
natural_image
Cross-sectional diagram of a mechanical component with internal structure and green directional arrows indicating rotation (no text or symbols)UDSKIFTNING AF DET AKTIVE KULFILTER
natural_image
Diagram of a mechanical component with green arrows indicating rotational motion (no text or symbols)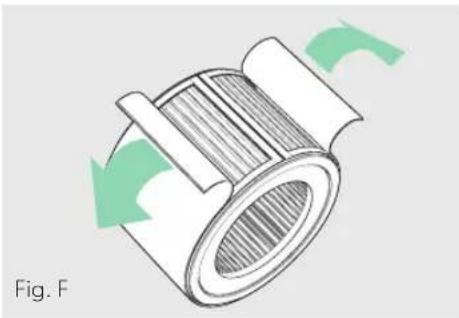
natural_image
Diagram of a mechanical component with green arrows indicating rotational motion (no text or symbols)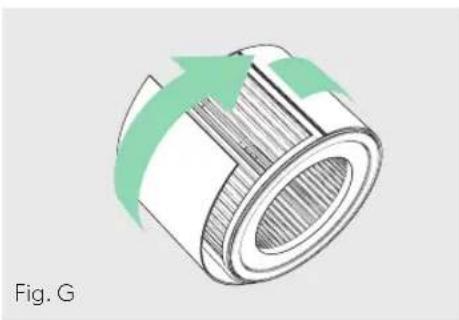
natural_image
Diagram of a cylindrical mechanical component with green arrows indicating rotation or flow direction (no text or symbols)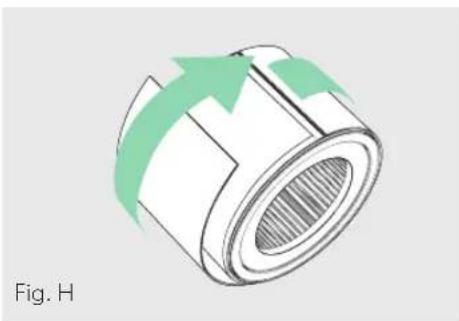
natural_image
Diagram of a cylindrical mechanical component with green arrows indicating direction, labeled 'Fig. H' (no text or symbols on the diagram itself)UDSKIFTNING AF UV-C-LAMPEN
natural_image
Technical illustration of a mechanical assembly with a hand pointing to a central component (no text or symbols visible)
natural_image
Technical diagram of a mechanical assembly with labeled components and directional arrow (no readable text or symbols)
natural_image
Cross-sectional diagram of a mechanical device showing internal components and assembly (no text or labels)
natural_image
Technical diagram of a mechanical device with a central tool and directional arrow, labeled Fig. L (no text or symbols on the diagram itself)
natural_image
Technical diagram of a mechanical assembly with a tool and directional arrow, no readable text or symbols present.
text_image
Technical diagram of a mechanical device with labeled components and directional arrow indicating motion or assembly.RENG∅RING AF SENSORPOD™
Rengøring af luftkvalitetssensoren
natural_image
Line drawing of a hand using a screwdriver to adjust or install a mechanical component (no text or symbols present)OFTE STILLEDE SP∅RGSMÅL OG FEJLFINDING
natural_image
Line drawing of a hand holding a small object with pins, labeled Fig. P (no text or symbols on the object itself)GARANTI
natural_image
Three-step diagram showing a mechanical component being rotated, with green arrows indicating the motion direction (no text or symbols present)natural_image
Two technical diagrams showing a cylindrical device being open and then closed, with green arrows indicating the process (no text or symbols present)3. Asennus
Kytke SensorPod pistorasiaan.
natural_image
Diagram of a container with green arrows indicating upward motion or flow, no text or symbols presentOHJAUSPANEELI

text_image
Z-2000 Power + + + UV Reset
Virtapainike

natural_image
Diagram of a Kuva A device showing internal components and green directional arrows indicating rotation (no text or symbols)
natural_image
Diagram showing a cylindrical container being inserted into a circular base with a green arrow indicating the process (no text or symbols)
natural_image
Diagram showing a cylindrical container being inserted into a circular component, with a green arrow indicating the process (no text or symbols)
natural_image
Technical illustration of a Kuva D component with internal structure and green motion arrows indicating rotation (no text or symbols)AKTIIVIHIILISUODATTIMEN
VAIHTAMINEN
natural_image
Diagram of a Kuva E mechanical component with green arrows indicating rotational motion (no text or symbols)
natural_image
Diagram of a curved mechanical component with green arrows indicating rotational motion (no text or symbols)
natural_image
Diagram of a cylindrical mechanical component with green arrows indicating direction, labeled 'Kuva G' (no other text or symbols)
natural_image
Diagram of a cylindrical mechanical component with green arrows indicating direction, labeled 'Kuva H' (no other text or symbols)UV-C-LAMPUN VAIHTAMINEN
natural_image
Technical illustration of a mechanical assembly with a hand pointing to a component (no text or symbols visible)
natural_image
Cross-sectional diagram of a mechanical device showing internal components and housing (no text or labels)
natural_image
Technical diagram of a mechanical assembly with a central tool and directional arrow, no readable text or symbols present.
text_image
Technical diagram of a mechanical assembly with labeled components and directional arrow indicating motion or forceSENSORPOD™-MITTARIN PUHDISTAMINEN
natural_image
Line drawing of a hand using a tool to adjust or install electronic components, labeled 'Kuva O' at the bottom (no other text or symbols)USEIN KYSYTYT KYSYMYKSET JA VIANMÄÄRITYS
natural_image
Line drawing of a hand holding a small object with a spring-like clip, labeled 'Kuva P' (no other text or symbols)TAKUU
natural_image
Three-step diagram showing a mechanical component being rotated, with green arrows indicating the motion direction (no text or symbols present)2. Feste filteret på nytt
natural_image
Two technical illustrations of a cylindrical mechanical component with green arrows indicating rotation or assembly (no text or symbols present)3. Oppsett
natural_image
Diagram of a cylindrical container with internal blades and green arrows indicating upward motion (no text or symbols)KONTROLLPANEL

text_image
Z-2000 Power + cres @ UV Reset
Strømknapp

Innstillinger for viftehastighet
Velg viftehastigheten selv eller velg automatisk modus. I automatisk modus justerer luftrenseren viftehastigheten automatisk basert på avlesningen av luftkvaliteten fra SensorPod.
natural_image
Diagram of a mechanical component with green arrows indicating rotational flow, labeled Fig. A (no text or symbols on the diagram itself)
natural_image
Diagram of a cylindrical container being inserted into a circular base, with a green arrow indicating the process (no text or symbols)
natural_image
Diagram of a cylindrical container being inserted into a circular base, with a green arrow indicating the process (no text or symbols)
natural_image
Cross-sectional diagram of a mechanical component with internal structure and green directional arrows indicating rotation (no text or symbols)SKIFTE UT AKTIVT KULLFILTER
natural_image
Diagram of a mechanical component with green arrows indicating rotational motion (no text or symbols)
natural_image
Diagram of a mechanical component with green arrows indicating rotational motion (no text or symbols)
natural_image
Diagram of a cylindrical mechanical component with green arrows indicating direction (no text or symbols)
natural_image
Diagram of a cylindrical mechanical component with green arrows indicating direction, labeled 'Fig. H' (no text or symbols on the diagram itself)SKIFTE UT UV-C-LAMPE
natural_image
Technical illustration of a mechanical assembly with a hand pointing to a component (no text or symbols visible)
natural_image
Technical diagram of a mechanical assembly with labeled parts and directional arrow (no readable text or symbols)
text_image
Technical diagram of a mechanical device with labeled components and Chinese annotations
natural_image
Technical diagram of a mechanical device with a tool inserted, showing internal components and a green arrow indicating motion (no text or symbols present)
natural_image
Technical diagram of a mechanical assembly with a green arrow indicating a specific component (no text or symbols present)
text_image
Technical diagram of a mechanical device with labeled components and directional arrow indicating motion or assembly.RENGJ∅RE SENSORPOD™
natural_image
Line drawing of a hand using a screwdriver to adjust or install a mechanical component (no text or symbols present)VANLIGE SP∅RSMÅL OG FEILS∅KING
natural_image
Line drawing of a hand holding a small object with a clip, labeled Fig. P (no text or symbols on the diagram itself)GARANTI
natural_image
Three-step diagram showing a mechanical component being rotated, with green arrows indicating the motion direction (no text or symbols present)natural_image
Two technical illustrations of a cylindrical mechanical component with green arrows indicating rotation or assembly (no text or symbols present)3. Installation
natural_image
Diagram of a cylindrical container with internal components and green arrows indicating upward motion (no text or symbols)KONTROLLPANEL

text_image
Z-2000 Power + + + UV Reset
Strömbrytare

natural_image
Diagram of a mechanical component with green arrows indicating rotational flow, labeled Fig. A (no text or symbols on the diagram itself)
natural_image
Diagram of a cylindrical container being inserted into a circular base, with a green arrow indicating the process (no text or symbols)
natural_image
Diagram of a cylindrical container being inserted into a circular base, with a green arrow indicating the process (no text or symbols)
natural_image
Cross-sectional diagram of a mechanical component with internal structure and green arrows indicating rotation (no text or symbols)BYTA KOLFILTRET
natural_image
Diagram of a mechanical component with green arrows indicating rotational motion (no text or symbols)
natural_image
Diagram of a mechanical component with green arrows indicating rotational motion (no text or symbols)
natural_image
Diagram of a cylindrical mechanical component with green arrows indicating direction (no text or symbols)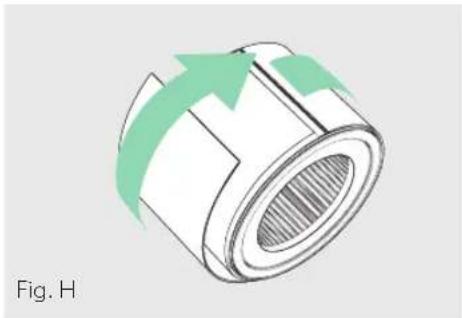
natural_image
Diagram of a cylindrical mechanical component with green arrows indicating direction, labeled 'Fig. H' (no text or symbols on the diagram itself)BYTA UV-C-LAMPAN
natural_image
Technical illustration of a mechanical component with a finger pointing to a central shaft (no text or symbols present)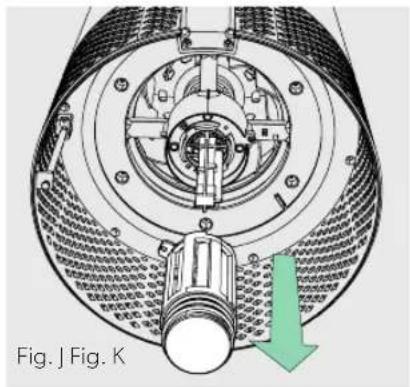
natural_image
Cross-sectional diagram of a mechanical device with internal components and a green arrow indicating direction (no text or symbols)
text_image
Technical diagram of a mechanical device with labeled components and Chinese annotations
natural_image
Technical diagram of a mechanical device with a wrench and lever mechanism, labeled Fig. L (no text or symbols on the diagram itself)
natural_image
Technical diagram of a mechanical assembly with a tool and component, labeled Fig. M (no text or symbols on the diagram itself)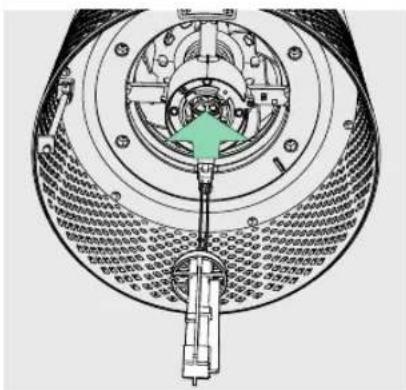
text_image
Technical diagram of a mechanical assembly with labeled components and directional arrow indicating motion or forceRENGÖRA SENSORPOD™
natural_image
Line drawing of a hand using a screwdriver to adjust or install a mechanical component (no text or symbols present)VANLIGA FRÅGOR OCH FELSÖKNING
natural_image
Line drawing of a hand holding a small object with pins, labeled Fig. P (no text or symbols on the object itself)GARANTI
https://declarations.accobrands.com/
natural_image
Three-step diagram showing a mechanical component being rotated, with green arrows indicating the motion direction (no text or symbols present)2. Paigaldage filter uuesti
natural_image
Two technical illustrations of a cylindrical mechanical component with internal gear and a base, showing green directional arrows indicating motion (no text or symbols present)3. Seadistamine
natural_image
Diagram of a container with green arrows indicating upward motion or flow, no text or symbols presentJUHTPANEEL

text_image
Z-2000 Power + + + UV Reset
Toitenupp

natural_image
Diagram of a mechanical component with green arrows indicating rotational flow, labeled 'joonis A' (no text or symbols on the diagram itself)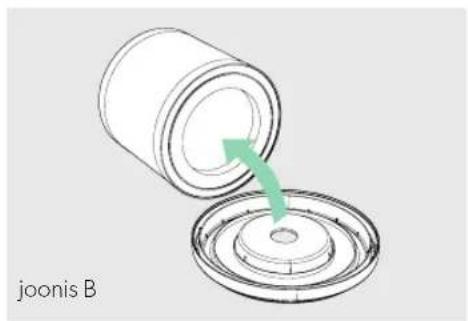
natural_image
Diagram showing a cylindrical container being inserted into a circular base with a green arrow indicating the process (no text or symbols on the diagram itself)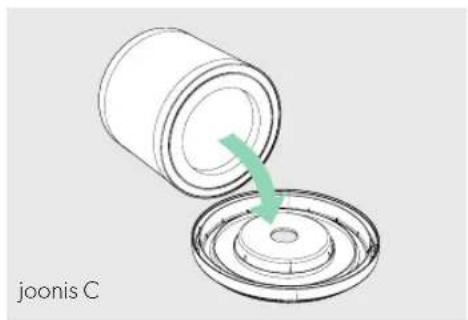
natural_image
Diagram of a mechanical component being inserted into a circular housing, with a green arrow indicating the process (no text or symbols on the diagram itself)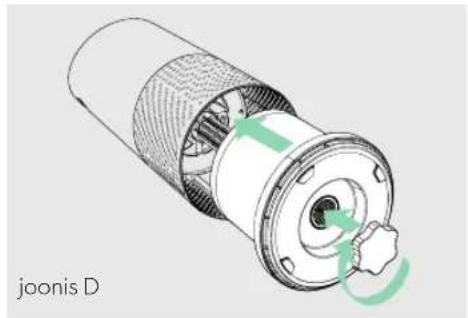
natural_image
Cross-sectional diagram of a mechanical component with green arrows indicating rotation or movement (no text or symbols)AKTIIVSÖEFILTRI VAHETAMINE
natural_image
Technical illustration of a mechanical assembly with a hand pointing to a central component (no text or symbols visible)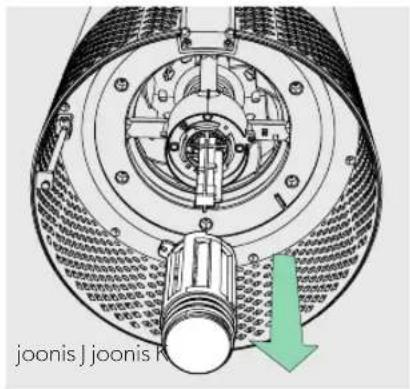
natural_image
Cross-sectional diagram of a mechanical device showing internal components and assembly (no text or labels)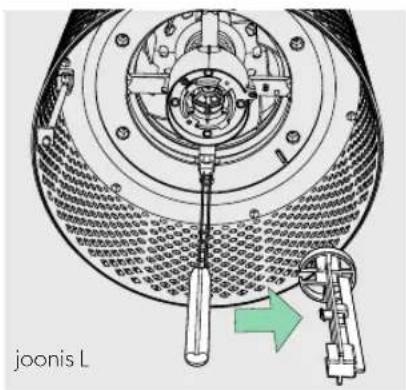
natural_image
Technical diagram of a mechanical device with a tool inserted, showing internal components and a green arrow indicating motion (no text or symbols)
text_image
Technical diagram of a mechanical device with labeled components and directional arrow indicating assembly or movement.SENSORPOD™-I PUHASTAMINE
natural_image
Line drawing of a hand using a screwdriver to adjust or install a mechanical component (no text or symbols visible)KKK JA VEAOTSING
natural_image
Line drawing of a hand holding a small object with a clip, labeled 'joonis P' (no other text or symbols)GARANTII
https://declarations.accobrands.com/.
natural_image
Three-step diagram showing a mechanical component being rotated, with green arrows indicating the motion direction (no text or symbols present)2. Piestipriniet filtru no jauna.
natural_image
Two technical illustrations of a cylindrical mechanical component with green arrows indicating rotation or assembly (no text or symbols present)3. Sagatavojiet ierīci.
lespraudiet SensorPod kontaktdakšu ligzdā.
natural_image
Diagram of a container with arrows indicating upward motion, no text or symbols presentVADĪBAS PANELIS

text_image
Z-2000 + + + UV Reset
Barošanas poga

natural_image
Diagram of a mechanical component with green arrows indicating rotational motion, labeled 'A att.' (no text or symbols on the diagram itself)
natural_image
Diagram showing a cylindrical container being inserted into a circular component, with a green arrow indicating the process (no text or symbols)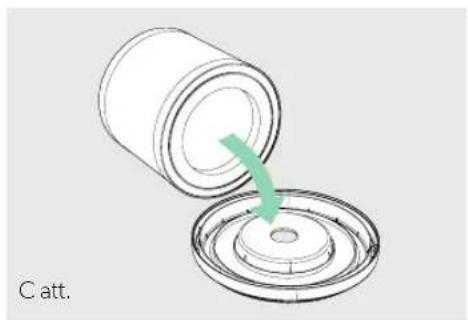
natural_image
Diagram of a cylindrical container being inserted into a circular base, with a green arrow indicating the process (no text or symbols)
natural_image
Cross-sectional diagram of a mechanical component with internal structure and green directional arrows indicating rotation (no text or symbols)AKTĪVĀS OGLES FILTRA NOMAINA
natural_image
Diagram of a mechanical component with green arrows indicating rotational motion (no text or symbols)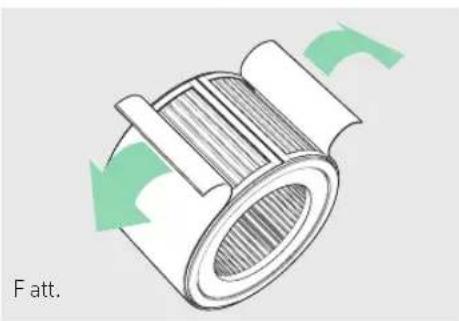
natural_image
Diagram of a mechanical component with green arrows indicating rotational motion (no text or symbols)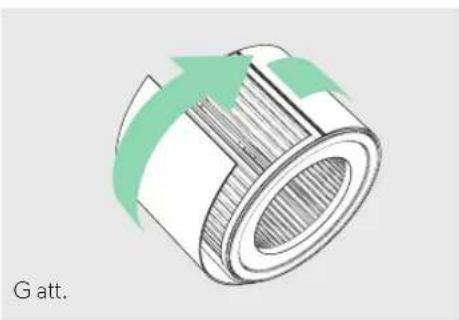
natural_image
Diagram of a cylindrical mechanical component with green arrows indicating direction, labeled 'G att.' (no other text or symbols)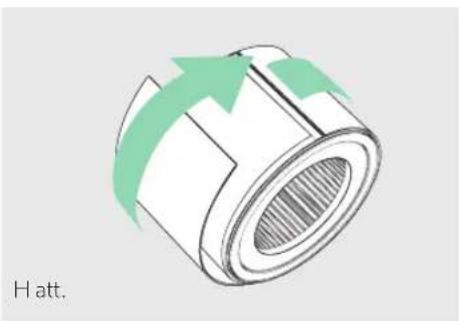
natural_image
Diagram of a cylindrical mechanical component with green arrows indicating direction, labeled 'H att.' (no other text or symbols)UV-C LAMPAS NOMAINA
natural_image
Technical illustration of a mechanical assembly with a hand pointing to a component (no text or symbols visible)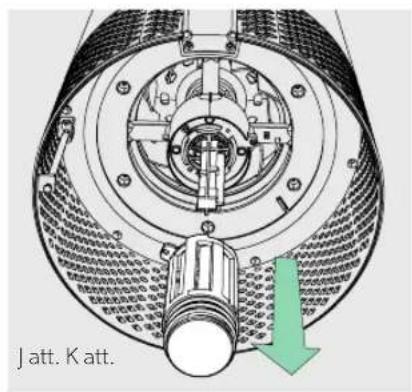
natural_image
Technical diagram of a mechanical assembly with labeled component 'Jatt. Katt.' and directional arrow (no readable text or symbols beyond label)
natural_image
Cross-sectional diagram of a mechanical device showing internal components and assembly (no text or labels)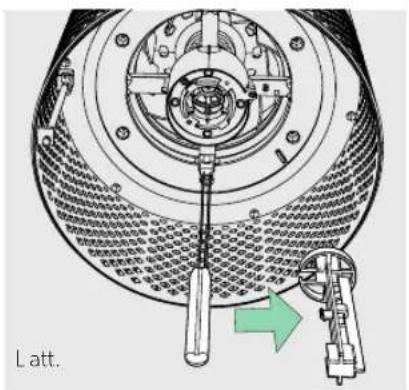
natural_image
Technical diagram of a mechanical assembly with a tool inserted, showing no text or symbols.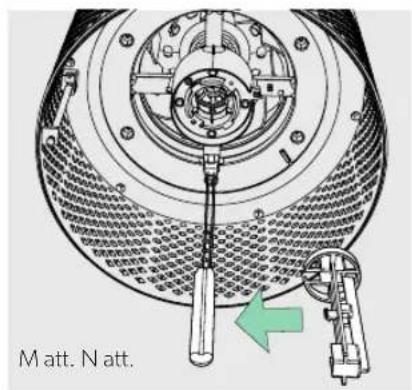
text_image
Matt. N att.
text_image
Technical diagram of a mechanical assembly with labeled components and directional arrow indicating motion or movement.SENSORPOD™ TİRİŞANA
natural_image
Line drawing of a hand using a screwdriver to adjust or install a mechanical component (no text or symbols present)BUJ UN PROBLÉMU NOVĚRŠANA
natural_image
Line drawing of a hand holding a small object with pins, labeled 'P att.' (no other text or symbols)GARANTIJA
natural_image
Three-step diagram showing a mechanical component with green arrows indicating rotation, no text or symbols present.natural_image
Two technical illustrations of a cylindrical mechanical component with green arrows indicating rotation or assembly (no text or symbols present)3. Saranka
natural_image
Diagram of a container with internal structure and green arrows indicating upward motion (no text or symbols)VALDYMO SKYDELIS

text_image
Z-2000 + + - + UV Reset
Maitinimo mygtukas

natural_image
Diagram of a mechanical component with green arrows indicating motion, labeled 'A pav.' (no text or symbols on the diagram itself)
natural_image
Diagram showing a cylindrical container being poured into a circular base, with a green arrow indicating the process (no text or symbols)
natural_image
Diagram of a cylindrical container being inserted into a circular base, with a green arrow indicating the process (no text or symbols)
natural_image
Cross-sectional diagram of a mechanical component with labeled D pav. (no text or symbols on the diagram itself)AKTYVINTOSIOS ANGLIES FILTRO
KEITIMAS
natural_image
Diagram of a mechanical component with green arrows indicating rotational motion (no text or symbols)
natural_image
Diagram of a mechanical component with green arrows indicating rotational flow, labeled 'F pav.' (no other text or symbols)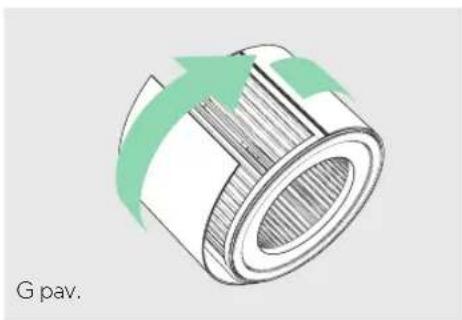
natural_image
Diagram of a cylindrical mechanical component with green arrows indicating direction, labeled 'G pav.' (no other text or symbols)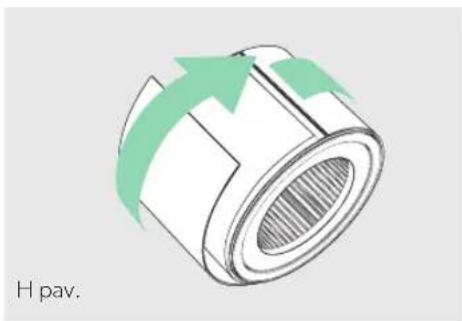
natural_image
Diagram of a cylindrical mechanical component with green arrows indicating direction, labeled 'H pav.' (no other text or symbols)UV-C LEMPOS KEITIMAS
natural_image
Technical illustration of a mechanical component with a hand pointing to a central shaft (no text or symbols visible)
text_image
J pav. K pav.
natural_image
Cross-sectional diagram of a mechanical device showing internal components and housing (no text or symbols)
text_image
L pav.
text_image
M pav. N pav.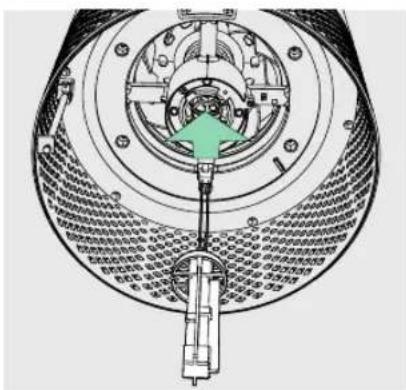
text_image
Technical diagram of a mechanical assembly with labeled components and directional arrow indicating motion or forcenatural_image
Line drawing of a hand using a screwdriver to adjust or install a mechanical component (no text or symbols visible)DUK IR TRIKČIŲ ŠALINIMAS
natural_image
Line drawing of a hand holding a small object with pins, labeled 'P pav.' (no other text or symbols)GARANTIJA
natural_image
Three-step diagram showing a mechanical component being rotated, with green arrows indicating the motion direction (no text or symbols present)natural_image
Two technical illustrations of a cylindrical mechanical component with green arrows indicating rotation or assembly (no text or symbols present)3. Příprava
natural_image
Diagram showing green arrows pointing upward over a circular structure with layered patterns (no text or symbols)OVLÁDACÍ PANEL

text_image
Z-2000 UV Reset
Vypínač

natural_image
Diagram of a mechanical component with green arrows indicating rotational flow, labeled 'Obr. A' (no text or symbols on the diagram itself)
natural_image
Diagram showing a cylindrical container being inserted into a circular base with a green arrow indicating the process (no text or symbols)
natural_image
Diagram of a cylindrical container being inserted into a circular component, with a green arrow indicating the process (no text or symbols)
natural_image
Cross-sectional diagram of a mechanical component with internal structure and green directional arrows indicating rotation (no text or symbols)VÝMĚNA FILTRU S AKTIVNÍM UHLÍM
natural_image
Diagram of a cylindrical mechanical component with green arrows indicating rotational flow (no text or symbols)
natural_image
Diagram of a mechanical component with green arrows indicating rotational flow (no text or symbols)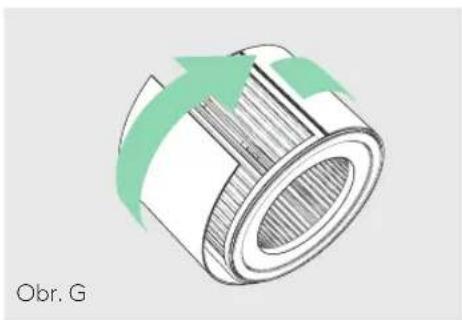
natural_image
Technical illustration of a mechanical component with green arrows indicating motion or flow (no text or symbols)
natural_image
Diagram of a cylindrical mechanical component with green arrows indicating direction, labeled 'Obr. H' (no other text or symbols)VÝMĚNA UV-C LAMPY
natural_image
Technical illustration of a mechanical component with a finger pointing to a central shaft (no text or symbols visible)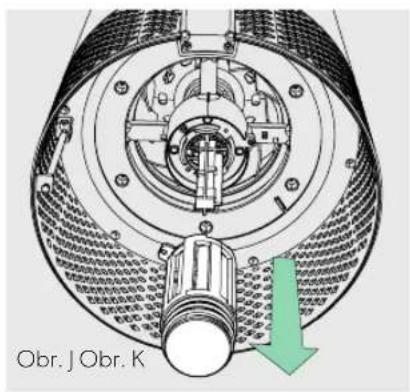
text_image
Obr. J Obr. K
natural_image
Cross-sectional diagram of a mechanical device showing internal components and assembly (no text or labels)
natural_image
Technical diagram of a mechanical device with a wrench and lever mechanism, no visible text or symbols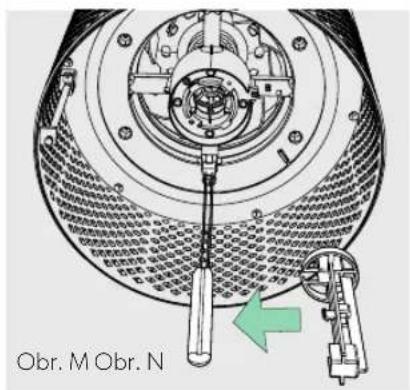
text_image
Obr. M Obr. N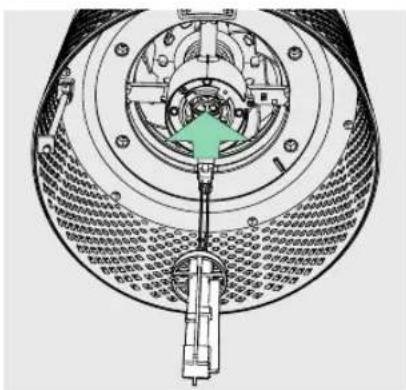
text_image
Technical diagram of a mechanical assembly with labeled components and directional arrow indicating motion or forcenatural_image
Line drawing of a hand using a screwdriver to adjust or install a mechanical component (no text or symbols visible)ČASTÉ DOTAZY A ŘEŠENÍ PROBLÉMŮ
natural_image
Line drawing of a hand holding a small object with pins, no text or symbols presentZÁRUKA
natural_image
Three-step diagram showing a mechanical component being rotated, with green arrows indicating the motion direction (no text or symbols present)2. Znova pripojte filter
Prichytte filter k spodnému krytu a umiestnite ho spät do čističa.
natural_image
Two technical illustrations of a cylindrical mechanical component with green arrows indicating rotation or assembly (no text or symbols present)3. Nastavenie
Zapojte zariadenie SensorPod do zásuvky.
natural_image
Diagram of a cylindrical container with internal blades and green arrows indicating upward motion (no text or symbols)OVLÁDACÍ PANEL

text_image
Z-2000 + + 5 5 5 UV Reset
Tlačidlo napájania

natural_image
Diagram of a mechanical component with green arrows indicating rotational flow, labeled 'Obr. A' (no text or symbols on the diagram itself)
natural_image
Diagram showing a cylindrical container being inserted into a circular component with a green arrow indicating the process (no text or symbols)
natural_image
Diagram of a cylindrical container being inserted into a circular base, with a green arrow indicating the process (no text or symbols)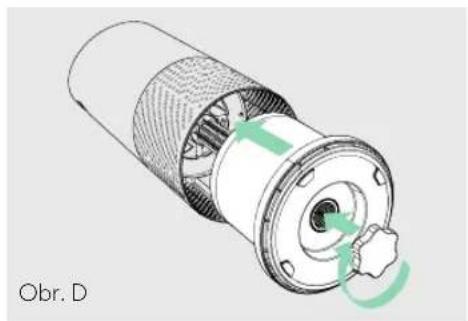
natural_image
Cross-sectional diagram of a mechanical component with internal structure and green arrows indicating rotation (no text or symbols)VÝMENA AKTÍVNEHO UHLÍKOVÉHO FILTRA
natural_image
Diagram of a mechanical component with green arrows indicating rotational motion (no text or symbols)
natural_image
Diagram of a mechanical component with green arrows indicating rotational flow (no text or symbols)
natural_image
Technical illustration of a mechanical component with green arrows indicating motion or flow direction (no text or symbols)
natural_image
Diagram of a cylindrical mechanical component with green arrows indicating direction, labeled 'Obr. H' (no other text or symbols)VÝMENA UV-C LAMPY
natural_image
Technical illustration of a mechanical assembly with a hand pointing to a central component (no text or symbols visible)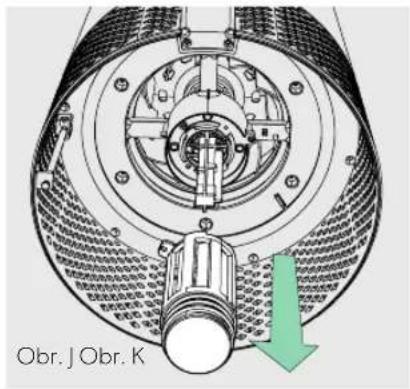
text_image
Obr. J Obr. K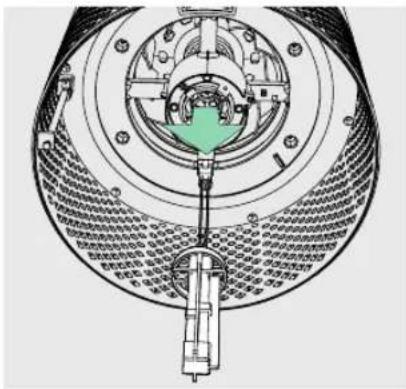
natural_image
Cross-sectional diagram of a mechanical device showing internal components and assembly (no text or labels)
natural_image
Technical diagram of a mechanical device with a wrench and lever mechanism, no visible text or symbols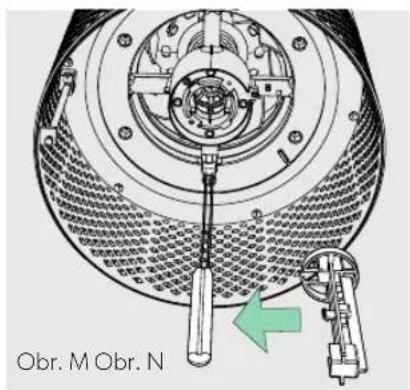
text_image
Obr. M Obr. N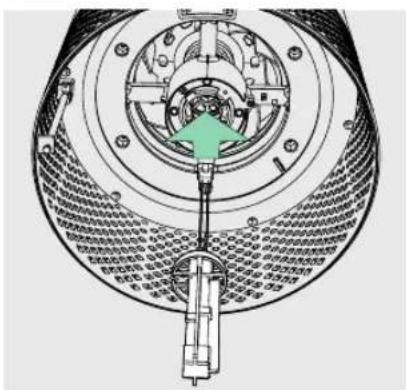
text_image
Technical diagram of a mechanical device with labeled components and directional arrow indicating assembly or movement.ČISTENIE ZARIADENIA SENSORPOD™
natural_image
Line drawing of a hand using a screwdriver to adjust or install a mechanical component (no text or symbols visible)ČASTÉ OTÁZKY A RIEŠENIE PROBLÉMOV