SP 22.000 Dirt - Pump Kärcher - Free user manual and instructions
Find the device manual for free SP 22.000 Dirt Kärcher in PDF.
| Product type | Clean water submersible pump for dirty water |
| Model | SP 22.000 Dirt |
| Brand | Kärcher |
| Intended use | Removal of water from flooded rooms, transferring water from containers, well drainage, pumping fresh water from boats |
| Permissible feed fluids | Fresh water with soiling up to 30 mm particle size, swimming pool water with additives, washing lye (rinse after use) |
| Forbidden fluids | Flammable, explosive, corrosive liquids, fats, oils, salt water, sanitary waste water |
| Mains voltage | 230–240 V |
| Power frequency | 50 Hz |
| Nominal power | 750 W |
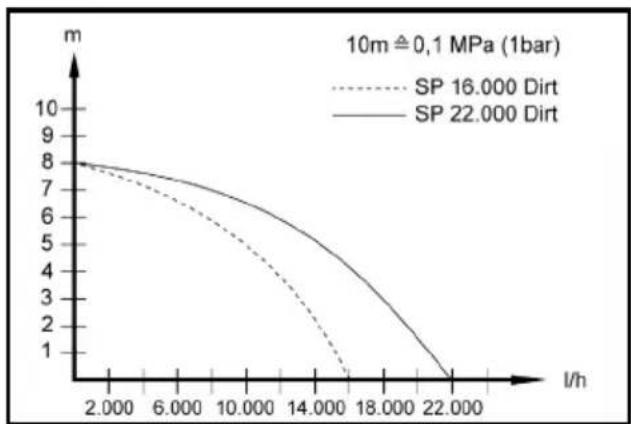
| Maximum flow rate | 22,000 l/h |
| Maximum pressure | 0.08 MPa (0.8 bar) |
| Maximum delivery height | 8 m |
| Maximum immersion depth | 7 m |
| Permissible feed fluid temperature | 5 °C to 35 °C |
| Maximum particle size (dirty water) | 30 mm |
| Minimum fluid level (manual mode) | 50 mm |
| Residual fluid height (manual mode) | 35 mm |
| Weight (without accessories) | 6.5 kg |
| Operating modes | Automatic (float switch) and manual |
| Automatic venting device | Yes, for self-priming |
| Float switch | Adjustable height, cable length setting |
| Connection system | Quick-Connect (push-fit) for hoses 1", 1¼", 1½", 3/4" |
| Check valve | Included (accessory for G1 connection) |
| Pre-filter | Integrated in foot for SP 22000 Dirt |
| Scope of delivery | Pump, connection nozzle, G1½ pump connecting piece, G1 threaded connection, float switch, lock, Quick-Connect, check valve (as accessory) |
| Dry run protection | Thermal switch shuts off pump; manual operation must be monitored |
| Frost protection | Do not operate or store in freezing conditions; empty completely before storage |
| Maintenance | Rinse with clean water after pumping dirty liquids; clean suction area if clogged; no regular maintenance required |
| Spare parts and accessories | Available at www.kaercher.com |
| Warranty | Conditions apply; contact dealer or authorized service |
Frequently Asked Questions - SP 22.000 Dirt Kärcher
User questions about SP 22.000 Dirt Kärcher
0 question about this device. Answer the ones you know or ask your own.
Ask a new question about this device
Download the instructions for your Pump in PDF format for free! Find your manual SP 22.000 Dirt - Kärcher and take your electronic device back in hand. On this page are published all the documents necessary for the use of your device. SP 22.000 Dirt by Kärcher.
USER MANUAL SP 22.000 Dirt Kärcher

H.Jenner
Chairman of the Board of Management
S. Reiser
Manager Regulatory Affairs & Certification
71364 Winnenden (Germany)
Tel.: +49 7195 14-0
Fax: +49 7195 14-2212
Winnenden, 2021/06/01
Contents
General notes. 8
Intended use 8
Hazard levels 9
Environmental protection 9
Accessories and spare parts. 9
Scope of delivery. 9
Warranty. 9
Device description 9
Initial startup 10
Operation 10
Care and maintenance. 11
Transport 11
Storage 11
Troubleshooting guide 11
Technical data 12
Optimising the flow rate. 12
Declaration of Conformity. 12
General notes
Read these original operating instructions and the enclosed safety instructions before using the device for the first
time. Proceed accordingly.
Keep both books for future reference or for future owners.
Intended use
Only use the device in private households.
Intended use:
- Removal of water from building sections in the event of flooding
-
Transferring and pumping water from containers
Water removal from wells and shafts -
Pumping fresh water out of boats and yachts For notes on functional principle, see chapter Operation.
Permissible feed fluids
△DANGER
Danger of death and risk of damage when pumping explosive, flammable or unsuitable substances!
Flammable or explosive substances may ignite or explode.
Unsuitable substances can damage the pump.
Do not pump explosive, flammable or corrosive liquids or gases (e.g. fuels, petroleum, nitro thinner) and do not pump fats, oils, salt water or waste water from sanitary facilities or water that has a lower flowing ability than clean water.
Permissible feed fluids:
- Fresh water up to a certain degree of soiling.
SP 16000 Dirt:
Water with a degree of soiling up to grain size 20 mm
SP 22000 Dirt:
Water with a degree of soiling up to grain size 30 mm
- Swimming pool water with intended dosage of additives.
- Washing lye, e.g. from leaking washing machines. Then rinse and clean the pump with clear fresh water, see chapter Rinsing and cleaning.
- The temperature of the pumped liquids must lie between 5^ and 35^ .
Improper use
ATTENTION
Risk of damage due to frost!
Operation during frost may damage the device.
An incompletely emptied device can be damaged by frost.
Do not operate the device during frost.
Protect the device from frost.
ATTENTION
Risk of damage during continuous operation!
The device is not suitable for continuous operation. Do not operate the device continuously for long periods (e.g. continuous circulation operation in ponds) or as a stationary installation (e.g. as a water lifting system, fountain pump).
Note
The manufacturer accepts no liability for possible damage caused by improper use or incorrect operation.
Hazard levels
△DANGER
- Indication of an imminent threat of danger that will lead to severe injuries or even death.
WARNING
- Indication of a potentially dangerous situation that may lead to severe injuries or even death.
CAUTION
- Indication of a potentially dangerous situation that may lead to minor injuries.
ATTENTION
- Indication of a potentially dangerous situation that may lead to damage to property.
Environmental protection

The packing materials can be recycled. Please dispose of packaging in accordance with the environmental regulations.

Electrical and electronic appliances contain valuable, recyclable materials and often components such as batteries, rechargeable batteries or oil, which - if handled or disposed of incorrectly - can
pose a potential threat to human health and the environment. However, these components are required for the correct operation of the appliance. Appliances marked by this symbol are not allowed to be disposed of together with the household rubbish.
Notes on the content materials (REACH)
Current information on content materials can be found at: www.kaercher.com/REACH
Accessories and spare parts
Only use original accessories and original spare parts. They ensure that the appliance will run fault-free and safely.
Information on accessories and spare parts can be found at www.kaercher.com.
Scope of delivery
The scope of delivery for the appliance is shown on the packaging. Check the contents for completeness when unpacking. If any accessories are missing or in the event of any shipping damage, please notify your dealer.
Warranty
The warranty conditions issued by our sales company responsible apply in all countries. We shall remedy possible malfunctions on your device within the warranty period free of cost, provided that a material or manufacturing defect is the cause. In a warranty case, please contact your dealer (with the purchase receipt) or the next authorised customer service site.
(See overleaf for the address)
Device description
See graphics page for illustrations Illustration A
① Carrying handle
2 Power supply cable with plug
3 Automatic venting device
4 Quick-Connect
5 Pump connecting piece G 112 (1", 1 14 and 1 12 ) hose connection and G 112 thread
6 Connection nozzle (G 1 112 thread)
⑦ lock(float switch)
8 Height adjustment(float switch)
9 Float switch
^10 Pump connecting piece G 1 ( 3/4'' and 1'' hose connection and G 1 thread)
1 Check valve
12G 1 Threaded connection (SP 16000 Dirt)
Pre-filter (SP 22000 Dirt)
*Not included in the scope of delivery.
Initial startup
△DANGER
Risk of electric shock and risk of injury!
The device contains electrical and mechanical components.
Always disconnect the device from the power supply before assembling, disassembling or cleaning.
Note
The shorter the hose length and larger the hose diameter, the higher the delivery rate.
To avoid clogging the pump, use a pre-filter for hose diameters smaller than 114 .
SP 16000 Dirt Special accessories
SP 22000 Dirt Integrated in the foot
The pump connection is equipped with a plug system (Quick-Connect).
The connection nozzle with pump connecting piece
G 112 and G 1 threaded connection are supplied unassembled with the device.
Note
Hoses with a diameter of 1^ 114'' and 112'' can be connected to the pump connecting piece G 112 .
A sufficiently large hose diameter must be selected and the G112 pump connecting piece must be shortened at the grooves so that the required particle size can be pumped. A large hose diameter is also recommended for smaller particle sizes to allow a high flow volume.
Connecting a hose to the pump when using a 1",
114'' or 112'' hose:
1 Screw the G 1 12 pump connecting piece onto the connection nozzle.
Illustration B
2 Push the hose clamp onto the hose.
3 Push the hose onto the G 112 pump connecting piece and fasten it with a hose clamp.
4 Push the connection nozzle into the Quick-Connect. Illustration C
Connecting a hose to the pump when using a 3/4'' or 1'' hose (SP 16000 Dirt):
1 Screw the G 1 threaded connection onto the connection nozzle.
2 Fit the special accessory G 1 pump connecting piece(6.997-359.0 pump connecting piece G 1 (33.3 mm) incl. check valve - not included in the scope of delivery) onto the G 1 threaded connection:
a Place the check valve on the G 1 threaded connection so that the lettering "UP" is legible.
b Screw the pump connecting piece G 1 onto the G 1 threaded connection.
3 Push the hose clamp onto the hose.
4 Push the hose onto the pump connecting piece G 1 and fasten it with a hose clamp.
5 Push the connection nozzle into the Quick-Connect. Illustration C
Erecting/immersing the pump:
1 Fit the height adjustment of the float switch into the lock.
Illustration D
2 Place the pump securely on solid ground in the pumped liquid or immerse it via a rope attached to the carrying handle.
Note
The suction area must not be blocked by soiling. If the ground is muddy, place the pump on a brick or similar.
Make sure that the pump stands level. Do not carry the pump using the cable or hose.
Operation
△DANGER
Danger of death from electric shock.
Danger of death from electric shock if live parts are touched.
During operation, do not touch the rope attached to the carrying handle or any objects that are in contact with the pumped liquid (e.g. pipelines protruding into the pumped liquid, railings) and do not reach into the pumped liquid.
Automatic venting device
- If the fluid level is low, any sucked-in air, or air present in the pump, may escape via the automatic venting device. Fluid can also leak along with air. If the pump has problems with suction when the fluid level is low, unplug and plug in the mains plug repeatedly to assist the suction process.
Illustration E
Automatic mode
- Adjust the float switch via the height adjustment and the cable length.
Note
If the pump is operated unattended, always set the float switch to the top position to ensure reliable pump switch-off.
Illustration F
Note
When the pump is set to the lowermost position, set the cable length between the float switch and the lock to 2.5cm see marking on the cable.
Illustration G
- Plug the mains plug into the socket.
Note
In automatic mode, the float switch controls the pumping process automatically.
The pump switches on as soon as the float switch reaches the switch-on height caused by the rising fluid level.
The pump switches off as soon as the float switch reaches the switch-off height caused by the sinking fluid level.
The float switch must be able to move freely.
The cable length between the float switch and the locking device must be at least 2.5cm
Switch-on height / switch-off height (float switch in lowest position):
| Min / Max SP 1600 | Dirt SP 22000 | Dirt |
| Switch-on height cm* | 18 / 21 20 / 24 | |
| Switch-off height cm* | 4 / 12 6 / 15 |
Switch-on height / switch-off height (float switch in uppermost position):
| Min / Max SP 160 | 00 Dirt SP 22000 | Dirt |
| Switch-on height cm* | 28 / 31 33 / 36 | |
| Switch-off height cm* | 14 / 22 19 / 27 |
- The switching heights vary depending on the position of the float switch and the cable length between the float switch and the lock. We recommend retaining the set cable length.
Manual mode
Note
In manual mode, the pump stays switched on. The fluid level must be at least 60~mm (SP 16000 Dirt) or 50~mm (SP 22000 Dirt) for the pump to prime itself in manual mode. The pump can pump up to a residual fluid height of 25~mm (SP 16000 Dirt) or 35~mm (SP 22000 Dirt). The specified residual fluid height is only achieved in manual mode.
The float switch must be able to move freely.
- Fasten the float switch in the lock pointing upwards.
Illustration H
ATTENTION
Risk of damage from dry running!
Dry running leads to increased wear on the pump.
Do not leave the pump unattended in manual operation. In case of dry running, immediately pull the mains plug out of the socket.
- Plug the mains plug into a mains socket.
Finishing operation
1.Pull the mains plug out of the socket. The device stops.
ATTENTION
Risk of damage!
Risk of damage due to dried soiling or additives. Rinse and clean the device immediately after each use.
-
If dirty liquids or liquids with additives have been pumped, rinse and clean the device immediately after finishing operation, see chapter Rinsing and cleaning.
-
Drain the device and accessories and let them dry.
Care and maintenance
△DANGER
Risk of electric shock and risk of injury!
The device contains electrical and mechanical components.
Cleaning and user maintenance may not be carried out by children.
Rinsing and cleaning
ATTENTION
Risk of damage!
Risk of damage due to dried soiling or additives. Rinse and clean the device immediately after each use.
1 If dirty liquids or liquids with additives have been pumped, the device must be rinsed afterwards: Use the device to pump clear fresh water without additives until all soiling or additives have been flushed out of the device.
△DANGER
Risk of electric shock and risk of injury!
The device contains electrical and mechanical components.
Always disconnect the device from the power supply before assembling, disassembling or cleaning.
2 Pull the mains plug out of the socket.
3 Press the Quick-Connect button and remove the connection nozzle.
Illustration C
4 Where necessary, remove residue from the hose and on Quick-Connect.
5 Clean the outside of the device with a soft, clean cloth and clear fresh water.
6 Drain the device and accessories and let them dry.
Service
The device is maintenance-free.
Transport
Manual transport
CAUTION
Risk of injury from tripping!
There is a risk of injury from tripping on loose cables and hoses.
Be careful of cables and hoses when moving the device. 1. Lift and carry the device by the carrying handle.
Transport in vehicles
WARNING
Risk of injury, risk of damage!
Note the weight of the device during transport.
Store or secure the device in accordance with applicable guidelines so that it cannot slip or be thrown around during transport.
- When transporting the device in vehicles, secure it to prevent it from slipping or overturning in accordance with the respectively applicable guidelines.
Storage
ATTENTION
Risk of damage due to frost!
An incompletely emptied device can be damaged by frost.
Completely empty the device and accessories before storing them.
Protect the device from frost.
Store the device in a frost-free place and not outdoors.
CAUTION
Risk of injury and damage!
The device may tip over on sloping surfaces.
Be aware of the weight of the device during storage.
- Completely empty the pump and accessories.
- Allow the pump and accessories to dry out.
- Store the pump in a frost-protected place.
Troubleshooting guide
Malfunctions often have simple causes that you can remedy yourself using the following overview. When in doubt, or in the case of malfunctions not mentioned here, please contact your authorised Customer Service.
Technical data
| Fault Cause Rectification | ||
| The pump is running, but not delivering | Air is in the pump. 1. Pull the mains plug | out of the socket and plug it in again several times, until the fluid is drawn in. |
| The suction area is clogged. 1. Pull the m | mains plug out of the socket.2. Clean the suction area. | |
| The fluid level is too low in manual operation. | 1. Immerse the pump deeper into the feed fluid if possible, see chapter Operation. | |
| The pump does not start up, or stops suddenly during operation | The power supply is disconnected. 1. Check | Check the fuses and the electrical connections. |
| The thermal protection switch has switched off the pump because of overheating. | 1. Pull the mains plug out of the socket.2. Allow the pump to cool down.3. Remove any dirt particles in the suction area.4. Clean the suction area.5. Prevent the pump from running dry. | |
| Dirt particles block the suction area. 1. Pull | Pull the mains plug out of the socket.2. Clean the suction area. | |
| The pumping capacity decreases | The suction area is clogged. 1. Pull the m | mains plug out of the socket.2. Clean the suction area. |
| The delivery rate is too low | The maximum delivery head is exceeded.The hose diameter and the hose length have been selected incorrectly. | 1. Observe the maximum delivery head, see chapter Technical data.2. If necessary, select a greater hose diameter or a shorter hose length, see chapter Optimising the flow rate. |
| Quick-Connect cannot be opened or closed | The push-fit system is dirty. 1. Remove the clip.2. Clean the clip.3. Install the clip. | |
Declaration of Conformity
| SP16.000Dirt | SP22.000Dirt | ||
| Device performance data | |||
| Mains voltage V 230-240 230-240 | |||
| Power frequency Hz 50 | 50 | ||
| Nominal power | W | 550 | 750 |
| Maximum flow rate | I/h | 16.000 | 22.000 |
| Pressure (max.) | MPa(bar) | 0,08(0,8) | 0,08(0,8) |
| Delivery height (max.) m 8 | 8 | ||
| Immersion depth (max.) | m 7 | 7 | |
| Perm. temp. feed fluid °C | 5...35 | 5...35 | |
| Particle size (max.) of per-missible feed fluids | 20 | 30 | |
| Minimum fluid level (manu-al mode) | 60 | 50 | |
| Residual fluid height | mm | 25 | 35 |
| Weight (without acces-sies) | kg | 4,9 | 6,5 |
Subject to technical modifications.
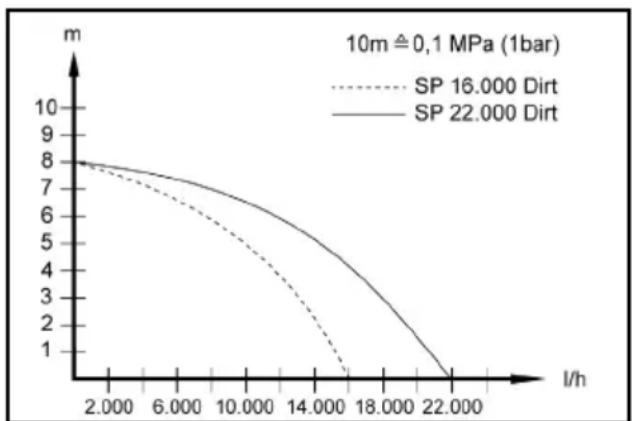
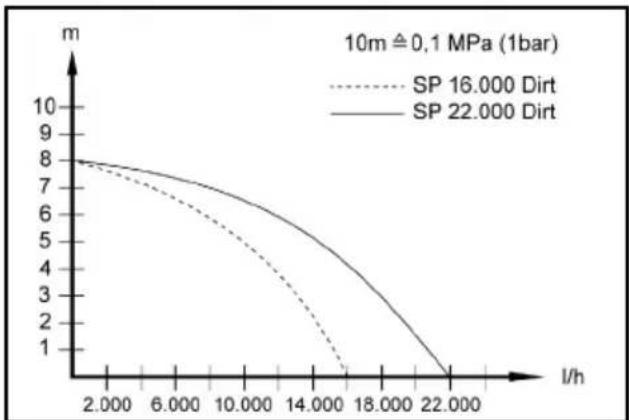
Optimising the flow rate
The flow rate is further increased:
The lifting height is reduced.
- The diameter of the hose used is increased.
The length of the hose used is decreased.
- The smaller the pressure loss caused by the connected up accessories.
EU Declaration of Conformity
We hereby declare that the machine described below complies with the relevant basic safety and health requirements in the EU Directives, both in its basic design and construction as well as in the version placed in circulation by us. This declaration is invalidated by any changes made to the machine that are not approved by us.
Product: Pump
Type: 1.645-xxx
Currently applicable EU Directives
2014/35/EU
2014/30/EU
2011/65/EU
2009/125/EC
Commission Regulation(s)
(EU) 2019/1781
Harmonised standards used
EN 60335-1
EN 60335-2-41
EN 62233: 2008
EN 55014-1:2017 + A11:2020
EN 55014-2: 2015
EN 61000-3-2: 2014
EN 61000-3-3: 2013
ENIEC63000:2018
The signatories act on behalf of and with the authority of the company management.

H.Jenner
Chairman of the Board of Management

S. Reiser
Manager Regulatory Affairs & Certification
Documentation supervisor:
S. Reiser
Alfred Kärcher SE & Co. KG
Alfred-Karcher-Str.28-40
71364 Winnenden (Germany)
Ph.: +49 7195 14-0
Fax: +49 7195 14-2212
Winnenden, 2021/06/01
Declaration of Conformity (UK)
We hereby declare that the product described below complies with the relevant provisions of the following UK Regulations, both in its basic design and construction as well as in the version put into circulation by us. This declaration shall cease to be valid if the product is modified without our prior approval.
Product: Pump
Type: 1.645-xxx
Currently applicable UK Regulations
S.I. 2016/1101 (as amended)
S.I. 2016/1091 (as amended)
S.I. 2012/3032 (as amended)
S.I. 2010/2617 (as amended)
Commission Regulation(s)
(EU) 2019/1781
Designated standards used
EN 60335-1
EN 60335-2-41
EN 62233: 2008
EN 55014-1:2017 + A11:2020
EN 55014-2: 2015
EN 61000-3-2: 2014
EN 61000-3-3: 2013
ENIEC63000:2018
The signatories act on behalf of and with the authority of the company management.

H.Jenner
Chairman of the Board of Management
S. Reiser
Manager Regulatory Affairs & Certification
Documentation supervisor:
S. Reiser
Alfred Kärcher SE & Co. KG
Alfred-Karcher-Str. 28 - 40
71364 Winnenden (Germany)
Ph.: +49 7195 14-0
Fax: +49 7195 14-2212
Winnenden, 2021/06/01
Contenu
Remarques generales. 13
Ordonnance(s) appliquee(s)
(UE) 2019/1781
71364 Winnenden (Germany)
Tel.: +49 7195 14-0
Télécopie: +49 7195 14-2212
Winnenden, le 01/06/2021
Indices

H. Jenner
Chairman of the Board of Management

S. Reiser
Manager Regulatory Affairs & Certification
71364 Winnenden (Germany)
Tel.: +49 7195 14-0
Fax: +49 7195 14-2212
Winnenden, 01/06/2021
Inhoud

H. Jenner
Chairman of the Board of Management

S. Reiser
Manager Regulatory Affairs & Certification
71364 Winnenden (Germany)
Tel.: +49 7195 14-0
Fax: +49 7195 14-2212
Winnenden, 2021/06/01

H. Jenner
Chairman of the Board of Management
S. Reiser
Manager Regulatory Affairs & Certification
Responsible de documentacion:
S. Reiser
Alfred Kärcher SE & Co. KG
Alfred-Karcher-Str. 28 - 40
71364 Winnenden (Germany)
Tel.: +49 7195 14-0
Fax: +49 7195 14-2212
Winnenden, 01/06/2021
Indices
Indicaoesgerais 32

H.Jenner
Chairman of the Board of Management
S. Reiser
Manager Regulatory Affairs & Certification
Optimering af transportmengden 41
EU-overensstemmelseserklaering 41
H. Jenner
Chairman of the Board of Management
S. Reiser
Manager Regulatory Affairs & Certification
71364 Winnenden (Germany)
TIf.: +49 7195 14-0
Fax: +49 7195 14-2212
Winnenden, 2021/06/01
Indhold
Generelle merknader. 42
Optimere transportmengden 45
EU-samsvarserklaering 45
Generelle merknader
Lesdenneoversettelsenavdenorigina ledriftsveiledningenforapparatettasibrukforestegang,ogfologvedlagte
4 Skyv tilkoblingsstussen inn i Quick-Connect.
Figur C
Koble slangen til pumpen nár du bruker en 3 / 4 "eller 1" slange (SP 16.000 Dirt):
1 G 1 - Skru gengekobligen på tilkoblingsstussen.
2 Spesialtilbehör pumpekoblingsstykke G 1 (6.997-359.0 pumpekoblingsstykke G 1 (33,3 mm) inkl. tilbakeslagsventil -/DDKE inkludert i leveringen) pa den gjengekoblingen G 1:
Optimere transportmengden
Chairman of the Board of Management
S. Reiser
Manager Regulatory Affairs & Certification
71364 Winnenden (Germany)
TIf.: +49 7195 14-0
Winnenden, 2021/06/01
Innehäll
Allman information. 46
Avsedd anvandning. 46
Risknivaaer. 46
Miljöskydd. 47
Chairman of the Board of Management
S. Reiser
Manager Regulatory Affairs & Certification
Dokumentationsbefullmaktigad:
S. Reiser
Alfred Karcher SE & Co. KG
Alfred-Karcher-Str. 28 - 40
D-71364 Winnenden (Germany)
Tfn: +49 7195 14-0
Fax: +49 7195 14-2212
Winnenden, 01.06.2021
Sisaltö
Yleisiä ohjeita 50
Chairman of the Board of Management

S. Reiser
Manager Regulatory Affairs & Certification
71364 Winnenden (Germany)
Puh.: +49 7195 14-0
Puroion /Buroion avTiaic:
1 SuovdeoteTovpuouiTn uouc tou TlawtnpoidiaKOTTN Otnv aopaaEia. Eikova D
2 ToTIOeTnOte Tnv avTIA aOpAeia o e Otaepo Edaqoc meo aTO avTlouEvo Uypo n BuHioTe Tnv m OupuatoxOivo Tnou Eivai OTEpeewevo OTn AaBn Metaopac.
Yπóδεiξη
To oneio avappoqnoC dev einnptetai va paoi a okaaepae. Eav to edapoc evai laotmuevo, totoeintote nva atia oeva roulo n kani npopoio. Bebaowteire n wcs n atia evai opizovria. Mnv metapepeTe nvaatia kparwtau c n v aTto kaawio n tov eaotiko owwna.
AειTOUpyia
KINADYNO
Oavaoiouc kivduovoc Aoyw nAekipomAnxias!
Kata to ayiyi ma nEeTpoFOPWv EapntmuVTAPXeIKivduvo cavatou aTO nEeTpoTnEia.
Kata n diapkeia tns aeitoupyias, mny ayyicet to
oupatoxoivo TOU Eiva npoaaptnevo stn AaBn
etaopoc oue kantoia avtikeiEvvaou epxovtae
enapn e to avtlouEv o ypo (π.x. owAnvwoei cTou
tpoeExovu oavlouEv o ypo, kivkldwata) kai
mnu anawve to xepi oac meo sto avtlouEv o ypo.
Autopatn diataqn egaepwnc

H.Jenner
Chairman of the Board of Management

S. Reiser
Manager Regulatory Affairs & Certification
YTEUBOVOC TEXVIKOU qakeLou:
S. Reiser
Alfred Kärcher SE & Co. KG
Alfred-Karcher-Str. 28 - 40
71364 Winnenden (Germany)
Tnλ: +49 7195 14-0
Φαξ: +49 7195 14-2212
Winnenden, 2021/06/01
Içindekiler
Genel uyarilar 60

H.Jenner
Chairman of the Board of Management
S. Reiser
Manager Regulatory Affairs & Certification
Winnenden, 2021/06/01
Copepkahne
O6uye yka3aHn 64
IcnoJIb3OBAHne no Ha3HaueHnIO 64
CTeneHb onaCHOCTn 65
3aunTaOkpykaIOuei cpebl. 65
PpHaIeXHocTn 3aNaChbIe YacTn 65
KOMJIeKT NOCTABKN 65
Tapantna 65
OncanHe yctpoNCTBa 65
BBOI B 3KcPnyatauHIO 66
3Kcnnyatau.. 66
YxOuI TeXHnueckoe 67
TpaHcnpOpBbKa 68
XpahHne 68
Pomoub npn HeucnpabHocT8 68
Texnueckne xapakTepcntu 69
ONTUMN3aIpy npOn3BOIDTeNbHOCn 69
IeknapaunOcooTBcTBnCTaHapTaMC 69
Obune yka3aHnA
IpeepnepBbIM npimHeHneM yctpoiCTBa 03HaKOMNTbcr C daHHo OPINHAJIbHO IHCTpyKUneI NO
3KCNyatauN IN npNJaraembIMN yka3aHnM NTOxHnke 6e3oNaCHOCTN. DeiCTBOBaT B COOTBETCTBUN C HmN.
CoxpaHb o6e 6pouOpbln daJIbHeIwero
IIOJIb3OBAHn IIN IIN cIeIyUoTe BOJaIeJIba.
IcnoJIb3OBAHHe nO Ha3HaYeHnIO
YcTpoIcTBo IpeHa3HaueHo TOnbko DnA
NcNoJb3OBAHnB BDOMaWHeM Xo3YNCtBe.
IcnoJb3OBaHHe NO Ha3HaueHnIO:
OTkaUKa BObI N3 YacTeH 3daHn BO BpeM 3aTOnJIeHn
- NpeekaKa n BbIkaKa BOI bI 3 pe3epByapoB
3a6op BOdbI n3 KOJIOueB uaxT
- Otkauka npecHOBbI n3 IIOOK JxT
Yka3aHnOTHOCHTJIbHO npHHUNa DeIcTBn CM.B pa3dJe 3Kcnnyamaua.
Donyctnmbie dna nepekaaykn XndKoCTN
ONACHOCTb
Onachocmb dna xu3Hu onachocmb
noepekdeHn npu nepekaKe 83pbioonacHbIX,
JeekoOocnnaMeHraUxcxu unu HenoDxoduxeueecme!
Ie2koocnnaMeHraouuec unu 63pbioonacbie
eeuecmba Moym 6ocnnamaHumbcra unu 63opeambcra.
Henodxodraueeueecmea Moaym noepedmb hacoc.
He nepekaueamb 63pbioonacbte,
neakobocnnaMeHraouuec unu edkue kudkocmu unu
za3bl (HaNPumep, monnuo, hepbmb,
Humpopazaeumelb), a makuke jupbi, macna,
conenyo body, cmochble eodbl u3 myanemob unu body,
mekyuecb komopou Huxe, yem y uucmoi bodbl.
Onyctmbie dJaNepekauKn Xukoctn:
- Ppechra BODa DO ONpeJeHHOI CTeHNI 3aRpa3HeHnA.
SP 16.000 Dirt:
Boa co cTepeHbIO 3arpa3HeHnI Do pa3Mepa
yactu 20 MM
SP 22.000 Dirt:
Boda co cTepeHbIO 3aRpa3HeHnI Do pa3Mepa
yactu 30 MM
Boda B 6accenHax npn HauJeKauei Do3npOBKe do6abok.
Pactbop MOUero cpeCTBa, HanpMep BOa, BITEKwaa n3 CTnpaJIbHO MaUNHb. 3aTeM npomblb HACOC YNCTOINPECHOH BOIO N OUCHNTB erO, CM. rnaBy Ppombkeu ouucmka.
TemnepaTpa nepeKaunBaembIX JNKIOKcTei DOJXHa 6bITB npeDenax oT 5^ do 35^
IcnoJb3OBaHne He no Ha3HaueHnIO
BHIMAHHE
Onachocmb noepekdeHua npu 03deucmbuu Mop03a!
3Kcnnyamaue eo epem Mop0a MoXem npueecmu K noepexdeHIO ycmpoucmea.
He noHocmbio onopoxhenhoe ycmpoucmeo moxem 6bim nopekdeho npu 03deucmeuu mop03a. He kcnnyamupo8amb ycmpoucmeo 60 epmma mop03a. 3aumumbycmpoucmeo om mop03a.
BHUMAHNE
Onachocmb noepexdeHn npu dnumelbHOJ 3Kcnnyamauu!
Ycmpoucme He noxdum dna dnumenbHou 3Kcnnyamauu6e3 nepepbiaea.
He 3knnyamupoabmb ycmpoucmeo 8 meueHue dIumelbHO2O bpeMeHu 6e3 nepepbiea (HaNPUMep, dna npodonxumelbHO upekaHKu 80dBi 8 npdyax) unu 8 kaecmee cmaUOHApHO ucmahoeku (HaNPUMep, 8 kaecmee noBemHO2O ycmpoucmea, fohmaHHO2 Hacocca).
PpumeyaHue
Pou38oDumenb He Hecem oemeemcmeHHocmu 3a noepexkdeHua, nonyueHHbe e pezylbmae UcnoIb3OeaHua He nHa3HaehuO uUu HenpaBulbHO2O obpaueHua c npubopom.
CTeneHb onaCHOCTN
ONACHOCTb
- Yka3aHue omHocumenbHo HenocpeDcMeHHo
- ep03aueu onacHocmu, Komopar npueodum K
- mJxKeBIM mpaBMaM uU K Cmepu.
△PENDyINPEXKDEHNE
- Yka3aHue omHocumenbHO 603MOxHou nomeHuAnbHO onachOu cumyaUU, KOMopa MoXem npueecMu K mJKeIbIM mpaEMam UNU K Cmepmu.
△OCTOPOXHO
- Yka3aHue Ha nomeHuzaIbHo onachHyo cumyaIu, Komopra MoXem npueecMu K noJyehuO neKux mpaM.
BHIMAHHE
- Yka3aHue omHocumenbHO 603MOxHou nomeHuAunHo onachou cumyauu, Komopar MOxem noBney 3a co6oMamepuanbHyuep6.
3aunTa OkpykaOuSei cpeDbI
YnakoBouHbIe MaTePnaJIbI NOJaIOCTc BTOpNCHoI nepepa6Ote. YnakoBky Heo6xOIMo yTIN3uPoBaTb 6e3 yUep6a dIra OkpykaIOuei Cpebl.
3Jektpnueckne n 3JeKtpOnHbIe yctpOcTBA. qacto coepkataeHHbIe MaTePnaIbI, npirohblie dIaBTOpHuOH nepepa0tKn, n 3aacTyIO TAKNE KOMNOHeHTbI, KaK bAtapen, aKKymyTAOpbl IIN MacNo, KOToPbI pN HEnpaBnIbHom o6paUeHNn IIN HeHaDnHexaIeeyTuIN3aunPiPeDCTabJIOT NotEHuaJIbHyO ONaCHOCTb DnA 3dOpOBbI N 3KOJOrnn. Tem He MeH DaAHHbIe KOMNOHeHTbI Heo6XoIMMbI dNpPaBnIbHO pa6oTBly YcTpoiCTBa. YcTpoiCTBa, 6o3NaueHHbIe 3 CmBOLOM, 3anpeuHoYTuIN3uPoBaTb BMeCTe C 6bItOBbIM NTxOaAMn.
Yka3aHnno nHrpEneHTam (REACH)
ABTOMaTHueckoe yCTpoNCTBO DJIY BbInycka BO3dyxa
1.Пи Hn3KOM ypOBHe JnIDKOCTn aBTOMaTneckoe ycTpoiCTBO dIЯ BbInycka BO3dYxa ydaIaReT cIyuaiHO BCocAHbI BO3dYx nIII BO3dYx, haoJauNcB HacoCe.BmecTe C BO3dYXOM MOKeT BbIXOHTb I XnIDKOCTb. EcNi B HacoCe npHn3KOM ypOBHe JnIDKOCTn BO3HnKaIOT npo6JIembl C OTkaUHCoI, OTKnIOHTb IN NOkKnIOHTb WTeNCeNBHyIO BNlKy, YTO6bl YnUyWNTb npOceCC OTKaUKN. PncyHok E
ABTomatueckn pexim pa6oTbI
- OtperynipoBAtb nonlaBkoBb BblKnHouateIb C nOmoIbOp erpyIaTopa BbICOTbI N dInHy Ka6eJIa.
PpumeyaHue
Ecnu hacoc paobaem 6e3 npucmmpa, 6ce2da ycmahaenabmb nonnaekobii biknouhamelbe eepxhee noonkehue, ymobl obecneumb hadexhoe omknouehue hacoca.
PucyHOK F
PpumeyaHue
Ko2da Hacoc ycmaHaabnueaemc8 HuXHee noIoxKeHue, ycmaHOumbb dnuHy ka6enMaJxdy nonnaKBosbEm bIKNoHameMeu u duKcamopom Ha 2,5 cm, cm. Memky Ha wHype.
PucyHok G
- BCTaBnTb WTeNceJIbHyIO BnJIky Bpo3eTKy.
PpumeyaHue
B aemomamuueeckom pekumpepaombi nonnaaKoebiu ebIKnOaMeJIb KOHmponupyem pa6omy hacoca aemomamuueeCKU.
Ko2da nonnaekobiu biknioamel3a cem no6bwaioueoocy ypoehra oodbo docmuzaem ypoehr ekluohura, Hacoc 3anyckaemcra.
Koada nonlaekoebi biknquamel 3a cem noHuaoueocy ypoehb oobdocmuem ypoeha eblknoehu, hacoc biknquaemc.
Длг smoо doJxHa 6bImb obecneueHa c8o6Oda nepemeueHua nnonjaekoe02 6bkIIouameJIa
Iiuna Ka6eJMaKoOy nonNa8KOeBIM eBiknIoayamEnu U fukcamopom doJxHa 6bim He MeHee 2,5 cm.
YPOBHeB BKNIOUeHn/OTKIOUeHn (NONJIaBKObBi BBIKIOuTeJIb B CaMOM HNXHEM NOIoxEHHN):
| Min/Max SP 16.00 | 0 Dirt SP 22.000 | Dirt |
| Урочь Въючения, CM* | 18 / 21 20 / 24 | |
| Урочь OTКlio佼ения, CM* | 4 / 12 6 / 15 |
YpOBeHbBkIIOUeHn/ByIKIIOUeHn (NONJIaBKOBBi BbIKIOUaTeJIb B CaMOM BepxHem NIOOXeHN):
ONTHMn3aunI pON3BODNTeJIbHOCTN
Pon3BODNTeJIbHOCTb TEM 6OJIbWe:
- YEM MeHbSe BbICOTa NOdaN;
- yem 60jIe dnaMeTp nCNoJIb3yEmo IJnHaHra;
- YEM KOPOye INCNOJIb3yEmbI WJNaHr;
- Yem Mehhe naeHne DaBHeHn, oByCIOBHeHHoe NOcOeHNHeHnEM DOIOJIHHTeJIbHO O6OpydoBaHn.
Декларачnia O COOTBETCTBUN
ctaHdapTaM EC
HactoI3aBnem,HTO KOHcIeN, KOHCTpyKuIy nCNOHNHe yka3aHHoH Hxke MaunHbI OTBeauOT COOTBECTByUoIM OCHOBHbIM Tpe6OBAHmI DnpeKTNB EC no 6e3onacHOCTn Oxpane 3doPobBy. Ppi IIO6bIX N3MeHENX MaunHbI, He cOrnaocBaHHbIX C HaWei KOMpaHne, daHHa DeKnapaTepaET CBOIO CNy. IV3dJIe: HAcOC Ttn:1.645-xxx
DeiCTByIOUne DnpeKTHBbI EC
2014/35/EC
2014/30/EC
2011/65/EC
2009/125/EC
PpmeHreMbIn(-bie)pernameHT(-bl)
(EC) 2019/1781
PpIMHeHHbIe rapMOH3npoBaHHbIe CtaHapTbI
EN 60335-1
EN 60335-2-41
EN 62233: 2008
EN 55014-1:2017 + A11:2020
EN 55014-2: 2015
EN 61000-3-2: 2014
EN 61000-3-3:2013
EN IEC 63000:2018
HxKeNoDnncabWneec Ja Da DeiCTbYOT OT NMeHN NO DOBepeHHoCTn PpaBHeHn.
H. Jenner
Chairman of the Board of Management
S. Reiser
Manager Regulatory Affairs & Certification
Пиц,OTBETCTBeHHoe3a BeDHeHneДOKymeHTaUN:
II. Pan3ep (S. Reiser)
Alfred Kärcher SE & Co. KG
Alfred-Karcher-Str.28-40
71364 Winnenden (Germany)
Ten.: +49 7195 14-0
ΦaKc: +49 7195 14-2212
r.BHHHeHDeH,01.06.2021
Tartalom
Chairman of the Board of Management

S. Reiser
Manager Regulatory Affairs & Certification
Winnenden, 2021/06/01
Obsah
ObecnéPokyny 74
Pouziti v souladu s urcenim 74
Stupne nebezpeci 75
Ochrana zivotniho prostedi. 75
Prisluosenstvi a nahradni dily. 75
Rozsa hodávky. 75
Záruka 75
Popis pristroje 75
Uvedeni do provozu 76
Provoz 76
Péce a udžba 77
Preeprava 77
Skladovani 77

H.Jenner
Chairman of the Board of Management
S. Reiser
Manager Regulatory Affairs & Certification
Zmocnenec pro dokumentaci:
S. Reiser
Alfred Kärcher SE & Co. KG
Alfred-Karcher-Str. 28 - 40
Winnenden, 2021/06/01
Kazalo
Splošna navodila 79
Namenska uporaba 79
Zadevne EU-directive
2014/35/EU
2014/30/EU
2011/65/EU
2009/125/ES
Uporabljena(-e) uredba(-e)

H.Jenner
Chairman of the Board of Management

S. Reiser
Manager Regulatory Affairs & Certification
Pooblascena oseba za dokumentacio:
S. Reiser
Alfred Kärcher SE & Co. KG
Alfred-Karcher-Str. 28 - 40
Chairman of the Board of Management

S. Reiser
Manager Regulatory Affairs & Certification
Administrator dokumentaci:
S. Reiser
Alfred Karcher SE & Co. KG
Alfred-Karcher-Str. 28 - 40
71364 Winnenden (Germany)
Tel.: +49 7195 14-0
Directive UE relevante
2014/35/UE
2014/30/UE
2011/65/UE
2009/125/UE
Regulament(e)utilizat(e)
(UE) 2019/1781
Norme armonizate aplicate
EN 60335-1
EN 60335-2-41
EN 62233: 2008
EN 55014-1:2017 + A11:2020
EN 55014-2: 2015
EN 61000-3-2: 2014
EN 61000-3-3: 2013
EN IEC 63000:2018

H. Jenner
Chairman of the Board of Management
S. Reiser
Manager Regulatory Affairs & Certification
Insarcinat cu elaborarea documentatiei:
S. Reiser
Alfred Kärcher SE & Co. KG
Alfred-Karcher-Str. 28 - 40
71364 Winnenden (Germania)
Tel.: +49 7195 14-0
Fax: +49 7195 14-2212
Winnenden, 2021/06/01
Obsah
71364 Winnenden (Germany)
Tel.: +49 7195 14-0
Fax: +49 7195 14-2212
Winnenden, 01.06.2021
Sadržaj
Opé napomene 98

H.Jenner
Chairman of the Board of Management
S. Reiser
Manager Regulatory Affairs & Certification
Winnenden, 01.06.2021.
Sadržaj
Opste napomene. 102
Namenska upotreba. 102
Stepeni opasnosti 103
Zastita zivotne sredine 103
Pribor i rezervni delovi. 103
Obim isporuke 103
Garancija. 103
Opis uredaja. 103
Pušanje u pogon 103
Rad. 104
Chairman of the Board of Management

S. Reiser
Manager Regulatory Affairs & Certification
Lice ovlasceno za Dokumentaciju:
S. Reiser
Alfred Kärcher SE & Co. KG
Alfred-Karcher-Str. 28 - 40
71364 Winnenden (Germany)
Tel.: +49 7195 14-0
Winnenden, 2021/06/01
CbDpXaHne
O6uynka3aHnna 107
- He e yact OT DoctaKaTata.
NyckaHe B eKcnploaTaun
ONACHOCT
Onachocom mokoe yap u HapaHaehaHua!
Ypeobm cbbpxa enekmpuueeCKu u MexahuHu KOMnoHeHMU.
Buhau u3knueaume ypeo om eIekmpo3axpahhema, npedu da 3anoHeme da 20 caJno6ame, pa3no6ame uu noucmeame.
yKa3aHue
KoNkomo no-MaKa e oBnKuHama Ha Mapkyua U KOnkomo no-20Jam e duAmempbm Ha Mapkyua, moNkoBa no-Eucoka e MoUHocMma Ha u3IOMneAHe.
3a da u36e2heme 3anyweaHna nomnama, npu duamempu Ha Mapkya, no-Manku om 114 " u3non3eaume npedapumelen funmbp.
SP 16.000Dirt cneuaJHa npuHaedJeXHocm
- SP 22.000 Dirt unheapupan e onopnua kpaK Bpb3kama 3a nomna e obopydeha c uencenha cucmemaa (Quick-Connect).
Ppucbodunumennm uyeepcnpucbedunumene enemeh3a nomnama G 1 12 u pe36o8ama epb3ka G 1 ca npuloxeku KbM ypeda, 6e3 da ca MOhmupaHu.
yKa3aHue
KbmpucbeduhumeHnue enemeHm Ha nomnama G 1 12 mosam da ce c6bp38am Mapkyu c duamembp 1^ ,114^ 112^
3a da MOZam da ce u3nombeam yacmuu c keJahua pa3mep Ha 3bphama,mp8ba da ce u3bupa docmambyHO 20JAM duamembp Ha Mapkya,a npucbeDuHumenHuM enEmeHn Ha nomnama G 1 ½ da ce cKcbreaCbomBeMnHO no Jne6oeme. Ppu 3bpaC NO-MaNka 20JEMUHa CbuO ce npenopbyea 20JAM duamembp Ha Mapkya,3a da moKe da ce noeuuu de6umbm.
Cbbp3BaHe Ha Mapkyu KbM nomnata, npu ynoTpe6a Ha mapkyu 1", 1 14 " nn 1 12
1 3aBnHTe Te npCbeEINHtENHn eIemEnHa nomnata G 112 Bbpxy npCbeEINHtENHn uyeep. Fnrypa B
2 NocTaBete Cko6aTa 3a Mapky Ha Mapkya.
3 NocTabeTe MapkyuBa Bbpxy npncBcEduHITenHn enemHT Ha nomnata G 1 12 n ro 3akpenete cbc cko6a 3a Mapky.
4 NocTabeTe npncbeHnHTenHnueB QuickConnect.
nrypa C
Cbpb3BaHe Ha Mapkyu KbM nomnata, npu ynoTpe6a Ha mapkyu 34 "nn 1" (SP 16.000 Dirt):
1 3aBnHTepe36oBaTa Bpb3ka G 1 Bbpxy npncBeINHInTeJIHHIuCyep.
2 MoHTnpaHHe Ha cneuHaHATA npHaJaNExKHOCT npncBeHNHTeJH eJEMeHT Ha NOMnata G 1 (6.997-359.0 PnpCbeHNHTeJH eJEMeHT Ha NOMna G 1 (33,3 mm), BKN. Bb3BpaTeH BeHTnJ - He ce CbDbpKa B KOMIIeKtHa DoCTaBkata) Ha pe36oBaTa Bpb3ka G 1:
a NocTaBete Bb3BpaTHnB BeHTnBbpxy pe36obata Bp3ka G 1 Taka, Ye da MoKe da ce. yeTe HauNcBT "UP".
b 3aBnHTeI npncbeIHHHnHnE nEmeHT ha nomnata G 1 Bbpxy pe36oBaT a Bp3ka G 1.
3 NocTabeTe cko6aTa 3a MapkyHaMapkyu.
4 NocTabeTe Mapkya Bbpxy npucbeHHTenHn enemHT ha nomnata G 1 n ro 3akpenete cbc ckob a 3a mapky.
5 IocTabeTe npncbeHNHTeHnna 7uuep B QuickConnect.
nrypa C
Cbxpanhaime ypeda Ha Mrcmo, Kbdemo He ce oukaea 3aMpb38aHe U He Ha6bH.
△PENPA3JNBOCT
OnachocomnapaHbauu noepdu!
Bbpy HAKIOHeHu NOEBpXHocMu ypeobm MoKe da ce npeo6bpHe.
Ppu cbxpanehuemo 3emaume noo bHumaune meanomo ha ypeda.
1.Изпраэнete Hanьлно nomnata npinaHdNexKHOCTnte.
2. OctaBeTe NOMnTa I npHaJNeXHoCTHte Da n3cbxHaT.
3. CbxpahraBaiTe NOMnataHa MxCTO, KbJeTo He MoKe Da 3ampb3He.
Iomou npn HEn3npaBHOCTN
M Horo yecTo npuHnHte 3a NoBpeDa ca enementapHn C NOMOHTA Ha cneHNTE yka3aHnMy MOKe camN da Tn OTCTpaHnTe. Ako He cTe CNrpyHn nn NobpeDnTe He ca ONncAHn Tyk, O6bphete Ce KbM OTOpN3npaHnCePbn3.
| Гразшka Причuna OTстраимаунe | 3axpaHbAHeTo C TOK e npeKbChaTo. | 1. Проветe рпедпаЗИтELITE И ЕNEKTprUeCKnTe BpьЗКи. |
| Помпата He Trpьгва Или спира ВHEЗАПно Вразе на paбotinga | 3aunTHOTO TepmOpelene e ИЗКЛIOчINLO nomпата поади перряBaHe. | 1. ИЗВадete МржOBИЯ сцencel OT контAKТa. 2. OCTabeTe NOMPATAда ce oxlaДи. 3. OTeCTPahETe ChACTNi 3ambrcYBaHry B oblaactTа Na 3acMyKBAHe. 4. ПочNTETe oblaactTа Na 3acMyKBAHe. 5. ПрEDOTbrPakBaIte cyxNЯ xOД Na nomPATA. |
| ЧаStиц 3ambrcYBaHry 6blokipat oblaactTа Na 3acMyKBAHe. | 1. ИЗВадete МржOBИЯ сцencel OT kontAKТa. 2. ПочNTETe oblaactTа Na 3acMyKBAHe. | |
| Мошноста Na Замуквае спада | OblaactTа Na 3acMyKBaHe e 3anuSheHa. | 1. ИЗВадete МржOBИЯ сцencel OT kontAKТa. 2. ПочNTETe oblaactTа Na 3acMyKBAHe. |
| Мошноста Na ИзnomlbAne e TBbPde слабa | МakcIMaJIHATA BINOCHINA Na ИЗnomlbAne e npeBIVSeHa. ИЗбparHi ca HeNPaBIVIni DnAmetbRи ДыЖИнa Na MapKучa. | 1. СыБюдавайte МAKCIMaJIHATA BINOCHINA Na ИЗnomlbAne, ВЖ. Гльа ТхHuYeCKu dahNu. 2. Пrin HeobXODIMoCT ИЗберETe NO-ROLIM DnAmetbRи IIN lo-MaIIKA ДыЖИнa Na MapKучa, ВЖ. Гльа OnmUMuzupaHe Na de6bMa. |
| Quick-Connect He moxe Да ce OTbOPи Или ЗATВОРи | Шeпселнata сисема e 3ambrcSeHa. | 1. CBanete скоБATA. 2. ПочNTETe сkoБATA. 3. MoHTIPAàiTe сkoБATA. |
TexHnueckn daHHN
DeBntbTeToNkoBaNo-ToJAM:
KOJIKOTO NO-HNCKa e BnCOUHaTa Ha n3nOMnBaHe,
KoJIKOTO NO-ROJAM e DnAmEtBpB T Ha N3NOJ3BaHn MapKyU,
KoJIkOTo No-KbC e N3NoJ3BaHnT MapKyU.
KONKOTo NO-MaIKo 3ary6n Ha HAnraHe npuHnRaBCbp3aHaTa npHaadNexHOCT.

H.Jenner
Chairman of the Board of Management

S. Reiser
Manager Regulatory Affairs & Certification
Пьномошник NOДOKум entaunraTа:
S. Reiser
Alfred Kärcher SE & Co. KG
Alfred-Karcher-Str. 28 - 40
71364 Winnenden (Germany)
Ten.: +49 7195 14-0
c: + 49719514 - 2212
BnHeHdeH,2021/06/01
Sisukord
Uldised juhised 112
Siftotstarbeline kasutamine 112
Ohuastmed. 112
Keskkonnakaitse 112
Lisavarustus ja varuosad. 113
Tarnekomplekt 113
Garantii. 113

H.Jenner
Chairman of the Board of Management

S. Reiser
Manager Regulatory Affairs & Certification
Dokumentatsionivolinik:
S. Reiser
Alfred Karcher SE & Co. KG
Alfred-Karcher-Str. 28 - 40
71364 Winnenden (Germany)
Tel: +49 7195 14-0
Winnenden, 2021/06/01
Satures
Visparigas norades 116
www.kaercher.com/REACH
Piederumi unrezervesdalas
Izmantot tikai originals pigeonumus un originalas re-zerves dalas, jo tie garantē drošu un nevainojamu ieri-ces darbūb.
Informaciju par piederumiem un rezerves damit skatit www.kaercher.com.
Piegades komplekts
lericespiegadeskomplektsrattelotsuziepakojuma.Iz-sainojotparbaudiet,vai satsirpilnigs.Ja trukst piederumi vailansportesanas laikaraudusies bojajumi,ludzu,informejiettirgotaju.
Garantija
Chairman of the Board of Management
S. Reiser
Manager Regulatory Affairs & Certification
Pilvarotais sagatavot dokumentaciju:
S. Reizers (S. Reiser)
Alfred Kärcher SE & Co. KG
Alfred-Karcher-Str.28-40
71364 Winnenden (Vacija)
Talr.: +49 7195 14-0
Fakss: +49 7195 14-2212
Vinendene (Winnenden), 01.06.2021.
Turinys

H.Jenner
Chairman of the Board of Management
S. Reiser
Manager Regulatory Affairs & Certification
Oxopoha doBkiJnla 126
Ppuaa Ta 3anaChi detani 126
KOMNNEKT NOCTABKN 126
Tapantia 126
Onnc npictpo 126
BBeHb Beknnyatauio 127
Ecknnyatauia 127
Dorra Ta texHue o6cnyroByBaHHa 128
TpaHcnpTyBaHHa 128
36epirannn 129
Dionomora y paazi HecnpaBHOCTeI 129
Texhihi xapaKTepcntkU 129
OnTmiaui noaui Hacoca. 130
Deknapaia npo BiinobiHicb cTaHapTAM EC. 130
3araJIbHI Bka3IBKN

PepenepwnBnKOpncTaHHm npntpo03HaOMNTncb 3 ciEo opinihbHOIO HcTpyKciEo 3
eknyataui Ta Bkazibkamn 3Texhikn 6e3nekn, 0doahtbcra. JiaTn BiNobiHO Do Hx.
36epiratn 6nbIb6poWpy nnaNoaIbWoB OBNOPcTahHn a6o nla HAcTyNHorO Bnachnka
BnKOpncTaHHa 3a npu3HaueHHaM
Pnncpi CNI BKNOPNCTOBByBaTN BKNIOUHO BDOMaHbOMy rocnoapCTBI. BKNOPNCtAHN 3a npn3HaueHHM:
BiiKauyBaHHB OAn 3 YactnH 6yDBeJIb NiJ Yac 3aTOnJIeHb
-ПepekaUyBaHHaTаВиKaUyBaHHaBn3 pe3epByapIB
3a6ip BOIN 3 KOIOJIAIB Ta waX7
BidkauybaHHn npicHOI BOIN 3 OOBHIB Ta WAXT BkaizBkn 0do npHHuNy po6Ou nB. rnaBy EKnnyamaui.
DonyctmI dIe nepekaUyBaHH pIDH
△HE6E3NEKA
He6e3neka dnn kummma pu3uk nowkodkeHHy pa3i nepekaayeaHnE u6yxohe63neuHX,
Jeeko3aumcux a6o Henpudamhux peo8uH!
JNeKo3aumcmi ma buxyohe6e3neuHi peOeuHUMoxymb 3auHmuc a6o buxyHymu.
Henpudamhi peoouhu mojymb nowkodumu hacoc. He nepekauyume buxyxohoe63neuhi, ne2ko3aumcmi abo kopo3iHiPIDunHu yu a3u (HanpuKnaD, naIbHe, haMy, himpopo3uuHnku) ma Macmuna, onueu, Mopcbky body u KaHani3auuHi cmoku 3 myanemhux cucmem abo body, kamac Mehuy mekyicmb, hix qucma boda.
Donyctnimi dIynepeKaYBaHHp iDHH:
- Ппсна Вoga до 3a3haueHoro CTyneHЯ 3a6pydHeHH.
SP 16.000 Dirt:
Boda 3i CTyneHem 3a6pydHeHHn DO po3mipy yactok 20 MM
SP 22.000 Dirt:
Boda 3i cTyneHem 3a6pydHeHHa Do po3mipy YacTOK 30 MM
Boda B 6aceHax 3a yMOBN BiINOBiDHoro DO3yBaHHN Do6abOK.
- Po3yH MnHoro 3ac06y, HapnKnaB Oda, Jka BNTekNa 3 npaIbHoI MaunHn. Notim npomntu Haoc uCTOIO BOHO TO a OHCTHTN IORO, DNB. rIaby Mummay ouuueHHra.
TemnepaTpa piINH,IO nepekauyOTbcra,NOBHHa 6ytn BiD 5^ do 35^
BukopncTaHH He 3a npn3NaueHHam
yBAFA
He6e3neka nowko0dxhenn iid yac Mopo3y!
Eknnnyamaia nid yac mopo3y moke nowkodmu npucmpiu.
He noeHicmIO cnopokHeu npucmpiu Moke bymu nowkodKeHu NiO yac Mopo3y.
He ekcnnyamyume npucmpiu nd yac Mopo3y.
3a6e3neumu 3axucm npucmpoio biMopo3y.
yBAFA
He6e3neka nowkodxehnnaid yac 6e3nepepehoieKcnnyamaui!
Ppucmpiu He npudamnu dnr 6e3nepepehoi mpueanoi po6omu.
He ekcnnyamyume npucmpiu 6e3nepepehno npomrao mpuabaio nepiody yacy (hanpuknaad, dna mpuabaio nepekaueaHnB 8 cmaekax) abo k cmaionapHy ycmaHOky (hanpuknaad, k niHimnbHy ycmaHOky, foHmAHHu Hacoc).
Bka3ieka
Bupo6Huk He Hece bIDnoeidaIbHocmi 3a 36umku, 3aeDAHI HeiDIOeIHUM afo HnpaunbHM 3acmocyeAHnmpo.
CTyniHb He6e3neKn
△HE6E3NEKA
Bka3ieka uo do He6e3neku, kka 6e3nocepeHb0 3a2pOxye ma npu3eodumb do mKkux mpaem yu cmepmi.
△NONEPEDXKEHH
Bka3iKa uodo nomeHuiHo moXnueoI He63neuHOI cumyaui, 0o MoKe npu3eecmu do mKuxmpaem 4u cmepi.
△OBEPEXHO
Bka3iKa uodo nomenu Ho he63neuHc cumyaui, k a Moke cnpuunmu ompumannn neakxmpaem.
yB4A
Bka3i8ka uo do moxJueo i nomeHuiHo He63neuHoi cumyaui, oO moKe cnpuuHumu MamepiabHi 36umku.
Oxopoha doBkinn

NakyBaJIbHi MaTepiAn npuaTHi Do BVtopnHHO nepepo6Kn. YnaKOBky Heo6xIDHO yTuIi3yBatn 6e3 uKOdi DaBOKJIIJ.

EneKtpnHi Ta eNeKtpoHHi npncTpoi HanyactiWe MicTb ciHmatepiAun, kI npndATHI BO TOpHHOJI nepepO6Kn, Ta KOMnoHEHTN, Taki JK Baataei, akymyJrTopOn Yu MaCTnIO, kI y pa3i
HepaBbHOrO NOOKeHH3 HmN a6o
He npabnboHOyTuNl3auuMOKyTB CTBOpNTu NOTeHHy
He6e3neKy dnn 3dopOB' JIOuHN Ta DOBklln. Odnak
ZI KOMNoHEHTn Heo6xDiHJn HaJeKHOeKCNlyatauII
PpncTPOIO.PnpCTPOI, No3HaueHi UIM CmMBOJOM,
3a6bOpOHcTbcraYTuNl3yBaTN pa30m i3 no6yTOBM
CMITTM.
Bka3iBkn ⅢOIO kOMnOHeHTIB (REACH)
AkyJIbHI BiOMOCTI npo KOMNOHEnHaBeDeHi Ha caTI: www.kaercher.com/REACH
PpnaT Ta 3anachi deTani
CniD BnKOpNCToBvBaTJ NIme OpriHaJIbHe npIaJaTa opriHaJIbHi 3anachi YacTHInH, TOMy IIO came BOHr rapaHTyIOb 6e3neHy Ta 6e3nepe6iMy EKcnIyatauio npicTpOIO.
Inopmaia 10o npuaT Ta 3anaCHx qactnH MICTNbcaHa caTi www.kaercher.com.
KOMNJIeKT NOCTaBKn
KomnneKtaui npncTroo 3aHaueHa Ha ynaKobci. Nid
yac po3nakyBaHH npncTroo nepeBipuTNI
komnneKtaio. Y pa3i hectayi npuaadna60
ykoJxHb,OTpMaHnx nd yapc TpaHcnopTyBaHH,
cniD nobIDomTu npo ue ToproBehHi opraHiaaui, kA
npodana npncTpii.
Tapaantia
YKoXHi KpaIHi DIIOTb BiIDNObIHr rapaHTiHi yMOBn, BCTaHOBNeHi yNOBHObaKeHOO opraH3aJIeIO 36yTu Haoi npOdyuKiB uCkri H. MoxNbi HecnpabHOcTi npICTPOIO npOTAROM rapaHTiHOrO CTPOKY MN yCyBaEMo 6e3KOuTobHO, kUO pRnuHa HecnpabHOcTI NOJRAE B DeΦeKTax MaTePIAIB abO BnPo6HNoMy 6paKy. Y pa3i BnHNKHeHH NpeTeH3I INpOTAROM rapaHTiHOrO CTPOKY npoxAHN 3BepTaTcR, MaOUn npu CoBI YeK npO nOKynK, Do ToproBeJIbHOI opraH3aJIi, UO npOdaNa npOdyKT, aO do NaHbNkQOI yNOBHObaKeHOI cIyXbN cepBicHOro 06cIyROvBaHH. (Adpcn dNb. Ha 3Bopoti)
Onnc npnctpok
PncyHKn DnB. Ha cToPiHKax 3 pncyHKamMaIIOHOK A
①Pyuka dnia nepeHeceHHa
② MepexeBn Ka6enb 3i TTeNcEnbHOIO BUNKOHO
③ ABOTMATUHNI npucTpi JIy BuaJeHHN NOBITpr
4 Quick-Connect
3^ 3'eHbBnBa DeTaNb Hacoca G1½ (NaTpy6OK nIpiKIIuOeHHa UHaRa 1", 1¼" i 1½" Ta Hapi3b G1½)
6 3'εdhyBaIbHn natpy6ok (Hapi3b G1½)
⑦ΦikcaTop (NONJaBKOu BmNkau)
⑧ PerylaTOp BnCOTn (NONJIaBKObN BmMkaU)
9ПоллавКOBиВИМИКaу
10 *3'eHyBaIbHa DetaIb Hacoca G1 (natpy6ok nIiKnIOeHHra IaHra 4" i 1" ta Hapi3b G1)
⑪ *3BopOTHiKnahan
12 Hapi3Hn natpy6ok G1 (SP 16.000 Dirt)
13ΦinbtpnonepedhbooOnuueHHa(SP22.000Dirt)
- He BXOДиТь Do KOMЛпЕтУ noctaВи.
BBeDeHnB eKcnnyataciIO
HE6E3NEKA
He6e3neka ypaxeHH enekmpuHUM cmpymom ma He6e3neka mpaemyeaHH!
Ppucmpiu Mae enekmpuhi ma MexaHHi KOMNOHeHMU.
3aekdu eid'cdhyume npucmpiu eid dxepeena kueeneHH nepeed 36upaHHm, po36upaHHm afo ouuueHHm.
Bka3ieka
Uo meHwa doBxuHa uanaea i 6iIbuu uOa o diamemp, mo eua npodykmuehicmb nepekauyehn.
Uo6 yHuKHymu 3acMiuYeHHHaHcoCa,
eukopucmooyamu fijbmp nonepedhbozo ouuueHHa dnwanahe diamempom mehué 1 / 4
Cneuiabhe npunaadra SP 16.000Dirt
- SP 22.000 Dirt immeapoeaHu e onopHy cmiuky PioknueHna hacoca ochaueHO cucmemoIO po3'emie (Quick-Connect).
3'edhyeanbhu nampy6ok 3i 3'dhyeaIbHOIO demannn Hacoca G1% ma hapizhu nampy6ok G1 exodarmb do cknaody npucmpoio e pozibpaHomy buanrdi.
Bka3ieka
Do 3'edhyeabhoi demani hacoca G1% moxha nidknoamu wnaau diamempom 1", 1/ma 1%. Dnpekaayehnpiu 3 yacmkamu nompi6hzo o po3mipy cnid obpamu wanahe npaeunbhoz0 diamempa ma ckopomumu 3'edhyeabhy demanb hacoca G1% ha na3ax. Y pa3i nepekaayehnpiu 3 dpibmu dacmkamu makoek pekomehdyembc bukopucmanha wnaea benuko0 diamempa dna 3a6e3neueHHBinbwo npodykmuehoocmi.
PnueHaHHaHaHaDo Haocca, y pa3i BnKOpncTaHHaHaHa1" 1", 1/4" a6o 1/2":
1 Harbntn 3'EnHyBaIbHy DeTaNb Hacoca G1%Ha 3'EnHyBaIbHn NaTpby60k.
MaJIHOHOK B
2 HaTnXomYTJnIaHaHaHaHaHr.
3 Haartnu hnaHrHa 3'EnHyBaIbHy deTaJIb Hacoca G1½ i3akpinntxomyTOM dna uHaHa.
4 BctabuTn 3'eDhyBaJIbHn natpy6ok y QuickConnect.
MaJIHOHOK C
PnueHaHHaHra do Hacoca, y pa3i BnKOpncTaHHaHaHa 3/4" a6o 1"(SP 16.000 Dirt):
1 Harbntn Hapi3Hn nptp6ok G1 ha 3'edHyBaJbHn nptp6ok.
2 YctaHOBHTn CneuaJIbHe npNJaIaJ3 3'EDHyBaJIbHy DeTaJIb Hacoca G1 (6.997-359.0 3'EDHyBaJIbHa DeTaJIb Hacoca G1 (33,3 MM) 3i 3BOpOTHM KnaHOM, He BXoIITb DO KOMPiKeKTy NOCTaBKn) Ha HapiIsHni NaTppy6ok G1:
a POKlaCTn 3BOpOTHm KIanaH Ha Hapi3Hn NaTpy6ok G1 TaKIM YINHom, Uo6 6yNo BnHO Hannc «UP».
b HarBnHTnTn 3'EnHyBaJIbHy DeTaJIb HacOca G1 HaHapi3HnI NaTppy6ok G1.
3 HaJrTnXOMyTdnaIshaHaIshaHr.
4 HaJrTn 1nHa 3'EnHyBaIbHy DeTaIb HAcOca G1 i 3akpinTu XOMYToM dJa IJHaJra.
5 BCTaBnTn 3'eDHyBaJIbHn nATpy6ok y QuickConnect.
MaHHOK C
YcTaHOBJIeHHra/3aHypeHHHaHocca:
1 Bctabnt nperynTOp BnCOTn nonnaBkoBOro BmNkayu y fikcatop.
MaJIHOHOKD
2 HadiHb BCTaHOBHTn Haoc H TaBepy nobepxH0 y piINHy dIe nepeKaUyBaHHa 6o onyCTNT3a DOnOMOrO npKpInNeHoro do pyuKn Tpoca.
Bka3ieka
30ha EcmokmyaHH He noeunHa 6ymu 3abNOKoeHa 6pydom. Kaio noepxHa Mynucma, cmaHOBum Hacoc Ha ueunHy afo anaoizHy meepdy noepxHIO.
Cmexkumu 3a mum, uo6 hacoc cmore zoupuzhmabHo. He nepenocmu hacoc 3a ka6enb afo wanahe.
Ekcnnyatauaia
△HE6E3NEKA
He6e3neka dny kumma ype3 ypaXeHHa
eneKmpuHUMcmpyMom!
He6e3neka dna kumma ypeez ypaxenHH enekmpuHUM cmpymom y pazi mopkaHHcmpymonpoBihux qacmuh.
Iid yac po6omu He mopkaumecmnpoc, npukpinnoho do pykU dna nepenecnna, a6o 6yob- kux npedmemie, kki KOhmacmyomb i3 pduHO, zo nepekauyemcb (HappuKnad,mpy6,00 KOhmacmyomb 3 pduHO dna nepekaayehnna, npuynE), i He mopkaumecpduHu, 00 nepekauyemcb.
ABTomuHn npucTpiJ DJI BuaJeHHa NOBITpr
- Y pa3i Hn3bkoro piBna piDnHn ABTOMaTHn npncTpi dna BnuDAJIeHHra NOBITpRA BnuIaJIe BCMOKTaHe NOBITpA a6o NOBITpRA, 3o 3hAxOHTbcB Hacoci.Kpim NOBITpRA,TAKOX MOxE BNTiKaTu PiINHa. RaKIO uepe3 Hn3bKnPiBeHb piDnHn HAcOC He MoXe BCMOKTyBaTN,BuHrATn IBCTaBtTu WTeNCeJIbHy BNkky KInbKa pa3iB, 5o6 NiItpMaTu npOec BCMOKTyBaHHra.
MaJIHOHOK E
ABTOMaTHHmpeXmpo6OTn
- YctaHOBHTI NOJIaBKOBI BUMNKaU 3a DOnOMOTOppeRyIaTOpA BUCOTi i BiDpeRyIbOBAu TIOBXnHyKa6eJIIO.
Bka3ieka
Konu Hacoc npaioe 6e3 Haiay, ecmHOeBamu nonnaKoBu Bumukau 3aekdu y eepxhi no3uii dna 3a6e3neHnHaediHo2o BumukHHH Hacoca.
MaHIOHOK F
Bka3ieka
KoNu Hacoc ecmahoebmoebcya HuxhbomnynojoxeHHi, ecmahobum doekuny kaBenIO mix nonnaekobum bumkaayem ma qikcamopom Ha 2,5 cm, duB. no3HaKy ha kaBenI.
MaJIHOHOK G
- BctabTuN uTeNCeBHy BuJky Bpo3eKy.
Bka3ieka
B aemomamuuhomy pexumi po6omu nonnaakobu bumukay KOHmpoioe po6omy hacoca aemomamuho.
Kou nonnaekou bumukau 3a paxyhok pieh piuhu, uo nideuuyemcbc, docraae pieh yimkheHHn, hacoc 3anyckaembc.
KoNu nonnaekobu eumukau 3a paxyHOK piHra piDuHu, uO 3HuXkyembcr, dooc2ac pieHra bumKHeHHra, Hacoc bumkaembcra.
IyuOzo Heo6xioHO 3a6e3neumu eInbHe nepemiuueHH nonna6K0e02o BUMkaHa.
DobxuHa Ka6enHO mix nonnaKoBum bumkaHem i fikcamopom noBuHHa 6ymu He MeHwe 2,5 cm.
PibeHb yBIMKHeHHBUMKHeHHN (nonlaBkoBn BmHKaU HauHHXQOMy NOJoxHHi):
| Min/Max SP 16.00 | 0 Dirt SP 22.000 | Dirt |
| Ровень увимкегня, CM* | 18 / 21 20 / 24 | |
| Ровень Бимкегня, CM* | 4 / 12 6 / 15 |
PibeHb yBIMKHeHHBUMKHeHHN (nonlaBKOBN BMMKaU HnBuOmy NOIOKeHHI):
| Min/Max SP 16.00 | 0 Dirt SP 22.000 | Dirt |
| Ров几乎所有 CBIMKHeHЯ, CM* | 28 / 31 33 / 36 | |
| Ров几乎所有 CBIMKHeHЯ, CM* | 14 / 22 19 / 27 |
*Pibhi nepemukahn 3aIexkaTb BiD noIoxeHH nonnaBkoBOro Bmukaca i DOBXHn Ka6eHIO mix nonnaBkoBm Bmukayem Ta fikcaTopom.
PekomeHnyeMo 3aIINHTn NonepeHbO HanaTObaHy DoBxuHy Ka6eNIO.
PuyHn peXm po60Tu
Bka3ieka
UpyHOMy pexkmi po6omu HAcoc nocmiHo 3aIuuaembcyaEIMKHeHUM. Uo6 y pyHOMy pexkmi Hacoc npauo8a camocmiHo, pieeHb piDuHu noBuHc 6ymu miniym 60 MM (SP 16.000 Dirt) afo 50 MM (SP 22.000 Dirt). Hacoc moKe biKaayama 3aIuuok pidunu do pibn 25 MM (SP 16.000 Dirt) afo 35 MM (SP 22.000 Dirt). 3aHaueHu pieeHb 3aIuukoBoi pidunu docraaembcra nuwe y pyHOMy pexkmi. Ira uOzo Heo6xido 3a6e3neumu bInbHe nepemiuennr nonnaekoo2o eumukaya.
- 3akpiinTu nonJaBKOBN BUMNKaU y φikcaTopi y cnprMoBaHOMy BROPu nOxKeHHi. ManIOHOK H
yB4A
He6e3neka nowkodkeHHy pa3i cyxoso xody!
Cyxu xid npuzodumb do nideuueho2o 3Hocy hacoca. He 3aunuaume hacoc y puhyom pykumi po6omu 6e3 Haajy.
Y pa3i cyx02o xody HeauiHo iO'edHaume npucmpiu eID Mepeki.
- BcTaBnTm MepexeBn uTeKepey po3eKy.
3aBepueHHpo60Tu
- BuTyrHyTu WTeNceIbHy BnIKy 3 po3eTKI.
Pnpctpi 3ynnHnTbca.
yBAI
He6e3neKa nowkodxehnHa!
He6e3nega nouKoJxHnuepe3 3acoXnui 6pyo a6o do6aBku.
Ppomueaume ma ouuaume npucpiu opa3y nicn KOKHO2 BuKOpucmaHH.
- RaKuo nepeKauyeTbC6pyHa B0a Yn B0a 3 do6abkamn, npomnte Ta Ounchtib npncpti onpa3y nicra3akHueHH eKcnnyatauii, nB. rnaBy Mummur ouuueHH.
- CnopoxHHTn npicpti Ta noRo npnaDra Ta daTe IM BnCOxHyTu.
DornaTatexHicHe 06cnyroByBaHHa
HE6E3NEKA
He6e3neka ypaxeHH eJekmpuHUM cmpyMOM ma He6e3neka mpaemyeaHH!
Ppucpiu Mae enekmpuHi ma MexaHiKOMTOHeHMu.
Диммзабороньсяnpoeodum ouuцehma mexhivhe obcny2o8ybaHH, nepeobachehe dnokopucmyaaya.
MNTTMyOuHcHHe
YBAGA
He6e3neKa nowkodxehra!
He6e3neKa nowKoJxHnHaYepe3 3acoXnU 6pyd a60 do6aBku.
Pomueaume ma ouuaume npucpiu opa3y nicnkoKxHo2eukOpucmaHH.
1 RaKuo nepeKauycTbC6pUHa BOa YN BOa 3 Do6abkamn, npncptiH Heo6xIDHO nicra UBO npomnt: nepeKauyBaTu npncTpOeM uCTy npichy BOy 6e3 Do6abOK doTN, DOKN 3 npncTpOHe 6yde BUMNTo 6pyd nn Do6abKn.
HE6E3NEKA
He6e3neka ypaxeHH eJekmpuHUM cmpyMOM ma He6e3neka mpaemyeaHH!
Ppucpiu Mae enekmpuHi ma MexaHiKOMTOHeHMu.
3aekdu eid'edhyume npucmpiu bi dxepeena kuehneHH nepeod 36upaHHm, po36upaHHm afo ouuueHHM.
2 BuTyrHyTu WTeNceJbHy BnKy 3 po3eTK.
3 HaTnCHyTN KhONkY Quick-Connect Ta 3HrTn 3'6dHyBaJIbHN nATpy6ok. ManIOHOK C
4 Y pa3i Heo6xidnocti BndaJntu 3i WnaHra Ta Ha Quick-Connect 3aunukn.
5 OuHCTHTn npncptpi 3OBHI M'RAKOIO YNCTOIO raHcyipKOIO Ta YNCTOIO pICHOIO BOIOIO.
6 CnpoxHnTn npncptpi Ta noRo npuaJaTa daTe IM BnCOxHyTu.
TexHicHe 06cIyRObyBaHHa
PnucpiH He nOtpe6yecTexHiuHoro 06cIyroByaHHa.
TpaHcNoptyBaHHa
PepenecenBpyHy
△OSEPEXHO
He6e3neka mpa8myBaHHaHacnIdok cnomukHHa!
He6e3neka mpaBmyaHnE hacniOc cnomukHHo He3akpinneni KaBeni ma wnaheu.
Iid yac nepemiueneHH npucmpoIO 3eepmaue yba2y Ha kaBeni ma uHaHeu.
1.Пднгпnpсстriиучkyi nepehectn.
IpepeBe3eHH TpaHcnpTHnMm 3ac06amN
△NONEPEDKEHH
He6e3neka mpaemybaHHa, He6e3neka nowko@keHHa!
Пд усmpанспормунь epaxoeуамu bazy npucmpoio.
36epiaume afo 3akpinlmoe npucmpiu bionoiedho do uHHux dupekmue, oobin He Ko83a ma He nadae nid qac mpaHcnopmyeaHna.
2.Пдчac TpaHcnpOpTyBaHHB TpaHcnpOpTHnx 3ac06ax 3akpinTn npncTpim 3riJHO 3 YHHHMn HopMaMn dЯ 3ano6iraHну ORO KOB3aHHIO Ta nepeBepTaHHIO.
36epiraHHN
yB4A
He6e3neka nowko0dxeHHn iD ac Mopo3y!
He noeHicmIO cnopoxHeu npucmpiu moKe bymu nowkodxHeu niO yac Mopo3y.
IobHicmIO cnopoxHumu npucmpiu ma npunaedra, nepu HIX nomiamaix Ha 36epieaHH.
3a6e3neumu 3axucmpoio biMopo3y.
36epiaume npucmpiu y 3axuueHomy iD mopo3y Micui, a He npocmo He6a.
△OBEPEXHO
He6e3neKa ompumahnHa mpaem ma yukodKeHb! Pnpcmpi Moke nepekuhymucb Ha noxunu noeepxn Niudac 36epiaaHn epaxoeyeamu bazy npucmpoio.
- NOBHICTO cnopoxHN HACOC Ta npnaIaIaIaIaIaIaIaIaIaIaIaIaIaIaIaIaIaIaIaIaIaIaIaIaIaIaIaIaIaIaIaIaIaIaIaIaIaIaIaIaIaIaIaIaIaIaIaIaIaI
- DAtn HAcocy Ta npNJaDDIO BmCOxHyTN.
- 36epiratn hacoc y 3axuheHomy BiD MOp03y npmiueHHI.
Donomora y pa3i HecnpaBHOcTei
Yacto noUKoJKeHHa E npocTmM, TOMy 3a donomorHO HabeDeHOro HnKHe OrJaIy ix MoXHa ycHyTu camOciHNo. Y pa3i cyMHIBy a6o HaABHoCTi NOUKoJKeHb, He 3raDaHnx y orJIaI, 3BeptaTncrdo ABTOpN3OBaHOc cepBicHOc cnyk6n.
| Поминka Причina Усынney | |
| Hacoc npaцюс,鉴定 He nepekeачe | Y hacosci 3нхODITbCS NOBITPRA. |
| 3OHa BCMOKTYBaHHa 3aCmIeHa. | |
| 3amaln pIBeHb piDInH y puHOMy peKIMi po6otn. | |
| Hacoc He 3anuyscaetbcyaabo panTob03упягьсЯ B xodipo6otn | Перетвана подаче eNeKTPOeHepri. |
| 3axushe Tepmopelne BiKIIQUHNo HACOC chepe3 neperpiv. | |
| Частки 6руdu 6blokyOTb 3Ony BCMOKTYBaHHa. | |
| 3низласnyodukTINBHicTbepekeaUvBaHHa | 3OHa BCMOKTYBaHHa 3aCmIeHa. |
| 3aNadTo Hn3bKa npodukTINBHicTbepekeaUvBaHHa | Makcimalha Bincota noDAci nepeBvIeHa. |
| HeprabinbHn Bv6ip diAmeTa taДOBxHnшlaHra. | |
| 3'edhanna Quick-Connect He bIDkpINAeTbCS a6o He 3akpINAeTbCS | Систema 3'edhanha 3a6pudHeHa. |
TexhiHiXapaKTePncTnKn
Chairman of the Board of Management

S. Reiser
Manager Regulatory Affairs & Certification
Oco6a, BiinobiaJbHa 3a BeHeHHaDOKyMeHTaJIi:
II. Pau3ep (S. Reiser)
Alfred Karcher SE & Co. KG
Alfred-Karcher-Str. 28 - 40
71364 Winnenden (Germany)
Ten.: +49 7195 14-0
ΦaKc: +49 7195 14-2212
M. BiHHeHdEh, 01.06.2021
Ma3MyHbI
Kannbl HycKaynap 130
MaKcaTbHa caiKeC KoiJaHy. 130
Aa3ra 6aunahbicmbi 3akbimdahy kayni 6ap!
Ara3da kymbc icmey KypbIrfbHb 3aKbIMdaybl MyMKIN.
TolbfbImeH mezimmeeH Kpbilrbl a3daH 3aKbIMdanybI MymkIH.
KypbblbHbIa3da nauOanHa6aHbI3.
Kypblnfbihb a3aH KOpRaHbI3.
HA3AP AYdAPbIHbI
Y3diKci3 Kymbic KeiHde 3aKbIMdany Kayni 6ap!
KypbInrbl y3diKci3 Kymbic icmeyae Kapamauobbl.
KypbInfbHb y3ak yaKbIm 60oubl y3diKci3 (Mbicanbl, moraHdapdaBf y3diKci3 auHaNbIM) Hemece mypaKmbi KOHObpBp pemHoe (MbicaNbl, copfbl cmaHuaRcbl, cy6ypkac copfbicbl) naudanaHaHbI3.
Hyckay
OHDipyui MaKcambiHa cau naudanahay xhe dypbic icke Kocnay hemuxecihde mybHdaarh bikmuman 3aKbIMdap yuiH kayanmbi 6oMauidbl.
Kayin DeHreJnepi
KAYIN
- Ayip kapaKammaHyra Hemece eImae anapbIn corambih mikeenu Kayin 60uBuHua Hyckay.
△ECKEPTY
- Aybp KapakammaHyra Hemece enimae anapbin corybMyMKIH Kayinmi Kardau 6ouhwa Hyckay.
△ABAHJAHbI3
- XeHin kapaKammaHyra anapbin corybl bikmuman Kayinmi kaardau boBuHwa Hcyay.
HA3AP AYdAPbIHbI
- Mamepuandbik 3uHf anaapbn corybl bikmuman Kayinmi kardau boibHwa HcyKay.
KopwaFAH opTaHbI KopFay

OpaybI MaTePnAnDapbH yTnIn3aunnaayFa 6oNaDb. OpaybIuTapdbI KopwaRaH opTaF aKayinci3 Typde yTnIn3aunnaHaB13.

3NeKtpIik XHe 3NeKtpoHdbIK 6YbIMdapDbIH KypamblHa KaTe KOJdaHy Hemece
yTnIn3aunay HETnKecinde aam
DeHcayIbIbHa XeHe KOpShaFaH opTaKayin
TeHdipyblkTmAn,kyHbI KaTa eHdeMEni MaTePnAnap KHe 6aTapeenap, aKcMyJrTopnap Hemece MaCnAeKTB6eNWeKTe Kni Ke3DeceJI.
AnaJa, aTaAMbIi 6eJIWeKTepeYbIMdbTicHHe naDanaHy iin KaXeT 6oNaDb. Ocb TaHbAmeh 6enrIneHRe 6yBIMapDb y KOKbICTapbIme 6ipre Tactayfa 6oMaJdb.
Kypamdaftb3attap6oBbHwaHyckaynap (REACH)
BiybIMhbH KypambIHdaftb3aTtap TpyaIb COHfbl MmImeTTep TeMeHderi MeKeHxai BoHyHwa KOJXeTIMdi: www.kaercher.com/REACH
KepeK-kaPak XeHe KocaIKbl 6eJnweKTeP
TeK TynHcyKaJIbI KepeK-JkapA Hemece KocaJIkbI 6eJWeKeTpDi naJaHaHaBbI3, c6e6i on KypaJIdbIH Kayinci3 XHe anatcbI3 Kymblc icTeyIHe KeninDik 6oNaDbI.
Kepek-kaapakap MeH Kocankb6JnweKtep TpaJIbI aKnapaT www.kaercher.com Be6-caTbIHda konkeTimdi.
XeTkizim XnHaFbI
BvibMbHbIH XeTkiJIM XINHaBbI opayblTbIH YcTIHe KepceTInreH. BvibMbI opayblTaH WbIFapraHaJxNHaKTBIH TObnkTBbIFbIH TeKcepIN WbIFbIHb3.KepeKJapakTap KeTicnerEHemeCeTacbImaJday Ke3IHDe 3aKbIMap TnREH KaJaJa, DnJepiHi3re xa6apnaCbIHb3.
KeninDik
Ope nnde kepriniikti dinctpn6bHOTnpnap 6epren KeninikipapTAPbKOndaHbIaDb. BmyIMda MaTePnAnDbIK Hemece eHdipictik akaynap aHbIKtaIraH kafdaJa, bIKTMan akaynapdbi keninik MEP3imi iuiHne akbcIb3 XeHdeMiz. Keninik MEP3imHe Hapa3bIbIKTapbIHb3 6oNca, 6yibIMdbi catkaH cayda MekeMecihe Hemece KaBHdaftbEkinETTI KbI3Met Kepcety OphbHa Ty6ipteKpEcapnacBih3.
(MeKeHkaBIMb3 apTkbi 6etTe)
KypbIINfbIHbH cNnATTaMaCbI
CypeTepi 6ap 6eTTi kapaHb13 CypTe A
① KblnKbityra apHaJrAcan
② Awaacbi 6ap kyaT cbIMbi
③ ABTomaTTbI XeJIeTeTy Kypblfbcbl
④KbIJaM KocblbIM
⑤ G 112 copfbHbH 6aJnHaHbICTbIpyu bI 3JIeMeHTi (1", 114'' XHe 112'' WnAHR KocblmbI JxHe G 112- 6ypaHa)
⑥ Kanfay 6eniri (G 1½-6ypaHda)
⑦ Bekitkiu (kaJIbImaJIbKOcKbiU)
8 BnIKti peTtey (KaKbImaIb KoCKbl)
9 KaJIbIMaJIbI KOCKblu
10 *G 1 copfbihbH 6aIHaHbCTbpyuBbI anemeHTi (3/4" XeHe 1" WnAHR KocblmbI XeHe G 1-6paHda)
① *Kepi cokkbl knaanbbl
12 G 1-6ypaHdaJIbI KocblbIM (SP 16.000 Dirt)
13 AnbH ana Ta3aay cy3rici (SP 22.000 Dirt)
* XeTKe3y XnblITbIfbHa KOCBJNMAfAH.
PaiDanaHyFa eHri3y
KAYIN
3neKmp mozblbH cory kHe kapaKam any Kayni!
KypbInfbda 3neKmpnik XaHe MexaHukanblk KOMnoHeHmmep 6ap.
Kypacmbipy,6enwekmey Heme ma3anay andbHda KpybInrBHBi epKaawah Kyam Ke3iHeaXkbipamblbI3.
Hycay
UnaHmbiY3bHdbfI HerypnbIM Kbicka XaHe duamempi HerypnbIM KOrapbl Bonca, bepy Kbindamdbfbl CORYpbIM KOrapbl Gonadbl.
CopbihbimenyiHe kon 6epmey ywiH duamempi 114'' -deh a3 wnaHa ywiH andbIH-ana cy32iHi KOJdaHbIbI3.
SP 16.000 Dirt aphaubi kepek-kaapaKmapbI
SP 22.000 Dirt KypbIbnFbcBHa mipey aRfbl kipikmipinaeH
CopfblKocblbIMbl anblH6anblxyeMeH Ka6dbkmanraH (kbIDam KocblbIM).
G 1½ copbHbH 6aunahbcmbpywby 3neMeHm xHe
G 1 6ypaHdaanbl KocbInbIMbl 6ap Xanray 6enizi KypbInfbHbl Xemki3y XubHmbfbiHa 6enweekmenzeH mypde kipeidi.
Hycay
G 1½ coprblbH 6aunahbicmbpuywbl 3neMeHmHe duamempi 1", 1¼" xene 1½" wnahamapdbkocyra bona db.
Kaemmi enwemdei myipwikmepi 6ap zammapdbkauma auday ywiH kemkiniikmi yken duamempdei wnahehi maHan, G 1 12 coprbihb
baunahbcmbipywbl3neMeHmin cahbnaynap 6oubihwa
kbickapmy Kepek. Cohdau-ak, myuipwikmepi
kiukehmaa zammap ywiH yIKeH duamempdezi wnaHai
ycbHbnda: 6y npApkblbl yIKeH arbiHHbIH KeJIeMIHe
KoJ KEMKi3y2e 6Ola dbI.
1", 1¼" Hemece 1½" WJNaHrTbI naJaJaHaR Ke3de WJNaHrTbI copfbifa KocbiHbI3:
1 G 1½ copfblbHb6aJINaHbICTbIpyuBb3JIeMeHTIH XaJray 6enirHe 6ypaHb3. Cypet B
2 Wnahr Kbickblwih WnahrKa cbipfbTbHb3.
3 ⅢnahrtbG1½copfbHbH6aJnahbcTbpyu bI 3JIeMeHTiHe cbipfblIN, JNAHR KbICKblWBIMeH 6ekirihi3.
4 Xanfay 6enirih kblndam Kocblbim iHHe nTepiH3. Cypet C
3/4" Hemece 1" wnaHrbl (SP 16.000 Dirt)
naJaHaHaH Ke3De WHaHTbI CopFbIfa KocbiHbI3:
1 G1-6ypaHaJIbIKocblIMbIH XaNfay 6eJIirHe 6ypaHbI3.
2 G1 copfblhblb6aIIaHaHbICTbpyuIaIeMeHTiHi apHaahblKepeK-kaPakTapbln (6.997-359.0 G 1 copfblhblb6aIIaHaHbICTbpyuIaIeMeHTi (33,3 MM), OHbIH iWihde Kepi cokkbl klaanaHbI - KeTki3y KnbIHTbIfbHa KipMeiDi) G 1 6ypaHaJbI KOcbJIbIMbHaOpHaTbHbI3:
a Kepi coKbI KnaanHbIH G 16paHdaJIbIKocblbIMbHa «KOFAPbl» cezi OkblaTbIHdaIeIN KOBIHbI3.
b G 1 copfblhbi 6aJlhaIcTbipyu bIeMeHTIH G 1 6ypaHdaJIbIKocblnbIMbHa 6ypan caIbHbI3.
3 ⅢnahrKbickblWBHJNahRkcbipfbTbHbI3.
4 ⅢnahrtbI G1 copfbihbH 6aIIaHaBtbyu bI 3JIeMeHTiHe cbIPfblTbI, IJIaHI KbICKblWBIMEH 6ekirihi3.
5 KaIay 6eJiriH KblnDAM KocblbIM iWHe NTepiHa. Cypet C
CopfbHbI opHaTy/6aTbipy:
1 KaikbimabI KockbiHTbIH 6nIKTK peTteriWih 6eKTIwke caJIbHbI3.
Cypert D
2 CopbHbI copbInaTbIH cybIKbIKTa KaTTb6eKEMbIKTan opHaTbIHb3 Hemece OHbl TaCbIMaJdayTyTKacbHa 6ekitijiren apKaHMeh 6atbipbHbI3.
Hycay
Copy aumaribi kipmenbimenin kalmaybi kepek. Eeep jau bocap, copbihki kipniuke Hemece yKcac HApceze caBih3. CopbHbH mypaHaHaBHaHa K03 XemkiisH3. CopbHb KaebbdeHemece wHaHaMaH ycman macbImaHb3.
Paindanahy
KAYIN
Tok corydaH eMipze kayin 6ap!
Kephey emki3iuw benuekempae muen Ke3de, 3nekmp mo2bIHbH corybHaH omipae Kayin meHedi.
Kymbic KeiHde macbImaanday mykacbHa 6ekiminee Ka6ebze HeMece copbIambIH cyubikmbiKeH 6aunhbcma bonambIH ke3-kenzeh 3amKa (Mbicbl, copbIambIH cyubikmbiKa wbirambIH Ky6bpnap, mykapanap) muai36eH3 XHe copbIambIH cyubikmbiKa kon muzi36eH3.
ABTomaTTbI JeIeTeY Kypblfbcbl
- CynbIKTBk DeHreI TeMeH 60nraH Ke3e copfbacopbIraH HeMeCe coprdaIbKe3 KeIReH ayaabTOMaTTbXeNDeTy KpyblfbcI apKbInbCbIpTkAdbI. Ayadah 6acka CynbIKTBk afbn KeTyIMMKIH.
Erep copbl cybIKtbk deHrein TeMeH 6onraHa TaTbipyda KnbIHbIKKa tan 6onca, TOnTbpy npouecine KEMeKTEcy ywiH Kyat cbIMbIH KaTaKaIa axbipatbn, Kocblh3.
Cyper E
ABTomaTbIpeXIM
- BnkiKti peTtey MeH Ka6en y3bIHdbfbl apKbJIbI KaIKbIMaNbl KCKblWtbl OpHaTbIHbl3.
Hycay
CopfbHbKapaycbI naudanaHrah Ke3de, copfb ceHimDi mypde euwipinyi KaMMamacbI emy yuih KaJIbIMaJIb KCKblUmbI epkawah KOrapfb KYue KOUbIHbI3.
Cypem F
Hycay
KaikbimabIKockbiuEHmMeH2I Kyue opHamblifaHda,KaikbImabIKOCKbiu NeiIMeK apacbiHdaBf Ka6BeJy3bHdbfB1H 2,5cm emin pemmeHi3, Ka6enbdei maHaB1 KapaHbI3.
Cypem G
- AshaHbi po3eTKaFa caIbIbI3.
Hycay
Azmomammbi pexumde Kaikbimani Bockbiu auday npouecih azmomammbi mype6bacapadbl.
Cyubikmbk deHzeuiHH Kemepiyine 6aunahicmbi KaJIbIManbl KocBliu Kocy buikmiahe xemkeHde copfbl Kocblnaabbl.
Cyubikmbk deHzeuiHH meMeHdeyIe baunahicmbi KaKbImaBbl KocBliw eWipy buikmizihe XemkeHde copfbl ueedi.
KankbimabI KocbIumbIH Ko3ranbc epkiHdiieHe Kenindik bepy kepek.
KaankbImaBIOckbiWneH6ekimkiwapacbIHdaBf Ka6eJIy3bIHdbfBI KEMiHoe2,5cm6OnyBeKepeK.
Kocy 6nikiri/ewipy 6niktiri (kaIkbimalbIOCKbiTemeHri no3uJra):
| Мин/Макс | SP 16.000 Dirt | SP 22.000 Dirt |
| Косу SFIKTİRi CM* | 18/21 | 20/24 |
| Θшіру SFIKTİRi CM* | 4/12 6/15 |
Kocy 6nikTiri/ewipy 6nikTiri (KaJIkbImaJIbI Kockblx KOFapfbl No3nuaJa):
| Мин/Макс | SP 16.000 Dirt | SP 22.000 Dirt |
| Косу биiktiri см* | 28/31 | 33/36 |
| Өширу-bиiktiri cM* | 14/22 19/27 |
*AybICTbIPbIN-Kocy 6niktiri KaNkbIMaJIb KCKblTbIH
kaJdaBHaKaHe KaNkbIMaJIb KCKbl NeH 6eKlKiU
apacbHdArfKa6eBdIH Y3bIHbIFbHa 6aJNaHbICTbl.
Ka6eNbDiH Y3bIHDbIFbIH eDenKI 6oBHwa
KaIbIPyDbYcBlHaMbI3.
KoImen 6ackapy peknmi
Hycay
KoImen baccapy pexumihde copfbl 6apbik yaKbimma Kocynbl Kyude kanaabI. Cyubikmbik dehzeui KEM deaeHde 60 MM (SP 16.000 Dirt) Hemece 50 MM (SP 22.000 Dirt) 6onybl kepek, ocblauwa copfbl KOImen baccapy pexumihde e3dizieHc npbina anadbl Copfbl 25 MM (SP 16.000 Dirt) Hemece 35 MM (SP 22.000 Dirt) KaandbIK cyubikmbik dehzeuihe deuih copa anadbl. Cyubikmbikmh KepcemilnaeH kaandbIK dehazueiHe meK KOImen baccapy pexumihde kon KemkiineDi.
KankbimabkckbiumbIH KO3ranbc epkiHdiieHe Keriindik bepy kepek.
- Kaikbimabk KockbiuTb6ekitkiuTe Xofapk Kapatbin 6ekitiH3. Cypet H
HA3AP AYdAPbIHbI
KypraKyuiHdeXyMbic icmey Ke3iHde 3aKbImdaHy Kayni 6ap!
KypraK JxMbIC CopFbIbIH mo3ybiHa eKeJedi.
KoImeH bAckapy pexumHde copfbHbI Kapaycbi3 KaIbIpMaHbI3.
KypraK xMyBc Ke3iHoeKeinik awaHbI depey po3emKaadaH cyblpBlb13.
- Kyat auaacbiH 3JIeKTP po3eTKacbiHa KocbiHbI3.
Xymbictbih aarkanybi
- Xeni ictiKweciH po3eTKaHaA xKbipaTbIHbI3. Kypblfbl TOkTaIbI.
HA3AP AYdAPbIHbI 3aKbIMday moyekeni!
Kambin Kanrah Kip Hemece Kocnanap caIapbHaH 3aKbIMdaHy Kayni.
KypbIINbIHAp KonoaHraHHaH KeuiH depey waUbIHb13 XHe ma3anaHb13.
-
Erep nac HeMece Kocnacb6ap cynbIKtbik aiaJanca, XyMbICTb TOKtaKaHHaH KeiH KypblfHbI Depey WauBbIb3 XHe Ta3anaHbI3, WauBbIb3 XHe ma3anaHbI3-TapayDbI KapaHbI3.
-
Kypblfbl MeH kepek-kapaKaTapdbI 6ocatbIn, KypfaTbIHbI3.
Kytim XaHe TexHnKaJIbIK KbI3MeT Kepcety
KAYIN
3neKmp mo2bHbH cory kHe kappaam any Kayni! KypbIrfbda 3neKmpnIK kHe MexaHukalbIK KOMnoHeHmmep 6ap.
Bananapra mazanay khe naohyubihmexhukanbk b3Mem kepemy ymbicmapbHkyp2i3ye mbubim canbHaobi.
WaihbiHb3 XoHe Ta3aJahb3
HA3AP AYdAPbIHbI
3aKbIMday mayekeni!
Kambl Kanrah Kip HeMece Kocanap caDapbHaH 3aKbIMdahy Kayni.
KypbIINHbI ap KOndaHraHHaH KeuiH depey waibHb3
KHe ma3anaHb3.
KAYIN
3neKmp mozbiHbH cory kHe kappaam any Kayni!
1 Erep aIdaIaTbIH cyIbIKtbIK Kip 60Ica Hemece KypambHda Kocnapanap 60Ica, KypblfBbHc OdaH KeinH wao KepeK: KypblfDaH 6apJIbIK Kip Hemece Kocnapanap Wai bINraHwa, Kocnacbi3 Ta3a TyuBi CydbI KypblfBImeH copbIH3.
KypbIbIbIda 3neKmpnIK XaHE MexaHkaNbIK KOMnoHeHmmep 6ap.
Kypacmbipy,6nuekemy Heme ma3anay anbHda KpybInrBHyI apKaawH Kyam Ke3iHeAxxbpamblb3.
2Xeniictikwecin po3eKaadaa xkbipatbHb3
3 Kblam Kocblny TyImeciH 6acbln, KocblbIM 6enikTePiH Tapbln aJIbIbI3. Cypert C
4 KaKer 6oJca, uHaH neH XbIaam KocblbIM Kypblfbcihdaftb KaNdbkTapDb anbln TactaHb3.
5 KypbIfblHbIH cbIpTBH KymCaK, Ta3a Wy6peKeH XHe MeNdiP TyuCyMeH Ta3AnaHbI3.
6 KypbIITbI MeH KepeK-XkapaKTapDbI 6ocatBIn, KypFaTbIHbI3.
TexHnKaIbIK KbI3MeT KepCeTy
KypbIbnfblTexHnKaIbIK Kbl3MeT KepcTeNdi.
TacbImaJday
KoImeH tacbMaJday
△ABAHJIAHbI3
Cypiny KeiHde kapaKam any Kayni 6ap!
Boc KaBeIbdep MeH WJIaHaMapra cypHydeH Kapakam any Kayni 6ap.
KypbIINrBHyI KbiNkBImKaH Ke3de Ka6enbdep MeH WnHaMapra Ha3ap aydapbHb3.
- KypbIJIbHbI TyTkAcbIHaH KeTepiH3 XHe TaCbIHbI3. Kenik KypanapbImeH TacbImanday
△ECKEPTY
Xapaqam any kayni, 3aKbIMdaHy kayni 6ap!
TacbImaanday Ke3iHde KypblfblhbcamMarbiEcekepiH3.
TacbImaIay Ke3iHde OHbIN KbInKbIn KemyiHe HEmece aHaJnacbHa NaKmbipbIybiHa Kon6epMey yuIH KpbIbHbI KOJIdaHbICMaRbI Hcckaynapra caKeC KoUbHbI3 HEmece 6ekimih3.
- KypbIrfbHbKeNikTepeTacbImaNay Ke3iHKeJnDaHbICTaBHyCKaynapra CaiKec OHbCbIpBInKeTydeHxHe aydapblbN KeTydeH CaKaTb13.
CaKay
HA3AP AYdAPbIHbI
Aa3ra 6aunhaBicmbI 3akbImdaHy kayni 6ap!
ToIbIrBImeH mezInMezeH KypbInrbl a3daH 3aKbIMDaNybl MymkIH.
CaKmamac 6ypbIH KypblfBi MeH KepeK-kaPakapkabI moJIbIFImeH 6ocambIbI3.
KypblfblbIa30aH KOpFaHbI3.
KypbIINfblHbI aUbIK ayada eMec, aR3cb13 Kepde caKaMaHbI3.
△ABAHJIAHbI3
KapaKaam any KeHe 3aKbIMdaHy Kayni 6ap!
KypbInrbl KeIbey bemmepde ayadapblin kemyi MymkiH.
TacbImaanday Ke3iHde KypblfbiHbIH caJMaFBiH eckepiH3.
- Copfbl MeH KepeK-XapaKaTapDbI TObIfbImeH 6ocatblh3.
- Copfbl MeH KepeK-JapaKaTapDbI KeNTipiH3.
- CopfblbIa3dAn KopfraJraH Jekpe caKaTahbI3.
Keedeprinep 6oJFaHda KeMeKaany
KemwiikteprinCe6e6iHaCTbJa KepcetIReH T3imRe caikec 3iH3 Joa anyibHb3 MymKiH. KydkTI Kaanapda HeMece ocBHa atanFaH emec Ce6e6i Kaanapda KbImet KepcTey 6enimH apHaab Maamadapbme HxaapnacbHb3.
| Kate Ce6e6i Jxou | ||
| Coprьжуmbic icten tyn, bipakберлinc жok | Coprьda aya 6ap | 1. Coprьиblc cybiktbik ausdan шыгарылмайынша кение бірhoe рет косын, кайтабырсылб. |
| Copy aiMaftbl NaCTaHfAH. | 1. Кypьлгьнblа лпекгь Куатынah Жыралын. 2. Copy aiMaftbln Ta3alaHb3. | |
| Колmen opынданatableн рекIMderi счыltык DeHrei TbIM TeMeH. | 1. Мукин болca copььнbl copь anынatableн счыltыкka Мукиндінше体现在 салынbl3, Мынбеліді карынbl3: Падалану. | |
| Coprь icke Косылмайы HeMece Жуmbic ke3iHde Ke3diencoK ТOKтВлады | Злект куаты ожьрatableн. | 1. Сацандырьштар мен лпект Косылмьнн Т ekсерінiz. |
| Терморе copьынbl KBi3bln Keу себобинен eшіpresн. | 1. Кypьлгьнblа лпекгь Куатынah Жыралын. 2. Copy aiMaftbln lacбелшектpe徳 Тазалын. 3. Copy aiMaftbln lacбелшектpe徳 Тazалын. 4. Copy aiMaftbln ta3alaHb3. 5. Copy aiMaftbln «Курак» Куатынah алын. алын. Сорьынbl««Кура? Сорьынbl««Ку? Сорьынbl««Ку? Сорьынbl««Ку? Сорьынbl««Ку? Сорьынbl««Ку? Сорьынbl««Ку? Сорьынbl««Ку? Сорьынbl««Ку? Сорьынbl««Ку? Соу? Соу? Соу? Соу? Соу? Соу? Соу? Соу? Соу? Соу? Соу? Соу? Соу? Соу? Соу? Соу? Соу? Соу? Соу? Соу? Соу? Соу? Соу? Соу? Соу? Соу? | |
| Пас белшект copy aiMaftbln 6iteДi. | 1. Кypьлгьнblа лпекгь Куатынah Жыралын. 2. Copy aiMaftbln Ta3alaHb3. | |
| Фимділік т\'emendіdі | Copy aiMaftbl NaCTaHfAH. | 1. Кypьлгьнblа лпекгь Куатынah Жыралын. 2. Copy aiMaftbln Ta3alaHb3. |
| Aydan shyirapу kyyi Tbim a3 | МakcmaIdbi afbyн δиктiriingen acbyn ketTI. Шланг дnametpri мен узibdIFbl duþbɪc TaHdaImaFah. | 1. CoprByhIn MaksmaIdbi apbyHbIn eckepiɪz3, Texrukʌblk Maflmammap- tapaydlb KaPahl3. 2. Kajet bOJca, улк希еркшланг дnametprɪn Hemece Kbickapak ShlaHg y3blDfblH TaHdaHb3, Abyln JxblDAmöfblH ОнmaɪlaHbpy-Tapaydlb KaPahl3. |
| Жыл dam ajхырайын Косылбic aussылмайы He JxabImaiDbI | Aжырату куineri NaCTaHfAH. | 1. Кыспалы albHb3. 2. Кыспалы ta3alaHb3. 3. Кыспалы кени. 3. |
TexHnKaJIbIK MaFJyMaTTap

Chairman of the Board of Management

S. Reiser
Manager Regulatory Affairs & Certification
KykaTamaHbI Kypri3etIH yekineTTi Tynfa:
C. Pau3ep
Alfred Kärcher SE & Co. KG
Alfred-Karcher-Str.28-40
71364 Winnenden (Германь)
Ten.: +49 7195 14-0
Tenepa: +49 7195 14-2212
BHHHeHdEh, 2021/06/01
目次
一般的不注意事項 135
規定に沿った使用 135
安全上的二注意 136
環境保護 136
亚克沙尼 136
同棚品 136
保证 136
機器に關於説明 136
setoTAP 136
運軀 137
手入和MENNTANNS 138
搬送 138
保管 138
障害發生時のト 138
技術一夕 139
流量の最適化 139
EU準抛宣言 139
一般的在注意事項

Chairman of the Board of Management

S. Reiser
Manager Regulatory Affairs & Certification
文書の全種委員:
S. Reiser
Alfred Karcher SE & Co. KG
Alfred-Karcher-Str. 28 - 40
71364 Winnenden (Germany)
電話番号:+49719514-0
FFss: +49 7195 14-2212
Winnenden, 2021/06/01
Jd
1 11111111111111111111111111111111111
| الإستعمال | ||
| .1. راني حبى فصحي مينال صادس مينال صادس مينال صادس مينال صادس مينال صادس مينال صادس مينال صادس مinyinال صادس مinyinال صادس مinyinال صادس مinyinال صادس مinyinال صادس مinyinال صادس مinyinال صادس مinyinال صادس مinyinال صادس مinyinال صادس مinyinال صادس مinyinال صادس مinyinال صادس مinyinال صادس مinyinال صادس مinyinال صادس مinyinال صادès مinyinال صادس مinyinال صادس مinyinال صادس مinyinال صادس مinyinال صادس مinyinال صادس مinyinال صادس مinyinال صادس مinyinال صادس مinyinال صادس مinyinال صادس مinyinال صادس مinyinال صادس مinyinال صادس مinyinال صادس مinyinال صادس مinyinال Smythetic 2.1. 4. 5. | . . . . . . . . . . . . . . . . . . . . . . . . . . . . . . . . . . . . . . . . . . . . . . . . . . . . . . . . . . . . . . . . . . . . . . . . . . . . . . . . . . . . . . . . . . . . . . . . . . . . - . . . . . . . . . . . . . . . . . . . . . . . . . . . . . . . . . . . . . . . . . . . . . . . . . . . . . . . . . . . . . . . . . . . . . . . . . . . . . . . . . . . . . . . . . . . . . . . . . . . 2.1. 2.2. 2.3 |
aal
#
2x - 6 = 2 + 2k 2x + 6 = 2 + 2k .
aJU
SP-111K SP
当 AP//EF 且 AP = EF ,求 S
.020001 000
Ditt Ditt
Jia 100
| 230-240 | 230-240 | V | الله IMM��راني بورس |
| 50 | 50 | Hz | الله IMM��راني بورس |
| 750 | 550 | W | الله IMM��راني بورس |
| 22.000 | 16.000 | l/h | الله IMM��راني بورس |
| 0,08(0,8) | 0,08(0,8) | MPa(bar) | (,)الله IMM��راني |
| 8 | 8 | m | (,)الله IMM��راني |
| 7 | 7 | m | (,)الله IMM��راني |
| 5...35 | 5...35 | جعَة | الله IMM��راني |
| 30 | 20 | mm | الله IMM��راني |
| 50 | 60 | mm | (,)الله IMM��راني |
| 35 | 25 | mm | (,)الله IMM��راني |
| 6,5 | 4,9 | kg | (,)الله IMM��rاني |
Jzaiill aeiol aaiil aaiolgai
4
yIol
a11111111111111111111111
j1j1j1j1j1j1j1j1j1j1j1j1j1j1j1j1j1j1j1j1j1j1j1j1j1j1j1j1j1j1j1j1j1j1j1j1j1j1j1j1j1j1j1j1j1j1j1j1j1j1j
4a
10401 8999 aie 4aod jai
aibi = c_i
g/ASsG/ aaezj 10eJ1 J2005
a.bu
. 2
Jogill Jgolg jIogill pblj 3
C a>la! o
gbsjll ggsgallalglssg jll scc 4
Jgglpui jcg
clog aabig aosti wagaae jgljgl 5
.
6
aIall
. aIaU U JgJl
Jai
J
4a#
-
-
-
-
-
-
-
-
-
-
- 12
-
-
-
-
-
-
-
-
-
pblglll 1
aioiaoo
jglal 10j1 1c pab1g 11uL11 J aui
.1
JJIJI
(1)
yIomega, j0j0ll, Jb5, aiomega, Jb5
jgl11 jg o1c0, 1e Jai11 ic
jUJgJgaaal/2JgllIaogaiolgljge//
JaiIeIyIyIyIg
gljuiu jgeJU 1000 JJIaJlA lac .2
L>aaJyJyJyJyJyJyJyJyJyJyJyJyJy
#
a
1
JolSlll aedall 111 111
gai
laljololalolg jgl
2a ≥ 1 j_0 ≥ j ≤ 1 即 a > 0
g/1 juJg 10 JU
1
a a
592//j#w/1c/4910g22uU
a//jg//Jc jy//uaa//o yj//j
.
. 2
J
.1
.
aW
- | x - 2| = | x - 4|
a//1g//g//1//w//w//w//
j121 15 10000000000000000000000000000000000
10.2
Jbbl Jswll elgwl ojwla aabg jgJlcbaw
.
.3
aUg aU
b > 4
PQ = 23 .
J
4k ④
iYilq5 ao ool >o olzll 1
cJ>1 mJ Lsc aJLg s aJ0 cJ> 0o oJ1 Jc Jb> Jli
algslu algo
1wU/gJax//juaa/au//muuU,juuui/u
jIw oJrll jUaallg/ wUJI Joo) 111 IJUauolll
1/221 Jluu Ug (221
Sulogigolgusuui jge
(G1 2)logglog aogj 1/2 1
(G1%2bggU) Jgag
(aJgSJI aolgai) JaaJI
6
7
(a)UgJ aolgeJI) eJI U Jd; aLw
a|jLgJl a|olgJl ⑨
aog 1g aog 34 gobj alog) G 1 axao alog*
(G1 2gUg
> 0 = 0 ①
(SP 16.000 Dirt)G 1 aJgloa
(SP 22.000 Dirt)
.0gall 1jaggl aegao no ao jwJ
J
B^ 两点共线 严
oal/ aol/2w/wic,ds pgsj b9 plw
aaiSoo 51 aoo 519goo Saa
aog:1 waeo gboj poaiw iic aiaally gbojll Jggi
_g! 1 / 2 g | _g! 1 / 4 g|
Jogill aG 1½?aal alog 1
a>la|gB
pgsjllggsjlld 2
aag G 1%?aal alog lgeb j> 3
0g
Jgogill pI jogill aogj 4
a|la|g
pulllj e p2xuU
4
1gai/11yj
jgllllglw/llw/
Jlss JolSll aai pui jil jg/1 2g
.
gau//luj/luu
Jzill jIgll 1laol dIc
4
juaa//jzw//cl/1j0j
E111 1
aiill lc bcl aee ybae alal ggo no alal
aIg aag slgo aig jSULg aIyjgJU oje U sgi
glaaslaa.aaaljaoeJz>1,lcIaggssss
aillg jnlll a 1c ojgs kss
U. aibb ojg y, gio jol jol jol jol
U.aaaawoogoojgljzjjgoojooj0
jiaall ylll g o jorll l iog aal all oge uol al
(REACH)
:gall lgl g>all 1go Jg> aJl>ll loglaal
www.kaercher.com/REACH
JgBgaggaaasssllalal
jglgag aalalalalalalalalal
. www.kaercher.comg
palaill sio
g>2g>2g>25.ogoll jc gao jgejll puiu Sgi>0
gl alas cdo aai allg. g. xic agjll ogx
Jlaljla> Jy jai Jai aacn jg 1a|
Jalal
gssssssssssssssssssssssssssssssssssssssssssssssssssssssssssssssssssssssssssssssssssss
JU 1111111111111111
ooos ooc loic Jlaa Jaaal Jll
aLac gI aoxiaal algall gocgge JllacU
a aaa a a a a a a a a a a a a a a a a a a a a
aieo cllac aooj gglg jgol
(a) a > a, a
J
141
141
141
141
141
141
141
142
142
142
143
143
143
144
144
144 200
aolc|d|
Jgl JgLiqjgwhll Jd ocI g>
aulllll lwrj! 1g jg jg pds
.1uJ LgjglpIaXul
logalwgl>U1p2xWUuJg uuiuuiu bla>Ul dIc
JUJU
laallll lallll
JiaJIJaawW JgJp
:laallll
-
JaaJIbJaaJIaJbJg>clsI
Lg:2gawal jalljlgw
1,2,3 · 1,3,4 · 2,3,4 · 3,4,5
a10gj aJxai/19oo 2oo xie jioogg ofo
Jawllo g/JeuWll
jai jai u g Jiau u
Register your product and benefit from many advantages.
www.kaercher.com/welcome


Rate your product and tell us your opinion.
www.kaercher.com/dealersearch
Alfred Kärcher SE & Co. KG
Alfred-Karcher-Str.28-40
71364 Winnenden (Germany)
Tel.: +49 7195 14-0
Fax: +49 7195 14-2212