
iSENSYS MF651 CW - Printer CANON - Free user manual and instructions
Find the device manual for free iSENSYS MF651 CW CANON in PDF.
| Product type | Color multifunction printer |
| Brand | Canon |
| Model | iSENSYS MF651 CW |
| Print technology | Color laser |
| Functions | Print, Copy, Scan, Fax |
| Print speed (A4 black) | Up to 21 pages/min |
| Print speed (A4 color) | Up to 21 pages/min |
| Print resolution | Up to 600 x 600 dpi |
| Supported paper sizes | A4, A5, B5, Letter, Legal, Envelopes |
| Paper tray capacity | 250 sheets (standard tray) |
| Connectivity | Ethernet, Wi-Fi, USB 2.0 |
| Display | 5-line color LCD |
| Dimensions (W x D x H) | 430 x 484 x 479 mm |
| Weight | Approximately 26 kg |
| Power supply | AC 220-240 V, 50/60 Hz |
| Power consumption (standby) | Approximately 10 W |
| Power consumption (printing) | Approximately 1,200 W max |
| Operating temperature | 10 to 30 °C |
| Operating humidity | 20 to 80% RH (non-condensing) |
| Safety | Automatic shutdown in case of overheating, CE certification |
| Maintenance and cleaning | Regularly clean the output tray and sensors with a soft, dry cloth |
| Spare parts and repairability | Toner cartridges, drum unit, waste toner container available |
| General information | User manual available for download on the Canon website |
Frequently Asked Questions - iSENSYS MF651 CW CANON
User questions about iSENSYS MF651 CW CANON
0 question about this device. Answer the ones you know or ask your own.
Ask a new question about this device
Download the instructions for your Printer in PDF format for free! Find your manual iSENSYS MF651 CW - CANON and take your electronic device back in hand. On this page are published all the documents necessary for the use of your device. iSENSYS MF651 CW by CANON.
USER MANUAL iSENSYS MF651 CW CANON
• After you finish reading this guide, store it in a safe place for future reference.
- The information in this guide is subject to change without notice.
1 Important Safety Instructions Be sure to read these instructions before using the machine.
2 Setup Guide (this document)
3 User's Guide / FAQ

text_image
QR code with a hand holding a smartphone displaying a QR code, likely for mobile payment or scanning.https://oip.manual.canon/
Unless otherwise stated, illustrations used in this document are for the MF657Cdw.
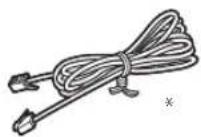
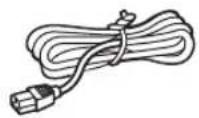
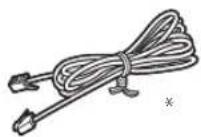
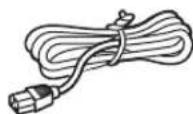
1 Checking the Items Included

natural_image
Line drawing of a printer with an attached case and a close-up view (no text or symbols)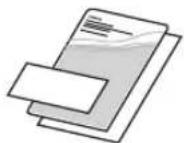


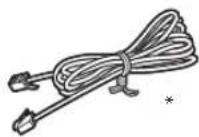
* May not be included with some models.
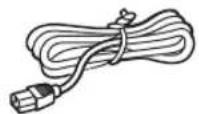
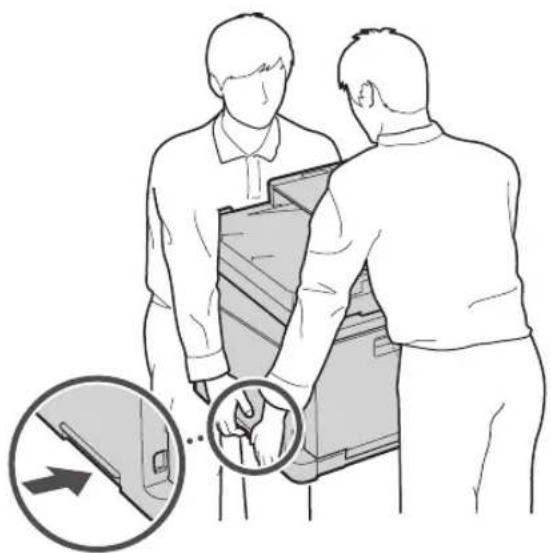
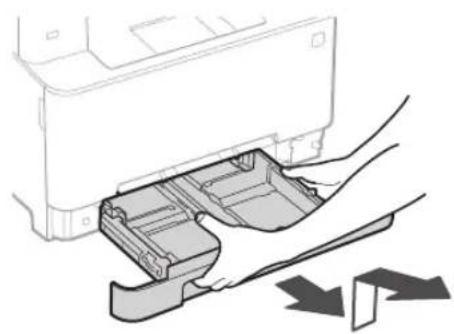
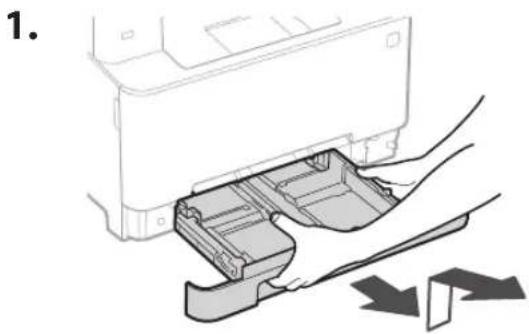
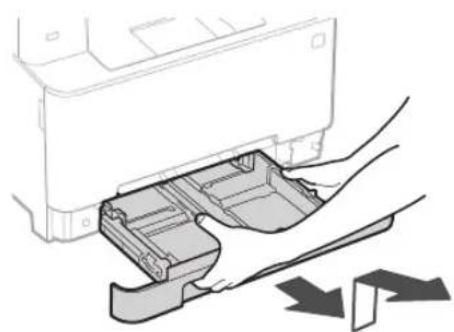
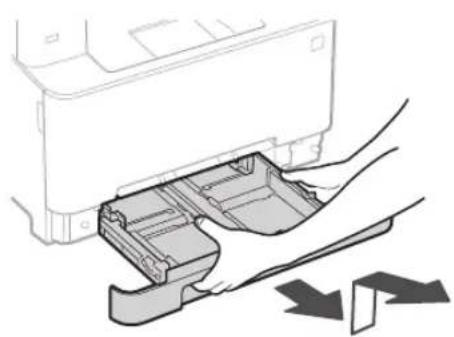
2 Removing the Packing Material
- Install the machine in the location where it will be used.
natural_image
Illustration of two people interacting with a device, showing hand positioning and directional arrows (no text or symbols)2. Remove all packing material.
Remove all of the tape.

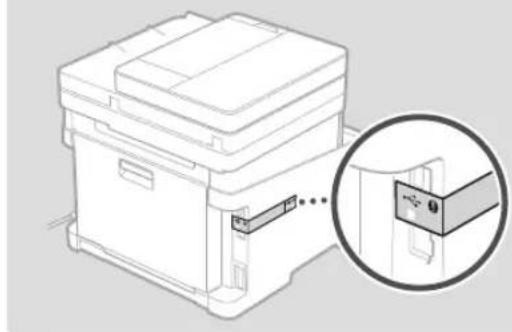
Do not remove the sticker that covers the USB port until you actually use the USB port.
natural_image
Diagram of a printer or scanner device with an inset close-up showing a close-up of its internal components (no text or symbols present)
natural_image
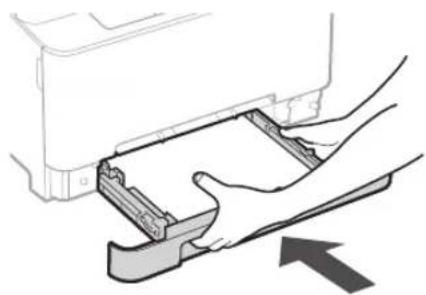
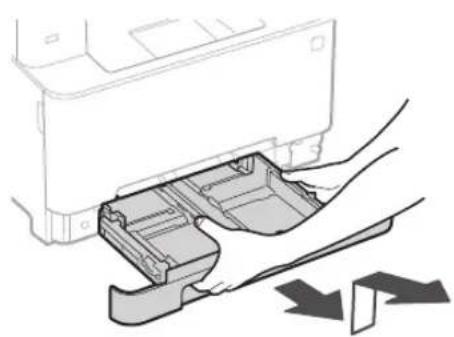
Diagram of a printer's internal structure showing paper feed, paper tray, and scroll (no text or symbols)3 Loading Paper
1.

natural_image
Illustration of a printer's internal structure being inserted into a slot, with no visible text or symbols
text_image
A4/A5 A4/LGL
text_image
Ensure that the amount of paper loaded is not above this line4.

natural_image
Illustration of hands inserting a device into a folder, with an arrow indicating direction (no text or symbols present)4
Installing the Optional Part

If you are not using optional part, proceed to step 5
Before Installing the Optional Part
When installing the optional part after the machine has been installed, perform the following before starting work:
- Shut down the machine and your computer.
- Unplug the machine from the mains power outlet.
- Disconnect all cords and cables from the machine.
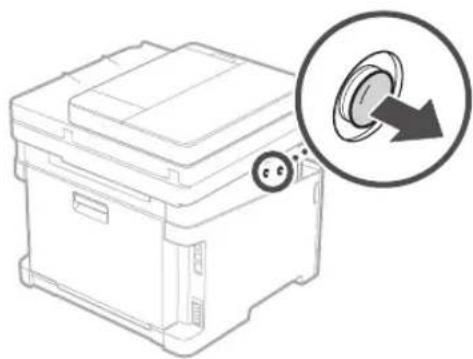
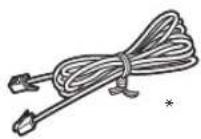
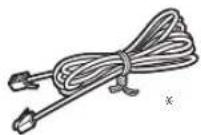
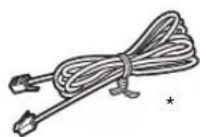
Handset
* The handset cannot be used with some models.
natural_image
Line drawing of a mechanical device with a magnified inset showing a circular button labeled '←' (no text or symbols on the device itself)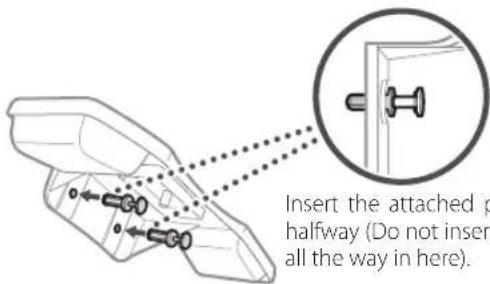
text_image
Insert the attached p halfway (Do not insert all the way in here).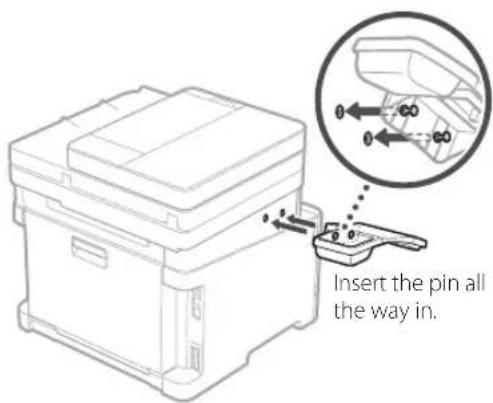
text_image
Insert the pin all the way in.
text_image
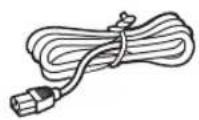
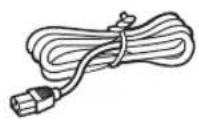
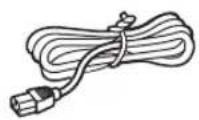
Diagram showing a printer device with cable routing and a magnified inset highlighting the internal connection point.5 Connecting the Power Cord
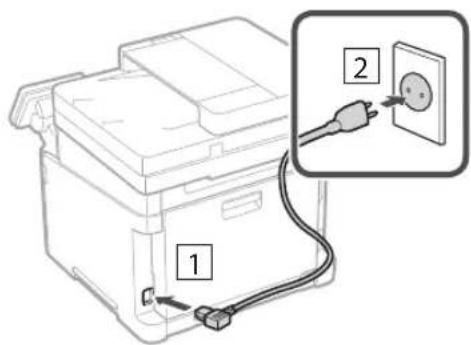
text_image
Diagram showing a printer with labeled parts and an electrical outlet, highlighting two connected components.6 Specifying the Basic Settings
When you turn on the machine for the first time, the Setup Guide appears on the operation panel. Perform the initial machine setup by following the on-screen instructions.
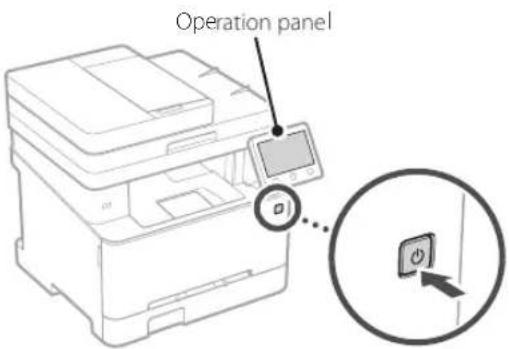
text_image
Operation panel-
Select the language, then the country/region and finally the time zone.
-
Set the current date/time.
7 Specifying the Security Settings
Specify the basic security settings to prevent unauthorized access to the machine.
-
To use the Remote UI, select
. -
To continue without using the Remote UI, select
and proceed to step 8. -
To use System Manager mode, select
. -
Set the System Manager ID and PIN so that you can configure the settings for extended functions and the management of access privileges, etc.
-
To continue without using System Manager mode, select
and proceed to step 5. -
Set the System Manager ID.
Enter any number and then select
-
Set the System Manager PIN.
-
Enter any number and then select
. -
Re-enter the same PIN on the next screen as confirmation and select
. -
To use General User mode, select
. -
Set the PIN to be used by general users to access the Remote UI.
-
To continue without using General User mode, select
and proceed to step 8. -
Set the Remote UI Access PIN.
-
Enter any number and then select
. - Re-enter the same PIN on the next screen as confirmation and select
.
8 Using Color Correction
For better print results, the use of color correction is recommended.
- Choose whether to use color correction.
- Check that the paper displayed on screen is actually loaded and then select
. - Select
and correct the colors by following the on-screen instructions.
9 Specifying the Network Settings
Specify the settings for connecting the machine to a network. Before proceeding, check that the computer and router are correctly connected to the network.
Wireless LAN
- Check the router's "SSID" and "Network key."
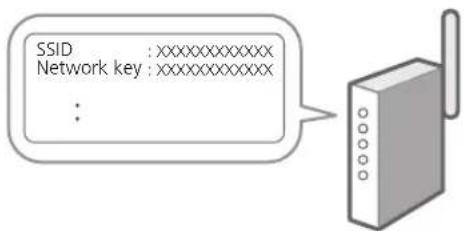
text_image
SSID :XXXXXXXXXXXX Network key :XXXXXXXXXXXX :- To configure the settings, select
on the operation panel. - Check the message and select
. - Select the network with a matching SSID.
- Enter the password (network key) and select
.
Wired LAN
Connect the router to the machine with a LAN cable and then select
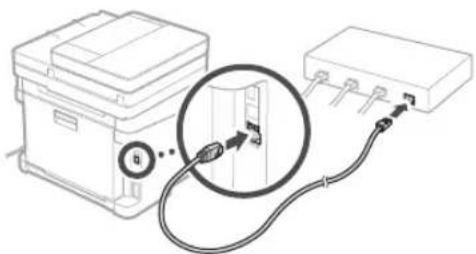
natural_image
Diagram showing a device connected to a rectangular electronic device via cable, with no visible text or symbols.10 Ending the Setup Guide
Check the description in the Application Library and then select
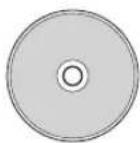
11 Installing the Software/Drivers
Install the software and drivers from the CD/DVD-ROM included, or visit the URL below and download them from the Canon website for your country/region.
https://global.canon/en/support/
XXXXXXXX download
Example: MF657Cdw download

On models with a fax function, configure the fax settings next.
12 Fax Setup
*These settings do not appear on models without a fax function.
The first time you select
Setup Procedure
- Select
on the Home screen. - Select
. - Select
. - Enter the Unit Telephone Number and select
. - Select
. - Enter the Unit Name (name and company name, etc.) and select
. -
Select the receive mode that best suits your telephone connection and the way you receive calls.
Refer to the illustration below and selector . Finally, select to set the receive mode. -
Connect the machine to a telephone line.
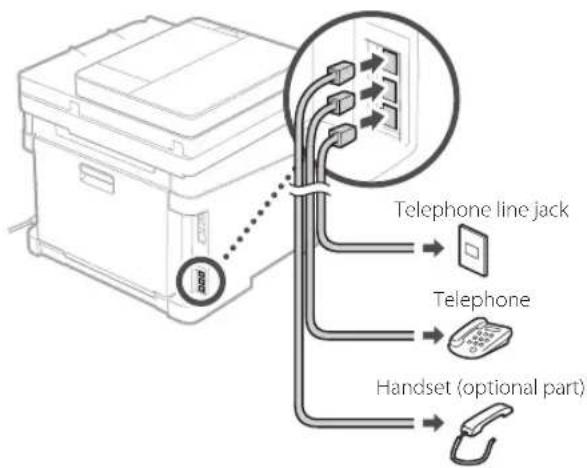
flowchart
graph TD
    A["Printer"] --> B["Telephone line jack"]
    B --> C["Handset (optional part)"]
    C --> D["Phone"]
-
When you have completed the connection, select
. -
Select
.
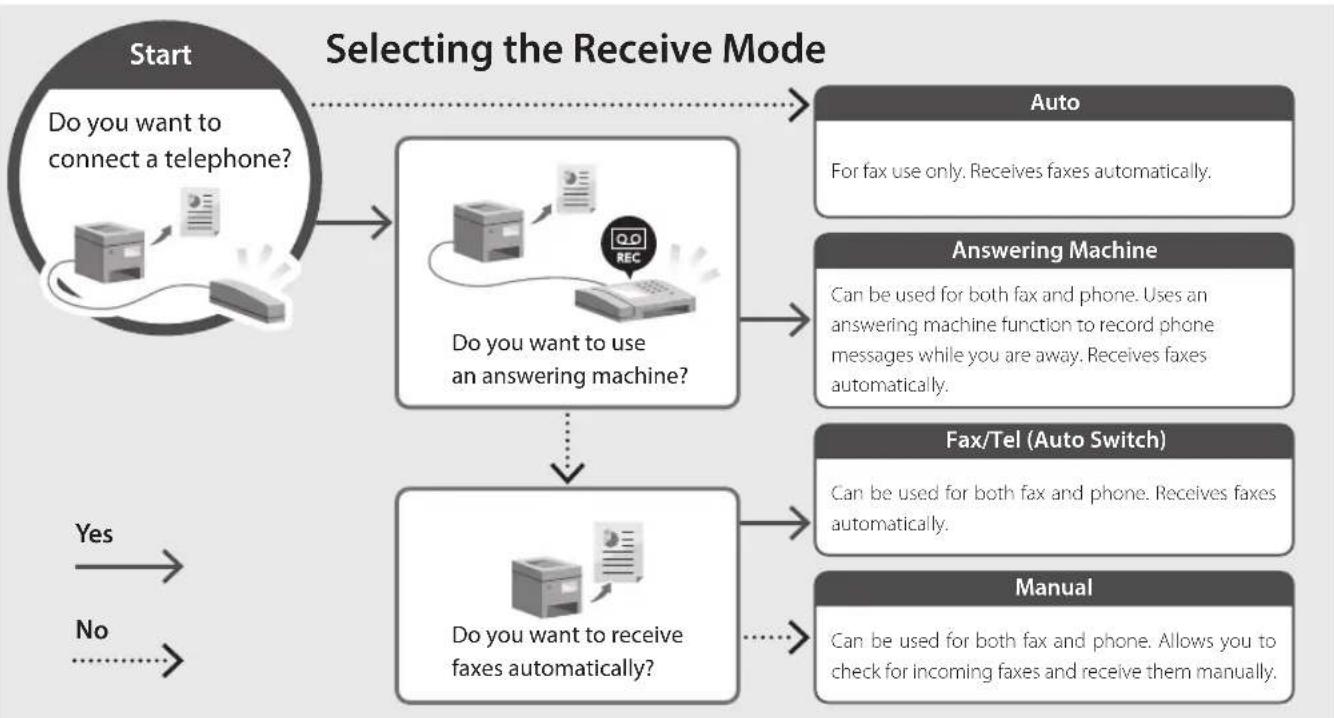
flowchart
graph TD
    A["Start\nDo you want to connect a telephone?"] --> B["Do you want to use an answering machine?"]
    B --> C["Auto\nFor fax use only. Receives faxes automatically."]
    B --> D["Answering Machine\nCan be used for both fax and phone. Uses an answering machine function to record phone messages while you are away. Receives faxes automatically."]
    B --> E["Fax/Tel (Auto Switch)\nCan be used for both fax and phone. Receives faxes automatically."]
    B --> F["Manual\nCan be used for both fax and phone. Allows you to check for incoming faxes and receive them manually."]
    G["Yes"] --> H["No"]
    I["No"] --> J["Selecting the Receive Mode"]
Canon
MF657Cdw
MF655Cdw
MF651Cw
Guide de configuration
text_image
QR code and smartphone payment interface with Chinese text labelshttps://oip.manual.canon/
natural_image
Line drawing of a printer with an attached case and a close-up view (no text or symbols)

natural_image
Illustration of two people interacting with a device, showing hand positioning and directional arrows (no text or symbols)natural_image
Line drawing of a mechanical device with an inset close-up showing a component detail (no text or symbols)
natural_image
Diagram of a printer's internal structure showing paper feed, print tray, and scroll wheel (no text or symbols)natural_image
Illustration of a printer's internal structure being inserted into a device, with no visible text or symbols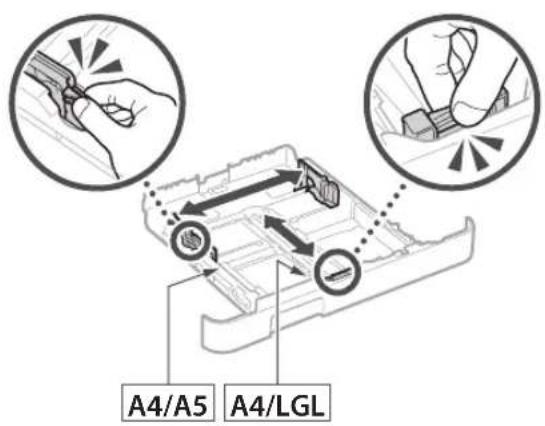
text_image
A4/A5 A4/LGL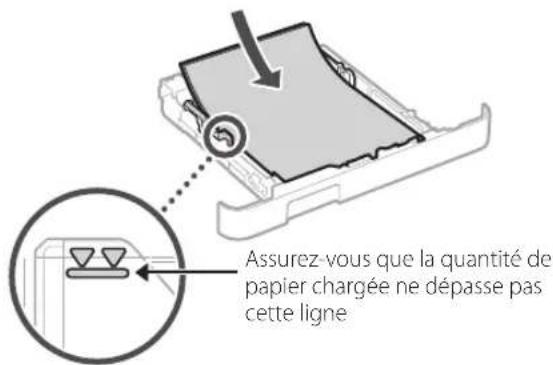
natural_image
Illustration of hands inserting a device into a folder (no text or symbols visible)4
natural_image
Line drawing of a mechanical device with a magnified inset showing a circular button labeled '←' (no text or symbols on the device itself)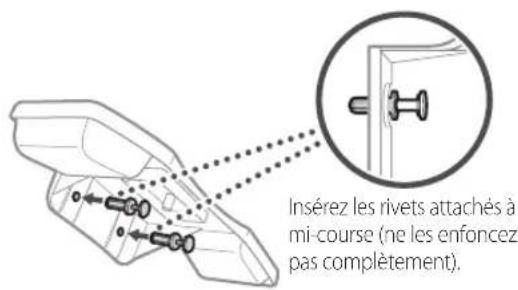
natural_image
Line drawing of a printer with cable and connector, showing internal components and a magnified inset (no text or symbols)text_image
Diagram showing a printer with labeled components and an electrical outlet, highlighting two connected outlets.6 Réglages de base
natural_image
Diagram showing a device connected to an electronic device via cable, with no visible text or symbols.text_image
QR code with a hand holding a smartphone displaying a QR code, likely for mobile payment or scanning.https://oip.manual.canon/
natural_image
Line drawing of a printer with an attached close-up of its internal components (no text or symbols)


natural_image
Illustration of two people interacting with a device, showing hand positioning and directional arrows (no text or symbols)natural_image
Diagram of a printer or printer device with an inset close-up showing a close button (no text or symbols present)
natural_image
Diagram of a printer's internal structure with arrows indicating motion, no text or symbols presentnatural_image
Illustration of a printer's internal structure being inserted, showing paper feeding into a plastic sheet (no text or symbols)
text_image
A4/A5 A4/LGL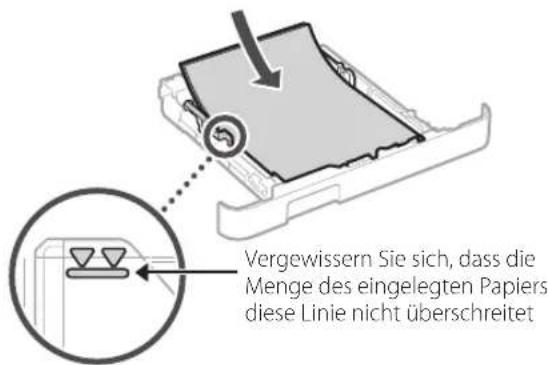
natural_image
Illustration of hands inserting a device into a folder, with an arrow indicating direction (no text or symbols present)4
natural_image
Line drawing of a mechanical device with a magnified inset showing a circular button or dial (no text or symbols)
text_image
Diagram showing a printer or scanner device with an attached cable, highlighting a cable being inserted into a device panel.text_image
Diagram showing a printer with labeled parts and an electrical outlet, including a plug and socket connection.natural_image
Diagram showing a device connected to an electronic device via cable, with no visible text or symbols.text_image
QR code with a hand holding a smartphone displaying a QR code, likely for mobile payment or scanning.https://oip.manual.canon/
natural_image
Line drawing of a printer with an attached case and a close-up view (no text or symbols)


natural_image
Illustration of two people interacting with a device, showing hand positioning and a magnified inset of the device (no text or symbols)natural_image
Diagram of a printer or scanner device with an inset close-up showing a close-up of its internal components (no text or symbols present)
natural_image
Diagram of a printer's internal structure showing paper feed, paper tray, and scroll wheel (no text or symbols)3 Caricamento carta

natural_image
Illustration of a printer's internal structure being inserted, showing hand placement and arrow indicating process (no text or symbols)
text_image
A4/A5 A4/LGL
natural_image
Illustration of hands inserting a device into a folder, with an arrow indicating direction (no text or symbols present)4
natural_image
Line drawing of a mechanical device with a magnified inset showing a circular button (no text or symbols)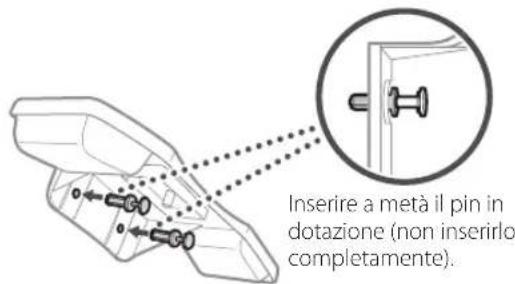
text_image
Diagram showing a printer with cable and connector, highlighting a close-up of the device's internal structure.text_image
Diagram showing a printer with labeled parts and an electrical outlet, highlighting two connected components.text_image
SSID :XXXXXXXXXXXX Chiave di rete :XXXXXXXXXXXX :natural_image
Diagram showing a device connected to an electronic device via cable, with no visible text or symbols.text_image
QR code with a hand holding a smartphone displaying a QR code, likely for mobile payment or scanning.https://oip.manual.canon/
natural_image
Line drawing of a printer with a close-up view of its internal components (no text or symbols)

natural_image
Illustration of two people interacting with a device, one pointing at a hand gesture (no text or symbols present)natural_image
Diagram of a printer or printer device with an inset close-up showing a close-up of its internal structure (no text or symbols present)
natural_image
Diagram of a printer's internal structure showing paper feed, paper tray, and scroll (no text or symbols)3 Cargar papel
1.

natural_image
Illustration of a printer's internal structure being inserted into a paper holder, with no visible text or symbols.
text_image
A4/A5 A4/LGL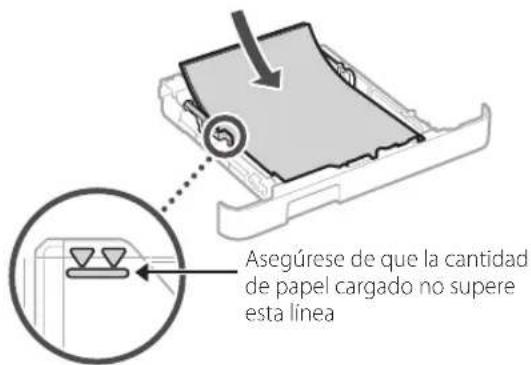
natural_image
Illustration of hands inserting a device into a folder, with an arrow indicating direction (no text or symbols present)4
natural_image
Line drawing of a portable electronic device with a magnified inset showing a circular button labeled '←' (no text or symbols on the device itself)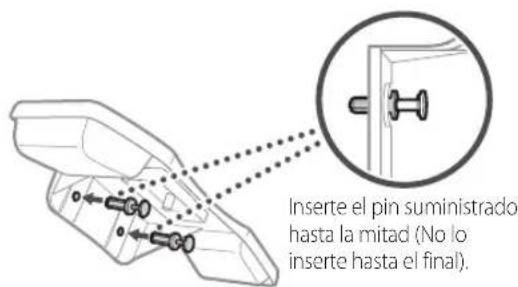
text_image
Diagram showing a printer with cable and connector, highlighting a close-up of the device's internal structure.text_image
Diagram showing a printer with labeled parts and an electrical outlet, highlighting two connected components.natural_image
Diagram showing a device connected to an electronic device via cable, with a magnified inset highlighting a component (no text or symbols present)text_image
QR code with a hand holding a smartphone displaying a QR code, likely for mobile payment or scanning.https://oip.manual.canon/
natural_image
Line drawing of a printer with an attached case and a close-up view (no text or symbols)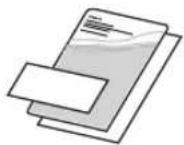


natural_image
Illustration of two people interacting with a device, showing a hand gesture inside a device (no text or symbols present)natural_image
Diagram of a printer or scanner device with an inset close-up showing a close-up of its internal components (no text or symbols present)
natural_image
Diagram of a printer's internal structure with arrows indicating motion, no text or symbols present3 Càrrega de paper
1.

natural_image
Illustration of a printer's internal structure being inserted into a paper holder, with no visible text or symbols.
text_image
A4/A5 A4/LGL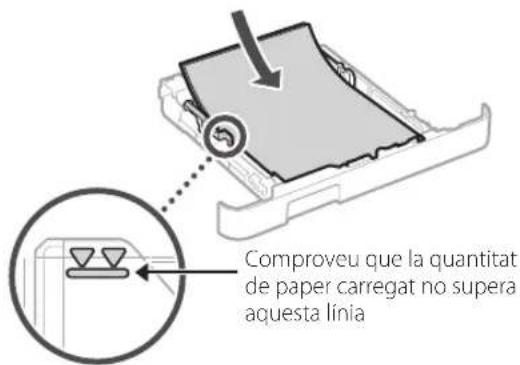
natural_image
Illustration of hands inserting a device into a folder, with an arrow indicating direction (no text or symbols present)4
natural_image
Line drawing of a mechanical device with a magnified inset showing a circular button (no text or symbols)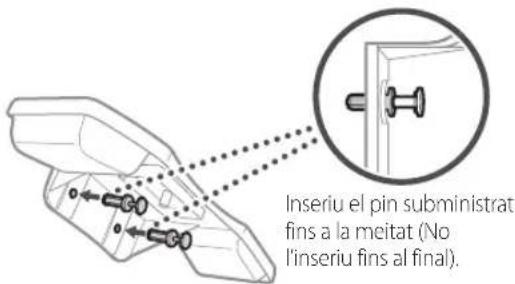
text_image
Diagram showing a printer with cable and connector, highlighting a close-up of the device's internal structure.text_image
Diagram showing a printer with labeled parts and an electrical outlet, highlighting two connected components.natural_image
Diagram showing a device connected to an electronic device via cable, with no visible text or symbols.MF657Cdw MF655Cdw MF651Cw
Konfigurazio gidaliburua
text_image
QR code with a hand holding a smartphone displaying a QR code, likely for mobile payment or scanning.https://oip.manual.canon/
natural_image
Line drawing of a printer with a separate close-up of its internal components (no text or symbols)


natural_image
Illustration of two people interacting with a device, showing hand positioning and directional arrows (no text or symbols)natural_image
Diagram of a printer or printer device with an inset close-up showing a close-up of its internal structure (no text or symbols present)
natural_image
Diagram of a printer's internal structure with arrows indicating motion, no text or symbols present3 Papera kargatzea
1.

natural_image
Illustration of a printer's internal structure being inserted into a paper holder, with no visible text or symbols.
text_image
A4/A5 A4/LGL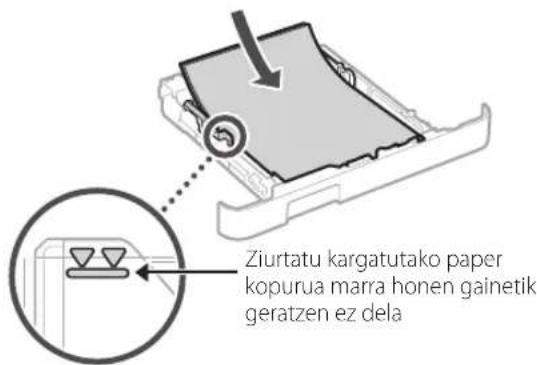
natural_image
Illustration of hands inserting a device into a folder, with an arrow indicating direction (no text or symbols present)4
natural_image
Line drawing of a mechanical device with a magnified inset showing a circular button (no text or symbols)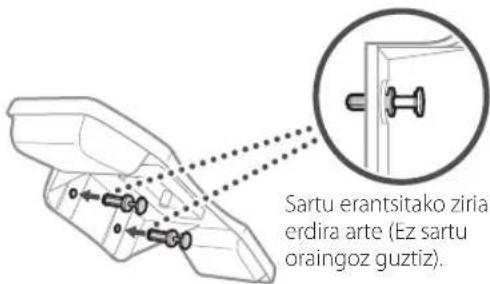
natural_image
Diagram of a printer with cable and connector, showing internal components and connection (no text or symbols)text_image
Diagram showing a printer with labeled parts and an electrical outlet, highlighting two connected components.text_image
Operazio panelatext_image
SSID :XXXXXXXXXXXX Sareko gakoa :XXXXXXXXXXXX :natural_image
Diagram showing a device connected to an electronic device via cable, with no visible text or symbols.10 Konfigurazio gida amaitzea
text_image
QR code with a hand holding a smartphone displaying a QR code, likely for mobile payment or scanning.https://oip.manual.canon/
natural_image
Illustration of two people interacting with a device, showing hand positioning and directional arrows (no text or symbols)text_image
Diagram illustrating the process of printer handling a device, showing step-by-step assembly and rotation mechanism.3 Colocar papel
1.

natural_image
Illustration of a hand inserting a plastic into a printer drawer (no text or symbols visible)
text_image
A4/A5 A4/LGL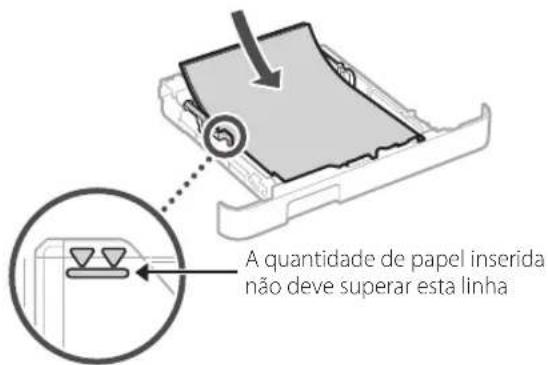
natural_image
Illustration of hands inserting a device into a folder, with an arrow indicating direction (no text or symbols present)4
natural_image
Line drawing of a mechanical device with a magnified inset showing a circular button (no text or symbols)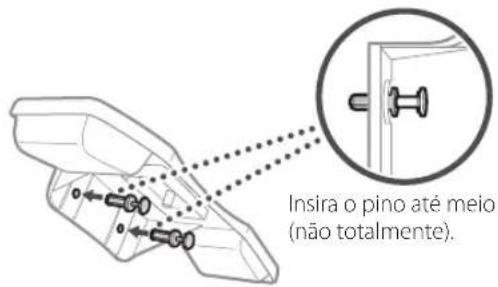
text_image
Diagram showing a device with cable and connector, highlighting a close-up of the internal panel with an arrow indicating connection.text_image
Diagram showing a printer with labeled parts and an electrical outlet, including a plug and cable connection.text_image
SSID :XXXXXXXXXXXX Chave de rede :XXXXXXXXXXXX :natural_image
Diagram showing a device connected to an electronic device via cable, with no visible text or symbols.MF657Cdw MF655Cdw MF651Cw
Οδηγός διαμόρφωσης
text_image
QR code and smartphone icon with Chinese text, likely for scanning to access digital content or a payment apphttps://oip.manual.canon/
natural_image
Line drawing of a printer with an attached case and a close-up view of the case (no text or symbols)
natural_image
Illustration of two electronic components: a stack of documents and a cord with a USB cable (no text or symbols)
natural_image
Illustration of two people interacting with a device, showing hand positioning and directional arrows (no text or symbols)natural_image
Diagram of a printer or printer device with an inset close-up showing a close-up of its internal components (no text or symbols present)
natural_image
Diagram of a printer's internal structure showing paper feed, paper tray, and scroll wheel (no text or symbols)natural_image
Illustration of a printer's internal compartment being inserted into a paper holder, with no visible text or symbols.
text_image
A4/A5 A4/LGL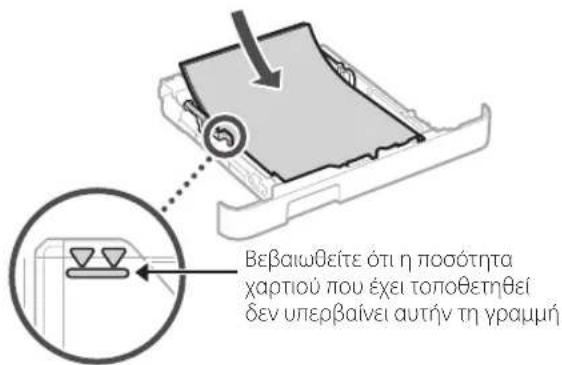
natural_image
Illustration of hands inserting a device into a folder (no text or symbols visible)4
natural_image
Line drawing of a mechanical device with a magnified inset showing a circular component (no text or symbols)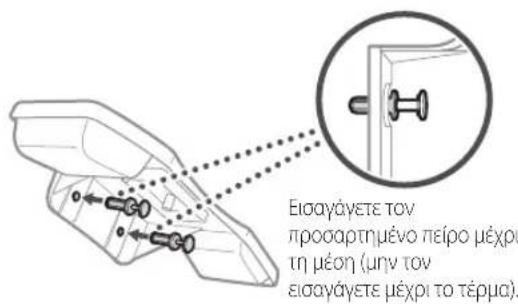
text_image
Diagram showing a printer with cable and connector, highlighting a cable being inserted into a device panel.text_image
Diagram showing a printer with labeled parts and an electrical outlet, including a plug inserted into the socket.natural_image
Diagram showing a device connected to an electronic device via cable, with no visible text or symbols.text_image
QR code with a hand holding a smartphone displaying a QR code, likely for mobile payment or scanning.https://oip.manual.canon/
natural_image
Line drawing of a printer with an attached case and a close-up view (no text or symbols)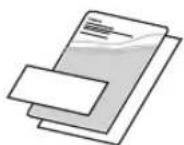

natural_image
Illustration of two people interacting with a device, showing hand positioning and a magnified inset of the device (no text or symbols)2. Fjern alle emballagematerialer.
Fjern al tape.

natural_image
Diagram of a printer or printer device with an inset close-up showing a close-up of its internal structure (no text or symbols present)
natural_image
Diagram of a printer's internal structure showing paper feed, paper tray, and scroll (no text or symbols)3 Ilægning af papir
1.
natural_image
Illustration of a printer's internal drawer with a hand inserting a clip (no text or symbols)
text_image
A4/A5 A4/LGL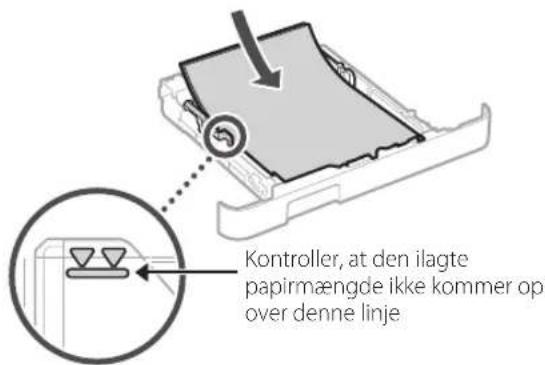
natural_image
Illustration of hands inserting a device into a folder, with an arrow indicating direction (no text or symbols present)4
natural_image
Line drawing of a mechanical device with a magnified inset showing a circular button (no text or symbols)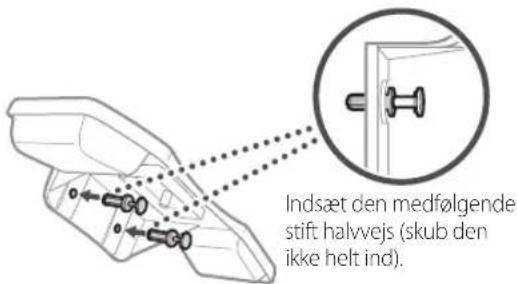
text_image
Diagram showing a printer device with cable routing and a magnified inset highlighting the internal structure.text_image
Diagram showing a printer with labeled parts and an electrical outlet, highlighting two connected components.text_image
SSID :XXXXXXXXXXXX Netverksnoge :XXXXXXXXXXXX :natural_image
Diagram showing a device connected to an electronic device via cable, with no visible text or symbols.11 Installation af software/ drivere
text_image
QR code with a hand holding a smartphone displaying a QR code, likely for mobile payment or scanning.https://oip.manual.canon/
natural_image
Line drawing of a printer with an attached case and a close-up view of the case (no text or symbols)


natural_image
Illustration of two people interacting with a device, showing hand placement and directional arrow (no text or symbols)natural_image
Diagram of a printer or printer device with an inset close-up showing a close-up of its internal structure (no text or symbols present)
natural_image
Diagram of a printer's internal structure showing paper feed, paper tray, and scroll wheel (no text or symbols)3 Papier laden
1.

natural_image
Illustration of a printer's internal structure being inserted into a paper holder, with no visible text or symbols.
text_image
A4/A5 A4/LGL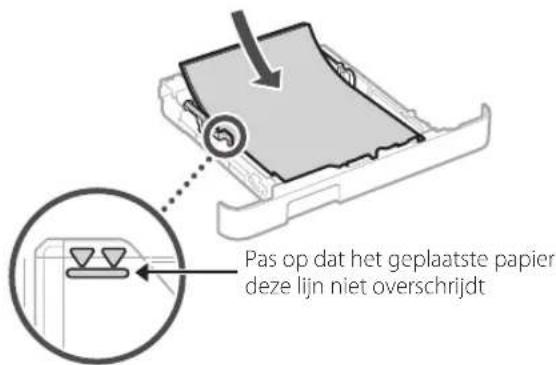
natural_image
Illustration of hands inserting a device into a plastic housing (no text or symbols)4
natural_image
Line drawing of a mechanical device with a magnified inset showing a circular button labeled '←' (no text or symbols on the device itself)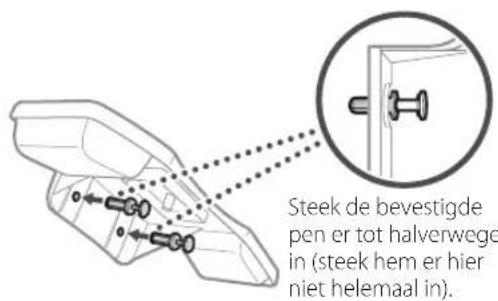
text_image
Diagram showing a device with cable and connector, highlighting a close-up of the internal component with arrows indicating connection.text_image
Diagram showing a printer with labeled components and an electrical outlet, including a plug and socket connection.text_image
SSID :XXXXXXXXXXXX Netwerksleutel:XXXXXXXXXXXX :natural_image
Diagram showing a device connected to an electronic device via cable, with no visible text or symbols.text_image
QR code with a hand holding a smartphone displaying a QR code, likely for mobile payment or scanning.https://oip.manual.canon/

natural_image
Line drawing of a printer with an attached case and a close-up view (no text or symbols)


natural_image
Illustration of two people interacting with a device, showing hand positioning and directional arrows (no text or symbols)natural_image
Technical line drawing of a mechanical device with an inset close-up showing a close-up detail (no text or symbols)
natural_image
Diagram of a printer's internal structure showing paper feed, print tray, and scroll wheel (no text or symbols)3 Legge i papir
1.

natural_image
Illustration of a printer's internal structure being inserted into a paper holder, with no visible text or symbols.
text_image
A4/A5 A4/LGL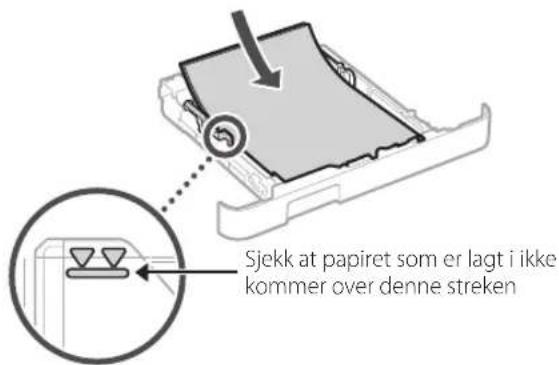
natural_image
Illustration of hands inserting a device into a folder, with an arrow indicating direction (no text or symbols present)4
natural_image
Line drawing of a mechanical device with a magnified inset showing a circular button (no text or symbols)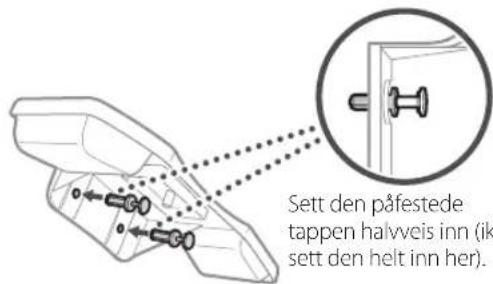
text_image
Diagram showing a printer with cable and connector, highlighting a close-up of the device's internal structure.text_image
Diagram showing a printer with labeled parts and an electrical outlet, including a plug and socket connection.natural_image
Diagram showing a device connected to a rectangular electronic component via cable, with no visible text or symbols.MF657Cdw MF655Cdw MF651Cw
Installations-guide
text_image
QR code with a hand holding a smartphone displaying a QR code, likely for mobile payment or scanning.https://oip.manual.canon/
natural_image
Line drawing of a printer with an attached case and a close-up view (no text or symbols)

natural_image
Illustration of two people interacting with a device, showing hand positioning and directional arrows (no text or symbols)natural_image
Diagram of a printer or scanner device with an inset close-up showing a close-up of its internal components (no text or symbols present)
natural_image
Diagram of a printer's internal structure showing paper feed, paper tray, and scroll wheel (no text or symbols)3 Fylla på papper
1.

natural_image
Illustration of a printer's internal compartment being inserted into a paper holder, with no visible text or symbols.
text_image
A4/A5 A4/LGL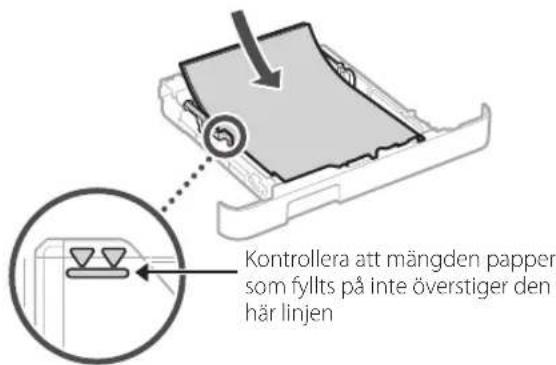
natural_image
Illustration of hands inserting a device into a folder, with an arrow indicating direction (no text or symbols present)4
Installera tillvalskomponent

natural_image
Line drawing of a mechanical device with a magnified inset showing a circular button (no text or symbols)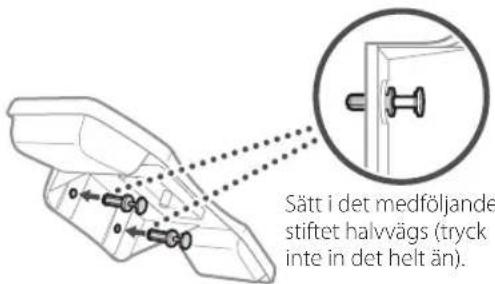
text_image
Diagram showing a device with cable and connector, highlighting a close-up of the internal panel with an arrow indicating connection.5 Ansluta nätkabeln

text_image
Diagram showing a printer with labeled parts and an electrical outlet, highlighting two connected components.text_image
SSID :XXXXXXXXXXXX Nätverksnyckel :XXXXXXXXXXXX :natural_image
Diagram showing a device connected to an electronic device via cable, with no visible text or symbols.10 Avsluta installationsguiden
11 Installera program/ drivrutiner
text_image
QR code with a hand holding a smartphone displaying a QR code, likely for mobile payment or scanning.https://oip.manual.canon/
natural_image
Line drawing of a printer with a close-up view of its internal components (no text or symbols)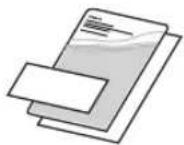


natural_image
Illustration of two people interacting with a device, showing hand positioning and a magnified inset of the device (no text or symbols)natural_image
Diagram of a mechanical device with an inset close-up showing a component detail (no text or symbols)
natural_image
Diagram of a printer's internal structure showing paper feed, paper tray, and scroll (no text or symbols)natural_image
Illustration of a printer's internal structure being inserted, showing paper feeding into a plastic sheet (no text or symbols)
text_image
A4/A5 A4/LGL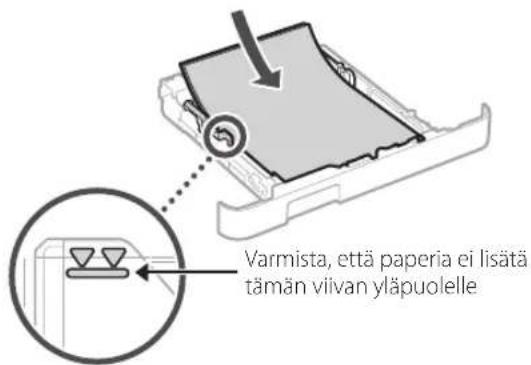
natural_image
Illustration of hands inserting a device into a folder, with an arrow indicating direction (no text or symbols present)4
natural_image
Line drawing of a mechanical device with a magnified inset showing a circular button (no text or symbols)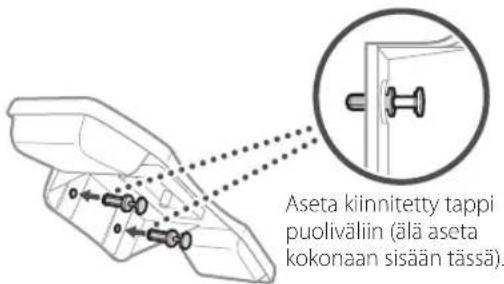
text_image
Diagram showing a printer with cable and connector, highlighting a close-up of the device's internal structure.text_image
Diagram showing a printer with labeled parts and an electrical outlet, highlighting two connected components.natural_image
Diagram showing a device connected to an electronic device via cable, with a magnified inset highlighting a detail (no text or symbols present)text_image
Hand holding smartphone displaying a QR code on screen, with motion lines indicating speed and alerthttps://oip.manual.canon/
natural_image
Line drawing of a printer with an attached case and a magnified view (no text or symbols)


natural_image
Illustration of two people interacting with a device, showing hand positioning and a magnified inset of the device (no text or symbols)natural_image
Diagram of a printer or printer with an inset close-up showing a close-up of its internal structure (no text or symbols present)
natural_image
Diagram of a printer's internal structure showing paper feed, print tray, and control panel (no text or symbols)3 Загрузка бумаги
natural_image
Illustration of a printer's internal structure being inserted, showing hand placement and arrow indicating process (no text or symbols)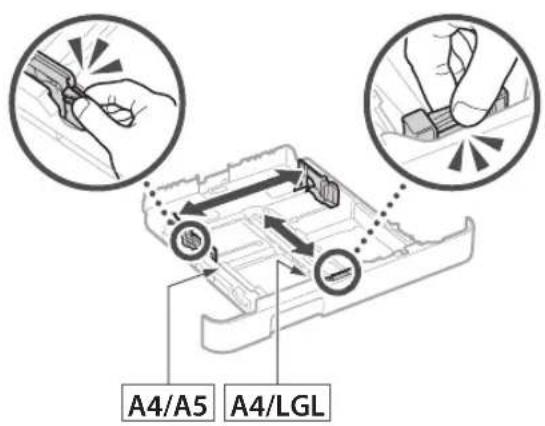
text_image
A4/A5 A4/LGL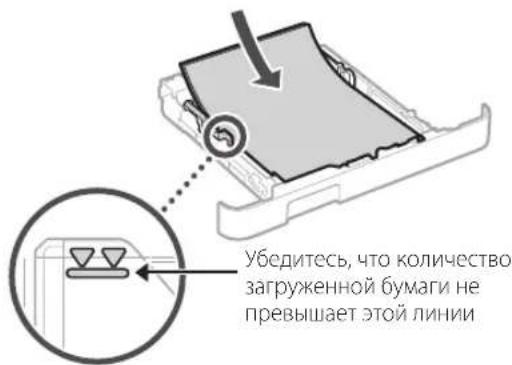
natural_image
Illustration of hands inserting a device into a drawer (no text or symbols visible)4
natural_image
Line drawing of a mechanical device with a magnified inset showing a circular button (no text or symbols)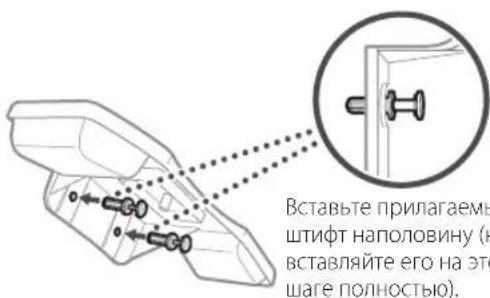
text_image
Diagram showing a device with cable and connector, highlighting a cable being inserted into a panel with an arrow indicating direction.text_image
Diagram showing a printer with labeled parts and an electrical outlet, highlighting two connected components.natural_image
Diagram showing a device connected to an electronic device via cable, with no visible text or symbols.MF657Cdw MF655Cdw MF651Cw
text_image
QR code with a hand holding a smartphone displaying a QR code, likely for mobile payment or scanning.https://oip.manual.canon/
natural_image
Line drawing of a printer with an attached case and a close-up view (no text or symbols)

natural_image
Illustration of two people interacting with a device, showing a hand gesture inside (no text or symbols)natural_image
Line drawing of a printer or printer with an inset magnified view showing a close-up of the printer's internal structure (no text or symbols present)
natural_image
Diagram of a printer's internal structure with arrows indicating motion, no text or symbols presentnatural_image
Illustration of a printer's internal structure being inserted, showing hand placement and arrow indicating process (no text or symbols)
text_image
A4/A5 A4/LGL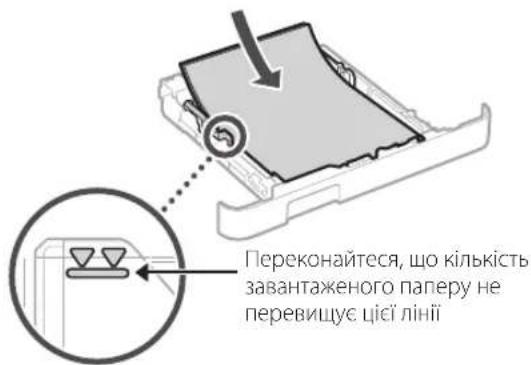
natural_image
Illustration of hands inserting a device into a folder, with an arrow indicating direction (no text or symbols present)4
natural_image
Line drawing of a mechanical device with a magnified inset showing a circular button or dial (no text or symbols)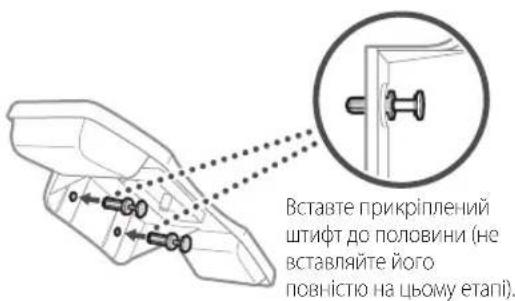
text_image
Diagram showing a device with cable and connector, highlighting a close-up of the internal panel with an arrow indicating connection.text_image
Diagram showing a printer with labeled parts and an electrical outlet, highlighting two connected components.natural_image
Diagram showing a device connected to a rectangular electronic component via cable, with no visible text or symbols.MF657Cdw MF655Cdw MF651Cw
text_image
QR code with a hand holding a smartphone displaying a QR code, likely for mobile payment or scanning.https://oip.manual.canon/
natural_image
Line drawing of a printer with an attached case and a close-up view (no text or symbols)


natural_image
Illustration of two people interacting with a device, showing hand positioning and directional arrow (no text or symbols)natural_image
Diagram of a printer or scanner device with an inset close-up showing a close-up of its internal components (no text or symbols present)
natural_image
Diagram of a printer's internal structure showing paper feed, paper tray, and scroll (no text or symbols)natural_image
Illustration of a printer's internal structure with a hand holding the lid and a tool, showing no text or symbols.
text_image
A4/A5 A4/LGL
natural_image
Illustration of hands inserting a device into a folder, with an arrow indicating direction (no text or symbols present)4
natural_image
Line drawing of a mechanical device with a magnified inset showing a circular button (no text or symbols)
text_image
levietojiet komplektä ieklauto tapu lidz puse (neievietojiet to lidz galam).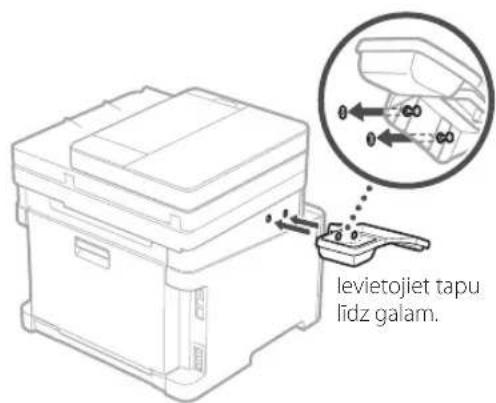
text_image
levietojiet tapu lidz galam.
text_image
Diagram showing a printer with cable and connector, highlighting a cable connection to a device panel with an arrow indicating the cable's direction.text_image
Diagram showing a printer with labeled parts and an electrical outlet, highlighting two connected components.text_image
SSID :XXXXXXXXXXXX Tikla atsléga :XXXXXXXXXXXX :natural_image
Diagram showing a device connected to an electronic device via cable, with no visible text or symbols.text_image
QR code with a hand holding a smartphone displaying a QR code, likely for mobile payment or scanning.https://oip.manual.canon/
natural_image
Line drawing of a printer with an attached case and a close-up view (no text or symbols)


natural_image
Illustration of two people interacting with a device, showing hand positioning and a magnified inset of the device (no text or symbols)natural_image
Diagram of a printer or printer device with an inset close-up showing a close-up of its internal components (no text or symbols present)
natural_image
Diagram of a printer's internal structure showing paper feed, paper tray, and scroll (no text or symbols)natural_image
Illustration of a printer's internal structure being inserted, showing hand placement and arrow indicating process (no text or symbols)
text_image
A4/A5 A4/LGL
natural_image
Illustration of hands operating a device with an arrow indicating direction (no text or symbols present)4
Papildomos dalies irengimas

natural_image
Line drawing of a mechanical device with a magnified inset showing a circular button or dial (no text or symbols)
text_image
Diagram showing a device with cable and connector, highlighting a close-up of the cable's internal connection.5 Maitinimo laido prijungimas

text_image
Diagram showing a printer with labeled parts and an electrical outlet, including a plug and socket connection.text_image
SSID :XXXXXXXXXXXX Tinklo raktas :XXXXXXXXXXXX :natural_image
Diagram showing a device connected to an electronic device via cable, with no visible text or symbols.text_image
Hand holding smartphone displaying a QR code on screen, with motion lines indicating speed and alerthttps://oip.manual.canon/
natural_image
Line drawing of a printer with an attached case and a close-up view (no text or symbols)


natural_image
Illustration of two people interacting with a device, showing hand positioning and a magnified inset of the device (no text or symbols)natural_image
Diagram of a printer or scanner device with an inset close-up showing a close-up of its internal components (no text or symbols present)
natural_image
Diagram of a printer's internal structure showing paper feed, paper tray, and scroll (no text or symbols)3 Paberi asetamine
1.

natural_image
Illustration of a printer's internal structure being inserted, showing paper feeding into a plastic holder (no text or symbols)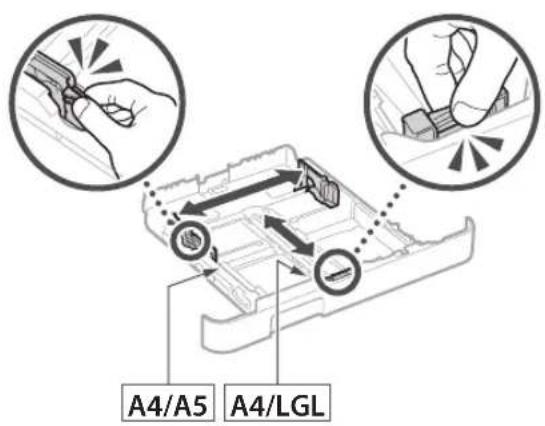
text_image
A4/A5 A4/LGL
natural_image
Illustration of hands inserting a device into a folder, with an arrow indicating direction (no text or symbols present)4
Lisavarustuse paigaldamine

natural_image
Line drawing of a mechanical device with a magnified inset showing a circular button labeled '←' (no text or symbols on the device itself)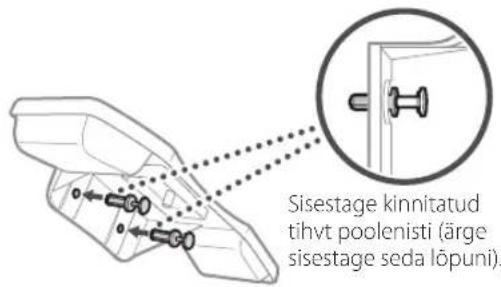
text_image
Diagram showing a printer with cable and connector, highlighting a close-up of the device's internal structure.text_image
Diagram showing a printer with labeled parts and an electrical outlet, including a plug and socket connection.natural_image
Diagram showing a device connected to an electronic device via cable, with no visible text or symbols.text_image
QR code with a hand holding a smartphone displaying a QR code, likely for mobile payment or scanning.https://oip.manual.canon/
natural_image
Line drawing of a printer with an attached case and a close-up view (no text or symbols)


natural_image
Illustration of two people handling a device with a magnified inset showing hand positioning (no text or symbols)natural_image
Diagram of a printer or scanner device with an inset close-up showing a close-up of its internal component (no text or symbols present)
natural_image
Diagram of a printer's internal structure showing paper feeding into a tray with arrows indicating rotation (no text or symbols)3 Ładowanie papieru
1.
natural_image
Illustration of hands inserting a printer into a plastic case (no text or symbols visible)
text_image
A4/A5 A4/LGL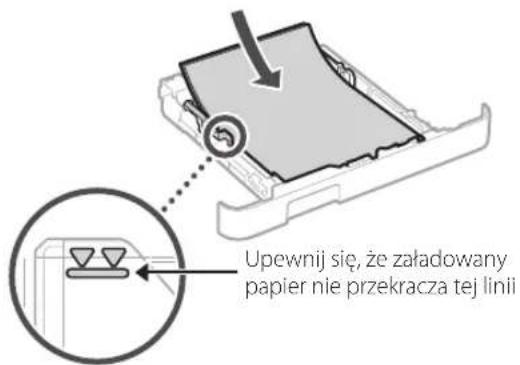
natural_image
Illustration of hands inserting a device into a folder, with an arrow indicating direction (no text or symbols present)4
natural_image
Line drawing of a mechanical device with a magnified inset showing a circular button or dial (no text or symbols)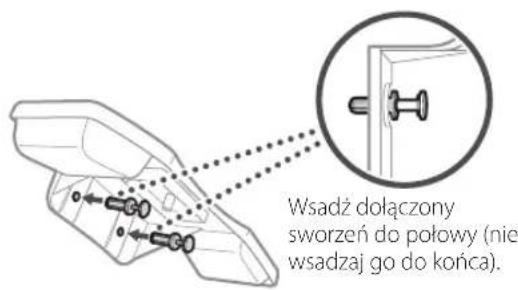
text_image
Diagram showing a printer with cable and connector, highlighting a close-up of the device's internal structure.text_image
Diagram showing a printer with labeled parts and an electrical outlet, highlighting two connected components.text_image
SSID :XXXXXXXXXXXX Klucz sieciowy :XXXXXXXXXXXX :natural_image
Diagram showing a device connected to an electronic device via cable, with no visible text or symbols.text_image
QR code with a hand holding a smartphone displaying a QR code, likely for mobile payment or scanning.https://oip.manual.canon/
natural_image
Line drawing of a printer with an attached case and a close-up view (no text or symbols)


natural_image
Illustration of two people interacting with a device, showing hand positioning and a magnified inset of the device (no text or symbols)natural_image
Diagram of a printer or printer device with an inset close-up showing a close-up of its internal structure (no text or symbols present)
natural_image
Diagram of a printer's internal structure showing paper feed, paper tray, and scroll (no text or symbols)3 Vkládání papíru
1.

natural_image
Illustration of a printer's internal structure being inserted, showing paper feeding into a plastic sheet (no text or symbols)
text_image
A4/A5 A4/LGL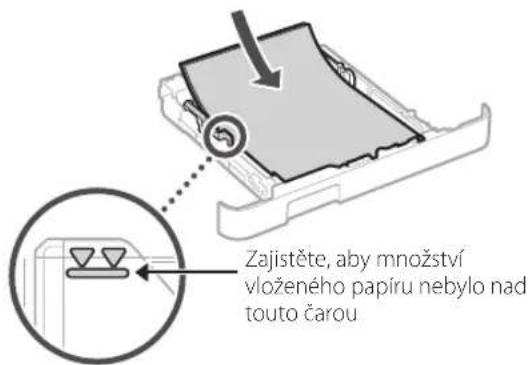
natural_image
Illustration of hands inserting a device into a folder, with an arrow indicating direction (no text or symbols present)4
natural_image
Line drawing of a portable electronic device with a circular arrow pointing to its side panel (no text or symbols present)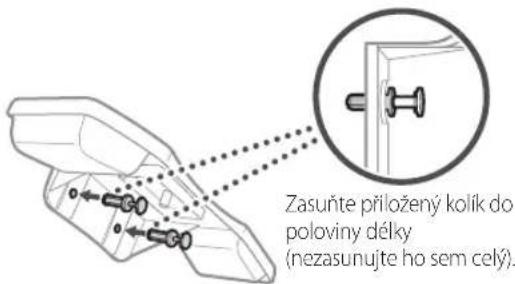
text_image
Diagram showing a printer device with cable and connector, highlighting a close-up of the internal component.text_image
Diagram showing a printer with labeled parts and an electrical outlet, highlighting two connected components.natural_image
Diagram showing a device connected to an electronic device via cable, with no visible text or symbols.text_image
QR code with a hand holding a smartphone displaying a QR code, likely for mobile payment or scanning.https://oip.manual.canon/
natural_image
Line drawing of a printer with an attached close-up of its internal components (no text or symbols)


natural_image
Illustration of two people interacting with a device, showing hand positioning and a magnified inset of the device (no text or symbols)natural_image
Diagram of a printer or printer device with an inset close-up showing a close-up of its internal structure (no text or symbols present)
natural_image
Diagram of a printer's internal structure showing paper feed, paper tray, and scroll (no text or symbols)3 Vkladanie papiera
1.

natural_image
Illustration of a printer's internal structure being inserted into a paper holder, with no visible text or symbols.
text_image
A4/A5 A4/LGL
natural_image
Illustration of hands inserting a device into a folder, with an arrow indicating direction (no text or symbols present)4
natural_image
Line drawing of a mechanical device with a magnified inset showing a circular button labeled '←' (no text or symbols on the device itself)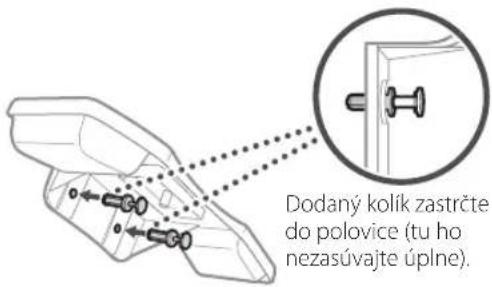
text_image
Dodaný kolik zastrčte do polovice (tu ho nezasúvajte úplne).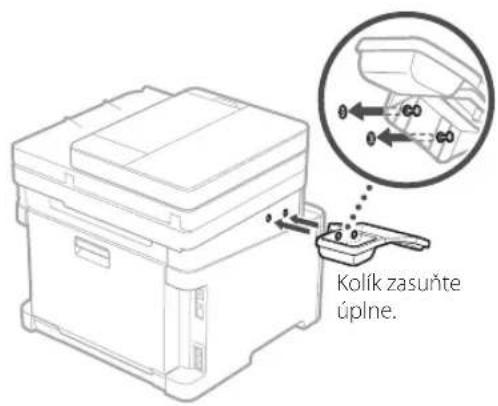
text_image
Diagram showing a printer with cable and connector, highlighting a close-up of the device's internal structure.text_image
Diagram showing a printer with labeled parts and an electrical outlet, highlighting two connected components.natural_image
Diagram showing a device connected to an electronic device via cable, with no visible text or symbols.text_image
QR code with a hand holding a smartphone displaying a QR code, likely for mobile payment or scanning.https://oip.manual.canon/
Če ni drugače navedeno, se slike v tem dokumentu nanašajo na MF657Cdw.
1 Preverite priložene elemente
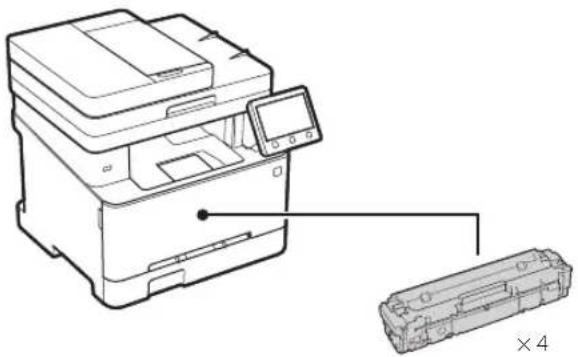
natural_image
Line drawing of a printer with an attached close-up of its internal components (no text or symbols)


*Samopri nekaterih modelih.
natural_image
Illustration of two people interacting with a device, showing hand positioning and a magnified inset of the device (no text or symbols)2. Odstranite ves embalažni material.
Odstranite vse trakove.

natural_image
Diagram of a printer or printer device with an inset close-up showing a close-up of its internal structure (no text or symbols present)
natural_image
Diagram of a printer's internal structure showing paper feed, paper tray, and scroll (no text or symbols)natural_image
Illustration of a printer's internal structure being inserted, showing paper feeding into a plastic sheet (no text or symbols)
text_image
A4/A5 A4/LGL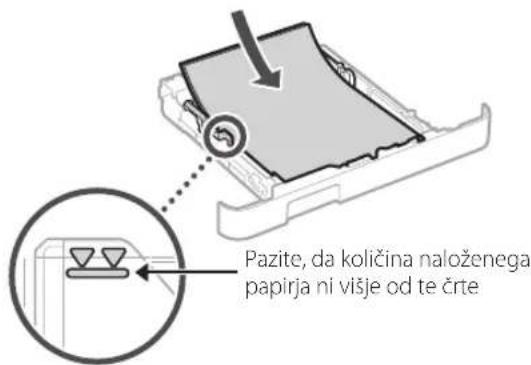
natural_image
Illustration of hands inserting a device into a folder, with an arrow indicating direction (no text or symbols present)4
natural_image
Line drawing of a mechanical device with a magnified inset showing a circular button labeled '←' (no text or symbols on the device itself)
text_image
Vstavite priloženi zatič do polovice (ne do konca).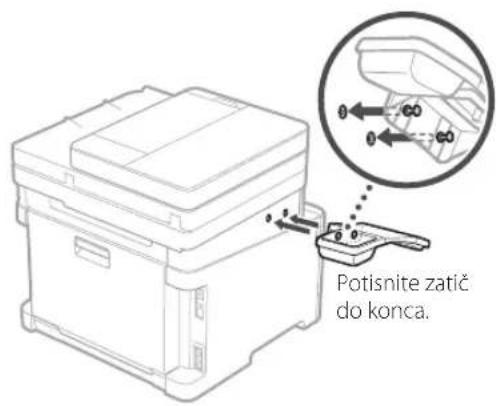
text_image
Potisnite zatič do konca.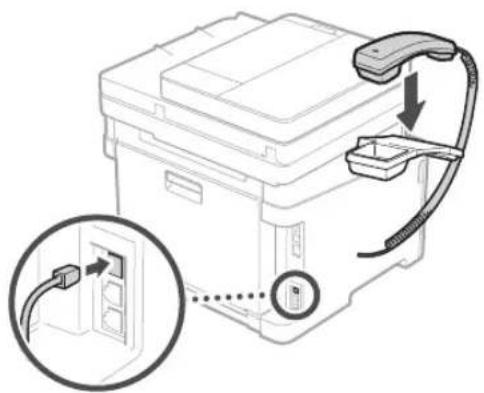
text_image
Diagram showing a printer with cable and connector, highlighting a close-up of the device's internal structure.text_image
Diagram showing a printer with labeled parts and an electrical outlet, highlighting two connected components.6 Določanje osnovnih nastavitev
natural_image
Diagram showing connection between a device box and a USB cable with a magnified inset (no text or symbols)MF657Cdw MF655Cdw MF651Cw
Vodič za postavljanje
text_image
QR code with a hand holding a smartphone displaying a QR code, likely for mobile payment or scanning.https://oip.manual.canon/
Ako nije drugačije navedeno, ilustracije korištene u ovom dokumentu odnose se na MF657Cdw.
natural_image
Line drawing of a printer with an attached close-up of its internal components (no text or symbols)


* nije sadržano u nekim modelima.
natural_image
Illustration of two people interacting with a device, showing hand positioning and directional arrows (no text or symbols)- Uklonite svu ambalažu.
Uklonite svu traku.

natural_image
Diagram of a file organizer with an inset showing a close-up of the folder (no text or symbols present)
natural_image
Diagram of a printer's internal structure showing paper feed, paper tray, and scroll (no text or symbols)3 Umetanje papira
1.

natural_image
Illustration of a printer's internal structure being inserted into a paper holder, with no visible text or symbols.
text_image
A4/A5 A4/LGL
text_image
Pazite da količina umetnutog papira ne prelazi ovu liniju4.
natural_image
Illustration of hands inserting a device into a folder, with an arrow indicating direction (no text or symbols present)4
natural_image
Line drawing of a mechanical device with a magnified inset showing a circular button (no text or symbols)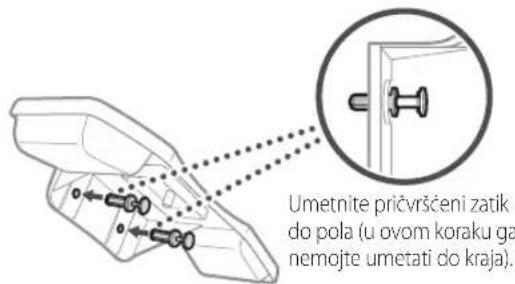
text_image
Diagram showing a printer device with cable routing and a magnified inset highlighting the internal structure.text_image
Diagram showing a printer with labeled parts and a plug inserted into an electrical outlet, marked as components 1 and 2.6 Određivanje osnovnih postavki
Vodič za postavljanje pojavljuje se na upravljačkoj ploči pri prvom uključivanju uređaja. Slijedeći upute na zaslonu, odradite početno postavljanje uređaja.

text_image
Radna pločanatural_image
Diagram showing a device connected to an electronic device via cable, with no visible text or symbols.10 Kraj Vodiča za postavljanje
Pogledajte opis u Application Library te zatim odaberite
11 Instaliranje softvera / upravljačkih programa
MF657Cdw MF655Cdw MF651Cw
Beállítási útmutató
text_image
QR code with a hand holding a smartphone displaying a QR code, likely for mobile payment or scanning.https://oip.manual.canon/
natural_image
Line drawing of a printer with a close-up view of its internal components (no text or symbols)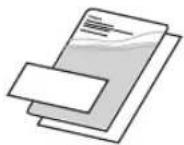
natural_image
Illustration of two people interacting with a device, showing hand positioning and a magnified inset of the device (no text or symbols)natural_image
Diagram of a printer or printer device with an inset close-up showing a close-up of its internal components (no text or symbols present)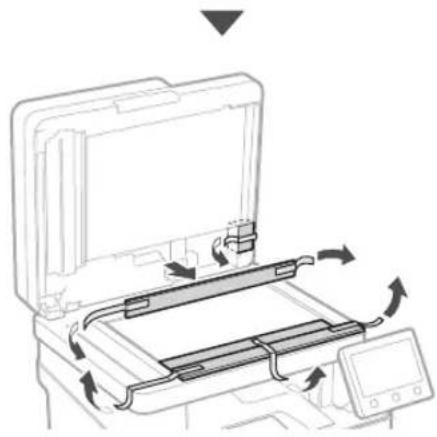
natural_image
Diagram of a printer's internal structure with arrows indicating motion, no text or symbols present3 Papír betöltése
1.

natural_image
Illustration of a printer's internal structure being inserted into a paper holder, with no visible text or symbols.
text_image
A4/A5 A4/LGL
natural_image
Illustration of hands inserting a device into a folder, with an arrow indicating direction (no text or symbols present)4
natural_image
Line drawing of a mechanical device with a magnified inset showing a circular component (no text or symbols)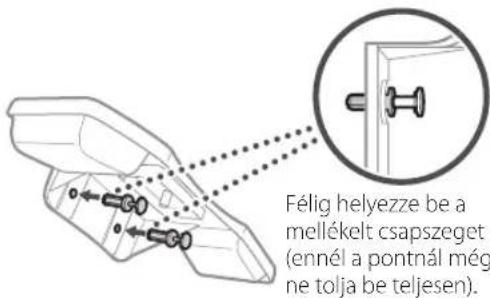
text_image
Diagram showing a printer device with cable routing and a magnified inset highlighting the internal components.text_image
Diagram showing a printer with labeled parts and an electrical outlet, including a plug-in socket labeled '2'natural_image
Diagram showing a device connected to an electronic device via cable, with no visible text or symbols.text_image
QR code with a hand holding a smartphone displaying a QR code, likely for mobile payment or scanning.https://oip.manual.canon/
natural_image
Line drawing of a printer with an attached case and a separate case labeled '×4' (no text or symbols on the diagram itself)


natural_image
Illustration of two people interacting with a device, showing hand positioning and directional arrows (no text or symbols)natural_image
Diagram of a printer or scanner device with an inset close-up showing a close-up of its internal components (no text or symbols present)
natural_image
Diagram of a printer's internal structure with arrows indicating motion, no text or symbols presentnatural_image
Illustration of a printer's internal structure being inserted into a paper holder, with no visible text or symbols.
text_image
A4/A5 A4/LGL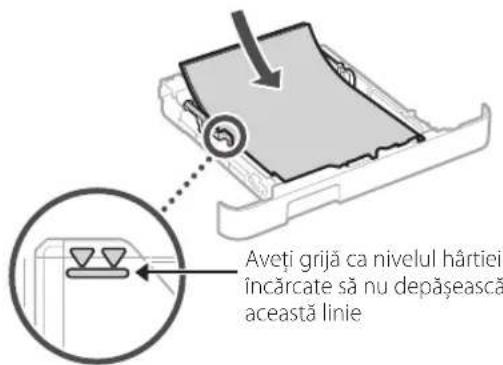
natural_image
Illustration of hands inserting a device into a folder, with an arrow indicating direction (no text or symbols present)4
natural_image
Line drawing of a mechanical device with a magnified inset showing a circular button (no text or symbols)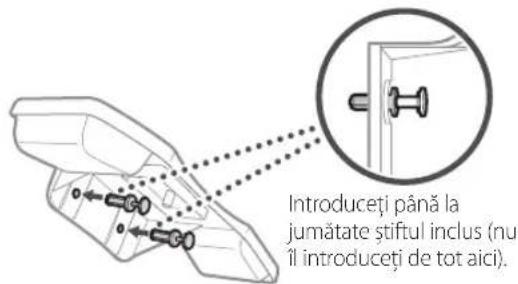
text_image
Diagram showing a printer device with cable and connector, highlighting a close-up of the internal component.text_image
Diagram showing a printer with labeled parts and an electrical outlet, highlighting two connected components.text_image
SSID :XXXXXXXXXXXX Cheie de retea :XXXXXXXXXXXX :natural_image
Diagram showing a device connected to a rectangular electronic component via cable, with no visible text or symbols.MF657Cdw MF655Cdw MF651Cw
text_image
QR code with a hand holding a smartphone displaying a QR code, likely for mobile payment or scanning.https://oip.manual.canon/
natural_image
Line drawing of a printer with an attached case and a close-up view (no text or symbols)


natural_image
Illustration of two people interacting with a device, showing a hand gesture inside (no text or symbols)natural_image
Technical line drawing of a mechanical device with an inset magnified view showing a close-up detail (no text or symbols)
natural_image
Diagram of a printer's internal structure showing paper feeding into a tray with arrows indicating rotation (no text or symbols)natural_image
Illustration of a printer's internal compartment being inserted, showing hand placement and tool path (no text or symbols)
text_image
A4/A5 A4/LGL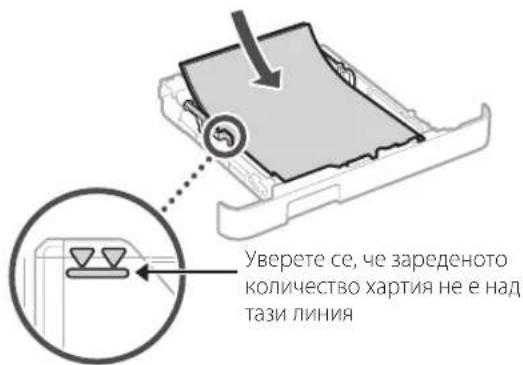
natural_image
Illustration of hands inserting a device into a folder, with an arrow indicating direction (no text or symbols present)4
natural_image
Line drawing of a mechanical device with a magnified inset showing a circular component (no text or symbols)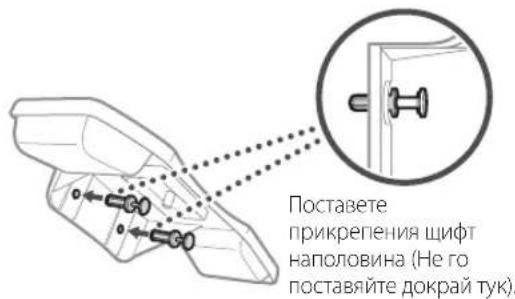
text_image
Diagram showing a device with cable and connector, highlighting a close-up of the internal component with an arrow indicating connection.text_image
Diagram showing a printer with labeled parts and an electrical outlet, highlighting two connected components.natural_image
Diagram showing a device connected to an electronic device via cable, with no visible text or symbols.text_image
QR code with a hand holding a smartphone displaying a QR code, likely for mobile payment or scanning.https://oip.manual.canon/
natural_image
Line drawing of a printer with an attached case and a close-up view of the case (no text or symbols)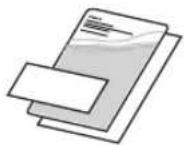


natural_image
Illustration of two people interacting with a device, showing hand positioning and directional arrows (no text or symbols)natural_image
Diagram of a printer or printer device with an inset close-up showing a close-up of its internal components (no text or symbols present)
natural_image
Diagram of a printer's internal structure showing paper feed, paper tray, and control panel (no text or symbols)3 Kağıt Yükleme
1.

natural_image
Illustration of a printer's internal compartment being inserted into a paper holder, with no visible text or symbols.
text_image
A4/A5 A4/LGL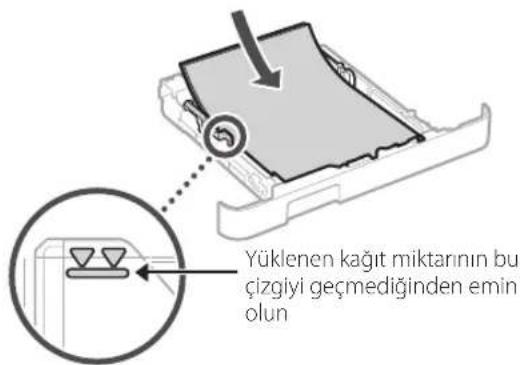
natural_image
Illustration of hands inserting a device into a folder, with an arrow indicating direction (no text or symbols present)4
natural_image
Line drawing of a mechanical device with a magnified inset showing a circular button (no text or symbols)
text_image
Takilan pimi yariya kadar sokun (tamamini sokmayın).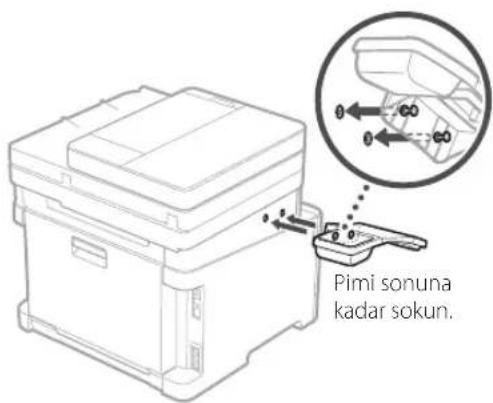
text_image
Diagram showing a printer device with cable and connector, highlighting a close-up of the internal component.text_image
Diagram showing a printer with labeled components and an electrical outlet, including a plug and socket connection.natural_image
Diagram showing a device connected to an electronic component via cable, with no visible text or symbols.MF657Cdw MF655Cdw MF651Cw

natural_image
Sequence of gray square blocks with arrowheads, no text or symbols presentnatural_image
Diagram of a printer's internal structure showing paper feed, paper tray, and control panel (no text or symbols)تحميل الورق
natural_image
Illustration of a hand inserting a plastic into a device component (no text or symbols visible)natural_image
Line drawing of a printer with an attached physical case (no text or symbols present)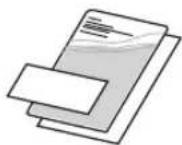
natural_image
Illustration of two people interacting with a device, showing a hand gesture inside (no text or symbols)سماعة الهاتف
natural_image
Line drawing of a mechanical device with a magnified inset showing a circular button (no text or symbols)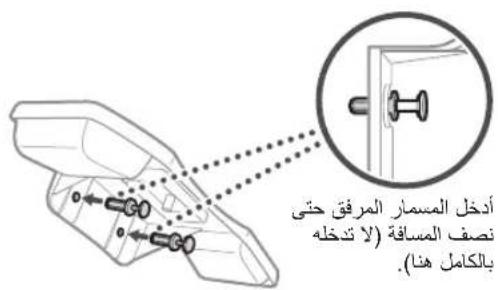
text_image
Diagram showing a printer or scanner device with an attached cable and a magnified inset highlighting the internal connection point.
text_image
A4/A5 A4/LGL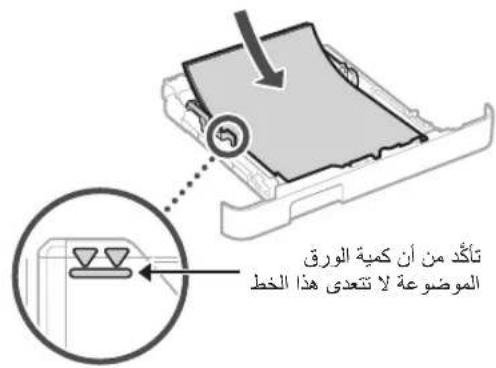
natural_image
Illustration of hands inserting a device into a folder, with an arrow indicating direction (no text or symbols present)natural_image
Diagram showing connection between a device box and a USB port, with a magnified inset highlighting the cable (no text or symbols present)natural_image
Sequence of gray square blocks with left-pointing arrow indicators, no text or symbols presenttext_image
Hand holding smartphone displaying a QR code with a magnifying glass icon, likely for mobile payment or scanning purposes.https://oip.manual.canon/

natural_image
Sequence of gray square blocks with arrowheads, no text or symbols presentnatural_image
Diagram of a printer or scanner with internal components and directional arrows indicating motion (no text or symbols)بارگذاری کاغذ
natural_image
Illustration of hands inserting a printer into a plastic case (no text or symbols visible)natural_image
Line drawing of a printer with an attached case and a separate close-up view (no text or symbols)
natural_image
Illustration of two electronic components: a stack of documents and a cord with a plug (no text or symbols)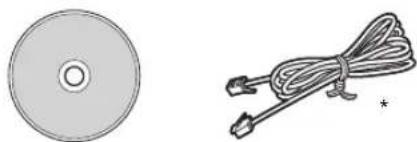
natural_image
Two unrelated objects: a circular disc and a coiled cable with connectors (no text or symbols)natural_image
Illustration of two people interacting with a device, showing hand positioning and directional arrow (no text or symbols)
natural_image
Line drawing of a mechanical device with a magnified inset showing a circular button or dial (no text or symbols)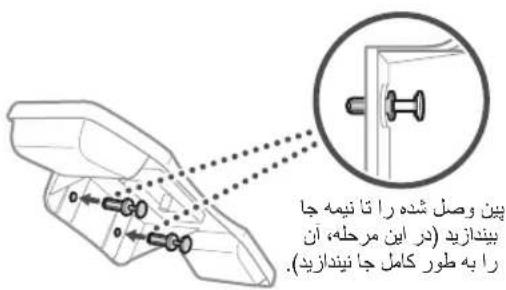
text_image
Diagram showing a printer setup with cable routing and a magnified view of the device's internal connection.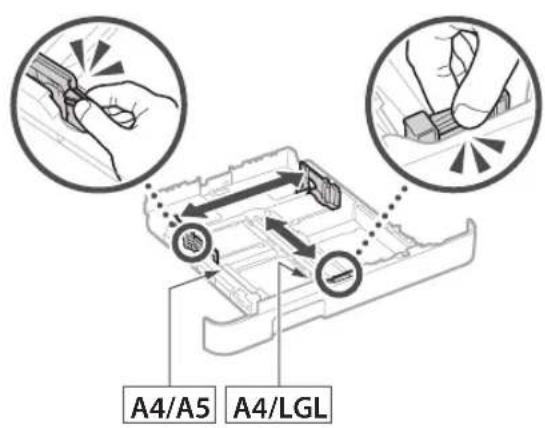
text_image
A4/A5 A4/LGL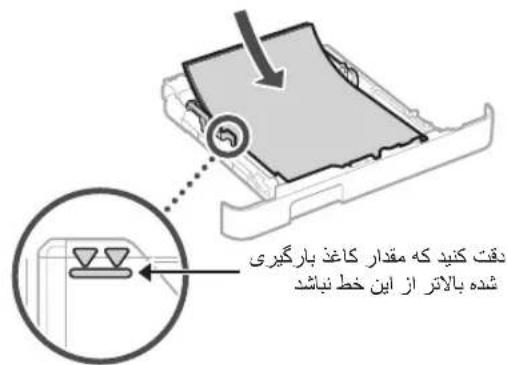
natural_image
Illustration of hands inserting a device into a folder, with an arrow indicating direction (no text or symbols present)نصب قطعه جانبی

text_image
Diagram showing electrical connection with labeled components and a magnified inset showing a plug inserted into a socket.تعيين تنظیمات اصلی
9
<...must be configured
- A Remote I
پایان راهنمای تنظیم

natural_image
Diagram showing a device connected to an electronic device via cable, with no visible text or symbols.natural_image
Sequence of gray square blocks with left-pointing triangular arrows, no text or symbols present30-2, Shimomaruko 3-chome, Ohta-ku, Tokyo 146-8501, Japan
One Canon Park, Melville, NY 11747, U.S.A.
CANON EUROPA N.V.
Bovenkerkerweg 59, 1185 XB Amstelveen, The Netherlands
CANON SINGAPORE PTE LTD
1 Fusionopolis Place, #15-10, Galaxis, Singapore 138522
CANON AUSTRALIA PTY LTD
Building A, The Park Estate, 5 Talavera Road, Macquarie Park, NSW 2113, Australia
CANON GLOBAL WORLDWIDE SITES
https://global.canon/

text_image
Barcode image with black and white vertical bars, no visible text or symbols beyond the patternFT6-2757-000