Norr - Car seat Nuna - Free user manual and instructions
Find the device manual for free Norr Nuna in PDF.
| Product Type | Car Seat |
| Brand | Nuna |
| Model | Norr |
| Orientation | Rear-facing only |
| Child Height | 40 cm - 105 cm |
| Child Weight | ≤ 18 kg |
| Safety Standard | UN R129/03 (i-Size) |
| Installation Type | ISOFIX i-Size + load leg |
| Recline Positions | 7 (baby mode, rear-facing) |
| Headrest Adjustment | 8 positions (with harness) |
| Side Impact Protection | Automatic engagement (deploys when harness is tightened) |
| Seat Rotation | Yes, to facilitate installation and access to the child |
| Included Accessories | ISOFIX base, ISOFIX guides, infant insert, removable cushions |
| Care and Cleaning | Machine washable covers at ≤30°C, no bleach, no ironing, dry in shade |
| Warranty | Customized, register on nunababy.com |
| Customer Service | info@nunababy.com |
Frequently Asked Questions - Norr Nuna
User questions about Norr Nuna
0 question about this device. Answer the ones you know or ask your own.
Ask a new question about this device
Download the instructions for your Car seat in PDF format for free! Find your manual Norr - Nuna and take your electronic device back in hand. On this page are published all the documents necessary for the use of your device. Norr by Nuna.
USER MANUAL Norr Nuna
IMPORTANT! KEEP THESE INSTRUCTIONS FOR FUTURE REFERENCE:
READ CAREFULLY


Designed around your life
nuna
Contents
Product information 3
Product Registration
Warranty
Contact
Child Usage Requirements 4
For Use with Base 5
Parts List 6
Warning 7
Product Use 10
Cleaning and Maintenance 16
Francais (FR) 17
German (DE) 35
Nederlands (NL) 53
Italiano (IT) 71
Espanol (ES) 89
Portugues (PT) 109
Polski (PL) 129
Cesky (CZ) 147
Slovencina (SK) 165
Hrvatski (HR) 183
Slovenscina (SL) 201
Pycckn (RU) 219
Norsk (NO) 239
Svenska (SV) 255
Suomi (FI) 271
Dansk (DK) 289
Romana (RO) 305
EAAyniKa (EL) 323
Turkce (TR) 343
44 · 1
(AR)
NORR instructions

Product Information
Model Number:
Manufactured Date:
Product Registration
Please fill in the above information. The model number and the manufactured in date are located on the bottom of the NORR.
To register your product please visit:
www.nunababy.com
Click the "Register Gear" link on the homepage.
Warranty
We have purposely designed our high-quality products so that they can grow with both your child and your family. Because we stand by our product, our gear is covered by a custom warranty per product, starting from the day it was purchased. Please have the proof of purchase, model number and manufactured in date available when you contact us.
For warranty information please visit:
www.nunababy.com
Click the "Warranty" link on the homepage.
Contact
For replacement parts, service, or additional warranty questions, please contact our customer service department.
info@nunababy.com
www.nunababy.com
In the United Kingdom
infouk@nunababy.com
www.nunababy.com
NUNA International B.V.
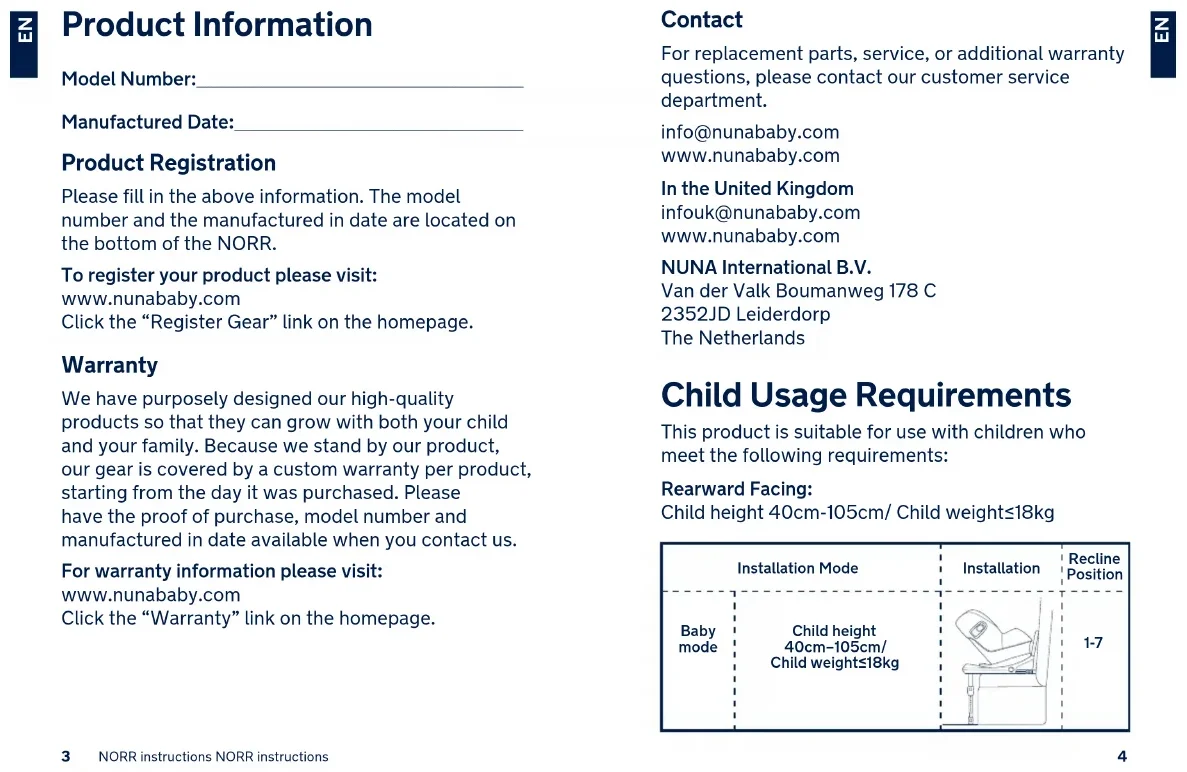
This product is suitable for use with children who meet the following requirements:
Rearward Facing:
Child height 40cm-105cm/ Child weight ≤ 18kg
| Installation Mode | Installation | Recline Position | |
| Baby mode | Child height 40cm-105cm/ Child weight≤18kg | 1-7 | |

For Use with Base
i-Size universal ISOFIX Rearward facing 40cm-105cm/
二
E030537 UN Regulation No.129/03
1 According to the UN Regulation No.129/03, the Enhanced Child Restraint with base is a Universal ISOFIX Enhanced Child Restraint and should be fitted using the ISOFIX connections.
2 This is an "i-Size" Enhanced Child Restraint System. It is approved according to UN Regulation No.129, for use in, i-Size compatible vehicle seating positions as indicated by vehicle manufacturers in the vehicle users' manual.
3 If in doubt, consult either the Enhanced Child Restraint System manufacturer or the retailer.
Parts List
1 Head Support
2 Infant Part
3 Seat Pad
4 Adjustment Webbing
5 Rotating Button
6 ISOFIXAdjustment Button
7 LoadLegAdjustment Button
8 Load Leg
9 LoadLegAdjustment Button
10 ReclineAdjustment Button
11 Shoulder Strap
12 Rebound Bar
13 ISOFIX Connector
14 HeadSupport Adjustment Lever
15 Auto-engagingSide Impact
16 Load Leg Indicator
17 ISOFIX Guides
18 2nd Seat Pad
19 Buckle holder


WARNING
Any load leg should be in contact with the vehicle floor and any straps restraining the child should be adjusted to the child's body. The straps should not be twisted.
After your child is placed in this enhanced child restraint, the safety harness must be used correctly. Ensure that any lap strap is worn low down, so that the pelvis is firmly engaged, shall be stressed.
Any luggage or other objects liable to cause injuries in the event of a collision shall be properly secured.
Always secure child in enhanced child restraint, even on short trips, as this is when most accidents occur.
Children are not left in their enhanced child restraint system unattended.
Consult the distributor for issues concerning maintenance, repair and part replacement.
Correct Installation is only permitted by use of the ISOFIX connectors.
Do take care so that the rigid items and plastic parts of an enhanced child restraint system shall be so located and installed that they are not liable to become trapped by a moveable seat or in a door of the vehicle.
Frequently check the ISOFIX guides for dirt and clean them if necessary. Reliability can be effected by ingress of dirt, dust, food particles etc.
Must use the rebound bar.
Please keep this enhanced child restraint away from sunlight, otherwise it may be too hot for the child's skin. Always touch the enhanced child restraint before placing child in it.
Please check before you purchase this enhanced child restraint to make sure it can be installed properly in your vehicle.
Remove this enhanced child restraint from the vehicle seat when it is not in use for a long period of time or it is not in regular use.
This enhanced child restraint should be replaced when it has been subject to violent stresses in an accident. An accident can cause damage to it that you cannot see.
The enhanced child restraint system must be used with manufacturer supplied soft goods and accessory.
The soft goods is an integral part of the child restraint system in terms of its safety performance.
DO NOT use the rearward facing enhanced child restraint systems in seating positions where there is an active frontal airbag installed. Death or serious injury may occur.

DO NOT make any alterations or additions to the device without the approval of the type approval authority. The user should follow closely the installation instructions provided by the enhanced child restraint manufacturer.
DO NOT use this enhanced child restraint if it has damaged or missing parts.
DO NOT have your child in large/oversized clothes because this will prevent your child from being properly and securely fastened by the shoulder harness straps and the crotch strap between the legs.
DO NOT place any objects in the load leg area in front of your enhanced child restraint.
DO NOT use any load bearing contact points other than those described in the instructions and marked on the enhanced child restraint.
NEVER use a second-hand enhanced child restraint or an enhanced child restraint whose history you do not know because it may have structural damage that compromises your child's safety.
NEVER use ropes or any other substitutes to secure enhanced child restraint in vehicle or to secure child into enhanced child restraint.
The child restraint may not fit in all approved vehicles when used in one of these positions.
Product Use
DO NOT install this enhanced child restraint on vehicle seats that face sideways or rearward with respect to the moving direction of the vehicle. (1)-1
DO NOT use the rearward facing enhanced child restraint systems in seating positions where there is an active frontal airbag installed. Death or serious injury may occur. (1)-2 Please reference vehicle owner's manual for more information.
It is recommended to install this enhanced child restraint on the rear vehicle seat. (1)-3
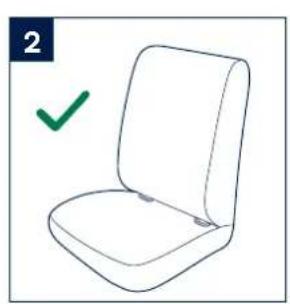
This enhanced child restraint is suitable for vehicle seats with i-Size ISOFIX anchor points. (2)
DO NOT install this enhanced child restraint on vehicle seats unstable during installation.
Installation
1 Unfold the load leg from the storage compartment. (3)
2 Fit the ISOFIX guides into the ISOFIX anchor points. (4) The ISOFIX guides can protect the surface of the vehicle seat from being torn. They will also guide the ISOFIX connectors.
3 Press the ISOFIX adjustment button on either side of the base, then pull out the ISOFIX connectors. (5)
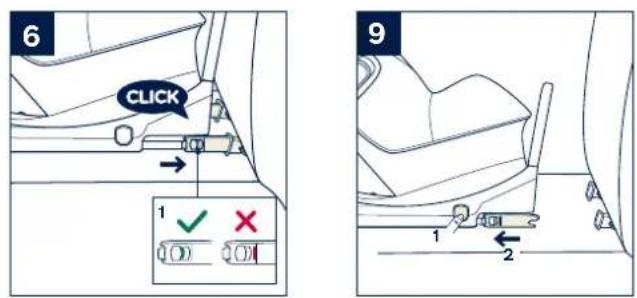
4 Line up the ISOFIX connectors with the ISOFIX guides, and then click both ISOFIX connectors into the ISOFIX anchor points. (6)
Make sure that both ISOFIX connectors are securely attached to their ISOFIX anchor points. There should be two audible clicks and the colors of the indicators on the both ISOFIX connectors should be completely green. (6)-1
Check to make sure the enhanced child restraint is securely installed by pulling on the both ISOFIX connectors.
5 There are 9 adjustable positions for ISOFIX. Press the ISOFIX release button and push the base back against the vehicle seat until tight.
6 After placing the enhanced child restraint on the vehicle seat, extend the load leg to floor. (7) The load leg indicator will show green when installed correctly, red means it is installed incorrectly. (7)-3
The load leg has 24 positions. When the load leg indicator shows red this means the load leg is in the wrong position.
! Make sure the load leg is secure by pressing down on the front of the enhanced child restraint.
! To shorten the load leg, squeeze the load leg release button and pull the load leg upwards.
7 To remove the enhanced child restraint, press the ISOFIX adjustment button (5)-1 and pull the base away from the seat, then while squeezing the ISOFIX release button and secondary lock on the ISOFIX connectors remove from the vehicle. (8)
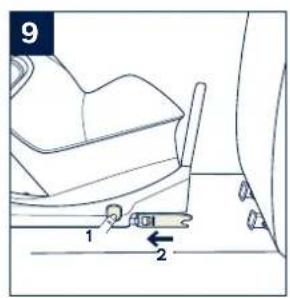
8 Press the ISOFIX adjustment button to store the ISOFIX. (9)
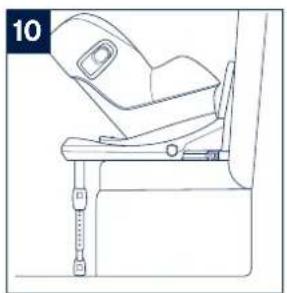
The completely assembled enhanced child restraint is shown as (10).
Use Auto-engaging Side Impact
! Ensure the side impact shield is locked in the open position for maximum side impact safety.
1 Side impact shields are automatically activated when the harness buckle is moved back into position and the harness is tightened, both sides will be opened automatically. (11)
IMPORTANT: Please note that unfolding the side impact protection elements do NOT mean that the child is already restrained tight enough.
2 The side impact shield opposite the vehicle door can be closed to allow more seating space, if needed. The side closest to the vehicle exterior should always be in the open position. (12)
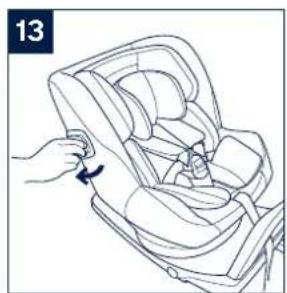
3 The side impact shield can be manually opened as shown on (13).
Recline Adjustment
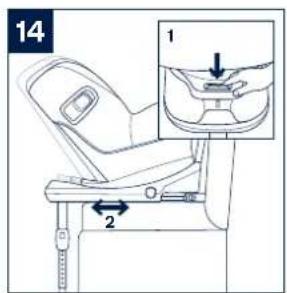
Squeeze the recline adjustment button (14)-1 to adjust the enhanced child restraint to the proper position. The recline angles are shown as (14).
Please recheck the load leg position after reclining.
There are 7 recline angles for baby mode.
Rearward Facing Mode Only
Rearward Facing Child height 40cm-105cm/ Child weight ≤ 18kg
Recline position Position 1-7
1 Press the rotating button to rotate the seat facing the rear of the vehicle. (15)
! Please recline the seat to be in positions 3 through 7 for ease of rotation.
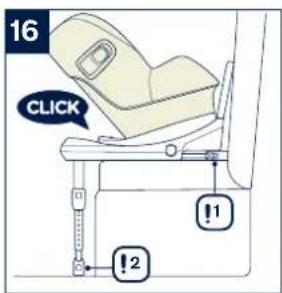
2 Rearward facing mode assembled as (16).
! The ISOFIX connectors must be attached and locked onto the ISOFIX anchor points. (16)-1
! The load leg must be installed correctly with green indicator. (16)-2
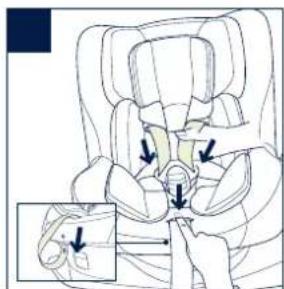
Height Adjustment for Head Support and Shoulder Harnesses
Check that shoulder harness straps are set at the proper height.
Squeeze the head support adjustment lever (17), while pulling up or down on the head support until it snaps into one of the 8 positions. The head support positions are shown as (18).
Shoulder harness straps must be at a height nearest to your child's shoulders (19), but not above the shoulder line (20).
If the shoulder harness straps are not at the proper height, the child might be ejected the enhanced child restraint if there is a crash.
13 NORR instructions NORR instructions
Securing Child
Rotate the seat to the side to make it easier to put in or carry out the baby. (26) After the child is placed into the seat, check whether the shoulder harness straps are at proper height. Please rotate the seat backwards and lock it after fixing the baby.
1 While pressing the harness adjustment button located at the front of the enhanced child restraint, pull the two shoulder harness straps of the enhanced child restraint. (21)
2 Unlock the buckle of the harnesses by pressing the red button. (22)
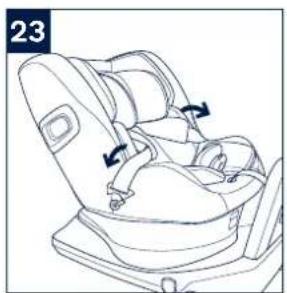
3 Fix the buckles on the both sides of seat to make placing the baby more convenient. (23)
4 Use Infant part.
Infant part is for children's protection. (24)

5 Place the child into the enhanced child restraint and lock the buckle. Please refer to (25).
6 Tighten the shoulder harness straps by pulling the adjustment webbing. (26)
Make sure to tighten the harness properly and get rid of any belt slack. Too loose harnesses will reduce the safety performance of the seat.
Detach Soft Goods
1 Open the buckle (27), then remove the Infant part.
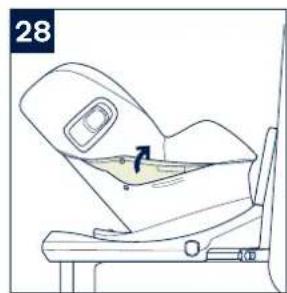
2 Open the snaps. (28)
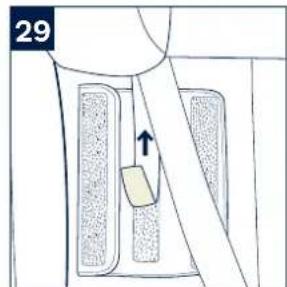
3 Detach the hook and loop fasteners to remove the shoulder belt cover. (29)
4 Detach the snaps on the main seat pad behind shoulder harnesses. (30)
5 Push the crotch strap through the crotch strap opening. (31)
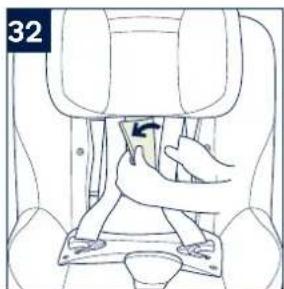
6 Place the shoulder harnesses behind the flap below the headrest. (32)
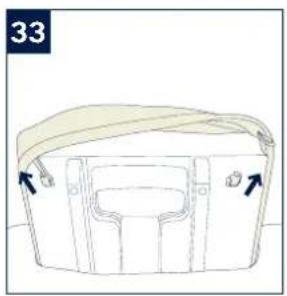
7 Unfasten the elastic on the back of headrest to remove the head support soft goods. (33) (34)
8 Remove the soft goods. (35)
To assemble winter and summer soft goods according to reversed steps above.
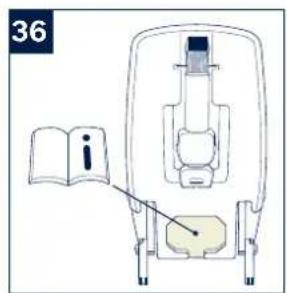
Please keep the instruction manual in the storage compartment at the bottom of the enhanced child restraint (36).
15 NORR instructions NORR instructions
Cleaning and Maintenance
After removing the wedge from the infant part, please store it somewhere that the child cannot access it.
Please wash the bottom seat pad and the top seat cover with cold water under 30^ .
Do not iron the soft goods.
Do not bleach or dry clean the soft goods.
Do not use undiluted detergents, gasoline or other organic solvents to wash the enhanced child restraint. It may cause damage to the product.
Use only mild detergent, water and a soft cloth to clean the enhanced child restraint shell, handle and harness straps.
Do not twist the soft goods to dry with great force. It may leave the soft goods with wrinkles.
Please hang dry the soft goods in the shade.
Please remove the enhanced child restraint from the vehicle seat if not in use for a long period of time. Put the enhanced child restraint in a cool, dry place and somewhere your child can not access it.
NUNA International B.V. Nuna and all associated logos are trademarks.
IMPORTANT! CONSERVEZ CES INSTRUCTIONS POUR CONSULTATION ULTÉRIEURE!
LIRE ATTENTIVEMENT
Table des matieres
Instructions NORR Instructions NORR
Listedespièces
29 Instructions NORR Instructions NORR
31 Instructions NORR Instructions NORR
Productregistrationie

IMPORTANT! KEEP THESE INSTRUCTIONS FOR FUTURE REFERENCE:
READ CAREFULLY


Designed around your life
nuna
Contents
Product information 3
Product Registration
Warranty
Contact
Child Usage Requirements 4
For Use with Base 5
Parts List 6
Warnings 7
Product Use 10
Cleaning and Maintenance 16
Français (FR) 17
German (DE) 35
Nederlands (NL) 53
Italiano (IT) 71
Espanol (ES) 89
Portugues (PT) 109
Polski (PL) 129
Cesky (CZ) 147
Slovencina (SK) 165
Hrvatski (HR) 183
Slovenscina (SL) 201
Pycckn (RU) 219
Norsk (NO) 239
Svenska (SV) 255
Suomi (FI) 271
Dansk (DK) 289
Romana (RO) 305
EAAynivka (EL) 323
Turkce (TR) 343
44.
(AR)_
WAZNE! PRZED UZYCIEM FOTELIKA PROSIMY ZAPOZNAC SIE Z ZAWIERAJACA WAZNE INFORMACE INSTRUKCJAI ZACHOWACJA NA PRZYSZY UZYTEK.
CZYTAJ UWAZNIE.
Spistresci
Informace o produkcie 131
= / = / = / = / = / = / = / = / = / = / = / = / = / = / = / = / = / = / = 0 = 0 = 0 = 0 = 0 = 0 = 0 = 0 = 0 = 0 = 0 = 0 = 0 = 0 = 0 = 0 = 0 = 0 = 0 = 0 = 0 = 0 = 0 = 0 = 0 = 0
DeTCKoe aBTOKpeCNO NOxOuNT IJNA yCTaHOBKn He BO BcEx pa3peUeHHbIX aBTOMoBnIax npN NcNoJIb3OBaHnB OJHOM n3 CJIeDuOuNX POnIOKeHn.
3KcPnyataunn 13dEJIIN
3ANPEUCAETC yCTaHaBnBaTb ynyuweHHOe DeTCKoe aBTOKpeCNo Ha aBTOMoBnIbHbIX CnIeHbAx, yCTaHOBJIeHHbIX NlCuOM npOTNB XOda DBNKeHnRA IIIN B CTOPHY OT XOda DnBKeHnA bTOMoBnIa. (1)-1
3ANPEUCAETCnONb3OBAt ynyuweHoe
DeTCKOE aBTOKpeCNO B NIOJKeHH JINcOM npOTNB
HaNPaBHeHn DnHexeHHa CNdeHbIX, OCHaueHHbIX
AKTNBbIMN pPOHTaJIbHbIMN NOdyUKAMN
6e3oNaChOCTn. 3To MOxET nPbIECTN K TpaBMam INN
CMEpTeNbHOMy NCXOy.(1)-2 3a dONONHTeNBHO
INHΦopMaunei ObpaaIteCb K pyKOBOdCTBy NO
3KcNJIyatauIN ABTomO6nI.
PekomeHnyeTcYcTaHaBnBaTb DaHHoe yIyUWeHHoe DeTCKoe ABTOKpeCNo Ha 3aHem CnJeHbe ABTomO6nJI. (1)-3
DaaHHe ynyuHHeHoe DeTCKoe ABTOKpeCNo npEHa3HaueHo DnA ABTOMo6BnBbIX CnDEHn C aHKePbIMn FkCaTopamn i-Size ISOFIX. (2)
3ANPEUCAETC yCTaHaBnBaTb yIyUyeHHoe DeTCKoe aBTOKpeCNO Ha aBTOMOuNbHbIX CnDeHbAx, HeycTouNbbix BO Bpem yCTaHOBKn.
YctaHOBka
1 N3BnEKeNTe ONOpHyHO HOKKy I3 OTcKa dIpaHeHna. (3)
2 BcTaBbTe HnpaBnaIoune ISOFIX B TOUKN aHkepHoro KpeJIeHnRA ISOFIX. (4) HnpaBnaIoune ISOFIX 3aunuaOT NOBepxHOCTb ABtOMo6nIbHorO cNdeHbA OT NOBpeKdEHN. TaKKe OHN cnyKaT B KaueCTBe HnpaBnaIOux dJa KpeJIeHn IOSIFIX.
3 HauKmTe Ha KhoNkpeRyInpOBKn ISOFIX c o6eHX CTOpOH OCHOBaHnA, a 3aTeM BbITAHnTe KpeIJIeHnIA ISOFIX. (5)
4 CoBmecTe KpennenHn ISOFIX c HappaNIOuMn ISOFIX n BCTaBte o6a fKcaTopa ISOFIX B TOkN anKepeHoro KpennenHn ISOFIX do ueKa. (6)
Y6eIInTeCbB TOM,уTo o6aФИкcaTopa ISOFIX NaIexKHO 3aKpeNJIeHbI B ToUkax KpeNJIeHnIAISOFIX.ДоJnxHo Ipo3ByuATb Dba ueJIyka,и CBet INdIkaTOpOB O6oXkpeNJIeHn ISOFIXdoJxHe6blTb 3eJIeHbIM.(6)-1
PpOBepbTe HaedKHOCTb 0nKcaun ynyuHHeHHoro detCKoro ABTOKpecna, notaHyB 3a oba 0nkcatopa ISOFIX.
5 OocTyHNO 9 noJoxeHn peRynipOBKn ISOFIX. HaxMnte Ha KONky BbICBO6OxJeHn ISOFIX n 3aDbNtBte OCHOBaHne Ha3aD, NIOTHo npKabero K cINHKe aBTOMO6uNbHoro cnDeHbJ.
6 NocTaBbTe yIyUWeHHe OE tckoe ABTOKpeCNo Ha aBTOMoBnIbHoE cIeHbe, BbIDBnHbTe onOpHyHO HOxKy Do nOJa. (7) Ecnu INdNkatop ONOPHO HOKK3eJIeHbI, yCTaHOBka BbINOnHeHa npabInbHo, ecN KpaChbI - HeppaBnIbHo. (7)-3
OnopHaj HOKka yCTaHaBJIbAeTcB 24 noLoXeHn.
Ecnn INdNkATOp onOpHOJ HOKKn KpaChbI,
3TO 3NaHT, YTO onOpHaj HOKka HaxOJTcB
HeNPaBnblHom NIOXeHn.
!Haxmte Ha nepeHIOU qactb ynyuHHOIeTCKOra aBtOKpcna, YTO6bl npOBepntbHaJeXHOCb KpeNHeHn ONOpHoH HOKKn.
!YtobIyKOpOTnTbONOpHyHOxKy,COXMMTe KHOHKCaTopaNIOHMMTE ONOpHyHOxKy.
7 UTo6bI n3BJeUyUeHHeOe DeTCKoe ABTOKpeCNo I3 aBTOMo6nJa, HaxMnte Ha KhoNky peryInpoBKn ISOFIX (5)-1 n NotHnTe OCHOBaHne OT CnIHKn CuDeHbA bTOMo6nJa. 3aTeM, CxIMMa 3Ty KHOJky N BTOpyIO KHOJky fHKcatopa ISOFIX, DocTaHbTe aBTOKpeCNo I3 aBTOMo6nJa. (8)
8 HaxmTe Ha KhoIky peRyIpObKn ISOFIX nIa NOMEeHn IA SOFIX Ha xpaHeHne. (9)
IOnHOCTbIO CO6paHHeO ynyuweHHoe DeTCKoe ABTOKpeCIO NOKa3aHO Ha PnCyHKe (10).
ABTOMATNUeCKn 6OKOBO3aUNTHbI 3KpaH
! YDOCTOBeBpTEcB YTO 6OKOBo3aUHTbI 3KpaH 3aΦNkCnPoBaH BpackpbITOM NIOXKeHN, YTO6bl 06ecneHTb MAKcImaJIbHyU 3aUHTy pe6eHka OT 6OKOBbIX yApOB.
1 BoKOBbIe 3aUHTHbIe 3KpaHbI aBTOMaTHeCKn aKTUBpyIOTCr npu nepMeUeHNn npJxKn peMHeB NcXoDHOe NOJoxHeN u HaTJKeHNpemHe, npu 3TOM aBTOMaTHeCKn packpbBaHOtC r o6 cToPOhbl. (11)
!BAKHO: CneJeYeT yuHTbIBaTb, YTOpackIaIbIbAHHe 60KOBbIX 3aUINTHbIX 3JEMEHTOBHE O3HaayaeT, YTO pe6eHOK yXe 3aФNKcnpOBaHdoCTaTOUHO IIOTHO.
2 BOKOBo 3aunThbI 3KpaH Ha npOTnBOONOXHO OT DBepn aBTOMo6nJIra CTOPOHe MOxHO 3aKpbITb, yTO6bl OCBO6oJntb DOOnJHInTeJbHoe npocTpaHCTBO dIpe6eHa. UHTOK y HapyXHO CTOpOHbI aBTOMo6nJIra Bcerda DoJnxH 6bITb packpblT. (12)
3 BOKOBIN 3aUNTHbI INKpaH packpbIBaETcBpyHyIO, KAK NOKa3aHO Ha pnc. (13).
PerynipoBka HAKNoHa
CoxmTe KhoNky peryu npOBKn HaKNoHa (14)-1 n yCTaHOBnTE ynyuweHHe DeTCKoe ABTOKpeCNO B HyxHoe NIOJKeHne. YrIbI HAKIOHa NOKa3aHbI Ha pnc.(14).
Iocne HacTpoKn yrJa HaKNoHa npOBepbTe noJoxeHne onOpHOH OKKN.
B noJoxeHn Iy MaIbIwe JocTyNHO 7 yrnoBaHaKJIOHa.
ToIbKO B INoJoxeHn JNuOm IpOTuB XoDa DBNXeHn
He OTKImaTe TkaHeBbIe DeTaJI, CBePhyB nX C ycJInem. NocJe 3TOrO Ha TkaHeBbIX DeTaJIAX MOrYr O6pa3oBaTbcra CKnadkn.
BbIeWnBaIe TkaHeBbIe DeTaII IN dYcUKN B TeHn.
Ecn ynyuHHe DeTCKoe ABTOKpeCno He
HCNOJb3yeTcB TeueHne DInTeJIbHO BpEmeHn,
N3BNeKaIte erO n3 ABTomO6nla. IomeCTnte
ylyuHHeHoe DeTCKoe ABTOKpeCNo B npoxJaHOM
cyxOM MeCe, HeIOCTynHom dnn DeTei.
NUNA International B.V.
Nuna nBce conyTCTByIOUne NOrOTnblrABnIOTc TOBaPbIMn 3HaKaAMN.
PykoBODCTBO no 3KcnnyatauN NORR PykoBODCTBO no 3KcnnyatauN NORR
VIKTIG! TA VARE PÄ DISSE INSTRUKSJONENE FOR FREMTIDIG OPPSLAG LES NÖYE
Innhold
Produktinformationsjon 241
Produktregistrering
Garanti
Kontakt
IMPORTANT! KEEP THESE INSTRUCTIONS FOR FUTURE REFERENCE:
READ CAREFULLY


Designed around your life
AUNa
Contents
Product information 3
Product Registration
Warranty
Contact
Child Usage Requirements 4
For Use with Base 5
Parts List 6
Warnings 7
Product Use 10
Cleaning and Maintenance 16
Français (FR) 17
German (DE) 35
Nederlands (NL) 53
Italiano (IT) 71
Espanol (ES) 89
Portugues (PT) 109
Polski (PL) 129
Cesky (CZ) 147
Slovencina (SK) 165
Hrvatski (HR) 183
Slovenscina (SL) 201
Pycckn (RU) 219
Norsk (NO) 239
Svenska (SV) 255
Suomi (FI) 271
Dansk (DK)
Romana (RO) 305
EAAynikα (EL) 323
Turkce (TR) 343
1
(AR)
VIKTIGT! BEHÄLL DESSA ANVISNINGAR FÖR FRAMTIDA BRUK!
LÄS IGENOM NOGA
Innehäll
Produktinformation 257
Produktregistrering
Garanti
Kontakt
Bakatvant lage endast
Bakatvand Barnets langd 40 cm-105 cm/ Barnets vikt≤18 kg
Lutningsposition Position 1-7
3 MaIaIaI KaIaIaIaIaIaIaIaIaIaIaIaIaIaIaIaIaIaIaIaIaIaIaIaIaIaIaIaIaIaIaIaIaIaIaIaIaIaIaIaIaIaIaIaIaIaIaIaIaIaIaI
13 ISOFIX
4 IavTacpuOuIaIc
14 MoXIoC puOuIOns OtnpivmuToC Kepaiou
5 Nepiotpovikokoumi
15 OwpaKion ppooTaOiaC aTIO PAAEUPIK OUYKPOU
6 Koupi puθμiΩn ΜOFIX
16 Deiktns okeauos poptiou
7 Koupi puθmiong
σελouc φoptiou
17 Oooyoi ISOFIX
8 Σκελος φροτιου
ailllll lllllll jilil 1000000000000000
d( 11) = 4 d( 1) = 4
1 1
gall yj y jia jia jia jia jia jia
www.nunababy.com
aaiiiaaiiie

1j21
10
i11
12
ISOFIX 13
14
15
Jusih jusj 16
ISOFIX 17
18
19
J11 1
2
3
4
5
ISOFIX 6
7
Jzill 8
Jusill glu bao j 9


AR
NORR NORR
#
uall i-Size uall
jaiyai jai jai jai
ISOFIX
m : x = 1 或 3x + 4y + 1 = 0
P( 1,0) .Q( -12,34)
- 12 < p ≤ 12

No. ( r,q, - r,s)
a 199/4 a jaiilal 12
10 10
.1ISOFIX
aaii jaiy aiee jaij ai 1
No.199 a j 2014 111 111 111 111 111 111
aas i-size aill aal lal
a
a
.
AR
364363
Jabll 150 Jabll 130 Jabll 120
1 1
sll slll lal lal lal lal
jaii Iaa Jai jaiu 1e Jia jia gao ela
()
J 1
aiee ie eae
aill 1000
4g lal 151 jall as r gall pall
S BCA = S COD + S_ BDO
Jus Jus d 15
a aabjaiabw gao jka Jaaal
ai = a1 + c_i( 0) ^i - 1
aill aaiy yssll gaaiae eaii
g 1
j jlll jll l j 1
jui jai jy jyba pbi j Jaiinna yba pbi jsiinl j
aaii iiaiaiaiaiaiaiaiaiaiaiaiaiaiaiaiaiaiaiaiaiaiaiaiaiaiaiaiaiaiaiaiaiaiaiaiaiaiaiaiaiaiaiaiaiaiaiaiaiaiaiaiaiaiaiaiaiaiaia
a 1
jolal jll jla jall jll jll jll jll jll
sie 2aieall clll jai jia jia jia jia jia jia jia jia jia jia jia jia jia jia jia jia jia jia jia jia jia jia jia jia jia jia jia jia jia jia jia jia jia jia jia jia jia
i 1
(4).ISOFIX jjSOFIX 1
(1·)
g d 1
e 1
aal 122
ae gaae yjy jyge ie jilallll lcllll 1
D 1
(1)
alalal jaoalal juaic 1aij ala 5y y aia
Saae
y
i 1
(1)
(1) 00all g cagaa laLggy aaiil all clalnll e j
A
gai gai jy ball pail bial 1- (1) ally laia jie o ay biai
(1)
Alloy Iy Jia 2y Jaaill gla y aie gao 1e jll sla!
aai jiall lalil g aaiy lly j y cia
ISOFIX 1aI a ISOFIX 1aI aI aI aI aI aI aI aI aI aI aI aI aI aI aI aI aI aI aI aI aI aI aI aI aI aI aI aI aI aI aI aI aI aI aI aI aI aI aI aI aI aI aI aI aI aI
1-().ISOFIX
aaiy jbal Jabll 4s Ja aie e ae jol 50
.ISOFIX
jie baiol ayall aie 1g ISOFIX
y j 1
( S_0) = ( 1 - 12) ( 0)
aill jll gj 1s jll d aie jgall pblil q
gai jia jiai lui aill iu jia jia jia liie (V)
g 1
-(V).
jll jilil glu jiaol 11, jnil glaia y
()
Plll lao 1e Jai biai ly Jauill jiu ci 5o! Jo Ss
aaii iiaill glw yj jgde biaial llaill glw yaaai
1-(0)ISOFIX b2j jbail
g jll ldl, jll 1e bwlal eil g wcll ne i y
(A).ISOFIX
Jabll
(17)AasJabllgusLjss
e 1
Jellall 111111111111111111111111
a jall g aagall a jalil a gaaabj j abnll
iill a jai gao yao jia jao jao jao jao jao jao jao
(1).
()jll jllg lalilai jajl gagaae jll
e, 1
()
aaii iia
()

NORR NORR
b 1
PQ = 1 - x,y
_j=1^n 1 ≥slant _j=1^n j
V-1 aiaa aaiiaaa