
Arra - Car seat Nuna - Free user manual and instructions
Find the device manual for free Arra Nuna in PDF.
| Product Type | Child Car Seat |
| Brand | Nuna |
| Model | Arra |
| Safety Standard | UN R129/03 Regulation - i-Size universal ISOFIX |
| Child Use | Height 40 to 85 cm, weight ≤ 13 kg (approx. 1.5 years or less) |
| Installation Type | ISOFIX + load leg (i-Size) |
| Backrest Positions | 3 recline positions |
| Headrest Adjustments | 10 height positions |
| Side Protection | Side impact protection device (door side) |
| Handle | 2 positions: car/hand/stroller carry and baby chair |
| Canopy | Removable with ventilation window |
| Newborn Insert | Recommended for babies < 60 cm |
| Load Leg | Lock indicator (green/red) |
| Cleaning and Maintenance | Damp cloth, no abrasives or bleach; wash per label |
| Safety - Warnings | Do not use with active frontal airbag; always restrain child; replace after accident |
| Spare Parts | Use only original Nuna parts |
| Customer Service | info@nunababy.com / www.nunababy.com |
Frequently Asked Questions - Arra Nuna
User questions about Arra Nuna
0 question about this device. Answer the ones you know or ask your own.
Ask a new question about this device
Download the instructions for your Car seat in PDF format for free! Find your manual Arra - Nuna and take your electronic device back in hand. On this page are published all the documents necessary for the use of your device. Arra by Nuna.
USER MANUAL Arra Nuna
natural_image
Silhouette of a person wearing a helmet and holding a tool, standing on a textured beige background (no text or symbols)IMPORTANT! READ THESE INSTRUCTIONS CAREFULLY BEFORE USE AND KEEP THEM FOR FUTURE REFERENCE.

natural_image
Line drawing of a chair seat with a flat top and side seat (no text or symbols)
natural_image
Line drawing of a car with two people inside, one seated and one standing, no text or symbols present

natural_image
Illustration of a hand using a tool to lift a small object, with a black arrow indicating the motion (no text or symbols present)

natural_image
Line drawing of a baby car seatbelt with a hand adjusting the seat (no text or symbols)


natural_image
Line drawing of a car trunk with two directional arrows indicating movement or movement (no text or symbols)


natural_image
Line drawing of a person using a medical device to lift a patient's seat (no text or symbols present)
natural_image
Technical line drawing of a mechanical device with no visible text or symbols
natural_image
Technical line drawing of a mechanical component with an arrow indicating upward motion (no text or symbols)
natural_image
Illustration of a baby wearing a seatbelt in a car seatbelt (no text or symbols)
natural_image
Anatomical diagram of a human head and neck showing internal structures with an arrow indicating a specific area (no text or labels present)


natural_image
Line drawing of a person's seat with hands placed on the seat, no text or symbols present
natural_image
Line drawing of a mechanical device with directional arrows indicating motion (no text or symbols)
natural_image
Illustration of a baby wearing a seatbelt in a car seatbelt (no text or symbols)
natural_image
Illustration of a person wearing a helmet with a blue arrow indicating a specific part (no text or symbols present)
natural_image
Line drawing of a mechanical component with arrows indicating motion direction (no text or symbols)


natural_image
Illustration of a baby seat with a curved arrow indicating rotation (no text or symbols)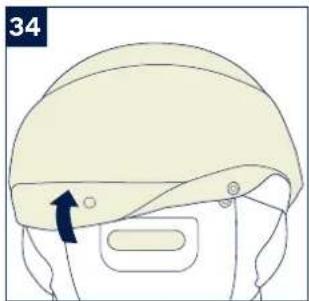
natural_image
Illustration of a helmet with a blue arrow indicating a specific area, no text or symbols present
natural_image
Illustration of a car seatbelt being adjusted for a seatbelt, showing hand placement and two arrows indicating movement (no text or symbols present)
natural_image
Illustration of a baby in a car seat being lifted by a hand, with a downward arrow indicating the pressure point (no text or symbols present)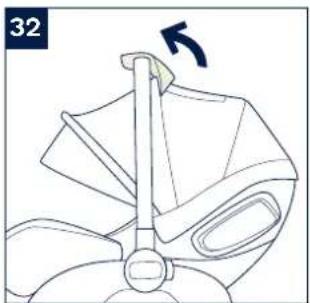
natural_image
Line drawing of a car seatbelt with a hand operating the seat (no text or symbols)

natural_image
Anatomical line drawing of a human head and neck with two arrows indicating specific regions (no text or labels present)

natural_image
Diagram of a car seat with an upward arrow indicating direction (no text or symbols)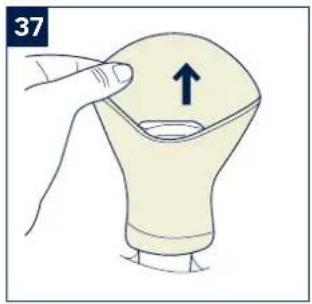
natural_image
Illustration of a hand pointing to a curved object with an upward arrow, no text or symbols present
natural_image
Technical line drawing of a mechanical component with an arrow indicating a specific feature (no text or symbols present)
natural_image
Diagram of a mechanical component with a blue arrow indicating a directional motion (no text or symbols)
natural_image
Line drawing of a person's seat with an arrow indicating upward motion (no text or symbols)
natural_image
Diagram of a pliers or tool with an arrow indicating a specific part (no text or symbols present)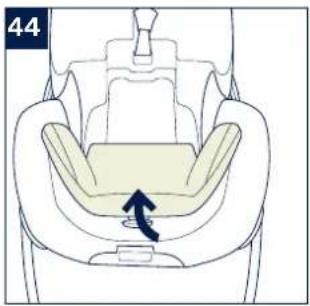
natural_image
Diagram of a car seat with an arrow indicating a motion or force (no text or symbols present)Designed around your life

Contents
Product information
Product Registration 3
Warranty
Contact
Child Usage Requirements 4
Warnings 6
Parts List 11
Product Use 13
Cleaning and Maintenance 19
French (FR) 21
German (DE) 41
Dutch (NL) 61
Italian (IT) 81
Spanish (ES) 101
Portuguese (PT) 121
Polish (PL) 141
Czech (CZ) 161
Slovak (SK) 181
Croatian (HR) 201
Slovenain (SL) 221
Russian (RU) 241
Swedish (SV) 261
Finnish (FI) 281
Romanian (RO) 301
Greek (EL) 321
Turkish (TR) 341
Arabic (AR) 361
Product Information
Model Number:
Manufactured Date:
Product Registration
Please fill in the above information. The model number and the manufactured in date are located on the back and bottom of the Enhanced Child Restraint and base.
To register your product please visit:
www.nunababy.com
Click the "Register Gear" link on the homepage.
Warranty
We have purposely designed our high-quality products so that they can grow with both your child and your family. Because we stand by our product, our gear is covered by a custom warranty per product, starting from the day it was purchased. Please have the proof of purchase, model number and manufactured in date available when you contact us.
For warranty information please visit:
www.nunababy.com
Click the "Warranty" link on the homepage.
Contact
For replacement parts, service, or additional warranty questions, please contact our customer service department.
info@nunababy.com
www.nunababy.com
In the United Kingdom:
infouk@nunababy.com
www.nunababy.com
NUNA International B.V.
This product is suitable for use with children who meet the following requirements:
| Figure for Installation Suitable for | |
 | Child height 40cm-85cm/Child weight≤13kg(approximately 1.5 years old or under) |

1 "i-Size" (Integral Universal ISOFIX Enhanced Child Restraint Systems) is a category of Enhanced Child Restraint System primarily designed for use in all i-Size seating position of a vehicle.
2 According to the UN Regulation No. 129, the Enhanced Child Restraint with base is a Universal ISOFIX Enhanced Child Restraint and should be fitted using the ISOFIX connections.
3 This is an "i-Size" Enhanced Child Restraint System. It is approved according to UN Regulation No. 129, for use in, i-Size compatible vehicle seating positions as indicated by vehicle manufacturers in the vehicle users' manual.
4 If in doubt, consult either the Enhanced Child Restraint System manufacturer or the retailer.
5 ARRA instruction ARRA instruction
WARNING
Failure to follow these warnings and instructions could result in serious injury or death.
After your child is placed in this enhanced child restraint, the safety belt must be used correctly.
Any luggage or other objects liable to cause injuries in the event of a collision shall be properly secured.
Be sure that the enhanced child restraint is installed in such a way that no part of it interferes with movable seats or in the operation of vehicle doors.
Before carrying the enhanced child restraint by hand, ensure that the child is fastened with the child harness, and that the handle is correctly locked in a vertical position.
Consult the distributor for issues concerning maintenance, repair and part replacement.
Correct Installation is only permitted by use of the ISOFIX connectors.
Frequently check the ISOFIX guides for dirt and clean them if necessary. Reliability can be effected by ingress of dirt, dust, food particles etc.
Please check before you purchase this enhanced child restraint to make sure it can be installed properly in your vehicle.
Please keep the enhanced child restraint away from sunlight, because it may be too hot for child's skin. Always touch the enhanced child restraint before placing child in it.
Remove this enhanced child restraint from the vehicle seat when it is not in regular use.
The enhanced child restraint system soft goods should not be replaced with any other than the one recommended by the manufacturer, because the soft goods constitutes an integral part of the restraint performance.
The parts of the enhanced child restraint should not be lubricated in any way.
The load leg should be in contact with the vehicle floor and the straps restraining the child should be adjusted to the child's body. The straps should not be twisted.
To avoid serious injury or death, NEVER place enhanced child restraint on elevated surface seat with child in it.
To avoid the risk of falling out, always secure the child using the child harness when the child is placed in the enhanced child restraint, even when the enhanced child restraint is not in the vehicle.
To use this enhanced child restraint with the ISOFIX connections according to UN Regulation No. 129, your child must meet the following requirements. Child height 40cm-85cm/ Child weight≤13kg (approximately 1.5 years old or under).
NEVER leave your child unattended with their enhanced child restraint.
NEVER use a second-hand enhanced child restraint or an enhanced child restraint whose history you do not know because it may have structural damage that compromises your child's safety.
NEVER use ropes or any other substitutes to secure enhanced child restraint in vehicle or to secure child into enhanced child restraint.
NO enhanced child restraint can guarantee full protection from injury in an accident. However, proper use of this enhanced child restraint will reduce the risk of serious injury or death to your child.
DO NOT continue to use this enhanced child restraint after it has suffered any type of crash, even a minor one. Replace immediately as there may be invisible, structural damage from the crash.
DO NOT have your child in large/oversized clothes because this may prevent your child from being properly and securely fastened by the shoulder harness straps and the crotch strap between the legs.
DO NOT install this enhanced child restraint without following the instructions in this manual or you may put your child at serious risk of injury or death.
DO NOT leave this enhanced child restraint or other items unbelted or unsecured in your vehicle because an unsecured enhanced child restraint can be thrown around and may injure occupants in a sharp turn, sudden stop, or collision.
DO NOT make any modification to this enhanced child restraint or use it along with component parts from other manufacturers.
DO NOT place any objects in the load leg area in front of your base.
DO NOT put anything other than the recommended inner cushions in this enhanced child restraint.
DO NOT use any load bearing contact points other than those described in the instructions and marked on the enhanced child restraint.
DO NOT use the enhanced child restraint without the soft goods.
DO NOT use the rearward facing enhanced child restraint systems in seating positions where there is an active frontal airbag installed. Death or serious injury may occur. Please reference vehicle owner's manual for more information.
DO NOT use this enhanced child restraint if it has damaged or missing parts.
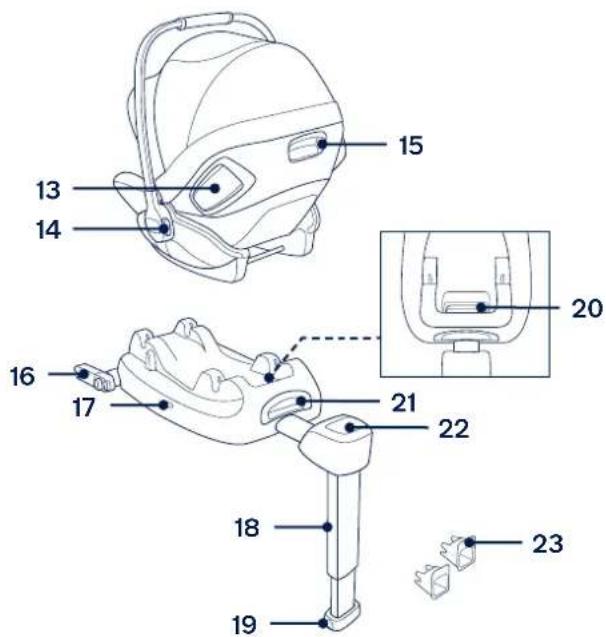
Parts List
Make sure all parts are available before assembly. If any part is missing, please contact Nuna (see page
3 & 4 for information). No tools are required for assembly.
1 Handle
2 Canopy
3 Instruction
Manual Storage
Compartment
4 Seat Pad
5 Infant Insert
6 Webbing Adjustment Button
7 Adjustment Webbing
8 Shoulder Harness Covers
9 Stroller Fix Releasing Button
10 Crotch Harness Cover
11 Harness Connector
12 Harness Buckle
13 Side Impact Shield
14 Handle Adjustment Button
15 Backrest Adjustment Button
16 ISOFIX Connector
17 Shell Indicator
18 Load Leg
19 Load Leg Adjustment Button
20 ISOFIX Adjustment Button
21 Enhanced Child Restraint Releasing Button
22 Load Leg Indicator
23 ISOFIX Guides

Product Use
Installation Concerns
This enhanced child restraint is suitable for vehicle seats with i-Size ISOFIX anchor points with the Base. (1)
DO NOT use the rearward facing enhanced child restraint systems in seating positions where there is an active frontal airbag installed. (2) Death or serious injury may occur. Please reference vehicle owner's manual for more information.
DO NOT install this enhanced child restraint on vehicle seats that face sideways or rearward with respect to the moving direction of the vehicle.
Please refer to your vehicle owner's manual for recommended or suggested installation positions.(3)
It is recommended to install this enhanced child restraint on the rear vehicle seat. (4)
DO NOT install this enhanced child restraint on vehicle seats movable during installation.
Side Impact Shield
Ensure the side impact shield is locked in the open position for maximum side impact safety.

IMPORTANT: Please note that unfolding the side impact shield does NOT mean that the child is already restrained tight enough.
1 The side impact shield can be manually opened as shown on (5).
2 The side impact shield opposite the vehicle door can be closed to allow more seating space, if needed. (6) The side closest to the vehicle exterior should always be in the open position.
Handle Adjustment
1 The handle of the enhanced child restraint can be adjusted to 2 positions. (7)
Position for car, hand or stroller transportation.
(7)-1
Baby chair position. (7)-2
2 To adjust the handle, squeeze handle adjustment buttons on both sides to release it (8)-1, and then rotate the handle until it clicks into any of the 2 positions. (8)-2
Installation with Base
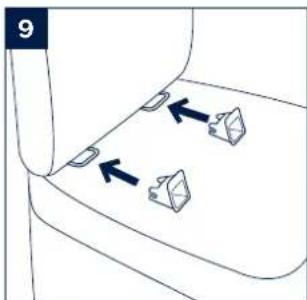
1 Fit the ISOFIX guides with the ISOFIX anchor points. (9) The ISOFIX guides can protect the surface of the vehicle seat from being torn. They can also guide the ISOFIX connectors.
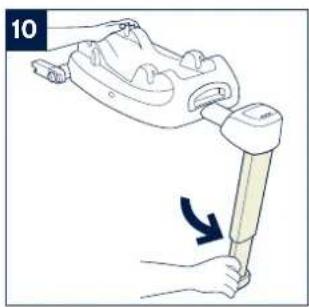
2 Unfold the load leg from storage compartment. (10)
3 Press the ISOFIX adjustment button to adjust the ISOFIX connectors. Line up the ISOFIX connectors with the ISOFIX guides, and then click both ISOFIX connectors into the ISOFIX anchor points. (11)
Make sure that both ISOFIX connectors are securely attached to their ISOFIX anchor points. There should be two audible clicks and the colors of the indicators on the both ISOFIX connectors should be completely green. (11)-1
Check to make sure the base is securely installed by pulling on the both ISOFIX connectors.
4 After placing the base on the vehicle seat, extend the load leg to floor (12). When the load leg indicator shows green means it is installed correctly, red means it is installed incorrectly. (12)-2
The load leg has multiple positions. When the load leg indicator shows red this means the load leg is in the wrong position.
Make sure the load leg is in full contact with the vehicle floor pan.
⚠ Squeeze the load leg adjustment button, then shorten the load leg upwards. (12)-1 The completely assembled base is shown as (13).
The ISOFIX connectors must be attached and locked onto the ISOFIX anchor points. (13)-1
The load leg must be installed correctly with green indicator. (13)-2
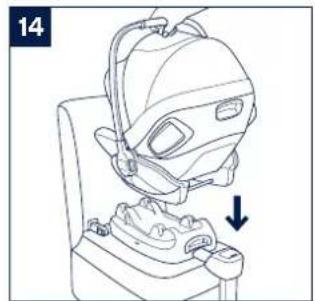
5 Push the enhanced child restraint down into the base (14), if the enhanced child restraint is secure, the shell indicator shows green. (15)
Pull up on the enhanced child restraint to be sure it is securely latched into the base.
6 Press the ISOFIX adjustment button (16)-1, and push the base back against the vehicle seat until tight. (16)-2
7 To remove the enhanced child restraint, lift the enhanced child restraint off (17)-2 while pressing the enhanced child restraint adjustment button. (17)-1
8 To remove the base, press the secondary lock button (18)-1 first and then the button (18)-2 on the ISOFIX connectors before removing the base from the vehicle seat. (18)
Height Adjustment
for Head Support and Shoulder Harnesses
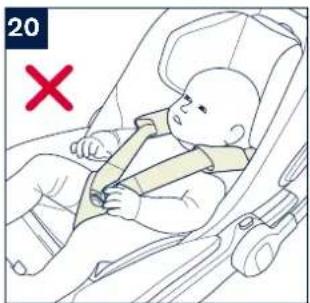
Check that shoulder harness straps are set at the proper height. Please choose the proper pair of shoulder harness according to the child's height.
Shoulder harness straps must be nearest to your child's shoulders (19), but not above the shoulder line. (20)
If the Shoulder harness straps are not at proper height, the child might be ejected from the enhanced child restraint if there is a crash.
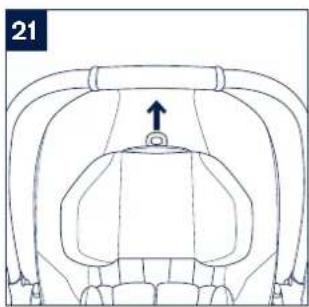
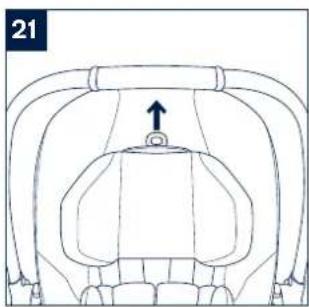
Pull the head support adjustment lever (21), meanwhile pull up or down the head support until it snaps into one of the 10 positions. The head support positions are shown as (22).
Backrest Adjustment
There are 3 angles for the backrest.
Please press backrest adjustment button to heighten or lower the backrest. (23)(24)
Securing Child
Use Infant Insert
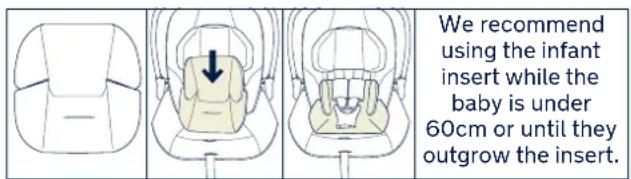
After the child is placed in the enhanced child restraint, check whether the shoulder harness straps are set to the proper height.
1 While pressing the webbing adjustment button, pull completely the two shoulder harness straps of the enhanced child restraint. (25)
2 Unlock the buckle of the harnesses by pressing the red button. (26)
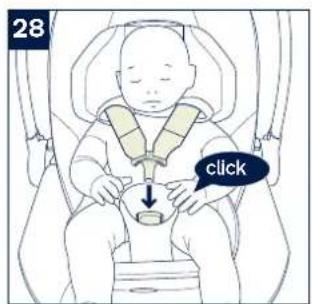
3 Place child into the enhanced child restraint and lock the buckle. (27)(28)
4 Tighten the shoulder harness straps by pulling the adjustment webbing. (29)
Make sure the space between the child and the shoulder harness straps is about the thickness of one hand.
Canopy
1 To assemble the canopy, snap the canopy to the rear of seat. (30)
2 To open the canopy, pull the canopy toward, and to close the canopy, push it back. (31)
3 The canopy window can be opened for ventilation. (32)
Detach & Assemble Soft Goods
see images (33)-(44)
To re-assemble the soft goods, reverse the aforementioned steps.
Cleaning and Maintenance
Clean the frame, plastic parts, and fabric with a damp cloth, but do not use abrasives or bleach. Do not use silicon lubricants as they will attract dirt and grime.
To ensure long-lasting use, wipe this product off with a soft, absorbent cloth after using it in rainy weather.
Refer to the care labels attached to the soft goods for washing and drying instructions.
It is normal for fabric to color from sunlight and to show wear and tear after a long period of use, even when used normally.
For reasons of safety, only use original Nuna parts.
Check regularly if everything functions properly. If any parts are torn, broken, or missing, stop using this product.
NUNA International B.V.
Nuna and all associated logos are trademarks.
19 ARRA instruction ARRA instruction
IMPORTANT! LISEZ ATTENTIVEMENT CES INSTRUCTIONS AVANT LA PREMIÈRE UTILISATION ET CONSERVEZ-LES.
Sommaire
39 Instructions ARRA Instructions ARRA

natural_image
Line drawing of a car seat with a helmet and seatbelt (no text or symbols)natural_image
Line drawing of a car seat with a helmet and seatbelt (no text or symbols)IMPORTANT! READ THESE INSTRUCTIONS CAREFULLY BEFORE USE AND KEEP THEM FOR FUTURE REFERENCE.

natural_image
Line drawing of a chair seat with a flat top and side seat (no text or symbols)
natural_image
Line drawing of a car with two people inside, one holding a potted plant (no text or symbols)
natural_image
Illustration of a hand using a medical device to lift a patient's chest (no text or symbols present)

natural_image
Line drawing of a baby car seatbelt with a hand adjusting the seatbelt (no text or symbols)


natural_image
Diagram of a car trunk with directional arrows indicating movement or movement (no text or symbols)


natural_image
Line drawing of a medical device with a hand adjusting its seat (no text or symbols)
natural_image
Technical line drawing of a mechanical device with a labeled dimension (2), no text or symbols present.
natural_image
Technical line drawing of a mechanical component with a central bracket and upward arrow (no text or symbols)
natural_image
Illustration of a baby wearing a seatbelt in a car seatbelt seat, with a green checkmark indicating a safety or comfort condition (no text or symbols present)
natural_image
Anatomical diagram of a human head and neck showing internal structures with an arrow indicating a specific area (no text or labels present)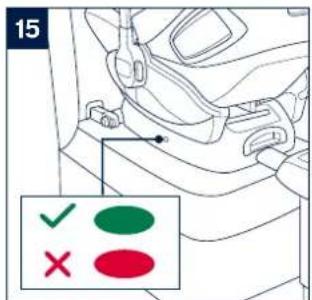


natural_image
Line drawing of a person's seatbelt with hand and arrow indicating movement (no text or symbols)
natural_image
Line drawing of a mechanical device with directional arrows indicating motion (no text or symbols)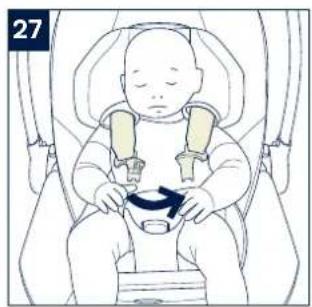
natural_image
Illustration of a baby in a car seatbelt with a blue belt, no text or symbols present
natural_image
Illustration of a person wearing a helmet with a blue arrow indicating a specific part (no text or symbols present)
natural_image
Line drawing of a mechanical component with arrows indicating motion or force direction (no text or symbols)

natural_image
Illustration of a baby seat with a curved arrow indicating rotation (no text or symbols)
natural_image
Illustration of a helmet with a blue arrow pointing to the side panel (no text or symbols)
natural_image
Illustration of a car seatbelt being adjusted for a seatbelt, showing two arrows indicating movement (no text or symbols present)
natural_image
Illustration of a baby in a car seatbelt being lifted by a hand, with a downward arrow indicating pressure or discomfort (no text or symbols present)
natural_image
Line drawing of a seatbelt mechanism with a directional arrow indicating rotation (no text or symbols)

natural_image
Anatomical line drawing of an insect head showing internal structures with two downward arrows indicating specific regions (no text or labels present)

natural_image
Diagram of a car seat with an upward arrow indicating motion or direction (no text or symbols)
natural_image
Illustration of a hand pointing to a curved object with an upward arrow, no text or symbols present
natural_image
Technical line drawing of a mechanical clamp or clip assembly (no text or symbols)
natural_image
Diagram of a mechanical component with a blue arrow indicating direction, no text or symbols present
natural_image
Line drawing of a person's seat with an arrow indicating upward motion (no text or symbols)
natural_image
Illustration of a mechanical tool with a highlighted section and arrow indicating direction (no text or symbols)
natural_image
Line drawing of a car seat with a highlighted arrow indicating a specific seat area (no text or symbols present)Designed around your life

Contents
Product information
Product Registration 3
Warranty
Contact
3
4
Child Usage Requirements 4
Warnings 6
Parts List 11
Product Use 13
Cleaning and Maintenance 19
French (FR) 21
German (DE) 41
Dutch (NL) 61
Italian (IT) 81
Spanish (ES) 101
Portuguese (PT) 121
Polish (PL) 141
Czech (CZ) 161
Slovak (SK) 181
Croatian (HR) 201
Slovenain (SL) 221
Russian (RU) 241
Swedish (SV) 261
Finnish (FI) 281
Romanian (RO) 301
Greek (EL) 321
Turkish (TR) 341
Arabic (AR) 361
VAŽNO! PRIJE UPORABE PAŽLJIVO PROČITAJTE OVE UPUTE I ZADRŽITE IH ZA BUDUĆU UPORABU.
Sadržaj
Podaci o proizvodu
Registracija proizvoda 203
Jamstvo 203
Kontakt
204
Uvjeti za upotrebu 204
Upozorenja 206
Popis dijelova 211
Upotreba proizvoda 213
Čišćenje i održavanje 219
Podaci o proizvodu
Broj modela:
Datum proizvodnje:
Registracija proizvoda
Ispunite gore navedene podatke. Broj modela i datum proizvodnje nalazi se na stražnjoj strani i na dnu napredne dječje sjedalice i baze.
ARRA upute ARRA upute
POMEMBNO! PRED UPORABO SKRBNO PREBERITE NAVODILA IN JIH SHRANITE ZA POZNEJŠO UPORABO.
Vsebina
Informacije o izdelku
Registracija izdelka 223
Garancija 223
Stik 224
Uzbek-Ongkou-10000000000000000000000000000000000000000000000000000000000000000000000000000000
#
natural_image
Abstract pattern of blue elongated shapes on beige background, no text or symbols present
Find out more at nunababy.com

natural_image
Abstract pattern of blue brushstroke-like shapes on beige textured background (no text or symbols)


- Designed around your life
- Contents
- Product Information
- Product Registration
- Warranty
- Contact
- WARNING
- Parts List
- Product Use
- Installation Concerns
- Side Impact Shield
- Handle Adjustment
- Installation with Base
- Height Adjustment
- Backrest Adjustment
- Securing Child
- Canopy
- Detach & Assemble Soft Goods
- Cleaning and Maintenance
- IMPORTANT! LISEZ ATTENTIVEMENT CES INSTRUCTIONS AVANT LA PREMIÈRE UTILISATION ET CONSERVEZ-LES.
- Sommaire
- IMPORTANT! READ THESE INSTRUCTIONS CAREFULLY BEFORE USE AND KEEP THEM FOR FUTURE REFERENCE.
- VAŽNO! PRIJE UPORABE PAŽLJIVO PROČITAJTE OVE UPUTE I ZADRŽITE IH ZA BUDUĆU UPORABU.
- Sadržaj
- Podaci o proizvodu
- Registracija proizvoda
- POMEMBNO! PRED UPORABO SKRBNO PREBERITE NAVODILA IN JIH SHRANITE ZA POZNEJŠO UPORABO.
- Vsebina
Brand : Nuna
Model : Arra
Category : Car seat