
Royl - Car seat Nuna - Free user manual and instructions
Find the device manual for free Royl Nuna in PDF.
| Brand | Nuna |
| Model | Royl |
| Product type | Child car seat |
| Category | Car seat |
| Use | Forward-facing only (harness or booster mode) |
| Child weight (harness mode) | 13.6 to 29.4 kg (30-65 lb) |
| Child weight (booster mode) | 18 to 54.4 kg (40-120 lb) |
| Child height (harness mode) | Up to 124.4 cm (49 in) |
| Child height (booster mode) | 96 to 144.8 cm (38-57 in) |
| Minimum age (harness mode) | 2 years |
| Minimum age (booster mode) | 4 years |
| Installation | With vehicle seat belt or Universal Anchorage System (UAS) + tether strap (required in harness mode) |
| Number of recline positions | 4 |
| Headrest adjustment | 8 positions |
| Leg rest adjustment | Yes (angle and length) |
| Cup holders | 2 removable |
| Harness | 5-point, storable in booster mode |
| Certification | Airplane use approved in harness mode (forward-facing) |
| Cleaning and maintenance | Cover and pads machine washable per label; harness hand wash with soapy water; shell and buckle wipe clean |
| Lifespan | 10 years after purchase or manufacture date |
| Customer service | 1-800-667-4111 / service@nunababy.ca |
Frequently Asked Questions - Royl Nuna
User questions about Royl Nuna
0 question about this device. Answer the ones you know or ask your own.
Ask a new question about this device
Download the instructions for your Car seat in PDF format for free! Find your manual Royl - Nuna and take your electronic device back in hand. On this page are published all the documents necessary for the use of your device. Royl by Nuna.
USER MANUAL Royl Nuna
natural_image
Illustration of a dark blue car seat with white outline patterns and blue accent lines (no text or symbols)nuna®
nuna®
Thank you!
You've just purchased a Nuna product, and you can be sure that your child is getting the best there is. Our products are expertly engineered for safety, with luxury fabrics and sophisticated style.
Whatever made you fall in love with Nuna, rest assured your adventures with your little one will be easier from now on, freeing you to enjoy more happy family moments together.
Easy Installation
Our products are designed to make your life easier, so installing this child restraint doesn't require outside assistance. While we encourage the use of Certified Child Passenger Safety Technicians to ensure you have installed the seat correctly, you can install the child restraint in your vehicle without these professionals by carefully reading and following these instructions.
IMPORTANT! KEEP THESE INSTRUCTIONS FOR FUTURE REFERENCE:
READ CAREFULLY
WARNING: Read and understand ALL warning labels affixed to the child restraint and all written instructions. Failure to do so can result in serious injury or death. Store instructions in the slot on the bottom of the leg rest for future use.
Contents
Important Information
Product Information/Registration 4
Child Usage Requirements 5
Safety Warnings 6
Vehicle Compatibility 10
Car Seat Use after a Crash 16
Aircraft Installation 16
Child Restraint Overview
Parts List 17-19
Features Usage 20
Harness mode Installation (forward facing) 38
Booster mode Installation
(without built-in harness) 46
Securing Child
In Harness mode (forward facing) 54
Booster mode (without built-in harness) 56
Cleaning and Maintenance 58
Product Information/Registration
EN
Model Number:
Manufactured (date):
Product Registration
Please fill in the above information. The model number and the manufactured in date are located on a label on the bottom of your child restraint. Fill out the prepaid registration postcard attached to the seat cover and mail it today.
Child restraints could be recalled for safety reasons. You must register this restraint to be reached in a recall. Send your name, address, e-mail address if available and the restraint's model number and manufacturing date to:
Nuna Canada
2520 Av. Marie-Curie
St-Laurent, QC, H4S 1N1
1-800-667-4111
or register online at:
www://nunababy.ca/en/registration
Warranty
We have purposely designed our high-quality products so that they can grow with both your child and your family. Because we stand by our product, our gear is covered by a custom warranty per product, starting from the day it was purchased. Please have the proof of purchase, model number and manufactured in date available when you contact us.
Contact
For replacement parts, service, or additional warranty questions, please contact our customer service department.
Phone: 1-800-667-4111
or email: service@nunababy.ca
Child Usage Requirements
To use this child restraint, your child must meet ALL the weight and height requirements below:
Be at least 2 years old
Weight: 13.6–54.4 kg (30–120 lbs)
Height: 144.8 cm (57 in.) or less
In booster mode (without built-in harness), child must be at least 4 years old and must be able to sit relatively still in the same position with the shoulder and lap belt properly positioned on their body throughout the car ride.
WARNING
DEATH OR SERIOUS INJURY CAN OCCUR
When used in harness mode (forward facing), use ONLY with children who weigh 13.6–29.4 kg (30–65 lbs) and whose height is 124.4 cm (49 inches) or less and are at least 2 years of age.
When used in booster mode (without built-in harness) use ONLY with children who weigh between 18–54.4 kg (40–120 lbs) and whose height 96 to 144.8 cm (38 to 57 inches) and are at least 4 years old.
DO NOT use in any configuration not shown in the instructions. Please refer to vehicle owner's manual for recommended or suggested installation positions.
DO NOT use the child restraint if it is more than 10 years from date of purchase (proof of purchase required) or manufactured otherwise. Check the label on the bottom of the child restraint.
DO NOT use another manufacturer's cover, padding, fabric, or other soft materials with this child restraint, as these constitute an integral part of the child restraint performance.
DO NOT modify your child restraint or use any accessories or parts supplied by other manufacturers unless they are approved by Nuna for use with this child restraint. Doing so may be unsafe and may void the warranty.
DO NOT use a cut, frayed or damaged vehicle seat belt. NEVER use the child restraint if it has frayed or cut harness straps, any damaged or missing parts, or has been in a damaging crash. To find out if damaged parts are replaceable, call 1-800-667-4111.
NEVER use a car seat that has been involved in a moderate to severe crash. See page 16 to learn the difference between a minor and moderate to severe crash.
DO NOT allow anyone who has not read the instructions to install or use this child restraint. NEVER give this child restraint to another person without also giving them these instructions.
NEVER leave child unattended in this child restraint.
To avoid strangulation, do not allow children to play with vehicle or child restraint belts or straps. If possible, move unused belts out of reach.
Cover the child restraint when your vehicle is parked in sunlight. Parts of a child restraint can become very hot if left in the sun, and can burn a child's skin. Check for hot parts before putting your child in the child restraint.
NEVER leave child restraint unsecured in your vehicle even when it is unoccupied. In a crash, it could become a projectile and injure other vehicle occupants.
NEVER leave luggage or other objects unsecured in a vehicle, as they are liable to cause injuries in the event of a collision.
DO NOT install on a rear facing or side facing vehicle seat.
This booster should be installed in the rear vehicle seat so that it can be installed with the vehicle lower anchors.
DO NOT install in the front passenger seat with an active airbag, unless the air bag can be turned OFF.
The child restraint is NOT certified for aircraft use when used as a booster. Aircraft belts are lap belts only, and a child cannot be secured in the booster with only a lap belt.
WARNING! Use ONLY the vehicle's lap and shoulder belt system when restraining the child in this booster seat. Use of any other method of securement will not properly secure the child, which could result in serious
injury or death. DO NOT use the built-in harness when using the booster seat.
Properly position the vehicle lap and shoulder belt on your child. Make sure the vehicle lap and shoulder belt are not loose. A loose or improperly positioned vehicle lap and shoulder belt could cause the child to be ejected in a sudden stop, turn or crash and cause serious injury or death.
The vehicle shoulder belt should rest on the child's shoulder and across the center of the chest.
The vehicle lap belt must remain snug across the child's thighs.
This restraint system can only be used in these classes of vehicles: passenger cars, multipurpose vehicles and trucks that have lap, lap/shoulder belts and UAS connectors.
Vehicle Compatibility
EN
WARNING: You MUST read and understand ALL child restraint related instructions and warnings in your vehicle owner's manual to correctly and safely use this child restraint in your vehicle.
This child restraint can ONLY be installed on vehicle seats that face forward. DO NOT install in seats that face to the sides or rear of the vehicle.

IMPORTANT: According to accident statistics, children are safer when properly restrained in the rear seating positions than in the front seating positions.
Using UAS
This Child Restraint can be installed without vehicle belts, by connecting the Restraint's Universal Anchor Belts to the lower anchorages in your vehicle.
UAS (Universal Anchorage System) is a system for installing a child restraint in a vehicle without using the vehicle belts.
Refer to your vehicle owner's manual to determine if your vehicle is equipped with UAS, and how to correctly use UAS to install this child restraint in your vehicle.
UAS and Tether Locations
Common locations of UAS and tether in a vehicle are shown below (consult your vehicle owner's manual). Other locations of the tether are shown on the next page.

UAS in Harness Mode (Forward Facing)
This child restraint is designed to be used with UAS anchors at the standard spacing of 28 cm (11 inches). UAS anchor points are defined as 28 cm (11 inches) from the center of one UAS anchor to the center of another UAS anchor.
WARNING: DO NOT USE the UAS anchor belt to attach this child restraint forward facing with harness mode when restraining a child weighing over 18 kg (40 lbs).
Tether
The child restraint's tether strap must ALWAYS be used in Harness mode (forward facing) as it provides a more secure installation and is proven to be safer. In a crash, the tether limits a child's forward movement, protecting their head and neck and reducing the risk of injury.
Common tether locations (consult your vehicle manual):

UAS in Booster mode (without built-in harness)
Non-standard spacing of the lower anchors is allowed in booster mode ONLY IF the vehicle manufacturer allows it; consult your vehicle owner's manual.
An example of non-standard spacing is installing the booster in the center seating position of your vehicle where there are no lower anchors and using the closest lower anchors from the outboard positions instead.
When using non-standard spacing, lower anchors MUST NOT interfere with the vehicle seat belt.
Using Vehicle Belts
Vehicle belt type is based on mode, as specified below:
Lap/Shoulder Belt (A)
Harness mode (forward facing)
Booster Mode Lap Belt Only (B)
Harness mode (forward facing)

Belts MUST be able to be locked. Refer to your vehicle owner's manual to determine if the belts in your vehicle lock by: A) switching the seat belt's retractor by pulling the belt all the way out, or B) a locking latch plate that locks the vehicle's seat belts so they will not move freely.
If the belt cannot be locked using one of these methods, contact Nuna Customer Service for a locking clip.
Vehicle Belts that CANNOT Be Used
The following types of vehicle belts MUST NOT be used to install this child restraint. They will not provide a secure, safe installation. Refer to your vehicle owner's manual for which seating positions in your vehicle can be used to install this child restraint using vehicle belts or UAS.
In a foster mode, child must be secured by a lap/shoulder belt, NEVER a lap belt only.
1 - Motorized Belts (Automatic)
These should not be used unless the shoulder belt can be removed, the lap belt is locked and use is allowed by the vehicle manufacturer.
2 - Dual Retractor Lap/Shoulder Belts
If allowed by the vehicle manufacturer, the lap belt only may be used to secure the child restraint if it can be locked in accordance with this manual and the vehicle's manual.
3 - Non-Locking (ELR) Lap Belts
This belt locks only in a crash or sudden stop and should only be used with a belt shortening clip. Contact your vehicle manufacturer if needed.
4 - Airbag/Inflatable Belts
This belt is only allowable in booster mode.
5 - Door Mounted Belts
6 - Lap Belts forward of Seat Bight (where the seat bottom and back meet)


natural_image
Simple line drawing of a closed book with a bookmark and a red X mark (no text or symbols on the book itself)Car Seat Use after a Crash
Nuna recommends that car seats be replaced following a moderate or severe crash. Car seats do not automatically need to be replaced following a minor crash.
A minor crash is one in which ALL of these apply:
- The vehicle was able to be driven away from the crash site.
- The vehicle door nearest to the car seat was not damaged.
• None of the passengers in the vehicle sustained any injuries in the crash. - If the vehicle has air bags, none of the air bags deployed during the crash; and
• There is no visible damage to the car seat.
Any crash that does not meet all of the above criteria for a minor crash is considered a moderate to severe crash. NEVER use a car seat that has been involved in a moderate to severe crash.
Aircraft Installation
The FAA recommends that children up to 18 kg (40 lbs) use a child restraint while traveling on an aircraft.
When used in harness mode (forward facing):
This restraint is certified for use in aircraft.
When used in Booster mode (without built-in
harness): This restraint is NOT certified for use in aircraft, since aircraft belts are lap belts only.
Contact your airline about their policies prior to travel.
Install child restraint forward facing in a forward facing aircraft seat following vehicle lap belt instructions, but install aircraft belt on top of closed True Tension™ door, under seat cover.
Parts List
Front View
1HeadrestAdjustment Button
2 Headrest
3 Shoulder Harness Pad (x2)
4 Crotch Pad
5 Leg Rest Button
6 Leg Rest
7 Harness Release Button
8 Harness Adjustment
Strap
9 Seat Cover
10 Harness Buckle
11 Cup Holder (x2)
12 Harness Strap
13 Chest Clip

Interior View
14 Harness Storage Compartment
15 True Tension™ Door
16 True Tension™ Door Release Button
17 Lower Anchor Attachment Strap
18 Universal Anchorage System (UAS)
Storage Door Release Button
19 Universal Anchorage System Storage Door
20 Lower Anchor and Harness Buckle Storage Compartment (under UAS Storage Door)

18 ROYL ^TM instructions 19ROYL
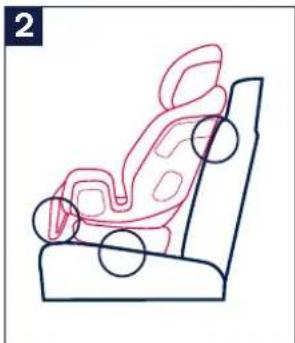
Side View
21 Booster Shoulder Belt Guide
22 Side Impact Protection Pod
23 Forward Facing Belt Path
24 Magnetic Buckle
Tongue Holder
25 Booster Lap
Belt Path
26 Recline Position Indicator
27 Recline Button
28 Instruction Storage
Back View
29 Tether Strap Cover
30 Tether Strap
31 Tether Strap
Adjuster
32 Tether Hook
33 Lower Anchor Belt
34 Lower Anchor Connectors
35 Lower Anchor Adjuster


^m instructions
Features Usage
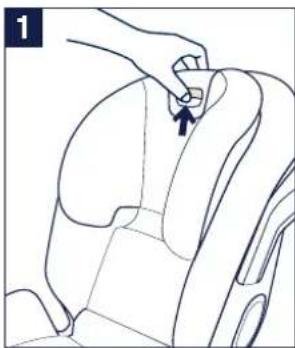
Harness Use
1 - To Loosen Harness
Press on harness release button (1) while pulling forward on the harness straps (2).
2 - To Open Chest Clip
Press button on front of clip (1) and pull clip apart (2).
3 - To Open Harness Buckle
Press red button on front of buckle (1) and pull out buckle tongues (2).
4 - To Use Magnetic Buckle Tongue Holders
Loosen and unbuckle harness. Place the buckle tongues against the magnetic area on the side of the child restraint so that the tongues are held in place.
5 - To Fasten Chest Clip
Push chest clip halves together until they click. (1) Pull to check.
To Fasten Buckle
Insert buckle tongues firmly into buckle until they click. (2) Pull up on tongues to ensure they are locked.
6 - To Tighten Harness
Pull on harness adjustment strap. (1) Place chest clip at child's armpit level after tightening. (2)


natural_image
Line drawing of a car seatbelt buckle with a highlighted grip (no text or symbols)


Shoulder Pad and Crotch Pad Use
1 - In harness mode, the pads are a comfort feature that may be used or removed for any child.
To use the shoulder pads, fold each pad in half over the harness strap and attach the snaps.
To use the crotch pad, slide the harness buckle through the loop on the pad.

Harness Buckle Adjustment
The harness buckle has two positions. Use the position that is closest to (but not under) your child. Loosen and unbuckle harness.
1 - Unsnap seat cover (1) and pull forward while pulling harness buckle backwards through slot in seat cover (2).
2 - Route harness buckle strap through either slot (1 or 2) on the UAS storage door. Pull buckle through corresponding slot in seat cover and replace seat cover.
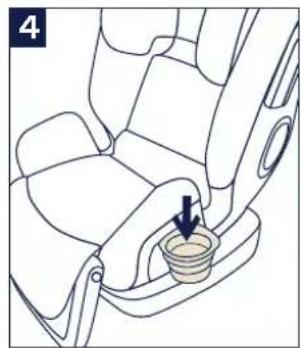
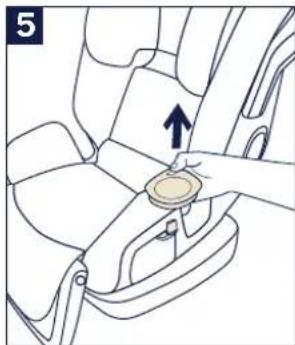
Cup Holder Use
3 - Pivot cup holder up and lock in use position.
4 - Push center of cup holder down to extend to opened position.
5 - While in the opened position, pull up on the cup holder to remove for washing.
6 - To store, collapse cup holder and pivot down. Press to lock in position.
DO NOT place glass or metal containers or hard or sharp objects in cup holder. In a crash they could cause serious injury.

natural_image
Line drawing of a car seat with a car seatbelt and a downward arrow indicating direction (no text or symbols)

natural_image
Line drawing of a car seatbelt with a hand holding a small circular object, no text or symbols present
natural_image
Line drawing of a car seatbelt with a circular button and arrow indicating rotation (no text or symbols)
natural_image
Line drawing of a car seatbelt with a blue arrow indicating the grip (no text or symbols present)Headrest Adjustment
There are 8 headrest positions.
1 - With harness loose, squeeze headrest button and move headrest up or down to desired position.
Release headrest button and slide headrest slightly up or down until locked into position. The headrest will click when it locks.
CHECK that headrest is locked on both sides by pulling firmly up and down.
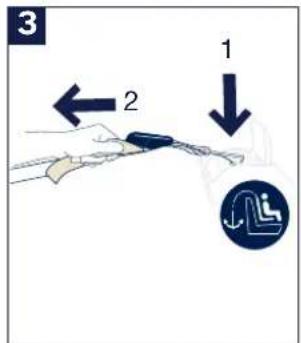
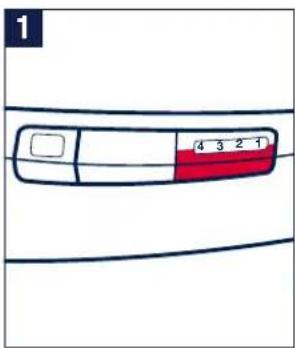
Recline Use
2 - There are 4 recline positions.
3 - Press recline button (1) on either side of the child restraint and tilt seat to desired recline position (2).
Release recline button, and check that child restraint is locked in desired recline position.
To change recline position after installation, you MUST uninstall child restraint, select new recline position, and then reinstall child restraint.
natural_image
Line drawing of a car seat with a hand adjusting the seat area (no text or symbols)


Leg Rest Use
The fully adjustable leg rest can be used in both modes of the child restraint. It can be angled to achieve proper leg support and extended for longer legs.
1 - ⚠ The leg rest MUST NOT be above the child restraint seating surface.
To Adjust Leg Rest:
2 - Push and hold the buttons on both sides of the leg rest. You can now angle and extend the leg rest simultaneously.
3 - Adjust the leg rest to the desired position by tilting to rotate the angle (1) and pulling forward to extend for a child with longer legs (2).
Once you reach the desired position, release the buttons. You will hear them click as they spring back into place, locking the leg rest.
If the buttons do not spring back right away, gently tilt the leg rest until it locks into place. Angle must be locked before extension can be locked.


natural_image
Line drawing of a car seatbelt with a belt buckle, showing no text or symbols
True Tension™ Door Use
The True Tension ^™ door is located underneath the seat cover.
Z
Loosen and unbuckle harness, and retain with magnetic buckle tongue holders.
1 - Adjust headrest to highest position, unsnap seat cover and pull to front of seat.
2 - Lift True Tension™ door release button.
3 - Open True Tension™ door. Follow instructions for belt routing:
- Forward facing, p.38
- Booster, p.46
4 - Close True Tension™ door by pressing down firmly on door until it latches in place. Replace seat cover.


natural_image
Diagram of a car seat with an arrow indicating upward motion (no text or symbols)

natural_image
Line drawing of a hand pressing a button on a vehicle seat (no text or symbols)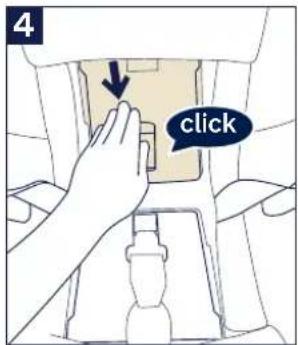
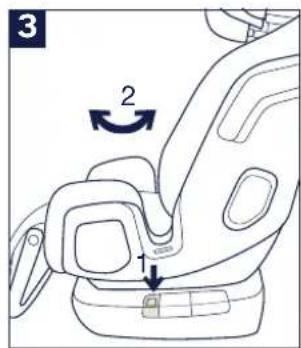
UAS Use
The UAS belt can be used instead of a vehicle belt to install this child restraint. The lower anchor belt MUST NOT be used forward facing if your child weighs more than 18 kg (40 lbs).
The lower anchor belt can be used with the booster from 18-54.4 kg (40-120 lbs).
The lower anchor belt and connectors are stored under the UAS storage door.
Loosen and unbuckle harness, and unsnap seat cover.
1 - Lift UAS storage door release button.
2 - Take out the lower anchor belt and connectors.
3 - Lengthen lower anchor belt for use by pressing adjuster button while pulling on belt.
4 - For belt routing, see p.38 or p.46. To connect lower anchor belt to lower anchors in vehicle, press connector firmly onto lower anchor and pull to check. Lower anchor belt MUST NOT interfere with the vehicle seat belt.
5 - Remove all slack from lower anchor belt by pulling loop at end of belt.
6 - To release lower anchor belt, press red button on end of connector while pulling on belt.
Store lower anchors when not in use. Place one lower anchor connector in each half of the storage compartment. Fold excess belt webbing into compartment. Belt MUST NOT interfere with latching of storage door.

DO NOT cut the lower anchor attachment ap. It permanently secures the lower anchors the child restraint.

natural_image
Line drawing of a hand pressing down a car seatbelt component (no text or symbols)
natural_image
Illustration of a hand using a screwdriver to tighten a bolt (no text or symbols present)


natural_image
Illustration of a hand holding a wooden buckle with a belt buckle, showing a right-hand rule (no text or symbols)
natural_image
Illustration of hands using a tool to apply a red object to a small object, with arrows indicating direction (no text or symbols)
natural_image
Hand holding a small object with a red mark, no visible text or symbolsTether Use
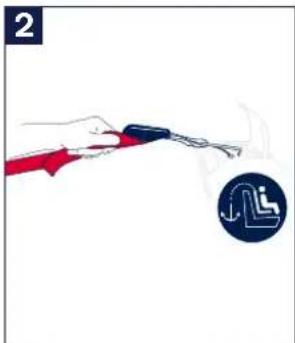
1 - Open the tether strap cover by undoing the hook and loop (1). Unclip the tether hook (2) by pushing in the back of the hook while pulling the hook down and off of the anchor.
2 - To extend tether for use, tilt tether adjuster and pull to lengthen.
3 - Locate the tether anchor in your vehicle. Look for the tether icon pictured here. Attach the tether hook to the vehicle tether anchor (1). Once tether is anchored, tighten by pulling on tether strap to remove all slack (2).
Close the tether strap cover by attaching the hook and loop.
4 - When attaching the tether hook to the vehicle tether anchor, route the tether strap over the top of the closed tether strap cover, not out of the bottom.
5 - To store, attach tether hook to the back of the child restraint (1) and remove slack from tether strap. Loose strap should then be rolled neatly and stored under tether cover (2). When not in use, tether MUST be properly stored.
⚠ ALWAYS use tether for harness mode (forward facing) installation.


natural_image
Illustration of a hand holding a tool with two arrows indicating motion (no text or symbols)
Harness Storage
Z
⚠ ALWAYS store the harness when using the child restraint as a booster.
1 - Loosen harness, open chest clip, and open harness buckle.
Fully raise head support (1). Unsnap and lift the upper and lower seat covers (2).
2 - Gently slide each harness strap under the harness storage compartment cover (1). DO NOT FORCE OR BEND the compartment cover.
Store chest clip and buckle tongues inside harness storage compartment (2).
3 - Slide harness buckle through slot in UAS storage door.
4 - Store harness buckle in lower anchor storage compartment. Replace seat cover.
Shoulder Belt Guide Use
When securing child in booster, the vehicle shoulder belt MUST be routed through the shoulder belt guide.
5 - Pull the shoulder belt guide back (1) and slip the vehicle shoulder belt in front of the open shoulder belt guide (2).
6 - Release the shoulder belt guide.
The vehicle shoulder belt must route COMPLETELY through the shoulder belt guide and across the center of the child's chest, and must not fall off the child's shoulder.

Z


natural_image
Line drawing of a car seatbelt being adjusted for a piece, showing hands and a belt switch (no text or symbols)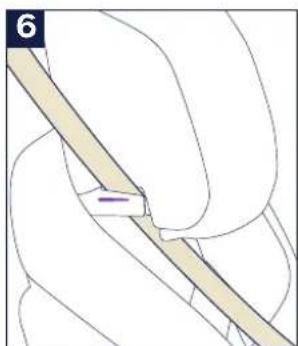
natural_image
Illustration of a hand holding a thin rod with a purple line, no text or symbols presentHarness Mode (forward facing) Installation
At least 2 years old, 13.6–29.4 kg (30–65 lbs), 124.4 cm (49 in.) or less

bar
| Category | Weight (kg) | Weight (lbs) | |---|---|---| | Forward Facing with vehicle belt & tether | 13.6 | 30 | | UAS & tether | 18 | 40 | | Total | 29.4 | 65 |Forward Facing Setup
Remove tether from storage and lengthen for use.
1 - Select desired forward facing recline position 1-4.
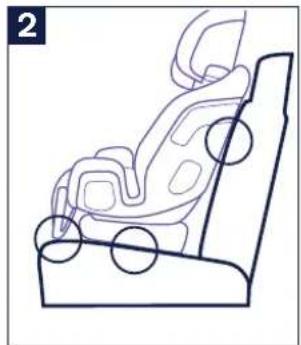
2 - Place child restraint forward facing in a compatible vehicle seat with the bottom of the restraint parallel to the vehicle seat bottom and the top of the restraint contacting the vehicle seat back. The leg rest MUST NOT be above the restraint seating surface.
Loosen and unbuckle harness and retain with magnetic buckle tongue holders.
3 - Fully raise headrest, lift seat cover, and open True Tension™ door.
Complete installation using your vehicle's lap/shoulder belt (p.40), the UAS belt (p.42), or a compatible vehicle lap belt (p.44).
Move leg rest to desired installation position.

DO NOT install with both the vehicle seat t and UAS.
natural_image
Line drawing of a car seat with highlighted seating areas (no text or symbols)
natural_image
Hand pressing a button on a vehicle interior (no text or symbols visible)Using Vehicle Lap/Shoulder Belt
(preferred installation method)
1 - Route vehicle lap/shoulder belt through forward facing belt path and buckle vehicle lap/shoulder belt (1). Vehicle belt MUST be routed under True Tension™ door.
Remove all slack from the vehicle belt (2).
Close True Tension ^™ door (3). Lock vehicle belt (refer to vehicle owner's manual). Test by pulling on shoulder belt to ensure it is locked.
Replace seat cover.
2 - Attach tether hook to tether anchor on vehicle.
3 - Tighten by pulling on tether strap to remove all slack.
Tuck excess webbing behind child restraint.
To reopen True Tension" door, unbuckle vehicle belt and lift door release button.

WARNING: Check that child restraint is surely installed before each use.
Check Installation
☐ Seat is securely installed. Hold seat near belt path and move seat side to side, front to back, and up and down. Seat should move less than 2.5 cm (1 inch).
□ Tether is properly used and attached to vehicle tether anchor.

natural_image
Illustration of a hand holding a tool with a red handle and a blue circular icon showing a circuit symbol (no text or labels)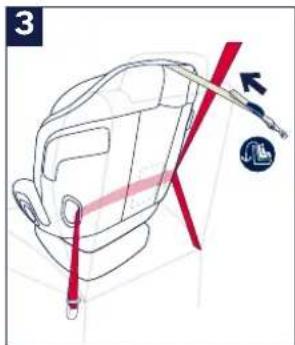
Using UAS
Z
WARNING: Do not install by this method for a child weighing more than 18 kg (40 lbs).
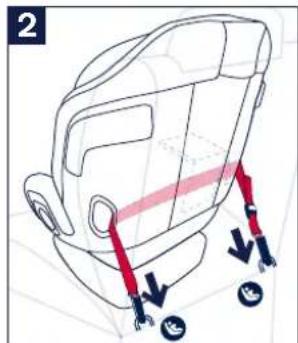
1 - Remove UAS belt from storage compartment and route through forward facing belt path. Belt MUST be routed under True Tension™ door.
2 - Lengthen UAS belt as necessary and attach to lower anchor points in vehicle.
3 - Remove all slack from lower anchor by pulling loop at end of belt straight back from lower anchor connector (1).
Close True Tension door (2). Replace seat cover.
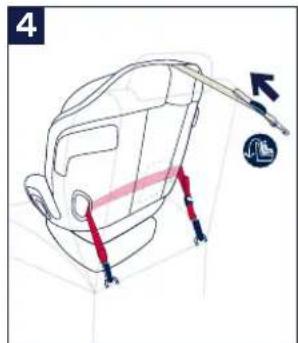
4 - Attach tether hook to tether anchor on vehicle and tighten.
Tuck excess webbing behind child restraint.
To reopen True Tension ^™ door, release tether and lower anchors. If needed, slightly push child restraint against vehicle seat to relieve tension on lower anchor belt before releasing anchors. Lift door release button.

WARNING: Check that child restraint is surely installed before each use.
Check Installation
☐ Seat is securely installed. Hold seat near belt path and move seat side to side, front to back, and up and down. Seat should move less than 2.5 cm (1 inch).
☐ Tether is properly used and attached to vehicle tether anchor.

natural_image
Line drawing of a mechanical device with red belt and arrow indicating motion (no text or symbols)
Using Vehicle Lap Belt
1 - Route vehicle lap belt through forward facing belt path and buckle vehicle lap belt. (1) Vehicle belt MUST be routed under True Tension™ door.
Remove all slack from the vehicle lap belt to properly secure the child restraint (2).
Close True Tension ^TM door (3). Lock vehicle belt (refer to vehicle owner's manual). Test by pulling on lap belt to ensure it is locked.
Replace seat cover.
2 - Attach tether hook to tether anchor on vehicle.
3 - Tighten by pulling on tether strap to remove all slack.
Tuck excess webbing behind child restraint.
To reopen True Tension ^™ door, unbuckle vehicle belt and lift door release button.

WARNING: Check that child restraint is surely installed before each use.
Check Installation
☐ Seat is securely installed. Hold seat near belt path and move seat side to side, front to back, and up and down. Seat should move less than 2.5 cm (1 inch).
□ Tether is properly used and attached to vehicle tether anchor.


natural_image
Illustration of a hand holding a tool with a blue handle and a small circular symbol (no text or labels)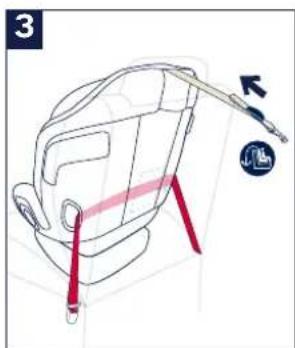
Booster Mode Installation (without built-in harness)
At least 4 years old 18–54.4 kg (40–120 lbs), 96–144.8 cm (38–57 in.) tall

bar
| Category | Weight (kg) | Weight (lbs) | |---|---|---| | Booster | 18 | 40 | | Other | 54.4 | 120 |Booster Setup
1 - Harness MUST be stored when using the child restraint as a booster. Raise headrest and store harness straps and harness buckle inside the seat.
2 - Place child restraint forward facing in a compatible vehicle seat that has both a lap belt and a shoulder belt. The bottom of the restraint should be parallel to the vehicle seat bottom and the top of the restraint should contact the vehicle seat back. The leg rest MUST NOT be above the restraint seating surface.
3 - Select desired booster recline position 1-4.
Adjust or remove the vehicle headrest as needed to remove interference. If you remove your vehicle headrest, be sure to store it in a secure place; check your vehicle owner's manual.
4 - Open seat cover.
Complete installation with the lower anchor belt (p.50) or, if necessary, without (p.52).
Move leg rest to desired installation position.


natural_image
Line drawing of a car seat with wheels and seatbelt (no text or symbols)
natural_image
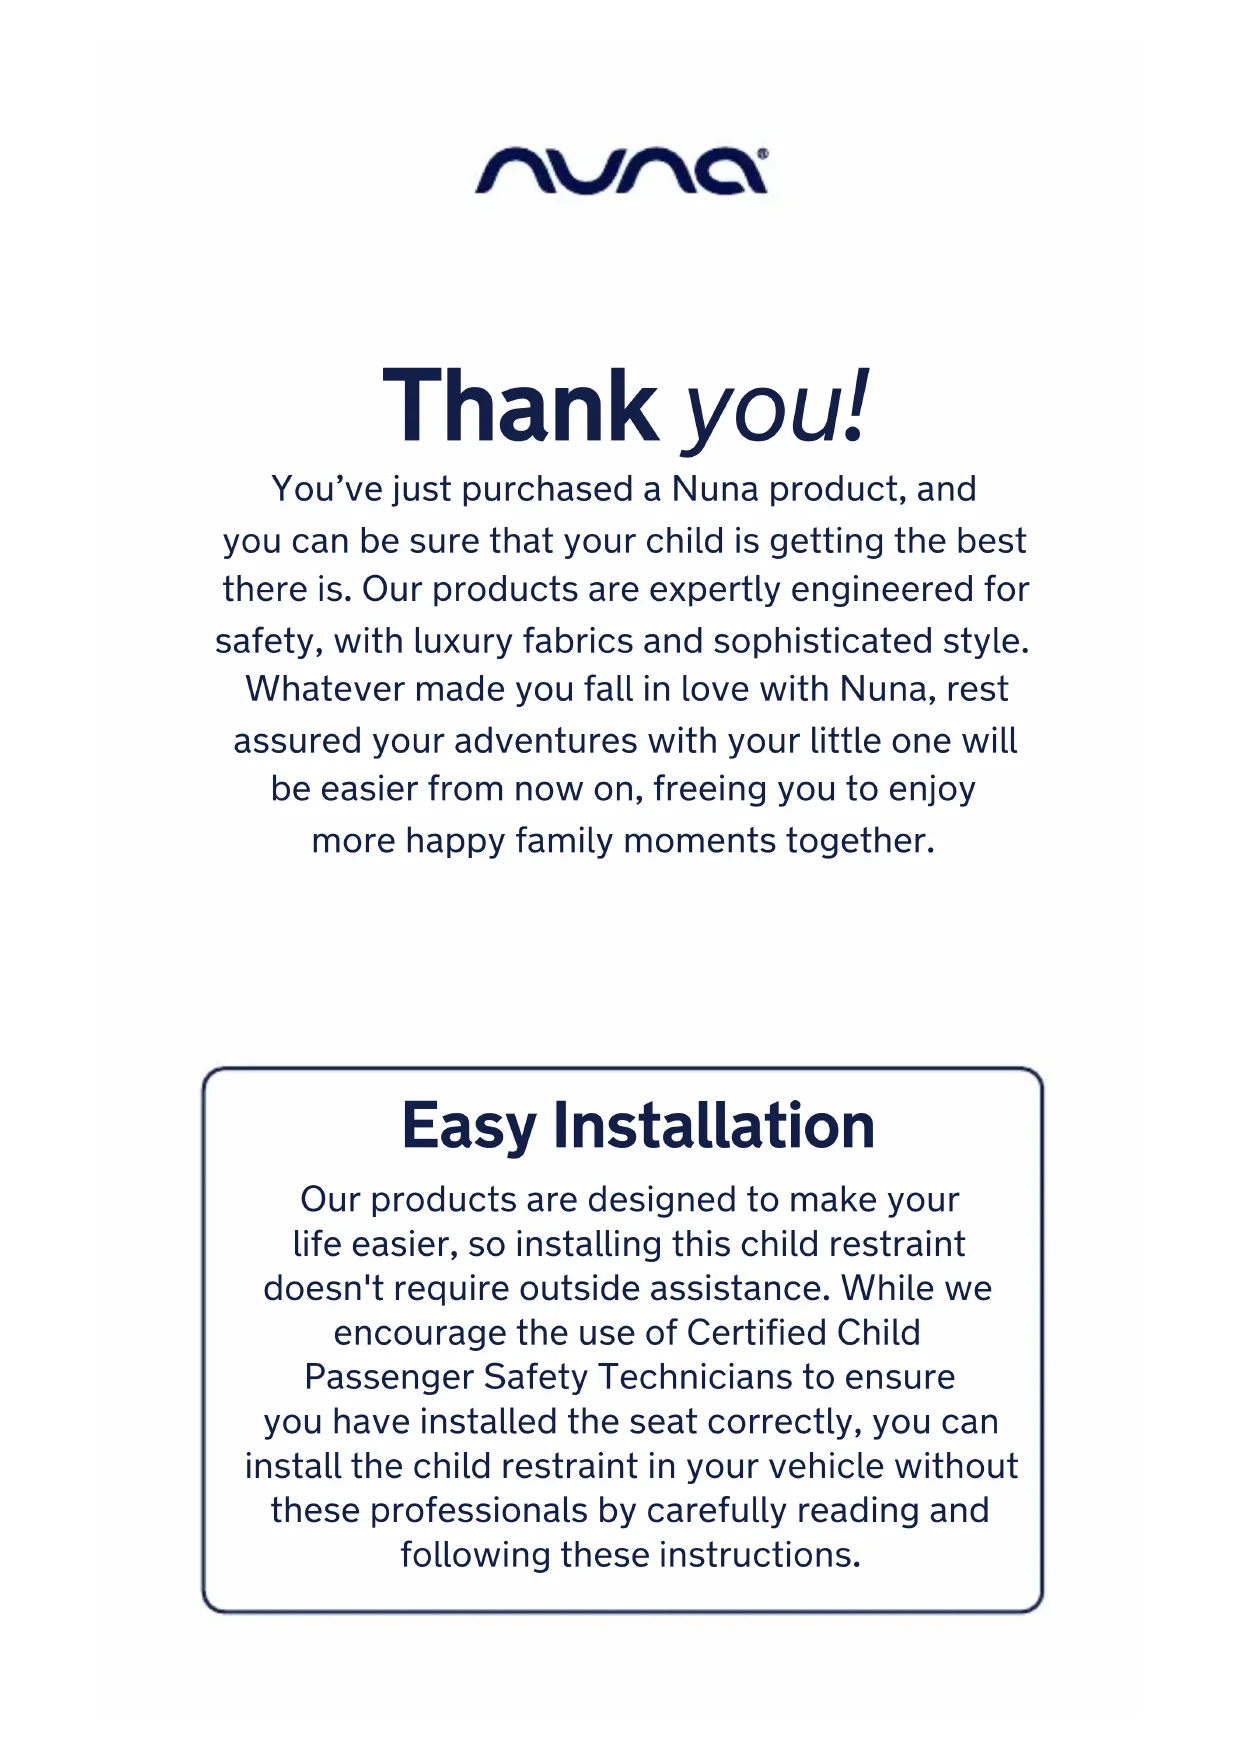
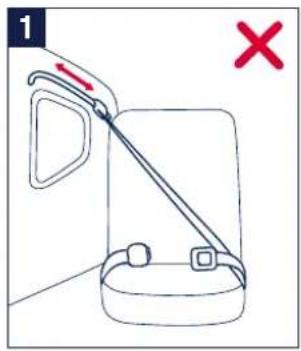
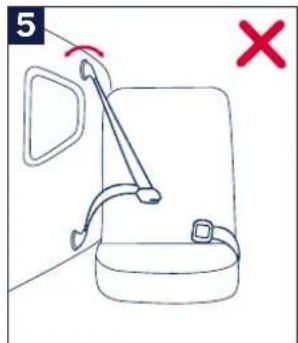
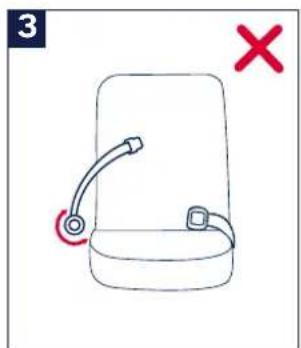
Line drawing of a car seat with a belt and arrow indicating clockwise motion (no text or symbols)Booster Mode Installation (without built-in harness) (continued)
Z
1 - DO NOT use with the vehicle seat not in an upright position.
2 - DO NOT use with the vehicle seat angled forward.
3 - The front of the booster MUST NOT hang over the front of the vehicle seat.

natural_image
Line drawing of a car seat with a red X mark indicating no text or symbols on the seat itself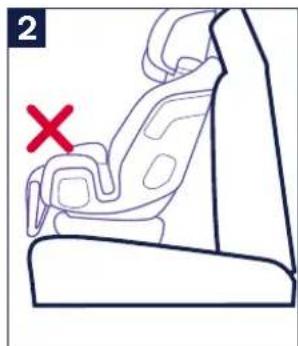

natural_image
Line drawing of a car seat with a red X mark indicating absence or error (no text or symbols present)
Using UAS
(preferred installation method)
Z
WARNING: Booster MUST remain secured by UAS even when unoccupied to avoid becoming a projectile in the vehicle.
1 - Remove UAS belt from storage compartment and route through forward facing belt path. Belt MUST be routed under True Tension ^™ door.
2 - Lengthen UAS belt as necessary and attach to UAS anchor points in vehicle.
UAS belt MUST NOT interfere with the vehicle seat belt.
3 - Remove all slack from UAS belt by pulling loop at end of belt straight back from latch connector (1).
Close True Tension ^TM door (2). Replace seat cover.
WARNING: Check that child restraint is securely installed before each use.
Check Installation
□Harness is stored.
□Seat does not interfere with the vehicle headrest.
□Seat is securely installed.

natural_image
Line drawing of a person wearing a seatbelt with a belt and arrow indicating movement (no text or symbols)
natural_image
Line drawing of a car seat with purple belt and buttons, no text or symbols present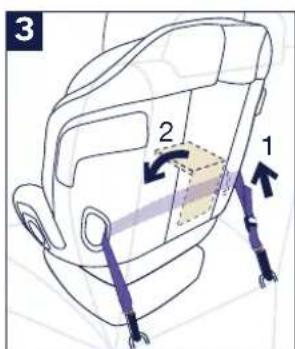
^™ instructions
Without UAS
This installation should ONLY be used if installation with UAS is not possible.
Z
WARNING: When NOT secured by UAS, booster MUST be secured with vehicle belt when unoccupied to avoid becoming a projectile. Route vehicle belt as in forward facing use or as though securing a child.
1 - ⚠️ WARNING: When the child restraint is installed without UAS, the leg rest MUST be minimally extended and angled down towards the vehicle seat.
2 - Leg rest MUST NOT be extended or angled out enough that a child can step on it and tip the child restraint over, which could cause serious injury.
3 - Leg rest MUST NOT be pushing into the vehicle seat enough to lift the child restraint off the seat.
4 - When not using UAS, the back of the booster seat MUST fit tightly against the back and bottom of the vehicle seat. Adjust or remove the vehicle headrest as needed to remove interference.

WARNING: Check that child restraint is surely installed before each use.
Check Installation
□ Harness is stored.
□Seat does not interfere with the vehicle headrest.
☐ Leg rest is minimally extended and down against vehicle seat.
□ Back and bottom of booster fit tightly against vehicle seat.

natural_image
Line drawing of a car seatbelt with a green checkmark indicating a specific seatbelt (no text or symbols present)
natural_image
Line drawing of a car seat with a red X mark indicating a specific area (no text or symbols present)
natural_image
Illustration of a car seat with a red X mark pointing to the seat area (no text or symbols present)
natural_image
Line drawing of a car seat with wheels and a green checkmark indicating selection (no text or symbols)Securing Child
Z
WARNING: If your child is not properly secured in the child restraint, he may be ejected in a crash, resulting in serious injury or death.
In Harness mode (Forward Facing)
Loosen and unbuckle harness. Retain with magnetic buckle tongue holders.
1 - Place child in child restraint with child's back flat against child restraint seat back. DO NOT allow child to slouch.
If child's head falls forward, recline the seat more.
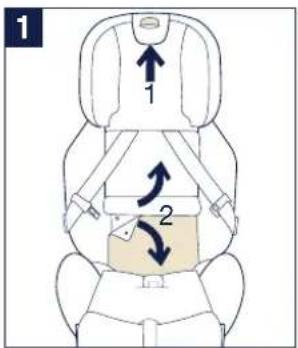
2 - Adjust headrest to position harness AT or just above shoulders.
Adjust harness buckle to fit child. Harness buckle should be close to, but not under child.
Position harness over child's shoulders and around child's waist, and buckle harness.
3 - Remove slack from shoulder straps and waist belt by pulling up on shoulder straps (1). Pull harness adjustment strap (2) to tighten. Harness should fit snugly on child's shoulders and thighs; it is snug if you cannot pinch a fold in the strap horizontally.
Fasten and position chest clip level with child's armpits (3).
A snug strap should not allow any slack. It lies in a relatively straight line without sagging. It does not press on the child's flesh or push the child's body into an unnatural position.

Z


Booster Mode (without built-in harness)
Make sure the harness and harness buckle are stored inside the seat.

With the booster installed in the vehicle, have the child sit in the booster with their back flat against the booster seat back.
1 - Route the vehicle belt across the child's chest and through the booster lap belt path toward the vehicle buckle.
2 - Secure the vehicle buckle and listen for a "click." Pull up on vehicle belt to remove slack.
3 - Route the vehicle shoulder belt through the shoulder belt guide.

The vehicle shoulder belt MUST:
- route completely through the guide
- lie between the child's neck and shoulder
• not fall off the child's shoulder
The vehicle lap belt MUST lie flat and snug across the child's thighs.
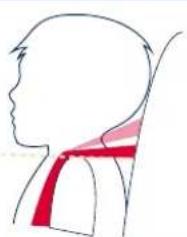
4 - Adjust the head support. The correct head support height is obtained when the vehicle shoulder belt is:
• between the child's neck and shoulder
- flat across the center of the child's chest.
Bottom of head support will be approximately even with the top of child's shoulders.

natural_image
Illustration of a person's seatbelt with a hand and arrow indicating pressure or movement (no text or symbols)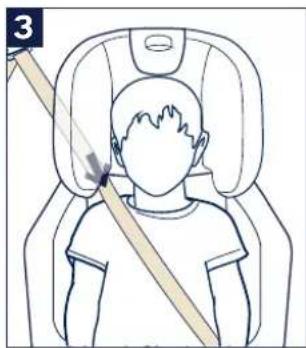


natural_image
Line drawing of a child seated in a car seat with a belt and two circular markings (no text or symbols)
Cleaning and Maintenance
Cleaning the Seat Cover and Harness Pads
Seat cover and harness pads can be cleaned according to the instructions on the tag attached to the seat cover.
Cleaning the Harness
The child restraint harness system cannot be removed. DO NOT attempt to remove the harness system. When required, harness may be cleaned with a cloth and warm, soapy water.
Towel dry excess water and allow to air dry.
Cleaning the Shell
Shell may be cleaned with a damp cloth.
Towel dry.
DO NOT use abrasive cleansers on the shell.
Cleaning the Buckle
BUCKLE CANNOT BE REMOVED.
To clean buckle, wipe with damp cloth.
DO NOT use bleach or other harsh chemicals to clean any part of the seat.
DO NOT attempt to iron the covers or pads.
Nuna Baby Essentials, Inc. Nuna and all associated logos are trademarks.

Merci!
St-Laurent, QC, H4S 1N1
1-800-667-4111
natural_image
Simple line drawing of a closed book with a bookmark and a red X mark (no text or symbols on the book itself)FR
natural_image
Line drawing of a car seatbelt buckle with a black arrow pointing to the seat (no text or symbols)


natural_image
Diagram of a car seatbelt with directional arrows indicating movement (no text or symbols)natural_image
Line drawing of a car seatbelt with a cup insert, no text or symbols present
natural_image
Line drawing of a car seatbelt with a hand holding a circular component (no text or symbols)
natural_image
Line drawing of a car seat with a circular vent and arrow indicating rotation (no text or symbols)
natural_image
Line drawing of a car seatbelt seat with a hand pointing to the seat area (no text or symbols)natural_image
Line drawing of a car seat with a hand adjusting the seat area (no text or symbols)
natural_image
Line drawing of a car seatbelt with a handle and arrow indicating a joint detail (no text or symbols)
natural_image
Diagram of a car seat with an arrow indicating upward motion (no text or symbols)
natural_image
Line drawing of a hand pressing a button on a vehicle seat (no text or symbols)
Utilisation du SAU
natural_image
Line drawing of a hand pressing down a mechanical component (no text or symbols)
natural_image
Illustration of a hand using a screwdriver to tighten a bolt (no text or symbols present)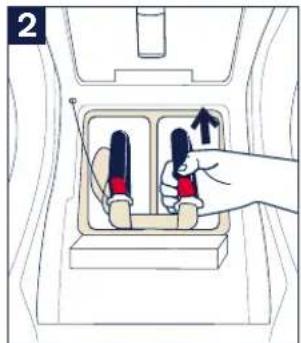

natural_image
Illustration of a hand holding a wooden buckle with a belt buckle, showing a right-hand rule (no text or symbols)
natural_image
Illustration of hands using a tool to apply a red object to a small object, with arrows indicating direction (no text or symbols present)
natural_image
Hand holding a small black object with a red mark, no visible text or symbolsnatural_image
Illustration of a hand holding a tool with two arrows indicating motion (no text or symbols)

natural_image
Line drawing of hands installing a seatbelt on a vehicle (no text or symbols)
natural_image
Illustration of a hand holding a thin strip with a purple line, no text or symbols presentnatural_image
Line drawing of a car seat with highlighted seating areas (no text or symbols)
natural_image
Hand pressing a button on a vehicle interior (no text or symbols visible)natural_image
Illustration of a hand holding a tool with a blue object and a small circular icon showing a circuit symbol (no text or labels)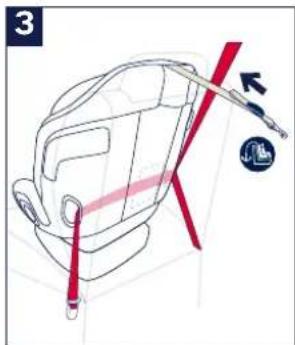
TM Mode d'emploi
natural_image
Line drawing of a mechanical device with red belt and arrow indicating movement (no text or symbols)

natural_image
Diagram of a car seat with red safety belt and blue buttons, no text or symbols present
natural_image
Line drawing of a car head with red and black suspension bands, no text or symbols presentnatural_image
Illustration of a hand holding a tool with a blue handle and a small circular symbol (no text or labels)
natural_image
Line drawing of a car seat with wheels and seatbelt (no text or symbols)
natural_image
Line drawing of a car seat with a belt buckle and arrow indicating clockwise motion (no text or symbols)natural_image
Line drawing of a car seat with a red X mark indicating no text or symbols on the seat itself

natural_image
Line drawing of a car seat with a red X mark indicating a specific location (no text or symbols present)natural_image
Line drawing of a car seatbelt device with purple belt and black arrow indicating movement (no text or symbols)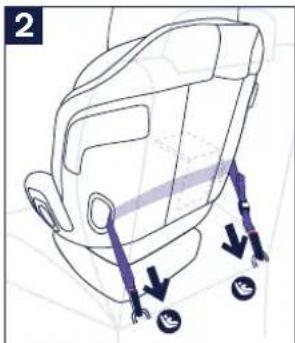
natural_image
Line drawing of a car seat with attached blue guide rails and wheels (no text or symbols)
Installation sans le SAU
natural_image
Line drawing of a car seat with a green checkmark indicating the right side (no text or symbols present)

natural_image
Line drawing of a car seatbelt with a red X mark indicating a specific area (no text or symbols present)
natural_image
Line drawing of a car seat with wheels and a green checkmark indicating selection (no text or symbols)Attacher l'enfant
natural_image
Illustration of two individuals performing seated exercise with check and cross symbols (no text or labels)FR
2
natural_image
Silhouette of a person viewed from the side profile, wearing a red neckerchief (no text or symbols)TM Mode d'emploi
natural_image
Illustration of a person's arm and shoulder with a black arrow indicating a specific point (no text or symbols present)
natural_image
Line drawing of a child seated in a car seat with a diagonal band indicating force or pressure (no text or symbols)

natural_image
Line drawing of a child seated in a car seat with a belt and seatbelt (no text or symbols)LA BOUCLE N'EST PAS AMOVIBLE.
Nuna Baby Essentials, Inc.


- nuna®
- Thank you!
- Easy Installation
- IMPORTANT! KEEP THESE INSTRUCTIONS FOR FUTURE REFERENCE:
- READ CAREFULLY
- Contents
- Important Information
- Child Restraint Overview
- Booster mode Installation
- Securing Child
- Product Information/Registration
- Product Registration
- Nuna Canada
- Warranty
- Contact
- Child Usage Requirements
- Be at least 2 years old
- WARNING
- DEATH OR SERIOUS INJURY CAN OCCUR
- Vehicle Compatibility
- Using UAS
- UAS and Tether Locations
- UAS in Harness Mode (Forward Facing)
- Tether
- UAS in Booster mode (without built-in harness)
- Using Vehicle Belts
- Vehicle Belts that CANNOT Be Used
- Car Seat Use after a Crash
- Aircraft Installation
- Parts List
- Front View
- Interior View
- Side View
- Back View
- Features Usage
- Harness Use
- Shoulder Pad and Crotch Pad Use
- Harness Buckle Adjustment
- Cup Holder Use
- Headrest Adjustment
- Recline Use
- Leg Rest Use
- To Adjust Leg Rest:
- True Tension™ Door Use
- Z
- UAS Use
- Tether Use
- Harness Storage
- Shoulder Belt Guide Use
- Harness Mode (forward facing) Installation
- Forward Facing Setup
- Using Vehicle Lap/Shoulder Belt
- Check Installation
- Using Vehicle Lap Belt
- Booster Mode Installation (without built-in harness)
- Booster Setup
- Booster Mode Installation (without built-in harness) (continued)
- Without UAS
- In Harness mode (Forward Facing)
- Booster Mode (without built-in harness)
- Cleaning and Maintenance
- Cleaning the Seat Cover and Harness Pads
- Cleaning the Harness
- Cleaning the Shell
- Cleaning the Buckle
- BUCKLE CANNOT BE REMOVED.
- Merci!
- Utilisation du SAU
- Installation sans le SAU
- Attacher l'enfant
- FR
- 2
- LA BOUCLE N'EST PAS AMOVIBLE.
Brand : Nuna
Model : Royl
Category : Car seat