
Base next - Car seat Nuna - Free user manual and instructions
Find the device manual for free Base next Nuna in PDF.

| Product Type | ISOFIX car seat base |
| Brand | Nuna |
| Model | Base next |
| Compatibility | PIPA next, ARRA next, TODL next, CARI next |
| Installation | ISOFIX with green locking indicators |
| Support leg | Height adjustable with ground contact indicator (green/red) |
| Rotation | Rotation button for easy access to child |
| Approximate weight | 5 kg |
| Main materials | Plastic and metal |
| Safety | Visual and audible indicators for ISOFIX locking and support leg |
| Infant carrier attachment | Snap-in with green indicator |
| Release | Carrier release button |
| ISOFIX guides | Included to protect vehicle seats |
| Manual storage | Integrated compartment under the base |
| Care and cleaning | Damp cloth and mild detergent |
| Warranty | Custom warranty, registration required on nunababy.com |
| Product registration | Required at www.nunababy.com |
| Customer service | info@nunababy.com, www.nunababy.com |
| Manual available | Free download at notice-facile.com in multiple languages |
Frequently Asked Questions - Base next Nuna
User questions about Base next Nuna
0 question about this device. Answer the ones you know or ask your own.
Ask a new question about this device
Download the instructions for your Car seat in PDF format for free! Find your manual Base next - Nuna and take your electronic device back in hand. On this page are published all the documents necessary for the use of your device. Base next by Nuna.
USER MANUAL Base next Nuna
natural_image
Silhouette of a car seat with visible seat, legs, and side arm (no text or symbols)nuna®
IMPORTANT! THIS SHORT INSTRUCTION IS FOR OVERVIEW ONLY. FOR MAXIMUM PROTECTION AND COMPLETE INFORMATION IT IS ESSENTIAL TO
READ AND FOLLOW THE INSTRUCTION MANUAL OF THE CHILD RESTRAINT CAREFULLY.
natural_image
Line drawing of a chair seat with a flat top and seat base (no text or symbols)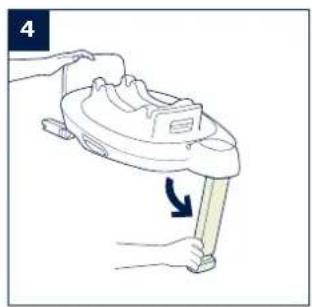
natural_image
Line drawing of a hand holding a small cylindrical object with an arrow indicating rotation (no text or symbols)

natural_image
Diagram of a baby car seat with a fan and arrow indicating direction (no text or symbols)
natural_image
Diagram showing three directional arrows pointing to a 3D object on a curved surface (no text or symbols)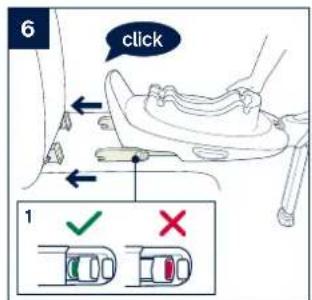

natural_image
Line drawing of a person using a backpack to lift a seatbelt, with a downward arrow indicating the down force (no text or symbols present)
natural_image
Anatomical line drawing of a mechanical joint or connector, showing a finger and base (no text or labels)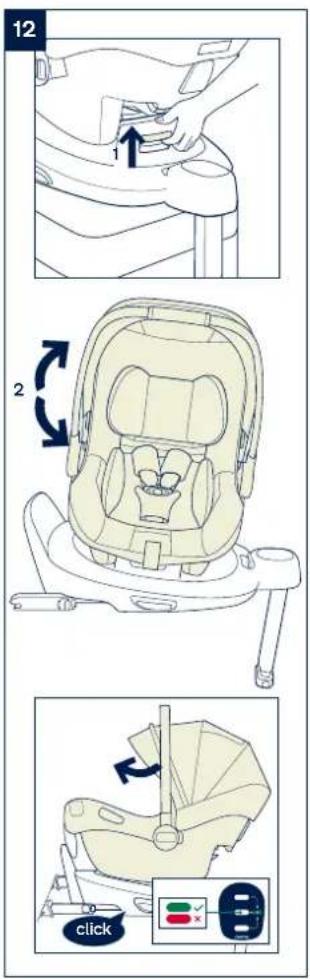

Designed around your life

Contents
Product information 3
Product Registration
Warranty
Contact
Warning 4
Parts List 5
Product Set Up 6
Product Use 6
Français (FR) 9
Deutsch (DE) 17
Nederlands (NL) 25
Italiano (IT) 33
Español (ES) 41
Português (PT) 49
Polski (PL) 57
Čeština (CZ) 65
Slovenčina (SK) 73
Hrvatski (HR) 81
Slovenščina (SL) 89
Русский (RU) 97
Norsk (NO) 105
Svenska (SV) 113
Suomi (FI) 121
Dansk (DK) 129
Română (RO) 137
Ελληνικά (EL) 145
Türkçe (TR) 151
(AR) العربية
Product Information
Model Number:
Manufactured Date:
Product Registration
Please fill in the above information. The model number and the manufactured date are located at the bottom of BASE next.
To register your product please visit:
www.nunababy.com
Click the "Register Gear" link on the homepage.
Warranty
We have purposely designed our high-quality products so that they can grow with both your child and your family. Because we stand by our product, our gear is covered by a custom warranty per product, starting from the day it was purchased. Please have the proof of purchase, model number and manufactured date available when you contact us.
For warranty information please visit:
www.nunababy.com
Click the "Warranty" link on the homepage.
Contact
For replacement parts, service, or additional warranty questions, please contact our customer service department.
info@nunababy.com
www.nunababy.com
NUNA International B.V.
In the United Kingdom:
infouk@nunababy.com
www.nunababy.com
WARNING
Failure to follow these warnings and instructions could result in serious injury or death.
For proper protection of your child, it is important to use and install BASE next according to the instructions given in this manual.
BASE next is compatible with PIPA next* / ARRA next / TODL next / CARI next.
*For use with PIPA next, please check if below module mark is on the bottom of the shell.

This short instruction is for overview only. For maximum protection and complete information it is essential to read and follow the instruction manual of the following carefully:
Please refer to PIPA next instruction manual for the installation of PIPA next.
Please refer to ARRA next instruction manual for the installation of ARRA next.
Please refer to TODL next instruction manual for the installation of TODL next.
Please refer to CARI next instruction manual for the installation of CARI next.
Parts List
Make sure all parts are available before assembly. If any part is missing, please contact local retailer. No tools are required for assembly.
1 ISOFIX Adjuster Button
5 ISOFIX Guides
2 Child Restraint Release Button
6 ISOFIX Connector
3 Load Leg
7 Instruction Manual Storage Compartment
4 Load Leg Adjustment Button
8 Infant Carrier Rotation Button

Product Set Up
Installation Concerns
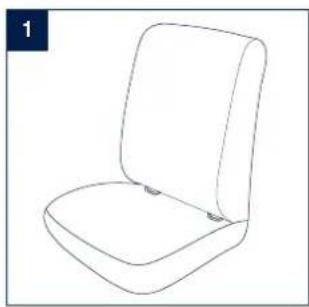
This enhanced child restraint is only suitable for vehicle seats equipped with ISOFIX anchorage bars. (1)
DO NOT install this enhanced child restraint on vehicle seats that face sideways or rearward with respect to the moving direction of the vehicle. (2)
Product Use
Base Installation
1 - Attach the ISOFIX guides to the vehicle's ISOFIX anchor bars (see vehicle owner's manual). (3) The ISOFIX guides can protect the surface of the vehicle seat from being torn. They can also guide the ISOFIX connectors.
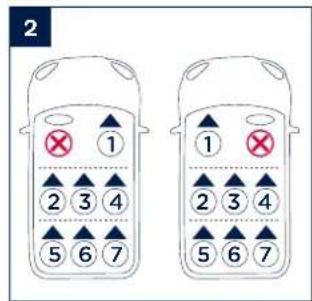
2 - Unfold the load leg from storage compartment. (4)
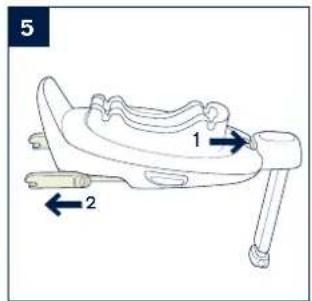
3 - Extend the ISOFIX connectors by pressing the ISOFIX adjustment button while pulling on the connector. (5)
4 - Press the ISOFIX adjustment button to adjust the ISOFIX connectors. Line up the ISOFIX connectors with the ISOFIX guides, and then "click" both ISOFIX connectors into the ISOFIX anchor bars. (6)
! Make sure that both ISOFIX connectors are securely attached to their ISOFIX anchor bars. There should be two audible clicks and the colors of the indicators on both ISOFIX connectors should be completely green.
(6)-1
! Check to make sure the base is securely installed by pulling on both ISOFIX connectors.
5 - After placing the base on the vehicle seat, extend the load leg to the floor (7). When the load leg is installed correctly, the load leg indicator will show green. Red will be shown when installed incorrectly. (7)-2
! The load leg has multiple positions. When the load leg indicator shows red this means the load leg is in the wrong position.
! Make sure the load leg is in full contact with the vehicle floor pan.
! Squeeze the load leg adjustment button, then shorten the load leg upwards. (7)-1
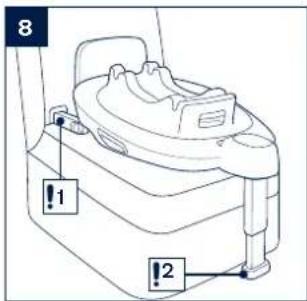
The completely assembled base is shown as (8).
! The ISOFIX connectors must be attached and locked onto the ISOFIX anchor bars. (8)-1
! The load leg must be installed correctly with green indicator. (8)-2
Attaching Infant Carrier to the Base
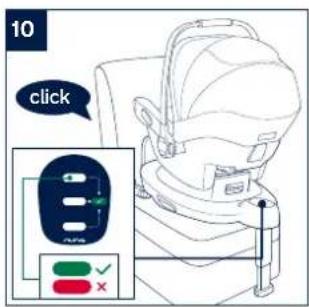
1 - Push the enhanced child restraint down onto the base (9), If the enhanced child restraint is secure, the enhanced child restraint indicator will show green. (10)
! Check that the infant carrier is locked onto the base by pulling up on the handle.
2 - Press the ISOFIX adjustment button and push the base back until it comes in contact with the vehicle seat back. (11)
3 - Press and hold the rotation button to rotate for easier side loading/unloading of the child. (12)
4 - To release the infant carrier, squeeze the infant carrier release button (13)-1, then lift the infant carrier up. (13)-2
Uninstalling the Base
1 - To remove the base, press the secondary lock button (14)-1 first, followed by the button (14)-2 on the ISOFIX connectors before removing the base from the vehicle seat. (14)
2 - For transporting, press ISOFIX Adjustment button and move the ISOFIX connectors back into the storage position. (15)
NUNA International B.V. Nuna and all associated logos are trademarks.
7 BASE next instruction BASE next instruction
IMPORTANT! CES INSTRUCTIONS COURTES SERVENT UNIQUEMENT DE VUE D'ENSEMBLE. POUR UNE PROTECTION MAXIMALE ET UNE INFORMATION COMPLÈTE, IL EST ESSENTIEL DE LIRE ET DE RESPECTER SCRUPULEUSEMENT LE MANUEL D'INSTRUCTIONS DU SIÈGE AUTO.
Sommaire
NUNA International B.V. Nuna and all associated logos are trademarks.
Produkt aufbauen
NUNA International B.V. Nuna and all associated logos are trademarks.
BASE next is compatibel met PIPA next* / ARRA next / TODL next / CARI next.
Installeren product
NUNA International B.V. Nuna and all associated logos are trademarks.
NUNA International B.V. Nuna and all associated logos are trademarks.
NUNA International B.V. Nuna and all associated logos are trademarks.
NUNA International B.V. Nuna and all associated logos are trademarks.
NUNA International B.V. Nuna and all associated logos are trademarks.
Sestavení produktu
NUNA International B.V. Nuna and all associated logos are trademarks.
Zostavenie výrobku
NUNA International B.V. Nuna and all associated logos are trademarks.
Postavljanje proizvoda
O čemu voditi računa prilikom postavljanja
NUNA International B.V. Nuna and all associated logos are trademarks.
87 Upute za BASE next Upute za BASE next
NUNA International B.V. Nuna and all associated logos are trademarks.
POMEMBNO! TA KRATKA NAVODILA SO LE PREGLEDNA. ZA MAKSIMALNO ZAŠČITO IN POPOLNE INFORMACIJE JE POMEMBNO, DA
PREBERETE IN UPOŠTEVATE PRIROČNIK Z NAVODILI ZA OTROŠKI SEDEŽ.
Vsebina
Informacije o izdelku 91
Registracija izdelka
Garancija
Stik
Opozorilo 92
Seznam delov 93
Priprava izdelka 94
Uporaba izdelka 94
Informacije o izdelku
Številka modela:
Datum izdelave:
Registracija izdelka
Priprava izdelka
NUNA International B.V. Nuna and all associated logos are trademarks.
95 Navodilo za BASE next Navodilo za BASE next
Установка изделия
Вопросы установки
NUNA International B.V. Nuna and all associated logos are trademarks.
NUNA International B.V. Nuna and all associated logos are trademarks.
NUNA International B.V. Nuna and all associated logos are trademarks.
BASE next-instruktioner BASE next-instruktioner
TÄRKEÄÄ!
TÄMÄ LYHYT OHJE ON
VAIN YLEISKATSAUS.
MAKSIMAALISEN
SUOJAUKSEN JA
TÄYDELLISTEN
TIETOJEN SAAMISEKSI
ON OLENNAISTA
LUKEA JA TOIMIA
HUOLELLISESTI
AUTONISTUIMEN
KÄYTTOOHJEIDEN
MUKAISESTI.
Sisältö
Tuotetiedot 123

- IMPORTANT! THIS SHORT INSTRUCTION IS FOR OVERVIEW ONLY. FOR MAXIMUM PROTECTION AND COMPLETE INFORMATION IT IS ESSENTIAL TO
- Designed around your life
- Contents
- Product Information
- Product Registration
- Warranty
- Contact
- WARNING
- Parts List
- Product Set Up
- Installation Concerns
- Product Use
- Base Installation
- Attaching Infant Carrier to the Base
- Uninstalling the Base
- Sommaire
- Produkt aufbauen
- Installeren product
- Sestavení produktu
- Zostavenie výrobku
- Postavljanje proizvoda
- O čemu voditi računa prilikom postavljanja
- POMEMBNO! TA KRATKA NAVODILA SO LE PREGLEDNA. ZA MAKSIMALNO ZAŠČITO IN POPOLNE INFORMACIJE JE POMEMBNO, DA
- Vsebina
- Informacije o izdelku
- Registracija izdelka
- Priprava izdelka
- Установка изделия
- Вопросы установки
- Sisältö
Brand : Nuna
Model : Base next
Category : Car seat