
Todl next - Car seat Nuna - Free user manual and instructions
Find the device manual for free Todl next Nuna in PDF.



| Product Type | i-Size Car Seat |
| Model | Todl next |
| Brand | Nuna |
| Safety Standard | UN R129 (i-Size) |
| Maximum Child Weight | 19 kg |
| Minimum Child Height (rear-facing) | 40 cm |
| Maximum Child Height | 105 cm |
| Rear-Facing Use | 40-105 cm, ≤19 kg, up to 4 years |
| Forward-Facing Use | 76-105 cm, ≤19 kg, from 15 months |
| 360° Rotation | Yes, with rotation button |
| ISOFIX Attachment | Yes, with connectors and green indicators |
| Support Leg | Yes, adjustable with green/red indicator |
| Side Impact Protection | Removable module on door side |
| Adjustable Recline | 5 positions in rear and forward modes |
| Adjustable Headrest | 6 positions |
| Harness | 5-point, magnetic buckle |
| Removable Infant Insert | For child <60 cm and ≤13 kg |
| Cover Washing | Cold water <30°C |
| Drying | In the shade, do not wring |
| Warranty | Personalized, register at www.nunababy.com |
| Manufacturer Contact | info@nunababy.com |
Frequently Asked Questions - Todl next Nuna
User questions about Todl next Nuna
0 question about this device. Answer the ones you know or ask your own.
Ask a new question about this device
Download the instructions for your Car seat in PDF format for free! Find your manual Todl next - Nuna and take your electronic device back in hand. On this page are published all the documents necessary for the use of your device. Todl next by Nuna.
USER MANUAL Todl next Nuna
natural_image
Line drawing of a car seat with white outline and black seat, no text or symbols presentnuna®
IMPORTANT! KEEP THESE INSTRUCTIONS FOR FUTURE REFERENCE:
READ CAREFULLY
natural_image
Line drawing of a chair seat with no text or symbols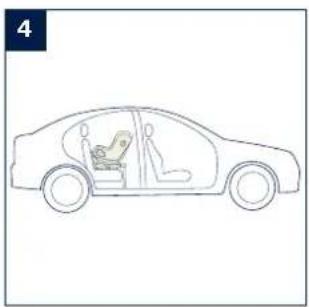
natural_image
Line drawing of a car interior view showing two people seated in a driver seat (no text or symbols)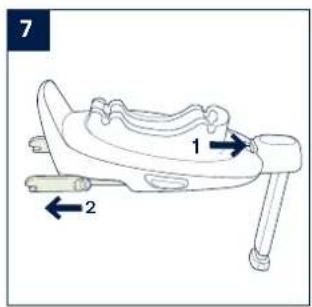
text_image
7 1 2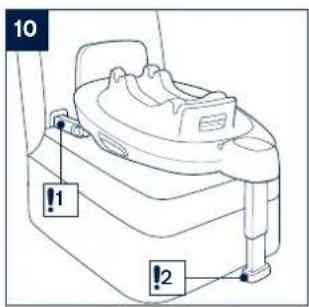
text_image
10 !1 !2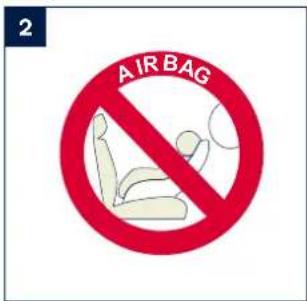
text_image
2 AIR BAG
natural_image
Diagram showing two directional arrows pointing to a device on a curved surface (no text or symbols)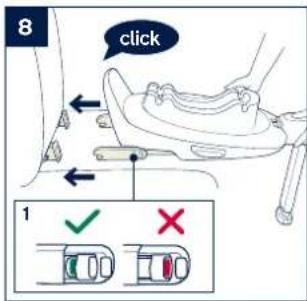
text_image
8 click 1 ✓ ✗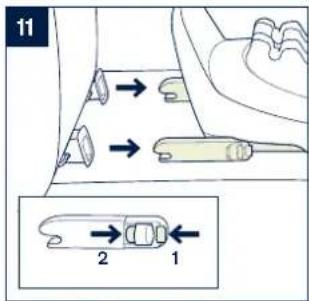
text_image
11 2 1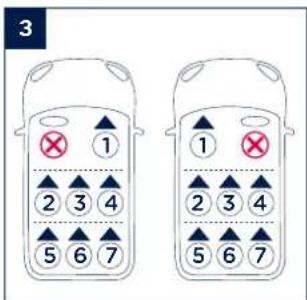
text_image
3 1 2 3 4 5 6 7 1 2 3 4 5 6 7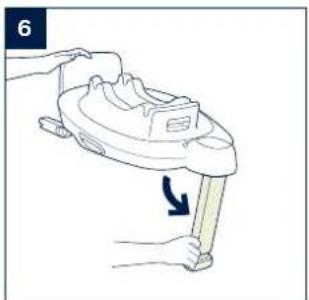
natural_image
Illustration of a hand holding a small mechanical component with an arrow indicating rotation (no text or symbols)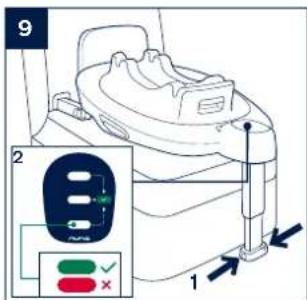
text_image
9 2 1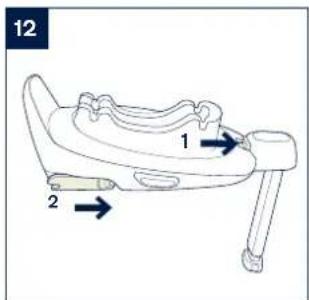
text_image
12 1 2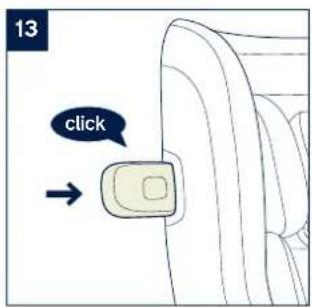
text_image
13 click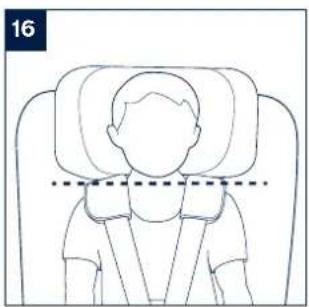
natural_image
Line drawing of a person seated in a chair with a dashed line indicating measurement or alignment (no text or symbols)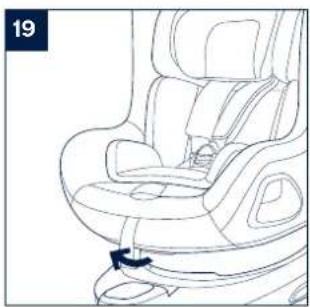
natural_image
Line drawing of a car seat with a black arrow indicating the seatbelt (no text or symbols present)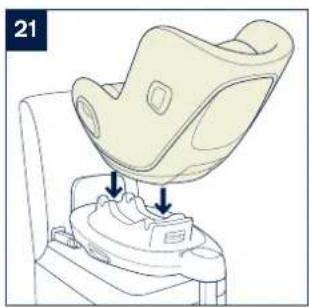
natural_image
Illustration of a baby car seat with two arrows indicating the seat structure (no text or symbols present)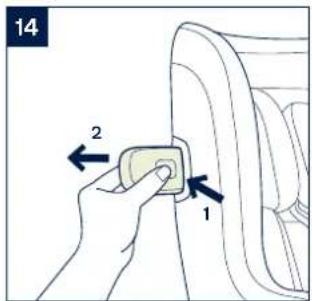
text_image
14 2 1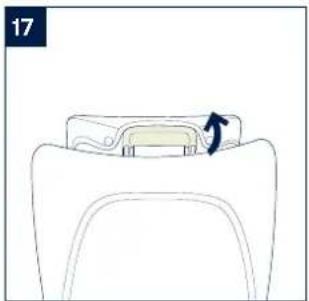
natural_image
Diagram of a car seat with a highlighted component and directional arrow (no text or symbols)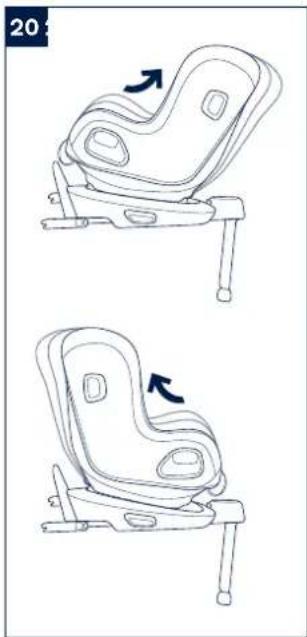
natural_image
Line drawings of a car seat assembly with two views showing seat movement (no text or symbols)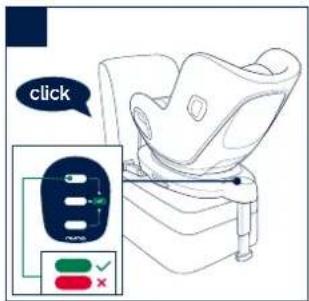
text_image
click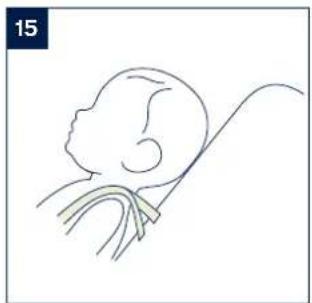
natural_image
Simple line drawing of a baby with a long tail, no text or symbols present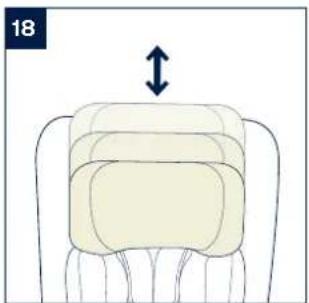
natural_image
Diagram of a car seat with an upward arrow indicating motion or direction (no text or symbols)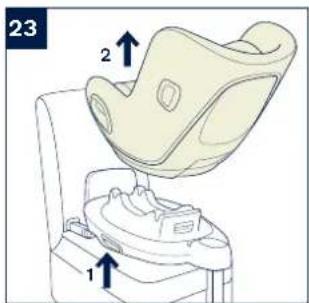
text_image
23 1 2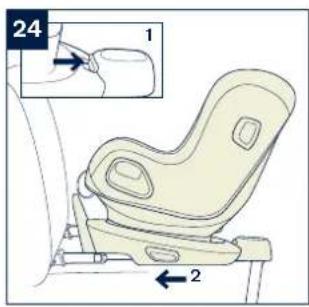
text_image
24 1 2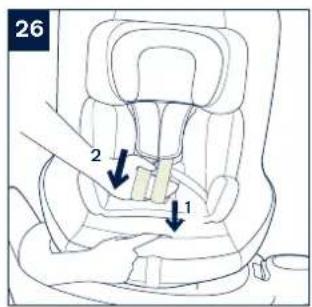
text_image
26 1 2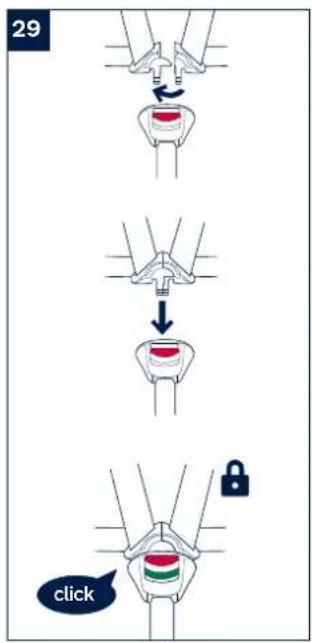
text_image
29 click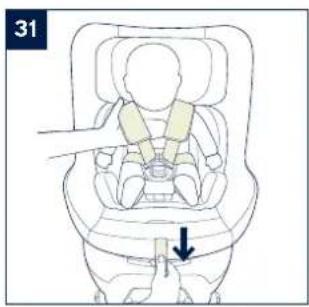
text_image
31
text_image
25 1 2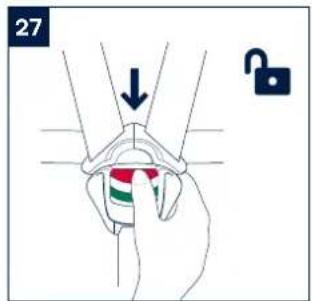
text_image
27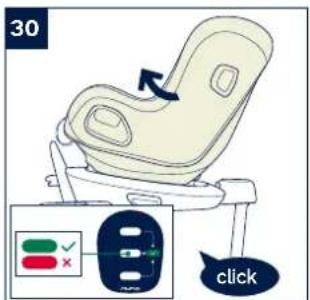
text_image
30 click
text_image
32 1 2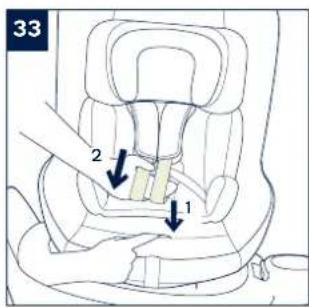
text_image
33 2 1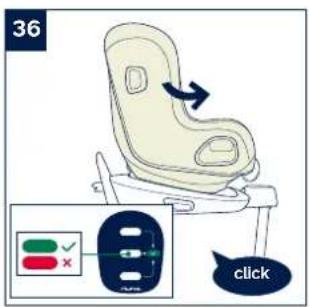
text_image
36 click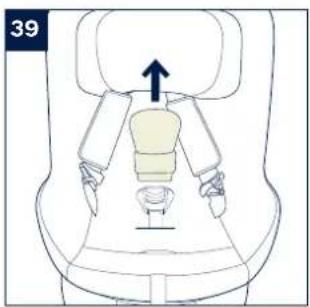
natural_image
Top-down view of a car seat with a highlighted seatbelt and upward arrow (no text or symbols)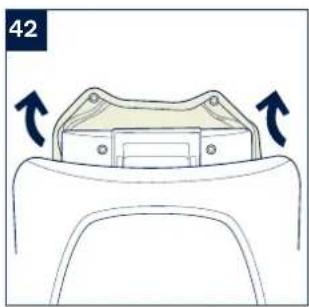
natural_image
Diagram of a car interior showing a seat with two arrows indicating direction (no text or symbols)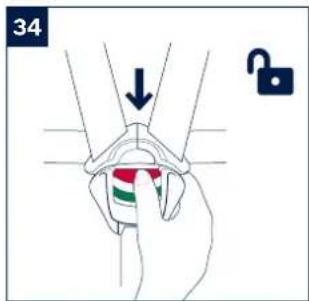
text_image
34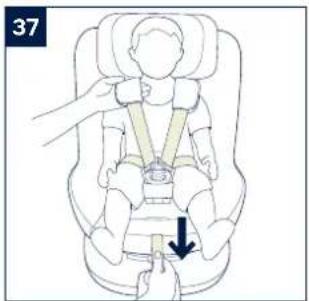
text_image
37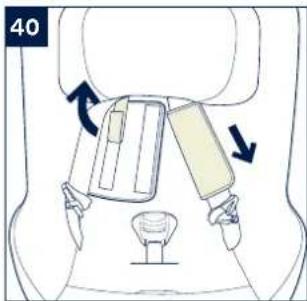
text_image
40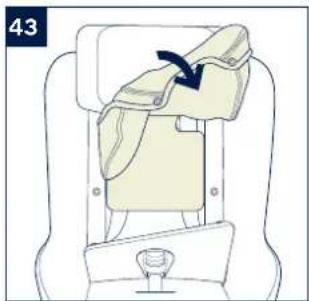
natural_image
Diagram of a car seatbelt with a fabric being folded, showing no text or symbols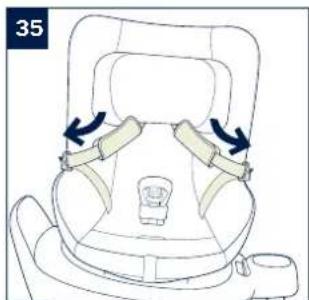
natural_image
Line drawing of a car seatbelt with arrows indicating side arm positions (no text or symbols)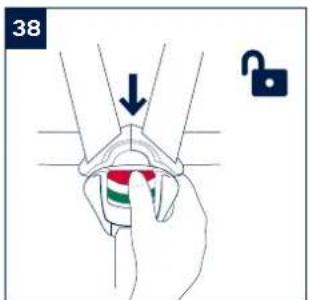
text_image
38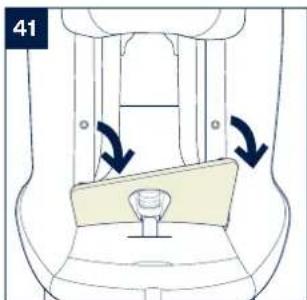
natural_image
Diagram of a car seatbelt with directional arrows indicating movement (no text or symbols)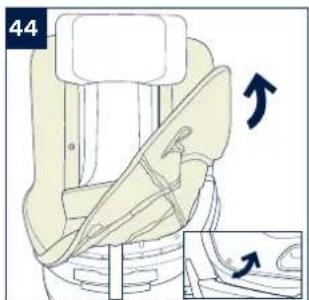
text_image
44Designed around your life

Contents
Product information 3
Product Registration
Warranty
Contact
Child Usage Requirements 4
Warning 5
Parts List 7
Product Set Up 9
Product Use 9
Cleaning and Maintenance 14
Français (FR) 15
Deutsch (DE) 29
Nederlands (NL) 43
Italiano (IT) 57
Español (ES) 71
Português (PT) 85
Polski (PL) 99
Čeština (CZ) 113
Slovenčina (SK) 127
Hrvatski (HR) 141
Product Registration
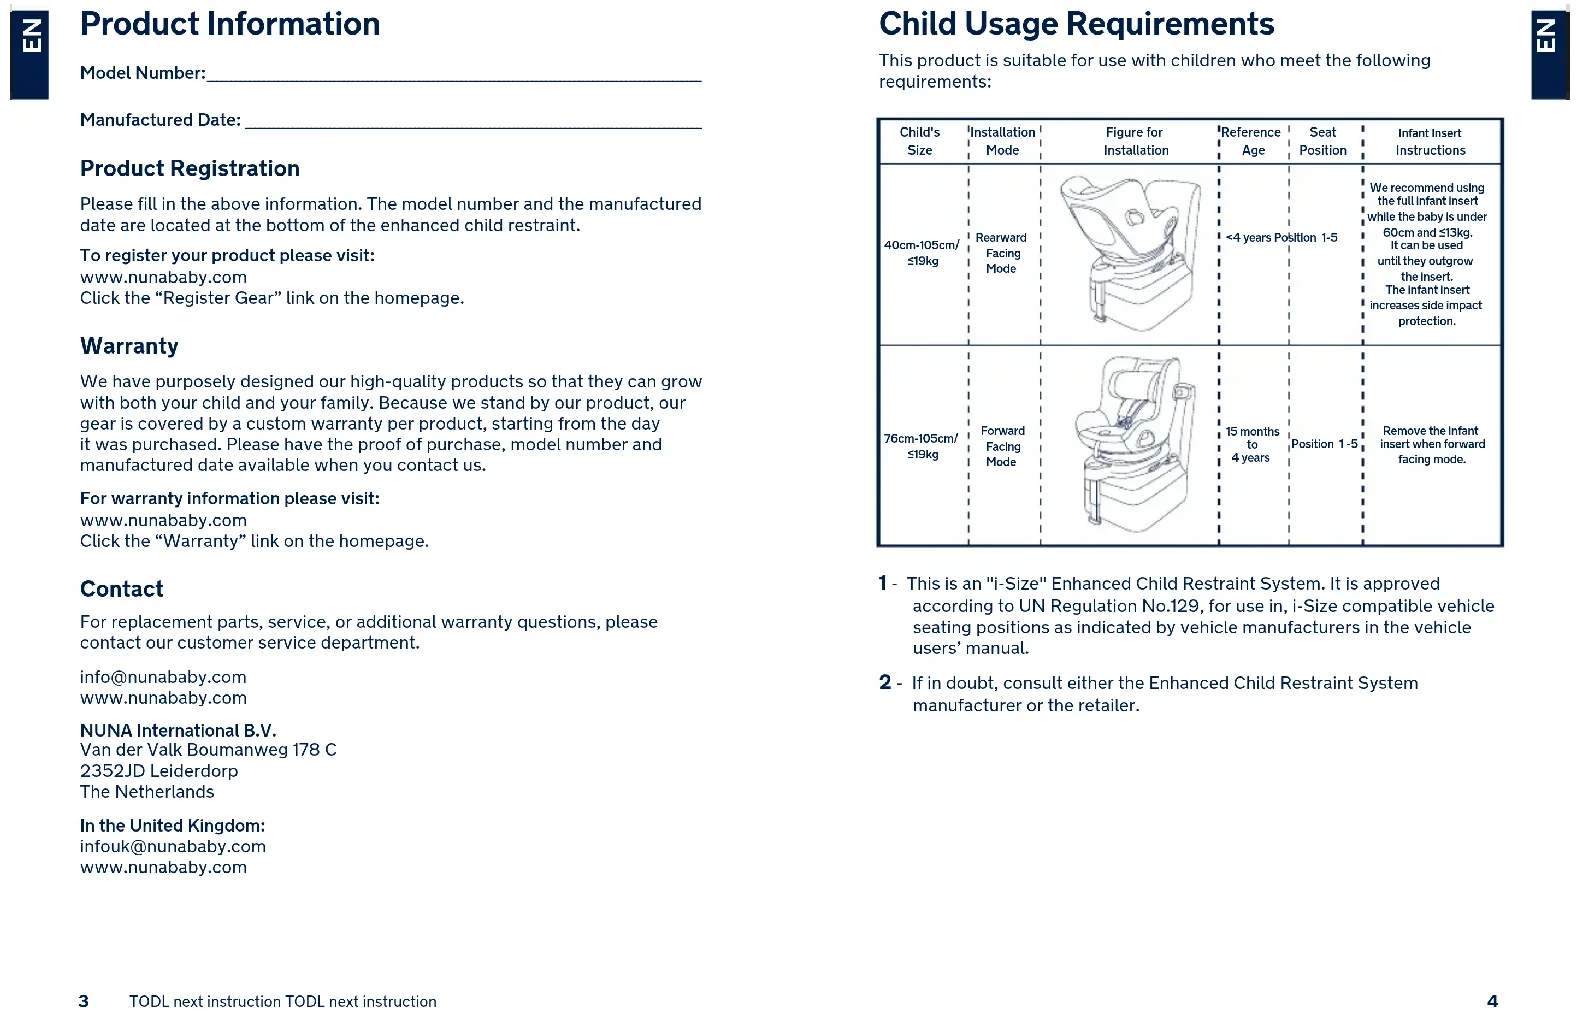
Please fill in the above information. The model number and the manufactured date are located at the bottom of the enhanced child restraint.
To register your product please visit:
www.nunababy.com
Click the "Register Gear" link on the homepage.
Warranty
We have purposely designed our high-quality products so that they can grow with both your child and your family. Because we stand by our product, our gear is covered by a custom warranty per product, starting from the day it was purchased. Please have the proof of purchase, model number and manufactured date available when you contact us.
For warranty information please visit:
www.nunababy.com
Click the "Warranty" link on the homepage.
Contact
For replacement parts, service, or additional warranty questions, please contact our customer service department.
info@nunababy.com
www.nunababy.com
NUNA International B.V.
In the United Kingdom:
infouk@nunababy.com
www.nunababy.com
Child Usage Requirements
This product is suitable for use with children who meet the following requirements:
| Child's Size | Installation Mode | Figure for Installation | ^1 Reference Age | Seat Position | Infant Insert Instructions |
| 40cm-105cm/≤19kg | Roarward Facing Mode | 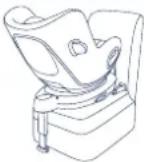 | <4 years Position 1-5 | We recommend using the full Infant Insert while the baby is under 60cm and ≤13kg. It can be used until they outgrow the Insert. The Infant Insert increases side impact protection. | |
| 76cm-105cm/≤19kg | Forward Facing Mode | 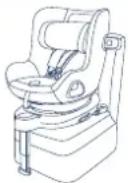 | 15 months to 4 years | Position 1-5 | Remove the infant insert when forward facing mode. |
1 - This is an "i-Size" Enhanced Child Restraint System. It is approved according to UN Regulation No.129, for use in, i-Size compatible vehicle seating positions as indicated by vehicle manufacturers in the vehicle users' manual.
2 - If in doubt, consult either the Enhanced Child Restraint System manufacturer or the retailer.
WARNING
Failure to follow these warnings and instructions could result in serious injury or death.
DO BE cautious that the rigid items and plastic parts of an enhanced child restraint system shall be located and installed so that they are not liable to become trapped by a moveable seat or in a door of the vehicle.
DO NOT use the rearward facing enhanced child restraint system in seating positions where there is an active frontal airbag installed.
To use this enhanced child restraint according to the UN Regulation No.129, your child must meet the following requirements.
Rearward Facing: Child height 40cm-105cm/ Child weight ≤19kg;
Forward Facing: Child height 76cm-105cm/ Child weight ≤19kg;
IMPORTANT - DO NOT USE FORWARD FACING BEFORE THE CHILD'S AGE EXCEEDS 15 MONTHS (Refer to instructions)
Any support-leg should be in contact with the vehicle floor and any straps restraining the child should be adjusted to the child's body. The straps should not be twisted.
Ensure that any lap strap is worn low down, so that the pelvis is firmly engaged, shall be stressed.
This enhanced child restraint should be replaced when it has been subject to violent stresses in an accident. An accident can cause damage to it that you cannot see.
Consider the danger of making any alterations or additions to the device without approval of the adequate authority, and the danger of not following closely to the installation instructions provided by the enhanced child restraint manufacturer.
Please keep this enhanced child restraint away from direct sunlight, otherwise it may become too hot for child's skin. Always test the temperature by touching the enhanced child restraint before placing child in it.
Children should not be left unattended in their enhanced child restraint system.
Any luggage or other objects liable to cause injuries in the event of a collision shall be properly secured.
The enhanced child restraint may not fit in all approved vehicles when used in one of these positions.
The enhanced child restraint system shall NOT BE USED without the soft goods.
The soft goods should not be replaced with any other than the one recommended by the manufacturer, because the soft goods constitutes an integral part of the restraint performance.
The instructions should be retained on the enhanced child restraint for its life period.
Please also pay attention to the instructions and warnings in the vehicle manufacturer's handbook.
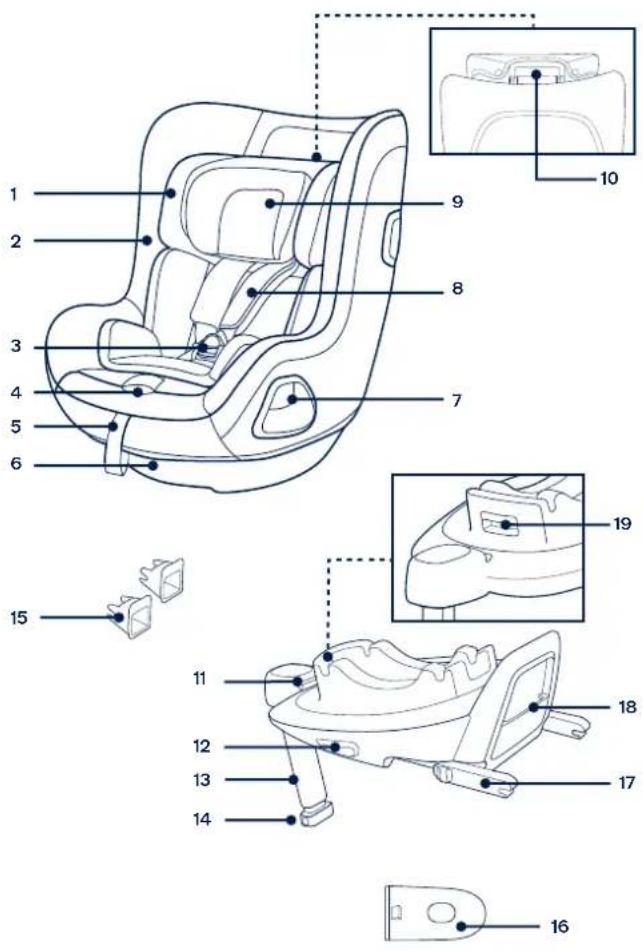
Parts List
Make sure all parts are available before assembly. If any part is missing, please contact local retailer. No tools are required for assembly.
1 Head Support
2 Seat Pad
3 Buckle
4 Webbing Adjustment Button
5 Adjustment Webbing
6 Recline Adjustment Button
7 Rotating Button
8 Shoulder Harness Covers
9 Infant Insert
10 Head Support Adjustment Lever
11 ISOFIX Adjustment Button
12 Child Restraint Release Button
13 Load Leg
14 Load Leg Adjustment Button
15 ISOFIX Guides
16 Side Impact Protection Pod
17 ISOFIX Connector
18 Instruction Manual Storage Compartment
19 Infant Carrier Rotation Button
text_image
1 2 3 4 5 6 7 8 9 10 11 12 13 14 15 16 17 18 19Product Set Up
Installation Concerns
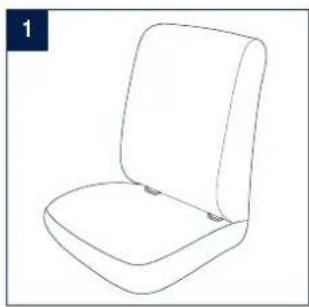
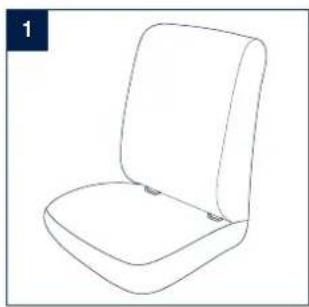
This enhanced child restraint system is only suitable for vehicle seats equipped with ISOFIX anchorage bars. (1)
DO NOT use the rearward facing enhanced child restraint system in seating positions where there is an active frontal airbag installed. (2) Death or serious injury may occur. Please reference vehicle owner's manual for more information.
DO NOT install this enhanced child restraint system on vehicle seats that face sideways or rearward with respect to the moving direction of the vehicle.
Please refer to your vehicle owner's manual for recommended or suggested installation positions. (3)
It is recommended to install this enhanced child restraint on the rear vehicle seat. (4)
DO NOT install this enhanced child restraint system on movable vehicle seats.
Product Use
Base Installation
1 - Attach the ISOFIX guides to the vehicle's ISOFIX anchor bars (see vehicle owner's manual). (5) The ISOFIX guides can protect the surface of the vehicle seat from being torn. They can also guide the ISOFIX connectors.
2 - Unfold the load leg from storage compartment. (6)
3 - Extend the ISOFIX connectors by pressing the ISOFIX adjustment button while pulling on the connector. (7)
4 - Press the ISOFIX adjustment button to adjust the ISOFIX connectors. Line up the ISOFIX connectors with the ISOFIX guides, and then click both ISOFIX connectors into the ISOFIX anchor bars. (8)
! Make sure that both ISOFIX connectors are securely attached to the vehicle's ISOFIX anchor bars. There should be two audible clicks and the colors of the indicators on both ISOFIX connectors should be completely green. (8)-1
! Check to make sure the base is securely installed by pulling on both ISOFIX connectors.
9 TODL next instruction TODL next instruction
5 - After placing the base on the vehicle seat, extend the load leg to floor (9). When the load leg is installed correctly, the load leg indicator will show green. Red will be shown when installed incorrectly. (9)-2
The load leg has multiple positions. When the load leg indicator shows red this means the load leg is in the wrong position.
! Make sure the load leg is in full contact with the vehicle floor pan.
! Squeeze the load leg adjustment button, then shorten the load leg upwards. (9)-1
The completely assembled base is shown as (10).
! The ISOFIX connectors must be attached and locked onto the ISOFIX anchor bars. (10)-1
! The load leg must be installed correctly with green indicator. (10)-2
6 - To remove the base, press the secondary lock button (11)-1 first followed by the button (11)-2 on the ISOFIX connectors before removing the base from the vehicle seat. (11)
7 - For transporting, press ISOFIX Adjustment button and move the ISOFIX connectors back into the storage position. (12)
Use Side Impact Protection
1 - The enhanced child restraint is delivered with removable side impact protection pod. This side impact protection pod MUST be used on the door side of the vehicle. Installation shown in (13).
2 - Press the release button to remove side impact protection pod. (14)
Height Adjustment
for Head Support and Shoulder Harnesses
Please adjust the head support and check if the shoulder harnesses are at the correct height according to (15)(16)(17)(18).
When used in rearward facing mode, the shoulder harness height must be even with or just below the top of child's shoulders. (15)
When used in forward facing mode, the shoulder harness height must be even with the top of child's shoulders. (16)
Pull the head support adjustment lever (17), meanwhile pull up or down the head support until it snaps into one of the 6 positions. The head support positions are shown as (18).
Recline Adjustment
1 - Squeeze the recline adjustment button to adjust the enhanced child restraint to the proper position. (19)
2 - Both rear facing mode and forward facing mode have 5 recline positions, the recline angles are shown as. (20)
Rearward Facing Mode
(Child height 40cm-105cm/ Child weight ≤19kg)
! Please install the enhanced child restraint on the rear vehicle seat, and then place the child in the enhanced child restraint.
1 - Push the enhanced child restraint down onto the base (21). If the enhanced child restraint is secure, the enhanced child restraint indicator will show green. (22)
2 - To release the enhanced child restraint, first take the child out of the child restraint. Squeeze the child restraint release button (23)-1, then lift the child restraint up (23)-2.
The enhanced child restraint can ONLY be installed and released when in rearward facing mode.
3 - Press and hold the ISOFIX adjustment button and push the enhanced child restraint system back until it comes in contact with the vehicle seatback. (24)
4 - Press and hold the rotation button to rotate for easier side loading/unloading of the child, then rotate the seat to the rear facing position. (25)
! Press the rotation button on either side to rotate the enhanced child restraint.
5 - Press the harness adjustment button while pulling the shoulder harnesses to the desired length (Pull from below the fixed shoulder pads to lengthen). (26)
6 - Unlock the buckle of the harnesses by pressing the red button. (27)
7 - Place the buckle tongues against the magnetic area on the outer side of the enhanced child restraint so that the tongues are held in place. (28)
Use Infant Insert

text_image
We recommend using the full infant insert while the baby is under 60cm and ≤13kg. It can be used until they outgrow the insert. The infant insert increases side impact protection. Remove the head support portion of the infant insert when the child's head no longer fits comfortably. Remove the body portion of the infant insert when the infant's shoulders no longer fit comfortably. Remove the infant insert cushion by detaching the snaps to allow more space when the infant does not fit comfortably. The cushion can be used separately without being attached to the insert to bolster the infant's back for more comfort.8 - Place the child into the enhanced child restraint and pass both arms through the harnesses.
9 - Engage the buckle. Please refer to (29).
10 - Rotate the enhanced child restraint to rearward facing. The enhanced child restraint indicator will show green. (30)
11 - Pull down the adjustment webbing and adjust it to the proper length to make sure your child is properly secured. (31)
! Always keep child secured in harness and properly tightened by removing any slack.
Forward Facing Mode
(Child height 76cm-105cm/ Child weight ≤19kg) (Child's Age ≥15 Month)
! Please install the enhanced child restraint on the rear vehicle seat, and then place the child in the enhanced child restraint.
1 - Press the rotation button to rotate for easier side loading/unloading of the child, then rotate the seat to the forward facing position. (32)
! Press the rotation button on either side to rotate the enhanced child restraint.
2 - Press the harness adjustment button while pulling the shoulder harnesses to the desired length (Pull from below the fixed shoulder pads to lengthen). (33)
3 - Unlock the buckle of the harnesses by pressing the red button. (34)
! Remove the infant insert when in forward facing mode.
4 - Place the buckle tongues against the magnetic area on the outer side of the enhanced child restraint so that the tongues are held in place. (35)
5 - Rotate the enhanced child restraint seat to forward facing, the enhanced child restraint indicator will show green. (36)
6 - Pull down the adjustment webbing and adjust it to the proper length to make sure your child is properly secured. (37)
! Always keep child secured in harness and properly tightened by removing any slack.
! DO NOT use forward facing unless your child is at least 76cm AND 15 months old
Detach & Assemble Soft Goods
Press the red button to disengage the buckle. (38)
Follow steps (39) - (44) to detach soft goods.
To re-attach the soft goods please repeat the above steps in reverse.
Cleaning and Maintenance
Please store the infant insert somewhere out of the child's reach.
Please wash the soft goods with cold water under 30^ C.
DO NOT iron the soft goods.
DO NOT bleach or dry clean the soft goods.
DO NOT use undiluted neutral detergent, gasoline or other organic solvent to wash the enhanced child restraint. It may cause damage to the enhanced child restraint.
DO NOT twist the soft goods to dry with great force. It may leave the soft goods with wrinkles.
Please hang dry the soft goods in the shade.
Please remove the enhanced child restraint from the vehicle seat if it will not be in use for a long period of time.
IMPORTANT! CONSERVEZ CES INSTRUCTIONS POUR RÉFÉRENCE ULTÉRIEURE :
LIRE ATTENTIVEMENT
Sommaire
IMPORTANT! KEEP THESE INSTRUCTIONS FOR FUTURE REFERENCE:
READ CAREFULLY
natural_image
Line drawing of a chair seat with no text or symbols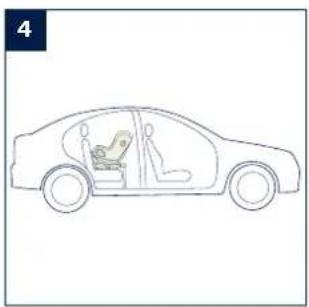
natural_image
Line drawing of a car interior view showing two people seated in a driver seat (no text or symbols)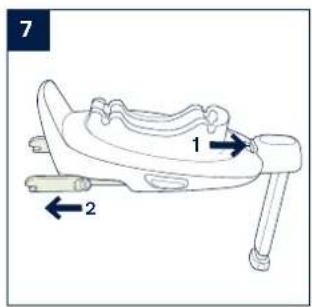
text_image
7 1 2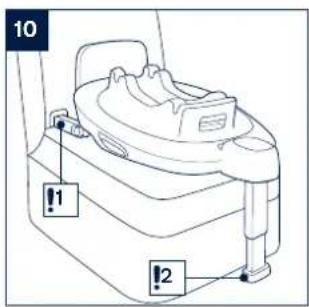
text_image
10 !1 !2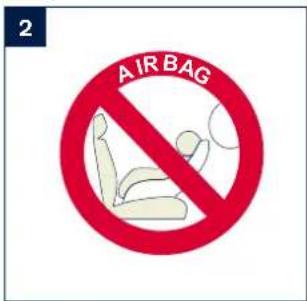
text_image
2 AIR BAG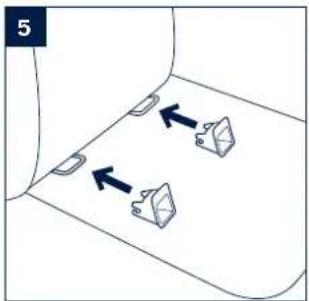
natural_image
Diagram showing two directional arrows pointing to a device on a curved surface (no text or symbols)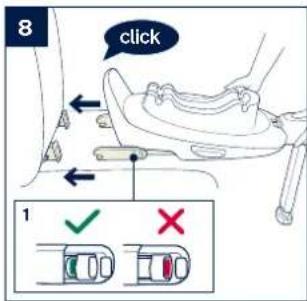
text_image
8 click 1 ✓ ✗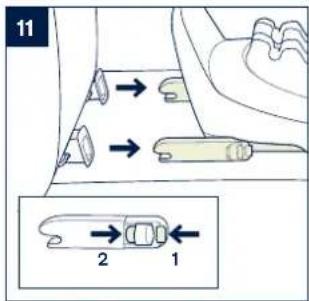
text_image
11 2 1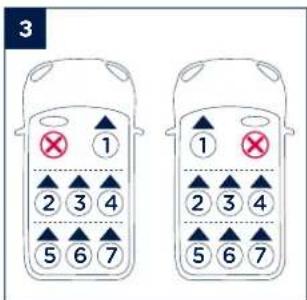
text_image
3 1 2 3 4 5 6 7 1 2 3 4 5 6 7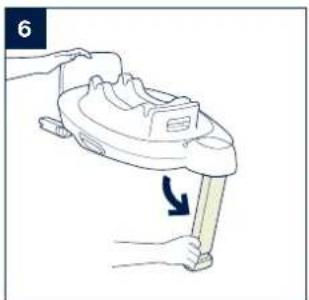
natural_image
Illustration of a hand holding a small mechanical component with an arrow indicating rotation (no text or symbols)
text_image
9 2 1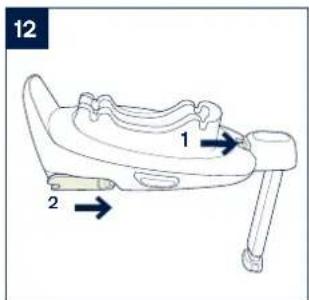
text_image
12 1 2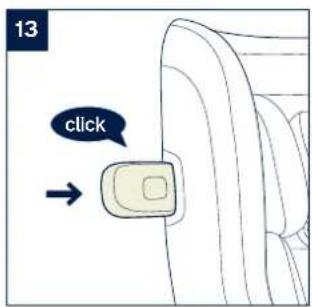
text_image
13 click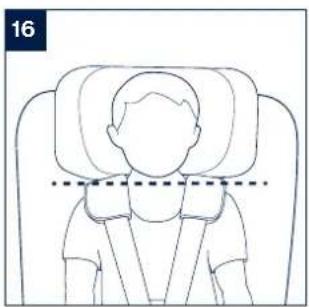
natural_image
Line drawing of a person seated in a chair with a dashed line indicating measurement or alignment (no text or symbols)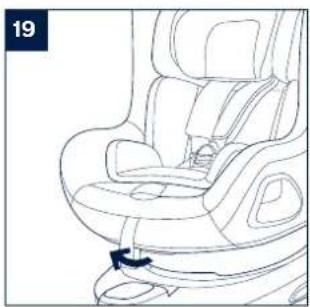
natural_image
Line drawing of a car seat assembly with a black arrow indicating the seatbelt (no text or symbols present)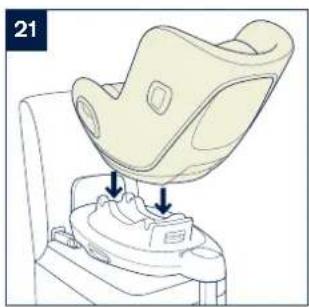
natural_image
Illustration of a baby seat with two arrows indicating the seat structure (no text or symbols present)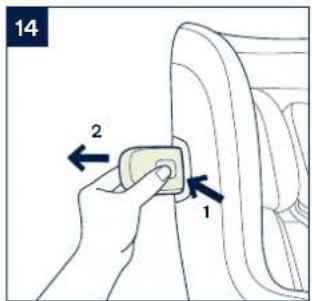
text_image
14 2 1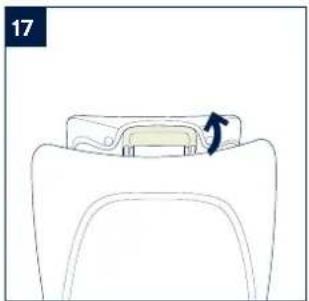
natural_image
Diagram of a car seat with a highlighted component and directional arrow (no text or symbols)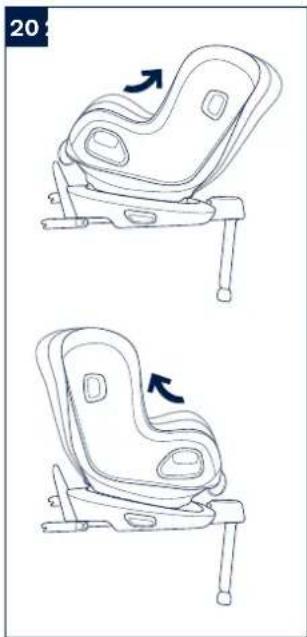
natural_image
Line drawings of a car seat assembly with two views showing seat movement (no text or symbols)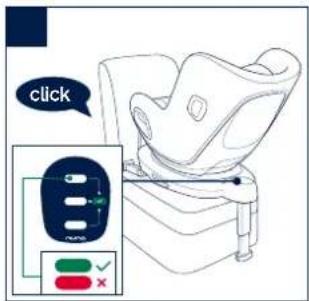
text_image
click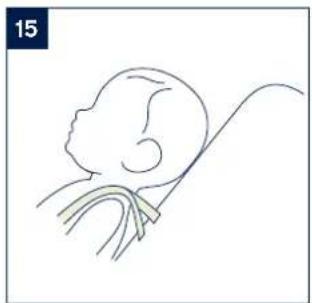
natural_image
Simple line drawing of a baby with a long tail, no text or symbols present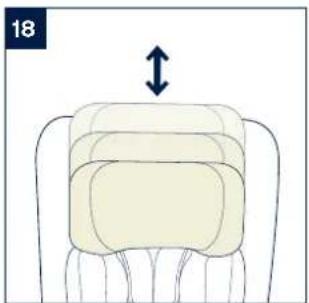
natural_image
Diagram of a car seat with an upward arrow indicating motion or direction (no text or symbols)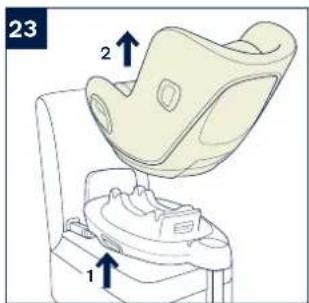
text_image
23 1 2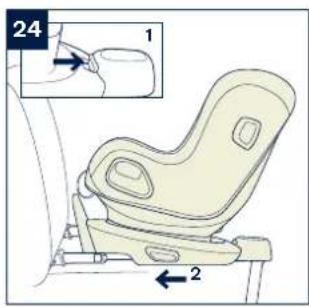
text_image
24 1 2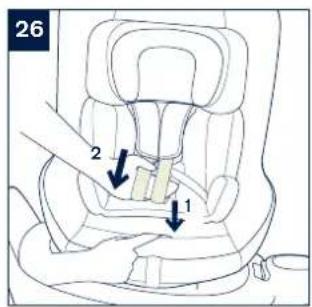
text_image
26 1 2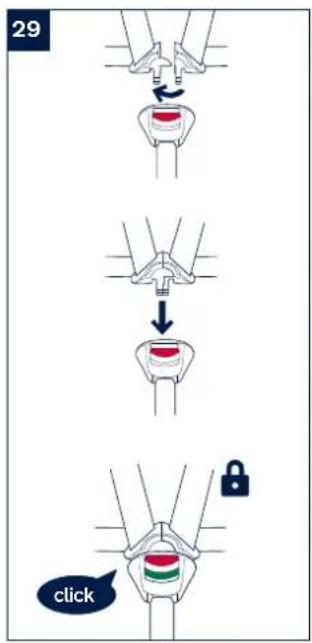
text_image
29 click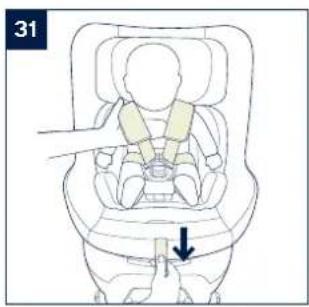
text_image
31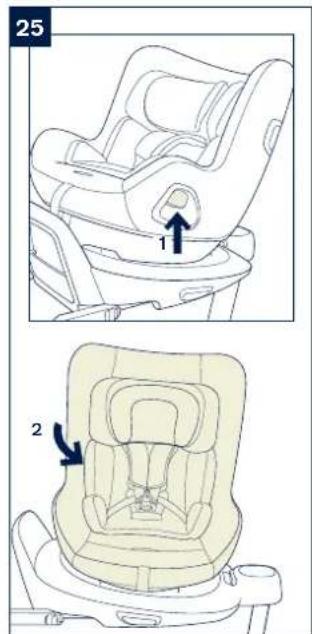
text_image
25 1 2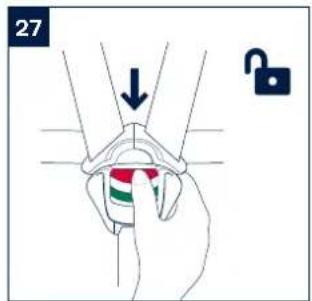
text_image
27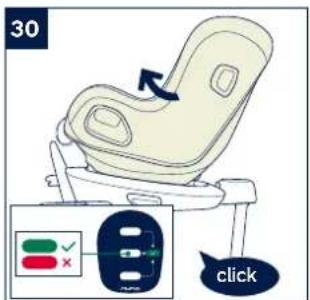
text_image
30 click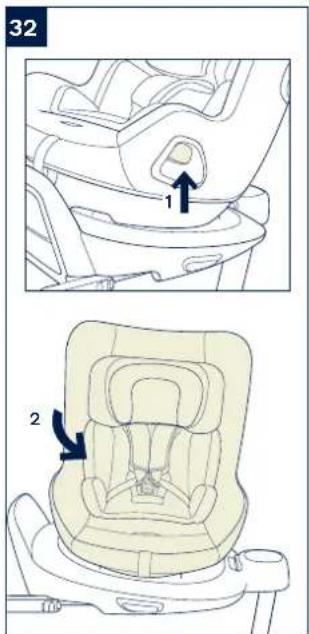
text_image
32 1 2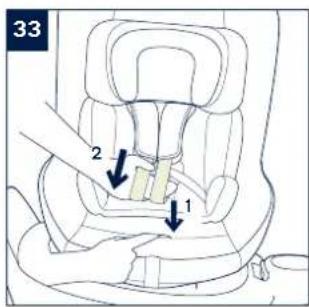
text_image
33 2 1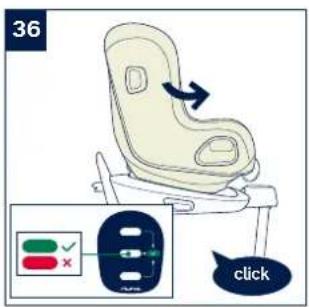
text_image
36 click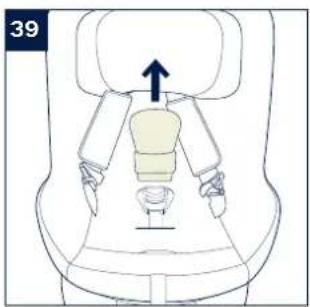
natural_image
Top-down view of a car seat with a highlighted seatbelt and upward arrow (no text or symbols)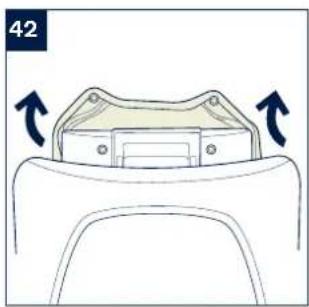
natural_image
Diagram of a car interior showing a seat with two arrows indicating direction (no text or symbols)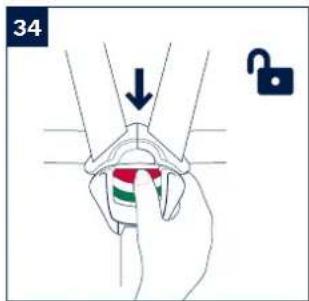
text_image
34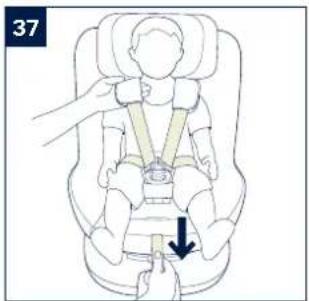
text_image
37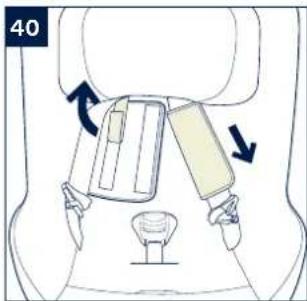
text_image
40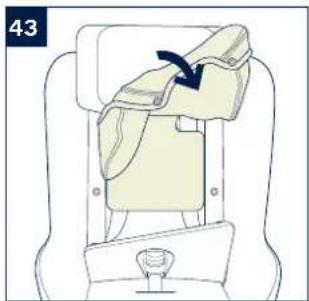
natural_image
Diagram of a car seatbelt with a fabric being folded, showing no text or symbols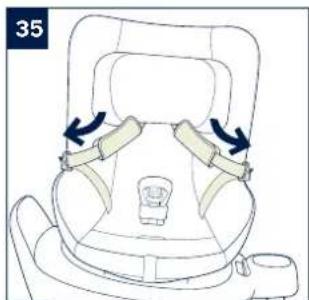
natural_image
Line drawing of a car seatbelt with arrows indicating side arm positions (no text or symbols)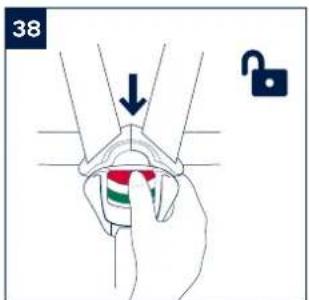
text_image
38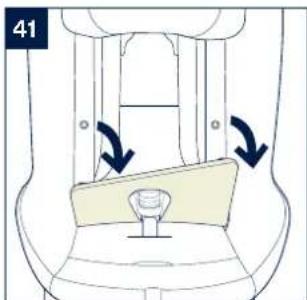
natural_image
Diagram of a car seatbelt with directional arrows indicating movement (no text or symbols)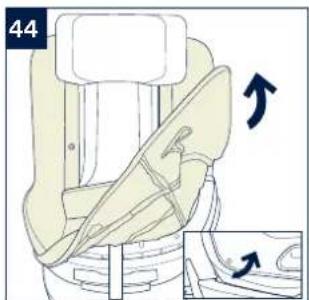
text_image
44Designed around your life

Contents
Product information 3
Product Registration
Warranty
Contact
Child Usage Requirements 4
Warning 5
Parts List 7
Product Set Up 9
Product Use 9
Cleaning and Maintenance 14
Français (FR) 15
Deutsch (DE) 29
Nederlands (NL) 43
Italiano (IT) 57
Español (ES) 71
Português (PT) 85
Polski (PL) 99
Čeština (CZ) 113
Slovenčina (SK) 127
Hrvatski (HR) 141