
PowerClear - Electric drain cleaner RIDGID - Free user manual and instructions
Find the device manual for free PowerClear RIDGID in PDF.
| Product Type | Electric Drain Cleaner |
| Brand | RIDGID |
| Model | PowerClear |
| Dimensions (L x W x H) | 356 x 229 x 292 mm (14 x 9 x 11.5 in) |
| Weight | 5.44 kg (12 lb) |
| Power supply | 100-120 V, 50-60 Hz, 0.8/0.9 A |
| Motor power | 1/4 HP |
| Drum capacity (cable) | 30 ft (9.15 m) of 1/4 in (6 mm) diameter cable |
| Compatible pipe diameter | 20 to 40 mm (3/4 to 1.5 in) |
| Cable feed speed | 5.5 m/min (18 ft/min) |
| No-load drum speed | 450 rpm |
| Feed system | Bidirectional AUTOFEED, lever-controlled |
| Controls | Forward/Off/Reverse switch + pneumatic foot pedal |
| Safety device | GFCI (Ground Fault Circuit Interrupter) integrated into cord |
| Required protective equipment | Safety glasses, leather gloves, latex under-gloves |
| Maintenance and cleaning | Rinse with water after use; lubricate AUTOFEED system with light mineral oil |
| Spare parts and repairability | RIDGID replacement parts available; repair by authorized service |
| Warranty | Full Lifetime Warranty |
Frequently Asked Questions - PowerClear RIDGID
User questions about PowerClear RIDGID
0 question about this device. Answer the ones you know or ask your own.
Ask a new question about this device
Download the instructions for your Electric drain cleaner in PDF format for free! Find your manual PowerClear - RIDGID and take your electronic device back in hand. On this page are published all the documents necessary for the use of your device. PowerClear by RIDGID.
USER MANUAL PowerClear RIDGID
Recording Form for Machine Serial Number 1
Safety Symbols 2
General Power Tool SafetyWarnings
Work Area Safety 2
Electrical Safety 2
Personal Safety 3
Power Tool Use and Care 3
Service 3
Specific Safety Information
Drain Cleaner SafetyWarnings 3
Description and Specifications
Description 4
Specifications 5
SwitchIcons 5
Machine Assembly 5
Configuring Guide Hose/AUTOFEED Assembly 6
Pre-Operation Inspection 6
Machine and Work Area Set-Up 7
Operating Instructions
Feeding the Cable into the Drain 9
Passing Through Traps or Other Transitions 10
Cleaning the Drain 10
Working the Blockage 10
Handling a Stuck Tool 11
Freeing a Stuck Tool 11
Retrieving the Cable. 11
Draining the Machine 11
Preparing for Transport 11
Maintenance Instructions
Opening Drain Cleaner/Removing Drum 12
Cleaning 12
Replacing the Cable. 12
Optional Equipment 13
Machine Storage
Service and Repair
Disposal
Troubleshooting
EC Declaration of Conformity. Inside Back Cover
Lifetime Warranty . Back Cover
*Original Instructions - English
Drain Cleaner
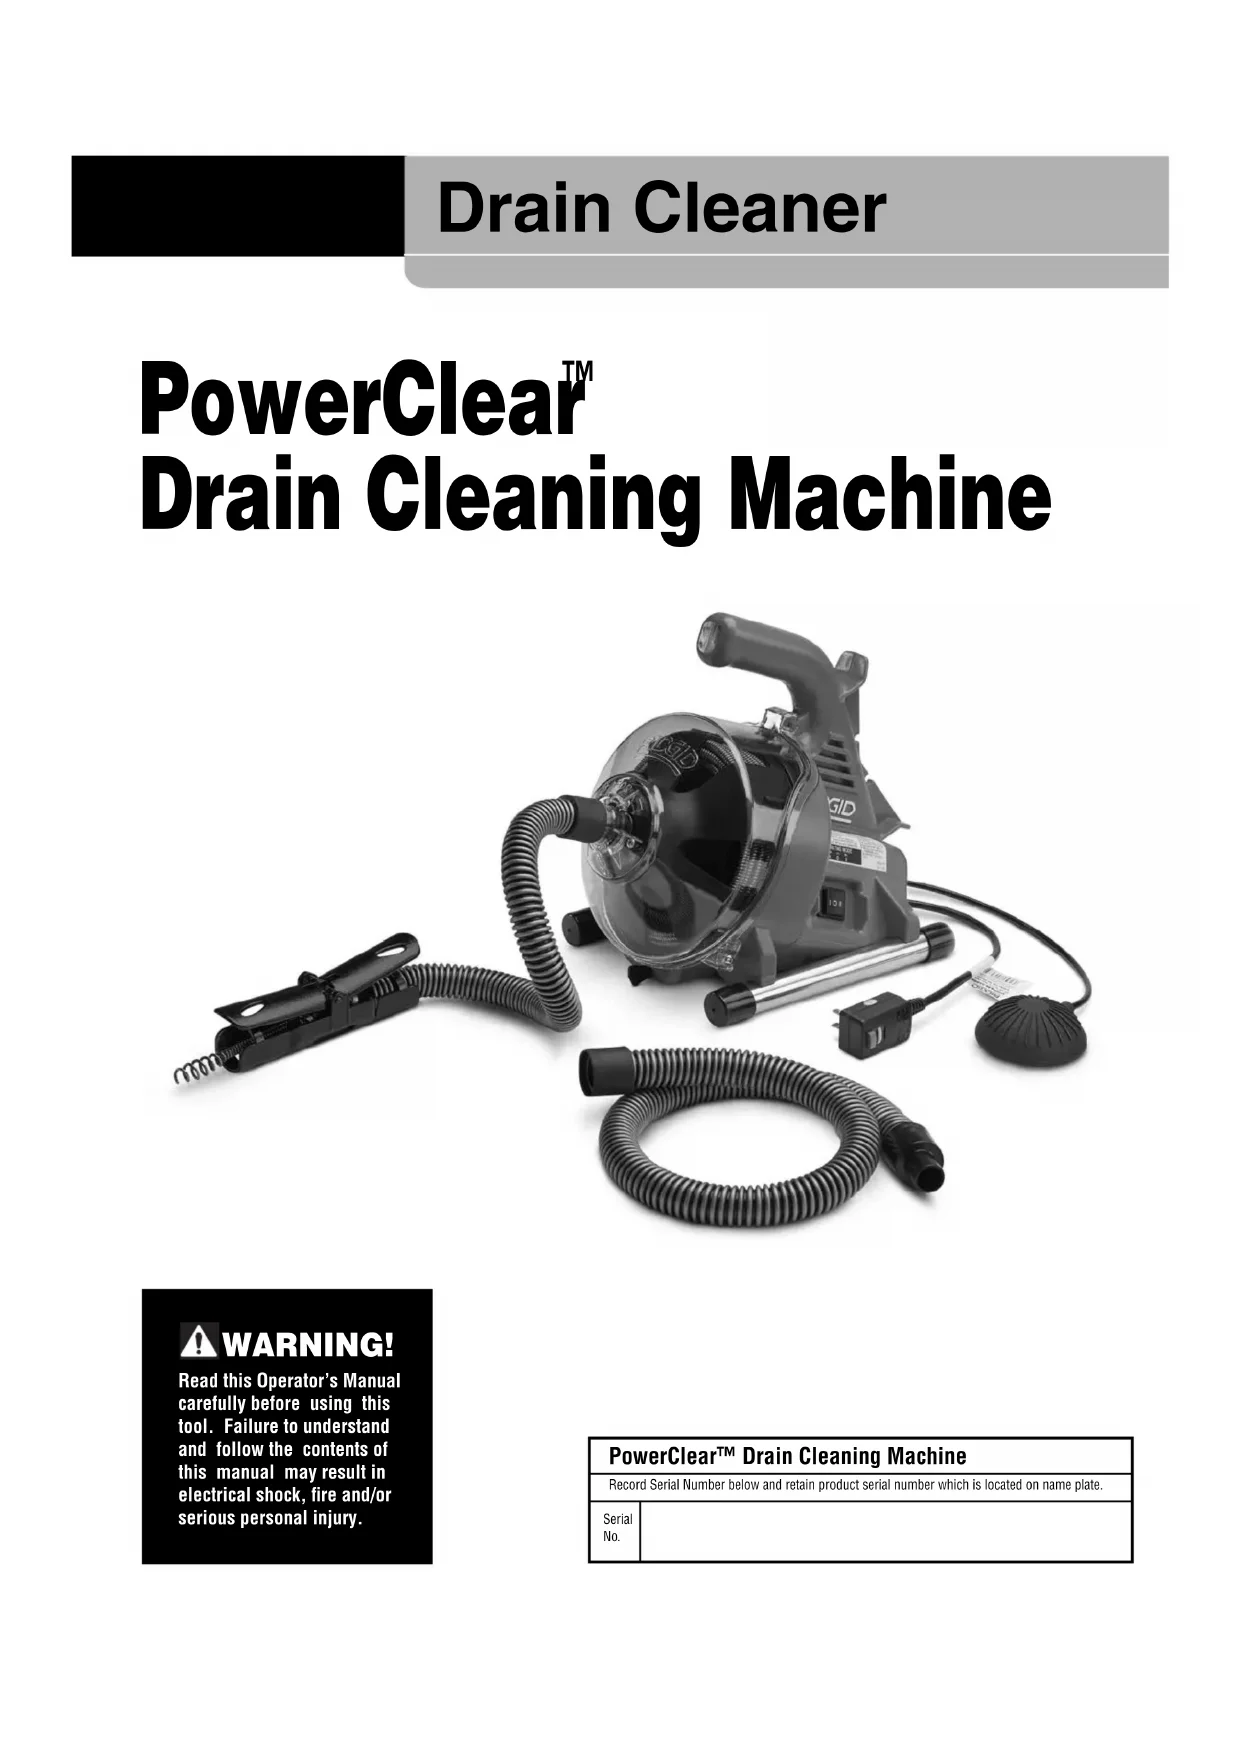
PowerClear™ Drain Cleaning Machine

WARNING!
Read this Operator's Manual carefully before using this tool. Failure to understand and follow the contents of this manual may result in electrical shock, fire and/or serious personal injury.
| PowerClear™ Drain Cleaning Machine | |
| Record Serial Number below and retain product serial number which is located on name plate. | |
| Serial No. | |
Safety Symbols
In this operator's manual and on the product, safety symbols and signal words are used to communicate important safety information. This section is provided to improve understanding of these signal words and symbols.

This is the safety alert symbol. It is used to alert you to potential personal injury hazards. Obey all safety messages that follow this symbol to avoid possible injury or death.

DANGER
DANGER indicates a hazardous situation which, if not avoided, will result in death or serious injury.

WARNING
WARNING indicates a hazardous situation which, if not avoided, could result in death or serious injury.

CAUTION
CAUTION indicates a hazardous situation which, if not avoided, could result in minor or moderate injury.
NOTICE
NOTICE indicates information that relates to the protection of property.

This symbol means read the operator's manual carefully before using the equipment. The operator's manual contains important information on the safe and proper operation of the equipment.

This symbol means always wear safety glasses with side shields or goggles when handling or using this equipment to reduce the risk of eye injury.

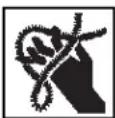
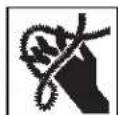
This symbol indicates the risk of hands, fingers or other body parts being caught, wrapped or crushed in the drain cleaning cable.

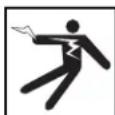
This symbol indicates the risk of electrical shock.
General Power Tool SafetyWarnings*
WARNING
Read all safety warnings, instructions, illustrations and specifications provided with this power tool. Failure to follow all instructions listed below may result in electric shock, fire, and/or serious injury.
SAVE ALL WARNING AND INSTRUCTIONS FOR FUTURE REFERENCE!
The term "power tool" in the warnings refers to your mains-operated (corded) power tool or battery-operated (cordless) power tool.
Work Area Safety
- Keep work area clean and well lit. Cluttered or dark areas invite accidents.
- Do not operate power tools in explosive atmospheres, such as in the presence of flammable liquids, gases, or dust. Power tools create sparks which may ignite the dust or fumes.
- Keep children and by-standers away while operating a power tool. Distractions can cause you to lose control.
Electrical Safety
- Power tool plugs must match the outlet. Never modify the plug in any way. Do not use any adapter plugs with earthed (grounded) power tools. Unmodified plugs and matching outlets will reduce risk of electric shock.
- Avoid body contact with earthed or grounded surfaces such as pipes, radiators, ranges and refrigerators. There is an increased risk of electrical shock if your body is earthed or grounded.
- Do not expose power tools to rain or wet conditions. Water entering a power tool will increase the risk of electrical shock.
- Do not abuse the cord. Never use the cord for carrying, pulling or unplugging the power tool. Keep cord away from heat, oil, sharp edges or moving parts. Damaged or entangled cords increase the risk of electric shock.
- When operating a power tool outdoors, use an extension cord suitable for outdoor use. Use of a cord suitable for outdoor use reduces the risk of electric shock.
- If operating a power tool in a damp location is unavoidable, use a ground fault circuit interrupter (GFCI) protected supply. Use of a GFCI reduces the risk of electric shock.
Personal Safety
- Stay alert, watch what you are doing and use common sense when operating a power tool. Do not use a power tool while you are tired or under the influence of drugs, alcohol, or medication. A moment of inattention while operating power tools may result in serious personal injury.
- Use personal protective equipment. Always wear eye protection. Protective equipment such as dust mask, non-skid safety shoes, hard hat, or hearing protection used for appropriate conditions will reduce personal injuries.
- Prevent unintentional starting. Ensure the switch is in the OFF position before connecting to power source and/or battery pack, picking up or carrying the tool. Carrying power tools with your finger on the switch or energizing power tools that have the switch ON invites accidents.
- Remove any adjusting key or wrench before turning the power tool ON. A wrench or a key left attached to a rotating part of the power tool may result in personal injury.
- Do not overreach. Keep proper footing and balance at all times. This enables better control of the power tool in unexpected situations.
- Dress properly. Do not wear loose clothing or jewelry. Keep your hair, and clothing away from moving parts. Loose clothes, jewelry, or long hair can be caught in moving parts.
- If devices are provided for the connection of dust extraction and collection facilities, ensure these are connected and properly used. Use of dust collection can reduce dust-related hazards.
- Do not let familiarity gained from frequent use of tools allow you to become complacent and ignore tool safety principles. A careless action can cause severe injury within a fraction of a second.
Power Tool Use and Care
- Do not force power tool. Use the correct power tool for your application. The correct power tool will do the job better and safer at the rate for which it is designed.
- Do not use power tool if the switch does not turn it ON and OFF. Any power tool that cannot be controlled with the switch is dangerous and must be repaired.
- Disconnect the plug from the power source and/or the battery pack from the power tool before making any adjustments, changing accessories, or
storing power tools. Such preventive safety measures reduce the risk of starting the power tool accidentally.
- Store idle power tools out of the reach of children and do not allow persons unfamiliar with the power tool or these instructions to operate the tool. Power tools are dangerous in the hands of untrained users.
- Maintain power tools. Check for misalignment or binding of moving parts, breakage of parts and any other condition that may affect the power tool's operation. If damaged, have the power tool repaired before use. Many accidents are caused by poorly maintained power tools.
- Keep cutting tools sharp and clean. Properly maintained cutting tools with sharp cutting edges are less likely to bind and are easier to control.
- Use the power tool, accessories and tool bits etc. in accordance with these instructions, taking into account the working conditions and the work to be performed. The use of the power tool for operations different from those intended could result in a hazardous situation.
- Keep handles and grasping surfaces dry, clean and free from oil and grease. Slippery handles and grasping surfaces do not allow for safe handling and control of the tool in unexpected situations.
Service
- Have your power tool serviced by a qualified repair person using only identical replacement parts. This will ensure that the safety of the power tool is maintained.
Specific Safety Information
WARNING
This section contains important safety information that is specific to this tool.
Read these precautions carefully before using the PowerClear Drain Cleaning Machine to reduce the risk of electrical shock or other serious injury.
SAVE ALL WARNING AND INSTRUCTIONS FOR FUTURE REFERENCE!
Keep this manual with machine for use by the operator.
Drain Cleaner Safety
- Before using the tool, test the ground fault circuit interrupter (GFCI) provided with the power supply
cord to insure it is operating correctly. A properly operating GFCI reduces the risk of electrical shock.
- Only use extension cords that are protected by a GFCI. The GFCI on the machine power cord will not prevent electrical shock from extension cords.
- Only grasp the rotating cable with gloves recommended by the manufacturer. Latex or loose fitting gloves or rags can become wrapped around the cable and may result in serious personal injury.
- Do not allow the cutter to stop turning while the cable is turning. This can overstress the cable and may cause twisting, kinking or breaking of the cable and may result in serious personal injury.
- One person must control both the cable and the switch. If the cable end stops rotating, the operator must be able to turn the machine motor OFF to prevent twisting, kinking and breaking of the cable.
- Use latex or rubber gloves inside the gloves recommended by the manufacturer, goggles, face shields, protective clothing, and respirator when chemicals, bacteria or other toxic or infectious substances are suspected to be in a drain line. Drains may contain chemicals, bacteria and other substances that may cause burns, be toxic or infectious or may result in other serious personal injury.
- Practice good hygiene. Do not eat or smoke while handling or operating the tool. After handling or operating drain cleaning equipment, use hot, soapy water to wash hands and other body parts exposed to drain contents. This will help reduce the risk of health hazards due to exposure to toxic or infectious material.
- Only use the drain cleaner for the recommended drain sizes. Using the wrong size drain cleaner can lead to twisting, kinking or breaking of the cable and may result in personal injury.
- Keep gloved hand on the guide hose/AUTOFEED unit whenever the machine is running. This provides better control of the cable and helps prevent twisting, kinking and breaking of the cable and may result in serious personal injury.
- Position machine so that the AUTOFEED unit is within 6'' (15 cm) of the drain inlet or properly support exposed cable when the distance exceeds 6'' (15 cm). Greater distances can cause control problems leading to twisting, kinking or breaking of the cable. Twisting, kinking or breaking cable may cause striking or crushing injuries.
- Do not operate the machine in REV (reverse) rotation except as described in this manual. Operating in reverse can result in cable damage and is used to back the cable end out of blockages.
- Keep hands away from rotating drum and guide tube. Do not reach into drum unless machine is unplugged. Hand may be caught in the moving parts.
- Do not wear loose clothing or jewelry. Keep your hair and clothing away from moving parts. Loose clothing, jewelry or hair can be caught in moving parts.
- Do not operate this machine if operator or machine is standing in water. Operating machine while in water increases the risk of electrical shock.
If you have any question concerning this RIDG product:
- Contact your local RIDGID® distributor.
- Visit RIDGID.com to find your local RIDGID contact point.
- Contact Ridge Tool Technical Service Department at rtctechservices@emerson.com, or in the U.S. and Cana da call (800) 519-3456.
Description and Specifications Description
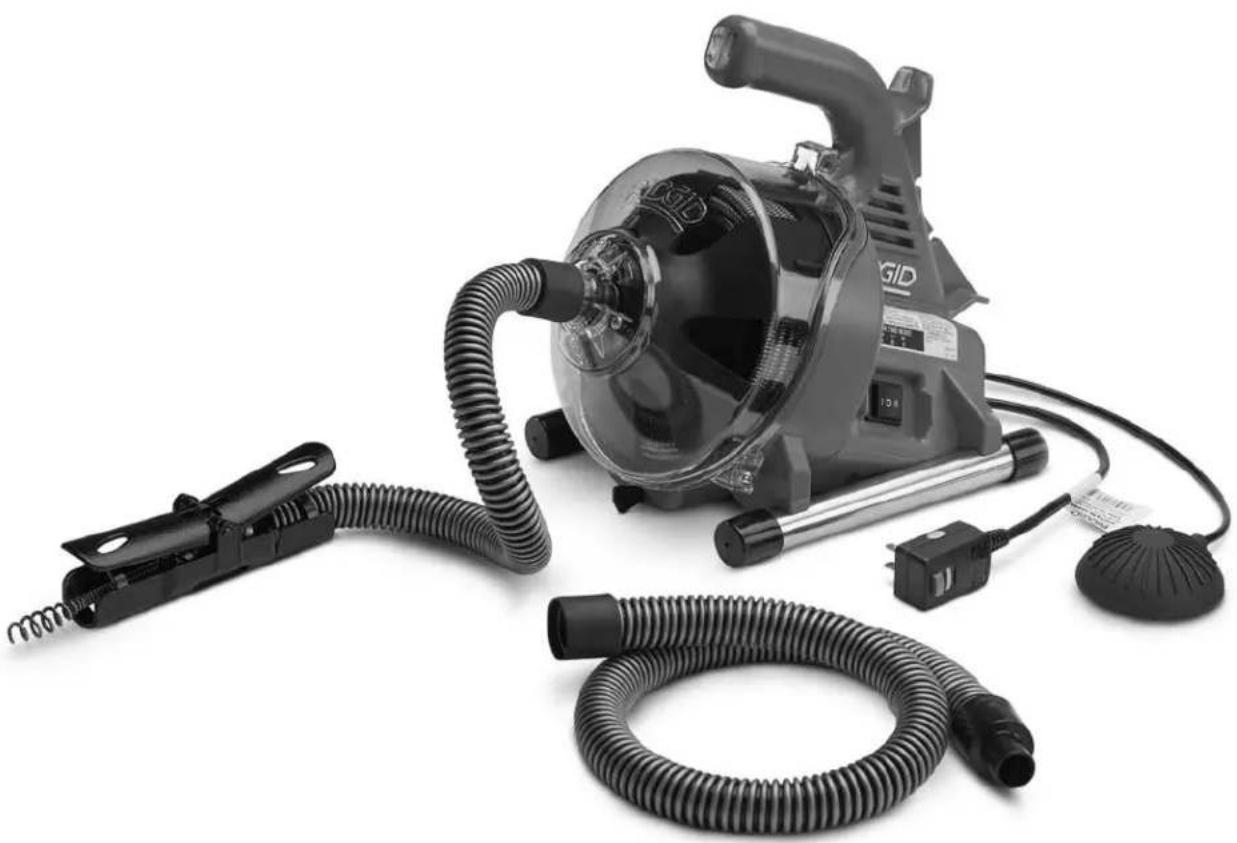
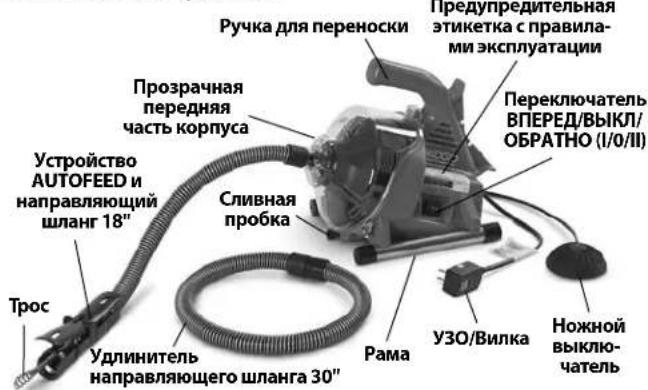
The RIDGID PowerClear™ Drain Cleaning machine is designed to clean 3/4'' (20mm) to 1/2'' (40mm) drain lines in sinks, tubs and showers. It is equipped with a 30' (9m) cable.
The PowerClear Drain Cleaner features a 2-way AUTO-FEED cable feed mechanism, which advances and re-trieves the cable with a push of a lever at a rate of 18^ per minute. A configurable guide hose, in conjunction with the AUTOFEED unit allows the cable to be directly fed into the drain which minimizes mess and helps to protect fixtures.
A FOR/OFF/REV switch controls drum and cable rotation and a pneumatic foot switch provides ON/OFF control of the motor. An integral Ground Fault Circuit Interruption (GFCI) is built into the line cord.
The drain cleaner has a clear front housing to allow monitoring of cable.
The PowerClear Drain Cleaner is not recommended for use with toilets.
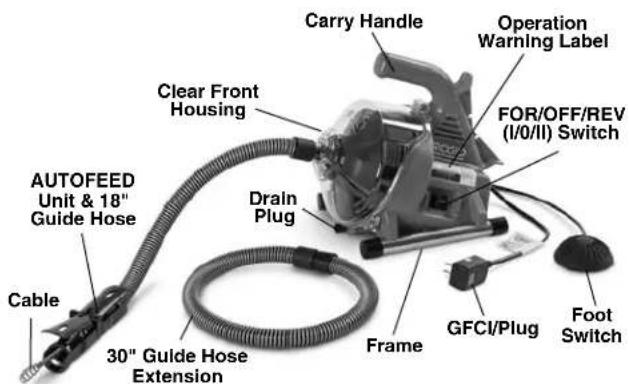
Figure 1 - PowerClear Drain Cleaning Machine
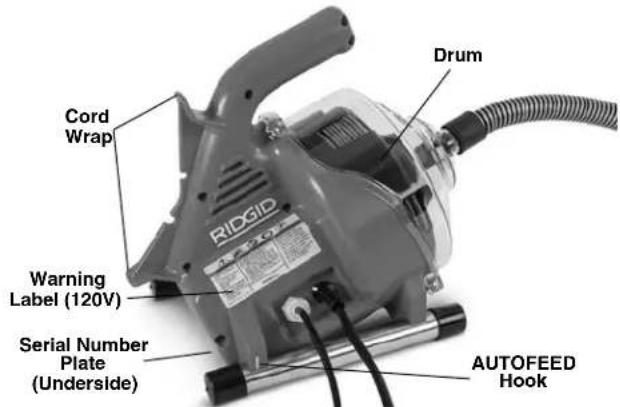
Figure 2 - PowerClear Drain Cleaning Machine
Specifications
Line Capacity . 3 / 4^ - 1% (20mm - 40mm)
Drum Capacity 30' (9.1m) of 14 " (6mm) Diameter Cable
Cable. 1 / 4^ × 30^(6mm× 9.1m) MAXCORETM50 Cable
Motor Type Universal
Motor Rating
100/120V~Motor.....1/4HP,0.8/0.9A,50/60Hz
230V~Motor 120W,0.5A,50Hz
See Serial Plate for Machine Specification Information.
No Load Speed (no)...450 RPM
AUTOFEED
Unit Feed Rate.....18 feet/min (5.5 m/min)
Controls.Forward/OFF/Momentary Re- verse Rotation Direction Control ON/OFF Pneumatic Foot Switch Motor Control
Advance/Retrieve Cable
AUTO FEED Unit with
Configurable Guide Hose
Operating
Temperature. 20^ - 120^ (-7^ - 49^)
Weight 12 lbs (5,44 kg)
Dimension L×W×H ....14" x 9" x 11.5"
(356 mm x 229 mm x 292 mm)
Sound Pressure (_)^ 70 dB(A), K = 3
Sound Power (_A)^* .79 dB(A), K = 3
-
Sound measurements are measured in accordance with a standardized test per Standard EN 62481-1.
-
Sound emissions may vary due to your location and specific use of these tools.
-
Daily exposure levels for sound need to be evaluated for each application and appropriate safety measures taken when needed. Evaluation of exposure levels should consider the time a tool is switched off and not in use. This may significantly reduce the exposure level over the total working period.
SwitchIcons
Forward Rotation (FOR)
Power OFF
Reverse Rotation (REV)

Figure 3 - Machine Serial Number
The machine serial number is located on the underside of the housing. The last 4 digits indicate the month and year of manufacture. (MM = month, YY = year).
NOTICE This machine is made to clean drains. If properly used it will not damage a drain that is in good condition and properly designed, constructed and maintained. If the drain is in poor condition, or has not been properly designed, constructed and maintained, the drain cleaning process may not be effective or could cause damage to the drain. The best way to determine the condition of a drain before cleaning is through visual inspection with a camera. Improper use of this drain cleaner can damage the drain cleaner and the drain. This machine may not clear all blockages.
Machine Assembly
WARNING
To reduce the risk of serious injury during use, follow these procedures for proper assembly. FOR/OFF/REV switch should be OFF and machine unplugged before assembly.
Configuring Guide Hose/AUTOFEED Assembly
The AUTOFEED guide hose can be assembled either as an 18" guide hose or as a 48" guide hose, depending on how far the PowerClear will sit from the drain opening in use. The 18" guide hose can work well when the machine can sit directly next to a sink, such as a kitchen or bathroom counter. The 48" guide hose may be appropriate when the machine will sit on the floor outside of a bathtub. Regardless of guide hose length used, the AUTOFEED assembly must be within 6" (15 cm) of the drain inlet. Do not extend the guide hose longer than 48".
-
If desired, connect the 18" and 30" guide hose sections. The connection is a friction fit - Insert the male fitting into the female fitting and confirm secure.
-
Remove and discard cable end cap (New machine). Pull enough cable from the drum to feed through the guide hose and AUTOFEED unit.
-
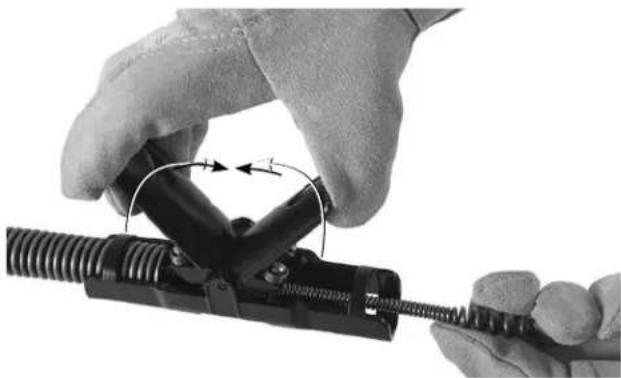
Feed cable through the guide hose. Lift the AD-VANCE and RETRIEVE levers to allow the bulb head of the cable to feed through the AUTOFEED unit. (Figure 5).
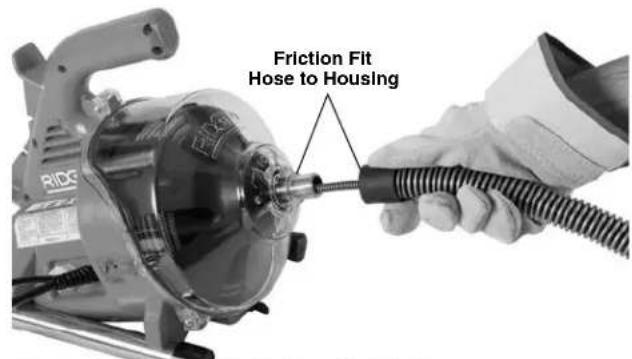
Figure 4 - Feeding Cable into Guide Hose
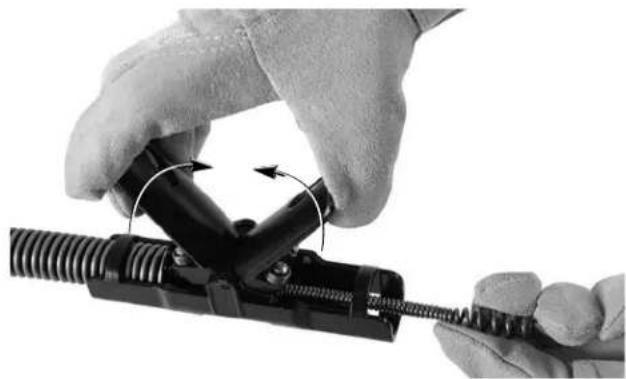
Figure 5 - Feeding Cable Through AUTOFEED Assembly
-
Release the ADVANCE and RETRIEVE levers.
-
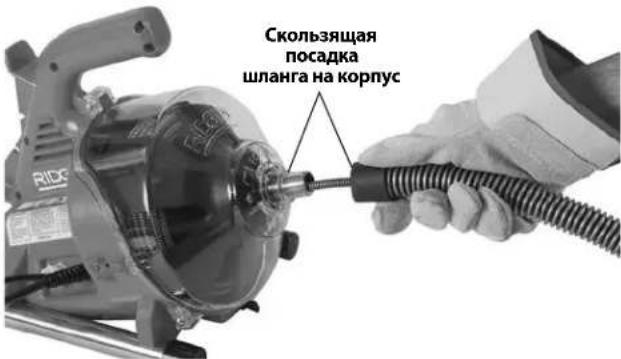
Attach the guide hose to the machine by pushing the hose over the nose of the front housing (Figure 4). Reverse process to remove.
Pre-Operation Inspection
WARNING
Before each use, inspect your drain cleaning machine and correct any problems to reduce the risk of serious injury from electric shock, twisted or broken
cables, chemical burns, infections and other causes and prevent drain cleaner damage.
Always wear safety glasses, leather work gloves, and other appropriate protective equipment when inspecting your drain cleaner.
- Inspect the leather work gloves. Make sure they are in good condition with no holes, tears or loose sections that could be caught in the rotating cable. It is important not to wear improper or damaged gloves. The gloves protect your hands from the rotating cable and drain contents. If the gloves are not leather work gloves or are damaged or worn out, do not use machine until proper gloves are available.
- Make sure that the drain cleaning machine is un - plugged and inspect the power cord, Ground Fault Circuit Interrupter (GFCI) (if provided) and plug for damage. If the plug has been modified, or if the cord is damaged, to avoid electrical shock, do not use the machine until the cord has been replaced by a qualified repair person.
- Clean the drain cleaner, including handles and controls. This aids inspection and helps prevent the machine or control from slipping from your grip. Clean and maintain the machine per the maintenance instructions.
-
Inspect the drain cleaning machine for the following items:
-
Proper assembly and completeness.
- Any broken, worn, missing, misaligned or binding parts.
- Make sure the foot switch is attached to the drain cleaning machine. Do not operate the machine without the foot switch.
- Presence and readability of the warning label (See Figure 1 and 2).
- Smooth and free movement of the AUTOFEED unit levers (Figure 9).
- Any condition which may prevent safe and normal operation.
If any problems are found, do not use the drain cleaner until the problems have been repaired.
-
Clean any debris from the cable. Inspect cable for wear and damage. Inspect for:
-
Obvious flats worn into the outside of the cable (cable is made from round wire and the profile should be round).
- Multiple or excessively large kinks (slight kinks up to 15 degrees can be straightened).
- Space between cable coils indicating that the cable has been deformed by stretching, kinking, or running in reverse (REV).
- Excessive corrosion from storing wet or exposure to drain chemicals.
All of these forms of wear and damage weaken the cable and make cable twisting, kinking or breaking more likely during use. Replace worn and damaged cable before using drain cleaner.
Make sure the cable is fully retracted with no more than 6'' (150mm) of cable outside of the machine. This will prevent whipping of the cable at start up.
-
Make sure that the FOR/OFF/REV (I/0/II) switch is set to the OFF position.
-
With dry hands, plug cord into properly grounded outlet. Test the GFCI (if provided) in the electrical cord to insure that it is operating correctly. When the test button is pushed in, the red button marked "RESET" should pop up slightly and the machine will not operate. Reactivate by pushing the red RESET button in. If GFCI is not functioning properly, unplug the cord and do not use the drain cleaning machine until the GFCI has been repaired.
- Move the FOR/OFF/REV switch into the FOR position. Press the foot switch and note the direction of rotation of the drum. If the foot switch does not control the machine operation, do not use the machine until the foot switch has been repaired. The drum should rotate counter-clockwise when viewed from the front of the drum, and will match the drum direction shown on the front housing (Figure 10).
Release the foot switch and let the drum come to a complete stop. Hold the FOR/OFF/REV switch in the REV position, and repeat above testing to confirm that the drain cleaner operates properly in reverse. If the rotation is not correct, do not use the machine until it has been repaired.
- With the inspection complete, move the FOR/OFF/ - REV switch into the OFF position and, with dry hands, unplug the machine.
Machine and Work Area Set-Up
WARNING

Set up the drainclean ing machineand work area ac-cording to these procedures to reduce
the risk of injury from electric shock, fire, machine tipping, twisted or broken cables, chemical burns, infections and other causes, and prevent drain cleaner damage.
Always wear safety glasses and other appropriate protective equipment when setting up your drain cleaner.
-
Check work area for:
-
Adequate lighting.
- Flammable liquids, vapors or dust that may ignite. If present, do not work in area until sources have been identified and corrected. The drain cleaner IS not explosion proof and can cause sparks.
- Clear, level, stable, dry location for all equipment and operator. Do not use machine while standing in water. If needed, remove water from the work area.
- Properly grounded electrical outlet of the correct voltage. Check machine serial plate for required voltage. A three-prong or GFCI outlet may not be properly grounded. If in doubt, have outlet inspected by a licensed electrician.
-
Clear path to electrical outlet that does not contain any potential sources of damage for the power cord.
-
Inspect the drain to be cleaned. If possible, determine the access point(s) to the drain, the size(s) and length(s) of the drain, distance to tanks or mainlines, the nature of the blockage, presence of drain cleaning chemicals or other chemicals, etc. If chemicals are present in the drain, it is important to understand the specific safety measures required to work around those chemicals. Contact the chemical manufacturer for required information.
- Determine the correct equipment for the application. See Specifications.
The PowerClear Drain Cleaner is not recommended for use with toilets.
Drain cleaners for other applications can be found by consulting the Ridge Tool Catalog, online at RIDGID.com
- Make sure all equipment has been properly inspected.
-
If needed, place protective covers in the work area. The drain cleaning process can be messy.
-
If needed, take appropriate steps to access the drain to be cleaned.
-
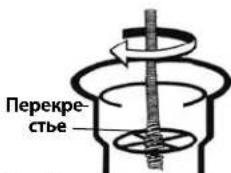
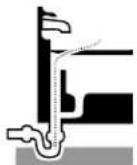
For many drains, the cable can be threaded through the cross hairs in the drain (Figure 6A).
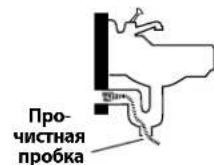
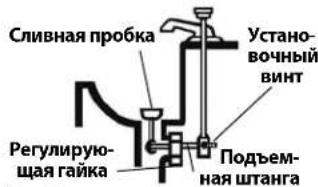
- For a sink with a pop up drain plug: Remove lift rod and drain plug. Be sure to place a container under the clean out or trap to catch any water that may come out. (Figure 6B).
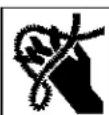
- For other sinks a clean out plug or trap may need to be removed. Be sure to place a container under the clean out or trap to catch any water that may come out. (Figure 6C).
- Bathtub overflow: For bathtubs, never try to go through the drain, this will damage the cable. Remove the overflow plate and any mechanism to access the drain (Figure 6D).
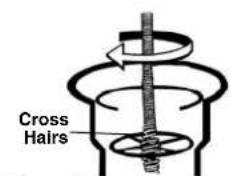
Figure A
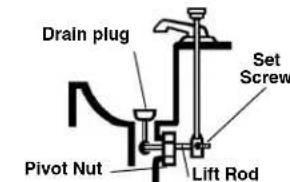
Figure B
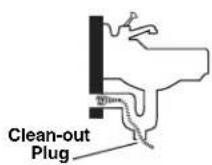
Figure C
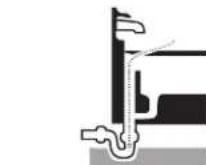
Figure D
Figure 6 - Drain Access
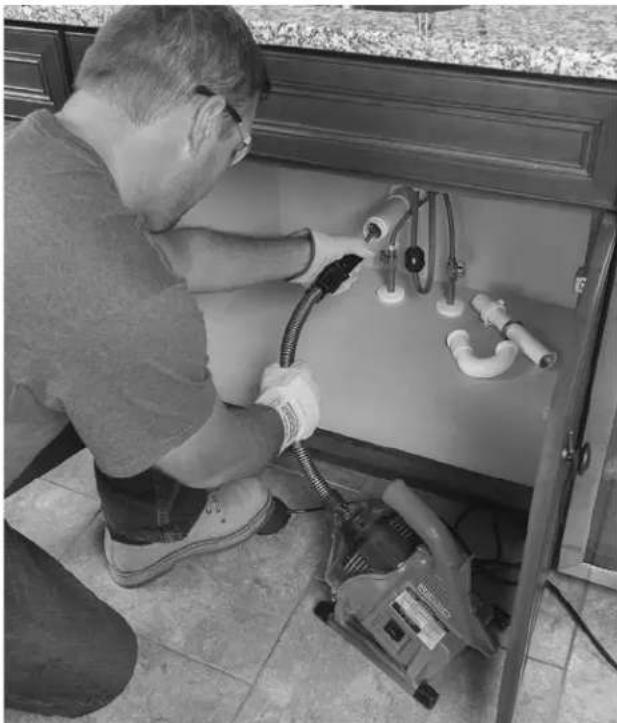
- Position the drain cleaning machine so it sits squarely and firmly on the rubber feet. Do not place the machine on carpet or other surfaces that could block the air vents on the underside of the machine. The end of the AUTOFEED unit must reach within 6" (15cm) of the drain access. The guide hose should not be pulled tight or kinked to reach this position. Greater distances from the drain access increases the risk of the cable twisting or kinking. If the machine cannot be placed with the drum opening within 6" (15cm) of the drain access, extend the drain access with similar sized pipe and fittings (See Figure 7). Improper cable support can allow the cable to kink and twist and can damage the cable or injure the operator.
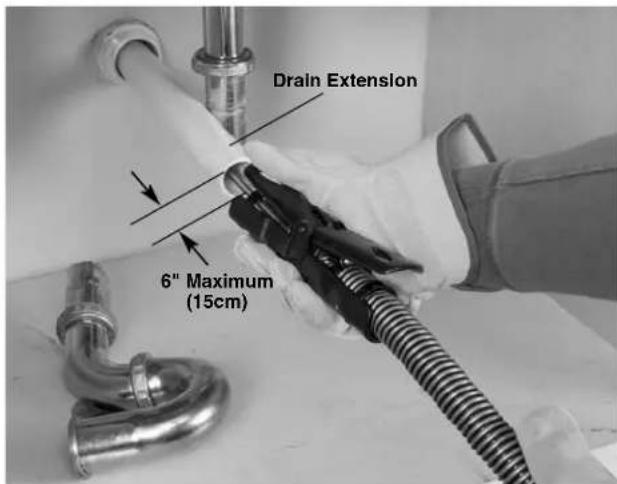
Figure 7 - Example of Extending Drain to within 6^ (15cm) of AUTOFEED Unit.
-
Evaluate the work area and determine if any barriers are needed to keep bystanders away from the drain cleaner and work area. The drain cleaning process can be messy and bystanders can distract the operator.
-
Position the foot switch for easy accessibility. You must be able to hold and control the guide hose and AUTOFEED levers, control the foot switch, and reach the FOR/OFF/REV switch.
-
Confirm that the FOR/OFF/REV switch is in the OFF position.
-
Run the cord along the clear path. With dry hands, plug the drain cleaner into a properly grounded outlet. Keep all connections dry and off the ground. If the power cord is not long enough, use an extension cord that:
-
Is in good condition.
- Has a plug similar to that supplied on the drain cleaner.
Is rated for outdoor use and contains a W or W-A in the cord designation (i.e. SOW), or complies with H05VV-F, H05RN-F types or IEC type design (60227 IEC 53, 60245 IEC 57). - Has sufficient wire size. For extension cords up to 50' (15,2 m) long use 16 AWG (1,5m) or heavier. For extension cords 50' - 100' (15,2 m - 30,5 m) long use 14 AWG (2,5mm) or heavier
When using an extension cord, the GFCI on the drain cleaner does not protect the extension cord. If the outlet is not GFCI protected, it is advisable to use a plug in type GFCI between the outlet and the extension cord to reduce the risk of shock if there is a fault in the extension cord.
Operating Instructions
WARNING

Always wear eye protection to protect your eyes against dirt and other foreign objects.
Always wear leather
work gloves in good condition. Latex or loose fitting gloves or rags can become wrapped around the cable and may result in serious personal injury. Only wear latex or rubber gloves under leather work gloves. Do not use damaged drain cleaning gloves.
Always use appropriate personal protective equipment while handling and using drain cleaning equipment. Drains may contain chemicals, bacteria and other substances that may be toxic, infectious, cause burns or other issues. Appropriate personal protective equipment always includes safety glasses and leather work gloves, and may include equipment such as latex or rubber gloves, face shields, goggles, protective clothing, respirators and steel-toed footwear.
Do not allow the cable end to stop turning while the machine is running. This can overstress the cable and may cause twisting, kinking or breaking of the cable. Twisting, kinking or breaking cable may cause striking or crushing injuries.
Keep gloved hand on the guide hose/AUTOFEED unit whenever the machine is running. This provides better control of the cable and helps prevent twisting, kinking and breaking of the cable. Twisting, kinking or breaking cable may cause striking or crushing injuries.
Position the machine so the AUTOFEED unit is within 6" (15cm) of the drain inlet or properly support exposed cable when the distance exceeds 6". Greater distances can cause control problems leading to twisting, kinking or breaking of the cable. Twisting, kinking or breaking cable may cause striking or crushing injuries.
One person must control both the cable and the foot switch. If the cable end stops rotating, the operator must be able to turn the machine motor OFF to prevent twisting, kinking and breaking of the cable. Twisting, kinking or breaking cable may cause striking or crushing injuries.
Follow operating instructions to reduce the risk of injury from twisted or broken cables, cable ends whipping around, machine tipping, chemical burns, infections and other causes.
-
Make sure that machine and work area is properly set-up and that the work area is free of bystanders and other distractions.
-
Pull cable out of machine and feed into drain. At least one foot (.3m) of cable must be in drain so that the end of the cable will not come out of the drain and whip around when the machine is started.
Directly route the cable from the outlet of the machine to the drain opening, minimizing exposed cable and changes in direction. Do not tightly bend the cable - this can increase the risk of twisting or breaking.
-
Assume a proper operating position to help maintain control of the cable and machine (see Figure 9):
-
Be sure you can control the foot switch. Do not press foot switch yet. In case of emergency, you must be able to release the foot switch.
- Be sure that you have good balance, do not have to overreach, and cannot fall on the foot switch, drain cleaning machine, the drain or other hazards.
- You must be able to control and support the guide hose and AUTOFEED unit levers as the cable feeds into the drain and blockage.
- You must be able to reach the FOR/OFF/REV switch.
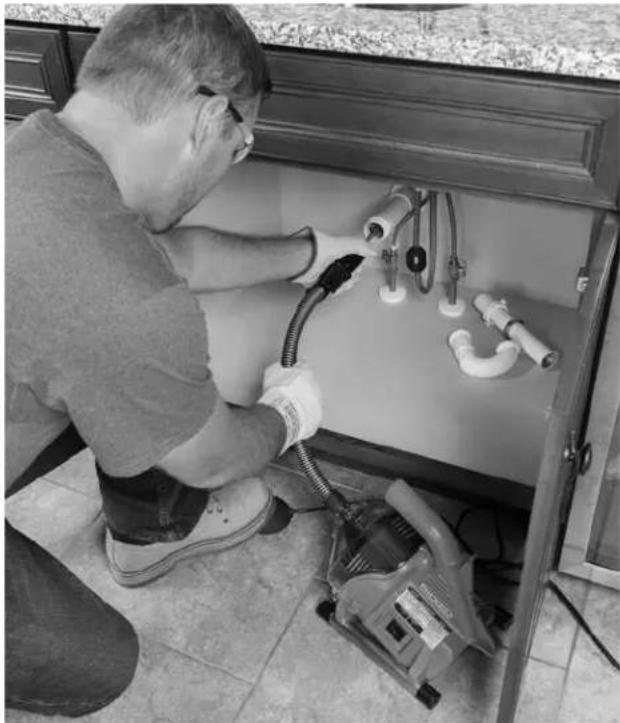
Figure 8 - In Operating Position
- Move the FOR/OFF/REV switch to the FOR position. Do not depress the foot switch yet. Do not rotate the cable in reverse except as specifically described in these instructions. Running the drain cleaner in REV can damage the cable.
Feeding the Cable into the Drain
Grasp the AUTOFEED unit with one hand and hold it so that the end of the unit is within 6'' (15cm) of the drain
opening (See Figure 7). The guide hose helps to protect the fixture from damage and contain the liquid thrown off the cable as it is retrieved from the drain. If the AUTO-FEED unit is not kept within 6^ (15cm) of the drain opening, the cable will not be properly supported and may allow the cable to twist, kink or break.
Pay attention to how the guide hose feels in your hand. Because the guide hose is over the cable, there is less sensitivity to the loading of the cable, and it can be hard to tell if the cable end is rotating or not. If the cable end is not rotating, the drain is not being cleaned.
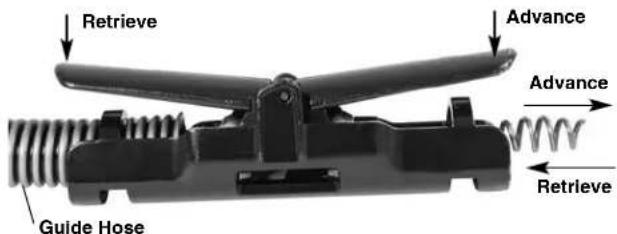
Figure 9 - Advance/Retrieve Feed Lever
Confirm at least one foot of cable is in drain and end of AUTOFEED unit is less than 6'' (15cm) from drain opening. Press on the foot switch to start the machine. To advance the cable into the drain, depress the ADVANCE feed lever (Figure 9). The rotating cable will work its way into the drain.
Passing Through Traps or Other Transitions
If it is hard to get the cable through a trap, the following methods or combination of methods can be used.
- First, sharp downward thrusts on the cable/guide hose, both with and without the cable rotating, can help to get the cable through a trap.
- A second method is to run the drain cleaner in REV (REVERSE) for several seconds while pushing down on the cable/guide hose. Only do this long enough to get the cable started through the trap. Running the cable in reverse can damage the cable. With the cable rotating in REV, the ADVANCE feed lever retrieves the cable and the RETRIEVE feed lever advances the cable.
If these options do not work, consider using a smaller diameter or more flexible cable, or a different RIDGID drain cleaner.
Cleaning the Drain
Always keep at least one hand on the guide hose/AUTO-FEED unit. Pay attention how the guide hose feels in your hand and watch the drum rotation.
As you feed the cable into the drain, you may feel and see the cable/drum slow down and feel the guide hose start to load or wind up (this will feel like the guide hose is starting to twist or squirm). This may be a transition in the drain line (trap, elbow, etc.) build up in the drain (grease, etc.), or the actual blockage. Feed the cable slowly and carefully. Do not let cable build up outside drain. This can cause the cable to twist, kink or break. Keep end of AUTOFEED unit within 6" (15cm) of drain opening.
Pay attention to the amount of cable that has been fed into the drain. Feeding cable into a larger drain line or similar transition may cause the cable to kink or knot and prevent removal from the drain. Minimize the amount of cable fed into the transition to prevent problems. The amount of cable in the drum can be monitored through the clear front housing (Figure 10).
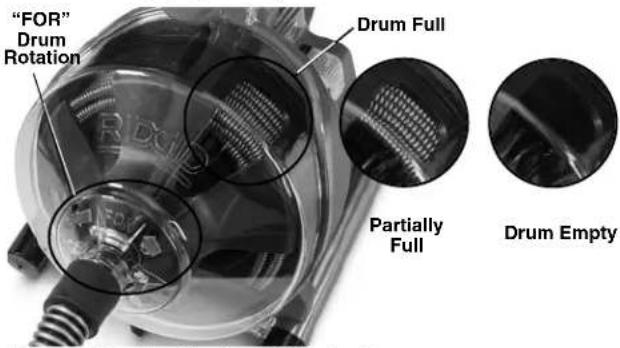
Figure 10 - Monitoring Cable in Drum
Working the Blockage
If the end of the cable stops turning, it is no longer cleaning the drain. If the cable end becomes lodged in the blockage and power is maintained to the drain cleaner, the cable will start to wind up (this may feel like the guide hose is starting to twist or squirm) or buildup outside the drain. Having a hand on the guide hose can allow you to feel this wind up and control the cable. As you feel the cable wind up or if the cable end stops turning, immediately release the AD-VANCE feed and depress the RETRIEVE feed lever to free the cable end from the blockage. Do not keep the cable rotating if the cable end is stuck in a blockage. If the cable end stops turning and the drum keeps rotating, the cable can twist, kink or break.
Once the cable end is free of the blockage and the cable end is turning again, you can slowly feed the rotating cable end back into the blockage. Let the spinning cable end "dwell" in the blockage to completely break it up. Do not try to force the cable end through the blockage. Work the cable end in this manner until it has moved completely past the blockage (or blockages), and the drain is flowing.
While working the blockage, the cable end may become clogged with debris and cuttings from the blockage. This can prevent further progress. The cable needs to be retrieved from the drain and the debris removed. See section on "Retrieving the Cable".
If the cable end continues to get hung up in the blockage, a different RIDGID drain cleaner may need to be used.
Handling a Stuck Tool
If the cable end stops turning and the cable cannot be pulled back from the blockage, release the foot switch, maintain a firm grip on the AUTOFEED unit and guide hose and release the feed lever. Do not remove your hand from guide hose or the cable may kink, twist and break. The motor will stop and the cable and drum will turn backwards until the energy stored in the cable is relieved. Do not remove hand from the AUTOFEED unit and guide hose until the tension is released. Place FOR/OFF/REV switch in the OFF position.
Freeing a Stuck Tool
If the cable is stuck in the blockage, hold the FOR/OFF/ - REV switch in the REV position. With both AUTOFEED levers released press the foot switch for several seconds until it is free of the blockage. Do not operate the machine in the REV position any longer than required to free the cable end from the blockage or cable damage can occur. Place the FOR/OFF/REV switch in the FOR position and continue cleaning the drain.
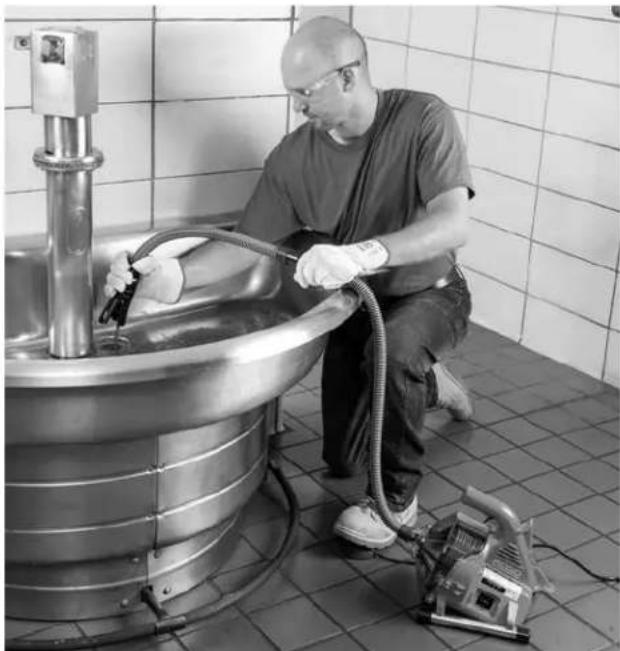
Figure 11 - Retrieving Cable
Retrieving the Cable
-
Once the drain is open, if possible start a flow of water down the drain to flush the debris out of the line and help clean the cable as it is retrieved. This can be done by turning on a faucet in the system or other methods. Pay attention to the water level, as the drain could plug again.
-
The FOR/OFF/REV switch should be in the FOR position - do not retrieve the cable with the switch in the REV position, this can damage the cable. As with feeding the cable into the drain, cables can be caught while being retrieved.
Depress the RETRIEVE feed lever to retrieve the cable (Figure 11). Keep hands firmly on the AUTO-FEED unit and guide hose for control. The cable end can become caught while being retrieved. Continue retrieving the cable until the tool is just inside the drain opening. Release the feed lever.
- Release the foot switch, allowing the drum to come to a complete stop. Do not pull the end of the cable from the drain while the cable is rotating. The tool can whip around and could cause serious injury.
- Place the FOR/OFF/REV in the OFF position and with dry hands unplug the machine. Pull the remaining cable from the drain by hand and feed into the drain cleaner. If needed, continue cleaning following the above process. Several passes through a line are recommended for complete cleaning.
Draining the Machine
If the machine needs to be drained, turn machine OFF, and with dry hands, unplug the machine. Remove the drain plug (See Figure 1) and drain. The back end of the machine can be elevated if necessary.
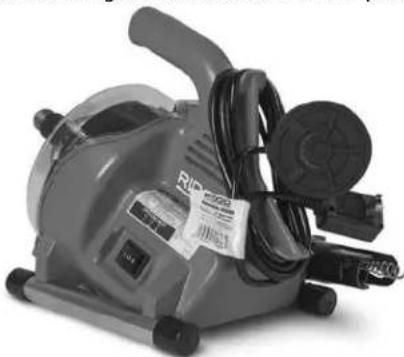
Preparing for Transport
Wrap cord and foot switch hose on cord wrap. Secure as shown in Figure 12. Secure AUTOFEED on hook.
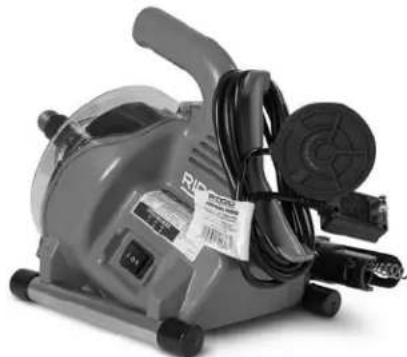
Figure 12 - Preparing For Transport
Maintenance Instructions
WARNING
FOR/OFF/REV switch should be OFF and machine unplugged before performing any maintenance.
Always wear safety glasses and other appropriate protective equipment when performing any maintenance.
Opening Drain Cleaner/Removing Drum
To open the machine to clean or change cable:
- If needed, drain the machine. Remove guide hose (see Assembly section).
- Feed cable into drum.
- Loosen (but don't remove) the three (3) cover screws. (see Figure 13).
- Pull front housing straight off.
- Remove drum by pulling straight forward.
- Reverse the process to reassemble. Drum may need to be rotated to seat onto the drive. Make sure drum washer is properly placed on drum.
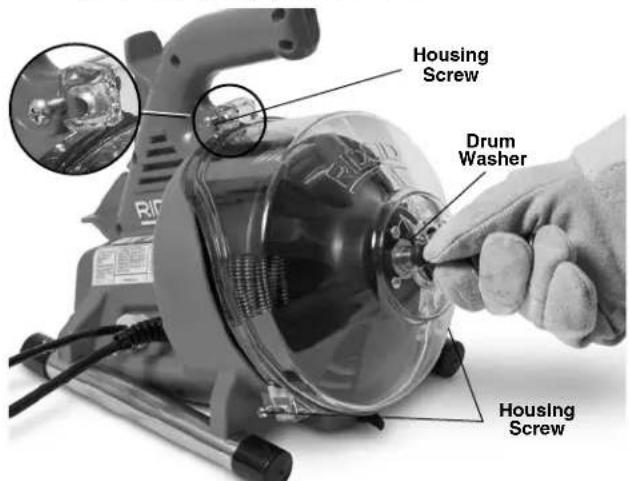
Figure 13 - Opening Drain Cleaner
Cleaning
After each use, clean the machine. Remove the guide hose and drum/cable from the machine. A mild detergent or antibacterial solution can be used if desired. Do not use solvents, abrasives or other harsh cleaning agents.
Machine - use a damp, soft cloth to wipe off the machine and wipe out the drum cavity. Do not submerge or flush the machine with water. Do not allow water to enter motor or other electrical components. Make sure unit is completely dry before plugging in and using.
Front Housing - Remove from machine, flush with water and wipe clean with a damp, soft cloth.
Drum and Cable - Flush drum and cable with water after every use to prevent damaging effects of sediment and drain cleaning compounds. Allow to dry before installing drum to reduce cable corrosion.
AUTOFEED Unit - Flush AUTOFEED assembly with water and lubricate with lightweight machine oil.
Guide Hose - Flush with water and drain.
Replacing the Cable
- Remove the guide hose (see Assembly section) and the front housing/drum (Figure 13).
- Pull the cable out of the front of the drum.
- Remove five (5) screws holding back of the drum (Figure 14).
- Disconnect the cable end from the drum back (Figure 15). Completely remove cable from drum.
- Feed the end of the new cable through the outlet of the drum. Attach end to the drum back as shown in Figure 15.
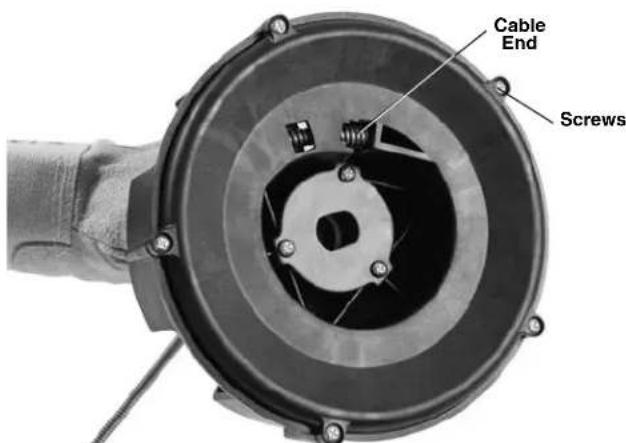
Figure 14 - Removing Drum Back
- Place the drum on back and manually feed the new cable into the drum.
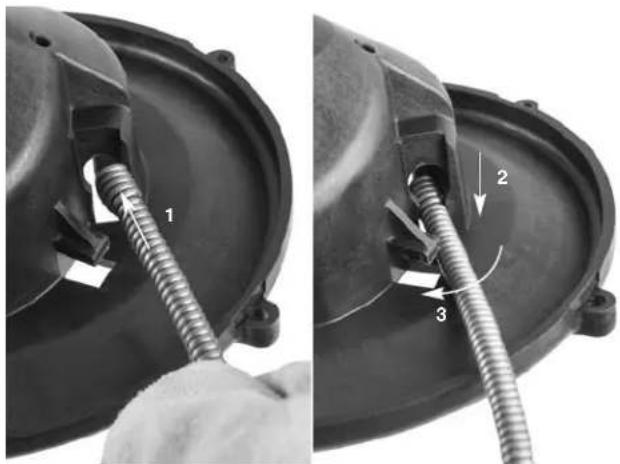
Figure 15 - Attaching Cable To Inner Drum
- Place the drum into the machine (Figure 16). Rotate the drum until it seats into place.
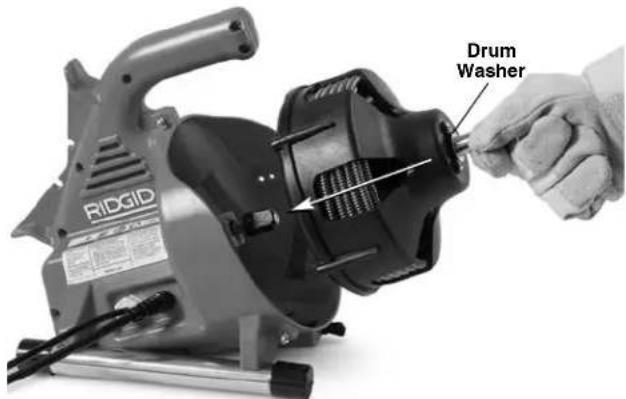
Figure 16 - Inserting Drum Into Machine
- Install the front housing and guide hose.
Optional Equipment
WARNING
To reduce the risk of serious injury, only use accessories specifically designed and recommended for use with the RIDGID PowerClear Drain Cleaning Machine, such as those listed below.
| Catalog No. No. Description | |||
| 41937 | — | RIDGID Drain Cleaning Gloves, Leather | |
| 55983 | — | 1/1" x 30' (6mm x 9.1m) MAXCORE™ 50 Cable | |
Further information on equipment available for PowerClear Drain Cleaning Machine can be found in the RIDGID Catalog and online at RIDGID.com.
Machine Storage
WARNING The drain cleaner must be kept dry and indoors or well covered if kept outdoors. Store the machine in a locked area that is out of reach of children and people unfamiliar with drain cleaners. This machine can cause serious injury in the hands of untrained users.
Service and Repair
WARNING
Improper service or repair can make the machine unsafe to operate.
The Maintenance Instructions will take care of most of the service needs of this machine. Any problems not addressed by this section should only be handled by an authorized RIDGID service technician.
Tool should be taken to a RIDGID Authorized Independent Service Center or returned to the factory. Use only RIDGID service parts.
For information on your nearest RIDGID Authorized Independent Service Center or any service or repair questions:
- Contact your local RIDGID distributor.
- Visit RIDGID.com to find your local RIDGID contact point.
- Contact Ridge Tool Technical Service Department at rtctechservices@emerson.com, or in the U.S. and Canada call (800) 519-3456.
Disposal
Parts of the PowerClear Drain Cleaning Machine contain valuable materials and can be recycled. There are companies that specialize in recycling that may be found locally. Dispose of the components in compliance with all applicable regulations. Contact your local waste management authority for more information.
For EC Countries: Do not dispose of electrical equipment with household waste!
According to the European Guideline 2012/- 19/EU for Waste Electrical and Electronic Equipment and its implementation into national legislation, electrical equipment that is no
longer usable must be collected separately and disposed of in an environmentally correct manner.
Troubleshooting
| PROBLEM POSSIBLE REASONS SOLUTION | ||
| Cable kinking or break-ing. | Cable is being forced. | Do Not Force Cable! Let the auger do the work. |
| Cable used in incorrect pipe diameter. | Use correct cable for pipe. | |
| Motor switched to reverse. | Use reverse only if cable gets caught in blockage. | |
| Cable exposed to acid. | Clean cables routinely. | |
| Cable worn out. | If cable is worn, replace it. | |
| Cable not properly supported. | Support cable properly, see instructions. | |
| Cable stops rotating while foot switch is depressed. | Hole in foot switch or hose. | Replace damaged component. |
| Restarts when foot switch is re-depressed. | Hole in diaphragm switch. | If no problem found with pedal or hose, replace diaphragm switch. |
| Cable turns in one direction but not the other. | Faulty FOR/OFF/REV switch. | Replace switch. |
| Ground Fault Circuit Interruptions when machine is plugged in or when foot pedal is depressed. | Damaged power cord. | Replace cord set. |
| Short circuit in motor. | Take motor to your nearest RIDGID Independent Service Center. | |
| Faulty Ground Fault Circuit Interruptions. | Replace cord set. | |
| Moisture in motor, switch box or on plug. | Take drain cleaner to your nearest RIDGID Independent Service Center. | |
| AUTOFEED unit doesn't work. | AUTOFEED unit full of debris. | Clean the AUTOFEED unit. |
| AUTOFEED unit needs lubrication. | Lubricate the AUTOFEED unit with lightweight machine oil. | |
| Machine wobbles or moves while cleaning drain. | Cable not evenly distributed. | Pull all cable out and feed again, evenly distribute. |
| Bumpers are not on ground. | Place on level stable surface. | |
| Ground not level. | Place on level stable surface. | |
Dégorgeoir
230V~Motor 120W,0.5A,50Hz
BEWAARALLE WAARSCHUWINGEN EN INSTRUCTIES,ZODAT U ZE OOK LATER NOG KUNT RAADPLEGEN!
Matt L x Bx H. 14 x 9 x 11.5 tum
(356 mm x 229 mm x 292 mm)
Ljudtryck (L_PA)^* 70 dB(A), K=3
Ljudeffekt (L_WA)^* 79 dB(A), K = 3
Figur 12 - Forberedelse for transport
MaLxBxH.14" x9" x 11.5"
(356 mm x 229 mm x 292 mm)
Lydttryk (L_PA)^* 70 dB(A), K=3
Lydeffekt (L_WA)^* 79 dB(A), K=3
Forberedelse for transport 163
100/120V~motor.....1/4HK,0.8/0.9A,50/60Hz
230V~motor. 120W,0,5A,50Hz
Forberedelse for transport

Figur 12 - Forberedelse for transport
Wymiary DxSxW 14" x 9" x 11.5"
(356 mm × 229 mm × 292 mm)
Csisnienie
dzwieku (L_PA)^* 70 dB(A), K=3
Moc dzwiqku (L_WA)^*....79dB(A) K = 3
100/120V~Motor 1/4 HP,0.8/0.9A,50/60 Hz
230V~Motor. 120W,0,5A,50Hz
Fevikc npoeiDonoioeic aovaleiac nEktpkoEpyaeiou 267
AoPaleia xwpou epyaioac 267
Hektpikn aovaleia 267
Ipoosnki aovaleia 268
XpnoKai φρovTiδa Tou nλεκτριού εργαλείου 268
ερβις 269
Eiokic nInpoopoeic yia tnvaospaaleia 269
Aoopaia unxavmuatoc anoopaenc anoxetueoewv 269
Iepiypapn kai texvika xapaktnpiotika 270
Iepypaq 270
Teviika xapaktnpiotiká 270
Σημata διακοπτων 271
He donyckaetc npncytcbne deten n noctopohnHX liu BO Bpemra60Tb C 3NeKtpoHnCTpyMeHTOM.OTBneueHNE BHIMAHN MOKeT pInBeCTOn onepaTopa K Notepe ynpabHeHn INCHPTyMeHTOM.
3neKtpo6e30nacHocTb
BnIKn Ha unhypax nHTAHN 3NeKTPoHnCTpymeHa DOnXHBn IOxOuNTb K CeTeBbIM po3eTKam. 3a- npeuaetc KaKoe-N6o W3MeHeHne KOHCTpykun BnIKn. 3anpeuaetc NcNoIb3OBaHne IIO6bIX nepeXoDHBix BnIOK dN 3NeKTPoHnCTpymeHTa C 3a- 3emHeHm (3a3EmHeHoro). NcNoIb3OBaHne HEMoDInΦuipoBaHbIX BnIOK IN COOTBeTCTByIOuNX PO3eTOK CHnJaET OnaCHOCTb NOPaKeHn TOKOM.
- He npukacaiTecb K 3a3emIeHHbIM nIIN 3AMKHytBIM Ha 3emIIO NOBepxHocTAM, HAnpImep, K Tpy6am, paDnAToPAM, KYXOHbIM NeYAM IN XOJOniNbHnKaM. Ecn TeNo Yenobeka 3a3emJIeHO nIIN 3AMKHyTO Ha 3emIIO, ONaCHOCTb NOPaKeHHN 3JeKTPOTOKOM NOBbiUaETCra.
3anpeaetcnoBepraT 3neKtpoHCTpyMeHT BO3dEChTBIO DOxJn NIN BLaRn. PpOnHKHOBeHne BOdb BYTpB 3neKtpoHCTpyMeHTa yBEnuHbAeT ONaCHOCb IopaxeHn 3neKtpuueCKIM TOKOM.
- 06paaatacbo whypom 3nektponntaanHaJnHexaum 6pa3om. 3anpeaaetca nCnoIb3oBaTbWhyp nHTAHN DnpeHocKn nn nepeDbNKeHHn HnCTpyMeTa, a TAKKe DnE OTKIOUeHHn Eero OT3neKTPOCeTN. O6epaaiTe whyp nHTAHN OT B03DeHCTBn BBICOKO TemnepaTypbl, Macen, OCTpbix
KpOMOK INN DnBxUcxCaeTaneH. NcnoIb3ObaHne NOBpeXeHHbIX INN 3aNyTaHHbIX UHypOB NOBbIaOT ONaCHOCTb NOPaKeHIN 3JIeKTPIueCKIM TOKOM.
- Ppi 3KcNpyataaun 3NeKTPoHnCTpymeHTa BHe nOmeueHnur NCNoIb3yUte COOTBETCTBYUuyn yDInHnTeJb. PpiMeHneHne uHypa 3NeKTPoHnTuHa, npedHa3NaHuEHHoro DnA 3KcNpyataun BHe NOMEueHnCHINKaetOnaChOCTb NOPaKeHn 3NeKTPuYeCKM TOKOM.
- Ecn npnxodTc npmeHb 3eKtpomHCTpyment BO BIAxHOM MeCTe, nCIOB3yIte NCTOCHNk 3eKTPoNTaHn, o6OpyObaHHb yCTpoiCTBOM 3auNTHoro OTKluoyehn (Y30).NCIOB3OBAHne Y3O CHNka-et ONaCHOCTb NOPaKeHn 3eKTPuueCKIM TOKOM.
Jnuch6e30nachoctb
- BydbTe BHNMaTeIbHbI, KOHTpOInpyUte BblINHaeMbIe DeICTBnM I NOIb3yIITecb 3dpaBbIM CMBICLOm npn pa6ote c 3neKTPoHHCTpymeHtOM. 3anpeuaetCra NcNOB3OBaTb 3neKTPoHHCTpymeHt, HaxOJaCB yCTaBWeM COCTOAHm IIN IOd DEIcTBnEM HApKOTnKOB, ANKOROA INN JekapCTBeHHbIX ppenapaTOB, DaJkeceKYHnA Notepa KOHcETPauqun npn pa6ote c 3neKTPoHHCTpymeHTAMMOXET PnPBecTI K cepbe3HbIM TpaBMam.
IcnoNb3yIte HNDNBdyaIbHbIe CpeDCTBa 3aunTbI. O6raTeNbHO HaedeBaIte 3aunTHbIe OcKn. IcnoNb3OBAHHe B COOTBeCTBMyUx YCIOBnIX PbJIe3aUnTHoM MaCKn, 6OTINOK C HeCKOB3aUMN NODOWAMN, KaCKn, 6epuWe nI IN Dpyrnx 3aunTHbIX CpeDCTB CHJXaeT TpaBMOONaCHOCTb.
He donyckaTe HenpeHaMepeHHoro 3anycka 3neK TPOHnCTpyMeHTa. IpexJe yem 6paTb 3neKTPoHHCTpyMeHT B pyKN, nepeHoCnTB erO nNN noDKnIOuATb K nCTOChNKy NOCToAHNHO u (nn) 6aTaepHORO nNTAHN, yDOCTOBpBtEcB, 4TO nepeKlIOUaTeNb HaxoITcB NonoXeHN BblKI. NepeHocKa 3neK TPOHnCTpyMeHTOB C naJIbCeM Ha nepeKlIOUaTeNe nNN noDzapAka INCTpyMeHTa C nepeKlIOUaTeEN M NOLOXeHN BkI MoKeT npINBeCTN K HeCchAcTHOMy cnyaIO. - IpepeBkIIOUeHHeM 3NeKTPoHnCTpymEHTa CneyET y6paTb IIO6bIe RaeuHbIe KIOuN. PeryIINPOBOUHbI INIraeHbIKIIOU, OCTaBLeHHbI pINCOeINHeHHbIM K BpaUIOSeICrDeTaII, MOKeT npINBeCTN K TpaBMe.
He nbItaTecb DoTMyTbcB.CBerda coxpaHnTe yctOnuBoe NIOXKeHne u paBHObecne.3To o6eaneyBaet 60one yBepeHHoe ynpabNeHne 3NeKTponHCTpyMeHTOM B He npedCKa3yeMbIX CITyaunx. -
OeBaITeCb HApEkaUIM 6pa3OM. He HaedeBaIte Cbo6oHyO odExdy nIn yKpaWeHnA. O6epaIte BOIOcBn ODeXyOT DnKxuXxCraCTe. Cbo6oHa HnOeKDa, YKpaSeHnN INININHHbI BONocBI MOrYT NONACTB B DnKxuNecr Actn.
-
EcnB yctpoiBax npedycmotpeH noDcoeHHe Hne K nbileouchntenl m nbilec6opnKam, npocneinte 3a Tem, UTO6bl OHbIN NOCoEHNHe bI NCNoB3OBaHcB npabuBHo. NcNoB3OBAHne nbI neC6OpHKnOB cHnKaet pNCKn, CBa3AHhBe C nbIbIO.
He donyckaTe coctoHHn paCCna6neHHocTn npHe6peXeHHn npabunamn 6e30NaCHOCTn, KOtOpbie MOryt BO3HKnHyTb npn NOcToHHOM MCNoB3OBAHm HnCTpyMeHTa. HeocToPOxKHOe deNCTBnE MOxET 3a DOnIO CEkyHdbI npuynHnTb cepbe3HyTO TpaBMy.
IcnoJb3ObaHme 3NeKtpoHCTpyMeHTa n yXoD 3a HmM
He npknaBbAte ype3MepHbe ycnnn K 3neKtpoHHCTpymeHT. NcnoB3yIte HndEkaun MHCTpymeHT, COOTBETCTBYIOUIN TUNy BbINONHEMO pa60tbl. PpaBnBbHb Bb16Op 3neKTPoHNCTpymeTA B COOTBETCTBn Cero npedHa3Naehnem O6ecNeuBaet 6Oone KaueCTBeHHoe, 6eONaCHOe n 6bICTpoe BbINONHeHne pa60tbl.
- He mncnbl3yute 3neKtpounHcTpymeT C hencnpabHbIM BbIKIIOUaTeNm. 3neKtpounHcTpymeHT, KOtOpbi HEnlb3A BKIOUOHTb ININ BbIKIOUOHTb, PpeICTabJIaET OnacHOCTb IN IOJNEXKT peMOHTy.
- OToCoeHNHTe BUNky OT NCTOCHNka NUTaHnna H/nnn aKKymyTOpHyo 6aTapeIO OT 3NeKTPoHnCTpymenTa, npexKeJe cem npOn3BODntb KaKne-Nn6o peryI npOBKn, 3aMeHy npHaNDExHOcte nn y6paTb MHCTpymeHT Ha xpaHeHne. TaKne npOphiNakTuYeCKne Mepbl yMeHbShaIoT pNCK HENpeDHaMepeHHOrO BKIOUeHnra 3NeKTPoHnCTpymeHTa.
XpaHnTe HeHCNOJb3yEmble 3JeKTPoUNHCTpyMeHTb BdaIIT OT DetEi. He donyckaTte NcNoJIb3OBaHnIe JKeKTPoUNHCTpyMeHTa IINUAMn, He pa6OtaBUnm pa-Hee C INHCTpyMeHTOM H O3HaKOMJIeHHbIMN C DaH- HbIMN IHCTpyKUJAAm. 3JeKTPoUNHCTpyMeHTbl npedCTaBIAIOT ONACHOCTb B pyKaX HeKBaIIuΦNIUPOBaHbIX NOJIb3OBaTEJIe.
BbINOHnHe TaHnEkauee Texnueckoe 06cnyKuBaHne 3NeKTpOHCTpyMeHa. CnEInTe 3a Tem, YTO6bl DnXyUncsca JAcTH 6bln OTperynnpoBaHb N 3akpenHebl. YcTpaHnTe nolomKn deTaneu nn IIO6bIe dpyrne fakTopb1, KOTopbIE MOrY T OTPaTeNbHO NobnraTb Ha pa6Otu HnCTpyMeHa. B CNYuae BbIXoDa 3NeKtpOHnCTpyMeHa 3Ctpor erO Heo6xOIMO OTPMOHTnpoBaTb DO Haana pa6Otbl. MHorne HeCuaCThble clyuan npOnCxOaT BcneCTBne npmHeHH 3NeKTPOHnCTpyMeHToB, He npOweJnx HAdnEkaUero Texo6cNkBaHn.
- Cnéinte 3a Tem,чтобile pexyuime Hacankn 6bIMN OCTpbIMN uHCTbIMN. PexyuIN INCHpymENT cOCTpbIMN pexyuINM KpOMKaAMN, 3a KOtOpBm BeDeTcRHaJIeJkaUIN yXoD,peXe 3aeJaET n 6OJIee yIooBeH B pa6ote.
- IcnoIb3yIte 3JIeKTPoHnCTpyMeHTbl, npHaJdJIeK-HocTn, pa6OuHe HakoHeuHKn n Ip. B COOTBeTCTBn C HaCTOaUIMM INHCTpyKcIaMn, npHUMa BO BHUMAHne YcIOBna N cEIN 3KcNlyatauMn. IcnoIb3OBAHHe 3JIeKTPoHnCTpyMeHTa He No Ha3HaueHIno MoKET CTaTb pNpHHoN OAnCHO nCtTuaun.
Cneinte 3a Tem, yTo6bI pyuKN u 3axBaTHbIe noBepxHOCTn 6bln cyXUMN uHcTbIMN; He donyckaTe nonadHna Ha Hnx Macna nn cMa3Kn. CkOJIb3KnepyuKN u 3axBaTHbIe NOBepxHOCTn npenrTCTBYOT 6e3-ONaCHOMy o6paueHnIO uynpaBLeHnIO nHcTpyMeHTOM B HenpeDbUdEHHbIX cTtuaJrx.
06cnyxnbAHne
- Pemont 3neKtpoHnCTpyMeHTa DOnJKeH OcyuEcTB JIbKbAHHNcHpOBAHHbI NepcoHaC NcNoJIb30BaHHm NdeHTuHBIX 3anYacte Ha 3aMeHy. TOnbKO TaKIM O6pa3OM rapaHTnpyETc 6e3ONaCHOCTb Pn INcNoJIb3OBAHM 3neKtpoHnCTpyMeHTa.
Информацma no TexнIKE6e3oNaChocTu npu pa6oTecданьIM NHCTpymeHTOM
BHIMAHVE
B daHOM pa3dene coedepeKNTcBaXhna HOpMaUaO 6e3oNaChOCTn, MMeIOuA rTOHOWeHne IMeHHO K daHOMy INCHTpMEnTy.
Ipepe mCnoB3OBAHHem npoucTHoM MaunHbI PowerClear BHNMaTeNbHO u3yUte yka3aHHbe Mepbl npedoctopoxkHOCTn. Vx co6JIOpHeHne CHN3NT yrpo3y nopaxeHn 3JIeKTPuYeCKm TOKOM NIN NOnyuHn ApyrNX cepBe3HbIX TpaBM.
COXPAHNTE BCE IPREyIPEKDEHNA INHCTPYKUNI DIA NOCLEYIOUeRO NCNOJb3OBAHNA!
XpaHHTe daHHyIO INCHpyKcIIO pRdOM C INHCTpyMeHTOM dIe ee nCNoJIb3OBAHnI OepaTOPOM.
MepbI npedoctopoXHocTH npu pa6oTe cHCTpyMeHTOM dya uNCTKN KaHann3aun
- Ipepe nCnoB3OBAHmE mNCHpymeHTa npOBepbTe HndIeKaUee fYHKuONHnPOBaHne yCTpOInCTBa 3a- uTHoro OTKIOUeHn (y30), KOTOpbIM OcHauen Whyp 3NeKTPoNTAHn. PpaBnBna pa6ota y3O cHnJkaet onaCHOCTb nopaxHeHn 3NeKTPoTOKOM.
- IcnoIb3yIe ToIbKO Te ydInHInTeIbHbIe 8hHypbl 3JIeKTPoINTaHH, KOtOpBie 6OpdyObaHbY30.Y3O Ha 5Hype 3JIeKTPoINTaHH INCTpyMeHTa He 3aUuHaet OT yIapa 3JIeKTPoTOKOM pRn HEnCpPaBHocTn ydInHInTeIbHOrO 5hHpa.
-ДязхьагаВрашадоюserocTpocaИснοлььутToIbko nepuATKn,peKOMeHDoBaHHbIe N3rOToBnTelem.JIateKCHbIe nII He o6neraIoUne pyKy nepuATKNII BeTOuB MOrTy HAMoTaTbCHa TpOC,HTO MoKeT npNBecTn K cepbe3HOITpaBMe.
He donyckaIte octahOBKn BpaueHnHOxKa BO BpeMBAeHnTpOca.3TO MOKeT co3daTb MexaHnueCKoe nepeHa npJKeHne TpOca N BblBaTb ero nepeKpyuHBaHne, nepen6nn6pbiv, yTO B pe3yJbTaTe MOKe TnpBecn K cepbe3HO npAme.
- YnpabJIeHne TpOCOM N BbIKIIOUaTeIem DoJXeH OcyIeCTBnTb OIN HonePAtOp. EcN KOHeC TPOCa npeKpaTNI BpaIeHne, O nepaTOP DoJXeH IMeTB BO3MOXHOCTb BbIKIOUYb 3NeKTPoDIBuTaIb MaUNHb I BO 36ExHaHne nepeKpyUBaHnA, nepERi6a UIN O6pbIbA TpOca.
- Ecnn B KaHn3aHnOHn Tpy6 npednonaraetc HauHnue XmHKaTOB, 6aKTePn, TOKcHbIX BeUeCTB nnn BO36yDnteNe INHfekuN, HadeBaTne IaTeKChbIe nn pe3HOBbIe nepaTk noJ nepaTKn, peKOMeHDoBaHHbIe N3rOToBnTeJeM, a TaKKe 3aKpbITbIe 3aunTHbIe OUYk, 3aunTHbIe MaCKn, 3aunTHyIO CneOpExdy n pecnpaTopbl. BoOcTOKn MOryt CoepKaTb XmHKaTb, 6aKTePn n dpyrNe BeSeCTBa, KOToPbIe MOrY 6bITb TOKcHbI, 3apa3Hbl, Bbl3bIBaTb OXoRn nn dpyrNe cepbe3HbIe TpaBMbl.
C6bIpaTe rHneHy.He eBte HHe KypTe BO BpeM nepeHoCKn nn pa6oTbIC nHCTpyMeHTo. NocIe nepeHoCKn nn pa6oTbIC o6OpyDoBaHnem dIy ChTKn KaHaJI3aUIM MoTe pyKu IN dpyrme qactN TeLa, CoPpKacABmEe C coDEpXmMbIM KaHaJI3aUIM, Ropaye BoOoi CMblOM. 3TO IMOxET CHINb ONaCHOE BO3dEiCTBNe Ha 3DOpOBBe TOKCuHbIX BeueCTB NIN BO36yDnteJe INfekUIN.
- IcnoIb3yIte MHCTpyMeHT dIy cHCTKn KaHaJIIN3aCIMTOJbKO dIy cHCTKN KaHaJIIN3aCUNOHbIX Tpy6 peKOMeHIOBaHHbIX TmNopa3MepOB. PpIMHeHne IHCTpyMe HTa dIy cHCTKN KaHaJIIN3aCIMn HeHaJIeKaeIero pa3Mepa MOKeT BbIBaTB NepeKpyUbaHne, neperN6 INI06pbIB TPOCA, YTO B pe3yJIbTaTe MOKeT pPUBecTN K cepBe3HOITpaBMe.
PykoB NepaTke ydepKbAte HnpaBnaUu m uHaHr/yctpoiCTBO AUTOFEED Bce Bpem, noka Maunha pa6oTaet. 3TO NO3BOJAE Tnyue ynpabnTb TPOCOM INpeD0TBaTntb erO nepeKpyuBaHne, nepeRn6 nn6pbIb, YTO B pe3yIbTaTe MOKe TnpBeCTN K cepbe3HO TpaBMe.
- YctaHOBnTe MaunHy TaK, yTo6bI yCTpOcTB0 AUTOFEED haoDInocb Ha pacCToHm He 6oJee 6" (15 cm) ot BXoDHoro OTBepCTn KaHann3aunn, nn nCnoB3yUte NOxODAuyo ONOpy dN BbITHYTORo TPOca, ecnn paCCTOHne npEbbuHaet 6" (15 cm).
YBeInuHHePaCCTOAHmMOKET BbI3BaT npo6JIeMbBy npaBHeHH, KOtOpBle npuBeyT K nepeKpyuHaHH, neperu6y nn o6pbby Tpoca. NepeKpyuBaHne, nepeRn6 nn 06pbB Tpoca moryt ctaT npuHOn yuN6a nn nepenoma.
BkIIOuATb BpaueHne IHCTpymeHTa B O6pAthOM HaNPaBLeHN (OBPATHO) cIeIyET ToIbKO B Tex Cnya-ax, KOtOpblc ONCaHbI B HAcTOnIeM pyKOBODCTBe. BpaueHne IHCTpymeHTa B O6pAthOM HApBaJIeHN MoKet IpiNBecTN K NOBpeJdeHNIO TPOCA,ero NcNOLb3YOT TOIbKO DnB BITrIIBaHNI KAHO TPOCA N3 3acopOB.
- 06eperaTe pyKn OT BpaauoJerooc 6apa6aHa HnapabnaIooJe Tpy6Kn. He ne3bte pykamu B 6apa-6aH, ecn Maun Ha He oToeDInHeHa OT cETn 3JIeKtponTahn. Pyka MoKeT nonactb B DbNkUyueceq yactn.
He HaeBaTe Cbo6oHyO odEky nn ykpaewen.ObeperaTe BOnocbIO odEky OT DnBxuyxcrauchen.Cbo6oHna OeKJa, ykpaewHn nn dnnHhble BONoCb MoKeT 3aTAYHb NIOBnKHbIe DeTaJIi.
3anpeaetcpa6oTaTb C MaunHou, eCn onepaTOp mncama MaunHa HaxoJatcB Boe.Pa6ota C MaunHO B OBe NOBbIaET yrpo3y nopaxeHn 3neK-TPnueCKM TOKOM.
Ecn y Bac Bo3HKn BOnpocbl, kacaHounecra daHHoro n3- dnn RIDGID:
- 06paTntecb K MeCTHOMy IINCTPN6bIOTOPY RIDGID
YTo6bHaHnTNOHTaKTHbI TeJefoh MeCTHOI CTpN6bIoTOPa RIDGID, BOJNTe Ha caiR RIDGID.com. - 06paTntecb BOTdEn TexHuecKOro o6cnyXnBaHnKOMnHaHmRidge Tool no aDpecyrtctechservices@emerson.com,ВCLJAnKaHae moxHO TaKHe N03BOHHTb NO Homepy (800)519-3456.
Описанne n TexHnueckme xapaKTePnCTnKn
OnmcaHne
Пожистая маша RAIDGID PowerClearmpedha3ha-ueHaДЯчSTКИ кадлзагонhhix Tpy6ДиametpOMOT 3 / 4^ (20 MM)do 112'' (40 MM)ДЯ рakOBH,BAHH nduwebIX ka6nH.Маша Oсашена TPOCOM dINHOI 30' (9 M).
Ipouchna MaunHa PowerClear obopydoBaHa MexaHn3MOM 2-CTOpOHHe Noaau Tpoca AUTOFEED, KOtOpbI npn Haxatnn pbuara o6cneuBAeT noauy n3BneueHne Tpoca co ckopocb10 18' B MNHyTu. N6kN HanpaBIAOUI nnAHR B COeTaHH C yCtpoiCTBOM AUTOFEED NO3BOJAE TnoaBaTb TPOC HenocpeDCTBeHHo B KaHAn3aUIO, YTO MInHMm3npyet 3arPra3HeHne n ObecneuBAeT 3aunTy IMyueCTBa.
IpeeknioateBNEPEI/BbIKI/OBPATHOynpaBnaET Bpa- 1eHem6apa6aHa c Tpocom, a nHeBMATnueckn HOxHOB BBKIOUatel obecneuBaet ynpabNeHne BKIOUeHnEM/ BBKIOUeHnEM 3NeKTPODnraTeTn. YcTpoiCTBO 3aunTHoro OTKnIOUeHn (Y30) BCTpoEHO B shyp 3NeKTponntAHn.
PpOzpaHnA nepeHnA qAcTb KOpnyCa pOpynCTHO MaHnHbI N03BONaET CneiHTb 3a TpOCOM.
POnuNCTHyIO MaunHy PowerClear He peKoMeHnyetc HcNoIb3OBaTb Ira TyaNETOB.
Pnc.1 -IpouchthmaMaunha PowerClear
Pnc.4- Iopaa Tpoca B Hnnpablaiouoi nnHa
Pnc.5- Iopaya tpoca ckb03b y3en AUTOFEED
- Otnyctnte pbuarrn IODAAYBNEPEEN DBNXEHN HA3AD.
- PpikpenTe HanpaBIAUoIe WlaHr K MaunHe, HacnB WlaHr Ha HocIK Ha nepeHHe Yactn KopnyCa (Puc. 4). IJI CHaTnB BbINONHIne DeiCTBnB O6patHom nopAKe.
PpeD3KcNpyaTaUNoHHbI OCMOTp
BHUMMAHVE
KaKdbi pa3 nepeid nCnoB3OBAHnEM Heo6xoJIMO npOn3BODMtB OCMOT npOuMCTHO MaHnHbI uYctpaHrTb BCE MaJeWHe NpO6nembl, YTO6bl CHN3HTb PNCK
TaeKeIOn TpaBmbi B pe3yNbTaTe NopaKeHn 3JeKtpNueckm TOKOM, nepeKpyuBaHn nn NoIOMKn TpOca,
XMMNueCKNX OKOROB, MHNHINPOBAAHNA IN Dpynx npuHH, a TAKKe IpeDoTbPAaTb NOBpeKdHeNE IpOcHCTHOI MaunHbl.
PnOcmTope npouHcTHoMaunHbI 063aTeNbHO HadeBaTte 3auuTHbIe OuyK, KOxKaHbIe pa6Oue nepaATKn Ipyrme HndLeXaUne cpeCTBa 3auuTbl.
- Ocmotpnte koxaHbIe pa6oue nepaTkn. Y6eNTecb, yTO OHn pInroHbI K 3KcPiyatauH, He IMeOTdbip, pa3pbIBOB N BbITraHytbx UyactKO, KOtOpBle MOrTy 6bITb 3aTMyTbI BpaauHOUMC TPOCOM. BaXHo HAdeBaTb COOTBeCTByUOuNE HENOBpeKdEHHbIe nepaTKn. NepaTkn 3aunuAOT pyKN OT BpaauAoERocr Tpoca n codepxMOrO KaHaIN3aUHN. Ecnn koxaHbIe pa6oue nepaTkn OTCyTCTByOT, NObpexKeHbI INN IN3HOWeHbI, He POnb3yTeCb MaunHOn, Noka HndJeKaUxN nepaTOK He 6yDet B HAnuHn.
- Y6eInTeCb, YTO npOuHCTHa MaunHa OTcoEINHeHa ot cEtN 3NeKTPoNTaHnI, INpOBepe Te UHyp nITaHnI, yCTPOINCTBO 3aUHTHO OTKIOUeHnI (Y3O) (ecnn IMe etc) I BNkNy Ha npEpmET NOBpeKdHnI. Ecn KOnCTpyKzna BUNKn 6bla MoINΦuNPoBaHa, NnI uHyp NOBpeKdHn, TO BO n36ExKaHne NOPaKeHnE 3NeKTPOTOKOM He nCNoB3yIte MaunHy, Noka UHyp He 6yDet 3ameHn KBaINΦuNPoBaHHbIM CNEuaJIInCTOM no pemOHty.
- OuHCTNTe npOuHCTHyMoAunHy, B TOM YnCne pyKoTKn IoprAhblypaBHeHn. 3To O6neryaeTcMOTp INOMORAET npeD0TBpaNTb BbICKaJIb3bBAHHe NHTpyMeHTa IIINoprHa ynpabHeHn I3 pyk. BbIOnHnTe OUHCTKy I O6ClyXnBAHHe MaunHb B COOTBeTCTBMn C HHTpyKznnmIO TExNHueCKomy O6ClyXnBAHnIO.
- Ocmotpnte npocnTHyMaunHy n npobepbTe cnedyouee:
-ПраьиьhoeCTb c6OpKи I KOMплеКтаци.
-OTcyTCTBnE NONOMaHHbIX, IN3HOweHHbIX, NOTepaHbIX, HEOTcHTPOBaHHbIX INI 3aeiaOuix Detanei.
Y6eIITecb B TOM, YTO npOuNCTHa MaunHa 06OpyIOBaHa HOXHbIM BbIKnOuChaTeIm.3aNpeuaTecA KcNpyaTnpOBaBb MaunHy 6eHOxHOro BbIKnOuChaTeJia.
HaHnue npa36OpuNBOCTb npeynpeintenbHOJ 3TNKeTKn (Cm.Puc.1u2).
-ПлавhoeиCB6oBdHoe nepemeueHne pbluaroB yctpoiCTBa AUTOFEED (Puc.9).
OTCyTCTBne IIO6bIX yCIOBnKOTOpBIE MOrY T BOCnpeNrTCTBOBaTb 6e3oNaCHO HOPMaIbHOH KcNpyatau.
PnO6HApXKeHH KaKnx-Jn6o npo6nem yctpaHnte nIX, npexJe cEm NCNoJIb3OBaT IpOCHTHyMoAunHy.
- OuHCTnTe Tpoc ot rpa3n. PpOBepbTe OTCyTCTBne n3HOca n NOBpeKdEHHa TpOca. PpOBepbTe OTCyTCTBne cNeedyUoJero:
Budnmbie nIOCKne yuactkn Ha TpOce BCNEcCTBne ero n3HOca (TPOC n3rotabINBaETcN 3 npOBOLOKn KpyrIoro cehen N ero npoΦnlb dONKeH 6blk Kpyrblm).
MHOROUCNEHHBIE HIN 3HaHTeJIbHbIe no pa3Mepe npereN6bl (He6oJbUne nepereN6bl Tpoca do 15 rpaDycOB MOKHO paCnpAmitb).
-Помекутк Мжду BNTkamu Tpoca, yka3bBaIOU 费 Ha TO, YTO TPOC NOBeprca DeΦopMaun B pe3yNbTaTe pactaRaHn, neperna nN BpaueHn B 6oPATHOM HapabJeHn (O5PATHO).
- Ype3MepHn Koppo3n BcIeCTBne XpaHeHHBO BlaJxHOM COCTOHN NIN BO3DeNCTBnA COepKaAUXxCBA KaHaJIu3aUNXUMKkAToB.
Bce 3n foPmbi n3Hoc a n NOBpeKdeHn CHNkaOT ynproctb Tpoca n NOBblaaot BepoTHocTb erO nepekpyuHaHn, neperna6a nn OpbBa BO BpeMg EKcnlyataun. 3ameHnte n3HOweHHbI nn NOBpeXdEHHbI Tpoc, npexde qem NCIOB3OBaTb npOCHTHyO MaunHy.
PpOBepbTe, 4TO TPOC NOHOCBtBO BTAHyT, n CHApyJMaunHbI BbICTyaet YAcTB TPOCa DnHOn He 60nee 6" (150 MM). 3TO NpeDOrBpaTNT 3axJeCTbIBaHHe TPOca npn 3anycke.
- Y6eIntecb B TOM, yTO nepeKlnHouateInb BNEPEJ/ BblKJI/ObPATHO (I/0/II) yCTaHOBHeB nNoIOKeHne BblKJI.
7.CyXIMn pyKAMn BCTaBbTe 5Hyp nITaNnB pO3eT Kc HADJIeKAsmM 3a3eMEnHeM. IpOBepbTe npaBnIbHOCTb 0yHKUHOHINPOBAHnY3O (ecnn NMeETc) B 5hHype 3JIeKTPoNtAHn. PpIn Haxatnn KhoKNi DnaIarHOCTKn DOJXHa BbICKOHTb KpaCHa KhoNkCa6pOca CMapKIOPOBko "RESET", npn 3TOM MaUNHa He 6yDet pa6oTaTb. JnI NOBTOPHoAKTINBaUM HAXMITE KpacHyIO KhoNk Cy6pOca "RESET". EcnN Y3O He 0yHKUHOHpyET HADJIeKAsmM O6pa3Om, INBLeKNTe BNIKy 5Hypa 3JIeKTPoNtAHn I He INCNOJb3yIte IpoOHCTHyIO MaunHy, noka Y3O He 6yDet OTPMOHTIPoBAHo. - IpebeTe nepeKIOuataIb BIIPEED/BbIKJ/OBpATHO B noIOXeHne BIIPEED.HaXMMte Ha HOxHOBBKIOUATEb HnoCpeIte 3a HApBaJIeHEm BpaIeHn6 bapabHa.EcHn HOxHO BBKIOUaTeHb He ynpabIeT pa6ToMaunHb,He NCNoIb3yIte MaHNHy Do yCTpaHENr erO HeCNpABHoCTn.Bapa6An DOJKeH Bpaatbcra IpOTNB YacOBOn CptelKn,ecn CMOTpeb Ha 6apa6aH cpeDIn, HnapBaJIeHne erO BpaueHnro DOJXHO COBnaTaB C HApBaJIeHEm, yKa3AHhIM Ha pePeHNe YactN KopnyCa (Puc.10).
OTNCTNE HOKHO BIKIOATENB IOXINTECB NOH OCTAHOBKn 6apa6aHa. YdepknBaNTe nepeKIOVAteNBPEED/BbIKI/O5PATHO B noJoxehnO5PATHO nOBtOpTe yka3aHHyIO Bbiue npOBepky, TTo6bl
y6eINTBcBnBnBbHOM yHKUHOHPOBaHN npo- uNCTHO MaunHb B o6paTHOM HnPaBHeHN. Pn He- npaBnBHom HnPaBHeHN BpaSeHnR He NCnObl3y- Te MaunHy Do yCTpaHeHN HeNCnPabHOCTN.
9. После завершени осмOTауCTaHOBITe nepeKJIIOUcATENB BINEPEN/BbIKJ/O6PATHO B noLoXKeHne BblKNI cyxIMn pyKaMn OTOcoEINHTe MaunHy OT eNekTpoNtAHIA.
IodrotOBka MaunHbI npa6oey 30Hbl
BHIMAHHE


IpoROTOBbTe npOuNCTHyIO MaunHy mpa6oyIO 3OHy B COOTBeTcBmC 3TN MnpoueDypamn,
TTO6bl CHN3NTb ONaCHOCTb TpaBMbl Bpe3yNbTaTe NopaxKeHn 3NeKTPoTOkOM, NOXapa, ONpOKnDbIbAHnMaunHbl, NepeKpyuHaHn MuO6pbIBa TpoCob, XMMUeCKNX OXOROB, INΦekqni N dpyrnx npuHH, a TakXe NpeDoTbPaTuTB NoBpeXdHeHne IPOuNCTHO MaunHbl.
Pn noDROTOBKe npOuNCTHO MaunHbI K pa6oTe 6o3aTeJbHo HaDeBaIte 3auNTbIe OcKn N pyrTne HadLeKaUne cpeCTBa 3auNTbl.
-
Поверпгаразочую зону по седунцим поиз围ям:
-
Haneluie COOTBETCTBYIOUeOOCBeueHnA.
-
OTCyTCTBHe BOCnIaMeHAnUxxCg KInKoCTe, naPob NIN PbIIN. PpN HANuYN TaKOBbIX, He CneDyET npNCTynatb K pa6Ote B 3ToI 30He Do Tex nop, noka NTOChNIOnachOCTe He 6yDyT ONpeJeeneHbI yCTpaHEbl. IpOvNCTHaMaUnHa HE RaBnaTeCBApbIBO6e3OpacHOH mOKeT CO3DaBaTb NCKpbl.
HaHnue nuctoro,poBHoro,yctoHnBoro n cyxoro Mecta nIonepaTopaN BCero 60pydoBaHna.3a- npseaetcnaCnoIb3ObaTb MaunHy,CToB BOe.Pn Heo6xoDmocTo ydaJInte BDOy n3 pa6oey 3Ohbl.
HaIyue HaJIeKaIe 3aEMeHHOJ 3JeKTPuYeCKo P03eTKn COOTBeTCTByIOUe Ro HApJxKeHJ. Tpe6yeMoe HaIpyKeHne npOBepTe NO Ta6NIuCe C cepuHbIM HOMepOM MaUNHbI. HAnyue Tpex UTBpeN nnY3O B PO3eTKe He O3Haayet, YTO OHa 3aEMeHa DOJXHBIM 06pa3OM. Ppi BO3HNKHOBEnm COMHeHn PO3eTKa NOpJExNT pOBepKe KBaINΦuIpOBaHHbIM 3JeKTPnKOM.
Hannue cbo6oHoro doctyna K 3neKtpnueckoP03eTke n OTCyTCTBNE NOTEHuaNbHbIX NCTOCHIKOB NOpeXDeHHu Hhpya NHTAHN. -
IOcmotpnte KaHann3aunOHnyo Tpy6y, KOtopa na NDJexnT Ounchke. No BO3MOxHOCTn ONpeJeNte TOOKy(TOCK) DOCTyna K KaHann3aUNOHHO Tpy6e, DnaMeTp(bi) n dInHy Tpy6, pacctOraHne do 6aKOB INn MaNCTpaIe, xapaKTeP 3acopa, HAnuue XIMNKaTOB IIN YNCTKN KaHann3aUIN INn Dpynx XIMNKaTOB IN T.I. Pn HANuHN B KaHann3aUIN XIMNKaTOB BAHXO npHHb ocObIe MEPb 6e3OnachOCTn, Heo6XoMMBie Pa60tBi B cpeDe, HacbiueHHo 3TmM XIMNKaTaMn. CBxNTecb C pON3BOUnTeEm XIMNKaTOB IIN NOUYeHn HEO6XoDMoN IHOPMaUIN.
- BbIePHTe HApNexKaaee o6OpyIOBaHne, COOTBeTCTByIOoee npImeHEnIO. Cm. pa3deN "TexHuueckue xa-pakmepucmuKU".
IpoHCTHyo MaunHy PowerClear He peKomeHnyETCnCNOb3OBaTb Ira TyaJIeTOB.
HnctpymEnbI, nOxOJaUe IJy dpyuX pa60 no UcTke KaHaJIIm3aUIn, MoKHO HauTN B KataJIoRE Ridge Tool Ha caTe no aDpecy RIDGID.com
- BCE o6opydoBaHne doJHKHO 6bITb 6o3aTeNbHO npOBepeHo Hndnexkaumm 6pa3OM.
- Pn Heo6xOUMOCTy CTAHOBNTe 3aUHTbIe UNTbI B pa6oyen 30He. PPOUCC YNCTKN KaHAN3aUN MOXET OKa3aTBCR rpa3HBIM.
- EcIn Tpe6yETc, npIMTe Heo6xOumMbIe MepbI dIa DOCTyna K KaHaJIIN3aCUNOHn Tpy6e, KOtOpYIO cIeDyEt nPoHnCTHTb.
Дябьшнства KaHann3aunOHbIX Tpy6 Tpoc MoKHO npOeTb chepe3 nepekpeCTbe B KaHann3aunOHHOn Tpy6 (Puc.6A).
PaKOBiHa CO BCnIbIbIaIOUeCNIBHO npo6kO: CNIMTe NOBemHyIO UtaHry N CnIBHyIO npo6Ky. O6ra3aTeNbHO yCTaHOBInTe NOI pOuHCTHoe OTBepCTne NN CnFOH EMKOCTb IJIa C6opa BObl, KOTOPaMoXeT BbTEyB.Puc.6B).
B HeKOTOpbIX paKOBnHax MOKeT notpe6oBaTbc8 CHaTb npO6ky npOuNCTHO OTBepCTna NN CnfoH. O6ra3aTeJbHo yCTaHOBNTe NOD npOuNCTHO OTBepCTne NN CnfoH EMKOCTb DnA C6opa BObl, KOTOPa MoKeT BbIteYb. (Puc.6C).
- NpeenB BaHHbl: He nbTaNTEcb npOBcTn Tpoc yepe3 CINB BaHHbl, 3TO MOKeT NOBpeNtB Tpoc. YTo6bl NOnyUHTb DOCTyn K CInBy, CHMNTe HaKJaDky nepeJInBa n IMeOuunm CexaHn3M (Puc.6D).
Pnc.A
Pnc.C
Pnc.B
Pnc.D
Pnc.6-DocTynKcnuBy
- UctaHOBInTe npOuNCTHyMaunHy Ha pe3nHOBBie HOxKn POBHO n IpOuHO.He pa3MeuaIte MaunHy Ha KOBe nn Ha dpyrnx NOBepxHOCTx, KOToPbE MOyT 3a6NoKINPOBaT BEHTnlaUIOHHbE OTBepCTNa HA HnXkHe CTOpOHe MaunHbI.Tope yCTpoiCTBa AUTOFEED oJxhen HaxoINTbcR He daNbwe 6'' (15 cm) OT DOCTyna K cInBy.B 3tOM NIOXKeHNn HapabnIOU- uin uHaHr He oJxhen 6bITb HataHyT uIN neperHyT. YBeJIuHEne pAcSTOAHn OTOCTyna K cInBy NObluIaET OnaCHOCTbepeKpyuHBn HnNEpERNu6a TPOca.Ecnn MaunHy HeBO3MOxHO pa3MeCTnTB Tak, YTO6bl OTBepCTne 6apa6aHa HaxoINOCb Ha pacCTOaHNn He 60one 6" (15 cm) OT DOCTyna K cInBy, yDInHnTE DOCTyn K cINBy C NOMOsbI TOpy6bl NfTHINRO aHaIOrnHoro pa3Mepa (cm.Puc.7).HeHaJNeKauaIaONopa TPOca MoKet npNBecTN K erO neperHy n peKpyuHBnIO, YTO MOKet NOBpeNTb TPOC NII TpaBMnPOBaT bOnepaTopa.

Pnc.7- PnpMep ydInHeHn cInBa do paCToHn6" (15cm) ot ycTpoNCTba AUTOFEED.
8.ИЗучnte pa6oуу 3OHy n onpeJenite ueleco06pa3-HocTb yCTaHOBKn ORpaxdEHHy, YTO6bl OrpaHnHTb DOcTyn NOcTOPOHHNX LIM K pOuHcTHOH MaUNHe N B pa6ouy 3OHy. IpoUeCC uNcTKn KaHaIN3aUN MOKet OKa3aTbC rPra3HbIM, KpOME TOrO NOcTOPOHHne MOrYt OTBNeKaTa b OepaTopa.
9. PacnoIoxKeTe HOxHOB BbIKIOHateJIb TaK, YTO6bIMeTb K Hemy CBO6OHNbI DOCTyn. Bbl DoJXHbI IMeTb BO3MOxHOCTb yDepKINBaTb HnpaBnHOuNm INaHR n pbiHaR yCtpojCTBa AUTOFEED uYnpaBnTb mN, ynpaBnTb HOxHbIM BbIKIOHateJeM, a TaKxe DoTaNHyTbcrdo nepeKInOaTeJI BNEPEJ/BbIKJ/OsPATHO.
10. Y6eIntecb B TOM, yTo nepeKIOuataIb BIIPEJ/ BblKJI/OBPATHO HaxoITcB NIOJOKeHNBblIKJI.
11. PpOLOKHTe 5Hyp NtAHnI NO CBO6oDHO TpaekToPnn.CyXmNpykAMN BCTaBBte BNly npOuNCTHO MaWnHbBPO3ETkyC HADJIeKaUIM 3a3EmJeHHem.CTeJNTe 3a TEM, YTO6bl BCE COeHNHeHn 6bln CyXmN IN He cOpNKacAINCb C 3emNe.EcNI UHP NtAHn IMeET HeOCTaTOHyIO DInHy, NCNOb3yIte YdNNHITenb, OTBeauOUsn CneDyIOUM Tpe6OBaHHM:
HaxoDITcB INCpabHOM COCTOHN.
-ObopydOBaH BUNKO, aHaJIOnuHcN Toi, KOtOpaYCTaHOBJIeHa Ha IpOChTHoMaIInHe.
-Ппетдзнayeh ДлИ ИСпОьБОВИЗ ВЕ РОмeшENI N CODEРЖNT MAPKINPOBky W IIN N W-A Ha 6O63HaueHnN npoBOda (HAnpIMep, SOW), nIN COOTBeTCTByET KOHCTpyKTHBbIM Tpe6OBaHnM TIna H05VV-F, H05RN-F nIN Tpe6OBaHnM MeJxHyapOdHOn 3JIeKTPoTeXHnueckO KOMnCCmN (60227 IEC 53, 60245 IEC 57).
IMeet npoB0a HaJnHexaJero nonepeuHoro ceueHH. JIy ynnHInTeNbHbIX WHyPOB dINHOI do 50' (15,2 M) nCnoJIb3yIte npoB0a KaII6pa 16 AWG (1,5 MM²) nIITOnIe. JIy ynnHInTeNbHbIX WHyPOB dINHOI 50'-100' (15,2 M - 30,5 M) nCnoJIb3yIte npoB0a KaII6pa 14 AWG (2,5 MM²) nIITOnIe
Pn nCnoB3OBaHn yDInHntBbHoro shHpa nTahn Cneyet yHtBbAte, YTO Y3O npOuNCTHO MaunHb He o6ecneuHaBcT 3aunTy dIy yDInHnteBHoro shHpy. Ecn 3JeKtpueckar po3eTKa He o6Opyobana Y3O, peKomeHdyTe cNcNoB3OBaTb BnKy c 3aunToY 30 Mekdy po3eTKo N yDInHnteBhBM WHPOM nTaNHe, YTOb CHN3NTb ONaHocTb nopaxeHn yJKeTpueckm TOKOM B Cnyae HeNCnpabHoctn yDInHntBbHoro shHpy.
PykoBoDCTBO no 3Kcnnyatau
BHIMAHVE


06a3aTeNbHO HaBeBaTe 3aunTHbIe OUKn, 4TO6bl 3aunTnB rna3a ot Tpr3n n dpynx HNOPOdHBxTe.
063aTeNbHO HaedeBaIte npuROHbIe K 3KcnnyataUmm KOxahIbe pa6OyHe nepaTKn. IaTeKChIbe NmHe o6JIeraIOUme pyk npEpaTkn nN BetoUb MoryTHAMOTATbCA HA Tpoc, YTO MOKeT npNBcETn K cepBe3HO TpaBMe.HaedeBaIte naTeKChIbe Nm pe3HHoBblpe npaTkn ToIbKO noD KOxAHbIe pa6OyHe nepaTKn. He mCnoNb3yUte nobpeXdEHbIe nepaTkn dnnCTKn KaHaIIIN3auun.
063aTeNbHO NcNoB3yIte COOTBeTCTByIOuNe HN DnBHyaNbHbIe CpeDCTBa 3aunTb I npn pa6ote c 06OpdyobAHnem InnuCTKn KaHaUN3auNN.BoOCTOKn MOrY TcoepKaTb XUMHKaTb, GAKTEPN IN dpyrne BeueCTBa, KOTopBle MOrY 6bITb TOKCNUHbl, 3apa3Hbl, Bbl3bIBaTb OKOrn NIN dpyrne cepbe3HbIe TpaBMbl. 063aTeNbHbIMN CpeDCTBAMN INDNBHyAHLbHO 3aunTbI ABJIoTcra 3aunTHbIe OQKN IN KOXKaHbIe pa6oune nepaTkN, KpOME HNX MOXHO MCNoB3OBaTb TaKne CpeDCTBa, KaK NaTeKChbIe NIN pe3MHOBble nepaTkN, 3aunTHbIe MaCKN, 3aKpbblie 3aunTHbIe OQKn, 3aunTHna CneuoJeKa, peCnHPaTOPbl N 06yBb Co CTaNbHbIM HOCOM.
He donyckaTe octaHOBKn BpaueHnKa KOua TpoCa BO BpeMa6TbI MaunHbI.3To MoKeT co3DaTbMexAHueckoe nepeHapJxKeHne TpOca N npuBeCTN Kero nepeKpyuBaHHo, neperNoy nn No6pbBy. NepeKpyuBaHHe, neperNo nn O6pbIB Tpoa MoryT cTaB pnuHHo ywn6a nn npePema.
PyKoB N nepuAtke ydePkmBaIte HnpaBIAUOnm mHaHr/yctpoIcTBO AUTOFEED Bce Bpem, noka Maunha pa6oTaET. 3TO o6ecneuNbae Tnyuwee ynpaBLeHne Tpocom N nomoraet npedotbpaTntb erO nepekpyuBaHne, nepern6 nn O6pbIB. NepekpyuBaHne, nepern6 nn O6pbIB Tpoca Moryt ctaTb npuHHoYwn6a nn nepenoma.
YctahOBITE MaunHy TaK, 406bl yCTpoiCTBO AUTOFEED haoDnOcb Ha pacCToAHm He 60onee 6'' (15 cm) ot BXoHoro orBepCTna KaHaIImaunn, nn nCnonb3yIte noxDxOAnuO onOpny nIg BblTAYtoro TpOa, ecnn pacCToAHme npebbiAaet 6". YBeHHueHne pacCToAHm MoKeT Bbl3BaTb npo6NeMbI B ynpabHeHn, KOTopbIe npNBeyr K nepekpyuNbAHIO, neperN6y nn O6pbBy TpOca. NepekpyuNbAHme, neperN6 nn O6pbIB TpOca Moryr cTaTb npuHHo yUn6a nn nepenoma.
YnpaBneHne Tpocm Hoxhblm BbIKNIOyateIeM donKeH ocUeCTBnTb oun H onepaTop. Ecn Koneu Tpoca npekpatnBpaueHne, onepaTop donKeH
MMeTb BO3MOXHOCTb BbIKHIOHTb 3NeKTPoDBnraTeNb MaunHbI BO n36exAHne nepeKpyuBaHHa, neperu6a nnu o6pb1Ba Tpoca. NepeKpyuBaHHe, neperu6 nnu o6pb1B Tpoca Moryr cTaTb npuHou ywn6a nnu nepenoma.
YTo6bI CHN3NTb ONaCHOCTb TpaBMnPOBaHnB CnEaCTBne nepeKpyuBaHHaNN NIN NOJOMKn TpOca, 3aXnectbIBAHNA KOHcOB TpOca, ONpOKnDbIBAHNA MaunHbI, XMMUeCKNX OxKOROB, INΦeKmN m Dpyrnx npuHH, Heo6XoDMo Co6JIoDaTb Tpe6OBaHHN HCTpykqnn no 3Kcnnyatauu.
- Y6eIntecb, yTo MaunHa n pa6oay 3OHa noJroTOBJIeHbI DOJXHbIM O6pa3OM, n B pa6oey 3OHe HET NOCTOPOHHNx n Dpynx OTBleKaIOUx MOMHTOB.
- BbITAHNTe TpOc N3 MaunHbI N BBeDHTe erO B KaHAn3aUHOHHyTOpy6y. YTO6bI KOHeu TPOca He BbICKOHn HApJyKuN3 Tpy6bI u He 3axLeCTHyNCr npuNyCKeMaunHbI, TPOC Heo6xOdM O BBeCTn BHYTpB KaHAn3aUHOHON Tpy6bHa DnHHy He MeHee Ondoro cyTa (0,3 M).
HanpaBnIte TpOC OT BIXOHDHO OTBepCTN MaHINHbI HenocpeDCTBeHHO BO BXODHOE OTBepCTne KaHAn3aUHOHOn Tpy6bl, CTapaCb MNHMn3nPoBaTb DnHy BbITHYTORo TPOCa N N3MeHeHNAHpaBnEHn NOaH. He cNeJyET CnIbHO n3rNo6aTb TpOC - 3TO NOBIIaet OnaCHOCTbe IpeKpyuHBnI nn O6pbBa.
- 3aMnTe yD06Hoe paOoee noIoxKeHne, KOtOpoe oecneHT ynpabJIeHne TpOCOM MauHHoH (cm.Puc.9):
-6eHNTecb, YTO Bbl MOKeTe ynpaBnTb HOXhBIM BblKlIOuATEIeM. Noka He Haxmaite Ha HOxHO BblKlIOUATeNb. Bcnyae onaCHOCTN Bbl DOJXHbI IMeTb BO3MOXHOCTb OTNYCTnTB HOXHO BblKlIOUaTeJIb.
- Y6eHntecb,уTO Bbl 3aHnMaTe yCTOnuHBOe nOIOxKeHne,Bam He Tpe6yeTc DaIeKO TAYHyTcB,N Bbl CnyaHHO He HATONKHeTecb Ha HOXHO BblKIOuTaTeNb, npOuNCTHyO MaunHy,KaHaUN3aUNoHHy Topy6y IIN DpyrIne ONaChbI ppeYrCTBnI.
BbI DOLJHbI IMeTb BO3MOXHOCTb yapedKuBaTb HnpaBraUoun uHaH n ynpaBraTb pbYuaraM yctpoiCTba AUTOFEED no Mepe noDaun Tpoca B KaHaJIIN3aUNIO IN B 3acop.
BbIOJXHb IMeTb BO3MOKHOCTb DOTRAHyTBcA NOpeKJIHOuATEB BIPEPB/BblKI/ObPATHO.
Pnc.8-Bpa6oemnoJoxKeHH
- YctahOBHTe nepeKJIIOUaTeIb BINEPDI/BbIKJI/ObPATHO B noIOxHeBNE BINEPDI. Ioka He HaxkmaIte Ha HOxHO BBIKIOUaTeIb. He DonyckaiTe BpaueHn TPOCA B O6pAthOM HAnpABJeHN 3a NCKIOUeHnEM CnyaEB, KOHKPeTHO ONICAHhBX B 3TIX INHCTpyKUn- Jx.Pa6oTApocTHOH MaunHbIB H AnpABJeHN OBPATHO MoKeT NOBpeINr TPOC.
Iopdaa Tpoca B KaHann3aunohnyu Tpy6y
Bo3bMITEcb 3a yctpoiCTBO AUTOFEED odHoi pyKoI uyepeXnBaTe erO, TaK YTO6bl Topeu yCTPOIcTBa HaxoDnCnHa paCCToAHn He 60Jee 6" (15 cm) OT BXODHoro OTBepCTnKaHAn3aUHOH Tpy6bl (cm. Puc. 7). HaPpABJIIOUm IINAHr NOMORAET 3aUNITb CaHTEXNkY OTOBPexKeHn INyepXnBAeT XIKOCtB, KOTOPa C6paCbIBaETc TPOCA NO Mepe ERO BbITARNBaHn N3 KaHAN3aUHOH Tpy6bl. ECNI paCCToAHne MEXd yCTPOIcTBOM AUTOFEED IN BXOHNBM OTBepCTnEM KaHAN3aUHOH Tpy6bl PpeBbIaAeT 6" (15 cm), Tpoc He 6ydeT IMeTb HndJeKaUeONOpbl, YTO MoKet pInBeCTn K erO nepeKpyuBaHnO, neperNo By nO6pbBy.
06paaTe BHMHHe Ha To, KaK HappabnOuIe IuHa ng OuyaaetcB pyke. TaK KaTpoC HaxoDntc BHytpn Ha npabJIOUero UHaHa, To cna6ee Ouyaaetc Harpy3ka Ha TPOC, IN MOKeT 6bITb TpydHO paCNo3HaT, Bpaaetc Koneu TPOCa NII Het. EcnN KOHeu TPOCa He Bpaaetc, 3NaHT, KaHaJIIm3aunOHHa TpyBa He IpOUnaetc.
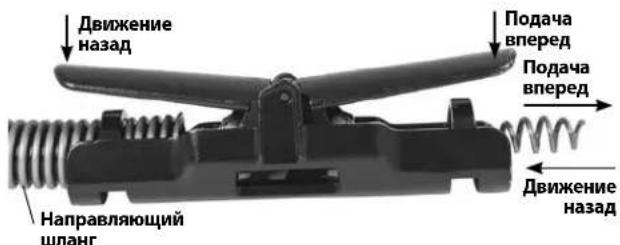
Pnc.9-PbIur noaun Tpoca BnpeA/DbHXeHna3a
Y6eIntecb, YTO Tpoc BBeDeH BHytpb KaHaJIIN3aUIOHOH Tpy6bHa dInHy He MeHee OJHO rOyta,a Topeu yCTpoi-CTBa AUTOFEED HaxoITcR He daIbwe 6" (15 cm) OT BXoHoro OTBepTnKaHaJIIN3aUIOHOH Tpy6b.HaxMnte Ha HOXHOB BYIKIOUATEnb,YTO6b3aNcyTnMb MaunHy. YTo6bI NOaTb Tpoc BnpeD b KaHaJIIN3aUIOHOH NHy TOpy6,HaxMnte pbur PQA4A BNEPED(Puc.9).BpaauouiCra Tpoc NaHET NoCTynatb B KaHaJIIN3aUIOHOH ty6y.
PpoxoJ Chepe3 rHdp03aTbOpbl HnI pyrne nepexOdbI
Ecni npoxokdeHne Tpoca uepe3 rnpo3aTbOp 3atpydHeHO,MOxHO npimMeHbYka3aHHbIe HNKe MeToDbI NIN COyehane MeToDOb.
Bo-epbbix,pe3Kne TOUKN TPOCA/HanpaBnHIOero 1IaHa BHN3,KaK npN BpaueHn TPOCA,TAK N6e3 Hero, MOryT NOMOHy npoTOJKNHYb TPOC Upe3 rIuP03aTBOp.
Btopo MeToD 3aKJIouaETcB TOM, yTO6bHa HeCKoIbKO CeKYHd 3aNyCTnTb IPOuHCTHyIO MaUINHy B O6paTHOM HApabLeHmN (OBPATHO), OdnOBpeMeHO TOkA TpOC/HanpaBIAIOUI shaHr. 3Ty onepaCIO CNeDyET BbIOJHHrTb TOnbKO, yTO6bITpoc Haan npoxoHTb uee3 rnpo3aTbOp. BpaSeHne Tpoca B O6paTHOM HApabLeHmMOKeT NobpeNTb erO. PIn BpaSeHm Tpoca B HApabLeHm NOBPATHO pbUar IODA4A BNEPEd 6yDet n3BleKaTb Tpoc, a pbUar DBNXEHNE HA3AAD 6yDet noDaBaTb Tpoc BnpeEd.
Ecni 3n MeToBb He pa6oTaIOT, nonpo6yTe nCnoB30BaT b Tpoc MeHbUero DnaMeTpA nn 6Ooe rR6Km Tpoc,nn dpyroHnCTpymEt RIDGID nIyNCTKn KaHaun3aun.
Ppoeypa uNCTkn KaHnn3aun
O6raTeIbHO ydepKmbaTe HnpaBnIooN mHaHr/ yctpoiCTBO AUTOFEED, no KpaIne Mepe, odHoi pyKo. O6paauTe BnMaHne Ha To, KaK HnpaBnIooN mHaHr OuYaaetcB pyKe, n CneDIne 3a BpaueHnem 6apa6aHa.
IIO Mepe IIOaun TPOCA B KaHAn3auOnHHy To py6y, Bb MoKeTe OuYUaTb N BuDeTb, YTO TPOc/6apabHaN 3ameJnEeTcR, N OUsuTaB, KaHApBaJIouOuN WNaHr HaUnHaET HarpyKaTbC INI HAcPyUHbTaBc (3TO OUsuAeTc TaK,
Kak 6ydtO HApabnIooHm IHaAHr HaunHaet nepekpyuBaTbca nHn H3rnbTaC).Bo3MOxHO, Tpoc npn Eton npoxoIT CTbIK B KaHAn3aUOnHOH Tpy6 (rnpDpo3aTBop, KOeHO n dp.), He6oBbwo 3acop B KaHAn3aUOnHOH Tpy6 (Knp n np.) nn Cepbe3hbl 3acop. MeJeHHo n octopoXHO nOdaBATE POC BnepeJ. He donyckaTe haKpyuBaHn TPOCA nepej BXoHDbIM OTBepCTnem KaHAn3aUOnHO Tpy6bl. 3TO MOxET pInBeCTN K pekepyuBaHn, Npern6by nnn Opbby Tpoca. YdepXnBaTe Topeuc yctpOCTBa AUTOFEED He daNbwe 6" (15 cm) ot BXoHoro OTBepCTnR KaHAn3aUOnHO Tpy6bl.
06paaTe BnMaHHe Ha dInHy TpOca, noaHoro B KaHaIIN3aOnOHy To6y. IOnaTa TpOca B KaHaIIN3aOn OHyTo Tpy6y 6oJIbUeRO dInaMeTp aNn B aHaONuHbI nepeXoMD MoKet npBecT N peRn6y Nn 3aB3bIBAHIO TpOca y3lOM, YTO He No3BOJNT BbITaHyTb TpOC n3 KaHaIIN3aUHn. Bo n36ExKaHne np6Lem MInHMn3uPyTe dInHy TpOca, NOdaBaEMrO B nepeXoD. dInHy TpOca B 6apa6a- He MOxHO OTCLeXnBaT buepe3 npo3paHyIO nepeHIO UacTh KOpNyCa (Puc.10).

Pnc.10-KoHTpOnb TpocaB 6apa6aHe
ydaJIeHne3acopa
Ecni KOHeT TpOca npeKpaAaet BpaAaTbCra,TO 30 O3Haay et,TO OH 60IbWe He npOuHaaet KaHAn3aOnHOHy TOpy6y.Ecnn KOHeT TpOca 3acTprnB 3acope,a Hn pOunCTHyu MaunHy npOdoJXAe TnDaBaTbCRA 3neKtpoNtAHne, Tpoc HaHT HApkyHBaTbCRA (3TO MOKeT OuyUaTbCRA KAK nepeKpyuHBaHne NnN N3r6 HnPaBnIOUero UnaHra) NN CO6PbTaCBnpeD BXoHNbIM OTBepCTmE KAnHIN3aUIOHOH Tpy6bl. YdepXNBaHnPaBnIOUHN WnAHR pyKO, Bbl MOKeTe NOyBCBOBaTb, KaOH NaKpyuHBaETCRA, INpPabJIbTB TPOCOM.Kak ToIbKO BBI NoCyBCTByete, YTO TpOC 3aKpyuHBaETCRA INN KOHeT TpOca npeKpatIN BpaUeHne, HEmedJeHHO OTNyCTnte pbur IODAUA BINEPD IN HaxMnte pbur ABNXEHNE HA3AD, YTO6bOcBOODNb KOHeT TpOca IN3acopa. He donyckaIte BpaUeHnI TpOca,ecn erO KOHeT 3acTprn B 3acope.Ecnn KOHeT TpOca npeKpatIN BpaUeHne,A6ap6an HnpOJkaet BpaAaTbCRA,3TO MoKeT npiBeCTN K nepeKpyuBAHIO, neperNo By nn O6pbBy TpOca.
Kak ToIbKO KOHeu TPOCA 6yDet OCB06xJDen H3 3acopa n npoIOnKIT BpaueHne, MoXHO 6yDet CHOba MeDJeHNOndaBaT BpauaOuNc KHeu TPOCA B 3acop. Heo6xOIMo "3aepKaTb" BpauaOuNc KHeu TPOCA B 3acope Ha HEKOTOpoe Bpemr, YTObI NnHOCTbIO pa3pyuNTb 3acop. He nbTaIteCb C cINo IpnotAknBaT KoHeU TPOCA CKBO3b 3acop. IpopaBotaTe TPOCOM TAKIM oBa3OM Do tex nop, NOKa OH NnHOCTbIO He npouET 3acop (nnn 3acopbl), IN BOda He NaHTe IpoTeKaTb NO KaHaJIIn3aUNOHHO Tpy6e.
Bo Bpem npoucTK 3acopa KOHeu TPOCA MOKeT 3a6ntb cMycopom N uactnuaamn 3acopa. 3TO MOKeT 3ATpydHNT bIaNbHeiuee nepemeueHne TPOca BnepeJ. Heo6xOdmo n3BLech TPOC IN3 KaHaJIIN3aUIOHHoT py6bl N ydaJIHTb My cop.Cm.pa3JeN "3BHeueHue mPOca".
EcnKoHeuTpOca npOdoJkaeT 3acTepeBaTb B 3acope, BO3MOxHO, Heo6xoDmO NcNoB3ObaTb Dpyro INHCTpyMeHTdIy uCTkn KaHaJIa3aUIN RIDGID.
06paueHnC 3acTpBWMM INHCTpyMeHTOM
Ecni KOHeu TpOca npeKpaTn BpaUeHne, n Tpoc He ydaetCBAITHYb Ha3aI N3 3acopa, OTNcyTnte HOxHOB BbIKIOuHaTeNb, Kpenko YdepXNBaHTe yCTpoiCTBO AUTOFEED n HAnpabJIauoJn WlaHr n OTNcyTnte pbUar Nodaun. IpOdoJkaTe YdepXNBaTB HAnpabJIauoJn WlaHr, B npOTnbHOM Clyae MOyT Bo3HKnHyTB NepERn6, NpeKpyuBaHne n O6pbTBPOca. 3JeKtpoDBIrataeNB OCTaHOBITcA, a Tpoc n 6apab6an 6ydt BpaTaBCra B o6paTHOM HAnpabJIeHN Do Tex NOP, NOKA AKKymnpoBaHHa TRPOCOM 3HepRn He 6ydet BBICBO6OKeJaHa. PpOdonKaTe YdepXNBaTB yCTpoiCTBO AUTOFEED n HAnpabJIauoJn WlaHr, NOKA He Ocna6het DeIcTBNe MexAHuecknx HnapxKeHN. UcTaHOBtnepeKIIouTeNbPEPED/BbIKJ/OsPATHOBnNoLoXeHne BblIKJ.
Ocbo60kdeHne 3aCtpBwero mHcTpyMeHt a
Ecnn Tpoc 3acptn B 3acope, ydepknBaIte nepeKIOUaTeNb BIIPED/BbIKN/OBPATHO B noIOKeHHN OBPATHO. OTnyCTNB Oba pbIura yctpoIcTBa AUTOFEED, haxMnte Ha HOXHOB BBkIOuATenb Ha HeCKoJIbKO ceKyHd, noka Tpoc He OCBO6OAnTcN 33acopa. 3anpeuaetcN EKnIyAtIpOBaTb MaunHy B pexnme OBPATHO doJIbwe, cem Tpe6ByTcN DnOCBO6OxDeHHN KOHa Tpoc aN 33acopa, nHaue Tpoc MoXeT 6bITb NobpeXdeH. YcTaHOBtne nepeKIOUaTeNb BIIPED/BbIKN/OBPATHO B noIOKeHHe BIIPED n npoONKaIte NcCTky KaHaJIIN3aCIn.

Pnc.11- N3BneueHnE Tpoca
M3BneHnE Tpoca
- Nocne npoucTkn KaHann3aunOHn Tpy6bl, NO BO3MOXHOCTN, HauHNTe NOdaBaTB B Hee BoYy, YTO6bl CMBITb NOTOKOM BObl MyCOP n3 MaHnCTpaNN I OUYCTNBILKAEmbI TPOC. JINr ETOrO MOxHO OTKpbITb BOONPOBOHbIK paH B CNCTeMe INN MCNOB3OBaTB dpyrNe cnoCo6bl. O6paaATe BHNMaHne Ha yPOBeHb BObl, TaK KAK KaHAN3aUNOHnAra Tpy6a MoKET CHOba 3acopntbcra.
- NpeeknouateBNEPEB/BbIKI/ObPATHO donkeh 6bTb yctahOBHeB noJIOKeHne BNEPE-3anpeaetcra n3BNeKaTb TPOC C nepeKlOuATEm B noJIOKeHN O5PATHO, tO moKET npNBecTN K NOBpeKdEHNTOpoca.Kak npnoDAe TPOCA B KaHAn3aUHOHHyTOpy6y, TPOC MOKET 3actPraB BnpoEcce n3BNeueHNA H3AAD(Puc.11).YTo6bl o6ecNeyTB KOHTpOJI, Kpenko UdepKnBaIte pykamn ycTpoiCTBO AUTOFEED nHaNPablaIOwn IhaHr. KoHeu TPOCa MoKET 3actPraB B npocce n3BNeueHna. IpdoJkaTe n3BKeKatb TPOC, noka IHCTpyMeHT He OKaKeTc pRMAOBtBPecttn KaHAn3aUOHHo Tpy6bl. OTnyCTne pbur.
- OTnycTne HOxHOB BbIKHouaTeNb, DoKdntecb noHON octaHOBKn 6ap6aHa. He BbITraBaIte KOHeu TPOca n KaHAn3auNoHHoN Tpy6bl, NOKa Tpoc Bpa-uaeTc. HCTpyMeHT MoKeT 3axNeCTHyTbc n npuHNtB cepbe3HyIO TpaBMy.
- YcTaHOBnTe nepeKIOHouaTeIb BNEPEJ/BblIKJI/ObPATHO B noIOXeHne BblIKN cyxMn pykAmn OToeINHnTe MaunHy ot po3eTKn 3JeKtpoNTaHn. PyKoI
BbITAHNTe N3 KaHAN3aUHOHHo Tpy6bl OCTabuINcra TPOC n 3aIpaBte erO B npOCHTHyIO MaunHy. Pn HEO6XODIMOCHT npOJONKTE ONUCTKy, CO6JIIOdA npNBedeHNHYo BbIwe MeTOdNKy. InI NOHOr ONUCTKn peKOMeHNdyETc BbINOHNtB HeCKOJBKO pNOXODOB CKBO3b Tpy6y.
CnMB BOdbi N3 MaunHbI
Ecn Heo6xOJIMO CnTb BDOy n3 MaunHbI, BblKIOUHTe ee n cyxIMn pykAMN OTcoeHNHTe MaunHy ot po3eTKn 3JIeKTPONHTAHy. Chmnte cInBHyIO np06Ky (cm.Puc.1) n CneTe BOy. PpN Heo6xOJMOCTn MOXHO pPnOaHrTB 3aDHIOU qACTb MaunHbI.
IoproTOBka K TpaHCnoptnpOBke
HamotaTe shyp 3neKtpOnnTaHn n shaHr HOxHOrO BblKlouatela Ha HamOTky dny shypa. 3akpenite, KaK noKa3aHo Ha Puc.12. 3akpenite yctpoiCTBO AUTOFEED Ha KpIOke.
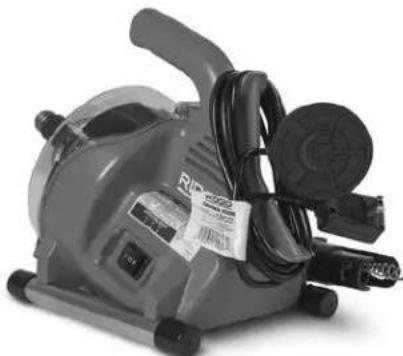
Pnc.12- IoproToBka K TpaHcnoptnpOBke
Инструкция по Тхичесkomу объжваимю
BHIMAHINE
IpeaBbInonHeHemIO6oToTexHueckoro 06cnyKmbHna Heo6xoJIMO yCTaHOBnTb nepeKIOuataIb BNEPEi/BbIKI/O5PATHO B noLoXeHne BblKl n oCoedHHtMaunHy O3NeKTpOnHTaHn.
Pn BbInoHHeHHn TexHmueckoro 06cnyKuBaHna 06a3aTeIbHo HaedeBaIte 3aunTHbIe ouKn n pyrne HadJeKaUne cpeCTBa 3auNTbl.
OTKpbBaHne npOuCTHO MaunHbI/CHrTne 6apa6aHa
YTo6bIOTKpbItbMaunHyDnOuHCTKnNn3aMeHbI TPOca:
-
Pn Heo6xOaIMOCt CneTe BDOy n3 MaunHbI.CNH Mnte HnpaBraUoiu WnaHr(cM.pa3deJ"C6opka").
2.3anpaBbTe Tpoc B6apa6aH. -
Cnerka OTBepHnte (HO He n3BneKaaTe) Tprn (3) BnHTa KpbIuKN. (Cm.Puc.13).
- CTaHInTe nepeDnIOu yAcTb KOpnyca.
- Chmnte 6apa6aH, NotaryB erO bnepei.
6.ДЯсборки BыногнITE npoceC B O6paTHOM noPRAKe.Bo3MOxHNO,notpe6yeTcnpOBepHyb 6aPa6aH,чTo6bl HacaIbErO Ha npuBOd.IpOBepBte npaBnIbHoCTb yctAHOBKn Wai6bl Ha 6apa6aH.

Pnc.13-OTKpbBaHme npOuNCTHO MaunHbI
UncTka
Iocne KaKdoRo NcNoB3OBaHn Heo6xOdmo OChCTNb MaunHy.CHMITE cMaunHbHa npabraIOu mlaHr n 6apabaH/tpoc.Pn Heo6xoIMOCtMoXHO NCNoB3OBaTb MArkoe MoOuue CpeCTBO Hn aHTnbAKeTpnaIbHbI paCTbOp.3anpeaaetcaNcNoB3OBaTb paCTbOpNTen,abpa3nBblnpyrme arpeccNBhie MOUe Me pectBa.
MaunHa - O60tpnTe MaunHy n npotpnte n3Hytpn noIocb 6apab6aHa BnaJxHm MrgKo TkaHbO. 3anpeaaetcN porpyKaTb MaunHy B BOy nnn pomblBaTb ee BOdo. He CJeNyET dOnyckTaB nonaHaHn BObl B 3neKTpoDBaratelb Hn Ha DpyrNe 3neKTpuYeCKne KOMnoHeHt. IpeD noNkIIOUeHem K 3neKTPOCetn N hauaON 3KcnIyatauyn y6eNTecb, YTO MaunHa PNOHOCTbO BBICoxJa.
NpeepnayacbKopnyca-CHMMTEcMaunHbl,npOMOTe BOoI INpOTPnTE HaNCTO BnaXHO MRAKO TKAHbIO.
Bapa6aHn Tpoc -PpomOte 6apa6aHn Tpoc BDOJ noCne KaKdoRo NcnoB3OBaHn, YTO6bl PpeD0TbPAuTb NOBpeKdaUoee BO3dEINCTBNE rpa3N u COCTaOB DnI YNCtKN KaHAn3aun. IpeD yCTaHOBKO 6apa6aHa Ha MecTo DOxKnTEcb erO BBcIbXaHn, YTO6bl yMeHbWNTb PkABNeHne Tpoca.
YcTpoNCTBO AUTOFEED -IpomOnTe y3en AUTOFEED BO-DOI N CMAKbTe IeRKM MaWHHbIM MaCnOM.
HarpablaouiuI uanhr -Ppomoe BoOn npocuynte.
3aMeHa Tpoca
- Chmnte HanpaBriauoiu mIaHr (cM. pa30en "C6opka") n IpeDHHIO uactb Kopnyca/6apa6aH (Puc. 13).
2.CTAHNTe TPOC C nepeDHeu qactn 6apa6aHa. - OTBepHnTe nTb (5) BnHTOB, yIepKnBaIOuIX 3aHIOO CTeHKy 6apa6aHa (Puc. 14).
- OToeHNHTe KOHeu TPOCA OT 3aHHei CTeHKn 6apa-6aHa (Puc.15).IIOHOCbIO CHMNITe TPOC c 6apa6aHa.
- 3anpaBte KOHeu HOBOro TpOca CKB03b BbIXOHOe OTBepCTne 6apa6aHa. PnIKpeNITe KOHeu K CTehKe 6apa6aHa, KaK NOKa3aHo Ha Puc. 15.
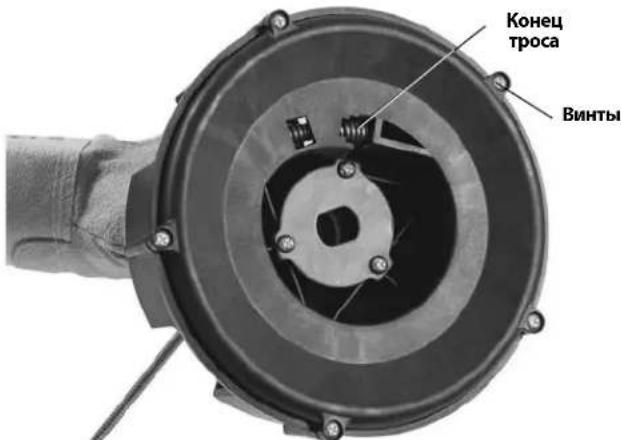
Pnc.14-CHTne 3aHne cTeHK6apa6aHa
6.Пложкite 6apab6ан Ha 3aHIOIO CTeHky N BpyHyIO 3anpaBbTe HObIy TpOc B 6apa6aH.

Pnc.15-KpenneHne Tpoca K BHyTppeHHemy 6apa6aHy
- YctaHOBnTe 6apa6aH B MaunHy (Puc. 16).IpoBepHnTe 6apa6aH, yTO6bl YCTaHOBnTb ero Ha MeCTO.
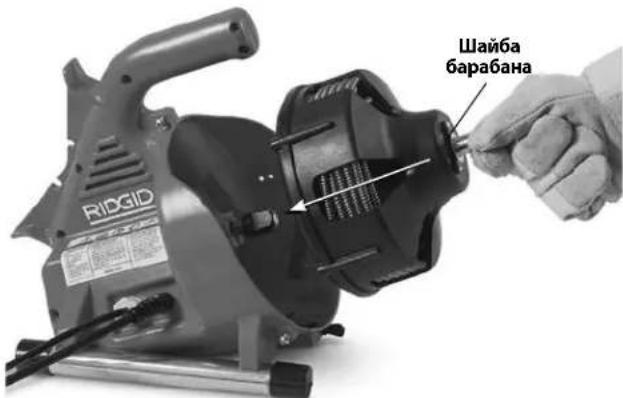
Pnc.16-YctaHOBka 6apa6aHa B MaunHy
8.YcTaHOBnTepeepHIOUacbKOpnyCaHaPpABJIou- 1111111111111111111
IOnonHntenbHbie npHaJneXHOCTn
BHIMAHVE
IINKHeHn PnCKa TAnKeNoi TpaBmbl NcnoNb3yTe ToIbKO yKa3aHHbIe HNXe npHaJdEHXOCTn, CneuaNbHO pa3pa6oTaHHbIe u peKomeHDoBaHHbIE K npumHeHIO c npoucTHoM MaunHoR RIDGID PowerClear.
PowerClearTM aFbIH Ky6bIpbIH Ta3aIay Kypblfbcbl
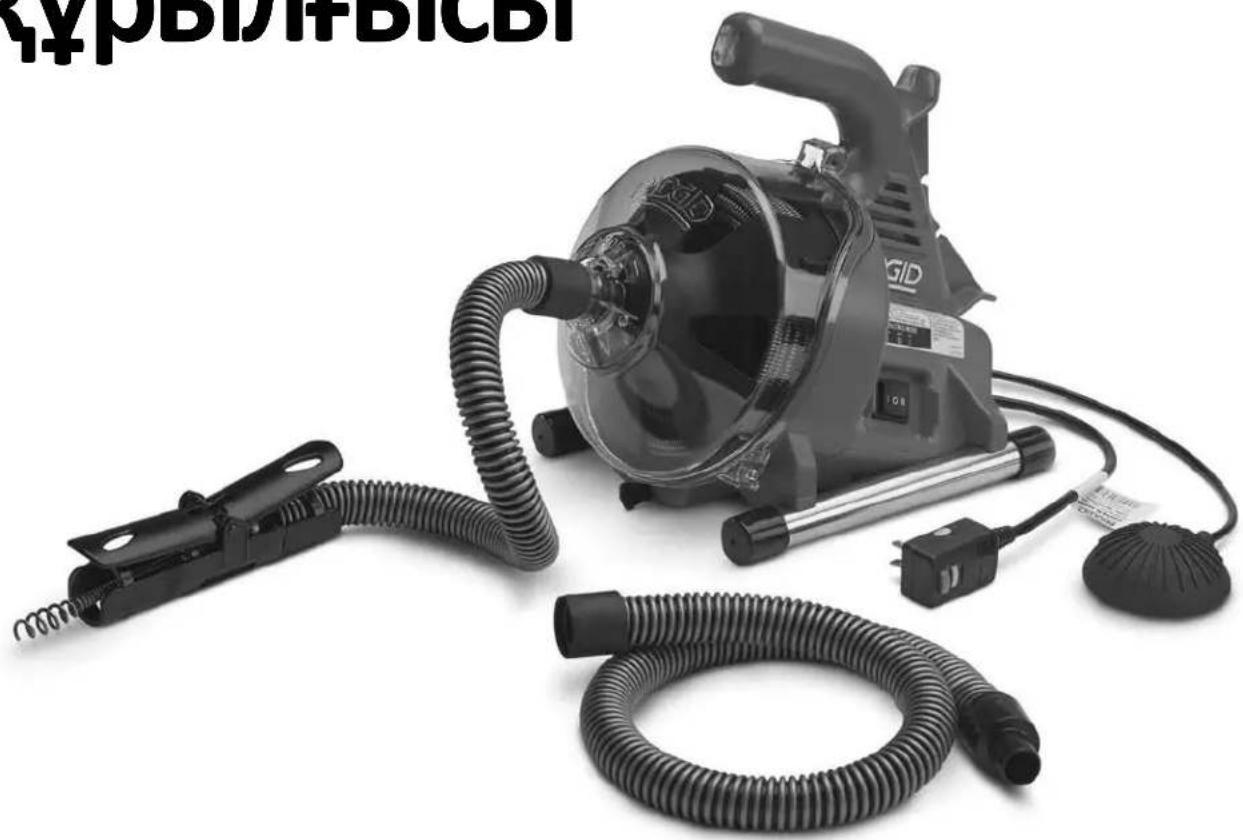

ECKEPTY!
Ocb KypalbnaaH6ac 6yphBn
OepatopdbH HcykaylbHbIM MyKmT
OKbHbIbHbIb3. Ocb HcykaybIKbTb
dypbic TyciH6ey XHe KaadaHaMaY
3JIeKtp TorbHbH COyBHa, bptKe
XaHe/Hemece aybp JapaKaTaKa
aKeYi MymkiH.
PowerClearTM afbIH Ky6bipbIH Ta3aJalay KypblfbcB
TemeHderi cepnblk Hemipdi Ka3bIn a1bHb3KaHe atay TaKTabHa opHaNaCKaH omHH cepnblk Hemipin cKaTaN KOBHb3.
CepnaybIK Hemip
Ma3MyHbI
KypbIbHbIH cepnJIbIK Hemipin Xa3y Ylrici 365
Kayinci3ik HbIshaHapbl 367
XaIbI 3neKtp KypalbHbH, Kayinci3ik eckepTynepi. 367
Kymbic ayMaBbIHbH Kayinci3diri 367
3neKtp Kayinci3di
KekeKayinci3ik 368
3neKtp KypalbH naDalaHa Hy KeHe oHa Kytim KepcTey. 368
Kb3MeT Kepcety. 368
Aphai kayinci3ik aknapaib 368
AfbH Ky6bIpaBn Ta3aay KypblfbcHbH, Kayinci3di. 369
CnataTama XaHe TexHkAibK, CnataTap 369
Cunatama 369
TexnkaIbIK cnilaTap 370
KockbIsh 6eJIiweIepi 370
KypblfblHbI Kypactbipy 371
Baftaybiu Kbybipwekt/AUTOFEED XbHtBfbn peTey. 371
Kymblc aIdbiHa TeKcepy 371
KypblfblHbI XaHe Kymbc ayMaBih opHaTy 372
PaiDalaHny HucKaynapbI 374
Kabelj afbH Ky6bipbHa eTKi3y 375
Topnap Hemece 6aca etnepe apkblb etki3y. 375
AfbH Ky6bIpbH Ta3aay 375
TbIfbIHdbpeTey 376
Tpybn KaIraH KypaIdbI peTey 376
Typbn KaIraH KypaIbI bocaty. 376
KabeljI sbirapbn any 376
Kypblfblb1 afb3y 377
TacbImaIayra daHday. 377
TexHnKaIbIK Kbi3MeT KepeCy HycKaynapbl. 377
AfbH Ky6bIpb Ta3aJaBbIbH aWy/5apabHdbIweu. 377
Tazalay 377
Kabeljaybictbyy 378
Kocbimua Jka6dbik 378
KypblfblHbI caTay 379
KbI3MeT Kepcety XaHe XeHdey. 379
Tacray 379
Akaaynbiktapdbixoio 380
EO caikecik malmdemeci Iuki apTKbl Mykaabac
Пайдалиу мерзimoreберігін кіпідік...........................................................ApTKbl Myka6a
Kayinci3dk HbIshaHdapbl
Byn naIdaHaHy HcybIfHdaFbXe He 0Hmderi Kayinc3ik HbHaHapbXeHe 6eRi ce3dep MaHb3dbKayinc3ik AknapaTbIH XeKtki3y yuHn aHaHaBinaDb. Byn 6bnim OcbI 6eRi ce3ep MeH HbHaHapdbXeTe Tycih YuHbepireH.

Bykayinc3ik eceptyi HbIaHb60bn Ta5bIaNb. Byi ci3re bKtMaJ deHe JkapakTbKayinTreji KehIHde ecepty kacay yuHn naIdaHaBnAdb. bKTMaJ kapaKaTTbH HeMece enIMHH anDbH any yuH ocbl hbuHd aepirreh yapbIK ayic3ik uapapanaphcakTaHb3.
KAYIN
KAYIN andbin anmafah KaFdaia Da oImre Hemece aybip KapaKaTka eKeIeTIH Kayinti KaFdaibdi 6ilipede.i
ECKEPTY
ECKEPTAanbIH anImaHaJH kafdaIa eIImre Hemece aybp JapaKaTaKa aKeJeYi MymKIn KayinTi KaFdaNdb 6iIipede.i
CAKTAHdbIPY
HA3AP AYdAPbIHbI aIbIH aIMaHaH KaIaIa KIWIIRIPIM Hemece opTaHa JapaKaTka eKenyi MymKiH Kayinti KaIaIbI 6IIipe.i
ECKEPTTNE
ECKPTIE Mynikti KopfayFa KaTbICTb aKnapaTb 6iNipdi.

ByHbIaH Ja6dbIKTbI NaIaIaNbIb6ac 6bybH naIaIaNHyCKayIbIFbIH MyKINr OKbIu bIFyDbI 6IJIpeDi. NaIaIaNHy HcKAYIbIFbIHJa Ka6dbIKTbI KayInc3 HaHe Tnict TypeNaIaNaIaNHy TypaJIbMaHbI3DbI aKnapat 6ap.

By Ta6a Ke3diH KapakaTAnhy KayniH a3aIy yuH ocbl Ka6bIKbI naIdaIaNHaJa, yHeMi 6yip KaKanapbl 6ap Ke3neKti He Ke3iNdiPiKTI KIO KepeKTirH 6iIndipeJ.

ByHbIaH afbIH Kybipih Ta3anay Ka6eJIHne KOJIbHbI3dbH, caYcafbHbI3dbH Hemece 6aca Dehe 6oJIirH3dH, KbIcblBn, opaBn Kany Hemece e3ny KayinH 6iJipeji.

Bny TaHa 3neKtp TOrbHbH, Cofy Kaynin KepceTei.
KaalnbI 3JIeKTp KypaIbIHbIH Kayinci3dk eckeptynepi*
A ECKEPTY
By 3nEeKp KpaBImen 6epinre HapbIK Kayinci3ik eckepTyepiH, HcaynapbH, CpeTepiH XaHe cnNtamalapbH OKbIHbI. TMeHde Kepctinre HapbIK HcyaynapdbOpHdAmay 3nEeTp TorbIHbH coryiHa, eptke XaHe/Hemecaybp JxapaKaTaKa AKeIy MyMkiH.
KEIHn AHbIKTAMALbIK PETIHDE BAPbIK ECKEPTyIEP MEH HYCKAYIAPDbI CAKTAN KOIBHbI3!
Eckenpyderi "3Jektp Kypalbi" TepeMHH Jxelilik (cbIMdb) 3Jektp KypalbH Hemece 6aTapeMeH Kymbic IteTIN (cbIMcB13) 3Jektp KypalbH 6iDipedi.
KymbcayMaFbIhBIn Kayinci3di
XMymbicaymaFbH Ta3a,api XapbIK yCTaHbI3. b6bipcbItbIFaH Hemece KapaHfblOpbIHapJka3aTahBMOKfAJaPaFAKeJeI.
3NeKtp KypaIapbIH XaHfbiI CyHbIKtbiTap, r3dap Hemece wah 6ap XapbIbIw optanapda naIaIaN6aHbI3. 3NeKtp KypaIapbI waH He TyTHdi TyTaHdbipybl MymKiH YWKBiHdpbl Ty3eNiDi.
3NeKtp KypalbIH icke KockaH Ke3de 6aIanap MeH XaHbIHb3dAbfI aadMdpbl XaKaBHdaTNaHb3. Ha3apbIHb3db6eY bAcApaydbJxofAITyblb3fAekeny MyMKIN.
3NeKtp Kayinci3diri
3NeKtp KypalbHbH aWanapb po3eTKaFa caikec KeIy i Kepek. AwaHb KaHaJ da 6ip KOImen MydEm e3reptneH3. Adantep aWanapbH Jxepre KocBraH (TybIKTaFah) 3NeKtp KypalDapbIMen NaDaIaH6aHbI3. TypHeHdpimereh aWanap XHe caikec KeiTeH po3eTKaIap 3NeKtp TorbHbH COY KaynIH a3aTaNbl.
Xepre KocbIHaH He TybIKTaIHaH 6eTepdi, MbicaJIbI, Ky6bpapdbI, padnatoPnapdbI, Ti36ekTepeJi XaHe ToHa3blKbIHTapdbI yCTamaHbI3. DeHeH3 Xepre Tnin Typca, 3JIeKTP TorbIHbIH, COy Kayni apTaIbI.
3NeKtp KypaIapbIH XaH6bp HEmec bIraI XaHaIaIIap 3cepHHe KaIbIbIPMaHbI3.3NeKtp KypaJIbHa cyDbIH eHyI 3NeKtp TorbIHbIH, COy KayNIH apTbIPAbl.
CbIMDbI Tepic KONMeH naDalaHa6aHb13. CbIMdbI 3NeKtp Ka6DbIbH Tacy, TapTy Hemece XeIiDeH axbipaty yuHn NaDalaHyFa 6oImaDbl. CbIMdbI KbI3yDaH, MaJaH, yWkip KxneKTepeH Hemece Ko3FaIaTbIH 6oIWeKTepeH anwak YcTaHb13. 3aKbIMdaHaH Hemece WaTbickaH CbIMdap 3JeKTP TorbHbIH COY KayIN apTTbIpaDbI.
3NeKtp KypalbIH cbipta icke Kockan Ke3de cbipta naDalaHyfa XkapamdbI y3apTkblu CbIMdbi naDalaHbIB3. CbPTT a naDalaHyfa apHaJFaH cbIMdbI naDalaHy 3neKtp TOBihIH COy KayniH a3aTaNbl.
- 3NeKtp KypalbH DblMkbH opbIHda naIaIaNHyfA Type KeIce, Xepre Kbicka TynbIKrTaly axbipatkbiUbImeH (GFCI) KopFaIHaN Kyat Ke3iH naIdanaHbHb13. GFCI naIdaIaNy 3NeKtp TorbHbH, COFy KaynH a3aiTaBbl.
KeKayinci3ik
Cak 60JIbIb3, He icTe XaTkaHbIb3Db6aKbIaNbI3
XaHE 3NEKtp KypaIbIH naIdaIaNfAH Ke3de caHaJIb TYpDe
apeKet etiH3. WapwafAH Ke3de Hemece eciptKI, aIKORoIb
Hemece dApi acePiHe 6OJaHa 3NEKtp KypaIbIH
naIdaIaNbAHI. 3NeKtp KypaIdApBH naIdaIaNfAH
Ke3de 3eHHHbip cat aybyI aybip Dehe XapaKaTaBHa
aKeNyIMMKIH.
KKeKopFaHbIiXa6dbIbHnaiDanaHbHb3.YHemi Ke3di KOpFay KypalbHKnin Kypinj3. WaHa KapcbI pecnPapOp, TaMaTbIH KopFaHbIiAek KIMi, DylbHa Hemece Kynak TbIFbHbCmRtB6Jrini 6ip Xa4aJnapda naDanaHbIaTbIH KOpFaHbIiXa6dbIbI DeHe KaapaTatbpH a3aTaDbI.
EpiKc3 icke KocbIydbH anDbH anbHb3. Kyat Ke3iHe XaHe/Hemec 6ataperaFkoCnac 6ypbH, KypbIrfHbI KTepey Hemece TacbImaJday anDbHa KaKcbIuTbH OLIIPY KyinHe eKeHHe Ke3 KeTki3iH3. 3NeKtp KypaIapbH CayCaKtB KoCKbiUbH yCTHe KObIn TaCbIMaJday Hemece KockbIb1 KOCybl 3NeKtp KypaIapbHa kyat 6epy Okbc KaFaanLapFa aeJeJI.
3NeKtp KypalbH KOCY aIbIHda peTteriW kINrIaIbn TactaHbI3. 3NeKtp KypalbHbH aHaMaJIb 6eNirHe 6ekTIyNI KaIraH bVpaHda Hemece KInr DeHe JapaKaTaHbA eKeNyIMMkiH.
C03bInB KON JIeKtiy ApeKetIH OpbHdAmHbI3. Dpybc aDbIMDaHbI3 XaHe Yhemi Tene-TeHdiKtCaKaTahbI3. Byn KYTnerEH KaFdaNapda 3neKtp KypalbHbIH, B6acApYbIH KaKCapTyFa MymKinhik6pepi.
Tnicti Typde KniHin3. Boc KIM Hemece aWekee TaKnaHb13. 1aWbHb13dbI, KIMiHj3di JHe KOfFanTapbHb13dbI Ko3FaImaB1 6aIweKeTpDen aIwak yCTaHb13. Boc KIM, aWekee Hemece y3bIn Waw Ko3FaImaB1 6aIweKeTpRe iHin KaYbMyMkiH.
Erepwah,copyKHeHNayHbicaHdapbinKaNfay KpybIbnapbl6epinreH 60nca,olapdbH KocblFaHbHa XHe Ticti Typne naDalaHbnaTbHbHa Ke3 JeKtizhi3. 1aHxHaftbI npaDanaHy waHa KaTbICTbI KayintilikTepeDi a3aTyfa MymkiHdk6epei.
KypaIapdbj Kni naJaIahydaH OJAPMeH TaHbIC 60nybIbIc KaTbIbIbI3DbjXoFAITbIN, KypaI Kayinci3dirIH KAFnIaIapbIbIH ene6eyiHe KOI GepMeH3. A6aIcbI3 apeKeT an-cTte aybp Jkapakatka ce6en 60nybl MyMkiH.
3NeKtp KypalbH NaJaHaHy XaHe OFaH KyTIm Kepcety
3NeKtp KypalbHa Kyyu TycipMeH3. KOndaHy Tyi yuih Tnict 3NeKtp KypalbH naaDanaHbHbI3. Tnict 3NeKtp Kypalbl KymblcTbI Dpybc XeHe 03iHe apHaIraH XbIJaMDbIKTa Kayinc3 opbIHdAdbI.
Erep Kockbi Onbi KOCNACA Xahe OUIIPMECE,3neKtp KypabIn naindaan6bH3.Kocbiupeh 6acapblmaTbH Ke3 KeIreH 3eKtp KypabblKayinTi XaHe OHb XeHdey Kepek.
Petteynep opbHday, Kocankb KypaIapdbayy bcytpy Hemece 3leKTP KypaIapbIH cakTay anDbHa aWahbkyat Ke3iHeh axbipatbH3 XHe/Hemece 6ataper XnHaftbH 3leKTP KypaIbHAn aBIn TactAh3. Mydai andbH any Kayinci3ik Wapapabpl 3leKTP KypaIbHbH baKaycb3da icke Kocblny Kaynin a3aiaTaBbl.
PaiDanaHbIMaTbIH 3NeKtp KypaIapBbH 6aIaIapDbH KOJIxETneITIH KepDe cakTaHbI3 XHe 3NeKtp KypaIbIMeH Hemece KypaIbbl naIdaIaNHy HcCKayIapbIMeH TaHbIC eMec aIaMDaPf OHbIMeH Kymlbic ICTeyre pyKcat etneHi. 3NeKtp KypaIbApbl OkyAH eTnerEH naIdaIaNHybIap KOJIbHa KaYiTI 6oJaBl.
3NeKtp KypaIapbHa KbI3Met Kepcetih3. Ko3FaImalbl 6BIIeKTepeH, Typa KeMeyuiniKtepi Hemece KbICbIbn KaIybiH, 6BIIeKTepeH cbHybH Xane 3NeKtp Xa6DbHbHbH JMybcIbHa acep eterH backa XaFdaIapdbI TekepiH3. Erep 3akbIManca, 3NeKtp KypaIbH naIadanHbAc 6ypbH XeHNTeiH3. KeTtereh OKbc IOKfApaIap Dpybc Kb13MeT KepcetimereH 3NeKtp KypaIapbHa 6BaIaNbIbCTbl opbH aIadbl.
- Keckiw KypaandapdbI eTkip, api Ta3a KyinHde yctahB13.
OTkip JnkeTepi 6ap Tnicti Typde Kb13MeT KepcetinetIH Keckiw Kypaandap aTeTte KaabicnaDbI KaHe OanpDbI bacapy OHai.
- ΘeKtp KypalbH, KepeK-JapaKaTapdbI XaHe KypaI KaaynapbIH Xymbc XaFaInapbI MeH opBHaIaNatbIH XymbICTbI ECEpe OTbIPbIN, OcbI Hcykaynapfa CaiKec naDalaHbIB3. ΘeKtp KypalbH e3re MaKcTaTapda naDalaHy Kayinti XaFdaNbIH, opBih aNyiba MymkiH.
TytkanapdbjXhHe yCTay 6ETepin KypfKa XHe Ta3a KyIe, MaJdah XHe Xakna MaJdaH Ta3a YCTaHbI. CbIpfaHaK TytkanapmehyCTay 6ETepi Kayinci KOnJaHyFa XHe Kytneren KaFdaJnapda KypaJNb6ackapyfMaMkiHdj6epMeNi.
Kb3MeT Kepcety
3NeKtp KypalbHa 6iikti XeHey MaMaHbIbIH, TeK 6ipdei Kocankbl 6oIweKtepimE KbI3MeT KepeTyH KaDaFanaHbI3. Byn 3NeKtp KypalbI Kayinci3diirih, CaKaTanyBbH KaMTaMaCbI eTeDi.
ApaHbI kayinci3dk aknapaTbI
ECKEPTY
Byi 6eimde ocbi KypaIFa KaTbICTbI MaHbI3dbI Kayinc3dkaknapaTbI 6ap.
PowerClear afbH K6bipbH Ta3anay KypbIfbcih naaanaH6ac 6pybH 3neKtp TorbHbH COy Kayin Hemece 6aca aybp dehe kapaKaTbI Kayin H aaiTy yuiH ocbl caKtbiK, wapapanapdbMykNt OKbIH3.
KEIHn AHbIKTAMAJbIK PETIHDE BAPJIbIK ECKEPTyIEP MEH HYCKAYLAPDbI CAKTAN KOIBHbI3!
ByHcyckayIbIKTb NaJaIaHaHyIbIH,NaJaIaHaYbI yUHH KpyblfIme6ipre yCTaHb3.
AfbiH Ky6bIplapbiH Ta3aJIay KypblfBiCbIHbH Kayinci3diri
KypaIbI naIaIaHy aIbIHda, dypbc Xymbc icteyIHe Ke3 KTeK3y yuH Kyat Ke3iHc bImbIme6ipre 6epinren Kepre KbIcka TybIKaTy axbipatKbIbHn (GFCI) TekepiH3. Dypbc icTeunTH GFCI anektp torbIHc cory kayniH aataTadbl.
- Tek GFCI apKbIbI KopFaIHaH y3apTkbl W cbIMapDbI naJaIaHbIbI3. KypbUIfbIHbIH KyaT cbIMblHaFBI GFCI y3apTkbl W cbIMapbIH aOpBH aIaNbIH 3JeKTp Torbl COFyblHbI aIbIH aImaiBbl.
AinHaiatbIn Ka6eBdi TeK eHdipywi KeHeC etKeH Kofannen YCTaHb3. IateK cHeme6 oocan KaIFaH Kofan Hemece WyBepek Ka6eBfre opalbin, aybp de He XkapakTaBHn AKeenyi Mymkin.
Ka6eIb aHaHaFan Ke3e KeckiWtH aHaNyBtH TOKtaTybHa J0n 6epMeH3. Byn Ka6eIbtre Kyy Tycipin, OHbIH 6ypaIbHa, BaIaNyBHa Hemece y3inyiHe AKeNyi MymKiH XHe aybip DeHe xapaKaTaHbA KeNyi MymKiH.
Bip aam Ka6eIbdi XaHe Kockbltbl 6aKblaybl Kepek. Erep Ka6eIb weTIaHaNyBH IN TOKtaTc, naDaHaYbU b Ka6eJIbepDIn H6paNByHa, 6aNaHbYbHa Hemece y3iYiHe JcoJ 6epMeY yuHIN Kpyblfbl Ko3FaNTKblbH IN OLIPE aanybl Kepek.
- ΘHdipywi KeHec etKeH KOJfAN iWiHderi NaTeKc Hemece pe3eHke KOJFa6bH, K03iDipikTi, 6et KaIKAhDapBH, KOPFaybiu KmDi XaHE aFBH XeNicIHde XmNraBk 3aTtApDbH, 6aKTePnApaDbH Hemece e3re yNbI Hemece Kxyna 3aTtApDbH, 6Oy bIKTMaNbHbHda pecnupatopbI naNdanaHbHbI3. AfbH Ky6bIpapbHa kYdiPin xi6epyI, YbI Hemece Kxyna 6oLybl MyMkiH Hemece e3re aybp DeHe xapaKaTbHa eKenyI MyMkiH XmNraBk 3aTtap, 6aKTePnApa JxHe e3re 3aTtap 6Oybl MyMkiH.
Tnicti TmHeHaBc KaTaHb3. KypaIbIbKOJaHaF HEmece naIdaIahFaHKe3DeTamakIiWneH3HEmece WblbIMweKneH3. AfbH Ky6bpHt Ta3aIayKa6DbIFbH KOnJaHaFHHH HEmece naIdaIahFaHHH Kein, KOJIbHb3DbJxHe aftbH KypaMbI tReH e3re Dehe 6oikTepi Jyy yuH bICTbK, ca6bHdbCydbI naIdaIahbHb3. Byy IbI HEmece KyaKnMa MATEpna Acepine BaIHaBcTb DeHCaybIK KayintiikTepi A3aTyfKa KMekeTecedi.
AfbH Ky6bipih Ta3anaFbiWbI TeK KeHeC etInre HafBn Ky6bipb EINwEmepeH naDanaHbHbI3. KApamcbE enWeMdi afbH Ky6bipbl Ta3anaFbiWbIH naDanaHy Ka6ebNbH, 6ypanybHa, 6aNaHbHa Hemece y3iJyHe Akenyi MymkH Xane Dehe JapaKaTaBHn Akenyi MymkH.
KypbIfbl Kymbic iCTen Typran Ke3de Konran Kuren KOnlbHb13dbi 6aftaybiu Ky6bipweKTH/AUTOFEED® 6bnirhe KoibHb13. Byl ka6eIb 6ackapbyih kakcapta,bj kHe Ka6ebJbH 6ypaIybiHa, 6aIIaHbHa JHe y3inyihe kon 6epmei jxHe aybp deHe JapaKaTbHa aKeJIy IyMmkiH.
AUTOFEED 6aIiri AbyH KxybipbHbH ay3bHAn 6 dIOHM (15 cm) WerinHe 6oNFAH Ke3e KypbIbHbOpHaJAcTbPbHb3 Hemece KaWbIKTBk 6dIOHMHeH (15 cm) aKaH Ke3e aWbIK Ka6eBdi Tnicti Typhe TipeH. YIkeHipeK KaWbIKTBkTap Ka6eBdiH bpaanyiba, 6aIIaHbHa Hemece y3iYiHe eKeletIH BacKapy KbiHDbIKTapBH TydbipyMymKIn. BypalFaH, 6aIIaHaFAn Hemece y3iReH Ka6eBcOcKbHa Hemece cOKTBfBCy JapaKaATabPiHa aKeNyIMMKIN.
KypblfblHbOcbHyckaylbkTa CnnaTaNFaHHaB6ackaREV (kepi) aHaanDbipbn naDanaH6aHb3. Kepi Kynde naDanahy Ka6eB 3aKbIMbHa aeJy MyMKIn JxHe Ka6eBwetIH TbfbHHa WbIFapy ywiH naDanaHbIaNbI.
KoIaHbIb3dbI aHaJIaTbIH 6apa6aHHa HKe 6afttaybiTuTKweDen Anbc yCTaHbI. Kypblfbl 0iipyni 6oImaca, 6apa6aHHbI iwiHe kIpMeH3. KoIbHbI3 Ko3raMaIbI 6oiJeKTEpre iinH KaIybl MymKiH.
Boc KIM KIMHei3 Hemece aWekei TaKNaHbI3.
WauhHbI3dbj XaHe KmimHj3di Ko3FaImalbl
6aWeKeTepDen aWak YCTaHbI3. Boc KIM, aWekei Hemece waJ KO3FaImalbl 6aWeKeTepre iNihci MyMKIn.
Erep naIdaIaNHybI He KypblfBi Cyda Typca, KypblfBiHbI naIdaIaN6aHbI3. KypblfBiHbI Cyda naIdaIaNHy 3neKtp TORbiHbIH COFy KayniH apTbIpaDbI.
Erepocbl RIDGID eHimHe KaTbICTb KaHdAa da cypaftbHb3 60la:
- Xepriiikr RIDGID, ducptn6bIOTOPbHa xa6apIacblHb3.
- Xepriikti RIDGID 6aJIaHbIC opHbIH Ta6y yuH RIDGID.comTopa6bHaKipiJ3.
Ridge Tool texHkaIbIK Kbi3MeT 6aIimiHe rtctechservices@emerson.com apKbIbI xa6apIacbIHbI3 Hemece AKIJI XaHE KaHaJa aYMaFbIHda (800) 519-3456 HOMiPiHe KOHbIPay WJIbIHbI3.
CnnaTama XaHe TexHnKaIbIK, cnnaTtap
Cunatrama
RIDGID PowerClearTM afbH KxybIpbIH Ta3aIay KypblfbcI KaYdaftb, Kayfadaftb XHe dyUtaftb ⅡIOmIK (20 MM) 1% IIOHMik (40 MM) afbH XeJIinepiH ta3aIayfa apHaHa. On 30 fytbIK (9 M) Ka6ebMeH Xa6dbIKTaHaF.
PowerClear afbih Ky6bipih Ta3aIaNfbiu MNHytbHa 18
yfT XbIJaDAMbIKTa TetikTi bacy apkbIbI Ka6ebdi anfa
XbIJIbIKITaBH XHe HbIFapBn aNtBn 2xKaKTbAI AUTOFEED KA6ebdi eTKi3y TetiriH KAMTNbl. PeTTeRiH 6aftTaybiu
K6bipwek AUTOFEED 6oirimeH 6ipre Ka6ebdi TiKeJe
aFBH Ky6bipbHa eTKi3y MymkiHdirH 6peDi, an 6yI
NaCTAHybl 6apbIHwa a3aHTabIg XaHe 6eJIkTeepDi KopFayFa
KEMeKTEceDi.
AIFA/OLIpy/KEPI Kockbiu6apabH MeH Ka6eIb aHaJIbIpydb 6akblnblxHe NHEBMATKANbIK aR, KOckbiu Ko3faNTkbIHTbIH KOCY/OLIpy BacapbyH kAMTamacbiE etdi. KeweHjKepre Kbicka tyibkTany aXbipatkbUb (GFCI) Jei cMbHa 6ekitireh.
AfbH Ky6bIpbTa3aIaFbIbHda Ka6eIbdi KaIaFaIay MymKHiDriH 6epetih aBbIK aIbHbFkpnpyc6ap.
PowerClear afbIH KybblpHbH Ta3aIaNbIbI TaKeTxHaDa naIaIaNyFa KeHeC eTIMeNdi.
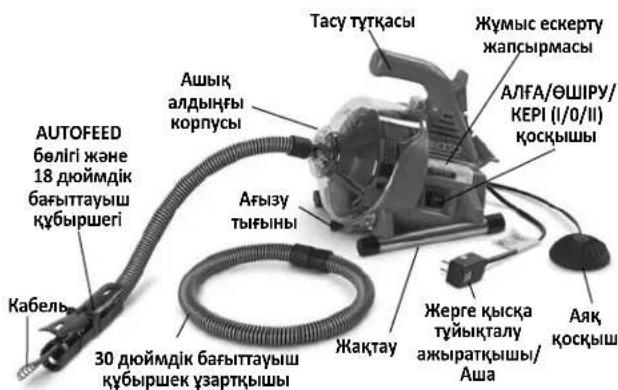
1-cyper-PowerClear afbin Ky6bipbH Ta3aJAY KypblfblCbl
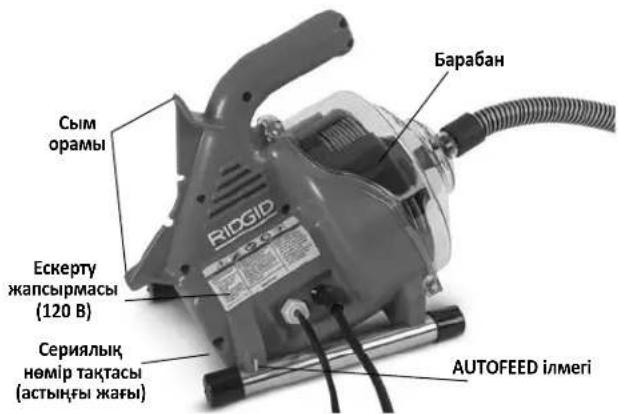
2-cyper - PowerClear afbin Kxy6bipbH Ta3aIay Kypblfblcbl
TexHnKaIbIK cnnaTtap
Xeni KyaTbunfbl ...34 H0M-12H0M (20 MM-40 MM)
Bapa6aH KyaTbIbIbIbI ... DnaMeTp i 14 IIOM (6 MM) Ka6eIbdiH 30 cyTbI (9,1 M)
Ka6eIb 14 IIOMx30ΦyT (6MMx9,1M) MAXCORETM 50 Ka6eI
Ko3faNTkbIw Typi ... ... 3m6e6an
Ko3faTbIbITbH,paTTbMhpei
100/120 B wamameh
Ko3faTKnbl 1/4a.k.0,8/0,9A,50/60r
230Bwamameh
Ko3faTbIu 120Bt,0,5A,50
KypbIbHbIH TexNkAkbICnATapbl TypaIbAknapa60BbIHwa cepraBbIK TaKaTbH KapaHbI3.
Kytemeci
KbIJaAMdbIfbl (no) 450aMH/MNH
AUTOFEED
6e9irin 6epy
KbIJaMdbHbI 18yT/MNH(5,5M/MNH)
BaKApy tetiktepi ..AHa/0UIPy/Je3e Kei aHaIbIpy 6aFbITbIH BaKApy
KOCY/THLIUPY NHEBMATNKAJIbIK AARK
KOCKblbIK03faTtKblBH6ackapy
Ka6eIbdi anfara KbiNkbity/ubHapbIn any
AUTOFEED 6eJIiri peTteJIeTIH
6aftaybiKy6bipwerim
Xymbic
Temnepatpacbl 20° -120°F (-7° -49°C)
CaImaFbl 12yHT(5,44Kr)
¥×Ex6 eJIeMepi 14HouMx9HouMx11,5HouM
(356 MM x 229 MM x 292 MM)
b| 6bcKbCbMb1 (L_pa)^* .70dB(A), K = 3
Db16bc KyaTb1 (L_WA)^* 79 dB(A), K = 3
*Bb6bcnueemepi EN 62481-1 CTaHdpTb6oBbHua cTaHdpTtFaH cbHaKa
UbifatbHdbicbOpahanahJxepiH3aeXaheOcbkypuaadapdb,6bniri 6ip
-Dbibctbkyndenikriacepdehrenepi ap6ip konany typihe 8aranahy kane KAKet 6oNraHda Tnict Kayincidjk wapanapabk Iona fa bHybnTic. 3epdeneireneip h anbKanfah Keynkpeyunin, naadnaanBammaYakytckepinyi Kaket. Byn KaJIbIy KMyCbIcKezEnHde acepeHefH enayip aasry MyMHIN.
aKeIyIMyMKIH.Ta3anamac 6pybH aFbH Ky6bIPbHBH KyIN TEKcepyIDH eH dpybc K0JI KaMepaHbI naDanaHa OTbIPbIN, BN3yAaDbI TeKcepy 6oBbIn Ta6bnaDbI. AFBH Ky6bIPbH Ta3aNafBHTb I Dpybc NaDanaHbay AFBH Ky6bIPbHBH Ta3aNafBbI MeH aFbH Ky6bIPbH 3aKbIMdaybIMyMKIH.By N KpybIFb6apbIK 6iteReH opBnDapdbTaaTpNaByIMyMKIH.
KypbInfblHbl Kypactbipy
A ECKEPTY
NaiDalaHcyKeiHde aybip kapaKaT Kayin a3aHTy yuIN OcbI Tnicti XnHaKtay pacimdepin opbIHdaHBi. XnHay anDbIHDa AJFA/OLIPY/KEPI KocbiBbIbI OLIPY KyHHde 6onybl KaXeT JHe KpybIFbl Axbipatynbl 6onybl Kepek.
BaftTaybi K6bipwekTi/AUTOFEED XnblTbIfbH peTey
PowerClear KypblfbcihHn naDanaHbIaNbIH aBih K6bipb caHbIaybiHaH opHaJacy KaWbIKTbIFbHa KapaA AUTOFEED 6aftTaybiH Ky6bpWerH 18 dOIMdk 6aftTaybiH Ky6bpWek Hemece 48 dOIMdk 6aftTaybiH Ky6bpWek petIH de HNtAYfa 6oJa.18 dOIMdk 6aftTaybiH Ky6bpWek Kypblf b acy Hemece BaHHa cpeci CnKrTb KaY JxHaBHda TikeeOpHAnackaH Ke3Te Tnicti Typde Kymbic icTeNi. 48 dOIMdk 6aftTaybiH Ky6bpWek Kypblf b 6blaydah TBc eDeHe opHAnackaH Ke3e JkapAmdbIoYb MyMKiH. PAnDaHaNbAtbH 6aftTaybiH Ky6bpWeri Y3bIHbIFbHa KapaMaCTAH, AUTOFEED XnbHTbfI aBih K6bpBi ay3bIHAN 6 dIOm (15 cm) weriHde 6oJIbyKepek. BaftTaybiH Ky6bpWekTI 48 dIOHMHe h ACA co36abH3.
- Erep KaKet 6oNca, 18 XaHe 30 HOnMdk 6aFbTTaybiu Ky6bIpwek 6eimdepin KaIfAhyb3. KaIfama yKeJIcIc KoHbIpMa 6oJbIn Ta6bIaNbI - CbIPTKbl ΦHTnHIT iWki ΦHTnHtke eHri3iH3 XaHe 6ekitireHIN pactaHb3.
- Ka6eIb WetIHderi KaKNaKTbI aIbn TactaHbI3 XaHe NaKtbpIn TactaHbI3 (KaHa Kypblfbl). BaftTaybiu Ky6bIpweK XaHE AUTOFEED 6eniri apkblbEtkiy yin H 6apa6aHHan KeTKiikrTa Ka6eIb MeIwepiH TapTbHbI3.
- Ka6eIbdi 6aftiTaybi Ky6bpwek 6oBImeH kypri3iH3. Ka6eIb 6acblHIn AUTOFEED 6eniri apKbIbI eTkisiYi yin AHFA XblXbITy Xane WbIFAPbIN A/NTikTePi H KTeepiH3.(5-cypem).
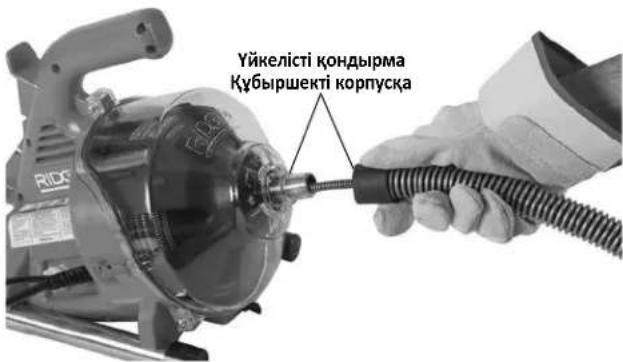
4-cpe-TKa6ebnbdi 6afblTaybiu Ky6bipwekeEtki3y

5-cypeT-Ka6eIbdi AUTOFEEDXHbIHtblfbl apKbIJIbI eTKi3y
4.A/IFA XbIJIbIXbITy Xhe IJIbIFApBn AITy terIKtepiH 6OcaTbIHb3.
5. Ky6bipweKti andbihfbi Kopnyc andbihhIn yctih 6acbn, 6aftTaybiW ky6bipweKti KpybIbfbTa TipKeH3 (4-cypem). Anbin Tactay yin Hepicti kepi opbHaB13.
Kymbic aIdbiHda TeKcepy
A ECKEPTY
Op6ip naDalaHny anDbIHda,3IeKtp TOrbHbH, COFybiHaH, 6paJFaH Hemece y3iRhen Ka6ebJbepDeH, XmNraBik KyIKTeH, KynlaIapdAn Kahe 6acKe6enTpRe6aiaNaHbictb
opbH aIaTbH aybip DeHe JkapakbI Kayin H a3aHTy KHe
aFbIH Ky6bIPbTa3aIaNbIbHbIH 3aKbIMdAynbIH 6oNdbIpMAY
yuH aFbIH Ky6bIPbH Ta3aay KypblfbcIH TEKcepHj3 KHe
aKayIbIKTapdbI KObnHbI3.
AfbH Ky6bIpb Ta3anaftbiuH TeKcepy KeiHde yHemi KopFaHbI W Ke3inDipikTePH, 6blnFapBx Kymbc KofanTAPBH XaHe 6acaTicTI KopFaHbI W Ka6dbfBn H naDanaHbHb13.
-
BbIfapbi JxMbic KONfantapbiH TeKcepiH3. Onap 6yTih, TecimereH He aHaHaTaBH Ka6eBtre iInHyi MymKiH 6oc 6enikTepi JxK eKeHHe Ke3 XeTKi3H3. OpbHcb3 HEmece 3aKbIMdaHFAH KONfantapDbI KIMEREH MaHb3DbI. KONfantap KOndapbIHb3DbI aHaHaTaBH Ka6eBdeH XaHe aFbIH Ky6bipbIH, iWHiDericinH KopFaNbI. Erep KOnfantap 6bIfapbi JxMbic KONfantapbi 6oMa ca He 3aKbIMdaHFAH HeMece To3FaH 6oLa, KypblnfbHbT Nicti KOJfantbI aHaHaNa naJaHaHa6aHb3.
2.AfbH Ky6bipbH Ta3aJAY KypblfbcHbH, aKbpaTbnFaHbHa Ke3 JkTeK3iH3 XaHe Kyat CbIMbHda, Xepre Kbicka Tybiktany axbpaTkbHbHa (GFCI) (erep 6epince) XaHe aaaa 3akmbHH 6ap-kofbH TKcepiH. Erep awa TypneHdpinre Hcna Hemece erep cbm 3akbmdanfaH 6oIca, 3nEeTp Torbl cFyblHbH, andbH any yuH cbIMdbi 6iikti XeHey MAmHb aybictbipfAHw KaPbIbfHb naDanaH6aHb3. -
Tykapanbpih XaHe 6ackapy Tetiktepi Koc afbH Kybipb Ta3anaFbIbH Ta3anaHbI. By TeKcepye KMekeTecei XaHe KypblfHbH, Hemece 6ackapy TetiriHb KbiCkiWtah CbIPbH KetyiHe KOJ bepMeDi. KypblfHbH KbIMET Kepcety HcyKaynapHa caiKeC Ta3anaHbI XaHe OFAH KbIMET KepcetHi3.
4.AfbH K6bipbH Ta3aay Kypblfbcihda MbHaIapdbi TeKcepH3:
Tniicti Typde JHHaKaTay JaHe TOIbIKTbIfbl.
Ke3 KeIreH CbIHbIK, To3FaH, KOK, petci3 Hemece Ka6bickaH 6eikTeP.
AAK KCKbiUHTbIH aFBiH Ky6blpBH Ta3aJAY KypblfbcHa TipKeJIreHiHe Ke3 XeTKi3iH3. KypblfbiHbI aK KCKbiUIne Hicke KocnaHbI3.
Eckepy 6enricihh 6ap 6onybI KHe OHbI OKY MymkiHdiir (1Khahe 2-cypemmpdi KaapaHbI3).
- AUTOFEED 6eJiri TeTikTePiH, 6ipKaIbIITbI JHe epKiH Ko3fAnybl (9-cypem).
Kayinci3 XaHe KaIbIntbI JxMByC icTeYiHe KOn 6epMeyi MyMKH Ke3 KeJIrTeH KaFdai.
ErepakaynbikTap Ta6bIcna,akaynbikTap TY3eITIREHwe aFBH Ky6bipbTa3anaFbiuBn naDanaH6aHb13.
- Ka6eIbIerI Ke3 KeIreH KOKbICTb Ta3aHaHbI3. Ka6eIbIi To3y XHe 3aKbIMFa TeKcepHi3. MbHaIapDbI TeKcepHi3:
Ka6eBbDIn CbipTbHa opaIfAH KepiHetIH Ka3bIKbIKTap (Ka6eBd OehreK cbIMHa XacaIfAH XaHe cy16acbl DeHReEk 60lyb KaKeT).
- BipHeWe Hemece WaMaJaH KcN 6aJNaMap (15 rpaDycka deiHi rKiWiiripim 6aJNaMdpI Ty3eTyre 6oJabl).
Ka6eNb nuiHinH co3y, 6aHnany Hemece Kepi eTKi3y (KEPI) apKbIbI e3repTInreH IN KepcTeTIN Ka6eNb opamapbl apacbIHdafbKeHICTIK.
bIfai Knyde caKaTaydah HEmece aFbH XmMnYblK,3aTApbIHbH, acepiHeOpbH aJtBbH WAmadH KEN Mykiny.
To3y MeH 3aKbIMHbIH,6apIbIK TypIepi Ka6eJIbdi AnicipTei
Jha He naIdaIahy Ke3IhJe Ka6eJIbepDIn K6bipeK
bypanybHa, MaibCyblHa He y3IyIHe aKeIeJI. AfbH
K6bIpbl Ta3aIaNbIbHn PaIbIaNbOac 6byPi H To3FaH Jha He
3aKbIMDaIraH Ka6eJIbDi ayBcTbIpHbI3.
KypbIbI cbiptbIHda Ka6eblH 6eJIi 6 IIOHMEN (150 MM) acnaiTbIHdai Ka6eblH iWKe TOnbIK TapbIHaBHa Ke3 KETKIiH3. ByI Ka6eblH 6acbIHda cA6bIPaybHa JOK 6epMeiDi.
6.AFA/OLIIPY/KEPI (I/O/II) KOKcbIbHbIH ΘLIIPY KyiHe opHaTbIraHbHa Ke3 KEKt3iH3.
7. Kypfak Konmeh cbIMdbTnicti Tpyde Jxepre KocbIHaH po3eTKaFA KocbIHb3. Dypbc Xymbc icTeiniHHe Ke3 KeTeK3y yuH 3neKtp cbIMbHaBfGFCI (erep 6epince) TekcepiH3. CbHak TYMecin 6ackan Ke3de "KAITA OPHATy" den 6enrileHren Kbl3bn TyMe a3dan KaIKbIn 1bYbI KaKeT Jxane KypblfbXymbc icTeMeNi. KAITA OPHATy tyMecin 6acbln KaTa icKe KocbHb3. Erep GFCI Dypbc Xymbc icTeMece, cbIMdb AxbpaTBb3 XHe GFCI XeHdReHWe aftbH Ky6bpH Ta3aay KypblFBcBn naJaAnaHa6aHb3.
8.A/FA/0UIPV/KEPI KCKbIbIH A/IFA KyIHe XbIbITbIH3. AIK Kcckbltb6acbln, 6apabahhhIn, aHAnly 6afbltih ecepiH3.Erep aK, Kcckblk Kpyblfbl Kymbcih 6ackapmaca, OHJI KxHderHeWe KpyblfblHn NaDaHaHa6bH3.BapaBn anDbHn KaPapaHa da CafTti 6faftbHa Kapcbi aHanyi KaKeet XaHe aNbHfbkopnyctaflb 6apaBn 6afbltHa cKepei (10-cypem).
AraK KockbIbTb 6OcTaBn, 6apa6aHbIb TOnbIbIMeH ToKaTbHb3. ANFA/OLIIPY/KEPI KocblbH KEPI KyiHe YCTan TypbHb3 XaHe aFbH Ky6bpI Ta3aNaFbIbHbHIn, KEPI KyiHne Dpybc XyMbIC ITeTIHHe Ke3 XeTKi3Y yuH IN KOfApblaFb CbHaKTb KaTaNAbH3.Erep Tnicti Typde aHaJMaCa, KypblbHbI XeHNDeJIreHwe naJaIaNbHaB3.
9. Tekcepy aKaTaHaAa AIfA/OfUIPy/KEPI KockbIbH bUIPy KyiHe KblNbITbIH3 XaHe Kypfak KOImEH KypblnFbIHbI aKbPaTbIH3.
KypbIrfbiHbl XHe XyMbIC ayMaftbIH OPhaty
A ECKEPTY

3JIeKtp TOrbIHbIH COfYbIHaH, eptTeH, KypblfbiHbIH KcAioBHaH, 6ypaIFaH He y3iReH
Ka6eIbIepdH 3aKbIM any Kaynin ToMeHDeT yuiH XaHe aFbIH Ky6bipbl Ta3anaFbIuBihH 3aKbIMdaHybHa KON 6epMey yuiH aFbIH Ky6bipbl Ta3anay Kypblfbcih HxHe Kymbic ayMaftbH OcbI pacimdepre caNkeocPHaTbHbI3
AfbH Ky6bipb Ta3aNaBbIbH OPhaTKaH Ke3Je YHeMi KopraHbIH Ke3iJdpikTepi HKe3e 6acka Tnicti KopraHbIH Xa6dbfBIn naDanaHbIHbI3.
- XymbcayMaFbIHaMbIHaNapApBt TeKcepiH3:
TnicjkapbikMeIeepi.
KahfbiuCyBikTbIKTapdbIH,6ynapdbIHHeMeceTyTaHybl MyMKHwaHbIH,6onybl.Bap6oHaH KaJaMaDaKe3depi aHbIKtaJIbIN,TV3eTIImMeHHue,ayMaKaTJ KMyMbICteMeH3. AfbH Ky6bipbIH Ta3aIaNbFliu KApblBicKa TeImdi EMEC JhHe YUkbHdap UbIFapbyMymKH.
- 5apbik kja6blk khe naaandahybI yuH aubk, teric, opHbIKbI, Kpyfak opbH. KypblfHbI cyda TypfaHa naaandaHaB13. Erep KaKet 6oIca, cybl JyMbIC ayMaFbIHaH KetipiH3.
Tic KepHeyDIn JKepre Dpybc TYbIKTaIHaH 3NeKtp po3eTKacbl. KypblfBHLH, cepnIbIK Hmip TaKtacBHa KaKeTTi KepHeyDi TeKcepiHJ. YU W Hemece GFCI po3eTKacbl JKepre Dpybc KocblMaFaH 6Olybl MyMkiH. KymaHj3 6oNca, po3eTKaHbI pyKcAbl Gap 3NeKtp MaMaHbHa TEKceTIH3.
3NeKtp po3eTKacbHa KaYaT CbIMbIHbIH bIKTMaJI 3aKbIMday Ke3depi JOK 6ereyinci KJON.
- Ta3anaHaTbH aftbH Ky6bipbH TeKcepiH3. Erep MymkiH 601ca, aftbH K6bipbHa Kipy HkyTelepiH, aftbH K6bipbI eJWeMdepH XaHe Y3bHDbIKTapbH, 6aKtapFa He Heri3ri TapMaKaTapFa KaWbIKbIKTbI, KenTeNy KyinH,
aBHH Ky6bipih Ta3anaTbH XMMKaTAPdbH Hemece 6aca XMMKaTAPdbH, 6OlybH aHbIKTaHbI3. Erep aBHH K6bipbHaXMMKaTAP 6oJa, ocbi XMMKaTAPMeH KMybcic iTey ywiH KaKeTTI apHaNbi Kayinc3dk WapapanabH TycHIn any MaHb3dbi. KaKeTTI aknapat 6oBbIHwa XMMKAT eHdipywicHe xa6apnaCbHbI3.
- Kɔŋdʌhγ yɪiŋ Ḥaρaʌmɒbɪ Ḥa6ɒbɪkTɒb aHbɪkTaHɒbɪ3. Texhɪkaɪnbɪk cunammapɒbɪ kɑpəhɒbɪ3.
PowerClear afbH Ky6bIpbHbIH Ta3aIaFbIbI bXeTXaHaDa naIdaNaHyFa KeHec eITMeiDi.
BaCKa KOJaHaFyFa apHaJIfAH aFBiH KY6bIpbI Ta3aJaFbiWTapBH RIDGID.com Topa6bIHdaFBI Ridge Tool OHJH KaTaNOrbIHa H Ta6yfa 6oJaDbI
- BapIbIK Ka6DbIKbIH Dpybc TEKcepiReHHe Ke3 KeTki3iHj3.
- Erep KaKet 6oIca, KopraybIi KaKnakTapbIH XyMbic ayMaFbHa opHaIaCTbIPbHb3. AfbIH Ky6bIPbIH Ta3aIay npouci KnbH 6oIybl MyMkiH.
- Erep KaKeT 6oJCa, KoprAybIi KaKnakTapdbI JxMbIc ayMaFbIH aOpHaJIaCTbIpbHbI3.
AfbH Ky6bIpaIbHbIH K6iCi yuIH Ka6eIbdi aFBH Ky6bIpaIHdaFb aiKac 6enrinep apKbIbI bcaKaTayFa 6oIaIbI (6A-cypem).
Kaikbimabif3y TbfHbImeKary yuH: Ketepy KaHaBfIH XHe aFb3Y TbfHbIH anBn TaTaHbI. LbIFyMymkiH cybl YcTaN kany uH Ta3aNay TbfHbI HEmece Top acTbHa bIDIC KoibHbI3. (6B-cypem).
- BaKa KaAynap YsiH Ta3anay TbIfbHbH Hemece TopbH aIbIn Tactay KaKet 60nybl MyMKH. LbHybl MyMKH cyDbI yCTan KaYyUsiH Ta3anay TbIFbHbH Hemece Top actbHa bIDbc KOJIbHb3. (6C-cypem).
- 5bIaydbIH tacby: 5bIaynap yuiH afBih Ky6bipbApkblbI eTyre apekeTeH6eH3, 6yI Ka6ebdi 3aKbIMdaIbI. AfbIH K6bipHa KaTbIHacy yuiH tacKaTacBih XaHE Ke3 KeIReH tetikti anBn TactaHbI (6D-cypem).
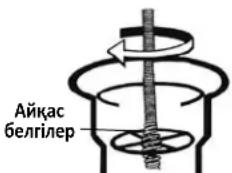
A-cyptet
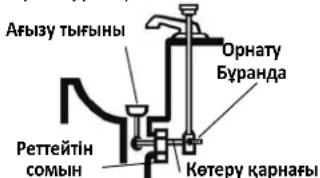
B-cypet
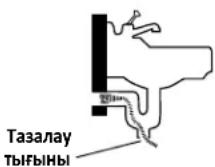
C-cypet
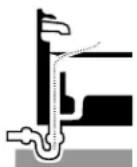
D-cypet
6-cypeT-AfbIH Ky6bipbHa KaTbIhAc
- AfbH Ky6bipbH Ta3aIay Kypblfbcihpe3Eke TabHaFb 6ip DeHreIe 60aTbHdAn XaHe 6apbHua TycTeIHdei etin opHanaCTbPbHbI. KypblfHbI naIacka Hemece KypblfHbH, actbHfbl JaFbHdaFbl aya CaHbIaNapbH
6iteyi MymkiH 6aca 6eTepre opHaIacbipMaHb3. AUTOFEED 6enirih Hweti afbi Ky6bipb KaTbHaCbIHaH 6 dIOm (15 cm) weriHe ketyi Tnic. Ocb Kyre ketyuH 6afttayib Wky6bpweKTI KaTb TaTnay He 6aJIaMAY KaKET. AfbH Ky6bpHah AnlwaFbpaK KaWbIKTBk Ka6ebJdih 6pyany Hemece 6aiNaHy KayniH apTbipadB. Erep 6apa6an CanbIaybl 6fBnH KBy6bpHa KaTbHaCTAH 6dOIM (15 cm) weriHe 60lbN, KypblFbHb OPHaIactbpy MyMKH 6oImaca, afBI KBy6bpHbHa KaTbHaCTbY KcCac 8IWeMei KBy6bpMeH KaHe QHTINHTepMeH co3bH3 (7-cypemmi KapaH3). Ka6eBdi DpybCTan TipMey Ka6eBdiH 6ypabIn XaHe WnblpWbIKTaBln KaLybHa 3KeincoFby MymkiH XaHe Ka6eBle 3aKbIM KeNTipin, naJaAnaHyBbHb Japakataybl MyMKH.
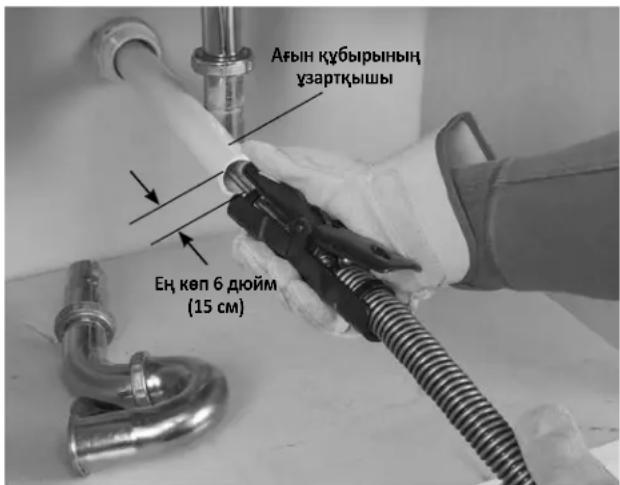
7-cypeT-AfbiH Ky6bipbH Autofeed 6JIiriHeH 6 JIOIM (15 cm) WerirHe de co3y ylrici.
- Kymbic ayMaBbH TeKcepH3 De, 6eIde aadapdbH aBbH Ky6bipb Ta3aNaFbUbHaH XaHe Kymbic ayMaBbHaH aJiak YcTay KaKeTTINIH TyDbipTaBH Kepeprineepinbap-KoFbH aHbIKTaHbI3. AfbH Ky6bipbH Ta3anay npoueci KnbH bonyMmKIn XaHe 6eIde aamdap naDanaHyUbHbI anaHdaTybl MyMKH.
- Oha Koi Jietimdi 6onybi yuih aek KockbiWtbi opHaTbHb3. Baftaybiu Kybipwekei Xahe AUTOFEED teTiktepi YcTan 6ackapy, aek KockbiWtbi 6akblay Xahe AJFA/0UIPY/KEPI KockbiwbaHa Koi JeTKi3y MymkiHdirir3 6onybi Kepek.
- A/IFA/ΘLIPY/KEPI KOCKbIbI ΘLIPY KyHnIe eKeHH paTaHaI3.
- CbIMdbaUdbK, KON 60nbimEn Hxypri3iH3. Kypfak KOblHb36eH aftbH Ky6bpbl Ta3anaFbIuBH Tnicti Typde Xepre TybIKtaIaNFaH po3eTKaFA XaINaFbH3. Baplbik KocblmbdApdbI Kypfak YCTaHb3 XaHe JepDIn 6etIHDe XaTkb36aHb3. Erep Kyat cbMbl XeTkiniKTi Typde Y3bH 6oImaca, MbiHaadai y3apTkblcBIMdb NaJaIaNbHbH3:
Kakcbkyneri.
-AfbH Ky6bIpbTa3anaFbIbIHdaFBifa YKcac aUaCbI 6ap.
CbIPTa naiDanahyfRa 6eRrIeHReH xHe cBIM TaarBHydAyBHJa W Hemece W-A (rAFHN, SOW) 6ap Hemece H05VV-F, H05RN-F TypelpiHH Hemece IEC TypiHH kacaKaTAmacbHa (60227 IEC 53, 60245 IEC 57) caKeK KeJI.
CbIM eIwemi KteKlkiT. 3bHdbfb50 50yTk a(15,2 M) DeiHri y3apTKblcMdpb yuih 16 AWG (1,5 MM²) Hemece aybpay cbIMdbi naJaHaNbHbHbI3. 3bHdbfbl 50-100 cyT (15,2 m-30,5 m) y3apTKblcMdpb yuih 14 AWG (2,5 mm³) Hemece aybpay cbIMdbi naJaHaNbHbHbI3. 3a3pkbllcbIMdbi naJaHaHaFAn Ke3de afBH Ky6bpbl Ta3aHaBbHdaFbGFCI y3apTKblcIMdbi KopFamaJbI. Erep po3eTa GFCI apkblbKopFaMaFah 6oIca, y3apTKblcIMda aKay 6oJaHaKaFdaTOK CofyblHbH aIbIH any YuHn po3eTa MeH y3apTKblcM dpbApacBHaFb GFCI TINTI KOckblTbI naJaHaY cBhlNAdbl.
Пайдалиу Нуckayлары
ECKEPTY

Ke3iH3di NaCTAH XaHe 6eIe 3aTTapAn KOpFay yuiH Ke3di KOpFay KypalbH Knin Kypinj3.
Yhemi Kyi Jxakcb6blfapbi KymbcKoIfantapbHKnih3.
JateKC Hemece 6ocan KaIahn KOIant Hemece uy6epek
Ka6ebre opalbin, aybpde He XapaKaTaHaAkeNyIMyMKH.
JateKC Hemece pe3eHKe KOIfantapdb TeK 6blfapbl
KymbcKOIfantapbHbH actbHda KNIH3.3aKbIMdaHaf
aBbH K6bipnapbH Ta3anay KOIfantapbH KNMeH3.
AfbH K6bipBn Ta3aay Ka6dbIbH KondaHfAH XHe naiDalaHFAH Ke3e YHMei Tnicti Xeke KopFaHbIu Xa6dbIbH naiDalaHaBbIb3. AfbH K6bIpnapbHa DaYbI, HnEKeKunraNbl 6Olybl, KydpIy Hemece Baca Xa4aHaNapDbI Tydbpybl MymKin XmMkaTAp, 6akTePnaIap XaHe 6acka 3aTAP 6Olybl MymKin. TnictixKeKopFaHbIw Xa6dbIbH aYHemikayinc3dk Ke3inDiPikTepi XaHe 6blrApbl XMybc KOnFaTApbl Kipei XaHe NaTeKC Hemece pe3eHke KonFanTap, 6et KaKaHdApbl, Ke3inDiPikTep, KopFaHbIu Kmim, pecnPnataOpnap XaHe Temip TYMcBIkTbI aRk KIM CnAaKtbl Xa6dbIKtbl KaMTbyl MymKiH.
KypbInFb icke Kocynb Ke3e Ka6eB WetinH, 6ypbInyDbI TOkTaTybHa JOn 6epMeH3. Byn Ka6eBre Kyw Tycipin, OHbH, 6ypaNbyHa, 6aNaHbHa Hemece y3inyihe AKeNyi MymKiH. BypaNfA, 6aNaHFaH Hemece y3iRer H Ka6eB cokkbifa Hemece coKtBbfcy JkapakTAPbHa AKeNyi MymKiH.
KypbIbI bI cke KocynI Ke3e KONfAN KINRe H KOJIbIHbI3bl 6aftTaybiu Ky6bpipweekke/AUTOFEED 6anirine KoibHbI3. Byn Ka6ebb6acapbyH xakcapTaDbI XHe Ka6ebdbiH, 6paanyBa, 6aanhybHa XHe y3inyHe Kon 6epMeyre KMeKTecei. BypanFAn, 6aanHan HeMece y3inre Ka6ebbCOKkbifa Hemece coKtBbIFbcy kapaKaTAPbHa eKeNyi MymkIn.
AUTOFEED 60Jiri afbH Ky6bipHbH ay3bHAn 6 dIOHM (15 cm) WerinHe 6oNFAH Ke3De KypbIITbHbOpHaJIaCTbPbHbI3 HEmece KaWbIKTBk 6dIOHMHeH ackAH Ke3De aWbIK Ka6BeJIi Tmicti Type IipeH3. YKeHipeK KaWbIKTBkTap Ka6eJIbIH 6paAlyBHa, BaIIaHyBaHa HEmecey3iYInE AkeLeTIbACkapAkyBnIBDkTApBH TYdbpybMyMKiH. BpaIaNanF, BaIIaNanF HEmece y3iRtn Ka6eBc KokBbifa HEmece cokTbHbCy JapaKaATTabbiHa eKeIyi MymKiH.
Bip aadam Ka6eIbdi Jxhe AAK KCKblWtbl 6akblaybl Kepek.
Erep Ka6eIb Weti AinHanybih TOKtaTca, naDanaHyybl Ka6eIbdepin 6ypaNbyHa, 6aIIaNybiHa Hemece y3inyiHe XoJbepmey yuHIN Kpyblfbl Ko3FaTTkbUbiHn OLLIPE anybi Kepek.
BypaIraH, 6aIIaNFAH Hemece y3iReH Ka6eIb cokkbifa Hemece coKtbfbicy kapaKaTapbHa eKeenyi MymkiH.
BypanHan He Ka6enbdepeH, Ka6enb yuBHIn 6oc TypybiHaH, KypblfBiHbH KcAcbHbAH, XmnaJIbIK ePTteH, HfekunraIapdaH XaHe 6ackanaie6eBentepDen Jkapat any Kayin a3aTyr uHJ MyMbIC HcykaynapbH opihDaHbI3.
- Kypblfbl MeH XyMbIC aMAmfbHbIH Tnicti Typde opHaTbIHaHaHa JxHe XyMbIC aMAmfbHda 6erDe aDAMap MeH 6acka da Ha3ap aydapybH HApcepepiH KOktbIfbHaKe3 JeTKi3IH3.
- Ka6eIbdi KypblfbiHa TapTbIn aIbIn, aFbH Ky6bipHa caIbIH3. Ka6eIbDi yIbI aFbH Ky6bipHaH WbIKnTaBHdAeTin, KEMIHde 6ip fyt (3M) Ka6eIbdi aFbH Ky6bipHa caIbIN, KypblfbiHbICKe KcKaH Ke3de aHaHaDbipa opan TactaHb3. Ka6eIbDi aIbIK KaIybiH XaHe 6aftTbIH e3repYiH 6apBHa a3aIbIn, Ka6eIbDi TkeJe Kypblfbl WbIFCbHaH aFbIH Ky6bipbl CaIbIayBaH Xypr3H3. Ka6eIbDi KaTTbI 6yKnEHI- 6yn 6ypany Hemece y3iny KayniH apTbpyb MyMKH.
- Ka6eIb MeH Kypblfbl 6acKapyBn CaKtay yuH IN Dpybc Hymbc opHbH TaHaHaB13 (9-cypemmi KapaHb13):
AaK KockbIITb6ackapa aIaNbIHbHb3DbI TeKcepiJ3.AaK KockbIITb aIb6acnHaB3.AnatOpbH anFaH XaFdaJa aKa KockbIITb 6ocatblnanybHb3KepeK.
Tnict Tene-TeHdkTih 6ap ekeHH, Wamaan Hken co3bIy KaKeTTiniri KOKTbHbIH XaHe aK KCKbiUka, aFBiH Ky6bipbH Ta3aIay KypblfbcHa, aFbH Ky6bipbHa Kylan KaImaiTbHbIHbI3dbI HeMece 6aca KayintiniKTepej TeKcepHj3.
Ka6eJIb afbH Ky6blpbiHa JxHe TbIbIHFa eTKi3inre HKe3Je 6aftTayBli K6bipweKti XHe AUTOFEED 6eniri TeikTePiH 6ackapbinipeanyBHB3 KepeK. - AIIFA/OLIIPV/KEPI KockbuBbKoNKeTIMd 60nybKepeK.
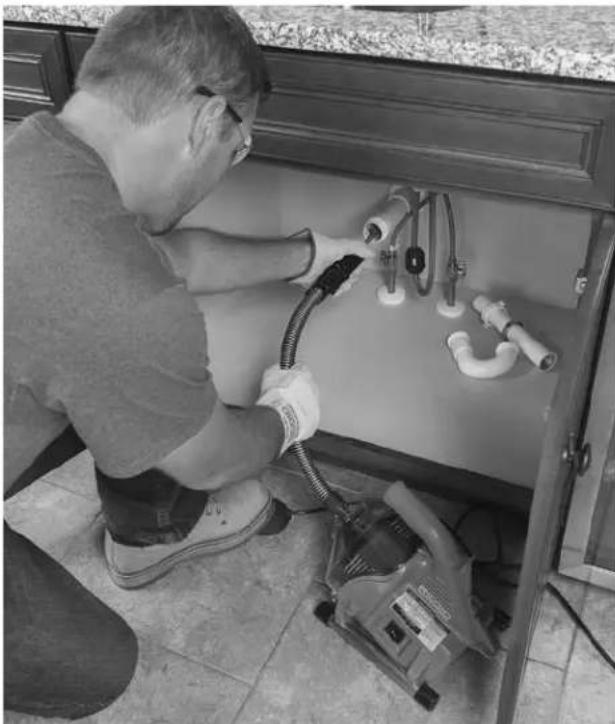
8-cypeT-Kymbic KyiHde
4.AJFA/OLIIPY/KEPI KOKbIbH AJFA KyIHe KblkbITbIH3. AAK KOckbltbI aIcnaHbI3.Ka6eJIbIO cbi Hcyaynapda KepcetImeHHe,Kepi aHaNDbpyFa 60lmadIb.I.AfbH Ky6bpTa3aHaFbIbH KEPI KyIHpe naJaHaNy Ka6eJIbDi 3aKbIMdaybIMyMKHI.
Ka6eIbdi afbH Ky6bipbHa eTKi3y
AUTOFEED 60nirih 6ip K0nbHb36en yctahb3 xhe 6nik weit afbH Ky6bIpbCaHbnaaybHaH 6 dIOm (15 cm) weiriHde 6oNaTbHaan etin OHbYCTaHb3 (7-cypemmi kapaHb3). BafttaFbW ky6bIpwek KpybIbfHb KopfayFa KomeKteCedi XHe Ka6eBb afBH Ky6bIpaH anbIHFAH Ke3e OHbIMe 6ipre WbIFaTH cyBtBtBtBt YCTan Kaana. Erep AUTO-FEED 60niri aFBH Ky6bIpb CaHbNaaybHaH 6 dIOm (15 cm) weriHne 6oImaca, Ka6eB TaICTi TypDe TipeMeNi JxHe Ka6eBdi H 6ypaNbHa, BaanlhyBaHa Hemece y3inyHe AekyI y MymkiH.
Baftaybky6bpkeKTH KOJIbHb3da KaIaIe Ce3ineTHiHe MaH 6epiJ3. BaftaybIyI KBy6bpweK Ka6ebYcTHe 6oIraHbIKTaH Ka6beJdIH KytEmecie Ce3IMtanDbIK TEmeH 6OlaDbI XaHe Ka6eb WetIH, aHaIaTbIHbIH He aHaIMaHTbIHbIH aTy KbIHFa COBy MyMKIH. Erep Ka6eb WETI aHaIImaca, aFbIH Ky6bpTa3aHaHbAidbl.

9-cypet-AfA KblKbIy/whbIapbin any apHacblHbTetiri
Ka6eIbJH KEMIHDe 6ip cyTb IaBtI Ky6bIpbIHda JxHe AUTOFEED 6JIiriH HETI aBtIH Ky6bIpbI cAHbIaNbIH H 6IOHMHe (15 cm) KEM EkeHH pactaHb3. KypblfHbIcKcKOcYuIN AAR KCKbUbIH 6acbHb3. Ka6eJIbI aHa fA tBtIH K6bIpbIH aKbUkBIty uIN AIFAXblNkbITy TeteIH 6acbHb3 (9-cypem).AHAaTbIH Ka6eJIbA bFtIH K6bIpbHa eTei.
Topnap Hemece 6aca etnelep apkblbl etki3y
Ka6eIbdi 6oIriw apkblany KbiH 6oIca, KeNeci aictepeHHeMece aictep tipkeciMH naDanaHyfa 6oIa.
KaebIaHaNbIpbH He aHaNDbipMa KaebIbe/ 6aftTaybW K6bIpweKke aHaWkbl, yWkp TeMeH Kapai COKKbI KaebIbI TopdAn ETKi3yRe KEMeKTEceJI.
Ekinui adici Ka6ebIi/6aftTaybI Ky6bpweKti 6acbin Typbn, afn H Ky6bp Ta3anaFbiWbH KEPI Kynihde 6iphewe cekynd naDanaHy 60bn Ta6bladbl. Ka6eIbdi K6bpDAn Etk3y ywn 6yn apeKttj Kteknikrty Tpye opbHday Kepe. Ka6eIbdi kepi 6aftTtA eK3y Ka6eIbdi 3akBmDyMymkIn. Ka6eIbdi KEPI Kynihde anHaDbipbn, A1FA XblIKbITY tetiri Ka6eIbdi WbIfapBn anaDbI Xane IblAPBIT AN TY tetiri Ka6eIbdi a1fa XblIKbITaBl.
Erep6ynndicepkapamaca,dnaamepti kiipipek hemecne ninnriuwey KaebnHe 6acKa RIDGID afbIH KybipbH Ta3aay KypbnFbCbiH naDanaHbIN KepiH3.
Afbih Ky6bipbh Ta3aay
Kemihde6ip KOnbHb3db6aftTaybiu Ky6bpweke/AUTOFEED 6nirine KOhHb3. BaftTaybiu Ky6bpwek KOhHb3da Kaan ce3inetih He hazap aydpabHb3Kahe 6apaaHHaHaNyib H kapaHb3.
Ka6ebNb di afbH Ky6bipbHbH iwiH eTki3reH Ke3de Ka6ebNb di/ 6apab6aHHbH 6aaynaBHyH ce3iHn KepyH3 XHe 6afblTaybIi Ky6bipweKTH JyKTeHe He opana 6actaFAhbH ce3yIH3 MyMKH (6yn 6afttaybIu Ky6bipweKTH 6ypaHa He WnblpWbIKTaIa 6actaFAh ciNkTbI ce3inyi MyMKH). Byn afbH JeiciciDi eri otne (Top, nH, T.6.), afbH Ky6bipbHdaFbI XnHaIy (Xakna MaI, T.6.) Hemece HaKtBt bTbHdAy 6Olyb MyMKH. Ka6ebdi akbpH hKeH MyKNrT caNbHbI3. Ka6ebdi aFbH Ky6bipbHbH cbptbHa 8bHyBaHa kon 6epMeH3. Byn Ka6ebdi H NbnipwBtanyBaHa, 6paBnB, cblhyBaHa aeJin cofybl MyMKH. AUTOFEED 6eJIirHi H WeTIH aFBH Ky6bipbCaBnayBaHah 6 dIOm (15 cm) weriHde YCTaHbI3.
AfbH Ky6bipbHa caIbIHFaH Ka6eIbDIn KcIemHe Ha3ap aydApblb3. Ka6eIbDi YIKKeHDey aFBH KeIicHe HEmec yKcac otner cany Ka6eIbDIn, 6ypaIbHa HEmec TyIHDenYiHe eKenin cOByI MyMKH KHe AFBH Ky6bIPbHaH aBHyBaH KOI bepMeyi MyMKH. AkayIbKTapDb 6oNdbIpMay yuH In otner caIbHaBH Ka6eIb MeJIwepiH 6apbIHwa a3aTbHb3. BapabHaftb Ka6eIb MeJIwepiH aBbIK aIbIHfBi Kopnyc apkblb 6akblayra 6oJadbl (10-cypem).
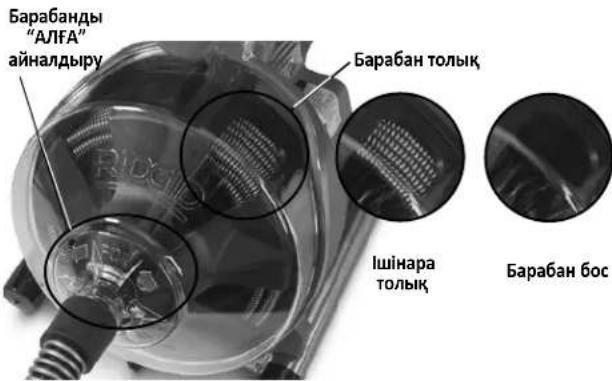
10-cyper-bapa6aHdaFbKa6ebIkaDaFaiay
TbIfbHdbpeTrey
Erep Ka6ebIb WeTI 6byIbYbIH TOKtTaC, OI 6yHaH aIbIH K6bIPbIH Ta3apTnAdbI. Erep Ka6eBb WeTI TbIFbIH Da TypbIN KaIFaH 6oJcKa He KyAT aFBH K6bIPbTA3aIaNbIbHa 6epince, Ka6eBb AFBH K6bIPbIHbH CbIPTBHa opana (6yI 6aftTaybiu K6bipweKTH 6ypana He WbIPWbIKTana 6actaFahBi cnaTb ceziM yMkiH) He xHnHa Ia BactaNbl. KoJIbHb3Db 6aftTbaIu K6bpweKke KoIHaH Ke3de ocbI opany ceiiny MymkH xHe Ka6eBdi BACkapa anacbl3. Ka6eBdH opAnFaHbH ce3reH Ke3De Hemece erep Ka6eB bWeTI 6byIbYbIH TOKtTaC, Depey ANFA XblNkbITy apHacBH 6ocatbl3 XHe Ka6eBb WeTI H TBIFbHH H 6ocaty wHlIfAPBIn AUY apHacBbIH TETIRH BacIBH3. Erep Ka6eB WteTI TbIFbIHDa TypbIn KaIca, Ka6eBdi AHaNHybHa KOI 6epMeH3. Ka6eB WeTI 6byIbYbIH TOKtTaKHaD, 6apa6aH aHaNByh XaNfactbipca, Ka6eB 6ypabyI, GaNaHybI He y3iny MyMKH.
Ka6ebI b weti TbfbHHan 6ocan, Ka6ebI b weti KaIaHaHraH Ke3de aHaHaTbH Ka6ebI b weti AkbpHb TbfbHfKa IaTc aLyfA 6oJaB. BypanaTbH Ka6ebI b wetiHn TBfbHdBo TLbIK, 6y3yI yuHn OHb iwiHne "Kanyiba" MymkiHik 6epiH3. Ka6ebI weti TbfbHday apkbln KyWten etK3yre TbpbicNaHbI3. Ka6ebI weti ToIbIfMeH TbfbHHan (TbfbHapdaH) etKeHwe JHe aFbIH K6bipbakKaHaJxKprizH3.
TbfbHdbpeTereh Ke3e Kaebnb Weti TbfbHdaFb KaanbKTapbmeH
Kahe KecihinepimEn 6iteymyMmH. Byn api Kapai bfi InrepiyeHH
aandn anaDb. Kaebnbia FbIH Ky6bpHanh wlbfapbn any Kahe
KOKbcIbTkety KaHET.Kabebdi wlbfapbn any" iwiHderi 6enimdi
kapaHb3.
ErepKa6eBweiTbFbHrainHkana6epce,6ackaRIDGID aBH Ky6bpTa3anaFbUbHnAdaHaKAKET 6OlyMymKiH.
TypbIn KaIFaH KypaIdbI peTRey
ErepKa6eBWeT6yblbHnTOKtaCaKaHe Ka6eBdi TbIbHHaH Kepi TaPty MymKIn 60Imaca, aR KCKbIITb6OcatbHb3, ATOFEED 6eJIri MeH 6aftTaybiu Ky6bpIweKti KaTbU yCTaHb3 XHe 6epy TeTirih 6ocatbHb3. Ko1bHb3dbi 6aftTaybiu Ky6bpIweKteH anMaHb3, aHTnece Ka6eB 6aJnaHyb, 6ypanyBi He y3iYi MymKIn. Ko3FaNTkbW TOKtAn, Ka6eB MeH 6apaBaH Ka6eBJe cKaTaNfAH 3HeprNkaTbI 6ocatbLnFaHua TeMeH Kapai XblKnDbI. KoblHb3DbI AUTOFEED 6eJIriHe HKaHe 6aftTaybiu Ky6bpIweKTeH KbICBM TyckHe W anMaHb3. AJFA/ OUIPY/KEPI KcokblbHn OUIPY KinyIe KoibHb3.
TypbIN KaIFaH KypaIdbI 6ocaty
Erep Ka6ebb TbIbHda TybpIn KaIca, AJFA/OLIPy/KEPI KockblbH KEPI KyHHde yctahb3. Eki AUTOFEED tetirih 6ocatbIn, aK CKbiTbTbFbHHaH 6ocafHaHa 6ipHeWe ckyHd 6acblb3. Ka6ebb WeeIH TbFbHHaH 6ocaty uH KybpNfBbH J KEPi KyHHde KaKeTTiDeh apTBk Yakbl NaJdaJaHa6aHb3, anTnece Ka6ebb 3aKbIMdaNybl MymKiH. AJFA/OLIPy/KEPI KockblbH ANFA KyHHe KoBIn, aFBH Ky6bpHbTHa3aJaYdbj XaJFaTbIpblb3.
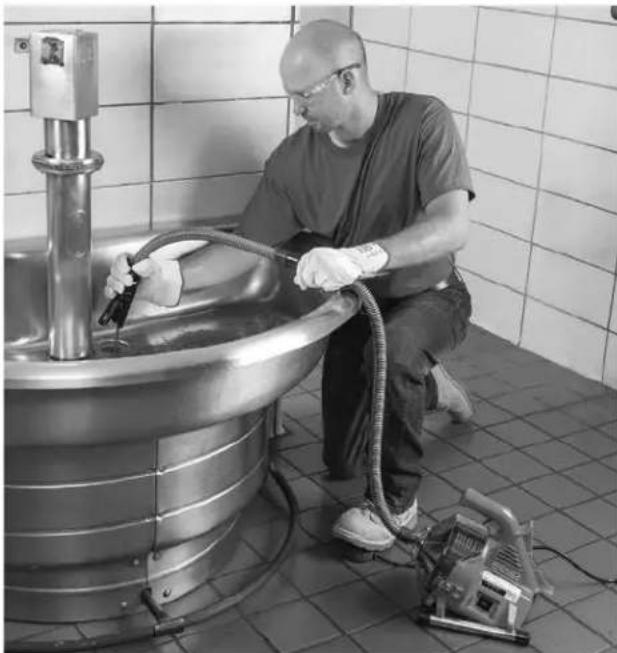
11-cypt-Ka6eIbdi wIbIrapbn any
Ka6eIbdi wIbIrapbin any
- AfbH Ky6bIpbI aIbIK 60JIFaH Ke3De, erep MymKih 60JcA, XeniJeH KOKbICTbI WaHO XaHe WbIFapBIn aIbIHFaH Ka6enbDi Ta3aay yuH cy aFbIHbH AFBH Ky6bIpBIme Hxipei3. Myhbl KyeJeeri WypaHbI KOCy apKbIbI He Baca AdicneH opBHdayfa 60JaBc. Cy DeHreIne MAn 6epiH3, ce6e6i aFbIH Ky6bIpbKaTAt KocblvMyMKH.
2.AJFA/OLIIPY/KEPI KCKbIbI AJFA KyinHe 6OnybKaKeT, KOckbIe KEPI KyinHe 6oIaHa Ka6eIbI aImaHb3,6yI Ka6eIbI 3aKbIMdayb MyMKiH.Ka6eIbI aFbH Ky6bpHa eTKi3reH cekJIdi,Ka6eIbDep WbIFapBn any KeiHde yCTaIybl MyMKIn.
Ka6enbdi w6fapbin any yuih 11biFAPBIN AJY teririh 6acbH3 (11-cypem). Ba6kapy yuih KOndapbH3dbI AUTOFEED 60niriHe xe He 6aftiTaybiu Ky6bpweKe TaTTb YCTaHb3. Ka6en b wet iwiFapbin any KeiHde iniHin KaIybi MymkiH. Kypal afbH Ky6bpHbH ay3bHbH iWHe JeKHe Hne Ka6enbdi TaptbHb3. Bepy teririh 6ocatbHb3.
3.AK KockbIbI bOcaTbI,6apabHbH,6apbHwa TOkTaybHa MymkiHik 6epiH3.Ka6eB aHaJIbH JAtKaHda afbIH Ky6bpHbHAn Ka6eB weH TAPTaHbI. Kypal opaJIbN KaIFAH XAFdAJa XapaKaATTAHyFa Keenin COYbIMKIN.
4.AJFA/OLIIPY/KEPI KCKbUbH INLIIIPY KyiHe opHaNaCTbIPbIH3 XaHe KypFak KOImeKypblfBhlAaBpaTbHb3. KaIraH Ka6eJIbI aFBH KY6bIPbIHaH KOJIbHb36e A1bIN, aFBH K6bIPbIH Ta3aIay KypblfCbIHcA bH3. KaKeTIHwe, Ta3aIayDbI KOFapblaFbI yepictCaTan KaIFaCTbIPbIHb3. TonbKa3aIay YwH JeIeH 6ipHeWe pet ETKi3en KeH.
KypblIfblHbI afb3y
Erep KypblfbiHbI aBb3y KaKet 6oNca, KypblfBiHbI eUWPIH3
KaHe KypFak KonMeH KypblfBiHbI aKbIpaTbHbI3. Afb3y
TbFbHbIH (1-cypemmi kapaHbI3) KaHe aFbIH Ky6blpHi aJbIn
TactaHbI. KaKet 6oNfaH Ke3Je KypblfBiHbH apTkbl WeiH
KeTepyre 6oNabiI.
TacbImaIayFa daIbIHday
CbIM MeH aK KCKbI W Ky6bIpWerIH CbIM opaMbHa opaHb3. 12-cypTe KepcetinreHdei 6ekitih3.ATOFEED 6enirih imMeke 6ekitih3.
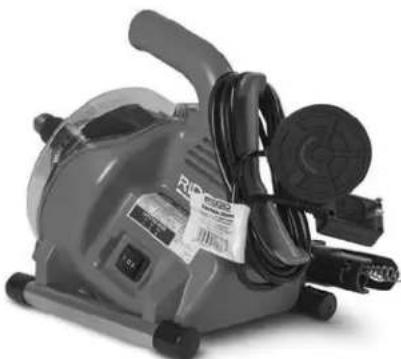
12-cypeT-TacbImaIayFa daibihday
TexHnKaJIbIK KbI3MeT KepCeTy HycKaynapbl
ECKEPTY
KaHdai da 6ip TexHnKaIbIK Kbi3Met KepcETnec 6ypbIH AJFA/ OUIPY/KEPI KocKblu bOUIPY KyiHde 6onybl KaKeT XaHe Kypblfbl ouiypi 6onyi Kepek.
Kb3met Kepcydi opbHdaFAN Ke3de YHEMI KopraHbIH Ke3indipikTepi HAne 6aKa Tnicti KopraHbIH Ka6dbfbIN naDanaHbIH3.
AfbiH Ky6bipTa3aJaftbIuBHaWy/ Bapa6aHdbIweWy
Taaay Hemece Kaebdi aybictby yuH KypblfbiHbIa yy:
- Erep KaKet 60nca, KypbIbHbI afb3bn XbiepiH3. BaftTaybiW Ky6bpweKTI anBIn TaTaHb3 (KuHaKmay 6enimH KapaHb3).
- Ka6eIbdi 6apa6aH iwiH eTki3iH3.
3.Yi(3)KaKnak6ypaHdacbH6ocatbHb3 (6ipakweuneHj3). (13-cypemmi kapaHb3).
4.AaHbI KOpNcyTb TaPbIN WbIFapbiHb3. - Bapa6aHdbla anFa TaPbIn WbIfapbHbIa3.
- Kaɪta JxHay yuH ydepicti kepi opbɪnʌhɒɪ. KæTeke eHri3y yuH 6apabHɒbl aɪHaɪnʌbɪpy kaXeT 6ɔŋyɒ bMYMKiH. BapabH TbɪfþipbɪfHbɪH 6apabHa TniCTI Typé OPHAJACTþipbɪnfaHbɪHa Kθ XeTki3ɪH3.
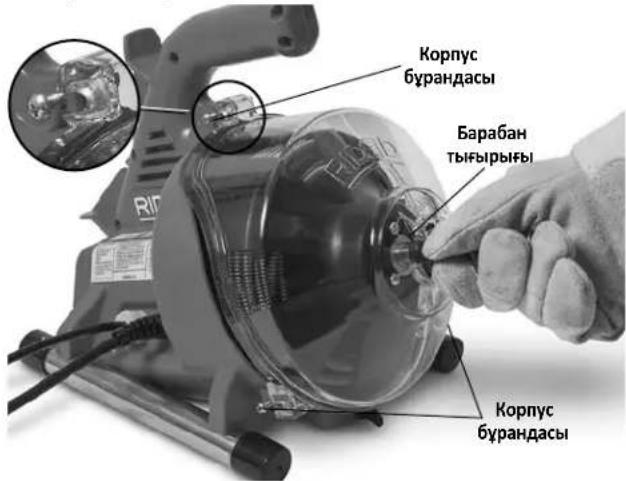
13-cypeT-AfbH Ky6bipbTa3aIarfbuibh aWy
Ta3anay
NananaHFaHHa KeiH KypblfHbTa3aHaB13. BaftTaybiu Ky6bIpweKti XaHe 6apabHb/ka6eBndi KypblFbIaH anbIn TaTaHbI. KaKeT 6oFaH Ke3Je KymCa Kyy KpaBIn Hemece 6akTePna KaCb epitHdHi naDalaHyfa 6olaDbI. EpitkiTepe, KbipHay Hemece 6acka KaTb Ta3aay KypaldpbH naDalaHaBbI3.
KypbIbIbI - KypblfblHbI cyptin sblyf fy Jhahe 6apa6aoh OnbicbH cyptin any yuhi DblMkbIn, kymcak uybepekti naJaHaNbHb13. KypblfblHbCyfa 6aTbIpMaHb13 He waMaHaB13.Cydln MOTOPfa He baca TneKtp KomnohHTtepine eHyHe KOJ 6epMej3. KypblfblHbIKocy XHe NaJaHaHy anDbHda OHbIH TOlbIFIme H Kypfak ekeHHe Ke3 keTki3iHj3.
AaibHbI KOpNc -KpybIbIbIaH aIbI nTaCTaHbI3, cyMeH 1aibHbI3 JHe bIMkbI, KymCaK WyBepeKeH cypTn aIbIHbI3.
Bapa6aH Xe He Ka6bIy-TYHbHbH XeHe aftbH Ky6bipbH Ta3aay KocnapanbHbH 3akbMday acepneepi 60ndbpMay yuH naindaanrHan caHbH 6apa6aHdbI XeHe Ka6eBdi Cymeh Waihbl3. Ka6eN MyxinyiH a3aHTy uH 6apa6aHdbI opHaty aJbHda KYPFaTbHbI3.
AUTOFEED 6eiri - AUTOFEED XnbiHbHbH CyMeH WaiBiHb3 XaHe XeHIn eHdiPictiK MaMmE HMaJaHaHb3.
BaftTaybiu Ky6bipwek-CyMeH WaiBihB3 XHe afb3bHb3.
Ka6eIbdi aybIcbIpy
- BaftTaybI Ky6bpweKTI (XuHaKmay 6nimH KapaHb3) XHe aIdbIHbI Kopnyctb/6apa6aHdI (13-cypem) anbin TaCTaHbI3.
- Ka6eIbI 6apa6aH anDbIHan TaTbpIuBIFapbIHbI3.
- Bapa6aH apTbIH yCTan TypaTbIH 6ec (5) 6ypaHaHa bI ueiHj3 (14-cypem).
- Ka6eIb wetIH 6apa6aH apTbIH aXbIpaTbIHb3 (15-cypem). Ka6eJIbdi 6apa6aHHaToBik aIbn TaCTaHbI3.
- Ka6eBb 6apab6aH bIbIbCbHbH 60bIMe eTKi3H3. 6eTin 6apab6aH apTBHa 15-cypemme KepcetireHei TipkeH3.
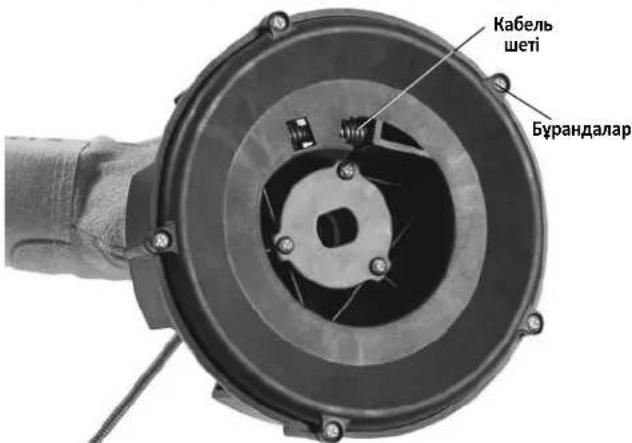
14-cypeT-Bapa6aH apTbH aIbIn TaCTay
- Bapa6aHbI apTbHa opHaIacTbIbIbI3 JxHe JxHa Ka6eJIbI 6ap6aH iJiHe KOlmEn EtKl3H3.
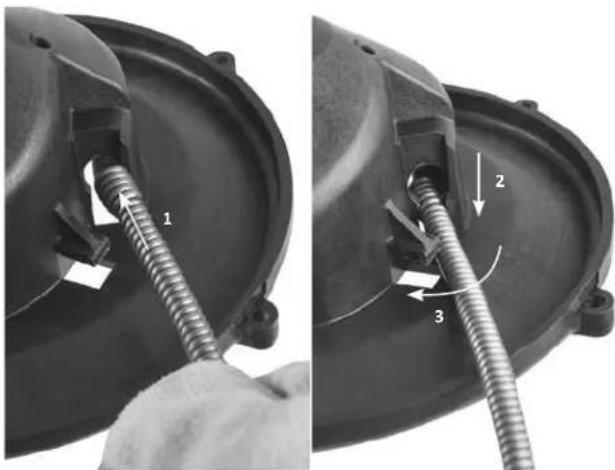
15-cypt - Ka6eIbdi iwiKi 6apa6aHra tipkey
7.Bapa6aHdbI KpybHfbl iHHe opHaNactbipbHb3 (16-cypem). Bapa6aHdbI opHbHa TcKehIe aHaHbIpbHb3.

16-cypeT-Bapa6aHdbI KypbInfbl iWHe eHri3y
8.AaHbIHbI KOpNcTbI XaHe 6aftTaybiu Ky6bpweKTI opHaTbIHbI3.
KocbIMwa Xa6dbIK
ECKEPTY
Aybp Dehe Xapakatbl Kayinih a3aity yuih Tomehde Kepcetiren RIDGID PowerClear afbH Ky6bipbH Ta3anay KypblfbcimEn naDanaHyfa apHaBbl XacaKaTaNFaH XaHe KeHec etiren Kocankbl Kypandapdbfa HAn daNanHbHbI3.
| Katalor Hemipi | Yliri Hemipi | Cinatattama | |
| 41937 | - | RIDGID aftbIH KUkbipbIH Ta3anay KoIfantapbl, 6bUfapbl | |
| 55983 | - | ¼Дюмx30ФуT (6MMx9,1M) MAXCORETM 50 ka6eni |
PowerClear afbih K6bipbH Ta3aay KypbInfbcI yuih KOJHKerimdi Ka6dbik TypaJIb KocbIMwa AknapaATbI RIDGID kataNoBriHa JxHe RIDGID.com Topa6bIHda OHnAH Ta6yfa 60na,bI.
KypbIFbIHbI caTay
A ECKEPTY AfbH Ky6bIpb Ta3aJafBih Kypfak KyHe JxHe JxHJe Hemece CbPTTa CaKaTah Ke3de 6apBihwa XaybIN KOIO KEPEK. KypblfBHLb 6anLapDbH KOJIbXeTneTIH XHe aFbH Ky6bIPbH Ta3aNlay KypblfBnApbMeH TaHbc Emec aDAMapdaH aIIwAky, KylntaybI ayMaKaTa caKaTaHbI. KypblfBt Taxipnbeci XOK NaDaHaHyBnApbIH KOJIbHa aybp XapaKaTa Kaekin COByM MmKiH.
KbI3MeT KOpCety XaHe XoHdey
A ECKEPTY
OpbIcbI3 Kbl3Met KepeTy HeMece XeHDey Kypblfbl naIdaIahybiH Kayinti eYi MymKIn.
TexHukanbIK Kbi3Mem Kepcemy HcyaynapbI OcbI KypblfBiHbIH KONTEREH Kbi3MeTTIK KaKeTTINIKTePiKAMTNDbI. OcbI 6eImDe KepcetINmereH KaHaJ da 6ip MaCeJIepePi RIDGID eKiJeTTI Kbi3MET Kepcety MAmHbI fHaHa WeuYi KaKeT.
KypandbiRIDGID ekinetti Tyeicci Kbi3MeT KepceTy opTaBbIfbHa anapy Hemece 3aytka KaTapy KaKeT.
EHKaBnRIDGID eKineTITayenci KbImET KepeTy opTaBbHbHeMeceKe3 KeIReH KbImET He XeHDey CypaKTapbl BoBbHsaaknapaTanywih:
-Keprinikri RIDGID nIctnp6bHToptbHa xa6aplaCbHb3.
-KepriniRiRIDGID 6aIHaHbIC opHbIH Ta6y yuH RIDGID.com Topa6bHa Kipih3.
Ridge Tool TexHnKaIbIK Kbl3MeT 6JIiime He rtctechservices@emerson.com MekeHkaIbI Hemece AKII neH KaHaJa ayMaftbIHa (800) 519-3456 HemipHe KOHbIpay Wany apKblIbXa6apIacbIbI3.
Tactay
PowerClear afbH Ky6bIpbH Ta3aJaiy KypblfbcihB H 6eJIweKTepeHde KHyDbI MaepnAanap 6ap JHe OApB Kaeta eHDeye 6oJaB.KepriniKTi KepeOpHaanacka KaTa eHDeymen aHaNbicaTbH KomnaHnraJap 6ap. KypamDactapdb6apbIK KOJaDaHbIaTbIH TaanTapfa cainke KaDere XkapaTbHb3.KocbIMwa aknapat any yiwH kepriniKTi KaIbIKTapdb peTey YmbMbHa xa6apnacBb3.
EO enepi yuih: 3neKtp Kaa6dbfbih TypMbictbIK KOkbcnEH 6ipre TactamaHbI3!
EyponaHbIH 2012/-19/EO KaIbIK 3neKtp XaHe 3neKtpoHdbIK Ka6dbIK BoiHwa HyCKaylbfbHa HxHE OHbIH YITbIK 3aHHaMaFa eHri3iIyHe CaiKec, 6yDaH api NaIdaNaHbIMaTbIH 3neKtp Ka6dbIbIb6eK XnHaBIn, KOp7aFAn optafa
3nH KeTIPMeTtH Tpye TaTaNbI KepeK.
AkaayIbIKTapdbIXOIO
| Акayльбik bIKTIN | Ал СEBENTPEI WELIMI | |
| Кабелдин майысули нemес узiiу. | Кабелbre Кш Тусяdi. Кабелbre Кш Тусірмен. | Бурсыfa жуmbic icteriiz3. |
| Кабел дурьс Кбулдпnametrпide пайдаалылмды. | Кьбур ушin ТиICTi кабелди пайдаалынbɪз. | |
| Керісінше косьлган motop. РеверстіTek Кабелыт bTyBɪHa iLiHn Kaflanн karлган karлдя пайдаалынbɪз. | Туьынглга iliniHn karлган karлдя пайдаалынbɪз. | |
| Кьшьл тиген Кабел. Кабелдрдж kin Tazal пайдаалынbɪз. | Туьынглгa. | |
| Кабел todzaH.Ерр Кабел todza, оны aybyct пьынbɪd. | Туьынглg. | |
| Кабел дурьс bekitilmenereн. Кабелди{Tticti | Турde bokitiiz3, hyckaynapdbi Kapaibiz3. | |
| Кабелаяк kocьш 6асылган кeze аиналувин токтатды. Аяк kocьш кайta 6асылган кeze дe кайta icke kocьлады. | Аяк kocьшын He Kьшршкteri cahblay. | Зakындогнkomnoнentti aybICtbpbɪz3. |
| Диafparma kocьшынdaftы саылay.Ер тет пide He Kьшршкte akaylbɪk, tablɪmaca, aybICtbpbɪz3 Диafparmaыk Kocьшы. | ||
| КабелTek 6ip 6afытka 6urbiladny. | AJFA/ошIPY/KEPI kocьшы Akaylbi. Kocьш Ты albiv. | Ты albICtbpbɪz3. |
| Жерre tyьытany тізberін сөнідірuyш Кьрылгы kocьлганд нemecse ряк тenkici 6асылганд icke kocьлады. | KyaT sbIMbI 3akbIMdaHfAH. CbIMЖиblHIn aBylcTbIPbɪZ3. | Туьындогнkomnoнentti aybICtbpbɪz3. |
| Мotordа Кьіcka Tуьытany opbɪn aʌdby. Козг Туьытany Tizberi nCehdipuShin akaybIbap. | Туьындогнkomnoнentti aybICtbpbɪz3. | |
| Жерre tyьытany Ti3beri In cehdipuShin akaybIbap. | СыmЖиblHIn aybICtbpbɪz3. | |
| Motorda, kocьш корabында He aшада ылгыbap. | Афын тазаалыtsbɪn eh Jжakын RIDGID tayelci3 КьIMet optaынlaын anapbɪzh. | |
| AUTOFEED 6ənliri ictemei. | Афын тазаалыtsbɪn eh Jжakын RIDGID tayelci3 КьIMet optaынlaын anapbɪzh. | |
| АutoFEED 6ənliri ictemei. | AUTOFEED 6ənliri Kocьшka Tóbl. AUTOFEED 6ənlirin Tazalana. | Туьындогнkomnoнentti aybICtbpbɪz3. |
| AUTOFEED 6ənliri maiy kajet. AUTOFEED 6ənlirin Jezhil enndipictik Майmen MauλaH. | Туьындогнkomnoнentti aybICtbpbɪz3. | |
| Аfvln Kьырbing tazalay KeziHne Кьрылгы shaikalada нemecse кьлжды. | Кабел bipkeknı Tapaalmafah. | Барындогнkomnoнentti aybICtbpbɪz3 JozHe Kaɪta etkiizhi3, bipkeknı Tapaalbɪz3. |
| Tipeулрgesem. | ТERIC opbiktsbI betyke ophalactbipbɪz3. | |
| Жep teric emec. | ТERIC opbiktsbI betyke ophalactbipbɪz3. |
RIDGID® PowerClear™ Drain Cleaning Machine
RIDGE TOOL COMPANY
400 Clark Street
Elyria, Ohio 44035-6001
U.S.A.
EC DECLARATION OF CONFORMITY
We declare that the machines listed above, when used in accordance with the operator's manual, meet the relevant requirements of the Directives and Standards listed below.
DECLARATION DE CONFORMITE CE
Ridge Tool Europe NV (RIDGiD)
DEKLARACJA ZGODNOSCI WE
Conforms to UL 62841-1
Certified to CSA STD. C22.2 #62841-1

Signature:
Qualification: V.P. Engineering
Date: 02/01/2018

For Warranty Information for your World Region visit RIDGID.com
Ridge Tool Europe NV (RIDGID)
Printed 06/20 999-995-082.09
EC44523 REV.D
C2016 2020 RIDGID, Inc.
The Emerson logo and RIDGID logo are registered trademarks of Emerson Electric Co. or RIDGID, Inc. in the U.S. and other countries.
All other trademarks belong to their respective holders.


- Drain Cleaner
- PowerClear™ Drain Cleaning Machine
- WARNING!
- Safety Symbols
- DANGER
- WARNING
- CAUTION
- NOTICE
- General Power Tool SafetyWarnings*
- SAVE ALL WARNING AND INSTRUCTIONS FOR FUTURE REFERENCE!
- Work Area Safety
- Electrical Safety
- Personal Safety
- Power Tool Use and Care
- Service
- Specific Safety Information
- Drain Cleaner Safety
- Description and Specifications Description
- Specifications
- SwitchIcons
- Machine Assembly
- Configuring Guide Hose/AUTOFEED Assembly
- Pre-Operation Inspection
- Always wear safety glasses, leather work gloves, and other appropriate protective equipment when inspecting your drain cleaner.
- Machine and Work Area Set-Up
- Operating Instructions
- Feeding the Cable into the Drain
- Passing Through Traps or Other Transitions
- Cleaning the Drain
- Working the Blockage
- Handling a Stuck Tool
- Freeing a Stuck Tool
- Retrieving the Cable
- Draining the Machine
- Preparing for Transport
- Maintenance Instructions
- Opening Drain Cleaner/Removing Drum
- Cleaning
- Replacing the Cable
- Optional Equipment
- Machine Storage
- Service and Repair
- Disposal
- Dégorgeoir
- BEWAARALLE WAARSCHUWINGEN EN INSTRUCTIES,ZODAT U ZE OOK LATER NOG KUNT RAADPLEGEN!
- Forberedelse for transport
- 3neKtpo6e30nacHocTb
- Jnuch6e30nachoctb
- IcnoJb3ObaHme 3NeKtpoHCTpyMeHTa n yXoD 3a HmM
- 06cnyxnbAHne
- Информацma no TexнIKE6e3oNaChocTu npu pa6oTecданьIM NHCTpymeHTOM
- BHIMAHVE
- COXPAHNTE BCE IPREyIPEKDEHNA INHCTPYKUNI DIA NOCLEYIOUeRO NCNOJb3OBAHNA!
- MepbI npedoctopoXHocTH npu pa6oTe cHCTpyMeHTOM dya uNCTKN KaHann3aun
- Описанne n TexHnueckme xapaKTePnCTnKn
- OnmcaHne
- PpeD3KcNpyaTaUNoHHbI OCMOTp
- BHUMMAHVE
- PnOcmTope npouHcTHoMaunHbI 063aTeNbHO HadeBaTte 3auuTHbIe OuyK, KOxKaHbIe pa6Oue nepaATKn Ipyrme HndLeXaUne cpeCTBa 3auuTbl.
- IodrotOBka MaunHbI npa6oey 30Hbl
- BHIMAHHE
- Pnc.6-DocTynKcnuBy
- PykoBoDCTBO no 3Kcnnyatau
- Iopdaa Tpoca B KaHann3aunohnyu Tpy6y
- PpoxoJ Chepe3 rHdp03aTbOpbl HnI pyrne nepexOdbI
- Ppoeypa uNCTkn KaHnn3aun
- ydaJIeHne3acopa
- 06paueHnC 3acTpBWMM INHCTpyMeHTOM
- Ocbo60kdeHne 3aCtpBwero mHcTpyMeHt a
- M3BneHnE Tpoca
- CnMB BOdbi N3 MaunHbI
- IoproTOBka K TpaHCnoptnpOBke
- Инструкция по Тхичесkomу объжваимю
- BHIMAHINE
- OTKpbBaHne npOuCTHO MaunHbI/CHrTne 6apa6aHa
- UncTka
- 3aMeHa Tpoca
- IOnonHntenbHbie npHaJneXHOCTn
- PowerClearTM aFbIH Ky6bIpbIH Ta3aIay Kypblfbcbl
- ECKEPTY!
- PowerClearTM afbIH Ky6bipbIH Ta3aJalay KypblfbcB
- Ma3MyHbI
- Kayinci3dk HbIshaHdapbl
- KAYIN
- ECKEPTY
- CAKTAHdbIPY
- ECKEPTTNE
- KaalnbI 3JIeKTp KypaIbIHbIH Kayinci3dk eckeptynepi*
- A ECKEPTY
- KEIHn AHbIKTAMALbIK PETIHDE BAPbIK ECKEPTyIEP MEH HYCKAYIAPDbI CAKTAN KOIBHbI3!
- KymbcayMaFbIhBIn Kayinci3di
- 3NeKtp Kayinci3diri
- KeKayinci3ik
- 3NeKtp KypalbH NaJaHaHy XaHe OFaH KyTIm Kepcety
- Kb3MeT Kepcety
- ApaHbI kayinci3dk aknapaTbI
- KEIHn AHbIKTAMAJbIK PETIHDE BAPJIbIK ECKEPTyIEP MEH HYCKAYLAPDbI CAKTAN KOIBHbI3!
- AfbiH Ky6bIplapbiH Ta3aJIay KypblfBiCbIHbH Kayinci3diri
- CnnaTama XaHe TexHnKaIbIK, cnnaTtap
- Cunatrama
- TexHnKaIbIK cnnaTtap
- KypbInfblHbl Kypactbipy
- BaftTaybi K6bipwekTi/AUTOFEED XnblTbIfbH peTey
- Kymbic aIdbiHda TeKcepy
- KypbIrfbiHbl XHe XyMbIC ayMaftbIH OPhaty
- 6-cypeT-AfbIH Ky6bipbHa KaTbIhAc
- 7-cypeT-AfbiH Ky6bipbH Autofeed 6JIiriHeH 6 JIOIM (15 cm) WerirHe de co3y ylrici.
- Пайдалиу Нуckayлары
- Ka6eIbdi afbH Ky6bipbHa eTKi3y
- Topnap Hemece 6aca etnelep apkblbl etki3y
- Afbih Ky6bipbh Ta3aay
- TbIfbHdbpeTrey
- TypbIn KaIFaH KypaIdbI peTRey
- TypbIN KaIFaH KypaIdbI 6ocaty
- Ka6eIbdi wIbIrapbin any
- KypblIfblHbI afb3y
- TacbImaIayFa daIbIHday
- TexHnKaJIbIK KbI3MeT KepCeTy HycKaynapbl
- AfbiH Ky6bipTa3aJaftbIuBHaWy/ Bapa6aHdbIweWy
- Ta3anay
- Ka6eIbdi aybIcbIpy
- 14-cypeT-Bapa6aH apTbH aIbIn TaCTay
- 15-cypt - Ka6eIbdi iwiKi 6apa6aHra tipkey
- 16-cypeT-Bapa6aHdbI KypbInfbl iWHe eHri3y
- KocbIMwa Xa6dbIK
- KypbIFbIHbI caTay
- KbI3MeT KOpCety XaHe XoHdey
- Tactay
- RIDGID® PowerClear™ Drain Cleaning Machine
- EC DECLARATION OF CONFORMITY
- DECLARATION DE CONFORMITE CE
- DEKLARACJA ZGODNOSCI WE
- For Warranty Information for your World Region visit RIDGID.com
Brand : RIDGID
Model : PowerClear
Category : Electric drain cleaner