USER MANUAL Unico Plus CHICCO
natural_image
Line drawing of a baby car seat assembly (no text or symbols)
• ISTRUZIONI D'USO
• MODE D'EMPLOI
• GEBRAUCHSANLEITUNG
• INSTRUCTIONS FOR USE
• INSTRUCCIONES DE USO
- INSTRUÇÕES PARA A UTILIZAÇÃO
• GEBRUIKSAANWIJZINGEN
• ANVÄNDNINGSINSTRUKTIONER
• NÁVOD K POUŽITÍ
• INSTRUKCJE SPOSOBU UŻYCIA
• ΟΔΗΓΙΕΣ ΧΡΗΣΗΣ
• KULLANIM BİLGİLERİ
- ИНСТРУКЦИЯ ПО ЭКСПЛУАТАЦИИ
• تعليمات الاستعمال
• ИНСТРУКЦИИ ЗА УПОТРЕБА
• ІНСТРУКЦІЯ З ВИКОРИСТАННЯ
• INSTRUÇÕES DE UTILIZAÇÃO


natural_image
Line drawing of a car seatbelt with a red circular marker (no text or symbols)


natural_image
Line drawing of a car seatbelt with hand placement and red directional arrows indicating motion (no text or symbols)


natural_image
Diagram of a car seatbelt mechanism with red arrows indicating movement or force (no text or symbols present)
natural_image
Line drawing of a hand pressing down on a car seatbelt (no text or symbols)
natural_image
Line drawing of a car interior with seats and a hand operating the seatbelt (no text or symbols)


natural_image
Anatomical illustration of a human pelvic region with directional arrows indicating movement or force (no text or labels present)
natural_image
Illustration of a hand performing a car seatbelt maneuver, showing a red arrow indicating the motion (no text or symbols present)


natural_image
Illustration of a hand pressing down on a car seatbelt, with a red arrow indicating the motion direction (no text or symbols present)
natural_image
Illustration of a person in a car seatbelt with a hand adjusting the seatbelt (no text or symbols)

natural_image
Line drawing of a car seatbelt with hand and red directional arrows indicating rotation (no text or symbols)


natural_image
Illustration of a hand using a cable to lift a car seatbelt, with no visible text or symbols

natural_image
Line drawing of a massage chair with a hand holding a bag, no text or symbols present

natural_image
Line drawing of a person using a seatbelt to lift a car (no text or symbols)

natural_image
Line drawing of a person using a rolling pin to adjust a helmet (no text or symbols)

natural_image
Line drawing of a car seatbelt with hands adjusting the seat (no text or symbols)


natural_image
Illustration of a hand holding a car seatbelt with a red arrow indicating a specific point (no text or symbols present)
natural_image
Illustration of a hand pressing down on a car wheel, with a red arrow indicating the motion direction (no text or symbols present)
natural_image
Illustration of a person lying in bed with hands near a chair, no text or symbols present
natural_image
Line drawing of a car seatbelt with red arrows indicating adjustment (no text or symbols)


natural_image
Line drawing of a hand adjusting a seatbelt buckle (no text or symbols)


natural_image
Line drawing of a car seatbelt being adjusted for a hand, showing the grip and seat (no text or symbols)

natural_image
Line drawing of a child inside a car seatbelt, with hands adjusting the seatbelt (no text or symbols)

natural_image
Line drawing of a child seated in a car seat, with a hand adjusting the seat (no text or symbols)
natural_image
Illustration of a child in a car seat being held by a hand, with a red arrow indicating the pressure point (no text or symbols present)
natural_image
Line drawing of a hand gripping a car seatbelt, no text or symbols present
natural_image
Line drawing of hands installing or adjusting a mechanical component with a red arrow indicating the left side (no text or symbols present)

natural_image
Illustration of a hand holding a car seatbelt, no text or symbols present
natural_image
Illustration of a hand holding a car tire with a red arrow indicating motion (no text or symbols)

natural_image
Line drawing of a human neck and shoulder with a finger inserted, no text or symbols present
natural_image
Technical line drawing of a mechanical component with no visible text or symbols

natural_image
Line drawing of a car interior showing dashboard, seatbelt, and dashboard panel (no text or symbols)

natural_image
Line drawing of a child seated in a car seat with a belt, no text or symbols present


natural_image
Line drawing of a hand pressing down on a car seatbelt, with a red arrow indicating the press direction (no text or symbols)

natural_image
Line drawing of a person adjusting a car seatbelt, no text or symbols present

natural_image
Line drawing of a hand adjusting a car seatbelt, no text or symbols present
natural_image
Line drawing of a hand adjusting a car seatbelt (no text or symbols)

natural_image
Line drawing showing a hand adjusting a seatbelt between two views (no text or symbols)
IT UNICO PLUS Gr. 0+/1/2/3 0-36 kg
IMPORTANTISSIMO! DA LEGGERE SUBITO.
IMPORTANTE: PRIMA DELL'USO LEGGERE
ATTENTAMENTE E INTEGRALMENTE QUE-
STO LIBRETTO D'ISTRUZIONI PER EVITARE
PERICOLI NELL'UTILIZZO E CONSERVAR-
LO PER OGNI FUTURO RIFERIMENTO. PER
NON COMPROMETTERE LA SICUREZZA
DEL VOSTRO BAMBINO SEGUITE ATTEN-
TAMENTE QUESTE ISTRUZIONI.
ATTENZIONE: PRIMA DELL'USO RIMUOVE-
RE ED ELIMINARE EVENTUALI SACCHETTI
DI PLASTICA E TUTTI GLI ELEMENTI FA-
CENTI PARTE DELLA CONFEZIONE DEL
PRODOTTO O COMUNQUE TENERLI LON-
TANI DALLA PORTATA DEI BAMBINI. SI
RACCOMANDA DI EFFETTUARE LO SMAL-
TIMENTO DI QUESTI ELEMENTI OPERAN-
DO LA RACCOLTA DIFFERENZIATA IN CON-
FORMITA' ALLE LEGGI VIGENTI.
INDICE:
- INTRODUZIONE
1.1 AVVERTENZE
1.3 PRODUCT FEATURES
1.4 RESTRICTIONS AND REQUIREMENTS REGARDING THE USE OF THE PRODUCT AND VEHICLE SEAT
- INSTALLATION
2.1 FITTING THE GR. 0+ CAR SEAT IN THE VEHICLE USING RIGID CONNECTORS AND TOP TETHER (0-13 KG)
2.2 FITTING THE GR. 0+ CAR SEAT USING THE RIGID CONNECTORS AND THE CAR'S THREE-POINT-BELT (0-13 KG)
2.3 FITTING THE GR. 1 CAR SEAT USING THE RIGID CONNECTORS AND THE CAR'S THREE-POINT-BELT (9-18 KG)
2.4 CHANGING THE CONFIGURATION OF THE CAR SEAT FROM GROUP 1 (9-18 KG) TO GROUP 2/3 (15-36 KG)
2.5 INSTALLING THE CAR SEAT IN THE CAR AND PLACING THE CHILD IN THE GROUP 2/3 CONFIGURATION WITH RIGID CONNECTORS AND THE CAR'S THREE-POINT SEAT BELT (15-36 KG)
2.6 RESETTING THE SEAT BELTS FOR USE IN 24
GROUPS 0+ (0-13 KG) and 1 (9-18KG)
3 OTHER OPERATIONS
- Read these instructions carefully before assembling and installing the product. Prevent anybody from using the product without reading the instructions.
- Keep this instruction booklet for future use.
• Each country has different safety laws and regulations for the transportation of children in cars. For this reason, contact local authorities for further information.
- WARNING! According to accident statistics, a vehicle's rear seat is generally safer than the front seat: therefore, we suggest to install the car seat on the rear seat of the vehicle. The safest seat is the rear middle seat, if equipped with 3-point seat belt and ISOFIX anchorages.
• Make sure that all passengers in the vehicle know how to release the child from the child car seat in case of an emergency.
- WARNING! HAZARD! For Group 0+ (from 0 up to 13 kg): never fit this child car seat on a front seat equipped with front airbag. Use only if the front airbag is deactivated: check with the car manufacturer or see the owner's manual for instructions on how to deactivate the airbag.
- Premature babies born before the 37th week of pregnancy can be at risk if placed in a child car seat. Newborn babies may have breathing difficulties when seated in the child car seat. We recommend consulting your doctor, or the hospital's staff, for their medical advice on whether your child can be transported in the child car seat when leaving the hospital.
- In the Group 1 configuration (9-18 kg) if the car seat is placed on the front seat with the front airbag activated, for greater safety it is advised to push the front seat as far back as possible, to an extent compatible with any passengers present in the rear seat.
- Never use this child car seat on side-facing or rear-facing car seats.


- Only fit the child car seat onto seats which are fastened to the car chassis and facing forwards.
- Pay attention when fitting the child car seat into the car in order to avoid damaging the car seat or car door, which may interfere with installation.
- No car seat can guarantee your child's total safety in the event of an accident, but the use of this product reduces the risk of serious injuries or death when installed correctly.
- The risk of serious injuries to the child increases, not only in the case of accidents, but also in other circumstances (i.e.: sudden braking, etc.) if these instructions are not followed carefully: always check that the child car seat is secured correctly to the vehicle's seat.
- If the child car seat is damaged, deformed or worn out, it must be replaced: it may no longer meet the original safety standards.
- This product must not be modified in any way unless the modification has been approved by the manufacturer.
- Do not fit any accessories, spare parts or components not supplied or approved by the manufacturer.
- Do not insert anything between the vehicle seat and the child car seat, or between the child car seat and the child, unless it is an accessory approved by the manufacturer: in case of accident, the child car seat may not work properly.
• After an accident, even a minor one, the child seat can incur damage which may not be visible to the naked eye: it must be replaced.
- DO NOT use the product for more than 10 years. after this period, alterations of the materials (e.g., due to exposure to sunlight) may reduce or compromise the product's effectiveness.
- Do not use second-hand child car seats: they may be structurally damaged, even if not visible to the naked eye, and could compromise the safety of the product.
- Never leave the child unattended in the child car seat for any reason.
- If the vehicle has been left in the sun, check that the different parts of the child car seat are not too hot before seating the child in it: in this case, let the child car seat cool down
first before placing the child into it, in order to avoid burns.
- The seat fabric must only be replaced with another approved by the manufacturer as it forms an integral part of the child car seat. To ensure your child's safety, the child car seat must never be used without the fabric cover.
- Check that the safety harness strap is not twisted to avoid the strap or any parts of the child car seat becoming trapped between the car doors, or rubbing against cutting edges. The car seat is no longer usable if the safety harness shows signs of cutting or fraying.
- When the child car seat is not in use, it should be left secured to the car's seat, or stowed in the car's boot with the seat inclination adjuster handle completely inserted into the lower part of the child car seat. In fact, an unsecured car seat may pose a hazard to the passengers in the event of an accident or sudden braking.
- Do not transport loose, unsecured objects or baggage on the back shelf of the vehicle: they may injure the passengers in the event of an accident or sudden braking.
• Make sure that all folding or rotating car seats are always firmly fastened in place, otherwise they could be dangerous.
- Check that the vehicle car seat headrest does not interfere with that of the child car seat: do not push it forwards. If this is the case, remove the headrest from the car seat on which the child car seat is fitted, without resting it on the luggage rack.
- Ensure that all the car passengers fasten their vehicle seat belt for their own safety as during the journey, they may injure the child in the event of an accident or sudden braking of the car.
- On long distance journeys, make frequent stops. Children get tired easily.
- Do not remove the child from the child car seat while travelling. If your child needs attention, find a safe place and stop.
- Artsana declines all responsibility for any inappropriate use of the product.
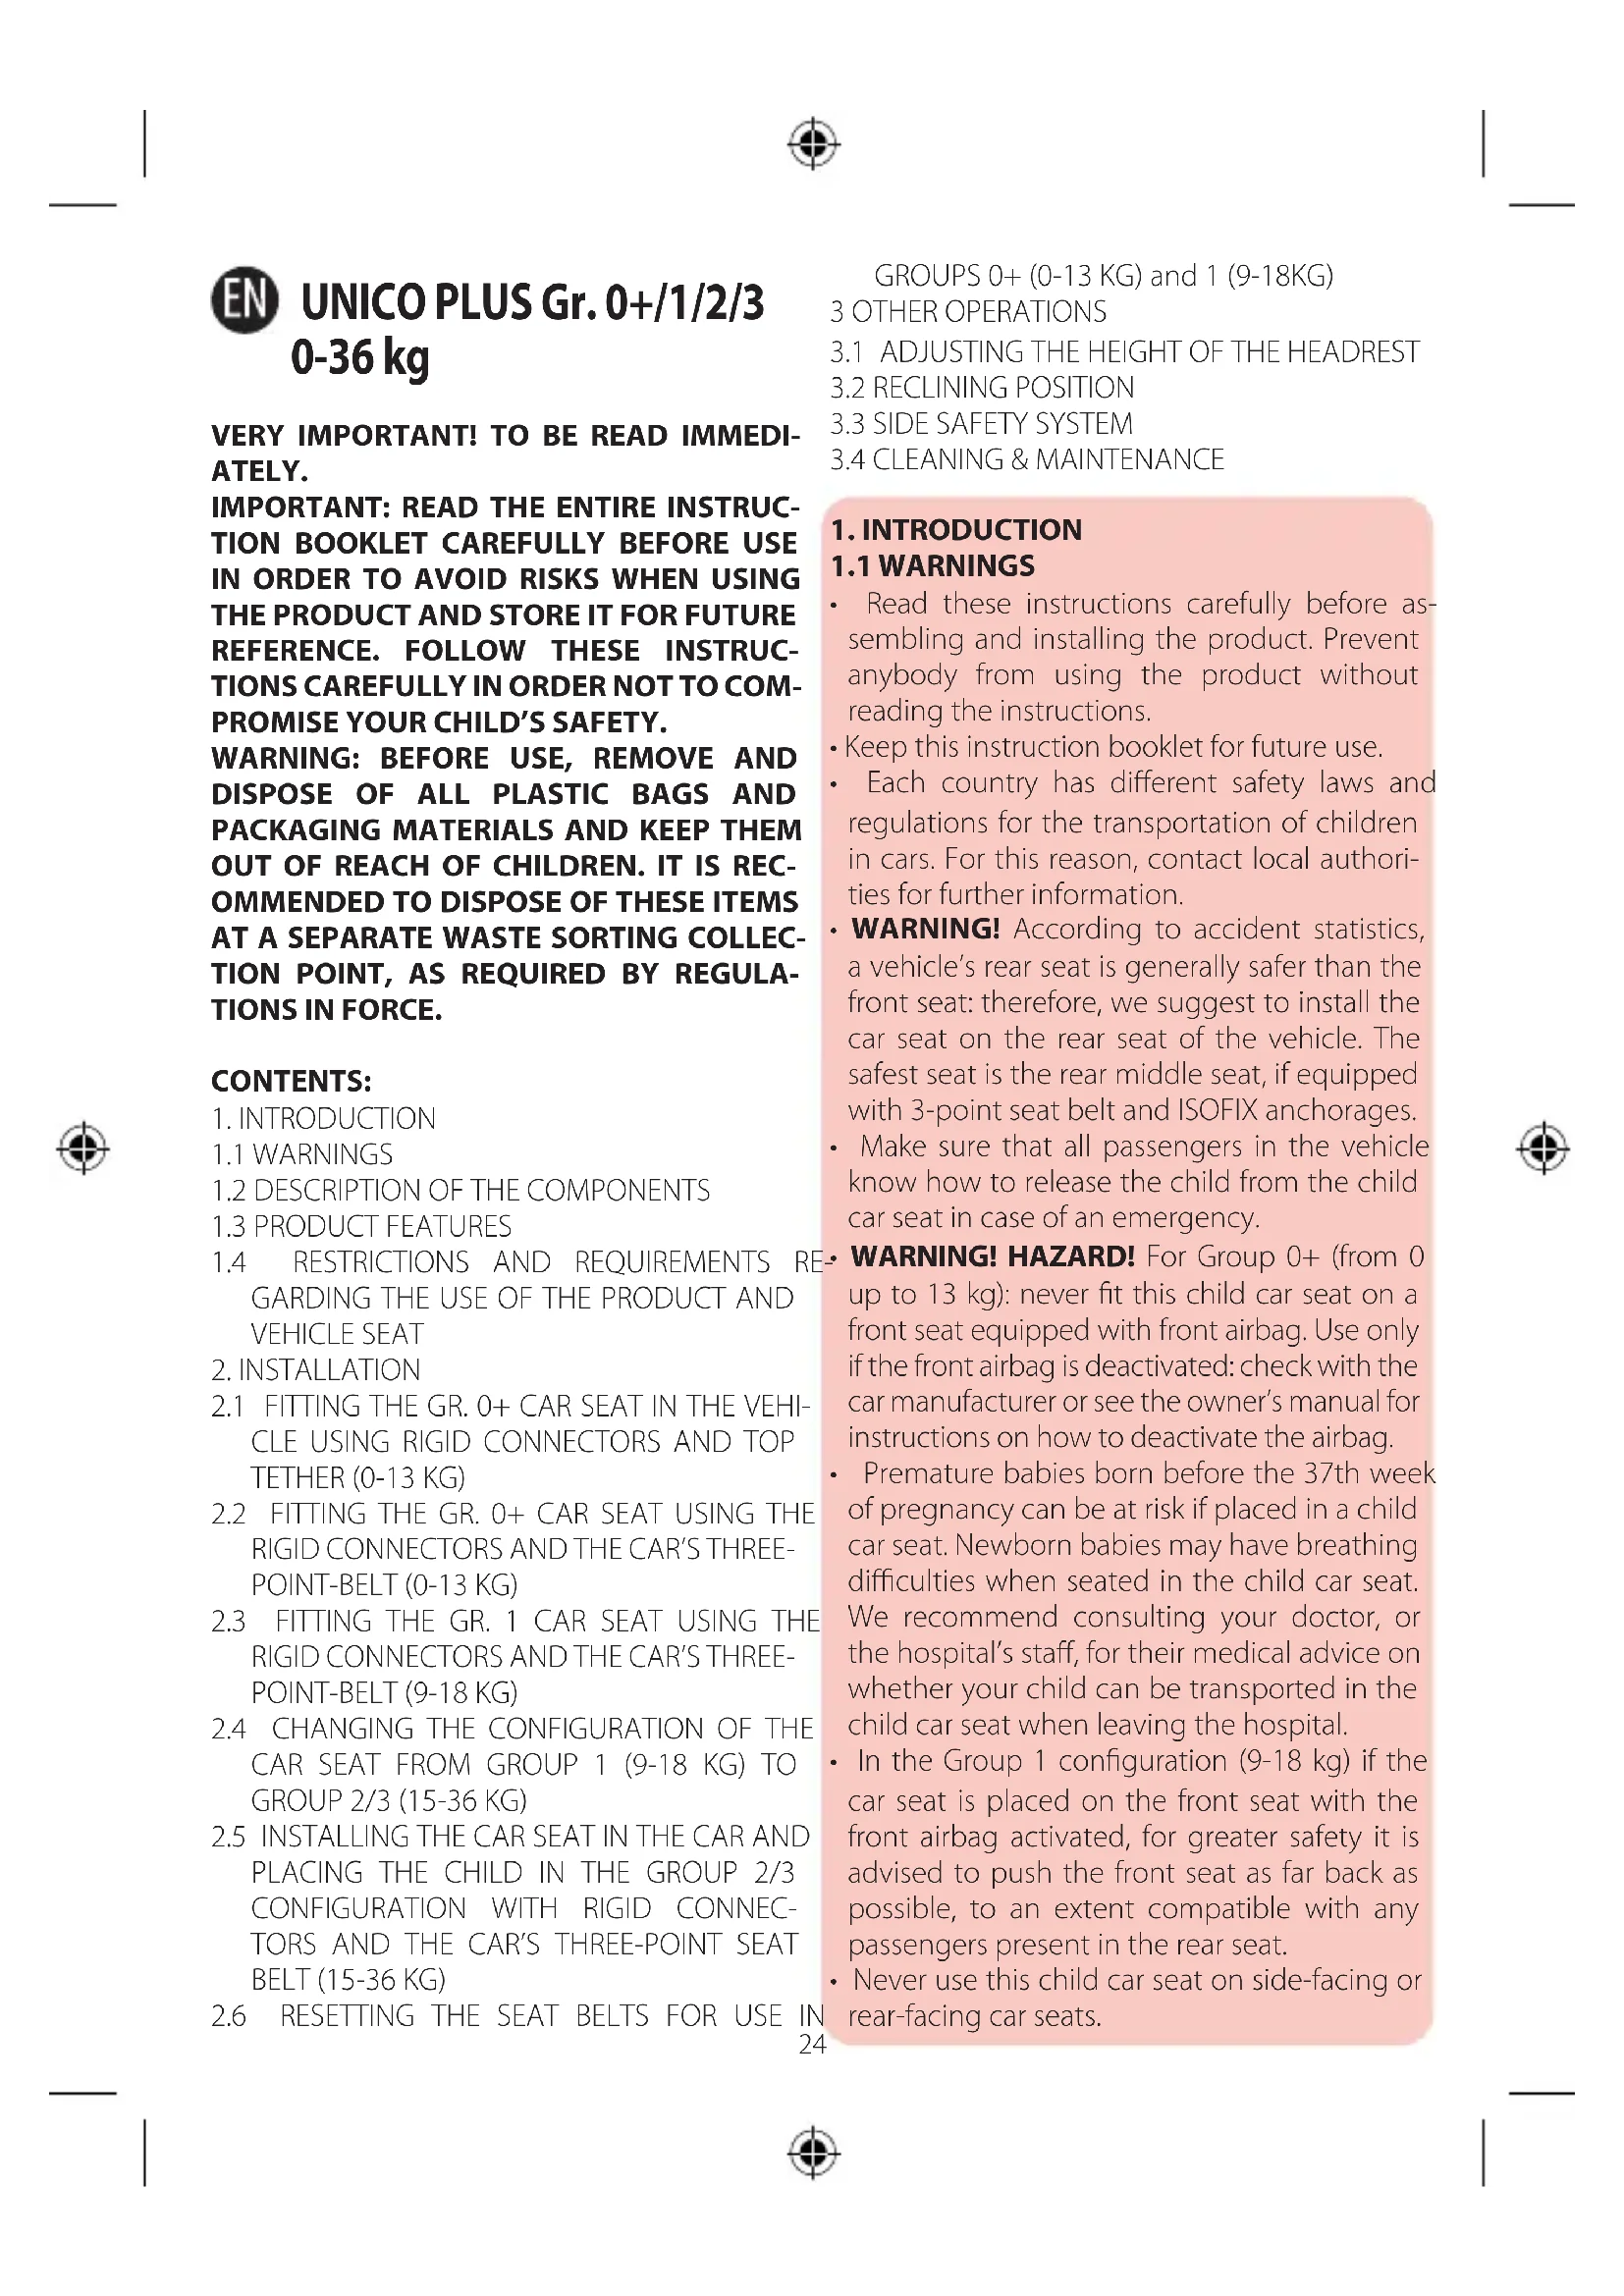
1.2 DESCRIPTION OF THE COMPONENTS Fig. A
A. Seat of Car seat
B. Car seat base
C. Rigid connectors
D. Rigid connector button
E. Rigid connector fastening indicators
F. Side Safety System
V. Top Tether
Fig. B
G. Headrest
H. Backrest
I. Shoulder straps
J. Child car seat restraint harness
K. Buckle
L. Recline lever
M. Seat rotation lever
N. Belt adjustment strap
O. Belt adjustment button
P. Belt guide
Q. Group 2/3 belt guide
R. Mini reducer
Fig. C
S. Headrest adjustment lever
T. Top belt guide
U. Belt slot
V. Top Tether
1.3 PRODUCT FEATURES
GROUPS 0+, 1, 2 and 3 (SEMI-UNIVERSAL).
IMPORTANT WARNING
- This is a "Semi-universal" child car seat, type-approved in accordance with ECE Regulation R44/04 and exclusively compatible with the vehicles specified in the "Vehicle list" that comes with the product.
- It is only suitable for vehicles which feature a 3-point static or 3-point retractable vehicle seat belt approved according to UN/ECE Regulation No.16, or other equivalent standards.
- In case of doubts, contact the manufacturer of the restraint device or your dealer.
1.4 RESTRICTIONS AND REQUIREMENTS REGARDING THE USE OF THE PRODUCT AND VEHICLE SEAT
WARNING! Follow the restrictions and requirements for use of this product and the vehicle car seat at all times: safety will not be guaranteed otherwise.
- This car seat is type-approved for use with children who weigh between 0 to 36kg (from birth until roughly 12 years of age).
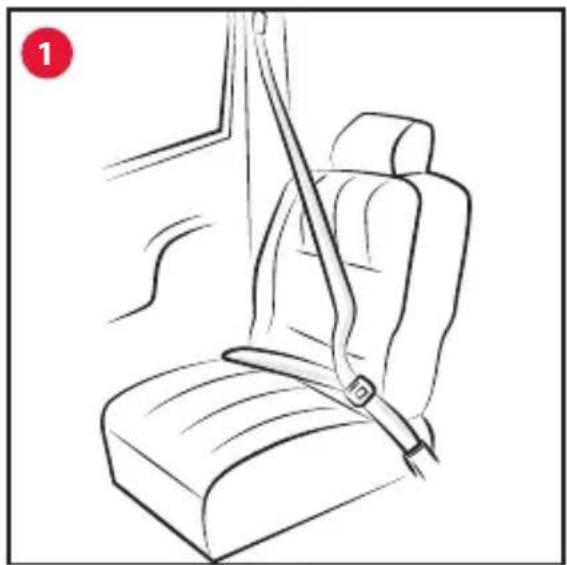
- The vehicle seat must be equipped with a 3-point vehicle seat belt, static or with retractor, type-approved in accordance with UNI/ECE Regulation No 16 or other equivalent standards (Figure 1).
WARNING! Never fit the child car seat to a vehicle seat that is only equipped with a 2-point safety belt (Fig. 2).
- The car seat may be fixed to the passenger side front seat equipped with ISOFIX anchorages or to any of the rear seats equipped with ISOFIX anchorages. In the Group 0+ configuration (0-13 kg) the car seat may only be fixed to the front seat if the airbag has been deactivated. Never use this child car seat on rear-facing or side-facing car seats (Fig. 3).
- This product is only intended to be used as a child car seat; it is not meant for use indoors.
- It may happen that the vehicle seat belt buckle is too long and exceeds the expected height above the bottom of the car seat (Fig. 4A-4B). In this case the seat must not be fixed on that seat but must be installed on another seat on which there is no problem. For more information, contact your car manufacturer.
WARNING! Group 0+ and Group 1. If it is used in a vehicle equipped with rear safety harnesses with integrated airbags (inflatable seat belts), the interplay between the inflatable portion of the seat belt and this child restraint system could cause serious injury or death. Do not install this child restraint equipment where an inflatable safety harness must be used.
WARNING! Group 2/3. When using in vehicles equipped with rear seat belts with integrated airbags (inflatable seat belts), follow the car manufacturer's instruction manual.
2. INSTALLATION
WARNING! The text and figures of these instructions refer to the installation of the child car seat on the right back seat. Follow the same steps to install the car seat in other positions.


2.1 FITTING THE GR. 0+ CAR SEAT IN THE VEHICLE USING RIGID CONNECTORS AND TOP TETHER (0-13 KG)
For the Group 0+ configuration, the car seat must ALWAYS be rear-facing, with the airbag deactivated.
Installation must ALWAYS be carried out using the rigid connectors and Top Tether.
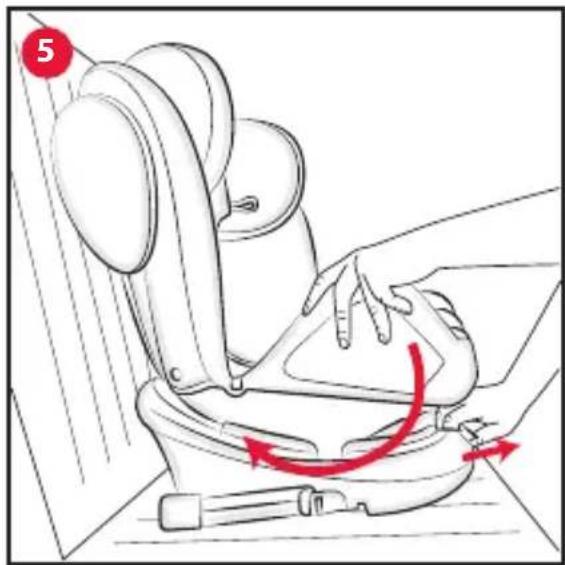
- Use the lever (M) to rotate the seat 180^ , verifying that it has locked in the rear-facing position (Fig. 5).
- Use the recline lever (L), to line up the red arrow with position R (Fig. 6).
- Position the car seat on the seat of the vehicle in the rear-facing direction.
- Pull the rigid connectors out completely (C), by using the button (D) (Fig. 7).
- Fasten the connectors to the hooks present between the backrest and the seat (Fig. 8). Once fastening occurs, you will hear a typical "click" and the indicator will change from red to green.
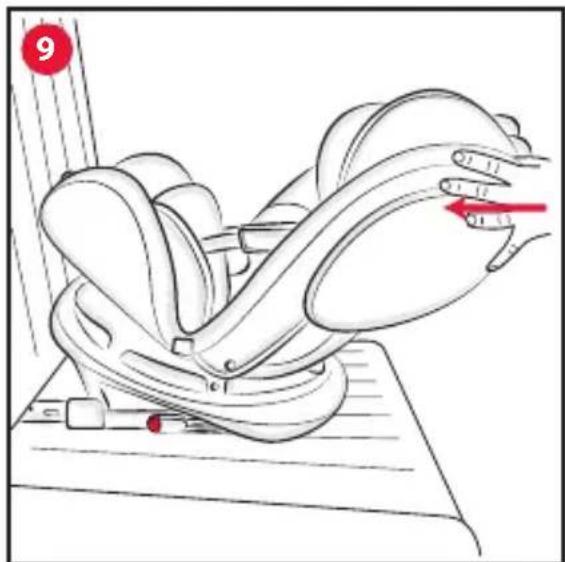
- Firmly push the car seat toward the backrest of the vehicle seat to ensure the best fit (Fig. 9).
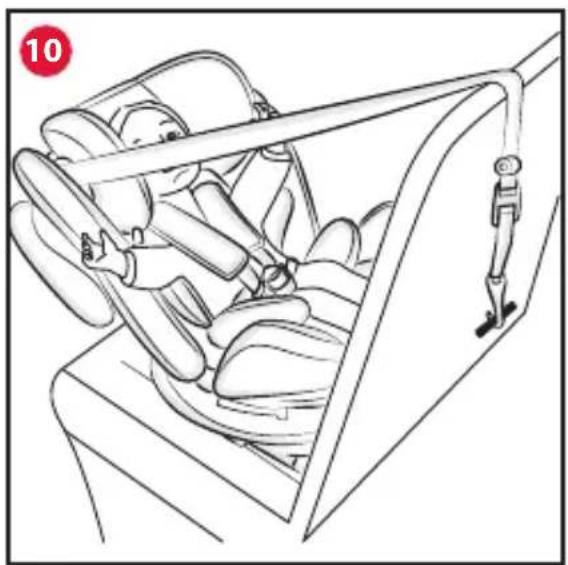
• Pass the Top Tether (V) through the indicated belt guide (P) (Fig. 10).
- Check that the Top Tether belt is properly positioned inside the indicated belt guide (Fig. 11).
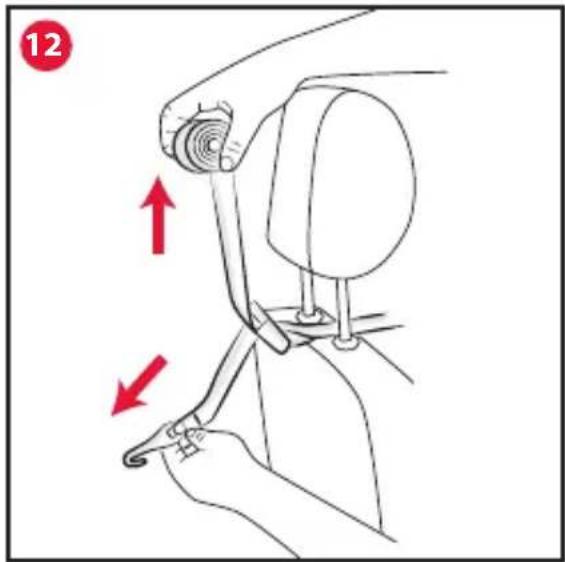
- WARNING! Pass the Top Tether between the top of the car seat backrest and the head-rest. Never pass the Top Tether above the car headrest (Fig. 12).
WARNING! Refer to your car's user manual to identify where the Top Tether of the child car seat is attached to the car. This fastening point is denoted with a specific label (Fig. 13) and can be found in the positions indicated by the figures 13A - 13B - 13C - 13D.
WARNING! Check that the Top Tether fastener used is the one that has been specially designated. Do not confuse it with a ring used for hanging bags.
- Once you have identified the fastening point, connect the Top Tether hook (V) to it. Adjust the length of the Top Tether belt by forcefully pulling the belt until it is tight. The indicator on the belt goes green when the tether is suitably tight (Fig. 14). Roll up any excess belt
and tie up using the velcro. The mini reducer cushion is to be used from birth up to 6 kg. Once installation is complete place the baby in the seat as follows:
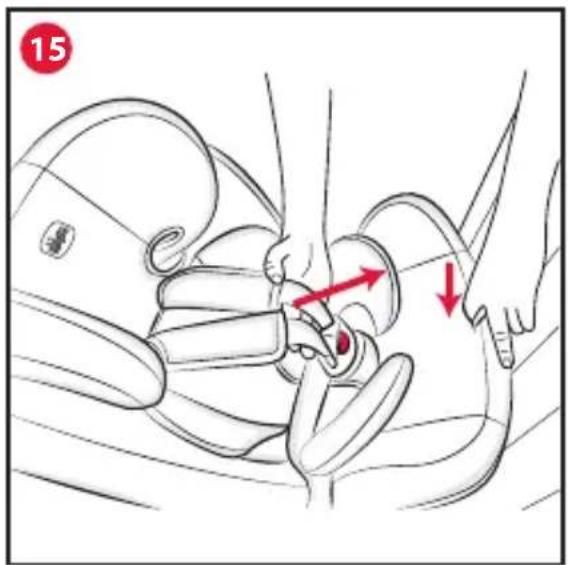
- Press the belt adjustment button (O) and hold and pull both the car seat belts toward yourself until the maximum length is reached (Fig. 15).
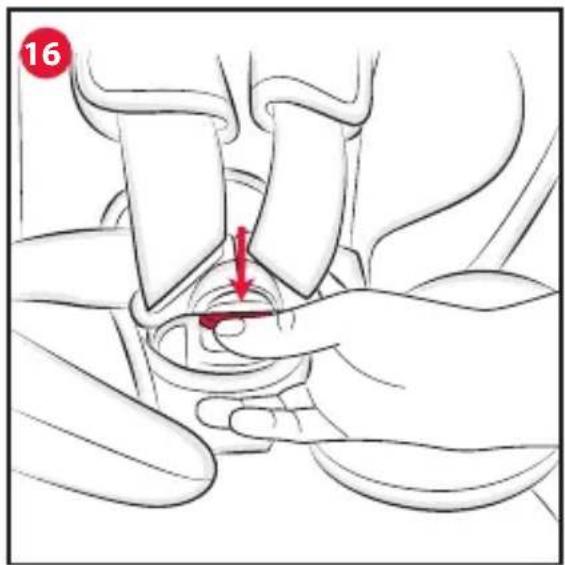
- Unbuckle the car seat belts by pressing the button on the buckle (Fig. 16).
- Place the baby in the car seat with care, join the two buckle tongues and fasten them once again (Fig. 17).
- Using the appropriate lever (S), adjust the height of the headrest, so that the belts exit at the height of the baby's shoulders (Fig. 18).
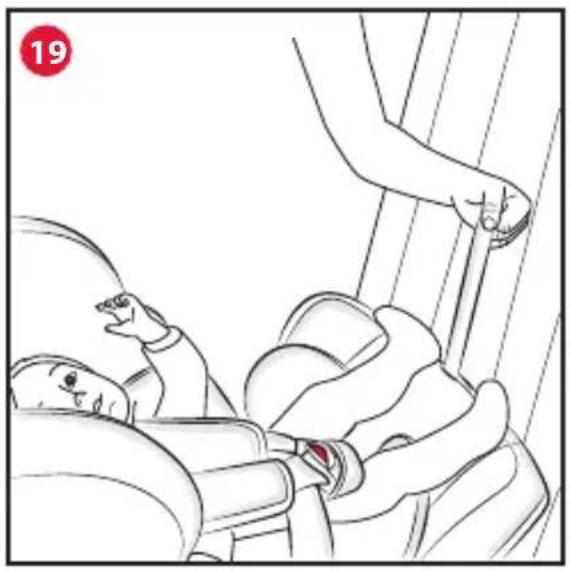
- To adjust belt tightness, pull the adjustment strap (N) upwards with caution until the belt is suitably tight (Fig. 19).
To remove the car seat, unhook the car seat belts and the rigid connectors (C) by pushing the release buttons (D).
2.2 FITTING THE GR. 0+ CAR SEAT USING THE RIGID CONNECTORS AND THE CAR'S THREE-POINT-BELT (0-13 KG)
For the Group 0+ configuration, the car seat must ALWAYS be rear-facing, with the airbag deactivated.
The installation must ALWAYS make use of the rigid connectors and the car's 3-point seat belt.
- Use the lever (M) to rotate the seat 180^ , verifying that it has locked in the rear-facing position (Fig. 20).
- Use the recline lever (L), to line up the red arrow with position R (Fig. 21).
- Position the car seat on the seat of the vehicle in the rear-facing direction.
- Pull the rigid connectors out completely (C), by using the button (D) (Fig. 22).
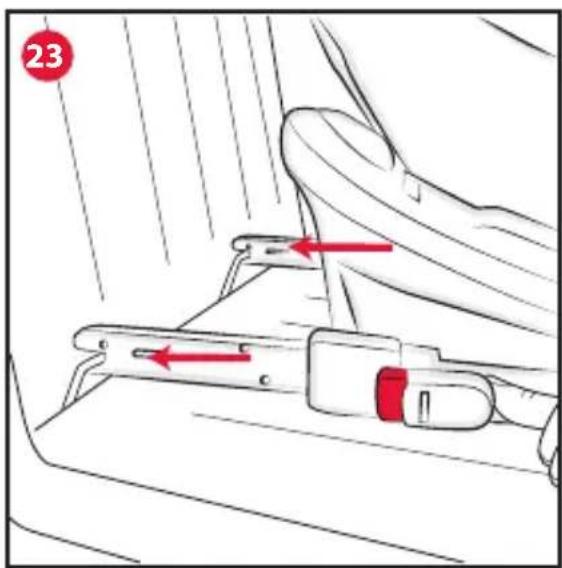
- Fasten the connectors to the hooks present between the backrest and the seat (Fig. 23). Once fastening occurs, you will hear a typical "click" and the indicator will change from red to green.
- Firmly push the car seat toward the backrest of the vehicle seat to ensure the best fit (Fig. 24).
- Remove the reducer and unhook the vehicle seat buckle (Fig. 25).


- Run the abdominal portion of the belt along the blue guide (P) (Fig. 26) run the diagonal portion of the car seat belt through the top guide (T), along the path between the head-rest and the seat following the indicated seat belt guide (Fig. 27).
- Fasten the belt to the buckle (Fig. 28).
- Put the mini reducer cushion back in place (0-6 kg).
- The final configuration of the car seat must match Fig. 29.
The mini reducer cushion is to be used from birth up to 6 kg.
Once installation is complete place the baby in the seat as follows:
- Press the belt adjustment button (O) and hold and pull both the car seat belts toward yourself until the maximum length is reached (Fig. 30).
- Unbuckle the car seat belts by pressing the button on the buckle (Fig. 31).
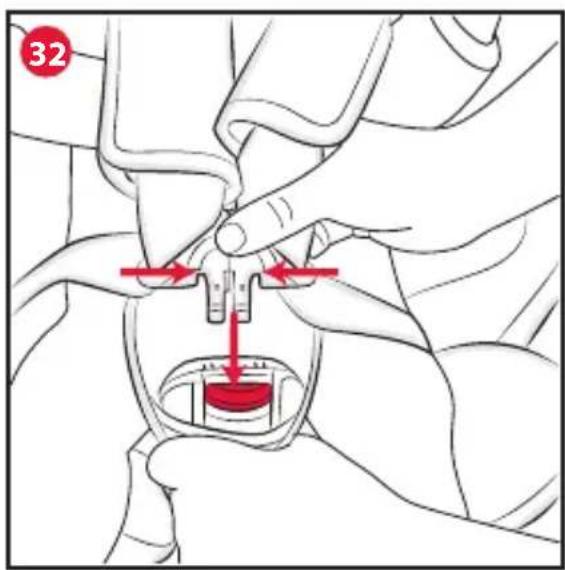
- Place the baby in the car seat with care, join the two buckle tongues and fasten them once again (Fig. 32).
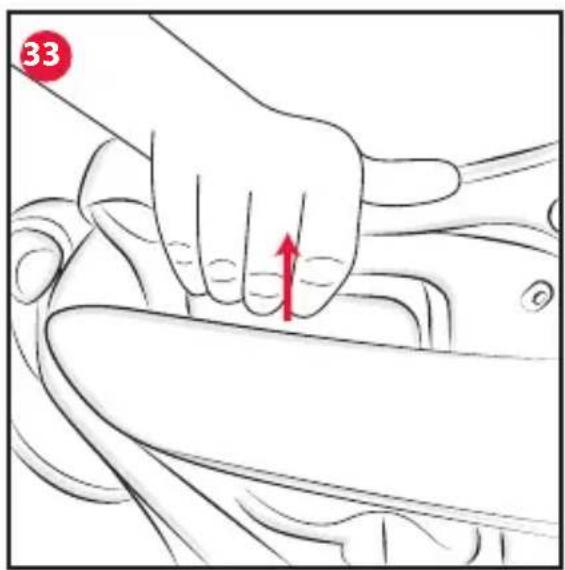
- Using the appropriate lever (S), adjust the height of the headrest, so that the belts exit at the height of the baby's shoulders (Fig. 33).
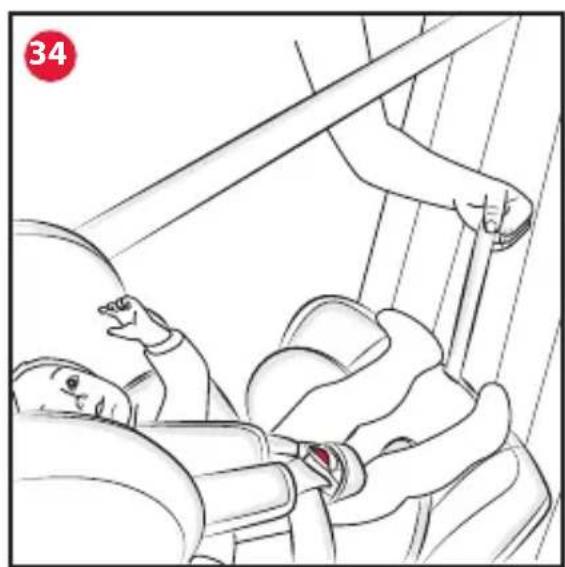
• To adjust belt tightness, pull the adjustment strap (N) upwards with caution until the belt is suitably tight (Fig. 34).
To remove the car seat, unhook the car seat belts and the rigid connectors (C) by pushing the release buttons (D).
2.3 FITTING THE GR. 1 CAR SEAT USING THE RIGID CONNECTORS AND THE CAR'S THREE-POINT-BELT (9-18 KG)
In the Group 1 configuration, the car seat must ALWAYS be front-facing, and must ALWAYS be installed using the rigid connectors and the car's 3-point seat belt.
WARNING! Use the reclined car seat in the positions 1, 2 or 3. NEVER use position R.
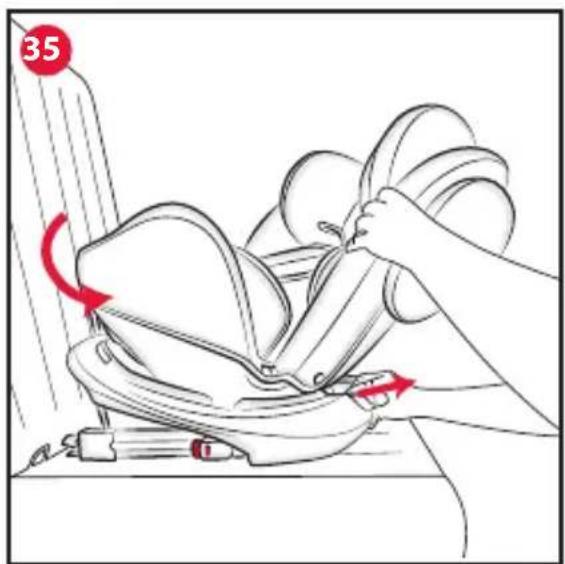
- Use the lever (M) to rotate the seat 180°, verifying that it has locked in the front-facing position (Fig. 35).
- Position the car seat on the seat of the vehicle in the front-facing direction.
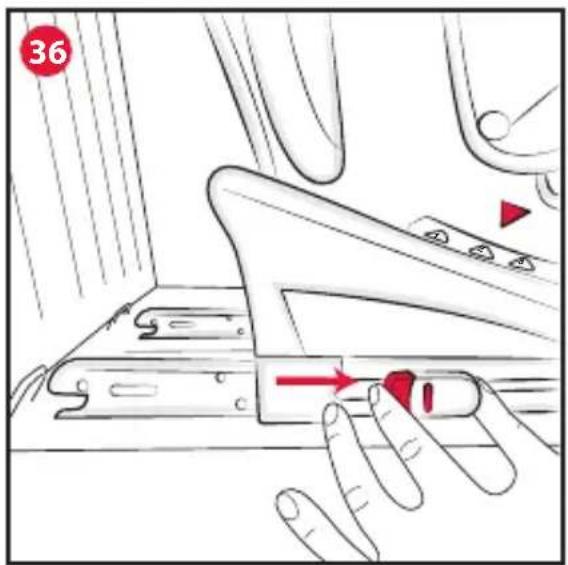
• Pull the rigid connectors out completely (C),
by using the button (D) (Fig. 36).
- Fasten the connectors to the hooks present between the backrest and the seat (Fig. 37). Once fastening occurs, you will hear a typical "click" and the indicator will change from red to green.
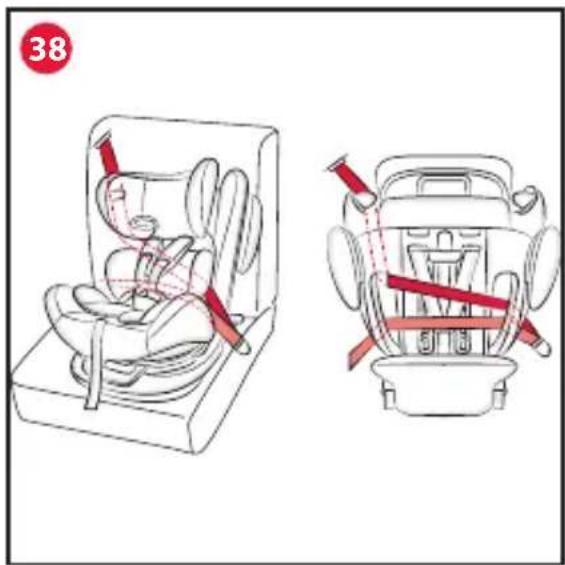
- Run the diagonal portion of the belt along the top belt guide (T). Insert the three-point belt in the belt slot (U) and have it exit from the slot on the opposite side (Fig. 38)
- Buckle the car's seat belt (Fig. 39)
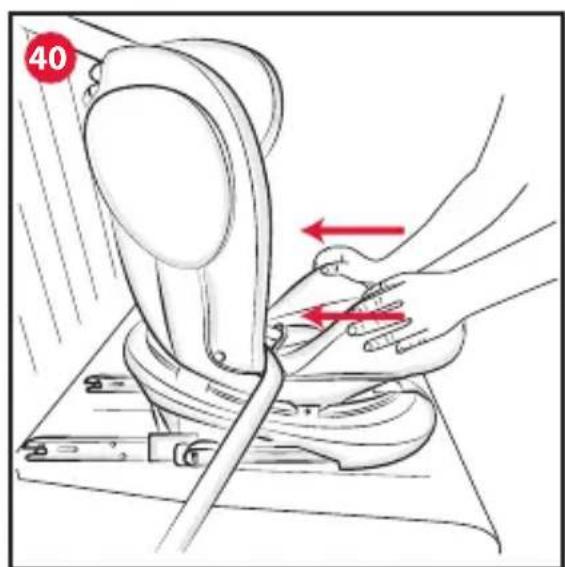
- Push the car seat firmly against the backrest of the vehicle seat to ensure the best fit (Fig. 40) and tighten the diagonal portion of the belt (Fig. 41).
Once installation is complete place the baby in the seat as follows:
- Press the belt adjustment button (O) and hold and pull both the car seat belts toward yourself until the maximum length is reached (Fig. 42).
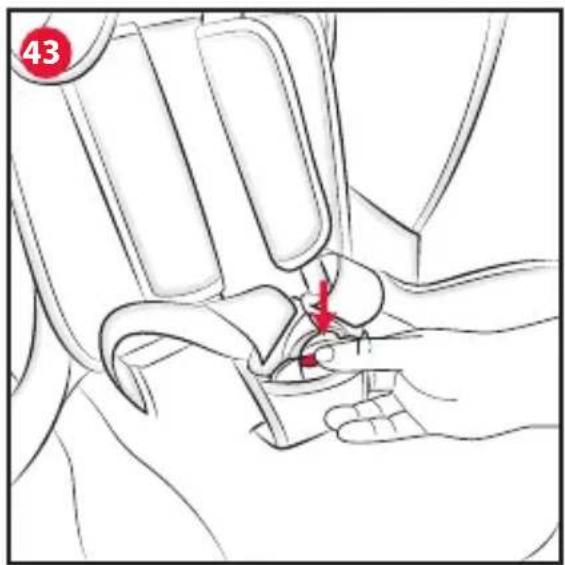
- Unbuckle the car seat belts by pressing the button on the buckle (Fig. 43).
- Place the baby in the car seat with care, join the two buckle tongues and fasten them once again (Fig. 44).
- Using the appropriate lever (S), adjust the height of the headrest, so that the belts exit at the height of the baby's shoulders (Fig. 45).
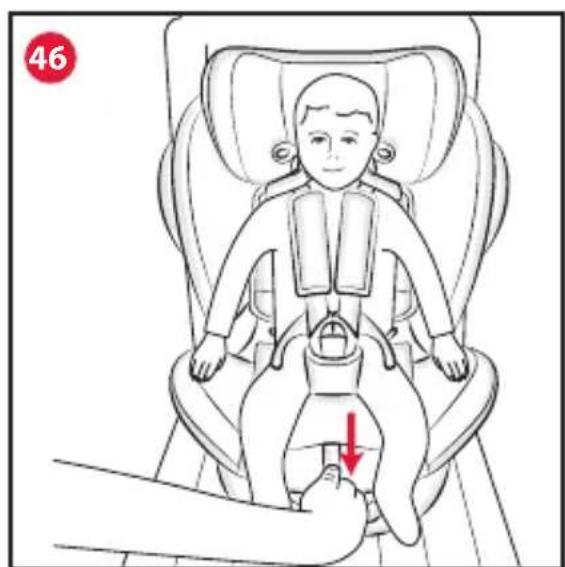
- To adjust belt tightness, pull the adjustment strap (N) with caution until the belt is suitably tight (Fig. 46).
2.4 CHANGING THE CONFIGURATION OF THE CAR SEAT FROM GROUP 1 (9-18 KG) TO GROUP 2/3 (15-36 KG)
To change the configuration from Group 1 to Group 2/3 you will need to complete the following steps:
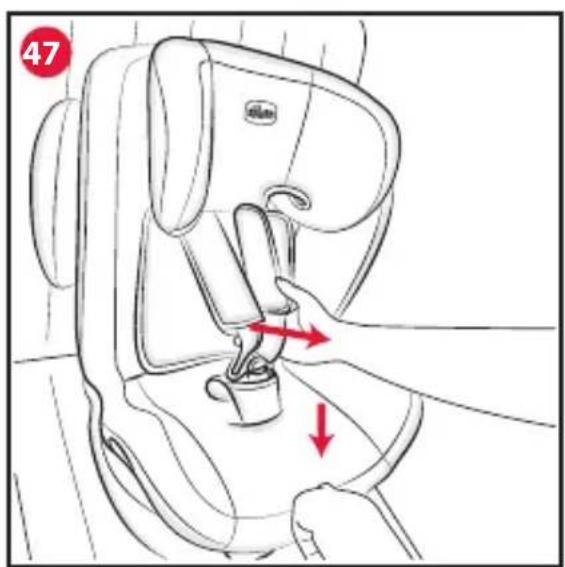
- Loosen the belts on the car seat completely by pressing the adjustment button (O) (Fig. 47).
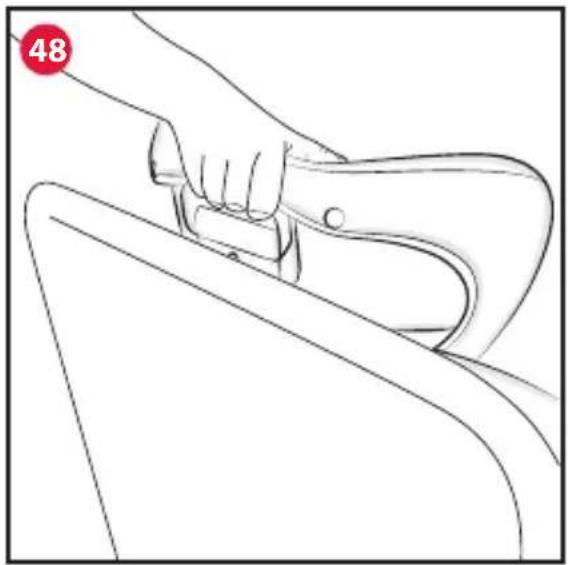
- Use the lever (S) to set the maximum extension possible for the headrest (Fig. 48).
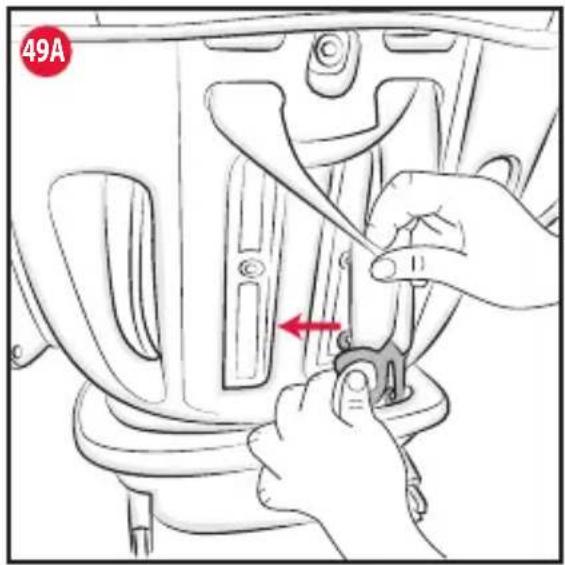
- Free the car seat belts from the anchor (Fig. 49A) and place the anchor in the appropriate housing (Fig. 49B).
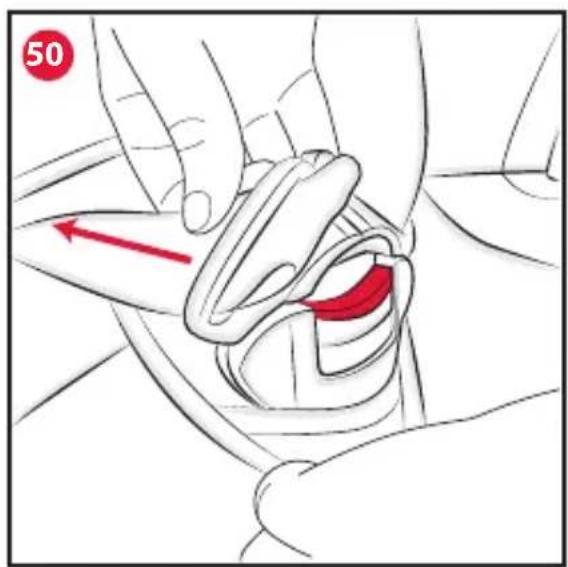
- Run the car seat belts through the holes and free them from the buckle (Fig. 50).
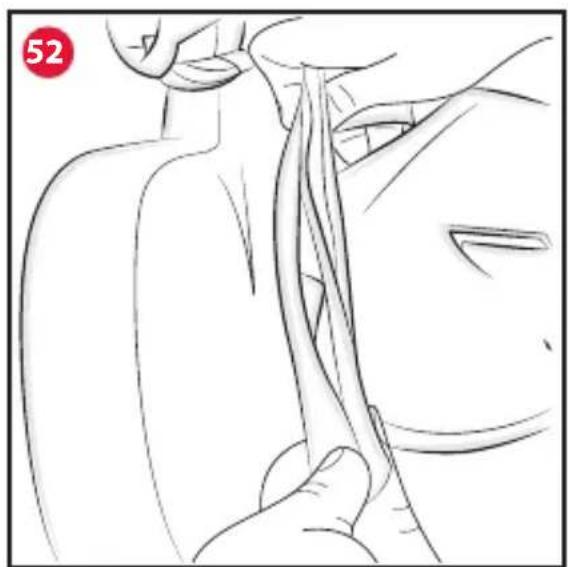
• After having lifted the fabric from the seat, position the buckle in the appropriate compartment located near the feet (Fig. 51).
- Roll up the belts and place them in the compartments present to the sides of the seat (Fig. 52).
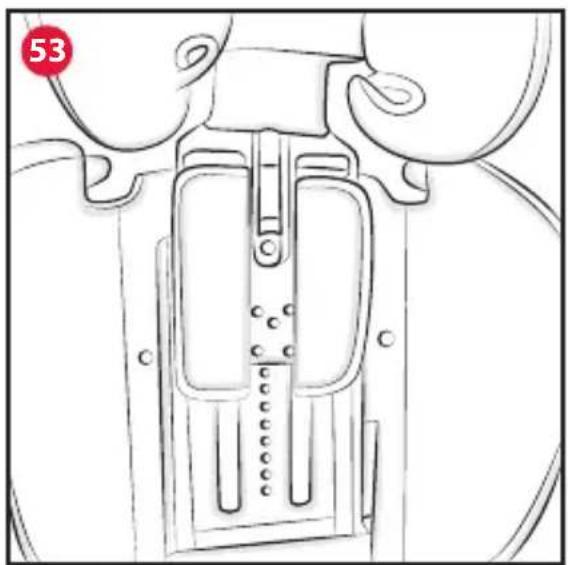
- Place the shoulder straps in the backrest (Fig. 53) and the leg separator guard under the seat fabric (Fig. 54).
2.5 INSTALLING THE CAR SEAT IN THE CAR AND PLACING THE CHILD IN THE GROUP 2/3 CONFIGURATION (15-36 KG) WITH RIGID CONNECTORS AND THE CAR'S THREE-POINT SEAT BELT.
WARNING! Use the reclined car seat in positions 1 and 2. NEVER use positions R and 3.
The installation must ALWAYS make use of the rigid connectors and the car's 3-point seat belt.
- Position the car seat on the seat of the vehicle in the front-facing direction.
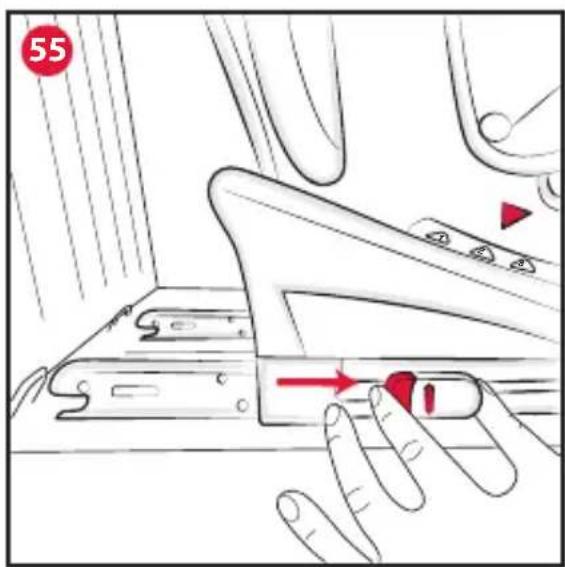
- Pull the rigid connectors out completely (C), by using the button (D) (Fig. 55).
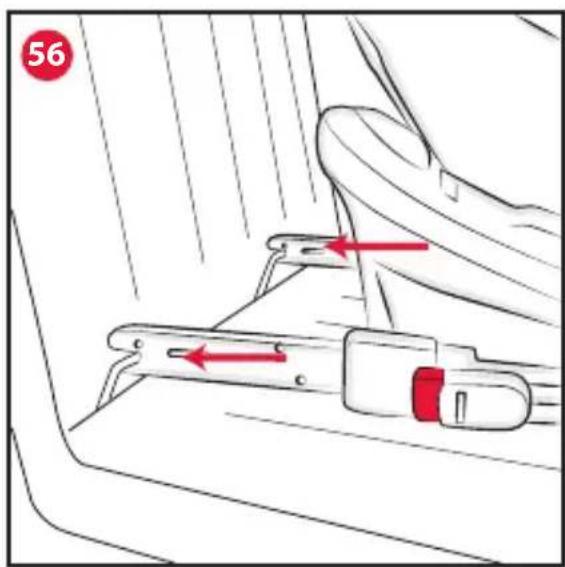
- Fasten the connectors to the hooks present between the backrest and the seat (Fig. 56). Once fastening occurs, you will hear a typical "click" and the indicator will change from red to green.
- Run the diagonal segment of the vehicle seat belt behind the headrest and through the red belt guide on the headrest (Q) (Fig. 57).
- Place the child in the car seat, verifying that the child's back rests firmly against the back-rest of the car seat.
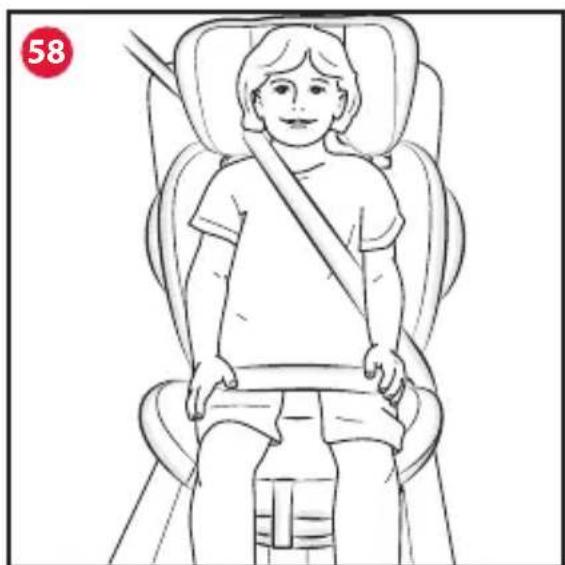
- Hook the vehicle seat belt to the buckle (Fig. 58).
- When adjusting the headrest check that the diagonal belt guide (Q) is located above the shoulder at a maximum distance of 2 cm (Fig. 59).
- Pull the diagonal portion of the belt toward the retractor, so that the belt is tight and fits snugly against the chest and legs of the child (Fig. 60).
WARNING!
• Always check that the seat belt is distributed evenly in all points and that it is not twisted.
- Check that the diagonal seat belt fits correctly across the child's shoulder and does not press on the child's neck; If necessary, adjust the
headrest.
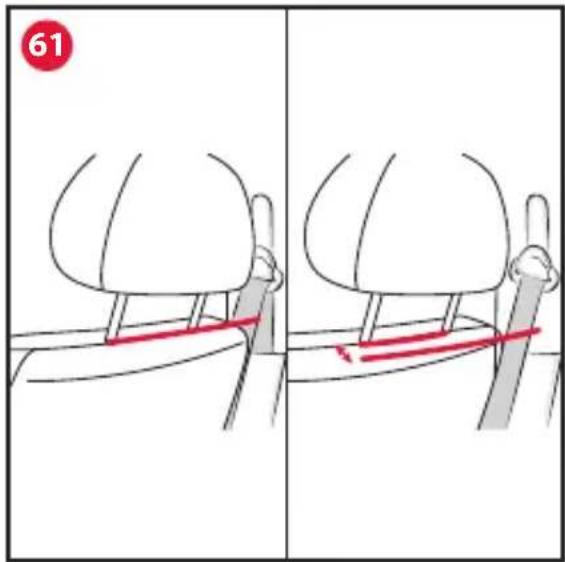
- Check that the car safety belt retractor is behind the backrest of the car seat (Fig. 61).
2.6 RESETTING THE SEAT BELTS FOR USE IN GROUP 0+ (0-13 KG) and GROUP 1 (9-18KG)
Work backwards through the steps described in chapter 2.3.
3. OTHER OPERATIONS
3.1 ADJUSTING THE HEIGHT OF THE HEADREST
The height of the headrest can be adjusted to better adapt the child car seat to the height of the child. When it is correctly adjusted, it ensures:
- That the head is always well positioned and protected (Group 1/2/3).
- That the vehicle seat belts of the car seat are always at the correct height, in other words at the shoulders (Group 0+ and Group 1).
- That the car's diagonal belt is always at the right height thanks to the guides built into the headrest (Q) (Group 2/3).
To adjust the height of the headrest, use the headrest adjustment lever (S), until the desired height is reached (Fig. 62).
3.2 RECLINING THE SEAT
The recline lever (L) located under the seat must be unlocked using the second safety catch to bring the incline of the seat to the desired position.
When the car seat is installed in the Group 0+ configuration (0-13 kg) it must be set to position R.
In the Group 1 configuration (9-18 kg) the car seat can be set to positions 1, 2 and 3.
In the Group 2/3 configuration (15-36 kg) the car seat can only be used in positions 1 and 2.
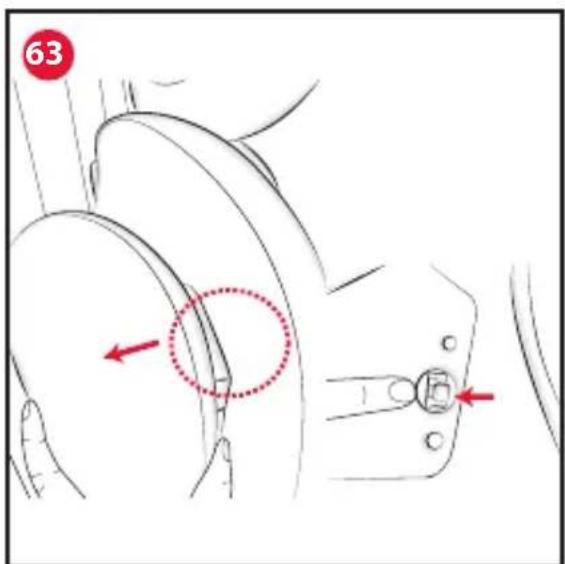
The car seat is equipped with a Side Safety System (F) to guarantee greater protection in the event of impact from the side.
Should the device interfere with vehicle components it can be removed, by unhooking it (Fig. 63).


3.4 CLEANING & MAINTENANCE
The cleaning and maintenance of the product must only be carried out by an adult. How to clean the fabric cover.
The child car seat's fabric cover can be removed and washed by hand or in a washing machine at
30°C. Please refer to the care label for instructions on cleaning the seat fabric.

Machine washable at 30°C

Do not bleach

Do not tumble dry

Do not iron

Do not dry clean
Never use abrasive detergents or solvents. Do not dry the fabric cover within a dryer, let it dry without squeezing it. The fabric cover must only be replaced with another cover approved by the manufacturer, since it is an integral part of the child car seat and, therefore, one of its safety elements.
WARNING! To ensure the safety of the child car seat, never use it without its fabric cover. To remove the fabric cover follow the instructions below:
Headrest
- Slide the headrest off the belt guide (Fig. 64) and unhook the buttons on the back (Fig. 65).
Seat
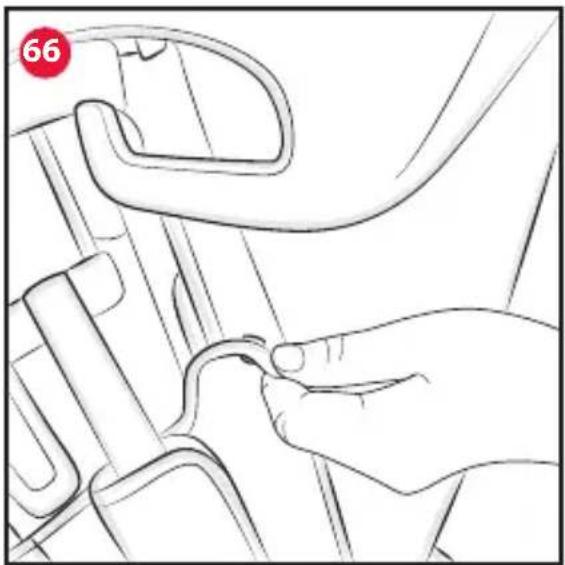
- Unhook the buttons of the central flap (Fig. 66) and then those located around the body (Fig. 67).
Clean the plastic and coated metal parts with a damp cloth only. Never use abrasive detergents or solvents. The moving parts of the child car seat must not be lubricated.
CHECKING THE CONDITION OF THE COMPONENTS
It is recommended to regularly check the con-
dition of the following components to make sure they are not damaged or worn:
- Fabric cover: check that the padding does not come out from the seams. Check the condition of the seams: they must always be intact and undamaged.
- Harnessstraps: check that the fabric lining is not frayed or the harness strap worn out in areas around the adjuster on the crotch strap, shoulders and harness adjustment plate.
- Plasticparts: check that the plastic parts are not worn out, damaged or faded.
WARNING! If the child car seat is damaged, deformed or excessively worn, it must be replaced as its original safety features may have been compromised.
STORING THE PRODUCT
When it is not fitted in the car, it is advisable to store the child car seat in a dry place, away from sources of heat and to protect it from dust, humidity and direct sunlight.
DISPOSING OF THE PRODUCT
When the child car seat no longer complies with the original safety standards, stop using it and dispose of it at an appropriate collection point. Always dispose of the child car seat following the guidance and regulations set out in the country of use.
WARRANTY
The product is guaranteed against any conformity defect in normal conditions of use as provided for by the instructions.
The warranty shall not therefore apply in the case of damage caused by improper use, wear or accidental events.
For the duration of the warranty on conformity defects please refer to the specific provisions of applicable national laws in the country of purchase, where appropriate.


FR UNICO PLUS Gr. 0+/1/2/3 0-36 kg
TRÈS IMPORTANT ! À LIRE IMMÉDIATEMENT.
IMPORTANT : LIRE ATTENTIVEMENT ET INTÉGRALEMENT CETTE NOTICE D'EMPLOI AVANT DE SE SERVIR DU PRODUIT POUR ÉVITER TOUT RISQUE PENDANT L'UTILISATION, CONSERVER LA NOTICE POUR POUVOIR LA CONSULTER PAR LA SUITE. VOTRE ENFANT RISQUE DE SE BLESSER SI VOUS NE LA SUIVEZ PAS.
ATTENTION : AVANT L'EMPLOI, ENLEVER ET ÉLIMINER TOUS LES SACS EN PLASTIQUE ET ÉLÉMENTS QUI FONT PARTIE DE L'EMBALLAGE DU PRODUIT ET LES TENIR HORS DE PORTÉE DES ENFANTS. NOUS RECOMMANDONS DE JETER CES ÉLÉMENTS CONFORMÉMENT AUX RÉGLEMENTATIONS EN VIGUEUR EN MATIÈRE DE TRI SÉLECTIF.
CONSERVATION DU PRODUIT
ÉLIMINATION DU PRODUIT
F. Side Safety System
V. Top Tether
Fig. B
G. Reposacabezas
H. Respaldo
I. Hombreras
2.4 ZMĚNA KONFIGURACE AUTOSEDA ZE SKUPINY 1 (9–18 KG) NA SKUPINU 2/3 (15–36 KG)
2.5 INSTALACE AUTOSEDAČKY DO VOZIDLA A USAZENÍ DÍTĚTE V NÍ U SK. 2/3 POMOCÍ PEVNÝCH KONEKTORŮ A TRÍBODOVÉHO PÁSU AUTOMOBILU (15–36 KG)
2.6 OBNOVENÍ NASTAVENÍ PÁSŮ PRO POUŽITÍ U SKUPIN 0+ (0–13 KG) a 1 (9–18 KG)
3 DALŠÍ ÚKONY
3.1 NASTAVENÍ VÝŠKY OPĚRKY HLAVY
3.2 NAKLOPENÍ
2.4 ZMĚNA KONFIGURACE AUTOSEDAČKY ZE SKUPINY 1 (9–18 KG) NA SKUPI-NU 2/3 (15–36 KG)
V. Top Tether (bovengordel)
1.3 KENMERKEN VAN HET PRODUCT
GROEP 0+, 1, 2 en 3 (SEMI-UNIVERSEEL).
BELANGRIJKE MEDEDELINGEN
INNEHÅLLSFÖRTECKNING:
- INLEDNING
1.1 WARNINGAR
1.2 BESKRIVNING AV KOMPONENTER
1.3 PRODUKTENS EGENSKAPER
1.4ANVÄNDNINGSBEGRÄNSNINGAROCH
KRAV GÄLLANDE PRODUKTEN OCH BILSÄ-
TET
- MONTERING
2.1 INSTALLATION AV BILBARNSTOL GR. 0+ I BILEN MED STYVA KONTAKTDON OCH ÖVRE FÄSTANORDNING (0-13 KG)
FÖRVARING AV PRODUKTEN
SKUPINE 0+, 1, 2 in 3 (DELNO UNIVERZALNE).
VAŽNO OPOZORILO
F. Side Safety System
V. Top Tether
Fig. B
ELIMINAREA PRODUSULUI
ARTSANA UK Ltd.
2nd Floor
1 Imperial Place
Maxwell Road
Borehamwood
Hertfordshire - WD6 1JN
01623 750870 (office hours)
www.CHICCO.uk.com

ARTSANA SPAIN S.A.U.
C/Industria 10
Pol. Industrial Urtinsa
Apartado De Correos 212 - E
28923 Alcorcon (Madrid)-Spain
902 117 093
www.CHICCO.es

ARTSANA PORTUGAL S.A.
Rua Humberto Madeira, 9
2730-097 Queluz De Baixo Barcarena Portugal
21 434 78 00
800 20 19 77
www.CHICCO.pt

ARTSANA BELGIUM N.V.
Temselaan 5 B-1853 Strombeek - Bever
Belgium
+32 23008240
www.CHICCO.be

ARTSANA INDIA PRIVATE LIMITED,
7Th Floor, Tower B, Paras Twin Towers,
Golf Course Road, Sector 54
Gurgaon - 122002 - Haryana, India
(+91)(124)(4964500)
www.CHICCO.in

ARTSANA S.p.A.
Via Saldarini Catelli, 1
22070 Grandate (CO) - Italy
Tel. (+39) 031 382 111
Fax (+39) 031 382 400
www.CHICCO.com


NOTE


natural_image
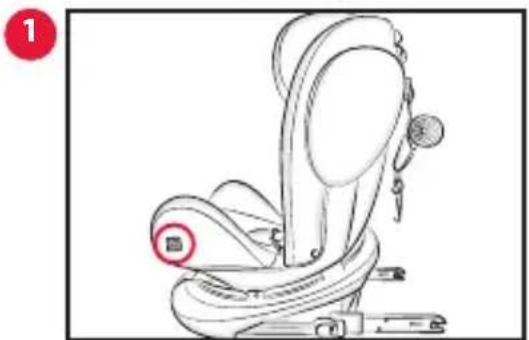
Line drawing of a car seat with a highlighted seat (no text or symbols)
natural_image
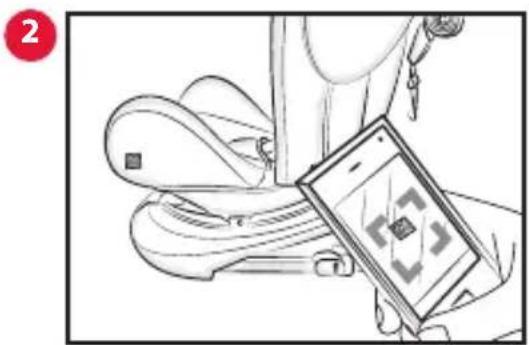
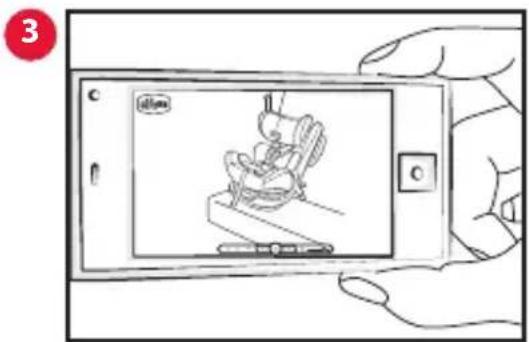
Illustration of a hand holding a smartphone displaying a QR code, with no visible text or symbols on the device or background.
ARTSANA S.p.A. - Via Saldarini Catelli, 1 - 22070 Grandate (CO) - Italy Tel. (+39) 031 382 111 - Fax (+39) 031 382 400 - www.chicco.com