eXperience 350 - Aquarium filter EHEIM - Free user manual and instructions
Find the device manual for free eXperience 350 EHEIM in PDF.
| Product type | External aquarium filter |
| Model | eXperience 350 |
| Brand | EHEIM |
| Power supply | Mains (220-240 V, 50 Hz) |
| Rated flow rate | Approx. 350 L/h |
| Max. installation height | 180 cm between water surface and filter bottom |
| Filtration capacity | Mechanical and biological |
| Filter media included | White filter wool (mechanical), blue foam, SUBSTRAT substrate |
| Spare parts references | White filter wool (2616265), blue foam (2616260), cleaning set (4009560), installation accessory (4005300), priming bulb (4003540) |
| Recommended maintenance | Clean filter media with running water, replace filter wool after each use, clean impeller and shaft with cleaning set |
| Safety | Disconnect before maintenance, indoor use, do not reduce flow via inlet, respect max. distance |
| Compliance | Certified according to European standards |
| Warranty | Refer to the manual for conditions |
| Usage | Domestic aquarium keeping |
| Materials | Plastic, rubber gaskets, ceramic (shaft) |
| Number of filter baskets | Multiple stackable baskets |
| Flow adjustment | Via outlet valve (OUT) |
| Supplied accessories | Hoses, strainer, suction pipe, suction cups, connection with shut-off valves, Vaseline |
| Dimensions (approx.) | Approx. 25 x 20 x 40 cm |
| Weight (approx.) | Approx. 3-4 kg |
Frequently Asked Questions - eXperience 350 EHEIM
User questions about eXperience 350 EHEIM
0 question about this device. Answer the ones you know or ask your own.
Ask a new question about this device
Download the instructions for your Aquarium filter in PDF format for free! Find your manual eXperience 350 - EHEIM and take your electronic device back in hand. On this page are published all the documents necessary for the use of your device. eXperience 350 by EHEIM.
USER MANUAL eXperience 350 EHEIM
natural_image
Cross-sectional view of a mechanical device with green liquid and metallic components (no visible text or symbols)350
(Typ 2426)


de Außenfilter
en External filter
fr Filtre extérieur
nl Buitenfilter
sv Ytterfilter
no Udvendig filter
fi Ulkosuodattimet
da Utvendigt filter
it Filtro esterno
sp Filtro exterior
pt Filtro exterior
el Εξωτερικό φίλτρο
cs Vn filtr
hu Külszürő
natural_image
Cross-sectional diagram of a mechanical device showing internal components and fluid flow (no text or labels)2426
natural_image
Pure technical line drawing of a mechanical component without any text, numbers, or symbols
text_image
1 x 2616260 oder / or / ou 1 x 2616265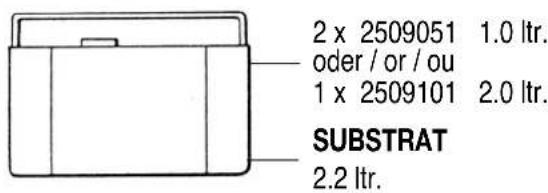
text_image
2 x 2509051 1.0 ltr. oder / or / ou 1 x 2509101 2.0 ltr. SUBSTRAT 2.2 ltr.
text_image
1 x 26162612426
text_image
Technical diagram of a mechanical device with numbered parts for identification and assembly reference.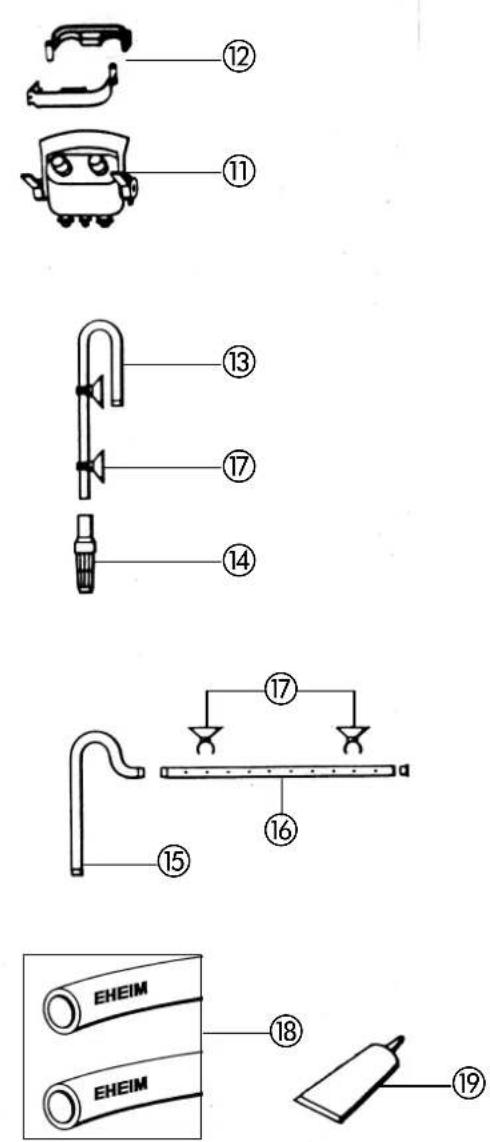
text_image
Diagram showing 19 labeled parts of a mechanical or electrical component, including spray bottle, valve, and EHEIM cable.2426
Für Süß- und Meerwasser / for fresh and marine water / pour eau douce et eau de mer / voor zoet- en zeewater
| 2426 | 230 V50 Hz | 120 V60 Hz | 240 V50 HzGB | 240 V50 HzAUS | 220 V60 Hz |
| No. | 1228019 | 1228099 | 1228119 | 1228129 | 1228189 |
| No. | 2226020 | -- | 2226510 | -- | -- |

text_image
7344100 7343100 7444550 7444200 7344100 7344100 1228 7343400 7343150 7342200 7656200 (50 Hz) 7656210 (60 Hz) 7444400 7255050 7656300 7342350 7343390 7344050 2616265 7480650 2616260 7480650 7444450 7676000 (2426) 7271950 7342500 (2426)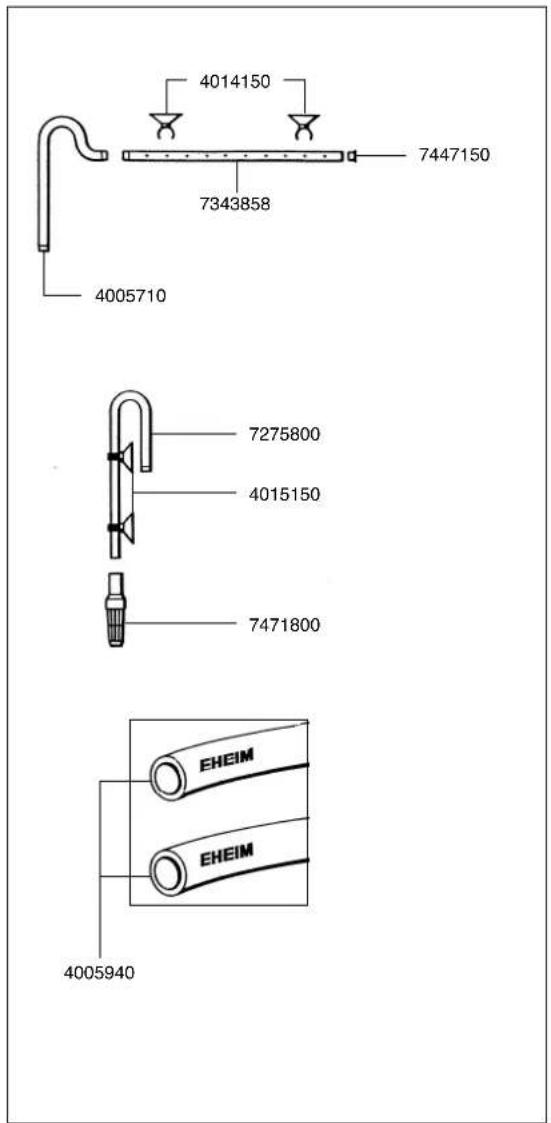
natural_image
Illustration of two different mechanical device setups with hands operating, showing internal components and mounting brackets (no text or symbols)natural_image
Illustration of a two-part storage unit with internal compartments and packaging (no text or symbols)natural_image
Simple line drawing of a container with liquid and a side outlet, no text or symbols present
natural_image
Illustration of a hand washing a faucet with water and granular material inside a container (no text or symbols)text_image
Technical diagram showing two stages of a container with material layers and directional arrows indicating process flow.natural_image
Technical line drawing of a mechanical component with no visible text or symbols
text_image
Diagram illustrating a mechanical or fluid system with directional arrows indicating movement or force, showing a component being processed into a container.ACHTUNG:
natural_image
Cartoon robot character with large eyes and a pink bottle nearby (no text or symbols)text_image
in out in outSchlauchinstallation
text_image
off on off on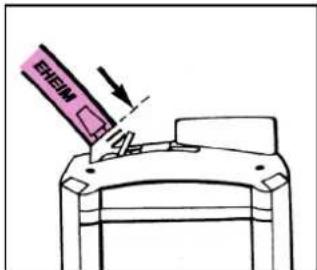
text_image
EHEIMnatural_image
Three abstract illustrations of stylized objects with no text or symbols
natural_image
Diagram of a mechanical component with three rods inserted into a housing (no text or symbols)text_image
Diagram showing two experimental setups with labeled components and tubing, likely illustrating fluid or gas flow methods.text_image
Diagram illustrating a mechanical or fluid system with labeled components and directional arrows, including a magnified inset showing flow direction.natural_image
Line drawing of a mechanical device with a purple cable inserted into a housing (no text or symbols)text_image
ON OFF IN OUT on
text_image
Nr. 4005300 off on intext_image
OFF IN OUT ONnatural_image
Three sequential diagrams showing a robotic arm operating on a platform, with no visible text or symbols.natural_image
Illustration of two hands opening a pink cylindrical object (no text or symbols)
natural_image
Illustration of hands operating a pink mechanical device with a base, no text or symbols presentnatural_image
Mechanical component diagram showing a rotating knob with rotation arrow (no text or symbols)
natural_image
Simple line drawing of a mechanical assembly with a lever and spherical component (no text or symbols)natural_image
Diagram of a mechanical or electrical component with directional arrows indicating motion (no text or symbols)natural_image
Technical line drawing of a mechanical assembly with bolts and housing (no text or symbols)TIPP:
natural_image
Illustration of a box with patterned contents and a lid, placed on a stand (no text or symbols)TIPP:
text_image
Technical diagram showing a mechanical assembly with labeled components and directional arrows indicating assembly steps.WARNING – To guard against injury, basic safety precautions should be observed, including the following.
a) READ AND FOLLOW ALL SAFETY INSTRUCTIONS.
b) DANGER – To avoid possible electric shock, special care should be taken since water is employed in the use of aquarium equipment. For each of the following situations, do not attempt repairs by yourself; return the appliance to an authorized service facility for service or discard the appliance.
1) If the appliance falls into the water, DON'T reach for it! First unplug it and then retrieve it. If electrical components of the appliance get wet, unplug the appliance immediately. (Non-immersible equipment only)
2) If the appliance shows any sign of abnormal water leakage, immediately unplug it from the power source. (Immersible equipment only).
3) Carefully examine the appliance after installation. It should not be plugged in if there is water on parts not intended to be wet.
4) Do not operate any appliance if it has a damaged cord or plug, or if it is malfunctioning or has been dropped or damaged in any manner.
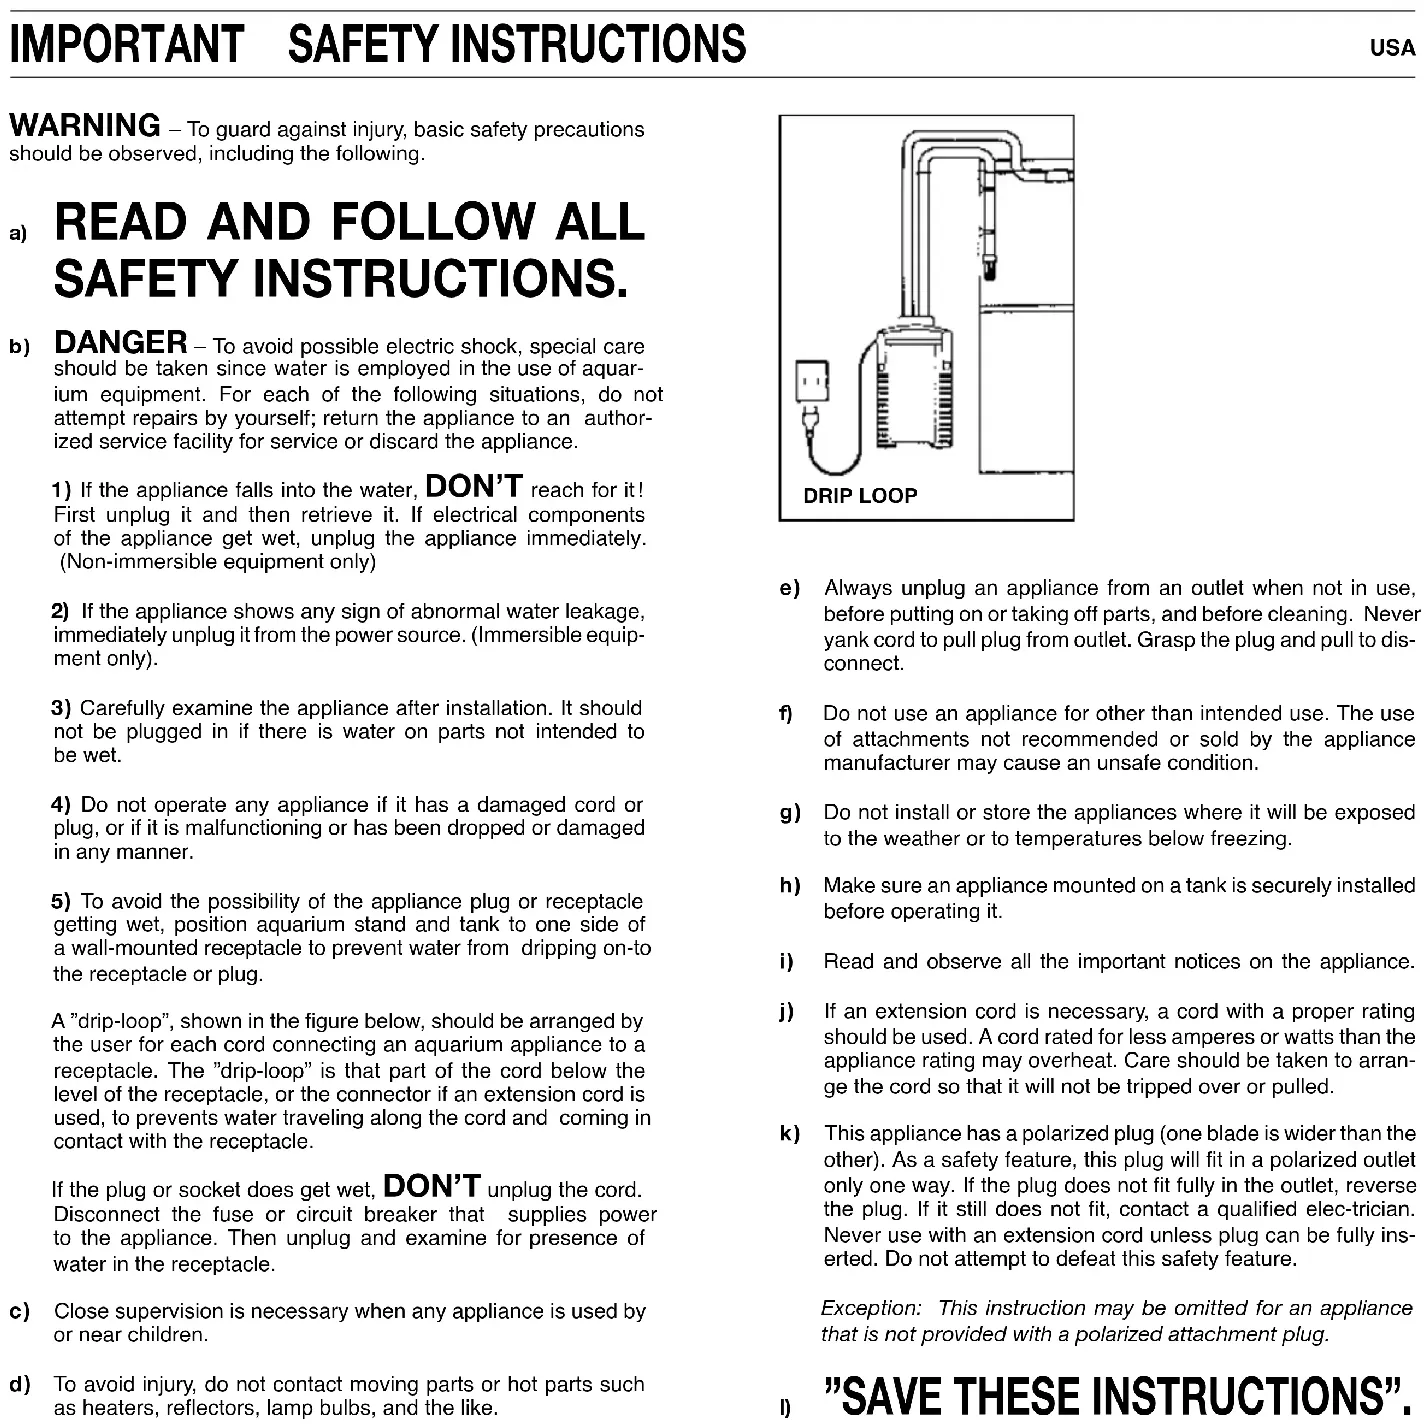
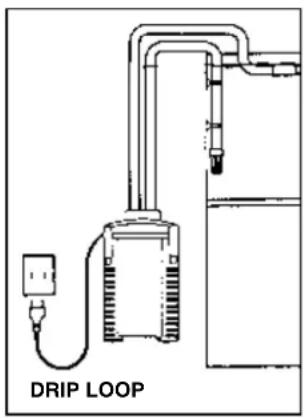
5) To avoid the possibility of the appliance plug or receptacle getting wet, position aquarium stand and tank to one side of a wall-mounted receptacle to prevent water from dripping on-to the receptacle or plug.
A "drip-loop", shown in the figure below, should be arranged by the user for each cord connecting an aquarium appliance to a receptacle. The "drip-loop" is that part of the cord below the level of the receptacle, or the connector if an extension cord is used, to prevents water traveling along the cord and coming in contact with the receptacle.
If the plug or socket does get wet, DON'T unplug the cord. Disconnect the fuse or circuit breaker that supplies power to the appliance. Then unplug and examine for presence of water in the receptacle.
c) Close supervision is necessary when any appliance is used by or near children.
d) To avoid injury, do not contact moving parts or hot parts such as heaters, reflectors, lamp bulbs, and the like.
text_image
DRIP LOOPe) Always unplug an appliance from an outlet when not in use, before putting on or taking off parts, and before cleaning. Never yank cord to pull plug from outlet. Grasp the plug and pull to disconnect.
f) Do not use an appliance for other than intended use. The use of attachments not recommended or sold by the appliance manufacturer may cause an unsafe condition.
g) Do not install or store the appliances where it will be exposed to the weather or to temperatures below freezing.
h) Make sure an appliance mounted on a tank is securely installed before operating it.
i) Read and observe all the important notices on the appliance.
j) If an extension cord is necessary, a cord with a proper rating should be used. A cord rated for less amperes or watts than the appliance rating may overheat. Care should be taken to arrange the cord so that it will not be tripped over or pulled.
k) This appliance has a polarized plug (one blade is wider than the other). As a safety feature, this plug will fit in a polarized outlet only one way. If the plug does not fit fully in the outlet, reverse the plug. If it still does not fit, contact a qualified elec-trician. Never use with an extension cord unless plug can be fully inserted. Do not attempt to defeat this safety feature.
Exception: This instruction may be omitted for an appliance that is not provided with a polarized attachment plug.
1) "SAVE THESE INSTRUCTIONS".
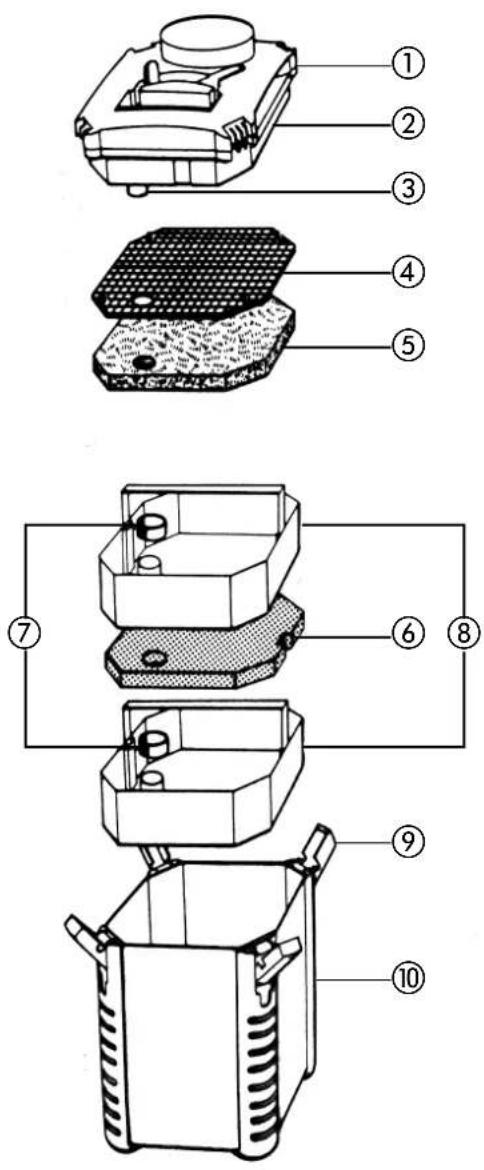
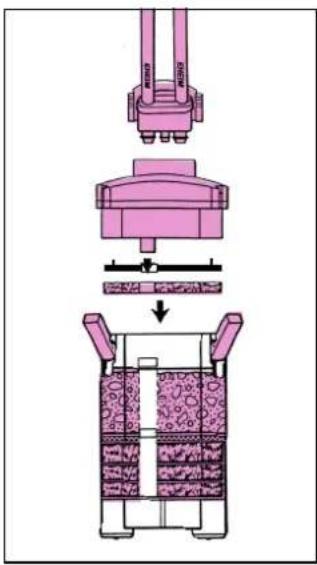
External filter 2426
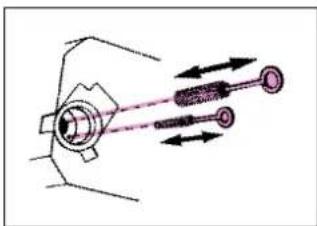
① Pump head ② Sealing gasket ③ Input connector ④ Lattice screen ⑤ Fine filter pad (white) ⑥ Coarse foam filter pad (blue) ⑦ Rubber hermetic seals ⑧ Filter media containers ⑨ EZ clips ⑩ Filter canister ⑪ Integrated double tap connector ⑫ Hose clamp ⑬ Intake pipe ⑭ Intake strainer ⑮ Security outlet pipe ⑯ Spray bar and end cap ⑰ Suction cups with clips ⑱ Tubing ⑲ Vaseline.
When unpacking, please check to ensure that all parts have been included.
Assembly
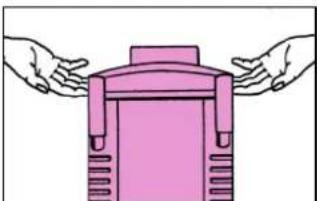
Flip all four EZ clips open and push upwards. With the help of the two recessed lid handles, the pump head of the filter can be easily lifted off.

natural_image
Illustration of two different mechanical device setups with hands performing assembly (no text or symbols)Remove lattice screen and fine filter pad and take out each media container by grabbing the retractable handles and pulling upwards. Fill the containers with EHEIM filter media to achieve best results.

natural_image
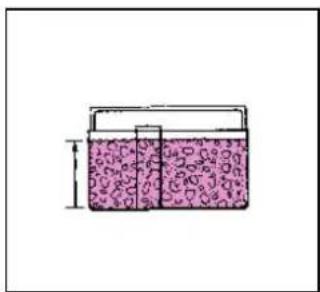
Diagram showing three different storage containers with different internal compartments, no text or symbols present.The lower filter tank is to be filled with EHEIM filter pads.
Fill the second container with the biological media SUB-STRAT to just below the edge.
Do not overfill. Do not clog flow-through pipe.

natural_image
Simple line drawing of a container with liquid and a tube, no text or symbols present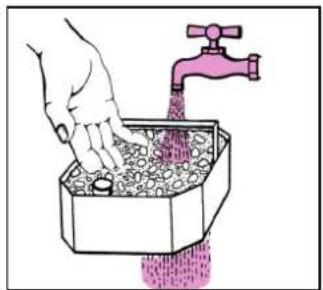
natural_image
Illustration of a hand washing a faucet with water being poured into a container (no text or symbols)Fill the first container with EHEIM filter pads, but leave just enough space so that the blue filter pad can be placed in the container under the retractable handle. Fill the second container with the biological media SUBSTRAT to just below the edge.
Then thoroughly rinse the filter media in the containers under running water until all cloudiness has disappeared.

text_image
Diagram illustrating a two-step process of material handling or processing, with labeled components and directional arrows.Insert the second media container in the same manner. Make sure the flow-through pipe openings line up on top of each other. Put second rubber hermetic seals on the upper media container. Lower each retractable handle and ensure that all media containers lie flush on top of each other.
Then insert the fine filter pad (white) and the lattice screen in such a manner that the round cut-out lines up with the respective flow-through pipe opening.
ATTENTION: Fine filter pad (white) should not be placed under the retractable handle of the media container.
Check to ensure that the sealing gasket on the pump head of the filter is not soiled and that it is properly placed into its groove.
Place the pump head onto the filter canister so that the input connector of the pump head is lined up with the input guide of the media containers. Close all four EZ clips.

natural_image
Technical line drawing of a mechanical component with no visible text or symbols
text_image
Diagram illustrating a mechanical assembly or process with directional arrows indicating movement or force direction.ATTENTION:
Before the integrated double tap connector is inserted into the pump head of the filter, examine all three o-rings for damage and correct fitting. Lightly grease the o-rings with Vaseline to help installation.

natural_image
Cartoon robot character with large eyes and a pink bottle nearby (no text or symbols)Insert the integrated double tap connector with the locking clamp in an upright position into the opening on the pump head. To fasten the locking clamp into its sealed position push the handle downwards.

text_image
in out in outTubing installation
Shut off the integrated double tap connector by shifting the two levers to the OFF position. Push the enclosed tubing onto the intake and output openings of the integrated double tap connector as far as they will go. Since this can be a relatively difficult task, soak the hoses in warm water beforehand to make them softer.
It is very important to use original EHEIM hoses only.
text_image
off on off on
text_image
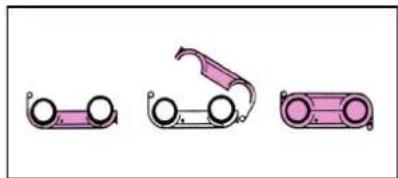
BEAMPlace the two-part hose clamp around the installed hoses, hang into the proper position and clip into place.
natural_image
Three abstract illustrations of stylized objects with no text or symbols
natural_image
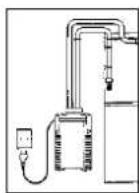
Diagram of a mechanical component with three rods inserted into a housing (no text or symbols)Place the now ready-to-use filter into the lower cabinet of your aquarium stand and observe the prescribed installation height: between water surface and base of filter there should be max. 180 cm (5'11") in order to attain optimum functioning.

text_image
max. 180 cm
natural_image
Diagram of two laboratory apparatus setups with tubing and connectors (no text or labels)Attach the intake strainer to the intake tube and fasten it onto the interior glass of the tank with two clips and suction cups.
Note: When using with an EHEIM professional hood, the intake pipe is simply clipped into place and you don't need the suction cups.

text_image
Diagram illustrating a mechanical or fluid system with labeled components and directional arrows, including a magnified inset showing flow direction.Connect the security outlet pipe and spray bar with a short piece of tubing and install in the aquarium with the clips and suction cups.
Place on the rear or on one of the sides of the tank, depending on available dimensions.
Close the open side of the spray bar with the enclosed end cap.
TIP: The spray bar can either be installed below water level or just above the surface, depending on whether you wish to have oxygen-rich surface movement or not.

natural_image
Technical line drawing of a mechanical device with a purple cable inserted into a housing (no text or symbols)Guide the hoses from the filter outwards, through the opening in the aquarium cabinet, and connect the installed intake pipe and output pipe according to the respective tubing diameters.
To achieve an even flow, be sure that the tubing is laid out smoothly and has no kinks; if necessary, shorten them.
TIP: If you lay the tubing into warm water for some time beforehand, they will become soft and possible kinks can be easily squeezed out.
Setting into operation
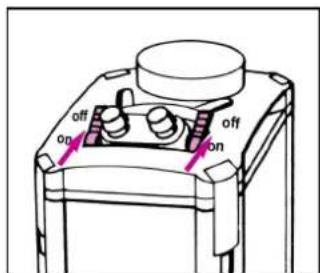
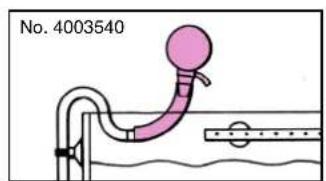
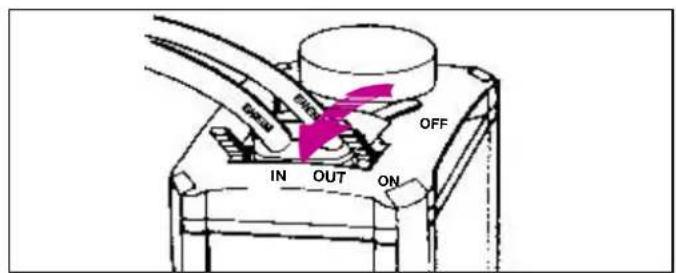
Open the taps of the integrated double tap connector by shifting both levers to position ON. Separate the output hose from the spray bar and suck strongly on the hose, to establish the syphon.
Alternatively use the EHEIM Universal Installation Kit 1 (diam. 16 mm, order no. 4005300) or the suction device (order no. 4003540).
The canister will then automatically fill up with water. Reconnect the hose to the spray bar.
text_image
No. 4003540
text_image
IN OUT
text_image
No. 4005300 off on inOnce again check all the connections for watertightness.
Then set the filter into operation by connecting the mains plug of the pump head.
text_image
IN OUT ON OFF DialsNote: The water flow from the pump can be controlled by using the tap only on the pressure side (OUT).
ATTENTION: Never reduce the pump output by closing the tap on the suction side (IN).
Maintenance and Servicing
Remove mains plug. Close both tap levers (position OFF). Swing the locking clamp upwards and then remove the integrated double tap connector from the pump head of the filter.

natural_image
Three-step diagram showing a robotic arm operating on a device, with no visible text or symbols.Take the filter out of the cabinet by using the two recessed lid handles. Open all EZ clips and remove the pump head from the canister.
natural_image
Illustration of two hands opening a pink cylindrical device (no text or symbols)
natural_image
Illustration of hands operating a mechanical device with a central component and two side supports (no text or symbols)In order to clean the pump chamber, turn the pump head upside down and open the sealing ring by turning it anticlockwise. Then remove the pump cover, impeller and shaft.

natural_image
Mechanical component diagram showing a rotating knob with rotation arrow (no text or symbols)
natural_image
Simple line drawing of a mechanical assembly with no text or symbolsClean all pump parts, impeller chamber and lubrication channel with EHEIM cleaning set (no. 4009560). Carefully rinse off shaft (risk of breakage!), then put impeller back together again and insert into proper position.

natural_image
Diagram of a mechanical or electrical component with directional arrows indicating motion (no text or symbols)Pay attention to the proper fit of the shaft bushings, lid and sealing ring. Lock pump cover by turning clockwise.

natural_image
Technical line drawing of a mechanical assembly with bolts and housing (no text or symbols)TIP:
If cleaning water should get into the cover element of the pump head of the filter, the cover can be unscrewed and wiped dry with a cloth.
Filter media:
Remove the lattice screen, filter pads and media containers from the filter canister.
Thoroughly wash out the filter media with used aquarium water – until no more clouding can be seen.
The fine filter pad (white) serves as mechanical fine filtration and should only be used once since adhering dirt particles cannot be washed out completely.
Use new pad, order no. 2616265!
The blue filter pad (1 x included in set, order no. 2616260) can be reused up to 2 -3 times.

natural_image
Illustration of a box being placed on a stand, showing top and side views (no text or symbols)TIP:
When renewing the SUB-STRAT media (the fine pores get clogged up with time), retain 1/3 of used filter medium and mix with new material to speed-up bacteria recolonization.
Filter must always be operated in an upright position only.
Wash out the filter canister. Then place the media containers back in position.
Press the first one down to the support frame and be sure that the following media containers have a flush fit. In the process, the pipe openings of the media containers must lie on top of each other and the rubber seals must be correctly fitted on the openings so as to achieve a hermetic seal.
Insert a new filter pad and cover it with the lattice screen.
ATTENTION: Fine filter pad (white) should not be placed under the retractable handle of the media container.
Check to ensure that the sealing gasket of the pump head fits properly and is clean.
Then lightly lubricate the sealing gasket of the pump head with Vaseline. Place the pump head on the filter canister, close the EZ clips and place the filter into the cabinet.
text_image
Diagram illustrating a mechanical assembly process with labeled components and directional arrows indicating assembly steps.Examine all three o-rings on the double tap connector for damage and correct fitting and lightly grease them with Vaseline; insert and lock in place.
After both of the tap levers on the integrated double tap connector have been opened (position ON), the filter will automatically fill up again with water and will be ready for operation.
Set the filter into operation by connecting the mains plug.
Safety instructions

For indoor use only. For use with aquariums. The aquarium filter is for domestic use only.

All electrical equipment in the water must be disconnected from the mains during care and maintenance work. It is imperative to disconnect the filter from the mains prior to opening it.

The connecting line of this device can not be replaced. In case of damage to the power cord, the device is to be scrapped. Never carry the pump by the cable; do not bend the cable.

This equipment is not intended for use by persons (including children) with limited physical, sensory or mental abilities or for persons with no experience or knowledge unless they are supervised by a person responsible for safety or unless they have received from such a person instructions on how to use the equipment.
Children should be supervised to ensure that they do not play with the equipment.

Notice: These devices produce magnetic fields which might cause electronic and mechanical disturbances or damages. This also refers to pacemakers. Please consult the manuals of medical equipment for the required safety margins.

Attention: Maintenance work presents the risk of crushing th fingers due to high magnetic forces.

For your own safety, we recommend to form a drip loop with the connection cable to prevent any water running along the cable from intruding into the socket. When using a multiple socket or an external power supply unit, position them atop the filter's power connection.

Since a wide variety of varnishes and polishes are used when processing timer, the appliance feet can leave visible traces on furniture or parquet floors as a result of chemical reactions. Therefore the device should not be placed on unprotected wooden surfaces.

To achieve optimal operational safety there must be a maximum of 180 cm between the surface of the water and the bottom of the filter.
Attention: Filter must always be operated in an upright position only.

Burning danger! Be careful when touching the heating coil of devices with integrated heater.

Take the necessary precautions when handling components that can discharge static electricity.
Do not clean the unit – or parts of it – in the dishwater. Not dishwater resistant!

Do not dispose of this product as normal household waste. Take it to your local refuse collection side.
The product is qualified in accordance with the respective national regulations and guidelines and meets EC standards.


natural_image
Illustration of two different mechanical devices with hands operating, showing internal components and a close-up view (no text or symbols)natural_image
Illustration of three different storage containers with different internal compartments, shown from different angles (no text or symbols)natural_image
Simple line drawing of a container with liquid and a tube, no text or symbols present
natural_image
Illustration of a hand washing a faucet with granular material inside a container (no text or symbols)text_image
Technical diagram showing two stages of a mechanical or material processing setup with directional arrows indicating movement or flow.natural_image
Technical line drawing of a mechanical component with no visible text or symbols
text_image
Diagram illustrating a mechanical press or clamping mechanism with labeled components and directional arrows indicating motion.Attention:
natural_image
Cartoon robot holding a pink toothbrush and a small pink object (no text or symbols)text_image
in out in outtext_image
off on off on EXEMnatural_image
Illustration of mechanical components including a roller, handle, and housing (no text or symbols)text_image
Diagram showing two experimental setups with labeled components and fluid flow indicatorstext_image
Diagram illustrating a mechanical or fluid system with labeled components and directional arrows, including a magnified inset showing flow direction.natural_image
Line drawing of a mechanical device with a purple cable inserted into a housing (no text or symbols)text_image
No. 4003540
text_image
ON IN OUT on off
text_image
No. 4005300 off on intext_image
IN OUT ON OFF DAStext_image
Diagram showing three stages of a robotic arm operation with labeled parts and directional arrowsnatural_image
Illustration of two hands stretching a pink cylindrical object with straps (no text or symbols)
natural_image
Illustration of hands supporting a pink mechanical device with a base, no text or symbols presentnatural_image
Mechanical component diagram showing a rotating knob with directional arrow (no text or symbols)
natural_image
Diagram of a mechanical assembly with a spring, bulb, and pin (no text or labels)natural_image
Diagram of a mechanical assembly with directional arrows indicating motion or force (no text or symbols)natural_image
Technical line drawing of a mechanical assembly with screws and housing (no text or symbols)natural_image
Illustration of a container with two pink containers and a lid, no text or symbols presentConseil:
text_image
Diagram illustrating a mechanical assembly process with labeled components and directional arrows indicating assembly steps.natural_image
Illustration of two different mechanical devices with hands performing assembly or maintenance (no text or symbols)natural_image
Illustration of a three-step food storage or packaging process with labeled components (no text or symbols)natural_image
Simple line drawing of a container with liquid and a side pipe, no text or symbols present
natural_image
Illustration of a hand washing stones in a water-filled container with a pink faucet (no text or symbols)text_image
Technical diagram showing two stages of a mechanical or material processing setup with arrows indicating process flow.natural_image
Technical line drawing of a mechanical component with no visible text or symbols
text_image
Diagram illustrating a mechanical or fluid system with directional arrows indicating movement or force, showing a component being processed into a container.Let op:
natural_image
Cartoon robot character with large eyes and a pink bottle nearby (no text or symbols)text_image
in out in outInstallatie slang
text_image
off on off on
text_image
ETHNICnatural_image
Three abstract mechanical components with circular ends and curved arms, no text or symbols present
natural_image
Diagram of a mechanical device with three rods inserted into a housing (no text or symbols)text_image
Technical diagram showing two mechanical or fluidic device setups with labeled components and flow pathstext_image
Diagram illustrating a mechanical or fluid system with labeled components and directional arrows, including a magnified inset showing flow direction.natural_image
Line drawing of a mechanical device with a purple cable inserted into a housing (no text or symbols)text_image
in out on in out off
text_image
Nr. 4005300 off ontext_image
IN OUT ON OFFtext_image
Diagram showing three steps of a robotic arm operation: cutting, holding tool, and lifting a weight.natural_image
Illustration of two hands opening a pink cylindrical container (no text or symbols)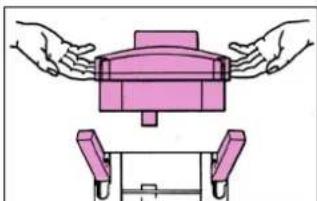
natural_image
Illustration of hands operating a pink mechanical device with a base, no text or symbols presentnatural_image
Technical line drawing of a mechanical component with a circular feature and rotation arrow (no text or symbols)
natural_image
Illustration of a mechanical device with a lever and spherical component (no text or symbols)natural_image
Diagram of a mechanical or electrical component with directional arrows indicating motion (no text or symbols)natural_image
Technical line drawing of a mechanical assembly with bolts and housing (no text or symbols)TIP:
natural_image
Illustration of a box with patterned contents and a lid, placed on a stand (no text or symbols)TIP:
text_image
Technical diagram showing a mechanical assembly with labeled components and directional arrows indicating process flow.natural_image
Illustration of two different mechanical device setups with hands holding a handle (no text or symbols present)natural_image
Illustration of three different storage containers with different internal compartments, shown from different angles (no text or symbols)natural_image
Simple line drawing of a container with liquid and a side pipe, no text or symbols present
natural_image
Illustration of a hand washing a container with a pink faucet, no text or symbols presenttext_image
Technical diagram showing two stages of a mechanical or material processing setup with directional arrows and layered components.natural_image
Technical line drawing of a mechanical component with no visible text or symbols
text_image
Diagram illustrating a mechanical press or lifting process with labeled components and directional arrows indicating motion.natural_image
Cartoon robot holding a pink bottle, no text or symbols presenttext_image
in out in outSlanginstallation
text_image
off on off on EXEMnatural_image
Illustration of three mechanical components with no visible text or symbolstext_image
Diagram showing two experimental setups with labeled components and fluid flow indicatorstext_image
Diagram illustrating a mechanical or fluid system with labeled components and directional arrows, including a magnified inset showing flow direction.natural_image
Technical line drawing of a mechanical assembly with no visible text or symbolstext_image
ON IN OUT on off
text_image
Nr. 4005300 off ontext_image
IN OUT ON OFFnatural_image
Three-step diagram showing a robotic arm operating a device, with no visible text or symbols.natural_image
Illustration of two hands opening a pink cylindrical device (no text or symbols)
natural_image
Illustration of hands operating a mechanical device with a central component and two side supports (no text or symbols)natural_image
Mechanical component diagram showing a rotating knob with rotation arrow (no text or symbols)
natural_image
Illustration of a mechanical device with a lever and spherical component (no text or symbols)natural_image
Diagram of a mechanical or electrical component with directional arrows indicating motion (no text or symbols)natural_image
Technical line drawing of a mechanical assembly with bolts and housing (no text or symbols)Tips:
natural_image
Illustration of a container with two compartments, one above and one below, showing different material patterns (no text or symbols)Tips:
text_image
Diagram illustrating a mechanical assembly process with labeled components and directional arrows indicating assembly steps.natural_image
Illustration of two hand-cranked containers with handles, one open and one closed, showing internal compartments (no text or symbols)natural_image
Illustration of a two-step food storage or packaging process with labeled components (no text or symbols)Fyll den nedre filterbeholderen med EHEIM filtermatter.
natural_image
Simple line drawing of a container with a side outlet and a height dimension (no text or symbols)
natural_image
Illustration of a hand washing a faucet with granular material inside a container (no text or symbols)text_image
Technical diagram showing two stages of a mechanical or material processing setup with directional arrows indicating flow or movement.natural_image
Technical line drawing of a mechanical component with no visible text or symbols
text_image
Diagram illustrating a mechanical assembly or process with directional arrows indicating movement or force, showing a component being inserted into a container.Merk:
natural_image
Cartoon robot character with a pink bottle and index finger beside it (no text or symbols)text_image
in out in outMontering av slange
text_image
off on off on
text_image
SHEIMnatural_image
Three abstract mechanical or electronic component diagrams with no visible text or symbols
text_image
Diagram showing a mechanical component with labeled parts and directional arrows indicating motion or forcetext_image
Technical diagram showing two mechanical or fluidic device setups with labeled components and flow pathstext_image
Diagram illustrating a mechanical or fluid system with labeled components and directional arrows, including a magnified inset showing flow direction.natural_image
Line drawing of a mechanical device with a purple cable inserted into a housing (no text or symbols)text_image
on IN OUT on in
text_image
Nr. 4005300 off on intext_image
IN OUT ON OFF TRANSnatural_image
Three-step diagram showing a hand holding a pen, with no visible text or symbolsnatural_image
Illustration of two hands opening a pink cylindrical device (no text or symbols)
natural_image
Illustration of hands operating a mechanical device with a central component and two supporting legs (no text or symbols)natural_image
Mechanical component diagram showing a rotating knob with rotation arrow (no text or symbols)
natural_image
Illustration of a mechanical device with a lever and spherical component (no text or symbols)natural_image
Diagram of a mechanical or electrical component with directional arrows indicating motion (no text or symbols)natural_image
Technical line drawing of a mechanical assembly with bolts and housing (no text or symbols)Tips:
natural_image
Illustration of two stacked containers with patterned lids, one above a larger container (no text or symbols)Tips:
text_image
Diagram illustrating a mechanical assembly process with labeled components and directional arrows indicating assembly steps.Kontroller alle tre o-ringene på den doble krankoblingen for skade og korrekt tilpasning og smør dem med et tynt lag Vaselin; adapteret presses inn og låses.
natural_image
Illustration of two different mechanical device setups with hands holding a handle (no text or symbols present)natural_image
Illustration of three different storage containers with different internal compartments, shown from different angles (no text or symbols)natural_image
Simple line drawing of a container with liquid and a side pipe, no text or symbols present
natural_image
Illustration of a hand washing a container with a pink faucet, no text or symbols presenttext_image
Technical diagram showing two stages of a mechanical or material processing setup with labeled components and directional arrows.natural_image
Technical line drawing of a mechanical component with no visible text or symbols
text_image
Diagram illustrating a mechanical assembly or processing process with labeled components and directional arrows indicating movement.Huomio:
natural_image
Cartoon robot holding a pink bottle, no text or symbols presenttext_image
in out in outLetkujen asennus
natural_image
Illustration of three mechanical components with no visible text or symbolstext_image
Diagram showing two experimental setups with labeled components and fluid flow indicatorstext_image
Diagram illustrating a water filtration or filtration system with labeled components and directional arrows indicating flow or movement.natural_image
Technical line drawing of a mechanical or electrical assembly with no visible text or symbolstext_image
ON IN OUT ONtext_image
IN OUT ON OFFnatural_image
Three-step diagram showing a hand holding a pen above a device, with no visible text or symbols.natural_image
Illustration of two hands stretching a pink cylindrical object (no text or symbols)
natural_image
Illustration of hands operating a mechanical device with a central component and two side supports (no text or symbols)natural_image
Mechanical component diagram showing a rotating knob with rotation arrow (no text or symbols)
natural_image
Illustration of a mechanical device with a lever and spherical component (no text or symbols)natural_image
Diagram of a mechanical device with directional arrows indicating motion or force (no text or symbols)natural_image
Technical line drawing of a mechanical assembly with bolts and housing (no text or symbols)Ohje:
natural_image
Illustration of a container with two pink containers and a top container, no text or symbols presentOhje:
text_image
Technical diagram showing a mechanical assembly with labeled components and directional arrows indicating assembly steps.natural_image
Illustration of two different mechanical device setups with hands performing maintenance (no text or symbols)natural_image
Illustration of three different storage containers with different internal compartments and packaging patterns (no text or symbols)natural_image
Simple line drawing of a container with a side outlet and a height dimension (no text or symbols)
natural_image
Illustration of a hand washing a faucet with granular material inside a container (no text or symbols)text_image
Technical diagram showing two stages of a mechanical or material processing setup with directional arrows indicating flow or movement.natural_image
Technical line drawing of a mechanical component with no visible text or symbolstext_image
Diagram illustrating a mechanical press or lifting process with labeled components and directional arrows indicating motion.
natural_image
Simple line drawing of a robot with a pink bottle beside it (no text or symbols)text_image
in out in outSlangemontering
text_image
off on off on
text_image
ECEANnatural_image
Three abstract mechanical or electronic components with circular and rectangular elements, no visible text or symbols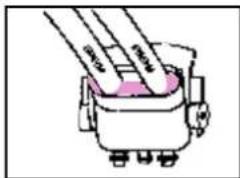
natural_image
Diagram of a mechanical device with a lever and base, no visible text or symbolstext_image
Technical diagram showing two mechanical or fluidic device setups with labeled components and connection linestext_image
Diagram illustrating a mechanical or fluid system with labeled components and directional arrows, including a magnified inset showing flow direction.natural_image
Line drawing of a mechanical device with a purple cable inserted into a housing (no text or symbols)text_image
ON IN OUT ON
text_image
Nr. 4005300 off on intext_image
IN OUT ON OFF DIPnatural_image
Three technical line drawings showing a robotic arm operating on a base, with no visible text or symbols.natural_image
Illustration of two hands stretching a pink cylindrical object with straps (no text or symbols)
natural_image
Illustration of hands operating a pink mechanical device with a base mount (no text or symbols)natural_image
Mechanical component diagram showing a rotating mechanism with a pink circular feature (no text or symbols)
natural_image
Simple line drawing of a mechanical assembly with a gear and wheel (no text or symbols)natural_image
Diagram of a mechanical or electrical component with directional arrows indicating motion (no text or symbols)natural_image
Technical line drawing of a mechanical assembly with bolts and housing (no text or symbols)Tip:
natural_image
Illustration of a box being lifted by a tray, showing two different material layers (no text or symbols)Tip:
text_image
Technical diagram showing a mechanical assembly with labeled components and directional arrows indicating assembly steps.natural_image
Illustration of two hand-cranked containers with handles, one open and one closed, showing internal compartments (no text or symbols)natural_image
Illustration of a two-step food storage or packaging process, showing steps from raw material to finished product (no text or symbols)natural_image
Simple line drawing of a container with liquid and a tube, no text or symbols present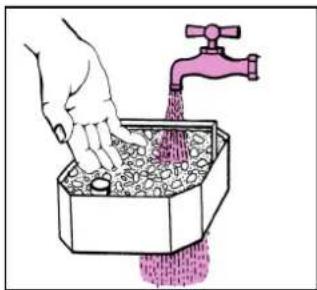
natural_image
Illustration of a hand washing a faucet with granular material inside a container (no text or symbols)text_image
Technical diagram showing two stages of a mechanical or material processing setup with labeled components and directional arrows.natural_image
Technical line drawing of a mechanical component with no visible text or symbols
text_image
Diagram illustrating a mechanical assembly process with labeled components and directional arrows indicating motion or movement.Attenzione:
natural_image
Cartoon robot character with a pink bottle beside it (no text or symbols)text_image
in out in outtext_image
off on off on BEINnatural_image
Technical illustration of a mechanical assembly with three views: two connected components and one assembled view (no text or symbols)text_image
Diagram showing two experimental setups with labeled components and fluid flow indicatorstext_image
Diagram illustrating a mechanical or fluid system with labeled components and directional arrows, including a magnified inset showing flow direction.natural_image
Technical line drawing of a mechanical assembly with no visible text or symbolstext_image
in out on in out on off
text_image
Nr. 4005300 off ontext_image
IN OUT ON OFFtext_image
Diagram showing three steps of a robotic arm handling a device, with Chinese labels indicating 'Start', 'Close', and 'End' states.natural_image
Illustration of two hands stretching a pink object into a container (no text or symbols)
natural_image
Illustration of hands operating a pink mechanical device with a base, no text or symbols presentnatural_image
Mechanical component diagram showing a rotating knob with rotation arrow (no text or symbols)
natural_image
Simple line drawing of a mechanical device with a lever and spherical component (no text or symbols)natural_image
Diagram of a mechanical device with directional arrows indicating motion or force (no text or symbols)natural_image
Technical line drawing of a mechanical assembly with bolts and housing (no text or symbols)Suggerimento:
natural_image
Illustration of a box being placed on a stand, showing top and side views (no text or symbols)Suggerimento:
text_image
Technical diagram showing a mechanical assembly with labeled components and directional arrows indicating assembly steps.natural_image
Illustration of two hand-cranked containers with handles, one open and one closed, showing internal compartments (no text or symbols)natural_image
Illustration of a food storage or packaging setup with three stages: open, folded, and closed (no text or symbols)natural_image
Simple line drawing of a container with liquid and a side outlet, no text or symbols present
natural_image
Illustration of a hand washing a faucet with granular material inside a container (no text or symbols)text_image
Technical diagram showing two stages of a mechanical or material processing setup with directional arrows indicating flow or movement.natural_image
Technical line drawing of a mechanical component with no visible text or symbols
text_image
Diagram illustrating a mechanical assembly process with labeled components and directional arrows indicating motion or movement.Atención:
natural_image
Simple line drawing of a robot with a pink bottle beside it (no text or symbols)text_image
in out in outtext_image
off on off on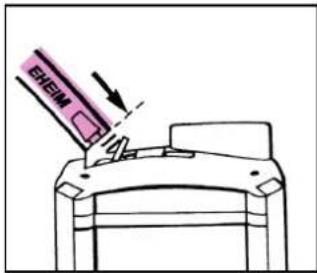
text_image
BEAMnatural_image
Three mechanical components with circular ends and colored bodies, no visible text or symbols
natural_image
Diagram of a mechanical device with three parallel rods inserted into a housing (no text or symbols)text_image
Diagram showing two experimental setups with labeled components and fluid flow indicatorstext_image
Diagram illustrating a fluid system with pipe connection and water flow, showing directional flow indicators.natural_image
Technical line drawing of a mechanical assembly with a purple rod inserted into a housing (no text or symbols)text_image
in out on off
text_image
Nr. 4005300 off on intext_image
Dots IN OUT ON OFFtext_image
Diagram illustrating a robotic arm operating a device, showing three sequential states of tool movement.natural_image
Illustration of two hands opening a pink cylindrical device (no text or symbols)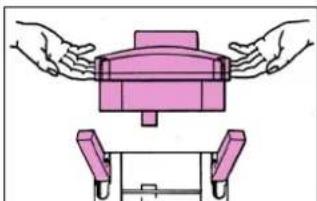
natural_image
Illustration of hands operating a pink mechanical device with a base, no text or symbols presentnatural_image
Mechanical component diagram showing a rotating mechanism with a pink circular feature (no text or symbols)
natural_image
Illustration of a mechanical device with a lever and spherical component (no text or symbols)natural_image
Diagram of a mechanical device with directional arrows indicating motion or force (no text or symbols)natural_image
Technical line drawing of a mechanical assembly with bolts and housing (no text or symbols)natural_image
Illustration of two pink decorative boxes placed on a metal frame, with one above and one below (no text or symbols)CONSEJO:
text_image
Diagram illustrating a mechanical assembly process with labeled components and directional arrows indicating assembly steps.natural_image
Illustration of two different mechanical device setups with hands performing assembly (no text or symbols)natural_image
Illustration of a two-part container with different internal compartments and packaging (no text or symbols)natural_image
Simple line drawing of a container with liquid and a tube, no text or symbols present
natural_image
Illustration of a hand washing a faucet with granular material inside a container (no text or symbols)text_image
Technical diagram showing two stages of a mechanical or material processing setup with labeled components and directional arrows.natural_image
Technical line drawing of a mechanical component with no visible text or symbols
text_image
Diagram illustrating a mechanical press or lifting process with labeled components and directional arrows indicating motion.natural_image
Cartoon robot holding a pink bottle, no text or symbols presenttext_image
in out in outtext_image
off on off on EXEEMnatural_image
Illustration of three mechanical components with colored outlines and a close-up view of the internal structure (no text or symbols)text_image
Diagram showing two experimental setups with labeled components and fluid flow indicatorstext_image
Diagram illustrating a mechanical or fluid system with labeled components and directional arrows, including a magnified inset showing flow direction.natural_image
Line drawing of a mechanical device with a purple cable inserted into a housing (no text or symbols)text_image
ON IN OUT ON OFF
text_image
Nr. 4005300 off on intext_image
IN OUT ON OFFtext_image
Diagram illustrating three steps of a robotic arm handling a device, with Chinese labels indicating 'Start', 'Close', and 'End' states.natural_image
Illustration of two hands opening a pink cylindrical device (no text or symbols)
natural_image
Illustration of hands holding a pink mechanical device above a chair (no text or symbols)natural_image
Mechanical component diagram showing a rotating mechanism with a circular feature (no text or symbols)natural_image
Diagram of a mechanical assembly with a spring and wheel component (no text or labels)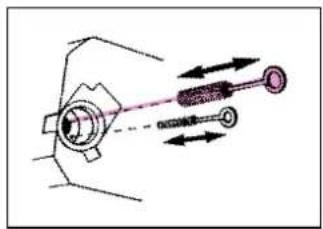
natural_image
Mechanical assembly diagram showing a shaft and housing with directional arrows indicating motion (no text or labels)natural_image
Technical line drawing of a mechanical assembly with screws and housing (no text or symbols)natural_image
Illustration of a box being placed on a metal stand, showing top and side views (no text or symbols)Conselho:
text_image
Technical diagram showing a mechanical assembly with labeled components and directional arrows indicating assembly steps.natural_image
Illustration of two different mechanical device setups with hands operating, showing internal components and mounting brackets (no text or symbols)natural_image
Illustration of a storage box assembly with three views: top view, side view, and bottom view (no text or symbols)natural_image
Simple line drawing of a container with liquid and a side outlet, no text or symbols present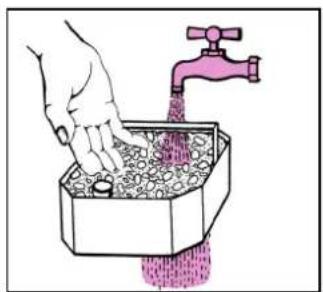
natural_image
Illustration of a hand washing a faucet with granular material inside a container (no text or symbols)text_image
Technical diagram showing two stages of a container with material layers and directional arrows indicating process flow.natural_image
Technical line drawing of a mechanical component with no visible text or symbols
text_image
Diagram illustrating a mechanical press or lifting process with labeled components and directional arrows indicating motion.natural_image
Cartoon robot character with a pink bottle beside it (no text or symbols)text_image
in out in outtext_image
off on off on
text_image
ECEMnatural_image
Three abstract mechanical or electronic component illustrations with no visible text or symbols
natural_image
Diagram of a mechanical component with three rods inserted into a housing (no text or symbols)text_image
Diagram showing two experimental setups with labeled components and fluid flow indicatorstext_image
Diagram illustrating a mechanical or fluid system with labeled components and directional arrows, including a magnified inset showing flow direction.natural_image
Technical line drawing of a mechanical assembly with no visible text or symbolstext_image
on IN OUT on off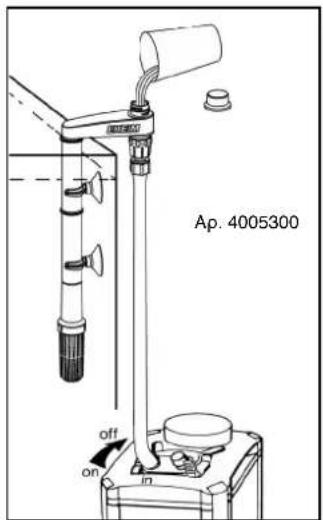
text_image
Ap. 4005300 off ontext_image
Dashed IN OUT ON OFFtext_image
Diagram showing three stages of a robotic arm operation with labeled parts and directional arrowsnatural_image
Illustration of two hands opening a pink container with handles (no text or symbols)
natural_image
Illustration of hands operating a pink mechanical device with a base mount (no text or symbols)natural_image
Diagram of a mechanical device with a circular component and rotation arrow (no text or symbols)
natural_image
Illustration of a mechanical device with a bulb, screwdriver, and gear (no text or symbols)natural_image
Diagram of a mechanical or electrical component with directional arrows indicating motion or force (no text or symbols)natural_image
Technical line drawing of a mechanical assembly with numbered components (no text or symbols)ΣΥΜΒΟΥΛΗ:
natural_image
Illustration of a box with two boxes, one above and one below, showing different material surfaces (no text or symbols)ΣΥΜΒΟΥΛΗ:
text_image
Technical diagram showing a mechanical assembly with labeled components and directional arrows indicating assembly steps.natural_image
Illustration of two different mechanical device setups with hands operating, showing internal components and mounting brackets (no text or symbols)natural_image
Illustration of three different storage containers with different internal compartments, shown from different angles (no text or symbols)natural_image
Simple line drawing of a container with liquid and a side outlet, no text or symbols present.
natural_image
Illustration of a hand washing stones in a water-filled container with a pink faucet (no text or symbols)text_image
Technical diagram showing two stages of a mechanical or material processing setup with directional arrows indicating flow or movement.natural_image
Technical line drawing of a mechanical component with no visible text or symbols
text_image
Diagram illustrating a mechanical press or lifting process with labeled components and directional arrows indicating motion.POZOR:
natural_image
Cartoon robot character with a pink bottle beside it (no text or symbols)text_image
in out in outInstalace hadice
natural_image
Illustration of three mechanical components with no visible text or symbolstext_image
Diagram showing two experimental setups with labeled components and fluid flow indicatorstext_image
Diagram illustrating a mechanical or fluid system with labeled components and directional arrows, including a magnified inset showing flow direction.natural_image
Line drawing of a mechanical device with a purple cable inserted into a housing (no text or symbols)text_image
UVMTR WE YIPMUTO ZAPMUTOtext_image
Diagram showing three stages of a robotic arm operation with labeled parts and directional arrowsnatural_image
Illustration of two hands opening a pink container with handles (no text or symbols)
natural_image
Illustration of hands operating a pink mechanical device with a base, no text or symbols presentnatural_image
Mechanical component diagram showing a rotating knob with rotation arrow (no text or symbols)
natural_image
Simple line drawing of a mechanical assembly with a lever and wheel (no text or symbols)natural_image
Diagram of a mechanical device with directional arrows indicating motion or force (no text or symbols)natural_image
Technical line drawing of a mechanical assembly with bolts and housing (no text or symbols)TIP:
natural_image
Illustration of a box with contents inside, showing top and side views (no text or symbols)TIP:
text_image
Technical diagram showing a mechanical assembly with labeled components and directional arrows indicating assembly steps.natural_image
Illustration of two hand-cranked containers with handles, one open and one closed, showing internal compartments (no text or symbols)natural_image
Illustration of a two-part container setup with one open and one closed, showing internal compartments (no text or symbols)natural_image
Simple line drawing of a container with liquid and a side pipe, no text or symbols present
natural_image
Illustration of a hand washing a faucet with granular material inside a container (no text or symbols)text_image
Technical diagram showing two stages of a mechanical or material processing setup with directional arrows indicating flow or movement.natural_image
Technical line drawing of a mechanical component with no visible text or symbols
text_image
Diagram illustrating a mechanical assembly or processing process with directional arrows indicating movement or force direction.natural_image
Cartoon robot character with large eyes and a pink bottle beside it (no text or symbols)text_image
in out in outA tömlő telepítése
text_image
off on off on
text_image
ETHETMnatural_image
Three abstract mechanical components with no visible text or symbols
text_image
Diagram showing a mechanical component with labeled parts and directional arrows indicating motion or force vectors.text_image
Diagram showing two experimental setups with labeled components and fluid flow indicatorstext_image
Diagram illustrating a mechanical or fluid system with labeled components and directional arrows, including a magnified inset showing flow direction.natural_image
Line drawing of a mechanical device with a purple cable inserted into a housing (no text or symbols)text_image
ON IN OUT on off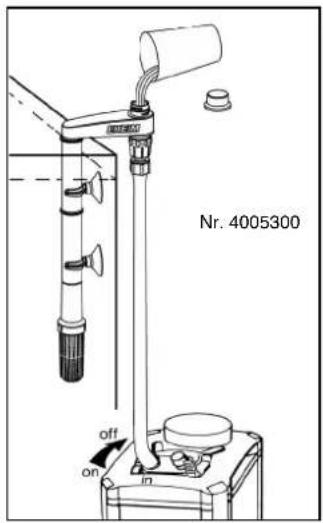
text_image
Nr. 4005300 off on intext_image
Dashed IN OUT ON OFFtext_image
Diagram showing three stages of a robotic arm operation with labeled parts and directional arrowsnatural_image
Illustration of two hands opening a pink cylindrical object (no text or symbols)
natural_image
Illustration of hands operating a mechanical device with a central component and two side supports (no text or symbols)natural_image
Mechanical component diagram showing a rotating knob with rotation arrow (no text or symbols)
natural_image
Simple line drawing of a mechanical assembly with a lever and spherical component (no text or symbols)natural_image
Diagram of a mechanical or electrical component with directional arrows indicating motion or force (no text or symbols)natural_image
Technical line drawing of a mechanical assembly with bolts and housing (no text or symbols)TIPP:
natural_image
Illustration of a box with patterned contents and a lid, placed on a stand (no text or symbols)TIPP:
text_image
Technical diagram showing a mechanical assembly with labeled components and directional arrows indicating process flow.natural_image
Illustration of two different mechanical device setups with hands performing assembly (no text or symbols)natural_image
Illustration of three different storage containers with different internal compartments and packaging patterns (no text or symbols)natural_image
Simple line drawing of a container with liquid and a side outlet, no text or symbols present
natural_image
Illustration of a hand washing a container with a faucet, showing liquid being poured into it (no text or symbols)text_image
Technical diagram showing two stages of a mechanical or material processing setup with directional arrows indicating movement or flow.natural_image
Technical line drawing of a mechanical component with no visible text or symbols
text_image
Diagram illustrating a mechanical press or lifting process with labeled components and directional arrows indicating motion.UWAGA:
natural_image
Cartoon robot character with a pink bottle beside it (no text or symbols)text_image
in out in outInstalacja węża
natural_image
Illustration of mechanical components including rollers, a switch, and a cylindrical device (no text or symbols)text_image
Diagram showing two experimental setups with labeled components and fluid flow indicatorstext_image
Diagram illustrating a mechanical or fluid system with labeled components and directional arrows, including a magnified inset showing flow direction.natural_image
Line drawing of a mechanical device with a purple cable inserted into a housing (no text or symbols)text_image
on IN OUT on off
text_image
Nr. 4005300 off ontext_image
IN OUT ON OFF DNCnatural_image
Three diagrams showing a robotic arm operating on a platform, with no visible text or symbols.natural_image
Illustration of two hands stretching a pink object with a handle (no text or symbols)
natural_image
Illustration of hands operating a mechanical device with a central component and two supporting legs (no text or symbols)natural_image
Mechanical component diagram showing a rotating knob with rotation arrow (no text or symbols)
natural_image
Simple line drawing of a mechanical assembly with no text or symbolsnatural_image
Diagram of a mechanical device with directional arrows indicating motion or force (no text or symbols)natural_image
Technical line drawing of a mechanical assembly with bolts and housing (no text or symbols)WSKAZÓWKA:
natural_image
Illustration of a container with two pink containers and a top container, no text or symbols presentWSKAZÓWKA:
text_image
Technical diagram showing a mechanical assembly with labeled components and directional arrows indicating process flow.natural_image
Illustration of two different mechanical device setups with hands operating, showing internal components and mounting brackets (no text or symbols)natural_image
Diagram showing three different storage containers with different internal compartments, no text or symbols present.Spodnjo filtrirno posodo napolnite s filtrirnimi blazinicami EHEIM.
Drugi vložek napolnite tik pod rob z biološko filtrirno spojino SUBSTRAT.
natural_image
Simple line drawing of a container with liquid and a side pipe, no text or symbols present
natural_image
Illustration of a hand washing a faucet with granular material inside a container (no text or symbols)text_image
Technical diagram showing two stages of a mechanical or material processing setup with directional arrows indicating flow or movement.natural_image
Technical line drawing of a mechanical component with no visible text or symbols
text_image
Diagram illustrating a mechanical or fluid system with directional arrows indicating flow or movement between components.POZOR:
natural_image
Cartoon robot character with large eyes and a pink bottle nearby (no text or symbols)text_image
in out in outNamestitev cevi
Če želite zapreti zaporne pipe, morata biti obe ročici adapterja obrnjeni v položaj OFF (Izklop).
Priložene gibke cevi potisnite vse do omejevalnika na cevnih nastavkih na adapterju. Pred tem zmehčajte gibke cevi s toplo vodo.
text_image
off on off on
text_image
ETHETMnatural_image
Three abstract mechanical or electronic component illustrations, no text or symbols present
text_image
Diagram showing a mechanical component with labeled parts and directional arrows indicating motion or forcetext_image
Diagram showing two experimental setups with labeled components and tubing, likely illustrating fluid or gas flow methods.Filtrirno košaro položite na sesalno cev in jo pritrdite na notranjo steno akvarija z dve- ma pritrdilnima elementoma in priseski.
text_image
Diagram illustrating a mechanical or fluid system with labeled components and directional arrows, including a magnified inset showing flow direction.natural_image
Line drawing of a mechanical device with a purple cable inserted into a housing (no text or symbols)text_image
ON IN OUT ON OFF
text_image
st. 4005300 off on intext_image
Dens IN OUT ON OFFNAMIG: Kapaciteto filtra lahko na tlačni strani brezstopenjsko regulirate z vgrajeno zaporno pipo (OUT).
natural_image
Three diagrams showing a robotic arm operating on a platform, with no visible text or symbols.natural_image
Illustration of two hands opening a pink cylindrical object (no text or symbols)
natural_image
Illustration of hands operating a mechanical device with a central component and two side supports (no text or symbols)natural_image
Mechanical component diagram showing a rotating knob with rotation arrow (no text or symbols)
natural_image
Simple line drawing of a mechanical assembly with a lever and wheel (no text or symbols)Dele črpalke in mazalni kanal temeljito očistite s čistilnim kompletom EHEIM, št. naroč. 4009560. Previdno sperite os (nevarnost zlo-ma!), nato rotor spet sestavi-te in ga vstavite.
natural_image
Mechanical diagram showing a rotating shaft with two attached components and directional arrows indicating motion (no text or labels)natural_image
Technical line drawing of a mechanical assembly with bolts and housing (no text or symbols)NAMIG:
natural_image
Illustration of a box with patterned contents and a lid, placed on a stand (no text or symbols)NAMIG:
text_image
Technical diagram showing a mechanical assembly with labeled components and directional arrows indicating process flow.natural_image
Illustration of two different mechanical device setups with hands operating, showing internal components and mounting brackets (no text or symbols)natural_image
Illustration of three different storage containers with different internal compartments, shown from different angles (no text or symbols)natural_image
Simple line drawing of a container with liquid and a side pipe, no text or symbols present
natural_image
Illustration of a hand washing stones in a container with a pink faucet above (no text or symbols)text_image
Technical diagram showing two stages of a mechanical or material processing setup with directional arrows indicating movement or assembly.natural_image
Technical line drawing of a mechanical component with no visible text or symbolsPOZOR:
text_image
Diagram illustrating a mechanical press or lifting process with labeled components and directional arrows indicating motion.
natural_image
Cartoon robot character with a pink bottle beside it (no text or symbols)Adaptér so zvislými zaistovacími úchytmi úplne zasuňte do otvoru v hornej časti filtra a zároveň zatlačte adaptér, kým nezapadne na svoje miesto.

text_image
in out in outInštalácia hadice
Na zatvorenie uzatváracích ventilov nastavte obidva pákové úchyty adaptéra do pozície OFF.
Priložené hadice nasuňte až nadoraz na hadicový nadstavec na adaptéri. Hadice vopred zmäkčite v teplej vode.
natural_image
Illustration of mechanical components with no visible text or symbolstext_image
Diagram showing two experimental setups for a water filtration or pressure measurement device, with labeled components and fluid flow paths.text_image
Diagram illustrating a mechanical or fluid system with labeled components and directional arrows, including a magnified inset showing flow direction.natural_image
Line drawing of a mechanical device with a purple cable inserted into a housing (no text or symbols)Hadice ved'te z filtra cez otvor v zadnej stene skrine.
text_image
on IN OUT on off
text_image
OFF IN OUT ONtext_image
Diagram showing three stages of a robotic arm operation with labeled parts and directional arrowsnatural_image
Illustration of two hands opening a pink cylindrical device (no text or symbols)
natural_image
Illustration of hands operating a pink mechanical device with a base, no text or symbols presentnatural_image
Mechanical component diagram showing a rotating knob with rotation arrow (no text or symbols)
natural_image
Simple line drawing of a mechanical assembly with no text or symbolsČasti čerpadla a mazací kanál dôkladne vyčistite pomocou čistiacej súpravy EHEIM, obj. č. 4009560. Opatrne opláchnite hriadel' (riziko zlomenia!) a potom znovu zmontujte a nasad'te rotor.

natural_image
Diagram of a mechanical or electrical component with directional arrows indicating motion (no text or symbols)natural_image
Technical line drawing of a mechanical assembly with bolts and housing (no text or symbols)TIP:
Ak by sa pri čistení dostala voda do ochranného krytu hornej časti filtra, kryt treba odskrutkovat' a vytriet' hand-rou dosucha.
natural_image
Illustration of two stacked containers with patterned lids, one above and one below, no text or symbols present.TIP:
text_image
Technical diagram showing a mechanical assembly with labeled components and directional arrows indicating process flow.natural_image
Illustration of two different mechanical device setups with hands operating, showing internal components and mounting brackets (no text or symbols)natural_image
Illustration of a two-part container setup with one open and one closed, showing internal compartments and packaging (no text or symbols)natural_image
Simple line drawing of a container with liquid and a side pipe, no text or symbols present
natural_image
Illustration of a hand washing a faucet with granular material inside a container (no text or symbols)text_image
Technical diagram showing two stages of a mechanical or material processing setup with directional arrows indicating process flow.natural_image
Technical line drawing of a mechanical component with no visible text or symbols
text_image
Diagram illustrating a mechanical or fluid system with directional arrows indicating flow or movement between components.ATENTIE:
natural_image
Cartoon robot character with large eyes and a pink bottle nearby (no text or symbols)text_image
in out in outtext_image
off on off on
text_image
ETHETMnatural_image
Three abstract mechanical or electronic component illustrations, no text or symbols present
text_image
Diagram showing a mechanical component with labeled parts and directional arrows indicating motion or forcetext_image
Diagram showing two experimental setups with labeled components and fluid flow indicatorstext_image
Diagram illustrating a mechanical or fluid system with labeled components and directional arrows, including a magnified inset showing flow direction.natural_image
Technical line drawing of a mechanical assembly with a purple cable inserted into a housing (no text or symbols)text_image
ON IN OUT ON OFF
text_image
Nr. 4005300 off ontext_image
Dashed Line IN OUT ON OFFtext_image
Diagram showing three stages of a robotic arm operation with labeled parts and directional arrowsnatural_image
Illustration of two hands opening a pink cylindrical object (no text or symbols)
natural_image
Illustration of hands operating a mechanical device with a central component and two side supports (no text or symbols)natural_image
Mechanical component diagram showing a rotating knob with rotation arrow (no text or symbols)
natural_image
Simple line drawing of a mechanical assembly with a lever and wheel (no text or symbols)natural_image
Mechanical diagram showing a rotating shaft with two bearings and directional arrows indicating motion (no text or labels)natural_image
Technical line drawing of a mechanical assembly with bolts and housing (no text or symbols)SFAT:
natural_image
Illustration of a box with patterned contents and a lid, placed on a stand (no text or symbols)SFAT:
text_image
Technical diagram showing a mechanical assembly with labeled components and directional arrows indicating process flow.natural_image
Illustration of two different mechanical device setups with hands operating, showing internal components and mounting brackets (no text or symbols)natural_image
Illustration of a two-part box assembly with different internal compartments and packaging (no text or symbols)natural_image
Simple line drawing of a container with liquid and a side pipe, no text or symbols present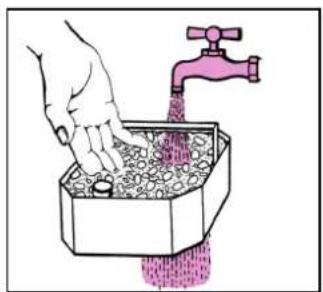
natural_image
Illustration of a hand washing a faucet with granular material inside a container (no text or symbols)text_image
Technical diagram showing two stages of a mechanical or material processing setup with labeled components and directional arrows.natural_image
Technical line drawing of a mechanical component with no visible text or symbols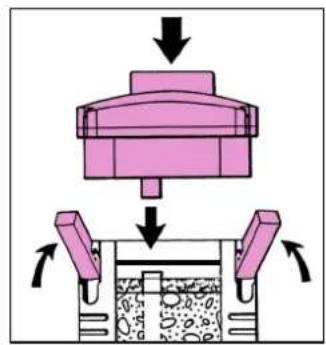
text_image
Diagram illustrating a mechanical press or lifting process with labeled components and directional arrows indicating motion.DIKKAT:
natural_image
Cartoon robot character with a pink bottle beside it (no text or symbols)text_image
in out in outHortum montaji
text_image
Kapal Açık Kapal Açıknatural_image
Illustration of three mechanical components with pink and white outlines, one showing a curved arm and two others with no visible text or symbols.text_image
Diagram showing two experimental setups with labeled components and fluid flow indicatorstext_image
Diagram illustrating a mechanical or fluid system with labeled components and directional arrows, including a magnified inset showing flow direction.natural_image
Line drawing of a mechanical device with a purple cable inserted into a housing (no text or symbols)text_image
4005300 off onnatural_image
Three diagrams showing mechanical assembly steps: tool, tool with base, and motor (no text or symbols)natural_image
Illustration of two hands opening a pink container with handles (no text or symbols)
natural_image
Illustration of hands operating a pink mechanical device with a base, no text or symbols presentnatural_image
Mechanical component diagram showing a rotating knob with rotation arrow (no text or symbols)
natural_image
Simple line drawing of a mechanical assembly with no text or symbolsnatural_image
Diagram of a mechanical or electrical component with directional arrows indicating motion (no text or symbols)natural_image
Technical line drawing of a mechanical assembly with bolts and housing (no text or symbols)iPUCU
natural_image
Illustration of a box with a patterned lid and a container, no text or symbols presentiPUCU
text_image
Technical diagram showing a mechanical assembly with labeled components and directional arrows indicating assembly steps.natural_image
Illustration of two hand-cranked containers with handles, one open and one closed, showing internal compartments (no text or symbols)Skinuti pokrivnu rešetku i flis filtera i izvaditi, jedan po jedan, pojedinačne filterske uloške. Upuštene drške filterskih uložaka mogu da se izvuku prema gore. Zatim uloške napuniti filterskom masom.

natural_image
Illustration of a two-part container setup with one open and one closed, showing internal compartments and packaging (no text or symbols)napuniti EHEIM filterskim platnom.
Drugi uložak napuniti skoro do ivice biološkom filterskom masom skoro do ivice biološkom filterskom masom SUBSTRAT.
Ne prepunjavati, voditi računa da se ne začepi prolaz za cev.
natural_image
Simple line drawing of a container with liquid and a side pipe, no text or symbols present
natural_image
Illustration of a hand washing a faucet with granular material inside a container (no text or symbols)Zatim filtersku masu u korpi temeljno ispirati pod tekućom vodom sve dok voda ne prestane da bude zamućena.
Staviti ponovo filterski uložak zajedno sa plavom filterskom prostirkom u posudu filtera i pritisnite ga snažno nadole dok se ne smesti ispravno na podlogu. Time je obezbeđena sigurna zaptivenost između filterskog uloška i posude.

text_image
Technical diagram showing two stages of a mechanical or material processing setup with directional arrows indicating flow or movement.Drugi filterski uložak takođe ugurati, pri čemu otvori za cevi moraju da budu jedni iznad drugih i da sa gumenima navlakama obrazuju siguran spoj Dršku ponovo upustiti i voditi računa da su svi filterski ulošci međusobno u ravni. Drugu gumenu navlaku navući na gornji filterski uložak Drugu gumenu navlaku ponovo navući na gornji uložak filtera.
natural_image
Technical line drawing of a mechanical component with no visible text or symbols
text_image
Diagram illustrating a mechanical or fluid system with directional arrows indicating flow or movement between components.PAŽNJA:
Pre nego što se adapter za crevne priključke stavi u gornji deo filtera, sva tri zaptivna prstena proveriti na oštećenja i ispravnu nameštenost. Radi lakše montaže, zaptivne prstenove malo podmazati vazelinom.

natural_image
Cartoon robot character with large eyes and a pink bottle nearby (no text or symbols)text_image
in out in outInstalacija creva
Za zatvaranje zaustavnih slavina se obe polužne ručke adaptera prebace na poziciju OFF.
Priložena creva gurnuti do graničnika na kratke delove creva na adapter. Prethodno toplom vodom malo omekšati creva.
U načelu koristiti samo EHEIM originalna creva.

text_image
off on off on
text_image
ETHETMDvodelni držač creva se stavlja oko montiranih creva, zakačen sa strane i spojen spojnicom.

natural_image
Three abstract illustrations of stylized car parts with no text or symbols
natural_image
Diagram of a mechanical component with three rods inserted into a housing (no text or symbols)Kompletno pripremljen filter staviti u donji ormar. Voditi računa o propisanom visinskom rastojanju: rastojanje između površine vode i dna filtera sme da iznosi maksimalno 180 cm da bi se postigao optimalan način rada.

text_image
maks. 180 cm
text_image
Diagram showing two experimental setups with labeled components and fluid flow indicatorstext_image
Diagram illustrating a mechanical or fluid system with labeled components and directional arrows, including a magnified inset showing flow direction.Izlaznu krivinu i mlaznicu spojiti kratkim komadom creva i montirati ih pomoću stezaljke i vakumskog držača u akvarijum.
U zavisnosti od dimenzija, sledi stavljanje na zadnju stranicu ili na jednu od bočnih stranica.
Otvorenu stranu mlaznice zatvoriti priloženim čepom za zatvaranje.
natural_image
Line drawing of a mechanical device with a purple cable inserted into a housing (no text or symbols)Sprovesti creva od filtera kroz otvore na bočnoj strani- ci ormara.
Povezati montiranu usisnu cev sa usisnom stranom, a izlaznu krivinu sa potisnom stranom filtera.
Voditi računa da su creva instalirana ravno i da nigde nisu presavijena. Eventualno ih skratiti.
SAVET:
Creva malo omekšati u toploj vodi. Na taj način mogu lako da se isprave eventualna presavijena mesta.
Puštanje u rad
Sada otvorite zaustavne slavine na adapteru filtera, tako što ćete obe polužne ručke da prebacite ka smeru vodi- ce creva (pozicija ON).
Nakon toga otpustiti potisno crevo na mlaznici i ponovo uspostaviti cirkulaciju vode. Za to je pogodan pre svega pogodan praktični EHEIM instalacioni SET 1 (br. art. 4005300, 16 mm ø) ili EHEIM usisivač (br. art. 4003540). Spoljni filter se samostalno puni vodom. Zatim ponovo spojiti creva.
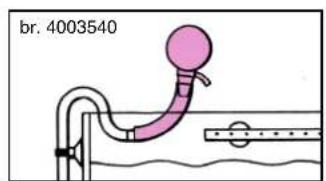
text_image
br. 4003540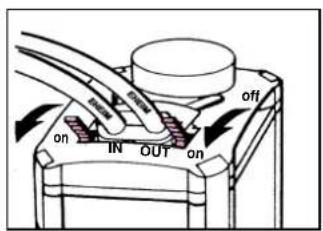
text_image
ON IN OUT ON off
text_image
br. 4005300 off onNakon što su svi spojevi creva još jednom provereni na zaptivenost, a držač creva na ispravnu nameštenost, filter može da se pusti u rad preko mrežnog utikača.

text_image
IN OUT ON OFFSAVET: Preko integrisanog zaustavnog filtera (OUT) snaga filtera može bestepeno da se reguliše sa potisne strane.
PAŽNJA: Snaga pumpe nikada ne sme da se smanji da usisne strane (IN).
Održavanje i nega
Izvući utikač za struju. Obe poluge za zatvaranje na adapteru prebaciti u poziciju OFF. Stezaljke za zaključavanje okrenuti nagore i odspojiti adapter od gornjeg dela filtera.
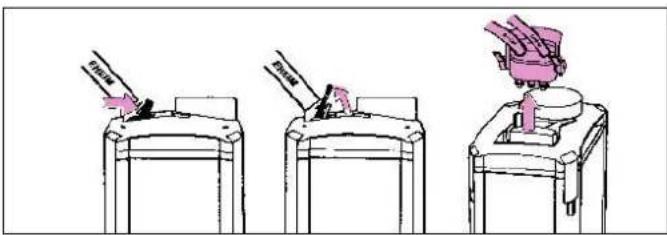
text_image
Diagram showing three stages of a robotic arm operation with labeled parts and directional arrowsSpoljni filter izvaditi iz ormara držeći ga za dva udubljenja za hvatanje Zatim otvoriti sve stezaljke i skinuti gornji deo filtera.

natural_image
Illustration of two hands opening a pink cylindrical object (no text or symbols)
natural_image
Illustration of hands operating a mechanical device with a central component and two side supports (no text or symbols)Za čišćenje prostora za pumpu, otvoriti prsten za zatvaranje na podnom delu gornjeg dela filtera lakim okretanjem nalevo. Izvaditi poklopac pumpe, rotor sa radnim kolom i osovinu.

natural_image
Mechanical component diagram showing a rotating knob with rotation arrow (no text or symbols)
natural_image
Simple line drawing of a mechanical assembly with a lever and spherical component (no text or symbols)natural_image
Diagram of a mechanical or electrical component with directional arrows indicating motion or force (no text or symbols)Prilikom montaže voditi računa o ispravnom naleganju navlaka, poklopca pumpe i zaptivnog prstena. Zatim ponovo staviti poklopac pumpe sa prstenom za zaključavanje.

natural_image
Technical line drawing of a mechanical assembly with bolts and housing (no text or symbols)SAVET:
natural_image
Illustration of a container with two compartments, one above and one below, showing different material patterns (no text or symbols)SAVET:
Prilikom nove primene SUBSTRAT po oko 1/3 korišćene filterske mase pomešati sa materijalom kako bi se kulture bakterija brže razmnožavale.
text_image
Technical diagram showing a mechanical assembly with labeled components and directional arrows indicating process flow.Sva 3 zaptivna prstena na adapteru proveriti na oštećenja i ispravnu nameštenost i malo ih podmazati vazelinom. Staviti adapter i zaključati.
Nakon što su obe zaustavne poluge na adapteru otvorene (položaj ON), filter se ponovo samostalno puni vodom i nakon toga je spreman za rad.
Na kraju filter preko utikača za struju ponovo uključiti.
Sigurnosne napomene

Koristiti samo u zatvorenim prostorijama za akvaristička područja primene. Filteri za akvarijum samo za privatnu upotrebu.

Pre nego što se ruka zaroni u vodu akvarijuma, sve električne uredaje koje se nalaze u vodi isključiti iz struje preko utikača. Pre otvaranja filtera načelno ga isključiti iz struje vađenjem utikača iz utičnice.

natural_image
Illustration of two different mechanical device setups with hands performing assembly (no text or symbols)natural_image
Illustration of three different storage containers with different internal compartments, shown from different angles (no text or symbols)natural_image
Simple line drawing of a container with liquid and a side outlet, no text or symbols present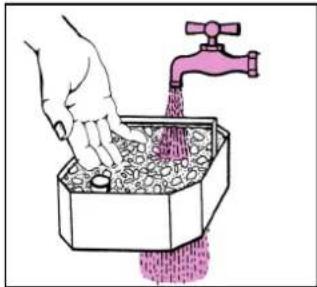
natural_image
Illustration of a hand washing a container with a pink faucet, showing liquid being poured into it (no text or symbols)text_image
Technical diagram showing two stages of a mechanical or material processing setup with labeled components and directional arrows.natural_image
Technical line drawing of a mechanical component with no visible text or symbols
text_image
Diagram illustrating a mechanical press or lifting process with labeled components and directional arrows indicating motion.ВНИМАНИЕ:
natural_image
Cartoon robot holding a pink bottle, no text or symbols presenttext_image
in out in outУстановка шлангов
text_image
off on off on EXEMnatural_image
Illustration of three mechanical components with no visible text or symbolstext_image
Diagram showing two experimental setups with labeled components and fluid flow indicatorstext_image
Diagram illustrating a water filtration or filtration system with labeled components and directional arrows indicating flow or movement.natural_image
Technical line drawing of a mechanical assembly with a purple rod inserted into a housing (no text or symbols)text_image
in out on in on off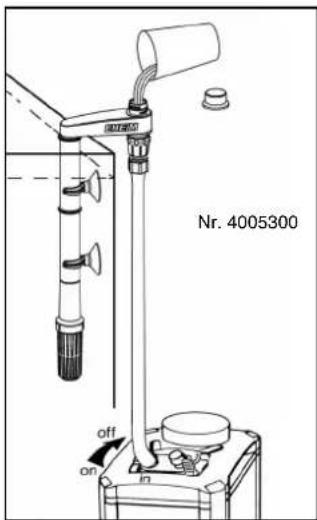
text_image
Nr. 4005300 off on intext_image
IN OUT ON OFFtext_image
Diagram showing three steps of a robotic arm handling a tool, with Chinese labels indicating 'Start', 'Close', and 'End' states.natural_image
Illustration of two hands stretching a pink container (no text or symbols)
natural_image
Illustration of hands supporting a pink mechanical device with a base (no text or symbols)natural_image
Diagram of a mechanical device with a circular component and rotation arrow (no text or symbols)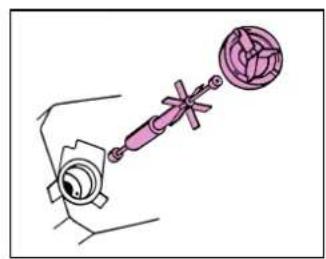
natural_image
Illustration of a mechanical device with a dart and spherical component (no text or symbols)natural_image
Diagram of a mechanical assembly with directional arrows indicating motion or force (no text or symbols)natural_image
Technical line drawing of a mechanical assembly with bolts and housing (no text or symbols)УКАЗАНИЕ:
natural_image
Illustration of a box with a lid and a pink container, placed on a stand (no text or symbols)УКАЗАНИЕ:
text_image
Technical diagram showing a mechanical assembly with labeled components and directional arrows indicating assembly steps.natural_image
Illustration of two different mechanical device setups with hands operating, showing internal components and assembly (no text or symbols)natural_image
Illustration of a two-part storage unit with internal compartments and top-down view (no text or symbols)natural_image
Simple line drawing of a container with liquid and a side pipe, no text or symbols present
natural_image
Illustration of a hand washing a faucet with granular material inside a container (no text or symbols)text_image
Technical diagram showing two stages of a mechanical or material processing setup with directional arrows indicating flow or movement.natural_image
Technical line drawing of a mechanical component with no visible text or symbols
text_image
Diagram illustrating a mechanical assembly or processing process with directional arrows indicating movement or force direction.ВНИМАНИЕ:
natural_image
Cartoon robot character with a pink bottle beside it (no text or symbols)text_image
in out in outМонтаж на маркучите
text_image
off on off on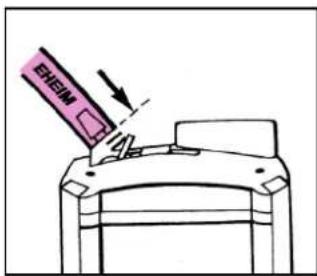
text_image
ECEPI ECEPInatural_image
Three abstract mechanical components with purple outlines and white circular bases, no text or symbols present
natural_image
Diagram of a mechanical component with three rods inserted into a housing (no text or symbols)text_image
Diagram showing two experimental setups with labeled components and fluid flow indicatorstext_image
Diagram illustrating a fluid system with pipe connection and water flow, showing directional movement and component placement.natural_image
Technical line drawing of a mechanical assembly with a purple cable inserted into a housing (no text or symbols)text_image
in out on on off
text_image
No 4005300 off ontext_image
Dots IN OUT ON OFFnatural_image
Three sequential diagrams showing a robotic arm operating on a platform, with no visible text or symbols.natural_image
Illustration of two hands opening a pink cylindrical device (no text or symbols)
natural_image
Illustration of hands supporting a pink mechanical device with a base, no text or symbols presentnatural_image
Mechanical component diagram showing a rotating assembly with a circular component (no text or symbols)
natural_image
Diagram of a mechanical assembly with a spring and wheel component (no text or labels)natural_image
Diagram of a mechanical assembly with directional arrows indicating motion or force (no text or symbols)natural_image
Technical line drawing of a mechanical assembly with screws and housing (no text or symbols)СЪВЕТ:
natural_image
Illustration of a box with a lid and patterned top, placed on a stand (no text or symbols)СЪВЕТ:
text_image
Technical diagram showing a mechanical assembly with labeled components and directional arrows indicating assembly steps.natural_image
Illustration of two different mechanical device setups with hands operating, showing internal components and assembly (no text or symbols)natural_image
Illustration of three different storage containers with different internal compartments, shown from different angles (no text or symbols)下部过滤桶,将填充EHEIM过滤滤材。
将生物过滤滤材-
natural_image
Simple line drawing of a container with two filled liquid, one with a side outlet and the other with a larger top outlet (no text or symbols)
natural_image
Illustration of a hand washing a faucet with granular material inside a container (no text or symbols)text_image
Technical diagram showing two stages of a mechanical or material processing setup with arrows indicating process flow.natural_image
Technical line drawing of a mechanical component with no visible text or symbols注意:
text_image
Diagram illustrating a mechanical assembly or processing process with directional arrows indicating movement or force directions.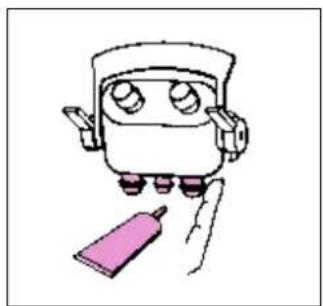
natural_image
Cartoon robot character with a pink bottle beside it (no text or symbols)text_image
in out in out软管安装
natural_image
Illustration of mechanical components with no visible text or symbolstext_image
Diagram showing two experimental setups for a water filtration or pressure measurement device, with labeled components and fluid flow paths.text_image
Diagram illustrating a mechanical or fluid system with labeled components and directional arrows, including a magnified inset showing flow direction.natural_image
Line drawing of a mechanical device with a purple cable inserted into a housing (no text or symbols)text_image
on IN OUT on off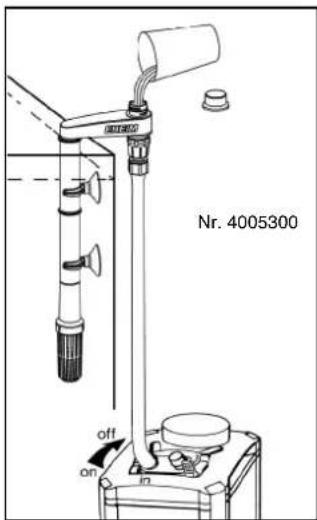
text_image
Nr. 4005300 off on再次检查所有连接处的密封性。
text_image
OFF IN OUT ONnatural_image
Three diagrams showing a robotic arm operating on a platform, with no visible text or symbols.natural_image
Illustration of two hands opening a pink cylindrical device (no text or symbols)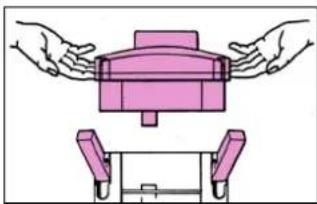
natural_image
Illustration of hands operating a pink mechanical device with a base mount (no text or symbols)natural_image
Mechanical component diagram showing a rotating knob with rotation arrow (no text or symbols)
natural_image
Simple line drawing of a mechanical assembly with no text or symbolsnatural_image
Diagram of a mechanical or electrical component with directional arrows indicating motion (no text or symbols)natural_image
Technical line drawing of a mechanical assembly with bolts and housing (no text or symbols)提示:
natural_image
Illustration of a box with a patterned lid and a container, no text or symbols present提示:
text_image
Technical diagram showing a mechanical assembly with labeled components and directional arrows indicating assembly steps.natural_image
Illustration of two hand-cranked containers with handles, one open and one closed, showing internal compartments (no text or symbols)natural_image
Illustration of a multi-step food storage or packaging process with labeled components (no text or symbols)natural_image
Simple line drawing of a container with two filled layers and a horizontal tube, no text or symbols present.
natural_image
Illustration of a hand washing a faucet with granular material inside a container (no text or symbols)text_image
Technical diagram showing two stages of a container with material layers and directional arrows indicating process flow.natural_image
Technical line drawing of a mechanical component with no visible text or symbols
text_image
Diagram illustrating a mechanical assembly or processing process with directional arrows indicating movement or force direction.주의:
natural_image
Cartoon robot character with a pink bottle beside it (no text or symbols)text_image
in out in out튜브 설치
text_image
off on off on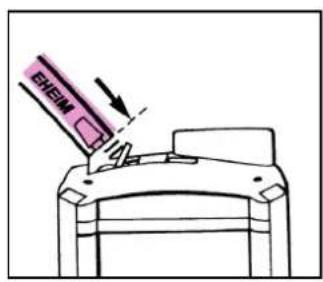
text_image
EHEIMnatural_image
Three abstract mechanical or electronic components with circular and rectangular elements, no visible text or symbols
natural_image
Diagram of a mechanical component with multiple rods inserted into a housing (no text or symbols)natural_image
Diagram of two laboratory apparatus setups with tubing and components, no visible text or symbolstext_image
Diagram illustrating a mechanical or fluid system with labeled components and directional arrows, including a magnified inset showing flow direction.natural_image
Line drawing of a mechanical device with a purple cable inserted into a housing (no text or symbols)text_image
in out on off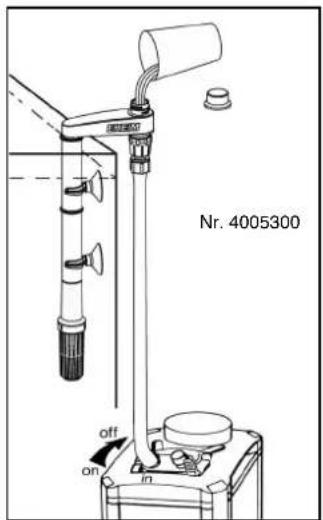
text_image
Nr. 4005300 off on intext_image
IN OUT ON OFF DIPtext_image
Diagram showing three steps of a robotic arm handling a tool, with Chinese labels indicating 'Start', 'Close', and 'End' states.natural_image
Illustration of two hands opening a pink cylindrical device (no text or symbols)
natural_image
Illustration of hands operating a pink mechanical device with a base, no text or symbols presentnatural_image
Mechanical component diagram showing a rotating knob with rotation arrow (no text or symbols)
natural_image
Illustration of a mechanical device with a lever and spherical component (no text or symbols)natural_image
Diagram of a mechanical or electrical component with directional arrows indicating motion (no text or symbols)natural_image
Technical line drawing of a mechanical assembly with bolts and housing (no text or symbols)팀:
natural_image
Illustration of two stacked containers with patterned surfaces, one above a larger container (no text or symbols)팀:
text_image
Diagram illustrating a mechanical assembly process with labeled components and directional arrows indicating movement or assembly.Reproduction or copying – even parts thereof – only with the express permission of the producer.