
222157 - Blender Hendi - Free user manual and instructions
Find the device manual for free 222157 Hendi in PDF.
| Product type | Professional hand blender |
| Brand | Hendi |
| Model | 222157 |
| Dimensions (L x W x H) | 71 x 71 x 444 mm |
| Net weight | 1.1 kg |
| Power supply | 220-240 V~50 Hz |
| Power | 250 W |
| Protection class | Class II |
| Protection rating (IP) | IP23 |
| Rotation speed | 6,600 to 13,500 rpm |
| Number of speeds | 6 (1 to 6) |
| Display | LCD speed screen |
| Blade material | Titanium blade assembly |
| Recommended container capacity | 1 to 4 liters |
| Maximum continuous operation time | 3 minutes |
| Sound level | < 85 dB(A) |
| Intended use | Professional kitchen use |
| Main functions | Mix, grind, puree, emulsify |
| Maintenance and cleaning | Arm and blade washable in warm soapy water; do not immerse the motor |
| Safety | Overheat protection, automatic shut-off, child lock not specified |
| Spare parts and repairability | List of 38 parts available; repairs by qualified technician only |
| Warranty | 12 months |
Frequently Asked Questions - 222157 Hendi
User questions about 222157 Hendi
0 question about this device. Answer the ones you know or ask your own.
Ask a new question about this device
Download the instructions for your Blender in PDF format for free! Find your manual 222157 - Hendi and take your electronic device back in hand. On this page are published all the documents necessary for the use of your device. 222157 by Hendi.
USER MANUAL 222157 Hendi
natural_image
Black and yellow electric shaver with a handle and base mount (no visible text or symbols)You should read this user manual carefully before using the appliance.
Keep these instructions with the appliance.
natural_image
Simple icon of a house with an arrow pointing left, labeled 'INDOOR' below (no other text or symbols)For indoor use only.

CE

natural_image
Simple geometric diagram of two concentric squares (no text or symbols)Thank you for purchasing this Hendi appliance. Read this manual carefully, paying particular attention to the safety regulations outlined below, before installing and using this appliance for the first time.
Safety regulations
- This appliance is intended for commercial use.
- Only use the appliance for the intended purpose it was designed for as described in this manual.
- The manufacturer is not liable for any damage caused by incorrect operation and improper use.
- Keep the appliance and electrical plug away from water and other liquids. In the event the appliance falls into water, immediately remove the power plug from the socket. Do not use the appliance until it has been checked by a certified technician. Failure to follow these instructions will cause life threatening risks.
- Never attempt to open the housing of the appliance by yourself.
- Do not insert objects into the housing of the appliance.
- Do not touch the plug with wet or damp hands.
- Danger of electric shock! Do not attempt to repair the appliance by yourself, repairs are only to be conducted by qualified personnel.
- Never use a damaged appliance! When it's damaged, disconnect the appliance from the socket and contact the retailer.
- Warning! Do not immerse the electrical parts of the appliance in water or other liquids.
- Never hold the appliance under running water.
- Regularly check the power plug and cord for any damage. When damaged it must be replaced by a service agent or similarly qualified person in order to avoid danger or injury.
- Make sure the cord does not come in contact with sharp or hot objects and keep it away from open fire. Never pull the power cord to unplug it from the socket, always pull the plug instead.
- Make sure that the power cord and/or extension cord do not cause a trip hazard.
- Never leave the appliance unattended during use.
- Warning! As long as the plug is in the socket the appliance is connected to the power source.
- Turn off the appliance before unplugging it from the socket.
- Connect the power plug to an easily accessible electrical socket so that in case of emergency the appliance can be unplugged immediately.
- Never carry the appliance by the cord.
- Do not use any extra devices that are not supplied together with the appliance.
- Only connect the appliance to an electrical outlet with the voltage and frequency mentioned on the appliance label.
-
Never use accessories other than those recommended by the manufacturer. Failure to do so could pose a safety risk to the user and could damage the appliance. Only use original parts and accessories.
-
This appliance should not be operated by persons with reduced physical, sensory or mental capabilities, or persons that have a lack of experience and knowledge.
- This appliance should, under any circumstances, not be used by children.
- Keep the appliance and its power cord out of reach of children.
- WARNING: ALWAYS switch off the appliance and unplug from power socket before cleaning, maintenance or storage.
Special Safety Regulations
- Use the appliance only as described in this manual. Indoor use only.
- This appliance should be operated and installed by specialized trained personnel in the kitchen of the food industry such as catering, restaurant, bar, etc.
- All maintenance, installation and repair works should be performed by specialized trained authorized technicians.
- Keep the appliance away from hot surfaces and open flames. Always operate the appliance on a level, stable, clean, heat-resistant and dry surface.
- Wear protective clothing, mask, or protective glasses if necessary during operation.
- This appliance is not intended to be operated by means of an external timer or separate remote-control system.
- WARNING: Keep all ventilation openings in the appliance clear of obstruction.
- WARNING: During operation, keep hands and utensils out of the container to reduce the risk of severe personal injury and / or damage to the blender.
- Allow at least 20 cm spacing around the appliance to avoid danger.
- Caution! Securely route the power cord if necessary in order to prevent unintentional pulling or contact with the moving blade.
- Do not immerse the shaft into the water or liquid less than 5cm.
- Do not continuously operate the appliance to avoid overheating the motor. The continuous operation time should not exceed over 3 minutes. Operate the appliance again, after it has been cooled.
- Do not use the machine outside the container.
- Do not touch the blade, blade guard and moving parts. Keep fingers, hair, clothing and utensils away from all moving parts.
- Do not wash the appliance with water or waterjet. Washing with water can cause leakage and increase the risk of electric shock. No parts are dishwasher safe.
- To avoid damaging the cord, do not squeeze, bend or chafe it on sharp edges. Keep it away from hot surfaces and open flames as well. Do not let rotating blades touch the power cord.
- Lay out the power cord in such a way that no unintentional pulling or tripping over is possible.
- Do not clean or store the machine unless it is completely cooled down.
- Danger of injury! Care should be taken when handling the sharp cutting blades during cleaning.
• This appliance is classified as protection class II.
Intended use
• This appliance is intended for professional use.
- This appliance is solely intended for crushing, mixing, mashing and pureeing suitable soft ingredients in a container. Any other use may lead to damage of the appliance or personal injury.
- Operating the appliance for any other purpose shall be deemed a misuse of the device. The user shall be solely liable for improper use of the device.
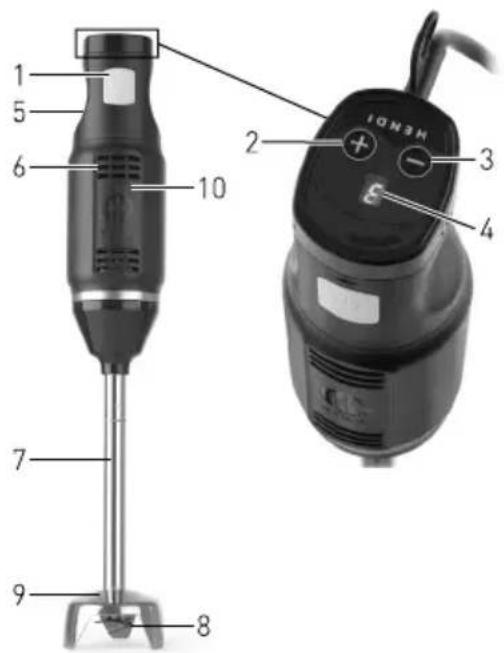
Main parts of the appliance
- ON/OFF switch ☐ Press and hold for continuous operation; Release the button to stop operation
- Increase speed setting + : Increase speed between 1 to 6
- Decrease speed setting - : Decrease speed between 1 to 6
- LCD display: To show the speed setting
- Handle
- Ventilation holes
- Detachable blending part
- Blade
- Blade guard
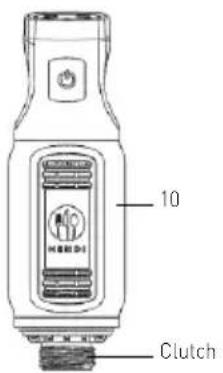
10.Main unit with motor
EN
Preparations before operation
- Remove all protective packaging and wrapping.
-
Check the appliance for completeness and transport damages. In case of incomplete delivery or damage, contact supplier immediately. DO NOT use the appliance. (See ==> Warranty).
-
Clean the appliance before use (See ==> Cleaning and Maintenance).
- Make sure the appliance is completely dry.
- Preparation of the food ingredients for processing.
Before operation
- Read this manual thoroughly and carefully before operation.
-
Ensure the appliance is placed in a dry area without any obstacles to block your operation.
-
Check to ensure the electrical power supply corresponds with the rating label on the appliance.
- Make sure the blending part (7) is installed firmly with the main body with motor part (10).
Transportation
- Do not move the appliance while it is under operation. Unplug the appliance when moving to another place.
- Hold the handle part of the appliance when moving away.
Operation
Observe the following safety advice at all times!
- Always ensure the appliance is disconnected from the power supply before it is assembled with the blending part (7).
-
Never put your hands into the food container (not supplied). Always use wooden or plastic spatulas, and only when the appliance is not running.
-
Do not operating the appliance with no foodstuff inside the container or with hard foods, hot liquids, heavy dough, etc. in order to prevent overheated.
- WARNING! Unplug the appliance immediately after use.
Assembling / Disassembly of the attachments
The assembly / disassembly operations of the appliance are performed with the appliance stopped and disconnected from the power supply.
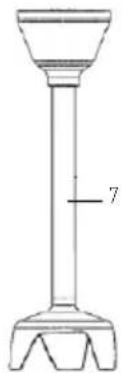
Main unit (10) and blending part (7):
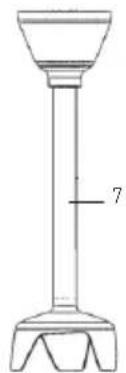
natural_image
Line drawing of a funnel-shaped object with a base and top, labeled with number 7 (no text or symbols on the object itself)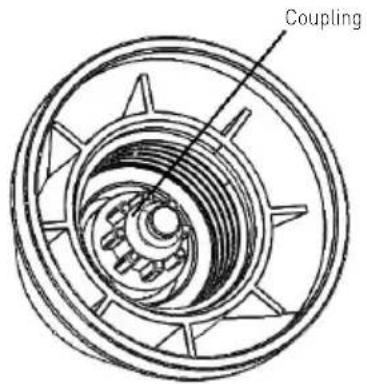
Disassembly:
- Hold the main unit (10) and screw out the blending part (7) by clockwise until it is fully detached.
Assembly:
- Align the coupling of the blending part (7) to the clutch of the main unit (10).
- Screw in the blending part (7) by anti-clockwise until it is fully tightened.
Blending part (7) and blade (8):
CAUTION! Please wear protective gloves for disassembly (not included).
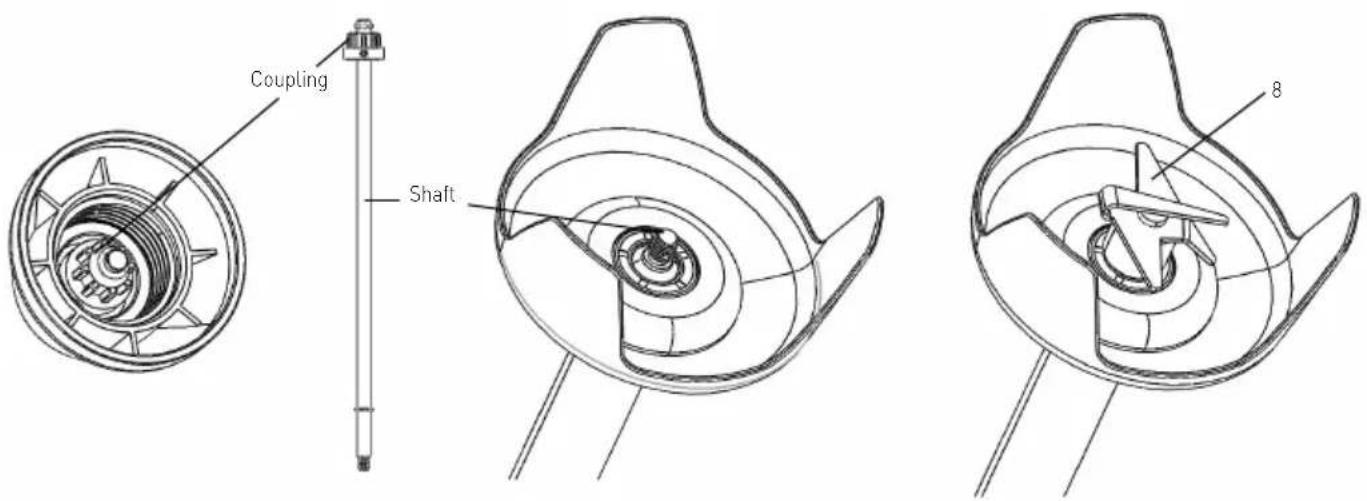
Disassembly:
-
Hold the coupling of the blending part (7) and screw out the blade (8) by anti-clockwise until it is fully detached.
-
Hold the blending part (7) and pull out the shaft.
Assembly:
-
Insert the shaft into the blending part (7) until it is fully inserted.
-
Hold the coupling of the blending part (7) and screw in the blade by clockwise until it is fully tightened.
| Suitable for: • Blending juices and shakes• Mixing soft ingredients (e.g. pancake batter or mayonnaise).• Mixing vegetables into soup (e.g. carrots, etc.) |
| Preparation: • Peel or pare food and cut them into small chunks.• Place the food into a suitable container of capacity 1~4 litres. |
| Maximum continuous operation time3 minutes to prevent motor overheated. Operate the appliance again after cool down. |
- Once connected to the power plug, "3" will be shown on the LCD display (4).
- Lower the blending part (7) into the food container (not supplied). Fully submerge blade (8) into the ingredients before starting the appliance.
ATTENTION: You should not submerge the blending part (7) above the Max. mark.
- Hold the main unit (10) firmly with one hand and the mixing container with the other hand.
- Press and hold the ON/OFF button (1), the appliance then starts blending continuously.
- Use a gentle up-and-down motion to blend the food ingredients smoothly.
- To avoid food spattering, do not lift the appliance out of the ingredients during operation.
- Select the blade speed by pressing the + (2) or - (3) button (Speed range: 1 to 6) during operation. The blade speed will be shown on the LCD display (4).
Note: No need to press the ON/OFF button (1) when selecting the blade speed simultaneously.
- After finish operation, release the ON / OFF button (1) to switch off the appliance.
- Wait until the blade (8) stop completely. Then, unplug it from the electrical supply.
- Turn the main unit (10) clockwise to disassembly the blending part (7) for cleaning.
Note:
-
Press and hold the decreasing and increasing button + (2) or - (3) button for fast adjustment.
-
The default blade speed will be set to "3" once plug in.
Cleaning and Maintenance
Attention: Always unplug the appliance from the electrical power outlet and let it cool down completely before cleaning and disassembly the blending part (7).
Cleaning
- Remove all obstacles near the blade.
- Place the blending arm and the bell in a suitable container with clean water and switch on for a few seconds. Never immerse the shaft above the Max. mark.
- Never immerse the motor unit or the handle in water; clean with a damp cloth or a sponge.
WARNING: Always dry the blades thoroughly after cleaning to avoid rust spotting.
Recommended cleaning procedure:
| Parts How to clean Frequency | ||
| Main unit with motor (10) | Never immerse this part into water or other liquids.Using a damp cloth with some detergent and water, rinse, sanitize and dry thoroughly. | Clean after each use |
| Blending part (7) • Clean it with warm water and some mild detergent. Do not submerge the Detachable blending part (7) above the Max. mark.Dry all parts before using again. | ||
| Blade (8) • Warning! Risk of injury! Take great care when cleaning the blades.Clean it with warm water and some mild detergent.Dry it thoroughly after cleaning. |
Storage
- Before storage, always make sure the appliance has already been disconnected from the electrical outlet and cooled down completely.
- Store the appliance in a cool, clean and dry place and keep out of reach of the children.
Troubleshooting
If the appliance does not function properly, please check the below table for the solution. If you are
still unable to solve the problem, please contact the supplier/service provider.
| Problems Possible causes Possible solution | ||
| Appliance does not switch on Power plug is not connected to a suitable power supply properly. | Check to make sure the power plug is connected to a suitable electrical outlet properly. | |
| ON/OFF button (1) is not pressed. Press and hold the ON/OFF button (1) to switch on the appliance. | ||
| Abnormal noises while processing | The blending part (7) is not connected correctly. | Disassembly and assembly the blending part (7) again. |
| Appliance cannot operate | Inside overheat devices activates. | Let the appliance cool down complete before start operation again. |
| Appliance is overheat | Overtime operation | Release the ON/OFF button and unplug the device, wait 10 minutes for the motor to cool down. |
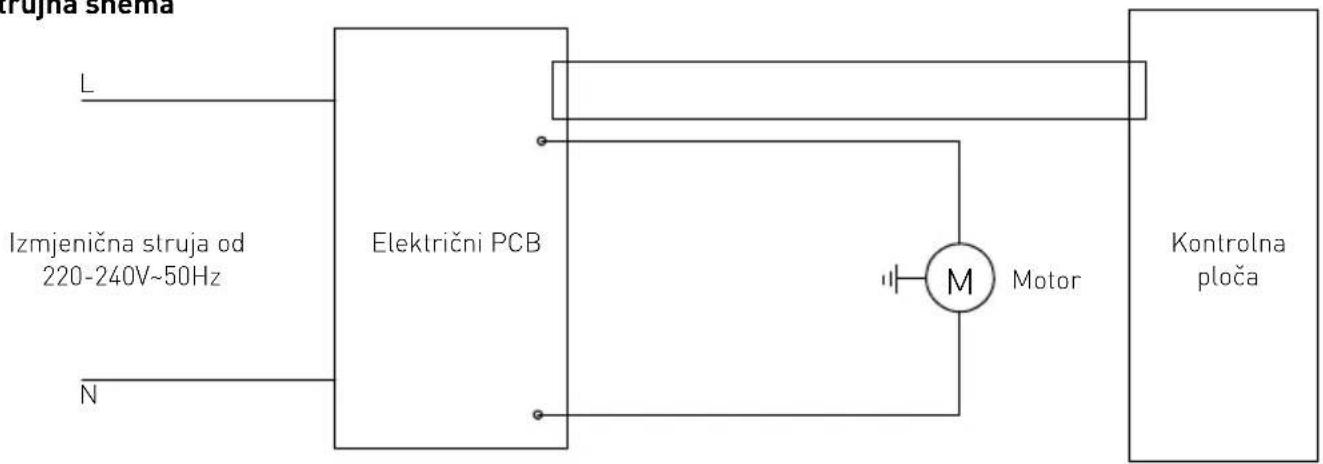
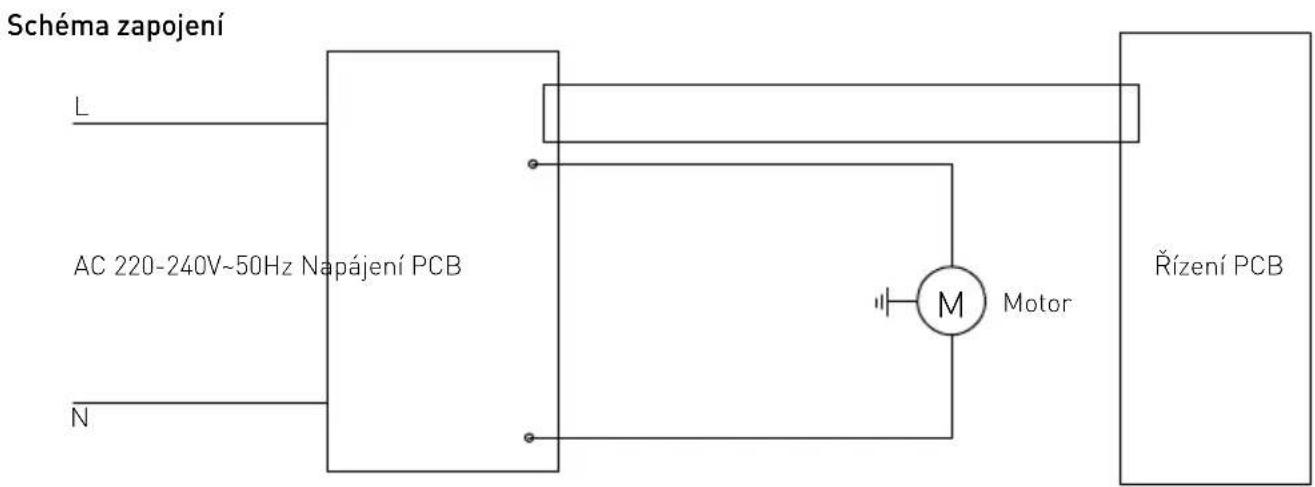
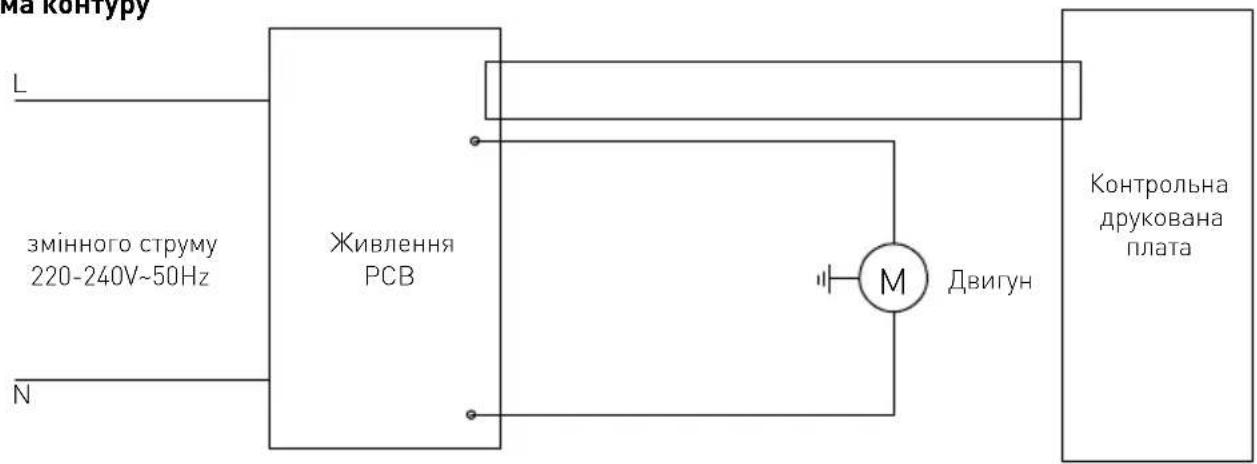
Technical specification
Item no.: 222157
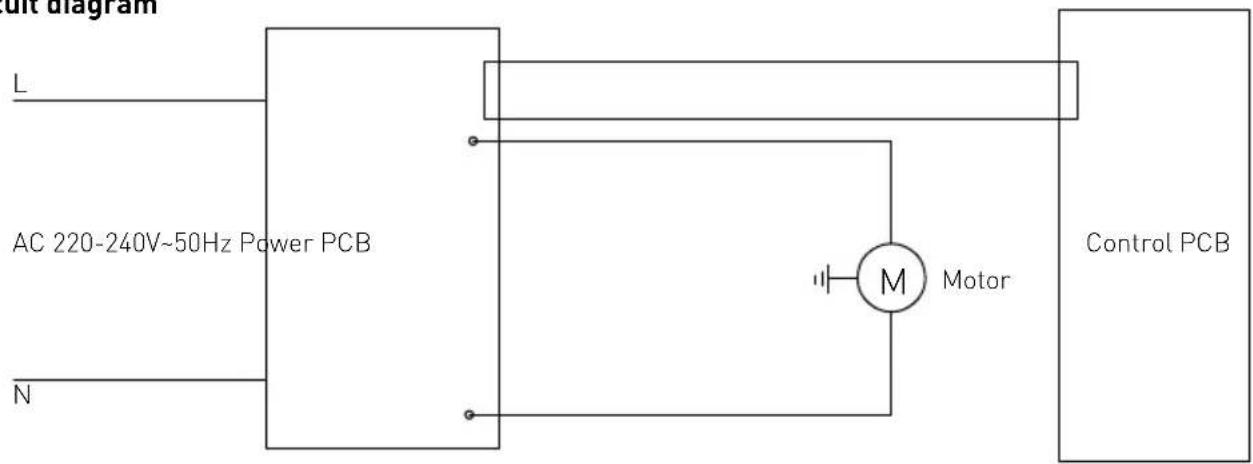
Operating voltage and frequency: 220-240V\~50Hz
Rated input power: 250W
Protection class: Class II

Waterproof protection class: IP23
Dimension: 71 x 71 x (H) 444 mm
Net weight: 1,1kg
Rotation speed (rpm): approx. 6,600 to 13,500
Noise level: < 85dB(A)
Remark: Technical specification is subjected to change without prior notification.
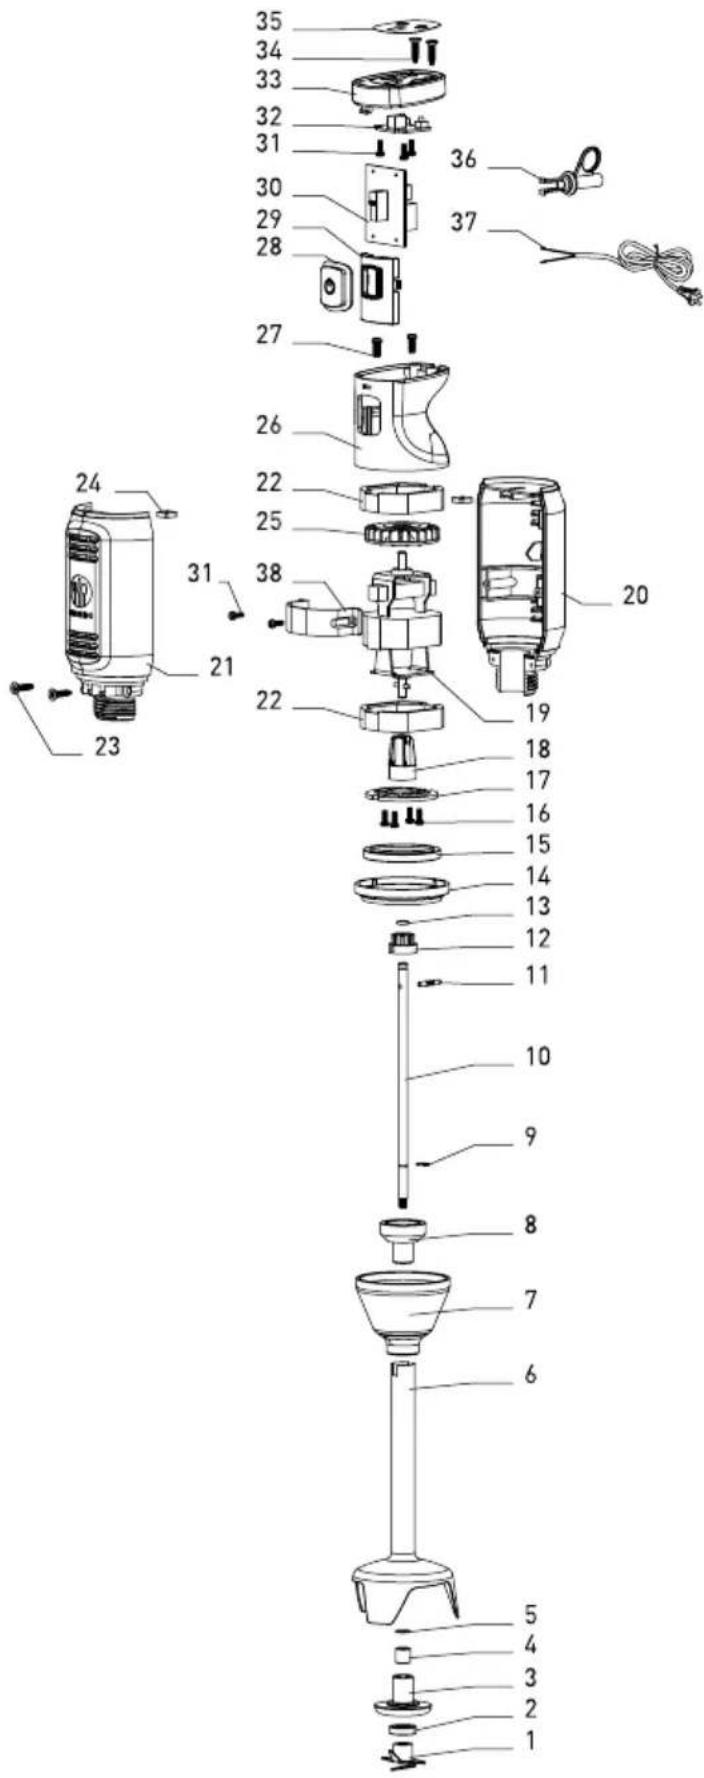
Part list for 222157
| Part no. | Part name Quantity | |
| 1 | Titanium blade assembly 1 | |
| 2 | Blade shaft seal ring 1 | |
| 3 | Fixing bushing 1 | |
| 4 | Bearing 1 | |
| 5 | Steel ring 1 | |
| 6 | Shaft 1 | |
| 7 | Head of shaft 1 | |
| 8 | Mounting shaft cover 1 | |
| 9 | E shape ring 1 | |
| 10 | Blade shaft 1 | |
| 11 | Blade shaft pin | 1 |
| 12 | Spline shaft | |
| 13 | Anti-vibration seal ring | 1 |
| 14 | Coated ring 1 | |
| 15 | Anti-vibration ring for motor | |
| 16 | Screw for motor | 4 |
| 17 | Motor fixing plate | 1 |
| 18 | Spline sleeve | 1 |
| 19 | Motor | |
| 20 | Right enclosure | 1 |
| 21 | Left enclosure | 1 |
| 22 | Motor absorbing cover | 2 |
| 23 | Motor mounting screw | 2 |
| 24 | Right and left enclosure mounting nut | 2 |
| 25 | Motor fan | 1 |
| 26 | Top enclosure | 1 |
| 27 | All enclosures mounting screw | 2 |
| 28 | On / Off button rubber | 1 |
| 29 | Button fixing frame | 1 |
| 30 | Power board | 1 |
| 31 | Mounting screw | 5 |
| 32 | Control board | 1 |
| 33 | Upper cover | 1 |
| 34 | Top enclosure mounting screw | 2 |
| 35 | Control sticker | 1 |
| 36 | Strain Relief | 1 |
| 37 | Power cord with plug | 1 |
| 38 | Motor fixing frame | 1 |
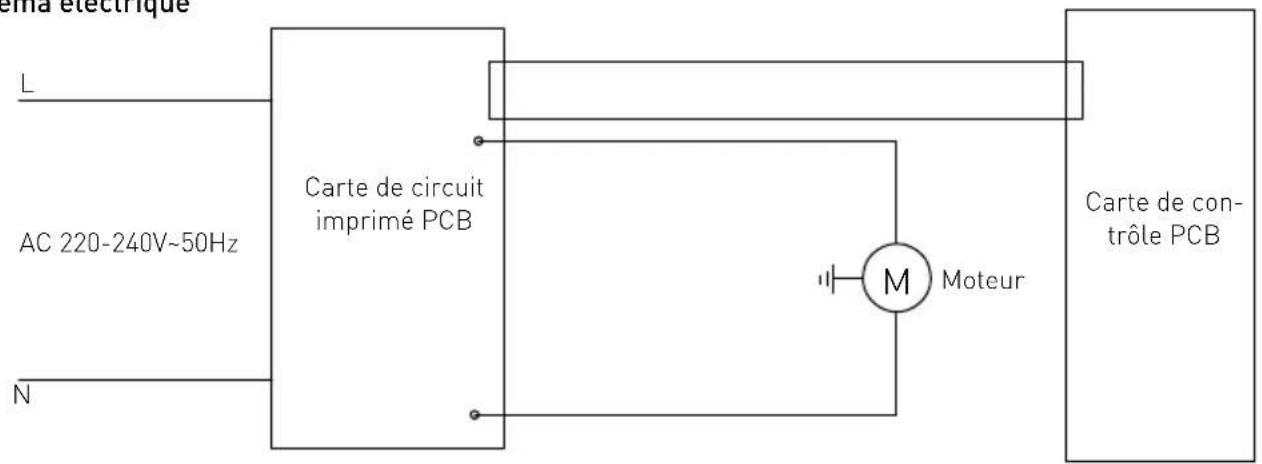
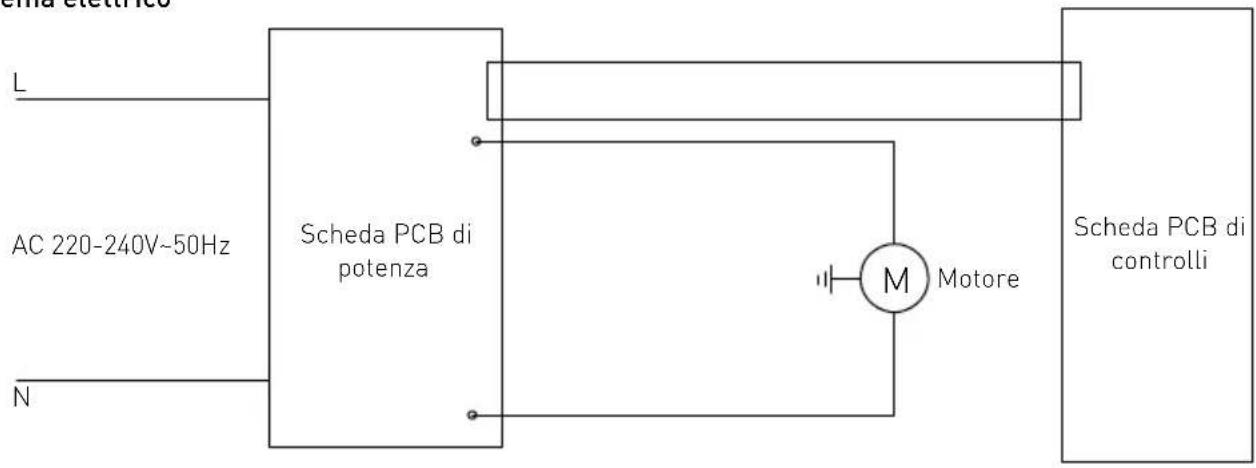
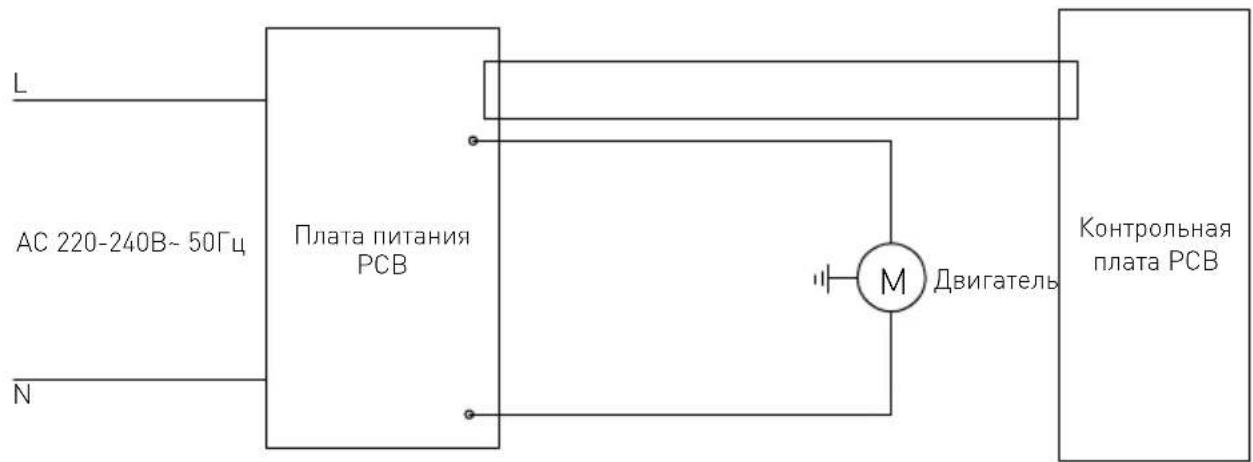
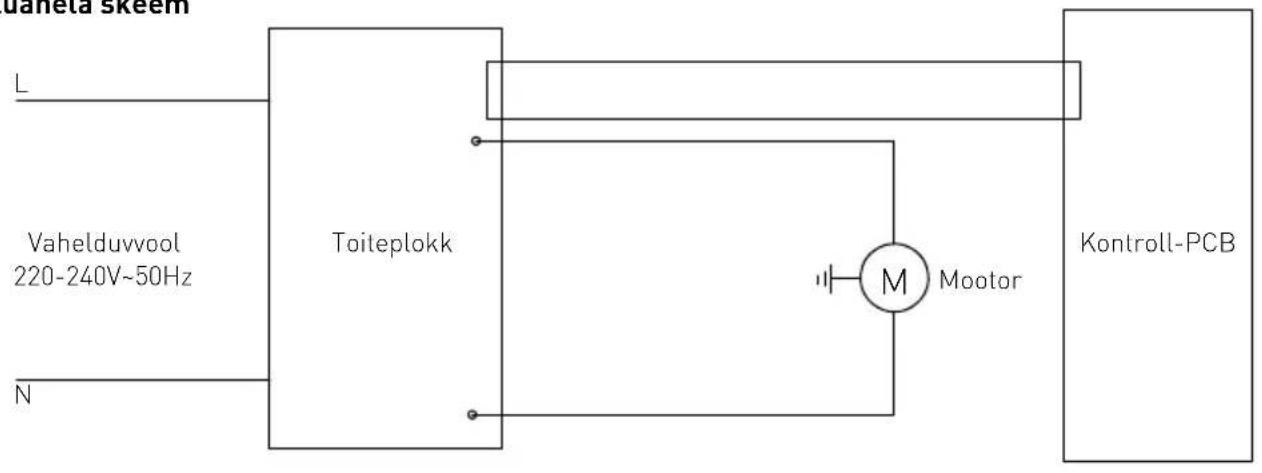
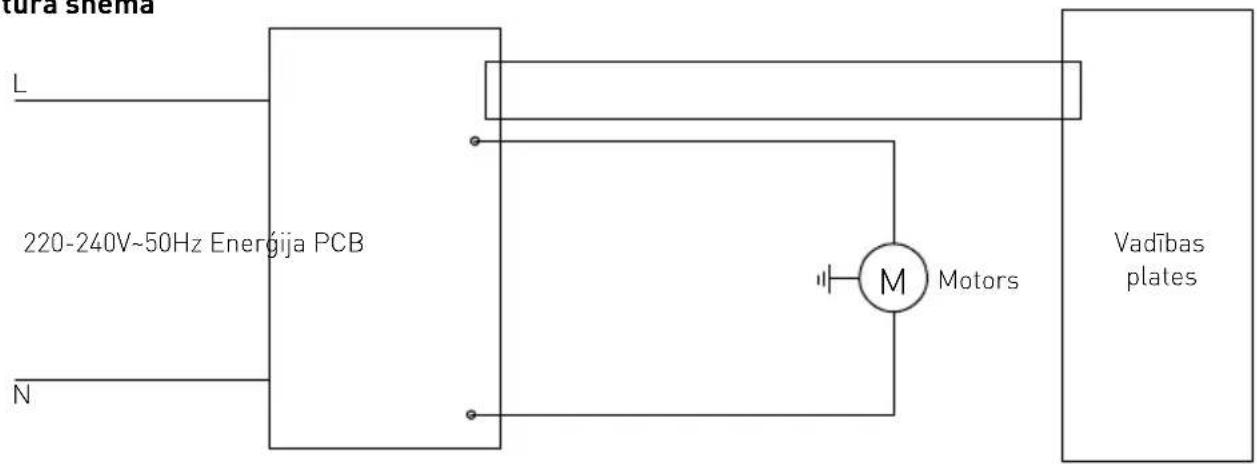
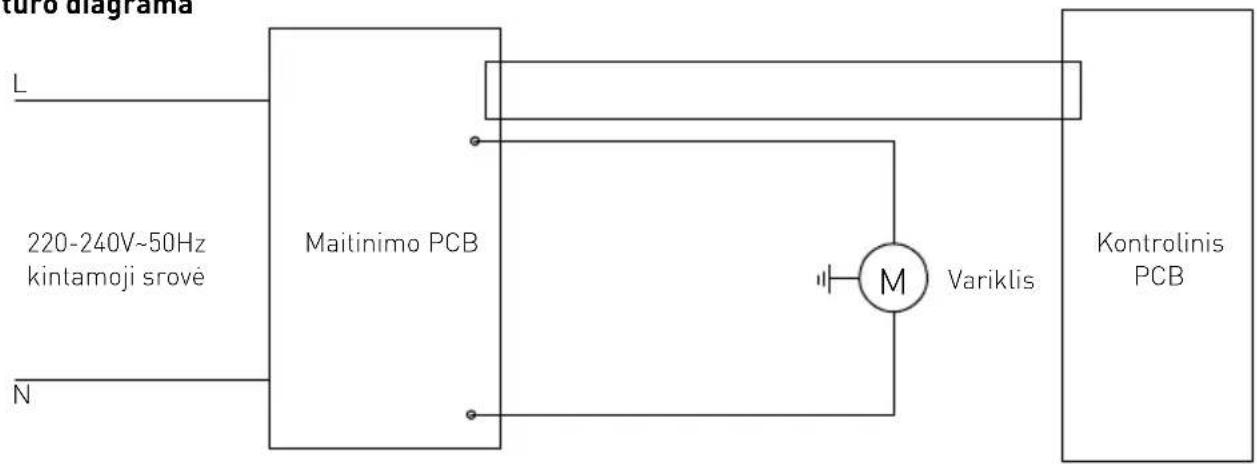
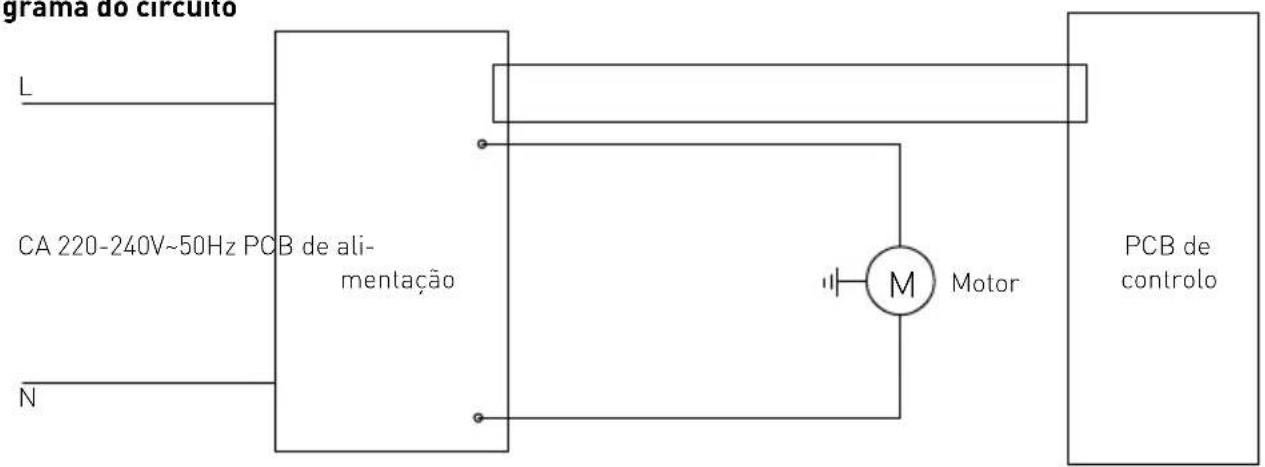
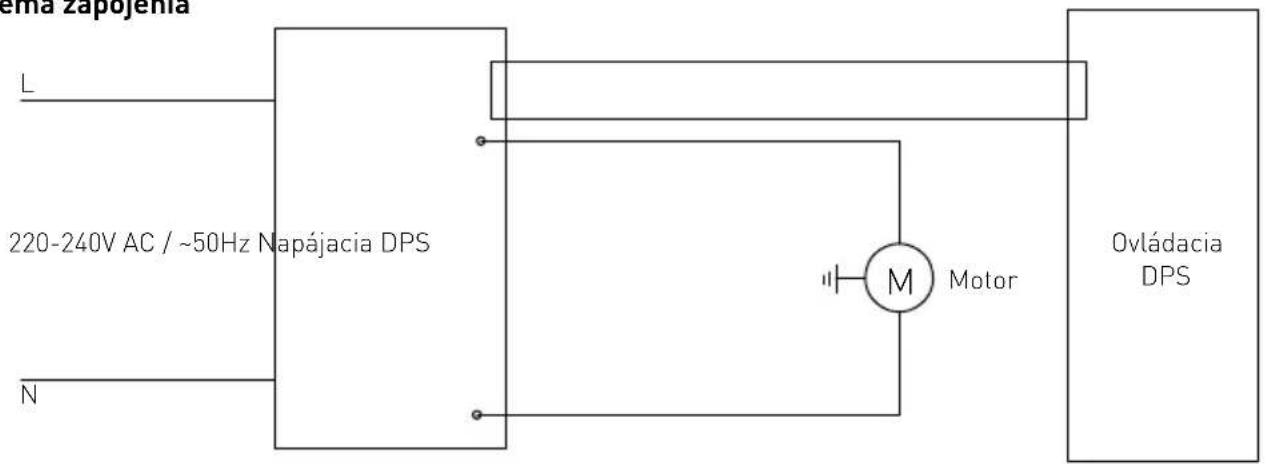
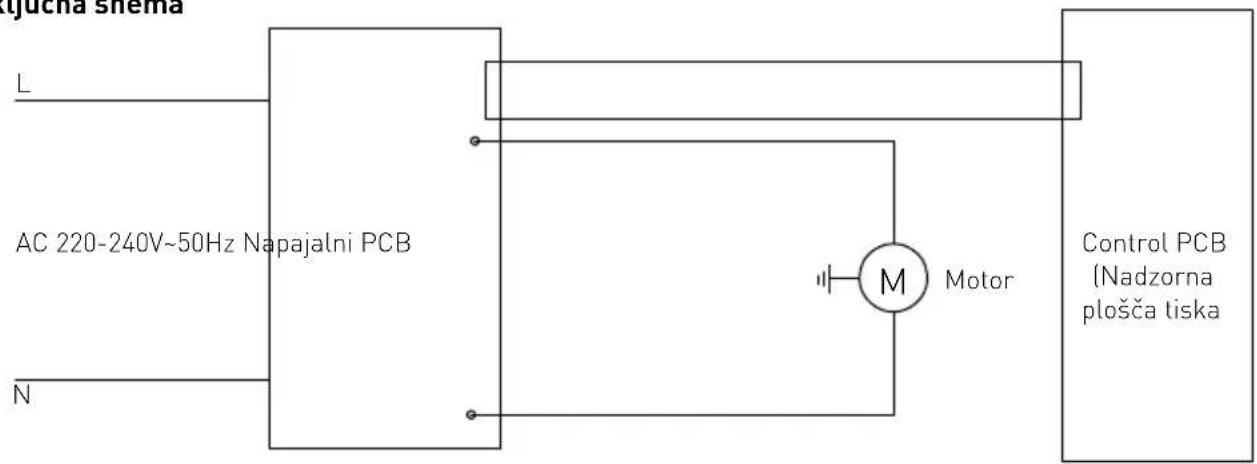
Circuit diagram
Warranty
Any defect affecting the functionality of the appliance which becomes apparent within one year after purchase will be repaired by free repair or replacement provided the appliance has been used and maintained in accordance with the instructions and has not been abused or misused in any way. Your statutory rights are not affected. If the appliance is claimed under warranty, state where and when it was purchased and include proof of purchase (e.g. receipt).
In line with our policy of continuous product development we reserve the right to change the product, packaging and documentation specifications without notice.
Discarding & Environment
When decommissioning the appliance, the product must not be disposed of with other household waste. Instead, it is your responsibility to dispose to your waste equipment by handing it over to a designated collection point. Failure to follow this rule may be penalized in accordance with applicable regulations on waste disposal. The separate collection and recycling of your waste equipment at the time of disposal will help conserve natural resources and ensure that it is recycled in a manner that protects human health and the environment. For more information about where you can drop off your waste for recycling, please contact your local waste collection company. The manufacturers and importers do not take responsibility for recycling, treatment and ecological disposal, either directly or through a public system.
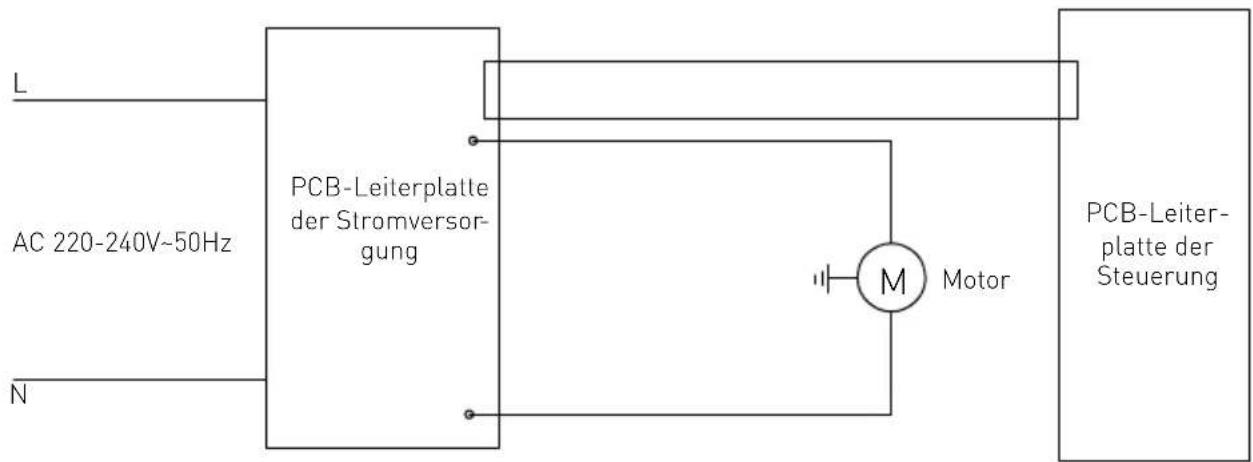
Elektroschema
WAARSCHUWING: Always dry the blades thoroughly after cleaning to avoid rust spotting.
Omwentelingssnelheid (tpm): ca. 6,600 to 13,500
Geluidsniveau: < 85dB(A)
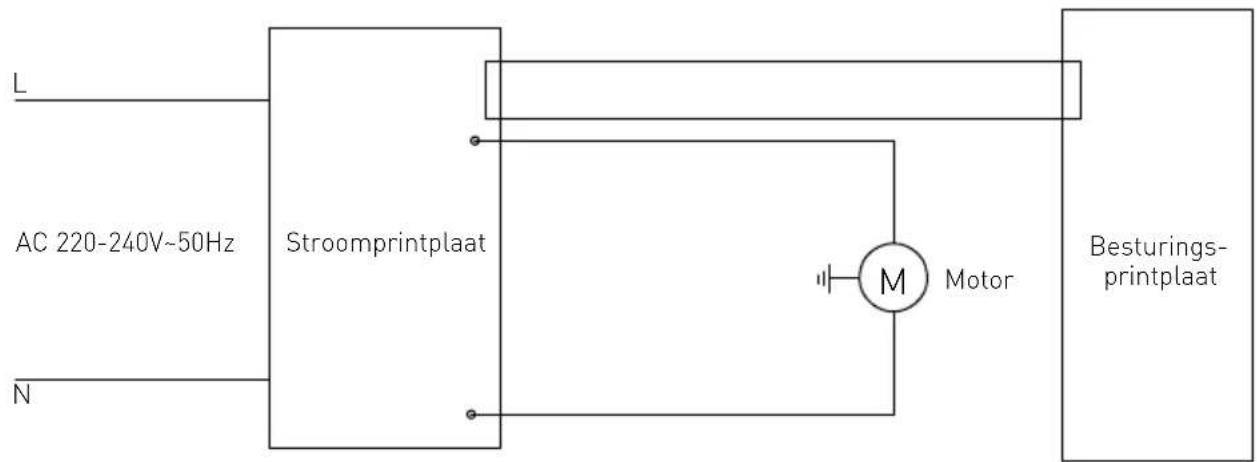
Schakelschema
Schemat elektryczny
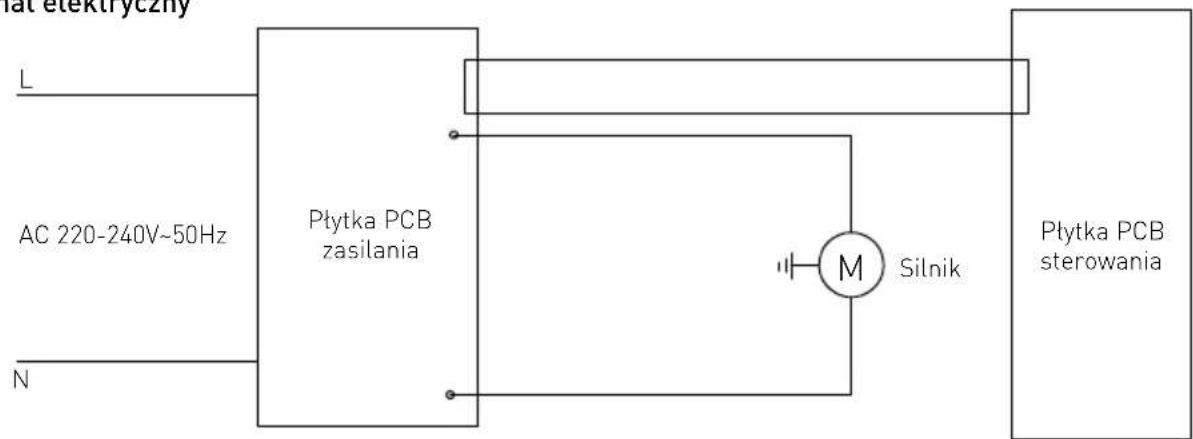
Schéma électrique
Schema elettrico
Электрическая схема
natural_image
Line drawing of a funnel-shaped object with a base and spout, labeled with number 7 (no text or symbols on the object itself)
Rastavljanje:
Strujna shema
Jamstvo
Kapcsolási rajz
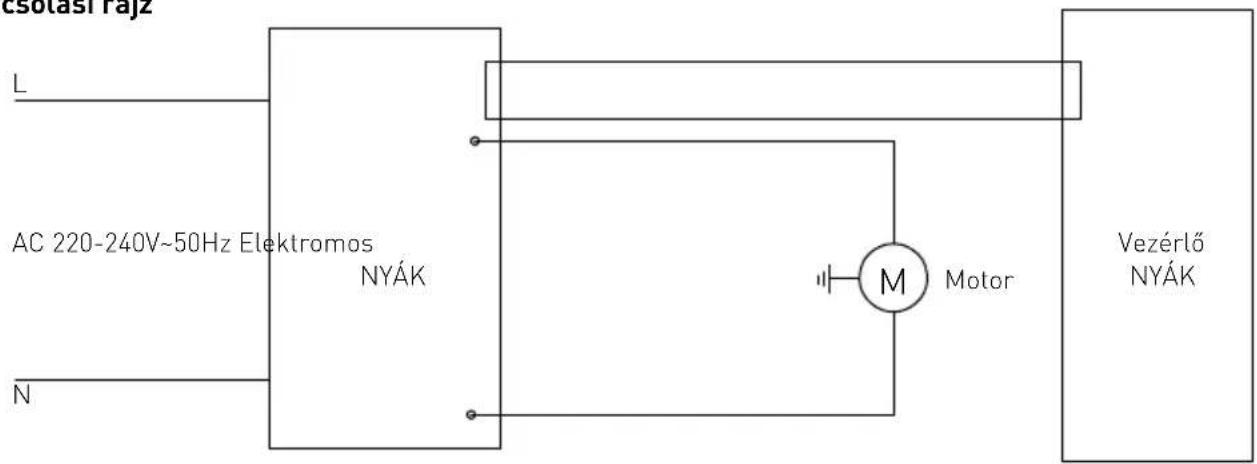
Схема контуру
Vooluahela skeem
Garantii
natural_image
Line drawing of a funnel-shaped object with a base, labeled with number 7 (no text or symbols on the object itself)
Kontūra shēma
Garantija
Kontūro diagrama
Garantija
Diagrama do circuito
natural_image
Line drawing of a funnel-shaped object with a base, labeled with number 7 (no text or symbols on the object itself)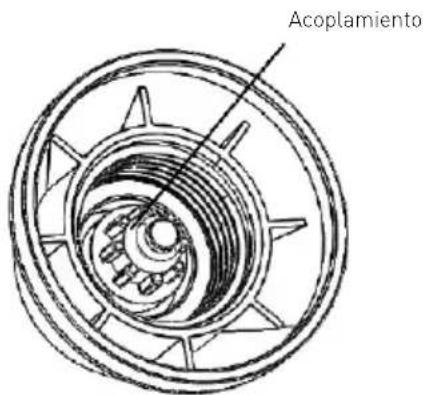
Desmontaje:
natural_image
Line drawing of a funnel-shaped object with a base, labeled with number 7 (no text or symbols on the object itself)
Demontáž:
Schéma zapojenia
Záruka
Razstavljanje:
-
Primate spojko mešalnega dela (7) in privijte rezilo (8) v nasprotni smeri urinega kazalca, dokler ni popolnoma odstranjeno.
-
Držite mešalni del (7) in izvlecite gred.
Sklop:
-
Vstavite gred v mešalni del (7), dokler ni popol-noma vstavljena.
-
Primate spojko mešalnega dela (7) in privijte rezi-lo v smeri urinega kazalca, dokler ni popolnoma privita.
Priključna shema
Garancija
EN: Meets the essential requirements as described in: /
EN: Has been engineered and manufactured in conformity to harmonized standards:
EN: Meets the requirements as described in regulations: /
EN: Meets the requirements as described in resolutions: /
Hendi Romania S.R.L.
PKS Hendi South East Europe SA
5 Metsovou Str.
18346 Moschato, Athens, Greece
Tel: +30 210 4839700
Email: info@pks-hendi.com
Hendi Italia S.R.L.
Via Leonardo da Vinci 4
39100 Bolzano (BZ), Italy
Tel: +39 800 727 438
Email: office.italy@hendi.eu
Hendi HK Ltd.
1208, 12/F Exchange Tower
33 Wang Chiu Road, Kowloon Bay, Hong Kong
Tel: +852 2154 2618
Email: info-hk@hendi.eu
Find Hendi on internet:
www.hendi.com
www.facebook.com/HendiToolsforChefs
https://www.linkedin.com/company/hendi-tools-for-chefs/
www.youtube.com/HendiEquipment
- A változtatások, a nyomtatási és a betűzési hibák fenntartva.
- Всі права захищені щодо змін, можливі помилки друку та верстки.
- Neid juhiseid võidakse muuta ja need võivad sisaldada trükivigu.
- Šī instrukcija var tikt mainīta, tajā tāpat var būt drukas klūdas.
- Šios instrukcijos gali būti keičiamos, jose taip pat gali pasitakyti spausdinimo klaidu.
- Alterações, impressão e erros de composição reservados.
- Reservado el derecho a realizar modificaciones, errores de impresión y tipografía.
- Zmeny, chyby v tlači a sadzbe vyhradené.
- Spremembe, tiskanje in tipnastavitev napake shranjenih.


- Safety regulations
- Special Safety Regulations
- Intended use
- Main parts of the appliance
- Preparations before operation
- Before operation
- Transportation
- Operation
- Observe the following safety advice at all times!
- Assembling / Disassembly of the attachments
- Main unit (10) and blending part (7):
- Disassembly:
- Assembly:
- Blending part (7) and blade (8):
- Note:
- Cleaning and Maintenance
- Cleaning
- Storage
- Troubleshooting
- Technical specification
- Warranty
- Discarding & Environment
- Elektroschema
- Schakelschema
- Электрическая схема
- Rastavljanje:
- Jamstvo
- Garantii
- Garantija
- Desmontaje:
- Demontáž:
- Záruka
- Razstavljanje:
- Garancija
- Hendi Romania S.R.L.
- PKS Hendi South East Europe SA
- Hendi Italia S.R.L.
- Hendi HK Ltd.
- Find Hendi on internet:
Brand : Hendi
Model : 222157
Category : Blender