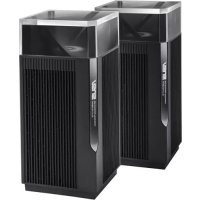
ZenWiFi Pro XT12 - Wireless Router ASUS - Free user manual and instructions
Find the device manual for free ZenWiFi Pro XT12 ASUS in PDF.



| Brand | ASUS |
| Model | ZenWiFi Pro XT12 |
| Product Type | Tri-band WiFi Mesh System |
| WiFi Standards | IEEE 802.11a/b/g/n/ac/ax |
| Frequency Bands | 2.4 GHz and 5 GHz |
| Network Ports | 1 × WAN 2.5G/1G, 2 × LAN 1G, 1 × LAN 2.5G/1G |
| Buttons | WPS, Reset, Power Switch |
| LED Indicators | Solid white (good signal), Solid yellow (weak signal), Solid red (no signal) |
| Power Supply | DC power adapter: output 19 V / 2.37 A or 19.5 V / 2.31 A |
| Operating Temperature | 0 °C to 40 °C |
| Storage Temperature | 0 °C to 70 °C |
| Operating Humidity | 50% to 90% |
| Storage Humidity | 20% to 90% |
| Main Features | AiMesh system, router/access point mode, Ethernet backhaul |
| Setup | Web interface (http://router.asus.com) or ASUS Router app |
| Safety | Minimum distance of 20 cm between device and body; avoid exposure to rain and humidity |
| Maintenance and Cleaning | Clean with a soft dry cloth; do not use liquid or aerosol products; do not block ventilation openings |
| General Information | Manual available for download in PDF format on the ASUS website |
Frequently Asked Questions - ZenWiFi Pro XT12 ASUS
User questions about ZenWiFi Pro XT12 ASUS
0 question about this device. Answer the ones you know or ask your own.
Ask a new question about this device
Download the instructions for your Wireless Router in PDF format for free! Find your manual ZenWiFi Pro XT12 - ASUS and take your electronic device back in hand. On this page are published all the documents necessary for the use of your device. ZenWiFi Pro XT12 by ASUS.
USER MANUAL ZenWiFi Pro XT12 ASUS
IN SEARCH OF INCREDIBLE
FAST Networking Solutions FARTHEST·EASY·SECURE·TRUSTED
ASUS ZenWiFi Pro
AX11000 Tri Band WiFi Router Model: XT12

natural_image
Line drawing of a 3D box with visible dimensions and branding (no text or symbols)Quick Start Guide
U19133 / First Edition / September 2021

Table of Contents
English....3
Български....12
Hrvatski....21
Čeština....30
Dansk 39
Nederlands 48
Eesti 57
Français 66
Suomi....75
Deutsch 84
Ελληνικά....93
102
Magyar 111
Italiano 120
Lietuvių 129
Latviski 138
Norsk....147
Português....156
Polski....165
Русский....174
Română 183
Español....192
Srpski 201
Slovensky....210
Slovenščina....219
Svenska 228
Türkçe 237
Українська....246




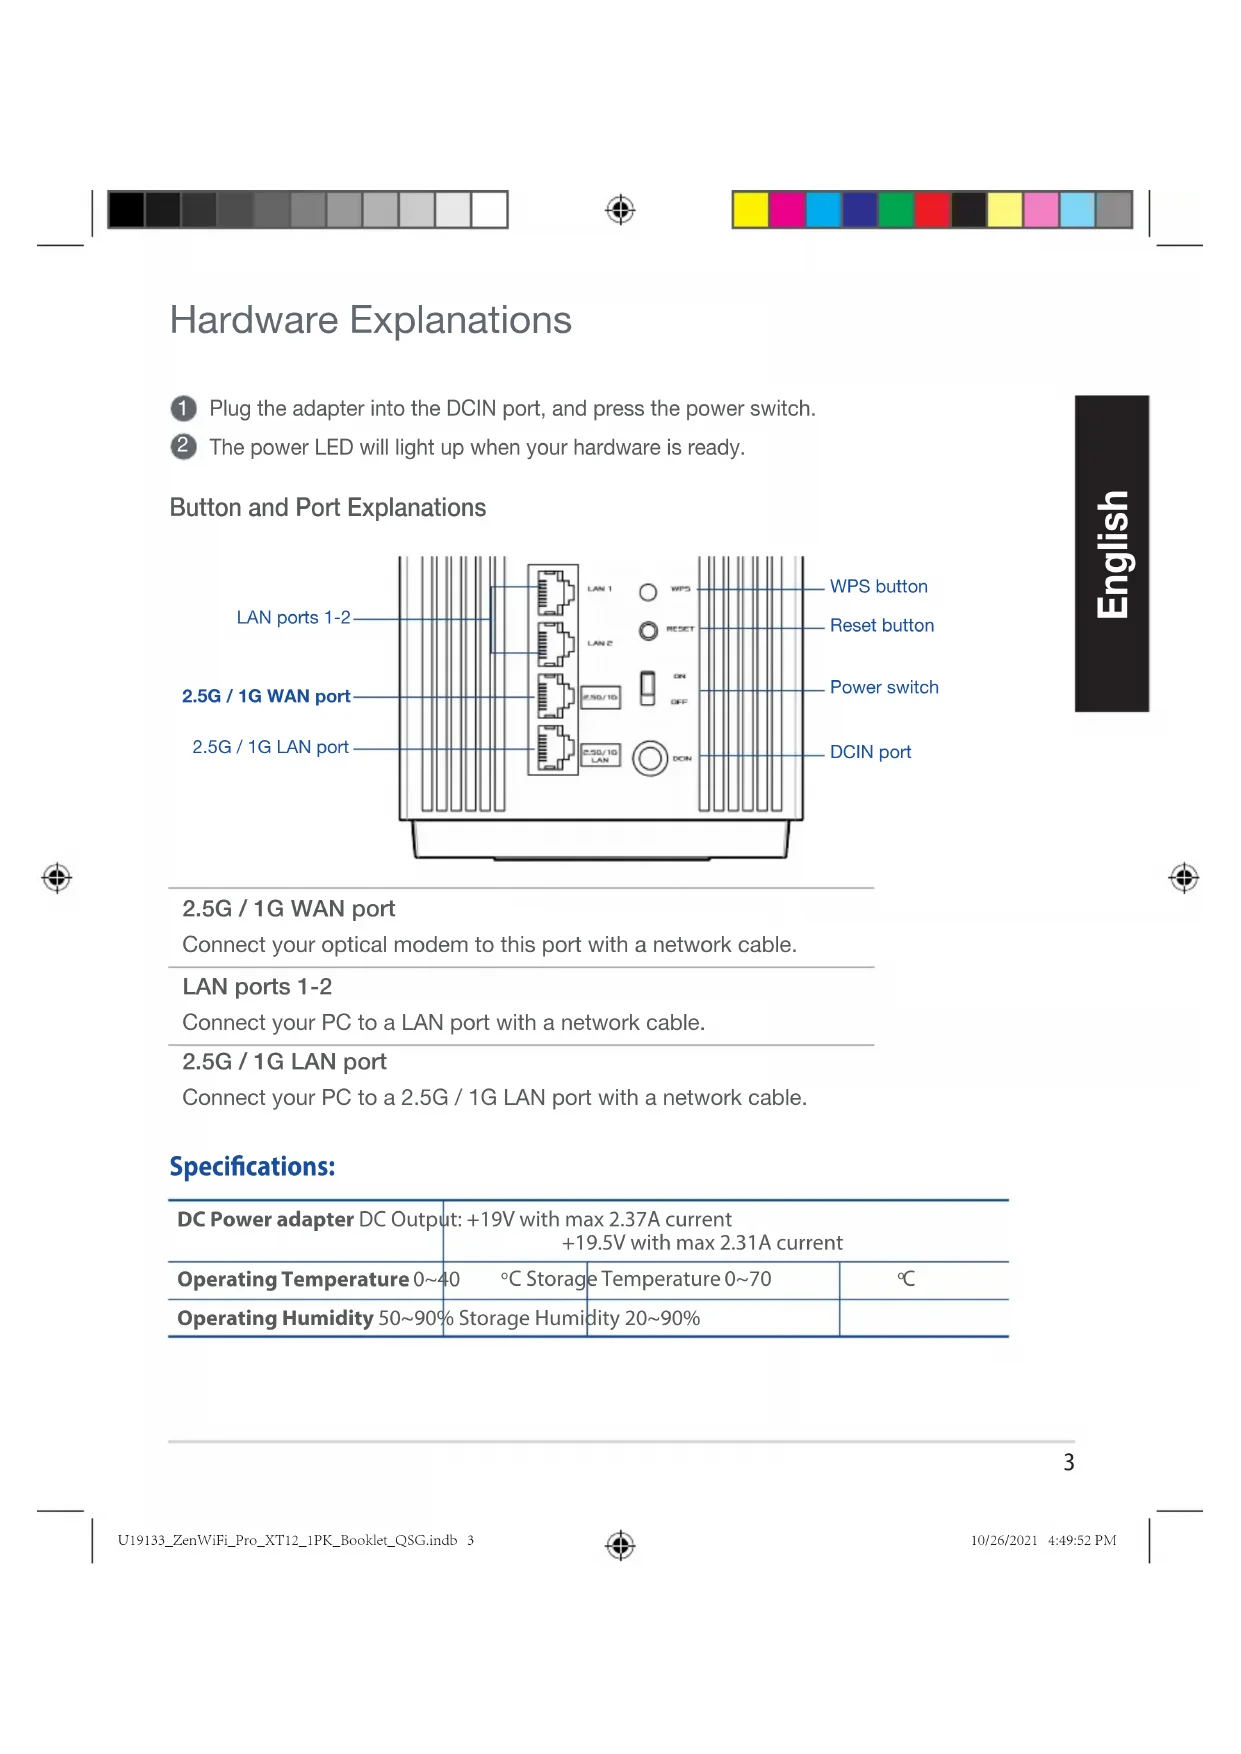
Hardware Explanations
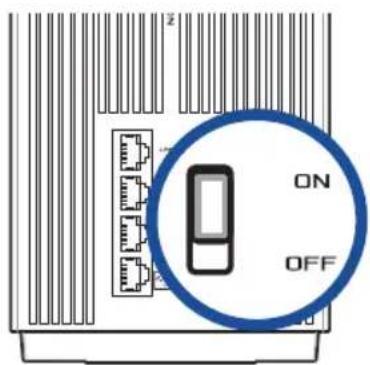
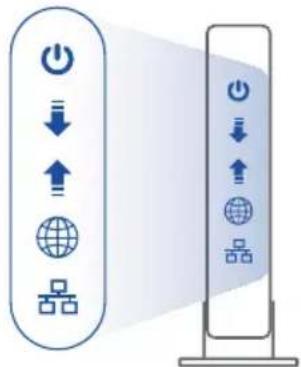
1 Plug the adapter into the DCIN port, and press the power switch.
② The power LED will light up when your hardware is ready.
Button and Port Explanations
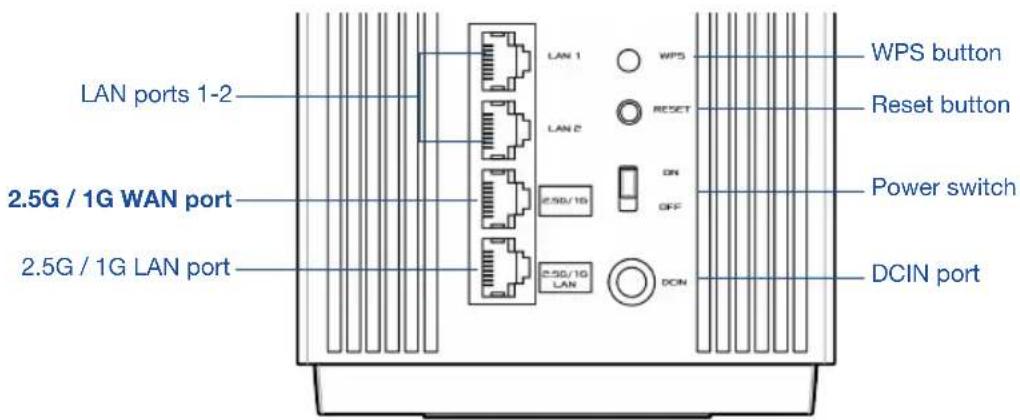
2.5G / 1G WAN port
Connect your optical modem to this port with a network cable.
LAN ports 1-2
Connect your PC to a LAN port with a network cable.
2.5G / 1G LAN port
Connect your PC to a 2.5G / 1G LAN port with a network cable.
Specifications:
| DC Power adapter DC Output: +19V with max 2.37A current+19.5V with max 2.31A current | |||
| Operating Temperature 0~40 | °C Storage | Temperature 0~70 | °C |
| Operating Humidity 50~90% | Storage Humidity 20~90% | ||


Before Setup
01 Setting up a standalone router
1 Go to ONE ROUTER SETUP STEPS.

natural_image
Diagram of a space station with Earth, globe, and solar panel connected by lines (no text or symbols)One Router Setup
02 Setting up an AiMesh WiFi system
1 Prepare two or more ASUS routers supporting AiMesh.
2 Assign one as AiMesh router, and another one as AiMesh node.
** If you have multiple AiMesh routers, we recommend using the router with the highest specifications as your AiMesh router and the others as AiMesh nodes.
3 Go to AiMesh SETUP STEPS.

natural_image
Diagram of a server connected to a globe and connected to a power unit (no text or symbols present)AiMesh routerAiMesh node
AiMesh Setup Steps



One Router Setup Steps
01 Prepare your Modem
1 Unplug the power of cable / DSL modem. If it has a battery backup, remove the battery. 1

if you are using DSL for internet, you will need your username / password from your Internet service provider (ISP) to properly configure your router.
2 Connect your modem to the router with the network cable provided.
3 Power on the modem. Plug modem to the power outlet and power on.

Modem back



4 Check the modem LED lights to ensure the connection is active.
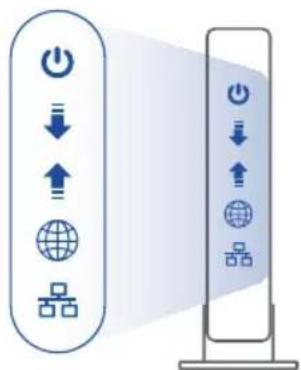
Modem front
02 Connect your Device
1 Power on the router.
Plug in and press the Power On/Off switch at the back of your router.
② Check that the LED turns solid blue to indicate that the hardware connection is ready for setup.
3 [Web] Connect your PC to the router using an additional network cable.
[App] Or you can use a phone or pad to complete the setup via ASUS Router App.

natural_image
Diagram showing a computer connected to a server rack with four D ports, no text or symbols present


03 Login and Connect
1 [Web] Open a web browser.
You will be redirected to the ASUS Setup Wizard. If not, navigate to http://router.asus.com.

[App] Launch ASUS Router App and follow the instructions to complete the setup.
AiMesh Setup Steps
01 Prepare
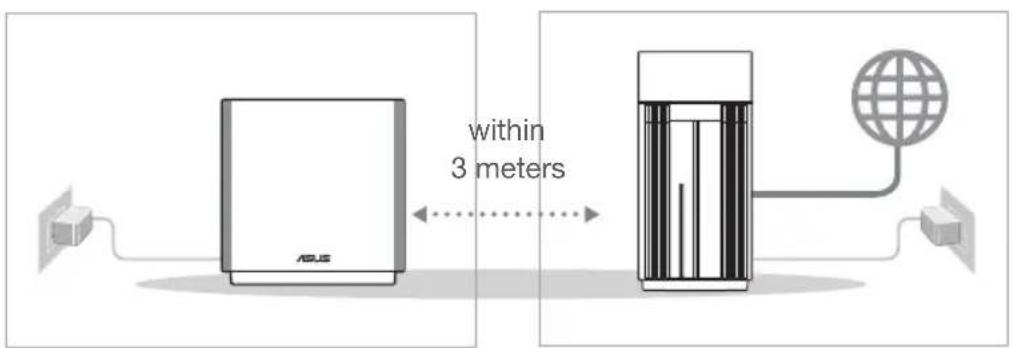
Place your AiMesh router and node within 3 meters of each other during the setup process.
02 AiMesh node
Keep your AiMesh node powered on and standby for AiMesh system settings.
AiMesh routerAiMesh node


03 AiMesh router
[Web] 1 Refer to ONE ROUTER SETUP
STEPS to connect your AiMesh router to your PC and modem, and then log in into the web GUI.
![ASUS ZenWiFi Pro XT12 - [Web] 1 Refer to ONE ROUTER SETUP - 1](/content/2026/04/586507/images/25b2dc9fba76bc881085ef2ae66a5d6950fde8f760285edd676a0afea618025a.jpg)
flowchart
graph TD
    A["Modem"] --> B["AiMesh router"]
    B --> C["AiMesh node"]
    D["Login/Reboot"] --> E["AiMesh Router"]
    style A fill:#f9f,stroke:#333
    style B fill:#ccf,stroke:#333
    style C fill:#cfc,stroke:#333
    style D fill:#fcc,stroke:#333
② Go to Network Map page, click AiMesh icon and then Search for your extending AiMesh node.
![ASUS ZenWiFi Pro XT12 - [Web] 1 Refer to ONE ROUTER SETUP - 2](/content/2026/04/586507/images/dca237498ebea560d2b39f07fd206dd9a292d4fe3852924766bf628a78572879.jpg)
flowchart
graph TD
    A["Network Map"] --> B["Node"]
    B --> C["Node"]
    C --> D["Node"]
    D --> E["Node"]
    E --> F["Node"]
    F --> G["Node"]
    G --> H["Search"]
    I["AiMesh"] --> J["Find AiMesh node"]
    J --> K["Search"]
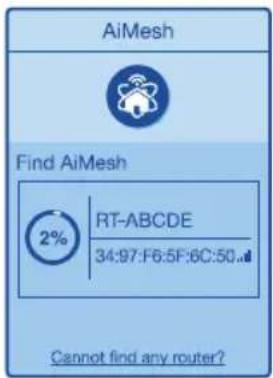
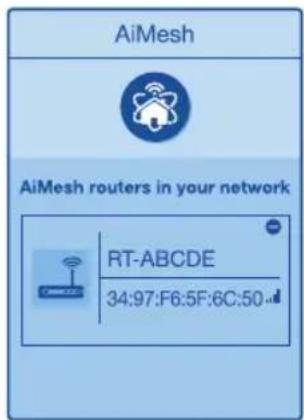
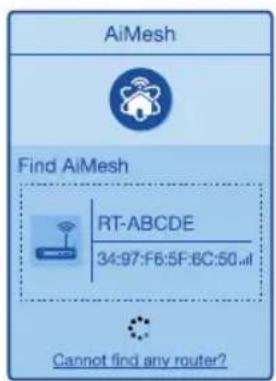
3 Click Search, it will automatically search for your AiMesh node nearby. When the AiMesh node shows on this page, click it to add it into the AiMesh system.
** If you cannot find any AiMesh node, please go to TROUBLE SHOOTING.

![ASUS ZenWiFi Pro XT12 - [Web] 1 Refer to ONE ROUTER SETUP - 5](/content/2026/04/586507/images/068992ebc62101b53b46d0e0b19d61147be1bc8d3bafd600aefca5633a2a48fd.jpg)
![ASUS ZenWiFi Pro XT12 - [Web] 1 Refer to ONE ROUTER SETUP - 6](/content/2026/04/586507/images/0197fbd99fba4a01d6f291e7c3d7fdba3e3e379c24a1bd0425ace143eee147c8.jpg)
![ASUS ZenWiFi Pro XT12 - [Web] 1 Refer to ONE ROUTER SETUP - 7](/content/2026/04/586507/images/e265fec220cfc3a36cee6fe17f5a3ab24f64db4b64c6574d1c58e8962a4a7f40.jpg)
4 A message is displayed when synchronization is completed.
Successfully added RT-ABCDE to your AiMesh system, it will take awhile to show up as connected in the AiMesh router list.
OK
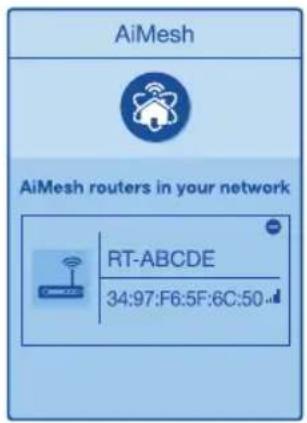
5 Congratulations! You will find the pages below show up when an AiMesh node has been successfully added to the AiMesh network.
[App] Log in to your existing router via ASUS Router App and choose "Add AiMesh Node" to complete the setup.
![ASUS ZenWiFi Pro XT12 - [Web] 1 Refer to ONE ROUTER SETUP - 9](/content/2026/04/586507/images/71ee182d3cb53dbc2452ad0031360cc82368e8e4accdee5c0281e4bf8b2e3206.jpg)
ASUS Router App
Download free ASUS Router APP to set up and manage your router(s).








Troubleshooting
If your AiMesh router cannot find any AiMesh node nearby or synchronization fails, please check the following and try again.
Move your AiMesh node closer to the AiMesh router ideally. Ensure that it is within 3 meters.
b Your AiMesh node is powered on.
Relocation
Locate the AiMesh router and node at the best place.

NOTES: To minimize interference, keep the routers away from devices like cordless phones, Bluetooth devices and microwave ovens.
We recommend that you place the routers in an open or spacious location.
ZenWiFi Pro XT12 LED indications

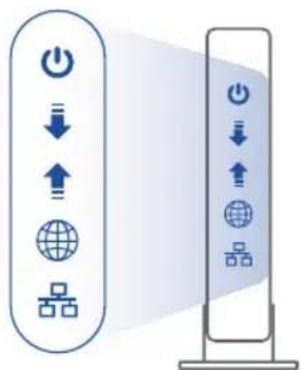
Solid white: Good signal

Solid yellow: Weak signal

Solid red: No signal
FAQ FREQUENTLY ASKED QUESTIONS
Q1: Does the AiMesh router support Access Point mode?
A: Yes. You can choose to set the AiMesh router as router mode or access point mode. Please go to web GUI (http://router.asus.com), and go to the page Administration > Operation Mode.
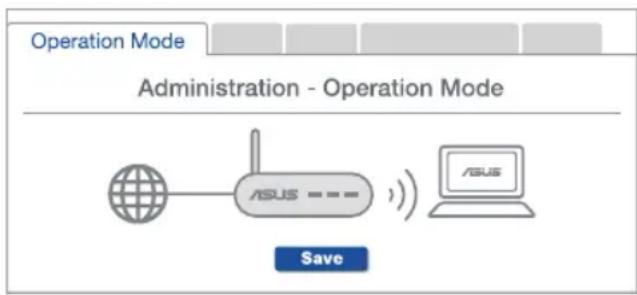
flowchart
graph TD
    A["ASUS"] --> B["Router"]
    C["ASUS"] --> D["Laptop"]
    E["Global"] --> A
    F["Save"] --> C
Q2: Could I setup wired connection between AiMesh routers (Ethernet backhaul)?
A: Yes. AiMesh system supports both wireless and wired connection between AiMesh router and node to maximize throughput and stability. AiMesh analyzes the wireless signal strength for each frequency band available, and then determines automatically whether a wireless or wired connection is best to serve as the inter-router connection backbone.
1 Follow the setup steps to establish a connection between the AiMesh router and node via WiFi first.
2 Place the node in the ideal locations for best coverage. Run an Ethernet cable from the LAN port of the AiMesh router to the WAN port of AiMesh node.

3 AiMesh system will auto-select the best path for data transmission, whether wired or wireless.



natural_image
Diagram of a space station with Earth, satellite, and ground station connected by a line (no text or symbols)ИНСТАЛИРАНЕ НА ЕДИН РУТЕР
Свързване на рутера



03 Свързване
barrapcki
Successfully added RT-ABCDE to your AiMesh system, it will take awhile to show up as connected in the AiMesh router list.
OK



natural_image
Diagram showing a globe connected to a vertical container with internal bars, and a separate rectangular block on the right (no text or symbols)natural_image
Diagram of a server system with connected devices and a globe, no text or symbols presentAiMesh modul
AiMesh usmjerivač
AiMesh POSTUPAK POSTAVLJANJA
Stražnja strana modema


4 Pogledajte LED indikatore kabelskog/DSL modema za provjeru aktivnosti veze.

Prednja strana modema
natural_image
Diagram showing a computer connected to a server rack with four D ports, no text or symbols present


Successfully added RT-ABCDE to your AiMesh system, it will take awhile to show up as connected in the AiMesh router list.
OK
5 Čestitamo! Kada se AiMesh modul uspješno doda u AiMesh mrežu, prikazat će se sljedeća stranice.
[App] Prijavite se na postojeći usmjerivač preko aplikacije za ASUS usmjerivač i odaberite "Dodaj AiMesh čvorište" za dovršavanje podešavanja.



NAPOMENE: Kako biste minimalizirali interferenciju, držite usmjernike podalje od uređaja poput bežičnih telefona, Bluetooth uređaja i mikrovalnih pećnica.
natural_image
Diagram of a space station with Earth, globe, and panel connected via cable (no text or symbols)INSTALACE JEDNOHO SMĚROVAČE
natural_image
Diagram of a smart air conditioner system with connected devices and a globe (no text or symbols)Uzel AiMesh
Směrovač AiMesh
POSTUP INSTALACE AiMesh
POSTUP INSTALACE JEDNOHO SMĚROVAČE
01 Příprava modemu
Zadní strana modemu






Successfully added RT-ABCDE to your AiMesh system, it will take awhile to show up as connected in the AiMesh router list.
OK




Odstraňování potíží
natural_image
Diagram of a space station with Earth, satellite, and ground station connected by lines (no text or symbols)natural_image
Diagram of a server connected to a globe and connected to an Apple device (no text or symbols present)AiMesh-routerAiMesh node
Trin Til Opsætning Af Aimesh


Modemmets bagside



Modemmets forside
02 Forbind din enhed
1 Tænd for din router.
natural_image
Diagram showing a computer connected to a server rack with four D ports, no text or symbols present


Successfully added RT-ABCDE to your AiMesh system, it will take awhile to show up as connected in the AiMesh router list.
OK






Fejlfinding
OFTE STILLEDE SP∅RGSMÅL
spørgsmål
natural_image
Diagram of a space station with Earth, globe, and solar panel connected by a line (no text or symbols)AiMesh-knooppunt AiMesh-router
Stappen Instelling AiMesh



Achterkant modem



Voorzijde modem



Successfully added RT-ABCDE to your AiMesh system, it will take awhile to show up as connected in the AiMesh router list.
OK
Nederlands






Problemen oplossen
natural_image
Diagram of a space station with Earth, a vertical cylinder, and an adjacent wall-mounted block (no text or symbols)ÜHE RUUTERI SEADISTAMINE
AiMeshi SEADISTUSTOIMINGUD
ÜHE RUUTERI SEADISTUSTOIMINGUD
Modemi tagapaneel



Modemi esipaneel
natural_image
Diagram showing a computer connected to a server rack with four D-brands, no text or symbols present


AiMeshi SEADISTUSTOIMINGUD
01 Ettevalmistus
Successfully added RT-ABCDE to your AiMesh system, it will take awhile to show up as connected in the AiMesh router list.
OK
[Rakendus] Log in to your existing router via ASUS Router App and choose "Add AiMesh Node" to complete the setup.

ASUS'E RUUTERI RAKENDUS
Laadige alla ASUS'e ruuteri tasuta RAKENDUS, et oma ruuterit (ruutereid) häälestada ja hallata.





Törkeotsing
natural_image
Diagram of a space station with Earth, globe, and panel connected via cable (no text or symbols)natural_image
Diagram of a server connected to a globe and connected via cable (no text or symbols)Arrière du modem




natural_image
Diagram showing a laptop connected to a server rack with a yellow cable (no text or symbols visible)


03 Vous connecter





Dépannage
natural_image
Diagram of a space station with Earth, globe, and panel connected via cable (no text or symbols)natural_image
Diagram of a server connected to a globe and connected to an ASML device (no text or symbols present)AiMesh-solmu AiMesh-reititin
AiMesh-Asetusohjeet



Modeemi takaa




Modeemi edestä
02 Liitä laitteesi
natural_image
Diagram showing a computer connected to a server rack with a yellow connector (no text or symbols visible)


Successfully added RT-ABCDE to your AiMesh system, it will take awhile to show up as connected in the AiMesh router list.
OK






Vianetsintä
HUOMAUTUKSIA:
natural_image
Diagram of a space station with Earth, globe, and panel array (no text or symbols)natural_image
Diagram of a server connected to a globe and connected to a power unit (no text or symbols present)AiMesh-RouterAiMesh-Netzknoten
Modem-Rückseite



natural_image
Diagram showing a laptop connected to a server rack with four ports and a yellow cable (no text or symbols)


Fehlerbehebung
natural_image
Diagram showing a globe connected to a vertical container with internal bars, and a wall-mounted block (no text or symbols)Πίσω πλευρά μόντεμ






Successfully added RT-ABCDE to your AiMesh system, it will take awhile to show up as connected in the AiMesh router list.
OK


natural_image
Diagram of a space station with Earth, globe, and panel array (no text or symbols)תָאַעְרִי הַרְה
AiMesh WiFi 02
הכלההוּרָה אַלְבָרִי, כְרָאֶתֹן, כְרָאֶתֹן, כְרָאֶתֹן, כְרָאֶתֹן, כְרָאֶתֹן, כְרָאֶתֹן, כְרָאֶתֹן, כְרָאֶתֹן, Los Angeles County, Los Angeles County, Los Angeles County, Los Angeles County, Los Angeles County, Los Angeles County, Los Angeles County, Los Angeles County, Los Angeles County, Los Angeles County, Los Angeles County, Los Angeles County, Los Angeles County, Los Angeles County, Los Angeles County, Los Angeles County, Los Angeles County, Los Angeles County, Los Angeles County, Los Angeles County, Los Angeles County, Los Angeles County, Los Angeles County, Los Angeles County, Los Angeles County, Los Angeles county, Los Angeles county, Los Angeles county, Los Angeles county, Los Angeles county, Los Angeles county, Los Angeles county, Los Angeles county, Los Angeles county, Los Angeles county, Los Angeles county, Los Angeles county, Los Angeles county, Los Angeles county, Los Angeles county, Los Angeles county, Los Angeles county, Los Angeles county, Los Angeles county, Los Angeles county, Los Angeles county, Los Angeles county, Los Angeles county, Los Angeles county, Los Angeles county, Los Angeles counties, Los Angeles counties, Los Angeles counties, Los Angeles counties, Los Angeles counties, Los Angeles counties, Los Angeles counties, Los Angeles counties, Los Angeles counties, Los Angeles counties, Los Angeles counties, Los Angeles counties, Los Angeles counties, Los Angeles counties, Los Angeles counties, Los Angeles counties, Los Angeles counties, Los Angeles counties, Los Angeles counties, Los Angeles counties, Los Angeles counties, Los Angeles counties, Los Angeles counties, Los Angeles counties, Los Angeles counties, Los Angeles County
תָרִי





AiMesh 03
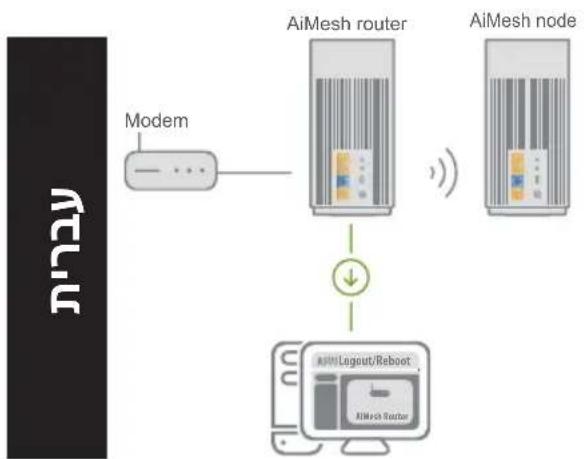
flowchart
graph TD
    A["Modem"] --> B["AiMesh router"]
    B --> C["AiMesh node"]
    D["Legout/Reboot"] --> E["AiMesh Router"]
    style A fill:#f9f,stroke:#333
    style B fill:#ccf,stroke:#333
    style C fill:#cfc,stroke:#333
    style D fill:#fcc,stroke:#333
הכלהה (בַרְׁהָה)
1

flowchart
graph TD
    A["Network Map"] --> B["Node"]
    B --> C["Node"]
    C --> D["Node"]
    D --> E["Node"]
    E --> F["Node"]
    F --> G["Node"]
    G --> H["Search"]
    I["AiMesh"] --> J["Find AlMesh node"]
    J --> K["Search"]
, (הכלה) Network Map הכלה הכלה הכלה הכלה הכלה הכלה הכלה הכלה הכלה הכלה הכלה AiMesh Search AiMesh
2


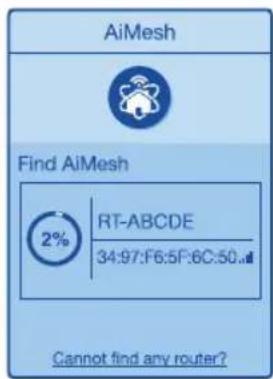
Successfully added RT-ABCDE to your AiMesh system, it will take awhile to show up as connected in the AiMesh router list.
OK





תְרָה בְּרָה
Operating < (Operating Administration) Administration, http://router.asus.com .(Operating Mode

flowchart
graph TD
    A["Operation Mode"] --> B["Administration - Operation Mode"]
    B --> C["ASUS"]
    C --> D["Laptop"]
    E["Save"] --> C
הכלה (בַרְׁעֹר)
:2U
הכלה.
natural_image
Diagram of a space station with Earth, globe, and panel (no text or symbols)natural_image
Diagram of a server system with connected devices and a globe, no text or symbols presentModem elôlapja
natural_image
Diagram showing a laptop connected to a server rack with ports and connectors (no text or symbols present)



Successfully added RT-ABCDE to your AiMesh system, it will take awhile to show up as connected in the AiMesh router list.
OK



Hibaelhárítás
natural_image
Diagram of a space station with Earth, globe, and panel (no text or symbols)natural_image
Diagram of a smart air conditioner system with connected devices and a globe, no text or symbols presentRouter AiMeshNodo AiMesh
Retro del modem



Fronte del modem





natural_image
Diagram of a space station with Earth, globe, and panel connected via a beam (no text or symbols)„AiMesh“ kelvedis„AiMesh“ mazgas
Modemo galiné pusè



Successfully added RT-ABCDE to your AiMesh system, it will take awhile to show up as connected in the AiMesh router list.
OK



Trikčių šalinimas

natural_image
Diagram of a space station with Earth, globe, and panel array (no text or symbols)Modema aizmugure



Modema priekšpuse
natural_image
Diagram showing a computer connected to a server rack with ports and a yellow connector (no text or symbols)


03 Piesakieties un pievienojieties
1 [Tikls] Atveriet timekla pārlūku.
Successfully added RT-ABCDE to your AiMesh system, it will take awhile to show up as connected in the AiMesh router list.
OK



Klūdu novēršana
natural_image
Diagram of a space station with Earth, globe, and solar panel connected by lines (no text or symbols)Oppsett Av Én Ruter
02 Forbereder å sette opp et AiMesh WiFi-system
AiMesh-noden
AiMesh-ruter
Trinn For Oppsett Av AiMesh
Trinn For Oppsett Av Én Ruter
01 Forbereder modemet
Modem bak



Modem foran
natural_image
Diagram showing a computer connected to a server rack with four D ports, no text or symbols present


Successfully added RT-ABCDE to your AiMesh system, it will take awhile to show up as connected in the AiMesh router list.
OK





Feilsøking
OFTE STILTE SP∅RSMÅL
Q1 Støtter AiMesh-ruteren tilgangspunktsmodus?
natural_image
Diagram of a space station with Earth, globe, and panel array (no text or symbols)Router AiMeshNode AiMesh
Traseira do modem



natural_image
Diagram showing a laptop connected to a server rack with a yellow cable, no text or symbols present


Successfully added RT-ABCDE to your AiMesh system, it will take awhile to show up as connected in the AiMesh router list.
OK




natural_image
Diagram of a space station with Earth, grid, and battery (no text or symbols)Tyl modemu



Przód modemu
natural_image
Diagram showing a laptop connected to a server rack with ports and connectors (no text or symbols present)


Router AiMeshNode AiMesh



03 Router AiMesh
Successfully added RT-ABCDE to your AiMesh system, it will take awhile to show up as connected in the AiMesh router list.
OK




natural_image
Diagram showing a globe connected to a vertical container with internal bars, and a separate panel mounted on a wall (no text or symbols)Роутер AiMeshУзел AiMesh
natural_image
Diagram showing a laptop connected to a server rack with a yellow cable (no text or symbols visible)177






natural_image
Diagram of a space station with Earth, globe, and panel array (no text or symbols)CONFIGURAREA CA ROUTER INDEPENDENT
Router AiMeshNod AiMesh
PAŞI DE CONFIGURARE AiMesh
PAŞI DE CONFIGURARE CA ROUTER INDEPENDENT



Față modem
natural_image
Diagram showing a computer connected to a server rack with a yellow cable (no text or symbols visible)


Successfully added RT-ABCDE to your AiMesh system, it will take awhile to show up as connected in the AiMesh router list.
OK



Depanarea
Alb constant: Semnal bun

Galben constant: Semnal slab

flowchart
graph TD
    A["Operation Mode"] --> B["Administration - Operation Mode"]
    B --> C["Network Connection"]
    C --> D["Save"]
    style C fill:#f9f,stroke:#333
    style D fill:#ccf,stroke:#333
Întrebare2:
natural_image
Diagram of a space station with Earth, satellite, and ground connections (no text or symbols)natural_image
Diagram of a device connected to a globe and a server unit, with no visible text or symbols.Router AiMeshNodo AiMesh
natural_image
Diagram showing a laptop connected to a server rack with a yellow cable (no text or symbols visible)


Successfully added RT-ABCDE to your AiMesh system, it will take awhile to show up as connected in the AiMesh router list.
OK




natural_image
Diagram of a space station with Earth, globe, and panel array (no text or symbols)PODEŠAVANJE JEDNOG RUTERA
natural_image
Diagram of a server system with an RS-88 connected to a central storage unit and global sphere, showing connection lines (no text or symbols)AiMesh ruterAiMesh mrežu
KORACI ZA PODEŠAVANJE AiMesh-a
KORACI ZA PODEŠAVANJE JEDNOG RUTERA
01 Priprema vašeg modema
Modem pozadi



4 Proverite LED lampice svog kabla/DSL modema da proverite da je veza aktivna.
Modem spreda
3 [Veb] Connect your PC to the router using an additional network cable.
natural_image
Diagram showing a laptop connected to a server rack with ports and connectors (no text or symbols)


03 Prijavite se i povežite se
1 [Veb] Otvorite internet pregledač.
Bićete preusmereni na ASUS čarobnjak za podešavanje. Ukoliko se to ne desi, idite na http://router.asus.com.

[Aplikacija] Pokrenite ASUS Router aplikaciju i pratite uputstva da završite podešavanje.
KORACI ZA PODEŠAVANJE AiMesh-a
01 Pripremite
Postavite svoj AiMesh ruter i čvorište na udaljenost od 3 metra tokom procesa podešavanja.
02 AiMesh račvište
Vodite računa da je napajanje uključeno tokom podešavanja AiMesh sistema.

flowchart
graph LR
    A["AiMesh mrežu"] -->|udaljenosti d 3 metara| B["AiMesh ruter"]
    B --> C["Global Network"]



03 AiMesh ruter
Srpski
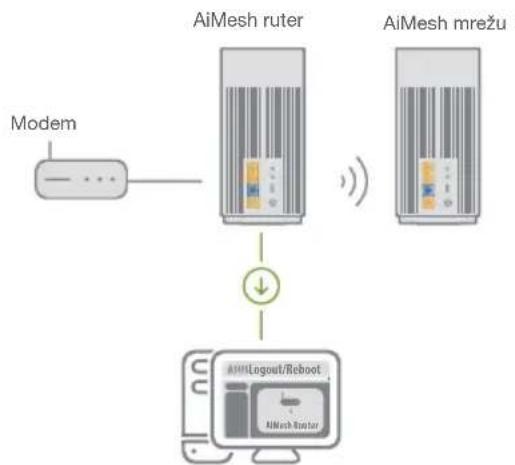
[Veb]① Pogledajte ONE ROUTER SETUP STEPS (KORAKE ZA PODEŠAVANJE JEDNOG RUTERA) da povežete svoj AiMesh ruter za svoj PC i modem, a potom se prijavite na internet GUI.
flowchart
graph TD
    A["Modem"] --> B["AiMesh ruter"]
    B --> C["AiMesh mrežu"]
    B --> D["Download"]
    D --> E["AIiLogout/Reboot"]
    E --> F["AiMesh router"]
2 Idite na stranicu sa Network Map (Mapom mreže), kliknite na AiMesh ikonicu i potom na Search (Pretraga) za svoje AiMesh račvište za proširenje.

flowchart
graph TD
    A["Network Map"] --> B["Node"]
    B --> C["AIMesh node"]
    C --> D["Search"]
    E["AIMesh"] --> F["Find AIMesh node"]
3 Kliknite na Search (Pretraga), ona će automatski potražiti vaš AiMesh čvor u blizini. Kada se AiMesh račvište prikaže na ovoj stranici, kliknite na njega da ga dodate u AiMesh sistem.
** Ukoliko ne možete da pronađete bilo koje AiMesh račvište, idite na TROUBLE SHOOTING (REŠAVANJE PROBLEMA).



Successfully added RT-ABCDE to your AiMesh system, it will take awhile to show up as connected in the AiMesh router list.
OK





Rešavanje problema
NAPOMENE: Da smanjite ometanje, držite rutere dalje od uređaja kao što su bežični telefoni, Bluetooth uređaji i mikrotalasne pećnice.
Preporučujemo da postavite rutere na otvorenu ili prostranu lokaciju.
ZenWiFi Pro XT12 LED indikacije

Postojana bela: Dobar signal

Postojana žuta: Slab signal

Postojana crvena: Nema signala
Česta pitanja
ČESTA PITANJA
natural_image
Diagram showing a globe connected to a vertical panel with a rectangular object, next to a wall-mounted device (no text or symbols present)NASTAVENIE JEDNÉHO SMEROVAČA
02 Príprava na nastavenie systému siete WiFi AiMesh
natural_image
Diagram of a smart air conditioner system with a base unit and global sphere, connected to devices (no text or symbols)Smerovač AiMeshUzol AiMesh
KROKY NASTAVENIA FUNKCIE AiMesh
Zadná strana modemu



4 Skontrolujte kontrolky LED na modeme DSL/napájací kábel a uistite sa, že pripojenie je aktívne.

flowchart
graph TD
    A["Power"] --> B["Down"]
    B --> C["Up"]
    C --> D["Global"]
    D --> E["Storage"]
    F["Server"] --> G["Down"]
    G --> H["Up"]
    H --> I["Global"]
    I --> J["Storage"]
Predná strana modemu
02 Pripojenie zariadenia
1 Zapnite smerovač.
Zapojte a stlačte vypínač na zadnej strane smerovača.
natural_image
Diagram showing a laptop connected to a server rack with an orange cable (no text or symbols visible)213



Successfully added RT-ABCDE to your AiMesh system, it will take awhile to show up as connected in the AiMesh router list.
OK





Riešenie problémov
natural_image
Diagram showing a globe connected to a container with vertical bars, and a separate box connected via a line (no text or symbols)NASTAVITEV ENEGA USMERJEVALNIKA
02 Priprava na nastavitev WiFi sistema AiMesh
natural_image
Diagram of a smart air conditioner system with connected devices and a globe, no text or symbols presentZadnja stran modema


4 Preverite lučke LED kabelskega modema/modema DSL in se prepričajte, da je povezava aktivna.
Sprednja stran modema
natural_image
Diagram showing a computer connected to a server tower with ports and connectors (no text or symbols present)Successfully added RT-ABCDE to your AiMesh system, it will take awhile to show up as connected in the AiMesh router list.
OK




Odpravljanje težav
natural_image
Diagram of a space station with Earth, globe, and power outlet (no text or symbols)natural_image
Diagram of a smart air conditioner system with connected devices and a globe, no text or symbols presentAiMesh-routerAiMesh-nod
Modemets baksida






Successfully added RT-ABCDE to your AiMesh system, it will take awhile to show up as connected in the AiMesh router list.
OK






Felsökning
natural_image
Diagram of a space station with Earth, globe, and power outlet (no text or symbols)natural_image
Diagram of a server system with a central tower and connected devices (no text or symbols)Modem arka



Modem ön
natural_image
Diagram showing a laptop connected to a server tower with ports and cables (no text or symbols present)


Successfully added RT-ABCDE to your AiMesh system, it will take awhile to show up as connected in the AiMesh router list.
OK





Sorun Giderme
natural_image
Diagram of a space station with Earth, satellite, and power outlet (no text or symbols)natural_image
Diagram of a smart air conditioner system with a server, globe, and connection points (no text or symbols)Задня панель модема


natural_image
Diagram showing a laptop connected to a server rack with a yellow cable, no text or symbols present


Successfully added RT-ABCDE to your AiMesh system, it will take awhile to show up as connected in the AiMesh router list.
OK





ASUS recycling and takeback programs come from our commitment to the highest standards for protecting our environment. We believe in providing solutions for you to be able to responsibly recycle our products, batteries, other components, as well as the packaging materials. Please go to http://csr.asus.com/english/Takeback.htm for the detailed recycling information in different regions.
REACH
Complying with the REACH (Registration, Evaluation, Authorisation, and Restriction of Chemicals) regulatory framework, we published the chemical substances in our products at ASUS REACH website at http://csr.asus.com/english/REACH.htm
Federal Communications Commission Statement
This device complies with Part 15 of the FCC Rules. Operation is subject to the following two conditions:
• This device may not cause harmful interference.
- This device must accept any interference received, including interference that may cause undesired operation.
This equipment has been tested and found to comply with the limits for a class B digital device, pursuant to part 15 of the FCC Rules. These limits are designed to provide reasonable protection against harmful interference in a residential installation.
This equipment generates, uses and can radiate radio frequency energy and, if not installed and used in accordance with the instructions, may cause harmful interference to radio communications. However, there is no guarantee that interference will not occur in a particular installation. If this equipment does cause harmful interference to radio or television reception, which can be determined by turning the equipment off and on, the user is encouraged to try to correct the interference by one or more of the following measures:
- Reorient or relocate the receiving antenna.
- Increase the separation between the equipment and receiver.
- Connect the equipment into an outlet on a circuit different from that to which the receiver is connected.
- Consult the dealer or an experienced radio/TV technician for help.

WARNING! Any changes or modifications not expressly approved by the party responsible for compliance could void the user's authority to operate the equipment.
Prohibition of Co-location
This device and its antenna(s) must not be co-located or operating in conjunction with any other antenna or transmitter.
IMPORTANT NOTE:
Radiation Exposure Statement: This equipment complies with FCC radiation exposure limits set forth for an uncontrolled environment. End users must follow the specific operating instructions for satisfying RF exposure compliance. To maintain compliance with FCC exposure compliance requirement, please follow operation instruction as documented in this manual.

WARNING! This equipment must be installed and operated in accordance with provided instructions and the antenna(s) used for this transmitter must be installed to provide a separation distance of at least 20 cm from all persons and must not be co-located or operating in conjunction with any other antenna or transmitter.
Compliance Statement of Innovation, Science and Economic Development Canada (ISED)
This device complies with Innovation, Science and Economic Development Canada licence exempt RSS standard(s). Operation is subject to the following two conditions: (1) this device may not cause interference, and (2) this device must accept any interference, including interference that may cause undesired operation of the device.
Operation in the band 5150–5250 MHz is only for indoor use to reduce the potential for harmful interference to co-channel mobile satellite systems.
CAN ICES-003(B)/NMB-003(B)
Radio Frequency (RF) Exposure Information
The radiated output power of the ASUS Wireless Device is below the Innovation, Science and Economic Development Canada radio frequency exposure limits. The ASUS Wireless Device should be used in such a manner such that the potential for human contact during normal operation is minimized.
This equipment should be installed and operated with a minimum distance of 20 cm between the radiator any part of your body.
This device has been certified for use in Canada. Status of the listing in the Innovation, Science and Economic Development Canada's REL (Radio Equipment List) can be found at the following web address:
http://www.ic.gc.ca/eic/site/ceb-bhst.nsf/eng/h_tt00020.html
Additional Canadian information on RF exposure also can be found at the following web: https://www.ic.gc.ca/eic/site/smt-gst.nsf/eng/sf08792.html
Precautions for the use of the device
a. Pay particular attention to the personal safety when use this device in airports, hospitals, gas stations and professional garages.
b. Medical device interference: Maintain a minimum distance of at least 15 cm (6 inches) between implanted medical devices and ASUS products in order to reduce the risk of interference.
c. Kindly use ASUS products in good reception conditions in order to minimize the radiation's level.
d. Keep the device away from pregnant women and the lower abdomen of the teenager.
• UK support e-mail: network_support_uk@asus.com
• For more information, visit the ASUS support site at: https://www.asus.com/support
UKCA statement
Simplified UKCA Declaration of Conformity
ASUSTek Computer Inc. hereby declares that this device is in compliance with the essential requirements and other relevant provisions of The Radio Equipment Regulations 2017 (S.I. 2017/1206). Full text of UKCA declaration of conformity is available at https://www.asus.com/support/.
The frequency, channel and the maximum transmitted power in UK are listed below:
2.4GHz: 802.11b, 802.11g, 802.11n (HT20), 802.11n (HT40), 802.11ac(VHT20), 802.11ac (VHT40), 802.11ax(HE20), 802.11ax(HE40)
5GHz: 802.11a, 802.11n (HT20), 802.11n (HT40), 802.11ac (VHT20), 802.11ac(VHT40), 802.11ac (VHT80), 802.11ac(VHT160), 802.11ax(HEW20), 802.11ax(HEW40), 802.11ax(HEW80), 802.11ax(HEW160)
6GHz: 802.11ax(HEW20), 802.11ax(HEW40), 802.11ax(HEW80), 802.11ax(HEW160)
The frequency, channel and the maximum transmitted power in EU are listed below:
2400-2483.5MHz (1-13): OFDM: 19.9dBm(97.7mW); CCK: 17.9dBm(61.7mW)
5150-5250MHz (36-48): 22.9dBm(195mW)
5250-5350MHz (52-64): 22.9dBm(195mW)
5470-5725MHz (100-140): 29.9dBm(977mW)
5945-6425MHz: 22.9dBm(195mW)
The device is restricted to indoor use only when operating in the 5150 to 5350 MHz frequency range.
The adapter shall be installed near the equipment and shall be easily accessible.
The WiFi operating in the band 5150-5350 MHz shall be restricted to indoor use for the country listed below:

UK
Authorized representative in United Kingdom:
ASUSTEK (UK) LIMITED
Address:1 st Floor, Sackville House, 143-149 Fenchurch Street, London, EC3M 6BL, England, United Kingdom
Tel: +44-01442-202-700
Fax: +44-01442-245-882
Support mail: network_support_uk@asus.com
http://uk.asus.com
UK CA

English
CE statement
Simplified EU Declaration of Conformity
ASUSTek Computer Inc. hereby declares that this device is in compliance with the essential requirements and other relevant provisions of Directive 2014/53/EU. Full text of EU declaration of conformity is available at https://www.asus.com/Networking-IoT-Servers/Whole-Home-Mesh-WiFi-System/ZenWiFi-WiFi-Systems/ASUS-ZenWiFi-Pro-XT12/HelpDesk_Manual/.
Declaration of Conformity for Ecodesign directive 2009/125/EC
Testing for eco-design requirements according to (EC) No 1275/2008 and (EU) No 801/2013 has been conducted. When the device is in Networked Standby Mode, its I/O and network interface are in sleep mode and may not work properly. To wake up the device, press the WiFi on/off, LED on/off, reset, or WPS button. This equipment complies with EU radiation exposure limits set forth for an uncontrolled environment. This equipment should be installed and operated with minimum distance 20 cm between the radiator & your body. All operational modes:
2.4GHz: 802.11b, 802.11g, 802.11n (HT20), 802.11n (HT40), 802.11ac(VHT20), 802.11ac (VHT40), 802.11ax(HE20), 802.11ax(HE40)
5GHz: 802.11a, 802.11n (HT20), 802.11n (HT40), 802.11ac (VHT20), 802.11ac(VHT40), 802.11ac (VHT80), 802.11ac(VHT160), 802.11ax(HEW20), 802.11ax(HEW40), 802.11ax(HEW80), 802.11ax(HEW160)
6GHz: 802.11ax(HEW20), 802.11ax(HEW40), 802.11ax(HEW80), 802.11ax(HEW160)
The frequency, channel and the maximum transmitted power in EU are listed below:
2400-2483.5MHz (1-13): OFDM: 19.9dBm(97.7mW); CCK: 17.9dBm(61.7mW)
5150-5250MHz (36-48): 22.9dBm(195mW)
5250-5350MHz (52-64): 22.9dBm(195mW)
5470-5725MHz (100-140): 29.9dBm(977mW)
5945-6425MHz: 22.9dBm(195mW)?
The adapter shall be installed near the equipment and shall be easily accessible.
The WiFi operating in the band 5150-5350MHz shall be restricted to indoor use for countries listed in the table below:
 | AT BE BG CZ DK EE FR | ||||||
| DE IS IE IT EL ES CY | |||||||
| LV | LI | LT | LU | HU | MT | NL | |
| NO | PL | PT | RO | SI | SK | TR | |
| FI | SE CH HR | UK(NI) UA | |||||
Safety Notices
- Use this product in environments with ambient temperatures between 0ircC(32ircF) and 40ircC(104ircF) .
- Refer to the rating label on the bottom of your product and ensure your power adapter complies with this rating.
• DO NOT place on uneven or unstable work surfaces. Seek servicing if the casing has been damaged. - DO NOT place or drop objects on top and do not shove any foreign objects into the product.
- DO NOT expose to or use near liquids, rain, or moisture. DO NOT use the modem during electrical storms.
- DO NOT cover the vents on the product to prevent the system from getting overheated.
- DO NOT use damaged power cords, accessories, or other peripherals.
- If the Adapter is broken, do not try to fix it by yourself. Contact a qualified service technician or your retailer.
- To prevent electrical shock hazard, disconnect the power cable from the electrical outlet before relocating the system.
264

Danish
CE-erklæring
- ASUS ZenWiFi Pro
- Table of Contents
- Hardware Explanations
- Before Setup
- Setting up a standalone router
- Setting up an AiMesh WiFi system
- One Router Setup Steps
- Prepare your Modem
- Connect your Device
- Login and Connect
- AiMesh Setup Steps
- Prepare
- AiMesh node
- AiMesh router
- [Web] 1 Refer to ONE ROUTER SETUP
- ASUS Router App
- Troubleshooting
- Relocation
- ZenWiFi Pro XT12 LED indications
- FAQ FREQUENTLY ASKED QUESTIONS
- Свързване
- barrapcki
- POSTUP INSTALACE JEDNOHO SMĚROVAČE
- Příprava modemu
- Odstraňování potíží
- Forbind din enhed
- Fejlfinding
- OFTE STILLEDE SP∅RGSMÅL
- spørgsmål
- Nederlands
- Problemen oplossen
- ÜHE RUUTERI SEADISTUSTOIMINGUD
- AiMeshi SEADISTUSTOIMINGUD
- Ettevalmistus
- ASUS'E RUUTERI RAKENDUS
- Törkeotsing
- Vous connecter
- Dépannage
- Liitä laitteesi
- Vianetsintä
- Fehlerbehebung
- AiMesh WiFi 02
- AiMesh 03
- תְרָה בְּרָה
- Hibaelhárítás
- Trikčių šalinimas
- Piesakieties un pievienojieties
- Klūdu novēršana
- Forbereder å sette opp et AiMesh WiFi-system
- Trinn For Oppsett Av Én Ruter
- Forbereder modemet
- Feilsøking
- OFTE STILTE SP∅RSMÅL
- Q1 Støtter AiMesh-ruteren tilgangspunktsmodus?
- Router AiMesh
- PAŞI DE CONFIGURARE CA ROUTER INDEPENDENT
- Depanarea
- Întrebare2:
- KORACI ZA PODEŠAVANJE AiMesh-a
- KORACI ZA PODEŠAVANJE JEDNOG RUTERA
- Priprema vašeg modema
- Prijavite se i povežite se
- Pripremite
- AiMesh račvište
- AiMesh ruter
- Srpski
- Rešavanje problema
- Česta pitanja
- Príprava na nastavenie systému siete WiFi AiMesh
- Pripojenie zariadenia
- Riešenie problémov
- Priprava na nastavitev WiFi sistema AiMesh
- Odpravljanje težav
- Felsökning
- Sorun Giderme
- REACH
- Federal Communications Commission Statement
- Prohibition of Co-location
- IMPORTANT NOTE:
- Compliance Statement of Innovation, Science and Economic Development Canada (ISED)
- Radio Frequency (RF) Exposure Information
- Precautions for the use of the device
- UKCA statement
- Simplified UKCA Declaration of Conformity
- UK
- Authorized representative in United Kingdom:
- UK CA
- English
- CE statement
- Simplified EU Declaration of Conformity
- Declaration of Conformity for Ecodesign directive 2009/125/EC
- Safety Notices
- Danish
- CE-erklæring
Brand : ASUS
Model : ZenWiFi Pro XT12
Category : Wireless Router