
5G03 - Router Tenda - Free user manual and instructions
Find the device manual for free 5G03 Tenda in PDF.
| Product Type | 5G/4G Router |
| Brand | Tenda |
| Model | 5G03 |
| Connectivity | 5G NR, 4G LTE, Wi-Fi, Ethernet |
| Ports | 1 LAN port, 1 WAN/LAN port, 1 USB-C 3.0 port |
| Power Supply | Included AC adapter (plug) |
| Buttons | Power, Reset (RST), WPS/Mesh |
| LED Indicators | Internet, Wi-Fi, 5G/4G Signal Strength |
| SIM Card | Nano SIM (4FF) |
| External Antennas | TS-9 connectors for N77/N78 antennas (not included) |
| Functions | Router, Access Point, EASYMESH R2 Mesh Extender |
| Security | Customizable Wi-Fi password, WPS, protected web interface |
| Configuration | Via web interface at tendawifi.com |
| Firmware Upgrade | Via USB-C 3.0 port |
| Support | Website: www.tendacn.com, Email: support.fr@tenda.cn |
| User Manual Languages | French and 30+ other languages |
| Maintenance and Cleaning | Clean with a soft, dry cloth |
| Repairability | Physical reset button, firmware update via USB-C |
Frequently Asked Questions - 5G03 Tenda
User questions about 5G03 Tenda
0 question about this device. Answer the ones you know or ask your own.
Ask a new question about this device
Download the instructions for your Router in PDF format for free! Find your manual 5G03 - Tenda and take your electronic device back in hand. On this page are published all the documents necessary for the use of your device. 5G03 by Tenda.
USER MANUAL 5G03 Tenda
I. Set up the router
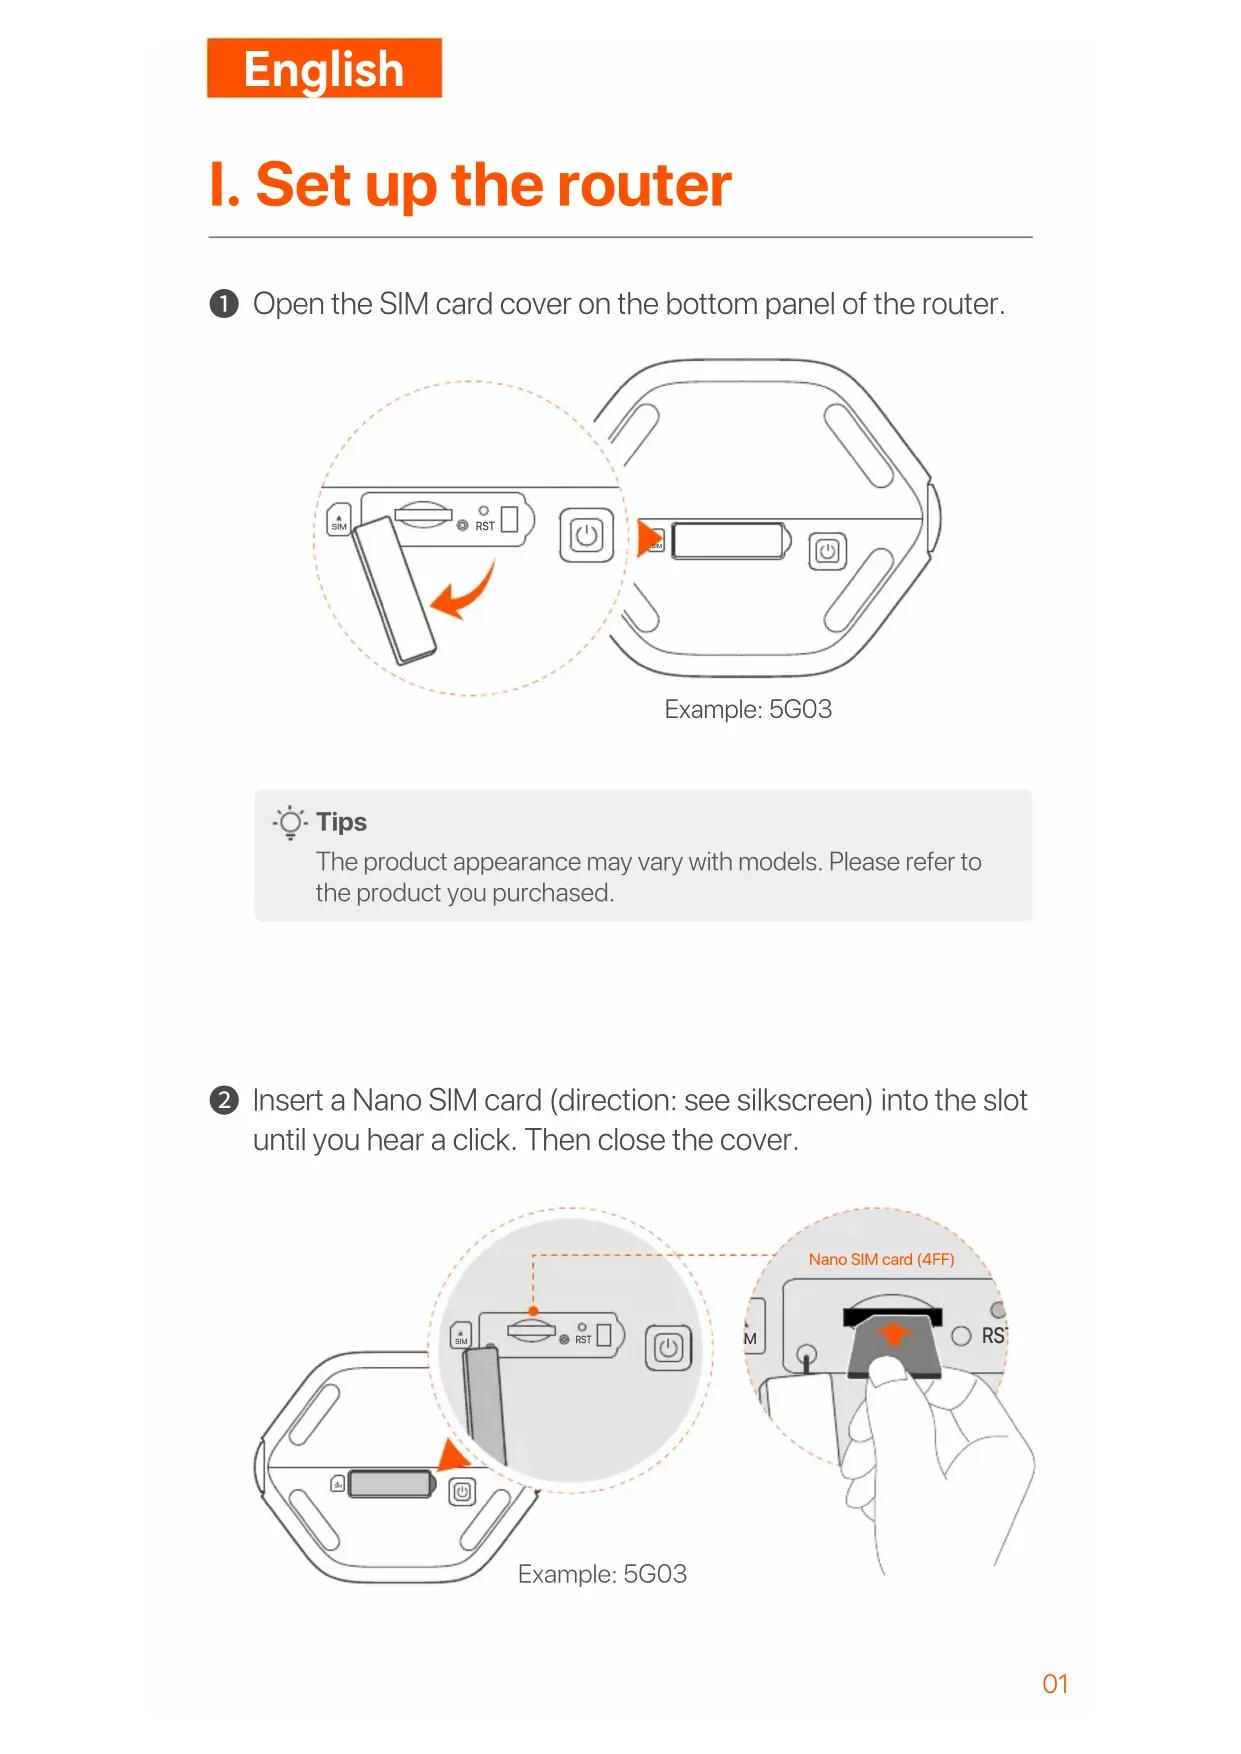
① Open the SIM card cover on the bottom panel of the router.
text_image
SIM RSTExample: 5G03

Tips
The product appearance may vary with models. Please refer to the product you purchased.
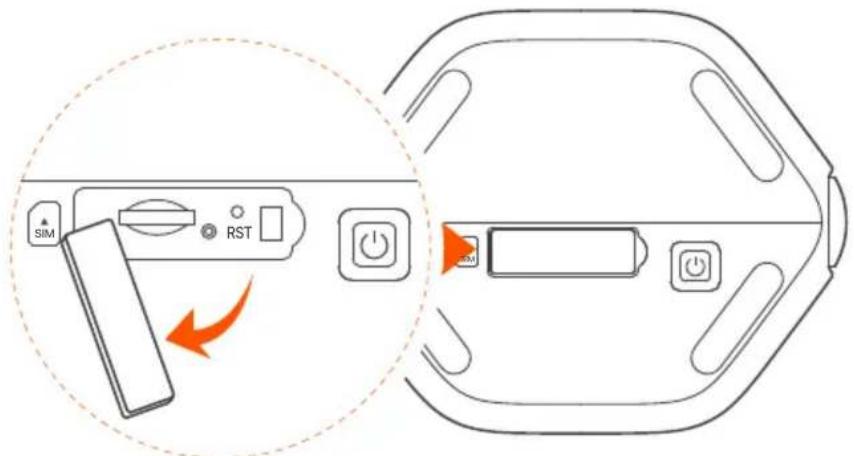
2 Insert a Nano SIM card (direction: see silkscreen) into the slot until you hear a click. Then close the cover.
text_image
Nano SIM card (4FF) Example: 5G03
Tips
- The product appearance may vary with models. Please refer to the product you purchased.
- To ensure performance and avoid damage to the SIM card, do not insert or remove the SIM card when the router is running.
- To remove the SIM card, gently press the SIM card until it clicks. The SIM card will automatically pop out.
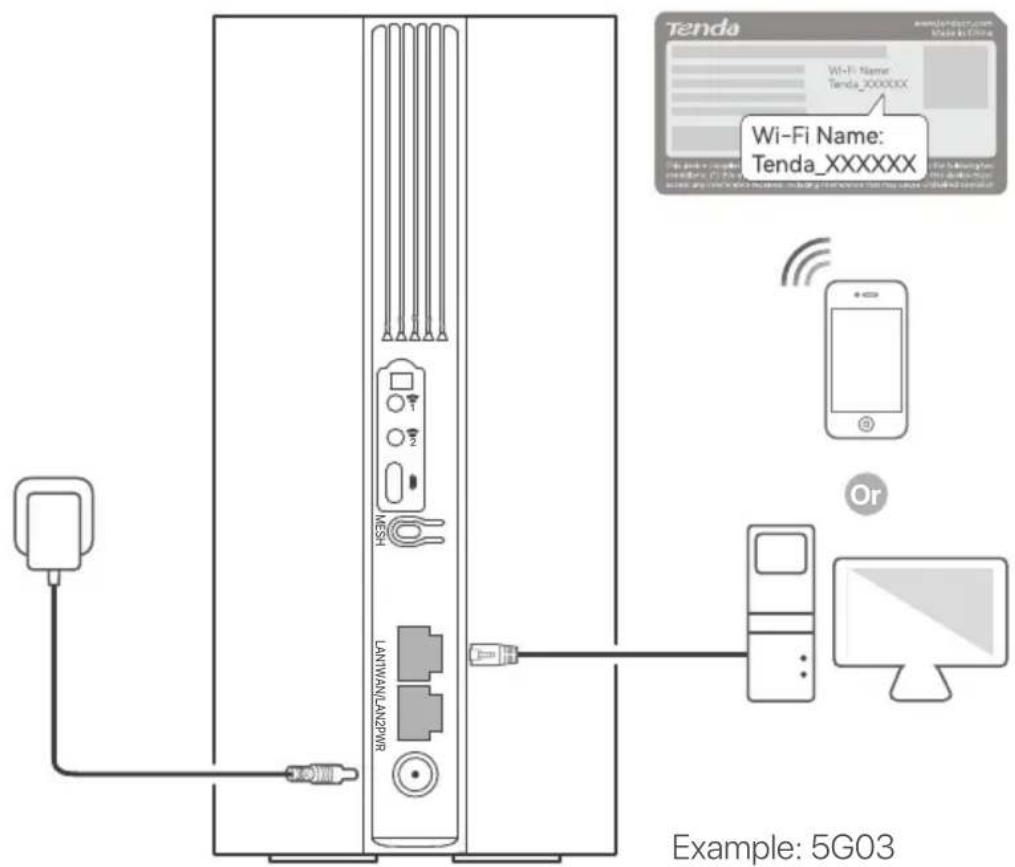
3 Use the included power adapter to connect the power jack of the router to a power source.
4 Press the ⏻ button on the router to turn it on.
All LED indicators light up and then off immediately. Wait a moment and then the Wi-Fi (💡), signal strength (illus) and internet (💡) indicators light up in sequence when the router is connected to the internet properly.
II. Connect clients to the internet
- Connect your wired device, such as a computer, to the LAN port of the router using an Ethernet cable.
- Connect your wireless device, such as a smartphone, to the Wi-Fi network of the router using the Wi-Fi Name and Wi-Fi Key labeled on the bottom panel of the router.
text_image
Tenda Wi-Fi Name: Tenda_XXXXXX Example: 5G03
Tips
The product appearance may vary with models. Please refer to the product you purchased.
To further configure the router, log in to the web UI of the router by visiting tendawifi.com on a connected device.

Tips
Set your login password promptly to prevent unauthorized access.
III. (Optional) Extend your network

Tips
- Currently, this router can be used as the primary node to network with devices that support the EASYMESH R2 protocol.
-
Please ensure that the new device you want to add has never been used. If not, reset it first.
-
Power on the router and connect it to the internet properly.
- Place the new device in an elevated and open position within 3 meters from your router and power it on.
- Press the MESH button of the router for about 1 to 3 seconds. The WiFi LED indicator (WiFi) blinks fast. Within 2 minutes, press the MESH/WPS button of the new device for 1 to 3 seconds to negotiate with this router.
When the WiFi LED indicator (💡) of the router blinks slowly for 10 seconds and then lights solid on, the networking is successful and the new device becomes a secondary node in the network. - Refer to the following relocation tips to locate the new device to a proper position:
- Ensure that the distance between any two nodes is within their coverage range.
- Keep your nodes away from electronics with strong interference, such as microwave ovens, induction cookers, and refrigerators.
- Place the nodes in a high position with few obstacles.
- Power on the new device again and check that its internet connection status is correct according to its user guide.
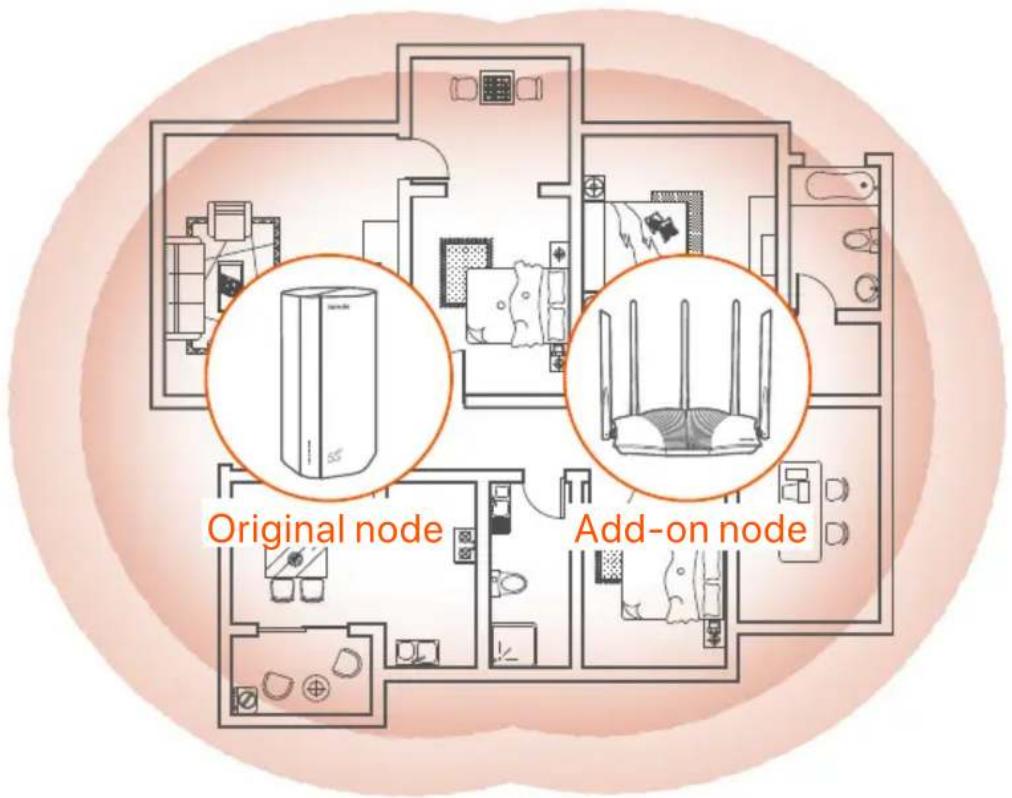
text_image
Original node Add-on nodeLED indicators
| LED indicator Status Description | |||
| Internet LED indicator | Solid on | The router is connected to the internet. | |
| Off | No internet access is available. | ||
| Solid green | Good 5G signal. | ||
| 5G/4G signal strength LED indicator | Blinking green slowly | Poor 5G signal. | |
| Solid orange Good 4G signal. | |||
| Blinking orange slowly | Poor 4G signal. | ||
| Off No 5G/4G signal. | |||
| Solid on | The Wi-Fi network is enabled. | ||
| Wi-Fi LED indicator | Blinking | The router is networking by the MESH button. | |
| Off | The Wi-Fi network is disabled. | ||
Ports & Buttons
| Position | Port/Button | Description |
| [CS48] | TS-9 antenna sockets.Used to connect self-prepared N77 or N78 external antennas to extend 5G New Radio (NR) signals. | |
| [72CD] | ||
| [CDWA] | USB-C 3.0 interface.Used for firmware upgrade. | |
| Back | MESH | WPS/Mesh button.WPS: When it is used as a WPS negotiation button, you can connect to the WiFi network of the router without entering the WiFi password.Mesh: When it is used as a Mesh networking button, you can extend your network with another device that supports the Mesh function.Method: Short press the button for about 3 seconds, and the WiFi LED indicator ( [IMAGE] ) blinks fast. Within 2 minutes, enable the WPS function of the other WPS-supported device to establish a WPS connection or press the MESH/WPS button of another device to negotiate with the router. |
| LAN1 | LAN port.Used to connect to wired devices, such as a computer. | |
| WAN/LAN2 | WAN or LAN port.By default, the router is under 4G/5G router mode and this port serves as a LAN port. When the router is set to the wireless router mode or the Failover function is enabled, this port serves as a WAN port. | |
| PWR | Power jack.Used to connect to a power source to supply power for the router. | |
| Bottom | Nano SIM card slot.Insert your SIM card into this slot. | |
| RST | Reset button.Hold down the button for about 8 seconds, and release it when all LED indicators light off and then light up. The router is reset. | |
| Power button.Used to turn on or off the router. |
Q1: The internet LED indicator ( √ ) does not light up. What should I do?
A1: Try the following solutions:
- Check that your SIM card is in the service area of your internet service provider (ISP).
- Check that your SIM card balance is sufficient.
- Start a web browser on the device connected to the router, and access tendawifi.com. Then perform troubleshooting as prompted.
- Confirm with your ISP if you are in a roaming service area. If yes, log in to the web UI of the router and navigate to Internet Settings to enable Data Roaming.
If the problem persists, contact our technical support.
Q2: I cannot access the web UI of the router by visiting tendawifi.com. What should I do?
A2: Try the following solutions.
If you log in with mobile clients:
- Ensure that your wireless device is connected to the Wi-Fi network of the router.
- Disable the cellular network of your wireless device.
- Clear the cache of your web browser or try again with another web browser.
If you log in with computers:
- Ensure that the computer has connected to the router properly.
- Ensure that the IP address of your computer is 192.168.0.X (X ranges from 2 to 254). If not, unplug and replug one end of the Ethernet cable between the router and the computer, and try again.
- Clear the cache of your web browser or change another web browser and try again.
If the problem persists, refer to Q3 to reset the router and try again.
Q3: How to reset the router?
A3: When the device completes startup, press the RST button for about 8 seconds, and release it when all LED indicators light off and then light up. The router will be reset successfully in about two minutes.
I. Configurar o roteador
text_image
SIM RST Power Power PowerПример: 5G03

Советы
| الوصف | الزر/المن夫妇 | موضع |
| .TS-9 قوابس هواني 9 تستخدم لتوصل الهوانيات الخارجية N78 المعدة (NR) نباتيا لتوسيع إشارات راديو 5Gunjacentة.UBB-C 3.0 واجهة. تستخدم لترقية البرامج الثابته.WPS/Mesh زر :WPS • يمكنك الاتصال Estonia WiFi (بسرعة) في غضون WiFi LED وسيومض مؤشر (بسرعة) في عضون WPS لجهاز الأخر المدعوم من dtقيمتين، قم بتمكين خاصية WPS لجهاز الأخر المدعوم من ------------------------------------------------ WPS لجهاز أخر للتفاض مع جهاز الراوتر. LANMinfzminfzminfzminfzminfzminfzminfzminfzminfzminfzminfzminfzminfzminfzminfzminfzminfzminfzminfzminfzminfzminfzminfzminfzminfzminfzminfzminfzminfzminfzminfzminfzminfzminfzminrWPS4G/5G ويعمل هذا Minfzdz Minfzdz Only LAN4G/5G ويعمل هذا Minfzdz Minfzdz Only LAN4G/5G ويعمل هذا Minfzdz Minfzdz Only LAN4G/5G ويعمل هذا Minfzdz Minfzdz Only LAN4G/5G ويعمل هذا Minfzdz Minfzdz Only LAN4G/5G ويعمل هذا Minfzdz Minfzdz Only LAN4G/5Gs.الراوتر على وضع جهاز الراوتر(Lلا스لكي) وتمكين خاصية تجاز الإخفاق، يعمل هذا Minfzdz Minfzdz Only LAN4G/5G ويعمل هذا Minfzdz Minfzdz Only LAN4G/5G ويعمل هذا Minfzdz Minfzdz Only LAN4G/5G ويعمل هذا Minfzdz Minfzdz Only LAN4G/5G ويعمل هذا Minfzdz Minfzdz Only LAN4G/5G ويعمل هذا Minfzdx Minfzdx Only LAN4G/5G ويعمل هذا Minfzdx Minfzdx Only LAN4G/5G ويعمل هذا Minfzdx Minfzdx Only LAN4G/5G ويعمل هذا Minfzdx Minfzdx Only LAN4G/5G ويعمل هذا Minfzdx Minfzdx Only LAN4G/5G ويعمل هذا Minfzdx Minfzdx Only LAN4G/WPS4G/WPS4G/WPS4G/WPS4G/WPS4G/WPS4G/WPS4G/WPS4G/WPS4G/WPS4G/WPS4G/WPS4G/WPS4G/WPS4G/WPS4G/WPS4G/WPS4G/WPS4G/WPS4G/WPS4G/WPS4G/WPS4G/WPS4G/WPS4G/WPS4G/WPWS4G/WPS4G/WPS4G/WPS4G/WPS4G/WPS4G/WPS4G/WPS4G/WPS4G/WPS4G/WPS4G/WPS4G/WPS4G/WPS4G/WPS4G/WPS4G/WPS4G/WPS4G/WPS4G/WPS4G/WPS4G/WPS4G/WPS4G/WPS4G/WPS4G/WFS4G/WPS4G/WPS4G/WPS4G/WPS4G/WPS4G/WPS4G/WPS4G/WPS4G/WPS4G/WPS4G/WPS4G/WPS4G/WPS4G/WPS4G/WPS4G/WPS4G/WPS4G/WPS4G/WPS4G/WPS4G/WPS4G/WPS4G/WPS4G/WPS4G/WMS4G/WPS4G/WPS4G/WPS4G/WPS4G/WPS4G/WPS4G/WPS4G/WPS4G/WPS4G/WPS4G/WPS4G/WPS4G/WPS4G/WPS4G/WPS4G/WPS4G/WPS4G/WPS4G/WPS4G/WPS4G/WPS4G/WPS4G/WPS4G/WPS4G/WPMWS4G/WPS4G/WPS4G/WPS4G/WPS4G/WPS4G/WPS4G/WPS4G/WPS4G/WPS4G/WPS4G/WPS4G/WPS4G/WPS4G/WPS4G/WPS4G/WPS4G/WPS4G/WPS4G/WPS4G/WPS4G/WPS4G/WPS4G/WPS4G/WPS4G/PGTA | [186C][1850C][8CVW]MESHLAN1WAN/LAN2PWR[H74A]RST[1TGTA] | |
| .TS-9 قوابس هواني 9 تستخدم لتوصل الهوانيات الخارجية N78 المعدة (NR) نباتيا لتوسيع إشارات راديو 5Gunjacentة.USB-C 3.0 واجهة. تستخدم لترقية البرامج الثابته.WPS/Mesh زر :WPS • عند استخدامه ب fortابة زر تفاض WPS • مكنك الاتصال Estonia WiFi (بسرعة) في غضون WiFi LED ويعمل هذا Minfzdz Minfzdz Only LAN4G/5G ويعمل هذا Minfzdz Minfzdz Only LAN4G/5G ويعمل هذا Minfzdz Minfzdz Only LAN4G/5G ويعمل هذا Minfzdz Minfzdz Only LAN4G/5G ويعمل هذا Minfzdz Minfzdz Only LAN4G/5G ويعمل هذا MiniMinfzdz Minfzdz Only LAN4G/5G ويعمل هذا MiniMinfzdz Minfzdz Only LAN4G/5G ويعمل هذا MiniMinfzdz Minfzdz Only LAN4G/5G ويعمل هذا MiniMinfzdz Minfzdz Only LAN4G/5G ويعمل هذا MiniMinfzdz Minfzdz Only LAN4G/5G ويعمل هذا MiniMiniMinfzdz Minfzdz Only LAN4G/5G ويعمل هذا MiniMiniMinfzdz Minfzdz Only LAN4G/5G ويعمل هذا MiniMiniMinfzdz Minfzdz Only LAN4G/5G ويعمل هذا MiniMiniMinfzdz Minfzdz Only LAN4G/5G ويعمل هذا MiniMiniMinfzdz Minfzdz Only LAN4G/5G wihgmsyiml#m#m#m#m#m#m#m#m#m#m#m#m#m#m#m#m#m#m#m#m#m#m#m#m#m#m#m#m#m#m#m#m#m#m#m#m#m#m#m#m#m#m#m#m#m#m#m#m#m#m#n#m#m#m#m#m#m#m#m#m#m#m#m#m#m#m#m#m#m#m#m#m#m#m#m#m#m#m#m#m#m#m#m#m#m#m#m#m#m#m#m#m#m#m#m#m#m#m#m#m#M#m#m#m#m#m#m#m#m#m#m#m#m#m#m#m#m#m#m#m#m#m#m#m#m#m#m#m#m#m#m#m#m#m#m#m#m#m#m#m#m#m#m#m#m#m#m#m#m#m#h#m#m#m#m#m#m#m#m#m#m#m#m#m#m#m#m#m#m#m#m#m#m#m#m#m#m#m#m#m#m#m#m#m#m#m#m#m#m#m#m#m#m#m#m#m#m#m#m#m#mm#m#m#m#m#m#m#m#m#m#m#m#m#m#m#m#m#m#m#m#m#m#m#m#m#m#m#m#m#m#m#m#m#m#m#m#m#m#m#m#m#m#m#m#m#m#m#m#m#m#c##m#m#m#m#m#m#m#m#m#m#m#m#m#m#m#m#m#m#m#m#m#m#m#m#m#m#m#m#m#m#m#m#m#m#m#m#m#m#m#m#m#m#m#m#m#m#m#m#m#m#.WPS/Mesh RSWPS RSWPS RSWPS RSWPS RSWPS RSWPS RSWPS RSWPS RSWPS RSWPS RSWPS RSWPS RSWPS RSWPS RSWPS RSWPS RSWPS RSWPS RSWPS RSWPS RSWPS RSWPS RSWPS RSWPS RSWPS RSWPS RSWPS RSWPS RSWPS RSWPS RSWPS RSWPS RSWPS RSWPSRSWPS RSWPS RSWPS RSWPS RSWPS RSWPS RSWPS RSWPS RSWPS RSWPS RSWPS RSWPS RSWPS RSWPS RSWPS RSWPS RSWPS RSWPS RSWPS RSWPS RSWPS RSWPS RSWPS RSWPS RSWPS RSWPS RSWPS RSWPS RSWPS RSWPS RSWPS RSWPS RSWPS RSw PSrsrsrsrsrsrsrsrsrsrsrsrsrsrsrsrsrsrsrsrsrsrsrsrsrsrsrsrsrsrsrsrsrsrsrsrsrsrsrsrsrsrsrsrsrsrsrsrsrsrsrsrsrsrsrsrsrsrsrsrsrsrsrsrsrsrsrsrsrsrsrsrsrsrsrsrsrsrsrsrsrsrsrsrsrsrsrsrsrsrsrsrsrsrsrsrsrsrsrsrsnsrsrsrsrsrsrsrsrsrsrsrsrsrsrsrsrsrsrsrsrsrsrsrsrsrsrsrsrsrsrsrsrsrsrsrsrsrsrsrsrsrsrsrsrsrsrsrsrsrsrsrsrsrsrsrsrsrsrsrsrsrsrsrsrsrsrsrsrsrsrsrsrsrsrsrsrsrsrsrsrsrsrsrsrsrsrsrsrsrsrsrsrsrsrsrsrsrsrsrsarsrsrsrsrsrsrsrsrsrsrsrsrsrsrsrsrsrsrsrsrsrsrsrsrsrsrsrsrsrsrsrsrsrsrsrsrsrsrsrsrsrsrsrsrsrsrsrsrsrsrsrsrsrsrsrsrsrsrsrsrsrsrsrsrsrsrsrsrsrsrsrsrsrsrsrsrsrsrsrsrsrsrsrsrsrsrsrsrsrsrsrsrsrsrsrsrsrsrsrssrssrsrsrsrsrsrsrsrsrsrsrsrsrsrsrsrsrsrsrsrsrsrsrsrsrsrsrsrsrsrsrsrsrsrsrsrsrsrsrsrsrsrsrsrsrsrsrsrsrsrsrsrsrsrsrsrsrsrsrsrsrsrsrsrsrsrsrsrsrsrsrsrsrsrsrsrsrsrsrsrsrsrsrsrsrsrsrsrsrsrsrsrsrsrsrsrsrsrsrsrssrsrsrsrsrsrsrsrsrsrsrsrsrsrsrsrsrsrsrsrsrsrsrsrsrsrsrsrsrsrsrsrsrsrsrsrsrsrsrsrsrsrsrsrsrsrsrsrsrsrsrsrsrsrsrsrsrsrsrsrsrsrsrsrsrsrsrsrsrsrsrsrsrsrsrsrsrsrsrsrsrsrsrsrsrsrsrsrsrsrsrsrsrsrsrsrsrsrsrswsrsrsrsrsrsrsrsrsrsrsrsrsrsrsrsrsrsrsrsrsrsrsrsrsrsrsrsrsrsrsrsrsrsrsrsrsrsrsrsrsrsrsrsrsrsrsrsrsrsrsrsrsrsrsrsrsrsrsrsrsrsrsrsrsrsrsrsrsrsrsrsrsrsrsrsrsrsrsrsrsrsrsrsrsrsrsrsrsrsrsrsrsrsrsrsrsrsrsrsrrswsrsrsrsrsrsrsrsrsrsrsrsrsrsrsrsrsrsrsrsrsrsrsrsrsrsrsrsrsrsrsrsrsrsrsrsrsrsrsrsrsrsrsrsrsrsrsrsrsrsrsrsrsrsrsrsrsrsrsrsrsrsrsrsrsrsrsrsrsrsrsrsrsrsrsrsrsrsrsrsrsrsrsrsrsrsrsrsrsrsrsrsrsrsrsrsrsrsnsrsnsrsnsrsnsrsnsrsnsrsnsrsnsrsnsnsnsnsnsnsnsnsnsnsnsnsnsnsnsnsnsnsnsnsnsnsnsnsnsnsnsnsnsnsnsnsnsnsnsnsnsnsnsnsnsnsnsnsnsnsnsnsnsnsnsnsnsnsnsnsnsnsnsnsnsnsnsnsnsnsnsnsnsnsnsnsnsnsnsnsnsnsnsnsnsnsnsnsnsnsnsnsnsnsnsnsnsnsnsnsnsnsnsnsnswpsmsmsmsmsmsmsmsmsmsmsmsmsmsmsmsmsmsmsmsmsmsmsmsmsmsmsmsmsmsmsmsmsmsmsmsmsmsmsmsmsmsmsmsmsmsmsmsmsmsmsmsmsmsmsmsmsmsmsmsmsmsmsmsmsmsmsmsmsmsmsmsmsmsmsmsmsmsmsmsmsmsmsmsmsmsmsmsmsmsmsmsmsmsmsmsmsmsmsmsmsrmssmsmsmsmsmsmsmsmsmsmsmsmsmsmsmsmsmsmsmsmsmsmsmsmsmsmsmsmsmsmsmsmsmsmsmsmsmsmsmsmsmsmsmsmsmsmsmsmsmsmsmsmsmsmsmsmsmsmsmsmsmsmsmsmsmsmsmsmsmsmsmsmsmsmsmsmsmsmsmsmsmsmsmsmsmsmsmsmsmsmsmsmsmsmsmsmsmsmsmsmmssmsmsmsmsmsmsmsmsmsmsmsmsmsmsmsmsmsmsmsmsmsmsmsmsmsmsmsmsmsmsmsmsmsmsmsmsmsmsmsmsmsmsmsmsmsmsmsmsmsmsmsmsmsmsmsmsmsmsmsmsmsmsmsmsmsmsmsmsmsmsmsmsmsmsmsmsmsmsmsmsmsmsmsmsmsmsmsmsmsmsmsmsmsmsmsmsmsmsrmSSWPS/Mesh RSWPS RSWPS RSWPS RSWPS RSWPS RSWPS RSWPS RSWPS RSWPS RSWPS RSWPS RSWPS RSWPS RSWPS RSWPS RSWPS RSWPS RSWPS RSWPS RSWPS RSWPS RSWPS RSWPS RSWPS RSWPS RSWPS RSWPS RSWPS RSWPS RSWPS RSWPS RSWPNWANWANWANWANWANWANWANWANWANWANWANWANWANWANWANWANWANWANWANWANWANWANWANWANWANWANWANWANWANWANWANWANWANWANWANWANWANWANWANWANWANWANWANWANWANWANWANWANWANWANWANNNNNNNNNNNNNNNNNNNNNNNNNNNNNNNNNNNNNNNNNNNNNNNNNNNNNNNNNNNNNNNNNNNNNNNNNNNNNNNNNNNNNNNNNNNNNNNNNNNNNNNNNNNNNNNNNNNNNNNNNNNNNNNNNNNNNNNNNNNNNNNNNNNNNNNNNNNNNNNNNNNNNNNNNNNNNNNNNNNNNNNNNNNNNNNNNNNNNNNNNNNNNNNNNNNNNNNNNNNNNNNNNNNNNNNNNNNNNNNNNNNNNNNNNNNNNNNNNNNNNNNNNNNNNNNNNNNNNNNNNNNNNNNNNNNNNNNNNNNNNNNNNNNNNNNNNNNNNNNNNNNNNNNNNNNNNNNNNNNNNNNNNNNNNNNNNNNNNNNNNNNNNNNNNNNNNNNNNNNNNNNNNNNNNNNNNNNNNNNNNnnnnnnnnnnnnnnnnnnnnnnnnnnnnnnnnnnnnnnnnnnnnnnnnnnnnnnnnnnnnnnnnnnnnnnnnnnnnnnnnnnnnnnnnnnnnnnnnnnnnnnnnnnnnnnnnnnnnnnnnnnnnnnnnnnnnnnnnnnnnnnnnnnnnnnnnnnnnnnnnnnnnnnnnnnnnnnnnnnnnnnnnnnnnnnnnnnnnnnnnnwnwnwnwnwnwnwnwnwnwnwnwnwnwnwnwnwnwnwnwnwnwnwnwnwnwnwnwnwnwnwnwnwnwnwnwnwnwnwnwnwnwnwnwnwnwnwnwnwnwnwnwnwnwnwnwnwnwnwnwnwnwnwnwnwnwnwnwnwnwnwnwnwnwnwnwnwnwnwnwnwnwnwnwnwnwnwnwnwnwnwnwnwnwnwnwnwnwnwnwnawnwnwnwnwnwnwnwnwnwnwnwnwnwnwnwnwnwnwnwnwnwnwnwnwnwnwnwnwnwnwnwnwnwnwnwnwnwnwnwnwnwnwnwnwnwnwnwnwnwnwnwnwnwnwnwnwnwnwnwnwnwnwnwnwnwnwnwnwnwnwnwnwnwnwnwnwnwnwnwnwnwnwnwnwnwnwnwnwnwnwnwnwnwnwnwnwnwnwnwnwwwnwnwnwnwnwnwnwnwnwnwnwnwnwnwnwnwnwnwnwnwnwnwnwnwnwnwnwnwnwnwnwnwnwnwnwnwnwnwnwnwnwnwnwnwnwnwnwnwnwnwnwnwnwnwnwnwnwnwnwnwnwnwnwnwnwnwnwnwnwnwnwnwnwnwnwnwnwnwnwnwnwnwnwnwnwnwnwnwnwnwnwnwnwnwnwnwnwnwnnwwnwnwnwnwnwnwnwnwnwnwnwnwnwnwnwnwnwnwnwnwnwnwnwnwnwnwnwnwnwnwnwnwnwnwnwnwnwnwnwnwnwnwnwnwnwnwnwnwnwnwnwnwnwnwnwnwnwnwnwnwnwnwnwnwnwnwnwnwnwnwnwnwnwnwnwnwnwnwnwnwnwnwnwnwnwnwnwnwnwnwnwnwnwnwnwnwnwnwnnmwwwnwnwnwnwnwnwnwnwnwnwnwnwnwnwnwnwnwnwnwnwnwnwnwnwnwnwnwnwnwnwnwnwnwnwnwnwnwnwnwnwnwnwnwnwnwnwnwnwnwnwnwnwnwnwnwnwnwnwnwnwnwnwnwnwnwnwnwnwnwnwnwnwnwnwnwnwnwnwnwnwnwnwnwnwnwnwnwnwnwnwnwnwnwnwnwnwnwntnwnwnwnwnwnwnwnwnwnwnwnwnwnwnwnwnwnwnwnwnwnwnwnwnwnwnwnwnwnwnwnwnwnwnwnwnwnwnwnwnwnwnwnwnwnwnwnwnwnwnwnwnwnwnwnwnwnwnwnwnwnwnwnwnwnwnwnwnwnwnwnwnwnwnwnwnwnwnwnwnwnwnwnwnwnwnwnwnwnwnwnwnwnwnwnwnwnwnwnnwnwnwnwnwnwnwnwnwnwnwnwnwnwnwnwnwnwnwnwnwnwnwnwnwnwnwnwnwnwnwnwnwnwnwnwnwnwnwnwnwnwnwnwnwnwnwnwnwnwnwnwnwnwnwnwnwnwnwnwnwnwnwnwnwnwnwnwnwnwnwnwnwnwnwnwnwnwnwnwnwnwnwnwnwnwnwnwnwnwnwnwnwnwnwnwnwnwntnwwwwwwwwwwwwwwwwwwwwwwwwwwwwwwwwwwwwwwwwwwwwwwwwwwwwwwwwwwwwwwwwwwwwwwwwwwwwwwwwwwwwwwwwwwwwwwwwwwwwwwwwwwwwwwwwwwwwwwwwwwwwwwwwwwwwwwwwwwwwwwwwwwwwwwwwwwwwwwwwwwwwwwwwwwwwwwwwwwwwwwwwwwwwwwwwwwwwwwwwwwwwwwwwwwwwwwwwwwwwwwwwwwwwwwwwwwwwwwwwwwwwwwwwwwwwwwwwwwwwwwwwwwwwwwwwwwwwwwwwwwwwwwwwwwwwwwwwwwwwwwwwwwwwwwwwwwwwwwwwwwwwwwwwwwwwwwwwwwwwwwwwwwwwwwwwwwwwwwwwwwwwwwwwwwwwwwwwwwwwwwwwwwwwwwwwwwwwwwwwwwhwwwwwwwwwwwwwwwwwwwwwwwwwwwwwwwwwwwwwwwwwwwwwwwwwwwwwwwwwwwwwwwwwwwwwwwwwwwwwwwwwwwwwwwwwwwwwwwwwwwwwwwwwwwwwwwwwwwwwwwwwwwwwwwwwwwwwwwwwwwwwwwwwwwwwwwwwwwwwwwwwwwwwwwwwwwwwwwwwwwwwwwwwwwwwwwwwwwwwwWWWWWWWWWWWWWWWWWWWWWWWWWWWWWWWWWWWWWWWWWWWWWWWWWWWWWWWWWWWWWWWWWWWWWWWWWWWWWWWWWWWWWWWWWWWWWWWWWWWWWWWWWWWWWWWWWWWWWWWWWWWWWWWWWWWWWWWWWWWWWWWWWWWWWWWWWWWWWWWWWWWWWWWWWWWWWWWWWWWWWWWWWWWWWWWWWWWWWWWWWWWWWWWWWWWWWWWWWWWWWWWWWWWWWWWWWWWWWWWWWWWWWWWWWWWWWWWWWWWWWWWWWWWWWWWWWWWWWWWWWWWWWWWWWWWWWWWWWWWWWWWWWWWWWWWWWWWWWWWWWWWWWWWWWWWWWWWWWWWWWWWWWWWWWWWWWWWWWWWWWWWWWWWWWWWWWWWWWWWWWWWWWWWWWWWWWWWWWWWWWWMWHWWWWWWWWWWWWWWWWWWWWWWWWWWWWWWWWWWWWWWWWWWWWWWWWWWWWWWWWWWWWWWWWWWWWWWWWWWWWWWWWWWWWWWWWWWWWWWWWWWWWWWWWWWWWWWWWWWWWWWWWWWWWWWWWWWWWWWWWWWWWWWWWWWWWWWWWWWWWWWWWWWWWWWWWWWWWWWWWWWWWWWWWWWWWWWWWWWWWWWWHWWWWWWWWWWWWWWWWWWWWWWWWWWWWWWWWWWWWWWWWWWWWWWWWWWWWWWWWWWWWWWWWWWWWWWWWWWWWWWWWWWWWWWWWWWWWWWWWWWWWWWWWWWWWWWWWWWWWWWWWWWWWWWWWWWWWWWWWWWWWWWWWWWWWWWWWWWWWWWWWWWWWWWWWWWWWWWWWWWWWWWWWWWWWWWWWWWWWWHWHWWWWWWWHWHWHWHWHWHWHWHWHWHWHWHWHWHWHWHWHWHWHWHWHWHWHWHWHWHWHWHWHWHWHWHWHWHWHWHWHWHWHWHWHWHWHWHWHWHWHWHWHWHWHWHWHWHWHWHWHWHWHWHWHWHWHWHWHWHWHWHWHWHWHWHWHWHWHWHWHWHWHWHWHWHWHWHWHWHWHWHWHWHWHWHWHWHWHWHWHWHWHWHWMWHWHWHWHWHWHWHWHWHWHWHWHWHWHWHWHWHWHWHWHWHWHWHWHWHWHWHWHWHWHWHWHWHWHWHWHWHWHWHWHWHWHWHWHWHWHWHWHWHWHWHWHWHWHWHWHWHWHWHWHWHWHWHWHWHWHWHWHWHWHWHWHWHWHWHWHWHWHWHWHWHWHWHWHWHWHWHWHWHWHWHWHWHWHWHWHWHWHWHWWHWHWHWHWHWHWHWHWHWHWHWHWHWHWHWHWHWHWHWHWHWHWHWHWHWHWHWHWHWHWHWHWHWHWHWHWHWHWHWHWHWHWHWHWHWHWHWHWHWHWHWHWHWHWHWHWHWHWHWHWHWHWHWHWHWHWHWHWHWHWHWHWHWHWHWHWHWHWHWHWHWHWHWHWHWHWHWHWHWHWHWHWHWHWHWHWHWHWHWhWHWHWHWHWHWHWHWHWHWHWHWHWHWHWHWHWHWHWHWHWHWHWHWHWHWHWHWHWHWHWHWHWHWHWHWHWHWHWHWHWHWHWHWHWHWHWHWHWHWHWHWHWHWHWHWHWHWHWHWHWHWHWHWHWHWHWHWHWHWHWHWHWHWHWHWHWHWHWHWHWHWHWHWHWHWHWHWHWHWHWHWHWHWHWHWHWHWHWH WHWHWHWHWHWHWHWHWHWHWHWHWHWHWHWHWHWHWHWHWHWHWHWHWHWHWHWHWHWHWHWHWHWHWHWHWHWHWHWHWHWHWHWHWHWHWHWHWHWHWHWHWHWHWHWHWHWHWHWHWHWHWHWHWHWHWHWHWHWHWHWHWHWHWHWHWHWHWHWHWHWHWHWHWHWHWHWHWHWHWHWHWHWHWHWHWHWHWHWHHHWHWHWHWHWHWHWHWHWHWHWHWHWHWHWHWHWHWHWHWHWHWHWHWHWHWHWHWHWHWHWHWHWHWHWHWHWHWHWHWHWHWHWHWHWHWHWHWHWHWHWHWHWHWHWHWHWHWHWHWHWHWHWHWHWHWHWHWHWHWHWHWHWHWHWHWHWHWHWHWHWHWHWHWHWHWHWHWHWHWHWHWHWHWHWHWHWHWHWHNHWHWHWHWHWHWHWHWHWHWHWHWHWHWHWHWHWHWHWHWHWHWHWHWHWHWHWHWHWHWHWHWHWHWHWHWHWHWHWHWHWHWHWHWHWHWHWHWHWHWHWHWHWHWHWHWHWHWHWHWHWHWHWHWHWHWHWHWHWHWHWHWHWHWH |
(FAQ) أستلة شائعة
text_image
SIM RST Power PowerExemplu: 5G03

Sfaturi
text_image
SIM RST Power PowerPríklad: 5G03

Tipy
text_image
QR code with a central logo depicting an open book or document iconhttps://www.tendacn.com/service/default.html
English - Get support and services
For technical specifications, user guides and more information, please visit the product page or service page on www.tendacn.com. Multiple languages are available.
You can see the product name and model on the product label.
Floor 6-8, Tower E3, No.1001, Zhongshanyuan Road, Nanshan District, Shenzhen, China. 518052
Website: www.tendacn.com
E-mail: support@tenda.com.cn
support.uk@tenda.cn (United Kingdom)
support.us@tenda.cn (North America)
Copyright
© 2023 Shenzhen Tenda Technology Co., Ltd. All rights reserved. Tenda is a registered trademark legally held by Shenzhen Tenda Technology Co., Ltd. Other brand and product names mentioned herein are trademarks or registered trademarks of their respective holders. Specifications are subject to change without notice.
V1.1 Keep for future reference.