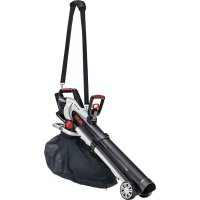
LBV 4090 - Blower AL-KO - Free user manual and instructions
Find the device manual for free LBV 4090 AL-KO in PDF.



| Product type | Battery-powered blower/vacuum |
| Brand | AL-KO |
| Model | LBV 4090 |
| Power supply | Lithium-ion battery 40 V max (not included) |
| Compatible battery capacity | 4 Ah (ref. 113280) or 5 Ah (ref. 113524) |
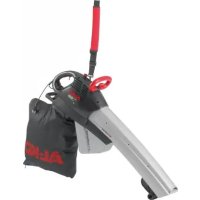
| Operating modes | Blowing and vacuuming |
| Variable blowing speed | Yes, via rotary switch |
| Collection bag | Yes, with zipper closure |
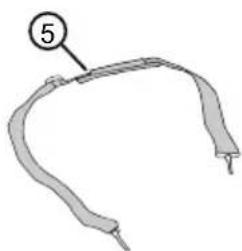
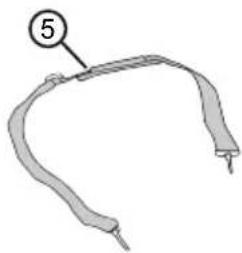
| Carrying strap | Yes, adjustable |
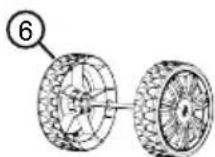
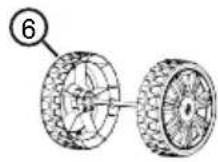
| Carrier wheels | Yes, pair of wheels |
| Sound power level (measured/guaranteed) | 99.5 dB(A) / 102 dB(A) |
| Battery type | Lithium-ion |
| Compatible charger | Ref. 113281 (not included) |
| Use | Private, outdoor |
| Safety devices | Protection grille, motor stop, splash guard |
| Weight (estimated) | Approximately 4.5 kg (without battery) |
| Dimensions (L x W x H) | Not specified |
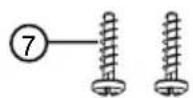
| Delivery contents | Base unit, vacuum nozzle, flat nozzle blower attachment, collection bag, strap, pair of wheels, locking screw, instruction manual |
| Recommended maintenance | Clean after each use, check safety devices |
| Warranty | Legal warranty against manufacturing defects |
Frequently Asked Questions - LBV 4090 AL-KO
User questions about LBV 4090 AL-KO
0 question about this device. Answer the ones you know or ask your own.
Ask a new question about this device
Download the instructions for your Blower in PDF format for free! Find your manual LBV 4090 - AL-KO and take your electronic device back in hand. On this page are published all the documents necessary for the use of your device. LBV 4090 by AL-KO.
USER MANUAL LBV 4090 AL-KO
natural_image
Technical line drawing of a mechanical device with wheels and a handle (no text or symbols)





Inhaltsverzeichnis
Deutsch 8
English....28
Nederlands 46
Français....66
Español 88
Italiano....109
Slovenščina 130
Hrvatski....150
Polski 169
Česky 191
Slovenská 210
Magyarul....230
Dansk 251
Svensk 270
Norsk 289
Suomi 308
Lietuvių 327
Latviešu 346
Русский 366
Україна....389
© 2018
AL-KO KOBER GROUP Kötz, Germany
This documentation or excerpts therefrom may not be reproduced or disclosed to third parties without the express permission of the AL-KO KOBER GROUP.
01
02
03
04
05
natural_image
Illustration of a battery connected to an electrical outlet (no text or symbols)
14
natural_image
Illustration of a person using a power saw machine with a 75° angle标注 (no text or symbols on the diagram itself)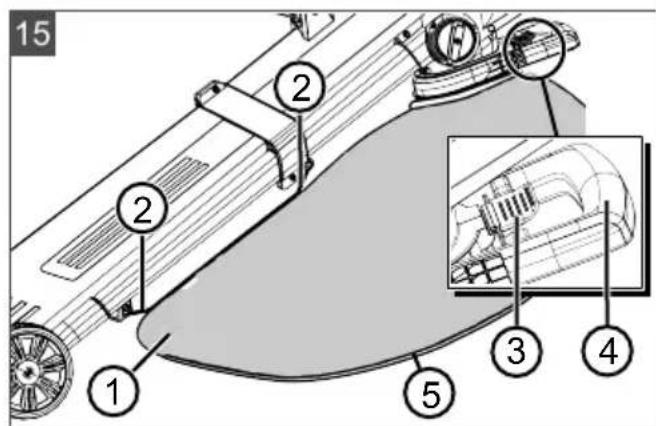
Nr. Bauteil
1 About these operating instructions ..... 28
1.1 Symbols on the title page.... 28
1.2 Legends and signal words ...... 29
2 Product description 29
2.1 Designated use 29
2.2 Possible foreseeable misuse ..... 29
2.3 Safety and protective devices ..... 30
2.4 Symbols on the appliance 30
2.4.1 Safety signs 30
2.4.2 Operating signs 30
2.5 Product overview (01) 30
3 Safety instructions 31
3.1 Safety instructions for rechargeable battery-operated leaf-blowers ..... 31
3.1.1 Safety in the workplace 33
3.1.2 Safety of persons, animals and property 33
3.1.3 Appliance safety 34
3.2 Vibration load 34
3.3 Safety information regarding the rechargeable battery 36
3.4 Safety information regarding the charging unit.... 37
4 Installation.... 38
4.1 Connecting the blowing and vacuum tube (02).... 38
4.2 Fitting the wheelset (03).... 39
4.3 Attaching blow/vacuum tube combination to basic unit (04).... 39
4.4 Attaching collection sack (05) ...... 39
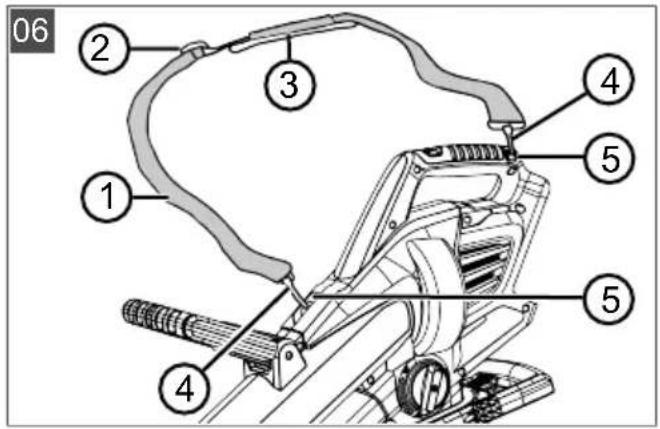
4.5 Attaching and adjusting carrying belt (optional) (06).... 39
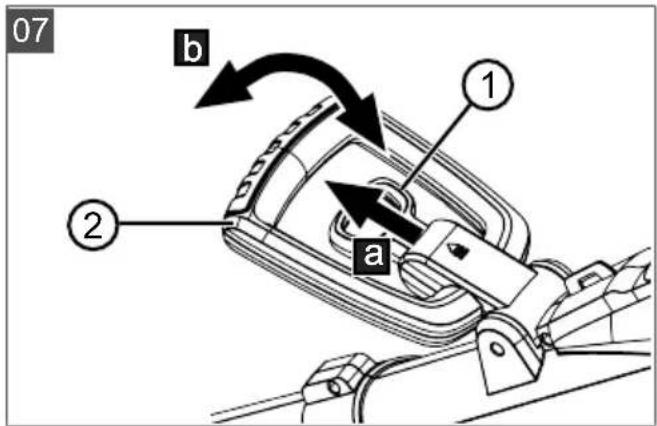
4.6 Adjusting front handle (07) 39
5 Start-up 39
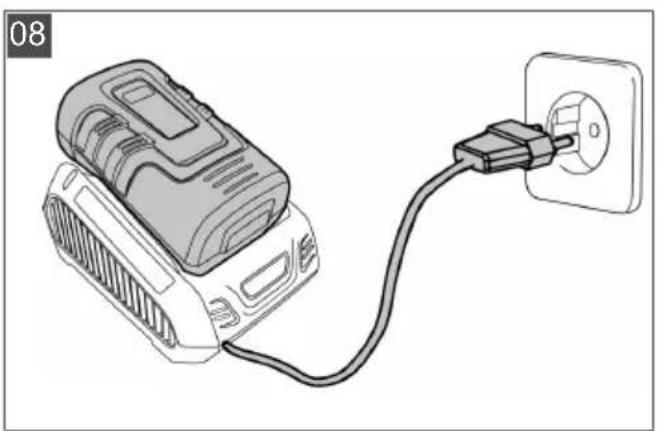
5.1 Charging the rechargeable battery (08).... 39
6 Operation 40
6.1 Determining the charge status of the rechargeable battery (09).... 40
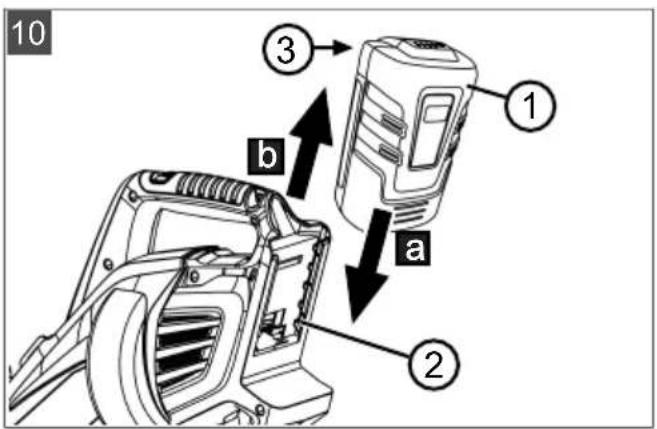
6.2 Inserting and pulling out the rechargeable battery (10) 40
6.3 Set blowing or vacuum operation (11) 40
6.4 Switching the appliance on/off and operating (12 - 14) 40
6.5 Emptying the collecting sack (15)...... 41
7 Maintenance and care.... 42
7.1 Maintenance schedule.... 42
8 Help in case of malfunction 42
9 Transport.... 43
10 Disposal.... 44
11 After-Sales / Service.... 44
12 Guarantee 45
13 Translation of the original EU/EC declaration of conformity.... 45
1 ABOUT THESE OPERATING INSTRUCTIONS
The German version is the original operating instructions. All additional language versions are translations of the original operating instructions.
■ Always safeguard these operating instructions so that they can be consulted if you need any information about the appliance.
■ Only pass on the appliance to other persons together with these operating instructions.
■ Comply with the safety and warning information in these operating instructions.
1.1 Symbols on the title page
Symbol Meaning

It is essential to read through these operating instructions carefully before start-up. This is essential for safe working and trouble-free handling.

Operating instructions
Symbol Meaning
Handle Li-Ion rechargeable batteries with care! In particular, observe the notes on transport, storage and disposal in these operating instructions!
1.2 Legends and signal words

DANGER!
Denotes an imminently dangerous situation which will result in fatal or serious injury if not avoided.

WARNING!
Denotes a potentially dangerous situation which can result in fatal or serious injury if not avoided.

CAUTION!
Denotes a potentially dangerous situation which can result in minor or moderate injury if not avoided.
IMPORTANT!
Denotes a situation which can result in material damage if not avoided.

NOTE
Special instructions for ease of understanding and handling.
2 PRODUCT DESCRIPTION
2.1 Designated use
This appliance can be used for:
■ Blowing away and collecting leaves, grass, dirt and refuse.
■ Vacuuming leaves and grass.
Only work with the appliance when it is fully assembled.
This appliance is intended solely for use in non-commercial applications. Any other use (as well as unauthorised conversions or add-ons) are regarded as contrary to the intended use and will result in exclusion of the warranty as well as loss of conformity (CE mark); the manufacturer will thus decline any responsibility for damage and/or injury suffered by the user or third parties.
2.2 Possible foreseeable misuse
The appliance is not designed for commercial use in public parks, sports facilities, agriculture and forestry.

DANGER!
Risk of explosion and fire
Vacuumed explosive and inflammable products, hot ashes, combustion residues without open flame or smouldering cigarettes lead to an immediate risk of explosion and fire.
- Do not vacuum up any of the products or similar objects mentioned above.

CAUTION!
Risk of injury and damage to property
The strong air jet of the appliance as well as the noise can cause injuries to persons and animals and lead to panic. Animals can panic and run away causing further damage. The loud noise can lead to hearing impairment.
■ Only use the appliance when there are no persons and/or animals in the working area.
■ Do not vacuum small animals.
- Maintain a safe distance, or switch off the appliance if persons or animals approach.
- Do not operate the appliance in the vicinity of hospitals, nursing homes and similar facilities.
IMPORTANT!
Danger of damage to the appliance
Vacuumed fluids, branches, pieces of glass, sharp objects, pieces of metal, stones or other objects damage the components in the appliance. Wet leaves or grass clog the appliance.
- Do not vacuum any of the objects mentioned above.
- Do not vacuum any liquids, wet leaves or grass.
2.3 Safety and protective devices

WARNING!
Risk of injury
Defective and disabled safety and protective devices can lead to serious injury.
■ Have any defective safety and protective devices repaired.
■ Never disable safety and protective devices.
2.4 Symbols on the appliance
2.4.1 Safety signs
Symbol Meaning

Pay special attention when handling this product!

Read the operating instructions before starting operation.
Danger due to objects being thrown out!
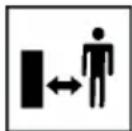
Keep other people out of the danger area.
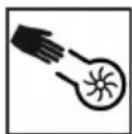
Do not reach into the fan!
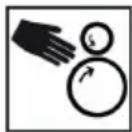
Danger due to rotating parts.
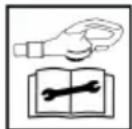
Read the operating instructions before maintenance work!

Wear protective glasses and ear defenders!
Symbol Meaning

Protect the appliance from rain and moisture!
2.4.2 Operating signs
Symbol Meaning
| On the rotary switch: | |
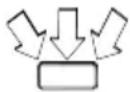 | ■ Vacuum operation |
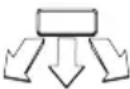 | ■ Blowing operation |
| ■ Switch between vacuum and blowing operation | |
| ■ On the rotary switch (on/off and motor speed): | |
 | ■ Switching on the appliance and increasing the motor speed |
 | ■ Switching off the appliance and decreasing the motor speed |
| On the battery slot: | |
 | ■ positive pole |
 | ■ negative pole |
| [YT6S] | ■ ground connection |
| Front handle: | |
| ■ Pull out the drawbar eye to unlock the front handle | |
2.5 Product overview (01)
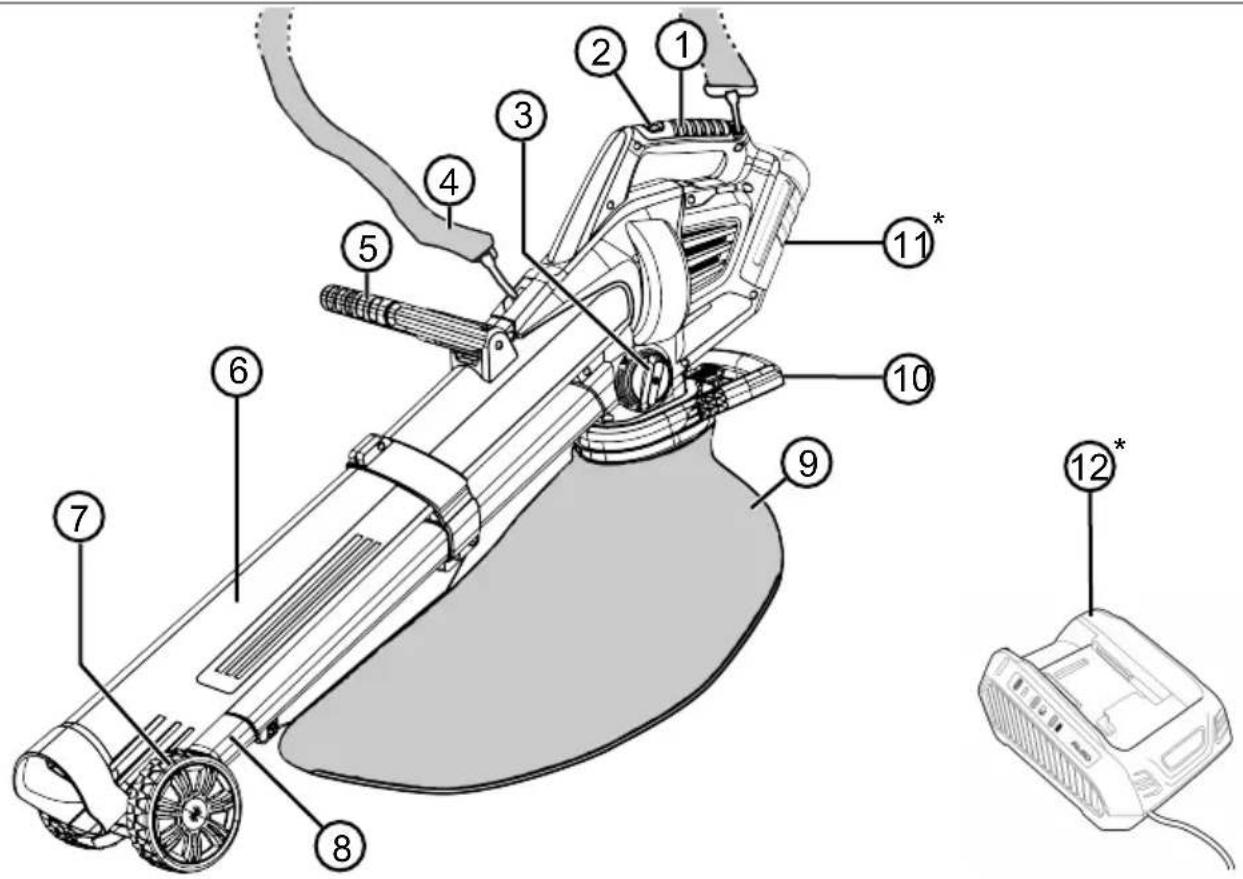
The product overview provides an overview of the appliance.
* Not included in the scope of delivery.
No. Component
| 01/1 Rear hand grip |
| 01/2 Rotary switch (on/off and motor speed) |
| 01/3 Operating mode selector switch |
| No. Component |
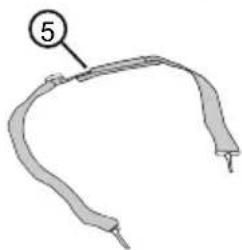
| 01/4 Carrying belt |
| 01/5 Front hand grip |
| 01/6 Vacuum tube |
| 01/7 Jockey wheels |
| 01/8 Blowing tube |
| 01/9 collection bag |
| 01/10 Transport handle at the collecting sack |
| 01/11 Rechargeable battery* |
| 01/12 Charger* |
3 SAFETY INSTRUCTIONS

DANGER!
Danger of fatal injury and danger of extremely severe injury!
Lack of knowledge of the safety instructions and operating instructions can lead to extremely serious and even fatal injury.
- Observe all safety instructions and instructions for use in these operating instructions as well the operating instructions which are referred to before you start using the appliance.
- Keep all supplied documents in a safe place for future reference.
3.1 Safety instructions for rechargeable battery-operated leaf-blowers
Operator
■ Carefully read the safety instructions. Familiarise yourself with the operating and adjustment elements and the intended use of the appliance.
■ This appliance can be used by children of 8 years and old-
er and by persons with re- duced physical, sensory or mental capabilities, or those lacking experience and knowl- edge, if they are supervised or have been instructed with re- gard to the safe use of the ap- pliance and the ensuing risks. Children must not be allowed to play with the appliance. Cleaning and maintenance must not be carried out by children without supervision.
■ People with very strong and complex restrictions may have needs that exceed the instructions described here.
■ Never allow children or persons unfamiliar with these instructions to use the appliance. National regulations may limit the age of the operator.
■ Do not operate the appliance if you are under the influence of alcohol, drugs or medication.
■ The user is responsible for accidents involving other people and their property.
Preparation
■ Before operation, always check that protective devices and covers are undamaged, present or correctly fitted.
Damaged protective devices and covers must be replaced, missing protective devices and covers must be correctly fitted.
■ Never put the appliance into operation while people, especially children or pets, are in the immediate vicinity.
■ Before working, remove any dangerous objects from the working area, e.g. branches, glass or metal pieces, stones.
operation
■ Always wear safety glasses and sturdy shoes when working with the appliance.
- Do not work with the appliance in bad weather conditions, especially when thunderstorms are approaching.
■ Only use the appliance in daylight or good artificial light.
■ Never use the appliance if protective devices and covers are damaged or not present.
■ Always disconnect the appliance from the power supply, i.e. remove rechargeable batteries or non-rechargeable batteries:
■ before leaving the appli-
ance unattended
■ before removing blockages in the appliance
■ before checking, cleaning or working on the appliance
■ whenever the appliance starts to vibrate in an unusual way
■ Always make sure that the ventilation openings on the appliance are free of foreign objects.
■ After contact with dangerous objects and foreign bodies, check the appliance for damage. Have the appliance repaired if it has been damaged.
Maintenance and storage
■ Before carrying out maintenance or cleaning work, disconnect the appliance from the power supply i.e. activate switch-on lock, remove rechargeable batteries or non-rechargeable batteries.
■ Always wear protective gloves during maintenance, care and cleaning work.
■ Only use the spare parts and accessories recommended by the manufacturer.
■ Regularly check and maintain the appliance. The appliance may only be repaired by an AL-KO service centre.
- Keep the appliance out of the reach of children when not in use.
3.1.1 Safety in the workplace
■ Work only in daylight or under very bright artificial light.
■ Before work, remove any hazardous products and objects from the working area, e.g. explosive and inflammable products, hot ashes, combustion residues, smouldering cigarettes, branches, pieces of glass, sharp objects, pieces of metal, stones.
■ Operate the appliance only on solid and level ground and not on sharp inclines.
■ Pay attention to stability.
■ When working, move cautiously and slowly. Do not run. Watch out for obstacles.
■ When working on a slope:
■ Never work on a smooth and slippery slope.
■ Always ensure that you are standing securely.
■ Always blow the leaves near to the ground.
■ Never work up a slope.
3.1.2 Safety of persons, animals and property
■ Only use the appliance for the purposes for which it is intended. Any non-intended use can lead to injury and property damage.
■ You are responsible for accidents and endangering other persons or your property.
■ Only switch on the appliance when there are no persons and/or animals in the working area.
- Maintain a safe distance to persons or animals, or switch off the appliance if persons or animals approach.
■ Never aim the blowing tube at persons or animals.
■ Never blow refuse in the direction of persons or pets.
■ During operation, keep your eyes and ears away from the intake opening.
- Do not reach into the vacuum and vent grilles when the motor is running. Injuries can occur due to rotating appliance parts.
■ Always switch off the appliance when it is not needed, e.g. when changing the work area, during maintenance and care work.
- Immediately switch off the appliance if there is an accident in order to avoid further injuries and/or property damage.
■ Never operate the appliance with worn or defective parts. Worn or defective appliance
parts can cause serious injuries.
- Keep the appliance out of the reach of children.
■ Switch off the appliance before crossing gravel paths.
■ Do not lay the appliance down on gravel whilst switched on.
3.1.3 Appliance safety
■ Only use the appliance under the following conditions:
■ The appliance is not dirty, especially not with petrol and oil.
■ The appliance show no signs of damage, especially the protective grille.
■ All controls function properly.
- All accessory parts intended for the respective operating mode are fitted on the appliance.
- Do not overload the machine. It is intended for light work in the private sphere. Overload can lead to damage to the appliance.
- Do not vacuum up any branches, pieces of glass, sharp objects, pieces of metal, stones or other objects. They will damage the shredding blade and the rotor.
■ Never block the vacuum and ventilation grille during operation in order to avoid any overheating of the motor.
- Immediately switch off the appliance if the motor begins to vibrate abnormally or strongly. There is an appliance fault in this case.
■ Never operate the appliance with worn or defective parts. Always replace defective parts with original spare parts from the manufacturer. If the appliance is operated with worn or defective parts, guarantee claims against the manufacturer are excluded.
3.2 Vibration load
■ Danger due to vibration
The actual magnitude of the vibration emissions during the use of the appliance may deviate from that stated by the manufacturer. Observe the following influencing factors before or during use:
Is the appliance being used as intended?
Is the material being cut or processed in the proper manner?
Is the appliance in a proper condition of use?
Is the cutting tool properly sharpened or is the correct cutting tool installed?
Are the handle grips and any optional vibration grips mounted, and are they firmly attached to the appliance?
■ Only operate the tool at the motor speed required for the respective work. Avoid using the maximum speed in order to reduce noise and vibrations.
■ The noise and vibrations of the tool may increase due to improper use and maintenance. This leads to health damage. In this case, immediately switch off the tool and have it repaired by an authorised service workshop.
■ The degree of stress due to vibration depends on the work to be performed or on the use of the tool. Estimate the stress and plan appropriate work breaks. This considerably reduces stress due to vibration over the entire working time.
■ Extensive use of the tool exposes the operator to vibrations, which can lead to circulatory issues ("white fingers"). To avoid this risk, wear gloves and keep your hands warm. If
any symptoms of "white fingers" occur, immediately consult a physician. These symptoms include: Numbness, loss of feeling, tingling, itching, pain, reduced muscular strength, changes in the colour or condition of the skin. Normally these conditions affect the fingers, hands or pulse. The risk increases at low temperatures.
■ Take long breaks during your working day so you can recover from the noise and the vibrations. Plan your work in such a way that the use of appliances that generate strong vibrations is spread over several days.
If you notice an unpleasant sensation or discolouration of the skin on your hands when using the tool, stop work immediately. Take sufficient work breaks. Without sufficient breaks, a hand/arm vibration syndrome can occur.
- Minimise your risk of being exposed to vibrations. Maintain the tool according to the instructions in the operating instructions.
■ If the tool is used frequently, contact your dealer to pur-
chase anti-vibration accessories (e.g. handles).
- Avoid working with the tool at temperatures below 10 °C.
Define how the vibration load can be limited in a work plan.
3.3 Safety information regarding the rechargeable battery
This section mentions all the basic safety instructions to be heeded when using the rechargeable battery. Read these instructions.
■ Remove the rechargeable battery from the power tool before starting any work on the power tool (e.g. maintenance, tool change), before transport and before storage.
■ Only use the rechargeable battery as designated, i.e. for AL-KO rechargeable battery-driven appliances. Only charge the rechargeable battery with the AL-KO charging unit provided.
■ Only unpack the new rechargeable battery from the original packaging when it is to be used.
■ Fully charge the rechargeable battery before using it for the first time and always use the specified charging unit. Com-
ply with the details given in these instructions for use for charging the rechargeable battery.
- Do not use the rechargeable battery in environments where there is a potential risk of explosion and/or fire.
- Do not expose the rechargeable battery to moisture and humidity when in use with the appliance.
■ Protect the rechargeable battery from heat, oil and fire to prevent it being damaged so no vapours and electrolyte liquids can escape. There is a danger of explosion!
- Do not subject the rechargeable battery to impacts or throw it.
- Do not use the rechargeable battery when soiled or wet. Before use, clean and dry the rechargeable battery with a dry, clean cloth.
- When the battery pack is not in use, keep it away from other metal objects to prevent bridging the contacts (e.g. paper clips, coins, keys, nails, screws). Do not use sharp objects (e.g. a screwdriver) to work on the battery. This can cause an internal short circuit which can lead to overheat-
ing, fire or explosion of the battery.
- Do not open, dismantle or crush the rechargeable battery. There is a danger of electric shock and short-circuit.
■ An improperly used and damaged rechargeable battery can cause vapours and electrolyte liquid to escape. Vent the room adequately and in the case of any disorders, consult a doctor.
If accidental contact with electrolyte liquid occurs, flush with water and thoroughly rinse the eyes immediately. Then consult a doctor.
This rechargeable battery must not be used by unauthorised persons unless they are supervised by a person responsible for their safety or have been instructed on how to use the rechargeable battery. Unauthorised persons include, for example:
■ Persons (including children) with limited physical, sensory or mental aptitude.
■ Persons who have no experience and/or knowledge of the rechargeable battery.
■ Children must be supervised and instructed so they do not
play with the rechargeable battery.
- Do not leave the rechargeable battery permanently in the charger. For prolonged storage, remove the rechargeable battery from the charger.
■ When not in use, remove the rechargeable batteries from the operated appliances. - Dry the unused rechargeable battery and store in a closed place. Protect from heat and direct sunlight. Unauthorised persons and children must not have access to the rechargeable battery.
3.4 Safety information regarding the charging unit
This section mentions all the basic safety and warning information to be heeded when using the charging unit. Read these instructions.
■ Only use the charging unit as designated, i.e. for charging the intended rechargeable batteries. Only charge original rechargeable batteries from AL-KO in the charging unit.
Before each use, inspect the charging unit – and especially the mains cable and the rechargeable battery compart-
ment – for damage. Only use the charging unit when it is in proper working order.
- Do not use the charging unit in environments where there is a potential risk of explosion and/or fire.
■ Only operate the charging unit indoors and do not expose it to moisture and humidity.
■ Always place the charging unit on a well ventilated and non-inflammable surface because it heats up during the charging process. Keep the ventilation slots clear and do not cover the charging unit.
■ Before connecting the charging unit, make sure that the mains voltage matches the voltage stated in the "Technical data".
■ Only use the mains cable for connecting the charging unit, not for any other purpose. Do not carry the charging unit by the mains cable and do not remove the power plug from the power outlet by pulling on the mains cable.
■ Protect the mains cable from heat, oil and sharp edges to prevent it being damaged.
■ Do not use the charging unit and rechargeable battery
when soiled or wet. Before using the charging unit, clean and dry the rechargeable battery.
- Do not open the charging unit or rechargeable battery. There is a danger of electric shock and short-circuit.
■ For your own safety, only have the charging unit repaired by qualified specialist personnel using genuine spare parts.
■ Dry the unused charging unit and store in a closed place. Unauthorised persons and children must not have access to the charging unit.
4 INSTALLATION

WARNING!
Danger if assembly is not carried out completely!
Operation of an incompletely assembled appliance can result in serious injury.
■ Only operate the appliance when it is fully assembled.
- Do not insert the battery into the appliance until it is fully assembled.
- Check that all safety and protective devices are in place and functioning correctly before switching on.
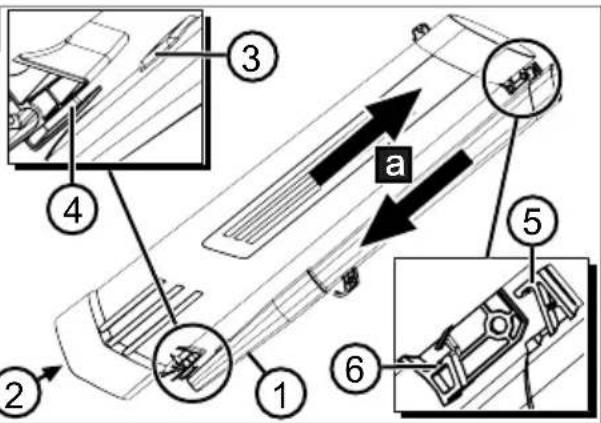
4.1 Connecting the blowing and vacuum tube (02)
The blowing and vacuum tube must first be combined. The flat nozzle (02/1) of the blow tube and the intake opening (02/2) of the vacuum tube must point in the same direction.
- Attach the blow tube to the vacuum tube as follows:
■ The metallic guide plate (02/3) of the blow tube and the guide (02/4) of the
vacuum tube must be in front of each other.
■ The blow tube hook (02/5) and the vacuum tube hook (02/6) must be in front of each other.
- Push the blowing and vacuum tubes against each other until they snap into place (02/a).
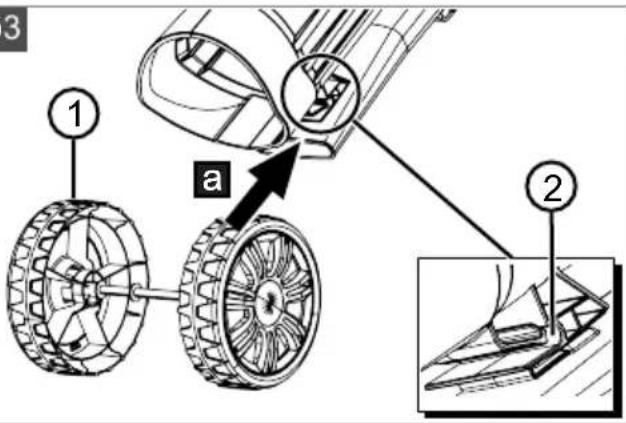
4.2 Fitting the wheelset (03)
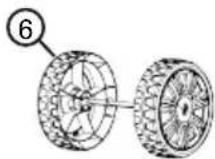
- Insert the wheel set (03/1) until it engages in the bearing (03/2) (03/a).
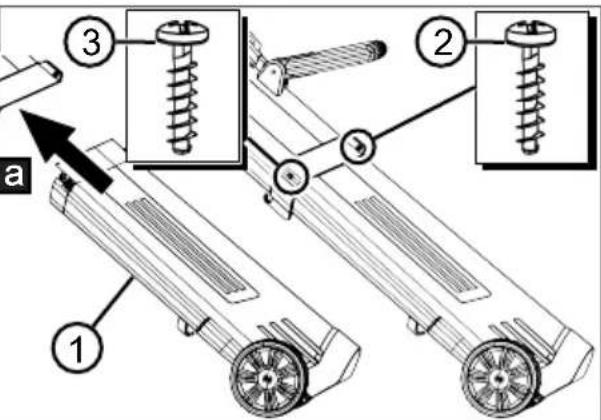
4.3 Attaching blow/vacuum tube combination to basic unit (04)
- Insert the blow/vacuum tube combination (04/1) up to the stop of the basic unit (04/a) and hold it in place.
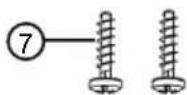
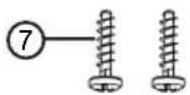
- Insert first securing bolt (04/2) and screw in loosely.
- Insert second securing bolt (04/3) and screw in loosely.
- Tighten both securing bolts.
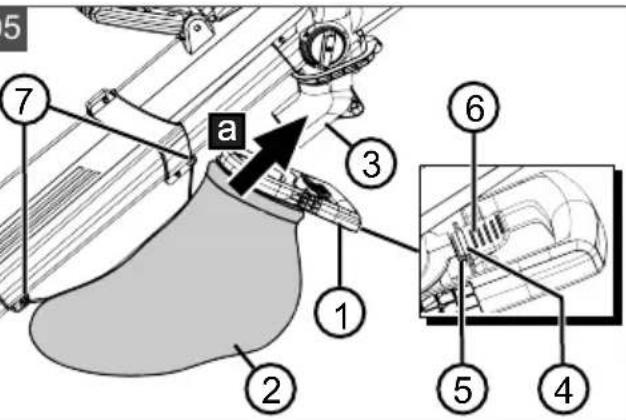
4.4 Attaching collection sack (05)
- Place the transport handle (05/1) of the collecting sack (05/2) onto the ejection nozzle (05/3) (05/a).
- Push the transport handle upwards until the hook (05/4) on the transport handle and the hook (05/5) on the basic unit engage.
Note: You can remove the collecting sack after pressing the release catch (05/6).
- Hook the two eyes of the bag into the hooks (05/7) of the blow tube.
4.5 Attaching and adjusting carrying belt (optional) (06)
-
Attaching the carrying belt:
-
Align the belt (06/1) on the appliance so that the buckle (06/2) is in front of the operator and the shoulder pad (06/3) is on the operator's shoulder.
■ Hook the snap hooks (06/4) of the carrying belt into the eyes (06/5) on the basic unit. -
Adjust the length of the carrying belt:
-
Hang the entire appliance on the shoulder with the carrying belt. The buckle must be in front of the operator and the shoulder pad on the shoulder.
■ Move the buckle until the support wheels touch the ground.
4.6 Adjusting front handle (07)
- Pull out (07/a) drawbar eye (07/1).
- Turn the front handle (07/2) to the desired position (07/b).
5 START-UP
5.1 Charging the rechargeable battery (08)

CAUTION!
Danger of fire during charging!
Due to heating of the charger, there is a danger of fire if it is placed on an inflammable surface and is not adequately ventilated.
■ Always use the charger on a non-inflammable surface or in a non-combustible environment.
If available: Keep the ventilation slots free.

NOTE
The rechargeable battery and the charging unit are not included.
The rechargeable battery is partially charged. Fully charge the rechargeable battery before using it for the first time. The rechargeable battery can be charged in any charge status. Interrupting charging does not damage the rechargeable battery.

NOTE
For detailed information, heed the separate operating instructions for the rechargeable battery and for the charging unit.
See:
■ Operating Instructions 441630 "Li-Ion rechargeable battery B150 Li (B05-3640), B200 Li (B05-3650)"
■ Operating Instructions 441633 "Charging unit C130 Li for batteries B150 Li (B05-3640), B200 Li (B05-3650)"
6 OPERATION

WARNING!
Danger if assembly is not carried out completely!
Operation of an incompletely assembled appliance can result in serious injury.
■ Only operate the appliance when it is fully assembled.
- Do not insert the battery into the appliance until it is fully assembled.
- Check that all safety and protective devices are in place and functioning correctly before switching on.
6.1 Determining the charge status of the rechargeable battery (09)
There is a control panel with a pushbutton (09/1) and LED charge status displays (09/2 to 09/5) on the front of the rechargeable battery.
-
Press the pushbutton (09/1).
The charge status displays light according to the charge status of the rechargeable battery. -
Read the charge level:
| Lighting LEDs | Charge status of the rechargeable battery |
| Green (09/2) | The rechargeable battery is fully charged. |
| Green (09/3) and (09/4) | Rechargeable battery is charged to over 50 %. |
| Green (09/4) | Rechargeable battery is charged to less than 50 %. |
| Red (09/5) | The rechargeable battery is fully discharged or the rechargeable battery has been overheated/undercooled. |
6.2 Inserting and pulling out the rechargeable battery (10)
Inserting the battery
- Push the rechargeable battery (10/1) into the battery slot (10/2) until it engages (10/a).
Pull out the rechargeable battery
- Press and hold the unlock button (10/3).
- Pulling out the rechargeable battery (10/b).
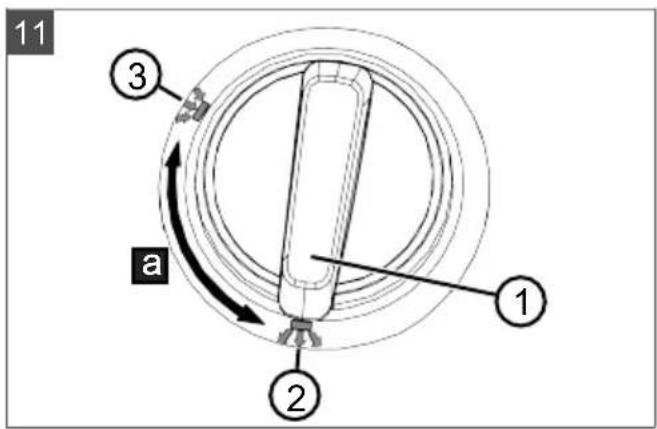
6.3 Set blowing or vacuum operation (11)
- Turn the operating mode selector switch (11/1) until it clicks into place on the symbol of the desired operating mode (11/a):
■ Blowing operation (11/2)
■ Vacuum operation (11/3)
6.4 Switching the appliance on/off and operating (12 - 14)

CAUTION!
Risk of injury and damage to property
Persons or animals can be injured and soiled by the air jet and blown away material.
It is essential to make sure that the air jet and blown away material does not negatively affect persons or animals or damage objects.
Note the wind direction.

NOTE
Never work against the wind to ensure that you and persons behind you are not soiled.
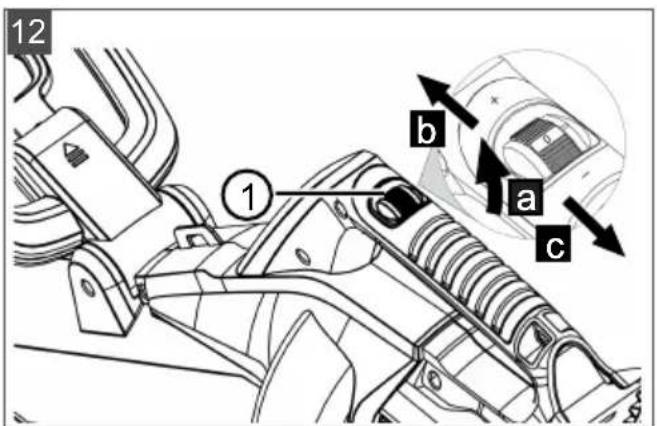
Switch on the appliance (12)
- Optional: Hang the unit over your shoulder and stand firmly.
- Turn the rotary switch (12/1) forwards vigorously to switch on (12/a), and after the click turn it further (12/b) until the desired blowing or vacuum speed is reached.
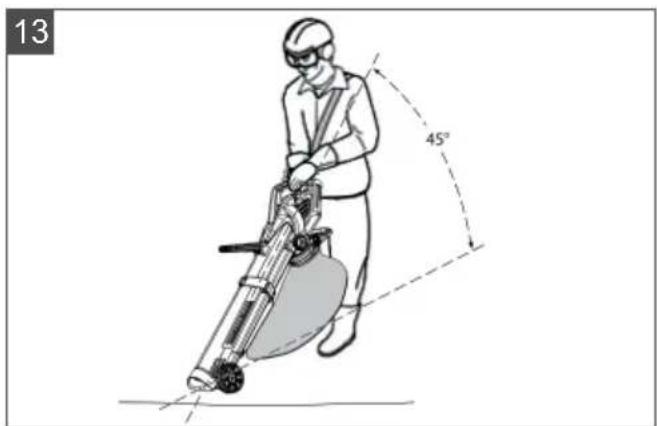
Working in blowing operation (13)

NOTE
The best blowing performance is achieved when the appliance is not operated directly on the ground, but somewhat away from the ground and preferably at a flat angle.
- Lift the appliance by the front handle and swivel it to the left and right. If necessary, you can place the unit on the support wheels.
- Adjust the blowing speed to the material to be blown away during work:
■ Low motor speed: For light, dry material, e.g. chippings, grains and dirt
■ Medium motor speed: For material of medium size and weight, e.g. dry leaves, grass cuttings
■ High motor speed: for heavy or wet material, e.g. wet leaves
Working in vacuum operation (14)

DANGER!
Risk of explosion and fire
Vacuumed explosive and inflammable products, hot ashes, combustion residues without open flame or smouldering cigarettes lead to an immediate risk of explosion and fire.
- Do not vacuum up any of the products or similar objects mentioned above.
IMPORTANT!
Danger of damage to the appliance
Vacuumed fluids, branches, pieces of glass, sharp objects, pieces of metal, stones or other objects damage the components in the appliance. Wet leaves or grass clog the appliance.
- Do not vacuum any of the objects mentioned above.
■ Do not vacuum any liquids, wet leaves or grass.

NOTE
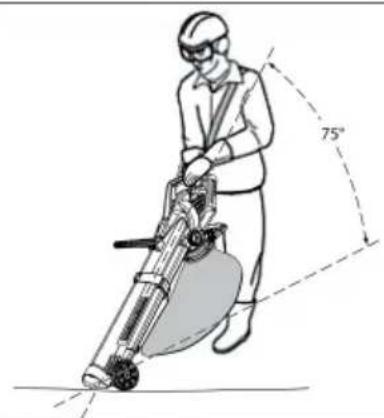
The best vacuum performance is achieved when the appliance stands directly on the ground or on the wheels and the appliance is operated at the steepest possible angle of approx. 75 degrees.

NOTE
Do not vacuum small animals.
-
Lift the appliance by the front handle and swivel it to the left and right. If necessary, you can place the unit on the support wheels.
-
While working:
■ Operate the appliance at medium/high engine speed.
- Keep the intake opening of the vacuum tube only a few centimetres above the ground.
Do not fill the collecting sack completely. The vacuum power decreases if the collecting sack is full.
- After vacuuming a dangerous object:
■ Turn the appliance off immediately.
■ Pull out the rechargeable battery.
■ Remove the object from the appliance and empty the collection sack (see chapter 6.5 "Emptying the collecting sack (15)", page 41).
- Check whether the appliance has been damaged.
Switch off the appliance (12)
-
Turn the rotary switch backwards (12/c) until you hear a click. The appliance is switched off.
-
If the appliance is not used for a longer period of time or if it is unattended:
■ Pull out the rechargeable battery (see chapter 6.2 "Inserting and pulling out the rechargeable battery (10)", page 40).
■ Empty the collecting sack (see chapter 6.5 "Emptying the collecting sack (15)", page 41).
6.5 Emptying the collecting sack (15)
There are two ways of emptying the collecting sack.
One by removing the appliance:
-
Switch off and set down the appliance (see chapter 6.4 "Switching the appliance on/off and operating (12 - 14)", page 40).
-
Remove the collecting sack (15/1):
■ Unhook both eyelets (15/2) of the collecting sack.
■ Press down the release latch (15/3).
■ Press down the transport handle (15/4) and remove the collecting sack.
- At the ejection point: Open the zip(15/5) of the collecting sack and shake out the contents. Close the zip again.
- Attach the collecting sack to the appliance again (see chapter 4.4 "Attaching collection sack (05)", page 39).
The second option is to go to the ejection point with the appliance and carry out the following steps.
-
Switch off the appliance (see chapter 6.4 "Switching the appliance on/off and operating (12 - 14)", page 40).
-
At the ejection point: Open the zip(15/5) of the collecting sack and shake out the contents. Close the zip again.
7 MAINTENANCE AND CARE

WARNING!
Danger of lacerations
Danger of cutting injuries when reaching into sharp-edged, moving appliance parts and into cutting tools.
■ Before maintenance, care and cleaning work, always switch off the appliance. Remove the rechargeable battery.
■ Always wear protective gloves during maintenance, care and cleaning work.
7.1 Maintenance schedule
The following information relates to normal application conditions. Under special conditions, such as working for a particularly long time or in a very dirty working area, the specified maintenance intervals must be shortened accordingly.
Parts are only allowed to be renewed by genuine spare parts.
| Interval Components Work to be performed | ||
| Before starting work | Complete appliance Visual inspection for condition | |
| Controls Functional check | ||
| After daily work | Complete appliance Clean | |
| Collecting bag Clean and dry when damp | ||
| If not functioning properly | Rotary switch Renew | |
| Operating mode selector switch | Renew | |
| If defective | All appliance parts Renew | |
| Collecting bag Renew | ||
| Safety sticker Renew | ||
* May only be carried out by your dealer or an authorised service workshop.
8 HELP IN CASE OF MALFUNCTION

CAUTION!
Risk of injury
Sharp-edged and moving appliance parts can lead to injury.
■ Always wear protective gloves during maintenance, care and cleaning work.
| Malfunction Cause Remedy | ||
| Appliance does not blow or vacuum. | Blockage in the unit Remove blockage. | |
| Motor does not run. | Rechargeable battery is flat. Charge the rechargeable battery. | |
| Rechargeable battery missing or rechargeable battery not seated correctly. | Insert the rechargeable battery correctly. | |
| Rechargeable battery is too cold or too hot. | Warm up the rechargeable battery slightly or allow it to cool down. | |
| Rotary switch is defective. Contact an AL-KO service centre. | ||
| Motor keeps cutting out. Rotary switch is defective. Contact an AL-KO service centre. | ||
| Motor cuts out. Motor protection switch has tripped. | Wait until the motor protection switch switches the machine back on. | |
| Rechargeable battery operating time is significantly shorter. | Ventilation openings are dirty. | Clean the equipment. |
| Rechargeable battery discharged because it has not been used for some time. | Charge the rechargeable battery. | |
| The service life of the rechargeable battery has expired. | Replace the rechargeable battery. Only use genuine accessories from the manufacturer. | |
| Rechargeable battery cannot be charged. | Rechargeable battery contacts are dirty. | Clean battery contacts with a dry cloth. Do not bridge battery contacts with metallic objects! |
| Rechargeable battery or charging unit is defective. | Order spare parts. Contact an AL-KO service centre. | |
| Rechargeable battery is too hot. | Allow the battery to cool down. | |
9 TRANSPORT
Before transporting, carry out the following measures:
- Switch off the tool.
- Remove the rechargeable battery from the appliance.
- Pack the battery properly.

NOTE
The nominal energy of the rechargeable battery is more than 100 Wh. Therefore, observe the following transport instructions.
The li-ion rechargeable battery contained in the appliance is subject to the hazardous goods law, but can be transported under simplified conditions:
The rechargeable battery can be transported on public roads by the private user without further conditions provided it is packaged for retail sale and the transport serves personal purposes.
■ Commercial users who carry out the transport in connection with their main activity (e.g. delivery from and to building sites, or demonstrations) can also take advantage of this simplification.
In both cases, it is essential to take the mandatory precautions mentioned above to prevent any leakage of the contents. In other cases, it is essential to comply with the regulations of the hazardous goods law. In the case of non-compliance, severe penalties can be imposed on the sender and possibly the transporter.
Additional notes on transport and shipment
■ Only transport or send the li-ion rechargeable battery in an undamaged condition.
For transporting the rechargeable battery, only use the original cardboard box or a suitable hazardous goods cardboard box (not required for rechargeable batteries with a nominal energy less than 100 Wh).
■ Tape off exposed rechargeable battery contacts to avoid a short circuit.
- Secure the rechargeable battery against shifting in the packaging to avoid damage to the rechargeable battery.
■ Ensure the correct marking and documentation of the shipment for transport or shipping (e.g. by parcel service or freight forwarding).
- Check in advance that transport with the selected service provider is possible and indicate the shipment.
We recommend involving a hazardous goods specialist in preparation of the shipment. Also heed any further national regulations.
10 DISPOSAL
Information on the German Electrical and Electronic Equipment Act (ElectroG)

■ Electrical and electronic appliances do not belong in household waste, but should be collected and disposed of separately.
■ Used batteries or rechargeable batteries that are not installed permanently in the old appliance must be removed before disposal. Their disposal is regulated by the battery law.
- Owners or users of electrical and electronic appliances are obliged by law to return them after use.
■ The end user bears personal responsibility for deleting his personal data from the old appliance to be disposed of.
The symbol of the crossed-through rubbish bin means that electrical and electronic appliances may not be disposed of in the household rubbish. Electrical and electronic appliances can be handed in at the following places at no charge:
■ Public service disposal or collection points (e.g. municipal building yards)
■ Points of sale of electrical appliances (stationary and online) provided traders are obliged to take them back or offer this voluntarily.
These statements only apply to appliances that are installed and sold in the countries of the European Union and are subject to European Directive 2012/19/EU. Different provisions may apply to the disposal of electrical and electronic appliances in countries outside the European Union.
Information on the German Battery Act (BattG)

■ Used batteries and rechargeable batteries do not belong in household waste, but should be collected and disposed of separately.
For safe removal of batteries or rechargeable batteries from the electrical appliance and for
information on their type or chemical system, follow the further information within the operating or installation instructions.
- Owners or users of batteries and rechargeable batteries are obliged by law to return them after use. Return is limited to the handover of customary household quantities.
Used batteries can contain harmful substances or heavy metals that can cause damage to the environment and human health. Reuse of the used batteries and use of the resources contained therein contributes to the protection of these two essential commodities.
The symbol of the crossed-through rubbish bin means that batteries and rechargeable batteries may not be disposed of in household rubbish.
In addition, if the symbol Hg, Cd or Pb appears under the rubbish bin, this stands for the following:
■ Hg: Battery contains more than 0.0005 % mercury
Cd: Battery contains more than 0.002 % cadmium
■ Pb: Battery contains more than 0.004 % lead
Rechargeable batteries and batteries can be handed in at the following places at no charge:
■ Public service disposal or collection points (e.g. municipal building yards)
■ Points of sale of batteries and rechargeable batteries
■ Disposal points of the common take-back system for the used batteries of appliances
■ Disposal point of the manufacturer (if not a member of the common take-back system)
These statements apply only to rechargeable batteries and batteries that are sold in the countries of the European Union and that are subject to European Directive 2006/66/EU. Different provisions can apply to the disposal of rechargeable batteries and batteries in countries outside the European Union.
11 AFTER-SALES / SERVICE
In the event of questions of warranty, repair or spare parts, please contact your nearest AL-KO Service Centre. These can be found on the Internet at:
www.al-ko.com/service-contacts
12 GUARANTEE
We will resolve any material or manufacturing faults on the appliance during the legal warranty period for claims relating to faults, in accordance with our choice either to repair or replace. The legal warranty period is determined by the legislation of the country in which the appliance was purchased.
Our warranty promise applies only if:
The warranty becomes void in the case of:
■ These operating instructions are heeded
■ The appliance is handled correctly
■ Original spare parts have been used
■ Unauthorised repair attempts
■ Unauthorised technical modifications
Non-intended use
The guarantee excludes:
■ Paint damage that can be attributed to normal wear and tear
■ Wear parts that are marked with a frame xxxxxx (x) on the spare parts card
The guarantee period commences with purchase by the first end user. The date on the proof of purchase is decisive. In the event of a guarantee claim, please take this guarantee declaration and the original proof of purchase, and contact your dealer or the nearest authorised customer service centre. This statement does not affect the purchaser's statutory claims for defects against the vendor.
13 TRANSLATION OF THE ORIGINAL EU/EC DECLARATION OF CONFORMITY
We hereby declare, as the exclusive responsible party, that this product in its marketed form conforms to the requirements of the harmonised EU Directives, EU safety standards and the product-specific standards.
Product
| Battery-operated leaf-blower/vacuum |
| Serial number |
| G2043012 |
Manufacturer
Duly authorised person for technical file
| Andreas Hedrich |
| Ichenhauser Str. 14 |
| D-89359 Kötz |
| Germany |
Type
| LBV 4090 |
EU directives
| 2006/42/EC |
| 2014/30/EU |
| 2000/14/EC |
| 2011/65/EU |
Harmonised standards
| EN 60335-1:2012 |
| EN 50636-2-100:2014 |
| EN 62233:2008 |
| EN ISO 12100:2010 |
| EN 55014-1:2006+A1:2009+A2:2011 |
| EN 55014-2:2015 |
| EN 61000-3-2:2014 |
| EN 61000-3-3:2013 |
| Kötz, 20/03/2018 |
Sound power level
| EN ISO 3744 |
| measured/guaranteed |
| 99.5 dB(A) / 102 dB(A) |
Conformity evaluation
| 2000/14/EC Appendix V |
Dr. Wolfgang Hergeth Managing Director
VERTALING VAN DE ORIGINELE GEBRUIKERSHANDLEIDING
Inhoudsopgave
2 PRODUCTOMSCHRIJVING
2.1 Beoogd gebruik
Nr. Component
Dr. Wolfgang Hergeth Managing Director
TRADUCTION DE LA NOTICE D'UTILISATION ORIGINALE
Table des matières
N° Pièce
www.al-ko.com/service-contacts
13 GARANTIE

natural_image
Simple line drawing of a curved mechanical or electrical component with no text or symbolsN.° Componente
1 Aparato básico
N. Componente
www.al-ko.com/service-contacts
13 GARANZIA

natural_image
Simple line drawing of a curved mechanical or electrical component with no text or symbolsŠt. Sestavni del
1 Osnovna naprava
2 Sesalna cev
3 Izpihovalna cev s ploskim nastavkom
4 Lovilna vreča
Št. Sestavni del
5 Nosilni pas
6 Komplet koles (2 oporni kolesi na osi)
12 SERVISNA SLUŽBA/SERVIS
www.al-ko.com/service-contacts
13 GARANCIJA
2000/14/ES, priloga V
Usklajeni standardi
EN 60335-1:2012
EN 50636-2-100:2014
EN 62233:2008
EN ISO 12100:2010
EN 55014-1:2006+A1:2009+A2:2011
EN 55014-2:2015
EN 61000-3-2:2014
EN 61000-3-3:2013
Kötz, 20. 3. 2018
Dr. Wolfgang Hergeth, generalni direktor
PRIJEVOD ORIGINALNIH UPUTA ZA UPORABU
Sadržaj
1 Informacije o Uputama za uporabu...... 150
1.1 Simboli na naslovnoj stranici.... 151
1.2 Objasnjenja oznaka i signalnih riječi .. 151
2 Opis proizvoda.... 151
2.1 Namjenska uporaba 151
2.2 Moguća predvidiva nepravilna uporaba 151
2.3 Ostali rizici.... 152
2.4 Sigurnosni i zaštitni uređaji .....152
2.5 Simboli na uređaju 152
2.5.1 Sigurnosne oznake.... 152
2.5.2 Oznaka rukovanja.... 152
2.6 Opseg isporuke 153
2.7 Pregled proizvoda (01).... 153
3 Sigurnosne napomene.... 154
3.1 Sigurnosne napomene za akumulatorske uređaje za puhanje lišća.... 154
3.1.1 Sigurnost na radnome mjestu..... 155
3.1.2 Sigurnost ljudi, životinja i imovine 156
3.1.3 Sigurnost uređaja 157
3.2 Opterećenje vibracijama .....157
3.3 Sigurnosne napomene za akumulator158
3.4 Sigurnosne napomene za punjač..... 160
4 Montaža 161
4.1 Sastavljanje cijevi za puhanje i cijevi za usisavanje (02) 161
4.2 Postavljanje sklopa kotača (03) .....161
4.3 Pričvršćenje sklopa cijevi za puhanje i cijevi za usisavanje na osnovni uređaj (04) 161
4.4 Pričvršćenje vreće za sakupljanje (05).... 161
4.5 Stavljanje i namještanje remena za nošenje (dodatno se naručuje) (06) ... 161
4.6 Namještanje prednje ručke (07) ..... 162
5 Puštanje u rad.... 162
5.1 Punjenje akumulatora (08) 162
6 Upravljanje 162
6.1 Provjera razine napunjenosti akumulatora (09) 162
6.2 Stavljanje i vađenje akumulatora (10) 162
6.3 Namještanje pogona za puhanje ili usisavanje (11) 163
6.4 Uključivanje/isključivanje i pogon uređaja (12 - 14)....163
6.5 Pražnjenje vreće za sakupljanje (15)..164
7 Održavanje i njega ....164
7.1 Plan održavanja....164
8 Pomoć u slučaju smetnji....165
9 Transport....166

natural_image
Simple line drawing of a curved mechanical or electrical component with no text or symbolsBr. Dio
1 Osnovni uređaj
2 Usisna cijev
3 Cijev za puhanje s ravnom mlaznicom
4 Vreća za sakupljanje
5 Remen za nošenje
6 Sklop kotača (2 potporna kotača s oso- vinom)
Br. Dio
www.al-ko.com/service-contacts
13 JAMSTVO
Možebitne greške u materijalu ili proizvodnji na uređaju uklonit ćemo tijekom zakonskoga roka zastare za jamstvo na nedostatke prema vlastitom izboru popravljanjem ili zamjenskom dostavom. Rok zastare određuje se prema pravu države u kojoj je uređaj kupljen.
Nr elementu
1 Urządzenie bazowe
2 Rura ssąca
Dr. Wolfgang Hergeth Managing Director
PŘEKLAD ORIGINÁLNÍHO NÁVODU K POUŽITÍ Obsah
Č. Součást
www.al-ko.com/service-contacts
13 ZÁRUKA
www.al-ko.com/service-contacts
13 ZÁRUKA
10 Opbevaring....267
10.1 Opbevaring af apparatet......267
12 Kundeservice/service 268
13 Garanti....268
Nr. Komponent
1 Basisapparat
2 Sugerør
www.al-ko.com/service-contacts
13 GARANTI
Nr. Komponent
1 Basenhet
2 Insugningsrör
www.al-ko.com/service-contacts
13 GARANTI
12 Kundeservice/service 306
13 Garanti....306
Nr. Komponent
7 VEDLIKEHOLD OG PLEIE

ADVARSEL!
Fare for kuttskader
www.al-ko.com/service-contacts
13 GARANTI
Dr. Wolfgang Hergeth Managing Director
KÄÄNNÖS ALKUPERÄISESTÄ KÄYTTÖOHJEESTA
Sisällysluettelo
Nro Osa
1 Peruslaite
2 Imuputki
www.al-ko.com/service-contacts
13 GARANTIJA
Nr. Detaja
www.al-ko.com/service-contacts
13 GARANTIJA
Ho- мер
компонента
www.al-ko.com/service-contacts
13 ГАРАНТИЯ
www.al-ko.com/service-contacts
13 ГАРАНТИЯ


- Inhaltsverzeichnis
- ABOUT THESE OPERATING INSTRUCTIONS
- Symbols on the title page
- Symbol Meaning
- Legends and signal words
- DANGER!
- WARNING!
- CAUTION!
- IMPORTANT!
- NOTE
- PRODUCT DESCRIPTION
- Designated use
- Possible foreseeable misuse
- Risk of explosion and fire
- Risk of injury and damage to property
- Danger of damage to the appliance
- Safety and protective devices
- Risk of injury
- Symbols on the appliance
- Safety signs
- Operating signs
- Product overview (01)
- SAFETY INSTRUCTIONS
- Safety instructions for rechargeable battery-operated leaf-blowers
- Operator
- Preparation
- operation
- Maintenance and storage
- Safety in the workplace
- Safety of persons, animals and property
- Appliance safety
- Vibration load
- ■ Danger due to vibration
- Safety information regarding the rechargeable battery
- Safety information regarding the charging unit
- INSTALLATION
- Connecting the blowing and vacuum tube (02)
- Fitting the wheelset (03)
- Attaching blow/vacuum tube combination to basic unit (04)
- Attaching collection sack (05)
- Attaching and adjusting carrying belt (optional) (06)
- Adjusting front handle (07)
- START-UP
- Charging the rechargeable battery (08)
- Danger of fire during charging!
- See:
- OPERATION
- Danger if assembly is not carried out completely!
- Determining the charge status of the rechargeable battery (09)
- Inserting and pulling out the rechargeable battery (10)
- Inserting the battery
- Pull out the rechargeable battery
- Set blowing or vacuum operation (11)
- Switching the appliance on/off and operating (12 - 14)
- Switch on the appliance (12)
- Working in blowing operation (13)
- Working in vacuum operation (14)
- Switch off the appliance (12)
- Emptying the collecting sack (15)
- MAINTENANCE AND CARE
- Danger of lacerations
- Maintenance schedule
- HELP IN CASE OF MALFUNCTION
- TRANSPORT
- Additional notes on transport and shipment
- DISPOSAL
- Information on the German Electrical and Electronic Equipment Act (ElectroG)
- Information on the German Battery Act (BattG)
- AFTER-SALES / SERVICE
- GUARANTEE
- TRANSLATION OF THE ORIGINAL EU/EC DECLARATION OF CONFORMITY
- VERTALING VAN DE ORIGINELE GEBRUIKERSHANDLEIDING
- Inhoudsopgave
- PRODUCTOMSCHRIJVING
- Beoogd gebruik
- TRADUCTION DE LA NOTICE D'UTILISATION ORIGINALE
- Table des matières
- GARANTIE
- N.° Componente
- Componente
- GARANZIA
- Št. Sestavni del
- SERVISNA SLUŽBA/SERVIS
- GARANCIJA
- Usklajeni standardi
- PRIJEVOD ORIGINALNIH UPUTA ZA UPORABU
- Sadržaj
- Br. Dio
- JAMSTVO
- Nr elementu
- PŘEKLAD ORIGINÁLNÍHO NÁVODU K POUŽITÍ Obsah
- Č. Součást
- ZÁRUKA
- Nr. Komponent
- GARANTI
- VEDLIKEHOLD OG PLEIE
- ADVARSEL!
- Fare for kuttskader
- KÄÄNNÖS ALKUPERÄISESTÄ KÄYTTÖOHJEESTA
- Sisällysluettelo
- Nro Osa
- GARANTIJA
- Ho- мер
- компонента
- ГАРАНТИЯ
Brand : AL-KO
Model : LBV 4090
Category : Blower