
GTLi 18V - Grass trimmer AL-KO - Free user manual and instructions
Find the device manual for free GTLi 18V AL-KO in PDF.
| Product type | Battery-powered grass trimmer |
| Brand | AL-KO |
| Model | GTLi 18V |
| Weight | 2.4 kg |
| Power source | 18 V, 1.3 Ah lithium-ion battery |
| Battery life | Approx. 25 min |
| Charging time | 200 min max. |
| Cutting width | 25 cm |
| Sound pressure level (LPA) | 73.8 dB(A) (K=2.5 dB(A)) |
| Sound power level (LWA) | 84.25 dB(A) (K=1.05 dB(A)) |
| Vibrations (hand) | < 2.5 m/s² (K=1.5 m/s²) |
| Cutting type | Nylon line with automatic feeding system |
| Handle | Top handle + adjustable auxiliary handle |
| Telescopic shaft | Yes, adjustable (approx. 10 cm extension) |
| Pivoting cutting head | Yes, tilt and 180° rotation |
| Plant guard | Protection bracket |
| Child safety | Lock hole (padlock not supplied) |
| Maintenance | Regular cleaning, do not use water jet |
| Spare parts | Replacement spool ref. 112969 |
| Warranty | According to national legislation, repair or replacement |
Frequently Asked Questions - GTLi 18V AL-KO
User questions about GTLi 18V AL-KO
0 question about this device. Answer the ones you know or ask your own.
Ask a new question about this device
Download the instructions for your Grass trimmer in PDF format for free! Find your manual GTLi 18V - AL-KO and take your electronic device back in hand. On this page are published all the documents necessary for the use of your device. GTLi 18V by AL-KO.
USER MANUAL GTLi 18V AL-KO
natural_image
Line drawing of a handheld cleaning tool with lever and handle (no text or symbols)| DE |
| EN |
| NL |
| FR |
| ES |
| IT |
| SL |
| HR |
| CS |
| SK |
| DA |
| SV |
| NO |
| FI |
| PL |
| LT |
| LV |
| RU |
| UK |
| HU |


Inhaltsverzeichnis
EN Operating Instructions.... 13
AL-KO KOBER GROUP Kötz, Germany
This documentation or excerpts therefrom may not be reproduced or disclosed to third parties without the express permission of the AL-KO KOBER GROUP.
natural_image
Illustration of a robotic arm in a grassy field with butterfly and hand symbols, no text or labels present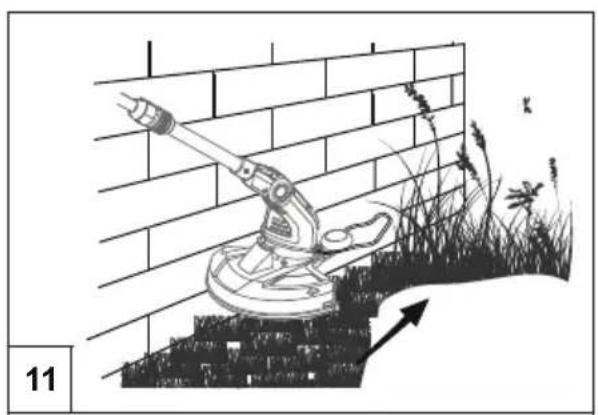
natural_image
Illustration of a robotic arm climbing a brick wall with grass and an arrow indicating upward motion (no text or symbols)Safety instructions....15
Assembly....16
Startup....17
Operation....18
Maintenance and care.... 18
Storage....18
Disposal....19
Troubleshooting....19
Warranty.... 20
EC Declaration of Conformity.... 20
PRODUCT DESCRIPTION
This documentation describes a hand-operated battery lawn trimmer.
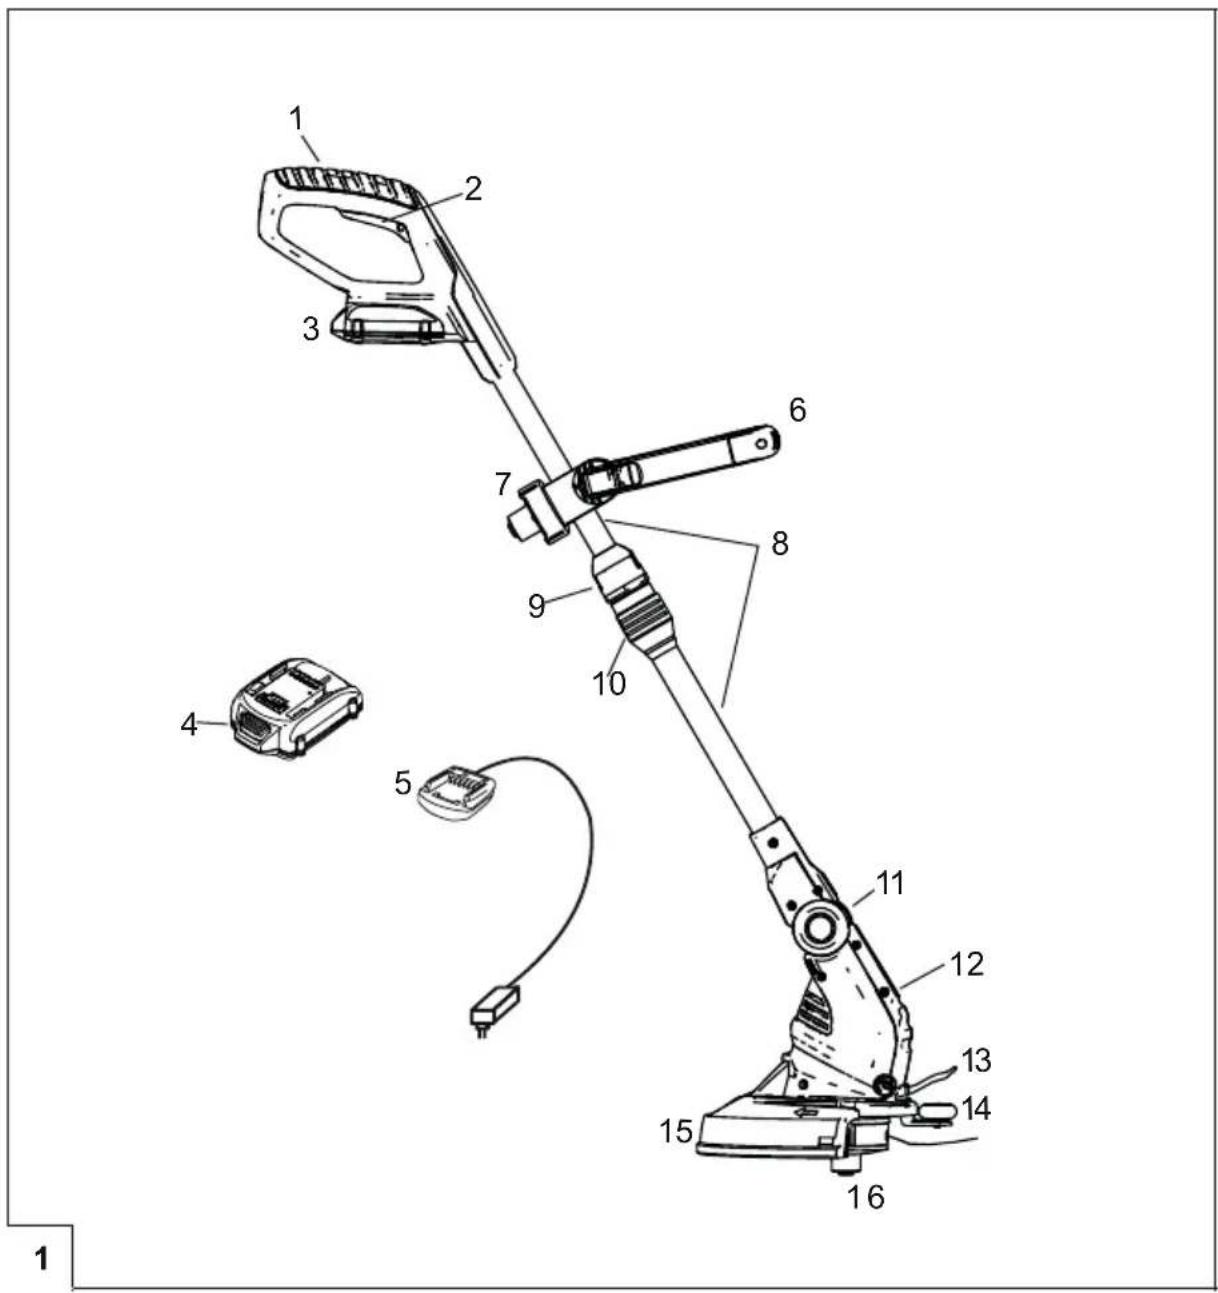
Product overview
The product overview (1) provides an overview of the appliance.
| 1-1 | Upper hand grip |
| 1-2 | Switch with child protection |
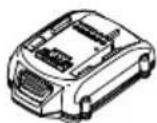
| 1-3 | Battery |
| 1-4 | Battery lock |
| 1-5 | Charger with mains plug |
| 1-6 | Auxiliary hand grip with tip lever |
| 1-7 | Holder with additional spool |
| 1-8 | Telescopic handle |
| 1-9 | Upper guide sleeve |
| 1-10 | Lower guide sleeve |
| 1-11 | Locking button for cutter head |
| 1-12 | Cutter head with motor |
| 1-13 | Plant protection bar |
| 1-14 | Guide wheel |
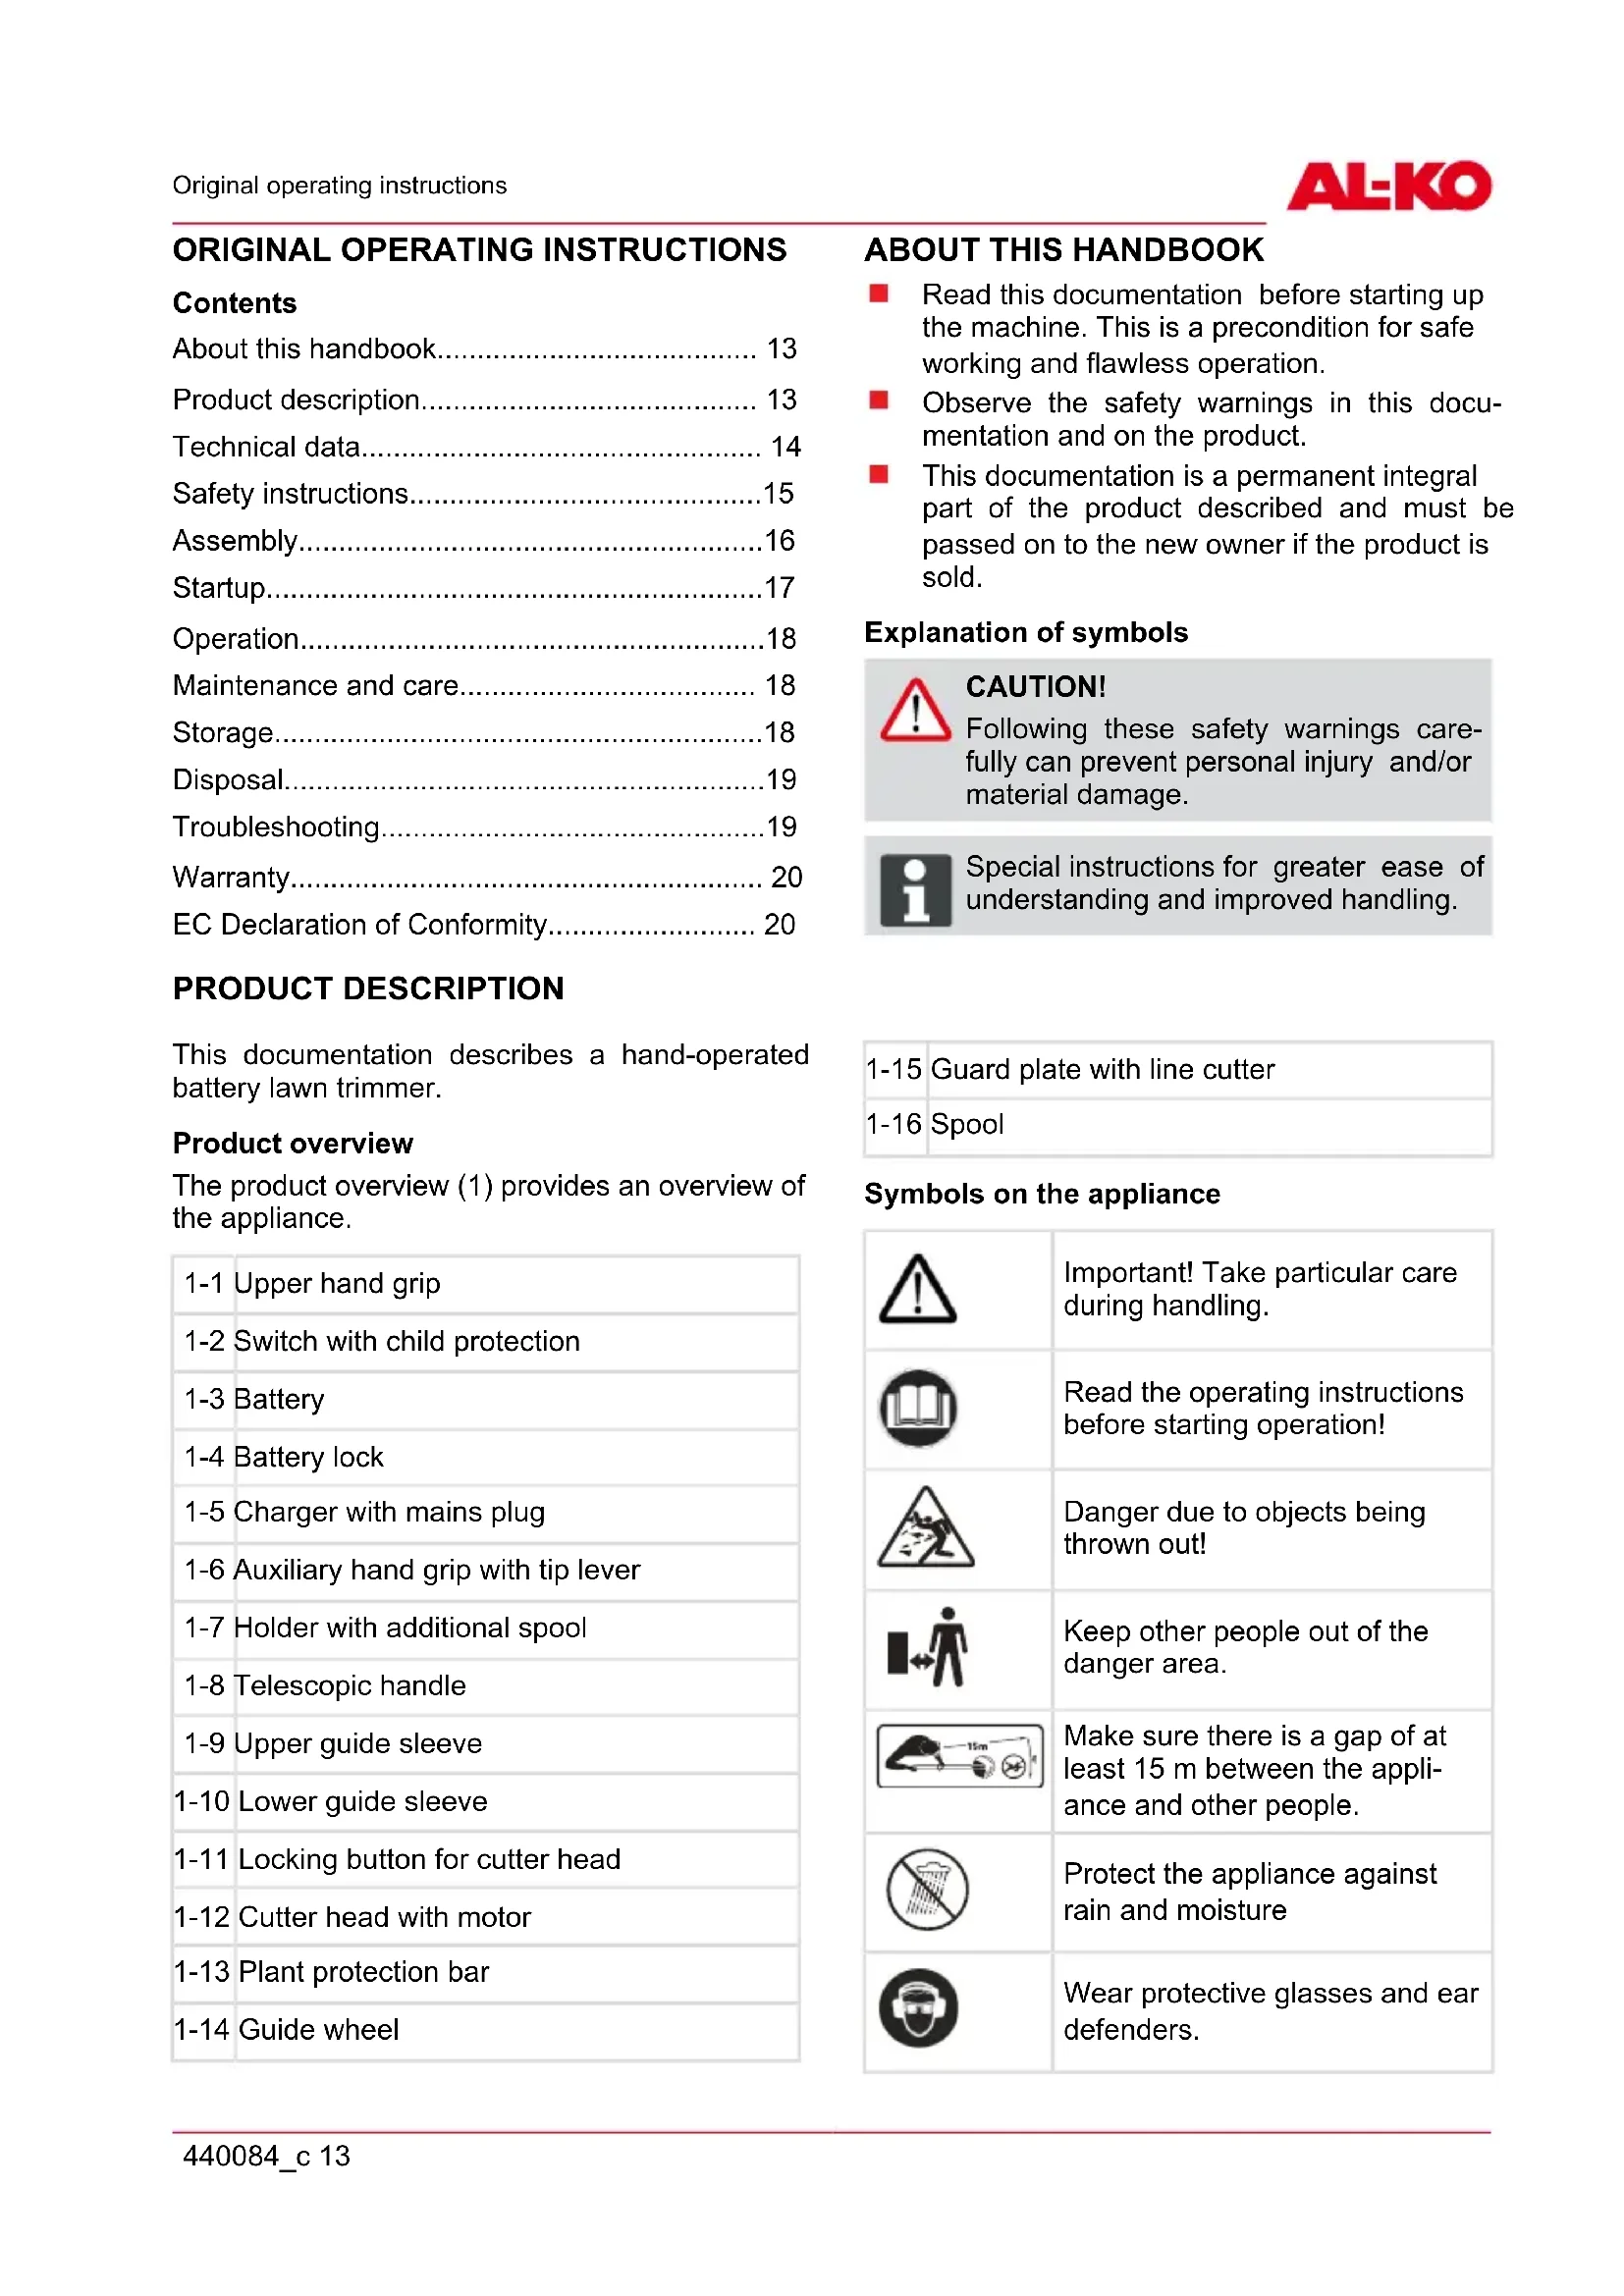
ABOUT THIS HANDBOOK
Read this documentation before starting up the machine. This is a precondition for safe working and flawless operation.
- Observe the safety warnings in this documentation and on the product.
This documentation is a permanent integral part of the product described and must be passed on to the new owner if the product is sold.
Explanation of symbols

CAUTION!
Following these safety warnings carefully can prevent personal injury and/or material damage.

Special instructions for greater ease of understanding and improved handling.
| 1-15 | Guard plate with line cutter |
| 1-16 | Spool |
Symbols on the appliance
 | Important! Take particular care during handling. |
 | Read the operating instructions before starting operation! |
 | Danger due to objects being thrown out! |
 | Keep other people out of the danger area. |
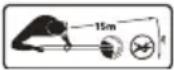 | Make sure there is a gap of at least 15 m between the appliance and other people. |
 | Protect the appliance against rain and moisture |
 | Wear protective glasses and ear defenders. |
Remove the battery before any adjustment or cleaning of the equipment is made or when the device is left unattended for a while.
Adjustable telescopic handle
The lawn trimmer is equipped with an adjustable telescopic handle. This allows the appliance to be set to individual body sizes, and allows the motor head to be swivelled.
Swivelling and adjustable cutter head
GT Li18V has a swivelling cutter head with an adjustable angle.
Automatic tip
An automatic tip function is equipped in the spool head, allowing the cutting line to be extended while the motor is running.
Safety and protective equipment
Child protection
The hole (5 mm) on the motor protection switch is provided for a padlock*. The padlock prevents the appliance from being switched on inadvertently.
* Not included in the scope of delivery

CAUTION!
Risk of injury!
Safety and protective devices should not be disabled.
Designated use
This appliance is intended for trimming a lawn in non-commercial applications. Any use not in accordance with this designated use shall be regarded as misuse.
This tool is not intended to be used by people (including children) who have restricted physical, sensory or mental capabilities; neither is it intended to be used by people lacking experience and/or knowledge unless they are supervised by someone who is responsible for safety, or receive instructions from this supervisory person in how to operate the tool. Children should be supervised in order to make sure that they do not play with the tool.

CAUTION!
The equipment is intended for domestic use only.
TECHNICAL DATA
 | GTLi 18V |
 | < 2,5 m/s2K 1,5 m/s2 |
 | LPA 73,8 dB(A)K 2,5 m/s2 |
 | LWA 84,25 dB(A)k = 1,05 dB(A) |
 | / III |
 | 25 cm |
 | 2.4 kg |
| Lithium-ion battery | |
| 18 V | |
| 1.3 Ah (lithium-ion) | |
| 200 min | |
| approx. 25 min | |
| Charger | |
| Input: 100-240 V ~ 50/60 Hz 14 WOutput: 20 V 500 mA | |
| 5 - 45 °C | |
Lithium-ion battery
 | 18 V |
 | 1.3 Ah (lithium-ion) |
 | 200 min |
 | approx. 25 min |
| Charger | |
 | Input: 100-240 V ~ 50/60 Hz 14 WOutput: 20 V 500 mA |
 | 5 - 45 °C |
Technical data acc. to the following standards:
Mechanical safety acc. to EN 786, 5.1.1, Annex E and D,
sound pressure and sound energy level acc. to DIN EN ISO 3744:2010
Measurement of mechanical vibration at the hand grip acc. to EN 28662-1:1992

The specified values have been established based on a standardised test process and can be used for comparing different electrical tools with one another.
In addition, these values are suitable for estimating in advance the loads to which the user is exposed due to vibration.

WARNING!
The actual vibration values may differ from those specified, depending on what the electrical tool is used for.
Take measures to protect yourself against vibration loads. In doing so, take account of the entire working process, i.e. also times during which the electrical tool is operating without load, or is switched off.
Suitable measures include regular maintenance and care of the electrical tool and the tool attachments, keeping your hands warm, taking regular breaks and planning the working sequences effectively.
SAFETY INSTRUCTIONS

CAUTION!
The cutting tools continue to rotate even after the motor has been switched off.
■ Wear suitable clothing, eye protection and gloves

WARNING!
Wear ear defenders to prevent impairment of hearing.
■ Never allow children or uninstructed persons to operate or maintain the machine. Local regulations may specify the minimum age of people operating the machine
- Stop using the machine when people, especially children (and also pets) are in the vicinity.
■ Only mow during daylight hours or with good artificial lighting.
Before taking the machine into operation, and following any impact, check the machine for signs of wear or damage and undertake the necessary repairs.
- Never use the appliance if any protective devices are damaged or missing.
■ Always keep hand and feet away from the cutting device, above all when switching on the motor.
■ Any device that is used for cutting off the line represents a danger of injury.
■ After pulling out a new line, always hold the machine in its normal working position before switching it on.
■ Never fit metallic cutting elements.
■ Only use genuine spare parts and genuine accessories.
■ Always remove the battery
■ when the appliance is unsupervised
■ before maintenance work
■ before cleaning the appliance
■ if the appliance is not going to be used for some time
■ Make sure that air openings are free from contamination.
In spite of technical and additional protective measures, there is always a residual risk when working with the machine.
- Keep the handles dry and clean.
■ Remove foreign objects from the working area.
■ Use the machine only in perfect working order.
■ Always keep the guard, string head and engine free of mowing debris.
- Keep body and clothing away from cutting parts.
- Persons who are not familiar with the trim-mer should practise handling it with the engine switched off.
■ Wear appropriate working clothes.
■ Always ensure stability when working.
■ Always operate the appliance with two hands.
- Keep others away from dangerous areas.
- Do not leave the appliance unsupervised.
- When mowing on sloping ground, always stand downhill of the cutting device.
If working on slopes:
■ Never work on a smooth and slippery slope.
■ Always make sure you are positioned securely.
■ Always work across the slope, never upward or downward.
Do not work on slopes with a more than 10^ gradient!
Take particular care when turning!
■ After contact with a foreign object:
Switch off the engine.
■ Examine the device for damage.
The machine must not be operated if the operator is under the influence of alcohol, drugs or medication.
■ Comply with the accident prevention regulations.
- Do not get the appliance wet or expose it to moisture.
- Keep children away from appliances equipped with batteries.
Safety notes for battery and charger

CAUTION!
Caution - Risk of fire and explosion!
Do not open the appliance. Danger of short circuit.
Do not put the appliance onto an open fire.
- Protect the appliance against heat and direct sunlight.
Only recharge batteries in chargers that are recommended by the manufacturer. Using a charger intended for one particular type of battery with a different type of battery represents a fire risk.
■ Only use batteries in the electrical implements that are intended for this purpose. Using other batteries can lead to injuries and represents the risk of fire.
- Keep the unused battery away from paper clips, coins, keys, nails, screws or other small metal objects that could short-circuit the contacts. A short circuit between the battery contacts can result in burns or fire.
Incorrect use can result in fluid leaking out of the battery. Avoid contact with the fluid. In case of inadvertent contact, rinse off with water. If the fluid gets into your eye, seek additional medical assistance. Leaking battery fluid can lead to skin irritations or burns.
■ Each time before using the charger, check the housing, plug and cable for damage.
- Do not use the charger if it is damaged.
Do not open the charger! Renew the charger if it is defective.
■ Protect the appliance, battery and charger against moisture. Only charge indoors.
■ Only have electrical appliances repaired by qualified electricians, and only using genuine spare parts. This ensures that the appliance remains safe.
ASSEMBLY

CAUTION!
The machine must not be put in operation before it has been assembled completely.

CAUTION!
Do not insert the battery until the appliance has been completely assembled.
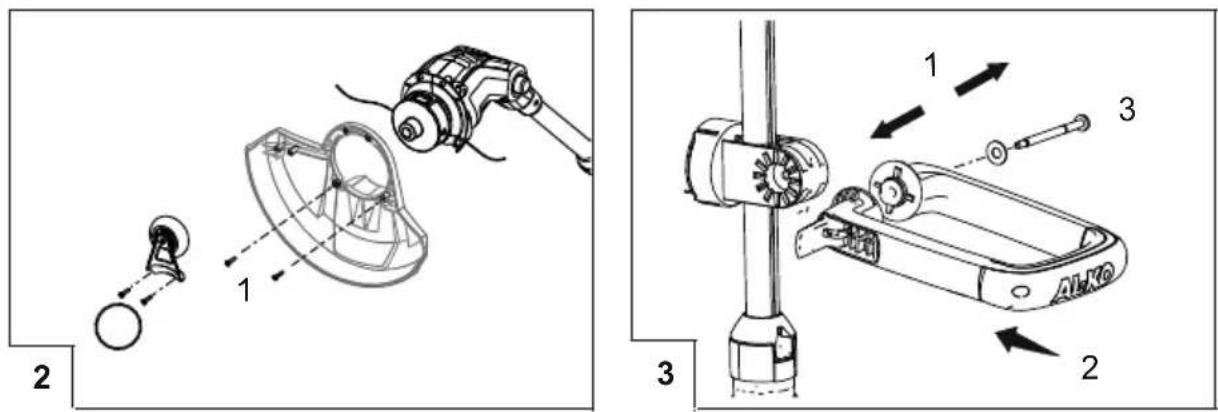
Install the guard plate

The knife integrated in the guard plate automatically cuts the line to the optimum length.
- Set the guard plate in relation to the cutter head (2-1).
- Make sure that the line is exposed.
- Screw the guard plate on at the rear with the supplied screws (2-1).
- Place the guide wheel on the guard hood and tighten the screws (2.2).
Installation of auxiliary handle
The holder of the auxiliary handle is mounted on the telescopic handle. The supplied replacement spool is integrated in the holder.
Installation of auxiliary handle
The angle of the handle can be individually adjusted using the tip lever.
- Push the holder onto the shaft.
-
Pull the grip bar of the auxiliary handle slightly apart (3-1).
-
Push the auxiliary handle onto the holder (3-2).
- Engage the auxiliary handle in the splines.
- Place the tip lever with pin holder onto the clamping pin.
- Screw the clamping pin tight so that the tip lever can be operated with little force (3-3).
STARTUP

CAUTION!
Always perform a visual check prior to start-up.

CAUTION!
Do not use damaged batteries. Danger of fire!

CAUTION!
Danger of explosion and fire!
The charger heats up during charging. Do not place it on a flammable surface or in a flammable environment.
Charging the battery

The battery is supplied partially charged! Fully charge the battery before the first use.
The battery can be charged in any charge level. Interrupting charging does not damage the battery.

The battery is protected against excessive charging by a supply voltage control function, which means it can be left connected to the mains for some time.
-
Connect the charger (1-5) to the mains without the battery (1-4). The LED on the mains adapter lights up green.
-
Connect the battery to the charger. The LED on the mains adapter lights up red. Charging starts.

The temperature range for charging should be between 5 and +45 °C.
The charging time for a full charge is max. 200 minutes. If the operating time of the battery is significantly shorter in spite of full charging, this indicates the battery service life has expired and it must be replaced by a new, genuine battery.
- The charging process has finished when the LED on the mains adapter lights up green - the battery is fully charged.
- Disconnect the charger from the mains.
- Remove the battery from the charger.
Inserting the battery
- Press the locking catch.
- Push the battery along the guide until the contact socket on the battery is firmly located on the contact plug of the appliance.
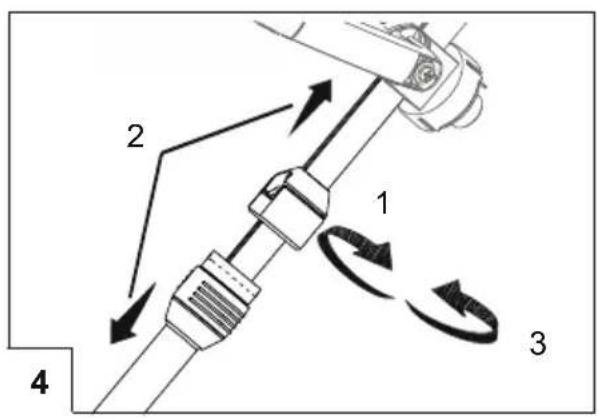
Adjusting the telescopic handle
- To release, turn the upper locking sleeve through about 180^ to the right (4-1).
- Set the telescopic handle to the individual physique. The telescopic handle can be extended by approx. 10 cm (4-2).
- Tighten the locking sleeve (4-3).
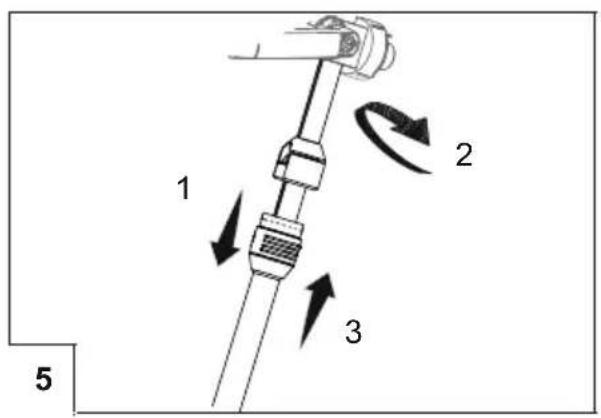
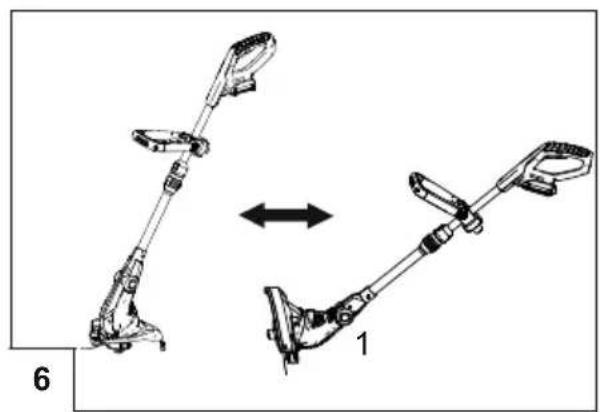
Swivelling the cutter head
To trim lawn edges, for example, it is possible to swivel the cutter head through 180^ (5, 6).
- Loosen the lower locking sleeve (5-1).
- Turn the telescopic handle through 180^ (5-2).
- Screw the locking sleeve tight (5-3, 6-1).
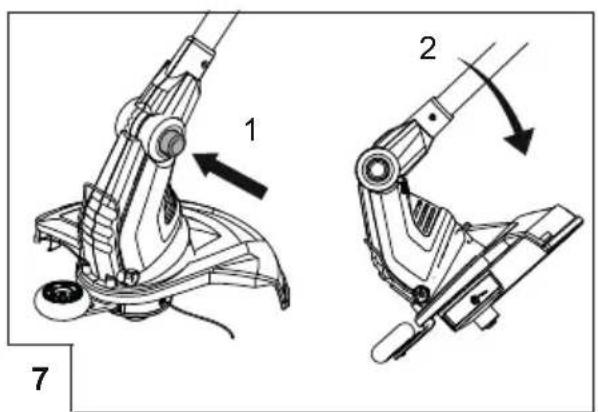
Angling the cutter head
By changing the pivot angle, it is also possible to trim areas that are difficult to access, e.g. under benches, overhangs, etc.
- Press the locking button (7-1).
- Engage the cutter head in the required angle (7-2).
- Release the locking button.

Remove the guard on the line cutter before taking into operation for the first time.
Starting the lawn trimmer
- Stand securely.
- Hold the appliance with both hands. Do not place the cutter head on the ground when doing this.
- Hold the auxiliary handle in one hand and the upper grip with your other hand.
-
Press the switch in the upper grip and hold it pressed. The appliance runs.
-
Let the lawn trimmer run at idling speed for a few moments. This causes the cutting line to be cut off to the correct length.
- The appliance switches off when the switch is released.

After the appliance has been switched off, the spool head continues to rotate for a few seconds.
OPERATION
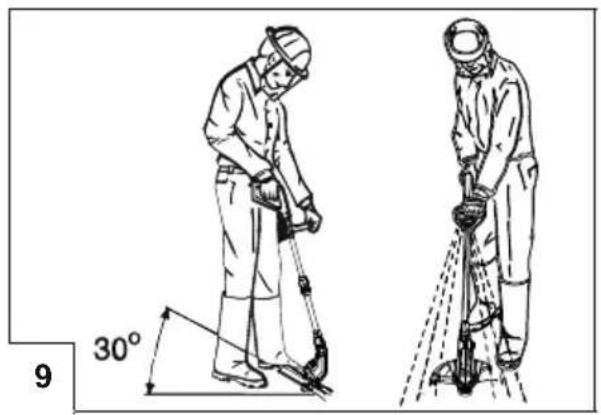
- Switch on the appliance before approaching the grass to be cut.
Angle the appliance forwards slightly, and walk forwards slowly (9).
Sweep the appliance to the right and left in order to cut the grass (9).
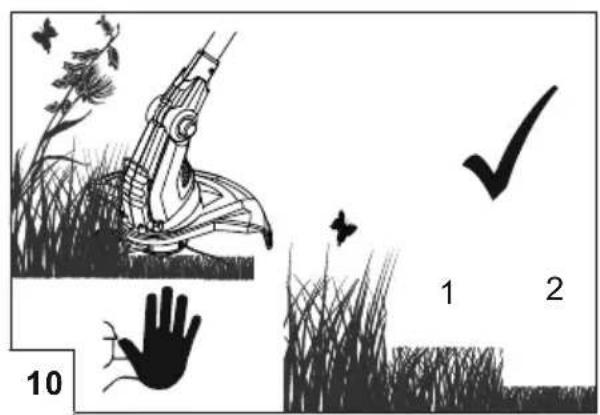
Long grass must be cut in several passes. Always proceed from top (10-1, 10-2) to bottom.

Tap the spool head on the ground from time to time when working. The automatic tip function always keeps the line at optimum length.
■ Use the plant protection car in order to hold the appliance at the correct distance from obstacles (11-1).
Do not overload the appliance during work.
■ Make sure the motor is stopped before you remove any cuttings.

CAUTION!
The vibration value during use of the electrical implement may differ from the indicated value, depending on what the appliance is used for.
If the battery lawn trimmer is overloaded in very long grass, the line will be blocked. Immediately remove the appliance from the long grass and reduce the load. Otherwise, the motor could be permanently damaged.
After use, remove the battery and check the appliance for damage.
MAINTENANCE AND CARE

CAUTION!
Remove the battery before starting any work on the appliance.
■ After use, remove the battery and check the machine for damage.
Electrical malfunctions are only allowed to be rectified by authorised specialist workshops.
- Never use the appliance if the blade of the line cutter is missing or damaged.
■ Always keep the guard, string head and engine free of mowing debris.
Do not spray the machine with water! Penetrating water can lead to malfunctions.
- Do not get the appliance wet or expose it to moisture.
- Regularly check the appliance is in good working order.
- Do not use any cleaning agents or solvents. They can cause irreparable damage to the appliance.
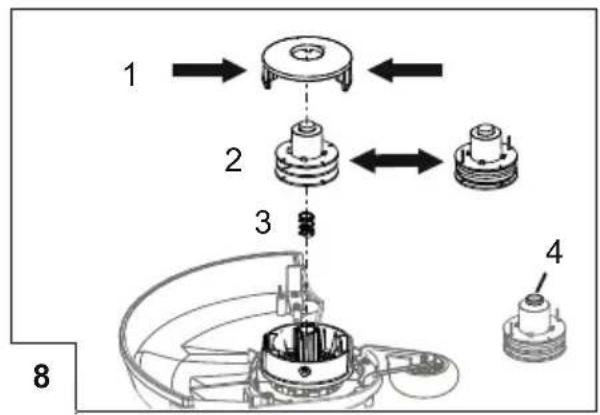
Changing the spool
(Replacement spool GT Li 18V art. no. 112969)
- Press the two locking catches to open the cover (8-1).
- Remove the empty spool (8-2).
- Insert the new spool.
- Make sure that the spring is re-inserted (8-3).
- Guide the line outwards on both sides.
- Put on the cover and engage the locking catches.
STORAGE
- Clean the appliance and its accessories after each use.
- Keep the appliance out of reach of children and unauthorised persons.

Hang up the lawn trimmer by its handle. This avoids placing unnecessary load on the cutter head.
Storing the battery and charger
- Store the battery in a dry place protected from frost, with an ambient temperature between 0 °C and +35 °C, and with the battery charged to approx. 40 - 60%
■ Completely recharge the battery for about 2 hours after 6 months in storage
Do not store the battery near metallic or acid-containing objects - these present a risk of short-circuit!
DISPOSAL
Do not dispose of worn-out machines or spent batteries (including rechargeable batteries) in domestic waste!
The packaging, machine and accessories are made from recyclable materials and must be disposed of accordingly.
The user is obliged to return the batteries. Disposal can be handled by the retailer or at recycling centres.
- Do not dispose of the battery unless it is discharged.
TROUBLESHOOTING
| Malfunction Possible cause Solution | ||
| Motor does not run Motor protection switch has switched offFlat battery | Wait until the motor protection switch switches the trimmer back on.Charge the battery | |
| Trimmer vibrates Spool is contaminated Clean the spool, renew it if necessary | ||
| Battery operating time is significantly shorter | Grass too long or too wetCutting height too lowBattery flat because not used for some timeBattery service life expired | Let it dry, set a higher cutRaise the cutting heightCharge the batteryRenew the battery. Only use genuine accessories from the manufacturer |
| Battery cannot be charged | Charge plug or contact socket contaminatedBattery or charger defective | Order spare parts acc. to the spare parts card |

If you encounter any malfunctions that are not listed in this table or which you cannot rectify yourself, please contact our responsible customer service.
WARRANTY
We will address claims for any defects in materials and workmanship during the statutory period of limitation by means of repairs or replacements of our choice. The period of limitation is governed by the laws of the country in which the machine was purchased.
Our warranty applies only if:
The machine has been properly handled
The operating instructions have been adhered to
■ Original replacement parts have been used
The warranty is no longer in effect if:
■ Efforts have been made to repair the machine
■ Technical modifications have been made to the machine
The machine has not been used for its intended purpose
The warranty does not cover:
■ Damage to paint work through normal use
Parts subject to wear as indicated in the replacement parts list with a box [xxx xxx (x)]
Internal combustion engines – separate warranty conditions of the respective engine manufacturer apply
The warranty period begins with the purchase by the first buyer. The warranty period begins on the date that appears on the original purchase receipt. In the event of a warranty claim, please your contact supplier or the nearest authorised customer service centre with this warranty declaration and the purchase receipt in hand. This warranty does not affect the legal warranty claims by the purchaser against the seller.
EC DECLARATION OF CONFORMITY
We hereby declare that this product in the version which we have introduced into circulation is in accordance with the requirements of the harmonised EU directives, EU safety standards and the product-specific standards.
Product Manufacturer Authorised representative
Serial number EU Directives Harmonised standards
| G130130 | 2006/42/EC |
| 2014/30/EU | |
| Sound pressure level | 2000/14/EC |
| EN ISO 3744 | 2014/35/EU |
| measured / guaranteed | 2011/65/EU |
| 90 / 92 dB(A) |
EN 60745-1
EN 786
EN 55014-1
EN 55014-2
EN 61000-3-2
EN 61000-3-3
EN 60335-1
EN 60335-2-29
EN 62233
Designated office Conformity evaluation Kötz, 23.06.2016
Société Nationale de Certification 2000/14/EC Appendix VI
et d'Homologation
No. 0499

Wolfgang Hergeth
Managing Director
INFORMATIONS SUR CE MANUEL
DÉCLARATION DE CONFORMITÉ CE
SCHEDA RICERCA GUASTI
VEDLIKEHOLD OG PLEIE

OBS!
DEKLARACJA ZGODNOŚCI WE
| Country | Company | Telephone | Fax |
| A | AL-KO KOBER Ges.m.b.H. | (+43)3578/2515-100 | (+43)3578/2515-31 |
| AUS | AL-KO INTERNATIONAL Pty. Ltd. | (+61)3/9767-3700 | (+61)3/9767-3799 |
| B / L | Eurogarden NV | (+32)16/805427 | (+32)16/805425 |
| BG | Valerii S&M Group SJ | (+359)2 942 34 02 | (+359)2 942 34 10 |
| CH | AL-KO KOBER AG | (+41)56/418-31 53 | (+41)56/4183160 |
| CZ | AL-KO KOBER Spol. S.R.O. | (+420)382/210381 | (+420)382/212782 |
| D | AL-KO GERÄTE GmbH | (+49)8221/203-0 | (+49)8221/97-8199 |
| DK | AL-KO GINGE A/S | (+45)98821000 | (+45)98825454 |
| EST/LT/LV | SIA AL-KO KOBER | (+371)67/627-326 | ((+371)67/807-018 |
| F | AL-KO S.A.S. | (+33)3/8576-3500 | (+33)3/8576-3581 |
| GB | Rochford Garden Machinery Ltd. | (+44)1963/828050 | (+44)1963/828052 |
| H | AL-KO KFT | (+36)29/5370-50 | (+36)29/5370-51 |
| HR | Brun.ko.-prom d.o.o. | (+385)1 3096 567 | (+385)1 3096 567 |
| I | AL-KO KOBER GmbH / SRL | (+39)039/9329-311 | (+39)039/9329-390 |
| IN | AGRO-COMMERCIAL | (+91)3322874206 | (+91)3322874139 |
| IQ | Avro Gulistan Com | (+946)750 450 80 64 | |
| IRL | Cyril Johnston & Co. Ltd. | (+44)2890813121 | (+44)2890914220 |
| LY | ASHOFAN FOR AGRICULT. ACC. | (+218)512660209 | (+218)512660209 |
| MA | BADRA Sarl | (+212)022447128 | (+212)022447130 |
| MK | Techno Geneks | (+389)2 2551801 | (+389)2 2520175 |
| N | AL-KO GINGE A/S | (+47)64/86-2550 | (+47)64/86-2554 |
| NL | O.DE LEEUW GROENTECHNIEK | (+31)38/444 6160 | (+31)38/444 6358 |
| PL | AL-KO KOBER Sp. z.o.o. | (+48)61/816-1925 | (+48)61/816-1980 |
| RO | SC PECEF TEHNICA SRL | (+40)344 40 30 30 | (+40)244 51 44 86 |
| RUS | OOO AL-KO KOBER | (+7)499/16708-42 | (+7)499/96600-00 |
| RUS | ZAO AL-KO St. Petersburg GmbH | (+7)812/446-1084 | (+7)812/446-1084 |
| S | GINGE Svenska AB | (+46)31/57-3580 | (+46)31/57-5620 |
| SK | AL-KO KOBER Slovakia Spol. S.R.O. | (+421)2/4564-8267 | (+421)2/4564-8117 |
| SLO | Darko Opara s.p. | (+386)1 722 58 50 | (+386)1 722 58 51 |
| SRB | Agromarket d.o.o. | (+381)34 308 000 | (+381)34 308 16 |
| TR | ZIMAS A.S. | (+90)232 4580586 | (+90)232 4572697 |
| UA | TOV AL-KO KOBER | (+380)44/392-07-08 | (+380)44/392-07-09 |


- Inhaltsverzeichnis
- PRODUCT DESCRIPTION
- Product overview
- ABOUT THIS HANDBOOK
- Explanation of symbols
- CAUTION!
- Symbols on the appliance
- Adjustable telescopic handle
- Swivelling and adjustable cutter head
- Automatic tip
- Safety and protective equipment
- Child protection
- Risk of injury!
- Designated use
- WARNING!
- SAFETY INSTRUCTIONS
- Safety notes for battery and charger
- Caution - Risk of fire and explosion!
- ASSEMBLY
- Install the guard plate
- Installation of auxiliary handle
- STARTUP
- Danger of explosion and fire!
- Charging the battery
- Inserting the battery
- Adjusting the telescopic handle
- Swivelling the cutter head
- Angling the cutter head
- Starting the lawn trimmer
- OPERATION
- MAINTENANCE AND CARE
- Changing the spool
- STORAGE
- Storing the battery and charger
- DISPOSAL
- WARRANTY
- Our warranty applies only if:
- The warranty is no longer in effect if:
- The warranty does not cover:
- EC DECLARATION OF CONFORMITY
- Designated office Conformity evaluation Kötz, 23.06.2016
- INFORMATIONS SUR CE MANUEL
- DÉCLARATION DE CONFORMITÉ CE
- SCHEDA RICERCA GUASTI
- VEDLIKEHOLD OG PLEIE
- OBS!
- DEKLARACJA ZGODNOŚCI WE
Brand : AL-KO
Model : GTLi 18V
Category : Grass trimmer