HC08 - Compressor SCHEPPACH - Free user manual and instructions
Find the device manual for free HC08 SCHEPPACH in PDF.
| Product type | Air compressor |
| Brand | Scheppach |
| Model | HC08 |
| Category | Compressor |
| Mains voltage | 230 V ~ 50 Hz |
| Max. power (S1) | 1100 W |
| Compressor speed | 2850 min⁻¹ |
| Pressure tank volume | 8 L |
| Max. working pressure | approx. 8 bar |
| Theoretical intake capacity | approx. 155 L/min |
| Theoretical output capacity | approx. 116 L/min |
| Protection class | IP30 |
| Recommended oil | DAB 46 or equivalent |
| Oil quantity | approx. 0.15 L |
| Weight | approx. 17 kg |
| Sound pressure level (LpA) | 71.7 dB |
| Sound power level (LwA) | 94 dB |
| Max. operating altitude | 1000 m |
| Operating mode | S1 (continuous) |
| Intended use | Compressed air tools up to 180 L/min (guns, inflation, spraying) |
| Regular maintenance | Clean air filter every 300 h, drain condensation after each use, change oil every 50 h |
| Safety | Safety valve, pressure switch, thermal switch |
| Wear parts | Air filter |
| Installation location | Dry, ventilated indoor area, temperature 5-40°C |
Frequently Asked Questions - HC08 SCHEPPACH
User questions about HC08 SCHEPPACH
0 question about this device. Answer the ones you know or ask your own.
Ask a new question about this device
Download the instructions for your Compressor in PDF format for free! Find your manual HC08 - SCHEPPACH and take your electronic device back in hand. On this page are published all the documents necessary for the use of your device. HC08 by SCHEPPACH.
USER MANUAL HC08 SCHEPPACH
EN IEC 61000-6-3:2021;
Division Manager Product Center

Andreas Pecher
Head of Project Management
Garantiebedingungen
Revisionsdatum 26.11.2021
https://www.scheppach.com/de/service
1 Introduction 16
2 Description of the product 16
3 Scope of delivery. 17
4 Proper use. 17
5 Safety instructions. 17
6 Technical data. 19
7 Unpacking 20
8Assembly. 20
9 Before commissioning. 20
10 Operation 20
11 Electrical connection 21
12 Cleaning and maintenance 21
13 Storage 22
14 Repair and ordering spare parts 23
15 Disposal and recycling 23
16 Troubleshooting 24
17 EU Declaration of Conformity. 24
Explanation of the symbols on the product
Symbols are used in this manual to draw your attention to potential hazards. The safety symbols and the accompanying explanations must be fully understood. The warnings themselves will not rectify a hazard and cannot replace proper accident prevention measures.
| Before commissioning, read and observe the operating manual and safety instruc-tions! |
| Wear hearing protection. Excessive noise can result in a loss of hearing. |
| Wear safety goggles. |
| Warning - Hot surfaces! |
| Warning against electrical voltage. |
| Warning! The product is equipped with an automated start-up control. Keep third-par-ties away from the working range of the product! |
| Attention! Prior to initial commissioning, check the oil level and replace the oil seal-ing plug! |
| Do not expose the product to rain. The prod-uct may only be stationed, stored and oper-ated in dry ambient conditions. |
| 94dB | Guaranteed sound power level of the product. |
| CE | The product complies with the applicable European directives. |
1 Introduction
Manufacturer:
Scheppach GmbH
GünzburgerstraBe 69
D-89335 Ichenhausen
Dear Customer
We hope your new product brings you much enjoyment and success.
Note:
In accordance with the applicable product liability laws, the manufacturer of this product assumes no liability for damage to the product or caused by the product arising from:
- Improper handling
Non-compliance with the operating manual - Repairs carried out by third parties, unauthorised speciaIstists
- Installing and replacing non-original spare parts
- Improper use
- Failures of the electrical system in the event of the electrical regulations and VDE provisions 0100, DIN 57113 / VDE0113 not being observed.
Note:
The operating manual is part of this product.
It includes important instructions for the safe, proper and economic operation of the product, for avoiding danger, for minimising repair costs and downtimes and for increasing the reliability and extending the service life of the product. In addition to the safety instructions in this operating manual, you must also observe the regulations applicable to the operation of the product in your country.
Familiarise yourself with all operating and safety instructions before using the product. Only operate the product as described and for the specified areas of application. Keep the operating manual in a good place and hand over all documents when passing the product on to third parties.
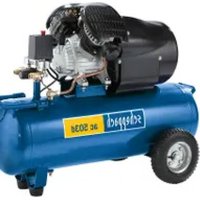
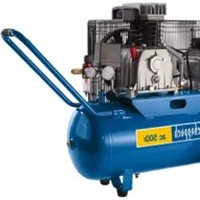
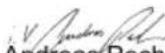
2 Description of the product
- Transport handle
- Pressure switch
- Pressure vessel
- Foot
- Compressor housing cover
-
Air filter
6a. Transport cap
6b. Phillips screw
6c. Washer
6d. Air filter cover
6e. Air filter housing
6f. Filter element -
Oil sealing plug
- Transport cap
- Oil filler hole
- Oil-level window
- Drain screw for condensate
- Safety valve
12a. Drain nut
12b. Safety connection
12c. Drain nut cap - Pressure gauge (vessel pressure can be read off)
- Pressure gauge (set pressure can be read off)
- Quick-coupling (regulated compressed air)
- Pressure regulator
- On/off switch
- Compressed air hose*
18a. Plug nipple
18b. Quick coupling
^* = may not be included in the scope of delivery!
3 Scope of delivery
Scope of delivery for article number 5906119901:
Item Quantity Designation
6.1 x Air filter
7. 1 x Oil sealing plug
1 x Oil bottle
1 x Operating manual
Scope of delivery for article number 5906119903:
6.1 x Air filter
7. 1 x Oil sealing plug
18. 1 x Spiral hose
1 x 13-part accessory set
1 x Oil bottle
1 x Operating manual
4 Proper use
The compressor is designed to generate compressed air for compressed-air driven tools which can be driven with an air volume of up to approx. 180 l/min (e.g. tyre inflator, blow-out pistol and paint spray gun). Due to the limited air output it is not possible to use the compressor to drive tools with very high air consumption (for example orbital sanders, die grinders and hammer screwdrivers).
The compressor may only be operated in a dry and well ventilated indoor space.
The product may only be used in the intended manner. Any use beyond this is improper. The user, not the manufacturer, is responsible for damages or injuries of any type resulting from this.
An element of the intended use is also the observance of the safety instructions, as well as the assembly instructions and operating information in the operating manual.
Persons who operate and maintain the product must be familiar with the manual and must be informed about potential dangers.
The liability of the manufacturer and resulting damages are excluded in the event of modifications of the product.
The product may only be operated with original parts and original accessories from the manufacturer.
The safety, operating and maintenance specifications of the manufacturer, as well as the dimensions specified in the technical data, must be observed.
Please note that our products were not designed with the intention of use for commercial or industrial purposes. We assume no guarantee if the product is used in commercial or industrial applications, or for equivalent work.
Explanation of the signal words in the operating manual

DANGER
Signal word to indicate an imminently hazardous situation which, if not avoided, will result in death or serious injury.

WARNING
Signal word to indicate a potentially hazardous situation which, if not avoided, could result in death or serious injury.

CAUTION
Signal word to indicate a potentially hazardous situation which, if not avoided, could result in minor or moderate injury.

TENTION
Signal word to indicate a potentially hazardous situation which, if not avoided, could result in product or property damage.
5 Safety instructions
General power tool safety warnings

WARNING
Read all safety warnings, instructions, illustrations and specifications provided with this power tool.
Failure to follow all instructions listed below may result in electric shock, fire and/or serious injury.
Save all warnings and instructions for future reference.
The term "power tool" in the warnings refers to your mains-operated (corded) power tool or battery-operated (cordless) power tool.
5.1 Safety instructions for compressors
ATTENTION
The following basic safety measures must be observed when using this compressor for protection against electric shock, and the risk of injury and fire. Read and observe these instructions before using the Product.
Safe work
-
Take care of your tools
-
Keep your compressor clean in order to work well and safely.
Follow the maintenance instructions. - Check the connection cable of the electric tool regularly and have it replaced by a recognised specialist when damaged.
-
Check extension cables regularly and replace them when damaged.
-
Pull the connector out of the socket
-
When the power tool is not in use or prior to maintenance and when replacing tools such as saw blades, drill bits, cutters.
-
Check the power tool for potential damage.
-
Protective devices or other parts with minor damage must be carefully inspected to ensure that they function correctly and as intended prior to continued use of the electric tool.
- Check whether the moving parts function faultlessly and do not jam or whether parts are damaged. All parts must be correctly mounted and all conditions must be fulfilled to ensure fault-free operation of the power tool.
- Damaged protective devices and parts must be properly repaired or replaced by a recognised specialist workshop, insofar as nothing different is specified in the operating manual.
- Do not use any faulty or damaged connection cables.
ATTENTION
For your own safety, only use accessories and additional equipment that are indicated in the operating manual or have been recommended or indicated by the manufacturer. Use of other tools or accessories that those recommended in the operating manual or in the catalogue could represent a personal danger to you.
-
Replacing the connection cable
-
If the connection line is damaged, it must be replaced by the manufacturer or an electrician to avoid danger. There is a risk of electric shock.
-
Inflating tyres
-
Check the tyre pressure immediately after filling using a suitable pressure gauge, e.g. at a petrol station.
-
Street-legal compressors in construction site operation
-
Ensure that all hoses and fixtures are suitable for the maximum permissible working pressure of the compressor.
-
Set-up location
- Only set up the compressor on a flat surface.
- In case of pressures above 7 bar, it is recommended to equip supply hoses with a safety cable (e.g. a wire rope).
- Avoid over-stressing the piping system by using flexible hose connections to prevent kinking.
5.2 Additional safety instructions
Observe the corresponding operating manuals of the respective compressed air tools / compressed air attachments!
The following general warnings must also be observed.
5.2.1 Safety instructions for working with compressed air and air blow guns
- Ensure there is sufficient distance to the product, at least 2.50m , and keep the compressed air tools / compressed air attachments away from the compressor during operation.
- Compressor pump and lines reach high temperatures during operation. Touching them will cause burns.
- The air which is sucked in by the compressor must be kept free of impurities that could cause fires or explosions in the compressor pump.
- When disconnecting the hose coupling, hold the coupling piece of the hose firmly with your hand. This will ensure that you avoid injuries caused by the hose re-coiling.
- Wear safety goggles and a respirator when working with the compressed air pistol. Duds are harmful to health! Foreign objects or blown off parts can easily cause injuries.

DANGER
Danger of injury!
Do not blow on people or clean clothing whilst on the body with the air blow gun.
5.2.2 Safety instructions when using spraying attachments (e.g. paint sprayers)
- Keep the spray attachment away from the compressor when filling so that no liquid comes into contact with the compressor.
- Never spray in the direction of the compressor when using the spraying attachments (e.g. paint sprayers). Moisture can lead to electrical hazards!

DANGER
Risk of explosion!
Do not process any paints or solvents with a flash point below 55^ C.

DANGER
Risk of explosion!
Do not heat up paints or solvents.
- If harmful liquids are processed, filter devices (face masks) are required for protection. Also observe the information on protective measures provided by the manufacturers of such substances.
- The information and labelling of the hazardous substances ordinance affixed to the outer packaging of the processed materials must be observed. If necessary, take additional protective measures, in particular wear suitable clothing and masks.

DANGER
Risk of explosion!
Do not smoke during the spraying process or in the working area.
Paint vapours are also highly flammable.
- Never set up or operate the equipment in the vicinity of a fire place, open lights or sparking products.
- Do not store or consume food or drinks in the work area. Paint fumes are harmful to health.
- The working area must be larger than 30m^3 and sufficient air exchange must be ensured during spraying and drying.
- Do not spray into the wind. Always observe the regulations of the local police authorities when spraying flammable or hazardous spraying materials.
- Do not use media such as white spirit, butyl alcohol and methylene chloride in conjunction with the PVC pressure hose. These media destroy the pressure hose.
- The work area must be separated from the compressor so that it cannot come into direct contact with the working medium.
5.2.3 Operation of pressure vessels
- Anyone who operates a pressure vessel must keep this in good working order, operate and monitor it correctly, perform the necessary maintenance and servicing works immediately and implement safety measures as required according to the circumstances.
- The regulatory authority can instruct necessary monitoring measures in individual cases.
- A pressure vessel must not be operated if it exhibits a defect that poses a danger to personnel or third parties.
- Check the pressure vessel for rust and damage each time before use. The compressor shall not be operated if the pressure vessel is damaged or rusty. If you discover damage, please contact the customer service workshop.
Store all safety information and instructions safely.
Residual risks
The product has been built according to state-of-the-art and the recognised technical safety rules. However, individual residual risks can arise during operation.
- Health hazard due to electrical power, with the use of improper electrical connection cables.
- Furthermore, despite all precautions having been met, some non-obvious residual risks may still remain.
- Residual risks can be minimised if the "Safety Instructions" and the "Intended Use" together with the operating manual as a whole are observed.
- Prevent the product being unintentionally started up.
- Keep your hands away from the working area when the product is in operation.
- Comply with the stipulated maintenance and safety instructions in the operating manual.

WARNING
This power tool generates an electromagnetic field during operation. This field can impair active or passive medical implants under certain circumstances. In order to prevent the risk of serious or deadly injuries, we recommend that persons with medical implants consult with their physician and the manufacturer of the medical implant prior to operating the power tool.
6 Technical data
| Rated voltage 230 V~/50 Hz |
| Rated power consumption max. 1100 W | S1* |
| Compressor speed 2,850 rpm |
| Pressure vessel volume 8 l |
| Maximum operating pressure approx. 8 bar |
| Theo. Suction capability approx. 155 l/min |
| Theo. Power output approx. 116 l/min |
| Protection category IP30 |
| Oil (DAB 46) approx. 0.15 l |
| Maximum installation 1000 m altitude (above sea level) |
| Weight approx. 17 kg |
Subject to technical changes!
*Operating mode S1 (continuous operation)
The product can be operated continuously with the specified power.
The noise emission values have been determined in accordance with EN ISO 3744:1995.
| Sound power level LwA | 94 dB |
| Sound pressure level LpA | 71.7 dB |
| Uncertainty KwA/pA | 2.17 dB |
If necessary, adhere to rest periods and limit the duration of work to the bare minimum.
7 Unpacking

WARNING
The product and the packaging material are not children's toys!
Do not let children play with plastic bags, films or small parts! There is a danger of choking or suffocating!
- Open the packaging and carefully remove the product.
- Remove the packaging material, as well as the packaging and transport safety devices (if present).
- Check whether the scope of delivery is complete.
- Check the product and accessory parts for transport damage. Immediately report any damage to the transport company that delivered the Product. Later claims will not be recognised.
- If possible, keep the packaging until the expiry of the warranty period.
- Familiarise yourself with the product by means of the operating manual before using for the first time.
- With accessories as well as wearing parts and replacement parts use only original parts. Spare parts can be obtained from your specialist dealer.
- When ordering please provide our article number as well as type and year of manufacture for the product.
8 Assembly
ATTENTION
Always make sure the product is fully assembled before commissioning!

WARNING
Danger of injury!
Do not insert the mains plug into the socket until you are ready to use the product.
8.1 Installing the air filter (6) (fig. 4, 5)
- Remove the transport lid (6a) and screw the air filter (6) to the equipment.
8.2 Top up oil (fig. 8, 9)
ATTENTION
Ensure that you add oil before commissioning. Use DAB 46 oil for this.
Check the oil level regularly before commissioning. An oil level that is too low can damage the motor.
Operation without oil will cause irreparable damage to the product and will invalidate the warranty.
- Remove the plastic transport cap (8) from the top of the compressor housing crankcase. (See fig. 7)
-
Fill the included compressor oil into the compressor pump housing and insert the supplied oil sealing plug (7) into the oil filler hole (9).
-
Check the oil level using the oil sight glass (10). The oil level must be within the red circle. (see fig. 8 item 10.1)
- Attach the oil sealing plug (7), which is included in the scope of delivery, and tighten it firmly. (Fig. 9)
9 Before commissioning
- Before connecting of the product, make certain that the data on the type plate matches with the mains power data.
- Prior to initial commissioning, remove the transport lid (8) and fill the compressor pump housing with oil as described in item 8.2.
- Check the product and accessory parts for transport damage. Immediately report any damage to the transport company that delivered the Product. Later claims will not be recognised.
The product must be installed close to the consumer. - Long air lines and supply cables (extension cable) should be avoided.
- Ensure that the intake air is dry and dust-free.
- Do not install the product in a damp or wet room.
- Operate the product only in suitable areas (well ventilated, ambient temperature +5^ to 40^ ). There must be no dust, acids, vapours, explosive or flammable gases in the room.
- The product is suitable for use in dry rooms. It must not be used in areas where splashed water is present.
The product may only be used outdoor briefly when the ambient conditions are dry. - The product must always be kept dry and must not be left outdoors after work is complete.
10 Operation
ATTENTION
Always make sure the product is fully assembled before commissioning!
10.1 On/Off switch (fig. 3)
- Pull the on/off switch (17) upwards to switch on the compressor.
- Press the on/off switch (17) down to switch off.
10.2 Adjusting the pressure (fig. 3)
- The pressure at the manometer (14) is adjusted with the pressure regulator (16).
The pressure set can be utilised by connecting to the quick-coupling (15). - The vessel pressure can be read off at the pressure gauge (13).
10.3 Setting the pressure switch
-
The pressure switch (2) is set at the factory.
-
Cut-in pressure approx. 6 bar
- Cut-out pressure approx. 8 bar
10.4 Fitting the compressed air hose (18) (fig. 1, 3)
- Connect the plug nipple (18a) of the compressed air hose (18) to the compressor quick coupling (15).
- Then attach the compressed air tool to the quick coupling (18b) of the compressed air hose (18).
10.5 Thermal protector
The thermal protector is built into the Product.
If the thermal protector has tripped, proceed as follows:
- Pull out the mains plug.
- Wait about two to three minutes.
- Plug the Product in again.
- If the Product does not start, repeat the process.
- If the device does not start again, Product the device off and on again at Product on/off switch.
If you have carried out all of the steps above and the Product still does not work, contact our service team.
11 Electrical connection
The electrical motor installed is connected and ready for operation. The connection complies with the applicable VDE and DIN provisions. The customer's mains connection as well as the extension cable used must also comply with these regulations.
When working with spray attachments and during temporary use outdoors, the product must be connected to a residual current circuit breaker with a trigger current of 30 mA or less.
11.1 Damaged electrical connection cables
The insulation on electrical connection cables is often damaged.
This may have the following causes:
- Pressure points, where connection cables are passed through windows or doors,
- Kinks where the connection cable has been improperly fastened or routed,
- Places where the connection cables have been cut due to being driven over,
Insulation damage due to being ripped out of the wall socket, - Cracks due to the insulation ageing.
Such damaged electrical connection cables must not be used and are life-threatening due to the insulation damage.
Check the electrical connection cables for damage regularly. Ensure that the connection cables are disconnected from electrical power when checking for damage.
Electrical connection cables must comply with the applicable VDE and DIN provisions. Only use connection cables of the same designation.
The printing of the type designation on the connection cable is mandatory.
Safety information for replacing damaged or defective mains connection cables
Connection type Y
If it is necessary to replace the mains connection cable, this must be done by the manufacturer or their representative to avoid safety hazards.
11.2 AC motor
Connections and repair work on the electrical equipment may only be carried out by electricians.
The mains voltage must be 230V
- Extension cables up to 25m long must have a cross-section of 1.5mm^2
11.3 Important information
In the event of overloading, the motor will switch itself off. After a cool-down period (time varies) the motor can be switched back on again.
12 Cleaning and maintenance

WARNING
Have maintenance and repair tasks that are not described in this operating manual, carried out by a specialist workshop. Use only original spare parts.

WARNING
Improper maintenance or cleaning work can cause injuries!

WARNING
The product may start unexpectedly and cause injuries and burns during cleaning, repair and maintenance work.
- Switch the product off.
- Pull out the mains plug.
- Allow the product to cool.
- De-pressurise the compressor.
12.1 Cleaning
- Keep protective devices, air vents and the motor housing as free of dust and dirt as possible. Rub the product clean with a clean cloth or blow it off with compressed air at low pressure. We recommend that you clean the product directly after every use.
- Clean the product at regular intervals using a damp cloth* and a little soft soap. Do not use any cleaning products or solvents; they could attack the plastic parts of the product. Make sure that no water can penetrate the product interior.
- We recommend that you clean the product directly after every use.
- The hose and injection tools must be disconnected from the compressor before cleaning. The compressor must not be cleaned with water, solvents or similar.
12.1.1 Cleaning the filter (6) (fig. 4, 6)
The air filter prevents dust and dirt being sucked in. It is necessary to clean this filter at least every 300 operating hours.
A blocked air filter significantly reduces the product power.
- Remove the air filter (6), loosen the Phillips screw (6b) and remove the washer (6c).
- Pull off the filter Air filter cover (6d). Now you can remove the filter element (6f) and the filter housing (6e).
- Carefully tap out the filter element (6f), the filter cover (6d) and the filter housing (6e).
- These components must then be blown out with compressed air (approx. 3 bar) and reassembled in reverse order.
12.2 Maintenance
12.2.1 Pressure vessel maintenance / condensate (fig. 1, 2)
ATTENTION
To ensure a long service life for the pressure vessel, drain off the condensate after each use by opening the drain screw.
- Release the vessel pressure beforehand (see 10.7.1).
- Open the drain screw (11) by turning it anti-clockwise (when looking at the screw from the bottom of the compressor) so that the condensate can be completely drained out of the pressure vessel. Then close the drain screw (11) again (turn clockwise).
- Check the pressure vessel for rust and damage each time before use.
- Do not operate the compressor with a damaged or rusty pressure vessel. If you discover any damage, please contact the customer service workshop.
ATTENTION
The condensate from the pressure vessel contains oil residue. Dispose of the condensate in an environmentally friendly manner at a suitable collection point.
12.2.2 Safety valve (12) (fig. 3)
- The safety valve is set to the maximum permissible pressure of the pressure vessel.
- It is not permitted to adjust the safety valve or remove the connection lock between the exhaust nut and its cap.
-
Actuate the safety valve every 30 operating hours but at least 3 times a year to ensure that it works when required.
-
Turn the perforated exhaust nut (12a) anti-clockwise to open it and use your hands to pull the valve rod outwards over the perforated exhaust nut (12a) to open the outlet of the safety valve (12).
- The safety valve (12) now audibly lets out air. Then, tighten the exhaust nut (12a) clockwise again.
12.2.3 Check the oil level via the oil sight glass (10) (fig. 8)
- Position the Product on a straight, level surface.
The oil level must be between MAX and MIN.
Recommended oil: DAB 46 or equivalent.
The first oil filling must be changed after 10 operating hours; afterwards, perform an oil change every 50 operating hours.
12.2.4 Changing oil (fig. 8, 9)
ATTENTION
Environmental damage!
Spilled oil can pollute the environment permanently. The liquid is highly toxic and can quickly lead to water pollution.
- Fill/empty oil only on level, paved surfaces.
- Use a filling nozzle or funnel.
- Collect drained oil in a suitable container.
- Wipe up spilled oil carefully immediately and dispose of the cloth according to local regulations.
-
Dispose of oil as per local regulations.
-
Switch the motor off and unplug the mains plug from the power outlet.
- After releasing any air pressure you can unscrew the oil sealing plug (7) from the compressor pump (5).
- To prevent the oil from running out in an uncontrolled manner, hold a suitable container under the opening and collect the oil in the container. If the oil does not drain out completely, we recommend tilting the compressor slightly.
- When the oil has drained out, re-fit the oil sealing plug (7).
- Dispose of the old oil at a drop-off point for old oil.
- To fill in the correct quantity of oil, make sure that the compressor stands on an even surface.
- Fill new oil through the oil filling opening (9) until it comes up to the maximum level. This is marked with a red dot on the oil-level window (10) (fig. 8 item 10.1). Do not exceed the maximum filling quantity. Overfilling the equipment may result in damage.
- Reinsert the oil sealing plug (7) into the oil filling opening (9).
13 Storage
Store the product and its accessories in a dark, dry and frost-free place that is inaccessible to children.
The optimum storage temperature is between 5^ and 30^ .
Store the product in its original packaging.
Cover the product to protect it from dust or moisture. Store the operating manual with the product.
ATTENTION
Pull out the mains plug and ventilate the compressor and all connected compressed air tools. Store the compressor in such a way that it cannot be used by unauthorised persons.
ATTENTION
Store the product only in dry locations that are inaccessible for unauthorised persons.
Do not tilt the unit, only store it upright!
13.1 Release excess pressure
Release overpressure in the compressor by switching off the compressor and using up the compressed air still in the pressure vessel, e.g. with a compressed air tool running at idle or with an air blow gun.
14 Repair and ordering spare parts
After repairs or maintenance, make sure that all safety-related parts are installed and are in perfect condition. All parts which may cause injury must be kept where they are inaccessible to children or others.
ATTENTION
According to the German Product Liability Act, no liability is accepted for damage caused by improper repairs or by not using original spare parts.
Such work should be performed by a customer service centre or an authorised specialists. The same applies to accessory parts.
Spare parts and accessories can be obtained from our Service Centre. To do this, scan the QR code on the front page.
Connections and repairs
Connections and repair work on the electrical equipment may only be carried out by electricians.
14.1 Ordering spare parts
Please provide the following information when ordering spare parts:
- Model designation
- Item number
- Type plate data
14.2 Service information
With this product, it is necessary to note that the following parts are subject to natural or usage-related wear, or that the following parts are required as consumables.
Wearing parts*: Air filter
^* = not included in the scope of delivery!
15 Disposal and recycling
Notes for packaging

The packaging materials are recyclable. Please dispose of packaging in an environmentally friendly manner.
Notes on the electrical and electronic equipment act [ElektroG]
![SCHEPPACH HC08 - Notes on the electrical and electronic equipment act [ElektroG] - 1](/content/2026/03/572556/images/37afdba7468dd1404cea3aa3961a8d683db932531ef58e154cac574540a328e3.jpg)
Waste electrical and electronic equipment does not belong in household waste, but must be collected and disposed of separately!
- Used batteries or rechargeable batteries that are not installed permanently in the old appliance must be removed non-destructively before disposal! Their disposal is regulated by the battery act.
- Owners or users of electrical and electronic devices are legally obliged to return them after use.
- The end user is responsible for deleting their personal data from the old device being disposed of!
- The symbol of the crossed-out dustbin means that waste electrical and electronic equipment must not be disposed of with household waste.
- Waste electrical and electronic equipment can be handed in free of charge at the following places:
Public disposal or collection points (e.g. municipal works yards)
- Points of sale of electrical appliances (stationary and online), provided that dealers are obliged to take them back or offer to do so voluntarily.
- Up to three waste electrical devices per type of device, with an edge length of no more than 25 centimetres, can be returned free of charge to the manufacturer without prior purchase of a new device from the manufacturer or taken to another authorised collection point in your vicinity.
Further supplementary take-back conditions of the manufacturers and distributors can be obtained from the respective customer service.
- If the manufacturer delivers a new electrical appliance to a private household, the manufacturer can arrange for the free collection of the old electrical appliance upon request from the end user. Please contact the manufacturer's customer service for this.
- These statements only apply to devices installed and sold in the countries of the European Union and which are subject to the European Directive 2012/19/EU. In countries outside the European Union, different regulations may apply to the disposal of waste electrical and electronic equipment.
16 Troubleshooting
The following table shows fault symptoms and describes remedial measures in the event of your product failing to work properly. If you cannot localise and rectify the problem with this, please contact your service workshop.
| Fault Possible cause Remedy | ||
| Product does not run. Mains voltage | ge not present. Check cable, m | mains plug, fuse and socket. |
| Mains voltage too low. Avoid | extension cables that are too long. Use extension cables with sufficient conductor cross-section. | |
| Outside temperature is too low. | Do not operate at outside temperatures below +5°C. | |
| Motor is overheated. Allow the | motor to cool down. If necessary, remedy the cause of the overheating. | |
| Product runs, but no pressure. The | the safety valve leaks. Contact you | your local service centre. Only allow qualified personnel to carry out repairs. |
| The seals are damaged. Check | the seals and have any damaged seals replaced by a service centre. | |
| The drain screw for condensate leaks. | Tighten the screw by hand. Check the seal on the screw and replace if necessary. | |
| Product runs, pressure shown on the manometer, but tools are not running | Hose connections leaking. | Check compressed air hose and tools, replace if necessary. |
| Quick-coupler leaking. Contact | your local service centre. Only allow qualified personnel to carry out repairs. | |
| Pressure set too low at pressure regulator. | Turn up the pressure regulator further. | |
17 EU Declaration of Conformity
Translation of the original Declaration of Conformity
Manufacturer:
Scheppach GmbH
GünzburgerstraBe 69
D-89335 Ichenhausen
We declare under our sole responsibility that the product described here complies with the applicable directives and standards.
Brand:
SCHEPPACH
Art. designation: Compressor - HC08
Art.no.
5906119901/5906119903
EU directives:
2014/30/EU, 2006/42/EC, 2000/14/EG_2005/88/EC, 2011/65/EU*,
- The object of the declaration described above fulfils the regulations of the directive 2011/65/EU of the European Parliament and Council from 8th June 2011, on the restriction of the use of certain hazardous substances in electrical and electronic equipment.
Applied standards:
EN 62841-1:2015/A11:2022;
EN 1012-1:2010;
EN IEC 61000-6-1:2019;
EN IEC 61000-6-3:2021;
Conformity assessment procedure:
2000/14/EG_2005/88/EC - Appendix: VI
Guaranteed
94 dB
sound power level (L_WA)
91.8 dB
Measured
sound power level (L_WA)
Notified body:
TÜV SUD
Documentation authorised representative:
Ann-Katrin Bloching
Günzburger Str. 69
D-89335 Ichenhausen
Division Manager Product Center
V
Andreas Pecher
Head of Project Management
Sommaire
Ref. 5906119901/5906119903
Directives UE :
2014/30/UE, 2006/42/UE, 2000/14/CE_2005/88/CE, 2011/65/EU*,
Division Manager Product Center

Andreas Pecher
Head of Project Management
Indice
EN IEC 61000-6-3:2021;
Division Manager Product Center
m : x = 1 或 3x + 4y + 1 = 0
Andreas Pecher
Head of Project Management
Inhoudsopgave
10.2 Drukinstelling (afb. 3)
12.2.4 Olieverversing (afb. 8, 9)
LETOP
Milieuschade!
EN IEC 61000-6-3:2021;
Division Manager Product Center
Andreas Pecher
Head of Project Management
Indices
2014/30/UE, 2006/42/UE, 2000/14/CE_2005/88/CE,
2011/65/UE*,
EN IEC 61000-6-3:2021;
Division Manager Product Center
Andreas Pecher
Head of Project Management
Indices
EN IEC 61000-6-3:2021;
Division Manager Product Center
Andreas Pecher
Head of Project Management
Obsah
Günzburger Straße 69
D-89335 Ichenhausen
EN IEC 61000-6-3:2021;
Postup posuzovani shody:
2000/14/EG_2005/88/EG - Priloha: VI
Zaručená 94 dB
Division Manager Product Center

Andreas Pecher
Head of Project Management
Obsah
EN IEC 61000-6-3:2021;
Postupy posudzovania zbody:
2000/14/ES_2005/88/ES - Priloha: VI
Zaručena
94 dB
hladina akustického
vykonu (L_wA)
Namerana
91,8 dB
hladina akustického
vykonu (L_WA)
Notifikovana osoba:
TÜV SÜD
Cislo:
Division Manager Product Center

Andreas Pecher
Head of Project Management
Tartalomjegyzék
EN IEC 61000-6-3:2021;
Division Manager Product Center

Andreas Pecher
Head of Project Management
Spis tresci
Günzburger Straße 69
D-89335 Ichenhausen
EN IEC 61000-6-3:2021;
Procedura oceny zgodnosci:
2000/14/WE_2005/88/WE - zaćznik: VI
Gwarantowany 94 dB
Division Manager Product Center

Andreas Pecher
Head of Project Management
Popis sadržaja
1 Uvod. 113
2 Opis proizvoda 113
3 Opseg isporuke 114
4 Namjenska uporaba 114
5 Sigurnosne napomene. 114
6 Tehnicki podatci 116
7 Raspakiravanje 116
8 Montaza 117
9 Prijestevaljanu u pigeon. 117
10 Rukovanje 117
11 Priključivanje na elektrichnu mrežu. 118
12 Cijscenje i odrzavanje. 118
13 Skladištenje. 119
14 Popravak i narucivanje rezervnih dijelova. 120
15 Zbrinjavanje i reciklaranje 120
16 Otklananje neispravnosti. 120
17 EU izjava o sukladnosti. 121
Objašnjenje symbola na proizvodu
Svrha je simbola u ovom prisucniku skrenuti va su pozornost na moguce rizike. Sigurnosne simbole i objasnjenja uz njih valja pomno prouciti. Sama upozorenja ne otklanjaju rizike i ne mogu zamijeniti isprawne mjere za sprečavanje Nesreca.
EN IEC 61000-6-3:2021;
Division Manager Product Center

Andreas Peichler
Head of Project Management
Kazalo
1 Uvod 122
2 Opis izdelka 122
3 Obseg dostave. 123
4 Namenska uporaba. 123
5 Varnostni napotki 123
6 Tehnicni podatki 125
7 Razpakiranje 125
8 Montaza 126
9Pred zagonom. 126
10 UPRAVLJANJE 126
11 Elektrichi priključek 127
12 Cišćenje in vždrževanje 127
13 Skladiščenje 128
14 Popravila in narocanje rezervnih delov 129
15 Odlaganje med opadke in reciklaza. 129
16 Pomoč pri motnjah 129
17 EU izjava o skladnosti 130
Razlaga simbolov na izdelku
Z uporabo simbolov v tem prirocniku zelimo va so pozornost usmeriti na mogoca tveganja. Varnostni simboli in razlage, ki jih spremljajo, je treba natancno razumeti. Sama opozorila ne odpravijo tveganj in ne morejo nadomesti ustreznih ukrepov za preprecevanje NESRC.
EN IEC 61000-6-3:2021;
Postopek ugotavljanja skladnosti:
2000/14/EG_2005/88/EG - Priloga: VI
Division Manager Product Center

Andreas Pecher
Head of Project Management
Sisukord
EN IEC 61000-6-3:2021;
Vastavushindamise menetlus:
2000/14/EU_2005/88/EU - lisa: VI
Garanteeritud 94 dB
heliooimsustase (L_WA)
Moodetud
heliooimsustase (L_WA)
Division Manager Product Center
Andreas Pecher
Head of Project Management
Turinys
2014/30/ES, 2006/42/EB, 2000/14/EB_2005/88/EB, 2011/65/ES*,
EN IEC 61000-6-3:2021;
Atitikties vertinimo procedura:
2000/14/EB_2005/88/EB - priedas: VI
Garantuotas 94 dB
Division Manager Product Center

Andreas Pecher
Head of Project Management
Satura raditajs
1 levads. 149
2 Ražojuma apraksts 149
3 Piegades komplekts. 150
4 Noteikumiem atbilstoša lietosana. 150
5 Drośības norādījumi. 150
6 Tehniskie dati. 152
7 Izpakosana 152
8 Montaza 153
9 Pirms lietoanas saksanas 153
10 Lietosana. 153
11 Pieslegsana elektrofklam 154
12 Tirisana un apkope 154
13 Glabasana. 155
14 Labošana un rezerves dalu pasutišana 156
15 Utilizacija un otreizeja izmantošana. 156
16 Traucejumu noversana 157
17 ES atbilstibas deklaracija. 157
Günzburger Straße 69
D-89335 Ichenhausen
EN IEC 61000-6-3:2021;
Atbilstibas vertesanas metode:
2000/14/EK_2005/88/EK - pielikums: VI
Garantêtais
94 dB
Division Manager Product Center

Andreas Pecher
Head of Project Management
Division Manager Product Center

Andreas Pecher
Head of Project Management
Sisallysluettelo
Günzburger Straße 69
D-89335 Ichenhausen
EN IEC 61000-6-3:2021;
Division Manager Product Center
Andreas Pechter
Head of Project Management
Indholdsfortegnelse
1 Indledning. 176
2 Produktbeskrivelse 176
3 Leveringsomfang. 177
4 Tilsigtet drug. 177
5 Sikkherhedsforskritter 177
6 Tekniske data. 179
7 Udpakning. 179
8 Montering 180
9 Før ibrugtagning. 180
10 Betjening 180
11 Elektrisk tilslutning. 181
12 Rengoring og vedligeholdelse 181
13 Opbevaring. 182
14 Reparation og reservedelsbestilling. 183
15 Bortskaffelse og genanvendelse. 183
16 Feijfinding. 183
17 EU-overensstemmelseserklaering. 184
5.2.3 Drift at trykbeholder
Division Manager Product Center

Andreas Pecher
Head of Project Management
Garantie DE
Obvious defects must be reported within 8 days after receipt of the goods, otherwise the purchaser loses all claims due to such defects. We guarantee our machines, if handled correctly, for the duration of the statutory warranty period from handover in such a way that we will replace free of charge any machine part that demonstrably becomes unusable within this period as a result of material or manufacturing defects. For parts that we do not manufacture ourselves, we only provide a warranty to the extent that we are entitled to warranty claims against the upstream suppliers. The purchaser shall bear the costs of fitting the new parts. Claims for conversion and reduction and other claims for damages are excluded.