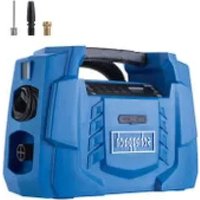
ac 500r - Compressor SCHEPPACH - Free user manual and instructions
Find the device manual for free ac 500r SCHEPPACH in PDF.

User questions about ac 500r SCHEPPACH
0 question about this device. Answer the ones you know or ask your own.
Ask a new question about this device
Download the instructions for your Compressor in PDF format for free! Find your manual ac 500r - SCHEPPACH and take your electronic device back in hand. On this page are published all the documents necessary for the use of your device. ac 500r by SCHEPPACH.
USER MANUAL ac 500r SCHEPPACH
natural_image
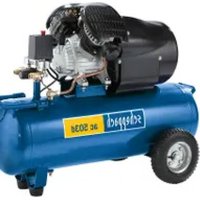
Black-and-white photo of a Schpeppach air compressor with visible branding and control panel (no text-heavy elements)D
Kompressor
Original-Anleitung
GB
Compressor
Translation from the original instruction manual
FR
Compresseur
Fig. 2
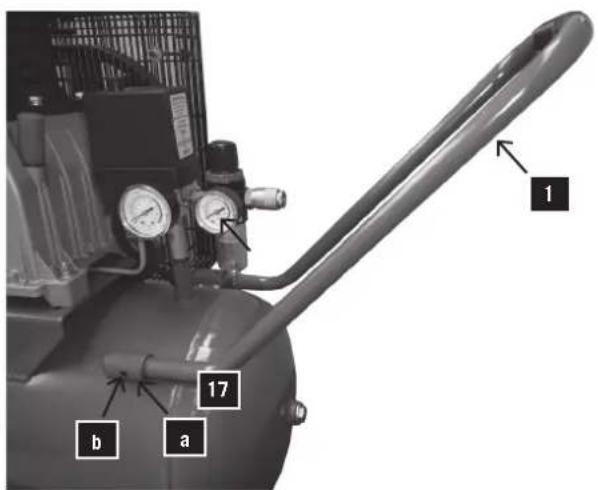
Fig. 3
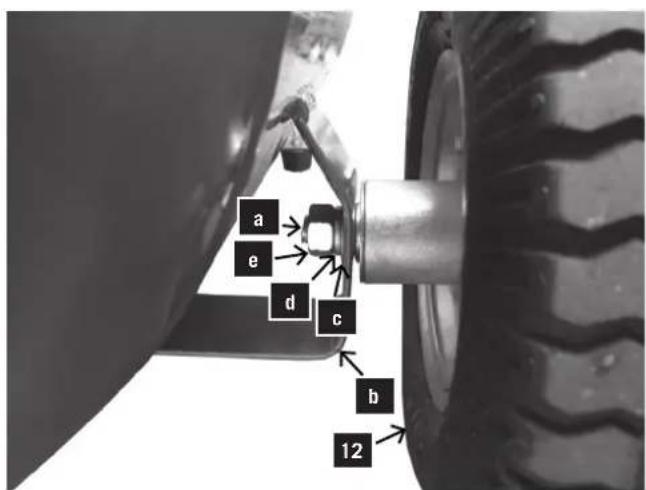
Fig. 4
natural_image
Close-up of a metallic V-shaped mechanical component with a small bolt and mounting base (no text or symbols visible)Fig. 5
natural_image
Close-up of a mechanical component with a hand adjusting parts, labeled '14' (no readable text or symbols beyond label)Fig. 6
natural_image
Close-up of a mechanical assembly with a numbered component (17) and bolted pins, no visible text or symbols beyond the number.Fig. 7
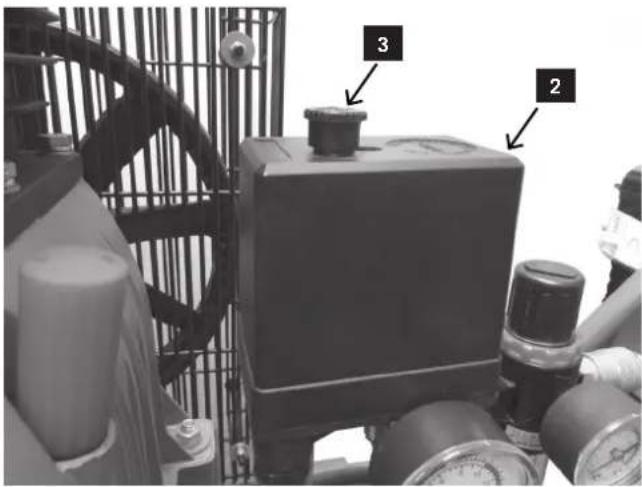
Fig. 8
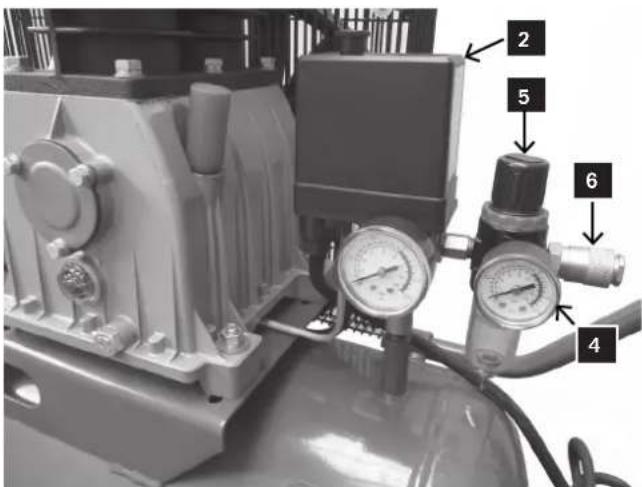
Fig. 9
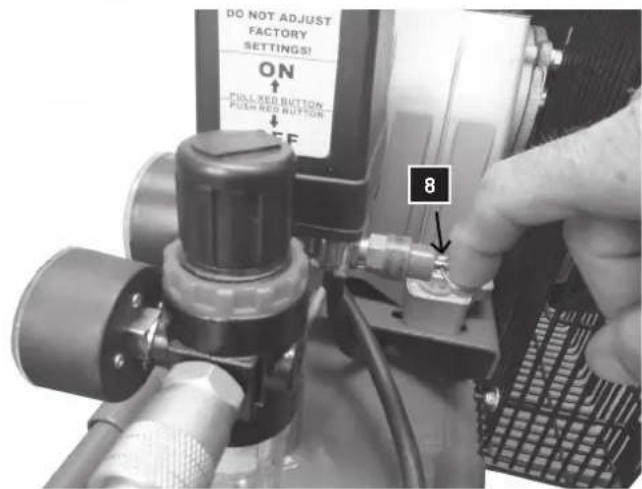
Fig. 10
natural_image
Close-up of a mechanical component with a labeled dimension '11' pointing to a cylindrical feature (no text or symbols beyond the label)Fig. 11
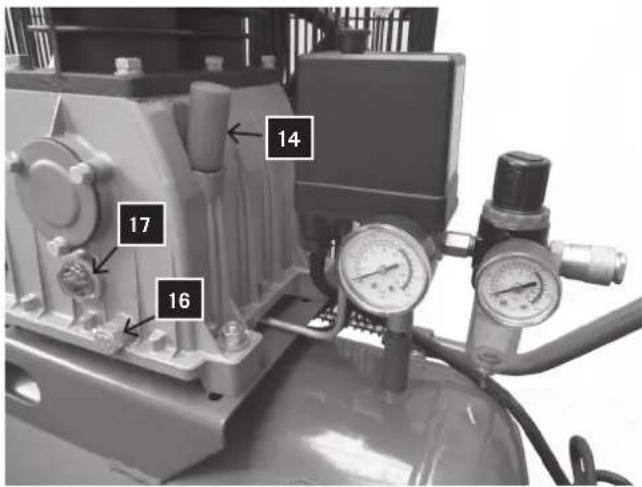
Fig. 12
natural_image
Close-up of a mechanical component with labeled part 'a' and internal structure (no text or symbols beyond label)Fig. 13
natural_image
Three black plastic electronic components labeled b, c, and d, showing different internal structures (no text or symbols on the parts themselves)Lieferumfang
Kompressor ac 500r
2 Laufräder
10m Gewebeschlauch
1 Beipackbeutel
Bedienungsanweisung
Technische Daten
Included in shipment
Compressor ac 500r
2 wheels
Woven hose 10m
1 accessory bag
Operating instructions
Technical data
Maximum operating pressure, bars 10
Maximum working pressure bars....10
Oil quantity, litres 1,25
Actual air discharge (FAD) l/min 220
Suction capacity (PD) l/min....290
Weight kg 58
| Motor 230 V / 50 Hz 400 V / 50 Hz | ||
| Input 2200 W 2200 W | ||
| Speed 2850 1/min 2850 1/min | ||
| Noise level | 96 dB(A) | 96 dB(A) |
General notes
In accordance with valid product liability laws, the manufacturer of this device shall not be responsible for damage to and from this device which results from:
- Improper care.
• Non-compliance with the Operating Instructions.
• Repairs made by unauthorized persons. - The installation and use of any parts which are not original replacement parts.
- Improper use and application.
- Failure of the electrical system as a result of non-compliance with the legal and applicable electrical directives and VDE regulations 0100, DIN 57113 / VDE 0113.
Read the Operating Instructions:
Carefully read the Operating Instructions before setting up the compressor or putting it into operation, or before doing any adjustment or maintenance work.
Dangerous electrical voltage
Attention: Before doing any adjustment, maintenance or cleaning work on the compressor, switch off the power supply.
Danger emanating from hot surfaces
Attention: The compressor contains some parts that can get very hot.
Danger through sudden start
Attention: After failure of electric power, the compressor can suddenly restart.
Warning:
The pressure control has been set in the works for maximum operating safety. Do not change the given setting.
Before assembly and putting into operation, read the entire Operating Instructions.
These Operating Instructions are to assist you in getting to know your machine and utilize its proper applications.
The Operating Instructions contain important notes on how you work with the machine safely, expertly, and economically, and how you can avoid hazards, save repair costs, reduce downtime, and increase the reliability and service life of the machine.
In addition to the safety requirements contained in these Operating Instructions, you must be careful to observe your country's applicable regulations.
The Operating Instructions must always be near the machine. Put them in a plastic folder to protect them from dirt and humidity. They must be read by every operator before beginning work and observed conscientiously. Only persons who have been trained in the use of the machine and have been informed of the various dangers may work with the machine. The required minimum age must be observed.
In addition to the safety requirements contained in these Operating Instructions and your country's applicable regulations, you should observe the generally recognized technical rules concerning the operation of woodworking machines.
• After unpacking, check all parts for any transport damage. Inform the supplier immediately of any faults. Later complaints cannot be considered.
• Make sure the delivery is complete.
- Before putting into operation, familiarize yourself with the machine by carefully reading these instructions.
- Use only original accessories, wearing or replacement parts. You can find replacement parts at your scheppach dealer.
- When ordering, include our item number and the type and year of construction of the machine.
Legend, Fig.1
Get to know your compressor:
1 Transport hanger
2 Pressure switch cover
3 ON/OFF switch
4 Pressure gauge for working pressure
5 Pressure regulator
6 Quick-disconnect coupling for adjustable pressure
7 Pressure gauge for boiler pressure
8 Pressure relief valve
9 Non-return valve
10 Drain plug
11 Boiler
12 Wheel (2x)
13 Thermo overload switch
14 Sealing plug
15 Air filter unit
16 Oil drain screw with
17 Oil level indicator

1
2
3
Description of symbols
The model plate on your machine may show symbols. They contain important information regarding the product or its use:
1 Wear ear protection.
Wear goggles.
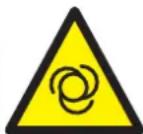
2 Warning! Automatic start.
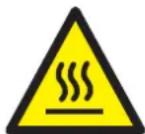
3 Warning! Hot Surface.
Meets the valid standards regarding electromagnetic compatibility.
General safety notes
Preserve these Operating Instructions well and have them carefully read by every person working with the compressor.
Important information
Attentively read these Operating Instructions. Most of the accidents when working with the
compressor occur through neglect of the basic safety rules. Recognizing potential dangers in time and conscientious observance of the safety instructions can avoid accidents. Only use the compressor following the recommendations of the manufacturer.
Safety notes
- Do not touch moving machine parts.
- Do not use the compressor with the guards removed.
• Always wear goggles or another adequate eye protection. Never point the compressed air current towards a part of your body or towards another person.
- Protection from electric shocks. Avoid inadvertent contact with the cables, the tank, or earthed metal parts of the compressor. Never use the compressor close to water or in a humid environment.
- Pull the power supply plug before starting repair, inspection, maintenance, or cleaning work, or before replacing any parts.
- Inadvertent starting. Do not transport the compressor while it is connected to the electric power. Make sure the switch is in OFF position before you plug in the electric cable.
- Store the compressor correctly. When the compressor is not used, it must be stored in a dry place protected from weather conditions.
- Working area. Make sure the work place is clean and well aerated. Put away any tools that are not needed. Do not use the compressor together with inflammable liquids or gases – risk of electric shock. Protect the compressor from rain and do not use it in humid or wet conditions. Since sparks can emanate from the compressor during work, it must be kept away from lacquers, gasoline, chemicals, glues, and other inflammable or explosive materials.
- Keep children away. Children, third persons or animals may not get in touch with the compressor. Unauthorized persons must observe a safety distance from the working zone.
- Working clothes. Wear close fitting clothes. Take off jewels as they could get caught in moving machine parts. Protect long hair by a net or cap.
- Do not misuse the electric cable. Do not remove the plug from the socket by pulling the cable. Keep the cable away from heat, oil and surfaces with sharp edges. Do not step on the cable, and do not squeeze it by putting heavy weights on it.
- Carefully service the compressor. Regularly check the electric cable. In case of a defect, have it repaired or replaced by an authorized service station. Carefully inspect the compressor from outside and have any defects repaired by a service station.
- Attention. Keep your mind at what you are doing. Use your common sense. Never work with the compressor when you are tired, or under influence of alcohol, drugs, or medicines causing drowsiness.
- Check the compressor for any defective parts or loss of air. Before you use the compressor again, check the correct position of the moving parts, cables, manometer, compressed air connections and all other parts important for the correct operation. Defective components must be
repaired or replaced by an authorized service station, observing the instructions given in this manual. The compressor may not be used with the pressure control valve defective.
- The compressor may only be used for the purposes specified in this operating manual. Do not allow children or inexperienced persons work with the compressor. The compressor is a machine generating compressed air. Use it according to the instructions given in this manual. Any other use exceeds authorization. The manufacturer is not responsible for any damages resulting from unauthorized use; risk is the sole responsibility of the operator.
- Keep the venting grids clean, especially when working in dirty conditions.
- Use the compressor at the rated voltage indicated on the model plate with the electrical data. The admissible tolerance range is +/- 5 %.
- Never use a defective compressor. If, during operation, you note a strange noise, excessive vibrations or any defects, switch it off immediately, check its good working order or contact your authorized service station.
- Only use original spare parts. The use of non-original spare parts renders the warranty invalid, and it can cause a malfunction of the compressor. Do not make any arbitrary modification on the compressor. Have repairs done by an authorized service station.
- Put the switch to OFF position when the compressor is not used. Put the switch to „0“ (OFF) to interrupt the power supply.
- Do not touch the hot parts of the compressor.
- Do not switch off the compressor by pulling the electric cable.
- Compressed air circuit. Use compressed air hoses and tools made for a higher (or identical pressure) than the maximum operating pressure of the compressor.
Additional safety notes for air compressors
Warning: Before connecting the compressor to the electric power (main switch on machine, socket, etc.), make sure the power supply corresponds with the data on the model plate. A higher mains voltage can cause serious injuries and damage the machine. Do not connect the machine in case of doubt. If the mains voltage is too low, the motor can get damaged.
Always pull the power supply plug before doing any maintenance or adjustment work, including changing the oil.
1 Never try to remove a part from the compressor while it is pressurized.
2 Never try to remove an electrical part while the compressor is connected to the mains supply. Switch the machine off and pull the power supply plug.
3 Do not adjust the safety valve.
4 Do not use an electrical extension cable.
5 If the drain plug underneath the switch cover (2) does not work while the ON/OFF switch is depressed, switch the power supply off and try to find the cause for the defect.
6 Make sure the lubrication oil is clean and the oil level remains in the centre of the red circle on the oil sight glass (16).
7 Be careful when you vent the tank (from the safety valve, the drain plug, or the air escape). Compressed air can be extremely dangerous. Make sure the air current does not whirl up any dust, stones or other foreign bodies. Be also sure that the air does escape in a safe way.
- In order to reduce the risk of fire or explosions, never spray inflammable fluids in an enclosed room. It is normal that sparks escape from the motor during operation. When these sparks get in touch with gasoline vapours or inflammable liquids, they can ignite and cause fire or explosions.
- Always operate the compressor in a well vented room. Do not smoke during spraying. Do not spray in the presence of sparks or flames. Keep the compressor as far as possible away from the spraying place. The liquids trichlorethane and methylenchloride can cause a chemical reaction with aluminium that is used in some paint spray cartridges and can cause an explosion. If these liquids are used, make sure the spraying is only done with spraying bins made of stainless steel. The compressor is not impaired by these liquids.
- Never inhale directly the compressed air produced by the compressor. Do not use the compressed air for filling breathing tanks.
- Do not use any welding equipment near the compressor. Do not weld anything to the air tank of the compressor: This could dangerously weaken the tank and would render the warranty invalid.
- Do not work with the compressor in the open air while it is raining, or on a wet base. Any of these situations could cause an electric shock.
- Always switch off the compressor after use and before doing any maintenance work. Press the ON/OFF button and wait until the compressed air has escaped from the tank via the drain valve. Then pull the power supply plug.
- Check the maximum admissible pressure of all devices used with the compressor. The output pressure on the compressor must be set in such a way that it never exceeds the prescribed pressure of devices or accessories.
- In order to reduce the risk of injury from moving parts, never operate the compressor without the guard fitted. Let hot components cool down before touching them.
- Read all labels and notes on the paint tank or on other spray materials. Carefully
observe all safety instructions. Wear a breathing mask when there is a risk of inhaling spray materials. Carefully check the function of the breathing mask before putting it on.
• Always wear goggles when handling the compressor. Never direct the nozzle of an accessory towards your body or towards another person.
- Do not try to adjust the pressure switch or the drain valve underneath the pressure switch cover.
- Remove daily the liquid from the tank in order to avoid corrosion.
- Pull the ring on the safety valve to make sure it works well.
- Keep the compressor at least 300 mm away from the wall in order to ensure sufficient venting for the cooling.
- Before you transport the compressor, drain the compressed air from the tank and secure the machine safely.
- Protect the air hose and the cable set from damage. Regularly examine the components for weak and worn spots, and replace them in case of need.
- Do not use an extension cable for this pro-
duct. Use instead an additional air hose in order to avoid a drop in power and a possible motor damage. The use of an extension cable makes the warranty invalid.
• After a long period of work, the outer metal parts can get hot.
- Press the ON/OFF switch to switch off the compressor. Only then cut the mains supply or pull the power supply plug.
- Before working with the compressor, check the oil level. It must be near the red circle as shown on the display.
Attention: Oil must be filled in before the initial putting into operation.
- After using the compressor, press the ON/OFF switch, cut off the mains supply, and open the drain valve in order to reduce the pressure.
- Do not try to remove a part from the machine while it is pressurized.
- Make sure the lubrication oil is clean and always available in sufficient quantity. Change the oil according to the instructions given in the chapter „Maintenance“ of this manual.
- Wear safety gears including goggles or a screen, ear protection, breathing mask
and protective clothing.
• After connection to the mains and switching on, the machine starts automatically.
• Air escaping from the compressor may not be inhaled.
- Check the pressure control valve daily before starting work.
- Drain humidity from the tank. Avoid tank corrosion.
- Cut off the mains supply, remove the power supply plug, and relieve the pressure before starting maintenance work.
Wear goggles.
Wear ear protection.
Wear a breathing mask.
Never direct the output air from the compressor towards a part of the body or a person. Never try to block the air escape with your finger or a part of your body.
Use as authorized
The machine meets all valid EC machine guidelines.
- Only use indoors. Prohibited to use outdoors.
- The machine must only be used in technically perfect condition and conscious of the risks, in accordance with its designated use and the instructions set out in the operating manual.
- Any functional disorders, especially those affecting the safety of the machine, must be rectified immediately.
- The safety, working and maintenance instructions of the manufacturer as well as
the dimensions given in the chapter „Technical data“ must be adhered to.
- The relevant accident prevention regulations and other, generally recognized safety-technical rules must also be adhered to.
- The machine may only be used, maintained, and operated by persons familiar with it and instructed in its operation and procedures.
- Arbitrary alterations to the machine release the manufacturer from all responsibility for any resulting damages.
- The machine may only be used with original accessories and original tools supplied by the manufacturer. Any other use exceeds authorization. The manufacturer is not responsible for any damages resulting from unauthorized use; risk is the sole responsibility of the operator.
Remaining hazards
The machine has been built using modern technology in accordance with recognized safety rules. Some remaining hazards, however, may still exist.
- Noise can be a health hazard. If the permitted noise level is exceeded when working, be sure to wear ear protection.
- The use of incorrect or damaged mains cables can lead to injuries caused by electricity.
- Even when all safety measures are taken, some remaining hazards which are not yet evident may still exist.
- Remaining hazards can be minimized by following the instructions given in the chapters „Safety notes“ and „Use as authorized“ as well as in the entire operating manual.
Even when all safety measures are taken, it is not possible to exclude all remaining hazards. Due to the construction of the machine, the following risks can occur:
- Injury of the lung when no breathing mask is worn.
- Injury of the ear when no ear protection is worn.
- Injury of the eyes when no efficient goggles (or protective screen) are worn.
Warning:
If an air hose is broken off or damaged, the air input on the compressor must be switched off. A broken air hose that is not supported, is extremely dangerous and can quickly start to rotate, hitting people or blowing foreign bodies
in the air.
Do not try to catch the hose. Instead, immediately remove all spectators from the dangerous area, cut off the air input, and switch the machine off by pressing the ON/OFF switch. Then remove the hose from the compressor.
Unpacking
Due to modern series production it is improbable that your compressor has any defects or that a part is missing. Should you note a fault, however, do not switch the machine on before the parts are replaced or the fault has been remedied. Not observing this instruction can lead to serious injuries.
Assembly
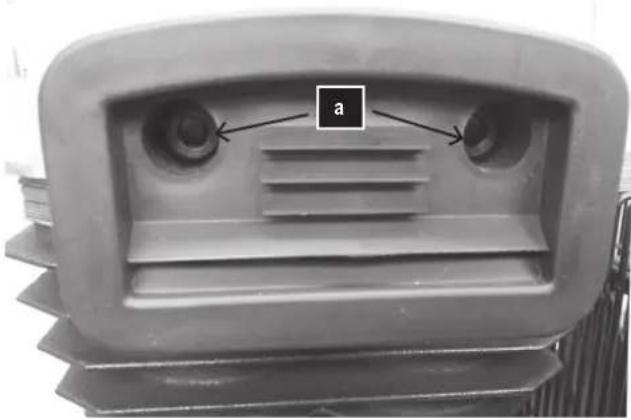
Transport hanger Fig. 2
Insert the transport hanger (1) on each side into the sockets (a)
and secure them with 2 hex socket head cap screws.
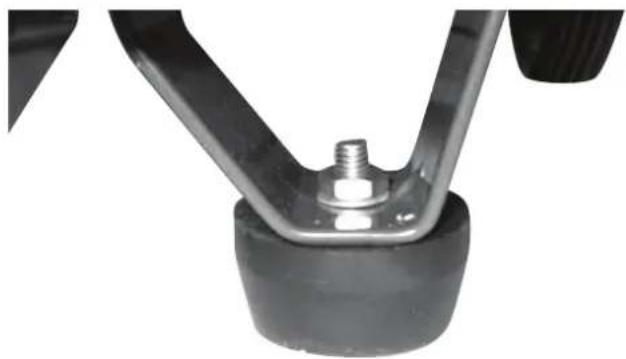
Rubber Bumper, Figure 4
Secure the rubber bumper on the bracket on the front side of the tank. Use the enclosed screws, washers, and nuts.
centre of the circular marking.
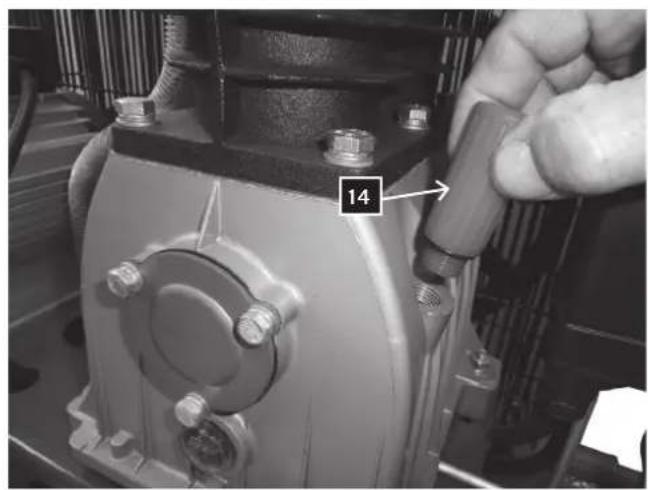
3 Close the opening using the sealing plug (14) included in the delivery.
Wheels, Fig. 3
1 To attach the wheels, first guide the bolts (a) through the wheel (12).
2 Slide the wheel unit through the lug under the tank
3 Attach this with a washer (c), a safety disc (d) and a nut (e) and secure these tightly.
4 Repeat this procedure for the second wheel.
Oil, Figure 5, 6
Warning: It is imperative that you check the oil level before using the machine for the first time!
Operation of the machine without oil will cause irreparable damage and invalidate the guarantee.
1 Remove the plastic oil filler plug located in the crank box of the compressor housing.
2 Fill the crankcase with oil, until the oil level in the oil-level indicator (16) reaches the
Putting into operation
Warning:
It is absolutely necessary to check the oil fill level before the first use!
1 Make sure the place of setting up is clean, dry, and well vented.
2 Make sure that the oil level is correct and that the air filters are installed.
3 Start the compressor as described in the chapter „Switching on and off the compressor“. At switching on for the first time, let the compressor run for ten minutes at no load with the drain valve open, so that all the parts get well lubricated.
Warning: As compressed air comes off the output, the output may not be directed towards the operator or people in the vicinity. The air coming off the exit may not be inhaled. Daily check the pressure control valve.
Switching on and off the compressor, Fig. 7
1 Check the model plate on the compressor: 230 - 240 V (or 110 - 120 V).
2 Plug the compressor cable into a standard socket (240 V or 120 V) and switch the compressor on.
3 For switching the compressor on, lift the ON/OFF switch (3) on the pressure switch cover (2).
4 For switching the compressor off, depress the ON/OFF switch.
3 For switching the compressor on, lift the ON/OFF switch (3) on the pressure switch cover (2).
3 For switching the compressor on, lift the ON/OFF switch (3) on the pressure switch cover (2).
3 For switching the compressor on, lift the ON/OFF switch (3) on the pressure switch cover (2).
3 For switching the compressor on, lift the ON/OFF switch (3) on the pressure switch cover (2).
3 For switching the compressor on, lift the ON/OFF switch (3) on the pressure switch cover (2).
Operation
Fig. 8
1 The pressure in the tank is controlled by the pressure switch under the pressure switch cover (2). When the maximum pressure set is reached, the pressure switch is activated and the motor switched off. The pressure is reduced as the air is consumed by the connected tool, until the minimum pressure set is reached. Then the pressure switch re-engages the motor. The operator at the compressor should take care that the motor engages and disengages dictated by the influence of the increasing and decreasing pressure in the tank. The motor engages without any previous warning.
2 The maximum and minimum pressure have been set in the works. These settings may not be altered.
3 All accessories were connected to the adjustable drain valve (6).
4 As shown on the adjustable output pressure gauge (4), the pressure of the adjustable exit can be altered by turning the adjustable button (5).
Attention: In order to read the correct output at the output gauge, air must flow through the output. The adjustable valve must be set and the pressure gauge read with the valve open, while the air flows from the output set through the accessory.
Turn the pressure regulator clockwise to increase the air pressure. Turn the pressure regulator anticlockwise to reduce the air pressure.
Attention: The absence of air flow during setting produces an incorrect display. For a correct display, air must flow.
5 Upon termination of your work, or when you leave the compressor unattended, switch it off as follows:
- Press the ON/OFF switch (3).
- Wait until the compressed air has escaped via the drain valve under the switch cover (2).
Attention: On pressing the button you should hear a short air exit (about half a second).
Fig. 9
- Switch the machine off and pull the mains plug.
- Pull the ring on the safety valve (8) in order to make sure that the compressed air has escaped from the tank, or open the drain plug of the tank in order to let the pressure escape.
- Switch the machine off and pull the mains plug.
Maintenance
Attention!
1 Unplug the power supply before all cleaning and maintenance work.
2 Allow the compressor to cool down; burn hazard.
3 Depressurise the tank.
Fig. 10
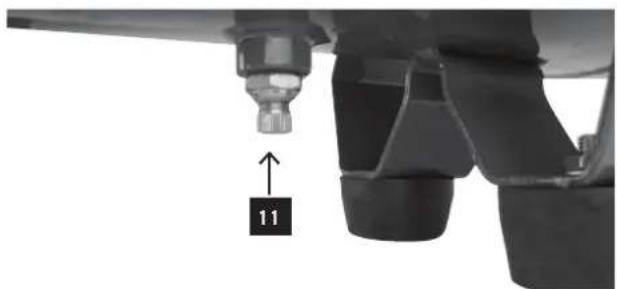
Condensation water
After every day in operation, use the drain screw (11) under the tank to drain off the condensate.
Attention!
The condensate contains oil residues. Dispose of the condensation water in an environmentally sound way at an appropriate collection point.
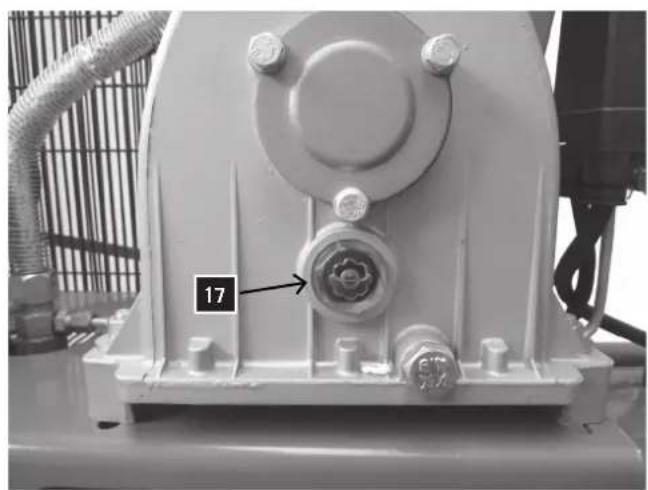
Oil level Fig. 11
Place the compressor on an even surface. The oil level should be between Max und Min in the display window (17).
The recommended oil is 15W/40 or equivalent. The first oil change should be carried out after 100 hours of use.
After this, change the oil after every 500 hours of use.
Oil change Fig. 11
1 Stop the engine and remove the plug.
2 Drain the compressed air.
3 Place a waste container under the oil drain screw (16).
4 Undo the oil drain screw (16).
5 Drain the oil (tilt the compressor slightly so that all the oil can drain out).
6 Close the oil drain screw (16).
7 Pour oil into the oil fill up to the mark in the display window (17) and close the sealing plugs (14).
Used oil
Dispose of the used oil in an environmentally sound way at an appropriate collection point.
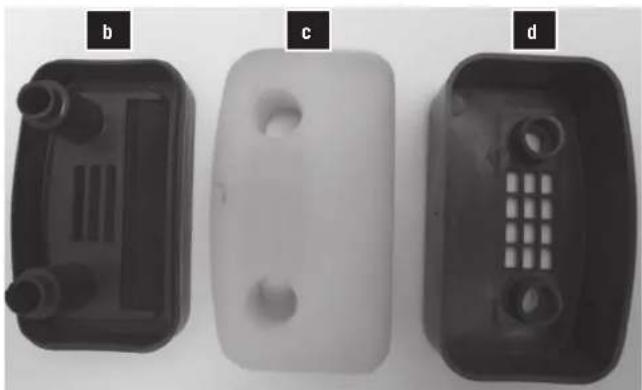
Air filter Fig 12.13
Regularly check the inner air filter. Remove the two hex cap screws (a) and remove the air filter from the cylinder head. Open the two casing shells (b) and remove the filter (c). Clean all the parts by tapping them or with low-level air pressure (approx. 3 bar). After cleaning, reassemble the filter and screw it back onto the cylinder head.
Caution! Never operate the compressor without air filter.
Before every startup of the machine, check the functioning of the safety valve. When checking, the tank must read at nearly maximum pressure.
For checking the valve, set the tank under pressure and pull the ring on the safety valve to the outside.
There should be air escaping from the valve. At releasing the ring from the safety valve, the escaping air must stop.
Fan belt
Tensioning the fan belt
Attention! Unplug the power supply
Loosen 4 engine-fastening screws Move the engine until the fan belt can be pushed through another approx.
1-2 cm.
Retighten the engine-fastening screws.
Warnings
For this test goggles must be worn. Do not hold your face close to the safety valve as there the air escapes at a high pressure. Should the safety valve not work properly as described above, immediately switch off the compressor and have the safety valve examined by your dealer.
Do not work with the compressor when the safety valve does not work properly, as described above.
General inspection
1 Regularly check all the fixing bolts for their tight seat.
2 Regularly check, at short intervals, the electric cable for damages. A damaged cable must be replaced by an electrician in order to avoid any danger.
Cleaning
1 Always keep the air inputs and outputs free and clean.
2 Regularly remove dust and dirt with a soft brush or a soft cloth.
3 Regularly grease all moving parts.
4 When the compressor must be cleaned, wipe it with a soft, moist cloth. A mild rinsing agent may be used, but no alcohol, gasoline, or another cleaning agent.
5 Never use any caustic agents for cleaning plastic parts.
Attention: Water may never come into contact with the compressor.
Electric connection
Maintenance of the electric cable
The cable set may only be repaired or replaced by a specialized workshop. In case of damage, contact your dealer.
Trouble-shooting
| Motor does not start, runs too slowly, or gets extremely hot. | Fault in electric current or mains voltage too low. | Check mains voltage. |
| Electric cable too long or too thin. Get a new cable | from your dealer. | |
| Faulty pressure switch. Have it repaired or replaced | by your dealer. | |
| Faulty motor. Have it repaired or replaced by your dealer. | ||
| Main compressor does not run smoothly, got stuck. | Have it repaired or defective parts replaced by your dealer. | |
| Main compressor does not run smoothly, got stuck. | Moving parts damaged by heat due to insufficient lubrication. | Crank shaft, bearing, connecting rod, piston rings etc. to be checked by your dealer and replaced, if needed. |
| Moving parts damaged or blocked by foreign bodies. | ||
| Vibrations or strange noise. | Loose parts. Have checked by your dealer and repaired, if needed. | |
| Foreign body in compressor. Have checked by your dealer and repaired, if needed. | ||
| Piston rod with valve seat. Have the gasket enlarged by your dealer. | ||
| Moving parts too hot. Have repaired by your dealer or replaced. | ||
| Insufficient pressure or drop in output capacity. | Motor runs too slowly. Have checked by your dealer and repaired, if needed. | |
| Dirty filter cartridge. | Clean or replace filter cartridge. | |
| Leakage in safety valve. | Have switch repaired or replaced by your dealer. | |
| Leakage in tube. | Have checked by your dealer and repaired, if needed. | |
| Gasket damaged. | Have checked by your dealer and repaired, if needed. | |
| Valve seat damaged or covered with carbon layer. | Have checked by your dealer and repaired, if needed. | |
| Piston ring or cylinder damaged. | Have checked by your dealer and repaired, if needed. | |
| Oil consumption too high. | Oil level too high. | Keep oil at correct level. |
| Hole in oil inlet plug (14) blocked. | Check and clean it. | |
| Piston ring and/or cylinder worn or damaged. | Have checked by your dealer and repaired, if needed. | |
| × | 2006/42/EC |
| × | 2006/95/EC |
| × | 2004/108/EC |
| × | 2009/105/EC |
| 2000/14/EC_2005/88/EC L_WA dB(A) | |
| 2004/26/EC | |
EN 1012-1, EN 60204-1, EN 60335-1, EN 61000-6-1, EN 61000-6-3, EN 61000-3-2, EN 61000-3-11
The technical documentation is kept by our
authorized representative
Deutschland
Nur für EU-Länder
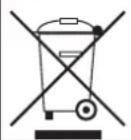
Only for EU countries.
Do not dispose of electric tools together with household waste material! In observance of european directive 2002/96/EC on wasted electrical and electronic equipment and its implementation in accordance with national law, electric tools that have reached the end of their life must be collected separately and returned to an environmentally compatible recycling facility.
France
Apparent defects must be notified within 8 days from the receipt of the goods. Otherwise, the buyer's rights of claim due to such defects are invalidated. We guarantee for our machines in case of proper treatment for the time of the statutory warranty period from delivery in such a way that we replace any machine part free of charge which provably becomes unusable due to faulty material or defects of fabrica-
tion within such period of time. With respect to parts not manufactured by us we only warrant insofar as we are entitled to warranty claims against the upstream suppliers. The costs for the installation of the new parts shall be borne by the buyer. The cancellation of sale or the reduction of purchase price as well as any other claims for damages shall be excluded.