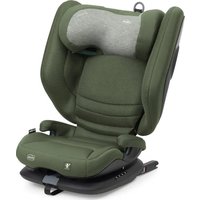
Fold&Go iSize - Car seat CHICCO - Free user manual and instructions
Find the device manual for free Fold&Go iSize CHICCO in PDF.
| Brand | Chicco |
| Model | Fold&Go iSize |
| Category | Car seat |
| Approval | Regulation R129/03 (i-Size) |
| Child size | 100 to 150 cm |
| Installation | Forward-facing, with Isofix + 3-point belt or 3-point belt only |
| Folding | Yes, backrest folds onto seat for compact transport |
| Backrest height adjustment | 9 positions |
| Backrest width adjustment | Yes, by wheel |
| Recline adjustment | 4 positions |
| Side Safety System | Removable side protection |
| Safe Pad | Abdominal/diagonal belt protector |
| Cover | Removable and machine washable at 30°C |
| Plastic cleaning | Damp cloth, mild detergent, no solvents |
| Lifespan | 10 years maximum |
| Spare parts | Cover exclusively approved by the manufacturer |
| Warranty | Conformity defects, according to national legislation |
Frequently Asked Questions - Fold&Go iSize CHICCO
User questions about Fold&Go iSize CHICCO
0 question about this device. Answer the ones you know or ask your own.
Ask a new question about this device
Download the instructions for your Car seat in PDF format for free! Find your manual Fold&Go iSize - CHICCO and take your electronic device back in hand. On this page are published all the documents necessary for the use of your device. Fold&Go iSize by CHICCO.
USER MANUAL Fold&Go iSize CHICCO
natural_image
Line drawing of a car comfort seat with green accents and seatbelt (no text or symbols)- Istruzioni D'uso
- Mode D'emploi
- Gebrauchsanleitung
- Instructions
- Instrucciones De Uso
- Instruções De Utilização
- Gebruiksaanwijzing
- Kullanim Bilgileri
- Bruksanvisning
• Οδηγιεσ Χρησησ - Upute Za Uporabu
text_image
A B C D E F G H I J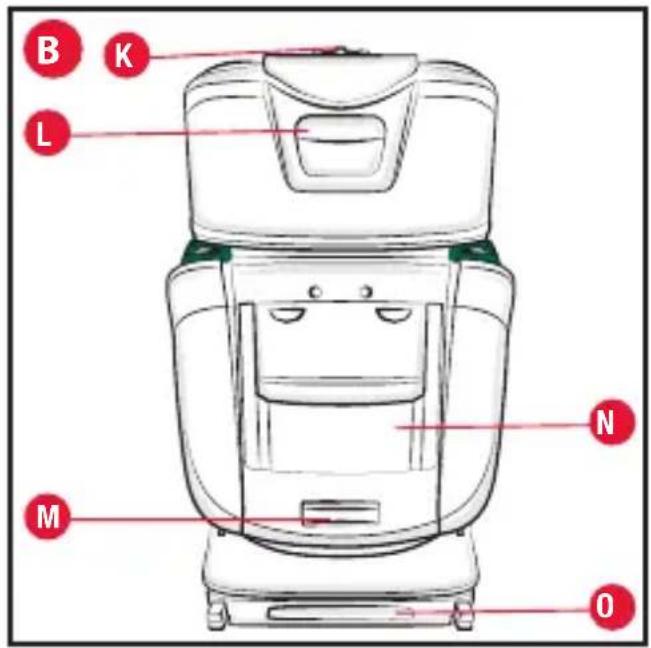
text_image
B K L M N O
text_image
C T Q S P R
natural_image
Line drawing of a car seatbelt with a belt buckle, no text or symbols present
text_image
2 NO!
text_image
3A No
text_image
4 OK NO! NO!
text_image
5A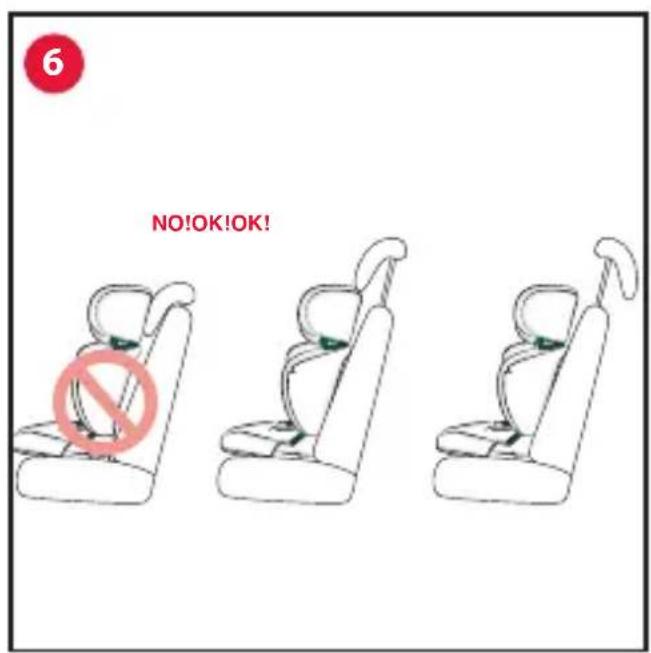
text_image
6 NO!OK!OK!
text_image
7 1 2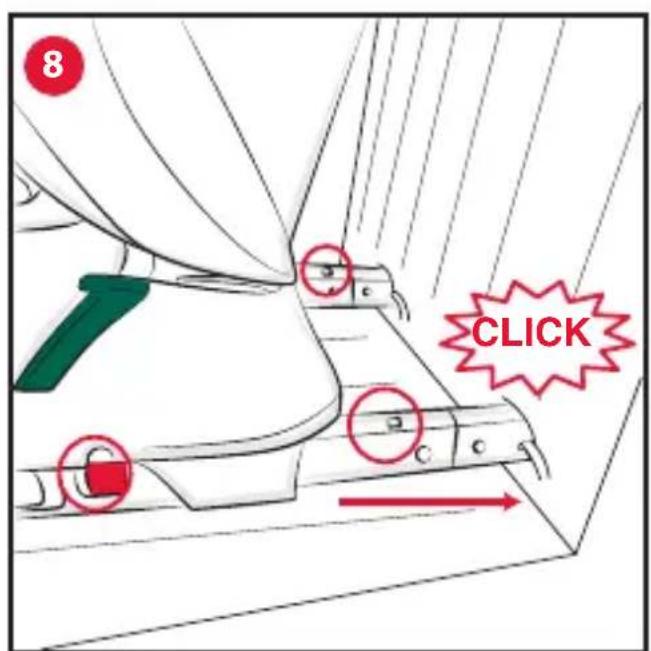
text_image
8 CLICK
text_image
9 OK!
text_image
10 2 1
text_image
11
natural_image
Illustration of a person seated with hands placed on the back of the spine, no text or symbols present
text_image
13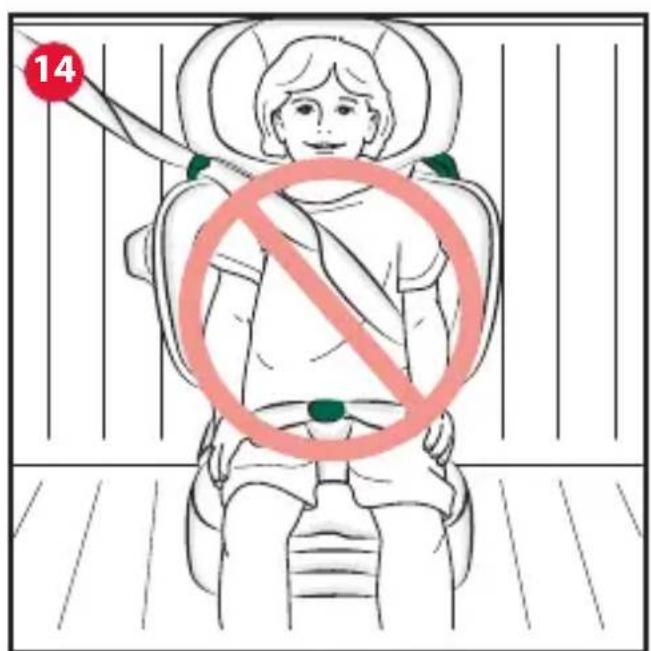
text_image
14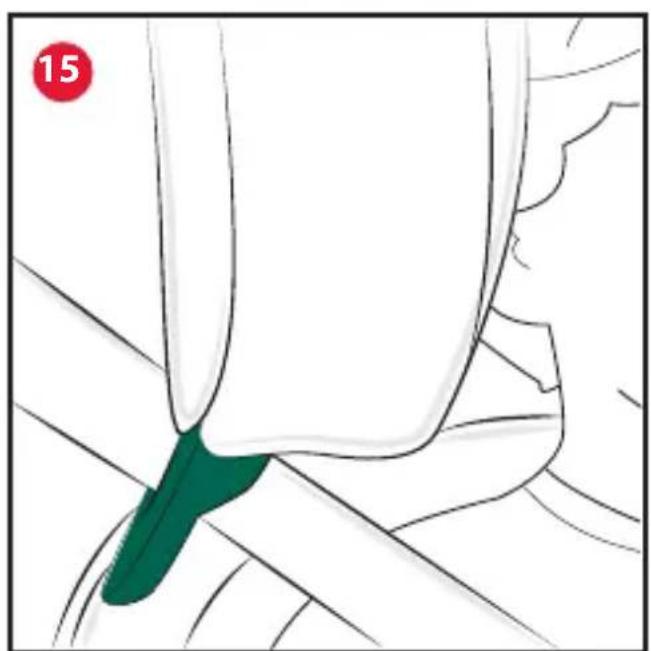
natural_image
Medical illustration showing a surgical instrument inserted into tissue, with no visible text or symbols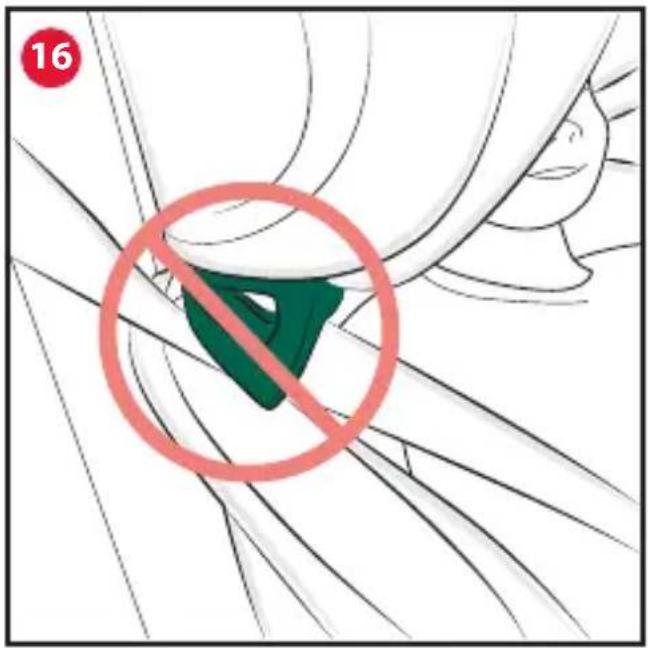
text_image
16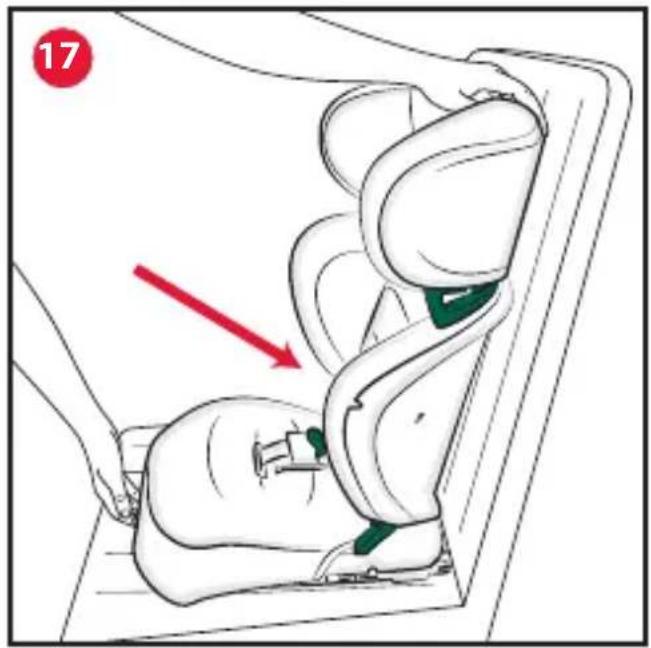
text_image
17
text_image
18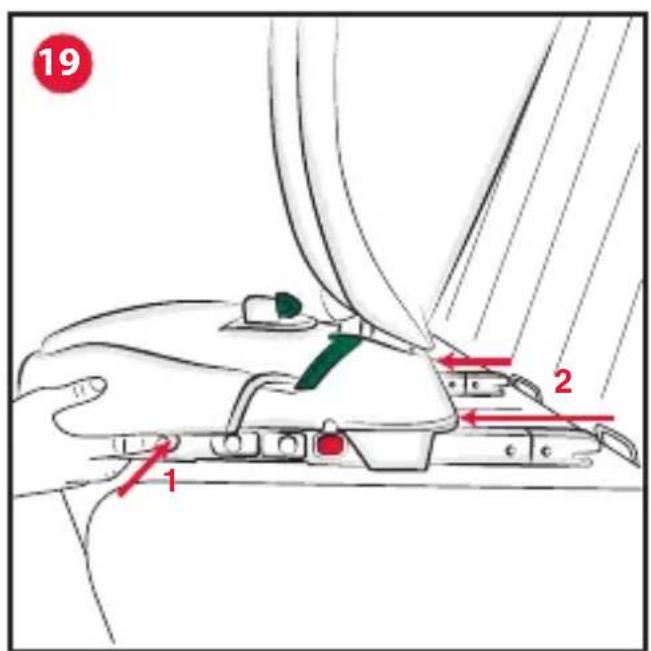
text_image
19 2 1
text_image
20 1 5
natural_image
Illustration of a hand using a tool to adjust or install a mechanical component, with no visible text or symbols.
text_image
22
text_image
23 1 2 1 2
natural_image
Diagram showing a mechanical or electrical component with red arrows indicating rotational motion (no text or symbols)
text_image
25 NO!NO!OK!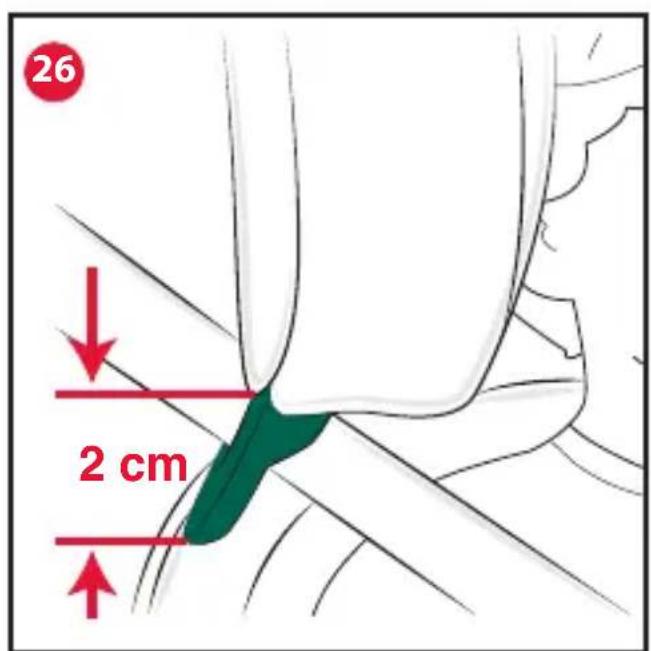
text_image
26 2 cm
text_image
27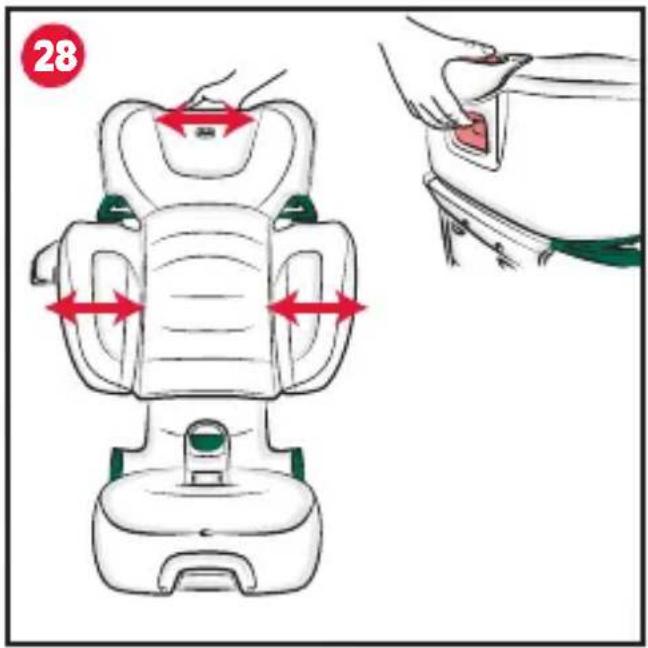
text_image
28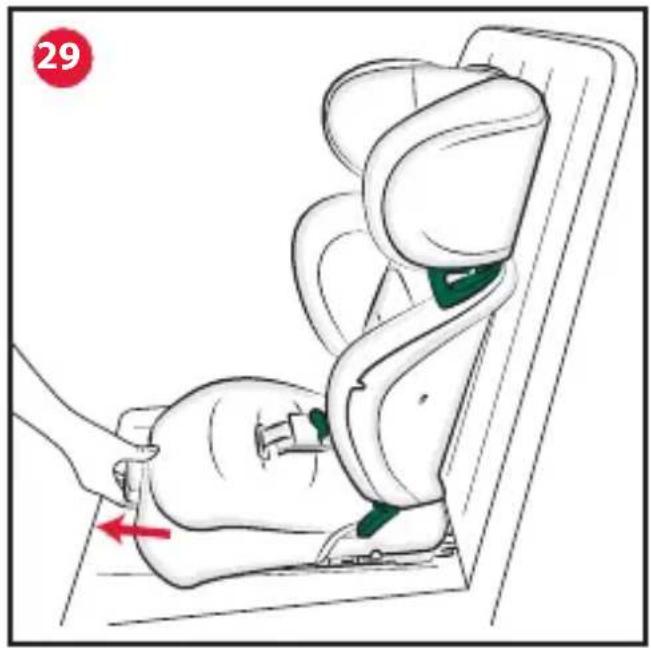
natural_image
Illustration of a person using a seatbelt device to lift a car seatbelt, with no visible text or symbols.
text_image
30 4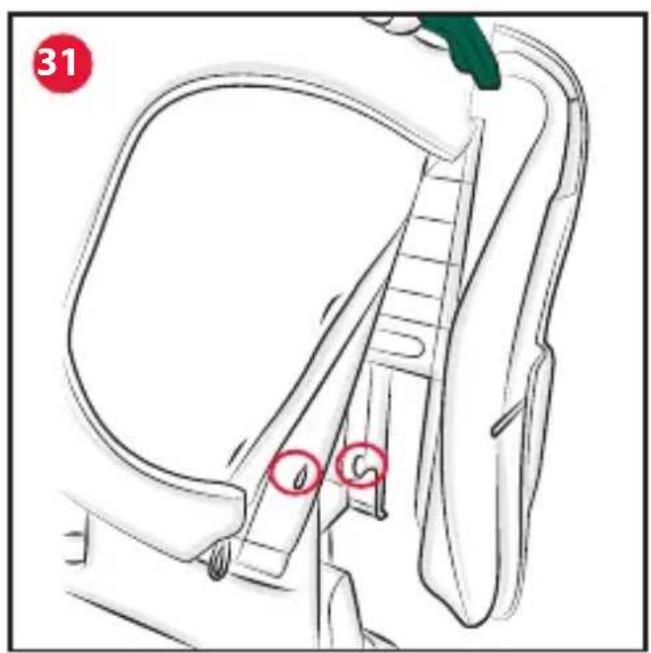
text_image
31 0 G
natural_image
Line drawing of a hand using a tool to adjust or install a mechanical component (no text or symbols visible)
text_image
33
natural_image
Line drawing of a toilet seat with red arrows indicating clockwise motion (no text or symbols)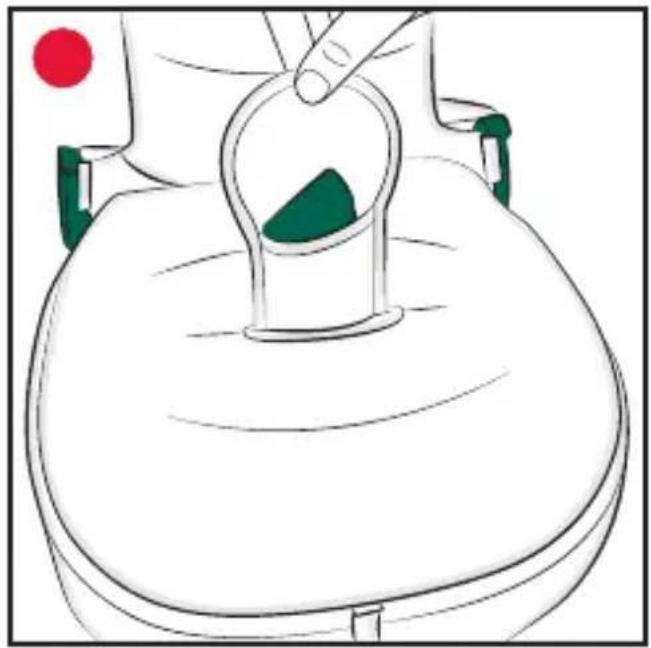
natural_image
Line drawing of a medical device with a green component inserted, no text or symbols presentFOLD&GO I-SIZE (100-150 cm)
IMPORTANTE: PRIMA DELL'USO LEGGERE ATTENTAMENTE E INTEGRALMENTE QUESTO LIBRETTO D'ISTRUZIONI PER EVITARE PERICOLI NELL'UTILIZZO E CONSERVARLO PER OGNI FUTURO RIFERIMENTO. PER NON COMPROMETTERE LA SICUREZZA DEL VOSTRO BAMBINO SEGUITE ATTENTAMENTE QUESTE ISTRUZIONI. ATTENZIONE! PRIMA DELL'USO RIMUOVE-RE ED ELIMINARE EVENTUALI SACCHETTI DI PLASTICA E TUTTI GLI ELEMENTI FACENTI PARTE DELLA CONFEZIONE DEL PRODOTTO O COMUNQUE TENERLI LONTANI DALLA PORTATA DEI BAMBINI. SI RACCOMANDA DI EFFETTUARE LO SMALTIMENTO DI QUESTI ELEMENTI OPERANDO LA RACCOLTA DIFFERENZIATA IN CONFORMITA' ALLE LEGGI VIGENTI.
INDICE:
1. INTRODUZIONE
1.1. Warnings
1.2. Product features
1.3. Description of the parts
1.4. Restrictions and requirements regarding the use of the product and vehicle seat
2. INSTALLING THE CHILD CAR SEAT
2.1. Installing the seat with vehicle seat belts and Isofix rigid connectors
2.2. Installing the seat with vehicle seat belts
3. REMOVING THE CHILD CAR SEAT
4. FOLDING AND TRANSPORT OF THE SEAT
5. INSTALLING AND REMOVING THE SIDE SAFETY SYSTEM
6. INSTALLING THE SAFE PAD
7. OTHER OPERATIONS
7.1. Adjusting the backrest height
7.2. Adjusting the backrest width
7.3. Adjusting the backrest/seat angle
7.4. Removing the backrest/seat cover
7.5. Maintenance and cleaning the fabric cover
WARNINGS
• Each country has different safety laws and regulations for the transportation of children in cars. For this reason, contact local authori-
ties for further information.
- Measures for adjusting the child car seat shall be implemented exclusively by an adult.
- Do not let anyone use this product without having first read the instructions.
- The risk of serious injuries to your child increases, not only in the case of accidents, but also in other circumstances (sudden braking, etc.) if these instructions are not followed carefully.
- Keep this instruction booklet for future reference: there is a dedicated pocket behind the backrest of the seat for storing the instruction booklet.
- The product is intended exclusively to be used as a Car Seat, therefore not for home use.
- Artsana declines any liability for the improper use of the product or any other use other than that specified in these instructions.
- No car seat can guarantee your child's total safety in case of accident, but using it reduces the risk of serious injuries.
• Always transport a child using the child car seat, fitted correctly, including for short journeys; if you fail to do so, you may put their safety at risk. In particular, make sure that the seat belt is properly tensioned, free of knots and in proper position. - DO NOT use the product for more than 10 years. After this period, alterations of the materials (e.g., due to exposure to sunlight) may reduce or compromise the product's effectiveness.
• After an accident, even a minor one, or an accidental fall, the child car seat incurs damage, even if it is not visible to the naked eye. It must therefore be replaced. - Do not use second-hand child car seats: they may have suffered damages not visible to the naked eye, but such to compromise the product's safety.
- Do not use a damaged, deformed, excessively worn out car seat, or with any missing any parts: as its original safety features will have been be compromised.
- This product must not be modified in any way unless the modification has been approved by the manufacturer.
- Do not install accessories, spare parts or
components which are not supplied and approved by the manufacturer on the car seat.
- Do not use spacers, for example pillows, blankets, etc., to distance the child car seat from the car seat or to distance the child from the child car seat: in case of accident, the child car seat may not work properly.
- Make sure that no objects are positioned between the child and the car seat (e.g., schoolbag, daypack), between the car seat and the vehicle's seat or between the car seat and car door.
- Make sure that the vehicle seats (foldable, tiltable or rotating) are well secured.
- Do not transport loose, unsecured objects or baggage on the back shelf of the vehicle: they may injure the passengers in the case of an accident or sudden breaking. • Do not let children play with the child car seat components or parts.
- Do not let other children play with the child car seat components or parts.
- Never leave your child unattended in the car, it can be dangerous!
- Do not transport more than one child at a time in the child car seat.
- Ensure that all the car passengers fasten their vehicle seat belt for their own safety during the journey, they may injure the child in the event of an accident or sudden braking of the car.
- WARNING! When adjusting the child car seat (the headrest and the backrest), make sure that the movable parts of the car seat do not come into contact with the child's body.
- If you need to carry out any adjustment on the child car seat or on your child when travelling, stop the vehicle in a safe place.
- Check from time to time that your child does not release the buckle of the vehicle seat belt or has interfered with the car seat or parts of it.
- Avoid giving food to your child while traveling, especially lollies, ice lollies or other foods on sticks. Your child may be injured in case of an accident or sudden braking.
- Stop frequently during long trips: children tire easily whilst using the child car seat and need to move around. It is recommended that children get in and out of the child car seat from the curb side (only if accompanied
by an adult).
- Do not remove the labels and logos from the cover of the child seat, as this may damage the cover itself.
- Avoid exposing the child car seat to the sun for extended periods of time: it may change the colour of the materials and fabric.
- If the vehicle has been left in the sun, check it, that the different parts of the child car seat are not too hot: if necessary, let them cool off before accommodating your child to prevent burns.
1.2 PRODUCT FEATURES
This child car seat has been approved under regulation ECE R 129/03 for transport of children with height ranging from 100 to 150 cm.
IMPORTANT WARNING
-
This is a i-Size booster seat Enhanced Child Restraint System. It is approved according to Regulation No. 129, for use primarily in "i-Size seating positions" as indicated by vehicle manufacturers in the vehicle user's manual. If in doubt, consult either the Enhanced Child Restraint System manufacturer or the retailer.
-
Fold&Go i-Size is installed in the direction of travel with Isofix anchorage in a vehicle equipped with Isofix anchorage points, in combination with the 3-point car seat belt, approved according to UN/ECE Regulation No. 16 or other.
-
If the vehicle is not fitted with Isofix anchorage, the Fold&Go i-Size can be installed in the direction of travel with a 3-point car seat belt, approved according to UN/ECE Regulation No. 16 or equivalent.
-
Fold&Go i-Size is approved for children from 100 to 150 cm in height, for use in the direction of travel.
-
When used for children between 135 cm and 150 cm in height, Fold&Go i-Size may not be suitable in all cars, especially in the case of cars with a low roof at the sides.
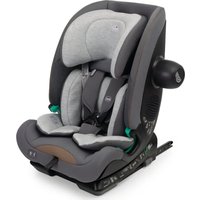
1.3 DESCRIPTION OF THE COMPONENTS Figure A
A. Headrest
B. Diagonal belt guide
C. Backrest
D. Lateral wings
E. Seat
F. Abdominal belt guide
G. Belt Positioner
H. Safe Pad
I. Recline adjustment lever
J. Backrest blocking strip (for closing the child seat)
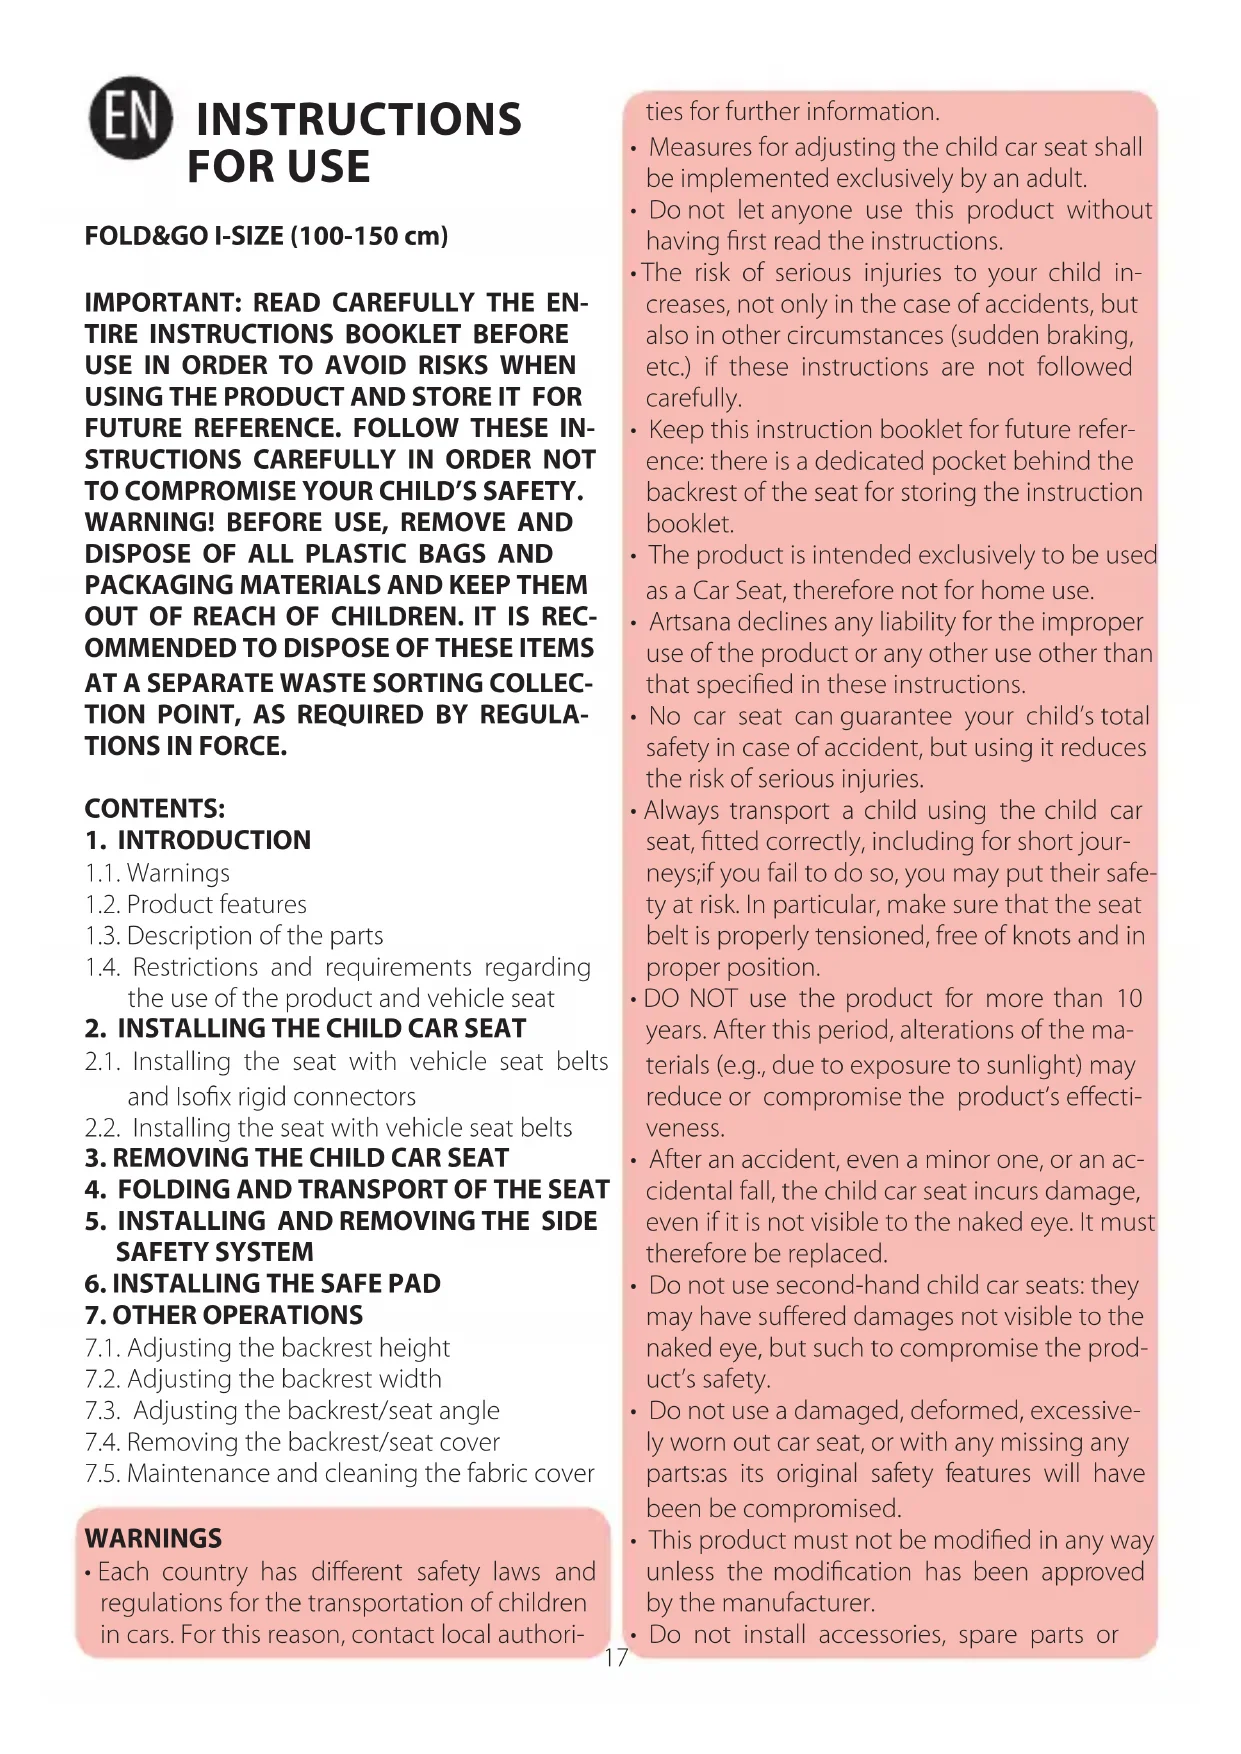
Figure B
K. Backrest width adjustment wheel
L. Backrest height adjustment lever
M. Backrest release lever
N. Back pocket for instruction manual
O. Carry handle
Figure C
P. Isofix connector eject button
Q. Isofix connector release button
R. Isofix connectors
S. Isofix connector indicators
T. Side Safety System
1.4 RESTRICTIONS AND REQUIREMENTS REGARDING THE USE OF THE PRODUCT AND VEHICLE SEAT
WARNING! Strictly comply with the following restrictions and requirements for use concerning the product and vehicle seat: If not followed your child's safety will be compromised.
- The height of the child must be between 100 and 150cm .
- The vehicle's seat must be equipped with 3-point vehicle seat belt, whether static or with winder, approved according to UN/ECE Regulation no. 16 or other equivalent standards (Fig. 1-2).
WARNING! When using in vehicles equipped with rear seat belts with integrated airbags (inflatable seat belts), follow the car manufacturer's instruction manual.
- It may happen that the vehicle seat belt buckle is too long and exceeds the expected height above the bottom of the car seat (Fig. 3A-3B). In this case the seat must not be fixed on that seat but must be installed on another seat on which there is no problem. For more information, contact your car manufacturer.
- The Car seat can be installed on the front seat, passenger side, or on any of the rear seats, and always positioned in the driving sense. Never use this child car seat on vehicle seats facing the sides or opposite to the direction of the drivers seat (Fig. 4).
WARNING! According to accident statistics, a vehicle's rear seat is generally safer than the front seat: we therefore suggest installing the car seat on the rear seat of the vehicle. In particular, the safer seat is the rear central one, if featuring a 3-point belt: in this case, we suggest positioning the Car seat on the rear central seat. If the Car seat is positioned on the front seat, for further safety, we suggest pushing the seat as far back as possible, depending on the presence of other passengers on the rear seat, and adjust the backrest in upright position. If the car features a belt height regulator, secure the latter in the lowest position. Then, make sure that the belt regulator is positioned far back (or aligned) compared to the backrest of the vehicle's seat (Fig. 5A-5B). If the front seat is equipped with front airbag, is not advisable to install the Car seat on this seat. Always refer to your vehicle's instruction manual when installing the child car seat on any seat protected by airbag.
2. INSTALLING THE CHILD CAR SEAT
2.1 INSTALLING THE CHILD CAR SEAT WITH THE VEHICLE SEAT BELT AND ISOFIX RIGID CONNECTORS
WARNING! The text and figures of these instructions are for the installation of the child car seat on the right back seat. When fitting the child car seat in other position these operations should in any case be carried out in the same order.
WARNING! Before installing the child car seat with Isofix connectors, make sure the child car seat is in vertical position, not reclined.
WARNING! •Check that the car seat headrest does not interfere with the headrest of the child car seat: it must not push it forward (Fig. 6). If this happens, remove the headrest from the car seat. Remember to reposition the headrest on the vehicle seat if the child car seat is removed and the seat is used by a passenger.
- Remove the Isofix connectors (R) by pressing and holding button (P) down (Fig. 7).
- Fasten the two rigid connectors (R) to the corresponding ISOFIX hooks on the car seat between the backrest and the seat (Fig. 8).
WARNING! Make sure that the seat has been fitted correctly by checking that the two indicators (S) are green (Fig. 9).
- Push the child car seat firmly against the backrest of the car seat with the button pressed (p) to make sure that it adheres perfectly to the car seat (Fig. 10).
WARNING! The back of the child car seat must closely adhere to the car seat.
-
Place the child in the seat with their back leaning against the backrest. Check the height of the backrest (see section "7.1 ADJUSTING THE BACKREST HEIGHT"). Check the width of the backrest (see section "7.2 ADJUSTING THE WIDTH OF THE BACKREST").
-
Insert the diagonal portion of the car seat belt in the diagonal belt guide (B) (Fig. 11).
-
Fasten the vehicle seat belt by passing the waist part through the seat Belt Positioner (G) (Fig. 12).
-
Pull the diagonal part of the belt upwards so the entire belt is taut and fits closely over the child's legs and chest (without being too tight) (Fig. 13).
WARNING! Check that the vehicle safety belt is tightened properly.
WARNING! Check that the vehicle safety belt is free of knots (Fig. 14).
WARNING! Check that the diagonal seat belt fits correctly across your child's shoulders (Fig. 15) and does not press on the their neck; if necessary, adjust the height of the backrest (see section "7.1 ADJUSTING THE BACKREST HEIGHT").
WARNING! Check that the car seat belt adjuster is reclined or at least aligned with the car seat backrest (Fig. 5A-5B).
WARNING! Never pass the vehicle seat belt in positions other than those indicated in this instruction booklet! (Fig. 16)
WARNING! When the child car seat is not in use, it should always be left secured with the Isofix connectors to the car seat or stowed in the boot. In fact, an unsecured Car seat may
pose a hazard to the passengers in case of accident or sudden braking.
To remove the child from the child car seat, simply unfasten the buckle of the car safety belt, accompanying the belt during rolling.
2.2 INSTALLING THE CHILD CAR SEAT WITH THE VEHICLE SEAT BELT
WARNING! The text and figures of these instructions are for the installation of the child car seat on the correct back seat. When fitting the child car seat in other position these operations should in any case be carried out in the same order.
WARNING! The seat MUST ALWAYS be installed with the vehicle seat belt.
WARNING! •Check that the car seat headrest does not interfere with the headrest of the child car seat: it must not push it forward (Fig. 6). If this happens, remove the headrest from the car seat. Remember to reposition the headrest on the vehicle seat if the child car seat is removed and the seat is used by a passenger.
- Position the child car seat NOT reclined and with the connectors NOT pulled out against the backrest of the car seat (Fig. 17).
WARNING! The back of the child car seat must closely adhere to the car seat.
-
Place the child in the seat with their back leaning against the backrest. Check the height of the backrest (see section "7.1 ADJUSTING THE BACKREST HEIGHT"). Check the width of the backrest (see section "7.2 ADJUSTING THE WIDTH OF THE BACKREST").
-
Insert the diagonal portion of the car seat belt in the diagonal belt guide (B) (Fig. 11).
-
Fasten the vehicle seat belt by passing the waist part through the Belt Positioner (G) (Fig. 12).
-
Pull the diagonal part of the belt upwards so the entire belt is taut and fits closely over the child's legs and chest (without being too tight) (Fig. 13).
WARNING! Check that the vehicle safety belt is tightened properly.
WARNING! Check that the vehicle safety belt is free of knots (Fig. 14).
WARNING! Check that the diagonal seat belt fits correctly across your child's shoulders (Fig.
15) and does not press on the their neck; if necessary, adjust the height of the backrest (see section "7.1 ADJUSTING THE BACKREST HEIGHT").
WARNING! Check that the car seat belt adjuster is reclined or at least aligned with the car seat backrest (Fig. 5A-5B).
WARNING! Never pass the car safety belt in positions other than those indicated in this instruction booklet! (fig. 16).
WARNING! Make sure that your child is correctly secured in the child car seat, so that he does not slide forward.
WARNING! Check that the unused Isofix rigid connectors are not pulled out.
WARNING! When the child car seat is not in use, it should always be left secured with the 3-point belt to the car seat or stowed in the boot. In fact, an unsecured car seat may pose a hazard to the passengers in case of accident or sudden braking.
To remove the child from the child car seat, simply unfasten the buckle of the car safety belt, accompanying the belt during rolling.
3. REMOVING THE CHILD CAR SEAT
WARNING! Remove the child from the child car seat before removing.
- Release the car seat belt.
- Remove the diagonal part of the belt from the guide, accompanying it during rolling.
- If the child car seat has also been fastened with the Isofix rigid connectors, it is necessary to release them from the appropriate hooks using the release button (Q).
WARNING! The release button (Q) may not be accessible, so you need to press and hold the Isofix (P) connector eject button and simultaneously pull the child car seat towards you until the Isofix connectors are fully pulled out.
- Pull the two red buttons (Q) to release the connectors from the corresponding Isofix connections of the car seat (Fig.18), so that the indicator is totally red.
- Push the rigid connectors into the base of the child car seat and completely retract them into the base, holding down one of the buttons (P) (Fig. 19).
4. FOLDING AND TRANSPORT OF THE SEAT
For easy transport of the child car seat, it is possible to compact it by folding the backrest over the seat. To carry out this step, it is necessary to check that the backrest is in the lowest position (see paragraph "7.1 ADJUSTING THE BACKREST HEIGHT").
At this point, use the backrest release lever (M) to fold the backrest into the seat (Fig. 20).
WARNING! With the backrest not fully lowered, the backrest release lever (M) may not be easily accessible.
To keep the child car seat compact, remove the backrest blocking strip (J) from its seat and fasten it to one of the two special slots on the side of the backrest width adjustment wheel (K) (Fig. 21).
To comfortably move the seat in this configuration, you can use the carrying handle (O) located on the back of the seat (Fig. 22).
5. INSTALLING AND REMOVING THE SIDE SAFETY SYSTEM
The Side Safety System (T) is a device that is installed on the door side for utmost protection in the case of a side impact.
To install it, insert the hook "1" in the hole on the side flap (D) on the door side and press the central part until the other end "2" is also fastened to the structure (Fig. 23).
6. INSTALLING THE SAFE PAD
The Safe Pad (H) is a device that must ALWAYS be installed on the diagonal vehicle seat belt to ensure proper protection in the event of an impact.
For correct installation, it is necessary to position the diagonal belt under the two Velcro straps of the Safe Pad (Fig. 24) and close it on itself making sure that the circular part is positioned between the chin and the chest of the child (Fig. 25).
WARNING! The Safe Pad must ALWAYS be used.
7. OTHER OPERATIONS
7.1 ADJUSTING THE BACKREST HEIGHT
It is possible to adjust the backrest height in 9 positions to the height of your child. Ensure
that the child's head is secured and that the car's diagonal belt is correctly supported on the child's shoulder. When adjusting the height of the backrest, check that the diagonal belt guide (B) is positioned above the shoulder at a maximum distance of 2 cm (Fig. 26).
To adjust:
- Press the backrest height adjustment lever (L) on the back of the headrest with one hand and raise/lower the backrest to adapt it to the height of the child's shoulders (Fig. 27).
- Release the lever verifying that it has been engaged in the desired position.
7.2 ADJUSTING THE BACKREST WIDTH
It is possible to adjust the width of the backrest to better adapt the child car seat to the size of your child. To adjust, hold down the backrest height adjustment lever (L) on the back of the headrest with one hand and simultaneously operate the backrest width adjustment wheel (K) which can be seen above the headrest (fig. 28). After adjusting the width of the backrest, check that it is secured correctly in the desired position.
7.3 ADJUSTING THE BACKREST/SEAT ANGLE
You can recline the child car seat using the reclining adjustment lever (l). The child car seat allows reclining the backrest/seat in 4 positions to allow the child to travel as comfortably as possible. To carry out the adjustment operations more easily, it is recommended to remove the child from the seat; otherwise the operation will be more difficult. To return the car child seat to a vertical position, use the reclining adjustment lever (l) to push the seat towards the backrest of the car seat (Fig. 29).
WARNING! After adjusting the reclining angle, check that the car safety belts are correctly tensioned and at most 2 cm above the child's shoulder (Fig. 26).
7.4 REMOVING BACKREST/SEAT COVERS
The child car seat cover is fully removable so that it can be machine-washed. Lift the backrest (C) completely and widen the side flaps (D).
BACKREST
- Release the elastic loops from the respective
hooks on the upper and lower sides of the side flaps (Fig. 30) and remove the fabric from the flaps.
- Continue by removing the central part of the backrest, removing the loops from the right and left pins (Fig. 31).
- Complete the removal of the fabric from the bottom upwards, removing the cover of the headrest paying attention to the elastic behind the backrest (Fig. 32).
SEAT
- Remove the cover from the seat by removing the plastic profiles from the right and left belt guides (Fig. 33).
- Release the plastic flaps from under the seat (Fig. 34).
- Pull the child car seat fabric out from the Belt Positioner (Fig. 35).
To cover the car seat, proceed in reverse order following the instructions above.
7.5 MAINTENANCE AND CLEANING THE FABRIC COVER
The cleaning and maintenance of the product must only be carried out by an adult.
HOW TO CLEAN THE FABRIC COVER
The child car seat's fabric cover can be removed and washed. Please refer to the care label for instructions on washing the fabric:

Machine washable at 30°C

Do not bleach

Do not tumble dry

Do not iron

Do not dry clean
- Never use abrasive detergents or solvents.
- Do not dry the fabric cover within a dryer, let it dry without squeezing it.
The fabric cover must only be replaced with another cover approved by the manufacturer, since it is an integral part of the child car seat
and, therefore, one of its safety elements.
WARNING! To ensure the safety of the child car seat, never use it without its fabric cover.
provisions of applicable national laws in the country of purchase, where appropriate.
CLEANING PLASTIC PARTS
Clean the plastic parts only with a soft cloth soaked in water or a neutral detergent. Never use abrasive detergents or solvents. The moving parts of the child car seat must not be lubricated.
CHECKING THE CONDITION OF THE COMPONENTS
It is recommended to regularly check the condition of the following components to make sure they are not damaged or worn:
- fabric cover: check that the padding does not come out from the seams. Check the condition of the seams: they must always be intact and undamaged.
- plastic parts: check that the plastic parts are not worn out, damaged or faded.
WARNING! If the child car seat is damaged, deformed or excessively worn, it must be replaced, as its original safety features may have been compromised.
STORING THE PRODUCT
When it is not fitted in the car, it is recommended to store the child car seat in a dry place, away from sources of heat and to protect it from dust, humidity and direct sunlight.
DISPOSING OF THE PRODUCT
When the child car seat no longer complies with the original safety standards, stop using it and dispose of it at an appropriate collection point. Dispose of the child car seat always following environmental rules and regulations adopted within the country of use.
WARRANTY
The product is guaranteed against any conformity defect in normal conditions of use as stated in the instructions. Therefore, the warranty does not apply in the case of damage caused by improper use, wear or accidental events. For the duration of the warranty on conformity defects please refer to the specific
FOLD&GO I-SIZE (100-150 cm)
IMPORTANT : LIRE ATTENTIVEMENT ET INTÉGRALEMENT CETTE NOTICE D'EMPLOI AVANT DE SE SERVIR DU PRODUIT POUR ÉVITER TOUT RISQUE PENDANT L'UTILISATION, CONSERVER LA NOTICE POUR POUVOIR LA CONSULTER PAR LA SUITE. VOTRE ENFANT RISQUE DE SE BLESSER SI VOUS NE LA SUIVEZ PAS.
AVERTISSEMENT ! AVANT L'EMPLOI, ENLEVER ET ÉLIMINER TOUS LES SACS EN PLASTIQUE ET ÉLÉMENTS QUI FONT PARTIE DE L'EMBALLAGE DU PRODUIT ET LES TENIR HORS DE PORTÉE DES ENFANTS. CES ÉLÉMENTS DOIVENT ÊTRE ÉLIMINÉS PAR TRI SÉLECTIF CONFORMÉMENT À LA LÉGISLATION EN VIGUEUR.
1.2 CARACTÉRISTIQUES DU PRODUIT
T. Side Safety System
1.4 LIMITATIONS ET CONDITIONS D'UTILISATION RELATIVES AU PRODUIT ET AU
SIÈGE-AUTO
CONSERVATION DU PRODUIT
ÉLIMINATION DU PRODUIT
WAARSCHUWING! Breng de autogordel
6. INSTALACE BEZPEČNOSTNÍ VLOŽKY (SAFE PAD)
7. DALŠÍ ÚKONY
6. INSTALACE BEZPEČNOSTNÍ VLOŽKY (SAFE PAD)
7.3 PYOMIZH THΣ KLIESHΣ THΣ ΠΑΤΗΣ/ΒΑΣΗΣ
ΚΑΘΑΡΙΣΜΟΣ ΠΛΑΣΤΙΚΩΝ ΜΕΡΩΝ
6. INSTALAREA SAFE PAD
7. OPERATIUNI ULTERIOARE
6. INSTALAREA SAFE PAD
ELIMINAREA PRODUSULUI
INNEHÅLLSFÖRTECKNING:
1. INLEDNING
FÖRVARING AV PRODUKTEN
- retirement impossible Agricultural Affairs
ARTSANA GERMANY GMBH
Borsigstrasse 1-3
28923 Alcorcon (Madrid)-Spain
902 117 093
www.CHICCO.es

ARTSANA PORTUGAL S.A.
ARTSANA POLAND Sp.z o.o.
Ul. Połczyńska 31 A
01-377 Warszawa
+48 22 290 59 90
www.CHICCO.pl

ООО "Артсана Рус"
ARTSANA BRASIL LTDA.
Dec V. Ruben Dario 1015
Colonia Lomas De Providencia 44647
Guadalajara, Jalisco-Mexico
01800 702 8983
www.CHICCO.com.mx

ARTSANA ARGENTINA S.A.
Uruguay 4501
Victoria Cp(1644)
San Fernando- Buenos Aires-Argentina 0810-888-2442
www.CHICCO.com.ar

ARTSANA INDIA PRIVATE LIMITED,
7Th Floor, Tower B, Paras Twin Towers, Golf Course Road, Sector 54
Gurgaon - 122002 - Haryana, India (+91)(124)(4964500)
www.CHICCO.in

ARTSANA S.p.A.
22070 Grandate (CO) - Italy
Tel. (+39) 031 382 111
Fax (+39) 031 382 400
www.CHICCO.com

text_image
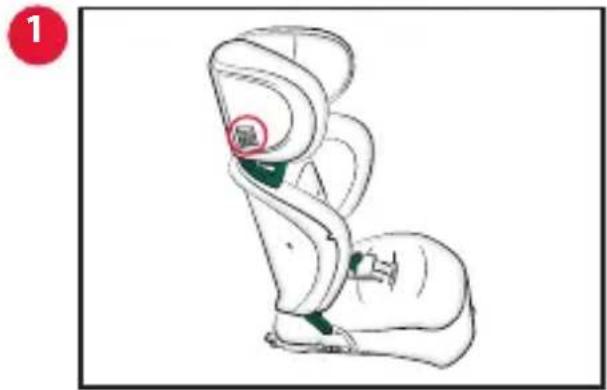
QR code image containing encoded data, no visible human-readable text
natural_image
Line drawing of a seated car seat with a highlighted circular area and a numbered label (1) in the corner, no text or symbols present.
text_image
Diagram showing a person using a smartphone to interact with a device, with a QR code and green logo visible.
text_image
3 C CARTSANA S.p.A. - Via Saldarini Catelli, 1 - 22070 Grandate (CO) - Italy Tel. (+39) 031 382 111 - Fax (+39) 031 382 400 - www.chicco.com

text_image
chicco®Fold & Go i-Size  | Car Compatibility List (rev1 2019.05.16) | ||
| Car Model | Introduction Month | Introduction Year | Suitable Seating Positions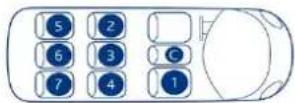 |
| ALFA ROMEO | |||
| Giulia (952) | 10 | 2016 | 2,4 |
| Stelvio (949) | 1 | 2017 | 2,4 |
| AUDI | |||
| A3 Cabrio (8V) | 5 | 2014 | 1,2,4 |
| A4 (B5 - 8D) | 1994 | 2,4 | |
| A4 (B7 8E) | 2004 | 1,2,4 | |
| A4 Cabrio (B6 8E) | 2002 | 1,2,4 | |
| A6 (C7) FL | 9 | 2014 | 1,2,4 |
| Q5 FL (8R) | 9 | 2012 | 1,2,4 |
| Q7 (4 L) | 3 | 2006 | 1,2,4,5,7 |
| Q5 (8 R) | 11 | 2008 | 1,2,4 |
| A4 Cabrio (B7 8E) | 1 | 2006 | 1,2,4 |
| A4 (B8 8K) | 12 | 2007 | 2,4 |
| A7 Sportback (4G) | 10 | 2010 | 1 |
| A6 (C7) | 4 | 2011 | 1,2,4 |
| A7 Sportback 5-seater (4G) | 8 | 2011 | 1 |
| Q3 (8U ) | 10 | 2011 | 1,2,4 |
| A6 allroad quattro (C7 4B) | 5 | 2012 | 2,4 |
| A3 (8V) | 8 | 2012 | 1,2,4 |
| A3 Sportback (8V) | 2 | 2013 | 1 |
| SQ5 (8R) | 1 | 2013 | 2,4 |
| A3 Saloon (8V) | 9 | 2013 | 1 |
| Q7 FL (4L) | 2009 | 1,2,4,5,7 | |
| Q7 e-tron (4M ) | 8 | 2016 | 1,2,4 |
| A6 allroad quattro FL (C7 4B) | 11 | 2014 | 2,4 |
| A3 Sportback e-tron (8V) | 10 | 2014 | 1 |
| Q7 (4M ) | 6 | 2015 | 1,2,4 |
| Q3 FL (8U) | 7 | 2015 | 1,2,4 |
| A4 (B9 8W) | 9 | 2015 | 1,2,4 |
| A4 Avant (B9 8W) | 9 | 2015 | 1,2,4 |
| Q2 (GA) | 10 | 2016 | 1 |
| A5 (B8 F5) | 11 | 2016 | 1 |
| A5 Sportback (B8 F5) | 1 | 2017 | 1 |
| Q5 (FY) | 1 | 2017 | 1,2,4 |
| A4 Avant 4x4 (B9 8W) | 9 | 2015 | 1,2,4 |
| A3 FL (8V) | 7 | 2016 | 1,2,4 |
| A3 Saloon FL (8V) | 7 | 2016 | 1 |
| A3 Sportback FL (8V) | 7 | 2016 | 1 |
| A4 Allroad quattro (B9 8W ) | 6 | 2016 | 1,2,4 |
| SQ7 (4M) | 10 | 2016 | 1,2,4 |
| A5 Cabrio (B8 F5) | 3 | 2017 | 1,2,4 |
| A3 Cabrio FL (8V) | 12 | 2016 | 1,2,4 |
| A6 (C8) | 6 | 2018 | 1,2,4 |
| A6 Avant (C8) | 6 | 2018 | 1,2,4 |
| BMW | |||
| 3 (E90) FL | 9 | 2008 | 2,4 |
| 5 (E60) | 1 | 2003 | 1,2,4 |
| X5 (X70_E70) | 3 | 2007 | 2,4 |
| 3 (E90) | 2005 | 2,4 | |
| X3 (F25) | 11 | 2010 | 2,4 |
| 5 (F10) | 3 | 2010 | 2,4 |
| 1 (F20) | 9 | 2011 | 2,4 |
| 6 GranCoupe (6C_F06) | 6 | 2012 | 2,4 |
| 1 3-door (F21) | 6 | 2012 | 2,4 |
| 5 GranTurismo (F07) | 8 | 2009 | 2,4 |
| 5 Touring FL (E39) | 9 | 2001 | 2,4 |
| 5 Touring FL (F11) | 7 | 2013 | 2,4 |
| X5 (F15) | 11 | 2013 | 2,4 |
| 5 FL (F10) | 6 | 2013 | 2,4 |
| i3 (I3) | 7 | 2013 | 2,4 |
| X3 FL (F25) | 3 | 2014 | 2,4 |
| X4 (F26) | 7 | 2014 | 2,4 |
| 1 5door FL (F20) | 3 | 2015 | 2,4 |
| 2 Gran Tourer (F46) | 6 | 2015 | 1,2,4 |
| 1 3door FL (F21) | 3 | 2015 | 2,4 |
| X6 M (F86) | 4 | 2015 | 2,4 |
| X5 M (F85) | 4 | 2015 | 2,4 |
| 7 (G11) | 10 | 2015 | 2,4 |
| M2 (F87) | 4 | 2016 | 2,4 |
| X1 (F48) | 10 | 2015 | 1,2,4 |
| 5 (G30) | 3 | 2017 | 2,4 |
| 2 Active Tourer Hybrid (F45) | 6 | 2016 | 1,2,4 |
| 5 Touring (G31) | 6 | 2017 | 2,4 |
| X2 (F39) | 3 | 2018 | 1,2,4 |
| CHEVROLET | |||
| Matiz II (KLAK) | 2005 | 2,4 | |
| Captiva (KLAC) | 10 | 2006 | 2,4 |
| Orlando (KL1Y) | 3 | 2011 | 2,4 |
| Malibu (KL1G) | 7 | 2012 | 3 |
| Cruze SW (KL1J) | 9 | 2012 | 2,4 |
| Captiva FL (KLAC) | 2011 | 2,4 | |
| HHR (2LT) | 2 | 2008 | 2,4 |
| Spark FL (KL1M) | 1 | 2013 | 2,4 |
| Aveo saloon (T250) | 2006 | 2,4 | |
| CITROEN | |||
| C3 Picasso (SH) | 2009 | 2,4 | |
| C3 5 door FL (S) | 2005 | 2,4 | |
| C1 (P) 5 door, 4 seater | 7 | 2005 | 2,4 |
| C3 (F) | 1 | 2010 | 2,4 |
| Nemo (A) | 2007 | 2,4 | |
| C1 II 5door FL (P) | 6 | 2018 | 2,4 |
| C3 Picasso FL 1 (SH) | 1 | 2013 | 2,4 |
| C3 Picasso FL 1 nosb (SH) | 1 | 2013 | 2,4 |
| C8 (E) | 2002 | 2,4 | |
| Grand C4 Picasso (3) | 10 | 2013 | 2,3,4 |
| Grand C4 Picasso FL (3) | 11 | 2016 | 2,3,4 |
| C4 Picasso FL (U) | 10 | 2010 | 3 |
| DS5 (K) | 3 | 2012 | 2,4 |
| Berlingo II FL (7) | 4 | 2012 | 2,4 |
| C3 Pluriel FL (H) | 2008 | 2,4 | |
| C8 FL (E) | 2008 | 2,4 | |
| C5 FL (RC_RE) | 9 | 2004 | 2,4 |
| C4 Picasso single seats (3) | 6 | 2013 | 3 |
| C3 FL (F) | 4 | 2013 | 2, 4 |
| Grand C4 Picasso StgBox (3) | 10 | 2013 | 2, 3, 4 |
| C4 Cactus (O) | 6 | 2014 | 2, 4 |
| C1 II 5 door (P) | 6 | 2014 | 2, 4 |
| C3 5 door (S) | 2002 | 2, 4 | |
| Berlingo FL2 (7) singleseat | 7 | 2015 | 2, 4 |
| C4 Picasso FL (3) | 11 | 2016 | 3 |
| Grand C4 Picasso FL StgBox (3) | 11 | 2016 | 2, 3, 4 |
| C3 III (HY_) | 1 | 2017 | 1 |
| C-Elysee (D) | 5 | 2016 | 2, 4 |
| C-Zero (1) | 4 | 2012 | 2, 4 |
| Grand C4 SpaceTourer (3) | 6 | 2018 | 3 |
| C4 Spacetourer (length adjustable seats) (3) | 6 | 2018 | 3 |
| DACIA | |||
| Duster (SD) | 4 | 2010 | 2, 4 |
| Sandero (SD) | 6 | 2008 | 2, 4 |
| Lodgy FL (SD) | 5 | 2017 | 2, 3, 4 |
| Lodgy (SD) | 6 | 2012 | 2, 3, 4 |
| Sandero II (SR) | 11 | 2012 | 2, 4 |
| Dokker (SD) | 2 | 2013 | 2, 3, 4 |
| Logan MCV (SR) | 6 | 2013 | 2, 4 |
| Duster FL (SD) | 1 | 2014 | 2, 4 |
| Logan MCV RL (SR) | 12 | 2016 | 2, 4 |
| DAIHATSU | |||
| Terios II FL (J2) | 2009 | 2, 4 | |
| DS AUTOMOBILES | |||
| DS5 (K) | 7 | 2015 | 2, 4 |
| DS5 Diesel-Hybrid (KF) | 7 | 2015 | 2, 4 |
| DS 3 Cabrio (S) | 4 | 2016 | 2, 4 |
| FIAT | |||
| Bravo (198) | 7 | 2007 | 2, 4 |
| Grande Punto (199) | 1 | 2006 | 2, 4 |
| Sedici (189) | 1 | 2007 | 2, 4 |
| Doblo (263) | 2 | 2010 | 2, 4 |
| Punto Evo (199) | 6 | 2010 | 2, 4 |
| Freemont (JC) | 9 | 2011 | 2, 4 |
| Panda (319) | 3 | 2012 | 2, 4 |
| Punto 3door FL2 (199) | 2 | 2012 | 2, 4 |
| Qubo FL (225) | 9 | 2016 | 2, 4 |
| Qubo (225) | 2 | 2008 | 2, 4 |
| 500L Living (199) | 9 | 2013 | 2 |
| Panda (319)5 Seater | 3 | 2012 | 2, 4 |
| Doblo FL (263) | 6 | 2015 | 2, 4 |
| Punto 5door FL2 (199) | 2 | 2012 | 2, 4 |
| Tipo Kombi (356) | 6 | 2016 | 2, 4 |
| Tipo (356) | 6 | 2016 | 2, 4 |
| Ulysse FL singleseat (179AX) | 2 | 2008 | 5, 7 |
| Ulysse FL seatbench (179AX) | 2 | 2008 | 2, 4 |
| FORD | |||
| Kuga (DM2) | 2 | 2008 | 2, 4 |
| Focus (DYB) | 3 | 2011 | 2, 4 |
| Mondeo Turnier FL (BA7) | 11 | 2010 | 2, 4 |
| Grand C-Max (DXA) | 12 | 2010 | 2, 4 |
| Galaxy II FL (WA6) | 5 | 2010 | 2, 3, 4 |
| Mondeo FL (BA7) | 12 | 2010 | 2, 4 |
| C-Max (DM2) | 5 | 2003 | 2, 4 |
| S-Max FL (WA6) | 4 | 2010 | 2, 3, 4 |
| C-Max (DXA) | 12 | 2010 | 2, 4 |
| EcoSport FLII (JK8) | 3 | 2018 | 2, 4 |
| Galaxy II (WA6) | 6 | 2006 | 2,4 |
| Focus 3door (DA3) | 2004 | 2,4 | |
| B-Max (JK8) | 10 | 2012 | 2,4 |
| Fiesta 5door FL (JA8) | 1 | 2013 | 2,4 |
| Tourneo CU STOM (FAC) | 7 | 2012 | 2,3,6 |
| EcoSport (JK8) | 6 | 2014 | 2,4 |
| Tourneo Courier (JU2) | 3 | 2014 | 2,4 |
| Tourneo Connect II (PJ2) | 6 | 2014 | 2,4 |
| Focus FL (DYB) | 11 | 2014 | 2,4 |
| Focus Turnier FL (DYB) | 11 | 2014 | 2,4 |
| Mondeo Hybrid (BA7) | 10 | 2014 | 2,4 |
| S-MAX II (WA6) | 9 | 2015 | 2,3,4 |
| Grand C-Max FL (DXA) | 6 | 2015 | 2,4 |
| Galaxy III (WA6) | 9 | 2015 | 2,3,4 |
| C-Max FL (DXA) | 6 | 2015 | 2,4 |
| Fiesta 5 door (JH1) | 11 | 2001 | 2,4 |
| Kuga FL (DM3) | 1 | 2017 | 2,4 |
| EcoSport FL (JK8) | 4 | 2016 | 2,4 |
| Edge (SBF) | 6 | 2016 | 2,4 |
| Focus Turnier (MK4) | 9 | 2018 | 2,4 |
| Focus (MK4) | 9 | 2018 | 4 |
| HONDA | |||
| Jazz FL (AA) | 4 | 2011 | 2,4 |
| Civic 9 Tourer FL (FK) | 1 | 2015 | 2,4 |
| CR-V 4 (RE) | 11 | 2012 | 2,3,4 |
| Jazz FL (GK) | 5 | 2018 | 2,4 |
| Civic 9 Tourer (FK) | 1 | 2014 | 2,4 |
| Jazz (AA) | 2007 | 2,4 | |
| HR-V (RU) | 9 | 2015 | 2,4 |
| Jazz (GK) | 9 | 2015 | 2,4 |
| HYUNDAI | |||
| Santa Fe FL (CM) | 1 | 2010 | 2,4 |
| ix20 (JC) | 11 | 2010 | 2,4 |
| i40 (VF) | 10 | 2011 | 2,4 |
| i20 FL 5door (PBT) | 6 | 2012 | 2,4 |
| i30 Kombi (GD) | 6 | 2012 | 2,4 |
| Santa Fe (DM) | 9 | 2012 | 2,4 |
| i10 (IA) | 11 | 2013 | 2,4 |
| i20 5door (PBT) | 2008 | 2,4 | |
| i30 (GD) | 3 | 2012 | 2,4 |
| i40 cw (VF) | 6 | 2011 | 2,4 |
| i30 3-door (GD) | 2 | 2013 | 2,4 |
| Grand Santa Fe 6-seater (DM) | 10 | 2013 | 2,4 |
| Grand Santa Fe 7-seater (DM) | 10 | 2013 | 2,4 |
| i20 5door (GB) | 12 | 2014 | 2,4 |
| i40 FL (VF) | 1 | 2014 | 2,4 |
| i30 Kombi FL (GD) | 8 | 2015 | 2,4 |
| Tucson ( TLE) | 7 | 2015 | 2,4 |
| ix20 FL (JC) | 9 | 2015 | 2,4 |
| i20 Active (GB) | 1 | 2016 | 2,4 |
| i30 (PD) | 1 | 2017 | 2,4 |
| i10 FL (IA) | 12 | 2016 | 2,4 |
| i40 cw FL (VF) | 12 | 2015 | 2,4 |
| Grand Santa Fe 7-seater FL (DM) | 6 | 2016 | 2,4 |
| i30 Kombi (PDE) | 7 | 2017 | 2,4 |
| loniq Plug in Hybrid (AE) | 8 | 2017 | 2,4 |
JAGUAR
| XF FL(CC9) | 8 | 2011 | 2,4 |
| XF (CC9) | 3 | 2008 | 2,4 |
| F-Pace (DC) | 4 | 2016 | 2, 4 |
| JEEP | |||
| Grand Cherokee (WK2) | 12 | 2010 | 2, 4 |
| Compass FL (MK49) | 6 | 2013 | 2, 4 |
| Grand Cherokee FL (WK2) | 6 | 2013 | 2, 4 |
| Cherokee (KL) | 6 | 2014 | 2, 3, 4 |
| Renegade (BU) | 10 | 2014 | 2, 4 |
| Grand Cherokee FLII (WK2) | 1 | 2017 | 2, 4 |
| KIA | |||
| Sportage (SL) | 8 | 2010 | 2 |
| Venga (YN) | 1 | 2010 | 2, 4 |
| Soul FL (AM) | 10 | 2011 | 2, 4 |
| Cee'd sw (JD) | 9 | 2012 | 2, 4 |
| Carens (RP) | 3 | 2013 | 2, 4 |
| Cee'd (JD) | 6 | 2012 | 4 |
| Optima (TF) | 2 | 2012 | 2, 4 |
| Sorento FL (UM) | 5 | 2018 | 2, 4 |
| Soul (AM) | 2008 | 2, 4 | |
| Optima FL (TF) | 12 | 2013 | 2, 4 |
| Soul (PS) | 3 | 2014 | 2, 4 |
| Sportage FL (SL) | 2 | 2014 | 2, 4 |
| Sorento (UM) | 1 | 2015 | 2, 4 |
| Venga FL (YN) | 2 | 2015 | 2, 4 |
| Cee'd FL (JD) | 9 | 2015 | 4 |
| Cee'd sw FL (JD) | 9 | 2015 | 4 |
| Pro Cee'd FL (JD) | 9 | 2015 | 2, 4 |
| Sportage (QL) | 2 | 2016 | 2, 4 |
| Optima (JF) | 1 | 2016 | 2, 4 |
| Niro Hybrid (DE) | 10 | 2016 | 2, 4 |
| Optima Sportswagon (JF) | 6 | 2016 | 2, 4 |
| Soul FL (PS) | 11 | 2016 | 2, 4 |
| Cee'd SW (CD) | 9 | 2018 | 2, 4 |
| LANCIA | |||
| Thema (405) | 11 | 2011 | 3 |
| Voyager (404) | 11 | 2011 | 2, 4 |
| Delta FL (844) | 2011 | 2, 4 | |
| Delta (844) | 1 | 2008 | 2, 4 |
| LAND ROVER | |||
| Freelander2 FL (LF) | 3 | 2011 | 2, 4 |
| Range Rover Evoque (LV) | 9 | 2011 | 2, 4 |
| Range Rover (LG) | 10 | 2012 | 2, 4 |
| Freelander2 FL2 (LF) | 2013 | 2, 4 | |
| Range Rover Sport (LW) | 9 | 2013 | 2, 4 |
| Discovery Sport 4x4 7seats (LC) | 2 | 2015 | 2, 4 |
| Discovery Sport (LC) | 2 | 2015 | 2, 4 |
| Range Rover Evoque FL (LV) | 9 | 2015 | 2, 4 |
| Range Rover Velar (L560) | 8 | 2017 | 2, 4 |
| Discovery (LR) | 4 | 2017 | 1, 2, 4, 5, 7 |
| LEXUS | |||
| LS 600h (HF4(A)) | 1 | 2013 | 2, 4 |
| GS 450h HL10 (A (GRL1_GWL1)) | 6 | 2012 | 2, 4 |
| NX (AZ1) | 10 | 2014 | 2, 4 |
| RX450h (AL2) | 7 | 2015 | 2, 4 |
| GS FL (HL10 (GRL1_GWL1)) | 1 | 2016 | 2, 4 |
| GS-F FL (HL10 (GRL1_GWL1)) | 1 | 2016 | 2, 4 |
| RX (AG L20) | 1 | 2016 | 2, 4 |
| MAZDA | |||
| 5 (CW) | 10 | 2010 | 2, 4 |
| 3 FL(BL) | 9 | 2011 | 2, 4 |
| CX-5 (KE) | 4 | 2012 | 2, 4 |
| 6 estate (GJ) | 2 | 2013 | 2, 4 |
| 3 (BM) | 10 | 2013 | 2, 4 |
| 3 (BL) | 1 | 2009 | 2, 4 |
| 5 (CW) FL | 3 | 2013 | 2, 4 |
| 6 saloon (GJ) | 3 | 2013 | 2, 4 |
| 6 saloon FL (GJ) | 3 | 2015 | 2, 4 |
| 6 estate FL (GJ) | 3 | 2015 | 2, 4 |
| CX-5 FL (KE) | 9 | 2015 | 2, 4 |
| 3 FL (BM) | 2 | 2017 | 2, 4 |
| 6 estate FLII (GJ_GL) | 10 | 2016 | 2, 4 |
| MERCEDES | |||
| B FL (245) | 6 | 2008 | 2, 4 |
| C FL (204) | 3 | 2011 | 2, 4 |
| B (246) | 11 | 2011 | 2, 4 |
| Citan Kombi RWB StgBox (415) | 10 | 2012 | 2, 4 |
| E model T FL (212) | 4 | 2013 | 2, 4 |
| E FL (212) | 1 | 2013 | 2, 4 |
| C (W205) | 3 | 2014 | 2, 4 |
| B (245) | 6 | 2005 | 2, 4 |
| C (204) | 3 | 2011 | 2, 4 |
| Citan Kombi RWB (415) | 10 | 2012 | 2, 4 |
| E (W212) | 3 | 2009 | 2, 4 |
| E model T (212) | 11 | 2009 | 2, 4 |
| V 6 seater (447) | 2 | 2014 | 2, 4, 5, 7 |
| B FL (246) | 11 | 2014 | 2, 4 |
| B Electric Drive (246 G) | 10 | 2014 | 2, 4 |
| GLE Coupé (C292) | 8 | 2015 | 2, 4 |
| GLC (204 X) | 9 | 2015 | 2, 4 |
| GLS (X166) | 11 | 2015 | 2, 4, 5, 7 |
| E (W213) | 2 | 2016 | 2, 4 |
| E model T (S213) | 11 | 2016 | 2, 4 |
| S (A217) | 5 | 2016 | 2, 4 |
| E All Terrain (S213 ) | 3 | 2017 | 2, 4 |
| MINI | |||
| Mini 2 FL (R56) | 8 | 2010 | 2, 4 |
| Clubman 4seater (R55) | 9 | 2007 | 2, 4 |
| One (R50) | 2001 | 2, 4 | |
| Countryman 5-seater FL (R60) | 10 | 2012 | 2, 4 |
| Countryman F L (R60) | 4 | 2014 | 2, 4 |
| COUNTRYMAN 4-seater (UKL_X)(R60) | 9 | 2010 | 2, 4 |
| Clubman (F54 ) | 10 | 2015 | 1, 2, 4 |
| Cabrio (F57) | 11 | 2015 | 1 |
| Countryman (F60 ) | 2 | 2017 | 1, 2, 4 |
| MITSUBISHI | |||
| Outlander PHEV (CW0) | 10 | 2013 | 1, 2, 4 |
| Outlander (CW0) | 10 | 2012 | 2, 4 |
| Outlander F L (CW0) | 11 | 2015 | 1, 2, 4 |
| Outlander PHEV FL (CW0) | 11 | 2015 | 1, 2, 4 |
| ASX FL II (GA0) | 10 | 2016 | 2, 4 |
| NISSAN | |||
| Qashqai (J10) | 2 | 2007 | 2, 4 |
| Note F L (E11) | 2009 | 2, 4 | |
| Note (E12) | 10 | 2013 | 2, 4 |
| Qashqai (J11) | 2 | 2014 | 2, 4 |
| X-Trail (T32) | 8 | 2014 | 2, 4 |
| Pulsar (C13) | 10 | 2014 | 2, 4 |
| Qashqai FL (J11) | 7 | 2017 | 2, 4 |
| Navara Crew Cab (D23) | 2 | 2016 | 2, 4 |
| Micra (K14) | 3 | 2017 | 1 |
| X-Trail FL (T32) | 8 | 2017 | 2, 4 |
| OPEL | |||
| Corsa D FL (S-D) | 1 | 2011 | 2, 4 |
| Corsa C 3door (XD) | 2000 | 2, 4 | |
| Meriva A (X01) | 5 | 2003 | 2, 4 |
| Zafira B FL (A-H) | 2 | 2008 | 2, 4 |
| Agila (H-B) | 4 | 2008 | 2, 4 |
| Astra J (PJ-SW) | 12 | 2009 | 2, 4 |
| Meriva B (S-D) | 6 | 2010 | 2, 4 |
| Insignia FL I (OG-A) | 8 | 2011 | 2, 3, 4 |
| Zafira C Tourer (P-JSW) | 1 | 2012 | 2, 4 |
| Mokka (E-V) | 10 | 2012 | 2, 4 |
| Adam (S-D) | 1 | 2013 | 2, 4 |
| Insignia 5door FL II (OG-A) | 9 | 2013 | 2, 3, 4 |
| Insignia Country Tourer FL II (OG-A) | 10 | 2013 | 2, 3, 4 |
| Corsa C 5door FL (XD) | 8 | 2003 | 2, 4 |
| Adam Rocks (S-D) | 6 | 2014 | 2, 4 |
| Corsa E 5-door (XE) | 1 | 2015 | 1, 2, 4 |
| Corsa E 3door (XE) | 1 | 2015 | 1 |
| Insignia 5door FL I (OG-A) | 8 | 2011 | 2, 3, 4 |
| Meriva B FL (S-D) | 1 | 2014 | 2, 4 |
| Zafira B (A-H) | 2005 | 2, 4 | |
| Karl 4-seats (D-A) | 6 | 2015 | 2, 4 |
| Karl 5-seater (D-A) | 6 | 2015 | 2, 4 |
| Astra K 5door (B-K) | 10 | 2015 | 2, 4 |
| Astra K Sports Tourer (B-K) | 11 | 2015 | 2, 4 |
| Mokka X (J-A) | 9 | 2016 | 2, 4 |
| Zafira C Tourer FL (P-J SW) | 10 | 2016 | 2, 4 |
| Insignia Sports Tourer (Z-B) | 6 | 2017 | 2, 4 |
| PEUGEOT | |||
| 207 SW (W) | 5 | 2006 | 2, 4 |
| 4007 (V) | 9 | 2007 | 4 |
| 807 FL (E) | 2008 | 2, 4 | |
| 3008 (OU) | 2009 | 2, 4 | |
| 5008 (O) | 2009 | 2, 3, 4 | |
| 308 FL (4) | 5 | 2011 | 2, 4 |
| 308 sw FL (4) | 5 | 2011 | 3 |
| 4008 (B) | 6 | 2012 | 2, 4 |
| 206 CC FL (2) | 2003 | 1 | |
| 308 (L) | 9 | 2013 | 2, 4 |
| 3008 (OU)FL | 10 | 2013 | 2, 4 |
| 108 5door (P) | 6 | 2014 | 2, 4 |
| 508 FL sw (8) | 9 | 2014 | 2, 4 |
| 206 CC (2) | 2003 | 1 | |
| 207 SW FL (W) | 6 | 2009 | 2, 4 |
| 5008 FL (O) | 1 | 2014 | 2, 3, 4 |
| 508 sw (8) | 3 | 2011 | 2, 4 |
| 3008 (M) | 10 | 2016 | 1, 2, 4 |
| 5008 (M) | 2 | 2017 | 3 |
| 5008 GT (M) | 2 | 2017 | 3 |
| 3008 GT (M) | 10 | 2016 | 1, 2, 4 |
| RENAULT | |||
| Laguna 3 GrandTour FL (T) | 11 | 2010 | 2, 4 |
| Espace 4 FL (K) | 12 | 2010 | 3 |
| Clio III 5door FL (R) | 5 | 2009 | 2, 4 |
| Kangoo StgBox (W) | 1 | 2008 | 2, 4 |
| Mégane 2 CC (M) | 1 | 2006 | 2, 4 |
| Twingo 1 FL (C06) | 1 | 2002 | 2, 4 |
| Mégane 3 5door (Z) | 11 | 2008 | 2,4 |
| Twingo 2 FL (N) | 1 | 2012 | 4 |
| Scenic 3 FL (JZ) | 1 | 2012 | 3 |
| Clio IV (X98) | 10 | 2012 | 1 |
| Mégane 1 F L(BA) | 1999 | 2,4 | |
| Clio IV Grandtour (X98) | 1 | 2013 | 1,2,4 |
| Scenic XMOD (JZ) | 4 | 2013 | 2,4 |
| Clio IV RS (X98) | 3 | 2013 | 2,4 |
| Captur (R) | 9 | 2013 | 2,4 |
| Kangoo F L (W) | 10 | 2013 | 2,4 |
| Mégane 3 F L(Z) | 1 | 2014 | 2,4 |
| Mégane 3 F L Grandtour (Z) | 1 | 2014 | 2,4 |
| Twingo 3 (AH) | 9 | 2014 | 1 |
| Clio III 3door FL (R) | 5 | 2009 | 2,4 |
| Espace 5 (RFC) | 5 | 2015 | 2,3,4 |
| Kadjar (RFE) | 6 | 2015 | 2,4 |
| Captur F L (R) | 6 | 2017 | 2,4 |
| Megane 4 (RFB) | 3 | 2016 | 2,4 |
| Talisman (RFD) | 1 | 2016 | 2,4 |
| Scenic 3 FL2 (JZ) | 4 | 2013 | 3 |
| ZOE (AG) | 6 | 2013 | 1 |
| Megane 4 Grandtour (RFB) | 10 | 2016 | 2,4 |
| Scenic 4 (RFA) | 11 | 2016 | 1 |
| Grand Scenic 4 (RFA) | 10 | 2016 | 1 |
| Talisman Grandtour (RFD) | 6 | 2016 | 2,4 |
| Clio IV Grandtour FL (X98) | 10 | 2016 | 1,2,4 |
| Clio IV RS FL (X98) | 10 | 2016 | 2,4 |
| Twingo 3 GT (AH) | 10 | 2016 | 1 |
| Koleos (RZG) | 6 | 2017 | 2,4 |
| ZOE FL (AG) | 1 | 2017 | 1 |
| Clio III 3door (R) | 5 | 2005 | 2,4 |
| SEAT | |||
| Alhambra (7N) | 10 | 2010 | 2,3,4,5,7 |
| Mii 5door (AA) | 5 | 2012 | 2,4 |
| Altea F L (5P) | 5 | 2009 | 2,4 |
| Ibiza II FL (6K) | 1999 | 2,4 | |
| Leon (5F) | 11 | 2012 | 2,4 |
| Leon SC (5F) | 6 | 2013 | 2,4 |
| Leon ST (5F) | 6 | 2013 | 2,4 |
| Leon X-Perience (5F) | 10 | 2014 | 2,4 |
| Alhambra FL StgBox (7N) | 7 | 2015 | 2,3,4,5,7 |
| Altea (5P) | 11 | 2006 | 2,4 |
| Ateca (5FP) | 8 | 2016 | 2,4 |
| Mii 3door (AA) | 4 | 2012 | 2,4 |
| Leon FL (5F) | 2 | 2017 | 2,4 |
| Leon SC FL (5F) | 2 | 2017 | 2,4 |
| Leon SC Cupra FL (5F) | 2 | 2017 | 2,4 |
| Leon ST FL (5F) | 2 | 2017 | 2,4 |
| Leon ST Cupra FL (5F) | 2 | 2017 | 2,4 |
| Mii 5door FL (AA) | 2 | 2017 | 2,4 |
| Mii 3door FL (AA) | 2 | 2017 | 2,4 |
| Arona (KJ) | 1 | 2018 | 2,4 |
| SKODA | |||
| Octavia 2 FL (1Z) | 2009 | 1,2,4 | |
| Yeti FL (5L) | 9 | 2011 | 1,2,4 |
| Citigo 5door (AA) | 6 | 2012 | 2,4 |
| Rapid (NH) | 10 | 2012 | 2,4 |
| Octavia 3 (5E) | 2 | 2013 | 1,2,4 |
| Octavia 3 Combi (5E) | 5 | 2013 | 1,2,4 |
| Fabia 3 (NJ) | 9 | 2014 | 2,4 |
| Fabia 3 Combi (NJ) | 1 | 2015 | 2,4 |
| Superb 3 Combi (3V) | 6 | 2015 | 2,4 |
| Fabia 3 Combi FL (NJ) | 9 | 2018 | 2,4 |
| Fabia 3 FL (NJ) | 9 | 2018 | 2,4 |
| Yeti FL2 (5L) | 11 | 2013 | 1,2,4 |
| Kodiaq (NS) | 3 | 2017 | 1,2,4 |
| Octavia 3 Combi FL (5E) | 3 | 2017 | 1,2,4 |
| Octavia 3 FL (5E) | 3 | 2017 | 1,2,4 |
| SMART | |||
| ForTwo 3 (453) | 11 | 2014 | 1 |
| SUBARU | |||
| Outback (BS) | 3 | 2015 | 2,4 |
| Levorg (VM) | 9 | 2015 | 2,4 |
| XV FL (G4) | 6 | 2016 | 2,4 |
| Forester (SJ) FL | 3 | 2016 | 2,4 |
| Forester (SJ) | 3 | 2013 | 2,4 |
| XV (G4) | 3 | 2012 | 2,4 |
| Impreza (G5) | 12 | 2016 | 2,4 |
| SUZUKI | |||
| Alto | 3 | 2008 | 2,4 |
| Swift (MZ_EZ) | 1 | 2005 | 2,4 |
| Splash FL (EX) | 5 | 2012 | 2,4 |
| SX4S-Cross (JY) | 10 | 2013 | 2,4 |
| Grand Vitara 3 door FL (JT) | 1 | 2013 | 2,4 |
| Celerio (LF) | 12 | 2014 | 2,4 |
| Vitara (LY) | 6 | 2015 | 2,4 |
| Baleno (EW) | 6 | 2016 | 2,4 |
| SX4S-Cross FL (JY) | 9 | 2016 | 2,4 |
| Ignis 4-seater (MF) | 1 | 2017 | 2,4 |
| TOYOTA | |||
| Yaris Verso (P2) | 1999 | 2,4 | |
| Auris 5-door FL (E15) | 3 | 2010 | 2,4 |
| Prius 3 (XW3) | 1 | 2009 | 2,4 |
| RAV4 FL (XA3) | 5 | 2010 | 2,4 |
| Yaris III 5door (XP13) | 10 | 2011 | 2,4 |
| Prius + (XW4) | 6 | 2012 | 2,4 |
| Yaris I (P1) | 1999 | 2,4 | |
| Yaris III Hybrid (XP13M) | 6 | 2012 | 2,4 |
| Prius 3 FL (XW3) | 4 | 2012 | 2,4 |
| Prius 2 (HW2) | 2003 | 2,4 | |
| Auris 5-door (E180) | 1 | 2013 | 2,4 |
| Auris Touring Sports (E180) | 7 | 2013 | 2,4 |
| RAV4 (XA4) | 4 | 2013 | 2,4 |
| Verso FL (AR2) | 4 | 2013 | 2,4 |
| Avensis Kombi FL (T27) | 1 | 2012 | 2,4 |
| Land Cruiser FL2 (J15) | 1 | 2014 | 2,4 |
| Aygo 2 5door (AB1) | 7 | 2014 | 4 |
| Yaris III Hybrid 5d FL (HXP13a) | 10 | 2014 | 2,4 |
| Corolla (E170) | 3 | 2014 | 2,4 |
| Aygo 2 3door (AB1) | 3 | 2014 | 4 |
| Yaris III 5door FL (XP13) | 7 | 2014 | 2,4 |
| Prius +FL Hybrid (XW4) | 3 | 2015 | 2,4 |
| Avensis Kombi FUI (T27) | 6 | 2015 | 2,4 |
| Auris 5-door FL (E180) | 9 | 2015 | 2,4 |
| Avensis FL2 (T27) | 6 | 2015 | 2,4 |
| Prius 4 (XW5) | 4 | 2016 | 2,4 |
| Corolla FL (E170) | 9 | 2016 | 2,4 |
| Auris 5-door (E15) | 3 | 2007 | 2,4 |
| Avensis (T27) | 2009 | 2,4 | |
| Avensis FL (T27) | 1 | 2012 | 2,4 |
| Land Cruiser FL (J15) | 4 | 2012 | 2,4 |
| RAV4 (XA3) | 3 | 2006 | 2,4 |
| Verso (AR2) | 3 | 2009 | 2,4 |
| Verso FLII (AR2) | 5 | 2016 | 2,4 |
| Prius Plug-in Hybrid (XW5P) | 11 | 2016 | 2,4 |
| C-HR Hybrid (AX1T) | 10 | 2016 | 2,4 |
| VOLVO | |||
| V60 (F) | 2010 | 2,4 | |
| V50 FL (M) | 4 | 2007 | 2,4 |
| V70 FL (B) | 8 | 2011 | 2,4 |
| XC60 FL (D) | 10 | 2013 | 2,4 |
| XC90 (L) | 6 | 2015 | 2,4 |
| V60 Cross Country (F) | 7 | 2015 | 2,4 |
| XC90 (L) Hybrid | 6 | 2015 | 2,4 |
| V90 (P) | 9 | 2016 | 2,4 |
| V90 Cross Country (P) | 2 | 2017 | 2,4 |
| S90 (P) | 6 | 2016 | 2,4 |
| S90 Hybrid (P) | 11 | 2016 | 2,4 |
| V60 FL (F) | 6 | 2013 | 2,4 |
| XC60 (D) | 1 | 2008 | 2,4 |
| XC60 (U) | 7 | 2017 | 2,4 |
| XC40 (X) | 3 | 2018 | 1,2,4 |
| VW | |||
| Touran FL (1T) | 9 | 2010 | 2,4 |
| Golf 4 (1J) | 1997 | 2,4 | |
| Golf 5 (1K) | 2004 | 2,4 | |
| Golf 6 (1K) | 10 | 2008 | 2,4 |
| Passat B6 (3C) | 3 | 2005 | 2,4 |
| Polo 4 (9N) | 11 | 2001 | 2,4 |
| Polo 5 (6R) | 3 | 2009 | 2,4 |
| Passat B7 Variant (32) | 11 | 2010 | 2,4 |
| Golf 6 Cabrio (1K) | 6 | 2011 | 2,4 |
| Passat B7 (32) | 10 | 2010 | 2,4 |
| Tiguan FL (5N) | 7 | 2011 | 2,4 |
| Sharan 2 (7N) | 9 | 2010 | 2,3,4,5,7 |
| UP 5door (AA) | 5 | 2012 | 2,4 |
| Golf 7 (AU) | 11 | 2012 | 2,4 |
| Passat B5 Variant (3B_3BG) | 3 | 1997 | 2,4 |
| Polo 3 FL2 (6N2) | 1999 | 2,4 | |
| Polo 4 saloon (9N2) | 10 | 2003 | 2,4 |
| Golf 7 Variant (AUV) | 9 | 2013 | 2,4 |
| Polo 5 FL (6R) | 3 | 2014 | 2,4 |
| Golf 7 Sportsvan (AUV) | 6 | 2014 | 2,4 |
| Touareg 2 FL (7P) | 9 | 2014 | 2,4 |
| Passat B8 (3C) | 11 | 2014 | 2,4 |
| Passat B8 Variant (3C) | 11 | 2014 | 2,4 |
| Golf 7 GTE (AU) | 8 | 2014 | 2,4 |
| Polo 5 GTI FL (6R) | 11 | 2014 | 2,4 |
| Golf 5 3door (1K) | 0 | 2004 | 2,4 |
| e-Golf (AU) | 7 | 2014 | 2,4 |
| Passat B8 Variant GTE (3C) | 7 | 2015 | 2,4 |
| Touran (5T) | 9 | 2015 | 2,3,4,5,7 |
| Golf 7 R Variant (AUV) | 6 | 2015 | 2,4 |
| Caddy (2K0) | 7 | 2015 | 2,4 |
| Tiguan II (5N) | 4 | 2016 | 2,4 |
| Passat B8 Alltrack (3C) | 10 | 2015 | 2,4 |
| Caddy CNG (2K0) | 11 | 2015 | 2,4 |
| Golf 7 FL (AU) | 3 | 2017 | 2,4 |
| Golf 7 Variant FL (AUV) | 3 | 2017 | 2,4 |
| Golf 7 GTD (AU) | 3 | 2017 | 2,4 |
| e-UP! FL (AA) | 11 | 2016 | 2,4 |
| Golf 7 GTI FL (AU) | 3 | 2017 | 2,4 |
| Beetle Cabrio (16) | 11 | 2012 | 2,4 |
| e-Golf FL (AU) | 4 | 2017 | 2,4 |
| Beetle Cabrio FL (16) | 9 | 2016 | 2,4 |
| Golf 7 GTI (AU) | 3 | 2013 | 2,4 |
| Golf 7 RVariant FL (AUV) | 8 | 2017 | 2,4 |
| Golf 7 Sportsvan FL (AUV) | 1 | 2018 | 2,4 |
| Sharan 2 FL (7N) | 5 | 2015 | 2,3,4,5,7 |
| Touareg 2 (7P) | 4 | 2010 | 2,4 |