Oasys 1 Evo - Car seat CHICCO - Free user manual and instructions
Find the device manual for free Oasys 1 Evo CHICCO in PDF.
| Product type | Car seat Group 1 (9-18 kg) |
| Brand | Chicco |
| Model | Oasys 1 Evo |
| Approval | ECE R44/04 |
| Mounting system | Universal ISOFIX + Top Tether |
| ISOFIX size class | B1 |
| Recommended age | From 9-12 months to about 3 years |
| Headrest adjustment | 6 positions, simultaneous with harness straps |
| Recline adjustment | 5 positions |
| Cover | Removable, machine washable at 30°C |
| Care for plastic/metal parts | Damp cloth, no solvents |
| Spare parts | Replacement cover approved by manufacturer |
| Prohibited accessories | Unapproved cushions, blankets |
| Use after accident | Must be replaced even after a minor accident |
| Storage | Dry place, away from heat and sunlight |
| Warranty | Against conformity defects according to national conditions |
Frequently Asked Questions - Oasys 1 Evo CHICCO
User questions about Oasys 1 Evo CHICCO
0 question about this device. Answer the ones you know or ask your own.
Ask a new question about this device
Download the instructions for your Car seat in PDF format for free! Find your manual Oasys 1 Evo - CHICCO and take your electronic device back in hand. On this page are published all the documents necessary for the use of your device. Oasys 1 Evo by CHICCO.
USER MANUAL Oasys 1 Evo CHICCO
natural_image
Illustration of a blue and white car seat with orange buttons, no text or symbols present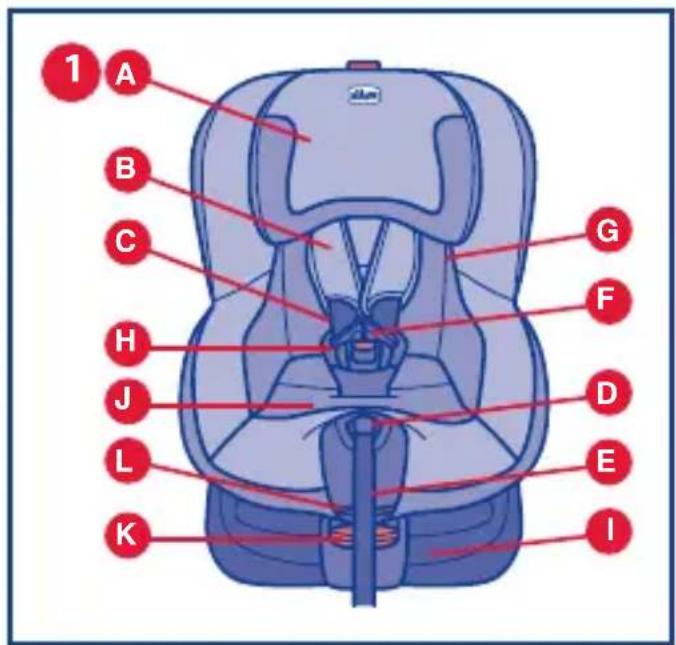
natural_image
Illustration of a hand pressing down on a car seatbelt component, showing red directional arrow (no text or symbols)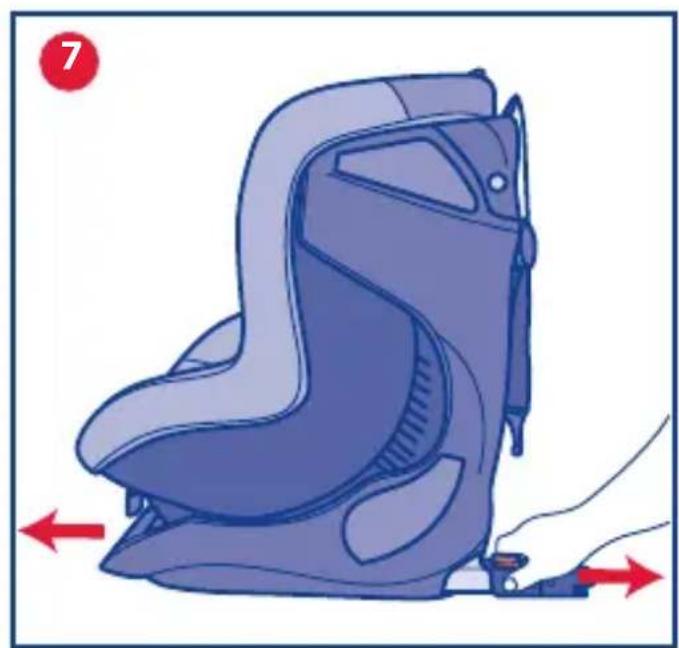
natural_image
Illustration of a blue and purple car seatbelt device with red directional arrows indicating movement or positioning (no text or symbols)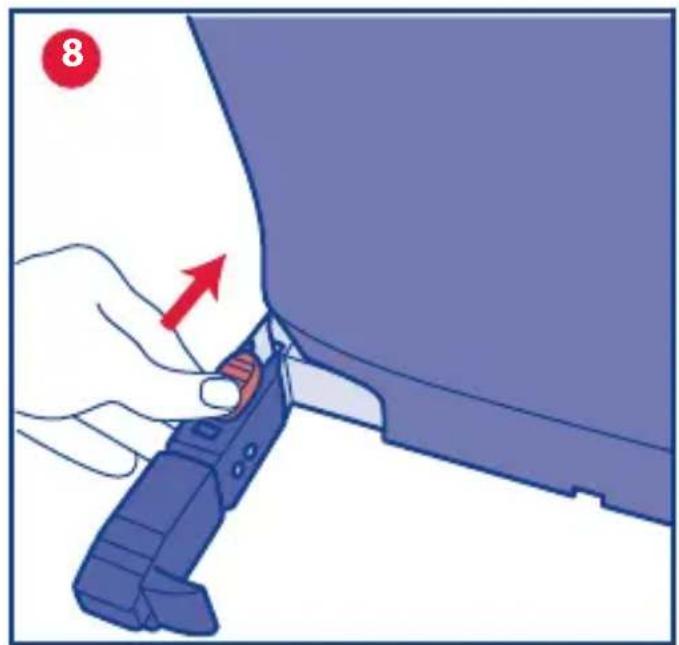
natural_image
Illustration of a hand holding a blue plastic tool, with a red arrow indicating the process (no text or symbols present)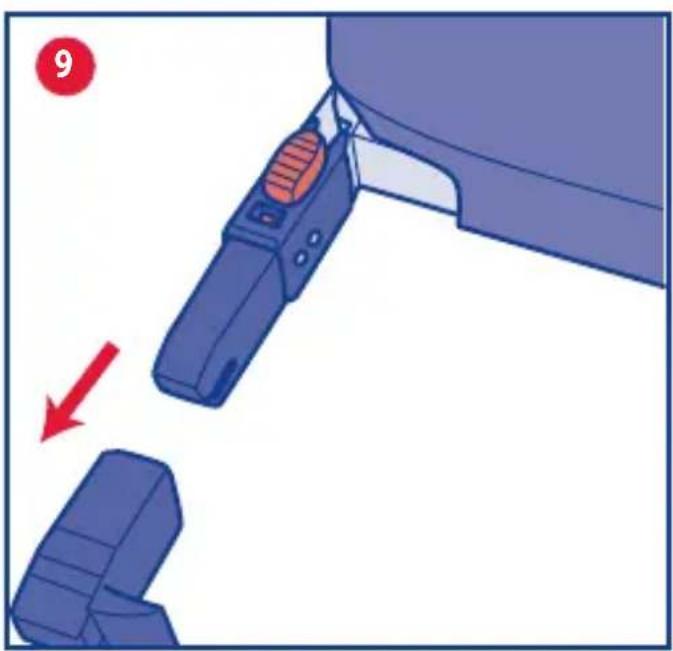
natural_image
Illustration of a blue mechanical device with a red arrow indicating a step, no text or symbols present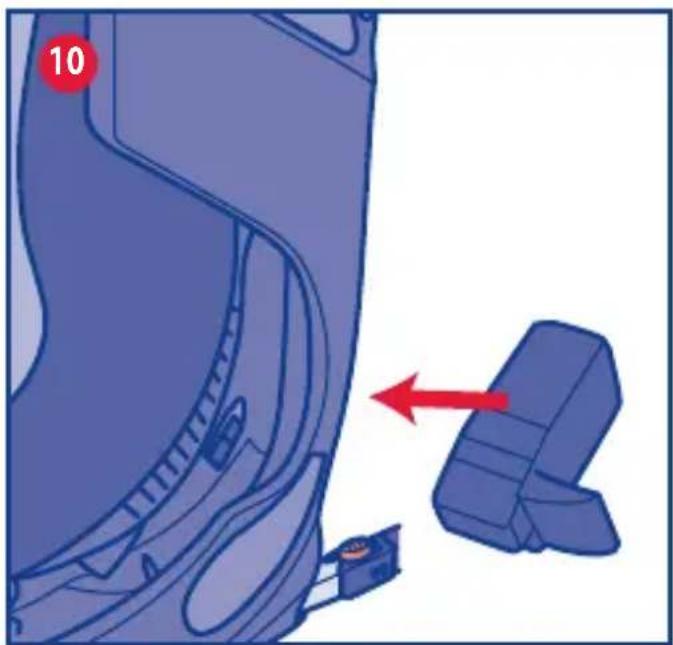
natural_image
Diagram of a car seatbelt mechanism with blue components and a red directional arrow indicating movement (no text or symbols)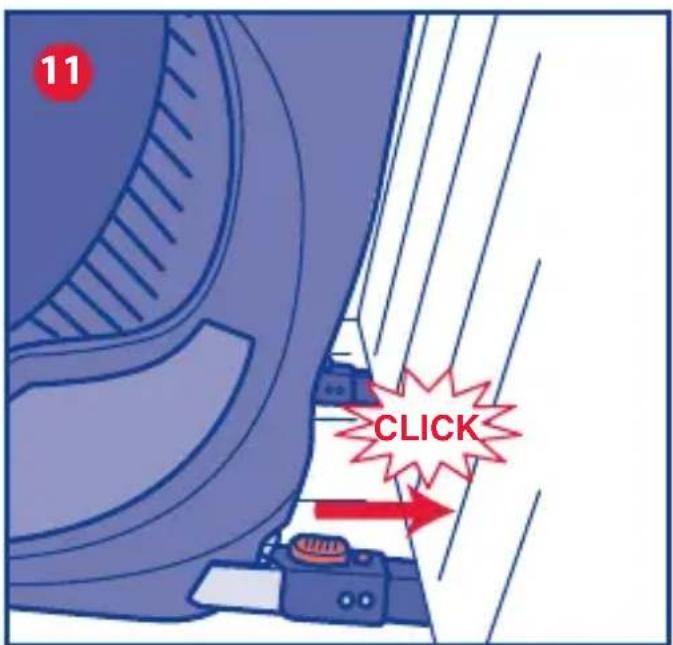

natural_image
Illustration of a blue cable being inserted into a container, with a red arrow indicating direction (no text or symbols)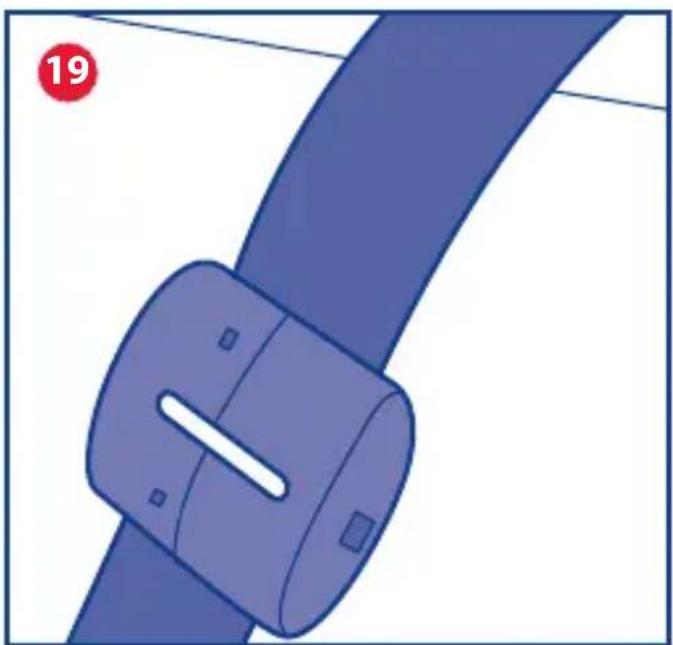
natural_image
Illustration of a blue mechanical clamp or bracket with a white slot, no text or symbols present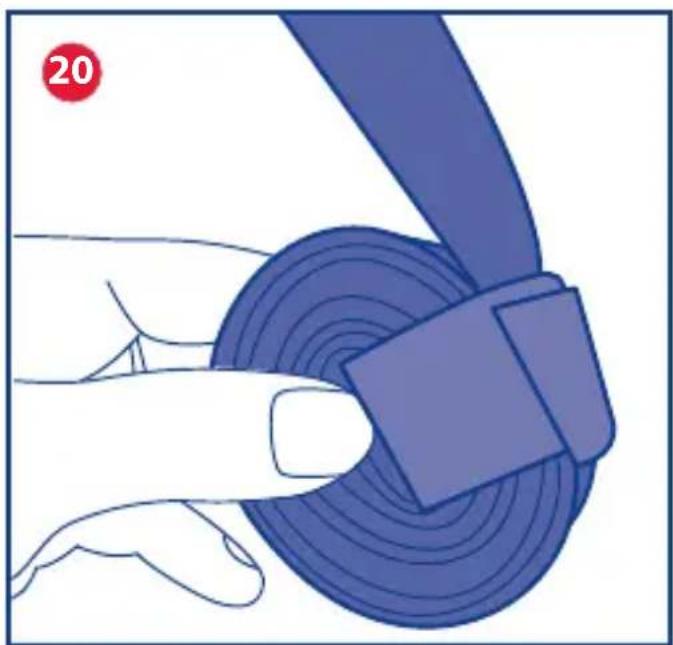
natural_image
Illustration of a hand holding a blue circular object with concentric rings, no text or symbols present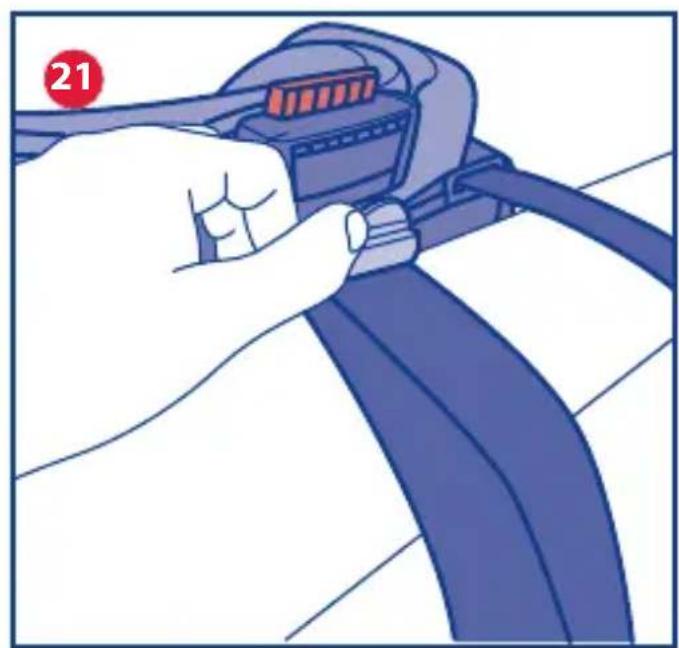
natural_image
Illustration of a hand inserting a cable into a connector (no text or symbols visible)
natural_image
Illustration of a person adjusting a seatbelt with a red arrow indicating the angle (no text or symbols present)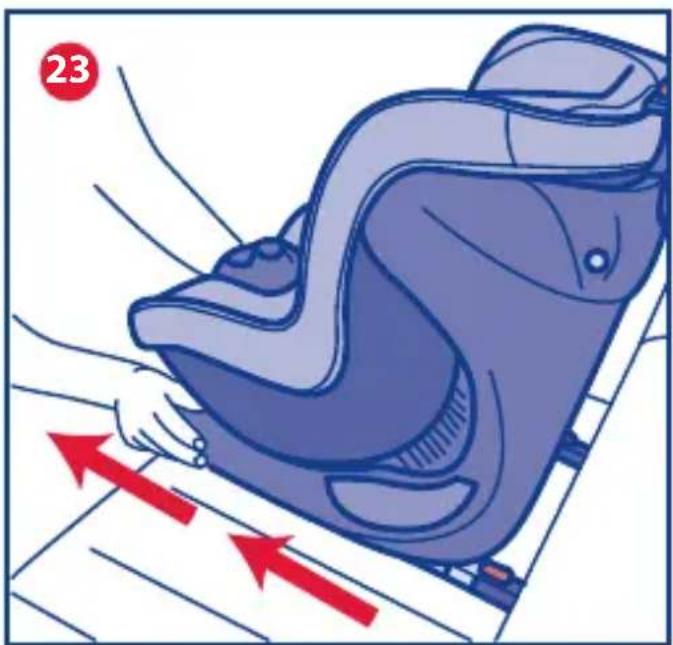
natural_image
Illustration of a blue massage chair with red directional arrows indicating movement or pressure (no text or symbols)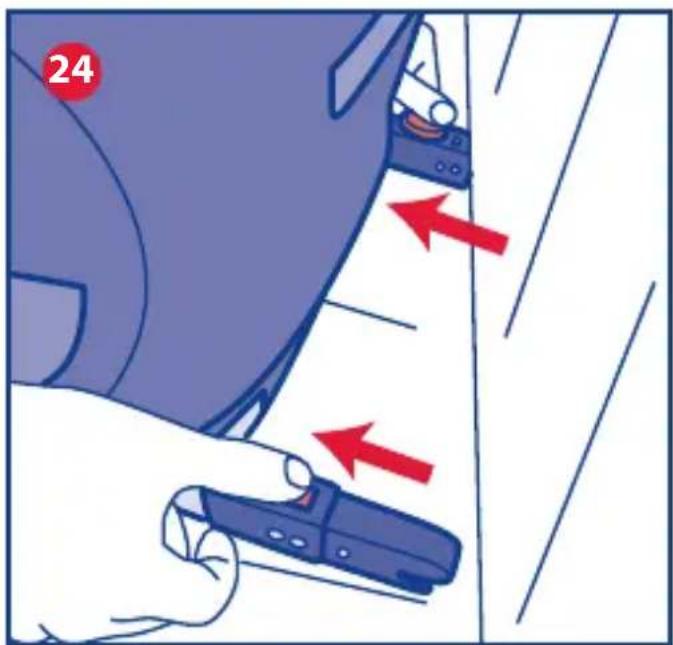
natural_image
Illustration of a robotic arm with a blue handle and two blue mechanical parts, one showing a red arrow indicating motion (no text or symbols)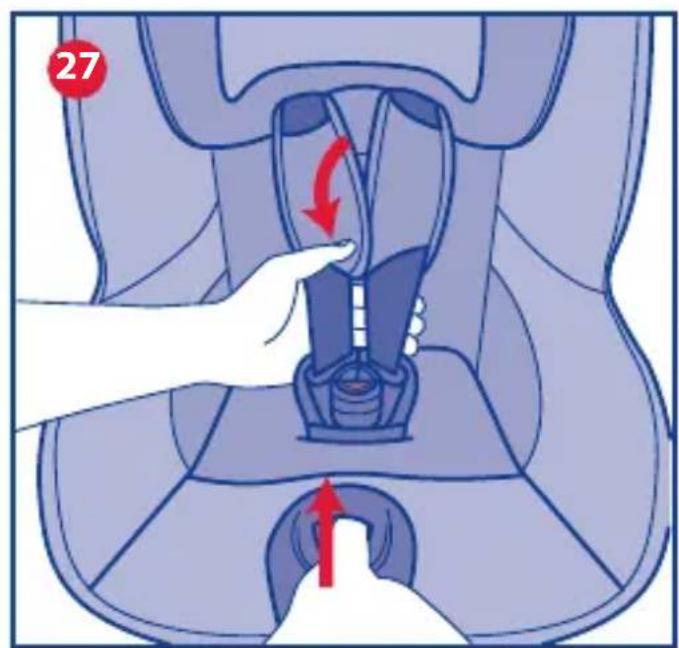

natural_image
Illustration of a mechanical component with a red arrow indicating a specific part (no text or symbols present)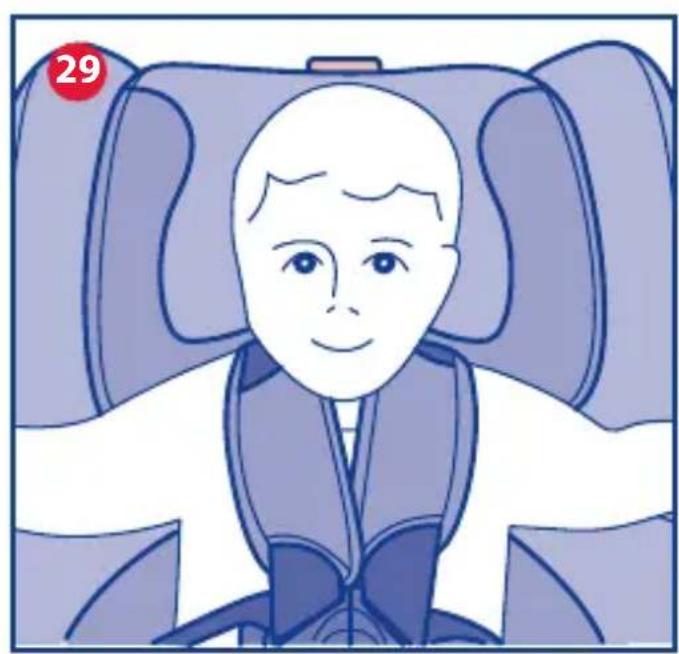
natural_image
Illustration of a person seated in a seat with head lifted (no text or symbols)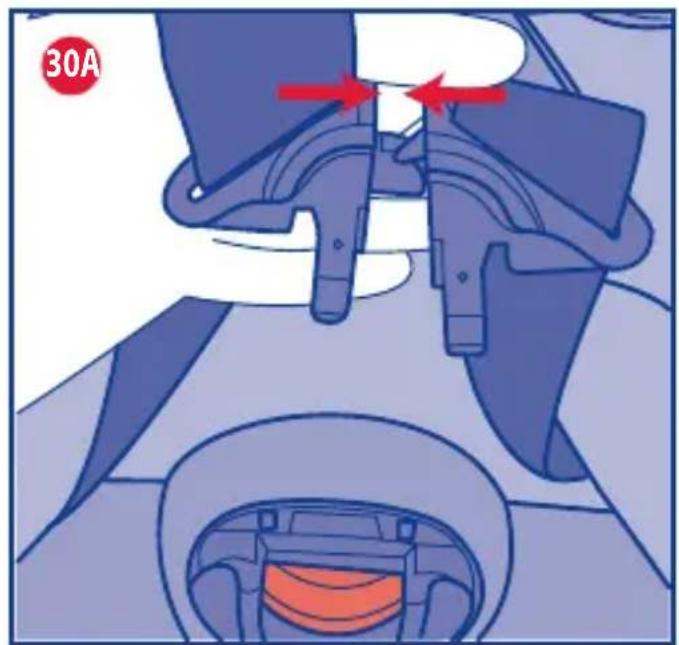

natural_image
Illustration of a hand placing a red object into a blue mechanical component (no text or symbols)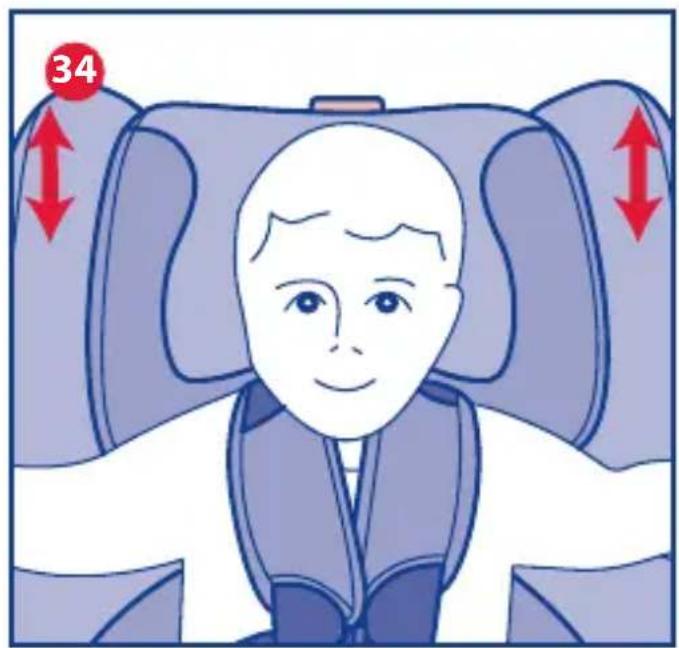
natural_image
Illustration of a person seated in a seatbelt, with hands adjusting the seat (no text or symbols)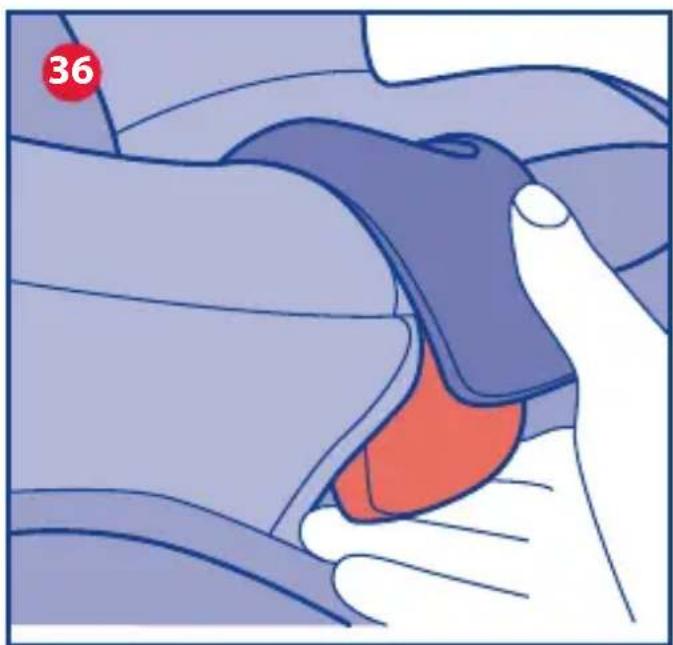
natural_image
Illustration of a hand holding a blue object with a red interior, no text or symbols present
natural_image
Illustration of a car seatbelt with a hand adjusting the seatbelt and red arrows indicating rotation (no text or symbols)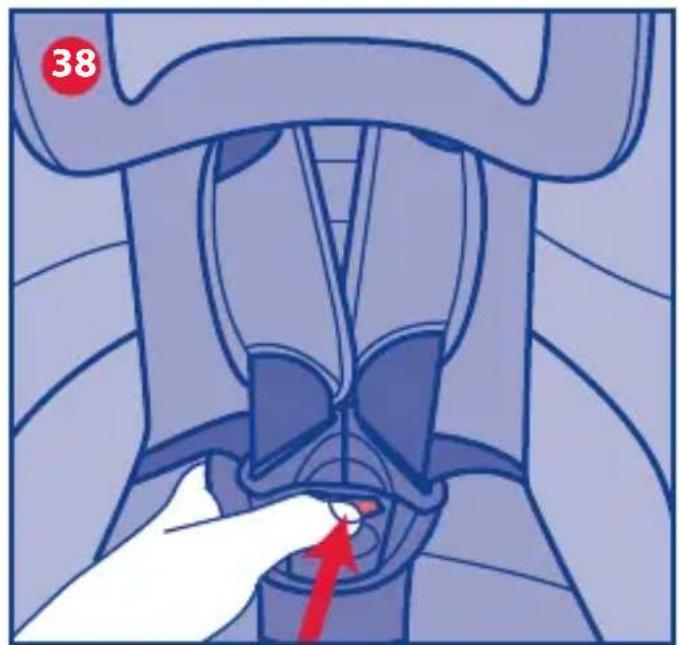
natural_image
Illustration of a mechanical component with a red arrow indicating a specific part (no text or symbols present)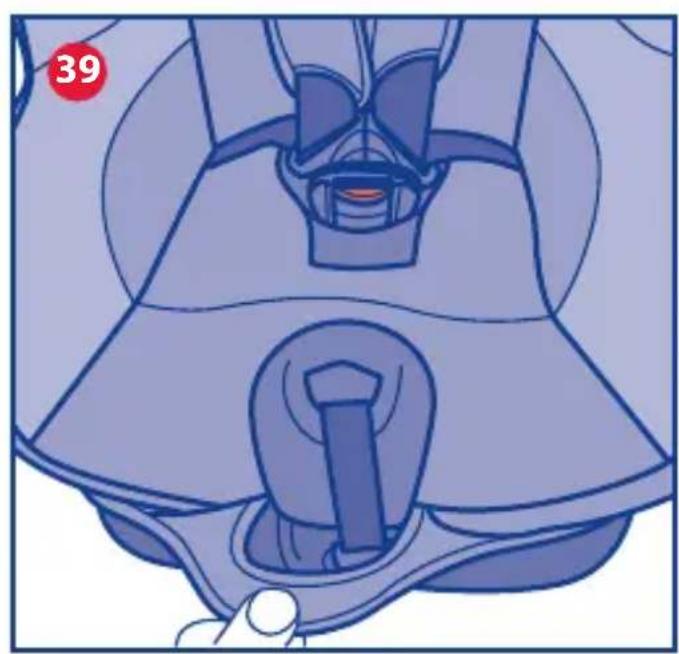
natural_image
Illustration of a robotic arm with a numbered label (39) and a circular badge, no readable text or symbols present.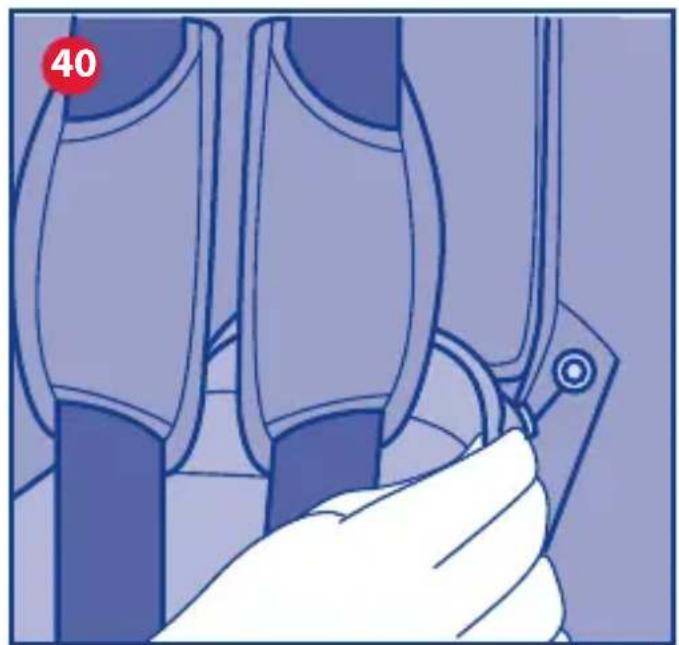
natural_image
Illustration of a hand holding a small object with a circular badge showing '40' (no text or symbols on the objects)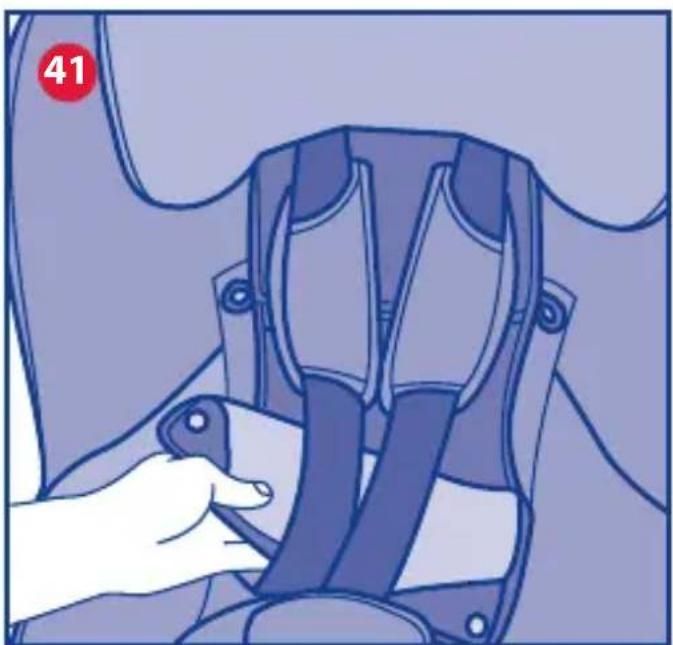
natural_image
Illustration of a hand adjusting a blue safety belt device (no text or symbols visible)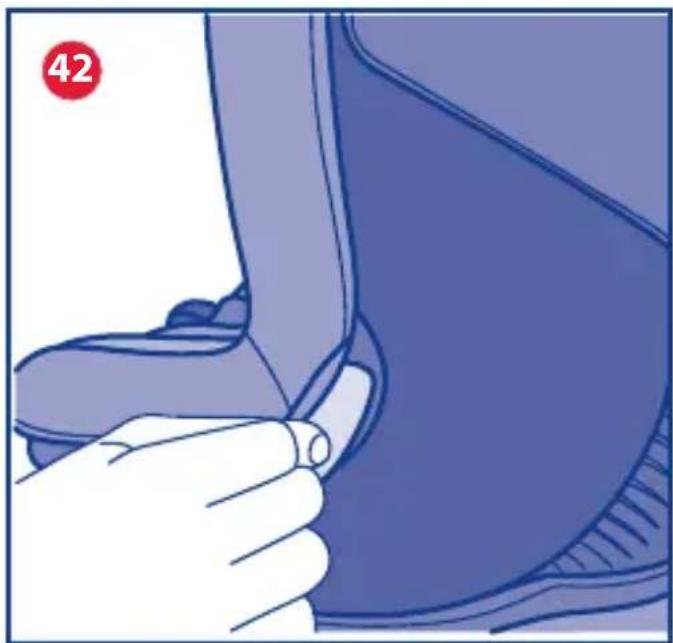
natural_image
Illustration of a hand adjusting a small object on a car seat (no text or symbols visible)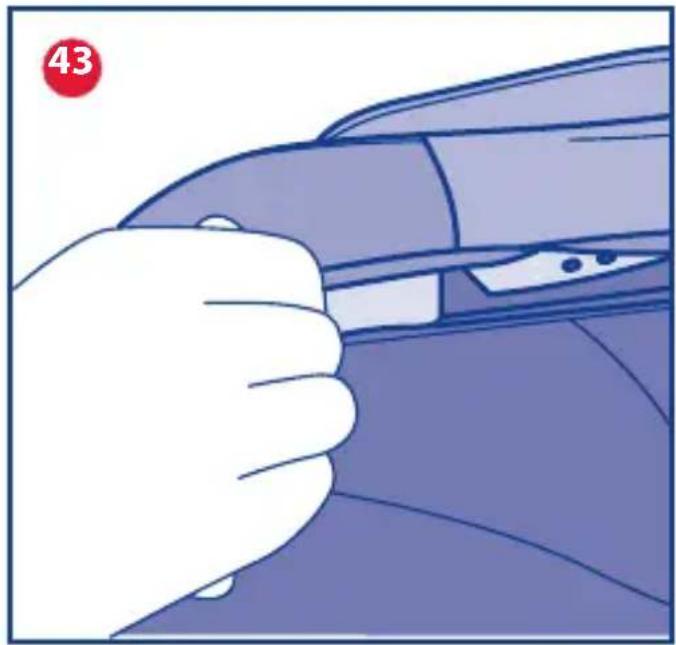
natural_image
Illustration of a hand pressing down on a car wheel (no text or symbols visible)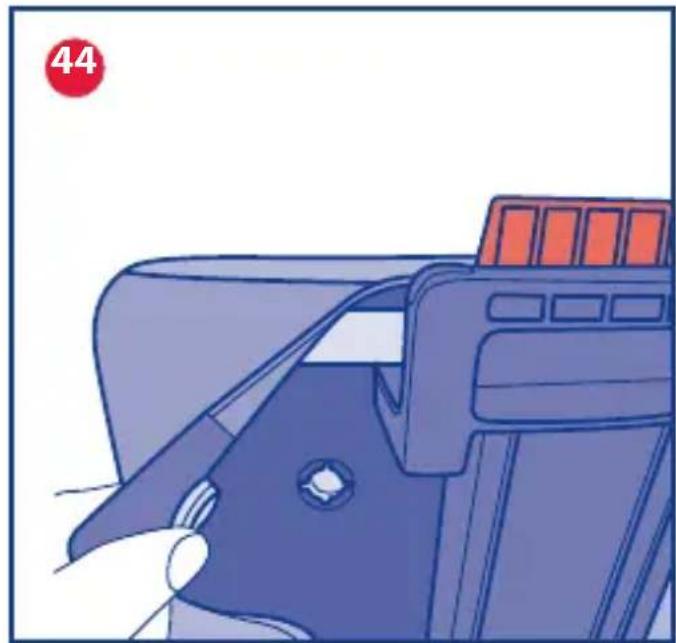
natural_image
Illustration of a blue and red object with a handle, possibly a device or tool, against a white background (no text or symbols)
OASYS 1 EVO IsoFIX
(9-18 KG)
Istruzioni d'uso
IMPORTANTE: PRIMA DELL'USO LEGGERE ATTENTAMENTE E INTEGRALMENTE QUESTO LIBRETTO D'ISTRUZIONI PER EVITARE PERICOLI NELL'UTILIZZO E CONSERVARLO PER OGNI FUTURO RIFERIMENTO. PER NON COMPROMETTERE LA SICUREZZA DEL VOSTRO BAMBINO SEGUITE ATTENTAMENTE QUESTE ISTRUZIONI ATTENZIONE! PRIMA DELL'USO RIMUOVERE ED ELIMINARE EVENTUALI SACCHETTI DI PLASTICA E TUTTI GLI ELEMENTI FACENTI PARTE DELLA CONFEZIONE DEL PRODOTTO O COMUNQUE TENERLI LONTANI DALLA PORTATA DEI BAMBINI. SI RACCOMANDA DI EFFETTUA-RE LO SMALTIMENTO DI QUESTI ELEMENTI OPERANDO LA RACCOLTA DIFFERENZIATA IN CONFORMITA' ALLE LEGGI VIGENTI.
WARNING! BEFORE USE, REMOVE AND DISPOSE OF ALL PLASTIC BAGS AND PACKAGING MATERIALS AND KEEP THEM OUT OF REACH OF CHILDREN. IT IS RECOMMENDED TO DISPOSE OF THESE ITEMS AT AN APPROPRIATE DIFFERENTIATED COLLECTION POINT, AS REQUIRED BY THE REGULATIONS IN FORCE.
IMPORTANT WARNING: Fitting the Child Car Seat with the ISOFIX System
- This is an ISOFIX child restraint device. It is approved to ECE R44/04 Standards for general use in vehicles equipped with ISOFIX safety anchorage systems.
- To use the UNIVERSAL ISOFIX system, it is necessary to read the instructions booklet of the vehicle before fitting the child car seat into the car. The instructions booklet will indicate the seats compatible with the class and age group of the child car seat approved to the UNIVERSAL ISOFIX system.
- This child restraint device has been classified as "Universal" under more stringent conditions than those that were applied to earlier designs which do not display this notice.
- The child mass group and ISOFIX size class for which the child restraint system may be used are: GROUP 1 class B1.
- If in doubt, consult either the child restraint device manufacturer or your retailer.
WARNING! Fixing the lower locking devices is not sufficient when using the ISOFIX system. It is necessary to fix the "Top Tether" to the locking device indicated by the car manufacturer.
VERY IMPORTANT!
TO BE READ IMMEDIATELY
This child car seat is approved for "Group 1", for the transport of children from 9 up to 18 Kg of weight (from 9-12 months up to approximately 3 years of age), and conforms to European norm ECE R 44/04.
- The child car seat adjustment operations must only be carried out by an adult.
• Each country imposes different road safety laws and regulations when transporting children in vehicles. This is why it is highly recommended to contact your local authorities to receive further information.
- The product must not be used by anybody who has not read these instructions.
- The risk of serious injuries to the child increases, not only in the case of accidents, but also in other circumstances (i.e.: sudden braking etc.), if these instructions are not followed carefully.
- This product is expressly intended to be used only as a child car seat; it should not be used indoors.
- No child car seat can guarantee the total safety of your child in the event of an accident, but the use of this product reduces the risk of serious injuries or death.
- Always use the child car seat, fitted correctly and with the safety harness fastened, including short journeys. Not using the child car seat constitutes a danger to your child's safety. In particular, check that the child car seat harness is tightened correctly, is not twisted and is in the correct position.
- An accident, even a minor incident, may cause damage to the child car seat, which is not visible to the naked eye: it may have suffered structural damage, which is not visible to the naked eye, but enough to seriously compromise the safety of the product.
- Never use a child car seat that is damaged, deformed, excessively worn or one with any missing parts: its original safety characteristics may have been seriously compromised.
- This product must not be modified in any way, unless such modification is approved by the manufacturer.
- Do not install accessories, spare parts or components not supplied or approved by
the manufacturer.
- Do not use anything, e.g. pillows or blankets, to raise the child seat up from the car seat, or to prop the child up in the child seat: this may compromise the correct safety function of the child seat in the event of an accident.
- Check that there are no lose objects between the child car seat and the car seat or between the child car seat and the door of the car.
- Check that vehicle seats (folding, adjustable or rotating versions) are secured correctly.
- Do not transport loose or unsecured objects or baggage on the back shelf of the vehicle: in the event, of an accident or sudden braking, they may injure the passengers.
- Do not let children play with the components or parts of the child car seat.
- Never leave your child unattended in the car, it can be dangerous!
- Do not carry more than one child at a time in the child car seat.
- Ensure that all the car passengers fasten their seat belt, for their own safety and because, during the journey, they may injure the child in the event of an accident or sudden braking of the car.
- WARNING! Ensure that during the adjustment operations the movable parts of the child car seat do not come into contact with your child.
- When travelling, stop the vehicle in a safe place before carrying out any adjustment operations on the child car seat or the child.
- Check periodically that your child does not unfasten the buckle of the child car seat safety harness, or tamper with any of its parts.
- Avoid giving food to your child while travelling, in particular lollypops, ice lollies or other foods on sticks. It may injure your child in the event of an accident or sudden braking.
- On long journeys, it is recommended to make frequent stops: children tire very easily in child car seats and need to stretch their legs. It is recommended to let your child in and out of the car from the pavement side, not the traffic road side.
- Do not remove any labels or brands from the product.
- Prolonged exposure of the child car seat to direct sunlight may cause the materials or fabric to fade.
- If the vehicle has been left in the sun, check that the different parts of the child car seat are not too hot: in such an event, let the child car seat cool down first before placing the child into it, in order to avoid burns.
- When the child car seat is not in use inside the vehicle, it should be left secured to the car's seat using the ISOFIX and Top Tether connections, or stowed in the car's boot. An unsecured child car seat may be a source of danger for the other passengers in the event of an accident or sudden braking.
- Artsana declines all responsibility for any inappropriate use of the product and for any use not in compliance with these instructions.
INSTRUCTIONS FOR USE
Components
Restrictions and requisites regarding the use of the product and car seat
- Fitting the child car seat into the car with the Isofix System
- preparing for installation
- how to fit the child car seat
- how to fit the top tether
Removal instructions
- Seating the child in the child car seat
- How to remove the child from the child car seat
- Adjusting the headrest and restraint harness
- Adjusting the inclination of the child car seat
- Maintenance
- how to clean the fabric cover
- how to clean the plastic or metal parts
Checking the condition of the components
Storing the Product
Disposing of the product
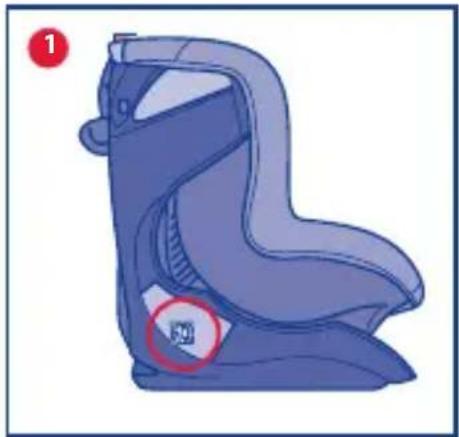
COMPONENTS (Diag. 1-2-3-4-5)
Diag. 1 (Front)
A. Headrest cushion
B. Shoulder straps
C. Child seat restraint harness
D. Restraint harness adjustment button
E. Restraint harness adjustment strap
F. Harness open / close buckle
G. Seat Fabric
H. Padded crotch strap
I. Child seat base
J. Seat
K. Handle to release the ISOFIX system
L. Reclining adjuster lever
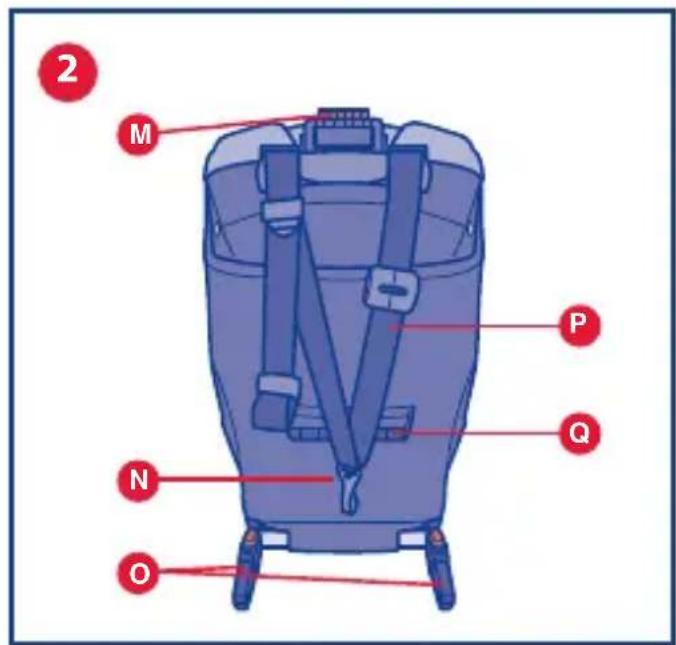
Diag. 2 (Back)
M. Headrest adjustment button
N. Homologation labels
O. Isofix connectors
P. Top Tether
Q. Instruction manual holder
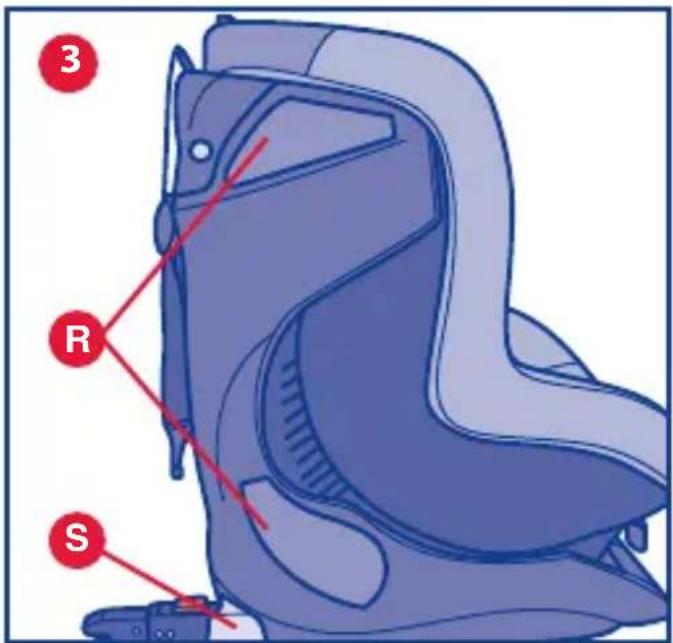
Diag. 3 (Profile)
R. Installation instructions labels
S. ISOFIX system
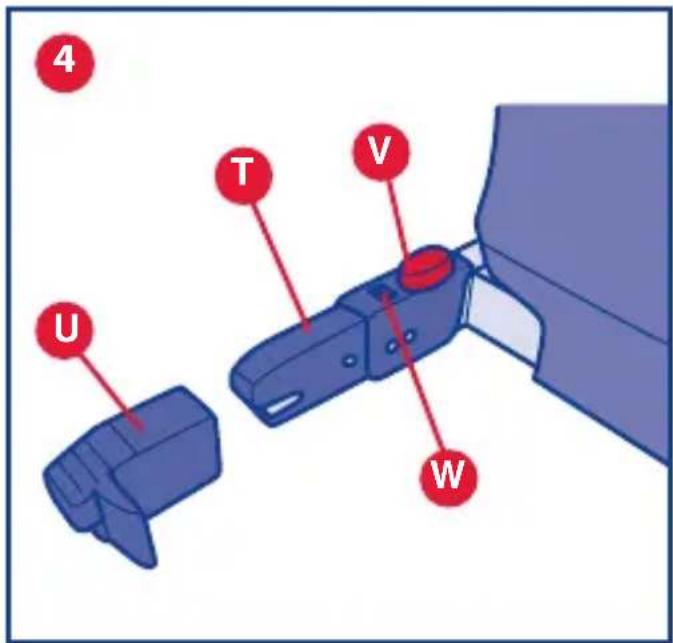
Diag. 4 (ISOFIX System Detail)
T. Connectors
U. Protective caps
V. Release buttons
W. Locking indicators
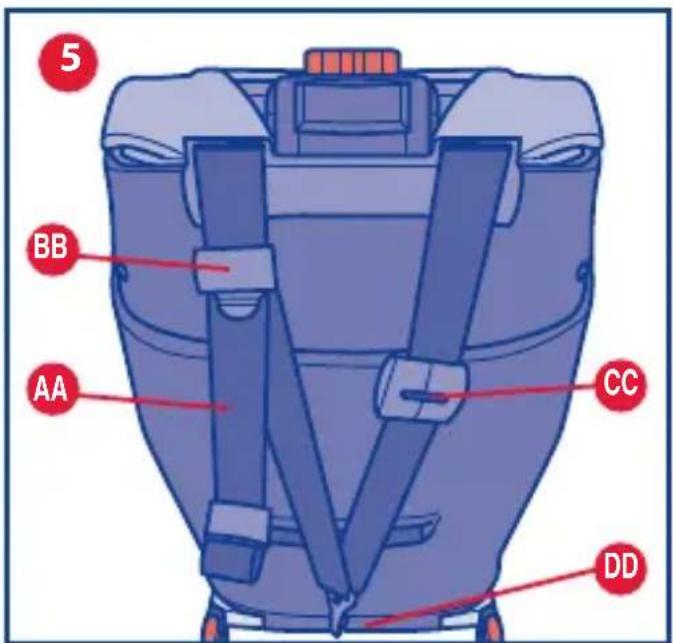
Diag. 5 (TOP TETHER Detail)
AA. Belt
BB. Adjuster
CC. Tension indication
DD. Hook
RESTRICTIONS AND REQUISITES REGARDING THE USE OF THE PRODUCT AND CAR SEAT
WARNING! Read these use restrictions and requisites carefully to ensure the product is used safely.
- The child car seat is suitable for children from 9 up to 18 Kg of weight.
- The child car seat must be fitted with the ISOFIX system in the positions indicated in the instructions for use of the vehicle.
WARNING! If the vehicle manual allows ISOFIX installation of the child car seat on the front seat of the car, in order to ensure maximum safety, it is recommended to push the seat back as much as possible, bearing in mind the comfort of the passenger sitting in the seat directly behind it and adjusting the backrest to the most vertical position. It is not recommended to fit the child car seat into a front seat equipped with airbag. If you wish to fit the child car seat in any seat protected by airbag, always refer to the vehicle instructions manual.
FITTING THE CHILD CAR SEAT INTO THE CAR WITH THE ISOFIX SYSTEM
Preparing for installation
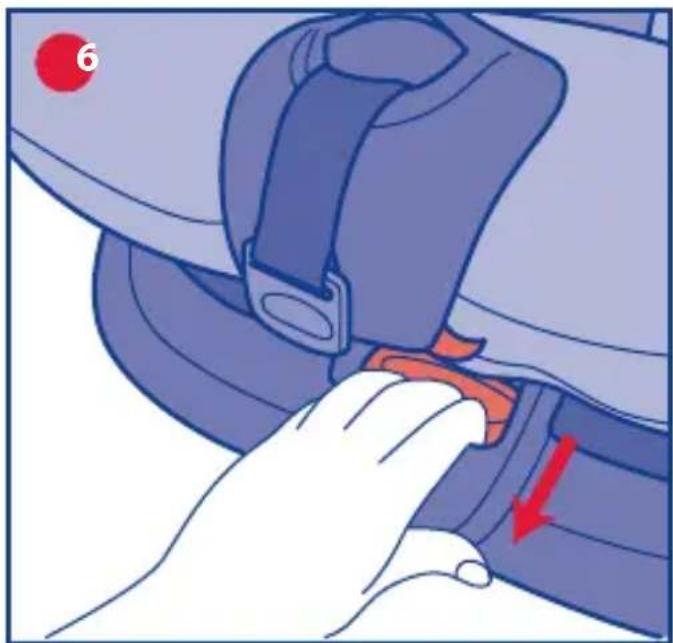
- Pull the unlocking handle (K) of the ISOFIX system externally (diag. 6).
- While keeping the handle pulled, pull out the ISOFIX system COMPLETELY from the rear of the backrest (diag. 7). Ensure that the system has been pulled out as far as possible.
- Push the two red buttons (Y) of the ISOFIX connectors inwards (diag. 8) and remove the two protective caps. 9).
- Place the two caps into the appropriate compartments, located between the base and the seat, once the latter has been reclined completely (diag. 10).
WARNING! Store the caps carefully, since they are indispensable for reinserting the ISOFIX system in to the base when the system is not in use.
How to fit the child car seat
- Place the child car seat onto the vehicle seat following the recommendations provided in the instruction manual of your vehicle. WARNING! Check that there are no loose objects between the child car seat and the car seat or between the child car seat and the door of the car.
- Insert the two ISOFIX connectors into the corresponding ISOFIX locking devices, located on the cars seat, between the backrest and the seat (diag. 11). WARNING! Pull the child car seat towards you to ensure it has been installed correctly and then check that the two indicators (W) are green.
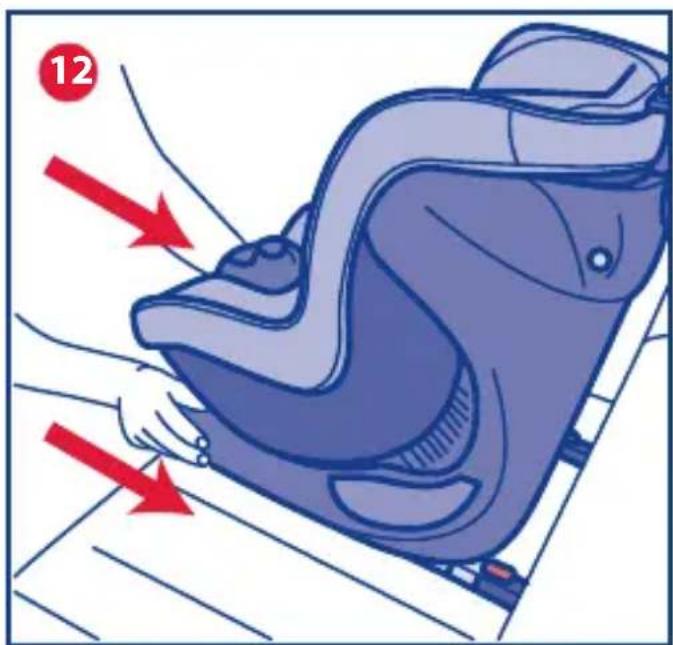
- Push the child car seat firmly against the backrest of the car seat (Diag. 12) to ensure maximum adherence.
How to fit the top tether
The installation of the child car seat is complete only by fitting the Top Tether.
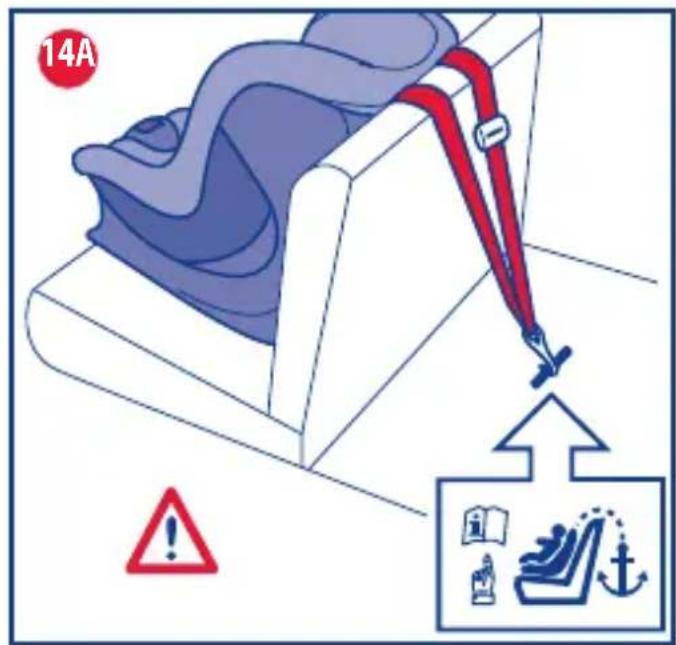
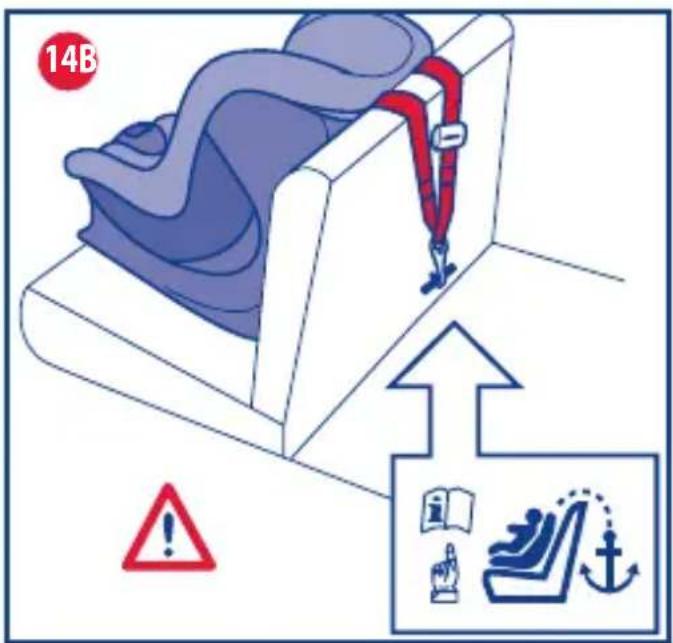
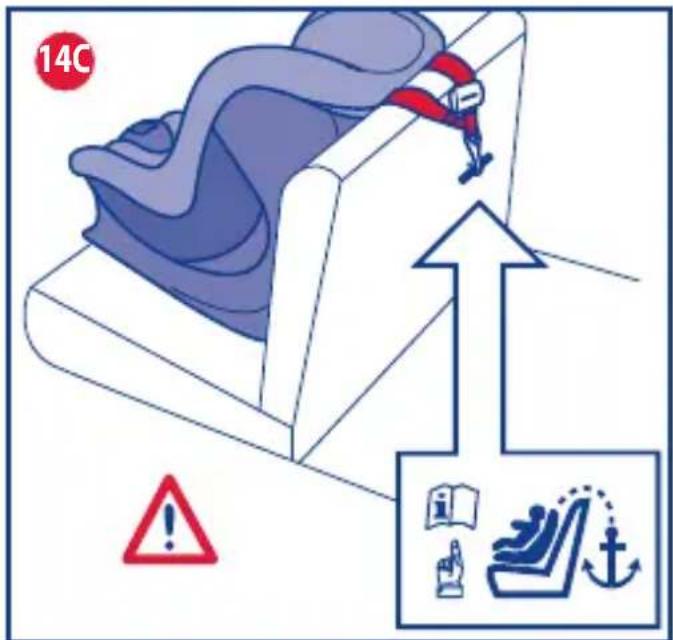
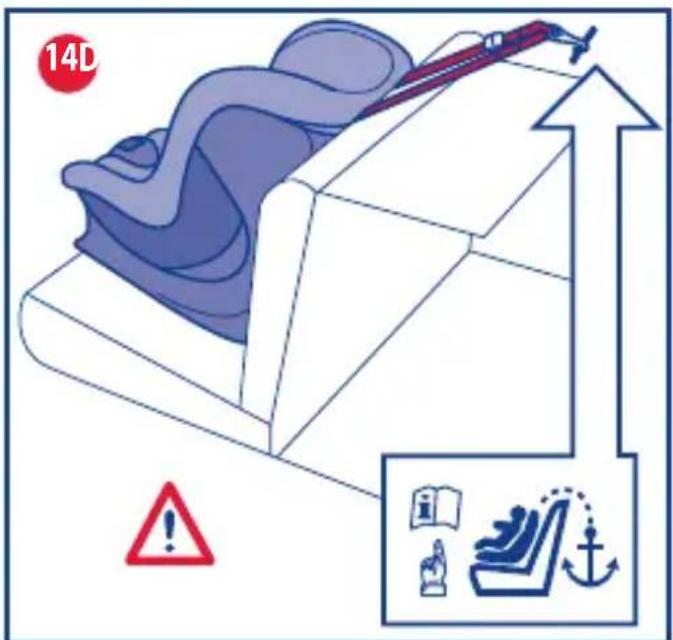
WARNING! Pease refer to the instructions booklet of the vehicle to identify the locking point of the Top Tether of the child car seat. This locking point is indicated by a special label (Diag. 13), and it may be located in the positions indicated in diagrams 14a – 14b – 14c – 14d.
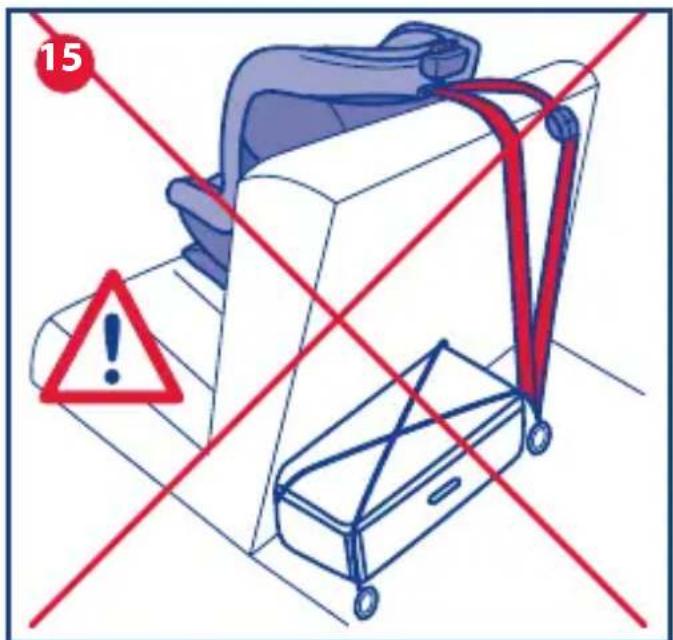
WARNING! Check that the Top Tether is locked with the correct locking device. Do not mistake the locking device of the Top Tether with the ring provided for securing luggage (diag. 15).
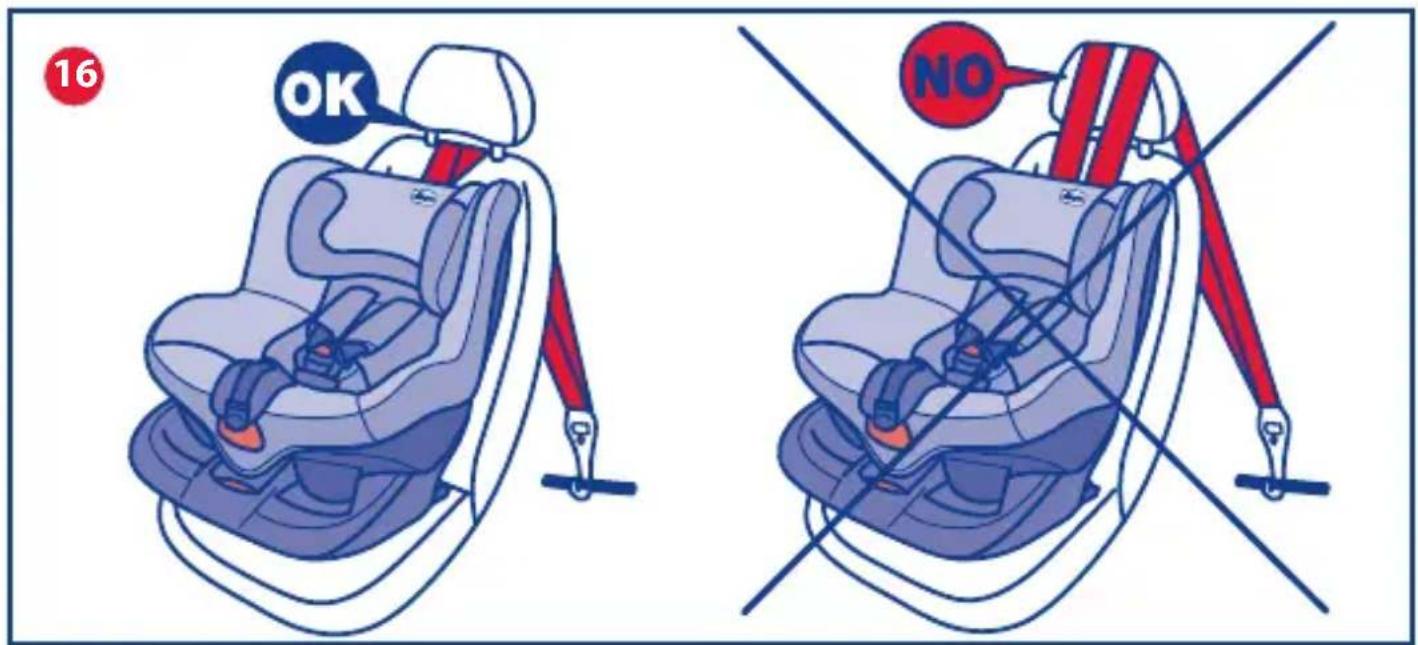
WARNING! Insert the Top Tether between the top part of the backrest of the car seat and the headrest. Never insert the Top Tether above the car headrest (diag. 16).
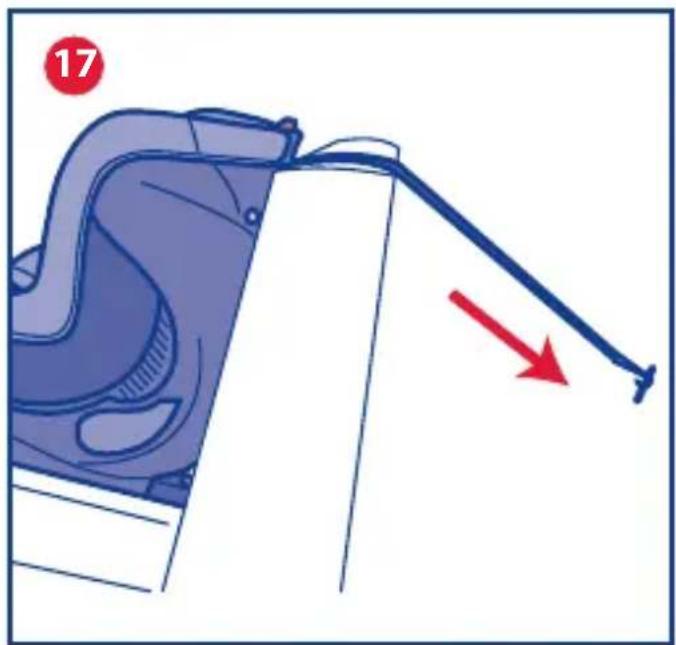
- After identifying the locking point, connect the hook (DD) of the Top Tether to it (diag. 17.
-
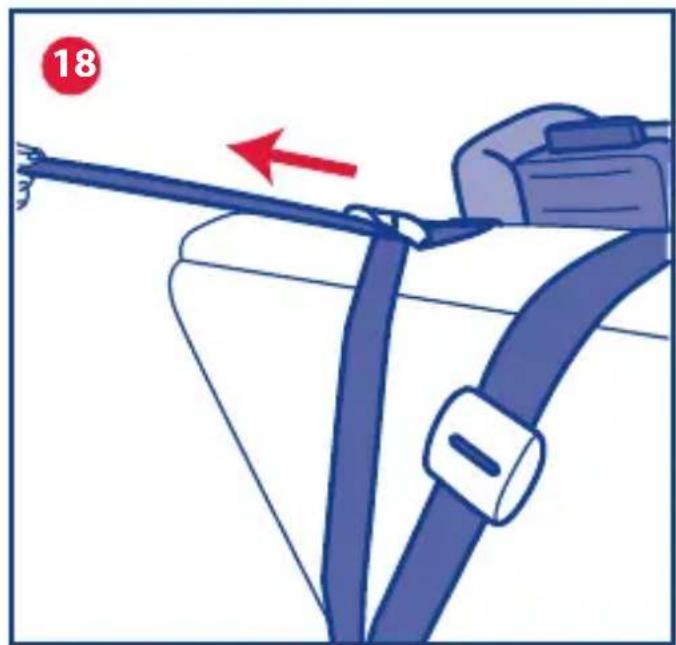
Adjust the length of the Top Tether belt, pulling the strap firmly to tension it correctly (diag. 18). The belt is tensioned correctly when the indicator located on the strap is green (diag. 19).
-
Roll up the excess strap and fasten it with the specific Velcro strap provided (diag. 20).
REMOVAL INSTRUCTIONS
WARNING! Remove the child from the child car seat before commencing.
- Loosen the Top Tether by pressing the appropriate button BB (diag. 21), then disconnect the hook DD.
- Roll up the Top Tether strap and fasten with the specific Velcro strap provided (diag. 20).
- Pull the ISOFIX system unlocking handle outwards and, whilst keeping hold of it (diag. 22) lift the child car seat away from the vehicle seat until it disconnects from the ISOFIX system (diag. 23).
- Push the two red buttons (V) inwards and release the connectors from the corresponding ISOFIX locking devices, located on the car seat (diag. 24).
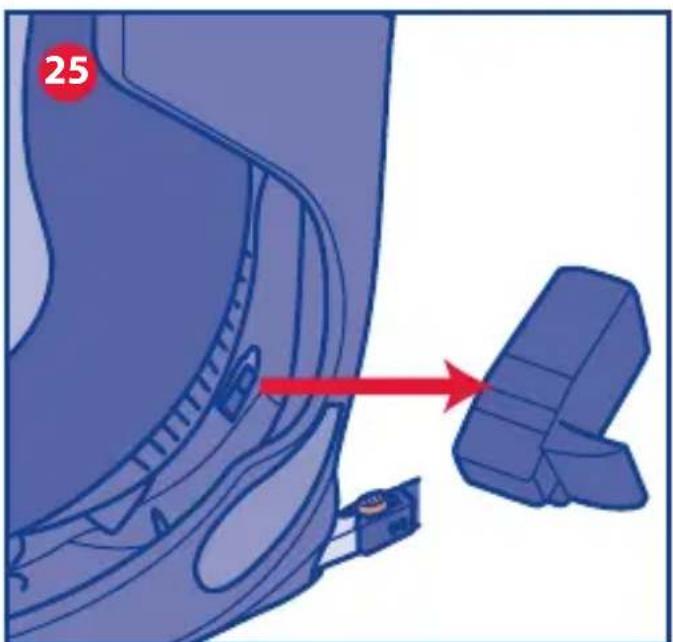
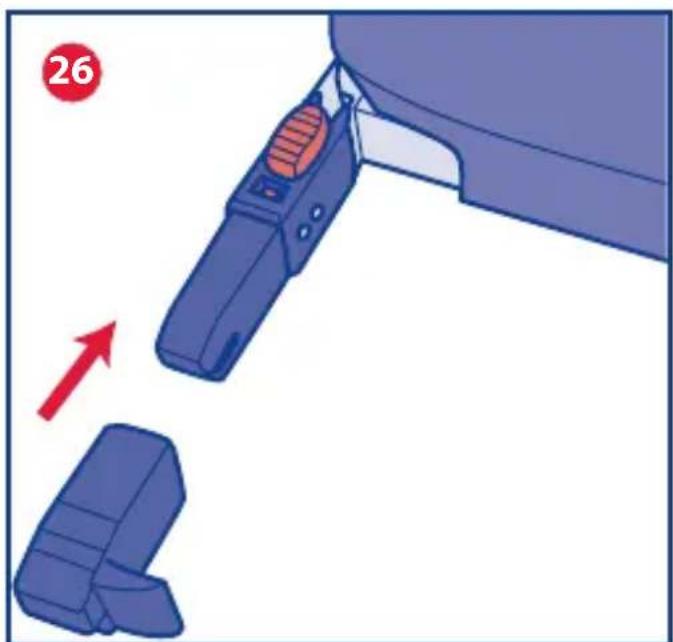
- Remove the two previously stored caps (U) from the compartment between the seat and the backrest (Diag. 25) and reinsert
them in the related ISOFIX connectors, paying attention that the two ends are facing inside (Diag. 26).
- Push the ISOFIX system inside the base of the child car seat, inserting it completely into the base.
SEATING THE CHILD IN THE CHILD CAR SEAT
Before sitting your child in the child car seat, press the harness adjustment button (D) and, at the same time, hold the two child car seat harnesses under the shoulder straps, and pull them in your direction to slacken them (Diag. 27).
- Unfasten the buckle (F) of the child car seat harnesses by pressing the red button (Diag. 28), and pull the harnesses in an outward direction. Now the child can be placed in the child car seat (diag. 29).
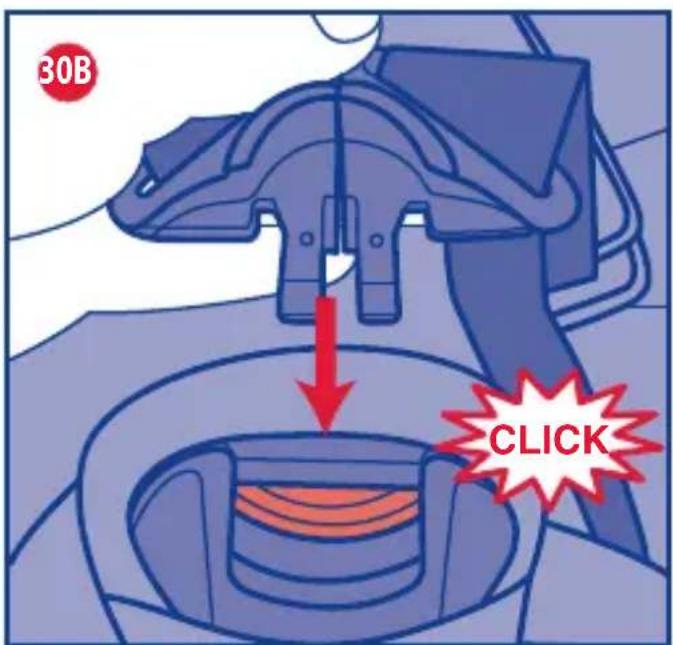
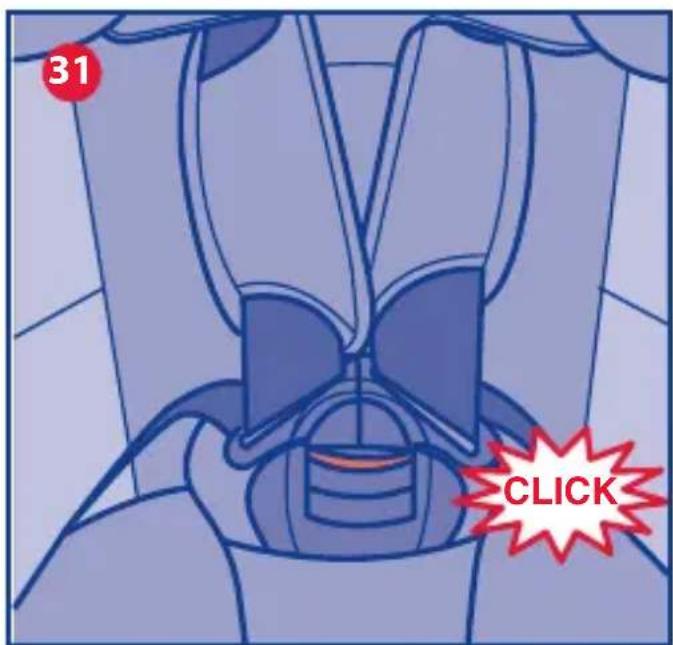
- Position the crotch strap correctly, take the harnesses, overlap the two buckle straps (diag. 30a - 30b) and push them together firmly inside the buckle slot, until a "click" is heard (diag. 31).
HOW TO REMOVE THE CHILD FROM THE CHILD CAR SEAT
To remove the child from the child car seat, press the red button on the buckle (F) and release the restraint harness.
ADJUSTING THE HEADREST AND HARNESSES
The height of the headrest and restraint harnesses can be simultaneously adjusted to 6 positions by pressing the button located at the rear (M).
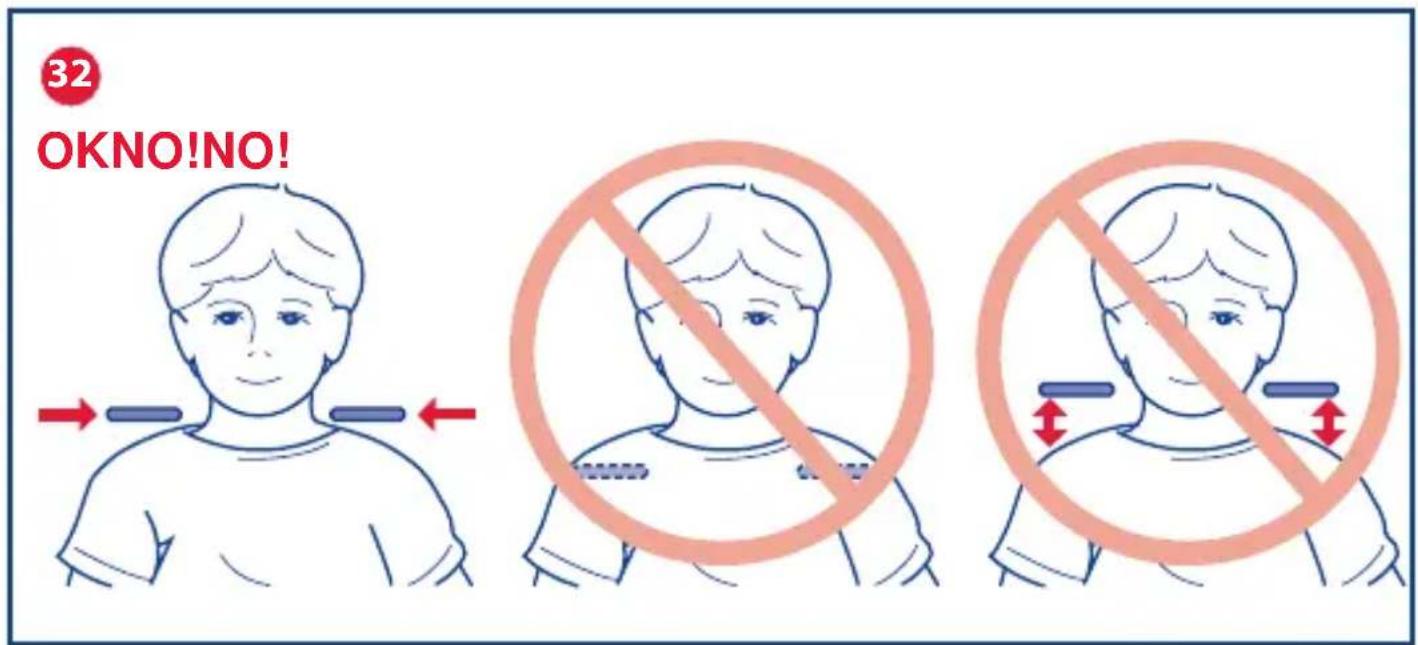
WARNING! To adjust them correctly, the headrest must be fitted so as to allow that the harnesses come out from the backrest at the height of the child's shoulders (diag. 32). To adjust the height, press the adjustment button (M), located at the rear of the backrest (diag. 33) and, at the same time, slide the headrest until the desired position is reached (diag. 34); now release the button and ease the headrest until a click is heard, indicating that it is locked correctly into position.
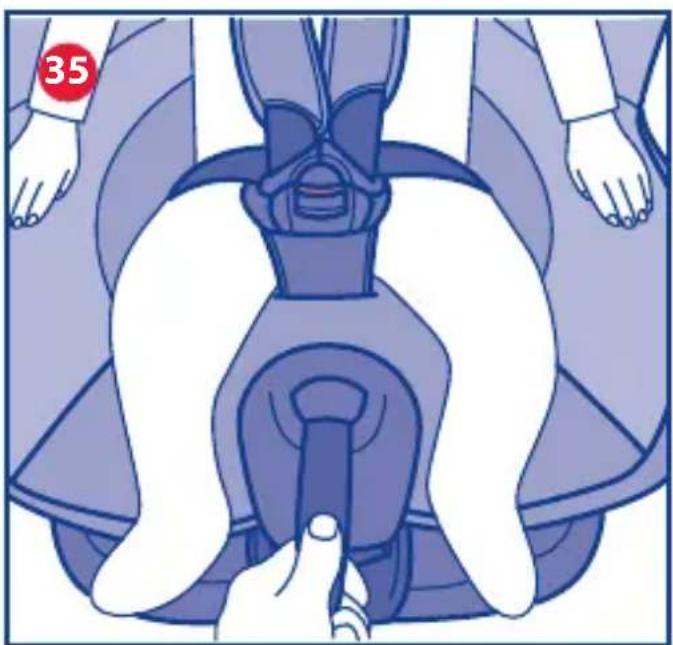
To tighten the restraint harnesses of the child
car seat, pull the adjustment strap of the restraint harnesses (E) (Diag. 35), until they are correctly fitted to the child's body.
After tightening the restraint harnesses, hold the shoulder straps and pull them in a downward direction to adjust the harnesses to the child's body.
WARNING! Do not over-tighten the harnesses around the child: if you can insert one finger between the harness and your child's shoulders, it means that they are tightened correctly
WARNING! Check that the harness straps are not twisted.
ADJUSTING THE INCLINATION OF THE CHILD CAR SEAT
The child car seat can be reclined to 5 positions.
To adjust the inclination of the child car seat, pull the lever located under the seat (L) towards you (Diag. 36).
WARNING! After adjusting the child car seat to the desired position, first release the lever, and then continue to move the seat until a click is heard, indicating that the lever is locked correctly.
WARNING! During the adjustment operations, ensure that no mobile parts come into contact with the child or other children in the car.
MAINTENANCE
The cleaning and maintenance operations must only be carried out by an adult.
How to clean the fabric cover
The child car seat's fabric cover can be removed and cleaned by hand or in a washing machine at 30°C. Please refer to the care label for instructions on cleaning the seat fabric.
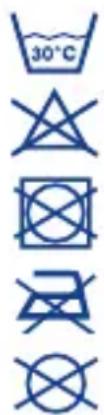
Machine washable at 30^ C.
Do not bleach
Do not tumble dry
Do not iron
Do not dry clean
Never use abrasive detergents or solvents. Do not spin dry the fabric cover, let it dry without wringing it.
The fabric cover must only be replaced with another cover approved by the manufacturer, since it is an integral part of the child car seat and, therefore, one of its safety elements.
WARNING! To ensure the safety of the child car seat, never use it without its fabric cover.
Now remove the cover following the instructions below:
-
Press the restrain harnesses adjustment button and, at the same time, hold the two harnesses of the child car seat, located under the shoulder straps, and pull in your direction to loosen them (diag. 37);
-
unfasten the restraint harness, pressing the red button on the buckle (diag. 38);
-
remove the cover starting from the reclining button at the bottom (Diag. 39);
-
release the Press Studs located in the centre of the backrest (Diag. 40), then remove the seat fabric from the child car seat;
-
repeat this procedure for the other strap (Diag. 41);
6). remove the seat fabric cover from the side (Diag. 42 and the top (Diag. 43);
- remove the headrest cover by opening the buttons on the back (Diag. 44).
To replace the fabric cover, perform the above operation in the reverse order from 7 to 1.
How to clean the plastic or metal parts
Clean the plastic and coated metal parts with a damp cloth only. Never use abrasive detergents or solvents.
The movable parts of the child car seat must not be lubricated.
CHECKING THE CONDITION OF THE COMPONENTS
It is recommended to regularly check the condition of the following components to ensure that they are not damaged or worn out:
- fabric cover: check that the padding does not come out from the seams. Check the condition of the seams: they must always be intact and undamaged.
- harness straps: check that the fabric weft is not frayed or the harness strap worn out in the parts corresponding to the adjustment strap, crotch, shoulders and harness adjustment plate.
- plastic parts: check that the plastic parts are not worn out, damaged or faded.
WARNING! If the child car seat is damaged, deformed or worn out, it must be replaced, as its original safety features may have been compromised.
STORING THE PRODUCT
When it is not fitted in the car, it is recommended to store the child car seat in a dry place, away from sources of heat and to protect it from dust, humidity and direct sunlight.
DISPOSING OF THE PRODUCT
When the child car seat no longer complies with the original safety standards, stop using it and dispose of it at an appropriate collection point. Dispose of the product as laid down in the environmental regulations in force in the Country of use.
WARRANTY
The product is guaranteed against any conformity defect in normal conditions of use as provided for by the instructions for use.
The warranty shall not therefore apply in the case of damages caused by improper use, wear or accidental events.
For the duration of warranty on conformity defects please refer to the specific provisions of national laws applicable in the country of purchase, where provided.

OASYS 1 EVO ISOFIX (9-18 KG)
Notice
IMPORTANT : AVANT L'UTILISATION, LIRE ATTENTIVEMENT ET ENTIÈREMENT CETTE NOTICE POUR ÉVITER TOUT DANGER ET LA CONSERVER POUR TOUTE RÉFÉRENCE FUTURE. POUR NE PAS COMPROMETTRE LA SÉCURITÉ DE VOTRE ENFANT, SUIVEZ ATTENTIVEMENT CES INSTRUCTIONS
ATTENTION ! AVANT L'UTILISATION, ÔTER ET ÉLIMINER TOUS LES SACHETS EN PLASTIQUE ÉVENTUELS ET TOUS LES ÉLÉMENTS COMPOSANT L'EMBALLAGE DU PRODUIT ET LES TENIR HORS DE LA PORTÉE DES ENFANTS. IL EST CONSEILLÉ D'ÉLIMINER CES ÉLÉMENTS EN FAISANT LE TRI SÉLECTIF CONFORMÉMENT AUX LOIS EN VIGUEUR.
LIMITATIONS ET CONDITIONS D'UTILISATION RELATIVES AU PRODUIT ET AU SIÈGE-AUTO
CONSERVATION DU PRODUIT
ÉLIMINATION DU PRODUIT
HET PRODUCT AFDANKEN
FÖRVARING AV PRODUKTEN
28923 Alcorcon (Madrid)-Spain
902 117 093
www.chicco.es

ARTSANA FRANCE S.A.S.
17/19 Avenue De La Metallurgie
93210 Saint Denis La Plaine - France
0820 87 00 41 (0.12€Ttc/Mn)
www.chicco.fr

ARTSANA PORTUGAL S.A.
ARTSANA GERMANY GMBH
Borsigstrasse 1-3
22070 Grandate (CO)-Italy
Tel:(+39)031 382 111
Yetkili Servis:
natural_image
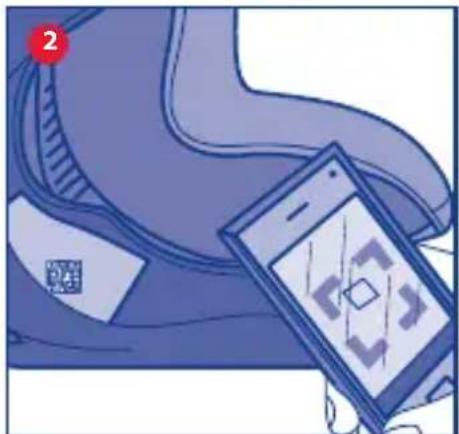
Illustration of a smartphone displaying a QR code on a blue phone, placed on a shoe (no text or symbols visible)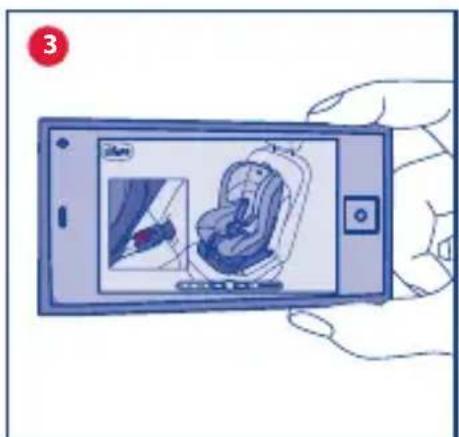
natural_image
Illustration of a hand holding a smartphone displaying a car seat with a close-up inset (no text or symbols visible)ARTSANA S.p.A. - Via Saldarini Catelli, 1 - 22070 Grandate (CO) - Italy Tel. (+39) 031 382 111 - Fax (+39) 031 382 400 - www.chicco.com