
Digital Bottle Warmer & Sterilizer - Bottle warmer CHICCO - Free user manual and instructions
Find the device manual for free Digital Bottle Warmer & Sterilizer CHICCO in PDF.
| Product Type | Digital Bottle Warmer & Sterilizer |
| Brand | Chicco |
| Model | Digital Bottle Warmer & Sterilizer |
| Reference | 00007390100070 |
| Power Supply | 220 W, 120 V~, 60 Hz |
| Warming Modes | Fast and Constant |
| Sterilization Function | Yes, with lid and support tray |
| Bottle Capacity | Up to 290 ml (9 oz) |
| Milk Bag Capacity | Up to 190 ml (6 oz) |
| Food Jar Compatibility | Yes |
| Compatibility with Silicone Bottles | Yes (wide neck setting) |
| Delayed Start | Yes, from 15 to 60 minutes (in 15-minute increments) |
| Cycle Memory | Yes, saves last settings |
| Descaling Alert | Yes, light icon |
| Automatic Shut-off | Yes (end of cycle and after 3 minutes of inactivity) |
| Safety | Polarized plug, hot surfaces, hot steam, do not immerse |
| Maintenance | Descaling with vinegar, cleaning with damp cloth |
| Removable Parts | Water level indicator |
| Included Accessories | Support tray, sterilizer lid |
| Made In | China |
Frequently Asked Questions - Digital Bottle Warmer & Sterilizer CHICCO
User questions about Digital Bottle Warmer & Sterilizer CHICCO
0 question about this device. Answer the ones you know or ask your own.
Ask a new question about this device
Download the instructions for your Bottle warmer in PDF format for free! Find your manual Digital Bottle Warmer & Sterilizer - CHICCO and take your electronic device back in hand. On this page are published all the documents necessary for the use of your device. Digital Bottle Warmer & Sterilizer by CHICCO.
USER MANUAL Digital Bottle Warmer & Sterilizer CHICCO
natural_image
Line drawing of three household appliances: a microwave oven, a cylindrical blender, and a rectangular appliance with a handle (no text or symbols)Digital Bottle Warmer and Sterilizer
IMPORTANT SAFETY INSTRUCTIONS
READ AND FOLLOW ALL INSTRUCTIONS
SAVE THESE INSTRUCTIONS
READ INSTRUCTIONS CAREFULLY

WHEN USING THIS ELECTRICAL EQUIPMENT, BASIC SAFETY PRECAUTIONS SHOULD ALWAYS BE FOLLOWED INCLUDING THE FOLLOWING:
BURN HAZARD
To avoid risk of burns:
- Bottle warmer components and water temperature can be very hot. Avoid direct contact with water and steam. Handle with care.
- Do not touch surfaces that may be hot. Wait until all parts of the unit have cooled before touching them.
- Bottles and food jars will be hot; remove with care.
- Before serving, be sure food is at a safe temperature.
• To avoid direct contact with hot water, use support tray when warming food containers or small bottles.
• Extreme caution must be used when moving the bottle warmer with hot liquid in it.
CAUTION
• NEVER use without water.
- This is NOT a toy. Keep out of reach of children.
- Adult supervision required.
- Close supervision is necessary when any appliance is used near children.
- For household use ONLY - Do NOT use outdoors.
- Only use appliance for intended use, do not modify or alter warmer.
- Do not use accessories, spare parts, or any components not supplied or approved by Chicco as they may cause injuries or damage.
- Do NOT use with any bottle or food
container that is not intended to be heated.
- Do not place on or near a hot gas or electric burner, or in a heated oven.
CAUTION
• Not for space heating purposes.
- Do NOT let cord hang over edge of table or counter or touch hot surfaces.
- NEVER use an extension cord.
- Before serving, unplug cord from wall outlet. Do not leave cord within child's reach.
• Always attach plug to bottle warmer first, then plug cord into the wall outlet. Always turn off the bottle warmer before removing the plug from the wall outlet.
- This appliance has a polarized plug (one blade is wider than the other). To reduce the risk of electric shock, a polarized electrical outlet will only allow the plug to be inserted one way. If the plug does not fit fully into the outlet, reverse the plug. If it still does not fit, contact a qualified electrician. Do not attempt to modify the plug in any way.
- Remove plug from outlet when the appliance is not in use, before putting on or taking off parts, and before cleaning. Allow to cool before handling.
- Inspect carefully before each use. Do not operate any appliance with a damaged cord or plug or after the appliance malfunctions or is dropped or damaged in any manner. If bottle warmer is faulty and/or not working correctly, switch it off immediately and unplug it from the wall outlet.
- To protect against electrical shock do not immerse cord, plugs, or bottle warmer in water or other liquid.
- Do NOT use if the bottle warmer, plug, or cord accidentally falls into water or becomes submerged.
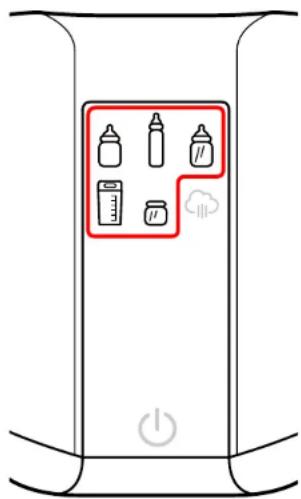
PARTS LIST

CONTROL PANEL


WIDE NECK BOTTLE

NARROW NECK BOTTLE

GLASS BOTTLE

MILK BAG

FOOD JAR

STERILIZE

QUICK MODE

STEADY MODE

CONTENT LEVEL

SETUP - ADD WATER TO TANK
Using the chart below, determine the level of water that is needed for heating. Content level is the actual amount of liquid inside the bottle or milk bag being warmed. It is NOT the size or capacity of the bottle.
Note: Warming cycle times may vary based on starting temperature, bottle size and contents. Use the chart below as a starting point. Warming cycle time may need to be adjusted to reach the desired temperature.

natural_image
3D diagram of a mechanical part with a labeled section (no text or symbols)
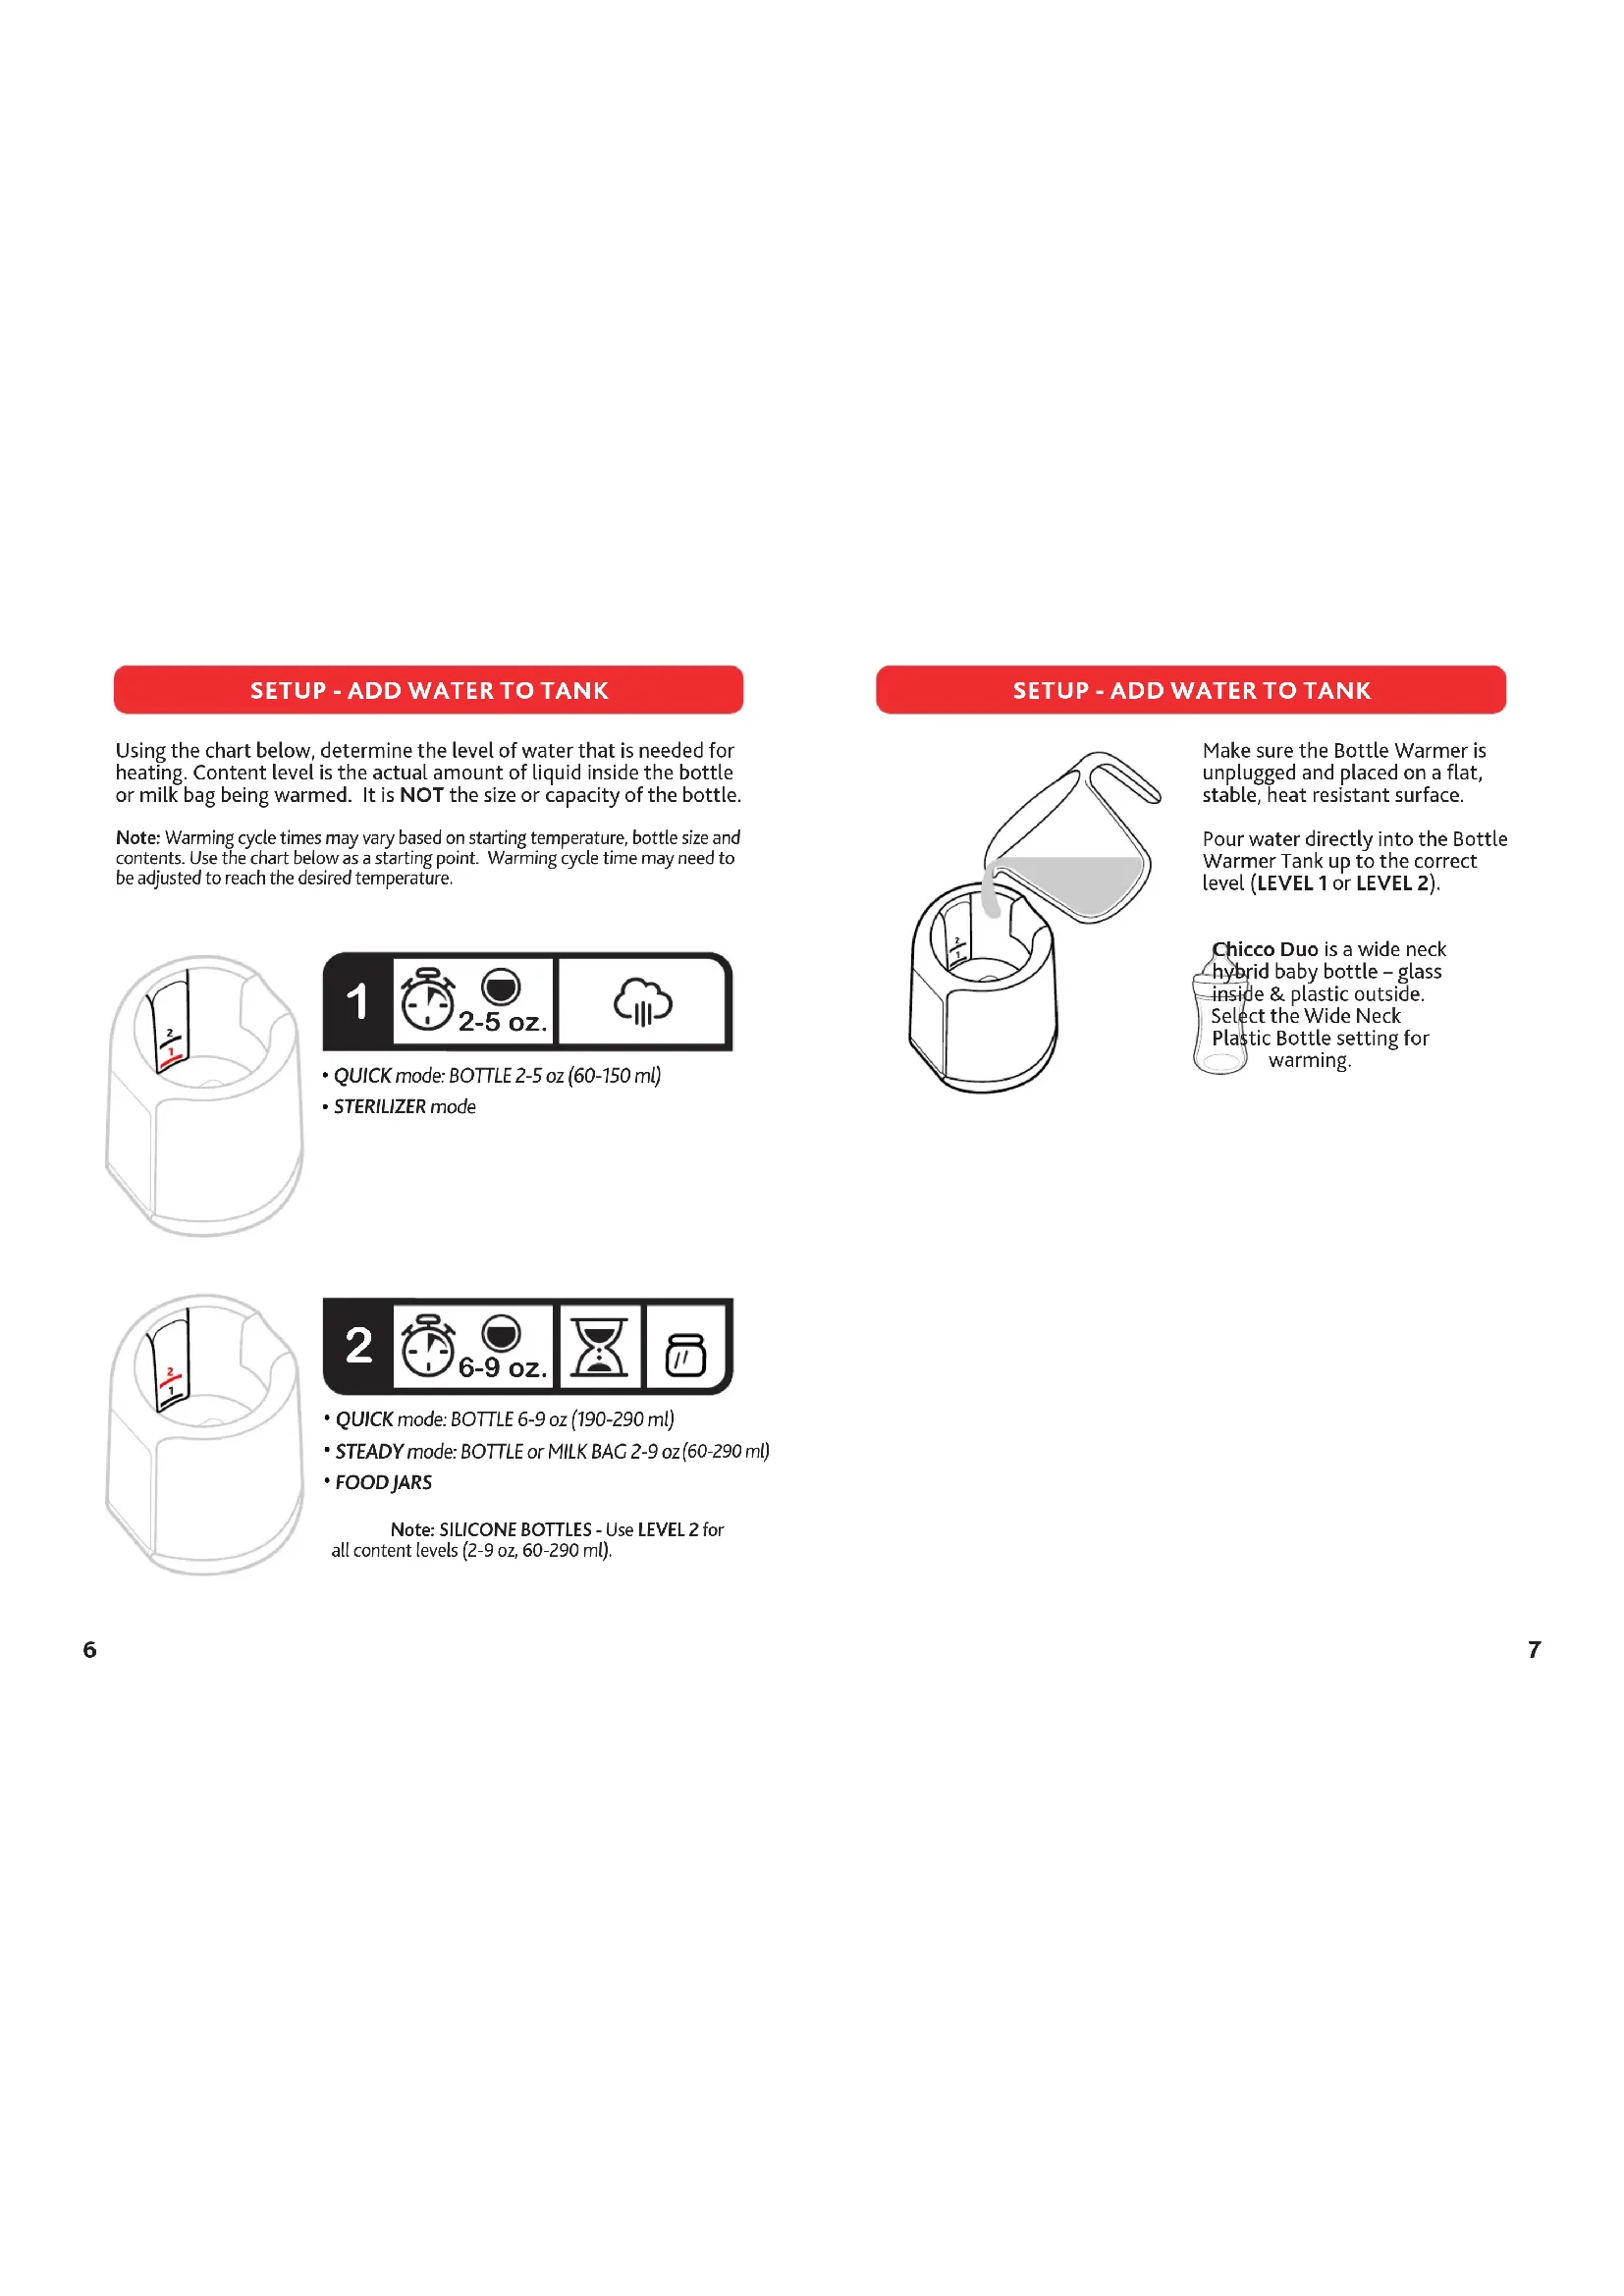
• QUICK mode: BOTTLE 2-5 oz (60-150 ml)
- STERILIZER mode

• QUICK mode: BOTTLE 6-9 oz (190-290 ml)
• STEADY mode: BOTTLE or MILK BAG 2-9 oz (60-290 ml)
• FOOD JARS
Note: SILICONE BOTTLES - Use LEVEL 2 for all content levels (2-9 oz, 60-290 ml).
SETUP - ADD WATER TO TANK
natural_image
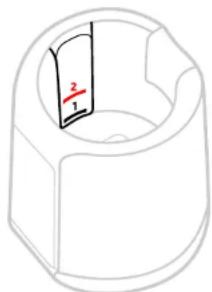
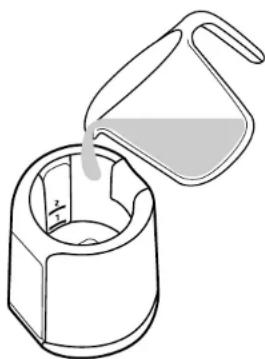
Line drawing of a bucket pouring liquid into a container (no text or symbols)Make sure the Bottle Warmer is unplugged and placed on a flat, stable, heat resistant surface.
Pour water directly into the Bottle Warmer Tank up to the correct level (LEVEL 1 or LEVEL 2).
Chicco Duo is a wide neck hybrid baby bottle – glass inside & plastic outside. Select the Wide Neck Plastic Bottle setting for warming.
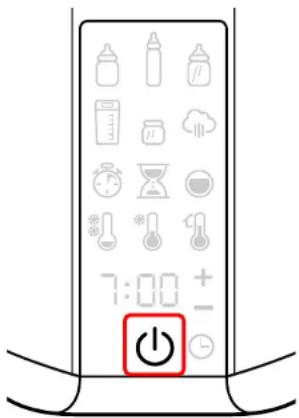
SETUP - POWER ON

natural_image
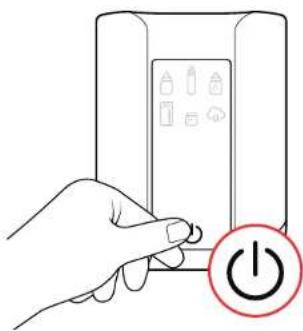
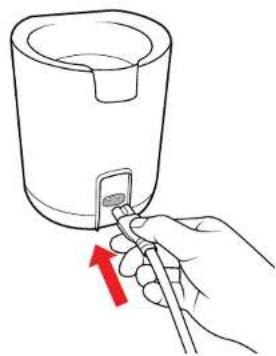
Line drawing of a hand holding a tool near a cylindrical container with a small object, no text or symbols presentPlug the cord into the back of the Bottle Warmer Tank and then plug it into the outlet. It will beep once.
Touch the START/STOP button. The icons on the Control Panel will blink indicating that a cycle is ready to be selected.
Note: If no warming cycle is selected for three minutes the Warmer will beep and switch off automatically.
natural_image
Hand holding a button next to a device with battery symbols and a power button icon (no text or labels)WARMING - STEP 1

natural_image
Line drawing of a baby bottle with a red downward arrow indicating compression or reduction (no text or symbols)Place bottle, milk bag, or food jar in the Bottle Warmer Tank.
For Bottles: Attach bottle ring and nipple before heating.
For Milk Bags: Make sure bag is sealed before heating.
For Food Jars: Remove lid before heating.
Make sure the tank water does not reach the ring of the bottle, the seal of the milk bags, or the top of the food jar.
Note: Works with most bottle types. If applicable, remove bottle venting systems when warming. Bottles made of various materials and construction will heat at different times.

natural_image
Line drawing of a kitchen appliance with a red arrow indicating a drop or compression process (no text or symbols)Use the Support Tray for food jars and milk bags.
WARMING - STEP 2
Select the warming mode by touching the desired button. The icon will light up to confirm your selection.
Note: At any time during this process you can go back and change a previously selected setting by touching on that icon. The selection program will restart from that point.
WIDE NECK BOTTLE*
NARROW NECK BOTTLE
GLASS BOTTLE
MILK BAG
FOOD JAR
*Always select "WIDE NECK BOTTLES" when warming any silicone bottles.

natural_image
Illustration of a kitchen appliance with a power button and battery display (no text or symbols)WARMING CYCLE MEMORY FUNCTION: The bottle warmer will save the previous settings to memory - Simply touch the START/STOP button to begin reheating using the previous settings.
WARMING - STEP 3
For Bottles: Select QUICK or STEADY mode.
For Milk Bags: Only STEADY mode is available - Milk Bags can NOT be warmed using QUICK mode. Skip to STEP 4.
For Jars: Skip to STEP 5.

QUICK Mode

STEADY Mode
WARMING - STEP 4

Touch "+" or "-" to select the Bottle/Milk Bag content level in ounces.
Then touch the flashing CONTENT LEVEL icon to confirm the amount.
Max. Allowable Content
Bottles: 9 oz (290 ml) Milk Bags: 6 oz (190 ml)
Note: The content level is the actual amount of liquid inside the bottle or milk bag to be warmed.
WARMING - STEP 5

Select the content temperature.


Note: Frozen setting unavailable for bottles. Room Temp. setting unavailable for Milk Bags.
WARMING - STEP 6

A default warming time will appear based on the previous selections. This time can be modified by touching "+" or "-" to increase or decrease the warming time.
SILICONE BOTTLES take longer to heat. Always add 3 minutes to the default warming time.
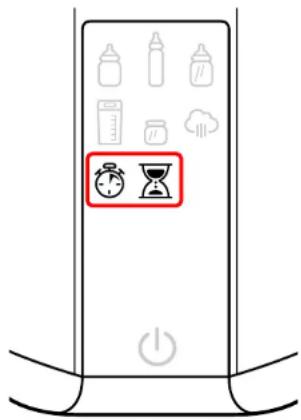
WARMING - STEP 7

The warmer will beep and the warming cycle will begin. The TIMER will show you the time remaining in the warming cycle.
The bottle warmer will turn off automatically once the warming cycle is complete.
Note: The warming cycle can be stopped at any time by simply touching the START/STOP button.
For information on DELAYED START see page 15.
ONCE WARMING CYCLE IS COMPLETE
CAUTION: BOTTLE WARMER TANK WATER MAY BE HOT: CAREFULLY REMOVE THE BOTTLE, MILK BAG, OR FOOD JAR IMMEDIATELY AFTER WARMING CYCLE IS COMPLETED.
ALWAYS CHECK THE TEMPERATURE OF THE CONTENTS BEFORE SERVING:
FOR FEEDING BOTTLES AND MILK BAGS:
Gently shake or stir the contents to ensure the temperature is even; check the temperature by squeezing a few drops onto the inside of your wrist.
FOR FOOD JARS:
Stir the contents of the jar to make sure the temperature is even; check the temperature by tasting.
- For best results, allow the bottle warmer to cool completely (approx. 30 mins.) before starting a new warming cycle.
- If you have twins, the Bottle Warmer can be used for two consecutive warming cycles by removing the plug from the wall outlet and carefully emptying the hot water and replacing it with room temperature water. After plugging in the warmer and turning it back on, simply touch the START/STOP button to begin reheating using the previous settings stored in memory.
- When warming Milk Bags and Jars from frozen, you may need to run a second cycle. The initial default warming time should be decreased as needed to prevent overheating during the second cycle.
- If the jar contents are not warm enough, repeat warming cycle until desired temperature is reached. When repeating a cycle, check the temperature of contents at regular intervals to avoid overheating. The initial default warming time can also be decreased as needed to prevent overheating during the second cycle.
- When finished, remove the plug from the wall outlet. Do not leave cord within child's reach. Allow the tank to cool down completely before pouring out the water. Dry the inside thoroughly.
DELAYED START

The warming cycle can be delayed for up to 60 mins. before beginning the cycle.
Before touching the START/STOP button (to start the warming cycle), touch the DELAYED START button. Adjust the time by pressing the "+" and "-" buttons.
The delayed start can be set for 15 mins., 30 mins., 45 mins., and 60 mins.
Then touch the START/STOP button to start the warming cycle with a delay. The timer will countdown and then the cycle will begin.
The delay can be skipped at any point by touching the START/STOP button again to run the cycle immediately.
STERILIZING - BEFORE FIRST USE
Before first use as a Sterilizer, run through a sterilizing cycle without anything except the support tray in the Bottle Warmer.
STERILIZING - STEP 1

natural_image
Simple line drawing of a container pouring liquid into a funnel (no text or symbols)Make sure Bottle Warmer is unplugged and placed on a flat, stable, heat resistant surface. Always clean and rinse the bottles and accessories before placing them in the Bottle Warmer Tank.
Pour water directly into the Bottle Warmer Tank up to LEVEL 1.
Then place the Support Tray into the Bottle Warmer Tank.

natural_image
Line drawing of a blender with a red arrow indicating compression or cooling process (no text or symbols)STERILIZING - STEP 2

natural_image
Hand holding a tool interacting with a small object inside a cylindrical container (no text or symbols visible)Plug the cord into the back of the Bottle Warmer Tank and then plug it into the outlet. It will beep once.
Touch the START/STOP button. The icons on the Control Panel will blink indicating that a cycle is ready to be selected.
Note: If no warming cycle is selected for three minutes the Warmer will beep and switch off automatically.

natural_image
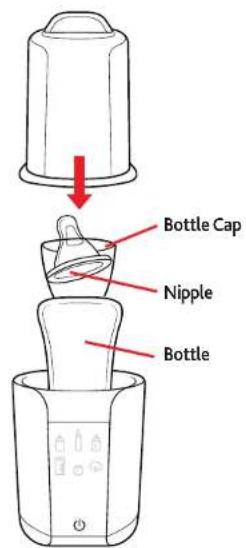
Hand holding a battery with a power button icon (no text or symbols on the device)STERILIZING - STEP 3

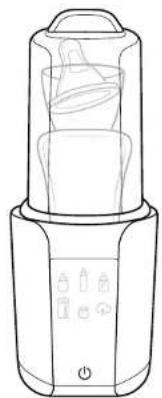
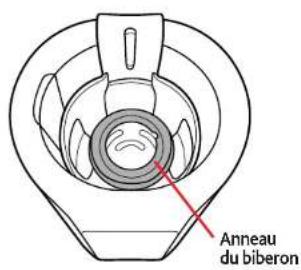
Place the bottle ring into the Support Tray.
Place the bottle UPSIDE DOWN into the Bottle Warmer Tank.
Then arrange the bottle cap, and nipple, as shown.
Place Sterilizer Lid onto the Bottle Warmer making sure the groove in the BACK of the Sterilizer Lid fits into the cutout in the Support Tray.
Make sure bottles and accessories do not prevent the lid from closing correctly.
natural_image
Line drawing of a blender with control buttons and a battery (no text or symbols)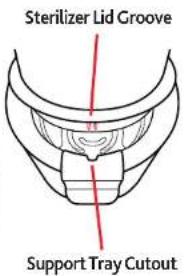
STERILIZING - STEP 4
natural_image
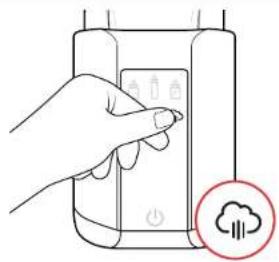
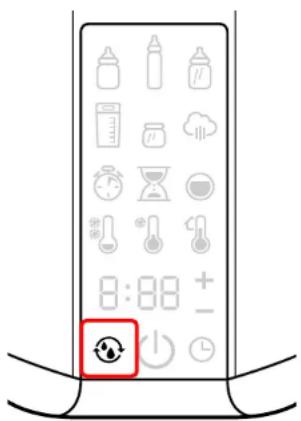
Hand interacting with a device showing a power button and cloud icon (no text or symbols)Touch the STERILIZE button. The icon will stop flashing to confirm your selection.

Then touch the START/STOP button to begin the cycle. The TIMER will show you the time remaining in the sterilization cycle.
ONCE STERILIZING CYCLE IS COMPLETE
When the cycle is complete, a long audible beep will be heard and the Warmer will turn off automatically.
Always clean your hands thoroughly before touching the sanitized objects. Sanitized items will remain sterile inside the Warmer with the lid on for about 24 hours. If there is a power outage during use of the Sterilizer the cycle must be restarted.
Allow the Warmer to cool completely before starting a new cycle. If complete, allow to cool then remove the plug from the wall outlet, pour out the water, and dry thoroughly before storing in a cool dry place.
DESCALING
The normal use of the Bottle Warmer can cause the formation of scale residue on the heating plate. Excessive scale residue may cause incorrect operation and prevent proper sanitation of the objects inserted in the appliance and/or cause permanent damage to the appliance.
The DESCALING icon will light up to indicate that you need to descale the Bottle Warmer.
To descale the Bottle Warmer, make sure it is unplugged and has cooled down completely.
Pour equal parts of water and vinegar directly into the Bottle Warmer Tank up to LEVEL 2. Let soak overnight.
Do NOT run the unit while soaking. After it has soaked overnight, empty out the water and vinegar solution. Dry thoroughly with a soft cloth.
After descaling, press and hold the DESCALING icon/button for about 2 seconds until it resets the descaling function and switches off.

natural_image
Line drawing of a container with liquid being poured into it (no text or symbols)CARE AND MAINTENANCE
AFTER EACH USE: Remove the plug from the wall outlet. Do not leave cord within child's reach. Allow the tank to cool down completely before pouring out the water. Dry the inside thoroughly.
CLEANING THE BOTTLE WARMER: Make sure the bottle warmer has cooled down completely and the plug has been removed from the wall outlet before cleaning. Use a damp soft cloth to clean the bottle warmer. Do NOT use bleach or any other harsh chemicals. The bottle warmer is NOT dishwasher safe. Dry thoroughly before storing in a cool, dry place.

TROUBLE SHOOTING AND REPAIR
| PROBLEM | POSSIBLE CAUSE | SOLUTION |
| The Warmer does not turn ON. | There is no power. | Check that there is power in the electrical outlet. |
| The cord plug or the cord connector has not been plugged in correctly, or they are damaged. | Check that the plug and connector have been plugged in correctly, and that they are in good condition.Should the product still not work, contact Customer Service. | |
| Appliance was submerged in water. | Discard unit. | |
| The feeding bottles are stained at the end of the sterilization cycle. | There are scale deposits in the appliance. | The Warmer needs to be descaled.See the "Descaling" section for more details. |
| High mineral content in tap water. | Use distilled water. | |
| Noise – Incomplete cycle. | Excessive scale deposits on heating plate. | The Warmer needs to be descaled.See the "Descaling" section for more details. |
| Rapid scale build-up. | Use of tap water with high mineral content, softened or treated water. | Use distilled water.The Warmer needs to be descaled.See the "Descaling" section for more details. |
FOR MORE INFORMATION
Please do not return this product to the store. If you have any questions or comments about this product, or are missing any of the parts, contact us in one of the following ways:

(877)-424-4226

info@chiccousa.com

www.chiccousa.com

1826 William Penn Way Lancaster, PA 17601
TECHNICAL INFORMATION
Reference: 00007390100070
Electrical Ratings: 220W 120V\~60Hz
Model: 06867_MU
Made In China

=WARNING!

= WARNING! Hot Steam.

LISTED
Bottle Warmer E351537

= WARNING! Hot Surface.

natural_image
3D diagram of a mechanical component with a curved top and internal slot, no text or symbols present
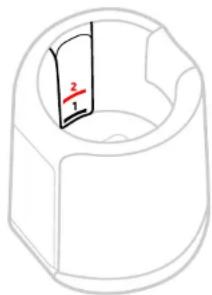
- Modo RÁPIDO: BIBERÓN 2-5 oz (60-150 ml)
- Modo ESTERILIZADOR
natural_image
3D diagram of a mechanical part with a curved cutout and a labeled dimension (no text or symbols beyond the label)
- Modo RÁPIDO: BIBERÓN 6-9 oz (190-290 ml)
- Modo CONTINUO: BIBERÓN o BOLSA DE LECHE 2-9 oz (60-290 ml)
• RECIPIENTES DE COMIDA
natural_image
Line drawing of a bucket pouring liquid into a container (no text or symbols)natural_image
Line drawing of a hand using a tool to press or install a small object into a container (no text or symbols)natural_image
Hand holding a button next to a device with battery icons and a power button icon (no text or symbols on the device itself)CALENTAMIENTO: PASO 1

natural_image
Line drawing of a baby bottle with a red downward arrow indicating compression or reduction (no text or symbols)natural_image
Line drawing of a kitchen appliance with a red arrow indicating a drop or change (no text or symbols)natural_image
Illustration of a kitchen appliance with a power button and battery display (no text or symbols)natural_image
Illustration of a blender being poured into a cup, showing the process with a red arrow indicating the drop (no text or symbols present)natural_image
Line drawing of a hand holding a tool near a container with a red arrow indicating direction (no text or symbols)natural_image
Hand holding a battery with a power button icon (no text or symbols on the device)natural_image
Line drawing of a blender with control panel and buttons (no text or symbols)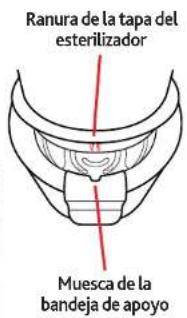
natural_image
Hand interacting with a device panel and cloud icon (no text or symbols)natural_image
Line drawing of a container with liquid being poured into a larger cylindrical container (no text or symbols)Bottle Warmer E351537


BIBERON À LARGE GOULOT

natural_image
3D diagram of a mechanical part with a highlighted section showing two numbered parts (no text or symbols)
natural_image
Simple line drawing of a mechanical component with a central slot and no text or symbols
natural_image
Line drawing of a bucket pouring liquid into a cylindrical container (no text or symbols)natural_image
Line drawing of a hand using a tool to press or install a small object into a container (no text or symbols)natural_image
Hand holding a button next to a device with battery icons and a power button icon (no text or symbols on the device itself)RÉCHAUFFEMENT - ÉTAPE 1

natural_image
Line drawing of a baby bottle with a red downward arrow indicating compression or reduction (no text or symbols)natural_image
Line drawing of a kitchen appliance with a red arrow indicating a drop or change in the interior (no text or symbols)natural_image
Illustration of a kitchen appliance with a power button and battery display (no text or symbols)natural_image
Simple line drawing of a container pouring liquid into a funnel (no text or symbols)natural_image
Line drawing of a device with a red arrow pointing to a component, no text or symbols presentSTÉRILISATION - ÉTAPE 2
natural_image
Line drawing of a hand using a tool to press or install a small object into a cylindrical container (no text or symbols)natural_image
Hand holding a battery with a power button icon (no text or symbols on the device)STÉRILISATION - ÉTAPE 3
natural_image
Line drawing of a blender with control panel and buttons (no text or symbols)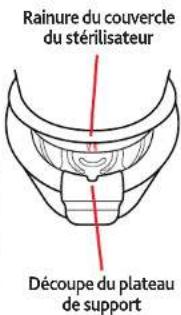
natural_image
Hand interacting with a device showing a button and power icon, with a cloud icon below (no text or symbols)natural_image
Line drawing of a mechanical component with a pouring arrow, no text or symbols presentBottle Warmer E351537

= ATTENTION! Surface Chaude

www.chiccousa.com


- Digital Bottle Warmer and Sterilizer
- IMPORTANT SAFETY INSTRUCTIONS
- READ AND FOLLOW ALL INSTRUCTIONS
- SAVE THESE INSTRUCTIONS
- READ INSTRUCTIONS CAREFULLY
- WHEN USING THIS ELECTRICAL EQUIPMENT, BASIC SAFETY PRECAUTIONS SHOULD ALWAYS BE FOLLOWED INCLUDING THE FOLLOWING:
- BURN HAZARD
- CAUTION
- PARTS LIST
- CONTROL PANEL
- SETUP - ADD WATER TO TANK
- SETUP - POWER ON
- WARMING - STEP 1
- WARMING - STEP 2
- WARMING - STEP 3
- WARMING - STEP 4
- WARMING - STEP 5
- WARMING - STEP 6
- WARMING - STEP 7
- ONCE WARMING CYCLE IS COMPLETE
- ALWAYS CHECK THE TEMPERATURE OF THE CONTENTS BEFORE SERVING:
- FOR FEEDING BOTTLES AND MILK BAGS:
- FOR FOOD JARS:
- DELAYED START
- STERILIZING - BEFORE FIRST USE
- STERILIZING - STEP 1
- STERILIZING - STEP 2
- STERILIZING - STEP 3
- STERILIZING - STEP 4
- ONCE STERILIZING CYCLE IS COMPLETE
- DESCALING
- CARE AND MAINTENANCE
- FOR MORE INFORMATION
- TECHNICAL INFORMATION
- CALENTAMIENTO: PASO 1
- RÉCHAUFFEMENT - ÉTAPE 1
- STÉRILISATION - ÉTAPE 2
- STÉRILISATION - ÉTAPE 3
Brand : CHICCO
Model : Digital Bottle Warmer & Sterilizer
Category : Bottle warmer