
MST1500EB - Multitools EGO - Free user manual and instructions
Find the device manual for free MST1500EB EGO in PDF.
| Product type | Cordless battery-powered multi-purpose tool |
| Brand | EGO |
| Model | MST1500EB (PH1400E power head + accessories) |
| Voltage | 56 V (DC) |
| Weight of power head (without battery) | 2.73 kg |
| Weight of edger attachment (without battery) | 1.59 kg |
| Cutting width (edger) | 38 cm |
| Cutting line diameter | 2.4 mm (twisted nylon line) |
| No-load speed (edger) | 5000 / 6000 rpm (2 speeds) |
| Guaranteed sound power level | 96 dB(A) |
| Sound pressure level at ear | 83.2 dB(A) (K=3 dB(A)) |
| Vibration (front handle) | 1.1 m/s² (K=1.5 m/s²) |
| Vibration (rear handle) | 1.4 m/s² (K=1.5 m/s²) |
| Package contents | Power head, adjustable auxiliary handle, shoulder strap, user manual, edger attachment, protective cover, hex key, multi-function wrench |
| Main functions | Compatible with EGO accessories: trimmer (EA0800), brushcutter (BCA1200), edger (STA1500), pole saw (PSA1000), pole hedge trimmer (HTA2000) |
| Maintenance and cleaning | Clean with a damp cloth and mild detergent. Lubricate transmission gears every 50 h with gear grease. Do not use solvents. |
| Safety | Wear eye and ear protection. Keep people and animals at least 15 m away. Use the shoulder strap. Do not expose to rain. |
| Spare parts | Compatible batteries: BA1120E, BA2240E, BA2800, BA3360, BA4200. Chargers: CH5500E, CH2100E. |
| Repairability | Have any repairs performed by a qualified repairer. Use only identical EGO replacement parts. |
| Warranty | See egopowerplus.com for full terms. |
Frequently Asked Questions - MST1500EB EGO
User questions about MST1500EB EGO
0 question about this device. Answer the ones you know or ask your own.
Ask a new question about this device
Download the instructions for your Multitools in PDF format for free! Find your manual MST1500EB - EGO and take your electronic device back in hand. On this page are published all the documents necessary for the use of your device. MST1500EB by EGO.
USER MANUAL MST1500EB EGO
Residual risk! People with electronic devices, such as pacemakers, should consult their physician(s) before using this product. Operation of electrical equipment in close proximity to a heart pacemaker could cause interference or failure of the pacemaker.
WARNING: To ensure safety and reliability, all repairs and replacements should be performed by a qualified service technician.
SAFETY SYMBOLS
The purpose of safety symbols is to attract your attention to possible dangers. The safety symbols and the explanations with them deserve your careful attention and understanding. The symbol warnings do not, by themselves, eliminate any danger. The instructions and warnings they give are no substitutes for proper accident prevention measures.
WARNING: Be sure to read and understand all safety instructions in this Operator's Manual, including all safety alert symbols such as "DANGER," "WARNING," and "CAUTION" before using this tool. Failure to follow all instructions listed below may result in electric shock, fire, and/or serious personal injury.
SYMBOL MEANING
SAFETY ALERT SYMBOL: Indicates DANGER,WARNING, OR CAUTION. May be used in conjunction with other symbols or pictographs.

WARNING: The operation of any power tools can result in foreign objects being thrown into your eyes, which can result in severe eye damage. Before beginning power tool operation, always wear safety goggles or safety glasses with side shields and a full face shield when needed. We recommend a Wide Vision Safety Mask for use over eyeglasses or standard safety glasses with side shields.
SAFETY INSTRUCTIONS
This page depicts and describes safety symbols that may appear on this product. Read, understand, and follow all instructions on the machine before attempting to assemble and operate it.
| Safety Alert | Indicates a potential personal injury hazard. | |
| Read operator's manual | To reduce the risk of injury, user must read and understand operator's manual before using this product. | |
| Wear Eye Protection | Always wear safety goggles or safety glasses with side shields and a full face shield when operating this product. | |
| CE | CE | This product is in accordance with applicable EC directives. |
| WEEE | Waste electrical products should not be disposed of with household waste. Take to an authorized recycler. | |
| Do Not Expose To Rain | Do not use in the rain or leave outdoors while it is raining. | |
| V Volt | Voltage | |
| mm Millimeter Length | or size | |
| cm Centimeter Length | or size | |
| in. Inch | Length or size | |
| kg Kilogram Weight | ||
| lb Pound Weight | ||
| Direct Current | Type or a characteristic of current | |
GENERAL POWER TOOL SAFETY WARNINGS
WARNING: Read all safety warnings and
instructions. Failure to follow the warnings and instructions may result in electric shock, fire and/or serious injury.
Save all warnings and instructions for future reference.
The term "power tool" in the warnings refers to your mains-operated (cored) power tool or battery-operated (cordless) power tool.
WORK AREA SAFETY
- Keep work area clean and well lit. Cluttered or dark areas invite accidents.
- Do not operate power tools in explosive atmospheres, such as in the presence of flammable liquids, petrol or dust. Power tools create sparks which may ignite the dust or fumes.
- Keep children and bystanders away while operating a power tool. Distractions can cause you to lose control.
ELECTRICAL SAFETY
Power tool plugs must match the outlet. Never modify the plug in anyway. Do not use any adaptor plugs with earthed (grounded) power tools. Unmodified plugs and matching outlets will reduce risk of electric shock.
- Avoid body contact with earthed or grounded surfaces, such as pipes, radiators, ranges and refrigerators. There is an increased risk of electric shock if your body is earthed or grounded.
- Do not expose power tools to rain or wet conditions. Water entering a power tool will increase the risk of electric shock.
- Do not abuse the cord. Never use the cord for carrying, pulling or unplugging the power tool. Keep cord away from heat, oil, sharp edges or moving parts. Damaged or entangled cords increase the risk of electric shock.
- When operating a power tool outdoors, use an extension cord suitable for outdoor use. Use of a cord suitable for outdoor use reduces the risk of electric shock.
If operating a power tool in a damp location is unavoidable, use a Ground-fault circuit interrupter protected supply. Use of GFCI reduces the risk of electric shock.
PERSONAL SAFETY
- Stay alert, watch what you are doing and use common sense when operating a power tool. Do not use a power tool while you are tired or under the influence of drugs, alcohol, or medication. A moment of inattention while operating power tools may result in serious personal injury.
Use personal protective equipment. Always wear eye protection. Protective equipment such as dust mask, non-skid safety shoes, hard hat, or hearing protection used for appropriate conditions will reduce personal injuries.
- Prevent unintentional starting. Ensure the switch is in the off-position before connecting to power source and/or battery pack, picking up or carrying the tool. Carrying power tools with your finger on the switch or energizing power tools that have the switch on invites accidents.
Remove any adjusting key or wrench before turning the power tool on. A wrench or a key left attached to a rotating part of the power tool may result in personal injury.
- Do not overreach. Keep proper footing and balance at all times. This enables better control of the power tool in unexpected situations.
- Dress properly. Do not wear loose clothing or jewelry. Keep your hair, clothing and gloves away from moving parts. Loose clothes, jewelry or long hair can be caught in moving parts.
If devices are provided for the connection of dust extraction and collection facilities, ensure these are connected and properly used. Use of dust devices can reduce dust-related hazards.
POWER TOOL USE AND CARE
- Do not force the power tool. Use the correct power tool for your application. The correct power tool will do the job better and safer at the rate for which it was designed.
- Do not use the power tool if the switch does not turn it on and off. Any power tool that cannot be controlled with the switch is dangerous and must be repaired.
- Disconnect the plug from the power source and/or the battery pack from the power tool before making any adjustments, changing accessories, or storing power tools. Such preventive safety measures reduce the risk of starting the power tool accidentally.
Store idle power tools out of the reach of children and do not allow persons unfamiliar with the power tool or these instructions to operate the power tool. Power tools are dangerous in the hands of untrained users. - Maintain power tools. Check for misalignment or binding of moving parts, breakage of parts and any other condition that may affect the power tool's operation. If damaged, have the power tool repaired before use. Many accidents are caused by poorly maintained power tools.
EN
-
Keep cutting tools sharp and clean. Properly maintained cutting tools with sharp cutting edges are less likely to bind and are easier to control.
-
Use the power tool, accessories and tool bits etc. in accordance with these instructions, taking into account the working conditions and the work to be performed. Use of the power tool for operations different from those intended could result in a hazardous situation.
This 56V power head PH1400E may be used with only the following EGO attachments or subsequently introduced by EGO for use with this power head:
| ATTACHMENT TYPE MODEL | NUMBER |
| Edger EA0800 | |
| Brush Cutter BCA1200 | |
| Line Trimmer STA1500 | |
| Pole Saw PSA1000 | |
| Pole Hedge Trimmer HTA200 | 00 |
BATTERY TOOL USE AND CARE
- Recharge only with the charger specified by the manufacturer. A charger that is suitable for one type of battery pack may create a risk of fire when used with another battery pack.
Use power tools only with specifically designated battery packs listed below. Use of any other battery packs may create a risk of injury and fire.
| BATTERY | CHARGER |
| BA1120E, BA2240E, BA2800, BA3360, BA4200 (BA3360 & BA4200 are not applicable when equipped with brush cutter attachment) | CH5500E, CH2100E |
- When battery pack is not in use, keep it away from other metal objects, like paper clips, coins, keys, nails, screws or other small metal objects that can make a connection from one terminal to another. Shorting the battery terminals together may cause burns or a fire.
Under abusive conditions, liquid may be ejected the battery; avoid contact. If contact accidentally occurs, flush with water. If liquid contacts eyes, additionally seek medical help. Liquid ejected from the battery may cause irritation or burns.
SERVICE
Have your power tool serviced by a qualified reperson using only identical replacement parts. This will ensure that the safety of the power tool is maintained.
If situations occur that are not covered in this manual, use care and good judgment. Contact the EGO Service Center for assistance.
SAVE THESE INSTRUCTIONS
ADDITIONAL SPECIFIC SAFETY RULES CAN BE FOUND IN THE APPLICABLE ATTACHMENT'S OPERATOR'S MANUAL
SPECIFICATIONS
| Voltage | 56 V |
| Weight (Without battery pack) 2.73 kg |
PACKING LIST
| PART NAME QUANTITY | |
| Power Head 1 | |
| Adjustable Front-Assist Handle | 1 |
| Shoulder Strap | 1 |
| Operator's Manual | 1 |
DESCRIPTION
KNOW YOUR POWER HEAD (Fig. A)
- Air Outlet
- Air Inlet
- Rear Handle
- Lock-off Button
High/low-Speed Switch
- Shoulder-strap Mount Hanger
- Threshold Ring
- Adjustable Front-Assist Handle
- Coupler
-
Shaft-Release Button
-
Wing Knob
- Trigger
- Battery-Release Button
- Rubber Pad Protection
- Latch
- Electric Contacts
- Ejection Mechanism
- Shoulder Strap (special accessory)
ASSEMBLY
WARNING: If any parts are damaged or missing, do not operate this product until the parts are replaced. Use of this product with damaged or missing parts could result in serious personal injury.
WARNING: Always remove the battery pack from the product when you are assembling parts, making adjustments, cleaning, or when the product is not in use.
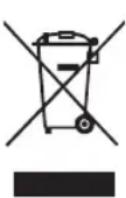
INSTALLING AN ATTACHMENT TO THE POWER HEAD
WARNING: Read and understand entire Operator's Manual for each optional attachment used on this power head and follow all warnings and instructions. Failure to follow all instruc tions could result in electric shock, fire and/or serious personal injury.
WARNING: This 56V power head PH1400E is designed to be used only with the EGO attachment models that are specified in this Operator's Manual or subsequently introduced by EGO for use with this power head. Use of other, unauthorized attachments could cause serious personal injuries or property damage.
WARNING: Never install, remove, or adjust any attachment while the power head is running or with the battery installed. Failure to stop the motor and remove the battery can cause serious personal injury. NEVER OPERATE THE POWER HEAD WITHOUT AN ATTACHMENT.
The attachment connects to the power head by means of a coupler device.
- Stop the motor and remove the battery pack.
- Loosen the wing knob.
- Remove the end cap from the attachment. Align the arrow on the attachment shaft with the arrow on the coupler and push the attachment shaft into the coupler until you hear a clear "click" sound, which indicates that the attachment shaft is mounted into place (Fig. B).
Fig. B parts description see below:
| B-1 | Attachment Shaft B-4 | Arrow | on the Coupler |
| B-2 | Arrow on the Attachment Shaft | B-5 | Shaft-Release Button |
| B-3 | Wing Knob B-6 Power-head | Shaft | |
-
Pull the shaft of the attachment to verify it is securely locked into the coupler. If not, rotate the attachment shaft from side to side in the coupler until it snaps into place.
-
Tighten the wing knob securely.
WARNING: Be certain the wing knob is fully tightened before operating equipment; check it periodically for tightness during use to avoid serious personal injury.
REMOVING THE ATTACHMENT FROM THE POWER HEAD
- Stop the motor and remove the battery pack.
- Loosen the wing knob.
- Press the shaft-release button, with the button depressed, pull or twist the attachment shift out of the coupler.
MOUNTING AND ADJUSTING THE FRONT-ASSIST HANDLE
- Stop the motor and remove the battery pack, if installed.
- Loosen the wing nut to separate the adjustable front-assist handle (Fig. C).
Fig. C parts description see below:
| C-1 | Lock Pole C-3 Front-Assist Handle |
| C-2 | Clamping Block C-4 Wing Nut |
- Push the front-assist handle onto the shaft between the threshold ring and the coupler (Fig. D).
- Insert the clamping block into the handle slot (Fig. E).
- Mount the lock pole, and pre-tighten them with the wing nut. Make sure that the front-assist handle is upwards and points toward the top of the rear handle (Fig. F).
- Adjust the front-assist handle between the threshold ring and the coupler to make sure your front arm is straight when operating and ensure that the arrow on the front-assist handle is within the limitation range marked on the coupler (Fig. 6).
Fig. G parts description see below:
| G-1 | Arrow | G-2 | Limitation Range |
- Lock the lever of the lock pole (Fig. H).
WARNING: Never operate the tool without the front-assist handle firmly in place.
WARNING: Only fix the front-assist handle between the threshold ring and the coupler.
MOUNTING THE SHOULDER STRAP
Depress the strap hook to open it and attach it onto shoulder-strap mount hanger on the power head (Fig. 1).
EN OPERATION
WARNING: Do not allow familiarity with this product to make you careless. Remember that a careless fraction of a second is sufficient to inflict serious injury.
WARNING: Always wear eye protection. Failure to do so could result in objects being thrown into your eyes and other possible serious injuries.
WARNING: Do not use any attachments or accessories not recommended by the manufacturer of this product. The use of attachments or accessories not recommended can result in serious personal injury.
WARNING:NEVER OPERATE THE POWER HEAD WITHOUT AN ATTACHMENT.
INSTALLING/REMOVING THE BATTERY PACK
NOTE: Fully charge the battery pack before first use.
To Install
Align the battery ribs with the mounting slots and press the battery pack down until you hear a "click" (Fig. J).
Fig. J parts description see below:
J-1 Mounting Slot
J-2 Rib
To Remove
Depress the battery-release button and pull the battery pack out (Fig. K).
WARNING: To avoid serious personal injury, always remove the bat tery pack and keep hands clear of the lock-off button and trigger when carrying or transporting the tool.
STARTING/STOPPING THE POWER HEAD (Fig. L)
To Start
Press down the lock-off button and hold it in that position. Depress the trigger to turn on the power head. Different pressure on the trigger results in variable rotating speed of the power head. More pressure, higher speed.
To Stop
Release the trigger.
NOTICE: The motor runs only when the lock-off button and trigger are both pressed.
Speed Adjustment Function (Fig. L)
The power head has two speeds. Position "1" is for low speed while Position "2" for high speed. Push or pull the high/low-speed switch to choose the suitable speed during operation.
Fig. L parts description see below:
L-1 Hign/Low-Speed Switch
L-2 Lock-off Button
L-3 Trigger
MAINTENANCE
WARNING: Before inspecting, cleaning or servicing the unit, stop the motor, wait for all moving parts to stop, and remove the battery pack. Failure to follow these instructions can result in serious personal injury or property damage.
WARNING: When servicing, use only identical replacement parts. Use of any other parts can create a hazard or cause product damage. To ensure safety and reliability, all repairs, other than the items listed in these maintenance instructions, should be performed by a qualified service technician.
NOTICE: Before each use, inspect the entire product for damaged, missing, or loose parts such as screws, nuts, bolts, caps, etc. Tighten securely all fasteners and caps and do not operate this product until all missing or damaged parts are replaced. Please contact customer service or a quali fied service technician.
GENERAL MAINTENANCE
Avoid using solvents when cleaning plastic parts. Most plastics are susceptible to damage from various types of commercial solvents and may be damaged by their use. Use clean cloths to remove dirt, dust, oil, grease, etc.
CLEANING THE POWER HEAD
- Stop the motor and remove the battery pack.
- Clean dirt and debris from the power head using a damp cloth with a mild detergent.
NOTICE: Do not use any strong detergents on the plastic housing or the handle. They can be damaged by certain aromatic oils such as pine and lemon.
STORING THE POWER HEAD
- Remove the battery pack from the power head before storing.
- Clean all foreign material from the power head.
- Store it in a place that is inaccessible to children.
- Keep away from corrosive agents such as garden chemicals and de-icing salts.
Protecting the environment

Do not dispose of electrical equipment, battery charger and batteries/ rechargeable batteries into household waste!
According to the European law 2012/19/EU, electrical and electronic equipment that is no longer usable, and according to the European law 2006/66/EC, defective or used battery packs/batteries, must be collected separately.
If electrical appliances are disposed of in landfills or dumps, hazardous substances can leak into the groundwater and get into the food chain, damaging your health and well-being.
TROUBLESHOOTING
See the applicable attachment's operator's manual.
WARRANTY
EGO WARRANTY POLICY
Please visit the website egopowerplus.com for full terms and conditions of the EGO Warranty policy.
01/12/2016
WAARSCHUWING: Lees alle
- Lock the lever of the lock pole (Fig. H).
SIKKERHET I ARBEIDSOMRADET
| G-1 | Pil G-2 | Greneomrade |
GENERELT VEDLIKEHOLD
CIMBOJbI 6E3OINACHOCTN
CmBONbI 6e3oNaCHOCTn PpeHa3HauHeHb DnnpNBHeueHn BHMaHn K Bo3MOXhBIM PnCKam.CmBONbl6e3oNaCHOCTn, a TaKke o5bAcHEnr K Hm, Tpe6yOTOCO6Oro BHMaHn N NOHMnHn. PpeDyPexKeHnno Texnke 6e3oNaCHOCTn Camn No Ce6e He yctpaHnOtOnaCHOCTb.NHcTpykUn n PpeDyPexKeHnne 3aMeHnIOT COOTBeTCTByIOUme Mepb I NO PpeDtBpaueHnHOHechactThbIX CnyaeB.
PNEpyPEXDEHNE. Nepe nCnoB3oBaHnem yCTPOINCTBA BHIMATEbHO npOHTaTe BCE IHCTpyKuIN B DaHHOM pyKOBOCTBE NOb3OBaTEJN O3HaKOMbTcBc C pNeypexKaIOUmm CmBONAM6Be3OanchoCTn, TAKIM KAK «ONACHOCTb», «PPEyPENXDEHNE» IN «BHIMAHNE». HecobIIODeHne BCex npNBEdEHbIX HIXe IHCTpyKuIM MoXET npVBECTN K nopaxKeHHO 3NEkTPnueckM TOKOM, BO3HKnHOBeHHIO NOxapa N/INN POnyueHHO cepbe3bIX TpaBM.
3HAUEHNE CMBBOJOB
PENEYPEXDAIOUIN CNMBOJ O3HauaET YBEOMNEHNA, PENEYPEXDEHNA IN PENEOCTEPEXEHNA. MoKet NcNoB3oBaTbCn C dpynnm CNBONAMN INN 306paXeHNMA.

ApeynpexkHeH. B pe3yIbTaTe
paobToI 3JIeKTPoHnCTpyMeHTa B rna3a
MoryT nonactb nocTopoHNHe npedMeTbI,
TO pINBeET K cepbe3HOMy NOBpeXdEHIO
rna3. Npeed Hauanom IcnoIb3OBAHnA
3JIeKTPoHnCTpyMeHTa BCERda HaedeBaInTe
3aunTHyo MACKy INN 3aunTHbIe OOKn C
60KOBbIMn UNTkAMN INONHpOPOfMbHyO
3aunTHyo MACKy (PnHne6xOdmocT).
Piobepx OOKOB INN CTAnDapThbIX 3aunTHbIX
OOKOB peKOMeHdyetc HaeBaTb MACKy Wide
Vision Safety.
HCHCTPYKUNI NO TEXHMKE B3OJACHOCTN
Jaee npBedeHOn 3o6paXeHne n OINCAHne CnMBOIOB
6eONaCHOCTN, KOtOpbIe MOryT pncytcBOBaTb Ha daHHOM
yCTpoCTBe. PpeD c6pKo nn NcNoIb3OBAHmE
BHMaTeNbHO npouHTaTe BCE nHCTpyKuIn, npBedeHHbIe
Ha yCTpoCTBe, n Co6nIoJaTe nx.
He no3BONJIte DeTm I NOCTOPOHMH HAXOHTbCRA B6IIN3 pa6oTaUoTe 3NEKTPoHnCTpymeHa.
OTBnkeKaHouneΦakTopbIMoRyT npnbecTu K noTepe KOHTpOJa.
3NEKTP0E30NACHOCTb
Bnka 3neKtpoHcTpymeHTa DOnxHa COOTBETCTBOBaTb po3eTke. HnKOrda He nepeDJIiBaIte BnKy. He nCnONb3yIe HnKaKnE npexOHNk dNBA NIOK c 3a3EmHeHem.
NcnoIb3OBAHHeOpINHnBbIXBnIOK COOTBeCTByIOUxIMPO3eTOKyMeHbWaetPCK nopaxenna 3neKTPnueckm TOKOM.
N36eRaTe npNKoCHOBENK 3a3eMNEHbIM oBekTAM, TAKIM KAK Tpy6bl, paNaTOpbl, NnTbI H XOLOINHBKN. PnCK nopaxehna 3JIeKTpueckm TOKOM BblE, KOrga TEIO 3a3eMJeHO.
He noDBepraIte 3JekTpOHCTpyMeHTbI BO3dEhCTBnIO DOxKJy HIN BnAIn. Pp nnonaHnn BOdb 3JIeKTPoHNCTpyMeHT yBeJIuHnBaETcR pNCK npaoKeHH 3JIeKTPnueckm TOKOM.
- O6paaTecb c Ka6eIem AkkypaTHo. HnKOrda He NpeHocHTe, He TAHNTe H He BbIKJUOaHTe 3JeKTPoHNCTpyment 3a Ka6eJIb. DepKInTe Ka6eJIb NODaJIbSe OTEcTOuHKnOB TeNla, Macna, OCTpbIX npEdMeTOB ININ DBNKyUxxCyAteTc. NObpeKeHHbIe ININ 3aNyTaHHbIe Ka6eIN NOBbIaHOT ONaCHOCTb NOPaKeHHa 3JeKTPnueCKM TOKOM.
Дя pa6oTbI c 3eKtpOnHcTpymeHtOM BHe NOMEueHnN IcNoJIb3yIte IpeHa3NaYeHbI JdЯ 3TOrO yDInHHTeJIbHbI Ka6eB. IcNoJIb3ObaHne Ka6eJIA, IOxOJaIero Ira IcNoJIb3OBAHnR BHe NOMEueHn, CHIXaET PnCK nopaxEHnI 3eKtpnueckm TOKOM.
EcnnncnoB3OBAHne 3JKeTPOUNCTpyMeHTA B cbipom nomeeHN HEn36ExHO, NOKIOUaTe ero uepe3 BbIKNoYaTeN KOpOTKOrO 3AmbKaHnHa 3emIIO (BK33).NCnoJIb3OBAHne BK33 yMeHbIaET pNCK nopaxEHN 3JKeTPOUeCKM TOKOM.
JIYUHARBE3OINACHOCTb
Pn nCnoJb3OBAHnn 3JIeKTPoHHCTpymHaT6yBte 6DHTenBHL, CneIITe 3a CBOHMnDeiCTBnAIMn CNeDyIe TdpaBOMy CMBICny. He NpIb3yItecB 3JIeKTPoHHCTpymEHToM,ecnBbl yctan nn HaxoJntecb NOD BO3deNCTBnEMHapKOTIKOB, aIKORONn NN MeINkAmEHTOB.JaKeKpaTKOBpeMeHHa HEBHMaTeJIbHOCTb Pn pa6Ote C3JIeKTPoHHCTpymEHToM MoKET PnIBcTt K TRAKeJIbIMTpabmam.
McnoIb3yIe cpeCTBa HINBnUaIbHOH 3auNTbI. Bcerda nCnoIb3yIe 3auNTbIe cpeCTBa dna rna3. IcnoIb3OBAHHe 3auNTbIX cpeCTB, TAKNX KAc peCnnpaTOp, HeckoJIb3KJ aauNTHa8 oByb, KACKa INIcpeCTBa 3auNTbI opraHOB CnyxA B COOTBETCTBYUux ycNOBnx yMeHBwaet pNCK NOUYEHNA TpaBM.
He donyckaTe HnpeBnDeHbIX 3anyckOB. Pepe I NOdknIOueHnEM INCTpyMeHTa K CeTn NITAHN (nnn AKKymnTOpY) n nepe ero nepenocKoy y6eIntecb, YTO BkKnIOUcATEnb HaxOHTcB BBkIOUeHHOM NIOXKeHn. He depxnte naeH na BkIOUaTeNe npn pepeHOCKe 3NEKTPOINCHPTpMENTOB n HE BKIOUaTe BNky B po3ETky, eCNI 3NEKTPOINCHPTpMENT BKNIOUeH. 3TO MOKET npNBecTI K HechactHOMy Cnyauo.
Ipeed BkIIOueHHeM 3JIeKTPoHnHCTpymeHTa CHIMNTE C Hero peryInpoBOuHbI HnCTpyMeHTbI nraeHbI KIIOHy. PeryInpoBOuHbI nHCTpyMeHTnIraeHbIKIOU, oCTaBnEHbI Ha BpaauouecyaCTn 3JIeKTPoHnHCTpyMeHTa, MoKET cTaTb npuHHO TpaBMbl.
He nepehanpaTecb.Bcerda coxpanHyeToHBOE nooxehne npabHOBece.3TO n03BOJNT Nyue KOHTponIpOBaTB 3JIeKTPONHCTpyMeHT B HEnpeBnDeHHbIX CNTyaUNX.
OeBaItebHaJIeKaaUMo6pa3OM.He HaIeBaIte CBo6OHyO OeJy uKpaWeHn. DePKeTBe BONocbl, OeJy n nepaTkn noanbwe OT DBNkUxncsYacTei.CBo6OHaN oEJka, yKpaWeHn N dINHHbE BONocbl MOryt NOnactbB DInKUxneCyaCTn.
Pn Hauuynn nbineynablnbaoux yctpoCTB 6eHNTcB TOM,TOO OHN NODKIOUeHbI n npabnbno paobato. IcnoIb3OBaHne nbineynablnbaoux yctpoCTB CHNkaet Bpei, npunHHReMbI nbIbIO.
NCIOJIb3OBAHNE IOBcIyXnBAHNE 3JIeKTPoHhCTPyMeHTA
He npknabBaTe K3neKtpOHCTpymeHType3MepHbIX ycHn. NcNoB3yTe NOxOaHnn DnBAWnx 3aDaY 3neKtpOHCTpymeHT. PpaBnIbHO Bb6paHHbI 3neKtpOHCTpymeHT 6oone 3ofoekTINBeH n 6e0anaceH np HOMHaJIbHO HApy3ke.
He nnonb3ynte 3neKtpoHnCTpymEn,ecnn erO BbIKNoaTeB HeNCnPabEh. 3neKtpoHnCTpymEnTbI C HcncPpABbIM BbIKNoaTeJIem ONaChbN I NOJnxKaT peMOHTy.
IpepeperynpoBko,cmHoi akceccyapOB nI npaHHeHem OTKIOUHTe 3NeKTPoHnCTpyMeHT OT cTe nITAHn I/IIn aKKMyJrTOPOB. TaKe MePbI npedocToPOXHOCTu yMeHbHaOT pCK cnYauHoro 3anycka 3NEKTPoHnCTpyMeHTa.
XpaHHe HeCnOJIb3yEmble 3NEKtpOHCTpyMeHTbIB MeCTax, HeIOCTynHBIX dIa DeTe, H He DOBepaIe 3NEKTPoHNCTpyMeHT IuCaM, He 3NaKOMbIM C Hm N C 3TNMI INCHCTpyKUmaN. 3NEKtpONHCTpyMeHTbI ONachb BY pykax HenoIroTOBneHHbIX NOIb3OBaTeJe.
BbINONHnTeTexHnueckoeO6cnyKnBaHne 3NEKTponHCTpymENTOB.PpOBepbTe BbIPaBNBaHne HcENIIeHNe NOBHXbIX DeTaeN,HaNHyNE NOIOMOK INPPOye YCNOBnK, KOTOpBe MOryT NOBnRb Ha pa6Ory 3NEKTponHCTpymENT. Ecn 3NEKTponHCTpymENT NOBpeXdE, nepeHNCNoJIb3OBAHNEMero Heo6xOIMO OTPMOHTnpOBaTb.HedocTaTOhYxOd 3a 3NEKTponHCTpymENTOM ABnRETC npuHHOI MHOrNX HEChAcTHbIX CNYaeB.
XpaHnTepeKyuIeNHCtpymEtblBcHCTOTE H3aTOUeHHOMcoTOrHH. IpabINbHOo6CnykBaembIe HxopoIO 3aTOUeHHbIepeKyuIe NHCtpyMeHTbl MeHbIe 3aknnHBaOTnNyUe KOHTpOJIpyKOTcR.
IcnoJb3yHe 3eKtpOnHCTpyMeHT, Akceccyapbl, Hacadn n T. n. B COOTBETCTBN C 3TmM INHCTpyKUHM, yHTbIBaYcNOBnN cneuNkky BblONHReMo paboTb.IcnoJIb3OBAHme 3eKtpOnHCTpyMeHTa dnn BblONHHeHH NHepeDycmOTpeHHbIX ONepaUM MoKet PpNBecTN K ONachbIM CITyaCnM.
3TOT npBODHO6nOK 56 B PH1400E moKET HcNoIb3OBAtBCr TOnbKO C yKa3aHHbIMn DaJIe HHCTpyMeHTAMN EGO.
- OctahOBITE DBNfateIb n 3BNeKITE aKKyMnyTOp.
- OTKpyTInTe 6apawkoBbI nnKcTOp.
- HaxMNTe KHOKNy N3BneHnBa Bana n, ydepKnBa eHaXaToN, BbITAHTE NIN BbIKpyTIne BA INHCTpyMeHTaN3 MyΦTbl.
YCTAHOBKA IN PEGYINMPOBKA INPEPEDHBNCNOMOIATEJIbHOI PYKORTKN
1.OctaHOBIne DnIraTeNb NIN3BNeKIne AKKMyJITOp,ecnOH YCTaHOBnEh.
2. Otkpytte 6apaiKOByI raiKy, YTObI CHrTb perynpyemyno nepedHHO BCNOMORAeBHyO pykortky (Pnc.C).
Onicahine yactei Ha Pnc. C
BEZPICZENSTWO W MIEJSCU PRACY
POLITYKA GWARANCYJNA EGO
LUGEGE KASUTUSJUHENDIT
EN Line trimmer attachment 5
Residual risk! People with electronic devices, such as pacemakers, should consult their physician(s) before using this product. Operation of electrical equipment in close proximity to a heart pacemaker could cause interference or failure of the pacemaker.
WARNING: To ensure safety and reliability, all repairs and replacements should be performed by a qualified service technician.
SAFETY SYMBOLS
The purpose of safety symbols is to attract your attention to possible dangers. The safety symbols and the explanations with them deserve your careful attention and understanding. The symbol warnings do not, by themselves, eliminate any danger. The instructions and warnings they give are no substitutes for proper accident prevention measures.
WARNING: Be sure to read and understand all safety instructions in this Operator's Manual, including all safety alert symbols such as "DANGER," "WARNING," and "CAUTION" before using this tool. Failure to follow all instructions listed below may result in electric shock, fire, and/or serious personal injury.
SYMBOL MEANING
SAFETY ALERT SYMBOL:Indicates DANGER, WARNING, or CAUTION. May be used in conjunction with other symbols or pictographs.

WARNING: The operation of any power tools can result in foreign objects being thrown into your eyes, which can result in severe eye damage. Before beginning power tool operation, always wear safety goggles or safety glasses with side shields and a full face shield when needed. We recommend a Wide Vision Safety Mask for use over eyeglasses or standard safety glasses with side shields.
SAFETY INSTRUCTIONS
This page depicts and describes safety symbols that may appear on this product. Read, understand, and follow all instructions on the machine before attempting to assemble and operate it.
| Safety Alert | Indicates a potential person- al injury hazard. | |
| Read Operator's Manual | To reduce the risk of injury, user must read and under- stand operator's manual before using this product. | |
| Wear Eye Protection | Always wear safety goggles or safety glasses with side shields and a full face shield when operating this product. | |
| Wear hearing protection | Always wear ear protection when operating this product. | |
| Cutting Width | The Max. cutting width of line trimmer | |
| Line Diameter | The Diameter of the nylon cutting line | |
| No Cutting Blade | Do not install metal or plastic cutting blades | |
| Keep Bystanders Away | Ensure that other people and pets remain at least 15m away from the line trimmer when it is in use. | |
| Keep Bystanders Away | Ensure that other people and pets remain at least 15m away from the line trimmer when it is in use. | |
| Do Not Expose To Rain | Do not use in the rain or leave outdoors while it is raining. | |
| CE | This product is in accordance with applicable EC directives. | |
| WEEE | Waste electrical products should not be disposed of with household waste. Take to an authorized recycler. | |
| Noise | Guaranteed sound power level. Noise emission to the environ- ment according to the European community's Directive. |
EN
EN
| V Volt Voltage | |
| mm Millimeter Length | or size |
| cm Centimeter Length | or size |
| in. Inch Length or size | |
| kg Kilogram Weight |
IMPORTANT SAFETY INSTRUCTIONS
WARNING: When using line trimmers, basic safety precautions should always be followed to reduce the risk of fire, electric shock, and personal injury, including the following:
READ CAREFULLY BEFORE USE
KEEP FOR FUTURE REFERENCE
DANGER! Do not rely on the tool's insulation against electric shock. To reduce the risk of electrocution, never operate the machine in the vicinity of any wires or cables (power, etc.) which may carry electric current.
CAUTION! Wear appropriate personal hearing protection during use. Under some conditions and durations of use, noise from this product may contribute to hearing loss.
TRAINING
- Read the instructions carefully. Be familiar with the controls and the proper use of the machine.
- Never allow people unfamiliar with these instructions or children to use the machine. Local regulations can restrict the age of the operator.
- Keep in mind that the operator or user is responsible for accidents or hazards occurring to other people or their property.
PREPARATION
- Never operate the machine while people, especially children, or pets are nearby.
- Wear eye protection and stout shoes at all times while operating the machine.
The distance between the machine and bystanders shall be at least 15m
OPERATION
Use the machine only in daylight or good artificial light.
- Never operate the machine with damaged guards or shields or without guards or shields in place.
- Switch on the motor only when the hands and feet are away from the cutting means.
Always disconnect the machine from the power supply (i.e. remove the plug from the mains or remove the disabling device).
whenever leaving the machine unattended;
before clearing a blockage;
before checking, cleaning or working on the machine;
after striking a foreign object;
whenever the machine starts vibrating abnormally.
Take care against injury to feet and hands from the cutting means.
Always ensure that the ventilation openings are kept clear of debris.
MAINTENANCE AND STORAGE
- Disconnect the machine from the power supply (i.e. remove the plug from the mains or remove the disabling device) before carrying out maintenance or cleaning work.
Use only the manufacturer's recommended replacement parts and accessories. - Inspect and maintain the machine regularly. Have the machine repaired only by an authorized repairer.
- When not in use, store the machine out of the reach of children.
OTHER SAFETY WARNINGS
- Avoid Dangerous Environments - Don't use trimmers in damp or wet locations.
Always turn the line trimmer off or remove the battery pack whenever leaving the trimmer unattended.
Don't Use In Rain.
- Keep Children Away - All visitors should be kept at a distance from work area.
- Dress Properly - Do not wear loose clothing or jewelry. They can be caught in moving parts. Use of rubber gloves and substantial footwear is recommended when working outdoors. Wear protective hair covering to contain long hair.
Use Safety Glasses - Always use a face or dust mask if operation is dusty.
Use the Right Tool-Do not use the tool for any job except that for which it is intended.
- Don't Force the Trimmer - It will do the job better and with less likelihood of a risk of injury at the rate for which it was designed.
- Don't Overreach - Keep proper footing and balance at all times.
Stay Alert - Watch what you are doing. Use common sense. Do not operate the trimmer when you are tired.
- Do not operate the trimmer while under the influence of alcohol or drugs.
- Keep guards in place and in working order.
- Store Trimmer Indoors - When not in use the trimmer should be stored indoors in a dry and high or locked-up place with the battery pack removed - out of reach of children.
- Maintain Trimmer With Care - Keep the cutting attachment clean for best performance and to reduce the risk of injury. Follow instructions for changing accessories. Keep handles dry, clean, and free from oil and grease.
- Check Damaged Parts - Before further use of the trimmer, a guard or other part that is damaged should be carefully checked to determine that it will operate properly and perform its intended function. Check for alignment of moving parts, binding of moving parts, breakage of parts, mounting, and any other condition that may affect its operation. A guard or other part that is damaged should be properly repaired or replaced by an authorized service center unless indicated elsewhere in this manual.
- Clear the area to be cut before each use. Remove all objects such as rocks, broken glass, nails, wire, or line that can be thrown or become entangled in the cutting attachment. Make sure that other persons and pets are at least 15m away.
Before using the machine and after any impact, check for signs of wear or damage and repair as necessary.
Always hold the trimmer firmly, with both hands on the handles while operating. Wrap your fingers and thumbs around the handles.
- Avoid Accidentally Starting - Don't carry the trimmer with your finger on the trigger.
- Do not operate the trimmer in petrolic or explosive atmospheres. Motors in these appliances normally spark, and the sparks might ignite fumes.
- Damage to Trimmer - If you strike a foreign object with the trimmer or it becomes entangled, stop the tool immediately, remove the battery pack from the line trimmer, check for damage and have any damage repaired before further operation is attempted. Do not operate with a broken guard or spool.
If the equipment should start to vibrate abnormally, stop the motor, remove the battery pack from the line trimmer, and check immediately for the cause. Vibration is generally a warning of trouble. A loose head may vibrate, crack, break or come off the trimmer, which may result in serious or fatal injury. Make sure that the cutting attachment is properly fixed in position. If the head loosens after fixing it in position, replace it immediately. Never use a trimmer with a loose cutting attachment.
- Replace a cracked, damaged or worn-out cutting head immediately, even if damage is limited to superficial cracks. Such attachments may shatter at high speed and cause serious or fatal injury.
- Check the cutting attachment at regular short intervals during operation, or immediately if there is a noticeable change in cutting behavior.
Only use EGO authorized polymer trimmer line accessories and trimmer line that are designed for use with this machine. Although certain unauthorized attachments might be fitted to the EGO line trimmer, their use may be extremely dangerous, and/or damaging to the tools.
To reduce the risk of serious injury, never use wire or metal-reinforced line or other material in place of the nylon cutting lines. Pieces of wire could break off and be thrown at high speed toward the operator or bystanders.
To reduce the risk of injury from loss of control, never work on a ladder or on any other insecure support. Never hold the cutting attachment above waist height.
If situations occur that are not covered in this manual, use care and good judgment. Contact the EGO Service Center for assistance. - Do not charge the battery pack in rain, or in wet locations.
Use only with EGO's battery packs and chargers.
| BATTERY | CHARGER |
| BA1120E, BA2240E, BA2800, BA3360, BA4200 | CH5500E, CH2100E |
The battery pack must be removed from the appliance before it is scrapped.
The battery shall be disposed of safely.
- Do not dispose of the battery in a fire. The cells may explode. Check with local authorities for possible special disposal instructions.
EN
- Do not open or mutilate the battery. Released electrolyte is corrosive and may cause damage to the eyes or skin. It may be toxic if swallowed.
Exercise care in handling batteries in order not to shol the battery with conducting materials such as rings, brackets, and keys. The battery or conductor may overheat and cause burns. - When servicing, use only identical EGO replacement parts. Use of any other accessory or attachment may increase the risk of injury.
- Battery tools do not have to be plugged into an electrical outlet; therefore, they are always in operating condition. Be aware of possible hazards even when the tool is not operating. Take care when performing maintenance or service.
- Do not wash with a hose; avoid getting water in motor and electrical connections.
Always wear substantial footwear and long trousers while operating the machine.
Always be sure of the footing on slopes and to walk, never run. - Save these instructions. Refer to them frequently and use them to instruct others who may use this tool. If you loan this tool to someone else, also loan these instructions to them to prevent misuse of the product and possible injury.
SAVE THESE INSTRUCTIONS
NOTE: SEE YOUR POWER HEAD OPERATOR'S MANUAL FOR ADDITIONAL SPECIFIC SAFETY RULES.
SPECIFICATIONS
| Cutting Mechanism Bump Head | ||
| Line Diameter | 2.4 mm nylon twist line | |
| Cutting Width 38 cm | ||
| No-Load Speed 5000/6000 min | -1 | |
| Weight (Without battery pack) 1.59 kg | ||
| Measured sound power level \( L_{WA} \) | 94.6 dB(A)K=1.80 dB(A) | |
| Sound pressure level at operator's ear \( L_{PA} \) | 83.2 dB(A)K=3 dB(A) | |
| Guaranteed sound power level \( L_{WA} \)(measured according to 2000/14/EC) | 96 dB(A) | |
| Valuation of vibration \( a_h \) | Front-assist handle | \( 1.1\mathrm{\;m}/{\mathrm{s}}^{2} \)\( K = {1.5}\mathrm{\;m}/{\mathrm{s}}^{2} \) |
| Rear handle | \( 1.4\mathrm{\;m}/{\mathrm{s}}^{2} \)\( K = {1.5}\mathrm{\;m}/{\mathrm{s}}^{2} \) | |
The above parameters are tested and measured equipped with power head PH1400E.
The declared vibration total value has been measured in accordance with a standard test method and may be used for comparing one tool with another;
The declared vibration total value may also be used in a preliminary assessment of exposure.
NOTICE: The vibration emission during actual use of the power tool can differ from the declared value in which the tool is used; In order to protect the operator, user should wear gloves and ear protectors in the actual conditions of use.
PACKING LIST
| PART NAME QUANTITY | |
| Line Trimmer Attachment 1 | |
| Guard 1 | |
| Hex Wrench 1 | |
| Multi-Function Wrench 1 | |
| Operator's Manual 1 |
About recommended cutting line, please visit the website egopowerplus.com or refer to the EGO Product Catalogue.
DESCRIPTION
KNOW YOUR LINE TRIMMER ATTACHMENT (Fig. A)
- End Cap
- Line trimmer Shaft
- Cutting Line
- Trimmer Head (Bump Head)
- Release Tab
- Line-cutting Blade
- Guard
- Hex Wrench
- Multi-Function Wrench
WARNING: Never operate the tool without the guard firmly in place. The guard must always be on the tool to protect the user.
ASSEMBLY
WARNING: If any parts are damaged or missing, do not operate this product until the parts are replaced. Use of this product with damaged or missing parts could result in serious personal injury.
WARNING: Do not attempt to modify this product or create accessories not recommended for use with this line trimmer. Any such alteration or modification is misuse and could result in a hazardous condition leading to possibly serious personal injury.
WARNING: Do not connect to power head until assembly is complete. Failure to comply could result in accidental starting and possible serious personal injury.
MOUNTING THE GUARD
WARNING: Always wear gloves when mounting or replacing the guard. Be careful of the blade on the guard and protect your hands from being injured by the blade.
- Lift the trimmer head and face it downward; align the two mounting holes in the guard with the two bolts that are preassembled on the base of the shaft. Make sure that the internal surface of the guard faces towards the trimmer head (Fig. C).
- Lock the guard in place with the bolts and the supplied hex wrench (Fig. D).
CONNECTING THE LINE TRIMMER ATTACHMENT TO THE POWER HEAD
This line trimmer attachment is designed for use with EGO Power Head PH1400E.
See "INSTALLING AN ATTACHMENT TO THE POWER HEAD" section in the power head PH1400E operator's manual.
EN
OPERATION
WARNING: Do not allow familiarity with this product to make you careless. Remember that a careless fraction of a second is sufficient to inflict serious injury.
WARNING: Always wear eye protection, along with hearing protection. Failure to do so could result in objects being thrown into your eyes and other possible serious injuries.
APPLICATIONS
You may use this product for the purpose listed below:
- Trimming grass and weeds from around porches, fences, and decks
NOTICE: The tool is to be used only for its prescribed purpose. Any other use is deemed to be a case of misuse.
Before each use check for damaged/worn parts
Check the trimmer head, guard and front-assist handle and replace any parts that are cracked, warped, bent, or damaged in any away.
The line-cutting blade on the edge of the guard can dull over time. It is recommended that you periodically sharpen it with a file or replace it with a new blade.
WARNING: Always wear gloves when mounting or replacing the guard or when sharpening or replacing the blade. Note the location of the blade on the guard and protect your hand from injury.
WARNING: To prevent serious personal injury, remove the battery pack from the power head before servicing, cleaning, changing attachments or removing material from the unit.
USING THE LINE TRIMMER WITH POWER HEAD
WARNING: Dress properly to reduce the risk of injury when operating this tool. Do not wear loose clothing or jewelry. Wear eye and ear/hearing protection. Wear heavy, long pants, boots and gloves. Do not wear short pants or sandals or go barefoot.
WARNING: Clear the area to be cut before each use. Remove all objects, such as rocks, broken glass, nails, wire, or string that can be thrown or become entangled in the cutting attachment. Clear the area of children, bystanders, and pets. At a minimum, keep all children, bystanders and pets at least 15m away; there still may be risk to bystanders from thrown objects. Bystanders should be encouraged to wear eye protection. If you are approached, stop the motor and cutting attachment immediately.
EN
For safe and better operation, put on the shoulder strap across the shoulder. Adjust the shoulder strap in a comfortable operating position. Hold the line trimmer with your one hand on the rear handle and your other hand on the front-assist handle. Keep a firm grip with both hands while in operation. The line trimmer should be held at a comfortable position with the rear handle about hip height. The trimmer head should be parallel to the ground such that it easily contacts the material to be cut without the operator having to bend over (Fig. B).
WARNING: The shoulder strap is also a quick release mechanism in hazardous situation. When emergency occurs, take it off from your shoulder immediately, no matter what way the strap is in.
After each use, clean the trimmer
See the MAINTENANCE section for cleaning instructions.
TO START/STOP THE TOOL
See "STARTING/STOPPING THE POWER HEAD" section in the power head PH1400E operator's manual.
ADJUSTING CUTTING LINE LENGTH
The trimmer head allows the operator to release more cutting line without stopping the motor. As line becomes frayed or worn, additional line can be released by lightly tapping the trimmer head on the ground while operating the trimmer (Fig. E).
NOTICE: Line release will become more difficult as the cutting line becomes shorter.
WARNING: Do not remove or alter the line-cutting blade assembly. Excessive line length will cause the motor to overheat and may result in serious personal injury.
LINE REPLACEMENT
NOTICE: Always use the recommended nylon cutting line with a diameter that does not exceed 2.4mm . Using line other than that specified may cause the line trimmer to overheat or become damaged.
WARNING: Never use metal-reinforced line, wire, or rope, etc. These can break off and become dangerous projectiles.
- Remove the battery pack
- Remove the remaining cutting line, if necessary. Simply pull it out by hand.
-
Rotate the spool retainer in the direction indicated by the arrow, as necessary, to align the LOAD line on the spool retainer with the eyelets in the spool base (Fig. F).
-
Cut 5m long cutting line, about 5 times the length of the trimmer aluminium shaft. Insert the line into the mounting hole inside the eyelet (Fig. G). Push and pull the line from the other side until equal amounts of line appear on both sides of the spool.
- Press, while rotating the spool retainer in the arrow direction, to wind the line onto the spool until approximately 14cm of line is showing on each side (Fig. H).
- Push the spool retainer down while pulling on the lines to manually advance the line and to check for proper assembly of the trimmer head.
When the cutting line breaks from the line outlet or the cutting line is not released when tapping the trimmer head, follow the steps below:
- Remove the battery pack.
- Press the release tabs on the spool retainer and remove the spool retainer by pulling it straight out (Fig. I & J).
- Remove the cutting line from the spool retainer.
- With one hand holding the spool base, use the other hand to grasp the spool retainer and align the tabs on the spool retainer with the holes in the spool base (Fig. K); use your palm to press and rotate the spool retainer left and right until the tabs lock with the spool base (Fig. L).
- Following the instructions in "LINE REPLACEMENT" to reload the cutting line.
When the tool is intended to use as a brush cutter, follow the steps as Fig. M & N shown to disassemble the trimmer head.
MAINTENANCE
WARNING: Before inspecting, cleaning or servicing the unit, stop the motor, wait for all moving parts to stop, and remove the battery pack. Failure to follow these instructions can result in serious personal injury or property damage.
WARNING: When servicing, use only identical replacement parts. Use of any other parts can create a hazard or cause product damage. To ensure safety and reliability, all repairs, other than the items listed in these maintenance instructions, should be performed by a qualified service technician.
GENERAL MAINTENANCE
Avoid using solvents when cleaning plastic parts. Most plastics are susceptible to damage from various types of commercial solvents and may be damaged by their use. Use clean cloths to remove dirt, dust, oil, grease, etc.
CLEAN THE UNIT
- Clear any grass that may have wrapped itself around the motor shaft or trimmer head.
Use a small brush or a small vacuum cleaner to clean the air vents on the rear housing.
Clean the unit using a damp cloth with a mild detergent. - Do not use any strong detergents on the plastic housing or the handle. They can be damaged by certain aromatic oils, such as pine and lemon, and by solvents such as kerosene. Moisture can also cause a shock hazard. Wipe off any moisture with a soft dry cloth.
The transmission gears in the gear case need be lubricated periodically with gear grease. Check the gear case grease level about every 50 hours of operation by removing the sealing screw on the side of the case.
If no grease can be seen on the flanks of the gear, follow the steps below to fill with gear grease up to 3/4 capacity.
Do not completely fill the transmission gears.
- Hold the line trimmer on its side so that the sealing screw is facing upwards (Fig. 0).
- Use the multi-function wrench provided to loosen and remove the sealing screw.
- Use a grease syringe (not included) to inject some grease into the screw hole; do not exceed 3/4 capacity.
- Tighten the sealing screw after injection.
STORING THE UNIT
Remove the battery pack from the trimmer.
Clean the tool thoroughly before storing it.
If the line trimmer attachment is removed from the power head and stored separately: Fit the end cap on the attachment shaft to avoid dirt getting into the coupler.
Store the unit in a dry, well-ventilated area, locked-up or up high, out of the reach of children. Do not store the unit on or adjacent to fertilizers, gasoline, or other chemicals.
Protecting the environment
Do not dispose of electrical equipment, battery charger and batteries/ rechargeable batteries into household waste!
According to the European law 2012/19/EU, electrical and electronic equipment that is no longer usable, and according to the European law 2006/66/EC, defective or used battery packs/batteries, must be collected separately.
If electrical appliances are disposed of in landfills or dumps, hazardous substances can leak into the groundwater and get into the food chain, damaging your health and well-being.
EC DECLARATION OF CONFORMITY

We, EGO EUROPE GMBH
Declare that the product 56V lithium-ion cordless line trimmer attachment STA1500, equipped with power head PH1400E.
Complies with the essential health and safety requirements of the following Directives:
2006/42/EC, 2014/30/EU, 2011/65/EU, 2000/14/EC
Standards and technical specifications referred to:
EN 60335-1, EN 50636-2-91, EN ISO 11806-1, EN ISO 12100, EN ISO 60745-1, EN 55014-1, EN 55014-2
Measured Sound Power Level: 94.6 dB(A), Guaranteed Sound Power Level: 96 dB(A)
Conformity assessment procedure of Annex VI is followed according 2000/14/EC.
^A (Authorized representative for CHERVON and responsible for technical documentation)
01/12/2016
EN TROUBLESHOOTING
| PROBLEM CAUSE SOLUTION | ||
| Line trimmer fails to start | The battery pack is not attached to the power head. No electrical contact between the power head and the battery pack. The battery pack is depleted. The lock-off lever and trigger are not depressed simultaneously. | Attach the battery pack to the power head. Remove battery, check contacts and reinstall the battery pack until it snaps into place. Charge the battery pack with EGO chargers listed in this manual. Press down the lock-off lever and hold it, then depress the trigger to turn on the line trimmer. |
| Line trimmer stops while cutting. | The guard is not mounted on trimmer, resulting in an overly long cutting line and motor overload. Heavy cutting line is used. The motor shaft or trimmer head is bound with grass. The motor is overloaded. The battery pack or line trimmer is too hot. The battery pack is disconnected from the tool. The battery pack is depleted. | Remove the battery pack and mount the guard on the trimmer. Use recommended nylon cutting line with diameter no greater than 0.095 in. (2.4 mm). Stop the trimmer, remove the battery, and remove the grass from the motor shaft and trimmer head. Remove the trimmer head from the grass. The motor will recover when the load is removed. When cutting, move the trimmer head in and out of the grass to be cut and remove no more than 8 inches of length in a single cut. Allow the battery pack or trimmer to cool until the temperature drops below 152°F (67°C). Re-install the battery pack. Charge the battery pack with EGO chargers listed in this manual. |
| Trimmer head will not advance line. | ■ The motor shaft or trimmer head is bound with grass. ■ There is not enough line on the spool. ■ The trimmer head is dirty. ■ The line is tangled in the spool retainer assembly. ■ The line is too short. | ■ Stop the trimmer, remove the battery, and clean the motor shaft and trimmer head. ■ Remove the battery and replace the cutting line; follow the section “LINE REPLACEMENT” in this manual. ■ Remove the battery and clean the spool retainer assembly and spool base. ■ Remove the battery, remove the line from the spool retainer and rewind; follow the section “RELOAD THE CUTTING LINE” in this manual. ■ Remove the battery and pull the lines manually while alternately pressing down and releasing the trimmer head. |
| Grass wraps around trimmer head and motor housing. | ■ Cutting tall grass at ground level. | ■ Cut tall grass from the top down, removing no more than 8 inches in each pass to prevent wrapping. |
| The blade is not cutting the line. | ■ The line-cutting blade on the edge of the guard has become dull. | ■ Sharpen the line-cutting blade with a file or replace it with a new blade. |
| Cracks on the trimmer head or the spool retainer comes loose with spool base. | ■ The trimmer head is worn out. | ■ Replace the trimmer head immediately; follow the section “TRIMMER HEAD REPLACEMENT” in this manual. |
| During line replacement, the line can’t be loaded into the trimmer head properly. | ■ Spool retainer’s LOAD lines do not align with the eyelets in the spool base. ■ The string line is not correctly inserted into the mounting hole in the eyelet. | ■ Rotate the spool retainer in the arrow direction to align the LOAD lines on the spool retainer with the eyelets in the spool base. ■ Align the LOAD lines with the eyelets firstly, then insert the line into the mounting hole, which is located inside the eyelet. |
WARRANTY
EGO WARRANTY POLICY
Please visit the website egopowerplus.com for full terms and conditions of the EGO Warranty policy.
2006/42/CE, 2014/30/UE, 2011/65/UE, 2000/14/CE
2006/42/CE, 2014/30/UE, 2011/65/UE, 2000/14/CE
2006/42/CE, 2014/30/UE, 2011/65/UE, 2000/14/CE
Normas e specificationsétricas relativas a:
EN 60335-1, EN 50636-2-91, EN ISO 11806-1, EN ISO
12100, EN ISO 60745-1, EN 55014-1, EN 55014-2
Nivel de potencia do som medico: 94,6 dB(A).
ANDERE VEILIGHEIDSWAARSCHUWINGEN
DE BESCHERMING MONTEREN
HET APPARAAT SCHOONMAKEN
HET APPARAAT OPBERGEN
| BATTERI | OPLADER |
| BA1120E, BA2240E, BA2800, BA3360, BA4200 | CH5500E, CH2100E |
RENGORING AF APPARATET
OPBEVARING AF APPARATET
BEHOLD FOR SENERE BRUK
VEDLIKEHOLD OG LAGRING
| BATTERI | LADER |
| BA1120E, BA2240E, BA2800, BA3360, BA4200 | CH5500E, CH2100E |
GENERELT VEDLIKEHOLD
CIMBOLI 5E30NACHOCTN
CIMBOIb630nachocTnnpaHa3NaHeHbI DnI npBHeHnBHMnHKnBOMOxHbIM PNCKAM.CIMBOIb630nachOCTn,aTakKe oBxHcHnK Hm, Tpe6yIoTOCo6oRbHMnHnNtHmHnHn. PpeynpeKdHnNoTexnke 630nachocTc camn No c6e He yctpaHIOtnaCHocTb.NHCtpkunn nPepynpeKdHnHe 3aMeHnIOcoBTBeTCTByuUne MepbI NppeDtBpaueHIO HeCuaCTHBx CnyaEB.
A NPEDYNPEXKDEHNE. Ipeed nCnObl3OBaHHeM UcTPOINCTBa BHIMATEbHO npOHTaIe BCE IHCTpyKuB IN DAHHOM PYKOBOCDBe NOJb3OBATeJI N O3HaKOMbTECb C pNeDYNPEXKaIOUcMM CmBONAMI 6e3oNaCHOCTN, TAKMM KAK «ONACHOCTb», «PPEDYNPEXKDEHNE» IN «BHIMAHHE». HecO6NIoDEHne BCex npINBEDeHHbIX HIXE INCHETpyKcMI MOKeT npINBecTI K NOPaXeHIO 3NEKTPnueckIM TKOM, BO3HKnHOBeHIO POjapa N/IN IN NONYeHIO cepbe3HbIX TpaBM.
3HAUHHE CUMBOIOB
PNEyPEXDAIOUIN CMBON O3haeT YBEOMHEHNA, PNEyPEXKDEHNA IN PEPDOCTEPEXKEHNA. MoKeT NcNoB3OBaTbC rDpyrMMN CMBONAMN nIIN306paKeHNMA.

ApeynpexdeHne.BpeynbTaTe
paobToI 3nEkpOnHCTpyMeHTaB Ia3a
MOrYI NOnaCTb NocToPOHHne PpeMeTb,
TOI npBeTe K cepe3HOMy NOBpExDeHIO
rJa. IpeD HaJIOM NcNoJb3OBAHn
3NeKtpOnHCTpyMeHTa BcERda HadeBaIte
3aunTHyo MACKy nnn 3aunTHbe OOKu C
6OKOBbIMN UNTkAMN NONHOpOfNilbHyU
3aunTHyo MACKy (pn Heo6xOIMOCtN).
PiOBepx OOKOB nnn CTaNapThbIX 3aunTHbIX
OCHOB peKoMeHdyETc HaeBaTb MACKy
Wide Vision Safety.
MHCTPYKUIMI NO TEXHNIKE BE3ONACHOCTN
Jaee npBedeHn36paXeHne nONCAHNE CMBBOOB 630NaChOCTM, KOTOpbIE MOrTy pNcYCTBOBaTb Ha DaHHOM yctpoCTBe. PpeCsbOpKo INN NcNoIb3OBAHNEM BHNMaTeNbHO IpOHTaIe BCE IHCTpyKuIN, npBedeHHbIe Ha yctpoCTBe, ncoIIIOaIte nx.
BAKHbIE INHCTPYKUNI NO TEXHNKE 6E30NACHOCTN
A PNEUYPEXJEHME. PnI nCOnb3OBAHm
TpMMepOB C necko Heo6xoJIMO co6IIOdaTcNeyOuHne OCHOBHbE MebpI PpeoCTOpOKHOCTn DnryMeHbWeHHB EpoaTHOCTN BO3HNKHOHeHHaIOXapa,napaxeHHa 3JeKtpueckm TOKOM IN NOnyueHHa TpaBM.
BHIMATEJIbHO IPOUHTAITE NPEI NCIOJIb3OBAHHEM
COXPAHNTE INIINIOJIb3OBAHnB B Byuem
ONACHO! He nonaraTecb Ha 30JnIO
yctpoCTBa OT npaxeHn 3neKtpnueckm TOKOM. YTo6bI CHN3NTb PNCK nopaXeHn 3neKTPnueckm TOKOM, He IcNoJIb3yIte yCTPOINCTBO B6JIn3n KaKx-Jn6o npOBoOB INI KabeJe (PiTaHn IND.) KOtOpBIE MOYr 6bITb NOI HapPaeHnEM.
BHIMAHNE!BoBpMaIcNoIb3OBAHnYcTpoIcTBa HaeBaIte COOTBeTCTByHOuNne INDINBHyAJIbHbIe CpeIcTBa 3aunIb OpraHOB cnyx Pnp ONpeJeENHbIX yCNOBnX n DInTeJIbHOCTn IcNoIb3OBAHnYwM OT DAHHORO yCTPOIcTBa MoKeT pINBeCTn K Notepe cnyxa.
O6yEHNE
BHMMATEbHO npOHTaTe HcTpyKm. O3HaKOMbTecb CO BCEMN 3nEMeHTAm NypaBHeHn N Hayntecb npaBnblHomy nCOnb3oBaHnO obOpydoBaHn.
HnKOrHa He No3BOJnTe NOJb3OBAbC8yCTPOiCTBOM
DETAM INI INoDM,HE 3HaKOBbIM C 3TNMI
INCHpykUmaM.MecThbIE HopMbIOrpyaHmBuBaTb
BO3pact OepaTopa.
HOMHTe, YTO onepaTOp INN BnaJeIeHecyT OTBETCTBEHHOCTB 3a HecuactHBie CnyauH u yuep6, HaHeceHHbI DpyfIM NIOJAM INN INN MMyIeCTBy.
IIOIROBKA
He nnoIb3yIte yctpoIcTBO,ecn praDM c BAMn HaxoIaTcra IIOu (OCO6eHHO Detn)nn KINBOThble.
Pn pa6ote c yctpoiCTBOM HadeBaIte 3aunTHbIe OcKn n npouHyIO obyBb.
PacctoHMe MeJy yCTpoiCTBOM NocToPOHHMNIaAMn DoJIxHO CoCTaJIrTb He MeHee 15 M.
NCIOJIb3OBAHNE
NcnoJb3yIte HCTpyMeHT ToJIbKO pIN DHeBHOM CBeTe UIN XopoWEM NCKYCCTBEHHOM OCBeUeHN.
He nCnoB3yIte HnCTpyMeHT,ecn 1NTKNOBpeKDeHbI IN He yCTaHOBneHbI.
Ipeed3anyckOM DnBraTeTEny ybeNTecb,TO pejxuine uactn HaxoJrTCHa IOCTaTOHOM pacctOHHN OT pyK n HO.
BcerdaOTKIOHauTe yCTPOINCTBO ONTOCHNKA NHTAHNA (T.e. INBNEKAeTE BUNKY IN3 PO3ETKN INN OTKIOUaTe OTKIOUaIOUeE yCTPOINCTBO) B CNEyIOUX CNyHAx:
ecnnnHCTpyMeHTOCTaETcR63 npncmOTpa;
peed ouchtk0 3acopeHHa
nepeI npOBepKO, ONUCTKoN ININ BbINONHeHnEM pa60T,CBA3aHHbIX C yCTPOINCTBOM;
NOCNE CTONKHOBEHNA C NOCTOPOHHM PpeMetOM;
B cnyuaye ue3mepeHou Bn6paun ycTpoiCTBa.
YTO6bI He DOnyCTnTB NoLyueHn TpaBm, pyKn HOrn DoJNkHbI HaxOoTbCn Ha 6e3oNaChom pacctoHn OT peKyuXn Xacte.
Cneinte 3a TEM,HTo6bI BEHTINIAIOHHbIE OTBepCTNHe 6bln 3acopeHbl.
06CJNYKBAHNE INXPAHEHNE
- Ppexde Yem BbINOJHbTb 6cbnyKbAHne NnO OHCTKy, BCERda OTKnIOUaHTe yCTpoNCTBO OT NCTOCHKA NITAHNA (T.e. INBNEKaIte BNky n3 pOeTKN NnO OTKnIOuayTe OTKnIOUaOooye yCTpoNCTBO).
IcnoJb3yTe TOnbKo 3aNaChbIe YacTn I dONOHHTeNbHbIe npCnocO6NeHry,peKOMeHDoBaHHbIe npOn3BOUInTeJIem.
Perynphno npOBepraTe n BbINOpHnIe TeXHueckoe 06cnyKBAHHe yCTpoiCTBa.PemOHyCTpoiCTBa DOJIkeH BbINOpHnIbToJbKO KBaINΦuPObAHbI cneuaIaNCT.
EcnHCTpyMeHT He NcNoB3yETcXpaHnTe erO B HEDOCYTNOM DnA DeTeMecTe.
IPOUNE IPEyIpeKDEHnI IO TEXHnKE B30NACHOCTN
He donyckaTpepaotbI B onachbIX yCIOBnX - He IcnoJb3yTe TpIMMepbI BCpbIX N BJIaKhbIX MecTax.
Bcerda BbIKIOaHTe yCTpoIcTBO uINu 3BNEkaTe H3 Hero aKKMyIaTOp, KOrDa OCTabIaTe TpMMep 6e3 npNCMOtpa.
He nCnoIb3yIte Bo BpEma DoXJa.
He noynyckaIte KycTroPcTBy DetTe- BCE NOCTOPOHHne DOJXHHbI HAXOJNTbcra Ha 6e3oNaCHOM PACCTOHNOT O6pa6aTbIbAemoro yuaCTka.
OdeBaITeCb HaJIeKaIIM O6pa3OM He HaeBaIte CBO6oHyIO OJExyU yKpaIeHn. OH MOrT nonactb B DBNkyIuec qACh. PeKOMHeYETcR nCnOB3oBaTpe3HOBbIe nepaTkn I npOHyO6yBb npi paOte Ha OKpbITOM Bo3dyX. HaeBaIte 3auNTbI rONBOHoy6Op, YTO6bI y6paTb DIIHHbIe BOIOcbI.
IcnoJb3yUte 3aunTHbIe OuKn -ecnB0BpeMpa6Otbl BO3Hkaet nbJIb,HaedeBaIte MACKy IINaHn peCnpapTop.
NcnoJb3yIte NOxOJaHm HnCTpyMeHt-He IcNoJb3yIte yCTPOIE CTBO He No Ha3HaueHmIO.
He npnnaarTe Ype3MePbHx ycnin K Tpmmepy -NCNoJb3oBaHne CnpedHa3NaeHHo CKOpocTbIO cnOCO6CTByET 60nee 3fKeKTHBOMy BblONJIeHHo pa60tIc MEHbUIM PICKOM NOnyuHINr TpaMBi.
He TAHInTeCb - BO BpEmpa6oTbI BcerDa coXpaHnTe yCTOuHBOE NOIOKeHne.
6ydbTe 6nTEnbHc1 CneDNTe 3a BbINONHReMo pa60To. PyKOBOCTByTEc 3dpaBBIM CMBICOM. He nonb3yIteCb TpMMepom,ecIn yCTaII.
He nIcNoJIb3yIte TpIMMep,ecnBbHaxOJntEcNb noB03dEiCTBnEM aIKORoIaHApKOTneCKNX CpeCTB.
3aunthbte orpaxkdeHn DOnKhbl 6bl yCTaHOBneHb HaxoNTbc B pa6oyem COCTOHN.
XpaHInTe TpMMep BHTpn NOMEeHnE-ecnYCTPOINCTBO He HcNOJb3yETC,ero HEOxOIMMO XpaHInB BCYXOM,BbICOKOM INI 3aKpbITOMMeCTe,HeIOCTUHOM DJIaTei,CINBLeueHHbIMAKKYMylTOpOM.
AkkypaTHO 6ocnykBaIte TpIMMep -dna ONTmAlbHOIpOn3BOIDTeBbHOCTn IN CHXKeHn PnCKa nOlyeHn TpaBMbl CneDnte 3a Tem, cy0bpeKyuee npncIOcO6JIeHne 6bIO OcTpBIM n YChTBIM. CoNIOdaTe NHTCPyKuIN NO 3aMeHe npHaNDIeXHOCTe. CneDIne 3a Tem, cy0bpyKoRTKn 6bII CyXIMn IN CYCTbIMn Hn Hx He 6bIO MaCIA IN mCMAOHTHO MATEPnAna.
PpOBepyIe HNCTpyMeHn Ha HAnuHne NOBpeKdeHHbIX
Yacte- nepeD daJIbHeIIM NcONlb3OBAHNEM
HnCTpyMeHTA Heo6xOJIMo TuaTeNbHO pOBepNTb
3aunTHoe OOrpaKdEnHne IIN dpyrne NOBpeKdEHbIe
Yactn y6eJntbcra Bnx NcnpabHo paBoTe n
BbINOHNHeHm npDeHa3HaueHNO cyHKm. PpOBepTe
npABInbHOe NoIOXeHne N CcENHeHne DBNkUxNCs
Yacte, HAIuHne IN NOBpeKdEHH, KpeLHeHne n
dpyrne ycNoBn, KOtOpbIE MOrT NOBnMrtb Ha pa60Ty
3NEKtpOnHCTpyMeHtA. B cnuyae NOBpeKdEHn IuTOK
INI dpyrme YacTHn HEo6xOJIMO OTpeMOHTnpOBaTb
HaJIeKaIIM MObpa3OM INI 3AmEHnB B
ABTOPi3OBAHHom CepBnCHOM ueHTpe, ecNI He Yka3aHO
HHOe B DAHHOM PYKOBOCTBE NOnb3OBATeJIa.
OuHuaTe 6pa6aTaBbAeMb yUactOK npeK KaKdbIM NcONb3OBaHnEM HNCTpyMeHTa. YdaIITe TAKHe npEdMeTb, KAK KAMHN, OCKONK CTeknA, RBO3n, IPOBOJOKy ININ BEPEKIN, KOtOpBE MOYr 3AnyTaTbcra B pexyuem PncnOCo6JeHn ININ KOtOpBe OHO MOKeT OTbpcntb. Y6eNTecb, YTO dpyrne IIOm IN XIBOTbHE HaxoJrTcHn Ha pacctOHRn He MeHee 15 M OT pa6oTaOoero yCTpOCTBa.
三GO
IpeHauanomnocne3aBepeHnHNCNtobAHnHCTpymenta npOBepTe erHa HAnuue n3HocnIOBpeKdHn;npn Heo6xOdmocTn OTPMOHTnpyTe.
BoBpemNcIIOJIb3OBAHnBceIdaKpeIKOepXHTe TprIMMep o6eIMn pykAmn 3a pykoTKn.ObxBaTnTe pykoTkn naiIbIamn.
YTo6bl npedotBpatntb cnyauHoe BKIOUeHne, BO BpEmpepeHocn He depKNTe naeHa Kypke.
He nCnoB3yIe TpMMep B ropOuHX IN B3pbIBOoNacbIX cpeax.Bo BpMa pa60Tb I DBIrataTe b yCTPOINCTBa reHepuPyET NcKpbI, KOTOpbl MOrYT BOCnPnAMEHtB rOIOUne ra3bl.
■ NOBpeXdHeNc TpMMepa -ecn yctpoCTBO CTOLKHyIOcB C NOCTOPOHHM PpeDMeTOM HnH 3aNYtaIOCb Yem-Ni6o, HemeDJIeHNO BbIKIOHTe erO, n3BNeKInTe aKKyMnyTOp, pOBepbTe TpMMep Ha HAIHne NOBpeXdEHn I OTpeMOHTpyIte NOBpeXdEHn NEped CneIyUcIM NcONlb3ObaHNEM yctpoCTBa. He nCOnb3yIte YcTPOCTBO C NOBpeXdHHbIMN UNTKOM INN KAtyUkoN.
Ecn yctpoiCTBOype3MepHO Bn6pnpyeT, 3aIyyuTe
DBiratteB, n3BNEKIne NT yctpoiCTBa aKKyMyJrTop
H HeMeJeHHo BbIaCHNe Tn PnUHy. O6bIHO
Bn6paun yka3bIaBcT HA BO3HNKHOBeHne NpO6NEmbl.
Ocna6HeHHa rOIOBA KMOET Bn6pnpoBaTb,
TpeKaTcBc, NOMaTBcR Nn COCKOHTb C TpIMMepa,
YTO MOKeT pINBeCTN K Cepbe3HbIM TpaBMam Nn
CmePTN. Y6eNTecB, YTO peKyuEe npNCNoC6JIeHne
yCTAHOBHeO DOxKNbIM O6pa3OM N HAdExH0
3aKpenHeo. Ecn rONobKa paSwaTbIAeTcNocLe
3aKpenHeHry, HEmeJeHHo 3aMeHnte ee. HNKOrda He
HCnoJIb3yIte TpIMMep, ecn KaKHe-Jn6o erO qactn
PiXo 3akpenHebl.
HemeJeHnO 3aMeHInTepeKyUToRIOBky,ecnOn OHa Tpechyna, nobpeJcHe HmN m3HoWeHa, daKe ecnIOBpeJcHeH haxoDITc ToIbKO Ha NobepxHOCTn. IobpeJcHeHbIe npncnoc6JIeHnMOrT pa3pyuHTbcHa BbICOKO CKOpOCTn H aHeCTn cepBe3HbIe nPi qatabMbI.
Perynphno npoBepaTe pekyuee npncnoc6JeHne BO Bpemr nCNoIb30BaHna, a TAKKe cpa3y nocNe 6hApuyKeHn cepBe3hIX N3MeHeHn B paBoTe yctpoCTba.
IcnoB3yIe TObko ABTOpH3OBaHHbIe EGO npncnOco6JIeHnI dNn IONmepHbIX NecOK TpIMMePOB npeKUne neckn,pa3pa6oTaHhIbe CneuaNbHO 1nToro yCTpoiCtBA.HcMOTpr Ha To YTO HeABTOpH3OBaHHbIe npncnOco6JIeHnI MOYr 6blb YcTaHOBHeHbI Ha TpIMMePbI EGOTM,IX NCNoB3OBaHHe OueHb OnaCHO H/INMOKET pnpBeCTN K NOBpeJdeHHO yCTpoiCTBa.
YTO6bI CHN3NTb PNCK NONYUeHNA Cepbe3hBIX TpaBM, HNKOrda He NcNoJIb3yIte NPOBOIOKyo, ycIneHHyO MeTaNOM NECK y INpyrne MaTePnAbl BMeCTO HeNHOBOI peKyuIe NcKn. KycOuKN pNOBOOKMOT OTNaMbIbATcR INOTpAcBbATcR C 60nbOJ CKOPoCTbO B CTOpOHy ONepaTopaN INCTOAnx PraDM.
YTO6bI CHN3NTb PNCK NOnyueHn TpaBM npn nOtepe KOHTPOJIa HNKoRJa He pa60TaIe Ha cTpeMnKHe nnHa IIO6oBdpyoH HeyCToHbONOBpEcxHOCTn. HNKoRa He noHNMaTe pexyuee npncnoc6neHne BbIe ypoBH TaIIIN.
Pn BO3HKnHOBHeH CNTyaH, He OINcaHHbIX B daHHOM pyKOoCTBe, COJIIOaIte OCTopoXHOCTb IN pyKOoCTbYTeCB 3dPaBBIM CMBICNM. O6paTInTEcb B cepBnCHbI ueHTp EGO 3a NOMOuBo.
He 3apjkaaTe akymyTOp noDdoxem nIN BO Bnaxhblx ycnobnx.
IcnoJb3yTeToJIbKOaKMyJrTOpbln3apJHbIe yCTPOICTBA,yKa3aHHBe HIXke.
| AKKUMYJIYTOP | 3APRAДHOE UCTPOДCTBO |
| BA1120E, BA2240E, BA2800, BA3360, BA4200 | CH5500E, CH2100E |
- PpexJe Yem Bbl6paCbIBaTb yCTpoiCTBO, Heo6xOJIMO u3Bnue bAkkymyIaTOp.
AkkymyTTop Heo6xOIMO yTNIm3npoBaTb 6e30nacHbIM cnoc6om.
He 6pocaTe aKMyIyIaTOpbI B OOrHb. AkyMnyIaTOpbl MOrYT B3OpBaTbCz. O3HaKOMbTeCb C MeCTHBIMN HopMaMn I npaBnAAMn, KOtOpbIe MOrYT CoepKaTaB CneuJIbHbIe HHTcpyKUIN NO yTuIN3aUN.
He BckpbBaIte Hn He deOpmpnyTe akkymyIaTOp. BbTEKmN 3JKeTPOJNT MoKET CTaTB npuHHOI Koppo3nn n npBecTn K nobpeJeHHIO IaN KOxN. OH TokCmH npn pOrlaTbBAHnn.
Будte octopokhbl npo obpaueHn C
akMyIyIopamN, YTObI He 3AMKHyTb KOHTaKtbl
npdMetamn n3 npOBoJxuM MatepnaIOB, TAKMn KAK
Kolba, bpcnTebl NKnOCh. AkMyJrTOp INN KOHTaKT
MOYr nepepeTbcr N Bb3BaTb OXOrn.
Pn peMOHTe NcNoJIb3yIte TOnbKO IeHTNtHbIe 3aNaChIbe qactn EGOTM. NcNoJIb3ObaHne Dpyrnx npHaJNeXHocTe INn npncnocobHeM MoKeT npBecTn K NoIyueHIO TpaMbI.
Pa60taHlue OE AkkyMnIaTOPOB HNCTpyMeHTbHE Tpe6yETc NOkJIOuATb K PO3eTke 3NEKTPoCeTN, IO3OMY OHN BcERda rTOBbIK NICONb3OBAHNIO. POMHNTe O BO3MOXHOCTN BO3HKNHOBEHn ONaChbIX CNYaun DaKe KOrDa yCTpoCTBO He NCIOnb3yeTc. Co6NoJaTe OCTopoXHOCTb Pn BblONHeHH TeXHuEcoT O6CnyKmBaHn INIppeMOHTA.
He MoTJe yCTpoiCTBO n3 WnHaRa. N36eraTe nonaHaHn BOdb B DnBraTeJIb n 3JNEKTPuYeCKne COeINHeHn.
PnpaOte CycTpoIcTBOM Bcerda HaeBaTe npouHyo6yBbNnnHhBie 6pKn.
CoxpaHnTe yCTOnuHBOe nOIOKeHHe Ha cKnHOax. IpepeBraItecb Waor, He 6eraTe.
CoxpaHnte daHHbIe IHCTpyKmI. Perynpho npocMatpBaTe Ix n ppeOCTaBnIte IIN O3HaKOMMeHn Dpym NOnb3OBeTEnM. OdaXnBaK KMy-1n6o yCTpoiCTBO, nepeaTe TaKke daHHbe IHNCTpyKmI dNn ppeDTBpaUeHn HnpaBnBHoro NCNoBtOBaHn IN BO3MOXhBIX TpaBM.
COXPAHNTE DAHHbIe INHCTPYKUIN
PIMMEUHNE. DIOJINHTeIbHbIE CNEUJIbHbIE PABUNa TEXHNI B3OJNACHOCTNC.M.BYKOBODCTBE IONBJ3OBATEJI NPBODHO BOKA.
TEXHUYECKNEXAPAKTEPNCTIKN
CACTH HACADKNTPUMMEPA CJECKOIN(Puc.A).
- KonzecBoN konnaOc
- Bantprmmepacnecko
- Pekyua Jiecka
- TOnOBKa Tprmmepa (KaTuJkN)
5.3aKMM - JIe3BVe IJIgIeCKn
- UHTOK
- ŒeCTnɪrpənHHb KJIou
- MhorodoyhkuHOnHaBHyraeHuKIIou
A PEPENPEXDEHNE. HnKorda He nCnoJb3yIte yCTPOINCTBO 6e3 HaDExHO yCTaHOBneHHORO uNTKa. UNTOK BcERda DOJXeH 6bITb YCTaHOBHe HA yCTPOINCTBO dIra 3aunTbI NOnb3OBaTeJI.
三GO
C6OPKA
A PEPENPEXKDEHNE. Ecn kakne-Jn6o qactn NOBpeXDeHb INN OTCyTCTBYOT, He NCNOJb3yTe yCTPOCTBO, NOKa OHn HE 6byT 3aMeHeHb. Icnonb3OBaHne yCTPOINCTBa B cnuyae NOBpeXdeHn INN OTCYCTBnA qACTe MoKeT pINBecTn K nOlyeHIO cepbe3HO TpaMbI.
A NPEyPExKHeHNE. He nbTaIteCb
m3MeHNb KOHCTpyKuIO TpMMepa ININ CO3DaTb
HE peKoMeHNoBaHNbIe IINr Hrero DOnOJIHnTeJIbHbIe
npncNo6NeHn. NoD6HoE n3MeHHeNcCHTaETcR
HEHaJNeKaUIM NCNOB3OBaHnEM m CNOco6CTByET
BO3HNHOBeHnO ONaCHOu CYaUN, KOTOPa PpNBEdET K
NONyueHIO cepbe3HO TpaBMbl.
A PEPENPEXKHENE. He noeknoaTe yctpoiCTBO K npINBOHOMy 6nOKy Do 3aBepueHn c6opKn. HecO6NoDeHne DaHHoro npaBnA moKeT npBecTn K npexdepeMeHHOMy 3aNcKy n NoJyHeHIO cepbe3hIx TpaBM.
YCTAHOBKA LNTKA
PENPYPEXHEHNE.BcerdaHaedeBaTe nepaTkn npynyctahOBke n demoHTaxe uNTka. OtepeaTecb ne3BnHa uNTke n bepernte pyknt oT nope3OB.
- POnHMMNTE roNoBky TpmmMepa n nepeBepHnTe ee CoBmectnte Dba kpenexhblx OTBepCTna Ha uTKe C dBymra 6oTAMn, KOtOpbe npedyctaHOBneHb Ha OCHOBAHNE Bala. Y6eNTecb, YTO BNYTPeHHra NOBepXHOCTb UNTKa oBaPaeHa B CTOPOHy rONOBKn TpmmMepa (Pnc.C).
2.3aФИКСИРУТЕЦИТOKHAМЕТЕпнпимоибontов nprinaraemoroшсгран HorOKnIOA(Pnc.D).
YCTAHOBKA HACADKNTPMMEPA CJECKOHNAPBBOHOI BLOK
3TOT TpMMeP C JneCKO INpeHa3NaHEn DnI NcNoB3OBaHHN C pINBOHbIM 6JOKOM EGO PH1400E.
CM.paen《YCTAHOBKA INHCTPYMEHTA HA IPNBOHOI BLOK》BpyKOBOCTBE noJIb3OBATeJI npINOHorO 6noka PH1400E.
INCIOJIb3OBAHNE
A PEPENPPEKDEHNE. He donyckaite He6peXHOCTN 6ecneuHOCTn npnaBoTe C yctpoiCtBOM. IOMHNTe, YTO nOtepN 6dntelbHOCTN Ha doJIIO CEkyHdbI DOCTaTOHNO DnI NOUYEHHcEpbE3HO TpaMbI.
A PEPENPEXDEHNE. Bcerda HaedeBaIte 3aunTHbIe OCHN, a TAKKHe NcnoJIb3yIte 3aunTy opraHOB cnyxa. B npOTNBOM cnyae Bbl6paCbIAemble npedMeTbI nonayT B rna3a, YTO MOXET pINBECTN K NOlyeHHO cepbe3HO TpaMbI.
ПРИМЕΗΝΕ
HaHoe yctpoCTBO MOXHO INCIOJIb3OBAtB CNEyIOUX 1eJAX:
CTPnKkTpaBbI COpHkoB OKoIO NODe3IOB,3a6opOB HACTNIOB.
A PnmuMeAHHe. DaHHbH NHTpyMeH DOnJKeH nCNoJIb3OBAbTcR ToJIbKO No Ha3NaYeHIO. JIo6oe dpyroE nCNoJIb3ObaHHe, KpOME yNOMaHyTOrO, CHTaTeTcR HeHaIeKaIIM.
PepaKaKdbIM NcNoJIb3OBAHnEM PPOBepaHTe yCTpOINCTBO Ha HAIuYne NOBpeXdEHbIX IN 3HOWeHHbIX YAcTeI.
PpOBepbTe roJOBky TpMMmepa, uHTOK npeDHOBCNOMORAteBHyO pyKoRTKY 3aMeHInTE BCE TpeCHyBwne,deOpMnPOBaHHbe, N3OrHyTbe IIN NOBpeXdEHhie qACTn.
JIe3BVE nIgOBpe3Kn JIeCKn Ha KpaH UITKa MoKet BpEmr OT BpEmHn 3aTyNlYbCra. PeKoMeHdYETcR nepNoDUnYeckn 3aTaUHbT bero HAnHbHkOM NIN 3aMeHrTb HObbIM.
PENPYPEXDEHNE.BceTaHaedeBaTe nepaTkn npu yctahOBKe Hn3aMeHe 5NTka,3aTOyKe Hn3aMeHe Je3Bn. OteperaiTebJe3Bn Ha 5NTke N6peRITe pyKn OT nope3OB.
A NPEDyPEXDEHNE. TTo6bl npedoTbpaTntb nOlyHeHne cepbe3hBIX TpaBM, h3BNeKaIe aKKMyJrTop n3 pRBOHOro 6noka nepeB bblONHHeHem cepBnCHoro 06cnyKBAHn, OHCTKN, 3aMeHb IpNHaDnEHHOCTe INy ydaJIENH MaTePnAna n3 ycTpOcTba.
NCHONb3OBAHNETPUMMEPA CJECKOINPUBODHBIM BLOKOM
A PEPDyPEXKHEME. OeBaItecB HaIneKaIMM 6pa3OM, YTObI CHN3NTb PNCK NIOyHeHNA TpaBM npn IcNoJIb3OBAHN DaHHoro INCTpyMeHTa. He HaIeBaIte CBO6oHyO OeJxNy uKpaWeHNA. IcNoJIb3yTe 3aunTy OPraHOB 3peHNA n Cnyxa. HaIeBaIte pIoTHbIe DInHHbIE 6pIKN, IpouHyO obYbN nePepaTKn. He HaIeBaIte WOpTb, CaHaIIN N He pa6oTaIte BocNKOM.
PNEUYPEXDEHNE.OuIaTeOcbpaTaBaembUyactOK nepeK KaXdbIM NcNoB3OBaHNEM INCTpyMeHTa.YdAnITE TAKNE ppeMetbl, KAK KAMH, OCKONK
CTeKNa, TBO3Dn, npoBOnOky HIN BepeBKn, KOtOpbIe MOryt 3aNyTaTbC B pexyUe mnpncNoc6NeHnn HIN KOTOpbIe OHO MoKET OTbPocntb. Ha yAcTke He DOJXHbI HaxoNTbCg DeTn, npoxKHe I XNBOTHbIe. DeTn, npoxKHe I XNBOTbIe DoJXHbI HaxoNTbcr Ha pacctOHaHm He MeHee 15 M, Tak KaK Bo BpempaBoTbI MOryt OTneTaB PpeMTebl. NocToPOHHne Iuca DOnJXHbI HAdBaTb 3aunTHbIe Ockn. B cnyae np6bnKeHnna NoToPOHHx Iuic HEmdJIeHNO octahOBITE DBiratEn b nepeKyuee npncnoc6JIeHne.
Дяболгсье Бзэпсноги uубног paobtBu nCNoIb3yIte HAnneHbpeMeH. OtperynpyTe HAnneHbpeMeH do yDo6Horo noLoXeHЯ.YdepxBaIte TpIMMepO hOnoh pyKoi 3a3aHIOpyKoRTky, a npYro- 3a nepeDHIOT BCnomoratBHyU pKoRtKy. Bo BpempaBoTb Kpenko dePKeTyeTrpoIcTB OBeHMnPykAMn. TpIMMep C neckoi HeOBxOIMO DePkaTb B yDo6Hom noLoXeHm TAK, YTO6bl 3aHry PaKoRTKa 6bIna pacnoLoXeHa Ha yPoBHe 6eJa. TOnOBka TpIMMepa DOnJHsPa pacnoIarTaBc napanneBHO 3eMJIe, YTO6bl OpeApToPy He HyXHo 6blIo HAr6aTbCra IJr TORO, YTO6bl rOToBKA MOrla lyUWe KOHTaKTIpoBaTb Co cpe3aEmbIM MaTePnAion (Pnc.B).
A PEPDyPEXDEHNE. HanneuHbI peMeHb TAKKE RBLaTcR 6bICTpOpa3BeMHbIM MExaHn3MOM, NcNoJIb3yUoUmC8 B onaChbIX CNTyaunX. B cNYae BO3NHKHOBEHnY Upe3BbUaHnOH CNTyaUN HEmeJNeHHO CHMMTE ERO C nPeHa JIObIM CNOCOBM.
Ouetae TpMMep nocJe kaxdoRo NCNoJb3OBAHn.
HCTpyKcnnnoOcnctkecm.Bpa3dene《OBCLNYKNA-HNE》.
BKVIOUOYEHNE IN BbIKIOUOYEHNE INHCTPYMEHTA
Cm. pa3dJeBkIOUOEHNE N BbIKIOUOEHNE PnIBoHDHO BOIOKA》BpyKOBOCTBe nIb3OBaTeJI npINBOHOrO 6noka PH1400E.
PERYUNPOBKA DIIINHbI PEKUeI JIECKN
TOnOBKa TpIMMepa No3BOJnEeT OepaTopy BbITryTb DOnONHtEnbHOe KOJInueCTBO NcKN, He BByKIOUa DaBnAteMb. EcNl NcKa N3HocnIacb BO BpeMa NcNoIb3ObaHnra TpIMMepa, Cnerka npNKmTe RoNObKy TpIMMepa K 3emNe, YTo6bl BbITryHb DOnONHtEnbHyHo NcKeY (Pnc.E).
PIMMEUHNE.BbITIaBHaHneJeCKnCTaHOBHTCnCloXHeeNoMepeeeyKopauBaHHa.
PPEYPNPEXDEHNE.He demoHTnpyTe n He 3MeHnTe y3en ne3BnI dIa o6pe3Kn Ieckn.CNIuKOM dNNHnA Jccka MoKet CTaTb npuHnO neperpeBa DBiratela n cepbe3hblx TpaBM.
3AMEHA JIECKI
A PIMMEYAHNE. Bcerda ncojb3yIte pekomehnoBaHHyo HeJIOHOBYIO pexuyIO necky dAmETpOM He 6oee 2,4 MM. IVcnoJIb3OBAHne IeCKn, He OTBeaUoJe TExNHueCKM XapAKTePNCAM yCTPOiCTBA, MoKet npBecTN K nepepeBy NIN NOBpeXdEHIO TpMMepa.
A PEPDYNPEXKDEHNE. HIKoTa He NcNoB3yIte ycunEnHyMeTaNOM NeCKy, npOBONOKy, BepeBky n T.D. Actn 3nx MaTePnaNob MOrTy OTdJeTbCn IN OAnCHO pa3neTaTbcra B CTOpOHbl.
- ɪərʌnɛknte aʊkʌyɪnʌtɒp.
- Pn Heo6xOIMOCn N3BJIeKNTe OCTaBlyIOc peKyUHO JncKy.PIOCTO BbITAHHTe ee BpyHyIO.
3.Пин Heo6xOIMOCn NOBepHnTe ΦKCatop KaTyuKn B HAnpaBneHn, yKa3aHHom CTpeJIKoI, YTo6bl COBmecTb MeKy LOAD (3arpy3ka) HaФКCatope KaTyuKn C yUkamn B OCHOBaHn KaTyuKn (Pnc.F). - OTPe5 M pexyuei neckn, yto npimepno paBNO 5 nnHAM aHOMHHeBO rBaI TaPMMepa. BCTABte necky B kpenekhoe OTBepCTne BHytpu ya (Pnc. G). PPOeHbTe N BBITHNTE necky C dpyroT CTOPHO tAKIM o6pa30M, yTO6bI C O6eHX CTOPOH KaTyuKn necka 6blna OdnHaKOBo DnHbl.
5.ПижмteФнкatopKaTuShuNВpaaJTe erOB HappaBHeHn,yka3aHHOMCTpeJIko,YTObIHaMOTaTb JeCKyHa KaTuShky,OCTaNBpU6JIIN3HTeNbHO nO 14cmCkaxdoiCTOpOHb(Pnc.H).
6.ПиКМTeФИКCaTOpKATyUKNI OJHOBpeMeHBOBHTeOBeJIeCKN,YTObBi BpyHyOToPryIINPOBaTBДINHUYI NpOBepNTbIpaBnIbHocTbC6OpKnroIOBKnTpMMpeA.
EcnnpeKyuaa necka BbickOuHa n3 OTBepCTnNnHe BbITARNAeTc npn HaxKaTuHa RoIOBky TpMMepa, CneDyIte IHCTpyKzM HnKe.
- ɪərʌnɛknte aʊkʌyɪnʌtɒp.
- Haxmnte Ha 3aJmmbHa fukcatope kAtywnn noTAHNTe erO, TTo6b ChrTb (Pnc.I J).
3.ИЗБЕКТЕ рекусюпесу ИЗ SFKCaTopa KaTyшк. - OdHou pyKo yIepKnBaIte oChOBaHne KaTyuKn, aDpyroI pyKO B03bMITEcB Ha QIKCaTOp KaTyuKn I COBMecITe 3aXIMbI Ha HEM COTBepCTnRM N OCHOBAHN KAtyUKN (Pnc.K). PnpKMTE QIKCaTOp KaTuuKn IaOHObIO N NOBEPHNTe erO BNeBO IN BnPaBO, Ioka 3aXIMbI He 3aΦNKCpYHTc H a OCHOBAHN KaTyuKn (Pnc.L).
5.Инстуким no yctaHOBKe pexkyuee JIeCKn Cm.B pa3deJe «3AMEHAJIeCKN»
三GO
CMA3KA LIECTEPHEPEN PDEYKTOPA
IeCTepnBpeDyKTOpe Heo6xOIMO nepnoOnuueckn CMA3bIBaTb TpaHCmCCNHOHcm3kOJ. IpOBepraTe yPOBeHcma3Kn kaxblte 50 acob pa60tbl, cHbYyNtHTeNBHbINBHT Ha 6OKOBO CTOpOHe KOpNyca.
Ecn no 6okam wectepeH He BnHO CneIOB CMA3K, BbINONHTe yka3aHHble HNKe DeICTBn, YTObI 3aINTb TpaHCmCCNOHHyO CMA3ky Ha 3/4 Osbema.
He 3aIbaiTe WeiTePn peyKTopa nonHOCTbIO.
1.ПОLOXITEТРIMMМЕСЛECКИHA6OKTAKMOM6pa3OM,TO6bI yINIOTHHTeJIbHbI BnHT 6bl HAnpabIeH BBepx(Pnc.O).
2.ИспоьзуITE npnnaeraMmHOROФункцmoHAJIbHbI raeyHbI KIOU,TO6bI OTKpyTITb I N3BNeY bNtHTeJIbHbI BNT.
3. Icnonb3yIte Cma3OuHbI Wnpiu (He BXoNT B KOMIIeKT), YTO6bl BnPbICHyTB HEMHO R CMA3KN B OTBepCTne Dnra BNHTa (He 60nee 3/4 O6beMa).
4.3akpytye ynilnTHteNbHbBn BHT nocne Cma3kn
XPAHEHNE YCTPOICTBA
13BnekeaKMyTOpnTPMMEpa.
TuaTeBbHOOcHCTNeYcTPOCTBOpePeXpaHeHnEM.
EcnHacaKa TpMMepa C necko ChraTc npBODHOI ROBKn XpaHITcR OTdJIbHO, yCTaHOBtKe KOHeBOI KOIIaOH Ka HO BAN IHCTpyMeHTa, YTO6bl N36ExkaTb nonadHn rpr3n BHyTp b Myfbl.
XpaHnTe yctpoCTBO C cyxom, XopoOIO npOBETpnaEMOM, 3aKpbTOM INN BbICOKOM MecTe, HEDOCYTNOM DnA DeTei. He xpaHnTe yctpoCTBO pRdOM C yDObpeHnMn, 6eH3INOM INN DpyrIMN XmMNECKMn BEIeCTBaMn.
3aunTa OkpykaHoue CpeDbI

He bIbpaCbIbAte 3JIeKTPoo6OpydoBaHne, 3apJHbIe yCTPOINCTBa, 6TaapeKn n aKKMyTIpObI BMeCTe C 6bITOBIMn OTxOaMn!
B COOTBETCTBnC eBPOneCKM 3aKoHOM 2012/19/EU 3eKtpueckoe n 3eKTPoHHe o6OpyOBAHnE, KOtOpoe He noJNEXKT daJIbHeIWe 3KnIyatauIm, a TAKKe HEPnIroHbIe I NCNoJIb3OBaHHbIe 6bATapeKnI N AKKMyTApOpbl (corNaCHO eBPOneCKOMy 3aKOHy 2006/66/EC)doJIkHbI 6bITb yTNIN3nPoBaHbI OTdeJIbHo.
Pn ytnin3aun 3Jektpueecknx
yctpoCTB Ha CBAKkax B NO3Emhble
BObl MOYT IpocOHTbcr OAnchbE BeUcE CTBa, KOTOpBle 3aTeM nonaDyT B nIuSeByIO
Cebn npBvdyK o6uemy yxudueno
3doopBbN 6laIarOnnyn.
DEKJIAPALUNO COOTBETCTBHN HOPMAMEC
Mbl, EGO EUROPE GMBH
DEKLARACJA ZGODNOSCI WE
Producent, EGO EUROPE GMBH
2006/42/WE, 2014/30/UE, 2011/65/UE, 2000/14/WE
POLITYKA GWARANCYJNA EGO
INÉ BEZPEČNOSTNÉ POKNY
| SET DE ACUMULATORI | INCÁRCÁTOR |
| BA1120E, BA2240E, BA2800, BA3360, BA4200 | CH5500E, CH2100E |
DECLARATIE CONFORMITATE CE
Noi, EGO EUROPE LTD.
2006/42/CE, 2014/30/UE, 2011/65/UE, 2000/14/CE
Standardesisi specificatiethnice la care se face referinta: EN60335-1,EN50636-2-91,ENISO11806-1,ENISO 12100,ENISO60745-1,EN55014-1,EN55014-2
Nivel de putere acustica maturat: 94,6 dB(A).
Nivel de putere acustica garantat: 96 dB(A).
Procedura deevaluate a conformitatei din Anexa VI esterespectatad conform 2000/14/CE.
Organism notification: Société Nationale de Certification et d'Homologation
Numar corp notificat: 0036


Peter Melrose Dong Jianxun
Director general EGO Europe GmbH Manager al calitatjla Chervon
Dong = Jionkun
Peter Melrose Dong Jianxun
Generali direktor druzbe Vodja kakovosti pri druzbi
EGO Europe GmbH Chervon
* (Pooblaosen predstavnik druzbe CHERVON in odgovorn za tehnico dokumentacion.)
01/12/2016
ODPRAVLJANJE TEZAV
SVARBUSAUGOS NUODYM AI
ISPEJIMAS: Naudodami akumulatorines zoiliapjoves, visada imkites svarbiausiu atsargumo priemoniu, kad sumazintumete gaisro, elektros smugio ir susizalojimo pavoju, iskaitant:
ATIDZIAI PERSKAITYKITE PRIES NAUDODAMI
PASIDEKITE, KAD PRIREIKUS GALÉTUMÉTE PASIZIÜRÉTI
| BATERIJA | IKROVIKLIS |
| BA1120E, BA2240E, BA2800, BA3360, BA4200 | CH5500E, CH2100E |
Dong = Jionkun
Peter Melrose Dong Jianxun
"EGO Europe GmbH" "Chervon" kokybes vadovas
vykdomasis direktorius
ΦYΛΑΕTE ΓΙΑ ΜΕΜΑΝΤΙΚΗ XΡΗ
KINAYNOE: Mny etavataueote OTn movon tou epyaieou evavti nektpoianxiac. Tn meiwan kivounu npktoanjiaotneun xepiciote Toynxavna Kovta o6 oupuata n kalwia (peuatoK.1T.) ta otioa mtopei va fepouv nektpiko peua.
IPOΦYΛEH:ΦopáTE kaTαλnλn atoμikn
TPOOATAI aKoNc KATA Tn XpHON. YTO Opioueves ouvnoKcKai XpovikEs Diapkeies XpHOns, o HopuBoc anto auto To TPOIOV MTopei Va ouveioFepEi OE atIWlambda nC aKoNc.
EKNA1DEY2H
Aiaaote me poooxn oec ts odnyie. Egoikewtheite e ta xeiipotnpia kai tn owotn xpion tou mxaavmaos.
Not e nyn enitpente o naia, aota u e iuveves quikcs, aiogtnpiakc n vontikc duvarotntes n e EAAeun emteipias kai ywoeuv n ce atoua un Eoikeiweva e autc Tis onyiev, va xpnoiopoioov to npxavna.
Exete Utoyn OAC OTXeipotns n Xpntnc evai atokkeiAtika uteuBuvoc ia atuxnata n Kivduvouc Tou tpokuovv TPOC aaaa atoja n Tny Tepioua touc.
IPOETOIMEAIA
Mn xpnojpoioite trote n ouakeun otav piaokovtai kovta atoua, iioic tiaia n katoikidia.
XpnoiopoTIOIE TPOoTATEUTIKA yia ta paia kai avOeKTIKA UTOBnmuata OUVEXc otav xpnoiopoTIOIE To mXavnua.
H arostaon metagu tou mynavnatoos kai twv npiaotaeewv npetie va eivai toulambdaio10 15
AEIOTYPTIA
XpnoiopoToe To xnaxvmaoivoe To Wc Tns nepa n e kaToexvnto wC.
Mn xpnoiopoioite TOTe To mnxavma av ta TPOoataeutikc eapntmu a n 0wpaikoeic evai xaouva n av 6vEv piaokovra tOn thetouc.
EvpyoTOIEITE Tov KIVNTnpa MVO OTV TA Xepia KaI Ta TIObia OAC BpiKovTai JAKPIA ATO TA KOTTIKA EApntmuata.
AtoauvEeTnavTo nXavma aTo tv Tpofooia axuoc (Onaan atouapuvete To uua aTo topeua n apaiote Tn oukeun anevepytoinons).
OTOTE aipivete To mnxavma avettnpnto,
三GO
PiivKaθaipioεEvaπλokapioμa,
Piv kave t EeYxo, Kaapio n aann epyaa trawo oynxavna,
E TEPITTTWON TOU XUTMNEOT E OE EVO aVTKEIevo.
Av to mnxavma apxige va doveitai apouka.
PooexeVA mynTPauuATIOTE OTA TIOIA KAI Xepia cto KAOTNIKA EApTnmuata.
Φpovtετa avoiyματεαεριον va εivai navta kaθapá, χωpiσκοιπία.
SYNTHPHEH KAI ANO'HKEYSH
AtouvdeTo mXavna atoTn Tpopo0aia 1xuOc (Onlaon anopakuve to Buapa aTo peua n apapeote tn oukeun anepepytoinans) npotou dieayete epyaiecs ouvnnpns n kaepioou.
Xpnoiopoioite movo ta avaalakka kai aoeouap TOUTUOTWTAIATOV KATAKEuaotn.
EeYxETKai ouvtpeite TAKtka to npxavnna. OI EITIOKEUcTou uXavnuaTO pTeTI NAtVa va TpayatotIoOuVTa ITO EVA EGouoioDToNeV O KevTPO EITIOKEUNG.
OTAV dev xnpoiopoite to npxavnua, aTOeKeETo 0E poc oTou dev TAnaiacov Traia.
AANESIPOEIAOIOIHSEIEAΦAANEIA
Atopoeuyete Etnikivouva Tepiabaovta-Mn xpoiioitoeite Xlookottikαe Bpeyuves n uypes totoheies.
ATeVEpyOTIOIEIe TAVTA To XlookOTNIKOe Vnna n atOpakpuVETe T OUToIOXIA PTTaPIW OITOTE aPnVETo To unxavnua avettnpnto.
Mxnpnpoioiee otnbpoxn.
Kparata ta tiaia pakia -Oloi oi etiokntte TpETIa va napaevouv oe ia anootaan to xwp epyaiaac.
Ntveote KataaAaa-Mn opate apoda pouxa n koanmuata. Eivai thavovayekawbiotouvota kivoueva eapntmuata. Otaevpyaceotee egwepikoucs xwpousuviotata va xpanoiotoeite aaotixvia yavia kai yepa tattoutia. Popate kalupa kepaanca ia vtpopulalete ta akpi aalia.
XpnoiopoToeite yuaia aqaaieias - XpnoiopoToeite Tavta ma aoka yia to paoawto n ppoatautiko ao tn oKovn eav odnioupyeital oKovn kata tv npyaia.
Xpnoiotoeite to owoTo epyaieo-Mn XpOIOeTe to epyaieio yia aAAn epyaia ato Tny Tpoopipocevn.
Mn copicTe To xlookotTIko-Hepyaia 0a yive Kautepa kai je Aiyotepuoc Kivovouc aTov puo yia Tov oToI exi oxediae.
Mny TPOEKEVEOT -NATATE TRAVTA Oahepa KAI diatnpite TNY IOOPPOTIA OAC.
Na eioe oe evnyopon kai va tpooeexeti kavete. Xpnoiopoioite Koivn loyikm Nm aeitoupeite to xlookottiko otav eioe koupaoevoi.
Mn xnpntoioeTo Xlookottikó év eioe UTO Tny Etnpeia akooh n qapukw.
Ta TPOoTATEUTIKA TpeTe va Tapauevouv otn tEon Touc KAI e ayoyn kataotaan aeitoupyia.
ATOnkEETO XLOOKOTIKO EeOTepkoXwpo- Otav To xnpoIOTIOIE TpTEVA TO ATOnkEETe OE eotepkoXwpo OEyvntTOToTeia,ynla n Oaqaleosneio,ExovtaacapapeeiTn outoixia mataipivkai kEtOS eBaeiaosaiDiw.
Suvtnpeite To xlookottiko e povtida - Diatnpite To Tpoaptna kottnc kaapoi ia eiaepetikn ano0kai yia meiwn tpaumatow. Akooute iis onyies oxetikae my aayn agouap. diatnpite tic naes oeyves, kaapecs kai atopakpuvee ato autc suxov laobia kai ypaso.
EeYxETa 0bpapve Eaaptnmuata -Piv
XpOIOIOHcETIepaIEpWTO XoOkOTIKo, TpeTtva EeYxETe IPOAEKTKa TA IPOOTATEUTKk n AALAA
Eapntmuata yia Evoeieic BaaBns yia va PPOOIOPIeTe
av Ba LEIToupynauov Owota KATPayuatoTOnouv
TN LEIToupyia vT Nv OTIoA TPooPiQovai. EeYxETe YIA
OTPeBAOWeIC n EMTLOKn Tuv KIVOUeVuv EsaptnTuWv,
OTAOIOUAPUoyan n
OTIOAOHTOTE AAN kATAOaON TOU EiAV TINbvo a
ETNpeaeTI AN TEIToupyia Tou NkEKPoiO Evyaleiou. H
KAUTPPa n OTIOOBNTOTE AALO TUNa TIOEVEIgE
Ba TIPTEIVA ETIOKEUAOTei OwTA n VA AVTKATAOTBei
OE EGouioBDOTmEvO anMeio OEPBC, EKTOS KAV
Avapepetai diaopoptika oTo TApov Evxepidio.
KaqicTe TIV TEPIOX KOTNS IV ATO KAe XPHON. ATOAPKUVET Ola Ta AVIkeiEva OTWc NTpecs, OTAOeVA Yuaia, KApia, OUPaTaN Vnata Ta OTIOA mTopei va TETAXTOv N VA MTEPDeUoV OTO PPOApTNa KOTNc. Egaopalote OTI aALa Atopa Ka katoikidba BpioKovtaouaxio To aOToaon 15 μ.
Piv xpoaiotoinote to unxavnka kai pata otioaonTTE TPOOKPOUN, EeVte yia evoeieicg oopac n cniac kai TPOBEIE OE ETIOKEUN OTUCAIITAI.
Kparate TAVTATO XAOOKOTIKO OpiXa KAI PE TA Dua xepia aTO TIC AaeC kata n aeitoupyia. TuivETa daxtula kai TOV avixeipa YUPW aTO TIC AaeC.
ATopeuyeteTuXiaekivnO-MnvetapepeTo XaokotTIkoTe to dxtuOoTOKavdaI.
Mn xepiciote To XAOOKOTIKO 0e atuOgpaipa Me Bevzvn n 0e EKPNKTiN atuOgpaipa. Ta potep 0e autes TIC oukeuns TAPOUIAcouv quoiolovik a otivhpe Cai oitivhpe cmuopei va avqafEvou apia.
Znua OTO XAOKOTNIKO-EAVXTUTNOETE EVA EVO AVTKEJEVO ETO XAOKOTNIKO H EAV TPOKUPEI MTAKAPIOJA, OTaUMATEO EPyAEIO aEOWC, ANOAKPUVETN OUTOIXIA MTTATAPIW ATO TO XAOKOTNIKO EVNA, ELEVETYCA ZNUEC KAI ETITPEVT NTV ETIOKEUN PIV ATIOPEPAIEW AEITOUPYIA.MN XEPICEOTE OE OTAQVEO TPOOTATEUTIKO KAPOUAI.
Eav o eotlaiopacxiova dovecaun quaoioyikotaatapntote tv kivtnpaa, atoakpuvetnoutoixiaattapiwv ao to xlookotnkoe vna.Eeeyteauocntv aia. Okpaaoi eiva ouvnoctpoedtoinan ppoBnatwv. Mia xaapan kepaanptoe va doveitai, va payoei, va otaei n vaeepyei anto xlookottiko e anotelaeua cobapo hBevatnpopo tpaumato.Bebaiweote ot to esaptnkaotncivai oawta otepeewevo atn theon tou. Eav nkepaln laokapei metn otepeowon tn theon ts,avtkataotnote tv auocws. Not enpnoiotoite evx lookottkoe laokapioevo pooaptnka kottns.
Avtkaotateia paayevn, neqniues n qapve n Kepaikootns aoeos, akopa kai eav n zniiaiv a movo etnpaveiaekpwyues. Teota ppoaptmuata mtopei va oaoouv oe uynl tanxtta kai va Tpokaleouv oapo n havaatnpopo tpaumatio.
ELeyxEToTPOaPTmaKOTnSAvaTakxPovika 8iaotmuataKaTa nAeIoupyia naeos,Eav Utrapxie aiOthnn aalayn Otn OuPiTePiopka KOTnC.
Xpoaiotoei mova ta eouoiodotneva ato TnV EGOaegouap vmaotc xlookottikou ato TIOAUpec kai to vna XLOOKOTIKOU TPOEVOU oxiedaotei via xpion me auta ta epyaia. Napoti opiaeva mEgouoiobotneva pooaptnata aTIOpe i va tottoetovtai oTo xlookottikovmaoc ts EGO TM, nxpon Touc mtopei va eivai eiaipetika etnikivuyn /kai mTOpei va Tpokantheziua oTo epyaiaio.
Tn neiwn oobapw rpaumaiuov, note n xpnoiortoe iTe uupativo vma n e taaikn evioxua n aaaa uika otn theon twv valiov vnatow konns. Teaxia uparos mpoepie va ataoov kai va ektoeuteouv oe uynAcs taxutntc npoc to xepiotn n Tapeupiokoevous.
Tia eioiou kivduovuopauatipoua o auaeia
eEyxou, Tote mny epyaceote enavw oe akala n oe
otioaontoe aaan m naqaaun uooepnign. Note mny
kpatate to ppoaptnka konns tiaw wto to uos
peans.
Eav Tpokuouv Kataotaeis Touev Kaunovai Oto Taopov Exyepidio, va eiete Tpoektikoi kai v Kaivete oWota. Etikoovwne t to Kevtpo epic nEGO yia Bonheia.
Mn qopriTe Tnv mTatapia Otn Bpoxn n oe uypes totoeoeie.
Xpnoiptoie MPOe OoToiXcmuTapWvKai qopTIOTE TOU AVaepovTAI TAPAKATW:
| ΣΥΣTOIXIA MΠATAPIΩN | ΦOPTIΣTHΣ |
| BA1120E, BA2240E, BA2800, BA3360, BA4200 | CH5500E, CH2100E |
Houotoia xmuataipwv pnte va atopakpvtheta aTo n oukeun npiv nTv anoppyn ts TEaetuaic.
H mtatapia pntetie va atoppinntetai e aovpaleia.
Mny atoppinTETIC mntapieC atn qwiHa Ta oToiexia mtopei va ekpayouv. ELeyEte Touc totikouc KWDikeS yia thavecs EIDKEs onnyies aToppius.
Mny avoivety n npapauoppwve t matapia. O nAeKtpoAUTNC Nou anoOeueetai eivai diaBpwtkoc kai mtopei va pokaalee iBaon ota patia n to depa. Mtopei va evai tojkoc eav katanothei.
Na eioe TPOOeKIOI KATA TO Xeiipioo MItatapiwovte va mny Bpauxukkawei n mttatapia ue aywiyuaikotwsbaxtuiaia, bpaxioia kai kaeiia. Hmrtatapia n o awyoc mtopei va utepepavboov kai va Tpokaouv Eykaumata.
Otav kaveo ouvtipnoi tou epyaieou, xnpoiottoite movo iia avtaaakikacns EGOH xpion oiooudntote aaou aegouap nppoaptmuos mtopei va uogoei tov kivuvopauatou.
Ta epyaleia mntapias de npetie va ouvodovai oe nekpiik npica. I' auto Bpiokovtai naTg kataotaan aeitoupyiac. PpoeXeTe TIBavouc KIVouous akopa kai otav to epyaleio deV aeitoupyei. PpoeXeTe otav dieayete ouvtnpn an oepbis.
Mny TLeveTe ME EukauTTO OAnVa. ATopeuyete va EIepxetai vepo OTov KInntpa kai otic nAekptike ouvdeoeiC
Na opate avektikau tiohjata kai jaepia Tavelovia kata n letoupyia tou mxavnato.
Beaiwveote navta oti stekeote kala oe kekuieva eaoi kai etionc va nepitatae,va unytpexte.
Phialeute autcTG obnyie.Avatpexete ae autcQ auX kai xnpaipotoeite Tc va Ea KTAIOEETe aALouc TOU mTOpei va npaipoTioHauov to epyaleio. Eav daveiaetae auto to epyaleio e KaTIOv allo, daveioTe kai autcTG odnyies, wote va eMTOIOEETe eoAevn xpnoTou ppoivTOG kAI TlBavo Tpaumatioio.
ΦYAAETE AYTEETOADHIIE!
EHMEIOH: AEITE TO EΓXEIPIAIO XPHESHTHE HAEKTPIKH ΣA Σ KEΦΑΛH ΠΑ ENΠPOZOETOYΕIAIKOYΣ KANONE Σ ΣΦΑΛEIAΩ.
PPOAIAPAE
LUGEGE KASUTUSJUHENDIT
OLULISED OHUTUSJUHISED
| AKU | LAADIJA |
| BA1120E, BA2240E, BA2800, BA3360, BA4200 | CH5500E, CH2100E |
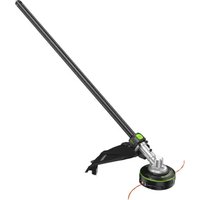
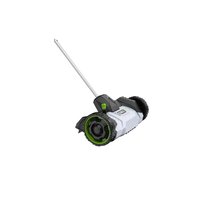


- SAFETY SYMBOLS
- SYMBOL MEANING
- SAFETY INSTRUCTIONS
- GENERAL POWER TOOL SAFETY WARNINGS
- Save all warnings and instructions for future reference.
- WORK AREA SAFETY
- ELECTRICAL SAFETY
- PERSONAL SAFETY
- POWER TOOL USE AND CARE
- EN
- BATTERY TOOL USE AND CARE
- SERVICE
- SAVE THESE INSTRUCTIONS
- SPECIFICATIONS
- PACKING LIST
- DESCRIPTION
- KNOW YOUR POWER HEAD (Fig. A)
- ASSEMBLY
- INSTALLING AN ATTACHMENT TO THE POWER HEAD
- REMOVING THE ATTACHMENT FROM THE POWER HEAD
- MOUNTING AND ADJUSTING THE FRONT-ASSIST HANDLE
- MOUNTING THE SHOULDER STRAP
- EN OPERATION
- INSTALLING/REMOVING THE BATTERY PACK
- To Install
- To Remove
- STARTING/STOPPING THE POWER HEAD (Fig. L)
- To Start
- To Stop
- Speed Adjustment Function (Fig. L)
- MAINTENANCE
- GENERAL MAINTENANCE
- CLEANING THE POWER HEAD
- STORING THE POWER HEAD
- Protecting the environment
- TROUBLESHOOTING
- WARRANTY
- EGO WARRANTY POLICY
- WAARSCHUWING: Lees alle
- SIKKERHET I ARBEIDSOMRADET
- GENERELT VEDLIKEHOLD
- CIMBOJbI 6E3OINACHOCTN
- 3HAUEHNE CMBBOJOB
- HCHCTPYKUNI NO TEXHMKE B3OJACHOCTN
- 3NEKTP0E30NACHOCTb
- JIYUHARBE3OINACHOCTb
- NCIOJIb3OBAHNE IOBcIyXnBAHNE 3JIeKTPoHhCTPyMeHTA
- YCTAHOBKA IN PEGYINMPOBKA INPEPEDHBNCNOMOIATEJIbHOI PYKORTKN
- BEZPICZENSTWO W MIEJSCU PRACY
- POLITYKA GWARANCYJNA EGO
- LUGEGE KASUTUSJUHENDIT
- IMPORTANT SAFETY INSTRUCTIONS
- READ CAREFULLY BEFORE USE
- KEEP FOR FUTURE REFERENCE
- TRAINING
- PREPARATION
- OPERATION
- MAINTENANCE AND STORAGE
- OTHER SAFETY WARNINGS
- NOTE: SEE YOUR POWER HEAD OPERATOR'S MANUAL FOR ADDITIONAL SPECIFIC SAFETY RULES.
- KNOW YOUR LINE TRIMMER ATTACHMENT (Fig. A)
- MOUNTING THE GUARD
- CONNECTING THE LINE TRIMMER ATTACHMENT TO THE POWER HEAD
- APPLICATIONS
- Before each use check for damaged/worn parts
- USING THE LINE TRIMMER WITH POWER HEAD
- After each use, clean the trimmer
- TO START/STOP THE TOOL
- ADJUSTING CUTTING LINE LENGTH
- LINE REPLACEMENT
- CLEAN THE UNIT
- STORING THE UNIT
- EC DECLARATION OF CONFORMITY
- EN TROUBLESHOOTING
- ANDERE VEILIGHEIDSWAARSCHUWINGEN
- DE BESCHERMING MONTEREN
- HET APPARAAT SCHOONMAKEN
- HET APPARAAT OPBERGEN
- RENGORING AF APPARATET
- OPBEVARING AF APPARATET
- BEHOLD FOR SENERE BRUK
- VEDLIKEHOLD OG LAGRING
- CIMBOLI 5E30NACHOCTN
- 3HAUHHE CUMBOIOB
- MHCTPYKUIMI NO TEXHNIKE BE3ONACHOCTN
- BAKHbIE INHCTPYKUNI NO TEXHNKE 6E30NACHOCTN
- BHIMATEJIbHO IPOUHTAITE NPEI NCIOJIb3OBAHHEM
- COXPAHNTE INIINIOJIb3OBAHnB B Byuem
- O6yEHNE
- IIOIROBKA
- NCIOJIb3OBAHNE
- 06CJNYKBAHNE INXPAHEHNE
- IPOUNE IPEyIpeKDEHnI IO TEXHnKE B30NACHOCTN
- 三GO
- COXPAHNTE DAHHbIe INHCTPYKUIN
- C6OPKA
- YCTAHOBKA LNTKA
- YCTAHOBKA HACADKNTPMMEPA CJECKOHNAPBBOHOI BLOK
- INCIOJIb3OBAHNE
- ПРИМЕΗΝΕ
- PepaKaKdbIM NcNoJIb3OBAHnEM PPOBepaHTe yCTpOINCTBO Ha HAIuYne NOBpeXdEHbIX IN 3HOWeHHbIX YAcTeI.
- NCHONb3OBAHNETPUMMEPA CJECKOINPUBODHBIM BLOKOM
- Ouetae TpMMep nocJe kaxdoRo NCNoJb3OBAHn.
- BKVIOUOYEHNE IN BbIKIOUOYEHNE INHCTPYMEHTA
- PERYUNPOBKA DIIINHbI PEKUeI JIECKN
- 3AMEHA JIECKI
- CMA3KA LIECTEPHEPEN PDEYKTOPA
- XPAHEHNE YCTPOICTBA
- 3aunTa OkpykaHoue CpeDbI
- DEKJIAPALUNO COOTBETCTBHN HOPMAMEC
- DEKLARACJA ZGODNOSCI WE
- INÉ BEZPEČNOSTNÉ POKNY
- DECLARATIE CONFORMITATE CE
- ODPRAVLJANJE TEZAV
- SVARBUSAUGOS NUODYM AI
- ATIDZIAI PERSKAITYKITE PRIES NAUDODAMI
- PASIDEKITE, KAD PRIREIKUS GALÉTUMÉTE PASIZIÜRÉTI
- ΦYΛΑΕTE ΓΙΑ ΜΕΜΑΝΤΙΚΗ XΡΗ
- EKNA1DEY2H
- IPOETOIMEAIA
- AEIOTYPTIA
- SYNTHPHEH KAI ANO'HKEYSH
- AANESIPOEIAOIOIHSEIEAΦAANEIA
- ΦYAAETE AYTEETOADHIIE!
- PPOAIAPAE
- OLULISED OHUTUSJUHISED
Brand : EGO
Model : MST1500EB
Category : Multitools