USER MANUAL T1 Pro Yaber
- YABER Lifetime Professional Support
- Important Precautions
- Product Overview
- Specification
- Installation
- Projection Settings
- Screen Mirroring
- Connectivity
- Bluetooth Settings
- Regular Cleaning
- System Upgrade
1. YABER Lifetime Professional Support
Dear Valued Customer,
Thank you for choosing the Yaber T1 Pro Projector. Please read the Quick Start Guide (QSG) carefully before using your T1 Pro Projector.
Scan the QR code on the next page to get detailed product user manual and video guideline. We encourage you to explore them in depth.
We understand that you may encounter various questions and issues while using the projector. However, leaving a review on the product page will not help improve your experience. (Please let us help you! We truly appreciate your feedback and will promptly provide a satisfying solution.)
If you encounter any issues, feel free to send your order number and the problems to us at service@yaber.com. (Title: US+T1 Pro+000-000000-000000+Issues) Rest assured, our service team will offer the solution to you within 24 hours.
Your satisfaction is our top priority. If you encounter any problems, we sincerely hope that you will give us the opportunity to resolve them.
We are dedicated to offering you the best possible solution. We appreciate your understanding and patience in advance.
Yaber Projector Customer Service Team
If you have any questions, please feel free to contact us.
service@yaber.com
2. Important Precautions
For safe and optimal use of the device, please follow these guidelines:
- Do not face the lens towards eyes because the strong projector light may cause injury to the eyes.
- Do not block the air inlet or outlet of the device to prevent overheating, hich could damage internal components.
- Do not wipe the lens directly with cleaning tools such as paper or cloth. Instead, remove dust from the lens using clean air blowing.
- Do not wash the device with chemicals, detergents, or any liquid as they may corrode the circuit board.
-
Keep the device and its components and accessories out of reach of children.
-
Make sure that the device is used in a dry, well-ventilated environment.
- Do not store the device in excessively hot or cold places, as this can reduce the lifespan of electronic components. Use and store it within a temperature range of 0^ - 40^ .
- Do not put the device into any heating equipment (e.g., dryer or microwave) for drying.
- Do not press down firmly on the device or place objects on top or behind it to avoid damage to the device.
- Do not throw, drop, or strongly shake the device to protect its internal circuit board.
- Make sure to clean the dust filter every six months to a year to keep the machine running cool.
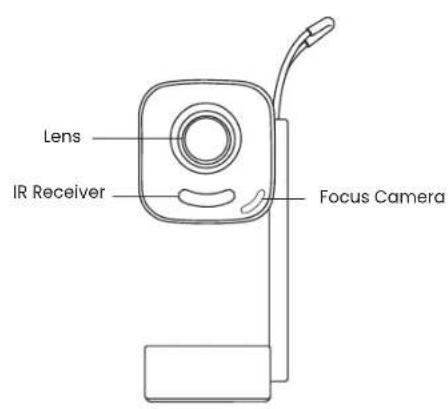
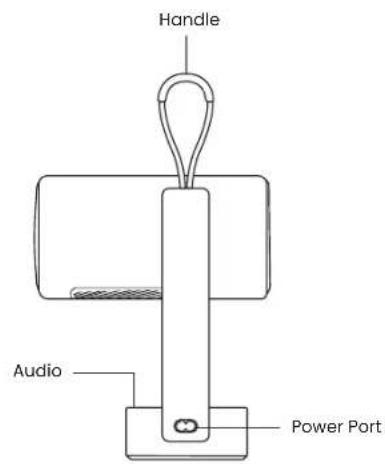
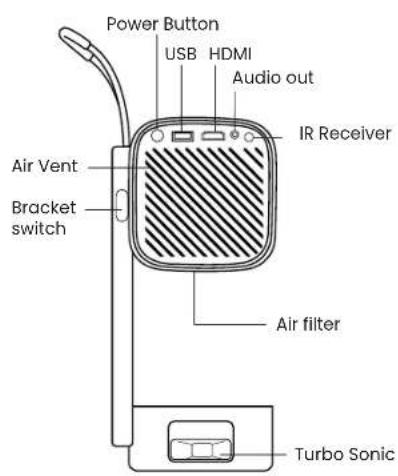
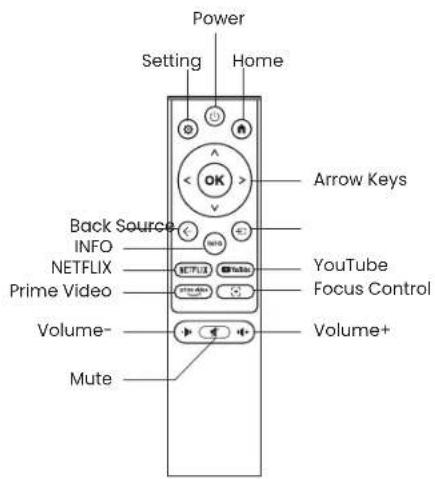
3. Product Overview
4. Specification
| Model No. T1 Pro |
| Native Resolution | 1920*1080 | Light Source | LED |
| Focus Auto/Eletric Keystone Correction | | Auto / Manual |
| Interface | USB×1 HDMI×1 Audio Out×1 | Unit Dimension | 10.5 × 11.5 × 24.5 cm
4.13 × 4.53 × 9.65 inches |
| Projection Ratio 1.18:1 Projection Distance | | Min 1.07m ~ Max 3.05m
Min 40 ~ Max 150 inches |
| Power Voltage | AC 100-240V / 50-60Hz | Power Consumption | 75W |
| Projectile Weight | 1.25 kg
2.76 lbs | Projection Method | Front/Rear on Desk
Front/Rear on Ceiling |
| Aspect Ratio | 16:9 | Projection Zoom | 50% - 100% |
| Picture Format | JPG, PNG, BMP, JPEG |
| Audio Format | MP3, WAV, ASF, 3GP, MP4, MPEG |
| Video Format | MKV, MP4, 3GP, MPEG, ASF, WMV, WebM, |
| USB Format | FAT 32, NTFS, exFAT |
5. Installation
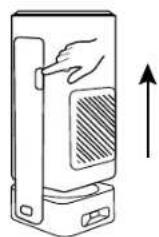
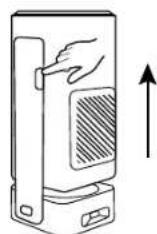
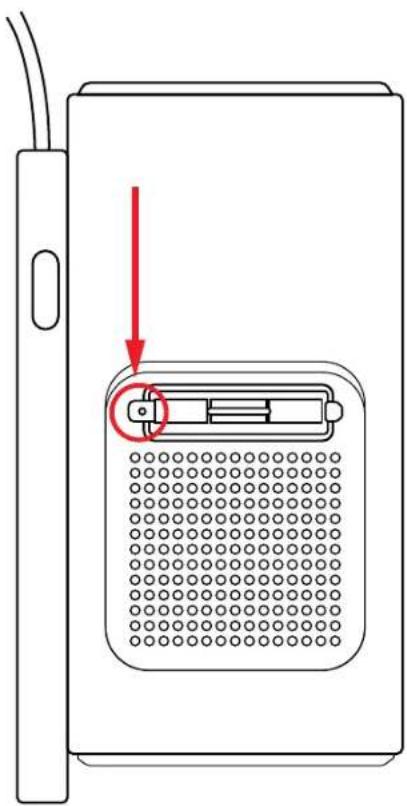
5.1 How To Turn On The Projector

Press the button and the projector pops up.

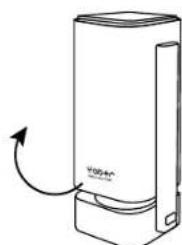
The Yaber logo is facing the front, rotate the body in this direction. Reverse rotation may cause damage.
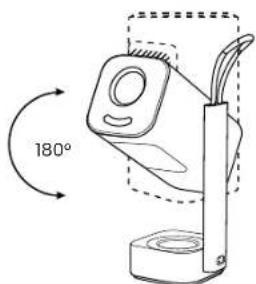
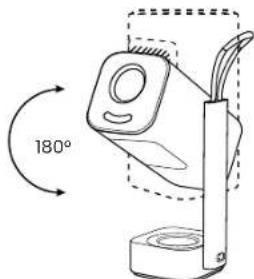
- You can choose your projection angle between 0 - 180^ .

Note: Do not rotate the device directly, as this may cause damage.

Note: To close the projector, align the body and press down until you hear a click.
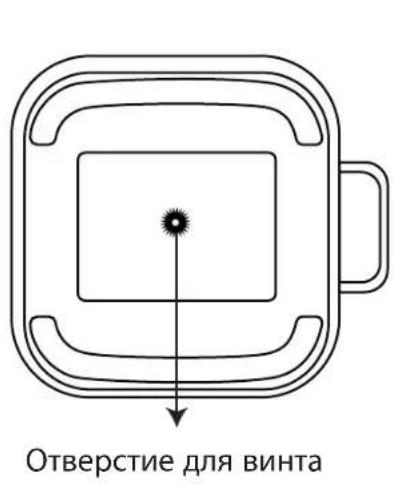
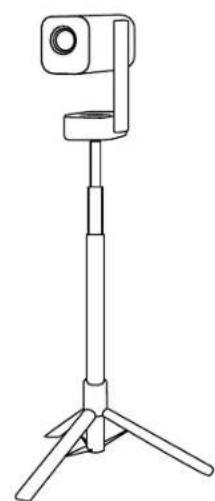
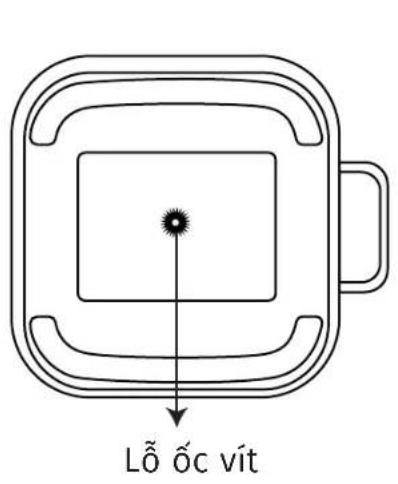
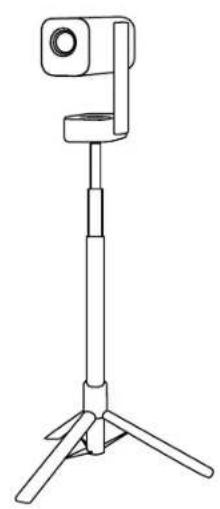
5.2 Projector Stand Mounting
The projector can be mounted from the ceiling using a bracket and 1/4 Screw (not included), or mounted on a tripod.


Notice: Make sure you have a universal mounting bracket that can fit the projector.

Notice: T1 Pro does not support four-corner mount installation.
5.3 Projection Distance
The projection distance of the T1 Pro ranges from 1.5ft to 10.04ft.


Tips: The recommended projection distance is about 6.78ft.
5.4 Ambient Light Mode
When the projector is in power-on or speaker mode, turn the projector downward to automatically enter the ambience mode.

6. Projection Settings
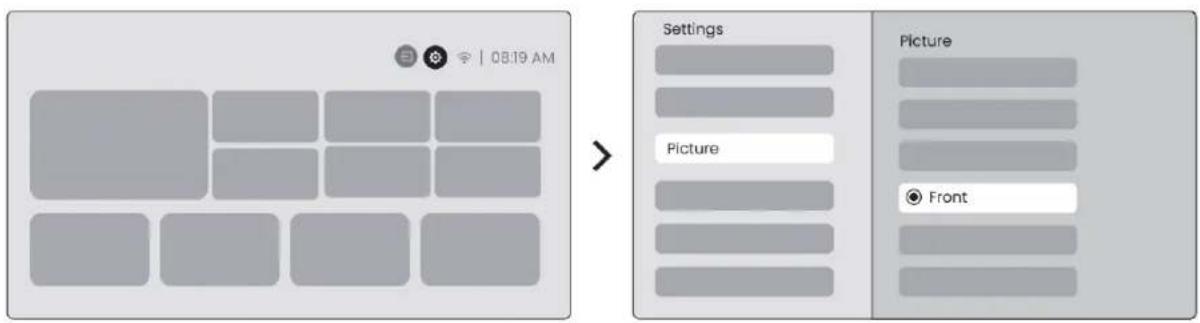
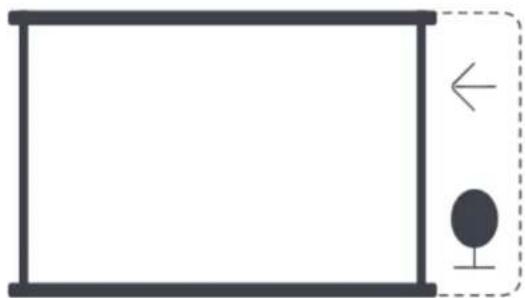
6.1 Projection Mode
T1 Pro supports four projection modes, you can choose the preferred way.

If you choosing ceiling mounting or rear projection, please go to homepage select the Settings [O] select [Picture] In [Projection] select an appropriate projection mode press [OK] to switch projection mode.
6.2 Auto Focus
This function automatically detects the clarity of the projected image and optimizes the focal length in real time, ensuring the image remains sharp and clear at all times. You can find this feature in the Settings [O] -> [Picture] -> [Focus].
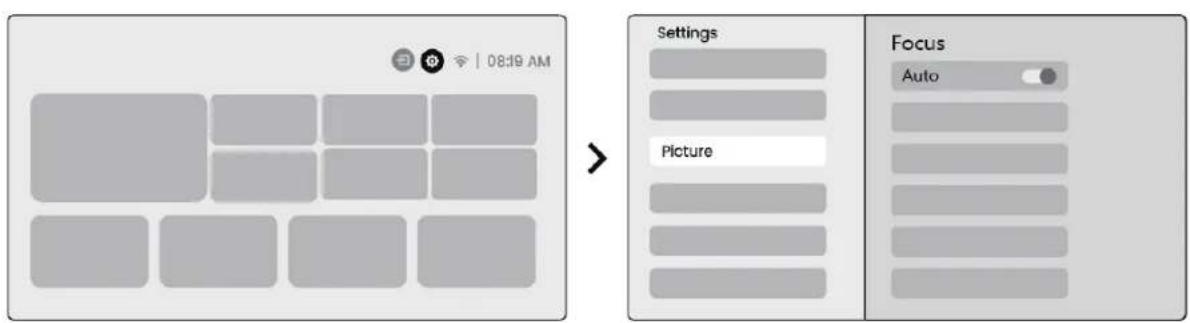

Notice: Auto Focus will be activated after each shift once it is turned on in the setting.

Notice: If you are unsatisfied with the current Auto Focus result, you can select [Execute Auto Focus] to recalibrate.

Notice: If picture remains blurry, please go to homepage select the Settings [ ] select [Picture] select [Manual Focusing] Use the up and down arrow keys to manually adjust the FOCUS until the image is sharp.

Notice: If picture remains blurry, please try adjusting the projection distance and make sure the projection distance is within the appropriate range (Please check [ 7.3 ] for details).
6.3 Keystone Correction
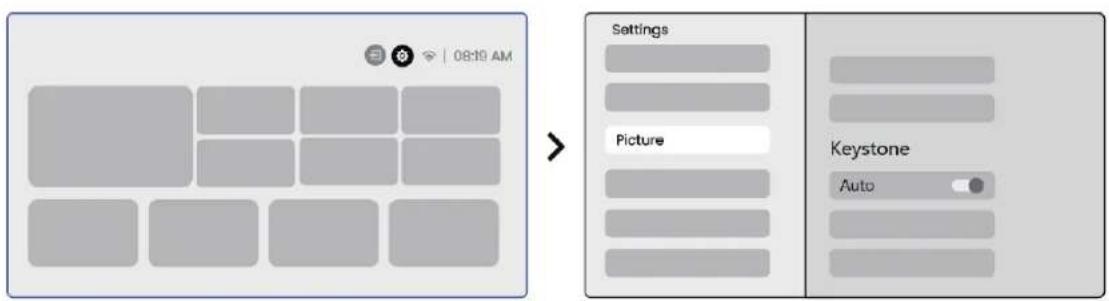
6.3.1 Auto Keystone Correction
The Auto Keystone Correction on T1 Pro automatically corrects trapezoidal distortion, ensuring the image stays square without manual adjustment. You can find this feature in the Settings [ ] -> [Picture] -> [Keystone ].


Notice: If you are unsatisfied with the current Auto Keystone Correction result, you can select [Execute Auto Keystone] to recalibrate.

Notice: Auto Keystone Correction is enabled by default when the machine is first used. If you want to turn it off, please go to home-page select the Settings [ ] select [Picture] In [Keystone] select [Auto] press [OK] to switch Off.
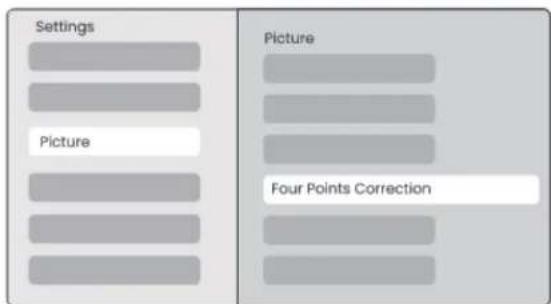
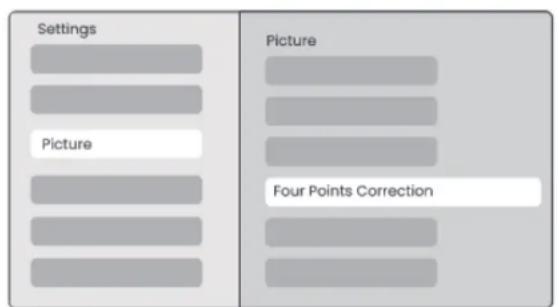
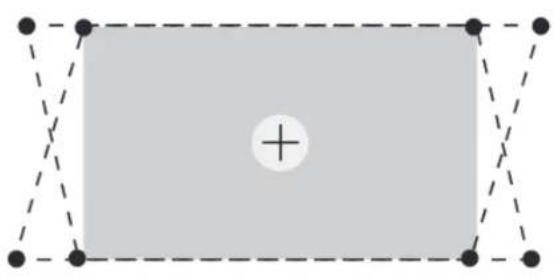
6.3.2 Manual Keystone Correction
If you need to further adjust the screen, you can use the Manual Keystone Correction feature.
Step1: please go to homepage -> select the Settings [O] -> select [Picture]
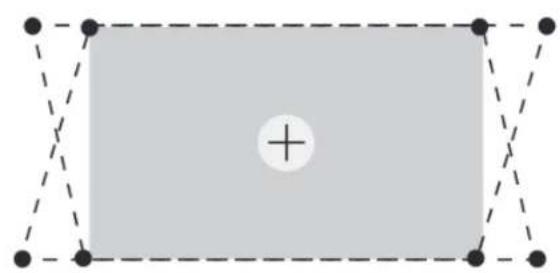
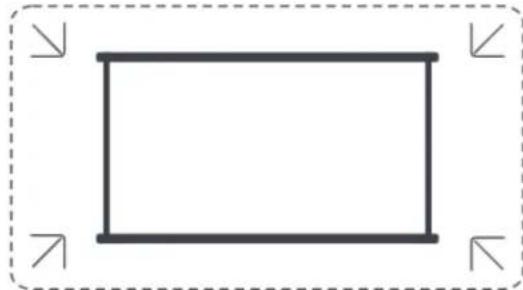
Step2: In [Picture] select [Four Points Correction] adjust the screen by dragging the arrows.
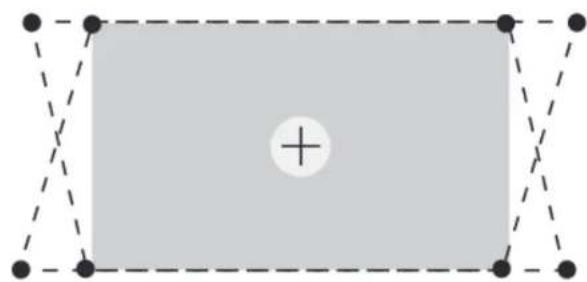

Please make sure the projector does not tilt more than 15 degrees vertically or horizontally. Please ensure the automatic focus work effectively.
6.3.3 Auto Keystone After Boot
This function automatically detects and corrects both vertical and horizontal keystone distortion of the projected image each time the projector is powered on, ensuring that you can immediately enjoy a clear, rectangular picture.
6.3.4 Auto Keystone After Boot
This function automatically detects and corrects both vertical and horizontal keystone distortion of the projected image each time the projector is powered on, ensuring that you can immediately enjoy a clear, rectangular picture.
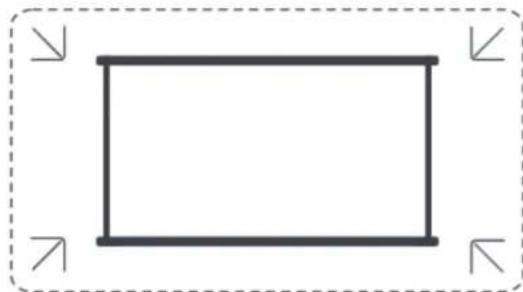
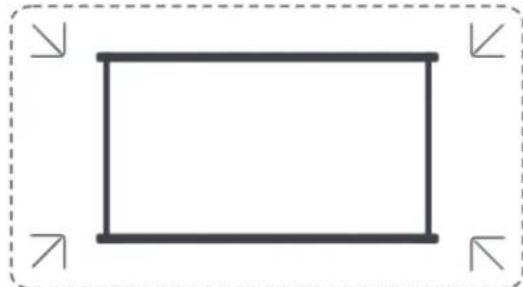
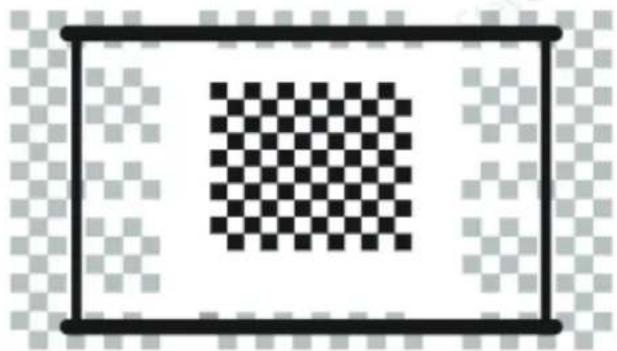
- The white background screen should have a black or other clear border, while the light-resistant screen has no border requirement.

- The projected image before the Screen Fitting needs to be larger than the screen area.

- When using the Screen Fitting function, please do not block the center of the screen.


Notice: Before using the Auto Screen Fitting and Auto Obstacle Avoidance functions, make sure the Auto Keystone and Auto Focus functions are turned on. Obstacle avoidance may not work when there are white or other light-colored objects in the target screen.
6.3.5 Automatic Obstacle Avoidance
This function automatically detects obstacles in the projection path and intelligently adjusts the image angle or position to prevent image obstruction, ensuring clear and complete projection.

Notice: Before using the Auto Screen Fitting and Auto Obstacle Avoidance functions, make sure the Auto Keystone and Auto Focus functions are turned on. Obstacle avoidance may not work when there are white or other light-colored objects in the target screen.
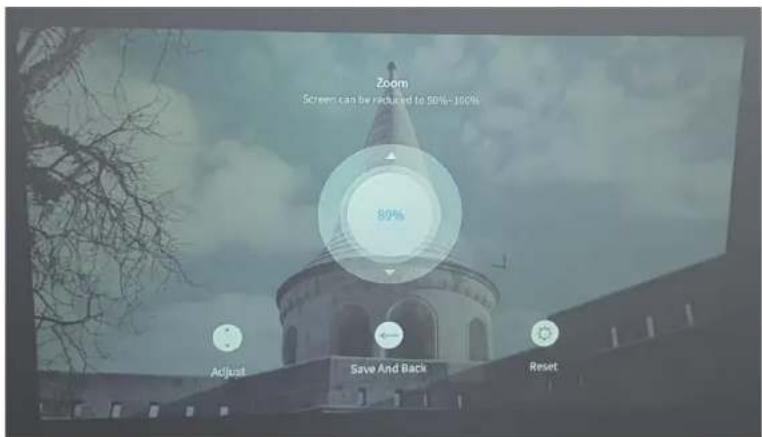
6.4 Image Zoom
You can adjust the size of the image according to your needs.
Step1: please go to homepage -> select the Settings [ ] -> select [Picture]
Step2: In [Picture] -> select [Image Zoom] -> Use the up and down arrow keys to manually adjust the Zoom until the image is desired.

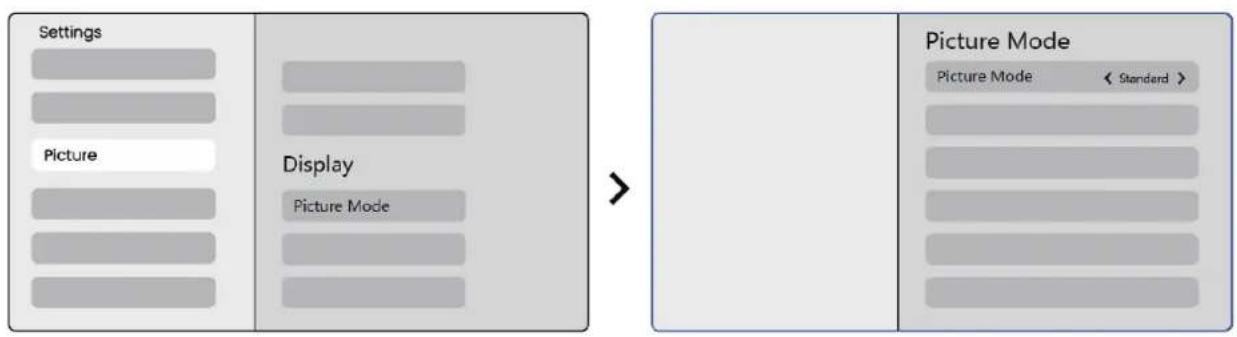
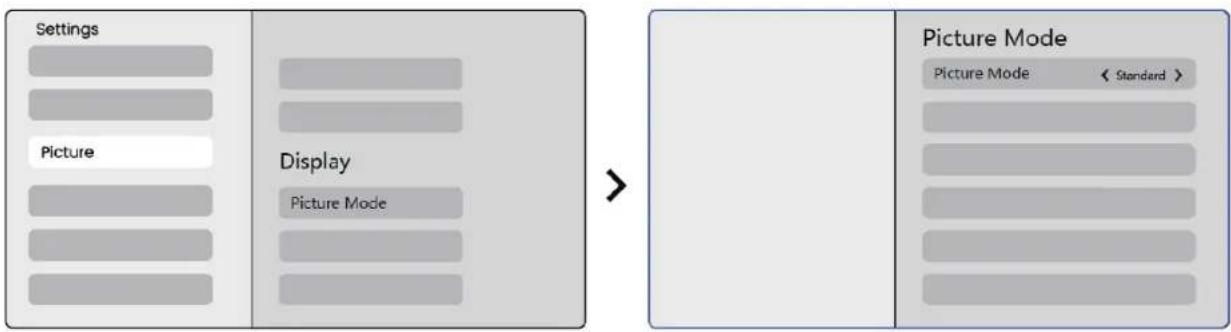
6.5 Display
You can adjust the Picture Mode according to your needs.
Step1: please go to homepage -> select the Settings [ ] -> select [Picture]
Step2: In [Picture] -> select [Picture Mode]
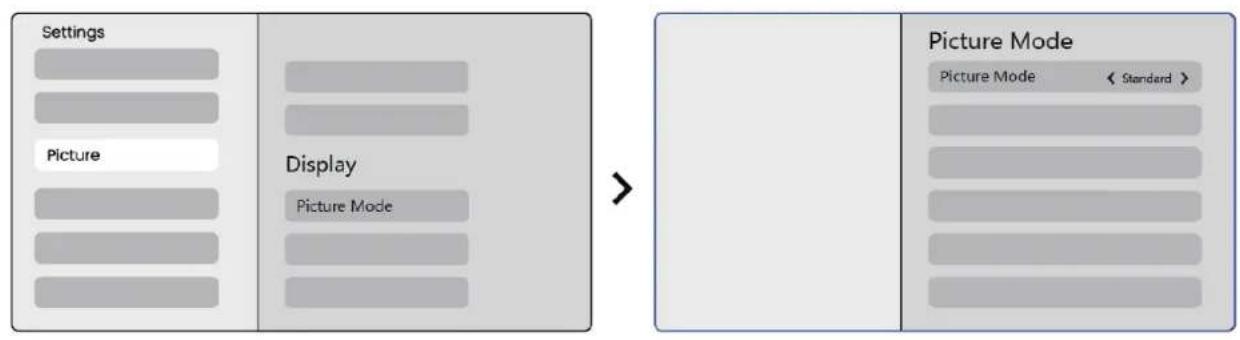

Attention: The Image color setting will only take effect when playing pictures or videos.
7. Screen Mirroring
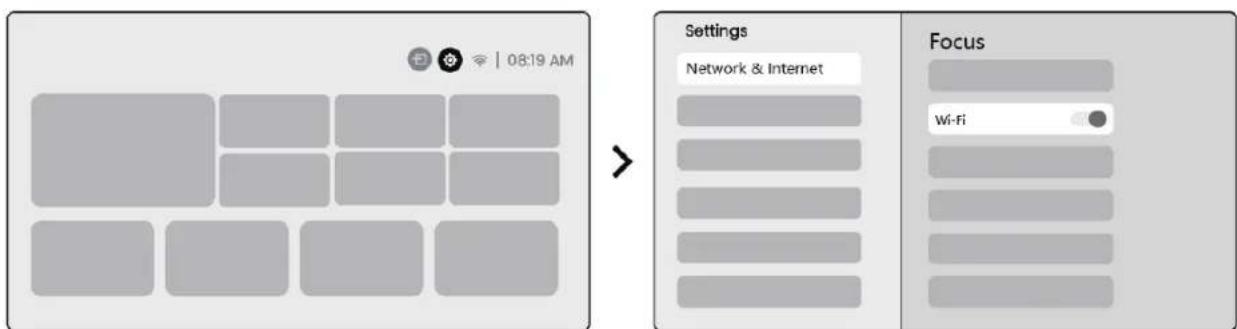
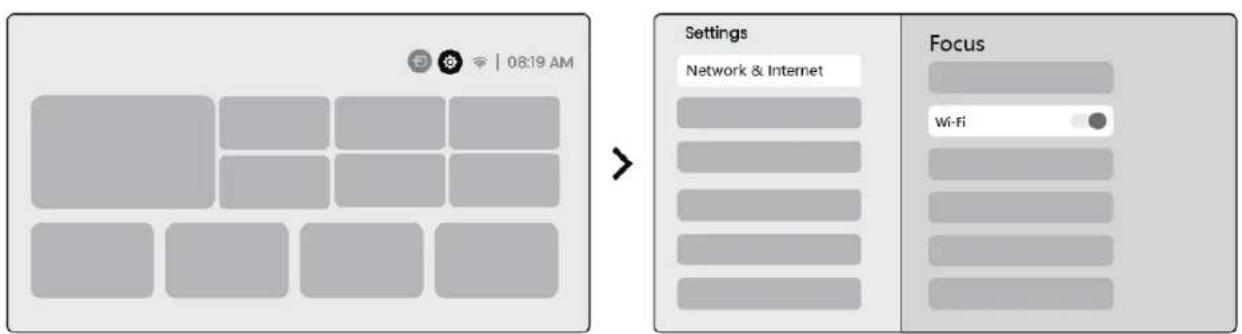
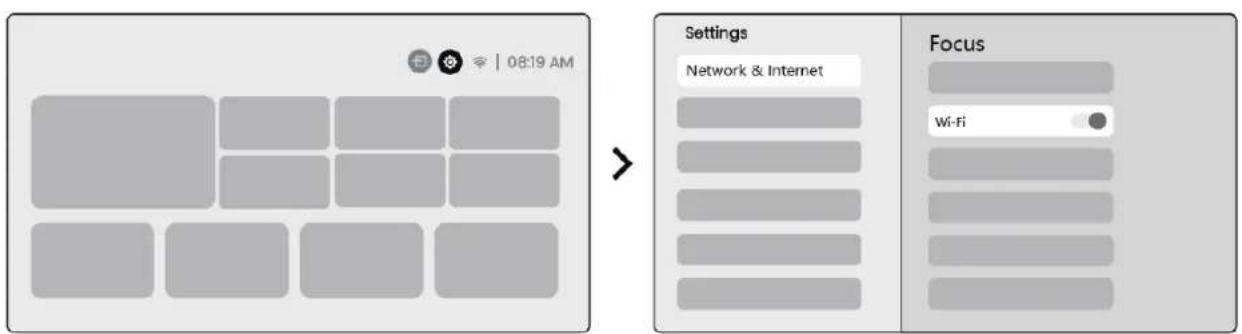
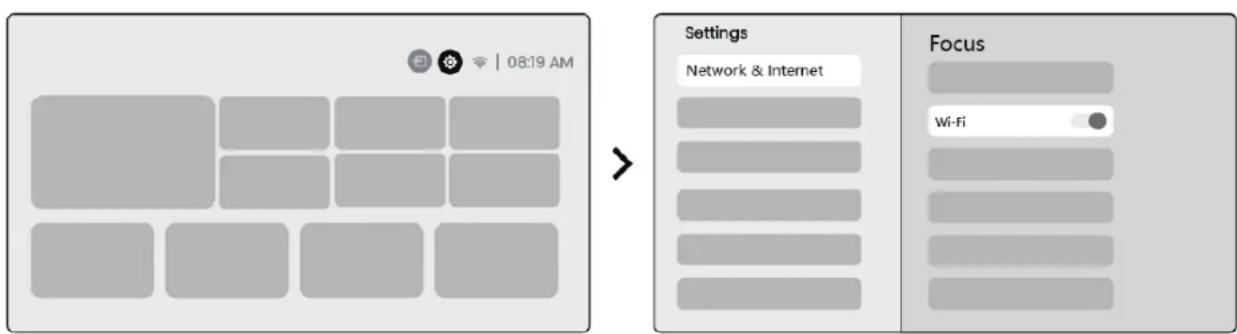
7.1 WiFi Settings
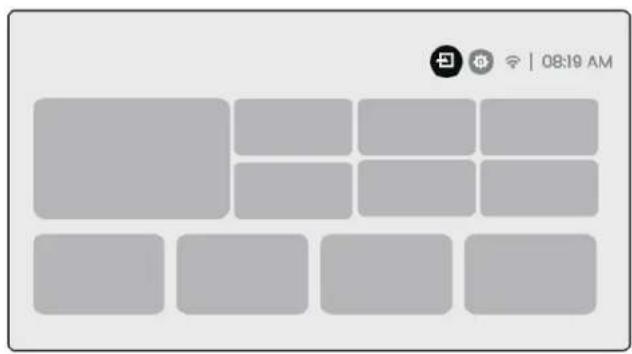
Step1: Press the Settings [ ] button -> Select [Network & Internet] -> Turn on [Internet Connection] button -> Select [Wi-Fi]
Step2: In [Available Networks] list-> Search your desired Wi-Fi network -> enter the password -> Select [OK] -> Wait for the projector to connect.


Notice: The smoothness of screen mirroring will be affected by the network environment. It is recommended to use a faster bandwidth.
7.2 iOS Cast (For iOS Devices)
Step1: Ensure Compatibility and Network Connection: Make sure your iOS device and the T1 Pro are connected to the same Wi-Fi network.
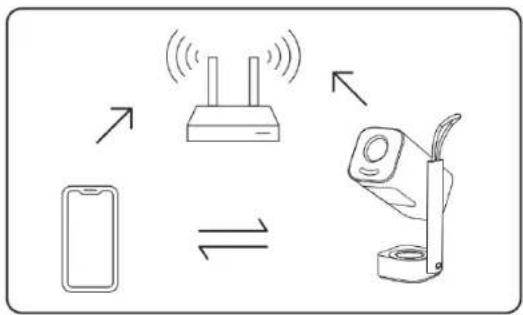
Step2: Go to the homepage -> select [My App] menu -> press [iPhone wireless on the same screen] -> Enter and stay on the [iPhone wireless on the same screen] page.
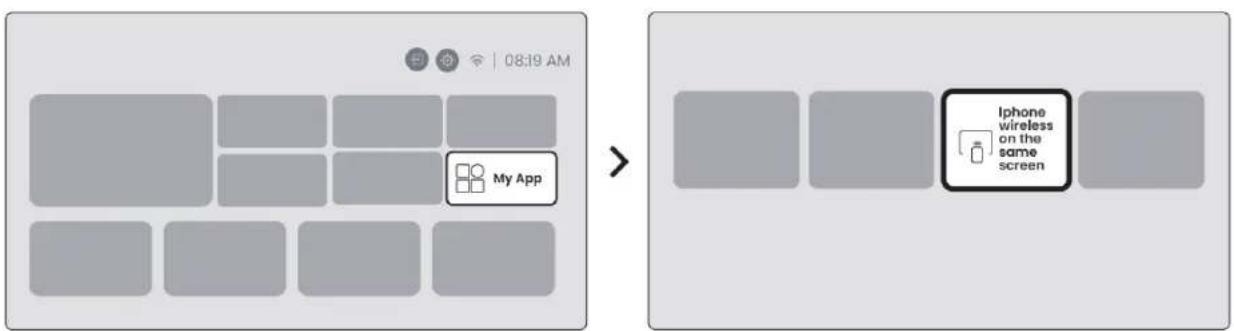
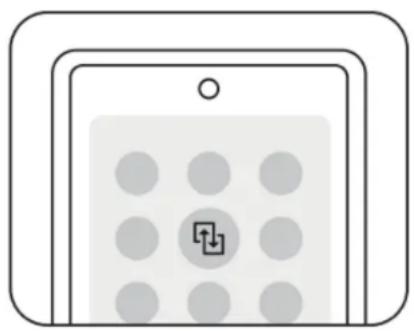
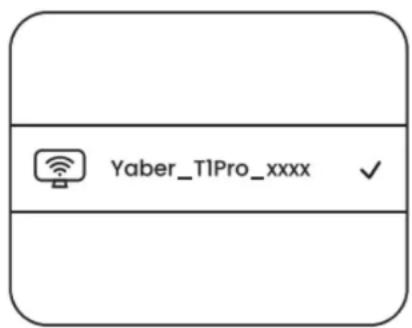
Step3: Open [Control Center] on your iOS device -> Select the screen mirroring function -> Connect the iOS Cast receiver named [Yaber_T1Pro_xxxx] -> Suc-
ceed.

7.3 Miracast (For Android Devices)
Step1: Please enable the Wi-Fi function on your Android phone (Not necessary to connect to Wi-Fi).
Step2: Go to the homepage -> select the [My App] menu -> press [Screencast] -> Enter and stay on the [Android Screen Share] page.
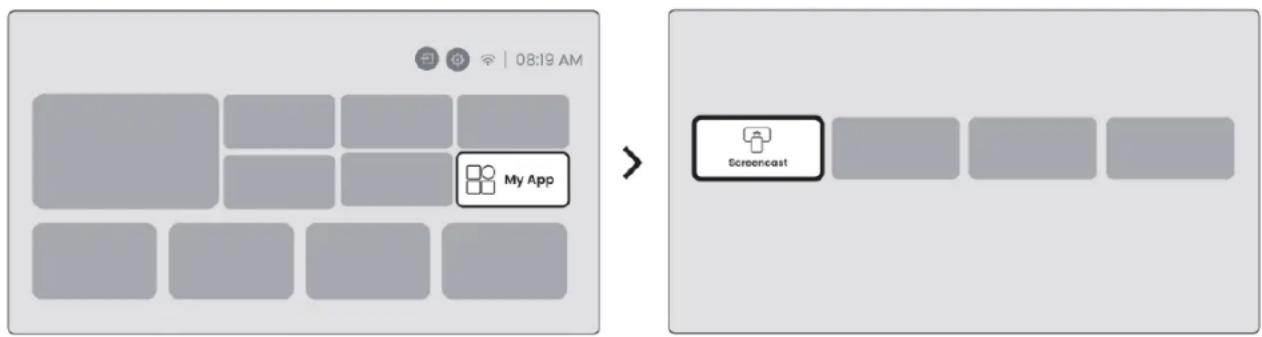
Step3: Access the [Control Center] on your Android device -> Select [Screen Mirroring/Smart View].Select and connect the Miracast receiver named [Y-aber_T1Pro_xxxx] ->Succeed.


Notice: Some google mobile devices only support chromecast and can not be cast by Airplay or Miracast.

Notice: Due to copyright protection, some copyrighted content (Netflix, Hulu, etc.) cannot be mirrored directly from the phone. Need to be used with a TV stick. If you need help, please contact us.

Notice: Mobile phone mirroring can only be realized by entering and staying on the wireless screen sharing page.

Notice: Please ensure that your mobile device is close to the projector. The smoothness of screen mirroring will also be affected by distance.
8. Connectivity
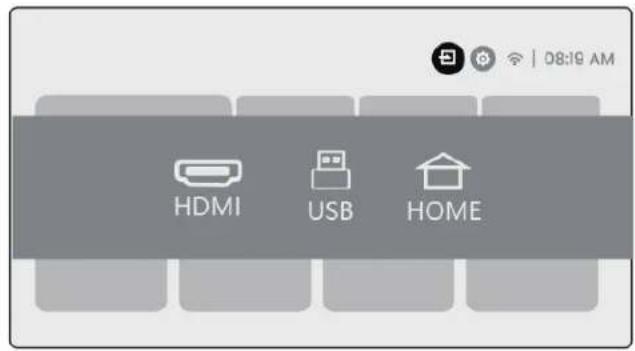
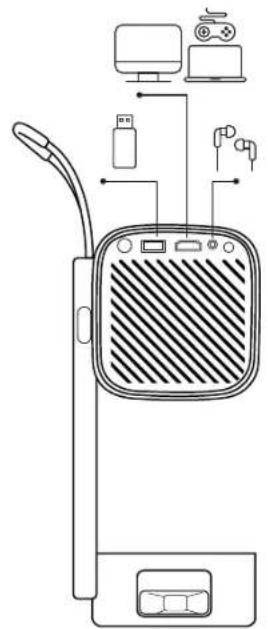
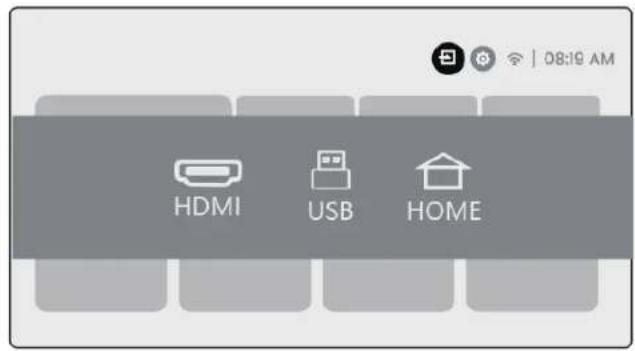
8.1 HDMI, USB, 3.5mm Audio out
Yaber TI Pro projector has 3 interfaces, HDMI port / USB port / 3.5mm audio port. Please select the right one to connect your device (PC, Phone, DVD Player, Soundbar, USB, PS5, etc.


Notice: The USB port is unable to provide sufficient power to the Dongle (Firestick) on its own. Please connect an independent power source.

8.2 USB


Notice: When searching for files on the USB device, please select the correct file category from "Video", "Music", "Image", otherwise you may not find the file you want.
8.3 HDMI
If you're meet some troubles while using HDMI, please try these solutions below:
Method 1. Switch HDMI EDID version to 1.4 in your external device settings.
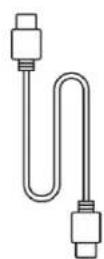
Method 2. Try changing the HDMI cable.
Method 3. Try to replace other external devices with HDMI function and check whether the HDMI interface of external device is working.


Notice: The USB port is unable to provide sufficient power to the Dongle (Firestick) on its own. Please connect an independent power source.
8.4 Audio Out

Note: If you experience stuttering or delay when using a Bluetooth speaker connection, you can use devices that support 3.5mm audio cable to play audio.
8.5 Wireless Connections

Notice: If you need to mirror Netflix, Prime Video, etc. to the projector, please connect a TV Dongle/Stick or other products with these streaming media via HDMI.
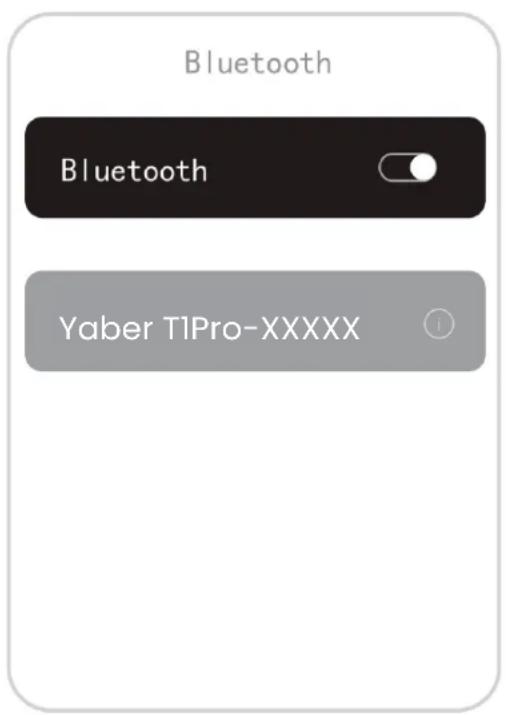
9. Bluetooth Settings
Step1: Turn on your Bluetooth device and prepare for Bluetooth connection.
Step2: Select [Bluetooth] menu -> Turn on Bluetooth button -> Select the Bluetooth device to pair and connect.
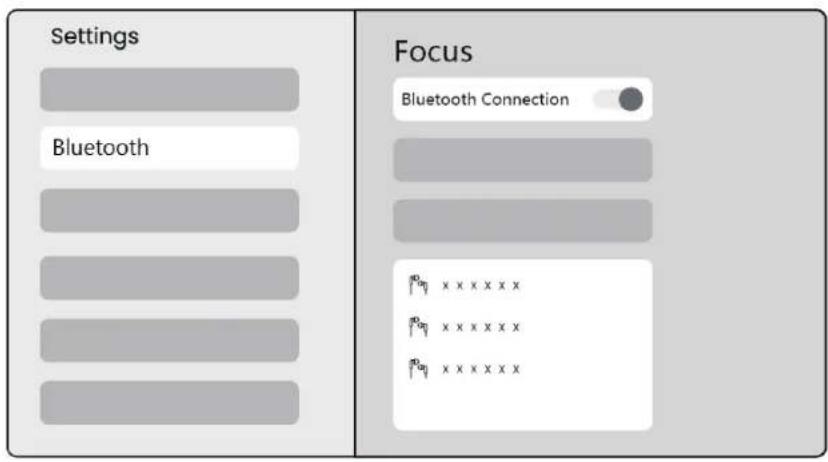

Notice: Please ensure the device is either disconnected from other devices or has Bluetooth mode enabled.
9.2 Bluetooth Speaker
Step1: On the homepage, select the [My App] menu.
Step2: Turn on the Bluetooth Speaker, Enter and stay on this page.

Step3: Search for [Yaber T1Pro-XXXX] on your phone's Bluetooth interface.

10. Regular Cleaning

Notice: Since T1 Pro uses an open optical machine, a small amount of dust may be inhaled during use. It is recommended to clean it regularly.


Remove the cover at the back of the machine and then remove the sealing cover with a screwdriver.
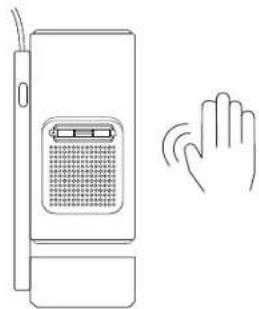
Method 1:
Lightly pat the projector.
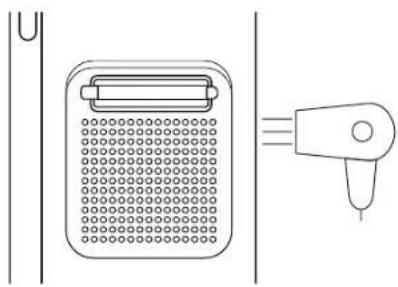
Method 2
Use cold air to blow into the dusting port.
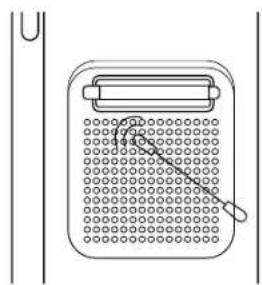
Method 3
Use cotton swabs to remove stubborn stains.
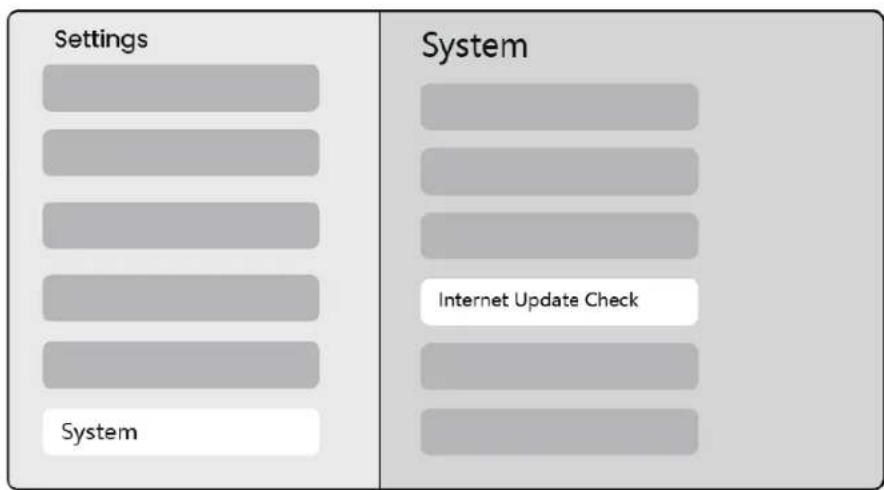
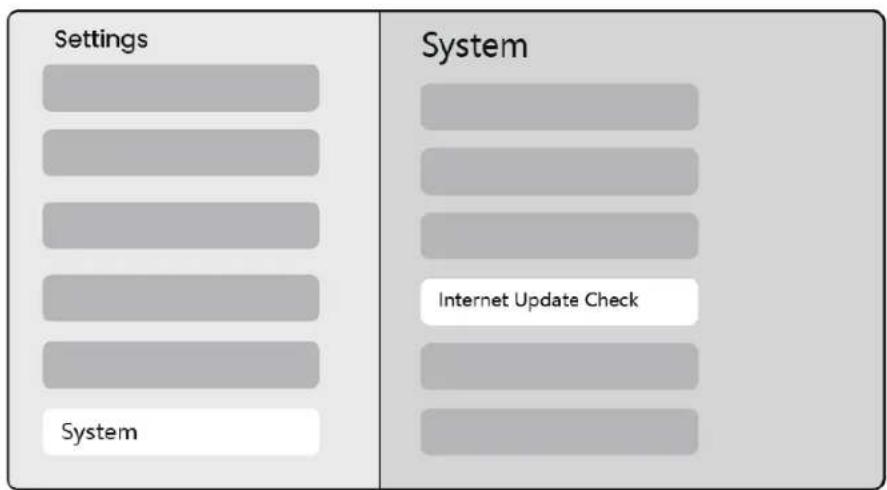
11. System Upgrade
You can check the system status of your device in [Settings]–[System]–[Internet Update Check].
If you have any questions, please feel free to contact us.

support@yaber.com
Yaben
PROJECTOR

Benutzerhandbuch
Projektor T1 Pro
DE
Inhalt
English 01
Deutsch 21
Italiano 43
Français 65
Espanol 87
日本語 109
Polski 129
Pycckn 152
174
mnu 221
繁体中文 243
Cestina 265
Schritt 2: In [Picture] select [ Four Points Correction] adjust the screen by dragging the arrows.


8.5 Wireless Connections

Notice: Auto Focus will be activated after each shift once it is turned on in the setting.

Notice: If you are unsatisfied with the current Auto Focus result, you can select [Execute Auto Focus] to recalibrate.

Notice: If picture remains blurry, please go to homepage select the Settings [ ] select [Picture] select [Manual Focusing] Use the up and down arrow keys to manually adjust the FOCUS until the image is sharp.

Notice: If picture remains blurry, please try adjusting the projection distance and make sure the projection distance is within the appropriate range (Please check [7.3] for details).
6.3 Keystone Correction
You can adjust the Picture Mode according to your needs.
Step1: please go to homepage select the Settings [ ] select [Picture]
Step2: In [Picture] -> select [Picture Mode]

Attention: The Image color setting will only take effect when playing pictures or videos.
7. Screen Mirroring
7.1 WiFi Settings
Step1: Press the Settings [ ] button -> Select [Network & Internet] -> Turn on [Internet Connection] button -> Select [Wi-Fi]
Step2: In [Available Networks] list-> Search your desired Wi-Fi network -> enter the password -> Select [OK] -> Wait for the projector to connect.

5.1 KaK BkIouNTb IpoeKTop
HaXmTe KHOKNy, IN npoeKTop BbIDBHNETc.

2 Iorotn YaberdoJKeH 6bITb HapabHeh Bnepei, NOBepHNTe Kopnyc B3Tom HapabJeHIn. O6paTHoe BpaueHne MoKet Bbl3BaTb NOBpeKdEHne.

BbIMoKeTe Bbi6paTb yroI npoeKuIN OT O do 180^

BHMaHne: He BpaaTe ycTpoiCTBO HnprMyIO, TaK KaK 3TO MoKet Bbl3BaTb NOBpeJKeHne.

BHMaHHe:YTo6bI 3aKpbITb npoeKTop,BbIpOBHnTe Kopnyc N HaxmAle BHN3,POKa He ycbliUnTe ueJyOK.
5.2 KpenJeHne IpoeKTopa Ha POncTaBKe
IpoekTop MoKet 6bITb 3aKpeHnHa NOTOKe C NcNoB3OBAHnEM KPOHHTeHa n BnHTa 1/4 (He BXODNT B KOMNKeT), IINyUCTaHOBNeH Ha WtATnBE.


BHMaHHe:Y6eI NTecb,yTo y BaC eCTb yHNBepCaJIbHbI KpOHHTeH, KOToPbI NOxOHT dIg IpoEKTopa.

BHMaHHe: T1 Pro He noDpeKnBaet yctaHObky c yeTbIpbM yrJaMn.
6.3.5 ABToMaTnueeCKoe N36eRaHne IpenrTCTBn
3TaФункця abTomatnueckn onpeedJIeT npenrTCTBna Ha nyTu npoekcni n ABTOMATnueckn peynpyeT yroI nnnoJoxKeHne u3o6paJxHn, YTO6bl npedOTbPaTntb 3aTpudHeHHu u3o6paXeHHa, rapaHTnpyur yeTKyU IN OINHyU npoekzio.


BnmaHne: Npeed nCnoIb3OBAHnem fynKcui ABTOOnoIroHKn 3kpaHa n ABToMaTnueckoro n36eRaHn IpnEaTCTBn y6eDInTeCb, UTO fynKcui ABTOKOppeKcui Tpaneu n ABTofoKocnpOBKn BkIouHebl. N36erAHe npEaTCTBn MoXeT He pa60TaTb, KOrda Ha ueBOM 3kpaHe HaxOJaTc8eblle nn DpyrNe CBetlbie ppeMeTbl.
6.4 MacstTa6npoBaHne I3o6paXeHna
BbIMoKeTe HAcTpOnTb pa3Mep n306paXeHnB COOTBeTCTBnC BaShmN IOTpe6HOCTaMn.
War 1: nepeiDnTe Ha rIaBHyIO cTpaHnUy -> BbI6epNte HacTpoKn [ ] -> Bbl6epnTe [N3o6paJKeHne]
War 1: HaxMMTe KhoNky HacTpoiKN [ ] -> Bbl6epnTe [CeTb NHTepHeT] -> BkIouNte KhoNky [POnKJIoueHne K INTepHeTy] -> Bbl6epnTe [Wi-Fi]
War 2: B cπncke [ДocTyHbIe CeTn] -> HainTe cBIO cETb Wi-Fi -> BBeINTe napoIb -> BbI6epnte [OK] -> DoxNITecb noDknUoyEnna npoeKTopa.

Ierko noctyuHTe no npoeKTopy.
MeToI2:
IcnoJb3yInTe xOIoNbI B03dUx IJI npOdyBKN B IopT IJI yJaJIeHNI PbIN.
MeToI3:
IcnoJIb3yIte BaTHbIe naIOUKN, yTo6bl ydaJIITb cToiKne IaTHa.


11. 06нов lienе Систembl
BbIMoKeTe npOBepntb coCTOaHne cncTeMbI BaWero ycTpoiCtBa B [HaCToPouKn]-[CncTeMa]-[PiPoBepka O6HOBJIeHm B INHTepHeTe].
Ecn y Bac eTb Bonpocbl, noxanycta, He cTechnTecb obaaatbc K Ham.

support@yaber.com
Yaben
PROJECTOR

사용자 썼 nondel
thro酪TPro
目录
English 01
Deutsch 21
Italiano 43
Francais 65
Espanol 87
日本語 109
Polski 129
Pycckn 152
174
mnnn 221
繁体中文 243
Cestina 265
daii j 1000000000000000000000000000000000000000000000000000000000000000000000000
- 僅朝朝朝朝朝朝朝朝朝朝朝朝朝朝朝朝朝朝朝朝朝朝朝朝朝朝朝朝朝朝朝朝朝朝朝朝朝朝

- 会用的
- 朝天朝,朝朝之治。


2.2017年:[海通]出版社 [i]iJiJiJiJiJiJiJiJiJiJiJiJiJiJiJiJiJiJiJiJiJiJiJiJiJiJiJiJiJiJiJiJiJiJiJiJiJiJiJiJiJiJiJiJiJiJiJiJiJiJi

6.5 ニスロー
皂藥上,如:
- [Ser] -> [Iner]
- [安]:[s]i]

unoun1: uuaunnnnns->ananns [ ] -> an [nW]
unoun2: [nW]-> 1aon [uUvua] -> U5unnuuauuansanans


unoun2: [nW] -> non [nsw] -> uananaaauwauuunrnnn
6.5 n
H
yunou1:luuulnnn->anannn[ ]->bnn [nW]
unoun2: [nW] -> n[wnn]


:
7. n5a:nnn
7.1 n5nWiFi
yunu1: nuyunravn [ ] -> 1on [aovvuae nn] -> u
[nt5oohouuunos]-> [Wi-Fi]
2: 157u [157u] nwnnwnwWifinwn- > uwsna ->
[nnav]->uUsvwnneur

JlJlJ1 JrJrJrJrJrJrJrJrJrJrJrJrJrJrJrJrJrJrJrJrJrJrJrJrJrJrJrJrJrJrJrJrJrJrJrJrJr
service@yaber.com
2. aolglb
J 10
J 1
·aIgKoJI I 1 J 1 J 1 J 1 J 1 J 1 J 1 J 1 J 1 J
·jIJIJI JJU 1JU JU JU JU JU JU JU JU JU JU JU JU JU JU JU JU JU JU JU JU JU JU JU JU JU JU JU JU JU JU JU JU JU JU JU JU JU JU JU JU JU JU JU JU JU JU JU JU JU JU JU
JU JU UUUUUUUUUUUUUUUUUUUUUUUUUUUUUUUUUUUUUUUUUUUUUUUUUUUUUUUUUUUUUUUUUUUUUUUUUUUUUUUUUUUUUUUUUUUUUUUUUUUUUUUUUUUUUUUUUUUUUUUUUUUUUUUUUUUUUUUUUUUUUUUUUUUUUUUUUUUUUUUUUUUUUUUUUUUUUUUUUUUUUUUUUUUuuuuuuuuuuuuuuuuuuuuuuuuuuuuuuuuuuuuuuuuuuuuuuuuuuuuuuuuuuuuuuuuuuuuuuuuuuuuuuuuuuuuuuuuuuuuuuuuuuuuuuuuuuuuuuuuuuuuuuuuuuuuuuuuuuuuuuuuuuuuuuuuuuuuuuuuuuuuuuuuuuuuuuuuuuuuuuuuuuuuuuuuuuuuuuuuuuuuuuuu uu
JbJgln cI 1 yjgwwSg uog jgjbl.
gll gll lglb nnnn nn nnnn nnnn nnnn nnnn nnnn nnnn nnnn nnnn nnnn nnnn nnnn nnnn nnnn nnnn nnnn nnnn nnnn nnnn nnnn nnnn nnnn nnnn nnnn nnnn nnnn nnnn nnnn nnnn nnnn nnnn nnnn nnnn nnnn nnnn
[jj]<-[0gJl]<-[-


a:ab

[1]

<--aissjlllaIJlLwK|yRgdsGggsOggy|d:ab>
JcJWs|<-[gS]du<-[gssll]du<-[ ]atla|
oooogaae

Sllg jlll al lglb gla yjy aaglg ggyaal 1: abx (Jus [7.3] yjy)
6.3
6.3.1
[fo] <-.

i kki i l l l l l l l l l l l l l l l l l l l l l l l l l l l l l l l l l l l l l l l l l l l l l l l l l l l l l l l l l l l l l l l l l l l

jIJI I pI JI I I I I I I I I I I I I I I I I I I I I I I I I I I I I I I I I I I I I I I I I I I I I I I I I I I I I I I I I I I I I I I I I I I I I I I I I I I I I
6.3.2 0000001J1000001J000
J 1 J 1 J 1 J 1 J 1 J 1 J 1 J 1 J 1 J 1 J 1 J 1 J 1 J 1 J 1 J 1 J 1 J 1 J 1 J 1 J 1 J 1 J 1 J 1 J 1 J 1 J 1 J 1 J 1 J 1 J 1 J 1 J 1 J 1 J


a d a a a a a a a a a a a a a a a a a a a a a a a a a a a a a a a a a a a a a a a a a a a a a a a a a a a a a a a a a a a a a
g 8 1 1 1 1 1 1 1 1 1 1 1 1 1 1 1 1 1 1 1 1 1

aLwI aLwJ 1 aWlWJ JdJgRgssllg2.

aIJ jS o p d c y, aIJI aJl do abg pl JwI sic 3.


aI aI I I I I I I I I I I I I I I I I I I I I I I I I I I I I I I I I I I I I I I I I I I I I I I I I I I I I I I I I I I I I I I I I I I I I I I I I I I I I I I
6.3.5
g 1 g j j j j j j j j j j j j j j j j j j j j j j j j j j j j j j j j j j j j j j j j j j j j j j j j j j j j
Iolg Iolg Ior c o aagll slwil gioJ.


aaii iil glll bnnn n aiai lll aiaaiaaiaaiaaiaaa aalp aaii aaii aaii aaii aaii aaii aaii aaii aaii aaii aaii aaii aaii aaii aaii aaii aaii aaii aaii aaii aaii aaii aaii aaii aaii aaii aaii aaii aaii aaii aaii aaii aaii aaii
a9gaiwai.
oo 6.4
diJg oJg all bfo diSoy.
[oo]ds<-[]dclc|ds<-aiesylllJllJllJyI yj:Ogbl I bI gI gI gI gI gI gI gI gI gI gI gI gI gI gI gI gI gI gI gI gI gI gI gI gI gI gI gI gI gI gI gI gI gI gI gI gI gI gI gI gI gI gI gI gI gI gI gI gI gI gI
aogc oogallg.

6.5 n
H
yunou1:luuulnnn->anannn[ ]->bnn [nW]
unoun2: [nW] -> n[wnn]


:
7. n5a:nnn
7.1 n5nWiFi
yunu1: nuyunravn [ ] -> 1on [aovvuae nn] -> u
[nt5oohouuunos]-> [Wi-Fi]
2: 157u [157u] nwnnwnwW-Wi-Fi nnovn- uwsnaW->
[nnav]->uUsvwnneur


vuaa: 1uauauauuuuunnnnnaauauauauauauauauauauau
8. 75
8.1 HDMI, USB, 3.5mm Audio out
Yaber T1 Pro 3 HDMI/USB/USB USB 3.5 m. U
ToennuunnnaaunnuuauuuuauuuuuuuuuuuuuuuuuuuuuuuuuuuuuuuuuuuuuuuuuuuuuuuuuuuuuuuuuuuuuuuuuuuuuuuuuuuuuuuuuuuuuuuuuuuuuuuuuuuuuuuuuuuuuuuuuuuuuuuuuuuuuuuuuuuuuuuuuuuuuuuuuuuuuuuuuuuuuuuuuuuuuuuuuuuuuuuuuuuuuuuuuuuuuuuuuuuuuuuuuUU

vana: wsn USB nwnnnaaewwawauan (Firestick) n
8.2 USB


"w" "w" "w" "w"
8.3 HDMI
HDMI Uusnaovuunuua
5.1 Cach Bât May Chieu
Nhan nut va may chieu bat len.
- Logo Yaber huǒng rapi truóc, xoay than may theo huǒng này. Xoay nguc co thegáy hu hóng.
Banco the chongoc chiu tu 0-180°

Luu y: Khong xoay thiet bi truc tiep, vi dieu nay co the gay hu hong.

Luu y: De dong may chieu, can chinh than may va nhanh xuong cho den khi nghe tieng click.
5.2 Lap Dát Già Do' May Chieu
Mày chieu có the duoc lap tu tran su dung già do va oc vit 1/4 (khong bao gom), hoac lap tren chan may.


Luu y: Hay dam bao bao có mOt già do lap dát da nang phu hop voi may chieu.

Luu y: T1 Pro khong hô tro lap dát goc bôn goc.
5.3 Khoang Cach Chieu
6.3.2 Hieu Chinh Keystone Thu Cóng
Néu bàn can diieu chinh them mân先进技术, bàn có the su dung tinng nang Hieu Chinh Keystone Thu Cóng.
Bucc 1: vui long vao tranq chu -> chon Cai dāt [♂] -> chon [Hinh anh]
Phuong phap 2. Thu thaty doi cap HDMI.
Phuong phap 3. Thu that the cac thiet bi ngoai khac voi chuc nang HDMI va kiem tra xem giao dien HDMI cua thiet bi ngoai co hoat dong khong.


Luu y: Cóng USB không thecung cap du diên cho Dongle (Firestick) tu né. Vui long két noi vovi nguôn diên doc lap.
8.4 Dàu ra Am thanh

Luu y: Néu bànGap hiên tuong giàt hoac tré khi sùdung két não loa Bluetooth, bàn có the su'dung thiet bi hôtro cap am thanh 3.5mm déphát am thanh.
8.5 Két Nói Khóc Day

Luu y: Néu bàn can phàn chieu Netflix, Prime Video, v.v.进展情况 may chieu, vui long két nôi môt Dongle/Stick TV先进技术 sān pham khac có phuong tiên truyen phat truc tuyén nay qua HDMI.
9. Cái Dát Bluetooth
Bucc 1:Bat thiet bi Bluetooth cua ban va chu an bi cho két noi Bluetooth.
Bucc 2: Chon menu [Bluetooth] -> Bât nét Bluetooth -> Chon thiet bi Bluetooth dé ghep moi va két moi.


Luu y: Vui long dam bao thiet bi khong két noi voi cac thiet bi khac hoac da bat che do Bluetooth.
9.2 Loa Bluetooth
Buoc 1: Trên trang chu, chôn menu [Ung Dung cua ],
Buc2:Bat Loa Bluetooth, Nhap va giu nguyen tranq nay.

Buc3: Tim kiem [Yaber T1Pro-XXXX] trong giao dien Bluetooth cua dien thoai cua ban.
10. Lê Sinh Phúng Xuyen

Luru y: Vi T1 Pro sù d lung不好意思 quang hoc mo, moot luong nhô buci co the bi hut vao trong qua trinh sù d lung. Khuyen nghi vê sinh thai ng xuyên.

7.2 iOS Cast (for iOS-enheter)
11. Systemoppgradering
6.3.3 Automatism keystone after opstart
Basta Várdefulla Kund,
Steg 2: I [Bild] -> Valj [Bildlage]