
TECS 181652 Li - Electric saw EINHELL - Free user manual and instructions
Find the device manual for free TECS 181652 Li EINHELL in PDF.
| Brand | Einhell |
| Model | TECS 181652 Li |
| Product type | Cordless circular saw |
| Blade diameter | 165 mm |
| Blade bore | 20 mm |
| Blade thickness | 1.6 mm |
| Cutting depth at 90° | 57 mm |
| Cutting depth at 45° | 39 mm |
| Cutting angle (miter) | 0° – 50° |
| No-load speed | 4,200 rpm |
| Battery voltage | 18 V DC |
| Weight | 2.9 kg |
| Sound pressure level (LpA) | 88.5 dB(A) with uncertainty K=3 dB |
| Sound power level (LWA) | 96.5 dB(A) with uncertainty K=3 dB |
| Vibration (main handle) | a_h,W = 2.81 m/s², K=1.5 m/s² |
| Vibration (auxiliary handle) | a_h,W = 4.45 m/s², K=1.5 m/s² |
| Main functions | Straight cut, bevel cut, LED guide, parallel stop, chip extraction |
| Safety devices | Tilting protective cover, spindle lock, switch lock, electrical shock protection |
| Maintenance and cleaning | Clean regularly with a damp cloth and mild soap; do not use aggressive agents or immerse in water |
| Wear parts | Saw blade, battery pack |
| Included accessories | Saw blade, blade key, parallel stop, instruction manual |
Frequently Asked Questions - TECS 181652 Li EINHELL
User questions about TECS 181652 Li EINHELL
0 question about this device. Answer the ones you know or ask your own.
Ask a new question about this device
Download the instructions for your Electric saw in PDF format for free! Find your manual TECS 181652 Li - EINHELL and take your electronic device back in hand. On this page are published all the documents necessary for the use of your device. TECS 181652 Li by EINHELL.
USER MANUAL TECS 181652 Li EINHELL
GB Original operating instructions Cordless Handheld Circular Saw
RO Instruetiuni de'utilizare originale Ferastrau circular manual cu accumulator
Akkugerat, Ladegerat = 10-40° C.
When using the equipment, a few safety precautions must be observed to avoid injuries and damage. Please read the complete operating instructions and safety regulations with due care. Keep this manual in a safe place, so that the information is available at all times. If you give the equipment to any other person, hand over these operating instructions and safety regulations as well. We cannot accept any liability for damage or accidents which arise due to a failure to follow these instructions and the safety instructions.
Explanation of the symbols used (see Fig. 17)
- Danger! - Read the operating instructions to reduce the risk of injury.
- Caution! Wear ear-muffs. The impact of noise can cause damage to hearing.
- Caution! Wear a breathing mask. Dust which is injurious to health can be generated when working on wood and other materials. Never use the device to work on any materials containing asbestos!
- Caution! Wear safety goggles. Sparks generated during working or splinters, chips and dust emitted by the device can cause loss of sight.
- Pull out the plug or battery pack!
- Caution! Do not look into the light beam.
1. Safety regulations
The corresponding safety information can be found in the enclosed booklet.
Warning!
Read all the safety information, instructions, illustrations and technical data provided on or with this power tool. Failure to adhere to the following instructions may result in electric shock, fire and/or serious injury.
Keep all the safety information and instructions in a safe place for future use.
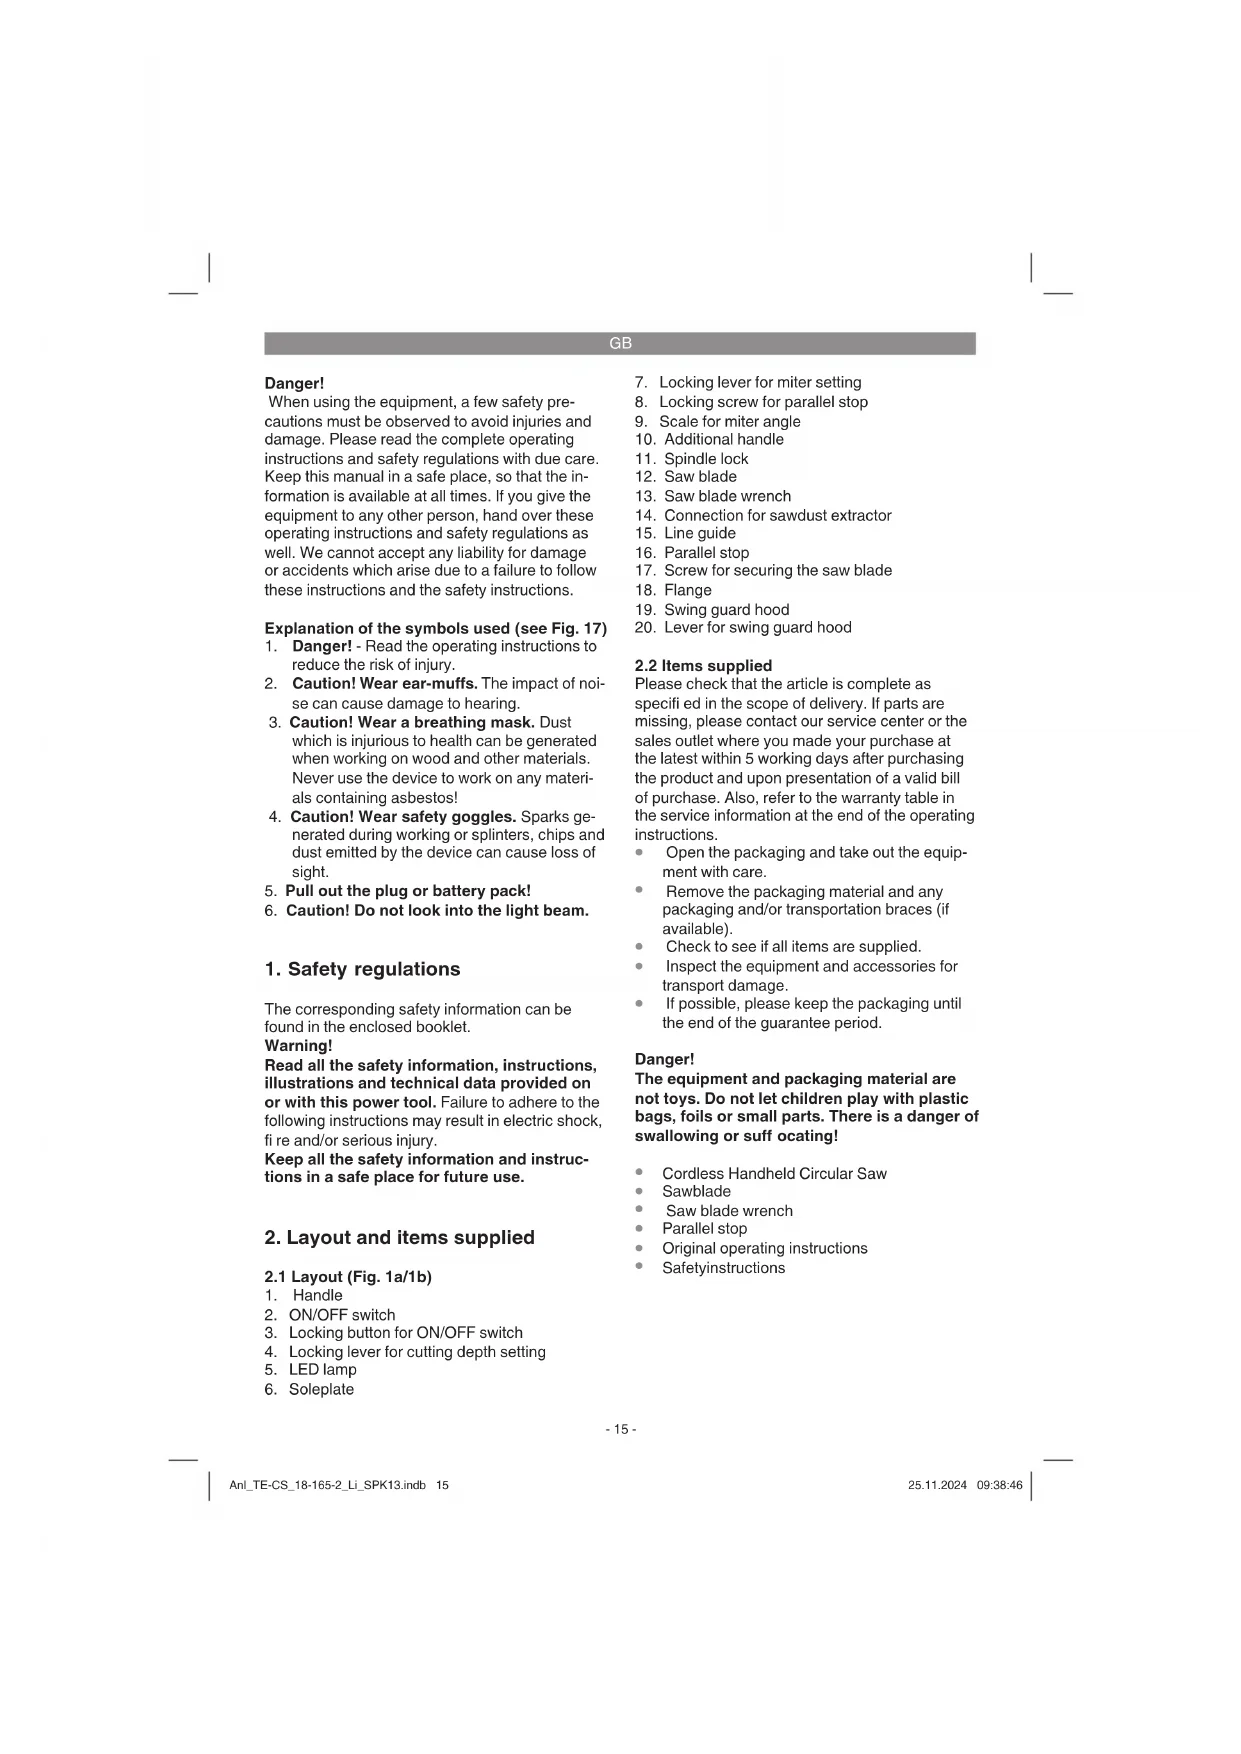
2. Layout and items supplied
2.1 Layout (Fig. 1a/1b)
- Handle
- ON/OFF switch
- Locking button for ON/OFF switch
- Locking lever for cutting depth setting
- LED lamp
-
Soleplate
-
Locking lever for miter setting
- Locking screw for parallel stop
- Scale for miter angle
- Additional handle
- Spindle lock
- Saw blade
- Saw blade wrench
- Connection for sawdust extractor
- Line guide
- Parallel stop
- Screw for securing the saw blade
- Flange
- Swing guard hood
- Lever for swing guard hood
2.2 Items supplied
Please check that the article is complete as specified in the scope of delivery. If parts are missing, please contact our service center or the sales outlet where you made your purchase at the latest within 5 working days after purchasing the product and upon presentation of a valid bill of purchase. Also, refer to the warranty table in the service information at the end of the operating instructions.
- Open the packaging and take out the equipment with care.
- Remove the packaging material and any packaging and/or transportation braces (if available).
Check to see if all items are supplied. - Inspect the equipment and accessories for transport damage.
If possible, please keep the packaging until the end of the guarantee period.
Danger!
The equipment and packaging material are not toys. Do not let children play with plastic bags, foils or small parts. There is a danger of swallowing or suffocating!
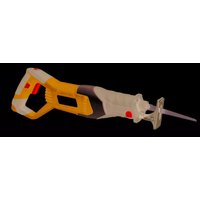
- Cordless Handheld Circular Saw
Sawblade
Saw blade wrench - Parallel stop
Original operating instructions - Safetyinstructions
GB
3. Proper use
The cordless handheld circular saw is designed for sawing straight cuts in wood, wood-type materials and plastics. In the case of plastic workpieces, be careful not to overheat the tips of the saw blade and melt the plastic.
The equipment is to be used only for its prescribed purpose. Any other use is deemed to be a case of misuse. The user / operator and not the manufacturer will be liable for any damage or injuries of any kind caused as a result of this.
Please note that our equipment has not been designed for use in commercial, trade or industrial applications. Our warranty will be voided if the machine is used in commercial, trade or industrial businesses or for equivalent purposes.
4. Technical data
Motor power supply: 18 V DC
ldling speed: 4200 min-1
Cutting depth at 90^ .. 57 mm
Cutting depth at 45^ .. 39 mm
Saw blade: 0 165 mm
Blade holder: 20 mm
Blade thickness: 1.6 mm
Weight: 2.9 kg
Danger!
Sound and vibration
Sound and vibration values were measured in accordance with EN 62841.
L_pA sound pressure level 88.5 dB(A)
K_pA uncertainty 3 dB
L_WA sound power level 96.5 dB(A)
K_WA uncertainty 3 dB
Wear ear-muff s.
The impact of noise can cause damage to hearing.
Total vibration values (vector sum of three directions) determined in accordance with EN 62841.
Handle
Vibration emission value a_h,W = 2.81 m/s^2
Kuncertainty = 1.5m / s^2
Additional handle
Vibration emission value a_t,W = 4.45 m/s^2
K uncertainty = 1.5m / s^2
The stated vibration emission levels and stated noise emission values were measured in accordance with a set of standardized criteria and can be used to compare one power tool with another.
The stated vibration emission levels and stated noise emission values can also be used to make an initial assessment of exposure.
Warning:
The vibration and noise emission levels may vary from the level specified during actual use, depending on the way in which the power tool is used, especially the type of workpiece it is used for.
Keep the noise emissions and vibrations to a minimum.
Only use appliances which are in perfect working order.
Service and clean the appliance regularly.
Adapt your working style to suit the appliance.
Do not overload the appliance.
- Have the appliance serviced whenever necessary.
- Switch the appliance off when it is not in use.
Caution!
Residual risks
Even if you use this electric power tool in accordance with instructions, certain residual risks cannot be rules out. The following hazards may arise in connection with the equipment's construction and layout:
- Lung damage if no suitable protective dust mask is used.
- Damage to hearing if no suitable ear protection is used.
- Health damage caused by hand-arm vibrations if the equipment is used over a prolonged period or is not properly guided and maintained.
5. Before starting the equipment
Warning!
Always remove the battery pack before making adjustments to the equipment.
GB
5.1 Setting the cutting depth (Figure 2/3)
- Release the handle on the rear of the guard hood for adjusting the cutting depth (4).
- Place the saw foot (6) flat on the surface of the workpiece you wish to saw. Raise the saw until the saw blade (12) is at the required cutting depth (a).
- Refasten the handle for adjusting the cutting depth (4). Check the handle is securely fastened.
5.2 Miter stop (Figure 4/5)
The preset standard angle between the saw foot (6) and saw blade (12) is 90^ . You can adjust this angle to carry out angled cuts.
- Release the locking lever for miter setting (7) on the front of the saw foot.
- You can now adjust the cutting angle to around 50^ . Keep an eye on the cutting angle scale (9) as you do so.
- Refasten the locking lever for miter setting (7). Check the handle is securely fastened.
5.3 Extraction of dust and chips (Figure 6)
- Connect a suitable vacuum cleaner to the provided chip extractor connector (14) of your circular saw (vacuum cleaner not included). This will provide excellent dust extraction on the workpiece. The benefits are that you will protect both the equipment and your own health. Your work area will also be cleaner and safer.
- Dust created when working may be dangerous. Refer to the section entitled "Safety instructions".
- Important! The vacuum cleaner you use for the extraction work must be suitable for the workpiece material.
- Check that all the parts are properly connected.
5.4 Parallel stop (Figure 7/8)
The parallel stop (16) enables you to saw parallel lines.
- Loosen the locking screw for the parallel stop (8) on the saw foot (6).
To assemble, slide the parallel stop (16) into the guide (c) on the saw foot (6) (see Figure 7)
- Set the required spacing and then tighten the locking screw (8) again.
Using the parallel stop: Position the parallel stop (16) flat on the edge of the workpiece and start the cut.
Important! Carry out a trial cut in a piece of waste wood
5.5 Line guide (Fig. 9)
Using the line guide (15) you can carry out exact cuts following cutting lines marked on the workpiece.
Use the mark (d) for the 0^ or 90^ angle setting and the mark (b) for the 45^ angle setting.
For information on the angle setting see 5.2
Important! Carry out a trial cut in a piece of waste wood
5.6 Charging the LI battery pack (Fig. 10-11)
- Remove the battery pack (g) from the handle, pressing the pushlock buttons (f) downwards to do so.
- Check that your mains voltage is the same as that marked on the rating plate of the battery charger. Insert the power plug of the charger (j) into the mains socket outlet. The green LED will then begin to flash.
- Push the battery pack onto the battery charger.
In section 10 "Charger indicator" you will find a table with an explanation of the LED indicator on the charger.
Important!
Only use the rechargeable battery and charger when dry and with an ambient temperature of 10 - 40^
Store the rechargeable battery, cordless tool and charger in a dry place with an ambient temperature of: Rechargeable battery = 10 - 20^
Cordless tool, charger = 10 - 40^
If the battery pack fails to become charged, please check
whether there is voltage at the socket-outlet
whether there is proper contact at the charging contacts on the charger.
If the battery still fails to become charged, please return
thecharger
the battery pack
to our Customer Service Department.
GB
To ensure that items are properly packaged and delivered when you send them to us, please contact our customer service or the point of sale at which the equipment was purchased.
When shipping or disposing of batteries and cordless tools, always ensure that they are packed individually in plastic bags to prevent short circuits and fi res.
To ensure that the battery pack provides long service, you should take care to recharge it promptly. You must recharge the battery pack when you notice that the performance of the device drops. Never allow the battery pack to become fully discharged. This will cause it to develop a defect.
5.7 Battery capacity indicator (Fig. 10 - Item h)
Press the battery capacity indicator switch (i). The battery capacity indicator (h) shows the charge status of the battery using 3 LEDs.
All 3 LEDs are lit:
The battery is fully charged.
2 or 1 LED(s) are lit:
The battery has an adequate remaining charge.
1 LED fl ashes:
The battery is empty, recharge the battery.
All LEDs blink:
The battery temperature is too low. Remove the battery from the equipment, keep it at room temperature for one day. If the fault reoccurs, this means that the rechargeable battery has undergone exhaustive discharge and is defective. Remove the battery from the equipment. Never use or charge a defective battery.
6. Operation
Warning!
Always remove the battery pack before making adjustments to the equipment.
6.1 Working with the hand-held circular saw
Always hold the tool firmly by the handles provided (1 and 10) to ensure that you handle it safely when using it.
The swing guard hood (19) is pushed back automatically by the workpiece.
Do not use force!
- Push forwards gently and evenly with the circular saw.
- The waste piece should be on the right-hand side of the circular saw so that the wide section of the support bench supports its full area.
If you are sawing down a line that has been drawn, guide the circular saw along the corresponding notch.
- Clamp small pieces of wood securely before sawing them. Never hold them with your hand.
Always follow the safety instructions. Wear safety goggles.
- Do not use defective saw blades or blades that are cracked or broken.
- Do not use any flanges / flange nuts whose bore hole is larger or smaller than those in the saw blade.
The saw blade must not be decelerated by hand or by applying lateral pressure to the blade.
- Check that the swing guard hood works properly. The swing guard hood must not jam, and it must return to its initial position when you have completed the cut.
Before you use the circular saw, check the function of the swing guard hood with the mains plug disconnected.
Before you use the machine, ensure that the safety equipment such as the swing guard hood, flanges and adjustment devices are in working order and are correctly adjusted and secure.
- You can connect a suitable dust extraction system to the sawdust extraction connector (14). Ensure that the dust extractor line is safely and correctly connected.
The moving swing guard hood must not be fixed in the retracted guard hood when the saw is in use.
6.2 Using the circular saw
Adjust the cutting depth, cutting angle and parallel stop (see section 5.1, 5.2 and 5.4)
- Do not switch on the circular saw until you have fitted a saw blade.
- Place the saw foot flat on the workpiece you wish to saw. The saw blade must not be in contact with the workpiece.
Hold the circular saw firmly with both hands.
GB
6.3 Switching ON/OFF (Fig. 12)
To switch on:
Press the locking button (3) and the ON/OFF switch (2) at the same time
- Allow the saw blade to accelerate until it reaches full speed. Then slowly move the saw blade along the cutting line. Only exert gentle pressure on the saw blade as you do so.
To switch off :
Release the locking button and ON/OFF switch
If you release the handle the equipment will shut down automatically which means that it cannot operate accidentally.
- Ensure that you do not cover or block the ventilation openings whilst working with the tool.
- Do not slow down the saw blade after you switch it off by pressing it sideways.
- Important! Do not put down the machine until the saw blade has reached a complete standstill.
Important. Carry out a trial cut in a piece of waste wood
6.4 Changing the saw blade (Fig. 13-16)
Warning!
Always remove the battery pack before making adjustments to the equipment.
Use only saw blades which comply with standard EN 847-1 and are of the same type as the saw blade supplied with this circular saw. Ask your dealer for advice.
Warning!
Do not use grinding wheels!
The diameters of the saw blades used must correspond to the diameters specified on the handheld circular saw blade!
Use only recommended saw blades!
Use the saw blade key (13) supplied to change the saw blade. The saw blade key (13) is stored in the housing. If required, pull the saw blade key (13) out of the housing (see Figure 13).
Important. The hand-held circular saw must not be operated with the saw blade key (13) inserted in it.
Press the spindle lock (11).
- Undo the screw to secure the saw blade (17) using the saw blade key (13).
- Push back and secure the moving swing guard hood (19) using the lever for the swing guard hood (20).
- Remove the flange (18) and the saw blade (12) in a downwards direction.
Clean the flange and insert the new saw blade. Pay attention to the running direction (see arrow on the guard hood and saw blade). - Tighten the screw to secure the saw blade (17), check it runs true.
Before you press the On/Off switch, make sure that the saw blade is correctly fitted and that moving parts run smoothly and the clamping screws are tightened securely.
6.5 LED lamp (Fig. 1/Item 5)
The LED lamp (5) can be used in poor lighting conditions to additionally illuminate the cutting position. The LED lamp (5) will come on automatically as soon as you press the locking button for the On/Off switch (3).
7. Cleaning, maintenance and ordering of spare parts
Danger!
Always pull out the battery pack before starting any cleaning work.
7.1 Cleaning
- Keep all safety devices, air vents and the motor housing free of dirt and dust as far as possible. Wipe the equipment with a clean cloth or blow it with compressed air at low pressure.
We recommend that you clean the device immediately each time you have finished using it.
Clean the equipment regularly with a moist cloth and some soft soap. Do not use cleaning agents or solvents; these could attack the plastic parts of the equipment. Ensure that no water can seep into the device. The ingress of water into an electric tool increases the risk of an electric shock.
7.2 Maintenance
There are no parts inside the equipment which require additional maintenance.
GB
7.3 Ordering replacement parts:
Please quote the following data when ordering replacement parts:
Type of machine
Article number of the machine
- Identification number of the machine
- Replacement part number of the part required For our latest prices and information please go to www.Einhell-Service.com
8. Disposal and recycling
The equipment is supplied in packaging to prevent it from being damaged in transit. The raw materials in this packaging can be reused or recycled. The equipment and its accessories are made of various types of material, such as metal and plastic. Never place defective equipment in your household refuse. The equipment should be taken to a suitable collection center for proper disposal. If you do not know the whereabouts of such a collection point, you should ask in your local council offices.
9. Storage
Store the equipment and accessories in a dark and dry place at above freezing temperature. The ideal storage temperature is between 10 and 40^ . Store the electric tool in its original packaging.
10. Charger indicator
| Indicator status | Explanations and actions | |
| Red LED Green LED | ||
| Off | Flashing | Ready for use The charger is connected to the mains and is ready for use; there is no battery pack in the charger |
| On Off Charging | The charger is charging the battery pack in quick charge mode. The charging times are shown directly on the charger. Important! The actual charging times may vary slightly from the stated charging times depending on the existing battery charge. | |
| Off | On | The battery is charged and ready for use. (READY TO GO) The unit then changes over to gentle charging mode until the battery is fully charged. To do this, leave the rechargeable battery on the charger for approx. 15 minutes longer. Action: Take the battery pack out of the charger. Disconnect the charger from the mains supply. |
| Flashing Off | Adapted charging | For safety reasons the charging is performed less quickly and takes more time. The reasons can be: - The battery pack has not been used for a very long time or an already fl at battery was further discharged (exhaustive discharge). - The battery pack temperature is outside the ideal range (between 10°C and 40°C). Action: Wait for the charging to be completed; you can still continue to charge the battery pack. |
| Flashing Flashing Fault | Charging is no longer possible. The battery pack is defective. Action: Never charge a defective battery pack. Take the battery pack out of the charger. | |
| On On Temperature fault | The battery pack is too hot (e.g. due to direct sunshine) or too cold (below 0°C). Action: Remove the battery pack and keep it at room temperature (approx. 20°C) for one day. | |
GB
Disposal

Power tools, rechargeable batteries, accessories and packaging should be sorted for environmental-friendly recycling.
Do not dispose of power tools and batteries/rechargeable batteries into household waste!
Only for EU countries:
According to the Directive 2012/19/EU on waste electrical and electronic equipment and its transposition into national law, power tools that are no longer usable, and, according to the Directive 2006/66/EC, defective or drained batteries must be collected separately and disposed of in an environmentally correct manner.
If disposed incorrectly, waste electrical and electronic equipment may have harmful effects on the environment and human health, due to the potential presence of hazardous substances.
Only for United Kingdom:
According to The Waste Electrical and Electronic Equipment Regulations 2013 (SI 2013/3113) (as amended) and the Waste Batteries and Accumulators Regulations 2009 (SI 2009/890) (as amended), products that are no longer usable must be collected separately and disposed of in an environmentally friendly manner.
The reprinting or reproduction by any other means, in whole or in part, of documentation and papers accompanying products is permitted only with the express consent of the Einhell Germany AG.
Subject to technical changes
GB
Service information
We have competent service partners in all countries named on the guarantee certificate whose contact details can also be found on the guarantee certificate. These partners will help you with all service requests such as repairs, spare and wearing part orders or the purchase of consumables.
Please note that the following parts of this product are subject to normal or natural wear and that the following parts are therefore also required for use as consumables.
| Category Example | |
| Wear parts* Battery | |
| Consumables* Saw blade | |
| Missing parts |
- Not necessarily included in the scope of delivery!
In the effect of defects or faults, please register the problem on the internet at www.Einhell-Service.com. Please ensure that you provide a precise description of the problem and answer the following questions in all cases:
Did the equipment work at all or was it defective from the beginning?
Did you notice anything (symptom or defect) prior to the failure?
What malfunction does the equipment have in your opinion (main symptom)?
Describe this malfunction.
F
Danger!
Akumulator je uplnne nability.
Svetita 2 ali 1 lucka LED
Eiva avaepva kai 3 LED:
O ouoawpeutnc exi oopitote nipwc.
Avabouv/ει2n1LED:
H matarapia eivai ak6m apkerta optiouevn.
AvaBooBriVeI eVa LED:
O ouoowpeutns elvai adesios, ooptote tov.
AvaBooBriVouv oλa Ta LED:
Ynepbaon nTc 0epuokpaiaac Tnc mntapiaac Aphiote tov ouoawpeut ano tn ouakeun kai apnoote tov eni ma npa oe 0epuokpdaia dwaatiou. Eav enavatapouaataei to ofalambda tote o ouawpeutnc exeikopotietekabouc kai ivai eattwajtikoac Aphiote tn mntapia ano tn oukeun. Mia elattwauatkni mntapia dev ivai duvatov va enavaxpoanotoinheiv na enavaopotietie!
6. Xειρισμός
PpoEIoOnoiOn!
ByaTe npwTa nmuatapia npiv kaveTE TIC puOIOeic oN OOKevn.
6.1 Epyaia to uikpo kukaiko npiovi xepio
Na kparate navta tn oukeun otaepa ano tic xipolaeec (1 kal 10) nou npooipocvtai yia tov okonto auto, etoi wote va eaoaalizte aphianxepiioko tata n xpno.
GR
To talaavteuopevo npoataeutiko kalaumaa (19) npwxyetai autouata npoc ta niow ano to katepyafoevavtkeiuevo.
Mny akeite Bia!
PpOxwpATEeTOpiOVI EaPpaKaU OoiooOpfa.
To axpnoTO kouAti va bioketaiTn 8Ela PEAUPa Tou npioviou, EtOI wote foapdu TmuA Tou Tpaneziouvaakoumae i e oan Tou nTv Eniia
Eav npioviTEe OE onmuEvn ypaun, va obnyeite to npovkata nkoa aut cTNS EYKoNTs.
ΣuσφiEτe kaλa τa μikpóTeρα Σuλiva KouμáTia πιν την επεΕργασί. Noté μη Kpatate με to xερι.
NaakoloutheiTeOnwoBnOteTicYevikec UnooEieC aaoaAiaC! Na xonoiunoeIe Tnpootateutika yuaia!
Mn xnpaiooieite Eaattwauikec npiovoauec n piovoauec e pwyue c k a EYKOTEC.
Mn xnpaunoeite phavtcnaEia yia favtcn npuvaovivai eyautepn n kpoepn ano tvpuana Tnpiovoauc.
eniipenetaivpEvapioTei npiovoamu to xepi n pAupiknieo.
Na eleyeTe tic aeitoupyiec tou npoatauteutikou kaUmuatoc.H taavteuouevn npoTaia va un nauokapei kai npeneu t a to tn anen Tou kukou epyaiaac v a bioketai n aI otnv apxikn Tg thon.
Pniv Tn xpnon Tou daKoTplov va eEyxTe Tnv ayoyn aeitoupyia Tou taavteuopevou npootatevtikou kaUmuac o apou byaAeTo Bua ano Tnv npka.
Na oivoupeveote npiv ano kae xpon tnc mnxavnc ta ouotnmuata aoaepaieac otws to taavteuoevo npootateutiko kalumna, nphivtca ka ta ouotnmuata puoiomc aeitoupyov aooya ka nioc evau oomega pauemuieva.
Tov npoapuoyea yia tvn avappofo n o pokavdisw (14) mnpie va ouv6eot e Katalnnlo ouvtma avappofo noc kovnc. Eaaiaote nwc to ouvtma avappofo noc kovnc. evai aaoaawc ka owtda uov6e6evo.
To Kivouevo taavteuoe npoataetukkaumaaevntpeetal va eiva tpaBnyevo kaiakvntooinevo kaTa thdiapkeia ts epyaiaac.
6.2 XpnoToudeltaokoplovou
- Ppooapuoote to baoc tsKoHc, T ywvat tsKoHc ka to npalaao tepa (ap. 5.1, 5.2 ka 5.4).
EevpyoOniOteToPiovMoVObtAvExu ToTOeTmEimuPiovlaa!
TootheTne To nEiAo Tou npioviou eniteBa Tnv OTo avtkeluevo Nou katepyacoe.T Hi piovoIaMa deV eNtpiTeiA va eXeTaIe eE nAnfMe To avtkeluevo NPO BteEepyaote.
Na kpatate to npiovi navta yepa e ta dox o xepia.
6.3 dakontnc evepyonooinc/ anevpyonoina (EK.12)
Evpyonolnon:
Na niécTe ouyxpova to nIknTPO φpaync (3) ka to diakontn evpyoioinoc/aIevpyoioinoc (2).
Aphote va Eekivnnei npwta n pirovoala maepoi va ftoaei tvn npn tauxnta tnc. Tote iioayete nvi pirovoala apyka tata uinkoc tc yapumk tonnc. Na aokite eiaphiia nien otny pirovoala.
Anevyponoin:
AphiTse EeueBepo To nKtpo Fpayns Kai Tov diakottn Evpytooinoc/anvepytooinoc.
'Orav aphive 3eueoepn Tx eipoaBn n uXavn anevpyoioiatal autoupata, etai wote dev evai duvat n aelntn aeitouyia TNS.
Na npooexeKata TnV epyaia va unv elau KIAIOTEc KaVa u n Bouwov ou trune Eaepiou.
Mn φρεναρετην πριονλάμα μετάντην απενεργοποίσην της με πλευρική πεόη.
Ppoooxn! Na akoumnte T mynxavn kantou v aoaovakivntononthe npiiovolambda.
Ppoooh! Dokmuotikk konn e axpoanto koumu
6.4 AALayn Tnc piovoaac (Eik.13-16) Ipoeisdonoinon!
ByaTe npwTa Tn mntapia npiv kavete tic puOmuEi Om ouokevn.
Na xpnaioioite anokkia kai mvo npiovoloaeouavtonokipovotao npoturo EN 847-1 kai eivai tou idou tounou onwc n ouapadisoeyn piovola autou tou Kuklikou npiovoixepoi. Zntnote ouBouLc EIKO KAATAOTma.
GR
Ipoεδοποιησι
Mn xnpaonoiieite sikouc iavoc!
Evnpwon yia to epbic
- punjac,adapter
akumulatorski paket
posalite naosoj sluzbi za korisnike
5. Pre puštanja u pigeon
Upozorenje!
Pre ngo保税e da podesavate uredaj uvek izvadite akumulator.
5.1 Podesavanje dubine rezanja (slika 2/3)
- Otpustite polugu za podesavanje dubine rezanja na zadnjoj strani zašitnogPoklopca (4).
RS
- Stopicu testere (6) položite ravno na povrsinu radnog predmeta koji obradujete. Podignite testeru toliko da list testere (12) dode na potrebnu dubinu rezanja (a).
- Ponovo pričvrstite polugu za poděsavanje dubine rezanja (4). Proverite učvṛścenost.
5.2 Kosi granicnik (sika 4/5)
- Prethodno podesen standardni ugao izmedu stopice (6) i lista testere (12) iznosi 90^ . Taj ugao要去 de promenite za izvodenje kosih rezova.
- Olabavite zavrtanj na prednjoj strani stopice testere za fiksiranje podesenog kosog položaja (7).
- Ugao rezanja_možete da promenite za 50^ , pri tom pripazite na skalu ugla rezanja (9).
- Ponovo prčivrstite polugu za fiksiranje podešenog kosog položaja (7). Proverite učvršćenost.
5.3 Usisavanje prasei i ivera (slika 6)
TOncHHeN K HcNoJIb3ObaHHbIM CMMBoJAM (cm.pnc.17)
- OnachoctbI -Дя УмнБшЕпЯOnaCHOCTN �лучтТРаBMу рpoHTte pykoBOdCTBO NO экCNlyaTaциM.
- Octopokho! HcnoIb3yIte cpeICTBa 3aunTbI cnyxa. Bo3deICTBne IyMa MoKeT Bbl3BaTb NotepIO cnyxa.
3.Octop0xH!NcNoIb3yItepeCnnpatop. PnO6pa6OTKe dpeBecnblIpyrnx MaTePnaIOB MOHTe 6pa3oBAtbcB BpeHnA JIN3OpOBbIbJIb.3aPpeSeHO 6pa6aTbIBaTb NpeMeTbI coepHaunie ac6ecT! - OcToPocKHO!McNoIb3yIte 3aUHTbIe OHN.Bo3HHaUOJIme BO BpeMpa60Tb IckpbI NIN BByIeJIIOUJHueCra N3 yCTpoIcTBa OBLOHMn, ONIIKN INbIb MOrY T nobpeDITb opraHbI 3peHnI.
- BbHbTe WTeKeP n3 po3eTHn n3BLeKeHTe aKHyMyJrTOp n3 yCTpoNCTBa.
- OctopoHNO! 3anpeueHo cMOrpeTb B HappaBHeHH NCTOCHNHa N3nyeHn.
1.Yha3aHHNoTexHHe 6e3onachocTH
COOTBETCTBYUHNEyka3AHN NO TEXNHKe 6e3oIacHOCTn HAXOJTCB NpINIOHeHHbIX 6pouHOPax!
PpeynpeKdHne!
O3HaHOMbTEcbo BcEMn yHa3aHnMn n
TEXHnHE 6e30NaChOCTN, HNCTpyKUAMn, H3o6paJHeHnMn INTexHnueChmN
XapaHTepnCTnKaAMn, KOTOpBie npnlaRaIOTcR
KdAHNOy 3JeHTpNHcHOMy INHCTpyMeHTy.
HeToOHoe Co6JIIOeHne yKa3aHN,
CoepKaaXcB CJeDyIOSei INHCTpyKUHN,
MOKeT pINBeCTN K NopaeHnO 3JeETpyCHNM
TOKOM, NOHApY (NII) TReEJIbIM TpaBMam.
CoxpaHnTe Bce yHa3aHnNo TEXHnHE
6e30NaChOCTN INHCTpyKUIN DIA
HCnoNb3OBaHHN B 6yduem.
2. CoCTaB ycTpoIcTba n coCTaB ynaHOBHN
2.1 CoCTaB yctpOHTBa (PcCyHn 1/2)
- PyKoRTka
- NepeKIOUaTeIb BkIOUeHO-BbIKIOUeHO
- Khonka 6nokupobkn dny nepeKIOUaTeJI BKNIOUeHO-BbIKIOUeHO
- Pbyar perylnpoBKn BbICOTb pe3Kn
- CBeToHnOHaNJaMnOuHa
6.Башмakплbli
7.YctaHOBOUHbINBHTIJIpeYIpOBKN pe3AHNIOyILOM - YcTaHOBOHyBIM BnHT dIra npaJIeJIbHoro ynpa
- Ⅲkana dny yrna pe3aHn
10.Дононтьня рукгТа - WnHdIbHOe fKcnpyIOoee ycTPOINCTBO
- NINbHOe NOJOTHO
- KIIOH nIIbHoro nonoTHa
- NooknueHne dna OTCocA ctpKKn
- HanpaBraJIOune IJIaIINHn npoNla
- Papannelbnynp
- BnHT dIy npedoxpaHnteIy nIbHoro noIOTHa
18.Фланец
19.OTKnDbBaIOoAraC3aunTHaKpblka - Pbyar 3aunTHo KpbuKn DbNHypeOcMexaHn3Ma
2.2 CoCTAB HOMNJIeKTA yCTpOJCTBA
PpOBepbTe KOMnIeKTHOCb H3dEInHa OCHOBaHNOnICaHHO OBema NocTbN.
PpO6hApyHeHH HeOpCTaHa KOMNoHETOB 6paHTcB B Haaw CepBncbY cHTp Hm MaarAnB, B KOtOpom Bbl npno6peIN yCtpoCTBO, He no3dHee Yem B TeueHne 5-Tn paoboux DHeN nocSe pno6peTeHH H3dEIny, PpeJbRB DeiCTBNTelbHyO KBHTaHIO O NOKynke. O6paTte BnMaHne Ha TaBnUy c
RUS
yka3aHnem rapaHTnHBix cpoKOB BdoKymente C HΦopMaueNe O cepBnCHOM 06cLyKnBaHn.
- OTKpOInTe yynakOBky N BbIHbTe OCTOpOXHO n3 yynakOBn yCTpoINCTBO.
- YdaJIte yIaKOBOCHbI MaTePnA1, a TaKHe npHCnocO6JIeHn 3aUHTbI yCTpoNCTBa npI yIaKOBbIBaHn I TpaHcNoPTnPoBKe (pni HAIuHH).
PpOBepbTe KOMnJIeKTHOcTb yCtpoNCTBa. - Поверыт eустpoctBoиnpинадлеснoctn
- На Habичne Bo3нкшиnp
- ТраHCnOPTnPoBKe NOBpeKdEHN.
CoxpaHnTe ynaKOBky no BO3MOxHOCTn Do nCTeueHnA cpoKa rapaHTnHbIX 68a3aTeJIbCTB.
Onachoctb!
YcTpoIcTBOn ynaHOBKa He RaJIaOTc
dETCHMM HpyuWAmn! 3anpeueHO Detam
HrpTaB C nlaCTNHOBBmN NaKetAmn,
PiEHHAMn MekHMn DeTajrMn! OnaHocb
3AKnUoAeTcB B TOM, YTO OHN MOrYT
nporlotntb nn Nn Norh6Hyb OT ydyubra!
AkkymyTOpHAn DnCKOBa pyHna nla
HbHOe NOIOTHO
HIOU NINbHORO NOLOTHA
- NapaannelbHbIy npOp
OpnHaJIbHoe pyKOBoDCTBO nO 3KcIyatauIN
- Yka3aHnno TExHHKe 6e3oNaCHOCTN
3.ИспобзOBанeВ COOTBETCTBnC npedHa3HaueHem
AkkymyIaTOpHaJaNcHOBa pyHaa Nnla npedHa3HaueHa dJa OcyuEcTBLeHnna pRMOJIneHbIX npOnIOJIOB B npEIMetax n3 dpeBeCInHb, n3 MaTePnAIOB, NOo6hIx dpeBeCHe, n3 NpACtMcbI. Pn 3ToM Heo6xOdIMO n36eBaTb nepepeBa BepHHN 3y6beeNIIbI paacnlaBHeNnlaocTMaccbl.
Pa3pe7aetca HcnoIb3ObaTb yctpoiCTBO TOnbHO B COOTBECTBm C ernpedha3Haehnem. JIO6oe dpytoe, OTNmuOJeecr OT 3TOO HCNOJIb3OBAHHe CHTAeTc He COOTBECTBYIOUINM npedha3HaueHHIO.3a BCE BO3NHKUnne B pe3yIbTaTe TaTORe HcnoIb3OBAHnYuep6 NIT PaABMbI IIO6oBtBuDA HeCET OBTBeTCTBHeHHOCb nonb3OBAteBn pa6oTaIoH C yctpOietCBOM,a heero H3ROTOBITEb.
YHTHe, YTO KOHCTpyKuaHaNX ycTpoCTB He npedHa3NaHeaIy IcNoJIb3OBAHnI Hx BnpMbIuJeHHo,peMeCLeHHoI INHUYCTpAaHBoN O6bAcTn. MbI He Hecem HNKAKo OTBeCTBHeHHOCTNs IOraPAHTmHbIM 063aTeJbCTBAM PnI cNoJIb3OBAHnI yCTPOCTBa I npMbIuJeHHo,peMeCLeHHoI INHUYCTpAaHBoN O6bAcTn, a TaHOe B NOIObHOJ DeTeJIbHOCTn.
4. TexHnuechne daHHbIe
3JNeKtpOnnTaHne DnBraTeJIa: 18 B noc.Toka Ckopoctb BpaueHnXoIOCToro XOJa: 4200 MHN
Tny6Ha pe3a npn 90^ ..57 MM
Tny6Ha pe3a np4 45^ .. 39 MM
YpOBeHb DaBJIeHnIyMa La8,5D(B(A)
HeonpeIeHnOCTb KpA 3d6
ypoBHeMoUHocTnWymaL 96,5A6(A)
HeonpeHeneHHocTb K. 3 d6
HcnoIb3yIte 3aunHTy opraHOB cnyxa.
Bo3dEiCTBHe Wyma MoKET BblBaTb NOTepIO cnIyxa.
CymmaHoe 3NaueHne BeIuNHBi Bn6paun (cymmaBeKTopoB Tpex HapBaIeHn) onpeDeJeHO B COOTBeTCTBn C EN 62841.
PyKoRTHa
3MnCCNOHHbI NOKa3aTeJIb BV6paCIN
aW=1,3M/CEK²
HeonpepeJeHHoCTbK=2,81M/ceK
DononHntbHaayhOHTka
EMCCNOHHI NOHA3aTeJIb BN6paUN aW=4,45M/ceK²
HeonpepeHnocbK=1,5M/ceK
RUS
PnpuBedeHHbIe CymMaPbHbIe 3HaHeHn Bn6paunu
I npaMaTePbI eMnCCmN WMya NOnLyHeHb I
pe3yJIbTaTe PrnMeHEne CTAnDaPTHO MeToDa
NCbITaHn I MOrYT bItb HcNoJIb3OBAhbl
dIra CpaBHeHn OJHO EJIeKTPueeCKHO
INHCTpyMeHTA C DpyrIM.
PnBBeEHbIe CymMappHbIe 3HaHeHH Bn6paunn I npaMeTpbl 3MmCCnn Wyma MOrTy TaKHe NCNoB3OBaTbCra IyIpeDbaNteBHO OueHKn yPoBHnHaRpy3Kn.
PpeynpeKdHne:
3HaueHnBbpaunnIyPoBNuWymaBoBpem 3KnpyataunNJIeKTPOnHCTpyMeHTA MOrT OTInaTcROTnPnBeDeHHbIX3HaueHnB 3ABNCMOCTnOTCNOCo6NcNoJb3OBAHN yCTpoHCTBa,NTactHOCTnOT Bnda 06pa6TaBbAEMORoN3dEINIA.
CbeNTe 06pa3OBaHHe WymoB N Bn6paun K MNHMMyM!
IcnoIb3yIeToJIbKO6e3yKOpN3HeHHO paOtaUoJe yCTpoIcTBA.
PeryIaRHO npoBOAnTeTexHnueckoe 06cIyJHbAHHeN OuHCTky yCTpoCTBa.
- Pn pa60te yuHTbIaIe OOC6EHHOCTNaBawero yctpoIcTba.
He noDBeprAte ycTpoINCTBO nepeRpy3ke.
- Pn Heo6xOdmocTn daJe npOBepntb yctpoCTBO cneuaJInCTam.
- OTKJIQUaIte ycTpoIcTBO, ecN bI erO He HcNoJIb3yTe.
Octopokho!
OctatoUHbIe ONaCHOCTN
Jahe B TOM cnyae,ecnBbI hncnoJb3yeTe ONCbIBaembl 3JeHTpruechm HNCTpyMeH T BOOTBETCTBHN C npeDnCAHHe,TO H TOrda BCERda OCTaerTc MeTo dIpncha. HnKe npHBedEN CNHC0K OCTaTOhBIX OnaCHOcteC, CBzAHHbIX C KOHCTpyHneH NactoJero 3JeHTprueCHOR HNCTpyMeHa:
- 3a6oJIeBaHHeJeIeKnX, B TOM cIyae ecn He IcNoJIb3YeTcR COOTBETCTByIOuN peCnnpaTOP.
2.Поврждени Слуха,В ТOMСлуха eclin He nCNoIb3yETcA COOTBEcTByIOUeE CpeCTBO 3aunTbI Clyxa.
3.HapuHnna 3OpOBbBpe3yIbTaTe BO3eINCTBnB Hbpaunn Ha npny npn DInTBeNbHom nCIOB3OBAHN yCToPcNTBa Nnnpn HEnpbaNbHOM NoJIb3OBAHN N HeHaDNeKaAeM TeXHmCheKOM yXoJe.
5. Npepe BBODOM B 3KcnnyatauHIO
PpeynpeKdHne!
Bcergda n3BnkeaTe aKKyMnyTop nepei HacTPOKoY cTPONCTBa.
5.1 PerynipOBHa rny6HbI pe3a (pncyHKn 2 n 3)
Ocna6bTe HaxoJHmCnHa 06paTHOH CTOpOHe 3aUHTHO KpbIuKn PbIuAr peYIpOBKn BbcOTbl Pe3Kn (4).
- YctaHOBHTe ONopy NINbI (6) INoCKOCTbIO Ha
NobepxHOCTb O6paBaTbBAEMOro npeDMeta.
PnIONDHMaIte NINy Do Tex NOP, NOKa
NINbHOE NoIOTHO (12) He 6yDet HaxOxDITbCt
Ha HyKHOI rIy6HHe pe3a (a).
BHOb3aФИKcHpyTe pbHar peryInpOBn BblcoTb pe3Kn (4).PpOBeBte npOHocTb KpeJIeHnI
5.2 Ynp dnype3kn npd yrnom (pncyhoK 4/5)
IpeBapnteIbHO yCTaHOBJIe CTaHdApTHo MeJy OOnOpNIIbI (6) NIIbHbIM NOIOTHom (12) yOrn B 90°. Bbl MoKeTe 3OT yOrn IImeHITb DnA torO, TTOsbOCUcEcbTbR pe3Hy nOd HxHbIM YrIOM.
Ocnaabe HaxoJnncHa nepeHnei CTOpHe onOpbl Nlbl CTOnOpHbBnHT dIpeRyInpOBn pe3aHnnoD yIOM (7).
Tenepb Bbl moKeTe n3MeHnTb yroI pe3Kn Do 50^ .JnA 3TOrO hCNoJIb3yIte WkaIy yctaHOBKn yrla pe3Kn (9).
BHOb3aФHcHpyTe yCTaHOBOHTBI BNTI pyerynpOBn pe3AHn npyTOM7. PObepbI npOHocb KpenHeHn.
5.3 OTCOC nbln H onHnok (pncyHKn 6)
IpondcoedHnTE K npedHa3NaeHHomy
JIA 3TOTO NOHIOUeHHIO OTCOCA ONIOK
(14)Baewei DNCKOBNIbI NpXODaui
JIA 3TOTO NblECOC. (NblECOC He
BXoINT B COCTAB Ha6opa).3TNIM Bbl
DOCTHRNTe ONTMAlbHOrO OTCOCA
NbIc C6pb6aTaIBaEMOro NpeDMeta.
PepmmyecTBa: TaHIM Obpa3OM, Bbl
ObceNEHTe 6peHXoe OTHoEHe K
ycTroY CTBy I COxPAHnTE CBOE 3dOpOBBe.
Hpome TORO BAwe pa6Oee MeCTO OCTaHETC
YCHCTbIM N6eOtAnChbIM.
O6pa3yUo7aCn npn pa6ote nbIb MOKeT cTaB npuHNOOnachOCTN. NToTMy Heo6xOJMo yueCTb yKa3aHnR NO TEXHNKe 6e3onacHOCTn.
RUS
BHHMaHHe!NcNoIb3yEmbI dJIaOTocaaNbIeCOCdoJKeH6bITbPpeHa3HaueHdMaTePnana 06pa6aTaBaEMo PpeMeta.
IpoBepbTe, HacKoJIbHO XopoOIO CoeINHeHbI DeTAlM MeKdY co60N.
5.4 Papanenbnyynop (pncyhoK 7/8)
- Pn n oomu npapallehoro ynpa (16) Bbl moKeTe nnInb BdoI npapallehBix nnHni.
Ocna6bTe haxoJauuCBA onope nHbI (6) yctahOBouHbI BnHT dJa npaJIeBHorO ynopa (8).
C6opka ocyuectBnreTc npTeM BCTaBHeHna napAeIbHo rO ynopa (16) B HnpaBnHOu(yo (c) B onope nIbI (6) (cmOTpntepncyHOK7). - YctaHOBHT Heo6xOdHMOe paCCToHHe n 3aTnHTe KpeNko yCTaHOBOUHb BnHT (8).
IcnoIb3OBAHnne npaJIeNbHoro ynpa: ycTaHOBtpe npaJIeNbHbI ynp (16) IIOCKOCtBuHa KpaI oBa6aTaBbAeMOrOppeMeTnHaHHaTe NIIeHne.
BnmaHne! OcyueCTbIte npo6hbl nponB DepeBHHOM npedMeTe n3 OTXOIOB.
5.5 HanpaBnIooNe IJIa IINHn npOnnla (pnc.9)
C nOMOBHO HAnpaBIAOxH DnI LINHn npOnnla (15) Bbl MoXeTe DeNaTb TOHbIe pe3bl No IInHnAM npOnnla, HaneceHbIM Ha pacnIINBaEMbl MaTePnA.I. NcNoJIb3yTe MApKnPOBky (d) npH vCTAHOBE Yrna B 0^ n 90^
MapknpoBky (e) cneJyET nCnOJIb3OBaTb npu yCTaHOBKe yrIa B 45°.
Yka3aHnno yctahOBKe yrna coepKaTcB pa3dene 5.2.
BHHMaHHe! OcyueCTbHTe npo6hbl npoHnB DepeBHHOM npedMeTe H3 OTXoDOb.
5.6 3apnka 6noha JntneBbix aHHymyIaTOpOB (pnc.10-11)
- N3BNEKHTe aKHyMnyTOpHbI 6LoK (g) n3 pyKoTKn, pNn 3OM HaXmaiTe fHKcnpUOuy KlaBmuy (f).
-
乌6eHITecbTOM,YTOyKa3aHHoe HaФИрмEHON TaBnUHe 3HaueHHe HAnpJxHEnCETn COOTBcTCTByET IMeIOUeMcy 3HaueHEnHO HApIyHEnHc CETn. BCTabBe WTeKe3apJdHOrO yCTpoiCTBa (j)B wTeNceLbHyU pO3eTy.3eHbI bCBToDnOHD NaHTet MInrTaB.
-
BCTaBbTe aHHyMylTOp B 3apAHOe yCTpoCTBO.
Bpa3dene 10 («HnndkaTOpbI 3apAnHoro yctpoCTBa») npBedeHa Ta6nua C yKa3aHneM 3Haehn CBToNDHOH HnDnKaun Ha 3apAnHom yctpoCTBe.
BHUMAHNE!
HcnoIb3yIneAHHMyJnTOpN3apRdHoe yCTPOCTBO TOLbKO B CYXOM COCTOHNn npi TemnepaType OkpykaIoUe CpeDb1 10-40°C.
XpaHnTe aKHyMylTOp, aKHyMylTOpHoe 3aprAHOe yCTPOIcTBO B CYXOM NOMEuEHN INPn CLeNyUoSei TempeaType: aKHyMylTOp = 10- 20^
aHymyTOpHoe H3apAnHoe yctpoiCtBO = 10-40°C;
Ecnn aKKyMylTOpHbI 6Lok He 3apraHaeTcA, Heo6xOIMO npOBepntb cJeDyUoee:
HaJIyHHe HApRJaHEHr CEtN B3JIeHTpUeCKo PO3ETke;
HaJIyHne IIOHTHO CoeINHeHn Ha KOHTaHTax 3apdHoro yCTpoIcTBA.
EcniakymyIaTOpHb6IOK BCEeHe 3apXaETc, npocb6aOTnpaBtB
3apdHoe yctpoCTBO n 3apdNbI aadTep
n aHHyMylTOpHbI 6Lok B Haaw OTdJI 06cIyKHBaHn.
ДяобсессениправиьhoITcblkn npocn m6paTbchB haw OTdeI 06cIyHnBaHn HIN B MaRa3HN, B HOTOPOM 6blno npno6peTeHO yCTpoNCTBO.
PnH OTCbIJIHe HIN yTHIN3aUHHKHyMЛrTOpOB,a TAHHe AKHMyJrTOpHbIXyCTPOHcTB yNAHyTe KaHdbI(Oe) N3 HNXBOTDeNbHbI NlactNtHObB NnAket DnToro, YTO6bI M36EHaTb KOpTHORO 3aMbIHANHnNoHapa.
Дяообсесеня дintelbHoro cpoka CnykblakKymyIaTOpHOrO 6loka He06xOdIMO
6ocEnuHTB erO CBOeBPemEHHy 3apRdhy. 3To He06xOdmo OcUaCteBTLb Oc06HeHO
B Text ClyaX, KOrda OTMeuaTeCnCHHeHne MoouoctHn UcToiCTBa. He DonychaiNeNoHoro
pa3raDa aKKymyIaTOpHOrO 6loka.3To BeDet K nobpeJeHHIO aKKymyIaTOpHOrO 6loka!
RUS
5.7 HnHnHaTOp 3apraa anKMyIaTopa (pnc. 10, no3. h)
HaHmIte KhONky HnDnKaun 3apJa
aKHyMnyTopa (i).NHNkAtop 3apJa
aKHyMnyTopa (h) nOKaKeT Bam yPoBeH 3apJa
aKHyMnyTopa npn NOMOu 3-X CBEToHOOB.
ToprBce 3 CBeToDnOda:
AkkymyIaTOp noJIHOCTbIO 3apRHeH.
Topr2nH1CBetOaHoa
OctaToHbI 3apAaKKMyIaTopa DoCTaTOeH.
Mnraet 1CBeToaHoD:
AkkymyTop pa3pRKeH, Heo6xOdmo 3aprntb ero.
Mrraot BCE cBetoNooJI:
Tempepatya aKHyMylTopa HnHe HopMbI.
H3BLeKeNte aKKyMylTOp n3 yctpoiCTBa
H OCTabBe T NOMeUeHN C KOMHaTHoI
temepatypoH naOnn DeH. Ecn Own6Ka
NOBTOpHTcR, aKHyMylTOp noJIHOCTbHO pa3prJH
H HeNCpAbEn. H3BLeKeNte aKHyMylTOp
n3 yctpoiCTBa. 3anpeJeHO npdoJXaTb
HCNoJb3ObaTb HeNCpAbHbI aKHyMylTOp n
3apJxTa b erO.
6.06paueHne c yctpoiCTBOM
PpeynpeKdHne!
Bcerda n3bIeKaaTe aKHyMnyTOp nepei NaCTpOIOKoYcTPOINCTBA.
6.1 6paueHne c dncHOB pyHoi nIIOJ
B ueJx 63oNaChOH 3KcNpyataun yctpoCTBa Bcerda KpeHNO ydepHnBaTepero 3a CneuaIbHo npedycmOTpeHHbIe pykoTKn (1 n 10).
OTKnIbIBaHOJcAraC3aUNTHaKpbIHa (19)OToDBNIRaETCRo6pa6aTbIBaEMORnpedMeta aBtOMaTHueCHN.
He nCnoIb3yIte cnly!
- PpOdBnraTecb DmCKOBpyHOnPiIOJnERKO npaBHomePBO Bpepe.
- Ndyuha B OTXObl Yactb paCNIINBaEMORnpedMeTa DOLNKHn HAXODNTBCr C npAOBCTOPoHb DNCKOBO pyHOnPiBl DnI TO,TO6bl WnPOKa Yactb OnOpHOrO CTONHkAnpInerana K HEMY NO BCB erO pIOCKOCTN.
Ecnn paacnn dnJHHe npoxoOnTb no HaepueHHo npedBapntelHo JINHN, TO HyKHO BECTn DnCKOByIO pyHyIO NIIy
BbIpe3OM BdOJIb Hee.
MaheHbKne npedMeTb n3 depeBa dJnKHBi 6bTb nepeo6paobTKo npOHO 3aKaTb. 3anpeeNo ydepKnaTb nx pyKoN.
CneNyTe HnpeMeHHO npaBnIam TexHKn 6e3oNaChocT! NcNoB3yTe 3aunTHbIe ouKn!
3anpeeHNOcnoIb3ObaTb NOBpeKdEHHbIE NIIbHbIE NOLOTHa IIN NOLOTHa, IMeIOUne TPEUHNBI INCKOJIbI.
3aIpeHcNcNoJb3ObaTb fHaJcbI raiHH c fHaJIeM, OTBepCTHe KOTOpBJX 60JbWe INIM MeHbIe, HcM OTBepCTHe B ININbHOM POJOTHe.
3anpeueHO octaHaBnBaTb nIbHoe NOIOTHO pyKoI nnIyTeM HAdaBnBaHnHa nIbHoe NoIOTHO c6Oky.
PpOBeBpTe nCnpaBnOcTb 3aunTHoH KpbIuKn DnNkUeROcMexaHn3Ma.He DOnyChAte 3aJInHnBaHN3aunTHoro npncnocO6JIeHn4DnNkUeROc MEXaHn3Ma; Nocle 3aBepWeHn paBoOero npoucecca OHO DoJIHHo HAXoDnTbcR BHCXoHOM pIoJooHeHH.
Ipeid nCnoB3OBAHHem DnCKOBo pyHoi NIIbI BblHyTb WTeKeP H3 po3eTKN IN NOBepNTb DeiCTBne OTKnHO 3aunTHOH KpbliKNI.
Y6eINTeBnpeI NcNoJIb3OBAHnEM yCTpoIcTBaBTOM,TO 3aunTHbIe npncnocobHeHHaK OTHdHa 3aunTHaKpbuHa,phianeu,a TaHKe npncnocobHepeyInpOBKn HaxoJrTcB BpaOHeM coToHn, npabInbHO OTPeyInpOBaHbN 3akpenHebl.
H NOdkIIOeHIO OTCOCA ONIOK (14) BbMOHETE NOIKIOHTb COOTBEcTBHOUeJyCTPOIECTBO BITIAHHN PbIJN. Y6eIHTecB B TOM, YTO yCTPOIECTBO OTCOCA NblIN NOIKIOUeHNO pABINbHO IN HAdEKeHNO.
3aIpeSeHO 6LOKnpoBaTb NOdBnKHyO OTKnDbIbAIOUHOc 3aUNTHyO KpbIuKy pNINHeH N B OTTNHYOM Ha3ad PNOJKeHn 3aUnTHoN KpbIuKy.
6.2 06paueHne c dncboy pyHoi nIIOJ
- Otpereynipyte rnybinype3a,yrol paeninibanHHnnapaJIeHbIy npop (cmotpnte paadJIb 5.1,5.2 n 5.4).
BkhUoyaTe DnCKOByIpyHyIy NIIy TOnbKO C yCTaHOBnEHHbIM B Hee NINbHbIM NOJOTHOM!
YcTaHOBtE ONOpy NINbI NIOCHOCtBu Ha 6pa6aTbIAeMbI npeMeT. NInbHoe 10IoTHo He DoJIHKHO pNkAcTaBcK 6pa6aTbIAeMOMy npeMeTy.
RUS
UepHnBaIteDnCKOByO pyHyIO nIy IKepeKo 0eHMn pyKaMn.
6.3 IpeekHIOUaTeIb BHIOUeHO-BbIKIOUeHO (pncyhoK 12)
BkIoueHne:
HaKaTb OJHOBpeMeHNO KONKy 6JIOHNPOBKN (3) HnepeKIOUaTeJIb BHIOUOHe-O-BkIOUOHeO (2).
JaTe NnIbHOMy NOIOTHy pa3oHaTbcra Do TEX nop, NOKa OHO He HaBepeT NoJHyO CKOpOCTb. 3aTeM BeINe TnIbHoe NOIOTHO MeJeHHO, BDoJI NInHn pacNla. PnI aTOM OKa3bIbAte TOIbKO IeRKe OaBJIeHne Ha NIIbHoe NOIOTHO.
BbIKIOueHHe:
OTnyCTHe KHOKNy 6JIOHNPOBKn n nepeKNIouaTeIb BIKIOUeHO-BbIKIOUeHO.
EcnOtnyctnbpykortky,ToyctpoNCTBO BbIKIOHTCnABTOMaTHueCKn,TakIM 6pa30m,IpeoTbpaaaeTcRBO3MOKHOCTb paobtbyctpoNCTBa63 KOHTPOJ.
BHNMaTeNbHO CNEIeNtE 3aTEM, YTO6bI BO BPEMpa6oTbI BeHTINIAuOHHbI OTBepCTHe 6bln 3aKpbITbIM NIN 3aKyOpenebl.
He ocTaHaBnBaIte nIbHoe nIoTHo nOcIe BbHIOUey HnyTe HaDaBnBaHry Ha Hero c60ky.
BHHMaHHe! OTKlaIbIbAaTe yCTpoiCTBO B CTOPHY TOnbKO Nocne TORO, KaK NIIbHOe NOJIOTHO NOJHOCTbIO OCTaHOBTcR.
BHHMaHHe!OcyueCTBnTe npo6Hoe nJIeHne Ha depeBraHHOM KcHc H3 OTXoDob
6.4 3aMeHa NnIbHoro nOToHa ( pncyHnn 13 n 16)
PpeynpeKdHne!
Bcergda n3BleKaaTe aKHyMnyTOp nepei NaCTpOoiKOYyCTPOINCTBa.
NcnoIb3yIne NCHIOHTelbHO COOTBeCTByIOUne Tpe6OBAHnM CTaHdapTa EN 847-1 NIIbHbe NoIOnTHa TAKOR KE TINa, YTO INoCTaBHeHoe B KOMNJIeKTE NIIbHOE NOItoH DoHHo pyHoi DNCKOBO pINbl. ObaNTecb 3a KOHCyIbTaunMe H C cneuaHn3npOBaHbM mara3IH.
PpeynpeHene!
3anpeHIO HcnoIb3oBaTb IINΦOBaIbHbIe Kpyr.
HnAmETpbI HcNoJIb3yEmbIX NINbHbIX NOIOTeH DOnHHbI COOTBETCTBOBaTb HnAmETpam, yKa3aHHbIM Ha DCIOBOI pyHoi nIIe.
NcnoB3yIe TOLbKO peKoMeHDoBaHHbIe NINbHbe NOJToHa.
3NeKtpOnHCTpymEnbI, aKKymIaTOpHbIe 6bAtpen, npHaadJeKHOcTN ynaKOBky HxKHO cdaBaTb Ha nepepa60Ky.
3anpeeHOn yTHnHnHPOBaTb 3JIeKTPoHnHCTpyMeHTbI n AnKHyMnTOpHbIe 6aTapeu/6aTaapeuN C 6bITOBbIM MycOpOM!
ToIbKO dIaIcTpaH-HeHOB EC:
B COOTBETCTBnC eBpOeNcHOn dIpeKTHBOy 2012/19/EU o6 OtpaBoTahbX 3JeKTPueChnx HJIeKTOHHx npM6Opax n ee Pnp6pa3oBaHnem B HaunHOHaNbHOe 3aHOHOaTeJbCTBO BblweDnE uOHTpe6JIeHnA Ie KTPoHNcTpyMeTbI H B COOTBETCTBN C eBpOeNcKOn dIpeKTHBOy 2006/66/EC DePcTHBHe Nn OTCNyKHNWHe CBOI cPoK aKHMyIaTOpHbIe 6aTaepu/6aTaapeKn DOJKNbCo6HpTaBCaPaeBHO n Cdaabatbca HA nepepa6OThY.
PnHnPaBnBHoYtunH3aunOtpa6oTaHHbE 3eKtpueckne H3eKtpoHHbIe np60pblMOrT OKa3aTb BpeDHOeBO3deJcTBHe Ha OKpyHaIOUy CpeNy H3OpOBBe YelOBeHa N3-3a BO3MOHOro npCycTCTBnB HNX ONaChbIX BeueCTB.
PepeneaTbBaHne INI npOue BnDbl pa3MHOKeHn DOKyMeHTaun IN COpOBoNTeBbIX INCTOB npOdyKuINΦnpMbI, NOJHOCTbIO INI NaCTNuHO, pa3peSeHNO pOn3BOUITb TOLbKO C OdHO3HaHOro pa3peSeHn Einell Germany AG.
CoxpaHnEeTc npaBO Ha TexHnueckne HmMeHenn
RUS
HΦopMaζηo cepBnCHOM 6cIyKHBaHH
Bo Bcex ctpaHax, yKa3aHHbIX B rapaHTnHOM CBnDETeNbCTBe, y Hac IMeIOTCa KOMNEteHTHbIe cepBnCHbIe napThepbI, KOHTAChbIe daHHbIe KOtOpbIX Bbl NaJdTe B rapaHTnHOM CBnDETeNbCTBe. OHN Bcerda B Baewem pacnopRaeHEN nIpeweHIn IIObIX BonpocOB, CB3aHHbIX C o6ClyKNaHBHeM, HannpMeP, JnpeMOHaT, NoCTaBN 3aNpacte N b6ICTpon3HaUNBaOuXcx dTaJe, a TaKHe npno6peTeHN paCXoNDbIX MaTePnaIob.
Cneyet 6bMaHTb BnMaHHe Ha To, YTO B 3OTm H3dIeIIN CNeDyoUe IeTaIIN IOBepKeHbI ECTeCTBeHHOMY H3HOcY IIN H3HOcy B CBa3N C 3KcPnyatauue / CneDyoUe IeTaIIN Tpe6yOTcB KaeeCTBe paCXoDHbIX MaTePnaIIOB.
Subject to change without notice
10

Declaration of conformity
We, Einhell UK Ltd
Champions Business Park, First Floor Unit 10, Arrowe Brook Rd, Upton, Wirral CH49 0AB, United Kingdom
declare the conformity to UK standards and legislation was assessed for:
Cordless Circular Saw TE-CS 18/165-2 Li (Einhell)
UK legislation
Simple Pressure Vessels (Safety) Regulation
Electrical Equipment (Safety) Regulation
Radio Equipment Regulation
Personal Protective Equipment Regulation
The Ecodesign for Energy-Related Products and Energy Information Regulation
The Restriction of the Use of Certain Hazardous Substances in Electrical and Electronic Equipment Regulation
Nolse Emisslon in the Environment by Equipment for use Outdoors Regulation
Annex V
Annex VI
Noise:measuredL = dB A):guaranteed L_w = dB A
P = kW; L/0 = 25 cm
UK Approved Body:
Supply of Machinery (Safety) Regulation
Annex IV
UK Approved Body:
UKTE Certificat No.:
Standards: BS EN 62841-1; BS EN 62841-2-5; BS EN 55014-1; BS EN 55014-2

Tom Chambers, Managing Director Einhall UK Ltd
Wirral, 2024.11.20
Archive-File/Record: NAPR029201
Article Number:43.312.30 L-No.:21014
Subject to change without notice Wiesenweg 22, 94405 Landau/Isar, Germany
Documents registrar: Christoph Egginger
EH 11/2024 (01)

- Explanation of the symbols used (see Fig. 17)
- Safety regulations
- Warning!
- Layout and items supplied
- Layout (Fig. 1a/1b)
- Items supplied
- Danger!
- GB
- Proper use
- Technical data
- Sound and vibration
- Wear ear-muff s.
- Handle
- Additional handle
- Warning:
- Keep the noise emissions and vibrations to a minimum.
- Caution!
- Residual risks
- Before starting the equipment
- Setting the cutting depth (Figure 2/3)
- Miter stop (Figure 4/5)
- Extraction of dust and chips (Figure 6)
- Parallel stop (Figure 7/8)
- Important! Carry out a trial cut in a piece of waste wood
- Line guide (Fig. 9)
- Charging the LI battery pack (Fig. 10-11)
- Important!
- Battery capacity indicator (Fig. 10 - Item h)
- All 3 LEDs are lit:
- or 1 LED(s) are lit:
- LED fl ashes:
- All LEDs blink:
- Operation
- Working with the hand-held circular saw
- Using the circular saw
- Switching ON/OFF (Fig. 12)
- To switch on:
- To switch off :
- Important. Carry out a trial cut in a piece of waste wood
- Changing the saw blade (Fig. 13-16)
- LED lamp (Fig. 1/Item 5)
- Cleaning, maintenance and ordering of spare parts
- Cleaning
- Maintenance
- Ordering replacement parts:
- Disposal and recycling
- Storage
- Charger indicator
- Disposal
- Only for EU countries:
- Only for United Kingdom:
- Service information
- F
- Svetita 2 ali 1 lucka LED
- Eiva avaepva kai 3 LED:
- Avabouv/ει2n1LED:
- AvaBooBriVeI eVa LED:
- AvaBooBriVouv oλa Ta LED:
- Xειρισμός
- PpoEIoOnoiOn!
- Epyaia to uikpo kukaiko npiovi xepio
- GR
- XpnoToudeltaokoplovou
- dakontnc evepyonooinc/ anevpyonoina (EK.12)
- Evpyonolnon:
- Anevyponoin:
- Ppoooh! Dokmuotikk konn e axpoanto koumu
- AALayn Tnc piovoaac (Eik.13-16) Ipoeisdonoinon!
- Ipoεδοποιησι
- Evnpwon yia to epbic
- Pre puštanja u pigeon
- Upozorenje!
- Podesavanje dubine rezanja (slika 2/3)
- RS
- Kosi granicnik (sika 4/5)
- Usisavanje prasei i ivera (slika 6)
- TOncHHeN K HcNoJIb3ObaHHbIM CMMBoJAM (cm.pnc.17)
- 1.Yha3aHHNoTexHHe 6e3onachocTH
- CoCTaB ycTpoIcTba n coCTaB ynaHOBHN
- CoCTaB yctpOHTBa (PcCyHn 1/2)
- CoCTAB HOMNJIeKTA yCTpOJCTBA
- RUS
- Onachoctb!
- 3.ИспобзOBанeВ COOTBETCTBnC npedHa3HaueHem
- TexHnuechne daHHbIe
- HcnoIb3yIte 3aunHTy opraHOB cnyxa.
- PyKoRTHa
- DononHntbHaayhOHTka
- PpeynpeKdHne:
- CbeNTe 06pa3OBaHHe WymoB N Bn6paun K MNHMMyM!
- Octopokho!
- OctatoUHbIe ONaCHOCTN
- Npepe BBODOM B 3KcnnyatauHIO
- PpeynpeKdHne!
- PerynipOBHa rny6HbI pe3a (pncyHKn 2 n 3)
- Ynp dnype3kn npd yrnom (pncyhoK 4/5)
- OTCOC nbln H onHnok (pncyHKn 6)
- Papanenbnyynop (pncyhoK 7/8)
- BnmaHne! OcyueCTbIte npo6hbl nponB DepeBHHOM npedMeTe n3 OTXOIOB.
- HanpaBnIooNe IJIa IINHn npOnnla (pnc.9)
- BHHMaHHe! OcyueCTbHTe npo6hbl npoHnB DepeBHHOM npedMeTe H3 OTXoDOb.
- 3apnka 6noha JntneBbix aHHymyIaTOpOB (pnc.10-11)
- BHUMAHNE!
- ДяобсессениправиьhoITcblkn npocn m6paTbchB haw OTdeI 06cIyHnBaHn HIN B MaRa3HN, B HOTOPOM 6blno npno6peTeHO yCTpoNCTBO.
- PnH OTCbIJIHe HIN yTHIN3aUHHKHyMЛrTOpOB,a TAHHe AKHMyJrTOpHbIXyCTPOHcTB yNAHyTe KaHdbI(Oe) N3 HNXBOTDeNbHbI NlactNtHObB NnAket DnToro, YTO6bI M36EHaTb KOpTHORO 3aMbIHANHnNoHapa.
- HnHnHaTOp 3apraa anKMyIaTopa (pnc. 10, no3. h)
- ToprBce 3 CBeToDnOda:
- Topr2nH1CBetOaHoa
- Mnraet 1CBeToaHoD:
- Mrraot BCE cBetoNooJI:
- 6.06paueHne c yctpoiCTBOM
- 6paueHne c dncHOB pyHoi nIIOJ
- 06paueHne c dncboy pyHoi nIIOJ
- IpeekHIOUaTeIb BHIOUeHO-BbIKIOUeHO (pncyhoK 12)
- BkIoueHne:
- BbIKIOueHHe:
- BHHMaHHe!OcyueCTBnTe npo6Hoe nJIeHne Ha depeBraHHOM KcHc H3 OTXoDob
- 3aMeHa NnIbHoro nOToHa ( pncyHnn 13 n 16)
- PpeynpeHene!
- ToIbKO dIaIcTpaH-HeHOB EC:
- HΦopMaζηo cepBnCHOM 6cIyKHBaHH
- Declaration of conformity
- Cordless Circular Saw TE-CS 18/165-2 Li (Einhell)
- UK legislation
Brand : EINHELL
Model : TECS 181652 Li
Category : Electric saw