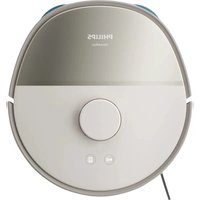
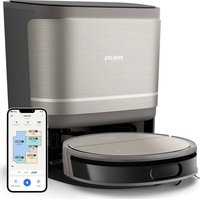
HomeRun 7000 Series XU7100 - Robot vacuum PHILIPS - Free user manual and instructions
Find the device manual for free HomeRun 7000 Series XU7100 PHILIPS in PDF.
| Product type | Robot vacuum cleaner |
| Brand | Philips |
| Model | HomeRun 7000 Series XU7100 |
| Main functions | Simultaneous vacuuming and mopping |
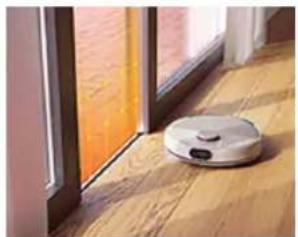
| Navigation technology | 360° laser navigation (LiDAR) and ToF 3D sensors for obstacle detection and avoidance (120° front, 8 around) |
| Sensors | Collision sensor (x2), IR receiver, IR emitter, anti-drop sensor (x6) |
| Cleaning modes | Automatic, Custom, Silent, Intensive, Individual |
| Cleaning options | Suction power (Eco, Normal, Strong, Maximum), water level (Off, Low, Medium, High), mopping vibrations, Y-shaped mopping, extra suction for carpet |
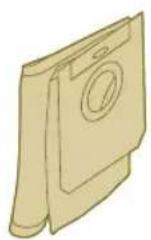
| Automatic dust emptying station | Yes (model XU7100), with dust bag |
| Dust bag capacity (station) | Replaceable dust bag (ref. XV1472) |
| Water tank | Built-in, washable |
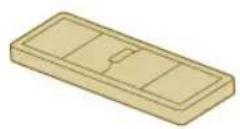
| Washable mop pad | 2 provided, replacement recommended every 3 to 6 months (ref. XV1470) |
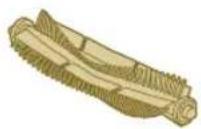
| Main brush | With removable cover, monthly cleaning, replacement 6 to 12 months |
| Side brush | Monthly cleaning, replacement 6 to 12 months |
| Filter | Washable, monthly cleaning, replacement 3 to 6 months |
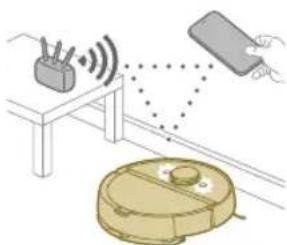
| Connectivity | Wi-Fi, Philips HomeRun app, voice assistant (compatible) |
| Mapping | Creation and storage of up to 5 maps, forbidden zones, dry zones, fragile zones |
| Power | Rechargeable battery, charging station, automatic resume after charging |
| Warranty and support | International warranty, support at www.philips.com/support |
| Spare parts available | Washable mop pads XV1470, dust bags XV1472, maintenance kit XV1473 |
Frequently Asked Questions - HomeRun 7000 Series XU7100 PHILIPS
User questions about HomeRun 7000 Series XU7100 PHILIPS
0 question about this device. Answer the ones you know or ask your own.
Ask a new question about this device
Download the instructions for your Robot vacuum in PDF format for free! Find your manual HomeRun 7000 Series XU7100 - PHILIPS and take your electronic device back in hand. On this page are published all the documents necessary for the use of your device. HomeRun 7000 Series XU7100 by PHILIPS.
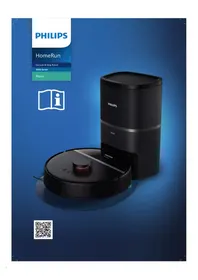
USER MANUAL HomeRun 7000 Series XU7100 PHILIPS
Introduction 6
Product overview 6
Sensor overview 7
Before first use 7
Preparing for use 8
Audible signals 13
How your robot works 13
Using your robot 18
Cleaning and maintenance 21
User interface signals and their meaning 32
Reset/restore the robot 34
Replacement 34
Warranty and support 36
Disposal and recycling 37
Troubleshooting 37
Introduction
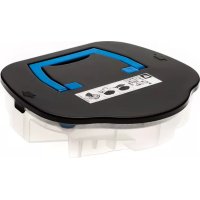
Congratulations on your purchase of a Philips HomeRun Vacuum and Mop robot 7000 Series Aqua! To get the most out of your robot and access all the advanced functions you can download and install the Philips HomeRun robot app. You can also find support videos and frequently asked questions in the app.
Read the separate safety booklet carefully before you use the machine for the first time and save it for future reference.
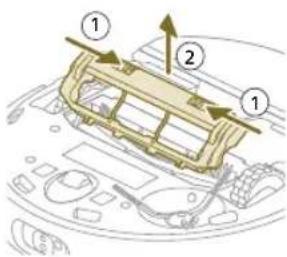
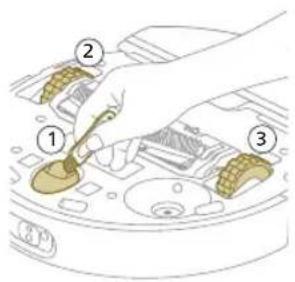
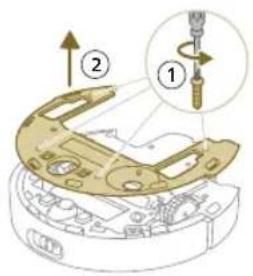
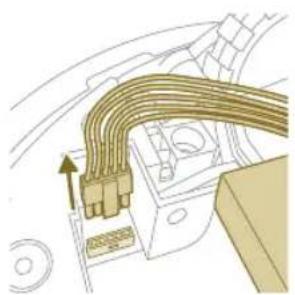
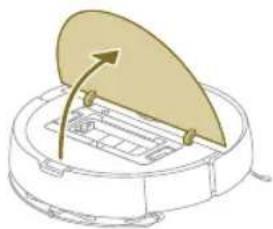
Product overview
1 Dust bin
2 Washable filter
3 Lid of the washable filter
4 Filter lock
5 Filter lid lock
6 Dust bin empty lid
7 Release buttons of the dust bin
8 On/off button
9 Home button
10 Reset button
11 Top cover
12 Bumper
13 Vacuum inlet
14 Air outlet
15 Water tank
16 Release button of the water tank
17 Water inlet
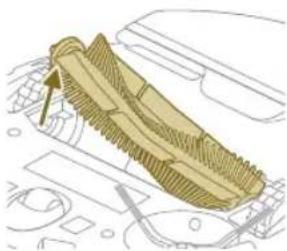
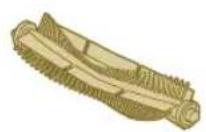
18 Main brush
19 Brush cover
20 Release buttons of the brush cover
21 Main wheels
22 Front caster wheel
23 Charging contact points (robot)
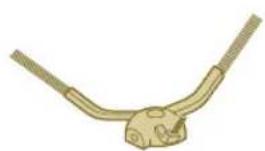
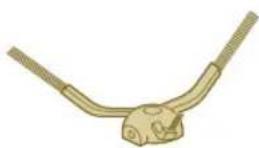
24 Side brush
25 Mop pad holder
26 Washable mop pad (2x)
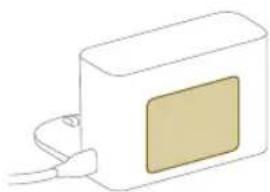
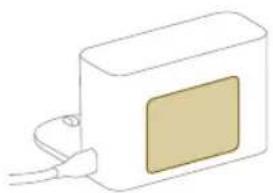
27 Power cord (XU7000)
28 (Charging) station (XU7000)
29 IR signal window (XU7000)
30 Charging contact points (station)
31 Power cord socket
32 Placemat (XU7000)
33 Dust bag (2x) (XU7100)
34 Canister lid
35 Dust bag compartment
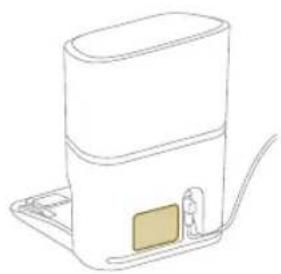
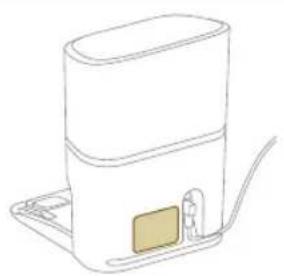
36 Auto-Empty station (XU7100)
37 Indicator light
38 IR signal window
39 Ramp
40 Auto-Empty inlet
41 Auto-Empty air outlet
42 Charging contact points (station)
43 Exhaust vent
44 Brush cleaning tool
45 Power cord socket
46 Power cord (XU7100)
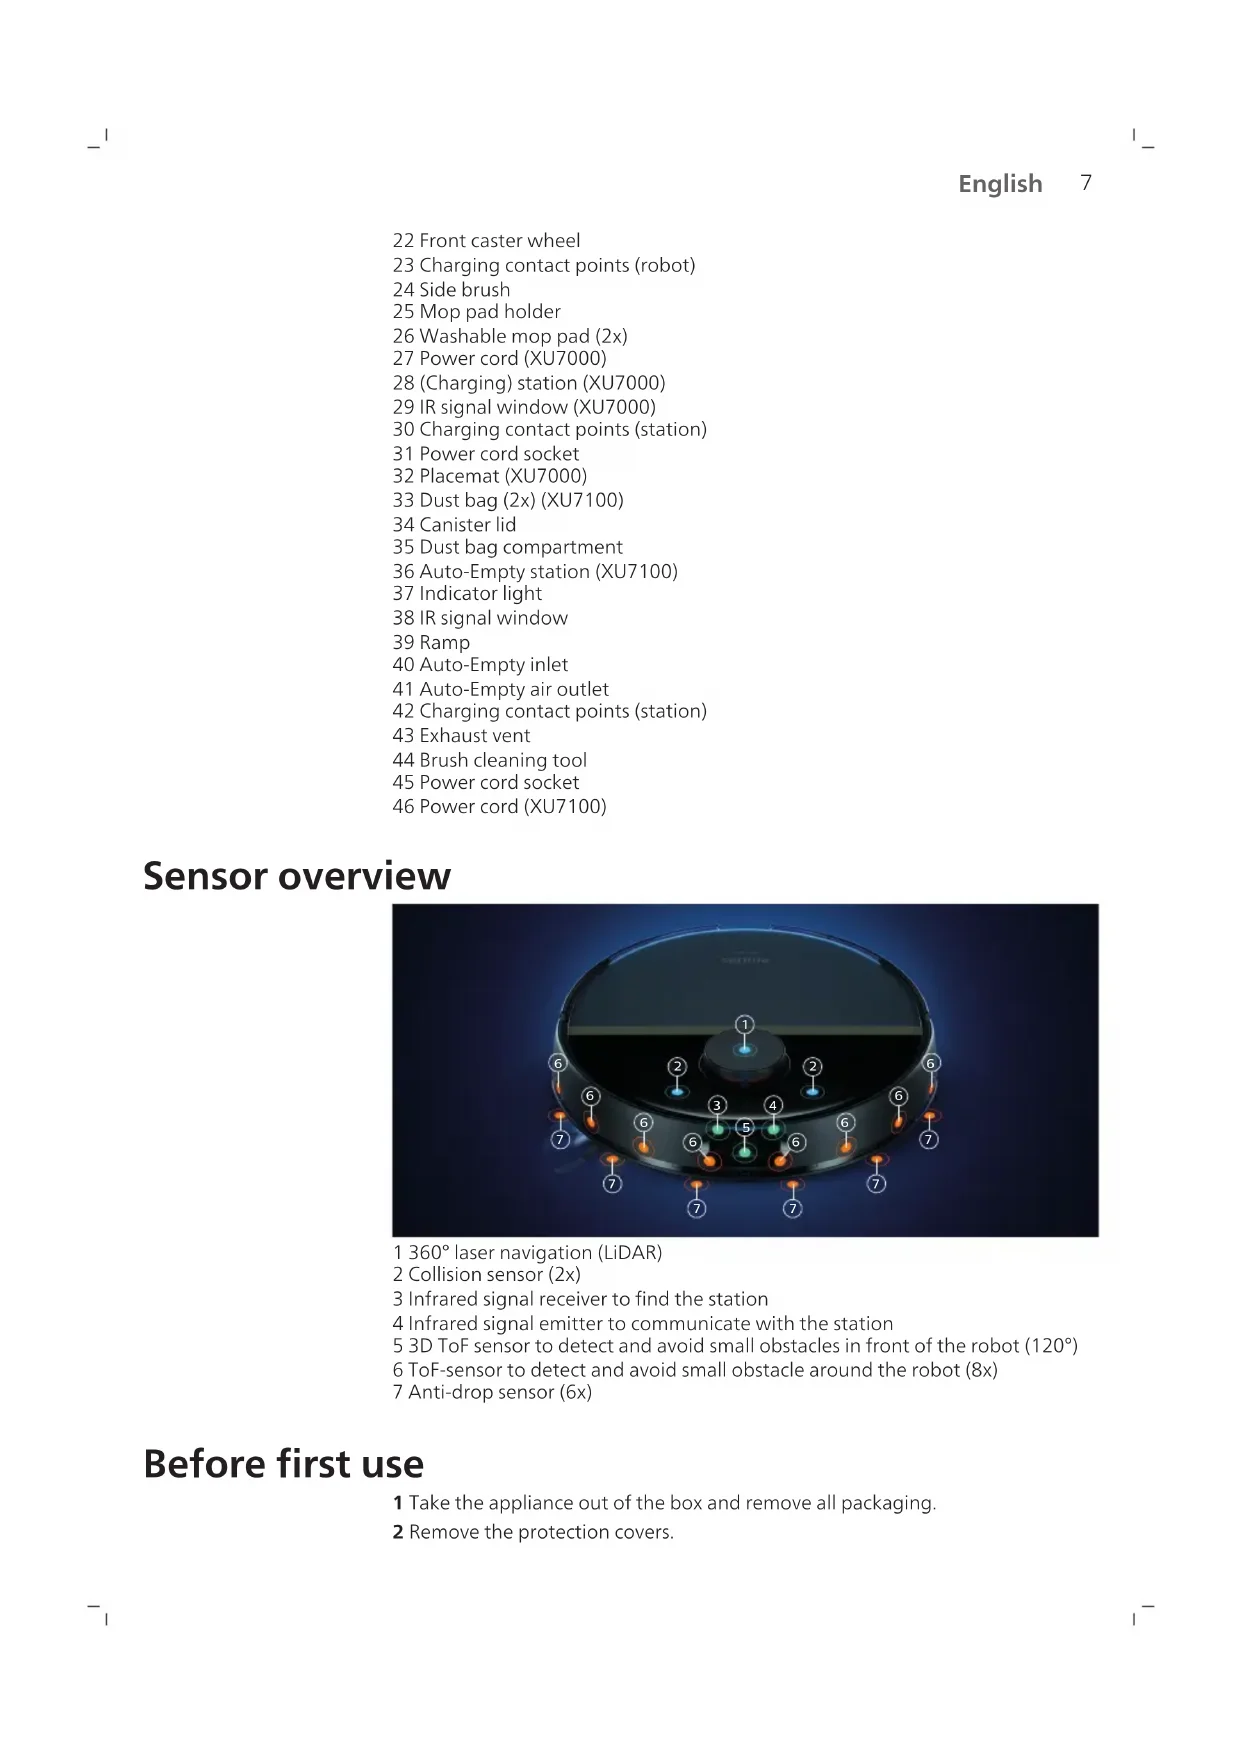
Sensor overview
1 360^ laser navigation (LiDAR)
2 Collision sensor (2x)
3 Infrared signal receiver to find the station
4 Infrared signal emitter to communicate with the station
5 3D ToF sensor to detect and avoid small obstacles in front of the robot (120^)
6 ToF-sensor to detect and avoid small obstacle around the robot (8x)
7 Anti-drop sensor (6x)
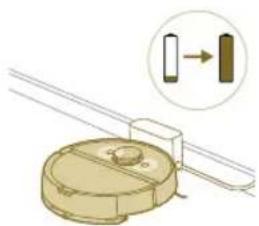
Before first use
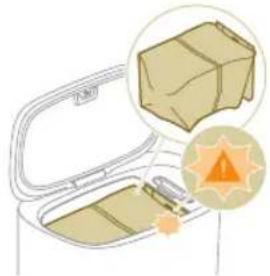
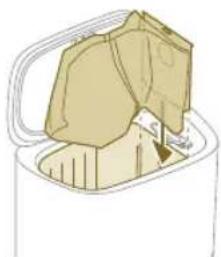
1 Take the appliance out of the box and remove all packaging.
2 Remove the protection covers.
8 English
3 If you see any sign of visible damage, go to www.philips.com/support or contact the Consumer Care Center in your country.
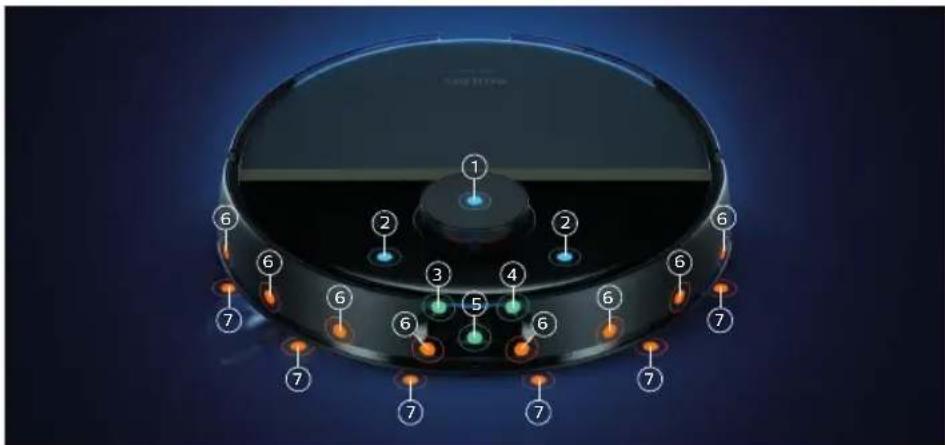
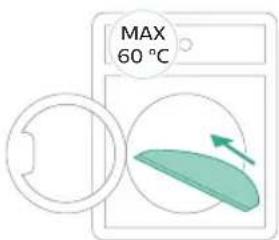
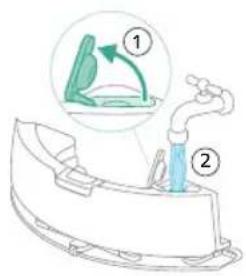
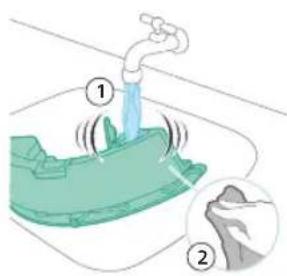
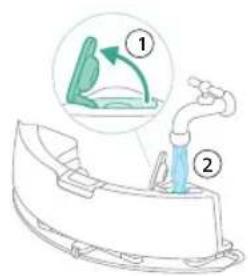
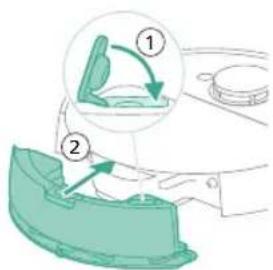
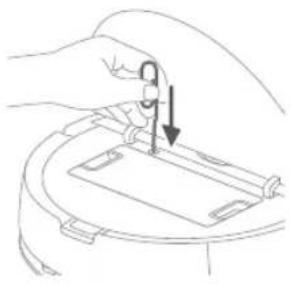
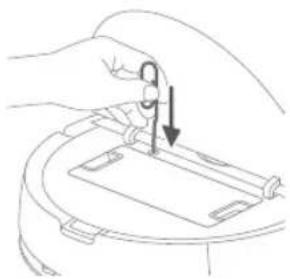
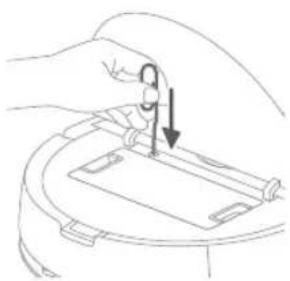
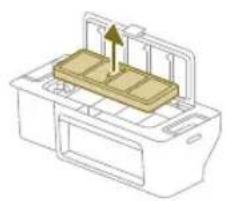
Install and fill the water tank
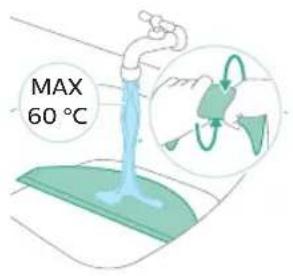
1 Fill the water tank. Use the water inlet.
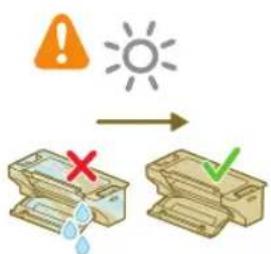
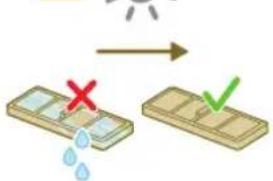
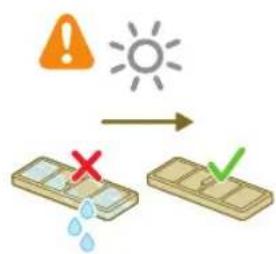
1 Note: Make sure that the outside of the water tank is dry.
Note: Do not use cleaning detergents.
2 Insert the water tank in the correct location.
Preparing for use
Install the robot and the station
Tips for choosing the best location for installing the station:
- Do not place the station in bright sunlight or under furniture. This will block the infrared signal that helps the robot find its way back to the station.
Install the station on a level surface against a wall.
Install the station on a hard floor. - Do not place the station near stairs or a heating source (radiator).
Install in a location with good WiFi coverage.
To install the station:
1 Install the station within the correct dimensions for placement.
- Model XU7100 - Model XU7000
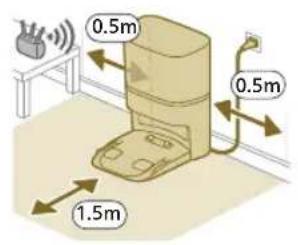
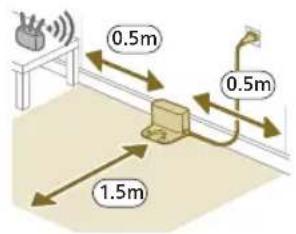
1 Note: Keep 0.5 meters of space on the sides of the station and 1.5 meters in front of the station.
2 Connect the station to the power supply.
3 Make sure that the remaining part of the power cable is well concealed behind the station so that the robot cannot drive over it.
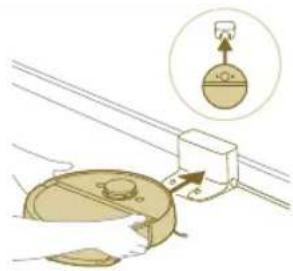
1 Note: For model XU7100 only, place the dust bag in the dust bag compartment of the station.
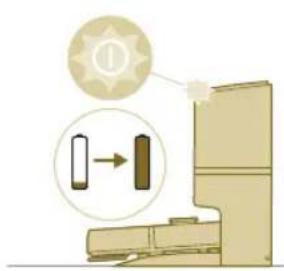
Charging the robot
1 Turn the robot to its correct position and put the robot on the floor in front of the station. The water tank should be facing away from the station.
- Model XU7100 - Model XU7000
2 Make sure that the station is connected to the wall socket.
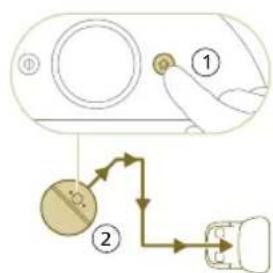
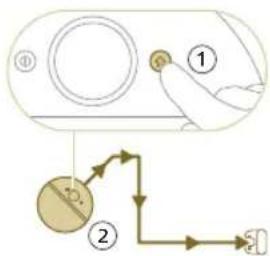
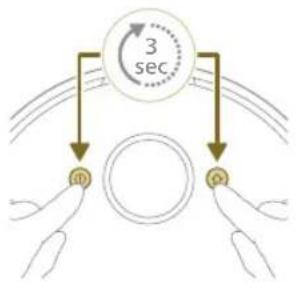
3 Press and hold the on/off button for 3 seconds to switch on the robot.
4 Press the home button. The robot drives to the correct position in the station.
- Model XU7100 - Model XU7000
5 Wait until the robot is fully charged.
If the battery is empty, the robot will not drive itself to the correct position. In this case, follow the next steps:
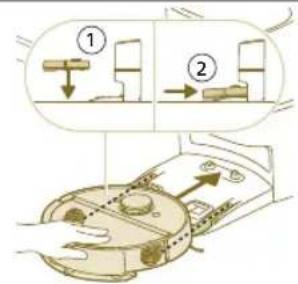
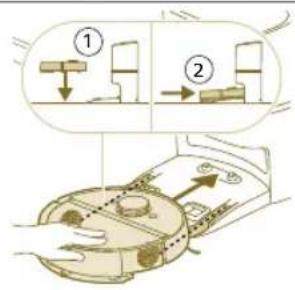
1 Turn the robot to its correct position and put the robot on the floor in front of the station.
2 Align the wheels with the tracks on the station (for model XU7100) or align the charge contacts of the robot with the charge terminals of the station (for model XU7000).
3 Push the robot in and let the wheels go in the tracks (for model XU7100) or put the robot with the charge contacts on the charge terminals of the station (for model XU7000).
Model XU7100 Model XU7000

Note: Make sure that the robot is in its correct position and starts to charge. The lights in the two buttons on the robot flash slowly. If the battery is empty, it may take a while before the robot indicates that it is charging.
4 Wait until the robot is fully charged.
1 Note: Make sure the robot is fully charged before you use it for the first time.
1 Note: When the robot is charging, the lights in the two buttons on the robot will flash slowly.
1 Note: For model XU7100 only, the white LED on the station also lights up to indicate that the robot is charging.
Note: For model XU7100 only, after the battery is fully charged, the white LED on the station will light up continuously, meaning the robot is now in standby mode.
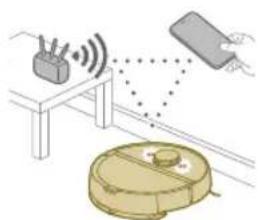
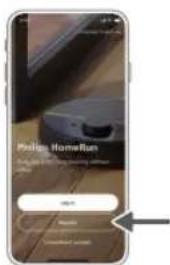
Download the app, register, and connect to Wi-Fi
App content
You can operate the robot with the Philips HomeRun robot app. The app allows you to manage your robot and offers help and support:
1 How-to-use videos.
2 Full user manual.
3 FAQs.
4 Contact Consumer Care.
5 Create a map of your home.
6 Select which rooms to clean.
7 Choose between different cleaning modes and settings for each room.
8 View the status of the cleaning run in real time and see the battery level.
9 Receive notifications and alerts.
10 Schedule a cleaning run.
11 See the maintenance status and find replacement parts.
12 Connect your robot with a digital voice assistant to operate it via voice commands.
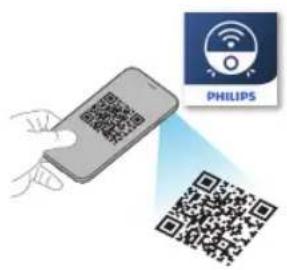
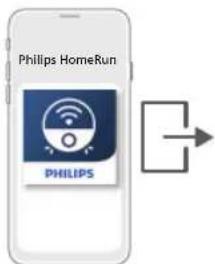
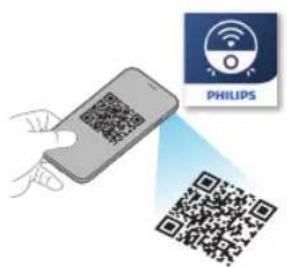
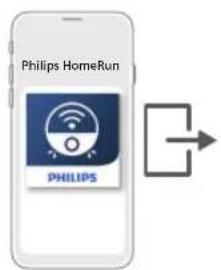
Downloading the app
1 Scan the QR code on the cover of this user manual or on the package of the robot.
Or:
Search for 'Philips HomeRun robot app' in the Apple App Store or one of the Android App Stores.
2 Download and install the app.
3 Follow the instructions in the app.
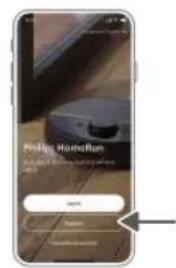
Registering a personal account
You can register a personal account and benefit from the following advantages:
- Control the robot from more than one device, e.g. a smart phone and tablet, or add multiple users in the household.
-
Save back-up of important data like customized cleaning plans for your home.
-
Connect your robot with a smart home speaker.
i Note: If you change your phone and you don't have an account, then you'll lose all customized cleaning plans.
Important: Philips values and respects your privacy. A link to our privacy notice can be found in the app before registering.

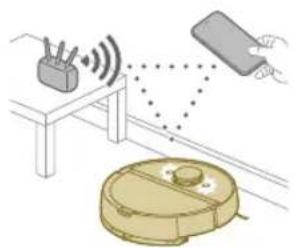
Setting up the Wi-Fi connection
Before you begin: make sure that the robot and your mobile device have good Wi-Fi coverage.
1 Press the 'Add robot' button in the app and follow the instructions.
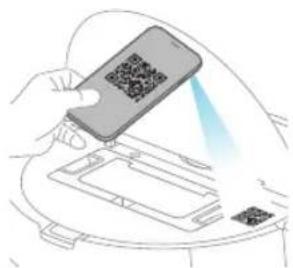
2 Select the model of your robot.
- Model XU7100 - Model XU7000
12 English

1 You can select the model of your robot by scanning the QR code on top of the robot, or you can look up the model number yourself on the type plate at the back of the station.
3 Install the station within the correct dimensions for placement.
4 Press and hold the on/off button and home button at the same time for three seconds. The lights in the buttons will flash orange to indicate that the robot is in in Wi-Fi set-up mode.
5 Pair the robot with the Wi-Fi in the app.
6 Click the join button if it's visible in the app to connect with the 'Philips robot' network.
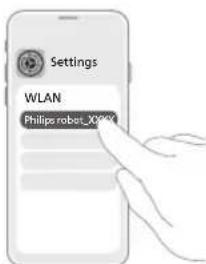
Note: If the join button is not visible in the app, leave the app and go to Wi-Fi under 'Settings' on your mobile device. There you can select the 'Philips robot' network and connect to it.
If the Wi-Fi pairing fails:
- Check if you have selected the correct robot model.
- Check your Wi-Fi connection
- Check if you entered the correct Wi-Fi password
- Check if the robot is still in Wi-Fi set-up mode.
1 Note: You can recognize this if the lights in the two buttons on the robot are still flashing orange.
Note: If you are unable to solve the problem, visit www.philips.com/myrobot7000 for support information and the contact details of Consumer Care.
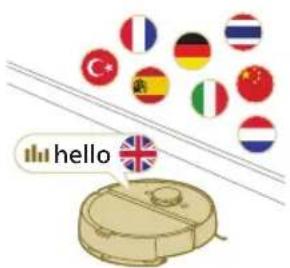
Audible signals
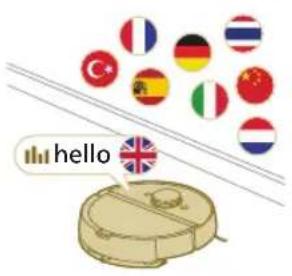
- The voice alert language of the robot can be changed from English to your local language. To change the language, download the app and connect the robot with the Wi-Fi, so that it can download the new language.
- The app will give alerts and reminders if the robot needs attention. This way you'll be fully informed on the real-time status even if the robot cleans while you're away.
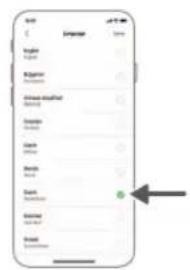
Set the language of the voice alert
1 You can set the language of the voice alert immediately after you have connected the robot to Wi-Fi
1 Make sure that the robot is connected with the app.
2 In two places in the app you can find the option to change the language of the voice alert.
- On the same app screen where you are asked to name the robot
- Or by pressing the three lines at the top left and then choosing the Robot settings tab.
3 Then choose the language of the voice alert there.
How your robot works
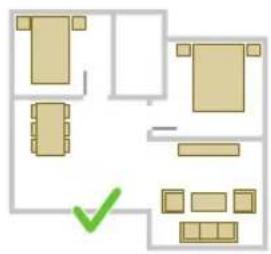
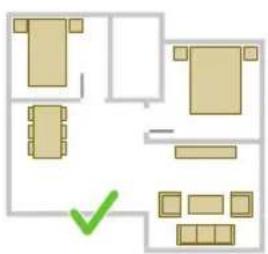
Create a mapping
How mapping works
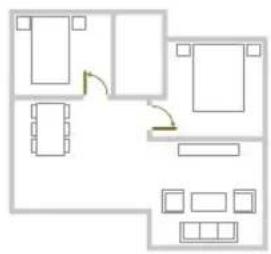
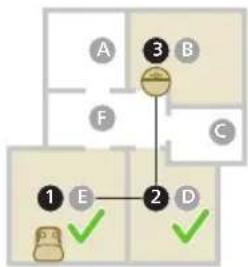
The robot drives through the rooms and the laser navigation quickly scans the rooms to build a map of the floor.
English
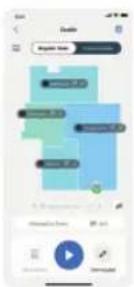
Map Edit
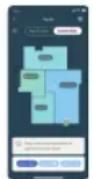
In the app, you can use Map Edit to:
Edit rooms (merge/divide rooms, name rooms) so you can customize the cleaning routine of the robot per room.
- Set up restricted areas to specify where the robot is allowed to clean and where it is not.
- Create a map for each floor of your home and store up to 5 maps. When you use the appliance, it generates a new map in a new environment. If you have maps that you use frequently and do not want to accidentally overwrite, you can lock up to 3 maps.
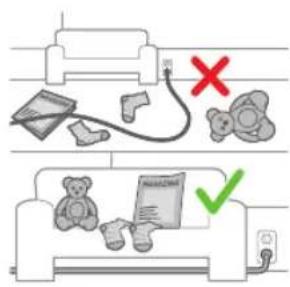
Preparing the room for mapping
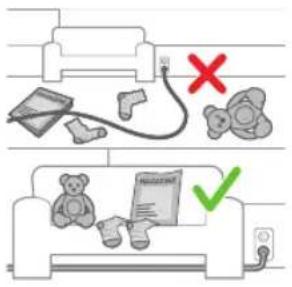
Before you start mapping, make sure to:
Tidy up the area.
Put furniture in the proper place.
Put away loose and small obstacles.
Note: This is important to avoid permanently storing the obstacles on the map.
- Open all in-house doors.
1 Important: Make sure the robot cannot get blocked during use.
Creating a map
1 Important: During mapping your robot will not clean.
1 Important: To create a map of a floor, it is very important to place the station on the floor that you want to map because the robot must be in the station when starting and ending the mapping. If you want to create a map of the 2nd floor, the station must be placed there during the mapping process. Thereafter the map of this floor can be used even if the station is on another floor.
Note: For model XU7100 only, after the robot has completed its mapping run, the Auto-empty station will start emptying the robot. This is not an error but normal behavior.
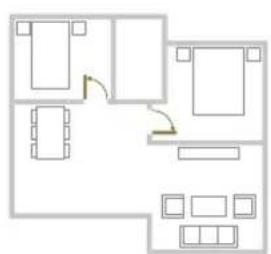
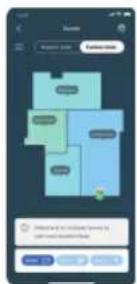
Tell your robot where not to clean with restricted cleaning zones
In the app you can set up restricted areas to indicate where the robot is allowed to clean and where it is not.
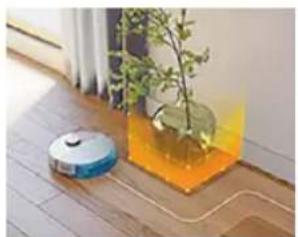
Virtual wall and No-Go zone
Create virtual walls and No-Go zones areas you do not want the robot to go. You can for example create virtual walls or No-Go zones to:
- Protect fragile objects. The robot cannot detect shiny, transparent (e.g. glass) or dark obstacles or surfaces.
Prevent the robot from getting stuck while cleaning.
Note: The robot can get stuck on high pile carpets, carpets with fringes or or very light rugs like in the bathroom. Also the robot cannot detect cables on the floor.
- Protect the robot.
Note: The robot should be kept away from liquids and wet areas such as pet bowls and plant trays.
i Important: virtual walls and No-Go zones should not be used to protect against hazards.
i Important: virtual walls and No-Go zones should not prevent the robot from returning to the station.
1 Important: Do not use your robot outdoors. It was not designed for outdoor use.
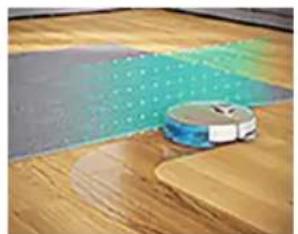
No-Mop zone
Create No-Mop zones to prevent the robot from mopping carpets or rugs. You can adjust the following options in the app under 'Robot settings':
- Avoid No-Mop zones when the rest of the room is mopped.
Only vacuum the No-Mop zone. Note that the mop can still be moist.
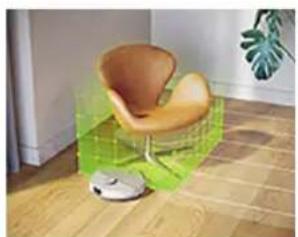
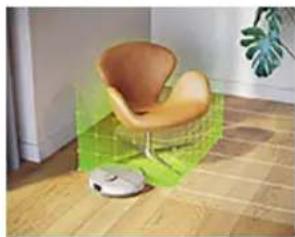
Gentle zone
Your robot can navigate over some furniture if need be. Don't want it to climb over certain things? Draw a Gentle zone on your map. Your robot will roll up to your furniture, climbing only a little, before turning away.
IMPORTANT: If you want your robot to still go into other rooms, make sure that your Gentle zone isn't too close to a door with a threshold. Set your Gentle zone at least 1 meter from a door with a threshold.
How your robot cleans
In the app, the following cleaning routines can be selected:
Routine Description
Regular cleaning

Regular cleaning is intended for your normal daily cleaning routines. The robot cleans each room according to the settings you specified and saved in the cleaning plan. If the environment is not recognized, the robot maps the environment and simultaneously vacuums it (the robot does not mop in this case). After completion, it returns to the station.
Custom cleaning
Custom cleaning can be used to have the robot perform cleaning actions at unique occasions. You can customize the cleaning routine of your robot to your wishes. You can set the following three options.
- Room: the robot cleans one or more rooms in an order you specify.
- Zone: the robot cleans a zone in a room you specify
- Spot: the robot cleans in a square of 1.5 by 1.5 meter in a specific spot in your house that you want to have cleaned.
Note: with spot cleaning, place the robot in the middle of the square you want the robot to clean.
After selecting one of the above options, you can select a cleaning mode and fine-tune your cleaning preferences and advanced settings.
Set cleaning preferences, advanced settings and cleaning order
In the app, you can select five different cleaning modes for each room. These are standard modes that can be used in most situations. You can customize your cleaning mode by fine-tuning cleaning preferences and advanced settings.
Cleaning modes
Mode Description
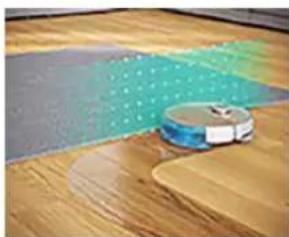
Wet & dry The robot vacuums and mops the floor at the same time. This mode is intended for regular cleaning of hard floors.
IMPORTANT: For mopping sensitive hard floors, such as parquet floors, set the mopping wetness level in the app to the lowest level.
Dry The robot only vacuums the floor. This mode can be used for areas that shouldn't be mopped.
Quiet The robot cleans with minimal noise. The suction power is lowered and the voice alerts are muted.
Cleaning modes
| Intensive The robot vacuums and mops the floor at the same time and at full power. This mode is intended for thorough cleaning of small areas. i Note that it is not recommended to clean large areas in this mode. The robot passes the area 5 times, so the cleaning time and battery usage will increase significantly. |
| Individual For this mode you can select all expert settings from scratch. |
Cleaning preferences
For each cleaning mode, you can fine-tune the following cleaning preferences:
Setting Description
| Suction power change the suction power: - Eco: for efficient cleaning with low energy consumption and low noise level. - Normal: for regular cleaning and effective removal of fine dust on hard floors with optimal balance between power and efficiency. - High: for a thorough cleaning of large floors. Can clean more on a single charge than max mode. - Max: ideal for removing large dirt like pet hairs or crumbs. The strong suction power removes fine dust particles hidden deep inside carpets and crevices. | |
| Water level determine the flow rate that is pumped from the electric water tank onto the mop: - Off: Switch off the mopping wetness for uncoated wooden floors and carpets. - Low: to mop a sensitive floor e.g. parquet. The combination of vacuuming and mopping removes more fine dust than vacuuming alone. - Middle: optimal for a regular wet & dry cleaning. The mop removes superficial dirt and bacteria to keep your home sanitized and healthy. - High: for an effective removal of footprints for a spotlessly clean home. It is recommended to combine this setting with mop vibrations turned on and 5 cleaning path repetitions for an intensive cleaning. | |
| Cleaning path sequence | Specify the number of cleaning passes. One pass is sufficient for normal cleaning. It is possible to program the robot to make two or even five passes for intensive cleaning of stubborn dirt. It is recommended to select this option only for specific cleaning areas as it impacts cleaning duration. |
Advanced settings
For each cleaning mode, you can fine-tune the following advanced settings:
Setting Description
| Mop vibration turn the mop vibration on or off. The vibrations gently yet effectively scrub the floor to loosen dirt and footprints. |
| Y-pattern mopping Change the mopping pattern to Y-pattern. By mopping in a Y-pattern, the robot will leave less watermarks and traces. Note that the cleaning time will be a bit longer than normal mopping. |
Setting Description
Carpet boost turn the carpet boost on or off. The robot automatically increases the suction power when it has driven onto a carpet or rug. It is recommended to enable this setting. However, you can disable it for rooms where no disturbance is wanted.
Using your robot
Preparing for a cleaning run
Before you start the robot on its cleaning run: - Pre-wet the mop for optimal results.
- Attach the washable mop pad to the mop pad holder.
IMPORTANT: The mop pad holder cannot be removed and when using the robot, the washable mop pad must always be attached to the mop pad holder, even if you use the robot without mopping. This is to prevent damage to the floor and the mop holder during use.
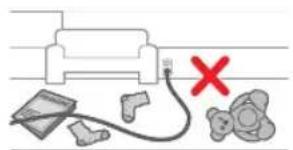
- Remove all cables, wires and cords from the floor to prevent the robot from getting entangled in them.
- Open all in-house doors.
Start your first cleaning program via the app (see H.)
Start
1 Open the app.
2 Select the cleaning program: Regular cleaning or Custom cleaning.
3 Press the 'start' icon.
Note: If the battery level is too low, cleaning cannot start. Wait until the robot is sufficiently charged before you start a cleaning run.
Stop
1 Press the Pause icon in the app. The robot stops.
2 Press the Start icon again. The robot continues.
3 Press the Home & charge icon. The robot goes back to the station.
Using the robot without the app
Note: For an optimal experience, we recommend using the app.
Without the app, you can use the two buttons on the robot to operate it:
-
On/off button
-
Long press (3s) to turn the robot on and off.
- Short press to start cleaning or to pause cleaning. Press again to resume cleaning.
Home button
- Short press (when the robot is not cleaning): the robot will find the station and charge.
-
Short press while cleaning: the robot will stop cleaning. Short press again: the robot returns to the station to charge.
-
Short press when the robot is driving back to the station: the robot will pause returning to the station. Press again to let it drive back to the station.
When operating the robot manually, it will vacuum and mop. However, if the water tank is empty it won't mop.
Your robot's cleaning pattern
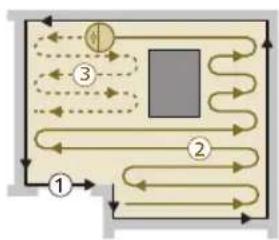
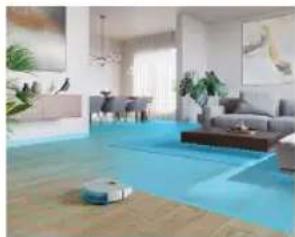
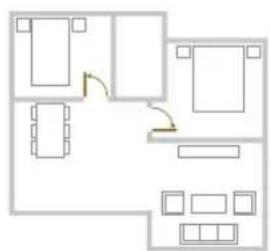
The robot cleans the home in a structured way. The robot cleans room by room and always starts by cleaning the edges of the room first before covering the remaining surface.
Note: If cleaning is completed within 10 minutes, the area will be cleaned twice. This is an extra touch up to improve cleaning results.
Returning to the station
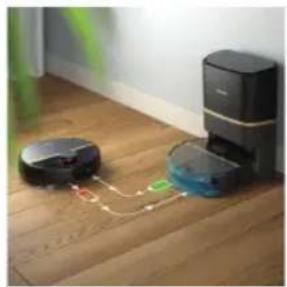
After the robot has completed its cleaning run, the robot will automatically drive back to the station to recharge.
i Note: When the robot is docked it will withdraw power to keep the battery performance optimal. However, the energy consumption is limited.
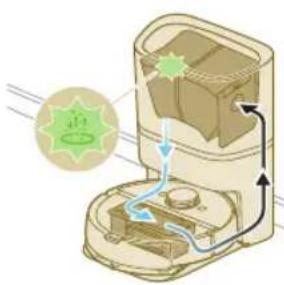
Note: For model XU7100 only, the station will also vacuum the dust bin of the robot empty. The dust is then collected in the dust bag of the station.
Auto recharge and resume
When the battery runs low (<20%) while cleaning, the robot automatically returns to the station to recharge. After the battery has been charged, the robot continues where it has left off.
Cleaning and maintenance
When to do maintenance
Item Cleaning Replacement
| Washable mop pad After every use 3-6 months | |
| Main brush Monthly 6-12 months | |
| Washable filter Monthly 3-6 months | |
| Side brush Monthly 6-12 months | |
| Main wheels & universal wheel | Monthly - |
| 360° laser navigation (LiDAR) sensor | Monthly - |
| Sensors: | Monthly - |
| - Collision sensor (2x) | |
| - Infrared signal receiver to find the station | |
| - Infrared signal emitter to communicate with the station | |
| - 3DToF sensor to detect and avoid small obstacles in front of the robot (120°) | |
| -ToF-sensor to detect and avoid small obstacle around the robot (8x) | |
| - Anti-drop sensor (6x) | |
| Charging contacts robot and station | Monthly - |
| Sensors to detect placement of dust bin and water tank | 6 months - |
| Dustbin (XU7000) Empty the dustbin after each use | - |
22 English
Dust bag in Auto-empty station (XU7100)
- When the orange LED on the auto-empty station flashes indicating that de dust bag is full.
Cleaning the washable mop pad
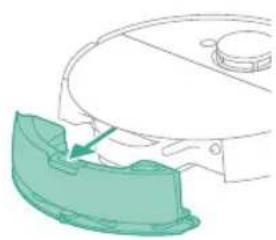
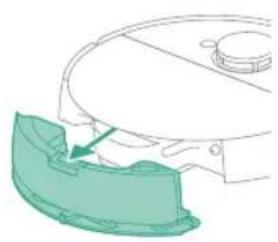
1 Push the water tank release button.
2 Pull the water tank out of the robot.
3 Pull the washable mop off the velcro material.
4 Slide the straight side of the washable mop out of the slot.
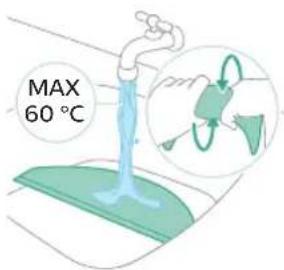
5 Rinse and clean the washable mop pad with water or wash it in the washing machine.
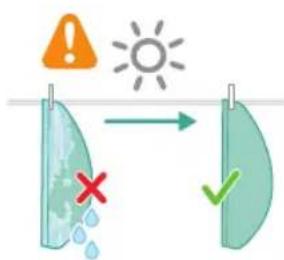
6 Air dry the washable mop pad.
1 Note: Do not use other ways to dry the washable mop pad.
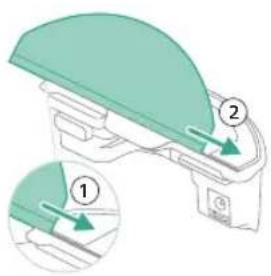
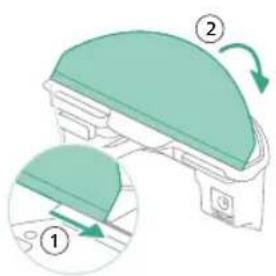
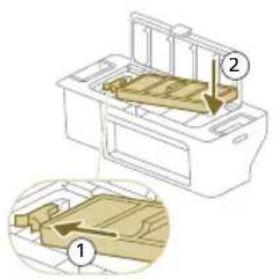
7 Slide the straight side of the washable mop pad in the correct slot of the mop pad holder
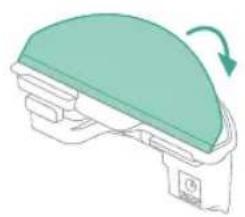
8 Attach the washable mop pad to the velcro material of the mop pad holder.
9 Fill the water tank. Use the water inlet.
1 Note: Make sure that the outside of the water tank is dry.
Note: Do not use cleaning detergents.

10 Insert the water tank in the correct location.
24 English
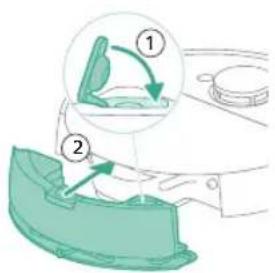
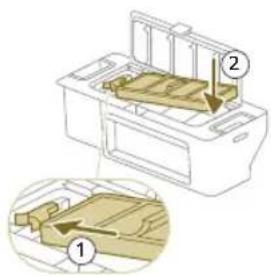
Emptying the dust bin
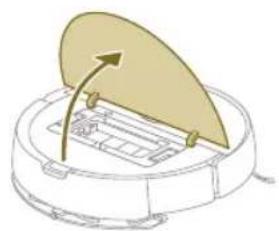
1 Open the top cover.
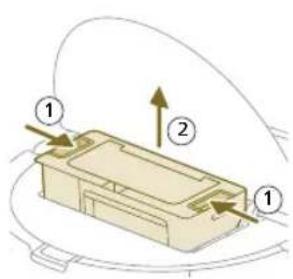
2 Push the release buttons of the dust bin at the same time.
3 Pull the dust bin out.
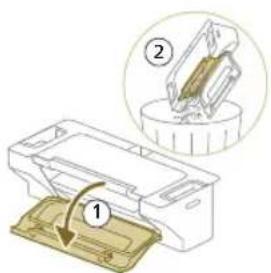
4 Open the empty door of the dust bin.
1 Note: Do not confuse the empty door of the dust bin with the lid of the washable filter. The empty door of the dustbin is blue.
5 Let the dirt out of the dust bin.
Cleaning and drying the dust bin
1 Rinse the dust bin with water.
1 Do not use cleaning detergents.
IMPORTANT:Do not wash the dust bin in the dishwasher.
2 Air dry the dust bin.
1 Note: Do not use other ways to dry the dust bin.
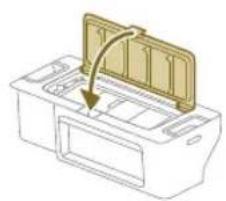
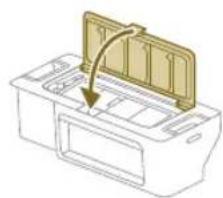
Cleaning the washable filter
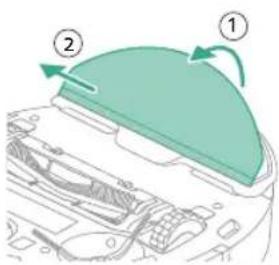
1 Open the lid of the washable filter.
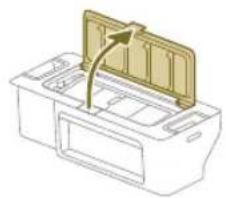
2 Pull the washable air filter out.
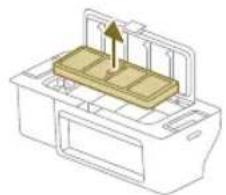
3 Rinse the washable filter with water.
4 Air dry the washable filter for 24 hours.
Note: Do not use other ways to dry washable filter.
5 Put the washable filter against the filter lock of the dust bin and push it in.
6 Push the washable filter down.
7 Close the lid of the washable filter.
26
English

8 Open the top cover of the robot.
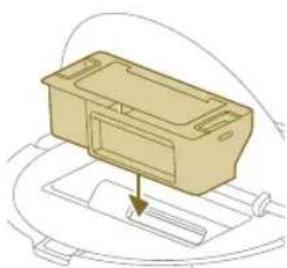
9 Insert the dust bin in the correct location.
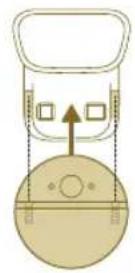
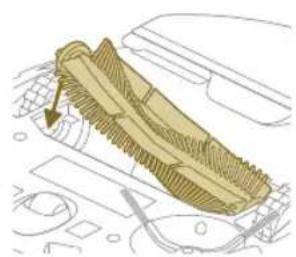
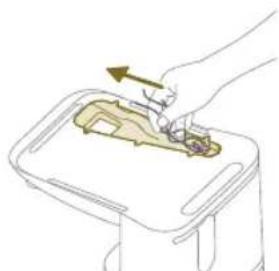
Cleaning the main brush
1 Put the robot upside down on a surface that is flat and stable.
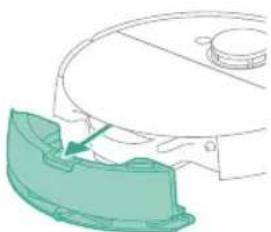
2 Push the release buttons of the brush cover at the same time.
3 Lift and remove the brush cover.
4 Pull the main brush out.
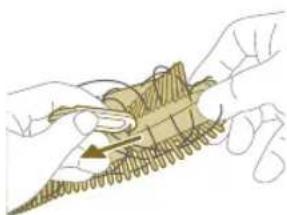
5 Use the brush cleaning tool to cut through the hairs.
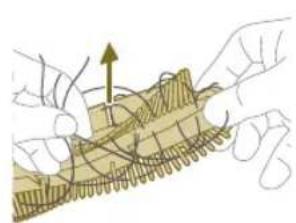
6 Remove the hairs and dirt from the main brush.
Tip: Use the brush end of the cleaning tool to remove the dirt on the main brush.
7 If necessary, install the caps on both ends of the main brush. Turn the caps clockwise to lock them in position.
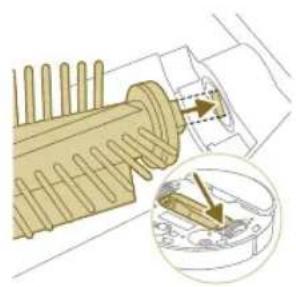
8 Install the main brush in the correct location.
9 Put the lips of the brush cover in the correct cutouts.
10 Push the brush cover in.

Cleaning the side brush
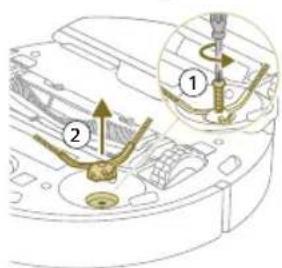
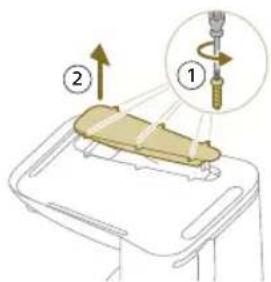
1 Put the robot upside down on a surface that is flat and stable.
2 Remove the screw with a screw driver.
3 Remove the side brush.
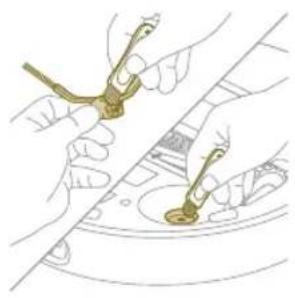
4 Use a brush with soft bristles (e.g. a toothbrush) to remove dust or fluff from the side brush and the robot.
Tip: You can use the brush end of the cleaning tool to remove dust or fluff from the side brush and the robot.

5 Put the cleaned side brush in the correct location.
6 Attach the side brush with the screw and a screw driver.
Cleaning the main wheels and the front caster wheel
1 Put the robot upside down on a surface that is flat and stable.
2 Use a brush with soft bristles (e.g. a toothbrush) to remove dust or fluff from the front caster wheel and main wheels.
You can use the brush end of the cleaning tool to remove dust or fluff from the wheels.
To maintain good cleaning performance, you have to clean sensor, contact points and IR signal window from time to time.

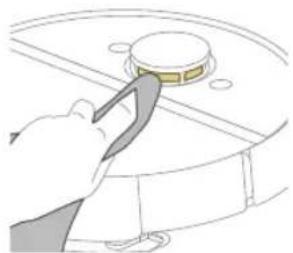
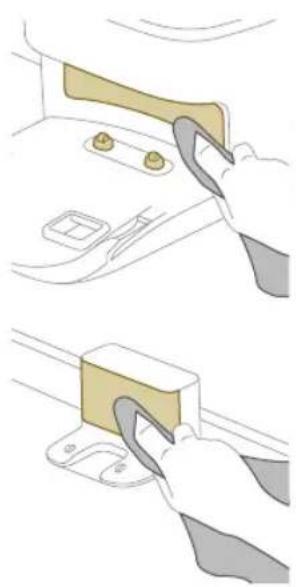

1 Unplug the station from the wall socket
2 Use a soft non-abrasive dry cloth. If necessary, lightly moisten the cloth.
3 Clean the components.
Note: Do not use cleaning detergents.
4 Dry the components and surfaces with a dry cloth.
Note: Do not use other ways to dry the components.
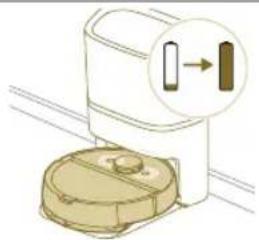
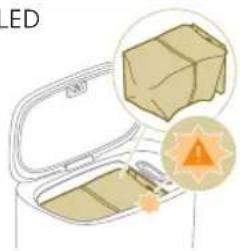
Replacing the dust bag (XU7100)

When the orange LED on the auto-empty station flashes indicating that de dust bag is full.
1 Open the lid of the Auto-Empty station.
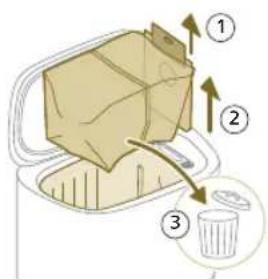
2 Pull the dust bag out of the Auto-Empty station.
3 Remove and dispose the dust bag.
4 Slide the cardboard piece of the dust bag into the slot that is indicated on the Auto-Empty station.
5 Close the lid of the Auto-Empty station.
1 For information on where and how to order new dust bags, see the 'Replacement' section in the manual.
Removing blockages from the Auto-Empty inlet (XU7100)
The Auto-Empty inlet of the Auto-Empty station (XU7100) may become clogged. You may notice this when the dust bin of the robot is no longer properly emptied by the Auto-Empty station. Below you can find the instructions to remove blockages from Auto-Empty inlet of the Auto-Empty station (XU7100).
1 Unplug the Auto-Empty station from the wall socket and put the Auto-Empty station upside down on a surface that is flat and stable.
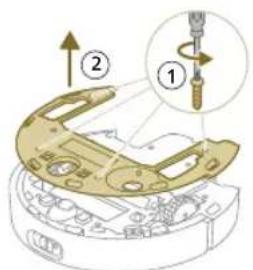
2 Remove the screws from the bottom cover with a screw driver.
3 Remove hair and dirt that is stuck in the Auto-Empty inlet.
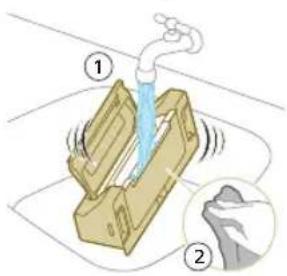
Cleaning the water tank
1 Push the water tank release button.
2 Pull the water tank out of the robot.
3 Rinse the water tank with tap water
4 Dry the outside of the water tank with a cloth.
1 Note: Do not use cleaning detergents.
IMPORTANT:Do not wash water tank in the dishwasher.
5 Keep the sealing cap of the water tank open and allow the inside of the water tank to air dry.
Note: Do not use other ways to dry the water tank.
6 Fill the water tank. Use the water inlet.
1 Note: Make sure that the outside of the water tank is dry.
1 Note: Do not use cleaning detergents.
7 Insert the water tank in the correct location.
Long term storage
1 Charge the battery until it is full.
2 Store the robot within a temperature range of below +35^ and above 8^
32 English
User interface signals and their meaning
Robot model number Signal Description of signal Meaning of signal
XU7100
XU7000


The lights in the two buttons The robot is charging on the robot flash slowly.
XU7100
XU7000
The lights in the two buttons The robot is fully charged. on the robot are on continuously.
XU7100
XU7000
The lights in the two buttons The robot is in in Wi-Fi set-up on the robot flash orange. mode.
XU7100
XU7000

The Robot's lights go out. The robot has gone into sleep mode.
C
Reset/restore the robot
You can reset/restore the robot by pressing the reset button with a needle.
- By long pressing the reset button for 3 seconds, you will not only restore factory settings, but also reset the firmware to the last version.
- By long pressing reset button for 10 seconds, the robot will clear all network connection information, map information, scheduled task, do-not-disturb information, and customization information, and reset the suction power to the default level.
Note: After resetting/restoring the robot, the robot needs to reconnect the app, and the relevant settings in the app are removed.
Replacement
Ordering accessories
To buy accessories or spare parts, visit www.philips.com/myrobot7000 or go to your Philips dealer. You can also contact the Philips Consumer Care Center in your country (see the international warranty leaflet for contact details).
Replacement parts:
XV1470 Replacement washable mops
XV1472 Dust bags
XV1473 Maintenance kit with 2 filters, 1
main brush and 1 side brush.
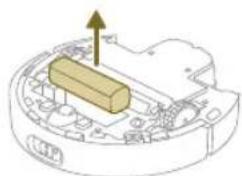
Removing the rechargeable battery
To remove the rechargeable battery, follow the instructions below. You can also take the robot to a Philips service center to have the rechargeable battery removed. Contact the Philips Consumer Care Center in your country for the address of a service center near you.
Take any necessary safety precautions when you handle tools to open the product and when you dispose of the rechargeable battery.
Warning: Before you remove the battery, make sure that the product is disconnected from the station and that the battery is completely empty.
1 Start the robot from a place somewhere in the room and not from the station station.
2 Let the robot run until the rechargeable battery is empty to make sure that the rechargeable battery is completely discharged before you remove it and dispose of it.
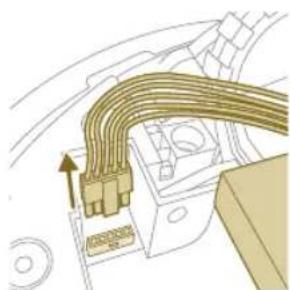
3 Undo the screws of the battery compartment lid and remove the lid.
4 Lift out the rechargeable battery and disconnect it by pressing the little clip on the battery connector to release the battery connector.
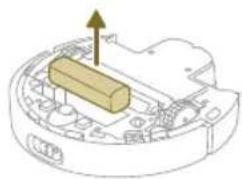
5 Take the robot and the rechargeable battery to a collection point for electrical and electronic waste.
Warranty and support
If you need information or support, please visit www.philips.com/support or read the international warranty leaflet.
Your robot vacuum cleaner has been designed and developed with the greatest possible care. In the unfortunate case that your robot needs repair, the Consumer Care Centre in your country will help you by arranging any necessary repairs in the shortest possible time and with maximum convenience. If there is no Consumer Care Centre in your country, go to your local Philips dealer.
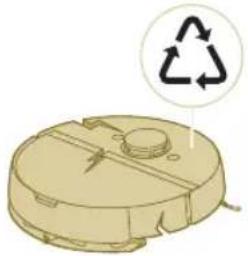
Disposal and recycling
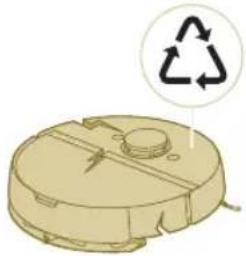
Do not dispose the robot in the regular trash. Make sure to bring it to your the recycling facility for electrical equipment.
Troubleshooting
This chapter summarizes the most common problems you could encounter with the appliance. If you are unable to solve the problem with the information below, go to the Philips HomeRun robot app or visit
www.philips.com/myrobot7000, where can also find support videos and frequently asked questions. You can also contact the Consumer Care Center in your country.
Problem Possible cause Solution
| The robot doesn't switch on. The battery is low. Charge the robot on the station before use. | ||
| The ambient temperature is too low or too high. | Use the robot at a temperature between 8 °C and 35 °C. | |
| The robot is unable to pair with the app. | The robot is no longer in pairing mode. | Put the robot back in pairing mode by holding the home and on/off button at same time (lights will flash orange). |
| The Wi-Fi connection (signal) is not good. | Place the robot in an area with a good Wi-Fi signal. | |
| A wrong Wi-Fi network selected or | Make sure you select the correct Wi-Fi network. | |
| A wrong password used. Make sure you use the correct Wi-Fi password. | ||
| A wrong robot model is selected in the app. | Make sure you select the correct robot model. | |
| A wrong app is downloaded Always use the app that you have downloaded via the QR-code from the quick start guide. | ||
| The app and the robot lose connection. | The robot has gone out of reach of the Wi-Fi signal. | Wait for robot to drive back into area with a good Wi-Fi signal. |
| The robot has gone into sleep mode. | The robot will go into sleep mode if it has not returned to the station. Press the on/off button for 3 seconds or longer to awake the robot. Then send it via the app to the station. | |
Problem Possible cause Solution
| The Wi-Fi password has been changed. | When Wi-Fi details have changed: add the robot to the app again. | |
| The Wi-Fi network name has been changed. | When Wi-Fi details have changed: add the robot to the app again. | |
| The app account was changed. When account details were changed, add robot to the app again. | ||
| The email with the verification code has not been received. | The verification code email may take up to a minute to arrive. | Wait more than a minute for the email. |
| The email has not been sent. Click the "resend" button. | ||
| The email may have landed in 'spam' or 'junk' folder. | Check the 'spam' or 'junk' folders. (The sender of the e-mail is: HomeRun_noreply@). | |
| A wrong email address is used. Check if you have used the correct email address. | ||
| The phone or computer doesn't have good internet connection to receive the email. | Make sure the phone or computer has a good internet connection. | |
| The robot can't find station. The station has been moved during a cleaning run. | Place the station back in the same place it was before the cleaning run started. | |
| The station is not connected to the power supply. | Connect the station to the power supply. | |
| The sensors on robot and/or station are dirty. | Clean all the sensors of the robot and the station. | |
| A No-Go zone was placed too close to the station | Don't save No-Go zones too close to the station. | |
| The station has been placed on a spot with very bright light. | Don't put the station in a place with very bright light (like direct sun light) this may interfere with the infra red signal. | |
| The robot pushes the station away. | The station is not standing close to a wall. | Place station with the back towards a wall. |
| The sensors on robot and/or station are dirty. | Clean all the sensors of the robot and the station. | |
| The station doesn't have enough space around it (0,5 meter to each side and 1,5 m to the front). | Make sure the station has enough space around it. | |
| The robot doesn't clean properly. | The dust bin of the robot is full (XU7000). | Empty the dust bin of the robot (XU7000). |
| The water tank is empty. Refill the water tank in time. | ||
Problem Possible cause Solution
| Obstacles are stuck in the brushes. | Remove all obstacles from the brushes. | |
| The filter has not been cleaned. Clean the filter regularly. | ||
| The filter has not been placed back or has not been placed back correctly. | Place the filter back correctly. | |
| The washable mop needs to be replaced. | Replace the XV1470 washable mop. Purchase a new XV1470 washable mop via de app or on www.philips.com/myrobot7000 | |
| The robot uses no or little water during mopping. | The water level is set too low. Set the water level higher in the app. | |
| Too much water comes out of the mop / the robot makes the floor too wet. | The water level is set too high. Set the water level lower in the app. | |
| IMPORTANT: For mopping sensitive hard floors, such as parquet floors, set the water level in the app to the lowest level. | ||
| Robot misses areas for cleaning/ robot does not clean the whole area/ robot has began to miss certain spots | The sensors of the robot are no longer clean. | Clean the robot's sensors with a dry cloth. |
| The robot is working on slippery polished floors. | Make sure the floor is dried before the robot starts cleaning. | |
| The robot is unable to reach certain areas blocked by furniture or barriers. | Tidy up the area to be cleaned by putting furniture and small objects in their proper place. | |
| The cleaning area is not tidy. Remove small objects from the floor and tidy up the cleaning area before the robot starts cleaning. | ||
| The robot keeps a safety margin in the distance close to No-Go zones and No-Mop zones, and this can cause that the robot won't pass a certain area. | Make the No-Go zone or No-Mop zone in the app a bit smaller. | |
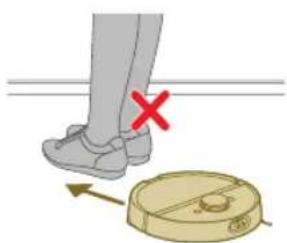
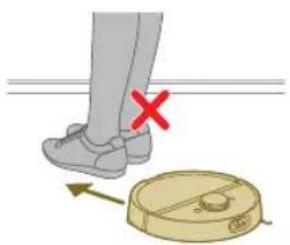
| The robot has blocked itself by eating a cable. | There are cables on the floor which the robot is unable to detect. | Stop the robot and remove the brush cover. Take away main brush and check if something is stuck in the side brush: remove side brush, take away the cable, reattach the side brush. Remove all cables from the floor before you start a cleaning run. |
Problem Possible cause Solution
| The robot falls from stairs. The anti-drop sensors on the bottom of the robot are dirty. | Clean the anti-drop sensors on the bottom of the robot. | |
| Objects have been placed on the top step of the stairs that the robot detects and therefore thinks it is safe to drive. | Remove the any objects that are placed on the top step of the stars. | |
| The robot doesn't charge or discharges very quickly. | The robot is stored in a space that is too hot or too cold. | Charge and store the robot at a temperature between 8 °C and 35 °C. |
| The Auto-Empty station doesn't collect dust from the robot (XU7100). | The dust bag has not been placed back or placed back correctly. | Place a dust bag correctly in the Auto-Empty station. |
| The dust bag is full. Place an empty dust bag in the Auto-Empty station. | ||
| The quiet mode or do not disturb setting has been activated in the app. | De-select the quiet mode or do not disturb in the app. | |
| The Auto-Empty station inlet is blocked. | Clean the Auto-Empty station inlet. | |
| There is foam buildup in the water tank and the robot moves strangely. | Detergent has been added to the water tank, causing the robot to be slippery. | Never add detergent to the water tank again. Clean the robot and its wheels, including a thorough rinse of the water tank. |
| The robot is making an abnormal noise. | The filter has not been placed back or has not been placed back correctly. | Check if filter is placed back correctly. |
| The brushes are no longer turning. | Hairs are stuck in the main brush. | Remove hairs with the brush cleaning tool provided with the robot. |
| Other obstacles are stuck in the brushes. | Remove other obstacles from the brushes. | |
| The main brush was not placed back correctly. | Remove the main brush and reassemble it. | |
| When main brush is not placed back correctly: reassemble correctly the square shaft into the square hole. | ||
| The side brush gets deformed. | Something may have gotten stuck in the side brush. | Put brush in hot water for a while and let it dry. |
| Purchase a new side brush via de app or on www.philips.com/myrobot7000 | ||
| The robot won't drive on to a black floor. | The robot thinks a pitch black floor is a falling hazard - the cliff detection is activated. | Make sure lights are switched on in the room with pitch black flooring. |
Problem Possible cause Solution
| Clean the anti-drop sensor on the bottom of the robot. | ||
| A schedule is set, but the robot doesn't start cleaning according to the schedule. | The 'do not disturb' function may be activated. | Check in the app if the 'do not disturb' function is switched on at the same time as the schedule. |
| The robot is in sleep mode. Make sure that the robot is charging in the station. | ||
| The wrong time zone has been selected in the app. | You can change the time zone in the app in 'My Account' under 'Profile'. | |
| The robot has lost connection with the Wi-Fi network. | Make sure the Wi-Fi network is working. | |
| The battery of the robot is empty. | Make sure that the station is connected to the power supply. | |
| It is not possible to log in to the robot app account. | The email address has been changed. | Create a new app account in case the email address has been changed. |
| The password is wrong. Enter the correct password. | ||
| In case the password is forgotten, click 'forgot password' and follow the steps. | ||
| The wrong country region is selected. | Select the correct country region in the app. | |
| Pop-up messages about app or firmware updates continue to be received. | App updates or firmware updates are not installed. | For continuous improvement of the robot we recommend installing all updates. |
Obsah
Uvod 42
Přehled výrobku 42
Preehled senzoru 43
Prid prvnim pouzitim 44
Margutuled roboti kahel
De stofzuigerzak is vol.
De robot resetten/herstellen
Repor/restaurar o robot
Encomendar acessórios
Robot model numarasi
MoJoXU7100 MoJoXU7000

3a6eJekka: PpOBepTe daHn po6oTbE B npabHNO noJoxKeHne H 3aNoUBa Da ce 3apexJa. CBeTInHHnte HndNkAToPn B DbTa 6yToHa Ha po6oTa MIRAT 6abHo. Ako 6aTepya e N3ToUeHa, Moxe Da OTHeMe N3BecTHO BpeMe, npeni po6oTbT da NOKaxe, ye ce 3apeXka.
4 N3kaKeTe,doKaTo po6oTbT ce 3apeN HnBnHO.
1 3a6eJekka: PpOBepTe daI np6oTbTe hAnbIHO 3apeH, ppeI Da ro n3noJI3BaTe 3a npBb Nt.
1 3a6eJekka: Korato po6oTbT ce 3apejda, cBeTnHHnTe nHdkaTopu B DbaTa My 6yToHa ue MURAT 6aBHO.
1 3a6eIexKa: Camo 3a Moen XU7100: 6ennr LED nHnKaTOp Ha cTaHnra Ta cbso 3aNoOyBa Da CBeTN, 3a da nokaxe, ye po6oTbT ce 3apeKda.
1 3a6eIexka: Camo 3a moJeXU7100: cneI kaTo 6atePnraTa ce 3apei HaHbInHO, 6JIyT LED uHnKaTop Ha cTaHcNtA ue 3anOue He da CBETn npOdbJxnteJIHo, KoETo O3HaayBa, ye po6oTbT cer a E b peKIM Ha rTOBHOCT.
I3TeTJIHe Ha npJIoXeHneTo, peRncTpnpaHe n CBbp3BaHe KbM Wi-Fi
CbIbPkaHneHa npNIOXKeHHeTo
Moxete da ynpablaBate po6oTa c npinoxeneTo 3a po6oTu Philips HomeRun. PnloxeHneTo Bn no3BoJBa da ynpablaBate po6oTa cn n npedna r nomou n noDpBXKa:
1 BndeoklnnoBe c nHCTpyKun 3a NaunHa Ha n3NoJ3BaHe.
2IbHNO pBKOBOCTBO 3a nITpe6nteJra.
3 YeCTO 3aJaBaHn Bbnpocn.

4 Bpb3Ka cOTdJeNa 3a 06cIyXBaHe Ha KIneHTN.
5 Cb3daBaHe Ha KapTa Ha Doma BN.
6 N36op Ha cTaN 3a NoOuNCTBaHe.
7 I36op meKdy pa3JnHn peKIMn Ha NOUcTbaHe n HAcTpoKn 3a BCa Ka CTa.
8 IperJeHa cBcTcHHeTo Ha uKbJa Ha noUcTbaHe BpeaJHo BpeMe HNBOTO Ha 3apraHa 6atepnaTa.
9 NolyuhaBaHe Ha n3BecTn n npdynpexkdeHna.
10ПланиразеHaцьнHa nouchBahe.
11 PperneHa cBcToHHeTo Ha nOndpBxKaTa HAMpaHe Ha pe3epBn Yactn.
12 Cbbp3BaHe Ha Baunna po6oT c uippoB rIacOB acnCTeHT 3a ynpabJIeHneTo My Upe3 rIacOBn KOMAHnn.
I3TeTlJaHe Ha npInloKeHneTo
1 CkaHpaTe QR kOda Ha KOpucaTa Ha ToBa pBkoBoCTBO 3a Notpe6nteJI nn Ha onakOBkata Ha po6ota.
Vnn:
NoTbpcTe npuioxehnTo 3a po60Tu Philips HomeRun B Mara3Ha 3a npuioxehn3a Apple nIIN B Mara3Ha 3a npuioxehn3a Android.
2 ⅢterIeTe n HcTaInpaIte npIIOKeHneTo.
3 CneBaaTe HnCTpyKunTe B npInIOxKeHneTo.
PertnctpnpaHe Ha JInueH aKayHT
MoxTe da pernctpnpaTe JnueH akayHT n Da ce Bb3NoJ3BaTe OT cneHNTE npedmCTBa:
- UnpaBJIeHHe Ha po6Ota OT NOBeYe OT eEDHO yCTpoIcTBo, HAnpIMep CMapTfoH n Ta6JeT, IIN IO6aBByHe Ha HRAKOLKO NOTpe6uTeiN B DOMAKNUHCTBOTO.
- 3ana3BaHe Ha pe3epBHO KOIIe Ha BaXHn DaHHN, KaTo nepcoHaJIIN3IpaHN IIaHOBe 3a NOUcTBaHe 3a BaWJr DOM.
Cbbp3BaHeHapo6oTa cInHTeINrEHTeH DOMaueH BnCOKOrOBOpuTeJ.
3a6eJekka: Ako cmeHnte TelefoHa cn HMaTe akayHT, ige 3ary6nte BCnukn nepcoHaJIIN3upaHn PnaHObe 3a NoOHCTBaHe.
1 Baxho: Philips ceHn uybaxaba Bawata noBepuTeJHoCT. IpeDu da ce perucptpate B npnoXeHneTo, Moxete Da BuInTe Bpb3kata KbM 6enexkata Hn 3a nobepuTeJHOCT.
HactpoJaHaWi-FiBpb3KaTa
I Ipei Da 3anoyhe: ybepe Ce, ye po6oTb T Mo6nHTo Bu yctpoNCTBO mMat do6po Wi-Fi nokpntne.
1 HaTnCHeTe 6yToHa Add robot (I06aBHe Ha po6oT) B npUloKeHneTo n CNeBaTe HNCTpyKuNTe.
900Блгарский

2 N36epete moeJa Ha Baunra po6oT.
-MoJenXU7100-MoJenXU7000
1 Moxete Na 36epeTe MoJena Ha BaunpaOTo, KaTo cKaHnpaTe QR Koda Ha po6oTa, NIn MoXeTe Da npOBepuTe Homepa Ha MoJeJa camn BbB cnPmeHa Ta6eKa Ha Tbp6a Ha cTahnraTa.
3 NocTaBete CTaHcIyTa B rpaHnCITe Ha npaBnHnTe pa3Mepu 3a NOCTaBHe.
4 HaTnchTe n 3aDpBxKTe eNHObpeMeHHo 6yToHa Bk./u3Kn. u 6yToHa Home B npOdbJXeHne Ha TprCeKHyHn. CBeTlNHHTe INdNKaTOPn B 6yToHnTe Ie MInrAT B opAHXeBO, 3a Da NOKaXaT, Ye po60TbT e B pexm Ha HactpoiKa Ha Wi-Fi.
5 CBoepe po6oTa cWi-Fi b npnloKeHneTo.
6 LpakHe Te Bbpy 6yToHa 3a npncBcEINHBAHe, aKO e BnIM B npJIOKeHneTO, 3a da ce CbpxTe C MpeXaTa Philips robot.

1 3a6eIeKka: Ako 6yToHbT 3a npncBcEiINHraHe He e BvIM B npInIOxEHnTe, n3Je3Te OT Hero n OTnTe Ha Wi-Fi B, HAcTpOuKn"Ha Mo6uHnHc n TepeOH. TaM MoKeTe Da n36epeTe MpeXaTa Philips robot n da ce CBpXeTe KbM He.
Ako cDBoBaHaTo Ha Wi-Fi e HeycneuHo:
- PpOBepTe dani cTe u36paI npaBnHm moJe po6oT.
- PpOBepeBaWataWi-FiBpb3ka.
- PpOBepete daJIi cTe BbBEn npabunHata napoJa 3a Wi-Fi.
- PpOBepeTe daJI np6oTb T BCE oUe e B pexm Ha hacToKa Ha Wi-Fi.
3a6eJexka: MoKTe da pa36peTe TOBa, aKO CBeTnHHnTe INHnKaTopu B DaTa 6yToHa Ha po6Ota BCE OSe MURAT B OpaHKeBO.
3a6eJkKa:Ako He MoXeTe Da pa3peuHte npo6Iema, nocetete www.philips.com/myrobot7000 3a INHΦopMaun OTHOCHO NOIpbKkata N daHHHe 3a KOHTc COTdela 3a o6CnyXBaHe Ha KIneHTn.
3ByKOBn CnHaJIi
E3NKbT Ha rIacOBnTE npedynpeXdeHna p6oTa moKe da 6bJe npomeHe nO t aHrnnckn Ha MeCTHn Bn e3NK. 3a da npomeHnTe e3Nka, n3TerIeTe npINOxKeHnTo n CbpxKeTe po6oTa c Wi-Fi, taKa ye da moKe da n3TerIi HOBnA e3NK.
- PnnojKeHneTo 3e n3daBnpeDynpexDeHnHaHOMHnA, aKo pO6TbT ce HxkdAe OT BHMaHne. NTo3n HaunN 3e 6bTe HaNbHO INΦOpMnpaHn 3a CbCToHnETo B pealHo Bpeme DOpn aKO pO6TbT NOuHCTBa, KOraTO Bn HMa y DoMa.
3aabaHe Ha e3nka Ha rIacobTo npeDynpexKdHne
i Moxete da 3aJaTe e3nka Ha rIacobTo npeDynpexKeHHe HnocpeCTBeHo, cIe KaTO CBbpxTe po6ToKaM Wi-Fi.
1YBepTe ce,ye po6oTbTe cBbp3aH c npnIOxKeHneTo.
2 Ha IBe MeCTa B npIIOxKeHnTo MoKeTe Da HamepuTe OnguTa 3a npOMHa Ha e3Nka Ha rIacOBOTo PpeDynpexKeHne:
Ha cBunna ekpaH Ha npInloXeHneTo, KbTeTo ce ncka da daTe NMe Ha po6ota;
IIN KaTo HATnCHete Tpnte YepTnKu B rOpHn JRAB bRbN n Cnei TOBa I36peTe pa3deJa 3a Robot settings (HaCTpoKn Ha po6ota).
902Блгарский
3 Cnei TOBa n36epeTe oTTaM e3nKa Ha rnaCOBTo npdynpexKdHHe.
Kak pa60tn po60TbT
Cb3daBaHe Ha KapTa

Ka pa6oTu KaTOrpaΦnpaHeTo
Po60bT ce npuBnKb u3 cTaIe n Ia3epHaTa HABnraqna 6bp3o rN cKaHnpa, 3a da cb3daKe KapTa a eTaXa.
PekaTpaHe Ha KapTa
B npnloxehneTo mokeTe da n3noJ3BaTe Map Edit (PeaktpaHe Ha KapTa) 3a:
peaTnpaHe Ha cTaIte (cInBaHe/pa3JeIHa Ha cTaIte, HAnMeHyBaHe Ha cTaIte), 3a da MoKeTe Da nepcoHaJIu3npaTe npoPpAmata 3a noUcnCTBaHe Ha po6ota 3a BcKa cTaI;
Hactpoika Ha orpaHueHn 30Hn, 3a da yKaXeTe KbJe e pa3peSeHo Hapobota Da nouchTa n KbJe He;
c63daBaHe Ha KapTa 3a BceKn etax Ha Baunn Dm N cbxpaHbAe Ha do 5 Kaptn. Korato n3noJ3BaTe ypeDa, Toi c63daBa HOBa KapTa B HOBa CpeDa. Ako mATE KapTn, KOITo n3noJ3BaTe yeCTO n He nCKaTe da rN 3aMeHIne C HOBn NO HeBHNMaHne, MoXeTe Da 3akJIOUHTe Do 3 KapTn.
IodroTOBka Ha cTaTa 3a KapTorpaHupaHe
Ipei n da 3anouhe Te KaptorpaΦnpaHeto, ce yBepTe, ye cTe HappaBnIcneHOTo:
Pa3Tpe6eTe 3oHaTa.
- PpeMeCTe Me6eJInte Ha npabUNHOTo MRCTO.
- PpuepeTe BCnUKN CBOOAnoH CTOnuN MaJIKN PpeTCTBna.
3a6eJekKa: Toba e BaXHo, 3a da ce n36erHe cbxpaHHe 3a noCToHHo Ha npenrTCTBnra Ta Bbpxy KapTaTa.
OTbOpTe BCnUKN BbTpEuHN BpaTN Bdoma cn.
Baxho: YbepeCe, ye po6oTbT He Moxe da 6bne 6JokupaH no BpeMe Ha ynotpe6a.
Cb3aBaHe Ha KapTa
Baxho: IIO BpeMe Ha KapTorpaHpaHeTo po6Ot bT He NouchTa.
1 Baxho: 3a da cb3daTe KapTa Ha etAx, e MHoro Baxho Da noCTaBtte CTAHnraHa ha etAx, KOIto NcKaTe Da KapTorpaΦnpaTe, TbN KaTO po6oTbT Tp8Ba Da 6bNe B cTAHnra, KOrato 3aNoUba N 3aBbPbBa KapTorpaΦnpaHeTo. Ako nckate Da cb3daTe KapTa Ha BTOpnae tEx, cTAHnraTa Tp8Ba Da e NOCTaBeHa TaM IO BpeMe Ha npoueca Ha KapTorpaΦnpaHe. CneT ToBa KapTaTa Ha TO3n eTx MoKe Da ce IN3NoJ3Ba DOpn aKO cTAHnraTa e Ha dpyr etAx.
3a6eIekka: Camo 3a Moen XU7100: cnei KaTo po6ObT 3aBbPn Unkbla cnHa KapTorpaΦnpaHe, CTAHcIra 3a aBTOMaTHuHO CamoONOHCTBaHe Ie 3aNoUHe Da n3npa3Ba po6Ota. Toba He e rpeuKa, a HopMaJIHo NOBeJeHne.
Kak da kajkeTe Ha po6oTa Kbde Da He NouchTbC NOMOuTa Ha OrpaHnueHn 30Hn 3a NouchTbHe
B npJIOxKeHHeTo MoKeTe Da 3aJaBaTe OgrpaHnueHn 3oHn, 3a Da NocOHTe KbIe e pa3peSeHo Ha po6Ota Da nouchTa n KbIe He.

BnptyaHa cTeHa n 3oHn, 3a6paHeHn 3a BnI3aHe
Cb3daIte BnptyalHn CTeHn 30Hn, 3a6paHeHn 3a Bn13aHe, 30HOHTe, B KOHTo He NcKaTe po6ObT Da Bn13a. MoKTe HapPmEp Da cb3daTe BnptyalHn CTeHn nn 30Hn, 3a6paHeHn 3a Bn13aHe, 3a:
3aunTa Ha yynnBn npedmetn. Po6oTbHe moKe da pa3nuaBa 6neCTaun, npo3paHn (Ha npimep cTBkNo) nn TbMHn npenTCTBn nn nobbpxHOCTn.
-празаЗванHapoботаДa He 3aceДHe,ДOKaTO NOuHCTBa.

3a6eJekKa: Po6oTbT MoKe Da 3aceHa B KInnMn CdbNt KocBm,KnIMn CpeHn Hn MHOrO Jekn NoTeJIkn, KaTO Te3n B 6aHra. Po6oTbT cbUo TaKa He MoKe da pa3no3Haba Ka6eJn no nOda.
- 3aunTaHa pO6oTa.
13a6eIexka: Po6oTbT Tp86Ba Da ce Ibpxn HactpaHa OT TeuHocTH N MOKpn 30HN, KaTO HApnpMeP Kynn 3a DomauHn JIO6mUu N TabN 3a pa3caN.
1 BaJxHO: BnpyaJIHNTe CTeH N 3OHTe, 3a6paHeH 3a BIn3aHe, He Tp86Ba da ce n3IOnl3BaT 3a 3aUHTa OT ONaCHOCTN.
Baxho:BnptyahnHte CTeHN 3oHnTe,3a6paHeH 3a BnnaHe,He Tp6Ba da npeeat Ha po6ota Da ce BbpHe B CtaHnraTa.
Baxho: He n3noJI3BaIte po6oTa Ha oTKpIto. ToH He e npEHa3NaueH 3a ynotpe6a Ha oTKpIto.
3oHa, 3a6paheHa 3a MOKpo NOuNCtBaHe
Cb3daIte 30H, 3a6paHeHn 3a MOKpo NOUcTbaHe Ba da nonpeuHte Ha po6ota da NoUcTba C MON KINIMN NIN NOCTeKN.
Moxete da perylnpate cneHnTe onuB npJIOxehnTo B Robot settings (HaCtpoikNa po6ota):
I36yraBe Ha 3oHHTe, 3a6paHeHH 3a MOKpo NOUcTbaHe, KOraTO ce NouCtBa C MON OCTaHaJaTa YAcT Ha CTaTa.
IocntBaHe Ha 3oHaTa, 3a6paHeHa 3a MOKpo NocntBaHe, cMoC npaxocmykaKa. ImaiTe ppeBnD, Ye MoNbT BCE OSe MoKe da e BlaJKeH.
ДeЛикаТнa 3Онa
Po6oT MoKe Da npemHaba No HAcON Me6eI npn Huxda. He nckate da ce KaTePn no onpeJeIeHn Hea? OueptaIte DeIikKaTHa 30Ha Ha KapTaTa. Po6oTbT 1e Ce cb6epe Do Me6eI, KaTo Ce nokatepu cAmO MaIKo, PpeDu Da ce BbpHe o6paTHo.
BAXHO: Ako nckaTe po6oTbT da npodbIxxn da o6xoxJa octaHaJIte cTaN, ce yBepeTe, ye DeIkaTHaTa 30Ha He e 6n3o Do Bpata C npar. 3aJaTe DeIkaTHaTa 30Ha Ha Nohe 1 MeTpO T Bpata C npar.
Kak nouchTba po6oTbT
B npJIOXeHneTo MoRat da ce n36npaT cIeHNHe nporpaMn 3a nouchTaBe:
Pporpamn OnpcaHne
PeDIOBHO nouchTaHe
PeIOBHO NOUcTBaHe e npEHa3HaueHo 3a o6uKHOe Ho exeJHeBHO NouCTBaHe. Po6oTbT NOuCtBa BcRA Ka CTa B 3aBnCmOcT OT HAcTpOuKnTe, KOtO CTe 3aDAnN 3aNa3nN B PnHa 3a NocCTBaHe. Ako CpeIATA He 6bJe pa3No3Hata, po6oTbT KApToRaΦnpa n EINOBpemeHHo C TOBa J NoucTBA C npaxOCMyKaUka (B To3N CnyaJ He N3BbPwBa MOKpo NOuCtBaHe). CneI KaTO npKlOuY, ToI ce Bpbua B cTaHcIyTa.
IepcoHaJIIn3- npaHo NOHCTBaHe
NepcoHaJIIN3npaHO nouchTaHe moKe Ja ce nI3noJ3Ba 3a hAcTpoJa Ha po6Ota Da nI3bJIHra DeIcTBnA 3a noUcTbaHe B cIeuaJHn ClyuAn. MoKeTe Ja nepcoHaJIIN3npaTe nporpaMaTa 3a noUcTbaHe Ha po6Ota cNopeJ BaUnTe JeJaan. MoKeTe Ja 3aJaJeTe cJeHNte Tpr OIun:
- Cta:po6oTbT nouchTa eHa nnIIOBue cTaB 3aJaDeH OT BaC pei.
-3OHa:po6oTbT NOUcTBA eHnA 3OHa B 3aJaDeHa OT Bac CTAJ.
-ПETHO:po6OtBJNoUHCTBaKbAipatcpa3Mepn1,5Ha1,5MeTpHa KOHKpeTHOMЯCTOB DOMa BN,KoETO NCKaTe Da 6bJe NoUHCTeHO.
1 3a6eJexka: npn nouchTaBHe Ha neTHo nocTaBeTe po6Ota B cpeJaTa Ha KBaIpaTa, KOIto uCKaTe po6ObT da NoUcSTn.
Cnei KaTo n36peTe eHa OT onuHte No-rope, MoKeTe da n36peTe peKIM Ha NOUCTBaHe I Da 3aJaTe npEiNoHTaHn 3a NOUCTBaHe I pa3WnpEn HacTpoKn.
3aDaBaHe Ha npednoHTaHna 3a nouchTbaHe, pa3upeHn HacTroKn n peHa nouchTbaHe
B npIIOxKeHnTo MoXeTe Da n36epTe Net pa3JIuHn peXmHa Ha NOUcTbaHe 3a BCa Ka CTa. Toba Ca cTaHdapTHn peXmN, KOINTo MOraT Da ce H3PON3BaT B NOBeueTo cTuayauu. MoXeTe Da nepcoHaJIn3npaTe Baunr peXm Ha NOUcTbaHe, KaTO 3aJaDeTe NoDpo6Hn PpeJNoHTaHn 3a NocCTBaHe n pa3UnpeHn HAcTpoKn.
PekimnHaNouchTbaHe
Pekm OnncaHne
Cyxo mokpo Po6oTb T noJa c npaxocmyka K a mon eHOBpeMeHHo. To3n peKIMe npedHa3Naueh 3a peIOBHO noOCTBaHe Ha TBbpN IOIOBN HAcTNIKN.
BAXHO: 3a MOKpo NOuHcTBaHe c MoN Ha ChyBcTBnTeJHn TBbpDn NODOBn HacTNlKN, KaTO NaPpMep NapKeT, 3aJaTe HaJ-HnCKOTO HnBO Ha BlaXHoCT B PrnloXeHneTo.
Cyxo Po6oTbT noUcCTBa nOda cAmO c npaxocmykaUka. To3n peKIM MOxE da ce n3noJ3Ba 3a 30H, KOnTO He Tp86Ba Da ce NoUcCTBaT C MoI.
Tnx Po6o7bT nouchTa C mHmMaIeH wym. BcMykaTeHaTa MoUHOCT e HamaIeHa, a rJaCOBITE npeDynpexKeHnra Ca N3KJIIOUeHN.
906Блгарскn
PekmHa NouchTaHe
HHTeH3nBeH Po6oTbT NOCTBa NOa C npaxocmyka K HA MON eNHOpeMeHHo Ha NbHa MOUHOCT. To3n peKIM e npeHa3NaueH 3a CTapaTeJHO NOUCTBaHe Ha MaJIKN 3OHN.
1IMaTe npedBn,ye pexmbT He ce npenopbUba 3a nouchBaHe Ha roJeMn 3OH. Po6oT npemHaBa npes3 30HaTa 5 nbTu, taKa ye BpeMeTo 3a nouchBaHe n 3noJ3BaHeTo Ha 6aTeepraTa 3NaHTeHNo ige Ce yBeJIuHaT.
Индиьдалелан 3a to3n pekIM moxete da n36epete BCNUKn ekCneptHn HacTpOyKn OTHyIaTa.
IpeDnoHTaHna 3a nouchTaHe
3a BCEKN peKIM Ha NOUcTBaHE MOKeTe Da HAcTPOuTE CneHInTe npeDnOuHTaHn 3a NoUcTBaHe:
Hactpoika OnpcaHne
BcmykaTeHa MOUHOCT
PpomHa Ha BcMyKaTeHHaTa MOUHOCT:
-ИКOHOMUHa:3a eФeKTHBHO NOuHCTBaHe C HnCKO NOTpe6JIeHne Ha eHeprIy n HnCKO HnBO Ha UyMa.
-HopMaJHa:3apeIOBHO NOUcTBaHe n eΦeKTHBHO OTCTpaHraBaHe HaΦnH npax NO TBbpIIN NOIOBn HAcTUNKn C ONTUMaJIeH 6aJNaHC MExkDy MOuHocT n eΦeKTHBHOCT.
-Bucoka:3a cTapateJHNO nouchTbaHe Ha roJeMn noIOBe. MoKeJa noUcCTBa NOBuee C eJHO 3apeXkaHe,OTKOLKOtopeXmblC MaKcMaJHa MOUHOCT.
- MakcmaJHa: To3 npexm e nideaJeH 3a OTcpaHbAHe Ha eBp 6oknyk, KaTo HapnmeKocMn OT domaunn IIObMn nn TPOxN. TOnMaT a BCMyKaTeJHa MOuHOC TOTcpaHbBa fHHnte npaxOBn qactnC, CKPHTn Dbl6OKO B KJIIMNTe n npoucenrte.
HnBO Ha BOdaTa 6 npedeJeHa He De6uTa, KOITo Da ce n3NOMnBa OT eJIeKTPnueckn KOTHeHep 3a BOda Bbpxy MoNA:
-ИЗКЛ.IИЗКЛЮВаHe Ha HINBOTO Ha BnaXHOCTTa 3a HeNOKpNTn IbрBEHn NOIDOBe N KIJIIMM.
- Hncko: 3a MOKpo NOUcTbaHe Ha YyBCTBuTeJIeH NOD, HAnpIMep NapKeT. KombHaunraTo AT NOuNCtBaHe C npaxOCMykaKa u MOKpo NoUcTbaHe C MON OTCTpaHЯBa NOBuee fHa npax, OTKoJkOTO cAmO NoUcTbaHETO C npaxOCMykaKa.
- CpeHIO: onTImaJIHO 3a peIIOBHO MOKpo I cyxo NocIcTaBe. MonbT OTCpaHraBa IOBbpxHOCTHaT a MPbcOTnIg 6aKTePmnte, 3a Ia IIOIbPxJa DOMa Bx XInrHeHn3npaH n 3dpaBOCIOBEH.
-BncoKo:3a efoekTnBHO OTCpaHbAHe Ha neTHa OT npbCTn B doma BN.3a HHTeH3NBHO NOUcTBaHe Ce npenOpbYBa Da KOM6HnHnpaTe Ta3n HAcTpoKa C BKIOueHen BV6paunn Ha MoNa 5 nobTOpeHnHa MapupyTa Ha noOcTbaHe.
IocneIOBATEHIOCT HaMapupyTaHa nouchBaHe
3aDaBaHe Ha 6poHa npemHaBaanrTa 3a nouCTBaHe. ENo npemHaBaHe e
doCTbUHO 3a HopMaHNO nouCTBaHe. Bb3MOxHo e pO6oTbT da ce nporpaMnpa Da
n3BbpWBA DBe NnDopn Net npemHaBaHnra 3a INHTeH3NBO NOuCTBaHe Ha
ynOpNTn 3aMbpcBaHn. PpenOpbTuTeJHo e Da n36puTe Ta3n OOnu caMo 3a
KOHKeTHn 30Hn 3a NouCTBaHe, Tb KATO Tg OKa3Ba BnnaHne Bbpxy
PpOdbLnKtJeJIHOCTTa Ha NouCTBaHe.
Pa3upeHn Hactpoyn
3a BCEKn peKIM Ha nouchTbaHe MoKeTe Da 3aJaTe CNeHnTe pa3wnpeHN HAcTpoiKN:
Hactpoika OnncanHe
| Вибрурахе на мona | Влесьаре полуни зкльочахе на вибрацята на мona. Вибраципгвимателно,Но eф ekт�вно помагараза за сизърka подьт за от dedяне на Мрьсотяп поочьаре на пет haол. Посьаре на мозда на мокр поочьаре на Y-mозд.Чeз мokр поочьаре на Y-mозд поочьт за сизял. Чe врет氧оу за рочьаре за сизяд. Моцьогост за каллмп Влесьаре полуни зкльочахе на рechима с уveличесна моцьогост за Каллмп. Росьогостав各项工作 Посьогostав各项工作 Каллмпни постлка. Преничесно сда akтувирatenе тази有很大ого Каллмп. Можete обаче за的一大akтувирatenе за сда, в Калто не有很大ого вдигаш汞. |
2 13BaTeMneuCeBb3NyWeH qnlTbp.
3 N3nlaKHeMeMneUeCeΦnITbpcBoa.
4 Octabete MneuIe Ce HnTbp Da n3cbXHe Ha Bb3dy 3a 24aca.
3a6eexka: He n3noI3BaIte npuHaunHn, 3a da noIcyuBaTe Mneuipe nnTbp.
916
Бларский
5 NocTaBeTe MneuCe fNtbp KbM 6IoknpoBkata Ha fNtbpHa KOHTeHepa 3a npax n ro 6yTHeTe HABbTpE.
6 HaTnchete HAnOly MneuYce fNtbp.
7 3aTbopeTe kanakaHa MneuIe Ce fJITbp.
8 OTbOpTe rOpHna KaNaK Ha po6oTa.

9 NocTaBeTe KOHTeHepa 3a npax Ha npaBnHOTo MrcTo.
XU7100 3eJIeHnIyT LED nHnKaTOp Ha
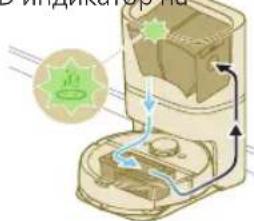
CTaHnraTa 3a aBTOMaTNoHOCAMONOuCTBaHe Mura.
CtaHcIaTa 3a aBtOMaTnHo camOnOuNCTBaHe N3Ppa3Ba C BakyM KOHTeHepa 3a npax Ha po6ota. IpxbT n Mpbcotna ce cb6npaT B Top6nKata 3a npax Ha cTaHcIra.
XU7100 OpaHKeBnT LED
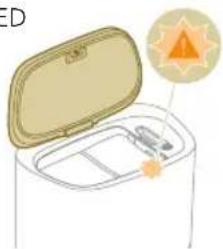
HINKATOP Ha CTaHcNtTa 3a ABTOMaTHHO CAMONOCHCTBaHe Mnra.
KanakbHa KOHTeHepa e OTBOpeH.
XU7100 OpaHxkeBnT LED
HINIKaTOP Ha CTaHcNtTa 3a aBTOMaTNoC aMOnOuNCtBaHe Mnra.
He nocTaBeHa TOp6nUka 3a npax.
924 BbIrapckn
Homep Ha MojeHa ha po6ota
CnHaJ Onncahne Ha cnHajA 3HaueHne Ha cnHajA
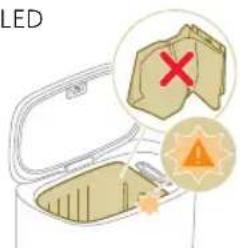
XU7100 OpaHKeBnT LED
Top6nukata 3a npax e nblna.
HINIKaTOP Ha CtaHcNtTa 3a aBTOMaTNoHO cAMONOuCTBaHe MnTa.
Hулран/Вьзстановаяне на робota

MoxkeTe Da HyInpate/Bb3ctaHOBITE po6Ota, KaTo HATnCHete 6yToHa 3a pectapTnpaHe C nIla.
-Пи haTnCKaHe Ha 6yToHa 3a HynipaHe B npOdbJxKeHne Ha 3 cekyHn He camo Ie Bb3ctaHOBInTe Fa6pHnTE HaCTPOkN, Ho CbIIO Taka Ie HynipaTe _lb pyepa Do nocJeHaTa Bercn.
IpnHaTnCKaHe Ha 6yToHa 3a HynipaHe B npOdbJxKeHne Ha 10 ckyHn npoBtIe n3uCTn IyIaTa HOpMaun 3a CBp3BaHe CmpekaT, HOpMaunra 3a KapTu, PAnHpaHnTe 3aDaun, HOpMaunra 3a He Me 6e3nOKoIe" uHOpMaunra 3a nepcoHaJI3aUnnTe N ue BB3CTaHOBN HNBO T NO NoDpa3bnpaHe Ha BCMyKaTeJIHaT MaOHCT.
3a6eJekka: CneH nyIpaHe/Bb3ctaHOBBAHe Ha pOBoTa ToI Tp8Ba Da ce CBbpKe OTHOBO KbM pNIOXeHNeTo, TbK KaTO CbOTBeHTHe NaCTpoiKn B npNIOXeHNeTo ca npemaxHaTn.
CmHa
PopbUbaHe Ha akcecoapn
3a da 3akynite akcecoapn nI nepe3epBn yactn, nocetete www.philips.com/myrobot7000 nIe ce o6bphTe KbM Baun Ta bproBeu Ha Philips. Moxete cTaka Da ce CbpxKeTe C eHTbpa 3a o6cnyXBaHe Ha notpe6nteHa Philips BvB BaWata DpbXaba (3a daHHN 3a KOHTaKT BHXTe JINCTOBkata 3a MeJdyHapOndHaTa rapaHua).
Pe3epBn qactn:
XV1470 Pe3epBn Mneu ce noJIOKKn 3a 3abpcBaHe
XV1472 Top6nukn 3a npax
XV1473 KomnneKt 3a no npbkkca 2
Φnntbpa,1OCHOBHa YetKa n 1 CTpaHnUHa YETKa.
I3BaXdAne Ha akymylatopHata 6aTePnA
3a da n3BaAnTe akyMylatopHaTa 6aTePnra, cIeBaNte HNCTpyKunnte no-dOJy. CbToTaka MoKeTe Da 3aHeCete pO6ota B OToPn3npaH cepBn3eH ceHTbp Ha Philips 3a n3BaXdaHe Ha akyMylatopHaTa 6aTePnra. CbBypKeTe ce C LcHtbp 3a o6CnyXbaHe Ha Notpe6uTeJI Ha Philips BB BaWata CTpaHa 3a aDpeca Ha cepBn3 6IIn3o Do Bac.
B3emete BCnukn Heo6xodmM mepKn 3a 6e3onacnoct, KOrato 6opabnte c nHcTpymeHTn 3a OTbapnHe Na npOyKta N KOrato n3XBpbIte akymylaTopHaTa 6aTeprna.
Преупекдени: Преи да n3BaДиTe 6aTeрьЯТа, ce yBepeTe, che npodyKTBt e n3KJIIOueH OT cTaHcIrya N 6aTePrya t e n3ToUeHa HanbJIHo.
1 CtaptnpaTe po6oTa OT HAKoe MRCTo B CTaTa, a HE O T cHaLnaTa.
2 Octabete po60ta da pa60tn,doKaTo akMyIaTopHaTa 6aTepeHce n3TOuN, 3a da cTe cnrypHn,ye e HAnbIHo pa3peDeHa, npeDn da a n3BaIte n da Jn3XBbpInTe.
3 Pa3BnTe BnHTOBeTe Ha KaNaka Ha otJeHneTo 3a 6aTepeYra n CBAJIeTe KaNaka.
4 N3BaTe aKymyIaTOPHATA 6aTePnI I pa3KaYeTe, KaTo HATncHeMaIkaTaUIIkA Ha KOHEKTopa n, 3a Ia ro OCBO6OJNTe.
5 3ahecepo6oTa n akymlaTophata 6atepnaB nyHKT 3a cb6npaHe Ha OTnabuOn OT eJektpnuyeckn n eJektpoHHn npOdykTu.
TapaHcIa n PoIdpbXkKa
Ako ce hyxdaete ot nHOpMaun nn noDpBkka, nocetete www.philips.com/support nn npooyTe JnCTOBkata 3a MeKnyHapOHa rapaHcna.
BaWata npaxoCmykaKa-po6oTe npoeKtnpaHa n pa3pa6oTeHa no Ha-nO6pna Bb3MOxKe HauH. Ako BbIpeKu TOBa Ce HALoxn Ta da 6bJe peMOHTnpaHa, UeHTbpT 3a ObcnyXbaHe Ha KIneHTN BbB BaWata cTpaHa 7e Bu CbJeCTBa 3a npEepnemae Ha Heo6xOdumite peMOHTn BbB Bb3MOxHO Ha-KpaTBk CpOK n npn MaKcImaHNo yDObCTBO 3a Bac. Ako BB BaWata cTpaHa Hma LCeHTbp 3a ObcnyXbaHe Ha KIneHTn, O6bPHeTe ce KbM MeCTHnra TbProBeU Ha YpeDi Ha Philips.
I3xBbpyHe n peuzklnpahe
He n3xbpIyte po6oTa npu o6nKHOBeHIne 6ntOBu OTnaDbu. 3aHeceTe ro B 6nn3knnyHKT 3a peunKnnpaHe Ha eJektpuecko 6opuyBahe.
Отстван Неницьоста
B Ta3n rIaBa ca 06o6eHn ha-yeCTnTe npo6nM, KOnto MoKe da cpeuHeT npn n3noJ3BaHe Ha ypeHa. Ako He moKeTe Da pa3peuNte npo6nema C NOMOHTa Ha HOpMaunra TnNo-dOny, OTNDTe B pnpIoXeHneTo 3a po6otn Philips HomeRun nn nocTeTe www.philips.com/myrobot7000, KbJeTO MOKeTe cbso Da HamePte BnDeoknIOBe 3a NODpBxka N yeCTO 3aDaBAHN Bbnpocn. MoKeTe cbso Da ce o6bpHeTe KbM ueHTbpa 3a o6cIyXBaHe Ha KJIeENTn BvB BaAata DpbXaBa.
PpO6JIem Bb3MOxHa npuHa PeSeHne
| Робов т He ce вкlioоча. Батерияа e Изтошени. 3ареде робota в станцята пedingуnotpe6a. | ||
| Temпегатура差别 на okолнасрEDA e TBьрд НИСКА ИлиВИСОКA. | Изposлбайт робota пri semпета typimexду 8°C и 35°C. | |
| Робов т He може дa ce сдвои c пиложенeto. | Робов т Ваче He e B pexim Ha cДвогаи. | Приевklючete робota OTнов В рexim Ha cДвогаи, кATO задьркiteе endobremenho 6byToHa Home n 6byToHa BкI./ИЗКЛ. (CBetлиннite Иndикатори лe мигат В оранжево). |
| Wi-Fi врьзкata (сигналы) He e до6pa. | Поставete робota в зона с добр Wi-Fi сигнал. | |
| Избраза e Гшиha Wi-Fi Мрека. | Уberete ce, че сTe Избраза правлиота Wi-Fi мрека. | |
| Изposлзвае e Гшиha napola. | Уberete ce, чe Изposлзвае правлиота napola за Wi-Fi. | |
| Избразе Гшин морел робот в пиложенeto. | Уberete ce, чe сTe Избразе правлиота морел робот. | |
| ИзTERгеляно e Гшино пиложене. | Виharу Изposлзвае правлиота, koeto сTe ИзTERгелячep3 QR кда оТ рьковдстота за 6bp3 стapt. | |
| Врьзкata мжду пиложенeto и робotinge пөрьснata. | Робов т Излязbl ИзВьн obxвata Ha Wi-Fi сигнал. | Изчakiite робовт дa ce Вьрne образно В зонa с добр Wi-Fi сигнал. |
PpO6IeM Bb3MOxHa npuHnA PeSeHne
| Роботьт e пеминал в спяш реким. | Роботьт Luke пемине в спяш реким, по нecе се вьрne в станцлга. Натиши: Задрых�е 6утона вkl./изкл. за по: секунд, за сьбуд; След Това го Изэрете поз рисло; Кьм STанцл; Кьм STанцл. Кьм STанцл. Кьм STанцл. Кьм STанцл. Кьм STанцл. Кьм STанцл. Кьм STанцл. Кьм STанцл. Кьм STанцл. Кьм STанцл. Кьм STанцл. Кьм STанцл. Кьм STанцл. Кьм Stанцл. Кьм STанцл. Кьм STанцл. Кьм STанцл. Кьм STанцл. Кьм STанцл. Кьм STанцл. Кьм STанцл. Кьм STанцл. Кьм STанцл. Кьм STанцл. Кьм STанцл. Кьм STанцл Кьм STанцл Кьм STанцл Кьм STанцл Кьм STанцл Кьм STанцл Кьм STанцл Кьм STанцл Кьм STанцл Кьм STанцл Кьм STанцл Кьм STанцл Кьм STанцл Кьм Stанцл Кьм STанцл Кьм STанцл Кьм STанцл Кьм STанцл Кьм STанцл Кьм STанцл Кьм STанцл Кьм STанцл Кьм STанцл Кьм STанцл Кьм STанцл Кьм STанцл | |
| Паролata 3a Wi-Fi e променера. | Korato даннite 3a Wi-Fi ca по老人家: Добавete OTHOBO рбotingа кьm прiloxe; Кьм Добathа Na Wi-Fi ca по老人家: Добавete OTHOBO рбotinga кьm прiloxe; Кьм Добathа Na Wi-Fi ca по老人家: Добавete OTHOBO рбotinga кьm прiloxe; Кьm Добathа Na Wi-Fi ca noHTA прim; Кьm Добathа Na Wi-Fi ca noHTA прim; Кьm Добathа Na Wi-Fi ca noHTA прim; Кьm Добathа Na Wi-Fi ca noHTA прim; Кьm Добathа Na Wi-Fi ca noHTA прim; Кьm Добathа Na Wi-Fi ca noHTA прIM; Кьm Добathа Na Wi-Fi ca noHTA прIM; Кьm Добathа Na Wi-Fi ca noHTA прIM; Кьm Добathа Na Wi-Fi ca noHTA прIM; Кьm Добathа Na Wi-Fi ca noHTA прIM; Кьm Добathа Na Wi-Fi ca noHTA прim; Кьm Добathа Na Wi-Fi ca noHTA прIM; Кьm Добathа Na Wi-Fi ca noHTA прIM; Кьm Добathа Na Wi-Fi ca noHTA прIM; Кьm Добathа Na Wi-Fi ca noHTA прim; Кьm Добathа Na Wi-Fi ca noHTA прim; Кьm Добathа Na Wi-Fi ca noHTA прIM; Кьm Добathа Na Wi-Fi ca noHTA прIM; Кьm Добathа Na Wi-Fi ca noHTA прim; Кьm Добathа Na Wi-Fi ca noHTA прIM; Кьm Добathа Na Wi-Fi ca noHTA прim; Кьm Добathа Na Wi-Fi ca noHTA прIM; Кьm Добathа Na Wi-Fi ca noHTA прIM; Кьm Добathа Na Wi-Fi ca noHTA прim; Кьm Добathа Na Wi-Fi ca noHTA прim; Кьm Добathа Na Wi-Fi ca noHTA прim; Кьm Добathа Na Wi-Fi ca noHTA прIM; Кьm Добathа Na Wi-Fi ca noHTA прim; Кьm Добathа Na Wi-Fi ca noHTA прIM; Кьm Добathа Na Wi-Fi ca noHTA прim; Кьm Добathа Na Wi-Fi ca noHTA прim; Кьm Добathа Na Wi-Fi ca noHTA прIM; Кьm Добathа Na Wi-Fi ca noHTA прim; Кьm Добathа Na Wi-Fi ca noHTA прim; Кьm Добathа Na Wi-Fi ca noHTA прim; Кьm Добathа Na Wi-Fi ca noHTA прim; Кьm Добathа Na Wi-Fi ca noHTA пр IM; Кьm Добathа Na Wi-Fi ca noHTA прIM; Кьm Добathа Na Wi-Fi ca noHTA прIM; Кьm Добathа Na Wi-Fi ca noHTA прIM; Кьm Добathа Na Wi-Fi ca noHTA прIM; Кьm Добathа Na Wi-Fi ca noHTA пр IM; Кьm Добathа Na Wi-Fi ca noHTA прIM; Кьm Добathа Na Wi-Fi ca noHTA прIM; Кьm Добathа Na Wi-Fi ca noHTA прIM; Кьm Добathа Na Wi-Fi ca noHTA пр IM; Кьm Добathа Na Wi-Fi ca noHTA пр IM; Кьm Добathа Na Wi-Fi ca noHTA прIM; Кьm Добathа Na Wi-Fi ca noHTA прIM; Кьm Добathа Na Wi-Fi ca noHTA прIM; Кьm Добathа Na Wi-Fi ca noHTA прIN; Кьm Добathа Na Wi-Fi ca noHTA прIM; Кьm Добathа Na Wi-Fi ca noHTA прIM; Кьm Добathа Na Wi-Fi ca noHTA прIM; Кьm Добathа Na Wi-Fi ca noHTA прIM; Кьm Добathа Na Wi-Fi ca noHTA прIN; Кьm Добathа Na Wi-Fi ca noHTA прIN; Кьm Добathа Na Wi-Fi ca noHTA прIN; Кьm Добathа Na Wi-Fi ca noHTA прIN; Кьm Добathа Na Wi-Fi ca noHTA прIN; Кьm Добathа Na Wi-Fi ca noHTA прIM; Кьm Добathа Na Wi-Fi ca noHTA прIM; Кьm Добathа Na Wi-Fi ca noHTA прIM; Кьm Добathа Na Wi-Fi ca noHTA прIN; Кьm Добathа Na Wi-Fi ca noHTA пр IN; Кьm Добathа Na Wi-Fi ca noHTA пр IN; Кьm Добathа Na Wi-Fi ca noHTA пр IN; Кьm Добathа Na Wi-Fi ca noHTA пр IN; Кьm Добathа Na Wi-Fi ca noHTA пр IN; Кьm Добathа Na Wi-Fi ca noHTA прIN; Кьm Добathа Na Wi-Fi ca noHTA пр IN; Кьm Добathа Na Wi-Fi ca noHTA пр IN; Кьm Добathа Na Wi-Fi ca noHTA пр IN; Кьm Добathа Na Wi-Fi ca noHTA прIN; Кьm Добathа Na Wi-Fi ca noHTA прIN; Кьm Добathа Na Wi-Fi ca noHTA прIN; Кьm Добathа Na Wi-Fi ca noHTA прIN; Кьm Добathа Na Wi-Fi ca noHTA пр IN; Кьm Добathа Na Wi-Fi ca noHTA пр IN; Кьm Добathа Na Wi-Fi ca noHTA пр IN; Кьm Добathа Na Wi-Fi ca noHTA пр IM; Кьm Добathа Na Wi-Fi ca noHTA пр IM; Кьm Добathа Na Wi-Fi ca noHTA пр IM; Кьm Добathа Na Wi-Fi ca noHTA пр IM; Кьm Добathа Na Wi-Fi ca noHTA пр IM; Кьm Добathа Na Wi-Fi ca noHTA пр IN; Кьm Добathа Na Wi-Fi ca noHTA пр IN; Кьm Добathа Na Wi-Fi ca noHTA пр IN; Кьm Добathа Na Wi-Fi ca noHTA пр IN; Кьm Добathа Na Wi-Fi ca noHTA пр IM; Кьm Добathа Na Wi-Fi ca noHTA пр IN; Кьm Добathа Na Wi-Fi ca noHTA пр IN; Кьm Добathа Na Wi-Fi ca noHTA пр IN; Кьm Добathа Na Wi-Fi ca noHTA пр IM; Кьm Добathа Na Wi-Fi ca noHTA прIM; Кьm Добathа Na Wi-Fi ca noHTA пр IM; Кьm Добathа Na Wi-Fi ca noHTA пр IM; Кьm Добathа Na Wi-Fi ca noHTA пр IM; Кьm Добathа Na Wi-Fi ca noHTA пр IM; Кьm Добathа Na Wi-Fi ca noHTA прIM; Кьm Добathа Na Wi-Fi ca noHTA пр IM; Кьm Добathа Na Wi-Fi ca noHTA пр IM; Кьm Добathа Na Wi-Fi ca noHTA пр IN; Кьm Добathа Na Wi-Fi ca noHTA пр IN; Кьm Добathа Na Wi-Fi ca noHTA пр IM; Кьm Добathа Na Wi-Fi ca noHTA пр IM; Кьm Добathа Na Wi-Fi ca noHTA пр IN; Кьm Добathа Na Wi-Fi ca noHTA пр IM; Кьm Добathа Na Wi-Fi ca noHTA пр IM; Кьm Добathа Na Wi-Fi ca noHTA пр IM; Кьm Добathа Na Wi-Fi ca noHTA пр IN; Кьm Добathа Na Wi-Fi ca noHTA пр IM; Кьm Добathа Na Wi-Fi ca noHTA пр IN; Кьm Добathа Na Wi-Fi ca noHTA пр IM; Кьm Добathа Na Wi-Fi ca noHTA пр IM; Кьm Добathа Na Wi-Fi ca noHTA пр IN; Кьm Добathа Na Wi-Fi ca noHTA пр IN; Кьm Добathа Na Wi-Fi ca noHTA пр In; Кьm Добathа Na Wi-Fi ca noHTA пр IN; Кьm Добathа Na Wi-Fi ca noHTA пр IN; Кьm Добathа Na Wi-Fi ca noHTA пр IN; Кьm Добathа Na Wi-Fi ca noHTA пр IN; Кьm Добathа Na Wi-Fi ca noHTA пр In; Кьm Добathа Na Wi-Fi ca noHTA пр IN; Кьm Добathа Na Wi-Fi ca noHTA пр IM; Кьm Добathа Na Wi-Fi ca noHTA пр IM; Кьm Добathа Na Wi-Fi ca noHTA пр IM; Кьm Добathа Na Wi-Fi ca noHTA пр In; Кьm Добathа Na Wi-Fi ca noHTA пр IM; Кьm Добathа Na Wi-Fi ca noHTA пр IM; Кьm Добathа Na Wi-Fi ca noHTA пр IM; Кьm Добathа Na Wi-Fi ca noHTA пр IM; Кьm Добathа Na Wi-Fi ca noHTA пр In; Кьm Добathа Na Wi-Fi ca noHTA пр IN; Кьm Добathа Na Wi-Fi ca noHTA пр IM; Кьm Добathа Na Wi-Fi ca noHTA пр IM; Кьm Добathа Na Wi-Fi ca noHTA пр IN; Кьm Добathа Na Wi-Fi ca noHTA пр In; Кьm Добathа Na Wi-Fi ca noHTA пр IM; Кьm Добathа Na Wi-Fi ca noHTA пр IM; Кьm Добathа Na Wi-Fi ca noHTA пр IM; Кьm Добathа Na Wi-Fi ca noHTA пр IN; Кьm Добathа Na Wi-Fi ca noHTA пр In; Кьm Добathа Na Wi-Fi ca noHTA пр IN; Кьm Добathа Na Wi-Fi ca noHTA пр IM; Кьm Добathа Na Wi-Fi ca noHTA пр IN; Кьm Добathа Na Wi-Fi ca noHTA пр IM; Кьm Добathа Na Wi-Fi ca noHTA пр IN; Кьm Добathа Na Wi-Fi ca noHTA пр IN; Кьm Добathа Na Wi-Fi ca noHTA пр IM; Кьm Добathа Na Wi-Fi ca noHTA пр IN; Кьm Добathа Na Wi-Fi ca noHTA пр IM; Кьm Добathа Na Wi-Fi ca noHTA пр In; Кьm Добathа Na Wi-Fi ca noHTA пр IM; Кьm Добathа Na Wi-Fi ca noHTA пр IM; Кьm Добathа Na Wi-Fi ca noHTA пр IN; Кьm Добathа Na Wi-Fi ca noHTA пр IM; Кьm Добathа Na Wi-Fi ca noHTA пр In; Кьm Добathа Na Wi-Fi ca noHTA пр IN; Кьm Добathа Na Wi-Fi ca noHTA пр IM; Кьm Добathа Na Wi-Fi ca noHTA пр IN; Кьm Добathа Na Wi-Fi ca noHTA пр IN; Кьm Добathа Na Wi-Fi ca noHTA пр In; Кьm Добathа Na Wi-Fi ca noHTA пр IM; Кьm Добathа Na Wi-Fi ca noHTA пр IM; Кьm Добathа Na Wi-Fi ca noHTA пр IN; Кьm Добathа Na Wi-Fi ca noHTA пр IN; Кьm Добathа Na Wi-Fi ca noHTA пр_IN; Кьm Добathа Na Wi-Fi ca noHTA пр IN; Кьm Добathа Na Wi-Fi ca noHTA пр IN; Кьm Добathа Na Wi-Fi ca noHTA пр IN; Кьm Добathа Na Wi-Fi ca noHTA пр IN; Кьm Добathа Na Wi-Fi ca noHTA пр_IN; Кьm Добathа Na Wi-Fi ca noHTA пр IN; Кьm Добathа Na Wi-Fi ca noHTA пр IM; Кьm Добathа Na Wi-Fi ca noHTA пр IN; Кьm Добathа Na Wi-Fi ca noHTA пр IN; Кьm Добathа Na Wi-Fi ca noHTA пр_IN; Кьm Добathа Na Wi-Fi ca noHTA пр IM; Кьm Добathа Na Wi-Fi ca noHTA пр IN; Кьm Добathа Na Wi-Fi ca noHTA пр IN; Кьm Добathа Na Wi-Fi ca noHTA пр IN; Кьm Добathа Na Wi-Fi ca noHTA пр_IN; Кьm Добathа Na Wi-Fi ca noHTA пр IM; Кьm Добathа Na Wi-Fi ca noHTA пр IM; Кьm Добathа Na Wi-Fi ca noHTA пр IN; Кьm Добathа Na Wi-Fi ca noHTA пр IN; Кьm Добathа Na Wi-Fi ca noHTA прIM; Кьm Добathа Na Wi-Fi ca noHTA пр IN; Кьm Добathа Na Wi-Fi ca noHTA пр IN; Кьm Добathа Na Wi-Fi ca noHTA пр IN; Кьm Добathа Na Wi-Fi ca noHTA пр IN; Кьm Добathа Na Wi-Fi ca noHTA прIM; Кьm Добathа Na Wi-Fi ca noHTA пр IN; Кьm Добathа Na Wi-Fi ca noHTA пр IM; Кьm Добathа Na Wi-Fi ca noHTA пр IN; Кьm Добathа Na Wi-Fi ca noHTA пр IN; Кьm Добathа Na Wi-Fi ca noHTA прIM; Кьm Добathа Na Wi-Fi ca noHTA пр IM; Кьm Добathа Na Wi-Fi ca noHTA пр IN; Кьm Добathа Na Wi-Fi ca noHTA пр IN; Кьm Добathа Na Wi-Fi ca noHTA пр IN; Кьm Добathа Na Wi-Fi ca noHTA прIM; Кьm Добathа Na Wi-Fi ca noHTA пр IM; Кьm Добathа Na Wi-Fi ca noHTA пр IM; Кьm Добathа Na Wi-Fi ca noHTA пр IM; Кьm Добathа Na Wi-Fi ca noHTA пр IN; Кьm Добathа Na Wi-Fi ca noHTA прIM; Кьm Добathа Na Wi-Fi ca noHTA пр IM; Кьm Добathа Na Wi-Fi ca noHTA пр IM; Кьm Добathа Na Wi-Fi ca noHTA пр IN; Кьm Добathа Na Wi-Fi ca noHTA пр IM; Кьm Добathа Na Wi-Fi ca noHTA прIM; Кьm Добathа Na Wi-Fi ca noHTA пр IM; Кьm Добathа Na Wi-Fi ca noHTA пр IN; Кьm Добathа Na Wi-Fi ca noHTA пр IM; Кьm Добathа Na Wi-Fi ca noHTA пр IM; Кьm Добathа Na Wi-Fi ca noHTA прIM; Кьm Добathа Na Wi-Fi ca noHTA пр IM; Кьm Добathа Na Wi-Fi ca noHTA пр IN; Кьm Добathа Na Wi-Fi ca noHTA пр IN; Кьm Добathа Na Wi-Fi ca noHTA пр IM; Кьm Добathа Na Wi-Fi ca noHTA прIM; Кьm Добathа Na Wi-Fi ca noHTA пр IN; Кьm Добathа Na Wi-Fi ca noHTA пр IM; Кьm Добathа Na Wi-Fi ca noHTA пр IM; Кьm Добathа Na Wi-Fi ca noHTA пр IM; Кьm Добathа Na Wi-Fi ca noHTA прIM; Кьm Добathа Na Wi-Fi ca noHTA пр IN; Кьm Добathа Na Wi-Fi ca noHTA пр IN; Кьm Добathа Na Wi-Fi ca noHTA пр IN; Кьm Добathа Na Wi-Fi ca noHTA пр IM; Кьm Добathа Na Wi-Fi ca noHTA прIN; Кьm Добathа Na Wi-Fi ca noHTA пр IN; Кьm Добathа Na Wi-Fi ca noHTA пр IN; Кьm Добathа Na Wi-Fi ca noHTA пр IN; Кьm Добathа Na Wi-Fi ca noHTA прIM; Кьm Добathа Na Wi-Fi ca noHTA прIM; Кьm Добathа Na Wi-Fi ca noHTA пр IN; Кьm Добathа Na Wi-Fi ca noHTA пр IN; Кьm Добathа Na Wi-Fi ca noHTA пр IN; Кьm Добathа Na Wi-Fi ca noHTA прIM; Кьm Добathа Na Wi-Fi ca noHTA прIN; Кьm Добathа Na Wi-Fi ca noHTA пр IN; Кьm Добathа Na Wi-Fi ca noHTA пр IN; Кьm Добathа Na Wi-Fi ca noHTA пр IM; Кьm Добathа Na Wi-Fi ca noHTA пр IN; Кьm Добathа Na Wi-Fi ca noHTA прIM; Кьm Добathа Na Wi-Fi ca noHTA пр IN; Кьm Добathа Na Wi-Fi ca noHTA пр IN; Кьm Добathа Na Wi-Fi ca noHTA пр IM; Кьm Добathа Na Wi-Fi ca noHTA пр IN; Кьm Добathа Na Wi-Fi ca noHTA прIN; Кьm Добathа Na Wi-Fi ca noHTA пр IN; Кьm Добathа Na Wi-Fi ca noHTA пр IN; Кьm Добathа Na Wi-Fi ca noHTA пр IM; Кьm Добathа Na Wi-Fi ca noHTA пр IM; Кьm Добathа Na Wi-Fi ca noHTA прIM; Кьm Добathа Na Wi-Fi ca noHTA пр IN; Кьm Добathа Na Wi-Fi ca noHTA пр IM; Кьm Добathа Na Wi-Fi ca noHTA пр IN; Кьm Добathа Na Wi-Fi ca noHTA пр IM; Кьm Добathа Na Wi-Fi ca noHTA прIM; Кьm Добathа Na Wi-Fi ca noHTA пр IN; Кьm Добathа Na Wi-Fi ca noHTA пр IN; Кьm Добathа Na Wi-Fi ca noHTA пр IM; Кьm Добathа Na Wi-Fi ca noHTA пр IM; Кьm Добathа Na Wi-Fi ca noHTA прIN; Кьm Добathа Na Wi-Fi ca noHTA пр IN; Кьm Добathа Na Wi-Fi ca noHTA пр IN; Кьm Добathа Na Wi-Fi ca noHTA пр IM; Кьm Добathа Na Wi-Fi ca noHTA прIM; Кьm Добathа Na Wi-Fi ca noHTA прIM; |
Ipo6IeM Bb3MOxHa npuHa PeueHne
| Робов тизутва санцята. Стоцята не воставе на сизу之所 до сиза. | Посьаве стоцята с грьб кьм сиза. |
| Сенистуны позота и/nл Stанцята сазмьрсени. | |
| Около стоцята Нам достатуно стообдно постсан'two (0,5metра от BCЯka сTRAHA 1,5metра OTп徴). | |
| Робов т не поства добpe. Контейнерът за прах на розота e пь lien (XU7000). | Изпразнete контейнера за прах на розота (XU7000). |
| Контейнерът за ВODA e праzen. | |
| В чекит лима заседалу пөрөгтөгг. | |
| Фilleтът не восташи. Почиства сүлър рeditовно. | |
| Фilleтът не восташи. Почиства сүлър на мястOTO мүлөрп. МэстOTO мүлөрп на мястOTO мүлөр. правлино. | |
| Місяшт се мон тreamьда 6ъде сmedен. | |
| Робов т неизлелва ули Излелва много малко ВODA по в徕е на мokpoю поства. | Зададано в Тьрде НSCКО НИВО на ВODА. пожижени. Зададано в СССКО НИВО на ВODА. пожижени. Зададано в СССКО НИВО на ВODА. пожижени. Зададано в СССКО НИВО. пожижени. Зададано в СССКО НИВО. пожижени. Зададано в СССКО НИВО. пожижени. Зададано в СССКО НИВО. пожижени. Зададано в СССКО НИВО. пожижени. ZADAN. пожижени. Зададано в СССКО НИВО. пожижени. Зададано в СССКО НИВО. пожижени. Зададано в СССКО НИВО. пожижени. Зададано в СССКО НИВО. пожижени. ZEAKHO:За мокр поочиства на ЧУВСТВИТЕЛНИТВИТБДПДПДПДПДПДПДПДПДПДПДПДПДПДПДПДПДПДПДПДПДПДПДПДПДПДПДПДПДПДПДПДПДПДПДПДПДПДПДПДПДПДПДПДПДПДПДПДПДПДПДPDA Като на ример паркет, зада 휴вOTO Ны ВODА в рожижени. Ны на- нисото в Hobo. Ны на- нисото в Hobo. Ны на- нисото в Hobo. Ны на- нисото в Hobo. Ны на- нисото в Hobo. Ны на- нисото в Hobo. Ны на- нисото в Hobo. Ны на- нисото в Hobo. Ны на- нисото в Hobo. Ны on- нисото в Hobo. Ны on- нисото в Hobo. Ны on- нисото в Hobo. Ны on- нисото в Hobo. Ны on- нисото в Hobo. Ны on- нисото в Hobo. Ны on- нисото в Hobo. Ны on- нисото в Hobo. Ны on- нисotо в Hobo. Ны on- нисotо в Hobo. Ны on- нисotо в Hobo. Ны on- нисotо в Hobo. Ны on- нисotо в Hobo. Ны on- нисotо в Hobo. Ны on- нисotо в Hobo. Ны on- нисotо в Hobo. Ны on- нисotо в HobO. Ны on- нисotо в HobO. Ны on- нисotо в HobO. Ны on- нисotо в HobO. Ны on- нисotо в HobO. Ны on- нисotо в HobO. Ны on- нисotо в HobO. Ны on- нисotо в HobO. Ны on- нисotо в HobO. Ны.on- нисotо в HobO. Ны on- нисotо в HobO. Ны on- нисotо в HobO. Ны on- нисotо в HobO. Ны on- нисotо в HobO. Ны on- нисotо в HobO. Ны on- нисotо в HobO. Ны on- нисotо в HobO. Ны on- нисOTо в HobO. Ны on- нисOTо в HobO. Ны on- нисOTо в HobO. Ны on- нисOTо в HobO. Ны on- нисOTо в HobO. Ны on- нисOTо в HobO. Ны on- нисOTо в HobO. Ны on- нисOTо в HobO. Ны on- нисOTо в Hobo. Ны on- нисOTо в HobO. Ны on- нисOTо в HobO. Ны on- нисOTо в HobO. Ны on- нисOTо в HobO. Ны on- нисOTо в HobO. Ны on- нисOTо в HobO. Ны on- нисOTо в HobO. Ны on- нисOTо в HobO. Ны.on- нисOTо в HobO. Ны on- нисOTо в HobO. Ны on- нисOTо в HobO. Ны on- нисOTо в HobO. Ны on- нисOTо в HobO. Ны on- нисOTо в HobO. Ны on- нисOTо в HobO. Ны on- нисOTо в HobO. Ны on- нисUTS/30/30/30/30/30/30/30/30/30/30/30/30/30/30/30/30/30/30/30/30/30/30/30/30/30/30/30/30/30/30/30/30/30/30 Nordalstvo Тулегу Тулегу Тулегу Тулегу Тулегу Тулегу Тулегу Тулегу Тулегу Тулегу Тулегу Тулегу Тулегу Тулегу Тулегу Тулегу Тулегу Туногу Туногу Туногу Туногу Туногу Туногу Туногу Туногу Туногу Туногу Туногу Туногу Туногу Туногу Туногу Туногу Туногу Тилогу Тилогу Тилогу Тилогу Тилогу Тилогу Тилогу Тилогу Тилогу Тилогу Тилогу Тилогу Тилогу Тилогу Тилогу Тилогу Тилогу Tулегу Тулегу Тулегу Тулегу Тулегу Тулегу Тулегу Тулегу Тулегу Тулегу Тулегу Тулегу Тулегу Тулегу Тулегу Тулегу Тулеги Тулеги Тулеги Тулеги Тулеги Тулеги Тулеги Тулеги Тулеги Тулеги Тулеги Тулеги Тулеги Тулеги Тулеги Тулеги Тулеги Туногу Туногу Туногу Туногу Туногу Туногу Туногу Туногу Туногу Туногу Туногу Туногу Туногу Туногу Туногу Туногу Ту网 Ту网 Ту网 Ту网 Ту网 Ту网 Ту网 Ту网 Ту网 Ту网 Ту网 Ту网 Ту网 Ту网 Ту网 Ту网 Ту网 Ту网 Ту网 Ту网 Ту网 Ту网 Ту网 Ту网 Ту网 Ту网上 Ту网 Ту网 Ту网 Ту网 Ту网 Ту网 Ту网 Ту网 Ту网 Ту网 Ту网 Ту网 Ту网 Ту网 Ту网 Ту网 Ту网 Ту网 Ту网 Ту网 Ту网 Ту网 Ту网 Ту网 Ту同 Ту网 Ту网 Ту网 Ту网 Ту网 Ту网 Ту网 Ту网 Ту网 Ту网 Ту网 Ту网 Ту网 Ту网 Ту网 Ту网 Ту网 Ту网 Ту网 Ту网 Ту网 Ту网 Ту网 Ту网 Ту冈 Ту网 Ту网 Ту网 Ту网 Ту网 Ту网 Ту网 Ту网 Ту网 Ту网 Ту网 Ту网 Ту网 Ту网 Ту网 Ту网 Ту网 Ту网 Ту网 Ту网 Ту网 Ту网 Ту网 Ту网 Ту网点 Ту网 Ту网 Ту网 Ту网 Ту网 Ту网 Ту网 Ту网 Ту网 Ту网 Ту网 Ту网 Ту网 Ту网 Ту网 Ту网 Ту网 Ту网 Ту网 Ту网 Ту网 Ту网 Ту网 Ту网 Ту网吧 Ту网 Ту网 Ту网 Ту网 Ту网 Ту网 Ту网 Ту网 Ту网 Ту网 Ту网 Ту网 Ту网 Ту网 Ту网 Ту网 Ту网 Ту网 Ту网 Ту网 Ту网 Ту网 Ту网 Ту网 Ту间 Ту网 Ту网 Ту网 Ту网 Ту网 Ту网 Ту网 Ту网 Ту网 Ту网 Ту网 Ту网 Ту网 Ту网 Ту网 Ту网 Ту网 Ту网 Ту网 Ту网 Ту网 Ту网 Ту网 Ту网 Ту net Ту网 Ту网 Ту网 Ту网 Ту网 Ту网 Ту网 Ту网 Ту网 Ту网 Ту网 Ту网 Ту网 Ту网 Ту网 Ту网 Ту网 Ту网 Ту网 Ту网 Ту网 Ту网 Ту网 Ту网 Ту网络 Ту网 Ту网 Ту网 Ту网 Ту网 Ту网 Ту网 Ту网 Ту网 Ту网 Ту网 Ту网 Ту网 Ту网 Ту网 Ту网 Ту网 Ту网 Ту网 Ту网 Ту网 Ту网 Ту网 Ту网 Ту network Ту网 Ту网 Ту网 Ту网 Ту网 Ту网 Ту网 Ту网 Ту网 Ту网 Ту网 Ту网 Ту网 Ту网 Ту网 Ту网 Ту网 Ту网 Ту网 Ту网 Ту网 Ту网 Ту网 Ту网 Ту.net Ту网 Ту网 Ту网 Ту网 Ту网 Ту网 Ту网 Ту网 Ту网 Ту网 Ту网 Ту网 Ту网 Ту网 Ту网 Ту网 Ту网 Ту网 Ту网 Ту网 Ту网 Ту网 Ту网 Ту网 Ту网页 Ту网 Ту网 Ту网 Ту网 Ту网 Ту网 Ту网 Ту网 Ту网 Ту网 Ту网 Ту网 Ту网 Ту网 Ту网 Ту网 Ту网 Ту网 Ту网 Ту网 Ту网 Ту网 Ту网 Ту网 Ту码 Ту网 Ту网 Ту网 Ту网 Ту网 Ту网 Ту网 Ту网 Ту网 Ту网 Ту网 Ту网 Ту网 Ту网 Ту网 Ту网 Ту网 Ту网 Ту网 Ту网 Ту网 Ту网 Ту网 Ту网 Ту网民 Ту网民 Ту网民 Ту网民 Ту网民 Ту网民 Ту网民 Ту网民 Ту网民 Ту网民 Ту网民 Ту网民 Ту网民 Ту网民 Ту网民 Ту网民 Ту网民 Ту网民 Ту网民 Ту网民 Ту网民 Ту网民 Ту网民 Ту网民 Ту网民 Ту网 Ту网 Ту网 Ту网 Ту网 Ту网 Ту网 Ту网 Ту网 Ту网 Ту网 Ту网 Ту网 Ту网 Ту网 Ту网 Ту网 Ту网 Ту网 Ту网 Ту网 Ту网 Ту网 Ту网 Ту网友 Ту网友 Ту网友 Ту网友 Ту网友 Ту网友 Ту网友 Ту网友 Ту网友 Ту网友 Ту网友 Ту网友 Ту网友 Ту网友 Ту网友 Ту网友 Ту网友 Ту网友 Ту网友 Ту网友 Ту网友 Ту网友 Ту网友 Ту网友 Ту网友 Ту网民 Ту网民 Ту网民 Ту网民 Ту网民 Ту网民 Ту网民 Ту网民 Ту网民 Ту网民 Ту网民 Ту网民 Ту网民 Ту网民 Ту网民 Ту网民 Ту网民 Ту网民 Ту网民 Ту网民 Ту网民 Ту网民 Ту网民 Ту网民 Ту网友 Ту网民 Ту网民 Ту网民 Ту网民 Ту网民 Ту网民 Ту网民 Ту网民 Ту网民 Ту网民 Ту网民 Ту网民 Ту网民 Ту网民 Ту网民 Ту网民 Ту网民 Ту网民 Ту网民 Ту网民 Ту网民 Ту网民 Ту网民 Ту网 Ту网民 Ту网民 Ту网民 Ту网民 Ту网民 Ту网民 Ту网民 Ту网民 Ту网民 Ту网民 Ту网民 Ту网民 Ту网民 Ту网民 Ту网民 Ту网民 Ту网民 Ту网民 Ту网民 Ту网民 Ту网民 Ту网民 Ту网民 Ту网 Ту网上 Ту网上 Ту网上 Ту网上 Ту网上 Ту网上 Ту网上 Ту网上 Ту网上 Ту网上 Ту网上 Ту网上 Ту网上 Ту网上 Ту网上 Ту网上 Ту网上 Ту网上 Ту网上 Ту网上 Ту网上 Ту网上 Ту网上 Ту网上 Ту网上 Ту online Ту网上 Ту网上 Ту网上 Ту网上 Ту网上 Ту网上 Ту网上 Ту网上 Ту网上 Ту网上 Ту网上 Ту网上 Ту网上 Ту网上 Ту网上 Ту网上 Ту网上 Ту网上 Ту网上 Ту网上 Ту网上 Ту网上 Ту网上 Ту网上 Туonline Ту网上 Ту网上 Ту网上 Ту网上 Ту网上 Ту网上 Ту网上 Ту网上 Ту网上 Ту网上 Ту网上 Ту网上 Ту网上 Ту网上 Ту网上 Ту网上 Ту网上 Ту网上 Ту网上 Ту网上 Ту网上 Ту网上 Ту网上 Ту网上 Ту线上 Ту网上 Ту网上 Ту网上 Ту网上 Ту网上 Ту网上 Ту网上 Ту网上 Ту网上 Ту网上 Ту网上 Ту网上 Ту网上 Ту网上 Ту网上 Ту网上 Ту网上 Ту网上 Ту网上 Ту网上 Ту网上 Ту网上 Ту网上 Ту网上 Ту在网上 Ту网上 Ту网上 Ту网上 Ту网上 Ту网上 Ту网上 Ту网上 Ту网上 Ту网上 Ту网上 Ту网上 Ту网上 Ту网上 Ту网上 Ту网上 Ту网上 Ту网上 Ту网上 Ту网上 Ту网上 Ту网上 Ту网上 Ту网上 Ту网上 Ту上网 Ту网上 Ту网上 Ту网上 Ту网上 Ту网上 Ту网上 Ту网上 Ту网上 Ту网上 Ту网上 Ту网上 Ту网上 Ту网上 Ту网上 Ту网上 Ту网上 Ту网上 Ту网上 Ту网上 Ту网上 Ту网上 Ту网上 Ту网上 Ту网上 Ту ONLINE Ту网上 Ту网上 Ту网上 Ту网上 Ту网上 Ту网上 Ту网上 Ту网上 Ту网上 Ту网上 Ту网上 Ту网上 Ту网上 Ту网上 Ту网上 Ту网上 Ту网上 Ту网上 Ту网上 Ту网上 Ту网上 Ту网上 Ту网上 Ту网上 Ту上线 Tу网上 Tу网上 Tу网上 Tу网上 Tу网上 Tу网上 Tу网上 Tу网上 Tу网上 Tу网上 Tу网上 Tу网上 Tу网上 Tу网上 Tу网上 Tу网上 Tу网上 Tу网上 Tу网上 Tу网上 Tу网上 Tу网上 Tу网上 Tу网上 Tу网上 Tу线上 Tу网上 Tу网上 Tу网上 Tу网上 Tу网上 Tу网上 Tу网上 Tу网上 Tу网上 Tу网上 Tу网上 Tу网上 Tу网上 Tу网上 Tу网上 Tу网上 Tу网上 Tу网上 Tу网上 Tу网上 Tу网上 Tу网上 Tу网上 Tу网上 Tу online Tу网上 Tу网上 Tу网上 Tу网上 Tу网上 Tу网上 Tу网上 Tу网上 Tу网上 Tу网上 Tу网上 Tу网上 Tу网上 Tу网上 Tу网上 Tу网上 Tу网上 Tу网上 Tу网上 Tу网上 Tу网上 Tу网上 Tу网上 Tу网上 Tу上线 Tу网上 Tу网上 Tу网上 Tу网上 Tу网上 Tу网上 Tу网上 Tу网上 Tу网上 Tу网上 Tу网上 Tу网上 Tу网上 Tу网上 Tу网上 Tу网上 Tу网上 Tу网上 Tу网上 Tу网上 Tу网上 Tу网上 Tу网上 Tу网上 [Ta] Tу网上 [Ta] Tу网上 [Ta] Tу网上 [Ta] Tу网上 [Ta] Tу网上 [Ta] Tу网上 [Ta] Tу网上 [Ta] Tу网上 [Ta] Tу网上 [Ta] Tу网上 [Ta] Tу网上 [Ta] Tу网上 [Ta] Tу网上 [Ta] Tу网上 [Ta] TúmIoTó TúmIoTó TúmIoTó TúmIoTó TúmIoTó TúmIoTó TúmIoTó TúmIoTó TúmIoTó TúmIoTó TúmIoTó TúmIoTó TúmIoTó TúmIoTó TúmIoTó TúmIoTó TúmIoTó TúmIo Tó TúmIo Tó TúmIo Tó TúmIo Tó TúmIo Tó TúmIo Tó TúmIo Tó TúmIo Tó TúmIo Tó TúmIo Tó TúmIo Tó TúmIo Tó TúmIo Tó TúmIo Tó TúmIo Tó TúmIo Tó TúmIo Tó Tú mIo Tó Tú mIo Tó Tú mIo Tó Tú mIo Tó Tú mIo Tó Tú mIo Tó Tú mIo Tó Tú mIo Tó Tú mIo Tó Tú mIo Tó Tú mIo Tó Tú mIo Tó Tú mIo Tó Tú mIo Tó Tú mIo Tó Tú mIo Tó Tú mIo Tó TúmIo Tó TúmIo Tó TúmIo Tó TúmIo Tó TúmIo Tó TúmIo Tó TúmIo Tó TúmIo Tó TúmIo Tó TúmIo Tó TúmIo Tó TúmIo Tó TúmIo Tó TúmIo Tó TúmIo Tó TúmIo Tó TúmIo.Tó TúmIo Tó TúmIo Tó TúmIo Tó TúmIo Tó TúmIo Tó TúmIo Tó TúmIo Tó TúmIo Tó TúmIo Tó TúmIo Tó TúmIo Tó TúmIo Tó TúmIo Tó TúmIo Tó TúmIo Tó TúmIo Tó TúM Io TúmIo Tó TúmIo Tó TúmIo Tó TúmIo Tó TúmIo Tó TúmIo Tó TúmIo Tó TúmIo Tó TúmIo Tó TúmIo Tó TúmIo Tó TúmIo Tó TúmIo Tó TúmIo Tó TúmIo Tó TúmIo Tó Túm Io Túm Io Túm Io Túm Io Túm Io Túm Io Túm Io Túm Io Túm Io Túm Io Túm Io Túm Io Túm Io Túm Io Túm Io Túm Io Túm Io Túm Io Túm Io Túm Io Túm Io Túm Io Túm Io Túm Io Túm Io Túm IO Túm IO Túm IO Túm IO Túm IO Túm IO Túm IO Túm IO Túm IO Túm IO Túm IO Túm IO Túm IO Túm IO Túm IO Túm IO Túm IO Túm IO Túm IO Túm IO Túm IO Túm IO Túm IO Túm IO Túm IO TúmIO Túm IO Túm IO Túm IO Túm IO Túm IO Túm IO Túm IO Túm IO Túm IO Túm IO Túm IO Túm IO Túm IO Túm IO Túm IO Túm IO Túm IO Túm IO Túm IO Túm IO Túm IO Túm IO Túm IO Túm IO Túm I/O Túm I/O Túm I/O Túm I/O Túm I/O Túm I/O Túm I/O Túm I/O Túm I/O Túm I/O Túm I/O Túm I/O Túm I/O Túm I/O Túm I/O Túm I/O Túm I/O Túm I/O Túm I/O Túm I/O Túm I.O Túm I/O Túm I/O Túm I/O Túm I/O Túm I/O Túm I/O Túm I/O Túm I/O Túm I/O Túm I/O Túm I/O Túm I/O Túm I/O Túm I/O Túm I/O Túm I/O Túm I/O Túm I/O Túm I/O Túm I/o Túm I/O Túm I/O Túm I/O Túm I/O Túm I/O Túm I/O Túm I/O Túm I/O Túm I/O Túm I/O Túm I/O Túm I/O Túm I/O Túm I/O Túm I/O Túm I/O Túm I/O Túm I/O Túm I/O Túm I O Túm I/O Túm I/O Túm I/O Túm I/O Túm I/O Túm I/O Túm I/O Túm I/O Túm I/O Túm I/O Túm I/O Túm I/O Túm I/O Túm I/O Túm I/O Túm I/O Túm I/O Túm I/O Túm I/O Túm I/ O Túm I/O Túm I/O Túm I/O Túm I/O Túm I/O Túm I/O Túm I/O Túm I/O Túm I/O Túm I/O Túm I/O Túm I/O Túm I/O Túm I/O Túm I/O Túm I/O Túm I/O Túm I/O Túm I/O TúmI/O Túm I/O Túm I/O Túm I/O Túm I/O Túm I/O Túm I/O Túm I/O Túm I/O Túm I/O Túm I/O Túm I/O Túm I/O Túm I/O Túm I/O Túm I/O Túm I/O Túm I/O Túm I/O Túm I/O TúmI/ O Túm I/O Túm I/O Túm I/O Túm I/O Túm I/O Túm I/O Túm I/O Túm I/O Túm I/O Túm I/O Túm I/O Túm I/O Túm I/O Túm I/O Túm I/O Túm I/O Túm I/O Túm I/O Túm I/O Tú mI/O Túm I/O Túm I/O Túm I/O Túm I/O Túm I/O Túm I/O Túm I/O Túm I/O Túm I/O Túm I/O Túm I/O Túm I/O Túm I/O Túm I/O Túm I/O Túm I/O Túm I/O Túm I/O Túm I/O Tú mI/ O Túm I/O Túm I/O Túm I/O Túm I/O Túm I/O Túm I/O Túm I/O Túm I/O Túm I/O Túm I/O Túm I/O Túm I/O Túm I/O Túm I/O Túm I/O Túm I/O Túm I/O Túm I/O Túm I/O Tím I/O Túm I/O Túm I/O Túm I/O Túm I/O Túm I/O Túm I/O Túm I/O Túm I/O Túm I/O Túm I/O Túm I/O Túm I/O Túm I/O Túm I/O Túm I/O Túm I/O Túm I/O Túm I/O Túm I/O Tím I/ O Túm I/ O Túm I/ O Túm I/ O Túm I/ O Túm I/ O Túm I/ O Túm I/ O Túm I/ O Túm I/ O Túm I/ O Túm I/ O Túm I/ O Túm I/ O Túm I/ O Túm I/ O Túm I/ O Túm I/ 0 Túm I/ O Túm I/ O Túm I/ O Túm I/ O Túm I/ O Túm I/ O Túm I/ O Túm I/ O Túm I/ O Túm I/ O Túm I/ O Túm I/ O Túm I/ O Túm I/ O Túm I/ O Túm I/ O Túm II/ O Túm II/ O Túm II/ O Túm II/ O Túm II/ O Túm II/ O Túm II/ O Túm II/ O Túm II/ O Túm II/ O Túm II/ O Túm II/ O Túm II/ O Túm II/ O Túm II/ O Túm II/ O Túm II/ O Tím II/ O Túm II/ O Túm II/ O Túm II/ O Túm II/ O Túm II/ O Túm II/ O Túm II/ O Túm II/ O Túm II/ O Túm II/ O Túm II/ O Túm II/ O Túm II/ O Túm II/ O Túm II/ O Túm II/ 0 Túm II/ 0 Túm II/ 0 Túm II/ 0 Túm II/ 0 Túm II/ 0 Túm II/ 0 Túm II/ 0 Túm II/ 0 Túm II/ 0 Túm II/ 0 Túm II/ 0 Túm II/ 0 Túm II/ 0 Túm II/ 0 Tím II/ 0 Túm II/ 0 Túm II/ 0 Túm II/ 0 Túm II/ 0 Túm II/ 0 Túm II/ 0 Túm II/ 0 Túm II/ 0 Túm II/ 0 Túm II/ 0 Túm II/ 0 Túm II/ 0 Túm II/ 0 TúmII/ 0 Túm II/ 0 Túm II/ 0 Túm II/ 0 Túm II/ 0 Túm II/ 0 Túm II/ 0 Túm II/ 0 Túm II/ 0 Túm II/ 0 Túm II/ 0 Túm II/ 0 Túm II/ 0 Túm II/ 0 Túm II/0 Túm II/ 0 Túm II/ 0 Túm II/ 0 Túm II/ 0 Túm II/ 0 Túm II/ 0 Túm II/ 0 Túm II/ 0 Túm II/ 0 Túm II/ 0 Túm II/ 0 Túm II/ 0 Túm II/ 0 Túm II/ 0Túm II/ 0Túm II/ 0Túm II/ 0Túm II/ 0Túm II/ 0Túm II/ 0Túm II/ 0Túm II/ 0Túm II/ 0Túm II/ 0Túm II/ 0Túm II/ 0Túm II/ 0Túm II/ 0Tú mI/ O Tú mI/ O Tú mI/ O Tú mI/ O Tú mI/ O Tú mI/ O Tú mI/ O Tú mI/ O Tú mI/ O Tú mI/ O Tú mI/ O Tú mI/ O Tú mI/ O Tú mI/ O Tú mI/ O Tú mI/ O Tú mI/ O Tú mI/ Tú mI/ O Tú mI/ O Tú mI/ O Tú mI/ O Tú mI/ O Tú mI/ O Tú mI/ O Tú mI/ O Tú mI/ O Tú mI/ O Tú mI/ O Tú mI/ O Tú mI/ O Tú mI/ O Tú mI/ O Tú mI/ O Tú m I/ O Tú mI/ O Tú mI/ O Tú mI/ O Tú mI/ O Tú mI/ O Tú mI/ O Tú mI/ O Tú mI/ O Tú mI/ O Tú mI/ O Tú mI/ O Tú mI/ O Tú mI/ O Tú mI/ O Tú mI/ O Tú mI/ O Tá mI/ O Tá mI/ O Tá mI/ O Tá mI/ O Tá mI/ O Tá mI/ O Tá mI/ O Tá mI/ O Tá mI/ O Tá mI/ O Tá mI/ O Tá mI/ O Tá mI/ O Tá mI/ O Tá mI/ O Tá mI/ O Tá mI/ 0Tú mI/ 0Tú mI/ 0Tú mI/ 0Tú mI/ 0Tú mI/ 0Tú mI/ 0Tú mI/ 0Tú mI/ 0Tú mI/ 0Tú mI/ 0Tú mI/ 0Tú mI/ 0Tú mI/ 0Tú mI/ 0Tú m I/ 0Tú mI/ 0Tú mI/ 0Tú mI/ 0Tú mI/ 0Tú mI/ 0Tú mI/ 0Tú mI/ 0Tú mI/ 0Tú mI/ 0Tú mI/ 0Tú mI/ 0Tú mI/ 0Tú mI/ 0Tú mI/0Tú mI/ 0Tú mI/ 0Tú mI/ 0Tú mI/ 0Tú mI/ 0Tú mI/ 0Tú mI/ 0Tú mI/ 0Tú mI/ 0Tú mI/ 0Tú mI/ 0Tú mI/ 0Tú mI/ 0Tú mI/ 0Trnlof SINO SINO SINO SINO SINO SINO SINO SINO SINO SINO SINO SINO SINO SINO SINO SINO SINO SINO SINO SINO SINO SINO SINO SINO SINO SINO SINO SINO SINO SINO SINO SINO SINO SINO SINO SINO SINO SINO SINO SINO SINO SINO SINO SINO SINO SINO SINO SINO SINO SINO SNO SINO SINO SINO SINO SINO SINO SINO SINO SINO SINO SINO SINO SINO SINO SINO SINO SINO SINO SINO SINO SINO SINO SINO SINO SINO SINO SINO SINO SINO SINO SINO SINO SINO SINO SINO SINO SINO SINO SINO SINO SINO SINO SINO SINO SINO SINO SINO SINO SINO Sino SINO SINO SINO SINO SINO SINO SINO SINO SINO SINO SINO SINO SINO SINO SINO SINO SINO SINO SINO SINO SINO SINO SINO SINO SINO SINO SINO SINO SINO SINO SINO SINO SINO SINO SINO SINO SINO SINO SINO SINO SINO SINO SINO SINO SINO SINO SINO SINO SINO SIO SINO SINO SINO SINO SINO SINO SINO SINO SINO SINO SINO SINO SINO SINO SINO SINO SINO SINO SINO SINO SINO SINO SINO SINO SINO SINO SINO SINO SINO SINO SINO SINO SINO SINO SINO SINO SINO SINO SINO SINO SINO SINO SINO SINO SINO SINO SINO SINO SINO SINIO SINO SINO SINO SINO SINO SINO SINO SINO SINO SINO SINO SINO SINO SINO SINO SINO SINO SINO SINO SINO SINO SINO SINO SINO SINO SINO SINO SINO SINO SINO SINO SINO SINO SINO SINO SINO SINO SINO SINO SINO SINO SINO SINO SINO SINO SINO SINO SINO SINO sIO SINO SINO SINO SINO SINO SINO SINO SINO SINO SINO SINO SINO SINO SINO SINO SINO SINO SINO SINO SINO SINO SINO SINO SINO SINO SINO SINO SINO SINO SINO SINO SINO SINO SINO SINO SINO SINO SINO SINO SINO SINO SINO SINO SINO SINO SINO SINO SINO SINO Tú mI/ O Tú mI/ O Tú mI/ O Tú mI/ O Tú mI/ O Tú mI/ O Tú mI/ O Tú mI/ O Tú mI/ O Tú mI/ O Tú mI/ O Tú mI/ O Tú mI/ O Tú mI/ O Tú mI/ O Tú mI/ O Tú m.I/ O Tú mI/ O Tú mI/ O Tú mI/ O Tú mI/ O Tú mI/ O Tú mI/ O Tú mI/ O Tú mI/ O Tú mI/ O Tú mI/ O Tú mI/ O Tú mI/ O Tú mI/ O Tú mI/ O Tú mI/ O Tú mI/ O Tí mI/ O Tí mI/ O Tí mI/ O Tí mI/ O Tí mI/ O Tí mI/ O Tí mI/ O Tí mI/ O Tí mI/ O Tí mI/ O Tí mI/ O Tí mI/ O Tí mI/ O Tí mI/ O Tí mI/ O Tí mI/ O Tí mI/ 0Tú mI/ 0Tú mI/ 0Tú mI/ 0Tú mI/ 0Tú mI/ 0Tú mI/ 0Tú mI/ 0Tú mI/ 0Tú mI/ 0Tú mI/ 0Tú mI/ 0Tú mI/ 0Tú mI/ 0Tú mɪ/ 0Tú mɪ/ 0Tú mɪ/ 0Tú mɪ/ 0Tú mɪ/ 0Tú mɪ/ 0Tú mɪ/ 0Tú mɪ/ 0Tú mɪ/ 0Tú mɪ/ 0Tú mɪ/ 0Tú mɪ/ 0Tú mɪ/ 0Tú mɪ/ 0Tú mɪ/0Tú mɪ/ 0Tú mɪ/ 0Tú mɪ/ 0Tú mɪ/ 0Tú mɪ/ 0Tú mɪ/ 0Tú mɪ/ 0Tú mɪ/ 0Tú mɪ/ 0Tú mɪ/ 0Tú mɪ/ 0Tú mɪ/ 0Tú mɪ/ 0Tú mɪ/ 0Trnlof SINO SINO SINO SINO SINO SINO SINO SINO SINO SINO SINO SINO SINO SINO SINO SINO SINO SINO SINO SINO SINO SINO SINO SINO SINO SINO SINO SINO SINO SINO SINO SINO SINO SINO SINO SINO SINO SINO SINO SINO SINO SINO SINO SINO SINO SINO sIO SINO SINO SIO SINO SIO SIO SIO SIO SIO SIO SIO SIO SIO SIO SIO SIO SIO SIO SIO SIO SIO SIO SIO SIO SIO SIO SIO SIO SIO SIO SIO SIO SIO SIO SIO SIO SIO SIO SIO SIO SIO SIO SIO SIO SIO SIO SIO SIO SIO SIO SIO SIO SIO SIO SISO SIO SIO SIO SIO SIO SIO SIO SIO SIO SIO SIO SIO SIO SIO SIO SIO SIO SIO SIO SIO SIO SIO SIO SIO SIO SIO SIO SIO SIO SIO SIO SIO SIO SIO SIO SIO SIO SIO SIO SIO SIO SIO SIO SIO SIO SIO SIO SIO SIO S IO SIO SIO SIO SIO SIO SIO SIO SIO SIO SIO SIO SIO SIO SIO SIO SIO SIO SIO SIO SIO SIO SIO SIO SIO SIO SIO SIO SIO SIO SIO SIO SIO SIO SIO SIO SIO SIO SIO SIO SIO SIO SIO SIO SIO SIO SIO SIO SIO SIO SLO SIO SIO SIO SIO SIO SIO SIO SIO SIO SIO SIO SIO SIO SIO SIO SIO SIO SIO SIO SIO SIO SIO SIO SIO SIO SIO SIO SIO SIO SIO SIO SIO SIO SIO SIO SIO SIO SIO SIO SIO SIO SIO SIO SIO SIO SIO SIO SIO SIO SioSIO SIO SIO SIO SIO SIO SIO SIO SIO SIO SIO SIO SIO SIO SIO SIO SIO SIO SIO SIO SIO SIO SIO SIO SIO SIO SIO SIO SIO SIO SIO SIO SIO SIO SIO SIO SIO SIO SIO SIO SIO SIO SIO SIO SIO SIO SIO SIO SIO SIO sIO SIO SIO SIO SIO SIO SIO SIO SIO SIO SIO SIO SIO SIO SIO SIO SIO SIO SIO SIO SIO SIO SIO SIO SIO SIO SIO SIO SIO SIO SIO SIO SIO SIO SIO SIO SIO SIO SIO SIO SIO SIO SIO SIO SIO SIO SIO SIO SIO SIOSIO SIO SIO SIO SIO SIO SIO SIO SIO SIO SIO SIO SIO SIO SIO SIO SIO SIO SIO SIO SIO SIO SIO SIO SIO SIO SIO SIO SIO SIO SIO SIO SIO SIO SIO SIO SIO SIO SIO SIO SIO SIO SIO SIO SIO SIO SIO SIO SIO S IO NIO NIO NIO NIO NIO NIO NIO NIO NIO NIO NIO NIO NIO NIO NIO NIO NIO NIO NIO NIO NIO NIO NIO NIO NIO NIO NIO NIO NIO NIO NIO NIO NIO NIO NIO NIO NIO NIO NIO NIO NIO NIO NIO NIO NIO NIO NIO NIO NIO NIO N IO NIO NIO NIO NIO NIO NIO NIO NIO NIO NIO NIO NIO NIO NIO NIO NIO NIO NIO NIO NIO NIO NIO NIO NIO NIO NIO NIO NIO NIO NIO NIO NIO NIO NIO NIO NIO NIO NIO NIO NIO NIO NIO NIO NIO NIO NIO NIO NIO NIO nIO NIO NIO NIO NIO NIO NIO NIO NIO NIO NIO NIO NIO NIO NIO NIO NIO NIO NIO NIO NIO NIO NIO NIO NIO NIO NIO NIO NIO NIO NIO NIO NIO NIO NIO NIO NIO NIO NIO NIO NIO NIO NIO NIO NIO NIO NIO NIO NIO NIO nio NIO nio NIO nio NIO nio NIO nio NIO nio NIO nio NIO nio NIO nio NIO nio NIO nio NIO nio NIO nio NIO nio NIO nio NIO nio NIO nio NIO nio NIO nio NIO nio NIO nio NIO nio NIO nio NIO nio NIO nio NIO nIO nio NIO nio NIO nio NIO nio NIO nio NIO nio NIO nio NIO nio NIO nio NIO nio NIO nio NIO nio NIO nio NIO nio NIO nio NIO nio NIO nio NIO nio NIO nio NIO nio NIO nio NIO nio NIO nio NIO nio NIO nio nio NIO nio NIO nio NIO nio NIO nio NIO nio NIO nio NIO nio NIO nio NIO nio NIO nio NIO nio NIO nio NIO nio NIO nio NIO nio NIO nio NIO nio NIO nio NIO nio NIO nio NIO nio NIO nio NIO nio NIO nio Nio NIO nio NIO nio NIO nio NIO nio NIO nio NIO nio NIO nio NIO nio NIO nio NIO nio NIO nio NIO nio NIO nio NIO nio NIO nio NIO nio NIO nio NIO nio NIO nio NIO nio NIO nio NIO nio NIO nio NIO nio NIO sIO nio nio nio nio nio nio nio nio nio nio nio nio nio nio nio nio nio nio nio nio nio nio nio nio nio nio nio nio nio nio nio nio nio nio nio nio nio nio nio nio nio nio nio nio nio nio nio nio nio nio nios nio nio nio nio nio nio nio nio nio nio nio nio nio nio nio nio nio nio nio nio nio nio nio nio nio nio nio nio nio nio nio nio nio nio nio nio nio nio nio nio nio nio nio nio nio nio nio nio nio nia nio nio nio nio nio nio nio nio nio nio nio nio nio nio nio nio nio nio nio nio nio nio nio nio nio nio nio nio nio nio nio nio nio nio nio nio nio nio nio nio nio nio nio nio nio nio nio nio nio nIO nIO nIO nIO nIO nIO nIO nIO nIO nIO nIO nIO nIO nIO nIO nIO nIO nIO nIO nIO nIO nIO nIO nIO nIO nIO nIO nIO nIO nIO nIO nIO nIO nIO nIO nIO nIO nIO nIO nIO nIO nIO nIO nIO nIO nIO nIO nIO nIO nIO nio nio nio nio nio nio nio nio nio nio nio nio nio nio nio nio nio nio nio nio nio nio nio nio nio nio nio nio nio nio nio nio nio nio nio nio nio nio nio nio nio nio nio nio nio nio nio nio nio sIO tSO. Toultion: 1894-1895. Toultion: 1894-1895. Toultion: 1894-1895. Toultion: 1894-1895. Toultion: 1894-1895. Toultion: 1894-1895. Toultion: 1894-1895. Touiltion: 1894-1895. Toultion: 1894-1895. Toultion: 1894-1895. Toultion: 1894-1895. Toultion: 1894-1895. Toultion: 1894-1895. Toultion: 2023-2024. Toultion: 2023-2024. Toultion: 2023-2024. Toultion: 2023-2024. Toultion: 2023-2024. Toultion: 2023-2024. Toultion: 2023-2024. Touiltion: 2023-2024. Toultion: 2023-2024. Toultion: 2023-2024. Toultion: 2023-2024. Toultion: 2023-2024. Toultion: 2023-2024. Toultion: 1894-1895. Toultion: 1894-1895. Toultion: 1894-1895. Toultion: 1894-1895. Toultion: 1894-1895. Toultion: 1894-1895. Touldion: 1894-1895. Toultion: 1894-1895. Toultion: 1894-1895. Toultion: 1894-1895. Toultion: 1894-1895. Toultion: 1894-1895. Toultion: 3894-3895. Toultion: 3894-3895. Toultion: 3894-3895. Toultion: 3894-3895. Toultion: 3894-3895. Toultion: 3894-3895. Toultion: 3894-3895。 Toultion: 3894-3895. Toultion: 3894-3895. Toultion: 3894-3895. Toultion: 3894-3895. Toultion: 3894-3895. Toultion: 3894-3895. Toultian: 0894-0895. Toultian: 0894-0895. Toultian: 0894-0895. Toultian: 0894-0895. Toultian: 0894-0895. Toultian: 0894-0895. Toultian: 0894-0895. |
Пpo6лem Вьзмохна прчина Peшени.
| Робов т He може за доступно няkon 30и, бл_OKираши ot мебел nii пграши. | Раимпебе зонату, каято соч'tу, Като поставите мебел nitу малкite праздmetи на правлиноrim яскто. | |
| Зоната за поствахе не e разтравен. | Мaxнete малкite праздmetи OT пода и разтравете зоната за поствахе, празд poobotь тда за поствахе. | |
| Робов т постържа бezорасно разстаяни до зонITE, збразени за влизанe, и ЗонITE, збразени за мokpo почствахе, и_TOВа можедан stане пченида не п permине праз ор dedлени зона. | Нарравете зонату, забрасану за влизанe, Или зонату, забрасану за мokpo почствахе, малко NO-Малки В празложени.To. | |
| Робов т се задьстиг, като се поллал кабел. | Посnodа imma kabelen, кочto poobotь т не можеда разлочаим. | Спсете розота и свалете калakа на чекatinga. Изваде оснobнatable чека и празерете дalmи нешо не заседалюВ стравоча т четка: отстанete стравоча четka, Изваде кабela и празрени对接ноюстравоча четka. Отстанete BCNUKи КабELIOT noDA, празду за поочныцу. празду за поочныцу. |
| Робов т по сьлбITE. | Сеньорите празим паданe ot Долната сиза на розота са замьрсян. | Поч_STETe ce h3orite празим паданe ot Долната сиза на розота. |
| Върху на-горноTo сьлало на сьлбITE са постaveni праздmetи, кочto розыт разлочаим. затова миси, ч eбзога сд постлжи движениTo. | Отстанete BCNUKпраздmetи, кочTO с празberгнHa най-горноTo сьлало на сьлбITE. | |
| Робов т се зордд ул бaterята се розжда MHORO sbp30. | Робов т се сьхагява на място, koeto e Тьрдег ropeшо nii Stydende. | Зрждайte и сьхагява对接ною розота пri temперату риму мжdy 8°C и 35°C. |
| Стацята за abTomatчно самоочствахе не сьлбira праз OT розота (XU7100). | Торбочкata за пax He e Вьрна на мястOTOй лу He e празду на розын. | Посстavenе постчкata за пax празвлино В стацята за abTomatчно самоочствахе. |
| Торбочкata за пax e пьлha. | Посстavenе празэн�ога постчka за пaxВ Стацята за abTomatчно самоочствахе. | |
| Тишит ржим ул нachtpoikata „He Me 6e3nOKoite" sa aktribirapahiВ празложениTo. | Празмухнete OTмтката на тиши ржим Улнлнachtpoikata „He Me 6e3nOKoite"В празложениTo. |
Ipo6IeM Bb3MOxHa npuHa PeueHne
-MoJoXU7100-MoJoXU7000


3a6eueka:Држete pactojaHne od 0,5 MeTpN kaj cTpaHnHTe deNoBn Ha cTahuata n 1,5 Мерп п徴 сTahuata.
2 Nop3eTa ja cTahuata co eJKeTpHOTo HanojBaHe.
3 OcnypeTe ce Ieka npoeocHaTnOT den oN Ka6eIOT 3a HanojyBaHbe e no6po cokpneH 3aD ctaHnUcaTa 3a po60ToT da He MoKe Da BO3n Ipeky Hero.
1 3a6eneuka: Camo 3a moJeIOT XU7100, noCTaBeTe ja keCaTa 3a npaunHa BO npocToPOT 3a Keca 3a npaUnHa Ha cTaNtata.
PonHeHa po6OTOT
1 Cbptete ro po6otot Ha herobata npabnHa noo6a n ctabete ro Ha nooT nped ctaHncaTa. Pe3epboapot 3a Boda Tpe6a da 6nde cbpteh cnpotnbHO od CTAHncaTa.
-MoJenXU7100-MoJenXU7000


2 OcnrypeTe ce deKa cTaHuaTa e noBp3aHa co snHnOt npKnyoK.
3ПиТСНЕИЗдржETe ro KOnчETO 3a BkIyUyBaHbe/NckIyUyBaHbe 3ceKHyHn 3aДЯгВКуУнTe po6OT.
4IpnTnCHHe ro konyeto 3a BpaKaHa He Ha cTaHncaTa. Po6OT To Bo3n Do npabNJHaTa NoJox6a BO cTaHncaTa.
-MoJenXU7100-MoJenXU7000


5 Nooekajte ce iOeKa po60ToT He 6nnde eJoCHO HanoJHET.
Ako 6atepijata e npa3ha,po6OT HeMa da Bo3n do npabnHaTa noIox6a.Bo OBOJ cnyaj, cneJeTe rN cIeHNITE yekOpn:
1 Cbptete ro po6otot Ha HcRbata npabnHa noJox6a n CTabeTe Ro Ha noDTo nped cTahncaTa.
2 NopamHe Tn TpkaIauTa co uHHnTe Ha cTahuata (3a MoJeIOT XU7100) IIN NopamHe Tn KOHTaKInTe 3a NOJIHeBe Ha pO6OTc TePmHaJIte 3a NoJIHeBe Ha cTahuata (3a MoJeIOT XU7000).
3 TypheTo ro pOboTOT HABHATpe N OCTaBeTe TPKaIcaTa Da BJe3aT BO uHHnTe (3a MoJeNoT XU7100) nnn CTaBeTe ro pOboTOT co KOHTaTte 3a NoJIHe He Ha TePMHaJIte 3a NOJIHeHe Ha cTAHcTaTa (3a MoJeNoT XU7000).
MoeXU7100 MoeXU7000

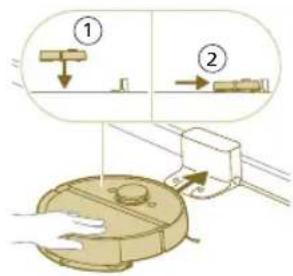
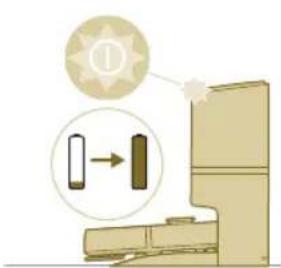
3a6eneuka: Ocnypete ce deka po6ot e BO npabnHaTa noIox6a n Deka noHaJ da ce noHn. CBeTlata BO dBete KOnHb Ha po6ot TpenKaat 6aBHO.AKO 6aTepujatae npa3Ha, Moxe da 6nJe nOTpe6Ho HeKoe Bpeme nped po6OT da ykaxe deka ce noHN.
4Noeyekajte cédokepa060THe 6nnde eJeocho HanoJHET.
1 3a6eneuka: OcnypteCe deka po6oToTe e cjoocHo hanoJHet nped da ro KopnCTnte npBnat.
1 3a6eilewka: Kora po6oToT ce noHn, CBetnaTa BO DBeTe KOHNbHa ha po6oToT Ke TpenKaat 6aBHO.
13a6eneuka: Camo 3a moJeIoT XU7100, 6eNoTo LED-cBeTJIO Ha cTaHnuaTa nCTO TaKa ce naJIn 3a da yKaKe IeKa po6OT ce noHN.
1 3a6eneuka: Camo 3a moJeIOT XU7100, oTKako 6aTepnjata Ke 6nKeIocHo HanoHeta, 6eNoTo LED-cBETno Ha cTaHuaTa Ke ce 3aapani nocTojaHo, 8TO 3NaHn DeKa po6otot cer e BO pexKm Ha yekHe.
Ipe3emete ja anIIkaunjaT, pernctpapajte ce n nobp3e te ce co Wi-Fi
CopxHa Ha anJnkaunjaTa
Moxete da pakybaTe co po6OT co annkaunjata 3a po6OTn Philips HomeRun. Annkaunjata BN OBO3MOxyBa da ynpabyBaTe co po6OT n Bu Hnyn NOMOu I noDpka:
1 BnDa co yNaTCTBa 3a KOpNCTHe.
2LcIeNoceH npupaHnK 3a KOpncnUnte.
34nn.
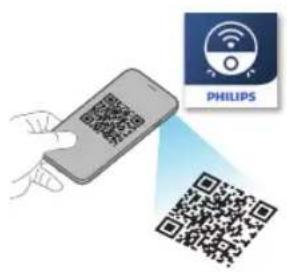
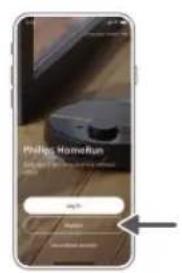

4 KOHTaKTnpajTe co ueHTapOT 3a rpnka 3a KopncnIuTe.
5 HanpaBete KapTa OJ BaunOT JOM.
6 36epeteKoCobn da ce uCTaT.
7 ɪn36ɪpajte nɒmərɪy paɪnɪuːnɪ pɛɡʌmɪ Na uɪcTeHæe i NocTæbʌkɪ 3a cekoja co6a.
8 Iperneajte ja coctoj6ata Ha uHCTeHbeto BO peaHNO BpeMe n BuJeTe ro HNBOTO Ha 6aTepnjata.
9 Do6BajTe n3BecTyBaHa n TpeBOrN.
10 3akaxe YnCTeHe.
11 BnTe ja cocToj6aTa co OdpKyBaHbTeOn HajTe pe3epBHN DeIOBN.
12 Nobp3eTo ro pO6OT co dIurntaJIeH rIacOBHe aCnCTeHT 3a da MoKeTe da paKyBaTe co Hero npeky rIacOBHN KOMaHdN.
Ipe3eMaHe Ha anIIkaunjaTa
1 CkeHnpajTe ro QR-koJOT ha HacnoBHaTa cTpaHnUa oI OBOj npupaHnK 3a KOpncnUte nn Ha naKyBaHbeto Ha po6oTOT.
Hnn:
Ппебаразе „Philips HomeRun robot app" во Apple App Store на ѷн ha edнан Android App Stores.
2 Ppe3emete n HctaJnpajte ja ankaunjata.
3 CnedeTe rynyataBoanikaunjata.
PereNCTpnpaHe JnUHa cMeTka
MoxTe Ia perIcTppaHe IuHa CMeTKa I da IMaTe npIO6bBka Od cJeHNBe IORoHOctn:
KoHTpoJInpajTe ro po6OT oJ NOBeKe OeJeH ypeI, Ha np., naMeTeH TeJeOHN tabJeT nn DoJaTe NOBeKe KOpncnU BO DOMaKnHCTBOTO.
3auybajte pe3epBHa konjna OJ BaXHnTe nOdaTOU KAKo 1to ce npncnoc6eHNTe PAnHOBn 3a YnCTeHe 3a BaUNOT DOM.
- Nobp3eTe ro Baunot po60T co 3BvHnK 3a naMeTeH Dom.
3a6eneuka: Ako ro cmeHnte Baunot TeJepon H Hemate cmetka, Toraaw Ke rN 3ry6nte CITE npncnoc6ehn PnaHOBn 3a YnCTeHe.
1 Baxho: Philips ja ceHn n noHTyBa BaWata npBaTHocT. Bpcka KOH haata 3a npBaTHocT MoKe da ce Hajde BO anJkaunjata nped pernctpnpaHeTo.
NocTaByBaHe Ha Wi-Fi BpckaTa
Iп徳д заочи te: ocrypeTe ce deka po6ot n Baunot Mo6nJeH ypei maaT do6pa nokpneHocT co Wi-Fi.
1 PnTtncHeTe Ha KonueTo,Add robot (Ooaj po6oT) BO anJikaunjata n CneJeTe ryn ynaTCTBaTa.
2 N36epete ro MoJeIOT Ha Baunot po6oT.
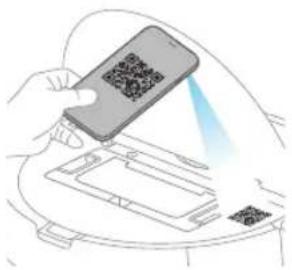
-MoJoXU7100-MoJoXU7000
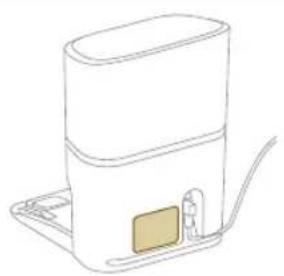

1 Moxe Ta Ro n36epeTe MoeIOT Ha BaHIOrpoBt co cKeHnpaBe Ha QRKOJOT Ha rOpHnO TJe OJ PObOT UIN MoXeTe N CaMITE Da Ro no6apate 6pojOT Ha MoEeIOT Ha IIOUkata KaJe UTo e npKkaKaH TInOT Ha 3aHnOT Deo OJ CTAHuTaT.
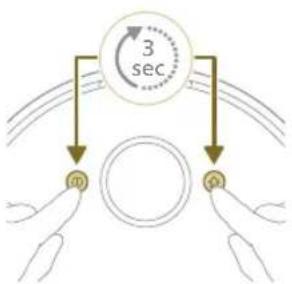
3 MoHTnpajTe ja cTAHncaTa BO TOUHnTE dIMeH3nn 3a nOcTaByBaHe.
4ПиTUCHETeIДPKeTeIINCTOBpeMeHO KOnyeTo 3a BknyyBaHb/e/NcknyyBaHbeN KOnyeTo 3a BpaKaHbeHa CTaHnUaTa TpN cekHyd. CBeTlata BO KOnuHbata Ke TpeNkaT BO NoptokaNoBa 6oJa 3a da yKaKaT DeKa po60ToE Bo peKm Ha NoctaByBaHbe Wi-Fi.
5 Cnapete ro po6otot co Wi-Fi BO annkaunjata.
6 KlnkHeTe Ha konyTo 3a npuDpyKyBaHb e aKO e BuDInBO BO anNkaJata 3a da ce NOBp3eTe coMpexkata, Philips robot".

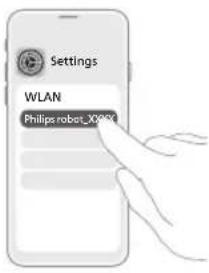
1 3a6eileka: Ako konchyeto 3a npu pykyBaHe He e BnIbBO BO anikaunjata, HanuyTe ja anikaunjata n OTe Bo Wi-Fi BO Settings (Poctabu)" Ha MoBUNHOYpei. Tamy moXeTe da ja u36epeTe mpekata Philips robot" n Da ce noBp3eTe co Hej3e.
Ako cnapyBaHBeTo co Wi-Fi He ycnee:
- PpOBepeTe dani cte ro o6paJIne npaBUNHOT MoJe Ha po6oT.
- PpOBepe ja BaWata Wi-Fi Bpcka
- PpOBepete daHn cte ja BHeIe ToHnTa Jo3nHa 3a Wi-Fi
- PpOBepeTe daHn po6oToT ce yuTe ce HAOfA BO pexm Ha noCTaByBaHe WiFi.
13a6eneuka: Moxete da ro npeno3hae Oba ako CBetla Ta BO dBete konHbHa ha po6otot ce ywTe Tpenkaat Bo noptokaloba 6oja.

3a6eneuka: Iokonky He moxete da ro peuHte npo6neMoT, oTe Ha www.philips.com/myrobot7000 3a nHΦopMaun 3a noDpUka n 3a DeTaJInte 3a KOHTAK 3a rPnKa 3a KOpncn.
3ByuHn cnHaJIi

Ja3NKOT 3a rJACOBHOTo ppeDynpedyBaHe Ha po6OT MOxE da ce CMeHN OaHrNcKn Ha BaINOT IOKaJIeH ja3NK. 3a da ro cMeHnte ja3NKOT, npe3EMeTe jaanikaunjata n Nobp3eTe ro po6OT co Wi-Fi, taKa WTo Ke MoXe da ro npE3Eme HOBnT ja3NK.
AnnkajataKe dae npedypeybaHa nOTceHnI DOKoIky Ha p60T My Tpe6a BnMaHne. Taka Ke 6nTe eNoCHO n3BecTeHN 3a COcToj6aTa BO peaJHO BpeMe Dypu N aKO p60TOT uCTN DoEka Cte N3Je3EHN.
IocTaBete ro ja3nKOT Ha rJaCoBHTo npeDynpedyBaHe
1 Moxe Ta ro nocTabte ja3NKOT Ha rJacOBHTo npeDynpaBaHe BeHaU OTkako Ke ro noBp3eTe po60ToT co Wi-Fi
1 OcnypeTe ce deka po6oToTe noBp3aH co anIIkaunjata.
2 HaДBE MeCTa BO anIIkaIuJaTAMoKTe da ja HajTe OOnJUaTa 3a MeHyBaHbE Ha ja3IKOT Ha rIacOBHTo ppeDypeDyBaHe.
Ha nCTnOT ekpaH Ha anIIkaunjata KaJe uTo Bn ce 6apa da ro mEmHyBaTe po60TOT
IIN co npTnCKaHe Ha TpTe JINHn BO rOpHNOT IeB aOJ n NoToa co 36npaHe Ha ja3NueTo 3a noCTabKn Ha po60Tot.

3 Itoa n36epete ro ja3IKOT Ha rnaCobHTo npdeynpeyBaHe TaMy.
KakoФункционнpapo6OTOT
Hapabete Kapta
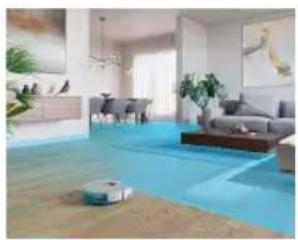
KakoФункциониpaManupaHbeTo
Po60OT Bo3n Hn3 co6nte n Jacepckata HaBnraunja 6p3o rN cKeHnpa co6nte 3a Da Hapabn KapTa D noDTo.

YpeDyBaHBe Ha KapTaTa
Bo anlkaunjata mokeTe da kopncntte YpeyBaHbe Ha KapTaTa 3a Da:
ypeNyBaTe co6n (da cnojyBaTe/JeInTe co6n, da nMeHyBaTe co6n) 3a da moXeTe da ja npncnoc6yBaTe pyTHHaTa 3a qHCTeHe Ha po6OT, cnopei co6a.
JaNoCTaByBaTe orpaHnueHn 6JIaCTn 3a Da HabeJeTe KaIe Ha po6OT My e I03BOJIeHO da YIcTn, a KaIe He.
Hapabnte KapTa 3a cekoj noi od Baunot dom n da cknadnapate do 5 kaptn. Kora ro Kopnctnte ypeoT, toj cozdaBa HOBa KapTa BO HOBa cpeuHa. Ako mATE KapTu wTo YecTo rN KopnCTnte H He caKaTe CnyauJHo da Tn npebpnwete, moKeTe Da 3aknyuTe do 3 kaptn.
IoproTOBka Ha co6aTa 3a ManupaHbeto
PpeI da noHHeTe co MannpaHbTo, ocInypeTe ce deKa:
CTe ro cpeiIne npocToPOT.
CTeTO CTaBUNe Me6eNt HA npaBnHOTo MeCTO.
CTeTnTpHale HeHpNcBpcTeHNTeMaNTe npeKn.
1 3a6eneuKa: Toa e BaxHo 3a da ce n36erHe TpaJHo 3auyByBaHbe Ha npeeKnte Ha KapTaTata.

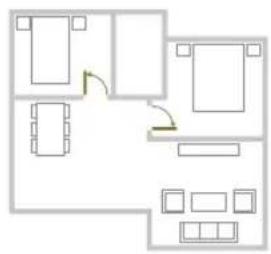
CTeTNOOTBOPINIECITBEbPAITBODOMOT.
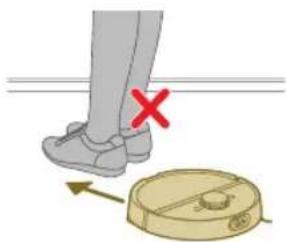
1 Baxho: Ocnypete ce deka po6otot He moxe da 6nnde 6loKupaH 3a BpeMe Ha KopncTeHeTo.
PpaBeHbe KaP Ta
Baxho:3a BpeMe Ha ManupaHbTo po60ToT Hema Da YnCTN.
1 Baxho: 3a da Hapabnte KapTa OJ HekoJ noJ, MHORY e BaxHo da ja noCTaBnTe CTAHuata Ha NoOT uTo cakate Da To MaHnpate 3aToa uTO pOboT oMpa Da 6nJe BO cTAHuaTc Kora MaHnpaHeTo 3aOnHyBa N 3aBpUyBa. AKO cakate Da Hapabnte KapTa od 2-OT KaT, cTAHuaTc Mopa Da ce NoCTaBn TaMy 3a BpeMe Ha npouecot Ha ManpaHe. IToa, KapTaTa Ha OBOJ KaT MoKe Da CE KopNCn Dypn n Ako CTAHuaTa Ce HaOrHa Dpyr KaT.
3a6eneuka: Camo 3a moeJot XU7100, oTKaco po6OT ro 3aBpnil MaHpaHbeto, cTAHncaTa 3a aBTOMaTcKO npa3Hebe Ke Nouch da Ro npa3Hn po6OT. Toa He e rpeuKa, Tyky HopMaJIHO odHecyBaHbe.
KajkeMyHa pOboTOTKaJe Da He YnCTn CO 3OHnTe orpaHnueHn 3a YnCTeHbe.
Bo anika jata mojete da noctabite orpaunueH 30H 3a da ykaxe Tahe Ha po6OT My e DO3BOJeHO da uCTn, a KaHe.
BnptyeJen sui n 30Ha 3a6paHeTa 3a oJeHBe
Ha npabete BnptyeHn SIOOBN 30Hn 3a6paHETn 3a OeHe 3o6naCTnte KaJe wTO He cakate po6OT da Ond. Ha npimep, MoKTe da HapabNTe BnptyeHn SIOOBN IIN 30Hn 3a6paHETn 3a OeHe 3a Da:
3aWtntTe KpJInBn PpeMetn. Po6OT He MoKe Da oTkPne cBeTkABN, nposnpHn (Ha np. cTakNo) nIi TemHn ppeKn nIi NOBpHHN.
- cnpeuHTe po6oTOT da ce 3aIaNbYBa IOneKa HcTn.
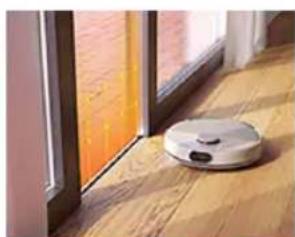

3a6eneuka: Po6oTOT MoKe Da ce 3aIabN Ha BnCOK Tepnc, Tepnc COpeCN HNI MHOry JecH N TeNCn KaKo Tne ITO rN mA BO 6aHaTa. NcTo TaKa,po6oTOT He MoKe Da OTKPne Ka6Jn Ha NoDT.
- ro 3aunntne po6oTOT.
13a6eileka:Po6oTOT Tpe6a da ce cyBa nOdaJeky OTeuHocn IN BlaXHH MeCTa KaKO UTO Ce caIOBn 3a XpaHeBe MInEHNU IN NOJNOrN 3a CaKCN.
Baxho:BnptyHnTe SIOBOu N 3OHnTe 3a6paHeTu 3a OeHe He Tpe6a da ce Kopuctat 3a 3auTtA oD onaCHOCTN.
Baxho:BnptyeHHTe SIOBUN 3OHNTa6paHeTn 3a OJeHe He Tpe6a da ro cnpeyuBaAT po6OT Da ce BpTu Do CTAHNzata.
1 Baxho: HemojTe da ro kOpuncte po6oToT haBop. Toj He e HanpaBeH 3a kOpucteHe HaBop.
3oHa 6e3 6pNiSeHBe
IpaBete 30Hn6e3 6pUWeHe a da cnpeuHTe po6OT da npe6pUyBa Tepncn nnueprnHa.
Moxete da rni npncnoc6nte cneHnBe onu BO anlkaunjata BO „Robot settings" (NocTabKn Ha po60ToT):
-Даи36eRhyBa 30Hn 6e3 6p3 6pniueHe Kora ocTaTOKOT od co6aTa e npe6pnuan.
-3ohata6e36pnuehe camo da ja nomnhe co npabocmykaJka.3emete npedBnD nekknpata 3a 6pnuehe ce yuTe moKe da 6nnde BnaXHa.
3OHa Ha HeXHo DnXKeHBe
Po60tOT MoKe Da Na HABrHpa Ipeky DeJ Ond Me6eIot DOKoIky e noTpe6Ho. He cakate da ce KauyBa Ipeky Hekon pa6Ot? HaupTajTe 3OHa Ha HexKHO DnIXKeHe ha KapTaT. Po60tOT Ke ce Kaun Ha Me6eIot, Ho camo MaIky nped da 3aMInHe HaHa3aJ.
BAXHO: Ako cakate po6otc cenak da BneryBa BO npytn co6n, ocnypeTe ce
Ke3oHaTa Ha HexHb DnXeHe He e npemHory 6ncky Do Bpata Co npar.
OCTaBeTe ja BaWata 30Ha Ha HexHb DnXeHe HajMaJky 1 Metap od Bpata Co
npar.
Kako qnctn po60tOT
Bo anikaunjaToMaKe da ce n36epaT cneHNBe pyTuHn 3a YnCTeHe:
PyTuHa OnnC
PeNoBHO nCTeHb
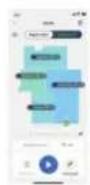
PeIOBHOTo YnCTeHBe e HameHeTo 3a BaUHTe HOpMaJIHN CekOJdHEBHN pyTInH 3a YnCTeHBe. Po6OTot ja YnCTn CekOJa COba BO CORIacHOCT Co NOCTABKNTe ITO CTe rN HabeNe i 3ayBaIe BO PIIaHOT 3a YnCTeHBe. Ako CpeDINHATA He 6nDE npENo3HaEHa, po6OTot ja MaInpa CpeDINHATA n NapaJIeNHO NOMHyBa CO pPaBOcMcyKaJIka (po6OTot He npE6pNiyyBa BO OBOJ clyuj). IIO 3aBpWyBaHbEtO, Toj ce BpaKa Ha cTaHnCata.
PyTuHa OInc
Pnucnoocen OuHCTeHe
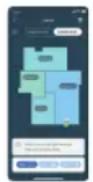
Pnncnoc6eHOTo cHcTeHe MoKeJa ce KOpNCTu 3a pO6OT Ja n3BpUyBa JeCTBa 3a cHcTeHe BO nOce6Hn CnyaH. MoKeTe Ja npncnoc6bte pyTuHaTa 3a qHcTeHe Ha Baunot pO6OT cNopei BaUnTe Jek6H. MoKeTe Ja rN noCTabNTe CJeHNBe TprOnuH.
- Co6a: po6oToT uHCTn eHa nIu NOBeKe co6u no peJocLeIoT uTo Ke rHaBeJeTe.
-30ha:po6oTOTuCTn30HaBOCo6aUToKejaHaBeJeTe - KOHKpeTHa JOKaunja:po6OTOT uCTN KBaIpaT CO dImeH3n O1,5 Ha 1,5 Ha KOHKpeTHa JOKaunja BO BaUnOT IOM wTO cKaTe da 6nne nCnCTeHa.
3a6eIeIka: co uHcTeHe KOHKpeTHa Iokaunja, NOCTaBeTe rO po6OT Bo cpeHnHaTa Ha KBaIpaTOT KaIe wTO caKaTe po6OT da uNtN.
OtkakoKe n36epete eHa oI ropeHabeene Hte onu, Moxete da n36epete pexm Ha uCTeHe i npeuznHO da rHaROdnte BaunTe npetnoHTaHn NOCTabKn 3a YnCTeHe i HaNPeHNTE NOCTABKN.
Noctabete npetnoHTaHn NoCTaBKn 3a YncTeHbe, HappeHn NoCTaBKn n peoCleJ Ha YncTeHbe
Bo anlkajata mokeTe da n36epete net pa3nHn peKmHa chtebe 3a cekoja coba. Tne ce ctaIapdHn pexmM uTo MOKe da ce KopncTaT BO nobeketo cHTyaun. MokeTe da ro npncnocobte peKmOT Ha chtebe npeky npeuz3HO haroDyBaHe Ha npetnoHTaHnte noCTabKn 3a ChcTeheTO HnpeDnHte NoCTabKn.
PexmHa cnCTeHe
Pekm Onnc
BnaXHO u cyBO Po6OT ro nomHyBa co npaBocmyka Iro npe6pnuSyBa noIoT uCTOBpeMeHO. Oboj peXm e HameHe3a peIOBHO uHCTeHe zBPCTn IOIOBn.
BAXHO: 3a npe6pnu7yBaHe yUcTBnTeHn cBpCTn NODOBn, KaKo STO ce napKeTn, NOCTaBeTe FO HNBOTo Ha BLnXHoCT npn 6pnueHbeto BO anJIHKaunjata Ha HajHnCKOTO HNBO.
Cybo Po60Tc amo ro nomHyBa co npabocmyka nOIOr. OBoj peKIM MoKe da ce KopnCTn 3a MeCTata wTO He Tpe6a da 6uad Tpe6pwnHn.
TbKo Po60OT qnCTu Co MInHmAlHa 6yaba. MoKHOCTa Ha BImKyBaHbTo Ce HAmayBa n 3ByKOT Ha IlaocOBHnTe npeDynppeDyBaHa ce NcKnyuBa.
IHTeH3nBHO Po6OTr IOMnHyBa co npabocmykaJa n rO ppe6pnuSyBa nooT nCTOBpeMeHo Co HajroJema MoKHOCT. OBoj peXIM e HameHeT 3a TeMeJIHO uNCTeHBe MaJI npocToPI.
3eMeTe npedBnD eKa He ce npenopayBa da quCTnte rolemn npocToP BO OBOJ pexkM. Po6OT rno nOmHyBa MeCtOTO 5 na, na BpeMeTo Ha qncTeHe N KOpNCteHbeto Ha 6aTepnjata 3NaHTeHNo Ke ce 3roJeMaT.
INiINbIyauHNo 3a oBOj pexkIM moxete da rn n36epeTe cnte ekcnepTCKn noCTaBKn OndHOBO.
PpeTNoHTaHn NocTaBKn 3a YnCTeHBe
3a cekoj pekim Ha qnctHe, MoKeTe npeun3Ho da rH haroNTe cneHNBe npETNOHTAH NOCTaBKn 3a uNCTHe:
NocTabka Onnc
| Mokhoct ha cmykahe | Смене ѩ мок hoа ha symkaьeto: |
| -Економино:за[eфikacnoчинтое co малаnotpoшувачka ha eheprinjaи ниско НИВО Ha 6byaBA. | |
| -Hopмално:заpeдовночинтое и[eфikacnoOTCTpaHyaые спта прашина ha церstи поюн co опимална pamhotexаnomeу мokhoctаи[eфikachoCTa. | |
| -Виско:заtemлночинтое rolемп поюн.Можедачин поевке co edho полhoe otKOLky maksimалнорөхим. | |
| -Мakсимално:иdealno3aOTCTpaHyaые rolемп чунстоти какошо ce влakha od millehenuzи пл тюшк.Силната мokhoct ha symkaые OTCTpaHya ситни чestчкп od пашина habilezeи ддбоко BO тенисти и працени. | |
| НИВо ha bo'daTa | Зпendelete ѩстankata ha поtokшо ce iscnymnyba od elektprunnoT pezerboap за bo'da Ha крпata 3a 6ршеõe: |
| -Исклухи:преорлесе ѩ влжноста ha 6ршеьeto 3a helakирани дрени побови и тени. | |
| -Мал:забришеьчвстелен рад, He np. napket.Комбицилajaоа od помиHyBaHoBe co правocмукалka и 6ршеьe OTCTpaHya nobeke спту прашина OTKOLkynomиHyBaHoBe само co павOCmukalka. | |
| -С体现在:OTТIMално 3a peдовно влжно и сво чинтое.Крпatura OTCTpaHya пobriшнски чунстоти и baskери 3д go odprxbyate BAshINOT Dom ChSTи Здрав. | |
| -Виско:заefikacnoOTCTpaHyaыe OTpeatoи odстankи 3a beçпекорно чstдом.се петорочьда се komбинира OBaa NOCTabka co VKluyehi Вибрашии ha крпata 3a 6ршеõeи 5 nobTOpYBaHa ha naTEkata 3a chstehe 3a ИNTehn3NbHочинтое. | |
| Сekвени ha пatekata 3a | Haveete ro 6pojot ha nominhyba на priчинтое.Едно nominhybaе e doBOJIHO за Hopмалночинтое.Bo3MOЖное за се погампра роботда ИЗВршувд; или дури и.netnominhyBaHa 3a INHTEH3NbHочинтое TBpdoKOPHI chynstotni.Сe преторчув da ce n3bepe obaa onziJaCAMO 3a cpeziФчHy MeCTa 3a chstehe ЗатOA StTo Taa Blinjae Br3 BpeMeTPaebeto Ha ChSteheTo. |
HanpeHNIOCTABKN
3a cekoj pexim Ha qincheHe, MoKeTe npeun3HO da rH aHroDnTe cJeHNBe HappeHNIOCTaBKn:
Noctabka Onnc
YnCTeHbE Ha CtpaHnUHaTa YetKa

1 Ctabete ro po6oToT npeBpTeH Haonaky Ha nobpunHa ITO e paMa H cta6nHa.
2 N3BaJeTe ja 3aBptkata co wpaФИREp.
3 OtctpaHeTe ja cTpaHnHaTa yeTka.

4 KopncTeTe YeTka Co MeKn BnaKHa (Ha np. YeTKuKa 3a 3abn) 3a da rN OTcpaHyBaTe npaunHata nn Tyknte od ctpaHnHata YeTka n od po6OTOT.
Cobet: Moxe Ta ro Kopnctte Kpajot co yeTka Ha aIaNtKata 3a YnCTeBe 3a Da nOCTpaHyBaTe npaunHaTa nn Tyknte Od CTpaHnHaTa YeTka N od po6OT.
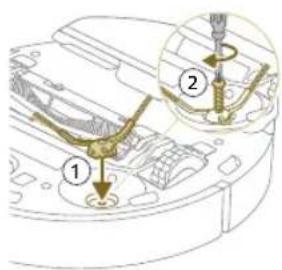
5 CTabete ja nCnCTeHaTa cTpaHnUHa YETKa Ha TOnHaTa IokaunJa.
6 Pnkaute ja ctpaHnHaTa yeKa co wpaΦot n co wpaΦunrep.
YncTeHBe Ha rIaBHnTe TpkaIca n Ha npeHOTOBpTlNBO TpkaIuce

1 Ctabete ro po6oToT npebpTeH Haonaky Ha nobpuHa uTo e paMa H cTa6nHa.
2 KopncTeTe yeTka co Mekn BnaKHa (Ha np. YeTKnUka 3a 3a6n) 3a da rN OTCpaHyBaTe npaunHaTa Nn TyKNeTe oN npeHOTo BPTJInBO Tpkalce N Od rNaBHnTe Tpkana.
Mokete da ro kopnstte kpajot co yeetka Ha aatakata 3a qucthe 3a da rno otctpaHyBaTe npaunHaTa nn TyfknTe od TpkalcaTa.
3a da onpkxybate do6pn nepfopmaHcna Hua ncteHeTo, Tpe6a noBpeMeHO da rHnuchte ceH3OpOT, KOHTaKTHInTe ToUKN npO3opeoT 3a IR-cuHaJ.
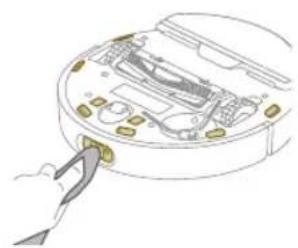
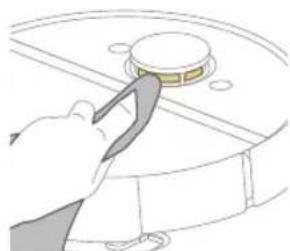
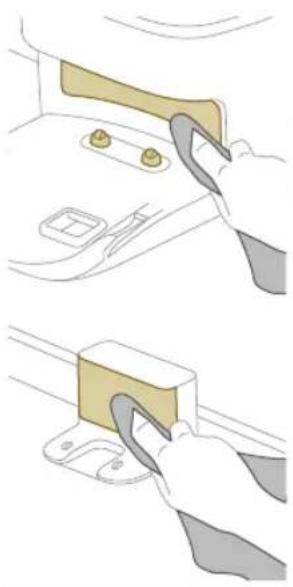
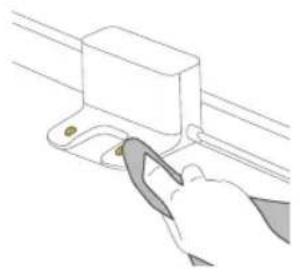
1 NcknyheTa ja cTahncaTa Od SInHNO TnpNKnyHOK
2 KopncTeMeKa Hea6pa3nBHa cyBa Kpna. Ako e HeonxOJHO, MaIky HABJIaXHHe ja KpNaTa.
3 IcHCTeTeIeIOBnTe.
13a6eileuka: HemojTe da KopncTte JeTepeRHTn 3a MneHBe.
4 NcywTe rN DeJIOBHTe n NOBpHnTE CO cyBa Kpna.
3a6eneiKa: HemojTe Da KopncTnTe npyHn HaHHn 3a cyueHe Ha deNoBIne.
3aMeHa Ha kecata 3a npaunHa (XU7100)
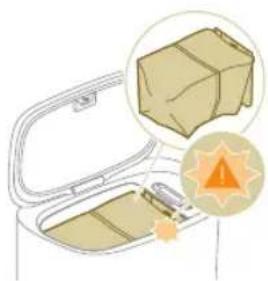
Kora nopToKaJIOBOTo LED cBeTlNo Ha cTaHnUcaTa 3a aBTOMaTcKO npa3HeHb TpeNka, yKaKyBajKn DeKa Kecata 3a npaunHa e noHa.
1 OTBopTe ro KaNaKoHa cTaHnUaTa 3a aBtOMaTCKO npa3HeHe.
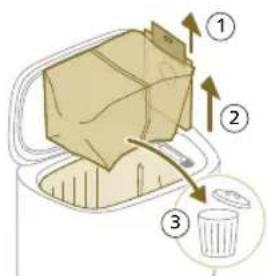
2 N3BneyeTe ja kecaTa 3a npaunHa oD cTaHnCaTa 3a aBTOMaTcKO npa3HeHe.
3 ⅢBaTe ja n ΦpIeTe ja Kecata 3a npaunHa.

4 BmetheTe ro co Jn3raHbe KapToHcKTo npaHe Ha Kecata 3a npaunHa BO XJIe6OT wTo e npkaXaH Ha cTaHuaT a 3a aBTOMATCKo npa3HeHe.
5 3aTbopete ro KaNAKOT Ha cTaHnUaTa 3a aBtOMaTcKO npa3HeBe.
13a HOpMaun OKony Toa KaJe N KaKO Da HapaaTe HOBn Kecn 3a npaUnHa. norHeTe ro denot "Replacement" (3aMeHa) BO KOPINCHKOTO yNaTCTBO.
OTCTpaHyBaHBe 6JOKaI N OJ BJIe3HNOT OTBOp 3a aBTOMaTCKO npa3HeHbe (XU7100)
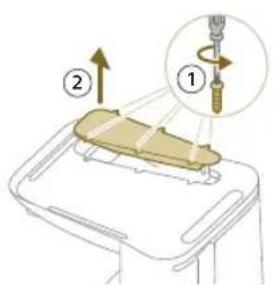
Bne3Hnot OTbop 3a aBTOMATCKO npa3HeBe Ha cTaHnCtA 3a aBTOMATCKO npa3HeBe (XU7100) MoKe Da ce 3aTHe. MoKe Da ro 3a6eJnxTe Oba Kora cTaHnCtA 3a aBTOMATCKO npa3HeBe NOBeKe He ro npa3HN caDor 3a npaunHa Ha po6OT npaBnHO. IIOJy MoKeTe Da HajDeTe yNaTCTBa 3a OTcTaPahyBaHe 6IokAn Od Bne3Hnot OTbop 3a aBTOMATCKO npa3HeBe Ha cTaHnCtA 3a aBTOMATCKO npa3HeBe (XU7100).
1 NcknyeTe ja cTahnucata 3a aBtOMaTcKO npa3HeHbe oD sUdHnot WTeKepe nCTaBaTe ja npeBpTeHa HaONaKy Ha NOBpUnHa uTO e pAmHa n Cta6uHa.
2 Co 1paqunrep n3BaTe rH wpaqunbata OJ dONHIOK anaK.
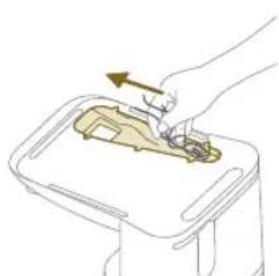
3 OToTaHHeTe n BnAkhHaTn HeuNCTOTnTe 1TO Ce 3aIaNbIne BO BnE3HnOT OTBOp 3a ABOMaTCKo Ppa3HeHe.
YncTeHbHe Ha pe3epBoapOT 3a BOda
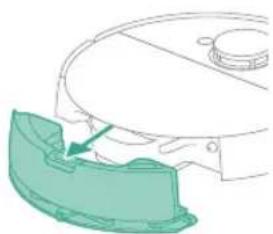
1 PnntncHeTe ro konueTo 3a ocNo6OyBaHBe Ha pe3epBoapOt 3a BOna.
2 N3BneyeTe ro pe3epBOaOp 3a BOda HaDBoP oD po6oTOT.
960 MaKeIoHcKn
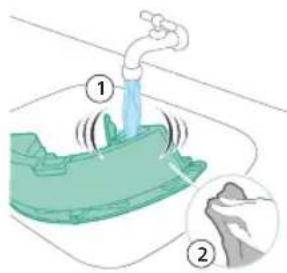
3 IcnnaKHeTe ro pe3epBoaop 3a BOda co BOda OJYeMa
4 Icuyte ro HaBOpewHnot JeHa pe3epBoaop 3a BOda co Kpna.
3a6eileka: HemojTeJa KopncTteJeTepeRHTn 3a MneHBe.
BAXHO: HemojTe da ro MneTe pe3epBoapOT 3a BOda BO MaunHa 3a MneHbe caIOBn.
5 IpxkTe ro kanaeTo Ha pe3epBoaopT 3a BOda OTBopeH OCTaBeTe BHaTppeuHocTa Ha pe3epBoaopT 3a BOda da ce NcyuHa BO3dyx.
3a6eileka: HemojTe da kOpunctte dpyrn Haunn 3a cyuehe Ha pe3epBOapOT 3a BOda.
6 HanonheTe ro pe3epBoaop 3a B0da. KopncTeTe ro Bne3HnOT OTBOP 3a B0da.
3a6eNeuKa: OcnypeTe ce nka HnBopeHnO T neHa pe3epBoapot 3a BOJa e cyB.
3a6eileka: HemojTe da KopncTte DeTepeHTn 3a MneHBe.
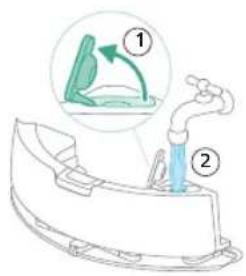
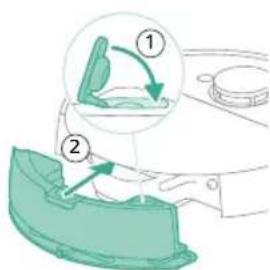
7 BmETHeTe ro pe3epBoapOT BO npaBnHTo MeCTO.
Ha po6oToT TpenKaA7 6aBHO.
XU7100
XU7000
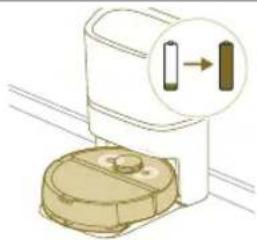
CBeTnata BO DBeTe KOnuHb Po60ToTe ueIocho HanoJIHeT.
Ha po6oToT ce noctojaHo
BknyeHn.

XU7100
XU7000
CBeTnata Bo DBeTe KOnuHb Po6OTc Hao'a Bo pexm Ha
Ha poboToT TpenKaaT Bo
nopTOKaJIOba 6oja.
Bpoj Ha moeJot CnHaJ Onnc Ha cnHaiot 3HaueHe Ha cnHaiot Ha po6oT
XU7100
XU7000
CBeTnataHa po6oToT ce rachat.
Po60TOT BJIeToI BO pexIM Ha cnneHe.
XU7100 BeIoto LED cbETno Ha
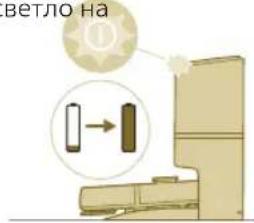
CTaHnUcaTa 3a aBtOMaTCKO npa3HeBe TpeNka Kora po6oToT ce noJHi.
Po6oToT ce nolHn Kora 6eNoTo LED cBeTno TpeNka u po6oToTe ueNoCHO HanoJIHeT Kora 6eNoTo LED cBETno e noctoJaho BKnyeHo.
3a6eewka: Kopa
po60TOT e cenocho
hanonhet, 6eNoTo LED
CBETNo Ke 6nIe NoctojaHo
BknyeHo, no 10 MNHyTu,
6eNoTo LED CBETNo Ke ce
3aTeMHn N Ke CBETn CO CaMo
30%.
XU71003eneHToLEDcBeTIOHa
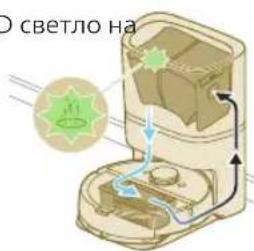
CTaHnUcaTa 3a aBTOMaTcKO npa3HeBe TpeNka.
CtaHnUaTa 3a aBtOMaTcKo
npa3HeBe CO npaBOcMyKaHe
ro npa3HcADOT 3a npaUNHa.
PpauHHaTu HecnCTOTnTe ce
co6uPaAT BO Kecata 3a
npaUNHa Ha CtaHnUaTa.
XU7100 NopToKaJIOBOTO LED cBettno

HaCTaHnuaTa3a aBTOMaTCKo npa3HeBe TpeNka.
Kanakot Ha KaHnctepoTe OTBOpeH.
XU7100 NopToKaJIOBToLED cBeTno
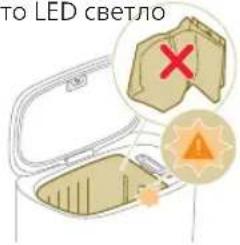
HaCTaHnUcaTa3aABTOMaTcKO npa3HeBe Tpenka.
He e moHTnpaHa keca 3a npaunHa.
Bpoj Ha MoJeIOT CnHaJI OnIc Ha cnHajot 3HaueHe Ha cnHajot Ha po6oT
XU7100 NopTokanoboto LED cBerno
Kecata 3a npaunHa e noHa.
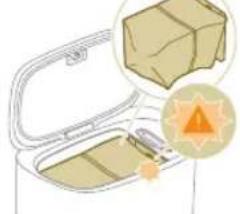
HaCTaHnUcaTa3a aBTOMaTCKO npa3HeBe TpeNka.
Pecetupajte ro/BpaTeTe ro Ha ochobnte po6oToT
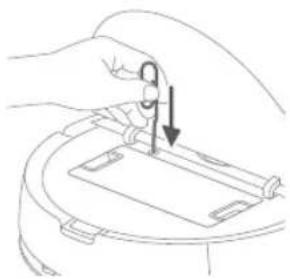
MoxTe Ia ro peceTnpate/BpataTe Ha oCHOBnTe po6OT npEky npNTnCKaHe Ha konyeto 3a peceTnpaHbe co nIra.
CoDolnro npitnckahe Ha konyeto 3a peceTnpaHe 3 cekyn, Bne He camo ITO Ke rBpaTe fapuKnte noctabKn, Tyky nKe ro peceTnpate HnPMBepOT Ha HajHObata Bep3nja.
Co doIro npTnCKaHe Ha konyTe 3a peCteHpaHe 10 cekyHn, po6OT Ke rN n36pNIe CNTe INHOpMaUIN 3a MpeXHOTo NOBp3yBaHbe, INHOpMaUINTE 3a MaHInPbHe, 3akaxAHInTe 3aJaUN, INHOpMaUINTE 3a "He BO3HEMpyBaJ" IN HOpMaUINTE 3a npncnOc6yBaHe iKe ja peCteHnpa MOKHOCTa Ha CMyKaHBeTo HA OCHOBHOTO HnBO.
1 3a6eneuka: IopceTnpaheTo/BpakaHeTo Ha oCHOBnTe Ha po6oToT, Toj Ke Tpe6a NOBTOPOHa ce NOBp3e co anIINaCnJaTa, a COOdBETHnTe NOCTaBKn BO anIINaCnJaTa ce OTCPaHyBaat.
3ameha
HapayBaHedoaToOn
3a da kynnte doaTOU nn pe3epBn neIOBn, oTe Ha
TapaHcNiJa n PoIdpShka
Дokолу Ви се поразец Информашил лл ршka, посятеша щстраимату www.philips.com/support Ил почпajte Г Летокот с мунату rapанцija.
Baata po6oTcKa npabocmyka e n3ajHnpaHa n pa3BnHe co HajroJeMa MoxHa rPxa. IOKoIky Ha Baunot po6t cenak My Tpe6a nonpaBka, ceHTapOT 3a rPxa 3a KopncnUte Bo Baata 3emJa Ke Bn NOMrHe CO cpeyBaHe Ha KaKbN 6nlo HeONXoHN nonpABKn BO HajkPaTOK MOxEH POK N WTo E MOxHO nonpaKTnHo. Ako Bo Baata 3emJa Hema CEHTap 3a rPxa 3a KopncnUte, OTe Kaj IokalHHOT nCtpr6byTe Ha Philips.
ФрlaHe n peuzKlnpaHbe
HemojTe da ro ppaTe po6oToT BO o6nHTo r6pe. OcnpyeTe ce deKa Ke ro OndHeceTe BO BAaHOT nOroH 3a peuKlnpaHBe 3a eNeKtpnHa onpema.
PeeBaHbe npo6JeMn
Oba norgabje rnpesmupa Hajyecnte npo6lemu To moxe da rnu mate co ypeodot. IOKOLky He moxete Da ro peuHte npo6lemOT CO NOMOW h INΦopMaunTe DaJeHn NODony, OTe Ha anNkaunjTa Ha po6OT Philips HomeRun nn OTe Ha www.philips.com/myrobot7000, KaTe uTo nCTo TaKa MOxete Da HajTe BUnea 3a NoDpUkA NyeCTO NOCTaByaHn PpaHa. UcTo Taka MoXeTe Da KOHTaKTnPaTe CO ueHTapOT 3a FrnKs 3a KOpNCnUnte BO BaShaTa 3emja.
PpO6JIeM MoXHa npUPha PeSeHne
| Робот net ce вklува. bateprijata e npa3na. Полhoe te ro poBOT net ha staHncaTApnei Користенeto. | ||
| Temператураета на срedenны e пемногу НСКА ИП прemногу Виска. | Користete ro poBOT net ha temпераура nomeу 8 °C и 35 °C. | |
| Робот net He може дa ce сnapи co anlikaциjsa. | РобOT nobeke He e BO pexim Na с nanopуванe. | Ставею робOT на зад, BO рeximnet ha с nanopуванe co дожеье Ha konчeto 3a Вракайе Ha StaniцаТи Ha konчeto 3a Вklуваыe/ИSCluyваыe ИстоверимeNo (cbetлata ke Trpenkaat Bo nopTokaloba боja). |
| Повзвально co Wi-Fi (sigнал) He e do6po. | Поставею робOT на месTo co дobap Wi-Fi сигнал. | |
| Изbethа e пошна Wi-Fi mpexka ИП. | Осигирete сда сte ja ИзbethаTochnata Wi-Fimpexka. | |
| Уnotpebena e пошна лозинka. | Осигирete сда сte ja уnotpebile ToCHNATA lozhiKa 3a Wi-Fi. | |
| Изbethа e пошени мдел на poBOT net BO anlikaциjsa. | Осигирete сда сte ro Изbethа ToCHNOT moedel ha poBOTot. | |
| Праземета e пошна anlikaциja | Секогш користete ja anlikaциjsaТStO cte ja пося老人家 QR-кдот od ВODINOT 3a 6p30 3anoHyBaHbe. | |
PpO6JIeM MoXHa npUChHa PeSeHne
| Аллик资助а и робот rotубат поsprуваhevо. | Роботот ИзLERОЛ об досerot на Wi-Fi сигналot. | Почекajte робот rot за вози наразов ВОпосторот сдобар Wi-Fi сигнал. |
| Роботот ВLE�OT BO pexIM Ha спесьe. | Роботот ке ВLEЗЕ BO pexIM Ha спесьe ako He ce bpaTIN Ha STANUcaTA. ПрітіСHTЕ ГКОЧETO 3a ВКИЧУВАБЕ/ИСКИЧУВАБЕ 3 sesунді пілі поДLOТ 3a Ду GAЯ разуduITE робот OT. ПOTOA ИСРРATEGуdo CTANUcaTA п配电у anlikauzjata. | |
| ЛозикATA 3a Wi-Fi epromeheta. | Kora Ke CE smeHAT DeTALNTe 3a Wi-Fi: NOBTOHRdoJaleTo ro pOBOTOT Ha anlikauzjata. | |
| Името на Wi-Fi Мржatura e smeHETo. | Kora Ke CE smeHAT DeTALNTe 3a Wi-Fi: NOBTOHRdoJaleTo ro pOBOTOT Ha anlikauzjata. | |
| СmetкATA Na anLlKauzjata e smeHETa. | Kora Ke CE smeHAT DeTALNTe 3a smetkata, NOBTOHRdoJaleTo ro pOBOTOT Ha anlikauzjata. | |
| E-nopakata co kODOT 3a noTBrDA He 6bila do6meha. | Може за sixе hotpe6ha Do edna MnHyta 3a e-nopakata co kODOT 3a noTBrDA da npICTINrHE. | Почекajte nobeke od edna MnHyta 3a e-nopakata. |
| E-nopakata He e nCpRatena. Klinkhete Na koncheto „resend" (incpatriu nobTOHRno). | ||
| E-noштata moxe6n pristyrHala BO nankata „spam“ ilny „junk". (Исрakayot Ha e-nopakata e: HomeRun_noreply@). | ||
| Уnotpe6eha e norgesha adpeca 3a e-noSTa. | Пrobepete dani cte ja kopicstete ToChnata adpeca 3a e-noSTa. | |
| ТелфонOT плkomпунерOT Hema do6po noBp3yBaHBe Na INTEPHT 3a Ду jaПримn e-nopakata. | Осигурete ce deka TeleфонOT плkomпунерOT плkomпунERovp3yBaHBe Na INTEPHT. | |
| РоботOT He може дa ja наJa destanuata. | Стониота e npeФрлеса 3a Brame Na ChsteHbe. | Пocstabete ja Staniцata Na3aД HaICSTOTO MeCTO Kaide ShTO 6bila PpeД Da 3aNoCHNATO ChsteHeto. |
| Стониота He e NobrZaHa co eIekTrpHOTo haboJyBaHBe. | Пobr3eTe ja Staniцata co eIekTrpHOTo haboJyBaHBe. | |
| Сentorite Na robOTп/NiStaHITa ce BaIIkanH. | Исчstete Г сITE ceH3orpHа robOTи Staniцata. | |
| Зona 3a6paneta 3a оdeHe e noctabeha npe6lncky do Staniцata | Hemojte da 3auchvbyBate 30Hn 3a6panetɪs 3a odeHe npe6lncky do Staniцata. | |
PpO6JIem MoXHa npUPha PeSeHne
CobetbI NO BbIbOpy ONTImaJIbHOro MeCTa Iry yCTaHOBKn DOK-CTaHcNt:
He pa3MeaIte DOK-CTAHUIO NOJ RPKIMN COJIHEHBM NUYAMN IIN NOJ Me6eJIbIO. 3TO 3a6LOKUPye INHΦpaKpaChBn CnIHAn, KOToPbN NOMoAeT pOboTy-NbIeCOCy HaxOuNTb DOpOry ObaTHO K DOK-CTAHUIN.
- YCTaHOBNTe DOK-CTaHcNIO Ha POBHOI NOBepXHOCTN y CTehbl.
YCTaHOBNTe DOK-CTAHUHO HA TBEPDOM NOJy.
He pa3meaainTe DOK-CTAHUPO PRAOM C JecTHNCEH NIN NCTOHNKOM TENLA (6atapeen OTONNEHNA.
YCTaHOBNTe DOK-CTAHUIO B MecTe C XOPOUUM NOKpbTHeM Wi-Fi.
YCTaHOBKa DOK-CTAHUIN:
1YctaHOBnte DOK-CTaHcHIO C CO6JIIOHeHEm npabINbHOJ INCTaHcHIO.
-MojeNb XU7100-MojeNb XU7000
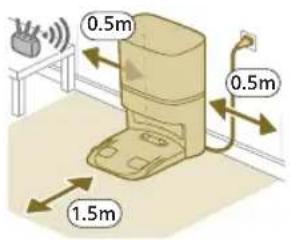

I IpnmeuHne. OcTaBte 0,5 MeTpa npoctpaHCTBa no 6okam dok-ctanuN 1,5 MeTpa nepeDOK-CTaHcnei.
2 POKJIIOUHTe DOK-CTAHUIO K NCTOUYHKY NITAHNA.
3 Y6eNTecb, yTO OCTaBwaCra YaCTb Ka6eN NHTAHN XoPoTHa 3a DOK-CTaHcneY, YTO6bI PO6OT-NbIEcOC He CMOr PPOExaTb No Hemy.
I PnmuMeaHne.ToIbKO dJa MoJeXU7100: nOmeCTHe MeoK dJa Mycopa B OTCEK Nblnc6OpHka DOK-CTAHUN.
3apraKa po6ota-nyIeocca
1 NOBepHnTe po6oT-ntbIeCoc B npaBnIbHoe nOLOXeHne H NOCTaBte erO Ha nonpepeDIOK-CTaHcnei Pe3epByap IJRA BObl OJXeH 6bITb O6paueH B npOTNBONIOXHyTO CTOPOHY OT DOK-CTaHcnn.
-MojeXU7100-MojeXU7000
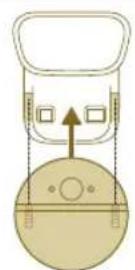
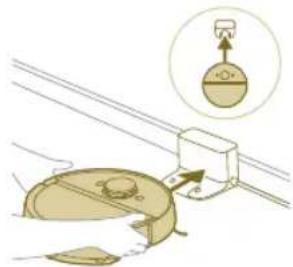
2Y6eINTEcB,HTO JOK-CTAHUINPOKJIHOHeHa K p03eTke.
3 HaKMTe n ydePknBaIte KHOJIky BKJIOUeyH/ByIKJIOUeyHn B TeueHne 3 cekyH, YTO6bI BKJIOUHTb po6OT-NbIEcOC.
4 HaxmTe KhoNky Home (Dom). Po6oT-nyIecoc nepemecntcB HyxHoe NOJoxKeHne Ha DOK-CTaHcUN.
-MojeXU7100-MojeXU7000
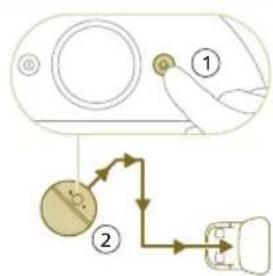
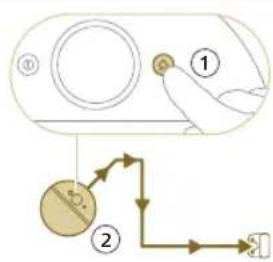
5 Poojnte, noka po6oT-nyecoc nonHocb 3apnTcra.
Ecnn akkymyIaTOp pa3pIeH,po6OT-NbIeCoc He CMOXeT camOCToTeJIbHO IepemecTITbcB H yKHOe NIOJOxHne. B 3OM cIyae BblIOJHInTe CNeIyUOuNc DeIcTBn:
1 NOBepHnTe po6oT-NbIeocB npabNbHoe noNoxKeHne n NOCTaBbTe erO HnOJI nepeD OK-CTaHcne.
2 CoBmctnte KOJIecnKc HAppaBIAOuIMHa DOK-CTaHcNn (DnMaMOeJXU7100) nn COBmctnte 3apAHHbIe KOHTaKTbIpo6oTa-NbIneCocac 3apAHHbIMNKJIeMMaMn DOK-CTaHcNn (DnMaMOeJN XU7000).
3 ToJKNHte po60-TbIeoc TAK, YTO6bI KOJIeCNI BOWJN B HApBaJIIOUne (ДЯ moJelen XU7100) nI nOCTaBbTe po60-TbIeoc TAK, YTO6bI 3apAINHbIe KOHTaKTbI COBMeCTnIInc b C 3apAINHbIM N KJIeMMaM N DOK-CTAHUN (ДЯ moJelen XU7000).
MoelbXU7100 MoelbXU7000

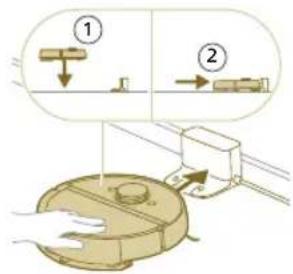
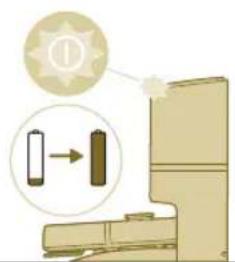
I IpimueaHne. Y6eintecb, yTo po6oT-nbilecoc haxoNTcB B npaBnblHom noloxehnn Hauan 3apjkaTbcra. NndkaTOpbHa DByx KhoNkax Ha po6oTeNbilecoce 6ydt MeJHeHNO MuraTb. Ecnn akKymJIrTOp pa3pXKeH, MoXeT npoHTn HeKOTopoe BpeMa, npexJe cem po6oT-nbilecoc coo6uNT, 4TO OH 3apjkaeTcra.
4Nooxdnte, noka po6oT-nyIecoc nonHocTB3apAITcra.
1PnmuueaHne.Y6eunTecb,yTo po6oT-nbcNecoc noJHoctbIO 3apxKeH, npexJe HmNCNoB3OBaTb erO B nepBbI pa3.
I IpimueaHne. Korda po6oT-nbilecooc 3apjxaeTc, INHdkaTopbHa nByx KhoKkax Ha po6ote-Nbilecoce 6ydyT MeJeHHO MInrTaB.
I IpnmeaHne.ToBkoIJMaMoJeXU7100:6eIbIcBeToIOHaDOK-CTaHnTakXe3arOpntc,yKa3bIBaH Ta To,HTo pO6OT-NblEcoC 3apjXaeTc.
I PnpmeaHne. TOnbKO dJa MoeJI XU7100: nocNe noNHO 3apAKn aKKymyJrTopa 6JIbI CBToJIOd Ha DoK-CTaHcN 6yJeT rOpTe HnpepbIBHO, YTO O3Haayet, YTO pO6OT-NbIeCOC HxOJNTcB B pexIme OxNiDaHn.
3arpy3ka npiloxkeHn, perncpaun n noKJIoueHne K Wi-Fi
CoepeKmOe npUloKeHna
Moxho ynpabnbpobotom-nbilecocom c nmoou npinojoxenr Philips HomeRun. Ppnojoxehne no3BOJareynpabnbpobotom-nbilecocom, a taKke npedoctabnreT nomoib ni noDpekky:
1 Bundeopoliknc cnHctpyKzmaM no nCnOJb3OBaHnIO.
2 NOnHoe pyKOBoDCTBO NOJb3OBaTeJIa.
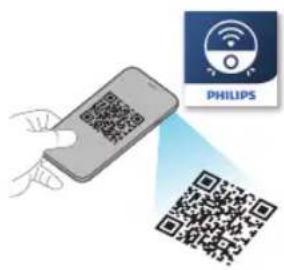
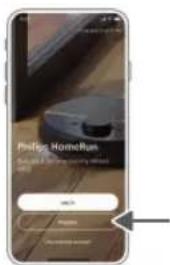
3 BonpocbnOTBeTbI.
4 06paueHnE B cHTp nOJIePxKn nOTpeBnteJei.
5 Co3dHHe KapTbI Doma.
6 BbIbOp nOmeuHn dJa y6bpKn.
7 Bb6op pa3nHbIX pexmOB y60pkn HacTpoek IaKkDoI OmeueHna.
8 IpocmTo pcoToHHy6OpKn BpeKnme peaJIbHOro BpeMeHN uHnKaun ypoBHa 3apJa aKKymyIaTopa.
9 PoiyuheHne yBeDomJhen n npdeynpeXeHn.
10 IlaHnpOBaHne y6OpKn.
11 PpOCMOTp COCTOHHN TExHnueCKoro 06CJyXnBaHN I NOnCK 3aNaChbIX qacteI.
12 IopKluoyHne po6oTa-nbIeocca K uNpOBOmy roLOOCOMy nOMouHNky, UTO6bl ynpabTb IM C NOMOuBIO rOJOCOBbIX KOMaHd.
3arpy3ka npniloxkeHna
1 OtckaHpyTe QR-KoJHa o6IoxKe daHHoro pyKOBoCTBa noJIb3OBaTeJnHa ynaKOBKe po6Ota-nbInecoca.
Vnn:
HaiDnte npiloxeHne Philips HomeRun (nra noncka 3aadte Philips HomeRun robot app) B Apple App Store nIN B OndHom n3 MaRa3nHOB npiloxeHne nIy Android.
2 CkaaHTe uYcTaHOBnTe npNJIOKeHne.
3 CneIyTe HNCTpyKUma, yKaa3aHHbIM B npNJIOKeHn.
PereCTpaunJInHOnyueTHoN3aINCS
BbMOxTe 3apeHnCTpnpoBaTb IHHHyIO yYeTHyIO 3aNNCb N BOCNoJIb3OBaTbCRA CneIyUOUMN npeMMyuEcTBaM:
- UnpabnIte po60tOM-NbIeCOCOM C HeCKoJIbKx yCTpoIcTB, HApnPmEp CO cMaprfoHa n PnaHWeTa, nn Do6aBnTe HeCKoJIbKx Nolb3OBaTeJeB CemblO.
CoxpaHnTe pe3epBhIe KOnnn BaxKbIX DaHHbIX, HapnMep INDnBnDyAhbIe PnaHbYbOpKn BaWero Doma.
PoiKJIouHTe pO6oT-NbIeCoc K yMHOJ OMaUHeN KOJOHKe.
I PnmeuHne. Ecn Bc mEnHte TeJeOHN y BaC He 6yTeYueTHo3aNcN, TO Bb NOTepReTe BCE HAcTpoEHHbI pHaHbI y6OpKn.
i Baxnha nHΦopMauny. Philips ueHNT yBaxaet KOHΦnIeHcnaIbHOCTb Baunx DaHHbIX. CbIKy Ha haWe yBeOMJeHne O KOHΦnIeHcnaIbHOCTn MOXHO HauTn B npINOKeHN nepeD perncTauneN.
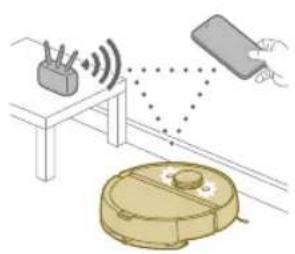
HacrpoKa coeInHeHnWi-Fi
I IpnexJe cem Haatb: ybeiTecb, YTO pOboT-nbIeocn BaWe MObIbHoe ycTpoIcTB OMEOT XopoOee NOKpbITne Wi-Fi.
1 Haxmte KhoNky Add robot (Oo6aBntb po60-tnbIeococ) B npnIOxehnn n CneDyTe HcTpyKuym.

2BbI6epnte moenpo6oTa-nbcocca.
-MojeXU7100-MojeXU7000

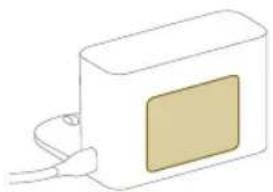
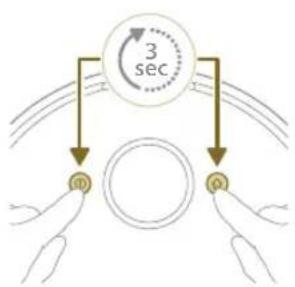
1 BbMOxTe BbIpaTb MoeJIb CBOero po60ta-NbIeCocA,OTcKaHnpOBaB QR-KoJ Ha BepXHeuactnpo60ta-NbIeCocA,HIn CaMoCTOteJbHO HauTIN HOpE moeHN HaΦnpeHHo Ta6nueKe Ha 3aHne NaHeN DoK-CTAHU.
3 YcTaHOBInTe DOK-CTaHnIO C co6JIoJeHNEm npaBnBHOJ DnCTaHnN.
4 Haxmte u ydepknaTe KONky BKNIOueHn/ByIKIOueHn n KONky Home (Oom) OndHOBpeMeHHo B TeueHne Tpex cekyH. NndkaTopbHa KONkax 6ydt Mrratb opaHkeBBIM UBeTOM, yKa3bBaJ Ha To, YTO po6OT-NbIeCoc HxodntcB pexnme HactpojKn Wi-Fi.
5 BbinoHnHe cnpjxKeHne po6oTa-nbInecocac Wi-Fi b npinoxKeHH.
6 Haxmte KhoNky npcoeHHeHna, ecn OHa BnHa B npnoKeHH, yTo6bl NOdkIouHTbcrK cTe n po6ota-ntbneCoca Philips.
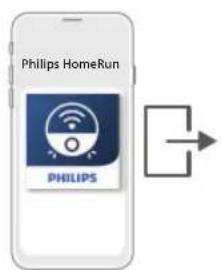
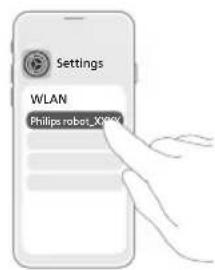

I InpmeaHne. Ecnn KhoNka npncoeHHHe OTo6paXaeTcB npIoXeHN, BbInnte n3 npIoXeHN npeenDnTe K nyHKty Wi-Fi B pa3Je Settings (HaCtpoiKn) Ha BaWe Mo6nIbHom yCTpoiCTBe. TaM Bbl MoKeTe Bb6paTb ceTb po6ota-nbIneCocca Philips n NOkJIIOHTbcR K Hei.
Ecn conpjxene no Wi-Fi He ydaIocb:
- y6eIntecb,уTO bIbpaHa npaBnIbHaMa moIeIb po6Ota-nblncocca.
- PpOBepbTe noKJIoueHne KWi-Fi.
- PpOBepbTe, npaBnIbHO JIN BBy BBeJI npoJIb Wi-Fi.
- PpOBePbTe, HaxoUntcra Jn po60-TbJIeNcO B pexKIme HaCTpoiKn Wi-Fi.
I npimueaHne.3To TaK,ecn HnDnKaTOpbHa DByx KhONkax Ha po6oTeNbJIeCOce BCE eue MmraOT opaHKeBBIM CBETOM.
I IpnmeaHne. EcnBbHe MoKeTe peuHTb npo6nemy, noceTnte Be6-caNT www.philips.com/myrobot7000 nJyNoJyUeHn NOMOUsN KOHTaKTHbIX daHHbx cJyX6bl noDnepkKn nOtpe6nteJe.
3ByKobblcNHaJIbI

Язбг rolocobix onOBeueHn po6Ota-NbIeCoca MoXHO n3MeHHTb c aHrnnckoro Ha BaI MeCHbIЯ3bIK. YTo6bl n3MeHHTbЯ3bIK, 3aRpy3nte npuioxeHne n nodklouHte po6OT-NbIeCoc K Wi-Fi, YTo6bl OH MOR 3aRpy3NTb HOBbIЯ3bIK.
-Пиложене 6удET NOДаВaTB CINHAblI HANOMHHaHnE,ecnCpo6OTOMпылесOCOM HuxHO 6удET BbINOJIHHTb KaKHe-JIbO DeIcTBn. TaKIMobpa3OM,Bbl 6удTe NOJUyA Tb NOJHy IO INHΦOpMaIIO O COCTOAHn y6OpKnBpeXmpealbHOrO BpeMeHn,Idxe ecnpo6OT-NbIeCoc 6уdET y6uPaTbcn, noka Bac HetДOMa.
HactpoIka y3bIka roJocOBbIX ONOBeUeHn
1 BbMoKeTe yCTaHOBnTB 3bIK rOIOCOBbIX ONoBEuHcpa3y nocne noKnIOUeHnpo6oTa-nbueCocKaWi-Fi.
1Y6eHntecb,HTo pO60-TbJIeOC NOKJIIOueH K npJIOKeHHIO.
2B DByx MecTax B npInIOXeHN MoXHO HaHTn NaPamTp IJIa N3MeHHeN RA3bIKA RONOCBbIX ONOBueHIN.
980 Pycckn
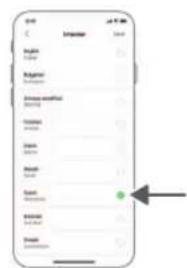
Ha Tom Xe 3KpaHe npInoxKeHn, rIe Bam npednaeraTc daTb mry po6Oty- nblncocy,
IIN Haxab Ha Tprn IINHIN B JEBOM Bepxhem yrJy, a 3aTeM Bb6paB BKlaKy Robot settings (HactpoKn po6ota-nbcocca).
3 3aTeM Bb6epnTE B 3Tom MeCTe A3bIK rOJOCOBx ONOBeHn.
Прицп п рбовп рботы рбota-пьлесoca
C03dahne KapTbI

PnHnIIOCTpoEHNA KapTbI
Po6oT-NbIeocnpoe3kaet NO KOMHaTaM, a JIa3epHaa HABnraun 6bictpo cKaHpyET NomeuEHHy, YTO6bl NoCTpOHTb KapTy TaXa.

PepaKtnpoBaHne KapTbI
B npJIOXeHN Bbl MoKeTe NcNoJIb3OBA Tb cyHKUIO peJaKTIpOBaHnKapTbI DnBa BblONHeHn CNeDyUOnx DeNCTBn:
- PendaTnObaHne KOMHaT (o6beUHeHne/pa3JeHneKOMHaT, npncBOeHne nMeH KOMHaTaM) NOBOLaET HAcTpaNBaTb peXm y6OpKn po6ota-NblIecoca IJIa KaXIOKOMHaTbI.
- YCTaHOBka 3anpeTHbIX 3OH, yTO6bI yKa3aTb, rIe po6Otu-NbIneCocy pa3peUHeo VbnpaTb, a rIe HET.
Co3dHHe KapTbI dna KaKdoRo 3TaKa BaWero DoMa (MOxHO COxpaHHTb Do 5 KapT). Korda Bbl NcNoB3yeTe np6Op, OH Co3daet HOByo KapTy B HOBOn cpeJe. Ecn y Bac eCTb KapTb, KOTOpBe Bbl qacto NcNoB3yeTe n He XOTnTe cnuyaHNO nepe3anncat bix, Bbl MoXeTe 3a6JOKnpoBaTb Do 3 KapT.
IodrotOBKa NOMeueHnK CO3daHnIO KapTbI
Ipeed nauajom co3dHnKapTb npOBepbTe cJeDyUoee:
HabeTe npaK B oIaCTn y60pKn.
IocTaBbTe Me6eBb HnDnEkauee MeTo.
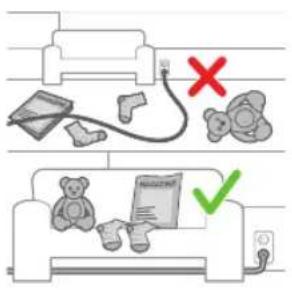
- y6epnte He3akpenIeHHbIe N MeIeN npenTCTBnI.
I npimeyaHne.3To HxHo IyToro,TO6bl npenrCTBna Ha KapTe He coXpaHnncb Habcerda.
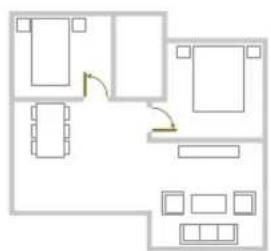
OTKpoTe BcE DBePn B Dome.

BaxnHa HOpMaun. Y6eHntecb, yTo po6oT-ntleoc He 3aCtprHET BO Bpem nCIOJIb3OBAHnI.
Co3dHaHne KapTbI
BaxnHa HOpMaun.Bo BpeM co3aHna KapTbI po6oT-nbIeoc He 6yJeT y6npaTbcra.
BaxnHa HOpmaun. Ia co3daHna KapTb 3TaKa Oyeh BaxHo pa3MeCTntb DOK-CTaHcHIO Ha 3TaKe, KOtOpb Bbl XOTNe HHeCTn Ha KapTy, NocKoJIbKy pO60t-NbIeCoc DoJnxH hXoDHTbcra Ha DOK-CTaHcN B Hauane n B KOHc cOCTabJeHnA KapTb. Ecn Bbl XOTne CO3DaTb KapTy 2-ro 3TaKa, DOK-CTaHcHIO HxHNO NOMeCTNb TyBaB npocece Co3DaHnA KapTb. Nocne 3TorO KapTy 3TorO 3TaKa MOxHO INcNoB3OBaTb, DaXe ecn DOK-CTaHcN HaxoDNTcRa Ha DpyROM 3TaKe.
I InpmeuHne.ToIbkoIra MoeJI XU7100: nocTe toro kaK po6ot-nbIeCoc 3aBepnIT COCTabHeHne KapTb, cTaHcNcA CfYHKcHcNc CamOooNCTKn HauHET onOpoxHeHne po6oTa-NbIeCocca.3To He OwN6ka,a HopMaJIbHOe NOBeDeHne.
YkaXnte po6Otu, rIe He HxKHO y6npaTb, c NOMoUbIO 3aIpeTHbIX 3OH y6OpKn
B npJIOXeHn moKHO HAcTpoNTb 3aIpeTHbIe 3OHbI, YTO6bl yKa3aTb, rIe po6Oty- nblneCoccy pa3peSeHo y6uPaTb, a rIe HeT.

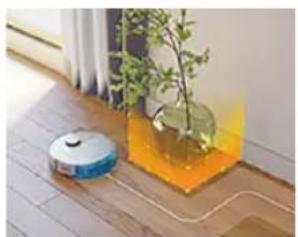
BnptyaJIbHa cTeHa n 3aIpeTHbIe 3OHbl
Co3daIe BnptyalbHbIe CTeHbI 3aIpeTHbIe 3OHbI O6laCTe, B KOTOpBle po6oT-tnIecoc He IOnJxHe 3ae3XaTb. HapPIMep, Bbl MoXKeTe Co3daTb BnptyalbHbIe CTeHbI INI 3aIpeTHbIe 3OHbI B CJIeDyIOuNX UeJAX:
3aunTa xpyknx npedmetOB. Po6oT-NbIeoc He cmoxet o6hApyKntb 6IecTnue, npO3paHbIe (HaPnMep, CTekJIaHHbIe) nII TeMHbIe npenrTCTBnI NII NOBepXHOCTN.
IpeDToBpaueHne 3aCTpeBaHnno po6Ota-tnbIeCoca BO BpeM y6OpKn.
I IpimueaHne. Po6oT-NbIeCoc MoXeT 3aCTPb Ha KOBpax C BbICOKM BOpcom, KObpax C 6axpomOn nnn ouEnb CBetnbIX KOBPnKax, HApnpMeB BAHHoN KOMHaTe. TaKxe po6oT-NbIeCoc He MoXeT O6hApxKnBaTb Ka6eNn Ha noJy.
- 3aunTa po6oTa-nbIeococa.
I PnpmeaHne. Po6oT-ntbilecoc cneJeT depXaTB noaJIbwe ot XnKocteN BnaXhIX MeCT, TaKHX KaK MnCKn IJa DOMaUHnx XNBOTbIX N NOdOHObl PaCTeHNI.
1 BaxnHa INΦopMaζη. BπpyaIbHbIe CTeHbI n 3aIpeTHbIe 3OhBi He CneIyET NcNoJIb3OBaTb IJN 3aUHTbIOT OnaCHOCTe.
BaxnHa nHΦopMaζη. BnpTyalbHbIe CTeHbI n3aPteTHbIe 3OHbI He DOnJxHbI npenTCTBOBaTb BO3BpaueHnIO po6Ota-NbIeNcoCa Ha DOK-CTaHnIO.
BaxnHa HOpMaun. He nCnoJb3yIe po6oT-nyecoc BHe nOmeuHn. OH npEHa3HaueH ToJIbKO dJa NcNoJb3OBaHn B NOMEuHn.
3oHb6e3BnaXHoY6OpKn
Co3aIte 30HbI 6e3 BnaXHO y6OpKn HTo6bI po6oT-nbIneCoc He npotnpan KObpblnn KOBpOBe IOKpbITnA.
B npuJoxeHn B pa3Je Robot settings (HaCtpoKn po6Ota-nbIecoca) MoXHO HAcTpOHTb CJIeDyUOune npaMeTpbl:
I36eRaTb 30HbI 6e3 BnaxHoH y6OpKn, KOrDa B OCTaJIbHOH YactN KOMHaTbI npoBOuNTcBnaxHnaY6OpKa.
ToIbKO IIJIeOCuTb 3OHb 6e3 BnJaxHoY6OpKn. O6paNTe BHImaHHe, YTO HAKJaIka MoKeT OCTaBaTbCra BnJxHOi.
30ha6epexhoy y6opkn
Pn Heo6xoJIMocTn po60-TbIeCoc MoKet nepemEaTbcra no Me6JI. He XOTte, yTo6bl OH nepeJe3aI uepe3 onpeJeHbIe npedMeTb? HapncyIte Ha KapTe 3OHy bepexHoYbOpKn. Po60-TbIeCoc hKaTITcRa Me6eJIb, hemHoro npINOHNMeTcA, a 3aTeM OTBepHeTcra o6paTHo.
BAXHAR INHOPMALIg. Ecn Bbl XOTte, YTObIpo6OT-NbIeCoc Mor 3ae3kaTb B dpyrHe KOMHaTbI, y6eNTecb, YTO 30Ha 6epeXhoYbOpKn He HaxoNTcra CnWkOM 6Jn3Ko KDbepn Cnoporom. UcTaHOBnte 3OHy 6epeXhoYbOpKn Ha paCCToaHnn He MeHee 1 MeTp a OT Dbepn Cnoporom.

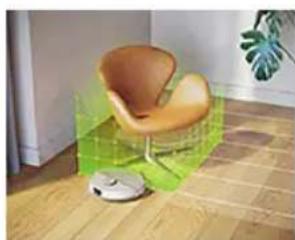
HactpanBae-ma y60pKa
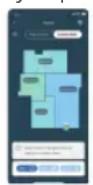
HacpanBaemyu y60ky Moxho nCnOJIb3OBaTb IJRA TORO, yTO6bl po6oT-NbIeocBbINOJIHrJy60ky B yHnKaJIbHbIX CNTyaCINJX. Bbl Moxete HacptponTb npOceDpyy 60pknpo60tOM-NbIeocOCM, ka Bam HyKHO. Moxho yCTaHOBnTB cJeDyUOJIne Tpu napameTpA.
- Komhata: po60T-Пылесoc y6epeT OndHy IJIH HeCKoJbKO KOMHaT ByKa3aHHOM BaMn nopraIke.
-3oHa:po6oT-nbIeoc y6epET 30Hy B KOMHaTe, KOtopyu Bbl ykaxKeTe.
-ToeHnA y6Opka:po60-ntbIecoc BblIOHNHT y6Opky B KBaIpaTe pa3Mepom 1,5 Ha 1,5 MeTpaB ONpeJeHHOM MecTe BaIero Doma, KOtOpoe HxKHO y6paTb.
I IpnmeuHne. PnToueHno y6opKe nOmeCTnte po6oT-nbIeCoc B ceHTp KbApaTa, KOtOpBb BBxOTnTe y6paTb.
Iocne Bb6opa OndHoro n3 BblwepepeuNCleHHbIX BapnaHTOB MOxHO Bbl6paTb peKIM y6opKn I TOUHO NaCTpOuTb napaMeTpbl y6opKn, a TAKKe DOnoJHnTeJIbHbIe napaMeTpbl.
HactpoKa npednoTeHn y6OpKn,doNoJIHnTeJbHbIX HacTpoEKNopJaKa y6OpKn
B npnloxehnn moxho Bb6paTb pTb pa3JNUHbIX pexmOB y6opKn Ira KaKdoi KOMHaTbI. 3TO cTaHdapTHbIe pexmbl, KOToPbIe MoXHO NcNoJIb3OBA Tb B 6oJIbShINCTBe CNTyaUuN. Bbl MoXTe HAcTpOnb pexm U6OpKn C nOMouBo TOHKoH NaCtpoKn PpeDNoUteHn y6OpKn I doONHInTeJbHbIX npaMaTePoB.
Pekimbl y6opkn
Pekm Onncahne
Mokpa n cyxaybopka
Po6oT-nbIeCoc OndHOBpeMeHHO nbIeCocNT mOe TnI. 3ToT peKm npedHa3HaeH nIra o6bUHO y6OpKn TBepblx HanoJIbHbIX NOKpbITn.
BAXKHAY INHΦOPMAUЯ.Дя Влжнов y6opkn ChyBCTBnTeNbHbIX TBepdIx HAnOJIbHbIX NOKpbITn, HApPIMep napKeTa, yCTaHOBNTe B npInIOxEHn Cambl Hn3Km ypOBeHb BlaJXHOCTn y6opKn.
Cyxay y6opka Po6oT-nbIeoc TOJIbKO nbIeocOIT non. 3TOT peKIM MOXHO nCNoJIb3OBaTb dny uactko,ДЯ KOTOpbIX He Tpe6yETc npOBdntb BlaJxHyO y60pky.
Tnxay6bOpka Po6oT-nyIeoc npOn3B0nIT y6Opky c MmHmAbhMypOBHeM uyma. MoHocTB BCaCbIBAHN CHXkAETc, a rOIOCOBBe ONoBEeHn OTKJIouaOTc.
984 Pycckn
Pekmby6opkn
I IpimmeaHne. He nCnoB3yTe dpyrnncnocobI dny cyuKmoUeNc HknaKn.

7 BctaBbTe npmyTO ctopoHy MOIOueNc HAKnaDN B npabnHbI na3 nepkaTeHaKNaDN.
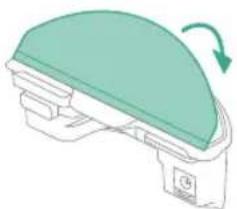
8 3akpennte moIoucyHaKnaIky Ha IInnyKe epKaTeIHaKJaIkn.
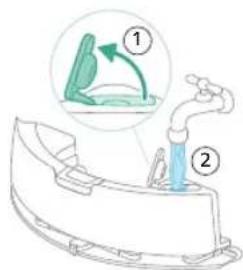
9 HanolnHte pe3epByap nla BOdbI. NcnoJIb3yIte OTBepCTne Ia 3aJIbBa BOdbI.
I PnpmeuHne. Y6eHntecb, yTO BHeHnra NOBepxHocTb pe3epByapa Inra BOdbI cyxa.
I PnpmeaHne. He nCnoJIb3yIte YnCTrae-MoIOuJe CpeDCTBa.
992 Pycckn
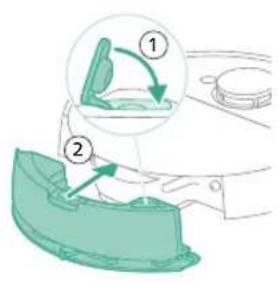
10 BcTaBbTe pe3epByap nla BOdbI b npaBnIbHoe MeTo.
Ounstka nbilec6opnka
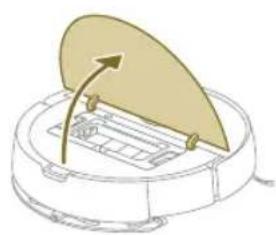
1 OTKpoTe BepxHIO KpbIiKy.
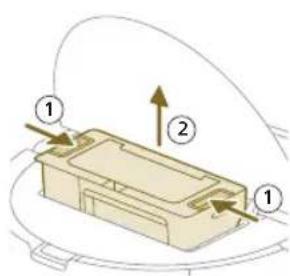
2 OndHOBpeMeHHo HaxMnte KHOKNOTcoeHNHeHnIbJIec6OpHnKa.
3 OocTaHbTe nbIeSc6OpHNK.
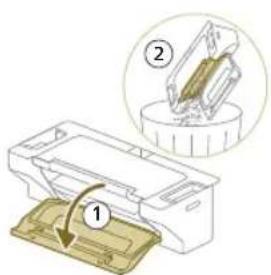
4 OtkpoTe DBepuy IaonopoxKHeHnIbIe6OpHnKa.
I IpnmeuHne. He nepenytaite DBepu dIy onopoxHeHn pyIe6OpHnKa C KpbIkwO MOUeOcA FJIbTpA. DBepu dIy onopoxHeHn Pblnc6OpHnKa cHHra.
5 BbtpxHnTe rpa3b n3 nbilec6opHka.
Ounstka n cywka nbIe6bOpHnka
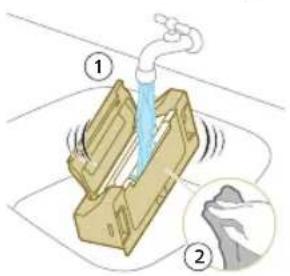
1 PpOMoIe nbJIeSc6OpHKn BOIoN.
He nCnoJIb3yIte YIcTae-MoIOUne CpeCDBa.
BAHXHAYIHΦOPMAU.JIe6OpHK HeJb3aMbITbB NOcydOMoeHou MaHHe.
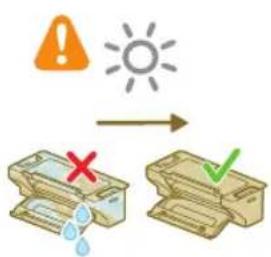
2 PocyuHTe nbIe6OpHnK Ha Bo3dyxhe.
I IpnmeaHne. He nCnoJIb3yIte npyrnE cnoc6bl dny cyuKn nbIe6OpHnka.
OuNCTKa MOUeRocnΦnIbTpTa
1 OtkpoTe KpbIshky MoIOuIeOcI qNJIbTpA.
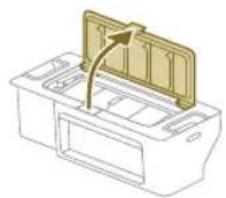
2 BbTaUHeMoIOUncra Bo3dyuHbIΦnIbTp.

3 CnoIocHTe MOUuNcA fNJIbTp BOJOn.
4 CywnTe MOUunCnHa Bo3DyXe B TeueHne 24 acob.
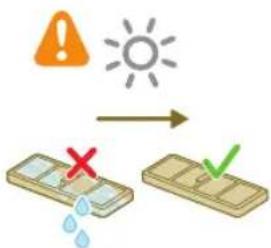
I IpnmeaHne. He nCnoB3yIe npYnE cnocobI dny cyuKmoUoerooc fnilbtpa.
994 Pycckn

5 IomeCTIte MOUuNcra fNtbp Ha 3aMOK fNtpa nbIe6OpHnka n 3aDbHbTe erO BHyTpB.
6 HaIaBnteHaMOIOUINcSaHnIbTp BHN3.

7 3akpoTe KpbIuKy MOIOeOcR fNJIbTpa.

8 OTKpoTe BepxHIOU KpbIuKy po6Ota-ntIneocca.
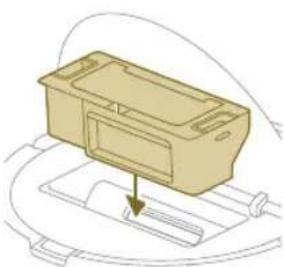
9 BctaBbTe nbIeSc6OpHKn B npaBnIbHoe MeCTo.
OuNTka OCHOBHOJ 5eTKN
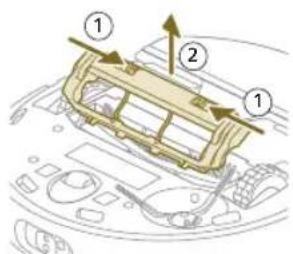
1 POnoXnTe po60T-nbIeCoc BBepx HOM Ha pOBHO n yctOuHBOI NOBepxHOCTN.
2 OndHOBpeMeHHo HaxMMte KhoNk OToeDnHeHn KpbIuKn IeTOK.
3 IOnHnMnte n CHnMnte KpbIuKy uTeK.
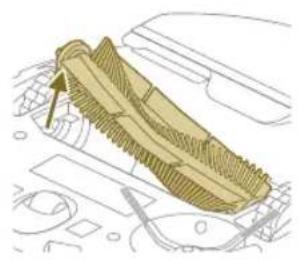
4 BbITaHnTe OCHOBHyIO UeTKy.
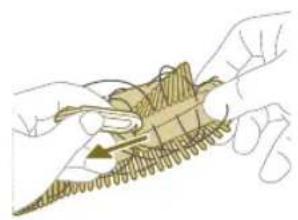
5 NcnoJb3yIte HnCTpymeHT dIa ONUCTKu 1eTKn, YTO6bl ydaJIb TB BONocbl.
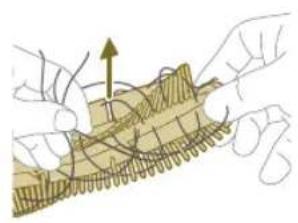
6 YdaJIte cOCHOBHOn UeTKN BOLOcbI MycOp.
Cobet. NcnoIb3yIte 5eToHbI KOHeu INHCTpyMeHTa IJRA OUNCK, YTO6bl ydaJIITb rpa3b Ha OCHOBHOI 5eTKe.
7 Ipn Heo6xOIMOCn yCTaHOBnTe KOJNaUkHa o6a KOHua OCHOBHOIeTKI. NObepHnTe KOJIpaKn No YacOBOn CTpeJIke, TTO6bl 3aΦNKCuPoBaTb INX B HxKHom INoJoxEHH.
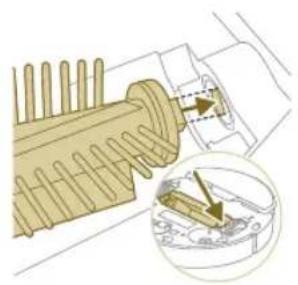
8 YcTaHOBInTe OCHOBHyIO UeTKy B npaBnIbHOM MeCTe.
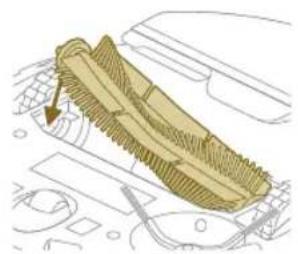
996 Pycckn
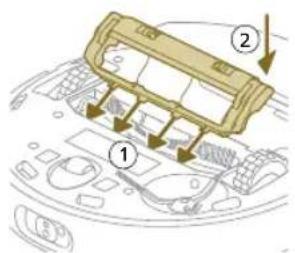
9 BcTaBbTe Kpa KpbIuKn UeTOK B npaBnHbIe Bblpe3bl.
10 BcTaBbTe KpbIiKy IeTOK.
OuNTka 6OKOBoi TeKn
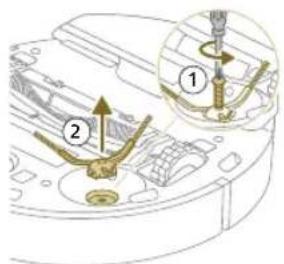
1 POnoJxte po60T-tnbIeCoc BBepx HOM Ha POBHOu yCTOuHBOH IOBepxHOCTn.
2 BbIKpyTnTE BnH T c NOMOuBo OTBeptKn.
3 CHIMITE 6OKOBYIO UeTky.
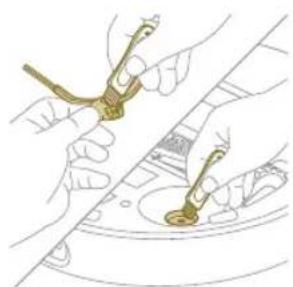
4 NcnoJb3yIte 1eKcy C mRkOu 1eTnHO (HaNPmep, 3y6Hyo 1eTKy), yTo6bl ydaJIITb nbIb nnpyx C 60KOBo 1eTKn n n3 po6Ota-nbIneCocca.
Cobet. Bby Moxete NcnoJb3ObaTb 8eToHbI KOHeU qNCTaero HHCTpyMeHTa IydaJeHn Ibln IIn Iyxa C6OKOBou 8eTKn n3 po6ota- nblncocca.
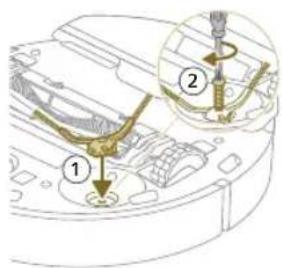
5 YcTaHOBnTe OunIeHHyIO 60KOByIO IeTKy B npaBnIbHoe MeTO.
6 3akpennte 6okobyoIeTky c nOMOuB BuHTa nOTBeptKn.
OuHCTKa OCHOBHbIX KOJIecNKOB I nepeIHeRo NOBOPOTHOKoJIeCnKa
1 IonoKnte po6oT-nbIeCoc BBepx HOM Ha pOBHO u yctOuHBOI NOBepxHOCTn.
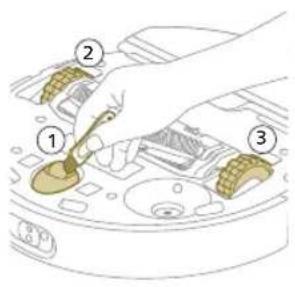
2 IcnoIb3yIte 5eTKy c MraKoN 5eTnHO (Ha npimep, 3y6HyIO 5eTKy), YTO6bl ydaJIITb IIb IIINpyx C npeDHeRo NOBOPOTHOrO KOJecNKa N OCHOBhIX KOJecNKOB.
BbIMoKTeIcNoJb3OBaTbIeToHbIKOHeUHCtRJeROINCHpymeHTaIydaJIeHnIbIINIIpyXaC KOJIecNKOB.
IJIIOJUyHeHnOHTIMaJIbHbIXpe3yJIbTaTOB y6OpKn Heo6XoJMo BpEmrOT BpEmHn IPOBOIDt bOChTky DaTcNkA, KOHTAKTOB NOKOWKa NK-CuHaJa.

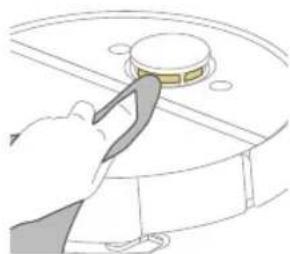
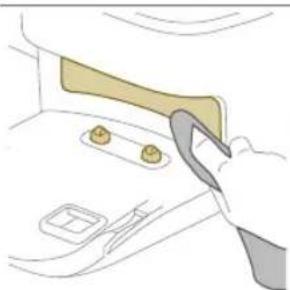
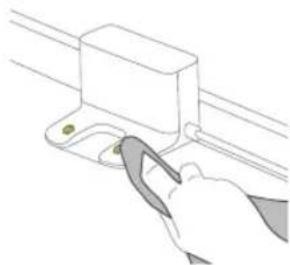
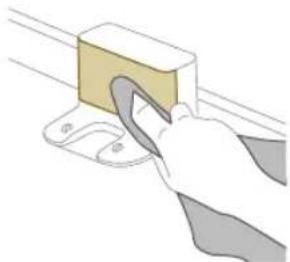
1 OTKJIIOHTe DOK-CTAHUNOOT HaCTEHON po3eTkn.
2 NcnoJb3yIe Mrgkyo Hea6pa3nBHyO cyxyIO TkaHb. Pp HEO6xoImocTn CnerKa CMOHTe TKaHb.
3 OuHCTNTe DetaJI.
I PnmuMeaHne. He nCnoB3yIe TcHCTaE-MoIOuNue CpeCDTbA.
4 BbITpnte n TaJIIN NOBepxHOCTu cyXoTkaHbIO.
I Pnmueyane. He nCnoJb3yute npyrne cnocobI dny cykni deTaeJe.
998 Pycckn
3ameHa Meushka dIy Mycopa (XU7100)
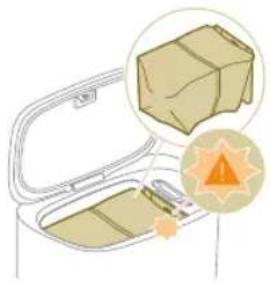
MiraHne opaHkeBOrO CBeToIIOHa Ha DOK-CTaHcNn C cyHKcNe cAmooUcTkn yKa3bIbAeT Ha To, YTO MeWOk dJa MYCopa 3aNoJIHeH.
1 OtkpoTe KpbIuKy DOK-CTAHUcN C cyHKUneN cmoOuHCTKn.
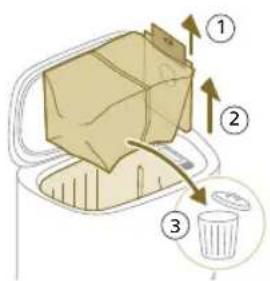
2 N3BLeKnte MeIok IJMy Mycopa n3 DOK-CTAHUN C yHKnue camooHCTKn.
3 CHIMMTEuYTNIN3NpyTe MeJOK IJNA Mycopa.
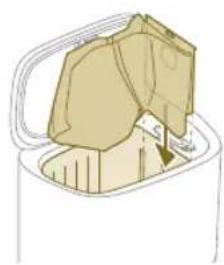
4 BctaBbTe KapToHHyU qacTh MeIka IJI MyCopa B UeJIb, 06O3HaueHHyU Ha DOK-CTAHUN C FyHKuNeJ cAMOOYnCTKn.
5 3aKpoTe KpbIuKy DOK-CTaHcMn CfYHKUne CaMOOChTKn.
iHOpMaIO O TOM, TKe I KaK 3aKa3aTb HOBbI MeuKn IJI MyCopa, CM. B pa3JeIe «3aMeHa» DaHHoro pyKOBoDCTBa.
Ydajene 3acopOB n3 BXoHoro OTBepCTnJa cMoOuNCTKN (XU7100)
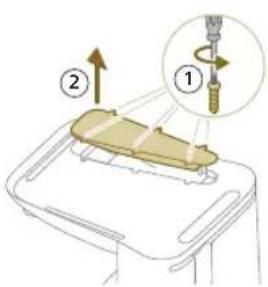
Bxodhoe OTBepCTne IJn camoouNCTKN DOK-CTAHUN C fYHKUeN cMOOuNCTKN (XU7100) MoKeT 3acopTbC. To MOxH O 3aMeNTb, KOrda Nblnc6OpHN kpo6ota-Nblncocca nepectaet npabINbHO ONOPOXHrTBcR DOK-CTAHUN e CfYHKUeN cMOOuNCTKN. Hnke ppeDCTaBHeH INHCTpyKUN NO ydaJIeHNU 3acopOB n3 BXoHOrO OTBepCTN Jn cMOOuNCTKN DOK-CTAHUN C fYHKUeN cMOOuNCTKN (XU7100).
1 OTKIIOHTe DOK-CTaHcNIO C cyHKUnei cAMOOUcNTK NTPO3eTKN NOJIOXHTe DOK-CTaHcNIO C cyHKUnei cAMOOUcNTK BBepx DNOM Ha POBHON UyTOUYBOI NOBepxHOCTN.
2 BbIKpyTnTE BNHTbI IN3 HNIXHe KpbIiKc NOMOuOTBepTKN.

3 YdaJIte BOJIOcBI IN TpR3b, 3aCTpRBUNe BO BXOJHOM OTBepCTINДЯ CAMOOUCHTEK.
Ounstka pe3epByapa IJRA BObl
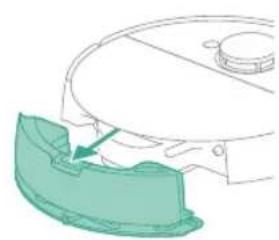
1 Haxmnte KhoNky OToCoeINHeHnpe3epByapa IIn BOIbI.
2 BbTaunTe pe3epByap nla BObni3 po6oTa-nIneocca.
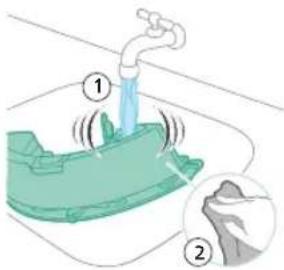
3 PpomouTe pe3epByap Ia BOdbI BOOnpoBOHHO BDOJ.
4 NpOtpnte BHeHIOI NOBepXHOCTb pe3epByapa IJIa BOIbI TKAHbIO.
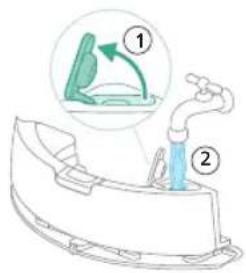
BAXHA INHOPMALI. PeepByap IJI BOdbI HeNb3a Mblb INocydomoeyHO MaUNHe.
5 OctabTe 3aIyUky pe3epByapa IJRA BOdbI OTKpbITOn I daHTe BHyTpeneHemy npocTpaHCTBy pe3epByapa IJRA BOdbI BBICOXHyTB Ha BO3dyXe.
I PnmeuHne. He nCnoJIb3yIte npyrue cnocobI dIa cyuKn peepByapa IJRA BObl.
6 HanonHnTe pe3epByap Iy BOnIb. NcnoJIb3yIte OTBepCTne Iy 3aJIbBA BoIbI.
I IpnmeaHne. Y6eDntecb, yTO BHeuHnnoBepxHoctb pe3epByapa nIBAObl cyxra.
I PnmueyHne. He nCnoB3yIne Tne CnTae-MoIOUne CpeDCTBa.
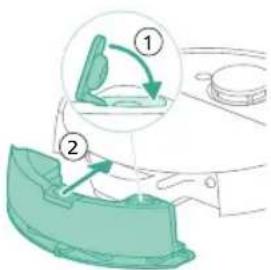
7 BcTaBbTe pe3epByap IJRA BOdbI B npaBnIbHoe MeTO.
Дительhoeхphaненe
1Полноctьюзардп Te aKKymyIЯтOP.
2XpaHnTepo6oT-nyIeoc npntempeatype Hxke 35^ n BbIwe 8^
CnHnaIbIOJIb3OBaTeJIbCKOro nHTepΦeIca nnx 3HaueHne
Homep moe nn CnHai Onncahne cnHaJa 3NaueHne cnHaJa po6ota- nblncocca
XU7100
XU7000
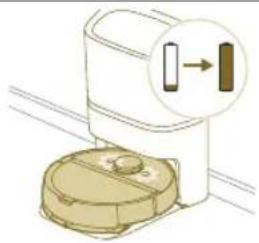
HnKatopbHaBvX KHonkx Ha po6ote- nIeocce 6ydyT MeJHeHHo MInaTb.
Pobot-ntbileoc3apxkaetc.
XU7100
XU7000
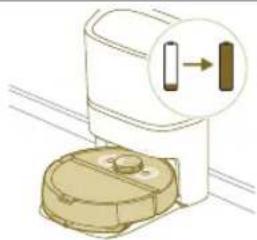
HnKAtOpbHaNbByx KhoNkax Ha po6ote- nIeCOce HenpepbIBHO CBETCA.
Po6oT-ntbIeCOC NOJIHOCTBIO 3apJxKeH.
XU7100
XU7000
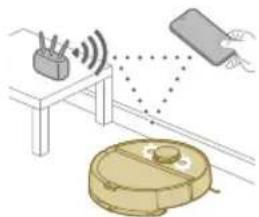
HnKAtOpbHaNbByx KhoIkax Ha pOBoTe bIeocceMraOT opaHKeBbIM CBETOM.
Po6oT-Пылесoc HaxOДNTcBpeKIMe NaCTpoiKn Wi-Fi.
Homep moeJn CnHai Onncahne cnHaJa 3HaueHne cnHaJa po6oTa- nblncocca
XU7100
XU7000
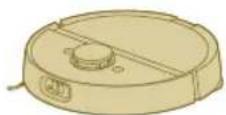
HnKaTopbpo6oTa nblncocanoracn.
Po6oT-nbIeCoc npeueB peXm cHa.
XU7100BeIbIcBETODIOHaDOK
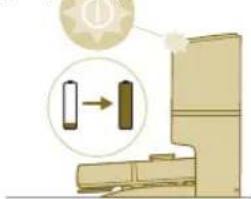
CTAHUN CΦyHKLneu camooHnCTKNMURAeT, KOrda po60t-ntbIeCoc 3apxkaetc.
Po60T-nyIeCoc 3apJxKaetc, KOrDa 6enb CBeToNDoMnraet. Po60T-Nblecoc NOnHOCTbIO 3apJxKeH, KOrDa 6enb CBeToNDoHeppepbIBHO rOpNT.
I IpimueaHne. Korga
po6oT-ntbIeCoc nOJIHOCTbIO
3apXKeH, 6eIbI CBTeOJIOI
6yEt HnpepbIBHO RopeTb.
Yepe3 10 MInHT 6eIbI
CBTeOJIOI NOTyCKHeET N
6yEt CBETNTbcra Ha 30% OT
IIONHO JPKOCTN.
XU71003eJIeHbIN CBEToIONoHaIOK
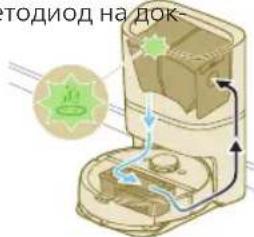
CTAHUNCfYHKUnei CAMOONCTKN MURAET.
DOK-CTAHnC cyHKnue n camooounCTKN OnpoxnHreT nbIe6opnK pOBoTaNbIeocCa. NbIb I rpr3b co6npaOTcB MeWKe dMycopa Ha DOK-CTAHnN.
XU7100 OpaHKeBbI cBeToIOHa
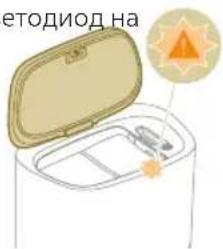
DOK-CTaHcUN CΦyHKcUeN cAMOOuNTK MfAeT.
Kpbiika6akaOTkpita.
XU7100 OpaHKeBbI cBeToIONoHa
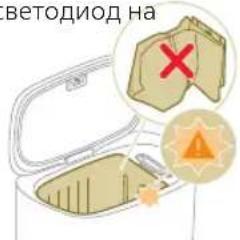
DOK-CTaHcNn CΦyHKcneN cmOoUncTK MraeT.
MeWOKIy Mycopa He yCTaHOBJIeH.