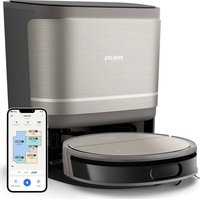
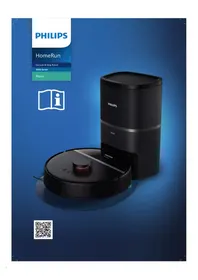
HomeRun 9000 XU9100 - Robot vacuum PHILIPS - Free user manual and instructions
Find the device manual for free HomeRun 9000 XU9100 PHILIPS in PDF.


| Product type | Robot vacuum and mop |
| Brand | Philips |
| Model | HomeRun 9000 XU9100 |
| Dimensions (L x W x H) | 34 x 34 x 9.5 cm |
| Weight | 4.2 kg |
| Power supply | Mains (station) and rechargeable lithium-ion battery |
| Navigation type | LiDAR laser (D-ToF) with anti-drop and anti-wall detection |
| Cleaning functions | Vacuuming, mopping, simultaneous vacuuming and mopping, vacuum then mop |
| Cleaning modes | Normal, Room, Zone; Silent, Intensive |
| Adjustable settings | Suction power (Low, Normal, High, Max), Water level (Minimum, Low, Medium, High), Passes (1 or more passes) |
| Mapping | Map creation and editing, up to 5 maps, no-go zones, virtual walls, dry zones, no-vacuum zones |
| Connectivity | Wi-Fi 2.4 GHz and 5 GHz |
| Mobile app | Philips HomeRun Robot (iOS and Android) with tutorials, scheduling, notifications |
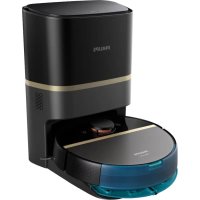
| Docking station | All-in-One: charging, automatic dust bin emptying, clean and dirty water tanks |
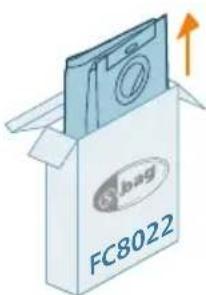
| Dust bag capacity (station) | Not specified (disposable bag FC8022) |
| Maintenance | Monthly cleaning of roller brush, filter, brushes, sensors; emptying dirty water tank |
| Spare parts | Roller brush XV1491, Maintenance kit XV1492, Floor cleaner XV1493, Dust bags FC8022 |
| Warranty | 2 years (Versuni) |
| Operating temperature | 8 °C to 35 °C |
| Sound signals | Voice alerts (language adjustable in app) and light signals |
Frequently Asked Questions - HomeRun 9000 XU9100 PHILIPS
User questions about HomeRun 9000 XU9100 PHILIPS
0 question about this device. Answer the ones you know or ask your own.
Ask a new question about this device
Download the instructions for your Robot vacuum in PDF format for free! Find your manual HomeRun 9000 XU9100 - PHILIPS and take your electronic device back in hand. On this page are published all the documents necessary for the use of your device. HomeRun 9000 XU9100 by PHILIPS.
USER MANUAL HomeRun 9000 XU9100 PHILIPS
![graph TD A["home.id/welcome"] --> B["QR code"] B --> C["Registration and Benefits"] B --> D["Download app"] B --> E["Quick start"] B --> F["Digital manual"]](/content/2026/04/715643/images/d345df74d18bf49e422abc27d04a6e2d0cd72670d80b2819095d4dc15eeb8b14.jpg)
English 4
Bahasa Indonesia 45
Bahasa Melayu 87
Čeština 129
Dansk 170
Deutsch 211
Eesti 254
Español 294
Français 336
Hrvatski 379
Italiano 420
Latviešu 463
Lietuviškai 504
Magyar 546
Nederlands 588
Norsk 630
Polski 670
Português 713
Română 754
Shqip 795
Slovenščina 838
Slovensky 879
Srpski 920
Suomi 961
Svenska 1002
Tiếng Việt 1043
Türkçe 1084
Ελληνικά 1125
Български 1170
Македонски 1215
Русский 1258
Українська 1303
Қазақша 1346
ภาษาไทย 1388
简体中文 1434
繁體中文 1477
العربية 1516
1556 فارسی
Contents
Introduction 4
Product overview 5
Before first use 5
Preparing for use 6
Charging the robot 6
Download the app, register, and connect to Wi-Fi 7
Audible signals 9
Set the language of the voice alerts 9
How your robot works 10
Create a map 10
Tell your robot where not to clean by adding zones 11
How your robot cleans ____ 11
Set cleaning mode, adjust settings and cleaning order 12
Using your robot 13
Preparing for a cleaning run 13
Start your first cleaning session via the app 16
Using the robot without the app 16
Your robot's cleaning pattern ____ 17
Returning to the station 17
Auto recharge and resume 17
Cleaning and maintenance 17
When to do maintenance 17
Cleaning the rolling mop and water tank in the robot 18
Cleaning the washable filter and dust bin 20
Cleaning the water tanks in the station 23
Cleaning the main brush 26
Cleaning the side brush 28
Cleaning the main wheels and the front caster wheel 29
Cleaning the sensors, contact points and IR signal window 30
Replacing the dust bag 31
Long term storage 32
Indicator light signals and their meaning 32
Reset/restore the robot 34
Replacement 34
Ordering accessories 34
Removing the rechargeable battery 35
Warranty and support 37
Disposal and recycling 38
Troubleshooting 38
Introduction
Congratulations on your purchase of a Philips HomeRun 9000 Series Robot vacuum cleaner! To get the most out of your robot and access all the advanced functions you can download and install the Philips HomeRun robot app. You can
also find support videos and frequently asked questions in the app or visit home.id.
Read the separate safety booklet carefully before you use the robot for the first time and save it for future reference.
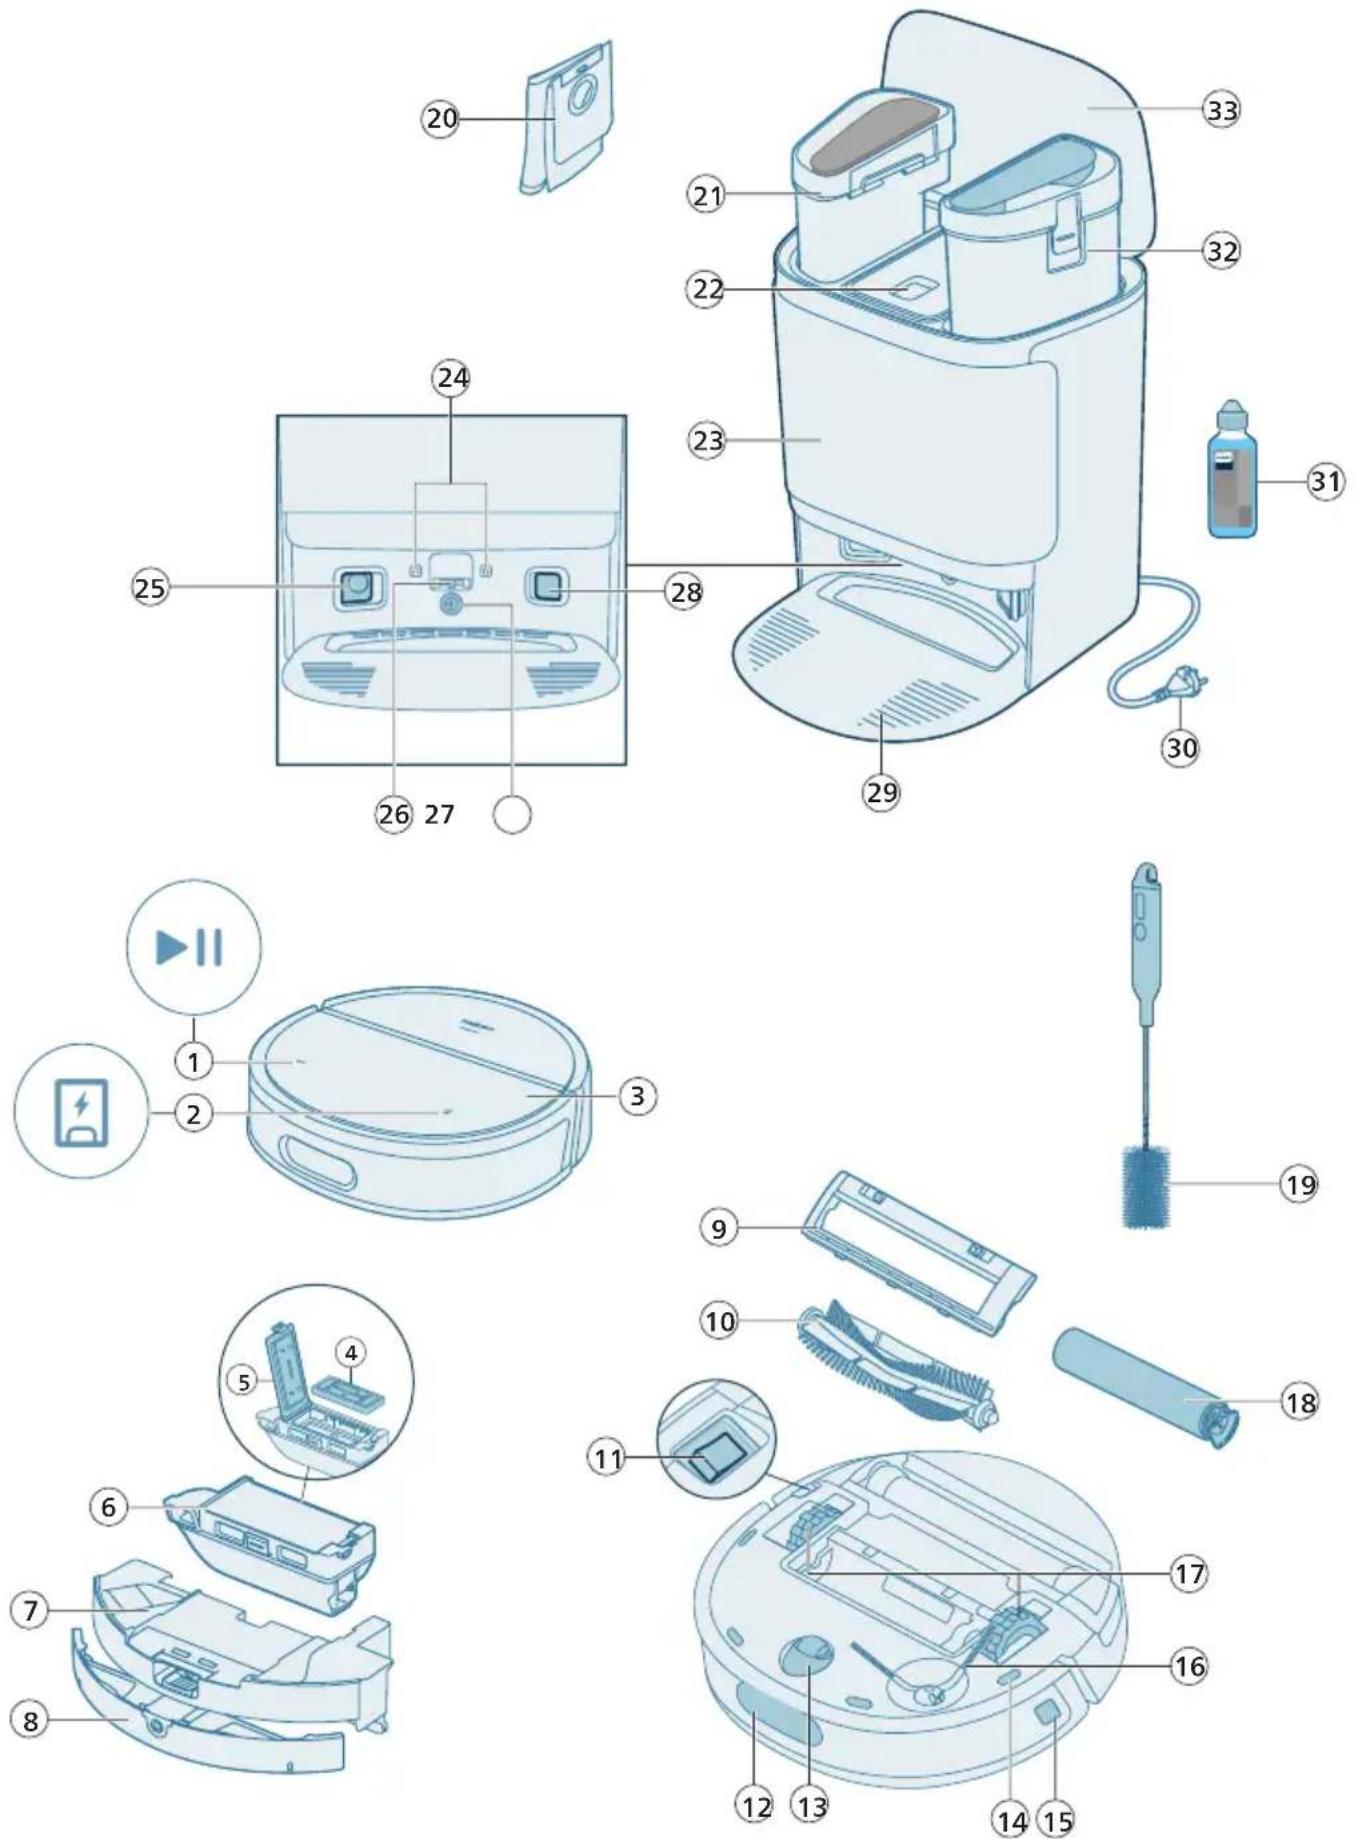
Product overview
1 Start/stop button
2 Return button
3 Top cover
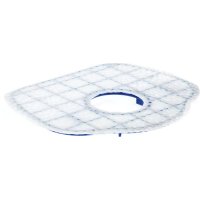
4 Washable filter
5 Dust bin lid
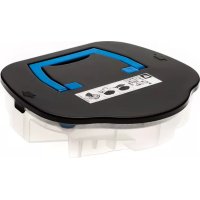
6 Dust bin
7 Cleaning module
8 Dirty water tank (robot)
9 Brush cover
10 Main brush
11 On/off switch
12 Sensor to avoid cliff and wall
13 Front caster wheel
14 Anti-drop sensor (4x)
15 Side sensor
16 Side brush
17 Main wheels
18 Rolling mop
19 Brush cleaning tool
20 Dust bag (2x)
21 Dirty water tank (station)
22 Dust bag compartment
23 All-in-One station
24 Charging contact points
25 Air inlet
26 Clean water inlet
27 Dirty water inlet
28 Air outlets
29 Tray
30 Power cord
31 Philips floor cleaner XV1493
32 Clean water tank (station)
33 Station lid
Before first use
1 Take the appliance out of the box and remove all packaging.
2 Remove the protection covers.
3 If you see any sign of visible damage, go to home.id or contact the Consumer Care Center in your country.
i Note: A small amount of clean water residue may be present inside the nozzle and tanks. This is a result of factory quality checks. Rest assured, the device is thoroughly clean and safe for use.
Preparing for use
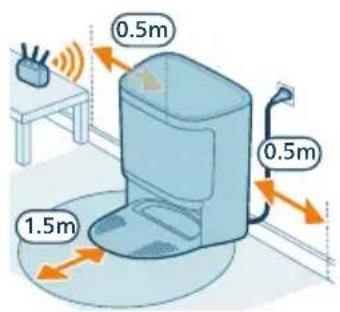
Tips for choosing the best location for installing the station:
- Do not place the station in bright sunlight or under furniture. This will block the infrared signal that helps the robot find its way back to the station.
- Install the station on a level surface against a wall.
- Install the station on a hard floor.
- Do not place the station near stairs or a heat source (radiator).
- Install in a location with good Wi-Fi coverage.
Install the station
1 Install the station within the correct dimensions for placement.
i Note: Keep 0.5 meters of space on the sides of the station and 1.5 meters in front of the station.
2 Connect the station to the power supply.
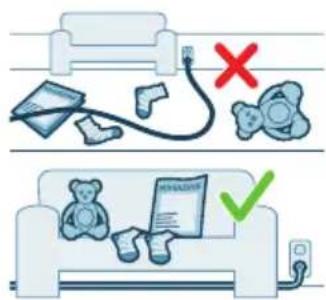
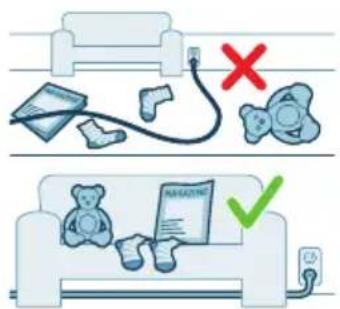
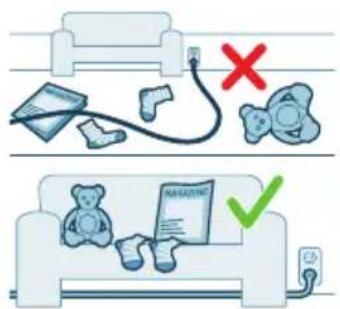
3 Make sure that the remaining part of the power cable is well concealed behind the station so that the robot cannot drive over it.
4 Install the tray on the station. Align the tray towards the front of station and press firmly down until you hear a "click" sound.
i Note: In order to remove the tray for maintenance, simply grip the sides of the tray and lift up till it pops out.
5 Place the dust bag in the dust bag compartment of the station and fill the station's clean water tank.
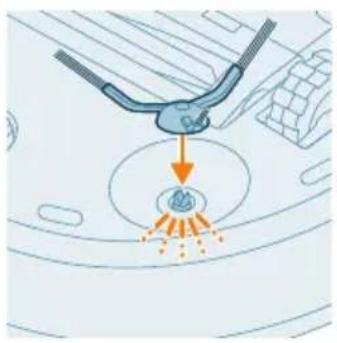
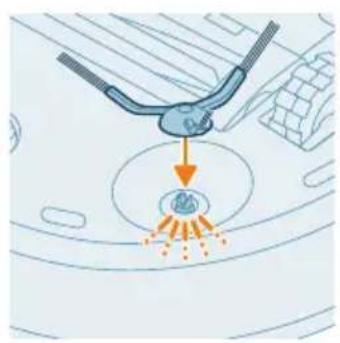
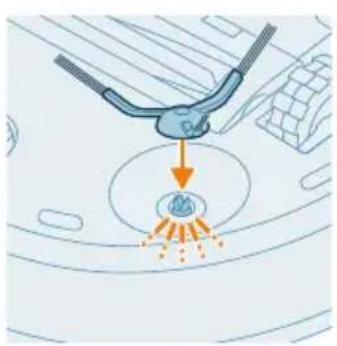
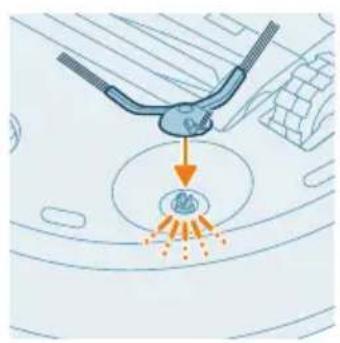
Install the side brush
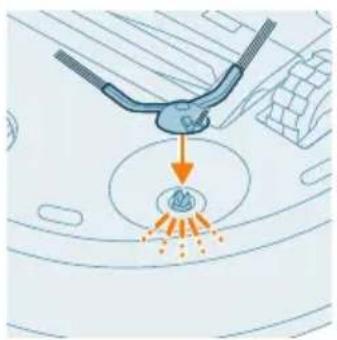
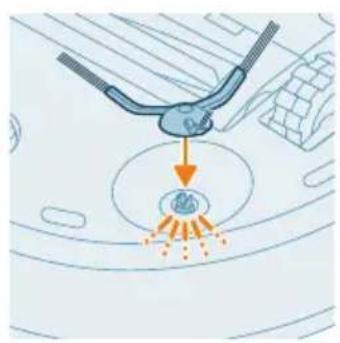
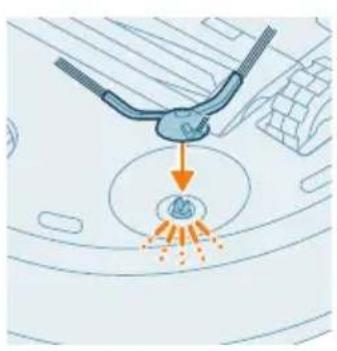
Attach the side brush by clicking it into the correct position on the bottom of the robot.
Charging the robot
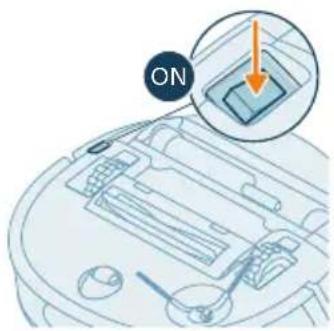
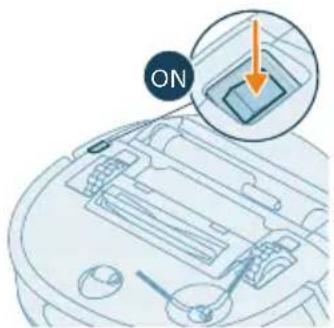
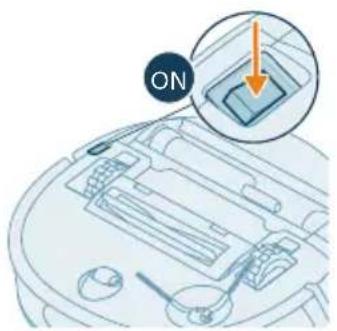
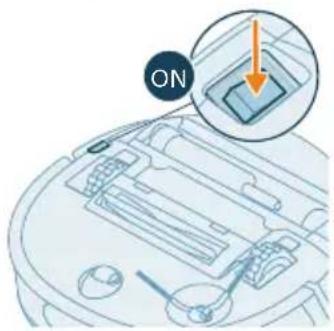
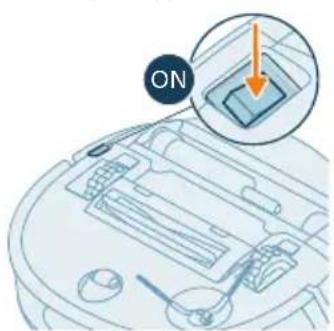
1 Press the on/off switch on the bottom of the robot to switch on the robot.
2 Turn the robot to its correct position and put the robot on the floor in front of the station.
3 Make sure that the station is connected to the power supply.
![graph TD A["①"] --> B["②"] B --> C["②"] style A fill:#f9f,stroke:#333 style B fill:#bbf,stroke:#333 style C fill:#dfd,stroke:#333](/content/2026/04/715643/images/6950f3c29ed840d32b4bef5e716e5279eba5c7aae443a95c3fc6b7436e64ecdb.jpg)
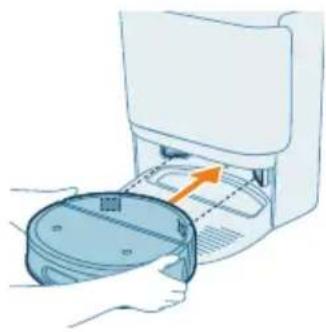
4 Press the return button. The robot drives to the correct position in the station. 5 Wait until the robot is fully charged.
If the battery is empty, the robot will not drive itself to the correct position. In this case, follow the next steps:
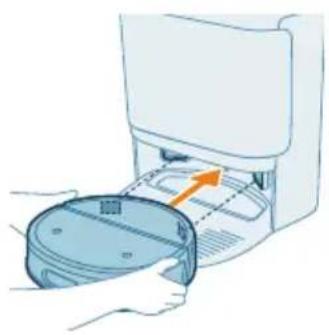
1 Turn the robot to its correct position and put the robot on the floor in front of the station. The water tank should be facing the station.
2 Align the charging contact points on the water tank of the robot with the charging contact points on the station.
3 Push the robot against the station so that the charging contacts of the robot make contact with the charging contacts of the station.
i Note: Make sure that the robot is in its correct position and starts to charge. If the battery is empty, it may take a while before the robot indicates that it is charging.
4 Wait until the robot is fully charged.
i Note: Make sure the robot is fully charged before you use it for the first time.
i Note: A white LED on the robot will flash slowly when the robot has started charging.
Download the app, register, and connect to Wi-Fi
App content
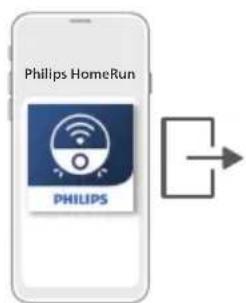
You can operate the robot with the Philips HomeRun robot app. The app allows you to manage your robot and offers help and support:
1 How-to-use videos.
2 Full user manual.
3 FAQs.
4 Contact Consumer Care.
5 Create a map of your home.
6 Select which rooms to clean.
7 Choose between different cleaning modes and settings for each room.
8 View the status of the cleaning session in real time and see the battery level.
9 Receive notifications and alerts.
10 Schedule a cleaning session.
11 See the maintenance status and find replacement parts.
Downloading the app
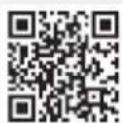
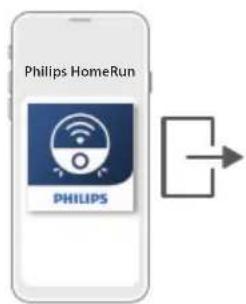
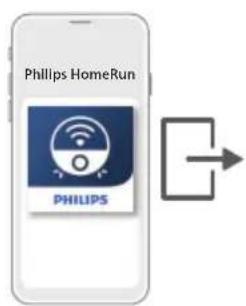
1 Scan the QR code on the left or on the packaging of the robot to download the Philips HomeRun robot app.
Or:
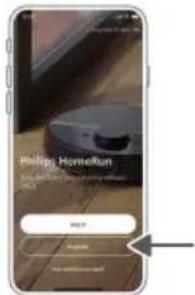
Search for 'Philips HomeRun robot app' in the Apple App Store or one of the Android App Stores.
2 Download and install the app.
3 Follow the instructions in the app.

Registering a personal account
You can register a personal account and benefit from the following advantages:
- Control the robot from more than one device, e.g. a smart phone and tablet.
- Save important data like customized cleaning plans for your home.
i Note: If you change your phone and you don't have an account, then you'll lose all customized cleaning plans.
i Important: Philips values and respects your privacy. A link to our privacy notice can be found in the app before registering.
Setting up the Wi-Fi connection
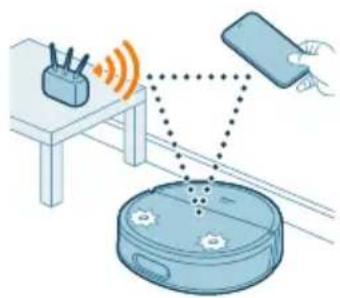
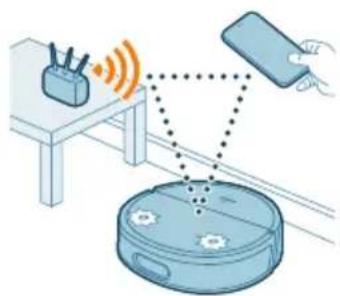
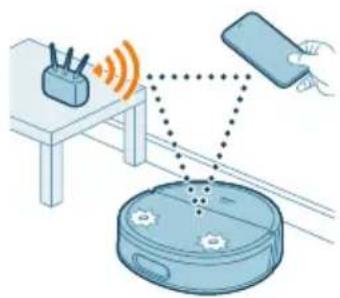
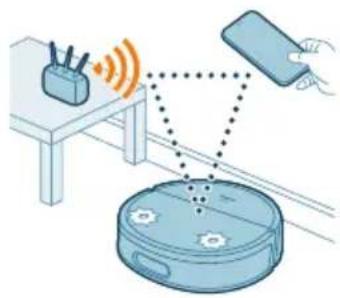
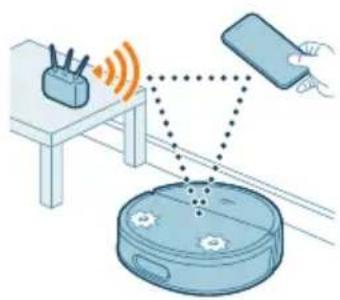
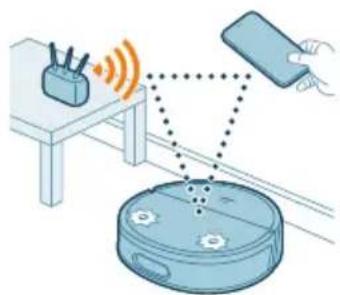
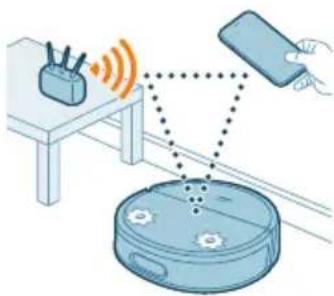
Before you begin: make sure that the robot and your mobile device have good Wi-Fi coverage, and that your mobile device is connected to the Wi-Fi network that you would like the robot to be connected to.
1 Press the 'Add robot' button in the app and follow the instructions.
2 Pair the robot with the Wi-Fi in the app. Make sure that you have your Wi-Fi password at hand.
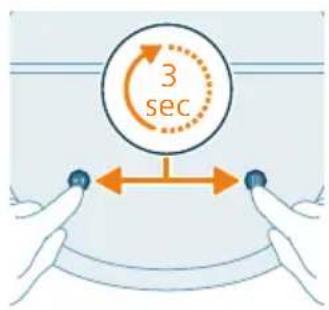
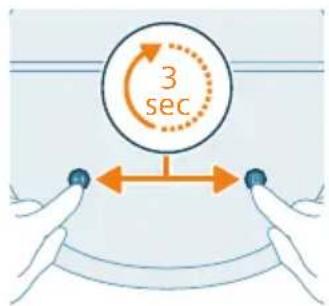
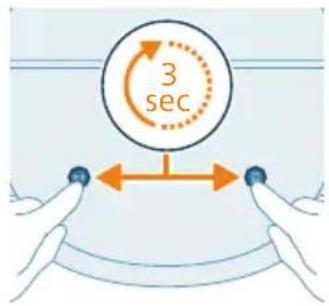
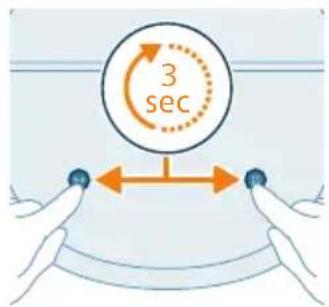
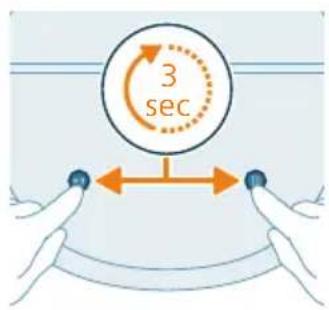
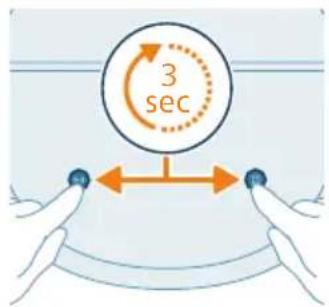
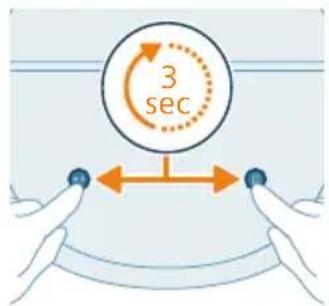
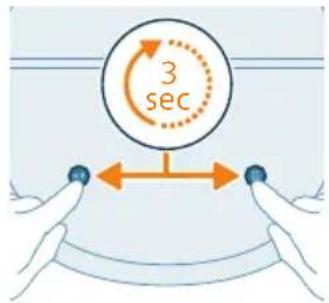
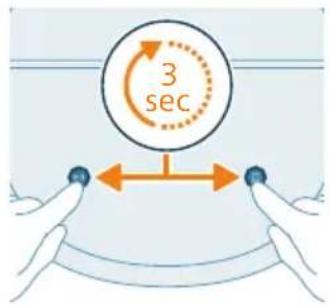
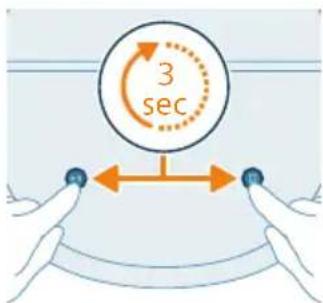
3 Press and hold the start/stop button and return button at the same time for three seconds. The light on the robot will flash white to indicate that the robot is in Wi-Fi set-up mode.
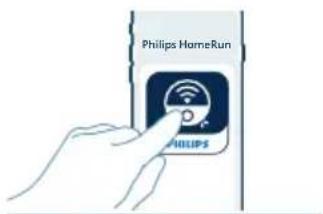
4 Tap on the join button if it's visible in the app to connect with the 'Philips robot' network.
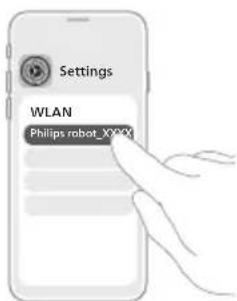
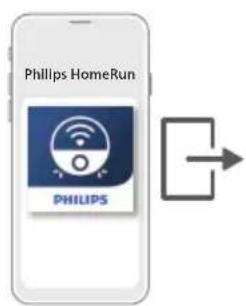
i Note: If the join button is not visible in the app, leave the app and go to Wi-Fi under 'Settings' on your mobile device. There you can select the 'Philips robot' network and connect to it. After connecting to 'Philips robot', manually go back to the HomeRun robot app to continue the Wi-Fi connection.
i Note: Your robot can connect to both 2.4GHz and 5GHz frequency Wi-Fi bands.
If the Wi-Fi pairing fails:
- Quit the HomeRun app.
- Check your mobile Wi-Fi connection.
- Check if you selected the correct model.
- Check if you entered the correct Wi-Fi password.
- Check if the robot is still in Wi-Fi set-up mode.
i Note: You can recognize that the Wi-Fi pairing fails if the light on the robot flashes amber.
i Note: If you are unable to solve the problem, visit home.id for support information and the contact details of Consumer Care.
Audible signals

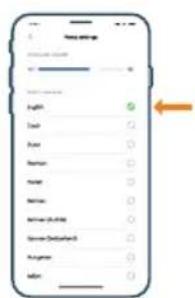
- The voice alert language of the robot can be changed from English to your local language. To change the language, download the app and connect the robot with the Wi-Fi, so that it can download the new language.
- The app will give alerts and reminders if the robot needs attention. This way you'll be fully informed on the real-time status even if the robot cleans while you're away.
Set the language of the voice alerts
i You can set the language of the voice alerts immediately after you have connected the robot to Wi-Fi.
1 Make sure that the robot is connected with the app.
2 In two places in the app you can find the option to change the language of the voice alert.
- On the same app screen where you are asked to name the robot.
- Or by pressing the setting icon at the top right corner and then choosing the "Voice settings" tab.
3 Then choose the language of the voice alert there.
How your robot works
Create a map
![graph TD A["Room 1"] --> B["Room 2"] B --> C["Room 3"] C --> D["Room 4"] D --> E["Room 5"] E --> F["Room 6"] F --> G["Room 7"] G --> H["Room 8"] H --> I["Room 9"] I --> J["Room 10"] style A fill:#cce5ff,stroke:#333 style B fill:#cce5ff,stroke:#333 style C fill:#cce5ff,stroke:#333 style D fill:#cce5f…](/content/2026/04/715643/images/7612281ccc7f3c5f6b613e450b93119061c43db92e4f1ae30786f3862490705e.jpg)
How mapping works
The robot drives through the rooms and the laser navigation quickly scans the rooms to build a map of the floor.
Map Editor
In the app, you can use Map Editor to:
- Edit rooms (merge/divide rooms, name rooms) so you can customize the cleaning routine of the robot per room.
- Add zones to specify where the robot can and cannot clean.
- Create a map for each floor of your home and store up to 5 maps. If something changes in the environment, your robot will automatically re-map in the next cleaning session.
Preparing the room for mapping
Before you start mapping, make sure to:
- Tidy up the area.
- Put furniture in the proper place.
- Put away loose and small objects.
i Note: If the robot gets stuck on an object, it will either stop mapping or go to sleep.
- Open all in-house doors and close doors to the outside.
i Important: Make sure the robot cannot get blocked during use.
Create and edit a map
i Important: During mapping your robot will not clean.
i Important: When the robot is done mapping, it will find its way back to the station on its own.
1 To create a map, either tap on "Create map" in the home screen directly after pairing the robot with the app or when no map has previously been created. Or tap on the setting icon in the top right corner, select "My maps", and select the "+" icon in the top right corner. Then follow the instructions in the app.
2 To edit your map, either tap on the map icon in the home screen or the setting icon in the top right corner, select "My maps", and select "Edit map" for the map that you would like to edit.
Tell your robot where not to clean by adding zones
Add zones where you want your robot to avoid by going to Map Editor in the app. It's a small icon on the bottom right-hand side of your map.
Virtual wall and No-Go zone
Virtual walls () seal off a room that leads to an area you do not want the robot to go. No-Go zones () section off an area within a room for the robot to avoid.
You can use Virtual walls and No-Go zones to:
- Protect fragile objects. The robot is only able to detect objects that are at least 2 cm in height, with a length and width greater than 2.5 cm.
- Prevent the robot from getting stuck while cleaning.
i Note: The robot can get stuck on high pile carpets, carpets with fringes or very light rugs like in the bathroom. Also the robot cannot detect cables on the floor.
- Protect the robot.
i Note: Do not use the robot in places where it could become covered, partially or completely, in water.
i Important: virtual walls and No-Go zones should not be used to protect against hazards.
i Important: virtual walls and No-Go zones should not prevent the robot from returning to the station.
No-Mop zone
Create No-Mop zones ( ) to prevent the robot from mopping carpets or rugs.
i Note: The robot will avoid the No-Mop zones when the robot is in 'Vac and Mop', 'Vac then mop', and 'Mop' modes.
No-Vac zone
Create No-Vac zones () to prevent the robot from areas you do not want to vacuum.
i Note: The robot will avoid the No-Vac zones when the robot is in 'Vac and Mop', 'Vac then mop', and 'Vacuum' modes.
How your robot cleans
In the app, the following can be selected:
Area Description
Regular Use this for your normal, daily cleaning of your whole floor.
If the environment is not recognized, the robot maps the environment and cleans according to the last set mode. After the cleaning is completed, the robot returns to the station.
Area Description
| Room Use it to clean one or several rooms, rather than the whole floor. |
| Zone Use it to clean part of one or multiple rooms, rather than the whole floor. |
After selecting one of the above options, you can select a cleaning mode and fine-tune your cleaning preferences and advanced settings.
Set cleaning mode, adjust settings and cleaning order
In the app, you can select six different cleaning modes for each room. These are standard modes that can be used in most situations. You can customize your cleaning mode by fine-tuning cleaning preferences and advanced settings.
Cleaning modes
Mode Description
| Vac & Mop Vacuum and mop in one go. Ideal for regular cleaning of floors. |
| IMPORTANT: For mopping sensitive hard floors, such as parquet floors, set the water level in the app to the lowest level. |
| Vac then mop Vacuum first and then mop. |
| Vacuum Vacuum only. Ideal for areas that shouldn't be mopped. |
| Mop Mop only. Ideal for hard floors that need a light clean. |
| Quiet Suction power will be lowered to minimize noise, and robot sounds will be muted. |
| Intensive Vacuum and mop in one go. Ideal for thorough cleaning of small areas.Note that it is not recommended to clean large areas in this mode. The robot passes the area 5 times, so the cleaning time and battery usage will increase significantly. |
i Note: The rolling mop will lift automatically when the robot senses a carpet/rug, when it is not in mop mode, or when it is returning to the all-in-one station.
i Note:The main brush will lift automatically when the robot is in mop-only mode or when it is returning to the all-in-one station.
Mode settings
For each cleaning mode, you can fine-tune the following mode settings:
Setting Description
Suction power Change the suction power:
- Low : Uses less energy and makes less noise.
- Normal : a regular, effective clean that uses moderate energy.
- High : good for cleaning larger areas and more energy efficient than Max.
- Max : good for removing pet hair and tougher particles lodged in carpets.
i Note: You can only use Max for 10 minutes at a time to prevent overheating. After 10 minutes, the robot will automatically switch to High.
Mop Wetness Determine the flow rate that is pumped from the electric water tank onto the mop:
IMPORTANT: Do not add hot water to the water tank.
- Minimum: uses minimal water to protect sensitive floors.
- Low: uses less water. Good for floors with minimal dirt.
- Medium: removes superficial dirt.
- High: removes tougher marks, like footprints, for a spotless finish.
Repetition Tell your robot how many passes you'd like it to make:
One pass is enough for a regular clean. Consider multiple passes if you need to remove stubborn areas of dirt.
Multiple passes increase the overall cleaning time.
Cleaning order
You can set your own cleaning order in the app by tapping on the setting icon in the top right corner and selecting "Cleaning order".
Using your robot
Preparing for a cleaning run
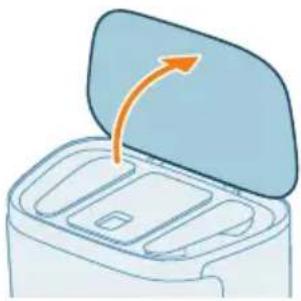
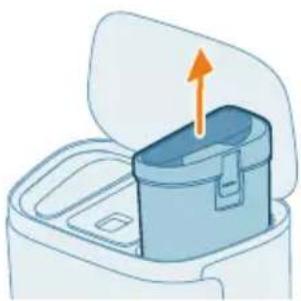
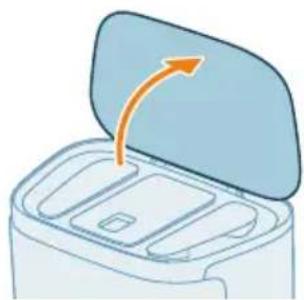
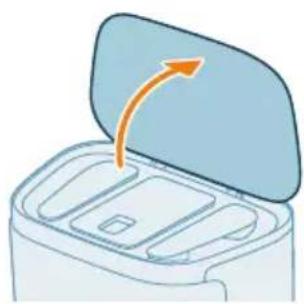
1 Open the lid of the station.
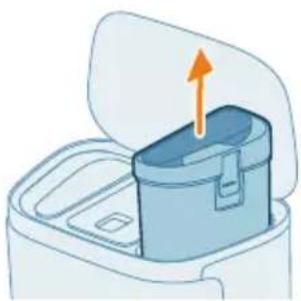
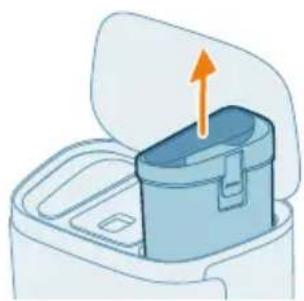
2 Take out the clean water tank.
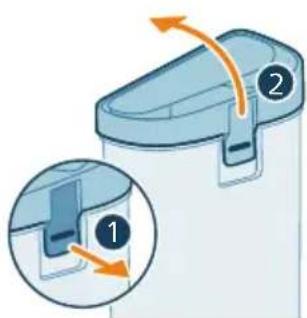
3 Open the clean water tank lid.
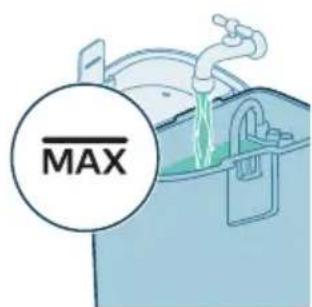
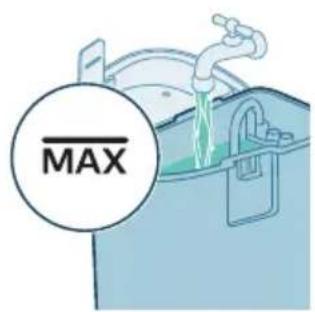
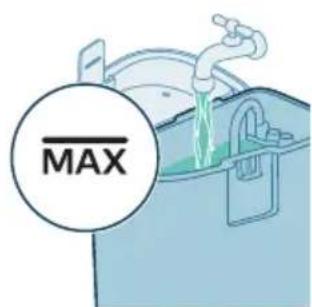
4 Add water to the clean water tank. Do not exceed the MAX water level indication.
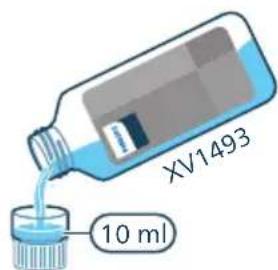
5 Optional: add 10 ml of Philips floor cleaner XV1493 in the clean water tank.
i Note: only use the supplied Philips floor cleaner XV1493, which is specially developed for our devices to ensure optimal performance and to elongate its lifetime.
i Note: using alternative cleaning detergents may compromise and potentially damage the machine's interior components.
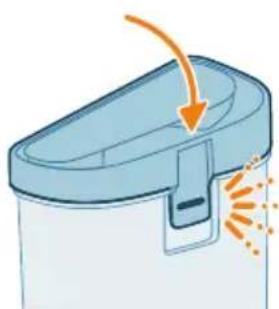
6 Close the clean water tank lid.
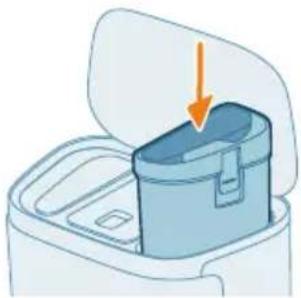
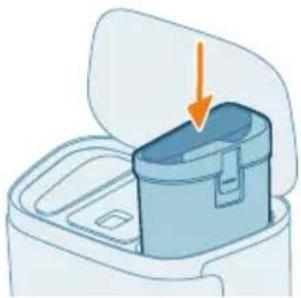
7 Put the clean water tank back to the station.
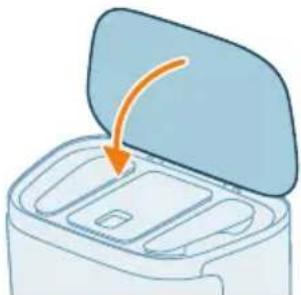
8 Close the lid of the station.
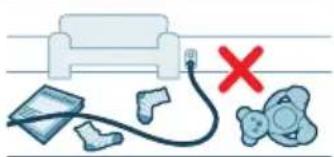
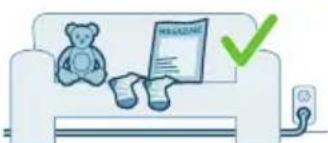
9 Remove all cables, wires and cords from the floor to prevent the robot from getting entangled in them.
![graph TD A["Room 1"] --> B["Room 2"] B --> C["Room 3"] C --> D["Room 4"] D --> E["Room 5"] E --> F["Room 6"] F --> G["Room 7"] G --> H["Room 8"] H --> I["Room 9"] I --> J["Room 10"] style A fill:#cce5ff,stroke:#333 style B fill:#cce5ff,stroke:#333 style C fill:#cce5ff,stroke:#333 style D fill:#cce5f…](/content/2026/04/715643/images/80ea19d3f389f5ae9fe181ad92a3ebf7e63226eb4686a3f2f2b00825552df121.jpg)
10 Open all in-house doors.
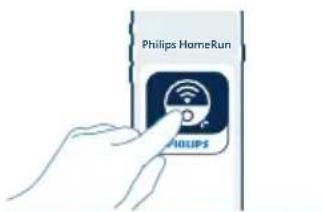
11 Start a cleaning session from the app or press the start/stop button on the robot.

Start your first cleaning session via the app
Start
1 Open the app.
2 Select the cleaning area: 'Regular', 'Room', or 'Zone'.
3 Press the 'start' icon.
i Note: make sure that the on/off switch on the bottom of the robot is set to the "on" position ("I").
i Note: If the battery level is too low, cleaning cannot start. Wait until the robot is sufficiently charged before you start a cleaning session.
Stop
1 Press the Pause icon in the app. The robot stops.
2 Press the Start icon again. The robot continues.
3 Press the Return icon. The robot goes back to the station.
Using the robot without the app
i Note: For an optimal experience, we recommend using the app.
Without the app, you can use the two buttons on the robot to operate it:
- Start/stop button
- Long press (3s) to turn the robot on and off.
- Short press to start cleaning or to pause cleaning. Press again to resume cleaning.
i Note: When you start a cleaning task by pressing the start/stop button on the robot, the robot runs in the 'Vac & Mop' mode by default.
- Return button
- Short press (when the robot is not cleaning): the robot will find the station and charge.
- Short press while cleaning: the robot will stop cleaning. Short press again: the robot returns to the station to charge.
- Short press when the robot is driving back to the station: the robot will pause returning to the station. Press again to let it drive back to the station.
i Note: To deactivate the robot's Wi-Fi function, press the bumper on the front side of the robot and the start/stop button on the robot for 10 seconds. You can still use basic functions without Wi-Fi, but for full access to all features, we highly recommend pairing the robot with Wi-Fi.
Your robot's cleaning pattern
![graph TD A["①"] --> B["②"] B --> C["③"] C --> D["④"] D --> E["⑤"] E --> F["⑥"] style A fill:#f9f,stroke:#333 style B fill:#ccf,stroke:#333 style C fill:#cfc,stroke:#333 style D fill:#fcc,stroke:#333 style E fill:#cff,stroke:#333](/content/2026/04/715643/images/a67d031b106d9c3a1934aebeb5f48aba75b0a890129000948cbd9659ae5542a0.jpg)
The robot cleans the home in a structured way. The robot cleans room by room and always starts by cleaning the edges of the room first before covering the remaining surface.
Returning to the station
![graph TD A["①"] --> E["②"] B["③"] --> δ[δ] C["④"] --> D["②"] E --> D style A fill:#f9f,stroke:#333 style B fill:#bbf,stroke:#333 style C fill:#f96,stroke:#333 style D fill:#9cf,stroke:#333](/content/2026/04/715643/images/65e51cc406ec28ec88a060dda29800786f3fb5c272b8010a37863e87fd1a916d.jpg)
After the robot has completed its cleaning session, the robot will automatically drive back to the station to recharge.
Auto recharge and resume
When the battery runs low (<15%) while cleaning, the robot automatically returns to the station to recharge. It will calculate the required power based on the remaining cleaning area, and once the battery is sufficiently charged, the robot will resume cleaning.
You can disable this function in the app by tapping on the settings icon in the top right corner and then toggling the "resume clean" option on or off.
i Note: After you disable this function in the app, the robot will not continue unfinished cleaning tasks after it is charged.
Cleaning and maintenance
When to do maintenance
Item Cleaning Replacement
| Rolling mop Monthly 3-6 months |
| Main brush Monthly 6-12 months |
| Washable filter Monthly 3-6 months |
| Side brush Monthly 6-12 months |
| Main wheels & Front caster Monthly - wheel |
D-ToF navigation (LiDAR) Monthly - sensor
Sensors: Monthly - - Infrared signal sensors - Wall detect (i-ToF) sensor - Anti-drop sensor (4x)
Charging contacts robot and station Monthly -
Tray of Station Monthly
Cleaning the rolling mop and water tank in the robot
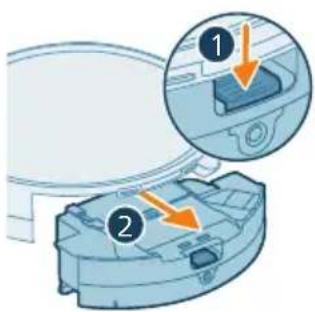
i Note: Do not clean the rolling mop and water tank with any cleaning detergent. Use tap water only.
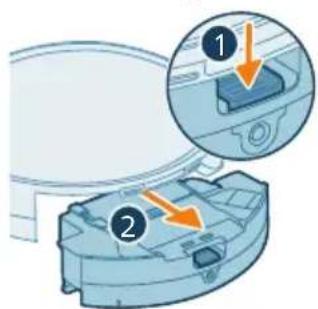
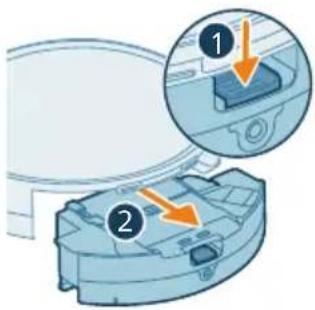
1 Push the release button and remove the cleaning module from the robot.
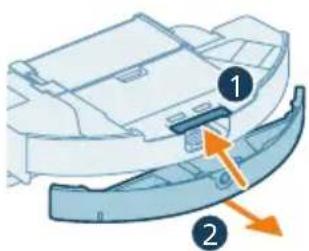
2 Remove the dirty water tank of the robot from the cleaning module.
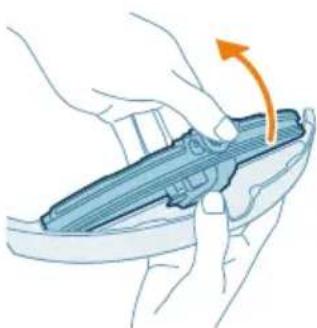
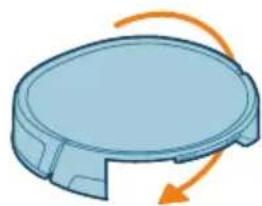
3 Grab the dirty water tank with both hands, press the circular button on the lid and flip up the lid.
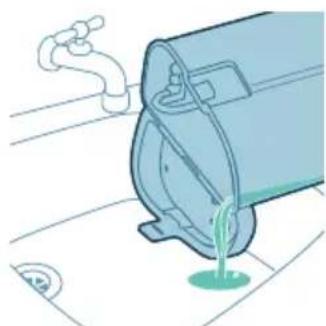
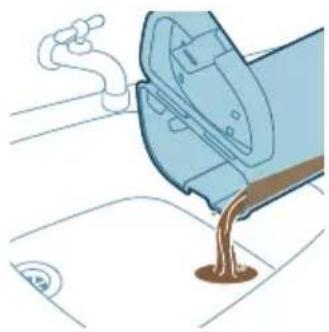
i Note: Open the dirty water tank at the sink to avoid dirty water spilling on the floor.
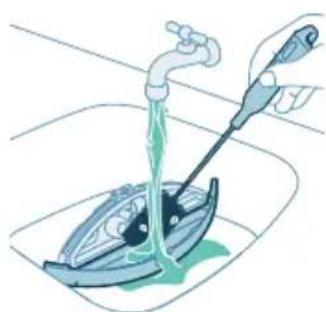
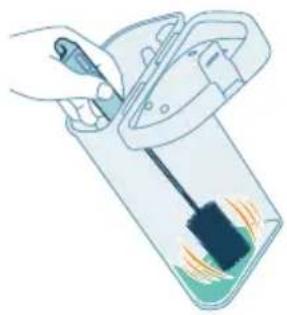
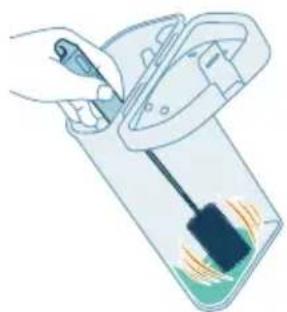
4 Clean the dirty water tank under the tap with the cleaning tool.
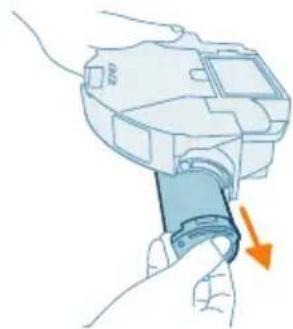
5 Remove the rolling mop from the cleaning module.
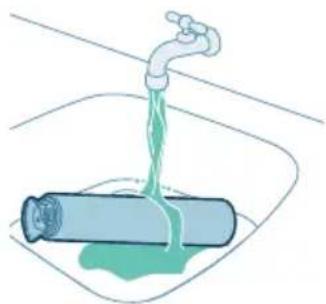
6 Clean the rolling mop under the tap.
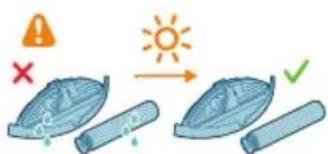
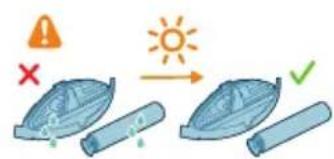
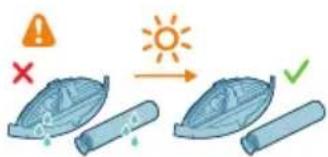
7 Let both the rolling mop and the dirty water tank dry completely in sunlight or air. Do not reassemble while they are wet.
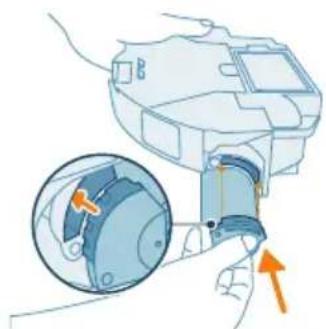
8 Insert the rolling mop into the cleaning module until the parts fit into each other.
i Note: when inserting the rolling mop, make sure to align the raised part on the rolling mop with the matching recess on the cleaning module.
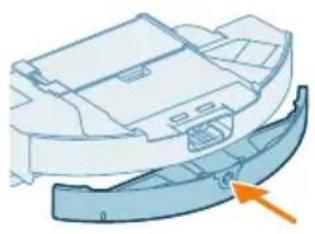
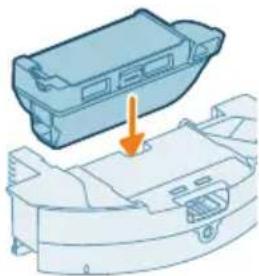
9 Insert the dirty water tank into the cleaning module.
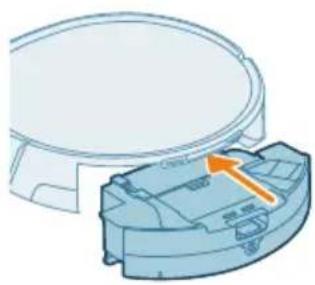
10 Insert the cleaning module back into the robot.
Cleaning the washable filter and dust bin
i Note: Do not clean the washable filter and dust bin with any cleaning detergent. Use tap water only.
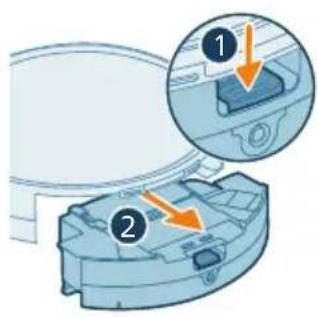
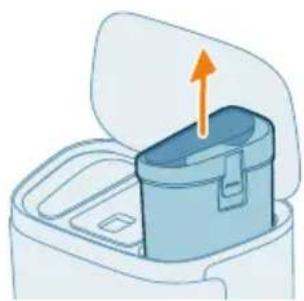
1 Push the release button and remove the cleaning module from the robot.
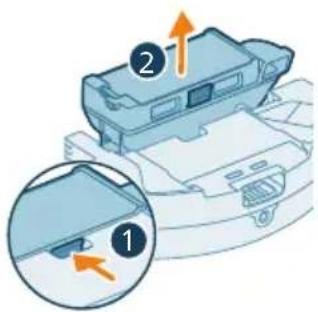
2 Remove the dust bin from the cleaning module.
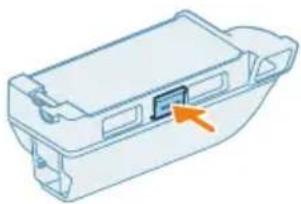
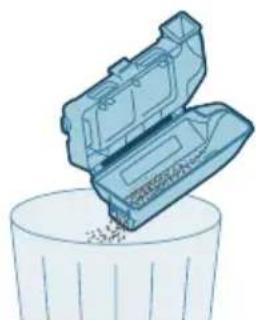
3 Press the button on the side of the dust bin to open it.
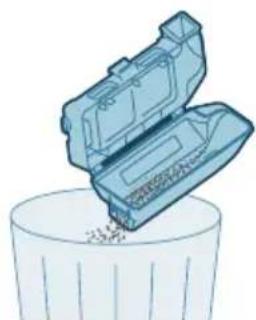
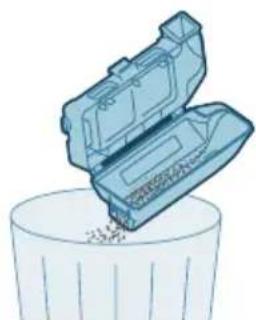
4 Pour out the dust and dirt in the dust bin.
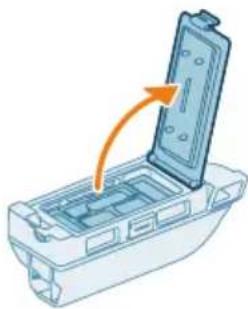
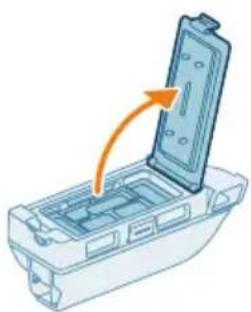
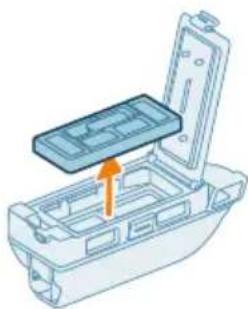
5 Open the lid of the washable filter.
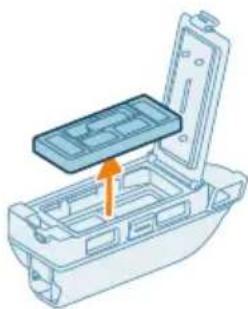
6 Remove the washable filter from the dust bin.
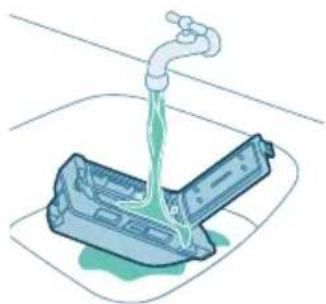
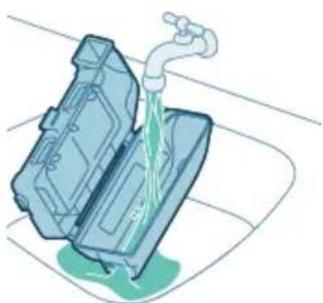
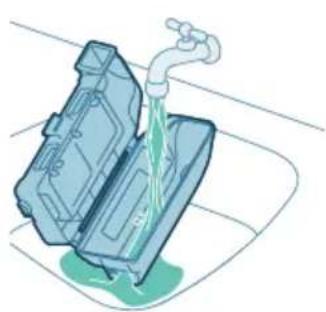
7 Rinse the filter compartment under the tap.
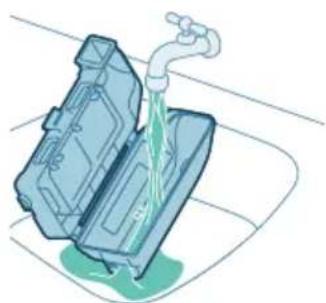
8 Rinse the dust bin under the tap.

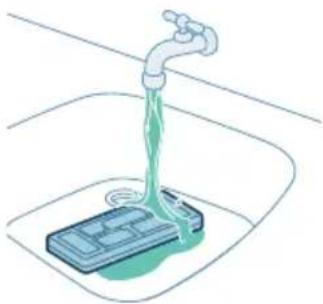
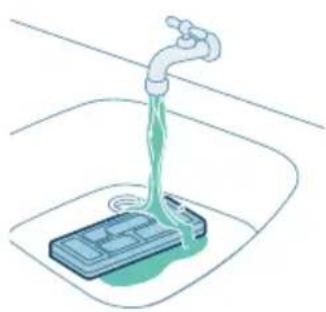
9 Clean the washable filter under the tap.
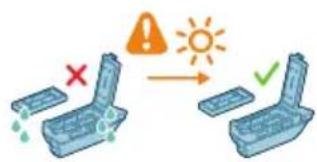
10 Allow both the dustbin and the filter to dry completely in sunlight or fresh air. Do not reassemble while they are wet.
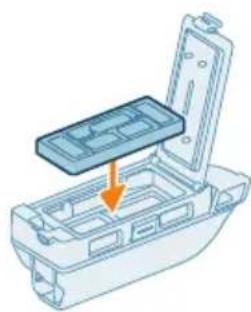
11 Insert the washable filter into the dustbin.
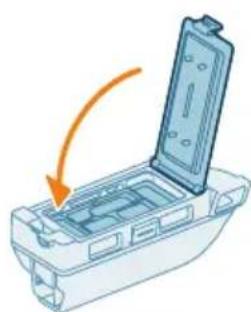
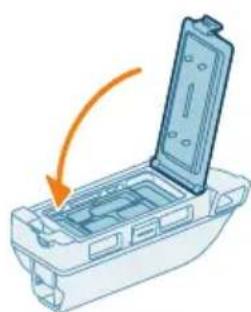
12 Close the lid of the washable filter.
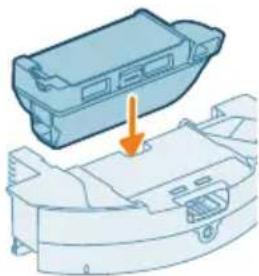
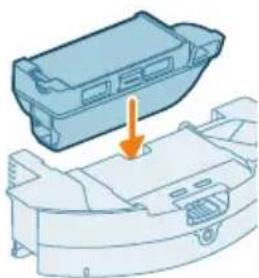
13 Insert the dustbin into the cleaning module.
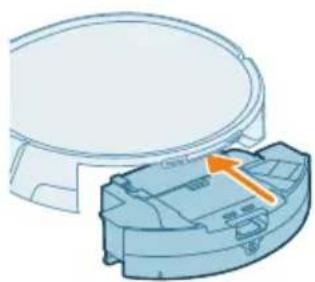
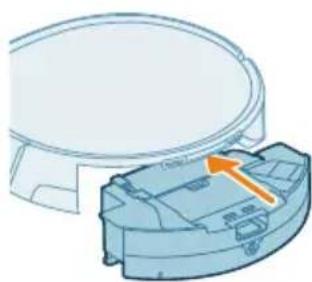
14 Insert the cleaning module into the robot.
Cleaning the water tanks in the station
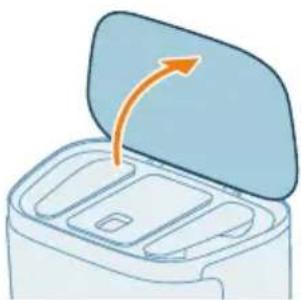
i Note: Do not clean the water tanks with any cleaning detergent. Use tap water only.
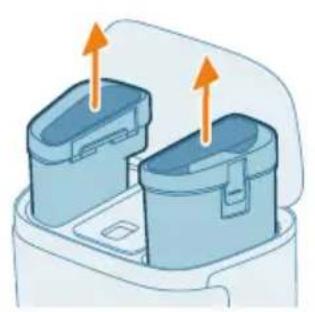
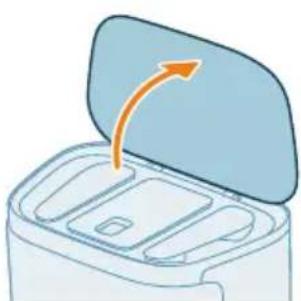
1 Open the lid of the station.
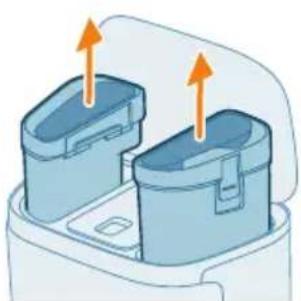
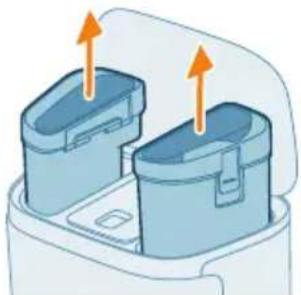
2 Remove both the clean water tank and the dirty water tank from the station.
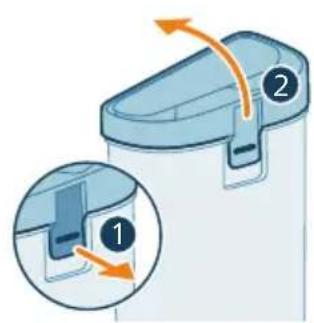
3 Open the lid of the clean water tank.
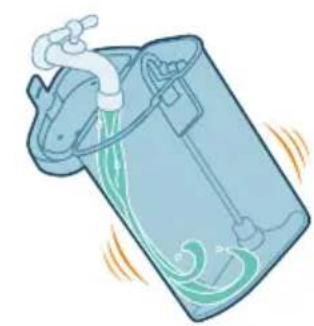
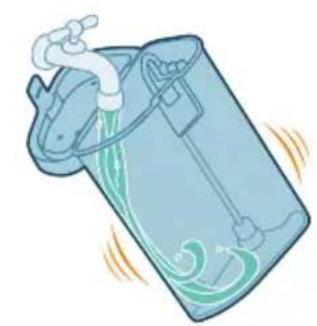
4 Rinse the clean water tank under the tap.
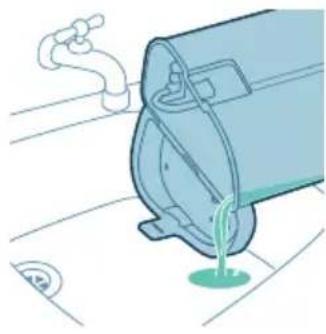
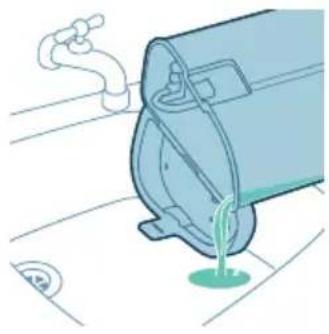
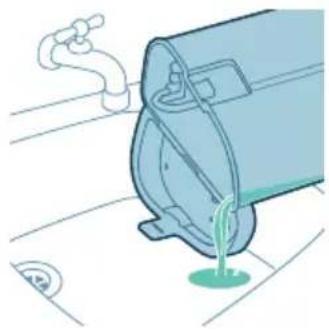
5 Pour out any remaining water in the clean water tank.
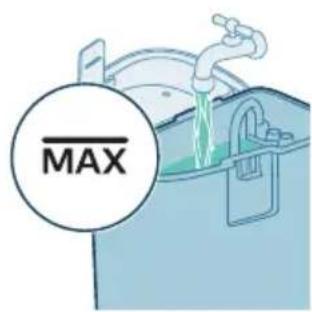
6 Refill the clean water tank to the MAX water level indication.

7 Optional: add 10 ml of Philips floor cleaner XV1493 in the clean water tank.
i Note: only use the supplied Philips floor cleaner XV1493, which is specially developed for our devices to ensure optimal performance and to elongate its lifetime.
i Note: using alternative cleaning detergents may compromise and potentially damage the machine's interior components.
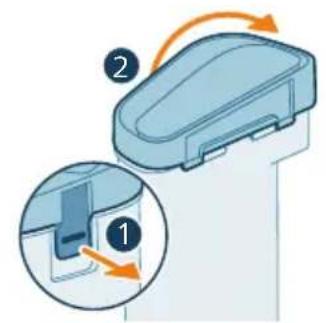
8 Open the lid of the dirty water tank.
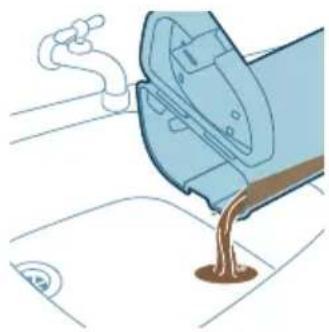
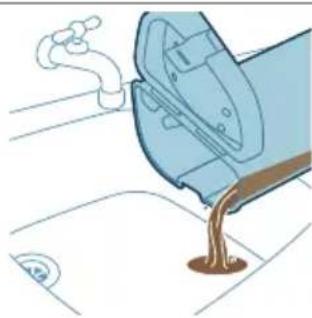
9 Pour the water out of the dirty water tank into the sink.
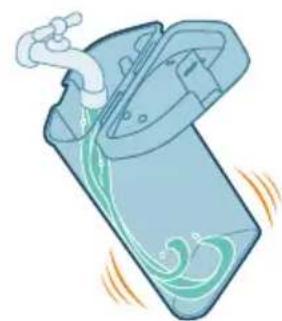
10 Rinse the dirty water tank under the tap.
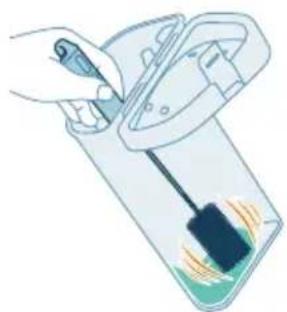
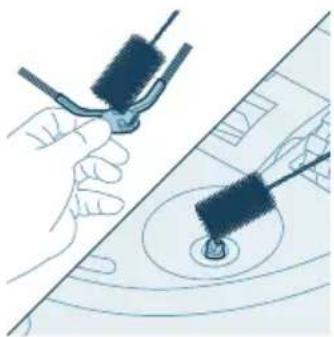
11 Clean the dirty water tank with the cleaning brush.
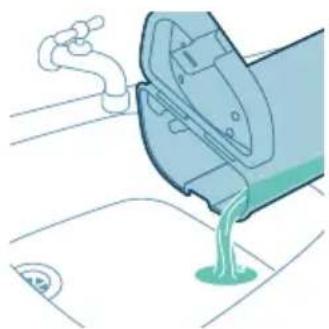
12 Pour out any remaining water in the dirty water tank.
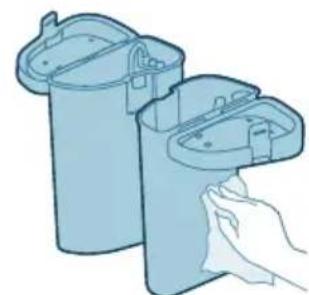
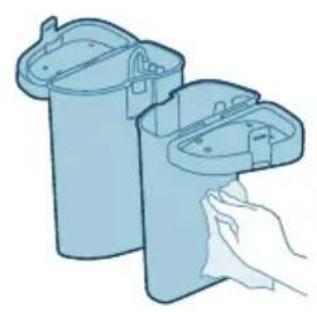
13 Dry the outside of the water tanks with a cloth.
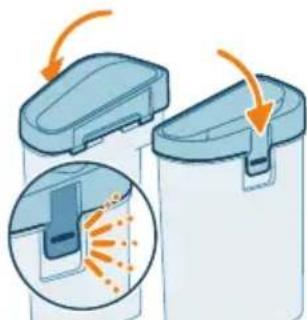
14 Close the lid of the water tanks until you hear a clicking sound.
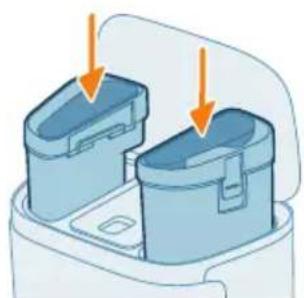
15 Insert both water tanks into the station.
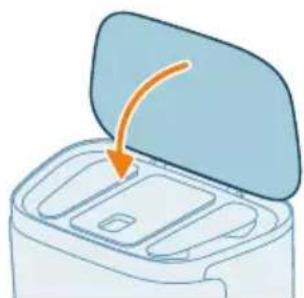
16 Close the lid of the station.
Cleaning the main brush
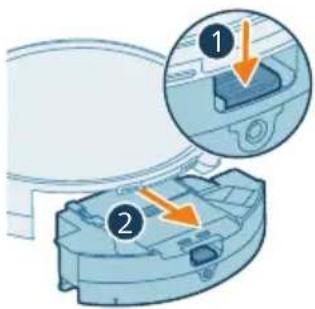
1 Remove the cleaning module from the robot.
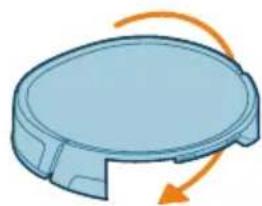
2 Place the robot upside down on a flat and stable surface.
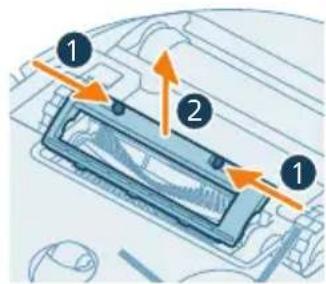
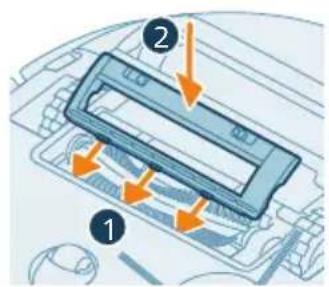
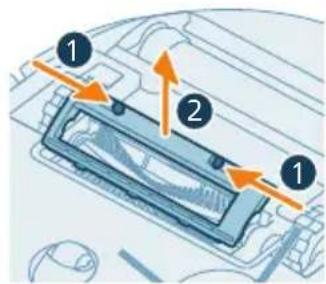
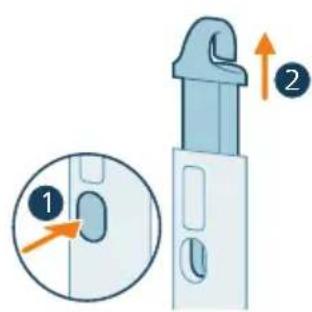
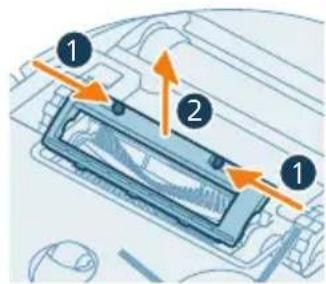
3 Push the release buttons of the brush cover at the same time to lift and remove the brush cover.
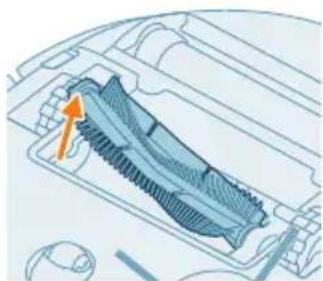
4 Pull the main brush out.
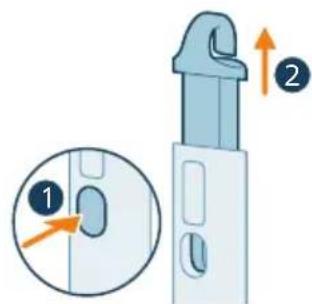
5 Detach the cutting tool from the brush cleaning tool.
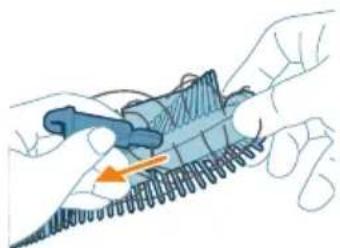
6 Use the cleaning tool to cut through the hairs.
7 Remove the hairs and dirt from the main brush.
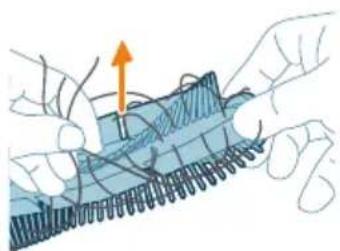
8 Install the main brush in the correct location. Match the square shaped peg with the square shape hole.
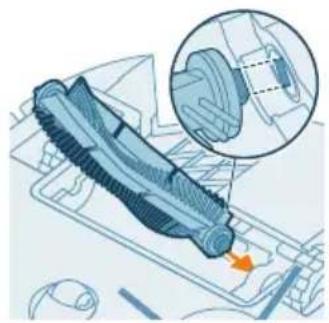
9 insert the other end of the brush into position.
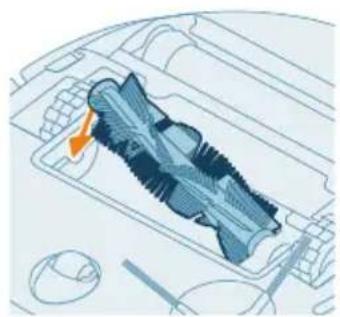
10 Put the lips of the brush cover in the correct cutouts.
11 Push the brush cover in.
Cleaning the side brush
1 Remove the cleaning module from the robot.
2 Place the robot upside down on a flat and stable surface.
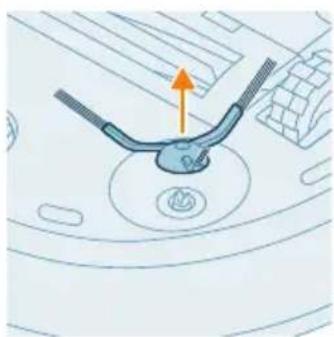
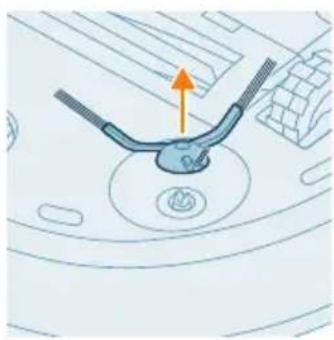
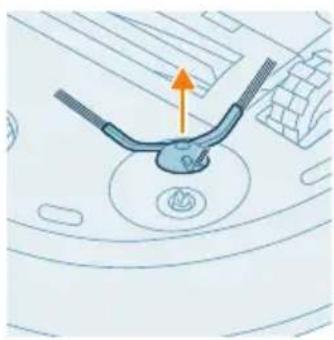
3 Remove the side brush.
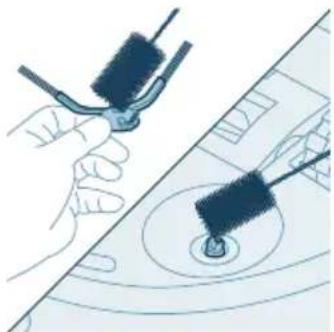
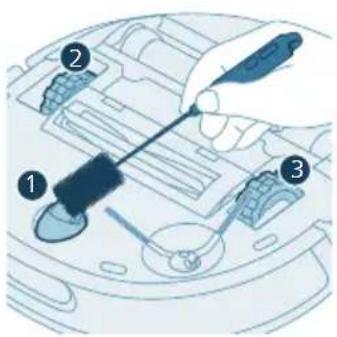
4 Use a brush with soft bristles (e.g. a toothbrush) to remove dust or fluff from the side brush and the robot.
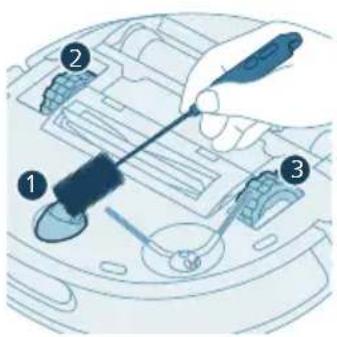
Tip: You can use the brush end of the cleaning tool to remove dust or fluff from the side brush and the robot.
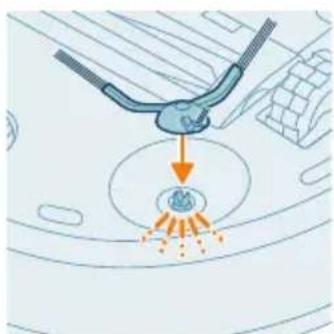
5 Attach the side brush by clicking it into the correct position on the bottom of the robot.
Cleaning the main wheels and the front caster wheel
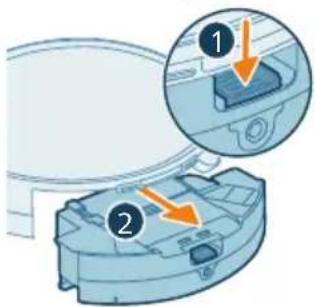
1 Remove the cleaning module from the robot.
2 Place the robot upside down on a flat and stable surface.
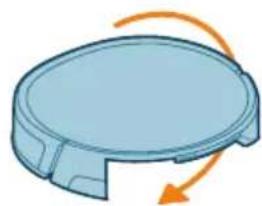
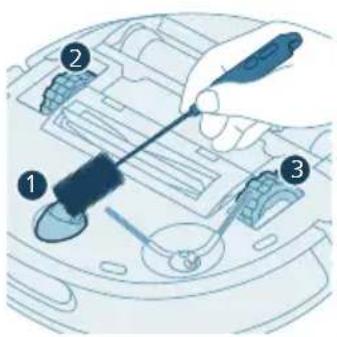
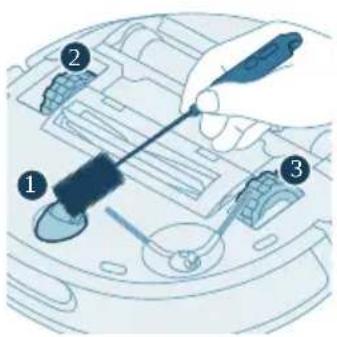
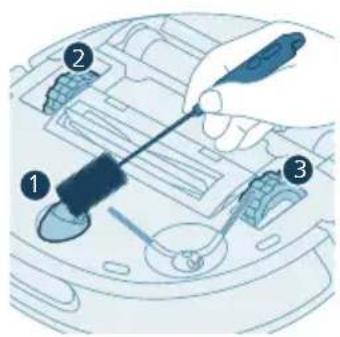
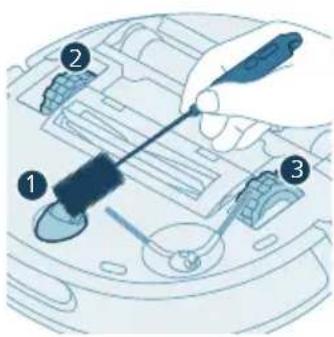
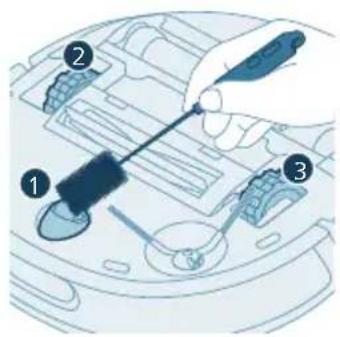
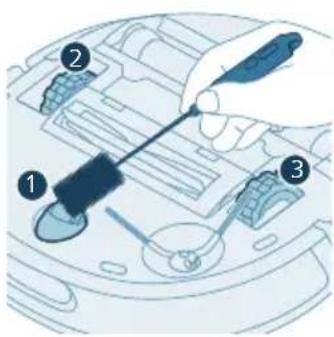
3 Use the cleaning brush to remove dust or fluff from the front caster wheel and main wheels.
You can use the hair cutting knife at the end of the brush cleaning tool to remove dust or fluff from the wheels.
Cleaning the sensors, contact points and IR signal window
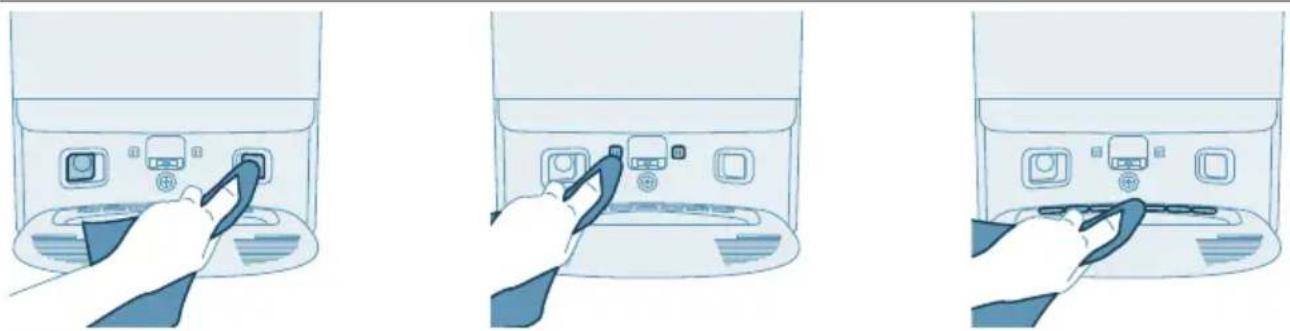
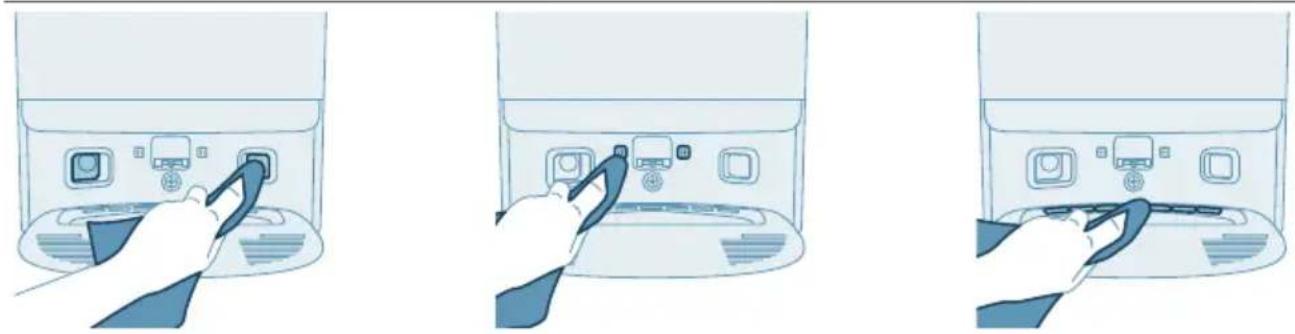
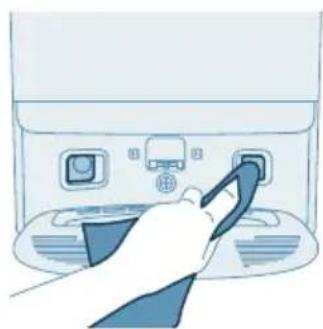
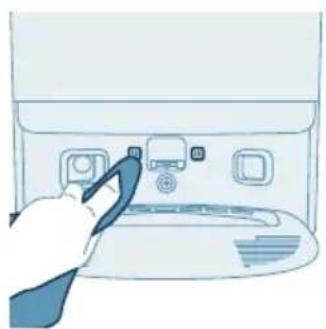
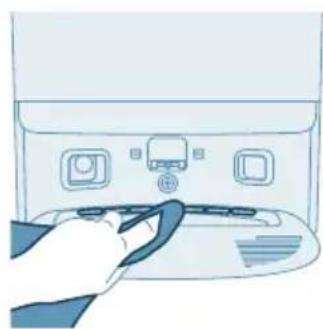
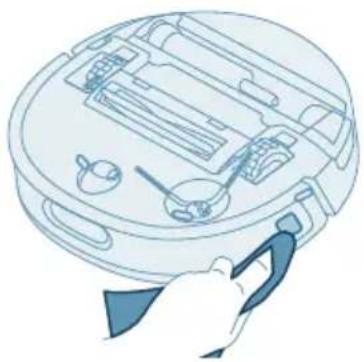
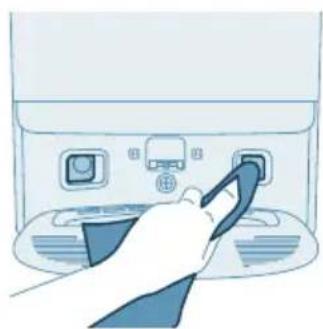
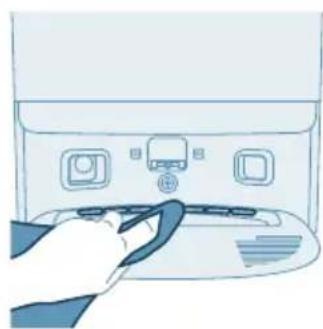
To maintain good cleaning performance, you have to clean sensor, contact points and IR signal window from time to time with a dry non-abrasive cloth.
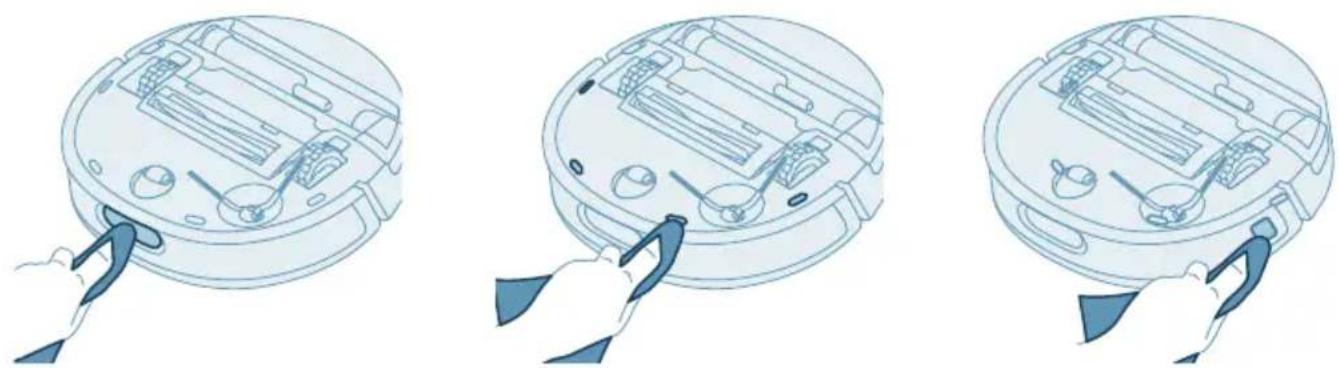
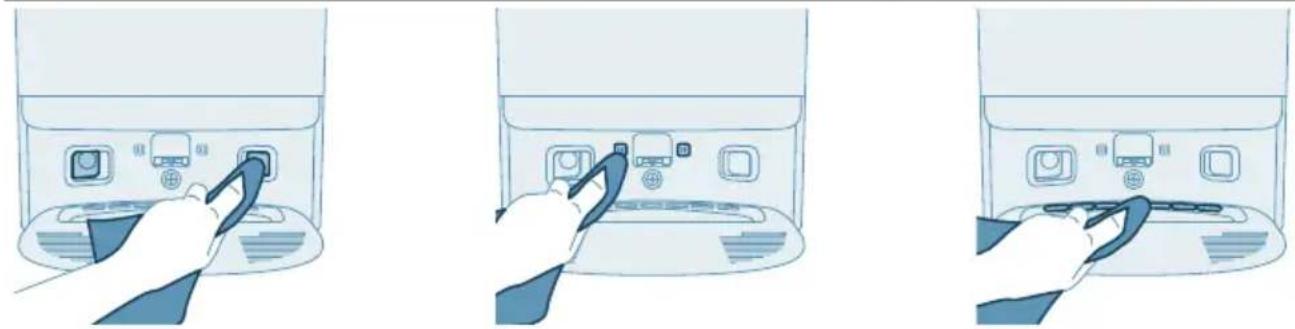
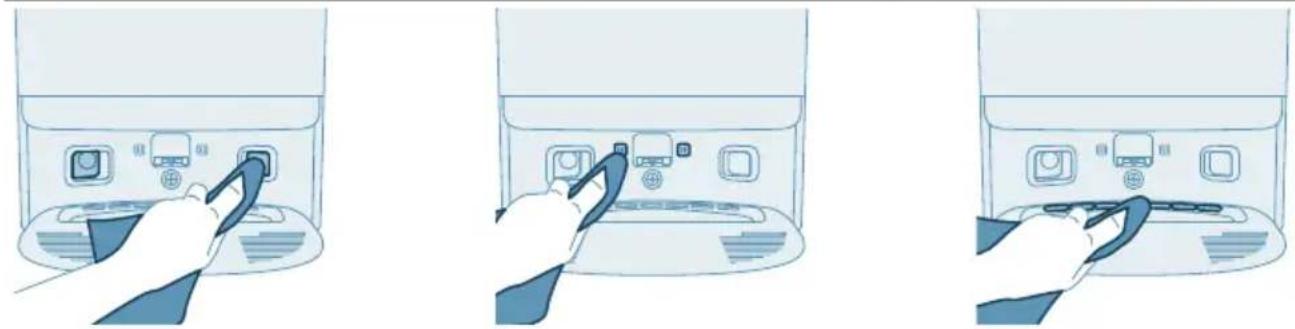
1 Unplug the station from the wall socket.
2 Use a soft non-abrasive dry cloth to clean the components.
i Note: Do not use cleaning detergents.
i Note: Do not use other ways to clean the components.
Replacing the dust bag
When the orange LED in the middle of the station flashes, it indicates that the dust bag is full, not placed, or not correctly placed.
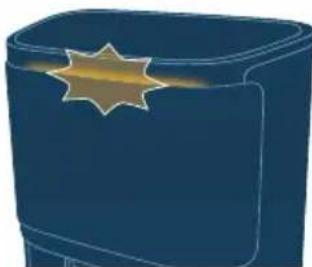
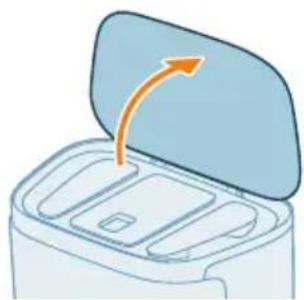
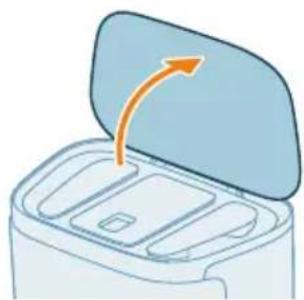
1 Open the lid of the station.
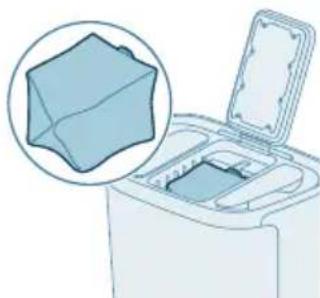
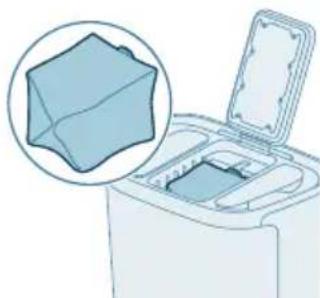
2 Open the lid of the dust bag compartment in the middle of the station.
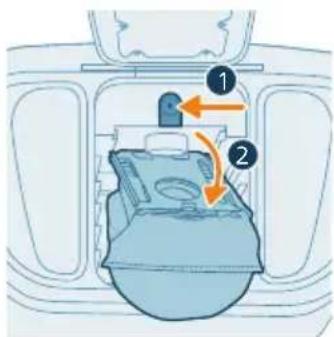
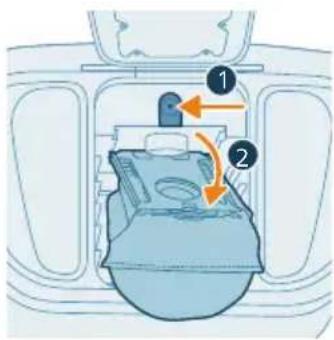
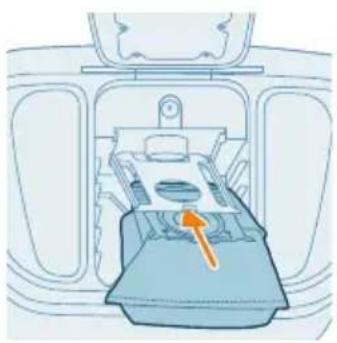
3 Press the release button and push the bag holder to the side.
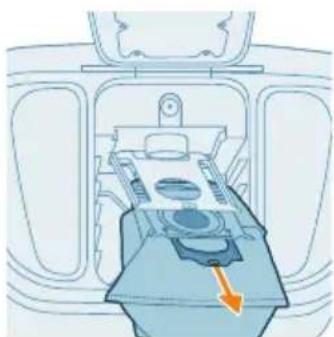
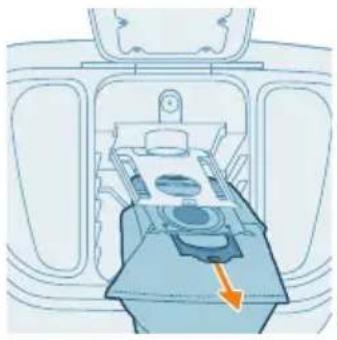
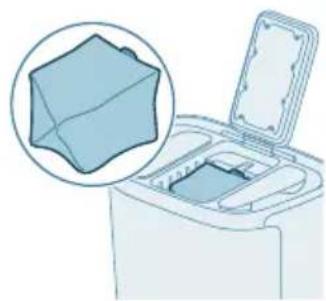
4 Remove the dust bag.

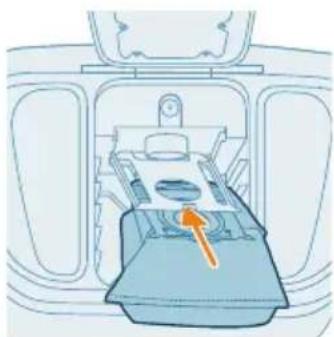
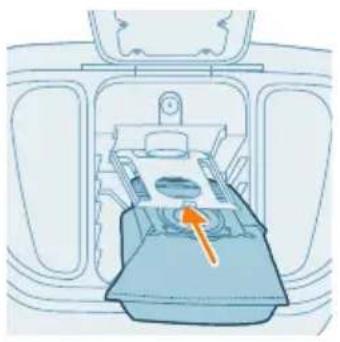
5 Slide the cardboard piece of the new dust bag onto the bag holder.
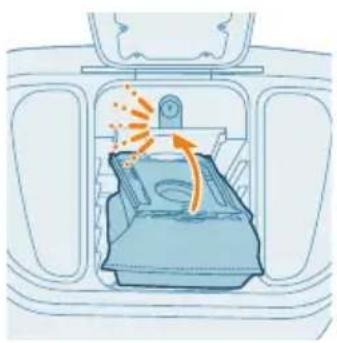
6 Push the bag holder back to its standing position until you hear a clicking sound.
7 Close the lid of the dust bag compartment.
8 Close the lid of the station.
i Note: For information on where and how to order new dust bags, see the 'Replacement' section in the manual.
Long term storage
1 Charge the battery until it is full.
2 Store the robot within a temperature range from 8 °C to 35 °C.
Indicator light signals and their meaning
Signal Meaning of signal
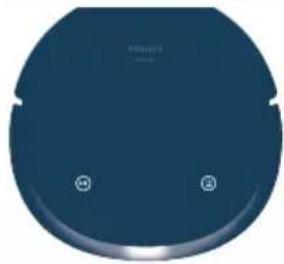
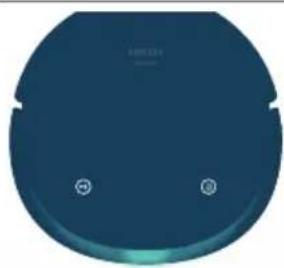
The light on the robot lights up white.
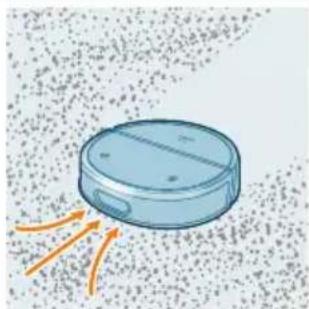
The robot is in the 'vacuum' mode.

The light on the robot lights up blue.
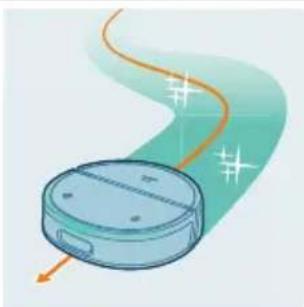
The robot is in the 'mop' mode.
i Note: When the robot is in the 'vacuum and mop' mode, the light on the robot alternates between white and blue.
Signal Meaning of signal
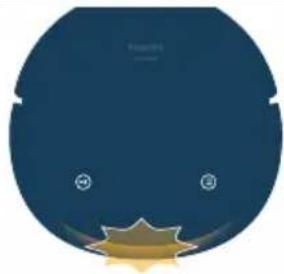
The light on the robot flashes orange.

The robot runs into an error that needs your attention.
Pay attention to the voice message on the robot, or go to the HomeRun app for more information.
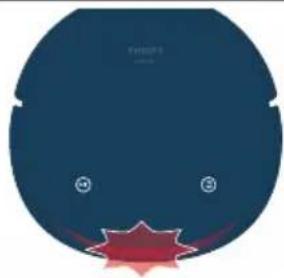
The light on the robot flashes red.

The robot is malfunctioning.
Contact the consumer care center in your country.
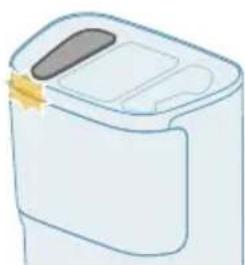
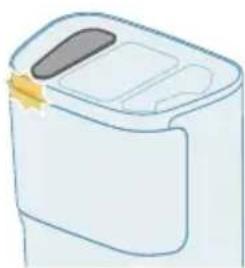
The light on the left side of the station flashes orange.
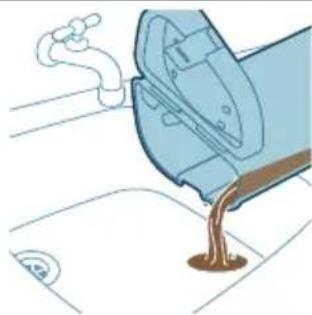
The dirty water tank is full. Empty the dirty water tank.
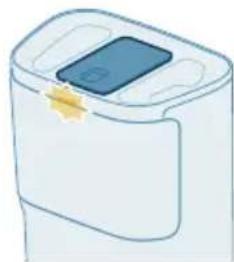
The light in the middle of the station flashes orange.


The dust bag needs to be replaced, is not installed, or not properly installed.
Replace the dust bag or check if its properly installed.
Signal Meaning of signal
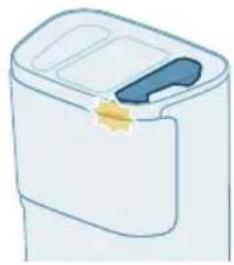
The light on the right side of the station flashes orange.
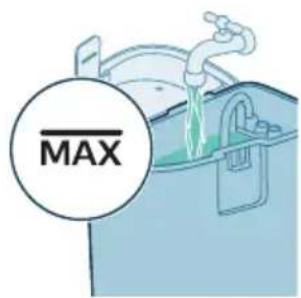
The clean water tank is empty. Refill the clean water tank to the MAX water level.
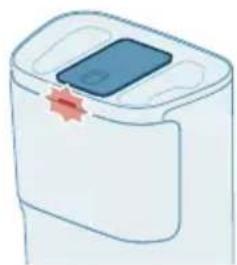
The lights on the station flash red.

The station is malfunctioning. Contact the consumer care center in your country.
Reset/restore the robot
You can reset/restore the robot by pressing and holding both the return and start/stop buttons on top of the robot for 15 seconds.
i Note: After resetting/restoring the robot, the robot needs to reconnect the app, and the relevant settings in the app are removed.
Replacement
Ordering accessories
To buy accessories or spare parts, visit
www.philips.com/RoboticsAccessoriesAPP or go to your Philips dealer. You can also contact the Philips Consumer Care Center in your country.
Replacement parts:
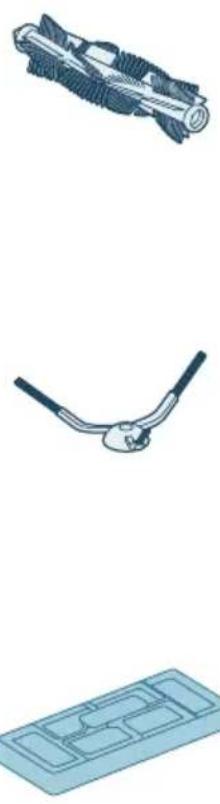
XV1491 2 replacement rolling mops

XV1492 Maintenance kit with 2
filters, 1 main brush and 1 side brush.
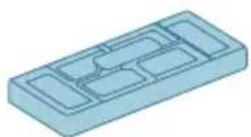
XV1493 Robot floor cleaner
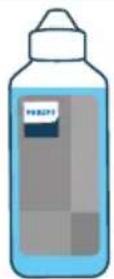
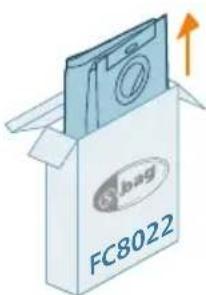
FC8022 Dust bags (anti-allergy s-bags)
Removing the rechargeable battery
To remove the rechargeable battery, follow the instructions below. You can also take the robot to a Philips service center to have the rechargeable battery removed. Contact the Philips Consumer Care Center in your country for the address of a service center near you.
Take any necessary safety precautions when you handle tools to open the product and when you dispose of the rechargeable battery.
Warning: Before you remove the battery, make sure that the product is disconnected from the station and that the battery is completely empty.
1 Start the robot from a place somewhere in the room and not from the station.
2 Let the robot run until the rechargeable battery is empty to make sure that the rechargeable battery is completely discharged before you remove it and dispose of it.
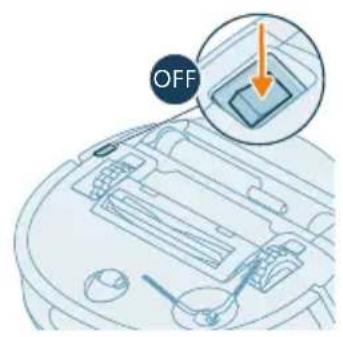
3 Press the on/off switch on the bottom of the robot to switch off the robot.
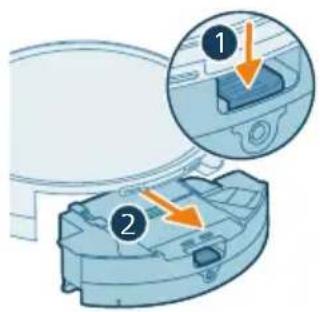
4 Remove the cleaning module from the robot.
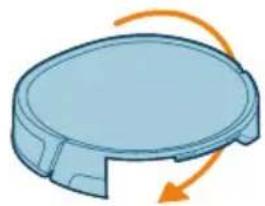
5 Place the robot upside down on a flat and stable surface.
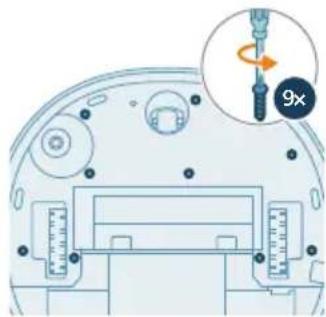
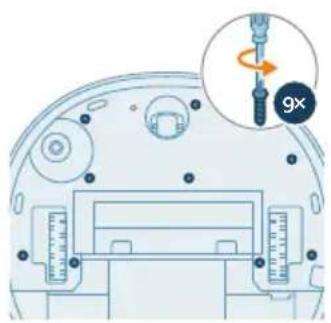
6 Undo the screws of the battery compartment lid and remove the lid.
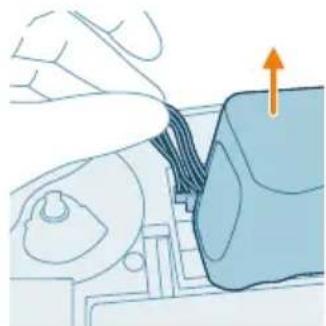
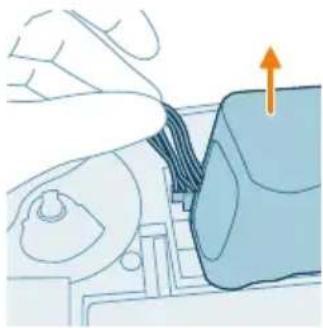
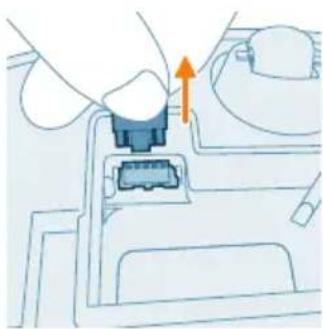
7 Lift out the rechargeable battery from the compartment.
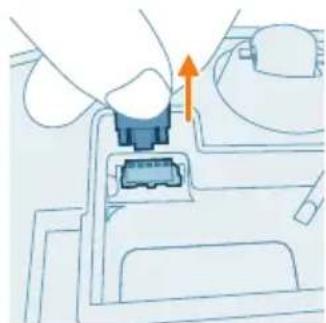
8 Disconnect it by pressing the little clip on the battery connector to release the battery connector.
9 Take the robot and the rechargeable battery to a collection point for electrical and electronic waste.
Warranty and support
Versuni offers a two-year warranty after purchase on this product. This warranty is not valid if a defect is due to incorrect use or poor maintenance. Our warranty does not affect your rights under law as a consumer. For more information or for invoking the warranty, please visit our website www.philips.com/support.
Your robot vacuum cleaner has been designed and developed with the greatest possible care. In the unfortunate case that your robot needs repair, the
Consumer Care Centre in your country will help you by arranging any necessary repairs in the shortest possible time and with maximum convenience. If there is no Consumer Care Centre in your country, go to your local Philips dealer.
Disposal and recycling
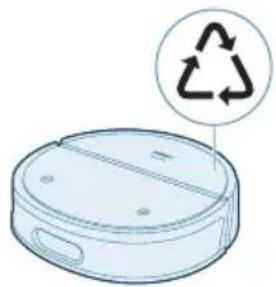
Do not dispose the robot in the regular trash. Make sure to bring it to your the recycling facility for electrical equipment.
Troubleshooting
This chapter summarizes the most common problems you could encounter with the appliance. If you are unable to solve the problem with the information below, go to the Philips HomeRun robot app or visit home.id, where can also find support videos and frequently asked questions. You can also contact the Consumer Care Center in your country.
Problem Possible cause Solution
| The robot doesn't switch on. | The battery is low. Charge the robot on the station before use. | |
| The ambient temperature is too low or too high. | Use the robot at a temperature between 8 °C and 35 °C. | |
| The robot is unable to pair with the app. | The robot is no longer in pairing mode. | Put the robot back in pairing mode by holding the return and start/stop button at same time (you can see the white scanning light on the robot). |
| The Wi-Fi connection (signal) is not good. | Place the robot in an area with a good Wi-Fi signal. | |
| A wrong Wi-Fi network selected. | Make sure you select the correct Wi-Fi network. | |
| A wrong password used. | Make sure you use the correct Wi-Fi password. | |
| A wrong robot model is selected in the app. | Make sure you select the correct robot model. | |
| A wrong app is downloaded | Always use the app that you have downloaded via the QR-code from the quick start guide. | |
| The app and the robot lose connection. | The robot has gone out of reach of the Wi-Fi signal. | Wait for robot to drive back into area with a good Wi-Fi signal. |
| The robot has gone into sleep mode. | The robot will go into sleep mode if it has not returned to the station. Press any button on the robot to awake the | |
Problem Possible cause Solution
| robot.Then send it to the station via the app or by pressing the return button. | ||
| The Wi-Fi password has been changed. | When Wi-Fi details have changed: add the robot to the app again. | |
| The Wi-Fi network name has been changed. | When Wi-Fi details have changed: add the robot to the app again. | |
| The app account was changed. | When account details were changed, add robot to the app again. | |
| The email with the verification code has not been received. | The verification code email may take up to a minute to arrive. | Wait more than a minute for the email. |
| The email has not been sent. | Tap on the "resend" button. | |
| The email may have landed in 'spam' or 'junk' folder. | Check the 'spam' or 'junk' folders. (The sender e-mail address starts with: HomeRun_noreply@). | |
| A wrong email address is used. | Check if you have used the correct email address. | |
| The phone or computer doesn't have good internet connection to receive the email. | Make sure the phone or computer has a good internet connection. | |
| The robot can't find station. | The station is not connected to the power supply. | Connect the station to the power supply. |
| The sensors on robot and/or station are dirty. | Clean all the sensors of the robot and the station. | |
| A No-Go, No-Mop, No-Vac, or virtual wall was placed too close to the station, or on the robot's way back to the station. | Do not save No-Go, No-Mop, No-Vac, or virtual wall too close to the station, or on the robot's way back to the station. | |
| The station has been placed on a spot with very bright light. | Don't put the station in a place with very bright light (like direct sun light) this may interfere with the infra red signal. | |
| The robot pushes the station away. | The station is not standing close to a wall. | Place station with the back towards a wall. |
Problem Possible cause Solution
| The sensors on robot and/or station are dirty. | Clean all the sensors of the robot and the station. | |
| The station doesn't have enough space around it (0.5 meter to each side and 1.5 m to the front). | Make sure the station has enough space around it. | |
| The robot doesn't clean properly. | The dust bin of the robot is full. | Empty the dust bin of the robot. |
| There is an obstacle inside the rolling mop. | Detach the cleaning module, take out the rolling mop and remove any obstacles. | |
| Obstacles are stuck in the brushes. | Remove all obstacles from the brushes. | |
| The filter has not been cleaned. | Clean the filter regularly. | |
| The filter has not been placed back or has not been placed back correctly. | Place the filter back correctly. | |
| The rolling mop needs to be replaced. | Replace the XV1491 rolling mop. Purchase a new XV1491 rolling mop via de app or on www.philips.com/RoboticsAccessoriesAPP. | |
| Too much water comes out of the mop / the robot makes the floor too wet. | The mop wetness is set too high. | Set the mop wetness lower in the app.⚠ IMPORTANT: For mopping sensitive hard floors, such as parquet floors, set the mop wetness in the app to minimum. |
| Robot misses areas for cleaning/ robot does not clean the whole area/ robot has begun to miss certain spots | The sensors of the robot are no longer clean. | Clean the robot's sensors with a dry cloth. |
| The robot is working on slippery polished floors. | Make sure the floor is dried before the robot starts cleaning. | |
| The robot is unable to reach certain areas blocked by furniture or barriers. | Tidy up the area to be cleaned by putting furniture and small objects in their proper place. |
Problem Possible cause Solution
| The cleaning area is not tidy. | Remove small objects from the floor and tidy up the cleaning area before the robot starts cleaning.The robot can detect obstacles at least 2 cm in height, with a length and width greater than 2.5 cm. | |
| The robot uses a safety margin when following No-Go, No-Mop and No-Vac zones, or Virtual Walls. The safety margin might block off a certain area. | Make the No-Go, No-Mop, No-Vac, or virtual wall in the app a bit smaller. | |
| The robot has blocked itself with a tangled cable. | There are cables on the floor which the robot is unable to detect. | Stop the robot and remove the brush cover. Check if the main brush is stuck and check if something is stuck in the side brush: remove side brush, take away the cable, reattach the side brush. Remove all cables from the floor before you start a cleaning run. |
| The robot falls from stairs. | The anti-drop sensors on the bottom of the robot are dirty. | Clean the anti-drop sensors on the bottom of the robot.If the robot continues to fall from stairs, draw a virtual wall on the top of the stairs in the app. |
| Objects have been placed on the top step of the stairs that the robot detects and therefore thinks it is safe to drive. | Remove the any objects that are placed on the top steps of the stairs. | |
| The robot doesn't charge or discharges very quickly. | The robot is stored in a space that is too hot or too cold. | Charge and store the robot at a temperature between 8 °C and 35 °C. |
| The all-in-one station doesn't collect dust from the robot. | The dust bag has not been placed back or placed back correctly. | Place a dust bag correctly in the all-in-one station. |
| The dust bag is full. Place an empty dust bag in the all-in-one station. | ||
| The quiet mode or do not disturb setting has been activated in the app. | De-select the quiet mode or do not disturb in the app. | |
| The all-in-one station inlet is blocked. | Clean the all-in-one station inlet. | |
Problem Possible cause Solution
| There is foam buildup in the water tank and the robot moves strangely. | Detergent different from the recommended Philips Robot Floor Cleaner XV1493 was used, causing the robot to be slippery. | Only use the recommended Philips Robot Floor Cleaner XV1493 or use no detergent at all.If you have used a wrong detergent, clean the robot and its wheels, including a thorough rinse of the water tank. |
| I didn't use any cleaning solution or detergent, but there is foam buildup in the robot's water tank, leaving foam on the ground. | During the production of the rolling-mop flannel, some detergent may remain on its surface.When using the robot, the high-speed rotation of the rolling mop could produce foam. | Put the robot back in the station and start the 'self-cleaning' process via the app once or twice. The foam will disappear. |
| The robot is making an abnormal noise. | The filter has not been placed back or has not been placed back correctly. | Check if filter is placed back correctly. |
| The robot has cleaned up a hard piece of dirt, which is now moving around inside the dustbin. | Empty the dustbin. | |
| The brushes are no longer turning. | Hairs are stuck in the main brush. | Remove hairs with the brush cleaning tool provided with the robot. |
| Other obstacles are stuck in the brushes. | Remove other obstacles from the brushes. | |
| The main brush was not placed back correctly. | Remove the main brush and reassemble it.Align the square protrusion on the main brush with the square hole on the cleaning module. | |
| The side brush gets deformed. | Something may have gotten stuck in the side brush. | Put brush in hot water for a while and let it dry. |
| Purchase a new side brush via the app or on www.philips.com/RoboticsAccessoriesAPP. | ||
| The robot won't drive on to a black floor. | The robot thinks a pitch black floor is a falling hazard - the cliff detection is activated. | Make sure lights are switched on in the room with pitch black flooring. |
| Clean the anti-drop sensor on the bottom of the robot. |
Problem Possible cause Solution
| A schedule is set, but the robot doesn't start cleaning according to the schedule. | The 'do not disturb' function may be activated. | Check in the app if the 'do not disturb' function is switched on at the same time as the schedule. |
| The robot is in sleep mode. | Make sure that the robot is charging in the station.The robot will go into sleep mode if it has not returned to the station. Press any button on the robot to awake the robot.Then send it to the station via the app or by pressing the Return button. | |
| The wrong time zone has been selected in the app. | You can change the time zone in in the app in 'My Account' under 'Profile'. | |
| The robot has lost connection with the Wi-Fi network. | Make sure the Wi-Fi network is working. | |
| The battery of the robot is empty. | Make sure that the station is connected to the power supply. | |
| It is not possible to log in to the robot app account. | The email address has been changed. | Create a new app account in case the email address has been changed. |
| The password is wrong. | Enter the correct password. | |
| In case the password is forgotten, tap on 'forgot password' and follow the steps. | ||
| The wrong country region is selected. | Select the correct country region in the app. | |
| Pop-up messages about app or firmware updates continue to be received. | App updates or firmware updates are not installed. | For continuous improvement of the robot we recommend installing all updates. |
| The Philips HomeRun robot app is not available in my country. | VPN may be blocking access to the right country information. | Disable any VPN service you are using. |
| Google or Apple account may be set to a different country. | Change the Google or Apple account information to match the country you bought the robot in. | |
| The firmware update fails. | The battery level is too low | The battery level of the robot needs to be more than 30% in order to install an update. |
Problem Possible cause Solution
| The robot is not at the station | Make sure the robot is charging in the station when you install the update. | |
| The Wi-Fi signal is not good enough. | Ensure the robot is in a spot with strong Wi-Fi | |
| The robot finished mapping, but I do not see a map in the app. | The robot got stuck or blocked while mapping. | Return the robot to the station and restart the mapping process. Identify the location where the robot got stuck earlier and remove any obstacles or block the robot from accessing that area. Once the map has been created, you can create a no-go zone to prevent the robot from entering that area again. |
| My map is lost from the app. | The maximum amount of maps had been reached. | The robot will create a new map when it recognizes a new environment. If you already have 5 maps, the robot will override an old one. |
| I do not want to use the Wi-Fi function. | The Wi-Fi function can be deactivated on your device. | To deactivate the robot's Wi-Fi function, press the bumper on the front side of the robot and the start/stop button on the robot for 10 seconds. You can still use basic functions without Wi-Fi, but for full access to all features, we highly recommend pairing the robot with Wi-Fi. |
lsi
Pendahuluan 45
Pasang sikat samping
Mengunduh aplikasi
10 Buka semua pintu dalam ruangan.
7 Bilas kompartemen filter di bawah keran.
8 Bilas wadah debu dengan air keran.
4 Bilas tangki air bersih di bawah keran.
5 Tuangkan sisa air di tangki air bersih.
12 Tuangkan sisa air di tangki air kotor.
Membersihkan sikat samping

3 Lepaskan sikat samping.
2 Buka tutup kompartemen kantong debu di tengah stasiun.
3 Tekan tombol pelepas dan dorong penahan wadah debu ke samping.
4 Lepaskan kantong debu.
Robot mengalami kegagalan fungsi.
Hubungi pusat layanan konsumen di negara Anda.
Lampu di sisi kiri stasiun berkedip oranye.
Mengecas robot
4 Tekan butang return. Robot bergerak ke kedudukan yang betul di stesen.
5 Tunggu sehingga robot dicas sepenuhnya.
![graph TD A["Room 1"] --> B["Room 2"] B --> C["Room 3"] C --> D["Room 4"] D --> E["Room 5"] E --> F["Room 6"] F --> G["Room 7"] G --> H["Room 8"] H --> I["Room 9"] I --> J["Room 10"] style A fill:#cce5ff,stroke:#333 style B fill:#cce5ff,stroke:#333 style C fill:#cce5ff,stroke:#333 style D fill:#cce5f…](/content/2026/04/715643/images/b998a2735a62258f35580815df51bf4a54fe9199d9f020decc396869ee2c3070.jpg)
8 Tutup tudung stesen.
6 Bersihkan mop bergolek di bawah paip.
12 Tutup penutup penuras boleh cuci.
13 Masukkan tong sampah ke dalam modul pembersihan.
1 Buka tudung stesen.
4 Bilas tangki air bersih di bawah paip.
10 Bilas tangki air kotor di bawah paip.
16 Tutup tudung stesen.
Membersihkan berus utama
1 Buka tudung stesen.
2 Buka penutup petak beg habuk di tengah stesen.

4 Keluarkan beg habuk.
Jak robot funguje
Vytvoření mapy
![graph TD A["Room 1"] --> B["Room 2"] B --> C["Room 3"] C --> D["Room 4"] D --> E["Room 5"] E --> F["Room 6"] F --> G["Room 7"] G --> H["Room 8"] H --> I["Room 9"] I --> J["Room 10"] style A fill:#cce5ff,stroke:#333 style B fill:#cce5ff,stroke:#333 style C fill:#cce5ff,stroke:#333 style D fill:#cce5f…](/content/2026/04/715643/images/b9b7cedb585b08109e25b837b570dd9a72e2235cead62c9d264d84ebe7e5fb09.jpg)
![graph TD A["Room 1"] --> B["Room 2"] B --> C["Room 3"] C --> D["Room 4"] D --> E["Room 5"] E --> F["Room 6"] F --> G["Room 7"] G --> H["Room 8"] H --> I["Room 9"] I --> J["Room 10"] style A fill:#cce5ff,stroke:#333 style B fill:#cce5ff,stroke:#333 style C fill:#cce5ff,stroke:#333 style D fill:#cce5f…](/content/2026/04/715643/images/c557bd98ae543e81b90482211506de92c08391b4c18b2280594e8f561b74ac96.jpg)
14 Vložte čisticí modul do robota.
Sådan fungerer din robot
Opret et kort
![graph TD A["Room 1"] --> B["Room 2"] B --> C["Room 3"] C --> D["Room 4"] D --> E["Room 5"] E --> F["Room 6"] F --> G["Room 7"] G --> H["Room 8"] H --> I["Room 9"] I --> J["Room 10"] style A fill:#cce5ff,stroke:#333 style B fill:#cce5ff,stroke:#333 style C fill:#cce5ff,stroke:#333 style D fill:#cce5f…](/content/2026/04/715643/images/31e145f97f1ee6c043d0a53138cd641f0a244731fc93298945a3944e4a516c9f.jpg)
3 Åbn låget til tanken til rent vand.
6 Luk låget til tanken til rent vand.
![graph TD A["Room 1"] --> B["Room 2"] B --> C["Room 3"] C --> D["Room 4"] D --> E["Room 5"] E --> F["Room 6"] F --> G["Room 7"] G --> H["Room 8"] H --> I["Room 9"] I --> J["Room 10"] style A fill:#cce5ff,stroke:#333 style B fill:#cce5ff,stroke:#333 style C fill:#cce5ff,stroke:#333 style D fill:#cce5f…](/content/2026/04/715643/images/97bf5d8b9a02f4fb074c0becda96c9758f71e817a839e6d8a9781c6d05678157.jpg)
5 Åbn låget til det vaskbare filter.
7 Skyl filterkammeret under vandhanen.
8 Skyl støvbeholderen under vandhanen.
11 Sæt det vaskbare filter i støvholderen.
12 Luk låget til det vaskbare filter.
3 Åbn låget på tanken til rent vand.
4 Skyl tanken til rent vand under vandhanen.
8 Åbn låget på tanken til snavset vand.
10 Skyl tanken til snavset vand under vandhanen.
2 Anbring robotten med bunden opad på et fladt og stabilt underlag.
2 Anbring robotten med bunden opad på et fladt og stabilt underlag.
2 Anbring robotten med bunden opad på et fladt og stabilt underlag.
Robotten er i "støvsugstilstand".
Robotten er i tilstanden "Gulvvask".
Indikatorlyset på robotten blinker orange.

FC8022 Støvposer (anti-allergi-s- poser)
![graph TD A["Room 1"] --> B["Room 2"] B --> C["Room 3"] C --> D["Room 4"] D --> E["Room 5"] E --> F["Room 6"] F --> G["Room 7"] G --> H["Room 8"] H --> I["Room 9"] I --> J["Room 10"] style A fill:#cce5ff,stroke:#333 style B fill:#cce5ff,stroke:#333 style C fill:#cce5ff,stroke:#333 style D fill:#cce5f…](/content/2026/04/715643/images/e9d43235815fd0c76bc28eb1844ebb318e2809ae51a9b8a63df3359a372ce64c.jpg)
232 Deutsch
Roboti laadimine
![graph TD A["Room 1"] --> B["Room 2"] B --> C["Room 3"] C --> D["Room 4"] D --> E["Room 5"] E --> F["Room 6"] F --> G["Room 7"] G --> H["Room 8"] H --> I["Room 9"] I --> J["Room 10"] style A fill:#cce5ff,stroke:#333 style B fill:#cce5ff,stroke:#333 style C fill:#cce5ff,stroke:#333 style D fill:#cce5f…](/content/2026/04/715643/images/475227b7e09b5e8b209aae090592c1dd864bf4def081ca5e9cad516fc84d4a59.jpg)
1 Avage jaama kaas.

10 Avage köik siseuksed.
![graph TD A["Room 1"] --> B["Room 2"] B --> C["Room 3"] C --> D["Room 4"] D --> E["Room 5"] E --> F["Room 6"] F --> G["Room 7"] G --> H["Room 8"] H --> I["Room 9"] I --> J["Room 10"] style A fill:#cce5ff,stroke:#333 style B fill:#cce5ff,stroke:#333 style C fill:#cce5ff,stroke:#333 style D fill:#cce5f…](/content/2026/04/715643/images/4d236300dfd94499b88b0d26f1a10854083ebcbadc01a140e6d486d9c15c4ee6.jpg)
6 Puhastage rullmopp kraani all.
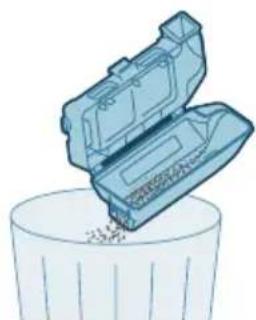
4 Valage tolm ja mustus tolmukambrisse.
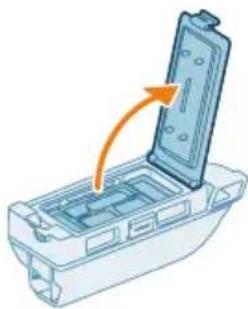
5 Avage pestava filtri kaas.
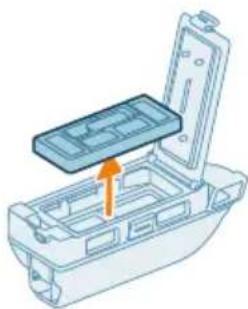
6 Eemaldage tolmukambrist pestav filter.
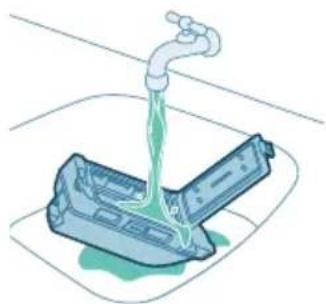
7 Loputage filtrisahtel kraani all puhtaks.
272 Eesti
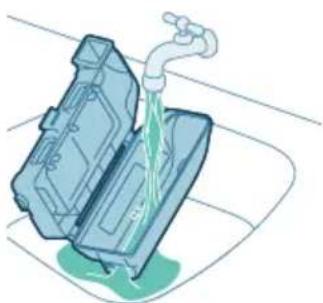
8 Loputage prügikasti kraani all.
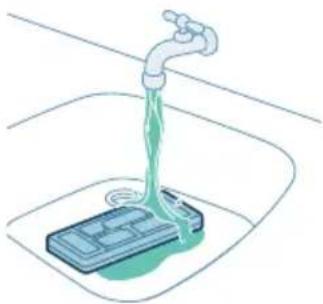
9 Puhastage pestav filter kraani all.
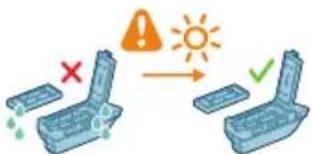
11 Asetage pestav filter tolmukambrisse.
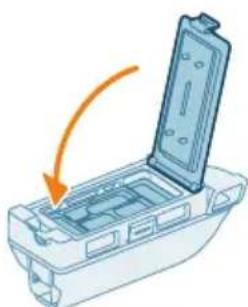
12 Sulgege pestava filtri kaas.
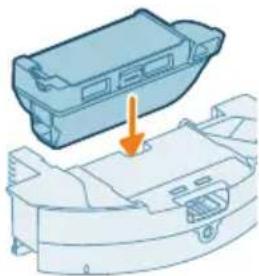
13 Sisestage tolmukamber puhastusmoodulisse.
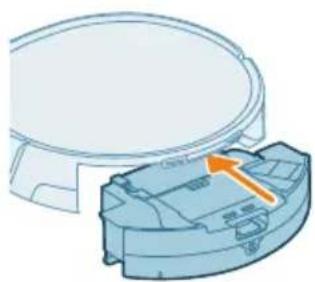
4 Loputage puhta vee paak kraani all.
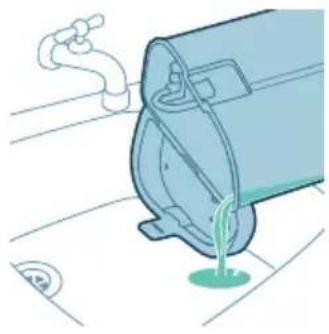
8 Avage musta vee paagi kaas.
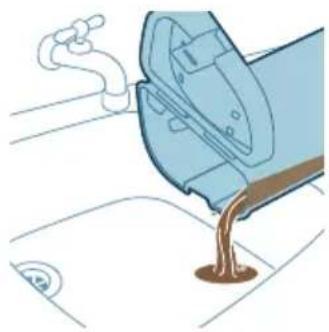
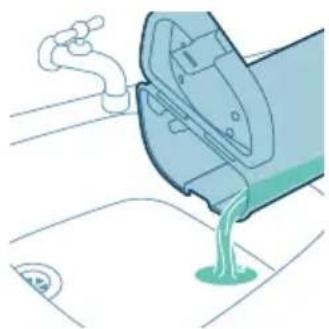
9 Valage vesi musta vee paagist kraanikaussi.
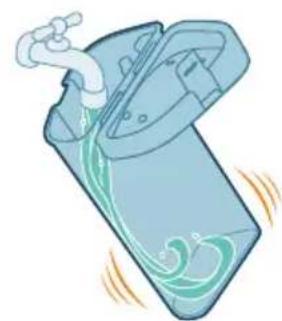
10 Loputage musta vee paak kraani all.
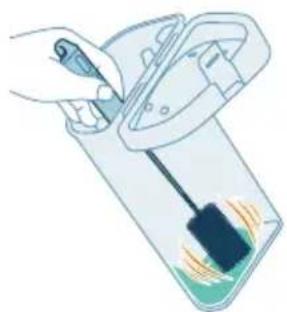
11 Puhastage musta vee paaki puhastusharjaga.
2 Asetage robot tagurpidi tasasele ja stabiilsele pinnale.
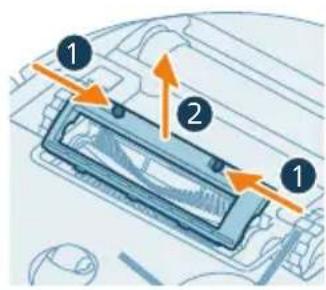
2 Asetage robot tagurpidi tasasele ja stabiilsele pinnale.
1 Avage jaama kaas.
4 Eemaldage tolmukott.
Roboti tuli vilgub oranžilt.

XV1492 Hoolduskomplekt, mis
5 Asetage robot tagurpidi tasasele ja stabiilsele pinnale.
6 Keerake akupesa kaane kruvid lahti ja eemaldage kate.
Cargar el robot
4 Sortez la brosse principale.
Punjenje robota
4 Pritisnite gumb za povratak. Robot vozi do pravilnog položaja na stanici.
5 Pričekajte da se robot potpuno napuni.
Ako je baterija ispražnjena, robot se neće sam odvesti u pravilan položaj. U tom slučaju, slijedite ove korake:
1 Okrenite robot u pravilan položaj i postavite ga na pod ispred stanice. Spremnik za vodu mora biti okrenut prema stanici.
2 Poravnajte kontakte za punjenje na spremniku za vodu robota s kontaktima za punjenje na stanici.
- Provjerite mobilnu Wi-Fi vezu.
- Provjerite jeste li odabrali pravi model.
- Provjerite jeste li unijeli ispravnu lozinku za Wi-Fi.
- Provjerite je li robot još uvijek u načinu postavljanja Wi-Fi veze.
Način na koji robotski usisavač radi
Izradite kartu
Na koji način radi mapiranje
Robot se kreće kroz prostorije, a laserska navigacija brzo skenira prostorije kako bi izradila kartu poda.
Alat za uređivanje karte
U aplikaciji možete upotrebljavati alat za uređivanje karte za:
![graph TD A["Room 1"] --> B["Room 2"] B --> C["Room 3"] C --> D["Room 4"] D --> E["Room 5"] E --> F["Room 6"] F --> G["Room 7"] G --> H["Room 8"] H --> I["Room 9"] I --> J["Room 10"] style A fill:#cce5ff,stroke:#333 style B fill:#cce5ff,stroke:#333 style C fill:#cce5ff,stroke:#333 style D fill:#cce5f…](/content/2026/04/715643/images/2b9b2e3849a2622022073416d5c2c28f66c419a4cc59807a6d52472d7549827c.jpg)
1 Otvorite poklopac stanice.
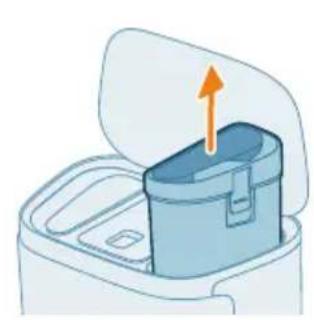
3 Otvorite poklopac spremnika za čistu vodu.

4 Ulijte vodu u spremnik za čistu vodu. Nemojte premašiti oznaku razine vode MAX (maksimalno).
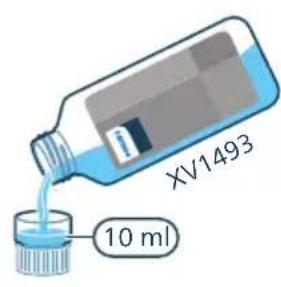
5 Mogućnost: dodajte 10 ml sredstva za čišćenje podova Philips XV1493 u spremnik za čistu vodu.
6 Zatvorite poklopac spremnika za čistu vodu.
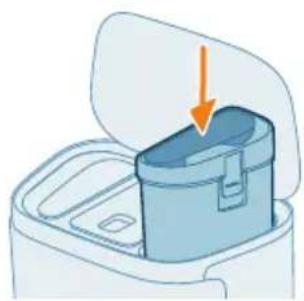
7 Vratite spremnik za čistu vodu natrag u stanicu.
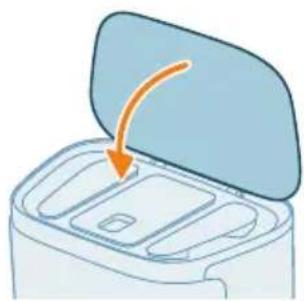
8 Zatvorite poklopac stanice.
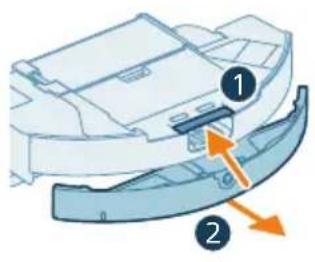
2 Uklonite spremnik za prljavu vodu robota iz modula za čišćenje.
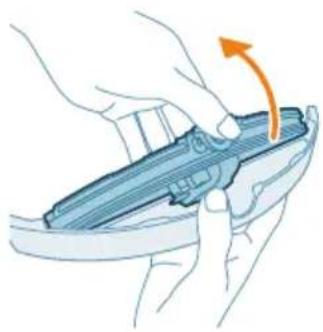
3 Uhvatite spremnik za prljavu vodu objema rukama, pritisnite okrugli gumb na poklopcu i podignite poklopac.
4 Operite spremnik za prljavu vodu pod mlazom vode iz slavine s pomoću pribora za čišćenje.
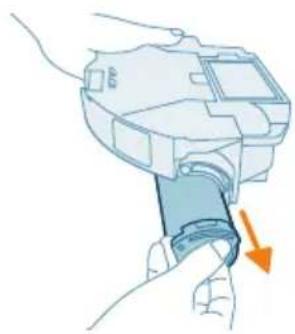
5 Uklonite valjkastu krpu iz modula za čišćenje.
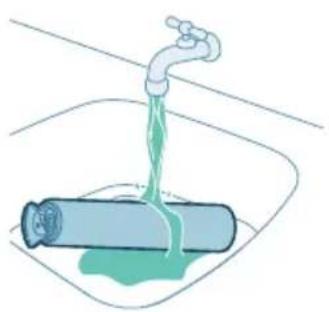
6 Valjkastu krpu operite pod mlazom vode iz slavine.
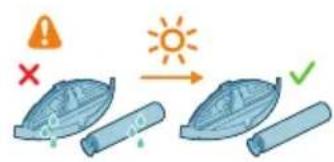
7 Pustite da se valjkasta krpa i spremnik za prljavu vodu potpuno osuše na suncu ili zraku. Nemojte ih ponovno sastavljati dok su mokri.
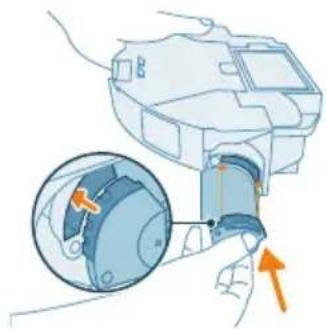
9 Umetnite spremnik za prljavu vodu u modul za čišćenje.
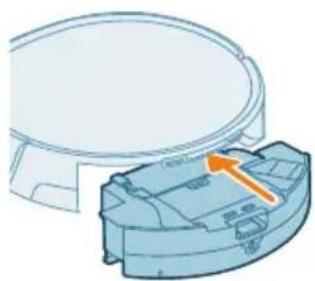
10 Vratite modul za čišćenje natrag u robot.
Čišćenje perivog filtra i spremnika za prašinu
i Napomena: Perivi filtar i spremnik za vodu nemojte čistiti deterdžentom za čišćenje. Koristite samo vodu iz slavine.
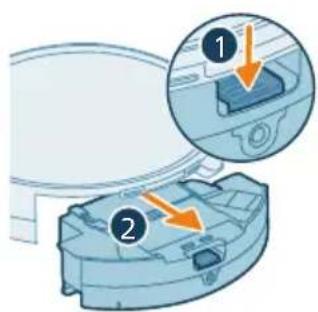
1 Pritisnite gumb za otpuštanje i uklonite modul za čišćenje iz robota.
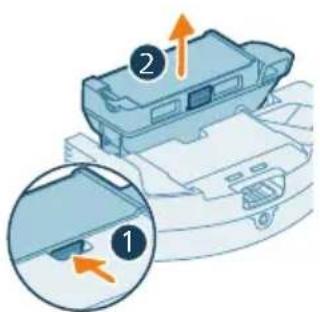
2 Izvadite spremnik za prašinu iz modula za čišćenje.
5 Otvorite poklopac perivog filtra.
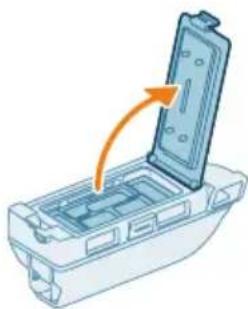
6 Izvadite perivi filtar iz spremnika za prašinu.
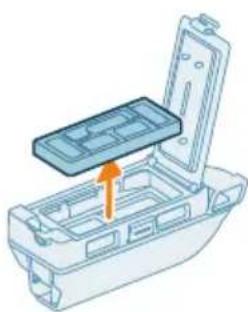
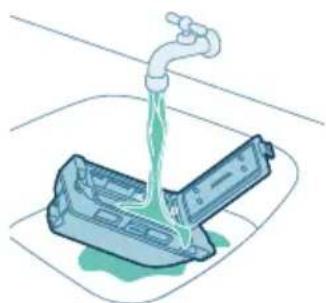
8 Isperite spremnik za prašinu pod mlazom vode.
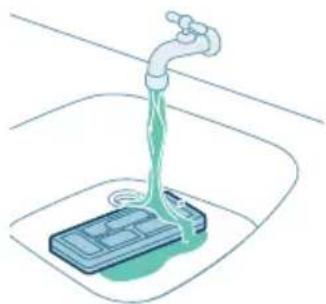
9 Operite perivi filtar pod mlazom vode iz slavine.
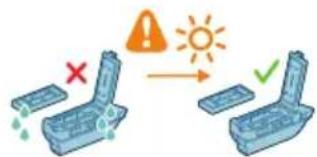
11 Umetnite perivi filtar u spremnik za prašinu.
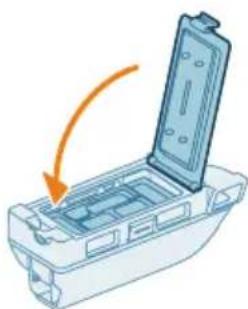
12 Zatvorite poklopac perivog filtra.
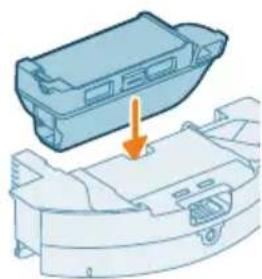
13 Umetnite spremnik za prašinu u modul za čišćenje.
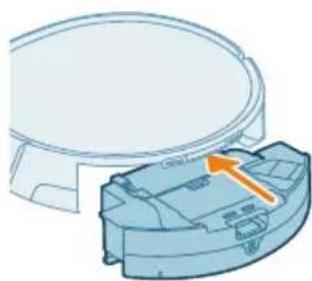
14 Umetnite modul za čišćenje u robot.
Čišćenje spremnika za vodu iz stanice
i Napomena: Nemojte čistiti spremnike za vodu deterdžentom. Koristite samo vodu iz slavine.
1 Otvorite poklopac stanice.
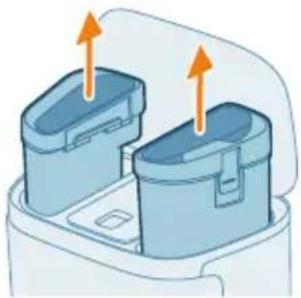
2 Uklonite i spremnik za čistu vodu i spremnik za prljavu vodu iz stanice.
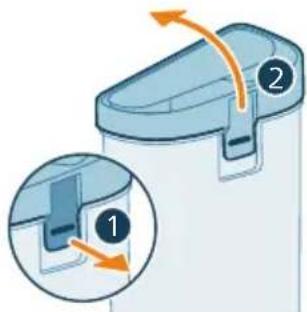
3 Otvorite poklopac spremnika za čistu vodu.
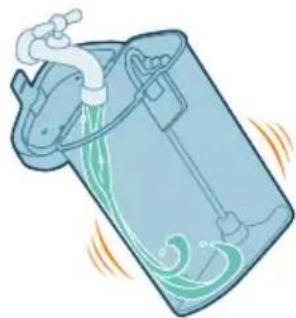
4 Isperite spremnik za čistu vodu pod mlazom vode iz slavine.
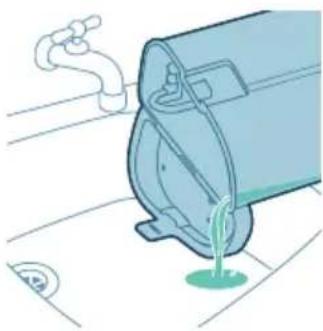
8 Otvorite poklopac spremnika za prljavu vodu.
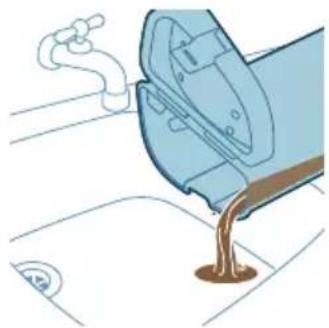
9 Izlijte vodu iz spremnika za prljavu vodu u odvod.
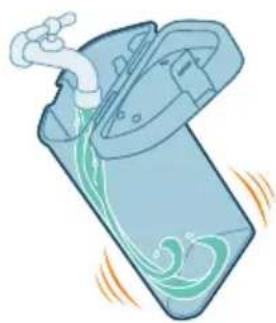
10 Isperite spremnik za prljavu vodu pod mlazom vode iz slavine.
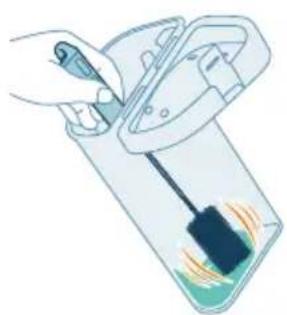
11 Operite spremnik za prljavu vodu četkom za čišćenje.
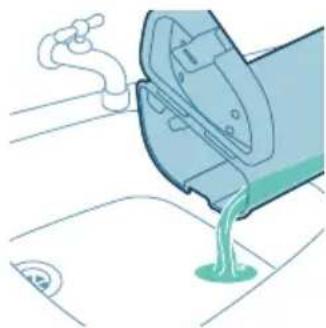
12 Izlijte svu vodu preostalu u spremniku za prljavu vodu.
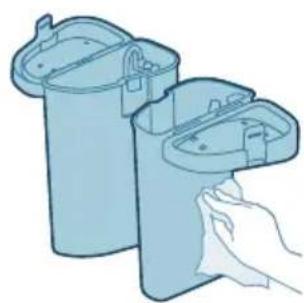
13 Posušite vanjski dio spremnika za vodu krpom.
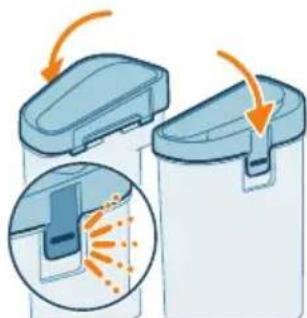
14 Zatvarajte poklopac spremnika za vodu sve dok se ne začuje zvuk klik.
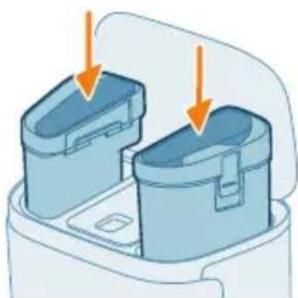
15 Umetnite oba spremnika za vodu u stanicu.
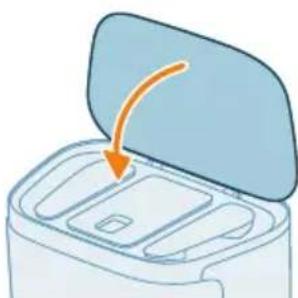
16 Zatvorite poklopac stanice.
1 Izvadite modul za čišćenje iz robota.
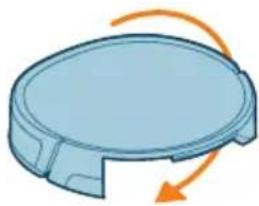
2 Robot postavite naopako na ravnu i stabilnu površinu.
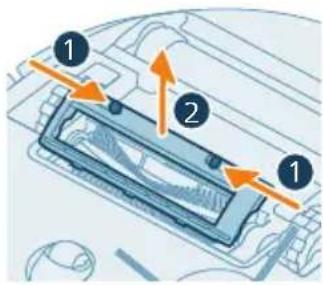
5 Odvojite alat za rezanje s alat za čišćenje četke.
10 Postavite jezičce poklopca četke u odgovarajuće ureze.
11 Gurnite poklopac četke.
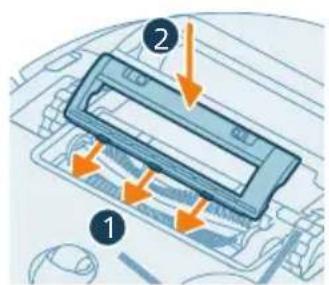
1 Izvadite modul za čišćenje iz robota.
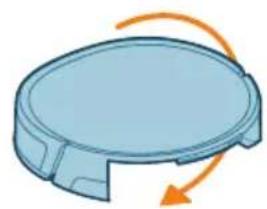
2 Robot postavite naopako na ravnu i stabilnu površinu.
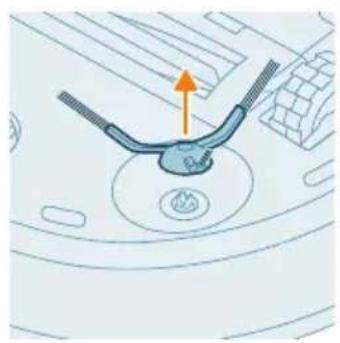
3 Uklonite bočnu četku.
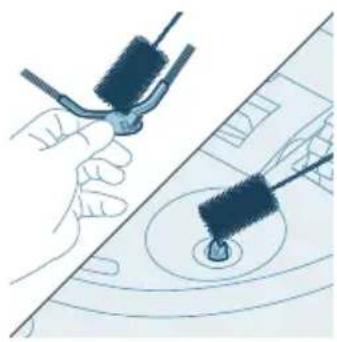
4 Pomoću četke s mekim vlaknima (npr. četkice za zube) uklonite prašinu i nakupine s bočne četke i robota.
5 Pričvrstite bočnu četku tako da je utisnete u točan položaj (dok ne čujete škljocaj) na donjem dijelu robota.
1 Izvadite modul za čišćenje iz robota.
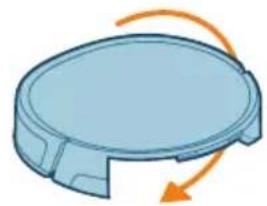
2 Robot postavite naopako na ravnu i stabilnu površinu.


1 Iskopčajte stanicu iz zidne utičnice.
2 Za čišćenje dijelova upotrebljavajte meku, suhu i neabrazivnu krpu.
1 Otvorite poklopac stanice.
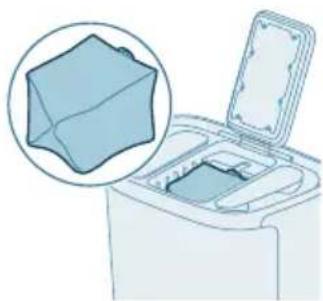
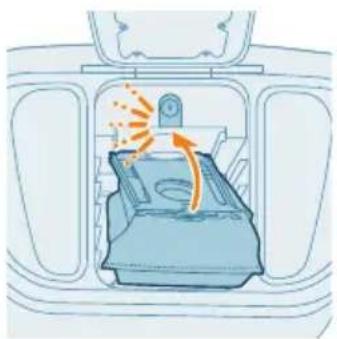
3 Pritisnite gumb za otpuštanje i pogurnite držač vrećice u stranu.
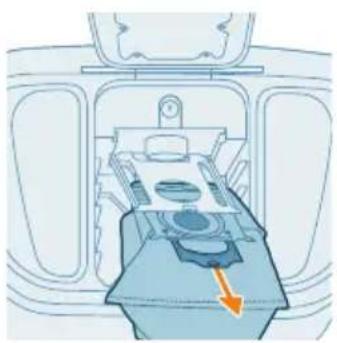
5 Kliznim potezom umetnite kartonski dio nove vrećice za prašinu u držač vrećice.
Robot se nalazi u načinu rada „usisavanje”.
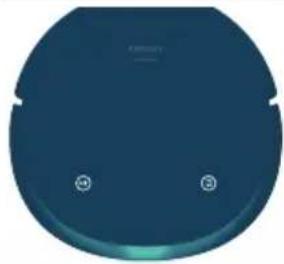
Robot se nalazi u načinu rada „brisanje”.
Robot je neispravan. Obratite se službi za potrošače u svojoj državi.
Spremnik za prljavu vodu je pun.
Ispraznite spremnik za prljavu vodu.
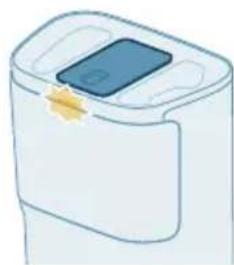
4 Izvadite modul za čišćenje iz robota.
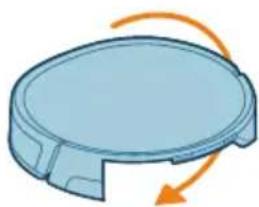
5 Robot postavite naopako na ravnu i stabilnu površinu.
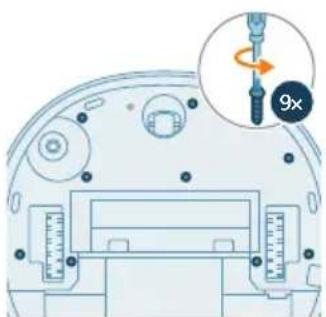
6 Odvrnite vijke poklopca na odjeljku za baterije i uklonite poklopac.
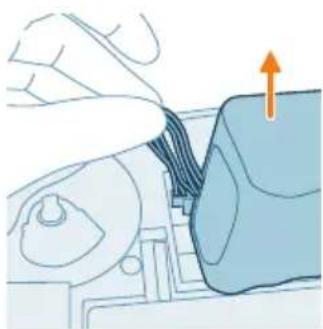
7 Izvadite punjivu bateriju iz odjeljka.
2 Capovolgete il robot su una superficie piana e stabile.
2 Capovolgete il robot su una superficie piana e stabile.

- CONTENTS
- INTRODUCTION
- PRODUCT OVERVIEW
- BEFORE FIRST USE
- PREPARING FOR USE
- INSTALL THE STATION
- INSTALL THE SIDE BRUSH
- CHARGING THE ROBOT
- DOWNLOAD THE APP, REGISTER, AND CONNECT TO WI-FI
- APP CONTENT
- DOWNLOADING THE APP
- REGISTERING A PERSONAL ACCOUNT
- SETTING UP THE WI-FI CONNECTION
- AUDIBLE SIGNALS
- SET THE LANGUAGE OF THE VOICE ALERTS
- HOW YOUR ROBOT WORKS
- CREATE A MAP
- HOW MAPPING WORKS
- MAP EDITOR
- PREPARING THE ROOM FOR MAPPING
- CREATE AND EDIT A MAP
- TELL YOUR ROBOT WHERE NOT TO CLEAN BY ADDING ZONES
- VIRTUAL WALL AND NO-GO ZONE
- NO-MOP ZONE
- NO-VAC ZONE
- HOW YOUR ROBOT CLEANS
- AREA DESCRIPTION
- SET CLEANING MODE, ADJUST SETTINGS AND CLEANING ORDER
- CLEANING MODES
- MODE SETTINGS
- SETTING DESCRIPTION
- IMPORTANT: DO NOT ADD HOT WATER TO THE WATER TANK
- CLEANING ORDER
- USING YOUR ROBOT
- PREPARING FOR A CLEANING RUN
- START YOUR FIRST CLEANING SESSION VIA THE APP
- START
- STOP
- USING THE ROBOT WITHOUT THE APP
- YOUR ROBOT'S CLEANING PATTERN
- RETURNING TO THE STATION
- AUTO RECHARGE AND RESUME
- CLEANING AND MAINTENANCE
- WHEN TO DO MAINTENANCE
- CLEANING THE ROLLING MOP AND WATER TANK IN THE ROBOT
- CLEANING THE WASHABLE FILTER AND DUST BIN
- CLEANING THE WATER TANKS IN THE STATION
- CLEANING THE MAIN BRUSH
- CLEANING THE SIDE BRUSH
- CLEANING THE MAIN WHEELS AND THE FRONT CASTER WHEEL
- CLEANING THE SENSORS, CONTACT POINTS AND IR SIGNAL WINDOW
- REPLACING THE DUST BAG
- LONG TERM STORAGE
- INDICATOR LIGHT SIGNALS AND THEIR MEANING
- SIGNAL MEANING OF SIGNAL
- RESET/RESTORE THE ROBOT
- REPLACEMENT
- ORDERING ACCESSORIES
- REMOVING THE RECHARGEABLE BATTERY
- WARRANTY AND SUPPORT
- DISPOSAL AND RECYCLING
- TROUBLESHOOTING
- LSI
- PASANG SIKAT SAMPING
- MENGUNDUH APLIKASI
- MEMBERSIHKAN SIKAT SAMPING
- MENGECAS ROBOT
- MEMBERSIHKAN BERUS UTAMA
- JAK ROBOT FUNGUJE
- VYTVOŘENÍ MAPY
- SÅDAN FUNGERER DIN ROBOT
- OPRET ET KORT
- 232 DEUTSCH
- ROBOTI LAADIMINE
- 272 EESTI
- CARGAR EL ROBOT
- PUNJENJE ROBOTA
- NAČIN NA KOJI ROBOTSKI USISAVAČ RADI
- IZRADITE KARTU
- NA KOJI NAČIN RADI MAPIRANJE
- ALAT ZA UREĐIVANJE KARTE
- ČIŠĆENJE PERIVOG FILTRA I SPREMNIKA ZA PRAŠINU
- ČIŠĆENJE SPREMNIKA ZA VODU IZ STANICE
Brand : PHILIPS
Model : HomeRun 9000 XU9100
Category : Robot vacuum