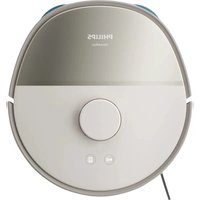
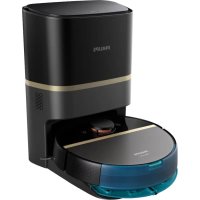
HomeRun 5000 XU5000 - Robot vacuum PHILIPS - Free user manual and instructions
Find the device manual for free HomeRun 5000 XU5000 PHILIPS in PDF.


| Product type | Robot vacuum |
| Brand | Philips |
| Model | HomeRun 5000 XU5000 |
| Power supply | Mains adapter, rechargeable lithium-ion battery |
| Battery life | Varies by mode (approx. 100 minutes) |
| Dustbin capacity | Approx. 400 ml (estimate) |
| Water tank capacity | Approx. 200 ml (estimate) |
| Cleaning modes | Vacuum and mop, Vacuum only, Mop only, Silent, Intensive |
| Connectivity | Wi-Fi 2.4 and 5 GHz, Philips HomeRun app |
| Mapping | Laser navigation (LiDAR), map creation, up to 5 maps |
| Avoidance zones | Virtual walls, no-go zones, dry zones |
| Sensors | Drop detection, infrared, LDS, obstacle detection |
| Noise level | Approx. 55-65 dB (estimate) |
| Maintenance | Washable filter, washable rotating wipes, cleanable brushes |
| Spare parts | Rotating wipes (XV1452), maintenance kit (XV1453), floor cleaner (XV1493) |
| Warranty | 2 years |
| Additional features | Resume cleaning, child lock, multilingual voice alerts |
Frequently Asked Questions - HomeRun 5000 XU5000 PHILIPS
User questions about HomeRun 5000 XU5000 PHILIPS
0 question about this device. Answer the ones you know or ask your own.
Ask a new question about this device
Download the instructions for your Robot vacuum in PDF format for free! Find your manual HomeRun 5000 XU5000 - PHILIPS and take your electronic device back in hand. On this page are published all the documents necessary for the use of your device. HomeRun 5000 XU5000 by PHILIPS.
USER MANUAL HomeRun 5000 XU5000 PHILIPS
![graph TD A["Welcome, Get started!"] --> B["home.id/welcome"] B --> C["Registration and Benefits"] B --> D["Download app"] B --> E["Quick start"] B --> F["Digital manual"]](/content/2026/04/730722/images/c1e8c821efbc13eb8c0d89884798b182fbe9af24f8a0f5d78648a8e69dbd3024.jpg)
English 4
Bahasa Indonesia 41
Bahasa Melayu 79
Čeština 117
Dansk 154
Deutsch 191
Eesti 230
Español 267
Français 305
Hrvatski 344
Italiano 381
Latviešu 420
Lietuviškai 457
Magyar 495
Nederlands 533
Norsk 570
Polski 606
Português 644
Română 681
Shqip 719
Slovenščina 758
Slovensky 795
Srpski 832
Suomi 869
Svenska 906
Tiếng Việt 943
Türkçe 979
Ελληνικά 1016
Български 1057
Македонски 1097
Русский 1136
Українська 1176
Қазақша 1214
ภาษาไทย 1252
简体中文 1294
繁體中文 1334
한국어 1369
1406 العربية
Contents
Introduction 5
Product overview 5
Before first use 5
Preparing for use 6
Install the station 6
Install the side brush 7
Charging the robot 7
Download the app, register, and connect to Wi-Fi 7
Audible signals 9
Set the language of the voice alerts ____ 9
How your robot works 10
Create a map 10
Tell your robot where not to clean by adding zones ____ 11
How your robot cleans 12
Set cleaning mode, adjust settings and cleaning order 12
Using your robot 14
Preparing for a cleaning session 14
Start your first cleaning session via the app 17
Using the robot without the app 17
Your robot's cleaning pattern 18
Returning to the station 18
Auto recharge and resume 18
Cleaning and maintenance 18
When to do maintenance 18
Cleaning the rotary mop pad 19
Cleaning the water tank and dust bin 21
Cleaning the washable filter 24
Cleaning the main brush 27
Cleaning the side brush 28
Cleaning the main wheels and the front caster wheel 29
Cleaning the sensors, contact points and IR signal window 29
Long term storage 30
Indicator light signals and their meaning ____
Reset/restore the robot 31
Child lock 31
Replacement 32
Ordering accessories 32
Removing the rechargeable battery 32
Warranty and support 33
Disposal and recycling 34
Troubleshooting 34
Introduction
Congratulations on your purchase of a Philips HomeRun 5000 Series Robot vacuum cleaner! To get the most out of your robot and access all the advanced functions you can download and install the Philips HomeRun Robot App. You can also find support videos and frequently asked questions in the app or visit home.id.
Read the separate safety booklet carefully before you use the robot for the first time and save it for future reference.
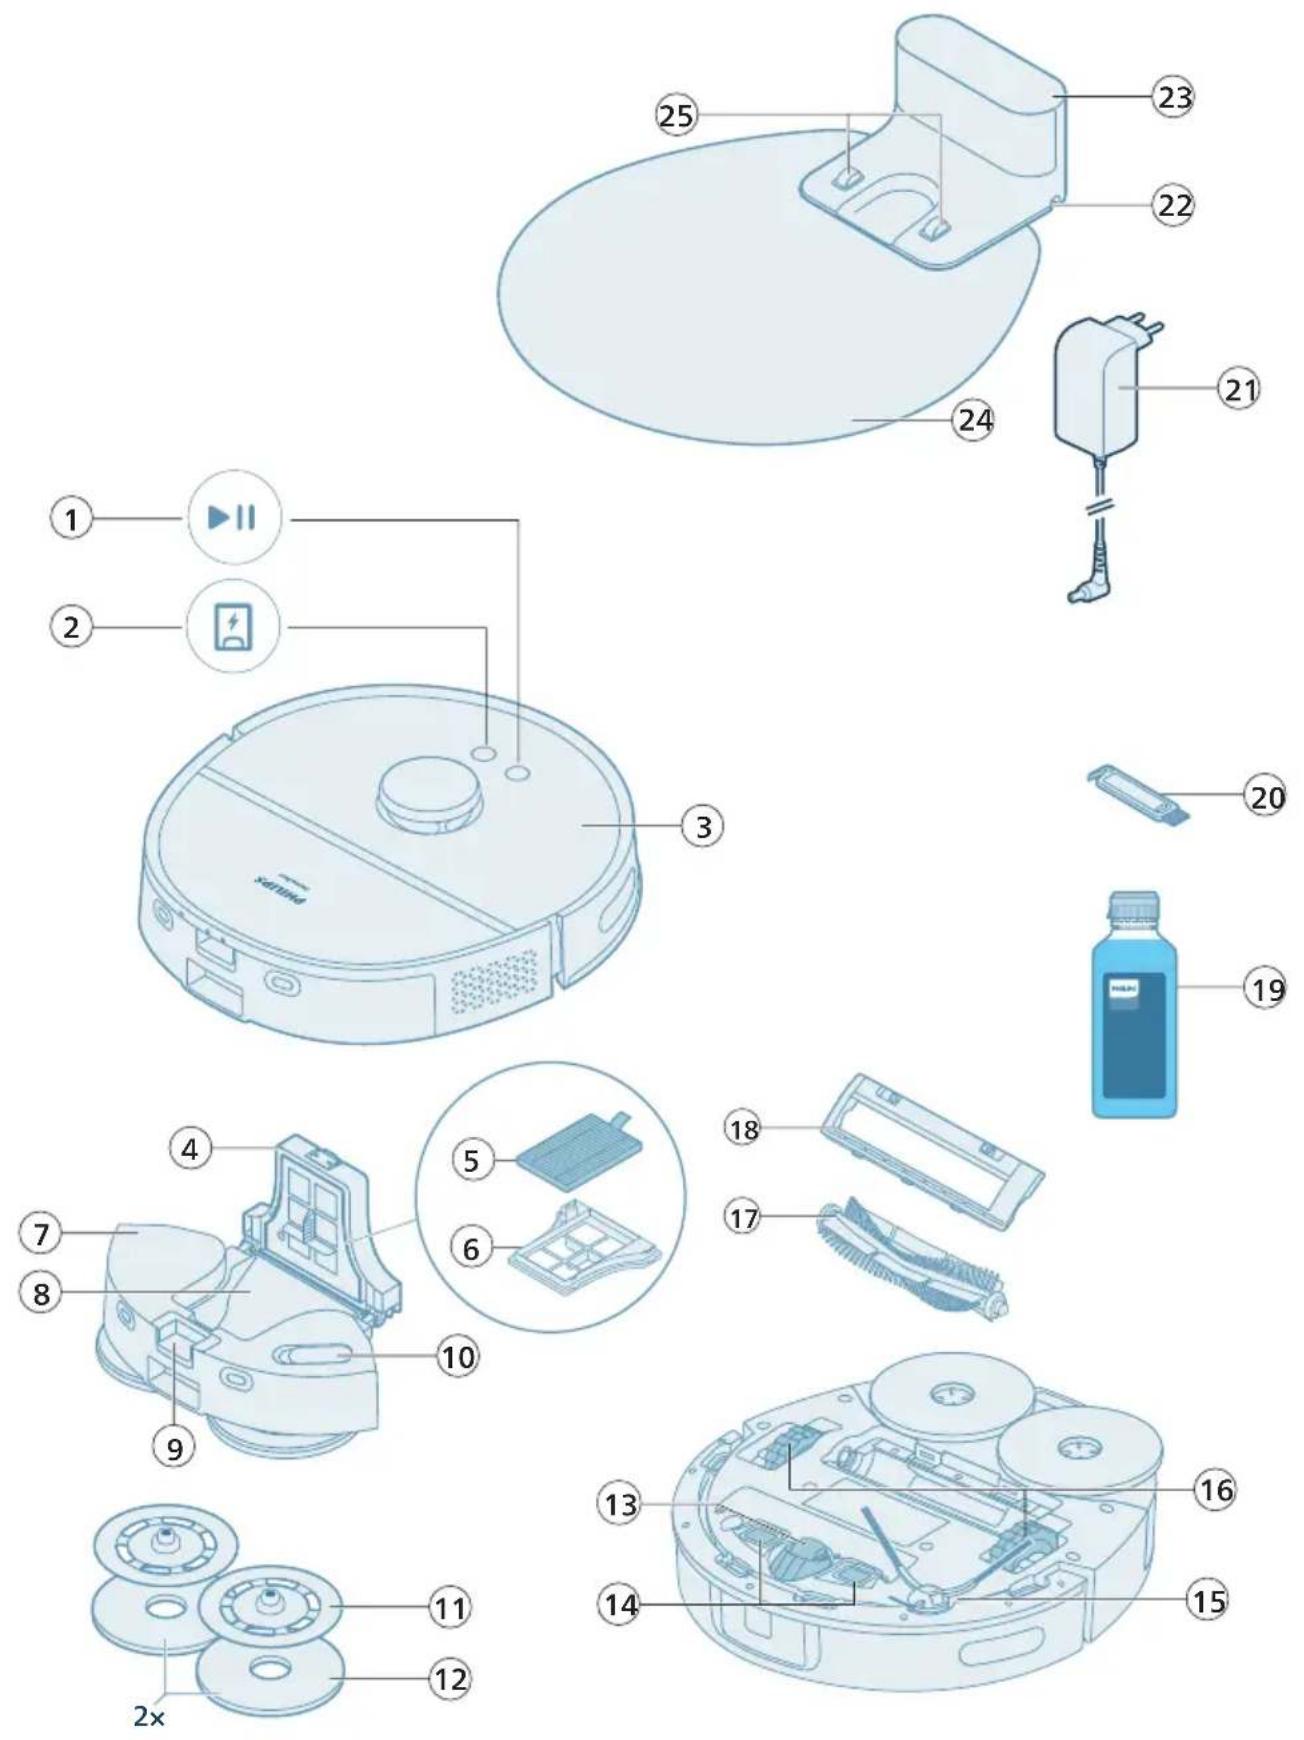
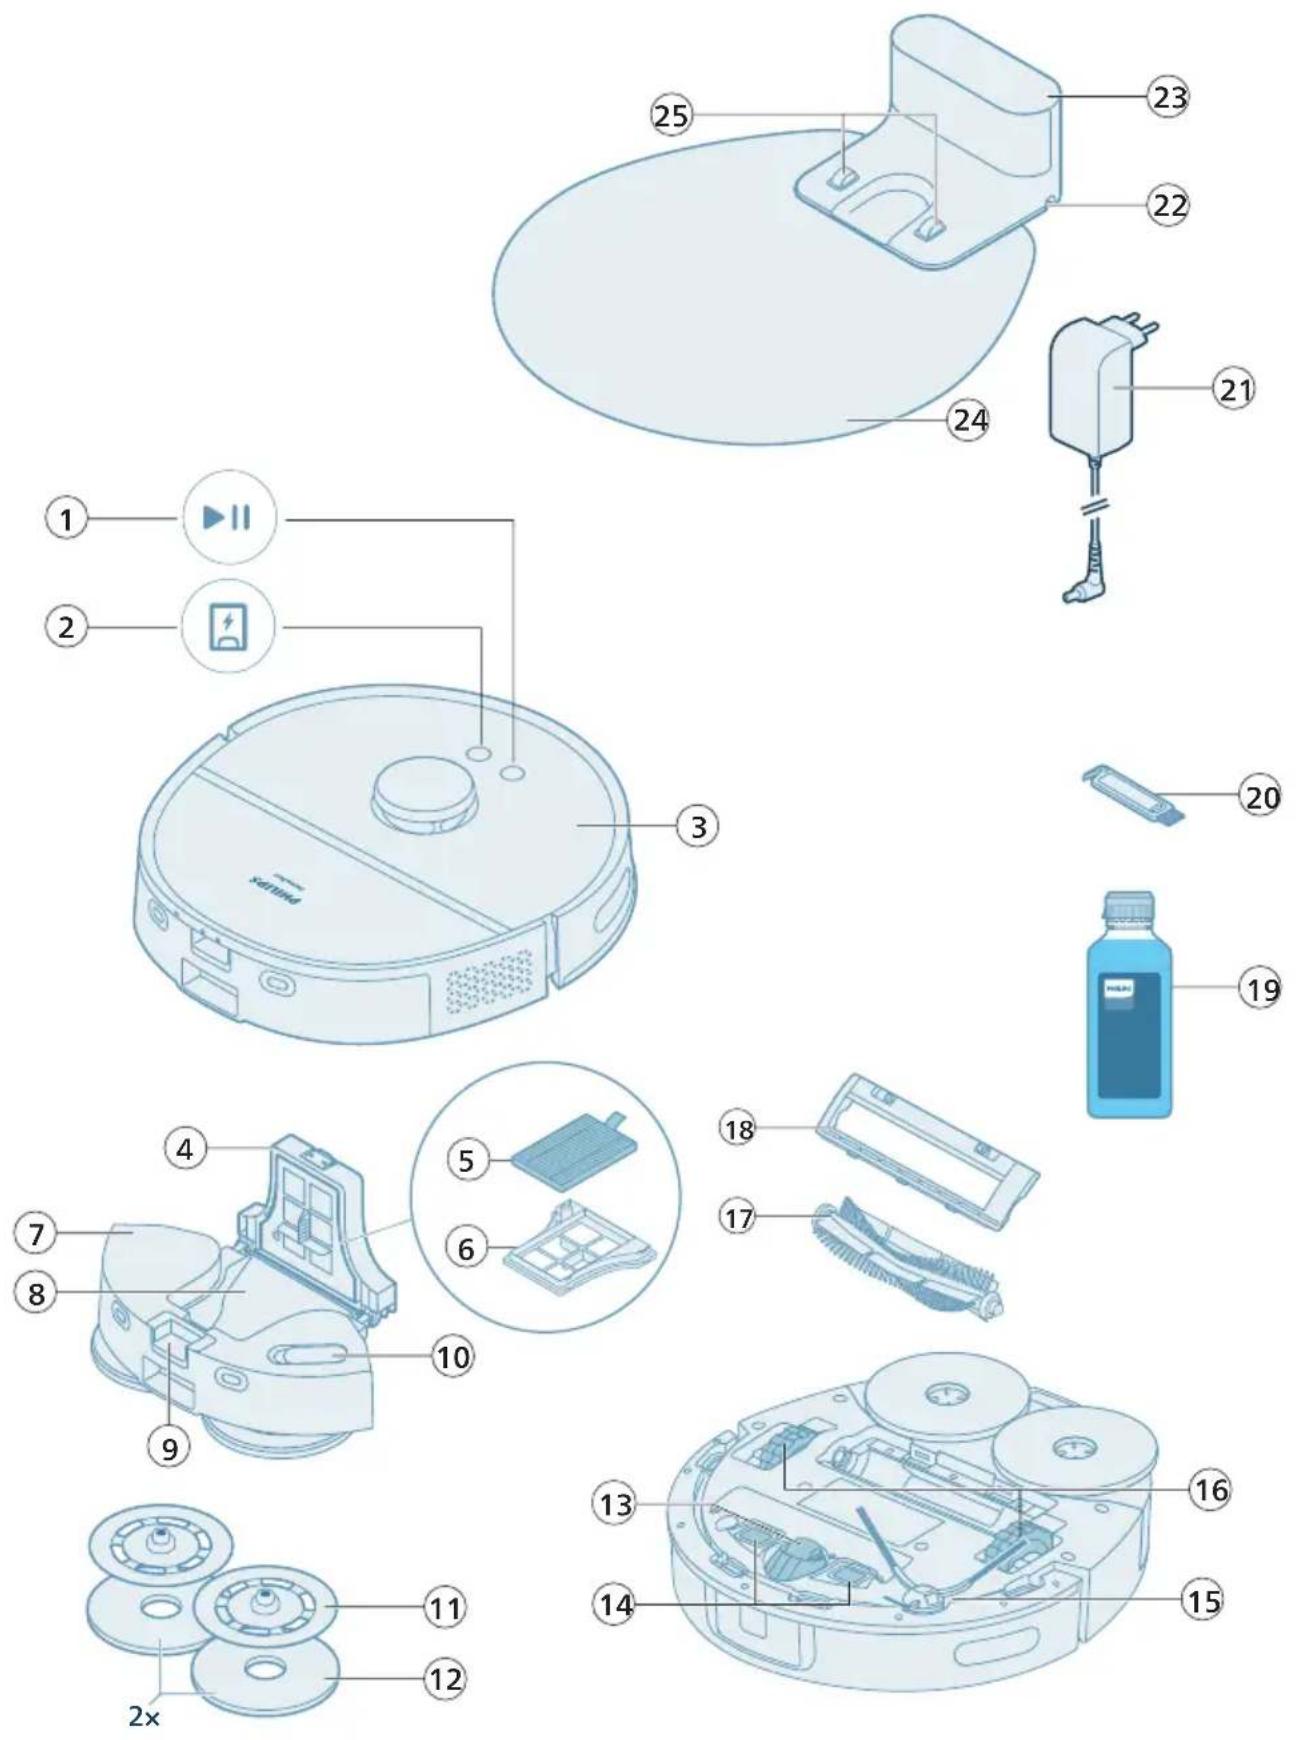
Product overview
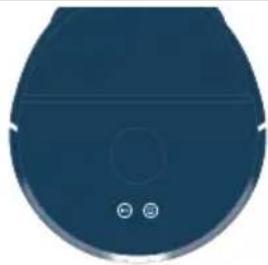
1 Start/stop button
2 Return button
3 Top cover
4 Dust bin lid
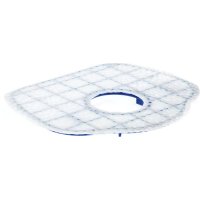
5 Washable filter
6 Filter casing
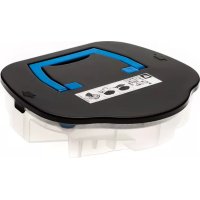
7 Cleaning module
8 Dust bin
9 Cleaning module release button
10 Water tank cap
11 Mop pad holder
12 Rotary mop pad
13 Front caster wheel
14 Charging contact points (robot)
15 Side brush
16 Main wheels
17 Main brush
18 Brush cover
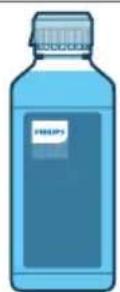
19 Philips floor cleaner XV1493
20 Cleaning tool
21 Adapter
22 Power cord socket
23 (Charging) station
24 Placemat
25 Charging contact points (station)
Before first use
1 Take the appliance out of the box and remove all packaging.
2 Remove the protection covers.
3 If you see any sign of visible damage, go to home.id or contact the Consumer Care Center in your country.
i Note: A small amount of clean water residue may be present inside the water tank. This is a result of factory quality checks. Rest assured, the device is thoroughly clean and safe for use.
Preparing for use
Tips for choosing the best location for installing the station:
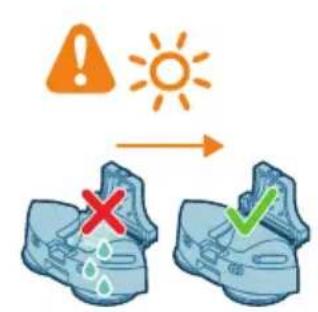
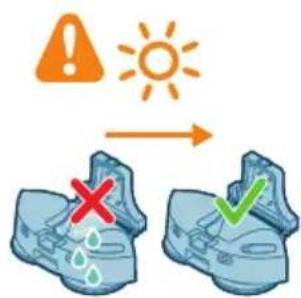
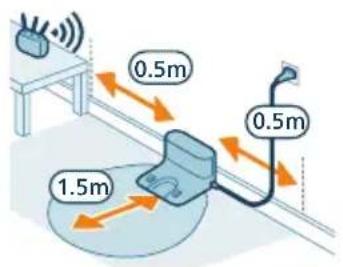
- Do not place the station in bright sunlight or under furniture. This will block the infrared signal that helps the robot find its way back to the station.
- Install the station on a level surface against a wall.
- Install the station on a hard floor.
- Do not place the station near stairs or a heat source (radiator).
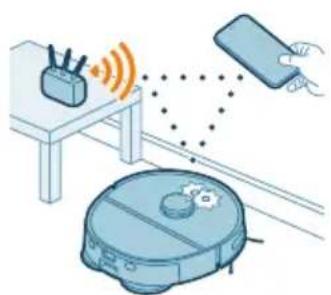
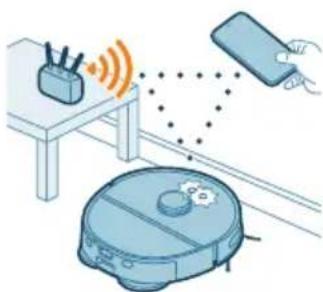
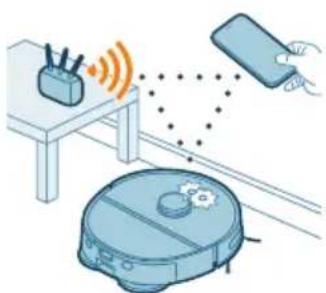
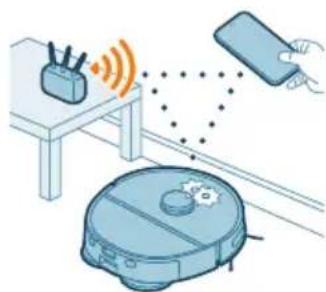
- Install in a location with good Wi-Fi coverage.
Install the station
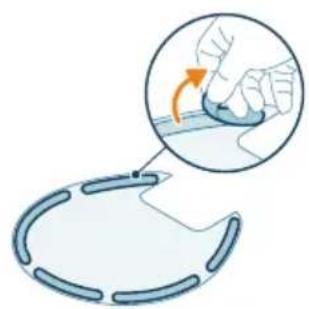
Install the station
1 Peel off the stickers on the back of the placemat.
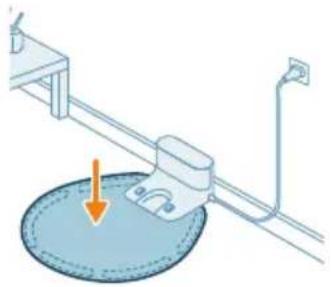
2 Turn the placemat to the front side and stick it firmly on the ground before placing the station on it.
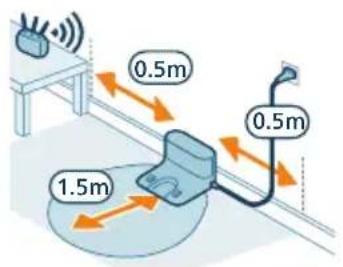
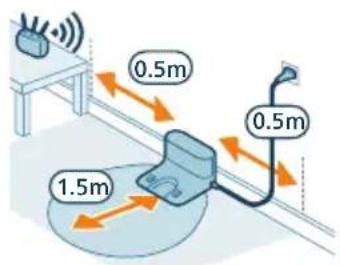
3 Install the station within the correct dimensions for placement.
i Note: Keep 0.5 meters of space on the sides of the station and 1.5 meters in front of the station.
4 Connect the station to the power supply.
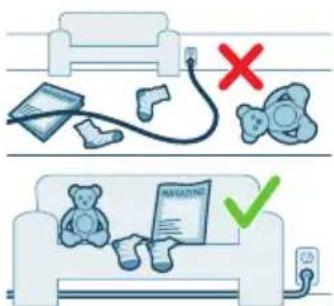
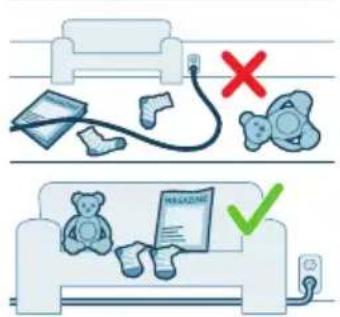
5 Make sure that the remaining part of the power cable is well concealed behind the station so that the robot cannot drive over it.
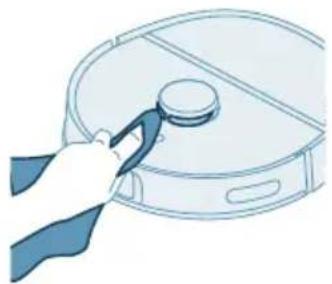
Install the side brush
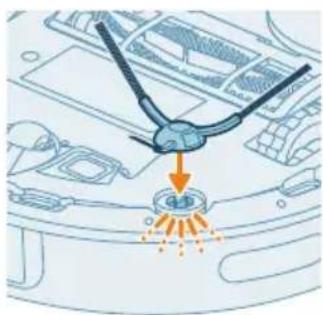
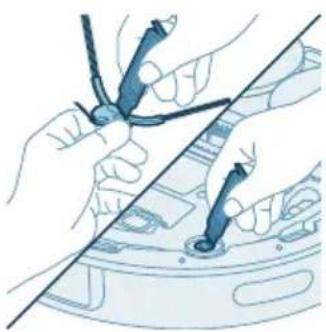
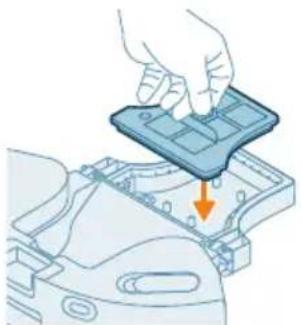
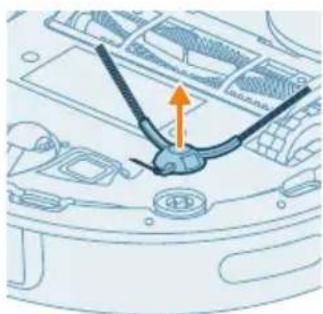
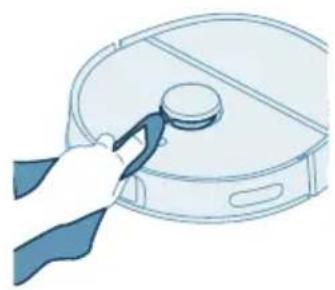
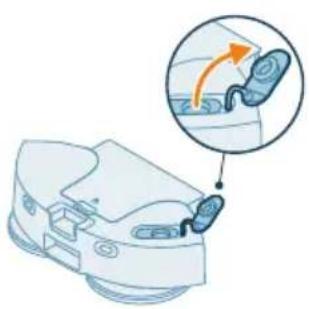
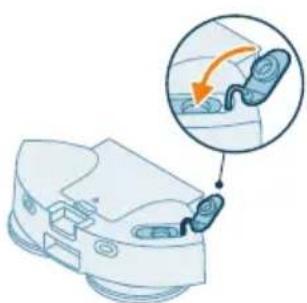
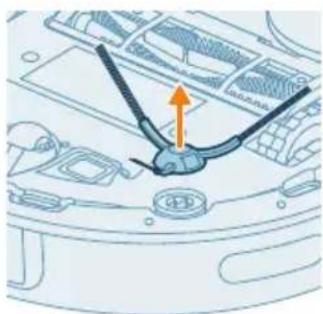
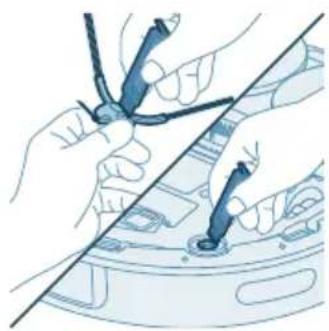
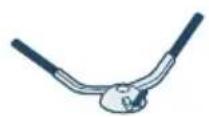
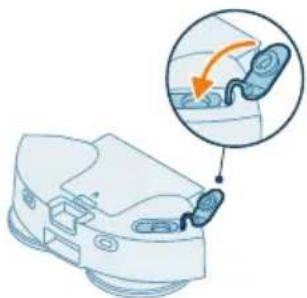
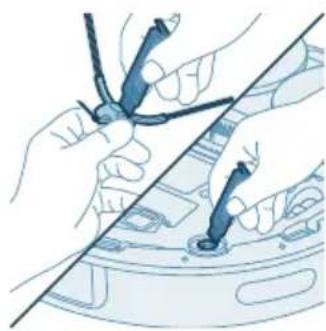
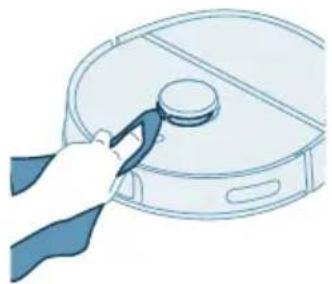
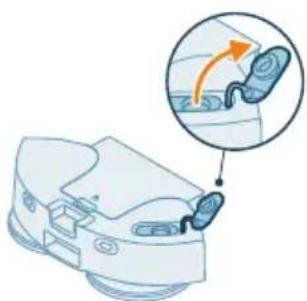
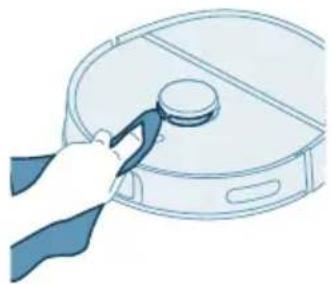
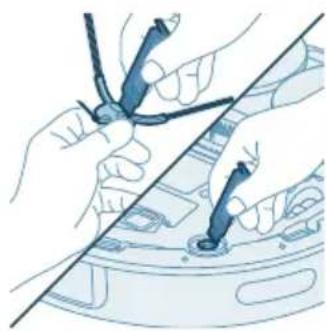
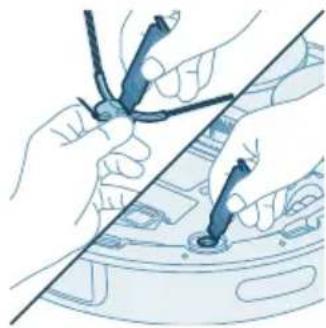
Attach the side brush by clicking it into the correct position on the bottom of the robot.
Charging the robot
![graph TD A["Device 1"] --> B["Component 2"] B --> C["Arrow from left to right"] style A fill:#f9f,stroke:#333 style B fill:#bbf,stroke:#333 style C fill:#dfd,stroke:#333](/content/2026/04/730722/images/84ffaf4e50fd880fe0c48d4b30c4ff9fef712a781a031d4b6b1fbd2e2e6b4143.jpg)
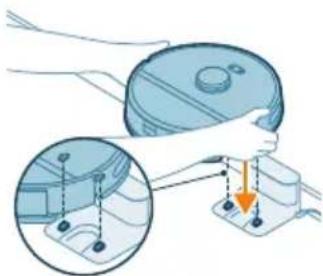
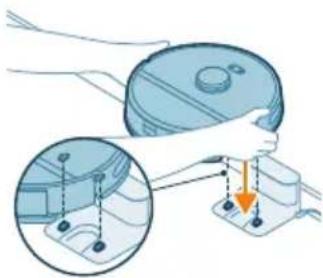
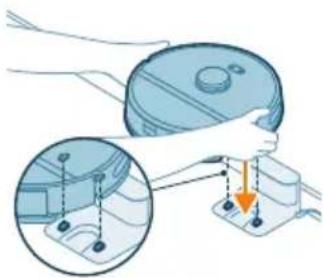
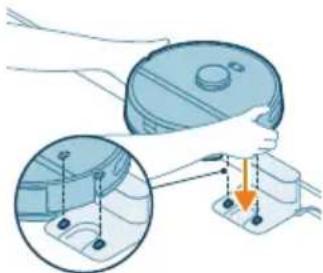
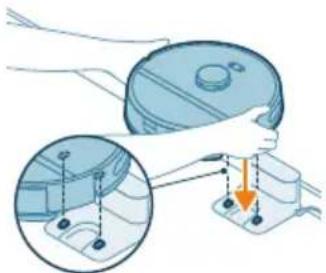
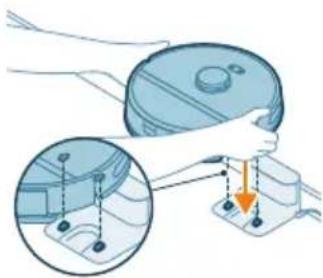
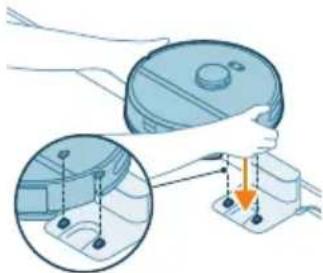
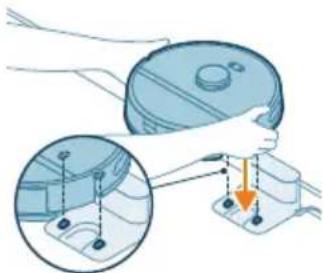
1 Turn the robot to its correct position and put the robot on the floor in front of the station.
i Note: Make sure buttons on the top cover are facing the station.
2 Make sure that the station is connected to the power supply.
3 Press the return button. The robot drives to the correct position in the station.
4 Wait until the robot is fully charged.
If the battery is empty, the robot will not drive itself to the correct position. In this case, follow the next steps:
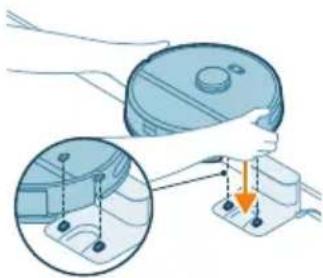
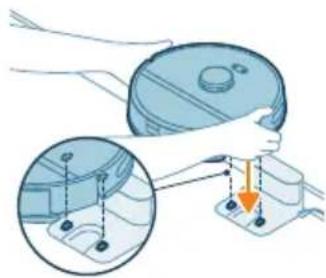
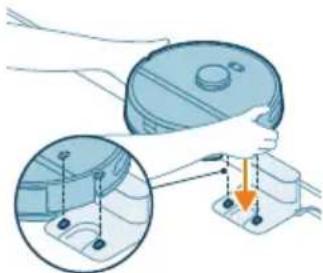
1 Turn the robot to its correct position and put the robot on the floor in front of the station.
i Note: Make sure buttons on the top cover are facing the station.
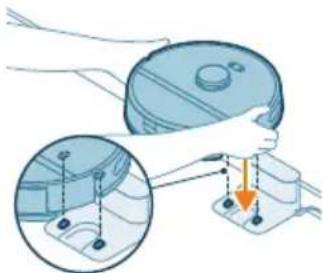
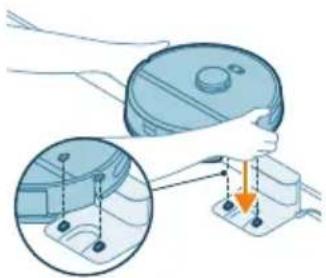
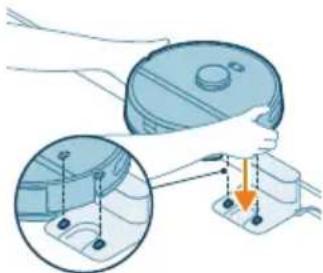
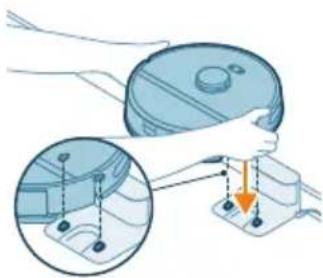
2 Align the charging contact points on the bottom of the robot with the charging contact points on the station.
3 Put robot on the station and make sure that the charging contacts on the bottom of the robot make contact with the charging contacts of the station.
i Note: Make sure that the robot is in its correct position and starts to charge.
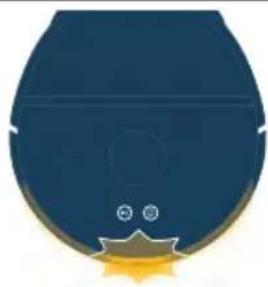
i Note: The buttons on the top cover of the robot will light up white (battery level: 15%–100%) or amber (battery level: <15%) when the robot starts charging. If the battery is empty, it may take a while before the robot indicates that it is charging.
4 Wait until the robot is fully charged.
Download the app, register, and connect to Wi-Fi
App content
The Philips HomeRun Robot App allows you to control your robot from anywhere. You can also manage settings and quickly access support.
With the app, you can:
- Create a map, or virtual floor plan, of your home.
- Select which rooms to clean.
- Switch between different cleaning modes and settings for each room.
- Monitor the cleaning session in real time and check the battery level.

- Receive notifications and alerts.
- Schedule a cleaning session.
- See the maintenance status and find replacement parts.
- Watch how-to-use videos.
- Access the full user manual.
- Find answers in the FAQs.
- Contact Consumer Care.
Downloading the app
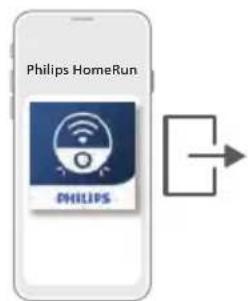
1 Scan the QR code on the left or on the packaging of the robot to download the Philips HomeRun Robot App.
Or:
Search for 'Philips HomeRun Robot App' in the Apple App Store or one of the Android App Stores.
2 Download and install the app.
3 Follow the instructions in the app.
Registering a personal account
You can register a personal account and benefit from the following advantages:
- Control the robot from more than one device, e.g. a smart phone.
- Save important data like customized cleaning plans for your home.
i Note: If you change your phone and you don't have an account, then you'll lose all customized cleaning plans.
i Important: Philips values and respects your privacy. A link to our privacy notice can be found in the app before registering.
Setting up the Wi-Fi connection
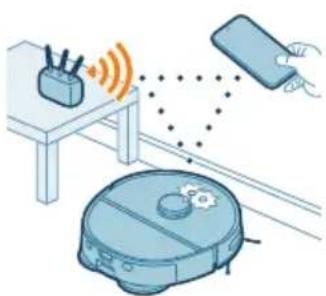
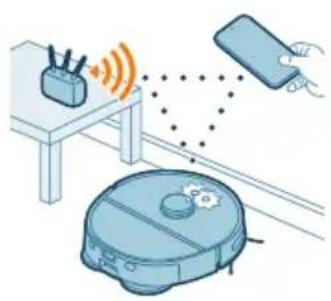
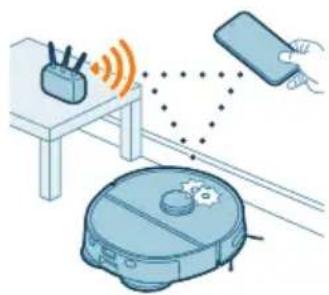
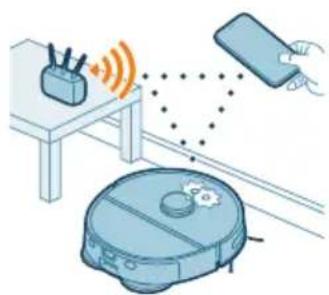
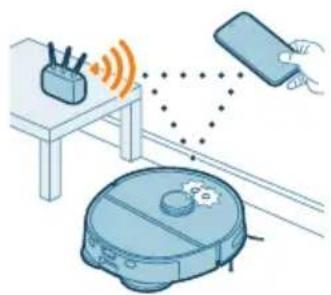
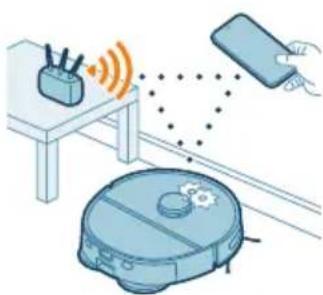
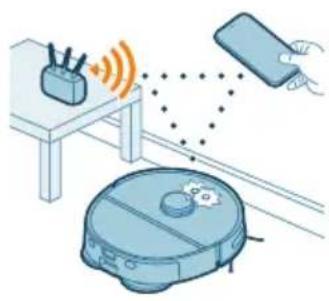
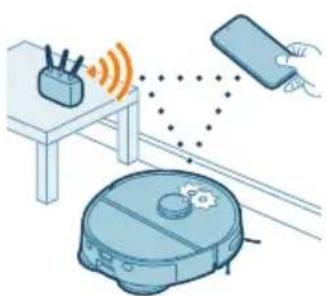
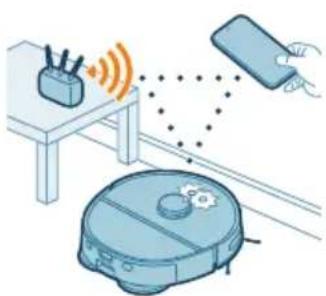
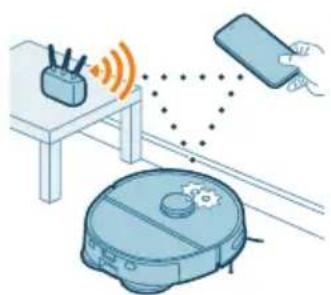
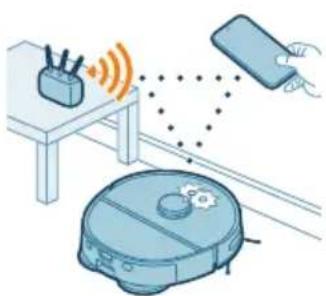
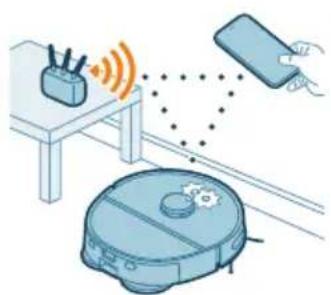
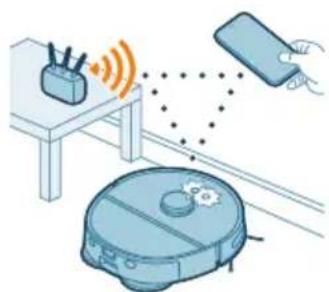
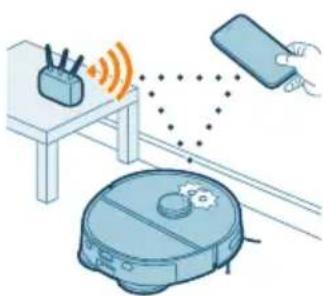
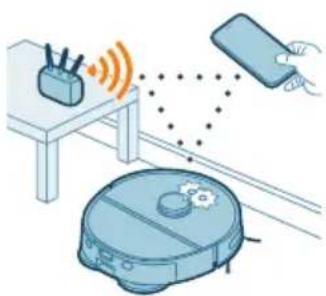
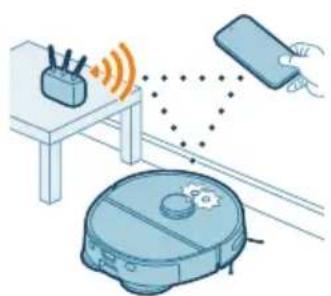
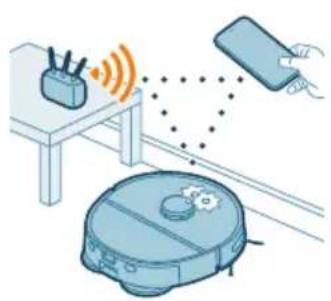
Before you begin: make sure that the robot and your mobile device have good Wi-Fi coverage, and that your mobile device is connected to the Wi-Fi network that you would like the robot to be connected to.
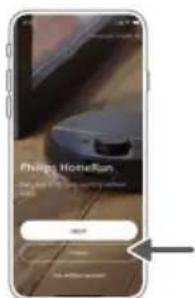
1 Press the 'Add robot' button in the app and follow the instructions.
2 Pair the robot with the Wi-Fi in the app. Make sure that you have your Wi-Fi password at hand.
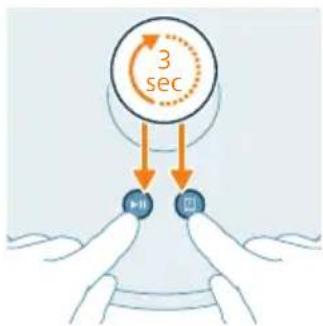
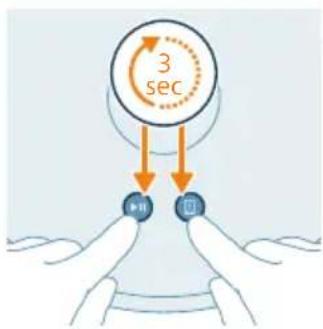
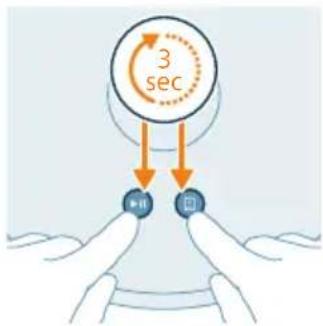
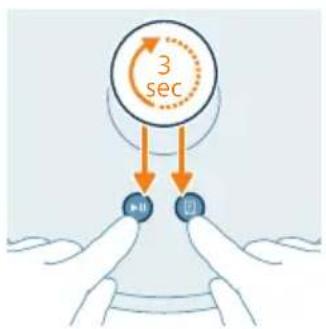
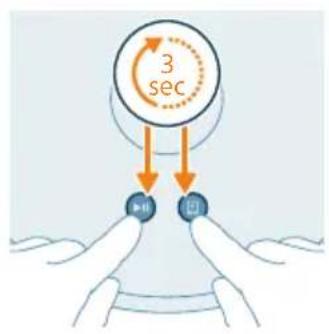
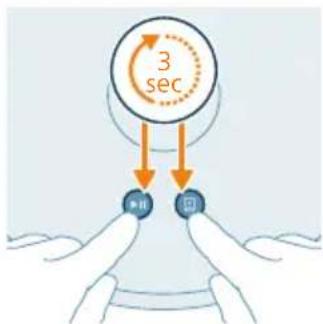
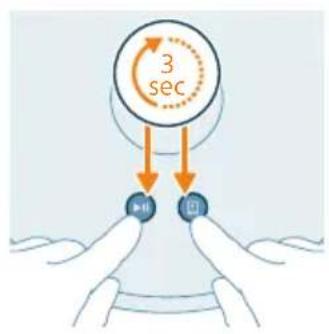
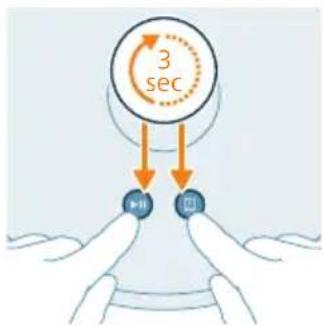
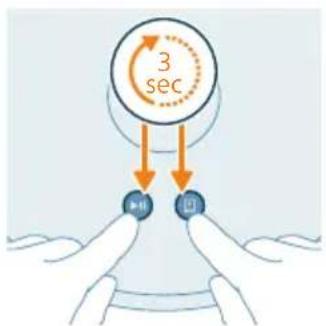
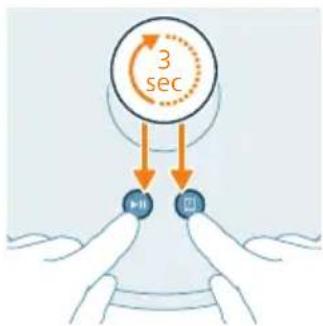
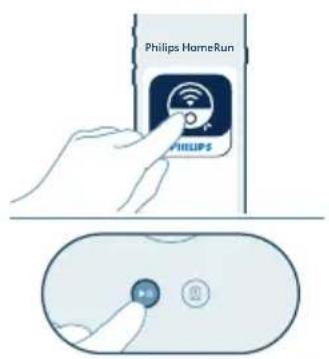
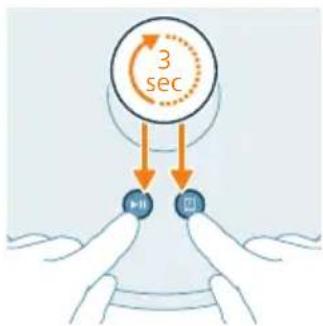
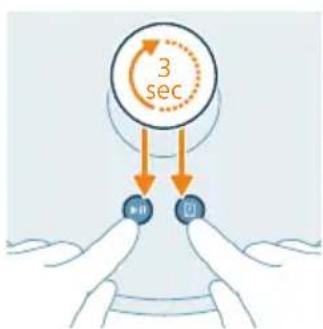
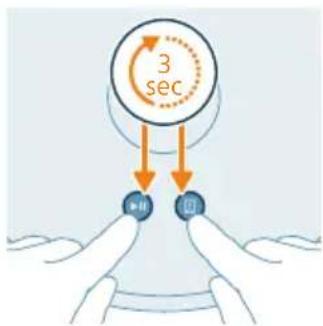
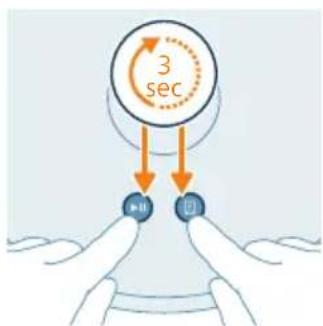
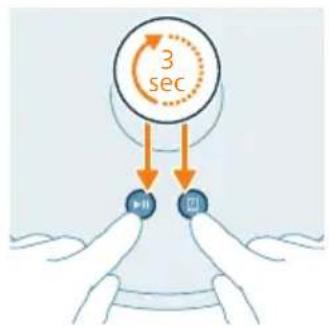
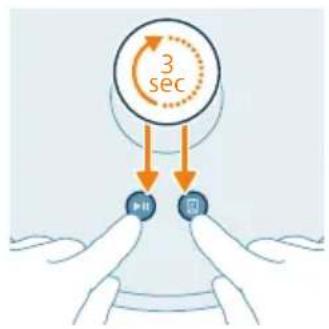
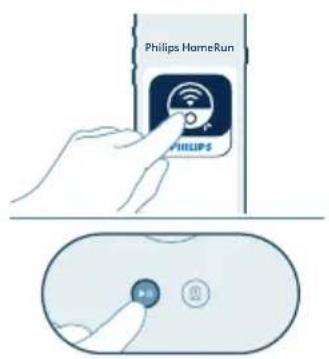
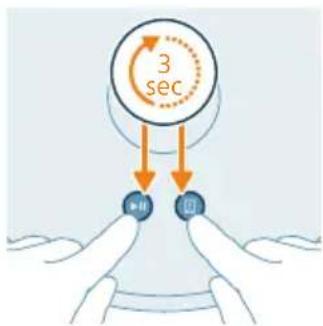
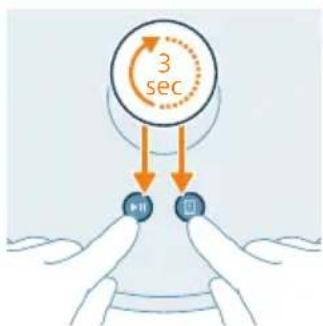
3 Press and hold the start/stop button and return button at the same time for three seconds. The light on the front edge of the robot will flash white to indicate that the robot is in Wi-Fi set-up mode.
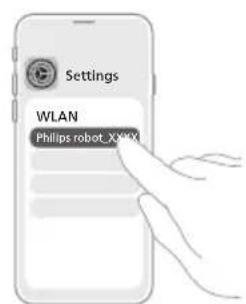
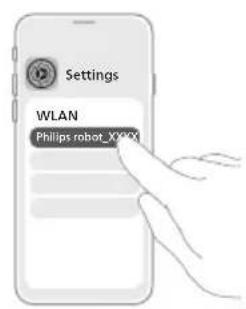
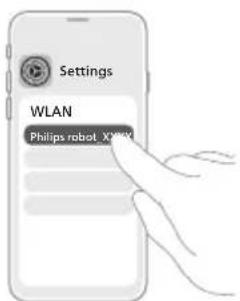
4 Tap on the join button if it's visible in the app to connect with the 'Philips robot' network.
i Note: If the join button is not visible in the app, leave the app and go to Wi-Fi under 'Settings' on your mobile device. There you can select the 'Philips robot' network and connect to it. After connecting to 'Philips robot', manually go back to the HomeRun robot app to continue the Wi-Fi connection.
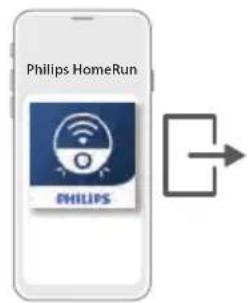
i Note: Your robot can connect to both 2.4GHz and 5GHz frequency Wi-Fi bands.
If the Wi-Fi pairing fails:
- Quit the HomeRun app.
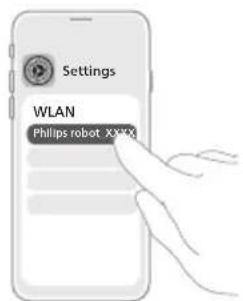
- Check your mobile Wi-Fi connection.
- Check if you selected the correct model.
- Check if you entered the correct Wi-Fi password.
- Check if the robot is still in Wi-Fi set-up mode.
i Note: You will know if pairing hasn't been successful if you see the light on your robot flash amber.
i Note: If you are unable to solve the problem, visit home.id for support information and the contact details of Consumer Care.
Audible signals

- The voice alert language of the robot can be changed from English to your local language. To change the language, download the app and connect the robot with the Wi-Fi, so that it can download the new language.
- The app will give alerts and reminders if the robot needs attention. This way you'll be fully informed on the real-time status, even if the robot cleans while you're away.
Set the language of the voice alerts
i You can set the language of the voice alerts immediately after you have connected the robot to Wi-Fi.
1 Make sure that the robot is connected to the app.
2 In two places in the app you can find the option to change the language of the voice alert.
- On the same app screen where you are asked to name the robot.
- Or by pressing the "Settings" icon on the top right corner and then choosing the "Voice settings" tab.
3 Then choose the language of the voice alert there.
How your robot works
Create a map
How mapping works
The robot drives through the rooms and quickly scans them to build a map of the floor.
Map Editor
In the app, you can use Map Editor to:
- Edit rooms (merge/divide rooms, name rooms) so you can customize the cleaning routine of the robot per room.
- Add zones to specify where the robot can and cannot clean.
- Create a map for each floor of your home and store up to 5 maps. If something changes in the environment, your robot will automatically re-map the area in the next cleaning session.
Preparing the room for mapping
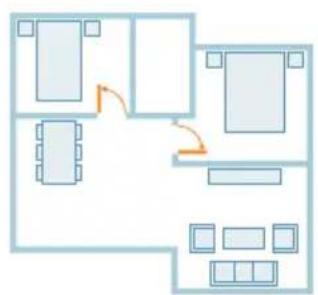
Help your robot drive through each room to create a map, or floor plan.
Check the following:
- Is the robot and station on the floor you want to map?
- Is all furniture in its regular place?
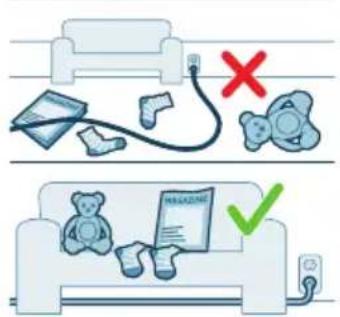
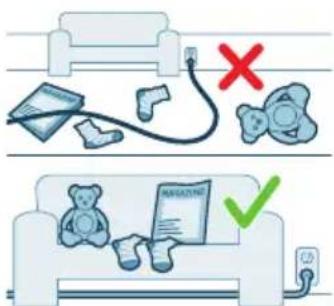
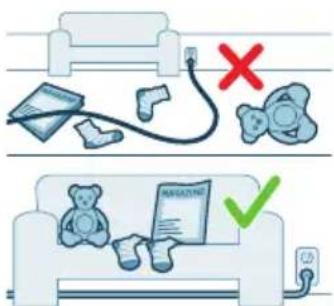
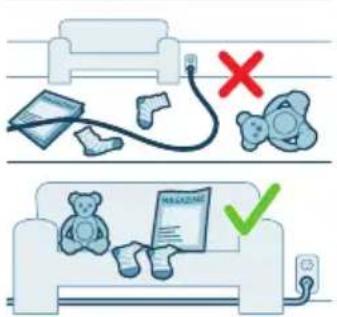
- Are small objects, like cables and toys, tidied away?
![graph TD A["Room 1"] --> B["Room 2"] B --> C["Room 3"] C --> D["Room 4"] D --> E["Room 5"] E --> F["Room 6"] F --> G["Room 7"] G --> H["Room 8"] H --> I["Room 9"] I --> J["Room 10"] style A fill:#cce5ff,stroke:#333 style B fill:#cce5ff,stroke:#333 style C fill:#cce5ff,stroke:#333 style D fill:#cce5f…](/content/2026/04/730722/images/d6162e40102808ce9e110cc127c1482839b88de0fe38b137234f0b0a14a23539.jpg)
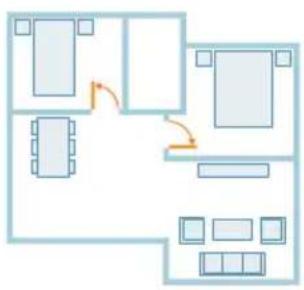
- Have you left doors between rooms open?
- Have you closed doors that lead outside?
i Note: If the robot gets stuck on an object, it will either stop mapping or go to sleep.
i Important: Make sure your robot has a clear path through the house.
Create and edit a map
i Important: When the robot is done mapping, it will find its way back to the station on its own.
i Important: Before starting the mapping process, remove the mop pads and mop pad holders from the robot. If the mop pads are attached, the robot's built-in carpet detection feature will prevent it from moving across and mapping carpeted areas. Removing the mop pads and holders ensures that the entire space, including carpets, is thoroughly mapped for optimal cleaning performance.
i Important: In case the robot is unable to move across the carpet, move the carpet to a different location till the robot finishes mapping.
1 To create a map, either tap on "Create map" in the home screen directly after pairing the robot with the app or when no map has previously been created. Or tap on the "Settings" icon on the top right corner, select "My maps", and select the "+" icon on the top right corner. Then follow the instructions in the app.
2 To edit your map, either tap on the map icon in the home screen or the "Setting" icon on the top right corner, select "My maps", and select "Edit map" for the map that you would like to edit.
i Note: You can only edit the map that is currently in use.
Tell your robot where not to clean by adding zones
Add zones where you want your robot to avoid by going to Map Editor in the app. It's a small icon on the bottom right-hand side of your map.
Virtual wall and No-Go zone
Virtual walls () seal off a room that leads to an area you do not want the robot to go. No-Go zones () section off an area within a room for the robot to avoid.
You can use Virtual walls and No-Go zones to:
- Protect fragile objects. The robot is only able to detect objects that are at least 2.5 cm in height, length and width.
- Prevent the robot from getting stuck while cleaning.
i Note: The robot can get stuck on high pile carpets, carpets with fringes or very light rugs like in the bathroom. Also the robot cannot detect cables on the floor.
- Protect the robot.
i Note: Do not use the robot in places where it could become covered, partially or completely, in water.
i Important: virtual walls and No-Go zones should not be used to protect against hazards.
i Important: virtual walls and No-Go zones should not prevent the robot from returning to the station.
No-Mop zone
Create No-Mop zones ( ) to prevent the robot from mopping carpets or rugs.
i Note: The robot will avoid the No-Mop zones when the robot is in 'Vac and Mop' and 'Mop' modes.
How your robot cleans
In the app, the following can be selected:
Area Description
| Regular Use this for normal, daily cleaning of your whole floor. If the robot does not recognize the environment, it will map first and then clean using the last set mode. Once it has completed the clean, it will return to the station. |
| Room Use it to clean one or several rooms, rather than the whole floor. |
| Zone Use it to clean part of one or multiple rooms, rather than the whole floor. |
Set cleaning mode, adjust settings and cleaning order
In the app, you can select five different cleaning modes for each room. These are standard modes that can be used in most situations. You can customize your cleaning mode by fine-tuning cleaning preferences and advanced settings.
Cleaning modes
Mode Description
Vac & Mop Vacuum and mop in one go. Ideal for regular cleaning of floors.
IMPORTANT: For mopping sensitive hard floors, such as parquet floors, set the water level in the app to the lowest level.
Vacuum Vacuum only. Ideal for areas that shouldn't be mopped.
i Note: The "Vacuum" mode is only available when the mop pads are not installed.
Mop Mop only. Ideal for hard floors that need a light clean.
Mode Description
Quiet Suction power will be lowered to minimize noise, and robot sounds will be muted.
Intensive Vacuum and mop in one go. Ideal for thorough cleaning of small areas.
Note that it is not recommended to clean large areas in this mode. The robot passes the area 5 times, so the cleaning time and battery usage will increase significantly.
Mode settings
For the "Vac & Mop", "Vacuum", and "Mop" modes, you can fine-tune the following mode settings:
Setting Description
Suction power Change the suction power:
- Low : Uses less energy and makes less noise.
- Normal : a regular, effective clean that uses moderate energy.
- High : good for cleaning larger areas and more energy efficient than Max.
- Max : good for removing pet hair and tougher particles lodged in carpets.
Mop Wetness Determine the flow rate that is pumped from the electric water tank onto the mop:
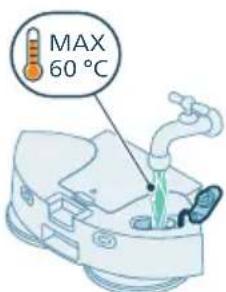
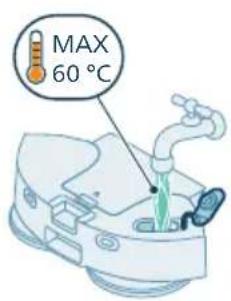
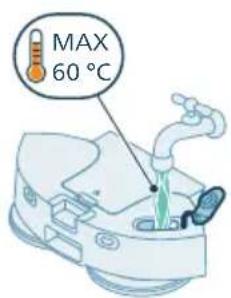
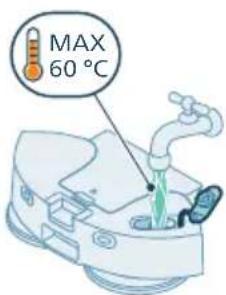
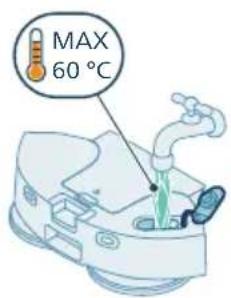
IMPORTANT: Do not add water hotter than 60° C to the water tank.
- Low: uses less water. Good for floors with minimal dirt.
- Medium: removes superficial dirt.
- High: removes tougher marks, like footprints, for a spotless finish.
Repetition Tell your robot how many passes you'd like it to make:
One pass is enough for a regular clean. Consider multiple passes if you need to remove stubborn areas of dirt.
Multiple passes increase the overall cleaning time.
Cleaning order
You can set your own cleaning order in the app by tapping on the setting icon in the top right corner and selecting "Cleaning order".
Using your robot
Preparing for a cleaning session
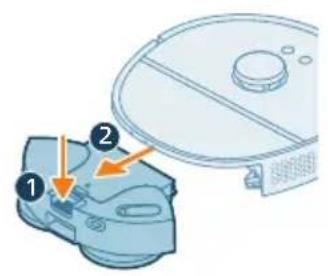
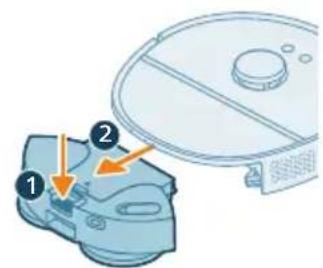
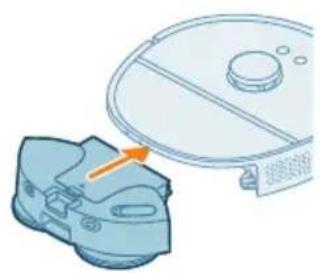
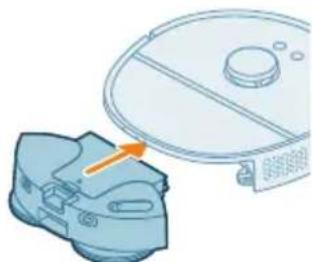
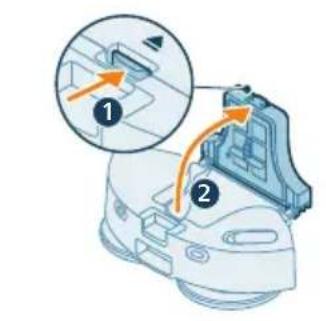
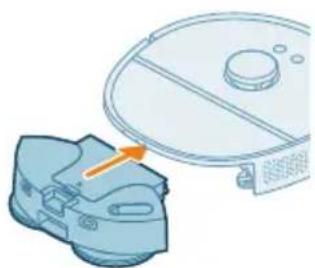
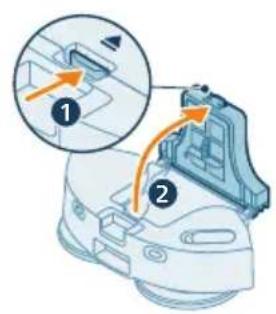
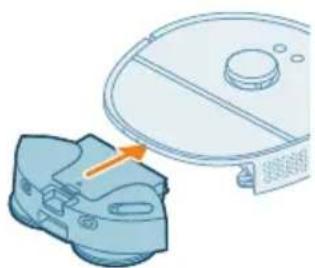
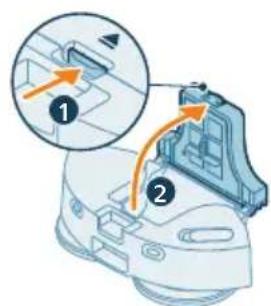
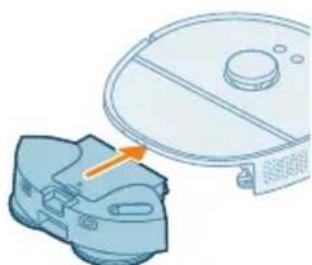
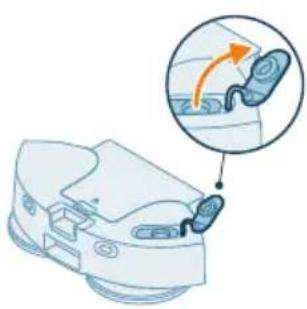
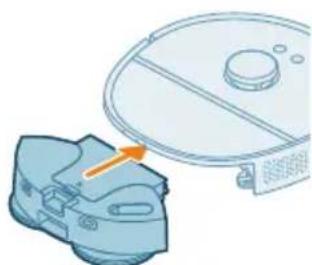
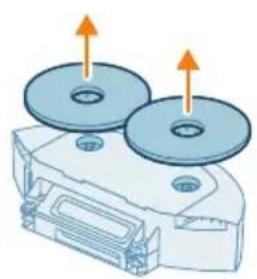
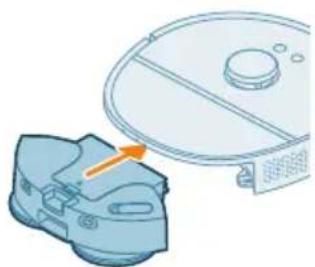
1 Press the release button and remove the cleaning module from the robot.
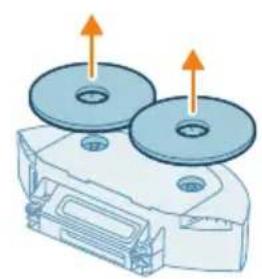
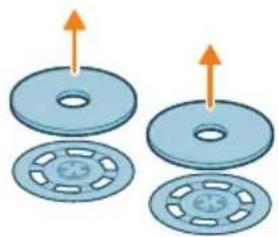
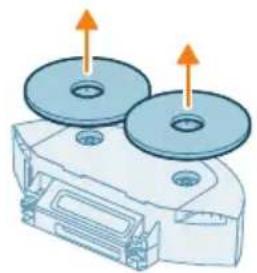
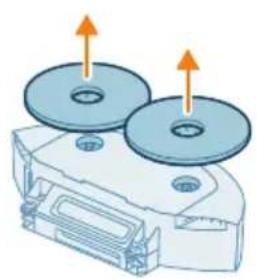
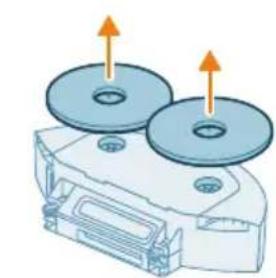
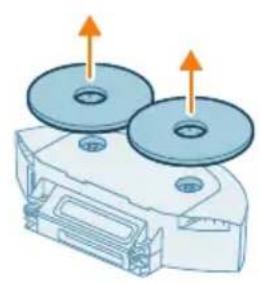
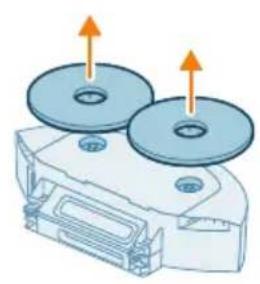
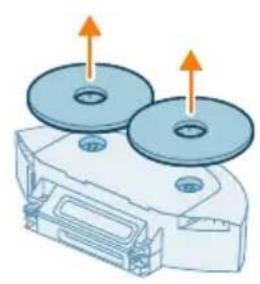
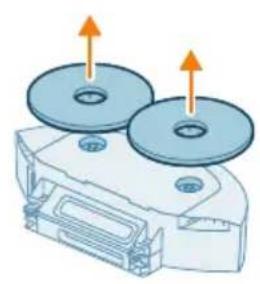
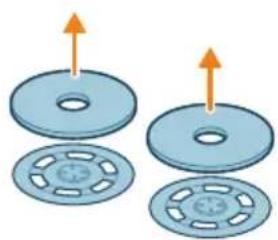
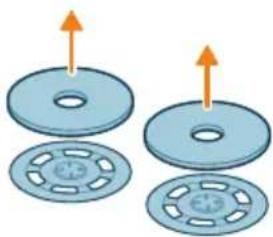
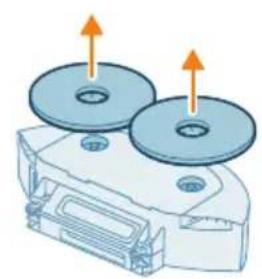
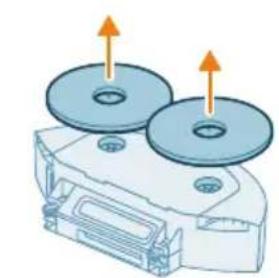
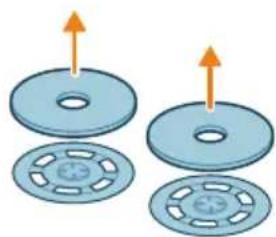
2 Remove the mop pad holders.
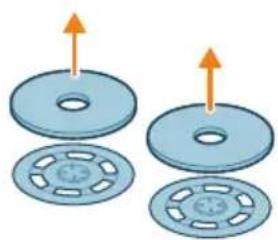
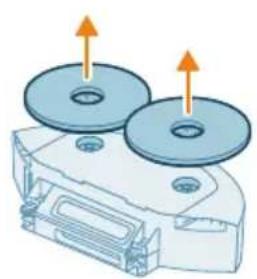
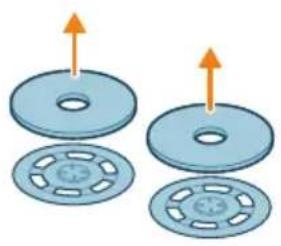
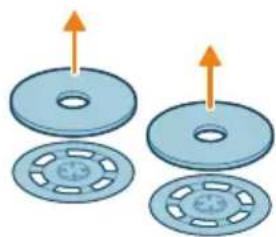
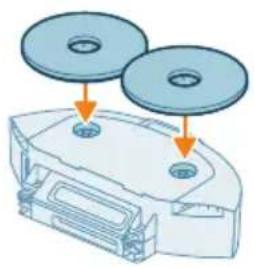
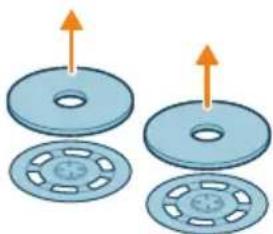
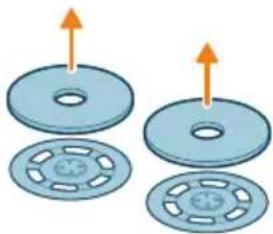
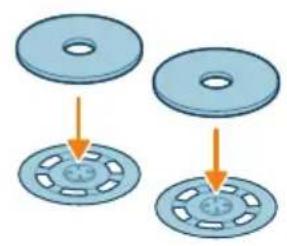
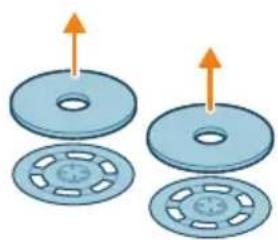
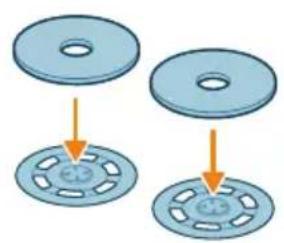
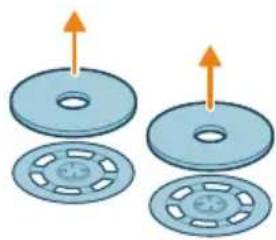
3 Remove the rotary mop pads from the mop pad holders.
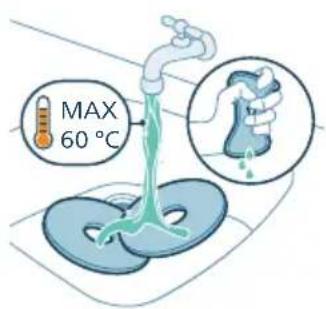
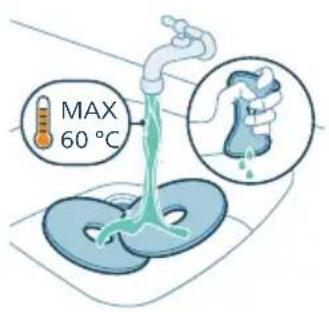
4 Pre-wet the rotary mop pads.
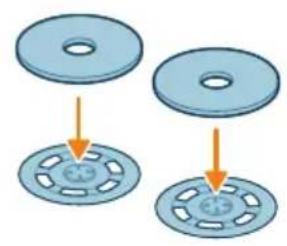
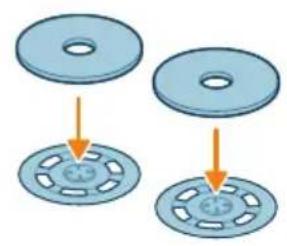
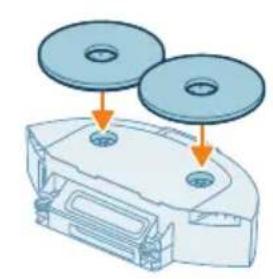
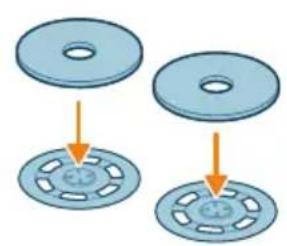
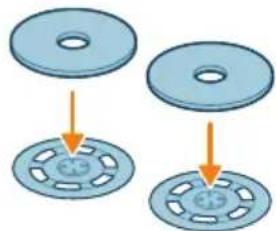
5 Stick the rotary mop pads to the mop pad holders.
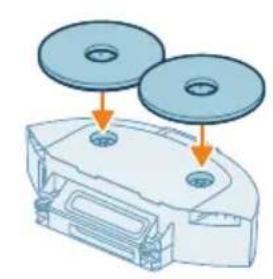
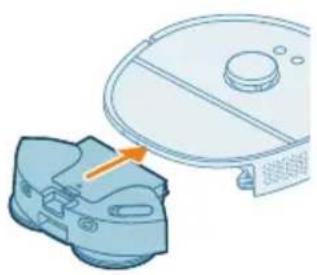
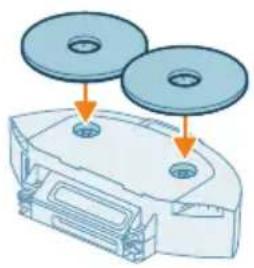
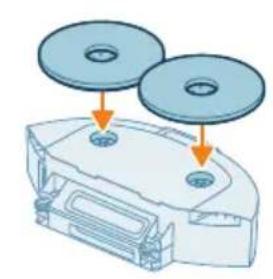
6 Install the mop pad holders onto the cleaning module.
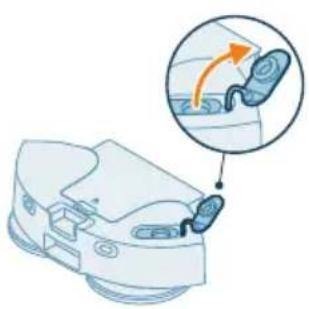
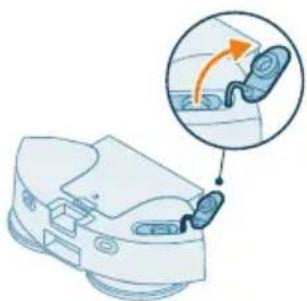
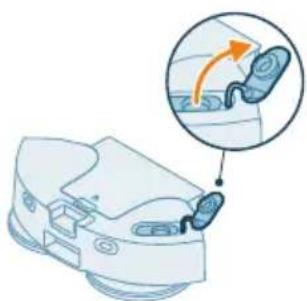
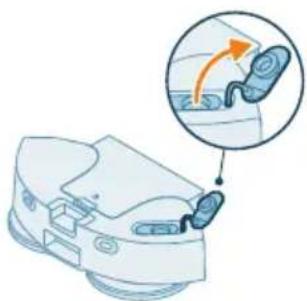
7 Open the cap of the water tank.
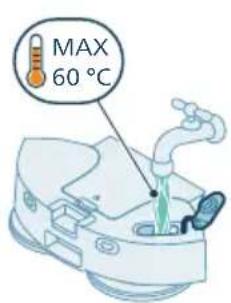
8 Fill the water tank with water up to 60° C.
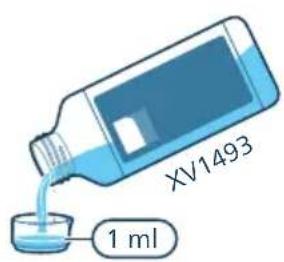
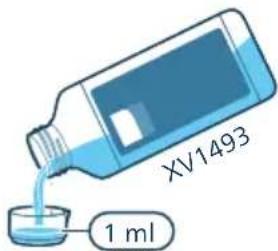
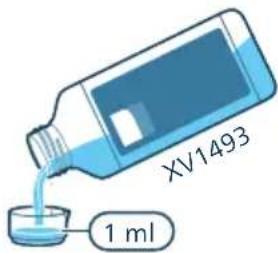
9 Optional: add 1 ml of Philips floor cleaner XV1493 in the water tank.
i Note: only use the supplied Philips floor cleaner XV1493, which is specially developed for our devices to ensure optimal performance and to elongate its lifetime.
i Note: using alternative cleaning detergents may compromise and potentially damage the machine's interior components.
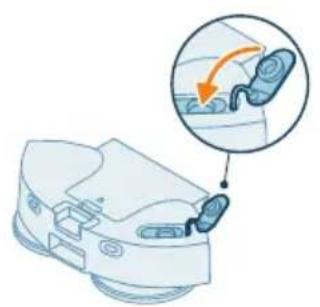
10 Close the water tank cap.
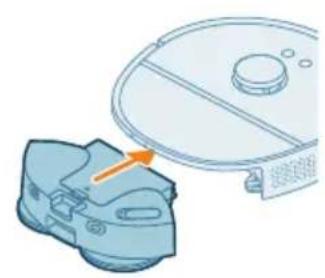
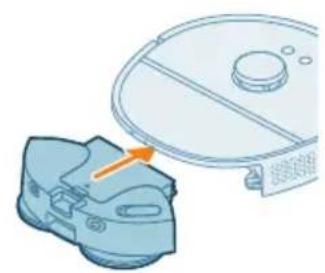
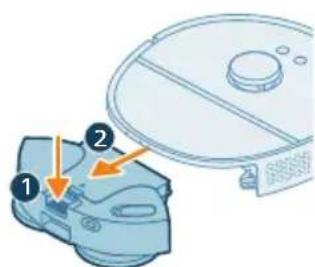
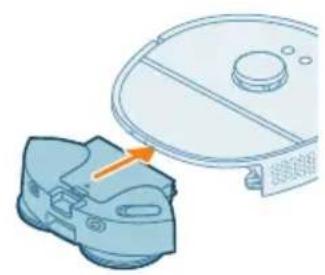
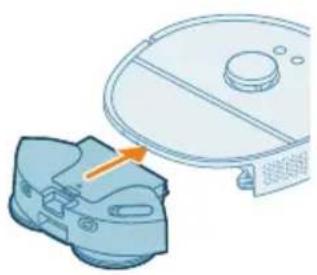
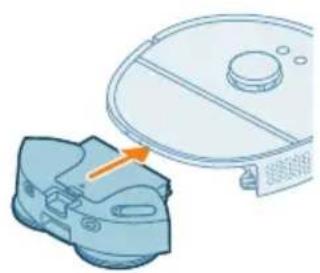
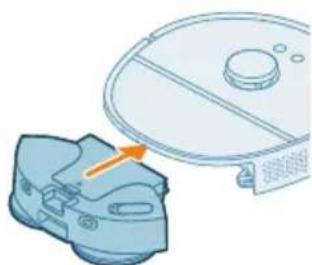
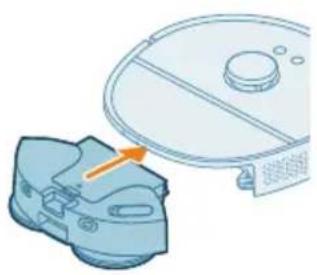
11 Insert the cleaning module back into the robot.
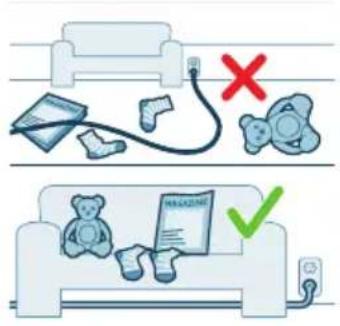
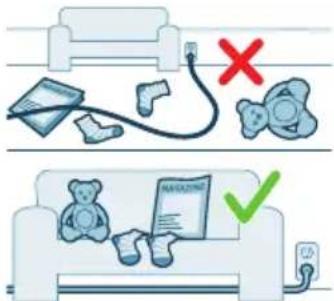
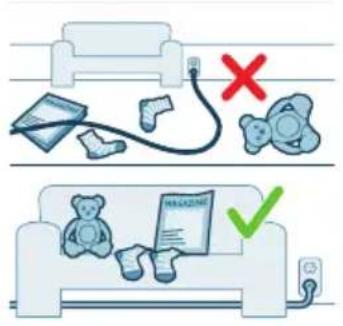
12 Remove all cables, wires and cords from the floor to prevent the robot from getting entangled in them.
![graph TD A["Room 1"] --> B["Room 2"] B --> C["Room 3"] C --> D["Room 4"] D --> E["Room 5"] E --> F["Room 6"] F --> G["Room 7"] G --> H["Room 8"] H --> I["Room 9"] I --> J["Room 10"] style A fill:#cce5ff,stroke:#333 style B fill:#cce5ff,stroke:#333 style C fill:#cce5ff,stroke:#333 style D fill:#cce5f…](/content/2026/04/730722/images/6084b0a059d706419a2d11bec4c94a79168a30193baaf547a3fb8904a1fff724.jpg)
13 Open all internal doors.
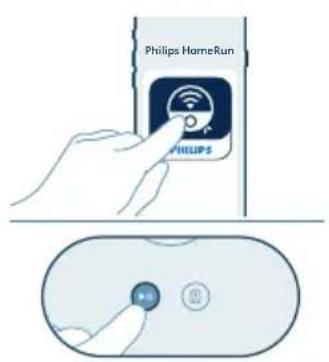
14 Start a cleaning session from the app or press the start/stop button on the robot.
Start your first cleaning session via the app
Start
1 Open the app.
2 Select the cleaning area: 'Regular', 'Room', or 'Zone'.
3 Press the 'start' icon.
i Note: If the battery level is too low, cleaning cannot start. Wait until the robot is sufficiently charged before you start a cleaning session.
Stop
1 Press the Pause icon in the app. The robot stops.
2 Press the Start icon again. The robot continues.
3 Press the Return icon. The robot goes back to the station.
Using the robot without the app
i Note: For an optimal experience, we recommend using the app.
Without the app, you can use the two buttons on the robot to operate it:
- Start/stop button
- Long press (3s) to turn the robot on and off.
- Short press to start cleaning or to pause cleaning. Press again to resume cleaning.
i Note: When you start a cleaning session by pressing the start/stop button on the robot, the robot runs in the 'Vac & Mop' mode by default.
- Return button
- Short press (when the robot is not cleaning): the robot will find the station and charge.
- Short press while cleaning: the robot will stop cleaning. Short press again: the robot returns to the station to charge.
- Short press when the robot is driving back to the station: the robot will pause returning to the station. Press again to let it drive back to the station.
i Note: To deactivate Wi-Fi, reset the appliance and remove the robot in the app. To turn on Wi-Fi, add the robot in the app again.
i Note: You can reset/restore the robot by pressing and holding the return button on top of the robot for 15 seconds."
Your robot's cleaning pattern
![graph TD A["①"] --> B["②"] B --> C["③"] C --> D["④"] D --> E["⑤"] E --> F["⑥"] style A fill:#f9f,stroke:#333 style B fill:#ccf,stroke:#333 style C fill:#cfc,stroke:#333 style D fill:#fcc,stroke:#333 style E fill:#ffc,stroke:#333](/content/2026/04/730722/images/ff4639c19a1d50dca78935c8fa80811c4715617c4cd4881736458931891dd8c6.jpg)
The robot cleans the home in a structured way. The robot cleans room by room and always starts by cleaning the edges of the room first before covering the remaining surface.
Returning to the station
![graph TD A["③"] --> B["②"] B --> C["①"] B --> D["②"] B --> E["①"] style A fill:#f9f,stroke:#333 style B fill:#bbf,stroke:#333 style C fill:#dfd,stroke:#333 style D fill:#dfd,stroke:#333 style E fill:#dfd,stroke:#333](/content/2026/04/730722/images/b99a9f157f9e0267517c9a56f07a9ee54e089bec46b3ceccbc482785c86d3cda.jpg)
After the robot has completed its cleaning session, the robot will automatically drive back to the station to recharge.
Auto recharge and resume
When the battery runs low (<15%) while cleaning, the robot automatically returns to the station to recharge. It will calculate the required power based on the remaining cleaning area, and once the battery is sufficiently charged, the robot will resume cleaning.
You can disable this function in the app by tapping on the settings icon in the top right corner and then toggling the "resume clean" option on or off.
i Note: After you disable this function in the app, the robot will not continue unfinished cleaning tasks after it is charged.
Cleaning and maintenance
When to do maintenance
Item Cleaning Replacement
| Rotary mop After use 3-6 months |
| Main brush Monthly 6-12 months |
| Washable filter Monthly 3-6 months |
| Side brush Monthly 6-12 months |
Main wheels & Front caster Monthly - wheel
LDS navigation(LiDAR) Monthly - sensor
Sensors: Monthly - - Infrared signal sensors - Anti-drop sensor (4x)
Charging contact points Monthly - (robot and station)
Placemat Monthly
Cleaning the rotary mop pad
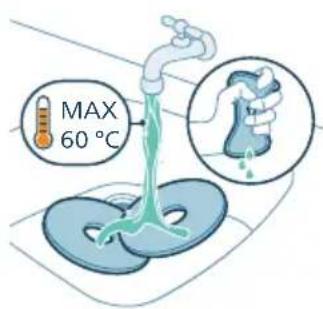
i Note: Do not clean the rotary mop pads with any cleaning detergent. Use tap water only.
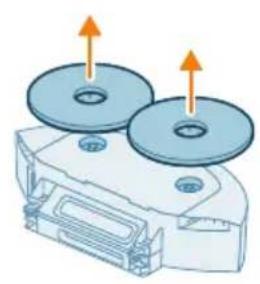
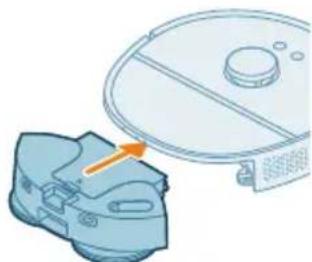
1 Press the release button and remove the cleaning module from the robot.
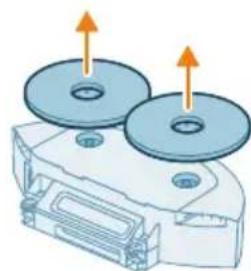
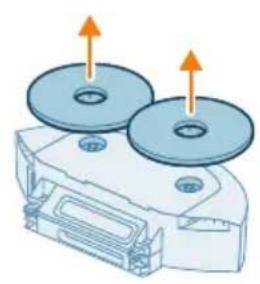
2 Remove the mop pad holders.
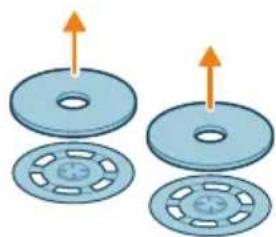
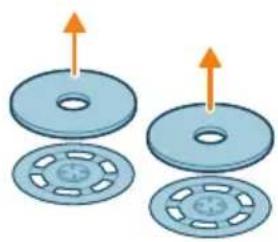
3 Remove the rotary mop pads from the mop pad holders.
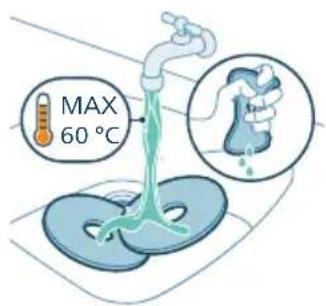
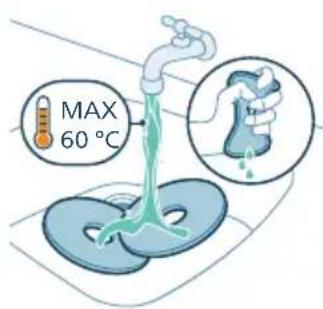
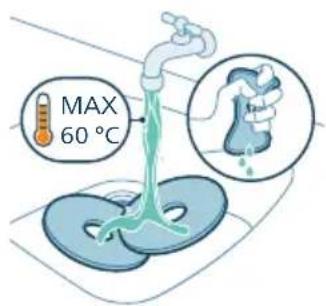
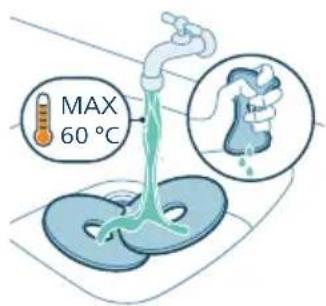
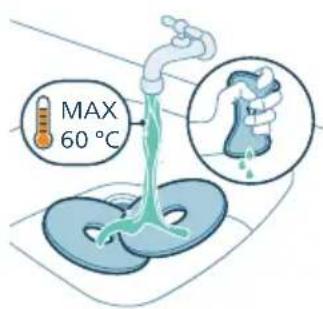
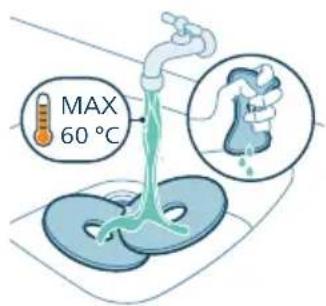
4 Rinse the rotary mop pads under the tap with water up to 60° C.
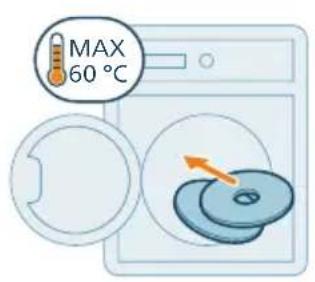
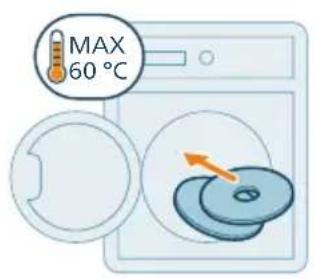
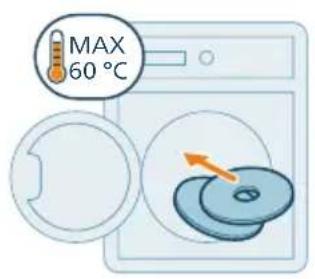
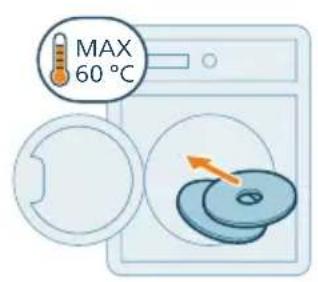
5 You can also wash the rotary mop pads in the washing machine.
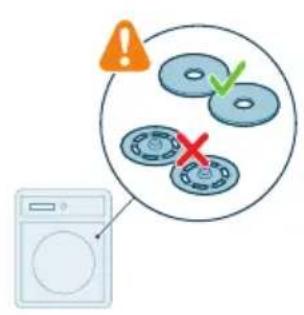
i Note: Do not wash the mop pad holders in the washing machine.
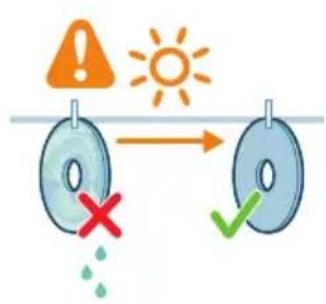
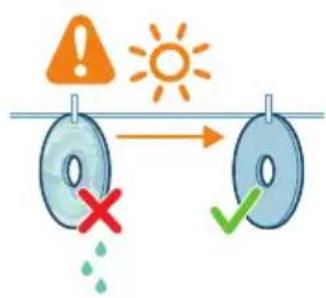
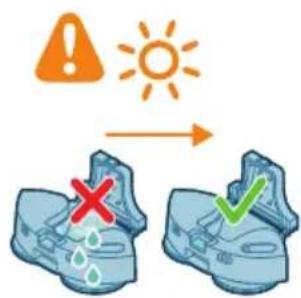
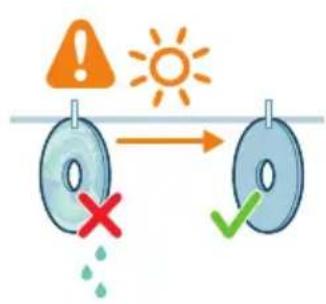
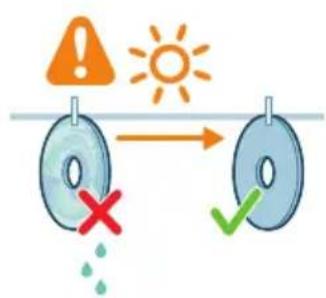
6 Air dry the rotary mop pads.
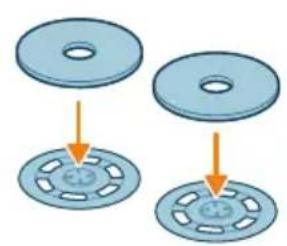
7 Stick the rotary mop pads to the mop pad holders.
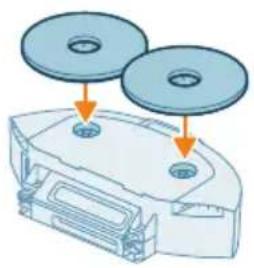
8 Install the mop pad holders onto the cleaning module.
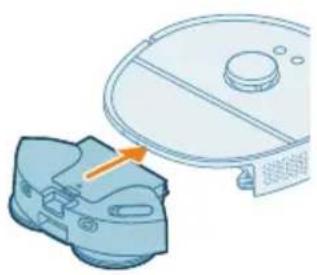
9 Insert the cleaning module back into the robot.
Cleaning the water tank and dust bin
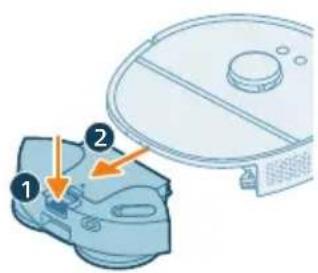
i Note: Do not clean the water tank and dust bin with any cleaning detergent. Use tap water only.
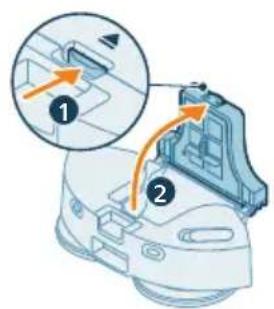
1 Press the release button and remove the cleaning module from the robot.
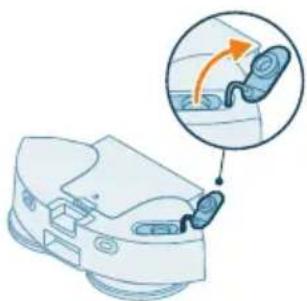
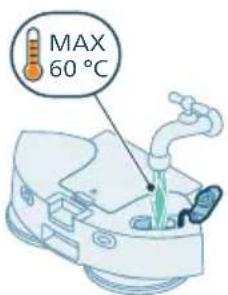
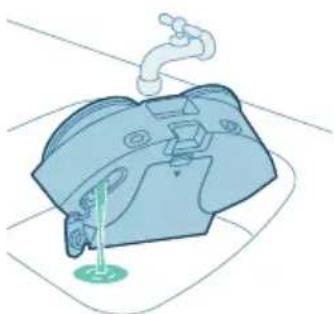
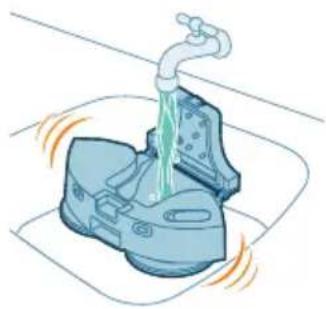
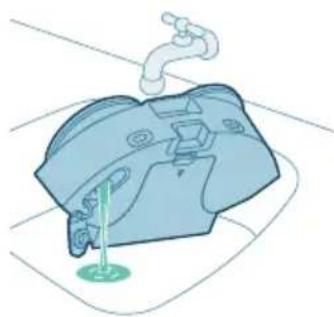
2 Open the cap of the water tank.
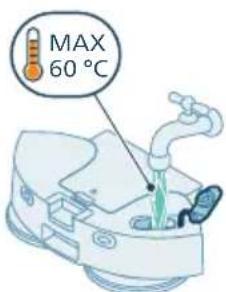
3 Fill the water tank with water up to 60° C.
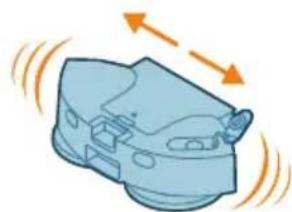
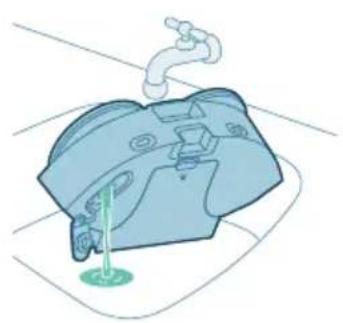
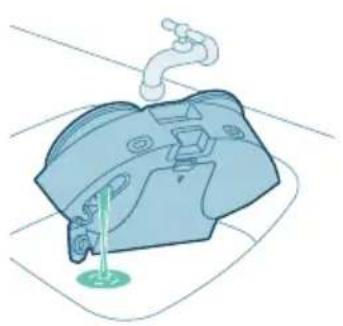
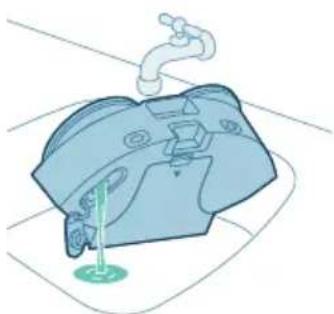
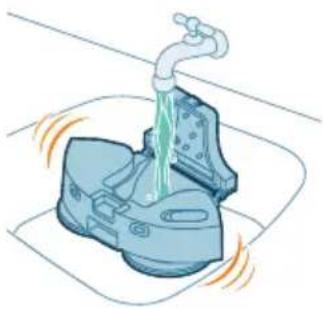
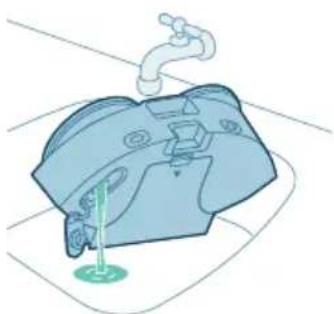
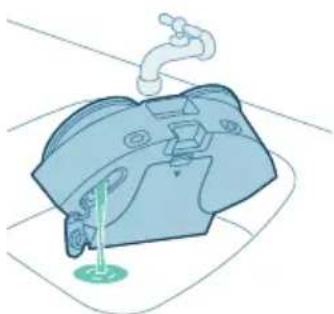
4 Shake the water tank over the sink.
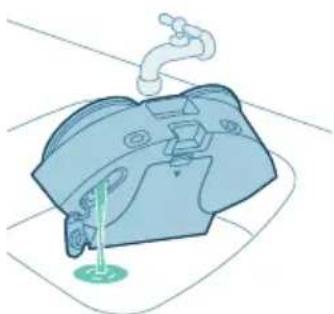
5 Pour out any remaining water in the water tank.
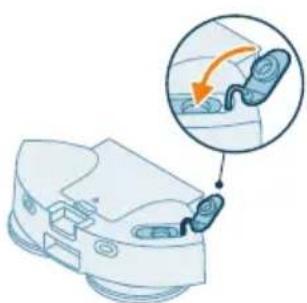
6 Close the cap of the water tank.
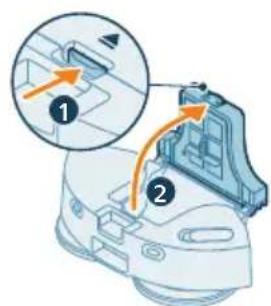
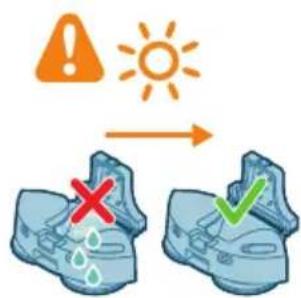
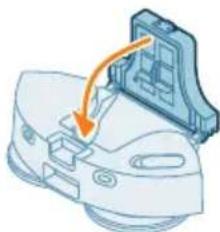
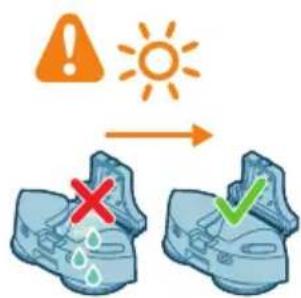
7 Press the release button to open the dust bin.
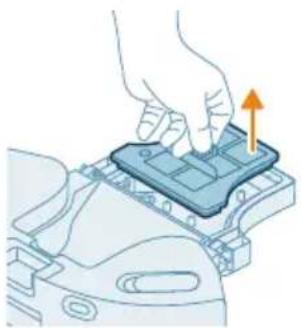
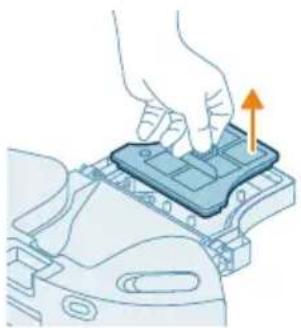
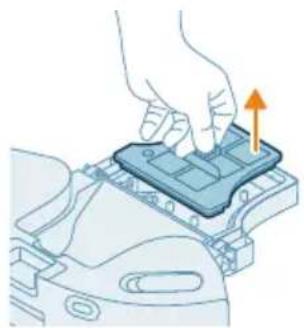
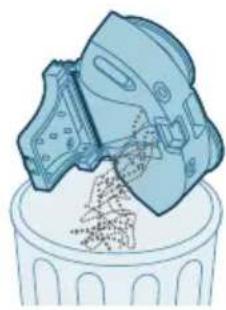
8 Remove the filter casing from the lid.
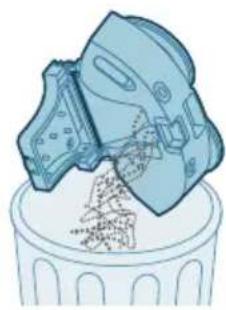
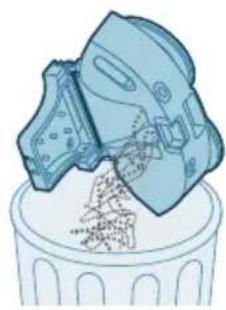
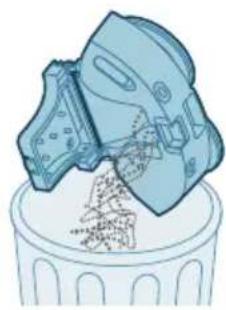
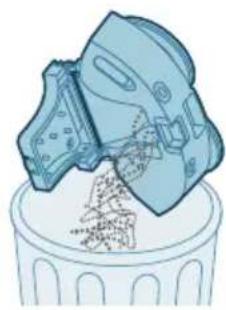
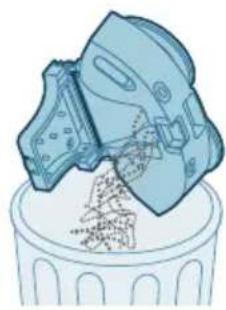
9 Pour out the collected dust in the dust bin.
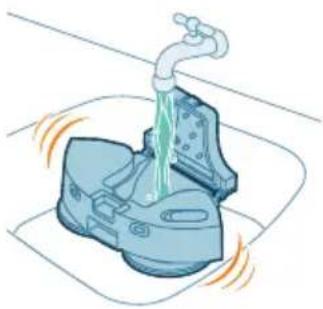
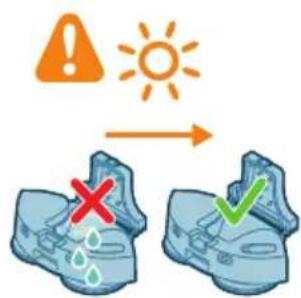
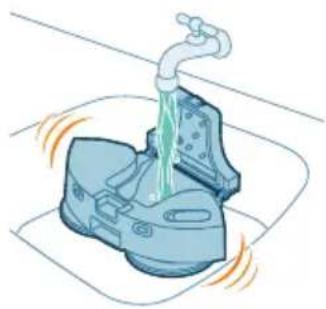
10 Rinse the dust bin under the tap.
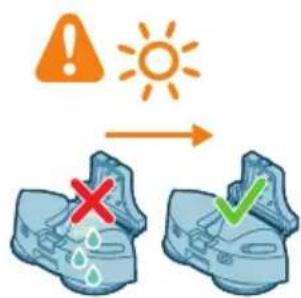
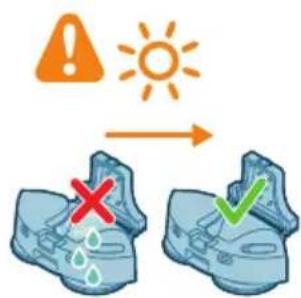
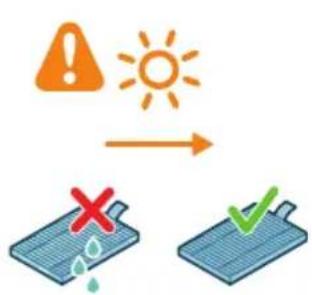
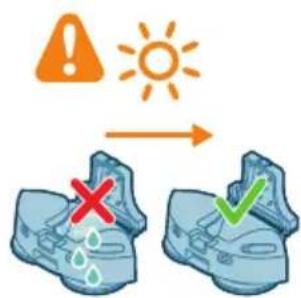
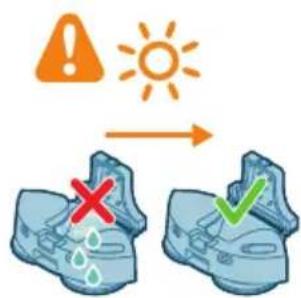
11 Air dry the dust bin.
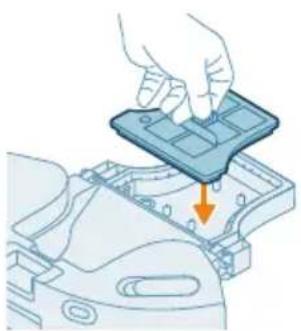
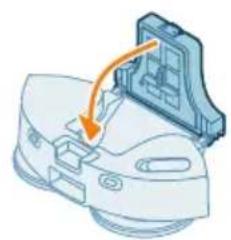
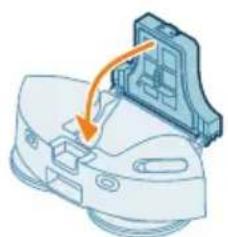
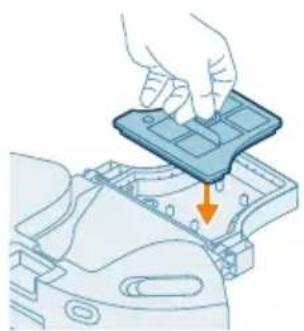
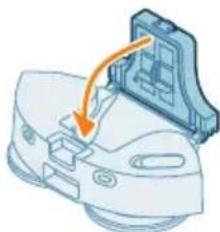
12 Place the filter casing back into the lid.
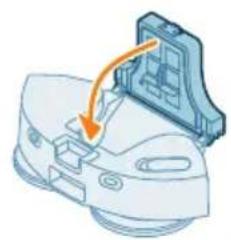
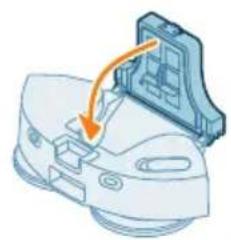
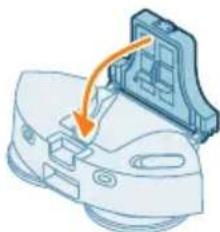
13 Close the lid of the dust bin.
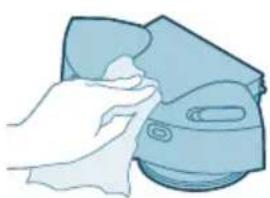
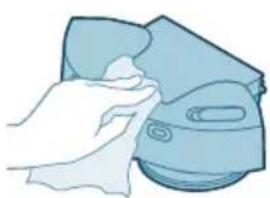
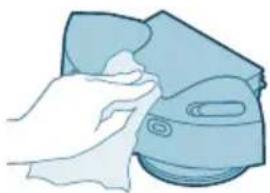
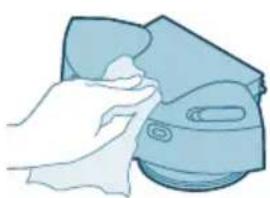
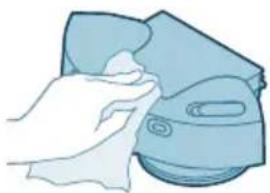
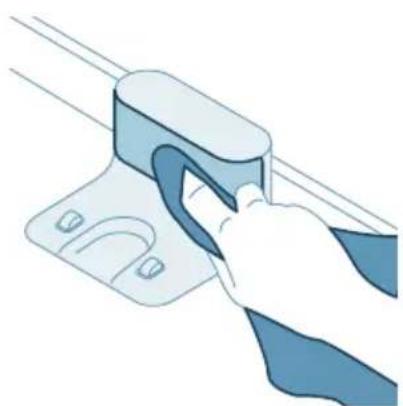
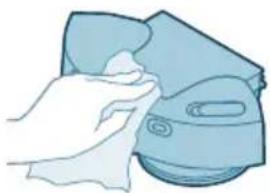
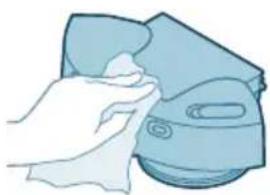
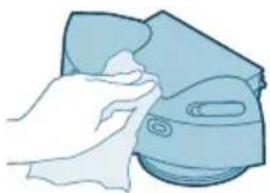
14 Use a clean dry cloth to wipe the outside of the cleaning module.
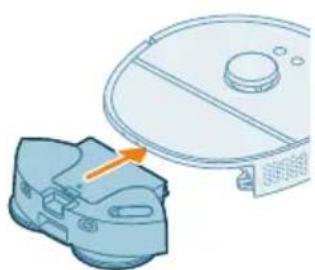
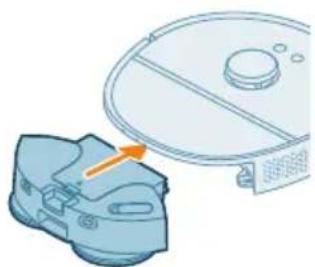
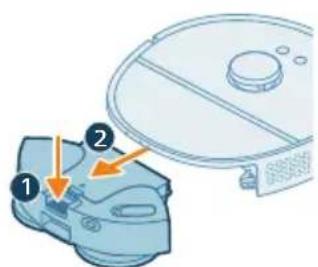
15 Insert the cleaning module back into the robot.
Cleaning the washable filter
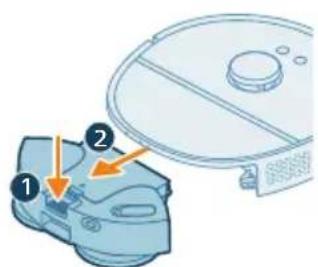
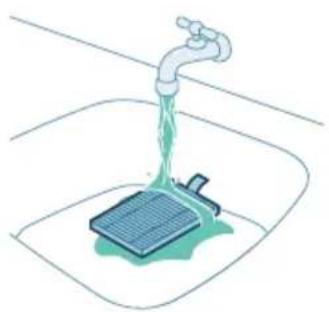
i Note: Do not clean the washable filter with any cleaning detergent. Use tap water only.
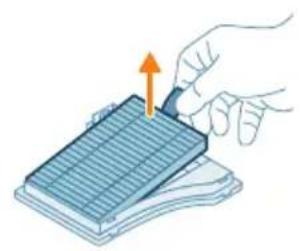
1 Press the release button and remove the cleaning module from the robot.
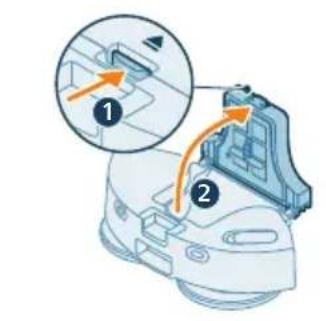
2 Press the release button to open the dust bin.
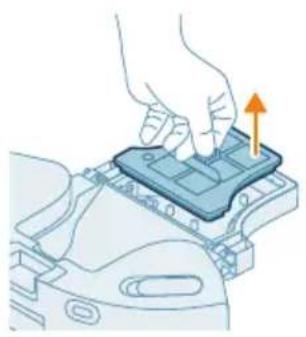
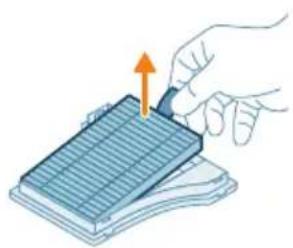
3 Remove the filter casing from the lid.
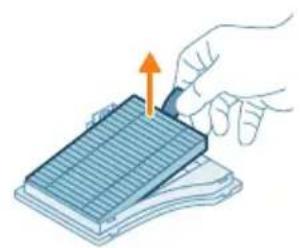
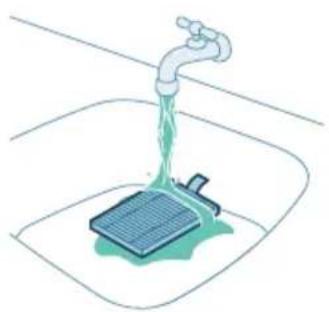
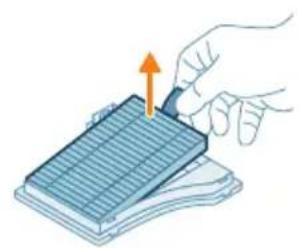
4 Pull the washable filter out of the casing.
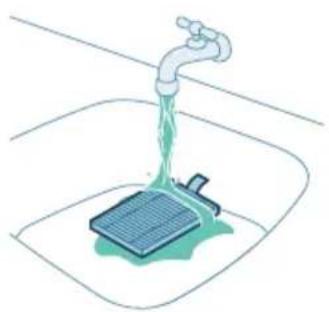
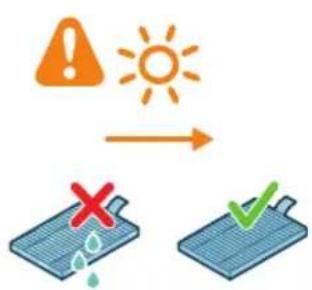
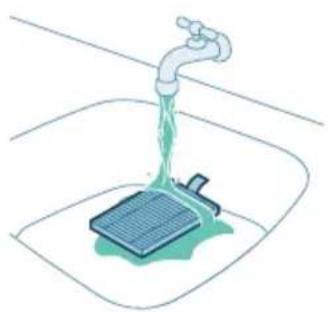
5 Rinse the washable filter under the tap.
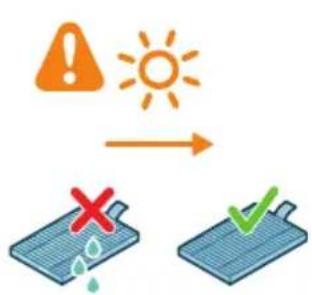
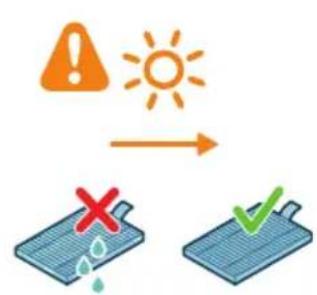
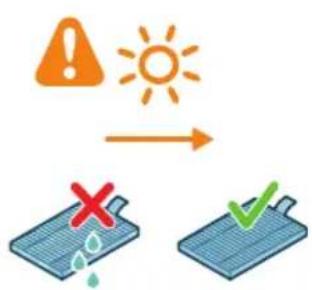
6 Air dry the washable filter.

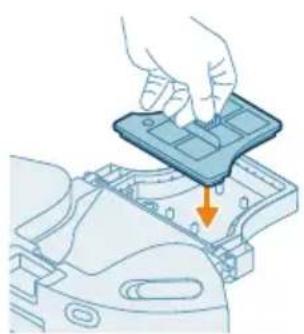
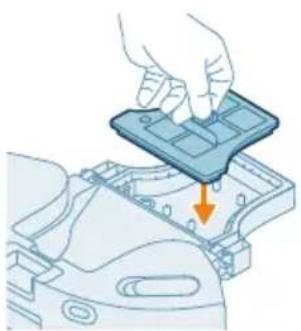
7 Insert the dry washable filter in the casing.
8 Place the filter casing back into the lid.
9 Close the lid of the dust bin.
10 Use a clean dry cloth to wipe the outside of the cleaning module.
11 Insert the cleaning module into the robot.
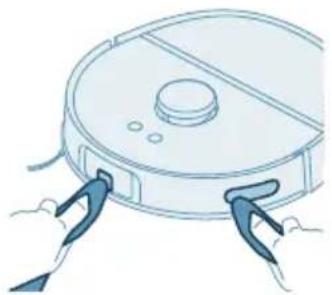
Cleaning the main brush
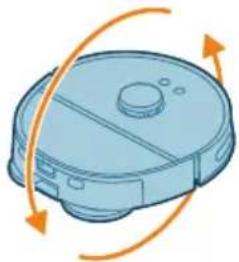
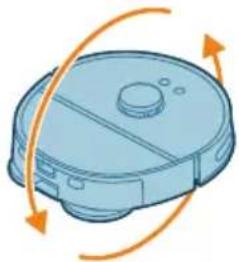
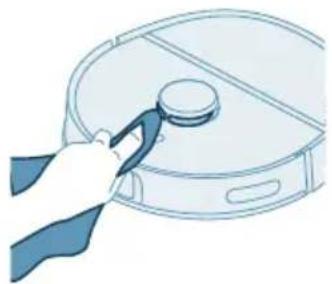
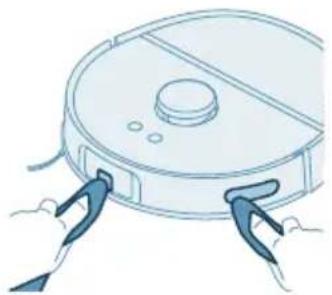
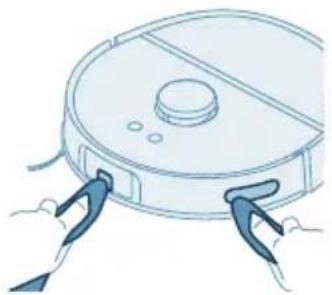
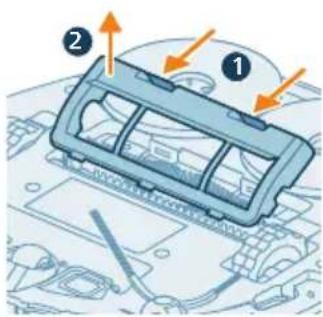
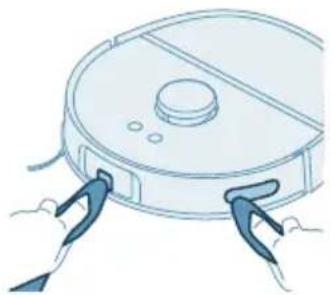
1 Place the robot upside down on a flat and stable surface.
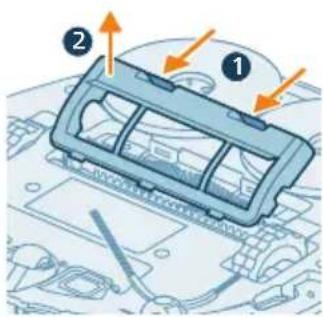
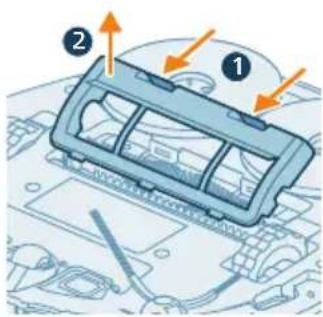
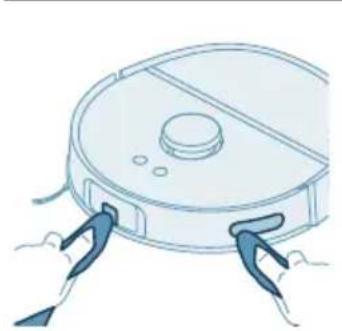
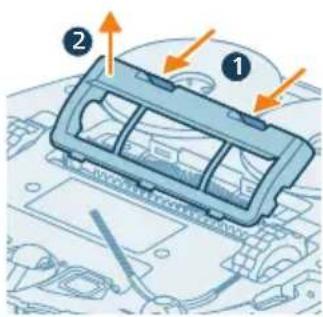
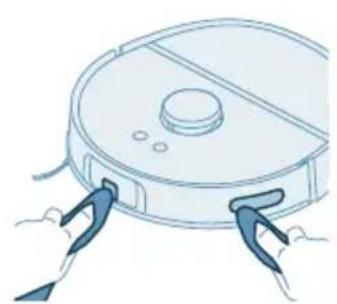
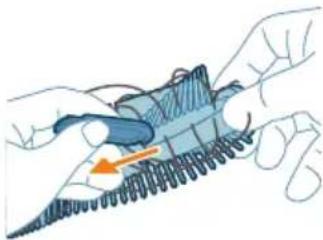
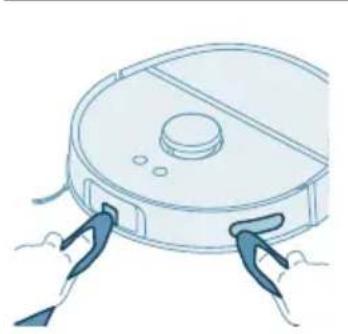
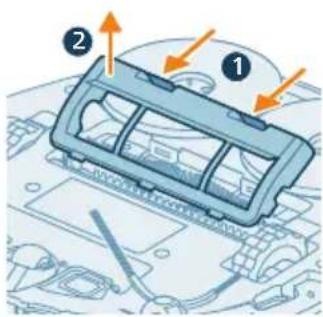
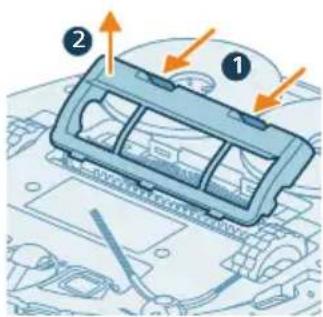
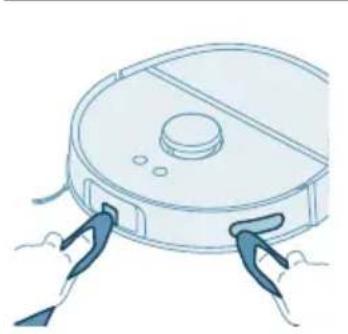
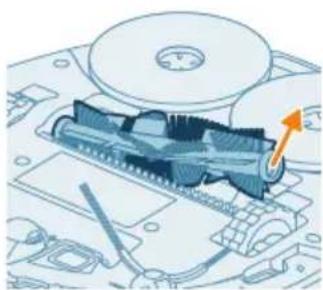
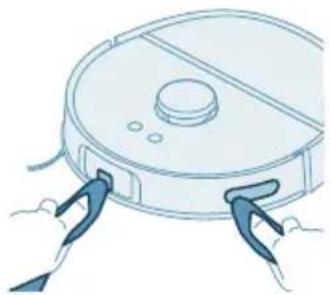
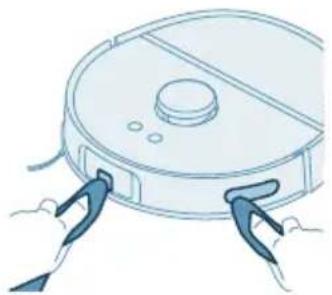
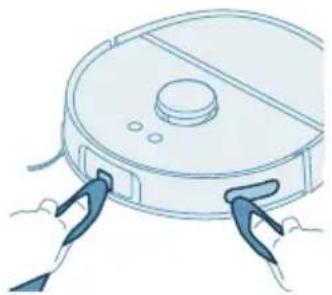
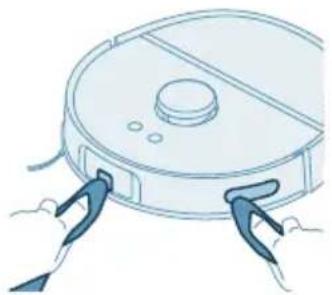
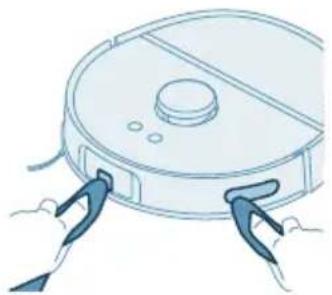
2 Push the release buttons of the brush cover at the same time to lift and remove the brush cover.

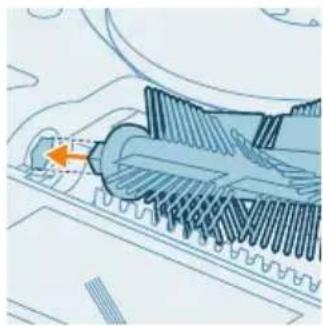
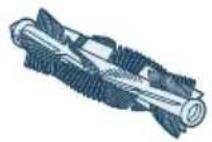
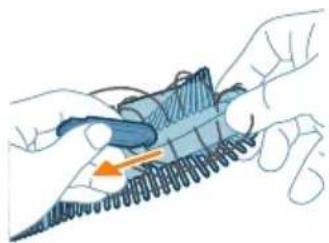
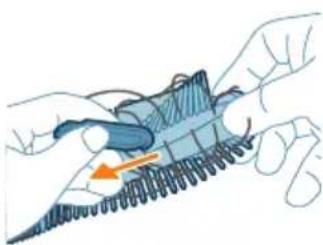
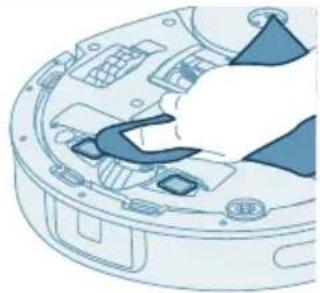
3 Pull the main brush out.
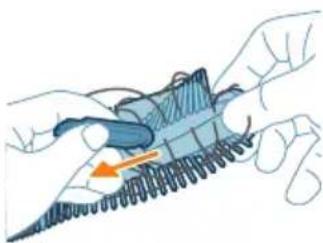
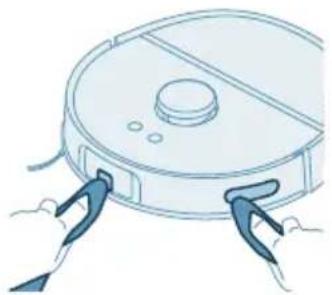
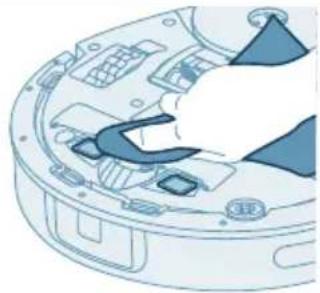
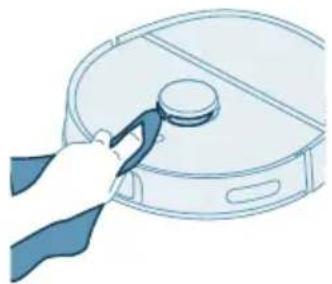
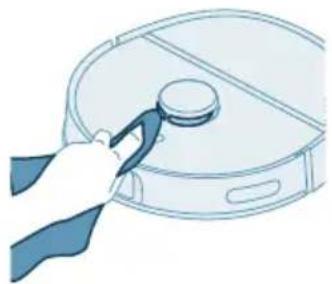
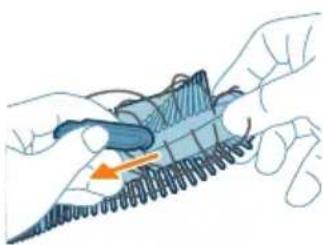
4 Use the cleaning tool to cut through the hairs.
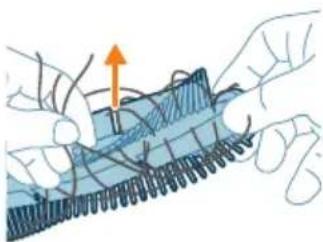
5 Remove the hairs and dirt from the main brush.
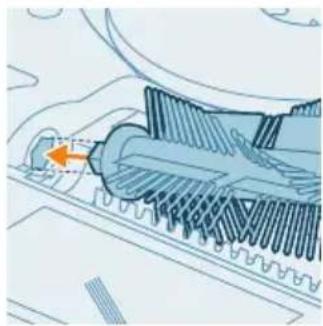
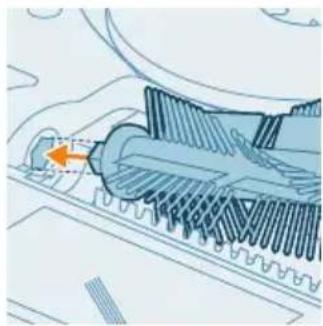
6 Install the main brush in the correct location. Match the square-shaped peg with the square-shaped hole.
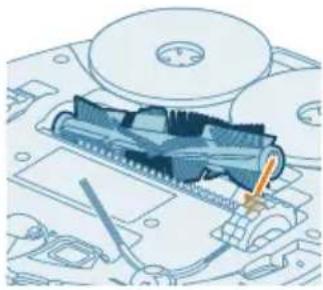
7 Insert the other end of the brush into position.
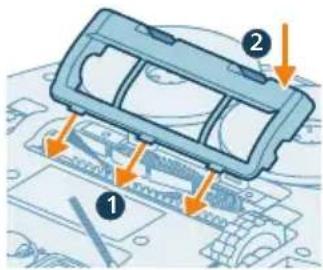
8 Put the lips of the brush cover in the correct cutouts.
Cleaning the side brush
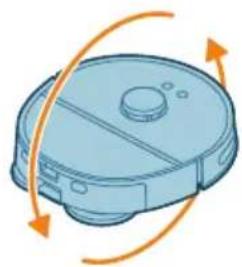
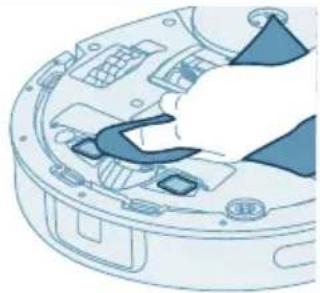
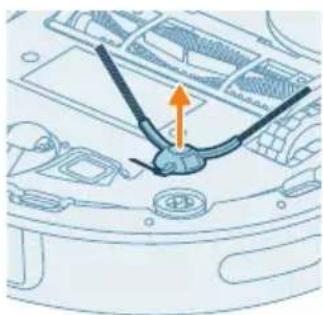
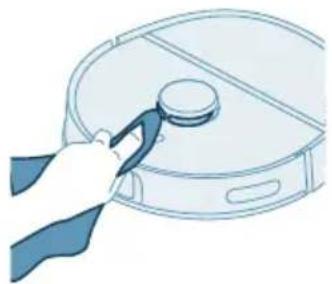
1 Place the robot upside down on a flat and stable surface.
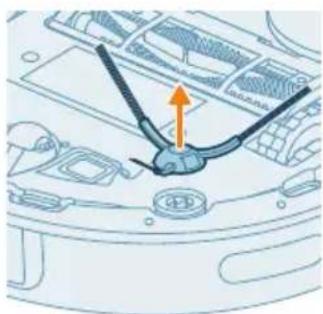
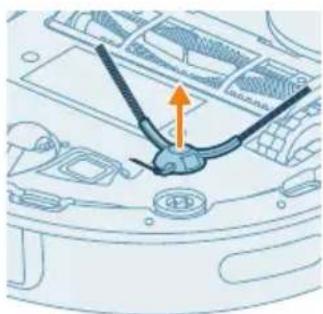
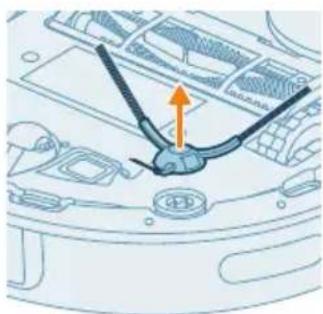
2 Remove the side brush.
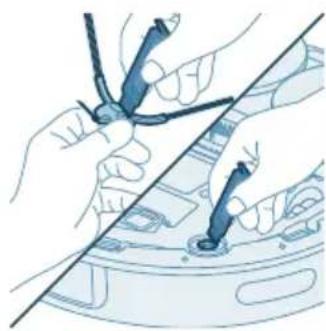
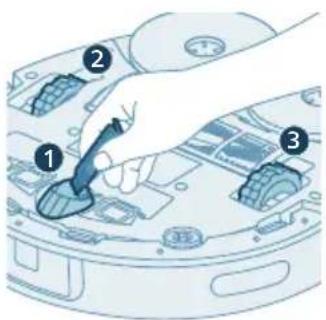
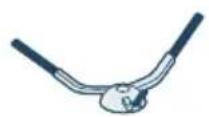
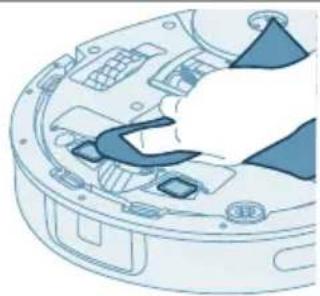
3 Use the cleaning tool to remove dust or fluff from the side brush and the robot.
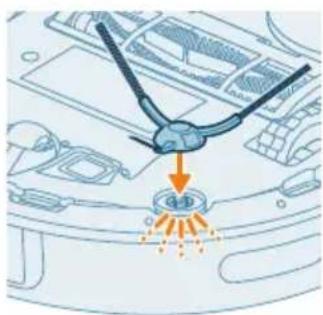
4 Attach the side brush by clicking it into the correct position on the bottom of the robot.
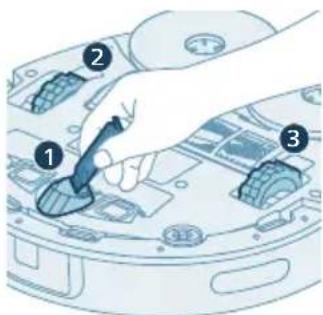
Cleaning the main wheels and the front caster wheel
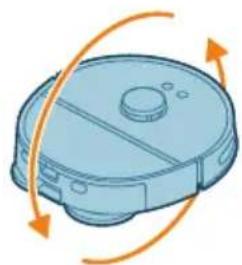
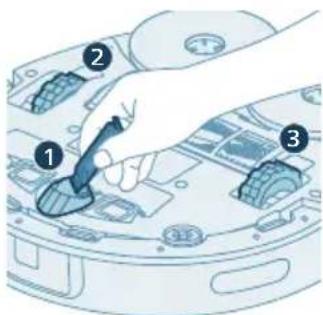
1 Place the robot upside down on a flat and stable surface.
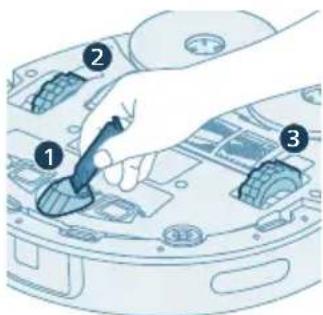
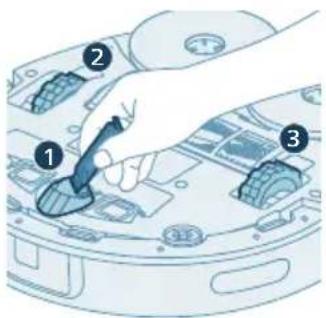
2 Use the cleaning tool to remove dust or fluff from the front caster wheel and main wheels.
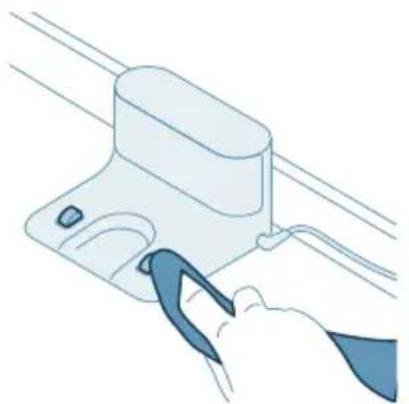
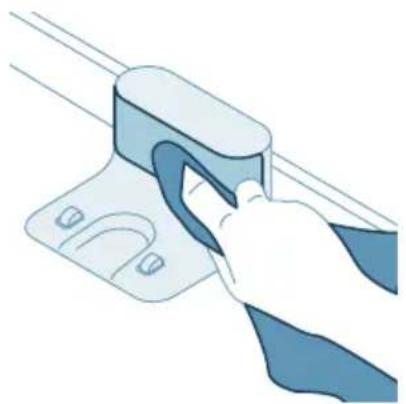
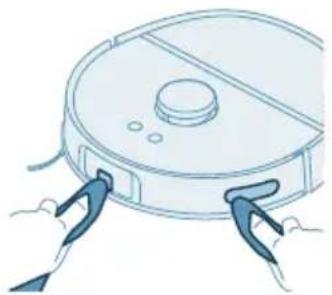
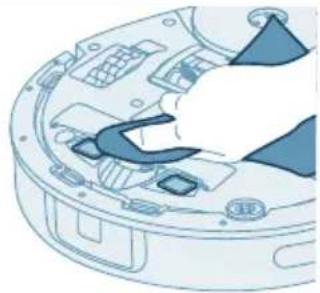
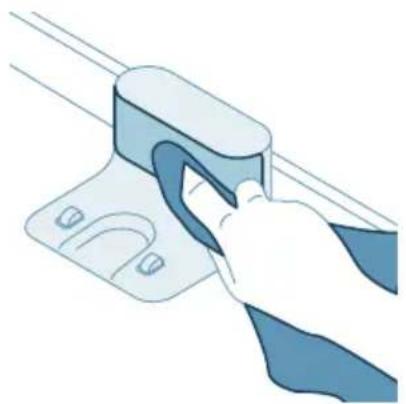
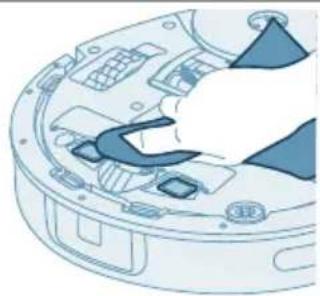
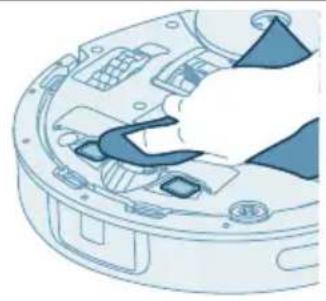
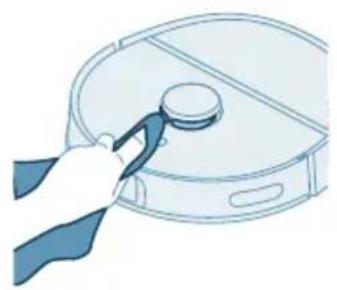
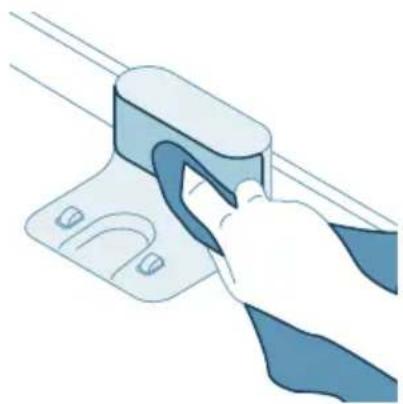
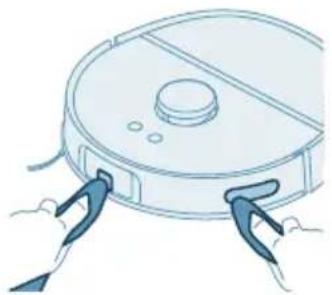
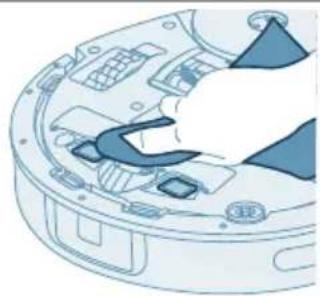
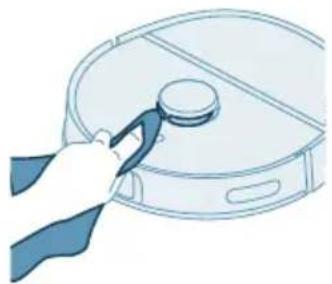
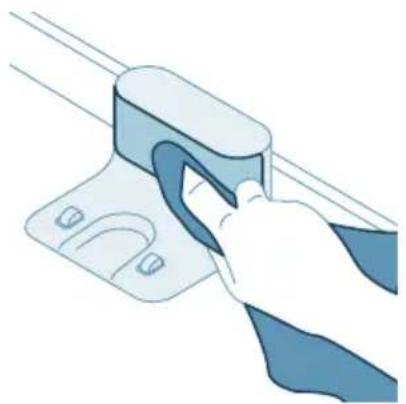
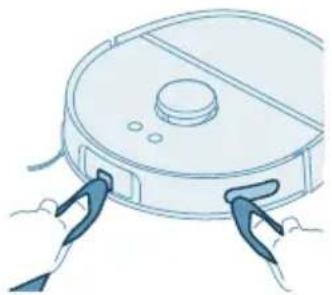
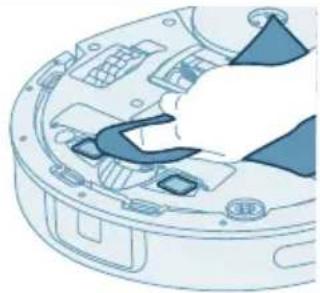
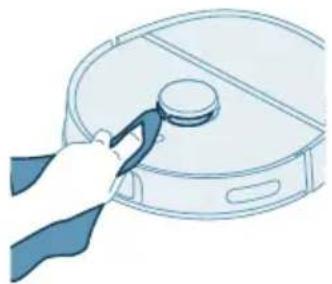
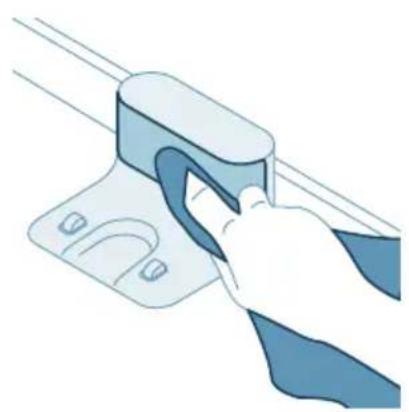
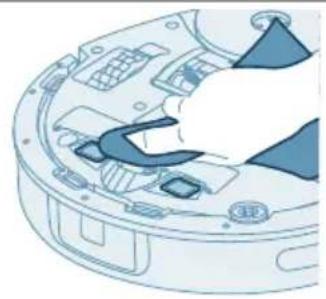
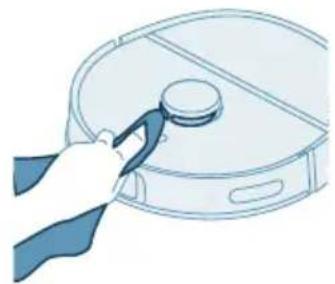
Cleaning the sensors, contact points and IR signal window
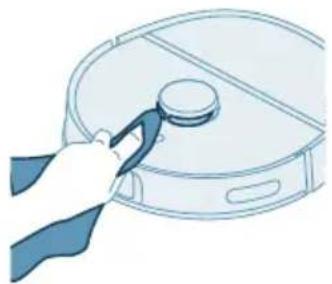
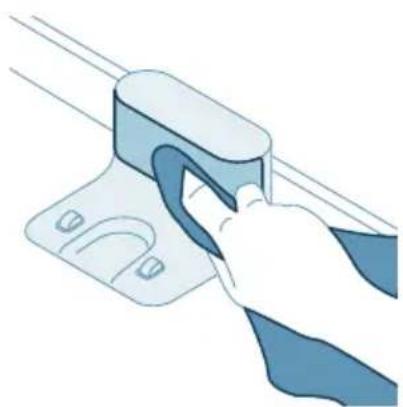
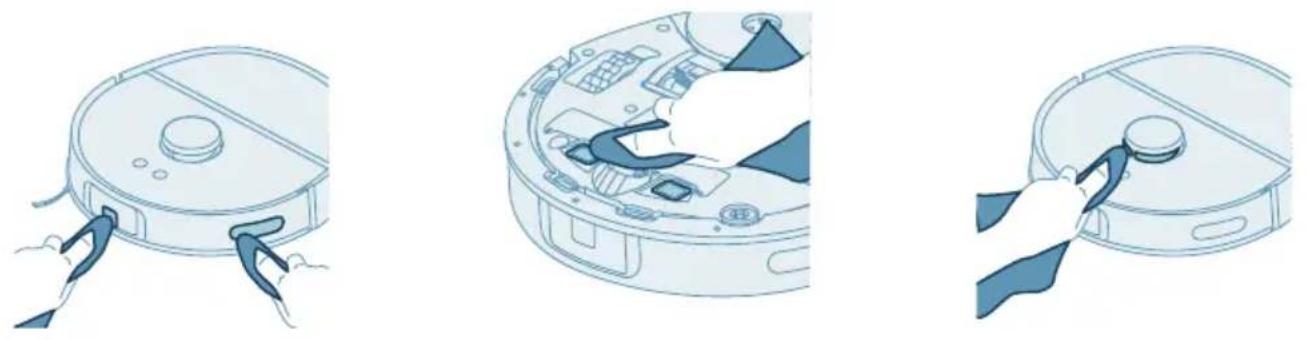
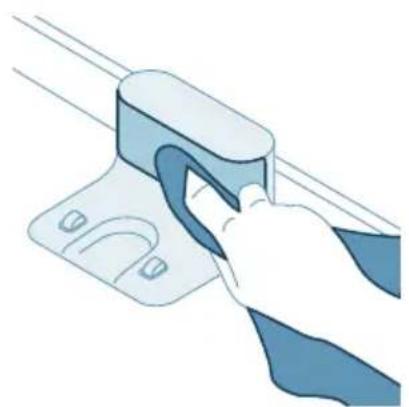
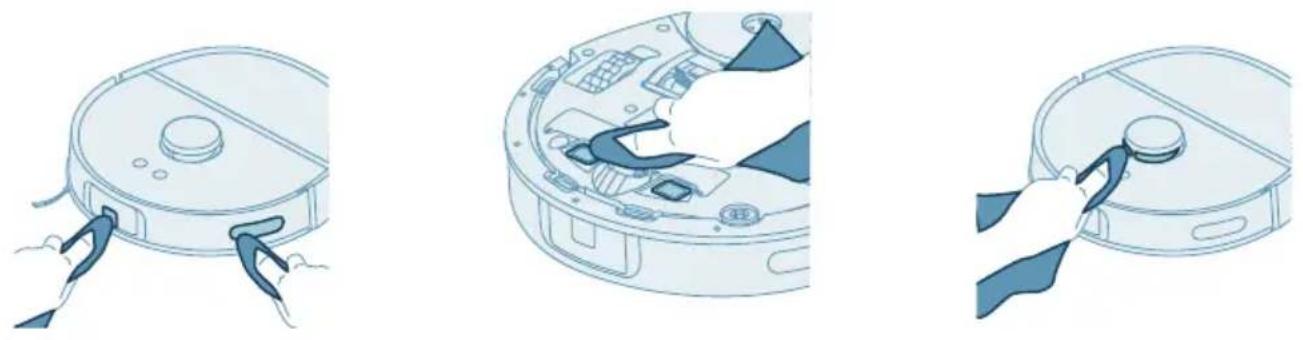
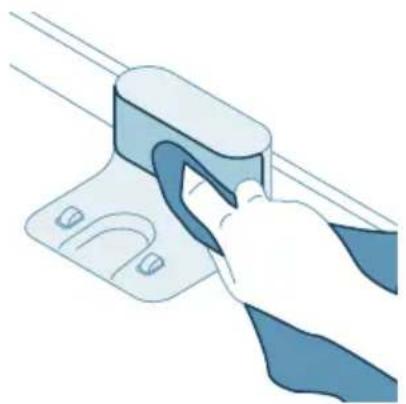
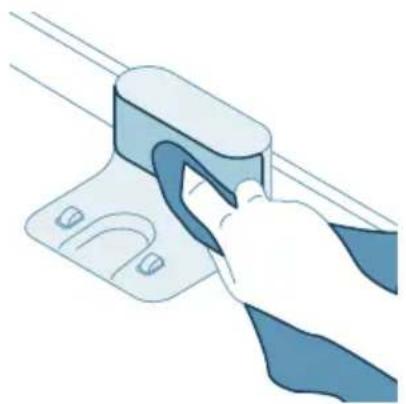
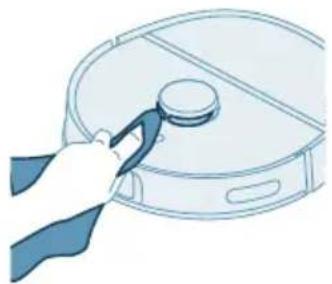
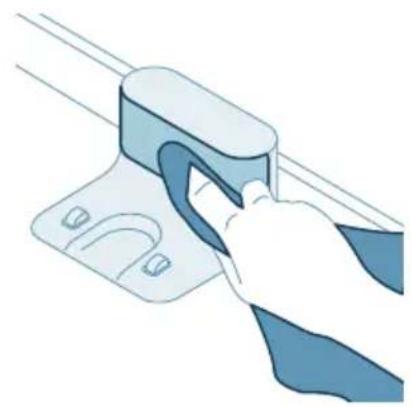
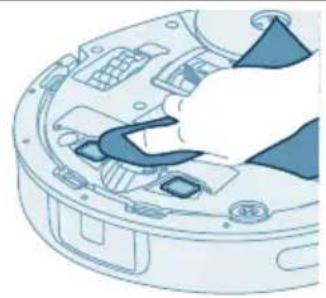
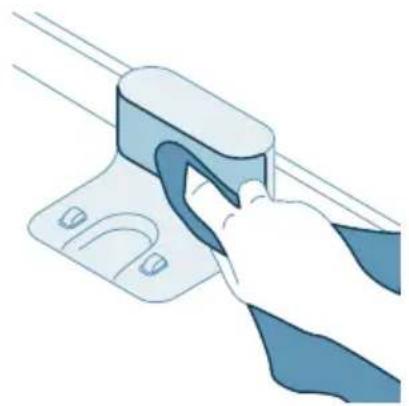
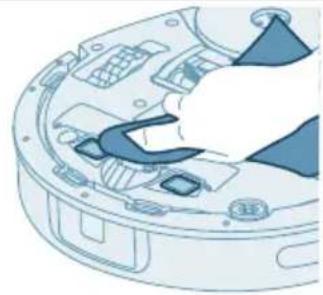
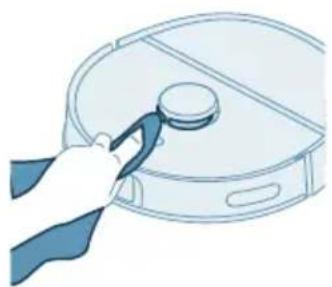
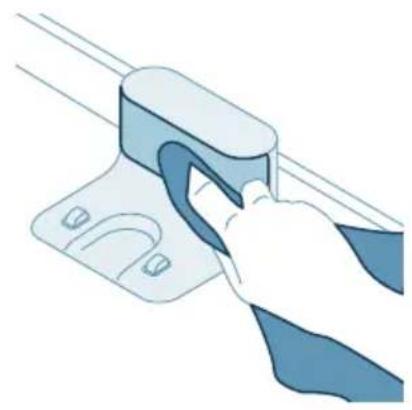
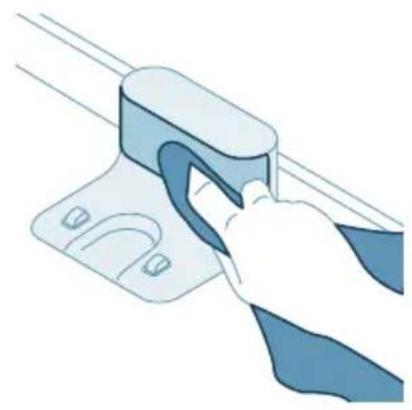
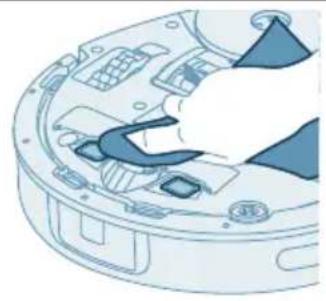
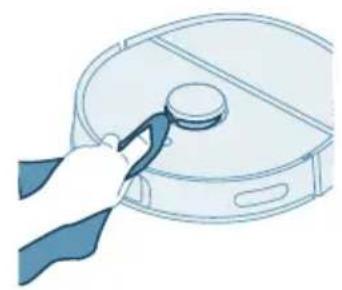
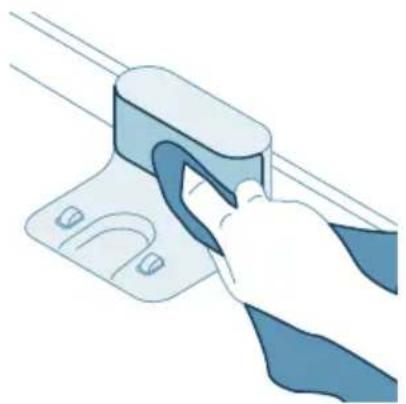
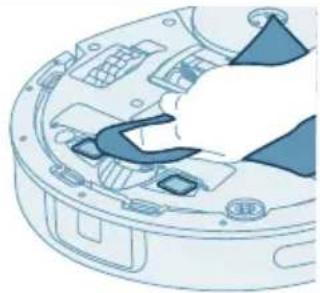
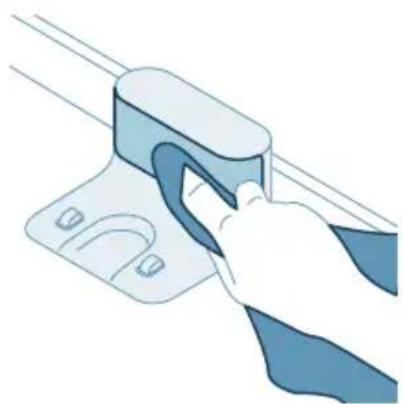
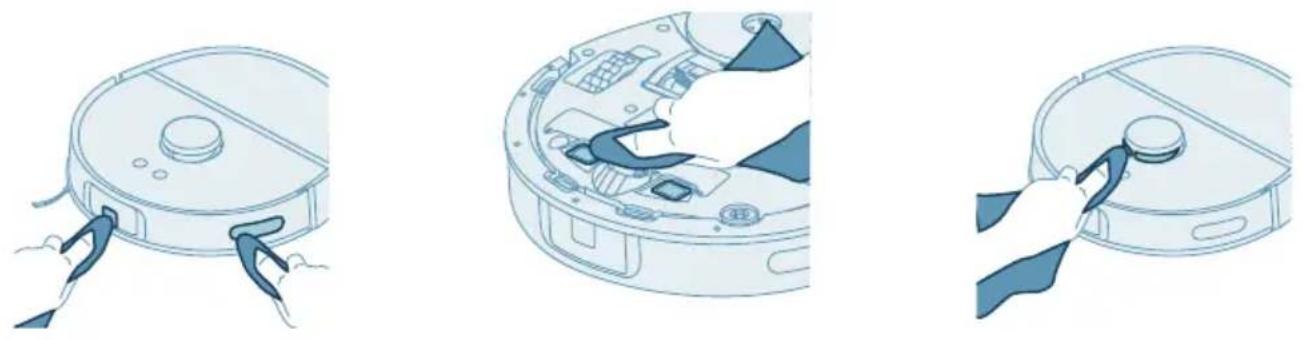
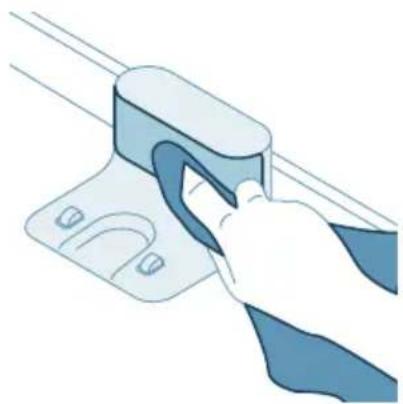
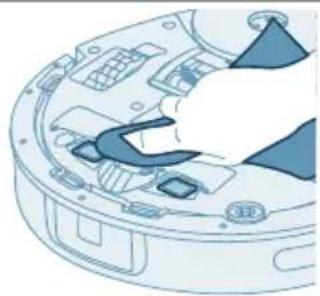
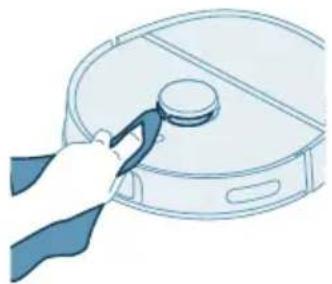
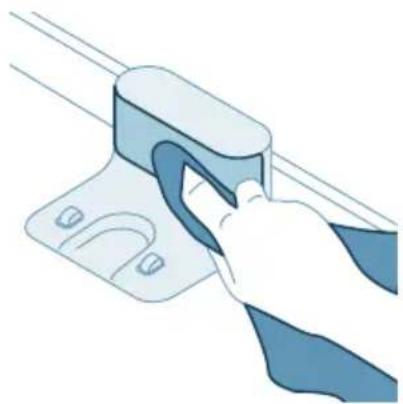
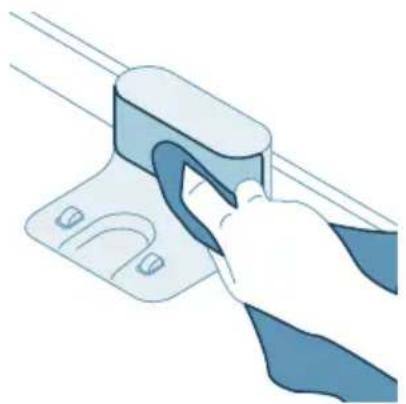
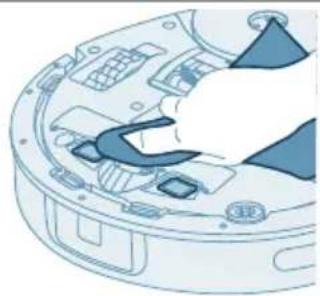
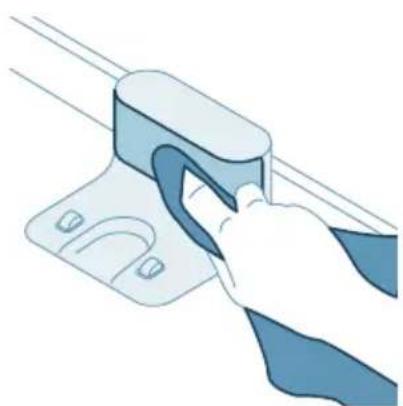
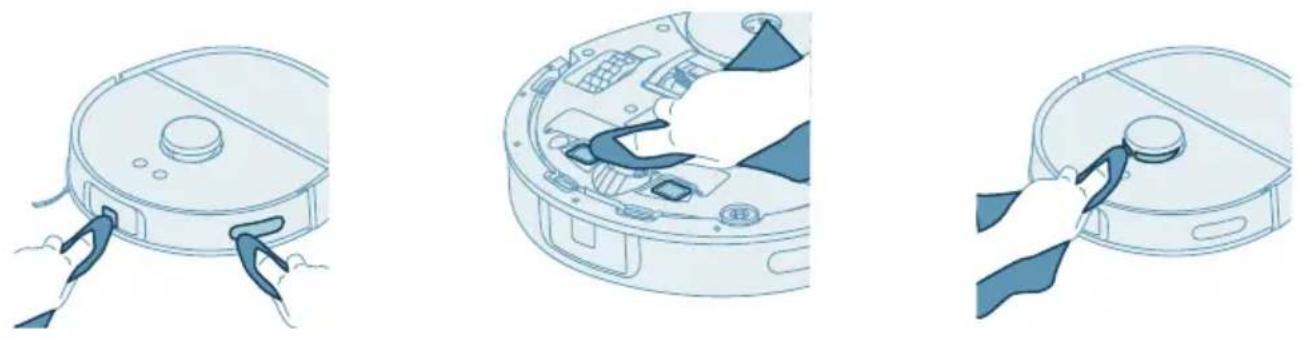
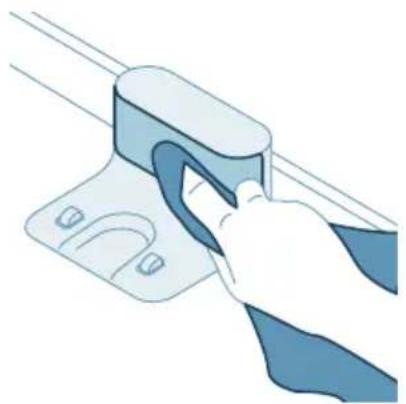
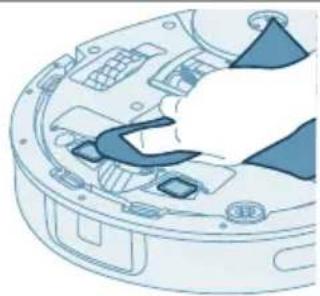
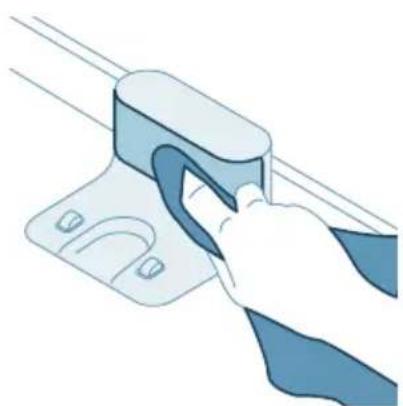
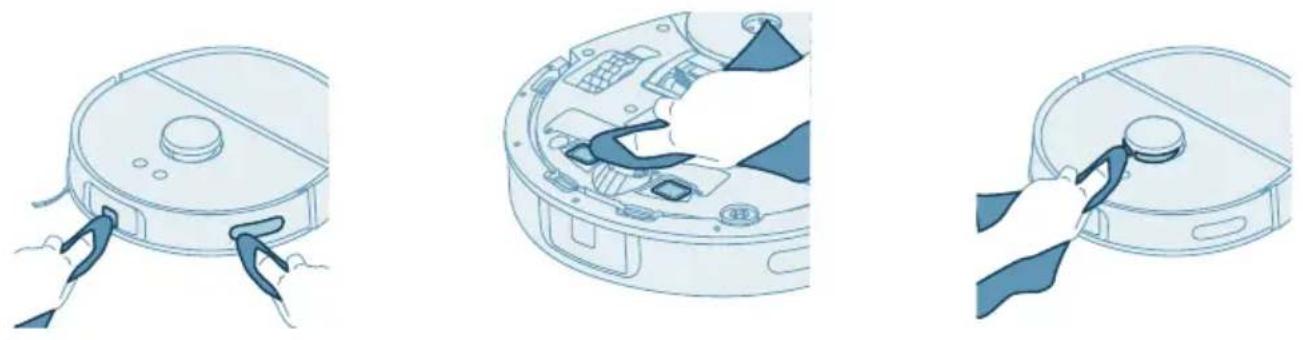
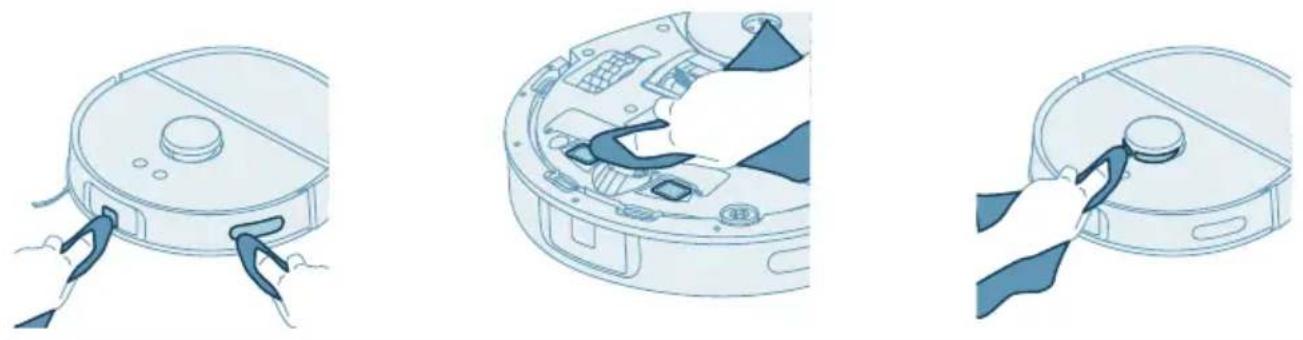
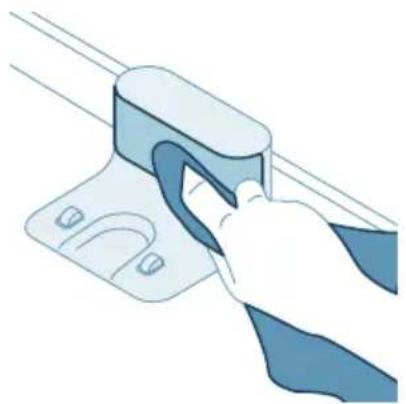
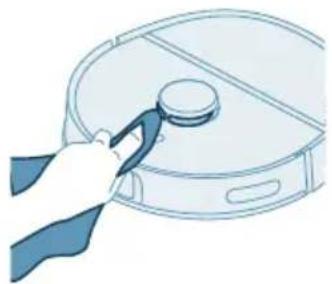
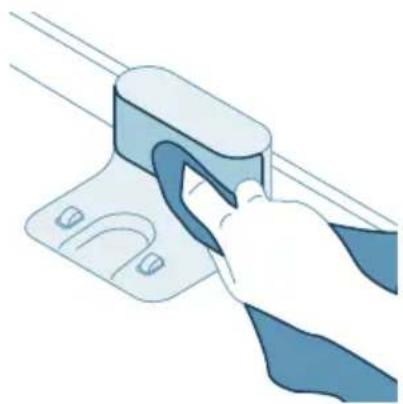
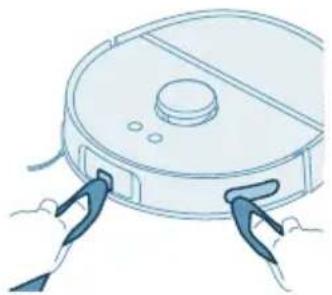
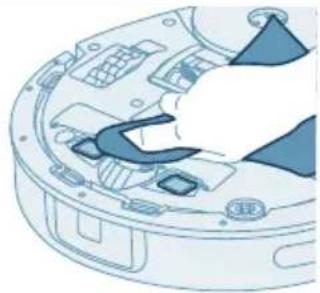
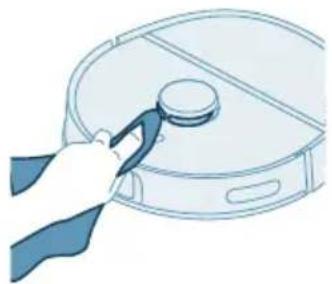
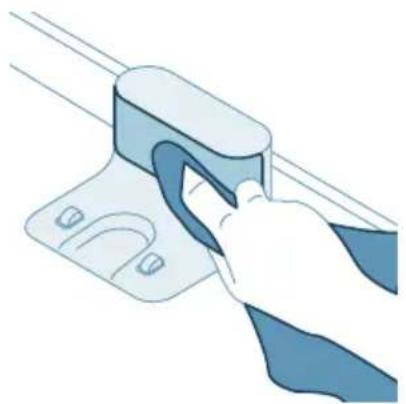
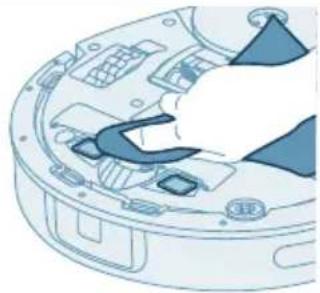
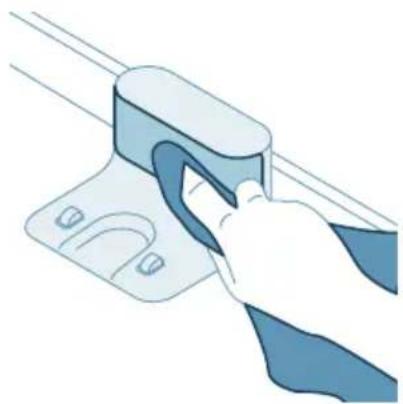
To maintain good cleaning performance, you have to clean sensor, contact points and IR signal window from time to time with a dry non-abrasive cloth.
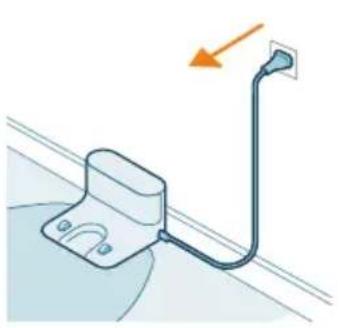
1 Unplug the station from the wall socket.
2 Use a soft non-abrasive dry cloth to clean the components.
i Note: Do not use cleaning detergents.
i Note: Do not use other ways to clean the components.
Long term storage
1 Charge the battery until it is full.
2 Store the robot within a temperature range from 8 °C to 35 °C.
Indicator light signals and their meaning
Signal Meaning of signal
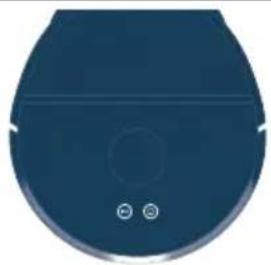
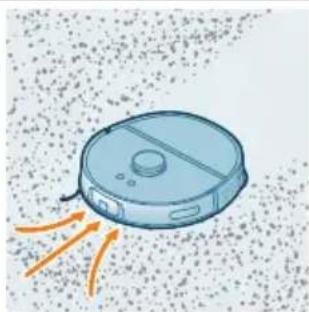
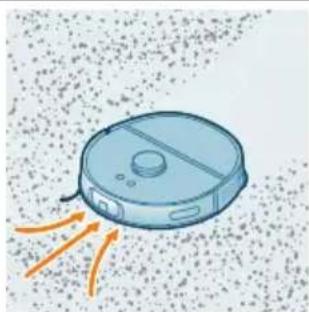
The light on the robot lights up white during cleaning.
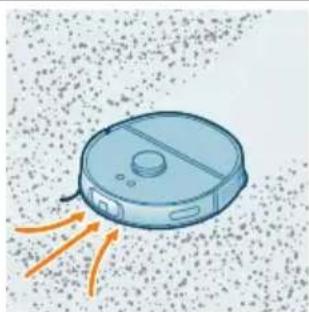
The robot is cleaning the floor.
Signal Meaning of signal
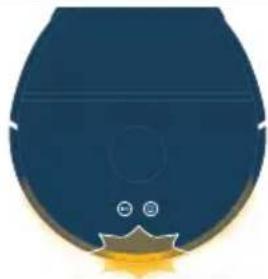
The light on the robot flashes orange.

The robot runs into an error that needs your attention.
Pay attention to the voice message on the robot, or go to the HomeRun app for more information.
Reset/restore the robot
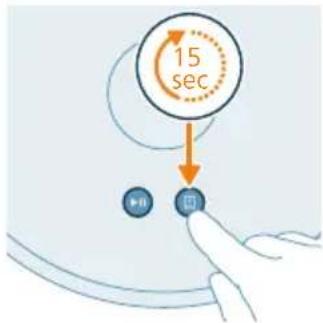
You can reset/restore the robot by pressing and holding the return button on top of the robot for 15 seconds.
i Note: After resetting/restoring the robot, the robot needs to reconnect the app, and the relevant settings in the app are removed.
Child lock
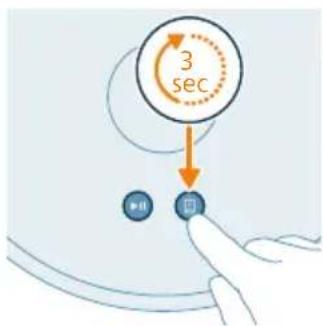
1 Activate child lock in the app or press the return button on the robot for 3 seconds.
2 To deactivate child lock, deselect child lock in the app or press the return button on the robot for 3 seconds again.
Replacement
Ordering accessories
To buy accessories or spare parts, visit
www.philips.com/RoboticsAccessoriesAPP or go to your Philips dealer. You can also contact the Philips Consumer Care Center in your country.
Replacement parts:
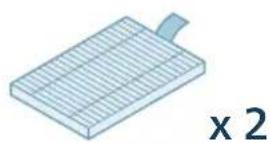
XV1452 2 pairs of replacement rotary mop pads
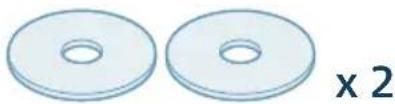
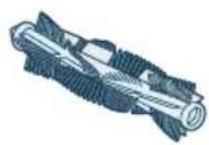
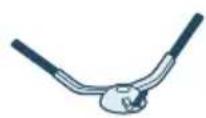
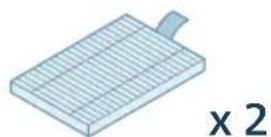
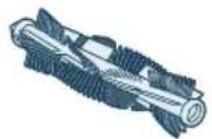
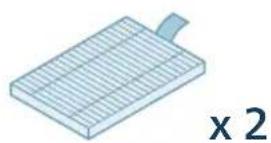
XV1453 Maintenance kit with 2 filters, 1 main brush and 1 side brush.
XV1493 Robot floor cleaner

Removing the rechargeable battery
To remove the rechargeable battery, follow the instructions below. You can also take the robot to a Philips service center to have the rechargeable battery
removed. Contact the Philips Consumer Care Center in your country for the address of a service center near you.
Take any necessary safety precautions when you handle tools to open the product and when you dispose of the rechargeable battery.
Warning: Before you remove the battery, make sure that the product is disconnected from the station and that the battery is completely empty.
1 Start the robot from a place somewhere in the room and not from the station.
2 Let the robot run until the rechargeable battery is empty to make sure that the rechargeable battery is completely discharged before you remove it and dispose of it.
3 Place the robot upside down on a flat and stable surface.
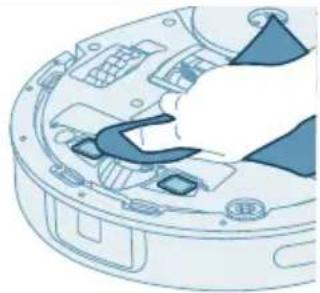
4 Undo the screws of the battery compartment lid and remove the lid.
5 Lift out the rechargeable battery from the compartment.
6 Disconnect it by pressing the little clip on the battery connector to release the battery connector.
7 Take the robot and the rechargeable battery to a collection point for electrical and electronic waste.
Warranty and support
Versuni offers a two-year warranty after purchase on this product. This warranty is not valid if a defect is due to incorrect use or poor maintenance. Our warranty does not affect your rights under law as a consumer. For more information or for invoking the warranty, please visit our website www.philips.com/support.
Your robot vacuum cleaner has been designed and developed with the greatest possible care. In the unfortunate case that your robot needs repair, the Consumer Care Centre in your country will help you by arranging any necessary repairs in the shortest possible time and with maximum convenience. If there is no Consumer Care Centre in your country, go to your local Philips dealer.
Disposal and recycling
Do not dispose the robot in the regular trash. Make sure to bring it to your the recycling facility for electrical equipment.
Troubleshooting
This chapter summarizes the most common problems you could encounter with the appliance. If you are unable to solve the problem with the information below, go to the Philips HomeRun Robot App or visit home.id, where can also find support videos and frequently asked questions. You can also contact the Consumer Care Center in your country.
Problem Possible cause Solution
| The robot doesn't switch on. | The battery is low. Charge the robot on the station before use. | |
| The ambient temperature is too low or too high. | Use the robot at a temperature between 8 °C and 35 °C. | |
| The robot is unable to pair with the app. | The robot is no longer in pairing mode. | Put the robot back in pairing mode by holding the return and start/stop button at same time (the light on the front edge of the robot will flash white to indicate that the robot is in Wi-Fi set-up mode). |
| The Wi-Fi connection (signal) is not good. | Place the robot in an area with a good Wi-Fi signal. | |
| A wrong Wi-Fi network selected. | Make sure you select the correct Wi-Fi network. | |
| A wrong password used. | Make sure you use the correct Wi-Fi password. | |
| A wrong robot model is selected in the app. | Make sure you select the correct robot model. | |
| A wrong app is downloaded | Always use the app that you have downloaded via the QR-code from the quick start guide. | |
| The app and the robot lose connection. | The robot has gone out of reach of the Wi-Fi signal. | Wait for robot to drive back into area with a good Wi-Fi signal. |
Problem Possible cause Solution
| The robot has gone into sleep mode. | The robot will go into sleep mode if it has not returned to the station. Press any button on the robot to awake the robot.Then send it to the station via the app or by pressing the return button. | |
| The Wi-Fi password has been changed. | When Wi-Fi details have changed: add the robot to the app again. | |
| The Wi-Fi network name has been changed. | When Wi-Fi details have changed: add the robot to the app again. | |
| Another user logged in. | If you log in with different account details, you will need to add the robot to the app again. | |
| The email with the verification code has not been received. | The verification code email may take up to a minute to arrive. | Wait more than a minute for the email. |
| The email has not been sent. | Tap on the "resend" button. | |
| The email may have landed in 'spam' or 'junk' folder. | Check the 'spam' or 'junk' folders. (The sender e-mail address starts with: HomeRun_noreply@). | |
| A wrong email address is used. | Check if you have used the correct email address. | |
| The phone or computer doesn't have good internet connection to receive the email. | Make sure the phone or computer has a good internet connection. | |
| The robot can't find station. | The station is not connected to the power supply. | Connect the station to the power supply. |
| The sensors on robot and/or station are dirty. | Clean all the sensors of the robot and the station. | |
| A No-Go, No-Mop, No-Vac, or virtual wall was placed too close to the station, or on the robot's way back to the station. | Do not save No-Go, No-Mop, No-Vac, or virtual wall too close to the station, or on the robot's way back to the station. | |
| The station has been placed on a spot with very bright light. | Don't put the station in a place with very bright light (like direct sun light) this may interfere with the infra red signal. |
Problem Possible cause Solution
| The robot pushes the station away. | The station is not standing close to a wall. | Place station with the back towards a wall. |
| The sensors on robot and/or station are dirty. | Clean all the sensors of the robot and the station. | |
| The station doesn't have enough space around it (0.5 meter to each side and 1.5 m to the front). | Make sure the station has enough space around it. | |
| The robot doesn't clean properly. | The dust bin of the robot is full. | Empty the dust bin of the robot. |
| Obstacles are stuck in the brushes. | Remove all obstacles from the brushes. | |
| The filter has not been cleaned. | Clean the filter regularly. | |
| The filter has not been placed back or has not been placed back correctly. | Place the filter back correctly. | |
| The mop pads need to be replaced. | Replace the mop pads. Purchase new mop pads via the app or on www.philips.com/RoboticsAccessoriesAPP. | |
| Too much water comes out of the mop / the robot makes the floor too wet. | The mop wetness is set too high. | Set the mop wetness lower in the app. ⚠ IMPORTANT: For mopping sensitive hard floors, such as parquet floors, set the mop wetness in the app to minimum. |
| Robot misses areas for cleaning/ robot does not clean the whole area/ robot has begun to miss certain spots | The sensors of the robot are no longer clean. | Clean the robot's sensors with a dry cloth. |
| The robot is working on slippery polished floors. | Make sure the floor is dried before the robot starts cleaning. | |
| The robot is unable to reach certain areas blocked by furniture or barriers. | Tidy up the area to be cleaned by putting furniture and small objects in their proper place. |
Problem Possible cause Solution
| The robot is unable to reach certain areas due to high pile carpets or rugs. | The robot can get stuck on high pile carpets and carpets with fringes. Remove the mop pads and mop pad holders completely from the robot and start the cleaning session again. If the robot is still unable to reach the area, move the carpet or rug to a different location. | |
| The cleaning area is not tidy. | Remove small objects from the floor and tidy up the cleaning area before the robot starts cleaning.The robot can detect obstacles at least 2 cm in height, length and width. | |
| The robot uses a safety margin when following No-Go, No-Mop and No-Vac zones, or Virtual Walls. The safety margin might block off a certain area. | Make the No-Go, No-Mop, No-Vac, or virtual wall in the app a bit smaller. | |
| The robot has blocked itself with a tangled cable. | There are cables on the floor which the robot is unable to detect. | Stop the robot and remove the brush cover. Check if the main brush is stuck and check if something is stuck in the side brush: remove side brush, take away the cable, reattach the side brush. Remove all cables from the floor before you start a cleaning session. |
| The robot falls from stairs. | The anti-drop sensors on the bottom of the robot are dirty. | Clean the anti-drop sensors on the bottom of the robot.If the robot continues to fall from stairs, draw a virtual wall on the top of the stairs in the app. |
| Objects have been placed on the top step of the stairs that the robot detects and therefore thinks it is safe to drive. | Remove the any objects that are placed on the top steps of the stairs. | |
| The robot doesn't charge or discharges very quickly. | The robot is stored in a space that is too hot or too cold. | Charge and store the robot at a temperature between 8 °C and 35 °C. |
| There is foam buildup in the water tank and the robot moves strangely. | Detergent different from the recommended Philips Robot Floor Cleaner XV1493 was used, causing the robot to be slippery. | Only use the recommended Philips Robot Floor Cleaner XV1493 or use no detergent at all.If you have used a wrong detergent, clean the robot and its wheels, including a thorough rinse of the water tank. |
| The robot is making an abnormal noise. | The filter has not been placed back correctly. | Check if filter is placed back correctly. |
Problem Possible cause Solution
| The robot has cleaned up a hard piece of dirt, which is now moving around inside the dustbin. | Empty the dustbin. | |
| The brushes are no longer turning. | Hairs are stuck in the main brush. | Remove hairs with the brush cleaning tool provided with the robot. |
| Other obstacles are stuck in the brushes. | Remove other obstacles from the brushes. | |
| The main brush was not placed back correctly. | Remove the main brush and reassemble it.Align the square protrusion on the main brush with the square hole on the cleaning module. | |
| The side brush gets deformed. | Something may have gotten stuck in the side brush. | - Put brush in hot water for a while and let it dry.- Purchase a new side brush via the app or onwww.philips.com/RoboticsAccessoriesAPP. |
| The robot won't drive on to a black floor. | The robot thinks a pitch black floor is a falling hazard - the cliff detection is activated. | - Make sure lights are switched on in the room with pitch black flooring.- Clean the anti-drop sensor on the bottom of the robot. |
| A schedule is set, but the robot doesn't start cleaning according to the schedule. | The 'do not disturb' function may be activated. | Check in the app if the 'do not disturb' function is switched on at the same time as the schedule. |
| The robot is in sleep mode. | Make sure that the robot is charging in the station.The robot will go into sleep mode if if it has not returned to the station. Press any button on the robot to awake the robot.Then send it to the station via the app or by pressing the Return button. | |
| The wrong time zone has been selected in the app. | You can change the time zone in in the app in 'My Account' under 'Profile'. | |
| The robot has lost connection with the Wi-Fi network. | Make sure the Wi-Fi network is working. | |
| The battery of the robot is empty. | Make sure that the station is connected to the power supply. | |
| It is not possible to log in to the robot app account. | The email address has been changed. | Create a new app account in case the email address has been changed. |
| The password is wrong. | Enter the correct password. |
Problem Possible cause Solution
| In case the password is forgotten, tap on 'forgot password' and follow the steps. | ||
| The wrong country region is selected. | Select the correct country region in the app. | |
| Pop-up messages about app or firmware updates continue to be received. | App updates or firmware updates are not installed. | For continuous improvement of the robot we recommend installing all updates. |
| The Philips HomeRun Robot App is not available in my country. | VPN may be blocking access to the right country information. | Disable any VPN service you are using. |
| Google or Apple account may be set to a different country. | Change the Google or Apple account information to match the country you bought the robot in. | |
| The firmware update fails. | The battery level is too low | The battery level of the robot needs to be more than 30% in order to install an update. |
| The robot is not at the station | Make sure the robot is charging in the station when you install the update. | |
| The Wi-Fi signal is not good enough. | Ensure the robot is in a spot with strong Wi-Fi | |
| The robot finished mapping, but I do not see a map in the app. | The robot got stuck or blocked while mapping. | Return the robot to the station and restart the mapping process. Identify the location where the robot got stuck earlier and remove any obstacles or block the robot from accessing that area. Remove the mop pads and mop pad holders from the robot before starting the remapping process. Once the map has been created, you can create a no-go zone to prevent the robot from entering that area again. |
| The Philips HomeRun Robot App is not refreshed. | Clear the cache and refresh the app.Navigate to the Profile section of the app and select "Clear Cache".Once the cache has been cleared, return to your Robot List and swipe down to refresh the app. | |
| My map is lost from the app. | The maximum amount of maps had been reached. | The robot will create a new map when it recognizes a new environment. If you already have 5 maps, the robot will override an old one. |
| The robot starts remapping. | There are environment changes. | When furniture moves or doors open or close from their regular position, the robot remaps to account for this. |
Problem Possible cause Solution
| There are reflective surfaces. | Surfaces like mirrors or floor-to-ceiling-windows reflect the robot's laser causing disorientation. | |
| The robot is mapping an empty room. | Rooms that have very little furniture, or none at all, can confuse your robot. | |
| The robot is mapping inside a corridor. | A deep corridor can affect the robot's laser reception, which means it's temporarily unable to orientate itself. | |
| I do not want to use the Wi-Fi function. | The Wi-Fi function can be deactivated on your device. | To deactivate Wi-Fi, reset the appliance and remove the robot in the app. To turn on Wi-Fi, add the robot in the app again. |
| The robot is not responding. | Child lock is activated. | To check whether child lock is activated on your robot, press and hold the Return button for 3 seconds. A voice alert will indicate the activation status of the child lock. If the child lock is activated, simply press and hold the Return button for 3 seconds again to deactivate it.In case this does not work, reset the robot by pressing and holding the Return button for 15 seconds. You will then need to add the robot to the app again. |
lsi
Pendahuluan 42
Memasang stasiun
![graph TD A["Room 1"] --> B["Room 2"] B --> C["Room 3"] C --> D["Room 4"] D --> E["Room 5"] E --> F["Room 6"] F --> G["Room 7"] G --> H["Room 8"] H --> I["Room 9"] I --> J["Room 10"] style A fill:#cce5ff,stroke:#333 style B fill:#cce5ff,stroke:#333 style C fill:#cce5ff,stroke:#333 style D fill:#cce5f…](/content/2026/04/730722/images/9bc0ecaa989bcaa6900e9a3a026ece1ab8e43172f08a8030fe3ad053c82cb44e.jpg)
2 Lepaskan penjepit kain pel.
2 Lepaskan penjepit kain pel.
i Catatan: Jangan mencuci penjepit kain pel di mesin cuci.
4 Goncangkan tangki air di bak cuci atau wastafel.
10 Bilas wadah debu dengan air keran.
12 Masukkan kembali casing filter ke tutup.
8 Masukkan kembali casing filter ke tutup.
Membersihkan sikat samping
2 Lepaskan sikat samping.
Pasangkan stesen
![graph TD A["Room 1"] --> B["Room 2"] B --> C["Room 3"] C --> D["Room 4"] D --> E["Room 5"] E --> F["Room 6"] F --> G["Room 7"] G --> H["Room 8"] H --> I["Room 9"] I --> J["Room 10"] style A fill:#cce5ff,stroke:#333 style B fill:#cce5ff,stroke:#333 style C fill:#cce5ff,stroke:#333 style D fill:#cce5f…](/content/2026/04/730722/images/47bbdb26789638ba185d4d327b22f5096e4d598e56d48e402b8c6612dfead0f7.jpg)
7 Buka tudung tangki air.
2 Buka tudung tangki air.
4 Goncang tangki air di atas singki.
10 Bilas tong habuk di bawah paip.
11 Keringkan bekas habuk di udara.
Instalace stanice
![graph TD A["Room 1"] --> B["Room 2"] B --> C["Room 3"] C --> D["Room 4"] D --> E["Room 5"] E --> F["Room 6"] F --> G["Room 7"] G --> H["Room 8"] H --> I["Room 9"] I --> J["Room 10"] style A fill:#cce5ff,stroke:#333 style B fill:#cce5ff,stroke:#333 style C fill:#cce5ff,stroke:#333 style D fill:#cce5f…](/content/2026/04/730722/images/f71bb9ac370d67707715c86eb98ba435a6ab0fae2a8e07984cc1680bad767837.jpg)
Záruka a podpora
Installer stationen
3 Installer stationen inden for de korrekte dimensioner til placering.
![graph TD A["Room 1"] --> B["Room 2"] B --> C["Room 3"] C --> D["Room 4"] D --> E["Room 5"] E --> F["Room 6"] F --> G["Room 7"] G --> H["Room 8"] H --> I["Room 9"] I --> J["Room 10"] style A fill:#cce5ff,stroke:#333 style B fill:#cce5ff,stroke:#333 style C fill:#cce5ff,stroke:#333 style D fill:#cce5f…](/content/2026/04/730722/images/5aeeb59d6a5aec8f319359b336034e45e5fc726f54f41cbf57272aac3cd70adc.jpg)
3 Fjern de roterende moppepuder fra moppepudeholderne.
10 Luk vandtankens dæksel.
3 Fjern de roterende moppepuder fra moppepudeholderne.
4 Ryst vandtanken godt over vasken.
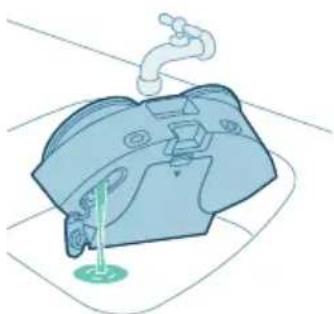
10 Skyl støvbeholderen under vandhanen.
5 Skyl det vaskbare filter under vandhanen.
1 Anbring robotten med bunden opad på et fladt og stabilt underlag.
1 Anbring robotten med bunden opad på et fladt og stabilt underlag.
1 Anbring robotten med bunden opad på et fladt og stabilt underlag.
Langtidsopbevaring
Indikatorlyset på robotten blinker orange.

![graph TD A["Room 1"] --> B["Room 2"] B --> C["Room 3"] C --> D["Room 4"] D --> E["Room 5"] E --> F["Room 6"] F --> G["Room 7"] G --> H["Room 8"] H --> I["Room 9"] I --> J["Room 10"] style A fill:#cce5ff,stroke:#333 style B fill:#cce5ff,stroke:#333 style C fill:#cce5ff,stroke:#333 style D fill:#cce5f…](/content/2026/04/730722/images/3c4d4cb33e027142c526ffb593db8748429f220abd11d60f1d2c3af555a1f31e.jpg)
7 Avage veepaagi kork.
10 Sulgege veepaagi kork.
13 Avage köik siseuksed.
![graph TD A["Room 1"] --> B["Room 2"] B --> C["Room 3"] C --> D["Room 4"] D --> E["Room 5"] E --> F["Room 6"] F --> G["Room 7"] G --> H["Room 8"] H --> I["Room 9"] I --> J["Room 10"] style A fill:#cce5ff,stroke:#333 style B fill:#cce5ff,stroke:#333 style C fill:#cce5ff,stroke:#333 style D fill:#cce5f…](/content/2026/04/730722/images/1a2ce0dc28be910b61a25895a08bcc7698100779647c66216f6aa4863a242be6.jpg)
i Märkus. Ärge peske mopipadja hoidikuid pesumasinas.
2 Avage veepaagi kork.
6 Sulgege veepaagi kork.
7 Tolmukambri avamiseks vajutage avamisnupule.
10 Loputage tolmukambrit kraani all.
12 Pange filtrikorpus tagasi kaane sisse.
250 Eesti
13 Sulgege tolmukambri kaas.
2 Tolmukambri avamiseks vajutage avamisnupule.

5 Loputage pestav filter kraani all.
1 Asetage robot tagurpidi tasasele ja stabiilsele pinnale.
1 Asetage robot tagurpidi tasasele ja stabiilsele pinnale.
1 Asetage robot tagurpidi tasasele ja stabiilsele pinnale.

Robot puhastab pôrandat.
Roboti tuli vilgub oranžilt.

Instalar la base
![graph TD A["Room 1"] --> B["Room 2"] B --> C["Room 3"] C --> D["Room 4"] D --> E["Room 5"] E --> F["Room 6"] F --> G["Room 7"] G --> H["Room 8"] H --> I["Room 9"] I --> J["Room 10"] style A fill:#cce5ff,stroke:#333 style B fill:#cce5ff,stroke:#333 style C fill:#cce5ff,stroke:#333 style D fill:#cce5f…](/content/2026/04/730722/images/66561ba1ce5d3e63045b03f62c46b4cd5cfc61bf97bd57ec9c8edc8fe40f09c9.jpg)
Installation de la station
3 Installez la station en respectant les distances de placement.
Configuration de la connexion Wi-Fi
![graph TD A["Room 1"] --> B["Room 2"] B --> C["Room 3"] C --> D["Room 4"] D --> E["Room 5"] E --> F["Room 6"] F --> G["Room 7"] G --> H["Room 8"] H --> I["Room 9"] I --> J["Room 10"] style A fill:#cce5ff,stroke:#333 style B fill:#cce5ff,stroke:#333 style C fill:#cce5ff,stroke:#333 style D fill:#cce5f…](/content/2026/04/730722/images/142dfa1f79d0b1ef730c1ec727b349f9e1511052abf83e54bc190c7b72076b21.jpg)
3 Sortez la brosse principale.
Postavljanje stanice
2 Okrenite podlogu na prednju stranu i čvrsto je zalijepite za pod prije nego što na nju postavite stanicu.

3 Postavite stanicu unutar pravilnih dimenzija za položaj.
i Napomena: ostavite 0,5 metara razmaka s obje strane stanice i 1,5 metara ispred stanice.
4 Spojite stanicu na napajanje.
1 Okrenite robota u pravilan položaj i postavite ga na pod ispred stanice.
i Napomena: gumbi na gornjem poklopcu moraju biti okrenuti prema stanici.
3 Zatim ondje odaberite jezik glasovnog upozorenja.
Način na koji robotski usisavač radi
Izradite kartu
Na koji način radi mapiranje
Robot se kreće kroz prostorije i brzo ih skenira kako bi izradio kartu podova.
Alat za uređivanje karte
U aplikaciji možete upotrebljavati alat za uređivanje karte za:
![graph TD A["Room 1"] --> B["Room 2"] B --> C["Room 3"] C --> D["Room 4"] D --> E["Room 5"] E --> F["Room 6"] F --> G["Room 7"] G --> H["Room 8"] H --> I["Room 9"] I --> J["Room 10"] style A fill:#cce5ff,stroke:#333 style B fill:#cce5ff,stroke:#333 style C fill:#cce5ff,stroke:#333 style D fill:#cce5f…](/content/2026/04/730722/images/04c4a1108d2953566fe4c28e3825a779012ad72f4d36d5f0b9fe3a073e16c571.jpg)
- Jeste li ostavili otvorena vrata između prostorija?
- Jeste li zatvorili vanjska vrata?
i Napomena: Ako robot zapne na predmetu, ili će prestati s mapiranjem ili će ući u stanje mirovanja.
1 Pritisnite gumb za otpuštanje i izvadite modul za čišćenje iz robota.
2 Uklonite držače krpa.
3 Uklonite rotirajuće krpe iz držača.
4 Prethodno navlažite rotirajuće krpe.
5 Pričvrstite rotirajuće krpe na držače krpa.
6 Montirajte držače krpa na modul za čišćenje.
11 Vratite modul za čišćenje natrag u robot.
i Napomena: Rotirajuće krpe nemojte čistiti deterdžentom. Koristite samo vodu iz slavine.
1 Pritisnite gumb za otpuštanje i izvadite modul za čišćenje iz robota.
2 Uklonite držače krpa.
3 Uklonite rotirajuće krpe iz držača.
360 Hrvatski
4 Rotirajuće krpe isperite pod mlazom vode temperature do 60 °C.
i Napomena: držače krpa nemojte prati u perilici rublja.
7 Pričvrstite rotirajuće krpe na držače krpa.
8 Montirajte držače krpa na modul za čišćenje.
9 Vratite modul za čišćenje natrag u robot.
i Napomena: spremnik za vodu i spremnik za prašinu nemojte čistiti deterdžentom za čišćenje. Koristite samo vodu iz slavine.
1 Pritisnite gumb za otpuštanje i izvadite modul za čišćenje iz robota.
4 Protresite spremnik za vodu iznad sudopera.
5 Izlijte svu vodu preostalu u spremniku za vodu.
8 Uklonite kućište filtra s poklopca.
9 Izbacite nakupljenu prašinu iz spremnika za prašinu.
10 Isperite spremnik za prašinu pod mlazom vode.
12 Vratite kućište filtra u poklopac.
13 Zatvorite poklopac spremnika za prašinu.
15 Vratite modul za čišćenje natrag u robot.
Čišćenje perivog filtra
i Napomena: perivi filtar i spremnik za vodu nemojte čistiti deterdžentom za čišćenje. Koristite samo vodu iz slavine.
1 Pritisnite gumb za otpuštanje i izvadite modul za čišćenje iz robota.
3 Uklonite kućište filtra s poklopca.
4 Izvucite perivi filtar iz kućišta.
5 Isperite perivi filtar pod mlazom vode iz slavine.
6 Osušite perivi filtar na zraku.

7 Umetnite suhi perivi filtar u kućište.
8 Vratite kućište filtra u poklopac.
9 Zatvorite poklopac spremnika za prašinu.
1 Robot postavite naopako na ravnu i stabilnu površinu.
8 Postavite jezičce poklopca četke u odgovarajuće ureze.
1 Robot postavite naopako na ravnu i stabilnu površinu.
2 Uklonite bočnu četku.
3 Pomoću alata za čišćenje uklonite prašinu i nakupine s bočne četke i robota.
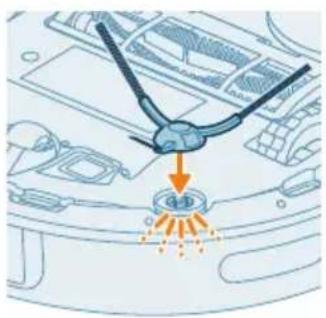
4 Pričvrstite bočnu četku tako da je utisnete u točan položaj (dok ne čujete škljocaj) na donjem dijelu robota.
1 Robot postavite naopako na ravnu i stabilnu površinu.
Dugotrajna pohrana
1 Potpuno napunite bateriju.
2 Pohranite robot na temperaturi u rasponu od 8 °C do 35 °C.
Robot čisti pod.
XV1453 Komplet za održavanje s 2 filtra, 1 glavnom četkom i 1 bočnom četkom.
![graph TD A["Room 1"] --> B["Room 2"] B --> C["Room 3"] C --> D["Room 4"] D --> E["Room 5"] E --> F["Room 6"] F --> G["Room 7"] G --> H["Room 8"] H --> I["Room 9"] I --> J["Room 10"] style A fill:#cce5ff,stroke:#333 style B fill:#cce5ff,stroke:#333 style C fill:#cce5ff,stroke:#333 style D fill:#cce5f…](/content/2026/04/730722/images/93eb89e56c7808461b8d96375ae5065e416222d48fdc62a46c13a38b162cf9ff.jpg)
392 Italiano
1 Capovolgete il robot su una superficie piana e stabile.
1 Capovolgete il robot su una superficie piana e stabile.
1 Capovolgete il robot su una superficie piana e stabile.
![graph TD A["Room 1"] --> B["Room 2"] B --> C["Room 3"] C --> D["Room 4"] D --> E["Room 5"] E --> F["Room 6"] F --> G["Room 7"] G --> H["Room 8"] H --> I["Room 9"] I --> J["Room 10"] style A fill:#cce5ff,stroke:#333 style B fill:#cce5ff,stroke:#333 style C fill:#cce5ff,stroke:#333 style D fill:#cce5f…](/content/2026/04/730722/images/a4b7af18668a41e13963acc4f63ae42554d2ee3a64035b6a749028d89464faf9.jpg)
12 Novāciet no grīdas visus kabelus un vadus, lai robots tajos nesapitos.
4 Pakratiet üdens tvertni virs izlietnes.
11 Laujiet puteklu tvertnei nožut.
4 Izvelciet mazgājamo filtru no korpusa.
5 Nonemiet matus un citus netīrumus no galvenās sukas.
Ilgstoša glabāšana
Robots tīra grīdu.
Robota indikators mirgo oranžā krāsā.

XV1453 Apkopes komplekts ar 2 filtriem, 1 galveno suku un 1 sānu suku.
Stotelès montavimas
![graph TD A["Room 1"] --> B["Room 2"] B --> C["Room 3"] C --> D["Room 4"] D --> E["Room 5"] E --> F["Room 6"] F --> G["Room 7"] G --> H["Room 8"] H --> I["Room 9"] I --> J["Room 10"] style A fill:#cce5ff,stroke:#333 style B fill:#cce5ff,stroke:#333 style C fill:#cce5ff,stroke:#333 style D fill:#cce5f…](/content/2026/04/730722/images/3b3ec68d4d28f5299b4cf0cc1aeab3748fc4079b42e87899bc5db8075f60a6ff.jpg)
7 Atidarykite vandens bakelio dangtj.
2 Atidarykite vandens bakelio dangtj.
6 Uždarykite vandens bakelio dangtelj.
2 Vienu metu spauskite šepečio dangtelio atlaisvinimo mygtukus ir nukelkite bei nuimkite šepečio dangtelj.
3 Ištraukite pagrindinj šepetj.
2 Išimkite šoninj šepetj.

Ilgalaikis laikymas
Valymo metu lemputė ant roboto jsižiebia balta spalva.
Roboto lemputė mirksi oranžine spalva.

![graph TD A["Room 1"] --> B["Room 2"] B --> C["Room 3"] C --> D["Room 4"] D --> E["Room 5"] E --> F["Room 6"] F --> G["Room 7"] G --> H["Room 8"] H --> I["Room 9"] I --> J["Room 10"] style A fill:#cce5ff,stroke:#333 style B fill:#cce5ff,stroke:#333 style C fill:#cce5ff,stroke:#333 style D fill:#cce5f…](/content/2026/04/730722/images/a00d7b410f2c18ee7d84249e77db2258cfb5ae9f8b9cbb3000aae0dffacde3b8.jpg)

Tárolás
![graph TD A["Room 1"] --> B["Room 2"] B --> C["Room 3"] C --> D["Room 4"] D --> E["Room 5"] E --> F["Room 6"] F --> G["Room 7"] G --> H["Room 8"] H --> I["Room 9"] I --> J["Room 10"] style A fill:#cce5ff,stroke:#333 style B fill:#cce5ff,stroke:#333 style C fill:#cce5ff,stroke:#333 style D fill:#cce5f…](/content/2026/04/730722/images/dade6c5a5e853e7e2593b4a291fc40f6cebb4992aecf60547e918b0e3fcb2419.jpg)
13 Open alle deuren in huis.
10 Spoel de stofbak af onder de kraan.
3 Trek de borstel eruit.
Langdurige opslag
Installer stasjonen
2 Fjern holderne for mikrofiberklutene.
5 Fest de roterende mikrofiberklutene i de tilhørende holderne.

10 Lukk lokket på vannbeholderen.
2 Fjern holderne for mikrofiberklutene.
6 La de roterende mikrofiberklutene lufttørke.
7 Fest de roterende mikrofiberklutene i de tilhørende holderne.
4 Rist ut vannbeholderen over vasken.
6 Lukk lokket på vannbeholderen.
10 Skyll støvbeholderen under springen.
13 Lukk lokket på støvbeholderen.
4 Trekk det vaskbare filteret ut av huset.
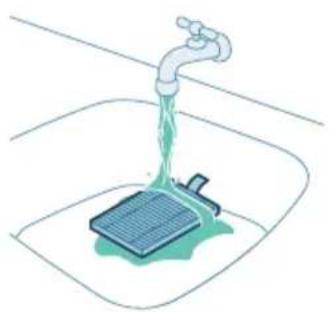
5 Skyll det vaskbare filteret under springen.
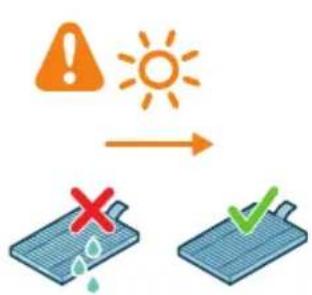
6 La det vaskbare filteret lufttørke.
592 Norsk

7 Sett filteret tilbake på plass i huset när det er tört.
Langtidsoppbevaring
1 Lad opp batteriet helt.
2 Oppbevar roboten i et temperaturområde fra 8 °C til 35 °C.
Lampen på roboten blinker oransje.

Instalowanie stacji
![graph TD A["Room 1"] --> B["Room 2"] B --> C["Room 3"] C --> D["Room 4"] D --> E["Room 5"] E --> F["Room 6"] F --> G["Room 7"] G --> H["Room 8"] H --> I["Room 9"] I --> J["Room 10"] style A fill:#cce5ff,stroke:#333 style B fill:#cce5ff,stroke:#333 style C fill:#cce5ff,stroke:#333 style D fill:#cce5f…](/content/2026/04/730722/images/d705d42fad2419e44f8b8dedee7c47f0d04a95349460d63a4d4311f8b4689d4e.jpg)
622 Polski
Instalar a base
![graph TD A["Room 1"] --> B["Room 2"] B --> C["Room 3"] C --> D["Room 4"] D --> E["Room 5"] E --> F["Room 6"] F --> G["Room 7"] G --> H["Room 8"] H --> I["Room 9"] I --> J["Room 10"] style A fill:#cce5ff,stroke:#333 style B fill:#cce5ff,stroke:#333 style C fill:#cce5ff,stroke:#333 style D fill:#cce5f…](/content/2026/04/730722/images/a1740636f25e415e38328fefd773d4174c17f70b29f76901433b0047b7a1593e.jpg)
6 Instale os suportes para a base da esfregona no módulo de limpeza.
8 Instale os suportes para a base da esfregona no módulo de limpeza.
8 Remova o invólucro do filtro da tampa.
9 Despeje o pó recolhido do recipiente do pó.
12 Volte a colocar o invólucro do filtro na tampa.
13 Feche a tampa do recipiente do pó.
3 Remova o invólucro do filtro da tampa.
4 Utilize a ferramenta de limpeza para cortar os pelos.

2 Remova a escova lateral.
Armazenamento a longo prazo
A luz do robot acende intermintemente a laranja.

Encomendar acessórios
Instalati statia
![graph TD A["Room 1"] --> B["Room 2"] B --> C["Room 3"] C --> D["Room 4"] D --> E["Room 5"] E --> F["Room 6"] F --> G["Room 7"] G --> H["Room 8"] H --> I["Room 9"] I --> J["Room 10"] style A fill:#cce5ff,stroke:#333 style B fill:#cce5ff,stroke:#333 style C fill:#cce5ff,stroke:#333 style D fill:#cce5f…](/content/2026/04/730722/images/9438f85ed68f2037559606f955b4a0a41b51789faaaaf47fe7fc00a9156b74e0.jpg)
Instaloni stacionin
Me aplikacionin, ju mund të:
![graph TD A["Room 1"] --> B["Room 2"] B --> C["Room 3"] C --> D["Room 4"] D --> E["Room 5"] E --> F["Room 6"] F --> G["Room 7"] G --> H["Room 8"] H --> I["Room 9"] I --> J["Room 10"] style A fill:#cce5ff,stroke:#333 style B fill:#cce5ff,stroke:#333 style C fill:#cce5ff,stroke:#333 style D fill:#cce5f…](/content/2026/04/730722/images/9bc809a55a5311619a8c2799e910ebc105e01eb2666cf2ca59ba44cc08f3ce9e.jpg)

4 Shkundni rezervuarin e ujit mbi lavaman.
11 Futni modulin e pastrimit te fshesa robotike.
Sinjali Kuptimi i sinjalit
Roboti po pastron dyshemenë.
Namestitev postaje
2 Obrnite podlogo in jo trdno prilepite na tla, preden nanjo postavite postajo.
1 Robota obrnite v pravo smer in ga položite na tla pred postajo.
- Preverite povezavo Wi-Fi v mobilnem telefonu.
- Preverite, ali ste izbrali pravi model.
- Preverite, ali ste vnesli pravilno geslo za Wi-Fi.
![graph TD A["Room 1"] --> B["Room 2"] B --> C["Room 3"] C --> D["Room 4"] D --> E["Room 5"] E --> F["Room 6"] F --> G["Room 7"] G --> H["Room 8"] H --> I["Room 9"] I --> J["Room 10"] style A fill:#cce5ff,stroke:#333 style B fill:#cce5ff,stroke:#333 style C fill:#cce5ff,stroke:#333 style D fill:#cce5f…](/content/2026/04/730722/images/085b37f3a37a0ee881f7fbcdcd85cab8b1fa4c2f0cb32ed2cee19fd98901a8db.jpg)
2 Odstranite držali krp za brisanje.
3 Odstranite vrtljivi krpi za brisanje z držal krp za brisanje.
4 Vrtljivi krpi za brisanje predhodno navlažite.
5 Pritrdite vrtljivi krpi za brisanje na držali krp za brisanje.
10 Zaprite pokrovček posode za vodo.
11 Vstavite čistilni modul nazaj v robota.
12 S tal odstranite vse kable in žice, da se robot ne bi zapletel vanje.
2 Odstranite držali krp za brisanje.
3 Odstranite vrtljivi krpi za brisanje z držal krp za brisanje.
4 Vrtljivi krpi za brisanje operite pod pipo z vodo, ki ima temperaturo največ 60 °C.
i Opomba: Držal krp za brisanje ne perite v pralnem stroju.
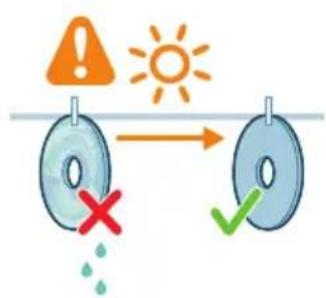
6 Vrtljivi krpi za brisanje posušite na zraku.
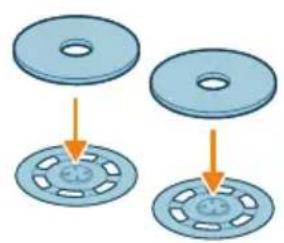
7 Pritrdite vrtljivi krpi za brisanje na držali krp za brisanje.
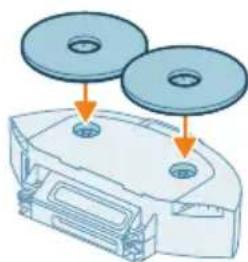
9 Vstavite čistilni modul nazaj v robota.
i Opomba: Posode za vodo in posode za prah ne čistite z nobenim čistilnim sredstvom. Uporabite samo vodo iz pipe.
4 Posodo za vodo pretresite nad pomivalnim koritom.
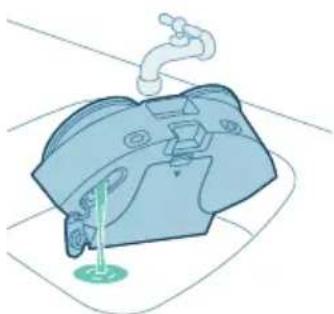
5 Iz posode za vodo izlijte morebitno preostalo vodo.
6 Zaprite pokrovček posode za vodo.
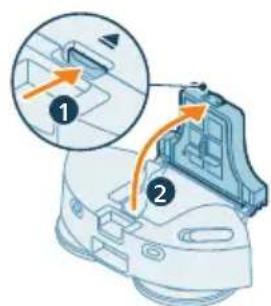
8 Odstranite ohišje filtra s pokrova.
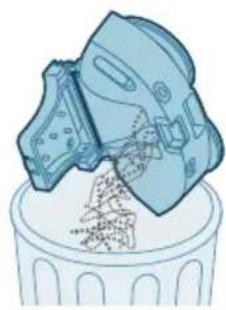
9 Nabrani prah stresite v smetnjak.
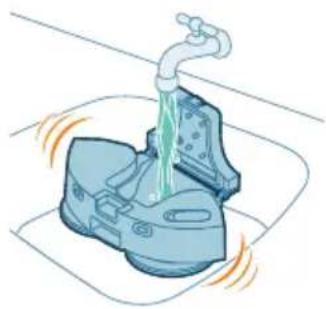
10 Posodo za prah izperite pod tekočo vodo.
11 Posodo za prah posušite na zraku.
13 Zaprite pokrov posode za prah.
14 S čisto suho krpo obrišite zunanjost čistilnega modula.
15 Vstavite čistilni modul nazaj v robota.
i Opomba: Pralnega filtra ne čistite z nobenim čistilnim sredstvom. Uporabite samo vodo iz pipe.
3 Odstranite ohišje filtra s pokrova.
4 Izvlecite pralni filter iz ohišja.
5 Pralni filter operite pod tekočo vodo.
6 Pralni filter posušite na zraku.

5 Z glavne ščetke odstranite lase, dlake in umazanijo.
8 Robove pokrova ščetke vstavite v prave zareze.
1 Izključite postajo iz električne vtičnice.
2 Z mehko in suho krpo očistite sestavne dele.
Dolgotrajno shranjevanje
1 Baterijo povsem napolnite.
2 Robota shranjujte pri temperaturi od 8 °C do 35 °C.
Robot čisti tla.
Signal Pomen signala
Lučka na robotu utripa oranžno.

Robot javlja napako; potrebno je ukrepanje.
1 Robota zaženite nekje v prostoru, ne na postaji.
2 Preden odstranite in zavržete akumulatorsko baterijo, se prepričajte, da je popolnoma prazna tako, da sesalnik pustite delovati, dokler se baterija ne izprazni.
3 Robota položite na ravno in stabilno površino z zgornjo stranjo navzdol.
4 Odvijte vijake pokrova prostora za baterije in odstranite pokrov.
5 Akumulatorsko baterijo dvignite iz prostora za baterijo.
6 Izključite jo tako, da pritisnete malo sponko na priključku baterije, da se ta sprosti.
7 Robota in akumulatorsko baterijo odnesite na zbirno točko za električne in elektronske odpadke.
Jamstvo in podpora
Inštalácia stanice
![graph TD A["Room 1"] --> B["Room 2"] B --> C["Room 3"] C --> D["Room 4"] D --> E["Room 5"] E --> F["Room 6"] F --> G["Room 7"] G --> H["Room 8"] H --> I["Room 9"] I --> J["Room 10"] style A fill:#cce5ff,stroke:#333 style B fill:#cce5ff,stroke:#333 style C fill:#cce5ff,stroke:#333 style D fill:#cce5f…](/content/2026/04/730722/images/f43ff5e26acb547fb8b702cb60eba5b6910c5a7ba27fb5a811138d4d6ccad3a0.jpg)
1 Stlačte tlačidlo na uvolnenie a vyberte z robota modul čistenia.
2 Odstráňte držiaky na utierku mopu.
3 Z držiakov na utierku mopu odstráňte rotačné utierky mopu.
4 Rotačné utierky mopu navlhčite vopred.
806 Slovensky
6 Namontujte držiaky na utierku mopu na modul čistenia.
11 Vložte modul čistenia spät do robota.
2 Odstráňte držiaky na utierku mopu.

3 Z držiakov na utierku mopu odstráňte rotačné utierky mopu.

4 Opláchnite rotačné utierky mopu pod tečúcou vodou s teplotou do 60 °C.
8 Namontujte držiaky na utierku mopu na modul čistenia.
9 Vložte modul čistenia spät do robota.
Čistenie nádoby na vodu a nádoby na prach
i Poznámka: Nádobu na vodu a nádobu na prach nečistite čistiacimi prostriedkami. Používajte iba vodu z vodovodu.
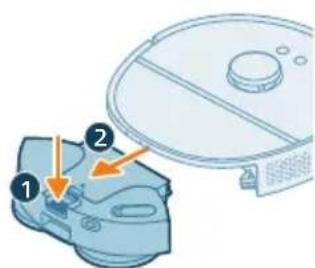
1 Stlačte tlačidlo na uvolnenie a vyberte z robota modul čistenia.
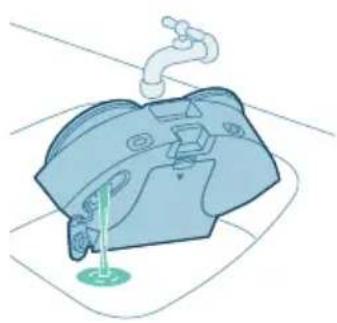
4 Nádobou na vodu zatraste nad drezom.
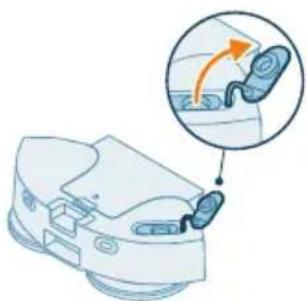
6 Zatvorte uzáver nádoby na vodu.
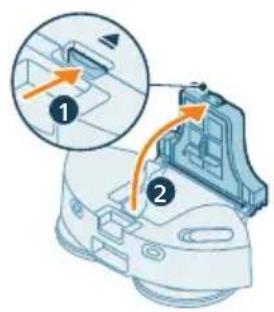
8 Odoberte z veka puzdro filtra.
11 Nádobu na prach nechajte uschnút na vzduchu.
13 Zatvorte veko nádoby na prach.
15 Vložte modul čistenia spät do robota.
1 Robot prevrátte hore dnom a položte na rovný a stabilný povrch.
3 Vytiahnite hlavnú kefu.
1 Robot prevrátté hore dnom a položte na rovný a stabilný povrch.
1 Spustite robota z l'ubovolného miesta v miestnosti (a nie zo stanice).
2 Aby sa zabezpečilo, že je nabíjateľná batéria pred odstránením a likvidáciou úplne vybitá, nechajte robot zapnutý, kým sa batéria úplne nevybije.
3 Robot prevráťte hore dnom a položte na rovný a stabilný povrch.
4 Odskrutkujte skrutky krytu priečinka na batériu a odmontujte kryt.
5 Vyberte nabíjatel'nú batériu z priestoru.
6 Odpojte ju stlačením malej svorky na konektore batérie, čím uvolníte konektor batérie.
7 Robot a nabíjatel'nú batériu zaneste na zberné miesto elektrických a elektronických výrobkov.
Záruka a podpora
Postavljanje stanice
2 Okrenite podmetač na prednju stranu i čvrsto ga zalepite na zemlju pre nego što postavite stanicu na njega.
1 Okrenite robot u pravilan položaj i postavite ga na pod ispred stanice.
i Napomena: Uverite se da su dugmad na gornjem poklopcu okrenuta prema stanici.
2 Proverite da li je stanica uključena na napajanje.
3 Pritisnite dugme za povratak. Robot dolazi do pravilnog položaja na stanici.
4 Sačekajte dok se robot potpuno ne napuni.
- Nadgledanje sesije čišćenja u realnom vremenu i proveravanje nivoa baterije.
- Prijem obaveštenja u upozorenja.
- Zakazivanje ciklusa čišćenja.
- Prikaz statusa održavanja i pronalaženje rezervnih delova.
- Pogledajte video zapise sa uputstvima za korišćenje.
- Pristupite celom korisničkom priručniku.
- Pronadite odgovore u često postavljanim pitanjima.
- Kontakt sa korisničkom podrškom.
- Proverite Wi-Fi vezu mobilnog uređaja.
- Proverite da li ste izabrali pravi model.
- Proverite da li ste uneli tačnu lozinku za Wi-Fi.
- Proverite da li je robot i dalje u režimu za postavljanje Wi-Fi veze.
i Napomena: Znaćete da uparivanje nije uspelo ako vidite da lampica na robotu treperi žuto.
- Na ekranu aplikacije na kom se traži da date ime robotu.
- Možete i da pritisnete ikonu „Podešavanje“ u gornjem desnom uglu i izaberete karticu „Voice settings“ (Glasovna podešavanja).
![graph TD A["Room 1"] --> B["Room 2"] B --> C["Room 3"] C --> D["Room 4"] D --> E["Room 5"] E --> F["Room 6"] F --> G["Room 7"] G --> H["Room 8"] H --> I["Room 9"] I --> J["Room 10"] style A fill:#cce5ff,stroke:#333 style B fill:#cce5ff,stroke:#333 style C fill:#cce5ff,stroke:#333 style D fill:#cce5f…](/content/2026/04/730722/images/6b65085aabcb47455ed831ddca6b43a956c1d8573e19b66594bd9236691aad7a.jpg)
- Da li ste ostavili otvorena vrata između soba?
- Da li ste zatvorili vrata koja vode napolje?
1 Pritisnite dugme za otpuštanje i izvadite modul za čišćenje iz robota.
6 Postavite držače umetka za brisanje na modul za čišćenje.
11 Umetnite modul za čišćenje u robota.
i Napomena: Nemojte čistiti rotacione umetke za brisanje deterdžentima za čišćenje. Koristite isključivo vodu sa česme.
1 Pritisnite dugme za otpuštanje i izvadite modul za čišćenje iz robota.
6 Osušite rotacione umetke za brisanje na vazduhu.
8 Postavite držače umetka za brisanje na modul za čišćenje.
9 Umetnite modul za čišćenje u robota.
i Napomena: Nemojte da čistite rezervoar za vodu i posudu za prašinu deterdžentima za čišćenje. Koristite isključivo vodu sa česme.
1 Pritisnite dugme za otpuštanje i izvadite modul za čišćenje iz robota.
4 Protresite rezervoar za vodu nad sudoperom.
7 Pritisnite dugme za otvaranje i otvorite posudu za prašinu.
8 Uklonite kućište filtera sa poklopca.
9 Izbacite prikupljenu prašinu iz posude za prašinu.
10 Isperite posudu za prašinu pod mlazom vode.
12 Postavite kućište filtera nazad u poklopac.
13 Zatvorite poklopac posude za prašinu.
15 Umetnite modul za čišćenje u robota.
Čišćenje perivog filtera
i Napomena: Nemojte da čistite perivi filter deterdžentima za čišćenje. Koristite isključivo vodu sa česme.
1 Pritisnite dugme za otpuštanje i izvadite modul za čišćenje iz robota.
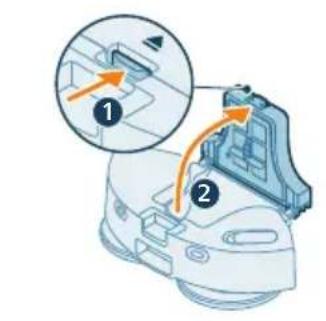
2 Pritisnite dugme za otvaranje i otvorite posudu za prašinu.
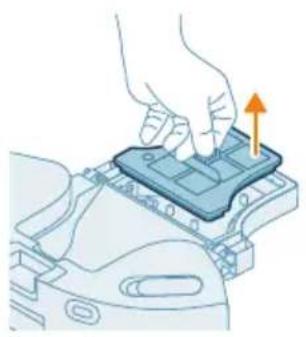
3 Uklonite kućište filtera sa poklopca.
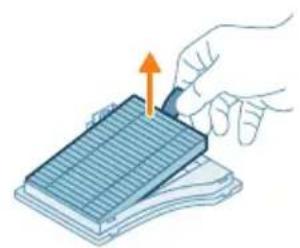
4 Izvucite perivi filter iz kućišta.
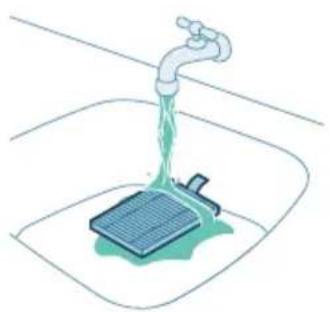
5 Isperite perivi filter pod mlazom vode sa česme.
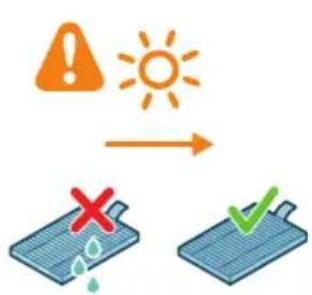
6 Osušite perivi filter na vazduhu.

7 Umetnite suvi perivi filter u kućište.
8 Postavite kućište filtera nazad u poklopac.
9 Zatvorite poklopac posude za prašinu.
1 Postavite robota naopako na ravnu i stabilnu površinu.
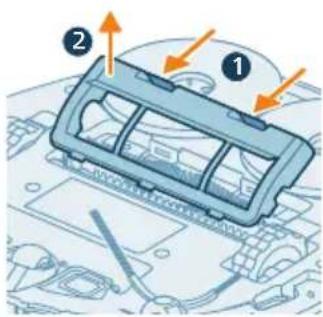
2 Istovremeno pritisnite dugmad za otpuštanje na poklopcu četke da biste podigli i skinuli poklopac četke.
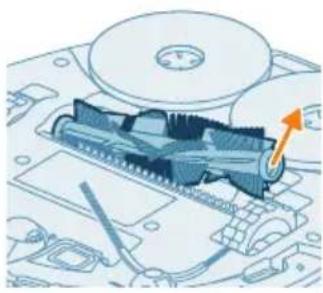
7 Umetnite drugi kraj četke na mesto.
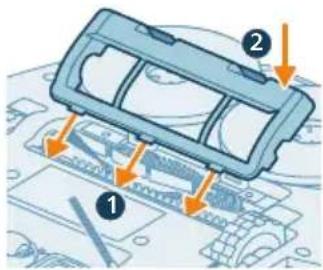
8 Postavite jezičke na poklopcu četke u odgovarajuće ureze.
1 Postavite robota naopako na ravnu i stabilnu površinu.
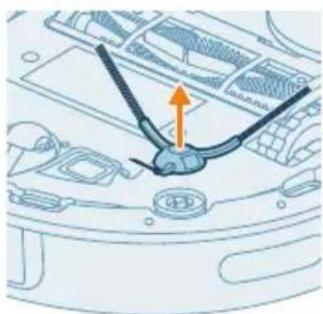
2 Izvadite bočnu četku.
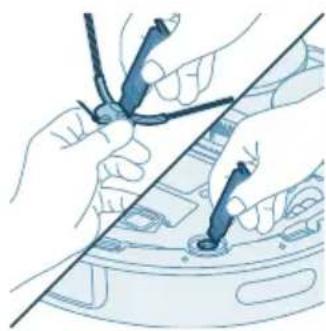
3 Za uklanjanje prašine i dlačica sa bočne četke i robota koristite alatku za čišćenje.
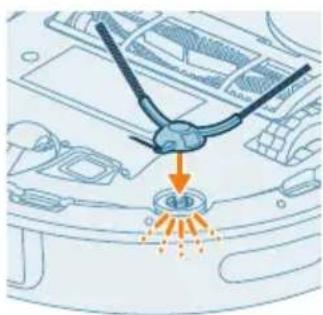
4 Spojite bočnu četku tako što će kliknuti u pravi položaj pri dnu robota.
1 Postavite robota naopako na ravnu i stabilnu površinu.
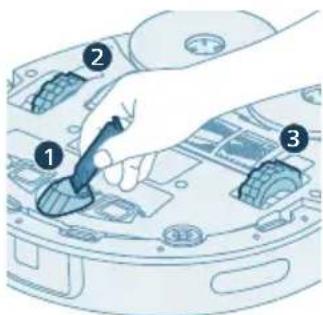
1 Isključite stanicu iz zidne utičnice.
2 Koristite meku neabrazivnu suvu krpu za čišćenje komponenti.
Tokom čišćenja, svetlo na robotu svetli belo.
Robot čisti pod.
Lampica na robotu trepće narandžasto.

1 Pokrenite robot sa nekog mesta u prostoriji, a ne sa stanice.
2 Ostavite robot da radi dok se punjiva baterija ne isprazni kako biste bili sigurni da je potpuno prazna pre nego što je izvadite i bacite.
3 Postavite robota naopako na ravnu i stabilnu površinu.
4 Odvijte vijke sa poklopca odeljka za baterije i skinite poklopac.
5 Izvadite punjivu bateriju iz pregrade.
6 Odvojte je tako što ćete pritisnuti malu kopču na priključku baterije kako biste ga oslobodili.
7 Odnesite robota i punjivu bateriju na mesto za prikupljanje električnog i elektronskog otpada.
Garancija i podrška
![graph TD A["Room 1"] --> B["Room 2"] B --> C["Room 3"] C --> D["Room 4"] D --> E["Room 5"] E --> F["Room 6"] F --> G["Room 7"] G --> H["Room 8"] H --> I["Room 9"] I --> J["Room 10"] style A fill:#cce5ff,stroke:#333 style B fill:#cce5ff,stroke:#333 style C fill:#cce5ff,stroke:#333 style D fill:#cce5f…](/content/2026/04/730722/images/05771111e4eb4df255b33a18c2ccdb0694751fd4b7479e6a6c19940631fd8472.jpg)
8 Irrota suodatinkotelo kannesta.
Installera stationen
![graph TD A["Room 1"] --> B["Room 2"] B --> C["Room 3"] C --> D["Room 4"] D --> E["Room 5"] E --> F["Room 6"] F --> G["Room 7"] G --> H["Room 8"] H --> I["Room 9"] I --> J["Room 10"] style A fill:#cce5ff,stroke:#333 style B fill:#cce5ff,stroke:#333 style C fill:#cce5ff,stroke:#333 style D fill:#cce5f…](/content/2026/04/730722/images/e347974860054712d9836f146824ca816017c099721eddb04b7a81e954bf0c13.jpg)
13 Öppna alla innerdörrar.
14 Torka av rengöringsmodulen med en ren, torr trasa.
2 Ta bort sidoborsten.

Långvarig förvaring
Robotens indikator blinkar orange.

Lắp trạm
![graph TD A["Room 1"] --> B["Room 2"] B --> C["Room 3"] C --> D["Room 4"] D --> E["Room 5"] E --> F["Room 6"] F --> G["Room 7"] G --> H["Room 8"] H --> I["Room 9"] I --> J["Room 10"] style A fill:#cce5ff,stroke:#333 style B fill:#cce5ff,stroke:#333 style C fill:#cce5ff,stroke:#333 style D fill:#cce5f…](/content/2026/04/730722/images/6690602410b482af3d83b8bdcaee17b750df9f0b5c0ff1724936e02491be3e7f.jpg)
2 Tháo chối bên.
Cất giữ lâu dài
İstasyonu kurma
![graph TD A["Room 1"] --> B["Room 2"] B --> C["Room 3"] C --> D["Room 4"] D --> E["Room 5"] E --> F["Room 6"] F --> G["Room 7"] G --> H["Room 8"] H --> I["Room 9"] I --> J["Room 10"] style A fill:#cce5ff,stroke:#333 style B fill:#cce5ff,stroke:#333 style C fill:#cce5ff,stroke:#333 style D fill:#cce5f…](/content/2026/04/730722/images/ff393893f21990c4179814e6dad2feb4a101142a9e114d901901335b89ec95c7.jpg)
- CONTENTS
- INTRODUCTION
- PRODUCT OVERVIEW
- BEFORE FIRST USE
- PREPARING FOR USE
- INSTALL THE STATION
- INSTALL THE SIDE BRUSH
- CHARGING THE ROBOT
- DOWNLOAD THE APP, REGISTER, AND CONNECT TO WI-FI
- APP CONTENT
- DOWNLOADING THE APP
- REGISTERING A PERSONAL ACCOUNT
- SETTING UP THE WI-FI CONNECTION
- AUDIBLE SIGNALS
- SET THE LANGUAGE OF THE VOICE ALERTS
- HOW YOUR ROBOT WORKS
- CREATE A MAP
- HOW MAPPING WORKS
- MAP EDITOR
- PREPARING THE ROOM FOR MAPPING
- CREATE AND EDIT A MAP
- TELL YOUR ROBOT WHERE NOT TO CLEAN BY ADDING ZONES
- VIRTUAL WALL AND NO-GO ZONE
- NO-MOP ZONE
- HOW YOUR ROBOT CLEANS
- SET CLEANING MODE, ADJUST SETTINGS AND CLEANING ORDER
- CLEANING MODES
- MODE DESCRIPTION
- MODE SETTINGS
- SETTING DESCRIPTION
- IMPORTANT: DO NOT ADD WATER HOTTER THAN 60° C TO THE WATER TANK
- CLEANING ORDER
- USING YOUR ROBOT
- PREPARING FOR A CLEANING SESSION
- START YOUR FIRST CLEANING SESSION VIA THE APP
- START
- STOP
- USING THE ROBOT WITHOUT THE APP
- YOUR ROBOT'S CLEANING PATTERN
- RETURNING TO THE STATION
- AUTO RECHARGE AND RESUME
- CLEANING AND MAINTENANCE
- WHEN TO DO MAINTENANCE
- CLEANING THE ROTARY MOP PAD
- CLEANING THE WATER TANK AND DUST BIN
- CLEANING THE WASHABLE FILTER
- CLEANING THE MAIN BRUSH
- CLEANING THE SIDE BRUSH
- CLEANING THE MAIN WHEELS AND THE FRONT CASTER WHEEL
- CLEANING THE SENSORS, CONTACT POINTS AND IR SIGNAL WINDOW
- LONG TERM STORAGE
- INDICATOR LIGHT SIGNALS AND THEIR MEANING
- SIGNAL MEANING OF SIGNAL
- RESET/RESTORE THE ROBOT
- CHILD LOCK
- REPLACEMENT
- ORDERING ACCESSORIES
- REMOVING THE RECHARGEABLE BATTERY
- WARRANTY AND SUPPORT
- DISPOSAL AND RECYCLING
- TROUBLESHOOTING
- LSI
- PENDAHULUAN 42
- MEMASANG STASIUN
- MEMBERSIHKAN SIKAT SAMPING
- PASANGKAN STESEN
- INSTALACE STANICE
- ZÁRUKA A PODPORA
- INSTALLER STATIONEN
- LANGTIDSOPBEVARING
- 250 EESTI
- INSTALAR LA BASE
- INSTALLATION DE LA STATION
- CONFIGURATION DE LA CONNEXION WI-FI
- POSTAVLJANJE STANICE
- NAČIN NA KOJI ROBOTSKI USISAVAČ RADI
- IZRADITE KARTU
- NA KOJI NAČIN RADI MAPIRANJE
- ALAT ZA UREĐIVANJE KARTE
- 360 HRVATSKI
- ČIŠĆENJE PERIVOG FILTRA
- DUGOTRAJNA POHRANA
- 392 ITALIANO
- ILGSTOŠA GLABĀŠANA
- STOTELÈS MONTAVIMAS
- 100
- ILGALAIKIS LAIKYMAS
- TÁROLÁS
- LANGDURIGE OPSLAG
- INSTALLER STASJONEN
- 592 NORSK
- LANGTIDSOPPBEVARING
- INSTALOWANIE STACJI
- 622 POLSKI
- INSTALAR A BASE
- ARMAZENAMENTO A LONGO PRAZO
- ENCOMENDAR ACESSÓRIOS
- INSTALATI STATIA
- INSTALONI STACIONIN
- SINJALI KUPTIMI I SINJALIT
- NAMESTITEV POSTAJE
- DOLGOTRAJNO SHRANJEVANJE
- SIGNAL POMEN SIGNALA
- JAMSTVO IN PODPORA
- INŠTALÁCIA STANICE
- 806 SLOVENSKY
- ČISTENIE NÁDOBY NA VODU A NÁDOBY NA PRACH
- ČIŠĆENJE PERIVOG FILTERA
- GARANCIJA I PODRŠKA
- INSTALLERA STATIONEN
- LÅNGVARIG FÖRVARING
- LẮP TRẠM
- CẤT GIỮ LÂU DÀI
- İSTASYONU KURMA
Brand : PHILIPS
Model : HomeRun 5000 XU5000
Category : Robot vacuum