
CPHS410X - Cordless telescopic hedge trimmer SCHEPPACH - Free user manual and instructions
Find the device manual for free CPHS410X SCHEPPACH in PDF.
| Product type | Cordless telescopic hedge trimmer |
| Brand | Scheppach |
| Model | CPHS410X |
| Motor voltage | 20 V |
| Motor type | Brushed motor |
| Cutting length | 410 mm |
| Cutting diameter | 16 mm |
| Angle adjustment | 11 positions (90° to 240°) |
| Cutting speed | 2400 min⁻¹ |
| Total length | 2.6 m |
| Weight (with auxiliary tool, without battery) | 2.95 kg |
| Weight (without battery and auxiliary tool) | 1.1 kg |
| Sound pressure level | 81.0 dB |
| Sound power level | 89.0 dB (guaranteed 91.6 dB) |
| Vibrations (front handle) | 3.04 m/s² |
| Vibrations (rear handle) | 2.69 m/s² |
| Compatible battery | IXES 20 V series (not included) |
| Overload protection | Yes (automatic battery shutdown) |
| Shoulder strap included | Yes |
| Blade guard included | Yes |
| Warranty | 5 years (extendable to 10 years upon registration) |
| Intended use | Cutting hedges, bushes and shrubs (domestic use only) |
| Safety instructions | Mandatory PPE (goggles, gloves, helmet, etc.) |
| Maintenance and cleaning | Clean after each use, lubricate the cutting bar |
| Repairs and spare parts | Only by authorized service center, original parts |
Frequently Asked Questions - CPHS410X SCHEPPACH
User questions about CPHS410X SCHEPPACH
0 question about this device. Answer the ones you know or ask your own.
Ask a new question about this device
Download the instructions for your Cordless telescopic hedge trimmer in PDF format for free! Find your manual CPHS410X - SCHEPPACH and take your electronic device back in hand. On this page are published all the documents necessary for the use of your device. CPHS410X by SCHEPPACH.
USER MANUAL CPHS410X SCHEPPACH
Division Manager Product Center

Andreas Pecher
Head of Project Management
Table of contents
1 Product description (Fig. 1-9) 17
2 Scope of delivery (Fig. 1) 18
3 Proper use. 18
4 Safety instructions. 18
5 Technical data. 21
6 Unpacking 21
7 Before commissioning. 21
8 Operation 22
9 Working instructions. 23
10 Cleaning. 24
11 Maintenance 24
12 Storage and transport 25
13 Repair & ordering spare parts. 25
14 Disposal and recycling 25
15 Troubleshooting 26
16 Warranty conditions - Scheppach 20V IXES series 26
17 EU Declaration of Conformity. 28
18 Exploded view. 266
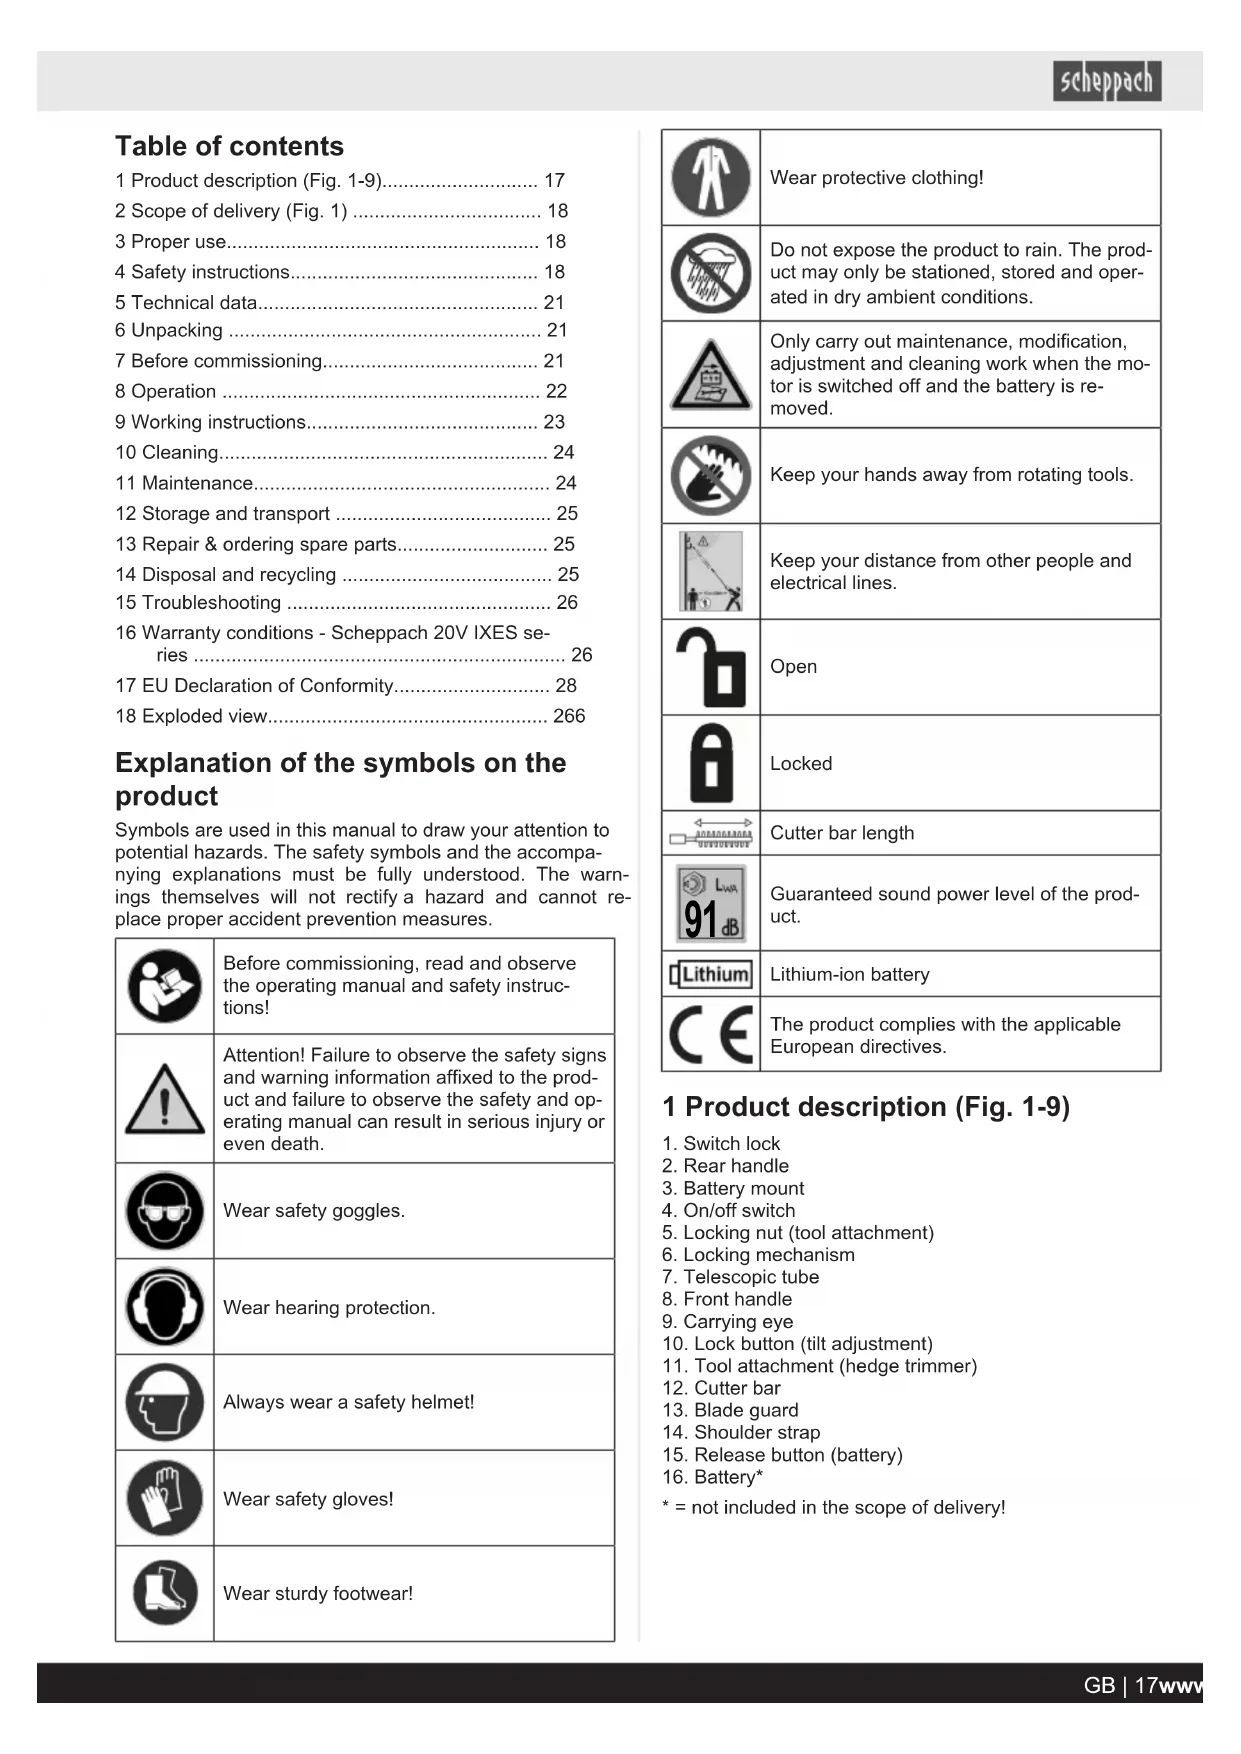
Explanation of the symbols on the product
Symbols are used in this manual to draw your attention to potential hazards. The safety symbols and the accompanying explanations must be fully understood. The warnings themselves will not rectify a hazard and cannot replace proper accident prevention measures.
| Before commissioning, read and observe the operating manual and safety instruc-tions! |
| Attention! Failure to observe the safety signs and warning information affixed to the product and failure to observe the safety and operating manual can result in serious injury or even death. |
| Wear safety goggles. |
| Wear hearing protection. |
| Always wear a safety helmet! |
| Wear safety gloves! |
| Wear sturdy footwear! |
| Wear protective clothing! | |
| Do not expose the product to rain. The product may only be stationed, stored and operated in dry ambient conditions. | |
| Only carry out maintenance, modification, adjustment and cleaning work when the motor is switched off and the battery is removed. | |
| Keep your hands away from rotating tools. | |
| Keep your distance from other people and electrical lines. | |
| Open | |
| Locked | |
| Cutter bar length | |
| Guaranteed sound power level of the product. | |
| Lithium-ion battery | |
| The product complies with the applicable European directives. |
1 Product description (Fig. 1-9)
- Switch lock
- Rear handle
- Battery mount
- On/off switch
- Locking nut (tool attachment)
- Locking mechanism
- Telescopic tube
- Front handle
- Carrying eye
- Lock button (tilt adjustment)
- Tool attachment (hedge trimmer)
- Cutter bar
- Blade guard
- Shoulder strap
- Release button (battery)
- Battery
^ = not included in the scope of delivery!
2 Scope of delivery (Fig. 1)
Item Quantity Designation
- 1 x Tool attachment (hedge trimmer)
- 1 x Blade guard
- 1 x Shoulder strap
1 x Cordless telescopic hedge trimmer
1 x Operating manual
3 Proper use
The product may only be fitted to the motor head supplied.
This hedge trimmer is intended for cutting hedges, bushes and shrubs.
The product may only be used in the intended manner. Any use beyond this is improper. The user/operator, not the manufacturer, is responsible for damages or injuries of any type resulting from this.
An element of the intended use is also the observance of the safety instructions, as well as the assembly instructions and operating information in the operating manual.
Persons who operate and maintain the product must be familiar with the manual and must be informed about potential dangers.
The liability of the manufacturer and resulting damages are excluded in the event of modifications of the product.
The product may only be operated with original parts and original accessories from the manufacturer.
The safety, operating and maintenance specifications of the manufacturer, as well as the dimensions specified in the technical data, must be observed.
Please note that our products were not designed with the intention of use for commercial or industrial purposes. We assume no guarantee if the product is used in commercial or industrial applications, or for equivalent work.
Explanation of the signal words in the operating manual

DANGER
Signal word to indicate an imminently hazardous situation which, if not avoided, will result in death or serious injury.

WARNING
Signal word to indicate a potentially hazardous situation which, if not avoided, could result in death or serious injury.

CAUTION
Signal word to indicate a potentially hazardous situation which, if not avoided, could result in minor or moderate injury.
ATTENTION
Signal word to indicate a potentially hazardous situation which, if not avoided, could result in product or property damage.
4 Safety instructions
Save all warnings and instructions for future reference.
The term "power tool" in the warnings refers to your mains-operated (corded) power tool or battery-operated (cordless) power tool.

WARNING
Read all safety warnings, instructions, illustrations and specifications provided with this power tool.
Failure to follow all instructions listed below may result in electric shock, fire and/or serious injury.
1) Work area safety
a) Keep your work area clean and well-lit. Cluttered or dark areas invite accidents.
b) Do not operate power tools in explosive atmospheres, such as in the presence of flammable liquids, gases or dust. Power tools create sparks which may ignite the dust or fumes.
c) Keep children and bystanders away while operating a power tool. Distractions can cause you to lose control.
2) Electrical safety
a) The connection plug of the electric tool must fit into the socket. Never modify the plug in any way. Do not use any adapter plugs with earthed (grounded) power tools. Unmodified plugs and matching outlets will reduce risk of electric shock.
b) Avoid body contact with earthed or grounded surfaces, such as pipes, radiators, ranges and refrigerators. There is an increased risk of electric shock if your body is earthed or grounded.
c) Do not expose power tools to rain or wet conditions. Water entering a power tool will increase the risk of electric shock.
d) Do not abuse the cord. Never use the cord for carrying, pulling or unplugging the power tool. Keep cord away from heat, oil, sharp edges or moving parts. Damaged or entangled cords increase the risk of electric shock.
e) When operating a power tool outdoors, use an extension cord suitable for outdoor use. Use of a cord suitable for outdoor use reduces the risk of electric shock.
f) If operating a power tool in a damp location is unavoidable, use a residual current device (RCD) protected supply. Use of an RCD reduces the risk of electric shock.
3) Personal safety
a) Stay alert, watch what you are doing and use common sense when operating a power tool. Do not use a power tool while you are tired or under the influence of drugs, alcohol or medication. A moment of inattention while operating power tools may result in serious personal injury.
b) Wear personal protective equipment and always safety goggles. Protective equipment such as a dust mask, non-skid safety shoes, safety helmet or hearing protection used for appropriate conditions will reduce personal injuries.
c) Prevent unintentional starting. Ensure the switch is in the off-position before connecting to power source and/or rechargeable battery, picking up or carrying the tool. Carrying power tools with your finger on the switch or energising power tools that have the switch on invites accidents.
d) Remove any adjusting tools or spanners/keys before turning the power tool on. A wrench or a key left attached to a rotating part of the power tool may result in personal injury.
e) Avoid abnormal postures. Keep proper footing and balance at all times. This enables better control of the power tool in unexpected situations.
f) Dress properly. Do not wear loose clothing or jewellery. Keep your hair and clothing away from moving parts. Loose clothes, jewellery or long hair can be caught in moving parts.
g) If devices are provided for the connection of dust extraction and collection facilities, ensure these are connected and properly used. Use of dust extraction can reduce dust-related hazards.
h) Do not let familiarity gained from frequent use of tools allow you to become complacent and ignore tool safety principles. A careless action can cause severe injury within a fraction of a second.
4) Power tool use and care
a) Do not force the power tool. Use the correct power tool for your application. The correct power tool will do the job better and safer at the rate for which it was designed.
b) Do not use the power tool if the switch does not turn it on and off. Any power tool that cannot be controlled with the switch is dangerous and must be repaired.
c) Disconnect the plug from the power source and/or remove the battery pack, if detachable, from the power tool before making any adjustments, changing accessories, or storing power tools. Such precautionary measures reduce the risk of starting the power tool accidentally.
d) Store idle power tools out of the reach of children and do not allow persons unfamiliar with the power tool or these instructions to operate the power tool. Power tools are dangerous in the hands of untrained users.
e) Maintain power tools and attachments. Check for misalignment or binding of moving parts, breakage of parts and any other condition that may affect the power tool's operation. If damaged, have the power tool repaired before use. Many accidents are caused by poorly maintained power tools.
f) Keep cutting tools sharp and clean. Properly maintained cutting tools with sharp cutting edges are less likely to bind and are easier to control.
g) Use electric tools, insertion tools, etc. according to these instructions. Take into account the working conditions and the work to be performed. Use of the power tool for operations different from those intended could result in a hazardous situation.
h) Keep handles and grasping surfaces dry, clean and free from oil and grease. Slippery handles and grasping surfaces do not allow for safe handling and control of the tool in unexpected situations.
5) Battery tool use and care
a) Only charge the batteries with battery chargers recommended by the manufacturer. A battery charger that is suitable for a particular type of battery poses a fire hazard when used with other batteries.
b) Only use the batteries in power tools that are designed for them. The use of other batteries can lead to injuries and a risk of fire.
c) Keep the unused battery away from paper clips, coins, keys, nails, screws or other small metal objects that could cause a short-circuit between the contacts. A short-circuit between the contacts of the battery could result in burns or fires.
d) Liquid may leak from the battery if used incorrectly. Avoid contact with it. In case of accidental contact, rinse with water. If the liquid gets into your eyes, seek additional medical attention. Leaking battery fluid may cause skin irritation or burns.
e) Do not use a damaged or modified battery. Damaged or modified batteries can behave unpredictably and cause fire, explosion or injury.
f) Do not expose a battery to fire or excessive temperatures. Fire or temperatures above 130^ may cause an explosion.
g) Follow all charging instructions and never charge the battery or rechargeable tool outside the temperature range specified in the operating manual. Incorrect charging or charging outside the approved temperature range can destroy the battery and increase the risk of fire.
6) Service
a) Only have your power tool repaired by qualified specialists and only with original spare parts. This will ensure that the safety of the power tool is maintained.
b) Never attempt to service damaged batteries. Any type of battery maintenance shall be carried out only by the manufacturer or an authorised customer service centre.
4.1 General safety instructions
a) Stay alert, watch what you are doing and use common sense when operating a power tool. Do not use a power tool while you are tired or under the influence of drugs, alcohol or medication. A moment of inattention while operating power tools may result in serious personal injury.
b) National regulations may restrict the use of the product.
c) Take regular breaks and move your hands to promote circulation.
d) Always hold the product tight with both hands during work. Make sure that you have a secure footing.
4.2 Safety instructions for hedge trimmers
a) Do not use the hedge trimmer in bad weather conditions, especially when there is a risk of lightning. This decreases the risk of being struck by lightning.
b) Keep all power cords and cables away from cutting area. Power cords or cables may be hidden in hedges or bushes and can be accidentally cut by the blade.
c) Hold the hedge trimmer by insulated gripping surfaces only, because the blade may contact hidden wiring or its own cord. Blades contacting a "live" wire may make exposed metal parts of the hedge trimmer "live" and could give the operator an electric shock.
d) Keep all parts of the body away from the blade. Do not remove cut material or hold material to be cut when blades are moving. Blades continue to move after the switch is turned off. A moment of inattention while operating the hedge trimmer may result in serious personal injury.
e) Make sure all switches are off and the battery is removed before removing trapped clippings or servicing the product. Unexpected actuation of the hedge trimmer while clearing jammed material or servicing may result in serious personal injury.
f) Carry the hedge trimmer by the handle with the blade stopped and taking care not to operate any power switch. Proper carrying of the hedge trimmer will decrease the risk of inadvertent starting and resultant personal injury from the blades.
g) When transporting or storing the hedge trimmer, always use the blade cover. Proper handling of the hedge trimmer will decrease the risk of personal injury from the blades.
4.2.1 Pole hedge trimmer safety warnings
a) Always use head protection when operating the pole hedge trimmer overhead. Falling debris can result in serious personal injury.
b) Always use two hands when operating the pole hedge trimmer. Hold the pole hedge trimmer with both hands to avoid loss of control.
c) To reduce the risk of electrocution, never use the pole hedge trimmer near any electrical power lines. Contact with or use near power lines may cause serious injury or electric shock resulting in death.
4.2.2 Additional safety instructions
a) Always wear safety gloves, safety goggles, hearing protection, sturdy shoes and long trousers when working with this product.
b) The hedge trimmer is intended for work where the operator stands on the ground and not on a ladder or other unstable standing surface.
c) Electrical hazard, remain at least 10m from overhead wires.
d) Do not attempt to loosen a jammed/blocked cutter bar until you have switched off the product and removed the battery. There is a danger of injury!
e) The blades must be checked regularly for wear and have them resharpened. Blunt blades overload the product. Any resulting damage is not covered by the warranty.
f) If you are interrupted while working with the product, first finish the current operation and then switch off the product.
g) Store idle power tools out of the reach of children and do not allow persons unfamiliar with the power tool or these instructions to operate the power tool. Power tools are dangerous in the hands of untrained users.
Residual risks
The product has been built according to state-of-the-art and the recognised technical safety rules. However, individual residual risks can arise during operation.
Cutting injuries.
- Damage to eyes if the stipulated eye protection is not worn.
- Damage to hearing if the stipulated hearing protection is not worn.
- Residual risks can be minimised if the "Safety Instructions" and the "Intended Use" together with the operating manual as a whole are observed.
- Use the product in the way that is recommended in this operating manual. This is how to ensure that your product provides optimum performance.
- Furthermore, despite all precautions having been met, some non-obvious residual risks may still remain.
WARNING
This power tool generates an electromagnetic field during operation. This field can impair active or passive medical implants under certain circumstances. In order to prevent the risk of serious or deadly injuries, we recommend that persons with medical implants consult with their physician and the manufacturer of the medical implant prior to operating the power tool.
WARNING
In case of extended working periods, the operating personnel may suffer circulatory disturbances in their hands (vibration white finger) due to vibrations.
Raynaud's syndrome is a vascular disease that causes the small blood vessels on the fingers and toes to cramp in spasms. The affected areas are no longer supplied with sufficient blood and therefore appear extremely pale. The frequent use of vibrating products can cause nerve damage in people whose circulation is impaired (e.g. smokers, diabetics).
If you notice unusual adverse effects, stop working immediately and seek medical advice.
ATTENTION
The product is part of the 20V IXES series and may only be operated with batteries of this series. Batteries may only be charged with battery chargers of this series. Observe the manufacturer's instructions.

WARNING
Follow the safety and charging instructions and correct usage given in the instruction manual of your 20V IXES Series battery and charger. A detailed description of the charging process and further information are provided in this separate manual.
5 Technical data
| Motor voltage: 20 V |
| Type of motor: Brush motor |
| Weight (without battery and tool attachment): 1.1 kg |
| Cutting length: 410 mm |
| Cutting diameter: 16 mm |
| Angle adjustment: 11 steps (90° - 240°) |
| Cutting speed: 2400 rpm |
| Overall length: 2.6 m |
| Weight (drive and tool attachment, without battery): 2.95 kg |
Subject to technical changes!
Noise and vibration

WARNING
Noise can have serious effects on your health. If the machine noise exceeds 85 dB, please wear suitable hearing protection for you and persons in the vicinity.
The noise and vibration values have been determined in accordance with EN 62841-1/EN ISO 3744:2010.
Noise data
| Sound pressure LpA | 81.0 dB |
| Sound power LwA | 89.0 dB |
| Measurement uncertainty KpA | 3 dB |
Vibration parameters
| Vibration ah front handle 3.04 m/s2 |
| Vibration ah rear handle 2.69 m/s2 |
| Measurement uncertainty K 1.5 m/s2 |
The total vibration emission values specified and the device emissions values specified have been measured in accordance with a standardised test procedure and can be used for comparison of one electric tool with another.
The total noise emission values specified and the total vibration emission values specified can also be used for an initial estimation of the load.

WARNING
The noise emission values and vibration emission value can vary from the specified values during the actual use of the power tool, depending on the type and the manner in which the electric tool is used, and in particular the type of workpiece being processed.
Try to keep the stress as low as possible. For example: Limit working time. In doing so, all parts of the operating cycle must be taken into account (such as times in which the power tool is switched off or times in which it is switched on, but is not running under a load).
6 Unpacking

WARNING
The product and the packaging material are not children's toys!
Do not let children play with plastic bags, films or small parts! There is a danger of choking or suffocating!
- Open the packaging and carefully remove the product.
- Remove the packaging material, as well as the packaging and transport safety devices (if present).
- Check whether the scope of delivery is complete.
- Check the product and accessory parts for transport damage. Immediately report any damage to the transport company that delivered the Product. Later claims will not be recognised.
- If possible, keep the packaging until the expiry of the warranty period.
- Familiarise yourself with the product by means of the operating manual before using for the first time.
- With accessories as well as wearing parts and replacement parts use only original parts. Spare parts can be obtained from your specialist dealer.
- When ordering please provide our article number as well as type and year of manufacture for the product.
7 Before commissioning

DANGER
Danger of injury!
If an incompletely assembled product is used, serious injuries can be caused.
- Do not use the product until it has been fully fitted.
Before each use, carry out a visual inspection to check that the product is complete and does not contain any damaged or worn components. Safety and protective devices must be intact.

WARNING
Danger of injury!
Remove the battery from the power tool before carrying out any work on the power tool (e.g. maintenance, tool change, etc.) and when transporting and storing it. There is a risk of injury if the on/off switch is operated unintentionally.

WARNING
Always make sure that the tool attachment is fitted correctly!
- Place the product on a level, even surface.
7.1 Fitting the tool attachment (11) onto the telescopic tube (7) (Fig. 2-4)
- Attach the desired tool attachment (11) to the telescopic tube (7), paying attention to the position of the tongue and groove.
- The tool attachment (11) is secured by tightening the locking nut (5).
7.2 Adjusting the telescopic handle height (Fig. 1)
The telescopic tube (7) can be infinitely adjusted using the locking mechanism (6).
- Loosen the lock (6) on the telescopic tube (7).
- Change the telescopic tube length by pushing or pulling.
- Tighten the lock (6) again to fix the desired working length of the telescopic tube (7).
7.3 Adjusting the cutting angle (Fig. 1, 9)
You can also work in inaccessible areas by changing the cutting angle.
- Press the two locking buttons (10) on the hedge trimmer tool attachment (11).
- Adjust the inclination of the motor housing in the locking steps. The locking steps integrated in the motor housing secure the tool attachment (11) and prevent it shifting unintentionally.
Hedge trimmer (11):
Cutting angle positions 1-11
7.4 Fitting the shoulder strap (14) (Fig. 5, 6)

WARNING
Danger of injury!
Always wear a shoulder strap when working. Always switch the product off before loosening the shoulder strap.
- Clip the shoulder strap (14) into the carrying eye (9).
-
Place the shoulder strap (14) over the shoulder.
-
Adjust the belt length such that the carrying eye (9) is at hip height.
7.5 Inserting/removing the battery (16) into/from the battery mount (3) (Fig. 7)

CAUTION
Danger of injury!
Do not insert the battery until the battery-powered tool is ready for use.
Inserting the battery
- Push the battery (16) into the battery mount (3). The battery (16) clicks into place audibly.
Removing the battery
- Press the unlocking button (15) of the battery (16) and remove the battery (16) from the battery mount (3).
8 Operation

TENTION
Always make sure the product is fully assembled before commissioning!

WARNING
Danger of injury!
The on/off switch and the safety switch must not be locked!
- Do not work with the product if the switches are damaged. The on/off switch and the safety switch must switch off the product when released.
- Make sure the product is in working order before each use.

WARNING
Electric shock and damage to the product possible!
Contact with a live cable during cutting can result in electric shock. Cutting into foreign objects can cause damage to the cutter bar.
- Scan hedges and bushes for hidden objects, such as live wires, wire fences and plant supports, before cutting

TENTION
Make sure that the ambient temperature does not exceed 50^ and does not fall below -20^ during work.

TENTION
The product is part of the 20V IXES series and may only be operated with batteries of this series. Batteries may only be charged with battery chargers of this series. Observe the manufacturer's instructions.

DANGER
Danger of injury!
If the product is jammed, do not try to pull the product out by using force.
-
Switch off the engine.
-
Use a lever arm or wedge to get the product free.

CAUTION
After switching off, the product will run on. Wait until the product has come to a complete stop.
8.1 Switching the product on/off and operating it (Fig. 1, 8)

WARNING
Danger of injury due to kickback!
- Never use the product one-handed!
Notes:
The speed can be steplessly controlled by the on/off switch. The further you press the on/off switch, the higher the speed.
Before switching on, make sure that the product does not touch any objects.
- Pull the blade guard (13) off the cutter bar (12).
Switching on
- Hold the front handle (8) with your left hand and the rear handle (2) with your right hand. Thumb and fingers must firmly grasp the grips (2/8).
- Bring your body and arms into a position in which you can absorb the kickback forces.
- Press the switch-on lock (1) on the rear grip (2) with your thumb.
- Press and hold the switch lock (1).
- To switch on the product, push the on/off switch (4).
- Release the switch lock (1).
Note:
It is not necessary to keep the switch lock pressed after starting the product. The switch lock is intended to prevent accidental starting of the product.
Switching off
- To switch it off, simply release the on/off switch (4).
- Put on the supplied blade guard (13) after each instance of working with the product.
8.2 Overload protection
In the event of overloading, the battery will switch itself off. After a cool-down period (time varies), the product can be switched back on again.
9 Working instructions

CAUTION
After switching off, the product will run on. Wait until the product has come to a complete stop.
Notes:
Before switching on, make sure that the product does not touch any objects.
Some noise pollution from this product is unavoidable. Postpone noisy work to approved and designated times. If necessary, adhere to rest periods.
Only process free, flat surfaces with the tool attachment.
Carefully inspect the area to be cut and remove all foreign objects.
Avoid bumping into stones, metal or other obstacles.
The tool attachment could be damaged and there is a risk of kickback.
- Wear prescribed protective equipment.
- Ensure that other people remain at a safe distance from your workspace. Anyone who enters the workspace must wear personal protective equipment. Fragments of the workpiece or broken accessory tools can fly off and cause injury - even outside the immediate working area.
- If a foreign object is hit, switch off the product immediately and remove the battery. Inspect the product for damage and perform the required repairs before starting again and working with the product. If the product begins to experience exceptionally strong vibrations, switch it off immediately and check it.
- Hold the power tool by the insulated handles when you are carrying out work in which the accessory tool may come into contact with concealed power cables. Contact with a live wire may make exposed metal parts of the power tool live and could give the operator an electric shock.
- Do not use the product in a thunderstorm - Danger of lightning strike!
- Check the product for obvious defects such as loose, worn or damaged parts before each use.
- Switch on the product and only then approach the material to be processed.
- Do not exert excessive pressure on the product. Let the product do the work.
Always hold the product tight with both hands during work. Make sure that you have a secure footing. - Avoid abnormal postures.
- Check that the shoulder strap is in a comfortable position to make it easier for you to hold the product.
9.1 Hedge trimmer
9.1.1 Cutting techniques
- Cut out thick branches beforehand with pruning shears.
- The double-sided cutter bar allows cutting in both directions, or using a pendulum movement, swinging the trimmer back and forth.
- When cutting vertically, move the product smoothly forwards or up and down in an arc.
-
When cutting horizontally, move the product in a crescent shape towards the edge of the hedge so that cut branches fall to the ground.
-
To get long straight lines, it is advisable to stretch guide strings.
9.1.2 Pruned hedges
It is advisable to cut hedges in a trapezoidal shape to prevent the lower branches from becoming bare. This corresponds to natural plant growth and allows hedges to thrive. When pruning, only the new annual shoots are reduced, so that a dense branching and a good screen is formed.
- Trim the sides of a hedge first. To do this, move the product with the direction of growth from bottom to top. If you cut from the top down, thinner branches move outwards and this can create thin spots or holes.
- Then cut the top edge straight, roof-shaped or round, depending on your taste.
- Trim even young plants to the desired shape. The main shoot should remain undamaged until the hedge has reached the planned height. All other shoots are cut in half.
9.1.3 Cut at the right time
Leaf hedge: June and October
- Conifer hedge: April and August
- Fast growing hedge: around every 6 weeks from May
Pay attention to nesting birds in the hedge. Delay the hedge cut or leave this area out if this is the case.
9.2 After use
- Always switch the product off before placing it down and wait until the product has come to a standstill.
- Remove the battery.
- Put on the supplied blade guard after each instance of working with the product.
- Allow the product to cool.
10 Cleaning

WARNING
Have maintenance and repair tasks that are not described in this operating manual, carried out by a specialist workshop. Use only original spare parts.
There is a risk of accident! Always perform maintenance and cleaning work with the battery removed. There is a danger of injury! Let the product cool down before all maintenance and cleaning tasks. Elements of the engine are hot. There is a danger of injury and burning!
The product can start unexpectedly and cause injuries.
- Remove the battery.
- Allow the product to cool down.
-
Remove the tool attachment.
-
Wait until all moving parts have come to a standstill.
-
We recommend that you clean the product directly after every use.
-
Keep handles and grasping surfaces dry, clean and free from oil and grease. Slippery handles and grasping surfaces do not allow for safe handling and control of the tool in unexpected situations.
- If necessary, clean the handles with a damp cloth* washed in soapy water.
- Never immerse the product in water or other liquids for cleaning.
- Do not splash the product with water.
- Keep protective devices, air vents and the motor housing as free of dust and dirt as possible. Rub the product clean with a clean cloth or blow it off with compressed air at low pressure. We recommend that you clean the product directly after every use.
- Ventilation openings must always be free.
- Do not use any cleaning products or solvents; they could attack the plastic parts of the product. Make sure that no water can penetrate the product interior.
10.1 Hedge trimmer
- Clean the cutter bar with an oily cloth after each use.
- Oil the cutter bar after each use with the oil can or a spray.
11 Maintenance

WARNING
Have maintenance and repair tasks that are not described in this operating manual, carried out by a specialist workshop. Use only original spare parts.
There is a risk of accident! Always perform maintenance and cleaning work with the battery removed. There is a danger of injury! Let the product cool down before all maintenance and cleaning tasks. Elements of the engine are hot. There is a danger of injury and burning!
The product can start unexpectedly and cause injuries.
- Remove the battery.
- Allow the product to cool down.
-
Remove the tool attachment.
-
Check the product for obvious defects such as loose, worn or damaged parts before each use.
- Check the covers and protective devices for damage and correct seating. Replace them if necessary.
- Regular, careful servicing is required to guarantee the safety level and performance of the product.
- Position the Product on a straight, level surface.
- Do not splash the product with water.
- For safety reasons, replace worn or damaged parts.
- Any work not described in this operating manual must be performed by an authorised specialist workshop only.
Notes:
Maintain the product carefully. Check for misalignment or binding of moving parts, breakage of parts and any other condition that may affect the product's operation. Have damaged parts repaired before using the product.
11.1 Hedge trimmer
- Check that the screws in the cutter bar are tight.
- You can smooth out slight nicks on the cutting teeth yourself. To do this, draw an oil stone along the cutting edges. Only sharp cutting teeth provide a good cutting performance.
- Blunt, bent or damaged cutter bars must be replaced.
12 Storage and transport
Store the product and its accessories in a dark, dry and frost-free place that is inaccessible to children.
The optimum storage temperature is between 5^ and 30^ .
Store the product in its original packaging.
Cover the product to protect it from dust or moisture.
Store the operating manual with the product.
12.1 Preparation for storage
- Remove the battery.
- Attach all protective covers.
- Empty the product completely.
- Clean and check the product for damage.
12.2 Transport

WARNING
Danger of injury!
Remove the battery from the power tool before carrying out any work on the power tool (e.g. maintenance, tool change, etc.) and when transporting and storing it. There is a risk of injury if the on/off switch is operated unintentionally.
The product may only be transported on the handle provided for this purpose.
- Attach all protective covers.
- The product must be secured against tipping and slipping during transport in vehicles in order to prevent damage and injuries.
13 Repair & ordering spare parts
With this product, it is necessary to note that the following parts are subject to natural or usage-related wear, or that the following parts are required as consumables.
ATTENTION
According to the German Product Liability Act, no liability is accepted for damage caused by improper repairs or by not using original spare parts.
Such work should be performed by a customer service centre or an authorised specialists. The same applies to accessory parts.
Spare parts and accessories can be obtained from our Service Centre. To do this, scan the QR code on the front page.
13.1 Ordering spare parts
Please provide the following information when ordering spare parts:
- Model designation
- Item number
- Type plate data
Spare parts / accessories
| Battery pack SBP2.0 - Article no.: 7909201708 |
| Battery pack SBP4.0 - Article no.: 7909201709 |
| Battery charger SBC2.4A - Article no.: 7909201710 |
| Battery charger SBC4.5A - Article no.: 7909201711 |
| Battery charger SDBC2.4A - Article no.: 7909201712 |
| Battery charger SDBC4.5A - Article no.: 7909201713 |
| StarterKit SBSK2.0 - Article no.: 7909201720 |
| StarterKit SBSK4.0 - Article no.: 7909201721 |
14 Disposal and recycling
Notes for packaging


The packaging materials are recyclable. Please dispose of packaging in an environmentally friendly manner.
Notes on the electrical and electronic equipment act [ElektroG]

Waste electrical and electronic equipment does not belong in household waste, but must be collected and disposed of separately!
- Used batteries or rechargeable batteries that are not installed permanently in the old appliance must be removed non-destructively before disposal! Their disposal is regulated by the battery act.
- Owners or users of electrical and electronic devices are legally obliged to return them after use.
- The end user is responsible for deleting their personal data from the old device being disposed of!
- The symbol of the crossed-out dustbin means that waste electrical and electronic equipment must not be disposed of with household waste.
- Waste electrical and electronic equipment can be handed in free of charge at the following places:
Public disposal or collection points (e.g. municipal works yards)
- Points of sale of electrical appliances (stationary and online), provided that dealers are obliged to take them back or offer to do so voluntarily.
- Up to three waste electrical devices per type of device, with an edge length of no more than 25 centimetres, can be returned free of charge to the manufacturer without prior purchase of a new device from the manufacturer or taken to another authorised collection point in your vicinity.
Further supplementary take-back conditions of the manufacturers and distributors can be obtained from the respective customer service.
- If the manufacturer delivers a new electrical appliance to a private household, the manufacturer can arrange for the free collection of the old electrical appliance upon request from the end user. Please contact the manufacturer's customer service for this.
These statements only apply to devices installed and sold in the countries of the European Union and which are subject to the European Directive 2012/19/EU. In countries outside the European Union, different regulations may apply to the disposal of waste electrical and electronic equipment.
Notes on lithium-ion batteries

Remove the battery before disposing of the device!
- Do not dispose of the battery in household waste, in a fire (risk of explosion) or in water. Damaged batteries can harm the environment and your health if toxic vapours or liquids escape.
Defective or used batteries must be recycled in accordance with Directive 2006/66/EC. - Hand in the device and the battery charger at a recycling centre. The plastic and metal parts used can be separated by type and thus recycled.
- Dispose of batteries when discharged. We recommend covering the poles with an adhesive strip to protect against a short circuit. Do not open the battery.
- Dispose of batteries according to local regulations. Return batteries to a used battery collection point where they can be recycled in an environmentally friendly manner. Ask your local waste disposal company about this.
15 Troubleshooting
Fault Possible cause Remedy
| The product cannot be started. | The battery power is too weak. Charge the battery. | |
| The battery is not properly inserted. | Push the battery into the battery mount. The battery clicks into place audibly. | |
| On/off switch is defective. Please contact our service department. | ||
| The engine is defective. | ||
| Product works with inter-ruptions. | Internal loose contact. Please contact our service department. | |
| On/off switch defective. | ||
| Cutter bar blunt. Check cutter bar, sharpen | or contact our service department. | |
| Too much friction due to lack of lubrication. | Oil the cutter bar. | |
| Dirty cutter bar. | Clean the cutter bar. | |
| Poor cutting technique. | Observe the working instructions. | |
| Cutter bar becomes hot. | Cutter bar blunt. Check cutter bar, sharpen | or contact our service department. |
| Cutter bar has nicks. | ||
| Too much friction due to lack of lubrication. | Oil the cutter bar. | |
16 Warranty conditions - Scheppach 20V IXES series
Revision date 25/04/2024
Dear customer,
our products are subject to strict quality checks. However, if a product does not function perfectly, we deeply regret this and ask that you contact our customer service at the address specified below. We will also be glad to assist you by telephone via the service number. The following information is intended to help you to process and settle your claim without any problems.
For the assertion of warranty claims, the following applies:
-
The warranty conditions govern our additional manufacturer warranty services for purchasers (private end consumers) of new products. The statutory warranty claims are not affected by this warranty. This is the responsibility of the dealer who you purchased the product from.
-
The manufacturer's warranty only covers defects in a new product purchased by you that are due to a material or manufacturing defect. If material or manufacturing defects occur during the warranty period, the manufacturer as guarantor shall provide one of the following services of its choice under this warranty:
Free repair of the goods
Free replacement of the goods with an item of equal value (if necessary also replacement with a successor model if the original goods are no longer available).
Replaced products or parts shall become our property. Please note that our products were not designed for commercial, trade or professional use. A warranty claim is therefore not valid if the product has been used in commercial, trade or industrial operations within the warranty period or has been subjected to equivalent stress.
-
The following are excluded from our warranty services:
-
Damage to the product which was caused by non-observation of the assembly instructions, improper installation, non-observation of the operating instructions (e.g. connection to an incorrect mains voltage or type of current) or the maintenance and safety regulations or use of the product in unsuitable environmental conditions as well as by insufficient care and maintenance.
- Damage to the product caused by misuse or improper application (such as overloading the product or using non-approved tools and accessories), penetration of foreign bodies into the product (such as sand, stones or dust), transport damage, use of force or external influences (such as damage caused if dropped).
- Damage to the product or parts of the product which is due to intentional, normal (operational) or other natural wear as well as damage and/or wearing of wear parts.
Defects in the product which have been caused by the use of accessories, expansions or spare parts that are not original parts or are not used as intended. - Products on which changes or modifications have been made.
- Minor deviations from the target characteristics which are irrelevant for the value and usability of the product.
- Products on which unauthorised repairs have been carried out, in particular by an unauthorised third party.
If the marking on the product or the identification information of the product (machine label) is missing or illegible. - Products that are very dirty and are therefore refused by the service personnel.
-
Claims for damages and consequential damages are generally excluded from this warranty.
-
The warranty period is usually 5 years (12 months for batteries/rechargeable batteries) and starts from the date of purchase of the product. The date on the original purchase receipt is decisive. Warranty claims must be made immediately after becoming aware of them. The assertion of warranty claims after expiry of the warranty period is excluded. The repair or replacement of the product does not result in an extension of the warranty period, nor does this service initiate a new warranty period for the product or for any installed spare parts. This also applies when using an on-site service. A prerequisite for a claim under the warranty is that the manufacturer, as the guarantor, is enabled to examine the warranty claim by sending in the goods at the manufacturer's request. Care must be taken to avoid damage during transport by using appropriate packaging. The product concerned is to be cleaned and returned to the service centre together with a copy of the purchase receipt, which must include the date of purchase and the product designation. If a product is sent in incomplete without the complete scope of delivery, the missing accessories will be charged / deducted in value if the product is exchanged or in the event of a refund. Partially or completely dismantled products cannot be accepted as a warranty claim.
In the event of an unjustified complaint or if outside the warranty period, the purchaser shall generally bear the transport costs and the transport risk. Please report a warranty claim in advance to the service centre (see below). It is generally agreed upon that the defective product will be returned to the service address given below with a brief description of the fault by organised return or, in the case of repair outside the warranty period, with sufficient postage, taking the appropriate packaging and shipping guidelines into account. Please note that your product (depending on the model) will be free of all operating materials when returned for safety reasons. The product sent to our service centre must be packaged in such a way that damage to the product under complaint is avoided during transport. After successful repair / replacement, we will send the product back to you free of charge. If products cannot be repaired or replaced, a sum up to the purchase price of the defective product may be refunded at our own discretion, taking into account any deduction for wear and tear. These warranties are only for the benefit of the original private purchaser and cannot be assigned or transferred.
-
Extension of the warranty period to 10 years: Scheppach offers an additional warranty extension of 5 years on products of the Scheppach 20V series. Thus, the warranty period for these products totals 10 years. Batteries / rechargeable batteries, battery chargers and accessories are excluded from this. You can claim this warranty extension by registering your Scheppach product from this range at https://garantie.scheppach.com no later than 30 days from the date of purchase. After registering online successfully, you will receive confirmation for the item-related warranty extension.
-
In order to submit your warranty claim, please contact our service centre.
Preferably, please use our form on our homepage: https://www.scheppach.com/de/service
Please do not send us any products without first contacting and registering with our service centre.
Contacting our service centre first is mandatory to claim these warranty promises. Warranty claims must be made before expiry of the warranty period within 14 days of discovery of the defect. For this purpose, the original purchase receipt and, if necessary, confirmation of the item-related warranty extension are required.
- Processing time - We normally process complaint consignments within 14 days of receipt at our service centre. If, in exceptional cases, the processing time mentioned is exceeded, you will be informed in good time.
-
Wear parts are generally excluded from the warranty! - Wear parts are: a) supplied, attached and/or installed batteries / rechargeable batteries as well as b) all model-dependent wear parts (i.e. belts, saw blades, tool attachments, grinding discs, filters, carbon brushes etc., see operating manual). The warranty does not cover batteries or rechargeable batteries that are deeply discharged or those with damaged housing or battery terminals.
-
Cost estimate - Products that are not covered or no longer covered by the warranty will be repaired at extra cost. Upon request to our service centre, you can send in the defective products for a cost estimate and, if necessary, give the service centre approval for the repair in writing (by post, e-mail). No further processing will take place without approval for the repair.
The warranty conditions only apply in the current version at the time of the complaint and, if necessary, can be found on our homepage (www.scheppach.com).
In case of translations, the German version is decisive.
Scheppach GmbH · Günzburger Str. 69 · 89335 Ichenhausen (Germany)
Tel: +800 4002 4002 · E-Mail: customerservice.GB@scheppach.com · Internet: https://www.scheppach.com
We reserve the right to make changes to the warranty conditions at any time without prior notice.
17 EU Declaration of Conformity
Translation of the original Declaration of Conformity
Manufacturer:
We declare under our sole responsibility that the product described here complies with the applicable directives and standards.
Brand: SCHEPPACH Art. designation: CORDLE TRIMME C-PHS41
Item No. 5910608900
EU directives:
2014/30/EU, 2006/42/EC, 2000/14/EC_2005/88/EC, 2011/65/EU*
- The object of the declaration described above fulfils the regulations of the directive 2011/65/EU of the European Parliament and Council from 8th June 2011, on the restriction of the use of certain hazardous substances in electrical and electronic equipment.
2000/14/EG_2005/88/EC - Appendix: III
Guaranteed sound power level (LWA) :89.0 dB Measured sound power level (LWA) :91.6 dB
Applied standards:
EN 62841-1:2015/A11:2022;
EN 62841-4-2:2019/A11:2022;
EN IEC 55014-1:2021;
EN IEC 55014-2:2021
Documentation authorised representative:
David Rümpelein Günzburger Str. 69
D-89335 Ichenhausen
Simon Schunk
Division Manager Product Center
Andreas Pecher
Head of Project Management
Sommaire
Chere cliente, cher client,
Division Manager Product Center

Andreas Pecher
Head of Project Management
Indices
Division Manager Product Center
Andreas Pecher
Head of Project Management
Inhoudsopgave
Division Manager Product Center

Andreas Pecher
Head of Project Management
Indices
Division Manager Product Center

Andreas Pecher
Head of Project Management
Indices
Utilize, de preferência, o formulário na)nossa homepage: https://www.scheppach.com/de/service
Division Manager Product Center

Head of Project Management
Obsah
Division Manager Product Center

Andreas Pecher
Head of Project Management
Obsah
1 Popis vyrobku (obr. 1-9). 106
2 Rozsah dodávky (obr. 1). 106
3 Pouzitie v sulade s urcenim 107
4 Bezpečnostné upozornenia. 107
5 Technické udaje 110
6 Vybalenie 110
7Pred uvedenim do prevadzky 111
8 Obsluha 111
9 PracovnéPokyny. 112
10 Cistenie 113
11 Udrzba 114
12 Skladovanie a preprava 114
13 Oprava a objednávanie nahradnych dielov..... 114
14 Likvidácia a recyklácia 115
15 Odstrańovanie poruch. 115
16 Záručné podmienky - Séria Scheppach 20V IXES. 116
17 EU vyhlase nie o zhode 117
18 Rozlozeny vykres. 266
Vysvetlenie symbolov na vyrobku
Pokyny k litiovo-ionovym akumulatorom

Demontujte akumulátor pred likvidáciou pristroja!
Division Manager Product Center

Andreas Pecher
Head of Project Management
Tartalomjegyzek
Division Manager Product Center

Andreas Pecher
Head of Project Management
Spis tresci
Division Manager Product Center
Andreas Pecher
Head of Project Management
Popis sadrzaja
1 Opis proizyoda (sl. 1-9) 144
2 Sadrzaj isporuke (sl. 1) 144
3 Namjenska uporaba. 145
4 Sigurnosne napomene 145
5 Tehnicki podatci 148
6 Raspakiravanje 148
7 Prijee stavljanu u pigeon. 149
8 Rukovanie 149
9 Napomene za rad. 150
10 Ciścense 151
11 Odrzavanje 152
12 Skladistenje i transport. 152
13 Popravak i narucivanje rezervnih dijelova. 152
14 Zbrinjavanje i recikliranje 153
15 Otklanjanje neispravnosti 153
16 Uvjeti jamstva - serija Scheppach 20 V IXES.... 154
17 EU izjava o sukladnosti 155
18 Povecani crtez 266
Objašnjenje symbola na proizvodu
Svrha je simbola u ovom prisucniku skrenuti va'sp pozornost na moguce rizike. Sigurnosne simbole i objasnjenja uz njih valja pomno prouciti. Sama upozorenja ne otklanjau rizike i ne mogu zamijeniti ispravne mjere za sprečavanje nesreca.
| Prije stavljanja u pigeon pročitajte i poštujte priručnik za rukovanje i sigurnosne napome- ne! | |
| Pozor! Nepridržavanje znakova sigurnosti i upozoravajućih obavijesti postavljenih na proizvodu te nepridržavanje sigurnosnih na-pomena i uputa za rukovanje moze uzroko-vati teške ozljede ili Čak smrt. | |
| Nosite zaštitne naočale. | |
| Nosite štitnik sluha. | |
| Uvjek nosite zaštitnu kacigu! | |
| Nosite zaštitne rukavice! | |
| Nosite Čvrste cipele! |
| Nosite zašitnu odjeću! | |
| Proizvod ne izlažite kiši. Proizvod je dopu- šteno stacionirati, skladišti i rabiti samo u suhim okolnim uvjetima. | |
| Radove održavanja, opremanja, namješta- nja i cisćenja obavljaje samo kada je motor isključen, a akumulator izvaden. | |
| Držite šake podalje od rotirajućih alata. | |
| Budite udaljeni od drugih osoba i elektrčnih vodova. | |
| Otvoreno | |
| Zaključano | |
| Duljina nosača noža | |
| 91dB | Zajamčena razina zvučne snage proizvoda. |
| Lithium | Litij-ionski akumulator |
| CE | Proizvod je u skladu s važćim europskim direktivama. |
1 Opis proizvoda (sl. 1-9)
- Uklopni zapor
- Stražnja ručka
- Držač akumulatora
- Sklopka za uključivanje/isključivanje
- Blokirna matica (alat)
- Blokada
- Teleskopska cijev
- Prednja rucka
-
Drzac remena
-
Zaporni gumb (namjestanje nagiba)
-
Alat (skare zaŽivicu)
- Nosač noža
- Šitnik noža
- Rameni remen
- Tipka za deblokiranje (akumulator)
- Akumulator*
^ = nije sadrzano u opsegu isporuke!
Division Manager Product Center

Head of Project Management
Kazalo
1 Opis izdelka (sl. 1-9). 156
2 Obseg dostave (sl. 1). 156
3 Namenska uporaba. 157
4 Varnostni napotki 157
5 Tehnični podatki 160
6 Razpakiranje 160
7Pred zagonom. 161
8 Uporaba 161
9 Delovna navodila. 162
10 Cischenje 163
11 Vzdrzevanje 164
12 Skladischenje in transport. 164
13 Popravilo in narocanje nadomestnih delov 164
14 Odlaganje med opadke in reciklaza. 165
15 Pomoč pri motnjah 165
16 Garancijski pogoji - serija Scheppach 20V IXES. 166
17 EU izjava o skladnosti 167
18 Eksplozjska risba. 266
Razlaga simbolov na izdelku
Z uporabo simbolov v tem prirocniku zelimo va so pozornost usmeriti na mogoca tveganja. Varnostni symboli in razlage, ki jih spremljajo, je treba natancno razumeti. Sama opozorila ne odpravijo tveganj in ne morejo nadomesti ustreznih ukrepov za preprecevanje NESRC.
Division Manager Product Center

Andreas Pecher
Head of Project Management
Sisukord
Division Manager Product Center

Andreas Pecher
Head of Project Management
Satura raditājs
1 Ražojuma apraksts (1.-9. att.) 180
2 Piegades komplekts (1. att.) 180
3 Noteikumiem atbilstoša lietosana. 181
4 Drostbas noradijumi 181
5 Tehniskie dati. 184
6 Izpakosana 184
7 Pirms lietoanas sakanas. 185
8 Lietosana. 185
9 Darba noradijumi. 186
10 Tirisana. 187
11 Apkope. 188
12 Glabasana un transporte. 188
13 Remonts unrezerves dalu pasutisana. 188
14 Utilizacija un或其他izeja izmantošana. 189
15 Traucjumunovrsana 189
16 Garantijas noteikumi - Scheppach 20V IXES serija. 190
17 ES atbilstibas deklaracija. 191
18Klaidskats. 266
Simon Schunk Division Manager Product Center
Andreas Pecher
Head of Project Management
Turinys
Division Manager Product Center

Andreas Pecher
Head of Project Management
Division Manager Product Center

Andreas Pecher
Head of Project Management
Sisallysluettelo
Division Manager Product Center

Andreas Pecher
Head of Project Management
Indholdsfortegnelse
2000/14/EF_2005/88/EF-Tillag:III
Garanteret lydeffektniveau (L_wA) :89,0 dB
Malt lydeffektniveau (L_WA) :91,6 dB
Division Manager Product Center

Andreas Pecher
Head of Project Management
Innholdsfortegnelse
Reservedeler /tilbehor
| Batteri SBP2.0 artikkel-nr.: 7909201708 | |
| Batteri SBP4.0 artikkel-nr.: 7909201709 | |
| Lader SBC2.4A artikkel-nr.: 7909201710 | |
| Lader SBC4.5A artikkel-nr.: 7909201711 | |
| Lader SDBC2.4A artikkel-nr.: 7909201712 | 2 |
| Lader SDBC4.5A artikkel-nr.: 7909201713 | 3 |
| Startersett SBSK2.0 artikkel-nr.: 7909201720 | 1720 |
| Startersett SBSK4.0 artikkel-nr.: 7909201721 | 1721 |
Division Manager Product Center

Andreas Pecher
Head of Project Management
CbDbpxKaHne
1 Onncnne Ha npOdykTa (Fur. 1-9) 252
2 O6em Ha doctabkata (Hr. 1). 253
3 YnoTepe6a no npedHa3NaueHne. 253
4Yka3aHn 3a6e3oNaChocT 253
5TexHueckn daHHn 256
6 Pa3oNaKOBaHe 257
7Ппди русь В ekрноаця.. 257
8 Ynpablenne 258
9 Yukazanya pa60Ta 259
10Поунствае 260
11 Ppckka 261
12 CbxaheHne n TpaHcnpOpTupaHe. 261
13 Pemont n npbuka ha pe3epBn yactn. 261
14 IV3xBbPJIaHe n peuKJInpaHe 262
15OTcTaHbAHeHaHen3npaBHOctn. 262
16 TapaHcHOnHH yCIOBn - cepna Scheppach 20V IXES. 263
17 EC DeKlapaun 3a cbOTBETCTBne. 265
18 N3o6paXeHnE B pa3rno6eH BnD 266
O6aCHeHne Ha cIMBOJnTe Bbpxy npoDyKta
I3noJ3BaHeTo Ha CmBOLn B HactoOTo pKOBoDCTBO cJeBa Da HacOuH BHMaHneTo Bn KbM eBeHTyaJIHn PnCKObE.CmBONITE 3a 6e3oNaChocT n O6rCheHnTa, KOtTO rnpdpykabat, Tp6Ba Da 6bDat pa36paHn ToHNO. CaNte npdynpexKeHn He npemaxBat pckOBete n He Morat Da 3aMeHrT npabNJHnTe MepKn 3a npedOTbpaTBAHe Ha 3JIOJnyKn.
| Пробны ручkanе в Екspлноатацьи почтete и сдаимаши ръковodстото за уnotреба и указанята за бezонасост! | |
| Вимане! Несдаимею за почтete за бezонасост и пождөгдөнүтä, пост- вени на р overdукта, кakто и песдаимею п дөдүдөдүлөдүйүдүлүдүдүдүдүдүдүдүдүдүдүдүдүдүдүдүдүдүдүдүдүдүдүдүдүдүдүдүдүдүдүдүдүдүдүдүдүдүдүдүдүдүдүдүдүдүдүдүдүдүдүdэдүдүдүдүдүдүдүдүдүдүдүдүдүдүдүдүдүдүдүдүдүдүдүдүдүдүдүдүдүдүдүдүдүдүдүдүдүдүдүдүдүдүдүдүдүдүдүдүдүд应有的 довeled do сэрupsизни наразнayваши ял дори д смьрт. | |
| Hocete зашилни очILA. | |
| Hocete зашилни за сныха. | |
| Винаги рочete п徴пазни каска! | |
| Hocete п徴пазни ръковици! |
| Hocete 3dparv no obvkn! | |
| Hocete 3auntho obnekno! | |
| He n3laarate npodukta ha nbjxnd. Ppoduk- TbT Tpmba da ce pa3nolara, cbxpanra va eKcnpoatnpa camo npu cyxu ycnoBna ha okonhata cpeia. | |
| I3Bbprwbaiote deiHocnt no pOndpBXkata, nPpeucptpoictboto, peyunipaneto i no- ChCTBaHeto camo npu n3KnUoyen DVBrataeI ni n3BaDeHa akymylatopHa 6aTepyia. | |
| Дрьжte рьцete cn daneu OT bvpTЯши ce pa6OTHi INCTPymeHTN. | |
| Cna3BaIte pa3ctOJHne ot dpyru n liuca i eJeKtpnueckn pRObODHniu. | |
| ОТКПчeH | |
| 3aklquhen | |
| Дылгahoxkobarpeda | |
| ГаразнтupaNo HInBO Ha 3BykoBa MoUHOCT Ha прodukta. | |
| ЛитnevBo-ионha akymylatopHa 6aTepyia | |
| ПрodуктBJT OTROBapry Ha prinloXmITE eb- poneiSCN dinpeKTINB. |
1 OnscaHne Ha npOdykTa (PnR. 1- 9)
1.БлOKировka cpeув BKПИЧВанe
2.3aHa pBkoXBaTka
3.Приемно Гезdo 3a akymynaTOp
4.ПпeвклioуBaTeЛ 3aВКlIOUyBaHe/N3KlIOUyBaHe
5.ФИКСИРаца raиka (pa6OTeH INHcTpymeHT)
6.Блokровka
7. TeleckonuHa Tpb6a
8.Празда рькхватka
9.Дьрkaч3a pembk
10.Блokирац 6уToH (perylnpaHe Ha hakIOHa)
11. Pa60TeH INHCTpyMeHT (HOXnUca 3a JxN B nJNeT)
12.HoXoBa rpeDa
13. 3aunTa Ha HoXa
14. Pamehen pembk
15. ByToH 3a ocBo6oxJaBaHe (akymyIaTop)
16. AkymytaTop*
* = He e BkJIIOueH B O6ema Ha DoCTaBkata!
2 O6em Ha doctabkata (Фиг. 1)
P03.БpoHHaMHeOBaHne
11.1 x Pa60TeH nHCTpyMeHT (HOXnua 3a XnB nnet)
13. 1 x 3aunTa Ha Hoxa
14. 1 x Pamehen peMbK
1x Akymynatopha TeleckonuHa HOXnua 3a nnet
1xPbkoBOdCTBO3aynoTpe6a
3 YnOTope6a no npEHa3HaueHne
IpoDyKbT MoKe da 6bJe MOHTnpaH cAmo KbM DoCTabeHnA DBurateneH 6Jok.
Ta3n Hoxuata 3a nIeTe noxOja 3a noPraBaHe Ha KINBn PJIeTOBe IN XpactN.
PpOdykTbT MoKe da ce n3noJ3Ba cAmo cbrnaCHO CBOeTo npEHa3NaueHHe. BcKa pa3nUaBaua ce ot TOBa ynoTppe6a He e no npEHa3NaueHHe. 3a BcKaKbB BnD npOn3TnuAun OT TOBa uetn HApAHBaHnO TROBOPHOCT Hocn Notpe6ntenT/onepaTopbT, a He npOn3BoDInTeJrT.
CbctabHa yact OT ynoTpe6aTa no npeHa3haeHne e cB- 10n Cna3BaHeTo Ha yka3aHnraTa 3a 6e3oNaCHoc, KaKTo n pkoBOcTBOTO 3a MOHTax N yka3aHnraTa 3a ekcnloatauB pkoBOcTBOTO 3a ynotpe6a.
JIuata, KOITO 06cnykBaT N NOIbPkaT npOyKTa, Tp86Ba Da ca 3aNo3HaTN C Hero N Da ca NHΦopMnpaH N OTHO Bb3MOXHNTE ONaCHOCTN.
PpomeHnte no npOdyKta OCBO6oxkDaBaT n3qJIo npOn3-BoDHTeJI OT OTROBOPHOCT 3a Bb3HNKHAn B pe3yIITat OT TOBa UeTI.
PpOdykTbT MoKe da ce n3nO13Ba cAmO C opuHaJIHn pe-3epBHN qactn I opuHaJIHn npHaJnxHocTn Ha npoI3-BOUHTeJIa.
PpeDnncAHnra 3a 6e3oNaChocT,pa6ota n noDpBkKa Ha npOn3BOAnTeJRAKAKTO nNocoyeHnTe pa3Mepn B TexHNuecknTe DaHHN, Tpr6Ba Da 6bDat cna3BaHn.
MOn, o6bPHeTe BHNMaHne, Ye HaunTe npOyKTn He ca KOHCTpyuPAHn C npEdHa3HaueHne 3a TbproBcKa, npOpeCNoHaJIHa nII npOMnJleHa ynoTpe6a. He noeMaMe rapaHua, aKO npOyKbT ce n3noJ3Ba BV TbproBckN, 3aHa-RTnCKn nII npOMnJleHn npEepnTn, KaKTo n npaPBHOCHn DeHOCtN.
O6aChenHe Ha CnHnHnTe Dymn B pKOBODCTBOTO 3a yNoTpe6a

ONACHOCT
CnHaHa Dyma 3a 06o3HaayabaHe Ha HenoCpeiCTBeHO OnaCha CHTyaun, KOrTO, aKO He 6bJe n36erHata, ige DoBede Do CmbpT NJI cepno3Ho HapaHbAhe.

PPEyPExKDeHne
CnHaHa Dyma 3a 06o3HaayBaHe Ha Bb3- MoXHa OnaCha CHTyaun, KOrTo, aKO He 6bJe H36erHaT, MOKe Da IOBeDe Do CMBpT Hn cepNo3HO HapaHbAHe.

БЛАГОРАЗУМЕ
CnHaHa Dyma 3a Obo3HaayBaHe Ha NotenuJIHO onacHa cnTyauN, KOrTo, aKO He 6b-De n36erHata, MoKe Da doBeDe Do Jekn nn CpeHN HapaHraHna.
BHIMAHNE
CnHaHa Dyma 3a Obo3HaUbaHe Ha NotenuHaNo OnacHa CNTyaun, KOrTo, aKO He 6b-De n36erHata, MoKe Da DOBeDe Do NOBpeKDaHe Ha npOdykTa HIn NmUyecTBeHN uetN.
4 Yuka3aHnna 3a 6e3oNaCHOCT
3ana3e BCnKu yka3aHna 3a 6e3oNaCHOCT n HNCTpyKu 3a 6bDeu cnpaBKn.
N3noJ3BaHOTOByka3aHHaT3a6e3oNaCHOCTNoHRTne "eJeKTPnueCKn INHCTpymeHT"ce OTHacrdo 3axpaHbAHN OT MPekaTaeNeKTPnueCKn INHCTpymeHTn (CMpeXOB npoBODnK)NJIO do 3axpaHbAHCakymyJatop eJeKTPnueCKn INHCTpymeHTn (6e3 MPekOB npoBOdNHk).

PPEyPExKDeHne
Ipooyete BCnKu yka3aHna 3a 6e3onac-HocT, HNCTpyKcH, NIOCTpaCm N TexHnueCKn DaHH, PpeOCTaBeHn C To3n eJekTpHu-yeCKn HNCTpyMeHT.
Pponyckn npn cna3BaHeTo Ha nHCTpyKmnte no-dony MOraT Da DoBeMaT DO TOKOB yIap, noXkap u/Unn TeKKn HapaHbAHNA.
1)БezonachocHT ha pa60THOTo MrcTo
a) Nopdbpkaite pa60HTOcMn MCTO n do6pe oCBeTeHO. 6e3npAdbKbT HnH HeOCBteHnTe pa60THMeCTa Moat Da DOBeaT Do 3JIOJNYKn.
b) He pa6oTeTe c eIeKtpnueckn HNcTpymEt BBB3pNUBOONACHa CpeDa, B KOrTo NMa 3anaJIIMn TeuHocTn, ra3OBe nn npaxOBe. EneKtpnuecknte nHCTpyMeHTn Cb3daBaT uCKpn, KOnTO MOraT da Bb3nJaMeHrT npaxa nn napTe.
c)ДьхTe Decaи Дуглina LaNeu no BpeMe Ha n3noI3BaHeTo Ha eJekTpueckn INHCTpyMeHT. Ppu pa3ceBae MoKeTe da n3ry6nte KOHTpon Bbpxy eJekTpueckn INHCTpyMeHT.
2) Be3onacnoct npa6ota c enektpnueckn TOK
a) ΜεncenbT ha eNeKtpnueckn HNCTpymeHT Tp86Ba da OTROBapHa KOHTa. ΜεncenbT he 6nBa da ce npomeH no HnKaKBb Haun. He n3no13BaTe aanTepn Μεnceln 3aeDHO CbC 3a3eMeHn eKeK Tpnueckn HNCTpymeHTn. HenpomeH eencei n NOxOJaI KONTn HamaJIbaT pCKa OT TOKOB ynap.
b) Ⅲ6rBaIe TeIeceH KOHTaKT CbC 3a3emeHn NOBbpxHOCTN KATO Tp6bN, OTONJIteJHn YpeN, cyprHn xHaADHnHnC. CbIeCTByBa NOBUnEHN PnCKOT TOKOB yIap, KORATO TAnOTo Bn e 3a3emeHo.
c) Na3eTe eNektpnuecknte HNCTpymeHTN O T bJxN Bnara. IpoHnKBaHeTo Ha BOda B eJIeKtpnueckn NHC TpyMeHT yBeJIuYaba pNCKa OT TOKOB yIap.
d) He n3non3BaIte cBeHNHTENHn npOBoHNk He no npedHa3NaueHHe, 3a HocHe nn 3aKaaye Ha eJeKtpnueckn HnCTpyMeHn 3a N3DbpNAhe Ha uencena ot KOtakTa. Na3e TcBeHNHTENHn npOBoHNk OT ropeunHa, MacNo, ocTp n Pb6Obe nn DnHexeN ce qactn. NobpeHn nn yCykaHn CBeHNHTENn npOBoHNu yBEnuYabat pNCKa oT ToKOB yDap.
e) Korato pa60nte c enektpnueckn Hhctpymehn Ha OTKPnTO, n3non3BaIte cAmO yDbJXnTeHNn JINHNN, KOnTO CbIO ca NOxODAa 3a yNOTpe6a Ha OTKPnTO. N3non3BaHTo Ha NOxODAa 3a yNOTpe6a Ha OTKPnTO yDbJXnTeHNHa JINHNAHAMANRA pncA OTOKOB ynap.
f) Korato ynoTpe6aTa Ha eNeKtpnueckn HnCTpy-MeHT BbB BnaXHa CpeDa He MoKe Da 6bDe n36e- rHATA, n3NOJ3BaIte DeΦeKTHOTOKOBa 3auNTa. N3- NOJ3BaHTo Ha DeΦeKTHOTOKOBa 3auNTa HamaJIraBa pUCKa OT TOKOB yap.
3) Be3onacHOCT Ha xopaTa
a)БbTe BnMaTeHn,OpbuaTe BnMaHne Ha TOBa,KoTo npaBnte,N NOxoxJaTe pa3ymHo KbM pa6oTaTc eEkeTpueckn HhctpyMeHT. He 3NO3BaIte eEkeTpueckn HhctpyMeHTn, aKO CTe yMopeHN IIN NOD BnHHeTO Ha HApKOTnIaIKOXON IIIM MeDnKaMeHTN. MoMeHT HeBHnMaHne npu IN3No3BaHeTO Ha eEkeTpueckn HhCTpyMeHT MoKe Da DOBeDe Do cepNo3Hn HapaHraBaHna.
b) Hocete IuHn npedna3Hn cpeCTBa u BnHaun npedna3Hn OuHa. HocHeTo Ha IuHn npedna3Hn cpeCTBa, KaTO npOTBONpaxOba MaCKa, npedna3Hn 6yBKn, KOnto He ce Xlb3raT, KACKa nN aHTNOH, CnopeB u yNoTpe6aTa Ha eNeKtpueckn INCTpyMeHT, HamaJIbBA pNcKa OT HapaHbAHn.
c) N368BaTe HeBOJHO BKNIOUBAHe. YBepTe Ce, ye eNEKtpnuecknT HNCTpyMeHT e N3KnIOueH, npedn da ro CBpXeTe KbM eNEKtpo3axpaHbaHeTo u/nnn akymyIaTopa, npedn Da ro B3emTe nn Hocnte. Ako npn HOceHTo Ha eNEKtpnueckn HNCTpyMeHT DbpxNte PpbCTa CN BbPxy PpeKbCbAua NN CbPxTe KbM eNEKtpo3axpaHbaHeTO BKNIOueH eNEKtpu-yeCKn INHCTpyMeHT, TOBa MoKe Da DOBeDe Do 3NOIOnnyKn.
d) OTeIpaHete IHCTpyMeHTte 3a HAcTpOka nIraeHHTE KIOUOBE, npEi Da BKNIOHTe eJeKTPnueckna IHCTpyMeHT. IHCTpyMeHT nII KIOU, HAMPaUc Ce BBB BbPTaUca Ce YAcT Ha eJeKTPnuCeCKN INCHCTpyMeHT, MoKe da DOBeDe Do HapaHBAHn.
e) N36yBaIte HnnpaBnHa CToIka Ha TAnIoto.OcnIpype cN CTabIJIeH CToEK I NOCTOHNHO Na3eTepaBHOBecne.Taka MoKeTe Da KOHTpOJIpaTe eJekTpUYeCKINHCTpyMeHT No-Do6pe npn HeOuaKaBaNcITyaUN.
f) Hocete noxdoxoio o6neKn. He hocete wnpokn dpexn nn Hakntn. DpbkTe kocata n 6bneKnoto cn daJeY OT DBNXeN CE qactn. Wnpokn dpexn, HAKNTN nn Dblnn KOCN MORAT Da 6bdaT 3axBaHaTN OT DBNXeN CE qactn.
g)Korato Morat Da 6bDat MOHTnpaHn npaxOn3-CMyKBaun n npaxOynaBraun yCTpoNCTBa, Te Tp8-BA da Ca Cbbp3aHn N da ce N3non3Bat npabNHO. H3non3BaHeTo Ha npaxOn3CMyKBaUo yCTpoNCTBO MoKe da HamaN BpeDnte 3a 3dpaBeTO npaDn npax.
h) He ce noДаВаTe Ha ФалИнБОТу CBCTBO 3a 6e3onachOCTи He npeHe6perBaIte npabnlaTa 3a 6e3onachOCT npa6Ota C eNEKtpuYeCKnte nHcTpymEHTN, DOpn aKO cNeD MHOROkPaTHaTaN MyoTpe6a MmCInTe ye rN NO3HaBATE do6pe. He6pexKHITE DeiCTBnA MORaT Da IOBeDaT Do TeKKn TEJIeCHN NOBpeDN B pAMKInTe Ha YaCTN OT CeKYHdaTa.
4) Ynotpe6a n 6opabene c eIeKtpnueckn IHCTpyMeHT
a) He npetobapBaIte eJektpueckn HhctpymeH. 3nnon3BaIte noXoJusna 3a Baawata pa6ota eJektpueckn HhctpyMeH. C noXoJusna eJektpueckn HhctpyMeH pa6OTnte no-dO6pe n no-CnrypHO B dHaana3OHa Ha pa6OTnTe My xapaKtepnCTNKN.
b) He n3noJ3BaIte eJekTpueckn HNCTpyMeH, qHTo npEkbCbae noBpeH. EJekTpueckn HNCTpyMeH, KOHTo HE MoKe Da Ce BKNHOBy NIN N3KJIIOUBy, e OnaceH n Tp6Ba Da 6bJe peMOHTnpaH.
c) N3BaTe 9eCeJa OT KOHTaTa H/Inn N3BaTe CMeHReMn AkyMylatop, npei Da N3BbPwBaTe HAcTpoKn No ypeDa, da CMeHrTe Yactn Ha pa6oTHN HAHCTpyMeHT Nn Da OCTaBnte eNeKTpueckn HNCTpyMeNTa HAcTpaH. Ta3n MnpKa 3a 6e3onacHOCT npeDoTbPaTaBA HeymuJeHTo BKnIOyBaHe Ha eJIeKTPnueCKn INHCTpyMeHT.
d) CbxaPahraBaTe He3n03BaHnte eJektpueeckn HhctpyMeHTHa HeoCTbHNO 3a Deua Macto. He n03BOJRAaTe eJektpueeCKnT HhctpyMeHT da 6bJe n3nO3BaH OT Nua, KOtO He ca 3aNo3HaTc Hero nn He ca npoyeJI Te3n HhctpyKcN. EJektpueecknte HhctpyMeHTn Ca onachN, aKO ce n3- non3BAT OT HeONTHN JUca.
e) NpOdbpkaTe eNEKtpuecknTe HNcTpymEnu pa6oTHnH NHCtpymEnr rpnXKnBO. IpOBepraBe TaNN DnBnKeUte ce qactn FyHKnOHnpat 6e3ynpeuHO He 3aJkDaT, daNN HMa CuyneHN nn Taka NOBpeHn Yactn, ye Da HApUbaBt FyHKcuHnHa ToeEETPueckn HNcTpymENT. NpBpeHnTe Yactn CnEDBa Da 6bDat peMOHTnpaHN npEIN 3NoI3BaHeTo Ha eNEKtpueckn HNcTpymENT. MHorO 3NoIOnyKn ca pnpUHHEN OT NoIO NOd-DbpxAHn eNEKtpueckn HNcTpymENT.
f) NpOaBpKaItepeXeUHHTn HHTpyMeHTn HHTpyMeHTn C OCTPn peXeU p6oBe ce 3aklnHBat noMaJko n Ce BOJr NO-JIECHO.
g) N3non3BaIte eNeKtpnueckn HNCTpyMeHT, pa60THH NHCtpymeHT, pa60THnte HNCTpyMeHTn T.H. CbrracHO HactoJnte HNCTpyKcnn. Pp n ToBa B3emaTe NOBHNMaHne ycNoBnTa Ha pa6Ota N DeiCTBHeTo, Koeto Tpa6Ba Da ce N3BbPun. YnoTpe6aTa Ha eNeKtpnueckn HNCTpyMeHTn 3a pa3NIuHN OT ppeBnDEHIne npnIOKeHH MoKe da DoBeDe Do ONaCHn CNTyaCnn.
h) Na3eTe dpbKnTe n TexHnTe NOBbpxHOCTn cyxN, uectn 6e3 macno n rpec. Xnb3raBnTe dpbKn n TexHnTe NOBbpxHOCTn He no3BOJRAb T 6e3oNa cHa pa-60ta n KOHTpOHa eNeKtpUeCKn HcTpyMeHT B He- npedBnDeneH cnTyauuN.
5) YnOTope6a n 6opabene c akymyIaTOPHnI NHCTpyMeHT
a) 3apekdaTe akymyNaTopHnTe 6atepn cMo CbC 3apAHH yCTpoNCTBa, npenopbuaHOn OT npoN3BO- dnteJ. 3a 3apAHO yCTpOInCTBO, KOeTo e npedHa3- NaHeHO 3a ONpeDeneHn BnD akymyNaTOpN, cbIecTByBa OnaCHOCT OT NOxap, aKO To ce n3no13Ba C dpyr BnD akymyNaTOpN.
b) 3aTOBa B eJekTpuecknTe HNCTpyMeHTn N3noJI3BaIte cAmo npeBnDeHnTe 3a ceJIta akymyNaToPn. Ynotpe6ata Ha npyrn akymyNaTopn MoKe da doBeNe Do HapaHraBaHn I ONaCHOCT OT NOxap.
c)ДьхтЕ HeN3NoI3BaHInTe aKymyIaTOpN daneY OT KJIaMepn, MoHETn, KJIIOOBE, INIIN, BINTOBe IIN IpyrI dpe6HN MetaIIHn IpEIMTe, KOtTO 6nxA MORIN Da npuHHr T CbBp3BaHe HaKbCO Ha KOHTaKTInTe. Kbco CbeINHeHne MExdy KOHTAKTInTe Ha aKyMyIaTopa MoKe Da npuHHn N3rapAHN IIN NOkap.
d) Pn HnpabnHa ynotpe6a ot akymyataopa moke da n3Je3e TeuHocr. N36raBaiTe KOHTaC He. Pn cnUyaeh KOHTA KNTnJaKHeTc BOda.AKO TeuHocTTa nonaHD B OHTe, DOnbHInTeJHO NO- TbpceTe MeunuHcKa nomou. N3nnaaata TeuHOCT MOKe Da DoBeDe Do pa3Dpa3HeHn IIN N3rapa-Hn Ha KOKaTa.
e) He n3non3BaIte NOBpeDeHa IIN npOMEHeHa ayMynatopHa 6aTePn. NOBpeDeH INI npOMEHeHn akymyNatopHn 6aTePn MORAT Da ce IbPxKt HnpeDcKa3yeMo n Da npuHnT NoXap, EKcnNo3n IIN Ha-paHЯBaHe.
f) He n3naraite akymylaTophata 6atepy Ha orbH nn npekomephn Tempepatyp. Ioxkap nn Tempepatypn Hd 130 ^ C Morat da npedn3Bkat ekcnno- 3na.
g) Cna3BaIte BcNcKn HNcTpkykun 3a 3apeXdahe N HNKora He 3apeXdaIte akymyIaNtOpHata 6aTepeN nn aKymyIaNtOpHn INHCTpyMeHT nBbH TempeA TpyHn dana3OH, NOcoeH B pkoBOdCTBOTO 3a eknnloatau. HenpaBUNHO TO 3apeXdaHe nn 3apeXdaHTo n3BbH Oo6peHn TEmpePaTypeH dana30H MOKe da yHnIOxN aKymyIaNtOpHata 6aTepeN nn Da yBeJIuN PnCKa OT NoXap.
6) CepBn3
a) Bb3naTe peMOHTn no Baun eNeKtpnueckn HhctpymeHT cAmo Ha KBaHnФnupaHcneuaHnCTn n cAmO cOpuHaHnPe3epBn Yactn. Taka ce rapaHTnpa, ye 6e3onacHocTtHa eNeKtpnueckn HhctpymeHT ue ce 3ana3n.
b) Hnkora He cepBn3npaIte NOBpeDeHnte akymyataTOPHN 6atepn. Npdpbkkata Ha akymyataOpHnte 6atepn Tpr6Ba da ce n3BbpUba cAmO OT npOn3BO-DHTeJI INN OT OPUN3npAHn cepBn3Hn CEHTPOBE.
4.1 06и уka3aHnna 3a 6e3onacnoct
a)БbTe BnMaTeHn,OpbuaTe BnMaHne Ha TOBa,KoTo npaBnte,N NOxoxJaTe pa3ymHo KbMa pa6oTaTc eEKeTpueckn HnCTpyMeHT.He N3NoI3BaIte eEKeTpueckn HnCTpyMeHTn,ako CTe yMopeHn HnIOB BnHaHHeTO Ha HapKOTu, aIKOXOn Hn MeDnKaMeHTn. MoMeHT HeBHnMaHne npN 3No3BaHeTo Ha eEKeTpueckn HnCTpyMeHT Mo-Ke Da DOBeDe Do cepno3Hn HapaHraBaHna.
b) HaiznoHaJIHnTe npeIncaHnMorat da orpaHnUaBaT 3nOJ3BaHeTo Ha npOdyKTa.
c) PpaBete peIOBHN NOUBNK IN DnBXKeTe pbcTe CN, 3a Da CTmMyInpaTe KpbBOO6paueHneTo.
d) No Bpeme Ha pa6ota BnHaH np6kTe npOdykTa 3dpabo C DBeTe cn pue. Ocnypete 6e3onacho pa3CToRHe.
4.2 Yka3aHnna 3a 6e3oNaChocT 3a HOXnU 3a XNB PJIeT
a) He n3noI3BaIte HOxuata 3a JXNB IJIeT npn looBpeMe,OCO6eHO aKO mMa ONaCHOCT OT rpbMOTeBnHn 6ypn. NTo3n HauHH ce HaMaJIraBa pNCKbT da6bDeTe ydapeHn OT MbJHn.
b)ДрьжTe BCnUKN 3axpaHbauN Ka6eNn DaJeuOT 30HaTa Ha pR3aHe. Ka6eJInte MoRat da 6bDat CKPHTN BKIN PJIET IN XpactN IN CInyauNHO da 6bDat npepr3aHn OT HOKa.
c)ДрьхTe HOxNcaTa 3aЖИВ ПЛeT cAmO 3a N3OJnpaHHTe NOBbPxHOCTn 3a 3axBaUaHe,ТБи KaTO pexeIuT HOK MoKe Da 3acerHe CkPHT eNeKTponpoBOd n Hn CO6CTBeHn Bn 3axpaHbA u Ka6eI. CbnpNKoCHObeHneTo Ha HOXOBeTe C npOBODnK NOd HaNPExeHne MOKe Da DOBeDe Do HAppeKeHne B MetanHHTe Yactn Ha ypeDa N da PnUnHn TOKOB yap.
d) Na3eTe BCnUKN Yactn Ha TAnOTo DaJeu OT HOXa. He ce OnntBaIte Da OTCpaHInTe OTP3aH MaTePnAn nn Da 3aBpKInTe MaTePnAna 3a OTP3BaHe npn DBrNKeU Ce Hox. HoxoBeTe npoDbJNaBaT da ce DBNXaT nCneI n3KJIIOUHa He npeBkJIIOHbATEn. Moment HeBHNMaHne npn n3NON3BaHeto Ha HOXnCaTa 3a PNET MOKe Da DOBeE Do TEKKn HapaHbAHna.
e) YBepete ce, ye BCnUKN ppeBKnIOuBaTeHN ca n3- KInOueHn aKymyJatOpbTe e n3BaJeH, npeHn da OTCTpaHBAte nonaHaHn n3pe3Kn nn da o6CnyKBaTe npodykta. HeoayKaBaHOT 3aJeIcTbaHe Ha HOxNtata 3a JKN Bnn Tnpn OTCTpaHBAhe Ha 3a-KneueHn MaTePnAn MoKe Da DoBede Do CepNo3Hn HapaHBAHn.
f) Hocete HOXncaTa 3a KINB nIeT 3a dpbKkaTc HeNoOBnHexH OHX N BHMaBaTe Da He 3aJeCTBaTe npebKnIOuBaTeI.. PpaBnHTo HocHe Ha HOXnCaTa 3a KINB nIeT HAMAnBa PnCKa OT CnyaHNO 3aDei-CTBaHe I NOcneDbaUO HapaHraBe OT OCTpNeTO.
g) BnHaH n3dIbPnBaIe Kanaka Bbpxy HOxOBete, KOraTo TpaHCnOpTnpaTe NIn CbXpaHraBaTe HOxu-ata 3a XnB PNeT. PpaBnHTo 6opabeHe c HOxu- Ta 3a XnB PNet HamaJIraBa pNcKa OTHapaHraBaHe OT HOxa.
4.2.1 Yka3aHn 3a 6e3oNaCHOCT 3a HOKn 3a XNB PJIET C yDbJXKeH O6XBaT
a) Hocete npedna3n cpeCTBa 3a rnaBata, koraTo pa6OTte HaI rnaBata C HOKncaTa 3a XNB PNET C ydbJxKeH 06xBa. IaDaIte OTNOMKn MORat da npuHHrT cepno3Hn HapaHraBaHn.
b) BnHaH pa6oTe c HOxuata 3a KNB nIe T cyBJIkeH o6cer c DBete cn pue. IpBXkTe HOxuata 3a KNB nIeT C yDJIkeH o6cer c DBete cn pue, 3a da He 3ary6nte KOHTPOJ.
c) Hamane pncka ot cmbpTOHOceH TOKOB yap, KaT O HNKORA He N3NON3BaTe HOXncaTa 3a JNVB NNet C yIbJxKeH 06xBaT B 6n3OCT Do eNEKTpuYeCKn Ka6enn. KOHTAKTB T Cnnn IN3NON3BaHeTo B 6n3OCT Do eNEKTPoPBOOn MoKe Da IOBeDe Do cepNo3HO HaPaHraBaHe nn PhaTaneH TOKOB yap.
4.2.2 pyru yka3aHHa 3a 6e3onacHocT
a) BnHaHn HocTe npedna3Hn pbKaBnU, 3auNTn OuHa, 3auNTa 3a Cnyxa, 3dpabN o6yBKn n Dblr NaHTaNoH, KOrato pa60nte c To3n npOdyKT.
b) Hoxuata 3a kivn pIe t npedha3hauhe ha 3a pa6ota, npk KOrTo OepaTopbT CTOn Ha 3emrTa, a He Ha cTbna Dpyra HectaBnHa NOBbpxHocT.
c) OnachocT OT eJektpnueckn TOK,ДрькTe Ha pa3ctorHne Hau-manko 10 M ot dalekonpoBOnTe.
d) He ce onntBaIte da pa3xna6nte 6noknpaHa/3akneHa HOKOBa rpeDa, DOKATO He n3KnIOHTe npOdyKta I He n3BaIte akymylaTopa. CbIeCTByBa onaCHOCT OT HapaHraBe!
e) HoxoBete Tp6Ba Da ce npOBepaBat peoBHO 3a n3-HocBaHe n da ce 3aTOuBAt OTHOBO. TbNTe HOxOBe npetobapBat npOdykTa. BcNKn npOn3Tuaun OT ToBa nobpeHn He ce NOKpNBat OT rapaHnraTa.
f) Ako cTe npekbchATn no Bpeme Ha pa6oTa c npodykTa, NbpBO npNKJIIOHeTe Tekyuata Oepaunr n CneT ToBa N3KJIIOHeTe npodykTa.
g) CbXpaHbAte He3nO3BaHnte eEeKtpueeckn HhCTpyMeHT Ha HeoCTbNHO 3a Deua MRCTo. He N03BOJBAite eEeKtpueeCKnT INcTpMeHT da 6bJe n3no3BaH OT Nua, KOnto He ca 3an03HaTn C Hero nn He ca npoyen Te3n INcTpkyknn. EeKtpueecknte INcTpmeHTn ca onaCHn, aKO ce n3- no3BaT OT HeONuTHn Nua.
OcTaTbUHn pUncKOBe
PpOdykTBt E KOHcTpynpaH CbIaNcHO HNBOTo Ha pa3BNTHe Ha TexHnKaTa N npn3HaTte npaBnJa Ha texHnKa Ha 6e3onacHocr. Bbnpekn ToBa, npu pa6oTa MORaT Da Bb3HNKHaT OTeJHH OCTaTbUH pNCKOBe.
- Iope3Hn HapaHaBaHna.
- YbpeKdane Ha OHTe, aKO He ce Hocn npedncaHaTa 3auntHa OHNTe.
- YBpejdaHe Ha cnyxa, KOrato He ce Hocn npeDncaHata 3aunTa 3a cnyxa.
OCTaTbUHHTpe pncKOBe moRat da 6bDat HamaJIeHN, aKO 6bDat cna3BaHn rIaBn ,Yka3aHnra 3a 6e3oNaCHOCT" n ,yNotpe6a no npEHa3HaueHne", KaKTo n pb-KOBODCTBOTO 3a yNtpe6a KATO qAIO. - 3nON3BaIte npOdykTa, KaKTo e npenOpBuHaBO TToBa pBkoBOCTBO 3a yNtpe6a. TaKa nocTnIrate ONImaJIHa npOn3BoDnteJIHOCHT Ha Baunr npOdyKT.
OcBeH ToBa, BbIpeKn BCnKn B3eTn IpeIa3Hn MepK, MoTa Da CbIeCTByBaT HeaBn OcTaTbHn PnCKoBe.

PPEyPExKDeHne
IIO Bpeme Ha ekcnloatauia To3n eNeKtpueeckn HNCTpyMeH Tc3dAba eNeKtpomarHHTHO none. Pnp onpeDeJeHn ycNoBna TOBa nOne MoKe Da hapuHn FyHKUHOHPaHTo Ha AKTNBH NnPi NaCBHm MeuHnCKNMMnAHTn. 3a Da ce HamaJn OAnCHOCTTa OT cepno3nNn CMbPToHOCn HapaHbAHn, npenopbYBaMe HaNJUca C MeDUNCHKn MMnAHTn Da Ce KOHCytupaT CbC CBOA Jekap N c Ppon3BODntela Ha MeuChnHckn IMnAHT, ppei eNeKtpueecknT INCTpyMeH Da 6bde N3NOJ3BaH.

PPEyPExKDeHne
B cnuyaHa npoDbJnxHTenHa pa6ota MoKe Da ce CTnHr He do HapyuEHHa Ha KpbBoO6paueHneTo (CNHpOM Ha 6eHn npbCT), DblKauu Ce Ha Bn6paunn B pbute Ha onepaTopa.
CnHpOMbT Ha PeHcEcbDOBO 3a6OJIbAHe, npKoTe MAnKITE KpbBOHOCHcBDOBe Ha npbCTHTe Ha pBuTe N KpaKaTaCe CBNBaT CnA3MaTHUHO. 3aceHaTInTe yAcTBuBE He NoIyuaBt DOCTaTbUHO KpbN NOpaN Ta3n PruHn HA nIgLeJXdAT MHOrO 6JeDn. YecToTO n3No3BaHe Ha Bn6bpapaN pOdyKTm MoKe Da npuHn YBPexJaHe Ha HEPBtpe Pn INuCa, YMeTo OPOcBAHe Ha KpaHnUte e HApUSeHo (HaNPIMep NyuaH, Dna-6etTu).
Ako 3a6eJENKe HЯKaKBO HeoBuaHNo yBpeXdaHe, He-3a6abHO npeKpaTe pa6oTa Ta cn i ce KOHCyItpaTe cJIekap.
BHIMAHHE
IpoodykTBt e cach ot cepnra 20V IXES n moke da pa-6oTn cAmO c akymyNatOpn ot Ta3n cepn. AkymyNatOpnTe MoRat da ce 3apeXdat cAmO cbc 3apdHn yCTpOnCTBa OT Ta3n cepn. Pnp ToBa cb6IIOdaBaIte yka3aHnTa Ha npOn3BODInTeJI.

PPEyPExKDeHne
Cna3BaIte yka3aHnraTa 3a 6e3OnacHOCTN HNCTpyKunTe 3a 3apeXdaHe n npabUNHa ynoTpe6a, daEnH B pBKOBOdCTBOTO 3a ekcnloatauHa BaUnTe aKymyNatop n 3apAnHOycTpoiCTBO OT cepNaTa 20V IXES. NOpboHo ONncAHne Ha npocca Ha 3apeXdaHe n DoNbHNHTeHa INΦopMaun MoKeTe Da HamePHTe B TOBA OTDeJIHO pBKOBOdCTBO.
5 TexHnueckn daHHN
| Нарlexене на двигатуг: 20 V | |
| Тил на двигатуг: | Четков двигатуг. |
| Терно (бezakумалатор и paбов ten Истру金融市场): | 1,1kg |
| Дыжina на рязache: | 410mm |
| Диамetedр на рязache: | 16mm |
| Perулиране на вгьда: 11стени | (90°-240°) |
| Скорост на рязANE: 2400 min | -1 |
| ОвSETS дылжина: 2,6 m | |
| Терно (задвижвае и павOTен инскртумент, бezа akумунатор): | 2,95 kg |
3ana3Ba ce npabOTo HaTexHueckn npomeH!
Uymn Bn6paun

PPEyPExKDeHne
UymbT moKe da OKaKe cepNo3Hn Bb3deIcTBnBbpxy BaWeTo 3dpabe.AKO UymbT, n3daBaHOT MaunHaTa, HAnxBbpna 85 dB, MoNa, Bne n Xopata, HamnpauCe B HenocpeDCTBeHa 6n30CT Do MaunHaTa, HocTe noXoJnCpeDCTBa 3a 3aUnTa Ha cnYxa.
CToHocHTe Ha 7yM N Bn6paun ca onpeJeHn Cb- rJacHO EN 62841-1/EN ISO 3744:2010.
XapakTepeNCTKn Ha yMa
| Ниво на 3Буково налягане LpA | 81,0 dB |
| Звукова моцноct LwA | 89,0 dB |
| Heopendelehoct на Измервано To KpA | 3 dB |
Napametpn Ha Bn6paunnte
| Вибрацnia ha пешанata ръкoxьатka 3,04 m/s | 2 |
| Вибрацnia ha занata ръкoxьатka 2,69 m/s | 2 |
| Heonpe徳енocst ha ИзмерваноТК 1,5 m/s | 2 |
Iocohata 067a cToHocT Ha Bn6paunTe n nocoehaTa cToHocT Ha yMOBNTe EMNCu Ca n3MepeHn NO CTaHapTeH MeTOd Ha n3nITBaHe N MoRat Da 6bDat n3NoJ3-BAHN 3a CpaBHeHne Ha eDInH eJeKtpueckn HcTpymEt CdpYr.
Iocouehata cTOnHOCT Ha wymOBNTe emncn n nocoehata o6ua cTOnHOCT Ha Bn6paunnte MORa T cbio da 6bDat N3PON3BaHn 3a npedBapntHa OueHka Ha HatoBapBaHETo.

PPEyPExKDeHne
No BpeMe Ha DeIeCTBnTEJHOTO n3NOJ3BaHe Ha eJIeKTPnueCKn HNCTpymeHT WymOBNTe EMNCn N CTOnHOCTTa Ha EIMCNITE Ha BN6paunMoraT Da ce pa3NJuYaBt OT NOOCYeHNTE CTOnHOCTN B 3aBNCmOcT OT BnDa NHaUNHa, NO KOJTO eJIeKTPnueCKn T NCHpymeHT Ce N3PON3Ba, N NO-CNEUHaNHO T BnDa Ha O6pa60TBaHnJa DetaJl.
OonTaTe ce da noDbpxKe HaTOBapBaHTo Bb3MOKHO Han-HnCKo. PnpMepn MepKn: OrpaHnuBaHa He HbpeMeTo Ha pa60ta. Pn ToBa Tp6Ba Da ce B3eMaTND BHIMAHHe BCNUKu Yactn Ha pa6OTNuaKbI (HaNPmep BpeMeHaTA, npe3 KOnTO eNEkTpuecknT NCTpyMeHT e N3KNUoyeh, N TaKnBA, B KOnTO To E BKJIIOyeh, Ho pa60Tu 6e3 HA TOBAPBaHe).
6 Pa3onaKoBaHe

PPEyPExEHHNE
IpoDyKTbN ONaKOBbUHnTe MaTePnAIn He ca DeTcKa nrrpaYka!
Dea He 6nBa da nIrpAraT c nIaCTMaOBu TOpBnKn, foIno n Ipe6Hn Yactn! CbuecTByBa onaCHOCT O norlbuahe n 3aDywaBaHe!
- OTbopete onaKOBkata n BHIMATEJHO 3BaTe npoDyKtA.
- OtctpaHete onaKOBbUHnMaTePnaJI, KaKTo n ONaKO-BbUHIne n TpaHCnOpTHIne OCnrypOBN (aKO nMa TaKnBa).
- PpOBepe TaJIN O6EmbT Ha DoCTaBkata e nJIeH.
IpoBepeTe npOyKta n npHaJnEJXHOCTnte 3a NOBpeDn OT TpaHCnOpTnpaHTo. He3a6abHo cbo6uTe Ha TpaHCnOpTHATA KOMNaHn, C KOrTO e 6n IocTaBeH npOyKta, 3a BB3HNKHJaNTe 5eTn. No-KbCHn peKaMaun He ce npn3HaBaT. - No Bb3MOxHOC7 3ana3eTe onaKOBkata Do n3TuHaHe Ha rapaHcNoHHn Cpok.
-Прениуnotpe6a ce 3ano3HaIte c npOdykTa nocpeDCTBOM pKOBODCTBOTO 3a ynoTpe6a.
3a npHaJnKHOCTN, KaKTo 3a n3HocBaun Ce n pe3epBn Yactn, n3noJ3BaJte cAmO npHnHaJn Yactn. Pe3epBn Yactn MoKeTe Da cn Ha6abnte ot Baunr CneuJn3npaH TbproBeU.
-При поьчкп поочьду Нашия Homeр Ha apTNkyI, KaKTo n Tnna n rOdnHaT a Ha npOn3BOdCTBO Ha npOdy-KTa.
7 Ipeeni nuck B eKcnIooatauia

ONACHOCT
Onachoct OT HapaHbaHe!
Ako ce n3no13Ba HEnbHNO crNo6e H npOyKTo, MoKe da ce CTnRHe Do cepNo3Hn HapaHaBbAHna.
He n3no3BaIte npOdykTa,doKaTo He 6bJe HAnbIHO crNo6eH.
- PpeBn BcKa ynoTpe6a n3BbPwTe Bn3yAnHa npoBepka, 3a Da ce yBepnte, ye npOdyKtBt e Nblen HHe CbDbpXa NOBpeDeHn NnN n3HOceH KOMNoHEH Tn. YcTpoiCTBaTa 3a 6e3oNaChOCT n 3aunTa Tp6Ba Da ca HENOKbTHaTN.

PPEyPExKDEHNE
Onachoct OT HapaHbaHe!
N3BaxdaTe akymyNaTopa oT eJektpnueckn INHCTpyMeHT npedn BCsKaKbPa6Ot nO eJektpnueckn INHCTpyMeHT (HaNP. NOdPbXkKa, CMHa Ha INHCTpyMeHT n T.H.), KaKTo n npn HerOBOTO TpaHCnoptnpaHe n Cxbxpa-HeHne. Pn HeBOIHO 3aDeiCTBaHe Ha npeBkIIOuBaTe JIA 3a BkJIIOUBAHe/IN3KIIIOUBAHe CbIeCTByBa ONaCHOCT OT HapaHbAHe.

PPEyPPEKDEHNE
Bunharne yBepaute, ye pa60THnT nHCTpyMeT e MOHTpAn npabnHO!
- NocTaBete npOdykTbVbpxy paBHa nobBbpxHocT.
7.1 MoHTpaIte pa6OTeH nHcTpymeT (11) Bbpxy TeNeckoNnHaTa Tp6a (7) (ФИг.2-4)
- NocTabeTe KeJaanHpa6oTeH HnCTpyMeHT (11) Bbpxy TeJeckOnuHata Tpb6a (7). BHIMaBaTe 3a No3nuaTa Ha Kne6a nNoNkata.
2.Чeз завиHTBaHe Na ФИКсUpaцаТа raɪka (5) pa6OTnHЯТ ИНСТРМЕNT (11) ce ФИКсUpa.
7.2 PerynnpaHe Ha BncoOnHaTa Ha TeleckonNuHaTa Tpb6a (fnr.1)
TeeneckonuHata Tpb6a (7) Moke da ce perynupa 6e3-CTeeneHHO Upe3 6nokupOBkata (6).
- Pa3xJa6eTe 6JIOKInpOBAkata (6) Ha TeJIeCKOnNHyHaTa Tpb6a (7).
2.ПоменeteДБЛЖИнагаHa TeJeCKONuHATA Tpb6a ue3 n36yTbaHe nnnn3dbpnaHe. - 3aTBOpTe OTHO6IOKnPOBkata (6) n c TOBaΦnKcnpaTepKaeHaTa pa6oTHa IbJxHnHa Ha TeJeckOnnHuHa Ta Tpb6a (7).
7.3 Perynilpae Ha bIbJa Ha pIaHe (fnr. 1, 9)
C npomeHeHn bTbJ Ha p3aHe MoXeTe da o6pa6oTBaTe DOpu HEnOCTbHN MeCTa.
- HatncheTe Dbata 6Ioknpaun 6ytoHa (10) Ha pa6oTHNIA INCTpyMeHT HOXnua 3a XINB PNET (11).
- Hactpoite HaKIOHa Ha Kopnyca Ha DBnraTeB BbB Kcnpaunte CTeneHN. BrpaHHe B Kopnyca Ha DBnraTeB Kcnpaun CTeneHN KcnpaT pa60THN INCTpyMeHT (11) npeD0TBpTaBaT HeBOHPO pa3MecTbaHe Ha pa60THN INCTpyMeHT (11).
Hoxnua 3a kNB nIeT (11):
P03nnaHa bTbHa p83ane 1-11
7.4 NocTaBeTe paMeHHnpeMbK (14) (ФИR.5,6)
I PENEYNPEXKDEHNE
OnachocT OT HapaHbAhe!
Bunharn Hocete pamehen pembk npu pa6ota. Bnharn n3knoubaite MaunHata, npedna ocbo6oute paMeHHra pembk.
- 3aKaYeTe pameHHnpeMbK (14) B dIbpxkaa 3a peMbK (9).
2.Пoctabepe pAMEHHnpeMbK(14)Ha pAMOTO cn. - HactpoTe IbIxHHaTa Ha peMbKa Taka, Ye IbPxKaYbT 3a peMbK (9) da ce HAMnpa Ha BnCOuHATA HaXbI6oka.
7.5 NocTaBHe/u3BaJdAne Ha akymyIaTopa (16) B/ot npneMHOTo rHe3do 3a akymyIaTop (3) (Φnr. 7)
BJIAGOPA3yMNE
Onachoct ot hapaHbaHe!
IocTabaIte akymyNatopHata 6atepna cmo kOrato akymyNaTOPHNHT HCTpyMeNT e roTOB 3a pa6ota.
H3noJ3BaTe aKymyataTopa
1.Пиьзhteakymynatopa(16)Впремнотг He3do 3a akymynatop(3).AkymynatopbT(16)цракbaHa Moc-TOTO cn.
I3BaXdaHe Ha akymyNaTopHaTa 6aTepe
- Hatnche 6yToHa 3a ocbo6oxdaBaHe (15) Ha akymy- nataopa (16) n n3BaTe akymynataopa (16) ot npneM HOTO rHe3do 3a akymynatop (3).
8 YnpaBJIeHne
BHIMAHHE
PpeynyckBekcnnoataaun, e Heo6xOmo da ro crno6nte HanbIHO!
I PEPdUYPEXDEHNE
Onachoct OT HapaHbaHe!
IpeBknHouBaTeJr3a BKnHouBaHe/H3KnHouBaHe H 3a- uHTnHrNt N3KnHouBaTeH He TpR6Ba Da ce qNKCuPaT!
-He pa6oTeTe c npOdykTa, ako npEbkHouBaTeIInTe ca nobpeDeHN. IpEbkHIOUbaTeJIaT 3a BkHIOUBaHe/ n3KlIOUBAHe n 3aunTHnT n3KlIOUBaTeI Tp8Ba da n3KlIOUBAI npOdykTa CneI nyckaHTo My.
- PpeDn Bcra Ka ynoTpe6a ce yBepaTe, Ye npOdyK-TbTe n3npaBeH.
I PENEYPEXDEHNE
Bb3MOxHn ca TOKOB yIap n nobpeHa npOdykTa!
OocerbT c liHnHa nOd HAnpeXeHne NO BpeMe Ha p3aHe MoKe Da DoBeDe Do TOKOB yIap. P3aHeTo Ha UyK-UNI pEaMeTu MoKe Da DoBeDe Do NOBpeDa Ha HOKOba-Ta rpeDa.
- Ppei Da 3anoHete da pexkete, nperneaute XIN BnIe NT xpaCTnte 3a ckpNTn ppeMetn, KATO XNt Ni ND HappeKeHne, TeJeHn OrpaN n Onopn 3a pacteHn
BHIMAHHE
YBepete ce, ye TemnepaTypaTa Ha OKonHaTa cpeJa no Bpeme Ha pa6oTa He HndBnUba 50 ^ C n He npa noD -20°C.
BHIMAHHE
IpoDyKbTe e qact OT cepnTa 20V IXES n moKe da pa-botn cAmO c akymyNatOpn OT Ta3n cepn. AkymyNatOpnte Morat Da ce 3apekDaT cAmO cbc 3apdHn yCTpOInCTBa OT Ta3n cepn. Pnp TOBa cb6IIOdaBaiTe yka3aHn- rTa Ha npOn3BOoNTeJ.

ONACHOCT
Onachoct ot HapaHBAhe!
Ako npOdykTbTe 3akneueH, He ce onNTBaIte da ro n3-DbpnaTe cbc cina.
-ИЗкlioуeteДВи ratena.
-Ⅰ3noI3BaIte NoCT nIN KInH, 3a Da OCBO6OAnTe npOdykTa.

БЛАГОРАЗУМЕ
Cnei n3KJIOUHbHe npOyKtBn npOdbJXkBa da pa6oTn. N3aKaBaIte DOKaTO npOyKtBcnpe HanbJIHO.
8.1 BkIIOUyBaHe/u3KIIIOUyBaHe Ha npOdyKta u pa6Ota c Hero (Φnr. 1, 8)

PNEyPExKDeHne
OnachocT OT HapaHbAHe nopadn OTKaT!
- HnKora He n3noJIbAaTe npOdykTa c eHa pIka!
Yka3aHua:
C npEKBKIOUBATeIa BKNIOUBAHe/U3KIOUBAHe MOKeTe da peryInpate 6e3TeeneHHO o6OpOTne. KoIKOTO NOBe-ye HATNCKaTe npeBKBIOUBATeJIa BKNIOUBAHe/U3KIOUBAHe, TOJKOBA No-BnCOKn ca O6OpOTne.
Ipei Da BkIIOUHTe, ce yBepete, ye npOyKtBT He doKoCBA HnKaKBr IpeMeTn.
- Издьрайт eе 3aцитata Na Hoxka (13) ot HoxkoBata rpeda (12).
BkJIIOUyBaHe
1.ДрьктпpoукtaслЯВа tcрьka 3a npeДнATERpkoXBATka(8)исяСHATAрьka 3a 3aДнATERpkoXBATka(2).ПалeцвпnpbCTNTeТр6Ba DAдьржATЗраBOрькOBATKNTE(2/8).
2. NocTABYIe TnIOTo n pBcTe CN B NOJIOKeHne, BOETo MoKTe Da N3DbPbKInTe Ha OTKaTHnte CUNI.
3. HatncheTe c naneL 6noknpOBkata CpeuB BKIOUbaHe (1)Ha 3aHnHaTa pkoXBAtka (2).
4. 3aDpBxTe 6JIOKINPOBkata cpeuY BKNIOUbaHe (1) HATN CHATA.
5.3a BKNIOUBAHe Ha npOdyKta HATnCHeTe npeBKnIOUBATeJIra 3a BKNIOUBAHe/N3KNOUBAHe (4).
6. Ocbo6oDeTe 6JIOKupOBkTa CpeuBy BKJIHOUBaHe (1).
Yka3aHue:
He e Heo6xOIMO da Ibpxnte 6nOKnpOBkata 3a BKnIOuBaH e HATNCHATA cIeI cTAPtnpAhe Ha npOyKTA. BnOKpOBkata 3a BKNIOUBAHe e npEHa3HaYeHa da npEDoTbpaTN cIyauHOTcTAPtnpAhe Ha npOyKTA.
N3KNIIOUBAHe
- 3a n3KnIOuBaHe nychete npebKIOUbaTeJIa 3a BKnIOUBAHe/n3KnIOUBaHe (4).
2.CneB BcKa pa6oTa c npOdykTa noCTaBnTe npeDIOCTaBeHrTe 3auNTaHa HOxA (13).
8.2 3aunTa cpeu npetOBapBaHe
Ako 6aTepeyra e npetoBapeHa, Ta Ce n3KnHouBa AToMaTnUHO. Cnei n3BeCTHO Bpeme Ha OxnaKdAne (pa3nUHO BB Bpemeto) npOdykTB MoKe Da Ce BKnHOn OTHOBO.
9 Yukazanna 3a pa6ota

БЛАГОРАЗУМЕ
Cnei n3KJIOUbaHe npOyKtB T npOdbJXaBA da pa6oTn.
N3ayKaBaIte DOkATO npOyKtB Cnpe HAnbJIHO.
yKa3aHua:
Ipei Da BkIOUHTe, Ce yBepTe, Ye npOyKTbT He KOcBa HnKaKBr npeMEn.
N3BecTHO KOJIuYeCTBO 8yMoBO 3aMbpcBaHe OT To3n npOdyKT e HEn36ExHo. N3BbPbBaIte 8yMHNTE pa60tn npe3 dOnyctUmnte n ppeHa3HaueHnte 3a TOBa YacObe Ha DeHc. Cna3BaIte nepNoDInTe Ha noYHBka, aKe o Heo6XoJIMo.
C pa60THnI INCTpyMeHT 6pa6oTBaIte cAmO YnCTn, paBHN IIOU.
HNCNEKtnpaTe BHNMaTeNo NIOuTa 3a KOceHe n OTCpaHete BCNU KUxN TeNa.
I36yraBte yapn B kambn, MeaI nn npenTCTBn.
Pa60THnIHTpymeH 6n MoBJI da ce NOBpeN n Cb-ueCTByBa ONaCHOCT OT OTKaT.
Hocete npenopbunteHNTE npedna3n cpecdtba.
Cnepe 3a 6e3onacno pa3ctoHnHe Ha npyn Nua do Baawata pa60tha 30ha. Bcekn, KoToBn3a B pa60hata 30ha, Tpa6Ba Da Hocn LnuHn PpeNa3HN CpeCTBa. OTyynenH napyea ot o6pa60TaHa HT NOBbpxHOCT INN ChyneH pa60TH INHCTpyMeHTMOrat da OTJETAT HAcTpaHH n da pnuHnHapAHBAHn DOpN n 3BbH npKaTa pa60tha 30ha.
Ako nonaHHeHa YyKn npEeMeT, He3a6aBHO n3KnIO-yeTe npOdykTa n 3BaJeTe akyMyJatOpHaTa 6aTePna. PpOBepTe npOdykTa 3a Nobpeu n HapPaBeTe Heo6xoDMITE peMOHTn, ppeDu a r CTapTpupate N da pa-bOTnte OTHOBO C Hero. Heo6xOUMa e He3a6abHa npOBepka, Ako npOdykTbT 3anoUHe d Bn6pnpa Heo6NuayHo.
-ДрькTe eNEKtpOHcTpymeHTa 3a n3OInpahnTe NOBbpxHOCTn Ha pBkoXBaTKaT, KOrato n3BbPbW BATE pa6OTn, npN KOnto CmehemrT NHCTpyMeH T MOnKe Da DOKOCHe cKnTu eNEKtpueeCKn PPOBOH Nc. KOHTaKTbT CnpoBOHnK NoD HAnpeXeHne MoKe Da NoCTaBn NoD HAnpeXeHne CbIo N MeTaHn Yactn OT ypeDa N da DoBeDe Do TKOB ynap.
3a6paHHe e n3noJ3BaHTo Ha npOdykTa no BpeMeHa rpbMOTeBnuHa 6py - OnachOCT OTMbHNn!
-Ппети BCяka ynotpe6a npOBepraBaIte npOdyKta 3a OueBvHn DeΦeKtn, KaTo pa3xIa6eHn, n3HOceHn IIN NOBpeDeH Yuactn.
BknHouTe npOdykTa n eBa cneT OBa ce np6nHexeTe do o6pa6oTBaHn MaepnA.
- He OKa3BaIe TpeKaIeHO CnIeH HATNcK Bbpy NpoDykTa. Octabete npOdykTa Da CbBpIu pa6oTata cn.
- IIO Bpeme Ha pa6oTa BnHaHr DpbXTe npOyKtA 3dpaBO C DBeTe cn pBcE. Ocnypete 6e3onacHO pa3CTOHNHe.
- 1368baTe HnpaBnHa CToIka Ha TAnoto.
- PpOBepTe yIobHaTa No3nua Ha peMbka 3a HocHe, KOrTo yIeChraBa IbPkaHEno Ha npOdyKta.
9.1 Hoxnua 3a XNB nIeT
9.1.1 TexHnKn Ha pЯЗаHe
- Ппебарпелно Изржete De6eJIte KIOHc KIOHOpe3aYka.
-Дугота HOЖОВА ГЕДА NOЗВОЛBA рязАе В ДБETE NOСКИ ИПУPEЗ OCиИнраHE OT eДНАТА КБМ ДPyгета CTпА.
-Пи Верпкално рязан Двикете порукta paBHomeрно HanpeДИДьro06pa3HOroge И Надoly.
Korato noopra3BaTe XOpn3oHTaJIHO, DnBxKeTe npOy- KTa BbB fOpMaTa Ha NOJyMeCeU KbM Kpa Ha XnBnI nnT, Taka Ye OTPraHHe KNoHcyTa Da naHaT ha 3eMra.
3a da nonyuHTe DJIIN n npaBN NHHn, e npenopbTuTeNHO da onbHeTe UHypOBete.
9.1.2 Nopdpa3BaHe Ha XnBn nneTOBe
IpenopbHntelnoeXNBnT nIe Da ce NOpP3Ba B Tpa- neOuHa fOpMa, 3a da ce IpeoTbpaTH OOrBaHeTo Ha doHNte KNOH. ToBA cbOTBeCTBa Ha eCTeCTBeHH paCTeK Ha pacteHnra TnIO3BOJRABa Ha XNBtE IIeTOBe Da ce pa3BnBAT ONTMALHO. Ppi pr3aHETo Ce OTP3BaT cAmo HOBtE eDHOrOduHn JTeOPaCTn, KOEt BOdN Do TbCTo pa3KnOHaBe H Do6pa 3aunTa Ha NUnHOTO npoc- TpaHCTBO.
- Pbpo nopeke Te ctpaHnTe Ha KINBn nnet. 3a ceI Ta DnKte npOdykTa OT DOny HArope No Nocoka Ha pactexka. Ako pekeTe OT rope HADony, NO-TbHKnTe KNOH Ce IpemecTBaT HABbH, KOeTo MOKe Da DOBeDe Do NOBaTa HA TbHK MeCTa INN DynKn.
CneT OBa OTpeKTe rOpHn KpaI npaB, BbBΦopMaTa Ha NOKpNB INN KpbIbn, B 3aBNCIMOCT OT npeINoYHTAHnTa BN.
Iopra3BaIte MlaIte paTeHnI Do JKeHaHaT aOpMa.OchOBHNr Ietopact Tpr6Ba Da oCTaHe HEnOKbTHaT, DOKATO XuBnT PNET He DOCTURHe PNaHpaHaTa BUCOuHa. BCuKN OCTaHaN N3DbHKn Ce pexaT HanoIOBnHa.
9.1.3 NopdpaBaHe B ToHnM oMeHT
-卍pokonnteH nIeT: HnH NOKtombpr
- Irrnoncten nnet: anpunn a bryct
- 6bþ3opacTlIeT: ot Maŋ npɪbɪ. Ha BceKN 6 ceɪMNUI
BHHMABaIte 3aMbTeuINITnUIN BIIeta.Toraba OTIOKeTe NOpra3BaHeTo Ha IIeta INN N3KNIOyTe Ta3N Yact.
9.2 Cnei n3noJ3BaHe
Bunhar n3knHoyBaHT npOdykTa, npEa rO noCTaBHTe, n3yakBaHTe, dOKaTO npOdyKTbT cnpe.
-ИЗbaДeTe aKуМуЛaTOpHаТа 6aTeРиЯ.
- Cnéi BcKa pa60a c npOyKta noCTaBnTe npeDIOCTaBeHnTe 3auNTata Ha HOxA.
- OctaBeTe npOyKTBt Da ce oxlaAn.
10 NocTbaHe
I PENEYNPEXDEHNE
PemOHTHHe pa6OTn np6OTnTe no nOd- dpbKkata, KOTo He ca OnncanB TOBa pbKOBOcTBo 3a yNtpe6a, Tp6Ba Da ce n3BbPWBat OT cneuaHn3npan cepBn3. N3- NOJ3BaIte caMo opuHnHaHn pe3epBn YacTN.
CbueCTByBa onachoct ot 3nononyka! N3BbPWBaIte pa60TN no NOdpbXka nNoYnCTBaHe NO npABINO CbC CBaEN aKymyIaTOp. CbueCTByBa onachoct OT HapaHBAHe!BunrnoctabraTe npOdyKTbT da ce oxJaNnpedn noDPbXka n NouchTbaHe. EneMeHTe Ha DnRaTeNa ca ropeu. CbueCTByBa onachoct OT HapaHBAHe n N3raphe!
PpOdykTbT MoKe Da Ce CTapTnpa HeoayKaBaHo, KoETo Da DOBeDe Do HapaHraBaHn.
-OTCTpaHeteakymyIaTopa.
-OctaBeTe npOdyKta Da n3CTnHe.
- OTepaHete pa6oTHnI INHCTpyMeHT.
1.ИЗчakай Te BCnUKN DBNIXeUN ce YacTN da cnpaT.
2. IpenopbHbame da nouchBaTe npOyKta BeHaRa CJIeD BcRA Ka yNtpe6a.
3. PanaTe DpbKnTe N TexHnTe NOBbpxHOCTCuXn, YnTn n 6e3 MacIO n Ipec. XJb3raBnTe DpbKn N TexHnTe NOBbpxHOCTn He No3BOJRAb T 6e3ONaCha pa60Ta n KOHTpON Ha eNEKtpuYeCKn INHCTpyMeHT B HnpeDbNDeHN CNTyAUIN.
4. Ako e Heo6xOIMO, NoocTe Te DpbKKe Tc BnaKHa KbpNa* Cbc CanyHeHa.
5. B HnkaBcIyaua 3a NoocTbaHe He NotanrTe npOdyKta BbB BOda IIN DpyrN TeuHOCTn.
6. He npbckaTe npoDyKta c Boda.
7. PnDbpxaTe npednaHnte npncoc6JIeHn, BeHTnlaQHOHHte npouen H Kopnyca Ha DBnraTeHa B3MOxHo Hau-NCtN OT npax H 3AmBpcBaHnH. N36bpcBaIte npOdykTA C nCTa Kbpna* nnr To npOdyXbaIte Cbc CrbCTeH B3dyx* NOd HnCKo HAnraHe. IpenOpbYBaMe Da nouchTBeTe npOdykTA BeDHara CneBBCa YNOTpe6a.
8. BeHTnlaCNoHHNte OTBOpN Tp6Ba BnHaHn da ca YNC-
9. He n3noN3BaIte NouchTbaU npenapaTu nn pa3TBOpHTeN; Te 6xMa MOrn Da pa3raDt NactMacOBuTe YAcTu Ha npOdykTa. BHMABAITE 3a ToBa, Da He MoKe Da nonaHHe BOa BB BbTpewHocTTa Ha npoDyKTA.
10.1 Hoxnua 3a XNB nIeT
1.ПоунctBaHTe HOxOBaTa rpeDa c OmacNeHa KbPna CneB BcRAKa yNtpe6a.
2. Hama3BaIte HOKOBaTa rpeDa C MaCNo CJIeD BCRAKa ynoTpe6a, KaTo N3NOJ3BaTe KytTnra TcMaCNo IIN CNpei.
11 Poadpbkka

PPEyPExEHENE
PemOHTHHe pa6OTn npa6OTne no nOdpbXkata, KOtO He ca ONHcAH N TOBa pbKOBODCTBO 3a yNtpe6a, Tp6Ba Da ce n3BbPWBAT OT cNeuaHn3npaH cepBu3. H3-NOJ3BaIte caMo opuHHaHn pe3epBHN qacTN.
CbueCTByBa onachocT ot 3JonoJyka! N3BbPWBaIte pa60TN no NOdpbXka nNoCHTaBe No npABnIO CbC CBaEN aKymJaTOp. CbueCTByBa onachocT OT HapaHBAhe!BHHArOcTabraIte npOdyKTbT da ce OxnaInpedn NOdpbXka nNouchTbaHe. EJeMeHTe Ha DBratela ca ropeu. CbueCTByBa onachocT OT HapaHBAhe nN3rapaHe!
PpOdykTbT MoKe Da Ce CTapTnpa HeoayKaBaHo, Koeto Da DOBeDe Do HapaHraBaHna.
- OtctpaHete akymynaTopa.
-OctaBeTe npOdyKta da n3ctnHe. - Otctpahepe pa60THnHnHCTpyMeHT.
-Ппсдь BCяka ynotpe6a npOBepBaIte npOdykTa 3a oueBnHn DeΦeKtn, KaTo pa3xJa6eHn, n3HOceHn nIN NOBpeDeHn YactN.
-Пюверете калачит e 3aцHTHte yctpoCTBa 3a noBpei n npabuHNo noLoXeHne. CmeHete r, ako e Heo6xoJMo.
Heo6xOIMO epeoBHO,BHIMATEeHNOIOIbPkaHE B n3npaBnOCT,3a da ce rapaHTnpa HNBOTo Ha 6e3onac-HocT HnnpomeHa pa60Ta Ha npOyKta.
-
NocTabeTe npOdykTa Bbpxy paBHa, xOpN3OHTaJHa noBbpxHOCT.
-
He npbckaIte npoDyKta c BOJa.
-OTcbo6paXeHn3aCnpypHOCTnoDMeHnTeu3HoceHNnnNOpeDeHnYactn.
Pa6oTnte, KOTo He ca ONuCaHn B HactoIooTO pkoBOcTBo 3a yNoTppe6a, Tp6Ba Da ce N3BbPWBat cAmOBOTOpuPAH CneuaNn3uPAH cepBn3.
yKa3aHua:
O6cnykTe npdykTa BHIMATEHNo. PpOBepe TaNn DBNXeUHTe Ce yactn cyHKUONHupat 63ynpueHo n He 3aJxDat, daNn HMA CUYneH NnTaka NOBpeHn YacTN, Ye Da HApYsBaT cyHKUONHpaHeTo Ha npOyKTA. NobpeHnTE cactn cJeDbA da 6bDat pemOHnpaHn npedn n3non3BaHTo Ha npOyKTA.
11.1 Hoxuza 3a xNB nIeT
1.Поверete Дали ВИNTOBETe Ha Hoxobata rpeda ca 3aTeHATn.
2. MoxeTe cAmI da n3rIaIte JekTe BdIb6HaTHHn nopeXeIte 3b6n. 3a ceIta n3dbpnaite peXeIte p6oBe c nOMOuTa Ha kambk 3a ToyeHe. Camo octpnpeXeU 3b6n OcNpyraBt Do6pa npOn3BOInTeHHOCT Ha pr3aHe.
3. Tbnte, orbHaTn nn noBpeHn HOXOBn rpeN Tp6Ba Da ce CMeHr.
12 CbXpaHHe N TpaHcnpTupaHe
CbxpaHbAte npOykTa n HerOBuTe npHaIeKHOHa TbMHO, cyxo H3aMpb3BaUo MAcTo, HeOcTbNHO 3a Deua.
OnTmHaTa TemnepaTypa 3a cbXpaHeHne e MeKdy 5^ n 30^
CbxaHbAaTe npOdyKaT BOpHnHaHHaTa My onaKOBka.
PoknTe npdykTa, 3a da ro 3aunntte ot npax nnn Bnara. CbxpaHbAte pkoBOdCTBOTO 3a ynotpe6a npn npodykTa.
12.1 Nodrotobka 3a cxbxpaHeHne
1.ИЗbaTeAkymyNaTOpHaTa6aTePnA.
2. NocTabete BCnK npeDna3Hn Kanaun.
3.ɪnpa³heTepoodykTaHabJIHo.
4.Почиртeteи npobepete npodukta 3a nobpeDn.
12.2 TpaHcnpTnpaHe

PPEyPPEKDEHNE
Onachoct OT HapaHyaBe!
N3BaxdaTe akymylaTopa ot eJektpueckn HhctpyMeHT npedn BCaKaBn pa6To n o eJektpueckn HhCTpyMeHT (HaNP. NOdPbXka, CmHa Ha HhCTpyMeHT n T.H.), KaKTo n npn HerOBOTO TpaHCNoPTnpaHe n CbXpa-HeHne. Pn HeBOJHO 3aDeIcTBaHe Ha npeBkIOuBaTeJIa 3a BkJIIOUBAHe/IN3KJIIOUBAHe CbIeCTByBa ONaCHOCT O HapaHbaHe.
- PpOdyKtBt MoKe Da ce TpaHcNOpTnpa CaMo C NOMOuTa Ha npEeBnDHeHaTa 3a Ta3n Uen pBkoXBaTKa.
- NocTaBte BCnUKN ppeNa3HN Kanaun.
3a da npdeoTbpaTne nobpeu n HapaHbAHn, npu TpaHCnpOpTnpaHe B aBtOMobJIn oBe3onacete npodyKta cpeuy npoe6pbuahe n noxJb3Bahe.
13 Pemontи почka ha pe3epBHu actn
Tp6Ba da ce ima npedBn, ye cneHnTe yactn Ha To3n npOyKT ca o6ekt Ha n3HocBaHe nopadn n3HocBaHe nn Ha eCTeCTBeHO n3HocBaHe, pecn. cJeHNTe Yactn ca Heo6xOdIMn KaTO KOHCymatNB.
BHIMAHNE
CbIaCHO 3aKoHa 3a OTROBOPHOCTTa 3a npOdyKTnTe He ce HOCN OTROBOPHOCT 3a ueTN npuHHeH ON He npaBnJenpemOH Nn HEn3No3BaHe Ha opunHaHn pe3epBHN qactn.
O6aTe ce B cepBn3eH cHTbp nnn Ha OToPn3npaCneuaJIncT. CbIooTO BaKn 3a akcecoapnte.
Pe3epBHTe yactn n akcecoapnte ce npedlarat B haunie cepBn3en uehbp. 3a cenTa ckaHnpaTe QR kOda Ha 3a- rnaBHata CTpaHua.
13.1 NopbUbaHe Ha pe3epBn qactn
Pn npbUbahe Ha pe3epBn qactn Tp6Ba da ce noco- yat cneHnTE daHHN:
- 0603NaueHne Ha MoDela
- ApTnKynH Hoomep
JaHHHa TnOBaTa Ta6eNka
Pe3epBn yactn / npHnaJeXHOCTN
| Актулатор SBP2.0,(apтikuken №:7909)201708 | |
| Актулатор SBP4.0,(apтikuken №:7909)201709 | |
| Зарадно устристwo SBC2.4A,(apтikuken №: | 7909201710 |
| Зарадно устристwo SBC4.5A,(apтikuken №: | 7909201711 |
| Зарадно устристwo SDBC2.4A,(apтikuken №: | 7909201712 |
| Зарадно устристwo SDBC4.5A,(apтikuken №: | 7909201713 |
| Компльekt за статуше SBSK2.0,ap- тikuken №: | 7909201720 |
| Компльekt за статуше SBSK4.0,ap- тikuken №: | 7909201721 |
14 N3xBbPnaHe npeuzknpahe
Yka3aHn 3a onakOBkata

OnakOBbHnTe MaTePnaJn ca peuKnnpyEm. MoJ, nXbPnTe onakOBkata no npnpOdo6pa3eH haHH.
Yka3aHn 3a3aKaHa 3a eNeKtpnueckoTo n eNeKtpoHHoTo o6OpyDbAhe (ElektroG)

CTapoto eIeKtpnuecko n eIeKtpoHNO o6OpyDbaHe He Tp86Ba Da ce n3xBbpna 3aedHO C6ntOBtte OTnadbuc, a Tp86Ba Da ce c6bnpa n n3XBpna pa3dEnHo!
CTapnte 6aTeepn n akymlaTopn, KOnto He ca Hne NOBmKHO MOHTnpaHn B CTaprr ypei, Tpr6Ba da 6bDaT n3BaDeHn npEi npedabaHe 6e3 da ce pa3pyaBat! TxHtO n3XbPnIe e pernaentupaHo ot 3aKaHa 3a 6aTeepnte n akymlaTopnte.
CobTeHnTe,pecn. non3BaTeIInTe Ha eNeKtpuecko n eNeKtpoHNo o6OpUdBaHe ca 3aKOHOBO 3aDJIKeHN da rN BbPHaT cneI ynoTppe6a.
KpaHnI rntpe6nte e oTROBOpEn 3a n3TpNBaHeTo Ha NnHInTe My daHHN OT cTapna ypei, KOHTo Tp8Ba Da 6bJe u3XbPneH!
CIMBOJbT Ha 3aepKHaTa KoFa Ha KOIeNa O3Haayaba, ye OTnabuTE OT eNEKtpueckOTO n eNEKtpoHHOTO 6OpuyBaHe He Tp8Ba Da ce NxBbPnT 3aEDHO C 6HTOBtE OTnabuN.
- EneKtpnueckoto n eNeKtpoHHOTo o6OpyDbaHe MoKe Da ce npedaba 6e3nlaTHO Ha cneHHTe MeCTa:
-ny6JnUHn c6bnpaTeHN nyHKTOBE (HaNPmep DBOPOBE Ha 06uHcN crpaDn)
- Mara3HH 3a npoJax6ha Ha eJekTPOHH ypeHn (ФИЗЧЕСКИ OПЛАн), npn yCNoBne Ye TbproBcHTe ca IINbXHN Da rN B3emAT O6paTHO nIIN npednarat TOBa B3emaHe Do6pOBONHO.
-MoKeTe Da npedaeTe Do TpN CTapn eNeKtpnueckn ypeDa OT BCEKN TINypeD C MaKcHmHaNbJxHa Ha p6a OT 25caHTumetpa 6e3 Da KnyBaTe HOB ypeD OT npOn3BOInTeJ, INN Da nnpedeTBe Bpyr OToPn3npan Cb6nPateJen NyHKTBBB Baun paOH.
-3a donbJIHHTeJIHHTe ycIobn 3a BpbUaHe Ha npOn3BOIDTeJIN nDnCTpN6TyOpn Ce o6bpHeTe KbM CBoTBeTHnueHTbp 3a O6cnyKBAHe Ha KInEHTn.
Ako HOBnT eNeKtpueckn ypeI ce doCTaB OTo pOn3BODInTeJI Ha YAcTHO DOMAKHCTBO, ToM MoKe Da OpraHn3npa 6e3nlaTHo N3BO3BaHe Ha CTapN EneKtpueckn ypeI npi NOnCKBaHe OT KpaHn4 Notpe6nteJ. 3a cEITa ce CbPjXeTe COTdela 3a ObcLykBaHe Ha KJIneHTn Ha POn3BODInTeJI.
ToBa ce OTHacr cAmo 3a ypeDInTe, KOInTo ce HnHCTaJIpaT n npOdaBAT B EbponeNcKnCsbIO3 n ca npEmdet Ha ebponeckata DnpeKtnBa 2012/19/EC. B ctpaHn3BbH Ebponeckra CbIO3 MORat Da ce npNJarat pa3JINH pa3npoe6n 3a N3XBpIyHe Ha OTnaDbUIne OT eJeKtpnuecko n eJeKtpoHNO obOpyDahe.
Yka3aHn 3a NHTneBO-IOHHTe aKymlaTopn6aTePnn

I3BaTe aKymNaTopHaTa 6aTePn IpeN da n3XbPnTe ypeA!
He n3xBpIyTe akyMylatopHaTa 6aTepeN B 6ntOBnTe OTnAbzU, B ObH (onacHOCT OT EKcnIO3n) NnBb BOda. IobpeHnte akyMylatopHn 6aTeepn MoRat Da HABpeJrT Ha OKoHnHa T cpea n BaWeTo 3dpaBe, aKO n3nyCKaT TOKCUnHn 3napeHn nn TeuHOCTn.
- DepeKTHnTe nnnn3non3BaHnTe aKymyNaTOpHN 6aTePnn Tp86Ba da ce peuNKnnpa Cbrrncho DnpeKTnBa 2006/66/EO.
- PpeaTe ypea n 3apdHTo yctpoCTBO B nyHKT 3a peuKnipane. N3noN3BaHnTe pnaCTMaCOBn mMetanH Yuactn Moat da 6bDat cOpTuPAHn peuKnipapAHn.
- IV3xBbPnIte akymyNatOpHnTe 6aTePNB IN3TOeHO cBCTOAHne. IpenOpbYBaMe da NOKpneTe NOIOcHTe CbC 3aENBaUa JeHTa, 3a Da n PpeDna3nte OT KbcO cBeDuHeHne. He OTBapraTe akymyNatOpHata 6aTePnI.
-3xBbPnIe akymlyaTopHnTe 6aTePN cbrnacHO MeCTHnTe pa3npoe6n. PpeaTe akymlyaTopHnTe 6aTePN B nyKt 3a cb6upane Ha OTnaDbuN OT 6aTePN, KbTeTO ue 6bDat peuNKnpaHn No eKOJOnuHn Haun. IOnNTaHTe MeCTHata KOMNaHn 3a IOTnIn3nPaHe Ha OTnaDbuNte.
15 OTeTpaHЯBaHe Ha Hen3npaBHOCTN
Hn3npabHocBb3MOxHa npuHa OTrpaHBAHe
| Проблемы не моче настура. | Проблемы не моче настура. Акymу latоров浊е и постаме в постура Вилно. | Зараздente akymу latора. |
| Пльзные akymу latора в постаме в постура Му latор. Akymу latорьш! Чебец! Я'mя с'tо)! | ||
| Helen III ppabnoc T Bb3moXHa npuHnHa OToTpaHbAbe | ||
| П repн e ce к b m haWaTa cepBn3Ha cnyk6a. | ||
| ДиогаTeЯ r e nobpeDen. | ||
| П рodyкт bT pa60t c npe-КьсВаня. | Ра3хla6eн Вьт repeшen kOHTaKr.T.ОБь | п rece ce к b m haWaTa cepBn3Ha cnyk6a. |
| Дeфektener prpeBknOchBaTeI 3aВКlIOUBAHe/ИЗКlIOUBAHe. | ||
| HoxOBaTa rpeDa e 3aTbNeHa/. ПрOB | Ерete HOxOBaTa rpeDa, NaTOChTeЯ ипce oБьреТе к b m haWnI cepBn3eN OTdEN. | |
| Тьрд e roJЯMo trPte He nopadi linPca Ha cMa3BaHe. | Смжete HOxOBaTa rpeDa. | |
| ЗамьрсeHa HOxOBa rpeDa. ПOniCteTe HoxOBaTa rpeDa. | ||
| Лошa ТeХNiKa Ha pR3aHe. Спa3BaYte | ЕнctpyKuzInTe 3a pa60ta. | |
| HoxOBaTa rpeDa ce harpBa. | HoxOBaTa rpeDa e 3aTbNeHa/. ПрOB | Ерete HOxOBaTa rpeDa, NaTOChTeя ипce oБьреТe к b m haWnI cepBn3eN OTdEN. |
| HoxOBaTa rpeDa Иma BdIb6HaTn-Hn. | ||
| Тьрд e roJЯMo trPte He nopadi linPca Ha cMa3BaHe. | Смжete HOxOBaTa rpeDa. | |
16 rapaunnoHHn ycNoBna - cepna Scheppach 20V IXES
DataHaHImeHeHne25.04.2024r.
Ybaxaemn KJineHTn,
IpoDyKTte Hc o6eKHa cTpor KOHTpOHa KaueCTBO-TO.AKO BbPekn TOBa ce Cnyu Taka,Ye To3n IpoDyKT da He fynkunOpupa 6e3ynpeuHo, n3Ka3BaMe cbXaJIeHne 3a TOBa N Bu MoJIM Da ce O6bPheTe KbM Ha7aTa cepBn3Ha cny6Ba Ha NoocHeHn NO-dony aDpec. C ydoBoNCTBne Cme Ha BaWe pa3noNoXeHne n Ha cepBn3Hn Hn TepeHohome. CneHata INHcpOpMaunr HmA 3a ueI da BN NOMorHe Da o6pa6OTte N ypeDuTe NcKa cn 6e3npo-6JemHo.
3a npedraBaHe Ha rapaHnOHn npeTeHn Baxn cIeHTo:
-
Te3n rapaHcnoHH yCNoBna perynnap HauHnte noTbHNHTENr rapaHcnoHH ycnyr Ha npou3BOJNTe 3a KyNyBaun (yactHn KpaHn NoTppe6nteH) HA HOBn npOdyKTn. 3aKoHOBnTe rapaHcnoHH npaba He ce 3acraT ot Ta3n rapaHcnu. Toba e OTROBOPHOCT Ha TbpRoBeca,OT KOROTO CTe 3akynnn npOdykTa.
-
RapaHcHOnHHa YcNyHa npOH3BOIDTeJI NOKpINBa cAmo NOBpeHn Ha 3akynen OT Bac HOB npOdyKT, KOIT Oce DbJxKAT Ha DeEeKT Ha MaTePnAna Hn IpON3BOCTBeH DeEeKT. Ako No BpeMe Ha rapaHcHOnHHn nepuOD Bb3HNKHAT DeEeKTHn Ha MaTePnAna Hn IpON3BOCDTBeHn DeEeKTHn, IpON3BOIDTeJI R KaueCTBOTo CN Ha rapaHT Tp86Ba Da npEOCTABN EHa OT CNEHNTE YcLyHn NO CBOH N36Op B pAMKITE Ha Ta3N rapaHcHn:
-
6e3nnaTeH peMOHT Ha CTOKata
-6e3nnaHa 3aMaHa Ha cTOKaTa C apTnKyI Ha cbUata CTOnHOCT (ako e Heo6xOIMo, CbIo N 3aMaHa C NOcneBaMu MoJe, Ako OpiuHaHHaTaCTOKa BeYe He e HauNuHa).
3aMeHeHte npOyKtn nIu qactn CTaBt Hawa co6CTBeHOCT. MoJI, o6bPheTe BHMMaHne, Ye HaUNTE npOyKtn He ca KOHcTpyuPAHN CnpEHa3HaueHne 3a TbproBcKa, 3aHaarTuMckA IIN npOpceNoHaJHa ynoTppe6a.CneIOBaTeJIHO rapaHcNOHHata npTeHnra He e BaJIuHa, aKO npOyKtBT e 6bn n3noJ3BaH B Tbp
ROBCKN,3aHaTcHcKn INI pOMMJIeHn PpeIprnTINBaPMKIne Ha rapaHcNoHHnepnoD nIN e 6NJNOJIOXKeH Na paBHocToHn Ho HtOBapBaHe.
3. HauHTe rapaHcNoHH yCNOBn He BKIOuBaT cJeHNHea:
IIOBpeDi Ha npOyKTA, npuHHeH OTe HecNa3BaHe Ha IHCTpyKUnITE 3a MOHTax, HEnpABUNeH MOHTax, HecnA3BaHe Ha IHCTpyKUnITE 3a EKCnloaTaUa (HaNP. Cbbp3BaHe KbM HEnpABUNo MpeXOBO HanpeXeHne Nn Bn TOK), pecn. npabNJata 3a NOdpbXkKa n 6e30anachocT, nNn OT n3NO3BaHe Ha npOyKTA npn HeNoDxOJa uCNoBna HA OKoJHata CpeDa, KaKTo n OT HeNoDxOJa u TpXKn n NOdpbXkKa.
-Поврени на пордукта,причiniен OT He npabunHa ynoTpe6a Иин He npabunHo npinoxkehene (HaNPIMep npeTOBapBaHe Ha npodykta Иин И3NoI3BaHe Ha HeoOobpeHn INCTpyMeHTn IINДОbIHNTeHnnpHaIJIeXHocTn),понИКВаHе HaЧУждТeЯВ pOdykTa (HAnpimepЯсьK,KaMbHnИnpax),пов徴п ри ТраHCNOpTIpaHne,ИЗПON3Ba-He Ha cnla Иин Вьнши ВьзdeIcTBnY (HAnpimep nobpeDi,причiniENOT naDAhe).
- NOBpeHn npOdykTa nHn Ha yAcTn OT Hero, KOnTO Ce IbJxKAT Ha HopMaIHO, ObUyauHo (ekCnIooaTaunOHo) nIN dpyro eCTeCTBeHO u3HOCBaHe, KaKTo n HA NOBpeHn/nn amOpTu3aunr Ha 6bpoun3-HOCBaUNTE ce YAcTn.
IobpeHn Ha npOyKa, npuHHeHn OT n3NoJ3BaHHeTo Ha DonbJIHHTeJIHn PpHaJNeXKHOCTN, DOnbJIHNTeJIHn YAcTn IIN pe3epBn YAcTn, KOtO He caOpHHaHn YAcTn INn He ca n3NoJ3BaHn No npedHa3HaueHne.
- IpoodykTN, KOINTO ca 6nIN npomeHeH nIN MoNΦuipaHn.
He3haHTeHHN OTKIOHEHn OTO HOpMaJIHOTOCbCTOHHne, KOITo He Ca OT 3HaueHne 3a CToHOCTTa N3NoJ3BaEMOCTTa Ha npOdykTa.
- PpOdykTN, Ha KOnTo ca 6nIu n3BbPseHn Hepa3peWeHn peMOHTn nn NoppaBKn, no-CneuaNHOOT HeyNbJHHomOSeHa TpTa CTpaHa.
-Ako MapknpoBkata Bbpy npOyKta nI INeHTnΦKaUHOHHaTnHOpMaun3a npOyKta (CTNKePHa MaUNHATA) NINCBAT nIc HHeETnBn.
- PpOdyKTH, KOHTO Ca CINHO 3aMbpeHN I nopAIT TOBa CE OXTBbPnT OT cepBn3Hn NepcoHaN.
-IVCKOBeTe 3a o6e3uTeEHn n OocneBaun uetn NO pInHcN Ca n3KnUoyehn OT Ta3n rapaHun.
-
RapaHcHOnHnT cPOK 6bKHOBeHo e 5 roHN (12 Meceua 3a 6aTePmTe/AkyMylNaTOPHnTe 6aTePN) n 3anoYBa Da Teue OT dataHa 3akynyBaHe Ha npOdyKta. PeWabaAe e dataHa opunHnHaHnTa KacOBa 6eJexKa 3a Nokynka. RapaHcHOnHnTe npTeHcHn Tp8Ba Da ce npedBraBat He3abABHO CneD y3Haba- Hto Nm. YBaXbaAe Ha rapaHcHOnHn npTeHcHn CneD n3TuHahe Ha rapaHcHOnHHn CpOK e n3KnUoyeho. PemOHbT Nn NIOMaHnTA Ha npOdyKTA He BDO HnTO Do ydbNkBaAe Ha rapaHcHOnHHn CpOK, HTO Do CTAPtnpaHe Ha HO rapaHcHOnHeh CpOK 3a npOdyKta Nn 3a KaBnTo N da e BpAdEHN pe3epBHN qactn noPapn To3npeMOHT. CbIOTo Baxn n npn 3no3BaHe Ha cepBN3 Ha MCTO. PpeBraBaHTo Ha nck No raPahuia PpeINocTabr PON3BOITeRAT, KATO papaHT, Da nma Bb3MOxHOCT, NO HerOBO nCKaHE, Da pa3rJe da rapaHcHOnHHn Cnyauqye3 noyuaBaHe Ha cTOKATA. Baxho e da ce rapaHTnpa, ye uetne no BpeMe Ha TPAHCNOPTnape He 6bDat n36erHnat ype3 n3no3BAHe Ha ndoXODya OnakOBKa. 3aceHaTnT npOdyKT Tp8Ba Da 6bde noocten H bvpnat B cepBn3Hna CEHTbp 3aeDHO C KOJIe OT KACOBATA 6eJExKa 3a noKynka, KOAYTO Tp8Ba Da cbDbpxKa DaTATA Ha noKynkTa N mEto Ha npOdyKTA. Ako npOdyKbT e n3npaTeH B HeBLeHN BND, 6e3 nbHNs OBxBat HA DOCTABKATA, INCBaUnTE DOnbInHeTN PPNAHn PpNHaN E Oe 6bDat kpeHTnpaHN/npCnADHATn B cTOnHOCTHO n3PaxHne, Ako npOdyKbT 6bDe 3amehen nn Bb3ctAHOBena cymata. UactNuHO nn HantbnHO pa3rIo6EHn npOdyKTH He Morat da 6bDat npNeTI Kato rapaHcHOnHHn PteTeHcn. Ako peKlAmauqraT e HeOC-HOBATEHA Nn INBbH rapaHcHOnHHn CpOK, KynBaYbT NO npNCHIN POEMA TPAHCNOPTnHe PAxOHN TPAHCNOPTnue Pnck. MoN, cbO6uete npEdBapuTEHNo 3a rapaHcHOnHH npeTeHcn B cepBn3HNu CEHTbp (BVXtne no-dony). IOp naJIO e DorobopeHO DepeKTHnT npOdyKT, C KpatKO ONncAHne Ha noBpeDA, da 6bde n3npaTeH ype3 oprAn3npaHO Bpb- uane - B cnuyai Ha pEmOH n3BbN rapaHcHOnHN HnepeoD-c DOCTaBuHa Cyma 3a nouehckn pa3XoDN, KATO CE cna3BAT CBOTBEHTNE YkazAHNA 3a onaKOBaHe N n3npaAnaHe, Ha cepBn3HN aDPEC, nocouen No-dony. MoN, ImaiTe npEDBnD, ye ot cbO6paXeHHN 3a 6e3onachocT, BAwnr TPOdyKT (B 3aBNCIMOCT OT MODEla) ue 6bDe BBpHaT 6e3 BCNUKN EKCIIIOatauONHH MaTePnaJN. IpOdyKTbT, n3npaTeH Do hawin cepBn3EN CEHTbp, Tpy6Ba Da 6bde ONAKOBAH No TaKB HauHH, Ye da Ce n36erHe NobpeDa Ha peKlAmupanHy npOdyKT no BpeMe Ha TPAHCNOPTnPaHE To My. CneI Kato pEmOHbT/3amraHata 6bDe n3BbPseHa, Hne ue BN n3npaTM npOdyKTA opaTHo 6e3NJAtHO. Ako npOdyKtNE He Morat DA 6bDat noPpABEH Nnn 3ameHen, No hawa npeeHKa MoKe da 6bDe BV3CTaHOBeHa napuHa cyMa B pa3meP do NOkynhata ZeHa Ha depeKTHnnpOdyKT, KAto CE BzEMat npEDBnD BCNUKN ydpBXKKN 3a n3HOCBaHe. Tezri rapaHcHOnHH yCLOBNA Baxat camo 3a IIpBoHOaJAN Hnia YACTEN KUYBaay H He MORAT DA 6bDat npoeOTCTbnBAHN NNI PPEXBpLHN.
-
YdIbIxkBaHe Ha rapaHcunOHn cpoK do 10 roHn: Scheppach npednara donbHntenHo ydbIxkaBaHe Ha rapaHcunTa ot 5 roHn 3a npodyKTn OT cepnTa Scheppach 20V. CneObaTeHNO rapaHcUNOHnRT cpoK 3a Te3n npodyKTn e o6to 10 roHn. N3KnIOyeHne npABT 6atepHTe/akymnatOPHTe 6atePn, 3apdHnTE yCTPOJCTBA u DonbHNHTeHnTE npHaJNEXKHOCTn. MoKeTe da ce Bb3no3BATEOT TOBa yDbIxkaBaHe Ha rapaHcunTA, kato perncTpnpate BAaHn npOyKT Scheppach ot Ta3n rama OHnaHn HA aDpec https://Garantie.scheppach.com He no-KbCHO ot 30 dHn ot DaTATA Ha 3akynBaHe. CneD ycneuHa OHnaHr pErncTpaUe Ie ONyHTe NOTBbPXDHeNe 3a yDbIxkBaHe Ha rapaHcunTa, CBbp3aHa c apTKyJa.
-
3a da npedBnTe rapaHcnoHna npetehn, Cbbp-KeTe ce c Haun cepBu3eH ueHTbp.
3a npednoHTane e da n3noJ3BaTe haunn oopMyIrp Ha hauata HaayJaHa CtpaHua: https://www.scheppach.com/de/service
Moi, He Hn n3npaauTe HnkaKb npOdykTn, 6e3 nbpBO Da ce CBpXeTe C Hac N da Ce perncTpupaTe B haun cepBn3eH ueHTbp.
3a da npedBnTe rapaHcnoHHa npetehnra, 3a-DbJXnTEJIHO n3NCKBaHe e nbpBOHaayHnRT KOHTaKT C Haunr cepBn3e HcHTbp. RapaHcnoHHnTe npetehn Tpr6Ba Da 6bDat npedBeHN B paMKnTe Ha 14 dHn OT OKPBAHeTo Ha depeKta npdN n3TNuHaHTo Ha rapaHcnoHnna nepoD. 3a Ta3n cen Ce n3NCKBa opnHaHnTa Kacoba 6eJexka 3a NOKyNk a, Ako e npNJoxMIO, NOBbPjKeHne 3a yDblXkBaHe Ha rapaHcyTA, CBbp3aHa C npOdyKaT.
7.Bpeme Ha o6pa6oTKa - IIO npabnlo o6pa6oTBame npatkn C peKnaMaunn B pamKeTe ha 14 dHn OT NOLy- yBaHeTO IM B Hauin CepBn3eH cHTbp. Ako B n3- KIOUHTeHN CJIyauN NOCOueHnT CpOK 3a o6pa6oTKa 6bJe HAdBnWeH, Hne Ue BN INHOpMnpe CBOEBpeMeHHO.
8.БьрзонзHOCBaunTe ce qactn no npHHun ca n3-KIIOueHn OT rapaHunra! -БьрзонзHocBaunCe qactn ca: a)doCTaBeHnTe, pnpKpeHn n/nn MOHTn-paHn 6aTePn/AkymyNatOpHn 6aTePn, KaKTo n 6) BCNUKN 3aBNCmN OT MOneNa 6bPcOn3HocBaunCe qactn (BKnIOuHTeJIHO pEmbU, peXeUdNCKObe, pa-60THN INCHTpymEnTn, UINΦOBuHN DnCKObe, fNITpn, BByIepoDn HcETKn T.H., BIXTe INCHCTpyKUnTe 3a ekCnNoatau).FapAHunrTa He NOKpInBa 6aTePn nn AkymyNatOpHn 6aTePn, KOnTO caNbIb6Oko pa3peDeHn, pecn. C nobpeDen KOpnyc nJIn KJIemN.
9. OueHka Ha pa3xOuInTe - IpoDyKTInTe, KOnto He ce nokpmbat uHn Beue He ce NOKPmbat OT rapaHcunra, ue 6bDat pemOHtnpaHn Cpeu7 3annauane. Ako noNCKate ot HauHn cepBn3eH cHTbp, MoKte Da n3- npaTne DeΦeKTHIne npOdyTKu 3a ouEHa pa3xoDInTe n, aKO e Heo6XoHMo, da daTe NmCmHo pa3peWeHne Ha cepBn3Hnue cHTbp 3a peMOHT (no NoUata, nMei). Hma Da ce n3BbPwBa no-HaTaTbSha o6pa60ka 6e3 Oo6peHne 3a peMOHT.
「rapaunohnte ycnobna Baxat cmoB Tekyuata BepcnKaBM MOMeHTa Ha peknamaunraTn MOrat da 6bdaT HamepeHn Ha Hauata NaHcTa nHaHnca (www.scheppach.com).Pnp npbeOndte Hemckata BepCnBaBHArE C npedmCTBO.
Scheppach GmbH · Günzburger Str. 69 · 89335 Ichenhausen (Германь)
Tepepon: +800 4002 4002 - Mei: customerservice.BG@scheppach.com - HntepHeT: https://www.scheppach.com
3ana3bame cn npaboto Ha npomeHn Ha hactoIte rapaunonHH yCIOBnno BcKO Bpeme 6e3 npedn3BecTne.
17 EC Декларачnia 3a CbOTBETCTBnE
IpeBOD Ha opnHaJHaTa deKnapaun Ha CbotBTCTBne
Pon3BODntel:
Simon Schunk
Division Manager Product Center
Andreas Pecher
Head of Project Management
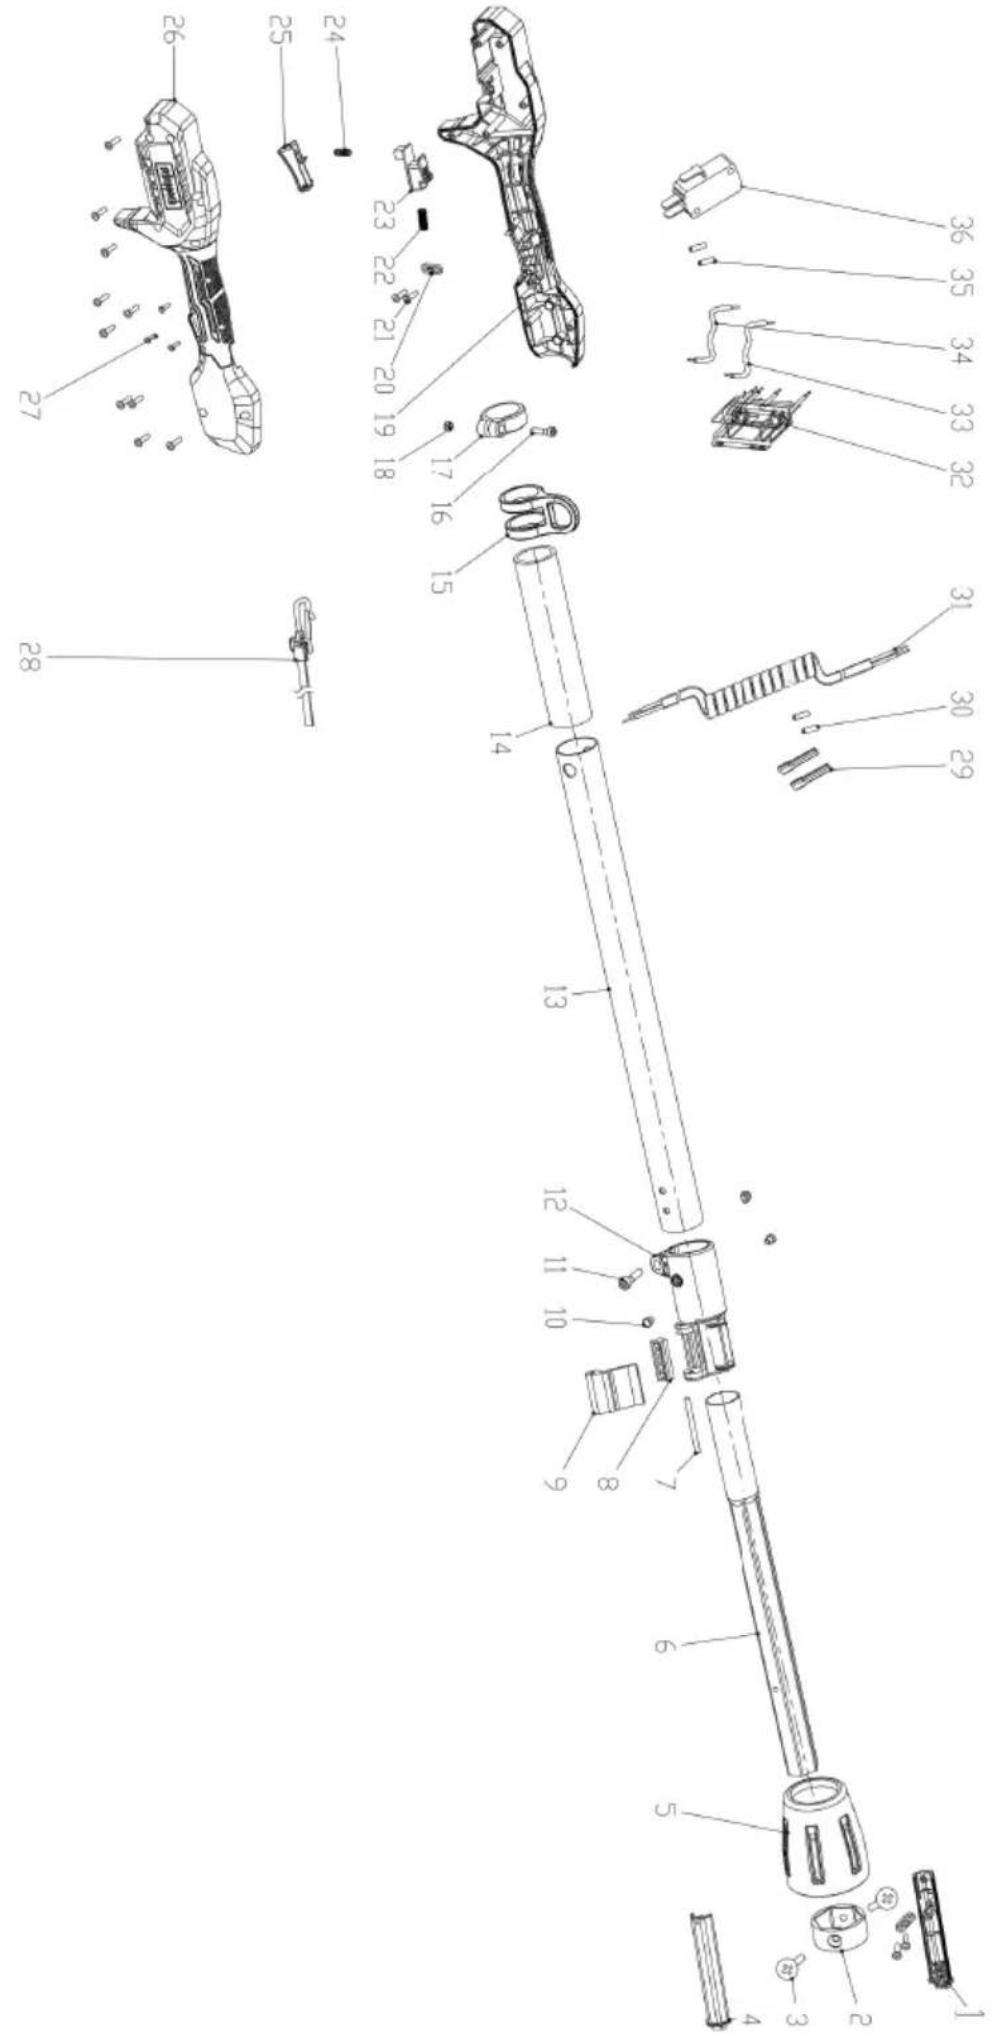
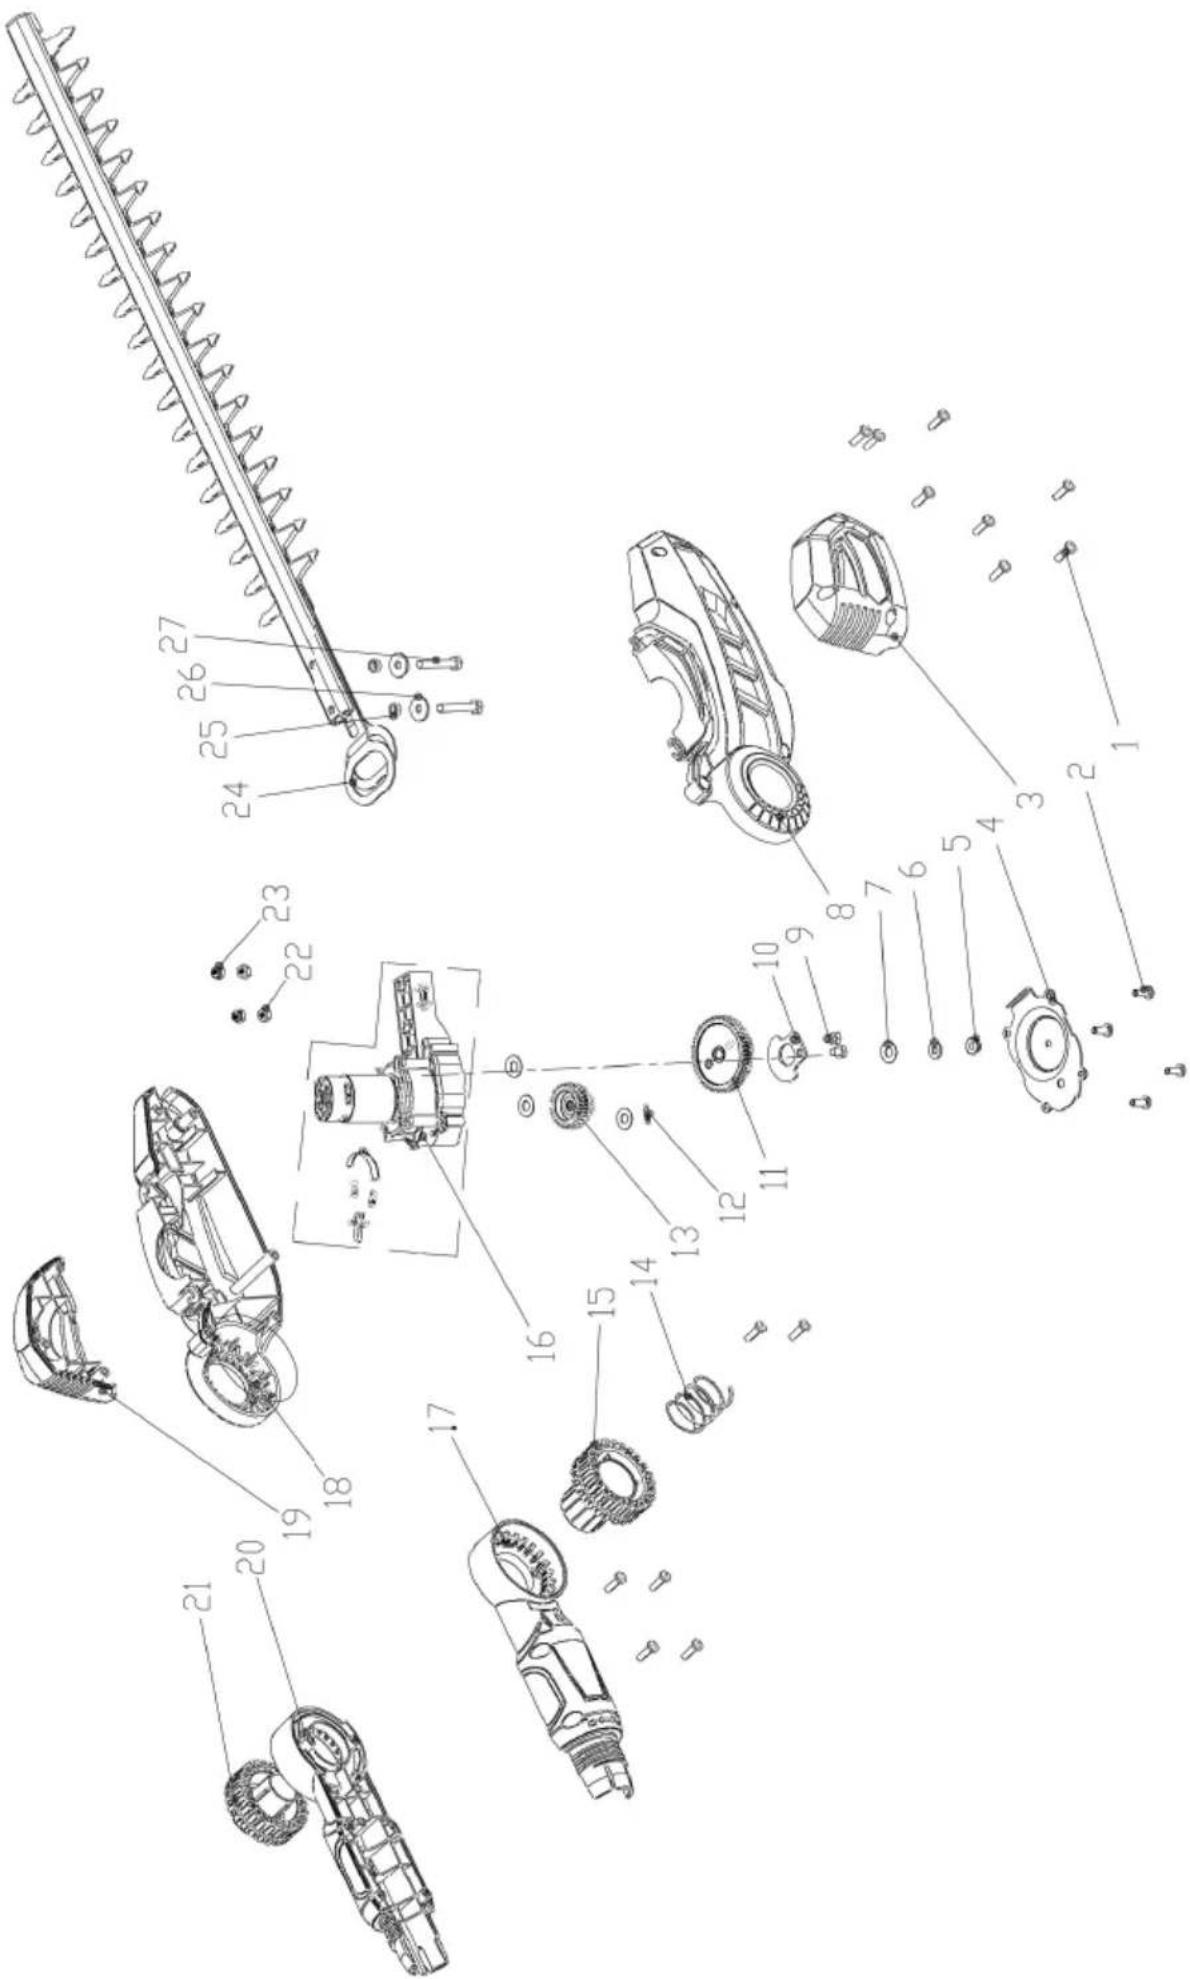
CE
SCHEPPACH GMBH
Günzburger Str. 69
D-89335 Ichenhausen

Stand der Informationen · Status of the information · Version des informations · Versione delle informazioni · Stand van de informatie
Información disponible · Versão das informações · Stav informaci · Stav informáci · Az informáciok kete · Stan informaci · Verzija informaci · Stanje informacij · Informatsooni.SEIS · Informacijas stavoklis · Informacijos data · Informationens status · Tietojen tila
Informationsstatus · Status for informasjon · Noclendha peaknHa nHfopmaunrTa
Update: 06/2024 · Ident.-No.: 5910608900
- Table of contents
- Explanation of the symbols on the product
- Product description (Fig. 1-9)
- Scope of delivery (Fig. 1)
- Item Quantity Designation
- Proper use
- Explanation of the signal words in the operating manual
- DANGER
- WARNING
- CAUTION
- ATTENTION
- Safety instructions
- 1) Work area safety
- 2) Electrical safety
- 3) Personal safety
- 4) Power tool use and care
- 5) Battery tool use and care
- 6) Service
- General safety instructions
- Safety instructions for hedge trimmers
- Pole hedge trimmer safety warnings
- Additional safety instructions
- Residual risks
- Technical data
- Noise and vibration
- Noise data
- Vibration parameters
- Unpacking
- Before commissioning
- Danger of injury!
- Fitting the tool attachment (11) onto the telescopic tube (7) (Fig. 2-4)
- Adjusting the telescopic handle height (Fig. 1)
- Adjusting the cutting angle (Fig. 1, 9)
- Fitting the shoulder strap (14) (Fig. 5, 6)
- Inserting/removing the battery (16) into/from the battery mount (3) (Fig. 7)
- Inserting the battery
- Removing the battery
- Operation
- TENTION
- Electric shock and damage to the product possible!
- Switching the product on/off and operating it (Fig. 1, 8)
- Danger of injury due to kickback!
- Notes:
- Switching on
- Note:
- Switching off
- Overload protection
- Working instructions
- Hedge trimmer
- Cutting techniques
- Pruned hedges
- Cut at the right time
- After use
- Cleaning
- Hedge trimmer
- Maintenance
- Hedge trimmer
- Storage and transport
- Preparation for storage
- Transport
- Repair & ordering spare parts
- Ordering spare parts
- Disposal and recycling
- Notes for packaging
- Notes on lithium-ion batteries
- Troubleshooting
- Warranty conditions - Scheppach 20V IXES series
- Dear customer,
- For the assertion of warranty claims, the following applies:
- EU Declaration of Conformity
- Sommaire
- Indices
- Inhoudsopgave
- Obsah
- Vysvetlenie symbolov na vyrobku
- Pokyny k litiovo-ionovym akumulatorom
- Demontujte akumulátor pred likvidáciou pristroja!
- Tartalomjegyzek
- Spis tresci
- Popis sadrzaja
- Objašnjenje symbola na proizvodu
- Opis proizvoda (sl. 1-9)
- Kazalo
- Razlaga simbolov na izdelku
- Sisukord
- Satura raditājs
- Turinys
- Sisallysluettelo
- Indholdsfortegnelse
- Innholdsfortegnelse
- CbDbpxKaHne
- O6aCHeHne Ha cIMBOJnTe Bbpxy npoDyKta
- OnscaHne Ha npOdykTa (PnR. 1- 9)
- O6em Ha doctabkata (Фиг. 1)
- P03.БpoHHaMHeOBaHne
- YnOTope6a no npEHa3HaueHne
- O6aChenHe Ha CnHnHnTe Dymn B pKOBODCTBOTO 3a yNoTpe6a
- ONACHOCT
- PPEyPExKDeHne
- БЛАГОРАЗУМЕ
- BHIMAHNE
- Yuka3aHnna 3a 6e3oNaCHOCT
- 1)БezonachocHT ha pa60THOTo MrcTo
- 2) Be3onacnoct npa6ota c enektpnueckn TOK
- 3) Be3onacHOCT Ha xopaTa
- 4) Ynotpe6a n 6opabene c eIeKtpnueckn IHCTpyMeHT
- 5) YnOTope6a n 6opabene c akymyIaTOPHnI NHCTpyMeHT
- 6) CepBn3
- 06и уka3aHnna 3a 6e3onacnoct
- Yka3aHnna 3a 6e3oNaChocT 3a HOXnU 3a XNB PJIeT
- Yka3aHn 3a 6e3oNaCHOCT 3a HOKn 3a XNB PJIET C yDbJXKeH O6XBaT
- pyru yka3aHHa 3a 6e3onacHocT
- OcTaTbUHn pUncKOBe
- BHIMAHHE
- Uymn Bn6paun
- XapakTepeNCTKn Ha yMa
- Napametpn Ha Bn6paunnte
- Pa3onaKoBaHe
- PPEyPExEHHNE
- Ipeeni nuck B eKcnIooatauia
- Onachoct OT HapaHbaHe!
- PPEyPPEKDEHNE
- MoHTpaIte pa6OTeH nHcTpymeT (11) Bbpxy TeNeckoNnHaTa Tp6a (7) (ФИг.2-4)
- PerynnpaHe Ha BncoOnHaTa Ha TeleckonNuHaTa Tpb6a (fnr.1)
- Perynilpae Ha bIbJa Ha pIaHe (fnr. 1, 9)
- NocTaBeTe paMeHHnpeMbK (14) (ФИR.5,6)
- I PENEYNPEXKDEHNE
- NocTaBHe/u3BaJdAne Ha akymyIaTopa (16) B/ot npneMHOTo rHe3do 3a akymyIaTop (3) (Φnr. 7)
- BJIAGOPA3yMNE
- H3noJ3BaTe aKymyataTopa
- I3BaXdaHe Ha akymyNaTopHaTa 6aTepe
- YnpaBJIeHne
- I PEPdUYPEXDEHNE
- I PENEYPEXDEHNE
- Bb3MOxHn ca TOKOB yIap n nobpeHa npOdykTa!
- BkIIOUyBaHe/u3KIIIOUyBaHe Ha npOdyKta u pa6Ota c Hero (Φnr. 1, 8)
- PNEyPExKDeHne
- OnachocT OT HapaHbAHe nopadn OTKaT!
- Yka3aHua:
- BkJIIOUyBaHe
- Yka3aHue:
- N3KNIIOUBAHe
- 3aunTa cpeu npetOBapBaHe
- Yukazanna 3a pa6ota
- Hoxnua 3a XNB nIeT
- TexHnKn Ha pЯЗаHe
- Nopdpa3BaHe Ha XnBn nneTOBe
- NopdpaBaHe B ToHnM oMeHT
- Cnei n3noJ3BaHe
- NocTbaHe
- I PENEYNPEXDEHNE
- Hoxnua 3a XNB nIeT
- Poadpbkka
- PPEyPExEHENE
- Hoxuza 3a xNB nIeT
- CbXpaHHe N TpaHcnpTupaHe
- Nodrotobka 3a cxbxpaHeHne
- TpaHcnpTnpaHe
- Onachoct OT HapaHyaBe!
- Pemontи почka ha pe3epBHu actn
- NopbUbaHe Ha pe3epBn qactn
- N3xBbPnaHe npeuzknpahe
- Yka3aHn 3a onakOBkata
- Yka3aHn 3a3aKaHa 3a eNeKtpnueckoTo n eNeKtpoHHoTo o6OpyDbAhe (ElektroG)
- Yka3aHn 3a NHTneBO-IOHHTe aKymlaTopn6aTePnn
- OTeTpaHЯBaHe Ha Hen3npaBHOCTN
- rapaunnoHHn ycNoBna - cepna Scheppach 20V IXES
- Ybaxaemn KJineHTn,
- 3a npedraBaHe Ha rapaHnOHn npeTeHn Baxn cIeHTo:
- HauHTe rapaHcNoHH yCNOBn He BKIOuBaT cJeHNHea:
- EC Декларачnia 3a CbOTBETCTBnE
Brand : SCHEPPACH
Model : CPHS410X
Category : Cordless telescopic hedge trimmer