KM 150500 R Bp Pack - Sweeper Kärcher - Free user manual and instructions
Find the device manual for free KM 150500 R Bp Pack Kärcher in PDF.
| Product type | Ride-on sweeper |
| Brand | Kärcher |
| Model | KM 150/500 R Bp Pack |
| Dimensions (L × W × H) | 2442 × 1570 × 1640 mm |
| Empty weight (without batteries) | 1398 kg |
| Total permissible weight | 3089 kg |
| Power supply | Battery 48 V, 700 Ah (2 battery packs of 24 V each) |
| Autonomy | 4 hours (fully charged battery) |
| Sweeping width (with side brush) | 1500 mm |
| Sweeping width (without side brush) | 1200 mm |
| Maximum sweeping capacity | 13800 m²/h (with 1 side brush) |
| Dust container capacity | 500 L |
| Maximum dump height | 1470 mm |
| Travel speed (forward/reverse) | 9 km/h |
| Maximum gradeability (driving direction) | 12 % |
| Turning radius (right/left) | 1515 mm / 1600 mm |
| Dust filter surface area | 7 m² |
| Sound pressure level (LpA) | 74 dB(A) |
| Vibration (seat) | 0.6 m/s² |
| Hydraulic oil type | HV 46 |
| Hydraulic oil quantity (tank) | 28 L |
| Maintenance | Daily: check brush wear, controls; weekly: clean cooler, check oil level; after 50 h: first service inspection |
| Safety | Seat contact switch, parking brake, safety bar for dumping, battery disconnect |
| Optional accessories | Cab, protective roof, flashing light, windshield wiper, work light |
Frequently Asked Questions - KM 150500 R Bp Pack Kärcher
User questions about KM 150500 R Bp Pack Kärcher
0 question about this device. Answer the ones you know or ask your own.
Ask a new question about this device
Download the instructions for your Sweeper in PDF format for free! Find your manual KM 150500 R Bp Pack - Kärcher and take your electronic device back in hand. On this page are published all the documents necessary for the use of your device. KM 150500 R Bp Pack by Kärcher.
USER MANUAL KM 150500 R Bp Pack Kärcher
71364 Winnenden (Germany)
Tel.: +49 7195 14-0
Fax: +49 7195 14-2212
Winnenden, 2018/09/01
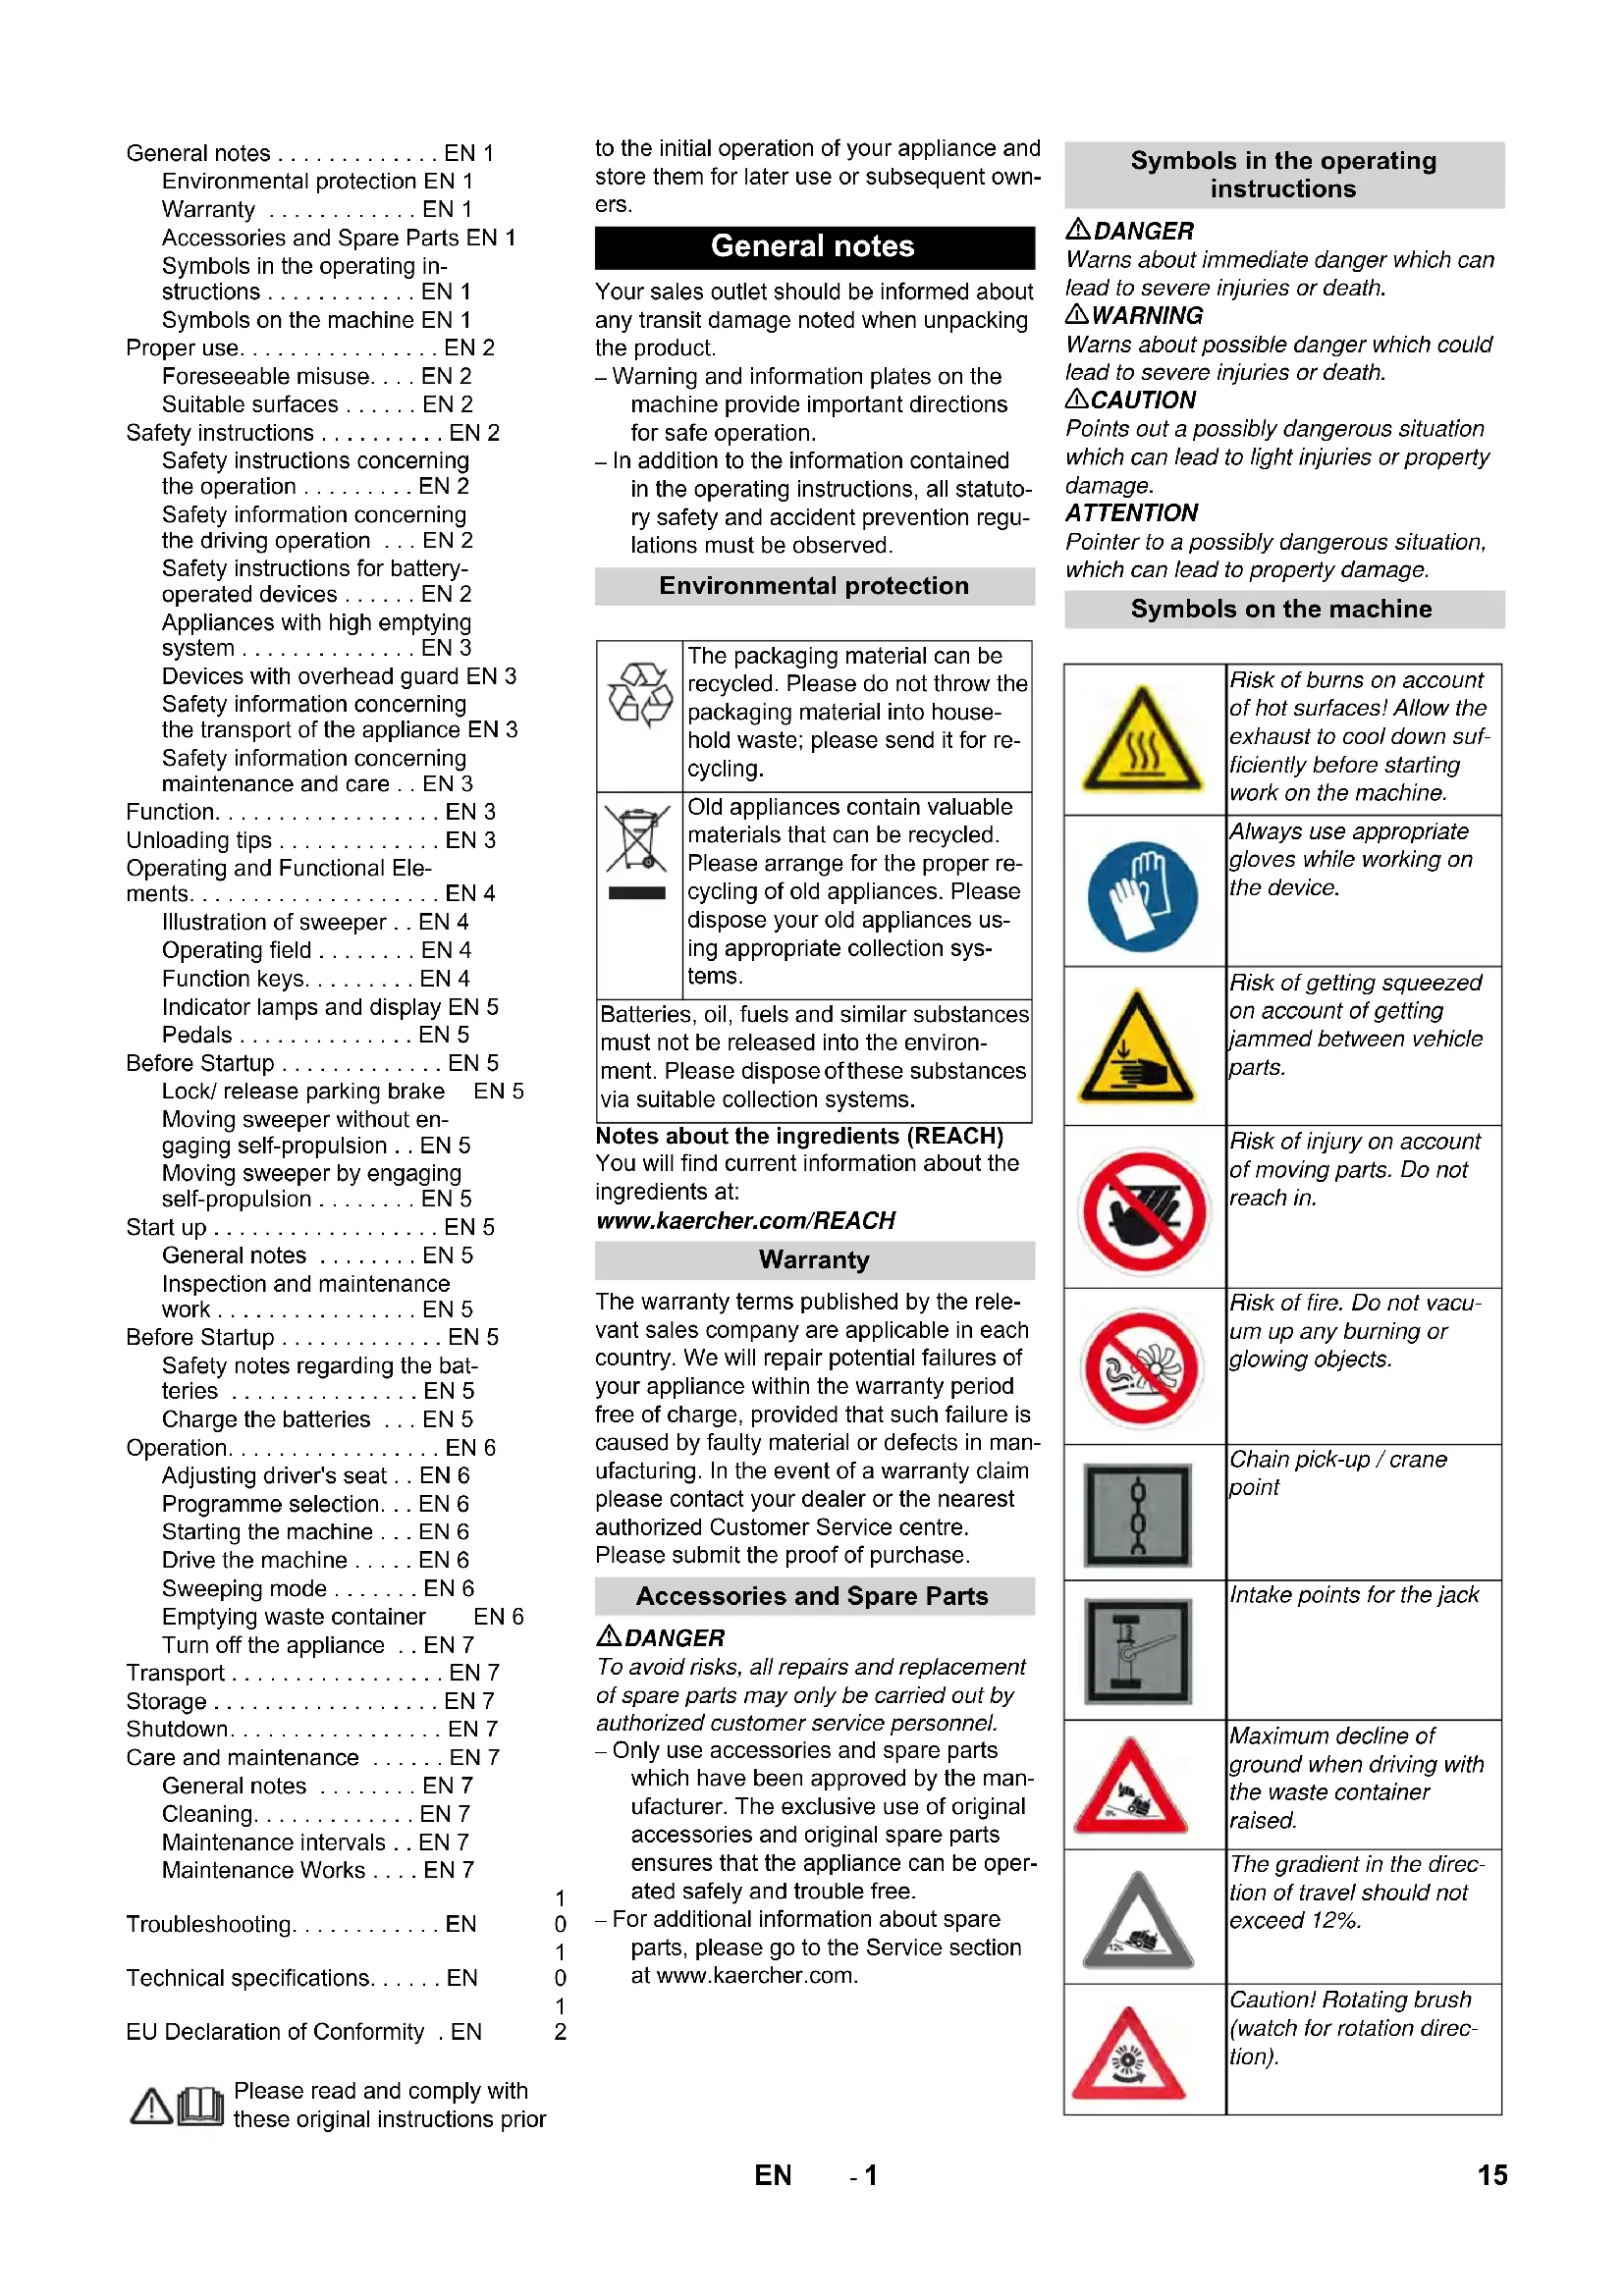
General notes EN 1
Environmental protection EN 1
Warranty EN 1
Accessories and Spare Parts EN 1
Symbols in the operating in
strictions EN 1
Symbols on the machine EN 1
Proper use. EN 2
Foreseeable misuse. . . . EN 2
Suitable surfaces . EN 2
Safety instructions EN 2
Safety instructions concerning
the operation EN 2
Safety information concerning
the driving operation . . . EN 2
Safety instructions for battery
operated devices . EN 2
Appliances with high emptying
system EN 3
Devices with overhead guard EN 3
Safety information concerning
the transport of the appliance EN 3
Safety information concerning
maintenance and care . . EN 3
Function. EN 3
Unloading tips EN 3
Operating and Functional Ele
ments. EN 4
Illustration of sweeper.. EN 4
Operating field EN 4
Function keys. EN 4
Indicator lamps and display EN 5
Pedals EN 5
Before Startup . EN 5
Lock/ release parking brake EN 5
Moving sweeper without en
gaging self-propulsion . . EN 5
Moving sweeper by engaging
self-propulsion . EN 5
Start up EN 5
General notes EN 5
Inspection and maintenance
work. EN 5
Before Startup EN 5
Safety notes regarding the bat
teries EN 5
Charge the batteries . . . EN 5
Operation. EN 6
Adjusting driver's seat . . EN 6
Programme selection.. EN 6
Starting the machine . . . EN 6
Drive the machine . . . . EN 6
Sweeping mode . EN 6
Emptying waste container EN 6
Turn off the appliance . . EN 7
Transport EN7
Storage EN7
Shutdown. EN 7
Care and maintenance . EN 7
General notes EN 7
Cleaning. EN 7
Maintenance intervals.. EN 7
Maintenance Works . . . EN 7
Troubleshooting. EN
Technical specifications. . . . . EN
EU Declaration of Conformity . EN
to the initial operation of your appliance and store them for later use or subsequent owners.
General notes
Your sales outlet should be informed about any transit damage noted when unpacking the product.
-
Warning and information plates on the machine provide important directions for safe operation.
-
In addition to the information contained in the operating instructions, all statutory safety and accident prevention regulations must be observed.
Environmental protection

The packaging material can be recycled. Please do not throw the packaging material into household waste; please send it for recycling.
Old appliances contain valuable materials that can be recycled. Please arrange for the proper recycling of old appliances. Please dispose your old appliances using appropriate collection systems.
Batteries, oil, fuels and similar substances must not be released into the environment. Please dispose of these substances via suitable collection systems.
Notes about the ingredients (REACH)
You will find current information about the ingredients at:
www.kaercher.com/REACH
Warranty
The warranty terms published by the relevant sales company are applicable in each country. We will repair potential failures of your appliance within the warranty period free of charge, provided that such failure is caused by faulty material or defects in manufacturing. In the event of a warranty claim please contact your dealer or the nearest authorized Customer Service centre. Please submit the proof of purchase.
Accessories and Spare Parts
DANGER
To avoid risks, all repairs and replacement of spare parts may only be carried out by authorized customer service personnel.
-
Only use accessories and spare parts which have been approved by the manufacturer. The exclusive use of original accessories and original spare parts ensures that the appliance can be operated safely and trouble free.
-
For additional information about spare parts, please go to the Service section at www.kaercher.com.
Symbols in the operating
instructions
DANGER
Warns about immediate danger which can lead to severe injuries or death.
WARNING
Warns about possible danger which could lead to severe injuries or death.
CAUTION
Points out a possibly dangerous situation which can lead to light injuries or property damage.
ATTENTION
Pointer to a possibly dangerous situation, which can lead to property damage.
Symbols on the machine
| Risk of burns on account of hot surfaces! Allow the exhaust to cool down sufficiently before starting work on the machine. | |
| Always use appropriate gloves while working on the device. | |
| Risk of getting squeezed on account of getting jammed between vehicle parts. | |
| Risk of injury on account of moving parts. Do not reach in. | |
| Risk of fire. Do not vacuum up any burning or glowing objects. | |
| Chain pick-up / crane point | |
| Intake points for the jack | |
| Maximum decline of ground when driving with the waste container raised. | |
| The gradient in the direction of travel should not exceed 12%. | |
| Caution! Rotating brush (watch for rotation direction). | |
| Beware of dangerous electrical current! | |
| Pay attention to the in-struction. | |
| Steer slowly! | |
| Please read the operating instructions and act ac-cordingly! | |
| Risk of damage! Do not rinse out the dust filter. |
Proper use
The sweeper is intended for cleaning floor surfaces for commercial use and e.g. for the following fields of application:
Car parks
Production facilities
Logistics areas
Hotel
Retail industry
Storage areas
Walkways
-
This sweeper has been designed to sweep dirt and debris from indoor as well as outdoor surfaces.
-
The machine with working equipment must be checked to ensure that it is in proper working order and is operating safely prior to use. Otherwise, the appliance must not be used.
- Use this sweeper only as directed in these operating instructions.
- The machine may not be modified.
- The machine is only suitable for use on the types of surfaces specified in the operating instructions.
- The machine may only be operated on the surfaces approved by the company or its authorised representatives.
- The following applies in general: Keep highly-flammable substances away from the appliance (danger of explosion/fire).
Foreseeable misuse
Never vacuum up explosive liquids, combustible gases or undiluted acids and solvents. This includes petrol, paint thinner or heating oil which can generate explosive fumes or mixtures upon contact with the suction air. Acetone, undiluted acids and solvents must also be avoided as they can harm the materials on the machine.
Never sweep/vacuum up reactive metal dusts (e.g. aluminium, magnesium, zinc), as they form explosive gases when they come in contact with highly alkaline or acidic detergents.
Do not sweep/vacuum up any burning or glowing objects.
The appliance is not suitable for sweeping off hazardous substances.
The machine may not be used or stored in hazardous areas. It is not allowed to use the appliance in hazardous locations.
It is strictly prohibited to take co-passengers.
Pushing/pulling or transporting objects by means of this appliance is prohibited.
Suitable surfaces
Asphalt
- Industrial floor
- Screed
Concrete
Paving stones
Safety instructions
Safety instructions concerning the operation
In order to maintain clearance and creepage distances, the device may not be operated over 2000 metres above sea level.
(Applicable for Finland only) The device may not be used at low ambient temperatures (below 0^ ) if it is equipped with a PVC hose line. Contact Kärcher if should have questions regarding your device.
The machine with working equipment must be checked to ensure that it is in proper working order and is operating safely prior to use. Otherwise, the appliance must not be used.
If the appliance is used in hazardous areas (e.g. filling stations) the corresponding safety provisions must be observed. It is not allowed to use the appliance in hazardous locations.
△DANGER
Risk of injury!
Do not use the appliance without an overhead guard in areas where the operator might get hit by falling objects.
The operator must use the appliance properly. The person must consider the local conditions and must pay attention to third parties, in particular children, when working with the appliance.
It is important to follow all safety instructions, rules and regulations applicable for driving motor vehicles.
Prior to starting work, the operator must ensure that all protective devices are properly installed and function correctly.
The operator of the appliance is liable for accidents with other individuals or their property.
Ensure that the operator wears tight-fitting clothes. Wear sturdy shoes and avoid wearing loose-fitting clothes.
Check the immediate vicinity prior to starting (e.g. children). Ensure sufficient visibility!
Never leave the machine unattended so long as the engine is running. The operator may leave the appliance only when the engine has come to a standstill, the appliance has been protected against accidental movement, and the key has been removed.
Please remove the key, when not in use, to avoid unauthorised use of the appliance.
The appliance may only be used by persons who have been instructed in handling the appliance or have proven qualification and expertise in operating the appliance or have been explicitly assigned the task of handling the appliance.
This appliance is not intended for use by persons (including children) with limited physical, sensoric or mental capacities or lack of experience and/or skills, unless such persons are accompanied and supervised by a person in charge of their safety or if they received precise instructions on the use of this appliance.
Children should be supervised to prevent them from playing with the appliance.
CAUTION
Risk of damage! Do not sweep up straps, strings or wires as these may wrap around the brush roller.
Safety information concerning the driving operation
△DANGER
Risk of injury! Verify the stability of the ground prior to driving on it.
DANGER
Risk of accident, risk of injury!
Danger of tipping if gradient is too high.
The gradient in the direction of travel should not exceed 12% .
Danger of tipping over when taking bends at high speed (particularly left-hand bends).
- Drive slowly when cornering.
Danger of tipping on unstable ground.
- Only use the machine on sound surfaces.
Danger of tipping with excessive sideways tilt.
The gradient perpendicular to the direction of travel should not exceed 10% .
Safety instructions for battery-operated devices
Note: Warranty claims will be entertained only if you use batteries and chargers recommended by Kärcher.
-
Always follow the instructions of the battery manufacturer and the charger manufacturer. Please follow the statutory requirements for handling and disposing batteries.
-
Never leave the batteries in a dis-charged state; recharge them as soon as possible.
- Always keep the batteries clean and dry to avoid creep currents. Protect the batteries and avoid contact with impurities such as metal dust.
- Do not place tools or similar items on the battery. Risk of short-circuit and explosion.
- Do not work with open flames, generate sparks or smoke in the vicinity of a battery or a battery charging room. Danger of explosion.
- Do not touch hot parts of the machine such as the drive motor (risk of burns).
- Be careful while handling battery acid. Follow the respective safety instructions!
- Used batteries are to be disposed according to the EC guideline 91/ 157 EWG in an environment-friendly manner.
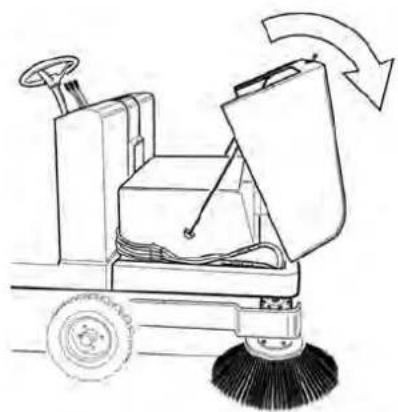
Appliances with high emptying system
△DANGER
Risk of injury!
When working on the high emptying system, completely lift and secure the waste container.
Perform the safeguarding only from outside the hazard zone.
Devices with overhead guard
NOTICE
The overhead guard (optional) protects the driver against larger falling objects. However, it does not provide rollover protection!
Check the overhead guard for damage daily.
If the overhead guard, as well as individual elements, should be damaged, replace the entire overhead guard.
Any modification of the overhead guard and installation of elements, components and assemblies other than those approved by Karcher is not permitted and may limit the function of the overhead guard.
Safety information concerning the transport of the appliance
Observe the net weight (transport weight) of the device during transport on trailers or vehicles.
To transport the device, unplug the battery plug and securely fasten the device.
Safety information concerning maintenance and care
First switch off the appliance and remove the key before performing any cleaning or maintenance tasks on the appliance, replacing parts or switching over to another function.
When performing any service and maintenance work on devices with a traction battery, the battery must be disconnected from the electrical system of
the device via the battery isolation point (battery plug).
Always disconnect the battery when working on the electrics.
To do this, first disconnect the negative terminal and then the positive terminal. Reconnection is performed in reverse sequence. Connect the positive terminal first, then connect the negative terminal.
Do not clean the appliance with a water hose or high-pressure water jet (danger of short circuits or other damage).
Maintenance work may only be carried out by approved customer service outlets or experts in this field who are familiar with the respective safety regulations.
Please observe the local safety regulations regarding portable commercially used appliances.
Always use appropriate gloves while working on the device.
Function
The sweeper operates using the sweepshovel principle.
- The rotating roller brush moves the dirt directly into the waste container.
- The side brush cleans the corners and edges of the surface and moves dirt and debris into the path of the roller brush.
- The fine dust is sucked in via the dust filter through the suction blower.
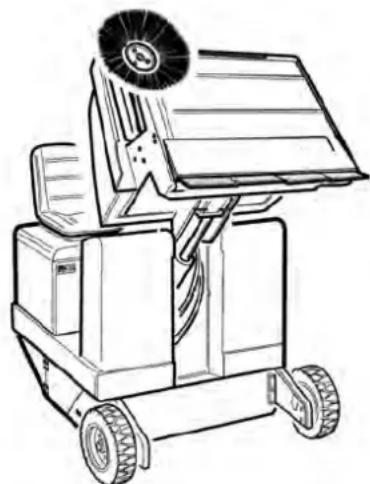
Unloading tips
Danger
Risk of injury, risk of damage!
Observe the weight of the appliance when you load it!
| Weight (without batteries) 1398 kg* | |
| Weight (with batteries) 2690 kg* | |
| * If upgrade kits are installed, the weight is respectively higher. | |
Do not use a forklift.
Use a suitable ramp or a crane to load the appliance!
Observe when using a ramp: Ground clearance 70~mm
If the machine is delivered on a pallet, you must create an unloading ramp using the boards provided. You will find the instructions for this procedure on page 2 (inside of cover). Important instruction: every board must be attached with at least 2 screws
Operating and Functional Elements
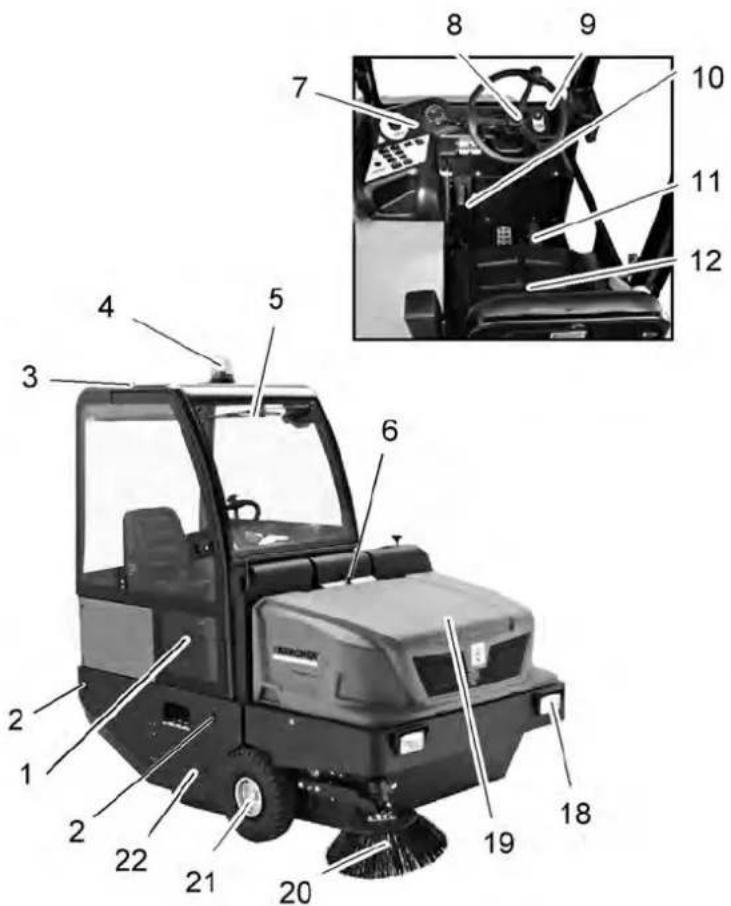
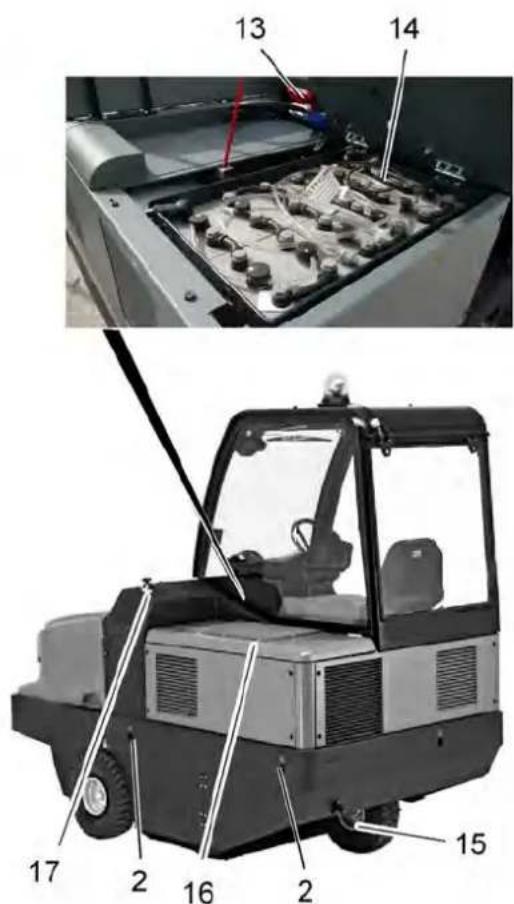
Illustration of sweeper Operating field
1 Cabin door (option)
2 Lashing point (4x)
3 Protective roof (option)
4 Beacon lamp
5 Windshield wiper (option)
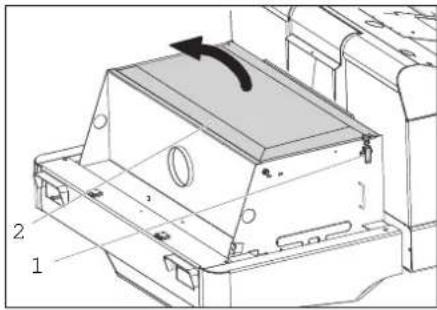
6 Lock of appliance hood
7 Operating field
8 Steering wheel
9 Ignition lock
10 Parking brake
11 Pedals
12 Seat (with seat contact switch)
13 Battery socket
14 Battery set 2 × 24 ~V
15 Rear wheel
16 Engine cover
17 Brush roller adjustment
18 Lighting system (optional)
19 Waste container
20 Side brushes
21 Front wheel
22 Roller brush access

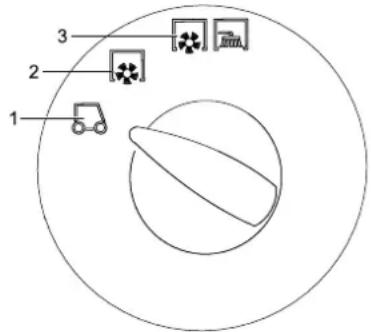
1 Function keys
2 Programme switch
3 Ventilation opening (option)
4 Multifunction display
5 Fuse box - work station
6 Ignition lock
Ignition switch

1 Ignition key
- Position 0: Switch off engine
Position 1: Ignition on
Position 2: Start the engine
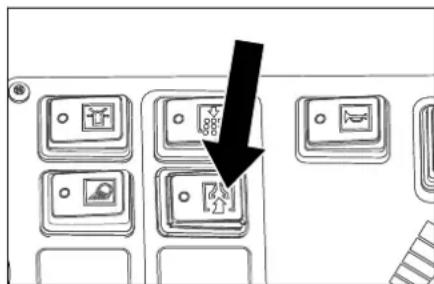
Function keys
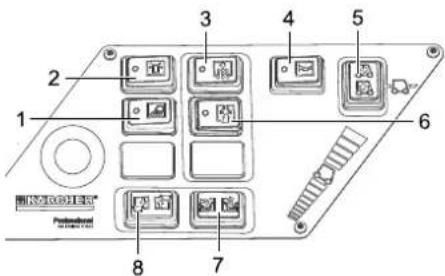
1 Work lights on/off
2 Beacon lamp on/off
3 Filter deducting
4 Horn
5 Selector for the direction of travel
6 Suction blower
7 Open/close container lid
8 Raise/lower waste container
Indicator lamps and display
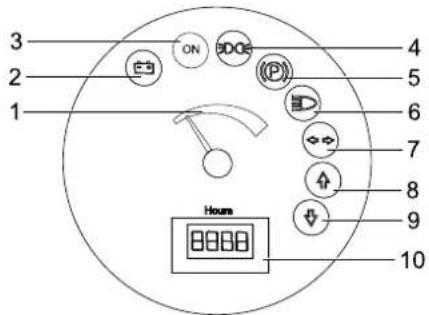
1 Battery capacity
2 Battery control lamp
3 Control lamp operating state
4 Indicator lamp for position lights
5 Indicator lamp (not connected)
6 Indicator lamp for dipper
7 Indicator lamp (not connected)
8 Indicator lamp - forward driving direction
9 Indicator lamp - reverse driving direction
10 Operating hour counter
Pedals
1 Drive pedal
2 Brake pedal
3 Parking brake
Before Startup
Lock/ release parking brake
Loosen parking brake; press brake pedal at the same time.
Activate the parking brake; press brake pedal at the same time.
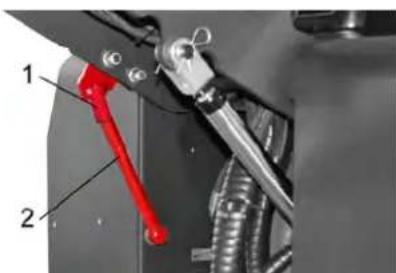
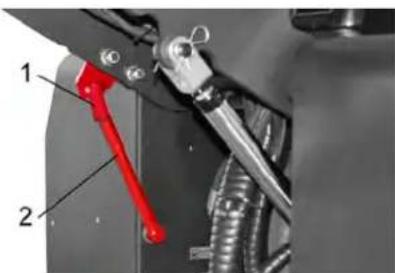
Moving sweeper without engaging self-propulsion
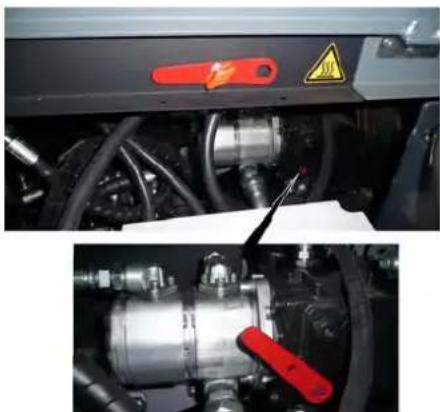
Open engine cover.
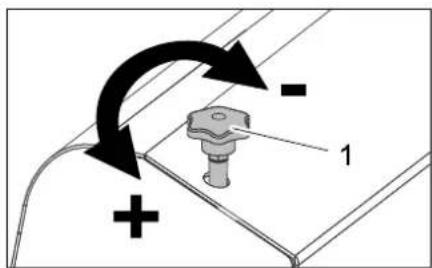
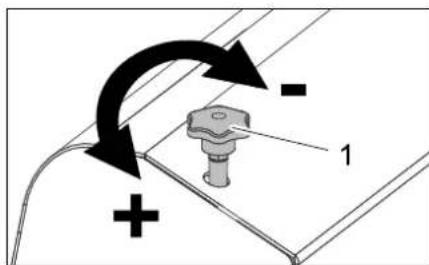
Turn the freewheel lever of the hydraulic pump (red) by 180^ (anti-clockwise). Use special tools.
NOTICE
The special tool (red screwdriver) is located in a holder in the vehicle frame, next to the freewheel.
CAUTION
Do not move the machine for long distances without engaging self-propulsion; a speed of 10km / h should not be exceeded.
Return the freewheel lever into its original position.
Moving sweeper by engaging selfpropulsion
If the freewheel lever of the hydraulic pump was opened to move the appliance, this must be turned back anticlockwise all the way to its stop. Use special tools.
Start up
General notes
Park the sweeper on an even surface.
Remove ignition key.
Lockparkingbrake.
Inspection and maintenance work
Daily before starting operations
Check battery charging status; charge batteries it if required (see Chapter "Charging the batteries").
Check the sweeping roller and the side brush for wear and wrapped belts.
Check the wheels for tied up belts.
Check function of all operator control elements.
Check appliance for damages.
Clean the dust filter with the filter cleaning button.
Note: For description, see section on Care and maintenance.
Before Startup
Safety notes regarding the batteries
Please observe the following warning notes when handling batteries:
| i | Observe the directions on the battery, in the instructions for use and in the vehicle operat-ing instructions! |
| Wear an eye shield! | |
| Keep away children from acid and batteries! | |
| Risk of explosion! | |
| Fire, sparks, open light, and smoking not allowed! |
| Danger of causticization! |
| First aid! |
| Warning note! |
| Disposal! |
| Do not throw the battery in the dustbin! |
| Beware of dangerous electrical current! |
Danger
Risk of explosion! Do not put tools or similar on the battery, i.e. on the terminal poles and cell connectors.
Danger
Risk of injury! Ensure that wounds never come into contact with lead. Always clean your hands after having worked with batteries.
Danger
Risk of fire and explosion!
Smoking and naked flames are strictly prohibited.
Rooms where batteries are charged must have good ventilation because highly explosive gas is emitted during charging.
Danger
Danger of causticization!
Rinse thoroughly with lots of clear water if acid gets into the eye or comes in contact with the skin.
- Then consult a doctor immediately.
- Wash off the acid If it comes in contact with the clothes.
Charge the batteries
Charge the batteries before commissioning the machine.
DANGER
Risk of injury! Comply with safety regulations on the handling of batteries. Observe the directions provided by the manufacturer of the charger.
Please read and follow the included operating instructions by the battery manufacturer and follow them.
Charge the battery only with an appropriate charger.
Rooms where batteries are charged must have good ventilation because highly explosive gas is emitted during charging.
Danger
Danger of chemical burns. Adding water to the battery in its discharged state can cause the acid to leak! Use safety glasses while handling battery acid and follow the safety instructions to avoid personal injury
or damage to clothes. Should the acid spray on to the skin or clothes, rinse immediately with lots of water.
CAUTION
Use only distilled or desalinated water (EN 50272-T3) for filling the battery.
Recommended batteries, chargers
| Order number | |
| Battery set 24 V, 700 Ah,(low-maintenance)* | 6.654-280.0 |
| Charger 48 V, 80 A 6.654 | 281.0 |
| * Appliance requires 2 batteries | |
The use of other batteries and chargers is not recommended and should be discussed with Karcher customer service.
Pull the battery plug from the machine and connect it to the plug of the charger.
Connect the plug of the charger to a proper socket of 16 A, the charger will charge automatically.
Always keep both motor covers open during the charging process.
Note: When the batteries are charged, first remove the charger from the mains and then disconnect it from the batteries.
Check fluid level in the battery and adjust if required
CAUTION
Please read and follow the included operating instructions by the battery manufacturer and follow them.
Check charging status of battery
-Display of the battery capacity in the green range: Battery is charged.
- Display of the battery capacity in the yellow range: Battery is halfway discharged.
- Display of the battery capacity in the red range: Battery is almost discharged. The sweeping mode will be shortly switched off automatically.
- Indicator lamp glows red Battery is discharged. The sweeping mode will be terminated automatically (the sweeping aggregates cannot be taken into operation until the battery is charged).
Drive the machine directly to the charging station; avoid any steep gradients in the process.
Charge battery.
Operation
Adjusting driver's seat
Pull seat adjustment lever outwards.
Slide seat, release lever and lock in place.
Check that the seat is properly locked in position by attempting to move it backwards and forwards.
Programme selection
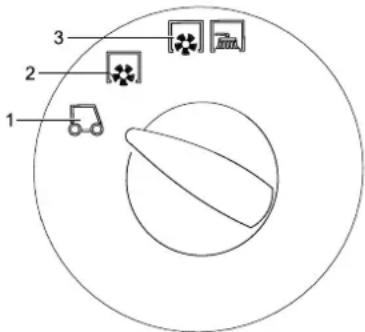
1 Transport drive
2 Sweeping with sweep roller
3 Sweeping using roller brush and side brushes
Starting the machine
Note: The machine is equipped with a seat contact switch If the driver's seat is vacated, the machine is switched off.
Sit on the driver's seat.
Bring the direction selector switch into the middle position.
Lockparkingbrake.
Insert the ignition key into the ignition switch.
Turn the ignition key to position "l". The appliance is now ready for operation.
Turn the ignition key to position "ll". The appliance can now be driven. Note: The display of the battery capacity will show the actual charge status after about 10 seconds.
Drive the machine
Set programme selection switch to "Transport drive".
Press brake pedal and keep it depressed.
Release parking brake.
Drive forward
Set the travel direction switch to "forward".
Press accelerator pedal down slowly.
Reverse drive
Danger
Risk of injury! While reversing, ensure that there is nobody in the way, ask them to move if somebody is around.
CAUTION
Risk of damage! Only use the direction switch when the machine is standing still.
Set the travel direction switch to "backwards".
Press accelerator pedal down slowly.
Driving method
- The accelerator pedal can be used to vary the driving speed infinitely.
- Avoid pressing the pedal suddenly as this may damage the hydraulic system.
Brakes
Release the accelerator pedal, the machine brakes automatically and stops.
Note: The braking effect can be supported by pressing the brake pedal.
Driving over obstacles
Driving over fixed obstacles which are 70 mm high or less:
Drive forwards slowly and carefully. Driving over fixed obstacles which are more than 70~mm high:
Only drive over these obstacles using a suitable ramp.
Sweeping mode
CAUTION
Do not sweep up packing strips, wire or similar objects as this may damage the sweeping mechanism.
Note: To achieve an optimum cleaning result, the driving speed should be adjusted to take specific situations into account.
Note: During operation, the dust filter should be shaken off and cleaned at regular intervals.
Sweeping dry floors
Switch on the blower.
Set the programme switch to sweep with sweeping brush when cleaning surfaces.
Set the programme switch to sweep with sweeping brush and side brush when cleaning edges.
Sweeping damp or wet floors
Switch off the blower.
Set the programme switch to sweep with sweeping brush when cleaning surfaces.
Set the programme switch to sweep with sweeping brush and side brush when cleaning edges.
Emptying waste container
Danger
Risk of injury! When emptying the waste container, care should be taken to ensure that no persons or animals are within its swivelling range.
Danger
Danger of crushing. Never reach into the rod assembly for the drainage mechanism. Stay away from the area under the raised container.
Danger
Danger of tipping. Place the machine on an even surface during emptying.
Set programme selection switch to "Transport drive".
Raise waste container.
Slowly drive towards the collection container.
Lockparkingbrake.
Open the container door: Press the left side of the switch and empty the waste container.
Close the container door: Press the right side of the switch (approximately 2 seconds), until the unit is tilted to the end position.
Release parking brake.
Drive away the collection container slowly.
Lower the waste container up to the end-position.
Turn off the appliance
Press brake pedal and keep it depressed.
Lockparkingbrake.
Turn ignition key to "0" and remove it.
Transport
△DANGER
Risk of injury and damage! Observe the weight of the appliance when you transport it.
Turn ignition key to "0" and remove it.
Lockparkingbrake.
Secure the appliance at the lashing points (4x) using tension belts, ropes or chains.
Secure the wheels of the machine with wheel chocks.
When transporting in vehicles, secure the appliance according to the guidelines from slipping and tipping over.
Storage
DANGER
Risk of injury and damage! Note the weight of the appliance in case of storage.
Shutdown
If the sweeper is going to be out of service for a longer time period, observe the following points:
Park the sweeper on an even surface.
Set programme selection switch to "Transport drive".
Turn ignition key to "0" and remove it.
Lock the sweeper to ensure that it does not roll off.
Clean the inside and outside of the sweeper.
Park the machine in a safe and dry place.
Remove the battery plug from machine.
Charge battery and recharge it approx. every 2 months.
Care and maintenance
General notes
CAUTION
Risk of damage!
Do not rinse out the dust filter.
First switch off the appliance, remove the key and remove the battery plug or disconnect the battery before performing any cleaning or maintenance tasks on the appliance, replacing parts or switching over to another function.
- Maintenance work may only be carried out by approved customer service outlets or experts in this field who are familiar with the respective safety regulations.
- Mobile appliances used for commercial purposes are subject to safety inspections according to VDE 0701.
Park the sweeper on an even surface.
Turn ignition key to "0" and remove it.
Lockparking brake.
Cleaning
CAUTION
Risk of damage! Do not clean the appliance with a water hose or high-pressure water jet (danger of short circuits or other damage).
Cleaning the inside of the machine △Danger
Risk of injury! Wear dust mask and protective goggles.
Clean machine with a cloth.
Blow through machine with compressed air.
External cleaning of the appliance
Clean the machine with a damp cloth which has been soaked in mild detergent.
Note: Do not use aggressive cleaning agents.
Maintenance intervals
Note: The elapsed-time counter shows the timing of the maintenance intervals.
Maintenance by the customer
Note: Where maintenance is carried out by the customer, all service and maintenance work must be undertaken by a qualified specialist. If required, a specialised Kärcher dealer may be contacted at any time.
Daily maintenance:
Check the sweeping roller and the side brush for wear and wrapped belts.
Check function of all operator control elements.
Check appliance for damages.
Weekly maintenance:
Clean the hydraulic oil cooler.
Check hydraulic unit.
Check the hydraulic oil level.
Check brake fluid status.
Check the pad for wear, replace if required.
Check the container lid and lubricate it
Maintenance following wear:
Replace sealing strips.
Readjust the side seals or replace them.
Replace roller brush.
Replace side brush.
Note: For description, see section on Maintenance work.
Maintenance by Customer Service
Maintenance to be carried out after 50 operating hours:
Have the first inspection done according to the service manual.
Maintenance to be carried out after 250 operating hours:
Have the inspection done according to the service manual.
Note: In order to safeguard warranty claims, all service and maintenance work during the warranty period must be carried out by the authorised Kärcher Customer Service in accordance with the maintenance booklet.
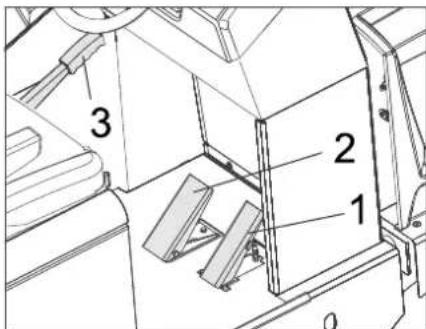
Maintenance Works
Preparation:
Park the sweeper on an even surface.
Turn ignition key to "0" and remove it.
Lockparkingbrake.
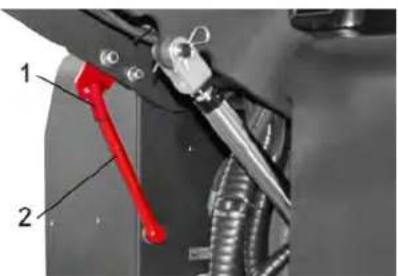
General notes on safety DANGER
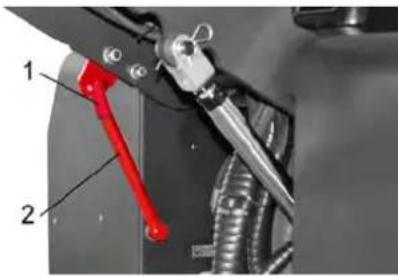
Risk of injury! Always apply the safety bar when the waste container is raised.
1 Holder of safety rod 2 Safety rod
Fold the safety rod for the high emptying up and insert it into the holder (se-cured).
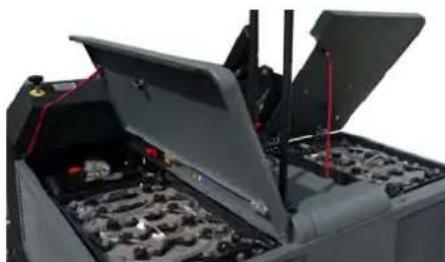
Replace batteries
The batteries can only be exchanged as a set. The exchange has to be performed by trained personnel.

Due to the heavy weight (each battery pack weighs 545kg ), the replacement must be performed by means of a crane.
When removing the battery, disconnect the negative terminal wire first.
Fasten the crane chains in the four eyelets of the battery set and carefully lift out the batteries.
Note: Prior to that, remove the side panels.
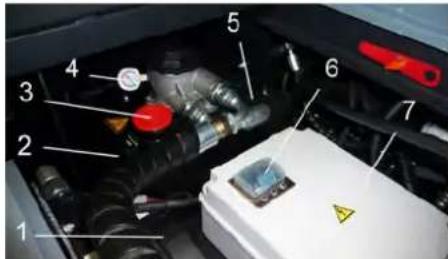
Check hydraulic oil level and refill hydraulic oil
NOTICE
The waste container must not be raised.
Open engine cover.
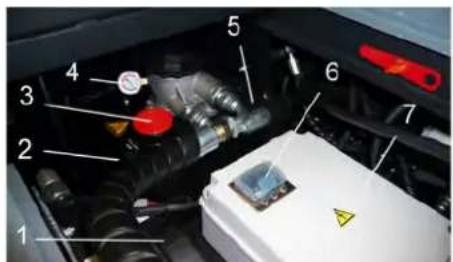
1 Hydraulic oil cooler
2 Looking glass
3 Screw cap, oil fill opening
4 Manometer
5 Hydraulic oil tank
6 Fuse FU 01 (main fuse)
7 Electronics casing
To be opened by customer service only.
Check hydraulic oil level in the looking glass.
- The oil level must lie between "MIN" and "MAX" marking.
- Add hydraulic oil if the oil level is below the "MIN" marking.
Loosen the closing cap of the oil filling opening.
Clean the filling area.
Refill hydraulic oil.
Oil grade: see Technical Data
Replace and tighten the closing cap of the oil filling opening.
NOTICE
If the pressure gauge shows an increased hydraulic oil pressure, the hydraulic oil filter must be replaced by Karcher customer service.
Check hydraulic unit
Lockparking brake.
Start the motor.
Only Kärcher Customer Service is authorised to carry out maintenance tasks on the hydraulic unit.
Check all hydraulic hoses and connections and ensure that they are leak-proof.
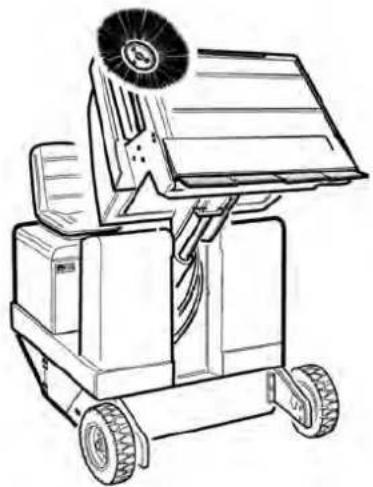
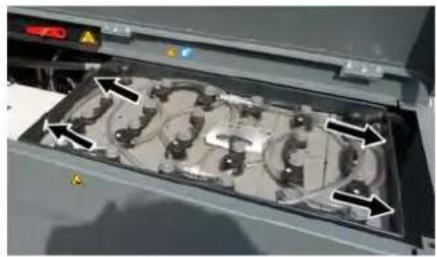
Checking roller brush
Turn the ignition key to position "l".
Raise the waste container up to the end-position.
Turn the ignition key to 0 position.
Lockparking brake.
Use the safety bar for emptying from a height.
Remove belts or cords from roller brush.
Remove the safety bar.
Insert the ignition key into the ignition switch.
Turn the ignition key to position "l".
Lower the waste container up to the end-position.
Switch off engine.
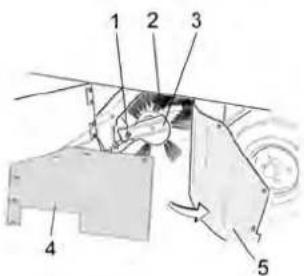
Replacing roller brush
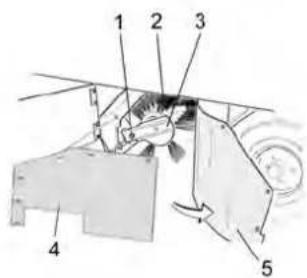
1 Fastening screws of the roller brush intake
2 Roller brush
3 Roller brush intake
4 Holding plate for side seal
5 Side seal

Open the side covers using a key.
Unscrew the wingnuts from the holding plate side seals and remove the holding plate.
Flip the side seal out.
Uncscrew the retaining screw of the roller brush intake, and swing the intake to the outside.
Pull out roller brush.
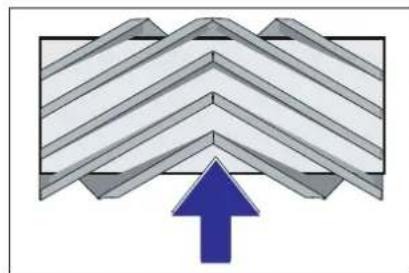
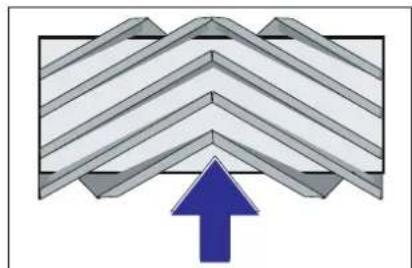
Installation position of roller brush in direction of travel (top view)
Note: When installing the new roller brush, ensure correct positioning of the bristle assembly.
Install new roller brush. The nuts of the roller brush must be inserted on the notches of the opposite crank.
Note: Once the new roller brush has been installed, the sweeping track must readjusted.
Check and adjust roller brush sweeping track
Check tyre pressure.
Switch off suction blower.
Drive sweeper on to a smooth, even surface covered with a visible layer of dust or chalk.
Set the programme switch to sweep with roller brush.
Set programme selection switch to "Transport drive".
Drive machine backwards.
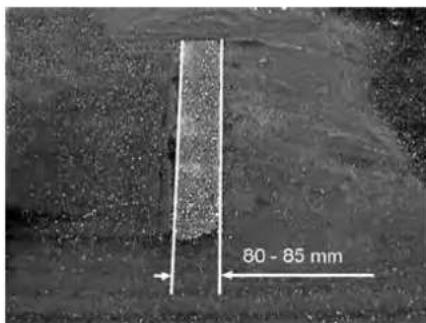
Check sweeping mirror.

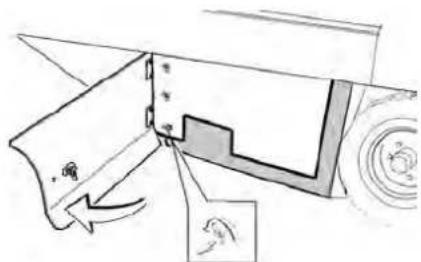
The sweeping track should have an even rectangular shape which is 80-85 mm wide. Adjusting the sweeping track:
1 Adjusting screw
Adjust the sweeping track position by adjusting the adjustment screw.
Check sweeping mirror.
Check and adjust sweeping track of the side-brush
The side-brushes lift up.
Drive sweeper on to a smooth, even surface covered with a visible layer of dust or chalk.
Set the programme switch to sweep with roller brush and side brush.
The side-brushes lift up.
Set programme selection to "Drive".
Drive machine backwards.
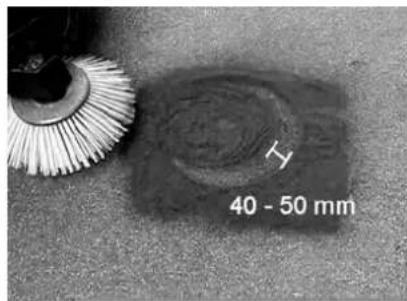
Check sweeping mirror.
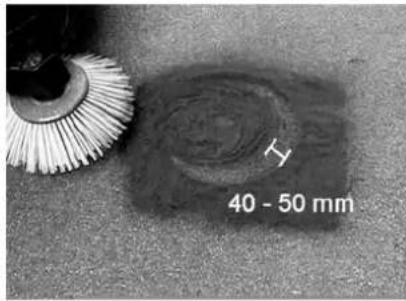
The width of the sweeping track should lie between 40-50 mm.
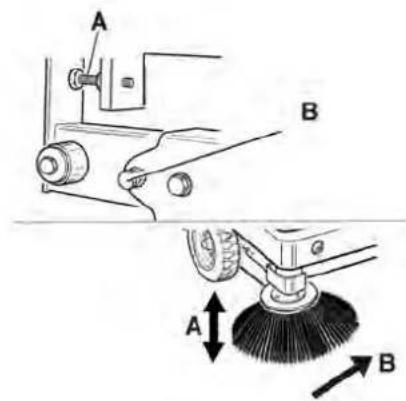
Set the sweeping track using the two adjusting screws.
Check sweeping mirror.
Adjust the side seals
Drive the waste container up and secure it with the safety rod.
△DANGER
Risk of injury! Always apply the safety bar when the waste container is raised.
Fold the safety rod for the high emptying up and insert it into the holder (se-cured).
1 Holder of safety rod
2 Safety rod
Open the side cover as described in Chapter "Replace brush roller".
Release the 6 wing nuts on the side holding plate.
Loosen 3 nuts (SW 13) on the front holding plate.
Press the side seal down (elongated hole) until it is about 1 to 3mm to the floor.
Screw in the holding plates.
Repeat the procedure on the other side of the appliance.
Manually clean the dust filter
Clean the dust filter with the filter cleaning button.
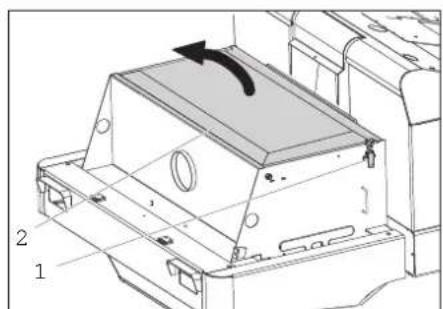
Replacing dust filter WARNING
Empty waste container before replacing dust filter. Wear a dust mask when working around the dust filter. Observe safety regulations on the handling of fine particulate material.
Open the lock, remove the star grip screw to do this.
Fold cover forwards.
Open filter cap.
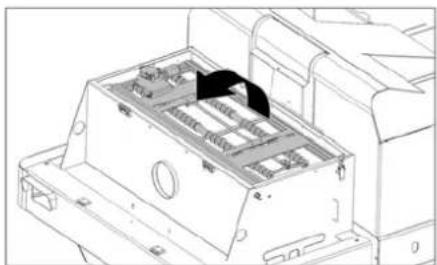
Fold the filter vibrator forward.
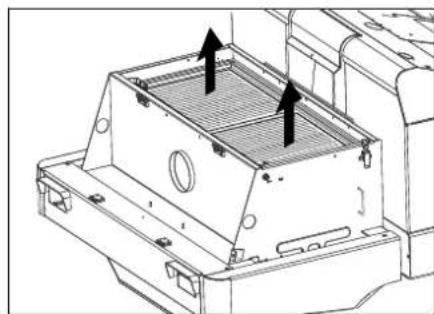
Replace the dust filter.
Close the filter cover.
Changing the headlight bulb (option)
Unscrew the head lamps.
Take out the head lamps and pull out the plug.
Note: Note the positions of the plugs.
Dismantle the head lamps.
Dismantle the head lamp casing and hold it horizontally because the lamp unit is not fastened.
Unlock the bracked and take out the bulb.
Insert new bulb.
Reinstall in reverse sequence.
Changing the blinker bulb (option)
Note: Remove the glass of the direction-indicator lamp from its casing to replace the bulb.
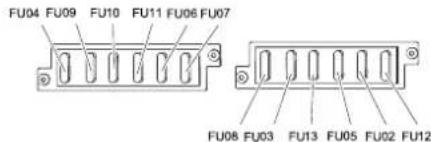
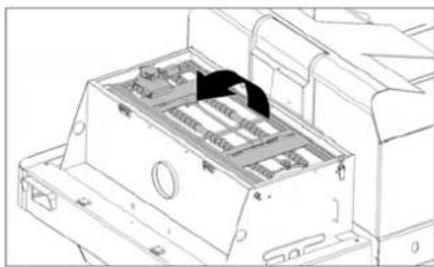
Replacing fuses
Open the fuse holder.
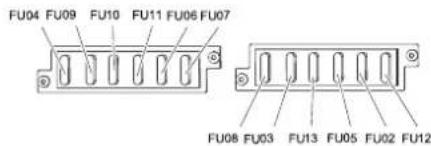
Check the fuses.
Replace defective fuses.
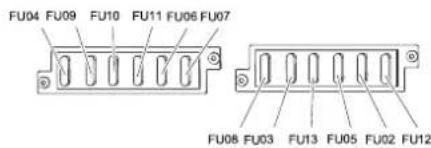
Note: The fuse FU 01 (main fuse) is located on the electronics casing.
The fuses FU 14, FU 15 and FU 16 are located in the electronics casing. Attention: Opening of electronics casing and replacing of fuses only by customer service.
Note: Only use fuses with identical safety ratings.
| FU 01 Main fuse 330 A | |
| FU 02 Seat contact switch 3 A | |
| FU 03 Driver cabin (optional) 10 A | |
| FU 04 Driving direction switch | 5 A |
| FU 05 Multifunction display 3 A | |
| FU 06 Hydraulic oil cooler 25 A | |
| FU 07 Program selection switch | 15 A |
| FU 08 Horn 10 A | |
| FU 09 Left lighting 7,5 A | |
| FU 10 Right lighting 7,5 A | |
| FU 11 Working light 10 A | |
| FU 12 Beacon lamp 5 A | |
| FU 13 Vibrator system 10 A | |
| FU 14 Motor 3 A | |
| FU 15 Voltage converter 20 A | |
| FU 16 Key switch 3A |
Troubleshooting
Technical specifications
| Fault Remedy | |
| Device does not drive or drives only slowly | Sit on the driver seat, the seat contact switch gets activated. |
| Switch on the triggered fuse FU 01 (on the electronic casing) | |
| Charging or replacing battery | |
| Release parking brake | |
| Check for trapped ribbons and strings. | |
| Inform Kärcher Customer Service. | |
| Whistling sound in the hydraulic system | Refill hydraulic fluid |
| Inform Kärcher Customer Service. | |
| Brushes are rotating slowly or not at all | Check for trapped ribbons and strings. |
| Inform Kärcher Customer Service. | |
| Too little or no suction power in the brush area | Clean filter |
| Inform Kärcher Customer Service. | |
| Dust gathers in the machine Adjust | the side seals |
| Switch on blower | |
| Clean dust filter | |
| Replace filter washers | |
| Inform Kärcher Customer Service. | |
| Sweeping unit does not pick up waste | Empty waste container |
| Clean dust filter | |
| Replacing roller brush | |
| Adjust sweeping track | |
| Replace sealing strips of the waste container | |
| Remove the blocking of the brush roller | |
| Inform Kärcher Customer Service. | |
| Waste container does not raise or lower | Check the fuses. |
| Inform Kärcher Customer Service. | |
| Waste container is rotating slowly or not at all | Inform Kärcher Customer Service. |
| Operation problems with hydraulic movement parts | Inform Kärcher Customer Service. |
| KM 150/500 R Bp | ||
| Machine data | ||
| Drive speed, forward km/h 9 | ||
| Drive speed, reverse km/h 9 | ||
| Climbing capability (max.) -- 12% | ||
| Surface cleaning performance without side brushes m | 2/h 11000 | |
| Surface cleaning performance with 1 side brushes m | 2/h 13800 | |
| Working width without side brushes mm 1200 | ||
| Working width with 1 side brushes mm 1500 | ||
| Protection type, drip-proof -- IPX 3 | ||
| Usage duration with battery fully charged h 4 | ||
| Electrical system | ||
| Battery capacity | V, Ah | 48, 700 |
| Total weight of battery pack (appliances requires 2 battery packs) kg | 1090 | |
| Hydraulic system | ||
| Oil quantity in the entire hydraulic system | | | 35 |
| Oil quantity in hydraulic tank | | | 28 |
| Hydraulic oil type -- HV 46 | ||
| Waste container | ||
| Max. unloading height mm 1470 | ||
| Volume of waste container I 500 | ||
| Roller brush | ||
| Roller brush diameter mm 380 | ||
| Roller brush width mm 1200 | ||
| Speed 1/min 360 | ||
| Sweeping track mm 80 | ||
| Side brushes | ||
| Side brush diameter mm 600 | ||
| Speed (continuous) 1/min 0 - 54 | ||
| Solid rubber tyres | ||
| Size, front -- 5.00-8 | ||
| Size, rear -- 4.00-8 | ||
| Brake | ||
| Front wheels -- mechanical | ||
| Rear wheel | -- hydrostatic | |
| Filter and vacuum system | ||
| Type | -- Flat fold filter | |
| Speed 1/min 2750 | ||
| Filter surface area, fine dust filter | m² | 7 |
| Nominal vacuum, suction system | mbar | 5 |
| Nominal volume flow, suction system | m³/h | 2400 |
| Vibrator system | -- Electric motor | |
| Working conditions | ||
| Temperature °C -5 and +40 | ||
| Air humidity, non-condensing | % | 0 - 90 |
| Values determined as per EN 60335-2-72 | ||
| Noise emission | ||
| Sound pressure level LpA | dB(A) | 74 |
| Uncertainty KpA | dB(A) | 3 |
| Sound power level LwA + Uncertainty KwA | dB(A) | 97 |
| Machine vibrations | ||
| Hand-arm vibration value | m/s² | 1,2 |
| Seat | m/s² | 0,6 |
| Uncertainty K | m/s² | 0,1 |
| Dimensions and weights | ||
| Length x width x height | mm 2442x1570 | x1640 |
| Right turning radius mm 1515 | ||
| Left turning radius mm 1600 | ||
| Unladen weight (with/ without battery) | kg | 1398/2690 |
| Permissible overall weight | kg | 3089 |
| Permissible front axle load | kg | 1417 |
| Permissible rear axle load | kg | 1672 |
| Subject to technical modifications! | ||
EU Declaration of Conformity
We hereby declare that the machine described below complies with the relevant basic safety and health requirements of the EU Directives, both in its basic design and construction as well as in the version put into circulation by us. This declaration shall cease to be valid if the machine is modified without our prior approval.
Product: Sweeper
Type: 1.186-xxx
Relevant EU Directives
2006/42/EC (+2009/127/EC)
2014/30/EU
2000/14/EC
Applied harmonized standards
EN 60335-1
EN 60335-2-72
EN 55012: 2007 + A1: 2009
EN 61000-6-2: 2005
EN 62233:2008
Applied conformity evaluation method
2000/14/EC: Appendix V
Sound power level dB(A)
Measured: 94
Guaranteed: 97
The signatories act on behalf of and with the authority of the company management.
H.Jenner

S. Reiser
Chairman of the Board of Management Director Regulatory Affairs & Certification
Documentation supervisor:
S. Reiser
Alfred Karcher SE & Co. KG
Alfred-Karcher-StraBe 28-40
71364 Winnenden (Germany)
Tel.: +49 7195 14-0
Fax: +49 7195 14-2212
Winnenden, 2018/09/01
Consignes generales. FR 1
www.kaercher.com/REACH
Garantie
2006/42/CE (+2009/127/CE)
2014/30/UE
2000/14/CE
71364 Winnenden (Germany)
Tel.: +49 7195 14-0
Fax: +49 7195 14-2212
Winnenden, 2018/09/01
www.kaercher.com/REACH
Garanzia
2006/42/CE (+2009/127/CE)
2014/30/UE
2000/14/CE
Chairman of the Board of Management

Director Regulatory Affairs & Certification
71364 Winnenden (Germany)
Tel.: +49 7195 14-0
Fax: +49 7195 14-2212
Winnenden, 2018/09/01
www.kaercher.com/REACH
Garantie
Product: Veegmachine
Type: 1.186-xxx
Chairman of the Board of Management

S. Reiser
Director Regulatory Affairs & Certification
71364 Winnenden (Germany)
Tel.: +49 7195 14-0
Fax: +49 7195 14-2212
Winnenden, 2018/09/01
www.kaercher.com/REACH
Garantia
2006/42/CE (+2009/127/CE)
2014/30/UE
2000/14/CE
Chairman of the Board of Management
S. Reiser
Director Regulatory Affairs & Certification
Responsible de documentacion:
S. Reiser
Alfred Kärcher SE & Co. KG
71364 Winnenden (Germany)
Tel.: +49 7195 14-0
Fax: +49 7195 14-2212
Winnenden, 2018/09/01
protection do conductor . . PT 3
Avisos de seguranca sobre o
Carregar as baterias . . . PT 5
Funciomento. PT 6
www.kaercher.com/REACH
Garantia
Carregar as baterias
Ajustar o assento do conductor
FU 01 Fusivel principal 330 A
Chairman of the Board of Management
S. Reiser
Director Regulatory Affairs & Certification
71364 Winnenden (Germany)
Tel.: +49 7195 14-0
Fax: +49 7195 14-2212
Winnenden, 2018/09/01
GenerelleHenisninger.DA1
Miljobeskyttelse . . . . . DA 1
Garanti DA 1
www.kaercher.com/REACH
Garanti
Service after 50 drifttimer:
2006/42/EF (+2009/127/EF)
2014/30/EU
2000/14/EF
Chairman of the Board of Management

S. Reiser
Director Regulatory Affairs & Certification
71364 Winnenden (Germany)
Tel.: +49 7195 14-0
Fax: +49 7195 14-2212
Winnenden, 2018/09/01
Generelle merknader.. NO 1
Miljøvern .NO 1
Garanti . NO 1
www.kaercher.com/REACH
Garanti
Anvisining for avlossing
△Fare
Fare for personskade, fare for materiell skade!
Stille inn feiemnonsterbredde:

1 Justerskrue
Rengjore stovfilter manuelt
Apne sikringsholder.
Kontroller sikringer.
Skift ut defekte sikringer.
Merk: Sikringen FU 01 (hovedsikring) er plassert pa elektronikkabinett.
2006/42/EF (+2009/127/EF)
2014/30/EU
2000/14/EF
Anvende overensstemmende normer
EN 60335-1
EN 60335-2-72
EN 55012: 2007 + A1: 2009
EN 61000-6-2: 2005
EN 62233: 2008
Anvendt metode for samsvarsvduring
2000/14/EF:Vedlegg V
Lydeffektnivá dB(A)
Malt: 94
Garantert: 97
Chairman of the Board of Management
S. Reiser
Director Regulatory Affairs & Certification
71364 Winnenden (Germany)
Tel.: +49 7195 14-0
Fax: +49 7195 14-2212
Winnenden, 2018/09/01
AllmannaHanvisningar .SV1
Miljöskydd . SV 1
Garanti . SV 1
traffande fordonets transportSV 3
Sakerhetsanvisiningar be
www.kaercher.com/REACH
Garanti
71364 Winnenden (Germany)
Tel.: +49 7195 14-0
Fax: +49 7195 14-2212
Winnenden, 2018/09/01
Yleisä ohjeita FI 1
www.kaercher.com/REACH
Takuu
71364 Winnenden (Germany)
Tel.: +49 7195 14-0
Fax: +49 7195 14-2212
Winnenden, 2018/09/01
www.kaercher.com/REACH
Eyyunon
Mny TLeveTe to qIAtpo OKovns.
→PiV aTo KaBapuKa Ka TOn ouvtnpOn Tn OoKEUn, Tn avtkaTaoaOn EApntmuov n Tn eTaon oAaN Aetoupyia, Penei va aTeevpyoAnoe-TE Tn OoKEUn, va apapeote to Kaeidi KA va byalete to Boogu Tn mAtapiac n va aOnouvdeote Tn mataipia.
-Epyaoie ouvtipnnc kai anokataa onc emtpeneta va ekteoovta movo ano Eouoioobotneva ouvepyia evo npetno n cnaotov n ao Eeidekeupevo npooikto, to oioio exei EoikeiO-0ei 0e 0e tic onmuavtkic npodiypaqec aopaaiaac.
Ta npooapmozómeva ava tounoc eayyelambdaoka oxnmuata otokeivtaotov eleyxo aopaaeiaoc tou VDE 0701.
→ Σταθμεδσετο μηχανικό σαρωθρο σε επιδη επιφανει.
→ TupioTe to kλεδi tnc piαc ση Θεση 0 κai βγαλετο kλεδi.
Aopαλiστοτεχερóφρενo.
Kaθαρισμός
IPOZOXH
Kivuovs BaaBns! To kaheapiaa ts ou-keunc dev emptetai va yivea ie aotiXo n e pkaou vepou uwnis mieans (Kivduoc bpaxukkawatw n aaawn
Eoatapokc kaatapopoc noc oovnc
Kivovos
Kivuvoc tpaumaioul Opate paoka npootaiaacntnokovn kpiptateunik yuaia.
Chairman of the Board of Management

S. Reiser
Director Regulatory Affairs & Certification
YTEUVOG ESYPaPW TEKUnpiwns
S. Reiser
Alfred Kärcher SE & Co. KG
Alfred-Karcher-StraBe 28-40
71364 Winnenden (Germany)
Tel.: +49 7195 14-0
Fax: +49 7195 14-2212
Winnenden, 2018/09/01
Genel bilgiler TR 1
Cevre koruma TR 1
Garanti TR 1
Akesuarlar ve yedek parca-
lar. TR 1
www.kaercher.com/REACH
Garanti
Calismaya baslamadan once her gun
Akurj durumunu kontrl edin, gerekirse akuleri sarj edin (bkz. "Akulerin sarj edilmesi" bolum).
Supurme merdanesinde ve yan fircada asinma ve sarilmis bant kontrolu yapin.
Tekerlekleri bant sarilmasi aciisindan kontrol edin.
Tum kumanda elemanlarina ait fonksi-yonu kontrl edin.
Cihaza hasar kontrlu yapin.
Toz filtresini filtrte temizlemetusuyla temizleyin.
71364 Winnenden (Germany)
Tel.: +49 7195 14-0
Fax: +49 7195 14-2212
Winnenden, 2018/09/01
Chairman of the Board of Management
S. Reiser
Director Regulatory Affairs & Certification
Ipeed haayamop pa60tbl. .RU 6
3aФнсрOBaTb/OTnYcTnTbCTOHAHbI TopMo3. . . RU 6
IpeBnKeHne NOmTaHOuE MaunHb6e3 Co6tBeHOro npBOda. .RU 6
IpeBnKeHne NOmTaHO 电 MaUNHbC NOMOIOco6CTBeHHoro npNbOda.RU6
Hauano pa60tbl. RU 6
Obune yka3aHnRA 6
Pa60TbI npOBepKe nTexHn-ueckomy 6ocnyxNBaHHU RU 6
IpepeHauanpa60tbu. RU7
Yka3aHnno TcHexnke 6e3- onaChocn no o6paueHnO c aKKMyJrTopamn. .RU7 3apRkda aKKMyJrTopoB RU7
3KcIyatauRA 7
HaCTpOntb noIoxKeHne cn- DeHb BODHTeJI.RU7
Bb6op nporpaMMbl .RU 7
3anycnpnbopa.RU8
IpeBnKeHne Ha annapaTe RU 8
PoumetaHne RU8
OnopoxKnHb pe3epByap
Ira c6opa Mycopa. . .RU 8
BbikloueHne np6opa.RU9
TpaHcnpOpTuPoBka. RU 9
XpAHHe. RU 9
BbIOu n3 3KcNJIyaTauu .RU9
YxOaI TeXHnueckoe O6cIyKn-
BaHne RU9
Obune yka3aHnRA 9
Ynctka RU 9
NepnoDnHooCTbTexHueCKoro 06cIyKnBaHHa..
Pa60tbi NO TEXHnueckomy
06cIyKINBaHIO. .RU
PomouB B cnyae Henonaadok RU
TexHueckne daHHbIe. RU
3aBJIeHne O COOTBeTCTBn EU RU
#
IpeepnepBbIM npImeHneMeBaWero npnbopa npouHTaTe
3TyOpnHaIbHyIO INCTpyKUIO NO 3KcNlIy-atauIN, NocNE 3TOrO DeiCTByTe COOTBeTCTBeHHO nCOxpaHnte ee IJRA DaIbHeJWe-TOIb30BaHnI INI dJIa CNeDyUoJero BlaJeBua.
06üne yka3aHn
Ppi O6hApUxKeHn BO BpeM paCnakOBbI-BAHHa annapaTa NOBpeKdEHN, NOnyHeHbIX B pe3yNbTaTe TpaHCnOpTnPOBKN, CNeDyET HemeIeHNO ObpaNTbcraB ToproByo opraHn3aCuNIO, PpOaBswuO Bam DaHHoe n3dene.
-
PpeynpeIteNbHbIe N yKa3aTeNbHbIe TaBnUKn, npKpEnJIeHbIe K np6Opy, CoepKAT BaJHyIO INΦOpMaUIO, Heo6xOdMMyIO IIN 6e3OnaChOH 3KcNlNyatauPi6opa.
-
Hapnyc yka3aHnMn no TeXnke 6e3Oanachoctn, coepxkaunmncB pykoBOCTBe nO kcnIyataun, Heo6xoIMMo TaKKe cO6nOdaTb o6uue NoLoKeHnra 3aKOHOdaTeNbCTBa nTO texHnke6e3OnacHocTN n npedOTbpaueHnHeCCHacthblxCnyaeB.
3aunTaOkpykaIouee cpebl

YnakOBOuHbI MaTePnaJIbI npIroDnbl IaB TOpUHoi nepepa60TkN. PoxkanyIcTa, He BbIbpaCbIBaIte ynakOBky BMeCTe C bItOBbIMN OTXdAMn, a cdaJte ee B ODNH N3 NyHKTOB pInema BToPHORo CbIpbra.
CTapbIy yctpoiCtBA coedepeKaT
eHHbIe nepepa6aTbIBaEmbIe
MaTePnJIbI, NOJNEXKaUNe nepe
daue B NYKtbl PnEMKn BToPnHoro cbIpBra. N30TMy yTuNJn3n-pynte nX Ypee3 COOTBeTCTByIO
uine CNCTeMbI PnEMKn OTxOIOB.
BaTapeN,Macno,TOnnHBO nNoo6hble MaTePnaIbI He DoJXHbI NOnaIaTb B OkpyKaIOUyO cpey.3Tu MaTePnaIbI Heo6xOIMO yTNJIN3npOBaT Hepe3 COOTBcTByIOUne CnCTeMbI C6OpHbIX NYKTOB.
HCTpyKnno npmHeHHIO KOMHOHETOB (REACH)
AkybHbCBeEHNOHTax npBHeHbHa Be6-y3ne no CneDyUoEmy aDpecy:
www.kaercher.com/REACH
Fapantna
B KaJdo CTpahe DeIcTByOT COOTBETCTBeHHo rapaHTnHbIe ycNoBna, n3DaHHbIe yIOHOMOeHHo opraHn3aIue n c6bItaHaWe npOdyKuNN B daHHo CTpaHe.Bo3MOxHbIe HncnPabHocTn np6opa B TeueHne rapaHTnHoro Cpoka Mbl yCtpaHReMBeCnPaTHo, ecN npUHa 3akHouaetcB DeΦeKTax MaepnAIOB nnn Own6kax npn N3rTOBJIeHN. B Cnyae BO3HKnHOBeHHnnpTeH3n B TeueHne rapaHTnHoro Cpoka npoc6ba Obpaatbc, mEner npn Ce6e YekO NOKynke, B ToproByO opraHn3aIcu, npDoBa7yU BAM np6Op nIN B 6bnXaIwYU yNOHOMOeHHyO cnjKy6 cypBnCHoro 06CnyKBaHn.
Data Bbinycka OTo6paxaetcHa 3aBODcko Ta6nue K 3aKoNDPOBAHOM BnDE.
Pn3OMOTdIbHbIeUHpbl HMeIOT cnedyIOoe 3HaueHHe::
Приимер: 30190
3 roBbInycka
0 cToJeTHe BbInycka
1 DecraTnneBbInycka
9 BTOPAIcpa Mecaa BbInycka
0 nepBaIuΦpa MeCraa BbInycka
TakIM 06pa3OM, B daHHOM npImpe KoD 30190 O3Haayet DaTy BbInycka 09/(2)013.
PnHaIeKHOCTn 3aIacHbIe Detanu
ONACHOCTb
Bo u36exaHue onachocmu, pemohu ycmaHOky 3anaChbix demaneu donxHbI bInolnHmbl monbko aemopuzupoaHHbI cepeuchbI ueHmpbl.
-Pa3pewaaetcnaCnoIb3OBAt bNckIIOuHTeIbHO Te npHnHaJIeXHocTn 3anaChbIe DeTaII, nCNOJb3OBAHne KOTOpbIX 6blNo OIO6peHo N3rTOBHTeIeM. IcnoIb3OBAHne opunHaJIbHbIX npHaJIeXHocTei oPunHaJIbHbIX 3anaChbIX DetaneI rapaHTnpyET Bam HndExKHyO pa60Ty np6opa.
-Даьншую Инфорmaцию 0ЗанчacTЯxBblandeTeHa caTte www.kaercher.comВраздene Service.
CnmboJIbBpykoBOdCTBe no 3KcnnyatauH
ONACHOCTb
Ppeynpexkaem o apo3aue onacHo cmu, komopam MoKem npueecmu K mKeJbIM yBeyam UNU K Cmepmu.
△PENDUNPEKDEHNE
Ipeynpexkaem 603MOxHou nomenu aIbHO onaCHO cumyaquu, Komopar moKem npueecMu K mXeJIbIM yeeYbM unU K cmepmu.
OCTOPOXHO
Yka3aHue omHocumelbHO 603MoXHoNo meHuaIbHO onaCHO cumyaquu, KOMopar MoKem npuecmu Kne2kum mpaemam UU noBney MamepuanbHbI yuep6.
BHIMAHHE
Yka3aHue omHocumelbHo 603MoXHO noMeHuaJIbHO onaCHO cmyauu, KOMopaJ MOKem NOBJeB MamepuJIbHi yuep6.
CmMBOJIbHa npn6ope
AkkymyIaTOp 3apJxHnHAnIOBnHy.
- INHINKATOP eMKoCTN aKKyMylTopa B KpaCHOH oBnactn:
AkkymyIaTOp noTu npa3pJxKeH. NOpMeTaHHe BCKope aBtOMaTHueeKn IpeKpaauaetc.
-KoHTpOJIbHnaIaMnOuKa rOpNT KpaCHbIM UBEtOM
AkkymyIaTOp pa3pIKeH. NOpMTeHne aBTOMaTnueckn npeKpaUaetc (PpOdoJIkeHne pa60bI NobopoTHoro arpeRata BO3MOxHO TOJbKO nocJIe 3apIKn aKKymyIaTOpa).
B 3TOM clyuae annapat cneyet Ha-npaBnTB K 3apAHOH CTAHUN, H36eray npN 3TOM NOBEMOB.
3apAaTb aKKyMnyTOp.
3Kcnnnyatauia
Hactpontb noJoxeHne cndeHbB BOIDNTeJI
→ NotarytB CTOPOHy pbIar perynipOBKn CnDEHbI.
→ IpeaBnHyt bCnDeHbe,OTnyCTnTb pbIyar n DaTb emy 3aФNKCuPOBaTbCra.
→Перемшеним сиденьь впешd/надлpoверпь erо Фкcaцю.
Bb6op nporpammbi
1 TpaHcnpTnpoBka
2y60pka noMetaaUIM BaON
3ПоДметанeсипьзованeМоДmetаюцeroВалибokobвixцetOK
3anyck npn6opa
Yka3aHne: AnnapaT OChaSeH KOHTAkhBIM nepeKInOuHaTeJem CnDeHb. PpN BCTaBaHN C CnDeHbB BoNTeJra annapaT OTKnIOuHaETcR.
3aHbMeCToB CnDeHbe onepaTopa.
→ IpebeCTn IpeekIIOUaTeJIb HappaBJIeHnIg DINIXeHnB CpeDHee NIOLOXeHne.
3aФнксypyTe cTOrHouHbI TOpMo3.
BCTaBnTb KIOUy B 3AMOK 3aXnIraHna.
→ NObepHyTb KInOu 3axnraHnB NoIooKeHne,I". YcToPocTBo roTOBO pa6Ote.
→ПовернгьклочахоганьВпложене"II". YсторCTBO rOTOB K nepemeцhenIO. Yka3aHne:ИнdkaTop eMKoCTn aKkyMyJrTOpa OTo6paxaet paKTNUeCKoe COCTOHRHe 3apra c 3aepxkoB 10 ceKyHd.
IpepeBnkeHne Ha annapaTe
→ NpebeBcTn nepeKIOUaTeJIb nporpaMM B noJoxHeH "TpaHCnpTupOBKa"
→ HaxaTb N ČepXaTb HaxaToi NeaJIb TopMo3a.
OTnyCTIe CToHouHbI TOPMO3.
PepedBnKHe Bnepe
IpeeknquateIb HnpaBHeHnI DnHexeHnHaXoDntcB nIoXeHn "BpeE".
→Плавно нажать на петаль akceпера-topa.
IpepeBnxKeHne Ha3a
Onachocmb
Onachocmb nonyuehura mpaB!Ppu e3de 3aHUM xOoM He doJxHa co3dabmbc onachocmb dner dpyeux luu, npu Heo6xodumomcmu, ux Heo6xodmo npedynpe-dumb.
OCTOPOXHO
Onachocmb nopekdeHura!peeknouamemb hnpaeneHua dbxueHua pa3pwaemcakmueupoabmb monko nocne ocmahOBku ycmpoucmea.
IpekeKIOUaTeIb HApBaJIeHnIy DBrJKeHnI HaxOuNTcB NpIoXeHnI "Ha3aD".
→Плавно Нжаь Ha Neдалb akcepepa-topa.
XapakTeP DvIXeHn
- C nomoBIO neaann akcepepatopa BO3MOxH0 beccTyneHuatoe peylnpoBaHHe CKOpOCTn DnKHeHH.
- CnEnyETn36eRaTb pe3KOro HaxaTna Ha neJaI, TAK KAK B 3TOM CnUyae RnDpaBnueckKa CnCTema MoXeT NOyUHTb NOBpeXdHeHne.
TopMoxeHne
→Пи OTnyckaHn NeDAJI N DBIXeHn annapat ABTomATUeCKN TOPMO3NTcN OCTaHaBJIbAeTCr.
Yka3aHHe: DeIcTBne TOPMo3a MoKHO yCNJIHTb, HauKaB Ha HOKHOI TOPM03.
PpeoJoIeHne npenTCTBn
ПпeoДоЛени HeNoDnKhBIX npeЯTcTbN BbICOTOn Do 70 MM:
→ПpenЯTCTBnA CNeDyET npeoJoneBaTbOCTopoKHO,BO BpEmA DBNKeHnBnPeIHa MeDJIeHHo CKOpocTu.
PpeoOJIeHHe HEnoDBNXhBIX npenrTCTBn BbICOTOn CbbIwe 70 MM:
→ PnOo6HbIe npenTCTBna CneJeYe TpeOdoNeBaTb ToIbKO C NcNoIb3ObaHHeM PNOxOJaUe paMbl.
IopmetaHne
OCTOPOXHO
He donyckamb nonadahu 8 Maunhy ynaKoeyhbx Iemn, npoeonoku u m.d., mak KaK 3mo MoXem npueecmu K noepexdeHuo NODmemaUoeseo MexaHu3Ma.
Yka3aHHe:ДЯdoCTNXeHNOITMmaIbHO-rope3yIbTaTapa6oTbHEo6xOIMOCopa3MePApTbCKOpOcTBDbXeHnCMeCThblMN yCIOBnAMN.
Yka3aHHe:BoBpempa6oTbCneDyET pe-nyraPHO OuHaTaBΦnIbTp DnIbIIN.
Iopmetahne cyxoro nona
BKNIOHTbHaHHeTaTeJIb.

→Пи ПОметан И NOBepxHOCTeI nepeBecTN IPOrpaMMb BbIKIOUaTeIb BpeKIM ПОметанИСИСПОЛБ3OBAHnEM ПОметаTOOero BAJa.
→Пичстke каeBпepeBecTu nporpaMMbI BbIKHQuaTeJIb BpeKIM NOMeTahnI C NcONb3OBAHNEM NOdMetAOUero BaJauN6OKOBbIX UeTOK.
IopmetaHne BnaXHoro Hn MOKporo nona
BbIKIOHTbHaHHeTaTeNb.
→Пи ПОметан И NOBepxHocTe NepeBecTN PpOgPAMMHy BbIKIHyoAteIb BpeKIM ПОметан C INCNoIb3OBaHnEM ПОметаTOUeBOBaIa.
→ Pn uCTke kpaeb npeBecTu nporpamMHb BbIKIOaTeJIb B peKIM IOdMe
TaHnC NcONb3OBAHNEM IOmMeTaHO ⅢeRO BAAu 60KOBbIX UTeOK.
OnopoxHnTb pe3epByap dna c6opa mycopa
Onachocmb
Onachocmb nonyuehura mpaB! Bo epemya danaenura codepkumoo u3 peepuyapa dna c6opa mycopa 8 30he e2o deuxehure He doxkhbl haxodumbcra JIOU u XueomHbIe.
Onachocmb
Onachocmb cdaBnueaHua! He dompaau bambcdo pbyuaxHo2o MexaHu3Ma onopoxhnoe2o ycmpoucmea pe3epeyapa. He cmoryb noD noDnHaMb im pe3epeyapom.
Onachocmb
Onachocmb onpokubibaHua!Bo epem ydaenu codepkumoo u3 peepsyapa dna mycopa annapam donxhen haxodumb cHa poHoI noepeXhOcmu.
→ ΠepeBecTn nepeKJIIOUaTeNb nporpaMM B noJoxHeH "TpaHCnOpTnpoBka"
→ PnnoHnTb pe3epByap dna c6opa mycopa.
MeHnHO noDbexaTb K pe3epByapy dna c6opa nblnn.
3aФИКСИРУTe CTOrHOUHbI TOpM03.
OTkpbTb KpbIuKy pe3epByapa:HaKaTb nepeKlnOuateBnBeBO nOnOpOxHtB pe3epByap dna c6opa Mycopa.
3aKpbTb KpbIuKy pe3epByapa:HaKaTb nepeKnOuChaTeNb BnpaBO(ydEprXnBaTb B TeueHHe np6I.2 cekyH)do qnkcaUIN B KOHcBOM NOLOKeHHN.
OTnyCTnTe CTORHOuHbI TopMo3.
MeDneHNOOTbExaTbOTpe3epByapa dna c6opa nbln.
Onyctntb pe3epByap nIa c6opa Mycopa B HauaJIbHoe NIOXKeHne.
BbikloueHne np6opa
→ HaxaTb n ārpXaTb hαxatōn peānTb Topmo3a.
3aФнксypyTe cToRHOHbI TOpM03.
KJIIOU 3aJrHaHnI NOBepHyb B No3N- UIO "0" N BBtAunTb erO n3 aMka.
TpaHcnpTnPOBka
△ONACHOCTb
Onachocmb nonyuenu mpaum u nopejdehu! Ppu mpancpmupoeke cneyem obpammb bHumaue Ha eec ycmpoucmea.
→ Klnu3aKnraHnIOBepHyTb BNo3nUHOo"0"N BbTaunTbe 13 3aMka.
3aФнксypTe cTOrHouHbI TOpM03.
→ PπκκρεπηMbγcτροιCTBO K yctOιηHbIM Mecṭam KpeπΠeHηra (4 wt) C nOMΟύβo HataχXBix pεmHe, TpOCOB nII ΚeNe.
3aФнксрOBaTB annapaT, noДLoXnB nOД erO KOJIeCa KInHb.
→Пипеське annapataВ trpaHcnopTHbIX CpeCTBax CNeDyET YUHTbIBaTbDeIcTBYIOJIne MecTHbIe TOCyApCTBeHHbIe HOpMbI, HanpaBJIeHHbIe Ha 3a-NTy OT CKONBXKeHЯ NOnpOKnDbIbAHNIA.
XpaHeHne
ONACHOCTb
Onachocmb nolyeHu mpaem u nopeXdenu!Ppu xpanehuu cneyuem obpammb 6HMaHue Ha eec ycmpoucmea.
BbIbOuN3 3KcnJyataun
Ecni noJmetaIOUma MaUNHa He IcNoJIb- 3yETcB TeueHne DInTeNbHO BpeMeHN, CNeDyET CO6NIOaTb CNeDyIOUne NYKtbl:
→ NocTaBnTb NOmTaIOUyMoAunHy Ha pOBHoi NOBepxHOCTN.
→ ΠepeBecTn nepeKIOuOaTeIb npoPpAMM B noloxHeH "TpaHCnpTIpOBKa"
→ Knou 3aKunraHn noBepHyTb B no3n- uo "0" n BbTaunTb ern 3aMka.
→ПинЯть Меры пotин БирпзВьнь-HORO KaueHnnoTmoTeaOuSei MaunHbI.
OuHCTnTb NIOMeTaHOU MaUNHy CHAPyKIN BHYTpN.
→ NocTabnBb annapaT B 3aunuHHom n CyXOM MecTe.
→ N3Bneueb wTeKepe akKMyJrTopa n3 Ma- uHHbl.
→ AkkymnyTop cneIyET 3apAITb, a 3aTeM 3apJkaTb np6JI. KaKdIbe IBa MeCya.
YxOuN TexHnueeCKoe 06cnyXnBaHne
06uyeka3aHn
OCTOPOXHO
Onachocmb nopekdeHnra!
Ibineooufunbmp HeHyxho npombieams.
→ PeneO ouHcTKoN I npOBeHnEM TexHmueckoro 06CnyKnBaHnI npBopa,3aMeHbI DeTanei NnH NaCTpOKnHaDpyrHe FyHKuN nPnBop CneDuYET BblKNIOHTb,BbIHyTB KNOU3aXnraHnNn3BJeB aKKMyJrTOHpHbI WTeKepeNNOTCOeHNHTb.
- PpOBeHnEM pEmOHThbIX pa60t pa3pe7aetcra 3aHIMaTbcra TOnbKO aBTOPI3OBaHHbIM cepBNCbIM ueHTpaM, ININ CNEuHaJIncTAMN B 3ToI cPepe, KOTOpPbIE O3HaKOMNeHbIC COOTBETCTBYIOU
Mn npedncaHnMa npaBJI TexHnKn 6e3oNaCHOCTN.
-Передвикныеnpomblшнныпрбopь npoxoДТnpobepky6e3onachocTN corlachoVDE 0701.
→ NocTaBtB NOMaTeaIOUyIO MaUNHy HApOBHOn NOBepxHOCTN.
→ KJIIOU 3aXnIraHn I NOBepHyb B N03N UHO "O" IN BBItauNTb ERO n3 3AMKa.
3aФнксypynte cTOrHouHbI TOpM03.
UncTka
OCTOPOXHO
Onachocmb nopekdeHua! He pa3pewa emcya uucmmb npubop u3 6o0HOO 7uHa2a unu cmpye b0bI nod 8bcOKUM daJIeHueM (onachocmb Kopomko2o 3aMbkaHua u dpyux nopekdeHu).
UcnTka annapata n3Hytpn
Onachocmb
Onachocmb noJyehua mpaM! Hocumb 3aumHyIO Macky npomue nbiu u 3aumHbE Oku.
→ Ptopeptb annapaT rpankO.
O6nyb annapaT CkAteIM BO3dyxOM.
Hnctka annapapa Chapykn
OuHCTnTb annapaT, nCNoB3yA DnA 3TORO BnaXhHyTO TpRkKy, npOniTaNHHyIO MRAKIM UeJIOUHbIM pACTBOPOM.
Yka3aHne:IcnoJb3ObaHne arpeCCNBbIX MOUm CpeDCTB He DonyckaetCra.
PepnoDnHocTbTexHnueckoro 06cnyKuBaHHa
Yka3aHHe: CHTyHK pa6OuHX yacOB COo6- ⅢaET O MOMeHTe npOBeHnro 06cnyKnBa-HNIA.
Texnueckoe 0cbnykBaHne, OcyuectBJrEmoe KHeHTOM
Yka3aHHe: Bce pa6oTbI no TEXnueckomy 06cIyKuBaHNIO CO cToPOHb KIneHTa DOJIHXbI IPOBOIDITcB KBAINΦuNpOBoAHHbIM CneUAnlntOM. B cNYaee Heo6xoNi-MoCTN B JIO6OI MOMEH MTXHO O6paNTbC 3a NOMOUsbIO B CNEUAN3nPOBaHHyTO TopROByO oprAhn3aunio fnpMbI Karcher.
EkeHeBHOeTexHueeCKoe 06cnyXnBaHne;
→ PpOBepntb MeTyuBn BaNk N 6OKOBIE UeTKHa H3Hoc HAnuHne HAMOTAB-UXCXJNEHT.
PPOBepntb HcnpabHoe COCTOHNBECEX JEMEHTOB YnpaBHeHn.
→ PpOBepntb np6op Ha npedmet nobpeXdEHH.
ExeHeIbHoeTexHnueckoe 06cnyKnBaHne:
OuHCTb rnpaBnueckm MacraHbI paHaTOp.
→PpOBepntb rnpabnueckyU yCTaHOB-ky.
PPOBepntb ypoBeHb Macna B rnpab-NNueckoN CNTeMe,
→ PpOBepntb ypoBeHb TOPMo3HOJ KIOCTN.
→ PpOBepNTb N3HOC yNIOHTnTeJIbHbIX HaKJaDOK, pN Heo6XoIMOCTn 3aMeHNTb
→Поверпьисma3аькршkype3epByapa.
TexHnueckoe 06cnyxBaHne n3HaunBaHOxxCy qacte:
3aMeHbYyNtHTeJIbHbIe IHaKn.
OTperpynpoBaTBnn3aMeHHTb6koBBIEyNIOTHEHNA.
3aMeHHTb NpMDMaTOUIN BaJ.
3aMeHHTb 60KOBbie 1eTkn.
Yka3aHne: Onncahne cM. B rnaBe "Pa60-TbI NO TEXHnueCKOMy 06cJIyKnBaHnIO".
Texnueckoe 0cnykBaHne, ocyuectBnme cepBnchOn cnky6o
O6cnyxnbHne yepe3 50 yacob pa6oTbl:
→ПювECTиперByIO Инспкцю пол.TexHnueckoroобсуЖиBaHЯ.
Texnueckoe o6cnykubHne yepe3 250 yacOB pa6oTbI:
→ PpOBecTN HcNEKUNIO Nocne TexHnueCKOrO 06CnyKINBAHN.
Yka3aHHe: Ira coxpaHHeH npaba Ha rapaHTnHoe 06cnyKbAHne BCE paOToI no TEXHueCKOMy INpOoHnAaKTNUeCKOMy 06cnyKbAHIO IN B TeUeHne rapaHTnHoro cPoka DOJIKNHbI pOBOuNTbcra YNoIHOmOeHHo CepBnCHoCnyKboΦnpMbI Karcher B COOTBeTCTBnC 6poWIpopo No TEXHueCKOMy 06cnyKbAHIO.
Pa60tblnoTexHnueckomy 06cnyKbAHnIO
Poirotobka:
→ NocTabNtB NOmTaHouMoMaHHy Ha pOBHoN NOBepXHOCTn.
→ KInOu 3aKnIraHn NOBepHyTb B No3nLIO "0" N BbITauNTb ERO H3 3aMka.
3aФнксуTe cTOrHouHbI TOpM03.
Obune cBeDeHnnoTexnke
6e3onachoctn
ONACHOCTb
Onachocmb nonyuhenmuBm! BCE2a npu nohramom pezepeyape dna c6opa Mycopa ycmahaenbambnpedoxpanemnHble omaeu.
1 DepeKaeIb npedeoxpaHHTeJIbHOJ 7TaHn
2IpeoXpaHnteJbHaJ uTaHa
OTKINHyTb HabePx npdeoxpAHNTeHHyIO WtAHry DnI ONOPOXHEHn NOIDHToro pe3epByapa N BCTaBnTbe B depXkATeN (npdeoxpAHNTeHbH)
3aMeHnTb aKkMyJrTopHbIe 6atapen OnycKaETc3aMeHa TOnbKO NOnHOro KOMnJIeKaTaNKKMyJrTopOB.3aMeHy pa3peWaeTCR OcyuectBnTb TOnbKO KBaJIuФnIPOBaHHOMy nepcoHaIy.
→ 13-3a 60nbwoRo Beca (Bec OJHOro akKymyIaTopa 545 Kr) 3ameHy cJeMyet npou3BOuNTb C npmuMeHeHem KpaHa.
→ПиВыИМаHIMnAKKMyIЯTopaBHaHaHaneCneJyEtO63aTeIbHoOTcoeHNHTbOTpuaTeIbHbI NOJIOC(-).
→ Pπκρεπηθb kρaσονθbile kaHaTbI K 4 net-NIAM KOMΠΕΚΤΑ ακχμMyΙΝΑΤΟρΗΧ δαταρει έΟCTOPOXHΟ Ι3ΒληυδακχμMyΙΝΑΤΟβΙ.
Yka3aHHe: 3apaHee ydaJIITb 6OKOBbie KpbIuKN.

PpOBepntb ypoBeHb ndoNTb Macno Dnra rnpaBnuecknx CnCTeM YBEOMJIEHNE
Pezepeyap dna c6opa mycopa He doJxeh 6bim npunoohm.
OTKpbItbKOxKyDnIraTeIa.
1 TnIpaBnIueckn MaCJIbHbI paIaNaTOp
2 CMOTPOBOE CTEKIO
3 KpbIka,OTBepCTne ⅡIaJIbKn MaCna
4 MaHOMEtP
5 BaK DnI rIpaBJIuYeCKOro Macna
6 PnpdooxpaHnteB FU 1 (rnaBnBn npde doxpaHnteB)
7 Kopnyc 3JNEKTOPOHHORO yCTPOINCTBA OTKpbBaTb pa3peWaeTc TOnbKO cneUmaNCTAM CEPBCHORO CEHTpa.
PpOBepntb ypoBHeh Macna B rnpabNueeCKO CNCTeME BCMTPOBOM OKHe.
- YpoBeHb Macna DoJxHe HaxoIITbcra MeKdy OTMeTKamn MIN" n "MAX".
-EcInypoBeHbMacnHaHnKeOTMeTKn MIN,DOJNTbMACNO.
OTKpyTntb 3anOpHyIO KpbIuKy OTBepCTNA DnRA 3aINVBKn MaCna.
OuHCTnTb 06JNaCTb 3aINBKN.
3aINMbMacNoDnIgdpabNuecknx CNTTEM.
Bud macna: cm. "TexHnueckne daHhble".
3akpyTntb 3anopHyKpbIuKy OTBepCTNn Dnna 3aJIbKn MaJna.
YBEVDOMNEHNE
Ecnu MaHomemp yka3bIeaem Ha noBbiweHue daBHeHua zuOpaBnueckozo Macna, Heo6xodumo o6paumbc8 cepBuChyocnyk6y Karcher no eonpocy 3amHeblmpa dner zuOpaBnueckozo Macna.
PpOBepntb rnpaBnueckyO yCTaHOBky
3aФнксуTe CTOrHouHbI TopMo3.
3anyctntb DnBraTeJIb.
Pemont rnpabnuecko yctahOBKn npOBOINTb TOnbKO C pNpBHeHEm cepBuCHOI cnykbbl qnpMb1 Karcher.
PPOBepnTb repMeTNUHOCTB BCEX 6e3 NCKJIIOUHeHnRAIpaBNIueCKNX IJNAHROB IN COEINHEHNI.
PpOBepka noDMetaoero Bana
→ NObepHyTb KInOu 3aXnraHnB nNoJoxeHHe J.
→ПОДнЯТьdoynopape3epeByapdЯc6o-paMycopa.
→ NObepHyTb KInOu 3aXnraHnB nNoJoxeHne O.
3aФИКСИРУТЕ CTORHOUHbI TOpMO3.
YctaHOBNTb npedoxpaHnteHbIe WtAHn dIy onopoxHeHHnoHrToRo pe3epByapa.
Ydannb c noMetaoUoero Bana HAMOTABWNEcA HeTbI BepeBKn.
BbHyTb npedoxpahntbHbIe WtAHn.
BcTaBnTb KInOu B 3aMOK 3aKnraHna.
→ NObepHyb KInOu 3aKnIraHnB NoIIOKe-Hne I.
Onyctntb pe3epByap dIra c6opa mycopa B hauanbHoe nnoxKeHne.
BbIKIOUHTbDnIaTeIb.
3aMeHa NOpMaTeAIOUeRo BaJa
1 Kpenexhbl BnHT depkaTeI noMeTaOuero BaJa
2 MeTyusn Bn
3 DepxkateIb noDMeTaOuIeRo Bana
4ПлоскаясторнашайббokoboroylnotheHn
5 BoKoboe yIyNoTHHeHne
OTKpbIb 60KOByIO nAHeJIb c NOMOJIbIO KIIHOa.
OTBnHTb 6apaKOBbIe raKn, pacno- loXeHHbIe Ha IIOCKoI CTOnOpHoi Wain6,OT 60koBOrO yNtOHEnHn CHaTB IIIOCKyIO CTOnOpHyIO Wain6y.
OTKINHyTb HApKy 60KOBOe yNIOtheHHe.
→ BbINHTnTB KpeneKHbI BNTH DepeKaTe- JI NOIMetaOero BAa NOBepHyTb HApKy npneMHoe yCTpoNCTBO.
BbIHyTb noDMetauBn BaI.
PacnoJoxKeHne noMTeaUoIero Bana npu yctaHOBe No HanpaBHeHIO DnIXeHn (BvD Cbepxy)
Yka3aHHe: Pn yCTaHOBKe HOBOr NOIMTeAIOUeBO Bana CNeINb 3a NONOKeHNEm UETINbI.
YcTaHOBnTb HOBm NOmTeaHou n BAn. Na3bI NOmTeaHooero Bana doJHK Hb COBnaCTb C BbICTyamn 6aHaHCupa.
Yka3aHne: Nocne yctaHOBKn HOBOr NOI-MetaKoIeR Bana HeobxOIMO CHOBa OTpeRyIINPOBaT NIOCKOCTb NOIMeTaHn.
PpOBepKa N KoppeKTHIpOBKa IIOCKOCTN NOMeTaHnA DnI NOMeTaHOUeBO Bana
→ПоверпьдавелhoeВшнх.
→ BbIKHIOHTb BCaCbIBaIOUIN BEHTUNIA-TOP
PocTabtB NOMTaHuy MaunHy H aOBbI rAdkn non, NOKpbTbB BmMbIM CNOEM bllnn MeHa.
YCTaHOBHTI nepeKlnHouaTeNb Ipo- rpaMM Ha NOmTaHHe C NcNoJb3OBAHnEM NOmTaIOUeBO Bana.
→ ΠepeBecTn nepeKIOHateIb nporpaMM B noJoxHeNc "TpaHCnOpTnpOBKa".
→ TaT a nnpaTy 3aHnXoJ.
PpOBepuTb nIOCKoCTb noDMaTHnA.
PpOΦnIb PNOMeTaHn DaONJKeH NmEeT BvD paBHomePHO npMoyrOJIbHnKa IuPnHOI 80-85 MM.
Otperyu npobatb uhpny npoepnna noDMetaH:
1YCTaHOBOUHbI BnHT
→ OtperynnpoBaTb noIoxKeHne npOphnna IIOMeTaHnpyTeM npeCTaHOBKn YcTaHOBOHOrO BuHTa.
PpOBepuTb NIOCKoCTb NOmTaHnA.
PpOBepKa N KoppeKTHPOBka npoФnna NOmTaHnA Dn8 6OKOBbIX UeTOK
→ PnnoHb6okOBbIeTkn.
→ NocTaBtB NOMMetaIooIyMoMaHHy HaPOBbI rJaDKn NoI, NOKpbITbI BUNMbIM CNoEM nbnn HmMea.
YcTaHOBnTb nepeKInOuAtenb npo- rpaMM Ha noDMetaHne C nCNoJb3OBAHNEM noDMetaIOeRO Bana N 60KOBoI ueTKN.
→PpnoHrB60KOBbIe 1eTKN.
YcTaHOBnTb nepeKJIIOuTeIb npo- rpaMM B NOJIOKeHne «DBrueKeHne»
→ DaTb annapaTy 3aHnH XoD.
PpOBepuTb NIOCKoCTb NOmTaHnA.
HpiHa npoqnna noMaTaHn DaonKha coCTaBnTb ot 40 do 50 MM.

OTperyIInpoBaTbNoIoxeHnePiOckoCTNIOIMetAHnC NOMOuBIO BByX yCTaHOBOUHbIX BNHTOB.
PpOBepuTb NIOCKoCTb NOmTaHnA.
YcTaHOBt6oKOBbIe yIIOITHeHn
→ Ποῦ ἡν Ḥ Bēvρ x pēεpByap dπλ σθρa Mycopa n 3aΦκηκηροBaT b C NOMOιbH npéoxpAHnteBHOHTaHn.
ONACHOCTb
Onachocmb nonyuhenmaPmB! Bceada npu noharnom pezepeyape dncbopa Mycopa ycmhaenbambnpedoxpahumelbHble wmaheu.
OTKINHyTb HabePx npdeoxpAHntelHyIO uTahry dIaONOPOXHeHnnoDHToro pe3epByapa N BCTaBnTbeB depXaTeNb (npdeoxpAHntelhbl)
1 DepeKaeIb npedeoxpaHHTeJIbHOJ uTaHn
2Ппeдoxphaнтельняштанra
OTKpbItb 6OKOByHnHaHeHb, KaK OINCAHO B rnaBe ,3aMeHa NODMeTaIOUeBOBana" Bblue.
Ocna6ntb 6 bapaKOBbix raeK ha 60-KOB0I IIOCKO CTOnOpH0I Wai6e.
Ocna6ntb3raa(SW13)Ha nepeDHei nIOCKoCToOpHoi 甲6e.
Hakimatb60kooe yIIOHTHeBHN3 (npoOnbHOe OTBepCTne) Do tex nop, noka erO kpaH He OKaKeTcHa pacctOraHN 1-3 MMOT nona.
→PnBnHTntb NIOCKyIO CTONOPHyIO WAn-6y.
→ NOBTOPNBnocneIOBATEJBHOCTbIa IpyoCtPOHbYcTPONCTBa.
BpyHyO ouHCTnTb hnIbTp dna nblnn
→ BbINOHNHTb YNCTKy FJIbTpa Dnra nbHIN C NOMOUsBO KONKn OYNCTKF NJIbTpa.
3aMeHa nIbeBOrO fHbTpTa △PENyPENKDEHNE
Hauana 3aMeHb nbIeoo pfunmpa ydaumb codepKumoe u3 peepsyapa dna cbopa Mycopa. Ppu paBome c pfunmpoBaHou ycmaHOeKOu Hocum Macky dna 3aumbo om nbu. Cobioaume npednucanu no mexhuke bezonacHcmu o omHoehuu obpaueHua C MeIKOu nbInbIO.

OTKpbItb 6JIOKNPOBky.ДЯ 3TOrO Heo6-XODIMO OTKpyTHTB BnHT C TOnOBKO B BnDe 3Be3Do4Kn.
OTKnHyTb KpbIuKy np60pa Bnepe
OTkpblkpbIuKyΦnBtpa.
OTKHyTb BCTpXnBaTeIb cHJbTpapBnepei.

3aMeHHTbNbJIeBOBΦnIbTp.
CHOBA3aKpbItb KpbIuKyΦnIbTpα.
3aMeHaJaMnblHakaJIbBaHnaΦapbl (onzur)
OTKpyTHTbapbl.
BbHyTbΦapbl N BblTaunTb WTeKepeHbipa3beM.
Yka3aHHe: 3anOMnHb noIOXeHne WTeKEPHOro pa3bema.
OTkpYntbapblpyrOtpyra.
OTKpyTntb Kopnyc faapbl, npn 3tOM DePkaTb Kopnyc rOpN30HTaNbHO, TAK KAK 6nok lambl He 3akpenneH.
Pa3XaTb cKo6y N BbHyTb NaMny HakaJIINBaHn.
BCTABnTb HOByIO JAMNOyK.
CHOBa co6paTb B 06paTHoN nocJeBOBATEJIbHOCTN.
3aemeHa nAMbI hakalnbHn yKa3aTeN NOBOPOTOB (onu)
Yka3aHne:ДЯЗамнБЯпamnaуka3aTeЯ NOBOPoTa BbIHyTb CTeKJIO N3 KOpnyca yka- 3aTeЯ.
3aMeHa npdeoxpahnteNei
OTKpbItb depkaTeIb npedoxpaHHTeI
PpOBepuTb npedeoxpaHnteHn.
HeicnpaBbIe npedoxpaHnten 3ame HHTb.
Yka3aHHe: YcTaHOBnTb npEdoxpaHnTeNb FU 01 (rnaBHy npeoOxApaHnTeNb) B Kopnyc 3neKToPHHOrO yCTpoNCTBa.
PpeoxpaHnteFNU14,FU15nFU16 HaxoJrTcBHyTpN KOpnyca 3neKtpoHHoro yctpOCTBa.BHMaHHe:OTKpbIBaTB KOpNyCn PPOBODHT 3ameHy ppeoxpaHNTeIe pa3peWaaTe TOnbKO yNoHOMOeHHBIM CNEuHaNTam CepBNCHO eHTpa.
Yka3aHne: IVcnoIb3ObaTb TOnbKO npEOxpaHHTeIN COnHaKOBbIM 3NaueHnEM.
NOMOUB Cnyae HenoJaOK
TexHnueckne daHHbIe
YpOBeHb MoUHOCTH 3Byka dE(A)
V3MepeHo:94
TapaANTnpo- 97
BAHO:
HnKEnoDnncabWnece JNuca DeiCTbYIO T OImeHN I NO DOBepenHNoT PpaBHeHna.
H.Jenner
Chairman of the Board of Management
S. Reiser
Director Regulatory Affairs & Certification
YIOJIHOMOueHHbI COTpydNHK IO BeDeEHIO DOKyMeHToobopota:
S. Reiser
Alfred Karcher SE & Co. KG
71364 Winnenden (Germany)
Tel.: +49 7195 14-0
Fax: +49 7195 14-2212
Winnenden, 2018/09/01
www.kaercher.com/REACH
Garancia
Chairman of the Board of Management
S. Reiser
Director Regulatory Affairs & Certification
71364 Winnenden (Germany)
Tel.: +49 7195 14-0
Fax: +49 7195 14-2212
Winnenden, 2018/09/01
www.kaercher.com/REACH
Záruka
2006/42/ES (+2009/127/ES)
2014/30/EU
2000/14/ES
2000/14/ES: Pflloha V
Chairman of the Board of Management

S. Reiser
Director Regulatory Affairs & Certification
71364 Winnenden (Germany)
Tel.: +49 7195 14-0
Fax: +49 7195 14-2212
Winnenden, 2018/09/01
Splośna navodila. SL 1
Varstvo okolja..SL 1
Garancija .SL1
Pribor in nadomestni deli SL 1
Simboli v navodilu za obrovanje SL 1
Simboli na napravi . . . . . SL 1
Namenska uporaba.. SL 2
www.kaercher.com/REACH
Garancija
V vsaki državi veljajo garancijski pogoji, ki jih doloca naše prodajno predstavnistvo. Morebitne motnje na naprvi, ki so posledica materialnih ali proizvodnih napak, v casu garancije brezplačno odpravljamo. V primeru uveljavljanja garancije, se z originalnim računom obrnite na prodajalca oziroma najblžiji uporabniski servis.
Pribor in nadomestni deli
NEVARNOST
Zadevne directives EU:
2006/42/ES (+2009/127/ES)
2014/30/EU
2000/14/ES
71364 Winnenden (Germany)
Tel.: +49 7195 14-0
Fax: +49 7195 14-2212
Winnenden, 2018/09/01
www.kaercher.com/REACH
Gwarancja
2006/42/WE (+2009/127/WE)
2014/30/UE
2000/14/WE
Chairman of the Board of Management

S. Reiser
Director Regulatory Affairs & Certification
Administrator dokumentaci:
S. Reiser
Alfred Karcher SE & Co. KG
71364 Winnenden (Germany)
Tel.: +49 7195 14-0
Fax: +49 7195 14-2212
Winnenden, 2018/09/01
www.kaercher.com/REACH
Garantie
Directive UE respectate:
2006/42/CE (+2009/127/CE)
2014/30/UE
2000/14/CE
Norme armonizate utilizezate:
EN 60335-1
EN 60335-2-72
EN 55012: 2007 + A1: 2009
EN 61000-6-2: 2005
EN 62233: 2008
H.Jenner Chairman of the Board of Management
S. Reiser
Director Regulatory Affairs & Certification
71364 Winnenden (Germany)
Tel.: +49 7195 14-0
Fax: +49 7195 14-2212
Winnenden, 2018/09/01
VseobecnePokyny SK1
www.kaercher.com/REACH
Záruka
2006/42/ES (+2009/127/ES)
2014/30/EU
2000/14/ES
2000/14/ES: Priloha V
71364 Winnenden (Germany)
Tel.: +49 7195 14-0
Fax: +49 7195 14-2212
Winnenden, 2018/09/01
Opé napomene . HR 1
Zastita okolisa .HR 1
Jamstvo .HR 1
www.kaercher.com/REACH
Jamstvo
U svakoj zemplji vaze jamstveni uvjeti koje je izdala naša nadlezna organizacija za distribuciju. Eventualne smetnej na stroju za vrijeme trajanja jamstva uklanjamo besplatno ukoliko je uzrok greka u materijalu ili proizvodnji. U sluceaju koji podlije ze garanciji obratite se, uz prilaganje potvrde o kupnj, Vašem prodavaču ili njblžoj ovlastenoj servisnoj sluzbi.
2006/42/EZ (+2009/127/EZ)
2014/30/EU
2000/14/EZ
Primijenjene uskladene norme:
EN 60335-1
EN 60335-2-72
EN 55012: 2007 + A1: 2009
EN 61000-6-2: 2005
EN 62233: 2008
H.Jenner Chairman of the Board of Management

71364 Winnenden (Germany)
Tel.: +49 7195 14-0
Fax: +49 7195 14-2212
Winnenden, 2018/09/01
Opste napomene. .SR 1
Zastita zivotne sredine. SR 1
Garancija .SR 1
Pribor i rezervni delovi . . SR 1
Simboli u uputstvu za rad SR 1
Simboli na aparatu. . . . SR 1
Namensko korišćenje SR 2
Predvidiva pogresna
upotreba. SR 2
Prikladne podloge . . . . SR 2
Sigurnosne napomene .SR 2
Sigurnosne napomene
vezane za rukovanje...SR 2
Sigurnosne napomene
vezane za voznju . . . . SR 2
Sigurnosne napomene za
uredaje koji se pogone uz
pomoć akumulatora . . . SR 3
Uredaji sa visinskim
pražnjenjem .SR 3
Ureadi sa zaistim krovom
vozačevekabine .SR3
Sigurnosne napomene
vezane za transport uredaja SR 3
Sigurnosne napomene
www.kaercher.com/REACH
Garancija
U svakoj zemlji vaze garantni uslovi koje je izdala naša nadležna distributivna organizacija. Eventualne smetnje na uredaju za vreme trajanja garancije uklanjamo besplatno, ukoliko je uzrok greška u materijalu ili proizvodnji. U slučaju koji podleže garanciji obratite se sa potvrdom o kupovini Vašem prodavcu ili najblioj ovlašćenoj servisnoj sluzbi.
Pribor i rezervni delovi
OPASNOST
U cilju sprečavanja opasnosti, popravke i ugradnju rezervnih delova sme izvoditi samo ovlašćena servisna služba.
Sme se koristiti samo onaj pribor i oni rezervni delovi koje dozvoljava proizvodač. Originalan pribor i originalni rezervni delovi garantuju za to da urežaj moze raditi sigurno i bez smetnji.
- Dodatne informacije o rezervnim delovima dobicete pod www.kaercher.com u delu Servis (Service).
Simboli u uputstvu za rad
OPASNOST
Ukazuje na neposredno pretecu opasnost koja dovodi do teskih telesnih povreda ili smrti.
UPOZORENJE
Ukazuje na eventualno opasnu situaciju koja moze dovesti do teških telesnih povreda ili smrti.
△OPREZ
Ukazuje na eventualno opasnu situaciju koja moze dovesti do laksih telesnih povreda ili izazvati materijalnu stetu.
PAZNJA
Napomena koja ukazuje na eventualno opasnu situaciju koja moze izazvati materijalne stete.
Simboli na aparatu
| Opasnost od opekotina na vrelim povrsinama! Pre obavljanja radova na urežaju treba sačekati da se izduvni sklop dovoljno ohladi. | |
| Radove na urežaju uvek obavljaje noseci odgovarajuće rukavice. | |
| Opasnost od prignječenja uvlacjenjem meū pokretne delove vozila | |
| Opasnost od povreda pokretnim delovima. Zabranjeno zahvatanje rukama. | |
| Opasnost od požara. Ne usisavajte zapaljene ili užarene predmete. | |
| Prihvatnik lanca i mesto oslanjanja krana | |
| Prihvatna mesta za autodizalicu | |
| Maksimalan nagib podloge prilikom vožnji s izdignutom posudom za prljavštinu. | |
| Dopusteno je savladavati samo uspone do 12% u smeru vožnje. | |
| Oprez od rotirajuće Četke (pazite na smer obrtanja). | |
| Upozorenje na opasnosti od elektrčnog napona! | |
| Obratiti pažnju! | |
| Polako upravljajte! | |
| Obavezno pročitajte uputstvo za rad i postupajte u skladu s njim! | |
| Opasnosti od oštećenja! Filter za prašinu ne sme da se pere u vodi. |
Namensko korijscenje
2006/42/EZ (+2009/127/EZ)
2014/30/EU
2000/14/EZ
Primenjene uskladene norme:
EN 60335-1
EN 60335-2-72
EN 55012: 2007 + A1: 2009
EN 61000-6-2: 2005
EN 62233: 2008
Chairman of the Board of Management
S. Belser
Director Regulatory Affairs & Certification
71364 Winnenden (Germany)
Tel.: +49 7195 14-0
Fax: +49 7195 14-2212
Winnenden, 2018/09/01
O6uynkaaHnB.G1
Ona3BaHe Ha okonHaTa cpe
da. BG 1
TapaunB .BG1
PpHaJaJIeXHoCTN n pe3epBHN qactn. BG
CIMBOJN Ha YnTBAHETO 3a
ynoTe6a BG1
CnmboHa ypea .BG1
YnoTpe6a no npedHa3nauHne BG 2
PpeBnDIma rpeuHa ynoTpe6a . BG 2
IopDxOJaHn HactnKn .BG2
Yka3aHnHa 6e3onacHOCT. .BG2
Yka3aHn 3a 6e3oNaCHOCT npn o6cnyXbaNe . . . BG 2
Yka3aHna 3a 6e3oNaCHOCT npn peKIM DnBxKeHne .BG3
Yka3aHn 3a 6e3oNaCHOCT 3a ypeiN 3aBnKBaHn OT BaTePnn .BG 3
Upei C BncoKo n3npa3BaHeBG 3
YpeDn CbC 3aUHTeH NOKpNB 3a BODaHa. BG 3
Yka3aHn 3a 6e30nacHOCT 3a TpaHCnOpTnpaHe Ha ype-da. BG 3
yka3aHnna 3a 6e3oNaChocT 3a NOdPbXkna NTexHuecko 06cnyKbaHe. . . . . . . BG:
ФУнкця BG3
Yka3aHn 3a pa3TOBapBaHe...BG3
O6cIyKbAsuNΦyHKUHOHaJIHN eJeMeHTn. BG 4
N3o6paXeHne Ha MaunHaTa 3a MeTeHe . . . BG4
O6cnyxbauo none .BG4
Функшонанн 6утон .BG4
KoHTpOHNnIaMnNnIuNc- nneB. BG 5 PedaJI. BG 5
Ipei NyckaHe B eKcNloaatauRG 5BIOknpaH/OCBO6OxJaBa-He Ha 3actonopraBaauTaCnnpaKa . BG 5
3aBnXBaHe Ha MeTaHata MaunHa 6e3 co6CTBeHo 3aBnXBaHe... BG5
3aBnKBaHe Ha MeTaHaTa MaunHa CbC Co6CTBeH XoBG 5
IyckaneBeknpoataun. .BG5 O6uynka3aHn. .BG5
KoHTpOHNn NOdIbpxkaUu nB
PpeDn nycKaHe B eKcnnoataunBG5
Yka3aHnna 3a 6e30nacHoCT
akymyIaTOPn .BG5
3apeJdaHe Ha akymyIaNTOpnte .BG6
Eknoataa.. BG6 Da ce Hactpon cdaikata Ha Boda. .BG 6
Ja ce n36epat nporpamn BG 6
CTapTupaHe Ha ypeHa..BG6
TbTyBaHe Ha ypeJa...BG 6
PexnM MeTeHe. .BG7
Da ce n3npa3n pe3epboapa
3a N3MeTeHOTO .BG7
I3KJIIOUeTe ypeDa .BG7
TpaHcnpr .BG7
CbXpaHHeHa ypea .BG7
Cnnpahe oEeknoatau..BG7
PnKn nnoDpBxka .BG7
06u yka3aHnB .BG7
Почистван. BG7
HHTepBaJIHaNoIpbXkaBG8
IeHIOCTn no noDpBxKkaT a BG 8
PmOu npn Heun3npaBHOCTN..BG 1
Texnueckn daHHN BG 1
ECIeknapa3a CbOTBECTBNE BG 3

IpeNnBpBOTo n3noTBAHe Ha Baunyaep npoTeTe TOBa
OpunHaJNo HnCtpyKUy 3a pa6oTa,
IeJCTBaIte CnopeHrero I rO 3ana3e 3a
IO-KbCHO n3n013BaHe nnn 3a CneDbauur
npTeXaTeJ.
06u yka3aHnA
Ako npa3oNaKOBaHe yCTaHOBnTe TpaHCnopTha NOBpeHa, yBeDoMeTe Mara3Ha, ot KOnTO CTe 3aKynnnypeHa.
-Ппдунрдгелнгteиуka3aTeHnHTe Ta6eJIKN Ha ypeDa Jabat BaxKn HanbTCTBn 3a 6e3onacha pa6ota.
-OCBEN yka3aHnraT B pBkoBOOCTBOTO 3a ekcnnoataun Tp6Ba Da ce cna3- Bat n O6uHTe HOpMaTHNBn npedncaHn 3a 6e3oNaCHOCT N npedna3BaHe OT 3IonoNykn.
Ona3BaHe Ha okonHaTa cpeDa

OnakobbHnTe MaTePnAIn MoRat da ce peuKnIpaT. Monr HeXBpIaIe OnakOBKnTe npn DoMaunHe OTnaDbu, a rnpedaIte Ha BTOpUHn CypOBHN CcEJI NOBTOHa yNtpe6a.
CTapnte ypeNi cbdbpKata CEHH MaTePnAni, NODIeXaUH a peZukInpaHe, KOITo MoT a da 6b-daT yNtpe6EH NOBtOHO. PopaTI TOBA MOJ OTcPaHraBaIte CTapnte ypeNi, N3NOJI3BaIKN NOxOJa3a 9eNTa CnCTeMn 3a cb6npaHe.
AkymylaTOPn,Macno,ropnBa nnoobHnHaTAX He 6nBa Da nnonaTaB OKoJHaTa cpea.MoJIy,niXbpyIe Te3n MaTePn-aJIy Upe3 POnxOJaUcCTEmu 3a Cb6paHe.
Yka3aHn 3a CbCTaBKnTe (REACH)
AkyaHa HOpMaun 3a CbCTaBKeTe Ue HaMePte Ha:
www.kaercher.com/REACH
Tapaanua
Bb BcKa cTpaHa BaKaT rapaHcIOHNHTe yCIOBn, Iy6IkyBaHn OT OToP3NpaHata OT Hac DnCTp6yTopcKa fnpMa. EBeHTy- aHn NOpeu Ha Baun ypeJe OTCpaHm B pAMKInTe Ha rapaHcIOHHn Cpok 6e3IIaTHo, Ako ce Kacae 3a DeEkeKT B MaTePnaJIte nn npn npOn3BOJcTBo. B rapAHCIOHeh CnyaH ce ObpHete KbM DCtPNbTyOpA nn Hau-6JI3KnO TOpU3NpaH cepBn3, KaTO npedCTabNTe KacOBaTa 6eJIeXkA.
PpHaIeKHOCTn pe3epBHN
actn
ONACHOCT
3a da ce u36e2ham ycnoxHHeHua, pEmohmume u MOhmaxa Ha pe3epHu yacmu Haypeda da ce u36bpuwam cmo om omopu3upaHua cepu3.
-Morat da ce n3non3BaT cAmo npnHaJIeXHocTN n pe3epBHN qacTN, KOnTO caNo3BOJeHN OT IpOuN3BOUInTeJIa. OpurnHaINHTe pnpHaJdNeXHocTN n opurnHaINHpe3epBHN qactn rapaHTnpAT cnrypHata n 6e3npo6nemHa pa60Ta haypeda.
-ДугИ Информuaи OTHOCH pe3epB-HNITeЧаNTMOKTeДЯ NOJUYITEHa www.kaercher.comВоблacrCEpBn3.
CIMBOJHa YnbTbaHTo 3a
ynoTpe6a
ONACHOCT
Ipeynpekdaaba 3a HenocepdeMeho ap03uoa onachocm, kOmo eodu do mexku meenechu noepdu unu do cmbpm.
△PENDEYUNPEKDEHNE
Ipeynpekdoaba 3a 6b3MOxHa onacha cumyaun, kOmo 6u MoZna da doeede do mekkmelechu noepdu unu cmbpm.
△PENEPA3JNBOCT
Yka3aHue 3a eb3MoXHa onacha cumya uua, kOmo 6u MoZna da doBeDe do neku meenechu nopeDu unu mamepuanHu ue Mu.
BHIMAHNE
Yka3aHue 3a eb3MOxHa onacha cumya- u, kOmo MoKe da doBeede do Mamepu- aHnHu ueMu.
CnmboHa ypea
Onachocm om u3aapnene npadu zoepu noBpxHocmu! Ppeu paobama no ypeda, ypebama ha aycnyxa da ce ocmaBu da ce oxnaDu docmambyno.

I3eBpuueaime paobomama no ypeda c noxdoxrau npbkaeu.
Onachocm om npuunpeane npadu 3akleueaHe mekdy noobuxhu acmu Ha npeo3Homo cpecm80.

Onapocm om hapahea-he npadu noobuxhu acmu. He sbpkaume eb-mpe.

Onachocm om noxap. He 3acmykaume zoepu unu mnee npedmemu.
| 3akpenbahe Na vepuza-ma / moyka 3a okuveane Ha Kpan | |
| Tochu 3a 3axbaanzahe Na aemomobunnua Kpuk | |
| Maksumalen haklonn Ha ochobama npu prudexk-eane c noeduzham pe-zepeoap 3a u3memeHo-mo. | |
| Ito nocoka Ha deuxkenue-mo da ce npemuHaba camo no haknohu do 12%. | |
| Bhumanue bvpmaiza ce yemka (cnaebaume noco-kama Ha bprmeHe). | |
| Ppeynpexdehne 3a onacno eeneKmpuecko napanpexhne! | |
| Cbplodabaeume yka3a-huemo! | |
| Unpaebnaeume b6aHo! | |
| Molra npouememe ynbmaeho 3a paBoma u deucmeaume cnped ne-zo! | |
| Opauchosc om noepeda! He muimefqumbpa 3a npax. | |
| YnoTpe6a no npedHa3NaChEne |
MaunHata 3a MeTeHe e npEbnHeHa 3a nouNCTBaHe Ha NIOBn NOBbpxHOCTn 3a npOMuJNeHa yNoTpe6a, HAnp. 3a CneHN- Te oBlaCTn Ha npNJIOKeHne:
napKnHn
PON3BODCTBEHN CNTEMN
JONCTUHN3OHN
XoTeJIH
TbproBnA
CKJaIOBNI3OHNI
TpoToapn
-Ta3n MeTaUHa MaUnHa e NpeHa3Ha-ueHa 3a MeTeHe Ha 3aMbpcEH NOBbpxHOCTN BbTpE HABbH.
- YpeBbT c npncnoc6bnHeNra 3a pa60-Ta npeHn3noJ3BaHe da ce npoBepu
3a 6e3ynpeHc bCTOAHne n EKCNIO-atauONHa CnypHOCT. Ako ypeBt He B OTMNHO cBCTOAHne, N3NON3BaHeTo My e 3a6paHeHo.
-3n0JI3BaIte Ta3n MeTaHa MaUHa CAMOBcBOTBETCTBHe CbC 3aJaHTe B HAcTOrAToO YNbTBaHc 3a EKcnPiOaTaLna.
-No ypeHa He Tp86Ba Da ce npednpne-MaT npomeHn.
- YpeBbTe nOxOJaIc Camo 3a OncaHITe B YnbTbaHeTo 3a ekCnNoatauia noKpTuI.
-Morat da ce MnHaba cAmo no nobbpx-HOCTn, N03BONeHN OT npednpneMaayu HNHEROBHTe yNbJHOMOeHN Nua 3a H3NOJ3BaHe Ha MaunHInTe.
-По пиинл вадк: Лесноалмпite MaTePnAaN Da ce bpxKat danehe otypeда (Опасноct ot ekcnno3na/ noxap).
PpeBnDmMa rpeHa ynoTpe6a
Hkora He n3mTaIe/3acMyKBaIte EKcNIO3BHN TeHOCTH, Bb3nJaMeHrE Mn Ra3OBe, KaTOn H He pa3peDeH NKeCENHn Pa3TBOpNTEn! KbM Tx npHaDnHexat 6eH3nH, pa3peDntEn 3a 60 nn Ma3yT, KOnTo npn 3abNxPHe C Bb3dyxa 3a BCMyKBaHe Morat Da o6pa3yBaT EKcNIO3BHN napu nn Cmecn, OCBeh TOBa aueToH, He pa3peDeH NKeCENHn Pa3TBOpNTEn, Tb' KATO Te aTakyBat n3NoJ3BaHnte 3a ypeDa MaTePnaJIn.
→ HNKORA He MeTeHe 3acMyKBaIte peakTNBn MeTaHn npaxOBe (HaNP. aNyMNHN, MaHcE3N, cHK) BbB Bp3Ka CbC CNJHO AKTNBn N KcEJI N NOuICTBaUN npenapTu O6pa3yBat EKcNIO-3NBn rA3OBe.
He n3mntaTe/3acMyKbAte ropaun nn Tneeu npedmetn.
YpeBt He e noDxoJa3a H3MnTaHe Ha onaCHN 3a 3dpaBeTo BeueCTBa.
3a6paHbBa ce npeToB onaChn 0bJaCTN.3a6paHeHa e pa6oTaTbBvB3pN-BOONaCHN NOMEeHn.
B3mHaTeO cbc Ce6e cn Ha npDpykaBaunn nua He ce Donycka.
→ CTo3n ypeHne eNo3B0JeHO N36yTBAHe/TeJIeHne HJIn TpaHCnOpTnpaHe Ha npedmetn.
PoaOaHnHaTnIKN
-AcdpaT
-Индустрпаини подове
-UMMeHTOBNIOOBe
-BeToH
- NaBeta
YkaaHna 3a6e3oNaCHOCT
Yka3aHn 3a6e3onacHOCT npn 06cnyXbaHe
→ 3a nodobpxkaHe Ha b3dyxa u nbmu-amaHa ymeuenok ypebmt He mpr6ea da ce u3noJ3ea Ha bucouHa 2000 Mempa had mopckomo paehuie.
(Baxu cmo 3a uHaHouA) Ako ype- dbm e o60pybaH c 2bKaae mpb6o
npo6o om PVC, He mpr6ba da ce u3non3ea npu hncu memnepamypu Ha 3ao6ukanuaama cpea (noo 0^ ).Ppu bynpocu omnocho Bauu yped, mojra, c6bpxe me ce Karcher.
Ypebmcnpucnocoblenhura3a pa-6oma npdeu u3non3ahe da ce npoeepu 3a 6e3ynpeuHc bcmOHue u eknnoamauONHa cueypHocm.Ako ype-0bme He e omnuHc bcmOHue, u3non3eaHem My e 3abpaHeno.
Da ce cna3aam yka3aHura ma 3a 6e3o-nachocm npu pa6oma c ypeda e onacHu 30Hu (Hanpumep Ha 6eH3uHocmaHuu). 3a6paHaHa p6omama 6be 63puoeonacHu nOmeueHua.
ONACHOCT
Onachocm om HapaHaehe!
He u3no13baumyepea6e3zauumen nokpu npomue naadu npedmemu 6 obnacmu,kbdemo cbueecmeyea 6b3- moxhocmma,obcnykeauam nepco Han da 6bde 3aceaHam om naadu npedmemu.
Ocbnykbaaomo nuce mpy6ba da u3- non3ea ypeda cnopep npednucanura. Ito epeMe Ha pa6oma mo mpy6ba da ce cbo6pa38a C OKoHume npedMemu u da eHmaea 3a mpemu nua u ocobeno 3a deua.
Tpy6ba da ce cnaeam och8ho Mep Kume Ha npednucnura, npabunama u npabunhuune, koumo ca bauo3u 3a MOMOPHu npee03Hu cpeocmea.
→Ppeu hauanomo ha pa6oma obcnyk eauomo nue mpr6ea da ce yeepu, ye ecuku 3auumHu npucno6neHua ca nocmaeHu npabunHo u fynKuoHupam.
06cnykeaumo nue ha ypeda e om-2o8opno 3a 3nnonyku c dpyaunu unu cmaxhomo umyuacemeo.
Ocbnykaaomo nuce mpa6ea da e c nIbMnO npupeHano o6neKnO. Hoceme 3dpaeu obyeku uuz6raBaume c6o-6odHomO o6neKnO.
→ПоьерьаUME npedu habnuzane (Ha- np.deua).Noaupxeme ce 3a docma-mbynaEuDumocm!
Ypeobm Hukoza He mpr6ba da ce oc-ma8a 6e3 had3op,dokamo Momopb m pa6omu.Obcnykaaomo nuce moke da Hanycka ypeda edea mo2aa,koama Momopbme yazachan,ypeobme ocayen npomue HnpeDhamepeHu obxekHua KIOUoyMe u3eadeH.
3a da ce u36e3e HeKOMnemehmHa ynompe6a Ha ype0a, da ce u3ea0u KIno4a.
Ypeobmmp6ea da ce u3non3ea camo om xopa, koumo ca obyuenu 3a ekc-nnoamauyma My u koumo ca doka3a-nu cnocobncmune cu 3a pa6oma C Hezo, u ca Hamoeapenu u3puHc u3- non3eaHem My.
To3u ypeD He e npedHa3haen 3a mo- 8a,da 6bde u3non3eah om luca (eknouumEnho deua) c opaHueHu fu3uuecku, ceHOpHu uyMcmeHu cnocobnocmu u lunca Ha onum U/Unu lunca Ha no3HaHua, oceeH akO me ca
nohada3opaHa om2o8aprao 3a mX hama bezonacnocm luue unu ca noIy uu om Hezo UHcmpkyu, KaK da u3 non3bam ypeda.
→ Deuama mpa6ea da 6bdam noD ha3Op, 3a da ce aapaHmupa, ye Hma da uapam cypeda.
PNEIa3NBOCT
Onachocm om yepexdahe! He uzmumaume lehmu, uhyoee unu men, 3aomome mozam da ce 3aueum okono memuaea
Yka3aHn 3a 6e3oNaChOCT npu peXMM DnKHeHne
ONACHOCT
Onachocm om HapaHaahe! Ipoeepem moeapohocumocmma ha ochoeama, npedu da npemuHeme no He.
ONACHOCT
Onachocm om 3Jnononyka, onachocm om hapaHraeane!
Onachocm om npeobpbuane npu mbpde 20JEMU HAKJIOH.
- No nocoka ha dbuxehuemo da ce npemuhaba camo no haknohu do 12%
Onachocm om npeo6pbuahe npu 6bp30 deuxeHue Ha 3aou (ocobeno npu 3aou hanaeo).
Ha 3aoume da ce kappa 6aBHO.
Onachocm om npeobpbuahe npu hecma-bunha ochoa. - Ypeobm da ce deuxu cmo Ha ykpeneHa ochoea.
Onachocm om npoeobpbuane npu mebpde 20JEM cmpaHueH HAKHOH. - HanpeuHo ha nocokama ha deuxkHeue da ce npemuHaam cmo hakIoHu do MakcumaHIO 10%
Yka3aHn 3a 6e3oNaChoc3a ypeN 3aDbXBAHNOT 6aTePnn
Yka3aHHe: TapaHIOHn IpTeHcIM MoRat Da CbIeCTByBaT CaMO, aKO I3NOI3BaTe npenOpbuaHnte O Karcher akymyNatopu n 3apAHN yCtpoiCTBa.
-He npemehno da ce cna3BaT yka3aHnra Ta 3a ekcnloatauHa npOn3BODnteHa akyMylatopa Ha 3apAHOTo ycTrooCTBO.Cna3BaIte npenopbKnTe Ha 3akOHdaTeJI npi 6obapeHc akyMylatOpN.
-Hnkora He octabnTe akymynatopnte Bpa3peDeHO CbCToHne,aTn 3apeTe OTHOBOBb3MOxHO Hau-CKOPO.
-3a n36rahe Ha 6nykaeun TOKOBe NOdIbpxKaIte AkyMylatOpnte BnHaHn YnCTn cyxN. Pa3eTe OT 3ambpcaBaHn, HnP.OT Metanen npax.
-He nocTabraIte HnctpyMeHTN Bbpxy akymylatopute.KbcO CbeDnHeHne n onachOCT OEKCNIO3N.
-B HnKaBcIyau He ce 3aHmBaaiTe B OTKPNT NnAmbK, He Cb3daBaiTe NCKPn I He NyuTe B 6JN3OCT Do aKyMaTApOp Nn B NOMeUeHne 3a 3apeXdA-He Ha akMyJatop. OnacHOCT OT eKcIIIO3nJ.
-Да He ce DoKocBaT ropeuTe YacTN, HApP. 3aDbuxBaU, MOTOp (OnaCHOCT OT n3rapAHe).
-BHIMMaHHe npi 6opabHe c KInCeJIHH 3a akymyIaTopn.Cna3BaIte cbOTBeHnTe npaBnIa No TexHnka Ha 6e3onacHOCT!
-3pa3xoDBAHnTe akymyIaTOPn Da ceOTCTpAHBaT ONa3BaMKn OKoHnHaTa cpeJa 3a OTnAbuCbIaCHO NpeKTHBnTe Ha EO 91/157 ENO.
UpeNi C BnCOKo n3npa3BaHe
ONACHOCT
Onachocm om HapaheaHe!
→ Ppu pa6oma nO bu6OKoMo u3npa3BaHe no8du2aUme doKpa pe3ep6oapa 3a u3Memehomo u zo ndcuayp8aUme.
→ N3eBpuEaume oBe3oNaCeaHemo Ha Onachama 30Ha cAmOmebH.
Ypei n c6c 3aunTeH nokpmb 3a BOda4a
YKA3AHHE
3aumnua m nokpu 3a 8oda a (onu) npednaa 3auma npomue no-eppu nada uacmu. Ypedume obaue He npednaaam 3auma npomue npoeobpuane!
EkeDHeBHO npoepeaume 3aumHua nokpue 3a nopeda.
Ppu noepeda Ha 3aumnna nokpu, cbuo u Ha omdeenu enememu om Heo,mpraea da ce cmehu eenuam 3a- uumeh nokpu.
He ce pa3pewasa KaKeamo u da e MoDudukauua Ha 3aUumHnue NOKpu6, KaKmo U nocmaeaHemo Ha pa3nHu om pa3peuHume om Karcher enemeHmu, KomnoHemu u Modynu, u moBa npu onpeDeJenuo bcmoemcmea opaanuHa yHKuaMaHa 3aUumHna NOKpu6.
Yka3aHnna 3a 6e3oNaCHoc 3a TpaHcnpOpTnpaHe Ha ypeDa
B3ememe nod eHumaHue meanomo 6e3 moaap (meano npu mpaHcnopm) Ha ypeo npu mpaHcnopmupahe c pemaKema unu camonemu.
3a mpaHcnpupaHe Ha ypeDa, u3- 8aXdaume uencena Ha akymynamopa u 3akpeneaume ypeDa hadekdo.
yka3aHnna 3a 6e3oNaChocT 3a NOdprbXkKa nTexHnuecko 06cnyXbaHe
→Ppeu noucmehe u noopbkaHa ypea,cmraHa qacmu un npemuHaBaHe KbM dpy2a fynkuua da ce u3knOyuypea u da ce u3eaDuKnioya.
Ppu ypeu c mpaKuoHeN akyMynamop npu eKaKeu pa6omu no nodpBka u peMoHm u akyMynamOpmbmpa da ce u3KnUoea om eJeKmuYeckama cucMeMa Ha ypea om Mcmomo Ha u3KnUoBahe Ha akyMynamopaa (ueencen Ha akyMynamopa).
Ppu pa6oma no eeneKmpuueckama ype6ba mpa6ea da ce omkau akymy-namopb.m.
3a cenma nppeo paKaYe me ompuamennu, ced moa noJoxumnHua nonloc.
NoomopHOMo cBp3eAne ce u38bpuea o6bamna nocneobamennocm.
Pbpco cBpxkeme nooxkumenHnua, cned moea ompuamennnnoIIOc.
He mprbaea da noucmeame ypeda c Mapkyu unu ceooha cmpyra nod hanahe (onacHocm om Kbco cbeDuHue unu om dpyu noepdu).
Pemohmu mprbaa da ce u3ebpuwam camo om omopuzupaH cepu3u unu om cneuauncmu 6 ma3u obnaom, Koumo ca 3ana3ham cuukn peDnucanha 3a cuzypnocm.
Da ce cna3ea npoeepkama e6e epb3ka cbc cuayphocmma ecbomeemcmue c eaunudume mecmhu paanopebu 3a CMeHau MuCmomo cu npomuunenHu ypeu.
→ N3eBpweaume paBomama no ypea c nodxodrau pu pkaauu.
Фунн
MaunHaTa 3a MeTeHe pa6oTu no npHUnHa Ha IOnaTata 3a MeTeHe.
-Bbptraunr Ce metraBnIpaaMpbcOTnTa DnpeKTHo B pe3epBoapa 3a N3MeTeHOTO.
-CTpaHnUHaTa MeTna NOuNCTBa brrInTe N KaHTOBeTe Ha NOBbPxHOCTTA 3a MeTeHE N H3npaUa MPbCOTnRA T B yIe HaMeTraUNBaJIK.
-ФИНЯТ npax ce 3acMyKbI npesФИн-Тьра 3a npax c nOMOuTa Ha CMyKaTeJI-NHЯ yNoBInTeJ.
Yka3aHnna 3pa3TOBapBaHe
Onachocm
Onachocm om HapaHraBaHe, onachocm om yepexkahe!
Ipu pa3moBapBaHe umaume nped bud meanomo ha ypeda!
TeTNO (be3 akymylatopn) 1398 kg* TeTNO (c akymylatopn) 2690 kg* Ako ca MOHTIpaHn npicTaBKn, TereIto e OoJe No-BvCOKO.
He n3noJ3BaIe BNIOBn TpaHcnpTbOpN.
→ Pn pa3TOBapBaHe Ha ypea n3non3BaHTe NOxOJaua paMa nIN KpaH!
→ПиИЗПОЛЗВанеHa paMaNa B3eMeTe NOД ВИМАнUE:
Cbo6oHNO MRCTo Ha noa 70 MM.
Ako ypeBt Ce doctab Bbpx naT, C npINOxKeHnTe Dbckn ce n3rpaXda pAMna 3a cnYcKaHe.
HCTpykUraCeHAMnpaHaCTpaHnua 2(BbTpewHaCTpHaHaKOpuata).
BaxHo yka3aHHe: BCa Ka Tpa6Ba Da 6bDe CbOTBeTHO 3aBnHTeHa c 2 BnHTa.
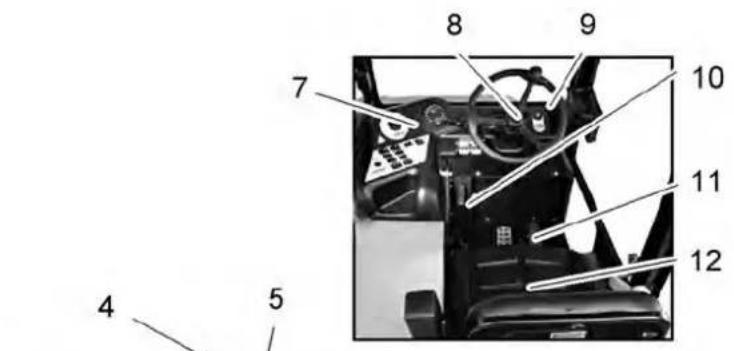
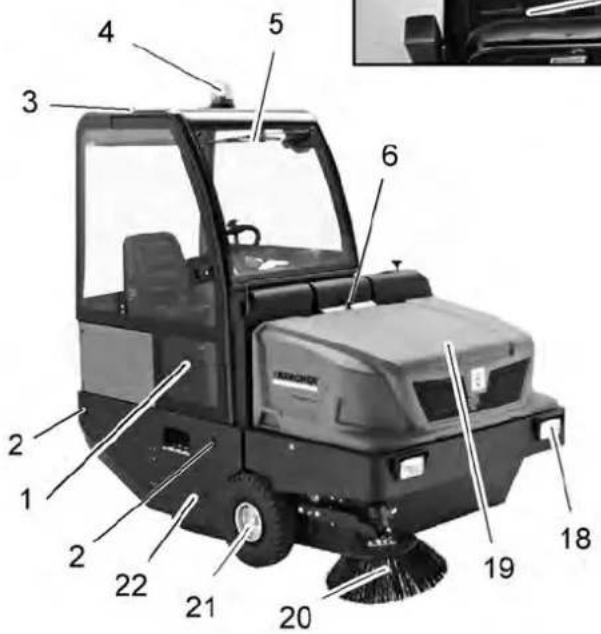
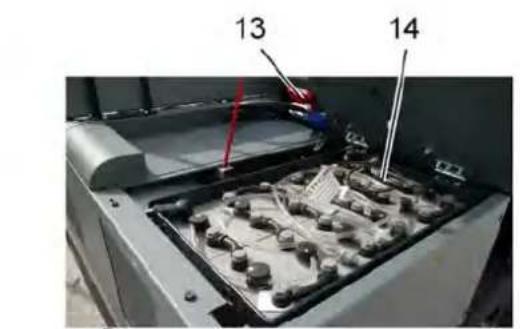
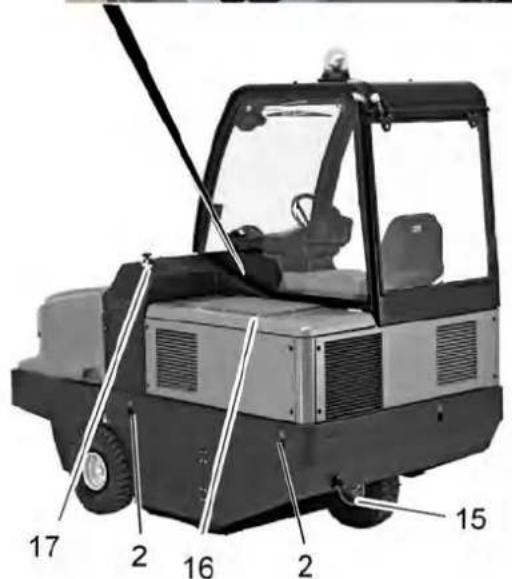
I3o6paXeHne Ha MaunHaTa 3a MeTeHe
1BpataHaKa6nHaT(aon
2ФИКСИРанaTOUka3a3aKpeNBaHc(4x)
3aunTeHnokpmb(onu)
4 AbapnHa lamna 3a cBeTeHe HaOKoNo
5 Ynctayn (onu)
6БлokировkaHaKaIaKaHaуpeДa
7O6cnyXBaAoo noJe
8Boln
93anaItepeH KJIIOU
10 3actonopbaa cnpauna
11 Pedianni
12 Cedaika (C KOHTaKTEN npeKbcBau Ha ceaJkata)
13 ΦencenHaakymyntopa
14 KomnneKT akymynaTOp 2x24V
15 3aHNO KOJIeNo
16 Kanak Ha DnurataTeia
17 Perynipane Ha MeTuaBnBnK
18 CnCTema 3a oCBetneHne (onLna)
19 Pe3epBoap 3a n3MeTeHTo
20 CtpaHnHmMeTn
21IpeHNO KOJIeNo
22 DoctbI Do MeTuaBaJIaK
06cnykbao none
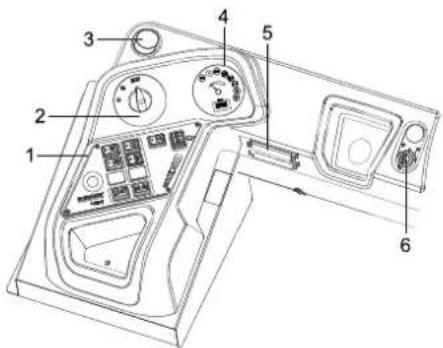
1ФyHKUHOHaJIHn6yTOHn
2IporpamEn npekcbau
3 BeHTnlaHnoHeH OTbOp (onu)
4 MyTnФyHKUHOHaHnIHHNkaCua
5 Ta6no npedna3nten pa6toMrcTo
6 3aapanTepeh KIOU
3anaJIntepen KIIOU
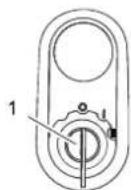
Yka3aHna 3a 6e3oNaChocT aKymyNaTopn
Ppi pa6oTa c akymyIaTOPnTe HnpeMeHHo CnA3BaIe CnEHNTe PpeDyIpeDInTeJIHN yKa3AHN:
| i | Спазбаше указаньама на akуламора, в Ульшанноу loу уломреба u в Исторik-цаяма за ekсловашия на преозномо среемо! |
| Hoceme зашиma за оочeme! | |
| Дръжme Deцama Насмалу om кUCELUNU u om akуламорu! | |
| Опасн检om ekсллозия! | |
| Забраимеam ce oSZh, uckpu, omkpuma севлина u nyшe-he! | |
| Опасн检om pa3яжданe! | |
| Пьразnomоц! | |
| Указамелna заменекka! | |
| Изховлpene! | |
| Pb | Акуламора дa He se xьр-лЯ в КOFAMA 3a БOKлук! |
| Прedesурждение зa onasho eelenkmpuuecocko напөжениe! |
Onachocm
Onachocm om ekcnno3u! Bbpxy akymynamopa, m.e. bbyx kpaHume noIIOcu u c8bp3aHemo Ha knemkume da He ce noCmaeim unhcmpymeHmu unu nodo6hu.
Onachocm
Onachocm om hapaheae! Hukoza He dokoeaume paHume c onofo. Cne pabo ma no akymyamopume buha zu noucmae baume pbeme cu.
OnachHocm
Onachocm om noxap u ekcnnoa! 3abpaHbam ce nyuhe u omkpum oebH.
- IomeeHura, 6 Koumo ce 3apek-dam akymyamopu,mpa6ea da ce npoempraeam do6pe,mbu kamo npu 3apekdahe ce o6pa3yeam bucokoekcno3ueHu 2a306e.
OnachHocm
Onachocm om pa3aXdahe!
- Ppcku om Kucenhu 0 oume un no kokama da ce u3nnaekam pecn. u3mu-6am c yucma oda.
- Cnod moea He3a6aeho da ce nombpcu nekap.
- 3aMbpcHomo oBneKnO da ce u3nepe c e0da.
3apexkdahe Ha akymylaTOpnte
Ipeu nycahe e ekcnnoamaua Ha ypeda 3ape deme akymyamopume.
ONACHOCT
Onachocm om hapaheane! Da ce cna3eam pa3npope6ume 3a be3onacncm npu bopaeene c akymyamopu. Da ce cna3eaYnbmbahemo 3a ynompe6a Ha npou3o0dumena Ha 3aprodHom ycmpoucmeo. Henpemehno 63ememe nod eHumanueynbmeahemo 3a ynompe6a Ha npou3o0dumena Ha akymyamopume u deucmeaume cb2anacho max.
Akymynamopume da ce 3apeym c noxdoxo 3apno ycmpoucmo.
PomeuHura, e Koumo ce 3apeKdAm akymamopu, mpa6ea da ce npoeempeam do6pe, mbu kamo npu 3apeKdahe ce o6pa3yeam eucokoeKn03ueHu 2a30e.
Onachocm
Onachocm om pa3aKaDahe. DOnuBaHemHa boda e pa3peDeHo cBcmoHue Ha akymyamopa moKe da doBeede do u3muAnaHe HA KucEnHa! Ppu pa6oma C KucEnHu 3aakymyamopU da ce u3non3am 3auumHu ouHa U da ce cna3bam npednucanura, 3a da ce u3626am HapaHaeahur u pa3pyueHue Ha obNeKnomo. EeEHmyaHume npbcku om KucenHa no KOxama unu obNeKnomo BeDHa a da ce u3nnakham c MHO20 Bda.
PNEI3NBOCT
3a donuBaHe Ha akymyamopume da ce u3non36a camo decmunupaHa unu obescoJeHa boda (EN 50272-T3).
PpenopbuaHn akymyntOpn,3apdHnyctpoiCTBa
| Homer 3a no-рьчк | |
| Монobлok 24 V,700 Ah, (с малka поддръжka)* | 6.654-280.0 |
| Зарадно уст保險TO48 V, 80 A | 6.654-281.0 |
| *Уре徧Тима Нужда OT 2 akумлирочибатери | |
He ce npenopbUba n3noI3BaHTo Ha npYn akymyntopu 3apJdHn ycTpoiCTBA, To e N03BOJeHO cAmo CJIeD KOHCyIITaCnBc cepBn3a Ha KARCHER.
→ N3TerIeTe UencenHa ha ayMyIaTopo OT MaunHata I rO CBpbKeTc UencenHa Ha 3apnHOTo yCTpoNCTBO.
NocTabete 电eHa3apJHOTO yCTPOIcTBOBipaBnHnKoHTaKTOT16A,3apJHOTOyCTpOJIcTBO3apeXJaabTOMaTHUHO.
→Пов蜱емеHa npoцетаHa 3apeжданeДрькTe OTBOPEHДBaTakanaKaHaДВИrataTeЯ.
Yka3aHHe:KoratoakymyIaTOPuTece 3apeJrT,3apnHOTo yCTpOInCTBO da ce OTkau NbpBOOTMpexKaTa,aCneT TOBaOTakymyIaTOPuTe.
Da ce npoBepu n da ce Kopnnpa HNBOTo HA TeHOCCTT Ha akymyJatopa.
PENEI3NIBOCT
Henpemehno 3eMe me nod eHumaue ynbmeahemo 3a ynompe6a Ha npou3o-dumena Ha akymynamopume u deucmeau me cbanacho max.
PpOBepKa Ha cBcTOrHneTo Ha 3apeXdaHe Ha aKymyNaTopa
- INHnKaun3a KaNaunTeHa aKymyIaTopa B 3eNeHaTa 30Ha: AkymyNatopbTe 3apeHeN.
- INHnKaun3a Kanaunteta Ha akymyIaTopa B XbIITata 3oHa: AkymyIaTOpBT e 3apehen HanoNobnHa.
-Индкадяза калцnteHa akymy- NaTopaВЧерБehаТЗоHA: AkymyatopbTe nouTn pa3pehen. PeKIM MeTeHe Μe npNKIOUH aBtOMaTHHO CneI KpaTko BpeMe.
-KoHTpOHaTaNMaNcBETNuCepBeHo AkymyNaTopbTe pa3peDen. Pekim MeTeHe pRnKJIouyBa aBTOMaTuHNO (NoB-TopHO NycKaHe B DeIeCTBHe Ha MeTaUNTe arpeRaTne Bb3MOxHo cMo CNei 3apexKaHe Ha akymyNaTopa).
YpeIbT Da ce 3aKapa IupeKTHO Do CTaHcIyraTa 3a 3apeKdaHe, npu TOBa da ce n36yBaT HAKIOH.
3apeTea kymyntopa.
Eknpnoatauia
a ce Hactpon ceJaIkaTa Ha BOdaqa
→ N3dbpnaTe HABbH JIOCTa 3a HAcTpoiKa Ha cedankata.
→ N3mecTe CeJaKaTa, nychete locta n ro fukcnpaTte.
→Поверете посретбом ДВИЖЕНЕ
Нарpeи И назд, Дади сдалкат e 3а-
ctOnopeha.
DneHoctn no noOpdpkkaT
NoIroTOBka:
→ MeTaUHATA MaUNHa CE NOCTABBbpxy paBHnIOCKOCT.
KnOu 3anaIbaHe da ce 3aBbptn Ha "0" n Da ce N3BaDn KIOUa.
Da ce 6nokupa 3actonopraBaata cnpaqka.
O6u yka3aHna 3a cnpypHOCT △ONACHOCT
Onachocm om HapaHaehe!PpeDna3Ha ma 7a2a da ce nocmae euhaue npu noeduaH am pe3epoap 3a u3Memehomo.
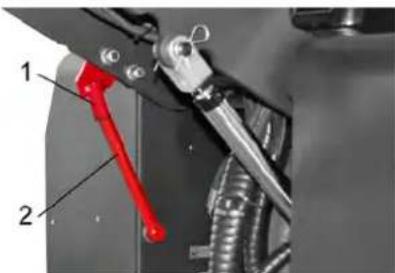
1Hocu npedna3Ha 2Pepna3Ha
3aBbptTe npedna3HaTa 3a nbHNO n3npa3BaHe HArpe nЯ noctabete B Hocaya (noDCnrypeHa).
CmHa Ha akymytaTopn
AkyMylatopnte Moar da 6bdaT CMeHn cAmo B KOMNKeT. N03BOnHea e CmHa cAmo OT CTpHa Ha KBaIINΦuPah Cne-uaJIInCT.
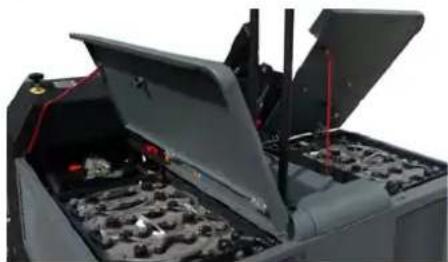
→ Iopadn BucOKOTerIIO (3a BCEKnyMyInpaI KOMNNEKT 545 Kr) CmHaTa Tp6Ba Da ce N3BbPwBa C kpaH.
→Пи demontax Ha akymyntopa da ce BHMMABa 3a TOBa, nbpBO da ce pa3kaNu KaBeJa Ha MInHycOBn Ka6eI.
3akpenete Bbkeeta Ha KpaHa Ha 4 xanka HA KOMJIeKta akymyIaTOP IN BHIMATEJHO N3BaTe aKymyIaTopnTe.
Yka3aHne: IpeBapntenHO OTCpaHeTe CTpaHHNTe Kaana.
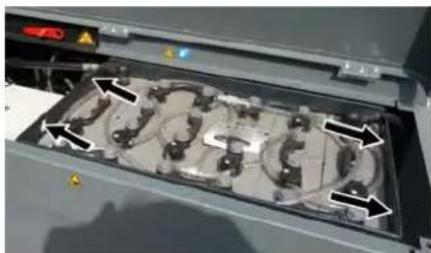
PpOBepKa HNBOTo Ha XnDpaBnHOTo MacNo I OIObIbAHe Ha XnDpaBnHOp MacNO
YKA3AHNE
Pe3epboapb m 3a u3memehomo He buea da 6bde nooouham.
OTBopete Kanaka Ha DnBaTena.
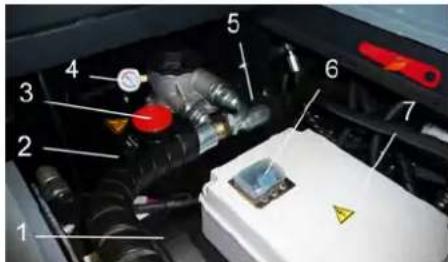
1 OxlaIaIeI Ha XuIpaBnHOTo MacNo
2 HablkuDaiTeHnO CTbKNO
3 3aTbapu Kaak, OTBop 3a IIbHe He MaCNO
4 MaHometbtp
5 Pe3epBoap 3a XnDpaBnHNo MaCIO
6 PpePn3nTeF U 1 (rnaBEN npEtnaTn
7 EneKtpoHEn Kopnyc
No3BOJHeO e OTBapRHe cMo OT cepBN- 3a.
PpOBepeHnBToHaXnDpaBnHnHOTo MacNo BHa6NkDaTeHnHOTcTbKnIO.
-HNBOTo Ha MacNoTo Tp8Ba Da 6bde MeKdMy MapKnupOBKa ,MnH"- n,MAKC".
-AKO HNBOTO Ha MacNoTo e NoI MapKnipOBkata,MH",da ce DonbInn XndpaBNIuHO MaNo.
Pa3BnTe 3aTbapraNkapanKaHaOTBo-pa 3a nJIHeHe Ha MacNo.
→ПочиретеДиANA3OHaHa nblHeHe.
→ DOnbHHeTe XnDpaBnUHmAcNo.
BnMaCNo:TexHnuecknDaHHN
3aBnTe 3aTbapraunKaNak Ha OTbopa 3aPiHeHa MaCNO.
YKA3AHHE
Ako MaHOMembpbm noka3a noeueho Hanraane Ha xuopaBnUHMO Macno, fummbpzm 3a xuopaBnUHMo Macno mpr6ba da bde cmehen om cepeu3a Ha Karcher.
IpoBepkaHaXnDpaBnHnHaTa ype6a
a ce 6nokupa 3actonopbaata cnpaqka.
CTapTnpaHe Ha MoTopa.
PoiipbXka Ha xnpabNnHaTa ype6a camo ot cepBn3a Ha Karcher.
→ BcunxuipabnHm Mapkyu n 3BO- Dn da ce npoBepr3 a xepMeTNUHOCT.
PpOBepKaHaMeTaaBnBaJAK
3aBbptete KIOU 3anaIbaHe B noIOKeHne "I".
→ПОБДИНЕТе pe3ePBOара 3a ИЗМeTeHOTOdo KpaHOTo NOJIOKeHne.
3aBbptete KIOU 3anaIbaHe B noIOKeHne 0.
Da ce 6nokupa 3actonopbaaata cnpaqka.
Ae nocTaBn npedna3HaTt aHaHra 3a BNCOKO n3npa3BaHe.
OTcTaHeteJeHTteUHypoBeTeOT METaUNBaJAK.
→ 3BaTe npeDn3HaTa 4aHa.
IOCTaBeTe KJIIOHa Ha 3anaIbAHetoB 3anaIITeJIHATA KJIIOyAJIka.
3aBbptete KIOU 3anaIbaHe B noIOKeHne "I".
CnyckaIte pe3epBoapa 3a n3MeTeHOTo Do KpaHOTo NIOJKeHne.
Da ce n3KIOUH MOTopa.
Da ce cmehn Metraa BaJAK
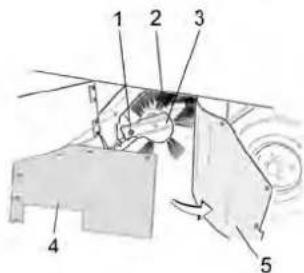
1 Bon 3a 3akpenBaHe Ha MeTnBaa
2MeraBnA
3 3aKpenBaHe Ha MeTuaBnBaJAK
4 CtpaHnUHO ynIbTHeHne Ha 3aIbpxka- uata naMapuHa
5 CtpaHnHO ynnbTHHeHne

OTBOPETe cTpaHnHATA o6nIOBka C KIOH.
Pa3BnHTeTe KpUHnatte raKn OT 3a-DbpxkaataJaMapuHa Ha CTpaHnHOTo yPbTHHeHne n CBAIeTe 3aDpbXa-uaTaJaMapuHa.
O6bphete ctpaHnHOTo ynIbTHHeHHe HABh.
Pa3BnTe 3akpenBaunr BnHT Ha 3aKpenBaHTo HA MetraUN GaJIK Ha-KNOHeTe 3akpenBaHTo HABH.
CbaNete metraBanrK.
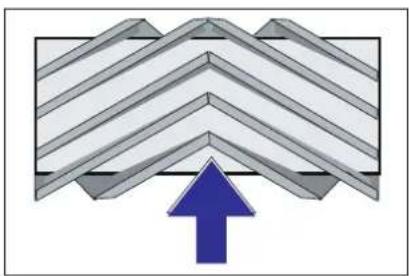
MOHTaXHo nIoXeHHe Ha MeTauN BAIK no nocoka Ha dVbXeHneTo (nOrIeD otrope)
Yka3aHne: Pn MOHTaxa Ha HOBn MeTtB BAnr BKHMabaiTe 3a NIOXKeHneTo HaKOMJIeKTA YeTKn C YeTnHa.
→ MoHTnpaTe HOBnMa METaB BAnK. Tlb-6OBeTe Ha MeTua BAJr K TpaBa Da Ce NoCTaBt B ONOpTE Ha MeTua BAJr HA CpeuynIOxHnB 6BanAHCp.
Yka3aHHe: CJIeM OMTaXHa HOBnMeTtA BANrK OTHOBo TpRbBa Da ce HAcTpponpeFNeKTopbT 3a MeTeHe.
IpoBepka HacTPOKa Ha peΦJIeKToPa 3a MeTeHe Ha MeTuaN BAJIK.
PpOBepTe HAIraHTo Ha rMNTe.
→ N3KJIIOUbaHe Ha CMyKaTeJIHHa YNoBn-TeI.
→MeTaHaTaMaHnHa Da Ce 3aKapa Ha paBHO nIpaNKO MxCTO, KOeTO e NOKpTo C npax Hn Te6eWnp Taka, Ye da ce BnKda.
→ NocTabete nporpamHnnpekbcBauHa MeTeHe C meta BANK.
→ NocTabete nporpamnna npekbcbaa Ha TpaHCnOPTHO NBTyBaHe.
KapaTe ypeHa Ha 3aEN xoI.
PpOBepePe peoNekTopa 3a MeTeHe.
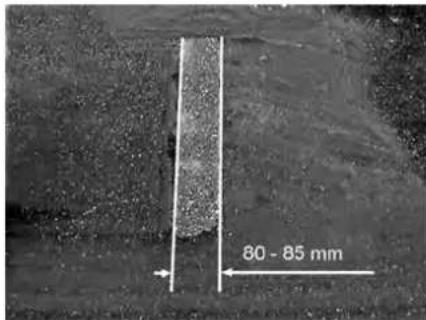
ΦopMaTa Ha pePnEeKTopa 3a MeTeHe Tp8Ba Da o6pa3yBa npabuNeH npaBoBbJHnK C wpiHa oT 80-85 MM.
Hacptponka Ha shnpoynHaTa Ha pepeKTopa 3a MeTeHe:
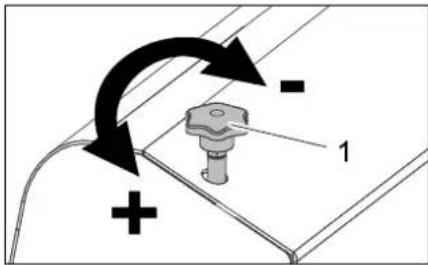
1 BoNT 3a NaCTpoIka
HacptoIte noIOXeHnTo Ha pePnEeKTopa 3a MeTeHe NocpeDCTBOM perynpahe Ha 60nta 3a HacptoNka.
PpOBepeTe peDJIeKTopa 3a MeTeHe.
IpoBepka N hAcTpoKa Ha peFJIeKTopa 3a MeTeHe Ha CTPaHnUHaTa MeTJa
→ПовдаганеHa cTpaHnHHTe MeTJI.
→MaHaTa MaHnHa Da Ce 3aKapa Ha paBHO INIpaKO MRCTO, KOET e NOKPnTO C npax nIeTeBeWnp TaKa, Ye da ce BIXkDa.
→ NocTabete nporpamHnnpekbcBaHu MeTeHe C MeTuaBnK nCTpaHnHn METJN.
→ПовдаганеHa CTpaHnHTe MeTJI.
→ NocTabete nporpaHn npekcbau Ha PnDnKbaHe.
KapaTe ypeHa Ha 3aEN xoI.
PpOBepTe peFNeKTopa 3a MeTeHe.

HInpuohnataHa peΦneKTopa 3a MeTeHe Tp6Ba Da 6bJe Mekdy 40-50 MM.
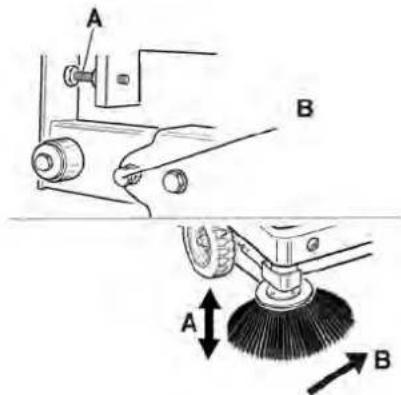
KopunpaTe peΦneKTopa 3a MeTeHe Dbata 60nta 3a HAcTpoKa.
PpOBepepepeKTopa3aMeTeHe.
Hactpoika Ha ctpaHnUHnTe
yNJIbTHHeHn
→ ⅢheCete Harope pe3epBoapa 3a n3-MTeHToI rO IIOcNpyPeTe C npEJa3-Hata uHaHa.
ONACHOCT
Onachocm om hapaHbAhe! PpeNa3Ha ma uHa2a da ce nocma8e Hauz npu roBouHAM pe3ep6oap 3a u3MeHemo.
3aBbptTe npedna3HaTa 3a NbIHO n3npa3BaHe HArpe nЯ noctabETe B Hocaya (noCnrypeHa).
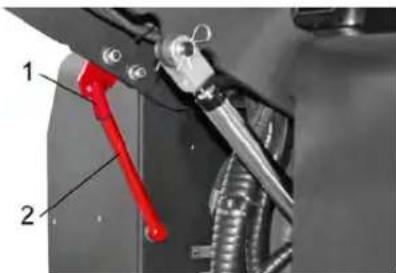
1 Hocay npedna3ha 7aHa
2 Ppepa3ha 4aHa
OTBOpTe cTpaHnUHaTa 0bIuOBA KaKTo e OINcAHO B rnaBa ,CMraHa Ha METaUNBaJr.
Pa3BnTe 6-Te KpNJaTn rAkn Ha CTpaHnHaTa 3aDbPkaaJaMaPnHa.
Pa3BnTe 3-Te raiKn (SW 13) Ha nped Hata 3aIbpxka JIamapHa.
→ PtntucheTe cTpaHnUHTe ynnbTHeHn DOTOJIKOBa HaOny (HaNbJxEH OTBOP), Ye da ce noIyu pa3ctOraHne ot 1 - 3 MM Do nOda.
3aterheTe 3aBbpxkaunTe JlamapHn.
→ NOBTOPe onepaunra Ha npyraTa cTpaHa Ha ypea.
PbHNO nouictBaHe Ha qnIITbpa 3a npa
→ NOnuHCTeTe φnITbpa 3a npax c 6yToHa 3a NoUcTBAHe Ha φnITbpa.
CmHa Ha qntbpa 3a npax
△PENDEYINPEKDEHNE
Ipedu Haayamono Ha cmyHa Ha fummbpa 3a npax u3npa3heme pe3epeoapa 3a u3 Memehomo. Ppu paboma no cucmemama Ha fummbpa Hoceme npaxo-3auumha macka.Cna3aeume Mepkume 3a bezonaacHocm npu paboma c pfun npax.

OTBOpTe 6JIOKINPOBkAta,3a CEITpa3BnIe 60NTa CbC 3Be3Doo6pa3Ha dpbXka.
O6bpeTe kanaKa Ha ypeHa Hanpei.
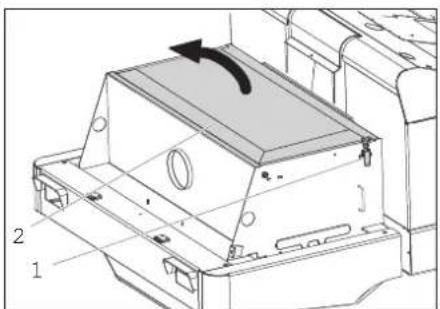
OTBopeTe KaNaKa HaΦnTbpa.
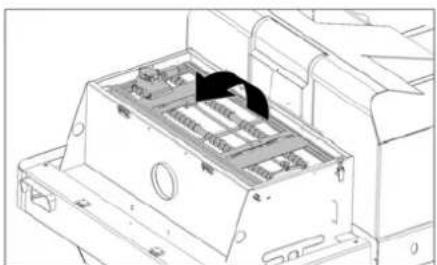
O6bphTe TpbckaHa Ha qntbpa Hnpei.

→ CMeHeTe ΦnTbpa 3a npax.
3aTBopete OTHOBO KaNaka HaΦnITb-pa.
CmHa Ha kpyuKa Ha fapa (onu)
PaBnTe papOBete.
→ Cbaene foapobete n 3BaTe ueke-pnte.
Yka3aHHe: CnAsBaITe N03NmIte Ha IeKePInTe.
Pa3rno6eTe paopBeTe.
Paarno6eTepaobete npu TOBa nDpBXTe XOpIN3OHTaIHO, TbK KaTO 3BeHO lamn He e 3AkpeNo.
→ De6nokupaTe 3aKoNpaBaUaTa cko6a n CBAneTe KpyuKaTa.
MOnTnpaIte HOBa KpyuKa.
Да ce moHTnpa B obpaTHa nocJeDoBa TEJIHOCT.
CMHa Ha Mmrau (onzna)
Yka3aHHe: 3a cMaHa Ha KpyuKaTa Ha MmraYa OTcPaHete CTbKnTo Ha MmraYa OT Kopnyca Ha MmraYa.
CmHa Ha npedna3nteH
OTBopeTe HocauHa npeDn3nten.
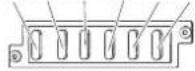
FU04FU09FU10FU11FU06FU07
Chairman of the Board of Management

S. Reiser
Director Regulatory Affairs & Certification
Пьномошник NO ДOKум entaцята: S. Reiser
Alfred Karcher SE & Co. KG
Alfred-Karcher-StraBe 28-40
71364 Winnenden (Germany)
Tel.: +49 7195 14-0
Fax: +49 7195 14-2212
Winnenden, 2018/09/01
Uldmarkusi. ET 1
Ohutusalased markused. ET 2
Tehnilised andmed. ET 0
1
ELi vastavusdeklaratsoon. .ET 2
www.kaercher.com/REACH
Garantii
Uldised ohutusnouded
OHT
71364 Winnenden (Germany)
Tel.: +49 7195 14-0
Fax: +49 7195 14-2212
Winnenden, 2018/09/01
www.kaercher.com/REACH
Garantija
Chairman of the Board of Management
S. Reiser
Director Regulatory Affairs & Certification
Pinvarotais sagatavot dokumentaciju:
S. Reiser
Alfred Kärcher SE & Co. KG
71364 Winnenden (Germany)
Tel.: +49 7195 14-0
Fax: +49 7195 14-2212
Winnenden, 2018/09/01
Bendrieji nurodymai. LT 1
www.kaercher.com/REACH
Garantija
Chairman of the Board of Management
S. Reiser
Director Regulatory Affairs & Certification
71364 Winnenden (Germany)
Tel.: +49 7195 14-0
Fax: +49 7195 14-2212
Winnenden, 2018/09/01
3araJIbHi Bka3iBKNUK1
3axnCT HABKoJIuHbOTo Ce-
peodovua UK 1
Tapaantir. UK 1
O6nHaHH Ta 3aNaChi Ha-
CTHNI. UK 1
3NaKy noci6nky .UK 1
CnmbonHa npncptoi..UK1
Ppabnblhe 3actocybaHHa. UK 2
YMNCHENHPaBnJIbHe 3a-
CTOCyBaHHa UK 2
PiiXoJnji noBepxHi. .. UK 2
PapBnla 6e3neKn UK 2
Bka3iBkn 36e3neKn nidaac
ekcnnyatauii UK 2
Bka3iBkn 3 6e3neKn B pexnmi
pyxy UK 3
Bka3iBkn 36e3neKn dny npn
CTPOIB,IO npauHOTb BiD
akymyntopho6aapei. UK 3
MaunHH 3 nIiHOMHIKOM
KoHTeHepa. UK 3
Pnpctpi i3 3axnchm da
XOM BOIDIA UK 3
Bka3iBkn 36e9n niD yac
TpaHcnpTyBaHHMaunHn UK 3
Bka3iBkn 36e3neKn iD yac
DornaTataTexHOro 6
CnyrobyBaHHa. UK 3
Pn3NaueHna. UK 3
Bka3iBkn npn po3BaHTaKeHHi . UK 3
ElenmEnTu npabnHnHaI cyh
KUIOHaJIbHi By3nI. UK 4
3o6paXeHHn iDmitaJIbHOi
MaunuUK4
PanaJIb ynpabJIHHa. UK 4
Функюньн Кони..UK4
KoHtpoJIbHi IHNkAtOpn Ta
dncnnneu. UK 5
PegaJI .UK 5
Ipeed noatkom poobto. .UK 5
3aφikcybATN/BiDnycttu
CTOHHKOBe rAJIbMo. .UK 5
IpecyBaHHn iMItaIbHoI
MaunHb3Bnachoro npn
Boda. UK 5
IpeceyBaHHn iinMaTalbHOi
MaunH3Bnachm npnBO
DOM UK5
BBeHeHH B Eeknlyatauio ... UK 5
3araJIbHI BkA3iBKn .UK 5
Ipebeipka i texiune o6cny
roByBaHHa UK 5
Ipeed noatkom poobotn. .UK 5
Bka3iBkn 3 TexHikn 6e3neKn
Udo akyMnyTOpB. UK 5
3apdntn akymyIaTOpN. UK 6
Ekcnnyataia. UK 6
Hactpoitn noJoxeHHa
CnHnBODIa. UK 6
Bubpatn nporpamy .UK 6
3anyctntnpictpi. .UK 6
PepecyBaHHa npnadi UK 6
PiimTaHHa. UK 6
Cnpoxhntpe3epByap
ДЯ CMITТ... UK 7
BmKHytn npncptpi...UK 7
TpaHcnpOpTuBaHHa UK 7
36epiraHHK 7
36epiraHHa UK 7
Dorra Ta texhiue o6cyroby
BaHHa. UK 7
3araIbHI Bka3iBKn. .UK7
U8
PepiouHicbTexHiHoro
06cnyrobybaHHa UK 8
PpOphiAaKTHHi po6oTu. UK 8
Dionomora y BnnaKy HenoJa- 1
ДOK UK 1
TexhihixapakTepeNTKU. UK 1
3aBa npB iDnOBiDnHicTb Ebp0-
nebcko rCnIBTOBapncTba...UK 3
Ipeep nepwim 3actocybaHHaBaaoro npncptoIO npouHTaTeOOpnHaBHy IHcTpyKuio 3 ekCnnyatai, nicra boro diIte BiINOBiHO Hei Ta6bepekItb II nlaNbWoRo KOpNCYbaHnA Odo nHaHCTynHO Bnachka.
3araabhi Bka3iBkn
Ku npo pO3nakyBaHHi 6ynBnBnBneHIOwKOJKeHH BID TpaHCnOpTyBaHH, HeaHcNObictb npo ue Mara3n, De BN Kynnnpnna.
-HaHeceHi Ha npictpi nonepkyBaalbHi 3nakTu TaTabuNcN DaHtB BaxNbi BkazIBKn Dny 6e3neHoE kcnnya-Taui npictpo.
-Pa3OM i3 Bkazibkamn Buii iHctpykii IJRA EKCNyatauCII C1ID BpaxoByBaTN 3araIbHI npabuna texhIKN 6e3neKN Ta HOPMN DnI NonepeXKeHH HeaChNX BNnAdKiB 3akoHOdaBvNx OprAhIB.
3axnCT HABKONHboro cepeOBUca

MaTepiAnynakOBKn iDnAIOBcra nepepO6ci dna nobTopHoro BnKOpNCtAHN. Byb naCk, He BnKnDaIte nakyBaNbHi MaTepiAIn pa3om i3 domaunHim CmITTm, BiDaIte ix nnHa nepepO6ky.
CTapi npictpoi MicTb ciHHi MaTepiAIn, kki MoKyTB nepepo6nTa n iDnraOtB nepeaHi BnyHKTI npinyomByBtopHHoI cPobHN. Tomy, bdy naCa, ytni3yIte CTapi npictpoi 3a do-nomoroIO cneiaJIbHnx CnCTem 3bOpY CMITTA.
BaTaapei, MaCTnIIO, nAJIbHe Ta cxOxI MaTepeiaHn He nobHHI nOTpanNTu HABKOJIuNHe cepedOBnue. Li MaTepiAn noTpiBHO yTuNl3yBaTu n epe3 BiINobiDiHi 36papJIbHI NyKHTN.
IHCpyku i3 3actocybaHHKOMNOHETiB (REACH)
AkyaIbHi BiOmoCTI npo KOMnoHEnTn HaBeDeHI Ha Be6-By3ni 3a aDpecoIO: www.kaercher.com/REACH
Tapaantria
YKOxHiKpaIiHIIIObYMOBn rapaHTi,Ha-daHOI BiINOBiHDHOΦipMOIO-npOdaBcEM. HenonlaKn Bpo6oTI npNCTPO MO yCyBaMo 6e3KoWTOBHO nPoTAROM TepMIHy iii rapaTlI, kUO BOHN BNIKNaHI 6paKOM MaTepiany Hn NOMIKAMN BINOToBNeHHa. Y BnnaKy HnHOI rapaTlI 3BeptITbcra Do
npoabua HnBna6bnKnyn aBTOp3OBaHn cepBicn UeHTp 3 DOkymeHTaJIbHm NiTBePdKeHHrM NOKyNKn.
06laHaHH Ta 3anachi YacTHH
HEBE3NEKA
Uo6 yHukhmu he63neku, pemoh i ycmaHOky 3anachux demaneu noBuHHi ekoHyamaunbku aemopuzoeaHi cepci ci eHmu.
-MoXHa BnKOpNCTOByBatn NIIe Te 0bnHnHH Ta 3aNaChi YacTnHi, IIO D03BOnEHI IIN BnKOpNCTaHH BnPo6 HNKOM. OpiRiHaJIbHe ObnAHH Ta opRiHaJIbHi 3anachYacTnHi E rapaHtIeHO TOrO, IIO npncTpiB 6yDe npauBoaT N 6e3neHTo Ta cnpabHo.
-Падьша iHΦopmaця no 3anachm Чаctиham e Ha caNTi www.kaercher.com B po3Дini Cepbic.
3HaKn y noci6Hnky
HE6E3NEKA
3anobiae npo He6e3neky,ya 6e3nocepedHb 3aapoxy ma npu38odmb do mxxmpaem yu cmepi.
△NONEPEDXEHH
3anobiae npo nomenuHO moxnuuy He- 6e3neHy cumyauiio, uO MOKe npu38ecmu do mkkuxmpaem Yu cmepi.
OSEPEXHO
Bka3ieKa eidHocHo nomeHuiHo moKnueoi He6e3neHoi cumyaui, uo MOKe npu3Be-cmu do ne2kux mpaem Yu cnpuunHumu MamepianbHi 3bumku.
YBAGA
Bka3ieka 0do moKluoI nomHe He6e3neHiu cumyaui, zo MoKe cnpuHuMu mamepiAnbHi 36umku.
CnmboHa npictpoi
| Hebe3neka oniki ob a- pЯчу поевхию!! Пeding почамков обслуобey- ьня пунаду сniδ даму вuxлonsни мрубі oxолodumusc. | |
| Робому i3 ристоим сniδ заеку поевODUMu minьку у viidnoobihux 3a- хUCHux rykaeuzyx. | |
| Hebe3neka zamussань pyxlnubumu demanЯMu amomobína | |
| Hebe3neka odeprжань mpaemu viδ pyxlnubux чa- сmun. He mopkamucr. | |
| Hebe3neka пожени. He donyuskamu всмokмухан- ны палiocux abo mnió- чux песdMemie. | |
| 3amuckдя lanujoa / moyka pozmauyeaаня крани | Точи пidуому дя do-mkpama |
| Мakcimальни hayun noeerpxni pru pyci 3nid-namumбунером. | У наразмку руху dovy-ckaembcra i3da по схunaх do 12%. |
| Yaba, obepmoja uzimka (dompumyeamucn haipry-my obepmanha). | Запобaningся по несз-пеку поазku ekenmpu-chum smypom! |
| Дорumsуamuscь укzie-ku! | Дорumsуamuscь укzie-ku! |
| Посераму поевно! | Посераму поевно! |
| Почumaime побнuk 3 ekcnnyamaui ma diuime 3ziiodho 3 zuo20 nojoxen-hamyu. | Небешика поcodжени! Пиювui φільчр поему-eаму не порibno. |
PpabnIbHe 3acTocyBaHHa
IiIMtAlbHy MaunHy np3HaueHo dI npocpeciHoro BkOpncTaHHn iIac npuBipapHH noBepxOHb, HApNKnaD, B TaKnx rany3x 3aCTOCyBaHH:
CTOHHK
Bnpo6Hnui cnpyDn
TepuTopiI IorictnHnx Cnyx6
Toteji
Pozpi6HaTopribn
Tepntopii cknaedcbknx npmimiueHb
TpoTyapn
- Lc mITTe36bpaIbHa MaunHa npn3HaueHa nI ndiMItaHn 3abpydHeHX NOBepxOHB y npmIeHHi Ha Bynui.
-Pered BnKOpNCtAHHm nepeBipTe HaJIeXHH CTa Ta 6e3Neky npicTpOu Ta 0bnaHaHH. JaKUo 0bnaHaHH 3Ha
XOINTBcY He6e3doraHOMy Ctani, IIOHO ME MOxHa BnKOpNCTOByBaTu.
BnKOpncToByNe TcI NITiMItaIbHy MaHINHy TiIbKn 3riH0 3 iHCTpyKciEIO no EKCnNyataui.
-3a6oPohrctbCBAHOCHTN3MiHNB npnna.
-Ппстpi npn3haeHn TiNbKn dЯ po60Tu Ha nobepxHx, 3a3haeHnx y daHomy nocibHky 3 ekcnnyatauii.
-Пилад може посясьатяпьк no NOBepxHx,doNyUeHnxДЯВNKOpnCTAHNII pIMItaNbHxMaunH KepiBHNUTBM NiIpncmCTBa a6o iXHIM PpeDCTaBHnKOM.
-Якагалби npabnno diнacTynHe: He donyckatni 3iTkHeHH npnnaу 3 nerko3aIMncTmnppeOBNHAMn (He6e3neKa B6xv/NoKexKi).
YmncHe HnpaBnIbHe 3actocyBaHH
3a6bopohraTbc nii6bupahnH/BCMOKtyBaHH Bn6yXoHe6e3neuHnx piin,HropHX ra3iB, a TAKOX HEP03BeDeHNX KNCOT Ta po3unHHNKIB! Lc CTOCyeTBc8 Se3nHy,po3piKxyBauiB dp6n Ta ma3Ty, kki MOxYb CTBOHOBATN Bu6yXoHe6e3neuHi ra3n a6o cymi, 3miuyOncb 3i BCMOKHTyaBHIM NOBITpAm, a TAOK aUeTOHy, HEP03BeDeHNX KNCOT Ta PO3UnHHKIB, OCKIbKn BOH NOWKOJxOToB MaTePiAn npucTpO.
3a6bopohraetbcnpnbpupaHHBcMOKryBaHHpeakTNBHORMeTaeBoroNny(Hanpknad,anlomiHIO,MarHIO,uHKy)B3'EDHaHHI 3CNJbHMn JyKHMn a60KNCJLOTHMn 3acobamn DnayuueHHA.
He donyckaTn nIMiTaHn/BCMOKtYBaHn nanaIOuNX a6o TNIIOUx npedMeTIB.
Cen npncpii He npn3naeHo dnia 36paHH He6e3neuHX dna 3doob'peOBOH.
3abopohraetbcrno36epirahnnyhe6e3neuHnxmicx.3abopoheno BnKOpncTOByBaTHnpCTpiyBn6byxoHe6e3neuHnx npimiuehhax.
He do3B0nAeTbc8bpaTu i3 co6oO cynpoBIDHX oc6.
He Do3B0JAEbC JTOBxATN/TaHTyTn a6o TpaHcnpTyBaTN PpeMETN 3a DO-nOMOrO IO DaHOr O npCTpOIO.
PiiXoJaui nobepxhi
-AcpaJIbT
- Ppomncnoi nndorn
-CyuiNbHa(HannBHa)nIiNora
-BeToH
-Буцатka
PpabuHa 6e3neKn
Bka3iBkn 3 6e3neKn nД yac ekcnnyatauii
→Длэ dompumannna napamempi no-bimpr i wnnxie eumoky npucmpi 3a-6bopoheno ekcnnyamyameu ha eucomi noHaD 2000 mempi HAD pihem Mopra.
(Diucho minbku dna FiHraHdi)Ka npucmpiu ochauehu wanaeom 3 PBX, uo2o 3aboponeho eukopcmo
6yeamu 3a HU3bKux memnepamyp HaekoIuwHbO2o cepedobuua (HuXue 0^) .Ypazi eunukHeHHra numahb uodo npucmppo 3eepamucca do Komnahii Karcher.
→Ipeed bukopumannnnepeipme Hanexhui cma ma 6e3neky npucmpoio ma obaHaHHa. KaO oBaHaHHa 3haxoDbcy y He6e3doaHHO My cmaHi, Uo2o He MoXHa BuKOpCmoeyamu.
Y pa3i bukopucmaHH npucmpo y He63neuHdiinHni (hanpuKnaad, 6eH30- KOONKa) Heobxio dompumyeamcue iOIOBHX IHcmpyku3 mexHiku 6e3neku. 3abopoHeHO buKOpucmoeyamu npucmpiu y 6ubxohoe3neuHux npumiuueHNyx.
HEBE3NEKA
He6e3neKa mpa8MyaHnHa!
He eukopucmooyamu npucmpiu 6e3 3axucnoo daxy a 30hax, de ichyc He- 6e3neka naodinna ppeMemie Ha onepa-mopa.
Kopucmyeau noBuHEn buKOpucmoeyamnpucmpiuy biOnoBIOHocmi do iHcmpykuii.BoHa noBuHa epaxoeyaMu yMoEu MicueoCmi, Niacpobomu 3 npucmpoem Heo6xioHO 3eepmamu ybaaHa mpermix ociO, oc0bnao Ha diMeu.
TaKox cnio dompumyamucc bcix npaeun i Hopm cmocoeHo mpaHcnopmhux 3acobig.
→ Npeod noyamkom po6omu onepamop noBuHeH nepeKoHaMaC8 momy, uO eci 3anobixhi npucmpoi 3haxoMbCra Ha Micui i npauqioMb HaneXHum U-HOM.
Onepamop npucmpoHece eidno-eiadbHicmb 3a BuHKHeHH HeuaChux eunadkie 3a yacmio hux IIOe a bO MaHa.
Cmexkumu 3a mum, uo6 opeamop hocu8 uinbno npuneauu oya. HocumuMiuee 3ymmra yhukamu Hocihna Binbho0 oday.
→Перед поамком pyxy nepeepumu Мермь зону (HappuKnaD, Ha HareHicMb dime). 3a6e3neyu docmamHiu O2nro!
→ He moxha 3anuwam npucmpiu 6e3 Haanlyo nio cac pobom Momopa.ObCnyooyomy nepcoany do380nnaebc 3anuwam npucmpiu minku nicra mzo, kdoayh 6yde 3ynuHeno, npucmpiu 3axuueHu iD buaokobo nepemueneHH i KIOU 6uHarnu.
Ulo yHuKHymu HecaHKuioHOeBaHOo 6ukOpucmaHH npucmpoIO cnio EuMaMu KJIou.
→ Ppucmpiu MaE uKOpucmoByaumc oOcbamu, 0 npouuIncmpykmax uOdo Uo2o EukOpucmaHnA abo NiMeepduu CBoi 3di6Hocmi dna 0cbny-08yeaHHn pucmpo, a makok ynoe-Ho8aKeHi eukOpucmoByaMu uOzo.
Lii npucpii He npu3naeHuu dnra euKOpucmaHnIObMu (BKnIOaHOu diMeu) 3 O6mKeHUM φi3UHUM, cEHcopHUM a6o p03ymOum 3dAmHo
cmmu a6o 3 biocymhicmo doceidy u/ abo biocymhicmo 3HaHb, 3a BuHmKOM bunaKie, konu 3a Hmu cmexumb eioeidaIbHa 3a be3neky ocoba a60HU odepxyomb eid Hei Eka3Eku nO 3acmocyeaHHIO npucmpno.
Heo6xioHo cmexumu 3a dimbmu, uo6 BOHu He apanu i3 npucmpoem.
OBEPEXHO
He6e3neka yukokxehnHa! He donyckamunonadaHH 8 npucmpiu cmpiOK, iipboeOKa0 dpomy, ockinbku BOHU MOKymb HAMomamucra Ha bai, uio niDmimac.
Bka3iBkn 36e3neKn BpeKmipyxy
HEBE3NEKA
Hebe3neka npaehnHa! Nepeepumu 3damnicmb noeepxhi neped i3doi.
HEBE3NEKA
He6e3neKa Heuacchoa0eBunaKy, He6e3neKa yukokxeHH!
Hebe3neka nepekuadHn npunaHy ha 3aHaOmo Kpymux cxunax.
- Y hānpyMKy pyxy doynckaembcj i3da no cxunax do 12%.
Hebe3neka nepekuadHnHa noOpomax nid yac pyxy Ha bucokiu wueokocmi (ocobnueo Ha noOpomax eniio).
Ha noeopomax cnid cnoeinbHobamu ueudkicmb pyxy.
Hebe3neka nepekuodanHa HecmabnHomy rpyhmi. - Do3eBnembc npunad minbku Ha miHi NiOcmaeui.
Hebe3neka nepekuadnna npunaody npu eeJukomy biHOMy KpeHi. - Y hapramkax, nonepeuHux do hapramky pyxy, donyckaembcn nepecyeaHna napama minbku no cxunax do maKc. 10%
Bka3iBkn 3 6e3neKn IJn npncTpoIB, IIO npaHOTb BiD akymyIaTOPHOI 6atapei
Bka3iBka: IpaBO Ha rapaHTiHe o6cnyoBByaHHa 36epiraTcR TaIbKn y BnAaKy BnKOpNCaHHa AkMyJrTopiB i 3apdHnx npucTpoB, uO peKomeHdye fipma Karcher.
- Cπiδ o6oB'3koBO DoTpyMByatnc iHCTpyKuii no EKcNnyatauii BiD Bnpo6HnKa akyMnyTopa 3apdHoro npi-CTPOI. DToPmuyTeCb BkazIBOK 3akoHOdaBCTBa no obiy 3 akyMnyTopamn.
-Hikon He 3aIiwaIte po3pJxKeHn akyMnyITop iAkomora WbNDwe 3HOBy 3apJntb Noro.
-ПИТРМУЛТЕ akyMуЛТОП 3aBxДN B YICTOMY I cyXOMY CTaHI UO6 yHmKHyTN BNTOKy CTPMy 3axuTaTN BiD BnyeHn H6pyd, HapnKnaD, MetanEBOrO nI Ny.
-He KnaTn IHCTpyMeHTn a6o noi6Hi npEpmTe Ha akymyIaTOp. He6e3neKa KopoTko 3amKahHn B6xy.
-YKoHOMy pa3i He opuyBaTu 3 BOrhem, icpntu a60 Kypntu no6n3y akyMnyTopa a6o B akymyTatopHi. He-6e3neKa B6xy.
-HeDToTOpKaTnC4do rapaHxBy3JIb, HapnKlaI,do npBvOHOrO DBNryHa (He6e3neKa oniky)
-Будье obepexhi npi po6oTi 3 akymyIЯTOPHM eNEKTPoJITOM.ДOTpUMyTe BiINOBIDHnx npaBnI Texhkn 63neKn!
-BNKOpNCtahi AkMyIaTOpn BapTo yTuNl3yBaTu, BiNIOBiIDHO Do DInpeKTHuB EC 91/ 157 EWG,6e3 uKOuIaHaB KOnuHbOro cepedOBuua.
MaunHn 3 NiJOMHnKoKHTeHepa
HEBE3NEKA
He6e3neKa mpa8myaHnHa!
Pioaocpoim3niodomhukomKoHmeuHep HeobxioHOOBHCIO nIDHmu ma3aifikcyamu.
Bukohyamu 3axum minbku 3308Hi He6e3neuHOi 30HU.
Pnucpii i3 3axncHM daXOM BOIDIA
NOBIDOMJIENHRA
3axuchu dax (onui) 3a6e3neyu3 axumc
bodia bi nadiHHKpynHux npedMemie.
Ane biH He moke 3axucmu npu nepe
eepmaHH!
LIOohna nepeepmu 3axuchui Haic Ha iOcymHicmb nowkoDxKeHb.
Y pa3i nowkoedhen 3axuchoo HabiCy, 6 momy yucni okpemux enemehmie, HeobxioHO 3amihmu eecb 3axuchu Habic.
Byob-ka Modufikaia 3axuchozo Ha-bicy i ecmaHoeNHe enEmeHmie, de-maneui Ey3nie, iDmiHHux eid do36oIe-Hux Kompaniio Karcher, He donycka-tombcra I moKymb obMeKyeamu fyn-Kuo 3axuchozo Habicy.
Bka3iBkn 3 6e3neKn niD qac TpaHcnopTyBaHHaMaunHn
3eepmamuyeaayHa enachy macy (mpaHcnopmhaeaaa) npucmpoio ndacmpaHcnopmybaHHa mpumayi aboHa mpaHcnopmhux 3acobax.
Pid yacmpaHcnpmyeAHn npucmpoBumrmu wmekep akymyarnopa i Hadiuho 3akpinmu npucmpiu.
Bka3iBkn 3 6e3neKn niD qac DorgnAy Ta TexHicHoro 06cnyroByBaHHa
→Ipepe ouuueHHm i npoebeHn mexhivnoo 0cbnyoeybaHH npu cmpoio, zamino demaneu abo hcmpoobahna ha inui dyHKui, npucmpi ciid euknoyum ma eunhamu KIOU.
Y npucmpox 3 mroobum akymyarnopom nid yac npo8eHnry 6by-kaux po6im 3 mexhiuho 06cIy2oeyeaHH i peMOHMy akymyarnop Heo6xioHO biO'ehAmu eID enekmuHoi cuCmemu npucmpo uepe3 moky po3'edHaHH akymyarnopa (wmekep akymyarnopap).
Ppu pobomi 3 eJekmpuHIO ycmahoeKOIO Heo6xioHO eiOeHaMu akyMnymopHy bamapeio.
Iyubozcnoamkyei'dhamu Hezamuhu nonoc,anomim nozumuhu.
IoknueHH 3diuchnoembcy y 380- pomHomy npaKy. Cnoamky nio'edhamu no3umuBu nnoc, a nomim Hezamuehu.
→ He do3e0bnembca yucumtu npuaad 3 e0dnozo wnahaa a6o cmpymehem eodu nio bucokum muckom (he6e3neka kopomko2o 3amukahnma iHux nowKoOxHeB).
→ Pemohmhi pobom mokymb npoobumucra nue aemopuzoeaHumc cepichumu cnyk6amu abo cneuaicamuy uui cpepi, kci 03haoumehi 3 ycima baxnueum npaeunammu mexhiku be3- neku.
Pobumu nepeeepky ha npedMem be3neku y eiodnoibocmi do iioxu Miceexux dupekmue nra hecmaiohaphux npucmpoe, uo bukopucmoyombcry npomucnoocmi.
Pobomu 3 npucmpoem Heo6xio 3a- EKdu npoeodumy cneuaIbHux nepayamkax.
Pn3NaeHn
Maunha, uo niDmitae, HanpaBnae cmTTBe3nocepEnbO B pe3epByap dIra 36opycmTTa.
-ObepToBn BaI, 10 NiIMiTae HappaBnae CmTTa npMa B pe3epByap dna 360py cmTTA.
-BiHa uItKa NiIMiTae KyTn KpaI NOBepxHi, 0o NiIMiTaeTbcra, i DocTaBnRe CMITRA B3OHy po6OTu Bana, 0o NiIMiTae.
-ДрбнIMПИВCMOKTyBANbHm BEHTINrTOpOM Yepe3ФЛБTpДЯ ПИNY.
Bka3iBn npn po3BaHTaxeHHi
He6e3neuHo
He6e3neKa 3dopeo8, He6e3neKa ykoKoKeHH!
Ipu bAHmaxKeHHi cnid 3eepHymu yeay Ha eay npucmpoio.
| Bara (6e3 akymylarytopnix 6a-tapei) | 1398 kg* |
| Bara (3 akymylarytopnimi 6aatapeymi) | 2690 kg* |
| * 3i BCTaHOBJIeHIM MOHTaXHIM KOMПлeK-TOM Bara пиСТрЮ, BiДnobIDNo, CTaE ZeIe 3NauchHiшi. | |
He BnKOpNCTOByBaTN BnIKOBn Ha BAHTaKyBaY.
→ПиЗаВаHTaKeHHi npIcTpOIO BnKOpNCTOByBaTn BiIIOBiDi CXoDi a60 KpaH.
→Пи ВИКОРИСТАНС CXOДЕнслД 3ВЕР-уTN yBaIy Ha HAcTynHe:ДорoxHII npocBIT 70 MM
→ RaKIO npncTpi NoCTaayetbca Ha niD-DoHI, Heo6XiHO cNopydHTN 3 npknaDeHnx DoOOK pAMNy dIra 3'3dy. IHCTpyKcII MoKHa 3HaITn Ha CTOp.2 (Ha BHyTpiuHi cTOPOHi KpUuKn).
Baxnbo: KOxHa DoUka Mae 6yTn 3a-KpinneHa 3a Donomoroo 2 rBuHTIB.
EnemEny npablinn i yHKioHaIbHi By3nn


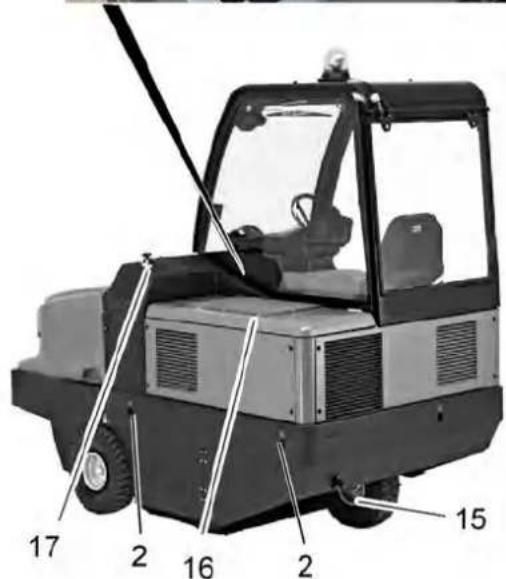
3o6paKeHHn iDmitaIbHoI MaunHn PAnelb ynpabInHH
1Дерікави (onця)
2 Ctiike Micke KpinnenHHa (4 wT.)
3 3axnchn Habic (onzi)
4Поблисковий маячok
5 Cknoounchnk (onui)
6 BLOKyBaHn KpUk nPncTpo
7 NaheIb ynpabnHHa
8 KepMoBe Koneco
9 3amok 3anaHOBaHHa
10CToHouHiTaJIbMa
11 Pedi
12 CniiHHa (3 KOHTaKTHm Nepemkaayem cniiHHa)
13 13
14 Komnnekt akymyntopib 2x24V
15 3aHKeKoIeCo
16 Koxyux DInryHa
17 PerynboHHaBanyo nmiTa
18 OcbitIbOaJIbHn npicTpii (Onia)
19 Pe3epByap dnn 360py cmitt
20 BiHa 1tKa
21 PpeaHc KOleco
22 Bxidn oTbip bany, 0 niDmitae

1ФyHKlioHaJIbHi KHONKn
2Перемкay nporpaM
3 BeHTnlaicHm OTbip (onua)
4 BaraTofoHHoHaBha iHnKaia
5 Bnok 3anobixhknib Ha pObooyom Micui
6 3amok 3anaJIIOBaHHr
3amok 3anaJIIOBaHHa

1 KnIOu 3anaIHOBaHHa
IIOJIOXKeHHa0:IBuRyH BmKHeHn
-Полженнaya 1:ВкlnуntиЗапаленя.
-Пложжени 2:Заустити Дыгун.
ФункцioHaJIbHi KHonKn

1 BmkaBmkaKa p06oHorO ocBtiJeHHa
2BMnKa/CBMnKaC npo6nCKOBOrMa-
3 Ouchka jinbtra
4 CunHaI
5Перемпачнрamypyxу
6 BcMoKtYaBaIbHn BeHTuJIaTOp
7 BiDHHHTN/3aHHHTN KPNKky pe3epBy- apy
8ПиOM/onyckaHHЯ EMHOCTIДЯ 36Opy CMITTR
KoHTpOJIbHI iHdNkaTOpN Ta DnCnNei
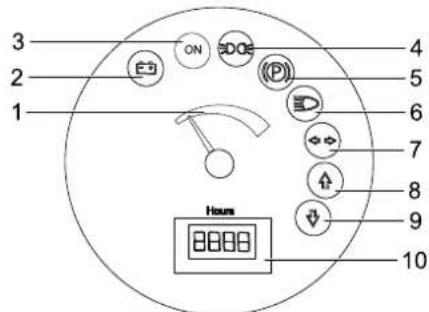
1 Notykhicb akymyraTropho6aTapei
2 IIndikatop 3apny ayakymyIaTopa
3 KOnTroJIbHa lamna pexmmy po6oTu
4 KOHTpOJIbHm iHnKaTOp rabapuTIB
5 KOnTpOJIbHn iINikKaTOp (He nIiKIOUeHN)
6 KOnTpOJIbHn iIaNKaTOp 6IINKHBoro CBITNa
7 KOnTpOJIbHn iHdNkaTOp (He nIiKlIOueHn)
8 KOnTpObnHn iHnKaTOp HAnpMy pyxy "Bnepei"
9 KOnTpOJIbHn iIINKaTOp HAnpMy pyxy "Ha3aD"
10JIiHbHnKpo6OuXrOaHn
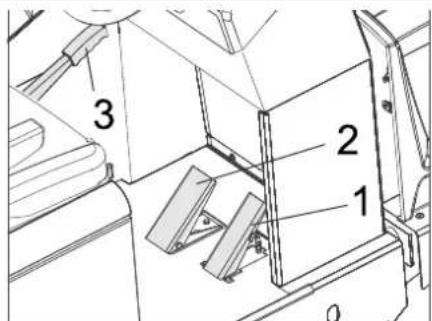
Peani
1 Akcepepatop
2 Peda nba JbMa
3CToHouHrraJbMa
Ipeed noaTkom po6oTu
3aΦikcyBaTN/BiDnycTNTU CTOrHKOBe rAJIbMO
BidiNyCTHTNCTOARHKOBe rALbMo,HaTNCKyIOH pni UbOMy Ha neJaIb rAJIbMa.
3aφikcyBatn CTORHKOBe ralMo,HaTNCkyOuH npu cBOMy Ha ndaJIb ralMa.
IpecyBaHHn iDmitaIbHoi MaunHH 6e3 Bnachoro npBODa
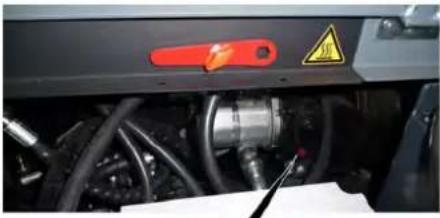
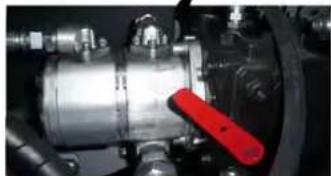
BidkpnKoKxyDbnryHa.
O6epHytn BaxkInb BInhoro xOxy (eepBOHn) rIpaBnHOro Hacoca Ha 180° (npToT roDHHNKOBoi CTrpIKN). BnkOpncTObyBaTN cneiaJbHn iHCTpyMeHT.
NOBIDOMJIENHRA
Cneuiabhu iHcmpymemt (peboHuzaikooiu KIOU) 3haxoDumbcg empuaHa pami aemomobina, bina Mexahi3My 6inbHO2O xOdy.
OBEPEXHO
He donyckaembcn nepecyamu Maunhy, zo nidmimac Ha eenuki biocmaH ma wudwe, hix 10 km/4.
→ PicnepemieHnnoBepHyBaKINb BIBHORO XOyB NOaTKOBe NIOJoxEH.
IpecyBaHHn niIMiTalbHoMaunH3BnaCHm npuBODOM
Raio Baxinb BinbHoro xOdy ripabnHoro Hacoca nepeBedeHn B noJoxeHnI npemiuueHHMaunHn, Noro CnID o6epHyTu y3BOPOTn 6iK 3a roHHNKOBHO CTPIKOHO DO ynopy. BnkopncTOByBaTn cneiaIbHn IHcTpymEHT.
BVeDENH B eKcπnyataciio
3araJIbHI BkA3iBKN
BCTAHOBHTMaHHy,IO NiIMiTae,HapibHI NOBepxHi.
BUTTHyTN KIIOU 3aAnIOBaHHA.
3aφikcyTe cTOraHouHy rAJIbMiBHy cnCTeMy.
Ipebeipka i Texhiue H 6cnyroByaHH
PekomeHDoBaHi akymyIaTOpHi 6aTapei, 3apnI npntpoi
AkymyIyTop 3apJxKeHn HanoIOBHy.
- INdikatop cMKoCTi aKymyIaTopa B cepBOHOi oBnaCTi:
AkymyIaTOp MaXke po3paXKeHNI.
PiIMiTAHnRA BtOMaTnUHO npuINHcTeBcra He3a6apom.
-KoHTpOJIbHa JAmnOuKa Tropntb UepBOHIM KOnbOpOM
AkymyIyTop po3prJxKHeH. NiDmitaHn Hr ABTOMaTNUHO npuNnHaTeBcra (PpOdoBKeHHpo60Tu NOBOPoTHoro arperaty MoKnBO TiJbKn nicna 3apdKn akymyIyTopa).
→ Peremictn npnnaD 63nocepeHbO Do cTahii 3apAKn, npu ubomy yHka-tn NiIyomib.
3apraNTn akyMnyTOp.
Ekcnnyatauia
Hactpoitn noJoxeHHcuiHHBodia
→ Notaryn y6ik BaxiJIb perynobAHnCnDINHH.
→ IpecyHytn CnDINH, BiDnyCTNTBaKjNb i DaTn Nomy 3aΦikCyBaTnC.
→ IpepeiueHHm cnHnHn BnpeepHa3aI nepebipTu NOro pikcaio.
Bn6paT nporpamy

1 TpaHcnpTyBaHH
2PiIMiTahHHPiIMiTauOHBAJOM
3PiIMiTAHH3 BnKOpNCtAHNBMana,00PiIMiTae i6iHnx 1itOK
3anyctn npncptpi
Bka3iBaKa:Ppnaad OChaueHn KOHTaKTHOIO HactuNKoO CnIHn. PpN BCTaBaHHI 3CnIHn BOJnpNCTIPIBkHNoaETbcR.
3aHraTn Micce Ha cnDinHi onepaTopa.
→ IpeBecTn IepemKau HaprMy pyxv B cepenHe noJoxeHH.
3aφikcyuTe cTOrHouHy rAJIbMiBHy cnCTeMy.
BcTaBnTn KIOU B 3aMOK 3aNaJIeHHA.
NOBEPHTN KJIIOU 3aIANIIOBAHHB NOJNOXEHH,1. I. PnCTpiI roTOBNI do pO6OTn.
→ NpeBecTn KInOu 3anaIeHHB nOIOXeHHNII.
PnCTpiI roTOBm Do nepeMiuIeHHN.
BkaibKa:IHnKaTOp EMKoCTi akyMnyTopa BiO6paKye paKTnHn CTan 3apyDiy 3atpumkoB 10 cekyHd.
IpecesyBaHnHa npuJa
→ NpeBecTu nepeMnKau nporpaB noNoXeHH "TpaHcnpTyBaHH"
→HaTnCHyTuTa yTpmyBaTu neaIb raJIbMa.
Bidnyctte cToHkoBe raIbMo
IxatnBnepe
IpeemkaHnpaMy pyxu 3haxoDntbC8B noloxenHi "Bnepei".
→ПиавноHaTnCHyTuHaNeaIbakcepe- patorpa.
IxatnHa3a
06epexHo!
Hebe3neka mpaemyeaHn!Ppu pyci ha3ad Hebe3neka He 3a2pOxye mpemim oc6am, kuo bye nompe6a, npoiHcmpyKmyeamu ix.
OBEPEXHO
He6e3neKa yuKoOKeHH! Nepemukay Ha npmy pyxy do3eONrEmcbac Akmuyeamu luue nicra 3ynuHku npucmpoio.
→Перемкauнлрamypyx3haXoNTb- c8 b noIoxKeHHi "Ha3aJ".
→ПиавноHaTnCHyTuHa neaIb akcepe- patorpa.
XapakTepepyx
-3doNOMORONeIaIakcepepatopa MoKnIBo 6e3cTyniHacte peryIIOBaHN HsBnIKoCT pyx
Bapto yHnKaTn pi3KOrO haTnCKaHHa Ha neDani, TOMy u ycbomy BNnAdKy riPabNiuHa cnCTema moKe 6yTu NOnuKOxDKeHa.
TalmyBaHHa
→ PnB iDnyckaHHI neaani xOy, npncpti camoctiHrTaIbMye i3ynHReTbc.
Bka3iBaKa:IIIOraIbMaMOXHa NiDCnHNT, HAHTNCKyC Ha HOXHe raIbMO.
NoonanHn nepeWkoD
IOnoHaHHa HepyXOMNX NpeuKOJ BnCToHO 50 MM:
→ ΠepeшкODи cnIg npoxoHTn o6epeKHo,pyxaOuYncb BnepeJHa nobInbHiin WbUdkocTi.
IpoonanHHn HepyXOMnx nepeuKOa BncoTOHO6iNbue 70 MM:
→Ioi6hi nepeuokoNc iid npoxoHTn Tiibkn 3 BnKOpncTaHHm nixOJaioi pamn.
Пдмитання
OSEPEKHO
He donyckamu enyuehn er Mauunhy nkyeabhux cmpiok, dpomy u make iHwe., momy uo ue moke npueecmu do yukodKeHHMexaHi3My, uo niDmimac.
BkaizbKa:ДЯdoCRAHHeHNAONTMaNbHOro pe3yNbTaTypo6OHT Heo6xIDHOPO3MiprAu WbNDKicTb pyxY 3MICUEBMn yMOBaMn.
BkaizbKa:Piqvacpo60tnCnippeyIepHO ouuatau pibtpnnny.
PiimTaHH cyxo iinor
→ YbIMKHyTuHaHHTaY.
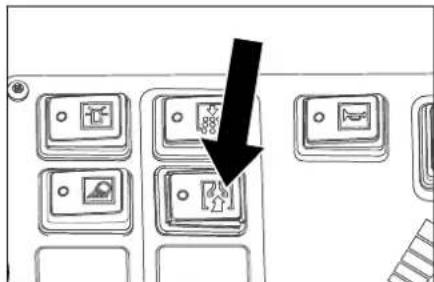
→ Pn n iDmitaHn nobepxoHb nepeBectn nporpaHHn Bmukay B peKIM nMiTahHH 3 BkOpncTaHHM BaIy, 0n niDmitac.
→ Pn uH eHH KpaIb NpeBecT nporpaMHN BmNKaU B pekim NiIMiTahH3 BNKOpCTaHHMaBny, 0o NiIMiTae, Ta6iHnx iITOK.
PiIMiTAHN BONORoI a6o MOKpoi NiJlOrn
BumkhTynHaHHTaY.
→ Pn n iDmitaHn noBepxohb nepeBecTn nporpaHm Bumkau B pexm nMi-taHH 3 BkOpncTaHHM Bany, LOn nIdmtac.
→ Pn YnueHni KpaIb NepeBecTn nporpaHHN BmNKaB B pexKIM niIMiTahH3 BNkOpNCtAHnM Bany, 0o NiIMiTae, Ta6iHuNX uitok.
CnopoXHHTPe3epByap dna cmITr BmKHyT npv
He6e3neH0
Hebe3neka mpaemyeaHn! NiO vac buOpoxHenHa e 30Hi bueahmaxeHHpe3ep6yapy dna cmimma 3abopohmcbnpepe6yeaHn IIOeMa meapun.
He6e3ne4Ho
Hebe3neka 3daebnboaHnn! Hikonu He mopKamucra cucmemu mraon MexaHiyoI cucMemu eunopoxHenHa. He cmou niid nHrammu pe3ep6yapom.
He6e3ne4Ho
Hebe3neka nepekuadnHa! Iid yac buno-poKHeHHc mabum npuna ha piHni noeepxHi.
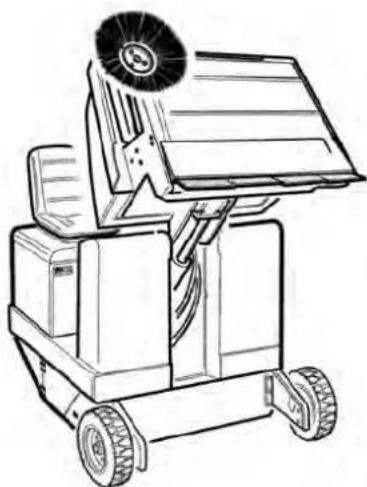
→ NpeBecTu nepeMnKau nporpaB noNoJKeHH "TpaHcnpTyBaHH"
PiHrtnpe3epByapn360pycmTTA
→ Nobinbno niz'ixatn do pe3epByapy dny 360py niny.
3aφikcyte cTOrHOHy rAJIbMiBHy CNTEmy.
→ BiKpnTu KpNkUy pe3epByapy: HATnCHyTu nepemukau BnIO Ta BnnpoxHnTu pe3epByap dIra 36OpY cmITT.
3akpnKpniuKy pe3epByapy:HaTnCHytn nepemnkauynpaBO (ytprmyBatn npotraRom np6n.2cekyH)do pfikcaii B KINcEBOMy NONOKeHHI.
BidiNyCTHTe CToHHKOBe ranbmo
→ NobilbHO BiixaTN BiD peepByapy nna 36opy nny.
→ BiDnycTnI pe3epByap IJN 360py CmIT TaB NOyATKOBe NIOJOKeHHJ.
HaTnCHyTuTa yTpMByBaTu neaJIb raJIbMa.
3aφikcynte cTOrHOHy rAnbMiBHy cnCTemy.
Knou 3anaIOBaHH NOBepHyTN B No3uio "0" i BNTaHyTN NOro 3 3Amka.
TpaHcnOpTyBaHHa
HE6E3NEKA
Hebe3neKa ompumahnma yuKoDxenb! Ppu mpaHcnpmyaHHi cnid 3eepymu yeay Ha easy npucmpoio.
Kniou 3anaIOBaHHn NOBepHyTN B No3N LIO "0" i BNTRHYTN NOrO 3aMka.
3aipikcynte cTOrHOHy rAJIbMiBHy CNTEmy.
→ PnKpInNT npncTpi D O CTINKx Micb KpinHeHHa 4 W T) 3a Donomoro HoTAAHX pEmeHIB, TPOCIB aO NaHOrIIB.
3aφikcybnt anapat, ndknabun niJ Noro Koneca KNHn.
→ Pn nepebeeHHi anapaty B tpaHcnopTHnx 3acobax cnBbpxoByBatN Mic-uebi diouhi depkaBHi HOpMn, Hanpab-NeHi Ha 3axnCT BiKD KB3aHHra nepeKndaHHa.
36epirahn
HEBE3NEKA
He6e3neka ompumahnma ywKo0keh!Ipu 36epiaaHhi 3eephymu yeazy Ha aay npucmpoio.
36epirannn
KaMoMaHnHa, 10 NiIMiTae He BkOpncToBBytbc npotraom TpmbanoR Oacy, cIIDOTpMByBatncr HactynHx Bka3IBOK:
BCTaHOBHTMaHHy, 10 NiIMiTae, HApBHHIOBepxHi.
→ NpeBecTu nepemukau nporpaM B noNoXeHH "TpaHcnpTyBaHH"
→ Knou3anaJIIOBaHHNoBepHyTN Bno3IIO "0" i BuTARHyTN Ioro 3 3Amka.
Bxntn 3axoib npotu MMOBijbHoro CKOyBaHH MaunH, nO NiIMiTae.
→ ΜΟΥΝΤΗ ΜΑΜΙΝΗ, ζΟ πίδιΜΙΑς 3cepeπηνική 3OBHI.
→ ΠοctaBHTn npuaŋd y 3axuεHOMy i cyxomY micui.
→ BntraHryTuI TeKep aKymyTIpota 3 Ma-
→ AkymyIaTOp BApTo 3apAHTn, a NotOM cnIa 3apAIXKaTn np6n. KoxHi Dba MiCraui.
Oorjra Ta texhinyo6cnyrobyBaHHa
3araJIbHI BkA3iBKn
OBEPEXHO
Hebe3neka nowokxehnHa!
Punoeu pInbmp npomueamu He nompiHo.
→ Ppeo ouuueHHm i npoebeHHm TexHCHoro 06cnyroBaHH npnCTPOO,3amHOo DeTanea a6o HacTpOuBAHH Ha IHwi cyHKqii, pncTpi cnid BKNJIOHTN, KIOU BNIHATN, Ta BNITTN aKymyIaTOpHNI WTeke apo BiD'EdHaTN aKymyJIaTOp.
-PemOHTHi pO60Tu MOKytb npoBOuNTnCra NlWe aBTop3OBaHMn cepBichHMn Cnyk6amn abcneuaicTAMyui Cpepi, kki O3HaonMJIeHi 3 ycima BaxKnBIMn npabNAmr TexHikn 6e3neKn.
-Пистpoi,оВИКОРИСТОВИTOBSC KOMepuHoy BIDIOBIDHOCTIdoMICUEBHXBIMOR,nINPRAIOTB npOBeEHNO nepeBIPKN3TexHIK6e3neKn3riHNO VDE0701.
BCTaHOBHTMaHHy, 10 NiIMiTae, HapBHHIOBepxHi.
→ Knou3anaIIOBaHH NOBepHyT B No3uio "0" i BuTaryHry NOro 3 3aMaKa.
3aφikcyTe cTOrHOHy rAJIbMiBHy cnCTeMy.
YnueHH
06EPEXHO
Hebe3neka yukokkeHH! He do380
Jnembcya ucmum npucmpi 3 60raHO2O
Unaa a6o cmpymeh bdu niD bucoKUM muckom (Hebe3neka Kopomko2O 3aMukaHMa iHux NowkoKeHb).
YnueHH anapata 3cepeHn H06epxHo!
Hebe3neka mpaemyeaHH! Odaaume 3axuchy macky npomu nnu i 3axuci Okjynpu.
→ PnpoTeTp anapat raHupkoIO.
O6nytn anapaT noBITPm nID TnCKOM.
YnueHHa anapaTa 3OBHi
OuHCTHTn anapaT, BIKOPNCOTBOYUHN Dnla Cboro BOIORY raHcy, npocoy Hcna6kIM JyKHM PO3HOM.
Bka3iBka: 3a6bOpohReTbcra BnKOpucTaHH arpeCNBHX MNHNX 3ac06iB.
PepioHnHcTbTexHiHoro 06cnyroByBaHHa
BkaizbKa:JIiunhNkpoobuXroIN nobiDOMnE npo MOMeHT npoBeHHeHHOcbny-ROByBaHH.
TexHue 06cnyroByBaHHa 3dIChIOeTbCkNIEHTOM
Bka3iBka:Bci pO60n 3TexHCHoro 6cnyroByBaHHra 360ky KJIeHTa NOBHHI npBOoDITNCKBAJIΦIKOBAHM qaxibcem.Bpa3i notpeBn B 6yNb-KN MOMENT MOXHa 3BepHyTnCn NO DOnOMr BY CneuiAnIOBAHy ToproBEnbHy opraHaiauio fipmN Karcher.
LQoENHeTexHieNe 0cnyroByBaHHa:
→ Ipebeipntn Ban, 0o nIdmitae i biHni TKN Ha 3HOswyBaHHa HArBHiCTb CTpiHOK, 0o HAOTANCA.
→ Ipebipntu cTah Bcix enemHTIB ynpabJIHH.
→ Ipebeipntn npnaad Ha npdeMet noiKoJxKeHb.
LToNkHeBTEXHcHneOcnyroByBaHHa:
OuHCTnTn rIpaBniHm MacnHn paiaTop.
→ IpepeBipu ripabniHy yctahOBky.
→ IpeBipu npBHeB rIpaBnHOro MaCTnJa.
→IpebeipuPiBHeRaIbMIBHOiPiHn.
→ ΠepeBipTN yuINbHOBaIbHi nHa 3HOseHcT Ta npn Notpe6i 3AmHtN.
→ Πepebipu i 3maCTnKpuiKy peepByapy.
TexHue OcbnyroByBaHHaCTnH, 3HOuyOTbc:
3amHItbYuINBHOBaJI nHaKN.
Biperynobatna 3amHNT6iHi yinbHeHH.
3amHItbBn,0nNiDiMaTae.
3amihtb6iHui tKn.
Bka3iBka: Doknaadhiue nIB. po3di "TexHiHHe 06cnyrobyBaHHa".
TexHne 06cnyroByBaHHn, 3dInCHIOETbCnYK6OIO
06cIyroBvBaHHcNoXnBauiB
O6cnyroByBaHHaYepe3 50 roHn po6oTn:
→ 菲斯元门 npoBecn 3riDHO 3 cepBICHO KHIROIO.
O6cnyrobyBaHHaYepe3 250 roDnH po-6oTn:
PpOBectn iHcneKIO nicraTexHiHoro 06CnyroByBaHHa.
Bka3iBa:ДЯ 36epeKHeHn npaBaHa ra paHTiNe OBCnyROByBaHH Bci poBoTn 3 texHrHorO n npoPfInaKTnHOrO oBCnyROByBaHH npToTrom rapaHTiHoro nepioDy noBHHI npOBODITNC BNOBHOBaKeHO cEpBicHO CnykboO fipMn Karcher BiINOBiHNo Do 6pOswypn NO texHrHOMy OBCnyROByBaHHIO
Pnpoiaktnuhi po6oTu
Плг罗вka:
BCTAHOBHTMaHHy,IO NIMITae,HapibHn NOBepxHi.
→ KnHou 3aIaJIIOBaHH NOBepHyT N IO3N LIO "0" i BNTaRHyT NoO 3 aMka.
3aφikcyTe cTOrHOHy rAJIbMiBHy cnCTemy.
3araJIbHI Bka3iBKN 0oDo 6e3neKn HE6E3NEKA
He6e3neka mpaBmyaHnHa? 3aBxdu npu niohymomy pe3epeyapi dny 3b0py cmimma ecmaHOBJo8amu 3anobixhi omahu.
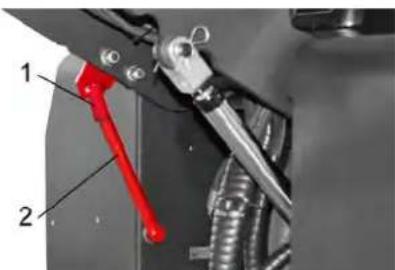
1 TpMaay 3anobixhoi taHn 2 3anobixkha tHaHa
→ BiKHyTu HABepx 3anobixkHy wTaHry DnA CnpoxKeHHN PiHrTOpe3epBy apy i BCTaBtu II y TpMau (3ano6ixkHn)
3aminHTnakymyIaTOpn
Donyckaetcb 3aimaTinbKn NOBHOKOMnneKty akyMnyIaTOPiB.3aIMHy Do3BOJnEeTbc 3diINCHOBaTN TinbKn KBanifikOBaHOMy nepcoHaNoY.
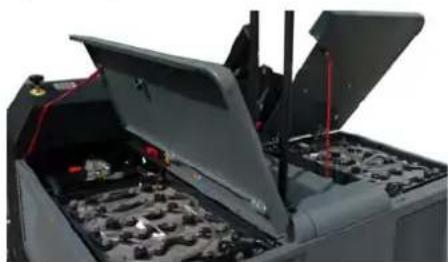
→ I3-3a BeInkoB BARN (Bara Ondoro AkyMyIyToppa 545 Kr) ZAMHy CnID 3dInChrtn i33actocyBaHHM KpaHy.
→ PnBnMaHHi akMyJrTopa cNoaTky 06o8'raKoBO Tpe6a Bi'dcHaTu HeraTNBHNI NOJIoc (-).
→ Pπκπiπιην KaHaTn KpaHα Do 4 neTeNb KOMπIeKty aKymyIaTOpHnx 6aTaapei i oBepexxHO BntTHyTn aKymyIaTOpN.
Bka3iBka: 3a3dneriDb BndaJntu6iHi KpUkN.
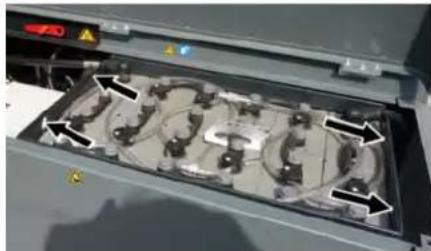
IpebipntpiBHeRiDpaBniHoro MaCTnJa Ta DoNHTu Horo IOBIOMJEHH
Pezepeyap 36bopy cimmn He mac 6ymu nHm.
BidkpntKoKxyDbnryHa.

1 Padiatop oxoJxkyBaHHr iipabniHoro Macna
2OrnaDBeckno
3Kpnka,OTBipnna3aJIbKnMaCTnla
4 MaHOMeTp
5 BaK IJIa IipabNiuHoro MaCTnla
6 3anobixnK FU 1 (roioBnHn 3anobixnK)
7 Kopnyc eeneKToHHoro npucTpoB BIDKpNBaTu Do3BOJnReTbcra TIIbKn faxIIBzM cepBicHOrO ueHTpy.
→ IpeBipu npiBHe MaTnA B rIpaB-nHnCnCTeMI BOrJrdoBOMy BiKHi.
-PiBHeb MaCTnna NOBHeH nepe6yBaTm MIX BiMItkAmn "MIN" i "MAX".
-JaKuo pibeHb MaCTnla HIXKHe BiIMiTKn MIN,DOJNTN MaCTnIO.
BikpyNTn KpnuKy OTbopy nra 3aNB-ku MaCTnla.
OuNCTnO6NaTb3aINBKN.
DOnMTn ripabniye MaCTNo.
Bud macna: DnB. Texhi ni dani
→ HArBnHTnTKnPmKy OTbOpy dIra 3aJIINBKN MaCTnJa.
IOBIDOMJIEHH
Kaio MaHomemp 6ka3yHa nideuene Hmucky iidaepnHoo Macmuna, Heo6xido 3eepnmuoc 6 cepicHy cny6y Karcher 3 numaHa 3amHu fInbmpy dna iidaepnHoo Macmuna.
Ipebeipu ridaepaBniHy yctahOBky
3aφikcynte cTOrHouHy rAInbMiBHy cnCTemy.
3anyCTnTn DnBnyH.
TexHne 06cnyroByBaHHraipabNIOHOYCTaHOBNMa3diINCHOBATn Nnue cepBicHa cnykba.
→ IpepeBipu ripabniHhi JnHaHn Ta 3'EDHaHHHa repMeTnHiCTb.
Ipebeipntn Ba, 0o niimTa
→ NObepHyTn KInOu 3aIaIIOBaHHB No- NOXeHHN
→Пингпpe3epByapДл36opycmITTB NOHaTKOBeNOJoxKeHH.
→ NObepHyTKnIOU 3aIaIIOBaHHB no- noXeHHo 0.
3aφikcyTe CTOHouHy rAIBHy cnCTemy.
BcTaHOBHTn 3anobixhhi taHn DnIa cnopoxHeHHn iDnToro peepByapy.
→ BuaNTn 3 BaJa, 10 NiMItaC, CTpiKn N MOTy3K, 10 HAOTaJIncr.
→ BmHn3an06jxhi wTaHn.
BCTaBHTN KIIOU B 3AMOK 3anaeHHRA.
PObepHyT KInOu 3aIaIOBaHHB noIIOXeHHJ.
→ BiDnyctnTn pe3epByap dna 360py cmi- TBA NOyATKOBENOJOXeHH.
BUMKHyTN DnBuYH.
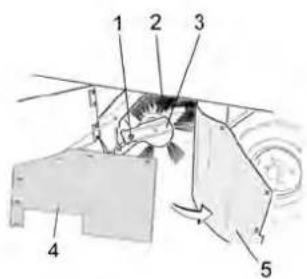
3amihabana,0o niimitae
1 KpinnbHn TBnHT TpMaaya Bany, 0o nDimitac
2Ban,io nIMtae.
3 Tpmau Bany, 0n Niimtae
4Ппockасторнашайб6iHoroушьн。
5 BiyuyeujiJIbHeHHa
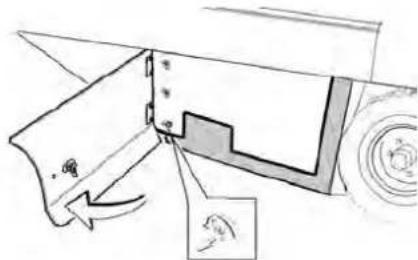
Bikpn 6iHy naHb 3a donomorok KIOUa.
BidBnHTn CmykOBI raKn, po3Ta- WOBaHI ha nlocki CTOnOpHni wa6i, BiD 6iHoro yuiNbHeHH Ta 3Hrtn nNoCKy CTOnOpHy wai6y.
BiknHytn Ha3OBHb6iHye yuinbHeHHa.
→ BnBHTNTN KpINNBHn TBnHT TpMa-ya Bany, 0o NiDMtAe, Ta o6epHytn Ha30BHi npMnBHN nPncTpI.
BnTyrHyBaI,io nIdMaTae.
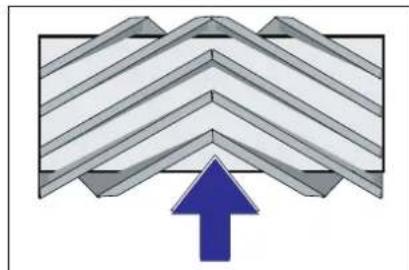
Po3TaUyBaHnB Bana, 10 NiDmita npi yctahOBuI no HApymky pyxy (Bnrrn3Bepxy)
Bka3iBa: Pnp yctaHOBu HOBO Rana, 0o nIMtAc, 3BepHyTu Ybary Ha noJIOKeHHa UeTINH
YCTAHOBHTHOBNBAJ,IOIiIMITae. Na3n BAJy,IOI iIMiTae,NOBHHI 36irTNC3 BNUCTyNam6baHaHCipa.
Bka3iBaKa: Picn yctahOBKn HOBO nIMitAnbHOro Bany Heo6xIDHO 3aHO BO BipeTyIIOBAtn NIOUHHy NiIMiTAHHa.
Ipebeipka KopektyBaHHn IIOuHH nIDmitaHH dna Bana, 0o nIDmitac
→ IpebebipuTuTcKy uHax.
BIMKHyTN BCMOKTyBaJIbHn BEHTNJr-Top.
NocTABUTMaunHy, uO NiIMiTae, HapBHy rIaKny iNnory, NOKpTu BUNMM wapom nIy a6o meJa.
→ ΠepeBecTn nporpAMHn BmNkau B peKIM niMItaHH 3 BnKOpNCtAHHm BaNy, 00 niMItac.
→ NpeBecTn nepeMnKa nporpaB nO- noXeHH "TpaHcnpTyBaHH".
→ DAtn npctpo1 3aHni xiD.
→ IpeBipuHnIIOUHy NiIMHaHH.
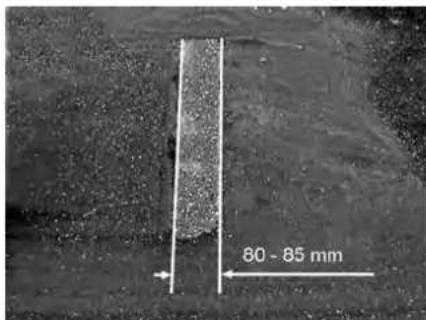
PpOJIb NiIMiTAHH NOBHeH MaTn BNrIaPiBHOMiPHOro PnpMOKyTHNka uNpHHO 80-85 MM.

BidperynobTu npnHy npophiio niMiTaHHa:
1 Perynobhnn TBnHT
→ BiDperynBoTa nOnoxeHHn npocinio niDimtaHHnJnxOM nepeCTaHOBKn peRyIOBaJIbHOrO rBNHTA.
→IpeBipu nnOuHny niMiTaHH.
Ipebeipka Ta KopektyBaHH npophiinnoiIMiTAHN DnBana, 0n iIMitac
→PiHaTn 6iHi uItkn.
NocTaNtMaunHy, uo NiDMiTae, HapibHy rnaKy niDnory, nokpTu BnuMm wapom nny afo meJa.
→ IpebeCTn nporpaHm BmHKaB pE KIM nIMtaHH3 BkOpNCtAHM BaNy, 0o nIMTa, Ta 6iHoJ uTKn.
PiHaTn 6iHi uItKn.
YctahOBHTn nepemukau nporpam y no JIOXeHHa "Pyx".
→ DAtn npncptpo 3aHni xi.
→ IpepeBipuTn nlounHy niMiTaHHa.
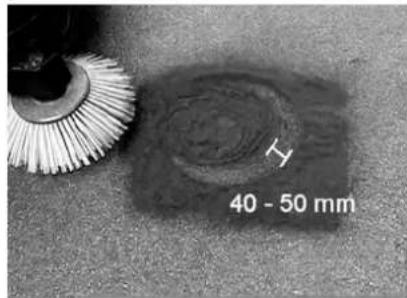
HnHa npophi nIiMItaHHNoBHHaCTaHOBTN BiD 40 00 50 MM.

→ BiDperyIOBAtn noJoxKeHH nNoCKOci NiIMTaHH 3a DOnOMorOo DBox perYIOBaIbHnx TBnHTiB.
→PipeBipuTn pnounHy ndMaHaH.
BctaHOBTN 6iHi yuinbHeHHA
→Пингшаверхpe3epByapДЯ 36bopy CMITTA 3aФikCyBAtN 3a DOnOMorHO 3an06jXHoiJtAHn.
HE6E3NEKA
He6e3neka mpaemyaHnHa? 3aeKdu npu ndhymomy pe3epeyapi dny 3b0py cmimma ecmaohoeJou6am 3anobixhi umaneu.
BidKHyTu HabePx 3an06ixHy uTaHry Dnra CnpoxkHeHHN iDnHrTOpe3epBy- apy i BCTaBtTu ii y TpMaay (3ano6ixHn)

1 TpImaU 3anaO6iXHOI UtaHn
2 3anobixha uTaHa
BikpnT6iHy naHeJIb, kO nIcHo B rIaBI 3amHa bany, yo NiIMiTae" Buie.
Ocna6ntn 6 cmykoBnx raok Ha 6iHnnnockcnctonopnniwa6i.
Ocnabntn3raaKn(SW13)Ha nepeHni nnocki ctonophi wai6i.
→ HatnckyBaTu 6iHHe yuINbHeHHBHN3 (NOOBXHi OTBip),NOKI NORO KpaH He BnABtbc Ra BiDCTaHI 1-3 MM BiD NiD-NOR.
→ PnurBnHTnT nNoCKy cTOnOpHy wai6y.
→ NOBTOPHTN NOCNIIOBHCbDnI INHOI CTOPOH PNDCTPOIO.
OuichiHnHnΦiNbTpynny npuyHy
→ BnKoHaTu NnueHn HnIbTp y nny 3a DOnOMOrO KHOKn NnueHHn Ib- Tpy.
3aHa nIOBOro fIbTa pA NOPEDEXEHH
Do noamky 3amiu nuo020 fInbmpa budanmu Bmic im3 peepeyapa dny 360py cimmma Ppu pobomi 3 fInbmpyealbHO ycmanoekoHocumu macky dny 3axucmy eid npny. Dompumyume npunucnb no mexhiui be3neku eiohocho obiy i3 dpibHum nunom.

Bikpn6nokybaHH.ДЯцboro He-06xIDHO BIKpyTNTI TBHIT 3 roJIBKOIO y Bnrrjdi 3ipOuKn.
BidKHyTu KpnuKy npncTroO BnpeD.
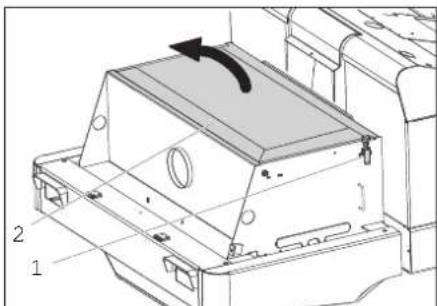
Bidkpntn Kpnuky pfIbTpa.

→ BiKnHyTni niTpuyBauchiNbtpy Bnepeq.
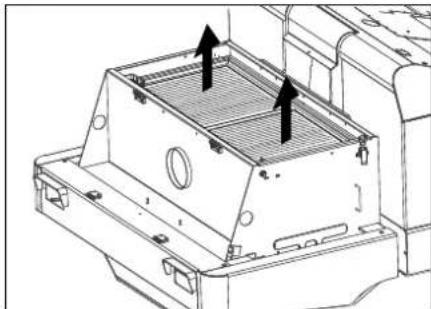
3aima nnoBoro fibtpa.
3HOBy 3aKnTuN KpuuKy pInbTpY.
3amHa lamnn po3XkapIOBaHHa (onucj)
Bikpynti npapy.
→ BnHHTN φapy Ta BNTaHyTN WTeKepeH NpO3"IM.
Bka3iBka: 3anaMaTatTu nonoKeHHa WTekePHORo PO3'EMY.
Bikpytni dpn OndHy BID oHOoi.
BikpyTNKopnycapn,piu bomy TpIMaTI KOPNycROPnOHTaJIbHO, OckIbKn6IOKJaMnHe3akPInneHn.
P03TnCKaTn CkO6y I BnHrTn JAMny P03KapIOBaHHJ.
BCTaHOBHTN HOBy JAMpy po3KapIOBaH
3HOBy 36epiTy 3BOpOTHi nocnIOB-HOCTI
3amHa lamn po3xkapOBaHHN oKaxnya nobopoTy (onzi)
Bka3iBka:ДЯЗамилamnnNOKaKHaKa NOBOPOTy BnHrTn CkNo 3 KOpnyCy NOKaK- uka.
3amHHn3an06xHnKn
Bidkpntn Tpmaa 3ano6iXnka.
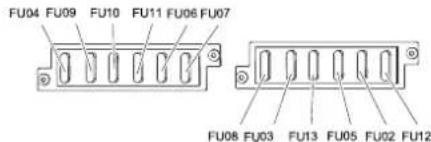
→ IpeBipTu 3an06iKHNK.
HecnpabHI 3anobixHHNKn 3amHHTN.
Bka3iBka:BcTaHOBnTu 3anO6ixHnK FU 01 (roJOBHm 3aNo6ixHnK) B KOpNyc eNeK- TPOHHOro npCTpO.
3anobikn Fu 14, FU 15 Ta FU 16 3haXoJbC8ycepeHni KOpnyc eJeKtpOHHO npctpo. YBara: BiKpBaTn Kopnyc i npOBOnTu 3amHy 3anobiknKIB Do3BOJaTeBcTinbKn yNoBHObaKeHm qaxiBcM cepBichoro ceHTpy.
Bka3iBaK:BnKOpNCToByBaTn 3aNo6iKnKINIe 3 ODAHAKOBIM 3HaHeHHM.
Donomora y BunaKy HenoJaok
TexHiChi xapaKTePncTnKi
| Hecnpabnictb Ucyhenn | |
| Прилад не щide abo щide заандто nobільно | Зайся місце на сідіні операюра, сістема ko\-тak\-нго вімікача сідінь\-у\-ct\-ь\-с\-. |
| У\-вім\-н\-у\-ts\-з\-э\-об\-і\-н\-н\-FU, ё\-о\-с\-р\-su\-ь\-в (\(\text{y}\)kopny\-с\-е\-к\-tr\-pon\-н\-го\-п\-р\-ct\-р\-о\-) | |
| А\-ку\-м\-л\-у\-port\-н\-б\-Б\-Б\-Б\-Б\-Б\-Б\-Б\-Б\-Б\-Б\-Б\-Б\-Б\-Б\-Б\-Б\-Б\-Б\-Б\-Б\-Б\-Б\-Б\-Б\-Б\-Б\-Б\-Б\-Б\-Б\-Б\-Б\-Б\-Б\-Б\-Б\-Б\-Б\-Б\-Б\-Б\-Б\-Б\-Б\-Б\-Б\-Б\-Б\-Б\-Б\-B\-Karcher | |
| Сbvstячийши в гідравлиій сі\-стemi | Зайся р\-об\-оч\-у\- р\-д\-и\-н\-д\-я\-г\-д\-р\-в\-l\-ч\-н\-х\-с\-ст\-tem |
| ЗBVHyTSCB\N�эн\-ы\-г\-ь\-ь\-ь\-ь\-ь\-ь\-ь\-ь\-ь\-ь\-ь\-ь\-ь\-ь\-ь\-ь\-ь\-ь\-ь\-ь\-ь\-ь\-ь\-ь\-ь\-ь\-ь\-ь\-ь\-ь\-ь\-ь\-ь\-ь\-ь\-ь\-ь\-ь\-ь\-ь\-ь\-ь\-ь\-ь\-ь\-ь\-ь\-ь\-ь\-ь\-в\/Кarcher | |
| UşіTKи обер\-ta\-ot\-ь\-sey nobільно\-aboHe obépta\-ot\-ь\-ь\-ь\-ь\-ь\-ь\-ь\-ь\-ь\-ь\-ь\-ь\-ь\-ь\-ь\-ь\-ь\-ь\-ь\-ь\-ь\-ь\-ь\-ь\-ь\-ь\-ь\-ь\-ь\-ь\-ь\-ь\-ь\-ь\-ь\-ь\-ь\-ь\-ь\-ь\-ь\-ь\-ь\-ь\-ь\-ь\-ь\-ь\-ь\-BayCIM | Завівіпін\-н\-н\-н\-н\-н\-н\-н\-н\-н\-н\-н\-н\-н\-н\-н\-н\-н\-н\-н\-н\-н\-н\-н\-н\-н\-н\-н\-н\-н\-н\-н\-н\-н\-н\-н\-н\-н\-н\-н\-н\-н\-н\-н\-н\-н\-н\-н\-н\-н\-н\/Karcher |
| Невелka по\-тукінів СВмokту\-ваньno\-aboII\-ы\-д\-с\-у\-н\-п\-в\/Б\-Б\-Б\-Б\-Б\-Б\-Б\-Б\-Б\-Б\-Б\-Б\-Б\-Б\-Б\-Б\-Б\-Б\-Б\-Б\-Б\-Б\-Б\-Б\-Б\-Б\-Б\-Б\-Б\-Б\-Б\-Б\-Б\-Б\-Б\-Б\-Б\-Б\-Б\-Б\-Б\-Б\-Б\-Б\-Б\-Б\-Б\-B\-Karcher | Очістka Ф\-п\-ы\-р\- |
| Звсініпівін\/ріошіnt\/Встанов\/ВNTN 6iynchɪ yuziŋhENHry | |
| У\-віm\-н\-н\-н\-н\-н\-н\-н\-н\-н\-н\-н\-н\-н\-н\-н\-н\-н\-н\-н\-н\-н\-н\-н\-н\-н\-н\-н\-н\-н\-н\-н\-н\-н\-н\-н\-н\-н\-н\-н\-н\-н\-н\-н\-н\-н\-н\-н\-н\-н\-NCH\/Karcher | |
| Підмітальни піс\-ст\-рій не з\-абі\- pa\-с\-smітэ | Ви\-д\-м\-NTN WMICI 3I peze\-р\-в\-у\-ар\-д\-Я\-З\-Б\-Op\-у\-с\-MɪTZ |
| Оч\-ш\-н\-н\-н\-н\-н\-н\-н\-н\-н\-н\-н\-н\-н\-н\-н\-NMLY | |
| Зamɪha bala, ё\-о\-п\-д\-мɪtəʊ | |
| Мо\-н\-tu\-в\-н\-н\-п\-р\-ф\-и\-о\-п\-д\-мɪ\-т\-ан\-н\- | |
| Зamɪha у\-ш\-н\-н\-н\-н\-н\-н\-н\-н\-н\-н\-н\-н\-NMLY Na\-р\-d\-mɪtəʊ | |
| У\-sy\-н\-н\-н\-н\-н\-н\-н\-н\-NMLY Na\-р\-d\-mɪtəʊ | |
| Звсініпін\/В сэр\-вісін\/сэр\-віс\/Кarcher | |
| Рeze\-р\-в\-у\-р\/дія\/смітій не піді\-ma\-ct\-ь\-ь\-ь\-ь\-ь\-ь\-ь\-ь\-ь\-ь\-ь\-ь\-ь\-ь\-ь\-ь\-ь\-ь\-ь\-ь\-ь\-ь\-ь\-ь\-ь\-ь\-ь\-ь\-ь\-ь\-ь\-ь\-ь\-ь\-ь\-ь\-ь\-ь\-ь\-ь\-ь\-ь\-ь\-ь\-ь\-ь\-ь\-ь\-ь\- bay | Завівіпін\/Зал\-біж\-н\-н\-н\-NMLY |
| Звсініпін\/В сэр\-віс\/Сэр\-віс\/Кarcher | |
| Рeze\-р\-в\-у\-р\/дія\/зэр\-ь\-ь\-ь\-ь\-ь\-ь\-ь\-ь\-ь\-ь\-ь\-ь\-ь\-ь\-ь\-ь\-ь\-ь\-ь\-ь\-ь\-ь\-ь\-ь\-ь\-ь\-ь\-ь\-ь\-ь\-ь\-ь\-ь\-ь\-ь\-ь\-ь\-ь\-ь\-ь\-ь\-ь\-ь\-ь\-ь\-ь\-ь\-ь\-ь\-bay | Звсініпін\/В сэр\-віс\/Сэр\-віs\/Karcher |
| Hecnpa\-вrostі[elemeɪtɪv, ѽо пі\-вді\-ь\-ь\-ь\/ в дію رɪ\-р\-в\-ліч\-н\-ю\C\-S\-CT\-Mо\-ю | Звсініпін\/В сэр\-віс\/Сэр\-віs\/Karcher |
Chairman of the Board of Management
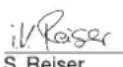
Director Regulatory Affairs & Certification
YIOBHOBaKeHm CnIBpo6iTHNK IIO BeDeHHIO DOKyMeHTo06iRy:
S. Reiser
Alfred Kärcher SE & Co. KG
Alfred-Karcher-StraBe 28-40
71364 Winnenden (Germany)
Tel.: +49 7195 14-0
Fax: +49 7195 14-2212
Winnenden, 2018/09/01
www.kaercher.com/REACH
质量保证
jgljll jol jil jll jlaalall
LgDyA
aai 100
a 1
2
aolal/1j> g, a 1/109 a/12
clj/1/20j/10j>g/1c/1ac/1c>1c
clj/10c/10c>1/1c/10c>1
acll/a jy/10j0e//a0t//aoL//
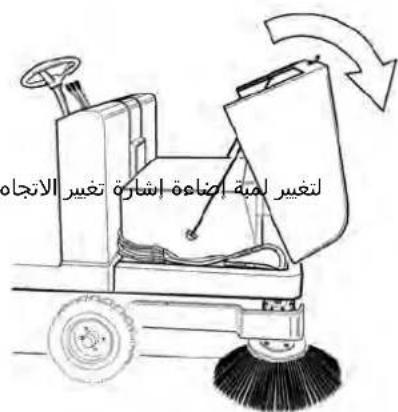
gjawall jd jg. aJlI alwgl
aaiia
pOwJgQJIcIbC 1
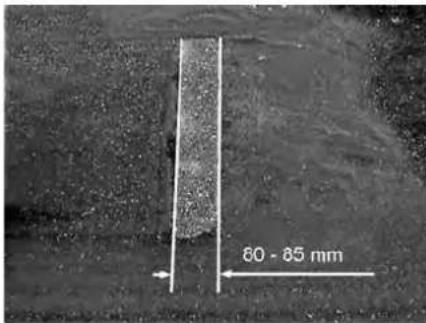
Jsw 85-80 aRg g jbiu

laaljlaa 1
Jx Jn jwSll oawg gogg L aio .aill Jawa Jzj .uill olawg a>g
aaiai aiaiol oawg aagao g
aagaaJ 1c uuSll aee
aalgl jjll 2gog olaog aolj gssg 1c 0o
.aaJJI aaSOLg oJGL JI aSIJLOJ aJJIaSOLg
.0aJgog JcJolalzao 1
50940

Jn 100 mssllolw9 a>g2a2a aP 1.aaill sIlaawo .mssllolw9 a>g2a2a
JSSI O.S
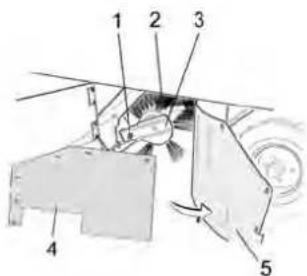
0gJll 1
aJgJU JUJU 2
o 3
a|j>1pK>yl a|e> 2g 4
ai + 1 > ai all
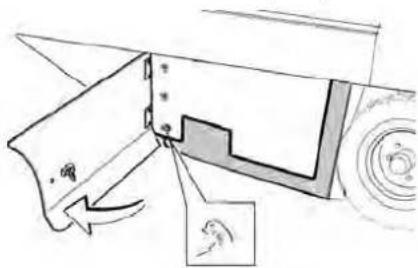
2100oLwUaJlOgssJz
gol gall aiaa Jolglal p 201 1000000000000000000000000000
cJwawlaipK>YIaab>pa
w gogolla laln
u 1000
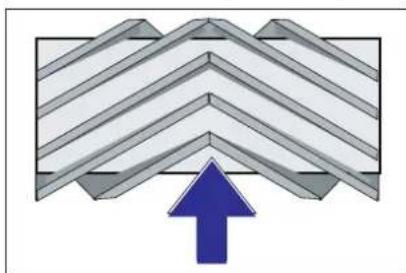
J 10000000000000000000000000000000000000000000000000
j>1 0aJl jSj Sj iic abgdo
w.00J0jgJUwJUoWsJp
0jglll jol 0jglj Jl>
Jlaal jolgals ggsall ogsall
oJl jol glj wksll owsj sakgdo
Jg 10
aJgJll mJl aJg Jg
ybyla bao a>pa
.1a0ll a>go Jaaaw cgl
aJg aGwaaJlcsuSll aRjLr
uulalgljllgogolbaog
olwjwssJgogJcGolJlTlaol
.0jgJl
Jaill gog lc golll 2ioi
uSllolw@g2x
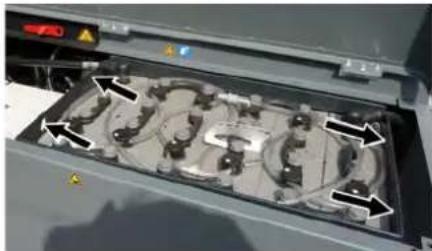
Jo JlaSsiIg Slgjglll jill sGima a>J0
Jz
Jew
Lgfo aolal/1jgsy
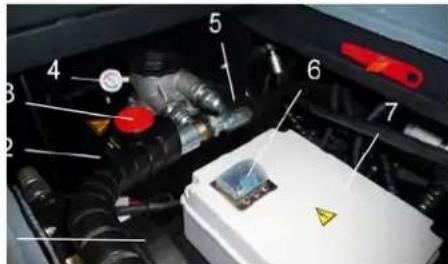
cIaai aoss Joo y Ieiaea
a>blj aawdjlNds
MAX,250V 2210A0xgMIN
1 1
Sglggl jll eJo JSoWg.MIN
cJlJ 0j a29 jlc osu o
Jolil 1uai uui
Suljgl jll Jo JSo
aaiiiaiaiaiaiaiaiaiaiaiaiaiaiaiaiaiaiaiaiaiaiaiaiaiaiaiaiaiaiaiaiaiaiaiaiaiaiaiaiaiaiaiaiaiaiaiaiaiaiaiaiaiaiaiaiaiaiaiaiaiaiaiaiaiaiaiaiaiaiaiaia
cJgJo a29 glooslaj
Jew
jllb2000000000000000000000000000000000000
jill jiljuiiic
Sue 100
a#gall 0
J 1
.0000
OoJy aolal alall Jlacl 1p
a1 = 2,a2 = - 4
aLgglll 10g1g pbljgl gaa> j
g>9 10
uSll 0s
"11111111111111111111
golal aolal jgs
.0gglJ J J J J J J J J J
..Jolj
a a a a a a a a a a a a a a a a a a
a aal al gaiia kaiu
wixgai aiaJyI aooJI aolgal
.VDE 0701JL
aagmo aol j mssll aocglo
"0"goglll jjzjlljzj
S木弟形 COBD = S COD + S BDO = S BOC +

JoljQ
←
m = 311
<.111Jol9 2
aaleaasLwIaI
ab 共线性
10011 1025 1025 1025 1025
lo
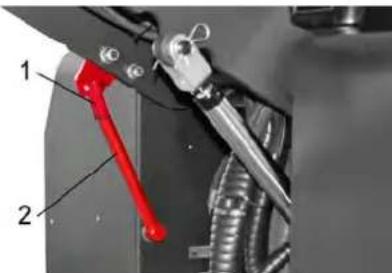
1
S OBC = S COD + S_ BOC
aai jie jia jia jia jia jia jia jia jia jia jia jia jia jia jia jia jia jia jia jia jia jia jia jia jia jia jia jia jia jia jia jia jia jia jia jia jia jia jia jia
JUWJ
aJyJI JIJI JIJI JIJI
aJllalgJrJlJllalpBb>gall
.
auiil auiy i jgui jai:abgala
山山
#
4g
jglzll cki jg y! /all joeill Ibs
jbs) bceall lcl clo jgi gbo s plswl
(5) | x - 1| = | x - 2| = | x - 3|
1
2ab
o aIgall eIc eIy Ie oJl loyI Jz
.0j1g jll
jlaa aaa
jglalabu bgsiaaolggelpaai
j 1
awgaoag allmo wai 9 a2b9 ooswul
jgljll caii jao Jgla
algco albu algo aolpaxu y albgdo
aalalalalalal
aLg0J Jxwll aLw Lx:abgdo
.
Jaaal jao Jgjra
gag gill ailwllg aooll Jlacglg> albgalo
a a
sI aaiyai jai xic Jgog
w0s0g>1.0g
:agogalajall
←
a.b.d.a.b.c.d. | x1| = | x2| = | x3| = 2| y1| = 2| y2| = 2| y3|
aagjabgllllaeJg
JLazimov
jgllclalg>g psc o 51
:aggJJIaJJI
sulgdlwjjduabii
a5 < 8,a6 或 a > 8 ( a > 6)
Sulgugllu jll sguoo a>1j0
Joljalljilw sgiua a2>1,
0g 11 100
.0jgJzll sic 2
aJw p9g cglllc2e a>
:Jfll 2a
.05>1y alo jai jai
.
Jlll lll (
aolalgaagboc
jllgogll aolalll jjJjI p
jgl
gJbI>JolalawgJcIaio
.
"0" g 1
.8aall Jg no a2w|g
jgljai
S APQ = S AQP + S_ PQQ
jz/110g 1y/211111111111111
alai,po
"0" 0000000000000000000000000000000000000
.3gall Jg no a2wgl
(4X)
jgl jgl w
. 1
jol j0r1.0jw jgljia
111 111 111 111
aall cl aJll
jzll 1i jg cI yall jyill ayolil bs
aijzuy plo/1u
alg ojai jglj
"0" 000000000000000000000000000000000000000
JgaiJIa9 10 a2wolg
Jxill 1000sll a c o
1111 1
←
.02
aJrJn aJllal
0 0
a
← alp j ay g9g1 awlg3 cdo39 g9j toxic
jlll 120 b
1ie 1g jigjagaiia jgl
.
:abg=do Joljallawg
glgolj
0701ggljy jlllglj
gJl jj>1 ic oJg JbJj
:70 1gbsauiiiaaijgljglj
aio piaowl y goll dl jgjy
.
4g
logjNw/gyaaoy/abpuyy
uui 15iLsio joojoo jdu uuuu uo
m = 1
aaiia aaiia aaiia JgaoJ:abgdo
gjUj/Jeaw/aeY. gJyI/ aI aol
.
B_S A
o 56g gai//aiaoccl>cll/1xla/1
gauo 2kw dc jgz//g9g9
111 111
.
A
Lulgpo
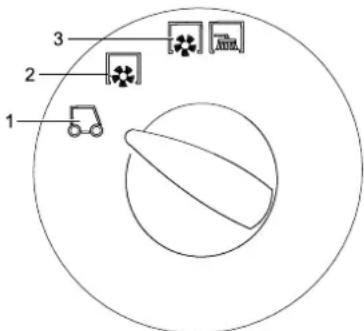
Jull pIbi 1
2
0JgJU JwJU 3
aui>ll auiSolg
jgljJ J
a.aaal jouol ojul 29jo jqJl:abgdo
glll o jjgljw
.
glullxaoJcunb>1
gogll lc sall obl 122 122 122
.bwgy
100
1"1g0glllgljzolalldlae
Jawill ojol> a,
111 111 111 111 111
joloojol>ajol
1g>2a aJbUoOjoo
. aJ 10
jglzll
<olll 21io lalid giall 1gai kai aiaol
Ig Jolalawgs Ia
abogao
Jolj0g jllb
pOJl Jd
giog jle mllolul x2x1eio boi
"loU"
clggyglawgglb2ol
aJll
k2 ≤
a/c/a/c/10.97 J5.60 1/20 y/10.0y/10.25
a>1/2ie9, 0y
laie//e/laic/
4g
12v 2000000000000000000000000000000000000000
- gao jzj 15 1y jwol
gog jolololololololol
"
aawgai
aal aas
awLwJswllacw
J
jgl/ jzwJ 10111111
2x
aoLw/laeolcJy>1/aoyjbs
Jololjoo Jor>1.0jllg//goJololl
ofo/ol/ylpfofofofofofo
)al/legioegjialloallg
gagall jwll ojg>gl jllal
| رطمن الحرفicit | |
| 6.654-280.0 | 24 24 24 24 24 24 24 24 24 24 24 24 24 24 24 24 24 24 24 24 24 24 24 24 24 24 24 24 24 24 24 24 24 24 17 700 * (العربية / محيى) |
| 6.654-281.0 | 80 80 80 80 80 80 80 80 80 80 80 80 80 80 80 80 80 80 80 80 80 80 80 80 80 80 80 80 80 80 80 80 80 80 17 700 |
| الجزز بورن نهش علّة | * |
y g s
jwks 002oJluuW Jg u jz
LwI Ww
o o
.
.
E:
J 1
.
aagj jlljilw sguo ajo
a
Jalalglgalllllglol
1/113 109 11111111111
.
JnJnJnJnJnJnJnJnJnJnJnJnJnJnJnJnJnJnJnJnJnJnJnJnJnJnJnJnJnJnJnJnJnJnJnJnJnJnJnJnJnJnJn
Jas A
aIw lo g/1g/1g/1g/1g/1g/1g/1g/1g/1g/1g/1g/1g/1g/1g/1g/1g/1g/1g/1g/1g/1g/1g/1g/1g/1g/1g/1g/1g/1g/1g/1g/1g/1g/1g
jow
wJll wJy oJyJll Jbly 0g>gall Jg>
x > 1
a
slaicy/(gjglw//us aC cJx yaoy 1y acnag algo /I/ll gvi/ Ic .aclu/ps 10,lc
g jj 1j jj jj jj j j j j j j j j j j j j j j j j j j j j j j j j j j j j j j j j j j j j j j j
Jc slacylgulwll wsi aqrclr
Joljoll awlg jlc laoio
aIyI Ig gagggl Jol jck
Joljllawgs,lc Jdo
JcIaicll 0g gaggl lss aeg kcr
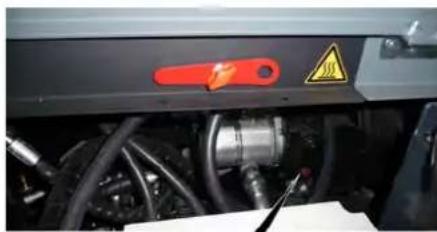
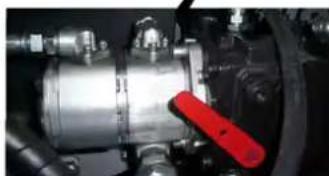
.
aLgll aiaaall (c|j) oJgI j
(ajoljololjusc)°180jlaa
aolb ooc p2xuwl
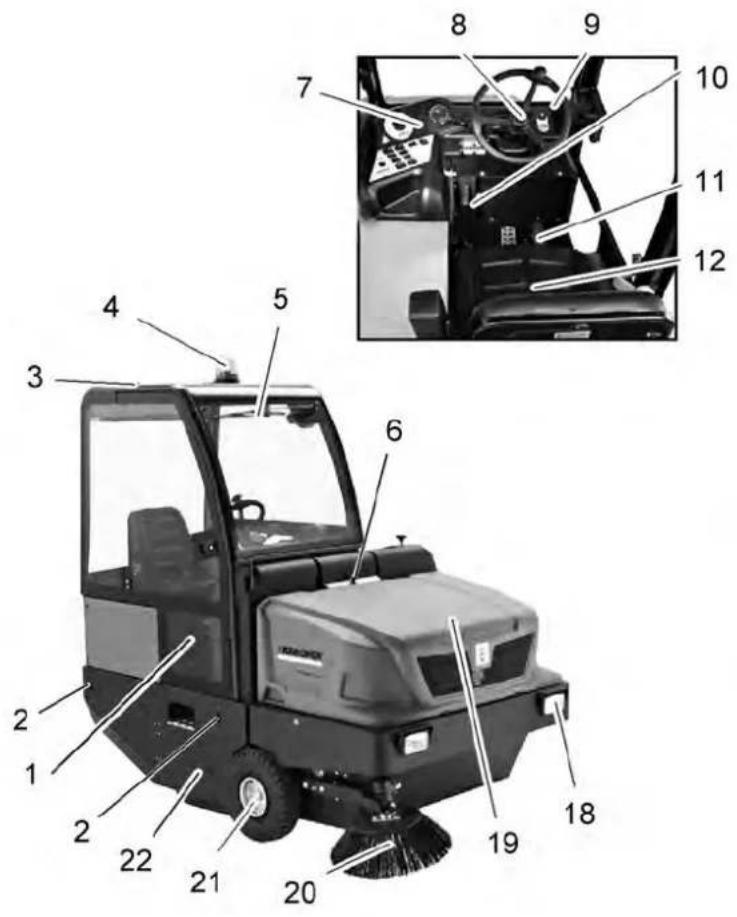
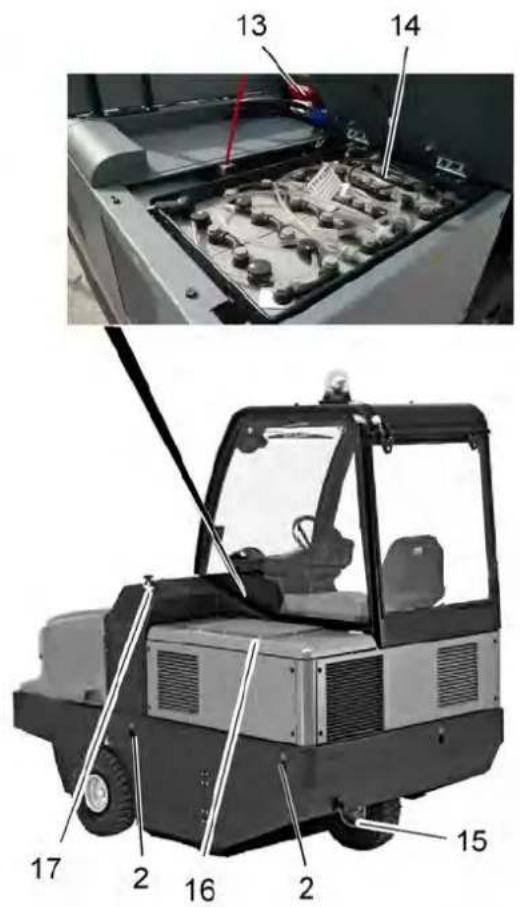
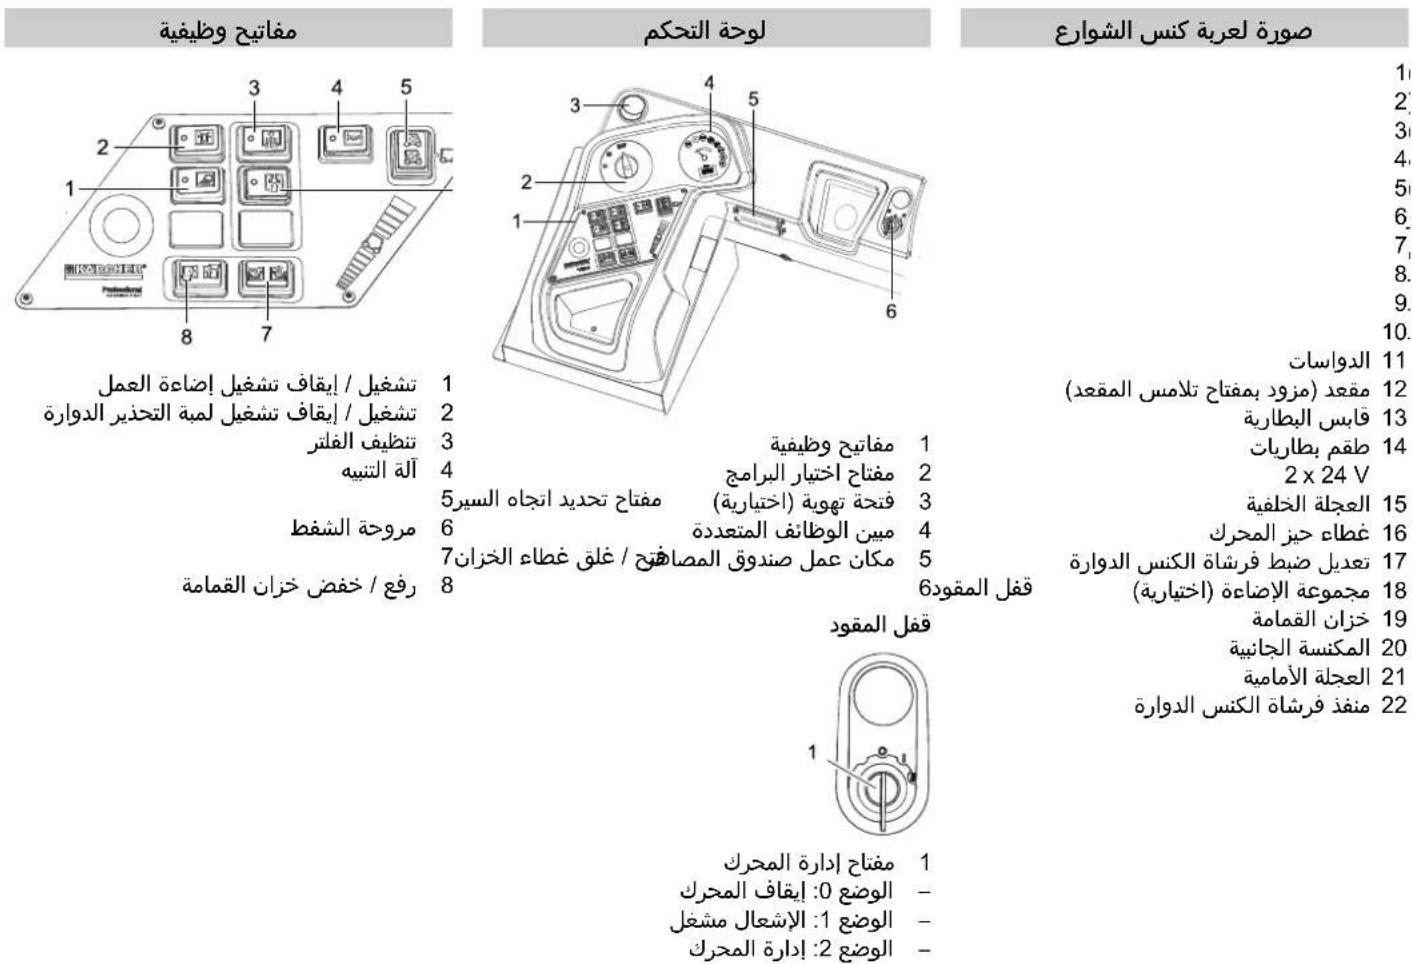
JgJlJzJ|aJ
ab 公式为: y = - 12x^2 + 35x + 4 BC//l
jll jolil jb2, yloy1 jb2
jull ic jqll jg olcr
gillwll aIa>aaawogjol ojey
Jew
JolS1a2//caw
g/la2//caow dc Jue/scl>gaow
s/s/aa/sclga2og c1j>gl/molcsu
asw 00g2aalldiKar
la2//caaw, abg/lcly/daoy gsw
.9gka//ae/9d//
jglj jai aolll aoalll
(jai//jg) jla//jga//olc/1c>1 <9i/1g2a//lc jai//cljgl2// 45jall
C 11111111111111111
aIg aIyIe IyIyIyIyIyIyIyIyIyIy
jglia//wogjgjgljwglajlgljgl a/ jgljgljglwgljgljgljgljgljgljgljgljgljgljgljgljgljgljgljgljgljgljgljgljgljgljgljgljgljgljgljgljgljgljgljgljgljgljgljgljgljgljgljgljgljgljgljgljgljgljgljgljgljgljgl
aIgblloJUogillolpug
JluuallbaiyagallubalJugy
jglgblpyo2iwljge//cbljg y
glljglg)baia/llc flo
(100
a05y1y/ y/ lao// jzj 2
Jnssaaio n9 Jg o g/le jnaal / cIae//
aIc, aewlg a/ jy ugeiai // Izal/ li
. alal / s/ aoLw// lae
aJlu// aJg/ oJy/ a29 olj 0e J LJI// alai// oJg/ yI aol// li
Jusic aai// jla// sJ/ laJ 0e JQ
a
aolal alal luygwlus Jss
aolaliljJy
JLl LwJ Jgag aaiall bawll g>g .0jglJL WsJL oWJrJL WO 1aagdJI aJyIbawbIbawll a>gpoe - .aJyIy
yI yI yI ayalglg/ogyI
yI ayalI ayaiI yI yO aylc
ayll lio o lae Ic ago> 12
jIyI li oVxuW aqS Uuy
puc o uill JlkbI ayol o
g/abw/ juspsjyjw/ jz> 1000000000000000000000000000000000000000000000000000
aJlaJlAeJLJrJ
k
Jaxll 0j.9 Jxj 1. aLoy/ jbs
laol jgsjbs eogg jbs
oclal jolll lc olaill sic yaiy jbs
aell ooi
jglw lll caleal jgo w y muil clj %12 leo aui
sic ao) acu w gbaoyi li cyaiy jbs
(luy olabeia/ .cabi / 9 cbay olaill lc w >1 -
.ayl//c c uoyjyl lc olaill sic yaiy jbs
.ayli ayjyl lc yjlg>ll dyy paaiy -
wiJ Js jzio 9 olaill sic yaiy jbs
gluo a> jy j//lejra//jc muy y -mu//olv y ayu//jku %10
alzai 0j>yl aolla oxlw onlwr j
J> 11aaii ggi a:abglo 100000000000000000000000000000000000000000000000
j 1 j 1 j 1 j 1 j 1 j 1 j 1 j 1 j 1 j 1 j 1 j 1 j 1 j 1 j 1 j 1 j 1 j 1 j 1 j 1 j 1 j 1 j 1 j 1 j 1 j 1 j 1 j 1 j 1 j 1 j 1 j 1 j 1 j 1 j
www.kaercher.com/REACH
laal
gai jai aai bgs w s g J 5 100000000000000000000000000000000000000000000000000000
o 100000000000000000000000000000000000000000000
gill jy jlll glzjglj g
a0d jgglgjgo yol
S AOB = S AOC + S_ AOB
jell glgag aalssll laooll
Rt
g^ ( x) = 1xL( x) - 1x( 1 - x)
cLac a25 50 Joo 1/1 Joo/1g29
.
1 AR
1 AR aill ala
1 AR
1 AR jIJI gBg aJSSJ IaJbJI
1 AR jzjll j0jgl jgjl
-0g>gall aAlBn yIg a nll lglh
2 AR
-12.00A 015uogy 11, gaiylo
2 AR aalil
2 AR
2 AR 1
2 AR oJJIa a aJ...
0g>yl aol aolw o15w
2 AR aJluI alaunll
Golgiolgiolgiolgi
2 AR
a>aa0gjol 0j>
3 AR
Jaa aalaaaalaaa
3 AR
aiee eae aee
3 AR
3 AR aIbgl
3 AR
PQ = AQ PQ = OQ
4 AR aagbgaiaa
5 AR JJ
5 AR
5 AR J
5 AR 999
g 1
JdJdJdJcSlaicly..
gss
JlgljLacly..
1
5 AR aole 1
aIwllg aJaiJIaI...
Jusill J
a
...
1
J
gilll 1000 buo
aoluljsl...
-ylglgAsRcLaxoaiolxowjrgaew
6 AR jololol
6 AR
6 AR aalall jgj
-1ogAARJg21
7 AR
ZwGAR
7 AR algojol jolal
7 AR
7 AR aole
7 AR
7 AR
7 AR aJal JacI...
10 AR Jbcic
11 AR a
1a
Jolaiu, a5jLgJl2xui Jgl
blaiygljlll iiaolai g jg 10
pssyglg>yls|J>Jd
> y

THANK YOU!
MERCI! DANKE! iGRACIAS!
Register your product and benefit from many advantages.
www.kaercher.com/welcome ★★★★★
Rate your product and tell us your opinion.
www.kaercher.com/dealersearch
Alfred Kärcher SE & Co. KG
Alfred-Karcher-Str. 28-40
71364 Winnenden (Germany)
Tel.: +49 7195 14-0
Fax: +49 7195 14-2212