
KM 150500 R Bp Pack - Sweeper Kärcher - Free user manual and instructions
Find the device manual for free KM 150500 R Bp Pack Kärcher in PDF.
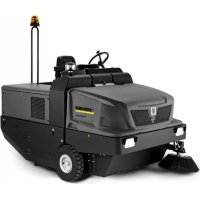



| Product type | Ride-on sweeper |
| Brand | Kärcher |
| Model | KM 150/500 R Bp Pack |
| Dimensions (L × W × H) | 2442 × 1570 × 1640 mm |
| Empty weight (without batteries) | 1398 kg |
| Total permissible weight | 3089 kg |
| Power supply | Battery 48 V, 700 Ah (2 battery packs of 24 V each) |
| Autonomy | 4 hours (fully charged battery) |
| Sweeping width (with side brush) | 1500 mm |
| Sweeping width (without side brush) | 1200 mm |
| Maximum sweeping capacity | 13800 m²/h (with 1 side brush) |
| Dust container capacity | 500 L |
| Maximum dump height | 1470 mm |
| Travel speed (forward/reverse) | 9 km/h |
| Maximum gradeability (driving direction) | 12 % |
| Turning radius (right/left) | 1515 mm / 1600 mm |
| Dust filter surface area | 7 m² |
| Sound pressure level (LpA) | 74 dB(A) |
| Vibration (seat) | 0.6 m/s² |
| Hydraulic oil type | HV 46 |
| Hydraulic oil quantity (tank) | 28 L |
| Maintenance | Daily: check brush wear, controls; weekly: clean cooler, check oil level; after 50 h: first service inspection |
| Safety | Seat contact switch, parking brake, safety bar for dumping, battery disconnect |
| Optional accessories | Cab, protective roof, flashing light, windshield wiper, work light |
Frequently Asked Questions - KM 150500 R Bp Pack Kärcher
User questions about KM 150500 R Bp Pack Kärcher
0 question about this device. Answer the ones you know or ask your own.
Ask a new question about this device
Download the instructions for your Sweeper in PDF format for free! Find your manual KM 150500 R Bp Pack - Kärcher and take your electronic device back in hand. On this page are published all the documents necessary for the use of your device. KM 150500 R Bp Pack by Kärcher.
USER MANUAL KM 150500 R Bp Pack Kärcher
71364 Winnenden (Germany)
Tel.: +49 7195 14-0
Fax: +49 7195 14-2212
Winnenden, 2018/09/01
General notes EN 1
Environmental protection EN 1
Warranty EN 1
Accessories and Spare Parts EN 1
Symbols in the operating instructions EN 1
Symbols on the machine EN 1
Proper use EN 2
Foreseeable misuse EN 2
Suitable surfaces EN 2
Safety instructions EN 2
Safety instructions EN 2
Safety instructions concerning
the operation EN 2
Safety information concerning
the driving operation . . . EN 2
Safety instructions for battery
operated devices . EN 2
Appliances with high emptying
system EN 3
Devices with overhead guard EN 3
Safety information concerning
the transport of the appliance EN 3
Safety information concerning
maintenance and care . . EN 3
Function. EN 3
Unloading tips EN 3
Operating and Functional Elements
EN 4
Illustration of sweeper.. EN 4
Operating field EN 4
Function keys. EN 4
Indicator lamps and display EN 5
Pedals EN 5
Before Startup . EN 5
Lock/ release parking brake EN 5
Moving sweeper without engaging self-propulsion . . EN 5
Moving sweeper by engaging self-propulsion . EN 5
Start up EN 5
General notes EN 5
Start up EN 5
Inspection and maintenance
work. EN 5
Before Startup EN 5
Safety notes regarding the batteries EN 5
Charge the batteries . . . EN 5
Operation. EN 6
Adjusting driver's seat . . EN 6
Programme selection.. EN 6
Starting the machine . . . EN 6
Drive the machine . . . . EN 6
Sweeping mode . EN 6
Emptying waste container EN 6
Turn off the appliance . . EN 7
Transport EN7
Transport EN7
Storage EN7
Shutdown EN7
Care and maintenance EN7
General notes EN7
Cleaning EN7
Maintenance intervals EN7
Maintenance works EN7
Troubleshooting EN
Technical specifications EN
EU Declaration of Conformity EN
to the initial operation of your appliance and store them for later use or subsequent owners.
General notes
Your sales outlet should be informed about any transit damage noted when unpacking the product.
- Warning and information plates on the machine provide important directions for safe operation.
- In addition to the information contained in the operating instructions, all statutory safety and accident prevention regulations must be observed.
Environmental protection

The packaging material can be recycled. Please do not throw the packaging material into household waste; please send it for recycling.
Old appliances contain valuable materials that can be recycled. Please arrange for the proper recycling of old appliances. Please dispose your old appliances using appropriate collection systems.
Batteries, oil, fuels and similar substances must not be released into the environment. Please dispose of these substances via suitable collection systems.
Notes about the ingredients (REACH)
You will find current information about the ingredients at:
www.kaercher.com/REACH
Warranty
The warranty terms published by the relevant sales company are applicable in each country. We will repair potential failures of your appliance within the warranty period free of charge, provided that such failure is caused by faulty material or defects in manufacturing. In the event of a warranty claim please contact your dealer or the nearest authorized Customer Service centre. Please submit the proof of purchase.
Accessories and Spare Parts
DANGER
To avoid risks, all repairs and replacement of spare parts may only be carried out by authorized customer service personnel.
- Only use accessories and spare parts which have been approved by the manufacturer. The exclusive use of original accessories and original spare parts ensures that the appliance can be operated safely and trouble free.
- For additional information about spare parts, please go to the Service section at www.kaercher.com.
Symbols in the operating
instructions
DANGER
Warns about immediate danger that can lead to severe injuries or death.
WARNING
Warns about possible danger that could lead to severe injuries or death.
CAUTION
Points out a possibly dangerous situation that can lead to light injuries or property damage.
ATTENTION
Pointer to a possibly dangerous situation that can lead to property damage.
Symbols on the machine
| Risk of burns on account of hot surfaces! Allow the exhaust to cool down sufficiently before starting work on the machine. | |
| Always use appropriate gloves while working on the device. | |
| Risk of getting squeezed on account of getting jammed between vehicle parts. | |
| Risk of injury on account of moving parts. Do not reach in. | |
| Risk of fire. Do not vacuum up any burning or glowing objects. | |
| Chain pick-up / crane point | |
| Intake points for the jack | |
| Maximum decline of ground when driving with the waste container raised. | |
| The gradient in the direction of travel should not exceed 12%. | |
| Caution! Rotating brush (watch for rotation direction). | |
| Beware of dangerous electrical current! | |
| Pay attention to the in-struction. | |
| Steer slowly! | |
| Please read the operating instructions and act ac-cordingly! | |
| Risk of damage! Do not rinse out the dust filter. |
Proper use
The sweeper is intended for cleaning floor surfaces for commercial use and e.g. for the following fields of application:
Car parks, production facilities, logistics areas, hotels, retail industry, storage areas, walkways.
- This sweeper has been designed to sweep dirt and debris from indoor as well as outdoor surfaces.
- The machine with working equipment must be checked to ensure that it is in proper working order and is operating safely prior to use. Otherwise, the appliance must not be used.
- Use this sweeper only as directed in these operating instructions.
- The machine may not be modified.
- The machine is only suitable for use on the types of surfaces specified in the operating instructions.
- The machine may only be operated on the surfaces approved by the company or its authorised representatives.
- The following applies in general: Keep highly-flammable substances away from the appliance (danger of explosion/fire).
Foreseeable misuse
Never vacuum up explosive liquids, combustible gases or undiluted acids and solvents. This includes petrol, paint thinner or heating oil which can generate explosive fumes or mixtures upon contact with the suction air. Acetone, undiluted acids and solvents must also be avoided as they can harm the materials on the machine.
Never sweep/vacuum up reactive metal dusts (e.g. aluminium, magnesium, zinc), as they form explosive gases when they come in contact with highly alkaline or acidic detergents. Do not sweep/vacuum up any burning or glowing objects. The appliance is not suitable for sweeping off hazardous substances. The machine may not be used or stored in hazardous areas. It is not allowed to use the appliance in hazardous locations. It is strictly prohibited to take co-passengers. Pushing/pulling or transporting objects by means of this appliance is prohibited.
Suitable surfaces
Asphalt
- Industrial floor
- Screed Concrete Paving stones
Safety instructions
Safety instructions concerning the operation
In order to maintain clearance and creepage distances, the device may not be operated over 2000 metres above sea level. (Applicable for Finland only) The device may not be used at low ambient temperatures (below 0°C) if it is equipped with a PVC hose line. Contact Kärcher if you have questions regarding your device. The machine with working equipment must be checked to ensure that it is in proper working order and is operating safely prior to use. Otherwise, the appliance must not be used. If the appliance is used in hazardous areas (e.g. filling stations) the corresponding safety provisions must be observed. It is not allowed to use the appliance in hazardous locations.
DANGER
Risk of injury!
Do not use the appliance without an overhead guard in areas where the operator might get hit by falling objects. The operator must use the appliance properly. The person must consider the local conditions and must pay attention to third parties, in particular children, when working with the appliance. It is important to follow all safety instructions, rules and regulations applicable for driving motor vehicles. Prior to starting work, the operator must ensure that all protective devices are properly installed and function correctly. The operator of the appliance is liable for accidents with other individuals or their property.
Ensure that the operator wears tight-fitting clothes. Wear sturdy shoes and avoid wearing loose-fitting clothes. Check the immediate vicinity prior to starting (e.g. children). Ensure sufficient visibility! Never leave the machine unattended so long as the engine is running. The operator may leave the appliance only when the engine has come to a standstill, the appliance has been protected against accidental movement, and the key has been removed. Please remove the key, when not in use, to avoid unauthorised use of the appliance. The appliance may only be used by persons who have been instructed in handling the appliance or have proven qualification and expertise in operating the appliance or have been explicitly assigned the task of handling the appliance. This appliance is not intended for use by persons (including children) with limited physical, sensoric or mental capacities or lack of experience and/or skills, unless such persons are accompanied and supervised by a person in charge of their safety or if they received precise instructions on the use of this appliance. Children should be supervised to prevent them from playing with the appliance.
CAUTION
Risk of damage! Do not sweep up straps, strings or wires as these may wrap around the brush roller.
Safety information concerning the driving operation
DANGER
Risk of injury! Verify the stability of the ground prior to driving on it.
DANGER
Risk of accident, risk of injury! Danger of tipping if gradient is too high. The gradient in the direction of travel should not exceed 12%. Danger of tipping over when taking bends at high speed (particularly left-hand bends). - Drive slowly when cornering. Danger of tipping on unstable ground. - Only use the machine on sound surfaces. Danger of tipping with excessive sideways tilt. The gradient perpendicular to the direction of travel should not exceed 10%.
Safety instructions for battery-operated devices
Note: Warranty claims will be entertained only if you use batteries and chargers recommended by Kärcher.
- Always follow the instructions of the battery manufacturer and the charger manufacturer. Please follow the statutory requirements for handling and disposing batteries.
- Never leave the batteries in a discharged state; recharge them as soon as possible.
- Always keep the batteries clean and dry to avoid creep currents. Protect the batteries and avoid contact with impurities such as metal dust.
- Do not place tools or similar items on the battery. Risk of short-circuit and explosion.
- Do not work with open flames, generate sparks or smoke in the vicinity of a battery or a battery charging room. Danger of explosion.
- Do not touch hot parts of the machine such as the drive motor (risk of burns).
- Be careful while handling battery acid. Follow the respective safety instructions!
- Used batteries are to be disposed according to the EC guideline 91/157 EWG in an environment-friendly manner.
Appliances with high emptying system
DANGER
Risk of injury!
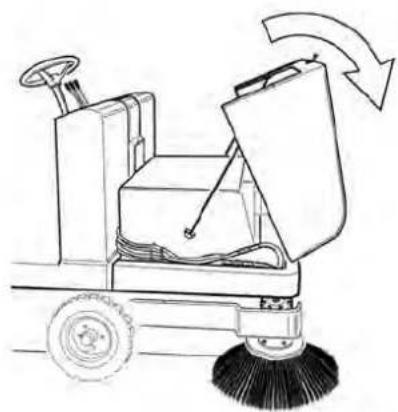
When working on the high emptying system, completely lift and secure the waste container. Perform the safeguarding only from outside the hazard zone.
Devices with overhead guard
NOTICE
The overhead guard (optional) protects the driver against larger falling objects. However, it does not provide rollover protection!
Check the overhead guard for damage daily. If the overhead guard, as well as individual elements, should be damaged, replace the entire overhead guard. Any modification of the overhead guard and installation of elements, components and assemblies other than those approved by Karcher is not permitted and may limit the function of the overhead guard.
Safety information concerning the transport of the appliance
Observe the net weight (transport weight) of the device during transport on trailers or vehicles. To transport the device, unplug the battery plug and securely fasten the device.
Safety information concerning maintenance and care
First switch off the appliance and remove the key before performing any cleaning or maintenance tasks on the appliance, replacing parts, or switching over to another function. When performing any service and maintenance work on devices with a traction battery, the battery must be disconnected from the electrical system of
the device via the battery isolation point (battery plug). Always disconnect the battery when working on the electrics. To do this, first disconnect the negative terminal and then the positive terminal. Reconnection is performed in reverse sequence. Connect the positive terminal first, then connect the negative terminal. Do not clean the appliance with a water hose or high-pressure water jet (danger of short circuits or other damage). Maintenance work may only be carried out by approved customer service outlets or experts in this field who are familiar with the respective safety regulations. Please observe the local safety regulations regarding portable commercially used appliances. Always use appropriate gloves while working on the device.
The sweeper operates using the sweepshovel principle.
The sweeper operates using the sweepshovel principle.
- The rotating roller brush moves the dirt directly into the waste container.
- The side brush cleans the corners and edges of the surface and moves dirt and debris into the path of the roller brush.
- The fine dust is sucked in via the dust filter through the suction blower.
Unloading tips
Danger
Risk of injury, risk of damage! Observe the weight of the appliance when you load it!
| Weight (without batteries) 1398 kg* | |
| Weight (with batteries) 2690 kg* | |
| * If upgrade kits are installed, the weight is respectively higher. | |
Do not use a forklift. Use a suitable ramp or a crane to load the appliance! Observe when using a ramp: Ground clearance 70 mm. If the machine is delivered on a pallet, you must create an unloading ramp using the boards provided. You will find the instructions for this procedure on page 2 (inside of cover). Important instruction: every board must be attached with at least 2 screws.
Operating and Functional Elements
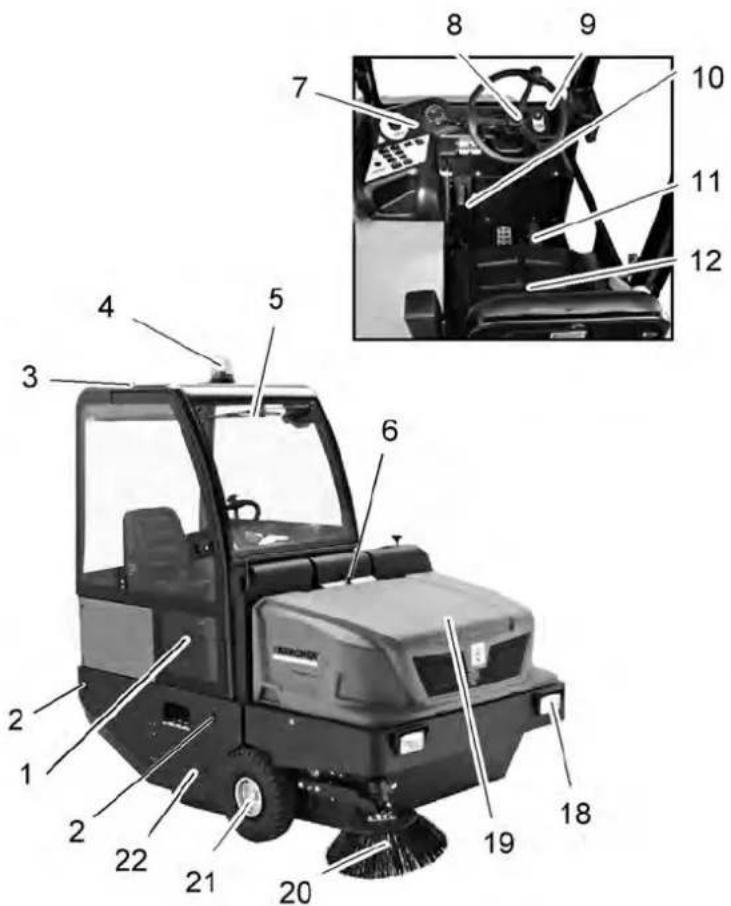
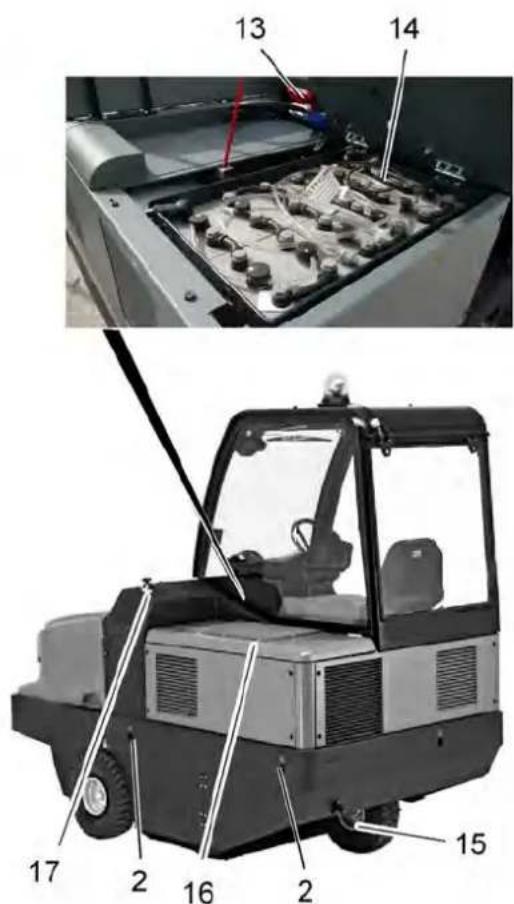
Illustration of sweeper Operating field
1 Cabin door (option) 2 Lashing point (4x) 3 Protective roof (option) 4 Beacon lamp 5 Windshield wiper (option) 6 Lock of appliance hood 7 Operating field 8 Steering wheel 9 Ignition lock 10 Parking brake 11 Pedals 12 Seat (with seat contact switch) 13 Battery socket 14 Battery set 2 × 24 V 15 Rear wheel 16 Engine cover 17 Brush roller adjustment 18 Lighting system (optional) 19 Waste container 20 Side brushes 21 Front wheel 22 Roller brush access
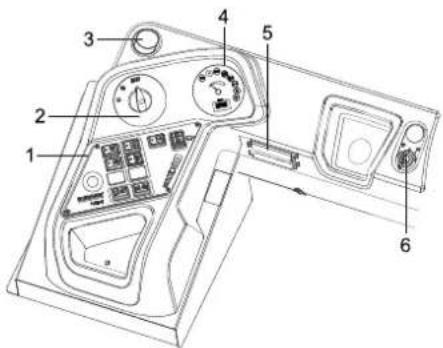
1 Function keys 2 Programme switch 3 Ventilation opening (option) 4 Multifunction display 5 Fuse box - work station 6 Ignition lock
Ignition switch
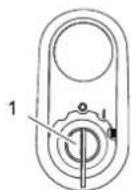
1 Ignition key - Position 0: Switch off engine Position 1: Ignition on Position 2: Start the engine
Function keys
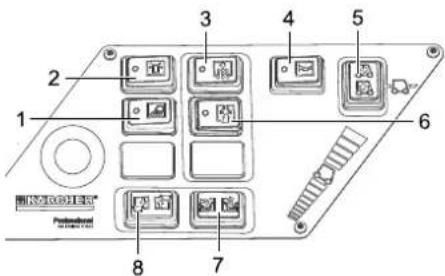
1 Work lights on/off 2 Beacon lamp on/off 3 Filter deducting 4 Horn 5 Selector for the direction of travel 6 Suction blower 7 Open/close container lid 8 Raise/lower waste container
Indicator lamps and display
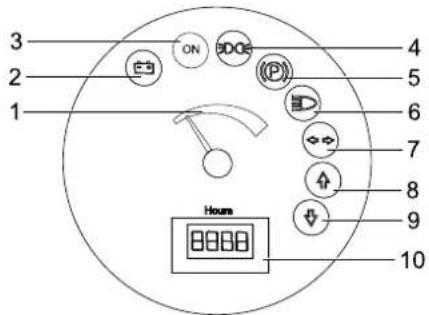
1 Battery capacity 2 Battery control lamp 3 Control lamp operating state 4 Indicator lamp for position lights 5 Indicator lamp (not connected) 6 Indicator lamp for dipper 7 Indicator lamp (not connected) 8 Indicator lamp - forward driving direction 9 Indicator lamp - reverse driving direction 10 Operating hour counter
Pedals
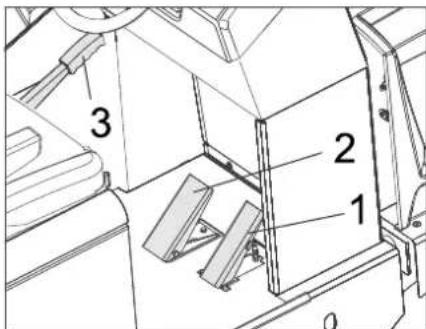
1 Drive pedal 2 Brake pedal 3 Parking brake
Before Startup
Lock/ release parking brake
Loosen parking brake; press brake pedal at the same time. Activate the parking brake; press brake pedal at the same time.
Moving sweeper without engaging self-propulsion
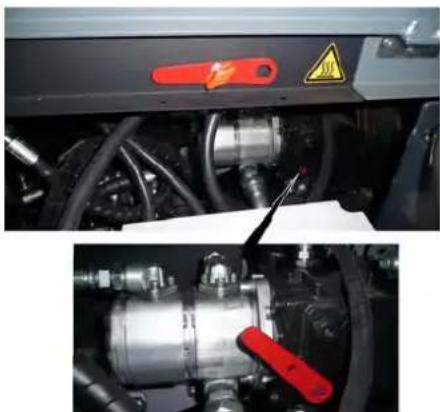
Open engine cover.
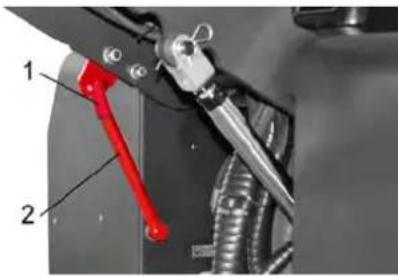
Turn the freewheel lever of the hydraulic pump (red) by 180° (anti-clockwise). Use special tools.
NOTICE
The special tool (red screwdriver) is located in a holder in the vehicle frame, next to the freewheel.
CAUTION
Do not move the machine for long distances without engaging self-propulsion; a speed of 10 km/h should not be exceeded. Return the freewheel lever into its original position.
Moving sweeper by engaging self-propulsion
If the freewheel lever of the hydraulic pump was opened to move the appliance, this must be turned back anticlockwise all the way to its stop. Use special tools.
Start up
General notes
Park the sweeper on an even surface. Remove ignition key. Lock parking brake.
Inspection and maintenance work
Daily before starting operations
Check battery charging status; charge batteries if required (see Chapter "Charging the batteries"). Check the sweeping roller and the side brush for wear and wrapped belts. Check the wheels for tied up belts. Check function of all operator control elements. Check appliance for damages. Clean the dust filter with the filter cleaning button.
Note: For description, see section on Care and maintenance.
Before Startup
Safety notes regarding the batteries
Please observe the following warning notes when handling batteries:
| i | Observe the directions on the battery, in the instructions for use and in the vehicle operat-ing instructions! |
| Wear an eye shield! | |
| Keep away children from acid and batteries! | |
| Risk of explosion! | |
| Fire, sparks, open light, and smoking not allowed! |
| Danger of causticization! |
| First aid! |
| Warning note! |
| Disposal! |
| Do not throw the battery in the dustbin! |
| Beware of dangerous electrical current! |
Danger
Risk of explosion! Do not put tools or similar on the battery, i.e. on the terminal poles and cell connectors.
Danger
Risk of injury! Ensure that wounds never come into contact with lead. Always clean your hands after having worked with batteries.
Danger
Risk of fire and explosion! Smoking and naked flames are strictly prohibited. Rooms where batteries are charged must have good ventilation because highly explosive gas is emitted during charging.
Danger
Danger of causticization!
Rinse thoroughly with lots of clear water if acid gets into the eye or comes in contact with the skin. - Then consult a doctor immediately. - Wash off the acid if it comes in contact with the clothes.
Charge the batteries
Charge the batteries before commissioning the machine.
DANGER
Risk of injury! Comply with safety regulations on the handling of batteries. Observe the directions provided by the manufacturer of the charger.
Please read and follow the included operating instructions by the battery manufacturer and follow them.
Charge the battery only with an appropriate charger.
Rooms where batteries are charged must have good ventilation because highly explosive gas is emitted during charging.
Danger
Danger of chemical burns. Adding water to the battery in its discharged state can cause the acid to leak! Use safety glasses while handling battery acid and follow the safety instructions to avoid personal injury
or damage to clothes. Should the acid spray on to the skin or clothes, rinse immediately with lots of water.
CAUTION
Use only distilled or desalinated water (EN 50272-T3) for filling the battery.
Recommended batteries, chargers
| Order number | |
| Battery set 24 V, 700 Ah,(low-maintenance)* | 6.654-280.0 |
| Charger 48 V, 80 A 6.654 | 281.0 |
| * Appliance requires 2 batteries | |
The use of other batteries and chargers is not recommended and should be discussed with Karcher customer service.
Pull the battery plug from the machine and connect it to the plug of the charger. Then connect the plug of the charger to a proper socket of 16 A; the charger will charge automatically. Always keep both motor covers open during the charging process. Note: When the batteries are charged, first remove the charger from the mains and then disconnect it from the batteries.
Check fluid level in the battery and adjust if required
CAUTION
Please read and follow the included operating instructions by the battery manufacturer and follow them.
Check charging status of battery
- Display of the battery capacity in the green range: Battery is charged. - Display of the battery capacity in the yellow range: Battery is halfway discharged. - Display of the battery capacity in the red range: Battery is almost discharged. The sweeping mode will be shortly switched off automatically. - Indicator lamp glows red: Battery is discharged. The sweeping mode will be terminated automatically (the sweeping aggregates cannot be taken into operation until the battery is charged). Then drive the machine directly to the charging station; avoid any steep gradients in the process. Then charge battery.
Operation
Adjusting driver's seat
Pull seat adjustment lever outwards. Slide seat, release lever and lock in place. Check that the seat is properly locked in position by attempting to move it backwards and forwards.
Programme selection
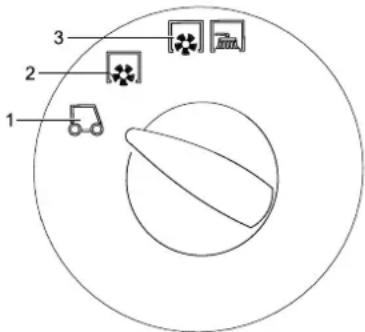
1 Transport drive 2 Sweeping with sweep roller 3 Sweeping using roller brush and side brushes
Starting the machine
Note: The machine is equipped with a seat contact switch. If the driver's seat is vacated, the machine is switched off.
Sit on the driver's seat. Bring the direction selector switch into the middle position. Lock the parking brake. Insert the ignition key into the ignition switch. Turn the ignition key to position "I". The appliance is now ready for operation. Turn the ignition key to position "II". The appliance can now be driven. Note: The display of the battery capacity will show the actual charge status after about 10 seconds.
Drive the machine
Set the programme selection switch to "Transport drive". Press the brake pedal and keep it depressed. Release the parking brake.
Drive forward
Set the travel direction switch to "forward". Press the accelerator pedal down slowly.
Reverse drive
Danger
Risk of injury! While reversing, ensure that there is nobody in the way. Ask them to move if somebody is around.
CAUTION
Risk of damage! Only use the direction switch when the machine is standing still.
Set the travel direction switch to "backwards". Press the accelerator pedal down slowly.
Driving method
- The accelerator pedal can be used to vary the driving speed infinitely.
- Avoid pressing the pedal suddenly as this may damage the hydraulic system.
Brakes
Release the accelerator pedal, the machine brakes automatically and stops.
Note: The braking effect can be supported by pressing the brake pedal.
Driving over obstacles
Driving over fixed obstacles which are 70 mm high or less:
Drive forwards slowly and carefully. Driving over fixed obstacles which are more than 70 mm high: Only drive over these obstacles using a suitable ramp.
Sweeping mode
CAUTION
Do not sweep up packing strips, wire or similar objects as this may damage the sweeping mechanism.
Note: To achieve an optimum cleaning result, the driving speed should be adjusted to take specific situations into account.
Note: During operation, the dust filter should be shaken off and cleaned at regular intervals.
Sweeping dry floors
Switch on the blower.
Set the programme switch to sweep with sweeping brush when cleaning surfaces. Set the programme switch to sweep with sweeping brush and side brush when cleaning edges.
Sweeping damp or wet floors
Switch off the blower. Set the programme switch to sweep with sweeping brush when cleaning surfaces. Set the programme switch to sweep with sweeping brush and side brush when cleaning edges.
Emptying waste container
Danger
Risk of injury! When emptying the waste container, care should be taken to ensure that no persons or animals are within its swivelling range.
Danger
Danger of crushing. Never reach into the rod assembly for the drainage mechanism. Stay away from the area under the raised container.
Danger
Danger of tipping. Place the machine on an even surface during emptying.
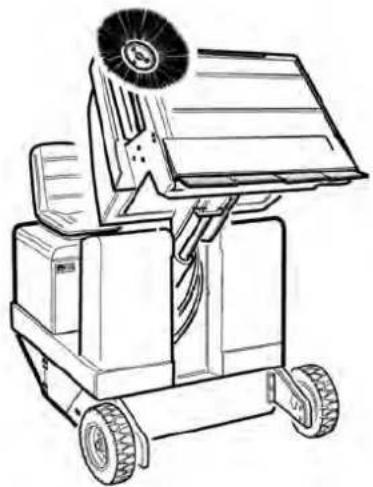
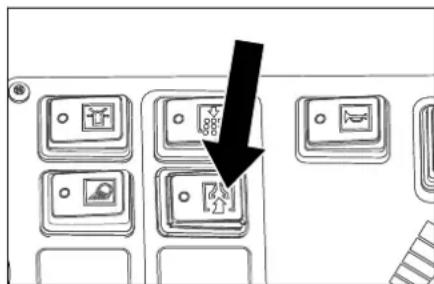
Set programme selection switch to "Transport drive". Raise waste container. Slowly drive towards the collection container. Lock parking brake. Open the container door: Press the left side of the switch and empty the waste container. Close the container door: Press the right side of the switch (approximately 2 seconds), until the unit is tilted to the end position. Release parking brake. Drive away the collection container slowly. Lower the waste container up to the end-position.
Turn off the appliance
Press brake pedal and keep it depressed. Lock parking brake. Turn ignition key to "0" and remove it.
Transport
DANGER
Risk of injury and damage! Observe the weight of the appliance when you transport it.
Turn ignition key to "0" and remove it. Lock parking brake. Secure the appliance at the lashing points (4x) using tension belts, ropes or chains. Secure the wheels of the machine with wheel chocks. When transporting in vehicles, secure the appliance according to the guidelines from slipping and tipping over.
Storage
DANGER
Risk of injury and damage! Note the weight of the appliance in case of storage.
Shutdown
If the sweeper is going to be out of service for a longer time period, observe the following points:
Park the sweeper on an even surface. Set programme selection switch to "Transport drive". Turn ignition key to "0" and remove it. Lock the sweeper to ensure that it does not roll off. Clean the inside and outside of the sweeper. Park the machine in a safe and dry place. Remove the battery plug from machine. Charge battery and recharge it approx. every 2 months.
Care and maintenance
General notes
CAUTION
Risk of damage!
Do not rinse out the dust filter.
First switch off the appliance, remove the key and remove the battery plug or disconnect the battery before performing any cleaning or maintenance tasks on the appliance, replacing parts or switching over to another function. Maintenance work may only be carried out by approved customer service outlets or experts in this field who are familiar with the respective safety regulations. Mobile appliances used for commercial purposes are subject to safety inspections according to VDE 0701. Park the sweeper on an even surface. Turn ignition key to "0" and remove it. Lock parking brake.
Cleaning
CAUTION
Risk of damage! Do not clean the appliance with a water hose or high-pressure water jet (danger of short circuits or other damage).
Cleaning the inside of the machine Danger
Risk of injury! Wear dust mask and protective goggles.
Clean machine with a cloth. Blow through machine with compressed air.
External cleaning of the appliance
Clean the machine with a damp cloth which has been soaked in mild detergent.
Note: Do not use aggressive cleaning agents.
Maintenance intervals
Note: The elapsed-time counter shows the timing of the maintenance intervals.
Maintenance by the customer
Note: Where maintenance is carried out by the customer, all service and maintenance work must be undertaken by a qualified specialist. If required, a specialised Kärcher dealer may be contacted at any time.
Daily maintenance:
Check the sweeping roller and the side brush for wear and wrapped belts. Check function of all operator control elements. Check appliance for damages.
Weekly maintenance:
Clean the hydraulic oil cooler. Check hydraulic unit. Check the hydraulic oil level. Check brake fluid status. Check the pad for wear, replace if required. Check the container lid and lubricate it
Maintenance following wear:
→ Replace sealing strips. Readjust the side seals or replace them. → Replace roller brush. Replace side brush.
Note: For description, see section on Maintenance work.
Maintenance by Customer Service
Maintenance to be carried out after 50 operating hours:
Have the first inspection done according to the service manual.
Maintenance to be carried out after 250 operating hours:
Have the inspection done according to the service manual.
Note: In order to safeguard warranty claims, all service and maintenance work during the warranty period must be carried out by the authorised Kärcher Customer Service in accordance with the maintenance booklet.
Maintenance Works
Preparation:
→ Park the sweeper on an even surface. → Turn ignition key to "0" and remove it. → Lock parking brake.
General notes on safety DANGER
Risk of injury! Always apply the safety bar when the waste container is raised.
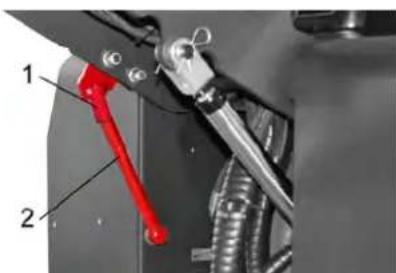
1 Holder of safety rod 2 Safety rod → Fold the safety rod for the high emptying up and insert it into the holder (secured).
Replace batteries
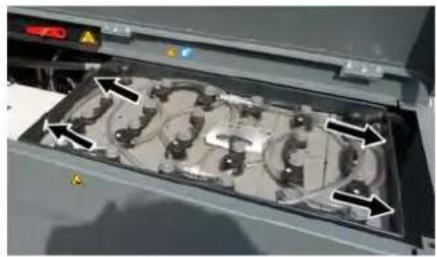
The batteries can only be exchanged as a set. The exchange has to be performed by trained personnel.
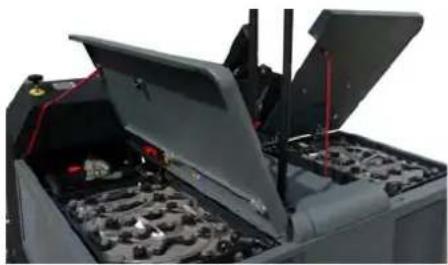
Due to the heavy weight (each battery pack weighs 545 kg), the replacement must be performed by means of a crane.
When removing the battery, disconnect the negative terminal wire first.
Fasten the crane chains in the four eyelets of the battery set and carefully lift out the batteries.
Note: Prior to that, remove the side panels.
Check hydraulic oil level and refill hydraulic oil
NOTICE
The waste container must not be raised.
Open engine cover.
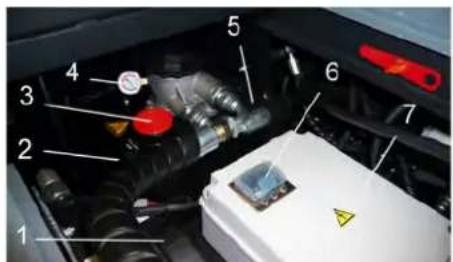
1 Hydraulic oil cooler 2 Looking glass 3 Screw cap, oil fill opening 4 Manometer 5 Hydraulic oil tank 6 Fuse FU 01 (main fuse) 7 Electronics casing To be opened by customer service only. Check hydraulic oil level in the looking glass. The oil level must lie between "MIN" and "MAX" marking. Add hydraulic oil if the oil level is below the "MIN" marking. Loosen the closing cap of the oil filling opening. Clean the filling area. Refill hydraulic oil. Oil grade: see Technical Data
Replace and tighten the closing cap of the oil filling opening.
NOTICE
If the pressure gauge shows an increased hydraulic oil pressure, the hydraulic oil filter must be replaced by Karcher customer service.
Check hydraulic unit
Lock parking brake. Start the motor. Only Kärcher Customer Service is authorised to carry out maintenance tasks on the hydraulic unit. Check all hydraulic hoses and connections and ensure that they are leak-proof.
Checking roller brush
Turn the ignition key to position "l". Raise the waste container up to the end-position. Turn the ignition key to 0 position. Lock parking brake. Use the safety bar for emptying from a height. Remove belts or cords from roller brush. Remove the safety bar. Insert the ignition key into the ignition switch. Turn the ignition key to position "l". Lower the waste container up to the end-position. Switch off engine.
Replacing roller brush
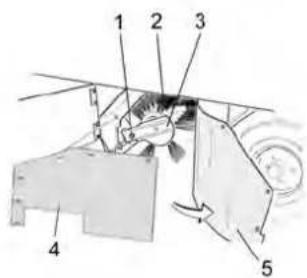
1 Fastening screws of the roller brush intake 2 Roller brush 3 Roller brush intake 4 Holding plate for side seal 5 Side seal

Open the side covers using a key. Unscrew the wingnuts from the holding plate side seals and remove the holding plate. Flip the side seal out. Unscrew the retaining screw of the roller brush intake, and swing the intake to the outside.
Pull out roller brush.
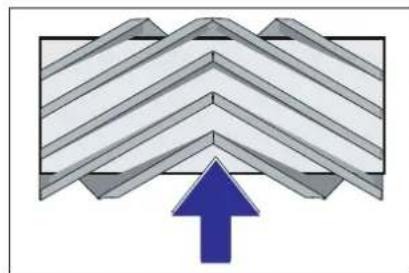
Installation position of roller brush in direction of travel (top view)
Note: When installing the new roller brush, ensure correct positioning of the bristle assembly.
Install new roller brush. The nuts of the roller brush must be inserted on the notches of the opposite crank.
Note: Once the new roller brush has been installed, the sweeping track must be readjusted.
Check and adjust roller brush sweeping track
Check tyre pressure. Switch off suction blower. Drive sweeper on to a smooth, even surface covered with a visible layer of dust or chalk. Set the programme switch to sweep with roller brush. Set programme selection switch to "Transport drive". Drive machine backwards. Check sweeping mirror.
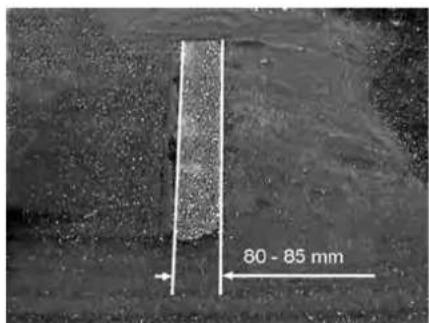
The sweeping track should have an even rectangular shape which is 80-85 mm wide. Adjusting the sweeping track:
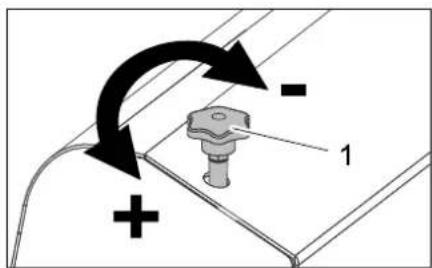
1 Adjusting screw
Adjust the sweeping track position by adjusting the adjustment screw. Check sweeping mirror.
Check and adjust sweeping track of the side-brush
The side-brushes lift up. Drive sweeper on to a smooth, even surface covered with a visible layer of dust or chalk.
Set the programme switch to sweep with roller brush and side brush. The side-brushes lift up. Set programme selection to "Drive". Drive machine backwards. Check sweeping mirror.
The width of the sweeping track should lie between 40-50 mm.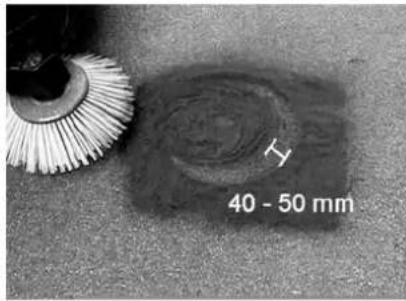
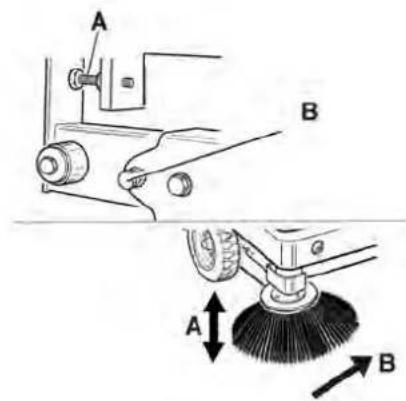
Set the sweeping track using the two adjusting screws. Check sweeping mirror.
Adjust the side seals
Drive the waste container up and secure it with the safety rod.
DANGER
Risk of injury! Always apply the safety bar when the waste container is raised. Fold the safety rod for the high emptying up and insert it into the holder (secured).
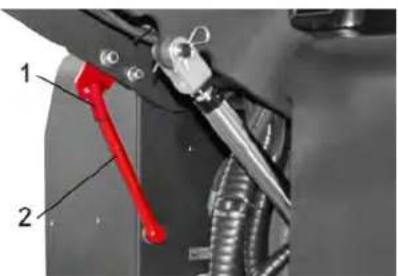
1 Holder of safety rod 2 Safety rod Open the side cover as described in Chapter "Replace brush roller". Release the 6 wing nuts on the side holding plate. Loosen 3 nuts (SW 13) on the front holding plate. Press the side seal down (elongated hole) until it is about 1 to 3 mm to the floor. Screw in the holding plates.
Repeat the procedure on the other side of the appliance.
Manually clean the dust filter
Clean the dust filter with the filter cleaning button.
Replacing dust filter WARNING
Empty waste container before replacing dust filter. Wear a dust mask when working around the dust filter. Observe safety regulations on the handling of fine particulate material.
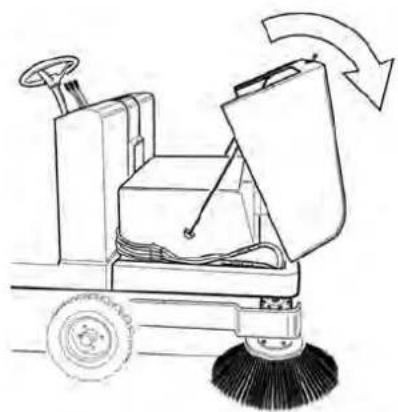
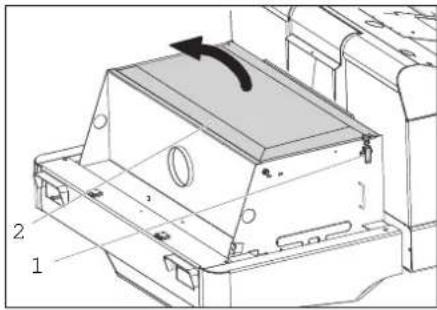
Open the lock, remove the star grip screw to do this. Fold cover forwards.
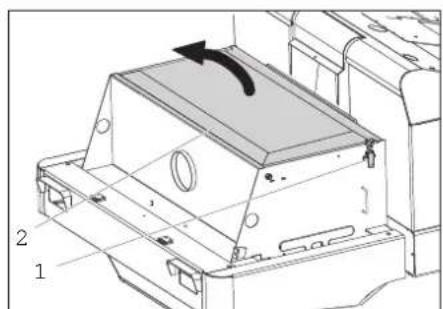
Open filter cap.
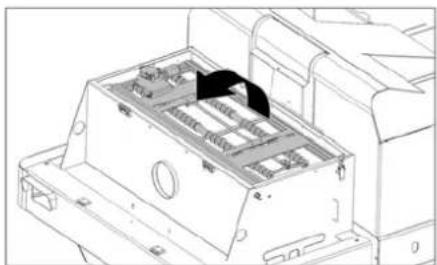
Fold the filter vibrator forward.
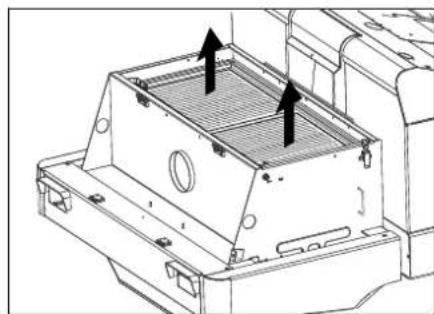
Replace the dust filter. Close the filter cover.
Changing the headlight bulb (option)
Unscrew the head lamps. Take out the head lamps and pull out the plug.
Note: Note the positions of the plugs.
Dismantle the head lamps. Dismantle the head lamp casing and hold it horizontally because the lamp unit is not fastened. Unlock the bracket and take out the bulb.
Insert new bulb. Reinstall in reverse sequence.
Changing the blinker bulb (option)
Note: Remove the glass of the direction-indicator lamp from its casing to replace the bulb.
Replacing fuses
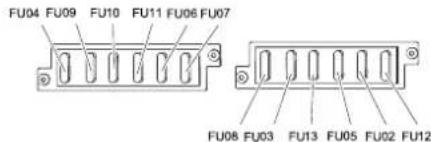
Open the fuse holder.
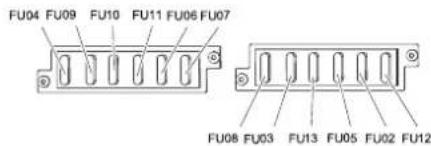
Check the fuses. Replace defective fuses.
Note: The fuse FU 01 (main fuse) is located on the electronics casing.
The fuses FU 14, FU 15 and FU 16 are located in the electronics casing. Attention: Opening of electronics casing and replacing of fuses only by customer service.
Note: Only use fuses with identical safety ratings.
| FU 01 Main fuse 330 A | |
| FU 02 Seat contact switch 3 A | |
| FU 03 Driver cabin (optional) 10 A | |
| FU 04 Driving direction switch | 5 A |
| FU 05 Multifunction display 3 A | |
| FU 06 Hydraulic oil cooler 25 A | |
| FU 07 Program selection switch | 15 A |
| FU 08 Horn 10 A | |
| FU 09 Left lighting 7,5 A | |
| FU 10 Right lighting 7,5 A | |
| FU 11 Working light 10 A | |
| FU 12 Beacon lamp 5 A | |
| FU 13 Vibrator system 10 A | |
| FU 14 Motor 3 A | |
| FU 15 Voltage converter 20 A | |
| FU 16 Key switch 3A |
Troubleshooting Technical specifications
| Fault Remedy | |
| Device does not drive or drives only slowly | Sit on the driver seat, the seat contact switch gets activated. |
| Switch on the triggered fuse FU 01 (on the electronic casing) | |
| Charging or replacing battery | |
| Release parking brake | |
| Check for trapped ribbons and strings. | |
| Inform Kärcher Customer Service. | |
| Whistling sound in the hydraulic system | Refill hydraulic fluid |
| Inform Kärcher Customer Service. | |
| Brushes are rotating slowly or not at all | Check for trapped ribbons and strings. |
| Inform Kärcher Customer Service. | |
| Too little or no suction power in the brush area | Clean filter |
| Inform Kärcher Customer Service. | |
| Dust gathers in the machine Adjust | the side seals |
| Switch on blower | |
| Clean dust filter | |
| Replace filter washers | |
| Inform Kärcher Customer Service. | |
| Sweeping unit does not pick up waste | Empty waste container |
| Clean dust filter | |
| Replacing roller brush | |
| Adjust sweeping track | |
| Replace sealing strips of the waste container | |
| Remove the blocking of the brush roller | |
| Inform Kärcher Customer Service. | |
| Waste container does not raise or lower | Check the fuses. |
| Inform Kärcher Customer Service. | |
| Waste container is rotating slowly or not at all | Inform Kärcher Customer Service. |
| Operation problems with hydraulic movement parts | Inform Kärcher Customer Service. |
| KM 150/500 R Bp | ||
| Machine data | ||
| Drive speed, forward km/h 9 | ||
| Drive speed, reverse km/h 9 | ||
| Climbing capability (max.) -- 12% | ||
| Surface cleaning performance without side brushes m | 2/h 11000 | |
| Surface cleaning performance with 1 side brushes m | 2/h 13800 | |
| Working width without side brushes mm 1200 | ||
| Working width with 1 side brushes mm 1500 | ||
| Protection type, drip-proof -- IPX 3 | ||
| Usage duration with battery fully charged h 4 | ||
| Electrical system | ||
| Battery capacity | V, Ah | 48, 700 |
| Total weight of battery pack (appliances requires 2 battery packs) kg | 1090 | |
| Hydraulic system | ||
| Oil quantity in the entire hydraulic system | | | 35 |
| Oil quantity in hydraulic tank | | | 28 |
| Hydraulic oil type -- HV 46 | ||
| Waste container | ||
| Max. unloading height mm 1470 | ||
| Volume of waste container I 500 | ||
| Roller brush | ||
| Roller brush diameter mm 380 | ||
| Roller brush width mm 1200 | ||
| Speed 1/min 360 | ||
| Sweeping track mm 80 | ||
| Side brushes | ||
| Side brush diameter mm 600 | ||
| Speed (continuous) 1/min 0 - 54 | ||
| Solid rubber tyres | ||
| Size, front -- 5.00-8 | ||
| Size, rear -- 4.00-8 | ||
| Brake | ||
| Front wheels -- mechanical | ||
| Rear wheel | -- hydrostatic | |
| Filter and vacuum system | ||
| Type | -- Flat fold filter | |
| Speed 1/min 2750 | ||
| Filter surface area, fine dust filter | m² | 7 |
| Nominal vacuum, suction system | mbar | 5 |
| Nominal volume flow, suction system | m³/h | 2400 |
| Vibrator system | -- Electric motor | |
| Working conditions | ||
| Temperature °C -5 and +40 | ||
| Air humidity, non-condensing | % | 0 - 90 |
| Values determined as per EN 60335-2-72 | ||
| Noise emission | ||
| Sound pressure level LpA | dB(A) | 74 |
| Uncertainty KpA | dB(A) | 3 |
| Sound power level LwA + Uncertainty KwA | dB(A) | 97 |
| Machine vibrations | ||
| Hand-arm vibration value | m/s² | 1,2 |
| Seat | m/s² | 0,6 |
| Uncertainty K | m/s² | 0,1 |
| Dimensions and weights | ||
| Length x width x height | mm 2442x1570 | x1640 |
| Right turning radius mm 1515 | ||
| Left turning radius mm 1600 | ||
| Unladen weight (with/ without battery) | kg | 1398/2690 |
| Permissible overall weight | kg | 3089 |
| Permissible front axle load | kg | 1417 |
| Permissible rear axle load | kg | 1672 |
| Subject to technical modifications! | ||
EU Declaration of Conformity
We hereby declare that the machine described below complies with the relevant basic safety and health requirements of the EU Directives, both in its basic design and construction as well as in the version put into circulation by us. This declaration shall cease to be valid if the machine is modified without our prior approval.
Product: Sweeper
Type: 1.186-xxx
Relevant EU Directives
2006/42/EC (+2009/127/EC)
2014/30/EU
2000/14/EC
Applied harmonized standards
EN 60335-1
EN 60335-2-72
EN 55012: 2007 + A1: 2009
EN 61000-6-2: 2005
EN 62233:2008
Applied conformity evaluation method
2000/14/EC: Appendix V
Sound power level dB(A)
Measured: 94
Guaranteed: 97
The signatories act on behalf of and with the authority of the company management.
H.Jenner
S. Reiser
Chairman of the Board of Management Director Regulatory Affairs & Certification
Documentation supervisor:
S. Reiser
Alfred Karcher SE & Co. KG
Alfred-Karcher-StraBe 28-40
71364 Winnenden (Germany)
Tel.: +49 7195 14-0
Fax: +49 7195 14-2212
Winnenden, 2018/09/01
General instructions. EN 1
www.kaercher.com/REACH
Warranty
2006/42/EC (+2009/127/EC)
2014/30/EU
2000/14/EC
71364 Winnenden (Germany)
Tel.: +49 7195 14-0
Fax: +49 7195 14-2212
Winnenden, 2018/09/01
www.kaercher.com/REACH
Warranty
2006/42/EC (+2009/127/EC)
2014/30/EU
2000/14/EC
Chairman of the Board of Management
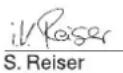
Director Regulatory Affairs & Certification
71364 Winnenden (Germany)
Tel.: +49 7195 14-0
Fax: +49 7195 14-2212
Winnenden, 2018/09/01
www.kaercher.com/REACH
Warranty
Product: Sweeper
Type: 1.186-xxx
Chairman of the Board of Management
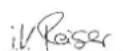
S. Reiser
Director Regulatory Affairs & Certification
71364 Winnenden (Germany)
Tel.: +49 7195 14-0
Fax: +49 7195 14-2212
Winnenden, 2018/09/01
www.kaercher.com/REACH
Garantia
2006/42/CE (+2009/127/CE)
2014/30/UE
2000/14/CE
Chairman of the Board of Management
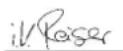
S. Reiser
Director Regulatory Affairs & Certification
Responsible for documentation:
S. Reiser
Alfred Kärcher SE & Co. KG
71364 Winnenden (Germany)
Tel.: +49 7195 14-0
Fax: +49 7195 14-2212
Winnenden, 2018/09/01
Driver protection . . PT 3
Safety instructions on
Charging the batteries . . . PT 5
Operation. PT 6
www.kaercher.com/REACH
Warranty
Charging the batteries
Adjusting the driver's seat
FU 01 Main fuse 330 A
Chairman of the Board of Management
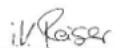
S. Reiser
Director Regulatory Affairs & Certification
71364 Winnenden (Germany)
Tel.: +49 7195 14-0
Fax: +49 7195 14-2212
Winnenden, 2018/09/01
General notes . . . . . DA 1
Environmental protection . . . . . DA 1
Warranty DA 1
www.kaercher.com/REACH
Warranty
Service after 50 operating hours:
2006/42/EC (+2009/127/EC)
2014/30/EU
2000/14/EF
Chairman of the Board of Management
S. Reiser
Director Regulatory Affairs & Certification
71364 Winnenden (Germany)
Tel.: +49 7195 14-0
Fax: +49 7195 14-2212
Winnenden, 2018/09/01
General notes.. NO 1
Environmental protection .NO 1
Warranty . NO 1
www.kaercher.com/REACH
Warranty
Instructions for unpacking
△Danger
Danger of personal injury, danger of material damage!
Setting the sweeping pattern width:

1 Adjusting screw
Clean the dust filter manually
Open the fuse holder.
-> Check fuses. -> Replace defective fuses.
Note: The fuse FU 01 (main fuse) is located on the electronic cabinet.
2006/42/EC (+2009/127/EC)
2014/30/EU
2000/14/EC
Applying harmonized standards
EN 60335-1
EN 60335-2-72
EN 55012: 2007 + A1: 2009
EN 61000-6-2: 2005
EN 62233: 2008
Applied method for conformity assessment
2000/14/EC: Annex V
Sound power level dB(A)
Measured: 94
Guaranteed: 97
Chairman of the Board of Management
S. Reiser
Director Regulatory Affairs & Certification
71364 Winnenden (Germany)
Tel.: +49 7195 14-0
Fax: +49 7195 14-2212
Winnenden, 2018/09/01
General references .SV1
Environmental protection . SV 1
traffande fordonets transportSV 3
Sakerhetsanvisiningar be
www.kaercher.com/REACH
Garanti
71364 Winnenden (Germany)
Tel.: +49 7195 14-0
Fax: +49 7195 14-2212
Winnenden, 2018/09/01
General instructions FI 1
www.kaercher.com/REACH
Warranty
71364 Winnenden (Germany)
Tel.: +49 7195 14-0
Fax: +49 7195 14-2212
Winnenden, 2018/09/01
www.kaercher.com/REACH
Please read and follow the operating instructions before using the device for the first time.
→ Before cleaning, maintenance, replacing parts or changing the device's function, switch off the device, remove the key and pull out the mains plug or disconnect the battery. Maintenance and repair work may only be carried out by authorized service personnel who have been trained in the relevant safety regulations. The locally applicable accident prevention regulations must be observed. → Park the mechanical sweeper on a level surface. → Turn the key to position 0 and remove the key. Secure the parking brake.
Cleaning
CAUTION
Risk of damage! The device must not be cleaned with a hose or high-pressure water jet (risk of short circuit or other damage).
Disposal of the device
Danger
Risk of injury! Wear protective goggles and protective gloves.
Chairman of the Board of Management
S. Reiser
Director Regulatory Affairs & Certification
Responsible for documentation
S. Reiser
Alfred Kärcher SE & Co. KG
Alfred-Karcher-Straße 28-40
71364 Winnenden (Germany)
Tel.: +49 7195 14-0
Fax: +49 7195 14-2212
Winnenden, 2018/09/01
General information TR 1
Environmental protection TR 1
Warranty TR 1
Accessories and spare parts TR 1
www.kaercher.com/REACH
Warranty
Before starting work, every day
Before starting work, every day
Check the current status, and if necessary, charge the batteries (see "Charging the batteries" section). Check the sweeping roller and side brush for wear and wrapped tape. Check the wheels for tape wrapping. Check the function of all control elements. Check the device for damage. Clean the dust filter with the filter cleaning button.
71364 Winnenden (Germany)
Tel.: +49 7195 14-0
Fax: +49 7195 14-2212
Winnenden, 2018/09/01
Chairman of the Board of Management
S. Reiser
Director Regulatory Affairs & Certification
Safety instructions for working with batteries. RU7
Instructions for safe handling of batteries. RU7 Charging batteries RU7
Operation 7
Adjust the position of the driver's seat. RU7
Selecting a program. RU7
Starting the device. RU8
Moving on the device RU8
Recommendation RU8
Empty the waste collection container. RU8
Switching off the device. RU9
Transportation. RU9
Storage. RU9
Disposal. RU9
Maintenance and technical
service RU9
General instructions
Device description
Maintenance schedule
Maintenance work
Maintenance...
Troubleshooting
Technical data
EU Declaration of Conformity
#
Before first use of the device, read this original instruction manual, then act accordingly. Keep it for future use by the next owner.
General instructions
If damage is found during unpacking of the device, resulting from transportation, immediately contact the trade organization that sold you this product.
Warning and information labels attached to the device contain important information necessary for safe operation of the device.
- Warning and information labels attached to the device contain important information necessary for safe operation of the device.
- In addition to the safety instructions contained in the operating manual, the general provisions of the legislation on safety and accident prevention must also be observed.
Protection of the environment

Packaging materials are recyclable. Please do not dispose of packaging with household waste, but take it to one of the collection points for recyclable materials.
Old devices contain valuable recyclable materials that must be taken to collection points for recyclable materials. Therefore, dispose of them through the appropriate waste collection systems.
Batteries, oil, fuel and similar materials must not enter the environment. These materials must be disposed of through appropriate collection point systems.
Instructions for use of components (REACH)
Current information on components can be found at the following web address:
www.kaercher.com/REACH
Warranty
In each country, the respective warranty conditions issued by the authorized sales organization apply. We will repair possible malfunctions of the device free of charge within the warranty period, provided that the defects are due to material or manufacturing errors. In the event of a claim within the warranty period, please contact the dealer from whom you purchased the device or the nearest authorized customer service.
The date of manufacture is shown on the type plate in coded form.
The digits have the following meaning:
Example: 30190
3 year of manufacture 0 decade of manufacture 1 decade of manufacture 9 second half of month of manufacture 0 first half of month of manufacture
Thus, in this device, the code 30190 indicates the date of manufacture 09/(2)013.
Accessories and spare parts
DANGER
To avoid danger, repairs and installation of spare parts must only be carried out by authorized service centers.
- Only use accessories and spare parts that have been approved by the manufacturer. The use of original accessories and original spare parts guarantees you trouble-free operation of the device. Further information about spare parts can be found on the website www.kaercher.com in the Service section.
Symbols in the operating instructions
DANGER
We warn of an imminent danger that can lead to serious injuries or death.
WARNING
We warn of a potentially dangerous situation that can lead to serious injuries or death.
CAUTION
Indication of a potentially dangerous situation that can lead to minor injuries or damage to property.
ATTENTION
Indication of a potentially dangerous situation that can lead to damage to property.
Symbols on the device
Battery charger.
- Battery capacity indicator in the red zone:
Battery is almost discharged. Charging will soon stop automatically.
The control lamp lights up red.
Battery is discharged. Charging stops automatically (further operation of the rotary unit is possible only after charging the battery).
In this case, the device should be sent to the charging station, avoiding shocks. Charge the battery.
Operation
Adjust the position of the operator seat
→ Press the seat adjustment lever. → Move the seat, release the lever and let it lock. → Move the seat forward/backward and check its locking.
Program selection
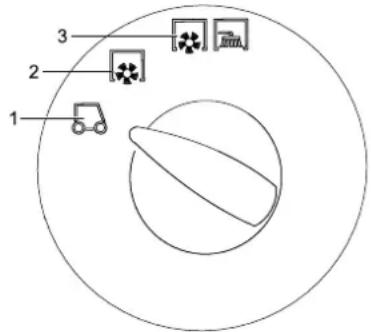
1 Transport 2 Sweeping with sweeping roller 3 Sweeping with side brushes
Starting the device
Note: The device is equipped with a contact switch on the seat. When the operator leaves the seat, the device switches off.
Take a seat on the operator seat. → Move the direction switch to the middle position. Apply the parking brake. Insert the key into the ignition lock. → Turn the key to position "I". The device is ready for operation. → Turn the key to position "II". The device is ready for movement. Note: The battery capacity indicator shows the actual charge state with a delay of 10 seconds.
Moving on the device
Move the program switch to the "Transport" position → Press and hold the brake pedal. Release the parking brake.
Moving forward
The direction switch is in the "Forward" position. → Smoothly press the accelerator pedal.
Moving backward
Danger
Danger of injury! When driving, make sure that no danger is created for other people; if necessary, warn them.
Caution
Danger of damage! The direction switch may only be activated after the machine has come to a complete stop.
The direction switch is in the "Reverse" position. → Smoothly press the accelerator pedal.
Driving characteristics
- Using the accelerator pedal, the driving speed can be adjusted continuously.
- Avoid sudden pressing of the pedal, as this may damage the hydraulic system.
Braking
When the pedal is released, the machine automatically brakes and comes to a stop.
Note: The braking effect can be increased by pressing the foot brake.
Overcoming obstacles up to 70 mm high:
→Obstacles should be overcome carefully, at low speed while moving. Overcoming obstacles higher than 70 mm: →Such obstacles should be overcome only with the use of the bypass frame.
Caution
CAUTION
Do not allow packaged items, wires, etc. to get into the machine, as this may lead to damage to the lifting mechanism.
Note: To achieve optimal performance, it is necessary to adjust the speed to the working conditions.
Note: During operation, the dust filter should be cleaned regularly.
Dry floor cleaning
Turn on the machine.
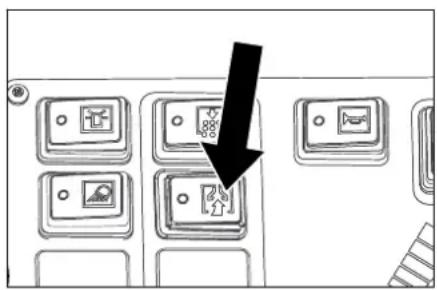
→For sweeping and surfaces, switch the program switch to sweeping mode using the sweeping roller. →For cleaning edges, switch the program switch to sweeping mode using the sweeping roller and side brushes.
Wet or damp floor cleaning
Turn on the machine. →For sweeping and surfaces, switch the program switch to sweeping mode using the sweeping roller. →For cleaning edges, switch the program switch to sweeping mode using the sweeping roller and side brushes.
with the use of the sweeping roller and side brushes.
Empty the debris collection reservoir.
DANGER! During emptying of the contents from the waste collection reservoir, people and animals must not be in the area of its movement.
DANGER
DANGER of crushing! Do not put your hands under the manual mechanism of the emptying device of the reservoir. Do not stand under the raised reservoir.
DANGER
DANGER of tipping over! During removal of the contents from the waste reservoir, the device must be on a level surface.
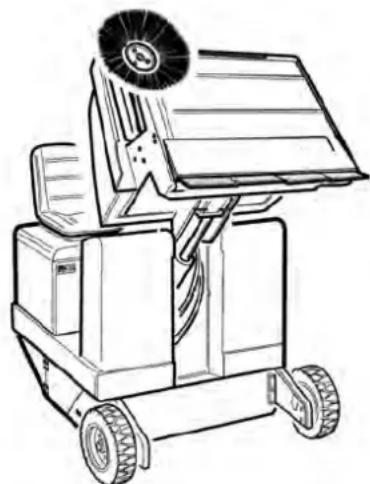
→ Move the program switch to the "Transport" position → Lower the waste collection reservoir. Slowly drive up to the dust collection reservoir. Apply the parking brake. → Open the reservoir lid: press the switch to the left to empty the waste collection reservoir. Close the reservoir lid: press the switch to the right (hold for about 2 seconds) until it locks in the final position. Release the parking brake. Slowly drive away from the dust collection reservoir. Lower the waste collection reservoir to the initial position.
Switching off the device
→ Press and hold the brake pedal. Apply the parking brake. Turn the ignition key to position "0" and remove it from the lock.
Transport
△DANGER
DANGER of injury and damage! When transporting, pay attention to the weight of the device.
→ Turn the ignition key to position "0" and remove it from the lock. Apply the parking brake. → Secure the device to stable attachment points (4 pcs) using tension belts, ropes, or chains. Secure the device by placing chocks under its wheels. → When transporting the device in vehicles, the applicable local government regulations aimed at preventing slipping and tipping must be observed.
Storage
DANGER
Danger of injury! When storing, pay attention to the weight of the device.
Storage
If the mower is not used for a long time, the following points must be observed:
→ Place the mower on a level surface. → Turn the program switch to the "Transport" position. → Turn the ignition key to position "0" and pull it out of the lock. → Take measures to prevent accidental starting of the mower. Clean the mower outside and inside. → Store the device in a dry and protected place. → Remove the battery from the machine. → The battery should be charged, and then charged approx. Every two months.
Maintenance and technical service
General instructions
CAUTION
Danger of injury!
The device does not need to be washed.
→ Before cleaning and maintenance, repairs, replacement of parts or adjustment of other functions, the device must be switched off, the ignition key pulled out, and the battery plug disconnected. - Repair work may only be carried out by an authorized service center or by specialists in this field who are familiar with the relevant
safety regulations. - Mobile industrial devices are subject to safety inspection according to VDE 0701. → Place the mower on a level surface. → Turn the ignition key to position "0" and pull it out of the lock. Secure the parking brake.
Cleaning
CAUTION
Danger of injury! Do not clean the device with a hose or a high-pressure water jet (danger of short circuit and other injuries).
Cleaning the device from the inside
Wear protective mask against dust and protective glasses.
→ Check the device for damage. Blow out the device with compressed air.
Cleaning the device from the outside
Clean the device using a damp cloth soaked in a mild alkaline solution.
Note: The use of aggressive cleaning agents is not permitted.
Maintenance frequency
Note: The counter of operating hours indicates when maintenance is due.
Maintenance performed by the customer
Note: All maintenance work on the customer side must be carried out by qualified specialists. If necessary, contact a specialized sales organization or the company Kärcher at any time.
Daily maintenance:
→ Check the metering tank and side brushes for wear and the presence of wound threads. Check the proper condition of all control elements. → Check the device for damage.
Weekly maintenance:
Clean the hydraulic oil radiator. → Check the hydraulic installation. Check the oil level in the hydraulic system. → Check the brake fluid level. → Check the wear of the sealing pads, replace if necessary.
→ Check the seal of the reservoir.
Technical service of the spare parts:
Replaceable plugs. Adjust or replace the bolts. Replace the drive shaft. Replace the side chains.
Note: See description in the chapter "Maintenance Work".
Technical service performed by the service department
Maintenance after 50 hours of operation:
→ Perform the first inspection of the technical maintenance.
Technical maintenance after 250 hours of operation:
→ Perform the inspection after technical maintenance.
Note: To maintain the warranty rights, all work on technical and preventive maintenance during the warranty period must be carried out by the authorized service department of the Karcher company in accordance with the maintenance brochure.
Maintenance work
Preparation:
→ Place the pump on a level surface. → Turn the ignition key to position "0" and pull it out of the lock. Secure the parking brake.
General technical information
Safety
DANGER
Warning! When using the waste collection container, protective shields must be installed.
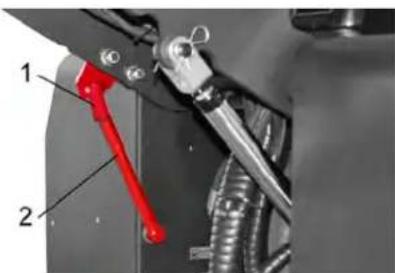
1 Fold down the protective shield
2 Protective shield
Fold up the protective shield to empty the waste container and insert it into the holder (protective shield).
Replacing the battery packs is only permitted for the complete set of batteries. Replacement may only be carried out by qualified personnel.
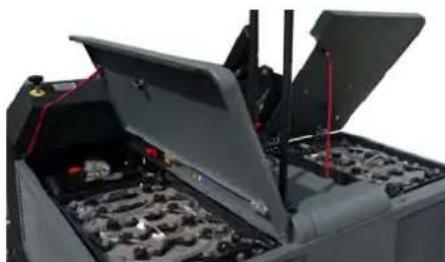
→ 13- Due to the heavy weight (weight of one battery 545 kg), replacement should be carried out using a crane. → Before handling the battery, the negative pole (-) must be disconnected. → Attach the crane cables to the 4 lifting points of the battery pack. Carefully lift the batteries.
Note: Remove the side covers in advance.
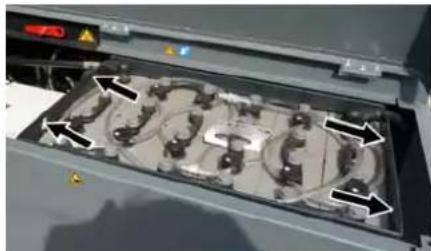
Check the oil level for hydraulic systems WARNING
The waste collection container must not be tilted.
Open the filler cover.
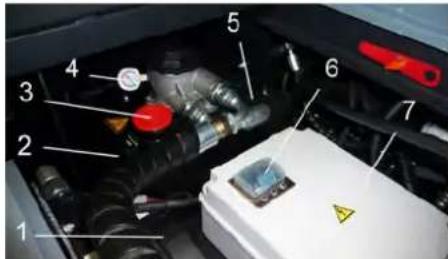
1 Hydraulic oil radiator 2 Sight glass 3 Cover, oil filler opening
4 Pressure gauge
5 Oil filler for hydraulic oil 6 Protective device FU 1 (main protective device) 7 Housing of the electronic device Opening is only permitted for specialists of the Service Center. Check the oil level in the hydraulic system in the sight glass. - The oil level must be between the "MIN" and "MAX" marks. - If the oil level is below the MIN mark, add oil. Unscrew the filler cap of the oil filler opening. Clean the filling area. Fill with oil for hydraulic systems.
Oil type: see "Technical data".
Screw the filler cap of the oil filler opening back on.
If the machine indicates an increase in hydraulic oil pressure, contact the Karcher service department regarding the replacement of the hydraulic oil filter.
Check the hydraulic system.
Engage the parking brake. Start the engine. Repair of the hydraulic system must only be carried out by the Karcher service department. Check the tightness of all hydraulic lines and connections without exception.
Check the sweeping roller
→ Turn the ignition key to position J. → Raise the refuse container. → Turn the ignition key to position O. Engage the parking brake. → Install the safety pins for the raised refuse container. Remove the wound rope from the sweeping roller. Remove the safety pins. Insert the key into the ignition lock. → Turn the ignition key to position I. Lower the refuse container to its initial position. Switch off the engine.
Replacing the sweeping roller
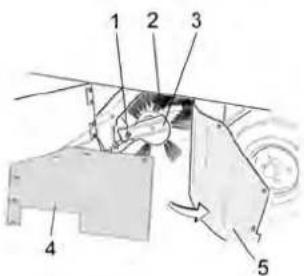
1 Fastening screw of the sweeping roller holder 2 Nut 3 Sweeping roller holder 4 Flat side washer of the lateral seal 5 Lateral seal
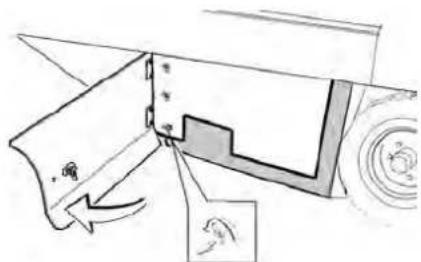
Open the side panel with the key. Unscrew the cap nuts located on the flat side washer, remove the lateral seal, remove the flat side washer. Fold back the lateral seal. → Pull out the fastening screw of the sweeping roller holder, fold back the intake device. Pull out the sweeping roller.
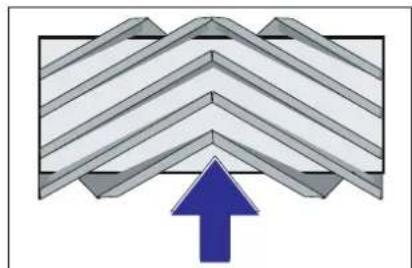
Position of the sweeping roller when installed in the direction of travel (view from above)
Note: When installing a new sweeping roller, pay attention to the position of the chain.
Install the new sweeping roller. The grooves of the sweeping roller must align with the projections of the balancer. Note: After installing a new sweeping roller, the sweeping plane must be readjusted.
Checking and correcting the sweeping plane of the sweeping roller
→ Turn the main switch off. → Switch off the suction fan. Place the sweeping machine on a level, smooth floor covered with a thin layer of sand. Set the program switch to sweeping with the sweeping roller. → Move the program switch to the "Transport" position. → Start the machine. Check the sweeping plane.
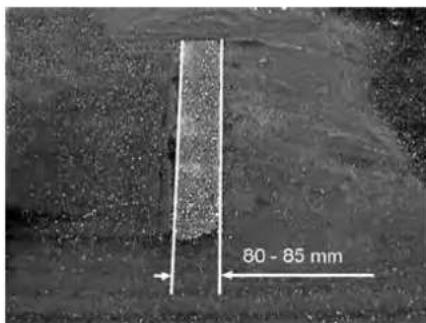
The sweeping profile must have the shape of a uniform rectangle with a width of 80-85 mm.
Check the marking device:
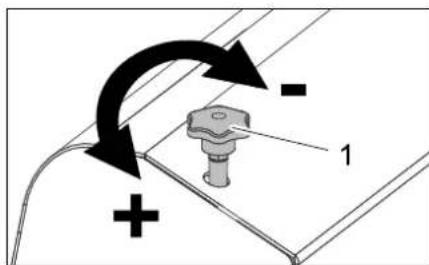
Adjusting screw
→ Adjust the position of the marking profile. Mark the installation position of the adjusting screw. Check the marking plane.
Checking and adjusting the marking profile for side brushes
→ Side brushes. → Place the marking device on a flat surface covered with a thin layer of paint. Set the program switch to marking using the marking roller and side brush. → Side brushes. Set the program switch to the "Movement" position. → Give the device a test run. Check the marking plane.
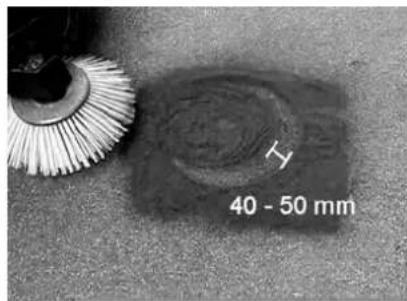
The marking profile should be 40 to 50 mm.
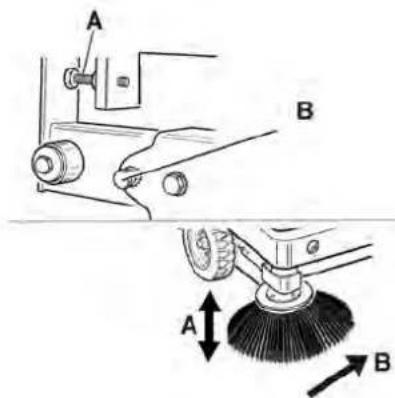
Adjust the position of the marking plane using the two adjusting screws. Check the marking plane.
Side seals
→ Before emptying the debris container, secure it with the safety catch.
DANGER
Danger of injury! Always install the safety catches when emptying the debris container.
Fold up the safety catch to empty the debris container and insert it into the holder (safety catches).
1 Safety catch
2 Safety catch
Open the side cover as described in the chapter "Replacing the marking roller" above. Loosen the six nuts on the side locking plate. Loosen the three screws (SW13) on the front locking plate. Press the side seal down (slot hole) until its edge is at a distance of 1-3 mm from the floor. → Tighten the locking plate. → Repeat the sequence on the opposite side.
→ To clean the dust filter, use the filter cleaning cone.
Replacing the dust filter
Before replacing the dust filter, remove the contents from the dust collection reservoir. When working with the filter unit, wear a mask to protect against dust. Follow the safety instructions regarding handling of fine dust.
Open the lock. To do this, unscrew the screw with a star-shaped head. Tilt the device cover forward.
Open the filter cover.
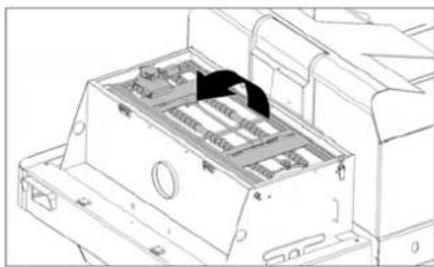
Tilt the filter shaker forward.
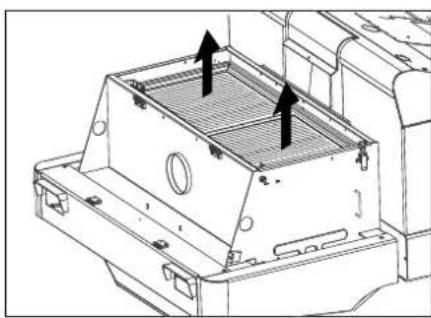
Replace the dust filter. Close the filter cover again.
Replacing the headlight bulb (halogen)
Unscrew the screws. Remove the headlight and pull out the connector plug.
Note: Remember the position of the connector plug.
Unscrew the screws on the other side. Unscrew the headlight housing, holding the housing horizontally, as the bulb block is not secured. Squeeze the clip and remove the halogen bulb. Insert a new bulb. Reassemble in reverse order.
Replacing the turn signal indicator bulb (halogen)
Note: To replace the turn signal indicator bulb, pull the glass out of the indicator housing.
Replacing the fuses
Open the protective devices
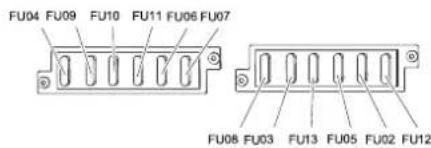
Check the protective devices. Replace faulty protective devices.
Note: Install the protective device FU 01 (main protective device) into the housing of the electronic device.
Protective devices FU14, FU15 and FU16 are located inside the housing of the electronic device. Caution: Opening the housing to replace protective devices is only permitted by authorized specialists of the service center.
Note: Use only protective devices with the same values.
In case of malfunctions: Technical data
Sound power level dB(A)
Measured: 94
Guaranteed: 97
Note:
The following signatures apply to the declaration of conformity.
H. Jenner
Chairman of the Board of Management
S. Reiser
Director Regulatory Affairs & Certification
Responsible employee for document management:
S. Reiser
Alfred Karcher SE & Co. KG
71364 Winnenden (Germany)
Tel.: +49 7195 14-0
Fax: +49 7195 14-2212
Winnenden, 2018/09/01
www.kaercher.com/REACH
Warranty
Chairman of the Board of Management
S. Reiser
Director Regulatory Affairs & Certification
71364 Winnenden (Germany)
Tel.: +49 7195 14-0
Fax: +49 7195 14-2212
Winnenden, 2018/09/01
www.kaercher.com/REACH
Warranty
2006/42/EC (+2009/127/EC)
2014/30/EU
2000/14/EC
2000/14/EC: Annex V
Chairman of the Board of Management
S. Reiser
Director Regulatory Affairs & Certification
71364 Winnenden (Germany)
Tel.: +49 7195 14-0
Fax: +49 7195 14-2212
Winnenden, 2018/09/01
General instructions. SL 1
Environmental protection..SL 1
Warranty .SL1
Accessories and spare parts SL 1
Symbols in the operating instructions SL 1
Symbols on the device . . . . . SL 1
Intended use.. SL 2
www.kaercher.com/REACH
Warranty
In every country, the warranty conditions issued by our sales representative apply. We will repair any faults on the device that are due to material or manufacturing defects free of charge during the warranty period. In the event of a warranty claim, please contact the dealer or the nearest customer service with the original receipt.
Accessories and spare parts
DANGER
Relevant EU directives:
2006/42/EC (+2009/127/EC)
2014/30/EU
2000/14/EC
71364 Winnenden (Germany)
Tel.: +49 7195 14-0
Fax: +49 7195 14-2212
Winnenden, 2018/09/01
www.kaercher.com/REACH
Warranty
2006/42/EC (+2009/127/EC)
2014/30/EU
2000/14/EC
Chairman of the Board of Management
S. Reiser
Director Regulatory Affairs & Certification
Documentation administrator:
S. Reiser
Alfred Karcher SE & Co. KG
71364 Winnenden (Germany)
Tel.: +49 7195 14-0
Fax: +49 7195 14-2212
Winnenden, 2018/09/01
www.kaercher.com/REACH
Warranty
Applicable EU Directives:
2006/42/EC (+2009/127/EC)
2014/30/EU
2000/14/EC
Harmonized standards used:
EN 60335-1
EN 60335-2-72
EN 55012: 2007 + A1: 2009
EN 61000-6-2: 2005
EN 62233: 2008
H. Jenner Chairman of the Board of Management
S. Reiser Director Regulatory Affairs & Certification
71364 Winnenden (Germany)
Tel.: +49 7195 14-0
Fax: +49 7195 14-2212
Winnenden, 2018/09/01
General Instructions SK1
www.kaercher.com/REACH
Warranty
2006/42/EC (+2009/127/EC)
2014/30/EU
2000/14/EC
2000/14/EC: Annex V
71364 Winnenden (Germany)
Tel.: +49 7195 14-0
Fax: +49 7195 14-2212
Winnenden, 2018/09/01
Operating instructions. HR 1
Environmental protection. HR 1
Warranty. HR 1
www.kaercher.com/REACH
Warranty
In every country, the warranty conditions issued by our responsible distribution organization apply. We will repair any faults on the machine free of charge during the warranty period, provided that the cause is a material or manufacturing defect. In the event of a warranty claim, please contact your dealer or the nearest authorized service center, presenting the proof of purchase.
2006/42/EZ (+2009/127/EZ)
2014/30/EU
2000/14/EZ
Applied harmonized standards:
EN 60335-1
EN 60335-2-72
EN 55012: 2007 + A1: 2009
EN 61000-6-2: 2005
EN 62233: 2008
H.Jenner Chairman of the Board of Management

71364 Winnenden (Germany)
Tel.: +49 7195 14-0
Fax: +49 7195 14-2212
Winnenden, 2018/09/01
General notes. .SR 1
Environmental protection. SR 1
Warranty .SR 1
Accessories and spare parts . . SR 1
Symbols in the operating instructions SR 1
Symbols on the device. . . . SR 1
Intended use SR 2
Foreseeable misuse. SR 2
Foreseeable misuse. SR 2
Suitable surfaces . . . . SR 2
Safety notes .SR 2
Safety notes
related to handling...SR 2
Safety notes
related to driving . . . . SR 2
Safety notes for
devices powered by
batteries . . . SR 3
Devices with height
discharge .SR 3
Devices with protective roof
for driver's cab .SR3
Safety notes
related to the transport of the SR 3 device
Safety notes
www.kaercher.com/REACH
Warranty
In every country, the warranty conditions issued by our responsible distribution organization apply. We will rectify any faults on the device free of charge during the warranty period, provided that the cause is a material or manufacturing defect. In the event of a warranty claim, please contact your dealer or the nearest authorized service center with your proof of purchase.
Accessories and spare parts
DANGER
To prevent hazards, repairs and the installation of spare parts may only be carried out by an authorized service center.
Only accessories and spare parts approved by the manufacturer may be used. Original accessories and original spare parts ensure that the device can operate safely and without faults.
- You can obtain further information about spare parts at www.kaercher.com under the Service section.
Symbols in the operating instructions
DANGER
Indicates an imminent threat of danger that leads to serious bodily injury or death.
WARNING
Indicates a potentially dangerous situation that could lead to serious bodily injury or death.
△CAUTION
Indicates a potentially dangerous situation that could lead to minor bodily injury or cause material damage.
ATTENTION
Note indicating a potentially dangerous situation that could cause material damage.
Symbols on the device
| Opasnost od opekotina na vrelim povrsinama! Pre obavljanja radova na urežaju treba sačekati da se izduvni sklop dovoljno ohladi. | |
| Radove na urežaju uvek obavljaje noseci odgovarajuće rukavice. | |
| Opasnost od prignječenja uvlacjenjem meū pokretne delove vozila | |
| Opasnost od povreda pokretnim delovima. Zabranjeno zahvatanje rukama. | |
| Opasnost od požara. Ne usisavajte zapaljene ili užarene predmete. | |
| Prihvatnik lanca i mesto oslanjanja krana | |
| Prihvatna mesta za autodizalicu | |
| Maksimalan nagib podloge prilikom vožnji s izdignutom posudom za prljavštinu. | |
| Dopusteno je savladavati samo uspone do 12% u smeru vožnje. | |
| Oprez od rotirajuće Četke (pazite na smer obrtanja). | |
| Upozorenje na opasnosti od elektrčnog napona! | |
| Obratiti pažnju! | |
| Polako upravljajte! | |
| Obavezno pročitajte uputstvo za rad i postupajte u skladu s njim! | |
| Opasnosti od oštećenja! Filter za prašinu ne sme da se pere u vodi. |
Intended use
2006/42/EC (+2009/127/EC)
2014/30/EU
2000/14/EC
Applied harmonized standards:
EN 60335-1
EN 60335-2-72
EN 55012: 2007 + A1: 2009
EN 61000-6-2: 2005
EN 62233: 2008
Chairman of the Board of Management
S. Belser
Director Regulatory Affairs & Certification
71364 Winnenden (Germany)
Tel.: +49 7195 14-0
Fax: +49 7195 14-2212
Winnenden, 2018/09/01
O6uynkaaHnB.G1
Ona3BaHe Ha okonHaTa cpe
da. BG 1
TapaunB .BG1
PpHaJaJIeXHoCTN n pe3epBHN qactn. BG
CIMBOJN Ha YnTBAHETO 3a
ynoTe6a BG1
Safety valve .BG1
Intended use BG 2
Preliminary use . BG 2
Order of parts .BG2
Safety instructions .BG2
Safety instructions for maintenance . . . BG 2
Safety instructions for driving mode .BG3
Safety instructions for charging from battery .BG 3
Device with high voltage BG 3
Device with water protection cover. BG 3
Safety instructions for transporting the device. BG 3
Safety instructions for maintenance and technical service. . . . . . . BG:
Function BG3
Instructions for unpacking...BG3
Maintenance functional elements. BG 4
Damage to the machine for metering . . . BG4
Service field .BG4
Functioning of the button .BG4
Control lamp- neB. BG 5 Pedal. BG 5
Before starting operation 5BIOknpaH/OCBO6OxJaBa-He Ha 3actonopraBaauTaCnnpaKa . BG 5
Starting the metering machine without its own drive... BG5
Starting the metering machine with its own drive... BG 5
Starting in operation... BG5 General instructions... BG5
Control and maintenance nB
Before starting operation BG5
Safety instructions for the battery .BG5 Charging the batteries .BG6
Operation.. BG6 To set the water hardness. .BG 6
To select a program BG 6
Starting the device..BG6
Shutting down the device... BG 6
PexnM MeTeHe. .BG7
Da ce n3npa3n pe3epboapa
3a N3MeTeHOTO .BG7
I3KJIIOUeTe ypeDa .BG7
TpaHcnpr .BG7
CbXpaHHeHa ypea .BG7
Cnnpahe oEeknoatau..BG7
PnKn nnoDpBxka .BG7
06u yka3aHnB .BG7
Почистван. BG7
HHTepBaJIHaNoIpbXkaBG8
IeHIOCTn no noDpBxKkaT a BG 8
PmOu npn Heun3npaBHOCTN..BG 1
Texnueckn daHHN BG 1
ECIeknapa3a CbOTBECTBNE BG 3

IMPORTANT: Read the operating instructions before using the device.
Original instructions. Follow them according to the spare parts list for proper use or for specific accessories.
General safety instructions
If the device is damaged during transport, notify the store from which you purchased it.
Read the safety instructions and the tables provided. They contain important information for safe operation.
In addition to the instructions in the operating manual, the general safety and accident prevention regulations must be observed.
Environmental protection

Packaging materials can be recycled. Please do not dispose of packaging in household waste, but return them to the recycling system.
Old devices contain valuable recyclable materials that can be reused. Therefore, do not dispose of old devices with household waste, but use the appropriate collection system.
Batteries, oil, fuel, and similar substances must not be released into the environment. Please dispose of these materials through the appropriate collection system.
Information on ingredients (REACH)
Current information on ingredients can be found at:
www.kaercher.com/REACH
Warranty
In each country, the warranty conditions published by our authorized distributor apply. Possible malfunctions of your device will be repaired free of charge within the warranty period, if they are due to material or manufacturing defects. In the event of a warranty claim, contact your distributor or the nearest authorized service center, presenting the proof of purchase.
Spare parts safety
action
DANGER
To avoid complications, repairs and maintenance of spare parts must be carried out only by authorized service.
Only accessories and spare parts approved by the manufacturer may be used. Original accessories and original spare parts guarantee safe and trouble-free operation of the device.
Further information about spare parts can be found at www.kaercher.com in the Service area.
Symbols on the device
for use
DANGER
Warning of immediate danger that can lead to serious injuries or death.
WARNING
Warning of a potentially dangerous situation that could lead to serious injuries or death.
CAUTION
Indication of a potentially dangerous situation that could lead to minor injuries or material damage.
ATTENTION
Warning about possible dangerous situation that may lead to material damage.
Signal word

Danger of burns from hot surfaces! Before working on the device, let the device cool down sufficiently.

Perform work on the device with protective gloves.

Danger of crushing when closing between moving parts of the device.

Danger of injury from moving parts. Do not reach inside.

Fire hazard. Do not cover hot or other objects.
| 3akpenbahe Na vepuza-ma / moyka 3a okuveane Ha Kpan | |
| Tochu 3a 3axbaanzahe Na aemomobunnua Kpuk | |
| Maksumalen haklonn Ha ochobama npu prudexk-eane c noeduzham pe-zepeoap 3a u3memeHo-mo. | |
| Ito nocoka Ha deuxkenue-mo da ce npemuHaba camo no haknohu do 12%. | |
| Bhumanue bvpmaiza ce yemka (cnaebaume noco-kama Ha bprmeHe). | |
| Ppeynpexdehne 3a onacno eeneKmpuecko napanpexhne! | |
| Cbplodabaeume yka3a-huemo! | |
| Unpaebnaeume b6aHo! | |
| Molra npouememe ynbmaeho 3a paBoma u deucmeaume cnped ne-zo! | |
| Opauchosc om noepeda! He muimefqumbpa 3a npax. | |
| YnoTpe6a no npedHa3NaChEne |
The cleaning machine is intended for cleaning hard surfaces for professional use, e.g., in the following areas:
Industrial kitchens, production facilities, hotels, shops, warehouses, and goods. This cleaning machine is intended for cleaning contaminated surfaces indoors. The device with accessories must be checked before use.
For perfect condition and operational safety. If the device is not in perfect condition, its use is prohibited.
Use this cleaning machine only in accordance with the instructions in the operating manual. No modifications to the device are allowed. The device may only be used for the surfaces described in the operating manual. Only surfaces approved by the manufacturer or authorized persons may be cleaned. Important: Flammable materials must be kept away from the device (danger of explosion/fire).
Intended use
Never vacuum/collect explosive substances, flammable liquids or gases, or undiluted solvents! These include petrol, solvents for oil, or fuel, which can form explosive vapors or mixtures when mixed with suction air. In addition, undiluted solvents attack the materials used in the device. → Never vacuum/collect reactive metal dusts (e.g., aluminum, magnesium, zinc) in combination with strongly alkaline or acidic cleaning agents, as explosive gases may form. Do not vacuum/collect hot or glowing objects. → The device is not suitable for vacuuming substances hazardous to health. Use in hazardous areas is prohibited. Working in explosive atmospheres is prohibited. Take the device with you when leaving the area; it is not allowed to leave it unattended. → The device is not allowed for disposal/collection or transport of objects.
Areas of application
- Asphalt - Industrial floors - Cement floors - Concrete - Pavement
SAFETY
Safety instructions for maintenance
→ To maintain the air and dust filter, the device must not be used at an altitude of more than 2000 meters above sea level. (See chapter on filters) If the device is equipped with a filter, it must
be made of PVC, it must not be used at high ambient temperatures (below 0°C). For questions regarding your device, please contact Karcher.
→ Before use, the device and its accessories must be checked for perfect condition and operational safety. If the device is not in perfect condition, its use is prohibited. → The safety instructions for working with the device in hazardous areas (e.g., petrol stations) must be observed. Work in potentially explosive areas is prohibited.
DANGER
Danger of falling objects!
Do not use the device without protective covers against falling objects in areas where there is a risk of falling objects. → The operator must use the device according to the instructions. During work, he must pay attention to the surroundings and especially to children. The safety measures, rules, and regulations applicable to motor vehicles must be observed. → Before starting work, the operator must ensure that all protective devices are correctly installed and functioning. → The operator is responsible for accidents involving other people or their property. → The operator must wear appropriate work clothing. Wear sturdy shoes and loose-fitting clothing. → Check before starting (e.g., the device). Ensure sufficient visibility! → The device must never be left unattended while the motor is running. The operator may only start the device when the motor is switched off, the device is secured against unintended rolling. To prevent unauthorized use, remove the key. → The device may only be used by persons who have been trained in its operation and have demonstrated their ability to work with it, and who have been explicitly instructed in its use. This device is not intended for use by persons (including children) with reduced physical, sensory, or mental capabilities, or lack of experience and/or knowledge, unless they are
supervised by a person responsible for their safety or have received instructions from them on how to use the device.
→ Children must be supervised to ensure that they do not play with the device.
CAUTION
Danger of burns! Do not touch the exhaust, muffler, or engine, as they can become hot during operation.
Safety instructions for operation
DANGER
Danger of falling objects! Check the stability of the base before driving over it.
Danger of electric shock!
Danger of tipping over on slopes with an incline of more than 20°.
- Only drive in the direction of travel on slopes with an incline of up to 12%. Danger of tipping over when driving fast on slopes (especially when turning left). Drive slowly on slopes. Danger of tipping over on unstable ground.
- Only drive on stable ground. Danger of tipping over on slopes with an incline of more than 20°.
- Only drive in the direction of travel on slopes with a maximum incline of 10%.
Safety instructions for charging the battery
Note: The warranty is only valid if you use original Kärcher batteries and charging devices.
- Always follow the operating instructions for the battery and the charging device. Follow the manufacturer's instructions when charging batteries. - Never leave the batteries in a discharged state; charge them as soon as possible. - To avoid short circuits, keep the batteries clean and dry. Protect them from moisture and metal dust. - Do not place tools on the batteries. Risk of short circuit and explosion. - Never work with an open flame, do not create sparks, and do not smoke near the battery or in the battery charging room. Danger of explosion. - Do not touch hot parts, e.g., charging socket, motor (danger of burns).
- Caution when handling battery acid. Follow the relevant safety regulations! - Dispose of used batteries in an environmentally friendly manner according to the applicable regulations (EU Directive 91/157/EEC).
Devices with high pressure
DANGER
Danger of electric shock!
→ When working with high pressure, keep a sufficient distance from the high-pressure hose and the spray gun. → Check the safety of the danger zone yourself.
Devices with water protection cover
Protective cover and coating for 8 years (optional) provides protection against corrosion of the first parts. The manufacturer does not provide protection against corrosion of the conductors!
Check the protective coating daily for damage. If the protective coating is damaged, as well as individual elements of it, the entire protective coating must be replaced. It is not permitted to modify the protective coatings, as well as to install different from the approved by Kärcher elements, components and modules, and this at certain times the original functional protective coating.
Safety instructions for transporting the device
Take into account the weight of the device without packaging (weight during transport) when transporting with a trailer or truck. For transporting the device, remove the battery and secure the device reliably.
Safety instructions for maintenance and servicing
Before cleaning and servicing the device, remove the parts or switch to another function and disconnect it. For devices with traction battery, during any maintenance and repair work, the battery must be disconnected from the electrical system of the device by disconnecting the battery (remove the battery). When working on the electrical equipment, the battery must be disconnected.
First connect the negative terminal, then the positive terminal.
Reconnect in the reverse order. First connect the positive terminal, then the negative terminal.
Do not clean the device with a jet of water or steam under pressure (danger of short circuit or other damage). Repairs must be carried out only by authorized service or by specialists in this field who are familiar with the relevant safety regulations. The safety check must be carried out in accordance with the local regulations for changing the location of the device. Perform work on the device with appropriate tools.
The sweeping machine works on the principle of the sweeping roller.
-The sweeping roller throws the dirt directly into the dirt container. -The side brush cleans the edges and corners of the sweeping surface and throws the dirt into the path of the sweeping roller. -The fine dust is sucked through the fine dust filter with the help of the suction fan.
Instructions for disposal
Danger
Danger, risk of injury! When talking, keep the device in mind!
Weight (without battery) 1398 kg* Weight (with battery) 2690 kg* If accessories are installed, the weight will be higher.
Do not use the machine as a transport vehicle. → When unloading the device, use a suitable ramp or crane! → When using a ramp, take the following into account:
Free space on the floor 70 mm.
If the device is delivered on a pallet, a lowering ramp is included with the accessories.
Instructions for use on page 2 (inside cover).
Important note: The cover must be secured with 2 screws.
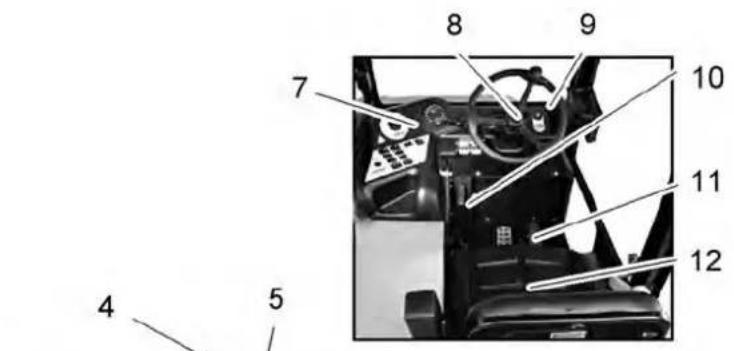
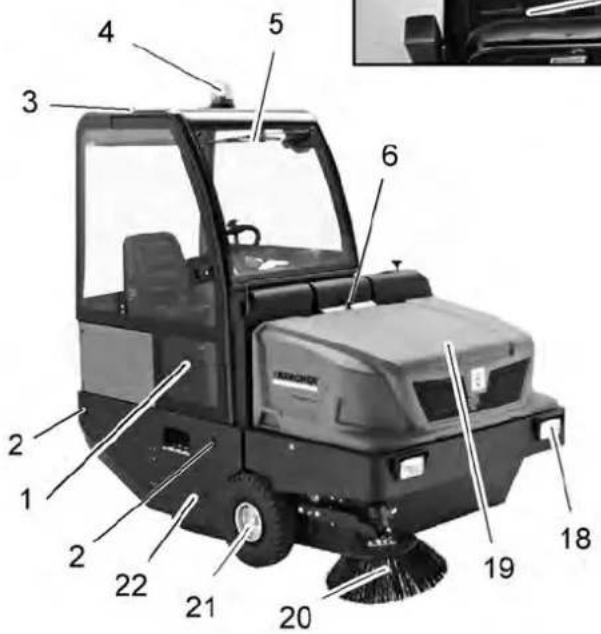
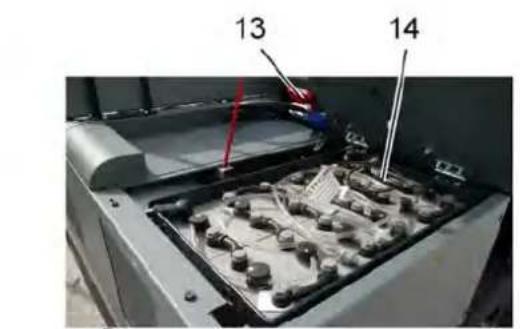
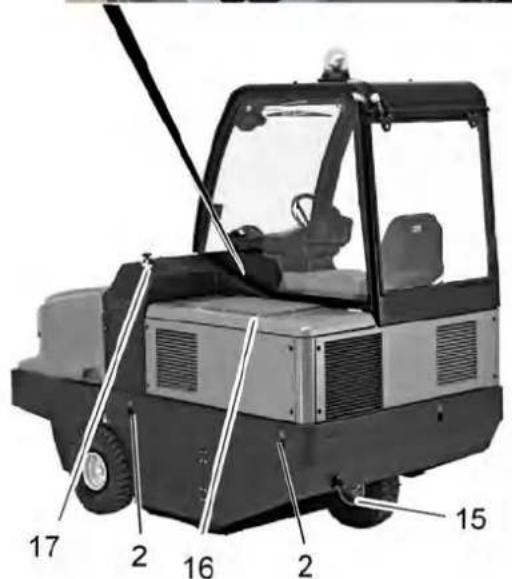
Machine overview
1 Cable inlet (optional) 2 Fixing point for securing (4x) 3 Protective cover (optional) 4 Work light (optional) 5 Control panel (optional) 6 Blocking lever for device 7 Service area 8 Water inlet 9 Ignition key 10 Steering column 11 Steering wheel 12 Seat (with seat contact) 13 Battery cover 14 Battery set 2x24V 15 Rear wheel 16 Water tank cap 17 Adjustment of squeegee 18 Lighting system (optional) 19 Water tank for detergent 20 Side brush 21 Front wheel 22 Squeegee
Service area
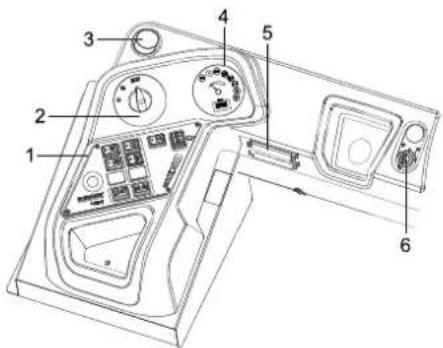
1 Function buttons 2 Program selection 3 Ventilation opening (optional) 4 Multifunctional display 5 Work table 6 Ignition key
Ignition key
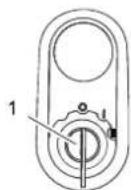
Battery safety instructions
When working with batteries, always follow the safety instructions:
| i | Спазбаше указаньама на akуламора, в Ульшанноу loу уломреба u в Исторik-цаяма за ekсловашия на преозномо среемо! |
| Hoceme зашиma за оочeme! | |
| Дръжme Deцama Насмалу om кUCELUNU u om akуламорu! | |
| Опасн检om ekсллозия! | |
| Забраимеam ce oSZh, uckpu, omkpuma севлина u nyшe-he! | |
| Опасн检om pa3яжданe! | |
| Пьразnomоц! | |
| Указамелna заменекka! | |
| Изховлpene! | |
| Pb | Акуламора дa He se xьр-лЯ в КOFAMA 3a БOKлук! |
| Прedesурждение зa onasho eelenkmpuuecocko напөжениe! |
Danger
DANGER! Risk of explosion! Above the accumulator, i.e. above both end caps and connected to the cells, do not place tools or similar objects.
DANGER
DANGER! Risk of electric shock! Never touch the terminals with bare hands. Before working on the accumulators, remove your watch and rings.
DANGER
DANGER! Risk of fire and explosion! Keep away from sparks and open flames.
- The room in which accumulators are charged must be well ventilated, because during charging highly explosive gases are formed.
DANGER
DANGER! Risk of injury!
- Risk of acid burns! If acid splashes onto skin or clothing, rinse immediately with plenty of clean water.
- After that, do not forget to consult a doctor.
- Contaminated clothing must be removed and washed with water.
Charging the accumulators
Before commissioning, the device must be charged.
DANGER
DANGER! Risk of electric shock! Observe the safety regulations when working with accumulators. Follow the manufacturer's instructions for the charging device. Be sure to also follow the manufacturer's instructions for the accumulators and act accordingly.
Always charge the device in a well-ventilated area.
The room in which the chargers are operated must be well ventilated, as highly explosive gases are produced during charging.
Danger
Danger of explosion. Splashing water on the battery can cause acid to leak! When working with acid batteries, wear protective goggles and follow the regulations to avoid damage and destruction of the device. Acid splashes on skin or clothing must be rinsed immediately with plenty of water.
SAFETY
For filling the batteries, use only distilled or deionized water (EN 50272-T3).
Charging the battery, charging device
| Homer 3a no-рьчк | |
| Монobлok 24 V,700 Ah, (с малka поддръжka)* | 6.654-280.0 |
| Зарадно уст保險TO48 V, 80 A | 6.654-281.0 |
| *Уре徧Тима Нужда OT 2 akумлирочибатери | |
Do not use the device with other battery chargers; this is only allowed after consultation with KÄRCHER service.
→ Remove the battery from the machine and connect it to the charging device.
→ Connect the charging device to the mains socket (16 A). The charging device charges automatically. → The charging process is indicated by the LED on the device. Keep the ventilation slots open. → Note: When the batteries are charged, the charging device must be disconnected from the mains first, then from the batteries.
Check and correct the electrolyte level of the battery.
SAFETY
Always follow the manufacturer's instructions for use of the batteries and act accordingly.
Checking the charging state of the battery
- Indicator of the battery capacity in the green zone: The batteries are charged.
- Charging the battery in the charging zone: The battery is fully charged. -The battery charge indicator is lit. Charging zone: The battery is almost discharged. The charging mode is not switched on automatically for a short time. -The control lamp lights up when the battery is discharged. The charging mode is switched on automatically (repeated starting in the presence of metal parts is possible only after a delay of the battery). → It is recommended to charge directly at the charging station, while avoiding tilting. Battery charger.
Operation
and adjust the water hardness setting
→ Perform the adjustment of the hardness setting. → Remove the seat, loosen the screw and fix it. → Turn by means of movement back and forth until the seat is locked.
Maintenance
Preparation:
→ The metal machine is placed on a flat surface. The start key must be turned to "0" and the key removed. → The parking brake must be locked.
General safety instructions DANGER
Danger of tipping! The machine must be secured when lifting or transporting the tank for maintenance.
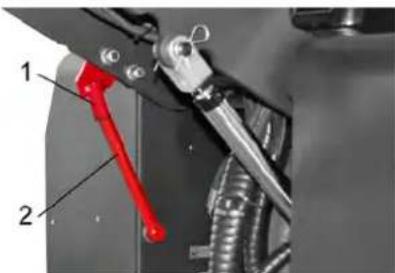
1. Wear protective gloves 2. Protective gloves
Close the protective cover completely before starting and place it in the holder (secured).
Battery replacement
The batteries may only be replaced in a set. Replacement is allowed only by a qualified specialist.
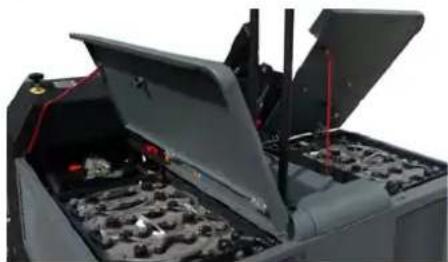
→ Due to the high weight (for each battery set 545 kg), the replacement must be carried out with a crane. → When removing the battery, be careful to first disconnect the negative cable. Attach the crane hooks to the 4 handles of the battery set and carefully remove the batteries.
Note: Remove the side covers beforehand.
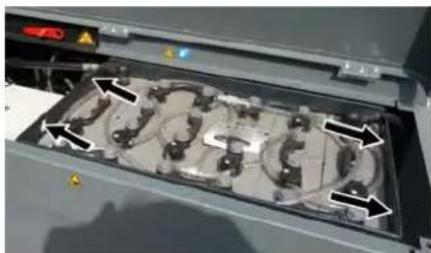
Checking the hydraulic oil level | Filling with hydraulic oil
INSTRUCTION
The reservoir for the changed oil must not be refilled.
Open the filler cap.
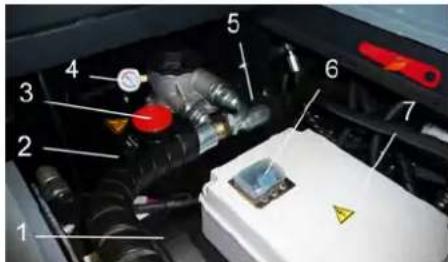
1 Hydraulic oil filler cap 2 Sight glass 3 Filler cap, oil filler opening 4 Pressure gauge 5 Hydraulic oil reservoir 6 Pressure relief valve (main valve) 7 Electrical housing
It is allowed to open the filler cap from the service side.
Check the hydraulic oil level through the sight glass. The oil level must be between the "MIN" and "MAX" markings. If the oil level is below the "MIN" marking, add hydraulic oil. Open the filler cap on the oil filler opening. → Clean the area around the filler opening. → Fill with hydraulic oil.
Note: Technical data
Close the filler cap on the oil filler opening.
INSTRUCTION
If the pressure gauge shows excessive pressure in the hydraulic oil, the hydraulic oil filter must be replaced by Karcher service.
Checking the hydraulic system
The locking pin is blocked. Start the motor.
Repair of the hydraulic system only by Karcher service. → All hydraulic connections must be checked for tightness.
Checking the metal housing
Turn the key to position "I". → Lower the reserve for the changed crane position. Turn the key to position 0. → To lock the locking bracket. Place the intended high pressure hose. Remove the metal guard. → The intended hose. Put the key on the starter lock. Turn the key to position "I". Lower the reserve for the changed crane position. → To switch off the motor.
To replace the metal guard
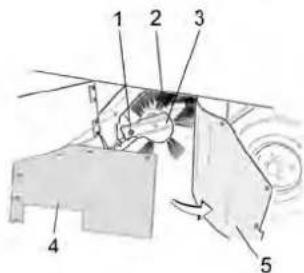
1 Bolt for securing the metal guard 2 Metal guard 3 Securing the metal guard 4 Side seal of the guard plate 5 Side seal
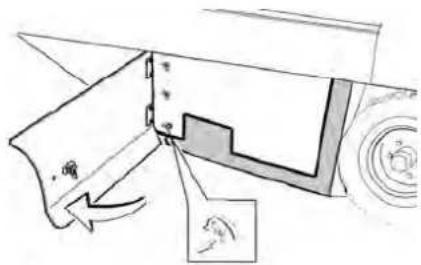
Open the side cover with the key. Unfold the hinges of the guard plate and remove the guard plate. Turn the side seal over. Unfold the securing bolt of the metal guard. Tilt the guard over. Remove the metal guard.
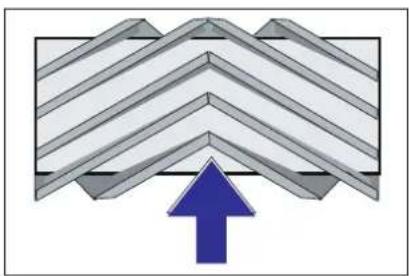
Mounting position of the metal guard in the direction of travel (after removal)
Note: When mounting the new metal guard, pay attention to the position of the brush set.
→ Mount the new metal guard. The bolts of the metal guard must be placed in the support of the metal guard on the opposite side.
Note: After mounting the new metal guard, the measuring reflector must be adjusted.
Check the adjustment of the measuring reflector on the metal guard.
Check the tension of the belts. → Switch off the suction unit.
→ The metal guard must be brought to a level position, which is covered with dust or similar, so that it can be seen. → Set the measuring program with the metal guard. → Set the program for transport operation. Drive the unit to the end stop. Check the measuring reflector.
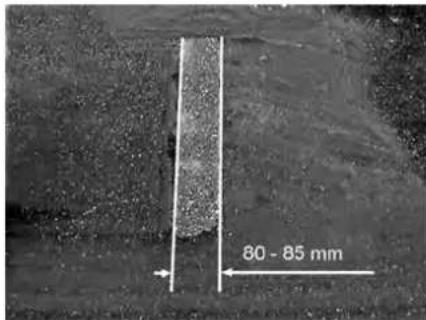
The shape of the measuring reflector must form a right angle with a width of 80-85 mm.
Adjustment of the measuring reflector:
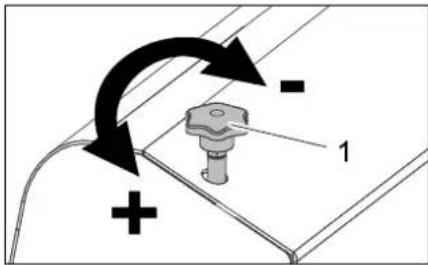
1 Adjustment bolt
Adjust the position of the measuring reflector by adjusting the adjustment bolt. Check the measuring reflector.
Checking and adjusting the paper feed reflector
→ Place the paper sheets. → Move the machine to a flat, dust-free area so that it is visible. → Set the program for paper feed with metal paper sheets. → Place the paper sheets. → Set the program for scanning. Run the machine for a few cycles. Check the paper feed reflector.
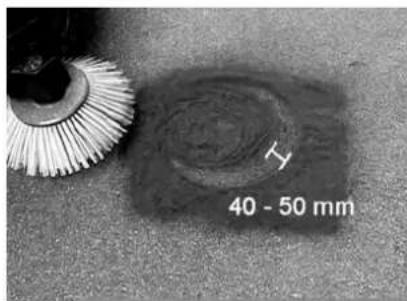
The paper feed reflector should be between 40-50 mm.
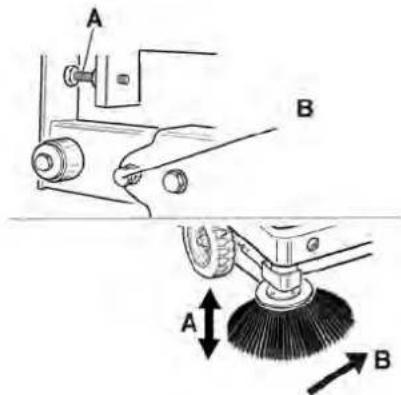
Correct the paper feed reflector using the adjustment bolt. Check the paper feed reflector.
Adjusting the paper sheets
Seals
→ Lift the reservoir for the ink and wipe it with a clean cloth.
DANGER
Danger of injury! The cleaning cloth must be placed under the ink reservoir. Tighten the cleaning cloth completely before placing it in the holder (provided).
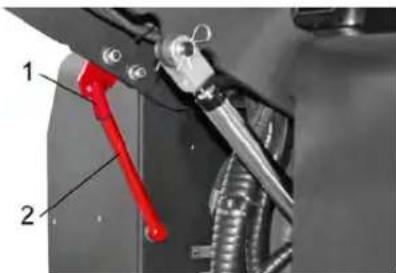
1 Cleaning cloth holder 2 Cleaning cloth Open the paper cover as described in chapter "Changing the metal sheets". Loosen the 6 wing nuts on the paper rear holder. Loosen the 3 nuts (SW 13) on the front holder. → Insert the paper seals into the ceiling opening (top opening) to obtain a distance of 1-3 mm from the floor. Tighten the holder nuts. → Repeat the operation on the other side of the device.
Cleaning the dust filter
→ Clean the dust filter with a vacuum cleaner for filter cleaning.
Changing the dust filter
WARNING
Before changing the dust filter, empty the ink reservoir. When working on the filter system, wear a dust mask. Follow the safety measures when working with fine dust.
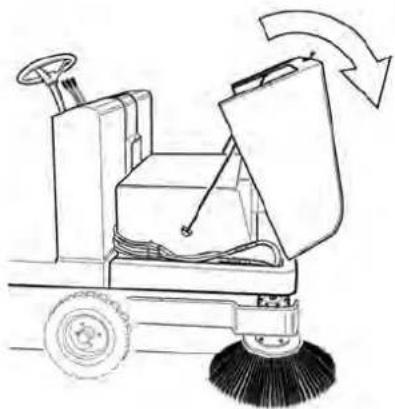
Open the locking cap, unscrew the bolt with the star-shaped washer. Find the channel on the rim.
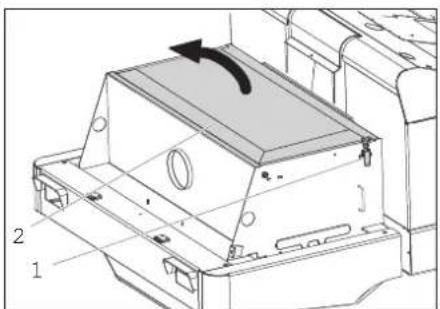
Open the filter channel.
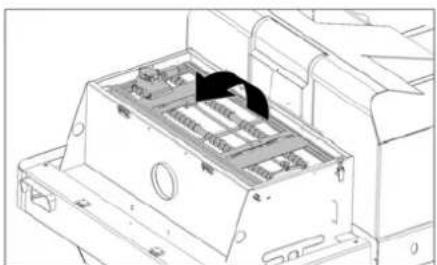
Find the crack on the filter rim.
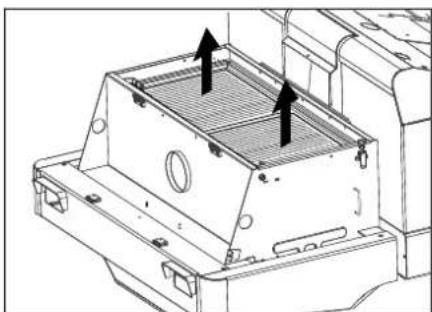
→ Replace the dust filter. Then close the filter channel again.
Replacing the lamp cover (optional)
Remove the screws. → Unscrew the screws and pull out the cover.
Note: Keep the positions of the covers.
Loosen the screws. When loosening the screws, first turn them horizontally, as the link is not secured.
→ Unlock the locking bracket and pull out the cover. Mount the new cover. → Mount in reverse order.
Replacing the lamp (optional)
Note: To replace the lamp cover, remove the lamp cover from the lamp housing.
Replacing the fuse
Open the fuse holder.
S. Reiser
Director Regulatory Affairs & Certification
Alfred Karcher SE & Co. KG
Alfred-Karcher-Straße 28-40
71364 Winnenden (Germany)
Tel.: +49 7195 14-0
Fax: +49 7195 14-2212
Winnenden, 2018/09/01
Safety notes. ET 1
Safety instructions. ET 2
Technical data. ET 0
1
EU Declaration of Conformity. ET 2
www.kaercher.com/REACH
Warranty
General safety instructions
DANGER
71364 Winnenden (Germany)
Tel.: +49 7195 14-0
Fax: +49 7195 14-2212
Winnenden, 2018/09/01
www.kaercher.com/REACH
Warranty
Chairman of the Board of Management
S. Reiser
Director Regulatory Affairs & Certification
Authorized to compile the documentation:
S. Reiser
Alfred Kärcher SE & Co. KG
71364 Winnenden (Germany)
Tel.: +49 7195 14-0
Fax: +49 7195 14-2212
Winnenden, 2018/09/01
General instructions. LT 1
www.kaercher.com/REACH
Warranty
Chairman of the Board of Management
S. Reiser
Director Regulatory Affairs & Certification
71364 Winnenden (Germany)
Tel.: +49 7195 14-0
Fax: +49 7195 14-2212
Winnenden, 2018/09/01
Section Table of Contents
Introduction UK 1
Warranty UK 1
General and spare parts
Accessories UK 1
Usage instructions UK 1
Symbol description UK 1
Proper use UK 2
Improper use
Proper use UK 2
Surface treatment UK 2
Safety rules UK 2
Safety instructions for
operation UK 2
Safety instructions in mode
Safety instructions for use
Construction, operation
accumulator battery. UK 3
Machines with a drive
container. UK 3
Devices with protection
against water ingress UK 3
Safety instructions during
transportation of machines UK 3
Safety instructions during
maintenance and
servicing. UK 3
Purpose. UK 3
Instructions for unpacking. UK 3
Control elements
Key switches. UK 4
Image of the original
Machine UK 4
Control panel. UK 4
Functions keys..UK4
Control indicators and
displays. UK 5
Pedal .UK 5
Before starting work. .UK 5
Lock/Release
Standby mode. .UK 5
Pressing the original
machine's own power
supply. UK 5
Specific input
Machine drive
UK 5
Commissioning ... UK 5
General instructions .UK 5
Inspection and maintenance
UK 5
Before starting work. .UK 5
Safety instructions
For batteries. UK 5
Charging batteries. UK 6
Operation. UK 6
Adjusting the position
Symbol. UK 6
Select program .UK 6
Repair of the device. UK 6
Maintenance. UK 6
Spare parts
For SMIT... UK 7
Turning off the device... UK 7
Transportation UK 7
Storage UK 7
Storage UK 7
Warranty and technical service
UK 7
General instructions... UK 7
U8
Periodic technical
Maintenance UK 8
Work safety. UK 8
Disposal at the end of service life. UK 1
UK 1
Technical specifications. UK 1
Declaration of Conformity with European
Directives. UK 3
Before first use of this device, read the operating instructions carefully and follow them. Keep them for future reference.
General instructions
If the device is intended for transportation, contact the store where you purchased it if you have any questions.
The warning signs and labels on the device are important instructions for safe operation of the device.
Along with the instructions in this manual, observe the general safety rules and regulations to prevent accidents as required by law.
Environmental protection

Packaging materials are recyclable. Please do not dispose of packaging materials with household waste; dispose of them for recycling.
Old devices contain valuable materials that can be recycled and should be taken to a recycling collection point. Therefore, please dispose of old devices using special collection systems.
Batteries, oils, and similar materials must not enter the environment. These materials must be disposed of through appropriate collection points.
Instructions for use of components (REACH)
Current information on components is available on the website at: www.kaercher.com/REACH
Warranty
The warranty conditions of the selling company apply to every country. Possible malfunctions of the device will be eliminated free of charge within the warranty period, provided they are caused by material defects or manufacturing errors. In case of warranty, please contact
the seller or the nearest authorized service center with the purchase document.
Accessories and spare parts
DANGER
To avoid danger, repairs and installation of spare parts must only be carried out by authorized service personnel.
Only use accessories and spare parts that are approved by the manufacturer. Original accessories and original spare parts guarantee that the device will work safely and correctly.
Further information on spare parts can be found on the website www.kaercher.com in the Service section.
Symbols in the manual
DANGER
Warning about immediate danger that can lead to serious injuries or death.
WARNING
Warning about a potentially dangerous situation that can lead to serious injuries or death.
Indicates a potentially dangerous situation that may lead to minor injuries or material damage.
WARNING
Indicates a potentially dangerous situation that may cause material damage.
Symbols on the device
| Hebe3neka oniki ob a- pЯчу поевхию!! Пeding почамков обслуобey- ьня пунаду сniδ даму вuxлonsни мрубі oxолodumusc. | |
| Робому i3 ристоим сniδ заеку поевODUMu minьку у viidnoobihux 3a- хUCHux rykaeuzyx. | |
| Hebe3neka zamussань pyxlnubumu demanЯMu amomobína | |
| Hebe3neka odeprжань mpaemu viδ pyxlnubux чa- сmun. He mopkamucr. | |
| Hebe3neka пожени. He donyuskamu всмokмухан- ны палiocux abo mnió- чux песdMemie. | |
| 3amuckдя lanujoa / moyka pozmauyeaаня крани | Точи пidуому дя do-mkpama |
| Мakcimальни hayun noeerpxni pru pyci 3nid-namumбунером. | У наразмку руху dovy-ckaembcra i3da по схunaх do 12%. |
| Yaba, obepmoja uzimka (dompumyeamucn haipry-my obepmanha). | Запобaningся по несз-пеку поазku ekenmpu-chum smypom! |
| Дорumsуamuscь укzie-ku! | Дорumsуamuscь укzie-ku! |
| Посераму поевно! | Посераму поевно! |
| Почumaime побнuk 3 ekcnnyamaui ma diuime 3ziiodho 3 zuo20 nojoxen-hamyu. | Небешика поcodжени! Пиювui φільчр поему-eаму не порibno. |
Correct use
The cleaning machine is intended for professional use for cleaning surfaces, floors, in the following areas of application:
Parking lots, industrial facilities, territories of public services, hotels, retail outlets, territories of warehouse premises, sidewalks
- This cleaning machine is intended for cleaning contaminated surfaces indoors and outdoors. Before use, check the proper condition and safety of the device and accessories. If the accessories are
in a dangerous condition, they must not be used.
Use this cleaning machine only in accordance with the operating instructions. It is forbidden to make modifications to the device. The device is intended only for work on surfaces specified in this operating manual. The device may be used on surfaces approved for use with cleaning machines by the manufacturer or its representative. The following safety rules apply: do not allow contact of the device with flammable materials (danger of fire/explosion).
Improper use
It is forbidden to use/suction explosive liquids, flammable gases, as well as undiluted acids and solvents! This applies to benzene, paint thinners and fuel that can form explosive gases or mixtures with the suction air, as well as acetone, undiluted acids and solvents, as they can damage the device material. It is forbidden to use/suction reactive metal dust (e.g., aluminum, magnesium, zinc) in combination with alkaline or acidic cleaning agents. Do not allow suction/use of falling or hot objects. The device is not intended for collecting substances hazardous to health. It is forbidden to store hazardous substances. It is forbidden to use the device in explosive atmospheres. It is not allowed to carry passengers. It is not allowed to lift, tilt, or transport objects with this device.
Surfaces to be cleaned
- Asphalt - Concrete floor - Dry (wet) floor - Concrete - Cobblestone
Safety instructions
Safety instructions for operation
To maintain the parameters of the device, it is forbidden to operate it at heights above 2000 meters above sea level. (See notes for Finland only). If the device is equipped with a PBX, it is forbidden to use it at low ambient temperatures (below 0°C). For any questions regarding the device, contact Karcher company.
Before use, check the device and accessories for proper condition and safety. If the accessories are in an unsafe condition, they must not be used. If the device is used in hazardous areas (e.g., petrol stations), it is necessary to follow the relevant safety instructions. It is forbidden to use the device in explosive atmospheres.
DANGER
Danger of injury!
Do not use the device without a protective cover in areas where there is a risk of falling objects on the operator. The user must use the device in accordance with the instructions. They must take into account the local conditions, and when working with the device, attention must be paid to third parties, especially children. Also, all rules and regulations regarding transport vehicles must be observed. Before starting work, the operator must ensure that all necessary devices are in place and functioning properly. The operator is responsible for any accidents involving third parties. Make sure the operator wears proper clothing. Loose clothing should be avoided. Before starting movement, check the surrounding area (e.g., for obstacles). Ensure sufficient visibility! Do not leave the device unattended while the motor is running. Maintenance personnel are allowed to leave the device only after it has been stopped, the device has been secured against accidental movement, and the key has been removed. To prevent unauthorized use, remove the key. The device must only be used by persons who have been instructed in its use or who have demonstrated their ability to operate it, and who are authorized to use it. This device is not intended for use by persons (including children) with reduced physical, sensory, or mental capabilities,
or lack of experience and/or knowledge, unless they are supervised by a person responsible for their safety or have received instructions on the use of the device.
It is necessary to supervise children to ensure they do not play with the device.
CAUTION
Risk of injury! Do not allow the device to come into contact with electric cables or wires, as they may become entangled in moving parts.
Safety instructions for the sprayer
DANGER
Danger of injury! Check the condition of the surface before use.
Important rules! Check the surface condition before use.
DANGER: Incorrect use of the device, danger!
The device tipped over when driving on steep slopes.
- When driving in a curve, driving on slopes of up to 12% is permitted. The device tipped over on roads when driving at high speed (especially on slopes). On curves, reduce speed. The device tipped over on unstable ground.
- Only use the device on stable surfaces. The device tipped over when the drive was tilted at a large angle.
- In directions perpendicular to the direction of travel, lateral tilting of the device on slopes of up to max. 10% is permitted.
Safety instructions for devices that operate with a battery
Note: The right to warranty service is retained only if the batteries and charging devices recommended by Karcher are used.
- It is mandatory to follow the operating instructions from the battery manufacturer and the charging device. Follow the legal regulations for handling batteries. - Never leave a discharged battery for a long time before recharging it. - Keep the battery always in a clean and dry condition to prevent leakage current and protect it from moisture, dirt, metal dust. - Do not place tools or similar items on the battery. Danger of short circuit. - Never dispose of batteries in fire, do not burn or smoke near the battery or in the battery compartment. Danger of explosion.
-Do not open the battery, do not touch the drive (danger of burns) -Be careful when working with the battery electrolyte. Follow the relevant safety regulations! -Used batteries should be disposed of in accordance with Directive EC 91/157 EWG, without harming the environment.
Machines with a tipping container
DANGER
Danger of tipping!
When working with the tipping container, it is necessary to observe the safety zone. Perform the tilting of the device only outside the safety zone.
Risk of crushing with a raised container
Protects the dust (dust) from getting into the device on the internal parts. But you cannot protect during operation!
→ Before each use, check the protective cover for damage. → In case of damage to the protective cover, even if individual elements are damaged, the entire protective cover must be replaced. → Any modification of the protective cover and installation of elements not approved by the manufacturer Karcher is not permitted and may limit the function of the protective cover.
Safety instructions for transporting the machine
Turn off the device (transportable) before transporting it on transport vehicles. → During transport, secure the battery charger and close the device.
Safety instructions for inspection and maintenance
→ Before cleaning and maintenance, when the device is switched off, remove the battery or disconnect it from other functions, the device must be switched off and the key removed. → For devices with a built-in battery, during any maintenance and repair work, the battery must be disconnected from the electrical system of the device through the battery disconnection point (battery charger). → When working with electrical equipment, the battery must be disconnected.
First connect the positive pole, then the negative pole.
Disconnect in reverse order. First disconnect the negative pole, then the positive pole.
→ Do not allow the device to be immersed in water or sprayed with water under high pressure (risk of short circuit and other damage). → Repair work may only be carried out by authorized service centers or specialists who are familiar with all relevant safety regulations. → Perform a safety check in accordance with local directives for non-stationary devices used in industry. Work with the device must be carried out in special training.
Intended use
The machine that sucks in and directs the dirt directly into the collection container.
The suction machine directs the dirt directly into the collection container. It sucks in the dirt from the surface to be cleaned and delivers the dirt to the working area of the suction fan. With a fine dust filter for dust.
Instructions for dismantling
Unsafe
He6e3neKa 3dopeo8, He6e3neKa ykoKoKeHH! Ipu bAHaxKeHHi cnid 3eepHymu yeay Ha eay npucmpoio.
| Bara (6e3 akymylarytopnix 6a-tapei) | 1398 kg* |
| Bara (3 akymylarytopnimi 6aatapeymi) | 2690 kg* |
| * 3i BCTaHOBJIeHIM MOHTaXHIM KOMПлeK-TOM Bara пиСТрЮ, BiДnobIDNo, CTaE ZeIe 3NauchHiшi. | |
He BnKOpNCTOByBaTN BnIKOBn Ha BAHTaKyBaY. →ПиЗаВаHTaKeHHi npIcTpOIO BnKOpCTOByBaTn BiIIOBiDi CXoDi a60 KpaH. →Пи ВИКОРИСТАНС CXOДЕнслД 3ВЕР-уTN yBaIy Ha HAcTynHe:ДорoxHII npocBIT 70 MM → RaKIO npncTpi NoCTaayetbca Ha niD-DoHI, Heo6XiHO cNopydHTN 3 npknaDeHnx DoOOK pAMNy dIra 3'3dy. IHCTpyKcII MoKHa 3HaITn Ha CToP.2 (Ha BHyTpiuHi cTOPOHi KpUuKn).
Baxnbo: KOxHa DoUka Mae 6yTn 3a-KpinneHa 3a Donomoroo 2 rBuHTIB.
EnemEny npablinn i yHKioHaIbHi By3nn
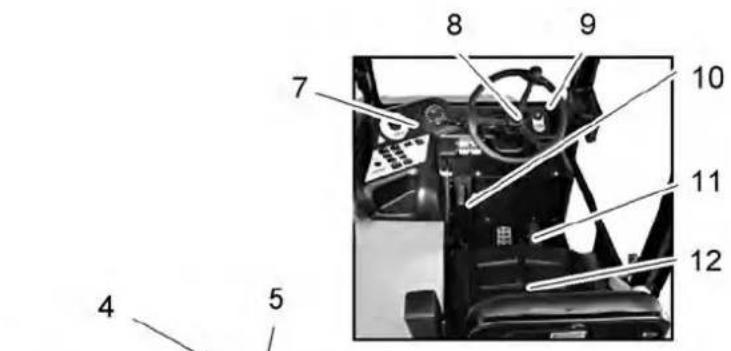
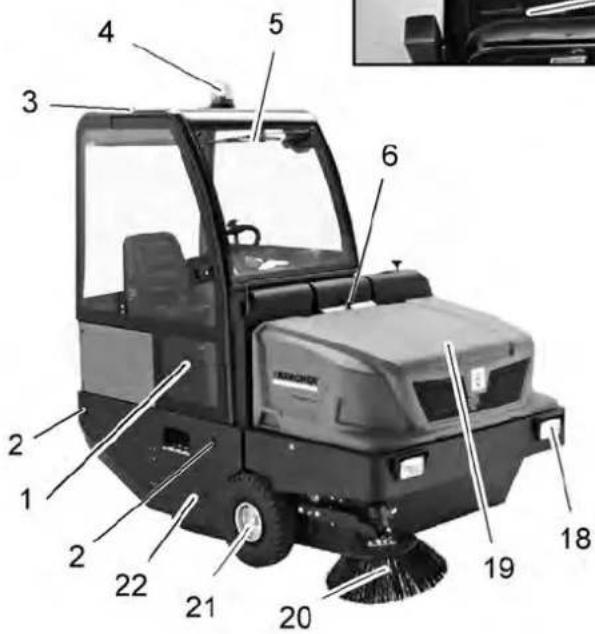
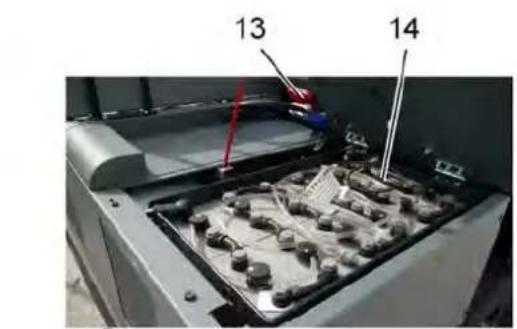
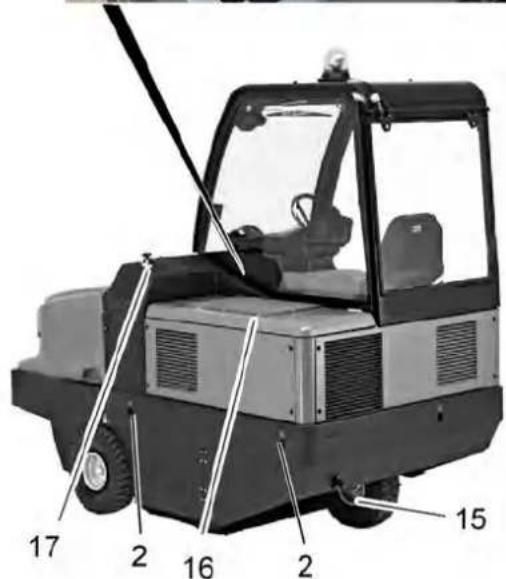
3o6paKeHHn iDmitaIbHoI MaunHn PAnelb ynpabInHH
1Дерікави (onця) 2 Ctiike Micke KpinnenHHa (4 wT.) 3 3axnchn Habic (onzi) 4Поблисковий маячok 5 Cknoounchnk (onui) 6 BLOKyBaHn KpUk nPncTpo 7 NaheIb ynpabnHHa 8 KepMoBe Koneco 9 3amok 3anaHOBaHHa 10CToHouHiTaJIbMa 11 Pedi 12 CniiHHa (3 KOHTaKTHm Nepemkaayem cniiHHa) 13 13 14 Komnnekt akymyntopib 2x24V 15 3aHKeKoIeCo 16 Koxyux DInryHa 17 PerynboHHaBanyo nmiTa 18 OcbitIbOaJIbHn npicTpii (Onia) 19 Pe3epByap dnn 360py cmitt 20 BiHa 1tKa 21 PpeaHc KOleco 22 Bxidn oTbip bany, 0 niDmitae
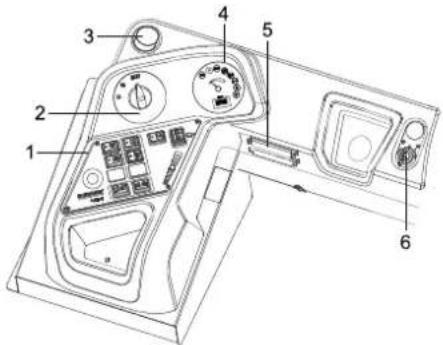
1ФyHKlioHaJIbHi KHOHKn 2Перемкay nporpaM 3 BeHTnlaicHm OTbip (onua) 4 BaraTofoHHoHaBha iHnKaia 5 Bnok 3anobixhknib Ha pObooyom Micui 6 3amok 3anaJIIOBaHHr
3amok 3anaJIIOBaHHa
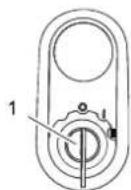
1 KnIOu 3anaIHOBaHHa IIOJIOXKeHHa0:IBuRyH BmKHeHn -Полженнaya 1:ВкlnуntиЗапаленя. -Пложжени 2:Заустити Дыгун.
ФункцioHaJIbHi KHonKn
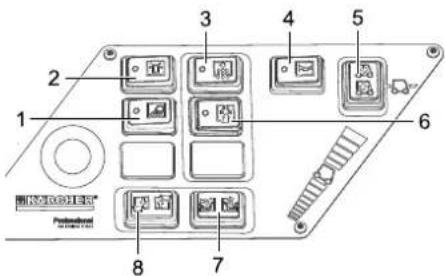
1 BmkaBmkaKa p06oHorO ocBtiJeHHa 2BMnKa/CBMnKaC npo6nCKOBOrMa- 3 Ouchka jinbtra 4 CunHaI 5Перемпачнрamypyxу 6 BcMoKtYaBaIbHn BeHTuJIaTOp 7 BiDHHHTN/3aHHHTN KPNKky pe3epBy- apy 8ПиOM/onyckaHHЯ EMHOCTIДЯ 36Opy CMITTR
KoHTpOJIbHI iHdNkaTOpN Ta DnCnNei
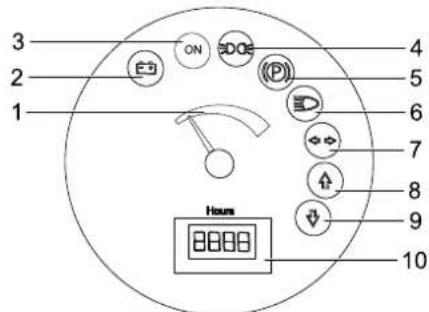
1 Notykhicb akymyraTropho6aTapei 2 IIndikatop 3apny ayakymyIaTopa 3 KOnTroJIbHa lamna pexmmy po6oTu 4 KOHTpOJIbHm iHnKaTOp rabapuTIB 5 KOnTpOJIbHn iINikKaTOp (He nIiKIOUeHN) 6 KOnTpOJIbHn iIaNKaTOp 6IINKHBoro CBITNa 7 KOnTpOJIbHn iHdNkaTOp (He nIiKlIOueHn) 8 KOnTpObnHn iHnKaTOp HAnpMy pyxy "Bnepei" 9 KOnTpOJIbHn iIINKaTOp HAnpMy pyxy "Ha3aD" 10JIiHbHnKpo6OuXrOaHn
Peani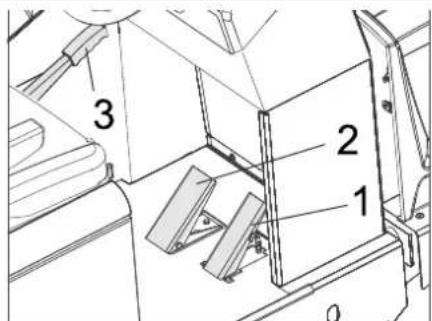
1 Akcepepatop 2 Peda nba JbMa 3CToHouHrraJbMa
Fix/release the brake pedal
Release the brake pedal, pressing on the brake pedal. Fix the brake pedal, pressing on the brake pedal.
Moving the feed machine without its own drive
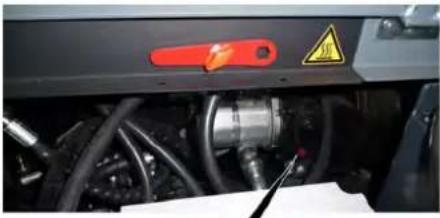
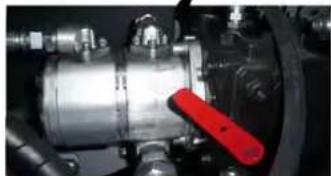
Open the cover. Turn the lever of the free wheel (ratchet) of the right pump by 180° (clockwise). Use a special tool.
NOTICE
The special tool (ratchet wrench) is located in the spare parts kit, near the free wheel mechanism.
CAUTION
Do not move the machine at a height or at a speed exceeding 10 km/h.
→ Return the free wheel lever to its initial position.
Moving the feed machine with its own drive
→ The lever of the free wheel of the right pump is moved to the position for moving the machine, then turn it counterclockwise until it stops. Use a special tool.
Commissioning
General instructions
Install the machine on a level surface. Pull out the locking key. Fix the brake pedal system.
Inspection and Technical Maintenance
Recommended battery, fully charged
Battery is fully charged.
- Battery capacity indicator in the service area:
Battery is almost discharged. Charging will start automatically shortly.
- Control lamp lights up red
Battery is discharged. Charging starts automatically (further operation of the rotary unit is possible only after charging the battery).
→ Connect the device directly to the charging station, while the indicator lights up. Charge the battery.
Operation
Adjusting the handle position
→ Press the adjustment lever. → Move the handle, release the lever and let it lock. → Before moving the handle, check its locking.
Select program
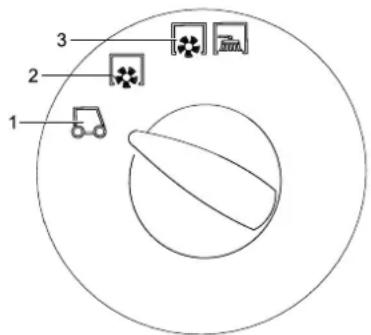
1 Transport 2 Charging with charger 3 Charging with used battery, 00 Charging of other batteries
Start the device
Note: The device is equipped with a contact strip. When inserting the strip, the device is activated.
Press the brake pedal. → Move the gear lever to the neutral position. Lock the parking brake system.
Insert the key into the ignition lock. → Turn the key to the ignition position. The device is ready for operation. → Move the key to the ignition position. The device is ready for movement.
The battery capacity indicator displays the actual charge state for 10 seconds.
Pressure setting
→ Move the program switch to the "Transport" position → Press and hold the brake pedal. Release the parking brake.
Forward travel
→ The gear lever is in the "Forward" position. → Smoothly press the accelerator pedal.
Reverse travel
Caution!
Danger of injury! When moving backwards, there is no danger to people, but those who need it should be instructed.
CAUTION
Danger of injury! Moving the lever to the reverse position is only allowed after the device has come to a complete stop.
→ The gear lever is in the "Reverse" position. → Smoothly press the accelerator pedal.
Characteristic of movement
The accelerator pedal can be continuously adjusted for travel speed. Avoid sudden pressing on the pedal, as in this case the braking system may be damaged.
→ Before starting the device, read the manual carefully. Indication: The pedal can be adjusted, see the discussion on the lower pedal.
Adjusting the pedals
Adjusting the fixed pedals to a height of 50 mm:
→ The pedals should be adjusted carefully, moving forward in the direction of the liquid flow.
Adjusting the fixed pedals to a height of more than 70 mm: → The pedals should only be adjusted using the appropriate tool.
Cleaning
CAREFULLY
Do not allow water, steam, or other substances to enter the machine, as this may cause damage to the mechanism that is being cleaned.
Indication: To achieve the best result, it is necessary to adjust the flow rate according to the operating conditions.
Indication: During operation, periodically check the filter.
Cleaning dry dirt
→ Turn off the device.
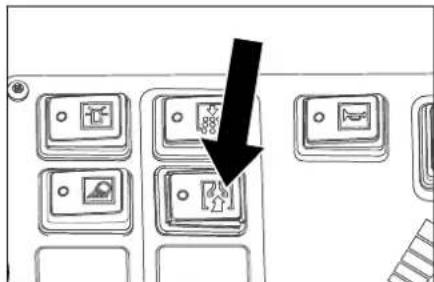
→ Before cleaning the surface, switch the program to cleaning mode using the valve, which is being cleaned. → If necessary, switch the program to cleaning mode using the valve, which is being cleaned, and the drain plug.
Cleaning with water or wet cloth
To switch to idle mode, turn the program switch to idle mode using the lever, then press the button. To switch to idle mode, turn the program switch to idle mode using the lever, then press the button, and the table will move.
Drain reservoir for fuel. Press
Danger
Danger of injury! During emptying in the area of the fuel reservoir, observe safety precautions.
Danger
Danger of crushing! Never use the machine's hydraulic system to empty it. Do not stand under the reservoir.
Danger
Danger of tipping! When emptying, place the machine on a level surface.
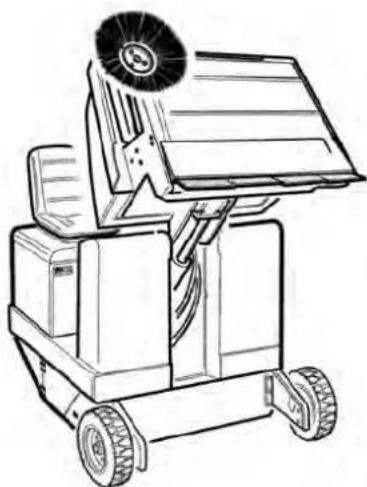
→ Switch the program switch to the "Transport" position. Approach the fuel reservoir. Engage the parking brake. → Open the reservoir cap: press the switch up and empty the fuel reservoir. Close the reservoir cap: press the switch down (hold for about 2 seconds) until it locks in the end position. Release the parking brake → Move away from the fuel reservoir. → Empty the fuel reservoir and return to the initial position.
Press and hold the brake pedal. Engage the parking brake. Turn the ignition key to position "0" and remove it from the lock.
Transport
DANGER
Danger of injury from moving parts! When transporting, pay attention to the device.
Turn the ignition key to position "0" and remove it from the lock. Engage the parking brake. → Secure the device with straps between the attachment points (4 and 7) using tensioning devices, ropes, or belts. Secure the device by placing blocks under its wheels. → When transporting the device in vehicles, observe the relevant national regulations regarding the transport of loads.
Storage
Danger! The instructions below must be followed to avoid damage to the device.
Storage
If the device is not used for a long period of time, the following instructions should be followed:
Install the battery, top side up. → Move the program switch to the "Transport" position → Turn the key switch to "0" and pull it out of the lock. Take protective measures against accidental starting of the machine, if necessary. → Mount the machine, with the protective cover on the outside. → Place the device in a protected and dry place. → Pull the battery out of the device. → The battery should be charged, and then the device should be charged. Every two months.
Care and maintenance
General instructions
CAUTION
Danger!
Risk of injury from improper use.
→ Before cleaning and performing maintenance on the device, or before adjusting or setting other functions, switch off the device, remove the key, and disconnect the battery from the device. -Repair work may only be carried out by authorized service centers or specialists who are familiar with all relevant safety regulations. -Devices used commercially must be checked for safety in accordance with VDE 0701. Install the battery, top side up. → Turn the key switch to "0" and pull it out of the lock. Secure the parking brake system.
Cleaning
CAUTION
Danger! Do not spray the device with water or expose it to high pressure (danger of short circuit and other damage).
Clean the device surface.
Attention! Put on the protective mask against dust and protective goggles.
→ Switch on the device. Operate the device under pressure.
Cleaning the device exterior
Clean the device using a soft cloth and mild detergent.
Note: The use of aggressive or abrasive cleaning agents is prohibited.
Maintenance intervals
Note: Only trained personnel may perform maintenance work.
Maintenance is performed by the customer
Note: All maintenance work must be carried out by qualified personnel. If necessary, you can contact the specialized trade organization at any time.
Maintenance work:
→ Check the hose for damage and leaks, and check the tightness of the connections. → Check the condition of all control elements. → Check the device for damage.
Maintenance work:
Clean the radiator fins. → Check the correct installation. → Check the oil level. → Check the oil level. → Check the filters for contamination and replace if necessary. → Check and replace the filter cartridge.
Maintenance work that is required:
Replace the filter cartridge. Adjust the filter cartridge. Replace the filter. Replace the filter.
Instructions: Read the section "Maintenance".
Maintenance is performed by the service
Maintenance personnel
Maintenance every 50 hours of operation:
→ Perform maintenance in accordance with the service book.
Maintenance every 250 hours of operation:
Perform inspection according to the maintenance schedule.
Note: To preserve warranty rights and maintenance, all technical and preventive maintenance work during the warranty period must be carried out by the authorized service company Karcher in accordance with the maintenance brochure.
Preventive work
Planning:
Install the machine on a level surface. → Turn the ignition key to "0" and pull it out. Lock the parking brake system.
General safety instructions DANGER
Danger of injury? Risk when the machine is started accidentally. Observe the warning signs.
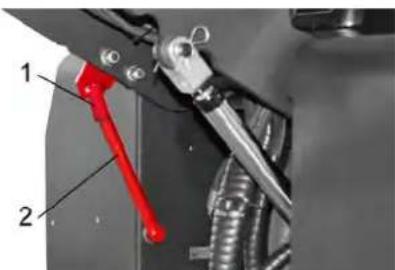
1 Hold the warning sign 2 Warning sign → Pull the warning sign upward to engage the parking brake and insert it into the holder (warning sign)
Protect the operator
Only qualified personnel are allowed to replace the battery pack. Replacement may only be carried out by qualified personnel.
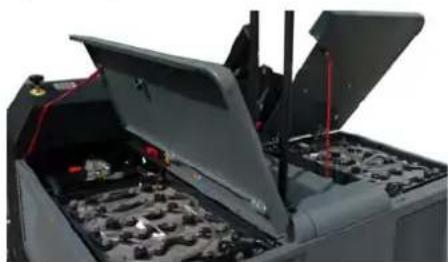
→ Due to the high weight (battery pack weighs 545 kg), replacement may only be carried out using a crane. → When removing the battery, the negative terminal (-) must be disconnected first.
→ Connect the crane cable to the 4 lugs of the battery pack and carefully lift the battery.
Note: Use original spare parts.
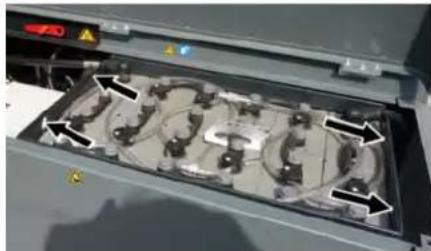
Checking the hydraulic oil level and topping it up
The oil collection reservoir must not be empty.
Open the filler cap.
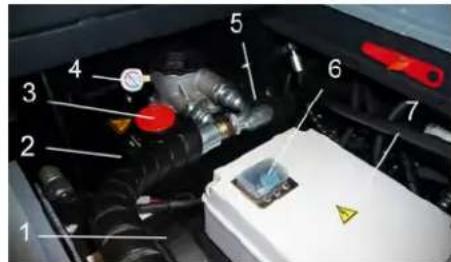
1 Hydraulic oil radiator 2 Sight glass 3 Filler cap for hydraulic oil 4 Pressure gauge 5 Hydraulic oil tank 6 Main fuse (main fuse) 7 Housing of the electrical device. Opening is only permitted for authorized service center personnel. → Check the hydraulic oil level in the sight glass. - The oil level must be between the "MIN" and "MAX" marks. - If the oil level is below the MIN mark, top up with oil. Unscrew the filler cap for oil filling. Clean the filler neck. Top up with hydraulic oil. Oil type: see technical data → Screw the filler cap back on.
TOPPING UP
If the pressure gauge indicates a drop in hydraulic oil pressure, contact Karcher service with the filter replacement inquiry for hydraulic oil.
Check the hydraulic system
Secure the lifting system. Start the engine.
Technical maintenance of the hydraulic system may only be carried out by service personnel.
→ Check hydraulic hoses and connections for tightness.
Check that the oil is not leaking.
Turn the key counterclockwise. → Open the drain valve for collecting condensate. → Turn the key counterclockwise. 0. Secure the main system. Install the drain valve for emptying the drain reservoir. → Remove the shaft, the impeller, the rods and the rope that remain. → Remove the drain valve. Insert the key into the drain lock. Turn the key counterclockwise. → Open the reservoir for collecting condensate. Remove the plug.
Remove the plug, the impeller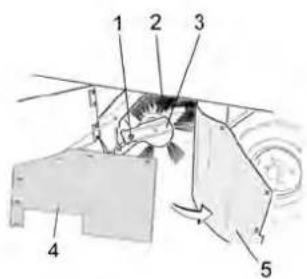
1. Remove the screw that holds the shaft, the impeller. 2. Remove the shaft, the impeller. 3. Remove the shaft, the impeller. 4. Flat washer. 5. Remove the bushing.
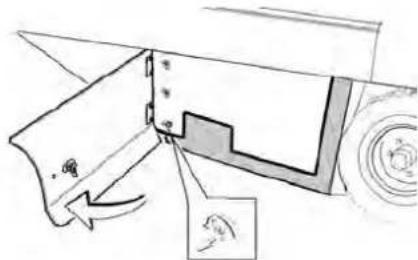
Remove the bushing using a key. Remove the rubber rings located on the flat washer, remove the bushing and remove the flat washer. Remove the bushing. → Remove the screw that holds the shaft, the impeller, and turn the device upside down. Remove the impeller.
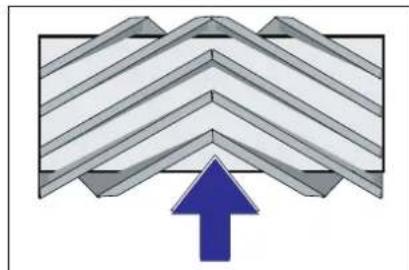
Position the shaft, the impeller, when installing according to the arrow movement (from above)
Note: When installing the new shaft, the impeller, pay attention to the position of the chain
Install the new shaft, the impeller. The shaft, the impeller, must align with the protrusion on the pump housing. Note: After installing the new impeller shaft, it is necessary to re-adjust the impeller clearance.
Checking and adjusting the impeller clearance for the shaft, the impeller
→ Check the current. Remove the shut-off valve. → Place the machine, the impeller, on a flat surface, cover the openings with paper or chalk. → Switch the program switch to the pumping mode using the shaft, the impeller. → Move the program switch to the "Transport" position. → Give the device a rest. → Check the pumping clearance.
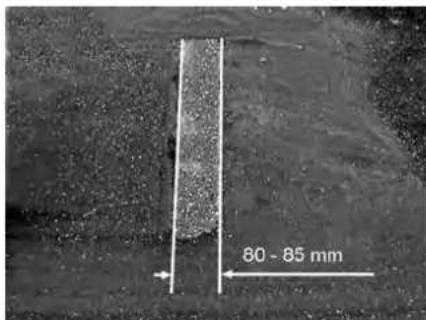
The pumping clearance should be 80-85 mm.
Adjust the pumping clearance: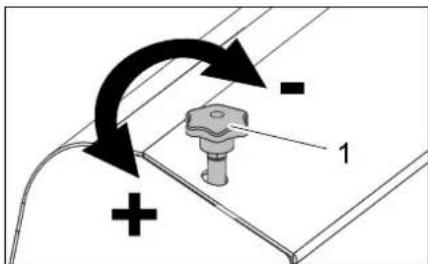
1. Adjusting screw
→ Adjust the position of the pumping clearance by rearranging the adjusting screw. → Check the pumping clearance.
Checking and adjusting the pumping clearance for the shaft, the impeller
→ Remove the white caps. → Place the machine, the impeller, on a flat surface, cover the openings with paper or chalk. → Switch the program switch to the pumping mode using the shaft, the impeller, and remove the white caps. Remove the white caps. Set the program switch to the "Movement" position. → Give the device a rest. → Check the pumping clearance.
Install the filter according to the dimensions from 40 to 50 mm.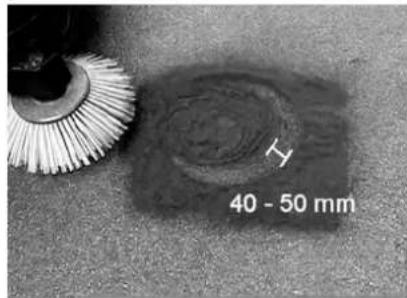
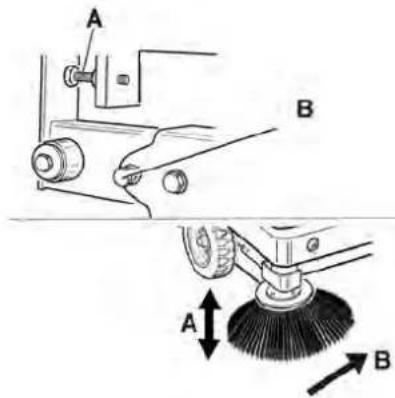
→ Adjust the position of the filter plate using the two adjusting screws. → Check the filter seal.
Install the high-pressure hose
→ Connect the reservoir for collecting condensate and secure it with the locking clamp.
SAFETY
Safety instructions? When the condensate reservoir is installed, the locking clamps must be secured.
Pull the locking lever up to release the reservoir and insert it into the bracket (locking).
1 Bracket for locking lever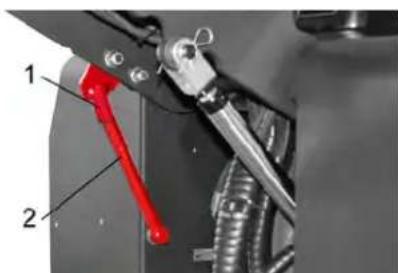
2 Locking lever
Open the panel as described in the chapter "Replacing the filter". Loosen the six bolts on the high-pressure hose support plate. Loosen the screws (SW13) on the front of the support plate. → Press the high-pressure hose connector (upper hole) until its edge is at a distance of 1-3 mm from the support plate. → Tighten the support plate. → Repeat the sequence on the other side of the device.
Clean the filter element → Remove the filter element from the housing using the filter removal hook.
Replacing the filter element
Before replacing the filter element, drain the condensate from the reservoir. When working with the filter, wear protective equipment. Follow the safety instructions for handling compressed air.
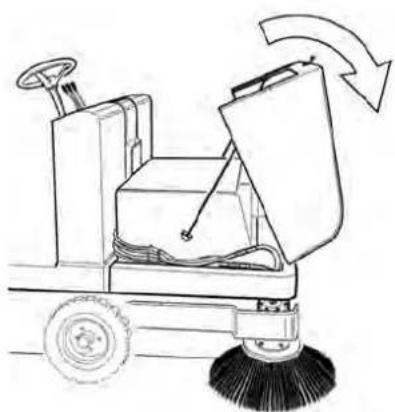
Open the cover. To do this, unscrew the screw with a screwdriver. Pull the cover of the device forward.
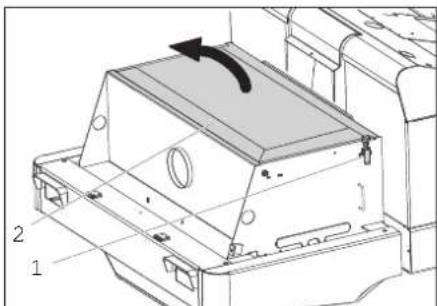
Open the filter cover.
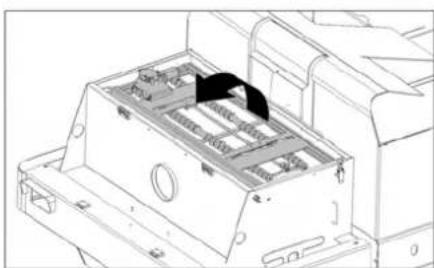
→ Turn the filter counterclockwise.
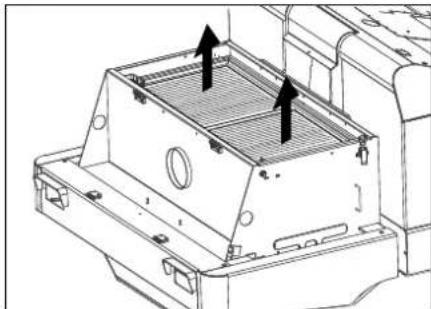
Remove the filter. Then close the filter cover.
Replacing the discharge lamp (description)
Turn the right side. → Unscrew the lamp and pull out the connector.
Note: Remember the position of the connector.
Turn the screws one by one. Turn the housing, as it is necessary to hold the housing horizontally, since the lamp is not secured. Unscrew the bracket and remove the discharge lamp. Install a new discharge lamp, then reassemble in reverse order.
Replacing the discharge lamp for the turn signal (description)
Note: To replace the turn signal lamp, remove the socket from the housing.
Replacing fuses
Open the fuse box.
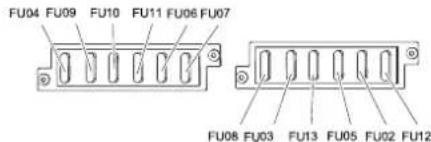
→ Check the fuses. Replace faulty fuses.
Note: Install fuse FU 01 (main fuse) in the housing of the electrical device.
Fuses FU 14, FU 15 and FU 16 are located in the middle of the electrical device housing. Caution: Opening the housing and replacing fuses is only allowed by qualified service center personnel.
Note: Use only fuses with the same rating.
Help in case of malfunctions Technical characteristics
| Hecnpabnictb Ucyhenn | |
| Прилад не щide abo щide заандто nobільно | Зайся місце на сідіні операюра, сістема ko\-тak\-нго вімікача сідінь\-у\-ct\-ь\-с\-. |
| У\-вім\-н\-у\-ts\-з\-э\-об\-і\-н\-н\-FU, ё\-о\-с\-р\-su\-ь\-в (\(\text{y}\)kopny\-с\-е\-к\-tr\-pon\-н\-го\-п\-р\-ct\-р\-о\-) | |
| А\-ку\-м\-л\-у\-port\-н\-б\-Б\-Б\-Б\-Б\-Б\-Б\-Б\-Б\-Б\-Б\-Б\-Б\-Б\-Б\-Б\-Б\-Б\-Б\-Б\-Б\-Б\-Б\-Б\-Б\-Б\-Б\-Б\-Б\-Б\-Б\-Б\-Б\-Б\-Б\-Б\-Б\-Б\-Б\-Б\-Б\-Б\-Б\-Б\-Б\-Б\-Б\-Б\-Б\-Б\-Б\-B\-Karcher | |
| Сbvstячийши в гідравлиій сі\-стemi | Зайся р\-об\-оч\-у\- р\-д\-и\-н\-д\-я\-г\-д\-р\-в\-l\-ч\-н\-х\-с\-ст\-tem |
| ЗBVHyTSCB\N�эн\-ы\-г\-ь\-ь\-ь\-ь\-ь\-ь\-ь\-ь\-ь\-ь\-ь\-ь\-ь\-ь\-ь\-ь\-ь\-ь\-ь\-ь\-ь\-ь\-ь\-ь\-ь\-ь\-ь\-ь\-ь\-ь\-ь\-ь\-ь\-ь\-ь\-ь\-ь\-ь\-ь\-ь\-ь\-ь\-ь\-ь\-ь\-ь\-ь\-ь\-ь\-ь\-в\/Кarcher | |
| UşіTKи обер\-ta\-ot\-ь\-sey nobільно\-aboHe obépta\-ot\-ь\-ь\-ь\-ь\-ь\-ь\-ь\-ь\-ь\-ь\-ь\-ь\-ь\-ь\-ь\-ь\-ь\-ь\-ь\-ь\-ь\-ь\-ь\-ь\-ь\-ь\-ь\-ь\-ь\-ь\-ь\-ь\-ь\-ь\-ь\-ь\-ь\-ь\-ь\-ь\-ь\-ь\-ь\-ь\-ь\-ь\-ь\-ь\-ь\-BayCIM | Завівіпін\-н\-н\-н\-н\-н\-н\-н\-н\-н\-н\-н\-н\-н\-н\-н\-н\-н\-н\-н\-н\-н\-н\-н\-н\-н\-н\-н\-н\-н\-н\-н\-н\-н\-н\-н\-н\-н\-н\-н\-н\-н\-н\-н\-н\-н\-н\-н\-н\-н\-н\/Karcher |
| Невелka по\-тукінів СВмokту\-ваньno\-aboII\-ы\-д\-с\-у\-н\-п\-в\/Б\-Б\-Б\-Б\-Б\-Б\-Б\-Б\-Б\-Б\-Б\-Б\-Б\-Б\-Б\-Б\-Б\-Б\-Б\-Б\-Б\-Б\-Б\-Б\-Б\-Б\-Б\-Б\-Б\-Б\-Б\-Б\-Б\-Б\-Б\-Б\-Б\-Б\-Б\-Б\-Б\-Б\-Б\-Б\-Б\-Б\-Б\-B\-Karcher | Очістka Ф\-п\-ы\-р\- |
| Звсініпівін\/ріошіnt\/Встанов\/ВNTN 6iynchɪ yuziŋhENHry | |
| У\-віm\-н\-н\-н\-н\-н\-н\-н\-н\-н\-н\-н\-н\-н\-н\-н\-н\-н\-н\-н\-н\-н\-н\-н\-н\-н\-н\-н\-н\-н\-н\-н\-н\-н\-н\-н\-н\-н\-н\-н\-н\-н\-н\-н\-н\-н\-н\-н\-н\-н\-NCH\/Karcher | |
| Підмітальни піс\-ст\-рій не з\-абі\- pa\-с\-smітэ | Ви\-д\-м\-NTN WMICI 3I peze\-р\-в\-у\-ар\-д\-Я\-З\-Б\-Op\-у\-с\-MɪTZ |
| Оч\-ш\-н\-н\-н\-н\-н\-н\-н\-н\-н\-н\-н\-н\-н\-н\-н\-NMLY | |
| Зamɪha bala, ё\-о\-п\-д\-мɪtəʊ | |
| Мо\-н\-tu\-в\-н\-н\-п\-р\-ф\-и\-о\-п\-д\-мɪ\-т\-ан\-н\- | |
| Зamɪha у\-ш\-н\-н\-н\-н\-н\-н\-н\-н\-н\-н\-н\-н\-NMLY Na\-р\-d\-mɪtəʊ | |
| У\-sy\-н\-н\-н\-н\-н\-н\-н\-н\-NMLY Na\-р\-d\-mɪtəʊ | |
| Звсініпін\/В сэр\-вісін\/сэр\-віс\/Кarcher | |
| Рeze\-р\-в\-у\-р\/дія\/смітій не піді\-ma\-ct\-ь\-ь\-ь\-ь\-ь\-ь\-ь\-ь\-ь\-ь\-ь\-ь\-ь\-ь\-ь\-ь\-ь\-ь\-ь\-ь\-ь\-ь\-ь\-ь\-ь\-ь\-ь\-ь\-ь\-ь\-ь\-ь\-ь\-ь\-ь\-ь\-ь\-ь\-ь\-ь\-ь\-ь\-ь\-ь\-ь\-ь\-ь\-ь\-ь\- bay | Завівіпін\/Зал\-біж\-н\-н\-н\-NMLY |
| Звсініпін\/В сэр\-віс\/Сэр\-віс\/Кarcher | |
| Рeze\-р\-в\-у\-р\/дія\/зэр\-ь\-ь\-ь\-ь\-ь\-ь\-ь\-ь\-ь\-ь\-ь\-ь\-ь\-ь\-ь\-ь\-ь\-ь\-ь\-ь\-ь\-ь\-ь\-ь\-ь\-ь\-ь\-ь\-ь\-ь\-ь\-ь\-ь\-ь\-ь\-ь\-ь\-ь\-ь\-ь\-ь\-ь\-ь\-ь\-ь\-ь\-ь\-ь\-ь\-bay | Звсініпін\/В сэр\-віс\/Сэр\-віs\/Karcher |
| Hecnpa\-вrostі[elemeɪtɪv, ѽо пі\-вді\-ь\-ь\-ь\/ в дію رɪ\-р\-в\-ліч\-н\-ю\C\-S\-CT\-Mо\-ю | Звсініпін\/В сэр\-віс\/Сэр\-віs\/Karcher |
Chairman of the Board of Management
Director Regulatory Affairs & Certification
Authorized Representative for Document Management:
S. Reiser
Alfred Kärcher SE & Co. KG
Alfred-Karcher-Straße 28-40
71364 Winnenden (Germany)
Tel.: +49 7195 14-0
Fax: +49 7195 14-2212
Winnenden, 2018/09/01
www.kaercher.com/REACH
Quality Assurance
a 1
2Δ
aolal/1j> g, a 1/109 a/12 clj/1/20j/10j>g/1c/1ac/1c>1c clj/10c/10c>1/1c/10c>1 acll/a jy/10j0e//a0t//aoL//
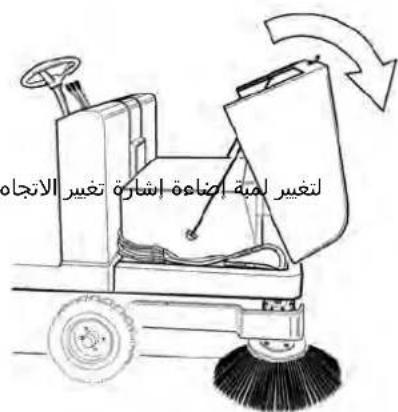
gjawall jd jg. aJlI alwgl
aaiia
pOwJgQJIcIbC 1
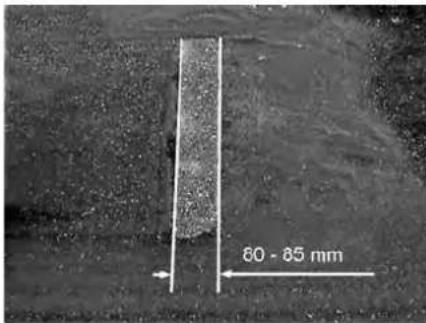
Jsw 85-80 aRg g jbiu
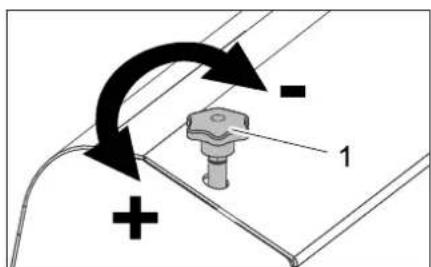
laaljlaa 1
Jx Jn jwSll oawg gogg L aio .aill Jawa Jzj .uill olawg a>g
aaiai aiaiol oawg aagao g
aagaaJ 1c uuSll aee
aalgl jjll 2gog olaog aolj gssg 1c 0o
.aaJJI aaSOLg oJGL JI aSIJLOJ aJJIaSOLg
.0aJgog JcJolalzao 1
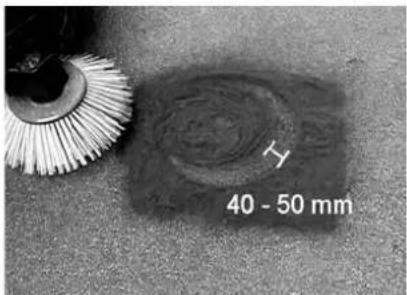
50940
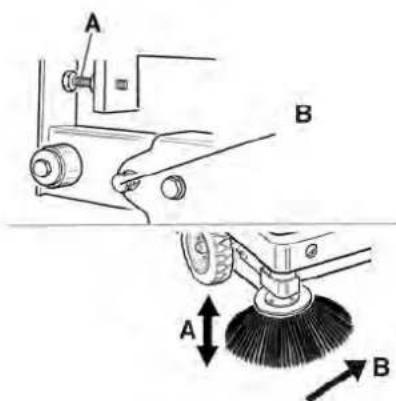
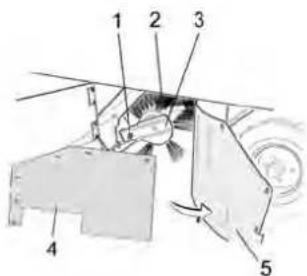
all a i + 1 >{a} {i}$
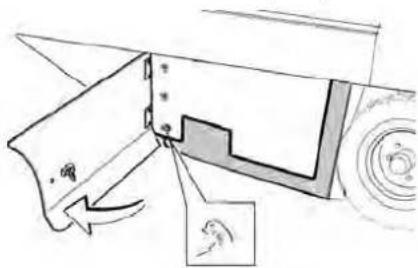
u 1000
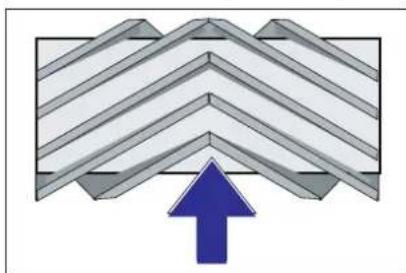
J 10000000000000000000000000000000000000000000000000
Jg 10
aJgJll mJl aJg Jg
ybyla bao a>pa
.1a0ll a>go Jaaaw cgl
aJg aGwaaJlcsuSll aRjLr
uulalgljllgogolbaog
olwjwssJgogJcGolJlTlaol
.0jgJl
Jaill gog lc golll 2ioi
uSllolw@g2x
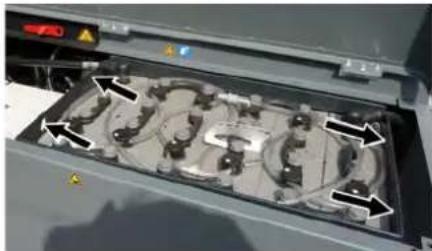
Jo JlaSsiIg Slgjglll jill sGima a>J0
Jz
Jew
Lgfo aolal/1jgsy
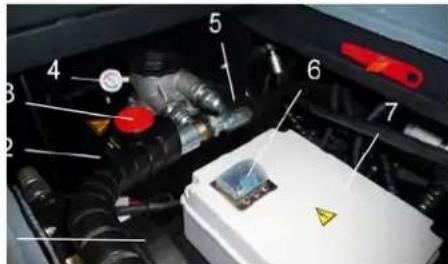
__SUPPIMER__
MAX,250V 2210A0xgMIN
1 1
Sglggl jll eJo JSoWg.MIN
cJlJ 0j a29 jlc osu o
Jolil 1uai uui
Suljgl jll Jo JSo
cJgJo a29 glooslaj
Jew
jllb2000000000000000000000000000000000000
jill jiljuiiic
Sue 100
a#gall 0
Therefore a1 = 2, a2 = -4
Therefore, the area of quadrilateral COBD equals the area of triangle COD plus the area of triangle BDO, which equals the area of triangle BOC plus
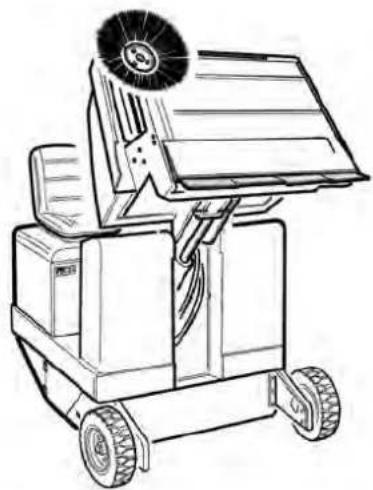
Therefore, m = 3/11.
The points a and b are collinear.
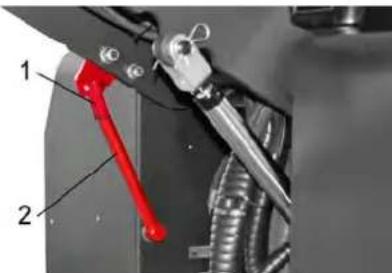
1
Therefore, the area of triangle OBC equals the area of triangle COD plus the area of triangle BOC.
(5) | x - 1| = | x - 2| = | x - 3|
1
2ab
Therefore, a.b.d.a.b.c.d. implies |x1| = |x2| = |x3| = 2|y1| = 2|y2| = 2|y3|.
a5 < 8, a6 or a > 8 (a > 6)
Therefore, the area of triangle APQ equals the area of triangle AQP plus the area of triangle PQQ.
Therefore m = 1
B_S ≅ ΔA
A
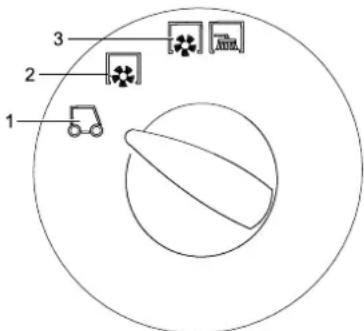
2
k2 ≤ Δ
a/c/a/c/10.97 J5.60 1/20 y/10.0y/10.25
a>1/2ie9, 0y
laie//e/laic/
| رطمن الحرفicit | |
| 6.654-280.0 | 24 24 24 24 24 24 24 24 24 24 24 24 24 24 24 24 24 24 24 24 24 24 24 24 24 24 24 24 24 24 24 24 24 24 17 700 * (العربية / محيى) |
| 6.654-281.0 | 80 80 80 80 80 80 80 80 80 80 80 80 80 80 80 80 80 80 80 80 80 80 80 80 80 80 80 80 80 80 80 80 80 80 17 700 |
| الجزز بورن نهش علّة | * |
__SUPPIMER__
Therefore, x > 1
a
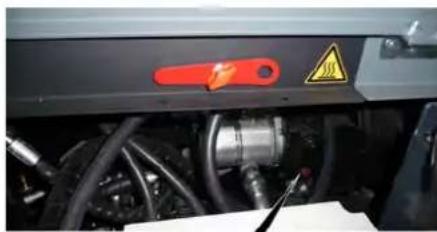
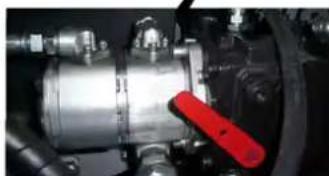
.
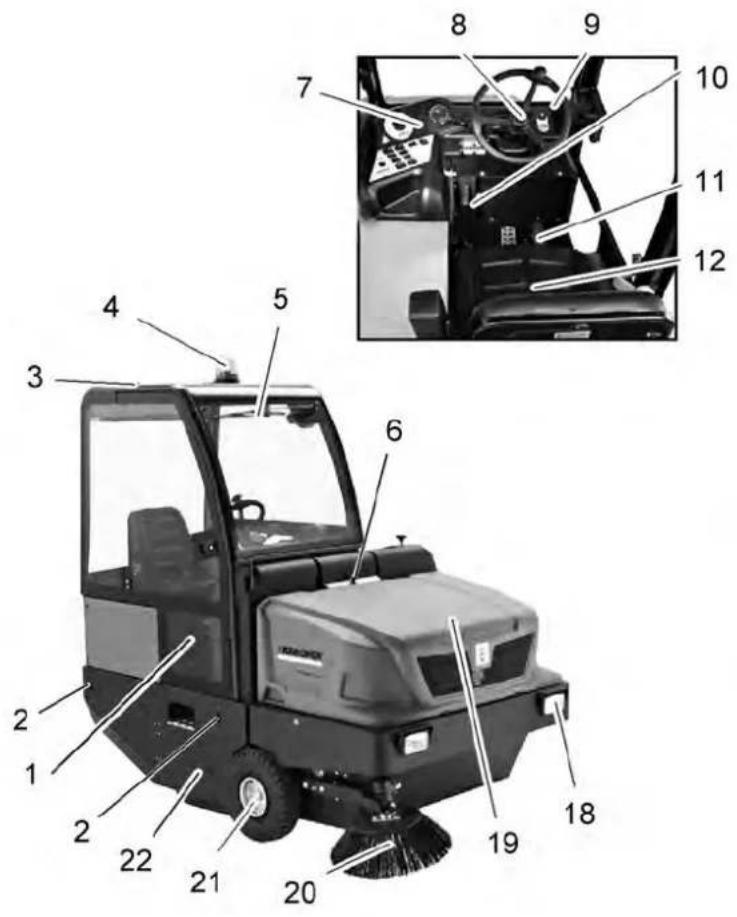
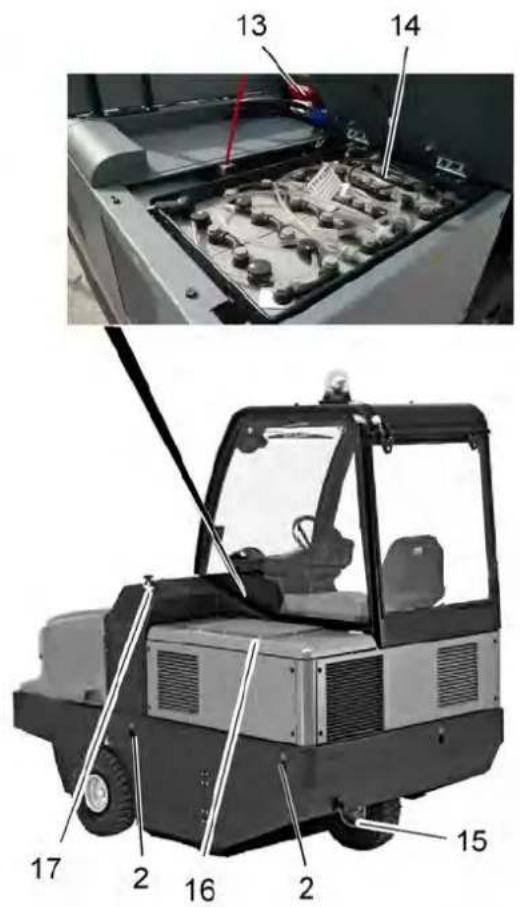
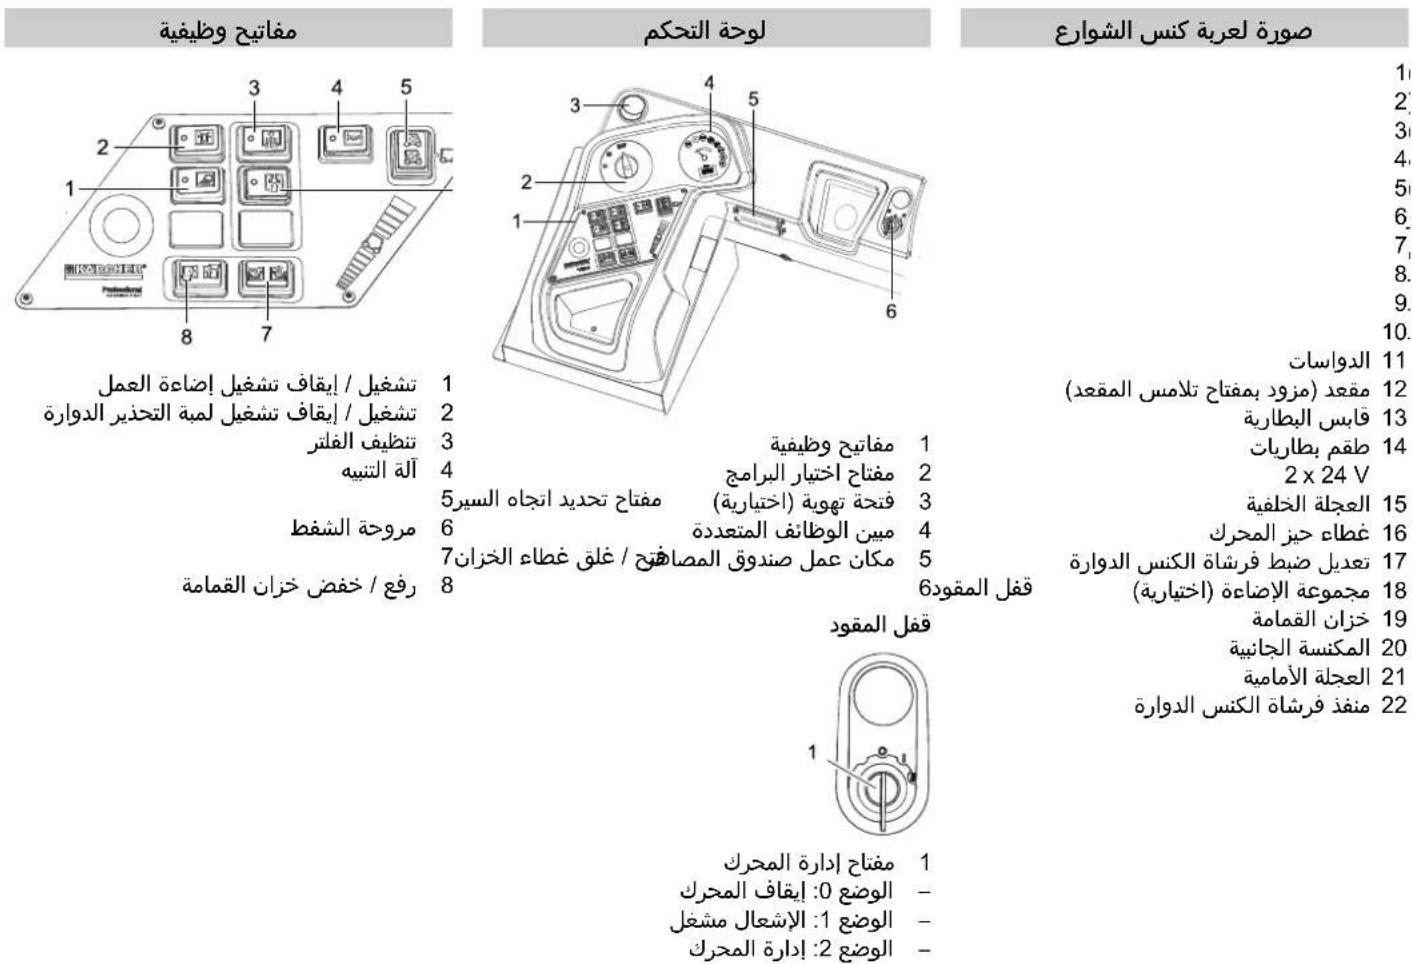
The formula is: y = -1/2x2 + 3/5x + 4 BC//l
www.kaercher.com/REACH
Therefore, the area of triangle AOB equals the area of triangle AOC plus the area of triangle AOB.
Right triangle
g'(x) = (1/x)L(x) - (1/x)(1 - x)
1 AR
1 AR
2 AR
-12.00A 015uogy 11, gaiylo
2 AR aalil
2 AR
2 AR 1
2 AR oJJIa a aJ...
0g>yl aol aolw o15w
2 AR aJluI alaunll
Golgiolgiolgiolgi
2 AR
a>aa0gjol 0j>
3 AR
Jaa aalaaaalaaa
PQ = AQ∴ PQ = OQ
1
5 AR aole 1
aIwllg aJaiJIaI...
Jusill J
a
...
1
J
gilll 1000 buo
aoluljsl...
-ylglgAsRcLaxoaiolxowjrgaew
6 AR jololol
6 AR
6 AR aalall jgj
-1ogAARJg21

THANK YOU!
MERCI! DANKE! GRACIAS!
Register your product and benefit from many advantages.
www.kaercher.com/welcome ★★★★★
Rate your product and tell us your opinion.
www.kaercher.com/dealersearch
Alfred Kärcher SE & Co. KG
Alfred-Karcher-Str. 28-40
71364 Winnenden (Germany)
Tel.: +49 7195 14-0
Fax: +49 7195 14-2212

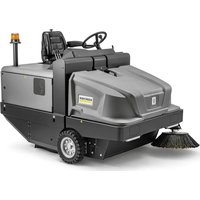
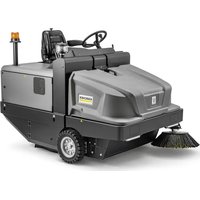
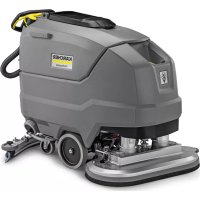
- GENERAL NOTES
- ENVIRONMENTAL PROTECTION
- WARRANTY
- ACCESSORIES AND SPARE PARTS
- DANGER
- SYMBOLS IN THE OPERATING
- INSTRUCTIONS
- WARNING
- CAUTION
- ATTENTION
- SYMBOLS ON THE MACHINE
- PROPER USE
- FORESEEABLE MISUSE
- SUITABLE SURFACES
- SAFETY INSTRUCTIONS
- SAFETY INSTRUCTIONS CONCERNING THE OPERATION
- SAFETY INFORMATION CONCERNING THE DRIVING OPERATION
- SAFETY INSTRUCTIONS FOR BATTERY-OPERATED DEVICES
- APPLIANCES WITH HIGH EMPTYING SYSTEM
- DEVICES WITH OVERHEAD GUARD
- NOTICE
- SAFETY INFORMATION CONCERNING THE TRANSPORT OF THE APPLIANCE
- SAFETY INFORMATION CONCERNING MAINTENANCE AND CARE
- THE SWEEPER OPERATES USING THE SWEEPSHOVEL PRINCIPLE
- UNLOADING TIPS
- OPERATING AND FUNCTIONAL ELEMENTS
- ILLUSTRATION OF SWEEPER OPERATING FIELD
- IGNITION SWITCH
- FUNCTION KEYS
- INDICATOR LAMPS AND DISPLAY
- PEDALS
- BEFORE STARTUP
- LOCK/ RELEASE PARKING BRAKE
- MOVING SWEEPER WITHOUT ENGAGING SELF-PROPULSION
- MOVING SWEEPER BY ENGAGING SELF-PROPULSION
- START UP
- INSPECTION AND MAINTENANCE WORK
- DAILY BEFORE STARTING OPERATIONS
- SAFETY NOTES REGARDING THE BATTERIES
- CHARGE THE BATTERIES
- RECOMMENDED BATTERIES, CHARGERS
- CHECK FLUID LEVEL IN THE BATTERY AND ADJUST IF REQUIRED
- CHECK CHARGING STATUS OF BATTERY
- OPERATION
- ADJUSTING DRIVER'S SEAT
- PROGRAMME SELECTION
- STARTING THE MACHINE
- DRIVE THE MACHINE
- DRIVE FORWARD
- REVERSE DRIVE
- DRIVING METHOD
- BRAKES
- DRIVING OVER OBSTACLES
- SWEEPING MODE
- SWEEPING DRY FLOORS
- SWEEPING DAMP OR WET FLOORS
- EMPTYING WASTE CONTAINER
- TURN OFF THE APPLIANCE
- TRANSPORT
- STORAGE
- SHUTDOWN
- CARE AND MAINTENANCE
- CLEANING
- CLEANING THE INSIDE OF THE MACHINE DANGER
- EXTERNAL CLEANING OF THE APPLIANCE
- MAINTENANCE INTERVALS
- MAINTENANCE BY THE CUSTOMER
- DAILY MAINTENANCE
- WEEKLY MAINTENANCE
- MAINTENANCE FOLLOWING WEAR
- MAINTENANCE BY CUSTOMER SERVICE
- MAINTENANCE TO BE CARRIED OUT AFTER 50 OPERATING HOURS
- MAINTENANCE TO BE CARRIED OUT AFTER 250 OPERATING HOURS
- MAINTENANCE WORKS
- PREPARATION
- GENERAL NOTES ON SAFETY DANGER
- REPLACE BATTERIES
- CHECK HYDRAULIC OIL LEVEL AND REFILL HYDRAULIC OIL
- CHECK HYDRAULIC UNIT
- CHECKING ROLLER BRUSH
- REPLACING ROLLER BRUSH
- CHECK AND ADJUST ROLLER BRUSH SWEEPING TRACK
- CHECK AND ADJUST SWEEPING TRACK OF THE SIDE-BRUSH
- ADJUST THE SIDE SEALS
- MANUALLY CLEAN THE DUST FILTER
- REPLACING DUST FILTER WARNING
- CHANGING THE HEADLIGHT BULB (OPTION)
- CHANGING THE BLINKER BULB (OPTION)
- REPLACING FUSES
- EU DECLARATION OF CONFORMITY
- GARANTIA
- CHARGING THE BATTERIES
- ADJUSTING THE DRIVER'S SEAT
- SERVICE AFTER 50 OPERATING HOURS
- INSTRUCTIONS FOR UNPACKING
- △DANGER
- SETTING THE SWEEPING PATTERN WIDTH
- CLEAN THE DUST FILTER MANUALLY
- GARANTI
- BEFORE STARTING WORK, EVERY DAY
- IF DAMAGE IS FOUND DURING UNPACKING OF THE DEVICE, RESULTING FROM TRANSPORTATION, IMMEDIATELY CONTACT THE TRADE ORGANIZATION THAT SOLD YOU THIS PRODUCT
- PROTECTION OF THE ENVIRONMENT
- SYMBOLS IN THE OPERATING INSTRUCTIONS
- SYMBOLS ON THE DEVICE
- ADJUST THE POSITION OF THE OPERATOR SEAT
- PROGRAM SELECTION
- STARTING THE DEVICE
- MOVING ON THE DEVICE
- MOVING FORWARD
- MOVING BACKWARD
- DRIVING CHARACTERISTICS
- BRAKING
- DRY FLOOR CLEANING
- WET OR DAMP FLOOR CLEANING
- EMPTY THE DEBRIS COLLECTION RESERVOIR
- SWITCHING OFF THE DEVICE
- MAINTENANCE AND TECHNICAL SERVICE
- GENERAL INSTRUCTIONS
- CLEANING THE DEVICE FROM THE INSIDE
- CLEANING THE DEVICE FROM THE OUTSIDE
- MAINTENANCE FREQUENCY
- MAINTENANCE PERFORMED BY THE CUSTOMER
- TECHNICAL SERVICE OF THE SPARE PARTS
- TECHNICAL SERVICE PERFORMED BY THE SERVICE DEPARTMENT
- MAINTENANCE AFTER 50 HOURS OF OPERATION
- TECHNICAL MAINTENANCE AFTER 250 HOURS OF OPERATION
- MAINTENANCE WORK
- GENERAL TECHNICAL INFORMATION
- SAFETY
- FOLD DOWN THE PROTECTIVE SHIELD
- PROTECTIVE SHIELD
- CHECK THE OIL LEVEL FOR HYDRAULIC SYSTEMS WARNING
- PRESSURE GAUGE
- CHECK THE HYDRAULIC SYSTEM
- CHECK THE SWEEPING ROLLER
- REPLACING THE SWEEPING ROLLER
- CHECKING AND CORRECTING THE SWEEPING PLANE OF THE SWEEPING ROLLER
- CHECK THE MARKING DEVICE
- CHECKING AND ADJUSTING THE MARKING PROFILE FOR SIDE BRUSHES
- SIDE SEALS
- REPLACING THE DUST FILTER
- REPLACING THE HEADLIGHT BULB (HALOGEN)
- REPLACING THE TURN SIGNAL INDICATOR BULB (HALOGEN)
- REPLACING THE FUSES
- WWW.KAERCHER.COM/REACH
- △CAUTION
- INTENDED USE
- GENERAL SAFETY INSTRUCTIONS
- SPARE PARTS SAFETY
- ACTION
- FOR USE
- SIGNAL WORD
- AREAS OF APPLICATION
- SAFETY INSTRUCTIONS FOR MAINTENANCE
- SAFETY INSTRUCTIONS FOR OPERATION
- SAFETY INSTRUCTIONS FOR CHARGING THE BATTERY
- DEVICES WITH HIGH PRESSURE
- DEVICES WITH WATER PROTECTION COVER
- SAFETY INSTRUCTIONS FOR TRANSPORTING THE DEVICE
- SAFETY INSTRUCTIONS FOR MAINTENANCE AND SERVICING
- INSTRUCTIONS FOR DISPOSAL
- MACHINE OVERVIEW
- SERVICE AREA
- IGNITION KEY
- BATTERY SAFETY INSTRUCTIONS
- CHARGING THE ACCUMULATORS
- CHARGING THE BATTERY, CHARGING DEVICE
- CHECK AND CORRECT THE ELECTROLYTE LEVEL OF THE BATTERY
- CHECKING THE CHARGING STATE OF THE BATTERY
- AND ADJUST THE WATER HARDNESS SETTING
- MAINTENANCE
- GENERAL SAFETY INSTRUCTIONS DANGER
- WEAR PROTECTIVE GLOVES 2. PROTECTIVE GLOVES
- BATTERY REPLACEMENT
- CHECKING THE HYDRAULIC OIL LEVEL | FILLING WITH HYDRAULIC OIL
- INSTRUCTION
- NOTE: TECHNICAL DATA
- CHECKING THE HYDRAULIC SYSTEM
- CHECKING THE METAL HOUSING
- TO REPLACE THE METAL GUARD
- CHECKING AND ADJUSTING THE PAPER FEED REFLECTOR
- ADJUSTING THE PAPER SHEETS
- SEALS
- CLEANING THE DUST FILTER
- CHANGING THE DUST FILTER
- REPLACING THE LAMP COVER (OPTIONAL)
- REPLACING THE LAMP (OPTIONAL)
- REPLACING THE FUSE
- SYMBOLS IN THE MANUAL
- CORRECT USE
- IMPROPER USE
- SURFACES TO BE CLEANED
- DANGER OF INJURY
- RISK OF INJURY! DO NOT ALLOW THE DEVICE TO COME INTO CONTACT WITH ELECTRIC CABLES OR WIRES, AS THEY MAY BECOME ENTANGLED IN MOVING PARTS
- DANGER OF INJURY! CHECK THE CONDITION OF THE SURFACE BEFORE USE
- SAFETY INSTRUCTIONS FOR DEVICES THAT OPERATE WITH A BATTERY
- MACHINES WITH A TIPPING CONTAINER
- RISK OF CRUSHING WITH A RAISED CONTAINER
- SAFETY INSTRUCTIONS FOR TRANSPORTING THE MACHINE
- SAFETY INSTRUCTIONS FOR INSPECTION AND MAINTENANCE
- INSTRUCTIONS FOR DISMANTLING
- UNSAFE
- ENEMENY NPABLINN I YHKIOHAIBHI BY3NN
- O6PAKEHHN IDMITAIBHOI MAUNHN PANELB YNPABINHH
- AMOK 3ANAJIIOBAHHA
- ФУНКЦIOHAJIBHI KHONKN
- KOHTPOJIBHI IHDNKATOPN TA DNCNNEI
- FIX/RELEASE THE BRAKE PEDAL
- MOVING THE FEED MACHINE WITHOUT ITS OWN DRIVE
- MOVING THE FEED MACHINE WITH ITS OWN DRIVE
- COMMISSIONING
- INSPECTION AND TECHNICAL MAINTENANCE
- ADJUSTING THE HANDLE POSITION
- SELECT PROGRAM
- START THE DEVICE
- PRESSURE SETTING
- FORWARD TRAVEL
- REVERSE TRAVEL
- CHARACTERISTIC OF MOVEMENT
- ADJUSTING THE PEDALS
- CAREFULLY
- CLEANING DRY DIRT
- CLEANING WITH WATER OR WET CLOTH
- DRAIN RESERVOIR FOR FUEL. PRESS
- CLEAN THE DEVICE SURFACE
- CLEANING THE DEVICE EXTERIOR
- MAINTENANCE IS PERFORMED BY THE CUSTOMER
- MAINTENANCE WORK THAT IS REQUIRED
- MAINTENANCE IS PERFORMED BY THE SERVICE
- MAINTENANCE PERSONNEL
- MAINTENANCE EVERY 50 HOURS OF OPERATION
- MAINTENANCE EVERY 250 HOURS OF OPERATION
- PREVENTIVE WORK
- PLANNING
- PROTECT THE OPERATOR
- CHECKING THE HYDRAULIC OIL LEVEL AND TOPPING IT UP
- TOPPING UP
- CHECK THAT THE OIL IS NOT LEAKING
- CHECKING AND ADJUSTING THE IMPELLER CLEARANCE FOR THE SHAFT, THE IMPELLER
- CHECKING AND ADJUSTING THE PUMPING CLEARANCE FOR THE SHAFT, THE IMPELLER
- INSTALL THE HIGH-PRESSURE HOSE
- REPLACING THE FILTER ELEMENT
- REPLACING THE DISCHARGE LAMP (DESCRIPTION)
- REPLACING THE DISCHARGE LAMP FOR THE TURN SIGNAL (DESCRIPTION)
- QUALITY ASSURANCE
- THANK YOU
- MERCI! DANKE! GRACIAS
Brand : Kärcher
Model : KM 150500 R Bp Pack
Category : Sweeper