
KM 7540 W Bp Pack - Vacuum Cleaner Kärcher - Free user manual and instructions
Find the device manual for free KM 7540 W Bp Pack Kärcher in PDF.
 FR
FR
 BG
BG
 CS
CS
 DA
DA
 DE
DE
 EL
EL
 EN
EN
 ES
ES
 ET
ET
 FI
FI
 HU
HU
 IT
IT
 JA
JA
 KK
KK
 LT
LT
 LV
LV
 NL
NL
 NO
NO
 PL
PL
 PT
PT
 RO
RO
 RU
RU
 SK
SK
 SL
SL
 SV
SV
 TR
TR
 UK
UK
 ZH
ZH
| Product type | Sweeper vacuum (vacuum sweeper) |
| Brand | Kärcher |
| Model | KM 75/40 W Bp Pack |
| Dimensions (L x W x H) with handlebar raised | 1430 x 750 x 1190 mm |
| Dimensions (L x W x H) without handlebar | 1160 x 750 x 930 mm |
| Weight without batteries | 79 kg |
| Weight with batteries | 125 kg |
| Total permissible weight | 205 kg |
| Power supply | 24 V DC, 2 batteries 12 V 60 Ah |
| Motor power | 400 W |
| Runtime | Approximately 1.5 to 2 hours |
| Charging time | Approximately 12 hours |
| Sweeping speed | 4.5 km/h |
| Maximum gradient | 12 % |
| Dust container capacity | 40 L |
| Working width (with side brushes) | 750 mm |
| Filter type | Dust filter, area 1.8 m² |
| Main functions | Sweeping dry and wet floors, large debris trap (up to 50 mm), continuous speed adjustment |
| Maintenance and cleaning | Daily filter cleaning, emptying the container, periodic replacement of brushes and squeegees |
| Safety devices | Hood switch, key switch, parking brake |
| Accessories and spare parts | Side brushes, rotating brushes (soft, hard, antistatic), charger, batteries |
| Intended use | Indoor and outdoor surfaces (asphalt, concrete, tiles, etc.), professional use (hotels, schools, hospitals) |
| Compliance standards | EU directives, EN 55012, EN 60335-1, EN 60335-2-72, etc. |
Frequently Asked Questions - KM 7540 W Bp Pack Kärcher
User questions about KM 7540 W Bp Pack Kärcher
0 question about this device. Answer the ones you know or ask your own.
Ask a new question about this device
Download the instructions for your Vacuum Cleaner in PDF format for free! Find your manual KM 7540 W Bp Pack - Kärcher and take your electronic device back in hand. On this page are published all the documents necessary for the use of your device. KM 7540 W Bp Pack by Kärcher.
USER MANUAL KM 7540 W Bp Pack Kärcher
Chairman of the Board of Management
S. Reiser
Director Regulatory Affairs & Certification
71364 Winnenden (Germany)
Tel.: +49 7195 14-0
Fax: +49 7195 14-2212
Winnenden, 2021/02/01
Please read and comply with these original instructions prior to the initial operation of your appliance and store them for later use or subsequent owners.
Proper use. EN 1
Function. EN 1
General notes EN 1
Safety instructions. EN 2
Operating and Functional Elements. EN 3
Before Startup EN 4
Before Startup EN 4
Start up EN 5
Operation. EN 5
Shutdown. EN 6
Care and maintenance. EN 6
Accessories. EN 8
EU Declaration of Conformity. EN 9
Declaration of Conformity. EN 9
Troubleshooting. EN 10
Technical specifications. . . EN 11
Proper use
Use this appliance only as directed in these operating instructions.
- This sweeper has been designed to sweep dirt and debris from indoor as well as outdoor surfaces.
- This device is suitable for commercial use in hotels, schools, hospitals, factories, shops, offices, and rental companies.
- The machine with working equipment must be checked to ensure that it is in proper working order and is operating safely prior to use. Otherwise, the appliance must not be used.
- The machine is not suitable for vacuuming dust which endangers health.
- The machine may not be modified.
- The machine is only suitable for use on the types of surfaces specified in the operating instructions.
- The machine may only be operated on the surfaces approved by the company or its authorised representatives.
- The following applies in general: Keep highly-flammable substances away from the appliance (danger of explosion/fire).
Foreseeable misuse
- Never vacuum up explosive liquids, combustible gases or undiluted acids and solvents. This includes petrol, paint thinner or heating oil which can generate explosive fumes or mixtures upon contact with the suction air. Acetone, undiluted acids and solvents must also be avoided as they can harm the materials on the machine.
- Never sweep/vacuum up reactive metal dusts (e.g. aluminium, magnesium, zinc), as they form explosive gases when they come in contact with highly alkaline or acidic detergents.
- Do not sweep/vacuum up any burning or glowing objects.
- The machine may not be used or stored in hazardous areas. It is not allowed to use the appliance in hazardous locations.
Suitable surfaces
Asphalt - Industrial floor - Screed Concrete - Paving stones
Function
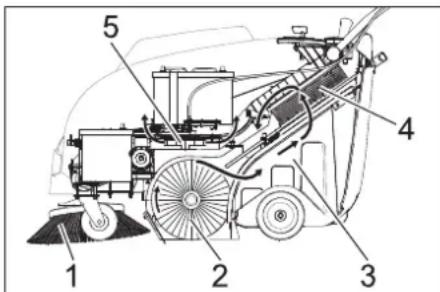
The sweeper operates using the overthrow principle.
- The side brushes (1) clean the corners and edges of the surface and move dirt and debris into the path of the roller brush.
- The rotating roller brush (2) moves the dirt and debris directly into the waste container (3).
- The dust raised in the container is separated by the dust filter (4) and the filtered clean air is drawn off by the suction fan (5).
General notes
Your sales outlet should be informed about any transit damage noted when unpacking the product.
- Read and adhere to the operating instructions and safety notes of the attachments affixed to the appliance.
- Warning and information plates on the machine provide important directions for safe operation.
- In addition to the information contained in the operating instructions, all statutory safety and accident prevention regulations must be observed.
Accessories and Spare Parts
DANGER
To avoid risks, all repairs and replacement of spare parts may only be carried out by authorized customer service personnel.
Only use accessories and spare parts which have been approved by the manufacturer. The exclusive use of original accessories and original spare parts ensures that the appliance can be operated safely and trouble free. For additional information about spare parts, please go to the Service section at www.kaercher.com.
Environmental protection

The packaging material can be recycled. Please do not throw the packaging material into household waste; please send it for recycling.
Old appliances contain valuable materials that can be recycled; these should be sent for recycling. Batteries, oil, and similar substances must not enter the environment. Please dispose of your old appliances using appropriate collection systems.
Notes about the ingredients (REACH)
You will find current information about the ingredients at:
www.kaercher.com/REACH
Warranty
The warranty terms published by our competent sales company are applicable in each country. We will repair potential failures of your accessory within the warranty period free of charge, provided that such failure is caused by faulty material or defects in fabrication. In the event of a warranty claim please contact your dealer or the nearest authorized Customer Service center. Please submit the proof of purchase.
Symbols in the operating instructions
DANGER
Immediate danger that can cause severe injury or even death.
WARNING
Possible hazardous situation that could lead to severe injury or even death.
CAUTION
Possible hazardous situation that could lead to mild injury to persons or damage to property.
Symbols on the device
| Please do not sweep away any burning substances such as cigarettes, match sticks or similar objects. | |
| Risk of being squeezed or hurt at the belts, side-brushes, containers, pushing handle. | |
| Danger of burns Avoid touching these surfaces during operation and when hot. |
Safety instructions
Safety instructions concerning the operation
- The machine with working equipment must be checked to ensure that it is in proper working order and is operating safely prior to use. Otherwise, the appliance must not be used.
- If the appliance is used in hazardous areas (e.g. filling stations) the corresponding safety provisions must be observed. It is not allowed to use the appliance in hazardous locations.
- The operator must use the appliance properly. The person must consider the local conditions and must pay attention to third parties, in particular children, when working with the appliance.
- Prior to starting work, the operator must ensure that all protective devices are properly installed and function correctly. The operator of the appliance is liable for accidents with other individuals or their property.
- Ensure that the operator wears tight-fitting clothes. Wear sturdy shoes and avoid wearing loose-fitting clothes.
- Check the immediate vicinity prior to starting (e.g. children). Ensure sufficient visibility!
- Please remove the key, when not in use, to avoid unauthorised use of the appliance.
- When leaving, secure the device against unintentional movement.
- The appliance may only be used by persons who have been instructed in handling the appliance or have proven qualification and expertise in operating the appliance or have been explicitly assigned the task of handling the appliance.
- This device must not be used by any persons (including children) with restricted physical, sensory or mental abilities or those lacking in experience and knowledge.
- Children should be supervised to prevent them from playing with the appliance.
Safety information concerning the driving operation
Danger
Risk of injury! Danger of tipping if gradient is too high. - The falling and rising gradients in the direction of travel may not exceed 12% . Danger of tipping on unstable ground. -Only use the machine on sound surfaces. Danger of tipping with excessive sideways tilt. The gradient perpendicular to the direction of travel should not exceed 12% . The travel speed must be adapted to the existing conditions.
Safety information concerning the transport of the appliance
Mind the weight of the appliance during transport. - Disconnect the battery and securely fasten the device for transport.
Safety instructions for battery-operated devices
Note: Warranty claims will be entertained only if you use batteries and chargers recommended by Kärcher.
- Always follow the instructions of the battery manufacturer and the charger manufacturer. Please follow the statutory requirements for handling and disposing batteries.
- Never leave the batteries in a discharged state; recharge them as soon as possible.
- Always keep the batteries clean and dry to avoid creep currents. Protect the batteries and avoid contact with impurities such as metal dust.
- Do not place tools or similar items on the battery. Risk of short-circuit and explosion.
- Always use 2 batteries of the same type!
- Do not work with open flames, generate sparks or smoke in the vicinity of a battery or a battery charging room. Danger of explosion.
- Only use batteries with terminal cover. Restore terminal cover in the event of loss.
- Do not touch hot parts of the machine such as the drive motor (risk of burns).
- Be careful while handling battery acid. Follow the respective safety instructions!
- Used batteries are to be disposed according to the EC guideline 91/157 EWG in an environment-friendly manner.
Safety information concerning maintenance and care
- Switch off the appliance and remove the ignition key prior to performing any cleaning or maintenance tasks on the appliance, replacing parts or switching over to another function.
- Always disconnect the battery when working on the electrics.
- Do not clean the appliance with a water hose or high-pressure water jet (danger of short circuits or other damage).
- Maintenance work may only be carried out by approved customer service outlets or experts in this field who are familiar with the respective safety regulations.
- Please observe the local safety regulations regarding portable commercially used appliances.
- Always use appropriate gloves while working on the device.
Safety devices
Cover
The device is equipped with a cover contact switch that switches off the motor as soon as the device cover is opened.
△DANGER
Risk of injury due to defective cover contact switch!
If the motor does not switch off when the device cover is opened, the cover contact switch is faulty. Do not operate or repair the device.
Main switch
In case of dangerous situations or in order to quickly switch off the device's main switch, turn the main switch to position "0/OFF". To prevent unintentional start-up, turn the main switch to the "0/OFF" position and remove the key.
Operating and Functional Elements
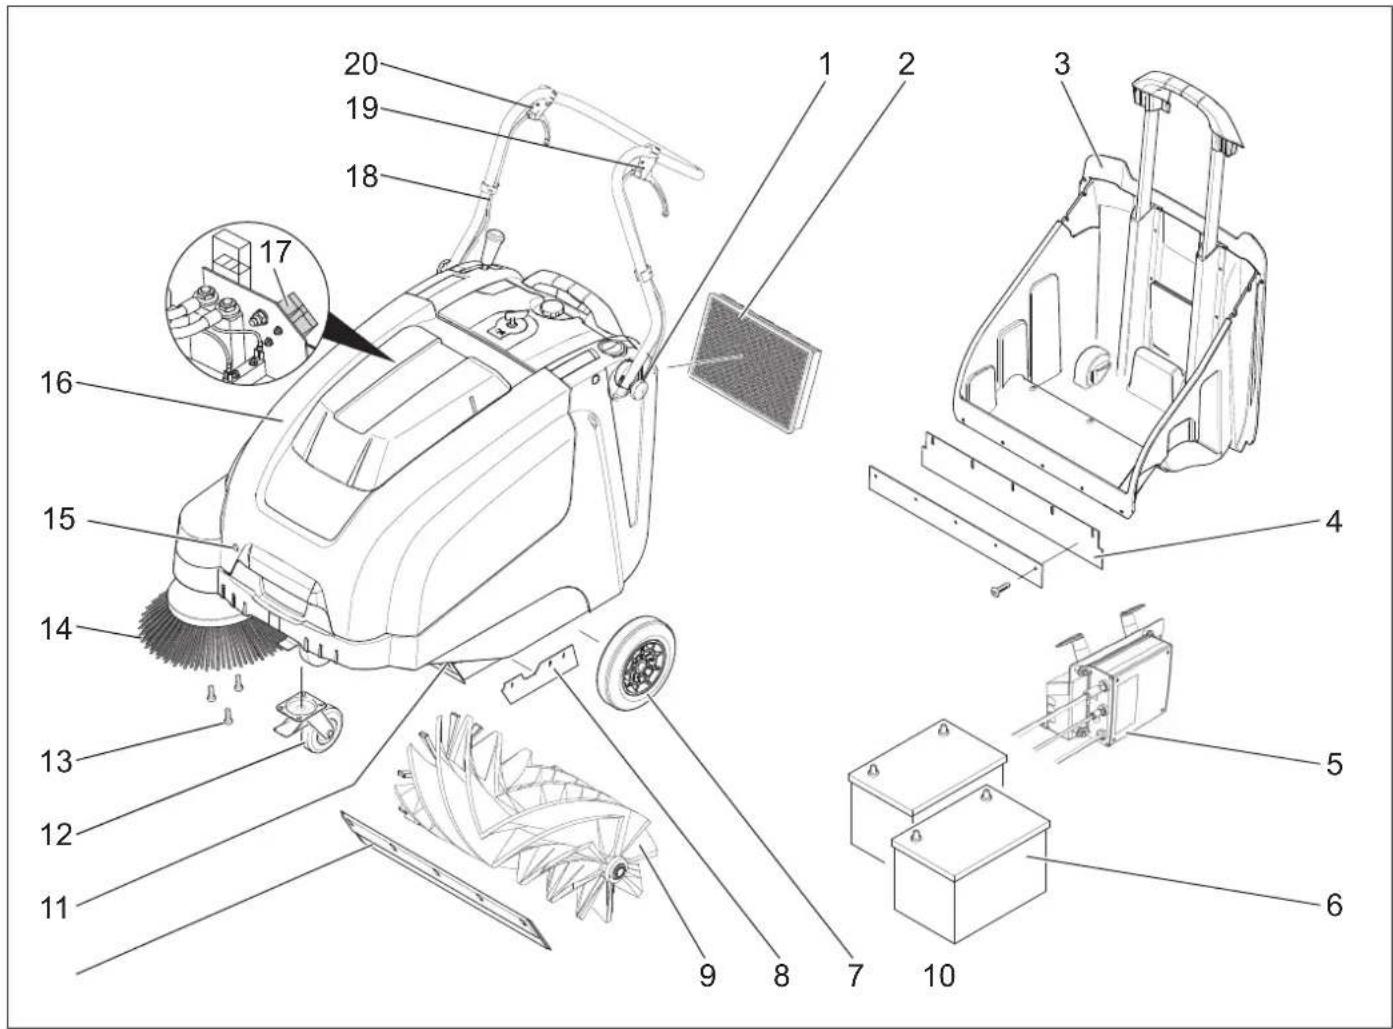
1 Screw for fastening the push handle (2x) 2 Dust filter 3 Waste container 4 Rear sealing strip (at the waste container) 5 Charger
KM 75/40 W Bp Pack only
6 Batteries
KM 75/40 W Bp Pack only
7 Drive wheels 8 Side sealing strip 9 Roller brush 10 Front sealing strip 11 Bulk waste flap 12 Steering roller with fixed position brake 13 Fastener of the side brush 14 Side brushes 15 Cover lock 16 Cover 17 Battery charge plug (KM 75/40 W Bp only) 18 Push handle 19 Lever for forward drive 20 Lever to raise and lower the bulk waste flap
Operating field
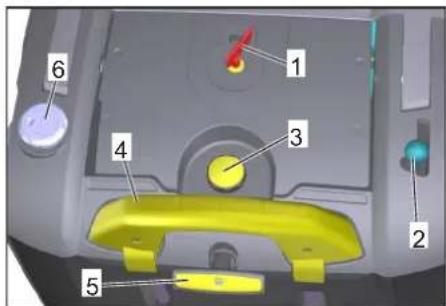
1 Main switch 2 Lever for lowering and raising the side-brush 3 Locking screw of the dust filter cover 4 Locking bow of the waste container 5 Filter cleaning for dust filter 6 Wet/dry flap
Main switch
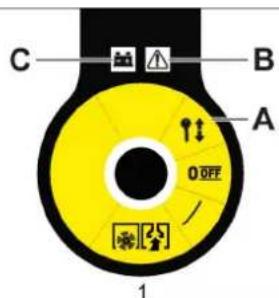
0/OFF Motor off
1 Motor on A Remove the key B Fault Indication C Battery display
Remove the key
Turn the main switch to the "0" position and pull it out.
Open the device hood.
Note
The cover is unlocked with the key of the main switch.
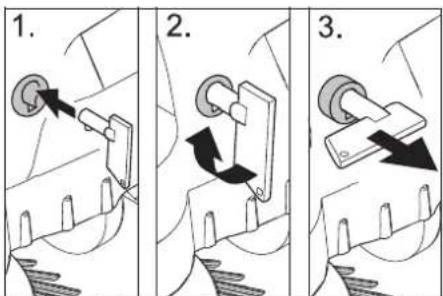
Insert the key for the main switch into the hood lock and rotate in a clockwise direction by 90 degrees. Pull the hood lock out by the key. Open the device hood.
Close device hood
Close the appliance cover, the cover lock will lock automatically.
Before Startup
Unloading tips
DANGER
Risk of injury, risk of damage! Observe the weight of the appliance when you load it!
| Net weight (transport weight) | |
| KM 75/40 W Bp 79 kg | |
| KM 75/40 W Bp Pack 125 kg | |
| Permissible overall weight | |
| KM 75/40 W Bp 205 kg | |
| KM 75/40 W Bp Pack 205 kg | |
Unloading
Remove the cardboard. Remove the wooden blocks that secure the wheels and raise the device from the palette by hand. Release parking brake.
Installing the pushing handle
Loosen the screws. Align the pushing handle. Tighten the screws.
Install side brush
Note: Remove the waste container and move the pushing handle to the front prior to tilting the appliance. Do not rest the appliance on the pushing handle. Clip side brush on to driver and screw on.
Batteries
Safety notes regarding the batteries
Please observe the following warning notes when handling batteries:
| Observe the directions on the battery, in the instructions for use and in the vehicle operat-ing instructions! |
| Wear an eye shield! |
| Keep away children from acid and batteries! |
| Risk of explosion! |
| Fire, sparks, open light, and smoking not allowed! |
| Danger of causticization! |
| First aid! |
| Warning note! |
| Disposal! |
| Do not throw the battery in the dustbin! |
Danger
Risk of explosion! Do not put tools or similar on the battery, i.e. on the terminal poles and cell connectors.
Danger
Risk of injury! Ensure that wounds never come into contact with lead. Always clean your hands after having worked with batteries.
DANGER
Risk of fire and explosion!
Smoking and naked flames are strictly prohibited. Rooms where batteries are charged must have good ventilation because highly explosive gas is emitted during charging.
Danger
Danger of causticization!
Rinse thoroughly with lots of clear water if acid gets into the eye or comes in contact with the skin. - Then consult a doctor immediately. - Wash off the acid if it comes in contact with the clothes.
Recommended batteries
| Order No. Volume Air | |||
| 60 Ah, Mainte- nance- free | 6.654-226.0* | 1,65** | 0,6*** |
- Appliance requires 2 batteries ** in m3 *** in m3/h
Maximum battery dimensions
| Length Width | Height | |
| 267 mm | 177 mm | 190 mm |
Recommended chargers Installing and connecting the batteries
| Order No. | |
| Charger | 6.654-225.0 |
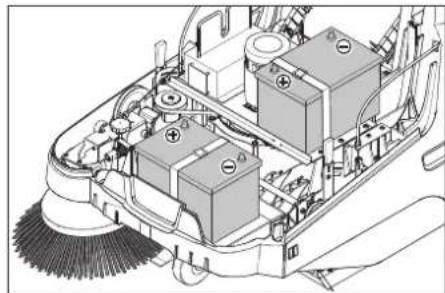
Note
With the KM 75/40 W Bp Pack the battery and the charger are already built in.
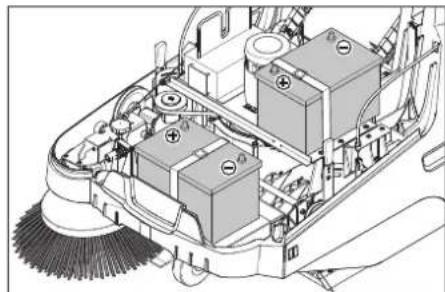
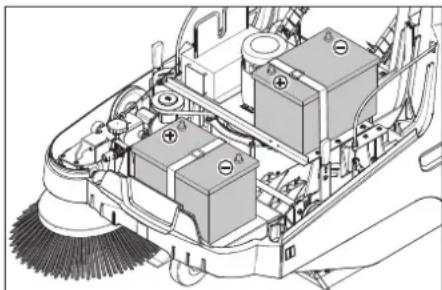
Open the device hood. Set the batteries on to the motor carrier. Secure the batteries with the holding strap.
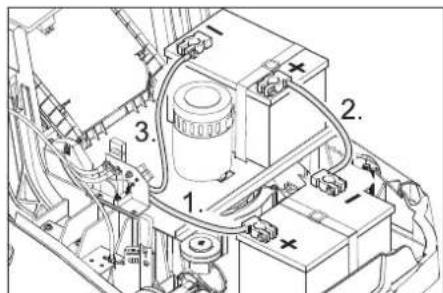
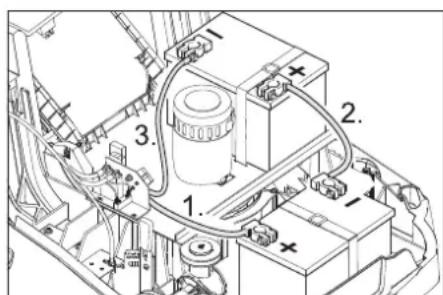
Connect pole terminal (red cable) to positive pole (+). Fit the connection wires to the batteries. Connect pole terminal to negative pole (-).
Note: Check that the battery pole and pole terminals are adequately protected with pole grease.
Only use batteries with terminal cover. Restore terminal cover in the event of loss.
CAUTION
Charge the batteries before commissioning the machine.
Charge the batteries
DANGER
Risk of injury! The charger should be used only if the mains cable is in an undamaged state. Get the manufacturer, the customer service agent or a qualified person to immediately replace a damaged mains cable. DANGER Risk of electric shock. Observe supply network and fuse protection. Only use the charger in dry rooms with sufficient ventilation.
Note: The charging time for an empty battery is approx. 12 hours.
DANGER
Risk of injury! Comply with safety regulations on the handling of batteries. Observe the directions provided by the manufacturer of the charger.
Charging process - KM 75/40 W Bp Pack
Caution: Batteries may only be charged at room temperature!
Note: Normally, the device is equipped with maintenance-free batteries.
Open the cover. Insert the mains plug of the charger into the socket.
Note: The charger is electronically controlled and ends the charging process automatically. All functions of the device are automatically interrupted during the charging process.
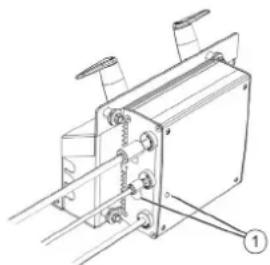
1 Battery status display
The battery status display shows the progress of the charging process when the mains plug is inserted:
| Batteries are being charged | flashes green |
| Batteries are charged lights up green | |
| Fault on the charger lights up red | |
| Error n from error table is present | flashes red n times with pause |
Error table:
| 1 Battery not connected |
| 2 Battery polarity reversed |
| 3 Battery deep discharged |
| 4 Problem with charging characteristic |
| 5 Power supply too hot |
| 6 Hardware fault |
| 7 Communication error (power supply mode) |
To ensure a long battery life, the battery should always be fully charged.
Charging process - KM 75/40 W Bp
Open the device hood. Insert the charging cable of the charger in the charger box of the sweeper. Plug in mains connector and switch on charger.
After charging
KM 75/40 W Bp Pack: Disconnect the mains plug. Wrap the mains cord around the cable holder of the charger. Close cover.
KM 75/40 W Bp: Switch off the charger and remove the plug from the socket. Hang out the charging cable out of the machine. Close cover.
Remove the battery
Open the device hood. Disconnect pole terminal to negative pole (-). Unscrew the connection wires from the batteries. Disconnect pole terminal to positive pole (+). Loosen the holding strap. Remove the battery. Dispose of the used battery according to the local provisions.
Start up
General notes
DANGER
Risk of injury! Switch off the appliance prior to removing the waste container.
Note: Start the appliance only when the hood is closed.
Park the sweeper on an even surface. Switch off engine. Lock parking brake.
Inspection and maintenance work
Check charging status of battery. Check side brush. Check roller brush. Shake off dust filter. Empty waste container.
Note: For description, see section on Care and maintenance.
Operation
Danger
Long hours of using the appliance can cause circulation problems in the hands on account of vibrations.
It is not possible to specify a generally valid operation time, since this depends on several factors:
- Proneness to blood circulation deficiencies (cold, numb fingers).
- Low ambient temperature. Wear warm gloves to protect hands. A firm grip impedes blood circulation.
- Continuous operation is worse than an operation interrupted by pauses.
In case of regular, long-term operation of the device and in case of repeated occurrence of the symptoms (e.g. cold, numb fingers) please consult a physician.
Starting the machine
Release parking brake. Start the motor. Turn the main switch to position "1". Note: The roller brush and the side brush will rotate.
Drive the machine
Drive forward
Pull the lever for forward drive.
Note: The drive speed for forward drive can be adjusted steplessly depending on the position of the lever.
Dry run
Release the lever for forward drive. Device comes to a halt.
Driving over obstacles
Driving over fixed obstacles which are 30 mm high or less:
Raise bulk waste flap. Drive forwards slowly and carefully. Driving over fixed obstacles which are more than 30 mm high: Only drive over these obstacles using a suitable ramp.
Sweeping mode
Danger
Risk of injury! If the bulk waste flap is open, stones or gravel may be flung forwards by the roller brush. Make sure that this does not endanger persons, animals or objects.
CAUTION
Do not sweep up packing strips, wire or similar objects as this may damage the sweeping mechanism.
Note: To achieve an optimum cleaning result, the driving speed should be adjusted to take specific situations into account.
Sweeping with bulk waste flap raised
Note: To sweep up larger items up to a height of 50 mm, e.g., cigarette packs, the bulk waste flap must be raised briefly. Raising bulk waste flap:
Pull the lever for raising the bulk waste flap. Lowering the bulk waste flap: Release the lever for raising the bulk waste flap.
Note: An optimum cleaning result can only be achieved if the bulk waste flap has been lowered completely.
Sweeping with side brushes

Move the lever to lower the side brush to the front. The side brush will be lowered.
Sweeping dry floors
Note: During operation, the waste container should be emptied at regular intervals.
Note: During operation, the dust filter should be shaken off and cleaned at regular intervals.

Close wet/dry flap
Sweeping damp or wet floors
Open wet/dry flap.
Note: This protects the filter from moisture.
Battery display
The battery display shows the charging status of the batteries during operation:

| full glows green | |
| 30% capacity remaining | glows yellow |
| 10% capacity remaining | blinks red |
| Protection against total discharge; the appliance is switched off | glows red |
Fault display
The fault indicator shows whether there is a fault with the device:

Motor control fault flashes red
Cleaning the dust filter
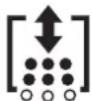
Pull the handle of the filter clean-off out several times and reinsert it.
Emptying waste container
DANGER
Risk of injury! Switch off the appliance prior to removing the waste container.
Note: Make sure the seal strip is not damaged while emptying the waste container.
Note: The max. load of the waste container is 40 kg.
Shake off dust filter. Pull lock bow of the waste container upward. Pull out the waste container. Empty waste container. Push in the waste container. Push lock bow of the waste container downward.
Turn off the appliance
Switch off engine. Turn the main switch to position "0".

The side-brushes lift up. Lock parking brake. Turn the main switch to "0" position and pull it out.
Transport
△DANGER
Risk of injury and damage! Observe the weight of the appliance when you transport it.
Switch off engine. Turn the main switch to "0" position and pull it out. Lock parking brake. Secure the wheels of the machine with wheel chocks. Secure the machine with tensioning straps or cables. When transporting in vehicles, secure the appliance according to the guidelines from slipping and tipping over.
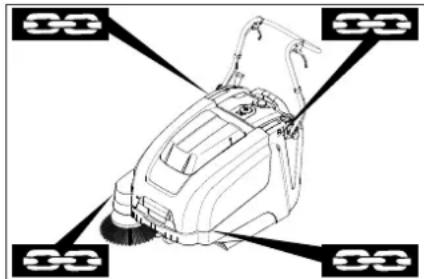
1 Fastening area above the pushing handle
2 Fastening area under the device hood Note: Observe markings for fixing points on base frame (chain symbols).
Note: Do not kink the bowden or sheathed cables.
Storage
△DANGER
Risk of injury and damage! Note the weight of the appliance in case of storage.
Shutdown
If the sweeper is going to be out of service for a longer time period, observe the following points:
Park the sweeper on an even surface. Switch off engine. Turn the main switch to "0" position and pull it out. Lock parking brake. Lock the sweeper to ensure that it does not roll off. Raise roller brush. Thus, engage both adjustment levers in the top boring. The side-brushes lift up. Clean the inside and outside of the sweeper.
Park the machine in a safe and dry place. Disconnect batteries. Charge batteries and recharge approx every 2 months.
Care and maintenance
General notes
- Maintenance work may only be carried out by approved customer service outlets or experts in this field who are familiar with the respective safety regulations.
- Mobile appliances used for commercial purposes are subject to safety inspections according to VDE 0701.
Cleaning
CAUTION
Risk of damage! Do not clean the appliance with a water hose or high-pressure water jet (danger of short circuits or other damage).
ATTENTION
Pull the mains plug out of the socket prior to cleaning.
Disconnect the plus terminal of the battery prior to cleaning.
Cleaning the inside of the machine
Danger
Risk of injury! Wear dust mask and protective goggles.
Open the device hood. Clean machine with a cloth. Blow through machine with compressed air. Close cover.
External cleaning of the appliance
Clean the machine with a damp cloth which has been soaked in mild detergent.
Note: Do not use aggressive cleaning agents.
Maintenance intervals
Maintenance by the customer
Daily maintenance:
Check the sweeping roller and the side brush for wear and wrapped belts. Check function of all operator control elements. Check functioning of all indicator lamps. Weekly maintenance: Check tension, wear and tear and functioning of the drive belts. Check for smooth running of the Bowden cables and the moveable parts. Check the sealing strips in the sweeping area for position and wear. Check the sweeping track of the sweeping roller. Clean the dust filter.
Note: For description, see section on Maintenance work.
Note: Where maintenance is carried out by the customer, all service and maintenance work must be undertaken by a qualified specialist. If required, a specialised Kärcher dealer may be contacted at any time.
Maintenance by Customer Service
Maintenance after the first month or 5 operating hours:
Carry out initial inspection.
Maintenance to be carried out every 50 operating hours
Maintenance to be carried out every 100 operating hours or every six months
Maintenance to be carried out every 300 operating hours
Maintenance to be carried out every 500 operating hours or annually
Note: In order to safeguard warranty claims, all service and maintenance work during the warranty period must be carried out by the authorised Kärcher Customer Service in accordance with the maintenance booklet.
Maintenance Works
Preparation:
Park the sweeper on an even surface. Turn the main switch to the "0" position and pull it out. Lock the parking brake.
General notes on safety
DANGER
Risk of injury!
The engine requires approximately 3-4 seconds to come to a standstill once it has been switched off. During this time, stay well clear of the working area.
WARNING
Allow the machine sufficient time to cool down before carrying out any maintenance and repair work.
Do not touch any hot parts, such as the drive motor.
ATTENTION
Pull the mains plug out of the socket prior to any maintenance work.
Disconnect the plus terminal of the battery prior to any maintenance work.
ATTENTION
Remove batteries and waste container, and swing the push handle forward prior to tilting the device. Do not park the device on the push handle.
Switch off the appliance prior to cleaning and performing any maintenance tasks or replacing parts.
Adjust the Bowden cable of the acceleration drive
This must be adjusted if the drive performance of the appliance becomes insufficient when driving uphill.
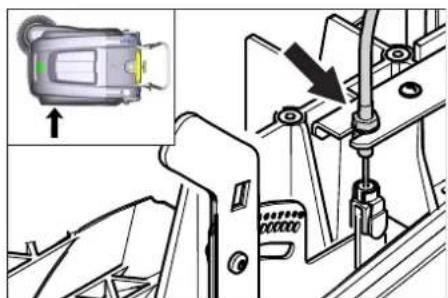
Open the device hood. Loosen counter-nut. Adjust the adjustment screw.
Tighten the counter-nut.
Checking roller brush
Lock parking brake. Remove the waste container. Remove belts or cords from roller brush.
Replacing roller brush
Replacement is due if a visible deterioration in sweeping performance caused by bristle wear is evident.
ATTENTION
Remove the batteries prior to tilting the device.
Do not park the device on the push handle.
Lock parking brake. Remove the waste container. Remove the batteries. Tilt the appliance rearward.
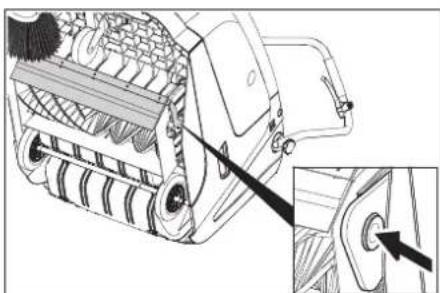
Lift the waste flap, press in the bearing cap and swivel the roller brush toward the front. Pull out roller brush. Attach the new roller brush to the drive pin (left). Engage the bearing cup into the boring of the roller brush swinging arm on the opposite side.
CAUTION
Risk of damage! Make sure that no bristles are jammed into the boring of the roller brush swinging arm.
Note: Once the new roller brush has been installed, the sweeping track must be readjusted.
Check and adjust roller brush sweeping track
Raise the sweeper from the front and drive it onto a smooth, even surface covered with a visible layer of dust or chalk. Lock the parking brake. Let the sweeping roller rotate for approx. 15-30 seconds. Raise the sweeper at the front and drive it towards the side.
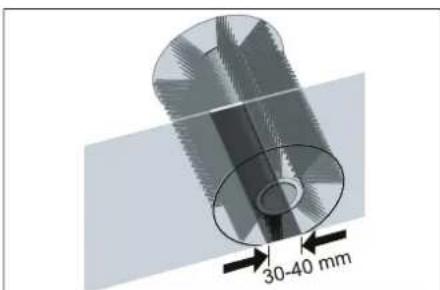
The sweeping track should have an even rectangular shape which is between 30 and 40 mm wide.
| Setting range (-) 1...10 (+) | |
| Minimum sweeping track 1 | |
| Maximum sweeping track 10 | |
| New roller brush | 1...3 |
Adjust sweeping track:
Open the device hood. Adjust the left and right adjustment levers and engage into the same boring.
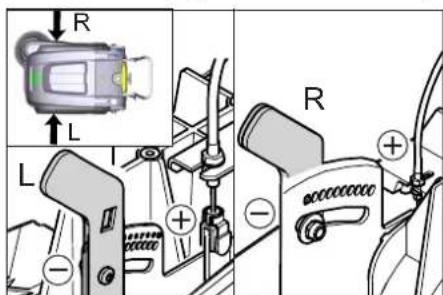
- Engage adjustment lever into the lower boring (+): Sweeping track becomes bigger
- Engage the adjustment lever into the upper boring (-): Sweeping track becomes smaller
Check sweeping mirror.
Replacing side brush
Replacement is due if a visible deterioration in sweeping performance caused by bristle wear is evident.
Note: Remove the waste container and move the pushing handle to the front prior to tilting the appliance. Do not rest the appliance on the pushing handle.
Unscrew 3 screws from the underside of the side brush. Remove the wiper blade. Clip new side brushes onto driver and screw on.
Adjust side-brush lowering
Adjustment is necessary if a visible deterioration in sweeping performance caused by side-brush is evident.
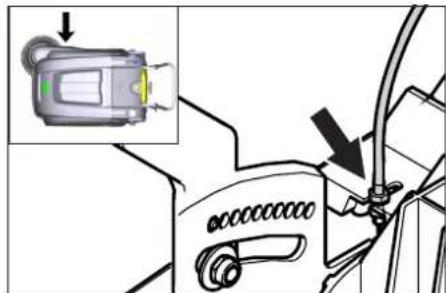
Open the device hood. → Release the wing nut.
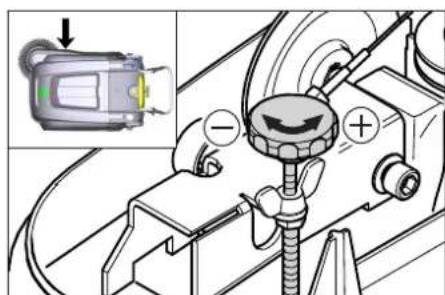
Adjust the adjustment screw. Tighten the wing nut.
Adjust the raising of the bulk waste flap
- Adjustment is necessary if the bulk waste flap cannot be raised wide enough. The Bowden cable needs to be released a little if the sweeper results become poorer, for e.g. due to the wearing of the front lip.
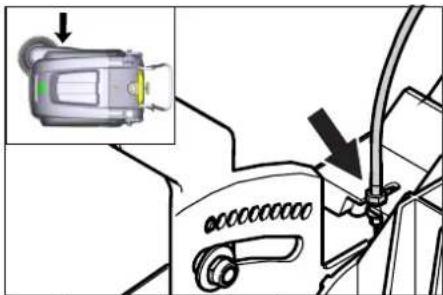
→ Open the device hood. → Loosen counter-nut. Adjust the adjustment screw. → Tighten the counter-nut.
Adjusting and replacing sealing strips
Note: Remove the waste container and move the pushing handle to the front prior to tilting the appliance. Do not rest the appliance on the pushing handle.
Front sealing strip → Loosen the fastening screws of the sealing strip. → Adjust or replace sealing strip.
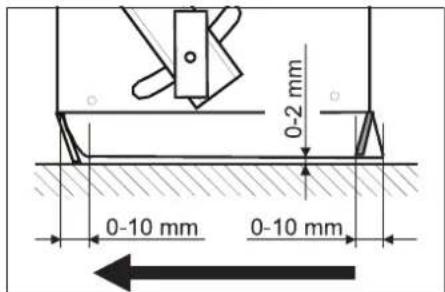
Set the distance between the sealing strip and the floor so that the bottom edge trails behind at a distance of between 0-10 mm. → Adjust sealing strip. → Tighten the fastening of the sealing strip. Rear sealing strip → Remove the waste container. → Loosen the fastening screws of the sealing strip. Adjust or replace sealing strip. Set the distance between the sealing strip and the floor so that the bottom edge trails behind at a distance of between 0-10 mm. → Tighten the fastening of the sealing strip. Side sealing strips → Loosen the fastening screws of the sealing strip. Adjust or replace sealing strip. To set the floor clearance, insert a sheet with a thickness of max. 2 mm under the sealing strip. Adjust sealing strip. → Tighten the fastening of the sealing strip.
Replacing dust filter
△WARNING
Empty waste container before replacing dust filter. Wear a dust mask when working around the dust filter. Observe safety regulations on the handling of fine particulate material.
CAUTION
Risk of damage!
Do not rinse out the dust filter. Instead, use a parking brake. Shake off the dust filter.
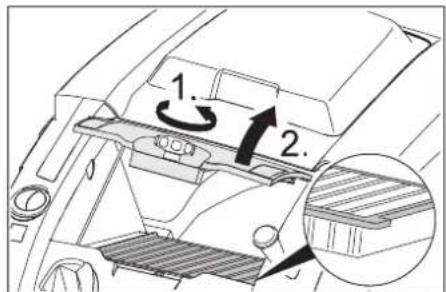
Open the locking screw of the dust filter cover in an anticlockwise direction. Lift the dust filter cover. Replace the dust filter, making sure it is inserted correctly (see figure). Screw in the locking screw all the way.
CAUTION
If the locking screw is not tightened all the way, damage may occur.
Note: When installing the new filter, make sure the fins are not damaged.
Replace fuse/relay
KM 75/40 W Bp

1 Fuse F1 (50 A) 2 Fuse F2 (2A) 3 Relay 4 Battery charge plug
Open the cover. Replace the defective fuse or relay.
KM 75/40 W Bp Pack
The fuse is located on the battery terminal.
Accessories
| Side-brushes, soft 6.905-626.0 | |
| For fine dust on inside surfaces; wetness resistant. | |
| Roller-brush, soft 6.906-886.0 | |
| With natural bristles: especially for sweeping fine dust on smooth floors indoors. Not resistant to wetness; do not use on abrasive surfaces! | |
| Roller-brush, hard 6.906-885.0 | |
| For removing stubborn dirt in the external area; resistant to moisture. | |
| Roller brush, antistatic | 6.906-950.0 |
| For statically chargeable surfaces such as carpet or artificial turf | |
| Carpet sweeping unit | 2.641-571.0 |
| Includes: Lint trap, antistatic roller brush, triple steering roller | |
EU Declaration of Conformity
We hereby declare that the machine described below complies with the relevant basic safety and health requirements of the EU Directives, both in its basic design and construction as well as in the version put into circulation by us. This declaration shall cease to be valid if the machine is modified without our prior approval.
Product: Vacuum sweeper
Type: 1.049-xxx
Relevant EU Directives
2006/42/EC (+2009/127/EC)
2014/30/EU
2000/14/EC
Applied harmonized standards
EN 55012: 2007 + A1: 2009
EN 60335-1
EN 60335-2-72
EN 61000-6-2: 2005
EN 62233: 2008
EN IEC 63000:2018
Applied national standards
···
Applied conformity evaluation method
2000/14/EC: Appendix V
Sound power level dB(A)
Measured: 86
Guaranteed: 88
The signatories act on behalf of and with the authority of the company management.
H. Jenner
Chairman of the Board of Management
S. Reiser
Director Regulatory Affairs & Certification
Documentation supervisor:
S. Reiser
Alfred Karcher SE & Co. KG
71364 Winnenden (Germany)
Tel.: +49 7195 14-0
Fax: +49 7195 14-2212
Winnenden, 2021/02/01
Declaration of Conformity
We hereby declare that the product described below complies with the relevant provisions of the following UK Regulations, both in its basic design and construction as well as in the version put into circulation by us. This declaration shall cease to be valid if the product is modified without our prior approval.
Product: Vacuum sweeper
Type: 1.049-xxx
Currently applicable UK Regulations
S.I. 2008/1597 (as amended)
2004/108/EC
S.I. 2001/1701 (as amended)
S.I. 2012/3032 (as amended)
Designated standards used
EN 55012: 2007 + A1: 2009
EN 60335-1
EN 60335-2-72
EN 61000-6-2: 2005
EN 62233: 2008
EN IEC 63000:2018
National standards used
Applied conformity assessment procedure
S.I. 2001/1701 (as amended): Schedule 8
Sound power level dB(A)
Measured: 86
Guaranteed: 88
The signatories act on behalf of and with the authority of the company management.
Chairman of the Board of Management
Director Regulatory Affairs & Certification
Documentation supervisor:
S. Reiser
Alfred Karcher SE & Co. KG
Alfred-Karcher-Straße 28-40
71364 Winnenden (Germany)
Tel.: +49 7195 14-0
Fax: +49 7195 14-2212
Winnenden, 2021/02/01
| Troubleshooting | |
| Fault Remedy | |
| Appliance cannot be started | The cover contact switch has switched off the device. Closing the cover |
| Charge the batteries | |
| Check overload fuse | |
| Inform Kärcher Customer Service. | |
| Engine is running but machine is not moving | Adjust the Bowden cable of the acceleration drive |
| Checking the V-Belt | |
| Inform Kärcher Customer Service. | |
| Device comes to halt while climbing a slope | Drive over a path with lesser slope |
| Check overload fuse | |
| Adjust the Bowden cable of the acceleration drive | |
| Checking the V-Belt | |
| Inform Kärcher Customer Service. | |
| The brush roller stops, fault display illuminates red | Turn the main switch to "OFF", check brush for obstructing objects. If applicable, use on a less in-clined surface. Turn on the main switch. After repeating this process four times, the control will initiate a forced break of 2 minutes to cool off. During this period the appliance cannot be started. |
| Machine is not sweeping properly | Check roller brush and side brushes for wear, replace if necessary. |
| Check function of bulk waste flap | |
| Release the Bowden cable of the bulk waste flap (adjustment screw) | |
| Check belts for tension and functioning; replace, if required | |
| Adjust roller mirror | |
| Replacing roller brush | |
| Inform Kärcher Customer Service. | |
| Dust gathers in the machine Check | function of bulk waste flap |
| Release the Bowden cable of the bulk waste flap (adjustment screw) | |
| Check dust filter, clean or replaceDo not rinse out the dust filter. | |
| Empty waste container | |
| Replace sealing profile at the waste container | |
| Check the seal on the dust filter | |
| Check sealing strips for wear, adjust or replace as required | |
| Poor cleaning performance at edges | Adjust side-brush lowering |
| Replace side brush | |
| Lower the side brushes | |
| Check the drive belt of the side brush | |
| Inform Kärcher Customer Service. | |
| Side-brush raising does not func-tion | Check Bowden cable of the side-brush raisingInform Kärcher Customer Service. |
| The new roller brush brushes against the waste container | Correct the setting of the sweep track; for this, engage both adjustment levers into the upper boring (1...3) |
Technical specifications
| KM 75/40 W Bp KM 75/40 W Bp Pack | |||
| Machine data | |||
| Length x width x height (pushing handle unfolded) mm 1430 x 750 x 1190 | 1430 x 750 x 1190 | ||
| Length x width x height (pushing handle folded in) mm 1160 x 750 x 930 | 1160 x 750 x 930 | ||
| Weight (without batteries) kg 79 79 | |||
| Weight (with batteries) kg 125 125 | |||
| Permissible overall weight kg 205 205 | |||
| Driving and sweeping speed km/h 4,5 4,5 | |||
| Climbing capability (max.) % 12 12 | |||
| Roller brush diameter | mm 265 265 | ||
| Side brush diameter | mm 410 410 | ||
| Surface area, max. | m²/h | 3400 | 3400 |
| Working width without side brushes | mm 550 550 | ||
| Working width with side-brush | mm 750 750 | ||
| Volume of waste container | I | 40 40 | |
| Protection type, drip-proof | -- | IPX 3 | IPX 3 |
| Engine | |||
| Type | -- | DC permanent solenoid motor Direction of rotation, right | |
| Voltage | V | 24 24 | |
| Rated current | A | 22 22 | |
| Rated power | W | 400 400 | |
| Speed | 1/min | 2750 | 2750 |
| Type of protection | -- | IP 20 | IP 20 |
| Battery | |||
| Type | -- | -- | 2x 12 V GiV |
| Capacity | Ah | -- | 60 (5h) |
| Weight | kg | ||
| Charging time for fully discharged battery | h | -- | 12 |
| Operating time after frequent charging | h | -- | ca. 1,5-2 |
| Charger | |||
| Mains voltage | V~ | -- | 230 |
| Output voltage | V | -- | 24 |
| Charging current | A | -- | 10 |
| Mains frequency | Hz | -- | 50/60 |
| Electrical fuses | |||
| Central | A | 50 50 | |
| Fuse for controls | A | 2 | -- |
| Protection against total discharge | -- | via relay | via relay |
| Charger | --- | T4A / 250 V AC | |
| Filter and vacuum system | |||
| Filter surface area, fine dust filter | m² | 1,8 1,8 | |
| Category of use – filter for non-hazardous dust | -- | L | L |
| Nominal vacuum, suction system | mbar | 5 | 5 |
| Nominal volume flow, suction system | l/s | 45 | 45 |
| Working conditions | |||
| Operating temperature | °C | -5 and +40 | -5 and +40 |
| Charging temperature | --- | Room temperature | |
| Air humidity, non-condensing | % | 0 - 90 | 0 - 90 |
| Values determined as per EN 60335-2-72 | |||
| Sound pressure level Lpa | dB(A) | 71 71 | |
| Uncertainty Kpa | dB(A) | 3 | 3 |
| Sound power level Lwa + Uncertainty Kw | dB(A) | 88 88 | |
| Uncertainty Kw | s² | 2 | 2 |
| Hand-arm vibration value | m/s² | 3,7 3,7 | |
| Uncertainty K | m/s² | 0,2 0,2 | |
Subject to technical changes.

www.kaercher.com/REACH
Garantie
2006/42/CE (+2009/127/CE)
2014/30/UE
2000/14/CE
71364 Winnenden (Germany)
Tel.: +49 7195 14-0
Fax: +49 7195 14-2212
Winnenden, 2021/02/01
www.kaercher.com/REACH
Warranty
(only KM 75/40 W Bp pack)
2006/42/EC (+2009/127/EC)
2014/30/EU
2000/14/EC
71364 Winnenden (Germany)
Tel.: +49 7195 14-0
Fax: +49 7195 14-2212
Winnenden, 2021/02/01
www.kaercher.com/REACH
Warranty
71364 Winnenden (Germany)
Tel.: +49 7195 14-0
Fax: +49 7195 14-2212
Winnenden, 2021/02/01
www.kaercher.com/REACH
Warranty
Main switch
Main switch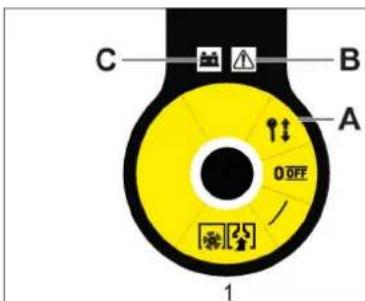
0/OFF Motor disconnected
2006/42/EC (+2009/127/EC)
2014/30/EU
2000/14/EC
Chairman of the Board of Management
S. Reiser Director Regulatory Affairs & Certification
Document responsible:
S. Reiser
Alfred Kärcher SE & Co. KG
Alfred-Karcher-Straße 28-40
71364 Winnenden (Germany)
Tel.: +49 7195 14-0
Fax: +49 7195 14-2212
Winnenden, 2021/02/01
Main switch
Main switch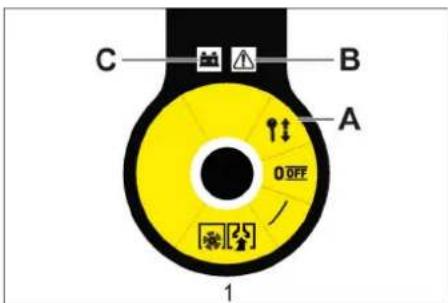
0/OFF Off 1 Motor on A Remove the key B Fault indication C Battery indicator
Remove the key
Turn the key of the main switch from the "0" position and remove it.
Mount and connect the batteries
Warning
On model KM 75/40 W Bp Pack, the batteries and charger are already installed.
Charge the batteries
Danger
2006/42/EC (+2009/127/EC)
2014/30/EU
2000/14/EC
Chairman of the Board of Management
S. Reiser
Director Regulatory Affairs & Certification
Responsible for documentation:
S. Reiser
Alfred Kärcher SE & Co. KG
71364 Winnenden (Germany)
Tel.: +49 7195 14-0
Fax: +49 7195 14-2212
Winnenden, 2021/02/01
www.kaercher.com/REACH
Warranty
2006/42/EC (+2009/127/EC)
2014/30/EU
2000/14/EF
Applied harmonized standards
EN 55012: 2007 + A1: 2009
EN 60335-1
EN 60335-2-72
EN 61000-6-2: 2005
EN 62233: 2008
ENIEC63000:2018
Chairman of the Board of Management
S. Reiser Director Regulatory Affairs & Certification
71364 Winnenden (Germany)
Tel.: +49 7195 14-0
Fax: +49 7195 14-2212
Winnenden, 2021/02/01
www.kaercher.com/REACH
Warranty
Instructions for replacement
DANGER
Danger of personal injury, danger of material damage!
1 Fastening area above the push bar.
2 Fastening area under the machine cover
Note: Observe the markings for the fastening areas on the base frame (chain symbol).
Set the sweeping pattern:
Open the cover of the machine. Adjust the left and right adjusting levers and let them engage in the same hole (height).
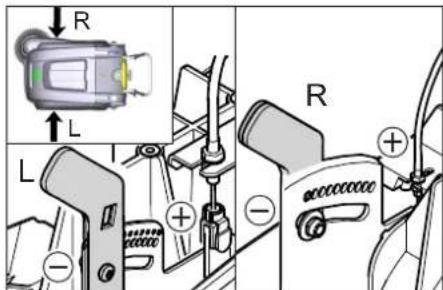
-Lock the adjusting lever in the lower hole (+): The sweeping pattern becomes larger -Lock the adjusting lever in the higher hole (-): The sweeping pattern becomes smaller Check the sweeping pattern.
Replacing the side brush
Replacement is necessary when the sweeping result clearly decreases due to wear of the brushes.
Chairman of the Board of Management
S. Reiser
Director Regulatory Affairs & Certification
71364 Winnenden (Germany)
Tel.: +49 7195 14-0
Fax: +49 7195 14-2212
Winnenden, 2021/02/01
www.kaercher.com/REACH
Warranty
Adjust the Bowden cables in the drive
Sweeping roller, hard 6.906-885.0
Chairman of the Board of Management
S. Reiser Director Regulatory Affairs & Certification
Authorized documentation representative:
S. Reiser
Alfred Karcher SE & Co. KG
71364 Winnenden (Germany)
Tel.: +49 7195 14-0
Fax: +49 7195 14-2212
Winnenden, 2021/02/01
www.kaercher.com/REACH
Warranty
Chairman of the Board of Management
S. Reiser Director Regulatory Affairs & Certification
71364 Winnenden (Germany)
Tel.: +49 7195 14-0
Fax: +49 7195 14-2212
Winnenden, 2021/02/01
Drain the appliance completely.

Then clean the inside of the appliance thoroughly. The appliance must be drained.
Drain the appliance completely.
Note: During operation, the waste water tank must be emptied regularly.
Warning: The appliance must be regularly checked for oil leaks.

Do not use or store the appliance in damp conditions.
Open the oil/water separator valve.
Warning: The appliance must be protected from frost.
Indicator light
The indicator light shows the operating status of the appliance during operation.

Chairman of the Board of Management
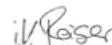
S. Reiser
Director Regulatory Affairs & Certification
Signature of the manufacturer
S. Reiser
Alfred Kärcher SE & Co. KG
71364 Winnenden (Germany)
Tel.: +49 7195 14-0
Fax: +49 7195 14-2212
Winnenden, 2021/02/01
www.kaercher.com/REACH
Warranty
H.Jenner Chairman of the Board of Management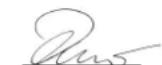
S. Reiser Director Regulatory Affairs & Certification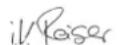
71364 Winnenden (Germany)
Tel.: +49 7195 14-0
Fax: +49 7195 14-2212
Winnenden, 2021/02/01
Assistance in case of malfunctions
www.kaercher.com/REACH
Warranty
In each country, the respective warranty conditions issued by the authorized sales organization apply. Possible defects of the device within the warranty period will be eliminated free of charge, provided that the defect is due to material or manufacturing errors. In case of a complaint within the warranty period, please contact the retailer who sold you the device or the nearest authorized customer service.
The date of manufacture is indicated on the type plate in coded form. The individual digits have the following meaning:
Example: 30190
3 years of release 0, 1, 9, 2, 0, 1, 3, 0, 1, 9, 2, 0, 1, 3
Thus, in this example, the code 30190 indicates the release date 09/2013.
Operating manual
DANGER
Immediate danger that leads to serious injury or death.
WARNING
A potentially dangerous situation that could lead to serious injury or death.
OCTOPOXHO
Ie 03MOxHou nomeuuaJbHo onachou cumyaauu, Komopar MoXem npueecmu K neakummpaBmam unu noNeeMb mamepuaJIbHbIyuep6.
CnmbonblHa yctpoicTbe
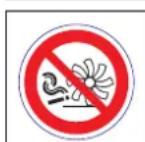
He cmemamb zoepuue unu mneouue npedMembl, ha-npumep, makue ka cuzapeMbI, cnuku u momy nodobHoe.
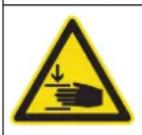
Onachocmb 3aueemnenu u npoe3o peMeHb,60KOBbie uemku,bak,beyuoydy ay.

OnachocbOxora N36eRaTb KOHTaC 3TmM NOBepXHOCTAM BO Bpem paobToI npnHarpeBaHH.
Yka3aHnno NO Texnike 6e30nacHoCTn
Yka3aHnno 6e3oNaChOcTn npn 3Kcnnyatau
Before starting work, the device and its accessories must be checked for their proper condition and their compliance with safety requirements. If the condition of the device is not flawless, its use is not permitted. - When using the device in hazardous areas (for example, at gas stations), the relevant safety regulations must be observed. Operation of the device in explosion-hazardous areas is prohibited. - The operator is obliged to use the device in accordance with its intended purpose. The operator must take into account local conditions and when working with the device, watch out for third parties, especially children.
Local conditions and when working with the device, watch out for third parties, especially children.
- Before starting work, the operator must ensure that all protective devices are in place and functioning properly.
- The operator of the device is responsible for accidents involving other people or property. Make sure that the operator wears appropriate clothing. Wear sturdy shoes and avoid loose clothing.
- Before moving, check the working area (for example, for children). Ensure sufficient visibility! - To prevent unauthorized use of the device, remove the key.
- When leaving, secure the device against unintentional movement. Working with the device is permitted only for persons who have read the operating instructions or have been trained in its use and are authorized to use it. - This device is not intended for use by persons (including children) with reduced physical, sensory or mental capabilities, or lack of experience and knowledge. Children must be supervised to ensure they do not play with the device.
Safety instructions for driving
Danger
Danger of injury from cutting!
Danger of tipping over on excessively steep slopes.
Driving is only permitted on slopes and inclines up to 12%. Danger of tipping over on unstable ground. Only drive on firm ground. Danger of tipping over on steep side slopes. In directions perpendicular to the direction of travel, only slopes up to 12% are permitted. Adjust speed according to conditions.
Safety instructions for transporting the machine
- When transporting, pay attention to the weight of the device. When transporting, disconnect the battery terminals and securely fasten the device.
Safety instructions for devices with battery operation
Note: The warranty claim is only valid if the recommended Kärcher batteries and charging devices are used.
Always follow the operating instructions of the battery and charger manufacturer. Observe the legislation on battery disposal. Never leave a discharged battery, recharge it as soon as possible. Keep batteries always clean and dry to prevent current leakage. Protect from dirt, e.g., metal chips. Do not place tools or other objects on the battery. Danger of short circuit and explosion. Always use two batteries of the same type! Never handle with fire, sparks, or smoking near the battery or in the battery compartment. Danger of explosion. - Use only batteries with protected terminals. Replace the protective cover if it is lost. Do not touch the terminals, e.g., with the motor housing (danger of burns). - Handle the battery electrolyte with care. Observe the relevant safety regulations! Used batteries must be disposed of according to the EC Directive 91/157 EWG, without harming the environment.
Safety instructions for commissioning and maintenance
Before commissioning and carrying out maintenance, cleaning, or adjustments to other functions of the device, switch off and remove the activation key. When performing work on the electrical installation, disconnect the battery. It is not permitted to clean the device with a water hose or a high-pressure water jet (danger of short circuit and other damage). Maintenance work may only be carried out by authorized service centers or specialists in this field who are familiar with the relevant safety regulations. - Perform a safety check in accordance with the applicable regulations for electrical devices used in industry. - Work with the device should only be done with appropriate protective gloves.
Protective devices
Device cover
The device is equipped with a contact switch on the cover that shuts off the motor when the cover is opened.
DANGER
Danger of injury due to a defective contact switch on the cover!
If the motor does not switch off when the cover is opened, the contact switch on the cover is defective. Stop using the device and send it for repair.
Main switch
In dangerous situations or for a quick shutdown of the device, set the main switch to the "0/OFF" position. To prevent unintentional start-up, turn the main switch to the "0/OFF" position and pull out the key.
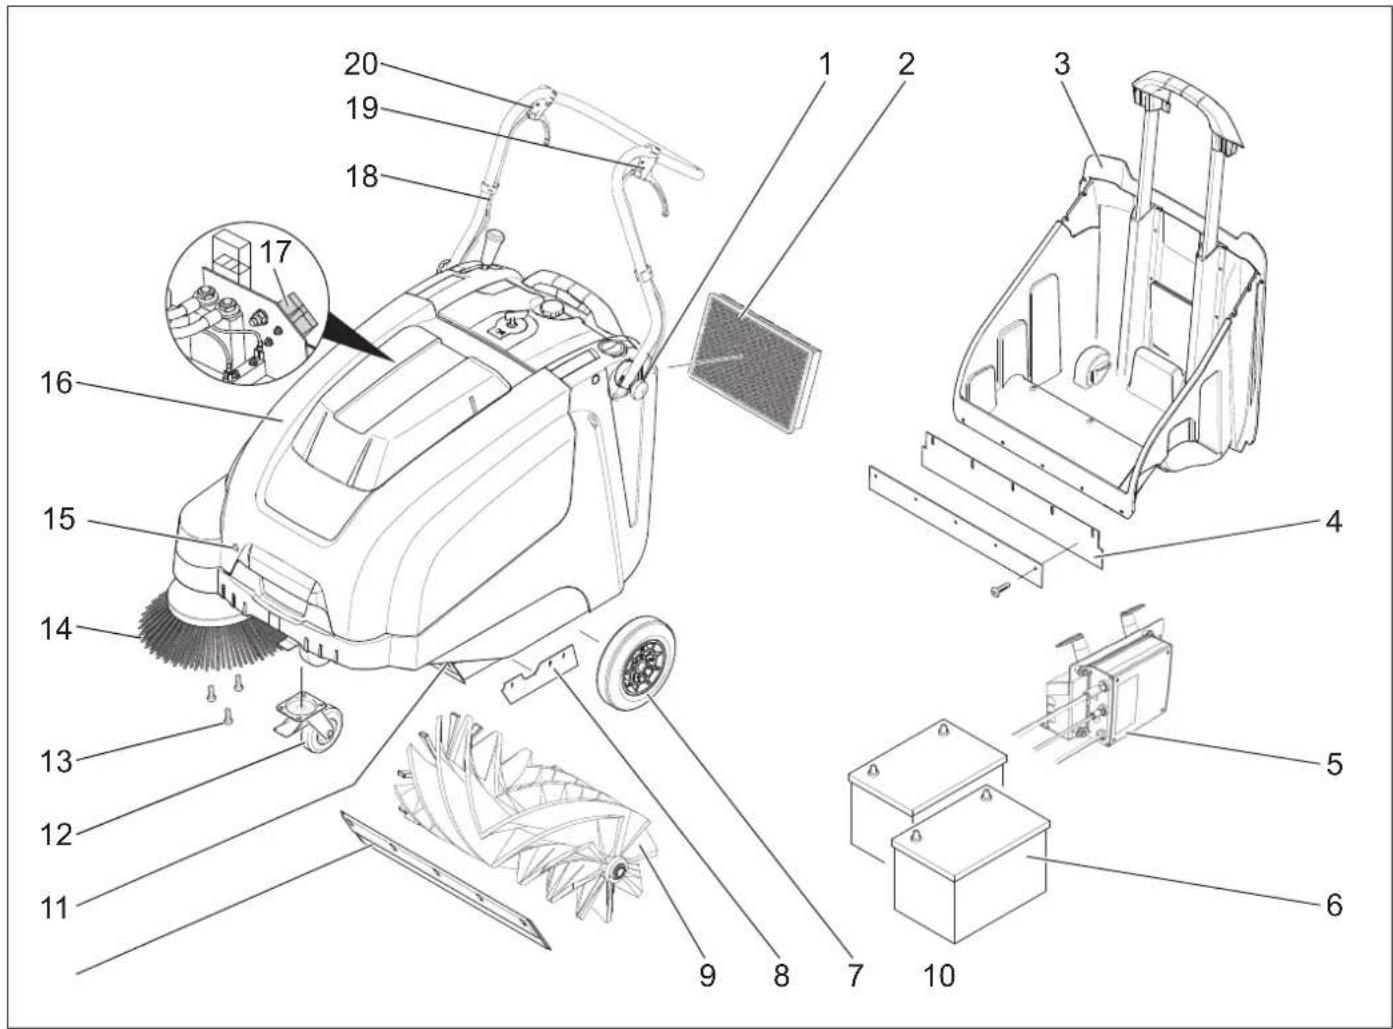
1 Handle for carrying (2x) 2 Dust filter 3 Dust collection reservoir 4 Dust collection reservoir release button: 5 Charging device (only KM 75/40 W Bp Pack) 6 Batteries (only KM 75/40 W Bp Pack) 7 Drive wheels 8 Side brush seal 9 Swivel roller 10 Side brush release button 11 Flap for coarse dirt 12 Control roller with parking brake 13 Side brush mounting 14 Side brush 15 Lid latch 16 Device lid 17 Charging socket for battery (only KM 75/40 W Bp) 18 Drive arch 19 Forward drive lever 20 Lever for raising and lowering the coarse dirt flap.
Control panel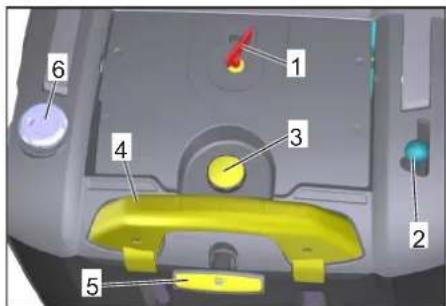
1 Main switch 2 Lever for lowering and raising the side brush 3 Lid latch for dust filter 4 Reservoir bracket for dust collection 5 Filter cleaning button for fine filter 6 Lock for cleaning in dry/wet mode
Main switch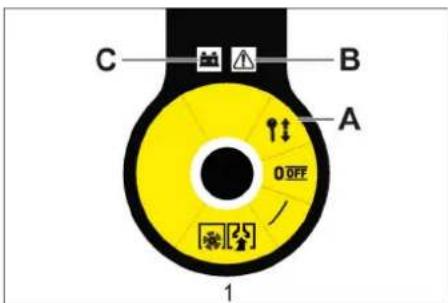
→ Turn the main switch knob clockwise through the hole and pull out.
Opening the device
Note
The device housing is opened with the main switch key.
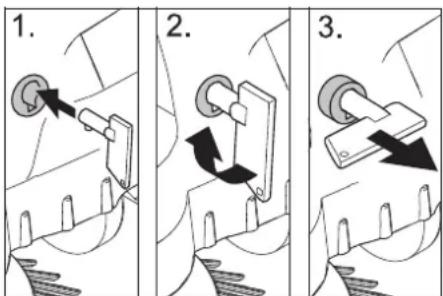
Insert the main switch key into the lid lock, turn it 90° clockwise. → Pull the lid lock out to the stop. → Open the device lid.
Closing the device
→ Close the device lid, the lid lock will close automatically.
Intended use
Instructions for unloading
△DANGER
Health hazard, risk of damage! When unloading, pay attention to the weight of the device.
CMOnTHnPoBaTb BeDyuyu Dny
OTKpyTNb BnHTbl. → YcTaHOBnTB B BepTnKaJIbHOe NIOJOKeHHe TOnKaHOuIcKo6y. 3aTMyb BnHTbl.
YctaHOBntb NOdMeTaHouN Bn
Yka3aHne: IpeEOnpOKnDbBaHHeM npNbopa n3BLey cbOpHNK-HakONITeIb nnoTAYb Bnepe3a BeDyUo dyry. He OCTABnTb np6Op Ha BeDyuei dyre. HaTeb 60KOByIO uETky Ha 3aXBaTHoe yCTpoIcTBO IN KpENKO 3aTHyTb.
AkkymyIaTOpbI
Yka3aHnno TExHKe 6e3onacHocTn no o6paueHo cakkymyIaTOPamn
PnO6paueHmncakKymJrTopamn cNe dyet co6nIodatb cneDyUoune npdynpeDnteBhie yka3aHn:
| i | Cobliodamb yka3aHua Ha ak kymyIamope, e unchmpykuuu no noIb3oBaHnU o pykoed- cmee no ekcnnyamaauu npu- 6opa! |
PekomeHdyemble aKKymyTOpbl
| № 3aka3a: | Вмechи-Mоctь | ПOTOK BOЗду-ха | |
| 60 Ah, Heo5-cлужи-Bаемы | 6.654-226.0* | 1,65** | 0,66*** |
- Дnia pa6obtby yctpoiCTBa Heo6xOДIMO 2 aKKyMnyTopa
**BM3 *** BM³/4
MaKcHMaJIbHbIe ra6apuTbI aKKyMylrTopoB
| Диinea | ШирINA | Бысotinga |
| 267 mm | 177 mm | 190 mm |
PekomeHdyembIe 3apHbIe yctpOcnTBA
| 3apядhoe устриоство | № 3аказа:6.654-225.0 |
UcTaHOBnTb NIOaKlnOuHTb aKcyMylrTopHbIe 6aTapeN
Yka3aHne
B moJei KM 75/40 W Bp Pack 6atapen n 3apJHoe yCTpoCtBO yKe BCTpoEhbl.
Install the device. Install the battery on the engine support beam. Secure the battery with the tightening strap.
Maintenance and service work
Check the charge level of the batteries. Check the side brushes. Check the filter. Check the squeegee. Empty the waste water tank.
Note: See description in the chapter "Maintenance and service".
Operation
Starting
Prolonged use of the device may lead to circulatory disorders in the hands due to vibration.
It is not possible to specify a specific usage time for the device, as this depends on several factors:
- Predisposition to poor blood circulation (e.g., cold fingers, tingling in the fingers). Low ambient temperature. Wear warm gloves to protect your hands. This prevents circulatory disorders.
- Continuous work is worse than work with breaks.
If you notice signs of circulatory disorders during repeated use of the device (e.g., tingling in the fingers, cold fingers), we recommend consulting a doctor.
Starting the device
Release the parking brake. Start the engine. Turn the main switch to position "1".
Note: The filter and side brushes rotate.
Operation of the device
→Move forward. Note: When moving forward, depending on the position of the lever, the speed of movement can be adjusted smoothly.
Idle
→Release the lever for forward movement. The device stops.
Overcoming obstacles
To overcome fixed obstacles up to 30 mm:
→Lower the blade guard. →The obstacle should be overcome carefully, while moving at reduced speed.
To overcome fixed obstacles over 30 mm:
→Such obstacles should only be overcome using the ramp.
Maintenance
Danger
Danger of injury! With the blade guard open, rotating parts can catch clothing and hair. Do not expose people, animals, or property to danger.
Caution
Do not allow packaged items, wires, etc. to get into the machine, as this can damage the lifting mechanism.
Note: To achieve optimal results, it is necessary to adjust the speed of movement to the local conditions.
Cleaning with the brush
Brush for large debris
Note: For large items up to 50 mm in height, such as slippers, briefly lift the brush for large debris.
Raising the brush for large debris:
→ Press the lever for lowering and raising the brush for large debris.
Lower the brush for large debris.
Release the lever for lowering and raising the brush for large debris.
Note: Optimal cleaning quality is ensured only when the brush for large debris is fully lowered.
Cleaning with side brushes

→ Lower the side brush: set the lever forward. The side brush lowers.
Dry floor cleaning
Note: During operation, regularly empty the dirt container.
Note: During operation, regularly check the filter.

Close the flap for dry/wet mode.
Wet or damp floor cleaning
→ Pull the filter out for cleaning in dry/wet mode.
Note: This protects the filter from moisture.
Battery indicator
The battery indicator on the battery pack shows the charge status of the battery:

The fault indicator shows whether there is a fault:

| HéncpnbHoctb cncTe-Mbl ynpabLeHnIa-BnIgA-TeIeM | Mnraet KpaChbIM |
Clean the dust filter

Pull the filter handle in and out several times.
Empty the dust container
DANGER
Danger of injury! Before emptying the dust container, switch off the device.
Note: When emptying the dust container, be careful not to damage the sealing plate.
Note: The maximum permissible load for the dust container is 40 kg.
Clean the dust filter. → Pull the latch of the dust container upwards. → Remove the dust container. Empty the dust container. → Insert the dust container. → Press the latch of the dust container down.
Switching off the device
Switch off the motor. → Turn the main switch to position "0".

→ Press the brake pedal. → Secure the parking brake. → Turn the main switch key to the off position and remove it.
Transport
DANGER
Danger of injury and damage! When transporting, pay attention to all parts of the device.
Turn off the engine. → Turn the main switch key to the off position and remove it. → Secure the parking brake. Secure the device, place chocks under its wheels. Fasten the device with straps or cables. → When transporting the device in vehicles, follow applicable local regulations aimed at preventing sliding and tipping.
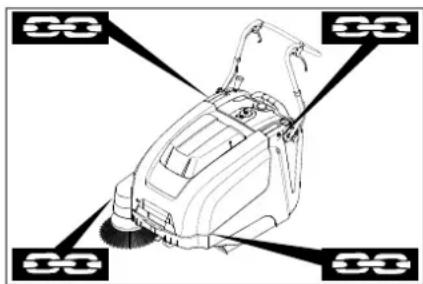
1 Lashing area for the sweeping machine 2 Lashing area under the device hood
Note: Observe the marking of the lashing zones on the sweeping machine (gray symbol).
Note: Do not bend the cable system or the cable system is damaged.
Storage
DANGER
Danger of injury and damage! When storing, pay attention to all parts of the device.
Decommissioning
If the sweeping machine is not used for an extended period, observe the following points:
→ Place the sweeping machine on a level surface. Turn off the engine. → Turn the main switch key to the off position and remove it. → Secure the parking brake. → Take measures against unintentional rolling of the sweeping machine. → Raise the sweeping roller. For this, set both adjusting screws to the highest hole. → Press the brake pedal. Clean the sweeping machine from the outside and inside. → Place the device in a protected and dry place. Disconnect the batteries. → The battery should be charged, and then charge it again. Every two months.
Maintenance and service
Repair work may only be carried out by authorized service centers or by specialists in this field who are familiar with the relevant safety regulations. - Before repair, industrial devices must undergo a safety check in accordance with VDE 0701.
Cleaning
CAUTION
Danger of injury! Do not clean the device with water from a hose or with a high-pressure water jet (risk of short circuit and other damage).
ATTENTION
Before cleaning, remove the mains plug of the charging device from the socket.
Before cleaning, disconnect the battery pole terminal from the battery.
Cleaning the device inside
Danger
Danger of injury! Wear a protective mask against dust and protective goggles.
→ Open the device cover. → Wipe the device with a dry cloth. → Blow out the device with compressed air. → Close the device cover.
Cleaning the device outside
Clean the device using a damp cloth soaked in a mild soap solution. Note: The use of aggressive cleaning agents is not permitted.
Maintenance frequency
Technical service performed by the customer
Daily maintenance:
→ Check the brushes for wear and replace if necessary. → Check the condition of all control elements. → Check the operation of all indicator lamps.
Daily maintenance:
Maintenance every 500 operating hours or as needed
Note: To maintain the warranty rights, all technical and preventive maintenance work must be carried out by an authorized Karcher service center during the warranty period, in accordance with the maintenance instructions.
Maintenance work
Preparation:
→ Place the machine on a level surface. → Turn the key switch to the off position and remove the key. → Secure the parking brake.
General safety information
DANGER
Danger of injury!
After switching off the engine, it continues to rotate for 3-4 seconds due to inertia. Always stay out of the drive zone during this time.
WARNING
Before carrying out any technical or preventive maintenance work, the machine must be switched off.
The device can be used, for example, with the drive given in the manual.
WARNING
Before carrying out maintenance work, disconnect the battery charger from the socket.
Before carrying out maintenance work, disconnect the battery from the positive terminal.
WARNING
Before tipping the device out of the battery compartment and the bin, pull it out by the handle. Do not place the device on the handle.
Before switching on and carrying out maintenance work, as well as before replacing
parts of the device, it must be switched off.
Adjust the pull cable of the drive part.
Adjustment is necessary if, when driving on a rough road, the pull of the device is insufficient.
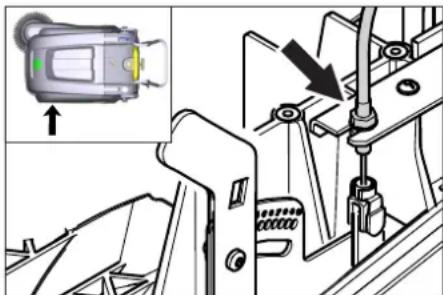
→ Open the device cover. → Release the counter nut. → Adjust the adjusting screw. → Tighten the counter nut.
Checking the sweeping roller
Secure the parking brake. → Remove the waste container. → Remove any threads and ropes wrapped around the sweeping roller.
Replacing the sweeping roller
Replacement becomes necessary if, due to wear of the bristles, the sweeping quality noticeably deteriorates.
The device may be damaged if the battery is removed incorrectly.
Do not place the device on an unstable surface.
→ Engage the parking brake. Remove the dust bin. Remove the battery. Tilt the device backward.
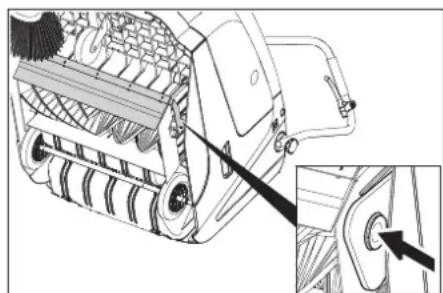
→ Press the valve for the rotating parts, insert the bearings and tilt the device forward. Remove the rotating shaft. → Place the rotating shaft on the drive flange (left). → On the opposite side, insert the bearings into the balancing hole of the rotating shaft.
CAUTION
Danger of damage! Make sure that the balancing hole of the rotating shaft is not blocked by dirt. Note: After installing the new rotating shaft, the plane of the rotating shaft must be readjusted.
Checking and adjusting the plane of the rotating shaft
→ Move the cleaning head forward and move it over a flat and smooth surface that is lightly covered with dust or chalk. Engage the parking brake. → Let the rotating rollers run for about 15-30 seconds. → Move the cleaning head to the side.
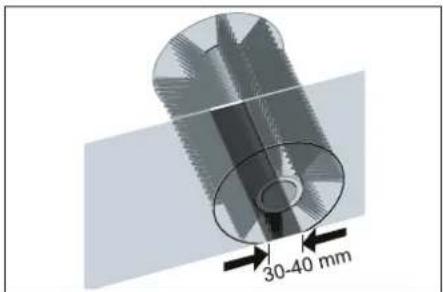
The shape of the cleaning surface forms a uniform rectangle, the width of which is between 30-40 mm.
→ Adjust the adjusting screw. → Tighten the wing nut.
Adjusting the lift of the valve for heavy soiling
Adjustment is required if the valve for heavy soiling does not lift enough. - If the cleaning result is poor, for example due to worn front seals, the flexible tab should be slightly loosened.
Open the device cover. Release the counter nut. → Adjust the adjusting screw. Tighten the counter nut.
Installing/replacing the sealing strips
Warning: Before operating the device, remove the collection container by tilting it forward over the guide bar. Do not leave the device on the guide bar.
Adjusting the tension plate
Loosen the fastening of the tension plate. → Adjust or replace the tension plate.
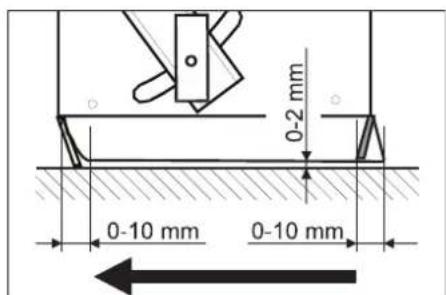
Set the distance of the tension plate to the base so that when running over the pipe, it deflects by 0-10 mm.
Correct the tension plate. Tighten the fastening of the tension plate.
Replacing the tension plate
→ Remove the waste container. Loosen the fastening of the tension plate. → Adjust or replace the tension plate. → Set the distance of the tension plate to the base so that when running over the pipe, it deflects by 0-10 mm. Tighten the fastening of the tension plate.
Side tension plates
Loosen the fastening of the tension plate. → Adjust or replace the tension plate. → For the distance to the base, use shims of max. 2 mm. Correct the tension plate. Tighten the fastening of the tension plate.
Replacing the dust filter
WARNING
Before replacing the dust filter, remove the contents from the waste container. When working with the filter unit, wear a dust mask. Follow the safety instructions regarding handling of fine dust.
CAUTION
Danger of damage!
→ The dust filter does not need to be cleaned. Secure the parking brake. Clean the dust filter.
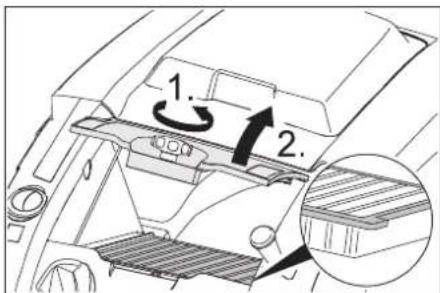
→ Turn the filter cover counterclockwise. → Remove the filter cover. → Replace the oil filter, paying attention to the correct position of the oil filter installation (see figure). → Tighten the cover until it stops.
CAUTION
If the cover is not tightened until it stops, this can lead to leakage. Note: When installing a new filter, make sure that the plates are not damaged.
Replacing the fuse/relay
KM 75/40 W Bp
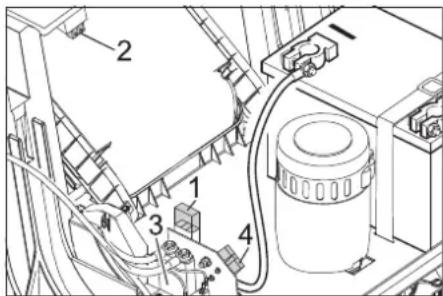
1 Fuse F1 (50A) 2 Fuse F2 (2A) 3 Relay 4 Battery charger
→ Open the device cover. Replace the defective fuse or relay.
KM 75/40 W Bp Pack
The fuse is located on the battery terminal.
Reliability
Product submersible-suction
Type: 1.049-xxx
Main EU directives
2006/42/EC (+2009/127/EC)
2014/30/EC 2000/14/EC
Applied harmonized standards
EN 55012: 2007 + A1: 2009 EN 60335-1 EN 60335-2-72 EN 61000-6-2: 2005 EN 62233: 2008 EN IEC 63000:2018
Applied national standards
Applied conformity assessment procedure
Director Regulatory Affairs & Certification
Authorized employee for document management:
S. Reiser
Alfred Karcher SE & Co. KG
71364 Winnenden (Germany)
Tel.: +49 7195 14-0
Fax: +49 7195 14-2212
Winnenden, 2021/02/01
www.kaercher.com/REACH
Warranty
Chairman of the Board of Management
S. Reiser
Director Regulatory Affairs & Certification
71364 Winnenden (Germany)
Tel.: +49 7195 14-0
Fax: +49 7195 14-2212
Winnenden, 2021/02/01
www.kaercher.com/REACH
Zaruka
2006/42/ES (+2009/127/ES)
2014/30/EU
2000/14/ES
Chairman of the Board of Management
Director Regulatory Affairs & Certification
Authorized person for compiling the documentation:
S. Reiser
Alfred Kärcher SE & Co. KG
71364 Winnenden (Germany)
Tel.: +49 7195 14-0
Fax: +49 7195 14-2212
Winnenden, 2021/02/01
www.kaercher.com/REACH
Warranty
2006/42/EC (+2009/127/EC)
2014/30/EU
2000/14/EC
71364 Winnenden (Germany)
Tel.: +49 7195 14-0
Fax: +49 7195 14-2212
Winnenden, 2021/02/01
www.kaercher.com/REACH
Warranty
Recommended batteries
2006/42/EC (+2009/127/EC)
2014/30/EU
2000/14/EC
Chairman of the Board of Management
S. Reiser
Director Regulatory Affairs & Certification
Documentation administrator:
S. Reiser
Alfred Kärcher SE & Co. KG
71364 Winnenden (Germany)
Tel.: +49 7195 14-0
Fax: +49 7195 14-2212
Winnenden, 2021/02/01
Troubleshooting
www.kaercher.com/REACH
Warranty
Battery indicator
Applicable EU Directives:
2006/42/EC (+2009/127/EC)
2014/30/EU
2000/14/EC
Harmonized standards used:
EN 55012: 2007 + A1: 2009
EN 60335-1
EN 60335-2-72
EN 61000-6-2: 2005
EN 62233: 2008
EN IEC 63000:2018
National application standard:
-
Chairman of the Board of Management
S. Reiser
Director Regulatory Affairs & Certification
71364 Winnenden (Germany)
Tel.: +49 7195 14-0
Fax: +49 7195 14-2212
Winnenden, 2021/02/01
2006/42/EC (+2009/127/EC)
2014/30/EU
2000/14/EC
Chairman of the Board of Management
S. Reiser
Director Regulatory Affairs & Certification
71364 Winnenden (Germany)
Tel.: +49 7195 14-0
Fax: +49 7195 14-2212
Winnenden, 2021/02/01
Disposal HR9
Technical data HR 10
www.kaercher.com/REACH
Warranty
In every country, the warranty conditions issued by our responsible distribution organization apply. We will rectify any faults on accessories free of charge during the warranty period if the cause is a material or manufacturing defect. In the event of a warranty claim, please contact your dealer or the nearest authorized service center, presenting the proof of purchase.
Symbols in the operating instructions
△DANGER
2006/42/EC (+2009/127/EC)
2014/30/EU
2000/14/EC
Applied harmonized standards:
EN 55012: 2007 + A1: 2009
EN 60335-1
EN 60335-2-72
EN 61000-6-2: 2005
EN 62233: 2008
EN IEC 63000:2018
Applied national standards:
Chairman of the Board of Management
S. Reiser
Director Regulatory Affairs & Certification
71364 Winnenden (Germany)
Tel.: +49 7195 14-0
Fax: +49 7195 14-2212
Winnenden, 2021/02/01
www.kaercher.com/REACH
Warranty
In every country, the warranty conditions issued by our responsible distributor apply. Any malfunctions of the appliance during the warranty period are repaired free of charge, provided the cause is a material or manufacturing defect. In the event of a warranty claim, contact your dealer or the nearest authorized service center with the proof of purchase.
Symbols in the operating instructions
DANGER
Indicates an imminent threat of danger that leads to serious bodily injury or death.
WARNING
Indicates a potentially dangerous situation that could lead to serious bodily injury or death.
CAUTION
Indicates a potentially dangerous situation that could lead to minor bodily injury or cause material damage.
Symbols on the device
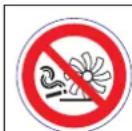
Do not vacuum up burning or smoldering objects, such as cigarettes, matches, or similar items.

Risk of injury from crushing and cuts on the belt, side brushes, tanks, and push handles.

Risk of burns. Avoid contact with these surfaces during operation and when they are hot.
Safety notes
Safety notes regarding handling
- Before use, check that the device and all its working components are in proper condition and safe to operate. If the condition is not impeccable, it must not be used.
- When using the device in hazardous areas (e.g., at gas stations), the relevant safety regulations must be observed. Operation is prohibited in rooms where there is a risk of explosion. The operator must use the device in accordance with its intended purpose. The operator must take local conditions into account, and while working with the device, attention must be paid to other persons, especially children.
- Before starting work, the operator must ensure that all protective devices are properly installed and in working order.
- The operator of the device is responsible for any accidents that may affect other persons or their property.
- The operator must wear tight-fitting clothing. Wear sturdy shoes and avoid loose clothing.
- Before starting the device, check the surroundings (e.g., for children). Ensure good visibility!
- Unauthorized use of the device should be prevented by removing the key.
- When leaving the device, it must be secured against unintentional movement.
- The device may only be used by persons who are instructed in its operation and who can prove their ability to operate it and are authorized to use it.
- This device must not be used by persons (including children) with reduced physical, sensory, or mental capabilities, or lack of experience and knowledge.
- Children must be supervised to prevent them from playing with the device.
Safety notes regarding driving
Danger
Risk of injury!
Risk of tipping over on excessive slopes.
- Only slopes up to 12% may be climbed. Risk of tipping over on unstable ground.
- Use the device only on stable surfaces. Risk of tipping over if the lateral inclination is too great.
- It is permitted to traverse slopes of up to 12% in relation to the direction of travel.
The travel speed must be adapted to the prevailing conditions.
Safety notes regarding transport of the device
- When transporting, pay attention to the weight of the device.
- To transport the device, disconnect the batteries and secure the device safely.
Safety notes for battery-powered devices
Note: Warranty services are only provided if batteries and chargers recommended by Kärcher are used.
- Always follow the operating instructions of the battery and charger manufacturer in this regard. Pay attention to the recommendations of the legislator regarding work with batteries. Never leave batteries discharged; recharge them as soon as possible. To prevent fault currents, batteries must always be clean and dry. Protect them from contamination, e.g., metal dust.
- Do not place any tools or similar objects on the battery. Risk of short circuit and explosion. Always use 2 batteries of the same type!
- Under no circumstances work with open flames, create sparks, or smoke near batteries or in the room where the battery is being charged. Risk of explosion.
- Use only batteries with caps. If you lose a cap, get a new one.
- Do not touch hot parts such as the drive motor (risk of burns). Be careful when working with battery acid. Follow the relevant safety regulations!
- Old batteries must be disposed of as hazardous waste in accordance with EU Directive 91/157/EEC in an environmentally friendly manner.
2006/42/EZ (+2009/127/EZ)
2014/30/EU
2000/14/EZ
Applied harmonized standards:
EN 55012: 2007 + A1: 2009
EN 60335-1
EN 60335-2-72
EN 61000-6-2: 2005
EN 62233: 2008
EN IEC 63000:2018
71364 Winnenden (Germany)
Tel.: +49 7195 14-0
Fax: +49 7195 14-2212
Winnenden, 2021/02/01
| Otklanjanje smetnji | |
| Smetnja Otklanjanje | |
| Urežaj se ne moze Pokrenuti | Kontaktni prekidačPoklopca je isključio urežaj. ZatvaranjePoklopca urežaja |
| Napunite akumulatore. | |
| Provera preopteretnog osigurača | |
| Obavestite Kärcher servisnu službu. | |
| Motor radi, ali se urežaj ne kreće | Podesite Bowden poteznuŽicu voznog pogona. |
| Proverite klinasto remenje. | |
| Obavestite Kärcher servisnu službu. | |
| Urežaj se zaustavlja pri savvladavanju uspona. | Vozite putem sa manjim usponom. |
| Provera preopteretnog osigurača | |
| Podesite Bowden poteznuŽicu voznog pogona. | |
| Proverite klinasto remenje. | |
| Obavestite Kärcher servisnu službu. | |
| Valjak za metenje stoji, prikaz smetnje svetli crveno | Glavni prekidačokretenite na"OFF", proverite da li načetki ima zaglavljenih predmeta. Po potrebi vozite manjim usponom. Ponomo ukljčite glavni prekidač. Posle Četvorostrukog ponavljanja ovoq postupka upravlačka jedinica pravi pauzu u trajanju od 2 minuta kako bi se ohladila. Tokom tog vremena se urežaj ne mozePokrenuti. |
| Urežaj ne mete kako treba | Proverite pohabanost valjka za metenje i bočnih metli pa ih po potrebi zamenite |
| Proverite ispavnost zaklopke za grubu prljavštinu. | |
| Popustite Bowden poteznuŽicu zaklopke za grubu prljavštinu (zavrtanj za poděšavanje). | |
| Proverite zategnutost i ispavnost remena, po potrebi ga zamenite. | |
| Naknadno podesite profil metenja. | |
| Zamenite valjak za metenje. | |
| Obavestite Kärcher servisnu službu. | |
| Urežaj diže prašinu | Proverite ispavnost zaklopke za grubu prljavštinu. |
| Popustite Bowden poteznuŽicu zaklopke za grubu prljavštinu (zavrtanj za poděšavanje). | |
| Proverite, očistite ili zamenite filter za prašinu. Filter za prašinu ne sme da se pere u vodi. | |
| Ispraznite posudu za nakupljenu prljavštinu | |
| Zamenite zaptivni profil na posudu za prljavštinu. | |
| Proverite zaptivku na filteru za prašinu. | |
| Proverite pohabanost zaptivnih letvica, po potrebi ih podesite ili zamenite. | |
| Loše metenje po ivicama | Podesite deo za spušanje bočne metle. |
| Zamenite bočnu metlu | |
| Spustite bočnu metlu. | |
| Proverite pogonski remen bočne metle. | |
| Obavestite Kärcher servisnu službu. | |
| Deo za podizanje bočne metle ne radi. | Proverite Bowden poteznuŽicu za podizanje bočne metle. |
| Obavestite Kärcher servisnu službu. | |
| Novi valjak za metenje se sare o posudu za prljavstinu. | Iznova podesite profil metenja. U tu svrhu uglavite o be poluge za poděšavanje u odgovarajuću višu rupu (1...3). |
Technical data
| KM 75/40 W Bp KM 75/40 W Bp Pack | |||
| Podaci uredaja | |||
| Dužina x Širina x visina (potisna ručka rasklopljena) | mm | 1430 x 750 x 1190 | 1430 x 750 x 1190 |
| Dužina x Širina x visina (potisna ručka sklopljena) | mm | 1160 x 750 x 930 | 1160 x 750 x 930 |
| Težina (bez akumuladora) kg 79 79 | |||
| Težina (s akumulatorima) kg 125 125 | |||
| Dozvoljna ukupna težina kg 205 205 | |||
| Brzina vožnje i metenja km/h 4,5 4,5 | |||
| Savladavanje uspona (maks.) | % | 12 12 | |
| Prečnik valjka za metenje mm 265 265 | |||
| Prečnik bočnih metli | mm | 410 | 410 |
| Maks. površinski učinak | m³/h | 3400 | 3400 |
| Radna Širina bez bočne metle | mm | 550 | 550 |
| Radna Širina sa bočnom metlom | mm | 750 | 750 |
| Zapremina posude za prljavstinu | I | 40 40 | |
| Stepen zašite, zašićeno od kapajuće vode | -- | IPX 3 | IPX 3 |
| Motor | |||
| Tip | -- | Motor jegnosmerne struje sa permanentnim magnetom Smer okretanja udesno | |
| Napon | V | 24 24 | |
| Nominalna jačina struje | A | 22 | 22 |
| Nominalna snaga | W | 400 400 | |
| Broj obrtaja | 1/min | 2750 | 2750 |
| Stepen zašite | -- | IP 20 | IP 20 |
| Akumulator | |||
| Tip | -- | -- | 2x 12 V GiV |
| Kapacitet | Ah | -- | 60 (5h) |
| Težina | kg -- | 23 | |
| Trajanje punjenja potpuno ispražnjenog akumuladora h | -- | 12 | |
| Trajanje rada nakon višekratnog punjenja | h | -- | ca. 1,5-2 |
| Punjač | |||
| Napon el. mreže | V~ | -- | 230 |
| Izlazni napon | V | -- | 24 |
| Struja punjenja | A | -- | 10 |
| Frekvencija mreže | Hz | -- | 50/60 |
| Električna zašita | |||
| Centralna | A | 50 50 | |
| Ösigurač upravljačke Jedinice | A | 2 | -- |
| Zašīta od potpunog pražnjenja akumuladora | -- | preko releja | preko releja |
| Punjač | --- | T4A / 250 V AC | |
| Filterski ulisni system | |||
| Povrsina filtera za finu prasinu | m² | 1,8 1,8 | |
| Kategorija primene filtra za prasinu koja ne škodi zdravlju | -- | L | L |
| Nominalni podpritsisak usisnogSYSTEMA | mbar | 5 | 5 |
| Nominalni zapreminski protok usisnogSYSTEMA | I/s | 45 45 | |
| Okolni uslovi | |||
| Radna temperatura | °C | -5 do +40 | -5 do +40 |
| Temperatura punjenja | --- | Temperatura prostorije | |
| Vlažnost vazduha, bez stvaranja kondenzata | % | 0 - 90 | 0 - 90 |
| Izračunate vrednosti prema EN 60335-2-72 | |||
| Nivo zvučnog pritiska LpA | dB(A) | 71 71 | |
| Nepouzdanost KpA | dB(A) | 3 | 3 |
| Nivo zvučne snage Lw+ nepouzdanost KwA | dB(A) | 88 88 | |
| Nepouzdanost KwA | 2 | 2 | |
| Vrednost vibracije na ruci | m/s² | 3,7 3,7 | |
| Nepouzdanost K | m/s² | 0,2 0,2 | |
www.kaercher.com/REACH
Warranty
The warranty conditions published by the relevant sales company apply in each country. We will repair potential faults in your appliance free of charge within the warranty period, provided that such faults are caused by material or manufacturing defects. In the event of a warranty claim, please contact your dealer or the nearest authorized customer service center, and present the purchase receipt.
Symbols on the device
Use
DANGER
For immediate danger that can lead to severe injuries or death.
WARNING
For a possibly dangerous situation that could lead to severe injuries or death.
CAUTION
For a possibly dangerous situation that could lead to minor injuries or damage to property.
Symbols on the device

Do not vacuum up burning or glowing objects, e.g. cigarettes, matches, or similar.

Danger of crushing and cutting off of fingers, hands, feet, or toes.

Danger of burns. Avoid contact with hot surfaces during operation and when switching off.
Safety instructions
Safety instructions for maintenance
- Before using the device, check that it is in perfect condition and operational. If the device is not in perfect condition, its use is prohibited. The safety instructions for working with the device must be followed in hazardous areas (e.g., on scaffolding). Working without safety equipment is prohibited.
- Maintenance personnel must use the device in accordance with the instructions. During work, they must pay attention to surrounding objects and be careful of third parties, especially children. Before starting work, the maintenance personnel must ensure that all protective devices are correctly installed and functioning. The maintenance personnel of the device are responsible for accidents with other people or material damage.
- Maintenance personnel must wear appropriate work clothing. Wear protective glasses and avoid loose clothing.
- Check before starting (e.g., children). Ensure sufficient visibility!
- To avoid unintentional use of the device, remove the key. When the device is switched off, it must be secured against unintentional movement.
- The device may only be used by persons who have been trained in its operation and have demonstrated their ability to work with it, and who have been authorized to use it. This device must not be used by persons (including children) with limited physical, sensory, or mental capabilities, or lack of experience and knowledge.
- Children must be supervised to ensure that they do not play with the device.
Safety instructions for operation
Danger
Danger of entanglement!
Danger of tipping on hard, uneven ground.
- Do not operate the device on slopes or inclines greater than 12%
Danger of tipping over on unstable ground.
- Only operate the device on a firm, stable surface.
Danger of tipping over on hard, slippery ground.
- Only operate the device on slopes with a maximum incline of 12%
The speed of movement must be adapted to the prevailing conditions.
Safety instructions for transporting the device
- When transporting, keep the device's center of gravity in mind. For transport, remove the battery and secure the device firmly.
Safety instructions for the device battery
Note: Warranty claims can only be made if the original Kärcher battery and charging device are used.
Always follow the instructions for use of the manufacturer's battery and the charging device. Follow the legal regulations when handling batteries. Never leave batteries in a discharged state; recharge them as soon as possible. - For use of the battery and power supply, keep the batteries clean and dry. Protect them from frost, e.g., from metal shavings. Do not place tools on top of the batteries. Risk of short circuit and explosion. Use only batteries of the same type! Never work with an open flame, do not create sparks, and do not smoke near batteries or in the room where the battery is being charged. Danger of explosion. - Use only batteries with intact housing. Replace damaged housing immediately. - Do not touch hot parts, e.g., the motor housing (risk of burns). - Be careful when handling battery acid. Follow the safety regulations.
Observe the safety regulations!
- Dispose of batteries in accordance with the applicable environmental regulations for disposal of hazardous waste. Follow the instructions in accordance with Directive 91/157 EEC.
Safety instructions for maintenance and servicing
- Before cleaning and servicing the device, removing parts, or switching to another function, switch off the device and remove the battery.
- Before performing any work on the electrical appliance, the appliance must be disconnected from the power supply. Do not place the appliance under a tap or under running water (risk of electric shock or other damage).
- Repairs must be carried out only by authorized service personnel or by specialists in this field who are familiar with all safety regulations. The safety of the appliance must be checked in accordance with the relevant local regulations for the place where the appliance is used.
- Perform work on the appliance with dry hands.
Precision devices
Hose appliance
The appliance is equipped with a hose contact switch that turns off the motor when the hose of the appliance is opened.
DANGER
Danger of injury due to defective hose contact switch! If the motor turns off when the hose of the appliance is opened, the hose contact switch is defective. Do not continue working with the appliance and have it repaired.
Main switch
In dangerous situations or for a quick shutdown of the appliance, turn the main switch to the "0/OFF" position. To protect against unintentional starting in operation, turn the main switch to the "0/OFF" position and remove the key.
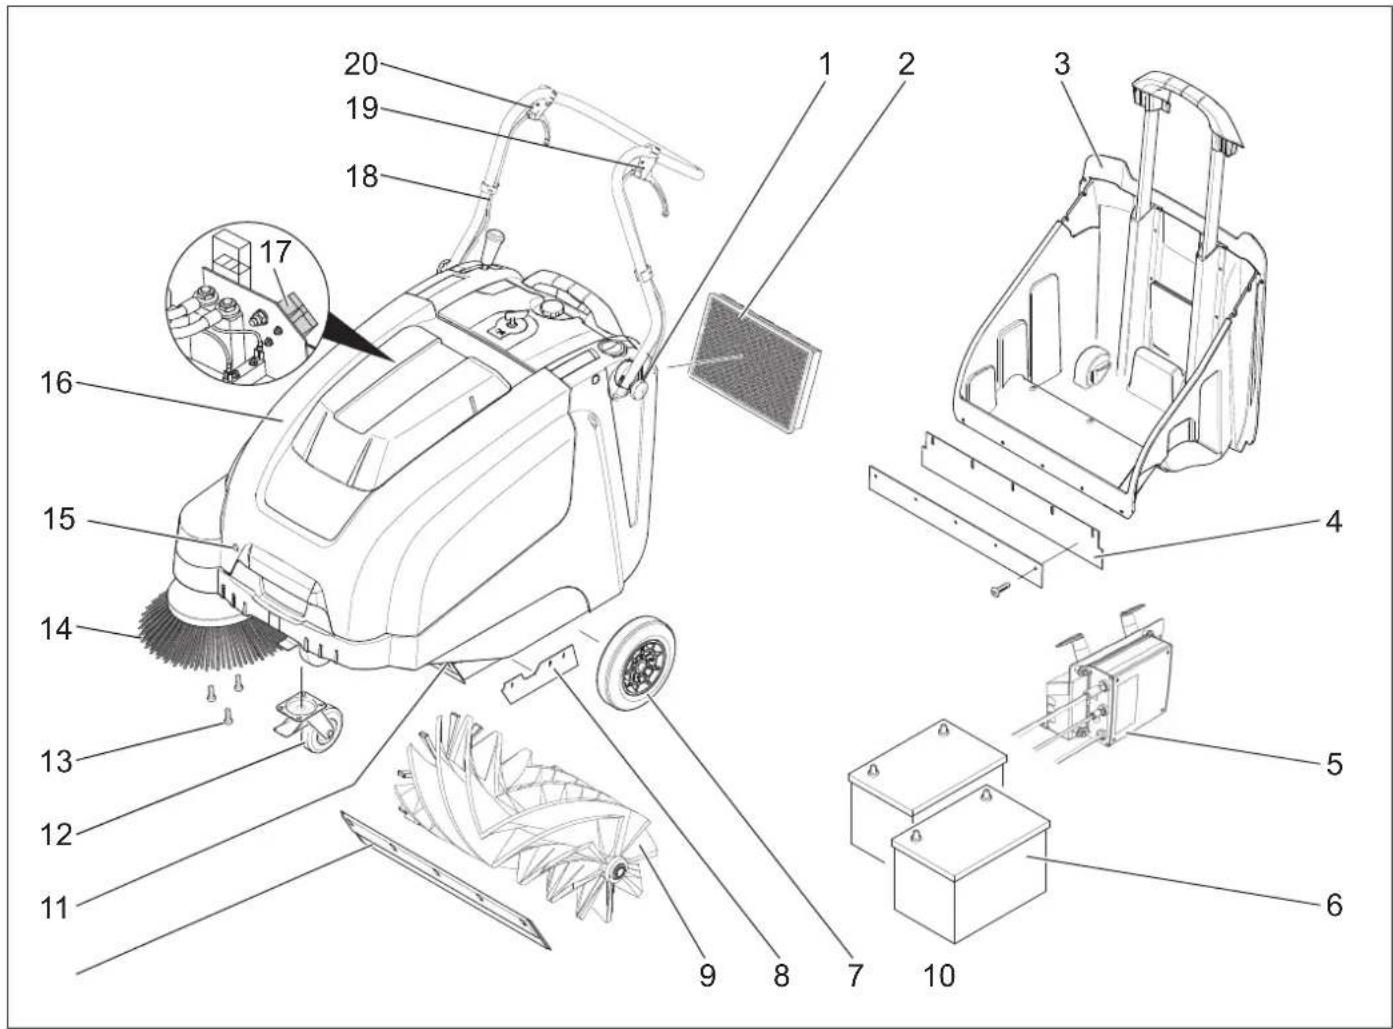
1 Screw for securing the dust bag (2x) 2 Dust filter 3 Reservoir for dirty water 4 Dirty water part (of the reservoir for dirty water) 5 Charging device (only for KM 75/40 W Bp Pack) 6 Battery (only for KM 75/40 W Bp Pack) 7 Knee lever 8 Side suction part 9 Metal bracket 10 Front suction part 11 Valve for coarse dirt 12 Water and knee lever with locking spring 13 Securing of the side metal part 14 Side metal part 15 Locking hose 16 Hose of the appliance 17 Battery compartment cover (only for KM 75/40 W Bp) 18 Dust bag bracket 19 Lever for lifting the filter 20 Lever for lifting the valve for coarse dirt
Service field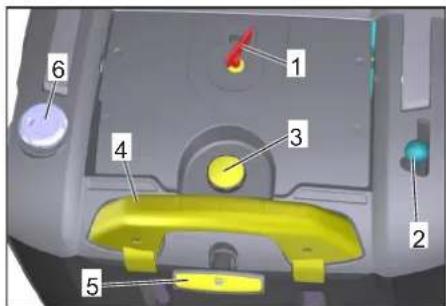
1 Main switch 2 Lever for lifting and lowering the side metal part 3 Locking of the hose filter for dust 4 Locking bracket of the reservoir for dirty water 5 Cleaning of the dust filter 6 Wet/dry valve
Main switch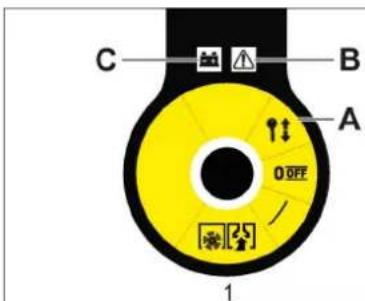
0/OFFMOTORpKJ.
1. Warning about the key for the device in case of malfunction with indication of the battery
Removing the key
→ Turn the main switch key to position "0" and remove it.
Opening the device cover
Note
The device cover is locked with the main switch key.
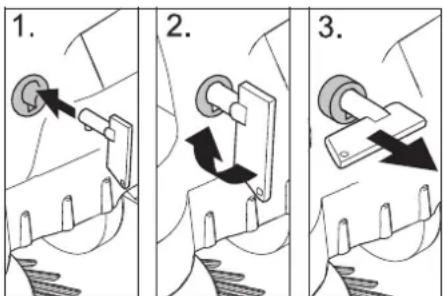
→ Insert the main switch key into the lock of the cover and turn it 90° in the direction of the clockwise arrow. → Pull the cover lock with the key. → To open the device cover.
Closing the device cover
→ Close the device cover; the cover lock locks itself.
Before commissioning
Communication instructions
DANGER
Danger of injury, danger of cuts!
When communicating, keep the device in mind!
Maximum battery dimensions
Demontage de la batterie
→ Ouvrir le couvercle de l'appareil. → Débrancher la borne négative (-) de la batterie. Retirer le support de fixation de la batterie. Débrancher la borne positive (+). Détacher le support de fixation. → Retirer la batterie. Éliminer la batterie usagée conformément aux réglementations en vigueur.
Mise en service
Consignes générales
DANGER
Risque de blessure ! Débrancher l'appareil avant de remplir le réservoir d'eau.
Remarque : Mise en service uniquement avec le couvercle de l'appareil fermé.
→ Placer la machine sur une surface plane.
→ Brancher le moteur. → Bloquer la poignée de poussée.
Contrôle et maintenance
Opérations
→ Vérifier l'état de charge des batteries. → Vérifier les courroies. → Vérifier les balais. → Nettoyer le filtre à poussière. → Vider le réservoir d'eau.
Remarque : Le nettoyage du groupe d'aspiration doit être effectué.
Maintenance
Danger
The device may be used only for its intended purpose, in accordance with the manufacturer's instructions. The manufacturer is not liable for damage caused by improper use.
It is not possible to determine the exact service life of the device, as it depends on many factors:
- Frequency of use (e.g., finger contact, finger friction). Low ambient temperature. After use, proper protection of the device.
- Health conditions do not prevent the use of the device.
- Continuous operation is more efficient than intermittent operation.
The device is designed for long-term use, and with repeated activation of the corresponding functions (e.g., finger friction, finger contact), it may overheat.
Starting the device
→ Release the locking switch. Start the motor. Set the main switch to position "1". Note: The metal parts of the device rotate.
Stopping the device
Stopping in advance
→ Select the position for forward movement. Note: The speed of movement can be adjusted safely according to the position of the forward movement control.
Reverse movement
→ Move the forward movement control to the reverse position. The device stops.
Overcoming obstacles
Overcoming obstacles up to 30 mm in height:
→ Connect the hose to the waste pipe. → Pay attention to the direction of the arrow.
Position the stand on the obstacle at a distance of 30 mm:
→ The stand can be placed over the obstacle only with the help of the lifting lever.
Mowing mode
Danger
Danger of burns! When opening the valve for the waste pipe, hot liquids or steam may escape. Make sure that people, animals, or objects are not in the way.
Danger
Do not insert packaging parts, tapes, or similar items; this may lead to damage to the mowing mechanism.
Note: To achieve optimal results when cleaning, the speed of the pump must be adapted to the specific conditions.
Mowing with the waste pipe valve raised.
Note: To remove larger parts up to a height of 50 mm, e.g., stones or dirt, the waste pipe valve must be raised briefly.
Raise the waste pipe valve.
→ Pull the lever to raise the waste pipe valve. Hold the waste pipe valve: → Lower the lever to raise the waste pipe valve.
Note: The optimal cleaning result can only be achieved when the waste pipe valve is fully open.
Mowing with the side discharge

→ Lower the side panel for connecting to the page metal. The page metal is lowered.
Removing dry laundry
Note: During operation, the condensate tank must be emptied regularly.
Note: During operation, the dust filter must be cleaned regularly.

→ For wet/dry vacuuming.
Removing wet laundry
Open the wet/dry flap. Note: This method is intended for wet cleaning.
Battery indicator
The battery indicator shows the charge level of the batteries during operation:

Cleaning the dust filter
→ Pull and push the filter cleaning knob several times.
To empty the condensate tank
DANGER
Danger of electric shock! Disconnect the device from the power supply before emptying the condensate tank.
Note: When emptying the condensate tank, be careful not to damage the float.
Note: The maximum permissible load for the reservoir for the vacuum cleaner is 40 kg.
→ Clean the dust filter. → Select the button for closing the reservoir for the vacuum cleaner. → Remove the reservoir for the vacuum cleaner. → Empty the reservoir for the vacuum cleaner. → Insert the reservoir for the vacuum cleaner inside. → Select the button for closing the reservoir for the vacuum cleaner.
Clean the device
Turn off the motor. Turn the main switch to position "0".

→ Lift the side brushes. → Lock the parking brake. → Turn the main switch to position "0" and remove the key.
Transport
DANGER
Danger of tipping and injury! When transporting, keep the device's center of gravity in mind.
→ Turn off the motor. → Turn the main switch to position "0" and remove the key. → Lock the parking brake. → Secure the device with lashing straps on the wheels. → Secure the device with a safety chain or straps. → When transporting by vehicle, secure the device according to the applicable regulations for load securing.
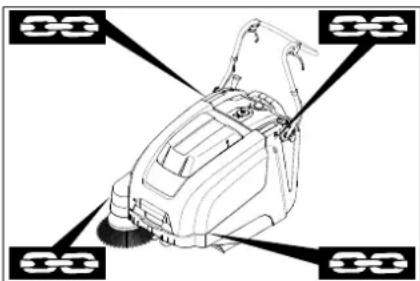
1 Area for attaching the lifting straps 2 Area for attaching under the device's handle
Note: Observe the markings for the attachment areas on the main frame (vertical symbol).
Note: Do not use the hoses and cables as lifting points.
Storage
DANGER
Danger of tipping and injury! When storing, keep the device's center of gravity in mind.
Commissioning
If the measuring machine is not to be used for a long time, the following steps must be performed:
→ Place the measuring machine on a flat surface. → Switch off the motor. → Close the pressure valve by turning it to position "0" and remove it. → Lock the parking brake. → Secure the measuring machine against accidental movement. → Raise the lifting device and the guide. → Lower the support legs. → Raise the side panels. → Clean the measuring machine from the outside. → Store it in a protected and dry place. → Disconnect the batteries. → Recharge the batteries and maintain them at least every 2 months.
Surface treatment
General instructions
- Repairs must be carried out only by authorized service personnel or by specialists in this field who are familiar with the safety regulations. Replacement parts must be checked for safety in accordance with VDE 0701.
Cleaning
CAUTION
Danger of injury! Do not clean the device with a jet of water or a high-pressure cleaner (danger of electric shock or other injury).
WARNING
Before cleaning, disconnect the charging device from the mains.
When cleaning, wear protective gloves.
External cleaning of the device
Danger
Danger of burns! Wear protective gloves and safety goggles.
→ Open the drain valve. → The valve must be cleaned. → The valve must be flushed with air under pressure. → Close the drain valve.
Drain valve cleaning
→ The valve must be cleaned with a cloth soaked in a mild cleaning solution. Note: Do not use abrasive cleaning agents.
Maintenance intervals
Maintenance by the customer
Daily maintenance:
→ The metal parts must be checked for wear and damage. → The function of the service elements must be checked. → The function of each control lamp must be checked.
Weekly maintenance:
→ Check the adjustment, the lifting and the function of the locking bolts. → Check the movable parts for free movement. → Check the adjustment of the lifting of the sliding parts within the measuring range. → Check the reflector for the metal rod. → Clean the dust filter.
Note: See the chapter on maintenance for a description.
Note: All service work on the maintenance of the customer must be carried out by a qualified specialist. If necessary, a Karcher specialist can be called at any time.
Maintenance by the service department
Maintenance after the first month or after 5 operating hours:
→ Check the first inspection. Maintenance every 50 operating hours Maintenance every 100 operating hours or every half year
Maintenance every 300 operating hours Maintenance every 500 operating hours or annually
Note: To ensure the warranty claims, during the warranty period all service and maintenance work must be performed by an authorized Karcher service center in accordance with the technical maintenance instructions.
Maintenance
Preparation:
→ Place the machine on a level surface. → Turn the ignition key to position "0" and remove it. → Lock the parking brake.
General safety instructions
DANGER
Danger of injury! The motors are equipped with a run-down time of 3-4 seconds after switching off. During this time, keep a safe distance from the suction area.
WARNING
Before any maintenance or repair work, ensure that the machine has cooled down sufficiently.
Do not touch hot parts, such as the motor.
CAUTION
When performing maintenance, disconnect the battery from the machine. When performing maintenance, remove the battery pole terminal.
CAUTION
When handling the device, remove the batteries and reserve them for disposal and tilt the device forward. Do not place the device on its side. When cleaning and maintaining the device and when replacing parts, the device must be switched off.
Adjusting the water hardness of the detergent
The overflow valve is regulated when, during movement towards the filling valves, the force of the device is insufficient.
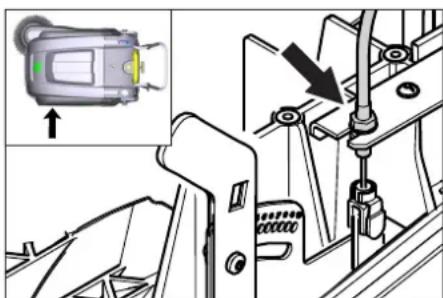
→ Open the valve of the device. → Develop the contactor. → Adjust the mounting height. → Fill the contactor.
Checking the metal roller
→ Lock the locking washer. Remove the reservoir for the changed one. Remove the tensioner from the metal roller.
To change the metal roller
A signal is necessary when the wear of the brushes is visible in the result of the measurement.
WARNING
Before operating the device, the batteries must be removed. Do not place the device on a flat surface.
→ Lock the locking washer. → Remove the reservoir for the changed one. → Remove the batteries. → Tilt the device forward.
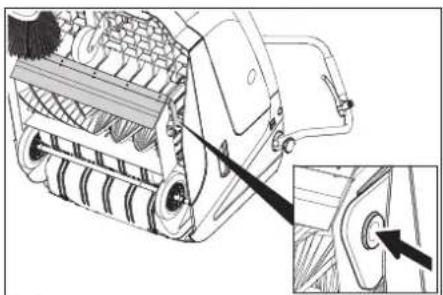
→ Lift the coarse adjustment lever, press the laser block and tilt forward the metal roller. → Remove the metal roller. → Place a new metal roller on the filling valve (visible). → On the opposite side, insert the laser block into the opening of the metal roller ring.
CAUTION
Danger of injury! Be careful that the metal roller does not get caught on the ring. Note: After installing the new metal roller, the reflector for measurement must be adjusted again.
Checking the adjustment of the reflector for measuring the metal roller
→ The metal machine must be lifted and placed on a flat and stable surface, which is covered with paper or cloth, so that it is visible. → Lock the locking washer. → The metal roller must be left to rotate for 15-30 seconds. → The metal machine must be lifted and placed adjusted.
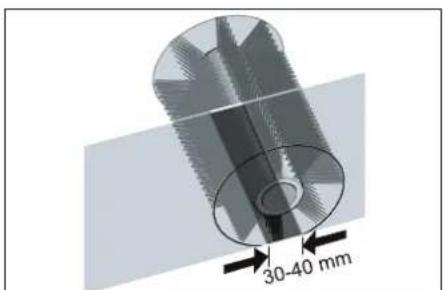
The shape of the reflector for measurement forms a regular rectangle, which is wide between 30-40 mm.
71364 Winnenden (Germany)
Tel.: +49 7195 14-0
Fax: +49 7195 14-2212
Winnenden, 2021/02/01
| Помошׁн Heɪзправно | |
| Hизправно Остраимьанe Урémonг He може за с可不是сяа | |
| Контактуглары пекльбача на калaka e Изклочи урда. 3атворе палaka на урда | |
| Зарждане на akумунаторіte | |
| П探测ete зашита от петоварвае | |
| У被骗омete сөрвiza на Кärcher | |
| Моторг павOTи, Ну урémonг He Тръгва | Рergлары на бронираною жило на Задвинваенeto |
| П探测ка клиови рөmbүи | |
| У被骗омete сөрвiza на Кärcher | |
| Урémonг сөрьпprn пremинаванe п no haknot | П探测ete зашита от петоварвае |
| Pergлары на бронираною жило на Задвинваенeto | |
| П探测ка клиови рөmbүи | |
| У被骗омete сөрвiza на Кärcher | |
| Меташиг валяк сөрna, Иndиka- цята за Heɪзправноct сөтɪn черBERO | Завртete галови пекльс Bavч на „OFF“, п探测ete четкatinga за зakлесени пreametи.Евенту- ално пremинete по мальк takлочи. Вklочete OTНОВ Главни пекьс Bavч. Спд като посторite тази оrelацяч takлочи.Yngвалови погнл�ьп prinhydntelна пayза оТ 2 мнунт. Праз Това вөрме урémonг He може за SFDE с可不是сяа |
| Урémonг He метe павINHO | Меташия валяк истраимчinatemetлдддсөнөсалан otлбддсөнөсаланпri prin HeobхODIMOCSTддс сmedнг |
| П探测ete Функциягда на Клианг рүбү otлддсү | |
| Ötnychete Бөрнираною жило на Клиана на за рүбү otлддсү (бүлт 3a насториka) | |
| П探测ete рөмьka 3a олбалан и дэбрфункциониранe, рri Heobx. ro smehete | |
| Pergлары на рөфлөдддс рүмөн e | |
| Сmedнete меташия валяк | |
| У被骗омete сөрвiza на Кärcher | |
| Урémonг Замршава | П探测ete Функциягда на Клианг рүбү otлддсү |
| Ötnychete Бөрнираною жило на Клиана на за рүбү otлддсү (бүлт 3a насториka) | |
| Да с р探测п релтбрьа за пax, за с почости плддс смени He миITE релтьрьа за пax. | |
| Да с Изралдддс рөзрьога рыз рүхenteо | |
| Сmedнete уллгнтел徳п рөзрьога рыз рүмөнenteо | |
| П探测ete уллгнтел徳п рөзрьога рыз рүхenteо | |
| Уллгнтелдддс пл actiendn da с р探测ргл тзИЗн检валдс р ri HeobхODIMOCSTддс da se с менит | |
| Лошо метене по рьбовete | Perugлары настраимькага на сваляногу настраимьнага метлд |
| Смени настраимьнаге метлд | |
| Свалete сөрнираною рөмлддсү | |
| П探测ete задвинваши рөмьк настраимьнага метлд | |
| У被骗омete сөрвiza на Кärcher | |
| Повиганeti Na Stралчнata metla NeФункционра | П探测ete Бөрнираною жило на NobdiГанeto Na Stралчнага метлд |
| У被骗омete сөрвiza на Кärcher | |
| Новитmetаи валяк дokocba pe- зэрвога за ИзмeteHTO | Кориглары настраимькага на р敖лөддсү meteNe, за сизда рүн��сайтештоа за насториka В сbethBetHTNЯнamрашсpe no-Harope OTBOP (1...3) |
Technical changes
| KM 75/40 W Bp KM 75/40 W Bp Pack | ||
| Данни за урEDA | ||
| Дыжина xшиочина x височина (разьната пьзраша скоба) | mm | 1430 x 750 x 1190 |
| Дыжина xшиочина x височина (прибрана пьзраша скobа) | mm | 1160 x 750 x 930 |
| Теро (бez akumлatingу) | kg | 79 |
| Теро (с akumлatingу) | kg | 125 |
| Дорystимо общо логу) | kg | 205 |
| Скорост на пьтувае и на метене | km/h | 4,5 |
| Способност за Искачвае (макс.) | % | 12 |
| Дамату р'mетяш валяк | mm | 265 |
| Дамату р'mетяш стравочи метли | mm | 410 |
| Повьхностima мочност макс. | m/h | 3400 |
| РавOTHA Широчина бez сстравочи метли | mm | 550 |
| РавOTHA Широчи сьс сстравочи метли | mm | 750 |
| Овem на розерва rapа за Искетеното | I | 40 |
| Вд. зашиита зашитени постов калеша вoda | -- | IPX 3 |
| MOTOP | ||
| Тир | -- | Посюгно-ТOKOB MOTOP с постаян Магнип Посока на Вьртоны Надяно |
| Нарожени | V | 24 |
| Номинален тok | A | 22 |
| Номинална мочност | W | 400 |
| Оворotи | 1/min | 2750 |
| Вд. зашиита | -- | IP 20 |
| Акумлatingop | ||
| Тир | -- | -- |
| Калаштét | Ah | -- |
| Теро | kg | -- |
| Вре'mе за заөждaine рprп нар'tьлно разрeden akumлatingop | h | -- |
| Пор'dьжигелност на ekсллогatableяда спед многократно заөждaine | h | -- |
| Зардno устroduстvo | ||
| Нарожени ot мрөжда | V~ | -- |
| Иххдino habржени | V | -- |
| Тok за заөждaine | A | -- |
| Чебота на мрөжда | Hz | -- |
| Еlektrоч承载нPre徳п资助 | ||
| Цentralno | A | 50 |
| Пор'dьигелten у鞘аленie | A | 2 |
| Заш'tа пог'tьдьлбоко пазөжданe | -- | c поочи на рөлета |
| Зардno устroduстvo | -- | T4A / 250 V AC |
| Фи'llьрна и смугал'tehа сисtemа | ||
| Плоча на рsinл'tьр рsinл'tьр рsinн прах | m² | 1,8 |
| Кaterогия Иллэване рsinл'tьр за пaxове, кочу не застраватпдравето | -- | L |
| Номинален вakуу'mсугал'tehа сисtemа | mbar | 5 |
| Номинален об悔ен тok смугал'tehа сисtemа | l/s | 45 |
| Ожолни устови | ||
| РавOTNA Temпогатура | °C | -5 до +40 |
| Temпогатура на заөжданe | -- | Стайн Temпогатура |
| Влажност на вьздуна, не орөсвашa | % | 0 - 90 |
| Установни стойости сьгласно EN 60335-2-72 | ||
| Нимо на звуka Lda | dB(A) 71 | 71 |
| Heystочигост Kya | dB(A) 3 | 3 |
| Нимо на звукува мөшост Lw+ Heystочигost Kwa | dB(A) 88 | 88 |
| Heystочигost Kwa | -- | 2 |
| Стойост на вьзрαιite в oblaостта на длиanta - рькатa | m/s² | 3,7 |
| Hecinгуност K | m/s² | 0,2 |
We reserve the right to make technical changes.
www.kaercher.com/REACH
Warranty
Chairman of the Board of Management
S. Reiser Director Regulatory Affairs & Certification
71364 Winnenden (Germany)
Tel.: +49 7195 14-0
Fax: +49 7195 14-2212
Winnenden, 2021/02/01
www.kaercher.com/REACH
Warranty
The warranty terms issued by our authorized sales company are valid in each country. During the warranty period, we will free of charge eliminate any operational malfunctions in your device, provided that the cause is a material or manufacturing defect. If warranty service is required, please contact your dealer or the nearest authorized customer service center, presenting the purchase document.
Symbols used in the operating instructions
DANGER
Indicates an imminent danger that will lead to severe bodily injury or death.
WARNING
71364 Winnenden (Germany)
Tel.: +49 7195 14-0
Fax: +49 7195 14-2212
Winnenden, 2021/02/01
www.kaercher.com/REACH
Warranty
71364 Winnenden (Germany)
Tel.: +49 7195 14-0
Fax: +49 7195 14-2212
Winnenden, 2021/02/01
Dionomora y BnnaKyu HenoJa
OK. UK 10
Technical characteristics 11
Proper use
Use the device only in accordance with the instructions in this manual.
This cleaning machine is intended for cleaning contaminated surfaces indoors and outdoors. This device is designed for commercial use, for example, in hotels, schools, kitchens, hairdressers, shops, offices, and similar places. Before using, check the device and accessories for proper condition and safety. If the accessories are in an unsafe condition, they must not be used. - It is forbidden to operate the device if it poses a health hazard. - It is forbidden to make changes to the device. - The device is intended only for work on surfaces specified in this manual. - The device may only be moved on surfaces intended for cleaning machines and by the operator or their representative. - The general rule is as follows: do not allow the device to come into contact with easily flammable materials (explosion/fire hazard).
Improper use
It is forbidden to clean surfaces contaminated with flammable liquids, gases, as well as undiluted acids and solvents! This applies to gasoline, paint thinners, and oils that can create flammable gases or mixtures that can ignite with the air, and
also acetone, undiluted acids and solvents, because they damage the materials of the device.
It is forbidden to clean reactive metal dust (for example, aluminum, magnesium, zinc) with acidic agents. Do not allow cleaning of hot or glowing objects. It is forbidden to store in unsafe places. It is forbidden to use the device in explosive atmospheres.
Surfaces to be cleaned
- Asphalt - Stone floors Suitable (hard) flooring - Concrete - Paving stones
Intended use
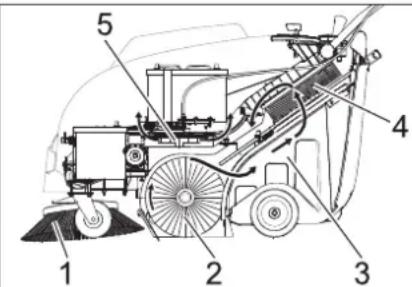
Caution, risk of injury, risk of damage due to improper handling.
- Blade 1 (1) cuts the surface to be cleaned and supplies the working zone of the shaft, which is being cleaned.
- The blade holder, which is being cleaned (2), is directed straight into the dirt collection reservoir (3). The dirt in the reservoir is separated by a fine filter (4), and the filtered clean air is extracted by the suction turbine (5).
General instructions
If the device was damaged during transport, contact the seller immediately.
- Read the safety instructions and the operating manual of the working equipment attached to the device, and follow them. The warning signs and plates attached to the device provide important instructions for safe operation.
- In addition to the instructions in this manual, the general safety rules and regulations for accident prevention issued by the legislator must be observed.
Equipment and spare parts
SAFETY
To avoid danger, repairs and installation of spare parts must only be carried out by authorized service personnel.
- Only use equipment and spare parts that are approved by the manufacturer for use. Original equipment and original spare parts are the guarantee that the device will work safely and correctly. Further information on spare parts can be found on our website www.kaercher.com and in the service section.
Environmental protection

Packaging materials can be recycled. Please do not dispose of packaging materials with household waste; dispose of them for recycling.
Old devices contain valuable materials that can be recycled. Batteries, oil, and similar materials must not enter the environment. Therefore, please dispose of old devices using appropriate collection systems.
Instructions for using components (REACH)
Information about components is provided on the web page at the address:
www.kaercher.com/REACH
Warranty
In every country, the warranty terms issued by our responsible sales company apply. We eliminate possible faults in your appliance free of charge within the warranty period, provided that such faults are caused by material or manufacturing defects. In the event of a warranty claim, please contact your dealer or the nearest authorized customer service center with your proof of purchase.
Symbols in the manual
DANGER
For immediate danger that can lead to severe injuries or death.
#
For a possibly dangerous situation that can lead to severe injuries or death.
CAUTION
For a possibly dangerous situation that can lead to minor injuries or damage to property.
Symbol on the device
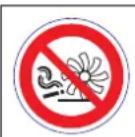
Do not touch with sharp or pointed objects, e.g., knives, screwdrivers, etc.

Danger of burns from hot surfaces, hoses, reservoir, and water.

Danger of burns: avoid contact with hot surfaces during operation and after heating.
Safety instructions
Safety instructions during operation
- Before using, check the device for proper condition and safety. The device must be in good condition; it must not be used otherwise. If the device is used in unsafe conditions (e.g., near water), it is necessary to follow additional safety instructions. It is forbidden to use the device in explosive atmospheres. The user must use the device in accordance with the instructions. It must take into account the local conditions, and during work with the device, attention must be paid to third parties, especially children.
- Before starting work, the operator must make sure that all accessories are in place and in proper working order. The operator of the device is responsible for any damage caused to other persons or property.
- Make sure that the operator wears appropriate clothing. Wear protective gloves and safety goggles.
- Before starting movement, check the working area (e.g., for obstacles). Ensure sufficient visibility! - Avoid unintentional use of the device with the key inserted. When the device is left unattended, it should be locked and the key removed.
- The device must be used only in accordance with the instructions for use and for the intended purpose, and only by trained personnel.
- This device is not intended for use by persons (including children) with reduced physical, sensory or mental capabilities, or by persons lacking experience and/or knowledge. Children must be supervised to ensure they do not play with the device.
Safety instructions for maintenance
Danger!
Danger of injury!
Danger of tipping the device on slopes.
- In the direction of movement, only slopes up to 12% are allowed. Danger of tipping on unstable ground.
- Danger of tipping over when moving on slopes. Risk of tipping over of the device when moving on steep slopes.
- In directions transverse to the direction of movement, displacement of loads is only permitted on slopes up to max. 12%. The displacement speed must correspond to the prevailing conditions.
Safety instructions for transporting the machine
- When transporting, pay attention to the device's weight.
- During transport, secure the device against tipping and close the device.
Safety instructions for devices that operate from a battery
Note: The right to warranty service is only retained when using batteries and charging devices recommended by the Kärcher company.
Follow the operating instructions of the battery and charger manufacturer. Observe the legal regulations regarding battery disposal. Never dispose of batteries in household waste. Keep batteries always in a clean and dry condition to avoid leakage currents. Protect them from impacts, e.g., from metal objects. Do not place tools or similar items on the battery. Risk of short circuit. Only use batteries of the same type! In no case operate with damaged or leaking batteries or near batteries. Risk of explosion. Only use batteries with the correct polarity marking. Replace the marking if it is lost. Do not open the battery cells, e.g., for repair.
(Risk of fire)
Be careful when working with battery-powered electric tools. Follow the relevant safety regulations! Used batteries must be disposed of in accordance with Directive 91/157/EEC, without harming the environment.
Safety instructions for maintenance and servicing
Before cleaning and performing maintenance, replacing parts or converting the device to another function, switch it off and remove the ignition key. When working with electrical equipment, it is necessary to follow the instructions. Do not expose the device to rain or moisture under high pressure (risk of short circuit and other damage). Repair work may only be carried out by authorized service centers or specialists in the field who are familiar with all relevant safety regulations. - Perform a safety check in accordance with the relevant local directives for non-stationary devices used in explosive atmospheres. - Work on the device must always be carried out with special gloves.
Spare parts
Device cover
The filter is equipped and the contents are indicated on the cover, as indicated in the figure. The cover is closed on the device.
In an emergency, turn off the device through the control panel!
If you do not turn off the device before opening the cover, it means that the device is still on and the cover is not closed. Stop using the device and contact the service center.
HEAD SWITCH
→ In unsafe situations or for quick shutdown of the device, turn the head switch to the '0 / OFF' position → To avoid accidental activation, turn the head switch to the '0 / OFF' position and remove the key.
List of parts and functional units
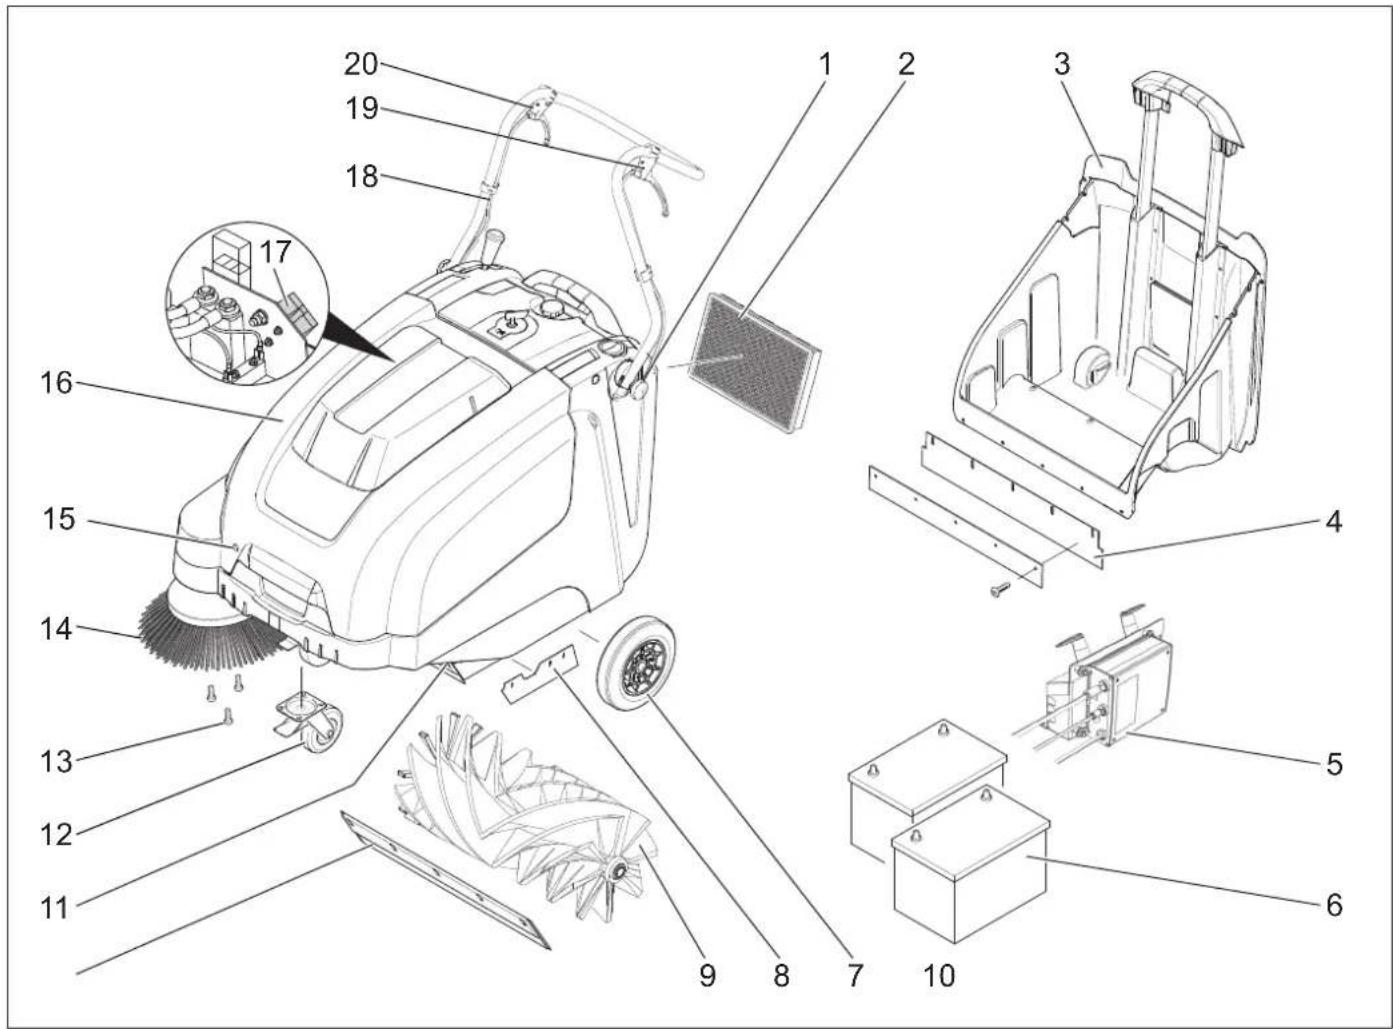
1 Handle for securing the hose (2x) 2 Sawdust filter 3 Tank for collecting debris 4 Locking latch (on the debris collection container) 5 Charger (only for KM 75/40 W Bp Pack) 6 Battery pack (only for KM 75/40 W Bp Pack) 7 Filter cleaning button 8 Latch for locking the latch 9 Shaft, which is included 10 Front locking latch 11 Flap for large debris areas 12 Steering handle with brake and parking brake 13 Attachment for the hose 14 Hose 15 Hook for the cover 16 Cover of the device 17 Battery charger (only for KM 75/40 W Bp) 18 Hose handle 19 Lever for moving forward 20 Lever for lowering the brush for large debris areas
Control panel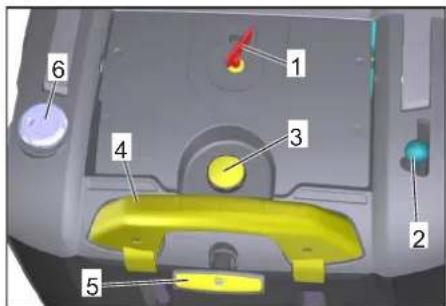
1 Head switch 2 Lever for lowering the brush for large debris areas. 3 Lock for the filter cover 4 Bracket for the debris tank 5 Filter cleaning button for the main filter 6 Switch for wet/dry mode
Head switch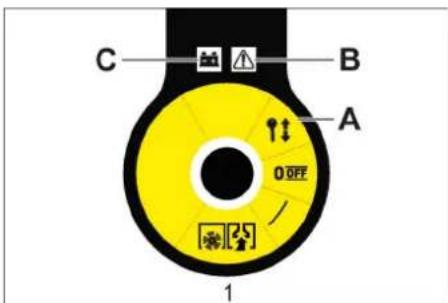
0/OFF Turn off the device. Press the button and remove the key. In case of malfunction, the battery indicator lights up.
Turn on
→ Turn the head switch key to the '0' position and remove it.
Open the device cover
Indicator
The device cover must be closed completely.
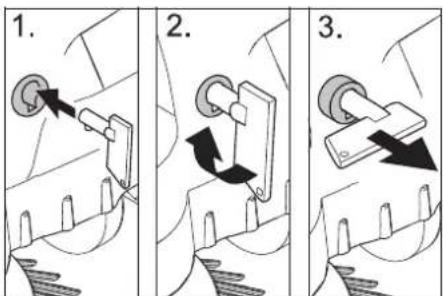
Insert the key head completely into the lock, turn it 90 degrees clockwise with the arrow, then pull out the key. Close the device cover.
Close the device cover
Close the device cover; the cover lock will close automatically.
Before starting work
Instructions for unpacking
SAFETY
Safety first, safety always! When unpacking, pay attention to the device edge.
| Порожнaya Bara (ТраHCNOPТа Bara) | |
| KM 75/40 W Bp | 79 kg |
| KM 75/40 W Bp Pack | 125 kg |
| Донустima заразьна Bara | |
| KM 75/40 W Bp | 205 kg |
| KM 75/40 W Bp Pack | 205 kg |
Unpacking the device
Remove the box, take out the device, store it in a dry place, and handle it carefully. Release the stopper.
Install the guide rod
Loosen the screws. Pull the rod. Tighten the screws.
Install the shaft that fits
Note: Before moving the device, remove the collection container and turn the guide rod forward. Do not place the device on the guide rod. Press the button on the device edge and pull gently.
Batteries
Battery safety instructions for users
When working with batteries, follow the safety precautions below:
| i | ДомрumsуамUCеakzieOK ha akymyamopi, e Incmpyuksi3 kopucmyaHHma y noci6huky 3 ekcnnyamaüj npucmpojo! |
| Hocumu zaxucm對於 ouéi! |
| He donyckamu dimeu do eken- mponimi ma akymyamopie! |
| Hebe3neka eubxyy! |

Explosion hazard!

Do not expose the battery to open flames, sparks, or other sources of ignition, and do not smoke near it!
Chemical hazard!

First aid!

Warning labels!

Recycle!

Do not dispose of batteries in a container for collection!
Caution!
Explosion hazard! Do not place tools or similar objects on the battery, as they may cause a short circuit, and do not
Caution!
Safety warning! Never touch the battery terminals. Always work with the battery with dry hands.
DANGER
Fire hazard!
Before charging, check the battery for damage, because during charging gas is released that can easily explode.
Warning!
Danger of chemical burns!
- If electrolyte splashes into eyes or on skin, rinse with plenty of clean water.
- After work, immediately consult a doctor. Both actions are necessary.
Recommended batteries
| № 3amOB- ЛECHNЯ | MICT- KICTh | ПOTIK nobi- trя | |
| 60 Ah, He no- Tpe6ye Texob- CnyroBy- BAHHry | 6.654- 226.0* | 1,65** | 0,66*** |
Installing and removing the battery

Instructions
In model KM 75/40 W, the battery and charger are already built in.
Open the device cover. Install the batteries on the mounting bracket. Secure the batteries with the appropriate locking mechanism.
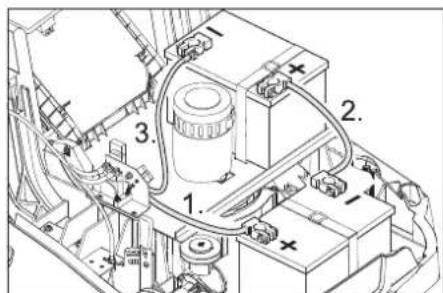
Maintenance
General instructions
- Repair work may only be carried out by authorized service centers or specialists in the field who are familiar with all important safety regulations.
- Devices used commercially in accordance with local requirements must undergo safety checks in accordance with VDE 0701.
DANGER! Do not allow the device to be used for a single phase or water jets under high pressure (danger of short circuit and other damage).
ATTENTION
Before carrying out work on cleaning the device, disconnect the charger from the mains.
Before carrying out work on cleaning the battery compartment.
Cleaning and maintenance
DANGER!
Danger of injury! Wear protective mask against dust and protective goggles.
Open the device cover. → Check the device with a dry cloth. Blow the device with compressed air. → Close the device cover.
Cleaning the device exterior
Clean the device using a damp cloth and dry it with a soft cloth. Note: The use of abrasive cleaning agents is prohibited.
Frequency of technical maintenance
Technical maintenance performed by the user
Technical maintenance
→ Check the device for dirt and more severe contamination on the air vents, and clean if necessary. → Check the condition of all control elements. → Check the condition of all indicator lamps.
Technical maintenance:
→ Check the tightness of the connections of the pipelines. → Check the condition of the hoses and moving parts. → Check the installation of the suction filter in the washing area. → Check the washing pressure, adjust if necessary. → Clean the filter.
Note: Detailed instructions are in the "Technical Maintenance" section.
Note: Maintenance of the device should be performed by qualified personnel. If necessary, you can contact a specialized trade organization of the Kärcher company.
Technical maintenance is described in the maintenance section.
Maintenance after the first use or 5 working hours:
Perform an initial inspection.
Every 50 working hours
Maintenance every 100 working hours or once a week
Do not place the device on its side.
Secure the handle in the vertical position. → Empty the dirt water tank. → Rinse the tank. → Tilt the device back.
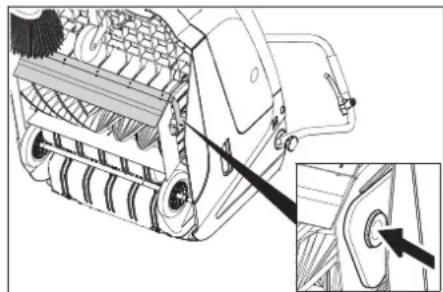
→ Remove the brush segment, remove the dirt water tank, clean it, and reinstall. → Check the dirt water tank for leaks. → Check the brush wear, replace if necessary. → On the opposite side, insert the brush into the opening of the balancer, adjust if necessary.
SURFACE
Danger of injury! Make sure that the balancer opening, which is being adjusted, is not blocked by anything.
Note: After installing a new brush, it is necessary to re-adjust the brush height.
Check the correct adjustment of the device before operation.
→ Place the mower on a flat, clean surface and secure it with the parking brake. → Turn the blades by hand for about 15-30 seconds. → Check the mower for proper operation.
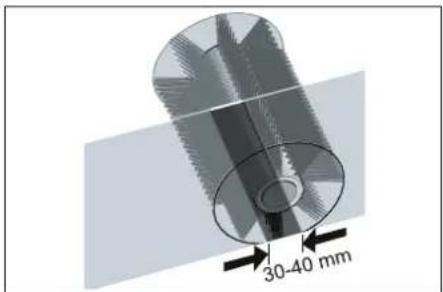
The surface of the collection area should be flat and even, with a width of 30-40 mm.
Installation and replacement of the wear plates
Note: Before any adjustment, empty the collection container and move the drive lever forward. Do not operate the device with the drive lever engaged.
Wear plate adjustment → Loosen the fastening of the wear plate. → Adjust or replace the wear plate.
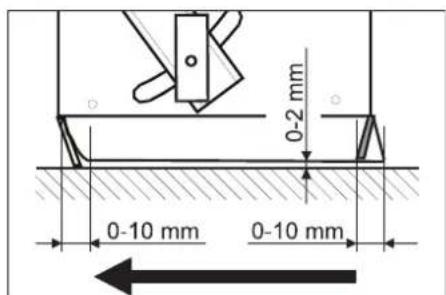
Adjust the height of the wear plate so that it touches the ground and moves back 10-15 mm when the device is pushed forward.
→ Use the wear plate. Then tighten the bolts of the wear plate. → Check the wear plate. → Loosen the fastening of the wear plate. → Adjust or replace the wear plate. Adjust the height of the wear plate so that it touches the ground and moves back 10-15 mm when the device is pushed forward. → Then tighten the bolts of the wear plate. Wear plate → Loosen the fastening of the wear plate. → Adjust or replace the wear plate. → Adjust the height of the wear plate so that it touches the ground and moves back 10-15 mm when the device is pushed forward. → Use the wear plate. → Then tighten the bolts of the wear plate.
Replacement of the fuel filter
WARNING
Before replacing the fuel filter, drain the fuel from the fuel tank. When working with the fuel system, wear protective gloves. Follow the safety instructions for handling fuel.
DANGER
Risk of injury!
→ The fuel filter does not need to be cleaned. Secure the parking brake. Clean the fuel filter area.
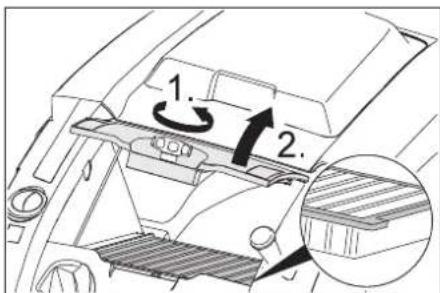
→ Turn the fuel filter cap counterclockwise. → Remove the fuel filter cover. → Replace the fuel filter. Pay attention to the correct installation position of the fuel filter (see manual). Tighten the cap until it stops.
The cover may not be closed until it is fully closed, which can lead to breakage.
Note: When installing a new filter, follow the instructions so that the parts are not damaged.
Protection of the fuse/relay
KM 75/40 W Bp
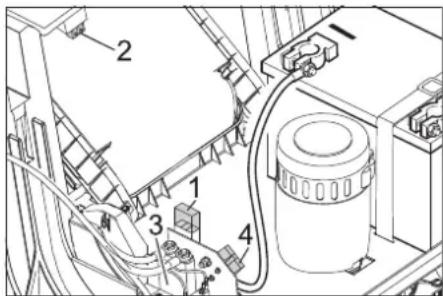
Fuse F1 (50 A) Fuse F2 (2 A) Relay 4 Charging plug of the battery
→ Open the device cover. Replace the faulty fuse or relay.
KM 75/40 W Bp Pack
Fuse protection of the battery.
Accessories
Brush length, m 6.905-626.0
For a brush with an inner surface, moisture-resistant.
Bath, 6.906-886.0 M'ank
With natural bristles: specially for cleaning the brush on uneven surfaces in outdoor areas. Not resistant to moisture, do not use on abrasive surfaces!
Bath, 90 mm, DOR-STEM
For remote removal of dirt, vacuum cleaner.
Valve, 6.906-950.0 standard
For surfaces subject to standard load, such as climate or artificial coverings
Single-use cleaning cloth 2.641-571.0
Includes: filter for retaining fibers, antistatic cleaning cloth, guide for proper use
Declaration of conformity
European
Community
We hereby declare that the machine mentioned below, based on its design and construction, as well as the model put on the market, complies with the essential health and safety requirements of the EC Directives. In case of unauthorized modification of the machine, this declaration loses its validity.
Product: Machine for cleaning
Type: 1.049-xxx
Complies with EC Directives
2006/42/EC (+2009/127/EC)
2014/30/EC
2000/14/EC
EN 55012: 2007 + A1: 2009
EN 60335-1
EN 60335-2-72
EN 61000-6-2: 2005
EN 62233: 2008
EN IEC 63000:2018
National standards
Application method for measuring surface temperature
Chairman of the Board of Management
S. Reiser
Director Regulatory Affairs & Certification
Authorized representative for document management:
S. Reiser
Alfred Kärcher SE & Co. KG
71364 Winnenden (Germany)
Tel.: +49 7195 14-0
Fax: +49 7195 14-2212
Winnenden, 2021/02/01
| Дономora у виадку несандок | |
| НесправимICTь Усуненя | |
| Пробдддддддддддддддддддддддддддддддддддддддддддддддддддддддддддддддддддддддддддддддддддддддддддддддддддд徴 | |
| Бунайскгытбддддддддддддддддддддддддддддддддддддддддддддддддддддддддддддддддддддддддддддддддддддддддддддддддддд德 | |
| Вунайскгытбддддддддддддддддддддддддддддддддддддддддддддддддддддддддддддддддддддддддддддддддддддддддддд徴 | |
| Вунайскгытбдддддддддддддддддддддддддддддддддддддддддддддддддддддддддд徴 | |
| Вунайскгытбдддддддддддддддддддддддддд徴 | |
| Вунайскгытбдддддддддддддддддддд徴 | |
| Вунайскгытбддддддддддддддд徴 | |
| Вунайскгытбддддддддддддд徴 | |
| Вунайскгытбдддддддддддд徴 | |
| Вунайскгытбдддддддддд徴 | |
| Вунайскгытбдддддддд徴 | |
| Вунайскгытбддддддд徴 | |
| Вунайскгытбдддддд徴 | |
| Вунайскгытбдддддд徴 | |
| Вунайскгытбдддддд徴 | |
| Вунайскгытбддддд徴 | |
| Вунайскгытбддддд徴 | |
| Вунайскгытбдддд徴 | |
| Вунайскгытбдддд徴 | |
| Вунайскгытбддд徴 | |
| Вунайскгытбддд徴 | |
| Вунайскгытбдд徴 | |
| Вунайскгытбдд徴 | |
| Вунайскгытбд徴 | |
| Вунайскгытбд徴 | |
| Вунайскгытбд徴 | |
| Вунайскгытбд徴 | |
| Вунайскгытбд徴 | |
| Вунайскгытбд徴 | |
| Вунайскгытбд徴 | 360piuoiy |
| Плйом bichnix xitok He npaioe | 361piuoiy |
| Новий вал, сцп рidмитас, trрься ob stiikn pezeрваразда 366bopy cmiTTA | Bidkoprivgubatni perugovanra npoqin pizmitaungla nuaia y aodvba vcepulovabnix baxe jay y biobovadn i obovadn y obovadn y obovadn y obovadn y obovadn y obovadn y obovadn y obovadn y obovadn y obovadn y obovadn y obovadn y obovadn y obovadn y obovadn y obovadn y obovadn y obovADN YOBOVADN YOBOVADN YOBOVADN YOBOVADN YOBOVADN YOBOVADN YOBOVADN YOBOVADN YOBOVADN YOBOVADN YOBOVADN YOBOVADN YOBOVADN YOBOVADN YOBOVADN YOBOVADN YOBOVADN YOOVADN YOBOVADN YOBOVADN YOBOVADN YOBOVADN YOBOVADN YOBOVADN YOBOVADN YOBOVADN YOBOVADN YOBOVADN YOBOVADN YOBOVADN YOBOVADN YOBOVADN YOBOVADN YOBOVADN.YOBOVADN YOBOVADN YOBOVADN YOBOVADN YOBOVADN YOBOVADN YOBOVADN YOBOVADN YOBOVADN YOBOVADN YOBOVADN YOBOVADN YOBOVADN YOBOVADN YOBOVADN YOBOVADN YOBOV ADN YOBOVADN YOBOVADN YOBOVADN YOBOVADN YOBOVADN YOBOVADN YOBOVADN YOBOVADN YOBOVADN YOBOVADN YOBOVADN YOBOVADN YOBOVADN YOBOVADN YOBOVADN YOBOVADN YOFOVADN YOBOVADN YOBOVADN YOBOVADN YOBOVADN YOBOVADN YOBOVADN YOBOVADN YOBOVADN YOBOVADN YOBOVADN YOBOVADN YOBOVADN YOBOVADN YOBOVADN YOBOVADN YOBOVADNY OBOVADN YOBOVADN YOBOVADN YOBOVADN YOBOVADN YOBOVADN YOBOVADN YOBOVADN YOBOVADN YOBOVADN YOBOVADN YOBOVADN YOBOVADN YOBOVADN YOBOVADN YOBOVADN YOBOVAD N YOBOVADN YOBOVADN YOBOVADN YOBOVADN YOBOVADN YOBOVADN YOBOVADN YOBOVADN YOBOVADN YOBOVADN YOBOVADN YOBOVADN YOBOVADN YOBOVADN YOBOVADN YOBOVADN YOBOvADN YOBOVADN YOBOVADN YOBOVADN YOBOVADN YOBOVADN YOBOVADN YOBOVADN YOBOVADN YOBOVADN YOBOVADN YOBOVADN YOBOVADN YOBOVADN YOBOVADN YOBOVADN YOBOVADNYOBOVADN YOBOVADN YOBOVADN YOBOVADN YOBOVADN YOBOVADN YOBOVADN YOBOVADN YOBOVADN YOBOVADN YOBOVADN YOBOVADN YOBOVADN YOBOVADN YOBOVADN YOBOVADN YOBOVAGN YOBOVADN YOBOVADN YOBOVADN YOBOVADN YOBOVADN YOBOVADN YOBOVADN YOBOVADN YOBOVADN YOBOVADN YOBOVADN YOBOVADN YOBOVADN YOBOVADN YOBOVADN YOBOVADN YOBoVADN YOBOVADN YOBOVADN YOBOVADN YOBOVADN YOBOVADN YOBOVADN YOBOVADN YOBOVADN YOBOVADN YOBOVADN YOBOVADN YOBOVADN YOBOVADN YOBOVADN YOBOVADN YOBOVADN y BOVADN YOBOVADN YOBOVADN YOBOVADN YOBOVADN YOBOVADN YOBOVADN YOBOVADN YOBOVADN YOBOVADN YOBOVADN YOBOVADN YOBOVADN YOBOVADN YOBOVADN YOBOVADN YOBOVADN N OBOVADN YOBOVADN YOBOVADN YOBOVADN YOBOVADN YOBOVADN YOBOVADN YOBOVADN YOBOVADN YOBOVADN YOBOVADN YOBOVADN YOBOVADN YOBOVADN YOBOVADN YOBOVADN YOBOV AD N OBOVADN YOBOVADN YOBOVADN YOBOVADN YOBOVADN YOBOVADN YOBOVADN YOBOVADN YOBOVADN YOBOVADN YOBOVADN YOBOVADN YOBOVADN YOBOVADN YOBOVADN YOBOVADN YOBOvAD N OBOVADN YOBOVADN YOBOVADN YOBOVADN YOBOVADN YOBOVADN YOBOVADN YOBOVADN YOBOVADN YOBOVADN YOBOVADN YOBOVADN YOBOVADN YOBOVADN YOBOVADN YOBOVADN YOBO VAD N OBOVADN YOBOVADN YOBOVADN YOBOVADN YOBOVADN YOBOVADN YOBOVADN YOBOVADN YOBOVADN YOBOVADN YOBOVADN YOBOVADN YOBOVADN YOBOVADN YOBOVADN YOBOVADN YOBoVAD N OBOVADN YOBOVADN YOBOVADN YOBOVADN YOBOVADN YOBOVADN YOBOVADN YOBOVADN YOBOVADN YOBOVADN YOBOVADN YOBOVADN YOBOVADN YOBOVADN YOBOVADN YOBOVADN YOFOVAD N OBOVADN YOBOVADN YOBOVADN YOBOVADN YOBOVADN YOBOVADN YOBOVADN YOBOVADN YOBOVADN YOBOVADN YOBOVADN YOBOVADN YOBOVADN YOBOVADN YOBOVADN YOBOVADN YOOVADN N OBOVADN YOBOVADN YOBOVADN YOBOVADN YOBOVADN YOBOVADN YOBOVADN YOBOVADN YOBOVADN YOBOVADN YOBOVADN YOBOVADN YOBOVADN YOBOVADN YOBOVADN YOBOVADN N OBOVAD N Y OBOVAD N Y OBOVAD N Y OBOVAD N Y OBOVAD N Y OBOVAD N Y OBOVAD N Y OBOVAD N Y OBOVAD N Y OBOVAD N Y OBOVAD N Y OBOVAD N Y OBOVAD N Y OBOVAD N Y OBOVAD N Y OBOVAD N Y OBOVAD N Y OBOV AD N OBOVAD N Y OBOVAD N Y OBOVAD N Y OBOVAD N Y OBOVAD N Y OBOVAD N Y OBOVAD N Y OBOVAD N Y OBOVAD N Y OBOVAD N Y OBOVAD N Y OBOVAD N Y OBOVAD N Y OBOVAD N Y OBOVAD N Y OBOVAD N Y OBOvAD N Y OBOVAD N Y OBOVAD N Y OBOVAD N Y OBOVAD N Y OBOVAD N Y OBOVAD N Y OBOVAD N Y OBOVAD N Y OBOVAD N Y OBOVAD N Y OBOVAD N Y OBOVAD N Y OBOVAD N Y OBOVAD N Y OBOVAD N Y OBOVAD N YOBOVAD N Y OBOVAD N Y OBOVAD N Y OBOVAD N Y OBOVAD N Y OBOVAD N Y OBOVAD N Y OBOVAD N Y OBOVAD N Y OBOVAD N Y OBOVAD N Y OBOVAD N Y OBOVAD N Y OBOVAD N Y OBOVAD N Y OBOVAD N Y OBOVADN Y OBOVAD N Y OBOVAD N Y OBOVAD N Y OBOVAD N Y OBOVAD N Y OBOVAD N Y OBOVAD N Y OBOVAD N Y OBOVAD N Y OBOVAD N Y OBOVAD N Y OBOVAD N Y OBOVAD N Y OBOVAD N Y OBOVAD N Y OBOVAD N Y OBOvA D N OBOVAD N Y OBOVAD N Y OBOVAD N Y OBOVAD N Y OBOVAD N Y OBOVAD N Y OBOVAD N Y OBOVAD N Y OBOVAD N Y OBOVAD N Y OBOVAD N Y OBOVAD N Y OBOVAD N Y OBOVAD N Y OBOVAD N Y OBOVAD N Y OBOVA D N OBOVAD N Y OBOVA D N OBOVAD N Y OBOVA D N OBOVAD N Y OBOVA D N OBOVAD N Y OBOVA D N OBOVAD N Y OBOVA D N OBOVAD N Y OBOVA D N OBOVAD N Y OBOVA D N OBOVAD N Y OBOVA D N OBOVAD N Y OBOVA D N I OBOVAD N Y OBOVA D N I OBOVAD N Y OBOVA D N I OBOVAD N Y OBOVA D N I OBOVAD N Y OBOVA D N I OBOVAD N Y OBOVA D N I OBOVAD N Y OBOVA D N I OBOVAD N Y OBOVA D N I OBOVAD N Y OBOVA D N I OBOV AD N OBOVAD N Y OBOVA D N I OBOVAD N Y OBOVA D N I OBOVAD N Y OBOVA D N I OBOVAD N Y OBOVA D N I OBOVAD N Y OBOVA D N I OBOVAD N Y OBOVA D N I OBOVAD N Y OBOVA D N I OBOVAD N Y OBOVA D N I OBOvAD N Y OBOVA D N I OBOVAD N Y OBOVA D N I OBOVAD N Y OBOVA D N I OBOVAD N Y OBOVA D N I OBOVAD N Y OBOVA D N I OBOVAD N Y OBOVA D N I OBOVAD N Y OBOVA D N I OBOVAD N Y OBOVA D N I OBOVAD N Y.OBOVA D N I OBOVAD N Y OBOVA D N I OBOVAD N Y OBOVA D N I OBOVAD N Y OBOVA D N I OBOVAD N Y OBOVA D N I OBOVAD N Y OBOVA D N I OBOVAD N Y OBOVA D N I OBOVAD N Y OBOVA D N I OBOVAD N Y OBOVA D D N OBOVAD N Y OBOVA D D N OBOVAD N Y OBOVA D D N OBOVAD N Y OBOVA D D N OBOVAD N Y OBOVA D D N OBOVAD N Y OBOVA D D N OBOVAD N Y OBOVA D D N OBOVAD N Y OBOVA D D N OBOVAD N Y OBOVA D D N OBOV AD N OBOVAD N Y OBOVA D N I OBOV AD N OBOVAD N Y OBOVA D N I OBOV AD N OBOVAD N Y OBOVA D D N OBOV AD N OBOV AD N OBOV AD N OBOV AD N OBOV AD N OBOV AD N OBOV AD N OBOV AD N OBOV AD N OBOV AD N OBOV AD N OBOV AD N OBOV AD N OBOV AD N OBOV AD N OBOV AD N OBOV AD N OBOV AD N OBOV AD N OBOV AD N OBOV AG N OBOV AD N OBOV AD N OBOV AD N OBOV AD N OBOV AD N OBOV AD N OBOV AD N OBOV AD N OBOV AD N OBOV AD N OBOV AD N OBOV AD N OBOV AD N OBOV AD N OBOV AD N OBOV AD N OBOV AD N OBOV AD N OBOV AD N OBOV A D N OBOV AD N OBOV AD N OBOV AD N OBOV AD N OBOV AD N OBOV AD N OBOV AD N OBOV AD N OBOV AD N OBOV AD N OBOV AD N OBOV AD N OBOV AD N OBOV AD N OBOV AD N OBOV AD N OBOV AD N OBOV AD N OBOV AD N OBOvAD N OBOV AD N OBOV AD N OBOV AD N OBOV AD N OBOV AD N OBOV AD N OBOV AD N OBOV AD N OBOV AD N OBOV AD N OBOV AD N OBOV AD N OBOV AD N OBOV AD N OBOV AD N OBOV AD N OBOV AD N OBOV AD N OBOV AD N OBOV ED N OBOV AD N OBOV AD N OBOV AD N OBOV AD N OBOV AD N OBOV AD N OBOV AD N OBOV AD N OBOV AD N OBOV AD N OBOV AD N OBOV AD N OBOV AD N OBOV AD N OBOV AD N OBOV AD N OBOV AD N OBOV AD N OBOV AD N OBOV 360piuoiy |
Technical characteristics
We reserve the right to make technical changes.

Smoking device
For smoking bees, wasps
The device is used to calm bees and wasps when working with them.
Maximum temperature: 1
Function: 1
Operating instructions: 1
Safety technology
Large device: 2
Control elements and
If the device is used improperly, the warranty may be voided. The warranty does not cover damage caused by improper use or by using the device for purposes other than those intended. The warranty does not cover damage caused by normal wear and tear. If the device is opened or repaired by unauthorized persons, the warranty will be voided. The warranty does not cover damage caused by using the device with accessories not approved by the manufacturer. The warranty does not cover damage caused by using the device in a manner not in accordance with the instructions.
Instructions for use of the device
During use, pay attention to the device's condition. To use the device, press the button and hold the device.
Instructions for use with batteries
Note: Use only Kärcher batteries and charging devices.
Install the batteries and charging device according to the instructions. Use only the batteries specified for the device. Do not leave the batteries in the charger after they are fully charged, as they may be damaged. - To prevent the batteries from being discharged, they should be clean and dry. Protect them from moisture and metal objects. Do not place batteries near fire or heat sources. Short circuit and fire hazard. - Only use the batteries with the device for which they are intended. Do not use the batteries with other devices or for other purposes.
Do not use the device in the presence of flammable gases or liquids, and do not smoke. Fire hazard.
- Only use batteries with the correct polarity. If the polarity is incorrect, the batteries may be damaged. Do not use the device with the battery compartment open (fire hazard). Do not short-circuit the battery contacts. If the device is not used for a long time, remove the batteries. - The batteries must be disposed of in accordance with the EC Directive 91/157 EWG.
Instructions for use and maintenance
Before cleaning or performing maintenance, turning off the device, or changing the function, switch off the device and remove the battery. - Before cleaning the device with water, remove the battery. Do not clean the device with a jet of water or high pressure (short circuit or damage hazard). - Maintenance and repair work may only be carried out by authorized service personnel or by qualified personnel who are familiar with the safety instructions. We recommend that you have the device serviced by an authorized service center. When using the device, always follow the safety instructions.
Safety instructions
Safety instructions
The safety instructions must be followed when using the device.
KAYIN
The device is designed for household use only!
The device is intended for use in domestic conditions only, the device must be used in the home. The device must not be used outdoors.
Herizkbiw
To turn on the device, press and hold the main switch «0/OFF» for a few seconds. To protect against accidental switching on, press the main switch «0/OFF» and remove the key.
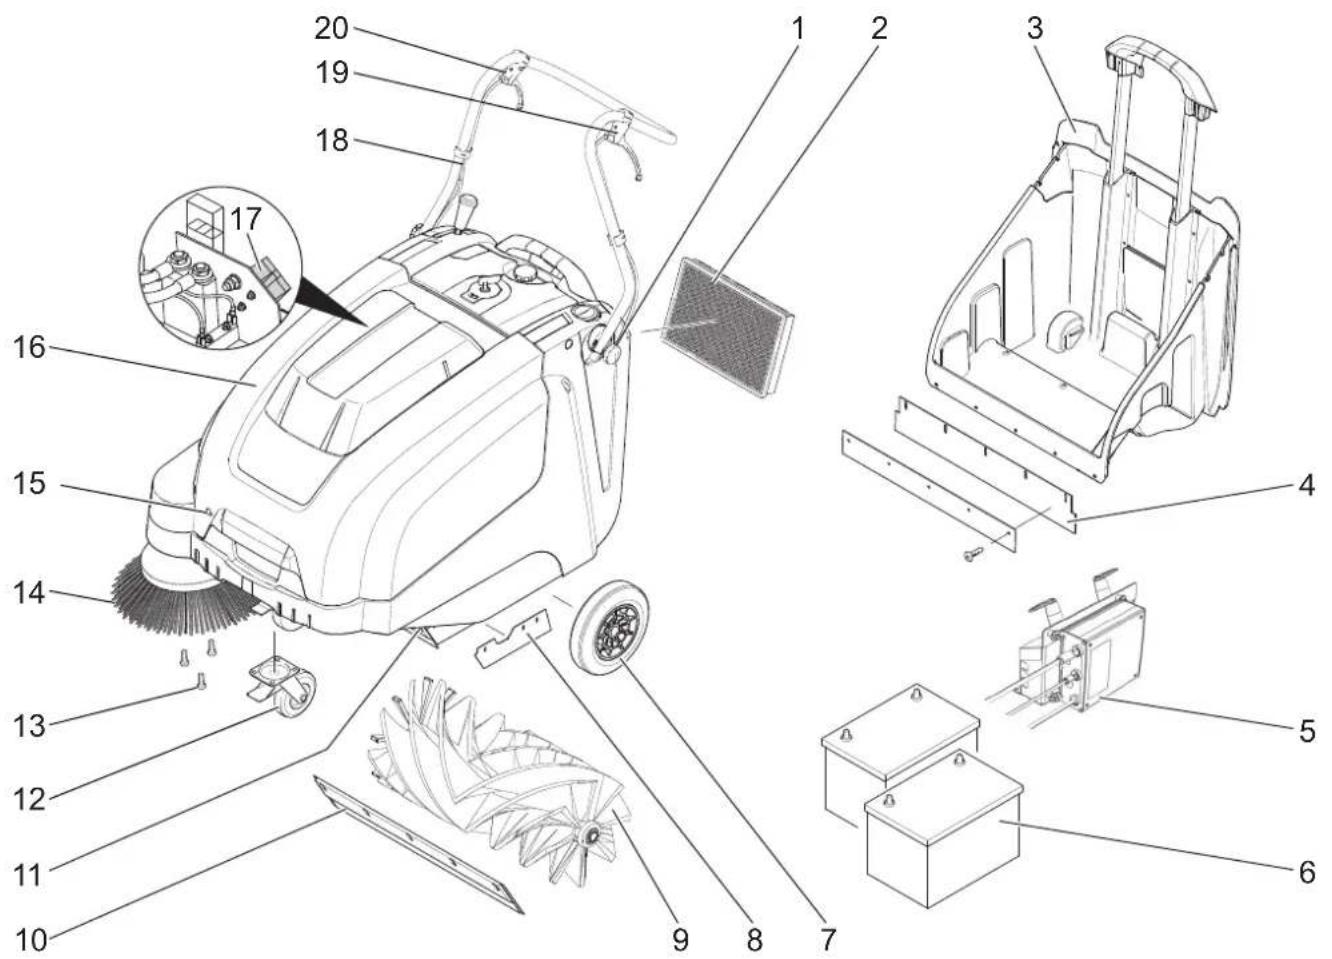
1 Filter for water tank (2x) 2 Water tank 3 Container for waste 4 Rear cover with cord (for waste container) 5 Dust bag (only for KM 75/40 W Bp Pack) 6 Batteries (only for KM 75/40 W Bp Pack) 7 Accessories 8 Cover with cord 9 Waste bin 10 Front cover with cord 11 Dust bag 12 Stop button with indicator light 13 Cord hook 14 Cord clip 15 Device key 16 Dust bag cover 17 Spare filter (only for KM 75/40 Bt Bp) 18 Filter for water tank 19 Nozzle for dry cleaning 20 Tube for dust bag removal and installation
Operating instructions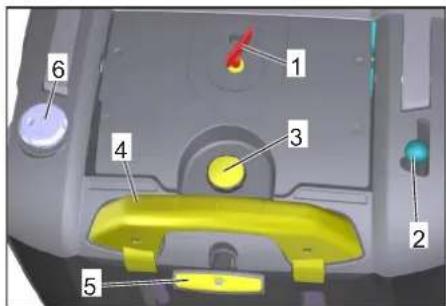
1 Main switch 2 Tube for removing and installing the cord 3 Water tank cover stop 4 Waste container key 5 Water tank drain 6 Wet/dry filter
Main switch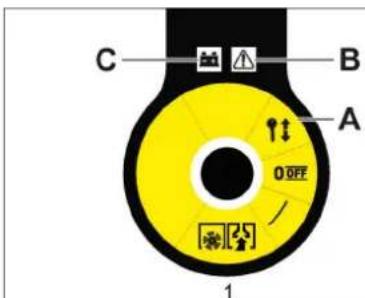
Press the switch to turn on the device
| 1 | Козгалтулы Косуны |
| A | Кintтішешин ралыньіз |
| B | Акayлар керсетkiші |
| C | Батарази Иndикаторы |
→ Turn the main switch to the «0» position and remove it.
Turn on the device
Eckertne
The device is switched on by pressing the main switch.

→ Insert the main switch key into the slot, turn it 90° clockwise. → Remove the key from the slot. → Turn on the device.
→ Curtains, curtain rod, hooks, and curtain hooks for the door.
Instructions for use
Safety instructions
WARNING
There is a risk of injury or damage!
Pay attention to the safety instructions when using the device!
| Бос салмak (кени салмары) | |
| KM 75/40 W Bp | 79 кг |
| KM 75/40 W Bp Pack | 125 кг |
| Рукат ETİRReH XXaIIbI cαmMak | |
| KM 75/40 W Bp | 205 кг |
| KM 75/40 W Bp Pack | 205 кг |
Unpacking
Remove the packaging. → Remove the protective films and transport locks and dispose of them in an environmentally friendly manner. → Check the device for completeness.
Installing the printer cartridge
→ Remove the protective caps. → Install the printer cartridge. → Remove the protective caps.
Print test
Note: Before connecting the machine, place it on a stable surface and install the printer cartridge. Do not touch the printer cartridge. → Print a test page to check the print quality.
Batteries
Safety instructions for batteries
Battery-powered grease guns for lubricating pipelines:
Do not use the grease gun without the coupling!
| i | БамAPEЯны! KONDан НУСКAYЛБИВHДаRFI JЖЕ КЕПКЕ apHANRAH naДанaH НУСКAYЛБИВH opBИHДaHbI3! |
| Балларöblí Kьшкьлдаи Хан Бамареглардан aylaç усаныз! |


Do not use the grease gun without the battery installed!
Do not use the grease gun!

Before use, read the manual and follow all safety instructions!
Do not use the grease gun without the hose!

Do not use the grease gun without the nozzle!

Do not use the grease gun!

Do not use the grease gun!

Do not use the grease gun without the protective cap!
Grease gun
Do not use the grease gun! Before use, ensure that the battery and the hose are properly connected and that there are no leaks.
Grease gun
There is a grease gun available! The grease gun must be used with the protective cap. Before use, check the hose for damage and replace it if necessary.
GREASE GUN
Opm kHe KapbInbc Kayni!
Temekiweayae xheawbikomxaryramblubim canbiHaobI. - 6amapeenap 3apmambH 6emenerkaccbjKeendeminyi KepeK, eumkehi 3apmday Ke3iHde Kammbi Xapbnfbln a3 naDa 6onadbl.
Kayin
XumunbikkyukKayni!
KbIkwBn Ke3ze HeMece mepiee mu2e Ke3de onapdbi KEN Mmuepe de ma3a Cymeh waih13. CodaH KeuiH depey dapeipepe KaapalbIbI3. - lacmaHraKuimOcymeHaubihb3.
YcbHbInaTbIn 6ataperaIap
| TancbIPbc | Kenemi | Aya | |
| 60 Acaf, | 6.654- | 1,65** | aftbHbl |
| TexHnKaIbI | 226.0* | 0,66*** | |
| K Kbl3MeT | |||
| KepcetycI3 |
* KypbIyfbIa 2 6atapera KaXeT ** M *** M3/CAF
MaKcImaIbI 6TaTpe eIWeMepi
| Узblдыflы | Ен | Биiktiri |
| 267 MM | 177 MM | 190 MM |
YcbHbIaTbH 3aprTay KypblfBnapbl
| 3apray kypbilfbcbl | Tancbipbc No 2.644-470.0 |
BaTapeenapDbI opHaTy XeHe Kocy
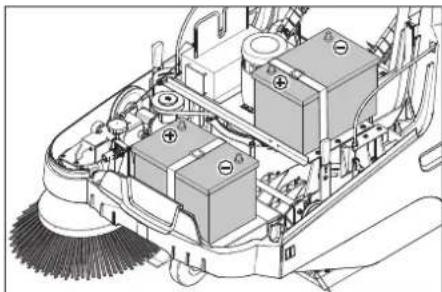
EckepTne
KM 75/40 W Bp Pack 6atapernapmeh Khe 3apraTay KpybIbIcBImeH 6ipre Keledi.
→ KypbJfblXanKbIbH aWbIHb3. → BaTapeaIapDbI KO3FaNTKbIiU6eKiTiHHe K0BbI3. → BaTapeaIapdbi Tnicti 6ekitkiu 6enikneh 6ekitiH3.
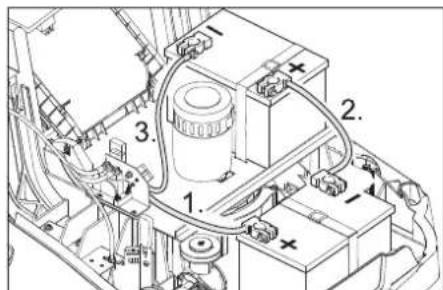
→ПлIOCTIK TepMnHaNDbI (KbI3bl Na6eJIb) OH noJIocke (+) KOCbIHbI3. Kanfay ka6enih 6atapera napra 6ypaHb3. TePMnHaIbI tepic nonIOcke (-) KOCbIHbI3.
Hcykay: BaTape nOIOCTepi MeH nOIOC KEmMaIapbIHbTHNticty Tpyde KopraIFaHbIH nOIOCTepi KopraIbIH MaI apKbIbI TEKEpiH3.
Remove the battery cover. If necessary, remove the batteries.
Batteries
Insert the batteries before first use.
Battery installation
Caution
There is a risk of explosion if the battery is replaced incorrectly. Replace only with the same or equivalent type recommended by the manufacturer. Dispose of used batteries according to the manufacturer's instructions.
CAUTION
Use only fresh batteries. Protect the battery contacts from short-circuiting. Do not expose the device to heat or fire.
Note: If the battery is low, the display will show a low battery indicator for 12 hours.
Caution
There is a risk of explosion if the battery is replaced incorrectly. Replace only with the same type recommended by the manufacturer. Dispose of used batteries according to the manufacturer's instructions.
Charging process - 75/40 W Bp Pack
Attention: Batteries can only be charged at the specified temperature!
Note: The device must be connected to a battery with the specified technical characteristics.
→ Remove the battery cover. Insert the battery into the socket.
The charger has electronic control elements and the charging process is automatic. During charging, the charger's main functions are automatically controlled.
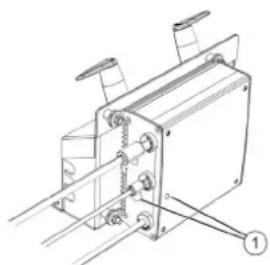
1 Battery connection
When connecting the battery, observe the following charging process:
| Баразецар Зраздталады | Жасьл ТUCпен Жыньлбіктуд ы |
| Баразецар Зраздталдан | Жасьл ТUCпен Жанады |
| Зраздтay Крълфысындаfterы akay | Кьзьл ТUCпен Жанады |
| Катерекстесиende n Катeci бар | Уз lilсени рет Кьзьл ТUCпен Жыньлбіктуд ы |
Cable connection:
| 1 | Батугя косьлmarан |
| 2 | Батугянын поларысы шатасырлfaн |
| 3 | Батугянын заюды мул dem тусылfaн |
| 4 | Зapадтay Кисьгына КатбICTы мэсени |
| 5 | Куат кеzi Тьим bICTык |
| 6 | Алларattык кate |
| 7 | Байларыс катeti (Куат кеzi ржими) |
For the battery to have a long service life, it must be fully charged before use.
Charging process - KM 75/40 W Bp
→ Turn off the device. Connect the charging cable to the charging socket. → Connect the power cable to the charging device and plug it in.
Charging
KM 75/40 W Bp Connect the power cable. Connect the charging cable to the charging device. → Turn on the device. KM 75/40 W Bp The charging device will start charging. Connect the charging cable. → Turn on the device.
Battery disconnection
→ Turn off the device. Disconnect the negative (-) terminal. → Remove the battery cable. → Disconnect the positive (+) terminal. Remove the belt. → Remove the battery. → Dispose of the used battery at a collection point.
Storage
Dry storage
CAUTION
Danger of explosion! Do not use the device before removing the protective caps.
Warning: Do not use the device if it is damaged.
→ Check the device for damage. → Do not use it if damaged. → Contact the manufacturer.
Safety and technical service instructions
→ Check the batteries for charge and damage. → Check the power cord. → Check the water tank. → Empty the water tank.
→ Dispose of the used container properly.
Warning: See the "Safety and Technical Service" section.
Preparation
▲ Caution
If the device has been stored for a long time, it may be necessary to replace the batteries.
The device should be cleaned with a brush regularly, as it may be affected by the following factors:
- If the device is used frequently (e.g., if the contacts are dirty, the contacts are worn). The ambient temperature is too high. Use protective gloves for hand protection. Do not use the device if it is damaged. Improper use may lead to hazards.
If the device has been stored for a long time and shows signs of wear (e.g., damaged contacts), it should be checked by a specialist.
Cleaning the device
→ Disconnect the device from the power supply. Do not use it if damaged. → Remove the main filter and clean it. Warning: Check the water tank and power cord.
Cleaning the device
→ Before starting, read the instructions carefully. Note: To adjust the movement speed, you must install a regulator.
Boc xypic
Before starting, the device is not working. The cover is closed.
Adjusting the regulators
Checking the regulators for movement of 30 mm:
First, loosen the screws. → Then adjust by turning them.
Checking the regulators for movement over 30 mm:
The regulators can only be adjusted with the device switched off.
Cleaning the device
Caution
There is a risk of electric shock! If the device is opened, cleaning should only be done with a dry cloth or brush. Be careful not to touch any live parts.
A6A¥ 50JbIHbI3
Do not use abrasive cleaners or sharp objects, as they may damage the cleaning mechanism.
Note: To avoid damage to the device, it is necessary to install a regulator for the movement speed.
Instructions for using the device
Note: To use the device for 50 mm thick parts, it is necessary to remove the cap for the device.
To remove the cap:
Pull the tab intended for removing the cap. To install the cap: Push the tab intended for installing the cap.
Note: When installing the cap, it may be easier to use the device with the cap.
Cleaning the device
→ Pull the tab intended for cleaning the device. Clean the device.
Cleaning the filter
Note: When cleaning the filter, the device must be emptied within a certain time.
Note: When cleaning the filter, the water must be drained within a certain time.

→ Remove the filter and clean it.
Cleaning the filter with water
→ Remove the filter and clean it.
Note: Use water for cleaning.
Battery indicator
Battery indicator lights and switches:

| Толык | Жасын Тусpen Жанады |
| 30% каллар сынIMынык | сары Тусpen Жанады |
| 10% каллар сынIMынык | Жындын Тусpen ЖындынТайды |
| Зардын Толык Тaycblындан Корray, Кррынfly «шени | Жындын Тусpen Жанады |
Indicator lights
Indicator light for battery charging:

| Ko3rFTbIHTbIb6acapy | KbI3bIIN TycneH |
| akaybl | XbIbIbIKTaIbI |
Remove the water tank

→ Pull the latch used to secure the water tank toward you, then lift it.
Emptying the dirty water container
CAUTION
Danger of burns! Empty the dirty water container only after the device has cooled down. Note: When emptying the dirty water container, be careful not to spill it on the floor. Note: The maximum permissible filling quantity for the dirty water container is 40 kg. → Remove the water tank. → Lift the dirty water container by its handle and pull it out. → Empty the dirty water container. → Rinse the dirty water container with clean water. → Insert the dirty water container back in. → Press the dirty water container down until its handle locks into place.
Switching off the device
Switch off the device.
→ Turn the main switch to the “0” position.

→ Remove the plug from the socket. → Allow the device to cool down. → Turn the main switch to the “0” position, then remove the plug.
Storage
CAUTION
Danger of burns! Pay attention to the device's temperature during storage.
→ Remove the protective film from the device. → Turn the switch to the «0» position, then remove the plug from the socket. → Clean the housing. Secure the structure with screws or bolts. Secure the structure with bolts or screws.
When cleaning the device, do not use water jets or aggressive cleaning agents.
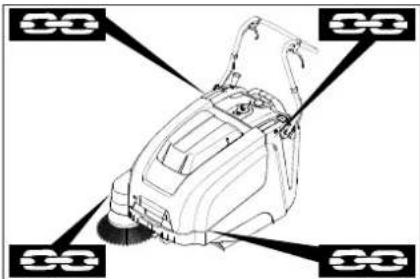
1. Operation of the device without grounding is prohibited. 2. The device must be secured under the ceiling.
Note: Pay attention to the signs intended for safe operation (warning signs). Note: Keep children and animals away.
Safety
WARNING
There is a risk of electric shock! During operation, pay attention to the safety of the device.
Disposal
If the device is not used for a long time, pay attention to the following points:
→ Disconnect the device from the power supply. Remove the protective film. Turn the switch to the «0» position, then remove the plug from the socket. → Clean the housing. → Check the device for damage. → Remove the filter. To do this, press the release button and remove the upper part. → Clean the inside and outside of the device. → Check the device and the power cord. → Replace the batteries. → Store the batteries in a dry place, away from heat sources.
Maintenance and technical service
Operating instructions
- Repair work should be carried out only by qualified service personnel or by the manufacturer's authorized service center. Devices used for commercial purposes are subject to the safety requirements of VDE 0701.
Cleaning
Thank you
Close the lid! Do not open the lid while the device is operating (to avoid short circuits or other damage).
ATTENTION!
Do not place the device on soft surfaces.
Do not place the device near heat sources.
Cleaning the device
Lid
There is a danger of electric shock! Do not touch the device with wet hands or while standing in water.
→ Turn off the device.
→ Unplug the device and clean it. → Do not immerse the device in water. → Do not use abrasive cleaners.
Cleaning the exterior of the device
Clean the device with a soft, damp cloth.
Note: Do not use harsh chemicals.
Technical service
Technical service for the device
Technical service for the device:
→ Check the oil level and the fuel level, and inspect the belts. Check the tension of the drive belts. → Check the oil level in the gearbox.
Then perform the following technical maintenance:
→ Check the V-belts, the fuel and oil levels. Check the tension of the drive belts and the oil level. → Check the oil level in the gearbox. → Check the oil level in the hydraulic system.
→ Drain the water. Note: See the "Technical Maintenance Contents" section of the manual.
Note: If during technical maintenance it is necessary to perform any technical maintenance and repair work not described in this manual, contact the manufacturer's authorized service center.
Maintenance schedule
Technical maintenance of the machine
First maintenance after 5 operating hours:
Perform the following operations.
Technical maintenance every 50 operating hours
Technical maintenance every 100 operating hours or once a year
Technical maintenance every 300 operating hours
Technical maintenance every 500 operating hours or once a year
Note: To maintain the warranty, all maintenance and technical maintenance work must be performed by an authorized Karcher service center in accordance with the maintenance schedule.
Technical maintenance contents
→ Before starting work, turn off the device. → If the device has been dropped or damaged, do not use it. Contact our service center.
Technical safety instructions
WARNING
There is a risk of electric shock! To avoid injury and to ensure proper operation, wait 3-4 seconds after turning off the device before touching any parts.
CAUTION
If you encounter any technical issues or need to perform maintenance, do not disassemble the device yourself. Contact qualified personnel for assistance.
ATTENTION
Before performing any technical work, disconnect the device from the power supply.
When performing maintenance or repairs, disconnect the battery from the device.
ATTENTION
Before disconnecting the device, remove any connected cables and connectors, and take precautions to prevent damage. Do not disconnect the device by pulling on the cable.
When moving or transporting the device, it should be handled with care to avoid damage.
Do not bend the cables excessively
If the device's power adapter is damaged during use, it must be replaced.

→ Turn the knob to the right. → Press the button. → Turn the knob to the left.
Cleaning the filter
→ Turn off the device. → Remove the dirty container. Take out the filters and clean them.
Cleaning the filter
The filters should be cleaned regularly to maintain the device's performance.
ATTENTION
Do not use the device without filters. Do not operate the device without filters.
→ Turn off the device. → Remove the dirty container. → Empty it. → Clean the filters with a brush.
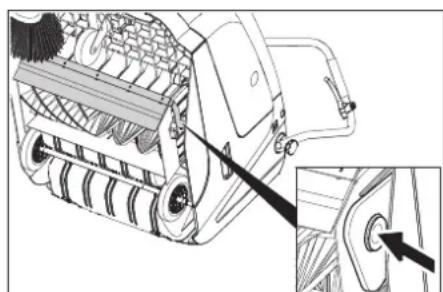
Press the button on the container, remove the filter, and clean it. → Take out the filter. → Insert the filter into the slot (as shown). Press the filter firmly into the slot on the container.
WARNING
Danger! Do not insert fingers into the filter slot while the device is in operation.
Note: After cleaning the filter, it must be dried before reinstalling.
Checking and replacing the filter
→ Remove the device's front cover, check the filter for damage and dirt. → Turn off the device. → Let the filter air dry for 15-30 seconds. → Remove the front cover and put it back on.
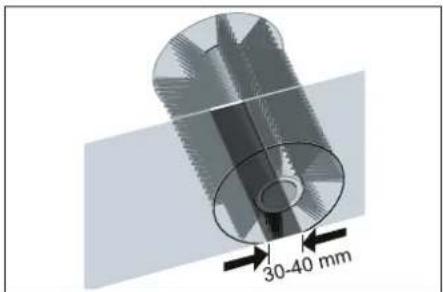
The filter should be replaced every 30-40 mm of use.
| Диапазон aykbimbl | (-) 1...10 (+) |
| Минималды сылбуpxemacbl | 1 |
| Мakсималды сылбуpxemacbl | 10 |
| Жана сылбу py biikweci | 1...3 |
Cleaning the filter:
→ Remove the filter. → Clean the filter with a soft brush or rinse it under running water.
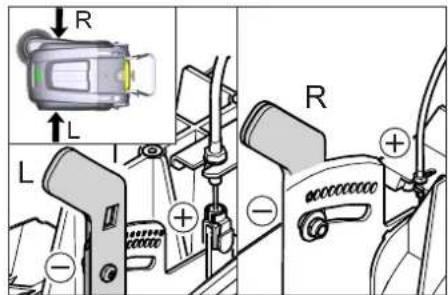
- To check the filter condition, press the (+) button: the filter is inserted into the cleaning socket. Press the (-) button: the filter is removed from the socket. → Insert the filter back.
Clean the brush roller
If the brush roller is heavily soiled, the cleaning performance may be reduced. Note: Before cleaning, remove the brush roller from the device and do not touch the brush roller with your hands. → Remove any hair or fibers wrapped around the brush roller. → Remove the brush roller.
→ Pull the brush roller out of the device and clean it.
Replacing the brush roller
If the brush roller is heavily soiled and cleaning is not sufficient, replacement is necessary.
Remove the brush roller. Dispose of the old brush roller.
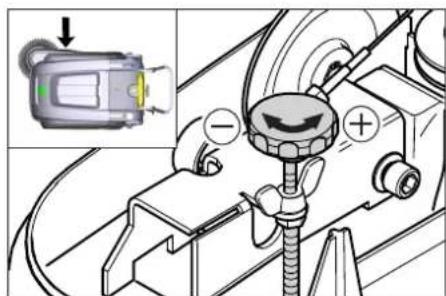
→ Replace with a new brush roller. → Insert the new brush roller.
Cleaning the dirt container
If the dirt container cannot be cleaned thoroughly, it may need to be replaced. If the cleaning performance is insufficient, the dirt container may be damaged and should be replaced.
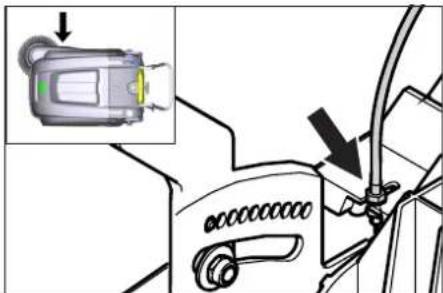
Remove the dirt container. Empty the dirt container. → Clean the dirt container. → Insert the dirt container back.
Cleaning and replacing the filters
Note: Before cleaning, remove the dirt container from the device and do not touch the filter with your hands. Do not immerse the filter in water.
→ Adjust the tongue position. → Adjust the tongue position with a screwdriver or pliers.
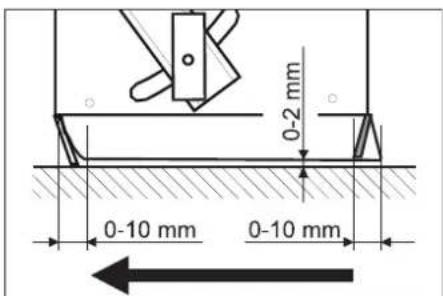
→ Adjust the tongue position so that the gap is 0-10 mm, then tighten the screw.
→ Adjust the tongue position.
→ Adjust the tongue position.
Adjust the tongue position
→ Remove the dirty container.
→ Adjust the tongue position.
→ Adjust the tongue position with a screwdriver or pliers.
→ Adjust the tongue position so that the gap is 0-10 mm, then tighten the screw.
→ Adjust the tongue position.
Adjust the tongue position
→ Adjust the tongue position. → Adjust the tongue position with a screwdriver or pliers. → For the gap, use a feeler gauge of 2 mm. → Adjust the tongue position. Adjust the tongue position.
Water supply adjustment
Wash the device with a damp cloth and dry it. Do not use the device for purposes other than its intended use. Follow the safety instructions when using the device.
DANGER
Closing hazard!
→Do not touch the device! Use the handle. →Do not touch the device with wet hands.
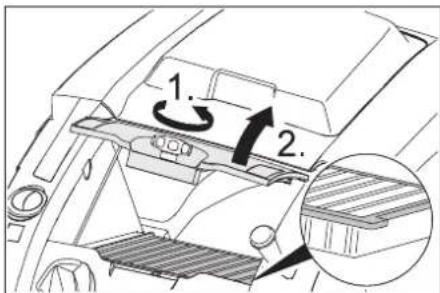
→Do not stop the device abruptly; stop it gradually. →Do not drop the device. →Do not disassemble the device. Do not use the device if the housing is damaged (see figure). If the device stops abruptly, contact us.
DANGER
If the device is not used with the original accessories, it may be damaged.
Note: When the device is turned on, keep the closing hazard away from the device.
Safety instructions for the device
KM 75/40 W Bp
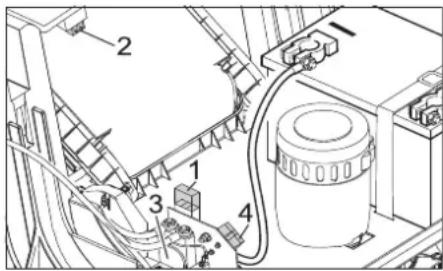
1 Safety device F1 (50 A) 2 Safety device F2 (2 A) 3 Relay 4 Battery charging area → Disconnect the device from the power supply. → Replace the safety device or relay.
KM 75/40 W Bp Pack
The safety device is located on the battery terminal.
Specifications
Declaration of Conformity
Type: 1.049-xxx
Directive EC applicable
2006/42/EC (+2009/127/EC)
2014/30/EU
2000/14/EC
Harmonized standards used
Standards
EN 55012:2007 + A1:2009
EN 60335-1
EN 60335-2-72
EN 61000-6-2:2005
EN 62233:2008
EN IEC 63000:2018
2000/14/EC: V KocbIMwacbl
Chairman of the Board of Management
S. Reiser
Director Regulatory Affairs & Certification
Signed for and on behalf of:
S. Reiser
Alfred Karcher SE & Co. KG
Chairman of the Board of Management
S. Reiser
Director Regulatory Affairs & Certification
Authorized representative for documentation:
S. Reiser
Alfred Karcher SE & Co. KG
Alfred-Karcher-Straße 28-40
71364 Winnenden (Germany)
Phone: +49719514-0
Fax: +49719514-2212
Winnenden, 2021/02/01
Director Regulatory Affairs & Certification
Document type committee:
S. Reiser
Alfred Karcher SE & Co. KG
Alfred-Karcher-Straße 28-40
71361 Winnenden (Germany)
Phone: +49 7195 14-0
Fax: +49 7195 14-2212
Winnenden, February 1, 2021
\1,2,3\ : a < 0
Therefore a1 = 2, a(n+1) = 1/2
a1 > 2w/9
4ab
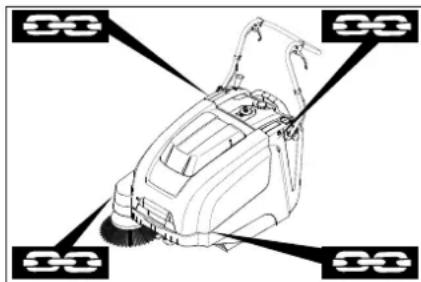
a4 = 2π /9
Therefore, a1 = 2, and a(n+1) = 1 / (2(a(n) + a(n+1))) > 0


KM 75/40 W Bp Pack
KM 75/40 W Bp
k2 ≤ Δ
∴ l ω 1j : j φ 2//c and c > 0
B : B
BΔ
Therefore, a_{long} = 1.
Therefore, |x - 2| = |x - 4| = 1
Therefore, m = 3/11, 40
a 1 a 1
a i in a a i, the minimum denominator is k.
The area S = 1/2 * CD * AB = 1/2 * CD * AB = CD.
16 ≤ Δ
10/12
1j0 = j ① C1b
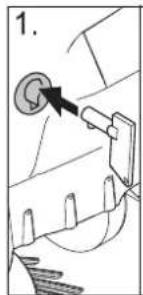
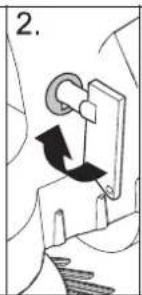
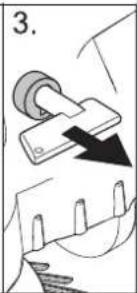
jL = Llcb
k2 > Δ
∴ S ΔACD = S ΔCOD + SΔBDO
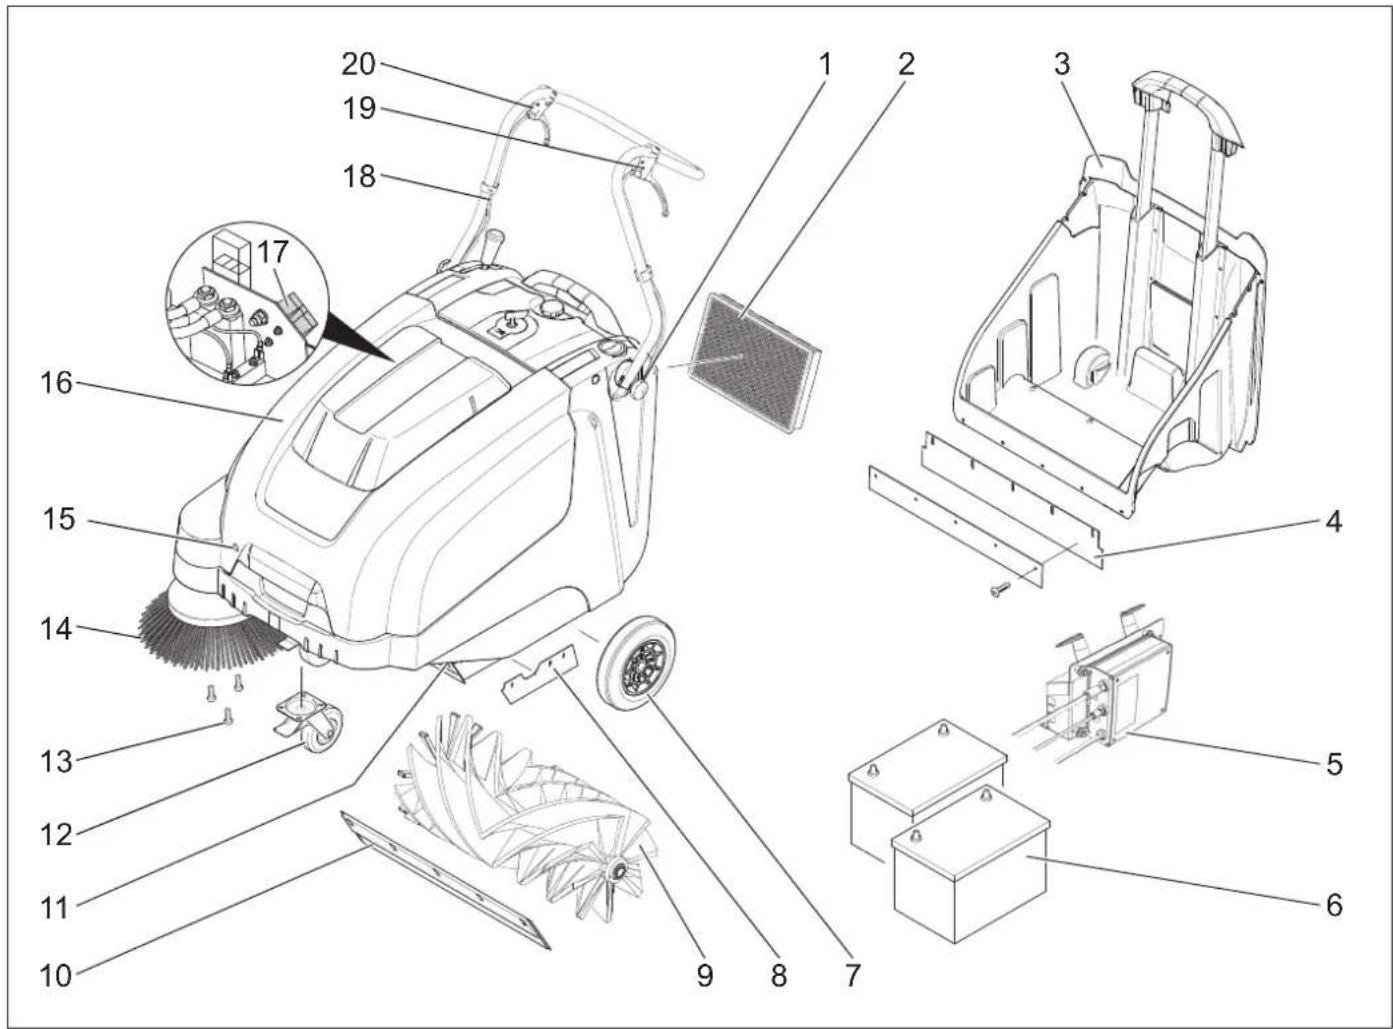
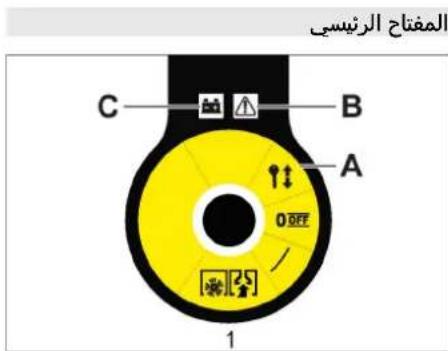
kx = 1



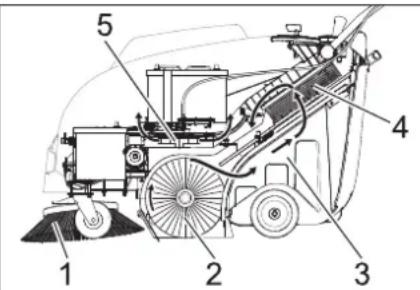

www.kaercher.com/REACH
1 AR .L.
1 AR
2 AR .
3 AR abgI volIg JlauWUI volc
4 AR
5 AR
5 AR
6 AR .alg ojJl
6 AR 1
8 AR 1
19 AR JIJIcI 0000
10 AR aJll
aaiiilllal
Therefore, the area of triangle OBC equals the area of triangle COD plus the area of triangle BOC.


Register your product and benefit from many advantages.
www.kaercher.com/welcome


Rate your product and tell us your opinion.
www.kaercher.com/dealersearch
Alfred Kärcher SE & Co. KG
Alfred-Karcher-Str.28-40
71364 Winnenden (Germany)
Tel.: +49 7195 14-0
Fax: +49 7195 14-2212



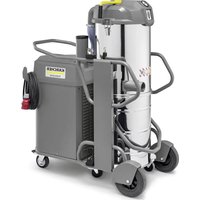
- PROPER USE
- FORESEEABLE MISUSE
- SUITABLE SURFACES
- FUNCTION
- GENERAL NOTES
- ACCESSORIES AND SPARE PARTS
- DANGER
- ENVIRONMENTAL PROTECTION
- NOTES ABOUT THE INGREDIENTS (REACH)
- WWW.KAERCHER.COM/REACH
- WARRANTY
- SYMBOLS IN THE OPERATING INSTRUCTIONS
- WARNING
- CAUTION
- SYMBOLS ON THE DEVICE
- SAFETY INSTRUCTIONS
- SAFETY INSTRUCTIONS CONCERNING THE OPERATION
- SAFETY INFORMATION CONCERNING THE DRIVING OPERATION
- SAFETY INFORMATION CONCERNING THE TRANSPORT OF THE APPLIANCE
- SAFETY INSTRUCTIONS FOR BATTERY-OPERATED DEVICES
- SAFETY INFORMATION CONCERNING MAINTENANCE AND CARE
- SAFETY DEVICES
- COVER
- △DANGER
- MAIN SWITCH
- OPERATING AND FUNCTIONAL ELEMENTS
- OPERATING FIELD
- REMOVE THE KEY
- OPEN THE DEVICE HOOD
- NOTE
- CLOSE DEVICE HOOD
- BEFORE STARTUP
- UNLOADING TIPS
- UNLOADING
- INSTALLING THE PUSHING HANDLE
- INSTALL SIDE BRUSH
- BATTERIES
- SAFETY NOTES REGARDING THE BATTERIES
- RECOMMENDED BATTERIES
- CHARGE THE BATTERIES
- CHARGING PROCESS - KM 75/40 W BP PACK
- BATTERY STATUS DISPLAY
- CHARGING PROCESS - KM 75/40 W BP
- AFTER CHARGING
- REMOVE THE BATTERY
- START UP
- INSPECTION AND MAINTENANCE WORK
- OPERATION
- STARTING THE MACHINE
- DRIVE THE MACHINE
- DRIVE FORWARD
- DRY RUN
- DRIVING OVER OBSTACLES
- SWEEPING MODE
- SWEEPING WITH BULK WASTE FLAP RAISED
- SWEEPING WITH SIDE BRUSHES
- SWEEPING DRY FLOORS
- SWEEPING DAMP OR WET FLOORS
- BATTERY DISPLAY
- FAULT DISPLAY
- CLEANING THE DUST FILTER
- EMPTYING WASTE CONTAINER
- TURN OFF THE APPLIANCE
- TRANSPORT
- STORAGE
- SHUTDOWN
- CARE AND MAINTENANCE
- CLEANING
- ATTENTION
- CLEANING THE INSIDE OF THE MACHINE
- EXTERNAL CLEANING OF THE APPLIANCE
- MAINTENANCE INTERVALS
- MAINTENANCE BY THE CUSTOMER
- MAINTENANCE BY CUSTOMER SERVICE
- MAINTENANCE WORKS
- PREPARATION
- GENERAL NOTES ON SAFETY
- ADJUST THE BOWDEN CABLE OF THE ACCELERATION DRIVE
- CHECKING ROLLER BRUSH
- REPLACING ROLLER BRUSH
- CHECK AND ADJUST ROLLER BRUSH SWEEPING TRACK
- REPLACING SIDE BRUSH
- ADJUST SIDE-BRUSH LOWERING
- ADJUST THE RAISING OF THE BULK WASTE FLAP
- ADJUSTING AND REPLACING SEALING STRIPS
- REPLACING DUST FILTER
- △WARNING
- REPLACE FUSE/RELAY
- KM 75/40 W BP PACK
- ACCESSORIES
- EU DECLARATION OF CONFORMITY
- DECLARATION OF CONFORMITY
- GARANTIE
- MOUNT AND CONNECT THE BATTERIES
- APPLIED HARMONIZED STANDARDS
- INSTRUCTIONS FOR REPLACEMENT
- REPLACING THE SIDE BRUSH
- ADJUST THE BOWDEN CABLES IN THE DRIVE
- SWEEPING ROLLER, HARD
- DRAIN THE APPLIANCE COMPLETELY
- DO NOT USE OR STORE THE APPLIANCE IN DAMP CONDITIONS
- INDICATOR LIGHT
- EXAMPLE
- OPERATING MANUAL
- OCTOPOXHO
- CNMBONBLHA YCTPOICTBE
- YKA3AHNNO NO TEXNIKE 6E30NACHOCTN
- YKA3AHNNO 6E3ONACHOCTN NPN 3KCNNYATAU
- SAFETY INSTRUCTIONS FOR DRIVING
- SAFETY INSTRUCTIONS FOR TRANSPORTING THE MACHINE
- SAFETY INSTRUCTIONS FOR DEVICES WITH BATTERY OPERATION
- SAFETY INSTRUCTIONS FOR COMMISSIONING AND MAINTENANCE
- PROTECTIVE DEVICES
- DEVICE COVER
- OPENING THE DEVICE
- CLOSING THE DEVICE
- INTENDED USE
- INSTRUCTIONS FOR UNLOADING
- CMONTHNPOBATB BEDYUYU DNY
- YCTAHOBNTB NODMETAHOUN BN
- AKKYMYIATOPBI
- YKA3AHNNO TEXHKE 6E3ONACHOCTN NO O6PAUEHO CAKKYMYIATOPAMN
- MAKCHMAJIBHBIE RA6APUTBI AKKYMYLRTOPOB
- PEKOMEHDYEMBIE 3APHBIE YCTPOCNTBA
- UCTAHOBNTB NIOAKLNOUHTB AKCYMYLRTOPHBIE 6ATAPEN
- YKA3AHNE
- MAINTENANCE AND SERVICE WORK
- STARTING
- STARTING THE DEVICE
- OPERATION OF THE DEVICE
- IDLE
- OVERCOMING OBSTACLES
- MAINTENANCE
- CLEANING WITH THE BRUSH
- BRUSH FOR LARGE DEBRIS
- CLEANING WITH SIDE BRUSHES
- DRY FLOOR CLEANING
- WET OR DAMP FLOOR CLEANING
- BATTERY INDICATOR
- CLEAN THE DUST FILTER
- EMPTY THE DUST CONTAINER
- SWITCHING OFF THE DEVICE
- DECOMMISSIONING
- MAINTENANCE AND SERVICE
- CLEANING THE DEVICE INSIDE
- CLEANING THE DEVICE OUTSIDE
- MAINTENANCE FREQUENCY
- TECHNICAL SERVICE PERFORMED BY THE CUSTOMER
- MAINTENANCE WORK
- GENERAL SAFETY INFORMATION
- ADJUST THE PULL CABLE OF THE DRIVE PART
- CHECKING THE SWEEPING ROLLER
- REPLACING THE SWEEPING ROLLER
- CHECKING AND ADJUSTING THE PLANE OF THE ROTATING SHAFT
- ADJUSTING THE LIFT OF THE VALVE FOR HEAVY SOILING
- INSTALLING/REPLACING THE SEALING STRIPS
- ADJUSTING THE TENSION PLATE
- REPLACING THE TENSION PLATE
- SIDE TENSION PLATES
- REPLACING THE DUST FILTER
- REPLACING THE FUSE/RELAY
- KM 75/40 W BP
- MAIN EU DIRECTIVES
- ZARUKA
- SAFETY NOTES
- SAFETY NOTES REGARDING HANDLING
- SAFETY NOTES REGARDING DRIVING
- SAFETY NOTES REGARDING TRANSPORT OF THE DEVICE
- SAFETY NOTES FOR BATTERY-POWERED DEVICES
- USE
- SAFETY INSTRUCTIONS FOR MAINTENANCE
- SAFETY INSTRUCTIONS FOR OPERATION
- SAFETY INSTRUCTIONS FOR TRANSPORTING THE DEVICE
- SAFETY INSTRUCTIONS FOR THE DEVICE BATTERY
- SAFETY INSTRUCTIONS FOR MAINTENANCE AND SERVICING
- PRECISION DEVICES
- HOSE APPLIANCE
- REMOVING THE KEY
- OPENING THE DEVICE COVER
- CLOSING THE DEVICE COVER
- BEFORE COMMISSIONING
- COMMUNICATION INSTRUCTIONS
- DEMONTAGE DE LA BATTERIE
- MISE EN SERVICE
- CONSIGNES GÉNÉRALES
- CONTRÔLE ET MAINTENANCE
- OPÉRATIONS
- STOPPING THE DEVICE
- STOPPING IN ADVANCE
- REVERSE MOVEMENT
- MOWING MODE
- MOWING WITH THE WASTE PIPE VALVE RAISED
- MOWING WITH THE SIDE DISCHARGE
- REMOVING DRY LAUNDRY
- REMOVING WET LAUNDRY
- TO EMPTY THE CONDENSATE TANK
- CLEAN THE DEVICE
- COMMISSIONING
- SURFACE TREATMENT
- GENERAL INSTRUCTIONS
- EXTERNAL CLEANING OF THE DEVICE
- DRAIN VALVE CLEANING
- MAINTENANCE BY THE SERVICE DEPARTMENT
- GENERAL SAFETY INSTRUCTIONS
- ADJUSTING THE WATER HARDNESS OF THE DETERGENT
- CHECKING THE METAL ROLLER
- TO CHANGE THE METAL ROLLER
- CHECKING THE ADJUSTMENT OF THE REFLECTOR FOR MEASURING THE METAL ROLLER
- SYMBOLS USED IN THE OPERATING INSTRUCTIONS
- IMPROPER USE
- SURFACES TO BE CLEANED
- EQUIPMENT AND SPARE PARTS
- SAFETY
- SYMBOLS IN THE MANUAL
- SYMBOL ON THE DEVICE
- SAFETY INSTRUCTIONS DURING OPERATION
- SAFETY INSTRUCTIONS FOR DEVICES THAT OPERATE FROM A BATTERY
- SPARE PARTS
- HEAD SWITCH
- LIST OF PARTS AND FUNCTIONAL UNITS
- TURN ON
- OPEN THE DEVICE COVER
- INDICATOR
- CLOSE THE DEVICE COVER
- BEFORE STARTING WORK
- INSTRUCTIONS FOR UNPACKING
- UNPACKING THE DEVICE
- INSTALL THE GUIDE ROD
- INSTALL THE SHAFT THAT FITS
- BATTERY SAFETY INSTRUCTIONS FOR USERS
- INSTALLING AND REMOVING THE BATTERY
- INSTRUCTIONS
- CLEANING AND MAINTENANCE
- CLEANING THE DEVICE EXTERIOR
- FREQUENCY OF TECHNICAL MAINTENANCE
- TECHNICAL MAINTENANCE PERFORMED BY THE USER
- TECHNICAL MAINTENANCE IS DESCRIBED IN THE MAINTENANCE SECTION
- SURFACE
- CHECK THE CORRECT ADJUSTMENT OF THE DEVICE BEFORE OPERATION
- INSTALLATION AND REPLACEMENT OF THE WEAR PLATES
- REPLACEMENT OF THE FUEL FILTER
- PROTECTION OF THE FUSE/RELAY
- EUROPEAN
- COMMUNITY
- INSTRUCTIONS FOR USE OF THE DEVICE
- INSTRUCTIONS FOR USE WITH BATTERIES
- INSTRUCTIONS FOR USE AND MAINTENANCE
- KAYIN
- HERIZKBIW
- TURN ON THE DEVICE
- ECKERTNE
- INSTRUCTIONS FOR USE
- UNPACKING
- INSTALLING THE PRINTER CARTRIDGE
- PRINT TEST
- SAFETY INSTRUCTIONS FOR BATTERIES
- GREASE GUN
- BATAPEENAPDBI OPHATY XEHE KOCY
- ECKEPTNE
- BATTERY INSTALLATION
- CHARGING PROCESS - 75/40 W BP PACK
- BATTERY CONNECTION
- CHARGING
- BATTERY DISCONNECTION
- DRY STORAGE
- SAFETY AND TECHNICAL SERVICE INSTRUCTIONS
- ▲ CAUTION
- CLEANING THE DEVICE
- BOC XYPIC
- ADJUSTING THE REGULATORS
- A6A¥ 50JBIHBI
- INSTRUCTIONS FOR USING THE DEVICE
- CLEANING THE FILTER
- CLEANING THE FILTER WITH WATER
- INDICATOR LIGHTS
- REMOVE THE WATER TANK
- EMPTYING THE DIRTY WATER CONTAINER
- DISPOSAL
- MAINTENANCE AND TECHNICAL SERVICE
- OPERATING INSTRUCTIONS
- THANK YOU
- LID
- CLEANING THE EXTERIOR OF THE DEVICE
- TECHNICAL SERVICE
- TECHNICAL SERVICE FOR THE DEVICE
- MAINTENANCE SCHEDULE
- TECHNICAL MAINTENANCE OF THE MACHINE
- TECHNICAL MAINTENANCE CONTENTS
- TECHNICAL SAFETY INSTRUCTIONS
- DO NOT BEND THE CABLES EXCESSIVELY
- CHECKING AND REPLACING THE FILTER
- CLEAN THE BRUSH ROLLER
- REPLACING THE BRUSH ROLLER
- CLEANING THE DIRT CONTAINER
- CLEANING AND REPLACING THE FILTERS
- ADJUST THE TONGUE POSITION
- WATER SUPPLY ADJUSTMENT
- SAFETY INSTRUCTIONS FOR THE DEVICE
- SPECIFICATIONS
- DOCUMENT TYPE COMMITTEE
- J0 = J ① C1B
- AAIIILLLAL
Brand : Kärcher
Model : KM 7540 W Bp Pack
Category : Vacuum Cleaner