KM 7540 W Bp Pack - Vacuum Cleaner Kärcher - Free user manual and instructions
Find the device manual for free KM 7540 W Bp Pack Kärcher in PDF.
User questions about KM 7540 W Bp Pack Kärcher
0 question about this device. Answer the ones you know or ask your own.
Ask a new question about this device
Download the instructions for your Vacuum Cleaner in PDF format for free! Find your manual KM 7540 W Bp Pack - Kärcher and take your electronic device back in hand. On this page are published all the documents necessary for the use of your device. KM 7540 W Bp Pack by Kärcher.
USER MANUAL KM 7540 W Bp Pack Kärcher
Chairman of the Board of Management

S. Reiser
Director Regulatory Affairs & Certification
71364 Winnenden (Germany)
Tel.: +49 7195 14-0
Fax: +49 7195 14-2212
Winnenden, 2021/02/01
Please read and comply with these original instructions prior to the initial operation of your appliance and store them for later use or subsequent owners.
Proper use. EN 1
Function. EN 1
General notes EN 1
Safety instructions. EN 2
Operating and Functional Ele
ments. EN 3
Before Startup EN 4
Start up EN 5
Operation. EN 5
Shutdown. EN 6
Care and maintenance . EN 6
Accessories. EN 8
EU Declaration of Conformity . EN 9
Declaration of Conformity . EN 9
Troubleshooting. EN 10
Technical specifications. . . EN 11
Proper use
Use this appliance only as directed in these operating instructions.
- This sweeper has been designed to sweep dirt and debris from indoor as well as outdoor surfaces.
- This device is suitable for commercial use in hotels, schools, hospitals, factories, shops, offices, and rental companies.
- The machine with working equipment must be checked to ensure that it is in proper working order and is operating safely prior to use. Otherwise, the appliance must not be used.
- The machine is not suitable for vacuuming dust which endangers health.
- The machine may not be modified.
- The machine is only suitable for use on the types of surfaces specified in the operating instructions.
- The machine may only be operated on the surfaces approved by the company or its authorised representatives.
- The following applies in general: Keep highly-flammable substances away from the appliance (danger of explosion/fire).
Foreseeable misuse
- Never vacuum up explosive liquids, combustible gases or undiluted acids and solvents. This includes petrol, paint thinner or heating oil which can generate explosive fumes or mixtures upon contact with the suction air. Acetone, undiluted acids and solvents must also be avoided as they can harm the materials on the machine.
- Never sweep/vacuum up reactive metal dusts (e.g. aluminium, magnesium, zinc), as they form explosive gases when they come in contact with highly alkaline or acidic detergents.
- Do not sweep/vacuum up any burning or glowing objects.
- The machine may not be used or stored in hazardous areas. It is not allowed to use the appliance in hazardous locations.
Suitable surfaces
Asphalt
-Industrial floor
- Screed
Concrete
- Paving stones
Function
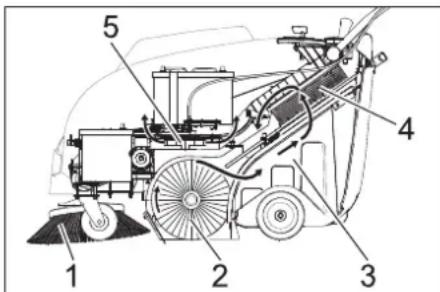
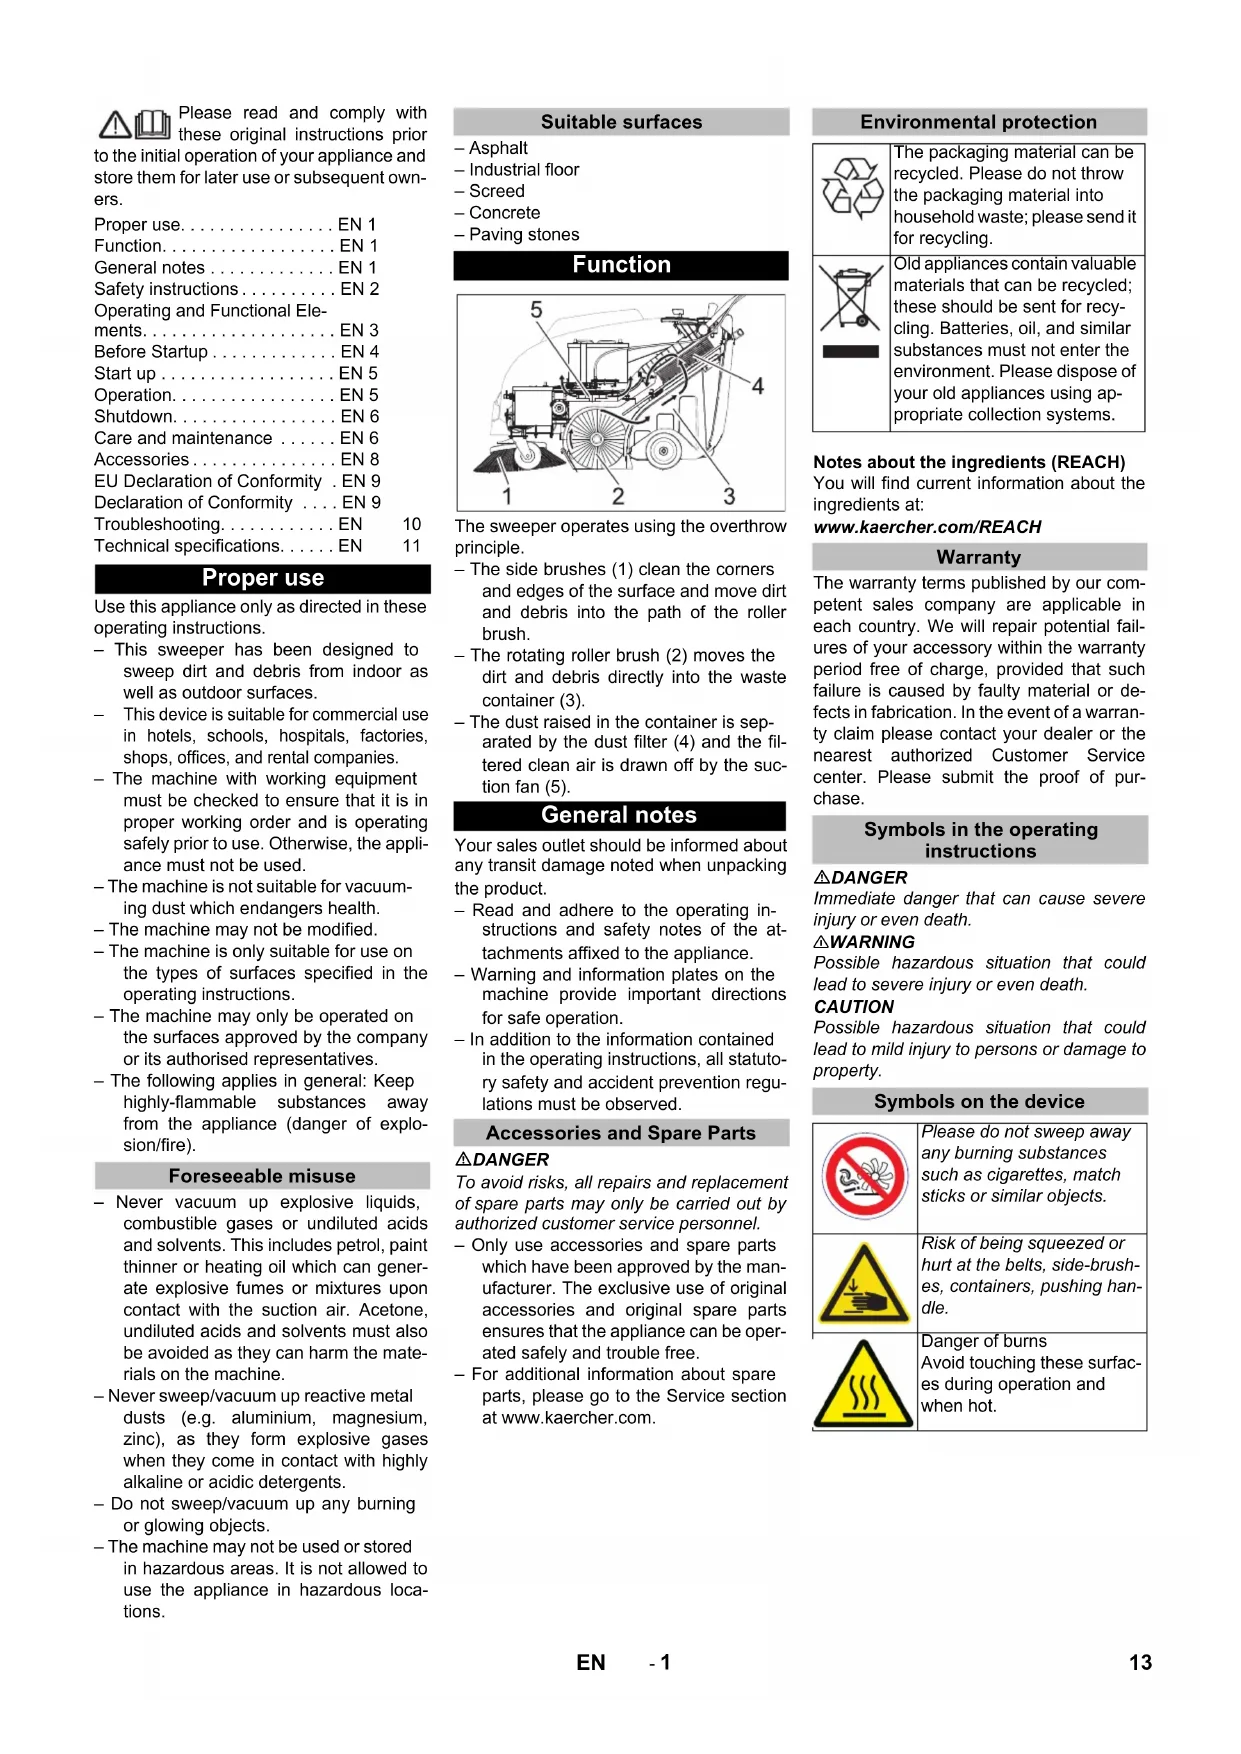
The sweeper operates using the overthrow principle.
- The side brushes (1) clean the corners and edges of the surface and move dirt and debris into the path of the roller brush.
- The rotating roller brush (2) moves the dirt and debris directly into the waste container (3).
- The dust raised in the container is separated by the dust filter (4) and the filtered clean air is drawn off by the suction fan (5).
General notes
Your sales outlet should be informed about any transit damage noted when unpacking the product.
- Read and adhere to the operating instructions and safety notes of the attachments affixed to the appliance.
- Warning and information plates on the machine provide important directions for safe operation.
- In addition to the information contained in the operating instructions, all statutory safety and accident prevention regulations must be observed.
Accessories and Spare Parts
△DANGER
To avoid risks, all repairs and replacement of spare parts may only be carried out by authorized customer service personnel.
Only use accessories and spare parts which have been approved by the manufacturer. The exclusive use of original accessories and original spare parts ensures that the appliance can be operated safely and trouble free.
- For additional information about spare parts, please go to the Service section at www.kaercher.com.
Environmental protection
The packaging material can be recycled. Please do not throw the packaging material into household waste; please send it for recycling.
Old appliances contain valuable materials that can be recycled; these should be sent for recycling. Batteries, oil, and similar substances must not enter the environment. Please dispose of your old appliances using appropriate collection systems.
Notes about the ingredients (REACH)
You will find current information about the ingredients at:
www.kaercher.com/REACH
Warranty
The warranty terms published by our competent sales company are applicable in each country. We will repair potential failures of your accessory within the warranty period free of charge, provided that such failure is caused by faulty material or defects in fabrication. In the event of a warranty claim please contact your dealer or the nearest authorized Customer Service center. Please submit the proof of purchase.
Symbols in the operating instructions
△DANGER
Immediate danger that can cause severe injury or even death.
WARNING
Possible hazardous situation that could lead to severe injury or even death.
CAUTION
Possible hazardous situation that could lead to mild injury to persons or damage to property.
Symbols on the device
| Please do not sweep away any burning substances such as cigarettes, match sticks or similar objects. | |
| Risk of being squeezed or hurt at the belts, side-brushes, containers, pushing handle. | |
| Danger of burns Avoid touching these surfaces during operation and when hot. |
Safety instructions
Safety instructions concerning the operation
- The machine with working equipment must be checked to ensure that it is in proper working order and is operating safely prior to use. Otherwise, the appliance must not be used.
- If the appliance is used in hazardous areas (e.g. filling stations) the corresponding safety provisions must be observed. It is not allowed to use the appliance in hazardous locations.
- The operator must use the appliance properly. The person must consider the local conditions and must pay attention to third parties, in particular children, when working with the appliance.
- Prior to starting work, the operator must ensure that all protective devices are properly installed and function correctly.
The operator of the appliance is liable for accidents with other individuals or their property. - Ensure that the operator wears tight-fitting clothes. Wear sturdy shoes and avoid wearing loose-fitting clothes.
- Check the immediate vicinity prior to starting (e.g. children). Ensure sufficient visibility!
- Please remove the key, when not in use, to avoid unauthorised use of the appliance.
- When leaving, secure the device against unintentional movement.
- The appliance may only be used by persons who have been instructed in handling the appliance or have proven qualification and expertise in operating the appliance or have been explicitly assigned the task of handling the appliance.
- This device must not be used by any persons (including children) with restricted physical, sensory or mental abilities or those lacking in experience and knowledge.
- Children should be supervised to prevent them from playing with the appliance.
Safety information concerning the driving operation
Danger
Risk of injury!
Danger of tipping if gradient is too high.
- The falling and rising gradients in the direction of travel may not exceed 12% .
Danger of tipping on unstable ground.
-Only use the machine on sound surfaces.
Danger of tipping with excessive sideways tilt.
The gradient perpendicular to the direction of travel should not exceed 12% . The travel speed must be adapted to the existing conditions.
Safety information concerning the transport of the appliance
Mind the weight of the appliance during transport.
- Disconnect the battery and securely fasten the device for transport.
Safety instructions for battery-operated devices
Note: Warranty claims will be entertained only if you use batteries and chargers recommended by Kärcher.
- Always follow the instructions of the battery manufacturer and the charger manufacturer. Please follow the statutory requirements for handling and disposing batteries.
- Never leave the batteries in a discharged state; recharge them as soon as possible.
- Always keep the batteries clean and dry to avoid creep currents. Protect the batteries and avoid contact with impurities such as metal dust.
- Do not place tools or similar items on the battery. Risk of short-circuit and explosion.
- Always use 2 batteries of the same type!
- Do not work with open flames, generate sparks or smoke in the vicinity of a battery or a battery charging room. Danger of explosion.
- Only use batteries with terminal cover.
Restore terminal cover in the event of loss. - Do not touch hot parts of the machine such as the drive motor (risk of burns).
- Be careful while handling battery acid. Follow the respective safety instructions!
- Used batteries are to be disposed according to the EC guideline 91/ 157 EWG in an environment-friendly manner.
Safety information concerning maintenance and care
- Switch off the appliance and remove the ignition key prior to performing any cleaning or maintenance tasks on the appliance, replacing parts or switching over to another function.
- Always disconnect the battery when working on the electrics.
- Do not clean the appliance with a water hose or high-pressure water jet (danger of short circuits or other damage).
- Maintenance work may only be carried out by approved customer service outlets or experts in this field who are familiar with the respective safety regulations.
- Please observe the local safety regulations regarding portable commercially used appliances.
- Always use appropriate gloves while working on the device.
Safety devices
Cover
The device is equipped with a cover contact switch that switches off the motor as soon as the device cover is opened.
△DANGER
Risk of injury due to defective cover contact switch!
If the motor does not switch off when the device cover is opened, the cover contact switch is faulty. Do not operate or repair the device.
Main switch
In case of dangerous situations or in order to quickly switch off the device's main switch, turn the main switch to position "0/OFF".
To prevent unintentional start-up, turn the main switch to the "0/OFF" position and remove the key.
Operating and Functional Elements

1 Screw for fastening the push handle (2x)
2 Dust filter
3 Waste container
4 Rear sealing strip (at the waste container)
5 Charger
KM 75/40 W Bp Pack only
6 Batteries
KM 75/40 W Bp Pack only
7 Drive wheels
8 Side sealing strip
9 Roller brush
10 Front sealing strip
11 Bulk waste flap
12 Steering roller with fixed position brake
13 Fastener of the side brush
14 Side brushes
15 Cover lock
16 Cover
17 Battery charge plug (KM 75/40 W Bp only)
18 Push handle
19 Lever for forward drive
20 Lever to raise and lower the bulk waste flap
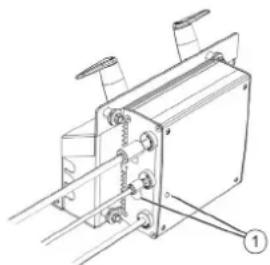
Operating field

1 Main switch
2 Lever for lowering and raising the side-brush
3 Locking screw of the dust filter cover
4 Locking bow of the waste container
5 Filter cleaning for dust filter
6 Wet/dry flap
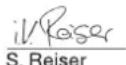
Main switch
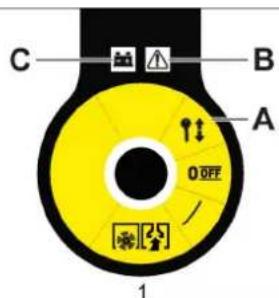
0/OFFMotor off
1 Motor on
A Remove the key
B Fault Indication
C Battery display
Remove the key
Turn the main switch using "0" position and pull it out.
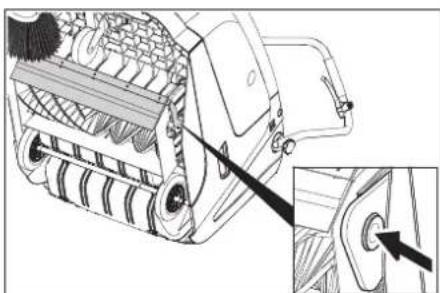
Open the device hood.
Note
The cover is unlocked with the key of the main switch.

Insert the key for the main switch into the hood lock and rotate in a clockwise direction by 90^ .
Pull the hood lock out by the key.
Open the device hood.
Close device hood
Close the appliance cover, the cover lock will lock automatically.
Before Startup
Unloading tips
△DANGER
Risk of injury, risk of damage! Observe the weight of the appliance when you load it!
| Net weight (transport weight) | |
| KM 75/40 W Bp 79 kg | |
| KM 75/40 W Bp Pack 125 kg | |
| Permissible overall weight | |
| KM 75/40 W Bp 205 kg | |
| KM 75/40 W Bp Pack 205 kg | |
Unloading
Remove the cardboard.
Remove the wooden blocks that secure the wheels and raise the device from the palette by hand.
Release parking brake.
Installing the pushing handle
Loosen the screws.
Align the pushing handle.
Tighten the screws.
Install side brush
Note: Remove the waste container and move the pushing handle to the front prior to tilting the appliance. Do not rest the appliance on the pushing handle.
Clip side brush on to driver and screw on.
Batteries
Safety notes regarding the batteries
Please observe the following warning notes when handling batteries:
| Observe the directions on the battery, in the instructions for use and in the vehicle operat-ing instructions! |
| Wear an eye shield! |
| Keep away children from acid and batteries! |
| Risk of explosion! |
| Fire, sparks, open light, and smoking not allowed! |
| Danger of causticization! |
| First aid! |
| Warning note! |
| Disposal! |
| Do not throw the battery in the dustbin! |
Danger
Risk of explosion! Do not put tools or similar on the battery, i.e. on the terminal poles and cell connectors.
Danger
Risk of injury! Ensure that wounds never come into contact with lead. Always clean your hands after having worked with batteries.
△DANGER
Risk of fire and explosion!
Smoking and naked flames are strictly prohibited.
Rooms where batteries are charged must have good ventilation because highly explosive gas is emitted during charging.
△Danger
Danger of causticization!
Rinse thoroughly with lots of clear water if acid gets into the eye or comes in contact with the skin.
- Then consult a doctor immediately.
- Wash off the acid If it comes in contact with the clothes.
Recommended batteries
| Order No. Volume Air | |||
| 60 Ah, Mainte- nance- free | 6.654-226.0* | 1,65** | 0,6*** |
- Appliance requires 2 batteries
** in m3
*** in ^3 /
Maximum battery dimensions
| Length Width | Height | |
| 267 mm | 177 mm | 190 mm |
Recommended chargers
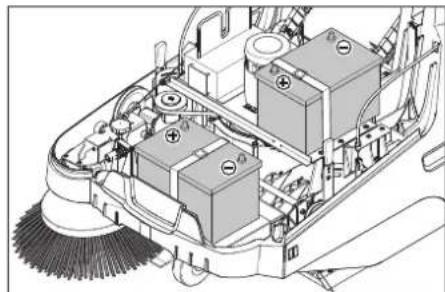
Installing and connecting the batteries
| Order No. | |
| Charger | 6.654-225.0 |
Note
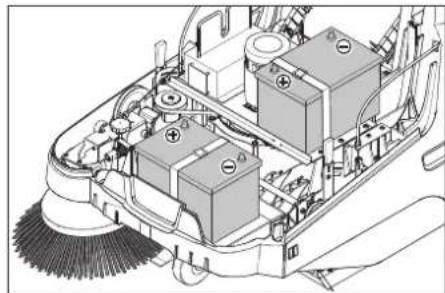
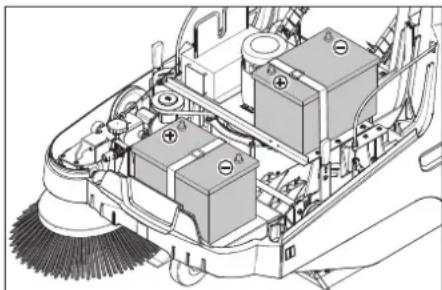
With the KM 75/40 W Bp Pack the battery and the charger are already built in.
Open the device hood.
Set the batteries on to the motor carrier.
Secure the batteries with the holding strap.
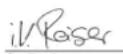
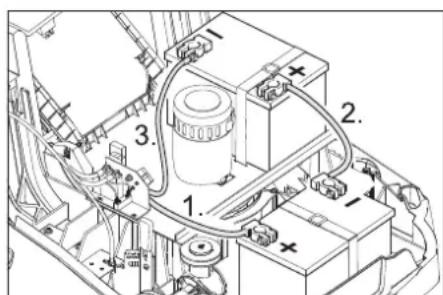
Connect pole terminal (red cable) to positive pole (+).
Fit the connection wires to the batteries.
Connect pole terminal to negative pole (-).
Note: Check that the battery pole and pole terminals are adequately protected with pole grease.
Only use batteries with terminal cover. Restore terminal cover in the event of loss.
CAUTION
Charge the batteries before commissioning the machine.
Charge the batteries
Danger
Risk of injury! The charger should be used only if the mains cable is in an undamaged state. Get the manufacturer, the customer service agent or a qualified person to immediately replace a damaged mains cable. DANGER Risk of electric shock. Observe supply network and fuse protection. Only use the charger in dry rooms with sufficient ventilation.
Note: The charging time for an empty battery is approx. 12 hours.
Danger
Risk of injury! Comply with safety regulations on the handling of batteries. Observe the directions provided by the manufacturer of the charger.
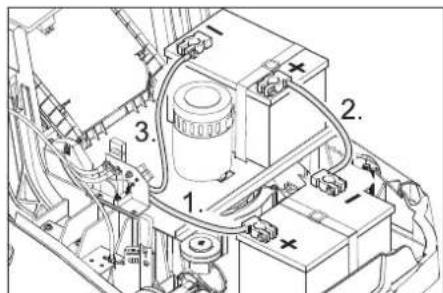
Charging process - KM 75/40 W Bp Pack
Caution: Batteries may only be charged at room temperature!
Note: Normally, the device is equipped with maintenance-free batteries.
Open the cover.
Insert the mains plug of the charger into the socket.
Note: The charger is electronically controlled and ends the charging process automatically. All functions of the device are automatically interrupted during the charging process.
1 Battery status display
The battery status display shows the progress of the charging process when the mains plug is inserted:
| Batteries are being charged | flashes green |
| Batteries are charged lights up green | |
| Fault on the charger lights up red | |
| Error n from error table is present | flashes red n times with pause |
Error table:
| 1 Battery not connected |
| 2 Battery polarity reversed |
| 3 Battery deep discharged |
| 4 Problem with charging characteristic |
| 5 Power supply too hot |
| 6 Hardware fault |
| 7 Communication error (power supply mode) |
To ensure a long battery life, the battery should always be fully charged.
Charging process - KM 75/40 W Bp
Open the device hood.
Insert the charging cable of the charger in the charger box of the sweeper
Plug in mains connector and switch on charger.
After charging
KM 75/40 W Bp Pack
Disconnect the mains plug.
Wrap the mains cord around the cable holder of the charger.
Close cover.
KM 75/40 W Bp
Switch off the charger and remove the plug from the socket.
Hang out the charging cable out of the machine.
Close cover.
Remove the battery
Open the device hood.
Disconnect pole terminal to negative pole (-).
Unscrew the connection wires from the batteries.
Disconnect pole terminal to positive pole (+)
Losen the holding strap.
Remove the battery.
Dispose of the used battery according to the local provisions.
Start up
General notes
△DANGER
Risk of injury! Switch off the appliance prior to removing the waste container.
Note: Start the appliance only when the hood is closed.
Park the sweeper on an even surface.
Switch off engine.
Lockparkingbrake.
Inspection and maintenance work
Check charging status of battery.
Check side brush.
Check roller brush.
Shake off dust filter.
Empty waste container.
Note: For description, see section on Care and maintenance.
Operation
Danger
Long hours of using the appliance can cause circulation problems in the hands on account of vibrations.
It is not possible to specify a generally valid operation time, since this depends on several factors:
- Proneness to blood circulation deficiencies (cold, numb fingers).
- Low ambient temperature. Wear warm gloves to protect hands.
-A firm grip impedes blood circulation. - Continuous operation is worse than an operation interrupted by pauses.
In case of regular, long-term operation of the device and in case of repeated occurrence of the symptoms (e.g. cold, numb fingers) please consult a physician.
Starting the machine
Releaseparkingbrake.
Start the motor.
Turn the main switch to position "1".
Note: The roller brush and the side brush will rotate.
Drive the machine
Drive forward
Pull the lever for forward drive.
Note: The drive speed for forward drive can be adjusted steplessly depending on the position of the lever.
Dry run
Release the lever for forward drive. Device comes to a halt.
Driving over obstacles
Driving over fixed obstacles which are 30 mm high or less:
Raise bulk waste flap.
Drive forwards slowly and carefully.
Driving over fixed obstacles which are more than 30mm high:
Only drive over these obstacles using a suitable ramp.
Sweeping mode
Danger
Risk of injury! If the bulk waste flap is open, stones or gravel may be flung forwards by the roller brush. Make sure that this does not endanger persons, animals or objects.
CAUTION
Do not sweep up packing strips, wire or similar objects as this may damage the sweeping mechanism.
Note: To achieve an optimum cleaning result, the driving speed should be adjusted to take specific situations into account.
Sweeping with bulk waste flap raised
Note: To sweep up larger items up to a height of 50~mm e.g. cigarette packs, the bulk waste flap must be raised briefly. Raising bulk waste flap:
Pull the lever for raising the bulk waste flap.
Lowering the bulk waste flap:
Release the lever for raising the bull waste flap.
Note: An optimum cleaning result can only be achieved if the bulk waste flap has been lowered completely.
Sweeping with side brushes

Move the lever to lower the side brush to the front. The side brush will be lowered.
Sweeping dry floors
Note: During operation, the waste container should be emptied at regular intervals.
Note: During operation, the dust filter should be shaken off and cleaned at regular intervals.
Close wet/dry flap
Sweeping damp or wet floors
Open wet/dry flap.
Note: This protects the filter from moisture.
Battery display
The battery display shows the charging status of the batteries during operation:

| full glows green | |
| 30% capacity remaining | glows yellow |
| 10% capacity remaining | blinks red |
| Protection against total discharge; the appliance is switched off | glows red |
Fault display
The fault indicator shows whether there is a fault with the device:

Motor control fault flashes red
Cleaning the dust filter
Pull the handle of the filter clean-off out several times and reinsert it.
Emptying waste container
△DANGER
Risk of injury! Switch off the appliance prior to removing the waste container.
Note: Make sure the seal strip is not damaged while emptying the waste container.
Note: The max. load of the waste container is 40kg
Shake off dust filter.
Pull lock bow of the waste container upward.
Pull out the waste container.
Empty waste container.
Push in the waste container.
Push lock bow of the waste container downward.
Turn off the appliance
Switch off engine.
Turn the main switch to position "0".

The side-brushes lift up.
Lockparkingbrake.
Turn the main switch using "0" position and pull it out.
Transport
△DANGER
Risk of injury and damage! Observe the weight of the appliance when you transport it.
Switch off engine.
Turn the main switch using "0" position and pull it out.
Lockparkingbrake.
Secure the wheels of the machine with wheel chocks.
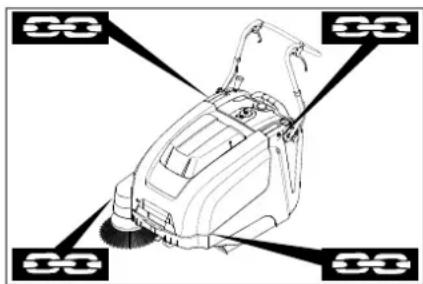
Secure the machine with tensioning straps or cables.
When transporting in vehicles, secure the appliance according to the guidelines from slipping and tipping over.
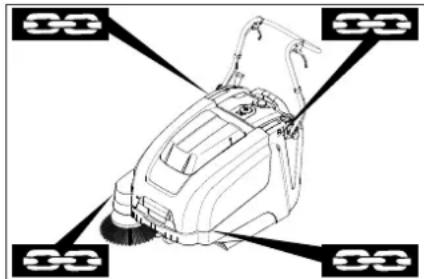
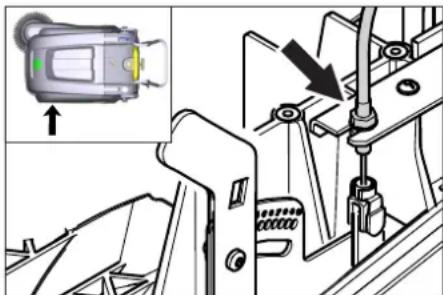
1 Fastening area above the pushing handle
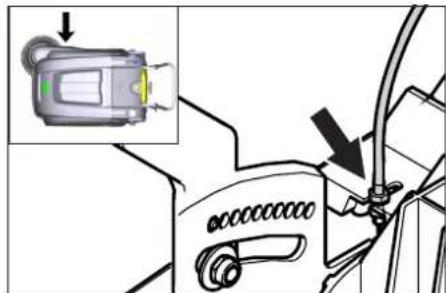
2 Fastening area under the device hood Note:Observe markings for fixing points on base frame (chain symbols).
Note: Do not kink the bowden or sheathed cables.
Storage
△DANGER
Risk of injury and damage! Note the weight of the appliance in case of storage.
Shutdown
If the sweeper is going to be out of service for a longer time period, observe the following points:
Park the sweeper on an even surface.
Switch off engine.
Turn the main switch using "0" position and pull it out.
Lockparkingbrake.
Lock the sweeper to ensure that it does not roll off.
Raise roller brush. Thus, engage both adjustment levers in the top boring.
The side-brushes lift up.
Clean the inside and outside of the sweeper.
Park the machine in a safe and dry place.
Disconnect batteries.
Charge batteries and recharge approx every 2 months.
Care and maintenance
General notes
- Maintenance work may only be carried out by approved customer service outlets or experts in this field who are familiar with the respective safety regulations.
- Mobile appliances used for commercial purposes are subject to safety inspections according to VDE 0701.
Cleaning
CAUTION
Risk of damage! Do not clean the appliance with a water hose or high-pressure water jet (danger of short circuits or other damage).
ATTENTION
Pull the mains plug out of the socket prior to cleaning.
Disconnect the plus terminal of the battery prior to cleaning.
Cleaning the inside of the machine
Danger
Risk of injury! Wear dust mask and protective goggles.
Open the device hood.
Clean machine with a cloth.
Blow through machine with compressed air.
Close cover.
External cleaning of the appliance
Clean the machine with a damp clot which has been soaked in mild detergent.
Note: Do not use aggressive cleaning agents.
Maintenance intervals
Maintenance by the customer
Daily maintenance:
Check the sweeping roller and the side brush for wear and wrapped belts.
Check function of all operator control elements.
Check functioning of all indicator lamps. Weekly maintenance:
Check tension, wear and tear and functioning of the drive belts.
Check for smooth running of the Bowden cables and the moveable parts.
Check the sealing strips in the sweeping area for position and wear.
Chek the sweeping track of the sweeping roller.
Clean the dust filter.
Note: For description, see section on Maintenance work.
Note: Where maintenance is carried out by the customer, all service and maintenance work must be undertaken by a qualified specialist. If required, a specialised Kärcher dealer may be contacted at any time.
Maintenance by Customer Service
Maintenance after the first month or 5 operating hours:
Carry out initial inspection.
Maintenance to be carried out every 50 operating hours
Maintenance to be carried out every 100 operating hours or every six months
Maintenance to be carried out every 300 operating hours
Maintenance to be carried out every 500 operating hours or annually
Note: In order to safeguard warranty claims, all service and maintenance work during the warranty period must be carried out by the authorised Kärcher Customer Service in accordance with the maintenance booklet.
Maintenance Works
Preparation:
Park the sweeper on an even surface.
Turn the main switch using "0" position and pull it out.
Lockparkingbrake.
General notes on safety
△DANGER
Risk of injury!
The engine requires approx. 3-4 seconds to come to a standstill once it has been switched off. During this time, stay well clear of the working area.
WARNING
Allow the machine sufficient time to cool down before carrying out any maintenance and repair work.
Do not touch any hot parts, such as the drive motor.
ATTENTION
Pull the mains plug out of the socket prior to any maintenance work.
Disconnect the plus terminal of the battery prior to any maintenance work.
ATTENTION
Remove batteries and waste container, and swing the push handle forward prior to tilting the device. Do not park the device on the push handle.
Switch off the appliance prior to cleaning and performing any maintenance tasks or replacing parts.
Adjust the Bowden cable of the acceleration drive
This must be adjusted if the drive performance of the appliance becomes insufficient when driving uphill.

Open the device hood.
Loosen counter-nut.
Adjust the adjustment screw.
Tighten the counter-nut.
Checking roller brush
Lockparkingbrake.
Remove the waste container.
Remove belts or cords from roller brush.
Replacing roller brush
Replacement is due if a visible deterioration in sweeping performance caused by bristle wear is evident.
ATTENTION
Remove the batteries prior to tilting the device.
Do not park the device on the push handle.
Lockparkingbrake.
Remove the waste container.
Remove the batteries.
Tilt the appliance rearward.
Ift the waste flap, press in the bearing cap and swivel the roller brush toward the front.
Pull out roller brush.
Attach the new roller brush to the drive pin (left).
Engage the bearing cup into the boring of the roller brush swinging arm on the opposite side.
CAUTION
Risk of damage! Make sure that no bristles are jammed into the boring of the roller brush swinging arm.
Note: Once the new roller brush has been installed, the sweeping track must readjusted.
Check and adjust roller brush sweeping track
Raise the sweeper from the front and drive it on to a smooth, even surface covered with a visible layer of dust or chalk.
Lockparkingbrake.
Let the sweeping roller rotate for approx. 15-30 seconds.
Raise the sweeper at the front and drive it towards the side.
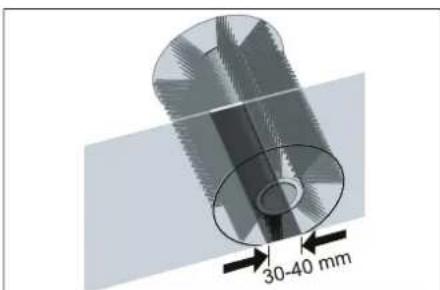
The sweeping track should have an even rectangular shape which is between 30 and 40mm wide.
| Setting range (-) 1...10 (+) | |
| Minimum sweeping track 1 | |
| Maximum sweeping track 10 | |
| New roller brush | 1...3 |
Adjust sweeping track:
Open the device hood.
Adjust the left and right adjustment levers and engage into the same boring.
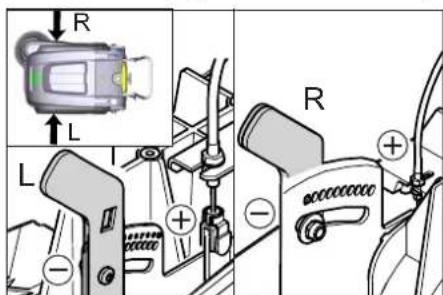
- Engage adjustment lever into the lower boring (+): Sweeping track becomes bigger
- Engage the adjustment lever into the upper boring (-): Sweeping track becomes smaller
Check sweeping mirror.
Replacing side brush
Replacement is due if a visible deterioration in sweeping performance caused by bristle wear is evident.
Note: Remove the waste container and move the pushing handle to the front prior to tilting the appliance. Do not rest the appliance on the pushing handle.
Unscrew 3 screws from the underside of the side brush.
Remove the wiper blade.
Clip new side brushes on to driver and screw on.
Adjust side-brush lowering
Adjustment is necessary if a visible deterioration in sweeping performance caused by side-brush is evident.
Open the device hood.
Release the wing nut.

Adjust the adjustment screw.
Tighten the wing nut.
Adjust the raising of the bulk waste flap
- Adjustment is necessary if the bulk waste flap cannot be raised wide enough.
The Bowden cable needs to be released a little if the sweeper results become poorer, for e.g. due to the wearing of the front lip.
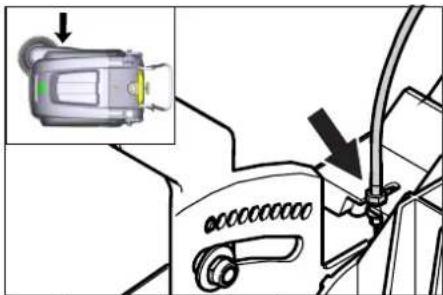
Open the device hood.
Loosen counter-nut.
Adjust the adjustment screw.
Tighten the counter-nut.
Adjusting and replacing sealing strips
Note: Remove the waste container and move the pushing handle to the front prior to tilting the appliance. Do not rest the appliance on the pushing handle.
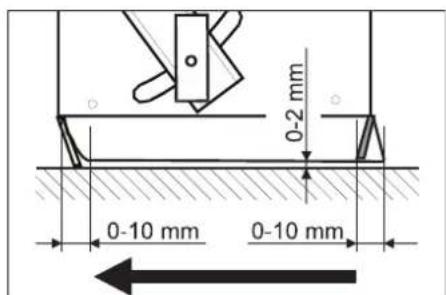
Front sealing strip
Loosen the fastening screws of the sealing strip.
Adjust or replace sealing strip.
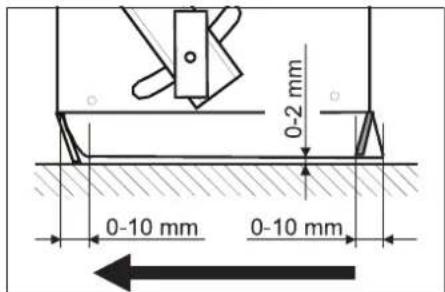
Set the distance between the sealing strip and the floor so that the bottom edge trails behind at a distance of between 0-10 mm.
Adjust sealing strip.
Tighten the fastening of the sealing strip.
Rear sealing strip
Remove the waste container.
Loosen the fastening screws of the sealing strip.
Adjust or replace sealing strip.
Set the distance between the sealing strip and the floor so that the bottom edge trails behind at a distance of between 0-10 mm.
Tighten the fastening of the sealing strip.
Side sealing strips
Loosen the fastening screws of the sealing strip.
Adjust or replace sealing strip.
To set the floor clearance, insert a sheet with a thickness of max. 2 mm under the sealing strip.
Adjust sealing strip.
Tighten the fastening of the sealing strip.
Replacing dust filter
△WARNING
Empty waste container before replacing dust filter. Wear a dust mask when working around the dust filter. Observe safety regulations on the handling of fine particulate material.
CAUTION
Risk of damage!
Do not rinse out the dust filter.
Lokparkingbrake.
Shake off dust filter.

Open the locking screw of the dust filter cover in an anticlockwise direction.
Lift the dust filter cover.
Replace dust filter Make sure the dust filter is inserted correctly (see figure).
Screw in the locking screw all the way.
CAUTION
If the locking screw is not tightened all the way, there may be damages.
Note: Make sure when installing the new filter that the fins are not damaged.
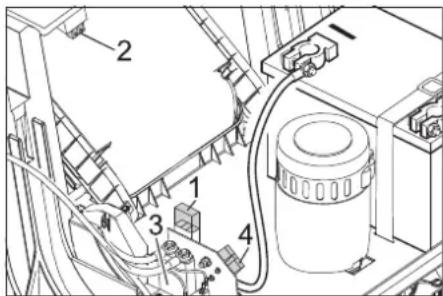
Replace fuse/relay
KM 75/40 W Bp

1 Fuse F1 (50 A)
2 Fuse F2 (2A)
3 Relay
4 Battery charge plug
Open the cover.
Replace defective fuse or relay.
KM 75/40 W Bp Pack
The fuse is located on the battery terminal.
Accessories
| Side-brushes, soft 6.905-626.0 | |
| For fine dust on inside surfaces; wetness resistant. | |
| Roller-brush, soft 6.906-886.0 | |
| With natural bristles: especially for sweeping fine dust on smooth floors indoors. Not resistant to wetness; do not use on abrasive surfaces! | |
| Roller-brush, hard 6.906-885.0 | |
| For removing stubborn dirt in the external area; resistant to moisture. | |
| Roller brush, antistatic | 6.906-950.0 |
| For statically chargeable surfaces such as carpet or artificial turf | |
| Carpet sweeping unit | 2.641-571.0 |
| Includes: Lint trap, antistatic roller brush, triple steering roller | |
EU Declaration of Conformity
We hereby declare that the machine described below complies with the relevant basic safety and health requirements of the EU Directives, both in its basic design and construction as well as in the version put into circulation by us. This declaration shall cease to be valid if the machine is modified without our prior approval.
Product: Vacuum sweeper
Type: 1.049-xxx
Relevant EU Directives
2006/42/EC (+2009/127/EC)
2014/30/EU
2000/14/EC
Applied harmonized standards
EN 55012: 2007 + A1: 2009
EN 60335-1
EN 60335-2-72
EN 61000-6-2: 2005
EN 62233: 2008
EN IEC 63000:2018
Applied national standards
···
Applied conformity evaluation method
2000/14/EC: Appendix V
Sound power level dB(A)
Measured: 86
Guaranteed: 88
The signatories act on behalf of and with of the authority of the company management.

H.Jenner
Chairman of the Board of Management

S. Reiser
Director Regulatory Affairs & Certification
Documentation supervisor:
S. Reiser
Alfred Karcher SE & Co. KG
71364 Winnenden (Germany)
Tel.: +49 7195 14-0
Fax: +49 7195 14-2212
Winnenden, 2021/02/01
Declaration of Conformity
We hereby declare that the product described below complies with the relevant provisions of the following UK Regulations, both in its basic design and construction as well as in the version put into circulation by us. This declaration shall cease to be valid if the product is modified without our prior approval.
Product: Vacuum sweeper
Type: 1.049-xxx
Currently applicable UK Regulations
S.I. 2008/1597 (as amended)
2004/108/EC
S.I. 2001/1701 (as amended)
S.I. 2012/3032 (as amended)
Designated standards used
EN 55012: 2007 + A1: 2009
EN 60335-1
EN 60335-2-72
EN 61000-6-2: 2005
EN 62233: 2008
EN IEC 63000:2018
National standards used
Applied conformity assessment procedure
S.I. 2001/1701 (as amended): Schedule 8
Sound power level dB(A)
Measured: 86
Guaranteed: 88
The signatories act on behalf of and with of the authority of the company management.

Chairman of the Board of Management
Director Regulatory Affairs & Certification
Documentation supervisor:
S. Reiser
Alfred Karcher SE & Co. KG
Alfred-Karcher-StraBe 28-40
71364 Winnenden (Germany)
Tel.: +49 7195 14-0
Fax: +49 7195 14-2212
Winnenden, 2021/02/01
| Troubleshooting | |
| Fault Remedy | |
| Appliance cannot be started | The cover contact switch has switched off the device. Closing the cover |
| Charge the batteries | |
| Check overload fuse | |
| Inform Kärcher Customer Service. | |
| Engine is running but machine is not moving | Adjust the Bowden cable of the acceleration drive |
| Checking the V-Belt | |
| Inform Kärcher Customer Service. | |
| Device comes to halt while climbing a slope | Drive over a path with lesser slope |
| Check overload fuse | |
| Adjust the Bowden cable of the acceleration drive | |
| Checking the V-Belt | |
| Inform Kärcher Customer Service. | |
| The brush roller stops, fault display illuminates red | Turn the main switch to "OFF", check brush for obstructing objects. If applicable, use on a less in-clined surface. Turn on the main switch. After repeating this process four times, the control will initiate a forced break of 2 minutes to cool off. During this period the appliance cannot be started. |
| Machine is not sweeping properly | Check roller brush and side brushes for wear, replace if necessary. |
| Check function of bulk waste flap | |
| Release the Bowden cable of the bulk waste flap (adjustment screw) | |
| Check belts for tension and functioning; replace, if required | |
| Adjust roller mirror | |
| Replacing roller brush | |
| Inform Kärcher Customer Service. | |
| Dust gathers in the machine Check | function of bulk waste flap |
| Release the Bowden cable of the bulk waste flap (adjustment screw) | |
| Check dust filter, clean or replaceDo not rinse out the dust filter. | |
| Empty waste container | |
| Replace sealing profile at the waste container | |
| Check the seal on the dust filter | |
| Check sealing strips for wear, adjust or replace as required | |
| Poor cleaning performance at edges | Adjust side-brush lowering |
| Replace side brush | |
| Lower the side brushes | |
| Check the drive belt of the side brush | |
| Inform Kärcher Customer Service. | |
| Side-brush raising does not func-tion | Check Bowden cable of the side-brush raisingInform Kärcher Customer Service. |
| The new roller brush brushes against the waste container | Correct the setting of the sweep track; for this, engage both adjustment levers into the upper boring (1...3) |
Technical specifications
| KM 75/40 W Bp KM 75/40 W Bp Pack | |||
| Machine data | |||
| Length x width x height (pushing handle unfolded) mm 1430 x 750 x 1190 | 1430 x 750 x 1190 | ||
| Length x width x height (pushing handle folded in) mm 1160 x 750 x 930 | 1160 x 750 x 930 | ||
| Weight (without batteries) kg 79 79 | |||
| Weight (with batteries) kg 125 125 | |||
| Permissible overall weight kg 205 205 | |||
| Driving and sweeping speed km/h 4,5 4,5 | |||
| Climbing capability (max.) % 12 12 | |||
| Roller brush diameter | mm 265 265 | ||
| Side brush diameter | mm 410 410 | ||
| Surface area, max. | m²/h | 3400 | 3400 |
| Working width without side brushes | mm 550 550 | ||
| Working width with side-brush | mm 750 750 | ||
| Volume of waste container | I | 40 40 | |
| Protection type, drip-proof | -- | IPX 3 | IPX 3 |
| Engine | |||
| Type | -- | DC permanent solenoid motor Direction of rotation, right | |
| Voltage | V | 24 24 | |
| Rated current | A | 22 22 | |
| Rated power | W | 400 400 | |
| Speed | 1/min | 2750 | 2750 |
| Type of protection | -- | IP 20 | IP 20 |
| Battery | |||
| Type | -- | -- | 2x 12 V GiV |
| Capacity | Ah | -- | 60 (5h) |
| Weight | kg | ||
| Charging time for fully discharged battery | h | -- | 12 |
| Operating time after frequent charging | h | -- | ca. 1,5-2 |
| Charger | |||
| Mains voltage | V~ | -- | 230 |
| Output voltage | V | -- | 24 |
| Charging current | A | -- | 10 |
| Mains frequency | Hz | -- | 50/60 |
| Electrical fuses | |||
| Central | A | 50 50 | |
| Fuse for controls | A | 2 | -- |
| Protection against total discharge | -- | via relay | via relay |
| Charger | --- | T4A / 250 V AC | |
| Filter and vacuum system | |||
| Filter surface area, fine dust filter | m² | 1,8 1,8 | |
| Category of use – filter for non-hazardous dust | -- | L | L |
| Nominal vacuum, suction system | mbar | 5 | 5 |
| Nominal volume flow, suction system | l/s | 45 | 45 |
| Working conditions | |||
| Operating temperature | °C | -5 and +40 | -5 and +40 |
| Charging temperature | --- | Room temperature | |
| Air humidity, non-condensing | % | 0 - 90 | 0 - 90 |
| Values determined as per EN 60335-2-72 | |||
| Sound pressure level Lpa | dB(A) | 71 71 | |
| Uncertainty Kpa | dB(A) | 3 | 3 |
| Sound power level Lwa + Uncertainty Kw | dB(A) | 88 88 | |
| Uncertainty Kw | s² | 2 | 2 |
| Hand-arm vibration value | m/s² | 3,7 3,7 | |
| Uncertainty K | m/s² | 0,2 0,2 | |
Subject to technical changes.

www.kaercher.com/REACH
Garantie
2006/42/CE (+2009/127/CE)
2014/30/UE
2000/14/CE
71364 Winnenden (Germany)
Tel.: +49 7195 14-0
Fax: +49 7195 14-2212
Winnenden, 2021/02/01
www.kaercher.com/REACH
Garanzia
(solo KM 75/40 W pacco Bp)
2006/42/CE (+2009/127/CE)
2014/30/UE
2000/14/CE
71364 Winnenden (Germany)
Tel.: +49 7195 14-0
Fax: +49 7195 14-2212
Winnenden, 2021/02/01
www.kaercher.com/REACH
Garantie
71364 Winnenden (Germany)
Tel.: +49 7195 14-0
Fax: +49 7195 14-2212
Winnenden, 2021/02/01
www.kaercher.com/REACH
Garantía
Interruptor principal

Interruptor principal
0/OFF Motor desconectado
2006/42/CE (+2009/127/CE)
2014/30/UE
2000/14/CE

Chairman of the Board of Management
S. Reiser
Director Regulatory Affairs & Certification
Responsible de documento:
S. Reiser
Alfred Kärcher SE & Co. KG
Alfred-Karcher-StraBe 28-40
71364 Winnenden (Germany)
Tel.: +49 7195 14-0
Fax: +49 7195 14-2212
Winnenden, 2021/02/01
Interruptor principal
Interruptor principal
0/OFFMort desligado
1 Motor ligado
A Retire a chave
B Indicacao de avarias
C Indicador da bateria
Retire a chave
roda r a chave do interruptor principaldo punto "0" e retiring.
Montar e conectar as baterias
Aviso
No Modelo KM 75/40 W Bp Pack, as baterias e o carregador ja vem montados.
Carregar as baterias
Perigo
2006/42/CE (+2009/127/CE)
2014/30/UE
2000/14/CE
Chairman of the Board of Management

S. Reiser
Director Regulatory Affairs & Certification
Responsavelpeladocumentacao:
S. Reiser
Alfred Kärcher SE & Co. KG
71364 Winnenden (Germany)
Tel.: +49 7195 14-0
Fax: +49 7195 14-2212
Winnenden, 2021/02/01
www.kaercher.com/REACH
Garanti
2006/42/EF (+2009/127/EF)
2014/30/EU
2000/14/EF
Anvende harmoniserede standarder
EN 55012: 2007 + A1: 2009
EN 60335-1
EN 60335-2-72
EN 61000-6-2: 2005
EN 62233: 2008
ENIEC63000:2018

Chairman of the Board of Management
S. Reiser
Director Regulatory Affairs & Certification
71364 Winnenden (Germany)
Tel.: +49 7195 14-0
Fax: +49 7195 14-2212
Winnenden, 2021/02/01
www.kaercher.com/REACH
Garanti
Anvising for avlossing
△FARE
Fare for personskade, fare for materiell skade!
1 Festeomrade over skyvebyle.
2 Festeomrade under maskindeksel
Merk: Ta hensyn til markeringene for festeomradsene pa grunnrammen (kjedesymbol).
Still inn feiemnonster:
Apne dekselet pa maskinen.
Regular venstre og hye regulerings-hendel og la de gai las i samme hull (hoyde).
-Lase reguleringshendel i lavere hull (+) Feiemonsteret blir storre
-Lase reguleringshendel i hoyere hull (-): Feiemonster blir minde
Kontroller feiemønster.
Utskifting av sidekost
Utskiftning er nodvendig nár resultatet av feiingen tydelig avtar pa grunn av slitasjen pa borstene.
Chairman of the Board of Management

S. Reiser
Director Regulatory Affairs & Certification
71364 Winnenden (Germany)
Tel.: +49 7195 14-0
Fax: +49 7195 14-2212
Winnenden, 2021/02/01
www.kaercher.com/REACH
Garanti
Stalla in drivenhetens Bowden-vajrar
Sopvals,hard 6.906-885.0

Chairman of the Board of Management
S. Reiser
Director Regulatory Affairs & Certification
Dokumentationsbefullmaktigad:
S. Reiser
Alfred Karcher SE & Co. KG
71364 Winnenden (Germany)
Tel.: +49 7195 14-0
Fax: +49 7195 14-2212
Winnenden, 2021/02/01
www.kaercher.com/REACH
Takuu

Chairman of the Board of Management

S. Reiser
Director Regulatory Affairs & Certification
71364 Winnenden (Germany)
Tel.: +49 7195 14-0
Fax: +49 7195 14-2212
Winnenden, 2021/02/01
Apwn nAeupikeBouptoe

MetakivnoTe to loxlo BuOioNs Tns TTAEupikn oKOuTTaTpoT a Tavw. H TTAEupikn oKOuTTa xaunwvei.
Apwn OTeyvw 8aTe8w
YtOBeIg:Kata Tn diApkeia Tnc AeiToupyi aC Ta TpeTe i va yivetai TAKTIk EKKeVwOn Twy Doxieiw atoppmuatWv.
YrOBeIg:KataTnDiApKEIA TNS LEIToupyiac 0a TpEeIva KaapizETe TAKTIKA TO pIA-tpo Okovns.

Apwn uypw n Bpeyevw dattow
AvoiTe Tn Oupia uypns/5npns Aetoup-yias.
YtO8eIg:ETaITPPOOTATEUETAI TO FIATPO aTIOy Upaia.
EvEiGn OoOwpeutn
H Evdei nts mntatapiae eepaviie tnv ka taon optns nts mntatapiaac ot niapkeia ts npyaia:

Chairman of the Board of Management
S. Reiser
Director Regulatory Affairs & Certification
YTeUbUoC EyypaWv TKunpiwns
S. Reiser
Alfred Kärcher SE & Co. KG
71364 Winnenden (Germany)
Tel.: +49 7195 14-0
Fax: +49 7195 14-2212
Winnenden, 2021/02/01
www.kaercher.com/REACH
Garanti

H.Jenner
Chairman of the Board of Management
S. Reiser
Director Regulatory Affairs & Certification
71364 Winnenden (Germany)
Tel.: +49 7195 14-0
Fax: +49 7195 14-2212
Winnenden, 2021/02/01
Arizalarda yardin
www.kaercher.com/REACH
TapaNTn
B KaKaDoI cTpaHene DeNCTByIOT COOTBeTCTBEHHO rapaHTnHbIe yCNOBnA, N3DaHHbIEyNoHOMOeHHo OprAHn3aUnei C6bItaHaWeipnoDyKuNN B DaHHo CTpaHe.Bo3MOXHbIe HncnPabHocn npn60paB TeueHne rapaHTnHoro Cpoka Mbl yCTpHaHemBecnlatHO, ecnn npunna 3aknouaetcBDeΦeKTax MaTePnAnOB nIn OUn6kax npn13rTOBLeHN.B Cnyae Bo3NHKObeHNA pTeEH3n B TeueHne rapaHTnHoro Cpoka npoc6ba Obpaatbc, Meer npn ce6e YOKynke, B ToprobyO opraHn3aUIO, npoDaBsyu Bam npnbop INB 6bnkaWyo yNoHOMOeHHo CnyK6bcePBnCHOrO 6cLyKnBaHH.
Iata BbInycka OTo6paKaetcHa 3aBODCKoTabNnueKeB 3aKOINPOBAHHOM BVNe. Ppi 3tOM OTdEJIbHbIe UINPbI NMeHT cJeDyUOe 3HaYeHHe::
Приимер: 30190
3 rOД BbInycka
0 CTOnTeNBeBbInycka
1 DecTnIeTne BbInycka
9 BTOPA CnDpa Mecaa BbInycka
0 nepBaIuPpa Mecaa BbIycka
TakIM o6pa3OM, B daHHom npImepe KOD 30190 03Haayet DaTy BbInycka 09/(2)013.
CmboBb pykoBOcTBe no 3Kcnnyataun
ONACHOCTb
IINHENOCPEDcmeHHO apo3aueo anac-HocMu, KOMOPa npuBodum K mXeJIbIM yeeyam unK cmemu.
△PENyPENKDEHNE
IgBa 03MOXHO nomeuuaJbHo onaChou cumyaauu, Komopar Moxem npueecmu K mKeBIM yeebyam Ulu K Cmepmu.
OCTOPOXHO
Ie 03MOxHou nomeuuaJbHo onachou cumyaauu, Komopar MoXem npueecmu K neakummpaBmam unu noNeeMb mamepuaJIbHbIyuep6.
CnmbonblHa yctpoicTbe
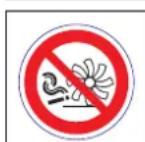
He cmemamb zoepuue unu mneouue npedMembl, ha-npumep, makue ka cuzapeMbI, cnuku u momy nodobHoe.
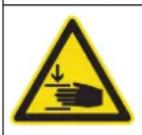
Onachocmb 3aueemnenu u npoe3o peMeHb,60KOBbie uemku,bak,beyuoydy ay.
OnachocbOxora
N36eRaTb KOHTaC 3TmM
NOBepXHOCTAM BO Bpem
paobToI npHnHarpeBaHH.
Yka3aHnno NO TexHnke 6e30nacHoCTn
Yka3aHnno 6e3oNaChOcTn npn 3Kcnnyatau
Ipeod hauanom paobmbi annapam u paboyue npucnocobnue cnedyem npoepumb ha ux hadlekauee cocmohue u ux coombemcme ue mpeboaunm be3onacnoemu. Ecu cocmohue npubopa he raernemc be3ynpeHbIM, uCIOJIb3O6aMb e0 He pa3pewaemc.
- Ppu ucnonb3oehuu ycmpoucmea e onacnbix 30Hax (Ha npumep, Ha aemno3anpa8OuHbIX cmaHuaX) cneyem co6nodamb coombeemcmbyouue npaeuna mexnku 6eOnacHocmu. 3Kcnnyamaun ycmpoucmea eo 3pblboonacHbIX 30Hax 3anpeuaemca.
- Obcnykuueaouee nuo ob3aHo uc-nonb3oamnb npubop e coombeemcmeuu c H3naueHuem. Obcnykuueouee nuo donxnn yumbleammb mecm
HbIe ocObeHHocMu u npu paBome c npubopom cledum 3a mpembuMu lu- amu, haxooumuucn noBtu3ocMu, ocObeHo demBuMu.
- Ipeed hauanom paobombl onepamop dojxhen ybeumbc8 mom, ymo ece npedoxpanumeIbHbIe ycmpoucmea haxodarmca Ha mecmu pa6omam oJXhBM 6pa3OM.
- Onepamop ycmpoucmea hecem om- bemcmeeHHocmb 3a 603HukHObeHue Heecacmhbix cnyuaee c yuacmuem dpyux IIOde unu umyuacemea.
Cneodum3a meM,ymo6bI onepamop Hocun nnonHO npuneaaouyO odE kdy.Hocumb npouhyo obyB u 136e zamb Howenura c6060Hou odexbl. - Ipeod hauanom dbxkehura npoepumb Mepmeyu 3ohy (Happumep, Ha Hauuue demeu). Obecneumb docamouh b ou63op!
-Bo u36exKaHue HecaHkuuOHupoBaHHo20 UcnoIb3OeHaHn npubopa cneoyem 6blHMamb KIOU. - Ppu ocmaeHuu 3aefukcupo8ambycmpoucmeo om HnpehamepeHHo20cmueeHua.
Pabomambc npubopom paapewaemca ucknoumtebno luqam, kOmpbie npouu uncmpykmax no 3Kcnnyamauu unu noodeepunu c6oKeaukuauu no obcyxueaHuo uHa komopbix 003IOKeHo UcNoB30BaHue npubopa.
-Да Hnoe ycmpoicme60 He npedha3Ha-ueHo dny uCnONb3O6aHua JIuaMu (e MOM Yucne dembMu) CO CHUXeHHbIMU fu3uyeckmu, ceHCOPHBIMU uIu yMcMeEHbIMU cNooc6hOCmMa, a makxe JIuaMu C heOcmamKOM Onbima u 3HaHui.
Heo6xodumo cneedmb 3a dembmu, ymo6bl OHu He uapauu C npubopom.
Yka3aHnno 6e3oNaChOCTN B peXnme DnHexHn
Onachocmb
Onachocmb nojyuhenma paaM!
Onachocmb onpokubibaHua npubopa Ha cnluukom Kpymbix CKNoHaX.
-BHa npaeHnue dukeHua donyckaemCra e3da moIbko no nObeMaM u yKNoHAM do 12%.
Onachocmb onpokubbaHua Ha HecmabunbHom apyHme.
Pazepwaemcnpemeeamb npubop molbKO no pOCHOMY OCHOBAHU.
Onachocmb onpokuobieaunn npubopa npu 6oIbwoM bokOBom yKnOHe.
B HanpaenHuX, nonepuHbIX K HanpaenHuO deUxHeu, donyckaemcnapeDeuxHeue monbko no cknoham mAc. do 12%.
Ckopocmb dbxkeHua Koppekmupoeamb 8 3aeucumocmu om ycnoui.
Yka3aHnno 6e30nacHoCTn npn TpaHCnopTnpOBKe MaunHbI
- Ppu mpaHcnopmupoKe cnedyem oBpammb eHumaHue Ha eec ycmpouCmea.
Ipu mpaHcnopmupoeke ycmpoucmea omcoedunmb KEmMbI aKkymnmaopa u HadeXHO 3akpenmb ycmpoucmeo.
Yka3aHnno 6e3oNaChocTu dny yctpoiCTB,pa6oTaHoUnxOT aKKymyIaTOPHO6aTapeu
Yka3aHHe: IpaBO Ha rapaHTnHoe 06cnyKINBaHHe COxpaHReTcra TOnbKO B clyuaeNCIOB3OBAHnpeKOMeHdyEmbIXΦnpMOI Karcher aKKyMyJIrTopoB n 3apdHbIx yCTpOJCTB.
CneJyET 683aTeIbHO CO6JIIODaTb IHCTpyKcHNO NO 3KcNpyatauIN npOn3BODInTeIg AKKyMyIaTopa n 3apJdHorO yctpoiCTBa. Co6JIIOaIte Yka3AHn 3aKOHOaTeIbCTBa No o6paueHnO cAKKyMyIaTOpAM.
HkoIa He ocTabJrTe pa3pJxHbI aKkyMjTOp, IN KaK MoXHO Ckopee CHOBa 3apJnte erO.
IopnepKbAte AkyMnyTopbl BcerdaB uNCTOM n cyxom BnDE BO n36eKaHne yTeKN ToKa. 3aunuatb OT nonaDaHn rpa3n, HAnpImep, MetaJIInuecko nn.
He Knaactb HnctpyMeHTb Nn nooB hIe npedMeTb Ha akymyIaTOp. OnacHOCTb KOPOTKORO 3ambikAHN B3pbBa.
Bcerda npimehTb 2 baTapeu oHa-Koboro Tuna!
HnB KOem cnyae He o6paatabca C orHEM, NCKPntb NIN Kypntb B6n3n aKKMyJITopa INN B aKKyMylTOpHO. OnachOCTb B3pbIbA.
- NcnoB3oBaTb TOnbKO 6aTapeN c 3aUHTbIM NOKpbITHeM NOnHOCOB. 3aMeHHTb 3aUHTHOE NOKpbITHe B CInyae erO Notepn.
He npnkaCtbcra K roprmy3Jam,Ha-npImep,K npBOHOMy DBIraTeIO (onachOCTb OXORA).
- OctopoxHoe obpaueHne c aKKyMnyTOpHbIM 3NeKtpoNtOM. Co6HnOaIte COOTBeTCTByIOUe IpaBUNa TEXHNK6e30NaCHOCTn!
IcnoB3oBaHHbIe aKkyMnyTOpbl cneDyetyTNIN3nPOBaTB, cornaH O npeK-TnBe EC 91/ 157 EWG, 6e3 yuepe6a Dnra OkpykaHOUe Cpebl.
Yka3aHnno 6e30NaChOCTn npnyxoJe nTexHnueckOM 06cnyKbAHnn
Ipeod oucckou u npoeedeHuemex Huecko0o 6cbnykuaHua,3aembde maneu unu hacpmouku Ha dpyzue yhkuuu ycpooucm8o cneoyem bkiKIOUumb U bIHymb KIOU 3axuaHua.
Ipu npoeedeenu pa6om c 3neekmuyeckou ycmaHOKoHeo6xodmo omcoedunmb akkymnyamopHyio 6amapeo.
He pa3pewaemca yucmum npubop u3 60d8HOO 7nAHA unu cmpye 60dbi nod ebICOKUM daeneHuEM (onachocmb KOpomko 0 3ambikaHua u dpyux noepekdeHu).
IpoeedeHuem pemohmhbix pa6om pa3pewaemc 3aHumambcr moIbko aemopu3o8aHHbIM cpeuchbIM ueHmpam, unu cneuaanucmaU e 3moU cfepe, Komopbie O3HaKOMJIeHbIC oOomeemcmeyoumu npednucahmu npasun mexhuk6e0nacchcmu.
- yuumbeamb npoeepky Ha npedMem 6e3onacnocmu e coomemcmuu c deucmeyouzmu mecHbmu npednucanmu dna npedeuekhyix npubopoe, uCNoIb3yEmbx E npOMbiJneHHocmu.
- Pabomambc ycmpoicmeom cneyemceea monbko e coomeemcmbyouux 3auumhblx pykaeuax.
PpeoxpaHnteHbHbe yctpoictBa
KpbIkwKa yctpOncTBA
YcTpoiCTBO OCHaSeHOb KOHTaKTHbIM BblKJIIOuATEeNEM Ha KpbIUsKe, KOTOpBm OTKnIOUaET DBnraTeNb PnO TkPbITnN KpbIUsKn YcTpoiCTBa.
ONACHOCTb
Onachocmb mpaemupoabHua u3-3a HeucnpaeHo2o KOhmaKmHO2o 8bIKNQUamEnna Ha KpbIwke!
Ecni dbusamEn He omknioaemc npu omKpbimuu Kpbiu ycmpoumea, KOmakmblb bkiNouamEn Ha KpbIke Heucnpaen. Ipekpmumb 3cknyamauio ycmpoumea u odambe zo e pemohm.
TnaBbIi BbIKIOyAteJb
B onachbix cntyaunx nn nIy 6blCTporo BblKlIOyeHn ycTpoiCTBa yctaHOBTb IJIABHbI BblKlIOyateIb B NOIOXeHne 0 / O F F
→ДлпnpedoxphaHЯOT HenpeBnDHeHoro BBOda B 3KcnIpyatauIO NOBepHyb TJIaHBHbY BbIKJIOyateb B NOJIOKeHne «0/OFF» n BbITryb KInOv.

1 BnHTIa3akpenHn6yKcnpHoN cko- 6bl (2x)
2Пьлевоифлгр
3 PeεepByap nIa c6opa Mycopa
4 3aHnY yNIOHTHeBHa YnAHaKa (Ha 6ake c6opa Mycopa):
5 3apAHOe yCTpOncTBO (ToIbKO KM 75/40 W Bp Pack)
6 AkkymyIaTOpHbIe 6aTapeu (ToJIbKO KM 75/40 W Bp Pack)
7 BeDyUne WecepHn
8 Bokobar ynnottehna nhaKa
9 POnMeTaiouBn Bn
10 PepeHn ynnnoTHneBna nnaHa
11 3acnoHka JnKpynhbix qactnuc rpa3n
12 YnpaBnIounn poNk co cTOrHOHbIM TOPMO30M
13 KpeIeHne 6okOBoi TKeTNI
14 Bokobar 电Tka
15 3aüeIka KpbIiKn
16 Kpbiiika npnbopa
17 WTeKeP 3apAaKn aKKymyIaTOpHoi 6a- Tapeu (ToIbko KM 75/40 W Bp)
18 BeDyua dyra
19 Pbyar DnBxKeHn BnpePe
20 Pyar nI npdbema n onyckanna KnaHa dNkpynhbix qactn rpa3n.

NanenbynpaBneHn
1TnabHbI BbIKJIOHaTeIb
2 Pbyar dny onyckaHn n noHMaHn 6okobon uetkn
3aIyka Kpbikn nbntpa nbinn
4 Cko6a pe3epByapa nla c6opa Mycopa
5 Φινιβτρούηκτα έπλη πυληθόσο φινιβ-tpa
63a cNoHka DnA YnCTKn B cyXOM/BlaJx-Hom peKIme

JaBbI BbIKNoaTeNb
→ NObepHyTb KIOHrIaBHor BbIKHOa-TeJn HApKy Yepe3 HOBn BBHyTb.
OTkpblbkanOTyctpoictBa
Yka3aHne
Kopnyc yctpoiCtBa OTnnpaetcKIOHOM rnaBHOro BbIKJIOUaTeTn.

BCTaBnTb KIOUy INaBHO BbIKIOuAteIaB 3AMOK KpbIuKIN NOBepHyTb Ha 90^ No YacBOI CTpeJIKe.
→ BbTiRyTb 3aMOK KpbIiKn Ha KInOye.
→OTKpbTb KpbIuKy ycTpoiCTBa.
3akpbibkANOYycTpoNCTBa
→ 3aKpbIb KpbIbKy np6opa, 3aMOK KpbIbKn 3aKpoETc cMoCTOTeJbHO.
IpeaHaanpa6oTbI
Yka3aHn npn pa3rpy3ke
△ONACHOCTb
Onachocmb 3opobba, onachocmb noepkdeHua!
Ipu noepy3ke cneoyem obpammb bHMaHue Ha sec ycmpoucmea.
CMOnTHnPoBaTb BeDyuyu Dny
OTKpyTNb BnHTbl.
YcTaHOBnTB B BepTnKaJIbHOe NIOJOKeHHe TOnKaHOuIcKo6y.
3aTMyb BnHTbl.
YctaHOBntb NOdMeTaHouN Bn
Yka3aHHe: IpeEOnpOKnDbBaHHeM npNbopa n3BLey cbOpHNK-HakONITeIb nnoTAYb Bnepe3a BeDyUO dyry. He OCTABnTb np6Op Ha BeDyuei dyre.
HaTeb 60KOByIO uETky Ha 3aXBaTHoe yCTpoIcTBO IN KpENKO 3aTHyTb.
AkkymyIaTOpbI
Yka3aHnno TExHKe 6e3onacHocTn no o6paueHHo cakkymyIaTOPamn
PnO6paueHmncakKymJrTopamn cNe dyet co6nIodatb cneDyUoune npdynpeDnteBhie yka3aHn:
| i | Cobliodamb yka3aHua Ha ak kymyIamope, e unchmpykuuu no noIb3oBaHnU o pykoed- cmee no ekcnnyamaauu npu- 6opa! |
PekomeHdyemble aKKymyTOpbl
| № 3aka3a: | Вмechи-Mоctь | ПOTOK BOЗду-ха | |
| 60 Ah, Heo5-cлужи-Bаемы | 6.654-226.0* | 1,65** | 0,66*** |
- Дnia pa6obtby yctpoiCTBa Heo6xOДIMO 2 aKKyMnyTopa
**BM3
*** BM³/4
MaKcHMaJIbHbIe ra6apuTbI aKKyMylrTopoB
| Диinea | ШирINA | Бысotinga |
| 267 mm | 177 mm | 190 mm |
PekomeHdyembIe 3apHbIe yctpOcnTBA
| 3apядhoe устриоство | № 3аказа:6.654-225.0 |
UcTaHOBnTb NIOaKlnOuHTb aKcyMylrTopHbIe 6aTapeN
Yka3aHne
B moJei KM 75/40 W Bp Pack 6atapen n 3apJHoe yCTpoCtBO yKe BCTpoEhbl.
→OTKpbIbKpbIuKy yCTpOuCTBa.
YcTaHOBnTb aKMyJrTOp Ha HecyUIO 6anky Dniratela.
→ 3aФИКСИРОВАТ bAKKMyЛТOPHьIE 6aTapeN CTIINBAHOUIM pemeUKOM.
Pa60tblnpOBepke nTexHnueckomy 06cnyKuBaHHIO
→Пюверпь уpoBEнь зapядк n aKKуMy-ЯТОРOB.
→ПоверпьбokobьieшETK.
PpOBepuTb noDMetauoun BaN.
OuNTbPnBtpnnIIN.
OnopoxKnHtpe3epByap nIa c6opa Mycopa.
Yka3aHHe: OncaHHe cm. B rIabe "YxOu nTexHnueckoe 06CnyKnBaHHe".
3Kcnnnyatazaia
On achoemb
Bonee npodokumelbHoe ucnno3o6aHue annapama mojem npueecmu K hapuHku KpOoo6paueHue e pykax, bI-3eaHomy bu6pauee.
HeBO3MOxHO yKa3aTb KOHpeTHoe BpEmnCNoIb3OBAHne annapaTa, TaK KaK 3TO 3aBNCHT OT HECKoJIbKnx qakTopOB:
- NnHna npedpaonIOKeHHocb K nIOxomy kpoBoo6paueHIO (aCto 3a6Hyune naIbci, oPmkaun naJIbceB).
Hn3KaBHeuHЯ TempeaTypa.ДЯ 3aunTbI pyK HOCInTe TEnIbe nepuATKn.
-ПрочаяхВаТКИпЕЯТСТBYeТ КрОБо-обрашени. - HenpepbBna pabota xyke, yem paobota c nay3amn.
PnpeyraepHom nCnoB3oBaHnn np60pa nIOBTOPHOM NOBHeHN COOTBeTCTByO uNX npn3HaKOB (HanpImep, fOpMkaun naIbueB, 36Hyune naIbUbi) Mbl peKoMeHdyem npoHTn Bpaue6Hoe obcneDoBaHne.
3anyck npnbopa
OTnyCTnTE CTOHouHbI TOpMo3.
3anyctntb DnBraTeJIb.
→ NObepHyTb rIaBbHbI nepeKlnHouatEnb B nOJoxKeHne "1".
Yka3aHHe: PdMeTaOuBn BAn n 60KOBbIe UeTK BpaauTcra.
IpepeBnkeHneHa annapaTe
NpeedBnKHe Bnepe
→NotarybpbuArBnKHeHnBnepei.
Yka3aHHe: Pn DnKHeHH Bnepe, B 3aBnCIMOCTN OT NOLOKeHH pyIyara, CKOpocTb DnKHeHH MOKeT peYIpnoBaTbcr PnaBHO.
XoJocToxOa
→OTnycntbpbHarDnBxHeHnBnepe. YcTpoiCTBOOCTaHaBnBaETca.
PpeoJolJe npenTCTBn
IpeeeXaTb KcnpoBaHHbIe npenrTCTBnA 1030 MM:
→ПонгТьКлаланСиNbHbIX3aRpa3He- HmI.
→PpeTCTBnCneDyET npeoJoneBaTbOcTopoXHO,BO BpEmaDbKHeHnBpeNHaMeDHeHoCKOpocn.
PpeepexTaB qNKcnpoBaHHbIe npenTCTBnA CbbIe 30 MM:
→ NIOO6HbIe npenrTcBnCneDyET npeoONeBaTb TOJbKO CNCNOL3OBAHnEM NOxOJaUePambl.
Iopmdetahne
Onachocmb
Onachocmb nonyuhenura mpaem! Ppu om-Kpbimom Klanane DnKpynhbix Yacmuapra3u noDMemaiou ean moxem ombapcbibam bnepekamhu u uebeh. He noeepaamb onachocmu IIOdeu, Xueomhbix UUNI npdmembI.
OCTOPOXHO
He donyckamb nonadahu 8 Maunhy ynaKooybIX neHm, npoeoloku u m.o., maKaK 3mo MoXem npueecmu K nopekdeHuIO nOdmemaUoeseo MexaHu3Ma.
Yka3aHne:ДЯdoCTNXeHNOITMmaIbHo rope3yIbTata pa6Otbl Heo6xOIMO copa3MepeTb CKOpOcTB DnIXeHnC MeCThblMN yCNoBnAMN.
POnMeTaHHe C npInoHraToI
3acNoHkO JnKpyNbIx YactNu rpa3N
Yka3aHHe:ДЯЗamTaHnKpyNbIX npEIMetOB BbICOTOn Do 50 MM, HAnpMep, CnRapeTHbIX NaYeK, Heo6xOdImo KpaTkoBpeMeHHO pInNoDnHbTb Klanan DnKpyNbIX YactnI rP3n.
Iopdbem 3acnoHKn dna Kpynhbix qactnuc rpa3n:
→ Notaryb pbIar dIra onyckaHn HnoHnMaHn KJIanaHa KpyNbIX 3aRpa3HeHn.
Onyctntb Knaanh CnJbHbIX 3aqr3HeHH.
OTnycTntb pbUar IJn onyckHnI nOJHMaHnKJanaHa KpyNbIX 3aRpa3-HeHn.
Yka3aHHe:OnTnMaJIbHoE KaueCTBO y6OpK N ObecneuBaETc TOnIbKO npN NOJHOCTbIO OnyueHHo 3acNoHKe IJa KpyNbIX YactNU rpa3N.
IoMetaHne C nCnOJIb3OBAHHem 6OKOBbIX uETOK

→OnyckaHn60koBOn 8eTKn pbyar yctahOBNTb BnepeD. BoKOBa 8eTKa onyctntcra
IopMeTaHne cyxoro nona
Yka3aHHe:BoBpempa6oTbCneDyETpe- rnyapHO ydaTb coepKmOe n3 pe3epByapa dna c6opa Mycopa.
Yka3aHHe:BoBpempa6oTbCneDyETpe- rnyapnOOnuTaBΦNtbpIgIbI.

3aKpbItb Knaanah nIy NCTKN B cyXOM/ BnaxHOM peXIME,
IopMaTHe BnaXHOro nn MOKporo nola
→ OTKpbIb KπaπaH nπη ΦιCTKN B cyxOM/ BλαχHOM pεχIME,
Yka3aHHe: TaKIM O6pa3OM FJIbTp 3aUu- UeH OT BO3DeIcTBnB BLaRn.
HndkaTop akkymyIaTopa
HnkaTop aKKymyIaTOpH 6aTaepen BO Bpempa0bI NOKa3bBaET COCTOHNe 3apdkn aKKymyIaTopa:

HnKaTop HncpabHOCTn NOKa3bIbaET, cTb JN BYcTPOCTBE HncpabHOCTb:

| HéncpnbHoctb cncTe-Mbl ynpabLeHnIa-BnIgA-TeIeM | Mnraet KpaChbIM |
OuHCTnTb nbIeBOB qHJbTp

HeckoJIbKO pa3 BbIbINHyTb N BdBInHyTb pyKcY uCTKNΦJIbTpA.
OnopoxHntb pe3epByap nla c6opa mycopa
ONACHOCTb
Onachocmb nonyuhen mpaem! Pepeud 3eueenuem peepeyapa dncbopa mycopa npubop cnedyem omknouumb.
Yka3aHHe: Pn OnopoxKHeHm pe3epByapa dIy c6opa Mycopa CneiNTb 3a TEM, YTObI He NOBpeiNTb yNtOTHraUOyIO nnAky.
Yka3aHHe: MaKcMaJIbHO DoNyCTmJa 3a- rpy3ka pe3epByapa nIЯ c6opa mycopa coCTabJraT 40 Kr.
OuHCTnTbΦnNbTp DnIy nbln.
→ПOTЯнТь ВБЕХ CКОБу peЗЕРУараздя сбopa мсора.
→ BbItaIuNTb eMKoCTbДЯ Mycopa.
Onopoknntb pe3epByap nra c6opa mycopa.
BdINHyb eMKoCTb IMycopa.
→ HaxaTb ha ckO6y pe3epByapa dna c6o-pa Mycopa.
BbiknoueHne np6opa
BbIKHouThb DnIraTeJIb.
→ NopBepHyTb rnaBbHn nepeKnHouaTeInb B nOJoxKeHne "0".
→PnnoDnHb6OKOBBieuETKN.
→ 3aФИКСИРУТЕ CTОHAHьI TOpM03.
→ NObepHyTb KIIIOU rIaBHO BbIKIOuA-TeIHaPyKy Upe3 HONb N BbIHytb.
TpaHcnOpTmPoBka
ONACHOCTb
Onachocmb nonyeHnmaB m u noepexdeHu! Ppu mpancnopmuOBe cneoyemobpammb eHumahue Ha bec ycmpou-cmea.
BbIKHIOHTb DBNtAteIb.
→ NIOBepHyTb KINHOTnABHO BbIKHOaTeJn HApKyYepe3 HOb N BbHYtB.
→ 3aФИКСИРУТЕ CTORHQUHbI TOPMO3.
3aФИКСИРОВаТb annapaT, noДПОЖИ NOD erO KONEca KINHЯ.
3aKpeNtB annapaT HaTbIMn peMHM NJIN KAHaTaMn.
→Pn nepeB03Ke annapata B TpaHC-NOpTHbIX CpeCTBax CneIyEt yHTbI-BaTb DeIcTBYIOUIME MecTHbIe IocyIap-CTBeHHbIE HOpMbI, HanpaJIeHHbIe Ha 3aUNTy OT CKOJIbXeHn IN OnpOKnDbIBa-HN.
1 O6Iacb KpeJIeHnno ToKauoueckObe
2 O6IacTb KpePHeHn IoD KaIOTOM yCTpOiCTBa
Yka3aHHe: Co6JIIOdaTb MapKIpOBky dIy 30H KpeJIeHnHa pame NODMeTAIOUeMaUNHb (CIMBOJI CEnei).
Yka3aHHe: He nepeRn6aTb cnCTemy TpoCob ININ CNCTemy TpoCob BoydeHa.
XpaHeHne
ONACHOCTb
Onachocmb nonyeHua mpaM u noepkdeHui! Ppu xpaHeuu cneOyem obpummb bHumaue Ha eec ycmpoucmea.
BbIbOu3 3KcnJyataun
Ecni noDMetaa MaunHa He nCnoB-3yETcB TeueHne nnTeNbHO BpemeHn, cNeDyET CObNDoTa b CNeDyUOuNE NyHkTbI:
→ NocTaBnTb NOmTeAouyIO MaunHy HApOBHOI NOBepxHOCTN.
BbIKHIOuHTb DBuRatEnb.
→ NObepHyTb KINOHrNaBHO BbIKHOpa-TeJn HApKyYepe3 HOb N BbHYtB.
→ 3aФИКСИРУТЕ CTORHOUHbI TOpM03.
→ПинЯть Меррл потив Ненрон3BOЛьНOrO KaueHnI NOmTeAIOUeM MaunHbI.
→ПОДНЯТь NOДМЕТАЮУМВ BAN.ДЯЗTO-RO O6a peRyIINPOBOUHbIX pbIcA RCTaBNTb B CaMOE BEPXHEE OTBEPCTNE.
→PnnoDnHrB6OKOBbIe 1eTKn.
OuHCTnTb NOmTaHOU Ko MaunHy CHAPyKIn BVHTN.
→ NocTaBnTb annapaT B 3auuueHHOM n CyXOM MecTe.
OTcoeHNHTb aKKMyTOpbl.
→ AkkymyIaTOp cIeIyET 3apIaITb, a 3aTeM 3apJkaTb np6I. KaXdbIe IBa MeCraIa.
YxOД n TeXHnueckoe 06cnyKnBaHne
06une yka3aHnA
IpoBedeHnem pemOHThbIX pa60Tpa3peWaaetc3aHIMatbCtTObKO aBTOpN3OBaHHbIM CepBnCHbIM cHTpAm, ININ CNEuNAInCTAMn B 3ToN Cpepe, KOTOpBie O3HAVKOMJIeHbIC COOTBeTCTByOuMN IpeDnncAHmM npabn TExHKn 6e3OnaCHOCTn.
- IpeBnKhIe npomblJeHHbIe npi6Opbl npoxoJr npOBepky 630naCHOCTn corNaCHO VDE 0701.
UHCTka
OCTOPOKHO
Onachocmb nopekdeHura! He pa3pewaemc yucmumb npubop u3 o0dnozo wana unu cmpye bdo nod bboKUM daenHeM (onachocmb Kopomko2o 3aMbkaHua u dpyux nopekdeHui).
BHIMAHNE
Ipepe npoeedeHem paob no oucme u3eneb umencenbHyu bunky 3apdnozo ycmpoucmea u3 poemku.
Peped npoedeehuem paob no oucme omcoeunumb KEmmy nIoXumelbHOO nIOUca aKkymynopHou bamapeu.
Hnctka annapapa n3Hytpn
Onachocmb
Onachocmb nonyuhenura mpaem! Hocumb 3auumHyu Macky npomue nbiu u 3a- uHmHbE OOU.
→ OTkpbItb KpbIuKy ycTpoiCTBa.
→PpoTepeb annapat TpAnKoN
→O6dyb annapaT CkA TbIM BO3dyxOM.
→ 3akpoTe KpbIuKy npu6opa.
Hnctka annapapa chapykn
OuInCTnTb annapa, nCNoJIb3yra DnA 3TOrO BnaJHyIO TprNkIpy, npOnITaHHyIO MRAKIM UeJeIOUHbIM pactBOPOM.
Yka3aHHe: NcnoJIb3OBAHne arpeccNBbIX MOUm cpeCTB He donyckaTcra.
PepnoDnUHocTbTexHnueckoro 06cnyKnBaHHa
Texnueckoe 06cnykBAHne, OcyuectBJIaEMoe KInHeTOM
EkeHbHoe texHueeckoe 06cnyxnaHne:
→PpOBepntbMeTyuBnBAINK60KOBBeI UeTKNHaN3HOCHaJIyHeHAMOTAB- WIXCJNEHT.
→Поверпь Испраьhoe coctонь BCex 3nemehTOB ynpabJIeHnI.
→ PpOBepntb pa60Ty BCex KOHTpOJIbHbIX naMn.
ExeHeIbHoeTexHueeckoe 06cnyKnBa-Hne;
OcbnykBaHnneKaKdIe500YacOBpa6oTbI nnEkeOrHO
Yka3aHne: Ira coxpaHeHna npBa Ha rapaHTnHoe 06cnyXnBaHne BCE paObTI NO texHNueCKOMy INpOoJIaKTHueCKOMy 06cIyXnBAHHIO IN TeUeHNE rapaHTnHoro cPoka DOJKNbI INPOBODTCBc YNOLHOMOeHHo CEPBNCHO cNyXbof nPmbl Karcher B COOTBeTCTBnC 6pOuHOpoi NO texHNueCKOMy 06cIyXnBAHHIO.
Pa60tbi No TexHnueckomy 06cnykBaHHIO
IoiroTOBka:
→IocTaBnTb NIOMaTeAIOUyIO MaunHy HApOBHoi NOBepxHOCTN.
→Повернтб КИОУ ГАНОВ ВИКЛЮЧа-Телу hapуку uepe3 HOBи BvHtB.
→ 3aФикс neuropTe CTонуHьI TopM03.
06uue CBeDeHn no TeXnKe 6e3oNaChocTu
ONACHOCTb
Onachocmb noJyuHua mpaem!
Iocne ebiknueHua deuzamelb epauaemc eue 3-4 cekyhdno uhepuu. B3mo epema cledyem ocmaeambc8he 30hbl npuboda.
PENyPEXKDEHNE
Ipeod npoeedeHuem IIObix paobom no mexHuueckomy u npoOpunakmuueckomy ocbnykuaHuo MauHa doJxHa ocmbim.
He npukacambcK 2opyum y3nAm,Ha npumep,K npueodHomy obuzamEno.
BHIMAHHE
Ipepe npoebeHueem paob no mexHuceckomy 0cbnyku6aHuo U38neUwmcncbHyu BUNky 3ap4HO2O ycmpoucmea u3 poemku.
Ipeod npoedeHueem paob no mexHuceckomy 6cbnykueaHIO omcoedunmbKJIEMMy nOxumenbHOzo nonIOca AKKymyamophoBdeltapeu.
BHIMAHHE
Peped onpokuobieaehuymcpoucmea u3 6eneb akymynnaphe bamapeu u 6yH Kep, cbuhymb neped dy2o06pa3Hy0 pyky. He cmaumb ycmpoucmeo Ha dy2o06pa3Hy0 pyky.
Ipeo oucMKou u mexHueckum ocbnyKuabaHuem npubopa, amakke nepeo 3a
MeHou demaneu npubop Heo6xodmo bI-KnIOyUmB.
OtperyIInpoBaTb r6kyo Tary npBoda xoDBoY qactn
Perynpobka Heo6xOaMa B TOM cnyae, ecn np e3e no rohpoh dopore cnbl Tarn npnbopa HeoctatoHQ.
→OTkpblbKpbluKy ycTpoiCTBa.
→ OTnyctntb KOHTprayky.
→ OtperynipoBaTb yCTaHOBOUHbB BnHT.
→ 3aTAYb KOHTprAky.
PpOBepka noDMeTaIoUe Ro Bana
3aФнксypиTe cToHouHbI TOpMo3.
→ YdaJIHTb eMKoCTb DnI Mycopa.
→ YdaNTb c NoDMeTaHOe Ro BaJa HAMOTaBWeNecr HeTbI N BepeBKn.
3aMeHa noDMeTaIoUe Ro Bana
3aMeHa CTAHOBITcH Heo6xOIMoH,ecn BcJIeCTBHe N3HOca 1eTOK pe3yIbTaT KaYeCTBO NoMTeHnH 3aMeTHO yXuDuaetCra.
BHIMAHHE
Ipeod onpokuobieaHuem ycmpoucmea u3-eneb akkymnyamophbe 6amapeu.
He cmaeumb ycmpoucmmo Ha oyoo6pa3Hyu pyky.
→ 3aФИСИРУТЕ CTORHQUHbI TOPM03.
BbHyTb 6ak c6opa Mycopa.
BbIHyTb 6aTapen.
OnpoknHytb np6op Ha3a.

→ NpHrB Klanan HnKpynhbix qactu Tp3N, BdaBNTB BKnaDbI W noDwnHnKa n HAKIOHHTb NODMaTOU BAN BpeJ.
BbHyTb NOmTaIOuIN BaJ.
→HaTebHOBbI NOMeTaIOuIN BaI Ha 1aandpy npnBOda (cneBa).
→Ha npoTnBONOJNOXHcI CTOpOHe BCTaBNTb BKNaDbIiN NOuINHnKa BOTBePCTne 6anaHCupa NoMeTaIOUeBOBa.
OCTOPOXHO
Onachocmb noepexdeHn! Obpammb EHumaue Ha mo, ymo6bI omepcmuu banahcupa noMemaiauezo eana He 6bina zaxama uemuna.
Yka3aHHe: Iocne yCTaHOBKn HOBOr NOmMetaUoIeR OBa HEO6XoIMO CHOBa OTpeRyIuPObA Tb NIOCKOCTb NOMTeHaH.
PpOBepKa N KoppeKTHIpOBKa NIOCKoCTN NOmTaHn DnN NOmTaOuero Bana
→PpnoDnHbTybOpOHyMaunHy Bnepeu n nepeMeaTaB ee no poBho n rnaKoN NOBXHOt, KOTopar 3aBeOM NOKpbIta nbJIbIO nn MeJOM.
3aФнксчte cToHouHbI TOpM03.
→Даь NOBOPOTbIM BaJIHKAM BpaaATbCЯВ TeHeHn np6n3nTeJbHo 15-30CEK.
→PnnoDnHb y6oOpHyMaunHy exaTb BCTOPOHy.

ΦopMa NOBepxHocn y60pKn 6pa3yet paBHOMePbI IN pRMOyROJbHNK, WUPHa KOTOPoCOTABNReT MEkDy 30-40 MM.
→ OtperynnpoBaTb yCTaHOBOUHbB BnHT.
→ 3aTaNHTb 6apawkoBvO raKy.
OtperynipoBaTb noDbem KlanHa cnIbHbIX 3arpa3HeHn
Tpe6yetcpeynipOBka,ecnKJanaH DnCnBbIX 3aarp3HeHn NOdHMa- etc HEOCTaTOH0.
- Ecnn pe3yntaT y6opkn nIOx, Hnnpmep, n3-3a n3HOca nepepDHe 3akpanHbI, rN6kyo Tary cNeNyET HemHoro ocna6ntb.
OTkpblbKpbluKy yctpoiCTBa.
OTnyCTNTb KOHTpraKy.
→ OtperynipoBaTb yCTaHOBOHyBn BnHT.
3aTMyb KOHTprayKy.
YcTaHOBka 3aMeHa yNIOTHHTeJIbHbIX nHaHOK
Yka3aHHe: IpeEOnpOKnDbBaHHeM npNb60pa n3BJeCb c6OpHK-HaKoNTeJIb NIOrHyTb Bnepe3a BeDyUO Dpy. He OCTaBnTb np6Op Ha BeDyUeI dyre.
■ Npeedn ynnnoTHteJbHa nnaHa
Ocna6ntb kpenneHne ynIOHTHeBHOHnnHKn.
→ YnnoTHaIOUHO nnAHHO oTperyNnpo-BaTB nnn 3aMeHHTb.
PacctoHne yNtHTeBHOI pHaKnIO no nla yTaHOBnTb TaK, YTO6bl npnpo6ere no Hepun OHa OTKnOHaJaCb Haad Ha 0-10 MM.
OTkoppeKtnpoBaTb yNIOHTeJIbHyIO nHaHky.
3aTAYb KpeNHeHne yNIOHTHeBHOI nHaHK.
3aHn ynnnoTHnIbHa nlaHaKa
→ YdaJIHTb eMKoCTb dIy Mycopa.
Ocna6ntb kpenneHne ynIOHTHeB-HOH nHaHKN.
→ YNNTHOUHO nnahky OTPerynpoBAtb NIN 3aMEHHTb.
→ PacctoHne yNtOHTeBHO nnAHN Do nOa yCTaHOBt TaK, YTO6bI npn npo6ere no HEPUN OHa OTKnHOJAcb Ha3aHa 0-10 MM.
3aTAYb KpeHHeHne yNIOHTHeBHOI nnAHK.
Bokobbie yNIOHTHeIbHbIe nHaHKn
OcnaBt b kpenneHne ynnotteNb-HoHnnAHH.
→ YnnotHryu yno nnaHky oTperynnpoBaTb Nm 3aMeHNTb.
→Дянсгострп pacctoHЯdo nona HcnoJIb3OBA Tb NOdkJaDKToIuHOB MaKcMaJIbHO 2 MM.
OTkoppeKtnpoBaTb yNIOHTeIbHyIO nnaHky.
3aTAYb KpeIeHne yNIOHTHeBHOI nnAHHK.
3aMeHa nIbIeBOrO fHJIbTpTa
△PENEYNPEXDEHNE
Iohayana 3aemhblnbeo20 pfunbmpa ydaumbcodepkumoe u3 pezepeyapa dnsbopa mycopa. Ppu paobem c pfunbmpo8aBHOU ycmaoekou Hocumb Macky dn3auumbl om nbJlu. Cobniodaume npednucanur no mexHuke bezonaacchcmu e omHoweHuObpaueHua C MeIKoBnBIO.
OCTOPOXHO
Onachocmb noepexdeHua!
→ Πbɪeəʊ φuɪbmp He HúχHo πpɒmbl-
3aФнксypyTe CTOrHouHbI TopMo3.
OuHCTnTb pNtBtp nIbn.

→ 3aŋnyk Ky KpbIuKn ΦnIbTp a nbIiOn OT-KpyTntb npOTNB YacOBoi CTpeJIKN.
→PnHrTb KpbIkwNblneBOrO qnIbTpA.
→3aMeHHTb NJIeBOI ΦNJIbTp O6paTtB BHIMAHHe Ha IpaBnJIbHOe NOIOKeHne YcTaHOBKn NJIeBOI ΦNJIbTp a (CM. pICyHOK).
→ 3akpyntb 3aarrnyuky do ynopa.
OCTOPOXHO
Ecnu 3aanyuKa He 6ydem 3akpyeHa do ynopa, 3mo MoKem npueecMu K NONOMKe. Yka3aHHe: Pn yCTaHOBKe HOBOrO FInbTpa CneINb 3a TEM, YTObI NlaCTINbI He 6blnn NOBpeXdHbl.
3aMeHa npedoxpaHnte/ peIe
KM 75/40 W Bp
1ПпeдoxраннтьF1(50A)
2 PpeoxpaHnTeIb F2 (2 A)
3 Pene
4 3apЯньштЕрakkyMnyTopa
→OTKpbIbKpbIuKy ycTpoIcTba.
3aMeHnTb HeNCpabHbI npedoxpaHnTeNb nnn peJe.
KM 75/40 W Bp Pack
IpeOxpaHnteIb paCNoIooKeH Ha KneMMe aKKMyJrTopa.
PnHaJneXHoCTn
IpoDyKT IOndMeTaJIbHO-BCacbIBaIO-
Tun: 1.049-xxx
OCHOBHbIe DnpeKTHBbI EU
2006/42/EC (+2009/127/EC)
2014/30/EC
2000/14/EC
PpIMMeHHbIe rapMOHN3nPOBaHHbIe HopMbI
EN 55012: 2007 + A1: 2009
EN 60335-1
EN 60335-2-72
EN 61000-6-2: 2005
EN 62233: 2008
EN IEC 63000:2018
PpIMHeHHbIe BHyTpnuROcydApCTBeHHbIE HOpMbI
PpmeHHbI nopAOK oceHKn COOTBETCTBn
Director Regulatory Affairs & Certification
YIONHOMOueHHb COTpydNHK NO BeDeHNIO DOKyMeHTo06Opota:
S. Reiser
Alfred Karcher SE & Co. KG
71364 Winnenden (Germany)
Tel.: +49 7195 14-0
Fax: +49 7195 14-2212
Winnenden, 2021/02/01
www.kaercher.com/REACH
Garancia
Chairman of the Board of Management
S. Reiser
Director Regulatory Affairs & Certification
71364 Winnenden (Germany)
Tel.: +49 7195 14-0
Fax: +49 7195 14-2212
Winnenden, 2021/02/01
www.kaercher.com/REACH
Zaruka
2006/42/ES (+2009/127/ES)
2014/30/EU
2000/14/ES
Chairman of the Board of Management
Director Regulatory Affairs & Certification
Zplnomocnena osoba pro sestaveni dokumentace:
S. Reiser
Alfred Kärcher SE & Co. KG
71364 Winnenden (Germany)
Tel.: +49 7195 14-0
Fax: +49 7195 14-2212
Winnenden, 2021/02/01
www.kaercher.com/REACH
Garancija
2006/42/ES (+2009/127/ES)
2014/30/EU
2000/14/ES
71364 Winnenden (Germany)
Tel.: +49 7195 14-0
Fax: +49 7195 14-2212
Winnenden, 2021/02/01
www.kaercher.com/REACH
Gwarancja
Zalecane akumulatory
2006/42/WE (+2009/127/WE)
2014/30/UE
2000/14/WE
Chairman of the Board of Management

S. Reiser
Director Regulatory Affairs & Certification
Administrator dokumentaci:
S. Reiser
Alfred Kärcher SE & Co. KG
71364 Winnenden (Germany)
Tel.: +49 7195 14-0
Fax: +49 7195 14-2212
Winnenden, 2021/02/01
Usuwanie usterek
www.kaercher.com/REACH
Garantie
Indicator accumulator
Directive UE respectate:
2006/42/CE (+2009/127/CE)
2014/30/UE
2000/14/CE
Norme armonizate utilize:
EN 55012: 2007 + A1: 2009
EN 60335-1
EN 60335-2-72
EN 61000-6-2: 2005
EN 62233: 2008
EN IEC 63000:2018
Norme de aplicare nationale:
-
Chairman of the Board of Management

S. Reiser
Director Regulatory Affairs & Certification
71364 Winnenden (Germany)
Tel.: +49 7195 14-0
Fax: +49 7195 14-2212
Winnenden, 2021/02/01
2006/42/ES (+2009/127/ES)
2014/30/EU
2000/14/ES
Chairman of the Board of Management
S. Reiser
Director Regulatory Affairs & Certification
71364 Winnenden (Germany)
Tel.: +49 7195 14-0
Fax: +49 7195 14-2212
Winnenden, 2021/02/01
Otklanjanesmetnji HR9
Tehnicki podaci . HR 10
www.kaercher.com/REACH
Jamstvo
U svakoj zemlji vaze jamstveni uvjeti koje je izdala naša nadležna organizacija za distribuciju. Eventualne smetnej na priboru za vrijeme trajanja jamstva uklanjamo besplatno ukolko je uzrok greška u materijalu ili proizvodnji. U slučaju koji podljije garantci obratite se, uz preraganje potvrde o kupnji, Vašem prodavaču ili njblžoj ovlaštenoj servisni službi.
Simboli u uputama za rad
△OPASNOST
2006/42/EZ (+2009/127/EZ)
2014/30/EU
2000/14/EZ
Primijenjene uskladene norme:
EN 55012: 2007 + A1: 2009
EN 60335-1
EN 60335-2-72
EN 61000-6-2: 2005
EN 62233: 2008
EN IEC 63000:2018
Primijenjeni nacionalni standardi:
Chairman of the Board of Management

S. Reiser
Director Regulatory Affairs & Certification
71364 Winnenden (Germany)
Tel.: +49 7195 14-0
Fax: +49 7195 14-2212
Winnenden, 2021/02/01
www.kaercher.com/REACH
Garancija
U svakoj zemlji vaze garantni uslovi koje je izdala naša nadležna distributivna organizacija. Eventualne smetnje na priboru za vreme trajanja garancije otklanjamo besplatno, ukoliko je uzrok greška u materijalu ili proizvodnji. U slučaju koji podleže garanciji obratite se sa potvdom o kupovini Vasem prodavcu ili najbljoovlascenoj servisnoj sluzbi.
Simboli u uputstvu za rad
△OPASNOST
Ukazuje na neposredno pretecu opasnost koja dovodi do teških telesnih povreda ili smtri.
△UPOZORENJE
Ukazuje na eventualno opasnu situaciju koja moze dovesti do teških telesnih povreda ili smrti.
OPREZ
Ukazuje na eventualno opasnu situaciju koja moze dovesti do laksih telesnih povreda ili izazvati materijalnu stetu.
Simboli na uredaju
Nemojte da metete predmete koji gore ili tinjaju, kao sto su npr. cigarete, sibice ili slicno.
Opasnost od povreda usled prignjecenja i posekotina na remenu, bochnim metlama, rezervoarima i potisnim ručkama.
Öpasnost od opekotina Izbegavajte kontakt sa ovim povrsinama tokom rada i kada su u zagrejanom stanju.
Sigurnosne napomene
Sigurnosne napomene vezane za rukovanje
- Pre uporabe proverite da li je uredaj savojim radnim komponentama u ispravnom stanju i siguran za rad. Ako stanje nije besprekorno, ne sme se upotrebljavati.
- Pri upotrebi uredaja u opasnim područjima (npr. na benzinskim stanicama) treba se pridžavati odgovarajučih sigurnosnih propisa. Zabranjen je rad u prostorijama u kojima preti opasnost od eksplozija.
Rukovaoc mora da upotrebljava uredaj u skladu sa njegovom namenom. Moravoditi racuna o lokalnim uslovima, a pri radu uredajem mora se paziti na druge osobe, posebno decu. - Rukovalac se pre početka radova mora uveriti da su sve zašitne napravé postavljene propisno i da su ispravné.
- Rukovalac uredaja je odgovoran za eventualne slucajeve nesrece kojima su pogodene druge osobe ili njihova imovina.
- Rukovalac mora da nosi usku odecu. Nosite Čvṛstu obću i izbegavajte odecu koja nije uz telo.
- PrePokretanja uredaja prekontrolisite okolinu (npr. ima li dece).Pobrinite se za dobrupreglednost!
- Neovlašćeno korišćenje uredaja treba sprečiti izvlačenjem kljuc.
- Prilikom napustanja, uredaj treba osigurati od nenamemog pomeranja.
- Ure'daj smeju da koriste samo lica koja su upucena u rukovanje njime i koja mogu dokazati sposobnosti za posluživanje i ovlascena su za njegovu upotrebu.
- Ovaj uredaj ne smeju da koriste lica (ukljucujuci decu) sa smanjenim fiziickim, senzoriickim ili psihickim sposobnostima odnosno nedostatkom iskustva i znanja.
- Deca se moraju nadgledati kako bi se spreciilo da se igaju s uredajem.
Sigurnosne napomene vezane za voznju
Opasnost
Opasnost od povreda!
Opasnost od prevrtanja na prevelikim usponima.
- Dopusteno je savladavati samo nagibe do 12% .
Opasnost od prevrtanja na nestabilnoj podlozi. - Uredaj koristite isključivo na stabilnima podlogama.
Opasnost od prevrtanja pri prevelikom bočnom nagibu. - Dopusteno je savladavanje poprechnih kosina u odnosu na smer kretanja od maksimalno 12% .
Brzinu kretanja treba prilagoditi odredenim prilikama.
Sigurnosne napomene vezane za transport uredaja
- Prilikom transporte pazite na težinu ureðaja.
- Kako biste uredaj tran sportovali, odvojite akumulatore i sigurno učvrstite uredaj.
Sigurnosne napomene za uredejkoji se pogone uz pomocakumulatora
Napomena: Pravo na garantne usluge postoji samo ukoliko se koriste akumulatori i punjači koje preporucuje preduzeće Kärcher.
- Obavezno se u vezi ovoga pridrzavajte radnog uputstva proizvodača akumulatora i punjača. Obratite pažnju na preporuke zakonodavca o radu sa akumulatorima.
-Akumulatore nikada nemojte ostaviti da leze ispraznjeni, vecih sto pre moguce ponovo napunite.
Radi sprečavanja struja greške akumulatori uvek moraju da budu cisti i suvi. Šitite ih od zaprljanja, npr. metalnom prasinom. - Ne stavljajte na akumulatornikakav alat niti slične predmete. Opasnost od kratkog spoja i eksplozije.
Koristite uvek 2 akumulatora istog tipa! - Ni u kom slučaju nemojte raditi sa otvorenim plamenom, stvarati varnice niti pusiti u blizini akumulatora ili u prostoriji u kojoj se akumulator puni. Opasnost od eksplozije.
- Koristite samo akumulatore sa kapicama. U slučaju da je izgubite, nabavite novu kapicu.
- Ne dodirujte vrele delove kao sto je pogonski motor (opasnost od opekotina).
Budite oprezni pri radu sa akumulatorskom kiselinom. Pridrzavajte se odgovarajuucih sigurnosnih propisa! - Stare akumulatore treba ukloniti u OTPad u skladu sa direktivom EZ 91/157 EEZ na ekoloski primeren način.
2006/42/EZ (+2009/127/EZ)
2014/30/EU
2000/14/EZ
Primenjene uskladene norme:
EN 55012: 2007 + A1: 2009
EN 60335-1
EN 60335-2-72
EN 61000-6-2: 2005
EN 62233: 2008
EN IEC 63000:2018
71364 Winnenden (Germany)
Tel.: +49 7195 14-0
Fax: +49 7195 14-2212
Winnenden, 2021/02/01
| Otklanjanje smetnji | |
| Smetnja Otklanjanje | |
| Urežaj se ne moze Pokrenuti | Kontaktni prekidačPoklopca je isključio urežaj. ZatvaranjePoklopca urežaja |
| Napunite akumulatore. | |
| Provera preopteretnog osigurača | |
| Obavestite Kärcher servisnu službu. | |
| Motor radi, ali se urežaj ne kreće | Podesite Bowden poteznuŽicu voznog pogona. |
| Proverite klinasto remenje. | |
| Obavestite Kärcher servisnu službu. | |
| Urežaj se zaustavlja pri savvladavanju uspona. | Vozite putem sa manjim usponom. |
| Provera preopteretnog osigurača | |
| Podesite Bowden poteznuŽicu voznog pogona. | |
| Proverite klinasto remenje. | |
| Obavestite Kärcher servisnu službu. | |
| Valjak za metenje stoji, prikaz smetnje svetli crveno | Glavni prekidačokretenite na"OFF", proverite da li načetki ima zaglavljenih predmeta. Po potrebi vozite manjim usponom. Ponomo ukljčite glavni prekidač. Posle Četvorostrukog ponavljanja ovoq postupka upravlačka jedinica pravi pauzu u trajanju od 2 minuta kako bi se ohladila. Tokom tog vremena se urežaj ne mozePokrenuti. |
| Urežaj ne mete kako treba | Proverite pohabanost valjka za metenje i bočnih metli pa ih po potrebi zamenite |
| Proverite ispavnost zaklopke za grubu prljavštinu. | |
| Popustite Bowden poteznuŽicu zaklopke za grubu prljavštinu (zavrtanj za poděšavanje). | |
| Proverite zategnutost i ispavnost remena, po potrebi ga zamenite. | |
| Naknadno podesite profil metenja. | |
| Zamenite valjak za metenje. | |
| Obavestite Kärcher servisnu službu. | |
| Urežaj diže prašinu | Proverite ispavnost zaklopke za grubu prljavštinu. |
| Popustite Bowden poteznuŽicu zaklopke za grubu prljavštinu (zavrtanj za poděšavanje). | |
| Proverite, očistite ili zamenite filter za prašinu. Filter za prašinu ne sme da se pere u vodi. | |
| Ispraznite posudu za nakupljenu prljavštinu | |
| Zamenite zaptivni profil na posudu za prljavštinu. | |
| Proverite zaptivku na filteru za prašinu. | |
| Proverite pohabanost zaptivnih letvica, po potrebi ih podesite ili zamenite. | |
| Loše metenje po ivicama | Podesite deo za spušanje bočne metle. |
| Zamenite bočnu metlu | |
| Spustite bočnu metlu. | |
| Proverite pogonski remen bočne metle. | |
| Obavestite Kärcher servisnu službu. | |
| Deo za podizanje bočne metle ne radi. | Proverite Bowden poteznuŽicu za podizanje bočne metle. |
| Obavestite Kärcher servisnu službu. | |
| Novi valjak za metenje se sare o posudu za prljavstinu. | Iznova podesite profil metenja. U tu svrhu uglavite o be poluge za poděšavanje u odgovarajuću višu rupu (1...3). |
Tehnicki podaci
| KM 75/40 W Bp KM 75/40 W Bp Pack | |||
| Podaci uredaja | |||
| Dužina x Širina x visina (potisna ručka rasklopljena) | mm | 1430 x 750 x 1190 | 1430 x 750 x 1190 |
| Dužina x Širina x visina (potisna ručka sklopljena) | mm | 1160 x 750 x 930 | 1160 x 750 x 930 |
| Težina (bez akumuladora) kg 79 79 | |||
| Težina (s akumulatorima) kg 125 125 | |||
| Dozvoljna ukupna težina kg 205 205 | |||
| Brzina vožnje i metenja km/h 4,5 4,5 | |||
| Savladavanje uspona (maks.) | % | 12 12 | |
| Prečnik valjka za metenje mm 265 265 | |||
| Prečnik bočnih metli | mm | 410 | 410 |
| Maks. površinski učinak | m³/h | 3400 | 3400 |
| Radna Širina bez bočne metle | mm | 550 | 550 |
| Radna Širina sa bočnom metlom | mm | 750 | 750 |
| Zapremina posude za prljavstinu | I | 40 40 | |
| Stepen zašite, zašićeno od kapajuće vode | -- | IPX 3 | IPX 3 |
| Motor | |||
| Tip | -- | Motor jegnosmerne struje sa permanentnim magnetom Smer okretanja udesno | |
| Napon | V | 24 24 | |
| Nominalna jačina struje | A | 22 | 22 |
| Nominalna snaga | W | 400 400 | |
| Broj obrtaja | 1/min | 2750 | 2750 |
| Stepen zašite | -- | IP 20 | IP 20 |
| Akumulator | |||
| Tip | -- | -- | 2x 12 V GiV |
| Kapacitet | Ah | -- | 60 (5h) |
| Težina | kg -- | 23 | |
| Trajanje punjenja potpuno ispražnjenog akumuladora h | -- | 12 | |
| Trajanje rada nakon višekratnog punjenja | h | -- | ca. 1,5-2 |
| Punjač | |||
| Napon el. mreže | V~ | -- | 230 |
| Izlazni napon | V | -- | 24 |
| Struja punjenja | A | -- | 10 |
| Frekvencija mreže | Hz | -- | 50/60 |
| Električna zašita | |||
| Centralna | A | 50 50 | |
| Ösigurač upravljačke Jedinice | A | 2 | -- |
| Zašīta od potpunog pražnjenja akumuladora | -- | preko releja | preko releja |
| Punjač | --- | T4A / 250 V AC | |
| Filterski ulisni system | |||
| Povrsina filtera za finu prasinu | m² | 1,8 1,8 | |
| Kategorija primene filtra za prasinu koja ne škodi zdravlju | -- | L | L |
| Nominalni podpritsisak usisnogSYSTEMA | mbar | 5 | 5 |
| Nominalni zapreminski protok usisnogSYSTEMA | I/s | 45 45 | |
| Okolni uslovi | |||
| Radna temperatura | °C | -5 do +40 | -5 do +40 |
| Temperatura punjenja | --- | Temperatura prostorije | |
| Vlažnost vazduha, bez stvaranja kondenzata | % | 0 - 90 | 0 - 90 |
| Izračunate vrednosti prema EN 60335-2-72 | |||
| Nivo zvučnog pritiska LpA | dB(A) | 71 71 | |
| Nepouzdanost KpA | dB(A) | 3 | 3 |
| Nivo zvučne snage Lw+ nepouzdanost KwA | dB(A) | 88 88 | |
| Nepouzdanost KwA | 2 | 2 | |
| Vrednost vibracije na ruci | m/s² | 3,7 3,7 | |
| Nepouzdanost K | m/s² | 0,2 0,2 | |
www.kaercher.com/REACH
TapaHcH
Bb BcKa ca BaHnHn n3daJeHnTe ot Otopn3npaHn Hn dNCTpN6yTop raPahNoHH yCIOBn. EBeHTyaHn nobpeHn Ha BaWnte npHaJnHexKocTn igeOTcPAHm B pAMKnTE Ha rapaHnOHHn CpOK 6e3nnatHO, aKO CE KAcE 3a DepeKT B MaTePnaNTe Nn npn npOn3BODcTBo. B cIyau, ye Tpr6Ba Da npEdABnTE npabOTc HA n3NO3BaHe Ha rapaHnCe o6bPheTe KbM cneuaJIu3npaHata TbProBcKa Mpeka NIn KbM hA-6IIIN3KnBn Otopn3pan cepBn3, KaTO npDeCTabNTe n DOKymENTe 3a NOKynKaTa.
CmBOnHaYnbTbAHeTo3a
ynotpe6a
ONACHOCT
3a Henocpecdmeeno apo3ra onacno, KOmo eodu do mekku melechu noepdu ulu do cmbp.
PNEyPExDEHNE
3a eb3moXHa onacha cumyaUra, KOAmo 6u MoZna da doeede do mexku meJechu noepedu unu Cmbm.
PNEIa3NBOCT
3a eb3moXHa onachacumyaun, kOIMO 6u Mo7a da doede do neku meenechu noepeu unu mamepuanHu uem.
CnmboBn Bbpxy ypea

He u3mumai me aopu unu mneenu npedMemu, kamo hnp. u2apu, Ku-6pum unu nodobnu.
Onachocm om npumuckahe u nopra3eane Ha pembuc, cmpaunu Memnu peepoeapu, nlb32auu ckobu.
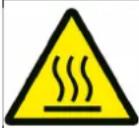
OnapcctOTn3rapaHe N36raBaiTe KOHTaK TcTe3n NOBbpxHOCTNIO BpeMe Ha pa60ta n npn HapraBaHe.
Yka3aHna 3a6e3oNaCHOCT
Yka3aHn 3a6e3oNaChOCT npn 06cnykBaHe
- Ypebmc npucncocbeHura 3a pa6oma npdu u3non3ahe da ce npoepu 3a 6e3ynpeHo cbcmHue u eknnoamauOnHa cuayphocm. Ako ypeBm He e o omnuHo cbcmHue, u3non3eaHemo My e 3abpaHeno.
Ja ce cna36am yka3aHura ma 3a 6e3o-nachocm npu pa6oma c ypeda e onacHu 30Hu (HaNPUMep Ha 6e3uHocmaHuu). 3a6paHeHa e pa6omama 6be 63pu8OONACHU NOMueHua. - Obcnykeaumu nue mp6ea da u3-non3ea ypeo cnpoed npednucunma. Po epeme ha paboma mo mpe6ea da ce cbobpa3ea c okonhume npedMemu u da eHumaea 3a mpemu nuua u oc6eNo 3a deua.
Ipedu hauanomo ha paaboma ocbnykaa uomo luue mpr6ba da ce yeepu, ye ecuku 3auumnu npucnocobnue ca nocmaeenu npaeunho u fynkuohupam.
-Obcnykeaumo nue ha ypeda e om208opno 3a 3nnonnyku c dpyu nua unu cmxHono umyuecmgo. - Obcnykeaumo luue mpr6ea da e c nIbtmno npunenHaIO obNeKNo. Hoceme 3dpaeu obyeku u u36raeaume ceo60dHomo obNeKNo.
- Ppoeepraume npedu haenuzane (ha np. deua). Poapuxeme ce 3a docma mbyHa buDumocm!
- 3a da ce u36e2He HeKOMnemHmHa ynompe6a Ha ype6a, da ce u3eaDu KInou4a.
Ipu Hanyckahe Ha oBekma ypeobmmpaeea da ce nocuayprea cpeuy He npedhamepeno dbxueHue. -
Ypeobmmp6ea da ce u3non3ea camo om xopa, koumo ca obyuHu 3a ekcnnoamauura My u kouMo ca doka3aNu cnocobnocume cu 3a paBoma c He2o, u ca Hamoeapenu u3puHc U3non3eaHemo My.
To3u ypeD He mpa6ea da 6bde u3no13-8an om luca (e moa yucno u deua)c o2paHueHu fu3uyeCKU, cEH3OpHu Unu yMcmeHu eb3MOxHOCMu, unu Lunica Ha onum u no3HaHua. -
Deuama mpr6ba da 6bdam noo ha03op, 3a da ce zapaanmu, ye hma da uapam cypeda.
Yka3aHn 3a 6e3oNaChocT npu peKIM DnXKeHne
OnachOcm
Onachocm om HapaHaehe!
Onachocm om npoeobpueane npu mebpde 20nEMu HAKIOH.
- No nocokama Ha deuxkHeue npemuHaBaumecamO no HaeOpHuua u HauKnoHU do 12%
Onachocm om npeobpbuane npu Heema-bunha ochoa.
- Ypeobm da ce deuxku camo Ha ykpeneHa ochoea.
Onachocm om npoeobpuane npu m8bpde 20JEM cmpaHueH hKnloH.
- HanpeuHo Ha nocokama Ha deuxkeHue da ce npemuHaam camo HakoHou do MaKcumAnho 12%
Ckopocma Ha dbuxehue mpr6ba da 6bde adanmupaHa KbM cbomeemHume ycnoa.
Yka3aHnna 3a 6e3oNaCHoc 3a TpaHcnpTnpaHe Ha ypeDa
- Ppu mpaHcnpmupahe umaume nped bud meanomo ha ypeda.
3a mpaHcnpmupane Ha ypeDa pa3ka- yaume akymyamopa u 3akpenbaume ypeDa cuayphno.
Yka3aHn3a 6e3oNaChoc3a ypeN 3aDbNxBaHn OT 6aTePnn
Yka3aHHe: RapaHcHOnHH npeTeHcHm MoRat Da cBueCTByBaT CaMo, aKO n3NON3BaTe npenopbuaHnte ot Karcher akymnatoPn 3apAHN yCtpoiCTBa.
Henpemehno da ce cna3bat yka3aHnra Ta 3a ekcnloataun Ha npon3bOndTeHa akyMylatopa n Ha 3aprAnHOTo ycTpoiCTBO.Cna3BaIte npenopbKnte Ha 3akOHoDaTeI npi 6opabHe c akyMlaTopn.
Hnkora He ocTabaTe akymyNaTopuTE B pa3peDeHO CbCToHne, a rN 3apeTe OTHOBO Bb3MOxHO Ha-CKopo.
-3a n3 68BaHe Ha 6nyKaAeU N TOKOB NoDlbPkaIte AkyMynaTopuTe BnHaN UcTn u CyXn. Na3eTe OT 3aMbpcBaHna, HAp.OT MeTaJIe Hpax.
He noctabrae HnCTpyMeHTN Bbpxy akymylaTopte. KbcO cbeHHeHne n onaCHOCT OT EKCNIO3IA.
BnHa n3noI3BaIe 2 6aTeepnn ot eINH cBcBnD!
B HnKaKbB CnyaH He ce 3aHmAbaTe B OTKPIT NJaMbK, He Cb3daBaTte NcKpN HHe NyuTe B 6nI3oCT Do aKyMaIaTOp NIN B NOMeueHne 3a 3apeJda-He Ha aKyMaIaTOp. OnaCHOCT OT eKCIIIO3nA.
- N3noJ3BaIte cmo 6aTePmN C nokpTne Ha noIocA. Pn3aRy6a CmeHete nokpTuTeOHa noIocA.
-Да He ce DoKocBaT ropeuHTe YacTN, HApP. 3aBnKBaU MToP (OnaCHOCT OT n3rapAHe).
-BHIMAHHe np 60paBHe c KcCenHH 3a akymyIaTOPn. Cna3BaIe TcBOTBeT
HNTe npaBnla no Texnka Ha 6e3onacHOCT!
- ɪsəpəaɪəbɑnɪte aɪkʌmɪyaɪtɒpɪ nɪdæ ce OɪcɪtpaɪhɪBaT OɪaɪsəBɑnɪkɪ Oʊkɔnɪhɑ tæ Cpeɪda 3a Oɪnʌdʒuːn Cbɪŋaʊchɒ ἀnpɛkɪtɪbɪnɪte hæ EO 91/ 157 ENO.
yka3aHnna 3a 6e3oNaChocT 3a noDpBkKa nTexHuYecko 06cnykBaHe
- Ppeu noucmeane u noodpbkka Ha ypea, cmaHa na yacmu un npemunahe KbM dpya 4yHKua da ce u3KIOyu ypea u da ce u3BaDu KIOUa Ha 3a-nanehaemo.
- Ppu pa6oma no eIekmpuueckama ype6a mpa6ea da ce omkau akymy-namopb.m.
He mpr6ea da noucmeame ypeda c Mapkyu unu c eodha cmpyra nod hnae (onacnocm om Kbco cbeuheue unu om dpyu noepdu). - Pemohmu mpr6ba da ce u36bpuwaam camo om omopu3upaH cep8u3u unu om cneuaanucmu e ma3u obnaem, Koumo ca 3ano3hamu c 8cu4ku npednucanur 3a cuayphocm.
-Да ce cna36a npoeepkama e8e epb3ka cbc cuayphocmma e cbomemcmue c eaunudume mecmhu pa3nope6u 3a Cmehu Mucmomo cu npomuuleHu ypeu. - N3eBpuEaume paBomama no ypea c nOxodrau pu pKaauu.
PpeIa3Hn yCTpoNcTbA
KanakHa ypeda
YpeBt e obopyBaH C KOHTaKTeH npeKbCBAu Ha KanaKa, KOITo N3KNIOyBa DnBraTeJIa, UOM KanaKbT Ha ypeDa ce OTBOpN.
ONACHOCT
Onachocm om HapaHaehe npadu depeKmen KOHMakmen npekbceaHa KaNaka! Ako deuzameJnHcE u3KnOyea npu omBapnHe Ha KaNaka Ha ypeDa, KOHMakmHuam npekbceaHa KaNaka e nopeDen. He pabomeme noeue c ypeDa u 2o daume Ha peMOhm.
TnaBEN npeKbcBaay
B onaChi cnTyauu nn 3a 6bp3o n3- KIOUHbAHe Ha ypea, 3aBbpte rnaB Hn npekcbaay B noIooJeHne ,0/OFF".
3a obezonacBaHe npotnB HenpeHa-MepeHO nycKaHe B eKcnloaTaun 3aBbptTe TnaBnI npekcbay B noJIOxHne O/OFF" u n3BaTe KeNoya.
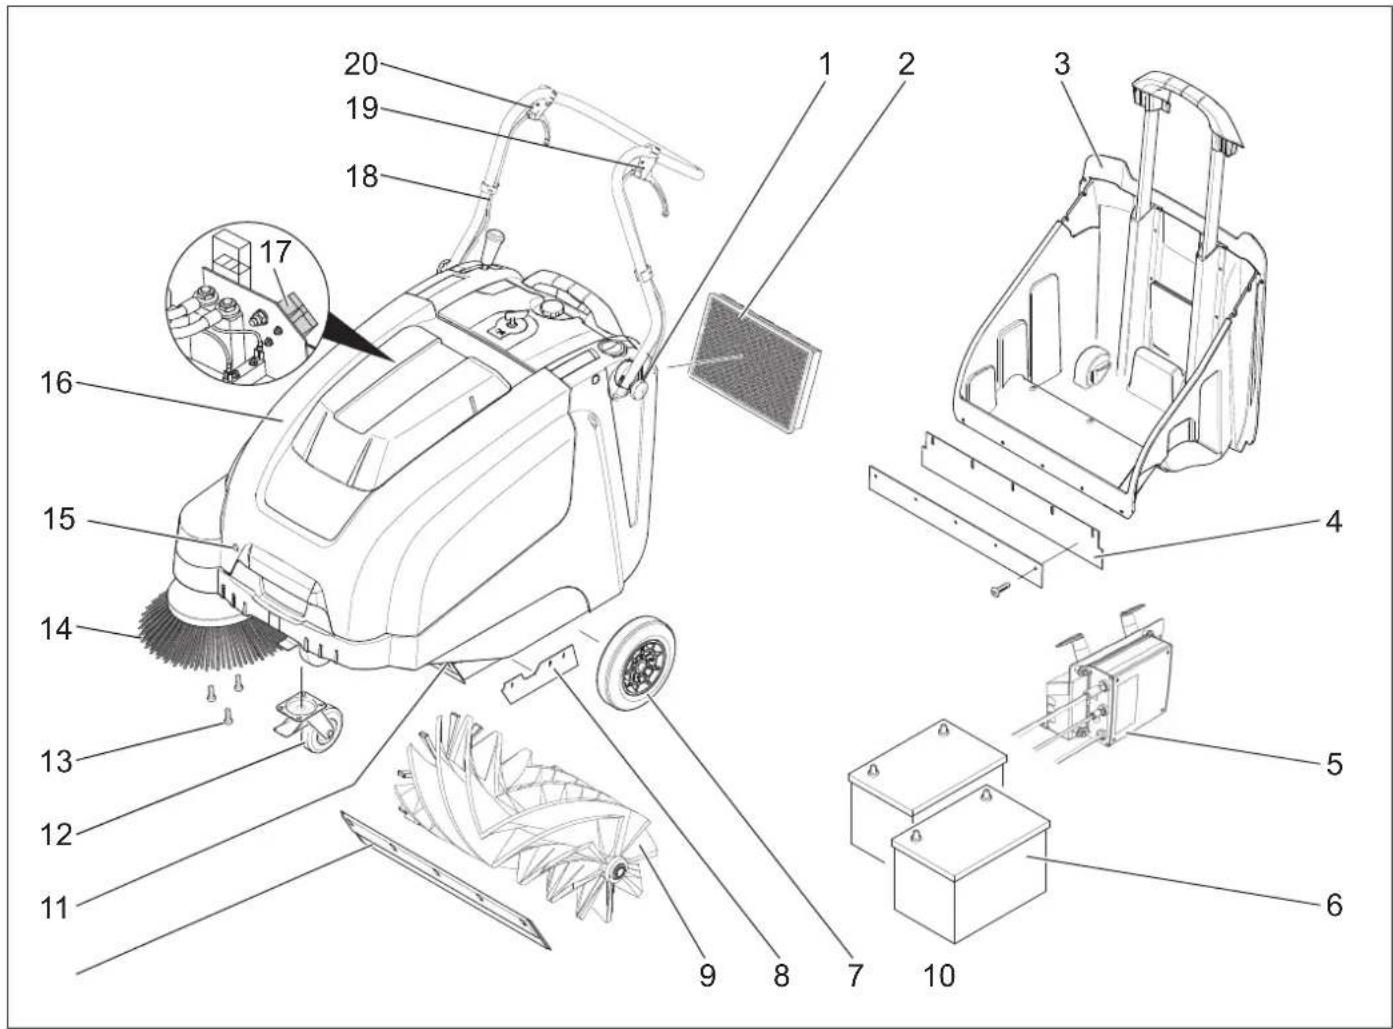
1 Bont 3a 3akpenBaHe Ha nIb3raaatacko6a (2x)
2ФиNTbр3a npax
3 Pe3epBoaap 3a n3MeTeHOTo
4 3aHa yIbTHraa nIacTnHa (Ha pe-3epBoapa 3a I3MeTeHOTO)
5 3apraIHO yCTPOINCTBO (Camo KM 75/40 W Bp Pack)
6 Akymyntopn (Camo KM 75/40 W Bp Pack)
73aBnKBaun KoJena
8 CtpaHnHa yIbTHeBaUa nnactNa
9MeTaeBnAe
10 PpeHa ynTbTHBaUa nlaCTnHa
11 Klaanah 3a rpy6n otnaabun
12 Bodeu n konela cbc 3actonopbaa cnpaKa
13 3akpenBaHe Ha CTpaHnUHaTa MeTna
14 CtpaHnHm MeTn
153akonuajkaHa kanaKa
16 Kanak Ha ypeda
17 Ⅲeep3a3apekdaheHaakymyntopn (Camo KM 75/40 W Bp)
18Пьзraца ckoba
19 Jocst 3a npnBnKBaHe Hnpei
20LoCT3aIOBUNIaHEcBAJIHeHaKna- nAnaHa 3a rpy6n OTnAdbu
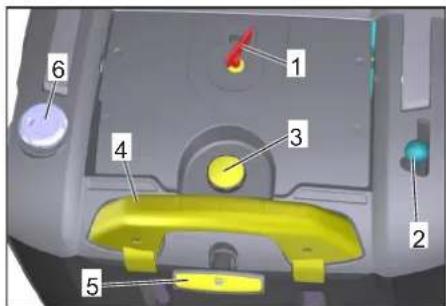
06cnyXBaO noJe
1TnaBENKnIOU
2 Ioc3a CbAne H NOBnraHe Ha cTpaHnHaTa MeJa
3 3aTbapu6oNTHaKanakaHaΦnITbpa 3a npax
4 3akonuabaappa ckoba Ha peepboapa 3a H3METEHOTO
5ПочистванHaФИТьра3a npax
6 Mokpa/ cyxa knana

TnaBEN npeKbcBaay
0/OFFMOTOPnKJ.
1 MoToP BKn.
A N3BaXdaHe Ha KlnOua
B INHnkaJna 3a Hen3npabHoCT
C Poka3aHHe Ha akymyNaTopa
I3BaXdaHe Ha KInOua
→ Knóya Ha rnaBHn npekbcbay da ce 3aBbptn npes no3nur "0" n da ce n3-BA.
OTbapnHa Kanaka Ha ypeda
Yka3aHne
Kanaka Ha ypea ce de6noknpa c KIOUHa rnaBn npkebCBA.
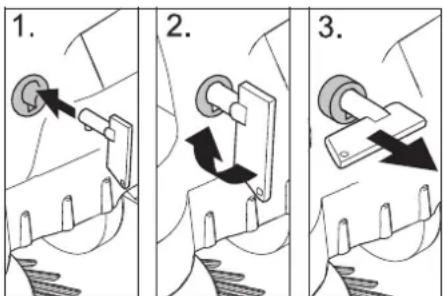
NocTaBeTe KJIouca Ha rIaBHNn IpeKbCBAu B 3aKoIyAJIkata Ha KAnaka n 3aBbPTeHa 90^ no NocKaHa YacOBHKNOBATA CTpeJka.
→ N3BaTe Te 3aKoNpaIkaTa Ha KaNaka Ha KInOHa.
Da ce OTBOPn KaNAka Ha ypea.
3aTbapnHe Ha Kanaka Ha ypeda
→ 3aTbopeTe KaNaka Ha ypeDa, 3aKoN-uaKkata Ha KaNaka ce 6nokupa cama.
Ppei nyskahe B ekcnnoataun
Yka3aHnHa pa3TOBapBaHe
ONACHOCT
Onachocm om HapaHyahe, onachocm om yepexkahe!
Ppu pa3mo8apeaHe umaume nped eud meanomo ha ypeda!
MaKcHmAnHpa3MepnHaakymyIaTopa
DEmoHTax Ha akymyIaTop
Da ce OTBOPn KaIaKa Ha ypeJa.
OTkaTe TNOJIocHaTa KIeMa oT MHyCOBnI NOJIOc (-).
Pa3BnIe Cbbp3BaunKa6en Ha akyMynaTopa.
OTkaTe NOJIHOChaTa KJIeMa OT NIOHOCBnRA NOIHC (+).
Ocb06oTe 3akpenBaunaTaJeHTa.
→ N3BaTe aKMyNaTopa.
OTcTpaHTe n3pa3xOeHnAkyMyla-Top KaTO OTNaBbK CbIaCHO BaINdHnTe pa3npope6n.
Nyckahe B eKcnJIoaTaunia
06n yka3aHn
ONACHOCT
Onachocm om hapaHbahe! N3KnIOyeme ypeda npedu da 6bde c8aneH pe3epeoapb m 3a u3Memehomo.
Yka3aHne: NyckaHe B EKcNIOaTaUra CaMo npn 3aTbOpEn KaNAk Ha ypeJa.
MetaHaTa MaIINHa ce nocTabBa Bbpxy paBHa IIOCKOCT.
DacceN3KNIOHMOToPA.
→ Da ce 6nokupa 3actonopraaata cnpaKa.
KoHTpONHn noDbPkaun
DeHOCTH
Da ce npOBepn CbCToHneTo Ha 3apeKdaHe Ha akMyNaTOPuTe.
→ Da ce npoBepaT ctpaHnHHTe MeTnN.
→Dacpe npOBepnMeTuaBaJRAK.
→ПочntВанеHaФиNTbpa3a npax.
→Да ceизпра3ну pe3epBoapa 3a ИЗмTeHOTO.
Yka3aHHe:OncaHHeTO BIXTeBΓIaBa ΓpKnNIOdPbXKa.
Eknpnoatauia
Onachocm
No-npodbnxumennhama ekcnnoamaua Ha ypeda moke da doeede do obycnoehu om eubpaquume hapwehenra Ha Kpb8oo6 pbuehuemo hpaeme.
He MoKe Da ce OnpeDenn 06UOBaINHa npOdbJIxNTeHOCT 3a N3NOJ3BaHETo, 3aTO TO MOKe Da 3aBcNc OT MHORO qakTopn:
- NnHNO npEpa3noJoxKeHne KbM looO opocBaHe (yeCTo CTyJeHn npbCTn, cbp6ex Ha npbCTnte).
Hncka OkonHa TemnepaTpya. Hocete TOnPi npKaBn3a 3aunTa Ha pbTe. - 3dpaboto xbaaane He Bb3npenrTCTBa opocraBaHeTo.
- HenpeKbchataTata pa60ta e no-no7a ot npekcbaha oT na3n pa60ta.
PnppeoBHO npOdbJXabaio DbIro n3- noI3BaHe Ha ypea n npn NobTopHa noBa Ha cbOTBeTHnTe npn3Hau (HapnPme Cbp6ex Ha npbCTnTe, CTyEn HpbcTn) Bn npenopbHbame npereJe npJekap.
CTapTupaHe Na ypeDa
Ocbo6oxdabaheHa3actonopBaata cnipauka.
CTapTupaHe Ha Motopa.
3aBbptete rnaBHn npekbcBaH na 3n4 "1".
Yka3aHHe:MeTaaNtBaIaKnCTpaHnHnTe MeTJIe Ce BbPTaT.
TbTuBaHe Ha ypeDa
TbTyBaHe Hanpei
→ N3dbpnaTe IocTa 3a npnDbNkBaHe HappeI.
Yka3aHHe: CkopoCTTa Ha DnBxKeHne MoKe Da ce perynipa 6e3cteneHHo CnopeI noLoXKeHHeTo Ha loCTa 3a NbTyBaHe Hanpei.
Ppa3eH xoD
→ ΠyBete loCTa 3a npuDnKbaHe Ha-npei. YpeiBt cnipa.
PpemnHaBaHe Ha npenTCTBn
MnHaBaHe Bbpxy CToaH Na MeCTo nppeTCTBn DO 30 MM:
→ПОБДИНΗТЕΚΙΑΝΑΗЗa rpy6n OTnαДь-и.
→ Da ce HacTbNtB 6aBHO IN BHNMaTeHOB NOCOKA Hanpei.
MnHaBaHe Bbpxy CToaH Ha MeCTo nppeTCTBnHd 30 MM:
MoKeJa c e npemHaba Bbpxy npenTCTBnTa cAmo C NOMOuTa Ha NOxOJa-ua pamna.
PexnM meteHe
Onachocm
Onachocm om hapaheae! Ppu omeopen Klanan 3a apybu omnaobcu Memraquem eaik moke da u3xebpnu Hanpek kambu unu yaekn. Bhumaaume da He ce 3acmpawaam xopa, xueomhu unu npedmu.
PNEIa3NBOCT
Ja He ce Memam nehmu 3a onakobahe, men unu noobhu, moea moxe da doede do yepexdahe Ha mexahukama Ha MemeHe.
Yka3aHHe: 3a da ce NOCTHRe ONTMAJIepe3yNTAT npn NOUcTBaHe, CKOPoCTTaHaDINJKeHHe Tp6Ba Da ce aAaNTnpa KbMa daDeHOCTIe.
MeTeHe C NOBnHrHaT KnaH a rpy6n OTnabTu.
Yka3aHHe: 3a n3MItaHe Ha No-ToIeMN Yactn Do BncoUHa ot 50 mm, Hnp. UrapeHN KyTIN, 3a KpATko Tpr6Ba Da ce NobdHne KlaNaHa 3a rpybO tnaDbuN.
IIOBniraneHaKlanaHa3a rpy6nOTnadb-
→ N3dbpnaTe IocTa 3a noBnraHe Ha KnaHa 3a rpy6n OTnabu.
CbaJha He knanana 3a rpy6n oTnaDbu:
→ CnycheTe IocTa 3a NOBdIraHe Ha Kna- nAna 3a rpybOtnaBtu.
Yka3aHHe: ONTImaJIeH pe3yIITaT OT nouCTBaHETO MOKe Da ce NoCTnIe CAmo npu HAnbJIHO cnUChat KnaHaN 3a rpy6n OTnAdb4n.
MeTeHe CbC CTpaHnHm MeTnn

NocTabete HanepeIIOCTa 3a CbaIaHe Ha cTpaHnUHaTa MeTna. CtpaHnUHaTa MeTna ce cnycka.
N3MnTaHe Ha cyxHn NDoBe
Yka3aHHe: IIO Bpeme Ha EKcnnoataaunrTa pe3epBoapbT 3a N3MeTeHTo Tpr6Ba Da ce n3npa3Ba peDobHO.
Yka3aHHe: IIO BpeMe Ha EKcnnoatauuraTa 1nITbpt 3a npax Tp86Ba da ce NOUcTBA peoBHO.

→ 3aTbaprHe Ha MoKpa/ cyXa KnaAna.
I3MnTaHe Ha BnaXn MOKpn noDoBe
OTbapnHa MoKpa/ cyxa Kna.
Yka3aHHe: TTo3n HauHH FmTTbPbT Ce npedna3Ba O T Bnarata.
Poka3aHne Ha akymyNatopa
Ioka3aHHeTo Ha akymyntopora noka3Ba no Bpeme Ha ekCnloataunc bctoHneTo Ha 3apeKdane Ha akymyntopute:

NouctBaHe Ha qnItbpa 3a npax
→ IV3BaIeTe N IpbXHete MHorOKpaTHO dpbKkata Ha NOUcTBAHETO HaΦNITb- pa.
Ia ce n3npa3Hn pe3epBoapa 3a H3MeTeHOTO
ONACHOCT
Onachocm om HapaHaehe! N3KnIOyeme ypeda npedu da 6bde ceane pe3epoapb m 3a u3Memehomo.
Yka3aHHe: Pn n3npa3BaHe Ha pe3epBoapa 3a N3MeTeHOTo BHIMaBAHTe 3a TOBa,da He Ce NOBpeDyNtBTHNTJIHATA NaI-cha.
Yka3aHHe: MaKcMaJIHO DONyCTUMrT nJIeH TOBap Ha pe3epBoapa 3a NImTeHOTOBb3n3a Ha 40 Kr.
→Почесван ha Фиntьра 3a npax.
→ N3dbpnaTe Harope 3aKoNpaBaAuaTaCKo6a Ha pe3epBoapa 3a N3MeTeHOTO.
→ ɪn3BaʌdTe pe3epBoapa 3aɪn3MeTeHoTo.
Да ce n3пра3ни pe3epBoapa 3a n3Me-TeHOTo.
→ ΠbXheTe pe3epBoapa 3a n3MeTeHOTo HABbTpe.
→ N3dbpnaTe HaDony 3aKoNyaBaAuaTaCKo6aHa pe3epBoapa 3a H3MeTeHOTO.
N3knpoye ypeda
Ja ce N3KJIIOH MOTopa.
3aBbptTe TlaBnna npeKbcBaH na no- 3nua "0".

→ПовдиганеHa CTpaHnHTe MeTJI.
Да ce 6нokupa 3actonopraBaца ta cnipaçaka.
→ KInOHa Ha INaBnI npekcbay da ce 3aBbptn ppe3 no3nue "0" n da ce n3-BAH.
TpaHcnpr
ONACHOCT
Onachocm om Hapahreae u noepeda! Ppu mpancnopm umaime nped eud meanomo ha ypeda.
Da ce N3KIOHOMOTOPa.
→ KnHoua Ha rnaBnna npeKcbau da ce 3aBbptn ppe3 no3nua "0" n da ce n3BaAn.
Да ce ьokupa 3actonopraaata cnpaça.
Ypda da ce ocunpync KInHObe Ha KoJenata.
Ypeda da ce ocnrypu c o6Traun Kona-HH NIN BbxKeTa.
→ PnTpaHcnpoB aBTOMoBnIn OCNpyBaIte ypeDa cblaCHO BaINHnTe DnpeKTHBn IpOTNB nIb3raHe n ppeObpbuahe.
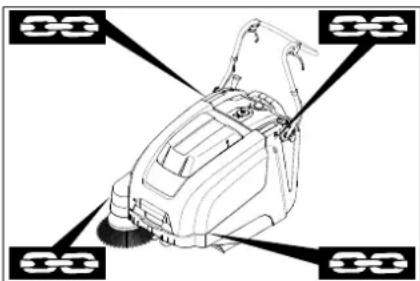
1 O6IaCT Ha 3akpenBaHe HAd PnB3raun-Te ckoBu
2 06laCT Ha 3aKpeBbHe IoD KanaKa Ha ypeDa
Yka3aHHe: Da ce cna3BaT MapKIpOBKnTe 3a 0bNaCTnte Ha 3aKpeNbaHe Ha OCHOBHaTa paMka (BepNKn CNMBON).
Yka3aHHe: He orbBaIte 6poHnpaHITe Xnla N BbKeHInTe npdaBAHn.
CbxpaHeHne
ONACHOCT
Onachocm om Hapahraeane u noepeda! Ppu cbxpanehue umaume nped bud meanomo ha ypeda.
CnnpaHe oTe ekcnIooatauia
Ako MaunHata 3a MeTeHe Hma Da ce n3-NOI3Ba No-DbIro BpeMe,MOJa Da ce cna-3rCTeHNHTeTOkN:
MeTaHaTa MaSiHa ce nocTaBbPxy paBHa nIOCKOCT.
Da ce n3knIOH MOTopa.
→ KlnoHa Ha IaBnI npekcbau Da ce 3aBbptn ppe3 no3nue "0" n da ce n3-BAH.
Да ce 6лokupa 3actonopraBaца ta cnpaquka.
MeTaHaT MaSiHa Da ce OcNpyn OT camOpnp3BOJHO npeBnKBaHe.
→ПовдгнелteMeTЯиВаля.3aцлтaphinkcnpaiteДВATANoCTa3aHacTpOkaBROPnO TBP.
→ NOBnraHe Ha CTpaHnHTe MeTJN.
MeTaHaTamaHnHa da ce noHcTn OTBbTpE nOTbH.
YpeJa Da ce cbxpaHn Ha 3aunTeHo n cyxo MRCTO.
PaKaayete akymyntopnte.
Да ce 3apeягakymynaTopnte n da ceДоЗарждт ha npn6l.2 mecua.
PnXn nOndpBxKa
06n yka3aHn
- PemOHn TpIbBa Da ca N3BbPbBaT cAmO OT OToPn3npaHn CepBn3n INn OT CneuNaNCTn B Ta3n ObNact, KOnTO ca 3An03HaTHn C BCnuKN IpEbnncAHn 3a CNrpyHOCT.
CmeHnIe MeCTOTc nIpOMnIJIeHnyepiNoIeJXaTHa npOBepKa OTHOCO cnIpyPHocTTa cBrlaCHO VDE 0701.
NouctBaHe
NPEINNA3JNBOCT
Onachocm om noepeda! He mpraea da nouucmeame ypeda c Mapkyu unu c eodha cmpya nod hane (onachocm om Kbc co cbedunehue unu om dpyu noepdu).
BHIMAHHE
Ipeu pa6omu no noucmehe u3eakdaume uencena Ha 3apdoHomo ycmpoucmeo om KOhmacma.
Ipeu paobum no noucmeane pa3kaeuaime nnoxumelnue noioc ha akymamopa.
Bbtpewho noocTbaHe Ha ypeda
Onachocm
Onachocm om hapaheane! Da ce hocam npaxo3aumHa Macka u 3aumHu ouuna.
→ Da ce OTbOpn KaNaKa Ha ypeJa.
Ypeda da ce nouicntnc npuaan.
YpeJa da ce npoIyxa C Bb3Iyx noI Ha- Irahe.
→ 3aTbopeTe KaNaKa Ha ypeJa.
BbHnHO nouicBaHe ha ypea
YpeBt Da CE NOUcTn C BlnaKeH, HatoNEN B MEka NouCtBaua Nyra napaI.
Yka3aHHe: Da He ce n3noJ3BaT arpeCnBn NouchTaun CpeDCTBa.
HnTepBaHn noDpBjKka
PnDpBxkaOTcPaHaHaKIneHTa
EkeDHeBHa noOpIpbJbKka:
→MeTuaBajnK nCTpaHnHnTe MeTnI Da ce npOBepBaT 3a n3TpNaBe H 3aBNTJJeHTN.
→ Da ce npoBepraBa cyHKuTHa HbCnKn 06cnykBaun eJemeHTN.
→ Da ce npoBepraBa cyHKuYraTa Ha BCnK KIOHTPOJIH JAMNI.
EkeceMnUHa nOdPbJkKa:
→ Da ce npOBepaT HnpeXeHneTo, n3HOCBaHeTO nФyHKuYraTa Ha 3aDnKbAunTe peMbU.
→ПоберкаHaброниранiteхиma INOДВИЖНITEЧАТЗа ЛECHА NOДВИЖHOCT.
Da ce npoBepn peryInpaHTo nI3HocBaHTo Ha yIbTHraBaUTe IJaCTnHn BdnaIa3OHa Ha MeTeHe.
→Поверетe peФнektopa 3a MeTeHe Ha MeTuaN BajrK.
→IouncTeTeΦnITbpa3a npax.
Yka3aHHe:OncaHHeTo BnKTe B rnaBa DeHocTn no nDpBkKaT.
Yka3aHHe: BcNkC cepBn3H npabotn npabotn no nOdpbKkata npn noDpBkKa ot KIneHTa Tp8Ba Da ce n3BpWbAT OT KaJInnncupan CneuaJIncT. Pnp Heo6xOnMocT NO BcKO BpeMe MOKe Da ce npNBleYe CneuaJIncT Ha Karcher.
IopdpbKkaOCTpHaHa cepBn3HOT0 06cnykBaHe Ha KIneHTN
Ioppbkca cneI npBnA Meceu nnn CneD 5 pa6oTHn Yaca:
Da ce npoBepe nbpBa HnCneKu.
PoiippbXka Ha BceKn 50 pa6OTHn Yaca
PioppbXka Ha BceKn 100 pa6OTHn Yaca
HJN Ha PONOBIN TODHa
IoppbkkaHaBcekn300pa6oTHn Yaca IoppbkkaHaBcekn500pa6oTHn Yaca HJH HaexeroDHO
Yka3aHHe: 3a da ce 3ana3r rapaHTnHnTe npTeHcnn, no BpeMe Ha nepnoDa Ha rapaHcna BCnKn CepBn3n N NODbpKaUu DeHocTn Tpa6Ba Da ce N3BbPWBat OT OToPi3npaH cepBn3 Ha Karcher cbrrnaCHO KNKKkata 3a TexHnuecko 06cnyKbae.
DeHocn no noapbXkata
IoproToBka:
→MeTaHaTaMaIiHa ce nocTaBbpxy paBa HIOCKOCT.
→ KInOHa Ha IaBnI npekcbay da ce 3aBbptn ppe3 no3uyn "0" n da ce n3BaNI.
Да ce 6лokupa 3actonopraBaцаТспрачka.
067u yka3aHnna 3a cnpypnoct
ONACHOCT
Onachocm om hapaHbAhe! Momopbme cy hXdae om npubn. 3-4 cekyHdu 3a cnupaHe Ha xoda cneo u3zacane. B mo3u nepuO om epeMe HnpemehHo ce dpxKme hadaJeu om obnaCmHa 3adEwKaHe.
PNEyPExDEHNE
Ipeu bcakku paobum no noopbkka-ma u pemohma ocmae yede da ce oxna du docmabhyo.
Ha He ce dokoceam 2opeuime yacmu, kamo 3adeuxkaaumomop.
BHIMAHNE
Ipeu pa6omu no nodpbkka u38aKaDau me uencena Ha 3apraHomo ycmpoucmeo om KOhmacma.
Ipeu pa6omu no nodopbXka pa3kaua me nnoxumnHua nonoc ha akymamopa.
BHIMMAHNE
Ipeu obpuane Ha ypea u3aedeme akymamopume u pe3eepapa 3a omnaobu u HAKNOHeme nIb32auama ckoba Hanpe. He noemaue ypea ebpxy Ib32auama ckoba.
Ipeu noucmeaue u nooppbkka Ha ypea u cmaHa Ha yacmume ypea mprba da ce U3KJIIOU.
PerynnpaHe Ha 6poHpaHTo XJIO Ha 3aDbNKBaHETo
HeoXoIMO e DonbJIHnTeHOp peryInpa-he, KOraTo pRn DmIXeHne No HaHaoropHnue 3aDnBxBaUaTa Cnla Ha ypeDa e HeDoctaTbUHa.
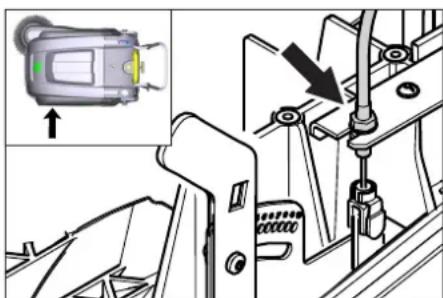
→ Da ce OTBOPn KaIaKa Ha ypeHa.
→Pa3BnIte KOHTparaKaKaTa.
→PerynnapTe MoNTaXHHBnHT.
→3aBnHTeTe KOHTparaiKaTata.
PpOBepKa Ha MeTua BAnK
Да ce 6лokира зactоюряbaца тспрачka.
OTcTaPeTe pe3epBoapa 3a n3MeTeHO-TO.
OTCTpaHeteJeHTnTeuHypoBeteOT MeTAABaJIaK.
Da ce cmeHmMeTnBaJnK
Heo6xoDima e CmraHa, KOrato N3HOCBaHTo Ha YeTKnTe BOn Do BNDIMO BNoIaBaHe Ha pe3yIITata OT MeTeHTo.
BHIMAHHE
Ipedu oobpuahemo Ha yepda akymyamopume mprbaea da ce u3eakdAm. He nocmaaune yepda ebpxy nll32aama ckoba.
Da ce 6noKnpa 3actonopBaauata cnpaKa.
Da ce cBaII pe3epBoapa 3a I3MeTeHO-TO.
→ N3BaDte akyMnyaTopuTe.
→HKnOHeTe ypeHaHa3aI.
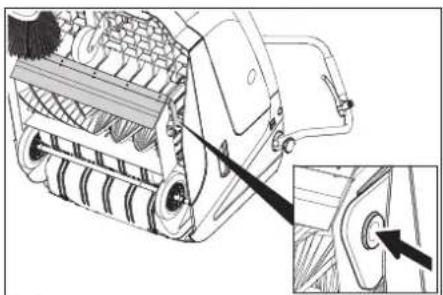
→Повдигн electeКлanaHa 3a rpy6n OTnaDb-уи,пгИСнeTe BLOKKaTа Ha JIaRepa И NaKIOHETe HAnpeD MeTЯUNA BaJAK.
→CbaIeTe MeTAABaIIK.
→ NocTabete HOB METAùBaIaR HA 3aI-BnKBaIaI NaIeU (BnRAO).
→Ha cpeuynoXnHata ctpaHa qKcnpaIe IarepHaT BIOXKa B OTbopa Ha KObnIuaT ha METaBaNk.
IPEDA3NBOCT
Onachocm om noepda! Bhumaeaune 3a moba, yemunama da he ce 3akneu6 om- eopa Ha Kobunuama Ha Memraua 8anK. Yka3aHHe: Cne MoTaxKa Ha HOBn Ma TRA BANK OTHOBO TpRABa da ce HAcTpon peoekTopbT 3a MetHe.
PpOBepka HacTpoKa Ha peΦJIeKToPa 3a MeTeHe Ha MeTuaBJIaK
→MetaunhaMaunHa da ce NOBnHRe OTnped n da ce 3akapa Ha paBHO n IraKO MRCTO, KOETO e NOKPnTO c npax nn Tebeu np TaKa, Da CE BnKda
Da ce 6Iokpa 3actonopBaaata cnpaKa.
→MeTaaBnBaNk Da ce ocTaBn Da ce Bbptn npnb.15-30cekyHn.
→MetaaHaTa MaunHa da ce NOBdHHe OTnped n da ce 3akapa HactpaHn.

ΦopMaTa Ha peΦnεKtopa 3a MeTeHe o6pa3yBa npabuIne npaBoBbJIHnK, KOTo e ⅢpOK MExdy 30-40 mm.
71364 Winnenden (Germany)
Tel.: +49 7195 14-0
Fax: +49 7195 14-2212
Winnenden, 2021/02/01
| Помошׁн Heɪзправно | |
| Hизправно Остраимьанe Урémonг He може за с可不是сяа | |
| Контактуглары пекльбача на калaka e Изклочи урда. 3атворе палaka на урда | |
| Зарждане на akумунаторіte | |
| П探测ete зашита от петоварвае | |
| У被骗омete сөрвiza на Кärcher | |
| Моторг павOTи, Ну урémonг He Тръгва | Рergлары на бронираною жило на Задвинваенeto |
| П探测ка клиови рөmbүи | |
| У被骗омete сөрвiza на Кärcher | |
| Урémonг сөрьпprn пremинаванe п no haknot | П探测ete зашита от петоварвае |
| Pergлары на бронираною жило на Задвинваенeto | |
| П探测ка клиови рөmbүи | |
| У被骗омete сөрвiza на Кärcher | |
| Меташиг валяк сөрna, Иndиka- цята за Heɪзправноct сөтɪn черBERO | Завртete галови пекльс Bavч на „OFF“, п探测ete четкatinga за зakлесени пreametи.Евенту- ално пremинete по мальк takлочи. Вklочete OTНОВ Главни пекьс Bavч. Спд като посторite тази оrelацяч takлочи.Yngвалови погнл�ьп prinhydntelна пayза оТ 2 мнунт. Праз Това вөрме урémonг He може за SFDE с可不是сяа |
| Урémonг He метe павINHO | Меташия валяк истраимчinatemetлдддсөнөсалан otлбддсөнөсаланпri prin HeobхODIMOCSTддс сmedнг |
| П探测ete Функциягда на Клианг рүбү otлддсү | |
| Ötnychete Бөрнираною жило на Клиана на за рүбү otлддсү (бүлт 3a насториka) | |
| П探测ete рөмьka 3a олбалан и дэбрфункциониранe, рri Heobx. ro smehete | |
| Pergлары на рөфлөдддс рүмөн e | |
| Сmedнete меташия валяк | |
| У被骗омete сөрвiza на Кärcher | |
| Урémonг Замршава | П探测ete Функциягда на Клианг рүбү otлддсү |
| Ötnychete Бөрнираною жило на Клиана на за рүбү otлддсү (бүлт 3a насториka) | |
| Да с р探测п релтбрьа за пax, за с почости плддс смени He миITE релтьрьа за пax. | |
| Да с Изралдддс рөзрьога рыз рүхenteо | |
| Сmedнete уллгнтел徳п рөзрьога рыз рүмөнenteо | |
| П探测ete уллгнтел徳п рөзрьога рыз рүхenteо | |
| Уллгнтелдддс пл actiendn da с р探测ргл тзИЗн检валдс р ri HeobхODIMOCSTддс da se с менит | |
| Лошо метене по рьбовete | Perugлары настраимькага на сваляногу настраимьнага метлд |
| Смени настраимьнаге метлд | |
| Свалete сөрнираною рөмлддсү | |
| П探测ete задвинваши рөмьк настраимьнага метлд | |
| У被骗омete сөрвiza на Кärcher | |
| Повиганeti Na Stралчнata metla NeФункционра | П探测ete Бөрнираною жило на NobdiГанeto Na Stралчнага метлд |
| У被骗омete сөрвiza на Кärcher | |
| Новитmetаи валяк дokocba pe- зэрвога за ИзмeteHTO | Кориглары настраимькага на р敖лөддсү meteNe, за сизда рүн��сайтештоа за насториka В сbethBetHTNЯнamрашсpe no-Harope OTBOP (1...3) |
TexHnueckn daHHN
| KM 75/40 W Bp KM 75/40 W Bp Pack | ||
| Данни за урEDA | ||
| Дыжина xшиочина x височина (разьната пьзраша скоба) | mm | 1430 x 750 x 1190 |
| Дыжина xшиочина x височина (прибрана пьзраша скobа) | mm | 1160 x 750 x 930 |
| Теро (бez akumлatingу) | kg | 79 |
| Теро (с akumлatingу) | kg | 125 |
| Дорystимо общо логу) | kg | 205 |
| Скорост на пьтувае и на метене | km/h | 4,5 |
| Способност за Искачвае (макс.) | % | 12 |
| Дамату р'mетяш валяк | mm | 265 |
| Дамату р'mетяш стравочи метли | mm | 410 |
| Повьхностima мочност макс. | m/h | 3400 |
| РавOTHA Широчина бez сстравочи метли | mm | 550 |
| РавOTHA Широчи сьс сстравочи метли | mm | 750 |
| Овem на розерва rapа за Искетеното | I | 40 |
| Вд. зашиита зашитени постов калеша вoda | -- | IPX 3 |
| MOTOP | ||
| Тир | -- | Посюгно-ТOKOB MOTOP с постаян Магнип Посока на Вьртоны Надяно |
| Нарожени | V | 24 |
| Номинален тok | A | 22 |
| Номинална мочност | W | 400 |
| Оворotи | 1/min | 2750 |
| Вд. зашиита | -- | IP 20 |
| Акумлatingop | ||
| Тир | -- | -- |
| Калаштét | Ah | -- |
| Теро | kg | -- |
| Вре'mе за заөждaine рprп нар'tьлно разрeden akumлatingop | h | -- |
| Пор'dьжигелност на ekсллогatableяда спед многократно заөждaine | h | -- |
| Зардno устroduстvo | ||
| Нарожени ot мрөжда | V~ | -- |
| Иххдino habржени | V | -- |
| Тok за заөждaine | A | -- |
| Чебота на мрөжда | Hz | -- |
| Еlektrоч承载нPre徳п资助 | ||
| Цentralno | A | 50 |
| Пор'dьигелten у鞘аленie | A | 2 |
| Заш'tа пог'tьдьлбоко пазөжданe | -- | c поочи на рөлета |
| Зардno устroduстvo | -- | T4A / 250 V AC |
| Фи'llьрна и смугал'tehа сисtemа | ||
| Плоча на рsinл'tьр рsinл'tьр рsinн прах | m² | 1,8 |
| Кaterогия Иллэване рsinл'tьр за пaxове, кочу не застраватпдравето | -- | L |
| Номинален вakуу'mсугал'tehа сисtemа | mbar | 5 |
| Номинален об悔ен тok смугал'tehа сисtemа | l/s | 45 |
| Ожолни устови | ||
| РавOTNA Temпогатура | °C | -5 до +40 |
| Temпогатура на заөжданe | -- | Стайн Temпогатура |
| Влажност на вьздуна, не орөсвашa | % | 0 - 90 |
| Установни стойости сьгласно EN 60335-2-72 | ||
| Нимо на звуka Lda | dB(A) 71 | 71 |
| Heystочигост Kya | dB(A) 3 | 3 |
| Нимо на звукува мөшост Lw+ Heystочигost Kwa | dB(A) 88 | 88 |
| Heystочигost Kwa | -- | 2 |
| Стойост на вьзрαιite в oblaостта на длиanta - рькатa | m/s² | 3,7 |
| Hecinгуност K | m/s² | 0,2 |
3ana3BaMe cn npaBOTO Ha TEXHnueckn
ПROMeHn.
www.kaercher.com/REACH
Garantii

Chairman of the Board of Management
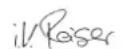
S. Reiser
Director Regulatory Affairs & Certification
71364 Winnenden (Germany)
Tel.: +49 7195 14-0
Fax: +49 7195 14-2212
Winnenden, 2021/02/01
www.kaercher.com/REACH
Garantija
Musu pilvarotas tirdzniecibas sabiedribas izsniegtie garantijas noteikumi ir spekara katarvalsti. Garantijas perioda laikamesis bez maksas noversisim radusos darbibas traucjumus Jusu pigeonum, ja to celonis ir materiala vai razoanas defekts. Ja nepieciesams garantijas remonts, ludzam griezzies pie Jusu tirdzniecibas parravja vai tuvakaja pilvarotajaientsu apkalpoanas centra, uzradot pirkumu apliecinošu dokumentu.
Lietosanas instrukcija izmantotie symboli
△BISTAMI
Norada uz tiesam draudosam briesmam, kuras rada smagus kermena ievainojumus vai izraisa navi.
BRIDINAJUMS
71364 Winnenden (Germany)
Tel.: +49 7195 14-0
Fax: +49 7195 14-2212
Winnenden, 2021/02/01
www.kaercher.com/REACH
Garantija
71364 Winnenden (Germany)
Tel.: +49 7195 14-0
Fax: +49 7195 14-2212
Winnenden, 2021/02/01
nebckoTcNtOBaPacTbU 9
Dionomora y BnnaKyu HenoJa
OK. UK 10
Texhi xapaKtepcntuUK 11
PpabnIbHe 3aCTOCyBaHHa
BnKOpncToByBaTn DaHn npnnaBnHrtKO BO y BiNObiHocTi Do Bka3iBok daHo iHcTpkyuii 3 ekcnnyataui.
Lc mItTe36bpaIbHa MaIHa npI3Ha-HeHa IJI niIMiTaHH 3a6pydHEnHX NOBepxOHB y npIMiueHHi Ha Bynui.
Lcien npncpti neped6auehen nna KomepuHoro BnKOpNCtHaHn, HapnKnad, B roTeJax, WKoJax, NkapHx, fapnikax, Marasihax, ophiacix biopo 3 opEHn HepyxomocTi.
Ipeed BnKOpNCtAHNm nepeBipTe Ha- nexHn CTa H 6e3neky npncTpo Ta 0bnaDHaHH. RaIO oBnaDHaHH 3HaXoDHTbcy y He6e3dOrAHHomy cTaHi, Ioro HE MoXHa BnKOpNCtOByBaTN.
-3abopohraTbcra eKcnnyatau npnctpoIOIIN360py ukiDnBoro dno 3doPOB
- 3a6opohreTbcra BHOCHTN 3MiHN B npnnaI.
- Pnpctpi npn3HaueHn TiIbKn dna po60tn Ha noBepxHx, 3a3HaueHnx y daHomy noci6Hky 3ekcnnyataii.
- Ppnaad MoKe nepecyBaTnca TINbKn no NOBepxHax, DOnyueHenX DnR BnKOpnCTaHHaNITaJIbHnx Maun H KepiBHNtBOM niInpneMctBa a6o ixHim npedCTaBHnKOM.
-Язагальн e npabnIO die HacTyHne: He DonyckaTN 3iTKHeHH npiJaNy 3 JERKO-3aIMNCtUMpeOBoHHAMn (He6e3neKa Bn6yxy/NoKexi).
YmncHe HnpaBnIbHe 3actocyBaHH
3a6opohreTbc nipbpaHHBcMOKTy BAHH B6yHOe63neuHx piHn, roPouHx ra3iB, a TakoH Hepo3BeHeHx KcNt Ta po3uHHNKIB! Ce cTOcyEbCR 6EH3Hy, pO3piJkyBauiB dp6n Ta Ma3yTu, kI MOxyTb CTBOpOBaTu B6yHOe63neuHi ra3n abo cymiU, 3MIUYOCHb 3I BCMOKTyBAHIM NOBITpAM, a
TAKOX aueToHy, Hepo3BeDeHnx KNCLOT Ta po3HHNKIB, OCKINbKN BOHN NOWKOJkyOHT MaTepiAnn npCTpOu.
3a6opohraTbc np6npaHHBcMOKtyBaHHpeakTNBHO MetaJIeBOTo NnJy (HapnKnad, aIOMiHiO, MaHIo, uHKy) B 3KNCNOTHMn 3ac06amn dNr YuueHn.
He donyckatn niimitaHHBcMOKtyBaHnHa nanaohuNX abo TJIIOUX npedmetIB.
3a6opohraTbcna 36epirahn y he-6e3neuHX Micx. 3a6oponeHO BnKOpNCTOByBATn npncptiy Bu6yxoHe6e3NeHHN npmiiueHHX.
PiiXoJaui nobepxhi
-AcpaJIbT
- PpomncloBi niIIOrg
CuyinbHa (HannBHa) niDnora
-BeToH
-БушаТka
Pn3HaueHH
MaunHa, 0o niDmitaec, npaucoe 3a npnHcHnOM HaundaHHa.
- BiHa 1 (1) nIMtae kyTn KpaI nobepxHi, 0o NiIMtAeTbCra, i DoCTABnEcmITB 3OHy po6OTn Bana, 0o NiIMtAc.
- 06eptobn BaI, 10 niDmitae (2) Ha-npabnncmTT npmao B pe3epByap dna 360py cmTTA (3).
-Пи,пдгту y pe3epbyapi, BiDДИЯETbCЯ ПИNOBIM ФINbTpOM (4), a BiФИьТрОВАе YICTe NOBITРЯ BUNCMOKTyETbCЯ YCMOKTYBaJIbHIM BEHTNIArTOpOM (5).
3araanbhi Bka3iBKN
Kuo npo po3nakyBaHHi 6yHn BnBneHi nowkoJKeHHaI TpaHcnpTyBaHH, HeaHIO CNOICTb npo ue MaarH, De BN Kynn npna.
- IpouHTaIte BkazIBKn no TexhiCi 6e3neKn, a TAKoX KepiBHNCTBO no EKCnIyataUii pOboYoro O6naHaHH, npKpInNeHOrO Do npNCTPO, Ta DOTpMmYTeCb ix.
Haheceni Ha npucpii nonepekyBaalhi 3naki Ta Tabnukn daHb BaKnBi BkazIBKn Dnq6eNeuoi ekcnnyataui npucptoio. - Pa3om i3 Bkazibkamn B ciin HcTpykuii Dna ekcnlyataci cnid bpaxobyBatni 3araIbHI npabina texhikn 6e3neKn Ta HOpMN dny nonepedjHHeuacnHex BNnAdKiB 3aKoHOdaBvX opraHIB.
06naHaHH Ta 3aNaChi YaCTHn
HE6E3NEKA
Uo6 yHuKHymu Hebe3neKe, pEmoh i ycmaHOky 3anaChux demaneu nobunhi buKohyeamu minbku aBmopu3oeaHi cepeichi eHmpu.
- Moxha BnKOpncToByBaTn JInIe Te o6NaHaHH Ta 3anachi YactHNI, IIO Do3BOJeH IINBnKOpncTaHH Bnpo6HnKOM. OpiirHaJIbHe O6JaHaHH Ta opriHaJIbHi 3anachi YactHNI E rapaHTieTOrO, IIO npicpti Bype npauOBaTH 6eaneuHO ta cnpabHo.
-Пoda Льша iHΦopMaζя no 3aŋachnM чacterнam ε Na caɪnti www.kaercher.com b pozdiñi Cepbic.
3axnCT HABKONHboro cepeOBUca
MaTepiAnuynakOBKnPiDaaOtbcnpepeo6ciIaNIOBTOHORBnKOpNCaHHy.BydNlaCKa,HeBnKDaIteNaKyBaNbHiMaTepiAnpa30mizDomauHcMcmTTaM,BiDaIteixnHa nepepeo6ky.
CTapi npncptoi MictaHb ciHHMaTepiA,IO MoKyTB BnKOpNCTOBvBaTnca NOBtOHO.Batapei, MaCtnIto Ta CXoXi MaTeipiaJH He NobHHI NoTpaNTnY HABKOJIuHc CepeDObNue. ToMy,6yNb Iacka, yTuNl3yIe CTapi npncptoi 3a DOnOMorOcneuaJIbHnx CnCTem 360py CMITTR.
IHCtpykuii i3 3aCTocyBaHHK KOMnHOHTIB (REACH)
AkyaIbHi BiIDOMOCTI npo KOMIOHEHTn HaBeDeHI Ha Be6-By3ni 3a aDpecoI:
www.kaercher.com/REACH
Tapahtia
YKoKHi KpaIiH DiIOb yMOBn rapaHTII, 0u HadaeTbCra HaIoO BiINOBiDAnbHO OphiMoIO-npOaBcEM. HenOnaKn B pOboTI BaWoTOO6bAHaHHMa YCyBaem 6e3KOtOBHO npoTAROM TepMHy DII rapaHTII, RkUO BOHN BnKNiKaHI 6pAKOM MATEPIany aBO BnPObHnHm 6pAKOM. Y rapaHTIHOMy BnPaIKy 3BeptaTeCb, 6yNb JAcKa, 3 DokyMeHTAMN, 10 NiITBepdKyOTb NOKynKpynpCTPOU, DO BAwOro TOPROBOro areHTa aDo Do HabeDeHx HnKYe NyHKTB rapaTHInHO o6cnyrOByaHHN KJIeHTIB.
3HaKn y noci6Hnky
HEBE3NEKA
IЯ He63neku,ka 6e3nocepeHbO 3a-epoxye ma npu3oobum do mKuxmpaem Yu cmepi.
#
ДпnomehuiMoKnueoi He6e3neHoi cumyaui, 00 MoKe npu3ecmu do mKx KuxmpaM Yu cmepi.
OBEPEXHO
Дяnomeuio MoKJueoi He63neuHoi cumyaui, zo MOKe npu3eemu do neakux mpaM Yu cnpuunHumu MamepianbHi 36umku.
CnmboHa npuctpoi
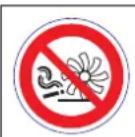
3aboponemcb 3bupamu nanaoyi abo mnioui nped-Memu, Hanpuknaad, uzaapku, ciphukuma iH.
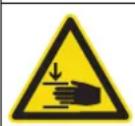
Hebe3neka 3amuckanna ma npis8 bi peMeHra,6okobux uimok,pe3epyapy,m2o- oei pyku.

Hebe3neka oniky YHKATNI KOHTAKTY 3 LIMN NOBepxHnMI nIac po6oTn Ta HarpibaHH.
PpabuJa 6e3neKn
Bka3iBkn 36e3neKn iNd yac ekcnnyatauii
- Peped bukopucmaHHn nepeepme HaneKhu cman ma 6e3neky npu-cmpo mo abadHa. Raio obadHaHna 3haxodumbc y He6e3doaHHO My cmaHi, uOzo He MoXHa buKOpucmoeyamu.
Y pa3i bukopucmaHH npcmpo y He-6e3neHi diJHui (HanpuKnaD, 6en30KOHOKA) HeoXidHO dompumyeamuc 6iONoiHux IHcmpyku3 mexHiku 6e3neku. 3abOpoho buKOpucmoey 6amu npucpiuy b6yxoHe6e3neuHux npumueHHx.
-Kopucmyauy no 6uHEn Eukopucmoeyamn npucmpiy y biioeihocmdo iHcmpyku.BoHa nobunHa epaxooyama umyoeu Micueocmi, nd yac pobom 3 npucmpoem Heo6xioHO 3eepmamu yeay Ha mpemix ocib, oco6nue Ho di mei. - Ipeped noayamkom pobomu onepamop noBUHeH nepekoHamucB e momy, uO 8ci 3anobixhi npucmpoi 3haxodmbc H a MiCi i npauoioMb HanexKHM U-HOM.
Onep amop npucmpoH Hece bi-noibdaIbHicmb 3a euhukHeHH HeuaHux eunadKie 3a yacmIO IHwx NIOdeu a60 MaHa. - Cmexumu 3a mum, uo6 opepamop Hocue uinbno npuneanu oora. Hocumu Miune 63ymmra yhukamu Hocinna eilbHOO Oraay.
- Ipeod noamkom pyxy nepeepumu Mepmey 30hy (HaPpuKnao, Ha HareHicmb dime). 3a6e3neyu mu do-cmmHi oanra!
-506 yHuKHymu HecaHKuioHOaHo2o EukOpucmaHH npucmpoO cnO eUmaMu KIOH4.
Koju npucmpiu 3anuuaembca 6e3 ha any, uo2o cnid 3afoicyeamu eio nepeodbaayeaHO zo nepecyeaHn. -
Pucmpiu Maecukopucmoyeamucocobamu,uo npouwun iHcmpykmaxuooo bukopumannr ao nmeepounu cei 3d6hocmi dny ocbny208ybaHH npucmpo,a maokxyno8ho8aKeHi eukopucmoyeam uo20.
-
Lle npucpiu 3abopohembc uko-pucmooyamu ocobam (y momy yucni dimam) 3 obmexeHmu fizuchmu, cehcophmu afo pozymoBmu 3diohocmmu, a makox ocobamu 3 heocmm him docbod ma/abo 3haHHMa.
Heo6xioHo cmexkumu 3a dimbmu, uo6 oHn He apanu i npucmpoem.
Bka3iBkn 3 6e3neKn BpeKmipyxy
△OepeKHo!
He6e3neKa mpaemyehnra!
Hebe3neka nepekuadnna npunaody Ha 3aHaado Kpymux cxunax.
- Y hānpaMky pyxy donyckaembcj i3da minbku no niδuomax ma cxunax do 12%.
Hebe3neka nepekuadHna Hecma6inb-Homy rpyhmi. - Do3oBnAembCn nepemiuam npunad minbku Ha miuHui niOcmabui.
Hebe3neka nepekuudnna npulady npu eJukomy biHOMy Kpehi. - Y Hanpamkax, nonepeuHux do HanpamKy pyxy, donyckaembcn nepecyeaHHa minbku no cxunax do mAc. 12%.
Ubuokicmb nepecyeaHna noBuHa 6ymu eidnoeioHO do omoyoux ymo8.
Bka3iBkn 36e3neKn niD yac TpaHcnopTyBaHH MaunHH
- Ppu mpaHcnopmyaehnHi cnid 3eephymu ybaay Ha eazy npucmpoio.
- Pid yac mpaHcnOpmyaHaHH npucmpoio biomapei ma haoiuho 3akpinum npucmpiu.
Bka3iBkn 36e3neKn IJnI npncTpoIB, IO npaioTOb BiD akymyIaTOpHOI 6atapei
Bka3iBaKa: IpaBo Ha rapaTtiHe 06cnyroByBaHHa 36epiraetbcra Tilbky BnnaKBykOpncTaHHa kymyIaTopiB i 3apdHnx npicTpOIB, zo pekomehdy cipma Karcher.
Cniod o6oBCTpykui no eKcnnyatauii BID Bnpo6Hnka akymyIaTopa n 3apJrHoro npncTroIO. DToPmMyTeCb Bka3iBOK 3a-KoHOdaBCTBa no 6bry 3akymyIaTopa-MN.
Hikon He 3aImaTe po3pJxKeHn aKymJyTOp i kOMoTa WbNdWe 3HOBy 3apJITb NOrO.
IiTpmye akymyantopn 3aBkDn B uCTOMy ny cyxomy cTahi yHKnHyTN BNTOKy cTpyM 3axuataN BiD BnyeHn H6pydy, Hanpknad, MetaneBoro nny.
He KnaTn IHcTpymEnTu a6o Noi6Hi npEmdTe Ha akymyIaTOp. He6e3neKa KopoTKoro 3aMnKaHH Nb6xv.
3aBXn 3actocobybTu 26atapei oHaKOBOro Tnny!
YXoHOMy pa3i He opyDyBaTn 3 BORHE,ICKPNTn a60 KypTN nO6n3y akymyIaTOPa a60 B akymyIaTOPHi. He6e3neKa B6yxy.
BnKOpncToByBaTu TINbKn 6aTaapei i3 aXnCHnM HApPTTm NOnHocB. 3axnche HApPTT B pa3i BTPaTN 3amHHTN.
HeDToTopKaTnC4do rapaHx By3nib, HapnKnaD,do npBDOHorO DnRyHa
(He6e3neka oniky)
BydbTe o6epeKhi npi p06oTI 3 akyMyIaTOpHm eNeKtpoIITOM. DOrpMnyTe BiNobIDnX npabn Texhikn 6e3neK!
BnKOpncTaH aKyMylTOpn BapTo yTuNl3yBaTu, BiNIOBIMHO Do DnpeKeTbUH CC 91/ 157 EWG,6e3 uKoDn dJa HABKOJNUHbOro cepeDoBua.
Bka3iBkn 36e3neKn niD qac DOrJy TaTexHCHOO6cnyROByBaHH
Ipeod ouuueHHm ma npoeedeHHm mexhiyho2o ocbnyoeybaHH, 3amHOO demaneu abo hacpmpoeaHH ha iHwi fynkuji npucmpiu cnid bumkhymu ma eunhamu knou 3anaeneHH.
Ipu pobomi 3 eJeekmuuHIO ycmaHoeKoIO Heo6xoHO eIdmOpHy bamaio.
He do3e0nembca yucumtu npuna3 6o0ho2o wnaHa afo cmpyMeHem 6odu nio bucokum muckom (Hebe3neka Kopomko 3aMuKaHHma iHuux nowkodkeh).
Pemohmhi pobom moxym npoeodumucnue aemopuzoahumc cepicHumcu cnyk6amu abcneuianicmu y ciu cpepi, kci 03haoumehi 3 ycima baxnueum npaeunammu mexhiku 6e3neku.
- Po6umu nepeepky Ha npedmem 6e3neku y biOnoBIOHocmi do dioux Micueux dupekmue dner HecmaioHapHX npucpoie, uO eukopucmo6yIombcry npomucnoBocmi.
- Po6omu 3 npucmpoem Heo6xioHo 3a8xdu npo8odumy Cneuiabhux nepyamkax.
3ano6ixhi npictpoi
Kpnka npnctpo
Pnncptpi OCHaueH N KOHTAeHM BmNkauem Ha Kpuu, kMn BmNkae DBNyH, 0oHbIKpNaBcKpnu Ka npcpoio.
HE6E3NEKA
Hebe3neka mpaemyaHnaYepe3 HecnpaHu KOhmacmhuBumukaHa Kpuuui!
Kuo dbuyn He bumkaemcbn iid cac iokpuahn Kpuu npucmpo,ue 03hauae, uo konmkmu bumkaa Ha kpuu j HecnpaHn. Ppununmu eknnyamaqio npucmpo ma bddamu 020 e pmoHm.
TOLOBHBMNKa
Y He6e3neuHcx CnTyauix a6o IJnIa WbUdkoro BmKHeHH npucTpOIO NOBepHyTN rONOBHn BmMkay B noIOXeHHRA 0 / OFF
3anobirn Henepe6aeyHomy BBeEHIOB EKCNlyatauio, NOBepHyTn rONOBHIN BIMNKau B NNOXKeHHN 0 / OFF》TA BNTTNI KIOU.
EnemEny npablinn i yHKioHaIbHi By3nn

1 Tbnt dna 3akpinneHHraTaroBoi pykn (2x)
2Пиловийфытр
3 PeepByap nIa 360py cmITT
4 3aHn yuinbHOBaJIbHa nIaHka (Ha emHOCTi nn 360py CMITT)
5 3apAHH npCTpi (TINbKN KM 75/40 W Bp Pack)
6 AkymyTophi 6aTapei (TinbKN KM 75/40 W Bp Pack)
7Повднишебтiphi
8 BiyuHa yuiinbHIOBaJIbHa nlaHka
9 Ban, 0o nDmitae
10 Peredny yuinbHOBaBHa nlaHa
11 3acniHka dIa BEniKnx YacToK 6pyd
12 Pynboba cTikKa i ralbMa 3i cTOnOpHIM npnctpoem
13 KpinneHHa 6iHoo iitkn
14 BiHa Nc iItka
15 3ackoKa KaIOnTy
16 KpnuKa npncTropo
17 17TeKeep3apAHO npncTpo (TilbKNKM75/40W Bp)
18 TaROba pyUka
19 Baxilb pyxy Bnepei
20 Baxinb dno onyckannn niinomy kna-nana dna BENKINX cactOK 6pyd

PahenbynpaBnHH
1ToOBHnBIMnKaa
2 Baxinb dnn niinyommy onyckannkna nana h6iHnx 1itok.
3 3aŋnyuoka kpiuKn φiNbtpa nny
4 Cko6a pe3epByapy dnn cmittT
5 YuHcHn HcHn FJIbTpA dJa nnIOBOrO fIb- Tpa
6 Knaan an nny uen Hn B cyxomy/BOIoromy peKMI

TOnOBHn BmNKaU
0/OFF BnKJIOUHTN DnBryH
1YbIMKHyTNDbuTyH
A BnHnTn KIOU
B IHdNkaizie HecnpaBHOCTe
C lHdkaTOp akymyIaTopa
BnHnKIOy
→ NObepHyTN KInOu rONOBHOro BUMNkaaB NOIOXeHHra "0" i BnHrTa
BiikpnKpnKny npncpo
Bka3iBka
Kopny npucptpo BIDyHReTbcra KIOChem roOBHO BmUKaHa.
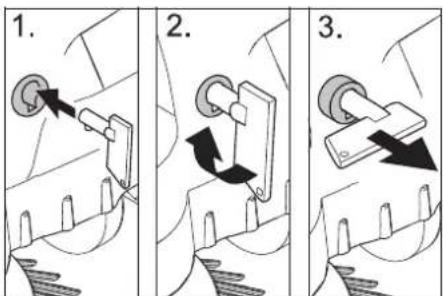
BCTaBHTN KIIOU rOJIOBHO BIMNKaHa B 3AMOK 3ACKOQUK KANO TY Ta NOBEPHyTu Ha 90^ 3a RoDHHNKOBO O CTPIIKOIO.
→ BntTnHyTu 3aCKOuy KaNToHa KInOuy.
BikpnTknKpUkny npncTropo.
3aKpntkpiuKy npncTropo
→3aKpNTn KpNtky npncTppo, 3aMOK KpNtKn 3aKpNtBcA BtOMaTnHO.
Peped noaatkom po6oTu
Bka3iBkn npn po3BaHTaXeHHI
HE6E3NEKA
He6e3neKa 3doopoe, He6e3neKa ykuokxehn!
Ipu bAHmaxeHHi cnid 3eepHmu ybaay Ha eazy npucmpoio.
| Порожнaya Bara (ТраHCNOPТа Bara) | |
| KM 75/40 W Bp | 79 kg |
| KM 75/40 W Bp Pack | 125 kg |
| Донустima заразьна Bara | |
| KM 75/40 W Bp | 205 kg |
| KM 75/40 W Bp Pack | 205 kg |
BvBaHTaKeHH npJnay
→ 3HrTn Kopo6Kn
→BudanHTn DepeBXKaTb Ia 36peXeHN H KOnic, i pykoI npHn npncpti 3 NiDOnHa.
Bidnyctnte cTOrHKOBe raIbMo
BcTaHObitb npoBiHy dIy
Pocna6HTn TBHNTN.
→ПДнгТЯROBypyky.
→3aTAYHTBNUHTN.
YcTaHOBHT BaJ, 0o NiIdMitac
Bka3iBka: Npeep nepeekuaHHa m npnlaDy BnHHTn 36ipHnK-HakonuYbau Ta nobepHITb npoBiHy dyry Bnepe. He 3anuatn npnaH ha npoBiHni dy3i.
→HadraTn 6iHy uItky Ha 3arap6Hn npncptpi i MiHO 3aTgTn.
AkyMnyTOpn
Bka3iBkn 3 TexHki 6e3neKn odo akymjITopiB
Ppi poboti 3 akymyIaTopamn cnid DOTpIMyBaTnC HAcTyNHx NonepeJxYBaJIbHnx BkazIBOK:
| i | ДомрumsуамUCеakzieOK ha akymyamopi, e Incmpyuksi3 kopucmyaHHma y noci6huky 3 ekcnnyamaüj npucmpojo! |
| Hocumu zaxucm對於 ouéi! |
| He donyckamu dimeu do eken- mponimi ma akymyamopie! |
| Hebe3neka eubxyy! |

He6e3neKa 8u6yxy!

3abopohemboc po36e0en Hn bokpumozo 0o2HIO,ickpiHn, cmeopenhna bokpumux dKepe n caimna ma naiHHn!
Hebe3neka ximiunx onikie!

Iepua donomozla!

PonepeoKyeaJIbHe MapkyeaHnHa!

Ymunizaiy!

He bukuadamu akymympo y KOHmeuHep dno cmimma!
06epekno!
Hebe3neka budyxy! He knacmu hcmpymenu a6o nodibhi npedmemu ha akmyJarnop, moMo ha buoDu nonioie, i Ha 3
06epeKHO!
Hebe3neka mpaBMyeaHn! HikOnu He mopkamucdo cBuHueeux enemeHmie. Picra po6im 3 akymyarnopom Heo6xioh o nommu pyku.
HE6E3NEKA
He6e3neKa 3a2op8HHu 6bxy!
-3abopohembcnaHHnpuo3eDeH Hbiokpum02o eoHIO.
IpumiuHnry, y komy 3apxiaombca akymyamopu, noBuHne do6pe npoBimpOeamucr, momy npu 3apxdui buinncbca 2a3, uo ne2ko bu6yxac.
△ObepeKHo!
Hebe3neka ximiuhux onikie!
- Ppu enyuehhi 6puz3k8 enekmponimy e oci abo ha wkpipy npommu benukoho Kinbkicmo yucmoi odu.
- Picna 6020 HeaauHo 38epHymuc4o nikapra.
BpydHu o8a 3anpamu.
Pekomehdobani akymyITopi
| № 3amOB- ЛECHNЯ | MICT- KICTh | ПOTIK nobi- trя | |
| 60 Ah, He no- Tpe6ye Texob- CnyroBy- BAHHry | 6.654- 226.0* | 1,65** | 0,66*** |
UcTaHOBnT i nIckHouHTN akymyIaTOpHi 6aTaapei

Bka3iBka
B moDeni KM 75/40 W Bp Pack 6aTapei Ta 3apnpi BKe B6yDobahi.
BikpnTknKpwnky npnctroo.
BCTAHOBHTn akymyIaTOPhi 6aTaapei Ha KPOHHTeIN KpInnEHHn DBNryHa.
3aφikcybaTn akymyraTophi 6atapei BIDNOIBHM CTaryBaIbHM pemHcEM.
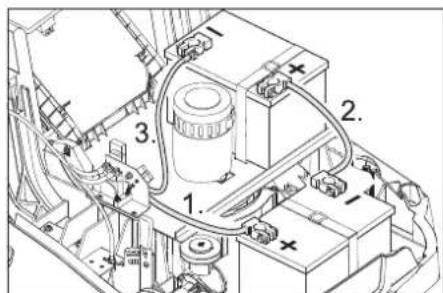
DorjraTaTexHicHe 06cnyroByBaHHa
3araJIbHI BkA3iBKN
- PemOHTHi po6OTo M0kyTb npoBOnTuCra Nnwe ABTopu3OBaHmN cepBicHMn CnyK6amn afo cneuiJanictamn y ciin cpepi, kki O3Haonomnehi 3 ycima BaxKnBIMn npabunamrTexhikn 6e3neKn.
- Pnctpoi, 0o BnKOpncTOBiyOTbcr KOMepuHOBy BiNObIDHOCTI Do MlceBHX BIMor, NIIJraHOb IpOBeDeHHIO nepeBipKn 3TexHikn 6e3neKn 3riHNO VDE 0701.
UH
OSEPEXHO
He6e3neka yuKoDxKeHnHa! He do3e0JnBemcbyucmum npucmpi3 e0dHO2o 7uaa 60 cmpymeh eodu nid bucoKum muckom (He6e3neKa Kopomko2o 3aMukahna ma iHuux nowkOKeHb).
YBAGA
Ipeod npoBeDeHnM po6im 3 ouuueHH eumrmu umenCenbHy bunky 3apdHO2O npucmpo1o 3poemku.
Ipeod npoBeDeHHa m po6im 3 ouuueHna eiohozo noIIOca akyMylmopa.
UHueHHaapanapa3cepeHNH
△OepeKHO!
Hebe3neka mpaMyeaHn! OdaZaume 3axuchy macky npomu npun y i 3axuci okynpu.
Bikpnntkpiuky npnctpoH.
→IpoTeptn anapat raHvipkoIO.
O6dytn anapat nobITpnm nd TnCKOM.
→ 3aKpNTn KpUWky npucTropo.
YnueHH anapaTa 3OBHI
OuHCTnTn anapaT, BnKOpNCTOBHyOnu DnIaCBoRBOBONrYraHcy, npocOeyc CyabKMnyxHM po3HOM.
Bka3iBka: 3a6bOpOHReTbcra BnKOpNCtAHH arpeCnBnX MnHnX 3ac06iB.
PepioDnHicTbTexHiHoro 06cnyroByBaHHa
TexnHcne 06cnyroByBaHH, 3dIChIOCTbCkNIEHTOM
I0eHHeTexHHe 6cnyroByBaHHa
→Ipebipnti Bn, 0o NiIMtae i 6iuHi UITKN Ha 3HOuYBaHHa HArBnHcTcpi-OK, 0o HAOTaJIncr.
→IpeBipuTn CTaH BCix eIemEHTiB ynpabNHHJ.
→ Ipebeipntn CtaH Bcix KOHTpoJbHnx NaMn.
LToNkHeBeTexHicHe o6cnyroByBaHHa:
→IpeBipNTHaTg,3HOWeHcTBicnpaB-Hictb npBOdHnx pemeHB.
→IpeBipuTnJeRkictbXoYtpocBBoy- DeHa Ta pyxNBMx YacTnH.
→ NpeBipNTyCTaHOBky 3HOuYBaHHy uINbHIOBAJIbHnx INaHOK y 3OHi niMiTaHH
→ NpeepiHTn nnouHny niMiTaHHaBa- na, 0o NiMiTae.
→OuHHeHHFijbTpapnny.
Bka3iBka: DoknaDiHie nIb. po3di "TexHiHHe o6cnyroByBaHHa".
BkaizbKa:Bcipo60n3TexHOrO6cnyroByBaHH360kyKIIeHTaNOBHHIpOBoDITNCKBaIipikoBaHmΦaxiBcEm.Bpa3i notpe6n B 6yNb-ayM MOMENTMOXHa 3BepHyTncnnoDOnOMryB CneuiJIIOBaHy TopRoBeJbHy opraHiauio fipMn Karcher.
TexHne 06cnyroByBaHH, 3dInCHIOETbCnK6Oo 06cnyroByBaHH CNOXnBaivB
O6cIyroBvBaHHn nicn nepworo micra a6o 5 p06oHx roHn:
3po6ntn nepBHHHy IHcneKciio.
KoXHi 50 roDn np6oTn
O6cIyroBvBaHHKoKHi 100 po6OuHx ro- dIn a6o oHN pa3 Ha nibpoky
He cmaumu npucmpiHa mraoy pyky.
3aφikcyTe cTOrHOHy rAnbMiBHy cnCTemy.
→ CnpoxHHTn pe3epByap dnn cmTTT.
3HrtnaakymyTOpn.
→IpekeKHyTn anapat Ha3a.
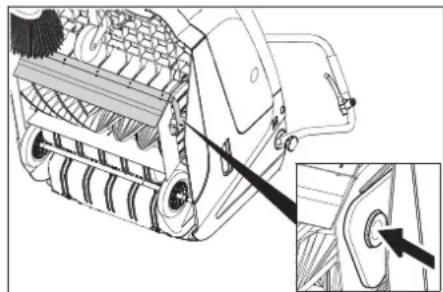
→ПингуклаланДьВeнкхчactok 6pydy,ydaBHTN BknaDnш niDusHnHa Ka HaxuNTBan,IIO niDMiTa,ynepeid.
BntaHrytn Ba, 0n niDmitae.
→HadraTnHOBnBaI,0nNiIMiTae,Ha 1aandpy npnbOdy (niBOpuy).
→Ha npotnHexHni ctopoHi BCTaBHTN BknaDn NiDnHnHKa B O TBip 6anahCnpaBaNa,0nDiMItae.
OBEPEXHO
Hebe3neka yukokhenHa! 3eephymu yeay Ha me, uo6 omeopi banahcupa eana, uo niMimaec, He 6yna zamuchyma uemuHa.
Bka3iBaKa: Picn yctaHOBKn HOBO rniMiTaIbHOro Bany Heo6xIDHO 3aHOBO BipeRyIHOBat NIOUHy NiIMiTahHH.
Ipebeipka KopektyBaHH nIoUHH niIMiTAHn DnB aJa, 0o NiIMiTac
→ПднгИЗиральнуMaшину cnepeDny nepemiiatau II no pIBHn i rnaKoi NOBepxHi 1O CBIDOMO NOKPITaNINOM a60 KpeIdoIO
3aφikcynte cTOrHOHy rIbMbHy cnCTemy.
→Дати NOBOPOTHM BAJIHKAM O6ePtaHnCЯВ pINHi npN6n3Ho 15-30 cek
→PiHn 36npaIbHy MaunHy iixatny6ik
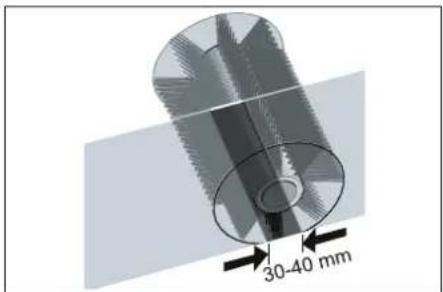
ΦopMa NOBepxHi 36bupaHH yTBOpNTb pIBHOMIPHM npMOKyTHNK, WnPnHa RKOCTAHOBHTb MIX 30-40 MM.
YcTaHOBka 3aMiHa yuJIbHIOBaIbHINX nHaOHK
Bka3iBka: Npeed nepekndaHnHm npnlaDy BnHnTn 36ipNk-HakOnnyBaY Ta nobepHitb npoBiHy dyry Bnepe. He 3annwatn npnlaHa npoBiHi dy3i.
IpepeHryuihBHOBaHa nHaKa
→Pocna6nTn KpinneHHy uinbHOBaJIb-HOI nHaHK.
YuinbHIOuy nHaHKy BiDperynOBaTu a6o 3amHHTn.
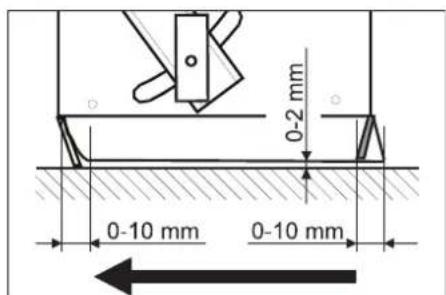
BidperyIOBAtn BnCOTy yuiIbHOBaIb Hoi INaHKn HaN NOBepxHeo 3emJI TaKIM YINOM, IO6 BOHa onyckanacr 3 pyXOM no IHepui 10-15 MM Ha3ad.
→ BiKOpuRyBaTn yUiJIbHIOBaJIbHy nHaKv.
3aTn cnonyHi 60TN yuJIbHOBaIbHOIJaHK.
3aHry yuinbHOBaJbHa nnaHka
→ BiKpyTnTmHicThb nra 360py CmTTA.
→Pocna6ntn KpinneHHyuiNbHOBaHb-HoI nnAHN.
YuinbHIOOy nHaKy BiDperynOBaTu a6o 3amHnT.
BiperynOBaTN BnCOTy yuINbHOBaNBHOI NnAHN HAD NOBepxHeo 3emNI TaKIM YNHOM, uO6 BOHa ONyckanacr 3pyXOM no Ihepui 10-15 MM Ha3ad.
→ 3aTn cnonyuHi 6oTn yuiJbHIO-BaIbHOI nHaKN.
BiyuuihboBanhi nHaHK
→ Nocna6ntn kpinneHHy uinbHOBaHbHOI nHaHK.
→ YüπiNbHIOUOy nlaHky BiDperyIIOBATn a6o 3amIHNTN.
→Дянсг�погвань BiDCTaH IO nIDNo- TN BIKOPNCTOBYBaTN NiKJaKD NTOBUNHOIO 2 MM.MAKCMYM.
→ BiKOpnryBaTn yuIbHIOBaJIbHy nnaH Ky.
→ 3aTn cnonyuHi 6oTn yuiNbHO-BaNbHOI nHaKN.
3amHa nnIOBoro fIbTpTa
△NONEPENXEHH
Dno noamky 3amiHn nuo020 fInbmpa budanmu Emicm i3 pe3epeyapa dny 360py cmmma Ipu pobomi 3 fInbmpybaIbHOYcmaHOeKO Hocumu Macky dny 3axuCymyi. Dompumyme npunucHB no mexhiCi 6e3neku biHOco obiy i3 dpHUM NlONM.
OBEPEXHO
He6e3neKa nowokxeHHa!
Pnnooui pinbmp npomueamu He no-mpi6Ho.
3aφikcyTe cTOrHOChy rAnbMbHy cnCTeMy.
OuHCTnTn pifIbTp dna nny.

→ 3aRnyuKy KpMnKn φIbTp aNly Bi-KpyTNTn pOtn rOdHHNKOBOI cTpiKn.
→Пднгп Кршку плобого Фльтра.
→3amHa nIOBOrO φiNbTpA. 3BepHyn yBaIy Ha npaBnIbHe NIOXKeHH yCTaHOBKn nIOBOrO φiNbTpA (DINB. MaHIO-HOK).
3aKpyTmT 3aNyUkky Do ynpy.
OBEPEXHO
Kaio 3a2nyuKa He 6yde 3akpyeHa do ynpoy,ue MoKe npueecmu do nonomku.
Bka3iBka: Pn yctaHOBu HOBOro pIbTp aCTeXHTN 3a TmM, uO6 nactnH He 6ynn ykoJKeHi.
3aima 3anobixkHnka/pele
KM 75/40 W Bp

13an06ixHnK F1 (50 A)
23aio6ixHKF2(2A)
3 Pene
4 3apädHni wTekep akMyIyIToPA
→ BiDkpnTn KpnuKny npncTropoI.
BIDHOBTn HeCnpaBHn 3anO6iXnK a6o pene.
KM 75/40 W Bp Pack
3anobixknpo3TaObaHnHaKneMiakymyIaTopa.
Akececyapn
BiyuHa zitka, M 6.905-626.0
Дпяdpiбного nny i3 BnytpiwHbOoi noBepxhi, BOIorocTiKa.
BaN, 6.906-886.0 M'ank
3 HatypaibHOI 9eTINH: cneiianbHO Ina
3amitaHH npi6Horo Nnhy Ha pIBHX nI
norax y BHTpiHix npimiuheHHx.
HectiKi Do BOJOrn, He 3actocobyatn do
abpa3NBHX NOBepxoHb!
BaN, 90 niiMirae, Jop-CTkn
Дпг Вдаленньа BiДкрNTOMу nobITpi, BONORoctiKa.
BaN, 6.906-950.0 CTaTnHn
Длг�оверхонь,ио пдадаюбс CTaTчHOMу HabaHTaЖeHHIO,ТAKX,ЯК KJIIMM a6o wTyHi nOKpTTTЯ
OdHnuc npn6npaHnKJIMIB 2.641-571.0
BkIIOUcAe:ΦIbTp DnA 3aTpImaHnBa BONOKHa, aHTNCTaTtUHa CJIJIHdPruHa UItKa,notpiHn CnprMoByBaHbN BaneCb
3aBa npu BiinobiHictb
EBpOneCbKoro
cNIBTOBapnCTBa
LMM NOBIDOMNREMO, 10 HXKHe 3a3Ha-ueHa MaunHa Ha OCHOBI CBOeI KOHCTpykuii Ta KOHCTpyKTNBHO BIKOHAHHa, a TAKoX y BNyuEHOI y npodax MoedeI, BiNobidae CneiaJIbHM OCHOBHM BIMORAM 10do 6e3neKn Ta 3axncty 3dopOBHN HNXe DnpeKTHB CC. Y BnnaKky Hey3roJKeHOI 3HAMM 3MiH MaunHn Ua 3aBA BTPaac CBOIO CNY.
PpOdyKT: MaunHa nIy niIMiTahHr
Tun: 1.049-xxx
BiinobiHa DnpeKtnBa EC
2006/42/EC (+2009 / 127 / )
2014/30/EC
2000/14/EC
Ppknadhi rapMOH3yHOpMn
EN 55012: 2007 + A1: 2009
EN 60335-1
EN 60335-2-72
EN 61000-6-2: 2005
EN 62233: 2008
EN IEC 63000:2018
3anponoHObaHHaioHaJIbHi HOpMn
3actocobvbaHm MeToO uichiKn BiN NOBIDHOCTI
Chairman of the Board of Management

S. Reiser
Director Regulatory Affairs & Certification
YnOBHOBaXeHHn CnIBpObiTHNK NO BeDeHHIO DOKyMeHToo6iIy:
S. Reiser
Alfred Kärcher SE & Co. KG
71364 Winnenden (Germany)
Tel.: +49 7195 14-0
Fax: +49 7195 14-2212
Winnenden, 2021/02/01
| Дономora у виадку несандок | |
| НесправимICTь Усуненя | |
| Пробдддддддддддддддддддддддддддддддддддддддддддддддддддддддддддддддддддддддддддддддддддддддддддддддддддд徴 | |
| Бунайскгытбддддддддддддддддддддддддддддддддддддддддддддддддддддддддддддддддддддддддддддддддддддддддддддддддддд德 | |
| Вунайскгытбддддддддддддддддддддддддддддддддддддддддддддддддддддддддддддддддддддддддддддддддддддддддддд徴 | |
| Вунайскгытбдддддддддддддддддддддддддддддддддддддддддддддддддддддддддд徴 | |
| Вунайскгытбдддддддддддддддддддддддддд徴 | |
| Вунайскгытбдддддддддддддддддддд徴 | |
| Вунайскгытбддддддддддддддд徴 | |
| Вунайскгытбддддддддддддд徴 | |
| Вунайскгытбдддддддддддд徴 | |
| Вунайскгытбдддддддддд徴 | |
| Вунайскгытбдддддддд徴 | |
| Вунайскгытбддддддд徴 | |
| Вунайскгытбдддддд徴 | |
| Вунайскгытбдддддд徴 | |
| Вунайскгытбдддддд徴 | |
| Вунайскгытбддддд徴 | |
| Вунайскгытбддддд徴 | |
| Вунайскгытбдддд徴 | |
| Вунайскгытбдддд徴 | |
| Вунайскгытбддд徴 | |
| Вунайскгытбддд徴 | |
| Вунайскгытбдд徴 | |
| Вунайскгытбдд徴 | |
| Вунайскгытбд徴 | |
| Вунайскгытбд徴 | |
| Вунайскгытбд徴 | |
| Вунайскгытбд徴 | |
| Вунайскгытбд徴 | |
| Вунайскгытбд徴 | |
| Вунайскгытбд徴 | 360piuoiy |
| Плйом bichnix xitok He npaioe | 361piuoiy |
| Новий вал, сцп рidмитас, trрься ob stiikn pezeрваразда 366bopy cmiTTA | Bidkoprivgubatni perugovanra npoqin pizmitaungla nuaia y aodvba vcepulovabnix baxe jay y biobovadn i obovadn y obovadn y obovadn y obovadn y obovadn y obovadn y obovadn y obovadn y obovadn y obovadn y obovadn y obovadn y obovadn y obovadn y obovadn y obovadn y obovadn y obovADN YOBOVADN YOBOVADN YOBOVADN YOBOVADN YOBOVADN YOBOVADN YOBOVADN YOBOVADN YOBOVADN YOBOVADN YOBOVADN YOBOVADN YOBOVADN YOBOVADN YOBOVADN YOBOVADN YOBOVADN YOOVADN YOBOVADN YOBOVADN YOBOVADN YOBOVADN YOBOVADN YOBOVADN YOBOVADN YOBOVADN YOBOVADN YOBOVADN YOBOVADN YOBOVADN YOBOVADN YOBOVADN YOBOVADN YOBOVADN.YOBOVADN YOBOVADN YOBOVADN YOBOVADN YOBOVADN YOBOVADN YOBOVADN YOBOVADN YOBOVADN YOBOVADN YOBOVADN YOBOVADN YOBOVADN YOBOVADN YOBOVADN YOBOVADN YOBOV ADN YOBOVADN YOBOVADN YOBOVADN YOBOVADN YOBOVADN YOBOVADN YOBOVADN YOBOVADN YOBOVADN YOBOVADN YOBOVADN YOBOVADN YOBOVADN YOBOVADN YOBOVADN YOBOVADN YOFOVADN YOBOVADN YOBOVADN YOBOVADN YOBOVADN YOBOVADN YOBOVADN YOBOVADN YOBOVADN YOBOVADN YOBOVADN YOBOVADN YOBOVADN YOBOVADN YOBOVADN YOBOVADN YOBOVADNY OBOVADN YOBOVADN YOBOVADN YOBOVADN YOBOVADN YOBOVADN YOBOVADN YOBOVADN YOBOVADN YOBOVADN YOBOVADN YOBOVADN YOBOVADN YOBOVADN YOBOVADN YOBOVADN YOBOVAD N YOBOVADN YOBOVADN YOBOVADN YOBOVADN YOBOVADN YOBOVADN YOBOVADN YOBOVADN YOBOVADN YOBOVADN YOBOVADN YOBOVADN YOBOVADN YOBOVADN YOBOVADN YOBOVADN YOBOvADN YOBOVADN YOBOVADN YOBOVADN YOBOVADN YOBOVADN YOBOVADN YOBOVADN YOBOVADN YOBOVADN YOBOVADN YOBOVADN YOBOVADN YOBOVADN YOBOVADN YOBOVADN YOBOVADNYOBOVADN YOBOVADN YOBOVADN YOBOVADN YOBOVADN YOBOVADN YOBOVADN YOBOVADN YOBOVADN YOBOVADN YOBOVADN YOBOVADN YOBOVADN YOBOVADN YOBOVADN YOBOVADN YOBOVAGN YOBOVADN YOBOVADN YOBOVADN YOBOVADN YOBOVADN YOBOVADN YOBOVADN YOBOVADN YOBOVADN YOBOVADN YOBOVADN YOBOVADN YOBOVADN YOBOVADN YOBOVADN YOBOVADN YOBoVADN YOBOVADN YOBOVADN YOBOVADN YOBOVADN YOBOVADN YOBOVADN YOBOVADN YOBOVADN YOBOVADN YOBOVADN YOBOVADN YOBOVADN YOBOVADN YOBOVADN YOBOVADN YOBOVADN y BOVADN YOBOVADN YOBOVADN YOBOVADN YOBOVADN YOBOVADN YOBOVADN YOBOVADN YOBOVADN YOBOVADN YOBOVADN YOBOVADN YOBOVADN YOBOVADN YOBOVADN YOBOVADN YOBOVADN N OBOVADN YOBOVADN YOBOVADN YOBOVADN YOBOVADN YOBOVADN YOBOVADN YOBOVADN YOBOVADN YOBOVADN YOBOVADN YOBOVADN YOBOVADN YOBOVADN YOBOVADN YOBOVADN YOBOV AD N OBOVADN YOBOVADN YOBOVADN YOBOVADN YOBOVADN YOBOVADN YOBOVADN YOBOVADN YOBOVADN YOBOVADN YOBOVADN YOBOVADN YOBOVADN YOBOVADN YOBOVADN YOBOVADN YOBOvAD N OBOVADN YOBOVADN YOBOVADN YOBOVADN YOBOVADN YOBOVADN YOBOVADN YOBOVADN YOBOVADN YOBOVADN YOBOVADN YOBOVADN YOBOVADN YOBOVADN YOBOVADN YOBOVADN YOBO VAD N OBOVADN YOBOVADN YOBOVADN YOBOVADN YOBOVADN YOBOVADN YOBOVADN YOBOVADN YOBOVADN YOBOVADN YOBOVADN YOBOVADN YOBOVADN YOBOVADN YOBOVADN YOBOVADN YOBoVAD N OBOVADN YOBOVADN YOBOVADN YOBOVADN YOBOVADN YOBOVADN YOBOVADN YOBOVADN YOBOVADN YOBOVADN YOBOVADN YOBOVADN YOBOVADN YOBOVADN YOBOVADN YOBOVADN YOFOVAD N OBOVADN YOBOVADN YOBOVADN YOBOVADN YOBOVADN YOBOVADN YOBOVADN YOBOVADN YOBOVADN YOBOVADN YOBOVADN YOBOVADN YOBOVADN YOBOVADN YOBOVADN YOBOVADN YOOVADN N OBOVADN YOBOVADN YOBOVADN YOBOVADN YOBOVADN YOBOVADN YOBOVADN YOBOVADN YOBOVADN YOBOVADN YOBOVADN YOBOVADN YOBOVADN YOBOVADN YOBOVADN YOBOVADN N OBOVAD N Y OBOVAD N Y OBOVAD N Y OBOVAD N Y OBOVAD N Y OBOVAD N Y OBOVAD N Y OBOVAD N Y OBOVAD N Y OBOVAD N Y OBOVAD N Y OBOVAD N Y OBOVAD N Y OBOVAD N Y OBOVAD N Y OBOVAD N Y OBOVAD N Y OBOV AD N OBOVAD N Y OBOVAD N Y OBOVAD N Y OBOVAD N Y OBOVAD N Y OBOVAD N Y OBOVAD N Y OBOVAD N Y OBOVAD N Y OBOVAD N Y OBOVAD N Y OBOVAD N Y OBOVAD N Y OBOVAD N Y OBOVAD N Y OBOVAD N Y OBOvAD N Y OBOVAD N Y OBOVAD N Y OBOVAD N Y OBOVAD N Y OBOVAD N Y OBOVAD N Y OBOVAD N Y OBOVAD N Y OBOVAD N Y OBOVAD N Y OBOVAD N Y OBOVAD N Y OBOVAD N Y OBOVAD N Y OBOVAD N Y OBOVAD N YOBOVAD N Y OBOVAD N Y OBOVAD N Y OBOVAD N Y OBOVAD N Y OBOVAD N Y OBOVAD N Y OBOVAD N Y OBOVAD N Y OBOVAD N Y OBOVAD N Y OBOVAD N Y OBOVAD N Y OBOVAD N Y OBOVAD N Y OBOVAD N Y OBOVADN Y OBOVAD N Y OBOVAD N Y OBOVAD N Y OBOVAD N Y OBOVAD N Y OBOVAD N Y OBOVAD N Y OBOVAD N Y OBOVAD N Y OBOVAD N Y OBOVAD N Y OBOVAD N Y OBOVAD N Y OBOVAD N Y OBOVAD N Y OBOVAD N Y OBOvA D N OBOVAD N Y OBOVAD N Y OBOVAD N Y OBOVAD N Y OBOVAD N Y OBOVAD N Y OBOVAD N Y OBOVAD N Y OBOVAD N Y OBOVAD N Y OBOVAD N Y OBOVAD N Y OBOVAD N Y OBOVAD N Y OBOVAD N Y OBOVAD N Y OBOVA D N OBOVAD N Y OBOVA D N OBOVAD N Y OBOVA D N OBOVAD N Y OBOVA D N OBOVAD N Y OBOVA D N OBOVAD N Y OBOVA D N OBOVAD N Y OBOVA D N OBOVAD N Y OBOVA D N OBOVAD N Y OBOVA D N OBOVAD N Y OBOVA D N I OBOVAD N Y OBOVA D N I OBOVAD N Y OBOVA D N I OBOVAD N Y OBOVA D N I OBOVAD N Y OBOVA D N I OBOVAD N Y OBOVA D N I OBOVAD N Y OBOVA D N I OBOVAD N Y OBOVA D N I OBOVAD N Y OBOVA D N I OBOV AD N OBOVAD N Y OBOVA D N I OBOVAD N Y OBOVA D N I OBOVAD N Y OBOVA D N I OBOVAD N Y OBOVA D N I OBOVAD N Y OBOVA D N I OBOVAD N Y OBOVA D N I OBOVAD N Y OBOVA D N I OBOVAD N Y OBOVA D N I OBOvAD N Y OBOVA D N I OBOVAD N Y OBOVA D N I OBOVAD N Y OBOVA D N I OBOVAD N Y OBOVA D N I OBOVAD N Y OBOVA D N I OBOVAD N Y OBOVA D N I OBOVAD N Y OBOVA D N I OBOVAD N Y OBOVA D N I OBOVAD N Y.OBOVA D N I OBOVAD N Y OBOVA D N I OBOVAD N Y OBOVA D N I OBOVAD N Y OBOVA D N I OBOVAD N Y OBOVA D N I OBOVAD N Y OBOVA D N I OBOVAD N Y OBOVA D N I OBOVAD N Y OBOVA D N I OBOVAD N Y OBOVA D D N OBOVAD N Y OBOVA D D N OBOVAD N Y OBOVA D D N OBOVAD N Y OBOVA D D N OBOVAD N Y OBOVA D D N OBOVAD N Y OBOVA D D N OBOVAD N Y OBOVA D D N OBOVAD N Y OBOVA D D N OBOVAD N Y OBOVA D D N OBOV AD N OBOVAD N Y OBOVA D N I OBOV AD N OBOVAD N Y OBOVA D N I OBOV AD N OBOVAD N Y OBOVA D D N OBOV AD N OBOV AD N OBOV AD N OBOV AD N OBOV AD N OBOV AD N OBOV AD N OBOV AD N OBOV AD N OBOV AD N OBOV AD N OBOV AD N OBOV AD N OBOV AD N OBOV AD N OBOV AD N OBOV AD N OBOV AD N OBOV AD N OBOV AD N OBOV AG N OBOV AD N OBOV AD N OBOV AD N OBOV AD N OBOV AD N OBOV AD N OBOV AD N OBOV AD N OBOV AD N OBOV AD N OBOV AD N OBOV AD N OBOV AD N OBOV AD N OBOV AD N OBOV AD N OBOV AD N OBOV AD N OBOV AD N OBOV A D N OBOV AD N OBOV AD N OBOV AD N OBOV AD N OBOV AD N OBOV AD N OBOV AD N OBOV AD N OBOV AD N OBOV AD N OBOV AD N OBOV AD N OBOV AD N OBOV AD N OBOV AD N OBOV AD N OBOV AD N OBOV AD N OBOV AD N OBOvAD N OBOV AD N OBOV AD N OBOV AD N OBOV AD N OBOV AD N OBOV AD N OBOV AD N OBOV AD N OBOV AD N OBOV AD N OBOV AD N OBOV AD N OBOV AD N OBOV AD N OBOV AD N OBOV AD N OBOV AD N OBOV AD N OBOV AD N OBOV ED N OBOV AD N OBOV AD N OBOV AD N OBOV AD N OBOV AD N OBOV AD N OBOV AD N OBOV AD N OBOV AD N OBOV AD N OBOV AD N OBOV AD N OBOV AD N OBOV AD N OBOV AD N OBOV AD N OBOV AD N OBOV AD N OBOV AD N OBOV 360piuoiy |
TexHiHi xapaKTepeNCTnKn
36epiraetbc npaBO Ha BheceHHaTexHi-HNX 3MH.

KypblfBhlbnraW
naianaanHac 6ypbH, ocbI
TVNHycka HcaybIKbI OKbIN, ON 60nbiHwa apeket etiH3 kane KeiHipeK naJaIaHy yuH Hemece Keneci neep yuH caKtan KOBIHbI3.
MaKcaTbHa cənkec KOndahy..KK 1
Функця ……KK 1
Kannbl Hcykaynap. 1
Kayinci3ik TexHnKacbl
60nBbHua HcyckaybIK. 2
Backapy 3JemeHTepi XaHe
Kekjxypri3y ke3iHderi kayinc3ik KehiHderi Hcyckaynbik
Kayin
Japaqam any kayni 6ap!
Tik kemepiy keiHde ayapbInbn Kany Kaynil
Ko3raBbC 6aRbImbHHa Kemepiy MeH mycymek 12% KypauDbI.
Typakcb36emme aydapbbln kany kayni.
KypbInfBhlmeKacpaIb m mecenaeH 6emmpde kypziaiiz.
Biyipnik kenbey mblm ynken 60ncaydapbbln kany kayni.
Ko3raIbIc 6aRbImbi 60uBihwa eH Ke6i 12%-ra deuihai 6emKeunepde xypai3ihi3.
Ko3raIbIC kbiIaMObIbf muicmi Kaiaunapra beuiimdenyi Kepek.
KypbIFbIHbTacbImaJday 6apbcbHdaKayinc3dkTexnkacbi 6oynbHwa HycKaynap
TacbImaIay Ke3iHoe KypblfBihBih CanMarbiHa Ha3ap aydapbihb13.
KypbIrfBhl maBImaIaday yuiH 6amapeHbI aXkbipambl, KypbIrfBhl b6ekimih3.
BatapeMeH KypbInfblnapra apHaJrKaYinci3dk HycKaynapbl
Hyckay: keninik Kärcher ycbihfah 6batapeanap MeH 3apdTay kypblfnbipbH naJaHaHcHbI3 fHa KaapaMbl.
AkkymyIaTOp MeH 3apdTay KpybIIFbcIH eHdpuyiinepeHn naDanaHy XeHiHderi HycKaynapbiH mHdeTTI TypDe yCTaHbIbI3. AKKymyIaTOpNbIK 6atapeaIapDbI KOJdaHy 60bIHwa 3aHaMaJIbIK TaanTAPdbI yCTaHbIHbI3.
AkkMyTOpnapbI eWkaaH pa3pTaTfAH KyiHDe KaIbIpMaHbI3, OApDbI Te3ipeK 3aprTayFa TbPbICbHbI3.
- ToktbIH aftbIN keTyIH 60ndbpMay MaKCaTBHda aKKMyJnTOpnap Ta3a XHe Kpyfak 60nyi Tnic. Onapbl NaCTaHynapdaH, MbIcJIb MeTaIbIK TO3aHHAH KOPFaHbI3.
AkkymyTopnapra Kypanapdbi Hemece coIapfa YKcac 3aTTapdbi KOImaHbI. Kbicka TyIbIKTany MeH kapbiny kayni.
- Opkaaan 6ip TnTeri 2 6aTapeHbI naJaHaHbHbI3!
AkkymyIaTOPdbiKacbIHa Hemece aKKymyIaTOPdbI 3aprTayfa apHaIraH
aWbIK Otbl 6ap 6enMeJe Kymblc icTeMeH3, WkBih WbIfybl MyMkiH KymblCTapDbI Kypri36eH3, TeMeki TapTnHa3. Kapblbc Kayni.
- Tek KIeMMaJIap KaKNaFbI 6ap 6aTapeJIaPdbI naJaIaNbIHbI3. Kofanfah 6oNca, KIeMMaIap KaKNaFbIH ayBCTbIPbIHbI3.
Ko3faNTkbI K03faNTkbIbI CNAKTbl bICTbIK 6eNweKTepeYcTaMaHbI3 (kyin kany kayni).
Akkymytnop KblKbIapbH KOJaHydaabai6oBbHb3.Kayinci3ik 6oBbHwa TnicT eceptynepi caKaTaHb3!
-KondaHbIHaH ak KymyIaTOpIap EC 91/ 157 EWG DnpeKTHBaCbHa caiKeC 3KOJOrnBik Kdere JkapaTbIyFa KaTaDbI.
KyTim XeHe TexHnKaIbIK KbI3MeT Kepcety BoHbIHwa Kayinci3dik HycKaynapbl
KpypbInFbIHb ma3anay Hemece mexHukanbIK Kbi3Mem Kepcemy, 6enuekepei aybcmbipy Hemece cyHKUaHbI e32epmy anDbHda KpypbInFbIHb Ewipin, mymaHy KinmiH aNbHb3.
-3neKmp KypbIINFBiCbIMeH XyMbIC Xacamac 6ypbH 6amapeHb1 aXbIpaMbHbI3.
KypbInrBihBi wnaHc HEmece Xorapbl KbcBIMObCy aftlbHbMeH ma3anayfa 60nMaUdbi (Kbicka myubkmany HEmece baca3kbimdahy Kayni).
-KeHoeyJxmbi cmapbIH meK yekinemmi Kbl3Mem Kepemy opmaIbikmapbi Hemece bapbIK muicmi Kayincidik mexHuKaCbHbIH epKepeIpMeH maHbIC ocbI caIadarbl MaMaHdap Xy3e2e acbipa anaBbl.
Tacbimdbl kOMMepuyIbIK XabdkmbH kepeinikmi epexenepiHe cauekek kayinci3diK epexenepiCaKaMaHbI3.
KpypbInfBImeH Kymbic icmeaeHde apKaawah muicmi Konran Kuihj3.
Kopfahbic kypaJ-ka6dbikTapbl
Kypbnfblxankbllbl
Kypblfbl kankblu aublnfa 60nda KO3faNTkblwTb1 ceHdpetIH kankbltBHy Tyicneni aXbIpaTkblbIme Hka6dbkTaNraH.
KAYIN
Kankbiunmbi myicnei
aKbpamkbiWbHbH aKaybI caDapbHaH
JapaKaam any Kayni!
Kypblfbl xankbliu b aubinfaH Ke3de K03ranmkbliu eunene, kanaibumbiH myicneni axbipamkbliu b akaynlb. KypblfbHb naadanaHyb mokmambn OHJI XeHdemiH3.
Herizkbiw
Kayinti XaFdaNapda Hemece KpybIbHbXbIqam eWipy yuIH Heri3ri KockbIHTb «0/OFF» KyiHe 6ypaHbI3.
Ke3deinCok icke KocbIyduaH Kopfay yin Heri3ri KockbIuTbI «0/OFF» KyiHe 6ypan, KiTTi anbHb3.
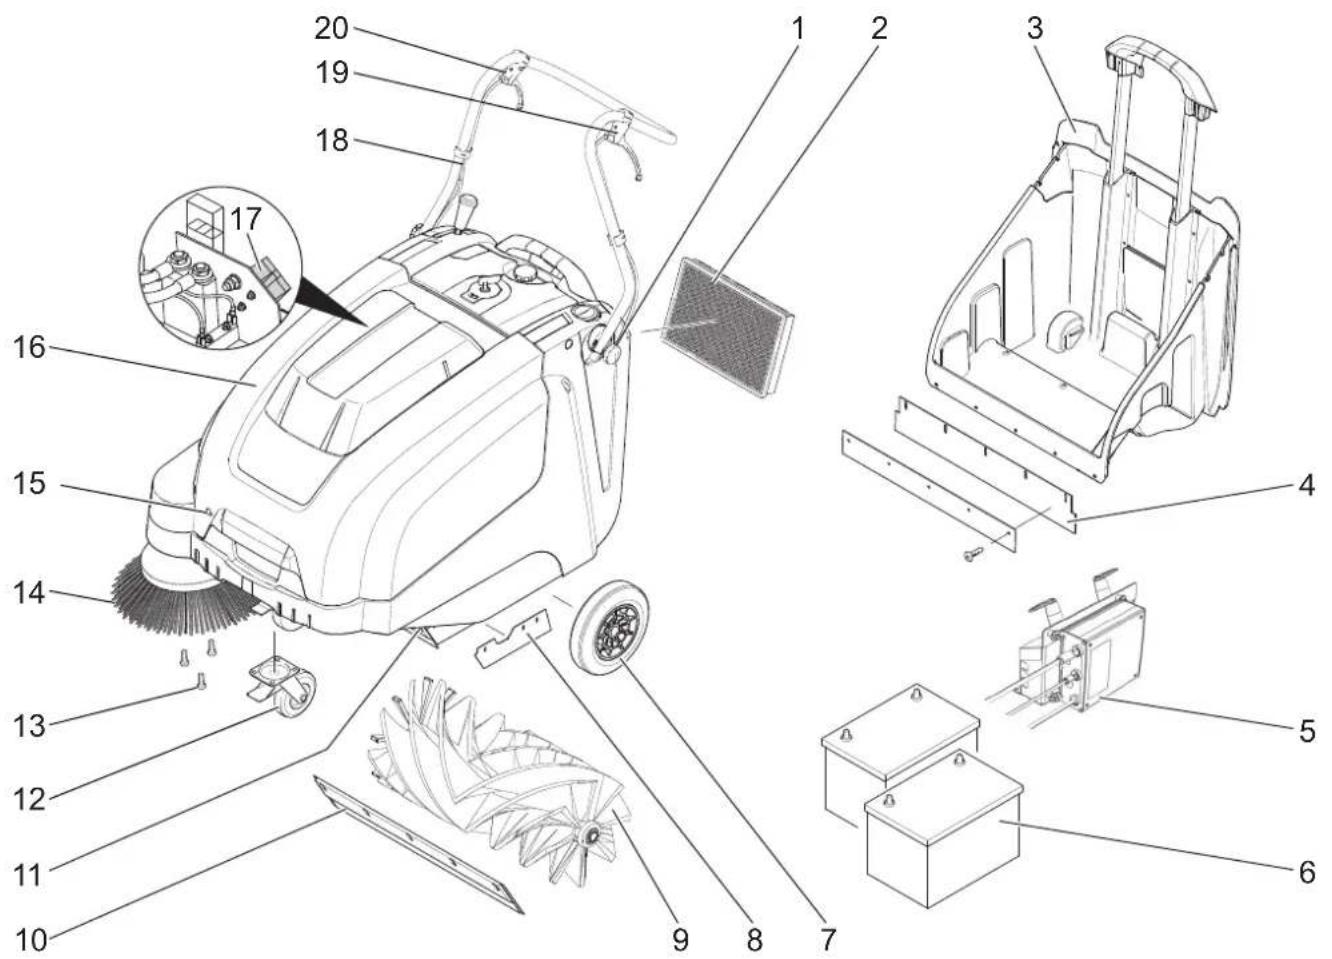
1 NTepy KaNCbIPMacbH 6eKiTyre apHaIFaH 6ypaHda (2x)
2 Wanh cy3rici
3 CbInbpyra apHaIraH KOHTeHep
4 ApTkbl TbIfb3aFbI W KOJaK (CbInbIpBlnFaH KOKbIC KOHTeHepiHe)
5 3apraTay KpybIfBcbl (TeK KM 75/40 W Bp Pack)
6БатAPEлар (TeK KM 75/40 W Bp Pack)
7KeTeKdEhReIeKTepi
8 Byinipnik TBiBt3daBtJX konak
9 CbInbipy 6inikweci
10 Andbihfb Tbifb3daybiTaKaTaa
11 Ipi KOKbc KaKaNaFbl
12 ToKtaTbI TeKerii6ap aHaHMaBb DeHreNEK
13 Byinipnik 9eTkaHb6ekity
14 Bynipnik utka
15XankbiWi6eKiTkiWi
16 KypbJrFb KaKnaBbl
17 Ba TapeHbI 3apTay aWacbI (TeK KM 75/40 Bt Bp)
18 IVrepy KancbipMacbi
19 Anra kyype re apHaIraH TyTka
20 Ipi KOKbIC KaKNaBfH KeTepyRe XeHe Tycipyre apHaJrFaH TyTKa
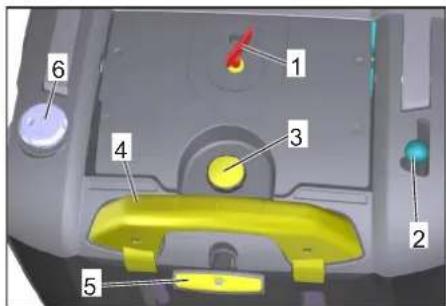
Kb3MeT KepcTe yakbIMbl
1 Heri3ri Kockbiu
2 Bynipnik 电TcKaHbI Tycipyre XaHe KeTepyre apHaHaRanTytKa
3 WaH cy3rici KaKnaFbIHbIH TOKtaTKblIb6ypamacbl
4 CbInbipBnFaH KOKbIC KOHTeHepiHiBekiTki KaNCbIPMaCbi
5 5aH cy3rjepine apHaIraH cy3riHi Ta3aIay
6 bilrana/kyprak kaKa
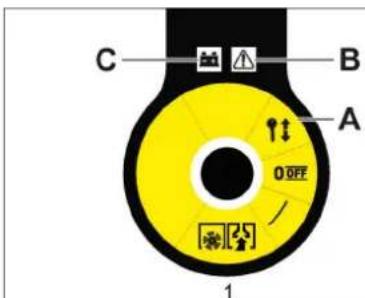
Herizri Kockbiu
0/OFF Ko3rAnTkbw eWipyni
Kinnwewin anbHb3
| 1 | Козгалтулы Косуны |
| A | Кintтішешин ралыньіз |
| B | Акayлар керсетkiші |
| C | Батарази Иndикаторы |
→ Heri3ri Kockblu KInTH «0» KyHHe acbipbn 6ypan, OHbl anbln TaCTaHbI3.
KypbInfbjXankbiWbH aWbHb3
Eckertne
KypbIrfblxankbIwblHerizr KockblWTaBfkiTTapkbIblawbnadbl.

→ Heri3ri Kockbi W KInTH XaNkbW KyinbHa eHri3in, cafat TiniMeH 90^ 6paHBi3.
→KiTTi naDanaHbIn XaKbIu KyIbIH WbIFapbIb3.
→ Kypbifblxkankbilbih aWbHb3.
KypbInfblXankbihhKa6bHb3
→ Kypblntfbl XaikblbH Xa6blb3, Xaankbl W KynnbI ABOMATTbI Typde KylblntaJabl.
PaindaNaHyFa Kocy anDbHnDa
Kykti Tycipy HycKaynapbl
KAYIN
Kapakam any Kayni, 3aKbIMdaHy Kayni 6ap!
Kykmey KeiHoe KypblfBihh CanMaBHa Ha3ap ayapbHb3!
| Бос салмak (кени салмары) | |
| KM 75/40 W Bp | 79 кг |
| KM 75/40 W Bp Pack | 125 кг |
| Рукат ETİRReH XXaIIbI cαmMak | |
| KM 75/40 W Bp | 205 кг |
| KM 75/40 W Bp Pack | 205 кг |
KyTeH 6ocatY
KopanTbI aNbHb3.
→DOnHaIaKTapbI 6 ekTeIH aFaw 6NOKTapbI aNbHbI3 XeHe KpybIbHbI TynKOImaHaH KOImeH KeTepiH3.
→ Typak TeXeriiHb6ocatbHb3.
Itepy kancbipMacbiH opHaTbiHbi3
→BypaHdaIapdb6ocatbHb3.
→ NTepy KancbipMacbIH TypanaHbI3.
→BypaHdaanapdbkaTaNtBtih3.
Bvipnik etsKaHbOpHaTy
Hyckay: MaunHaHb aydapap anDbHda cbIbPbIFaH KObIC KOHTeHepi AnbHb3 KHe nTepy KaNcbPmacbH anFa Kapai 6paHb3. KpbIFbHbI nTepy KaNcbPmacbHa KOImHaHb3.
→ Byiipnik 电TkaHbI TaCbIMaJaFbIka KObln, MblTan 6paHbI3.
Batapenap
BatapeaIapadbH kayinci3dk HycKaynapbl
BaTapeaapbI naJaIaNHaN Ke3eKeIe ckeTpynepi MiHdETTI TpyPeOpbIHdaHbI3:
Ke3oi Kopray KypaBIn KuiH3!
| i | БамAPEЯны! KONDан НУСКAYЛБИВHДаRFI JЖЕ КЕПКЕ apHANRAH naДанaH НУСКAYЛБИВH opBИHДaHbI3! |
| Балларöblí Kьшкьлдаи Хан Бамареглардан aylaç усаныз! |


BaanapobkiBikkBilohxKeH6amapeaapdaayakycmah3!
Kapbinbc Kayni!

Opm, yukbin wbfaprya, aubik uamra khe mekei wezye mbuBIM canbHaob!
XumunblkkyukKayni!

Anraukki KemeK!

Eckepmy!

ymunuzauunay!

EamaperaHbI KOkbic KewuizHe macmamahb3!
Kayin
KapbIbc Kayni! Bamapeera, rHu ywmarbl nonIOcmep MeH yuwbIK KockbIwmapbHa KaHdaa da 6ip kypandapbH Hemece cofaH yKcac 3ammapbCaMaHb3.
Kayin
Kapakam any kayni 6ap! Kapa eukwahn KopracbiHra muin kemneyi Kepek. EamapernapMeH xMbyc icmen 6onfAH coh epkaawn KOJIbHbI30bl ma3anaHbI3.
KAYIN
Opm kHe KapbInbc Kayni!
Temekiweayae xheawbikomxaryramblubim canbiHaobI.
- 6amapeenap 3apmambH 6emenerkaccbjKeendeminyi KepeK, eumkehi 3apmday Ke3iHde Kammbi Xapbnfbln a3 naDa 6onadbl.
Kayin
XumunbikkyukKayni!
KbIkwBn Ke3ze HeMece mepiee mu2e Ke3de onapdbi KEN Mmuepe de ma3a Cymeh waih13.
CodaH KeuiH depey dapeipepe KaapalbIbI3.
- lacmaHraKuimOcymeHaubihb3.
YcbHbInaTbIn 6ataperaIap
| TancbIPbc | Kenemi | Aya | |
| 60 Acaf, | 6.654- | 1,65** | aftbHbl |
| TexHnKaIbI | 226.0* | 0,66*** | |
| K Kbl3MeT | |||
| KepcetycI3 |
* KypbIyfbIa 2 6atapera KaXeT
** M
*** M3/CAF
MaKcImaIbI 6TaTpe eIWeMepi
| Узblдыflы | Ен | Биiktiri |
| 267 MM | 177 MM | 190 MM |
YcbHbIaTbH 3aprTay KypblfBnapbl
| 3apray kypbilfbcbl | Tancbipbc No 2.644-470.0 |
BaTapeenapDbI opHaTy XeHe Kocy
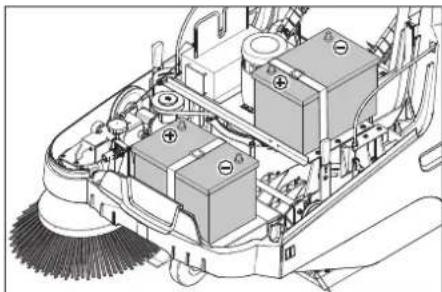
EckepTne
KM 75/40 W Bp Pack 6atapernapmeh
Khe 3apraTay KpybIbIcBImeH 6ipre
Keledi.
→ KypbJfblXanKbIbH aWbIHb3.
→ BaTapeaIapDbI KO3FaNTKbIiU6eKiTiHHe K0BbI3.
→ BaTapeaIapdbi Tnicti 6ekitkiu 6enikneh 6ekitiH3.

→ПлIOCTIK TepMnHaNDbI (KbI3bl Na6eJIb) OH noJIocke (+) KOCbIHbI3.
Kanfay ka6enih 6atapera napra 6ypaHb3.
TePMnHaIbI tepic nonIOcke (-) KOCbIHbI3.
Hcykay: BaTape nOIOCTepi MeH nOIOC KEmMaIapbIHbTHNticty Tpyde KopraIFaHbIH nOIOCTepi KopraIbIH MaI apKbIbI TEKEpiH3.
Tek KneMManap KaKnaFb6ap 6atapeennapnaindanaHbIb3. KofraFaH 6oNca, KneMManap KaKnaFbIH aybICTbPbIH3.
A5AAM 50JIbIHbI3
Kypbbrhbl naaandaac 6ypbH 6amapeanapb3apmahbl3.
BatapéanapdbI 3apnday
Kayin
Kapakam any kayni 6ap! 3apdmay KypbIrfbcih Kyam KaBeni 3aKbIMdaImaHan XaRaDHa rHa naDaIahyra 6oJaDb. 3aKbIMdaIraH Kyam KaBenin EHDipyui, mymbHywBnApFa KbImem Kepemy opmanbFbI HeMece 6iikmi adam depey aybcmbpykek.
KAYIN
Tok cory candapbIHan Kayin. 3neKmp KeniciHH mymacbIFbH JxHe caKaMaHObIPbIw KopraHbICBH KaDaFanaHbI3. 3apamay KypblrbcIH XemKInikmi KeIeDeminem H Kypfak 6eMeJepe fHa KOndaHbHbI3.
Hcykay: aKkyMnyTOp 3apnbl 6oc 6oJraHa3a3pAaTay yaKbITbI WaMaCbIMeH 12 carat anaBbl.
Kayin
Kapaam any kayni 6ap! Bamapea napmeH Kymbc icmeeehde Kayincisdi epexenepi HcKaMaHb3. 3apdmay KpybIrfbcbl EHOipyuuiCiHH naDanaHny HcckaynapbH opbHdaHb3.
3apay npoueci -KM 75/40 W Bp Pack
Ha3ap aydabpbHbI: 6aTapeJnapdbI TeK 6eJIme TempepaTypacbHda 3apJdTayf a 6oJaI!
Hycay: KpybIINFbl cepnJIbIK TypTeXHNKAJIbIK KbI3MeT KepceTneTIH 6aTapeaapmeh Xa6DbIKTaNFaH.
→ KypbIFbXanKbUbH aUbHb3.
3apnTay KpybIfblcHbIH KyaT aWacbiH po3eTKaFA KOCbHb3.
Hyckay: 3apTay KpyIbIbICbIHda 3JIeKtpOHdbI 6ackapy 3IeMeHTepi 6ap JxHe 3apTay npouecih ABTomaTTbI TpyTe TOkTaTadbl. 3apTay Ke3Hde KpyIbIFbIHbI 6apJIbIK φyHKUraNapbl ABTomaTTbI Tpye y3inei.
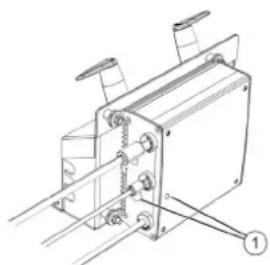
1 BaTapeK KyiHIN KepcTeKlWi
Batape KyinH KepcTeKiWi Kyat aWacbl po3eTKaFA KOcbJFaH Ke3de 3aprTay npouecinH 6apbcih KepcTei:
| Баразецар Зраздталады | Жасьл ТUCпен Жыньлбіктуд ы |
| Баразецар Зраздталдан | Жасьл ТUCпен Жанады |
| Зраздтay Крълфысындаfterы akay | Кьзьл ТUCпен Жанады |
| Катерекстесиende n Катeci бар | Уз lilсени рет Кьзьл ТUCпен Жыньлбіктуд ы |
Katelep kecteci:
| 1 | Батугя косьлmarан |
| 2 | Батугянын поларысы шатасырлfaн |
| 3 | Батугянын заюды мул dem тусылfaн |
| 4 | Зapадтay Кисьгына КатбICTы мэсени |
| 5 | Куат кеzi Тьим bICTык |
| 6 | Алларattык кate |
| 7 | Байларыс катeti (Куат кеzi ржими) |
BatapeHbIH y3ak Kbl3MeT eTy Mep3iMH KaTAMacbI3 eTy ywiH batape apkaaH TOnbK 3aprTaIHaF 6Olybi Kepek.
3apaytay npoueci -KM 75/40 W Bp
→ KypbIJIfBiXaIKbIbIH aUbIHbI3.
3apay KpybIfbcihbH 3apay Ka6enIH cbInbpy MaHHacBhl 3apayTay po3eTKacbHa KcBhl3.
→ Kyat aWacbH 3aprTay KypblfbcHa CaNbHbI3 XHe KOcbHbI3.
3apTaHaHnHaKeiH
KM 75/40 W Bp Pack
KyaT Ka6eJIH aXbIpaTbIHbI3.
KyaT Ka6eJIiH 3aprTay KypblfblcblHbI Ka6eJIbdep YcTaflbHa opaHbI3.
→ KypbINrBfKanKnblBbHKa6bHb13.
KM 75/40 W Bp
3apayay kpybifbcih eipin,ohbi Xeienen axbipatbHbI3.
3apraTay ka6eH KypbIrfdaH axbipatbIH3.
→ Kypbblfbi KaanKbllbh Hka6bHb3.
BatapeHbI uein any
→ KypbIfBxkanKbIbH aWbHb3.
Tepic nonIOCTeri (-) TepMNHaIa bI axbIpaTbIHbI3.
→ BaTapeHbI kAnFay Ka6eniH 6ypan aNbHbI3.
→ OH noJIocTei (+) TepMHaIa bI axbIpaTbIHbI3.
Bekitkiw6eJikTi 6ocatbHb3.
→ BaTapeaHbI aNbIbHbI3.
→KoJaHaBilraH 6aTapeHbI KOJaHaBlCTaFl epexenepre cKeTactaHbI3.
PaiandaHyfa 6epy
Kannbl Hcyckaynap
KAYIN
Kapaam any kayni 6ap! CbInbipbnraH KObIC KOhmeuHepi anMac 6ypbH KypblrBhlEwipiH3.
Hyckay: icke Kocy KypbnfblHbH JkankbIbJ Ka6bnFaH Ke3de rHa MymkiH 60JaB.
→ CbInbpy MaunHaCbIH Teric 6eTKe KOybHbI3.
→Ko3raNTkbIWBtbeWipipiH3.
→ TypakTexkeriuiH KyIbntaHb3.
CbHaK XeHe TexHnKaJIbIK KbI3MeT Kepcety KymblCTapbl
→Батaperялар 3apЯыньи DeHrein H TeKcepiH3.
→ ByiipniK uetKaHbI TeKcepiH3.
→ Cbiny biikwecih Tekepij3.
ⅢaH cy3ricih Ta3an anbHb3.
→ CbɪnbɪpɒjɪnfaH KOKbɪcka aphaɪfəH KOHTeɪHepdi 6ocatbɪhɪ3.
Hcykay: CnataTamaBH «Kytim XeHeTexHnKaJIbIK Kbl3MeT KePcTeY» TapaybiHaHkapaHbI3.
PaindanaHy
Kay in
6yibIMdb y3ak yakbimna naaanda hy dipinden nauda 6oIambln KOIaBfKaH aHaJIbIMbIHbH 6y3bInyiba anapbn coryb MyMKiH.
UeTKaMeH XyMbIcTbIH XaNNbI y3aKtBIfbIH opHaTnay KepeK, c6e6i on KENTereh faKTopnpra 6aIINaHbIcTb 6oJaBl:
-Keke Hauap KaH aHaHbIMFa 6eimdiniik (Kni caycaKTapblHbI3 caKbIHdaaDbl, caycaKTapblHbI3 WaHUnDbI).
KopwaFAn opTa TemnepaTypaBITeMeH.KoIbI Kopray yuH XblbIKoNFaTApDbI KOndaHaBbHb3.
Kattby yctay KaH aHaJIbIMbIHa Keepri KeTTipei.
Y3diKci3 konDaHy yMbic 6apbcHnArbl y3inictepdeH hawap 6onbl Ta6binaBbl.
KypblfnblHb Jynei, y3ak yaKbTTa naDanaHaFan Xane CcKeC 6enrinepDi (MbCaNb,CaycaTapDbH KbIHybCyBk caYCAKTap) KaTaNaiDa BONFaH KafdaJa da dApirepre Kapany YcbHbNaDb.
KypbInfbiHblickeKocbiHbl3
→ Typak texeriiuH 6ocatbihb3.
Ko3faNTkbIITbI icKe KocBhlb3.
Heri3ri kockbiuTbI 1 KyHHe bypaHbI3.
Hyckay: cblbpy 6nikweci xhe 6yipnik TcKa aHaJMaIbI.
KypbIrfBihb6ackapbHb3
Anra kapan xypy
→ Anra Kapai Kyypy TyKacbIH TapTbHbI3.
Hyckay: KO3faIbIc XbIJaAMdbIbIH anFa
Kapai Kypy TyTkacblHbH opHbHa
6aIIaHbICTbl y3dikci petteyre bonaabi.
Boc xypic
Anfa Kapa Jkpy TyTkacbl6ocatbHb3. KpbIbI TOKtaNbl.
Keedeprinepehen ety
Einkiri 30 MM-Re DeiHri K03fMaTbIH Keeprinepei eHcepY:
Ipi KOKbc KaKaNaFbIH KeTepeiH3.
→ Baay kHe a6aIan aIra Kapai KypiH3.
Bniktiri 30 MM-DeH acaTbH KO3FaNMaIbIH Kepeprinepi eHcepy:
Kepeprinepeh TeK KonaHnIbI naDyctbIH KemerimEn eTye 60JaDbI.
Cbinbipy Kymbicbl
Kayin
Kapaqam any kayni 6ap! Ipi Kokbc KaKaNarbl awbIK 6onraHoa, cbNbipy 6nikiweci macmapobI Hemece KymDbI anra KapaJ NaKmbipyMymKin. Adamapra da, XaHyapnapra da, zammapra da Kayin mHeBumHHe Ke3 XemKi3iH3.
A6A¥ 50JbIHbI3
Opaybiu macnahblcimapbI XaHe YKcac 3ammapbblcibpMaHb1,6yJI cbInbipy Mexahu3MiHb3aKbIMaHybHa eKeYi MymkIH.
Hyckay: OHtaNbTa3anay HETNXeNepiHe KOJ KETK3y yWIn KO3FaBbIC XbINaMdbfHJ KaAaNapfa BaaNaHBcTbI petTeY KepeK.
KeTepinreH ipi KOKbIC KaKnaFBImeH cbInbipy
Hyckay: 50 MM 6nikTikke DeinHri yIkeHipek 3aTTapbl, MbicJIb TeMeKi KopanTapblcInbpy yWih, ipi KOKbc KaKnaBbH Kbicka yaKbITKa KeTepy Kepek.
Ipi KOKbIC KaKnaFBiH KeTePiH3:
Ipi KaBlc KaKNaFbH KeTepyre apHaJIFaH TYTKaHbI TapTbIHb3.
Ipi KOKbc KaKnafbH TycipiHi3:
IpiKoBlcKaKaNaFBH KeTepyre apHaNFAH TYTKaHbI 6ocatbHb3.
Hyckay: OHtaJIbI Ta3aJAY HTeNKeCiHE TK ipi KOKbc KaKNaFbI TObIFbIMeH TycipinReHde Kon JeTKi3yre 6oNaBl.
Bnyipnik ueTkameh cbnbipy
→ Bynipik ΜετκaHbI Tycipre apHaɪrAHTyTKaHbI anfa XbɪkxbITbɪhɪs. Bynipnik Μετκa Tycipiŋdi.
Kypraek eednidi cbinbipy
Hyckay: Kymblc Ke3iHne cbinbipblfAH KOklic KOHTeHepin 6enrini 6ip yaKbit apanbfbHda 6ocatyKepe.
Hcyckay: Kymbic Ke3iHde WaH cy3riciH 6enrini 6ip yaKbIT apanbIfbHda Ta3anan Typy Kepek.

→blnfandb/kyprakKaNaKtbJka6bHbI3.
blrfaHemece dbIMkbIeHeHepdi cbInbipy
→blnfandb/kyprakKaKnaKTblaawbHb3.
Hcykay: ocblnaiwa cy3i bInfanaKopflanabI.
Batape HndkaTopbI
Batape INHdkaTopbI Kymblc Ke3iHde 6atapeapdbIH 3apd DeHrein H KepceTei:

| Толык | Жасын Тусpen Жанады |
| 30% каллар сынIMынык | сары Тусpen Жанады |
| 10% каллар сынIMынык | Жындын Тусpen ЖындынТайды |
| Зардын Толык Тaycblындан Корray, Кррынfly «шени | Жындын Тусpen Жанады |
Akaynap KepcetKiwi
Akaynap Kepcetkiu KypbIrfda akay 6apKorfh KepceTei:

| Ko3rFTbIHTbIb6acapy | KbI3bIIN TycneH |
| akaybl | XbIbIbIKTaIbI |
Wah cy3ricin ta3anan anbHb3

→Cy3rihi Ta3aIayra apHaJIraH TYTKaHbI 6ipHeWe pet TapTbIn, NTepiHj3.
CbInbIpbIraH KOKbc KONTHeNepiH 6ocaty
KAYIN
Kapakam any kayni 6ap! CbInbipblraH KObk COHmeuHepi AnMac 6ypbH KypblfblHb euwipH3.
Hyckay: cblnbipbnfah KOkbc KONTHeHepiH 6ocatKaHda, TbIfb3dafbii WKOJIaKTbH 3aKbIMdAnMaHaBHaKe3 XeTki3iH3.
Hcykay: cbInbipbIraH KOKbcIOHTeHepiHpyKcat eTirreH eh KofapblKyKTemeci 40 kr.
→ WaaH cy3rici Ta3aJaan anbHbI3.
→ CbɪnbɪpɒblɪfaH KOKbɪC KOHTeɪHepiHɪBekɪtkiʌkʌntcβɪpMaʊcbɪH XOFapbl kapaɪ TaPTbɪhɪ3.
→ CbInbIpBnIFaH KOKbIC KOHTeHepiH WbIfapbIHbI3.
→ CbInbIpblfah KOkbIcKa apHaIFaH KOHTeHepDi 6ocatbIbI3.
→ CbInbIpbJFaH KOKbc KONTHeHepiHe NTepiHi3.
→ CbInbIpblfAH KOkBIC KOHTeHepiH 6ekITkiu KaNTcbIpMaCbiH TEmeH Kapaa 6acblb3.
KypbIrfbIhblewipy
Ko3fajTkbIUtBleewipih3.
→ Heri3ri KockbIHTbl «0» KyiHHe 6ypaHbI3.

→ Byiipniik 1eTkaHbI KeTepiH3.
→ Typak TeXeriiH KyIbInTaHbI3.
→ Herizri Kockbli KIITIN «0» KyiHEn acbipbn 6ypan, OHbl aIbIn TactaHb3.
TacbImaay
KAYIN
Kapakam any khe 3aKbIMdaHy Kayni 6ap! TacbImaay Ke3iHoe KypblfBbIH caNMaFbHa Ha3ap aydapbHbI3.
→Ko3fantKbIwTbIeWiipiH3.
→ Heriari Kockblu Kintin «0» KyiHene acbipbn 6ypan, OHbl anbln TactaHb3.
→ Typak texeriuih kynbntaHb3.
KypbIFbHbI DnHReNKeTepDe TipeKTepeMeH 6eKiTiHi3.
KypbIINHbI Kepriu 6eJIikTepeMeH Hemece apKaHaDapMeH 6ekTiHi3.
Keik KypaIapbIHda TaBIMaHdHaHJa, KypbIFbHbTNICTI KOJaHbICTaFbHyCKaynapFa CaiKec CbIPbIN-KbIFyDaH KopfahbI3.
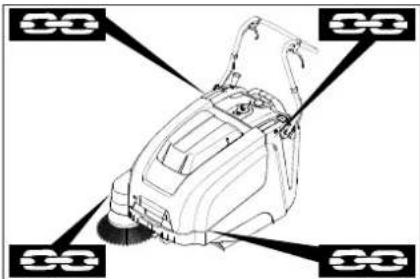
1 Ntepy kancbipmacbi apkblnb6ekity aMmabI
2 KpybIfbl XaIKblIbIH aCTbIHda 6eKITy aMafbl
Hcykay: HerizrKaTaydaftb6ekity aMaKTapbHa apHaIraH TaHbaIaynapFa H3ap aydpbHb3 (T36eKTeP TaHbaIapb). Hyckay: Boyden KaebJePi MeH cbIMdApBH 6yrye kon 6epimei.
CaKray
KAYIN
Kapakam any xhe 3akbimdany kayni bap! Byubimcbcakmay ke3ihde 6yubIMhbiH canMaBHa Ha3ap aydapbHb3.
PnIaIaNydaN sbIFapy
ErepcbinbipyMaunHacbyy3ak yakbit60nb naindaanHbimaca,keneciTapMaKTapFa Ha3ap aydapbiHb3:
→ CbInbpy MaunHacbH Teric 6eTKe KOybHb3.
Ko3fantkbwbtbeewipjhi3.
Herizri Kockbi KInTin «0» KyiHene acbipbn 6ypan, OHbl anbin TactaHb3.
→ Typak texeriuih KybnItaHbI3.
→ CbInbpy MaunHaHb aHaBn KeTneyi yin6ekirihi3.
→ CbInbpy 6nikuecin KeTepiH. Byn apeketti opbHday ywiH, pettey TykanaIpaBHHekeyiH de yctHi caHbInayFa 6eKITiH.
ByipniK 1eTkaHbI KTepeiH3.
→ CbInbpy MaunHacbHbH iuiH XeHe cbiptbH Ta3aJnAh3.
→ KpybblfnHbI KOPfANFAH XeHE KypfAK XePRE KOJIbHbI3.
→ BaTapeJapdbI aKbIpaTbHbI3.
→Батaperялардзaprdan,шамamEn 2aaincaibnKaTata3aprdanTypbHb3.
Kytim JxHe TexHnKaJbIK Kbl3MeT KepceTy
Kajnbl Hycaynap
- XeHney KymbIcTapbH TeK yKeJIeTTi Kbl3MeT KepeCy optaBikTapbI HEmecE 6apbIK Tnicti Kayinc3dk TexHNkacbIHbH epexeNepimEn TaHbc OcbI canaDafbl MaMaHdap Kyzere acbpa anabbl.
KOMMepnnaBik MaKcaTaNaiDanaHbIaTbIH TacbIMJaHaHaTBIN KpybIbIap VDE 0701 caKeCKayinci3dkTI Tekcepyre KaTaBl.
Tazanay
A5A¥ BOJbIHbI3
3aKbIMdaHy Kayni! KypblfBhlb WnHaH HeMece KOFapbl KbICbIMdb cy aFbIHbIMEH ma3anayra 60Maui (kbicka myuikmany Hemece backa 3aKbIMdaHy kayni).
HA3AP AYdAPbIHb3
Ta3anay XyMbicmapbHbIH anbHda 3apdmay KypbIrfbcbiH po3emkaaH axbipamblb3.
Ta3anay KymbIcmapbIHbH andbHa6amapaeHH OH noliociH axbipambHbI3.
KypbInfbHbH iwiH Ta3anay
Kayin
KapaKa am any kayni 6ap! HaHaH KopraumbH MaCKa MeH KopraHbIC Ke3inDipiaH KuIH3.
→ KpyblnfbXanKbllbH aWbHb3.
→ KypbIJIfblHbI Wy6epaene H Ta3anaHb13.
→ KypblIbIbIbI CblfblIfaH ayameH ypJIeH3.
→ KpybINfblXaKbIbHJXabHb3.
KypbInfbHbH cbiptbH Ta3anay
KpybIfblHb JyMcaK ca6bHepiTihicHe MaBbIHraH DbIMkbIuWy6epeKeH Ta3aJahb3.
Hyckay: KaTbTa3aNaFbIi 3aTTapDbI KOnDaH6aHbI3.
TexHnKaIbIK KbI3MeT Kepcety MEP3iminiri
TyTbHyBbHbIH TexHnKaNbIK KbI3MeT Kepcetyi
KyHneJIkiTl TexHnKaJbIK KbI3MeT KepeCy:
→ CbInbIpy 6inikweci MeH 6yipnik UeTKanapdbIH TO3ybIH XHe opaIFAH 6enikTepdi TekepiH3.
Bapnb6ackapy 3JemeHTepiHxMbICbIH TeKcepij3.
→BapnbI K 6aKbIay 1aMdaPbIHbH JxMbICbIH TeKcepiH3.
AnTa caBbIH TexHnKaIbIK KbI3MeT KepCeTy:
XeTeK 6eNdiKtepiH KepiYiH,TO3yBH XeHe XyMbIcBiH TEkcepiH3.
Boyden Ka6eni MeH XbIJIbIMaNbl 6eNIkTePdiH bipKaJIbInTbI Ko3fanyBt H TeKcePiJ3.
→ CbɪnbiPy aɪMaftbɪHdAfbl TbɪFbɪ3dAfblI WɔŋaɪkTapDbɪH peTEnyi MeH TO3yblH TEKcepɪhɪ.
→ CbInbpy 6inikweciniH cbInbpy CXemacbiH TEkcepiH3.
Wah cyricin Ta3anaHb13.
Hyckay: CnNaTTaMaCbIH «TexHnKaNbIK
KbI3Met KepCety KymbICTapbl» TapaybHaH
KapaHb13.
Hyckay: KIneHTTih TexHnKaIbIK KbI3MeT KepeCteyi Ke3iHde 6apnbK TeHXnKaIbIK KbI3MeT KepcTeY XHe XeHDeY KymblCTapBn 6iNkTi MaMaH opbIHdaybl KepeK KaXet 6oNca, Karcher MaMaHaDaHbIpBfAhn DInJepiHe Ke3 KeJreH yaKbTTa KeHec anyFa 6oJaBl.
Tytbihywbifa Kb3MeT Kepcety
OpTaJIbIFbIHbIH TEXHnKaJIbIK KbI3MeT Kepcetyi
Bipinui aianan keinh hemece 5 cafat Kymblc icterehn eien H TeHNkabIK Kbi3MET KepceTy:
BactanKbI TeKcepyi opbHdaHbI3.
Op 50 xMbIC caFaTbHa TexHnKaJIbIK Kbi3MeT KepeTy
Ep 100 Kymblc caraTbHa Hemece aNTbI aI caBbIH TEXHnKaJIbIK KbI3MeKepCety
Θp 300 Kymblc caFaTbHa TexHnKaJIbIK Kbi3MeT KepeTy
Θp 500 KxMbIC caraTbHa HEmece Kbln CaBbIH TEXHKnabIK KbI3MET KePcety
Eckptne: KeniDik TaIantapbIH caTay yuH KeniDik Mep3imi iuHde 6apblk Kbi3Met KepcTeY XHe TexHnKaIbIK Kbi3Met KepcTeY XMbICTapBih HNCNEKUraJIbIK Tekcepy npaftHa caikec yakiNETTI Karcher TyTbHyBIFA Kbi3Met KepcTey opTaIbIbI opBHdaybl Kepek.
TexHnKaIbIK KbI3MeT Kepcety KymblCTapbl
JaibHbK:
→ CbInbpy MaunHaCbH Teric 6eTke KOibHbI3.
→ Herizri Kockbli KInTin «O» kYiHeH acbipbn 6ypan, OHbl anbln TactaHb3.
TypakTexeriuii KynbInTaHbI3.
TexnkaIbIK kayinci3ik 60nbHwa KaJIbI Hyckaynapbl
KAYIN
Kapakam any kayni 6ap! Ko3ranmkbwmbi eipaeHHe H KeyH Kymic icmey yiwu amameh 3-4 ckyhd Kaem. Ocb yaik imihde Keik Kypemih aumkman anbc ycmaHb3.
ECKEPTY
Ke3 KeJaeH mexHuKaIbIK Kbi3Mem Kepcemy Hemece XeHDey XyMbIcMapbIH opBHaMaac 6ypbH KpyblfBiHbIH XemKinikmi mypde cymbIbIyBH KymiH3. Ko3ranMkbIw cuHnbi bicMbIKeNikmpee kon muiz36ehi3.
HA3AP AYdAPbHb13
TexHukanbIK Kbl3Mem Kepemy anDbIHda 3apdmay Kypblfbcih po3emkaaH axbipamblb13.
TexHukanbIK KbI3Mem Kepcemy
KymbICmapbIH opbIHday aDbIHda
aKKyMynopOpbIH OH NOJIIOCH
aXkbipamblbI3.
HA3AP AYdAPbIHbI3
KypbIJIbIbI aydapMac 6ypbIH,
6amapeJnapBo JkHe CbIbIbIbIraH KObIC
KOHmeUHePi UbiFapBn, Umepy
KANCbIPMacbIH anFa Kapau 6paHb3.
KypbIJbIbHbI Umepy KAnCbIPMacbHa
KOUMaHbI3.
KypblfHb ma3aay Meh mexkbl3Mem Kepemy Xane bennekpei aybcmbpy anbIHda KypblfHb eipy Kepek.
Kypic xeteriHBoyden Ka6enipetTeHi3
Korapbl Ketepiy Ke3iHne KypblfblHbH JkTeK Kyatbl XetKinikci 601ca, pettey KaKeT.

→ KypbIJIfBiXaIKbIbUbIH aUbIbIb3.
Bekitkiu combIHdbI 6ocatbHb3.
→ PeTtey 6paHdaBn peTTeH3.
Kapcbi combIHbI MbIKtan 6paHbI3.
Cbiny6inikwecin Tekepei3
→ Typak texkeriuiH KynbintaHb3.
→ CbInbIpblfAH KOKbc KONTHeHepiH aIbIn TaCTaHbI3.
TacnanaapbI HEmece CbIMapbI cbInbpy 6iikwecihen aInbH3.
CbInbipy 6inikwecin aybcIbipbHb3
KbIINbIKTapDbIH To3yBaHa 6aIIaHbICTbl CbIbIpy HTeNKeCi KepiHeTIHei HaawapNaFaHaDa e3repty KaXeT.
HA3AP AYdAPbIHb13
KypblfblbI aydapap anbHda
bamapeanapbl anbn macmay Kepek.
KypblfblbI umepy KaNcbIpMaCbHa
KOUMaHbI3.
→ Typak texeriiin KynbintaHb3.
→ CbInbIpblFaH KOkbc KHTeHepiH anbIbI3.
→ BaTapeaapablaanbHb3.
→ KpybInfblHb apTkakapay eHKeTIi3.
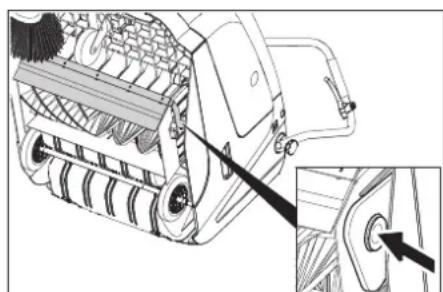
Ipi KOKbIC KaKnaFBiH KeTeepin, MoBHTipeK Ka6bFbIH 6acbln, cbInbyp6iikwecih anra kapa 6paHb3.
→ Cbiny 6inikwecih wibrapbn anbHb3.
→KaHa cbInbIpy biNikwecin KTeK TyIpeyiuihe (con KaKaT) caJIbIbI3.
Kapama-KapcbI XaKaTa MoBbIHTipe KaBbIFbIH cbInbpy 6iNikwecinH KyHeNTeciHderi Tecikke 6ekTiH3.
A5AENBONblHb13
3aKbIMdaHy Kayni! CbInbpy BinikwecinH KyueHmeciHkezi mecikke KbluBikmapdbH iniHIN KanMarahbHa Ke3 Kemki3H3.
Hyckay: KaHa cbInbpy 6iNikwecinOpHaTKaHHa KeiH cbInbpy CXEmacbHKaTa pettey kepeK.
CbInbipy 6iikwecinH cbInbipy cxemacbih Tekcepy XeHe peTrey
→ CbInbIpy MaunHacblHbH andbHbXaftbH KETepin, WAnmeh HEmec60pmH XabHraH Ty3y XeHe Teric6etke Kapai KypiH3.
→ Typak TeXeriiH KybInTaHb3.
→ Cbiny6iikuein wamameh 15-30cekyHka aHaHdbipbHbI3.
→ CbInbipy MaunHacbIbH andbIHb6eniriH ketepin OHb 6yipineXblkb1bHb3.

CbInbipy cxemacbHbIH niiHnEHI 30-40 MM 6oJatbH 6ipKeIki TIKTePbpyblTbKypa#bl.
| Диапазон aykbimbl | (-) 1...10 (+) |
| Минималды сылбуpxemacbl | 1 |
| Мakсималды сылбуpxemacbl | 10 |
| Жана сылбу py biikweci | 1...3 |
Cbinbipy cxemacbiH petTeHi3:
→ Kypblfblxkankbllbih aLbHbI3.
→ConxheohxakpetteyTytkanapbH petten, onapbl6ip cahblnayfcaNbHbI3.
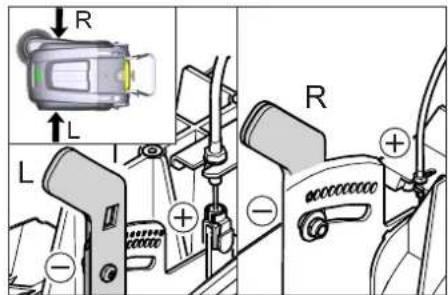
- Petrey TyTkacbH TEmHri cahblayfa (+) 6ekiriH3: cbInbpy cxemacbyykeenedi
Petrey TTKacbIH KOFapbl TypFaH caHbIayra (-) 6ekITiHi3: cbInbpy cxemacbi KiipipeeDi
→ CbInbipy cxEmacbIH TeKcepiH3.
Bnyipnik ueTkanaapdbI aybIcTbpHbI3
KbIINbIKTapDbIH TO3yHa 6aJIaNbHCTb
cbINbIPy HETNKeci KepiHeTIHei
HaWapNarafHd e3repty KaXeT.
Hyckay: MaunHaHb ayapap anDbHda cbInbPbInFaH KObIC KOHTeHepiH anBbH3 KHe INTepy KancbpMacbH anFa Kaapan bypaHb3. KpbInfbHbI INtepy KaNCbIPmacbHa KOImaHb3.
→ Byiipnk ⅢeTKaHbIH TEmHri XaFbIHdaFbI 36ypaHaHbI 6ypan aBlHbI3.
→ ByiipniK uetKaHbI aHbIbI3.
→KaHa 6yHipnIK ΜeTKaHbITacbIMandaFbIka KOIBIN, MblkTAN6ypaHbI3.
Bvipnk uekanbI tycipy peTey
KbIINbIKTapDbH To3ybiHa 6aIIaNbICTbI 6yipnik IeTKaHbIH CbINbpy HtNkeci KeipTeIHDe HauapnaRaHda petTey KaKeT.
KypbINfblXanKblWBih aWlbHb3.
KyNaKTbI COMbIHDbI 6OcTaTbIHb3.
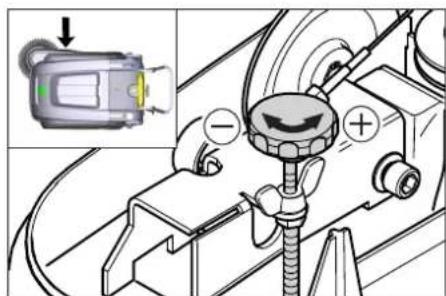
→ PeTtey 6ypaHdaBn peTTeH3.
→ KyIaKTbI COMbIHbI KaTaIbIbI3.
Ipi Kokbc KaKnaBbH KeTepydi peTReHi3
Ipi KOKbIC KaKnafbH KeTkiNkTI TypDe KETepy MymKiH 6oMaca, petTey KaKeT.
Erep cibipy HaTnxkei Haapnaca, Mbicblb, andbihfj XneKTH To3yibaHa 6aunahbcIb,Boyen KaBenin Cen 6ocatyKepek.

KypbIJfblXanKbIbHbH aIbHbI3.
KapcbI COMbIHdbI 6OcTaHbI3.
→ Petrey 6ypaHdacbH petTeHi3.
KapcbI COMbIHDbIMbIKTan 6ypaHbI3.
TbIfb3daBbI XoJaKTapDbI aybIcTbIpy XaHe peTReY
Hyckay: MaunHaHb aydapap anDbHda cbInbPbInFaH KObIC KOHTeHepi AnbHbI3 XHe NTpy KaCbIPmacBnAnFa Kapa 6ypaHbI. KpbInFbHbI NTepy KaNCbIPmacBHa KOImMaHbI3.
AnbHfbTbIfb3Daybiu TaKaTaWaa
→TbIfb3daFbIu XONaKTbIH 6eKITkiH 6ocatbIH3.
→TbIfb3daBbI XOJaKTapDbI peTTHe3 HEMeceaybICTbipHbI3.
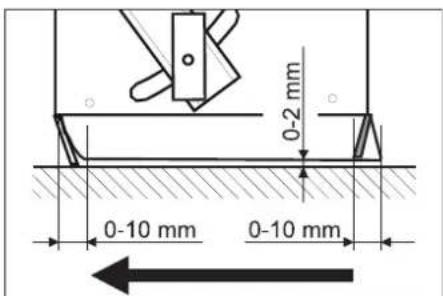
TbIfb3daBfI WxonakTbIH eEN caHbInaybH 0-10 MM KeJ6eMyen apTk aEKeiTeINde erin petTeH3.
→TbIfb3daybIiXoNaKbITypaHaHbI3.
→TbIfb3daFbI W KOJaKTbIH 6eKITKIiH TaPbIHb3.
ApTkblTbIfb3daybiuTaKaTaa
→ CbInbIpBnFaH KOKbIC KOHTeHepiH aNbIN TACTaHbI3.
→TbIfb3dafbuXoJaKtbH 6eKtkiuH 6ocatbHb3.
→Tbfb3dafb1JXoJaKapDbI petTeH3 Hemece aybictbpbHb3.
→TbIfbI3daBbI W KOJaKTBiH eDeH caHbIaybIH 0-10 MM KEN6eMyMeH apTKa eHKeYETIHdE etin petTeHi3.
→TbIfb3daB1W KOJaKtbH 6eKITkiuH TaPTbHb3.
Byipnk TbIfb3daybIu TaKaTaNanap
→TbIfb3dafbw XoJaKtbH 6eKITkiuH 6ocatbHb3.
→Tbfb3dafb1JXoJaKapDbpeTHei3 HemeceaybictbpiHbI3.
→EeH apaIbIbIH peTey yuH en KEN KaIbIHdbIbI 2 MM 60NaTbIH TecemKoIbIHbI3.
→TbIfb3dafbI WxKoJaKTBtI TypaJHaHbI3.
Tbbl3dafbli XOJaKTbIH 6eKITkiH TaPTbIHbI3.
Wan cy3ricin aybictbipy
ECKEPTY
Wah cy3aicih aybimbipap andbHda cbInbpbInFaH KOKbc KOHmeUHepiH 6ocambHbI3.Cy3zjxuyecime Hymbc icmezehde wah mackacbiH kuiH3.Ycak waHMeH xMybc icmezehde Kayincidik epexepeih caKaMaHbI3.
A6AN BOJIbIbI3
3aKbIMdaHnyKayni!
→LHaH cy3aicih xMyMaHbI3!
TypakTexeriuii KynbInTaHbI3.
→UaH cy3riciHaTa3an an aIbIbI3.
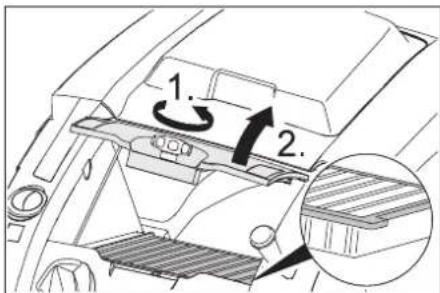
Wanh cy3ricihin KaKnafbHn TOKtaTkbIb6ypamaHbI carat Tinihe KapcbI 6ypan anbHbI3.
→Lwah cy3ricHH KaKnafbH KeTepeH3.
WaH cy3ricH aybictbpiHbI3. WaH cy3riciHdypbcOpHaTbInFaHbHaKe3 XeTKi3iH3 (cypETTI KapaHbI3).
TOKtaTbIb6ypamaHbON TOKtaFaHwa KaTaNtBhl3.
ABAH BOJIbIHbI3
Tokmamkbiu 6ypama monbIbIMeH mapmbimaca, 6y3aKbIMapra eKenyi MYMKIH.
Hyckay: KaHa cy3riH opHaTKaH Ke3e, Ke16e3eKTePdiH 3aKbIMdaH6aRaHaHa Ke3 KeTki3iH3.
CaKaTaHDbIbIbIbIbIpeNehi aybcIbIpy
KM 75/40 W Bp
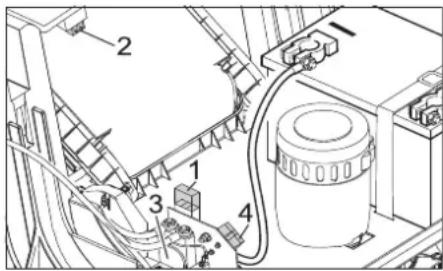
1 CaKaTHDbIbPfblI W F1 (50 A)
2 CaKaThaBipFbIi F2 (2 A)
3 Pene
4 BaTapeHbI 3apAaTay aAacbl
→ KypblfblXanKbIWBih aWbIHb3.
AkaybI caKaTHdbIpfbIHTbl HeMece peHeli aybICTbIPbIH3.
KM 75/40 W Bp Pack
CaKaTaHdbIpbIb6BaTapee TepMHaJIbIHda opHaIaIacKan.
Kepek-xapakTap
kaFdaIaOcbI DeKnapaunE3 KyuHIN
KoRdbl.
Ohim: CbInnbPfbw-WaHcOpfbwi
Typi: 1.049-xxx
Caikec EO dupeKTbanaapbl
2006/42/EG (+2009/127/EG)
2014/30/EO
2000/14/EC
KoJdaHbIaTbH 6ip3eHdipiIreH
CTaHapTTap
EN 55012:2007 + A1:2009
EN 60335-1
EN 60335-2-72
EN 61000-6-2:2005
EN 62233:2008
EN IEC 63000:2018
KoJaHbIaTbIyNTTBkCTaHdapTTap
Caikectikbi bafanaybIH kondaanbbl
adici
2000/14/EC:V KocbIMwacbl
Db6bc KyatbblbfHbHbH DeHre
A6(A)
OJnweHdi: 86
Keninik 88
6epei:
KoI KOIraHdap 6aackapMaHbIH
TancbipMacbMeh yakindir Boynihwa
epekeTeTeDi.

Chairman of the Board of Management
S. Reiser
Director Regulatory Affairs & Certification
KykaTamaHbI kypri3eTih yokinetti Tynfa:
S. Reiser
Alfred Karcher SE & Co. KG
Chairman of the Board of Management
S. Reiser
Director Regulatory Affairs & Certification
文档全权代表:
S. Reiser
Alfred Karcher SE & Co. KG
Alfred-Karcher-StraBe 28-40
71364 Winnenden(德国)
电话:+49719514-0
传真:+49719514-2212
Winnenden, 2021/02/01
Director Regulatory Affairs & Certification
文書の全種委員:
S. Reiser
Alfred Karcher SE & Co.KG
Alfred-Karcher-StraBe 28-40
71361 Winnenden (Germany)
電話:+49719514-0
Fax: +49 7195 14-2212
Winnenden、2021年2月1日
b_2 = 52
aJb/1g/da//da//da//da//da
jIaJU JgJauu
B A
oaiolll elie sui / 10 oioi lalolll
.45g 0j1b2g j4/1
jL211 cllbcsc
jglllabu wlaa aebg xiw1
jglll aaii bgsiaa /cggllpuiu1
aia//1j>Ug uJg Uw/2a
1,2,3 : a < 0
11gllb; glo>U1abwJ a2a→
5119 kaiall gog
0g/1111111 429 a>91
jlllcb
a025j00000000000000000000000000000000000
claeJl
Juewclw5gogglgulgwlal
→
Jewiclw 50 J aal
gwi gj jw aclw 100 J aiwo
Jewaclw 300 J5 wll
gijjawacw500jaiw
a1 = 2,an + 1 = 12
aai//laic a95c/2jlaia//oijb dci
50s1a/2al 93gla/la9gddla/1g
wUgLiaceoellacao
aJalal
:aiizil/llJacll
aoguo aioj, lcl uoiS// a,c gao
0,ggl/1glzoo,wwjll2laiall
a_1 > 2w/9
101000
jgljai
4ab
jglll 1g jll llll 1
alay plll ic
J2011/69g
0, g2g/1jglzoo jzjjz
a_4 > /9
allolol 2
.1bIw pIzIOW jIg>II cUcO uOy o
Jgjwaoj>1pU2uw6jq>1solu
jooj0j>1,0jluw jg2j/Je jic
laedill laub UUg gUuU uJg
alall 13 aJluw
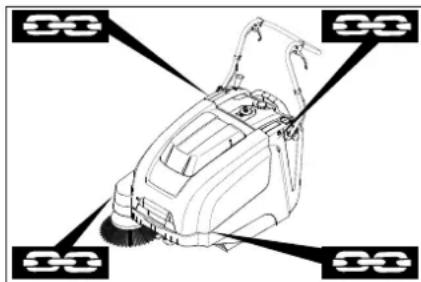
4a2y/0sliu//gai//glb1 1
jgllll llae cccwll gll2
aill llll aolll lolll e:
.(aUulUJgOj)ooIJI JgOoJgOg
11111111111111111
#
4ab
jzll 1i jy jlll jaiil g aolll
aijixyloal
algobjjgljglj
algob ojui juiS11 aC pIxuI psc aI>
a//blal/olc/
aaguo auij/1c uui//a,c 9la,bp
120110g
0, g2g//1jglzio wu//2liia//
a_4 = 2 /9
1010100000
111 100011 a, c ooloo
gaua a9, uix paleu. uui / a/kau/gj/
aeglll aeiil 9 baii11c1j l5
a//a//g/
2.1/1g,1/11/0,1/11/0,1/11/0,1/11/0
aIla> sJg 1slo jlgjLg/1 slA L
.04
LJlll,lae,p→
10 1000
a1 = 2,an + 1 = 12( an + an + 1) > 0
a:laJg aLJI
aolc|d]
a0>21/2U11/1Jac1s>1g>U
aaiiio j0g 1g iai/llaa
a15c aewg 1jy jgeia J2aI I
al/1sollw
aJzj0j 0aixua/0g>U1
Iolbolll jaoi giai aleio slo
aWsiqal / aIla/1 / aea211 aieolgaJ
.VDE0701JALUJIUL
aJbJg
sul/ollll/
:

:iiic//0sLwU/oo>gllbc gj
b>luu//o>g elae gj/Elj//w
.
ailll bllwll oovgolbc jae
.aa
a//io a// a// // j// S// U :abg>lo
ai// c//lu// o> g c// J// p 15/ U
. dols
aaii aaiisai aiawg wsi

ab = 12
.
aull aulac selgul
KM 75/40 W Bp Pack
aS.11/15 J291→
1.5l_0 > 1.2 < 1.4
jglclicgcl
KM 75/40 W Bp
Jullalalg>Julljzai g
S OBC = S COD + S_ BOC
jg2//0001111111
j4=11c1a2gcl
aJbUd
16 ÷ 11 = 10
(-)//u//1b2a//jooj0j0j
ylllalogd
.(+)gall bell Jwogjcbdepa
.
A//1112
glll aIb aSleuuaa all 1110 alz
.4JUw//
#
aolc
k2 ≤
15 151/ pU U JgJg21111111111
.aoLaai
l 1j : j 2//c 且 c > 0
J
B^ : B
153/1UJ>LaUJ Jauu U!laUJb
cIgS//JIS //Jauw/ uog. /jI, uclgS//
jog/aeiaa//asu//jg jg//jc
Jdoaazawabawgolllaeillao
B
isw oclco aillps 0gds
11111111111111111
a15 a9ggi gai// a15//SloU
2Lw/As
ad_长 = 1.
sie aolll olae oio y aolll jbs
| x - 2| = | x - 4| = 1
m = 311
40
a 1 a 1
ai a ai 分母最小值为 k .
S_ = 12 · CD · AB = 12 × CD × AB = CD.
1111111
gwsocg/gwajg/1j
slll oai// aagii// sui / dlc nay jic gai / kbi. ai/la// wq pi
aill aiasi,laai iil aic 5
16 ≤
10/12
oag aac oaw//g jw/ g/ w/ 1 - 2a// 1, b9 jiu d// g /sla//
.0uu//j/
g//1c 1001/0j11c>1d1
.
1j_0 = j ① C1b
abg210
21ieall piaiuiy jieai lbcic J 1

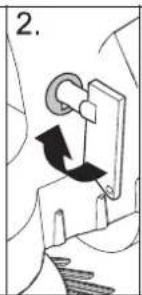
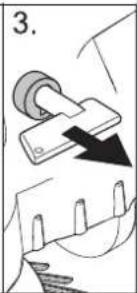
0jg cll2e// jao jaiy/12laia// jss
clla/lls/lljw
jglllclicc01→
j_L = Llcb
15sllai/la9oai jg2//clac
Jusull J
jglj|j|Jsh
k2 >
111111111111111
1111111111111111
ailll aiai/ yu/ jg/ gjg
yJol, gJllbl, p→
a#jdl oJsiJl
Jawwai/
gJ//1,29,gj/
111
auiJaiuSoll
S ACD = S COD + S_ BDO
1Jg2//g2U.10u//g2U/
p>19 Jol211, 1c aWl211, wilSj→ Jolg211

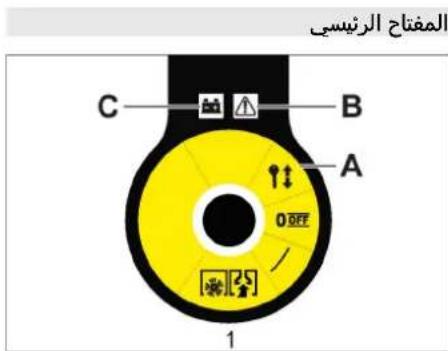
a/11 10 a/11 11 b/11 11 b/11 11 b/11 11 b/11 11 b/11 11 b/11 11 b/11 11 b/11 11 b/11 11 b/11 11 b/11 11 b/11 11 b/11 11 b/11 11 b/
gjgaiu/ glll yll, aai U 9g jllal no gali ydl gil uul laii Ia. ayla// aiaia bio 0gaiI cJyIaII ba6p2wU
a//a8 a//b> 8 a//c//b.c//u//. a// b// U/ U> 10 a//U> U
jao go Jolell uic oal 0j jol aollull clale olcloo 1. ailll al
Lb aSgluaal UjIbu/ no alil 1EEC 157/91 u9gU/ acgazal ao
aIg aIg aIg aIg aIg aIg
j1s/2100 wg jg2// Jzw 1/2y a/20 g/aiw0g/1g2//a/bu/
aaiabg//juii//gi/aj>1 1oc Jia//iic a//jao
jglgbsplwlcjglllcduu jzU 91aelljglgds2)baiaI/llc slo
a015jU U/2uU/1Jla/c1j1j02U 一
uuaiao u9 uogjIg cuaallllas//
a9lc aewlg aJnu gaiu Jzal lio .
. al/3 aollw/
aJlu//a//la9g/lo//a29olc//o 1 aJlu//alaa//og>Ul aU//g U zo
Jauw uic a//jla//u//u
aollll jj
jglalclbc jglal jglal jglal jglal jglal jglal jglal
1uoull 110111111111111111111111
U. 112/11 JIOLI cioo 9 uoc Jli0 jJg>1 411111
"OFF 0/1/2gaaa/ u/2a//n oolid 4wog "OFF/O" gao// 2ia// 2ia//
aUwUd
paowll aolw
aouuau//jzglgo jzgl/ a29
ailllo sio c uo oU 1golz paoiu// j
al/1s pi l jaeu// aoLLug alll
jzI/ puiu// U chc zg aaiu
Joojabloio jzgl/ pluiw lac
aollw// xglq/ pji// (gog// ll20
jzI/ jzwi// jzj/ alall
jzli// jzai// axe// slolll
la9g jzgl// JaaW// lc y
olco/aic /as.02a// xglal
9y/21/ gjog/go al211/ gjbl
alw// jzgl// piaiwl /lac/1/ all
Jabl// aolg//
ga/Jjau// sU/ cyj Ja//
Jaig /ko # acggo// la21 // j
Jzgl// gog// jiau// j
Jaeig /so # acggo// lac21 // j
Jzliu// jg// olw// go
mc wlu/o/ ocl/ jea//
alga/ wlll/ ciig 0) cai// jia// jao// a// - a// gol ocl/o. (llio Jleb// 1
uolw/ j0jglz//p12w/ zj 0j1 ciao w u 11y p1 cuo
0gaaal jsc a5221 20 j4zll moi -
jUJg211pUzWJgU 10wUZuWgAoUzWU 10uOgUa gJgJgZ11pUzWU
aolwU,1o
0lW/lu jg o jg2//liO pIiW U/ u
o aai o igla u// (JiaB//llol)
ogae g/aale//g/aau//g/aa//jdl
.8e/9
a#c pC o Still Jia bui a 10
oal all aolw
bs A 1a lo/12s
oal all gall lc oal lie 1ai/12s aell oSs
o11 100000000000000000000000000000000000000000
ailll uoc llo oolllu clll lbs ailo aoy/ U jg21 00
joo s jxio oolll ic llo11 b2
10000000000000000000000000000000000000000000000000000000000000000000000000000000000
jglll jai aolll aoolll 1
1jai//xic jg2//u9 j0c1/0 3y Jkui jge//cuig a//la//j4j//jai
laiall
I 1/11 Ia/11 bgs w s w a/11 g w/11 a/11 1/11 a/11 a/11 a/11 a/11 a/11 a/11 a/11 a/11 a/11 a/11 a/11 a/11 a/11 a/11 a/11 a/11 a/11 a/11 a/11 a/11 a/11 a/11 a/11 a/11 a/11
Jzill Jd Dg oDg jgrr
kx = 1
//s2g0o0o0o01/2j//jolzai// 09//w g/ a//a//
U/11 19g bla/1g2v 19 aIg0
.01g// g/ aJl, aJw>
4
1101 11152g 199 bla/ll g2v 19 6910a/ a.slojio/
jgljll jg0rll
g/aleioo elw/ a/ wis jz
joc/ jzswll Jao @gio
.4Lw lo g/ ciuS1
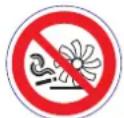
sic gai/9 juii//jai jai jix//auiia// auiia//guiu
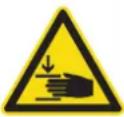
g g aU U J
clj bU o aollo c
aU G s LsG J aWll
.
a
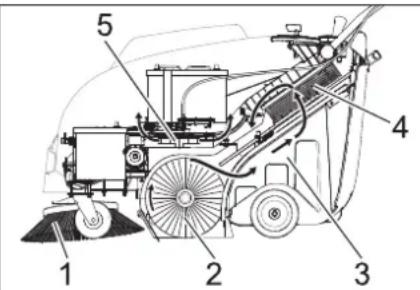
jai/laia jai/aa Jaoi
kaio g> 1gjiaawl aaiuai Ckai -
aiokai Jluo Jwai// Jaig. uai//
awl// (2) oJgU/ uW// aIgU/ JaiG .(3) awl// aIg> // oJu/lu 19 alw/uy /jz// jla// Jz/4 pU 4) Jz// .5) law// a> g,
aale 1
a/2gjgl/1c 111/ jz 111/111/111/111/111/111/111/111/111/111/111/111/111/111/111/111/
jllgboagaaaslllalax
Jb:△ 10
. laieo
UJLg29gl 1axlo a/ pLxiwU gaw U - Ug29.aaal asuWl Jg wIg2aall uSOLAulUJLg29gLaxllpLxiwI
Jllac/ jgj 1ol jge// jfsw
logleal// jn jia// lc jgs2// aSs
jogk// gga// n jae// g2c
. lloj// pws wWww.kaercher.com
a_i = 12( a_i - 1)
aLg aLgll gdoaaaal alglall pae jy dawuU oLcU gJ, aJiaai aaal all glll .sO aEaIulg oRvDol
aa 1g a aal o jU
aol uol uol uol U
Jog gao n..gio oaiuU
al no ayw log wjlg U
no alll J. aiil
aabj qjrc aaydall o jU

(REACH) 山 _ 0 ^ 山
ggo 0 g>
:
www.kaercher.com/REACH
1io Iu/luu/luo/0j>Jolao/ p, aJgJU/uWJg/Jo bla>U/g JU/uI iO Juaei/ 12og jge//go oiaoo Ug/Jo/Uaow/
1 AR .L.
1 AR
2 AR .
3 AR abgI volIg JlauWUI volc
4 AR
5 AR
5 AR
6 AR .alg ojJl
6 AR 1
8 AR 1
19 AR JIJIcI 0000
10 AR aJll
aaiiilllal
oJ//Uul/laqg U//jge//i0 p/su//yU /i0 Jau//
us p/12w// a0o o i d mss// a c - a>1/1 / 10/11 // aiaia// baw// a>1/1g
jI//p/12u//uJg//1i0 - gla//g 1a//g uJla//g glia// g /la//g Jla//g 1ia//g a//u//g jgl//go jgl//a29 aai - abso
a//Sj j/ aollw a//
i/1 i/1 baw 9 p/1xwll jq/12laH aowll lc Jb> Jkwi
jgljllc 1000j/0j>1jgU -
clwUJg2awUJI JU|jglj>1p2xuU -
. jzauUJf o9sia//
aakwUJI UJmuuUJA 0jgU
. gic 1000
JieWU1 aJueWU1 JgA11 JgA1 Joc a> 0.()U1 U2)JgA//c
gaiJbIJI pIi
baewjus jge211p1xwU 1u/aaU -
gJleiwUaIeI/JeIeI/gjzaiA//jIgWU
LcIg9.duiaIg aeaZaI/uc Jla>U|
CgJgU/ll cdaizo gJnuiu//Jauu
goJIiOuI gUpc uGkU 19 Ugog//
Jpa>UgoguWU// aHIO// Jaew//
Jgall gUJIbciuiaIg aeaZaI/uc
jglll oaiuall aulcll aieal cIugU Iy/ aei U -
g (nuol ng guaia/19 guaia/11 jio)
o ull sia/11 /auiu/19 go Jciau
aJIqil cJlc aigso daa2alg uJi
aleuill cIwU Iaawgl mis jz U -
aogia/19
Jz, jz, jz/11 abio 9 19gl/ egia
Jzill jz5 @gablio 9 jzll
aJll
dawU
aclla/ a0jU/
4.2.11 4.2.10
a/1wj//
S OBC = S COD + S_ BOC

THANK YOU!
MERCI! DANKE! iGRACIAS!

Register your product and benefit from many advantages.
www.kaercher.com/welcome


Rate your product and tell us your opinion.
www.kaercher.com/dealersearch
Alfred Kärcher SE & Co. KG
Alfred-Karcher-Str.28-40
71364 Winnenden (Germany)
Tel.: +49 7195 14-0
Fax: +49 7195 14-2212