
HD 25154 Cage Plus - Pressure washer Kärcher - Free user manual and instructions
Find the device manual for free HD 25154 Cage Plus Kärcher in PDF.
| Product type | High-pressure cleaner |
| Brand | Kärcher |
| Model | HD 25154 Cage Plus |
| Dimensions (L x W x H) | 1040 x 686 x 1080 mm |
| Weight | 119 kg |
| Electrical supply | 400 V / 3~50 Hz / 13 kW |
| Working pressure | 3 to 15 MPa (30 to 150 bar) |
| Maximum permissible pressure | 19.5 MPa (195 bar) |
| Water flow rate | 2500 l/h (41.7 l/min) |
| Max. supply temperature | 60 °C |
| Max. supply pressure | 1 MPa (10 bar) |
| Pump oil capacity | 1.3 L |
| Pump oil type | SAE 15W40 |
| Tire pressure | 0.20 MPa (2.0 bar) |
| Sound pressure level (LWA) | 93 dB(A) |
| Main functions | EASY! Force, EASY! Lock, pressure and flow regulation, force nozzle and rotor nozzle |
| Safety | Safety trigger, main switch, relief valve, pressure switch, phase protection, motor circuit breaker, safety valve |
| Maintenance | Check oil level before each use, clean filter weekly, change oil every 500 h |
| Included accessories | EASY! Force gun, EASY! Lock lance, force nozzle, rotor nozzle, EASY! Lock high-pressure hose |
| Warranty | According to dealer conditions |
Frequently Asked Questions - HD 25154 Cage Plus Kärcher
User questions about HD 25154 Cage Plus Kärcher
0 question about this device. Answer the ones you know or ask your own.
Ask a new question about this device
Download the instructions for your Pressure washer in PDF format for free! Find your manual HD 25154 Cage Plus - Kärcher and take your electronic device back in hand. On this page are published all the documents necessary for the use of your device. HD 25154 Cage Plus by Kärcher.
USER MANUAL HD 25154 Cage Plus Kärcher
Chairman of the Board of Management

S. Reiser
Director Regulatory Affairs & Certification
71364 Winnenden (Germany)
Tel.: +49 7195 14-0
Fax: +49 7195 14-2212
Winnenden, 2019/05/20
Technische Daten
Please read and comply with these original instructions prior
to the initial operation of your appliance and store them for later use or subsequent owners.
Before first start-up it is definitely necessary to read the operating instructions and safety indications Nr. 5.951-949.0!
In case of transport damage inform vendor immediately.
- When unpacking the product, make sure that no accessories are missing and that none of the package contents have been damaged.
Contents
Environmental protection . . . EN 1
Hazard levels EN 1
Proper use EN 1
Device elements EN 2
Symbols on the machine. . . . EN 2
Safety instructions. EN 2
Safety Devices EN 3
Start up EN 3
Operation EN5
Transport. EN7
Storing the device. EN 7
Care and maintenance. EN 7
Troubleshooting EN 8
Warranty EN 9
Accessories and Spare Parts. EN 9
EU Declaration of Conformity. EN 10
Technical specifications . EN 11
Environmental protection

The packaging material can be recycled. Please do not throw the packaging material into household waste; please send it for recycling.
Old appliances contain valuable materials that can be recycled; these should be sent for recycling. Batteries, oil, and similar substances must not enter the environment. Please dispose of your old appliances using appropriate collection systems.
Electrical and electronic devices often contain components which could potentially pose a danger to human health and the environment if handled or disposed of incorrectly. However, these components are necessary for the proper operation of the device. Devices marked with this symbol must not be disposed of with regular household rubbish.
Please do not release engine oil, fuel oil, diesel and petrol into the environment Protect the ground and dispose of used oil in an environmentally-clean manner.
Notes about the ingredients (REACH)
You will find current information about the ingredients at:
www.kaercher.com/REACH
Hazard levels
△DANGER
Pointer to immediate danger, which leads to severe injuries or death.
WARNING
Pointer to a possibly dangerous situation, which can lead to severe injuries or death.
CAUTION
Pointer to a possibly dangerous situation, which can lead to minor injuries.
ATTENTION
Pointer to a possibly dangerous situation, which can lead to property damage.
Proper use
Use this high pressure cleaner exclusively for:
- Cleaning machines, vehicles, buildings, tools.
with accessories and spare parts approved by Karcher.
Device elements
Illustrations on Page 2
1 Trigger gun EASY!Force
2 Safety catch
3 Trigger
4 Safety lever
5 Rotary coupling (not with HD 16/15-4 Cage)
6 High pressure hose EASY!Lock
7 Hourmeter (option)
8 Storage for spray pipe
9 Push handle
10 Hose/cable holder
11 Power switch
12 Stopper
13 Indicator lamp operation status / malfunction
14 Power cable with plug
15 Oil filler neck (oil container with HD 25/ 15-4)
16 Water connection with filter
17 Pressure/quantity regulation
18 Accessory compartment
19 Oil drain screw
20 Oil level indicator
21 High-pressure connection EASY!Lock
22 Manometer
23 Strut for crane loading
24 Power nozzle with covering nut
25 Spray lance EASY!Lock
26 Power press regulator
Colour coding
- The operating elements for the cleaning process are yellow.
- The controls for the maintenance and service are light gray.
Symbols on the machine
High-pressure jets can be dangerous if improperly used. The jet may not be directed at persons, animals, live electrical equipment or at the appliance itself.
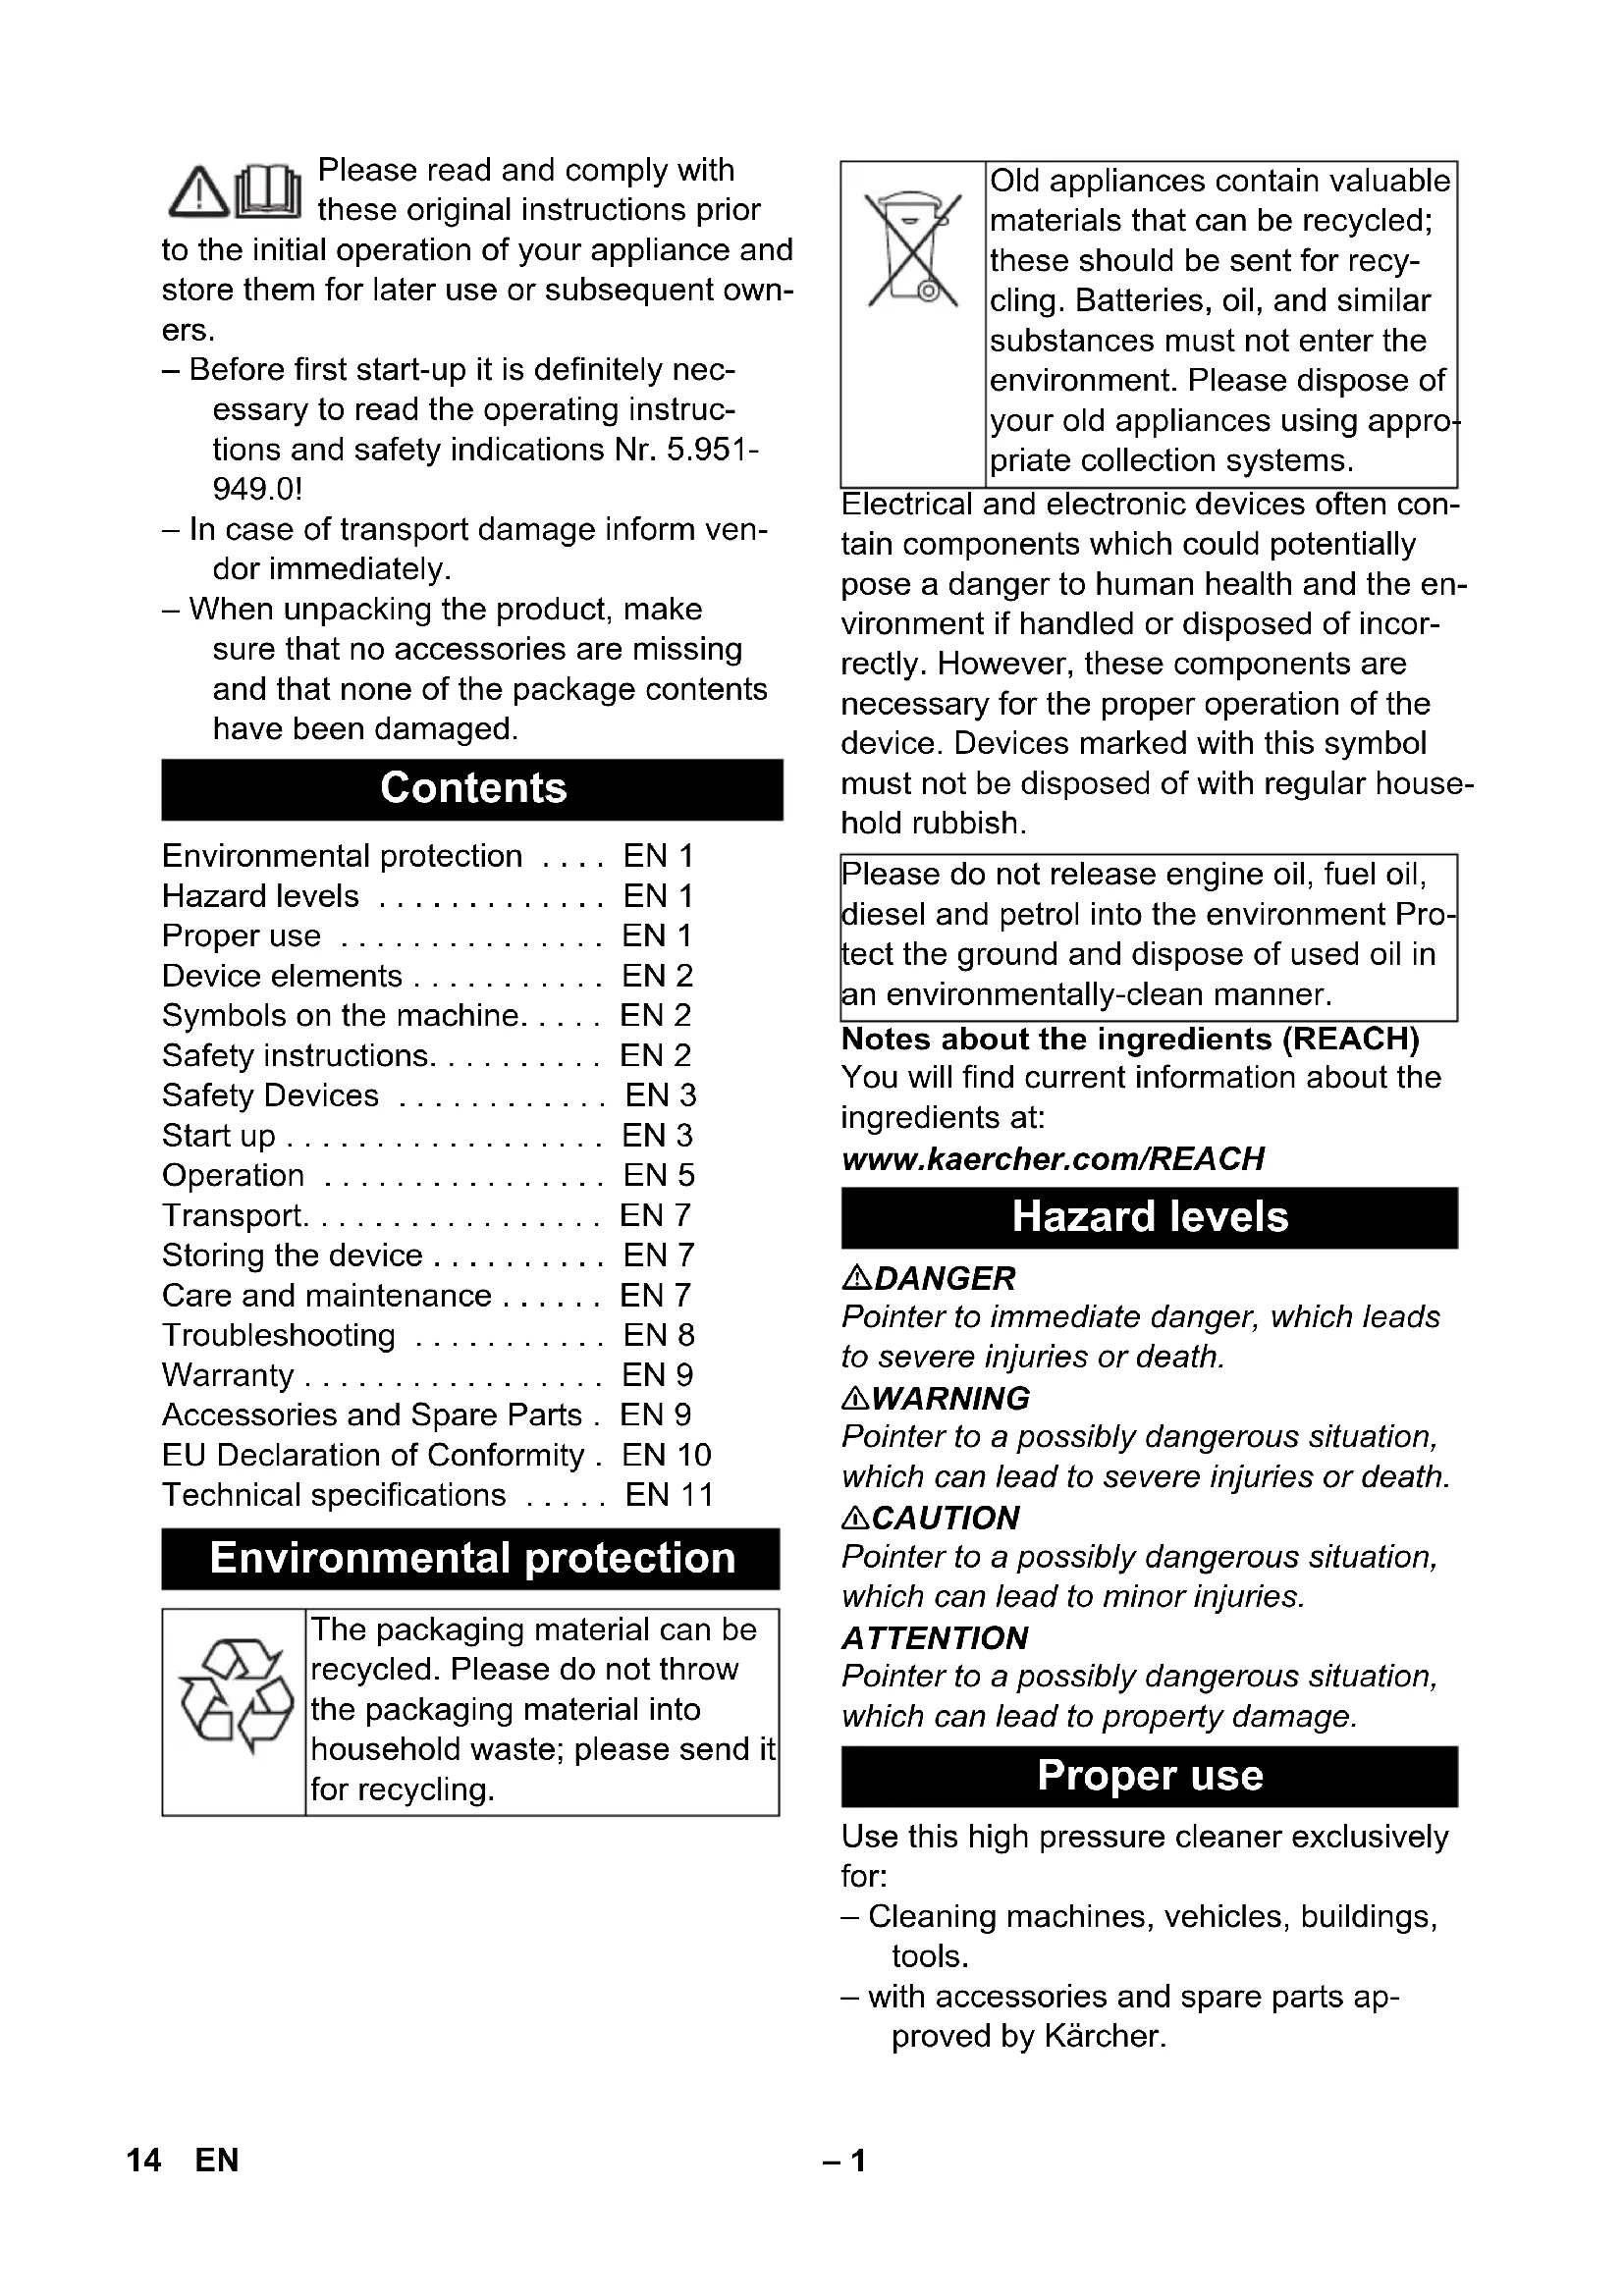
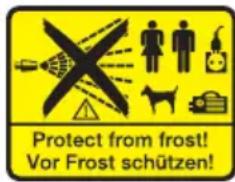
Danger of damage to the machine on account of frozen water! Store the appliance in a heated-room during winter or empty it.
△WARNING
Observe regulations of water supplier.
According to applicable regulations, the appliance must never be used on the drinking water net
without a system separator. A suit
able system separator by KARCHER or alternatively a system separator according to EN 12729 type BA must be used.
Water that was flowing through a system separator is considered non-drinkable.
CAUTION
Always connect the system separator to the water supply, never directly to the appliance!
Safety instructions
△DANGER
Risk of injury!
- Only use original high-pressure hoses.
- The high-pressure hose and the injection system must be suitable for the maximum operating pressure given in the Technical Data.
- Avoid contact with chemicals.
- Check the high pressure hose daily. Do not use hoses with kinks.
Stop using the high pressure hose if the external wire layer is visible.
-
Do not use the high-pressure hose anymore if the winding is damaged.
-Lay the high-pressure hoses in such a way that no vehicle can drive over it. -
Do not use high-pressure hoses that have been driven over, kinked, pressed or bent even if there is no externally visible damage.
- Store the high-pressure hoses in such a way that they are not subject to any mechanical load.
- The appliance/accessories must not be modified.
Safety Devices
Safety devices serve to protect the user and must not be rendered in operational or their functions bypassed.
Power switch
The switch prevents unintentioned starting of the appliance. Stop the appliance during breaks or after operation.
Safety catch
The safety catch on the trigger gun prevents the appliance from being switched on unintentionally.
Overflow valve with pressure switch
- While reducing the water supply/quantity regulation at the pump head, the overflow valve opens and part of the water flows back to the pump suck side.
- If the hand spray gun is closed, the overflow valve opens and the entire water volume will flow back to the pump suction side. The pressure switch on the overflow valve sends a signal to the control, which switches the pump off after approx. 30 seconds of trailing time (does not apply to HD 16/15-4).
- If the hand spray gun is opened, the pressure switch on the cylinder head turns the pump back on.
The overflow valve and pressure switch are set and sealed at the factory. Setting only by customer service.
Electrical circuit breaker
The electrical circuit breaker breaks the power circuit when there is no voltage in one of the phases.
Winding protection contact
The winding protection contact in the motor winding of the pump drive switches off the engine when there is a thermal overload.
Safety valve
The safety valve opens when there is a problem in the pressure switch. This valve is set and sealed in the factory. Do not change the setting.
Start up
△DANGER
Risk of injury! Device, tubes, high pressure hose and connections must be in faultless condition. If they are not in a perfect state then the appliance must not be used.
Check oil level
Cut off tip of oil container cover (HD 25/15-4).
Check oil level of the high pressure pump.
The oil level must be at the centre of the oil level display.
Add oil if required (see technical specifications).
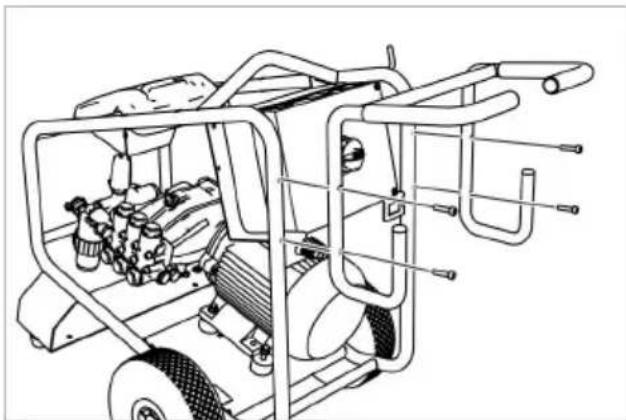
Installing the pushing handle

Fasten the pushing handle with the four screws enclosed in the packet.
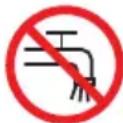
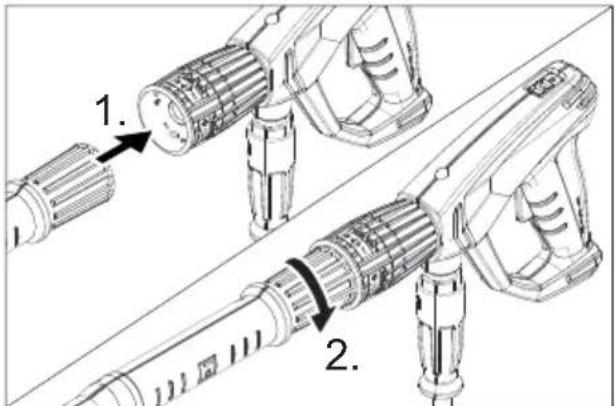
Install hand spray gun, spray lance and nozzle
Note: The EASY!Lock system joins components with a quick-fasten thread solidly and securely with just one turn.
WARNING
Risk of injury due to unsuitable accessories. Only use accessories that are approved for the working pressure of the device (see "Technical Data"). Only install accessories while the device is switched off.
Insert the high pressure nozzle onto the spray lance.
Install union nut and hand-tighten it (EASY!Lock).
Join the spray lance with the trigger gun and tighten until hand-tight (EASY!Lock).
Install the rotating coupling for the connection of the high pressure hose to the gun. (not with HD 16/15-4 Cage)
Join the high-pressure hose with trigger gun and high-pressure connection of the appliance and tighten until hand-tight (EASY!Lock).
Power supply
- For connection values refer to technical specifications.
- The electrical connections must be done by an electrician according to IEC 60364-1.
WARNING
The highest allowed net impedance at the electrical connection point (refer to technical data) is not to be exceeded.
In case of any uncertainty regarding the present net impedance at your connection point, please contact your local power supply company.
△DANGER
- Unsuitable electrical extension cables can be hazardous. Only use electrical extension cables outdoors which have been approved and labelled for this purpose and have an adequate cable cross-section.
1 - 10 m: 4 mm²
10 - 30 m: 6 mm²
Unwind the mains cable and place it on the floor.
Insert the mains plug into a socket.
Water connection
△WARNING
Observe regulations of water supplier.
According to applicable regulations, the appliance must never be used on the drinking water net without a system separator. A suitable system separator by KARCHternatively a system separator acc EN 12729 type BA must be used.
Water that was flowing through a system separator is considered non-drinkable.
CAUTION
Always connect the system separator to the water supply, never directly to the appliance!
Quality requirements for water:
| Parameter Value | |
| pH value 6,5...9,5 | |
| electrical conductivity max. 200 μS/cm | |
| Hydrocarbons < 0,01 mg/l | |
| Chloride < 250 mg/l | |
| Calcium < 200 mg/l | |
| Total hardness < 28 °dH | |
| Iron < 0,2 mg/l | |
| Manganese < 0,05 mg/l | |
| Copper | < 0,02 mg/l |
| Sulphate < 240 mg/l | |
| Active chloride | < 0,1 mg/l |
| free of bad odours | |
For connection values, see type plate/technical data.
Use a fibre-reinforced hose (not included in standard delivery). Minimum diameter 3/4 inch.
Connect the hose to the water connection of the appliance.
Connect the hose to the water tap.
Suck in water from vessel
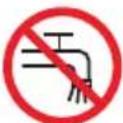
△DANGER
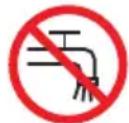
Never suck water from a drinking water container.
When fitted with the appropriate accessories, this high-pressure cleaner can draw in surface water, e.g. from water butts or ponds (max. suction height 0.5m ).
△DANGER
Never draw in fluids containing solvents or undiluted acids and solvents! This includes petrol, paint thinner and heating oil. The spray mist is highly inflammable, explosive and poisonous. Do not use acetone, undiluted acids and solvents, as they corrode the materials used on the appliance.
The standard water connection is not suitable for sucking in water; hence use Kärcher suction hose (minimum diameter approx. 1 inch) with filter (accessory).
Deaerating the appliance
Open the water supply.
Unscrew the nozzle.
Press the lever on the hand spray gun.
Switch on the appliance and let it run until the water exiting from the spray pipe is bubble-free.
Switch off the appliance and fit the nozzle again.
Operation
△DANGER
-
Risk of injury! Never use the appliance without the spray lance attached. Check and ensure proper fitting of the spray lance prior to each use. The screw connection of the spray lance must be finger-tight.
-
If the appliance is used in hazardous areas (e.g. filling stations) the corresponding safety regulations must be observed.
- Risk of injury! The trigger and safety lever may not be locked during the operation.
- Risk of injury! Contact Customer Service if the safety lever is damaged.
- Risk of injury from high-pressure water jet. Slide the safety catch on the trigger gun forward before performing any work with the appliance.
CAUTION
Clean engines only at places with corresponding oil separators (environmental safety).
Opening/closing the trigger gun
To open the trigger gun: Actuate the safety lever and trigger.
To close the hand spray gun: Release the safety lever and trigger.
Turning on the Appliance
Open the water supply.
Plug in the mains plug.
Set the appliance switch to "l".
Release the trigger gun. To do so, push the safety catch towards the back.
Open the hand spray gun.
High pressure operation
The appliance is equipped with the following nozzles:.
- Power nozzle, 25^ spray angle
Rotary nozzle
Power nozzle
- Carrying out the most common cleaning tasks
Rotary nozzle
- For strong contaminations.
Set working pressure and flow rate
△DANGER
When adjusting the pressure/quantity regulation, make sure that the screw connection of the spray lance does not become loose. Working pressure or quantity can be adjusted either at the pump unit or at the hand spray gun.
Do not reduce the pressure/quantity simultaneously at both the regulators. The following procedure is to be followed compulsorily:
Pressure/quantity regulation at the pump unit
Set (+) working pressure and quantity to maximum at the hand spray gun.
Set the working pressure and quantity by turning the pressure/quantity regulation mechanism at the pump unit. The working pressure can be read from the manometer.
Open the hand spray gun.
Pressure/quantity regulation at the hand spray gun
Set the pressure/quantity regulation at the pump unit to maximum working pressure and quantity by turning in clock-wise direction.
Set (+ / - ) the working pressure and quantity by turning the pressure/quantity regulation mechanism at the hand spray gun.
Open the hand spray gun.
Interrupting operation
Close the hand spray gun. The appliance switches off after 30 seconds.
Secure the trigger gun. To do so, push the safety catch towards the front.
Store the hand spray gun and spray pipe in the accessory mount.
After the interruption:
Release the trigger gun. To do so, push the safety catch towards the back.
Open the hand spray gun. The appliance will switch on again.
Turn off the appliance
After operating the water using saline water (sea water), open the hand spray gun and rinse the appliance for at least 2 - 3 minutes using tap water.
Shut off water supply.
Open the hand spray gun.
Switch on the pump with the power switch and allow to run for about 5-10 seconds.
Close the hand spray gun.
Set the appliance switch to "0/OFF".
Pull main plug out of socket with dry hands only.
Remove water connection.
Activate hand spray gun until device is pressure less.
Secure the trigger gun. To do so, push the safety catch towards the front.
Stow away the mains cable, the high-pressure hose and accessory at the appliance.
Frost protection
ATTENTION
Risk of damage! Freezing water in the appliance can destroy parts of the appliance. Store the appliance in a heated room during winter or empty it. During longer breaks in operation, it is advisable to pump in antifrost agents into the appliance.
Drain water
Screw off water supply hose and high pressure hose.
Blow through machine with compressed air.
Flush device with anti-freeze agent
Note:
Use normal glycol-based anti-freezing agents for automobiles.
Observe handling instructions of the antifreeze agent manufacturer.
Transport
CAUTION
Risk of personal injury or damage! Mind the weight of the appliance during transport.
ATTENTION
Protect the trigger from damage during transport.
Driving
Push the push handle down and push the appliance.
Transport by crane
△DANGER
Connect the lifting device in the center of the strut to load by crane.
Risk of injury due to dropping device.
- Adhere to the local accident prevention guidelines and safety notes.
- Check the appliance for crane loading for damage prior to each transport by crane.
- Check the lifting unit for damage prior to each transport by crane.
- Only lift up the appliance by this mechanism when loading by crane.
- Do not use stop chains.
- Protect the lifting device from inadvertent load release.
- Remove the spray pipe with hand spray gun as well as loose articles prior to transporting by crane.
- Do not transport any articles on the appliance during the lifting process.
- The appliance must only be transported by properly trained crane personnel.
- Do not stand below the load.
- Ensure that no persons are present in the immediate vicinity of the crane.
- Do not leave the appliance on the crane unattended.
When transporting in vehicles
When transporting in vehicles, secure the appliance according to the guidelines from slipping and tipping over.
Storing the device
CAUTION
Risk of personal injury or damage! Consider the weight of the appliance when storing it.
This appliance must only be stored in interior rooms.
Care and maintenance
△DANGER
Risk of injury by inadvertent startup of appliance and electrical shock.
First pull out the plug from the mains before carrying out any tasks on the machine.
Maintenance
Safety inspection/ maintenance contract
You can sign with your dealer a contract for regular safety inspection or even sign a maintenance contract.
Please take advice on this matter.
Before each use
Check mains cable.
The mains cable should not have been damaged (risk of electrical shock). A damaged mains cable must be replaced immediately by an authorised Customer Service Engineer or an electrician.
Check the high pressure hose for damages (risk of bursting).
Please arrange for the immediate exchange of a damaged high-pressure hose.
Check oil level from the oil level display of the high pressure pump.
Please contact Customer Service immediately if the oil is milky (water in oil).
- Check appliance (pump) for leaks. 3 drops per minute are permitted and can come out from the lower side of the appliance. Call Customer Service if there is heavy leakage.
Weekly
Clean filter at the water connection.
Check tire pressure of wheels (refer to "Specifications").
Every 500 operating hours, at least annually
Have the maintenance of the device performed by the customer service.
Change the oil in the high pressure pump.
Oil change
For oil type refer to technical specifications.
Turn out the oil drain screw.
Drain the oil in a collection basin.
Screw in oil drain plug.
Fill in new oil slowly until the centre of the oil level display.
Note:
Air pockets must be able to leak out.
Troubleshooting
△DANGER
Risk of injury by inadvertent startup of appliance and electrical shock.
- Prior to all work on the appliance, switch off the appliance and pull the power plug.
- Get the electrical components checked and repaired only by authorised customer service persons.
- Contact an authorised customer service person in case of problems not mentioned in this chapter or if you are in doubt or when you have been explicitly asked to do so.
Indicator lamp
The indicator lamps display the operating states (green) and interruptions (red).
Reset:
Set the appliance switch to "0".
Wait for a while.
Set the appliance switch to "l".
Operating status display
Continuous green:
- The appliance is now ready for operation.
1x blinking green:
- Operational readiness has expired after 30 minutes.
- The appliance has switched off after 30 minutes of continuous operation (safety if the high pressure hose bursts).
Fault indication
Continuous red light:
- Electrical problems in appliance
Pull out the mains plug.
Call Customer Service.
1x blinking red:
High pressure side is leaky
Check high pressure hose, hose connections and hand spray gun for leaks.
2x blinking red:
- Engine overload/overheat
Set the appliance switch to "0".
Allow device to cool down.
Set the appliance switch to "I".
Water pressure is too low
Ensure adequate water line pressure.
3x blinking red:
- Fault in the voltage supply
Check main connections and mains fuse.
4x blinking red: - Power consumption is too high
Call Customer Service.
Appliance is not running
- No power
Check whether the voltage indicated on the type plate corresponds to the voltage of the socket.
Check the mains connection cable for damages.
- Indicator lamp is blinking green
Operational readiness period has expired. Switch on/off the appliance again. - The water shortage fuse (option) was triggered due to low water inlet pressure. The indicator lamp "lack of water" will illuminate.
Check water inlet pressure, minimum value see "Specifications".
Turn the device switch to "0" and turn on again to restart the system.
- Motor overloaded/ over-heated or electrical circuit breaker or winding protection switch has got released.
Switch off appliance and let it cool down. Remove the cause of the problem. Turn on the appliance again.
Device is not building up pressure
- Wrong nozzle
Check nozzle for correct size (see technical specifications). - Flushed the nozzle.
Clean/ replace nozzle. - Filter is dirty.
Clean filter at the water connection. Unscrew the filter casing, remove the filter, clean it and replace it.
Air within the system
Appliance ventilation: Unscrew the nozzle. Switch on the appliance and let it run until the water exiting from the spray pipe is bubble-free. Switch off the appliance and fit the nozzle again. - Pipe inlets to pump are leaky or blocked
Check all supply lines to the pump for leaks or blockages.
High pressure side is leaky
3 drops per minute are permitted and can come out from the lower side of the appliance. Call Customer Service if there is heavy leakage.
High pressure pump is vibrating
Check all supply lines to the high-pressure pump for leaks or blockages.
Appliance ventilation: Unscrew the nozzle. Switch on the appliance and let it run until the water exiting from the spray pipe is bubble-free. Switch off the appliance and fit the nozzle again.
Warranty
The warranty terms published by the relevant sales company are applicable in each country. We will repair potential failures of your appliance within the warranty period free of charge, provided that such failure is caused by faulty material or defects in manufacturing. In the event of a warranty claim please contact your dealer or the nearest authorized Customer Service centre. Please submit the proof of purchase.
Accessories and Spare Parts
△WARNING
Risk of injury due to unsuitable accessories. Only use accessories that are approved for the working pressure of the device (see "Technical Data").
Only use original accessories and spare parts, they ensure the safe and trouble-free operation of the device.
For information about accessories and spare parts, please visit www.kaercher.com.
Special accessories
| Accessories Order number | |
| Hose drum 2.440-002.0 | 0 |
| Hose drum painted steel | 2.110-002.0 |
| Hose drum stainless steel | 2.110-001.0 |
| Operating hour counter | 2.851-066.0 |
| Breakdown-safe tyres | 2.851-067.0 |
| Swivel casters 2.851-0 | 42.0 |
| Water filter with enlarged filter surface. | 2.851-065.0 |
EU Declaration of Conformity
We hereby declare that the machine described below complies with the relevant basic safety and health requirements of the EU Directives, both in its basic design and construction as well as in the version put into circulation by us. This declaration shall cease to be valid if the machine is modified without our prior approval.
Product: High pressure cleaner
Type: 1.353-xxx 1.367-xxx
Relevant EU Directives
2000/14/EC
2006/42/EC (+2009/127/EC)
2011/65/EU
2014/30/EU
Applied harmonized standards
EN 60335-1
EN 60335-2-79
EN 60335-2-79
EN 55014-1: 2006+A1: 2009+A2: 2011
EN 55014-2: 2015
EN 61000-3-11:2000
EN 62233: 2008
HD 16/15-4 HD 20/15-4
HD 25/15-4
EN 61000-3-2: 2014
HD 9/50-4 HD 13/35-4
EN 60335-2-79
EN 60335-2-79
EN 61000-3-11:2000
Applied conformity evaluation method
2000/14/EC: Appendix V
Sound power level dB(A)
HD 16/15-4
Measured: 91
Guaranteed: 93
HD 20/15-4 Cage
Measured: 95
Guaranteed: 97
HD 25/15-4 Cage
Measured: 90
Guaranteed: 93
The signatories act on behalf of and with the authority of the company management.

Chairman of the Board of Management

S. Reiser
Director Regulatory Affairs & Certification
Documentation supervisor:
S. Reiser
Alfred Kärcher SE & Co. KG
71364 Winnenden (Germany)
Tel.: +49 7195 14-0
Fax: +49 7195 14-2212
Winnenden, 2019/05/20
Technical specifications
| Type HD 25/15-4 HD 20/15-4 HD 16/15-4 | ||||
| Power connection | ||||
| Voltage V 400 400 400 | ||||
| Current type Hz 3~50 3~50 3~50 | ||||
| Connected load kW 13 11,5 7,5 | ||||
| Mains fuse (slow-blow) A 25 25 | 16 | |||
| Maximum allowed net impedance | Ohm | (0,072+j0,045) | (0,072+j0,045) | (0,072+j0,045) |
| Type of protection | IPX5 | |||
| Water connection | ||||
| Max. feed temperature | °C | 60 60 | 60 | |
| Max. feed pressure | MPa (bar) | 1 (10) | 1 (10) | 1 (10) |
| Min. feed volume | l/h (l/min) | 3000 (50) | 2500 (42) | 2000 (34) |
| Inlet hose length (min.) m | 7,5 7,5 7,5 | |||
| Inlet hose diameter (min.) | Inch | 3/4 3/4 3/4 | ||
| Suck height from open container (20 °C) | m | 0,5 0,5 0,5 | ||
| Performance data | ||||
| Operating pressure of water (using standard nozzle) | MPa (bar) | 3...15 (30...150) | 3...15 (30...150) | 3...15 (30...150) |
| Max. permissible pressure | MPa (bar) | 19,5 (195) | 19,5 (195) | 19,5 (195) |
| Water flow rate | l/h (l/min) | 2500 (41,67) | 2000 (33,4) | 1600 (26,7) |
| Size of standard nozzle | -- 155 125 100 | |||
| Recoil force of trigger gun | N | 120 96 | 77 | |
| Fuel | ||||
| Oil quantity - pump | I | 1,3 1,3 1,3 | ||
| Oil type - pump | SAE 15W40 | |||
| Dimensions and weights | ||||
| Length x width x height | mm | 1040 x 686 x 1080 | ||
| Weight | kg | 119 | 117,2 105,5 | |
| Air pressure of wheels | MPa (bar) | 0,20 (2,0) | ||
| Values determined as per EN 60335-2-79 | ||||
| Hand-arm vibration value | ||||
| Hand spray gun | m/s2 | 3,6 4,6 5,3 | ||
| Spray lance | m/s2 | 6,0 5,9 5,7 | ||
| Uncertainty K | m/s2 | 1,1 | 1 | 1 |
| Sound pressure level LpA | dB(A) | 76 80 | 79 | |
| Uncertainty KpA | dB(A) | 3 | 3 | 3 |
| Sound power level LWA + Uncertainty KWA | dB(A) | 93 97 | 96 | |
www.kaercher.com/REACH
Niveau de danger
△DANGER
Type: 1.353-xxx
1.367-xxx
2006/42/CE (+2009/127/CE)
2011/65/UE
2014/30/UE
71364 Winnenden (Germany)
Tel.: +49 7195 14-0
Fax: +49 7195 14-2212
Winnenden, 2019/05/20
\section*{Caracteristiques techniques}
www.kaercher.com/REACH
Livelli di pericolo
△PERICOLO
2006/42/CE (+2009/127/CE)
2011/65/UE
2014/30/UE
Chairman of the Board of Management

S. Reiser
Director Regulatory Affairs & Certification
71364 Winnenden (Germany)
Tel.: +49 7195 14-0
Fax: +49 7195 14-2212
Winnenden, 2019/05/20
Dati tecnici
www.kaercher.com/REACH
Gevarenniveaus
△GEVAAR
Chairman of the Board of Management

S. Reiser
Director Regulatory Affairs & Certification
71364 Winnenden (Germany)
Tel.: +49 7195 14-0
Fax: +49 7195 14-2212
Winnenden, 2019/05/20
Technische gegevens
www.kaercher.com/REACH
Niveles de peligro
△PELIGRO
2006/42/CE (+2009/127/CE)
2011/65/UE
2014/30/UE
Chairman of the Board of Management

S. Reiser
Director Regulatory Affairs & Certification
Responsible de documento:
S. Reiser
Alfred Kärcher SE & Co. KG
71364 Winnenden (Germany)
Tel.: +49 7195 14-0
Fax: +49 7195 14-2212
Winnenden, 2019/05/20
Datasétécnicos
www.kaercher.com/REACH
Níveis do aparelho
PERIGO
Avisoreferentea umperigo eminenteque podeconduziragraphesferimentosouamorte.
ATENÇAO
Tip: 1.353-xxx 1.367-xxx
Respectivas Directrizes da UE
2000/14/CE
2006/42/CE (+2009/127/CE)
2011/65/UE
2014/30/UE
Chairman of the Board of Management

S. Reiser
Director Regulatory Affairs & Certification
71364 Winnenden (Germany)
Tel.: +49 7195 14-0
Fax: +49 7195 14-2212
Winnenden, 2019/05/20
Dados技术和
www.kaercher.com/REACH
Faregrader
△FARE
2006/42/EF (+2009/127/EF)
2011/65/EU
2014/30/EU
Chairman of the Board of Management

S. Reiser
Director Regulatory Affairs & Certification
71364 Winnenden (Germany)
Tel.: +49 7195 14-0
Fax: +49 7195 14-2212
Winnenden, 2019/05/02
Tekniske data
www.kaercher.com/REACH
Risikotrinn
△FARE
Type: 1.353-xxx 1.367-xxx
2006/42/EF (+2009/127/EF)
2011/65/EU
2014/30/EU
H.Jenner Chairman of the Board of Management
S. Reiser
Director Regulatory Affairs & Certification
71364 Winnenden (Germany)
Tel.: +49 7195 14-0
Fax: +49 7195 14-2212
Winnenden, 2019/05/20
Tekniske data
www.kaercher.com/REACH
Risknivæer
△FARA
Chairman of the Board of Management

S. Reiser
Director Regulatory Affairs & Certification
Dokumentationsbefullmaktigad:
S. Reiser
Alfred Kärcher SE & Co. KG
71364 Winnenden (Germany)
Tel.: +49 7195 14-0
Fax: +49 7195 14-2212
Winnenden, 2019/05/20
Tekniska data
www.kaercher.com/REACH
Vaarallisuusasteet
VAARA
Chairman of the Board of Management

S. Reiser
Director Regulatory Affairs & Certification
71364 Winnenden (Germany)
Tel.: +49 7195 14-0
Fax: +49 7195 14-2212
Winnenden, 2019/05/20
Tekniset tiedot
Chairman of the Board of Management

S. Reiser
Director Regulatory Affairs & Certification
71364 Winnenden (Germany)
Tel.: +49 7195 14-0
Fax: +49 7195 14-2212
Winnenden, 2019/05/20
www.kaercher.com/REACH
Tehlike kademeleri
△TEHLIKE
Calismayi yarida kesme
Tip: 1.353-xxx 1.367-xxx
Chairman of the Board of Management

S. Reiser
Director Regulatory Affairs & Certification
71364 Winnenden (Germany)
Tel.: +49 7195 14-0
Fax: +49 7195 14-2212
Winnenden, 2019/05/20
Teknik Bilgiler
www.kaercher.com/REACH
CTepeHb onaCHOCTN
ONACHOCTb
Yka3aHue omHocumelbHo Henocpedcm- beHNO 2po3aueu onachocmu, Komopar npueodum K mJKeIbIM yeeyBam uU K Cmepmu.
△PENEYNPEXDEHNE
Yka3aHue omHocumelbHO 803MOxHou noMeHuaJIbHO onaChou cumyaucu, Komopar MoXem npueecmu K mJKeIbIM yee-ychm unu K cMepmu.
OCTOPOXHO
Yka3aHue Ha nomeHuaJIbHO onachyIO cumyaUIO, Komopar moKem npueecmu K nonyuHeuIO ne2kux mpaEM.
BHUMAHNE
Yka3aHue omHocumelbHO 603MOxHoJ noMeHuaJIbHO onaCHO cumyaquu, Komopara MoXem NOBHeB MamepuJIbHi Yuep6.
IcnoJb30BaHne noHa3NaYeHnIO
IcnoJIb3yIe DaHHbI BbICOKHaOpHbI MOUu annapaT NCKJIIOHTeJbHO IJIa:
- MoiKoObOpyIOBaHnA, aBtOMoBnJeN, 3aHni, HcTpymeHTOB
-BMeCTe C DOnyuIeHHbIMN K INCIOJIb3O-BAHnIOΦIrpMoN Kdrcher npHaIpeK-HOCTaMn I 3aIyAcTMyN.
3JIeMeHTbI npn6opa
CM. pucyHKu Ha cmp. 2
1Пистолт-pacnbIINTeIbEASY!Force
2 PpeoxaHnteJIb
3 CnyckoBpUar
4 Pbyar npedoxpahnteJr
5 BpaaioaiaocoeHHteIbHaMyΦTa (He nH HD 16/15-4 Cage)
6 ΜηαΝΗ ΒυικΟΚΟ Σάνληνην EASY!Lock
7 CyeTnK YacOB pa6OToI (Onu)
8 MecTo xpaHEnn CtpyHOn Tpy6Kn
9 BeDyuaa dyra
10 DepkaTeNb 7nlaHra/ka6eJra
11 BkIIOuataJIb annapata
12 PpO6ka
13 KoHTpOJIbHbI INHdNkaTOp peKIma pa60TbI /c60J
14 cTeBOH uHyp co uTencelbHbIM pa3b-EMOM,
15 Патрубok залива масна (массянь 6ak дя HD 25/15-4)
16 NoBbO BDOCha6KeHnC cHnIbTpom
17 PerynipobKa daBJIeHn/koJIuYeCTBa
18 OtceK dIy npHaJnEJXHocTei
19 BnHT cnycka macna
20 Yka3aTeIb ypoBHa MacJa
21 NaTpy6OK BbICOKOTo DaBJeHnE EASY!Lock
22 MaHOMeTp
23CTaKkaIJIIOIporpy3KIcNOMOULIO KpaHa
24ΦopcyHka Power c haKnDHOraKoN
25 CtpyHnA Tpy6Ka EASY!Lock
26 PerynTop hacptpokn Servopress
LBeTHa MapKnpOBka
- Opranbl ynpablenia nI npoucecca ounstkn JKeJIToro UBeTa.
- OprahbI ynpabJeHnI dIa TeXnueckoTo 06cnyKuBaHnI n cepBnca CBeTIOceporo UBeTa.
CnMBoJIbI Ha np6ope
Bcocatb Body n3 6aka
△ONACHOCTb
Huko2da He bcabibamb body u3 emkocmu dna numbeoou oobi.
C NOMOJIbO COOTBeTCTByIOUeI O npNCIOco6JIeHnAaHHbI BbICOKOHApHbIMoIOuIIN pN6Op MoKeT HabpaTB Body I3 OTKpbITbIX pe3epByapOB, HAnpIMep, I3 6OueKДЯdoXJDeBOI BoblI INI npYdOB (BbICOTa BCacblBaHnMaKc.0,5M).
ONACHOCTb
BcacbbaHue ycmpoUcmbom kudKocmeu, codepkaux pacmbopumenu, a maKxe hepazneHHbIX Kucnom unu pacmbopumeu He donyckaemc! Kmakum beuecmbam omHocarm, Hanpumep, 6e3un, pacmbopumenu Kpacok u Ma3ym.
O6pa3yiouucra u3 maKux beuecme myMaH ne2ko 8ocnnamaHReemc, 63pb1600naceH u adoeum. He uCnoIb3oabmb auemOH, Hepa36a8neHbIe Kucnombu paCmBOpumenu, mak KaK OHU pa3pywaIOM Mamepuanbl, u3 KomopbIX u32om0NeHo ycmpoucmeo.
CTaHdapTbI BDO3a6Op He npncno-cobJeH IJIaKcIIyatauIN BpeXIme BCacbIBaHn, N03TOMU NCIOJb3OBaTb BCacbIBaOUsn IJNaHr QnpMbI Kdrcher (DnaMeTp MIn. 1 DIOm) C QnIbTpom (PpHaADJIeXHoCTb).
YdaneHne Bo3dyxa n3 annapaTa
OTKpbIbIOCTyINHeHne BOdbl.
→ OTBnHTntb opcyHky.
Haxatb pbiuar pyuHoro nucToJeTa- pacnbIInTeTn.
BknHouHTb npnbop n daTb emy nopaoToTb, noka Ha cTpyHOn Tpy6ke He HauHET BbIXoHtB BOda 6e3 py3blpboB BO3dyxa.
BbIKIOuHTb annapaT n CHOba npBnHTtB qOpcyHky.
YnpaBJIeHne
ONACHOCTb
- Onachocmb nolyueHnma mpaem! HuKo2da He uCnoB30aamb ycmpoucmeo 6e3 ycmaHOeHHou cmpyHou mpy6ku. PpOBePumb npOuHocmb fukcauu cmpyHou mpy6ku neped kaXdbim npumHeHuem. CneDyem nnomHo 3amHymb pyKaMu pe3b6Ooe coeduneHue cmpyHou mpy6ku.
- Ppu uCnoB3oBaHuu ycmpoucmea e onachbix 30hax (Ha npumep, Ha aemoo3anpa6OuHbIX cmaHuzx) cneoyem co6IIOdamb coomeemcmeyIoue npau-na mexHuKu 6e3oNaChocmu.
- Onachocmb noyuheu mpaem! Bo epempaobmy he pa3pewaemc 6noKupo8ka cnycko80u npedoxpuHumeNbHO2O pbIa208.
-
Onachocmb nojyeHuA mpaem! Ppu noepexdeHuu npedoxpanumelbHo2o pbuasa obpamumbc8 cepuechyio cnxy6y.
-
Onachocmb noyuheHna mpaembl om cmpyu 0oDbI noD daaHeuem. Npeod npoebeHuem IIObIX pa6om Ha ycmpoucme nepeoBuHymb npedoxpaHumeNbHbI uKcamop Ha pyHOM nuCmoneme-pacbnumene epeped.
△OCTOPOXHO
Ieuzamenu yucmumb molbko 6 Mecmax c coombemcmayouum macnoomdeuneme nem (oxpana okpykaiouecpebd).
OTkpbIbAHne/3aKpbIbAHne nCToJeTa-pacblnteJia
OTKpbITb NICTOJeT-pacNbIINTeJIb:HaXaTb IpeDOxpaHNTeJIbHbI IN CnyckoBOB pbUHaRn.
3aKpbIb nICTOJeT-pacNbIJNTeJb:OTnycHTb npEdoXpaHITeJbHbI N cnyCKOBoi pbUarN.
BknoueHne np6opa
OTKpbIbIOCTyINHeHne BOIbl.
BCTaBbTe wTeNceJbHyIO BnIKy B 3neK- Tpopo3eTKy.
YcTaHOBnte BbIKIOuAteIb np6opa B nOIOXKeHne "I".
Pa36IOKnpoBaTb NICTOJeT-pacnbIINTeIb,peeBnHyB npeoXpaHITeIb-HbIΦNKCaTOP Ha3aD.
→ OTKpbItb pyHOn nIcToJET-pacNbIIN-TeJIb.
Pexm pa60bI BbICOKOTo DaBneHn
Annapat ochaueh cneyuouuMn fopcyH-kan:
-ΦopcyHka Power,yroI paCnblneHna 25°
- PoToPna yopcyHka
ΦopcyHka Power
-Дя HanboJee paCnpocTpaHeHHbIX pa60T no YnCTke
PotopnHa fOpcyHka
-Дя устончых 3агрзHeHn
PerynpoBka pa6ooyero daBneHnI npOn3BOdnteJIbHOCTN
△ONACHOCTb
Bo epempeaynpobku daenHeu/koIue-cmea cneodyem obpammb eHmuHue ha mo, ymo6bpe3b6ooe coeduneHue cmpyHou mpy6ku He ocna6no.
Paboyee daBneHne n obbem noaun MOKHO yCTaHaBnBaTb KaK Ha Hacoce, TaK NHa pyuHOM nCToJeTe-pacblnteJe.
NoHHKeHne DaBHeHn/Obbema HeIb3a BbIOJIHrTa Ha O6Ox peryIaTopax OndOBpeMeHNO. Po3Tomy cNeDuYeT o6aTeIbHO C6JIIODaTcNeDyUoUne yKa3aHnA:
PerynipoBka daBneHna/KoJIyEcTba Ha Hacoce
YcTaHOBnTbpeRyIIpOBky daBneHnra/ oBbemaHa nIcToJeTe-pacBbIInTeJe Ha MaKcMmaJIbHoe pa6Ooee daBneHne H obBeM noaun (+)
YcTaHOBnTb pa6Ooee daBHeHne n npOuN3BOIDTeIbHOCTb C NOMOUsbOp eRyJrTopa Ha Hacoce. Pa6Ooee daBHeHne moXHo cHTaTb no MaHOMeTpY.
→ OTKpbITb pyHOn nIcToJeT-pacNbIIN-TeJIb.
PereynopOBka daBneHna/obema noaHa pyHOM nncToJeTe- paCnblnteIe
YcTaHOBnTbpeRyIINpOBkyDaBJeHnra/ o6BeMaHaHacoCeNoBOpOTmpeRyJIaTopaNoYacBOOnCTpeJIkeHaMaKcMJaIbHoe pa6Ooee DaBJeHneNobem eoDaun.
YcTaHOBnTb pa6Ooee daBJIeHne n npOuN3BOIDHTeJIbHOCTb C NOMOUsbIO peRyJITOPa Ha NiCTOJTe-pacNbIInTEne (+ / - )
→ OTKpbITb pyuHoi nIcToJeT-pacNbIIN-TeIb.
PpepbB pa6ote
3aKpbItb nIcToJeT-pacnblInTeJIb. Pnp6op oTKIOUaETcYepe3 30 ceKyHd.
3aФИКСИРОВАТь ПИСТОЛЕТ-паСиБИЛNTeЛь,пeрдИнHyВ ПeДoxpaHITeЛь-Hый ФИКСATOP ВepeД.
ПистонеТ-pacnbIINITeNb co cTpyHOn Tpy6ko NocTaBnTb Ha MeCTO ee XpaHeHnA.
Pocne npepbHaHra:
Pa36IOKIpOBaTb NICTOJeT-pacNbIINTeJIb,peEeBnHyB npeoXpaHITeJIb-HbIΦNKCaTOP Ha3aD.
OTKpbITb pyHOn NnCTOJET-pacNbIIN-TeJIb. YcTpoNCTBO CHOBA BKJIIOUaETcra.
Bbikljuoyehne np6opa
После ekсплуataци c coilecoideржа-шей BODоI (MOPСКОВODоI) npOMbITb annapat npn OTKpbITOM KlaPAne nICTOJIeTa-pacNbIINTEЯ BODONpOBODHOn BODоI MHNIMyM 2-3 MHNyTbI.
→ 3aKpbItb noJaCy BOДbl.
OTKpbIb pyHOn nncToJET-pacNbIIN-TeJIb.
→ BKNIOHTb HAcOC C NOMOUsbBO BbIKIIO- yateJI np60pa n DaTb emy npa6o-taTB 5-10 cekyHd.
3aKpbItb nucToneT-pacnbInnteJb.
IpepeBecTu nepeKluOuHaTeIb B noLoXeHne "0/OFF".
BbITacknBaIte 7TeNceIbHyIO BUNKy I3 pO3eTKI TOJIbKO cyXIMN pyKaMn.
OTcoeHNHTe BOOCha6KeHne.
→ BключntbпистОЛeТ-pacnbIINTeJIb, noka annapaT He ocbo6oJNTcR OТ давлелня.
3aФИKcHPOBaTb NUCToJeT-pacNbIIN-TeJIb,pepeBnHyB ppeOxpaHHTeJIb-HbIΦIKCaTOP BnepeI.
→ CNoXnTb ceTeB0i Ka6eIb, IJIaHr BblCOKOro DaBHeHn i npHaJnxKHOCTn Ha annapaTe.
3aunTa OT 3amep3aHnA
BHUMAHNE
Onachocmb noepexdeHua! 3aMeP3wa eoda e ycmpoucme MoKem pa3pyuumb ezo demaru.
XpaHnTe npH6Op 3mOu B OtanNnBaemom nomeueHHn Hn OnopoxHnTe ero. Pnp 60-nee pOdoJnxTeNbHbIX nepepbBax B 3Kcnnyataun peKOMeHnyetc npokaHaTb uee3 aannapat aHTnΦpN3.
CJINB BOdBi
OTBnHTTe IJNaHr NOpaun BOdbI IN IJNaHr BbICOKO RaBHeHn.
O6nytb annapaT cKaTbIM BO3dyXOM.
PpONoJaCKaTb aannapaT aHTnΦnpuN3OM
Yka3aHne:
IcnoJb3OBaTb CtaHdapTHbI aHTnΦpN3 DnA BTOMO6nJIe Ha OCHOBe TNIKOJIa.
Co6nHoaIte HNCTpyKUIN NO NcNOJb3OBAHNIO aHTnΦpN3a.
TpaHcnpTnpoBka
△OCTOPOXHO
Onachocmbmpaemblu nopejdeHua!
Obpammb eHumaHue Ha bec ycmpoucmba npu mpaHcnopmupoeke.
BHUMAHNE
Bo epemmpaHcnpmupo8ku obecne- yumb 3auumy cnycko02o pbiaaa om noepejdeHua.
Движени
→ HaxaTb 6yKcnpHyo ckOby npnbopa BnH3 nIepMeCTnTb npnbop.
TpaHcnpTnpoBka kpaHOM
3aKpeNtB NOJbEmHoe yCTpOiCTBO B cepeDInHe CTJKKn DJI NOrpy3Kn C NoMoUbIO KpaHa.
ONACHOCTb
Onachocmb noyuhenmu pam npu nae Huu ycmpoucmea.
-
Cobnoidamb mecmhble npednucnue no npedomepaueHIO Hecyaemhix cnyaee u yka3aHua nO mexHuke 6e3- onachocmu.
-
Pered kajdou mpaHcnpmupoekou KpaHOM npoeepmb npucnocobneHue dna no2py3ku c nomoubUo KpaHa Ha haInuue noepexdeHu.
- Pered kaxdou mpaHcnpmupoekou KpaHOM npoeepumb noobemHbiu MexaHu3M Ha noepejdeHua.
- Ppunodbimamb ycmpoucmbo monbko Ha npucnocobeneu u dna noapy3ku c NOMOUBKpaHa.
-He ucnonb3oebam yanoHbe ueu. - Iopbemhoe ycmpoucmbo npedoxpaHumb om HnpebdueHno2o omuenneHua 2py3a.
- Ydaunmb cmpyuHyo mpy6ky c pyuHbIM nucmonemom-pacblumemeJm u He3aKpePHeHHbI npedMembl nepeD mpaHcnpmuO8KOJ KpaHOM.
- Bo épèmá προεcca nodbēma He nepeHocumbha ycmpoùcmee Hukakux npedmemoe.
TpaHcnopmupo6ka ycmpoucmea kpaHOMdoJxHa npou3eodumbcra luuaMu, obyeHHbIM ynpaeJeHuO kpaHOM.
He cmoaemb noa py3om. - Ppu əmom obpammb eHumaHue Ha mo, ymo6bI e onaCHO 3OHe deucmeua KpaHa He haxoDunuc JIOdu.
He ocmaabnmb npubop noobweHbIM K kpaHy 6e3 npucmmpa.
TpaHcnpTnpoBka Ha TpaHCnOpTHbIX cpeIcTBax
→ПрипенихаannapataВТрансорTHbIX cpeДCTBax CNEdyeT yUHTbIBaTbDeIcTBYIOUIme MeCTHbIe rOcyIapCTBeHHbIe HOpMbI,HaNPaBJIeHHbIe Ha 3a-ⅢNTy OT cKOLBJXeHnI N OpPOKIbIBaHNIA.
XpaHHeHne npnbopa
OCTOPOXHO
Onachocmbmpaembu nopekdeHua!
Obpammb eHMaHue Ha bec ycmpoUcmBa npu xpaHeHu.
TO yctpoiCTBO pa3peWaeTcXpaHNTb TOIbKO BO BHYTpEHNX NOMeUeHNx.
YxOДи TeXHnueckoe 06cIyXnBaHne
ONACHOCTb
Onachocmb noJyueHua mpaembl om cnyuauHo 3anyueHHo20 annapama u 3JeKmpoWoka.
Ipeod npoeedeHue mIO6bix pa6om c npu-bopom, bIKIOUcUMb npubop u ebimnHymb wmenceIbHyIO BuNKy.
TexHnueckoe o6cIyXnBaHne
HcneKzna IO Texnke 6e3oNaCHOCTN/ DOROBOp O TexHnueCKOM 06cJyXnBaHHN
BbI Bcerda MoXeTe DoROBOpNTbcr C BaUIM ToproBbIM npedCTaBnTeJem O peryIpyHOM npoBeHeHH TeXnueCKOrO OcMOTpa NJI 3aKnIOHTb DoROBop TexO6CnyKINBAHN. ObpaaainTecb K Ham 3a KOHCyNbTaunie!
IpeepKaKdo3KcnJyataune
IobpeKdHbI ShaHr BbICOKO daBJIeHnHEMeDHeHHO 3aMeHHTb.
Пюверпь уровень на уkaЗатени уровая Macna BBICOKOHANOPHOrO Hacocca.
При молокообра3нов консTeHци Масla(ВODa B Maclle)HemeДпeнHo obpaTntbcaB ueHTp no obcnyxBaHnIO KJIneHTOB.
Поберпь сиза па_T(Hacoc)Ha repMeTNUHOCb.
3 KaJIIN BOJBI B MNHyTu DOJNyCTUMbI IN MOryT IpoCTyNaTb C HNXHei YacTn annapata. Ppi 6OJIe CInbHoi HerepMeTNUHOCTN O6paTNTbcR B UeHTp N0 06cIyKINBaHIO.
eKeHeIeJIbHo
Kakdble 500 yacob pa6oTbI, He pexe pa3a B roD
TexHnueckoe o6cnyxNBAHne yCTpoi-CTBa MoKeT OcyuEcTBJIaTb cepBnchA cnyx6a.
3aMeHnTb MaCNo B HAcOce BbICOKOro DaBHeHra.
3aMeHa macJa
CopTa Macna n 3aJIbBaemoe KOJInueCTBO CMOTpeTB "TexHnueeCKIX DaHHbIX".
→ BbIKpyTnTb BNHT cnYcKa Macna.
Cnyctntb MacNo B Macnoc6OpHnK.
→ BvHNTb pe3b6OByIO npo6ky.
→ Cbejee macno MeJneHNO 3aJIHTb Do cepeINhbl yka3aTeIyPOBHa.
YkaHne:
Ny3bIpbkn BO3dyxa DOJXHbI BbInTn.
HOMOuB BClyuae HENoJaIOK
ONACHOCTb
Onachocmb nolyuehura mpaembl om cnyuauHo 3anyueHHo2o annapama u 3neKmpouoka.
- Ipepe npoebeHue mIobbix pa6om no o6cnykuBaHuO ycmpoucmeo cneoyem 6blIOUumb u u3Bneu wmenceIbHyU 6unky u3 po3emku.
-3neKmpueeKue KOHcmpyKmueHbIe 3nemHmbI dOJxHbI npoepeMbcr moJbKO yNoHOMoHcHou cpeUcHou cnjXboU. - Ppu noepexkdeHua, He yka3aHHbIX 6 3mom pa3dene, e cnyuae comHeHua Unu npu yemkom yka3aHuu o6paumcbcra 8 ynoHOMOeHHyIO cepuechHyIO cnyx6y.
KoHTpoJIbHbI INHdNkaTOp
KoHTpoJIbHbI INHdNkATOp yKa3bIBaET pa-6Ooee COCToHnE (3eJIeHbI) n HeNoJaKn (KpaChbI).
C6poc:
YcTaHOBInTe BbIKIIOuAteJIb npIbopaB nOIOXeHne "0".
HemHoro noDoJkDnte.
YcTaHOBInTe BbIKIIOuAteIb npIbopaB nOJoxHeHne "I".
Yka3aHne pa6oeryo cocToHHn
HenpepbHbI 3eJIeHbI CBeT:
- Annapat rotoB k pa6ote.
1xMuraet3eJehbI:
- Pexim roTOBHOCTN K pa6OTn nCTeK no-cne 30 mHyT.
- Annapat OTKIIOUHnCЯ nocJe 30 MInHyT HenpepbIBHO DeiCTBna (3aunTa Ha cnyuAДрЯBOrO IHaHra BbICOKOro daBJIeHnA).
YkaHne HenoJaok
HenpepbHBhI KpaChbI CBeT:
- Θлектпческne HeNoJaKn B aannapate.
OTcoeHNHTe npnbop ot 3Jektpocetn.
→ O6paTnTbcra B cepBnchyO cnyk6y.
1x Mmraet Kpachbl:
-HerepMeTnUHOCb CO CTOpOHbI BbICOKO- ro daBneHn
→ПроверпьHa repMeTuHOCtьшlaHr BbICOKOrOДaBJIeHЯ,шlaHROBbie COe-ДИнHeHЯипICTОЛETpacNbIINTEJB.
2x Muraet Kpachbl:
- Perperpy3ka/peperpeB MoTopa
YcTaHOBInTe BblKJIIOuAteIb npI6Opa B nOLOXKeHne "0".
→ ΑaTb annapaty octbITb.
YcTaHOBInTe BbIKIIOuAteIb npI6opaB nOIOXeHne "I".
-ДаВлЕнe BОдbl CЛИшКOM HN3KOE
06ecneuHTbIOCTaTOUHoe DaBHeHne B Tpy6OpOBoDe.
3x Mmraet Kpachbln: - C6oB 3JeKTpOuNTaHn
→Проверпь подкючене сети птаняи пpedoхразнту.
4x Muraet Kpachbl: - CnIshKOM BbICOKoe nOtpe6JIeHne 3NeK- Tpo3Heprnn
→ O6paTnTbcra B cepBnchHyo cnyk6y.
Прибор не паботает
-OTcTyTCTBnE HanpJxKeHn
→ПюверьтесоOTВETCTBNEHaNPЯЖe-ня,уka3aHHOrOВЗвODСКОТаБЛИ-Ke,HaNPЯЖeHIONICTOчнИкaЗLEKТpo-пNTаHЯ.
→Проверпь кавель сеTeBOrO птаннЯ
На повөдэн.
-KoHTpoJIbHbI INdNkATOp MmraeT 3eJIeHbIM CBETOM
BpeMa peXIMa rOTOBHOCTn nCTeKNo. BkIOuHTb n CHOba BBIKIOUHTb annapaT.
-3a BO3HKnHOBeHnCNIuKOM Hn3KoTo DaBHeHn IOaun BoDbl Cpabotano yCTpOiCTBO IpepoxpaHnO T OTCyTCTBn BObl (ONU).
KoHTpOJIbHaJ lamNoUka "HeOcTaTOK BOdbl" HaunHaet CBETnTbcr.
Пюверпь ДаВленье Рдчи Воры, Мнимальhoe 3начене CM.В раздел "Texнческne даньie".
Дя NOBTOPOBO BBOBa B 3KcNpyatauO yCTaHOBnTB BbIKIOUaTeIb np60pa B noJoxKeHne ,0" nocJe Yero cHOba BKIOUHTb.
-Motop neperpyxen/nerperpet nnn cpa-6oTana 3aunta pa3, nn 3aunTHoe peIe o6MOTkn
→ BbIKHIOHTb annapaT n daTb emy octtbIb. YcTpaHITb npuHHy HeNoJaKn. CHOBa BKIOHTb annapaT.
Прибор He ha6ирaelabJIeHne
- HenpaBnIbHaJΦopcyHka
→ПрOBepNTb npaBnIbHocTb pa3Mepa φopcyHKn (cM. „TexHnueckne daH- HbIe"). - PpoDyTb φopcyHky.
OuHCTnTb/3aMeHNITbΦopcyHky.
-ΦnJIbTp 3aIrp3HeH.
→ПрочиТьФиЛьТВОДОЗбopa. PackpyTNTb KOpNycФиЛьТpa, BыИнТь ФиЛьТр,прочиТь eRo И сHOBA yCTa-HOBITb Ha MeCTO.
-Bo3nyx BCnCTeme
YdaNTb Bo3dyx n3 annapata. OTBnHTnb fOpcyHky. BKnIOuHTb npn-6op n DaTb emy nopabotb, noka Ha cTpyHoi Tpy6ke He hauHet BbICTynatb BOda 6e3 ny3bipkOB Bo3dyxa. BbIKIOuTe np6op n CHOba HABnHTne fOp-cyHKy.
-Питадошпе Линн Haocа HeRepMeTuHbI NIN 3acopeHbI
→Проверпь repMeTичHOCть ИЛЗаСОВ BCex 6e3 NCKIIOUeHЯ ПИТaIQUx ЛИНи HAcOca.
Herepmetnucoctb hacoca BbICOKOTo daBneHn
3 KaJIIN BOdI B MNHyTu DOnCyCTnMbI IN MOrTy IpoCTyNaTb C HnKHeN YaCTn an- napaTa. Ppi BoJee CnBHOH HeRepeMeTnUHOCTn O6paTITbcR B UeHTp No 06CnyKINBAHNIO.
Hacoc BbICOKOrO daBJIeHnA cTuyNT
→Проверпь repmetичноь ИИЗ acop BCex 6e3 nCKIIOUeHnЯ ПИТAOUIX JINHn HAcOca BbICOKOrO DaBNeHnY.
YdaHTb BO3dyx n3 annapata. OTBnHTb fOpcyHky. BKnIOHTb npI6op n DaTb emy nopabotb, noka Ha cTpyHoi Tpy6ke He hauHET BbICTynatb BOda 6e3 ny3bIPbKOB BO3dyxa. BbIKIOHTe np60p n CHOba HABnHTte fOp-cyHky.
TapaHTnA
B KaXdoI cTpaHe DeiCTbYIO T COOTBeTcTBENHO rapaHTnHbIe ycNoBnA, n3DaHHbIe yNOJHomOueHHo OPraHn3aUnei C6bIta HauWe I npOdyKuNN B DaHHo CTpaHe. Bo3MOxHbIe HeNCnPaBHOCTN np6Opa B TeueHne rapaHTnHOrO cPoka Mbl YcTpaHReM 6ecnPaTHO, ecn npuHa 3akIouaETcB B DeΦeKtAX MaTePnaJOB nII OwN6kax npn N3rTOBLeHIn. B cnUyae BO3NHKnHOBeHnnpTeH3n B TeueHne rapaHTnHOrO cPoka npoc6Ba o6paatbcra, Ime npi ce6 ueK O nOKynke, B TopROByooprAn3aUIO, npoDaBswyo Bam np6Op nIN B 6nIXaWHyO yNoJHomOueHHyO cnjX6by cepBnCHoro obCnyKuBaHn.
Data BbInycka OTo6paXaETcHa 3aBODCKoT a6nue K 3aKoInpOBAHHOM BnDE. Pn 3Tom OTdEnbHbIe UΦpbl IMeIOT cNeDuouee 3NaueHHe::
Приимер: 30190
3 roB BbInycka
0 CTOnTeBbInycka
1 DecaTnIeTne BbInycka
9 BTOPAuPpa Mecaa BBInycka
0 nepBaIuΦpa Mecaa BbInycka
TakIM 6pa3OM, B daHHOM npimepe KoI 30190 O3Haayet DaTy BbInycka 09/(2)013.
PpHaJnEeKHOCTN 3aNaChbIe deTaJIH
△PENEYNPEXDEHNE
Onachocmb nonyuhenura mpaMbI u3-3a npumehenra Henodxodauux npuhaedex-hocmeu. NcnoB3o8amb moIbKO npuhaedneXHocmu, paccumahhbie Ha pa6oee daenehura ycmpoucmea (cm. "TexHuueckue daHHbcie").
IcnoJIb3yIte opnHaJIbHbIe npHaJNeK-HoCTN 3aPacTNI -TOJIbKO OHI rapaHTNpyOT 6e3OJaChyIO 6ecnepeBoHyO pa-60Ty yCTpoiCTBa.
HnΦopMaUO O npHaJNeXHoCTx N 3a- nTactx Bbl MoKeTe HaHTN Ha caTte www.kaercher.com.
CneuaJIbHbIe npHaJdJIeXHoCTN
PpOdyKT BbICOKOHApHbIM MOIO- 1I pnp6op
Tun: 1.353-xxx
1.367-xxx
OchOBhIe DnpeKTHBb EU
2000/14/EC
2006/42/EC (+2009/127/EC)
2011/65/EC
2014/30/EU
PpIMMeHHbIe rapMOHn3npoBaHHbIe
HOPMBI
EN 60335-1
EN 60335-2-79
EN 60335-2-79
EN 55014-1: 2006+A1: 2009+A2: 2011
EN 55014-2: 2015
EN 61000-3-11:2000
EN 62233: 2008
HD 16/15-4 HD 20/15-4
HD 25/15-4
EN 61000-3-2: 2014
HD 9/50-4 HD 13/35-4
EN 60335-2-79
EN 60335-2-79
EN 61000-3-11:2000
PpIMHeHHbI NopraDOK OueHKn COOT
BETCTBNA
2000/14/EC:Прилloxене V
YpOBeHb MoUHocTn 3Byka dE(A)
HD 16/15-4
I3mepeHo:91
TapaHTnpoBaHo:93
HD 20/15-4 Cage
U3MepeHo:95
TapaHTnpoBaHo:97
HD 25/15-4 Cage
U3MepeHo:90
TapaHTnpoBaHo:93
Huxenodnncabwnece nua deiCTbYOT OT mEni no doBepenHOCTn PpaBneHna.

Chairman of the Board of Management

S. Reiser
Director Regulatory Affairs & Certification
YIIOHOMOeHHbI COtpdHnK nO BeDeHNIO DOKyMeHToo6Opota:
S. Reiser
Alfred Kärcher SE & Co. KG
71364 Winnenden (Germany)
Tel.: +49 7195 14-0
Fax: +49 7195 14-2212
Winnenden, 2019/05/20
TexHnueckne daHHbIe
www.kaercher.com/REACH
Veszély fokozatok
VESZÉLY
Chairman of the Board of Management

S. Reiser
Director Regulatory Affairs & Certification
71364 Winnenden (Germany)
Tel.: +49 7195 14-0
Fax: +49 7195 14-2212
Winnenden, 2019/05/20
Muszaki adatok
www.kaercher.com/REACH
Stupné nebezpečí
△NEBEZPECI
2006/42/ES (+2009/127/ES)
2011/65/EU
2014/30/EU
Chairman of the Board of Management

S. Reiser
Director Regulatory Affairs & Certification
71364 Winnenden (Germany)
Tel.: +49 7195 14-0
Fax: +49 7195 14-2212
Winnenden, 2019/05/20
Technické udaje
www.kaercher.com/REACH
Stopnje nevarnosti
NEVARNOST
Zadevne directive EU:
2000/14/ES
2006/42/ES (+2009/127/ES)
2011/65/EU
2014/30/EU
Chairman of the Board of Management

S. Reiser
Director Regulatory Affairs & Certification
71364 Winnenden (Germany)
Tel.: +49 7195 14-0
Fax: +49 7195 14-2212
Winnenden, 2019/05/20
Tehnični podatki
| Tip HD 25/15-4 HD 20/15-4 HD 16/15-4 | ||||
| Elektrichi priključek | ||||
| Napetost V 400 400 400 | ||||
| Vrsta toka Hz 3~50 3~50 3~50 | ||||
| Priključna moč kW 13 11,5 7,5 | ||||
| Omrežna varovalka (inertna) A 25 25 16 | ||||
| Maksimalno dopustna omrežna im-pedanca | Ohm | (0,072+j0,045) | (0,072+j0,045) | (0,072+j0,045) |
| Vrsta zaščite | IPX5 | |||
| Vodni priključek | ||||
| Maks dotočna temperatura | °C | 60 60 60 | ||
| Pritisk dotoka (maks.) | MPa (bar) | 1 (10) | 1 (10) | 1 (10) |
| Min. količina dotoka | l/h (l/min) | 3000 (50) | 2500 (42) | 2000 (34) |
| Dolžina dovodne cevi (min.) | m 7,5 7,5 | 7,5 | ||
| Premer dovodne cevi (min.) | Cola | 3/4 3/4 3/4 | ||
| Sesalna višina iz odprte posode (20 °C) | m 0,5 0,5 | 0,5 | ||
| Podatki o zmogljivosti | ||||
| Delovni tlak vode (s standardno šo-bo) | MPa (bar) | 3...15 (30...150) | 3...15 (30...150) | 3...15 (30...150) |
| Maks. dovoljeni tlak | MPa (bar) | 19,5 (195) | 19,5 (195) | 19,5 (195) |
| Črpalna količina, voda | l/h (l/min) | 2500 (41,67) | 2000 (33,4) | 1600 (26,7) |
| Velikost standardne šobe | -- 155 125 100 | |||
| Povratna sila ročne brizgalne pištole | N | 120 96 77 | ||
| Goriva | ||||
| Količina olja - Črpalka | I | 1,3 1,3 1,3 | ||
| Vrsta olja - Črpalka | SAE 15W40 | |||
| Mere in teža | ||||
| Dolžina x širina x višina | mm | 1040 x 686 x 1080 | ||
| Teža | kg | 119 | 117,2 10$5,5 | |
| Zračni tlak koles | MPa (bar) | 0,20 (2,0) | ||
| Ugotovljene vrednosti v skladu z EN 60335-2-79 | ||||
| Vrednost vibracij dlan-roka | ||||
| Ročna brizgalna pištola | m/s2 | 3,6 4,6 5,3 | ||
| Brizgalna cev | m/s2 | 6,0 5,9 5,7 | ||
| Negotovost K | m/s2 | 1,1 | 1 | 1 |
| Nivo hrupa LpA | dB(A) | 76 80 79 | ||
| Negotovost KpA | dB(A) | 3 | 3 | 3 |
| Nivo hrupa ob obretenitviLWA + ne-gotovost KWA | dB(A) | 93 97 96 | ||
www.kaercher.com/REACH
Stopnie zagrożenia
NIEBEZPIECZENSTWO
2006/42/WE (+2009/127/WE)
2011/65/UE
2014/30/UE
Chairman of the Board of Management
S. Reiser
Director Regulatory Affairs & Certification
Administrator dokumentaci:
S. Reiser
Alfred Kärcher SE & Co. KG
71364 Winnenden (Germany)
Tel.: +49 7195 14-0
Fax: +49 7195 14-2212
Winnenden, 2019/05/20
Dane techniczne
www.kaercher.com/REACH
Trepte de pericol
△PERICOL
Indicatie referitoare la un pericol iminent, care duce la vatakari corporale grave sau moarte.
△AVERTIZARE
Transportul in vehicule
In cazul transportei in vehicule asigura i aparatul contra deraparii si rasturnari conform normelor in vigoare.
Tip: 1.353-xxx 1.367-xxx
Directive UE respectate:
2000/14/CE
2006/42/CE (+2009/127/CE)
2011/65/UE
2014/30/UE
Norme armonizate utilize:
EN 60335-1
EN 60335-2-79
EN 60335-2-79
EN 55014-1: 2006+A1: 2009+A2: 2011
EN 55014-2: 2015
EN 61000-3-11: 2000
EN 62233: 2008
HD 16/15-4 HD 20/15-4
HD 25/15-4
EN 61000-3-2: 2014
HD 9/50-4 HD 13/35-4
EN 60335-2-79
EN 60335-2-79
EN 61000-3-11: 2000
Chairman of the Board of Management

S. Reiser
Director Regulatory Affairs & Certification
71364 Winnenden (Germany)
Tel.: +49 7195 14-0
Fax: +49 7195 14-2212
Winnenden, 2019/05/20
Date tehnice
www.kaercher.com/REACH
Stupne nebezpečenstva
NEBEZPECENSTVO
2006/42/ES (+2009/127/ES)
2011/65/EU
2014/30/EU
Uplatnovane harmonizované normy:
EN 60335-1
EN 60335-2-79
EN 60335-2-79
EN 55014-1: 2006+A1: 2009+A2: 2011
EN 55014-2: 2015
EN 61000-3-11:2000
EN 62233: 2008
HD 16/15-4 HD 20/15-4
HD 25/15-4
EN 61000-3-2: 2014
HD 9/50-4 HD 13/35-4
EN 60335-2-79
EN 60335-2-79
EN 61000-3-11:2000
2000/14/ES: Priloha V
Chairman of the Board of Management

S. Reiser
Director Regulatory Affairs & Certification
71364 Winnenden (Germany)
Tel.: +49 7195 14-0
Fax: +49 7195 14-2212
Winnenden, 2019/05/20
Technické udaje
| Typ HD 25/15-4 HD 20/15-4 HD 16/15-4 | ||||
| Siet'ové napájanie | ||||
| Napätie V 400 400 400 | ||||
| Druh prúdu Hz 3~50 3~50 3~50 | ||||
| Pripojovací vykon kW 13 11,5 7,5 | ||||
| Siet'ový istič (pomalý) A 25 25 | 16 | |||
| Maximálne prípustná siet'ová impe-dancia | Ohmov | (0,072 +j0,045) | (0,072 +j0,045) | (0,072 +j0,045) |
| Druh krytia | IPX5 | |||
| Pripojenie vody | ||||
| Teplota na privode, max. | °C | 60 60 | 60 | |
| Prívodný tlak (max.) | MPa (bar) | 1 (10) | 1 (10) | 1 (10) |
| Prietok na privode, min. | l/h (l/min) | 3000 (50) | 2500 (42) | 2000 (34) |
| Prívodná hadica - dlžka (min.) | m 7,5 7,5 7,5 | |||
| Priemer prívodnej hadice (min.) | palce | 3/4 3/4 3/4 | ||
| Sacia vyška z otvoreného zásobníká (20 °C) | m 0,5 0,5 0,5 | |||
| Vykonové parametre | ||||
| Pracovný tlak vody (so štandardnou tryskou) | MPa (bar) | 3...15 (30...150) | 3...15 (30...150) | 3...15 (30...150) |
| Max. prípustný tlak | MPa (bar) | 19,5 (195) | 19,5 (195) | 19,5 (195) |
| Dopravované množstvo, voda | l/h (l/min) | 2500 (41,67) | 2000 (33,4) | 1600 (26,7) |
| Veßkost' štandardnej dýzy | -- 155 125 100 | |||
| Reaktivna sila ručnej striekacej pištole | N | 120 96 | 77 | |
| Prevádkové látky | ||||
| Množstvo oleja, Čerpadlo | I | 1,3 1,3 1,3 | ||
| Druh oleja, Čerpadlo | SAE 15W40 | |||
| Rozmery a hmotnost' | ||||
| Dlžka x Širka x Vyška | mm | 1040 x 686 x 1080 | ||
| Hmotnost' | kg | 119 | 117,2 10$5,5 | |
| Tlak vžduchu v pneumatíkámch | MPa (bar) | 0,20 (2,0) | ||
| Zistené hodnoty podla EN 60335-2-79 | ||||
| Hodnota vibráci v ruke/ramene | ||||
| Ručná striekacia pištol | m/s2 | 3,6 4,6 5,3 | ||
| Rozstrekovacia rúrka | m/s2 | 6,0 5,9 5,7 | ||
| Nebezpečnost' K | m/s2 | 1,1 | 1 | 1 |
| Hlučnost' LpA | dB(A) | 76 80 | 79 | |
| Nebezpečnost' KpA | dB(A) | 3 | 3 | 3 |
| Hlučnost' LWA + nebezpečnost' KWA | dB(A) | 93 97 | 96 | |
Pije prve uporabe Vaseg ureda ja procitajte ove originalne radne upute, postupajte prema njima i sacvajte ih za kasnju uporabu ili za sljedeceg vlasnika.
- Prijeprhog stavljanu u pigeon obavezno procitajte sigurnosne naputke br. 5.951-949.0!
- U slučaju oštećenja pri transportu od-mah obavijestite prodavača.
- Provjerite prilikom raspakiravanja nedostaje li pribor i ima li ostecenja.
Pregled sadržaja
Zašita okoliša . HR 1
Stupnjevi opasnosti. HR 1
Namjensko korištenje . . . . . . HR 1
Sastavni dijelovi uredaja . . . . HR 2
Simboli na uredaju HR 2
Sigurnosni napuci . HR 2
Sigurnosni uredaji . HR 3
Stavljanje u pigeon . HR 3
Rukovanje HR 5
Transport. HR 6
Skladištenje uredaja. HR 7
Njega i odrzavanje . HR 7
Otklanjanesmetnji .HR8
Jamstvo. HR 9
Pribor i pričuvni dijelovi . . . . . HR 9
EU izjava o suklaadnosti. . . . . HR 10
Tehnicki podaci HR 11
Zaštita okoliša

Materijali ambalaže se mogu reciklirati. Molimo Vas da ambalažu ne odlažete u kućne otpatke, vec ih predajte kao sekundarme sirovine.
Stari uredaji sadrzej vrijedne ma- terijale koji se mogu reciklirati te bi ih stoga trebalo predati kao sekundarne sirovine. Baterije, ulje i slični materijali ne smiju do-spjeti u okolis. Stoga Vas molo da stare uredaje zbrinete preko odgovarajućih sabirnih sustava.
Elektricni i elektronicki dijelovi cesto sadrze sastavne dijelove koji pri pogresnom rukovanju ili pogresnom zbrinjavanju mogu predstavlati potencijalnu opasnost za ljudsko zdravlje i okolis. Ipak, ti sastavni dijelovi nužni su za propisani pogon uredaja. Uredaji označeni ovim simbolom ne smiju se odlagati u komunalni OTPad.
Motorno i loživo ulje, diesel i benzin ne smiju tspjeti u okoliš. Molimo Vas da šti-tite tlo i staro ulje zbrinete u skladu s propi-sima.
Napomene o sastojcima (REACH)
Aktualne informaci je o sastojcima możete pronaći na stranici:
www.kaercher.com/REACH
Stupnjevi opasnosti
OPASNOST
Tip: 1.353-xxx 1.367-xxx
2006/42/EZ (+2009/127/EZ)
2011/65/EU
2014/30/EU
Primijenjene uskladene norme:
EN 60335-1
EN 60335-2-79
EN 60335-2-79
EN 55014-1: 2006+A1: 2009+A2: 2011
EN 55014-2: 2015
EN 61000-3-11:2000
EN 62233: 2008
HD 16/15-4 HD 20/15-4
HD 25/15-4
EN 61000-3-2: 2014
HD 9/50-4 HD 13/35-4
EN 60335-2-79
EN 60335-2-79
EN 61000-3-11:2000
Chairman of the Board of Management

S. Reiser
Director Regulatory Affairs & Certification
71364 Winnenden (Germany)
Tel.: +49 7195 14-0
Fax: +49 7195 14-2212
Winnenden, 2019/05/20
Tehnicki podaci
| Tip HD 25/15-4 HD 20/15-4 HD 16/15-4 | ||||
| Strujni priključak | ||||
| Napon V 400 400 400 | ||||
| Vrsta struje Hz 3~50 3~50 3~50 | ||||
| Priključna snaga kW 13 11,5 7,5 | ||||
| Mrežni osigurač (intertni) A 25 25 | 16 | |||
| Maksimalno dozvoljena impedancija | Ohm | (0,072 +j0,045) | (0,072 +j0,045) | (0,072 +j0,045) |
| Zašita | IPX5 | |||
| Priključak za vodu | ||||
| Maks. dovodna temperatura | °C | 60 60 | 60 | |
| Dovodni tlak (maks.) | MPa (bar) | 1 (10) | 1 (10) | 1 (10) |
| Min. dovodni protok | l/h (l/min) | 3000 (50) | 2500 (42) | 2000 (34) |
| Duljina dovodnog crijeva (min.) | m 7,5 7,5 7,5 | |||
| Promjer dovodnog crijeva (min.) | inč 3/4 | 3/4 3/4 | ||
| Visina usisavanja iz otvorenih posu da (20°C) | m 0,5 0,5 0,5 | |||
| Podaci o snazi | ||||
| Radni tlak vod (sa standardnom mla-znicom) | MPa (bar) | 3...15 (30...150) | 3...15 (30...150) | 3...15 (30...150) |
| Maks. dozvoljeni tlak | MPa (bar) | 19,5 (195) | 19,5 (195) | 19,5 (195) |
| Protok vode | l/h (l/min) | 2500 (41,67) | 2000 (33,4) | 1600 (26,7) |
| Veličina mlaznice za standardnu mlaznicu | -- 155 125 100 | |||
| Povratna udarna sila ručnog pištolja za prskanje | N | 120 96 | 77 | |
| Radni mediji | ||||
| Količina ulja za pumpu l | 1,3 1,3 1,3 | |||
| Vrsta ulja za pumpu | SAE 15W40 | |||
| Dimenzije i težine | ||||
| Duljina x širina x visina | mm | 1040 x 686 x 1080 | ||
| Težina | kg | 119 | 117,2 10$5 | |
| Tlak zraka u gumama | MPa (bar) | 0,20 (2,0) | ||
| Uvtvržene vrijednosti prema EN 60335-2-79 | ||||
| Vrijednost vibracije na ruci | ||||
| Ručna prskalica | m/s2 | 3,6 4,6 5,3 | ||
| Cijev za prskanje | m/s2 | 6,0 5,9 5,7 | ||
| Nepouzdanost K | m/s2 | 1,1 | 1 | 1 |
| Razina zvučnog tlaka LpA | dB(A) | 76 80 | 79 | |
| Nepouzdanost KpA | dB(A) | 3 3 | 3 | |
| Razina zvučne snage LWA + nepouz-danost KWA | dB(A) | 93 97 | 96 | |
Pre prve upotrebe Vaseg ureada procitajte ove originalno
www.kaercher.com/REACH
Stepeni opasnosti
OPASNOST
Napomena koja ukazuje na reposredno pretecu opasnost koja dovodi do teških telesnih povreda ili smrti.
UPOZORENJE
Napomena koja ukazuje na eventualno opasnu situaciju koja moze dovesti do teskih telesnih povreda ili smrti.
△OPREZ
Napomena koja ukazuje na eventualno opasnu situaciju, koja moze izazvati lakse telesne povrede.
PAZNJA
Napomena koja ukazuje na eventualno opasnu situaciju koja moze izazvati materijalne stete.
Namensko korišćenje
Ovaj uredaj za ciscenje pod visokim pritiskom koristite iskljucivo:
- za ciścenje masina, vozila, zgrada, alata.
- uz primenu pribora i rezervnih delova koje odobrava Kärcher.
2006/42/EZ (+2009/127/EZ)
2011/65/EU
2014/30/EU
Primenjene uskladene norme:
EN 60335-1
EN 60335-2-79
EN 60335-2-79
EN 55014-1: 2006+A1: 2009+A2: 2011
EN 55014-2: 2015
EN 61000-3-11:2000
EN 62233: 2008
HD 16/15-4 HD 20/15-4
HD 25/15-4
EN 61000-3-2: 2014
HD 9/50-4 HD 13/35-4
EN 60335-2-79
EN 60335-2-79
EN 61000-3-11:2000
Chairman of the Board of Management

S. Reiser
Director Regulatory Affairs & Certification
71364 Winnenden (Germany)
Tel.: +49 7195 14-0
Fax: +49 7195 14-2212
Winnenden, 2019/05/20
Tehnicki podaci
| Tip HD 25/15-4 HD 20/15-4 HD 16/15-4 | ||||
| Strujni priključak | ||||
| Napon V 400 400 400 | ||||
| Vrsta struje Hz 3~50 3~50 3~50 | ||||
| Priključna snaga kW 13 11,5 7,5 | ||||
| Mrežni osigurač (intertni) A 25 25 | 16 | |||
| Maksimalno dozvoljena impedancija | Ohm | (0,072 +j0,045) | (0,072 +j0,045) | (0,072 +j0,045) |
| Stepen zašite | IPX5 | |||
| Priključak za vodu | ||||
| Maks. dovodna temperatura | °C | 60 60 | 60 | |
| Dovodni pritisak (maks.) | MPa (bar) | 1 (10) | 1 (10) | 1 (10) |
| Min. dovodni protok | l/h (l/min) | 3000 (50) | 2500 (42) | 2000 (34) |
| Dužina dovodnog creva (min.) | m 7,5 7,5 7,5 | |||
| Prečnik dovodnog creva (min.) | inč 3/4 | 3/4 3/4 | ||
| Visina usisavanja iz otvorenih posuda (20°C) | m 0,5 0,5 0,5 | |||
| Podaci o snazi | ||||
| Radni pritisak vode (sa standardnom mlaznicom) | MPa (bar) | 3...15 (30...150) | 3...15 (30...150) | 3...15 (30...150) |
| Maks. dozvoljeni pritisak | MPa (bar) | 19,5 (195) | 19,5 (195) | 19,5 (195) |
| Protok vode | l/h (l/min) | 2500 (41,67) | 2000 (33,4) | 1600 (26,7) |
| Veličina mlaznice kod standardne mlaznice | -- 155 125 100 | |||
| Povratna udarna sila ručnog pištolja za prskanje | N | 120 96 | 77 | |
| Radni mediji | ||||
| Količina ulja za pumpu l | 1,3 1,3 1,3 | |||
| Vrsta ulja za pumpu | SAE 15W40 | |||
| Dimenzije i težine | ||||
| Dužina x širina x visina | mm | 1040 x 686 x 1080 | ||
| Težina | kg | 119 | 117,2 10$5 | |
| Pritisak vizduha u gumama | MPa (bar) | 0,20 (2,0) | ||
| Izračunate vrednosti prema EN 60335-2-79 | ||||
| Vrednost vibracije na ruci | ||||
| Ručna prskalica | m/s2 | 3,6 4,6 5,3 | ||
| Cev za prskanje | m/s2 | 6,0 5,9 5,7 | ||
| Nepouzdanost K | m/s2 | 1,1 | 1 | 1 |
| Nivo zvučnog pritiska LpA | dB(A) | 76 80 | 79 | |
| Nepouzdanost KpA | dB(A) | 3 3 | 3 | |
| Nivo zvučne snage LWA + nepouzdanost KWA | dB(A) | 93 97 | 96 | |
Ipei npBpBOTo n3noJ3BaHe Ha BaunypeI npOeTeTe TOBa OpiHnHaHNO IHCTpyKUy 3a pa60Ta, DeiCTBaIte Cnpoed Hero I rO 3ana3eTe 3a IO-KbCHO n3PON3BaHe nn 3a CneDbaunr npITexKaTeI.
-ПредипьрвOTуckанБ ekрноataця Неременно почетete Уптba-heTo 3a ekрноataця №5.951-949.0!
-При ТранспорTN DeфektN He3a6abHNo HΦopMnpaIte TbproBeua.
-При разonaкован поверете даль ВОпаковыт ЛИncВаТ пинадлжноCTNOT OKOMЛКТOBKaTа Ил Има NOВpe-дени eIemehTN.
CbDtpxahanne
Ona3BaHe Ha okolHaTa cpea BG 1
CTeneHnHa onachocT. .BG1
Ynotpe6a no npedHa3NaueHne BG 2
ElenmEnHa ypea .BG2
CnmboHa ypea... BG 2
YkaaHna 3a 6e3oNaChocT...BG3
PpeDn3Hn npncno6JeHna . BG 3
ПусканБЕКСПЮАТAZA..BG4
06cnykBaHe BG 6
TpaHcnpT. BG 8
CbxaHHeHa ypea...BG8
PnKn noDpBxka .BG8
POMOUI npHn3npaBHOCTN..BG9
TapaHcna BG 11
IpnHaJIeJXHOCTn Ipe3epBHN
UacTn. . BG 11
ECДeКлараця3a cboTBetCTBnE. BG12
TexHnueckn daHHN BG 13
www.kaercher.com/REACH
CTeNeHn Ha onaCHOCT
ONACHOCT
Yka3aHue 3a HenocpeDcMbeHo apo3raua onachocm, kOmo bodu do mexku melecHu HapaHaeHua Unu do cMbpm.
△PENEYNPEXDEHNE
Yka3aHue 3a 6b3MOxHa onacha cumya- u, KoMo MoKe da doBeDe do mexku meNeCHu HapaHraHua unu do cMbpm.
△PENEIA3JNBOCT
Yka3aHue 3a 6b3MOxHa onacha cumya- uja, Kjmo moKe da doBeede do neku Ha- paHraHu.
BHUMAHNE
Yka3aHue 3a 6b3MOxHa onacha cumya- u, kOmo MoKe da doBeede do Mamepu-anHu uemu.
YnoTpe6a no преднзнayehne
I3noJI3BaIte To3n ypeI 3a noUcTbaHe C BnCOKO HaJIraHe caMo:
-3a NOUHCTBaHe Ha MaUNHH, INpeBO3HN CpeIcTBA, CTPOITeJIH NOKHTpyKUIN, INHCTpyMeHTN.
- c no3BoJeHn ot Kepxep npHaJneJHoCTn n pe3epBHN qactn.
ElenentnHa ypeda
Bux cxemume Ha cmpaHuza 2
1Пистолета рьчно пьбckaHe EASY!Force
2 PpeDnna3Ha cnnpaupka
3 NocT Ha cnycbKa
4 PpeDna3eH loct
5 Bbptaue ce kynnyn (He npn HD 16/15-4 Cage)
6 Mapkyu 3a Bucoko Hanelrahe EASY!Lock
7БpoaHa pa6oTHnTe yacObe (onzna)
8 NocTabka 3a CTomaHeHaTa Tpb6a
9Пььзраа ckoba
10ДьркATEнHaMapkya/ka6eJa
11 Kniou Ha ypeda
12 PpO6Ka
13 KoHTpOHa IaMna Pa6OTHO CbCToHHe / Hen3npaBHOCT
14 3axpaHbau Ka6e n c uence
15 TbpnoBnHa 3a nbHeHe Ha MacNo (Ma-cneH ne3epBoap npn HD 25/15-4)
16 3axpaHbAHe c BOna CΦnTbP
17 PerynnpaHe Ha HaNraHTo / KOJIueCTBOTO
18 YeKMeJxke 3a npHaJnEeXHoCTM
19 BnHT 3a n3nyckaHe Ha macNo
20 Noka3aHne 3a HNBOTo Ha MacnTo
21 Izhov 3a BvcoKo haJrahe EASY!Lock
22 MaHOMeTbp
23 HanpeuHa noOpa 3a ToBapeHe Ha KpaH
24 CnIOBa IIO3a cbc cbeHNHTeHa raIka
25 Tpb6a 3a pa3npbckBaHe EASY!Lock
26 Bbptaepyntop Servo-Press
LBeTHo 06O3HaueHne
-ObcnykBaunTe enemEnTn 3a npoueca Ha o6cnykBaHe ca XbNTn.
-ObcnykBaunTe enemeHTn 3a noDdpbXka n cepBn3 ca CBETIOCNBn.
CnmbolnHa ypeda
Cunhume cmpyu noD haJnrahe MOZam npu HnpaBUNHO nO36aHe da ca onacHu. He hacoYeaume cmpyma KbM xopa, XueomHu, akmuHueleKmpuuecku ypeDu unu KbM camu yped.
Opanchocm om yepexka-he npadu 3aepb3hana boda! Ppe3 3umama cbxpaHraume ypeda oomnonHe NomeueHue unu 2o u3npa3Heme.
△PENEYNPEXDEHNE
Cb6nrodaaume pa3npope6ume Ha bodo- cna6dumelhama komnaHua.
Cbajacno bauohme pa3nopeo 6u He ce no3e0nraea u3no13aHe Ha ypeda Bmpexama 3a numeuHa 8oda 6e3 pa3deNumen Ha cucme

mama. ɪnənɪsəume nɒdxdərɪpɑa3dɛŋumæn ha cucmemama ha φúpma KARCHER unu kamo anmephamueba pa3dɛŋumen ha cucmemama cβeɪn. EN 12729 mun BA.
IpeMuHaama npespa3eNumenHa cucmemama oda ce onpeednKaMo He2oHa 3a nueHe.
△PENEIA3JNBOCT
Cebp3eaume cucmemnpua3denumen en buhau KbM 3axpaheauy bodonpooD, hukozadupekmno Kbmypeda.
Yka3aHnna 3a 6e3oNaCHOCT
ONACHOCT
Onachocm om HapaHaeaHe!
- ɪnənɪ38aʊme cʌmO opUzɪHaɪnHú Mæp-KyU 3a 6uCOKo HʌŋzaHe.
- Mapkyubm 3a bucoko haJraane u npucnooc6neHuemo 3a npbckane mp8ea da 6bdam noDxodu 3a nocoyuHomo e TexHuueckume daHnu pa6omHo cBpXHaJraane.
- 136ja8aume KOhmakm c xumukanu.
- ExeDHeBNO npoBepraMaMe mApKyua 3a bucoKo HnJa2aHe. He npoBjNxBaAume da u3noJ3BaUme npesbhamume Mapkyu. Ako ce buxda bHunHm nIacm Ha meIma, He u3noJ3aUme nooepe MapKya 3a bucoKo HnJa2aHe.
He npodbIgkaaume da u3noI3eame Mapkyu 3a bucoKo Hnjahe c nope- deHa pe36a. - Ponnaaume Mapkyuime 3a bucoko HaJIaZaHe maka, ye da He MoKe da ce npemuHaBa ebpxy mx.
He npodbIxabaume da u3noI3bame Mapkyu, bpxy koumo e npemuHamo, Koumo ca npezhamu unu ydapeHu, dopu u aKO Hama buDUMo yepkdaHe.
Cbxpahraume Mapkyume 3a bucoko Hnnahe maka, ye da He Hacmbam MexahuHu HamoeapeaHua. - Pno ypeDa/akcecoapnte He Tp8Ba da ce npednpneMaT npomeHn.
PpeDna3Hn npncnoc06JeHnA
IpeHn3HnTe npncno6neHnCnyKaT 3a 3aHTa Ha notpe6nteHa Tp6Ba Da ce N3KnOyBaT nN da Ce npomeHr FyHKuNTe IM.
KlouHa ypeda
ToI npedotbpaTBA He npedHamepeHOTo 3aDeiCTBaHe Ha ypeHa. Pn npekbcBaHe Ha pa6ota npn npn cnpaHe Ha ekcnloataueta Da ce n3KnIOUH.
PpeDna3Ha cnpaquka
IpeHn3HOTo CnpaHNo 3b6Ho KOJIeNo Ha nCTOJeTa 3a pbuHO npbCKaHe IpeDoTbpaTBA HeBONHO BKNIOUvaHe Ha ypeHa.
IpeINBEN BeHTnC nHeBMaTnueH npekbCbay
-Пи hamajBaHe Ha KOJIuYeCTBOTO Ha BOdATo Ha c peRyInpaHe Ha HAIraHe-TO/KOJIuYeCTBOTo IpeINBnT BeHTnI OTBapr N eDHa YacT OT BOdATo N3TuHa 6bpaTHo KbM CMyKaTeHnHa TcPaHa Ha NOMnata.
-Ako ce noBbpxe nuctoJe 3a pbuho npbckaHe, ppeINBHnT BeHTnI ce otBapra n cyaTa BOda n3TuHa o6paTHO KbM CMyKaTeJIHaTa CTpaHa Ha NOMta. IHeBMaTNUHnT ppeKbcBauch Na ppeINBHnBEHTnI NOdaBa CNrHaN KbM ynpabJIeHnETo, KOeTO n3KJIIOvBa NOMnata cJeD np6J. 30 cekyHn nocJeBauch XoD (He HD 16/15-4).
-AKO INCTOJeta 3a pbUHO npbCKaHe OTHOBO CE OTBOpN, INHEBMATuHnT npeKbcBaHu rIbaTa Ha cIINHDbpa OTHOBO BKJIIOUyBa NOMnata.
IpeINBHNrT BeHTnI INHeBMaTHNrT IpeKbcBaU ca HactpoEHN Pha6pHNO n ca nnom6bnpaH. HactpoJka camo B cepBu3a.
Φa3OBA 3aUNTa npn n3nn3aHe OT cTPOJ
Φa3OBaTa 3aUHTa npn n3JIIN3aHe OT cTpoI ppeKbCBA TOKOBaTa Bepnra, KOraTo daDeHa φa3a OCTaHe 6e3 HAppeXeHne.
П配电ьсвач 3a 3aцNTа на hamOTКITE
ПпeКьСВачьТ 3a 3aциТа Ha HAMOTKITE B HAMOTKaTа Ha MOTopa Ha 3aДВИЖВaHETO Ha ПOMnATA ИЗКЛЮЧВa MOTopa пи ТерМИЧно пpeTOВapBaHe.
PpeDna3eH KlaanH
Pn He3npaBHOCT Ha NHeBMaTnUHnI npKbCBauch Ce OTBapr npedna3HNr TKnAnaH. To3n KpAne Hactpoeh pa6pnuHo n e nnom6bpah. HActpoikata He 6nBa da ce npomeh.
Пускан eКсплоataця
ONACHOCT
Onachocm om HapaHraBaHe! Ypeobm, 3aXpaHbauUme Ka6enu, Mapkyubm 3a pa60ma noD HnraAne u epb3Kume mpr6ea da6bdam e omnuHo ccbcmOHaue. Ako ypeobm He e o omluuHO cbcmOHaue, u3noJ3-BAHemo My e 3abpaHeno.
Да ce повери НвOTO Ha MacnotO
OTPeTe Bbpxa Ha KaNaKa Ha MacJeHnpe3epBoap (HD 25/15-4).
→Провере НИВОТо Ha MacNoTo Ha NOMnata NOД BUCOKO HAnЯгHe. HNBOTo Ha macNoTo Tp6Ba Da 6bIe Ha cpeDaTa Ha INdInKaUryTa 3a HNBOTo Ha MacNoTO.
→Пи Heo6xOIMocT da ce dOonee macNo(BnKTe TexHnueckn DaHHN).
MOnTnpaIte nIb3raaata cko6a
3aKpeTe PnIb3raUaTa cKo6a C YeTnpnte DOCTaBeHn 6OHTa.
MOnTnpaIte nucToJeTa 3a pBvHo npbdkaHe, Tpb6a 3a pa3npbckBaHe, IIO3a
Yka3aHHe: CnCTemata EASY!Lock cBbP3Ba KOMNoHEHTIte NocpeDCTBOM BUCOKOeΦeKTHBHa pe36a camo ceHNO 3aBbPTaHe-6bp30 nCnrgpHo.
△PENEYNPEXDEHNE
Onachocm om hapaHBeane npadu HeNoDxOaU npuaHdNekHocmu. H3noI3-BeAume camo npuaHdNekHocmu, Koumo ca pa3peWeHu 3a pa6omHomo HanraaHe Ha ypeDa (Buxme ,TexHuYeCKu daHnU"). Mohmupaume npuaHdNekHocmume camo npu u3KnUoyeH ypeD.
NocTaBeTe IIO3aTa 3a pa6oTa NOI BnCOKO HAnraHe Bbpxy Tpb6aTa 3a pa3- npbCKBaHe.
→ MoHTnpaIte cBeiHHTeHaTa rAka n 3aTeHHeTe Ha pBka (EASY!Lock).
→ CbpxeTe Tpb6ata 3a pa3npckBaHe c nictoJeTa 3a pbHNO npckaHe u 3aTeHHe Te 3dpabo Ha pbka (EASY!Lock).
MoHTnpaIe BbPraUna ce KynnyHr 3a CBbp3BaHe Ha MapKya 3a pa6Ota noi HanaRe He KbM NnCToJeTa. (He npH 16/15-4 Cage)
→ CbpxkTe Mapkya 3a pa60Ta noD BnCOKO Hajrahe C nIcToJeTa 3a pbHOn npckaHe n N3BOda 3a pa60Ta noD BN-COKO Hajrahe Ha ypeDa n 3aTeHete 3dpaboHa pbKa (EASY!Lock).
3axpaHbaHe c TOK
-ПараметриTe 3a CBbp3BaHe BuxTe OT TexHnueckn DaHHN.
- EneKtpnueckn n3BOD Tp86Ba da ce n3PbJHn OT eJeKtpoTeXnK n da CbOT-BetCTBa Ha IEC 60364-1.
△PENEYNPEXDEHNE
Ja He ce Haobuwa MaKcumAnHO donycmumomo NbIHO HanpeXeHue HaMpexamaHa eJeKmpueckama moka 3a npucbeUHrahe (Buxme TexHuceku daHnu).
Ipu HeacHomu no omHoweHue Ha HauyHomo Ha Bawama moka 3a npucbeDuHahe PbHNO HanpexKeHue Ha MpeXama MoJra da ce cBpxkeme c Bawemo npednpurmue no eNeKmpo3axpaHe.
ONACHOCT
- Henodxoaduume eekmuuecku yobjxumenu Ka6enu Mozam da ca onachu. Ha omkpuno u3no3baune camo cboemno pa3pewehme u cbomemno 0603naeHu eekmuuecku yobjxumenu Ka6enu c docmabhyo HanpeuHO ceehue Ha Ka6eNume: 1 - 10 M:4 MM2 10 - 30 M:6 MM2
Pa3BnIe 3axpaHbau nka6en I ro noJnoKTe Ha noDa.
BknHcyTe 1eNceJa B KOHTaKaTa.
3axpaHbAHe C BODa
△PENEYNPEXDEHNE
Cb6nlodaaume pa3npope6ume Ha bodo- cha6dumenHama komnaHua.
Cb2nacHo bauHume pa3npoed6u He ce no3e0nraea u3no13baHe Ha ypeDa Bmpexama 3a numeuHa boda 6e3 pa3deNumen Ha cucme
mama. ɪnənɪsɪeʌmæ nɒdxdərɪpɑa3dɛnʌmɛn ha cʊcmemama ha φuːpma KʌRCHER unu kamɑ anmephʌmæba pɑa3dɛnʌmɛn ha cʊcmemama cβaŋ. EN 12729 mun BA. IɒpμuHaʌmɑ nɒpe3 pa3dɛnʌmɛn ha cʊcmemama eoda ce onpɛdɛnɪ kamɑ he- zoðHa 3a nuehe.
△PPEIⅡA3JIINBOCT
Cebp3aume cucmemnna pa3denumen buhazu KbM 3axpaheauu eodonpoeod, Hukoza dupekmno Kbmypeda.
I3NCKBaHnKbM KaYeCTBaTa Ha BODaTa:
| Параметри Стойност | |
| pH-стийност 6,5...9,5 | |
| е leктрическа провдимост | max. 2000 μS/cm |
| Вълеворουи < 0,01 mg/l | |
| Хлорид < 250 mg/l | |
| Калций < 200 mg/l | |
| ОвSETS Тьрдост < 28 °dH | |
| Желаязо < 0,2 mg/l | |
| Мангалан < 0,05 mg/l | |
| MeД < 0,02 mg/l | |
| Сулфат < 240 mg/l | |
| Актувен xлор | < 0,1 mg/l |
| бешлошни мирниши | |
3a napametpnte 3a CBbp3BaHe Bux Ta-6eIkata Ha ypea/TexHnuecknte napametpn.
→ H3noI3BaIte ycInJeH Mapky (He ce cBdIbpxa B DoCTaBHnA o6m). DnaMeTbp MNHMym 3/4".
→ПОДВьржete Маркуа Ha n3BODa 3a BOda Ha ypeda.
→ NoBbpxKeTe MapKyua Ha BOdHnK paH.
→ CtaHdapTHOTO MRCTO 3a CBbp3BaHe Ha ypeDa He e NOxOJaIO 3a peKIM Ha BCMyKBaHe, 3aTOBa H3No3BaIte MapKyu 3a BCMyKBaHe Ha KepXep (DnAmetTbp MNHmym 1 cΦnITbP (npnHaJNeJXHOCT).
YpeDa da ce 06e3Bb3duyu
OTBopeTe 3axpaHbHeTo C BOna.
Pa3BnIteIIO3aTa.
3aDcTbHe Ha loCTa Ha nCtOJeTa 3a pBcHo npbcKaHe.
BknIOUeTe ypea n ro ocTaBeTe da pa6OTn DOTORaBa, DOKaTO BOdTa 3anOHe Da n3Tua 6e3 MexypyeTa OT Tpb6aTa 3a pa3npbckBaHe.
YpeDa Da ce N3KJIIOUH N OTHOBO Da ce 3aBne IIO3aTa.
06cnyxbahe
ONACHOCT
- Onachocm om hapaHae! Huko2a He u3noJ3BaUme ypeDa 6e3 mpb6a 3a pa3npbckBaHe. PpeDu eeyko u3noJ3BaHe npoeepBaUme 3dpauHama Ha 3akpenBaHe Ha mpb6ama 3a pa3npbcKaHe. 3aBuHmBeHemo Ha mpb6ama 3a pa3npbckBaHe mpa6ba da ce u3-ebpwa 3dpaboHa pbka.
- Ppu u3noJ3BaHe Ha ypeDa 6 onaChu 30Hu (Ha np. 6eH3uHocMaHuu) mpa6- 8a da ce 63emam noD eHUMaHue cbom- 8emHume pa3nope6u 3a 6e3oNaHocm.
- Onachocm om hapaHae! Io epeMe Ha pa6oma nocmb m Ha cnycbka u npedna3Huam nocm He mp8ea da 6b-dam 6nokupaHu.
- Onachocm om hapaHbaHe! Ppu nopepehen npednaeH nocm, ce cebpxkeme c Knuehmckama cnyx6a.
- Onachocm om hapaHraHua nopadu bOdHa cmpy noB buCko hAnyaHe. PpeDu EcuKu pa6omu no ypeDa, Ha-muche Me HnpeD nped naZumena Ha nucmonema 3a pb4Ho npbckaHe.
△PENEIA3JIINBOCT
Noucmeaume deusamenume cmo Ha Meema cbc cbomeemHu macnoynoumeu (3auuma Ha okonhama cpeda).
OTbaprHe/3aTbaprHe Ha nncToJeTa 3a pbyHo npbckaHe
OTbaprHe Ha nIcToJeTa 3a pbUHO npbckaHe:HaTnCHTe ppeDna3HnA loCT INIOCTa Ha cnycbKa.
3aTbaprHe Ha nIcToJeTa 3a pBHyOn npbckaHe:ocBo6OJeTe npedna3HnI NOCT IIOCTa Ha cnycbKa.
BkIIOUyBaHe Ha ypeDa
OTBopeTe 3axpaHbHaHeTo C BOda.
Bknjuye tce ence na B eeneKtpnueckata mpeka.
NocTabeTe KInOua Ha ypeHa Ha ,I".
ocbo6oJeTe nIcToIeTa 3a pbUHO npbCKaHe, KaTO 3a ueIHa36yTaTe Ha3aInpedna3HaTa cnIpaUka.
OTBOpTe nIcToIeTa 3a pbUHO npbCKaHe.
Pa6ota c BnCOKO HaJraHe
YpeBte o6OpyDbH cbc CneHNHe IIO3n:
-
Cniloba n03a, 25^ bIbI Ha pa3npbcKBaHe
-
PoToPHa nI03a
CnloBa IIO3a
-3a NaH-OBuHaHHeTu pa6oTu no NouchTBAHETO
PotopHa IIO3a
- 3a ynpnte 3ambpcBaHnA
Hac troka pa6oTHo haIraHe n KOJIuYeCTBO Ha IOnaBaHe
ONACHOCT
Ipu Hacmpoukama Ha HanelaHemo/Kolu-uecmbomo 6Humabaume 3a moa, da He ce pa38ue 3abuHmhaHemo Ha mpb6ama 3a pa3npbckeaHe.
Pa6oTHOHaJaRaHeNDe6uTaMoraTda ce HAcTpPoTnHa 3BeHOTo Ha NOMnTa nHa NtOteTa 3a pbUHO npbCKaHe.
HameleHne Ha HnraHeTo/koNueCTBOTO He Tp6Ba Da ce n3BbPwBa eHOBpeMeHHo Ha DbaTa peryIaTopa. 3aTOba HenpeMeHHo Da ce cna3Ba CJeHnHaunn Ha DeiCTBVE:
PerynipaHe Ha HanaRaHeTo/De6uTa Ba 3BeHOTo Ha NOMNaTa
HaMaJIeHHeTo Ha HaNJaTaHTo/Je6nTa Ha NtOJTe 3a PbUHO NpBcKaHe Da ce HAcTpOn Do MaKcImaJIHo pa6oTHo HaNJaHa He n De6nT(+).
Pa60THOTO HaJraHe HdeBuTa Da ce HactpoT NocpeDCTBOM 3aBbPtaHe Ha peryIInpaHTo Ha HaJraHaTeo/KoJIuYe-CTBOTO Ha 3BeHOTo Ha NOMnata. Pa60THOTO HaJraHe MoKe Da ce OTte C MaHometbp.
OTBopeTe nIcToIeTa 3a pbUHO npbCKaHe.
PerylnpaHe Ha HanelraHTo/De6nTa Ha nIcToJeTa 3a pBHyO npbckaHe
HaMaJIeHHeTo Ha HAnIraHEno/Je6nTa Ha 3BeHOTo Ha NOMnata Da ce HAcTpOn IocpeDCTBOM 3aBbPtaHe NO NOCOKa Ha YacOBHNKOBATA CTpeJIka Do MaKcImaJIHo pa6OTHo HAnIraHe n De6nT.
Pa60HOTo HaJIraHe n De6nTa Da ce HAcTpoT NocpeDCTBOM 3aBbPtaHe Ha peryIINpaHETo Ha HAIraHETO/KOIueCTBOTo HA INCTOJIeTa 3a pbUHO npbCKaHe (+ / - )
OTBopeTe nucToJeTa 3a pbuHo npbckaHe.
PpeKbcBaHe Ha pa6ota
3aTbaprHe Ha nuctoJeTa 3a pbHOn npbckaHe.
YpeBt ce n3KnIOuBa cIeI 30 cekyHn.
noDCnIpyTe NICTOJIeTa 3a pbUHO npbCKaHe, KaTo 3a ceJIta n36yTaTe HAppei npedna3HaTcnpaYka.
Пистолеета 3a рьчно пьбckahe BKЛ.Трьбата 3a pa3npьсквае да ce ппберат в мястOTO 3a сьхраhoeнe наТрьбата 3a pa3npьсквае.
Cnei npekbcBaHeTo:
ocbo6oJeTe nIcToJIeTa 3a pbUHO npbCKaHe, KaTO 3a cIeNTa H36yTaTe Ha3aI npedna3HaTa cnIpaUka.
OTbOpTe nIcToIeTa 3a pBHyO npbckaHe.
YpeDbT OTHOBO Ce N3KJIIOUvBa.
I3KJIouye ypeda
Cnei pa6ota cbc cbDbpxkaa coJ BOda (Mopcka BOda) n3nlaKHeTe ypeDa 3a MNHmym 2-3 MNHyTN npN OTBOpEn NICTOJeT 3a npbCKaHe Ha pbKa C BOda OT BOdONPOBOda.
3aTbopeTe BXoJa 3a BOJaTa.
OTBopeTe nIcToJIeTa 3a pbUHO npbCKaHe.
BknIOye Te nomnata c npEkbCbauHa ypeDa n octabeTe da pa6oTn 5-10 ceKyn.
3aTbaprHe Ha nIcToJeTa 3a pBHyO npbckaHe.
NocTaBete KJIIOUa Ha ypeHa Ha noIooXeHne ,0/OFF".
→Издьрпвайтейцениета OT KOHTaKta camo cbс cyxnpbce.
OTcTpaHeTe 3axpaHbHaTeO c B0da.
3aDéčTbaǐte πιcToJeta 3a npbCKaHe Na pbka,ДOKaTO ypeJa ocTaHe 6e3 HaJIraHa.
→ NOIDcHpyeTe NnCTOJEtTa 3a pByHO npbCKaHe, KaTo 3a ueJI Ta n36yTaTe HAnpei PpeDna3HaTa CnnpaUka.
→Пиберетe3axpaHbuaЯka6eJ,Mapkya3a pa6oTa noiHaJIraHeи npiHaJIeXHOCTnTe B ypeJa.
3aunTa OT 3ampb3BaHe
BHUMAHNE
Onachocm om yepexkahe! 3ampb3HaIama boda e ypeda moke da nopedu ya-cmume Ha ypeda.
Ipe3 3nMaTa cBxpaHbAaTe ypeDa B OTo- PnHeNo NomeuHne NIn rO n3npa3HeTe.
Pn no-npOdbJxHTeJIHN npOn3BOcTBeHn nay3n ce npenOpbUba, B ypeDa da ce Ha-nOMn aHTnΦpn3.
a ce npoodyxa BodaTa
Da ce pa3BnT 3axpaHbAunr Mapkyu 3a BODa n Mapkyua 3a pa6oTa noJHaJIyraHe.
YpeDa Da ce npoDyxa C Bb3dyx NOD HaJIraHe.
YpeDaIaCe n3nJaKHe c aHTnΦpN3
YkaaHne:
I3noJ3BaIte KOHBeHcNoHaJIeH npenapat 3a 3aUHTa OT 3ampb3BaHe 3a aBTOMo6nJI Na TIOKOJHa OCHOBA.
a ce cna3BaT pa3nope6nte 3a pa6ota Ha npou3BOdntela Ha npenapaTa 3a 3aun-Ta OT 3aMpb3BaHe.
TpaHcnpT
△PENEIA3NMBOCT
Onachoc om HapaHbaHe u yepexkaHua! Ppu mpancnpupahe umaume nped bud meanomo ha ypeda.
BHUMAHNE
Ipu mpaHcnpmupane npedna38aume Iocma Ha cnycbka om nopeda.
TbTyBaHe
→ Hatachete nIb3raaata cko6a haony n 6ytaTe ypeda.
TpaHcnpT c KpaH
3akpenete npncnocobneHHeTo 3a NOB-dirane B cpeaTa Ha HAnpeuHaTa nOp-nopa 3a TOBaPeHe Ha KpaH
ONACHOCT
Onachocm om hapaHBeane npadu npeo-6bpham yped
Cna3eaume MecmHume pa3npope6u 3a npedna3eane om 3nnonyku u yka- 3aHura ma 3a 6e3onacHocm.
- Ppeu BCEku mpaHcnpm C kpan npoeepaume npucnocobenuemo 3amobapene Ha kpan 3a yepexdaHua.
- Ppeu 8ceku mpaHcnpm c kpaH npoepepaume nodeMHomo npucnoc6neHue 3a yepexkahe.
- Pobduaume ypeda cmo 3a moea npucnoocobeneue 3a moapeHe Ha KpaH
He u3non3eaume cebp3eauuu eepuzu.
- Ocuypeme npucnoc6neHuemo 3a noeduahe om HenpeHaMepeHo om Kaayane Ha moepa.
- OmcmpaHeme mpb6ama 3a pa3npbcKbaHe c nucmonema 3a pbuHO npbckaHe u omdeHume npedMemu npedumpaHcnpma c kpaH.
- No epeme Ha onepaumma 3a noeduzaHe He mpancpmupaume npedmemu ebpxy ypea.
- Πο360JEHO e mpaHcnpmupaHemo Ha ypeda c KpaH cAmO om luuca, Koumo ca uHcmpyKmupaHu 3a o6cnyXbaHe Ha KpaHa.
- He cmoûme noð moeapume.
BHumaaume 3a moBa, e onachama obnacm Ha KpaHa da He ce Hamupam xopa.
He ocmae me ypea 6e3 ha6nioeHue Ha KpaHa.
TpaHcnpT B npeBo3Hn cpeDCTBa
→ПиТранспгВ abTomobии ocngrypЯBaIte ypeda cblacHO BaIIndHITeДИрЕКТИВ ИpoTиB Пь3raHe I ppeo-6pbuane.
CbxpaheneHa ypeda
△PENEIA3JNBOCT
Onachocm om HapaHrahe u noepeda! Ppu cbxpanHeue umaume nped eud meaIomo Ha ypeda.
CbxaHHeHTo Ha To3n ypeI e I03BOJeHo cMo BB BbTpeuHn NOMEueHn.
PnKn n PndpBxka
ONACHOCT
Onachocm om HapaHraBeHe nopadu He npedHamepeHo nomeaJau yped u enekmpueecku ydap.
Ipeu ecuku deu hocmu no ypda moa da ce u3knouu da ce u3ea du uencena.
Poaepbxxka
Hcnekua 3a cnryphocT/OrOBop 3a nodpbXka
Mokete da dorobopnte peoOBHa HnCneKu 3a cnpyhoc T Baunr TbproBeu nIi Da ckIOUHTe dorOBop 3a noDpBxKa.
MolnyckaiTe cbbetn.
Ppeu Bcya ekcnloaataua
Пювере тахсаньшия кавел. 3axpanbaит кавел не Трава да 6бдп повешен (onaCHOCT OT TOKOB ydap).Пювешен 3axpanbaц кавел Tрябва He3a6abHо Да ce cmeн OT OTOpNiupaH серВИЗ ИЛN eLEKТpoTEXнК.
Пюверете Маркуа 3a pa6oTa по налягане 3a уржданna (onaCHOCT OT nponykbahe).
He3a6abHcmeHeTe Mapkya 3a pa6oTa noHaIraHe.
Пюверете НИВОТо Ha MacNOTO OT ИнДиКацЯтА Ha MacNOTO Ha NOMna BUCOKO HANЯгHe.
Ako macnoto e MneKOno6Ho (Boa B Macnoto), BeHa rnoTbpcTe cepBn3a.
YpeDa (nomnata) da ce npoBepn 3a xepMeTNUHOCT.
3 KaKn BOda Ha MNHyTa ca DonyCTUMN MOraT Da N3Tuayat OT DonHaTa CTpaHa Ha ypeDa. Ppi No-CuHn HexepMeTuHHOCTN NObpcTe cepBu3a.
ExceMnH
→Почистефпгьра Ha 3axpaHbaHeTo C BODa.
Пюоверете наяганeto Ha вьздуха на Гумпт (Викт "ТexнческДаHHN").
Ha Bcekn 500 pa6oTHn Yaca, MmHmym exKeOrdHo
→ AnraxupaTe cepBn3a c noDpBjKka Ha ypeHa.
→ CMeHЯIte MacJIoTO Ha NOMna BnCOKO HAnJaHaHe.
CmHa Ha MacJo
BndaHaMacnoToN KOJnueCTBOTo Ha nblHeHe BnKTeB"TexHnueCKn DaHHn".
Da ce pa3BnE BnHTa 3a n3nyckaHe Ha MacNoto.
→ MacnoTo Da ce n3nyche B npneMHnA CbD.
Да ce 3aВиЕ BИNTa 3a ИЗпскaHe Ha MacJIoTO.
HOBOToMaCNoDaCeHaNbJIHn6aBHO Do CpeJaTa Ha NOKa3aHHeTO 3a HNBOTO Ha MacNoTO.
Yka3aHne:
Bb3duyhnte mexypueta Tp6Ba da morat da ce npcbchat.
YpeBt He Cb3daBa HanaRaHe
- rpeuHa duo3a
Поберете паBNHЯ pa3Мер HaДIO-3ata(BNXTe,TexHnueCkn DaHHN").
-ДиэтaelnnaKhaTa.
IIO3aTa Da ce NOUCTN/CMeHN.
-3aMbpceHΦnITbp.
→Почисте Te ФиNTьра Ha 3axpaHbAHeTo C BODa.
Ja ce pa3Bne Kopnyca Ha qnTbpa, da ce cBaJn qnTbpa, da ce nouchtn n da ce NOCTABN OTHOBO.
-Bb3DyxBcnCTemaTa
Ypea da ce 06e3Bb3dUwN.
Pa3BnIte IIO3aTa. BKnIOUeTe ypeDa n ro octabete Da pa6OTn DOTOraba,doKATO BOdAta 3aONuHe Da n3Tnua 6e3 MexypueTa OT Tpb6aTa 3a pa3npbCKBaHe. YpeDa Da ce N3KIOUH N OTHOBo Da ce 3aBne IIO3aTa.
-3axpaHbAunTe Tpb6OpPobOuN KbM NOMnata He ca XepMeTuHn IIn ca 3a-NyWeHn
Провере TE BCИЧК 3axpaHBAUи npoBODи KbM NOMnTa 3a XepMeTNUHOCr IJIIN 3anyuBaHe.
Помпа Високо налгаге HexepMeTnчHa
3 Kaankn Boda Ha MNHyTa ca DoNyCTMn N MoRa Tda N3TuHaT OT DoNHaTa CtpaHa Ha ypeDa. PpN No-CINHn HexepMeTuHOCTN NOTbpcTe cepBn3a.

Chairman of the Board of Management
S. Reiser
Director Regulatory Affairs & Certification
71364 Winnenden (Germany)
Tel.: +49 7195 14-0
Fax: +49 7195 14-2212
Winnenden, 2019/05/20
TexHnueckn daHHN
| Тин HD 25/15-4 HD 20/15-4 HD 16/15-4 | ||||
| Еnéktroизханвае | ||||
| Нашистени V 400 400 400 | ||||
| Вид ток H兹 3~50 3~50 3~50 | ||||
| Присьединелна мошноct кW 13 | 11,5 7,5 | |||
| Предимател A 25 25 16 | ||||
| Мakсимално дочустима пьлно на- пшистени на мрөжatable | Ohm | (0,072 +j0,045) | (0,072 +j0,045) | (0,072 +j0,045) |
| Вид зашиота | IPX5 | |||
| Зханвае с вoda | ||||
| Temпература на постывацatta вoda, мakсимално. | °C | 60 60 | 60 | |
| Налгаме на постывацatta вoda (makc.) | MPa (bar) | 1 (10) | 1 (10) | 1 (10) |
| Дебит за постывацatta вoda, м. нимум. | П/ч (П/Min) | 3000 (50) | 2500 (42) | 2000 (34) |
| Дылхина на зашянвация марку (min.) | M | 7,5 7,5 | 7,5 | |
| Диаметър на зашянвация марку (min.) | Цр | 3/4 3/4 | 3/4 | |
| Висунна на засукваце OT ово- рени сбд (20 °C) | M | 0,5 0,5 | 0,5 | |
| Данни за мошноctта | ||||
| РавOTNO на лягане вoda (със.stан- дэрtnа дюза) | MPa (bar) | 3...15 (30...150) | 3...15 (30...150) | 3...15 (30...150) |
| Мakсимално дочустима наляганe | MPa (bar) | 19,5 (195) | 19,5 (195) | 19,5 (195) |
| Дебит, вoda | П/ч (П/Min) | 2500 (41,67) | 2000 (33,4) | 1600 (26,7) |
| Големина на дюза за.stандэрtnа dюза | -- 155 125 | 100 | ||
| Сида на оtmора на пистоleta за рьчно пьсканe | N | 120 96 | 77 | |
| Горовни мaterиали | ||||
| Помма колочецво на маслоTO | П | 1,3 1,3 | 1,3 | |
| Помма вид масло | SAE 15W40 | |||
| Мерки и тergla | ||||
| Дылхина xши рочина x висуниha | MM | 1040 x 686 x 1080 | ||
| Тerglio | Кг | 119 | 117,2 10$,5 | |
| Вьздунho налягане на гумinte | MPa (bar) | 0,20 (2,0) | ||
| Установни стойости съласно EN 60335-2-79 | ||||
| Стойост на вибрацигente в облacr'tа на длиanta - рькatinga | ||||
| Пистолт за рьчно рискаheade | M/cek² | 3,6 4,6 | 5,3 | |
| Трьба за разрьсквае | M/cek² | 6,0 5,9 | 5,7 | |
| Hecигуност K | M/cek² | 1,1 | 1 | 1 |
| Инbero на звуka LpA | dB(A) | 76 80 | 79 | |
| Heystomonibocnt KpA | dB(A) | 3 | 3 | 3 |
| Инbero на звукова мочноct LwA + he- устонibocnt KwA | dB(A) | 93 97 | 96 | |

www.kaercher.com/REACH
Ohuastmed
△OHT
Osutab vahetult ahvardavale ohule, mis voib pohjustada tosiseid kehavigastusi voi loppeda surmaga.
HOIATUS
Osutab voimalikule ohtlikule olukorrale, mis vobpohjustada toseid kehavigastusi voi loppeda surmaga.
ETTEVAATUS
Viide voimalikule ohtlikule olukorrale, mis voib pohjustada kergeid vigastusi.
TAHELEPANU
Toode: Körgsurveyesur
Tuup: 1.353-xxx 1.367-xxx
Chairman of the Board of Management

S. Reiser
Director Regulatory Affairs & Certification
71364 Winnenden (Germany)
Tel.: +49 7195 14-0
Fax: +49 7195 14-2212
Winnenden, 2019/05/20
Tehnilised andmed
www.kaercher.com/REACH
Riska pakapes
△BISTAMI
Norade partiesi draudošam briesmam, kuras izraisa smagas traumas vai navi.
△BRIDINAJUMS
Norade par iespejami draudošam briesmam, kuras var izraisit smagas traumas vainavi.
△UZMANIBU
Norada uz iespejami bistamu situaciju, kura var radit vieglus ivainojumus.
IEVERIBAI
Chairman of the Board of Management
S. Reiser
Director Regulatory Affairs & Certification
Pilnvarotais sagatavot dokumentaciju:
S. Reiser
Alfred Kärcher SE & Co. KG
71364 Winnenden (Germany)
Tel.: +49 7195 14-0
Fax: +49 7195 14-2212
Winnenden, 2019/05/20
Tehniskie datum
www.kaercher.com/REACH
Rizikos lygiali
PAVOJUS
Nuoroda del tiesioginio pavojaus, galincio sukelti sunkius kuno suzalojimus ar mirtj. JSPEJIMAS
Nuoroda del galimo pavojaus, galincio sukelti sunkius kuno suzalojimus ar mirtj.
ATSARGIAI
Nurodo galimpaavoju, galinti sukelti lengvus sužalojimus.
DÉMESIO
Nuoroda del galimo pavojaus, galincio sukelti materialinius nuostolius.
Tipas: 1.353-xxx 1.367-xxx
Chairman of the Board of Management
S. Reiser
Director Regulatory Affairs & Certification
71364 Winnenden (Germany)
Tel.: +49 7195 14-0
Fax: +49 7195 14-2212
Winnenden, 2019/05/20
Techninai duomenys
3axnHi npncTroI .UK 3
BVeIeHnB Eeknpyatauio... UK 4
Ekcnnyataciu UK 6
TpaHcnpTyBaHHaUK8
36epiraHHn npncToIO. .UK 8
Iorna Ta texhiue o6cnyrobyBaHHa UK 8
BcTaHOBJIeHnPyuHOro nicToJeTa- po3nnIbBaay, cTpymnHooTpy6Kn Ta HacaIkn
Ppimitka: cncTeMa EASY!Lock 3aBdAnu WBnDkopo3HIMHomy pi3b6OBomy 3'EdHaHHIO Do3BOJRAc 3'EdHaTN KOMNoHEHTN WBNiKO n HadiiHo 3a Odn H oepT.
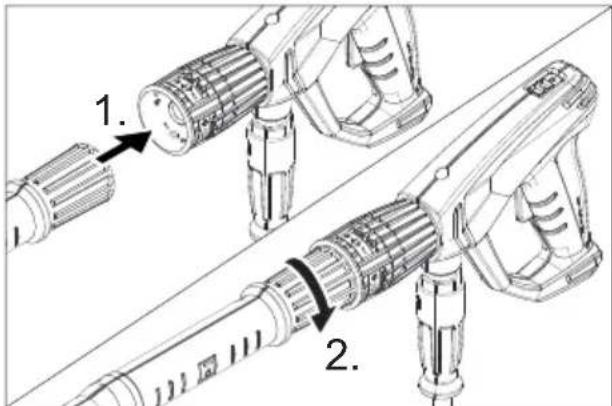
△NONEPEDXEHN
He6e3neKa odejkaHnHa mpaemu yepe3 3a
cmocybaHHn HeiDnoEHOzo npunaed.
Bukopucmoeyama minbku npunaed,
po3paxobani Ha po6oHi muCKu npucmpoO (duB. "Texhi dihi").
Biokluoymu npucmpiu neped ycmaHO8
koI npunaB.
BCTaHOBHTN COJIIO BNCOKO TNUCKY Ha CTpyMNHy Tpy6ky.
BcTaHOBnI BpyHy 3aTMyHHTn HaKNDHy raIKy (EASY!Lock).
3'εнанисту минни Трубку 3 nicToTeTOM-р03плювачем Та 3atЯгHTN BpyHy (EASY!Lock).
BctaHOBuTnHa nicToJeTI o6eptOBe 3'EDHaHHIyPiKlUoyEHNHaJHa BnCOKOro TnCKy. (He nnH HD 16/15-4 Cage)
3'edHaTN BnCOKoHaipHni 7nAhr 3 nictOJeTOM-p03nnIbBaayem i naTp6- KOM BnCOKOro TnCKy npncToPoTa 3aTЯrHyTu BpyuHy (EASY!Lock).
Cnctema eIekTpponocTaayHn
-NotyXHicTb DnB. B TexHiuHnx DaHnx.
- EneKtpnHi 3'edHaHHa NOBHHi 6yTN BnKOHaHI eNeKtpOMoHTaxHnKOM Ta BiD-nobiDaTI IEC 60364-1.
△NONEPEJXEHH
He moxha nepebuuyamau maKcumaNbHo npunycmuu imneadaHc e moqui ndKnIOueHHa do eIekmpuHoi Mepeksi (du. «TexHiXapaKmepucmuu').
Ipu Heu3NaueHocmex cmoc8Ho icHyouO zo impehcy mozi ndKluoyenna do Mepeki nompi6Ho 3eepHymucdo opaHi3aui, uo nocmaac eJeKmpoeHepzio.
△HEBE3NEKA
- Henpudamhi eIekmpuHi nodoexyeaI moxymb bymu Hebe3neHumu. Ha bIDkpumomy nobimpi bukopucmoeyamu minbku npudamHu dna ubozo eIekmpuHu nodoexyea3 iDnoBidHM mapkyeAHnMa doctamHim diamempor Ka6enIO.
1-10M:4MM2
10-30M:6MM2
Po3MoTaTn MepeXeBn Ka6eNb Ta noKnaCTn Ioro Ha NiDNoRy.
BCTaBTe MepeKHN uTKeep y uTenCeIbHy po3eTKy npuNaIy.
Побача Вори
△NONEPEJXEHHA
Dompumyeamucb iHcmpykuji niOppuemcmea eodonocmaaHHa.
BidnoiDHO do dioux dupekmue 3abopohembcra ekcnnyamaui npucmpoio 6e3 cucmemHo2o po3diinoeaay cuememi eodono-cmaaHnnumhoieodu.CniD buyeamu biDnoBDHu cucmemHu bau fipmu KARCHER a6o anbme Hu cumemHu po3diinoeaay, 32i 12729 muny BA.
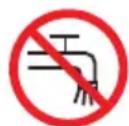
Boda, uo npouu na yepe3 cucmemHu po3diio8au, 6eaKaembca HnpuadamHOIO dna numma.
△OSEPEXHO
CucmemHu po3diIOBa4 3a6xdu noBuHeH 3haxodumuc8 cucmemi e0donocmaaHn, He do3eOJaembcn iDknouamu uo2o 6e3nocepedHbO do npucmpoI.
BnMOrn do kOcTi BODn:
IotpmyTeca iHCTpyKcii 3 BnKOpncTaHHaHTnΦpni3y.
TpaHcnpOpTyBaHHa
OBEPEXHO
He6e3neKa mpaem ma nowkodxeHb! Ppu mpaHcnpmyeaHHi cnid 3eepHymu ybay Ha baa npucmpoio.
YBAGA
Iid yac mpaHcnOpmyaHHa3abe3neumu 3axucm cnYcKOo2o bXeJIa iD nowkOd-KeHHa.
Eknpnyataciia
Haxatn 6yKcnpy cko6y npncptpoBHN3 Ta nepemictn npncptpi.
TpaHcnpTyBaHHKpaHOM
3aKpInTuPiHimalbHn npucTpiB cepeuHi CTJKKn Dnla HaBaHTaXeHHra 3a DonOMOrO KpaHa.
△HE6E3NEKA
Hebe3neka odepkaHnma ppaM npu naHHi npucmpo.
- Dompumyeamucb Micueeux 6ka3i0k no 3anobizahnHou Heuachux eunadki8 i 6ka3i0K 3 mexhiku 6e3neku.
- Pered KoxHm mpaHcnpmyeHaHnM KpaHOM nepeepmu npucmocyeaHnJ 3a donomozoKpaHa Ha Harehicmb yukodkeHb.
- Pered KoxHm mpaHcnpmyBaHHaM KpaHOM nepeepmu niDouomHu MeXaHi3 M Ha HareHicmb NowkodKeHb.
-Пidhimamu npucmpiu minbku Ha npucmocyeaHHi dna eahmaxkeHn3a doonomozoi KpaHa.
Heukopucmoeyamu yanoHi naHouo. - Obepiazmu nioHimalbHu npucmpiu bD eunadko0zo biyuennenhaanmaxy.
Budanumu cmpymunHy mpy6ky 3 pyHUM nicmonemom-po3nuloeaem ma He3akpinneHi npedmemu nepedmpaHcnpmyeaHnKpaHOM.
-Πid yac npouecy nioumy 3abopoHЯembca nepee03mu Ha npucmpoi6byb-ri npedmemu. - Ppucmpiu do360nembcs mpaHcnpmyeamu 3a donomooio kpaHa minbku ocobam, zo npouu iHcmpykmax 3 Kepyuahnn KpaHOM.
He cmou niobahmaxem.
- Ppu 3eepnmu yba2y Ha me, uo6 y He6e3neuHi 30Hi diKpaHa He nepe6yana IIOdu.
He 3aunu amu npucmpiu nideiueHUM do kpaHa 6e3 dozny.
TpaHcnpTyBaHHa TpaHcnpTHnMn 3acobamn
→Припегевеши anapatyВ trpaHcnpTnIX 3acobax cIiD bpxoBybTu MicuCiBi diouci depxkaBHi HOpMn, HanpaBJIeHi Ha 3axncT BiD KOB3aHHra TepeKndaHHa.
36epirahnnpnctroko
OBEPEXHO
He6e3neka mpaem ma nowkodxeHb! Ppu 36epiaaHHi 3eephymu yeasy Ha aasy npucmpoio.
Cen npnaMac 36epiraTncn y BHy- TpiHix npmiueHHx.
Texhihe o6cnyroByBaHHa
ObctexeHn6e3neuHocti/odorobip TexhiHoro 06cnyroByaHHa
Bm mokeTe domoBntncb npo peryIarpHe 6ctexeHH 6e3neuHocTi po6Ot n 3 Baunm npoDaBcem a6o 3aKnIOHTn dOrOBip texHicHoro 6cbnyROByBaHH.
Chairman of the Board of Management

S. Reiser
Director Regulatory Affairs & Certification
YnOBHOBaXeHn cnIBpo6iTnK nO BeDeHHIO DOKyMeHToo6iry:
S. Reiser
Alfred Kärcher SE & Co. KG
71364 Winnenden (Germany)
Tel.: +49 7195 14-0
Fax: +49 7195 14-2212
Winnenden, 2019/05/20
Texhichi xapaKTepeNCTnKn


