RMKM451E - Multi-cooker Redmond - Free user manual and instructions
Find the device manual for free RMKM451E Redmond in PDF.
User questions about RMKM451E Redmond
0 question about this device. Answer the ones you know or ask your own.
Ask a new question about this device
Download the instructions for your Multi-cooker in PDF format for free! Find your manual RMKM451E - Redmond and take your electronic device back in hand. On this page are published all the documents necessary for the use of your device. RMKM451E by Redmond.
USER MANUAL RMKM451E Redmond
natural_image
Exterior view of a modern rice cooker with digital display and control buttons (no visible text or symbols on the device itself)User manual
GBR 6
FRA 13
DEU 20
ITA 27
ESP 35
PRT 42
DNK 49
NOR 56
SWE 63
FIN 70
LTU 77
LVA 84
EST 91
ROU 98
HUN 105
BGR 112
HRV 120
SVK 127
CZE 134
POL 141
SVN 148
GRE 155
SRB 163
UKR 170
RUS 178
text_image
Labeled diagram of a cooking appliance with numbered parts for identification and assembly reference.A2

text_image
1 2 b c defghi 6 7 CANCEL/ REHEAT TIME DELAY 4 MENU 88:88 EXPRESS REHEAT KEEP WARM TEMPERATURE 188°C HOUR START MULTICOOK PILAF STEAM SOUP PASTA PORRIDGE STEW BAKE FRY YOGURT BREAD SLOW COOK MIN 3 a 5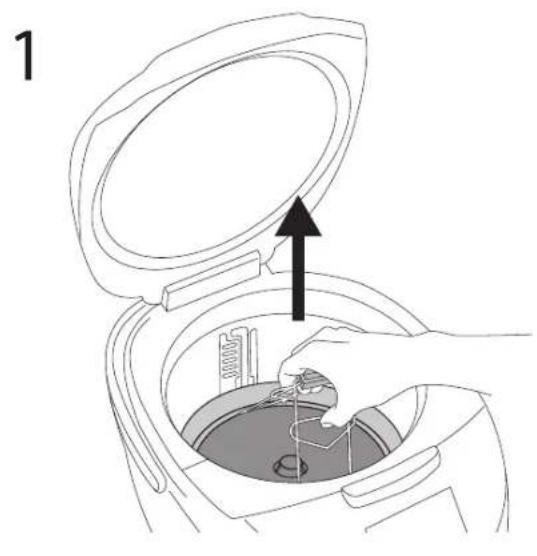
natural_image
Line drawing of a hand inserting a component into a container with an upward arrow (no text or symbols)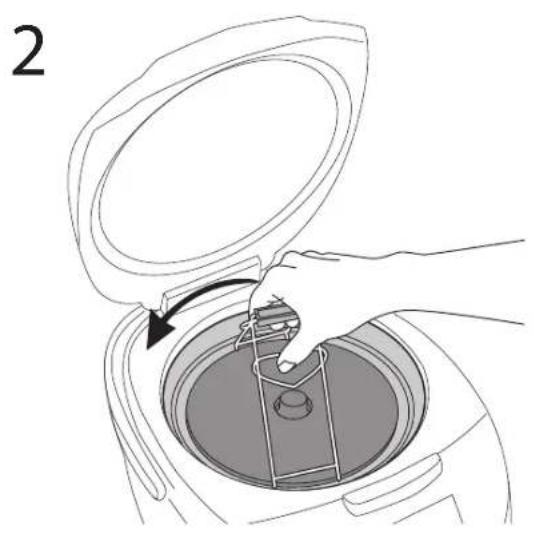
natural_image
Line drawing of a hand placing a component into a circular container with a handle, labeled '2' (no text or symbols on the diagram itself)REDMOND

Carefully read all instructions before operating and save them for future reference. By carefully following these instructions you can considerably prolong the service life of your appliance.
The safety measures and instructions contained in this manual do not cover all possible situations that may arise during the operation of the appliance. When operating the device the user should be guided by common sense, be cautious and attentive.
IMPORTANT SAFEGUARDS
- The manufacturer shall not be responsible for any failures arising from the use of this product in a manner inconsistent with the technical or safety standards.
- This appliance is a multifunctional appliance and is intended to be used for nonindustrial use in household and similar spheres of application. Industrial application or any other misuse will be regarded as violation of proper service conditions. Should this happen, manufacturer shall not be responsible for possible consequences.
- Before plugging in the appliance ensure that the circuit voltage matches operating voltage of the appliance (see technical specifications or manufacturer's plate on the appliance).
- Use an extension cord designed for power consumption of the appliance as the parameter mismatch may result in a short circuit or fire outbreak.
- The appliance must be grounded. Connect the appliance only to a properly installed power point. Failure to do so may result in the risk of electrical shock. Use only grounded extension cords.

CAUTION! While in use the appliance heats up! Care should be taken to avoid touching the housing, bowl, or any other metal parts while operating. Make sure your hands are protected before handling the device. To avoid burns, do not lean over the appliance while opening the lid.
- Unplug the appliance after use, before cleaning or moving. Remove the power cord with dry hands holding it by the plug, not cord.
- Do not place the cord in doorframes or by heat sources. Do not twist or bend the power cord, ensure it is not in contact with sharp objects, corners and edges of furniture.

PLEASE, NOTE: damaging the cord may lead to a failure that will not be covered by the warranty. If the cable is damaged or requires replacing, contact an authorized service centre to have the cord replaced.
- Never place the device on soft surfaces or cover it to keep ventilation slots clear of any obstruction.
- Do not operate the appliance outdoors to prevent water or any foreign object or insect from getting into the device. Doing so may result in serious damage of the appliance.
- Always unplug the device and let it cool down before cleaning. Follow cleaning and general maintenance guidelines when cleaning the unit.

DO NOT immerse the device in water or wash it in running water!
- When changing the position of the disc heating element it is necessary to use the tongs, included in set – it will eliminate the possibility of burns or other accidental injuries.
- When setting the heating disc to the upper position, ensure it is tightly fixed in the slots on the walls of the working chamber. Incorrect mounting of the heating element may lead to both its unrestricted displacement during operation and failure.
STOP Be sure to use a thermal glove for gripping the tongs. Do not touch the heating disc regardless of the position it's in!
To avoid electrocution do not change the position of the heating element, if the appliance is plugged in!
Do not close the lid if the disc heating element is set to an upper position.
- This appliance can be used by children aged from 8 years and above and persons with reduced physical, sensory or mental capabilities or lack of experience and knowledge if they have been given supervision or instruction concerning use of the appliance in a safe way and understand the hazards involved. Children shall not play with the appliance. Keep the appliance and its cord out of reach of children aged less than 8 years. Cleaning and user maintenance shall not be made by children without supervision.
- Keep packaging (film, foam plastic and other) out of reach of children as they may choke on them.
- No kind of modification or adjustment to the product is allowed. All the repairs should be carried out by an authorized service centre. Failure to do so may result in the device breakage, property damage or physical injury.

CAUTION! Do not use the appliance in case any defect has been noticed.
Technical specifications
| Model | RHK-M451E |
| Power | 860-1200 W |
| Voltage | 220-240 V, 50/60 Hz |
| Bowl capacity | 5 |
| Bowl / frying pan coating | non-silica, ceramic |
| Display | LED |
| Steam valve | removable |
| Inner lid | removable |
| Overall dimensions | 308 × 305 × 245 mm |
| Net weight | 4.5 kg |
Programmes
| 1. MULTICOOK | 8. BAKE |
| 2. PILAF | 9. FRY |
| 3. STEAM | 10. YOGURT |
| 4. SOUP | 11. BREAD |
| 5. PASTA | 12. SLOW COOK |
| 6. PORRIDGE | 13. EXPRESS |
| 7. STEW |
Functions
| “MASTERCHEF LITE” (to set cooling time and temperature during operation).......yes |
| “MASTERBRY” (passable heating element)......yes |
| “Keep Warm”....up to 12 hours |
| “Keep Warm” mode disabled in advance.......yes |
| Rcoat....up to 12 hours |
| “Time Delay”....up to 24 hours |
| Audible signals disabled....yes |
Package includes
| Multifitchen | 1 pc |
| Bowl | 1 pc |
| Steaming container | 1 pc |
| Stirring paddle | 1 pc |
| Serving spoon | 1 pc |
| Massuling cup | 1 pc |
| Beef tongs | 1 pc |
| Frying pan | 1 pc |
| Yogurt jars | 6 pc |
| Tops | 1 pc |
| Deck of recipes | 1 pc |
| Spreads/paddle holder | 1 pc |
| User manual | 1 pc |
| Service booklet | 1 pc |
| Power cord | 1 pc |
Manufacturer reserves the right to make any modifications to design, packaging, or technical specifications of the product without prior notice. The specification allows an error of 10%.
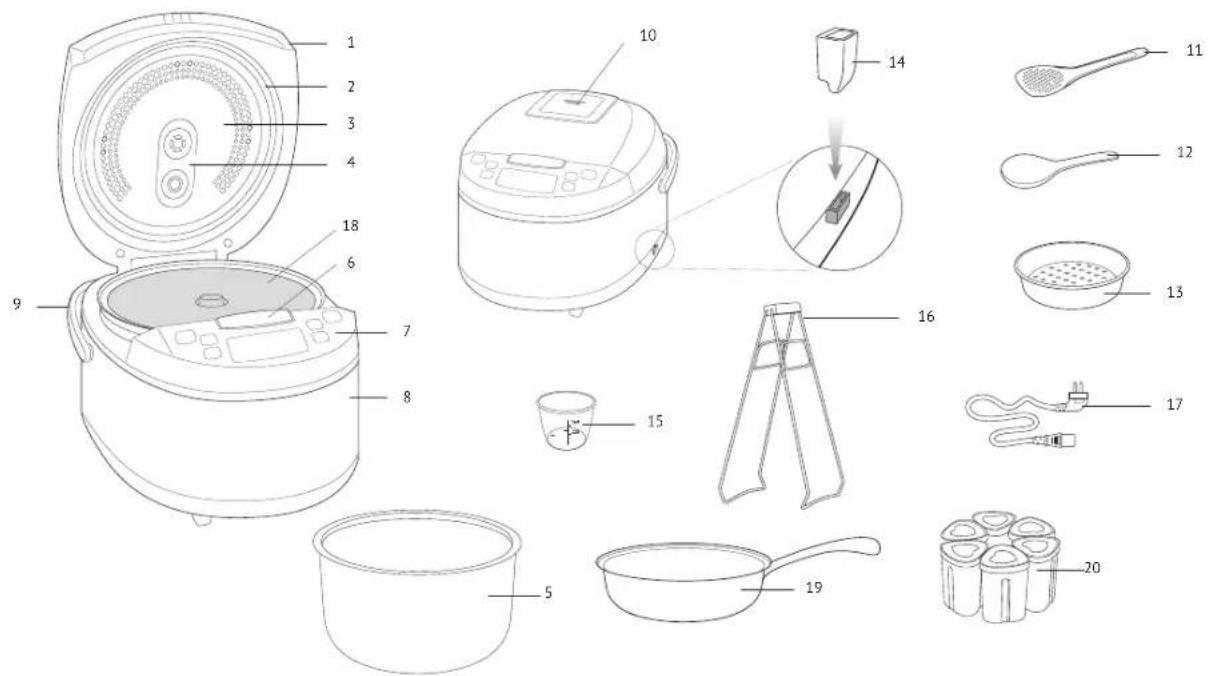
Parts of Appliance (scheme A1, p. 3)
| 1. Main lid | 11. Stirling paddle |
| 2. Seating ring | 12. Serving spoon |
| 3. Removable inner lid | 13. Steaming container |
| 4. Steam hole | 14. Sacon/paddle holder |
| 5. Bowl | 15. Measuring cup |
| 6. Lid release button | 16. Tongs |
| 7. Control panel with display | 17. Power cord |
| 8. Housing | 18. Raisable heating element |
| 9. Carrying handle | 19. Frying pan |
| 10. Removable steam valve | 20. Yogurt jars |
Control panel (scheme A2, p. 4)
-
"Cancel/Reheat" button is used to enable the "Reheat / "Keep Warm" functions, to stop a cooking programme operation, to reset settings.
-
Time Delay Button is used to enable the Time Delay function.
-
"Menu" button - to confirm a cooking programme selection.
- Display.
- "Min/-" button - to select an automatic cooking programme, to adjust the minute value, to reduce the temperature value.
- "Hour/+" button - to select an automatic cooking programme, to adjust the
hour value, to increase the temperature value. 7. "Start" button is used to start the selected mode.
Display (scheme A2, p. 4)
a. Automatic programmes indicators.
b. "Time Delay" mode indicator.
c. Looking mode indicator.
d Timler.
c. Keep Meini Mode Indicators.
f. "EXPRESS" programme indicator
o. Reheat mode indicator
6. Audible signals disabled indicator.
i. Temperature value indicator
I. PRIOR TO FIRST USE
Carefully remove the appliance and its accessories from the packaging. Dispose of all packaging materials.
Keep all warning labels, including the serial number identification label located on the housing.
After transportation or storage at low temperatures allow the appliance to stay at room temperature for at least 2 hours before using.
Wipe the housing of the appliance with a soft, damp cloth. Rinse the inner bowl with warm soapy water and dry thoroughly. An odor on first use of the appliance is normal and does not indicate a malfunction. In such case, clean the appliance, following "Cleaning and Maintenance".
STOP ATTENTION! It is forbidden to lift the device with the filled bowl by the handle.
Do not switch on the device without the bowl installed or with empty bowl inside. In case of accidental start of a cooking program, it may result in critical overheating or damage of the anti-stick coating. Before frying, pour inside a little vegetable or sunflower oil.
II. OPERATION
To adjust the current time
Plug in the appliance. Press and hold the "Hour/+" or "Min/-" buttons. Current time indicator will start flashing. Use the "Hour/+" button to adjust the hour value and "Min/-" button to adjust the minute value. The hour value increases irrespective of the minute value. After the maximum value is reached the adjustment starts again. Press and hold the corresponding button down to scroll through the digits. After setting is complete do not press the buttrans on the panel for 5 seconds. Settings will be saved automatically.
Disabled audible signals
To disable audible signals press and hold the "Menu" button in any mode. The disabled audible signals indicator will be flashing. To enable audible signals press and hold the "Menu" button again.
To adjust cooking time
REDMOND RMK-M451E allows adjusting cooking time for every programme, except for "EXPRESS". Adjustment increments and range depend on the selected programme. After an automatic programme is selected and the "Menu" button is pressed, use the "Hour/-" button, to adjust the hour value and the "Min/-" button to adjust the minute value. The hour value changes irrespective of the minute value. After the maximum value is reached the adjustment starts again. Press and hold the corresponding button to scroll through the digits.
In some automatic programmes the cooking time countdown starts only after the appliance reaches the set temperature. For example, if you pour cold water and set "STEAM" for 5 minutes, the programme will start to countdown only after water comes to a boil and sufficient amount of steam is generated in the bowl. In "PASTA" the time starts to countdown after water comes to a boil and "Start" is pressed again.
"Time Delay"
This function allows adjusting the time by which the dish will be ready (including the programme time). Maximum time of delay is 24 hours. Default time of delay comprises the programme time and the time required to enter the operational parameters (if provided by the factory settings of the programme). A programme can be delayed by 1 minute increments.
To adjust the time of delay after selecting of an automatic programme press the "Time Delay" button. To increase the hour value press the "Hour/#" button. To adjust the minute value press the "Min/—" button. The hour value changes irrespective of the minute value. After the maximum value is reached the adjustment starts again. Press and hold the corresponding button to scroll through the digits.
Current time value is displayed during "Time Delay". To see the cooking end time press and hold the "Time Delay" button. The function is available for all automatic programmes, except for "FIR", "BASTA" and "EXPRESS". Avoid using the "Time Delay" function for perishable meals (eggs, fresh milk, meat, cheese, etc.).
"Keep Warm"
This function automatically activates at the end of cooking, and keeps the food warm at 70-75°C for 12 hours. The "Keep Warm", "Cancel/Reheat" indicators and direct countdown are lit on the display. To disable the "Keep Warm" press and hold the "Cancel/Reheat" button.
"Keep Warm" disabled in advance
To enable the "Keep Warm" function at the end of a programme is not always desirable. REDMOND RMK-M451E provides disabling this function in advance during "Time Delay" or the main cooking programme. To activate this function press the "Start" during cooking. To enable the "Keep Warm" function press "Start" button again.
The "Keep Warm" function is not applicable for "YOGURT", "PASTA", "EXPRESS" and "MULTICOOK" programmes with the cooking temperature set below 40^ C.
Reheat
The appliance can reheat cold dishes. To reheat a dish:
-
Fill the bowl with food and position it inside the appliance.
-
Close the lid and plug in the appliance
-
Press and hold the "Cancel/Reheat" button. The indicators will light up solid.
The timer will start direct countdown of the reheating time.
The appliance will reheat food up to 70-75°C and will keep it warm during 12 hours. The "Reheat" function can be disabled by pressing and holding the "Cancel/Reheat" button, until the indicators go out.
The "Keep Waro" and "Reheat" functions enable the appliance to maintain the temperature of a dish for 12 hours. However it is not recommended to keep a meat worm for more than 2-3 hours, because this may affect its flavour.
MASTERFRY function (scheme A3, p. 5)
The appliance is equipped with a raisable heating element. It allows you to use both the bowl and the frying pan in the appliance (included in set).
For safety reasons use tongs when changing the position of the heating element (included in set).
Be sure to use a thermal glove for gripping the tangs. Do not touch the heating disc regardless of the position it's in!
To fix the heating element into the upper position carefully lift it until tight and slightly turn counterclockwise until secure fixation of the mounts in the slots on the walls of the working chamber. To place the disc heating element into the lower posi-
REDMOND
tion slightly lift it, so that its mounts exit slots on the walls of the working chamber, and, having turned the disc clockwise, carefully lower it.
Do not try to change the position of the heating element if the appliance is plugged into. Do not close the bit if the disc heating element is set to an upper position. For cooking in the appliance use only frying pan, included in set
"MASTERCHEF LITE"
Discover more possibilities for culinary creativity with the new "MASTERCHEF LITE" function! While "MULTICOOK" allows setting a programme parameters before it starts, then "MASTERCHEF LITE" allows adjustments during the cooking process.
You can always adjust any programme, so that it corresponds to you wishes. Does your soup boil over? Does your oatmeal 'escape'? Are your vegetables steamed for too long? Adjust the cooking temperature or time; without interrupting a cooking programme as if you cook on the stove or in the oven.
You can use "MASTERCHEF LITE" only during cooking. "MASTERCHEF LITE" is not applicable for "EXPRESS", "Time Delay" and waiting to access operating parameters. When using "MASTERCHEF LITE" the temperature can be adjusted between 35 and 170°C with 1°C increments. Possible cooking time range on the selected programme with 1 minute increments.
"MASTERCHEF LITE" can be very useful especially when you cook meals on complex recipes, requiring combination of different cooking programmes (e.g. cooking cabbage rolls, beef strepanoff, soup and different types of pasta, jam, etc.).
To adjust cooking temperature:
-
Press the "Menu" button during cooking. The temperature value indicator will be flashing.
-
Set the desired temperature. To increase the value press the "Hour/+" button, to reduce the value press the "Min/-" button. Press and hold the corresponding button down to scroll through the dials.
-
After the maximum (minimum) value is reached the adjustment starts again. Do not press the buttons on the control panel for 5 seconds. Settings will be saved automatically.
For overheat protection when setting the cooking temperature higher than 130°C the maximum programme operating time is limited to two hours (except for "BAKE"). Cooking temperature adjustment is not applicable for "YOGURT" programme.
To adjust cooking time: 1. Press the "Menu" button twice during cooking. Time value indicator will be flashing.
-
Set the desired cooking time. To increase the value with 1 hour increments press the 'Hour/ ^4 ' button, to increase the value with 1 minute increments press the 'Min' button. The hour value changes irrespective of the minute value. After the maximum value is reached the adjustment starts again. Press and hold the corresponding button to scroll through the digits.
-
Do not press the buttons on the control panel for 5 seconds. Settings will be saved automatically.
When setting cooking time value to 00:00, the programme operation will be stopped. Standard Operating Procedure for Automatic Programmes
IMPORTANT! When using the water boiling device (for example, when boiling products), DO NOT set the cooking temperature above 100°C. It may result in overheating and failure of the device. For the same reason, DO NOT use the BAKE, FRY and BREAD programs to boil water.
-
Prepare (measure) the ingredients.
-
Fill the appliance bowl with ingredients according to the cooking programme and position it inside the appliance. Ensure that all ingredients are evenly spread below the maximum fill mark on the inside of the bowl. Ensure that it has full contact with the heating element.
-
Close the main lid until it clicks into place. Plug in the appliance. ATTENTION! If you cook at high temperatures with much vegetable oil, always leave the device lid open.
-
Use the "Menu" button to resume from standby mode. Use the "Hour/+" and "Min/-" buttons to select a programme (the corresponding programme indicator will be flashing). Press the "Menu" button again to confirm the programme selection.
i "MULTICOOK" enables to set the desired cooking temperature. Use the "Hour/+ " button to increase the default value, "Min/-" button to reduce the value. Press the "Menu" button to finish the temperature setting.
- Use the "Hour/+" and "Min/-" buttons to adjust default cooking time.
- Set time of delay if necessary.
i Time Delay" is not applicable for "FRY", "PASTA" and "EXPRESS" programmes. 7. Press the "Start" button to begin cooking. The "Start" and "Cancel/Reheat" indicators will light up solid. Depending on the selected programme, the timer will begin countdown after pressing the "Start" button or upon reaching the required temperature in the bowl.
The "Keep Warm" function can be disabled in advance by pressing the "Start" button. The "Cancel/Reheat" indicator will go out. Press the "Start" button again to enable this function. "Keep Warm" is not applicable for "YOGURT" and "EXPRESS" programmes.
-
An audible signal will be produced to indicate that cooking is complete, the End indicator will light up on the display. Depending on the selected programme or current settings the appliance will either enter the "Keep Warm" mode (the Cancel/Reheat and "Keep Warm" indicators are lit on the display) or the Standby mode.
-
To cancel a programme, to interrupt cooking or the "Keep Warm" function, press and hold the "Cancel/Reheat" button.
To achieve a good result refer to the recipes included in the REDMOND RMK M451E cookbook, designed specifically for this model. You can also find corresponding recipes on www.redmond.company.
If you failed to achieve the desired result using standard automatic programmes, use MULTICOOK® programme, that provides great opportunities for your culinary experiments.
"MULTICOOK" Programme
The programme allows cooking time and temperature adjustment according to your needs. "MULTICOOK" enables the REDMOND RMK-M451E multicooker to function as a number of kitchen appliances and to cook any recipe found on the Internet or in a family cookbook.
If the cooking temperature does not exceed 80°C, the "Keep Warm" function will be disabled without possibility of manual switching.
Default cooking time of the programme is 30 minutes; default temperature is 100°C. The temperature can be manually adjusted between 35 and 170°C in 5°C increments, the time between 2 minutes and 15 hours in 1 minute increments.
i ATTENTION! For security purposes if the temperature is set to more than 130°C the cooking time will be limited to two hours.
The "MULTICOOK" programme enables to cook a wide variety of dishes. Use the attached cookbook by our professional chefs or the table of recommended temperature for cooking different dishes and products. You can also find necessary recipes on www.reamond.company.
STOP If you use the MULTICOOK program for boiling the water (for example, when cooking products), it is FORBIDDEN to set the cooking temperature above 100°C.
"PILAF" Programme
The programme is recommended for cooking different rice pilaf. Default cooking time of the programme is 35 minutes. The time can be manually adjusted between 10 minutes and 2 hours in 5 minute increments.
"STEAM" Programme
The programme is recommended for steaming meat, fish, poultry, vegetables and multicomponent steamed dishes. Default cooking time of the programme is 30 minutes. The time can be manually adjusted between 10 minutes and 2 hours in 5 minute increments. Use the steaming basket, provided with the appliance, to steam meals:
-
Fill the bowl with 400–800 ml of water. Position the steaming basket inside the appliance.
-
Measure and prepare ingredients according to the recipe directions and evenly distribute them inside the basket. Position the bowl inside the appliance. Ensure that it has full contact with the heating element.
-
Follow the instructions indicated in paragraphs 3-8 of the Standard Operating Procedure for Automatic Programmes*.
An audible signal will be heard after water comes to a ball and sufficient amount of steam is generated in the bowl. The programme time will start to count down.
In case you don't use automatic time settings in this programme refer to the "Recommended Steaming Time for Different Meals" table.
\*SOUP\* Programme
The programme is recommended for cooking broth, filling, vegetables and soup. Default cooking time of the programme is 40 minutes. The time can be manually adjusted between 20 minutes and 8 hours in 5 minute increments.
Before entering the operational parameters on audible signal will be heard.
"PASTA" Programme
The programme provides bringing water to a boil, adding ingredients and further cooking. An audible signal will be heard when water comes to a boil. Press the "Start" button again to begin the countdown. Default: cooking time of the programme is 8 minutes.
The time can be manually adjusted between 2 minutes and 1 hour in 1 minute increments. The "Time Delay" and "Keep Warm" functions are not applicable for the programme.
When cooking certain dishes (e.g. pasta, ravalli, etc.) some foam can be formed. Open the lid several minutes after adding ingredients into boiling water to prevent its possible leakage outside the bowl!
"PORRIDGE" Programme
The programme is recommended for cooking porridge with pasteurized skimmed or semi-skimmed milk. Default cooking time of the programme is 25 minutes. The time can be adjusted between 5 minutes and 1 hour 30 minutes in 1 minute increments.
For best results and in order to prevent milk from boiling away, we recommend you to do the following:
- rinse grain (rice, millet, etc.) thoroughly until water runs clear;
- follow proportions suggested in the recipe book, increase or reduce the amount of ingredients proportionately;
• using whole milk dilute it by half with water.
Cooking results may vary depending on the manufacturer and the origin of grain and milk. If you have failed to achieve the desired result using the "PORRIDGE" programme, apply "MULTICOOIC" instead. The optimal cooking temperature is 95°C. Measure the ingredients and adjust cooking time according to the recipe directions.
"STEW" Programme
The programme is recommended for making goulash, fried meat and ragout. Default cooking time of the programme is 1 hour. The time can be manually adjusted between 20 minutes and 12 hours in 5 minute increments.
"BAKE" Programme
The programme is recommended for baking cakes, puddings, pies from puff and yeast pastry dough.
Default cooking time of the programme is 50 minutes. The time can be manually adjusted between 20 minutes and 4 hours in 10 minute increments.
Readiness of a cake may be checked with a toothpick. Insert a toothpick in and if it comes out dry, your cake is ready. Disable the "Keep Warm" function when baking. Remove baked goods out of the appliance immediately after cooking is complete, to prevent them from getting extra-moist or soggy, or leave an "Keep Warm" for a short period of time only.
"FRY" Programme
The programme is recommended for frying vegetables, meat, fish, poultry and multicomponent fried dishes.
Default cooking time of the programme is 15 minutes. The time can be manually adjusted between 5 minutes and 1 hour in 1 minute increments. The "Time Delay" function is not applicable for the programme.

A signal will be heard when the appliance reaches the desired temperature.
Follow the recipe directions and stir ingredients occasionally to prevent them from burning or sticking. Let the appliance cool down thoroughly, before restarting the "FRY" programme. Fry meals with an open lid to create crispy crust.
"YOGURT" Programme
The programme is recommended for making homemade yogurt and proofing dough. Default cooking time of the programme is 8 hours. The time can be manually adjusted between 30 minutes and 12 hours in 30 minute increments. Ensure that the ingredients take no more than a half of the useful volume of the bowl. The "Keep Warm" function is not applicable for the programme.
"BREAD" Programme
The programme is recommended for making different types of wheat flour bread with rye flour addition. The programme provides complete cooking cycle from dough proofing to baking. Default cooking time of the programme is 3 hours. The time can be manually adjusted between 10 minutes and 6 hours in 5 minute increments. The maximum operating time of the "Keep Warm" function is limited to three hours. "Time Delay" function is not recommended for this programme, as it can affect the quality of baking.
Note that dough is proofed within the first hour of the programme and then starts baking. It is recommended to bolt the flour before use for oxygenation and removal of impurities. Use instant bread-mixes to save the time and facilitate cooking.

Ensure that the ingredients take no more than half of the useful volume of the bowl.
If time is set to less than 1 hour the baking process will begin after pressing "Start" button.
To bake bread evenly flip it over after the signal is heard.
ATTENTION! Use kitchen gloves to remove the bread from the appliance.
Do not open the lid during proofing dough! Product quality depends on it.
"SLOW COOK" Programme
The programme is recommended for cooking canned meat, fore shank and baked milk. Default cooking time of the programme is 3 hours. The time can be manually adjusted between 5 minutes and 12 hours in 10 minute increments.
"EXPRESS" Programme
The programme is recommended for cooking rice, fluffy water porridge. The programme is automatically disabled after complete boiling. Manual adjustment, the "Time Delay" and "Keep Warm" functions are not applicable for this programme. Press the "Start" button to start cooking in the standby mode. Cooking mode indicators and the "Start" button will light up solid.

If you have failed to achieve the desired result using standard automatic programmes, refer to the "Cooking tips", where you can find the answers to the frequently asked questions and get recommendations.
III. ADDITIONAL FEATURES
• Proofing dough
- Making funbue
- Dear frying
• Making cheese, cottage cheese
• Making baby food
• Stemizing tableware
• Pasteurization of liquid foods
IV. CLEANING AND MAINTENANCE
General Guidelines
- Prior to the first use or in order to remove the odour after cooking steam half a lemon for 15 minutes using the "STEAM" programme.
- Do not leave the cooking bowl with meals or liquids inside a closed multicooker for over 24 hours. Store cooked meals in a refrigerator and reheat them when required, using the "Reheat" function.
-
If not in use for long time, unplug the appliance. The cooking chamber, heating disc, cooking bowl, inner lid, steam valve, safety valve, and condensation collector must be dry and clean.
-
Before you start cleaning the appliance, make sure that it is unplugged and has completely cooled down. Use soft cloth and mild soap to clean.
DO NOT use a sponge or tissue with hard or abrasive surface or abrasive pastes. Do not use any chemically aggressive substances or any other agents that are not recommended for cleaning items that contact food.
DO NOT immerse the appliance in water or wash under running water!
- Be careful when cleaning silicone parts of the appliance, because damaged or deformed parts may lead to malfunction of the unit.
- Clean the housing when necessary. The cooking bowl, inner lid, removable steam valve, and safety valve need to be cleaned
after each use. Condensate, accumulating during cooking, needs to be removed after each use. Clean the interior of the cooking chamber when necessary.
To Clean the Housing
Use soft damp cloth or sponge to clean the housing. If necessary, use a mild soap solution and wipe the surface dry to remove soap residue and water spots.
To Clean the Bowl
- Wash the bowl by hand, using soft sponge and mild soap, or in a dishwasher (following its manufacturer's recommendations).
- If necessary fill the bowl with warm water, let soak and clean.
- Wipe the outer surface of the bowl dry before positioning it back inside the appliance.
When the appliance is used on a regular basis, inner non-stick coating of the bowl may partially or completely change color, which does not indicate a defect.
To Clean the Inner Lid
- Open the main lid. Press 2 plastic holders located in the lower part of its inner side.
- Remove inner lid and pull the sealing ring out of the rim.
- Wipe the surfaces of both lids with a damp cloth or sponge. If necessary, wash inner lid and sealing ring with mild soap and rinse under running water. It is not recommended to use dishwashing machine. Wipe both lids dry.
- Place sealing ring back into its original position. Ensure that the ring is securely in place.
- Loose or incorrectly positioned sealing ring may cause appliance malfunction or damage.
- Position inner lid into lower slots, align with the main lid, and slightly press until it clicks into place.
To Clean the Removable Steam Valve
Steam valve is located on the main lid of the appliance and consists of inner and outer casings.
- Carefully pull the outer casing holding it by the ledge, to remove.
- Press plastic holder on the inner casing to separate the two casings from each other.
- Remove the silicone sealing insert, if necessary. Rinse all parts of the steam v
- Reassemble the valve in reverse order of disassembly. Place sealing insert back into its original position, align ledges of the inner casing with corresponding slots on the outer casing, and press until they click into place. Screw the cap back onto the steam valve, cover with the outer casing, and press until it clicks into place.

CAUTION! Do not twist or stretch sealing insert to avoid its deformation.
To Remove Condensate
Condensate accumulates in the special cavity on the housing around the bowl. Wipe off any condensate remaining around the bowl with a dry cloth or tissue after each use.
To Clean the Cooking Chamber
Compliance with the user manual guidelines minimizes the risk of food particles or liquids accumulating inside the cooking chamber. However, if the inside of the chamber gets dirty, clean it to prevent improper operation or malfunction of the unit.

Before cleaning cooking chamber ensure, that the appliance is unplugged and has completely cooled down!
Walls of the cooking chamber, surface of the heating disc, and the casing of central thermal sensor (located in the middle of the heating disc) can be cleaned with a damp (not wet!) sponge or cloth. Remove any traces of soap or detergent if using any to prevent unwanted odours during cooking.
If there is a foreign object in the cavity around central thermal sensor, carefully remove it using tweezers, trying to avoid pressing on the casing of the sensor. Clean heating disc with a damp medium-hard sponge or synthetic brush, if necessary.
When the appliance is used on a regular basis, heating disc may partially or completely change color, which does not indicate a defect and does not affect proper operation of the unit.
REDOMOND
V. COOKING TIPS
Common Cooking Mistakes and Ways of Solving Them
This table familiarizes you with the practical tips and solutions to some common problems you may experience when using the appliance.
| Possible causes Solutions | ||
| The lid of the device was open or was not closed properly, so the cooking temperature was not high enough | Try to avoid opening the lid while cookingClose the lid until it clicks into place. Make sure that the rubber sealing ring located on the inner side of the lid is not deformed or damaged in any way | |
| Cooking temperature was not observed because the bowl and the heating element did not fit tightly | There should not be any foreign objects between the lid and the housing of the device, remove if any.Always make sure that the heating element is clean and fits tightly with the bowl before cooking | |
| Wrong ingredients or settings were chosen.General proportions were not observed, the foods were cut into pieces that are a bit too big.Wrong time settings. Chosen recipe is not appropriate for the appliance | We recommend that you use recipes adapted for the device. Choose proven recipes onlySet the time and cooking program, choose ingredients, proportions, and the size of pieces according to the recipe | |
| Steaming: the amount of water in the bowl is not enough to provide enough steam density | Use the amount of water recommended. If in doubt, check the water level while steaming | |
| Frying | Too much vegetable oil was added | For regular frying add an amount of vegetable oil just enough to cover the bottom of the bowlFollow recommendations given in the recipe while deep frying |
| Too much liquid inside the bowl | Do not close the lid of the device while frying unless specified in the recipe. Defrost and let drain the ingredients before frying | |
| Boiling: the broth boiled away while cooking acidic foods | Certain foods need to be washed or sautéed before cooking. Follow recommendations given in the recipe | |
| Boiling (dough failed to bake through) | While proofing the dough has reached the inner lid and covered the steam valve | Use a smaller amount of dough |
| Too much dough in the bowl | Take the product out of the bowl, turn it over and place back. Bake until readyNext time use smaller amount of dough | |
| Wrong ingredients or time settings, the foods were cut into pieces that are a bit too small. | We recommend that you use the recipes adapted for your model. Set the time and cooking program, choose ingredients, proportions and the size of the pieces according to the recipe |
| The dish was in the bowl in the "Keep Warm" mode for too long after being cooked | We recommend you to use the "Keep Warm" mode moderately. If your device enables you to switch "Keep Warm" off in advance, use it to avoid the problem |
| Milk boils away | Depending on both quality and properties of the milk used, it may boil away. To avoid this, we recommend that you use only ultra-pasteurized skimmed milk. Mix the milk with some water if needed |
| Foods were not properly processed (were not rinsed well, etc.)Wrong general proportions of ingredients | We recommend that you use the recipes adapted for the device. Try choosing proven recipes only. Set the time and cooking program, choose ingredients, proportions, and the size of the pieces according to the recipeWhole grains, meat, fish, and seafood need to be thoroughly rinsed before cooking |
THE DISH GETS BURNT
| The bowl was not properly washed before cooking. Non-stick coating is damaged | Before cooking ensure that the bowl is clean and has no coating defects |
| General amount of ingredients is smaller than recommended | Use proven recipes adapted for the device |
| Cooking time was too long | Reduce the cooking time or follow recommendations given in the recipe adapted for your model. |
| Frying: oil was not added; the ingredients have not been stirred or turned over | For regular frying add an amount of vegetable oil just enough to cover the bottom of the bowlFor proper frying stir or turn the ingredients occasionally in the bowl while cooking |
| Stewing: not enough liquid Add more liquid. | Avoid opening the lid while cooking |
| Baking: not enough liquid in the bowl (proportions were not observed) | Fallow recommended amounts of liquids and solids while cooking |
| Baking: the bowl was not greased before baking | Grease the bottom and sides of the bowl with butter or vegetable oil before baking (do not pour oil inside) |
INGREDIENTS LOSE THEIR SHAPE WHEN COOKED
| The ingredients have been stirred a bit too often | While frying foods, it is enough to stir the ingredients every 5-7 minutes |
| Cooking time was too long | Reduce cooking time or follow recommendations given in the recipe adapted for the device |
PASTRY IS DAMP
| Improper Ingredients were used (jairy fruit or vegetables, frozen berries, sour cream, etc.) | Use ingredients according to the recipe. Avoid using ingredients that contain excess moisture or use them in smaller amounts. |
| The baked product has been left in the appliance with the closed lid for too long | We recommend that you take the baked product out of the bowl right after the baking cycle is over or leave it on “Keep Warm” mode for a short period of time only |
PASTRY WON'T RISE
| Eggs and sugar were not whisked well | Use proven recipes adapted for the device.Choose, measure and process the ingredientsaccording to the recommendations given in therecipe. |
| The dough sat for too long before being baked | |
| The flour wasn't silted or the dough was not kneaded well | |
| Wrong ingredients | |
| Wrong recipe |
Certain REDMOND multichens feature overheat protection in the "STEM" and "SOUP" programmes. In case there is not enough liquid in the bowl, the appliance activates overheat protection automatically interrupts the programme, and switches to Keep Warmi.
Recommended Steaming Time for Different Meals
| NP Meal | Weight, g / Quantity, pcs. | Water, ml Cooking time, min | |
| 1 Pork/ beef fillet (cut into 1.5 – 2 cm cubes) 500 800 30/40 | |||
| No Meal | Weight, g / Quantity, pcs. | Water, ml Cooking time, min | ||
| 2 | Matton fillet (cut into 1.5 - 2 cm cubes) 500 800 40 | |||
| 3 | Chicken fillet (cut into 1.5 - 2 cm cubes) 500 800 20 | |||
| 4 | Meatballs/curlets 500 800 25/40 | |||
| 5 | Fish (fillet) 300 800 15 | |||
| 6 | Seafood mix (frozen) 300 800 5 | |||
| 7 | Dumplings 5 pcs. 800 25/30 | |||
| 8 | Potatoes (cut into 4 wedges) 500 800 20 | |||
| 9 | Carrots (cut into 1.5 - 2 cm cubes) | 500 | 800 | 35 |
| 10 | Beets (cut into 4 wedges) | 500 | 1500 | 90 |
| 11 | Vegetables (frozen) | 500 | 800 | 5 |
| 12 | Eggs | 5 pcs. 800 10 | ||
i Please note that these are only approximate guidelines. Steaming times may vary, depending on the quality of foods and your personal preferences.
Table of Default Settings
| Programme | Recommendations for use | Default time | Adjustment range/increments | "Time Delay" | Waiting to access operating parameters | "Keep Warm" |
| MULTI-COOK | Adjust cooking time and temperature to cook any dish of your choice | 00:30 | 2 min - 15 h/1 minIf temperature is higher than 130°C: 2 min - 2 h/1 min | √ | √ | √ |
| PILAF | Cook meat, fish, poultry, and vegetable pilafs | 00:35 | 10 min - 2 h/5 min | √ | √ | √ |
| STEAM | Steam meat, fish, vegetables, poultry, and other foods | 00:30 | 10 min - 2 h/5 min | √ | √ | √ |
| SOUP | Cook different types of saups and broths | 00:40 | 20 min - 8 h/5 min | √ | √ | √ |
| PASTA | Cook different types of pasta, sausages, ravoll and other convenience foods | 00:00 | 2 min - 1 h/1 min | √ | ||
| POR-RIDGE | Cook porridges with milk | 00:25 | 5 min - 1 h 30 min / 1 min | √ | √ | √ |
| STEIN | Make meat, fish, vegetable, side and multi-component dishes stews | 1:00 | 20 min - 12 h/5 min | √ | √ | |
| BAKE | Bake cakes, biscuits, puddings and pies from puff pastry dough and yeast dough | 00:30 | 20 min - 4 h/10 min | √ | √ | |
| FRY | Cook fried meat, fish, vegetable and multi-component dishes | 00:15 | 5 min - 1 h/1 min | √ | √ | |
| YOGURT | Cook different types of yogurt | 8:00 | 30 min - 12 h/30 min | √ |
| Programme | Recommendations for use | Default time | Adjustment range/increments | "Time Delay" | Waiting to access operating parameters | "Keep Warm" |
| BREAD | Make bread from rye and wheat flour (including dough proofing stage) | 3:00 | 10 min - 6 h / 5 min | √ | √ | |
| SLOW COOK | Cook baked milk, canned meat, fore shank, meat, jelly and aspic | 3:00 | 5 min - 12 h / 10 min | √ | √ | |
| EXPRESS | Quick cook rice, fluffy water portidge | Automatic shut-off after complete boiling of water |
Recommended Temperature for "MULTICOOK"
| Temperature, °C | Recommendations for use |
| 35 | Proofing dough, cooking vinegar |
| 40 | Make yogurts |
| 45 | Starter |
| 50 | Fermentation |
| 55 | Make fondant |
| 60 | Make green tea and baby food |
| 65 | Cook vacuum sealed meat |
| 70 | Make punch |
| 75 | Make white tea, pasteurize liquids |
| 80 | Make mulled wine |
| 85 | Make cottage cheese and other dishes,requiring long cooking times |
| 90 | Make red tea |
| 95 | Make oatmeal |
| 100 | Make jams and meringues |
| Temperature, °C | Recommendations for use |
| 105 | Make meat jelly |
| 110 | Sterilize tableware |
| 115 | Make sugar syrup |
| 120 | Make fore shank |
| 125 | Stew meat |
| 130 | Make pudding |
| 135 | Brown cooked foods |
| 140 | Smoke foods |
| 145 | Bake vegetables and fish in foil |
| 150 | Bake meat in foil |
| 155 | Fry fermented goods |
| 160 | Fry poultry |
| 165 | Fry streaks |
| 170 | Deep fry |
You can also refer to the cookbook provided with the appliance.
VI. ADDITIONAL ACCESSORIES
Additional accessories for the REDMOND RMK-M451E multilotchen and information on the innovations are available through www.redmond.company and our authorized dealers.
REDOMOND
VII. TROUBLESHOOTING
| Problem Possible causes Solution | |||
| Error message is displayed on the screen: E1 - E4 | System failure, possible control board or heating element failure | Urplug the appliance and let it cool down. Close the lid until tight, plug in the appliance | |
| The appliance does not switch on | Power cord is not connected to the appliance and (or) to the outlet | Ensure that the removable power cord is connected to the corresponding socket on the appliance and plugged in | |
| Faulty electrical outlet Plug in the appliance to the working outlet | |||
| Power supply failure | Check the voltage supply. In case of its failure, contact an authorized organization. | ||
| The meal is taking too long to cook | Power supply interruption (voltage level is unstable or below the standard) | Check the stable voltage supply. If it is unstable or below the standard, contact an authorized organization. | |
| There is a foreign object or particles between the bowl and the heating element,(fitter, grain, pieces of food) | Urplug the appliance and let it cool down. Remove the foreign object or particles. | ||
| The bowl is installed with the distortion Install the bowl properly | |||
| Heating element is dirty | Urplug the appliance and let it cool down. Clean the heating element. | ||
| The steam comes off from under the lid during cooking process | The tightness of connection between the bowl and inner lid is broken. | The bowl is improperly installed into the housing | Install the bowl property |
| The lid is loosely closed or there is a foreign object under it | Check for any foreign objects (fitter, grain, pieces of food) between the lid and the housing, remove them. Always close the appliance lid until it clicks into place. | ||
| Sealing rubber on the inner lid is dirty, deformed or damaged | Check the condition of the sealing rubber on the inner lid. Probably it needs to be replaced. | ||

In case you didn't manage to eliminate the defects, please, refer to the authorized service centre.

Environmentally friendly disposal (WEEE)
The packaging, user manual and the device itself shall be taken to the applicable collection point for the recycling of electrical and electronic equipment. Do not throw away the electronic waste to help protect the environment.
Old appliances must not be disposed with other household waste but must be collected separately. Municipal dis-
posal of recyclable wastes is free of charge. The owners of old appliances are required to bring it to a waste facility centre. With this little extra effort, you can help to ensure that valuable raw materials are recycled and pollutants are treated as appropriate.
This appliance is labelled in accordance with European Directive 2012/19/EU – concerning used electrical and electronic appliances (waste electrical and electronic equipment WEEE).
The guideline determines the framework for the return and recycling of used appliances as applicable throughout the EU.

Programme × PORRIDGE ×
Programma "PORRIDGE"
Programma "SLOW COOK"
UNDER KOGNING KOGER PRODUKTET UD
PRODUKT HAR TABT FORM EFTER SKÆRING
E. Inattent at the actuation of the following methods: 1. Indikator for an arrangement of EXPRESS
c. Indicator for oppvarmines modus
II. APPARATETS DRIFT
Programmet "PORRIDGE"
Programmet "SLOW COOK"
BAKET HAR INTE STIGIT UPP
GAMINYS PRARADO SAVO PIRMINĘ FORMA
TOIT EI SAANUD VALMIS
NEM EMELKEDETT FEL A SÜTEMÉNY
PRODUKT STRATIL TVAR KOLÁČA
-
YOCHURT (YOCHURT)
-
YOGURT (POGURT)
-
BREAD (RRCH)
-
SLOW COOK (POCASEN KUHAR)
-
EXPRESS
Funkcije
| MASTERCHEF LITE" (pa nastavitev časa kuhanja in temperature med delovanjem)...... |
| MASTERCHEF" (dvlg elementa ogrevanja)...... |
| Keep Warm funkcijo (Na 11 do lopia)......do 12 ur |
| Način „Keep Warm" je vnaprej onemogožen...... |
| Funkcija Rehest (jornovnega ogrevanja)......do 12 ur |
| Funkcija Time Delay (pakasitve)......do 24 ur |
| Zvočni signati onemogoženi...... |
Način Pakiranja
| Multistrichen | 1 kpc |
| Skledi | 1 kpc |
| Panev za cortje | 1 kpc |
| Kložn | 1 kpc |
| Posoda za pano | 1 kpc |
| Jogustovi kozari | 0 kpc |
| Mětlna čísla | 1 kpc |
| Somíne žíčka | 1 kpc |
| Veslo z mečanjem | 1 kpc |
| Kuharska lujiga | 1 kpc |
| Držao za šlčko/losatko | 1 kpc |
| Pričnik za uporato | 1 kpc |
| Serviera kajřice | 1 kpc |
| Elektríní kabel | 1 kpc |
Multikitchen dell (shema A1, str. 3)
-
Zaporali nokrav.
-
Tesnilni abrof
-
Orśtranilly netrapii pokryw
-
must to pass
-
Izust za parte.
-
Cilado
-
Skieda
-
Gumb za odpitanje pokrova.
-
Nadzorna plośca z zaslonom.
-
Obisie
-
Bočica to prevec
-
Kocita zr prenos.
-
Ostrariivi napi vontil.
-
Ostranijn paeni Ventic.
-
vesto z mesanjem
-
Servima žlica.
-
Posoda za paro
-
Držalo za žičko/lopatico.
-
Merilna 2a5a
16.
- KICSC.
-
[light]
-
Elektrichial Sabe
-
Sustivi grethi element.
-
Ponev za cvitje
-
Komplet jogurtovih kozarcev
HRANA JE PREMALO KUHANA
| Możni vzroki Raztopine | ||
| Pokrov napreve je bil odprt ali ni bil pravilno zaprt, zato temperatura kuhanja ni bila dovolj visoka. | Ne odpirajte pokrova med kuhanjem. | |
| Zapri pokrov, dokler se ne postali na svoje mesto. Pre- portiąte se, da tesnilo iz gume na notranji strami pokrova ni deformirano va poškodovano na nobeni način | Misa powinna być wstawiana do korpusu urządzenia równa, a jej dno sztześnie przylegać do tarczy grzewczej. Upewnij się, że w komarze botoczej urządzenie nie ma przedmiotów obcych. Nie dopuszczaj do zabrużeć tarczy grzewczej | |
| Temperaturo kuhanja niso opazili, ker se posoda in grelni element nista tesna prilegala. | Med pokrovani in ohlisjem naprave ne sme biti nobenih tujih predme- tov, će obstajalom. | |
| Pred kuhanjem vedno pazite, da je gretni element čist in se tesno prilega skledi. | Obowiązkowa nalewaj da misy wodyę w objętości, zalecancji w przepisić kulirnym. Jeżeti masz wątpliwości, sprawdz poziom wody w procesie gotowania | |
| Cvtije | Dodan je bit preveć rastlinskega olja. | Za redno cvrtje dodajte količino rastlinskega olja razno dovolj za kritje dno skiede. |
| Upoštevajte priporočila, podana v receptu med globokim cvrtjem | ||
| Preveć tekočine je v skiedi. | Med cvrtjem ne zaprite pokrova naprave, razen će je ta dolačeno v receptu. Odmzni si se in pusti, da sestavine odreće, preden se crete. | |
| Juha je zawrela, medtem ko je kuhala kisko hrano. | Nekatera živila je treba pred kuhanjem oprati ali speči. Upoštevajte navodlia za uporabu | |
| Pećenje (testo ni uspelo speči skozi) | Med dokazovanjem, da je testo dosego natranji pokrov in pre- krilo parni ventri | Uporabite manjsto količino testa |
| Preveć testa je v skiedi. | Vzemite izdelek iz posode, obrnite ga in ga postavite nazaj. Pečite, dokler ne boste pripravljeni. | |
| Naslednič uporabite manjsto količino testa | ||
HRANA JE RAZKUHANA