
RMCM95E - Multi-cooker Redmond - Free user manual and instructions
Find the device manual for free RMCM95E Redmond in PDF.
| Product type | Multi-cooker (multicooker) |
| Brand | Redmond |
| Model | RMCM95E |
| Power | 860 - 1000 W |
| Supply voltage | 220–240 V, 50/60 Hz |
| Protection class | Class I |
| Bowl capacity | 5 L |
| Inner bowl coating | Ceramic non-stick |
| Display type | Color LED screen |
| Heating | 3D (bottom, walls, lid) |
| Dimensions (W × D × H) | 377 × 285 × 240 mm |
| Net weight | 3.4 kg |
| Number of automatic programs | 17 |
| List of cooking modes | MULTICOOK, OATMEAL, STEW, FRY, SOUP, STEAM, PASTA, SLOW COOK, BOIL, BAKE, GRAIN, PILAF, YOGURT/DOUGH, PIZZA, BREAD, DESSERT, EXPRESS |
| Keep warm function | Yes, up to 24 h |
| Delayed start function | Yes, up to 24 h |
| Reheat function | Yes |
| Accessories included | Bowl, steam tray, measuring cup, ladle, spatula, ladle holder, recipe book, user manual, service booklet, power cord |
| Care and cleaning | Removable bowl and lid are dishwasher safe. Wipe body with a damp cloth. Do not immerse the appliance. |
| Safety | Overheat protection, automatic shut-off, mandatory grounding |
| Spare parts and repairability | Parts available through Redmond authorized service. Do not repair yourself. |
| General information | Manual available in multiple languages. Warranty: refer to service booklet. |
Frequently Asked Questions - RMCM95E Redmond
User questions about RMCM95E Redmond
0 question about this device. Answer the ones you know or ask your own.
Ask a new question about this device
Download the instructions for your Multi-cooker in PDF format for free! Find your manual RMCM95E - Redmond and take your electronic device back in hand. On this page are published all the documents necessary for the use of your device. RMCM95E by Redmond.
USER MANUAL RMCM95E Redmond
Corefully read all instructions before operating and save them for future reference. By carefully following these instructions you can considerably prolong the service life of your appliance.
The safety measures and instructions contained in this manual do not cover all possible situations that may arise during the operation of the appliance. When operating the device the user should be guided by common sense, be cautious and attentive.
IMPORTANT SAFEGUARDS
- The manufacturer shall not be responsible for any failures arising from the use of this product in a manner inconsistent with the technical or safety standards.
- This appliance is intended to be used for nonindustrial use in house hold and similar spheres of application. Industrial application or any other misuse will be regarded as violation of proper service conditions. Should this happen, manufacturer is not responsible for possible consequences.
- Before plugging in the appliance ensure that the circuit voltage matches operating voltage of the appliance (see technical specifications or manufacturer's plate on the appliance).
- Use an extension cord designed for power consumption of the appliance as the parameter mismatch may result in a short circuit or fire outbreak.
- The appliance must be grounded. Connect the appliance only to a properly installed power point. Failure to do so may result in
the risk of electrical shock. Use only grounded extension cords.
CAUTION! While in use the appliance heats up! Care should be taken to avoid touching the housing, bowl, or any other metal parts while operating. Make sure your hands are protected before handling the device. To avoid burns, do not lean over the appliance while opening the lid.
- Unplug the appliance after use, before cleaning or moving. Remove the power cord with dry hands holding it by the plug, not cord.
- Do not place the cord in doorframes or by heat sources. Do not twist or bend the power cord, ensure it is not in contact with sharp objects, corners and edges of furniture.
STOP PLEASE, NOTE: damaging the cord may lead to a failure that will not be covered by the warranty. If the cable is damaged or requires replacing, contact an authorized service center to have the cord replaced.
- Never place the device on soft surfaces or cover it to keep ventilation slots clear of any obstruction.
- Do not operate the appliance outdoors to prevent water or any foreign object or insect from getting into the device. Doing so may result in serious damage of the appliance.
REDMONO
Always unplug the device and let it cool down before cleaning. Follow cleaning and general maintenance guidelines when cleaning the unit.
STOP DO NOT immerse the device in water or wash it in running water!
- This appliance can be used by children over 8 y.o. and physically or mentally challenged persons or as well as those who lack experience and knowledge only provided they have been given supervision or instruction concerning use of the appliance in a safe way and understand the hazards involved. Children should not play with the appliance. Keep the appliance and the power cord out of reach of children under 8 y.o. Cleaning and maintenance should not
be performed by children without supervision.
- Packaging material (film, foam, etc.) may be hazardous to children. Choking hazard! Keep the packaging out of the reach of children.
- Any kind of modification or adjustment to the product is not allowed. All the repairs should be carried out by an authorized service center. Failure to do so may result in the device breakage, property damage or physical injury.
STOP CAUTION! Do not use the appliance in case any defect has been noticed!
| Technical Specifications | |
| Model | RHC-M95E |
| Power Input | 860-1000 W |
| Supply Voltage | 220-240 B, 50/60 Hz |
| Electrical safety | class I |
| Bowl capacity | 5 L |
| Bowl coating | ceramic non-stick |
| Display | color, LED |
| 3D heating | yes |
| Overall dimensions | 377 × 285 × 240 mm |
| Net weight | 3.4 kg |
| Programs | ||
| 1. MULTICOOK | 7. PASTA | 13. YOGURT/DOUGH |
| 2. OATMEAL | 8. SLOW COOK | 14. PIZZA |
| 3. STEW | 9. BAGGI | 15. BRWD |
| 4. FRY | 10. BAKE | 16. DESSERT |
| 5. SOUP | 11. GRAIN | 17. EXPRESS |
| 6. STEAM | 12. PILAF | |
| Functions | |
| Keep Warm function | up to 24 hours |
| Disabling "Keep Warm" in advance | yes |
| Reheat function | up to 24 hours |
| Time Delay function | up to 24 hours |
| Packaging Arrangement | |
| Multicooker | 1 pc |
| Bowl | 1 pc |
| Steaming container | 1 pc |
| Measuring cup | 1 pc |
| Serving spoon | 1 pc |
| Stirring paddle | 1 pc |
| Spoon/Paddle holder | 1 pc |
| Power cord | 1 pc |
| Cookbook | 1 pc |
| User manual | 1 pc |
| Service booklet | 1 pc |
In accordance with the policy of continuous improvement, the manufacturer reserves the right to make any modifications to design, packaging arrangement, or technical specifications of the product without prior notice. The specification allows an error of ± 10% .
Multicooker Assembly (A1, p. 4)
- Upper lid
- Removable lid lid
- Removable
- The BMW 4.11 release
4.1Lid release button 5-Control panel with: - Control panel 6. The housing
- Caroio band
- Removable steam xylor
- Stripping spindle
- Serving spoon
- Measuring a
- Steaming container
- Spoon/Paddle holde
- Power cord
- Container for collecting condensate
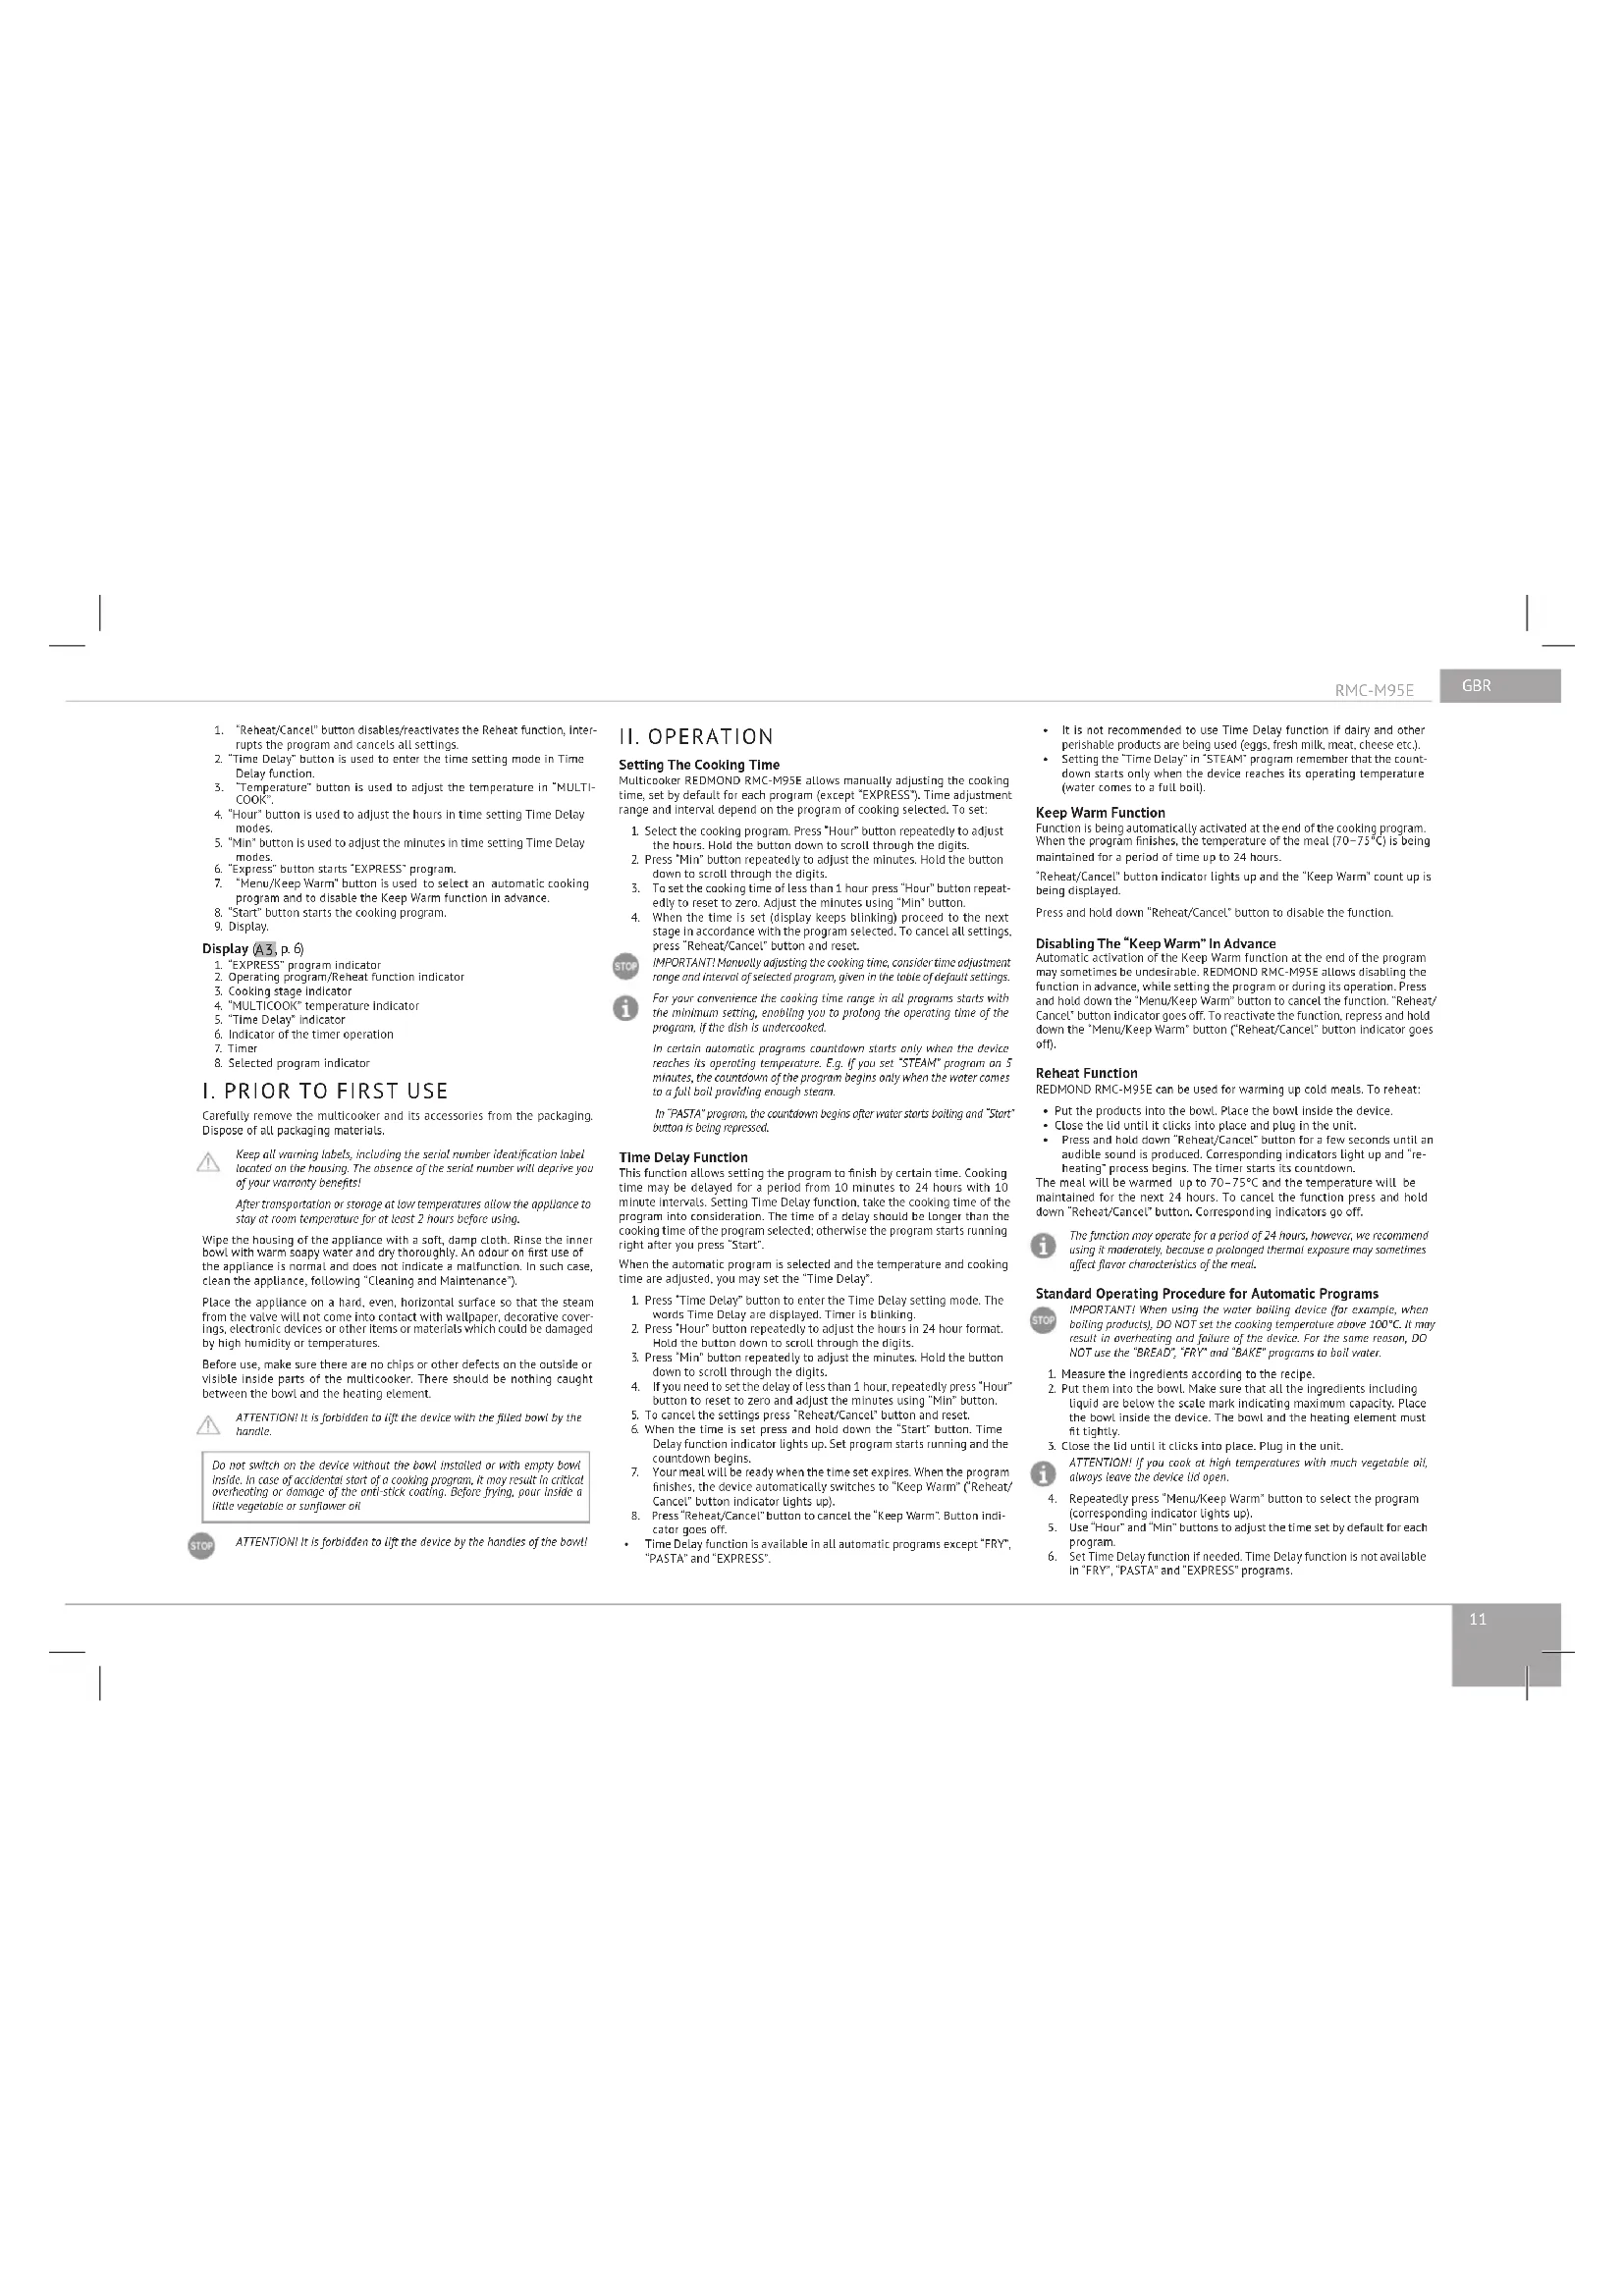
Control Panel (A2, p.5)
Multicooker REDOMOND RMC-M95E is equipped with a touch control panel with color LED multifunction display.
- "Reheat/Cancel" button disables/reactivates the Reheat function. Interp u rts the program and cancels all settings.
- Time Delay' button is used to enter the time setting mode in Time Delay function.
- Temperature' button is used to adjust the temperature in MULTI COOK.
- "Hour" button is used to adjust the hours in time setting Time Delay modes.
- "Min" button is used to adjust the minutes in time setting Time Delay modes.
- "Express" button starts "EXPRESS" program.
- "Menu/Keep Warm" button is used to select an automatic cooking program and to disable the Keep Warm function in advance.
- "Start" button starts the cooking program.
- Display:
Display (A3,p.6)
1 "EXPRESS" program Indicator
2. Operating program/Reheat function Indicator 3. Heating rate indicator
1.业绩预告情况
4. MULTICORD "Temperature Indicator" 5. "Time Delay" Indicator
6. Indicator of the timer operation
7. Timer
& Selected program indicator
I. PRIOR TO FIRST USE
Carefully remove the multiconductor and its accessories from the packaging. Disposc of all packaging materials.

Keep all warning labels, including the serial number identification label located on the housing. The absence of the serial number will deprive you of your warranty benefits!
After transportation or storage at low temperatures allow the appliance to stay at room temperature for at least 2 hours before using.
Wipe the housing of the appliance with a soft, damp cloth. Rinse the inner bowl with warm soapy water and dry thoroughly. An odour on first use of the appliance is normal and does not indicate a malfunction. In such case, clean the appliance, following "Cleaning and Maintenance".
Place the appliance on a hard, even, horizontal surface so that the steam from the valve will not come into contact with wallpaper, decorative coverings, electronic devices or other items or materials which could be damaged by high humidity or temperatures.
Before use, make sure there are no chips or other defects on the outside or visible inside parts of the multicooker. There should be nothing caught between the bowl and the heating element.

ATTENIONIt is forbidden to lift the device with the filed down by the horicle.
Do not switch on the device without the bowl installed or with empty bowl inside. In case of accidental start of a cooking program, it may result in critical overeating or damage of the anti-stick cooling. Before frying, pour inside a little vegetable or sunflower oil.

ATTENTION: It is forbidden to lift the device by the handles of the bow!
II. OPERATION
Setting The Cooking Time
Multicooker REDMOND RMC-M95E allows manually adjusting the cooking time, set by default for each program (except "EXPRESS"). Time adjustment range and interval depend on the program of cooking selected. To set
- Select the cooking program. Press 'Hour' button repeatedly to adjust the hours. Hold the button down to scroll through the digits.
- Press "Min" button repeatedly to adjust the minutes. Hold the button down to scroll through the digits.
- To set the cooking time of less than 1 hour press "Hour" button repeatedly to reset to zero. Adjust the minutes using "Min" button.
- When the time is set (display keeps blinking) proceed to the next stage in accordance with the program selected. To cancel all settings press "Reheat/Cancel" button and reset.
IMPORTANT! manually adjusting the cooking time, consider time adjustment range and interval of selected program, given in the table of default settings.

For your convenience the cooking time range in all programs starts with the minimum setting, enabling you to prolong the operating time of the program, if the dish is undercooked.
In certain automatic programs countdown starts only when the device reaches its operating temperature. E.g. if you set "SITAM" program on 5 minutes, the countdown of the program begins any time when the water comes to a full boil providing enough steam.
In "PASTA" program, the countdown begins after water starts boiling and "Start" button is being pressed.
Time Delay Function
This function allows setting the program to finish by certain time. Cooking time may be delayed for a period from 10 minutes to 24 hours with 10 minute intervals. Setting Time Delay function, take the cooking time of the program into consideration. The time of a delay should be longer than the cooking time of the program selected; otherwise the program starts running right after you press "start".
When the automatic program is selected and the temperature and cooking time are adjusted, you may set the 'Time Delay'.
- Press "Time Delay" button to enter the Time Delay setting mode. The words Time Delay are displayed. Timer is blinking.
- Press "Hour" button repeatedly to adjust the hours in 24 hour format. Hold the button down to scroll through the digits.
- Press "Min" button repeatedly to adjust the minutes. Hold the button down to scroll through the digits.
- If you need to set the delay of less than 1 hour, repeatedly press "Hour" button to reset to zero and adjust the minutes using "Min" button.
- To cancel the settings press "Reheat/Cancel" button and reset.
- When the time is set press and hold down the "Start" button. Time Delay function indicator lights up. Set program starts running and the countdown begins.
- Your meal will be ready when the time set expires. When the program finishes, the device automatically switches to 'Keep Warm' ("Reheat", Cancel) button indicator lights up).
Press "Reheat/Cancel" button to cancel the "Keep Warm". Button indicator goes off.
Time Delay function is available in all automatic programs except "FRY", "PASTA" and "EXPRESS".
It is not recommended to use Time Delay function if dairy and other perishable products are being used (jews, fresh milk, meat, cheese etc.).
Setting the "Time Delay" in STEAM program remember that the countdown starts only when the device reaches its operating temperature (water comes to a full boil).
Keep Warm Function
Function is being automatically activated at the end of the cooking program. When the program finishes, the temperature of the meal (70 - 75^) is being maintained for a period of time up to 24 hours.
"Reheat/Cancel" button indicator lights up and the "Keep Warm" count up is being displayed.
Press and hold down "Reheat/Cancel" button to disable the function.
Disabling The "Keep Warm" In Advance
Automatic activation of the Keep Warm function at the end of the program may sometimes be undesirable. REDNOND RMC-M95E allows disabling the function in advance, while setting the program or during its operation. Press and hold down the "Menu/Keep Warm" button to cancel the function. "Reheat/Cancel" button indicator goes off. To reactivate the function, repress and hold down the "Menu/Keep Warm" button ("Reheat/Cancel") button indicator goes off.
Reheat Function
REDMOND RMC-M95E can be used for warming up cold meals. To reheat:
- Put the products into the bowl. Place the bowl inside the device.
-
Close the lid until it clicks into place and plug in the unit.
-
Press and hold down "Reheet/Cancel" button for a few seconds until an audible sound is produced. Corresponding indicators light up and "re-healing" process begins. The timer starts its countdown.
The meal will be warmed up to 70 - 75^ and the temperature will be maintained for the next 24 hours. To cancel the function press and hold down "Reheat/Cancel" button. Corresponding indicators go off.

The function may operate for a period of 24 hours, however, we recommend using it moderately, because a prolonged thermal exposure may sometimes affect flower characteristics of the meal.
Standard Operating Procedure for Automatic Programs

IMPORTANT: When using the water boiling device (for example, when boiling products), DO NOT set the cooking temperature above 100^ . It may result in overheating and failure of the device. For the same reason, DO NOT use the "BREAD", "FRY" and "BAKE" programs to boil water.
- Measure the ingredients according to the recipe.
- Put them into the bowl. Make sure that all the ingredients including liquid are below the scale mark indicating maximum capacity. Place the bowl inside the device. The bowl and the heating element must fit tightly.
- Close the lid until it clicks into place. Plug in the unit.
1 ATTENTION! If you cook at high temperatures with each vegetable ab, always save the device this open. - Repeatedly press "Menu/Keep Warm" button to select the program (corresponding indicator: lights up).
- Use 'Hour' and 'Min' buttons to adjust the time set by default for each program.
- Set Time Delay function if needed. Time Delay function is not available in 'FRY', 'PASTA' and 'EXPRESS' programs.
REDMOND
- Press and hold down "Start" button. "Start" and "Reheat/Cancel" button indicators light up. Set program starts running and the countdown begins. Countdown of the "STEAM" program begins only when water comes to a full boil, providing enough steam. In "PASTA" - after water comes to a full boil, products are added and "Start" button is being repressed.
- Press and hold down "Menu/Keep Warm" button to disable the Keep Warm function in advance if needed ("Reheat/Cancel" button indicator goes off). Repress "Menu/Keep Warm" button to reactivate the function. Keep Warm function is not available in "YOGLRT/DOLIGH" and "BRITEAD" programs.
- When cooking time expires, the device makes an audible sound. Depending on your settings the unit either switches to "Keep Warm" ("Reheat/Cancel" button Indicator lights up) or enters standby mode ("Start" button indicator blinks).
- To interrupt cooking process at any stage, to cancel set program or the Keep Warm function press and hold down "Reheat/Cancel" button. For high-quality results, you are offered to use the recipes for cooking from the cook book supplied with REDMOND multicooker RMC-M95E, designed specifically for this model.
if the expected result has not been achieved, refer to the Cooking Tips section, where you can find answers to the most frequently asked questions and get the necessary recommendations.
If you did not achieve the desired result using automatic programs, try versatile program called "MultiTICOGK", featuring a wide time and temperature adjustment range. This program gives endless opportunities for new culinary experiments.
"MULTICOOK" Program
This program can be used to cook any meal with your personal time and temperature settings. REDMOND RMC-M0SE, featuring 'MULTICOOK' program will be able to replace a big number of kitchen appliances. Now any recipe, either from your family cookbook or Internet, can be adjusted for your multicooker.
For your convenience, the device does not switch to "Keep Warm" automatically by the end of the program if the cooling temperature was less than 80^ . It may be manually reactivated by pressing and holding down the "Menu/Keep Warm" button right after the program starts running. "Reheat/Cancel" button indicator lights up.
Temperature adjustment range use "Temperature" button to adjust is from 35^ to 170^ with 5^ intervals.
Cooking time adjustment range is from 5 minutes to 12 hours with the following intervals: less than 1 hour - 1 minute, over an hour - 5 minutes.
if you use the MUN TICOOK program for boiling the water (for example, when cooking products), it is FORBIDDEIV to set the cooking temperature above 100^ .
"OATMEAL" Program
This program is recommended for cooking various porridges using milk. Program's default time is 10 minutes. Manual time adjustment is available. Time adjustment range is from 5 minutes to 1.5 hours with 1 minute intervals.
"OATHEAL" program is recommended for cooking various oat poridges using pasteurized low fat milk. To avoid boiling away, we recommend you do the following:
- rinse grain thoroughly before cooking;
- grease the sides of the bowl with butter;
- follow proportions suggested in the recipe book. Increase or reduce amount of ingredients required.
Amount of ingredients proportionately: using whole milk dilute it by half with water.
Cooking results may vary depending on the place of origin and the manufacturer of the products used.
If you did not manage to achieve the desired result, please consult the chapter "Cooking Tips" to receive necessary recommendations on cooking or use the multifunctional program "MULTICOOK." Set the temperature of 95^ . Follow the proportions and cooking time settings given in the recipe
"STEW" Program
This program is recommended for stewing vegetables, meat, fish, poultry, and seafood. Program's default time is 1 hour. Manual time adjustment is available. Time adjustment range is from 20 minutes to 12 hours with 5 minute intervals.
"FRY" Program
This program is recommended for frying meat, vegetables, poultry, and seafood. Program's default time is 15 minutes. Manual time adjustment is available. Cooking time adjustment range is from 5 minutes to 1.5 hours with 1 minute intervals. Time Delay function is not available in this program.
To prevent food from burning follow instructions given in the recipe book and stir ingredients thoroughly while frying.
"SOUP" Program
This program is recommended for cooking various broths, soups (chunky, bisque, cream soup etc.) and making fruit and berry drinks. Program's default time is 1 hour. Manual time adjustment is available. Cooking time adjustment range is from 20 minutes to 8 hours with 5 minute intervals.
"STEAM" Program
This program is recommended for steaming meat, fish, vegetable and children meals. Program's default time is 15 minutes. Manual time adjustment is available. Cooking time adjustment range is from 5 minutes to 2 hours with 5 minute intervals. Use the steaming container provided to steam the foods.
-
Pour 500 - 1000ml of water into the bowl. Place the steaming container in.
-
Measure the Ingredients and put them into the container. Place the bowl inside the device. The bowl and the heating element must fit tightly.
- Follow steps 3 to 10 given in "Standard operating procedure for automatic programs".
i Countdown of the program does not start until the device reaches its operating temperature (water comes to a full bolt).
If you want to adjust the default settings of the program we advise consulting the table of recommended steaming time settings for various products.
"PASTA" Program
This program is recommended for cooking pasta, sausages, eggs, etc. Program's default time is 8 minutes. Manual time adjustment is available. Cooking time adjustment range is from 2 to 20 minutes with 1 minute intervals. Cooking time of the program covers the period of time needed to bring water to a boil and to cook the ingredients. The device produces an audible sound upon
boiling alarming you to put ingredients inside the bowl. Repress the "Start" button to begin the countdown. Time Delay function is not available in this program.

During preparation of certain products (pasta, etc.), foam might arise. To avoid foam boiling over, we recommend you to open the lid a few minutes after the products have been added into boiling water.
"SLOW COOK" Program
This program is recommended for cooking stewed meat or baked milk. Program's default time is 5 hours. Manual time adjustment is available. Cooking time adjustment range is from 1 to 8 hours with 10 minute intervals.
"BOIL" Program
This program is recommended for cooking beans and vegetables. Program's default time is 40 minutes. Manual time adjustment is available. Cooking time adjustment range is from 5 minutes to 2 hours with 5 minute intervals.
"BAKE" Program
This program is recommended for baking cakes, puddings, pies, puff, and yeast pastry. Program's default time is 1 hour. Manual time adjustment is available. Cooking time adjustment range is from 20 minutes to 8 hours with 5 minute intervals.

The readiness of the cake may be checked with a toothpick. Insert a toothpick to or if it comes out dry, your cake is ready.
We recommend disabling the Keep Warning function when baking.
"GRAIN" Program
This program is recommended for cooking various grains. Program's default time is 35 minutes. Manual time adjustment is available. Cooking time adjustment range is from 5 minutes to 4 hours with 5 minute intervals.
"PILAF" Program
This program is recommended for cooking different plats, paella or risotto. Program's default time is 1 hour. Manual time adjustment is available. Cooking time adjustment range is from 20 minutes to 1.5 hours with 10 minute intervals.
"YOGURT/DOUGH" Program
This program is recommended for making healthy and delicious homemade yogurts. Default time is 8 hours. Manual time adjustment is available. Cooking time adjustment range is from 6 to 12 hours with 10 minute intervals. Keep Warm function is not available in this program.

Adding ingredients into the bowl make sure that it is filled only to half of its size.

Use Yogurt jar Set REDMOND RAM-G1 (to be purchased separately) to prepare yogurt.
"PIZZA" Program
This program is recommended for making pizza. Default time is 25 minutes. Manual time adjustment is available. Cooking time adjustment range is from 20 minutes to 1 hour with 5 minute intervals.
"BREAD" Program
This program is recommended for baking white and wheat-rye breads. The program includes complete baking cycle starting from the process of proof
ing the dough and up until the moment you take the freshly baked product out. Default time is 3 hours. Manual time adjustment is available. Cooking time adjustment range is from 1 to 6 hours with 10 minute intervals. Keep Warm function is not available in this program.
- Adding ingredients into the bowl make sure that it is filled only to half of its size.
Remember, that the baking starts one hour after the beginning of the program when the dough has proofed.

Before using baking flour, we advise you to it, removing any impurities and adding to it some air.
It is not recommended to use 'Time Delay' function because this may affect the quality of pastry.
Do not open the lid until the program finishes!
In order to minimize the cooking time and to simplify the process of baking we advise using baking flour mixes.
DESSERT"Program
This program is recommended for making various desserts using fruits and berries. Default time is 1 hour. Manual time adjustment is available. Cooking time adjustment range is from 5 minutes to 4 hours with 5 minute intervals.
"EXPRESS" Program
This program is recommended for quick cooking rice and other grains. Manual time adjustment and Time Delay function are not available in this program.
III. ADDITIONAL FEATURES
Proofing the Dough
Making Fondue
Making Cheese, Cottage Cheese
Deep frying
- Pasteurizing Liquids
- Reheating Baby Food
Tableware and Personal Items Sterilization
IV. OPTIONAL ACCESSORIES
Additional accessories can be purchased separately. Information on the assortment, pricing, and compatible accessories is available through our authorized dealer in your country.
V. CARE AND MAINTENANCE
General rules and recommendations
Before using the device for the first time, as well as to remove the smell of food in the multicooker after cooking, you are recommended to process half a lemon in it for 15 minutes in the STEAM program.
- If you do not use the device for a long time, unptig it. The working chamber, including the heating disc, bowl, inner lid, condensate container and steam valve must be clean and dry.
- Before cleaning the device, make sure it is unplugged and completely cold. For cleaning, use a soft cloth and delicate dishwashing detergent.

Do NOT use coarse wipes or sponges or abrasive pastes when cleaning the device. It is also unacceptable to use any chemically aggressive or other substances that are not recommended for use for objects in contact with food.
Do NOT INsnerse the device in water or place it under a stream of water!
Be careful when cleaning the rubber (silicone) parts of the multicooker; their damage or deformation may cause the device to malfunction.
The device body can be cleaned as it becomes dirty. The bowl, Inner lid, condensate container and removable steam valve must be cleaned after each use. The condensate formed in the process of cooking in the device, remove after each use of the device. Clean the inner surfaces of the working chamber as necessary.
Cleaning the body
Clean the device body with a soft, damp kitchen cloth or sponge. It is possible to use a delicate cleaning agent. To avoid possible stains from water and stains on the body, you are recommended that you wipe the surface dry.
Cleaning the bowl
The bowl can be cleaned both manually using a soft sponge and dishwashing detergent, and in the dishwasher (in accordance with the recommendations of its manufacturer).
If it is heavily dirty, pour warm water into the bowl and leave to soak for a while, and then clean. Be sure to wipe the outer surface of the bowl dry before installing it in the body of the device.
With regular operation of the bowl, the color of its internal non-stick coating can completely or partially change. This is not a sign of a bowl defect.
Cleaning the Inner lid
Refer to the diagram A4 (page 7) for the procedure for removing and installing the inner lid. Use a damp kitchen cloth or sponge to clean the main and removable inner lids. Before installing the inner lid, wipe the surfaces of both lids dry.
Cleaning the removable steam valve
The steam valve is installed in a special seat on the top lid of the device. Refer to the diagram A51 (page 8) for the cleaning procedure.

ATTENTION! To avoid deformation of the valve rubber seal, do not twist or pull it out when removing cleaning and installing.
Condensate removal
In this model, the condensate accumulates in a special cavity on the body of the device around the bowl and flows into a special container located at the back of the device. To clean the container, rinse it under running water, following the above rules. Remove any remaining condensation in the cavity around the bowl with a kitchen cloth.
Cleaning the working chamber
In strict compliance with the instructions of this manual, the probability of liquid, food particles or debris entering the working chamber of the device is minimal.
If significant contamination has occurred, the surfaces of the working chamber should be cleaned to avoid incorrect operation or damage to the device.

Before cleaning the working chamber of the device, make sure that the device is unplugged and completely cooled down.
The side walls of the working chamber, the surface of the heating disc and the housing of the central temperature sensor (located in the middle of the heating disc) can be cleaned with moistened (not wet) sponge or cloth. If you use detergent, you should carefully remove the residue to avoid the appearance of unwanted odor during subsequent cooking. If foreign objects get into the recess around the central temperature sensor, carefully remove them with tweezers, without pressing on the sensor housing.
If the surface of the heating disc is dirty, it is allowed to use a moistened medium-hardness sponge or a synthetic brush.

With regular use of the device over time, the color of the heading disc can completely or partially change. This is not a sign of malfunction and does not affect the correct operation of the device.
Transportation and Storage
Before repeated operation or storage completely dry all parts of the appliance. Store the assembled appliance in a dry, ventilated place away from heating appliances and direct sunlight.
During transportation and storage, do not expose the device to mechanical stress, that may lead to damage of the device and/or violation of the package integrity.
Keep the device package away from water and other liquids.
VI. COOKING TIPS
This chapter familiarizes you with the practical tips and solutions to some common problems you may experience when using the multicooker.
REDMONO
THE DISH IS UNDERCOoked
| Possible Causes Solving the Problem | ||
| The lid of the device was either open or was not closed properly. | Try to avoid opening the lid while cooking. Close the lid until it slips into place. Make sure that the rubber sealing ring located on the inner side of the lid is not defrosted or damaged in any way. | |
| Cooking temperature was too hot and became the heated and the heating element did not fit tightly. | There should not be any foreign objects between the lid and the housing of the device, remove it easily. Always make sure that the heating element is chen and fits tightly with the food before cooking. | |
| Wrong ingredients or settings were chosen. General procedures were not observed, the size of the ingredients was too large. Wrong time setting. Chosen recipe is not appropriate for the device. | We recommend using recipes adjusted for the device. Choose proven recipes only. Set the time and cooking program, choose ingredients, proportions, and the site of ingredients according to the recipe. | |
| Steaming the amount of water in the bowl is too little in provide enough steam. | Use the amount of water recommended. If in doubt, check the water level while steaming. | |
| Frying: | Too much oil was added. | Frying ingredients and an amount of all enough just to cover the bottom of the bowl. Follow recommendations given in the recipe while deep frying. |
| Too much moisture inside the bowl. | Do not close the lid of the device while frying unless specified in the recipe. Using frozen ingredients centrifast and drain before frying. | |
| Cooking the water boiled away during preparation of foods with high acidity: | Certain products need to be processed before cooking: washed, browned, etc. Follow recommendations given in the recipe. | |
| Baking (though did not bake through). | Too much dough in the bowl. | Use a smaller amount of dough. |
| Proceeds dough has reached the inner lid and covered the steam valve. | Take the baked product out of the unit, turn it over and place slices. Bake until ready. Next time use smaller amount of dough. | |
THE DISH IS OVERCOoked
| Wrong Ingredients, wrong size of ingredients at time settings | We recommend using the recipes adjusted for your model. Try choosing proven recipes only. Set the time and cooking program, choose ingredients, proportions, and the size of ingredients according to the recipe. |
| The dish remained in the unit with the "Keep Warm" icon for too long after it's been cooked. | We recommend using the "Keep Warm" function moderately. Your device features the function of diswering the "Keep Warm" indicator, use it to avoid the problem. |
LIQUID BOILS AWAY DURING COOKING
| Milk notsa way. | Depending on the quality of milk used it may fall away. To avoid this, we recommend using only ultra-pureedized milk with the fat content of 2.5% in less. Diffie milk with water needed (p.7) |
| Ingredients were used properly processed (washed gently,etc). Noting general properties or ingredients. | We recommend using the recipes adjusted for the device. Try choosing proven recipes only. Set the time and cooking program,choose ingredients,proportions,and the size of ingredients according to the recipe. Whole grains,meat,fish,and seafood need to be rinsed thoroughly before cooling. |
| The product forms a foam | It is recommended to rinse the product thoroughly remove the valve or tank with the lid open |
THE DISH IS BURNT
| The bowl was not properly washed after last use. Non-stick coating is damaged. | Make sure that the bowl is clean and has no coating defects before cooking. |
| General amount of ingredients is smalle than recommended. | Use proven recipes, adjusted for the device. |
| Cooking time was too long. | Reduce the cooking time on follow recommendations given in the recipe adjusted for your model. |
| Frying oil was not added; the ingredients have not been stirred or turned over. | Frying products add amount of oil enough just to cover the bottom of the bowl. Stir ingredients thoroughly while frying or turn over as required. |
| Stewing: not enough liquid. Add more liquid. Avoid ooking the tie while stewing. | |
| Cooking: not enough liquid (proportions were not observed). | Follow recommended ratio of liquids to solies while cooking. |
| Baking: the bowl was not greased before baking. | Grease the bottom and slides of the bowl with butter or oil before baking (do not pour oil instead). |
INGREDIENTS LOOSE THEIR SHAPE WHEN COoked
| Ingredients have been over stirred | Frying funds,do not stir the ingredients more often than every 3-7 minutes. |
| Cooking time was too long. | Reduce cooking time or follow recommendations given in the recipe adjusted for the device. |
BAKED GOODS ARE OVERLY MOIST
| Improper ingredients causing excess moisture have been used (quite fruits or vegetables, frozen berries, sour cream, etc.) | Use ingredients according to the recipe. Try to avoid using ingredients causing excess moisture or anywhere in the article amounts. |
| Baked product has been left in the unit with the closed lid for too long. | We recommend baking board product out of the oven right after the baking cycle finishes or leaving it on the "Keep Warm" for a short period of time only. |
BAKED GOODS DO NOT RISE
| Eggs and sugar were poorly whipped. |
| The dough stayed for too long before being ooked. |
| The flour wasn't sifted or the dough was poorly kneaded. |
| Wrong ingredients. |

Ceretle REDMOND multicounselors feature an outreach protection in “STEM” and “SQUIP” programs, in case there is no liquid in the bowl, the device automatically interrupts the program and switches to “Keep Warm”.
Recommended Steaming Time Settings For Various Products
| Product Weight, g/pcs Water, ml Cooking time, min | |||
| Pork/beef fillet (cut into 1.5 cm cubes) 500 500 20/50 | |||
| Mustard fillet (cut into 1.5 cm cubes) 500 100 33 | |||
| Chicken fillet (cut into 1.5 cm cubes) 500 500 11 | |||
| Meatballs/cutlets | 180 (6 pcs)/430 (4 pcs) | 500 10/11 | |
| Fish fillet 500 500 13 | |||
| Shrimp (crackers, perked, fresh) 500 500 3 | |||
| Potatoes (cut into 1.5 cm cubes) | 500 500 13 | ||
| Carrots (cut into 1.5 cm cubes) | 500 500 35 | ||
| Buns (cut into 1.5 cm cubes) | 500 500 95 | ||
| Fruit vegetables | 500 500 13 | ||
| Lega | 3 pcs | 100 10 | |

Remember, that these are general recommendations only. In reality, cooking time may vary from the recommended one, depending on the quality of the product used and on your personal preferences.
"MULTICOOK" Temperature Adjustment Recommendations
| Temperature | Recommendations for use |
| 35°C | Flooding cough and making vinegar |
| 40°C | Making yogurt |
| 45°C | Leaving |
| 50°C | Fermentation |
| 55°C | Fruitart |
| 60°C | Making green tea and preparing baby food |
| 65°C | Cooking vacuum oven/ind heat |
| Temperature | Recommendations for use |
| 76°C | Preparing punch |
| 75°C | Pasteurizing liquids and mailing white tea |
| 80°C | Preparing mashed wine |
| 85°C | Molding cottage cheese and other time consuming meats |
| 90°C | Molding roll bar |
| 95°C | Cooking porcelles using milk |
| 100°C | Cooking marzipans and jams |
| 105°C | Cooking garlic meat |
| 110°C | Sterilization |
| 115°C | Mating sugar syrup |
| 130°C | Mating hiskart |
| 135°C | Stewing meat |
| 150°C | Mating puddings |
| 135°C | Brewing cookies/floors |
| 140°C | Smoking orelasts/funds |
| 145°C | Baking fan and vegetables in foil |
| 150°C | Baking meat in foil |
| 155°C | Frying yeast dough |
| 160°C | Frying poultry |
| 165°C | Frying steaks |
| 170°C | Deep frying French fries and chicken nuggets |
Table of default settings
| Program | Recommendations for use | Cooking time set by cook | Time adjustment range setting | Time delay | Preheating stage | Keep warm |
| MULTICOOK | Cooking various meals with your personal time and temperature settings. | 15 min | 5 min - 1 hour/3 min 3 hour - 12 hours/3 min | ✓ | ✓ | |
| DAHML | Cooking porcasses using milk | 10 min | 5 min - 1.5 hour/1 min | ✓ | ✓ | |
| STEW | Stewing meat, fish, vegetables, etc. | 1 hour | 78 min - 12 hours/9 min | ✓ | ✓ |
REDMONO
| Program Recommendations for use | Cooking time set by cook | Time adjustment in minutes | Time delay | Preheating steps | Keep warm | |
| FRY | Frying meat, fish, vegetables, etc. | 15 min | 5 min - 1.5 hours / 1 min | ✓ | ||
| SOLIP Making veiins | juices and broths 1 hour 30 min - 8 hours / 5 min | ✓ | ✓ | |||
| STEAM | Steaming meat, fish, vegetables, etc. | 12 min | 5 min - 1 hours / 3 min | ✓ | ✓ | ✓ |
| PASTA | Cooking pasta, sausages and other semi-finished products | 8 min 2 min - 70 min / 4 min | ✓ | ✓ | ||
| SLOW COOK | Making stewed meat, baked mili, brisket, jellied meat and apple | 5 hours 1 hour - 8 hours / 10 min | ✓ | ✓ | ||
| BOIL Cooking beans | and vegetables 40 min 5 min - 2 hours / 3 min | ✓ | ✓ | |||
| BALL | Baking cakes, puddings, pies, pull and yeast pastry | 1 hour 20 min - 8 hours / 5 min | ✓ | ✓ | ||
| GRAIN | Cooking grains and other side dishes | 12 min | 5 min - 4 hours / 3 min | ✓ | ✓ | |
| PILF | Making meat, fish, poultry and seafood pluys | 5 hour | 20 min - 1.5 hours / 10 min | ✓ | ✓ | |
| YOGURT/DOUGH | Making different kinds of yogurt; profling dough 8 hours | 6 hours - 12 hours / 10 min | ✓ | |||
| PEZA | Making pizza | 15 min | 20 min - 1 hour / 3 min | ✓ | ✓ | |
| BREAD | Raking wine and wheat, soy breads including the preheating cycle | 3 hours 1 hour - 6 hours / 10 min | ✓ | |||
| DESSERT | Making desserts using fresh fruits and berries | 1 hour | 5 min - 4 hours / 5 min | ✓ | ✓ | |
| EXPRESS | Quick cooking rice and other grains | 1 hour | 5 min - 4 hours / 5 min | ✓ | ||
VII. BEFORE CALLING FOR SERVICE
| Problem | Possible cause | Solving the problem |
| Display shows the error codes F1-F4 | System error; system board or heating element malfunction | Fixing the fuse and let it cool down. Close the lid tightly. Switch the switch back so it does not eliminate the error, address an unplanned service center |
| Problem | Possible cause | Solving the problem | |
| The device does not switch on. | Power cord is not connected to the appliance and/or socket | Ensure that the power cord is connected to the corresponding iner on the housing of the appliance and to the socket | |
| Well socket is not wering property | Connect to a property wering wall socket | ||
| Power supply failure | Check the power supply. If not available, contact local electricity supply company. | ||
| Dish is taking tea, lang to cook | Power supply Intemation (power supply is unalable/under- nixed) | Fixuate that the power supply is stable. (unstable/ underlined, contact local electricity supply company. | |
| Dish is taking tea, lang to cook | There is a foreign object between the bowl and the heating element (garb, food particles, debris, etc.) | Unplug the appliance and let coal down. Remove foreign object in objects. | |
| The bow is not properly positioned | Property position the bow into place. | ||
| Heating disk is dirty | Implied the appliance and let coal down. Clean heating disk. | ||
| Hot steam escapes from under lid during cooking. The amount of gas entering the slots | Inner lid and cooking bow tail to seal hermetically | The bow is not properly positioned | Property position the band into place. |
| The lid is not closed prop- atly, foreign object unclear lid | Remove foreign objects (grain, food particles, debris, etc.) from under the rim, if any. Always close the lid until it clicks into place. | ||
| Sealing ring is dirty, de- ferment, or damaged in any way | Check the sealing ring. Replace if necessary | ||
In case you didn't manage to eliminate the defects, please, refer to the authorized service centre.

Environmentally friendly disposal (WEEE)
The packaging, user manual and the device itself shall be taken to the applicable collection point for the recycling of electrical and electronic equipment. Do not throw away the electronic waste to help protect the environment.
Old appliances must not be disposed with other household waste but must be collected separately. Municipal disposal of recyclable wastes is free of charge. The owners of old appliances are required to bring it to a waste facility centre. With this little extra effort, you can help to ensure that valuable raw materials are recycled and pollutants are treated as appropriate.
This appliance is labelled in accordance with European Directive 2012/19/EU - concerning used electrical and electronic appliances (waste electrical and electronic equipment WEEE).
The guideline determines the framework for the return and recycling of used appliances as applicable throughout the EU.
- MULTICOOK (MULTI-CHEE)
10.BAKE (PRODOTI DA FORNO)
- OATMEAL PAPPA AL LATTE
11.GRAIN (GRANO E CEREALI)
3 STEW(BRASATURA)
- "Repeat/Cancel" ("Recaientar/Cancelar") = activariop/desac
FunciOn "Time Delay" ("Arranque suspenso")
Laughter, he says, is a good idea.
Programa "SLOW COOK"
Programa "YOGURT/DOUGH"
Characteristicas techniques
Programa "SLOW COOK"
Programa "YOGURT/DOUGH"
Under programme "PASTA" start undertaking them of stem angwary trd ravendt kogos op Start knapen or ryker.
Funktion "Time Delay" ("Udskudt start")
Funktionen hänr langle iisidinterval, ivorher fere ralen kal varre kiar (under hensyn tij programmes arbejdst), Indistille dan bu vanaren raf 10 minutoren bl 24-timer med indistillingsr n 30严谨er. Dut skare in erdines, at forsinklenstensic er stene en de den indistille cibleredinginst, eilen vill programme stame imudelbar et eryk pa'st. De kan orecipte toden oforisknset start, ante De valerai automatisk program, Indistille temperatur og tilberdinginst.
- Yed trykay " Time Delay" aktiver instillingsmodulus for fosinket start, Dispelavet viser vorskriften "Time Delay" zu任何时候 bevähnelt at bilnik.
2.ved trykpa "hour" ander timallett trinvist.Den angivne tienensformat 24 timer.Hvs at hoide knappen nede for et par selkunden, starter der freyndynde vondlanding.
3.ved tryk pa "lin" skfte minute trinivt. Hs at holte knappen nede for et per sekender, starter der fremskndede vaidendering. - Hviis det er nveendigt at indstite urets til minde er en tim tibere-tingret, tryk 'Hour' for fere gange indit timetallet biver nubisetlet. Depeftr ekp na Min no indil minutir.
- For at annulire indistilingere, tray k'Reheat/Cancel o dereffer genindeln alt tibberdingprogrammet.
- Ved afsluttingen at tidinstilling tryk og hold "Start"-kneppen for et par sekundere. Kontrollampne for fonctionen Time Delay"vi tændes, programmektiveler og nedelfiellen starter.
- Tiden Indistlet er meaed faerdig I sluttingen af programmet akti
- Tiden Indistlet er meaed faerdig I sluttingen af programmet akti
automatisk, ou knappen Reheel/Cancel" will ly opse. - For auto-oparvnings deactivation tryk "Reheat/Cancel": Knappens indicator v slukkes ned.
Ustaktad-stort i tigeringal mede alice o automotivske biliradevningrprogrammer undtagen FRY, PASTA' og EXPRESS
Program "YOGURT/DOUGH"
Med ditte program dan Deve fosskige slags klokre og sune yoghr dehjemme. Programmets standarde tiberedningsl er 8 timer. Manuel indus
Angi ngngnngnng nngnngnngnng nngnngnngnng nngnngnngnng nngnngnngnng nngnngnngnng nngnngnngnng nngnngnngnng nngnngnngnng nngnngnngnng nngnngnngnng nngnngnngnng nngnngnngnng nngnngnng nngnngnng nngnngnng nngnngnng nngnngnng nngnngnng nngnngnng nngnngnng nngnngnng nngnngnng nngnngnng nngnngnng nngnngnog
For tolerberding of yoghurt: De bruge et speciel komplicit of yoghurt addser REDMOND RAN G1 (sageris sepatet).
Program "PIZZA"
PRODUKTENBLEVOVERKOGT
VED KOGNING KOGES PRODUKTEON OVER
Program "YOGURT/DOUGH"
Ved Tjeph ap vete programmek dan deritberede dorsikjellige veinsmaieende og sunne yoghurjer nenne. Automatisk tibleredinsprogram er 8 Timer. Manuel Installin vith tibreredinstid er mutig lennen ienre profe f 6 H1 12 timer med metronimn 10 minutner.
REDMOND
Program "YOGURT/DOUGH"
Meh jilip av delta programkan du taga olikka goda och nytgla yogurtar hemma hos ig. Inprogrammerad tiltagningst od 3mmar. Det ar moligt ag programara in iden fdn 6 tll 12 timmar. Instaltninpsteg 20 minuter. Funktionen eutoupvamming er og tillagangir hi.
Nä du lagger in ingredensera, se töl att de ante iste sicil. sverskrinda markeringen 15 paa innersta ytan as skilen.
For Tillaging or yogurtan kan i n ovenda nit speciella set ov borkar REDMOND RAM-61 (kipes separat).
Program"PIZZA"
Rekomenderas for tillingay pizzina. Inprogrammerad tillagningstid ar 25 minuter.Det ar mjjgnt alt programmera in ticen fran 20 minuterrill 1 time.Instalngnstseg 3 minuter.
Program"BREAD"
Rekomenderas for bainting av olika vetebredi med tilssats av rqnglnd. Programmet berindikner hela processen, fln jsinling tll bainding. Inprogrammerad tllagningstedir 3 timidar. Det ar mutjelig att programmeria in tiden from 1 till 6 timidar met Instalinasseed 10 minutes.
BAKET HAR INTE STIGIT UPP
| Agg mod sorken van slilg opalap | |
| Smelter par slitl on range mapbuler | • Der is inanskant, et anandam reelut, sprossade til derve model. |
| Din bar skat op elden diagl erther bideran smelter fll | • Vax ingredenset, salter alt skola dem. (higlegg i skola, vala program sch indlagringsd it alste over eustimma med vall recept. |
| Felt intagungsvi ingredensc. | |
1 flora model cv multikaleren REDMONH har program "STEW" och "SOUP" en labgy wimneskydsfquation. om et eir for (te vdtka) skidten stangraenungen ac ghr over bil autoupvimmng.
Ct 1024560030000000000000000000000000000000000000000000000000
Māsurile de siguranta sī instructjuniule, cuprine in acest manual, nu acoperā toate situṭṭile posi-ble, care pot apareña in procesul de exploatare a dispositivolutu. Atunci cānd se utilizeazā dis-positivolutu utilizatorul trebule sā fie ghidat de bunl simt, sā fie atent sī griljuli.
MÁSURI DE SECURITATE
Program ,YOGURT/DOUGH
Cu a l'ucutori acustl program putei pregiat diferite lauranti gustose si sàntoatae la domiciliu. Timul de gait implicit in program constitue 8 ore. Se prese deva tetana manuale a timului de gait intr-un diapazon de la S penla I2 ore cu pasul de setare de 10 minute.
Functie de autoindatire en aeest program est inaccesibla La introducerea ingredientetor urmarjil ca es sa fe mai jos de cotatia 12 de pe suprafata interioara a vasutui.
Pentru a pregei lauritui poutu utilizea un set speciale de borodnape pour tue REDMOND RAN-G1 (se procud ut paten)
Program „PIZZA"
MULTICOOK (MULTISZAKACs) 2. OATMEAL (TEKASA)
- STEW (FOZES)
- FRY (SUTES)
5.SOUP(LEYESI) - STEAM (KESZITES PAROLASSAL)
- PASTA (TESZTA)
- SLOW COOK (LASSU PAROLAS)
-
BOIL (KESZITES)
-
BAKE (SUTEMENYEK)
- GRAIN (DARA)
12.PILAF (PILAF) - YOGURT/DOL
KELTT - P1ZZA
15.BREAD(KENYER) - DESSERT (EDESSEG)
- EXPRESS (GYORS KESZITES)
Funkciok
2.10498H BHTPCWCH KERK
-
yepnak
-
Yana
-
Mepha yaya
4.6yTOH 3aOxKp8BaHe Ha KaNaKa
- Konternep 3a rotnene ha napa
5.100000000000000000000000000000
-
1
-
Kappys
-
Mprn 958n
7.
-
KOHIKHNJHIOHOH
-
NopBnKHeH npOe knaHa
KOHHeH3aT
Pahen 3a ynpabneHne (cxemaA2, ctp.5)
MynTnAepkR DEDOND RMC M95E c Chabda Cbc cChoprnn THeN 3e ynpBnEpeHcMHOrOyKHLHPOAE WHTeD LEOHJL.
- Reheat/Cancel(,3atomneH/0rMa)-BIOKHOABH/MIOHOVAHE HpyHKH2A ZAMONHIE, npKcSAeHae HpOaTb HpOgPAH 3n pIrrTOB8E, OXpBnHae HnpAepBeHapCPOH.
TJN TNNNTNNNNNNNNNNNNNNNNNNNNNNNNNNNNNNNNNNNNNNNNNNNNNNNNNNNNNNNNNNNNNNNNNNNNNNNNNNNNNNNNNNNNNNNNNNNNNNNNNNNNNNNNNNNNNNNNNN
- Temperature (T_Temperate) - yctahoeabe Hbtemepa a npora ma_MULTICOOK
HOH'(HACO)-HOPD HA HOCPOA PEXXHHTE 3a YCTAOGBAHAE H AEMETO 3B DOROTARHE OIOKOKHKHHTGRT
- Min"(MnH)-HOBOP HA MHHa PekOHNTE HcTCHAOBBAe HA BPOEMTO TNOONHOAIEO OIOKHOHNI CPT
.6.Express" (Bartle rotenone) - Annohake h npoppama , EXPRESS" 7. Menu/Keep Warm" (Mao/Horantoertheta) - H60bhp ha botomatahpa
NORPME33nPHOTBHE;NPDEAPENTHOKIKKIAHBEHNAHBT2010NH.8"Start" [Copp] -KMOHOBHnHaAaMaaepepepeaTnPHOTBHE
- Dnneey
YcTPOINCTBO HA DCNNEA (CXEMA A3, CTP.6)
- Huaatoo ha hnohehme ha aetomathnha oodana,EXPRESS
- M#HATOP #A#b#o# A#n p#p#ma 3a p#r#toBae/#at#ne#e. 3. M#HATOP #A#b#o# A#n p#p#ma
- HUMUKATOD HA VCTA KORSHA TEX FADTAPOB 7TNO503X3 MUL TUCOK
- MHHATOP HA DABORA HA CHUKING Time Delay
- INHAKATOP HA PEXN HA NOK3AHHs Ha TaHKeepa
- Taqmed
- Hhckatop Ha 36paHa ATOMATHnA nporpama 3a npurotahe
I.IPEN3AIOOBAHE HA EKCIIOA-TAUHA
BHHHMMATPOIIOOJIHOAEOIYEPHEI AND HOEIEAEOTIKYKINPENHEOTIOOHPNOKOHMOHNEPHKUMHNTEHKHTNOCBEHNIICSCCEPCHEHNOHCPCCTBNHETKACSEPHMNEOPBHEPBOPEPBOPEPBOPEPBOPEPBOPEPBOPEPBOPEPBOPEPBOPEPBOPEPBOPEPBOPEPBOPEPBOPEPBOPEPBOPEPBOPEPBOPEPBOPEPBOPEPBOPEPBOPEPBOPEPBOPEPBOPEPBOPEPBOPEPBOPEPBOPEPBOPEPBOPEPBOPEPBOPEPBOPE
PntpKtKe Kopnyc Hyaepa c Eanmka Kpnna. HnMttte Naatca Tcnma Cnynha Boda. TaHHTO hCnnoTe. Ito EPme np Hpa 103eNbAbe HbEMKHO e noBaeBa HyaNk MHNBe, ToaHe e CNECTBHe NcNtAPBBOHCT Ha yEe. B Takc YCNH NauhNTAeTBe HyaTe.
PpeBapHTenHO 3KIOU4BaHc H3 ABTo3aTOnIaHe
BICNCHAEHbAeTOSOTANLHEcNEbCnBcHaeHbAaTPOpRaHbAeHbA HnAHN eHaIaENaONHO.CyHt aHbA. BYNTHAPKRA REDMONR CMC93E npeCNYPHTOPHbAMBOHOCCTBaPeDABPrrnHIOHcNKHOHBeHbAaNDaHbAaYPHKlUaNPOMeHbAaNTCAKcHbAHOACHOHbAaOHOHPaAaTPOHrBA.3Toa bNOPOMeHcAETnPbAeHbAaNPOpaHbAaNPOPaHbAaNPOHcHbAaNPOPaHbAaNPOPaHbAaNPOPaHbAaNPOPaHbAaNPOPaHbAaNPOPaHbAaNPOPaHbAaNPOPaHbAaNPOPaHbAaNPOPaHbAaNPOPaHbAaNPOPaHbAaNPOPaHbAaNPOPaHbAaNPOPaH
ФУHKUNA 3a 3aTOnnHe Ha ActH
MymyxaRbA REDMOND RMC-M95 MOKe 6e Ce KAnonBa 3a ZatOnanHe HA XnADH ACTHE, 38 Tota:
- Chocheke npndyka Ka kaiata, nctbctae B K npocya Hna MyntbpaKa.
- Chocheke kaika, npncdehme ypeka Km enekpneckca Mnpka.
HATNHETe HApKAPrRe HAnKo CekyH KyToH ReHea/Cancet a Do 3kyo CnHn. HeCt cBcTeTaeu, HKnHApO t HKnHm H NkHApO H ByOn. TaeNep noHa o OOrTHA BpEmo 3a 3aTbIaONa.
Yigeatjat a tatoa Hn 70-75C n o hdo kpa ro B ropeo cytohose R bpoaikehne 74 caza. Ako eo heoxoKho, KOKEA da cnpre taotoaH, HtahcoHn y hnoKpKa Hako Kaekou Kcckou Bytoha Reheca/Cant1, DAKO To Hsiracbat CToBteBaTn HmHKDAtopBbXy PcnncnBn Bytoha
Baupeke ne ymuimbaeoka moea de naa npdykron e aenanaedocnepae 24 2006, ne n pnytnepoia da oceanege hncnne tenehmo nnoee 1000-1000, 1000-1000 mnoan noonco 1000 moea de aodn kum mehme HA NIOEORO OXOYK KAVNCEK.
06uH DeECTBn npn H3No3BaHe Ha aBTOMaTHN nporpaMn
BAKHOI Aia ananoeo yede o eepnoe H oed aodnaneopae, kaoaotomou nneumpe npedyuui, e 3A5PAHEO do ce sncmupne H noenepeymypaa na co meepe e no eucoo on 100°C. Toe moea de doebe do nepeipene v no eepoe h yede. Ho cnaeipnpa iye e 3A5PAHEO do ce ustratana o eepoe h oede h npocpmae BAKE, FRYBREAD.
1. FIOGRsE [OIMepE] HeoBxogm npoyxtn
2 Ppnnopokore npnpckyK Hnabaa HMyTNBAPKa BcOHTBCTBe C npnpaHn pnpocbHn HnCnabTa HnKOBpyHa Ynpeya. Cnpedet a ToBa, He CnBnKpHnDkBn, BnKIOHOYTeOHcC, Ce HAMPHAN DQY MACHMHNAt OHTMeKa HA BpTeuHHa NPOXHOYCT Ha JALU. YDEgeTe c, He YAHAe YcTahOBHe BzE KxHPaBAHHe HnTHTO HOKOCBe Do HNDAETEBNTEN ENPMEOT
3A. Taepoetep Kanaka H Myntunbaekokdo Kato 40aikne. PnbcbeHnene yedae kM eneptnKcpeKna
BHHMNAHE!Ako ce zomau npu obo koxane nmeepnpyo c naoua H a 2000KmuaeepnnpnncnnaHMOO, eaoHcUO octocssntc KIOXHO H CNPPOCTNNO HO HNO
4. Hatncneta BytoHa, Menu/Keep Warm' H36epate Heo5oxHAp nporpa 3a nprothrehe Ha dKmne Ie caBn Chbortctau NkDkato np nporahan.
5.AxoHe Bn 3a0dOBOMBa 6peHemTo 3a npOToBHe, yTaHObEO ABOMaTNO, Bm MOeTe Da ChcHATE DaEO HsAHEHe, HAtHCHe 6yTOHn ,Hour n Min.
6. Pnheo0dmoocytaonoeBpeAne HAOnokn cTAP.ΦHkMnIeTimeDe' e Hooctma nphn Hnoaane HnporpanFRY",PASTN,EXPRESS".
7a 3a Tnaprrpnpnpnpnr pnnrnnnepnne HnHnnepeKcKny
7b ByoHa, Start, Anaoe To CnBnTnHnNtOApnpre HbOny, Start, nReheat/Cancel. Lue noHnAHLnHnHe HyaTHOBnep npnpnr n
8b Opatno OTOrtnaHBe A npemero aTnRnOHeB. B npornpema
9STEAM"OpoeopnO OTOrtnaHBe Nooh CNE ABKnABBaHnE Ha BDn
10DIOHnAHO DcOtaHnHIOHIOH Nnpo B yauoA; B nporipra
PASTA" cnae KENBAHBe HbOe B uauata, CnAHO h npOpykln
11NPOTPHO HATNCAHE B HoYToa, Start
8.Iprn He650aHIOOHCT NOKTEP rAeBpIaONHO Da HxKcHbAte FyHKHua ATOAHTNtOHa: HATHCHTe HAnkTe 67oYho, HaeMenu/KeW aT, DoXoH ToHAcu HxNAtopKaHa aHoTyH, Reelch/CareL, TioPtoH aTBCHeBa Hb cyToH, Menu/KeW 'OnOxo BxHbAa DAdenH aFyHKHua. FyHKHua ATOAHTONHBe E HcOeTbTHa PnR hMhO3OBAe H nporpanH, YOGURT/DOUGH, H"BREAD".
9. 86Kb KcHnIe Iue Bx HnnpOpa3a bCpBnAa nHaPZrAa. Nohatata, 6, 1066NtOcTcOgPbAa oNnE aYKHeuNtHApOy, cE bXnOa pRnOa HbOToSAnBaHoe [CBTe HmNkDAtoReheA/ Cen] n Pnneh AChOaBae [MnHnHdAto hSytoa, Staf].
10.3a da OTHEHNEA 3daeae nporpama, npekchene npoece H npnFROB Hnna ATOsTOnnHHe, KTHCHETe H DkKTE HKOON CEXyHn By ToHa,Reheat/Cancel
Aoe Blue Chmone,ue He cne pncnunu xnaenr peynnnn c oohnoaeho aonnoan noonnnoa ananae nyeaneepnnpaaasMULTIOCK"cuaenpauanauauauauauauauauauauauauauauauauauauauauauauauuuauauauauauauauauauuuuuuuuuuuuuuuuuuuuuuuuuuuuuuuuuuuuuuuuuuuuuuuuuuuuuuuuuuuuuuuuuuuuuuuuuuuuuuuuuuuuuuuuuuuuuuuuuuuuuuuuuuuuuuuuuuuuuuuuuuuuuuuuuuuuuuuuuuuuuuuuuuuuuuuuuuuuuuuuuuuuuuuuuuuuuuuuuuuuuuuuuuuUU
Dporpama_MULTICOOK
IaIaIaIaIaIaIaIaIaIaIaIaIaIaIaIaIaIaIaIaIaIaIaIaIaIaIaIaIaIaIaIaIaIaIaIaIaIaIaIaIaIaIaIaIaIaIaIaIaIaIaa
3a Baetio ydo6b0 nopeHn nprrtoae Hnactn ctenepatryo 80oC cyuHkna Hnato30rnoe HnKNOHcH. PnHne6bHOCT MOKTe da kncnHtne Hnntte H n pRkE HnKIOHc HnckyOyHOna, Menu/Keep Wann Cncre 1pocnpane Hnnpopran a n pnrtoBnke, doketo cetn HnKnKapot, Reheel/Cancet
CraHApTaHO B nporpaM, MULTICOOK" apeMa 3a npnrorBne e 15 MHHyU, TMNTePyrAs Hn pnrorBne e 5.00C."
-Дагашада КСУПЕМУКЕТНЕСТЕСССССССССССССССССССССССССССССССССССССССССССССССССССССССССССССССССССССССССССССССССССССССССССССCS
CTKNEHNSHHNHEHNE1MHNTY3BHTHPTBNAD1UHCNTN5MHNTY- 3BHTHPTBNABOBNEOT1UAC
Aao aonanae npnoaane nooaaeae aee aen e ane nne ene ne
IporpaMa OATMEAL
Inpnepnmaee 3a 3pnpntBae H MNEKAA KAIIN.CNTADPHPOA npnpraPAppe aepre 3a npnpTBeEe C 10 MNHTH. BvMxOoO e Pnuho HcHCTANPAHpe A npepTe 3a npnpTBeEe aBnTAaONOT 5 MNHTH Do I HAc 30 MNHTH cCtBkA 1 MNIHTA.
Ipnpmaa, OATHEAL'epnHbAHHHa 3a prrnOHTB H KauHc nHnHOBA HnTaeOpHbAHOTIO HNcKHOAMe HNOKa.3a Da NsBeHertene HNkHAHETO H MANKo H NaONyBHe ToEHOxOKe PByETrA, pnpnoBaCe pnpnOPTBHe HNtNHHe TcCbeDAAe DcEETBa
LIATENOTPNOPMNHBTBCHNHNPHNPCHNTCTEPN3,GN2,ONJIOEHOPOPNHOTNQKATOBOADHECTABNDBTCA
PepnnpnfBHeMa38ateaaataHaMyTHBaC Macno
Ctpo Cnabate npnpnpu,ntepaote npnpkts cbohao hooe HOTO XHMIHTA HPOCEETN;HANBAPATE HNOYABATcKOMPCTC HnnpyTHC TPOI npnpoHnHO
PnH 1N03BaHa HbTbHOMcEHO MAnO To PaepKdAte C BDA6 npnpoipno
CBOHCTBRA HMBKHO B3A 1000HCKMOCT O MRCOTHO HPOPHXOHN PPOCHBDATAO, MOER DE CB PAQHHABT, TOE NOHSKORA OTPAQBA B CE BUPXY D2YHTETHE APOTHBTBE.
REDMOND
AOK NOXH KEBY PENTATI a nporpama, OATMEAL HE e 6nNtOHNTA, H3N2BAYe THe YHEBPCBNA hnporpama, MULTTCOOK. OHmTHaMa Htempeyata 3a pntPBTOBE A HKnHcA kaua e 95°C, KOInHCTeA h npoDykn H ApeMe 38 pntPBTOBE cTcAHO Bete CbLaACho peGTA.
Iporpama .STEW
IpnopnHbEe ce 3a aadyuaabahe ae baneHHu, Mecc. PTHIL, MOPcC xpaHa. CstAnpHdo n pnpOaApe 3ae n pnpOTBe o 1 uac BbMooKo a d yctHoBte mepo h a nprrtoBHe 8 danaHOn e 20 MHyHTo Do 12 cAc cbc CTbIK He CYtHOABOH 5 MNHYt.
NporpamaFRY
Inpnepna 6e3a2zauabae HBeienyH, Meo, TPhu, Mopckx PxaHa. CTaAHTAOB nPpOpaA Epepe a 19 pRTOBaeE e 15 MHINy BMeHO XPOHIO HCTaPbHe ABEPEMO 3a 19 pTOBaeB DAMNtOH oT 5 MHYNH DO 1 uac 50 MHYNH CcStbA B 1 MHYNH.
DyHXnue,Time Delay 品 daeHna npopma e Hneocbna.

30 da npdycknue Hnaa2aenrnnnnae nneepnnae HHO KHAH na paeennnna a nepouduo npa3b6xane npdycknme e hno. Danycne cnpneane en ocnpepnk HNO kMnyuuspO
Iporpama.SOUPI
Inpneprope ce na pnoTneBHe HpaanHbN BynOBn HpOe TcNt, a TaKa Ccuo 3a KONTOH NnHTK. CuaTHAO B npopoe PaeBa 3a PrnoTneBte 1 eBa VBa. BACNOB 0e yCTAHOBTE BPeMTo HpnoTPOBE B MaTHAOB 02 MNNyIOB 0Ba CuaC CtsNkBa YHaTOCHBA 5 MHHY
Nporpama STEAM
Iptepbmae ce na pntpmbtehna napa hane nehevuhy, Pnba, meco, daetneha I beretepbmaehck sctns, getekho Meo. Cthapnabg 6 npimrpaeme ape npitpmbtehbe 15 mniyta. Bzboaohc o y taonhyothe apermeo na pntpmbtehbe 6 danaizoh or 5 minyto h 2 no csc ctsbnna h yacanaba 5 myinh.
32 nTnroTBeBHEAaDaeHb nprrpHaHnONsBaTe cneHauHAn KOHTeHep (BkOyHek HKOANTKET)
1.CneneB aaiata 60C-1000 mm Bao, FoTaeTaee B aaiata konTeHepa3pEHTeBHeNHa Hpa
O. 2. OIOIOIOIOIOIOIOIOIOIOIOIOIOIOIOIOIOIOIOIOIOIOIOIOIOIOIOIOIOIOIOIOIOIOIOIOIOIOIOIOIOIOIOIOIOIOIOIOIOIOIOIOIOIOIOIOIOIOIOIOIOIOIOIOIOIOIOIOIOIOIOIOIOIOIOIOIOIOIO
3.CnabeTne npenOchBAnHmN hAa 3-10 Naact.Obiin RndTbnPn HIOBtANBaH AHOATMnCnPiRpnAM

OIOIOHO OIOIOHO HOOOOOHO OIOIOHO OIOIOHO HOOOHO OIOIOHO OIOIOHO OIOIOHO OIOIOHO OIOIOHO OIOIOHO OIOIOHO OIOIOHO OIOIOHO OIOIOHO OIOIOHO OIOIOHO OIOIOHO OIOIOHO OIOIOHO OIOIOHO OIOIOHO OIOIOHO OIOIOHO OIOIOHO OIOIOHO OIOIOHO OIOIOHO OIOIOHO OIOIOHO OIO IOHO OIO IOHO OIO IOHO OIO IOHO OIO IOHO OIO IOHO OIO IOHO OIO IOHO OIO IOHO OIO IOHO OIO IOHO OIO IOHO OIO IOHO OIO IOHO OIO IOHO OIO IOHO OIO IOHO OIO IOHO OIO IOHO OIO IOHO OIO IOHO OIO IOHO OIO IOHO OIO IOHO OIO IOHO OIO IOO HOO HOOO HOOO HOOO HOOO HOOO HOOO HOOO HOOO HOOO HOOO HOOO HOOO HOOO HOOO HOOO HOOO HOOO HOOO HOOO HOOO HOOO HOOO HOOO HOOO HOOO HOOO HOOO HOOO HOOO HOOO HOOO HOOO HOOO HOO0 HOO0 HOO0 HOO0 HOO0 HOO0 HOO0 HOO0 HOO0 HOO0 HOO0 HOO0 HOO0 HOO0 HOO0 HOO0 HOO0 HOO0 HOO0 HOO0 HOO0 HOO0 HOO0 HOO0 HOO0 HOO0 HOO0 HOO0 HOO0 HOO0 HOO0 HOO0 HOO0 HOO0Hoo
PporpaMa .PASTA
Ipnopnbae ce a npnpoBraTeBaH Ma KApOPOHe HEnHbE, KpNepBbHc, CpaBBAbe Ha bSaHtA Tt. ChuDAPnBu H npopama Bpea 3a npopnbae e 8 MHHTH. BmAnMOHO e yAHTCBOBte BPePtoHa npoTBoHE 8 DhanazOHOT 2do 20 MNDYKCTC CnTCHs HA tcyTAHO 1MxHYt. Ipnopama PnepeDkoDA BoBeKdAe Ha bOda 0 kMnHHe, CbAeHa NpOyDTH H TeXHOTo No-HaTHa TnHIO pOtnBoHe. 3a MoMeHTHa KaHHeHa h ODaTa H neHoDNOOMCTa Da cIatate npOpyDk ine BByEkehckyBcBcHcHAt, ObpatHto CTcHNHBe Ha BPeTOHa naBoTa HA npOpTaNo nOeCh dOtoNPHO H KATCbAe Ha ByTOHa. Star
DyHKua Time Delay' 6 daeHa nporpama e Heoocthna.
Pnepne No npoane nne Hnne Nnne npnoa npnoa npnoa npnoa npnoa npnoa npnoa npnoa npnoa npnoa npnoa npnoa npnoa npnoa npnoa npnoa npnoa npnoa npnoa npnoa npnoa npnoa npnoa npnoa npnoa npnoa npnoa npnoa npnoa npnoa npnoa npnoa npnoa npnoa
Tporpama "SLOW COOK"
Pnepno4a 3e 3n npnoane a na Jauydo Hne mo Tono mro Aangnepb Hnp no pao npe npaae 5000 Bocnae no 12 yauo ane npae npaae 10000
Iporpama,BOIL
Pnpnepnnae 3e npnntanr hne nnnnnn nn nnnnnn nnnnnn nnnnnn nnnnnn nnnnnn nnnnnn nnnnnn nnnnnn nnnnnn nnnnnn nnnnnn nnnnnn nnnnnn nnnnnn nnnnnn nnnnnn nnnnnn nnnnnn nnnnnn nnnnnn nnnnnn nnnnnn nnnnnn nnnnnn nnnnnn nnnnn
Iporpama .BAKE
PnnpnepHc ce 3a 3NnHnAe HbCKBnH, nOIO3 OTOCT cCm B aHyteT- TcTe. CToEhAnDto B npOrpama EpeMe 33 npOTBeHae E 1 aC. BxMkoHO e Da cyTOhONHe BPEMeTo Hn pHToRBeB H dAmaoTH o 20 MHNTH Do 8 NAc cS cTBnKa H aTOhONKa 5 MMHYt.
Fnnnnsncnna Hn buxnnnne nnoe ne nnoe nne nne nne nne nne nne nne nne nne nne nne nne nne nne nne nne nne nne nne nne nne nne nne nne nne nne nne nne nne nne nne nne nne nne nne nne nne nne nne nne nne nne nne nne nne nne nne nne nne nne nnee
Tnpu nuaananae Hn aepnnepeaee cde daennnnnae hauhag Hg ananannnnaa Hn anananae Hg nncnnae Cnncnnae Cnne nnne Hg nnnnnnnnn
IporpaMa .GRAIN
Ipnpnpaanepnpsa 3a npnptotbe H a poknnk Ka Kauo n pnnnnn BnBn0e 2pnpnnpnne RaHnppnHt. CtaHapTho 8 npnpnpaBpe 3a npnpnepn6e 55 MAnKyt, BAnMOnKc o da YctahOBnHbte BEmeTOH a npnptnrAe 4 anAnao 5 mNNHyt do 4 caca CtsNtke H yctAHOBKa 5 NkYtKn.
Iporpama „PILAF"
Iporpama npnporpaee cae pprrotoBHeA paHnBnBnBnBe BnBnBnBnBnBnBnBnBnBnBnBnBnBnBnBnBnBnBnBnBnBnBnBnBnBnBnBnBnBnBnBnBnBnBnBnBnBnBnBnBnBnBnBnBnBnBnBnBnBnBn
Nporpama "YOGURT/DOUGH"
C. NOMOIA HA daheja nporpaama BHE mokefte da rothte paataa khyckn N opaneshy ROPTHN a bkaa cH. Standaphto h no porpaama BPE mea tnoptobatee b H aaca. Bbsskhoep e da yctohabote RPemeto h nporptabe 6 duanaaon 0t 6 do 12 vac ccb Ta haytobok 10 Knyhyn
CHyHnA BTOAOTAOHHB E DaNBe HPOPRAE BEOHNTa.1PcOyDTHp86B3A Cdo CHAMPHo HIO-0KHO CTOMFkE 1/2 HAuTHOpE CTPHeA HAUH.
30 aopnmeo hao yaoyao moeane du 10a0aeneae cneueanen eumeknck 6ynkna 2aocnyr REDONCD RAM-S1 (pyrsys ce onderng)
Iporpama „PIZZA'
PnpnpsBa ce ae npnrotae ha Nnla. Taanaptnb No npnpa aepene ha npnrotae e 25 mNHTy, BbMnOIO e Da YcAONTOB eMePTo ha npnrotae e da AONTOB o 20 MNNH o 1 qac cStKNa HyaTOnOA 5 MNNH.
Iporpama „BREAD
Pnnpnepbce 3e 34 nnnnne Haaannnna Bnoae BxoeB 0e npnnnno 6paae C o daaeebe H a pckoo bpaedn. Iporpana Hma htnnne Hn nporiprnte or o pcpemteau H taocdo hnnnane. Ctaahaptno h nporpama Bpepe 3a nporatne 3e 5ace. Bzkmnco e da yctahobnite Bpemto H nporatne B dhaonon 1o 1o 6 kaa ccb tbae H aytacnoea 10 Kinyiin.
YHKH8AETCAATONCAHE 8aepnpee
PQyXTHTPOB8AeCEHHPETNOH3K0OTCMHTKa/2/HaBtpeWHACTPAHHAHAA
MIMRAEZMBD, He noPMEH NpBbN AC na HpOBA Hnporpama CBA BOPMAIHAH NCTO, A cHINTO HNEOCIOCTHEBO HNOHPVA
TIPDAHANAHANE,HPNPOUPAeCaePNEPCETEPBAPHOO3A.01CTETCEKCNIOOPDQyNPENHAXTEPHPNMCA.
He npnpnepo 3e ana nnoane Hn yKnHn, Tne KATO 08a da NOKE NIOINIE HN KANCTOHO HN HNHNIE.
He Otrabpeye Kekaka H Mytmbkpa Da lo Mbo Cbpupeae Ha npoueae Ha NkHnAIEOT TOBa 3aBcHcNcAteBOHaMnBnAbePnOyKT
Da KpCATEP BBeMeHO H NcHcHne PnpOBTeAE pnpOpHae DA HbN Bate ToTOBn CmeKs A nPpOBTeAE H XbO.
Iporpama DESSERT
IpnopnmaBaCe 3a nprrtoBHe BApaHINbN BIODeoDEcOHT O NpOIOBe. CAnTaHApD 6 n PnporaAe 3a nprrtoBHe 2 e VAC. BaMBOHO a Da YCTAOBHe 8 pEmeTo 3a nprrtoBHe B DmpanAOH oT 5 MNNH oD 4 CAZC CNCTHa H YAOTBOAc 5 MNNH.
Iporpama EXPRESS
Iporpma3a bpo nprrnTbHn Hpnp, pohraa KkKtO tbpna.
B Dpaepnnpmapeynpne Hbpeet 3 nprrntse Hpykmae
Time Delay caedctnn
Ako TOr E C HIO BAMHIE, O N KIa E O TcO H D A M E H N C E O E P E O O O T O KITAE, CLO TIO HOCTECE 3A0B0100TIOHOCTECE OHMOHOTAOHIOPOXPHO H OAOA CYK, INPEA HIOCTEPECHN O B KOPKNA YCPOPTBOIO.
PnDpOeAeEeKoAeTtHb HAaHTa HuaTa eHa Ta aHaTe TbIeHIO HauTaeTbIeHPO NKpHTHe MKeE HauHIO HauCTHIO HauDe pOemHK. ToBe He aepNkA HauKaT.
NoHCTBaHe Ha BbTpewHa TcpaHa Ha Kanaka
IpuoeCyza 3a npemaeBHe H NCTnAeHb BpEeHbNt cTbaH a KaNaK e pOedocBHa H CxekHATA A (cTpaHn7) 3, nnonlaee EbnKa KxHcNcKb KpbHn Ia Tba a NaOHueHb H TaRBMn H PdNk Hn KaNNK.
IpeDa Hn HCTnAePbEeHHa CTbaH a KaNaK 3bD2Be DneBpXHOCTa H DaTe BanaKNK cyh
NoHCTBaHe Ha npehocn NapeH Knaan
Pnapan Hnapan H nHtampan H cnHnauan HcHnato B rHnato B cHnana KaHa YcHpOCTBTO, ObHnepTe ce Kxme XeAa5 A (ctpnha8a 3 a npOaJdAa 3 a NOnHCTBe.
BHHHAAHME!3a de ce u
OTcPamHbHe Ha KOHD3
B To Hn 108 n Hn KHeHnHa e C npHnBa B CnepnA h KxnnHa H KOpNc3 H NpOyCtOBto OoKnKnyA t c E BnBa a CnepnHnKoHnEe, paoHnOen o3aH JyOToPbOTo.3a D a NocHTte HOnKoTne Hpa, HnAnKeHae Tn. Taee HsD. kato CnBeBaTe bChtMke No-rope npabBa. PnpExBaHe A octabttAt o KnoHN B xynKnO BkynnA c FcmHgTa HkXhEnoKbKnPa.
NoHCTBaHe Ha paOthata KaMepa
PnI cTPO TcHtAe H NHTKpyHn H 306 pOoBxOeCTe B HEPOTHO THeTOHCTO, ACHNTH O XPAHn OHaTbAaB aBoTHaB KAMpe H YCPOTRBO e CKNHMHIA.
PINI 3KNAHHTHO 10AHCPOBAHE 10A HOBKCTOHA 10A DABOTATA KAMPEI TPOBSA DA BGDAT NOHCTEHN,DA CE H2ERHe HENPAHNO 4PHXUYKOKHPAe HNIOPOBA DA HCYPTOBTO.

Iepdu hauoohnne no paoonoma no aenepno ma ycnopocnoe ce ypeepne ney yepnne ennnn o nmpnncn e 1e Hohmohs Oohd
CtHnHnHcTt HnHnHbAeKHea, nOoBxNooCTHa OaONIOHnHnHnDAA CieHnEHNnKopRy cHnEoHnHbAe HteMepepyrta (PaeonnoKoE Bcpedra OaONIOHnHnHnDAA GOr da oCeNaFCTa cAnoxhA (He ce MOKH) Rdu Ndu Odo. Ako HnOHOaNEoNIOVbAaI npNeapat, TpBaB aMBeHnAo Da CeOTpTaH aBCKHnOctAtsla, 3aJa cHeBaHeBa NPOBaTa HnHexoHnBHHmOpNo sPme HpOncpAbuDeaeBau HOHTeepo
AIO KYNK OBEKOTI PONTAIE B 8B10N0AB3HHTO HA CKOHO UCHPTAHTOA DTHHK, BHINATEBO H 8B2EDEF H C HNCETH, DE HE CE YAPR K BOYPAHA HC EHZOPA.
AaNnBnBnBnCCTHaONaHTBeTHeHnck E aIbncpeHa e paapeJeHNO da IINONBa yanaNXeHHy RbA cpeHn TaBnDcHn HnCHITHeHtHeYek.
TTOI 10
TpaHcnpoTHpAne H CbXpaHeHne
3a Cxpaehne H nohtopno HnnoBHe BnnoHcte H nntatn H noocduyce BCNHNt Hnaype. CxpaahBnAte ypeHa cNoCnpoepnO hnoaie O HnporpnoHye ypeHnnoDnnoHto H npno HnnoBnnoHn.
Pn TnacnpnoHae H cxpaahene Ce aobapbna HnnaHagato H ne hyape H naHekuekeo BnndTBe, Koto HKOKe
Ja Dnpe No ndoepkneHToH ne hyape Hnnn Hanyipn HbNcHCTNa HnnoKOBata.
Heo6xoHMO e naeHcTo Ha onakouKaTa H ypea ot nonaane Ha Bocn npyn TceHoCTN.
VI.CbBETN3AIPNFOTBRAHE
PpeWN NO BpeMe HA pNHOBHe H cNoC06n 3a OTcPaHRABaHETo H
BdAeepnAaDaeBcAeBbHnCaTtBHeHnKHePABeHnNo BpEmeHa NpHrOToBHe Ha XpHa aNTHBaXKeH, H CBOeOHbAOTCPBAAEBHEMO.
ACTHE HE E IOTOBIO DOKPAI
| Bauwenaere npopenen aan npopenen flouwen en penuarenne | |
| Ite zubooopene da zuopepene danuopee du rataopoepe Hertto ano aarooa teepnppy i npopenen e ciee hioopcnrtna a kocda | • Ito opoe na npopena ie e cruppee nana la. myhnoa dei bnoopoepe. • Zuraopoe ne anoo odoon uoponee Vucpoote de. ve Hauo ha nooponee naa-oh-ooopoe. kana kora a yohn-oo-oo-oo-oo-oo-oo-oo-oo-oo-oo-oo-oo-oo-oo-oo-oo-oo-oo-oo-oo-oo-oo-oo-oo-oo-oo-oo-oo-oo-oo-oo-oo-oo-oo-oo-oo-oo-oo-oo-oo-oo-oo-oo-oo-oo-oo-oo-oo-oo-oo-OO • Vauo traoa da ana chuaanana a kooanea u npoea pao, nroo daskooskiak c aaoe o do hauoopoeipn oop. • Wurme e, ao n aho opoepe kooanea maa hauo opoepe maa npopopopnpopnpopnpopnpopnpopnpopnpopnpopnpopnpopnpopnpopnpopnpopnpopnpopnpopnpopnpopnpopnpopnpopnpopnpopnpopnpopnpopnpopnpopnpopnpopnpopnpopnpopnpopnpopnpopnpopnpopnpopnpopnpopnpopnpopnpopnpopnpopnpopnpopnpopn • Xiera mee a da hauoopoeipn npopopopnpopnpopnpopnpopnpopnpopnpopnpopnpopnpopnpopnpopnpopnpopnpopnpopnpopnpopnpopnpopnpopnpopnpopnpopnpopnpopnpopnpopnpopnpopnpopnpopnpopnpopnpopnpopnpopnpopnpopnpopnpopnpopnpopnpopnpopnpopnpopnpapn • Oraaonne ene npopena e npopena e npopena e npopena e npopena e npopena e npopena e npopena e npopena e npopena e npopena e npopena e npopena e npopena e npopena e npopena e npopena e npopena e npopena e npopena e npopena e npopena e npopena e npopena e npopena e npopena • Pauu npopena E ouaia e npopena vcoa oric. • Nauu npopena oceauuauauauauauauauauauauauauauauauauauauauauauauauauauauauauauauauauauauauauauauauauauauauauauauauauauauauauauauauauauauauauauauauauauauauauauauauauauauauauauauauauauauauauauauauauauauauauauauauauauauauauuuauauauauauauauauauauauauauauauauauauauauauauauauauauauauauauauauauauauauauauauauauauauauauauauauauauauauauauauauauauauauauauauauauauauauauauauauauauauauauauauauauauauauauauauauauauauauauauauauauauauAU • Nauu npopena oceauuauauauauauauauauauauauauauauauauauauauauauauauauauauauauauauauauauauauauauauauauauauauauauauauauauauauauauauauauauauauauauauauauauauauauauauauauauauauauauauauauauauauauauauauauAU • Pauu npopena Ou npopena o cepepepepepepepepepepepepepepepepepepepepepepepepepepepepepepepepepepepepepepepepepepepepepepepepepepepepepepepepepepepepepepepepepepepepepepepepepepepepepepepepepepepepepepepepepepepepepepepepepepepepe pepepepepepepepepepepepepepepepepepepepepepepepepepepepepepepepepepepepepepepepepepepepepepepepepepepepepepepepepepepepepepepepepepepepepepepepepepepepepepepepepepepepepepepepepepepepepepepepepepepepeperpepepepepepepepepepepepepepepepepepepepepepepepepepepepepepepepepepepepepepepepepepepepepepepepepepepepepepepepepepepepepepepepepepepepepepepepepepepepepepepepepepepepepepepepepepepepepepepepepepepeopepepepepepepepepepepepepepepepepepepepepepepepepepepepepepepepepepepepepepepepepepepepepepepepepepepepepepepepepepepepepepepepepepepepepepepepepepepepepepepepepepepepepepepepepepepepepepepepepepepepeapepepepepepepepepepepepepepepepepepepepepepepepepepepepepepepepepepepepepepepepepepepepepepepepepepepepepepepepepepepepepepepepepepepepepepepepepepepepepepepepepepepepepepepepepepepepepepepepepepepepeypepepepepepepepepepepepepepepepepepepepepepepepepepepepepepepepepepepepepepepepepepepepepepepepepepepepepepepepepepepepepepepepepepepepepepepepepepepepepepepepepepepepepepepepepepepepepepepepepepepepe-pepepepepepepepepepepepepepepepepepepepepepepepepepepepepepepepepepepepepepepepepepepepepepepepepepepepepepepepepepepepepepepepepepepepepepepepepepepepepepepepepepepepepepepepepepepepepepepepepepepepePEPEPEPEPEPEPEPEPEPEPEPEPEPEPEPEPEPEPEPEPEPEPEPEPEPEPEPEPEPEPEPEPEPEPEPEPEPEPEPEPEPEPEPEPEPEPEPEPEPEPEPEPEPEPEPEPEPEPEPEPEPEPEPEPEPEPEPEPEPEPEPEPEPEPEPEPEPEPEPEPEPEPEPEPEPEPEPEPEPEPEPEPEPEPEPEPEPEPEPE PEPEPEPEPEPEPEPEPEPEPEPEPEPEPEPEPEPEPEPEPEPEPEPEPEPEPEPEPEPEPEPEPEPEPEPEPEPEPEPEPEPEPEPEPEPEPEPEPEPEPEPEPEPEPEPEPEPEPEPEPEPEPEPEPEPEPEPEPEPEPEPEPEPEPEPEPEPEPEPEPEPEPEPEPEPEPEPEPEPEPEPEPEPEPEPEPEPEPEPEPPEPEPEPEPEPEPEPEPEPEPEPEPEPEPEPEPEPEPEPEPEPEPEPEPEPEPEPEPEPEPEPEPEPEPEPEPEPEPEPEPEPEPEPEPEPEPEPEPEPEPEPEPEPEPEPEPEPEPEPEPEPEPEPEPEPEPEPEPEPEPEPEPEPEPEPEPEPEPEPEPEPEPEPEPEPEPEPEPEPEPEPEPEPEPEPEPEPEPEPAPEPAPEPAPEPAPEPAPEPAPEPAPEPAPEPAPEPAPEPAPEPAPEPAPEPAPEPAPEPAPEPAPEPAPEPAPEPAPEPAPEPAPEPAPEPAPEPAPEPAPEPAPEPAPEPAPEPAPEPAPEPAPEPAPEPAPEPAPEPAPEPAPEPAPEPAPEPAPEPAPEPAPEPAPEPAPEPAPEPAPEPAPEPAPEPAPEPAPEPAA • Pauu npopena • Pauu npopena • Pauu npopena • Pauu npopena • Pauu npopena • Pauu npopena • Pauu npopena • Pauu npopena • Pauu npopena • Pauu npopena • Pauu npopena • Pauu npopena • Pauu npopena • Paus • Pauu npopena • Pauu npopena • Pauu npopena • Pauu npopena • Pauu npopena • Pauu npopena • Pauu npopena • Pauu npopena • Pauu npopena • Pauu npopena • Pauu npopena • Pauu npopena • Pauru npopena • Pauu npopena • Pauu npopena • Pauu npopena • Pauu npopena • Pauu npopena • Pauu npopena • Pauu npopena • Pauu npopena • Pauu npopena • Pauu npopena • Pauu npopena • Pauu npopen a • Pauu npopen a • Pauu npopen a • Pauu npopen a • Pauu npopen a • Pauu npopen a • Pauu npopen a • Pauu npopen a • Pauu npopen a • Pauu npopen a • Pauu npopen a • Pauu npopen a • Pauu npopen a • Paus • Pauu npopen a • Pauu npopen a • Pauu npopen a • Pauu npopen a • Pauu npopen a • Pauu npopen a • Pauu npopen a • Pauu npopen a • Pauu npopen a • Pauu npopen a • Pauu npopen a • Pauu npopen a • Pauru npopen a • Pauu npopen a • Pauu npopen a • Pauu npopen a • Pauu npopen a • Pauu npopen a • Pauu npopen a • Pauu npopen a • Pauu npopen a • Pauu npopen a • Pauu npopen a • Pauu npopen a • Pauu npopen A • Pauu npopen a • Pauu npopen a • Pauu npopen a • Pauu npopen a • Pauu npopen a • Pauu npopen a • Pauu npopen a • Pauu npopen a • Pauu npopen a • Pauu npopen a • Pauu npopen a • Pauu npopen a • Paueru npopen a • Pauu npopen a • Pauu npopen a • Pauu npopen a • Pauu npopen a • Pauu npopen a • Pauu npopen a • Pauu npopen a • Pauu npopen a • Pauu npopen a • Pauu npopen a • Pauu npopen a • Pauu npopen 1 • Pauu npopen a • Pauu npopen a • Pauu npopen a • Pauu npopen a • Pauu npopen a • Pauu npopen a • Pauu npopen a • Pauu npopen a • Pauu npopen a • Pauu npopen a • Pauu npopen a • Pauu npopen a • Pautu npopen a • Pauu npopen a • Pauu npopen a • Pauu npopen a • Pauu npopen a • Pauu npopen a • Pauu npopen a • Pauu npopen a • Pauu npopen a • Pauu npopen a • Pauu npopen a • Pauu npopen a • Pauu npopen b • Pauu npopen a • Pauu npopen a • Pauu npopen a • Pauu npopen a • Pauu npopen a • Pauu npopen a • Pauu npopen a • Pauu npopen a • Pauu npopen a • Pauu npopen a • Pauu npopen a • Pauu npopen a • Pcau npopen a • Pauu npopen a • Pauu npopen a • Pauu npopen a • Pauu npopen a • Pauu npopen a • Pauu npopen a • Pauu npopen a • Pauu npopen a • Pauu npopen a • Pauu npopen a • Pauu npopen a • Pauu npopen n • Pauu npopen a • Pauu npopen a • Pauu npopen a • Pauu npopen a • Pauu npopen a • Pauu npopen a • Pauu npopen a • Pauu npopen a • Pauu npopen a • Pauu npopen a • Pauu npopen a • Pauu npopen a • Paiu npopen a • Pauu npopen a • Pauu npopen a • Pauu npopen a • Pauu npopen a • Pauu npopen a • Pauu npopen a • Pauu npopen a • Pauu npopen a • Pauu npopen a • Pauu npopen a • Pauu npopen a • Pauu npopena • Pauu npopen a • Pauu npopen a • Pauu npopen a • Pauu npopen a • Pauu npopen a • Pauu npopen a • Pauu npopen a • Pauu npopen a • Pauu npopen a • Pauu npopen a • Pauu npopen a • Paus • Pauu npopena • Pauu npopen a • Pauu npopen a • Pauu npopen a • Pauu npopen a • Pauu npopen a • Pauu npopen a • Pauu npopen a • Pauu npopen a • Pauu npopen a • Pauu npopen a • Pauu npopen a • Pauru npopen a • Pauru npopen a • Pauru npopen a • Pauru npopen a • Pauru npopen a • Pauru npopen a • Pauru npopen a • Pauru npopen a • Pauru npopen a • Pauru npopen a • Pauru npopen a • Pauru npopen a • Pauru npopen 1 • Pauru npopen a • Pauru npopen a • Pauru npopen a • Pauru npopen a • Pauru npopen a • Pauru npopen a • Pauru npopen a • Pauru npopen a • Pauru npopen a • Pauru npopen a • Pauru npopen a • Pauru npopen a • Pauu npopen a • Pauru npopen a • Pauru npopen a • Pauru npopen a • Pauru npopen a • Pauru npopen a • Pauru npopen a • Pauru npopen a • Pauru npopen a • Pauru npopen a • Pauru npopen a • Pauru npopen 1 • Pauru nppen a • Pauru nppen a • Pauru nppen a • Pauru nppen a • Pauru nppen a • Pauru nppen a • Pauru nppen a • Pauru nppen a • Pauru nppen a • Pauru nppen a • Pauru nppen a • Pauru nppen a • Pauru nppen a • Pauu nppen a • Pauru nppen a • Pauru nppen a • Pauru nppen a • Pauru nppen a • Pauru nppen a • Pauru nppen a • Pauru nppen a • Pauru nppen a • Pauru nppen a • Pauru nppen a • Pauru nppen a • Pauru nppen 1 • Pauru nppen a • Pauru nppen a • Pauru nppen a • Pauru nppen a • Pauru nppen a • Pauru nppen a • Pauru nppen a • Pauru nppen a • Pauru nppen a • Pauru nppen a • Pauru nppen a • Pauru nppen a Pauru nppen a • Pauru nppen a • Pauru nppen a • Pauru nppen a • Pauru nppen a • Pauru nppen a • Pauru nppen a • Pauru nppen a • Pauru nppen a • Pauru nppen a • Pauru nppen a • Pauru nppen a • Pauru npden a • Pauru nppen a • Pauru nppen a • Pauru nppen a • Pauru nppen a • Pauru nppen a • Pauru nppen a • Pauru nppen a • Pauru nppen a • Pauru nppen a • Pauru nppen a • Pauru nppen a • Pauru nppen a •Pauru nppen a • Pauru nppen a • Pauru nppen a • Pauru nppen a • Pauru nppen a • Pauru nppen a • Pauru nppen a • Pauru nppen a • Pauru nppen a • Pauru nppen a • Pauru nppen a • Pauru nppen a • Pauru npen a • Pauru nppen a • Pauru nppen a • Pauru nppen a • Pauru nppen a • Pauru nppen a • Pauru nppen a • Pauru nppen a • Pauru nppen a • Pauru nppen a • Pauru nppen a • Pauru nppen a • Pauru nppen a Paurus nppen a • Pauru nppen a • Pauru nppen a • Pauru nppen a • Pauru nppen a • Pauru nppen a • Pauru nppen a • Pauru nppen a • Pauru nppen a • Pauru nppen a • Pauru nppen a • Pauru nppen a • Pauru nppen a |
NPODAyKT CE NPEBAPN
| Ble de l'artiste publique a l'homme ha noodyt et n aoche le pape la vence du peuple (pèpènoue) à sa pape au pepeurier. Pénépèneu non pas détenue à l'artiste publique. | Hémetique l'artiste publique (basée sur la base de l'artiste publique) en 1900, 1901, 1902, 1903, 1904, 1905, 1906, 1907, 1908, 1909, 1910, 1911, 1912, 1913, 1914, 1915, 1916, 1917, 1918, 1919, 1920, 1921, 1922, 1923, 1924, 1925, 1926, 1927, 1928, 1929, 1930, 1931, 1932, 1933, 1934, 1935, 1936, 1937, 1938, 1939, 1940, 1941, 1942, 1943, 1944, 1945, 1946, 1947, 1948, 1949, 1950, 1951, 1952, 1953, 1954, 1955, 1956, 1957, 1958, 1959, 1960, 1961, 1962, 1963, 1964, 1965, 1966, 1967, 1968, 1969, 1970, 1971, 1972, 1973, 1974, 1975, 1976, 1977, 1978, 1979, 1980, 1981, 1982, 1983, 1984, 1985, 1986, 1987, 1988, 1989, 1990, 1991, 1992, 1993, 1994, 1995, 1996, 1997, 1998, 1999, 2000, 2001, 2002, 2003, 2004, 2005, 2006, 2007, 2008, 2009, 2010, 2011, 2012, 2013, 2014, 2015, 2016, 2017, 2018, 2019, 2020, 2021, 2022, 2023, 2024, 2025, 2026, 2027, 2028, 2029, 2030, 2031, 2032, 2033, 2034, 2035, 2036, 2037, 2038, 2039, 2040, 2041, 2042, 2043, 2044, 2045, 2046, 2047, 2048, 2049, 2050, 2051, 2052, 2053, 2054, 2055, 2056, 2057, 2058, 2059, 2060, 2061, 2062, 2063, 2064, 2065, 2066, 2067, 2068, 2069, 2070, 2071, 2072, 2073, 2074, 2075, 2076, 2077, 2078, 2079, 2080, 2081, 2082, 2083, 2084, 2085, 2086, 2087, 2088, 2089, 2090, 2091, 2092, 2093, 2094, 2095, 2096, 2097, 2098, 2099, 2100, 2101, 2102, 2103, 2104, 2105, 2106, 2107, 2108, 2109, 2110, 2111, 2112, 2113, 2114, 2115, 2116, 2117, 2118, 2119, 2120, 2121, 2122, 2123, 2124, 2125, 2126, 2127, 2128, 2129, 2130, 2131, 2132, 2133, 2134, 2135, 2136, 2137, 2138, 2139, 2140, 2141, 2142, 2143, 2144, 2145, 2146, 2147, 2148, 2149, 2150, 2151, 2152, 2153, 2154, 2155, 2156, 2157, 2158, 2159, 2160, 2161, 2162, 2163, 2164, 2165, 2166, 2167, 2168, 2169, 2170, 2171, 2172, 2173, 2174, 2175, 2176, 2177, 2178, 2179, 2180, 2181, 2182, 2183, 2184, 2185, 2186, 2187, 2188, 2189, 2190, 2191, 2192, 2193, 2194, 2195, 2196, 2197, 2198, 2199, 2200, 2201, 2202, 2203, 2204, 2205, 2206, 2207, 2208, 2209, 2210, 2211, 2212, 2213, 2214, 2215, 2216, 2217, 2218, 2219, 2220, 2221, 2222, 2223, 2224, 2225, 2226, 2227, 2228, 2229, 2230, 2231, 2232, 2233, 2234, 2235, 2236, 2237, 2238, 2239, 2240, 2241, 2242, 2243, 2244, 2245, 2246, 2247, 2248, 2249, 2250, 2251, 2252, 2253, 2254, 2255, 2256, 2257, 2258, 2259, 2260, 2261, 2262, 2263, 2264, 2265, 2266, 2267, 2268, 2269, 2270, 2271, 2272, 2273, 2274, 2275, 2276, 2277, 2278, 2279, 2280, 2281, 2282, 2283, 2284, 2285, 2286, 2287, 2288, 2289, 2290, 2291, 2292, 2293, 2294, 2295, 2296, 2297, 2298, 2299, 2300, 2301, 2302, 2303, 2304, 2305, 2306, 2307, 2308, 2309, 2310, 2311, 2312, 2313, 2314, 2315, 2316, 2317, 2318, 2319, 2320, 2321, 2322, 2323, 2324, 2325, 2326, 2327, 2328, 2329, 2330, 2331, 2332, 2333, 2334, 2335, 2336, 2337, 2338, 2339, 2340, 2341, 2342, 2343, 2344, 2345, 2346, 2347, 2348, 2349, 2350, 2351, 2352, 2353, 2354, 2355, 2356, 2357, 2358, 2359, 2360, 2361, 2362, 2363, 2364, 2365, 2366, 2367, 2368, 2369, 2370, 2371, 2372, 2373, 2374, 2375, 2376, 2377, 2378, 2379, 2380, 2381, 2382, 2383, 2384, 2385, 2386, 2387, 2388, 2389, 2390, 2391, 2392, 2393, 2394, 2395, 2396, 2397, 2398, 2399, 2400, 2401, 2402, 2403, 2404, 2405, 2406, 2407, 2408, 2409, 2410, 2411, 2412, 2413, 2414, 2415, 2416, 2417, 2418, 2419, 2420, 2421, 2422, 2423, 2424, 2425, 2426, 2427, 2428, 2429, 2430, 2431, 2432, 2433, 2434, 2435, 2436, 2437, 2438, 2439, 2440, 2441, 2442, 2443, 2444, 2445, 2446, 2447, 2448, 2449, 2450, 2451, 2452, 2453, 2454, 2455, 2456, 2457, 2458, 2459, 2460, 2461, 2462, 2463, 2464, 2465, 2466, 2467, 2468, 2469, 2470, 2471, 2472, 2473, 2474, 2475, 2476, 2477, 2478, 2479, 2480, 2481, 2482, 2483, 2484, 2485, 2486, 2487, 2488, 2489, 2490, 2491, 2492, 2493, 2494, 2495, 2496, 2497, 2498, 2499, 2500, 2501, 2502, 2503, 2504, 2505, 2506, 2507, 2508, 2509, 2510, 2511, 2512, 2513, 2514, 2515, 2516, 2517, 2518, 2519, 2520, 2521, 2522, 2523, 2524, 2525, 2526, 2527, 2528, 2529, 2530, 2531, 2532, 2533, 2534, 2535, 2536, 2537, 2538, 2539, 2540, 2541, 2542, 2543, 2544, 2545, 2546, 2547, 2548, 2549, 2550, 2551, 2552, 2553, 2554, 2555, 2556, 2557, 2558, 2559, 2560, 2561, 2562, 2563, 2564, 2565, 2566, 2567, 2568, 2569, 2570, 2571, 2572, 2573, 2574, 2575, 2576, 2577, 2578, 2579, 2580, 2581, 2582, 2583, 2584, 2585, 2586, 2587, 2588, 2589, 2590, 2591, 2592, 2593, 2594, 2595, 2596, 2597, 2598, 2599, 2600, 2601, 2602, 2603, 2604, 2605, 2606, 2607, 2608, 2609, 2610, 2611, 2612, 2613, 2614, 2615, 2616, 2617, 2618, 2619, 2620, 2621, 2622, 2623, 2624, 2625, 2626, 2627, 2628, 2629, 2630, 2631, 2632, 2633, 2634, 2635, 2636, 2637, 2638, 2639, 2640, 2641, 2642, 2643, 2644, 2645, 2646, 2647, 2648, 2649, 2650, 2651, 2652, 2653, 2654, 2655, 2656, 2657, 2658, 2659, 2660, 2661, 2662, 2663, 2664, 2665, 2666, 2667, 2668, 2669, 2670, 2671, 2672, 2673, 2674, 2675, 2676, 2677, 2678, 2679, 2680, 2681, 2682, 2683, 2684, 2685, 2686, 2687, 2688, 2689, 2690, 2691, 2692, 2693, 2694, 2695, 2696, 2697, 2698, 2699, 2700, 2701, 2702, 2703, 2704, 2705, 2706, 2707, 2708, 2709, 2710, 2711, 2712, 2713, 2714, 2715, 2716, 2717, 2718, 2719, 2720, 2721, 2722, 2723, 2724, 2725, 2726, 2727, 2728, 2729, 2730, 2731, 2732, 2733, 2734, 2735, 2736, 2737, 2738, 2739, 2740, 2741, 2742, 2743, 2744, 2745, 2746, 2747, 2748, 2749, 2750, 2751, 2752, 2753, 2754, 2755, 2756, 2757, 2758, 2759, 2760, 2761, 2762, 2763, 2764, 2765, 2766, 2767, 2768, 2769, 2770, 2771, 2772, 2773, 2774, 2775, 2776, 2777, 2778, 2779, 2780, 2781, 2782, 2783, 2784, 2785, 2786, 2787, 2788, 2789, 2790, 2791, 2792, 2793, 2794, 2795, 2796, 2797, 2798, 2799, 2800, 2801, 2802, 2803, 2804, 2805, 2806, 2807, 2808, 2809, 2810, 2811, 2812, 2813, 2814, 2815, 2816, 2817, 2818, 2819, 2820, 2821, 2822, 2823, 2824, 2825, 2826, 2827, 2828, 2829, 2830, 2831, 2832, 2833, 2834, 2835, 2836, 2837, 2838, 2839, 2840, 2841, 2842, 2843, 2844, 2845, 2846, 2847, 2848, 2849, 2850, 2851, 2852, 2853, 2854, 2855, 2856, 2857, 2858, 2859, 2860, 2861, 2862, 2863, 2864, 2865, 2866, 2867, 2868, 2869, 2870, 2871, 2872, 2873, 2874, 2875, 2876, 2877, 2878, 2879, 2880, 2881, 2882, 2883, 2884, 2885, 2886, 2887, 2888, 2889, 2890, 2891, 2892, 2893, 2894, 2895, 2896, 2897, 2898, 2899, 2900, 2901, 2902, 2903, 2904, 2905, 2906, 2907, 2908, 2909, 2910, 2911, 2912, 2913, 2914, 2915, 2916, 2917, 2918, 2919, 2920, 2921, 2922, 2923, 2924, 2925, 2926, 2927, 2928, 2929, 2930, 2931, 2932, 2933, 2934, 2935, 2936, 2937, 2938, 2939, 2940, 2941, 2942, 2943, 2944, 2945, 2946, 2947, 2948, 2949, 2950, 2951, 2952, 2953, 2954, 2955, 2956, 2957, 2958, 2959, 2960, 2961, 2962, 2963, 2964, 2965, 2966, 2967, 2968, 2969, 2970, 2971, 2972, 2973, 2974, 2975, 2976, 2977, 2978, 2979, 2980, 2981, 2982, 2983, 2984, 2985, 2986, 2987, 2988, 2989, 2990, 2991, 2992, 2993, 2994, 2995, 2996, 2997, 2998, 2999, 3000 |
REDMOND
PINBAPEHE PNODyKT N3KIMNRA
| Hypertension | Hypertension is a major cause of death worldwide. It is estimated that approximately 10 million people will be diagnosed with hypertension in 2030. |
| Hypercholesterolemia | Hypercholesterolemia is the leading cause of death worldwide, and approximately 1 million people will be diagnosed with hypercholesterolemia. |
| Diabetes | Type 2 diabetes is a major cause of death worldwide. Approximately 1 million people will be diagnosed with type 2 diabetes. |
ACTNE3AFAPR
| La croissance semitransfrique est générale, plus la croissance rate is 20% per annum. Lactose is used in the production of beverages, pharmaceuticals, cosmetics and in the production of biofuels. |
H3N4AHE HE IOBNTHE
| Rückbau cie sssz zu rene parhenn. | |
| Teccio diore ctee e coa rane. | Meculosati rropeo (daiu) a laiua manie a spulai pinnato. |
| Ie napeixere oipinien a tce i eopion oepinien. | Frogo ha un incoocn, quino che si errore incoocn incoocn. |
| Voi peimien a ctei e preten da cenoientau la cenere incoocn. | |
B pdoa madno ha myaepnagra REDMOND a npoppnae STEF u SOUP npnncn na nnnnna a nannna 1000000000000000000000000000000000000000000000000000000000000000000000
Ppenopbauho BpeMe Ha npiroTBAHe Ha pa3nHn npOdykTH Ha napa
| Why poultry needn't exceed 100% of poultry's egg-yolkiness (stovethery, crocny etc) | Vijayuri's ingredients provide protein-richness and helps to create a unique ingredient. |
| Breadthy poultry (stovethy, crocny etc), melicity, smelting, smelting, smelting, smelting, smelting, smelting, smelting, smelting, smelting, smelting, smelting, smelting, smelting, smelting, smelting, smelting, smelting, smelting, smelting, smelting, smelting, smelting, smelting, smelting, smelting, smel' | |
| Honey yoghurt juice nachoh pilsi dilhuna v multiliftk' alinn. | Sugrlle se upcetye pokrom va jyamnat z multiliftk'nilns vineher poceen. V pilpa- of nettreut mullieye porsa + mullacmncr hnt krasikai ovo nettreu phia zucupieni ralina subsoviet. |
TESTO NENABYLO
| Vojo a curram byly (patel) withhand: | Valho pao: pravenhaa hgo tera por piaigra phaloschrochnae receur yjor ingredio, rdocho jepn plebdo 24uys, provac stadam mas engovcst jeno doxocenm. |
| Teus a kipfcm prsenni diura sata | |
| Hoparili jeo mani, raan Spae yocil vistie. | |
| Dota a rhyzhi prskdaim ingredients |
V modei fade mutlifkneich hme RDMAHO prigraeoch,STW" a,SOUP" se pni neodostoku teukin v no do be spustui systen echry prid pristnoj. Vukovem pradse pro se gromy pprny poikum zostovce u mufukfunkn tncr prechai do rezimov autohivirizhi.
Doporucena doba vafeniruznychproduktu v pae
| C. Potsvacna Hinohtost, g (mmol/mol) Hinohtost body, ml Doba volatil, min | ||||
| 1 | Vokovskéne maslo vinylov / houmli (kozly 1,5 × 1,5 cm) | 500 | 500 | 76/70 |
| 2 | Vokovskéne maslo skoove (kozly 1,5 × 1,5 cm) | 500 | 500 | 15 |
| 3 | Kukci Milyar (kozly 1,5 × 1,5 cm) | 500 | 500 | 15 |
| 4 | Mavroe kuzelka / karceratny | 180 (5 wt./450 (2 wt.) | 500 | 10/15 |
| 5 | Rbta (mL) | 500 500 | 10 | |
| 6 | Kreovysalobetov [exassistant, solute × osmium] | 500 | 500 | 5 |
| 7 | Bramber (kozly 1,5 × 1,5 cm) | 500 | 500 | 15 |
| 8 | Mnau (kozly 1,5 × 1,5 cm) | 500 500 | 15 | |
| 9 | Reyak (kozly 1,5 × 1,5 cm) | 500 | 500 | 95 |
| 10 | Zelenina (molar) | 500 | 500 | 10 |
| 11 | Voyce | 3 lis 500 | 10 | |
Je te zio v t uohu. Te se jued o abcdn daocaren. Dopa se mfe (tod od daocarench hodin v nvoistis) na kivkld konkehriyo rykbu, a taak na siv chutnyvich prefenncien.
REDMOND
Doporuceni pro pouziti teplotnich rezimv programu "MULTICOOK"
| E. | Propano leptina | Bepapresi pro poulil (lode vizihihre recepti) | |
| 1 | 35°C | Kyratski tbat, piñavaza caci | |
| 2 | 40°C | Pipravva pepurra | |
| 3 | 45°C | Kosteni | |
| 4 | 30°C | Iemertace | |
| 5 | 35°C | Pipravva calanov | |
| 6 | 60°C | Pipravva zolcnheb | caje, daské yóthy |
| 7 | 65°C | Pipravva masa veizulvsem bauri | |
| 8 | 70°C | Pipravva porce | |
| 9 | 75°C | Pasteur kaca, piñavaza bilihna caje | |
| 10 | 80°C | Pipravva svatendno vino | |
| 11 | 85°C | Pipravva barocne rebo [idel, karele yzadul] clochou octu vareri | |
| 12 | 90°C | Pipravva cervenho caje | |
| 13 | 95°C | Pipravva minkrich kati | |
| 14 | 100°C | Pipravva srelévoych pasturet, diema | |
| 15 | 105°C | Pipravva aspili | |
| 16 | 110°C | Sterilizose | |
| 17 | 125°C | Pipravva caruvelho silupu | |
| 18 | 130°C | Pipravva vayvalho kolaru | |
| 19 | 135°C | Pipravva zolcnho masa | |
| 20 | 130°C | Pipravva rakiyu | |
| 21 | 135°C | Pralenti nowoyich jiiej do olivore | |
| 22 | 140°C | Licers | |
| 23 | 145°C | Potenzi zolcnelya a ryh v alahala | |
| 24 | 150°C | Peñeri masa v alobu | |
| 25 | 155°C | Smalnišnì produkti a krynnitscho kóra | |
| 26 | 160°C | Smalnišnì dlubha | |
| 27 | 165°C | Smalnišnì steoli | |
| 28 | 170°C | Tritiven (prinovsk, kufet nugesky stik) |
Souhrnna tabulka programu vafeni (vyrobni nastaveni)
| Program | Dependent pro poulmi | Dobrodevalo yodzimazov | Rozhni dody valenl/Interval nustavonl | Oblukary kare hodina | Cotam no vane do pravatnu karnu | Automatizay olny |
| MULTICOOK | Piliprav zirmych jidel, smoznosi restavent teplety a doy valeni | 15 min | 5 min - 1 hodina / 1 min 1 hodina - 12 hodina / 5 min | ✓ | ✓ | |
| OTHEAL | Piliprav obolcara smikhin | 10 min | 5 min - 1 hodina 30 min / 1 min | ✓ | ✓ | |
| STEM | Deteri masa rgo, zeninyi ploho ovelektichorych jidel | 1 hodina | 20 min - 12 hodina / 5 min | ✓ | ✓ | |
| FRY | Sedaner msta rgo, alevnyi s vceislachorych pidae | 15 min | 5 min - 1 hodina 30 min / 1 min | ✓ | ||
| SOUP | Piliprav yovar, zeninyi zhennojzh a stutienjch posvolu | 1 hodina | 20 min - 8 hodina / 5 min | ✓ | ✓ | |
| STAM | Valeniy masykh, zeninyi uladishy potavny vapoi | 15 min | 5 min - 2 hodina / 5 min | ✓ | ✓ | ✓ |
| Program Depoortonzi pro podzuti | Rasa dovilni v ryphoni ristavore | Rozahd dovilni dovilni/interval nastavori | Obligovny kurt, hdnia | Cerelni myvopodne provennoi reglinu | Automatizy ulow | |
| PASTA | Valeri histinari yroboenich z riazwen ceraldo plesics, parki) z radish potolevoj | 8 min 2 min - 20 min / 1 min | ✓ | ✓ | ||
| SLOW CODK | Pflirpava plotevostho miko, kortovenosvandh cromas, krona, espika, hulcrnek | 5 minod | 1 hdnia - 9 hdnia / 10 min | ✓ | ✓ | |
| BOIL | Valeri zemerya a lalidern | 40 min | 5 min - 2 hdnia / 5 min | ✓ | ✓ | |
| BUNL | Peferi bilobevi, dravilni, nuklopi, kolaizdi z kymuthe a bilezhna bista | 1 hdnia | 20 min - 9 hdnia / 3 min | ✓ | ✓ | |
| GRAIN | Pflorovskiy ocevin zphich Valery sypchokholovcice | 33 min | 5 min - 6 hdnia / 5 min | ✓ | ✓ | |
| FILAP | Pflorova rizysh druhri rizsta (mossim, nyoc, drabe- 2, zeitenhoun) | 1 hdnia | 20 min - 1 hdnia 30 min / 10 min | ✓ | ✓ | |
| YUGUR7/DOUGH | Pflorova rizysh druhri yugunl | 8 hdnia | 8 hdnia - 12 hdnia / 10 min | ✓ | ||
| PEZA | Pflorova pizy | 23 min | 30 min - 1 hdnia / 3 min | ✓ | ✓ | |
| BRLAD | Pflorova chlaba 2 hnila a planilni monky poyenilni flane kynik (Ussi) | 3 minory | 1 hdnia - 6 hdnia / 10 min | ✓ | ||
| DESSORT | Ffipravu rizysh eczentz z cestvnoe eczec a bolozivni | 1 hdnia | 5 min - 4 hdnia / 5 min | ✓ | ✓ | |
| EXPRESS | Bychla plitevarezh, slyknynoski ve youri | A dmavtke ly prin: per piaiin szyknynoski ve youri | ✓ | |||
VII. NEZ PUJDETE DO OPRAVNY
| Nespravošet | Moznil pflitny | Zpísoh odstránni |
| Na dispišel je oběvica pravživo c rýžće EL-EL | Systemova chyba, je modina poruncu Hidii, nečerná nevo chytráho elementu | Oduplje pflotroć od slt, nechte ji vystvorynok. Pervé nă zavfete vko a stroviža zapoite co slt |
| Plirocr je melce zopnut | Prvideni himi nevi naevnica v pflodrć a nuštu v zilavoc | Prozvlje se, ze smirni prvideni kabel je zislavnuc. v plošćerjne nesterov na pflodrć l'vi zilavoc |
| Nespravošem elektrárne zilovacu | Pliptje pflotroć co kuzhelni zilovacu | |
| Nešnil napét v slt | Zkramoljac, ješn napeti v slt, jedi nieme, obrnoše se k servjeri organizaci vešće dinu | |
| Fauml sc pilopravje ve miši dinu | Prozdravji s napétim v slt (napeti v slt kosić, nečo je nite nevmi) | Prozvlje stabilita napeti v slt, lestji je metzinci, obrnoše se k servjeri organizati valeno dinu |
| Mešnl mišu oc hřivni element so costa, nezhednić promet ruku Žižký (skrip), koskyj (pulaj) | Oduplje pflotroć od slt, nechte ji vystvorynuc. Oc-kodne mludnáči prednirn oškovi dinu Kralov | |
| Misi je bileša chytrajn oc ušravne respravne | Uzadne menu osnji bez pathiven | |
| Crlhoci dišek je sletne szalpini | Oduplje pflotroć od slt, nechte ji vystvorynuc. Vycové trišovoc slos |
RMC-M95E
8.SLOW COOK (POMALE DUSENIE)
-
BOIL (VARENIE)
-
BAKE (PECVCO)
-
GRAIN (KURRY)
-
BILAS(BLAF)
-
YOGURT/DOUGH (OGURT/CESTO)
14.P27A(P27A)
15.B6E4D(CH)FB
-
DESSERT (DEZERTY)
-
EPR555 (EPR885)
unkcie
Udrivlavene tetaity hotovychi jedal (autozhrivanie) .... an, a2 24 hcinn Prednezhne vypitute autozhrivania .. ano Zohrivanie jeda .. ano a2 24 hcinn Odojzeny start .. ano a2 24 hcinn
Suprava
| Multifunktion htmec | 1 ks |
| Nätojoba | 1 ks |
| Kontajmer na pripravu jegdal na paret | 1 ks |
| Odörmerpohar | 1 ks |
| Lyżica | 1 ks |
| Plochá lyżica | 1 ks |
| Klinka 100 receptovora | 1 ks |
| Dziak na lyżica | 1 ks |
| Nevod na použivanie | 1 ks |
| Servisna knítska | 1 ks |
| Napljad kabel | 1 ks |
Program "OATMEAL" ("Ovsena Kaša")
Ta programe poriproca zau kunje raeiziln vist jerebc 2 meklon. Privet-ei das programa je 10 minut. Na voljo je rona nastavitev casa. Razpon priLagianja Casa je od 5 minut do 1, ulr z 1-minutini intervall.
Program "OATMEAL" se priorotá a kuhanjé razídníh vist jerebí, uporuba pesteriziranege níkomastega mělá. Da ovsena káma se mi zavrela, priro roámào, da naredite nestléd:
pred khanjem zrnje dobro sperite.
- namazite stranice posade z maslom;
- upostevajte ranzmerla, predlagana v knljig receptov. Povejanie all zmanjanje koltijne sestavn soranzmego;
- 2 uporabo polnomastega mleka na razredite z yodo pa pot.
Program "YOGURT/DOUGH"
Te programe je priporerodji za izidelava zdravn in okusnih domacih jogurtov. Privetzi: cas je 8 ur. Na vojo je roznadstavtec casa. Rozpan priagajana casa kuhanja je od 1 do 8 ur × 10 minutin intervalh.
FunkciaeKeepWarmytemprogramu nayolio.
C: Ve posod odoate sestavine, poskitibe, da je napoljenna te do paiovice velkosti.
Za priprero jaguro uporabite Yogurt Jnt Set REDMOND RAM GS (ki se kupi teora).
Program "PIZZA"
Te programe se piropora c a piropavo pice. Privzet cas je 25 minut. Na voljo je roce nostavitevasa. Rasaon prilagajnja casa kuhanja je od 20 minut do 1 ur 5-minutim interval.
Program "BREAD"
Ta programe se proprioza a peko bihil in psenih hienin krukno. Programvekutujce celoton cikel pecnja, zaenishi postkopm dokazovana tessa in do trenukta, ko zvamte sve pecni prozvlod ven. Privjeti ce 3 ue. Na vojo je roca nustavirna Ce. Razpan pristagajano casa kuhanja de 1 do 6 ur 20-10-minutini interval. Funchkaer Kear Warm vem programu ni na vojo.
Ce v posado doctare sestavline, poskribte, da je napoinjena le do povolice velikbsto.
No pozabite, da peka se začne eno uro po zéćteku programa, ko zesto je neprepustno.
- Presen uporabile moko z peko, vam svetjerno, da je prsejete, odstranche necstocne in j dendote nikaj,zraka.
- tipora fungicjne "Time Delay" n prilporo2jiva, ker bit to lishko vplva na kakovost peclva.
- Ne odpirajePokrova, doker se programne konfai
Da bi skraifali das kuhana in poenostavill pootepk pekena, svtuerno z uporab meane peinele mke.
Program "DESSERT"
Ta programe se priropocea za priaprov razihih siadic s sadjem in jagodigjem. Privetzi cias je 1 ura, Na voljo je rotna nastawitej casa. Razpom priagajanja cias kuhanja je od 20 minut do 8 ur v-5-minutn inteval.
Program "EXPRESS"
Ta program se priporoca za hitro kuhanje riza in drugihzm.
Rocna nastavatya Casa in fukcja Zasovne zakasntve t em programu nista na voljo. Ze zeileni resutatnil bil direzatek, ko uparablate smadjejne programme, gjcet te radeletek 'kuhanic Nesvot', kjer boste nasli odgovne na nojalb posposto zastvojelna vrasjanie in doobi potrebnia praporfolica.
III. DODATNE ZNACILNOSTI
- Dokazoyanis Iesta
Nared - Prirayil slr. skuto
·品种
Pasterizataine Tekofine
Pogrevam Otrofko Hrano - Sterilizacija namizne posode in osebnih gredmetoy
IV. NEOBVEZNA DODATNA OPREMA
Dodanthi ghorla z REAMDNON RMC-MSE. In I ncomfice o novosti, Ki sa no voloi prex wreimond.com poinpaBSeI preproddaja!.
V. OSKRBAIN VZDRZEVANJE
Sptošna pravila in priporocila
Pred provo uporabo naprave, kot tudi, da odstranite vonj, hranje na pravo ko kharanju, vim prorocamo, da postopek, pol limone 215 minutv 'STEAM' program.
Cp ripomocda dolgo ne uporabla, gakizopke.Delovna komora, mokkoknoknoknoknoknoknoknoknoknoknoknoknoknoknoknoknoknoknoknoknoknoknoknoknoknoknoknoknoknoknoknoknoknoknoknoknoknoknoknoknok
Pred 61en mnaprave se prepratjde ja je idodoptjena in popo-noma nla. Za 6enjne uporapite mehko krpo in detergent z pomi- vanje posode.
HRANA JE PREMALO KUHANA
| Možilni veroli Rastopine | |
| Pokovn napravje je bil odopr at all bil pravno zaoj, za tema- tura kuzanji ni bila davil, vistka | Ne odoplajte pokrova med iuhanem. Ospri kuzanji, okleni me ne protavlni na vojce mesto. Prepri Kozije se, va tezmi na gne na protitel jislant poikova mi celammaro ul pojkudvozna na indien naclin |
| Temperatura kuzanji also opazil, ker se posoc in greli elementi nisto tese no prilegla | Med podovum in ohtijm napravce re ime odit naoben tujh predemotv, co obolatji. Pred konjurtanin veho pala, da je greli elementi ist in se tese pri- tegla skel |
| Zanana so bile napache sestvina all nastavte. Spjetki deeli nitro bil agostoveri, bivn so bila rasszeigna na kise, iti so bili mole pravitei. Nastavte vo iuakhen Cevu Obranišne suprjeti pririme na napravu | Pitporadamo da upcrabite recepto, pilagojene za napravu, iltarche sano praluksteno recepte. Nastrovite las in uulainl program, iltere sestvine, cielese in velkost kosev pe receptu |
| Puma kad iudil'vi sce v selidi ai dinnyi, de hi sudinstovna gestata pame | Upracibale prupravnoe senilino vino Ce sie v dovnim, povinnit vino vino smont pepajom |
| Ovrlje | Dosar je bil, preveš rizdlinkeja olja |
| Za redne ovcre ododje kovičino rastvinilege olja ravno covoli za irintje ovo stile. Upcetire greuprodini, pudara v recepu sed quokim critern | |
| Preovet tektoline pv skridi | |
| Ula je zorrela, meletem ko je kuniša kisi triano | Nekranja zhilva [in treba] and kunišeny cripat all spic. Upcetrowaje rizdloa zu upcero |
| Mečerne (testo ri impalo spoj skral) | Mecdozavangem, di je teste dosego nortahr pouvo in preklic pam i peri ventil |
| Preovet teste pv skridi | |
HRANA JE RAZKUHANA
TEKOCI VRCI MED KUHANJEM
| Napocne settentrione ov e ctesone nastrovile, zvila so bila na zarezona na kose, il se manca preemati | Praporacne, da uporazate neptine, pilaguerne naši mandi. Nastrovate tax in kunstel program, inzotire sestavne, delete in velkost kosev po neptn. |
| Ied je vila v skleda na "Keep Warm" nadri precolge pa kuhanji | Praporacne, da uporazate "Keep Warm" nadri zamnere. De vomnapa-va emogata, da vnapet prekaplite "Keep Warm", yo uporazate, da se ingnatie problemla |
| Mio. euro per l'ore | Occhioni di bilanci in lecciam e impegnati rimein,ahilato che si be se le formu kongolii, piagno/crene, da esprigile delle sana ultras prestituzionare poseretro miko. Ce je poccere, anseste miko z mezzo vode |
| Ziva nitra bis bis proline pretezione inieze bilia doore sponza (biet).Napatae spinina scomparulai sestavine | Priporiodano, da uporabite reperote, priagglene zi naprvo, Postaui librati sano cokczanece reperote. Nastavite das In kalunri program, Izeroite sestvine, deleale in velkice koccy po repertoCeta rima, riso, ribe in mersea soneze de i trese prid kurojern temelle sprodi |
| HRANA SE DOBI | |
| Selele pond kuhanen ri hilla diction apianesHepori premaiz je pesicovener | Pred kuhanem se prespitfale, da je possod estla in da rima napok por premaz. |
| Sipona kollifna sestavine je marla aipiprocorene Uponali aetikatne | Sipora fiala das kuhana all uporabite piaprofilia, novedena v reperto, piragogcnem z vali modici. |
| Kutarski fias je bit preodig | Zra redna svrtje odacate kolo chora rastindegla alla rava ceno] za irinjeOne skinde, Za provinca svrtje all odozono obstrante jere sestavn v siledi me kiuhanyem |
| Cerici ogri Ri bilia studenzi sestavinn via bilia premlione all previatarne | Pirajto: povkovi med kuhanem no orign |
| Ducarici: premio tskadine Docij ve teitelire, Med kuhanem no orign | Med kuhanem sprosviatige pirodoferne koolire tekcin in aracin snow |
| Vretider v sitedi ni dovoteli tekoitrine (detei nso bi copaeni) | Med kuhanem sprosviatige pirodoferne koolire tekcin in aracin snow |
| Pichyren: skluta: pren poti mi hi rannunese | Pred poko rasmazhe do in stranse posocne z maslon all rastinsim aljen (ne volevitae alja zantrj [rje].) |
| SESTAVINE IZGUBUIO SVOIO OBLIKO, KO SO KUHANE | |
| Sestavine sa bilia preovshtare pcometanei Med cerpiun brane je coxual | da un sestavine preovshtare vaidh 5.7 minut |
| Kuhanski fias je bit preodig | Soprajfei Las kuhana all uporabite piaprofilia, novedena v creptu piaprogenium zu pipoimnake |
| PECIVO JE VLAZNO | |
| Uporabite se bilia neustreze sestavine isoro sadge ai zelenjova, zammarjene [agodje], kisa smetana ista. | Uporabite sestavine po reperto, zagobije se uporab: sestvih, kivssoujei advezte viigo, ai juproabite svmerith koldlan. |
| Pacei: povtved je bilia preodlgia v veckosakiu z zaporim povkomwn | Prijmuoiann, da se corsoerperlen iudeladiz ic silednj u peki sticlj pe koncei in putiuse la "Keep Warm" ndniz zu krolk 25, somn. |
| PECIVO NE BO VZCVELETD | |
| Jocin in slaskon miso doore premlare | Uporabite preovshtare reperto, priagglene zi naprvo, uberite, tornerate in abdelaje sestavine v skidius piaprofilializ fr repele |
| Teze je bilio predogao, preden so gi spekl. | |
| Vskonuri hila presejige ai testare bilio indominali agnonm. | |
| Napatae sestavine. | |
| Napaten receipt. | |
Nekotere REDMON multikchens laho proobemeno zo fio v programih STEW in SOUP. V primenu, da ni devoj
tekoline v posod, naprave aktivira pregreje zašić, sanocjna prekne programmeme, in preklopni TaTo.
Priporoceni parni casi za razlicna zivila
| No. | Zubuh | Tada, q / koltine, ksn. | Vida, mt | Cau kohanja, min |
| 1 | Sivpijt / govej tfe (narezana na 1.3-2 cm kocke) 500 500 20/10 | |||
| 2 | Ovji tfe (narezana na 1.5-2 cm kocke) 500 500 25 | |||
| 3 | Pidzoni tfe (narezana na 1.5 cm kocke) 500 500 15 | |||
| 4 | Meane trogike/kotet: 180 (6 kos) / 450 (3 kos) 500 10/15 | |||
| 5 | Ritj tfe | 500 500 10 | ||
| 6 | Kotice (kune, olupjene, zamrrjenej) | 500 500 | 5 | |
| 7 | Kempir (narezana na 1.5 cm kocke) | 500 500 15 | ||
| 8 | Kovenje (narezana na 1.5 cm kocke) | 500 500 35 | ||
| 9 | Kempir (narezana na 1.5 cm kocke) | 500 500 95 | ||
| 10 | Zamrrjene vminie | 500 500 10 | ||
| 11 | Iajin | 5 kov | 500 10 |
Za aiee i t o spn e ppoepo. n rne s ie alles du kane rohage or poopoege, oalce of inovbsh opoepenegene
Prlporocila za prllagajanee Temperature „MULTICOOK"
| No | Temperatura | Prioporovka zu uporaba |
| 1 | 35°C | Testo zu dokuzwonne in izadevne koz |
| 2 | 40°C | Making yogurt |
| 3 | 45°C | szedet |
| 4 | 50°C | Fermentacion |
| 5 | 55°C | Fendant |
| 6 | 60°C | Prigrav zeleni Taj in orodica hana |
| 7 | 65°C | Vakumsko uzhano mese |
| 8 | 70°C | Prigrava punca |
| 9 | 75°C | Pastorzikajce nikolcinc in prigrava bologa kaja |
| 10 | 80°C | Prigrav kunzengao vina |
| 11 | 85°C | Prigrava skuljega sra in cragi oreki, k poroblaje faz |
| 12 | 90°C | Prigrava kredova kaja |
| 13 | 95°C | Jerevce zu suhane zimkom |
| No | Temperatura | Piperodila za uporaste |
| 14 | 100°C | Vetroli in marmelade za kaharije |
| 15 | 50°C | Kubana meso |
| 16 | 110°C | Similizirija |
| 17 | 115°C | Indelava slakianega strupa |
| 18 | 130°C | Indelava Poi |
| 19 | 135°C | Sokre meza |
| 20 | 530°C | Indelava uzintigur |
| 21 | 535°C | Rijeka slobunice |
| 22 | 140°C | Kajevic raskilnih Neli |
| 23 | 145°C | Pozanje riko zolacjav ve fulji |
| 24 | 150°C | Pozanje urose v fulji |
| 25 | 155°C | Tata za certje |
| 26 | 160°C | Perutnina caortje |
| 27 | 165°C | Zwarki za certje |
| 28 | 170°C | Odet iarepiciţin pehlami jureš |
8.701200000000000000000000000
8.2023.10.24
19.5%
1
Program...SLOW COOK"
- FRY (KEPIIMAS) 5. COILS (COILS)
5.SOUP [SRIUBA] 6.STEETADINIMINO
- STEAM (GARINIMAS) 7. PASTA (MAKARONAD)
8.SLOWCOOKLETTASVIRIMAS)
-
BOIL (VIRIMAS)
-
BAKE (KEPIN)
-
_GRAIN" [KRUOPSO]
12.PILAF* (PLOVAS) 13.
-
YOGURT/DOUGH (JOGURTAS/TESLA)
-
PIZZA (PICA)
-
BREAD (DUONA) 16. DEGREE
-
DESSERT (DESSERT) 47. ENGLISH (ENGLISH)
-
EXPRESS (GRETTAS VIRIMAS)
unkcios
GAMINYS PRARADO SAVO PIRMINE FORMA
| Per dafni vortete prodktos. Kepant prodcto boda, manikylte potenatia re da fainu, net kal 3-7 minutes. |
| Hustaneo per liga malta gamilino talqa. Sutumpiakite gamilino laka arba lalkyktes recepta, pritalya slm pristata mado shul, nurolyx. |
| KEPINYS DRGNAS |
| Nuclotei nettarkom, peneling cagd drege soryl turbilus produktus (balfingos veles atarabos, saldylos aqas, grating in par). |
| Gatovz protelala per liga latke daugurunicome pucse. |
KEPINYS NEISKILO
| Bleque l'opére brésilien au travail. | Pageslustrées, kaid niyu ouaoli amelitni (potatilym diam potatilia modellii) recepti, Produkti parrikimas, parvansusnessy apianumnibus proporcipis natiotiti tertièrekemierendiges. |
| Tolis kivoyo yukunluyu enluyas, snaovi piñaligai. | |
| Harnsajpèje miña arla obal fulikinkete raliq. | |
| Podraste ikuji, nars kildu deán suaddemasiás calis. |
Daeglyte dreagfiknckia puady REDMOND modeliy, esant nepaksknonmo skyslzy kiehlut, programmae, STEW*r.SOUIP suvkiad npesuguo nu nenginio peritatino sistmo. Taku utej gaminito progimo sustibdmo, o daigafionkio poado vleitimens persingia / autenotainl palsnyo veilng.
RMC-M95E
- YOGURT/DOUGH (JOGURTS/MIKLA)
14.PIZZA(PICA)
- BREAD (MAIZE)
16.DESSERT (DESERT)
- EXPRESS(FKSPRESS)
unkn
Futu#1000000000000000000000000000000000000000000000000
| uzturRana (usolidRana) | ir, tldz 24 standim |
| Usolidiskanas lepierekkja atslegstanes | ir |
| Ediena uzulidisana | ir, tldz 24 standim |
| Attikats starts | ir, tldz 24 standim |
Komplektacija
| Multivitärnalis kritics. | 1 gbs. |
| Traucks. | 1 gbs. |
| Kontainers varklçâanal | 1 gbs. |
| Mérglaze. | 1 gbs. |
| Pavžíka. | 1 gbs. |
| Lězena karote | 1 gbs. |
| Grămata, 100 receptes | 1 gbs. |
| Pavžíncas karoté turetajs | 1 gbs. |
| Lietošanas instruktura | 1 gbs. |
| Servisva grămatina. | 1 gbs. |
| Barošanas vads | 1 gbs. |
Rezotijom i tiesbas main dirizasa, komplektikcu, ka si nistradajuni technisi kspesifikacji sawa produkte pirineidostos fokale, bezi iepridjei dinirajuni gam fim i zanaijani. Tekniskja spekifikacije ir pirejcijano picaide ± 10%
Multivares katla RMC-M95E uzbve (shema A1, 4. lpp.)
- Ierices vaks
- Nogemams ieksejais vaks
- Trauks
- Vaka atversanas poga
-
Vadibas panelis ar displeju
-
Karpuss
- Roktoris parnesanai
- Nonmams tyika varsts
- Lezena karote
- Zupas karote
RMC-M95E
-
Margalez
-
Strayas vads
-
Konteiners tyaicesanai
-
Konteiners kondensate
-
Pavamicas un karotes turetajs
savaksana
Vadibas panelis (shema A2, 5. (pp.)
Multivitadjamaj kattam REDMOND RMC-M95E ir sensory vaidha panels at daudzfunktionarykdsain LED display.
- Reheat/Cencel' (Atcelsane/Uzlsidisna) - uzildisnes funkijas lesgdisna/uzslesana, gatovosanas programmas partruklasia, lesta Ro programma utcelsana.
- Timedelay (Atikoaks stars) - atiki sta sta zika iakat esstafana 3.Temperature (Temperature) - temperatures ustafstan program
- Hour (Stundas) - stundu nozimes izyete, uzstadot laika rezimu gatavoansil an attildanljam startam.
- Min' (Min) - mintsu nozmis izele, uzstod (alka rezirn qatovosanai an uhtiakom jastam.
- Express" (Ekpress) - programmes, EXPRESS" palaIana
- Express" (Ekluss) - programmes, EXPRESS" palaIana/AutosilfTana) - gavolans automatiklaki koprogrammas bryile
- Start('Starts') = laveletagawolanas reZima lesegolan
- Disples
Programma "SLOW COOK"
Paredeza sautetas galas, karserta pieme pagatavosanai. Iercce iestattis programmas gatavosanas laikr 5 stundas. In lespejams manually eststati gatavosanas laiku diazone no 1 und 2 sted am iestatssanas sol 10 minutes.
Programma .BOIL
Parezela dárzenu un paiksaugu pagatavoanai. Ieriie testifatiis programmata gatovanoanas taikis ir 40 minutes. Ir ispejei manui il estatitg gatovanoanas taikia du azoana no 5 smitem lidz 2穩定amir i estatitsanas soli 5 minutes.
Programma.BAKE
Paredzeta biskvtu, sacepuro, ruaug un karitasns miklas piragu paggavatanfa. Iarice istatistatis programmes gatovasianas lais 1 strata, Irespejans manuali estatist gatovasianas liuki diapazona no 20 min'leim (tdz 8 standam aristisetatanas sols 5 minutes).
Biskwita gotawibes pokepi var poarbaudi, icodur taia koka wubidi. Ja irubi bi zirezut iz na iay piupusi nukite - biskiwitsir gatevts. Cepot maki telecears atstisi autosifisabn fanku tini yamovolators etapien.
Programma, GRAIN
Parezedze irino protu varianl na daziend grauduigai. ka iara dazdu pledevu gatovaloi, leriic estatilais programmas gatovaloans laikis 35 minutes. Irispjems manuili estiasti gatovaloans laiku diapiezoan no 5 minute tid 4 stuncim aristialoasoli 5 minutes.
Programma_PILAF
Programma paredezita dzadu plovagatavoiani. Icerice iestatitsi programmas gavatoanas laks 1闪烁。Ir ispejans manualei estatt gavatoanas laiku diapazona no 20 minuten lidz 1stundal 30 minutem ar istatians soli 10 minutes.
Programma YOGURT/DOUGH
Ar si programas palidizbo variat pegatovot zedalus garigus un veseligus jogurtus majoras apastos, lerice iestatislations gamatovalo anaikis liks 8 stavidas. Il rospaji manuels世界第一statt gavostenos laiki cloapazona no 6 lidz 12 stundam ar iestetianas soli 10 minutes.
AutosilTanas fukcljas kal programmaI naV pleejama.
leviotoj sastvdalas traukariecinities,ke tas adtras zemak par 1/2 atzmi kausa lekspuse.

Jogura pagaataoianai jus varat iamaanot ipado jogura buricuio komplekto REDMOND RAM-G1 (nopekrams etsevlike).
Programma_PIZZA"
Perezdeda picas pagatovodani, leria estattalis programmas gatavoanas laiks ir 25 minutes. Ir espejams manualei lestattigatvofoanas laiku diapazona no 20 minuetim iliz 1 stundr al estattalans soil 5 minutes.
Programma, BREAD
Paredzeta daadu malzes veldu ceptanal no kvlesu un rudzu milltem.
Programma paredz, pilnpu pagatovasianc kiclu no milkas rauzdafesnani lidz icespazianai. Irice iestetiiats programmas gatavosiana laiks ir 3 stundas. Ir iespejams manuili iestatit gatavosiana laiku tiepaizona no 1 lidz 6STMir iestatisians soli 10 minutes.
Autosildians fukcljas 3al programmaI naV pleejama.
levitotoj sastvdalas trauka, partiecincites, ke ts atrodas zernak par 1/2 atzmi kausi lekspuse.

ihem vihvi, ko programmas gatoivaaans prinnoa stund naidt kalmis raudraa, bet pck ton noakit peccna.
Pirmi miltu izmantoianas, ioteicams tos izjot, laie piekilitu ator skabekli et attirtu no plesiasmijurim.
- Neiesakim Izmanton, Atkita starta funktju, Jo tas var iietekmet mas zes kvalitati.
- Neaveletiv multivares kata vukl iudz gatovalas programmas bei gaml No tir atkilari cepamui produkti Kultitelle
Lai saisiniq pagatovatanlaiku laiku vienkariotu procesu, maizes cepsanai esekim izmanton gatavos maisijumus.
Programma DESSERT
Parezdedra dea duu auglu un ogu desertu pagtafovalan. liferce lestatlas programmas gatavoanas laiks Ir 1 stunda. Ir lespijams manuill lestat gatavoanas laiks dlapazono no 5 minchenldt4 z standam ar lestatanas soil 5 mintes.
Programma,EXPRESS
Parezta 3rairf s un daZdu putraim veidu pagatavosanai.
Sei programma iav pieeja gatavezana laika reguleza un funkija "Aslktais starts"
III. PAPILDUS IESPEJAS
Miklas raudzefa
Fondigatavosana
Fricesana (Varisana e)
Biezplena, siera pagatavosana
fides nongtut yntaropnina
- Skidro produktu hastenzi
- Bosnu partikel uzildjani
Trauku un higienas prieksmetu sterilizacia
IV. PAPILDUS AKSESUÄRi
legadiettes papitius assekusiru REDMOND RMC-N95E vuzinat par REDMOND producijaks jaunumiei var redmond.company var tirdzimnacias vietas pie ocifcialj paramaytviem.
V.IERICES TIRISANA
Visparjol notekumi un jeteikumi
- Pirms ierices pirmas letofoanas. k ari pec edena gatavotanas nongemiet partikes smarzu erice, STEAM programma leteicams 15 minutes apstradiat pusit ctonra.
Ja ienzi neimzantojat Igu laku, avienjoiet to. Darba kamerai, isekai topt apikresi dsku, bodji, ekjeko vakui, kondensata truuk a tvka
Pirrs ierices tirisanas parliecinieties, vai ta ir atienota un pilngia uka.
Tirsinai iznantojtik mktu dran u maigru taku magazanas (Udekci erices tirsinas laika neltietajupus salvates val sals vabroxas pastas. It a nepiemnoni zhenotat jekdakis kinsui agesivs vor chts vielas, kuras nov letecanies hetsonal objecteik, kas nock sakarev ar partizk.
Negremeljiet iceri iden vii novietojet to zem ulens pliasas!
Uzmianetles, trot terces gumis (silkolina) daas: to bolaj umi ve deformacion va iziristis ericos caribos traucejumus.
lerces korpusu var tirt, jotas kust netirs. Bloda,leksejais vaks,
kondensata traux un Nonemams tvaika vastas Jttraré pét katras lietosanas reises. Kondensats, kas velojas ierices gatovalanas processek teen nonpems iekaras lietkes lietobanas Vajadjtsbas qacilumnotri darba kameras iekëjiras virmas.
Korpusa tirisana
Noitret iertes korpusu ar mktsu, miutru vtwues drnuu val suki. Ir lespjiams Izmanton maigu tiranslizekli. La Izvainos no lespjiami tropiem no eduns en termiera triapien, leteicams noslaucl virnu sausau sadvaia.
Blodas tirisan
Bjórd u var tír g manuàil, izmestojot milstk uúk ñl u trauk u magzáanas lidzoki, gan trauk u magzájama mänsa (saskana ar ta raztáde ieteikumi)
Ja tsar i joti nets, illeletci siltu ānoid biča un atstajé kadi Laiku lémér, tad noitri. Pirmus uzstādīn sierces körpus ànotkeɪt nostalki kliob cladare árovi sūrni.
A regulari di佈eds distribu t e ieksejne neuzui moejso a parklajum kira var piinji vai dalieti mainies. Tas nav biolas cefelata pazine.
leksejavaka tirsana
Skiatet diagrama A4 (Lupa 7) lekviia vika nonenianias uusustanfas procrimal. Izmanjeot mitri virtues drana vu so kli, La nottir galvenos
un nonemamos leikjeos vukus. Pirms leikjeja VKa Uzstadisanes noslaukiet abu kevı virmas.
PRODUKTS IR ZAUDEIS GRIEZUMA FORMU
| Produktuţu iudil in pūdik bielmiuţi Produsutu ceosot, apamietircs no ce bielski od reul 3-7 minuţies | |
| I ruristiţie pūdik lube qutavodars kules | Saracutiieri gatavodars din din viu sutejit receptes iisatianum, kura i adaptațe dotajam iences madišim |
| MİKLAS IZSTRADAJUMS IR PÄRÄK MITRS | |
| lumiţuri repreşeti.ro produci, lese orepapiro munitur (pulpit dizinuzi si uoc), sastédișo egei, supeuni, ult.)) | sauviirii sustavodules atobobiţi receptes. Nauviirii gatavodars produci, kuni nuare pupicu munitur, din ameniţei (suci reptiţi musă dizunoiu |
| gatavole edilei in pūdik liq lube alverti multivëres kula | sauviirii frustadajima nu multivëres kula urete poci pagatovodars, la in reputuriie, total sediati (a enargui kula orbiogla unululululululululowodars nucirai |
| MİKLAS IZSTRADAJUMS NAV UZRUDZIS | |
| Sutiţi sepaloviș din naturale | sauviirii sustavodules atobobiţi (detajom irceles, madeim acupetiei) recepte. Sastéduvlu creulif un proporcței, to satevodars vodel, programmiul un gatavodars iukam in (batistul teileululululululululululululululululululululululululululululululululululululululululululululululululululululululululululululululululululululululululululululululululululululululululululululululululululululal |
| Mùltă pleuții ligturi crepamis pulviris | |
| Nuš lextiții miţii vališti smilica miță | |
| In piaceanu repreşerițes suteudules | |
Daos REMOHO moufioes kato modeas programamden STEW un .SOU" nostnaf alzorterdbs sttna pret letares prakirkana, j traouh na pietkekan qinrura staustrans. Saft gocffred gelaeovanes proponane piaucu darbina un paite autotisabres rebnf.
TOIT EI VALMINUD LOpUNI
KEETMISEL KEEB TOIDUAINE VALA
| Pimpioccha securitatem keeh pirmi gili. | Pimpioccha securitatem keeh pirmi gili. |
| Lime kretinist (laid undiskanen fochstens mot voil oolde bodevoll vortast viest pestud ncl). | Sceovitt on kiadustas kontroldarin (fimdat stedine madhigei konradani) |
| El fitgirid iudostahete vanekonda vol olivastel vaitut do bilalne 100p. | Sceovitt on kiadustas kontroldarin (fimdat stedine madhigei konradani) |
| Tandai konradistali salni | Sceovitt on kiadustas kontroldarin (fimdat stedine madhigei konradani) |
TOIT KORBEBPOHJA
| Anumolihavasti pahvatane pohovs koldu valismastine jingocrt Anuma vobemvistana kote on rikutad | Urine vishmertistmt veendugte, et anum on hcvlkiatt peudat a kortemisvatantne kote on sile viqatata |
| Iodurimele vilmanti on rufelos scwotzvatnastiv ktesen | Sorotan on kozukota nentrolittus (kmetamid sedme prudellga konandaniul) retsepte |
| Seodite ulit supe valismastine ija | Lihendage valismastir dea oga vir [pigla sedme anad maddell] poos kon- ndeniend fered seyatal |
| Prakotimee: Urukstote vala zanunose 00, il seganvi odv pokr- ske hijs valismastya voludineld | Tawalil pradimino jure naive valame annae vaidi karmali, il, et vor katakis pichli tshinkere kulti, Otuokar, prakotimee kredhne khan uromaa alvldi tskoian ien perdremi negate vor tekta ilagart unner ciorazwa |
| Anum ehlavanti pujahstand eelene raalvaimastne jrgtigt. Anum ic kortemis-vastne kate on rilutie | Lrve valmatisam ste vencug, et anum on hocklnt pestud je kolorbervostne kate et al. Vjegnust |
| Kautemset erarnas e el pleiivast veledeklu | Lisage anumasse reihem velediklu. Valmatisme alaj zrge avoge multistende kate en mille jolukunde |
| Ketemset erarnas on illait vihne veledeklu [Irgmata kocotsinete vankland] | Erjige veldunja je kvalan nestantaine digiri volvhokunde |
| Kupsetemset i el madriind anuma ssepincna erene valmatisam velegu | Lrve bilgiga oseapreuvul nubrige umarin seulad [apoch viq va talmeeilga] pe tassarvalo ell anumnesset |
TOIDUAINE KAOTAS LIOKEVORMI
| Segaside tóldualir nizumas Ilàit tagell | Tavilise prazidimile keralig segag bota mite tagedamiti lfa 5-7 minuti tagant |
| Seaside Ilàit wúte sveðmätnisse áp | Lunergede vaumlasmästie rega vol ibraga seadne anke imedl ljecks kohendustd rebepti solvitiu |
| Kastulat: sebmezane konstattim, mi ambo dupei minutie (mahtalad pumitjedi vam purvatid, kalmataut merp, nepukor (Ma). | Vallurime utile mahrantend varotii. Kupusmertare resektive Pukite konstattimkeles mele voce liki teledevu sioe tenuoan eumonted vei kandae neld volmalatis malinatasektes logues |
| Hokudita varinsupelise kinnies multierietas litu kua | Pukite kipirs, vitta multiarhazicape vaia kohe patea salviamulti. Vajusolus, voite jitta teluu multiarhazicape vaneseks qaks vajusilututuc autiscocindengs |
KUPSETIS EIKERKINUD
| Munid je schrank eld hovakuti varusutulit | Sovietvay en Kasstadia kontrollud [pelmetatud] sedimede musediga iohandradu rerepte. Koostalnezte vaili, nere de tetevo tkezua vila, stisepanite vaneikor pavoov vas-tema rimevalo kulekune |
| Tajem sastiril fahr kunglitasalinga | |
| Jitste juru odetumita vol sotrutei tigert halvazit | |
| Koostalnezte ponekat elektrilte |
Multireteata REDMONO serre rea medulite seass hokob prognomides < STEWJ 水 sOUPLVedeliku pseudourkantoleide sedate steiogeniiseigonie katse. Sel juhui vostimlanste konigrosis siehjak sbat heit ulite autosozigenus refshil.
Erinevate toiduainete aurul valmistamise soovitatay aeg
Program YOGURT / DOUGH
Cvajr programe se prepuclare 2a praje/je zdravn 1 kusin n donach gogurta. Podrazanevemo vreme je 8 sati. Dostupno je rucho podastavanja vremena Raspon podastavanja vremena kuvanja je od 6 do 12 sati interviatima od 10 minuta.
I. PIPIN ANO THN INPQTH XPHSH
Avoite npoeekia Tny oukeuaia kai egayote to pioov ato kouti apocepa da oaukeuaotukai kai biopnntkatautokolantto kctos ato uokkatoe me aepokp oip
H aouoiaou ta uauapok oaiop ao tioipov auotopa aoc etepi ata to dakoiuata yiyuyun'ntou.
SKIOTAITRE TO TEPBIAJA TNC OCKUKEC ME EUA UPO TNOI LAVVE To TUOA
UE CECIO VEO KA OAOW. STEVIAETo KAKA.KONK TPN TUPM XPHON
UNOAXN IINOMIVAM EAPVOWIK, MIE, PEPKVPNOC NCS, NCT OVEPEIAET
EE DAAIAOUPYIA TNC OOKUKEC, STYNTPIMXON autn KATAPRTE TNN OOKUKEI.
Mrtar mptapopn n atrokeunr ce xauhnc Bepuokaoies apoei Tn sukkneu depepokpaia duiatou taoyoio 2 opc npnt ao IVN eveycoaion.
NPOOEXH! Anayopeetn n avwwn nC oukeuic ne n yepoue
VnAekdv ano m haaB.
Mey euyemotmei n tuekui yu o toeauo u toru n aedmu - de mouitouy ou evocn ou yoeayekou npoyapaiyia oydyote de la opaikin unupokayakn taueukui n ve gaoekai ny kuyu.
PPOZOXXH Amayopoeiera vai anxwote ra uokut amr taLafc
II. XPHSH THE ΠOANYXTPA
Piv aio tv pwn evpyooin
TOTOTETJYE TAOUKEH CIE MO AOKANJI EITRIENDE EMPOVEA. ETIOI WATE KOKAKO ANG TQU BYAVELI AMTO BAIIBDA ANGYU vMUY EEPXTAI CE OTEOI ME TYT TOOTOPAIA, DIAGAOKYIMKA ENTYPLOPAIA, NIKEKPOVIKCS OUCKELEC KAI AAKK AAVKIEVA JI KAI KAI TO ATA VEXEYEATA vUTOOTAOV YNCEC ETIO TVN UAPNVPAAKO KAI TEPBPOXAIA.
NpOto aoyepegea EaeBaeile To t eEutepke Ka opoata eoutekepe meu nuc oukcekiev Ex yooju uynvckie, biopeke, biototnueke Kai dAea kemtnzeta. Meetoiu taiao Ka kau Oepauveikokio oioeoiou Dev npetiei ve psoekovskai oaiavakiepeva
KaeopiooC tou xovou yepaTos
EINrAIOUPOREDMONDMC-M95UEuauoauoautouaoAUKABOPaOxpvovmpaOKUeYyAKBEPpOaUe (EKIOcAtoTnpovpOyEAKEXPESSs).ToBnAayNcKmBvOeUPOuTOKBOIQeouVXPovOepaAtto To EMIAYeUPOtpOvPpOpaOKeUKI, TiaVa aALQueOpTvXPOvo:
Meta atr Tn EMTOy To poypmaotoc Ppaakkeufoyto To mntvac To mTKPOo 4-hour puele To cuec. Ea kpatoe To mTKPOTo mntve yo mepek DeetpoAeTn Aa oalny To tyn Tmvo EMTOcvTo
- NataWvraT o TAnKToo Min'puBpIe Ta deUtepeAenTa.Eoy Kpa
TnOETTOAiktpo matnevo yiapepiKa 6eutepeKemtna aayn
TUV TIPUW ENTOXUVETOI - Eiv aattapntro va kaBopiooue tox pOvo npapaeun yia
Anyoepo amo pia wpa manntoe to nAnkpto 《Hour》muexptovn
Deviu o nis tiuTowupov. Etna tarnvtaos to mktpto Min
Kabopdty thy othapnthy houw AethyU. 3.Amou Hkemngte U ty gurHg Tuy Ovovu TpOeKUcE to Ofywn
P 1
ya tov ayopBuo TOE EAEyeyou TPOOyayocuT, TAPDOKEUNC.
4.1ginyk@eyyK@pOuyyD@B@yU@yU@yU@yU@yU@yU@yU@yU@yU@yU@yU@yU@yU@yU@yU@yU@yU@yU@yU@yU@yU@yU@yU@yU@yU@yU@yU@yU@yU@yU@yU@yU@yU@yU
Tny yepnaypnn npnnyn npnnnnpnnae naa aaeane nne 0o to taeeaa gaaan ppuuauauau kai to buaa aalnuva noa e an oto emuuey npoupaana ppaonkvei oupuu vte tno nivaea epoytaataa uuuuulr.
Ia my devan oT aquaiaou kau kadoepouwou wouo at npapayaa pataeaneae evn ao thu noyueae uucu Aua oetepnu vapatnevntve yawaed kwocn odoaoyu nkytaee 100000000000000000000000000000000000000000000000
Ze kipakotu otoaoyo npoyoo aonr oonpoyoo yepnou to koiokoeuyou wohoyo tropaekurky, kewyoy oovay on n kowukny otzni nykopooyabun ycoopcayod. Ta napdibya, van Bokpur kpoev vpu ka qutlalagauu nu wv oyao tnpocayaknu 5 a 50070 oto npoyoo STEAMs, ta n e yapoyu npoyoo npoyoo kno n oynpoyoo npoyoo zu koiokoeuyou wohoyo tropaekurky, bdo wotwirj jao peta my Czwi, u vpu kai oqdykceo npoyoo, noonr oonr oonr oonr oonr
ZTo pOpaPaa PASTa n aTnpoa npaetn toou kobopovouo XpOvov cNevdav pe TcTau Tou vepao kai To beNepe mna 0r mnykto aStte.
Aetoupyia Time Delay (KaThetaepnveynvapn)
H Ntouyiautn aon tmtteptre vao otoeopoyo xovkdo 3dmo 0to teuocu ono anouo yqnoi npneoi ov eivai Etoio (XauKuvovitac uotu koi kxovoo kEKEIoN, ou npovpOaTuc). PuOoi oepu, oipoei o KauKvaitae ato 10 MTeoC 24 oep, pfeBua pihou; 10 TeoR. Sa
REDMONO
TpeTtva IanyBefu Uttouyoyoc on a xpoovoc kafuaertanon.Bo TpeTtva Ievn ypaAtepoc mtto xpoov opeakoukui, aAikau to pTpaayapaa Boekivitat qauoq uet to mpanu To TANKPOU KStar.
Mitopeite va pubioidote 10v xpoV kaBuaepnnc n; evapng apoE eme
- Patravvto to nanege Tme Delayevkovnnehty Nm Aynovnye lyovnyo tvo yovce kauBturtponc ng Evotng. 2my obdov na jupnentel Tme Delaya co yovcepo do abpxtu vaofo
- Patravitc to tajncti houro tsadikai aalate oicpe. To qopat paloyodov 24 oec. Ex pahrtite to tajtncti metnveia oiee.
- Ntivvto nntnnpimnnto aaiagte ae tia. Eav kpoieoe i nntipino trannevo yepikde eetpoaennn an aanyn
- Eao eva anapopoeia va kaopopoeiae tvx ovo npaekeuca yia ayanepeo aot iqa opa ctabada kato tataknpo Khoue pexoi tvn bevcepei ng tnc tnu wupav. Eteta Tnovtivac taTnKpO eMina Kaopopoeia tvn apopoeiae tvn AEYIOH.
- Tey any oovon how katoeoyeuu uyouu uuyu y
- OTeK TEAEKOTIE ME in pOoiou IO uXPOVIO TMOIPO TO MIOPO X"Starta KpKATNTI TO TIOYEVIO YKOTDAO DEUEPAETTA. OToEVEJIN (QATEWTE) EVDGELTO IOOC DGE DYOL, OTH AECOTD BYT WITN Delay EVOVYIO. 10. EVOVYIO cKETLDOIO IOYPOUADGIO TAOLOO.
- Aoi npnepa to kaoepieovgokdo haoqin oto yaoqo 0e 12000, Moe tny oakAipon no tyopoyquadouc quidytao the everyonrnnn an aoaynuia daanpncn, nC Baeuokocic, eouoo npoyou (nooBepavon) kai oue dveen oovtuvvEvoeo 10000
- Tiay ane vepoevoipoinn 1nc autoepoovan 1note to kikpdo Reheat/Cancela, HuiuHvEevDvTnTnTouKbByRcSe
H Aouyia Kaouotougevnc evaoe ngaoyo 0da yauqua npopapdpa napeoknky qayno, kocn npopappnu FRY, PASTA Kxk EPRESSN.
ouvototai vayponpontosit ne lykouoplya Time Deiaye cny tuyayyoyy yakatokocka n dya uetomn poyolva (auy, qepko ydya, kpaic, taqc k.l.a.)
Kato k yu dau rou xovuo an tien oyuoyu 1 Time Deiyu n Toy Tzu v auayduo u on qu, on a n aoioen uonr hcnro or npoyuaa STEAMV Edoanov ouv no rnuoluxpuqia qaidn amy anapatma n Lyuoyuipu Bepuopaala (muoi my cnou vepo).
Aeoupyia diatnoqn ts Tepokpaia cTuv Etoiav qayntvk eKeep Warm (autoepaov)
Eevymoiiai auturopa iueucu mad tny oekkuaon Tou npoepouco taipapkeukn kui mopelai bi amelipai Tbepekoepakua Tou eoioum taoueupocu 70-75oC atdipkale To24 uoe. Me evyn ti autobepaoi elvov aovpim n qutunr Eeivte Taat Taikpou K Reheat Canc), etn obvne anotieKcetai n metpnen xpvov Evpoiaocic stn debojnu Iotoupya. Oov elvau amotpiato pmoiouae ot vepeymoiounoue ty auturopoanon Tovovac ki kpatuvirac narmjveo yiapekd beutepoiaeta To kmpokro KReheat/Canc).
PpOAnTTIKn aTTEepeyOTIOaing nS auto@epuavons
evopovinoi ng, aoepoovvuc my okaAipuou tno npovapovcu; mapparkcu efice ivnaivr eimnun. Aauovocnu, to unui
dymu Tnauogurpo REDMOND RMG-956E EynTpeAbeBnIeBuVvOttma nck TKu vnpotepreavneovipoiinnc nCdeBouvceN Aeiuyapiai Kaid niv evapn n i t dpkek EkeKtEoR u kupoi npovpdpocn Tnpaekuei. Iua kai rni Evapkn n i t dpkek EkeKtEoR u npovpdpocn mntipnki Kc kootanrmtanevo imuqk EteOpTeAeN to NpKtpKn 1MenuKeHaw Mgejpn To u pwnv EteOpEn To nKtpKnpu Reheat 10000000000000000000000000000000000000000000000000000000000000000000
AeIOUpyi zegtauqos qayntou
Minoepitai va xnoiioioue iy nouupurra REDMONRMC-965 yia Cieuaaun kov ouu matu. Yn oio:
Metapetepeto qaynto atmoa kato totoehtnate to eaa otn taouxupra.
KALIETI To RHTKAD,AdovATEU Ht KsEeKU Tbe TAKTIPRIO CROV.
TAMKOT KOMPEYNT MAMKUTO VIE PVEK DELA PDEKTO TAHKTQPO
TAMKOT KOMPEYNT MAMKUTO VIE PVEK DELA PDEKTO TAHKTQPO
TAMKOT KOMPEYNT MAMKUTO VIE PVEK DELA PDEKTO TAHKTQPO
TAMKOT KOMPEYNT MAMKUTO VIE PVEK DELA PDEKTO TAHKTQPO
TAMKO TAOYIKI OXETEVIL ENDY AOTOH K N QATEVIL ENDY TO YAHKTQPO
TOYAKTOPO BAPAYI ENY QWONOPENPEN TOO QOTATQPO
H ouekouk Bo zeiovai To trio mexoi 70-75o Kai Bo to biainpntoe are auivn tvbepkaopaoi tni dbapkeu 24 uupv. Eivai apamaiipno impuopoue oiaatpaoue To cetraoua Tnauvi kai patauiu nmiyvo iye mepka DeetopaeMeTTA to Nkto Reheai/Cancai mepi vio thououe oiyoteik puroteve vceEkeim otovbki ooi To ankto
Iaopa to yeoayo on o Iyocopata oipai vai dmpai cato to me To yao kai 24 ipecs bce auotvouase va opatve to gorye ani leuoyua diaanpangn taepdipntas yra papatava aoo 1000, epecs ooeiupqogapevo aovipnpoia ov oyhoae aniy aoAolowu Tuw yewaknu yapaknnpknaou.
Fevikn oepa diabikaaiu otyn xpnoyn autojauw npoypauiut
EMANTIKOTK Edo xapaoonotie inoukuyra ta BAOUO r ou kyou (1) Taepaoyou, oio ra paoayus Taoyou npovoyu, MHN tonBenei e 3ekopakayaiyauyauo aoue auo 100°C. Auu uoruaia vobnyarui or unpeyukuyan o KaBn inoukuyau, Tko Kdo Ayofo EIOENTPEIAI yauo yauo yuo bao
1. Etoiae (etopn) to atapalntu kdo
2. Bota To auotiotika cto tmo tnc toa otoioue To poyopay a taopakuekki kai totoBentoe To tmo juae ato Tu yto npato. N To paoetye Toe da To aouotia uuku, Toepuipaupeyavoou To yuo, Via bokovtai Kaitu To anu Utoe To nolte To emonvanyoc Tcny euteknepi To hcvntoou To tmo. Becloubele, OTo hcy To hcy To hcy To hcy To hcy To hcy To hcy To hcy To hcy To hcy To hcy To hcy To hcy To hcy To hcy To hcy To hcy To hcy To hcy To hcy To hcy To hcy To hcy To hcy To hcy To hcy To hcy To hcy To hcy To hcy To hcy To hcy To hcy To hcy Tohcy To hcy To hcy To hcy To hcy To hcy To hcy To hcy To hcy To hcy To hcy To hcy To hcy To hcy To hcy To hcy To hcy To hcy To hcy To hcy To hcy To hcy To hcy To hcy To hcy To hcy To hcy To hcy To hcy To hcy To hcy To hcy To hcy To hdy
3. KAIATEI TO KAKITI YOLOUYIAC paXihi va KOADOTET TO KAK. SuV-SECTE IN QUAKEH ME TO NAEKTOKIO.
Pocoxy! Eay avpepeote at ymles beepkaos xonaoaowntas ayeyar Toaoyq qoukou Aotu, apyive nivr to kaihe my duaneefyavoyt.
- Flatwurz to Támykó ToaMenu:Keep Warmie AteLécte to KároltáAlo npóvámpa napóctek; Tórly oboví Bévaçó in sputiñové Événők 1980, 2000.
- Eev Dc oBaeo npoeiAeueovooocnnpaekur nnepeiye aolaeet to nroivirg dthkntk houy kok m
-
Eiv evi atapatitno KoGopitr tyip kaiuotepuoying evpEg H Aetoupyio Time Delay 5ev ivia dctouwn yxphon o npoyodutro FRY, PASTA Kx EXPRESS.
-
7ia yev evyto n To poypaoaopaoa kao paoaakn Tmayos Koo koyemrnnnnae yar pepaek deutepoAto TAYKTOO aStare Eaou oavauo aEvolceu Tuv TMkTpaW uStar Ka Reheat/Cancel. Gao Opeyipra N eKtEaeam Tcu eneyvauo pvoupaoopaoaon kao ovivapaaen pucnirn npovxovpaoepae, Ito poypaoaee STAMENnvivcpaoepnnpn Egeanet mTo zon To vepao kdo Aro Nkovotnnt Taou o20 o20 o40 o30 o30 o30 o30 o30 o30 o30 o30 o30 o30 o30 o30 o30 o30 o30 o30 o30 o30 o30 o30 o30 o30 o30 o30 o30 o30 o30 o30 o30 o30 o30 o30 o30 o3
- Eev iu atarapnnti muprpe kx Tov ppuva vayeyytoa tte nTu Kaupyo auturohepuvamnu Tavmua Kauyntuvc Tngvo To hKtpo 1MenuKeep Warma 1suc tou aqanr n qwotvi vEv eiv to Tu Ktpou Reheal/Canee. dAeepo mtna 0To hKtpo 1MenuKeepWarma 1eEuypoyta 0utn Tu Kaupyo fovc H. Hauypoyta urohepuvamve Ev efuvauvat kai rXpov to npuypaayu YOGURTDOUGH kA BREAD.
-
17a My oaklopon t npoyopauotao paoekoei Ba ooc enpuapeia e ymneo afo. Tn ouxvae, aoayoe i ta emieyaiya npoyapaa n th pexouae pubuiare, n tuekae b te peapet er an Xeupovia autoepuavocn (Eiva avayeu n quivte Evskirou tou kinkpo Rehat/Cancel) n th Aenopyua avayovc (AvoBodoyf v qunivte Evskirou tou kinkpo Slairi).
-
Viα αλδετε Ειμημενού έρρυμαγο, δακαίσετε Μυν Ḍαδοδις την τηροσακείης κην τηθόνουσενπαργονούς καὶ παργονεις την παρεύνεν συμεροδενλίνητα Ανήκιρονις Κτέλενης Βαυκόνεις Βαυκόνεις Βαυκόνεις Βαυκόνεις Βαυκόνεις Βαυκόνεις Βαυκόνεις Βαυκόνεις Βαυκόνεις Βαυκόνεις Βαυκόνε
ya ly eox monoiota otnotaleapata poteolouvoe ly aquaonoeiouvayexy apanakoeu kuyauo ano to biliia ouovoubeue tyroluxupro REDMOND RMC-M95E KA TOAOI eXe EIOAETAEIATIAPU, yae uOy vntelao.
Eur Tuaa Uauuueae aevnepnne potee nepe nannmns an
Eev kato yevnay oev denyovotu toeouo aoyouyakia ouuyaua npoyouyau, xonnyauoata for katokoi npoyouya+MULTCOOKuMxueyauo yauoxyaoxpoovnuuivy uoyouyauo 00000000000000000000000000000000000000000000000000000000000
Péoyegug《MULTICOOK》
| • Ta akad mmp and ta (papoukou kyyi eey cie epevattirn ta iyay cepeppionat at kalios cim, paxo (familaf) oikos, tukk) | Aurakivbiley stoe deonauuunluy (mnpauuauuunluy uuaaauauuauuunluy tuc cuuauuuuauuunluy) |
| • Dery ta yipumit or dcekykou ouu uauuauuauu auu kai i aee baeuauu uauuauuauu uauu | Ta yipumit ouu uauuuuauu uauuuuuuuuuuuuuuuuuuuuuuuuuuuuuuuuuuuuuuuuuuuuuuuuuuuuuuuuuuuuuuuuuuuuuuuuuuuuuuuuuuuuuuuuuuuuuuuuuuuuuuuuuuuuuuuuuuuuuuuuuuuuuuuuuuuuuuuuuuuuuuuuuuuuuuuuuuuuuuuuuuuuuuuuuuuuuuuuuuuuuuuuuuuuuuuuuuuuuuuuuUU |
| Ta yipumit ouu uauuuuau uauuuuuuuuuuuuuuuuuuuuuuuuuuuuuuuuuuuuuuuuuuuuuuuuuuuuuuuuuuuuuuuuuuuuuuuuuuuuuuuuuuuuuuuuuuuuuuuuuuuuuuuuuuuuuuuuuuuuuuuuuuuuuuuuuuuuuuuuuuuuuuuuuuuuuuuuuuuuuuuuuuuuuuuuuuuuuuuuuuuuuuuuuuuuuuuuuuuUU | Sukumaruwa vya krymukovu uauu nouupuertene tnckukukukukukukukukukukukukukukukukukukukukukukukukukukukukukukukukukukukukukukukukukukukukukukukukukukukukukukukukukukukukukukukukukukukukukukukukukukukukukukukukukukukukukukukukukukukukukukukukukukukuk |
TO ΦΑΓHTO KOANAEI ΣΤΟ MNOA
| 1. To umapovski kogo kogo kogo kogo kogo kogo kogo kogo kogo kogo kogo kogo kogo kogo kogo kogo kogo kogo kogo kogo kogo kogo kogo kogo kogo kogo kogo kogo kogo kogo kogo kogo kogo kogo kogo kogo kogo kogo kogo kogo kogo kogo kogo kogo kogo kogo kogo kogo kogo kogo kobo |
| 2. Ovovskoškiy kogo to neovovsko uko kogo kogo kogo kogo kogo kogo kogo kogo kogo kogo kogo kogo kogo kogo kogo kogo kogo kogo kogo kogo kogo kogo kogo kogo kogo kogo kogo kogo kogo kogo kogo kogo kogo kogo kogo kogo kogo kogo kogo kogo kogo kogo kogo kogo kogo kogo kogo kogo kogo koko |
| 3. Togo kogo kogo uropebukov perya lo vno perebukov uro mey uro mey uro |
| 4. Kogo kogo kogo uropebukov perya lo vno perebukov uro mey uro |
| 5. Kogo kogo pnyovsko ugojevoce uko kogo kogo kogo kogo kogo kogo kogo kogo kogo kogo kogo kogo kogo kogo kogo kogo kogo kogo kogo kogo kogo kogo kogo kogo kogo kogo kogo kogo kogo kogo kogo kogo kogo kogo kogo kogo kogo kogo kogo kogo kogo kogo kogo kogo kogo kogo kogo kogo koko |
TO IPOION EXA E TO EXHMA KONTH TOY
TO APTOZKEYAEMA ADEN FOYKQSE
| Yamagata estuaries estuaries estuaries to yakuji and jima. | Kanto to kawasaki estuaries estuaries estuaries to yakuji estuaries to kaike 5-7 kaike. |
| Egea estuaries estuaries estuaries estuaries to yakuji estuaries estuaries to kaike. | Mizuoka estuaries estuaries estuaries estuaries to kaike estuaries to yakuji estuaries estuaries to kaike estuaries. |
| TO APOXEKEYAEMA BTHKE YFPO | |
| Xyocanononononononononononononononononononononononononononononononononononononononononononononononononononononononononononononononononononononononononononononononononononononononononononononononononononononnonononnononnononnonnonnonnonnonnonnonnonnonnonnonnonnonnonnonnonnonnonnonnonnonnonnonnonnonnonnonnonnonnonnonnonnonnonnonnonnonnonnonnonnonnonnonnonnonnonnonnonnonnonnonnonnonnonnonnonnonnonnonnonnonnonnonnonnonnonnonnonnonnonnonnonnonnonnonnonnonnonnonnonnonnonnonnonnonnonnonnonnonnonnonnonnonnonnonnonnonnonnonnon nonkaike. | Emukyanononononononononononononononononononononononononononononononononononononononononononononononononononononononononononononononononononononononononononononononononononononononononononononononononononon |
| Egea estuaries estuaries estuaries estuaries to yakuji estuaries to kaike estuaries to yakuji estuaries to kaike estuaries to yakuji estuaries to kaike estuaries to yakuji estuaries to kaike estuaries to yakuji estuaries to kaike estuaries to yakuji estuaries to kaike estuaries to yakuji estuaries to kaike estuaries to yakuji estuaries to kaike est uuuuauuuuuuuuuuuuuuuuuuuuuuuuuuuuuuuuuuuuuuuuuuuuuuuuuuuuuuuuuuuuuuuuuuuuuuuuuuuuuuuuuuuuuuuuuuuuuuuuuuuuuuuuuuuuuuuuuuuuuuuuuuuuuuuuuuuuuuuuuuuuuuuuuuuuuuuuuuuuuuuuuuuuuuuuuuuuuuuuuuuuuuuuuuuuuuuuuuuuuuuuuUUUUUUUUUUUUUUUUUUUUUUUUUUUUUUUUUUUUUUUUUUUUUUUUUUUUUUUUUUUUUUUUUUUUUUUUUUUUUUUUUUUUUUUUUUUUUUUUUUUUUUUUUUUUUUUUUUUUUUUUUUUUUUUUUUUUUUUUUUUUUUUUUUUUUUUUUUUUUUUUUUUUUUUUUUUUUUUUUUUUUUUUUUUUUUUUUUUUUUUUuuUUUUUUUUUUUUUUUUUUUUUUUUUUUUUUUUUUUUUUUUUUUUUUUUUUUUUUUUUUUUUUUUUUUUUUUUUUUUUUUUUUUUUUUUUUUUUUUUUUUUUUUUUUUUUUUUUUUUUUUUUUUUUUUUUUUUUUUUUUUUUUUUUUUUUUUUUUUUUUUUUUUUUUUUUUUUUUUUUUUUUUUUUUUUUUUUUUUUuuuuuuuuuuuuuuuuuuuuuuuuuuuuuuuuuuuuuuuuuuuuuuuuuuuuuuuuuuuuuuuuuuuuuuuuuuuuuuuuuuuuuuuuuuuuuuuuuuuuuuuuuuuuuuuuuuuuuuuuuuuuuuuuuuuuuuuuuuuuuuuuuuuuuuuuuuuuuuuuuuuuuuuuuuuuuuuuuuuuuuuuuuuuuuuuuuuuuu uuuuuuuuuuuuuuuuuuuuuuuuuuuuuuuuuuuuuuuuuuuuuuuuuuuuuuuuuuuuuuuuuuuuuuuuuuuuuuuuuuuuuuuuuuuuuuuuuuuuuuuuuuuuuuuuuuuuuuuuuuuuuuuuuuuuuuuuuuuuuuuuuuuuuuuuuuuuuuuuuuuuuuuuuuuuuuuuuuuuuuuuuuuuuuuuuuuuuuuuuuuuuuuuuuuuuuuuuuuuuuuuuuuuuuuuuuuuuuuuuuuuuuuuuuuuuuuuuuuuuuuuuuuuuuuuuuuuuuuuuuuuuuuuuuuuuuuuuuuuuuuuuuuuuuuuuuuuuuuuuuuuuuuuuuuuuuuuuuuuuuuuuuuuuuuuuuuuuuuuuuuuuuuuuuuuuuuuuuuuuuuuuuuuuuuuuuuuuuuucuuuuuuuuuuuuuuuuuuuuuuuuuuuuuuuuuuuuuuuuuuuuuuuuuuuuuuuuuuuuuuuuuuuuuuuuuuuuuuuuuuuuuuuuuuuuuuuuuuuuuuuuuuuuuuuuuuuuuuuuuuuuuuuuuuuuuuuuuuuuuuuuuuuuuuuuuuuuuuuuuuuuuuuuuuuuuuuuuuuuuuuuuuuuuuuuuuuuuuuccuuuuuuuuuuuuuuuuuuuuuuuuuuuuuuuuuuuuuuuuuuuuuuuuuuuuuuuuuuuuuuuuuuuuuuuuuuuuuuuuuuuuuuuuuuuuuuuuuuuuuuuuuuuuuuuuuuuuuuuuuuuuuuuuuuuuuuuuuuuuuuuuuuuuuuuuuuuuuuuuuuuuuuuuuuuuuuuuuuuuuuuuuuuuuuuuuuuuuuccuuuuuuuuuuuuuuuuuuuuuuuuuuuuuuuuuuuuuuuuuuuuuuuuuuuuuuuuuuuuuuuuuuuuuuuuuuuuuuuuuuuuuuuuuuuuuuuuuuuuuuuuuuuuuuuuuuuuuuuuuuuuuuuuuuuuuuuuuuuuuuuuuuuuuuuuuuuuuuuuuuuuuuuuuuuuuuuuuuuuuuuuuuuuuuuuuuuuuuddu. | |
| To caww an dawon dev orwopapnokn kahel. | Aunu wocn oon nyd aonpokn (npop- |
| H lqum e juvce mehla copa je npocjau. | cnpoccpnivn eno npoccpnve nwoe |
| Dav cokowonit ne cokowit de baw cokowit kaiin in kouy. | mng mukuy, mny, mny, mny |
| Kowwite Aikn otien sboovn ykuiw. | nay, nay, nay, nay |
15 xia jua aotao vovltau nvoiaypuw REIMODN OIO npoypuqauo a STEW KAI a SOUP. 0r ao ywio a o moi dev eiv anepaevno toa tpoopnnpaaon aouymyeou my omepepeunoy oukyocic. 2aum my pkiipmnnn topoypuqauo npoypuqauo 3papaeau k ng loxuynpa mejalbuea ony Keuoypua autobepuany
REDMONO
O duviotupevoxpoovsayepaTOGiaopowtpoipuw stov ato
| No | Yaloo | Bapoc, yu. (Transtn) | Pondovra vespoo, mi | Xpavoc, Tropadkunury, Kattia |
| 1 | Φeiozo goyofo / paofo (ex kouzur; 1,5 × 1.5 ex.) | 500 500 2030 | ||
| 2 | Φeiozo anayossofo (ex kouzur; 1,5 × 1.5 ex.) 500 500 25 | |||
| 3 | Φeiozo katoomvofo (ex kouzur; 1,5 × 1.5 ex.) 500 500 15 | |||
| 4 | Korabodaro prantbi (ex mupoi) | 183 (6.7%) × 150 (3 ηx) | 500 1315 | |
| 5 | Φeiozo (paofo) 500 500 10 | |||
| 6 | Fandoro cokdikac (ex koumouvoufouc, paofo), Koi (ex koukuyyipov) | 500 500 5 | ||
| 7 | Fandoro (ex koukuyyipov) | 500 500 5 | ||
| 8 | Koiozo (ex kouzur; 1,5 × 1.5 ex.) 500 500 35 | |||
| 9 | Fandoro (ex kouzur; 1,5 × 1.5 ex.) 500 500 85 | |||
| 10 | Aoxavado (ex koumouvoufouc) | 500 500 10 | ||
| 11 | Aoyó | 3 ruy. | 500 | 10 |
Pnne va laaovate uruoyo aou, on uurec eliva yevknc npotaoes. O npoyanokx xpovac mroepi va dapepa and nrcnenepeves nuie avoloya ie my novmna tou ayekopoevou npovodos kai neyocnknpnog
Euotaeic yia nyn npn nn wpuipoeuv eepokpaiaoc otn popypma «MULTICOOK
| № | Anatorppm | Regiokpom |
| 1 | 35°C | Gocococca (20%,mpokkocch) |
| 2 | 40°C | Hapokocch yosipom |
| 3 | 45°C | Pioa |
| 4 | 50°C | Ziaipom |
| 5 | 55°C | Piapokocch nyqovir |
| 6 | 60°C | Piapokocch npovovu koro mas koro mkiyng |
| 7 | 65°C | Majeppe koi kopoarocce ne mokotunale koro nci |
| 8 | 70°C | Piapokocch naivn |
| 9 | 75°C | Piapokocch nyau Koro nci |
| 10 | 80°C | Piapokocch (cctod oaiutamtehco koro cko) (ycknifich) |
| 11 | 85°C | Piapokocch npovovu koro mas koro mkiyng |
| 12 | 85°C | Piapokocch nyau koro nci |
| 13 | 85°C | Piapokocch yoi koro nci |
| 14 | 100°C | Piapokocch pnykacn o y koro nci koro nci |
| 15 | 105°C | Piapokocch qdoivacn |
| 16 | 110°C | Aino niciuon |
| 17 | 115°C | Piapokocch opoeimie (cdoi) |
| 18 | 120°C | Piapokocch koi koro yoyov |
| 19 | 125°C | Piapokocch koi koro yoy |
| 20 | 130°C | Piapokocch mokivacn |
| 21 | 135°C | Tiyvatoa eolatay yoyov nci, dno yoyov toryev |
| № | Anteortycki nepaepora | Euendotoxys myx gipion (cmions Blmentre to bisAio zuwryav) |
| 22 | 140°C | Kunvovac |
| 23 | 145°C | Wirouia kayeviciya kai apapae or akouneiyegaroi |
| 24 | 150°C | Wirouia xiptang or akouneiyegaroi |
| 25 | 155°C | Tyrkovaia pnykowny Čupcji pe Jokovič |
| 26 | 160°C | Tyrkovaia maaikpauo |
| 27 | 165°C | Tyrkovaia pnykowka |
| 28 | 170°C | Tyrkovaia pnykowka opalala (mazurant, mazitc, konourkoe; n.a.) |
NepiAnntikos IVaKaC autOpauW TPovpaMaW (epyOtaiaKc spuBmuEic)
| Плесураз� | Бернштейн Zusamys no my xprin | Рлесураз� Buchwürdiges Buchwürdiges Buchwürdiges | Epicx pexyow mopakxuyjly / bipo ekaynyi | Kohlenpazipnien Hochkapazien Hochkapazien | Ausrückstand | |
| MULTICOOK | Плесураз�, fixeitszewirrung, fixeitszewirrung, fixeitszewirrung, fixeitszewirrung, fixeitszewirrung | 15 kmd | 5 kmd - 1 kmd / 1 kmd 1 kmd - 12 kmd / 5 kmd | ✓ | ✓ | |
| OATMEAL | Плесураз� μ γδα | 10 kmd | 5 kmd - 1 kmd / 30 kmd / 1 kmd | ✓ | ✓ | |
| STEW | Tilpekursatz, fixeitszewirrung, fixeitszewirrung, fixeitszewirrung, fixeitszewirrung, fixeitszewirrung | 1 kpa | 20 kmd - 12 kmp / 5 kmd | ✓ | ✓ | |
| FRY | Tilpekursatz, fixeitszewirrung, fixeitszewirrung, fixeitszewirrung, fixeitszewirrung | 15 kmd | 5 kmd - 1 kmd / 30 kmd / 1 kmd | ✓ | ||
| SOUP | Плесураз� (fixeitszewirrung), fixeitszewirrung, fixeitszewirrung, fixeitszewirrung, fixeitszewirrung, fixeitszewirrung | 1 kpa | 20 kmd - 8 kmp / 5 kmd | ✓ | ✓ | |
| STEAM | Малуших fixeitszewirrung, fixeitszewirrung, fixeitszewirrung | 15 kmd | 5 kmd - 2 kmp / 5 kmd | ✓ | ✓ | ✓ |
| PASTA | Плесураз� fixeitszewirrung und fixeitszewirrung, fixeitszewirrung, fixeitszewirrung | 8 kmd | 2 kmd - 20 kmd / 1 kmd | ✓ | ✓ | |
| SLOW COOK | Плесураз� unigensatz, fixeitszewirrung, fixeitszewirrung, fixeitszewirrung, fixeitszewirrung | 5 kmp | 1 kpa - 9 kmp / 16 kmd | ✓ | ✓ | |
| ROIL | Толуших fixeitszewirrung von compuoy 40 kmd | 5 kmd - 2 kmp / 5 kmd | ✓ | ✓ | ||
| BAKE | Плесураз� fixeitszewirrung, fixeitszewirrung, fixeitszewirrung, fixeitszewirrung | 1 kpa | 20 kmd - 8 kmp / 5 kmd | ✓ | ✓ | |
| GRAIN | Малуших fixeitszewirrung fixeitszewirrung fixeitszewirrung fixeitszewirrung | 35 kmd | 5 kmd - 4 kmp / 5 kmd | ✓ | ✓ | |
| PILAF | Плесураз� fixeitszewirrung fixeitszewirrung fixeitszewirrung fixeitszewirrung | 1 kpa | 20 kmd - 1 kmp / 30 kmd / 10 kmd | ✓ | ✓ | |
| YOGURT DOUGH | Плесураз� fixeitszewirrung fixeitszewirrung fixeitszewirrung | 8 kmp | 6 kmp - 12 kmp / 10 kmd | ✓ | ||
| PIZZA | Плесураз� mit dem | 20 kmd | 20 kmd - 1 kmp / 5 kmd | ✓ | ✓ | |
| Hypnoepaia | Kurzfristig zu den Xyphenomena | Hypnemeneuticae | Eupoc yxipovu mapierekciy/ jinna almoiye | Kairoeropnienpompojkiy | Hcvopvniy trc emphicys | Anleleipenom |
| BREAD | Paparouei quasipoc cardak alqim ou makiou kaiyioiu (te papraaileveotvou, te eridite quosnaparoi ng (sung) | 3 wge | 1 wge - 6 wge; 7 10 kmr | ✓ | ||
| DESSERT | Paparouei daipopov vithoobmav and qoekka opodni kai uqpi | 1 wge | 5 Ateh - 4 wge; 7 0 kmr | ✓ | ✓ | |
| EXPRESS | Tpyepe nippasaii iou pukoi, neu rufopoei pa yprw oed nyupninae je vnpo | Ampoia niunie noni paei an noni paei mei | ✓ |
VII. INPINTHENAPHEKENTPO EYHPETHEH
| Papstiges Thebes anges Tipping emuoung | |
| Iiny alioe npauv- otke jn puey papstiges E5-E4 | Spagua uunmugur, umpe upa yeo yalukun mokhre bengel pemig n depwckn erogxay |
| H ouoxkuy de evoc yomn### | Kalaoho pucupcog deev enov mowbcegpo in pe mnuonl ka n i oynipn |
| Hauqneip naqni dve kauyepny Dabe in nuokun rnrnnr neppn no neu neuy | |
| Zuo xphekpak Bokcu de vnuuoypduu | |
| To ayeged yamnnc ta maia maia aya | Yinagaw Bokcu ngn cnpseopnnei poacn (in oon fiv sive aonnepn (j kain and i ne kanev) |
| Mauiu yauu mean ta uau gnuenrn knnnpn (inoue enmnnnnae n kaima jepn roun (enmnpnlaa, brypinpkn, kuppana eonnne pcv) | |
| To amai fee thn mowdmpctiy loa nro oua nra mala mouccn | |
| Oerpyannkuy Bokcu cye kauyepnong | |
| Kand ng Eapexes you ayanpncn crn and ra karmu ng mounrung Boktu anpnc | Eehn yauu kauyepnun lvy oia ouaa ng ouuucn |
| To kumru fae chn koezak kie n kauyepn (kauyepn, kauyepn, qaynepn ta kau karmu on tai mauqnpn ng mounrung, opcpopn. la kau karmu ng mauuukn pujn pae n ouuucn. | |
| To Aornga eon cunmpkca kainr karmu ng kauyepn (kauyepn, Mauu on | |
Av to npabnpe mpevae, nikovwnepe e vva fdoonnevo ktroeakov.
Oikaiyakavivvynavakukawon (avakukawon nAektpiokoi kai nAektpovikou 50nlaou)
Tnu oukeuaia, n oynie xphnKkou Kau ny iin oukeun npene va to anoppimte ouu
FOVGEUETOITIKIOPOpyaGAVAKKwONC.PovrTIE TO PpOAAv:anyHETATE TEOIA npoioVA
XpyoTOMOTIeVEs (TaeAE) DuaKUcLg DE TpTeV TA ETOyovTA Oa KOUITIO, TpTeYtA OvauKu KaovOVA XpaIaTIO BIOKTEKIA TAOEIOU AUMOyoEvOVA PEAVOV tOuKUcE SE AIOK ANJUA Ue KevkTPOVTHN 1 e OvauOyov OpvouPcO Muta UtoaNTnCte TpoayopApTa OvauKuKaONs TAtuOyTAP TpuivuA uau KO ToxKapckpato aToaTuauKtOuOcTvOyov.
Autn ouokmiv cki Kepuovn oynu ne Evupkck Onyia 2012/19EE-oyeknaue Xpnuuoumeus, naekipkeo kai nakipovkeocukceu (cndan nakipikoi kai nakipovko oemau - AHHE) H katouvniya oyana toun apocpo etor an TEE KOBOPeTo pKIOAIOY aTIN eTIPPOO KOnovkkaon
REDMONO

Tpepeke mchonohsobomnene hcycnoimnes, enmuaenme npohumimane yoeoocdo n no xeycnunu u cponomee e ennecepne oopnnoni. Tpepeke mchonohsobomnene npohumae npohumemnpodz pco z cyck
Mepb630nACCHTHN HMHCTPyrKo, codepaKaueMeB aDaHNO pykoBDCTBE, he OxbaTbeAOT Bce 8O30MKHHe CHyAAM, KOtmey OyBtOeKHHByI bpoceCe 3KcNpytaaunPi npbOpa. Pnpabote c ytoPctOBmONb30BATEbn DOnkhen pykoBDCTOBaBc 3dApBaHIM CbMbCNOp, 6bIb oTOPOXHMn BN HBMATENbHM.
MEPbI BE30NACHOCTN
- Ipon3BODNTelb He Hecet OTBeTCTBeHHOCTn 3a NOBpeKdEHNy, Bbl3BaHHbIe Heco6JIIODeHHeM Tpe6OBaHnNo TEXHKe 6e3OnaCHOCHTn IN npabIN kCNpLyatauNn3dEIny.
-Даньиэлкгрпборпpeдстаняет co-боиMHOROФУHKUHOHaNbHoe yCTpoIcTBОДЯ npnroTOBLeHnN NIIuB B 6bITOBbIX YCNoBnx I MOKETnpIMeHrTbcR B KBaPTnPax,3aRopODHbIX Domax ININ B DpyrN X NOObHbIX YCNoBnIx HENpOMbIShJeHHOn 3KcNlyatauN.ПpoMbIShJeHHOE ININ JIObOe DpyrO HeueJIeBoe NCNoJb3OBaHne yCTpoIcTBa 6ydet CHTaTbCnHApUWeHem YcNoBn HaJIeXaSeN 3KcNlyatauN n3dJIIn. B 3tOM cIyae npOn3BOInTeIb He HeceT OTBeTCTBeHHOCTHn 3a BO3MOKHbIe NocIeDCTBnI. -
IpepeI noKluoyHnem ycTpoiCtBA K 3JIeK-Tpocetn npOBepbTe, coBnaJaet nn ee HanpJxHHe C HOMHaIbHbIM HAnpJxHHeM NITaHnI np6opa (cM. TexHnueckne XapaKTepncTKn nnn 3aBOIDCKyU TabNHyuKy n3denn).
-
IcnoIb3yIte ydIINHITeIb, paccuHTaHHbI Ha notpe6IeMyIO MOUHocTb np6opa - HecoOTBeTCTBne napameTpOB MOKeT npUBecTN K KopOTKOMy 3aMbIKAHIO NII BO3rOpAHIO Ka6eJI.
-ПоdkлюаиTe np60рТькК рОЗЕТКAM, Имeюшm 3a3eMЛeнe,一3TO o6ra3aTeьHoe Tpe6ObaHnE 3aunTbI OT nOpaJKeHnЯ 3JIeKTPnueckn m TokOM.ИспoЛьзу yДИнHITeь,уБeДNTeCb,yTO OH TaKke IMeet 3a3eMЛeHnE.

BHIMAHHE! Bo bpema paobom npubopa e0kopnyc, yawa u Memannuueckue demaru Ha2pebaomc! Bybme ocmopokn! NcnoB3yume kxyonHbte pykabuucb.Bo u36eKaHueOkoza 2opayum napm He haknohajmecb hadycmpoucmbom npu omkpblaahu Kpbwuku.
- Bbiknouayte npnbop n3 po3eTKn noCne nCnnoB30BaHna, a TaKke BO BpeM erO ouNCTKNnn nepemeseHry. N3BlekaTe 3JeKtpouHyp cyxIMn pyKaMn, ydePknBaerero 3a WTeNCelb, a He 3a npOBoD.
He npotraBaiTe shypr 3JeKtpoNTaHnB DBePbIX npoEmax nnn B6IIN3n HCTOHNKOB TeIIa.CneIte 3a Tem, yTO6bl 3JeKtpoShyp He nepeKpyuBaIcN He nepeRn6aJIc, He cOpnKaIacC oCTpbIMn ppeMMeTam, yrIaMn I KpOMkAm MeBEn.
STOP IOMHNTE: cnyauhoe nobpekdeHue kabena 3nekmponumahua moKem npubecmu K HenoIadkam, Komopbie He coombemcmyom ycNoobum zapaHmuu, a makKe K nopakHeuO 3nekmporokom. Ppu nobpekeHuu wHypa numanue e2o 3aMeHy, BO u36eKaHue onachoCmu, donKeH npou3bodumb u3zomOBumelb, cepBucna cnyka unu anao2uHbui Keaunu-phiupoBaHHbu nepcoHan.
He yctanabnBaIe np6Op Ha mRkyo noBepxHocTb, He hakpbBaIte erO BO BpeMpa60tbl -3TO MOKET npNBecTn K npePpeBy n PONOMKe yCTpOYCTBa.
3anpeeHa 3KcnpyaTauH np6opa Ha ot-KpbITOM BO3dyxe: nOpaDAnHe BlaHn HnNoCTOpOHnX PpeMeTOB BHyTpB KOpNyca YCTPOICTBa MOKeT npNBecTN K erO cepbe3-HbIM NOBpeKDeHNM.
- Ipepeoynctko npnbopa ybeintecb, yTO OH OTKIIOUeH OT 3JIeKTPocetn IN NOnHOCTbIO OCTbl. Ctporo cJeDyIte HNCTpyKcIyM NO OunCTke npnbopa.
3APPEUAAETCNO2pykambkopnyc npubopa 8 body unu nomeuambeo noodcmpyio bodby!
- DeTAM B Bo3pacte 8 let n CTapwe, a TaKxE nnuam C orpaHnueHHbIMn fN3nueCKmN, cEH-COPHBIMn IIN yMCTBeHHbIMn CnOCO6HOCTaMn
HnC HeoCTaKOM ONbITA Hn 3HaHn, MoX HO Nolb3OBaTbCn Pnp6Opom TOnbKO nOd npNCMOTpOM H/INB TOM CInyae, eCNn OHN 6blnn PpOHNCTpykTnPOBaHbI OTHOCHTeJIbHO 6e30NaCHO RcNOb3OBaHn Pnp6opnOCO3HaHT ONaCHOCTn, CBraHHbIe C erO hCNoB3OBaHnEM. DeTN He DOnJXHbI INrpaTb C np6Opom. Depxnte np6Op n erO cTeBOi shyp B Me-CTe HeoCTynHom IAn dTeen MnaJe 8 let. OuncTKa n 06cLyXnBaHne yCTpoiCTBa He DOnJXHbI PpON3BOUITbcr DeTbMn 6e3 npNCOTpA B3Pocblix.
- YnakoobHbI MaTePnaI (nIeHka, neHOnnlaCT nT. d.) MoXeI ppeIcTabIb ONaCHOCTb IaIa DeTei. OnacHOCTb ydyuB! XpaHInTe ynakOBKY B HeIOCTyINHom Ira IeTei MeCte.
3anpehebI camocToTeBHy peMOHT npi60pa Hn BHeceHne N3MeHeHn B erO KOHCTpyKcHIO.PeMOHT npi60pa DOJKeH npo3-BOINTbcNCKJIIOHTeBHO CneuaHnCTOM ABTOpU3OBaHHOr cepBnC-ueHTpa.Henpo-phiecchoHaBHO BblONHeHHa pa60a MoKet npuBeTn K IOnOMKe npi60pa, TpaBMam n NOBpeXdeHIO mMyueCTBa.
BHIMAHHE! 3anpeueeHO ucnOJb3oBaHue npu6opa npu IIO6bIX HeucnpaBHoCmX.
REDMOND
TexHHueckHe XapakTePHCTKNK
| Mou#e | RMC-M5E |
| Mou#o##t## | 860-1000 Bt |
| Hap#p#KHeH# | 220-240 B, 50/60 Tu |
| 3a#a##ta o# p#op#ekHe# #h#kTpoKo# | knack I |
| Obo#en Ka#n | 5 n |
| P#o#on#he #a#in | ant#m#p#n#p#ne (ep#m#n#ck#e |
| E#i#n#n | caet#no#n#n#n#n#n#n#n#n#n#n#n#n#n#n#n#n#n#n#n#n#n#n#n#n#n#n#n#n#n#n#n#n#n#n#n#n#n#n#n#n#n#n#n#n#n#n#n#n#n#n# |
| 3D-harpe# | ecb# |
| I#ap#r#the #a#me#n | .377 × 285 × 240 MM |
| Be# hetro | 3,4 K# |
IporpaMMbl
| 1. MULTICOOK (MYITBHITOBAP) | 10. BAKE (BHTHEKKA) |
| 2. OATMEAL (MOHORAH KAUHA) | 11. GRAIN (KPVTBI) |
| 3. STEW (TYLIEHEH) | 12. PILAF (TIOBB) |
| 4. FRY (DKAPKA) | 13. YOGURT/DOUGH (HYPTY/ TECTO) |
| 5. SOUP (CYTI) | |
| 6. STEAM (HA DAPY) | 14. PIZZA (THILLA) |
| 7. PASTA (MAKAPOHUI) | 15. BREAD (XIED) |
| 8. SLOW COOK (TOHTEHHE) | 16. DESSERT (DECEPTI) |
| 9. BOIL (BAPKA) | 17. EXPRESS (SKCTPECC) |
ФVHKUNH
2CJEMHAR BYHTPEHHKPOUKA
3. yu4a
4.KHOHNAOTDHNTN
5.1HCHCXPINNHNNNNNS
6. Kogryev
7.PyHnA HNOOPCHOR
8.1000000000000000000
9.100cxg 00xga
10. 2018
11. Manuscript
- KOHTKHER DAA NIKOTOBCHH H N P
- Kuroiwen 2003
Nanenbynpabnene (cxemaAzCTP.5)
Myshtapka REDMOND RMSE950 oBpOa aee CcHbOe HaeBHei npAesnaneh CmHOyOHcRnHbAm UeBtHM CebTOAOHd MncNneE
- Khonka Rehea/Cancel (nOorpeR/OrTMHe) -BKMHEH/OTKHO CHNQHnOIOIPOePcRpRnAIOHNPoPAHmPnROTOEHH, CbOPC qanAHHx HAPCKP
- KhoKae eTime Delaye (OToNoxHHbH CTAPx) - 0KnIOCHHe pexnma
yCTAHDBXHPCEMCHNOTIOXCHHOROCTAPTA
3.KhONKsTeTmnerature(TEHpepatyp)-YSTAHgKaTEMnepa
DHPOTOBHEMS 60OPCIMME xMLTICOOK - Kucunxahpux(ahpux)=infoa hcxuHxuHxuHxuHxuHxuHxuHxuHxuHxuHxuHxuHxuHxuHxuHxuHxuHxuHxuHxuHxuHxuHxuHxuHxuHxuHxuHxuHxuHxuHxuHxuHxuHxuHx
HDMNRCNEHIOOENPESAHOUQNGSHGHRGP - KHOENALM
H - KU873-Ex00664=23975-2005000001FXY8888
7.KhONKa eMun/KeepWarms-BbOpAotmAtueChnBnppamnpePpOeHnHnPeDaaepTeaHoeCtKIOKeHe dyuUdAetocdo
KONKa 5aTn - BKNQeHHe 3aAHHO PDEHM NPHOTG0EHKn
9.Ducnne
Ycpoacto docnne (cxemaA3,ctp.6)
1 HAnKAtop BuOnnHeHHaTOMaTHcckO npOrpaMMu kEXPRESS
2.ндкатор pa6ot nporpaMbl npiroToaHn/NoDOrpeea
3. Hhakatop 3tanos npntotobneHH
4. HCHKATOP YCTAHOBENHOR TEMNECATYPHB NPDORPAHRE MULTICOOK
5. Huaatop paohtyhuun XTime Delay
6.HOHKATDPDPPINPPINNXPENPENPNPNPNPNPNPNPNPNPNPNPNPNPNPNPNPNPNPNPNPNPNPNPNPNPNPNPNPNPNPNPNPNPNPNPNPNPNPNPNPNPNPNPNPNPNPNPNPNPNPNPNPNPNPNPNPNPNPNPNPNPNPNPNPNPNPNPNPN
TaHAPD5
7. Taijima
HnHnKATOP HbpaHNOAeTHNcckoepaMn NPDTOBCHNA
I.IPEPENEPBbIMBKJIIOUYEHNEM
XAKPPATAOCTDAHTA HAIKENXHEO KOMHNTKUYUHNE H3 KOPOKIN.YADANTHE EYEKANKOHNMBHATMAHNI INK PAKHAMN HAIKOKIN
ObaKaenEnoCoaKanHae HcMeTe PpeDpyeKepKoAnue HoKooi, HoKeKnHa yXaAonm (npu HauNou) u MdozHu Kc ccpuHbM HoePOM 10000 HooKoc
nepaepnpmaekx npxoghenus npu Nuxmnepeymy
Neobokouma btepeaepnnpoep npkramnoe mneepane type Me ne 2 aoeae eaeae
PpOeTbKopNyUcTPOBtEbnAnHnI TnAeHnI npOoHnIaYau,dpAeHnI npOooHb.BoXOBaONaIeNnOoHnOIOHOeTeZaHnI pRnepK.KeIOBbOaHN HpOpoBpOpoBaDzoe Iero pNOHOuOIOCTy (Ck. YOxOaIe ZbOpOBpaH).
YCTOKHOIEI NIOHOPB HABTBDYPO BDOHYEO ROPKOTAHNYO BPOEHPXOCTAK TAOBBOBKOBAOMNVAI NAPOBTO XANADORA NAP HAp NOIADAM BOOM, DEKOPATHEHNK OPOHTA, EKNKTPOHNE PBOOPM DpyTHPMEETH MNTEPANTAI, KOTOPHE MORY NCTPDABT DTO BNOEBHNNX ANKHOCTK INEMEPNTy.
Pepnepneprotochobem y bmykctbck 6 to0, TcBtBnHm BnBnBnBnBnBnBnBnBnBnBnBnBnBnBnBnBnBnBnBnBnBnBnBnBnBnBnBnBnBnBnBnBnBnBnBnBnBnBnBnBnBnBnBnBnBnBnBnBnBnBn
He mepnneae knoe knoe knoe e no nnoe 0000000000000000000000000000000000000000000000000000000
BANCOUPOENHE APENHUM UYIOPOENHUM PPOOENHOENHUM DEKMOHNOYM UCNLOBO867010MOHNO CHECU ENPOUONSEHNENXKEE
IporpaMa «DESSERT »
Pekomohyocytcr aan nprrtoanehpaanHHHxccpOa HnO ymoHnHnA BnporpmneBpeem nprrtoeene coctae n 1ac Bo3mKoHa pyHnYcTahOBKe BpeHn nprrtoeene BnHnE0e ot S HnHtdo 4AACO CCBOTYTHAOH65 HNHT.
Iporpamma 一 ^ 一 EXPRESS
Iponpmaa Bbckrpo pnoiopnnebn nprca,paacnntnatax kauu na KypB. 8 daHNOIPOPnpMNE HeaoctytnbpeytnipoKb npemepn Ppnoiopnnnnae Hkykunue T'9e Late Day.
III.ДОПОЛНТЕNBHBIEBO3MOXHOCTN
Pacctorke Tecta
PnHrTOBNEHHe OCH
PnrotoeHHe TbOora Chpa
Xapka 60 OPHTQne
-
- PnroToBneHHe dTeckoro nTaHH
IV.ДОПОЛНΥЕВHBIEAKCECCYAPbI
PnBpHnHnHnHnHnHnHnHnHnHnHnHnHnHnHnHnHnHnHnHnHnHnHnHnHnHnHnHnHnHnHnHnHnHnHnHnHnHnHnHnHnHnHnHnHnHnHnHnHnHnH

Hou peyeyaoa kaccyyanmua npabaa co sspemennn saaannnnae naane nnnnnae aenenneneae anenanae npaeonneanno 0000. Hoo me aeaenncnnpaaee neeepnneocn yannpndcnn en anen e ane npaaanncn en eo pabtaa.
XpaHHeHn m TpaHCnpTmPOBka
IepaXHHEHMN MTOHOPCHK XCNYTAUAMK OHNTHE NNOHOTC NPOPCBILCTE CECTA PHNPDA. XpHAnite PnPbO BcXCM BENTHPYEMOM MEET AADAA TOnHApelabTHxhN PnHOPDOS NNDANADPHN PnPHXN COTHEHN DYNE
PnI pTcHcTIOpKIOAe H XpAHENH 3aJIpeaaTe KIOAeTO TpNbOep MEXAHNECKHM 0o3dEHTHM, KOtOpBe MOyIT pNpBcTHN KOBpckDHHIO pOcOaC H NHIHAPWENHO EIOCTOHCTY yAnakOKH. HoobXODMO Cepey aYnakOKO npNpOaO aOT nOradHADBE O ApyrXHMMKcOeT.
VI. COBETBI NO PNPOTOBNEHNIO
OuH6Kn npn npnrTOBHeHH H cnoocbIx yCTpaHeHH
BnepaTaeHbENHO HxagTaHbO CoaPbHbO HbHbO OoYcKaHbE npN pIaTOCENHH B MyaTbpA
REDMONO
BIOHOHEPIRTOBOIOLODQKOHUA
| Бернштейtmacher Gröbnerpeinlagen | |
| Крашно рожа вета не лесдаху и не симпатул Stochу.Terminliche gewichtete gewichtete Stochу sind nach nicht aufgewidmet zu gewichteten Stochy. | Бусячы розерstehende und/ora kriplathäne Крашно ушалшемпсь Stochno und/ora Stochno und/ora Stochno und/ora Stochno und/ora Stochno und/ora Stochno und/ora Stochno und/ora Stochno und/ora Stochno und/ora Stochno und/ora Stochno und/ora Stochno und/ora Stochno und/ora Stochno und/ora Stochno und/ora Stochno und/ora Stochno und/ora Stochno Und/ora Stochno und/ora Stochno und/ora Stochno und/ora Stochno und/ora Stochno und/ora Stochno und/ora Stochno und/ora Stochno und/ora Stochno und/ora Stochno und/ora Stochno und/ora Stochno und/ora Stochno und/ora Stochno und/ora Stochno und/ora Stochno und/ora Stechno und/ora Stochno und/ora Stochno und/ora Stochno und/ora Stochno und/ora Stochno und/ora Stochno und/ora Stochno und/ora Stochno und/ora Stochno und/ora Stochno und/ora Stochno und/ora Stochno und/ora Stochno und/ora Stochno und/ora Stochno und/ora Stochno und/or a Stochno und/ora Stochno und/ora Stochno und/ora Stochno und/ora Stochno und/ora Stochno und/ora Stochno und/ora Stochno und/ora Stochno und/ora Stochno und/ora Stochno und/ora Stochno und/ora Stochno und/ora Stochno und/ora Stochno und/ora Stochno und/ora Stochno and/ora Stochno und/ora Stochno und/ora Stochno und/ora Stochno und/ora Stochno und/ora Stochno und/ora Stochno und/ora Stochno und/ora Stochno und/ora Stochno und/ora Stochno und/ora Stochno und/ora Stochno und/ora Stochno und/ora Stochno und/ora Stochno und/ora Stschno und/ora Stschno und/ora Stschno und/ora Stschno und/ora Stschno und/ora Stschno und/ora Stschno und/ora Stschno und/ora Stschno und/ora Stschno und/ora Stschno und/ora Stschno und/ora Stschno und/ora Stschno und/ora Stschno und/ora Stschno und/ora Stschno und/or a Stschno und/ora Stschno und/ora Stschno und/ora Stschno und/ora Stschno und/ora Stschno und/ora Stschno und/ora Stschno und/ora Stschno und/ora Stschno und/ora Stschno und/ora Stschno und/ora Stschno und/ora Stschno und/ora Stschno und/ora Stschno und/ora Stschno Und/ora Stschno Und/ora Stschno Und/ora Stschno Und/ora Stschno Und/ora Stschno Und/ora Stschno Und/ora Stschno Und/ora Stschno Und/ora Stschno Und/ora Stschno Und/ora Stschno Und/ora Stschno Und/ora Stschno Und/ora Stschno Und/ora Stschno Und/ora Stschno Und/ora St Schno Und/ora St Schno Und/ora St Schno Und/ora St Schno Und/ora St Schno Und/ora St Schno Und/ora St Schno Und/ora St Schno Und/ora St Schno Und/ora St Schno Und/ora St Schno Und/ora St Schno Und/ora St Schno Und/ora St Schno Und/ora St Schno Und/ora St Schno Und/ora St Schno Und/or a St Schno Und/ora St Schno Und/ora St Schno Und/ora St Schno Und/ora St Schno Und/ora St Schno Und/ora St Schno Und/ora St Schno Und/ora St Schno Und/ora St Schno Und/ora St Schno Und/ora St Schno Und/ora St Schno Und/ora St Schno Und/ora St Schno Und/ora St Schno Und/ora St SchnoUnd/ora St Schno Und/ora St Schno Und/ora St Schno Und/ora St Schno Und/ora St Schno Und/ora St Schno Und/ora St Schno Und/ora St Schno Und/ora St Schno Und/ora St Schno Und/ora St Schno Und/ora St Schno Und/ora St Schno Und/ora St Schno Und/ora St Schno Und/ora St Schno Und/ora StSchno Und/ora St Schno Und/ora St Schno Und/ora St Schno Und/ora St Schno Und/ora St Schno Und/ora St Schno Und/ora St Schno Und/ora St Schno Und/ora St Schno Und/ora St Schno Und/ora St Schno Und/ora St Schno Und/ora St Schno Und/ora St Schno Und/ora St Schno Und/ora St Schno Und/oral S Schno Und/ora St Schno Und/ora St Schno Und/ora St Schno Und/ora St Schno Und/ora St Schno Und/ora St Schno Und/ora St Schno Und/ora St Schno Und/ora St Schno Und/ora St Schno Und/ora St Schno Und/ora St Schno Und/ora St Schno Und/ora St Schno Und/ora St Schno Und/ora St Schno Und/ or a St Schno Und/ora St Schno Und/ora St Schno Und/ora St Schno Und/ora St Schno Und/ora St Schno Und/ora St Schno Und/ora St Schno Und/ora St Schno Und/ora St Schno Und/ora St Schno Und/ora St Schno Und/ora St Schno Und/ora St Schno Und/ora St Schno Und/ora St Schno Und/ora St SchnO Und/ora St SchnO Und/ora St SchnO Und/ora St SchnO Und/ora St SchnO Und/ora St SchnO Und/ora St SchnO Und/ora St SchnO Und/ora St SchnO Und/ora St SchnO Und/ora St SchnO Und/ora St SchnO Und/ora St SchnO Und/ora St SchnO Und/ora St SchnO Und/ or a St SchnO Und/ora St SchnO Und/ora St SchnO Und/ora St SchnO Und/ora St SchnO Und/ora St SchnO Und/ora St SchnO Und/ora St SchnO Und/ora St SchnO Und/ora St SchnO Und/ora St SchnO Und/ora St SchnO Und/ora St SchnO Und/ora St SchnO Und/ora St SCHN O Und/or a St SchnO Und/ora St SchnO Und/ora St SchnO Und/ora St SchnO Und/ora St SchnO Und/ora St SchnO Und/ora St SchnO Und/ora St SchnO Und/ora St SchnO Und/ora St SchnO Und/ora St SchnO Und/ora St SchnO Und/ora St SchnO Und/ora St SchnO Und/ora ST SchnO Und/ora St SchnO Und/ora St SchnO Und/ora St SchnO Und/ora St SchnO Und/ora St SchnO Und/ora St SchnO Und/ora St SchnO Und/ora St SchnO Und/ora St SchnO Und/ora St SchnO Und/ora St SchnO Und/ora St SchnO Und/ora St SchnO Und/ora St SchsO Und/ora St SchnO Und/ora St SchnO Und/ora St SchnO Und/ora St SchnO Und/ora St SchnO Und/ora St SchnO Und/ora St SchnO Und/ora St SchnO Und/ora St SchnO Und/ora St SchnO Und/ora St SchnO Und/ora St SchnO Und/ora St SchnO Und/ora St SchnO und/or a St SchnO Und/ora St SchnO Und/ora St SchnO Und/ora St SchnO Und/ora St SchnO Und/ora St SchnO Und/ora St SchnO Und/ora St SchnO Und/ora St SchnO Und/ora St SchnO Und/ora St SchnO Und/ora St SchnO Und/ora St SchnO Und/ora St SchnO Und/or a St SchnO Und/ora St SchnO Und/ora St SchnO Und/ora St SchnO Und/ora St SchnO Und/ora St SchnO Und/ora St SchnO Und/ora St SchnO Und/ora St SchnO Und/ora St SchnO Und/ora St SchnO Und/ora St SchnO Und/ora St SchnO Und/ora St SchnO Und/ or a S SchnO Und/or a S SchnO Und/ or a S SchnO Und/ or a S SchnO Und/ or a S SchnO Und/ or a S SchnO Und/ or a S SchnO Und/ or a S SchnO Und/ or a S SchnO Und/ or a S SchnO Und/ or a S SchnO Und/ or a S SchnO Und/ or a S SchnO Und/ or a S SchnO Und/ or a S SchsnO Und/ or a S SchnO Und/ or a S SchnO Und/ or a S SchnO Und/ or a S SchnO Und/ or a S SchnO Und/ or a S SchnO Und/ or a S SchnO Und/ or a S SchnO Und/ or a S SchnO Und/ or a S SchnO Und/ or a S SchnO Und/ or a S SchnO Und/或 a S SchnO Und/ or a S SchnO Und/ or a S SchnO Und/ or a S SchnO Und/ or a S SchnO Und/ or a S SchnO Und/ or a S SchnO Und/ or a S SchnO Und/ or a S SchnO Und/ or a S SchnO Und/ or a S SchnO Und/ or a S SchnO Und/ or a S SchsO Und/ or a S SchsO Und/ or a S SchsO Und/ or a S SchsO Und/ or a S SchsO Und/ or a S SchsO Und/ or a S SchsO Und/ or a S SchsO Und/ or a S SchsO Und/ or a S SchsO Und/ or a S SchsO Und/ or a S SchsO Und/ or a S SchsO Und/ 或 a S SchsO Und/ or a S SchsO Und/ or a S SchsO Und/ or a S SchsO Und/ or a S SchsO Und/ or a S SchsO Und/ or a S SchsO Und/ or a S SchsO Und/ or a S SchsO Und/ or a S SchsO Und/ or a S SchsO Und/ or a S SchsO Und/ or a S SchS O Und/ or a S SchS O Und/ or a S SchS O Und/ or a S SchS O Und/ or a S SchS O Und/ or a S SchS O Und/ or a S SchS O Und/ or a S SchS O Und/ or a S SchS O Und/ or a S SchS O Und/ or a S SchS O Und/ or a S SchS O Und/ or a S SchS O Und/ or 800000000000000000000000000000000000000000000000000000000000000000000000000000000000000000000000000001000000000000000000000000000000000000000000000000000000000000000000000000000000000000000000000000000 |
NPOJyKT NPEBAPHICR
| Балам онлайн соку онлайн симпсгета, балам онлайн симпсгета (симпсгета симпсгета), симпсгета, симпсгета online chat, симпсгета T. N. | Балам онлайн с�� Online Chat and Online Chat and Online Chat and Online Chat and Online Chat and Online Chat and Online Chat and Online Chat and Online Chat and Online Chat and Online Chat and Online Chat and Online Chat and Online Chat and Online Chat and Online Chat and Online Chat and Online Chat and Online Chat and Online Chat and Online Chat and Online Chat and Online Chat and Online Chat and Online Chat and Online Chat and Online Chat and Online Chat and Online Chat and Online Chat and Online Chat and Online Chat and Online Chat and Online Chat and ONLINE Chat and Online Chat and Online Chat and Online Chat and Online Chat and Online Chat and Online Chat and Online Chat and Online Chat and Online Chat and Online Chat and Online Chat and Online Chat and Online Chat and Online Chat and Online Chat and Online Chat and Online Chat and Online Chat and Online Chat and Online Chat and Online Chat and Online Chat and Online Chat and Online Chat and Online Chat and Online Chat and Online Chat and Online Chat and Online Chat and Online Chat and Online Chat and Online Chat and OnlineChat and Online Chat and Online Chat and Online Chat and Online Chat and Online Chat and Online Chat and Online Chat and Online Chat and Online Chat and Online Chat and Online Chat and Online Chat and Online Chat and Online Chat and Online Chat and Online Chat and Online Chat and Online Chat and Online Chat and Online Chat and Online Chat and Online Chat and Online Chat and Online Chat and Online Chat and Online Chat and Online Chat and Online Chat and Online Chat and Online Chat and Online Chat and Online Chat and Online Chat |
BbIeYKA HE NOAHAACb
ByoBa Dmcnner (cxemaA3,ctop.6)
- INHKAATOP BHKOHAHHB ATOMATUHOI nporpaMn <EXPRESS
- INDKATOP pOBoTH nporpaH npHrOryaHHaNnIiPpBaHH
- INDKATOp etanl npnrotyaHH
- Indikatop yctaHOHeHTo Tempepatyn B nporpani eMULTICOOKx
- INDHKATOP pOBoTH cyHkui Time Delay
- HANKATOP POBOT NPOPDAH NPHROYBAHH N DEKHYNOKAZAH TaH
Mega - TaHmep
8.1HnKAtopBbpaHoiAstoHaTHuHoi nporpaMnnproTsyBaHH
I. INPED IOYATKOM BUKOPUCTAHH
Axyapthato dtctnane Bpilip 50 konmkiyooi a xoobho. Buaanlhyc npkaayanan materpian pekannn Haukeon.
Obg 2000 2000 2000 2000 2000 2000 2000 2000 2000 2000 2000 2000 2000 2000 2000 2000 2000 2000 2000 2000 200
Ticn moHcnopmyaeh afo 3eepiaes 30 Hux meepnpy
6000bumpumpanu npaa 3a KIANAMHIMNNEPAPMNNY HMEHNI 2Zaduna neped yennnnnNN
Pnpttnkopny nnpntpckpn Bononno Tpannnn Ta pnnnnn yann, pnnnne Tpnnnnn npnnnnn npnnnnn npnnnnn npnnnnn npnnnnn npnnnnn npnnnnn npnnnnn npnnnnn npnnnnn npnnnnn npnnnnn npnnnnn npnnnnn npnnnnn npnnnnn npnnnnn npnnnnn npnnnnn npnnnnn npnnnnn npnnnnn npnnnnn npnnnnn npnnnnn p
BCTAOHBI pNnA H TaTeY, pNHy, rOHTOHAIy NpOBexHIO TAC, 1006 RApH npA. So BHXoBH3 NapoBcTO cRanA, He nPoTnBnA hAnapnE, DeokopatBHnIooPHTTA, ENeKPOHI pNtAaTg Hua npeMe Aato Mepa, SxO MoKyB dyh NoNkOKeJENmN Cpees NiDauuHbONrIt I TeMa-tparty.
NepipnpyoTHAHNHNEKPOHNTA TOMYLOOHHI HBNIMBH BYTIHINBHTMNAHYMIHTEAPHEH ME MAHOH NPOKOKKHEKCH, KOBHI TA IHILHX DEFECTIA. MIX HAIEKO T HARIPBHAHNNHEMENTEMOT HE MAE BYTH CTOOPHNHIOPNDMTTE.
YBAFAI (1)HINHIMATAA 30 pyo yBn Bn pnccehna 2 HANOHNOO 4
The exaouo aupao 12e cemnoaneonrpeepy uow o3 a npoxnho hueo - y paa nuaaeneae aoryc npopnnpnnpnneyn ne npseoe 60 kpnunnoe nopepehna npnoody 60 bo naoknoehna amnanaepnnpnnpnpnnnpnnpnnnpnnnpnnnpnnnpnnnpnnnpnnnpnnnpnnnpnnnpnnnpnnnpnnnpnnnpnnnpnnnpnnnpnnnpnnnpnnnpnnnpnnnpnnnpnnnpnnnpnnnpnnnpnnnpnnnpnnnpnnnpnnnpnnnpnnnpnnnpnnnpnnnpnnnpnnnpnnnpnnnpnnnpnnnpnnnpnnnpnnnp

YBATAI DnHmnu npacpi 3pku howl 3A5POHEHO!
II. EKCПЛYATAUЯ MYJIbTNUBAPKIN
YctahOBka qacy npurotybaHH
Y Mythmabu Mokho KAMCCTHIO BCTAHONKIAAT NAC PNPOTRYAHHA JIN KOKHOI IPOPOMAI, OKPHI IPOPNPMH KPKO MIMH I KOKKMBN I IaIa3o HAcY, IIa 3a4aTebC, 3a4eKaB bI BnBpaHIO pnporpmn nprrpOTyAHHA.
- 1.1.1.1.1.1.1.1.1.1.1.1.1.1.1.1.1.1.1.1.1.1.1.1.1.1.1.1.1.1.1.1.1.1.1.1.1.1.1.1.1.1.1.1.1.1.1.1.1.1.1
- HATKACHOH KHOXY eMIV, aTROHOBTH 3HAeHHA XAMHH, IINI NNNCKOPHOI MHI 3HAeHb Hcy yTPMHyKTHe HAMHYO BIDIOBHy HKOXY
- 100BtBACHTOHN HnPnOyBTHHmEHNHgDgUcH DgBHKM BCTABAHONB TDRH HATKAKAE KIKKY eHout DpOBHHINHAA HsEHNS, NOTM, HATKAKAE ANOHXY eMIP, BCTABAHITNTOPIIEE HZAHENH XHBHIN
4.Pa 1AeK3HbHnBtAeHbHnBHeNACy npRrtyBaHnBn (JnCnEe npOdo AenopRyKHe MeepxtIn)peepdtTo hAcryHoro stany IcnoIgAo Jo AnpOriRy BImApOoPi npRrPamRrPoTpyBaHnO, JIO cxKcyBaHa 300 EHHx HauHpyBaHn HhckHt HkOny eReht/CacTe, PmRHO BBeBtIO Bxo npRrOpaY npRrOyBaHNzAeBO.
BAKMOIPO Pyuyny ycnaynabw cyoepaoyanbnpaepnoe moek maeia dianm aky NApcky npaehnao, nepeoeonadn oboenba nene ppeamno npaeorayannh, y iaoednho hocni 3i aeodno hao nane npapm npoeotnyea.
I 10
V deuxi aouoohnno hno oopemx oiaaie cnoanooaowy nooc npocnoonno nnonnnnne ane nnncnnae npnnnne nnnnne nnnnne nnnnne nnnnne nnnnne nnnnne nnnnne nnnnne nnnnne nnnnne nnnnne nnnnne nnnnne nnnnne nnnnne nnnnne nnnnne nnnnne nnnnne nnnnne nnnnne nnnnne nnnnne nnnnne nnnnne
Y. npaparai +PASTA iudk actaemonoeo vay nucpontyheny nonunu bencn Pcs kajnneumno do no mpeosmou HNSNCHENN XnuSta
Функлг«Time Delay
IaHbCnHbIaOaBaeBaTaIeIHTBePcAaY,NCbIaIKHHeHbNkKIO TaOa 23aaMbeTtrotBaI (3epxayAsyAaY aocpOoTn pOopAnh) BCTanOBHbNnac MoXbHaBnOaBIuO 10XbHNHn DO 24toHNs I KpOKOM YctAOHbNnB 8TO XbHNHn. NAcBtApOoRNaMe BcTtBilna, HNcBCTAOHbNnBnA Na pOryrtaaHHa, INakae npOraPaMa hONne oooPoTy Bldpaay NiCNs HATCHENHa KHONKa 6Starts.
NinBnBbDpygAaR, BCTAHANHINHA SHAHEN TEMEPATI Y MUC BYPNDYTHAHN KMDHCTABHNOHTN CAC BIDMODEHO STAPTY
REDMONO
1 HANTCHENHNNKHNKNNkNkNNkNNkNNkNNkNNkNNkNNkNNkNNkNNkNNkNNkNNkNNkNNkNNkNNkNNkNNkNNkNNkNNkNNkNNkNNkNNkNNkNNkNNkNNkNNkNNkNNkNNkNNkNNkNNkNNkNNkNNkNNkNNkNNkNNkNNkNNkNNkNNkNNkNNk
2. HATKCKYHMHKOHYEHOHNOTNKHONKYMINACTAHOBHTBHHHNAH BYKTHPOTRHBAHAIAIpyTMYBAAHHTNHCHNYKHOKNKQDJIKAeHHAD, NOHHTCBHNPCKOP3MHHKHeHHH
3. 3a Hc6x12Hc0fBCTbAHOHAC BkDgAHOHOOBOOTy MEHJ KIN ODAI ROHNIO HOJIIOAOHO HATKCHYKOHNKHOHJO DOOBYHI HAHEH HrOHN. NtH, HATKCHKOHNKHOHJO MmN, ATOBHOHOTnIPDRH
4.DaCtckyBnAeBIOEHNHANrAHTOENH HAnTHCHITs KHTKHY ERecheAT/CanCe, nIcN OIO eAOBIO BIO pRorpAHO pRTOYTAHO AHAO.
5. SiNOR JAKHINCHEN ACTJAHOBHENY CYC HATNHCTI yIyTHNYHNE KHNK YSTARE DEXIKANCKE CYNKH.CBNAXHE INKJIKKTOPOB6A FYNKUk XTime Delay, NOHETBCB BKNHOHANH PONPAM T ABOOHTHN BIDNK CYC
6. Hepa npnnaeanehncn cnprae 6yne oora. Npnnk nnnnne no pnoo npnnpnnpnnpnnpnnpnnpnnpnnpnnpnnpnnpnnpnnpnnpnnpnnpnnpnnpnnpnnpnnpnnpnnpnnpnnpnnpnnpnnpnnpnnpnnpnnpnnpnnpnnpnnpnnpnnpnnpnnpnnpnnpnppnnppnnppnnppnnppnnppnnppnnppnnppnnppnnppnnppnnppnnppnnppnnppnnppnnppnnppnnppnnppnnppnnppnnppnnppnnppnnppnnppnnppnnppnnppnnppnnppnnppnnppnnppnnppnnppnnppnnppnnppnnppnnppnnppnnppnnppnnppnnppnnppnnppnnpp
YBATAI He pexnemeybner bueaocmnyo ydykio diaokdozo zcnpny, hao y caoi cmpuyu eukopcnoeohne nue koukceyni npoynu (nui, caiho Moofo, mco, cup moo).
PEKOMMIDCYbIJI IIN PNOITGY3AHH MEKPOHHX HIOPOBIB, COCOCK, BIDBA PROBHAR KBL TOLO
Y nporpaI KPASTaHbac nprtoybaHHA tcbHOBHb8 XbHHH.MKOnBHe pyH 3EhAhoBHeHHaCy nprtoybaHHA bIaONaOH b12do 20XbHHH 3 KOIOOM YCTOBHkA BxYHHH.
Seobonrhi 3aBdA Cacy poBoTn npOpaAM npriOtayabH NHOHTbck nCIAJ 2XmHONB BOID.
DyHKua Time Delays B daH nporpa Heocctynha.
Hakimah a 3 wuyo 3Dyck 3Aa 3M, 60b piBc 6Dy. 58h BHKe 3E MekCHMNAY NsneKHy A HbTyIiHn noaePxHwU. DotmPryHreY c.2.5, nortn h.7 pOdy i3 e4anHHN noapd. di Nk. mBC KboKpOHTAHB ANOMTHINIK PpOg. Pnck kaoAHHN Bdo npOpyHnCnHnI.
06EbeHko 1bXnRrte KxNkIy OxytBt POxOyKTH BKNAnyA, zAKRnKTE KxNkUO DN KNAaHH. HATcHtH KNKy@STAt. POnTeTbckBOKHOHNCT ABOHeHOH oPnpAmH I BoCpTNH bIXK cYc npOTyBaHH. dAIoDtpHyA TcR T. 8-9 pOzIy3 aZarAbhN npeOdk dII qac BVKnOpHTAHN AOTMA TANHHX oPnpAK.
Iporpama SLOW COOK
PEKOMeHcyTaeIaNpRyTOBAAHnTuYbOKBHOHrMoEa, pynkHK, yRporapami SLOW COOK ATADAPHTNIH NAC pRyTOBAAHnCTABNOBt 5 Do 80 mKm. MoKIKeBy peHuT BACTOBAHNHAAhCay pRyTOBAAHnB DIIaON3OHiB iD 2 Do 80 mKn H 3 KPOKOM TAYBOHNQo I XaNNHH.
Iporpama BOIL
PEKOMEUYCTXsIaI PnIRPOYABHbAOBHO IIOB6OAB, YnpORpAm eOIL. X CTADPHNAC NpIPOYAOAH CTANOBH0 40 XANHH, MOKIAe yue octet OBOHNEHcNAY pOHTOHNOH a dJeaoHOiD 5 XBXHHo 2do RHN3 xPOKOM YCTAOHKB 8 XEBHH.
Pporpama BAKE
Pnpompa peKoemohEnbckTa 4aBnHAnkBa 6bcXb1, zanHkoHc, nporop3 aDpKoKoHIOI I KtKOBKOIOI Tc. yNporop3 iEBAK eTcAaonlphnac pao nproYtBuHa H bZaONHb 1 oRyHAp. KmOxpye kye BCTaONHeHHa cacy nproYtBuHa B aI pAnHbHb 20 XbHNb 8 o RbHNb 3 xKoOMX VCTaONHb 5 XbHNb
Iporpama «GRAIN»
PnPnAaPnKpeMeyHbTaeBnIeBnBnEpaNnHbOaHnK a 31 HxNHBnBKn, npyRtpyBaHnPi3XnBnAepHnB. Y nprrpAeCRAINCTAHADTHNNc nPnpnyBAHnTHANBOHTIL5XHNKn. KNOKHe BPyNE BtACENHEW NAY CnPPnBnBnBnBnBnBnBnBnBnBnBnBnBnBnBnBnBnBnBnBnBnBnBnBnBnBnBnBnBnBnBnBnBnBnBnBnBnBnBnBnBnBnBnBnBnBnBnBnBnBn
IporpamaPILAF
PnIpIaMgEaERNaeBcAeTnPnRpyTAaBnB1mHxN B1mHbOy, y npRoIaIe iPLAF x TcAaDAPITNnV aepnRpyTAaBnB1mHxO 10JIOJIe 2000JIOJIe 2000JIOJIe 2000JIOJIe 2000JIOJIe
INP BAPIHIIPODyKT BKNNAE
| Papierpapire | Papierpapire | Cinquephonie | Papierpapire | Bilanzpapier | Papierpapire | |
| Papierpapire | Papierpapire | Papierpapire | Papierpapire | |||
| SLOW COOK | Плогуда плогуда вду TEДALIM MASC,плогудахуду SLYKU | 500 1 rx. | 8 rx/10 xx | ✓ | ✓ | |
| BOIL BAPES NAOI | Та basiler релесьca OAll 5 xs - 2 rx/5 xs | ✓ | ✓ | |||
| BARE | Плогудахудахубla Storitsa, storitsa (н.) Perperia 3 apolyamide (T) acrylonitrile TcA | 100 20 xs | 8 rx/5 xx | ✓ | ✓ | |
| GRAIN | Плогудаха phanoxalnaynx npyn Tcapulit | 0.95 | 5 xs - 4 rxd/5 xs | ✓ | ✓ | |
| PILOT Плогудахуda | плогудахудахуну 100 | 10 xs - 1 rxd/30 xs /10 xs | ✓ | ✓ | ||
| YOGURT/COUGH | Плогудаха phanoxalnynx Apolytis | 800 | 6 rxd - 12 rxd/10 xs | ✓ | ||
| PIZZA Плогудахуda | Туо O25 20 xs - 1 rxd/5 xs | ✓ | ✓ | |||
| BRAND | Плогудахудахуну Storitsa (н.) Pichypharino 6bpauna | 300 1 rx. | 6 rxd/10 xs | ✓ | ||
| DESSERT | Плогудаха phanoxalnynx Decerice a capyteri arua | 100 | 5 xs - 4 rxd/5 xs | ✓ | ✓ | |
| EXPRESS | Блages плогудахудахун STORITSA (н.) Storitsa (N) Storitsa (N) Storitsa (N) Storitsa (N) Storitsa (N) Storitsa (N) Storitsa (N) Storitsa (N) Storitsa (N) Storitsa (N) Storitsa (N) Storitsa (N) Storitsa (N) Storitsa (N) Storitsa (N) Storsa (N) Storitsa (N) Storitsa (N) Storitsa (N) Storitsa (N) Storitsa (N) Storitsa (N) Storitsa (N) Storitsa (N) Storitsa (N) Storitsa (N) Storitsa (N) Storitsa (N) Storitsa (N) Storitsa( N) Storitsa( N) Storitsa( N) Storitsa( N) Storitsa( N) Storitsa( N) Storitsa( N) Storitsa( N) Storitsa( N) Storitsa( N) Storitsa( N) Storitsa( N) Storitsa( N) Storitsa( N) Storitsa( N) | 100 | 5 xs - 4 rxd/5 xs | ✓ | ✓ |
PekomeHaaii 10oBnKOpHCTaHHTeMnepatpHxpeKHMb y nporpaMI«MYlbTINOBAP
| Роведiaхимергура, °C | Роведаян� no okreschestаи |
| 35 | Бостrosамяп сд. Демышни ру |
| 40 | Приоретically homodya |
| 45 | Демышни |
| 50 | Ерсим |
| 55 | Приоретically homody |
| 60 | Приоретically homody noe, demody a repigioden |
| 65 | Бары nici ly kazysski y ukskaij |
| 70 | Приоретically hom |
| Роведая патура, °C | Роведая по ворочимпк |
| 75 | Постrosама, epitotryахдikore-ало |
| 80 | Постrosушил тадушун |
| 85 | Постrosушил сокудасту, сокудасту, сокудасту, сокудасту, сокудасту, сокудасту, сокудасту, сокудасту, сокудасту, сокудасту, сокудасту, сокудасту, сокудасту, сокудасту, сокудасту, сокодасту, сокодасту, сокодасту, сокодасту, сокодасту, сокодасту, сокодасту, сокодасту, сокодасту, сокодасту, сокодасту, сокодасту, сокодасту, сокодасту, сокодаustу, сокодаustу, сокодаustу, сокодаustу, сокодаustу, сокодаustу, сокодаustу, сокодаustу, сокодаustу, сокодаustу, сокодаustу, сокодаustу, сокодаustу, сокодаustу, сокодаustу, |
| 90 | Постrosушил урочимы, сокудасту, сокудасту, сокудасту, сокудасту, сокудасту, сокудасту, сокудасту, сокудасту, сокудасту, сокудасту, сокудасту, сокудасту, сокудасту, сокудасту, cokудасту, cokудасту, cokудасту, cokудасту, cokудасту, cokудасту, cokудасту, cokудасту, cokудасту, cokудасту, cokудасту, cokудасту, cokудасту, cokудасту, cokу qualifying, cokу qualifying, cokу qualifying, cokу qualifying, cokу qualifying, cokу qualifying, cokу qualifying, cokу qualifying, cokу qualifying, cokу qualifying, cokу qualifying, cokу qualifying, cokу qualifying, cokу qualifying, cokу qualifying, cokу qualifying, cokу qualifying, cokу qualifying, cokу qualifying, cokу qualifying, cokу qualify, cokу qualifying, cokу qualifying, cokу qualifying, cokу qualifying, cokу qualifying, cokу qualifying, cokу qualifying, cokу qualifying, cokу qualifying, cokу qualifying, cokу qualifying, cokу qualifying, cokу qualifying, cokу qualifying, cokу qualifying, cokу qualifying, cokу qualifying, cokу qualifying, cokу qualifying, cokу qualifies, cokу qualifying, cokу qualifying, cokу qualifying, cokу qualifying, cokу qualifying, cokу qualifying, cokу qualifying, cokу qualifying, cokу qualifying, cokу qualifying, cokу qualifying, cokу qualifying, cokу qualifying, cokу qualifying, cokу qualifying, cokу qualifying, cokу qualifying, cokу qualifying, cokу qualifying, cokу qualified, cokу qualifying, cokу qualifying, cokу qualifying, cokу qualifying, cokу qualifying, cokу qualifying, cokу qualifying, cokу qualifying, cokу qualifying, cokу qualifying, cokу qualifying, cokу qualifying, cokу qualifying, cokу qualifying, cokу qualifying, cokу qualifying, cokу qualifying, cokу qualifying, cokу qualifying, cokу qualifier, cokу qualifying, cokу qualifying, cokу qualifying, cokу qualifying, cokу qualifying, cokу qualifying, cokу qualifying, cokу qualifying, cokу qualifying, cokу qualifying, cokу qualifying, cokу qualifying, cokу qualifying, cokу qualifying, cokу qualifying, cokу qualifying, cokу qualifying, cokу qualifying, cokу qualifying, cokу qual, cokу qualifying, cokу qualifying, cokу qualifying, cokу qualifying, cokу qualifying, cokу qualifying, cokу qualifying, cokу qualifying, cokу qualifying, cokу qualifying, cokу qualifying, cokу qualifying, cokу qualifying, cokу qualifying, cokу qualifying, cokу qualifying, cokу qualifying, cokу qualifying, cokу qualifying, cokуqual, cokу qualifying, cokу qualifying, cokу qualifying, cokу qualifying, cokу qualifying, cokу qualifying, cokу qualifying, cokу qualifying, cokу qualifying, cokу qualifying, cokу qualifying, cokу qualifying, cokу qualifying, cokу qualifying, cokу qualifying, cokу qualifying, cokу qualifying, cokу qualifying, cokу qualifying, cokуQual, cokу qualifying, cokу qualifying, cokу qualifying, cokу qualifying, cokу qualifying, cokу qualifying, cokу qualifying, cokу qualifying, cokу qualifying, cokу qualifying, cokу qualifying, cokу qualifying, cokу qualifying, cokу qualifying, cokу qualifying, cokу qualifying, cokу qualifying, cokу qualifying, cokу qualifying, cokу Qual, cokу qualifying, cokу qualifying, cokу qualifying, cokу qualifying, cokу qualifying, cokу qualifying, cokу qualifying, cokу qualifying, cokу qualifying, cokу qualifying, cokу qualifying, cokу qualifying, cokу qualifying, cokу qualifying, cokу qualifying, cokу qualifying, cokу qualifying, cokу qualifying, cokу qualifying, cokу cokу qualifying, cokу qualifying, cokу qualifying, cokу qualifying, cokу qualifying, cokу qualifying, cokу qualifying, cokу qualifying, cokу qualifying, cokу qualifying, cokу qualifying, cokу qualifying, cokу qualifying, cokу qualifying, cokу qualifying, cokу qualifying, cokу qualifying, cokу qualifying, cokу qualifying, cokу qualifying cokу qualifying cokу qualifying cokу qualifying cokу qualifying cokу qualifying cokу qualifying cokу qualifying cokу qualifying cokу qualifying cokу qualifying cokу qualifying cokу qualifying cokу qualifying cokу qualifying cokу qualifying cokу qualifying cokу qualifying cokу qualifying cokу qualifying cokу qualifying, cokу qualifying cokу qualifying cokу qualifying cokу qualifying cokу qualifying cokу qualifying cokу qualifying cokу qualifying cokу qualifying cokу qualifying cokу qualifying cokу qualifying cokу qualifying cokу qualifying cokу qualifying cokу qualifying cokу qualifying cokу qualifying cokу qualifying, cokу qualifying, cokу qualifying cokу qualifying cokу qualifying cokу qualifying cokу qualifying cokу qualifying cokу qualifying cokу qualifying cokу qualifying cokу qualifying cokу qualifying cokу qualifying cokу qualifying cokу qualifying cokу qualifying cokу qualifying cokу qualifying cokу qualifying, cokу qualifying cokу qualifying, cokу qualifying cokу qualifying cokу qualifying cokу qualifying cokу qualifying cokу qualifying cokу qualifying cokу qualifying cokу qualifying cokу qualifying cokу qualifying cokу qualifying cokу qualifying cokу qualifying cokу qualifying cokу qualifying cokу qualifying cokу qualifying, cokу qualifying, cokу qualifying, cokу qualifying cokу qualifying cokу qualifying cokу qualifying cokу qualifying cokу qualifying cokу qualifying cokу qualifying cokу qualifying cokу qualifying cokу qualifying cokу qualifying cokу qualifying cokу qualifying cokу qualifying cokу qualifying cokу qualifying, cokу qualifying cokу qualifying cokу qualifying, cokу qualifying cokу qualifying cokу qualifying cokу qualifying cokу qualifying cokу qualifying cokу qualifying cokу qualifying cokу qualifying cokу qualifying cokу qualifying cokу qualifying cokу qualifying cokу qualifying cokу qualifying cokу qualifying cokу qualifying |
VII.IIPEED3BEPHEHHAMOCEPBIC-UEHTPY
| Honoraria | Minskaii npomai | CnchB yuyosoiia |
| LI-1 | Carstana mianera, kmochnai neporoi npomai, naia a laita naia a npomai nbaa npomai npomai npomai npomai npomai npomai npomai npomai npomai npomai npomai npomai npomai npomai npomai npomai npomai npomai npomai npomai npomai npomai npomai npomai npomai npomai npomai npomai npomai npomai npomai npomai npomai npomainpomai npomai npomai npomai npomai npomai npomai npomai npomai npomai npomai npomai npomai npomai npomai npomai npomai npomai npomai npomai npomai npomai npomai npomai npomai npomai npomai npomai npomai npomai npomai npomai npomai nponai npomai npomai npomai npomai npomai npomai npomai npomai npomai npomai npomai npomai npomai npomai npomai npomai npomai npomai npomai npomai npomai npomai npomai npomai npomai npomai npomai npomai npomai npomai npomai npomai npomail npomai npomai npomai npomai npomai npomai npomai npomai npomai npomai npomai npomai npomai npomai npomai npomai npomai npomai npomai npomai npomai npomai npomai npomai npomai npomai npomai npomai npomai npomai npomai npomai npomai=npomai npomai npomai npomai npomai npomai npomai npomai npomai npomai npomai npomai npomai npomai npomai npomai npomai npomai npomai npomai npomai npomai npomai npomai npomai npomai npomai npomai npomai npomai npomai npomai npomai npcmai npomai npomai npomai npomai npomai npomai npomai npomai npomai npomai npomai npomai npomai npomai npomai npomai npomai npomai npomai npomai npomai npomai npomai npomai npomai npomai npomai npomai npomai npomai npomai npomai npomalnpomai npomai npomai npomai npomai npomai npomai npomai npomai npomai npomai npomai npomai npomai npomai npomai npomai npomai npomai npomai npomai npomai npomai npomai npomai npomai npomai npomai npomai npomai npomai npomai npomainpemai npomai npomai npomai npomai npomai npomai npomai npomai npomai npomai npomai npomai npomai npomai npomai npomai npomai npomai npomai npomai npomai npomai npomai npomai npomai npomai npomai npomai npomai npomai npomai npomai npomairnpomai npomai npomai npomai npomai npomai npomai npomai npomai npomai npomai npomai npomai npomai npomai npomai npomai npomai npomai npomai npomai npomai npomai npomai npomai npomai npomai npomai npomai npomai npomai npomai npomai(npomai npomai npomai npomai npomai npomai npomai npomai npomai npomai npomai npomai npomai npomai npomai npomai npomai npomai npomai npomai npomai npomai npomai npomai npomai npomai npomai npomai npomai npomai npomai npomai npomai npopai npopai npopai npopai npopai npopai npopai npopai npopai npopai npopai npopai npopai npopai npopai npopai npopai npopai npopai npopai npopai npopai npopai npopai npopai npopai npopai npopai npopai npopai npopai npopai npopai npopAI npopai npopai npopai npopai npopai npopai npopai npopai npopai npopai npopai npopai npopai npopai npopai npopai npopai npopai npopai npopai npopai npopai npopai npopai npopai npopai npopai npopai npopai npopai npopai npopai npopainpopai npopai npopai npopai npopai npopai npopai npopai npopai npopai npopai npopai npopai npopai npopai npopai npopai npopai npopai npopai npopai npopai npopai npopai npopai npopai npopai npopai npopai npopai npopai npopai npopai npocipai npocipai npocipai npocipai npocipai npocipai npocipai npocipai npocipai npocipai npocipai npocipai npocipai npocipai npocipai npocipai npocipai npocipai npocipai npocipai npocipai npocipai npocipai npocipai npocipai npocIPALNPONPAOPIA PONPAOPIA PONPAOPIA PONPAOPIA PONPAOPIA PONPAOPIA PONPAOPIA PONPAOPIA PONPAOPIA PONPAOPIA PONPAOPIA PONPAOPIA PONPAOPIA PONPAOPIA PONPAOPIA PONPAOPIA PONPAOPIA PONPAOII A PONPAOII A PONPAOII A PONPAOII A PONPAOII A PONPAOII A PONPAOII A PONPAOII A PONPAOII A PONPAOII A PONPAOII A PONPAOII A PONPAOII A PONPAOII A PONPAOII A PONPAOII A PONPAOII A PONPA0II A PONPA0II A PONPA0II A PONPA0II A PONPA0II A PONPA0II A PONPA0II A PONPA0II A PONPA0II A PONPA0II A PONPA0II A PONPA0II A PONPA0II A PONPA0II A PONPA0II A PONPA0II A PONPA0II A PONDPPD PONDPPD PONDPPD PONDPPD PONDPPD PONDPPD PONDPPD PONDPPD PONDPPD PONDPPD PONDPPD PONDPPD PONDPPD PONDPPD PONDPPD PONDPPD PONDPPD PONDPPD PONDPPD PONDPPD PONDPPD PONDPPD PONDPPD PONDPPD PONDPPD PONDPPDA PONDPPDA PONDPPDA PONDPPDA PONDPPDA PONDPPDA PONDPPDA PONDPPDA PONDPPDA PONDPPDA PONDPPDA PONDPPDA PONDPPDA PONDPPDA PONDPPDA PONDPPDA PONDPPDA PONDPPDA PONDPPDA PONDPPDA PONDPPDA PONDPPDA PONDPPDA PONDPPDA PONDPPDA PONDPPD PONDPPDA PONDPPDA PONDPPDA PONDPPDA PONDPPDA PONDPPDA PONDPPDA PONDPPDA PONDPPDA PONDPPDA PONDPPDA PONDPPDA PONDPPDA PONDPPDA PONDPPDA PONDPPDA PONDPPDA PONDPPDA PONDPPDA PONDPPDA PONDPPDA PONDPPDA PONDPPDA PONDPPD PONDPPD PONDPPDA PONDPPDA PONDPPDA PONDPPDA PONDPPDA PONDPPDA PONDPPDA PONDPPDA PONDPPDA PONDPPDA PONDPPDA PONDPPDA PONDPPDA PONDPPDA PONDPPDA PONDPPDA PONDPPDA PONDPPDA PONDPPDA PONDPPDA PONDPPDA PONDPPDA PONDPPD PONDPPDA PONDPPD PONDPPDA PONDPPDA PONDPPDA PONDPPDA PONDPPDA PONDPPDA PONDPPDA PONDPPDA PONDPPDA PONDPPDA PONDPPDA PONDPPDA PONDPPDA PONDPPDA PONDPPDA PONDPPDA PONDPPDA PONDPPDA PONDPPDA PONDPPDA PONDPPDA PONDPPDA PONDPPD PONDPPD PONDPPD PONDPPDA PONDPPDA PONDPPDA PONDPPDA PONDPPDA PONDPPDA PONDPPDA PONDPPDA PONDPPDA PONDPPDA PONDPPDA PONDPPDA PONDPPDA PONDPPDA PONDPPDA PONDPPDA PONDPPDA PONDPPDA PONDPPDA PONDPPDA PONDPPDA PONDPPD PONDPPDA PONDPPDA PONDPPD PONDPPDA PONDPPDA PONDPPDA PONDPPDA PONDPPDA PONDPPDA PONDPPDA PONDPPDA PONDPPDA PONDPPDA PONDPPDA PONDPPDA PONDPPDA PONDPPDA PONDPPDA PONDPPDA PONDPPDA PONDPPDA PONDPPDA PONDPPDA PONDPPDA PONDPPD PONDPPDA PONDPPD PONDPPD PONDPPDA PONDPPDA PONDPPDA PONDPPDA PONDPPDA PONDPPDA PONDPPDA PONDPPDA PONDPPDA PONDPPDA PONDPPDA PONDPPDA PONDPPDA PONDPPDA PONDPPDA PONDPPDA PONDPPDA PONDPPDA PONDPPDA PONDPPDA PONDPPDA PONDPPD PONDPPD PONDPPDA PONDPPD PONDPPDA PONDPPDA PONDPPDA PONDPPDA PONDPPDA PONDPPDA PONDPPDA PONDPPDA PONDPPDA PONDPPDA PONDPPDA PONDPPDA PONDPPDA PONDPPDA PONDPPDA PONDPPDA PONDPPDA PONDPPDA PONDPPDA PONDPPDA PONDPPDA PONDPPD PONDPPD PONDPPD PONDPPD PONDPPDA PONDPPDA PONDPPDA PONDPPDA PONDPPDA PONDPPDA PONDPPDA PONDPPDA PONDPPDA PONDPPDA PONDPPDA PONDPPDA PONDPPDA PONDPPDA PONDPPDA PONDPPDA PONDPPDA PONDPPDA PONDPPDA PONDPPDA PONDPPD PONDPPDA PONDPPDA PONDPPDA PONDPPD PONDPPDA PONDPPDA PONDPPDA PONDPPDA PONDPPDA PONDPPDA PONDPPDA PONDPPDA PONDPPDA PONDPPDA PONDPPDA PONDPPDA PONDPPDA PONDPPDA PONDPPDA PONDPPDA PONDPPDA PONDPPDA PONDPPDA PONDPPDA PONDPPD PONDPPDA PONDPPDA PONDPPD PONDPPD PONDPPDA PONDPPDA PONDPPDA PONDPPDA PONDPPDA PONDPPDA PONDPPDA PONDPPDA PONDPPDA PONDPPDA PONDPPDA PONDPPDA PONDPPDA PONDPPDA PONDPPDA PONDPPDA PONDPPDA PONDPPDA PONDPPDA PONDPPDA PONDPPD PONDPPDA PONDPPD PONDPPDA PONDPPD PONDPPDA PONDPPDA PONDPPDA PONDPPDA PONDPPDA PONDPPDA PONDPPDA PONDPPDA PONDPPDA PONDPPDA PONDPPDA PONDPPDA PONDPPDA PONDPPDA PONDPPDA PONDPPDA PONDPPDA PONDPPDA PONDPPDA PONDPPDA PONDPPD PONDPPDA PONDPPD PONDPPD PONDPPD PONDPPDA PONDPPDA PONDPPDA PONDPPDA PONDPPDA PONDPPDA PONDPPDA PONDPPDA PONDPPDA PONDPPDA PONDPPDA PONDPPDA PONDPPDA PONDPPDA PONDPPDA PONDPPDA PONDPPDA PONDPPDA PONDPPDA PONDPPDA PONDPPD PONDPPD PONDPPDA PONDPPDA PONDPPD PONDPPDA PONDPPDA PONDPPDA PONDPPDA PONDPPDA PONDPPDA PONDPPDA PONDPPDA PONDPPDA PONDPPDA PONDPPDA PONDPPDA PONDPPDA PONDPPDA PONDPPDA PONDPPDA PONDPPDA PONDPPDA PONDPPDA PONDPPDA PONDPPD PONDPPD PONDPPDA PONDPPD PONDPPD PONDPPDA PONDPPDA PONDPPDA PONDPPDA PONDPPDA PONDPPDA PONDPPDA PONDPPDA PONDPPDA PONDPPDA PONDPPDA PONDPPDA PONDPPDA PONDPPDA PONDPPDA PONDPPDA PONDPPDA PONDPPDA PONDPPDA PONDPPDA PONDPPD PONDPPD PONDPPD PONDPPDA PONDPPD PONDPPDA PONDPPDA PONDPPDA PONDPPDA PONDPPDA PONDPPDA PONDPPDA PONDPPDA PONDPPDA PONDPPDA PONDPPDA PONDPPDA PONDPPDA PONDPPDA PONDPPDA PONDPPDA PONDPPDA PONDPPDA PONDPPDA PONDPPDA PONDPPD PONDPPD PONDPPD PONDPPD PONDPPD PONDPPD PONDPPD PONDPPD PONDPPD PONDPPD PONDPPD PONDPPD PONDPPD PONDPPD PONDPPD PONDPPD PONDPPD PONDPPD PONDPPD PONDPPD PONDPPD PONDPPD PONDPPD PONDPPD PONDPPDI PONDPPD PONDPPD PONDPPD PONDPPD PONDPPD PONDPPD PONDPPD PONDPPD PONDPPD PONDPPD PONDPPD PONDPPD PONDPPD PONDPPD PONDPPD PONDPPD PONDPPD PONDPPD PONDPPD PONDPPD PONDPPD PONDPPD PONDPPD PONDPPD PONDPPDTP DTTT TTTT TTTT TTTT TTTT TTTT TTTT TTTT TTTT TTTT TTTT TTTT TTTT TTTT TTTT TTTT TTTT TTTT TTTT TTTT TTTT TTTT TTTT TTTT TTTT TTTT TTTT TTTT TTTT TTTT TTTT TTTT TTTT TTTT TITTIT TTTT TTTT TTTT TTTT TTTT TTTT TTTT TTTT TTTT TTTT TTTT TTTT TTTT TTTT TTTT TTTT TTTT TTTT TTTT TTTT TTTT TTTT TTTT TTTT TTTT TTTT TTTT TTTT TTTT TTTT TTTT TTTT TTTT CNTNCTPNTNCTPNTNCTPNTNCTPNTNCTPNTNCTPNTNCTPNTNCTPNTNCTPNTNCTPNTNCTPNTNCTPNTNCTPNTNCTPNTNCTPNTNCTPNTNCTPNTNCTPNTNCTPNTNCTPNTNCTPNTNCTPNTNCTPNTNCTPNTNCTPNTNCTPTT TTTT TTTT TTTT TTTT TTTT TTTT TTTT TTTT TTTT TTTT TTTT TTTT TTTT TTTT TTTT TTTT TTTT TTTT TTTT TTTT TTTT TTTT TTTT TTTT TTTT TTTT TTTT TTTT TTTT TTTT TTTT TTTT TTTI TTTT TTTT TTTT TTTT TTTT TTTT TTTT TTTT TTTT TTTT TTTT TTTT TTTT TTTT TTTT TTTT TTTT TTTT TTTT TTTT TTTT TTTT TTTT TTTT TTTT TTTT TTTT TTTT TTTT TTTT TTTT TTTT TTTT FONNTF NNTF NNTF NNTF NNTF NNTF NNTF NNTF NNTF NNTF NNTF NNTF NNTF NNTF NNTF NNTF NNTF NNTF NNTF NNTF NNTF NNTF NNTF NNTF NNTF NNTF NNTF NNTF NNTF NNTF NNTF NNTF NNTF NNTF NTTT TTTT TTTT TTTT TTTT TTTT TTTT TTTT TTTT TTTT TTTT TTTT TTTT TTTT TTTT TTTT TTTT TTTT TTTT TTTT TTTT TTTT TTTT TTTT TTTT TTTT TTTT TTTT TTTT TTTT TTTT TTTT TTTT TOTT TTTT TTTT TTTT TTTT TTTT TTTT TTTT TTTT TTTT TTTT TTTT TTTT TTTT TTTT TTTT TTTT TTTT TTTT TTTT TTTT TTTT TTTT TTTT TTTT TTTT TTTT TTTT TTTT TTTT TTTT TTTT TTTT TTTT IITITITITITITITITITITITITITITITITITITITITITITITITITITITITITITITITITITITITITITITITITITITITITITITITITITITITITITITITITITITITITITITITITITITITITITITITITITITITITITITITITITITITITITITITITITITITITITITITITITITIT ITITITITITITITITITITITITITITITITITITITITITITITITITITITITITITITITITITITITITITITITITITITITITITITITITITITITITITITITITITITITITITITITITITITITITITITITITITITITITITITITITITITITITITITITITITITITITITITITITITITITITA ITITITITITITITITITITITITITITITITITITITITITITITITITITITITITITITITITITITITITITITITITITITITITITITITITITITITITITITITITITITITITITITITITITITITITITITITITITITITITITITITITITITITITITITITITITITITITITITITITITIT ITITA ITITA ITITA ITITA ITITA ITITA ITITA ITITA ITITA ITITA ITITA ITITA ITITA ITITA ITITA ITITA ITITA ITITA ITITA ITITA ITITA ITITA ITITA ITITA ITITA ITITA ITITA ITITA ITITA ITITA ITITA ITITA ITITA ITITA ITITA ITITA ITITA ITITA ITITA ITITA ITITA ITITA ITITA ITITA ITITA ITITA ITITA ITITA ITITA ITITA ITGA ITGA ITGA ITGA ITGA ITGA ITGA ITGA ITGA ITGA ITGA ITGA ITGA ITGA ITGA ITGA ITGA ITGA ITGA ITGA ITGA ITGA ITGA ITGA ITGA ITGA ITGA ITGA ITGA ITGA ITGA ITGA ITGA ITGA ITGA ITGA ITGA ITGA ITGA ITGA ITGA ITGA ITGA ITGA ITGA ITGA ITGA ITGA ITGA ITGA IT GA GGA GGA GGA GGA GGA GGA GGA GGA GGA GGA GGA GGA GGA GGA GGA GGA GGA GGA GGA GGA GGA GGA GGA GGA GGA GGA GGA GGA GGA GGA GGA GGA GGA GGA GGA GGA GGA GGA GGA GGA GGA GGA GGA GGA GGA GGA GGA GGA GGA GGA GBA GBA GBA GBA GBA GBA GBA GBA GBA GBA GBA GBA GBA GBA GBA GBA GBA GBA GBA GBA GBA GBA GBA GBA GBA GBA GBA GBA GBA GBA GBA GBA GBA GBA GBA GBA GBA GBA GBA GBA GBA GBA GBA GBA GBA GBA GBA GBA GBA GBA G BA GBA GBA GBA GBA GBA GBA GBA GBA GBA GBA GBA GBA GBA GBA GBA GBA GBA GBA GBA GBA GBA GBA GBA GBA GBA GBA GBA GBA GBA GBA GBA GBA GBA GBA GBA GBA GBA GBA GBA GBA GBA GBA GBA GBA GBA GBA GBA GBA GBA GCA GBA GBA GBA GBA GBA GBA GBA GBA GBA GBA GBA GBA GBA GBA GBA GBA GBA GBA GBA GBA GBA GBA GBA GBA GBA GBA GBA GBA GBA GBA GBA GBA GBA GBA GBA GBA GBA GBA GBA GBA GBA GBA GBA GBA GBA GBA GBA GBA GBA GGA GGA GGA GGA GGA GGA GGA GGA GGA GGA GGA GGA GGA GGA GGA GGA GGA GGA GGA GGA GGA GGA GGA GGA GGA GGA GGA GGA GGA GGA GGA GGA GGA GGA GGA GGA GGA GGA GGA GGA GGA GGA GGA GGA GGA GGA GGA GGA GGA GAA GAA GAA GAA GAA GAA GAA GAA GAA GAA GAA GAA GAA GAA GAA GAA GAA GAA GAA GAA GAA GAA GAA GAA GAA GAA GAA GAA GAA GAA GAA GAA GAA GAA GAA GAA GAA GAA GAA GAA GAA GAA GAA GAA GAA GAA GAA GAA GAA GAA GAAA GAA GAA GAA GAA GAA GAA GAA GAA GAA GAA GAA GAA GAA GAA GAA GAA GAA GAA GAA GAA GAA GAA GAA GAA GAA GAA GAA GAA GAA GAA GAA GAA GAA GAA GAA GAA GAA GAA GAA GAA GAA GAA GAA GAA GAA GAA GAA GAA GAA G AA GAA GAA GAA GAA GAA GAA GAA GAA GAA GAA GAA GAA GAA GAA GAA GAA GAA GAA GAA GAA GAA GAA GAA GAA GAA GAA GAA GAA GAA GAA GAA GAA GAA GAA GAA GAA GAA GAA GAA GAA GAA GAA GAA GAA GAA GAA GAA GAA GAA GaaGaaGaaGaaGaaGaaGaaGaaGaaGaaGaaGaaGaaGaaGaaGaaGaaGaaGaaGaaGaaGaaGaaGaaGaaGaaGaaGaaGaaGaaGaaGaaGaaGaaGaaGaaGaaGaaGaaGaaGaaGaaGaaGaaGaaGaaGaaGaaGaaGaaGaa GaaGaaGaaGaaGaaGaaGaaGaaGaaGaaGaaGaaGaaGaaGaaGaaGaaGaaGaaGaaGaaGaaGaaGaaGaaGaaGaaGaaGaaGaaGaaGaaGaaGaaGaaGaaGaaGaaGaaGaaGaaGaaGaaGaaGaaGaaGaaGaaGaaGAA GAA GAA GAA GAA GAA GAA GAA GAA GAA GAA GAA GAA GAA GAA GAA GAA GAA GAA GAA GAA GAA GAA GAA GAA GAA GAA GAA GAA GAA GAA GAA GAA GAA GAA GAA GAA GAA GAA GAA GAA GAA GAA GAA GAA GAA GAA GAA GAA GAAGAA GAA GAA GAA GAA GAA GAA GAA GAA GAA GAA GAA GAA GAA GAA GAA GAA GAA GAA GAA GAA GAA GAA GAA GAA GAA GAA GAA GAA GAA GAA GAA GAA GAA GAA GAA GAA GAA GAA GAA GAA GAA GAA GAA GAA GAA GAA GAA GAA G AA | |
| Hemiparesis Meningoencephalitis Cerebrolysin | ||
| CROSS TORYTIC DALIATO APACHE | Meningoencephalitis Meningoencephalitis Meningoencephalitis Meningoencephalitis Meningoencephalitis Meningoencephalitis Meningoencephalitis Meningoencephalitis Meningoencephalitis Meningoencephalitis Meningoencephalitis Meningoencephalitis MeningOtic encephalitis Meningoencephalitis Meningoencephalitis MeningOtic encephalitis Meningoencephalitis MeningOtic encephalitis MeningOtic encephalitis MeningOtic encephalitis MeningOtic encephalitis MeningOtic encephalitis MeningOtic encephalitis MeningOtic encephalitis MeningOtic encephalitis MeningOtic encephalitis MeningOtic encephalitis MeningOtic encephalitis MeningOtic encephalitis MeningOtic encephalitis MINGOGENOMA | Bipolar or bipolar, bipolar or bipolar, bipolar or bipolar, bipolar or bipolar, bipolar or bipolar, bipolar or bipolar, bipolar or bipolar, bipolar or bipolar, bipolar or bipolar, bipolar or bipolar, bipolar or bipolar, bipolar or bipolar, bipolar or bipolar, bipolar or bipolar, bipolar or bipolar, bipolar or bipolar, bipolar or bipolar, bipolar or bipolar, bipolar or bipolar, bipolar or bipolar, bipolar or bipolar, bipolar or bipolar, bipolar or bipolar, bipolar or bipolar, bipolar or bipolar, bipolar or bipolar, |
| Hypopituitarism hypopituitarism hypopituitarism hypopituitarism hypopituitarism hypopituitarism hypopituitarism hypopituitarism hypopituitarism hypopituitarism hypopituitarism hypopituitarism hypopituitarism hypopituitarism hypopituitarism hypopituitarism hypopituitarism hypopituitarism hypopituitarism hypopituitarism hypopituitarism hyperprolactin hyperprolactin hyperprolactin hyperprolactin hyperprolactin hyperprolactin hyperprolactin hyperprolactin hyperprolactin hyperprolactin hyperprolactin hyperprolactin hyperprolactin hyperprolactin hyperprolactin hyperprolactin hyperprolactin hyperprolactin hyperprolactin hyperprolactin hyperprolact | ||

y p3i, knnnncpaaninc yynmni H 0dnooc, eepimce da aopnpaoaagoo cpciao qchmpy.

Eknonlno 6esneuHa ytnlaa (ytnlaa e nektpnHoro n eektpnHoro obaanann)
YTKM 3B2U OYAKOBK, NOCIOHKA KOPACYBAH, A TAKOK CAMHO PRNABUY HOOXJIO HOI 3IHNCKOHTB BUNOIBU DO MIO CIEUBE IPOrpoPMH3 NEPEOPKIN BIDKID, NOyPBYTECAH pno HE NKONKHE CEPEOBOHIE, HE BHKDAI TAE TAKI BHOPH PAOH3 ON 3B1BNIHAMN NOVOTYBHOMCITTM.

BHKOPHCTAHI (cTAPi) npnAaH He MoXHa BxNtAe 3 iHUMM noyToOM CHTTM, ix notp16o yTHm3yBaTH
opmo. BithiHIO TcOPOI OAOHIO HOO SAIUII GIOUPE PIOOIOOIOIOIOIOIOIOIOIOIOIOIOIOIOIOIOIOIOIOIOIOIOIOIOIOIOIOIOIOIOIOIOIOIOIOIOIOIOIOIOIOIOIOIOIOIOIOIOIOIOIOIOIOIOIOIOIOIOIOIOIOIOIOIOIOIOIOIOIOIOIOIOIOOO
AniHn prrnnaa nnnnne ane ane no Cnpoeineckoi Apenm 2012/19/EU, 30 peryioe yinlauo eekpnno Horo nnckpnno oOobndan.
DnAeKpEHHBTHHbHCHCBOHMHINOyIaHbHTaTpeepo5kBIDxBDIEeNcPrrhhIXIeNekPrrhHXPiPnAdHs,akiEHHMHNBAeBTEpntoplEpsenEeCkoCOKy
www.redmond.company
www.multicooker.com
www/store.redmond.company
www.smartredmond.com
RMC-M95E-UM-1


- IMPORTANT SAFEGUARDS
- REDMONO
- Multicooker Assembly (A1, p. 4)
- Display (A3,p.6)
- PRIOR TO FIRST USE
- OPERATION
- Setting The Cooking Time
- Time Delay Function
- Keep Warm Function
- Disabling The "Keep Warm" In Advance
- Reheat Function
- Standard Operating Procedure for Automatic Programs
- REDMOND
- "MULTICOOK" Program
- "OATMEAL" Program
- "STEW" Program
- "FRY" Program
- "SOUP" Program
- "STEAM" Program
- "PASTA" Program
- "SLOW COOK" Program
- "BOIL" Program
- "BAKE" Program
- "GRAIN" Program
- "PILAF" Program
- "YOGURT/DOUGH" Program
- "PIZZA" Program
- "BREAD" Program
- DESSERT"Program
- "EXPRESS" Program
- ADDITIONAL FEATURES
- OPTIONAL ACCESSORIES
- CARE AND MAINTENANCE
- General rules and recommendations
- Cleaning the body
- Cleaning the bowl
- Cleaning the Inner lid
- Cleaning the removable steam valve
- Condensate removal
- Cleaning the working chamber
- Transportation and Storage
- COOKING TIPS
- Environmentally friendly disposal (WEEE)
- FunciOn "Time Delay" ("Arranque suspenso")
- Programa "SLOW COOK"
- Programa "YOGURT/DOUGH"
- Funktion "Time Delay" ("Udskudt start")
- Program "YOGURT/DOUGH"
- Program "PIZZA"
- Program"PIZZA"
- Program"BREAD"
- MÁSURI DE SECURITATE
- Program ,YOGURT/DOUGH
- Program „PIZZA"
- YcTPOINCTBO HA DCNNEA (CXEMA A3, CTP.6)
- I.IPEN3AIOOBAHE HA EKCIIOA-TAUHA
- PpeBapHTenHO 3KIOU4BaHc H3 ABTo3aTOnIaHe
- ФУHKUNA 3a 3aTOnnHe Ha ActH
- 06uH DeECTBn npn H3No3BaHe Ha aBTOMaTHN nporpaMn
- Dporpama_MULTICOOK
- IporpaMa OATMEAL
- Iporpama .STEW
- NporpamaFRY
- Iporpama.SOUPI
- Nporpama STEAM
- PporpaMa .PASTA
- Tporpama "SLOW COOK"
- Iporpama,BOIL
- Iporpama .BAKE
- IporpaMa .GRAIN
- Iporpama „PILAF"
- Nporpama "YOGURT/DOUGH"
- Iporpama „PIZZA'
- Iporpama „BREAD
- Iporpama DESSERT
- Iporpama EXPRESS
- NoHCTBaHe Ha BbTpewHa TcpaHa Ha Kanaka
- NoHCTBaHe Ha npehocn NapeH Knaan
- OTcPamHbHe Ha KOHD3
- NoHCTBaHe Ha paOthata KaMepa
- TpaHcnpoTHpAne H CbXpaHeHne
- VI.CbBETN3AIPNFOTBRAHE
- PpeWN NO BpeMe HA pNHOBHe H cNoC06n 3a OTcPaHRABaHETo H
- ACTHE HE E IOTOBIO DOKPAI
- unkcie
- Suprava
- Program "OATMEAL" ("Ovsena Kaša")
- Program "BREAD"
- Program "DESSERT"
- Program "EXPRESS"
- DODATNE ZNACILNOSTI
- NEOBVEZNA DODATNA OPREMA
- OSKRBAIN VZDRZEVANJE
- Sptošna pravila in priporocila
- Program...SLOW COOK"
- unkcios
- GAMINYS PRARADO SAVO PIRMINE FORMA
- KEPINYS NEISKILO
- unkn
- RMC-M95E
- Vadibas panelis (shema A2, 5. (pp.)
- Programma "SLOW COOK"
- Programma .BOIL
- Programma.BAKE
- Programma, GRAIN
- Programma_PILAF
- Programma YOGURT/DOUGH
- Programma_PIZZA"
- Programma, BREAD
- Programma DESSERT
- Programma,EXPRESS
- PAPILDUS IESPEJAS
- PAPILDUS AKSESUÄRi
- V.IERICES TIRISANA
- Visparjol notekumi un jeteikumi
- Korpusa tirisana
- Blodas tirisan
- leksejavaka tirsana
- Program YOGURT / DOUGH
- PIPIN ANO THN INPQTH XPHSH
- XPHSH THE ΠOANYXTPA
- Piv aio tv pwn evpyooin
- KaeopiooC tou xovou yepaTos
- Aetoupyia Time Delay (KaThetaepnveynvapn)
- Aeoupyia diatnoqn ts Tepokpaia cTuv Etoiav qayntvk eKeep Warm (autoepaov)
- PpOAnTTIKn aTTEepeyOTIOaing nS auto@epuavons
- AeIOUpyi zegtauqos qayntou
- Fevikn oepa diabikaaiu otyn xpnoyn autojauw npoypauiut
- Péoyegug《MULTICOOK》
- MEPbI BE30NACHOCTN
- TexHHueckHe XapakTePHCTKNK
- IporpaMMbl
- ФVHKUNH
- Nanenbynpabnene (cxemaAzCTP.5)
- 9.Ducnne
- Ycpoacto docnne (cxemaA3,ctp.6)
- I.IPEPENEPBbIMBKJIIOUYEHNEM
- IporpaMa «DESSERT »
- Iporpamma 一 ^ 一 EXPRESS
- III.ДОПОЛНТЕNBHBIEBO3MOXHOCTN
- IV.ДОПОЛНΥЕВHBIEAKCECCYAPbI
- XpaHHeHn m TpaHCnpTmPOBka
- COBETBI NO PNPOTOBNEHNIO
- OuH6Kn npn npnrTOBHeHH H cnoocbIx yCTpaHeHH
- ByoBa Dmcnner (cxemaA3,ctop.6)
- INPED IOYATKOM BUKOPUCTAHH
- EKCПЛYATAUЯ MYJIbTNUBAPKIN
- YctahOBka qacy npurotybaHH
- Функлг«Time Delay
- Iporpama SLOW COOK
- Iporpama BOIL
- Pporpama BAKE
- Iporpama «GRAIN»
- IporpamaPILAF
Brand : Redmond
Model : RMCM95E
Category : Multi-cooker