Viaggio 123 Via - Car seat PEG PEREGO - Free user manual and instructions
Find the device manual for free Viaggio 123 Via PEG PEREGO in PDF.
| Product type | Child car seat |
| Brand | Peg Perego |
| Model | Viaggio 123 Via |
| Age/weight groups | Group 1 (9-18 kg, approx. 1-4 years) with 5-point harness; Groups 2-3 (15-36 kg, approx. 3-12 years) with seat belt |
| Approval standard | UN/ECE R44/04 |
| Vehicle installation | ISOFIX + Top Tether (Group 1); ISOFIX + 3-point belt (Groups 2-3) |
| Mounting direction | Forward-facing only |
| Headrest adjustment | Yes, multiple positions via a lever |
| Recline | Multiple positions, adjustable by lever under the seat |
| Insert cushion | Included, for children up to 12 kg (Group 1) |
| Harness | 5-point harness with central buckle, height and tension adjustable |
| Shoulder pads | Removable, included |
| Top Tether | Essential for safety in Group 1 |
| Materials | Plastic, polystyrene (white under seat/backrest), fabric cover |
| Cover maintenance | Machine washable at 30°C, do not use bleach, do not iron, do not dry clean, do not tumble dry |
| Cleaning plastic parts | Damp cloth, no solvents |
| Spare parts | Original Peg Perego, available via after-sales service |
| Warranty and support | After-sales service by phone, email, website |
| Dimensions (approximate) | Height adjustable: approx. 60-80 cm, width: approx. 45 cm, depth: approx. 55 cm |
| Weight (approximate) | Approx. 8-10 kg |
Frequently Asked Questions - Viaggio 123 Via PEG PEREGO
User questions about Viaggio 123 Via PEG PEREGO
0 question about this device. Answer the ones you know or ask your own.
Ask a new question about this device
Download the instructions for your Car seat in PDF format for free! Find your manual Viaggio 123 Via - PEG PEREGO and take your electronic device back in hand. On this page are published all the documents necessary for the use of your device. Viaggio 123 Via by PEG PEREGO.
USER MANUAL Viaggio 123 Via PEG PEREGO
EN· Spare parts available in different colours to be specified when ordering.
Thank you for choosing a Peg-Perego product

GENERALWARNINGS
Carefully read the instructions before use and keep them in a safe place for future reference. Failure to thoroughly follow the instructions for the installation of the car seat could expose your child to serious hazards.
Viaggio 1-2-3 must be assembled and installed by adults. The car seat must be assembled and installed when the child is not seated in it.
- When travelling, never hold your child in your arms or allow him to sit outside the car seat. In the event of sudden braking, even at low speeds, the child might easily be flung forward.
- Do not insert fingers into the mechanisms.
- When travelling take special care to make sure that luggage or other objects do not injure the child sitting in the car seat in the case of an accident.
- Do not use installation methods other than those recommended because they could cause the detachment of the car seat.
- Never leave your child unattended in the car seat: watch him/her even when s/he is sleeping.
- Never leave a child alone and unsupervised in a car, not even for a short time. The temperature inside the vehicle can change rapidly and become dangerous for the child inside.
- Never remove the child from the seat when the car is moving.
- Check that the child car seat is not blocked by a moving part of the seat or a door.
- Adjust the height and tension of the belts, checking that they adhere to the child's body without being too tight. Check that the safety belt is not twisted and the child cannot unfasten it.
- This car seat is designed only for short naps.
- Do not leave the car seat in the car if exposed to direct
sunlight, because some parts could overheat and cause injuries to the delicate skin of your child. Verify that the seat is not too hot before seating your child.
- Do not use the child car seat without the lining. This lining cannot be replaced by other lining that has not been specifically approved by the manufacturer because it is an integral part of the seat and is essential for safety purposes.
- Do not use the car seat without the protective shoulder pads as they are an integral part of the car seat and the safety system.
- Do not remove or replace the white polystyrene part under the seat, in the backrest and in the headrest, as it is essential for safety purposes.
- Do not remove the adhesive and sewn labels. The removal of these labels could result in the product not complying with the law.
- Do not use the child car seat if it is broken or if there are missing parts, if it is second-hand or if it has been subjected to heavy impacts as a result of accidents, because it may be structurally damaged and be a hazard.
- Do not alter the product.
This article is progressively numbered through its certification label, located on the bottom of the seat (fig. 51). - If in doubt, contact the manufacturer or retailer of this child car seat.
- Contact the post-sales service for repairs, the replacement of components and information on the product. Contact information is provided on the last page of this manual.
- The car seat must always be fixed in the car, even when there is no child sitting in it. In the event of sudden braking, it could injure the passengers.
- Do not use the child car seat if it is broken or if there are missing parts, or if it has been subjected to heavy impacts as a result of accidents, as it may have suffered structural damage which is not visible but is extremely hazardous.
- If using a second-hand product, make sure it is a recent model, comes with instructions, and is fully functional
in all parts. An obsolete product may not conform to safety standards, due to natural ageing of materials and updating of regulations. If you have any doubts, contact the manufacturer's customer service centre.
- Do not use accessories that have not been approved of by the manufacturer or competent authorities.
Car seat, Group 1, "Universal" category, with ISOFIX & Top Tether, class B1
Type approved under European standard ECE R44/04, for children of weight from 9 to 18kg (1 to 4 years approx).
- Compatible with most car seats, though not all.
- The car seat can be correctly installed if the vehicle's use and maintenance manual indicates compatibility with "Universal", Group 1 ISOFIX class B1 restraint systems with Top Tether. For further information on Top Tether use, please see the following section.
- This child car seat is classified as "Universal" and meets stricter homologation criteria compared to previous models, which did not have the homologation label.

IMPORTANT
- Viaggio 1-2-3 Via must always be installed faced forward only on seats with ISOFIX and Top Tether connectors.
- Do not use without Top Tether. The Top Tether is essential in order to guarantee complete safety.
- Do not install Viaggio 1-2-3 Via in seats that are not in the direction of travel or are transversal with respect to the direction of travel.
- It is always advisable to fit the child seat on the rear seats and on the passenger's side.
- If the child seat is installed on the front seat, it is advisable to place it as far as possible from the dashboard.
- This item has a progressive serial number.
- If you experience problems during the installation of Viaggio 1 2 3 Via, lift or remove the headrest.
IMPORTANT:TOP TETHER
Read carefully for proper use of your new PegPerego car seat:
Viaggio 1-2-3 Via.
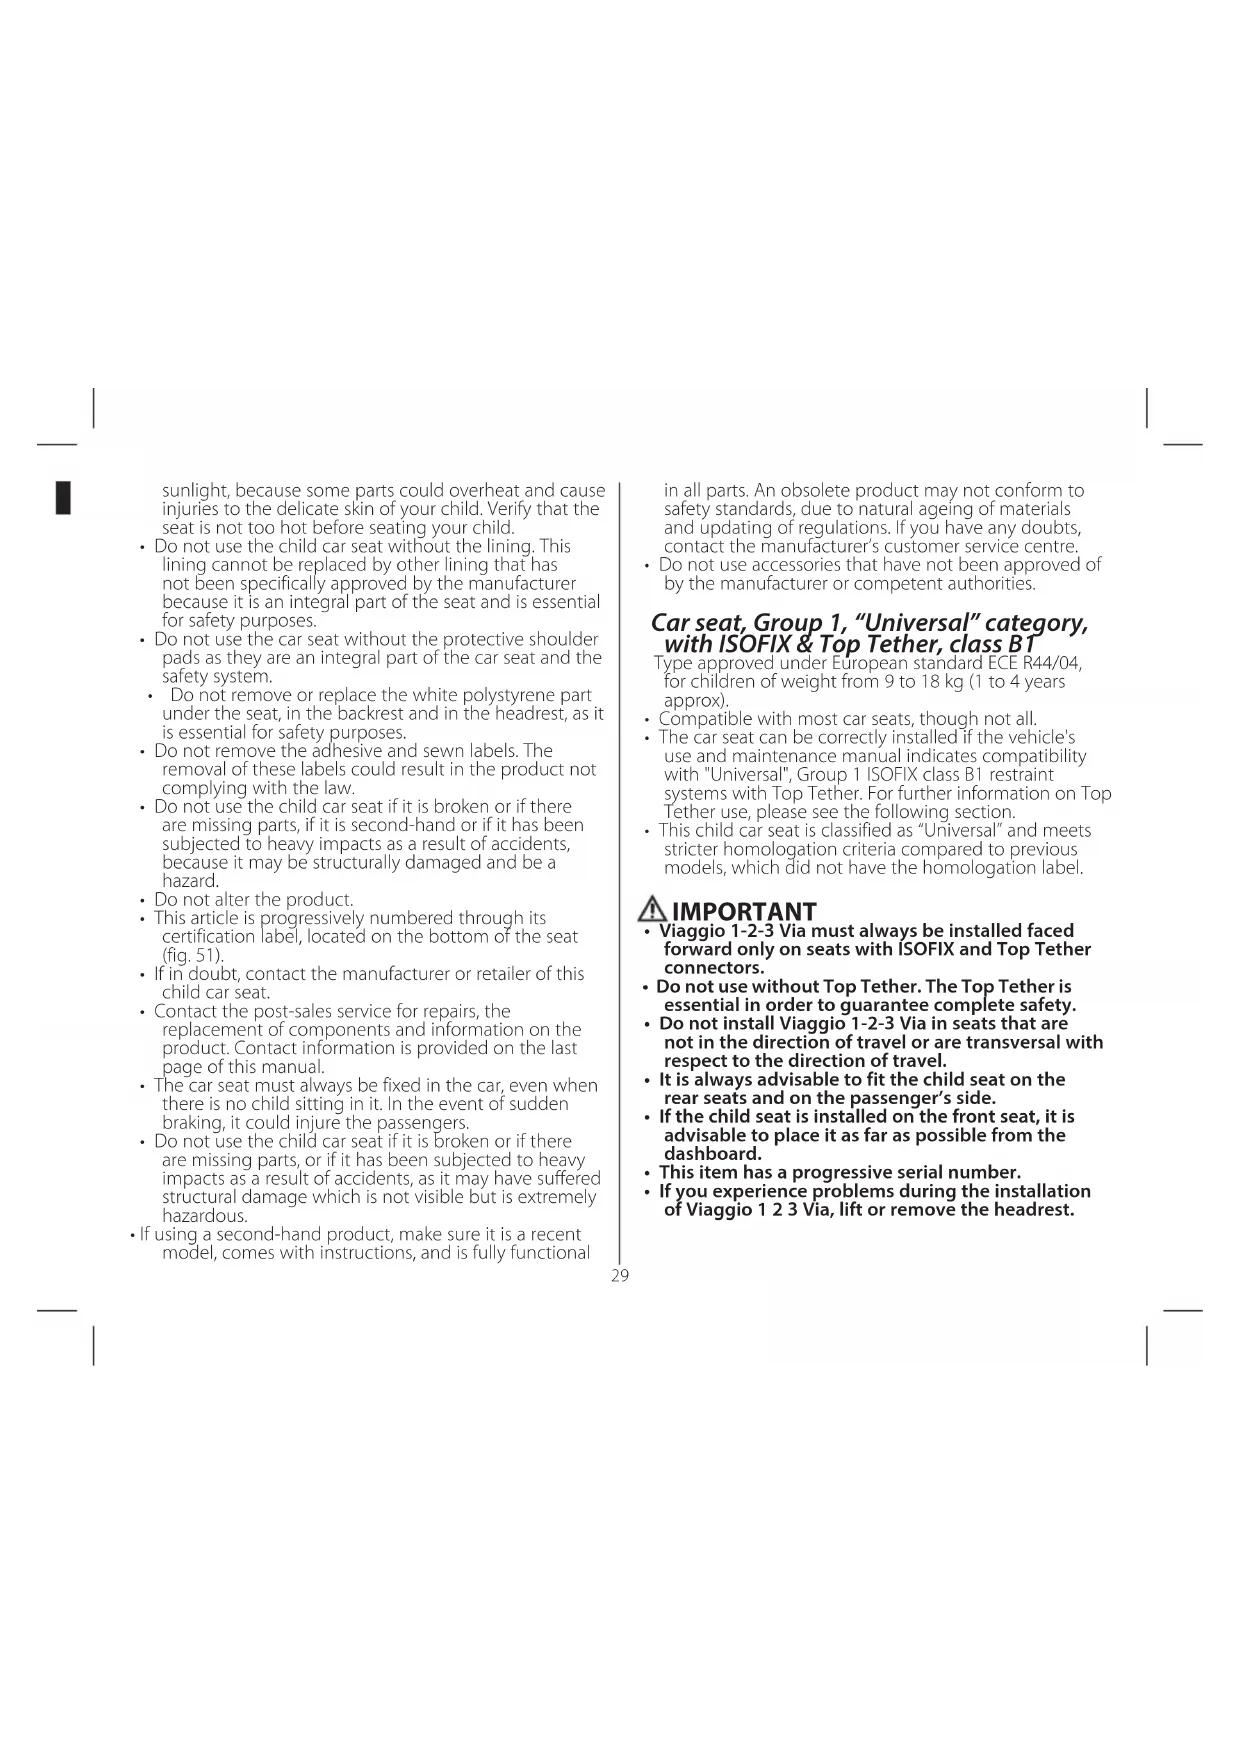
Viaggio 1 2 3 Via is the latest Peg-Perego child seat for children weighing 9 - 18kg It conforms to the European R44/04 Directive. Viaggio 1 2 3 Via uses the ISOFIX fastening device with Top Tether, in compliance with the most up-to-date European Directives, as a guarantee of utmost safety and reliability.
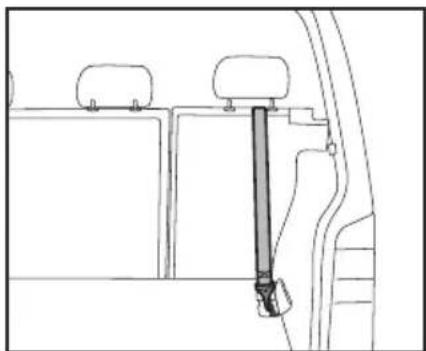
All recently produced vehicles are equipped by law both with the ISOFIX anchor, placed where the backrest meets the seat, and with the TOP TETHER hook.
This is normally located on the shelf behind the rear seat in minivan vehicles (photo A), behind the rear seat in hatchbacks (photo B), or in the trunk in SUVs / off-road vehicles (photo C): In order to prevent an unsuitable (i.e. non Top Tether) anchor being used, the vehicle's TT hook is generally marked by a label bearing the following logo:
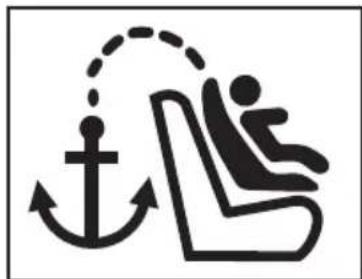
For more information and greater safety, consult your vehicle's instruction and maintenance booklet.
Ensure the car seat is securely fastened using the Top Tether. This not only guarantees utmost safety in the event of collision, but also maximum child stability during normal use.

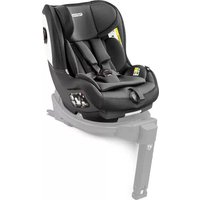
Article components (fig. pag 2)
Inspect the content of the package and contact the Customer Care if some items are missing.
The child car seat includes:
a) head rest
b) backrest
c) seat
d) ISOFIX anchors
e) Top Tether hook
f) shoulder pads
q) booster cushion
h) 5-point safety harness
i) ISOFIX anchor ejection lever
I) seat recliner lever
m) instruction manual compartment.
The car seat is ready for use: no assembly required.
Instructions
UNIVERSAL CATEGORY ISOFIX & Top Tether
Fastening with ISOFIX & Top Tether
1 Pull the yellow lever at the front of the seat base (1) and fully eject the ISOFIX anchors (2).
2 Open the rear door and release the Top Tether hook.
3 Lengthen the Top Tether hook according to your car needs.
4 Secure the ISOFIX anchors in their housings until they click; a red/green LED on the sides of the base will indicate correct anchoring.
5 Pull the yellow lever (1) and simultaneously push the child seat (2) firmly against the car seat.
TOP TETHER HOOK
IMPORTANT: There are 3 main variations to the Top Tether hook.
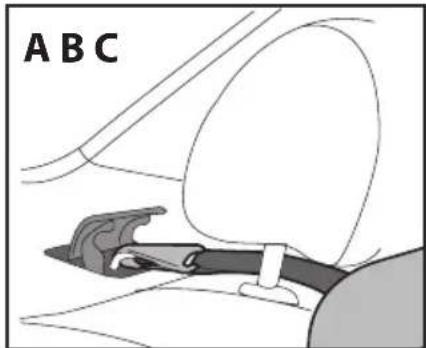
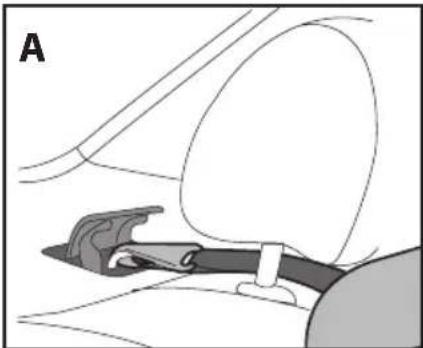
6 Type A:
Lift the headrest and slip the straps underneath.
Fasten the TT hook of the straps to the clearly visible vehicle hook, as shown in the figure.
Pull the strap tight and check correct tension.
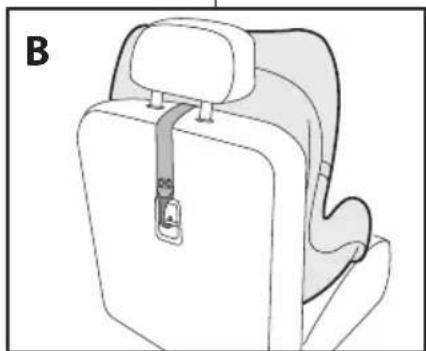
7 Type B:
Lift the headrest and slip the straps underneath.
Fasten the TT hook to the vehicle anchor, placed on the rear of the vehicle's backrest, as shown in the figure. Tighten the belt and check belt tension is correct using the mechanism highlighted in green.
8 Type C:
Lift the headrest and slip the straps underneath.
fasten the TT hook of the straps to the vehicle hook, placed in the boot. This is generally marked by the Top Tether symbol, as shown in the figure. Lift the cover and fasten.
IMPORTANT: to fit the belts correctly, tighten them firmly.
For any other fastening system, consult your vehicle's instruction booklet.
9 To remove the child seat from the car seat, release the Top Tether (1); move the child seat away from the car seat by pulling the lever (2) and seat (3) simultaneously until the yellow side levers appear.
10Once the side levers are visible, release as illustrated and remove the child seat.
How to secure your child in the Viaggio 1-2-3 Via car seat
11 Before placing the child in the car seat, release the harness using the red button on the crotch strap buckle.
12 Lift the safety belt to make room for your child.
13 Place the child in the car seat and arrange the harness over the child's shoulders and waist, as shown in the figure.
14 Lock the harness by overlapping (1) the tongues and inserting them into the buckle of the crotch strap (2) until they click into place.
15 The child is now sitting correctly with the harness fastened properly.
16 Finally, tighten the shoulder straps until they are snug to the child's body by pulling the central adjustment strap towards you as shown in the figure, taking care not to over-tighten the straps.
IMPORTANT: take hold of the straps under the shoulder pads and pull, as shown in the figure.
17 To loosen the safety belt, press the button at the centre of the car seat (1) under the fabric cover and simultaneously loosen the safety belt (2).
IMPORTANT: take hold of the straps under the shoulder pads and pull, as shown in the figure.
18 The car seat has a booster cushion which is only suitable for small babies (maximum 12kg ) and for when the harness is at the first level. To remove the booster cushion, release the buttons on its sides (1) and slide it out of the side straps (2).
How to adjust the seat and head rest
The headrest must be adjusted to match the child's height. There are several positions.
19 To switch from a low to a higher position: pull the tongue at the centre of the head rest (1) upward; the head rest simultaneously lifts (2).
To switch from a high position to a lower one: pull the lever in the upper central part of the headrest upwards and, at the same time, push the headrest down to the desired position.
When you have finished, slightly move the headrest to check it is properly locked into place.
20 To determine the best shoulder strap position, bear in mind that the child's shoulders must be just below the shoulder strap guides.
21 Important: the safety belts should not be too above or below the child's shoulders.
22 The Viaggio 1-2-3 Via car seat can be reclined into several positions.
To recline the seat, pull the lever under the seat (1) and adjust the seat to the desired position (2).
How to switch the car seat from Group 1 to Group 2-3
23 Lift the head rest (1) and remove the shoulder pad hooks (2) located behind the backrest and under the belt, as illustrated.
24 Release the Velcro and, from the front, remove the shoulder pads from the straps.
25Store the shoulder pads for future use.
26 Lift the headrest cover and slide the straps through the
slots in the plastic structure.
27 Remove the booster cushion; then unfasten the automatic buttons on the seat, lift up the fabric, and open the panel underneath.
28 Pull the crotch strap out of the seat fabric, then fasten the straps and close the panel, ensuring the straps slide through its side slots.
29 Raise the backrest by one position to make it easier for the vehicle's seat belt to slide through.
30 The safety belt must freely pass under the side of the child seat.
31 The child seat is correctly switched to Group 2-3.
Child car seat, Group 2-3, "Semi-universal" category with straps +ISOFIX
- Type approved under European standard ECE R44/04, for children of weight from 15 to 36kg (3 to 12 years approx).
- This child car seat is classified as "semi-universal" and can be fitted on the seats of car models specified in the list attached to these instructions.
- The child car seat can only be used in approved cars, fitted with safety belts with three static fixing points or winder, homologated in accordance with standard UN/ECE R16 or equivalent regulations. The car seat should be equipped with ISOFIX anchors.
IMPORTANT: the use of safety belts with two fixing points or an abdominal fixing point is forbidden.
- Viaggio 1-2-3 Via must always be installed faced forward only on seats with ISOFIX connectors.
- Do not install Viaggio 1-2-3 Via in seats that are not in the direction of travel or are transversal with respect to the direction of travel.
- It is always advisable to fit the child seat on the rear seats and on the passenger's side.
- If the child seat is installed on the front seat, it is advisable to place it as far as possible from the dashboard.
- This item has a progressive serial number.
- If you experience problems during the installation of Viaggio 1 2 3 Via, lift or remove the headrest.
How to install the Viaggio 1-2-3 Via car seat
32Pull the yellow lever at the front of the seat base (1) and fully eject the ISOFIX anchors (2).
33 Secure the ISOFIX anchors in their housings until they click; a red/green LED on the sides of the base will indicate correct anchoring.
34Pull the yellow lever (1) and simultaneously push the child seat (2) firmly against the car seat.
How to secure your child in the Viaggio 1-2-3 Via car seat
35Seat your child (fig_a) and pull the car 3-point harness as illustrated (fig_b).
36Fasten the seat belt, ensuring that it clicks into place. Position the two sections of the belt as shown in the figure.
37To finish, pass the belt from the shoulder straps on the head rest: insert the belt between the strap and head rest (1) until is easily slides in the strap slot (2).
IMPORTANT: if the belt is loose, pull over the strap (3). Verify that the belt is always tensioned and untwisted.
38 To remove the belt, remove it from the strap slot (1) and slide it between the strap and head rest (2) until fully removed.
How to adjust the seat and head rest
39 the safety belts are correctly positioned if the child's shoulders are slightly below the intersection point of the safety belts, as shown in the figure. Adjust the head rest to the desired position using the rear lever.
40Follow your child's growth to guarantee correct belt passage. To further increase height, lift the backrest to the desired position using the side buttons.
41 The side flaps can be widened for further adjustments as illustrated.
42Viaggio 1-2-3 Via reclining can be adjusted. Make sure the belt is always correctly fastened. If the car has an adjustable seat back, it can be reclined for maximum Viaggio 1-2-3 Via reclining (fig_a). If the seat back cannot be adjusted, if the car head rest interferes with the child seat head rest, remove the car head rest (fig_b).
43To remove the child seat from the car seat, move the child seat away from the car seat by pulling the lever (1) and seat (2) simultaneously until the yellow side levers appear. If used, release Top Tether.
44Once the side levers are visible, release as illustrated and remove the child seat.
How to remove the fabric cover
The fabric seat of the Viaggio 1-2-3 Via can be removed for cleaning.
45Follow the washing instructions on the seat package.
46 Lift the head rest (1) and remove the shoulder pad hooks (2) located behind the backrest and under the belt, as illustrated.
47 Recline the car seat to the maximum position (1), lengthen the straps and extract the metal anchor from behind the seat (2) as illustrated and unhook the strap.
REMOVE THE LINING FROM THE HEADREST.
48 Remove the lining from the head rest from the bottom and then top
REMOVING THE LINING FROM THE BACKREST
49 Remove the bottom part of the backrest lining (fig_a) and lift the two side flaps vertically out of their housings (fig_b). Lift the head rest for easier removal.
REMOVING THE LINING FROM THE SEAT:
50 Unbutton the buttons on the side of the seat. Remove the lining towards the front of the seat
Maintenance and cleaning of the fabric lining
Brush the fabric parts to remove dust.
- Follow the washing instructions on the label sewn onto
the seat's lining. (fig. 45)
- Do not use chlorine bleach.
- Do not iron.
- Do not dry clean.
- Do not remove stains with solvents.
- Do not tumble dry.
51 Accessories
Travel Bag Car Seat: practical travel bag that keeps the car seat clean and protected.
Serial numbers
52The following information can be found under the seat of the Viaggio 1-2-3 Via: product name, production date and serial number.
53 The type approval label can be found behind the backrest of the Viaggio Viaggio 1-2-3 Via
Product cleaning
This product requires minimal maintenance.
- Cleaning and maintenance must only be carried out by adults.
It is advisable to keep all the moving parts clean. - Clean the plastic parts periodically with a damp cloth. Do not use solvents or similar substances.
- Brush the fabric parts to remove dust or clean following the instructions provided in the dedicated section.
- Do not clean polystyrene parts with solvents or other similar products.
- Protect the product from atmospheric agents, such as humidity, rain or snow. Extended exposure to sunshine can cause colour changes in many materials.
- Store the product in a dry environment.
How to read the type approval labe
This paragraph explains how to interpret the type approval label (orange label).
- The label is double because this car seat is type approved for two types of installation in vehicles:
- SUREFIX BASE fixing system (the SEMI-UNIVERSAL marking indicates that the car seat is compatible with
the ISOFIX system).
Fixing system with a 3-point static seat belt or winder (the UNIVERSAL marking indicates that the car seat is suitable for vehicles with this kind of seat belt).
- The top of the label displays the trademark of the manufacturing company and the name of the product.
The letter E in a circle indicates the European type approval mark and the number indicates the country that issued the type approval (1: Germany, 2: France, 3: Italy, 4: Netherlands, 11: Great Britain, 24: Ireland).
- Type approval number: if it starts with 04, this indicates the fourth amendment (the one currently in force) of Regulation R44.
Reference standard: UN/ECE R44/04.
- Production serial number: on issue of type approval, each car seat is personalised with its own number.
PEG-PEREGO S.p.A.
Peg Perego SpA adopts a quality management system certified by TUV Italia Srl in accordance with the ISO 9001 standard.
Peg Pérego can make changes at any time to the models described in this publication for technical or commercial reasons.
Peg-Pérego after-sales service
If any parts of the item get lost or damaged, only use genuine Peg-Perego spare parts. For any repairs, replacements, information on the products and sales of genuine spare parts and accessories, contact the PegPerego Assistance Service and state the serial number of the product, if present.
tel.0039/039/60.88.213
Toll free number: 800/147.414 (contactable by landline)
e-mail: assistenza@pegperegogo.it
website: www.pegperegogo.com
All intellectual property rights on the contents of this manual are the property of PEG-PEREGO S.p.A. and are protected by the laws in force.
FR Francais
Klantenservice Peg-Perego
Peg-Pérego after-salgsservice
cbopouhbx onepaun He Tpe6yeTcA.
NoHIMnTe NoIroBnK n npOnyCTnTe peMHn no CEHTpy.
3aueHnTe KpIK TT pemHeK KpIky ABTomO6nna, paCNOJXeHHOMy Ha CnINHKe CNJeHb C3aN, KaK NOKa3aHO Ha pcyHke. HataHHTe pemHb n npOBepbTe npabInbHoe HaTaeHne yCTpoiCTBa (0603Haayetc8 3eHbIM UCBtOM).
8 Tun C:
NoHMMTe NoIgROBHK N npOyCTNe peMHn NO UeHTpy.
3aueHnTe KpK T pEmHe K KpOky ABTomO6nna, paONoXeHHOMy B 6aRaXnKe. ObHuHO OH 063Haayetc CmBOnom Top Tether, KaN oKa3aHo Ha pCynKe. POnHMnTe KpbIkwNy BblOnHnTe 3aJeHNHe.
BAXHO: yTo6bI peMHxOpoo npnneraH, nx HxKHO HaTAYb Cynnnm.
Pa3HbIe TINbI 3aKpEnIIeHnONiCaHbIB pyKOBOIDCTBe IOKCNpyTaUIN BaWero ABTomO6nla.
9 4TO6bI CHaTb aBtOKpeCnO C cnHeHbA bTOMo6nH, HxKHO OTcENITb peMeHb Top Tether (1); 3aTeM OTOBmHyTB aBtOKpeCnO OT cnHeHb, NOrHaYb pbUar (2) N oDHOBpeMeHHO KpeCnO (3) Do nOraBneHn B60KobblX XeNTbX pbuArOB.
10Korda nOBaTcB 6OKoBbIe pbuarn,OTcENITe KpeCIO, KaK NOKa3aHO Ha pucyHKe, u y6epnte erO.
Kak nocaaTb pe6eHka B aBtOKpeCNo Viaggio 1-2-3Via
11PpeJe yem ycaknBaTb pe6eHka B KpeCNo,OTcEInTe pEmN 630NaChOCTn, HaxaB Ha KpaCHyIO KNONKy PpAAKKI pEMH, IPOXoJrIero MExDyHorAM.
12 POnHmntpe mHN 6e3oNaCHOCTn, YTObI OCBOoNTb MeCTO Dnpe6eHa.
13 YcaNTpe6eHka n pa3MeCTnTe pemHn 6e3OnaCHOCTn Ha ero Pneuax N O TaNN, KaK NOKa3aHO Ha pncyHke.
14 3acteHnTe pemHn 6e3oNaCHocTn, HAOXnB (1) 3bYKn Dpyr Ha Dpyra N BCTaBnB IN B pRkky pemHn, npoxOJyero Mekdy Horamn (2),do Jenka.
15 Pe6eHOK cnIIT npaBnIbHO, pEmH 6e3OnacHOCTN 3acteHTbHaJIeKaUMM Opa3OM.
16B 3aBepWeHne 3aTAHnTe pEmHn pEmHe 6e3oNaCHOCHT Na pe6eHNKe,NotAHyB Ha c6b4 ueHTpaJbHbN peTyInpOBOuHHbpeMeHb,KaK NOKa3aHO Ha PcCyHKe. BydBe OCTOpOXHb,HTObI He 3aTARHYt b pEmHn Ha pe6eHKe CINIKOM CINJbHO.
BAXHO: octaBbTe He6oBbWOn 3a3Op (Ha ToIunHy naIbua) MExdy peMHeM n rpydHoi KneTKoI pe6eHa.
17 TTO6bI OcJIa6NtB HATJKeHHe pEMHe 6e3OnaCHOCTn, HAKMITE Ha KONky, paCNOJoxKeHHyO B LcHTpe aBTOKpeCna (1), NOd TKAHeBBIM YexlOM, IN OJHOBpeMeHHO OcJIa6bTe HAJKeHHe pEMHa (2).
BAKHO:3axBaTneuNotAHnTe pemHn 6e30nacHOCTN NOI NIIeYEBIMn HAKlaDKaMn, KaK nOKa3aHo Ha pucyHKe.
18 Kpecno ochaueho noyukon-BknaDbIeM, KOtopa nCNOB3yeTc TOnbKO dmaHbKnx DeTei (BecOM 12 Kr) nKorda pemHN 6eONaCHOCTn paCNOJKeHbHa HnKHNx yPOBHX. YTo6bl y6paTb NOdyWKy-BknaDbIi, HeoBXoNIMo OTCTeRHyTB KHONK, paCNOJKeHHbIe Ha ee 6OKOBbIX CTopoHax (1), a 3aTEM CHrTb ee C 6OKOBbIX pemHei (2).
Kak OtpereyIupoBaTb cnJeHbe n noDroJIOBnK
No Mpe B3poclennpebeHka noIroNOBHK cneyet peynpoBaTb TaK, 4TO6bl OH COOTBeCTBOBAn POCTy pebeHka. PpeDyCMOTpeHO HeCKOJIbKO IIOJIOKeHm.
19TTO6bI NpeHINOT HN3K0T NOIOJKeHN K 6Oone BbICOKOMY,NOTAHHTe BBepx pbuar,paCNOJIOKeHHBn CBepxBy CEHTpe NOIROJOBHnKa (1); NOIROJOBHnK 6ydtnoHNMaTBcBAMeCTe C Hm (2).
YTO6blI nepeynOT BbICOKOIO NOIOXeHnK 60JIee HN3KOMy,NOTAHHTe BBepx pbUar,pacNOJOxEHHbI
CBepxyBueHTpe NOIroNOBHnKa,NOHOBpeMeHHo HaKIMaTeHa NIOIROBHNK,DOHYKHOrO NIOXeHnA.
Iocne toro, Kaon onepaun 6ydet BbnoHeHa, nonpo6ynte noBnraTb NOrONoBNK, YTO6bl npOBepntb,3aΦNKcnpoBaH nOH.
20 PpaBnIbHoe nOIOXeHne pemHe: nIeHu pe6eHka HEMHO HOXe TOCKN BbIXOa peMHe n3 CNIHKN.
21 BAXHO: ToKa BbIXOa pemHe He DOJXHa HaxoHtBcH Hn CnWKOM BbICOKO, HN CnWKOM Hn3KO OTHOCHTeJbHO nIeY pe6eHka.
22 ABtOKpeCno Viaggio 1-2-3 Via MoKet npHIMaTb HeCKoJIbKO NOJIOXeHn C pa3HbIMyrJaMn HaKIOHa. UTo6bl HAKIOHNb KpeCNO, HyxHO nOraHyTb pbUar, paCNOJOKeHHb IOn CdneHbEm (1), npeBectn KpeCNo B XeJaEMoe NoIOXeHne (2).
Ka npeo6pa30BaTb aBTOKpeCIO n3 yctpoiCTBa rpynnbl 1 B yctpoiCTBO rpynnbl 2-3
23NoHMMTe NoIroNOBnK (1) nCHMITE KpeNHeHn IneBbIX HaKaJaOk (2), pacNOIOKeHHbIe B 3aDHeY aCTn CnIHKn NOD peHMem, KaK NOKa3aHO Ha pncyHke.
24PaccTeHHTE 3aCTeKnn-ynnyuKn n, cnepeN, chHmTe PnueeBbIe HaKnadKn C pemHei.
25CoXpaHnTe HannneHbIe HaKlaKn IaJIaBHeIero NCNoJIb3OBAHnI.
26NoHIMTe 06nBky noIroNOBnKa n npOTAHNTe pEmHn Yepe3 na3bI B IJIACTIKOBOK KOHCTpyKUHN.
27CHIMITE DOONHITeBHyIO NyKy; 3aTeM pacCTERHITe KHOKNHa CnDeHbe, NOHNIMITE TKAHb N OTKPOIte NaHeJI NOI HeI.
28BbTnHTe naxOBbI pEmHb N3 TkaHcNdeHbA, 3aTeM 3acteHnTe pEmHn H3akpoTte NaHeJIb, y6eINBwncb, 7TO pEMHn CBO6OHO npoxoJr Tpe3 0okObIe na3bl.
29NoHMMTe CnHHky Ha OJHO NIOJOKeHne, YTO6bI 06JIeYHTb IPOTARIBaHHe ABTOMO6NJBHOrO peMHr 6e3OnaCHOCTN.
30 PemeHb aBTOMO6NJIa DOLJKeH CBO6OHO IPOHTNIOD 6OKOBHOr KpeCna.
31 Kpecno npabnbo npoeobaoB yctpoiCTBO rpynnbl 2-3.
Abmomo6unbHoe Kpecno, zpynna 2-3, kamezopur "POnyyHubepcanbHoe" c peMHaMu +ISOFIX
- CepTnΦuIpOBAHO nO eBpOneNcKOMy cTaNdApTy UN/ ECE R44/04 nIa IeTeBecOM ot 15 do 36 Kr (npImepHo ot 3 do 12 neT).
JaHHoe Kpecno ceptnuupoBaHO nla 3Kcnnyataunn B Kateropnn "nonyyHBPcAebHoro" n npedHa3NaheHo nKnpeNneHn Ha cndeHbAx aBtOMobune, nepueNCHeHHbx B CnCkE, npnaRaemom K HactOJeMy nHOpMaIOHOHMy NCTky. - ABtOKpeCNo pa3peWaeTcNcNoB3OBAbT TOnbKO HnyTBEpXJeHHbIX ABTomO6nIax, OCHaJIeHHbIX TPexTOUeHbIM CTaTIueCKIM PEMHEM NIN HAmotuKOM, CepTNfNtupoBaHbIX No perIameHTy UN/ECE R16 NIN 3KbINBaJIeHTbIM CTaHApTAM. Kpome TorO, cIeHebe ABtomO6nIaONJHO 6bITb OBOpdyoBaHO KpeIeHnMa I SOFIX.
BAXHO: He donyckaetca ncoNobOahne DbyxTOueHORo PEMH Nn NOCHORo PEMH.
KpecnoViaggio 1-2-3 Via Heo6xOIMO Bcerda yCTaHaBnIBaTb NO XOyD ABNKeHn I TOIbKO Ha cnIeHnX, OChaSeHHbIX CoeHNHTeJIIMN ISOFIX.
KpecnoViaggio1-2-3ViaHeIb3yycTaHaBnBaTb Ha cnEhbax, NOBepHytbx npOTNB XOda nnN nepneHdkyIrpHO OobUYHOdy DBHXeHNABTOMOUIIA.
-
PekomeHnyetcnaHaBnBaTb DeTCKoe Kpecno Ha 3aHem CnEHe, CO CTOpOHbl, IpOTNBOIOnIOKHOm MeCTy BOITeJIa.
-
Ecnn aBToKpeCNOyCTaHbAINBaETc H Na HepeDHee CnDEHbe, COBeTyEM OTOBHNbYb ERO KaK MOKHO DaJIbSe OTNpBOpHNOIOCKN.
-ⅢdJIe BbIyckaetcC O CKB03HOI NopRKOBOHymepauei.
B CIIyae eCNI yCTaHObKa Viaggio 1 2 3 Via B aBTOMO6nJIb 3aTpPydHeHa, NOHIMITE INI CHIMITE NIOIROBHNK ABTOMO6nJIra.
Kač yctaHOBtB kpecno Viaggio 1-2-3 Via
32IOTAHHeXeJIbI pyuar, paCNOJoxeHbI CnepeDu Ha OCHOBaHm Kpcla (1), YTO6bl IIOIHOCtBIO BbIDBHyTb KpenneHn ISOFIX (2).
33BctabbTe KpeHnHa ISOFIX B cneuaNbHbe rHe3da do ueNka; KpaCha/3eneHae CNrHaNbHa JAmIOuKa, paCNOLOXeHHaNo 60KOBbIM CTOpOHAM OCHOBaHN, NOKaKeT, npAunbHO JIn CoeINHeHO KpeJIeHne.
34NotHnTe JeNTbI pyUar (1) nOJHOBpeMeHHo XopoWo npNXMITE aBtOKpeCNO (2) K CnDEhBIO ABTOM6NJIA.
Kak nocaNTb pe6eHka B aBtOKpeCIOViaggio 1-2-3 Via
35YIObHOyCaJntepebeHka(pnc_a)IpaCnOJOnKeITepTeTOUeyHbpeMeHbABTOMOBnJI,KaK NOKa3aHOHaPcynHke(pnc_b).
36PnCTeHHTe aBTOMObNbHbI peMeHb 6e3OnaCHOCTn Do ueJka. PaCnIOJXnTe IBe BETBn peMHa, KaK NOKa3aHO Ha PNCYHKe.
37Tto6bl 3aBepuHb 3akpenne Hn B aBTOMOBnne, npOnyCTnpeMeHb YpeE3 npOnyCKHbIe NpeeBbIe nTIN, pACNOJoxKeHHbIe Ha NOJrOLOBnKHe: INa 3TOBO BBeJIte peMeHb MekJy neTJeN i NOJrOLOBnKOM (1), IN OH JERKO COCKOJIb3HET B pONyCKHyIO neTJIIO (2).
BAXHO: ecn peMeHb HaTMycna6o, noTnHTe erHa npOnyckHoi nTeNei (3). BHMaHHe: peMeHb Bcerda DoJxKeH 6bItb HATMyT 6e3 nepeKpyuBaHH.
38TObby6paTbpeMeHb,13BNEKeTeero n3 nponyckHOI neTIN(1) INepemeuaTe MeKdyneTNei N NOrOBoHnKOM (2)doNtHoro n3BneueHn.
Kak OtpereynilpoBaTb cnJeHbe nnoTroNoBnK
39 BAXHO: npabunbHoe noLoXeHne pemHe: Pnue npbeHKa HEMHO HNKe TOKu BByXoJa PEMHe N3 CNHKn, KAK NOKa3aHO Ha PCyHKe. Dn npabunBO rpo 3aMepa OTpeRpyPe TIOrOBoHNOI DO HxHoro nOnOKeHn C NOMOcBIO 3aHero PbUHa.
40Tobbi pemeh npoxoHn npabunbHo, pernynpyteero no pocty pebeHKa no mepe ero B3pocneHn.ДЯдьншero yBeyuHHeHn BBICOTI NOHNMITE CINHky DoHyKHOrO NIOJKeHn C NOMOUsB 6OKOBbIX KHOIIOK.
41DOnHHTeBHapeynpOBKaBO3MOxHa 3a ChET pa3BeEH6OKOBbIX BCTaBOK, KaN OKA3aHO Ha pNCyHKe.
42KpecnoViaggio1-2-3 Via donyckaet perynipobkyrna HaKnIOHa.YbEnTecb,TO peMeHb Be3ne npOnyuee HnpaBnIbHO.Ecn ABTomOboNb OcHaueh perynpyeMoCnHKoM,MOxHO HAKnOHTb ee dJa DOCTNKeHnMAkCNMaBHO rYnHa KaNHOa KpeCnA Viaggio 1-2-3 Via (pnc_a).Ecn perynopOBKa cInHKn HeBO3MOXHa n3-3a TORO,TO NOIgONOBHnK abTOMOBnHBO HorO CnDEHb MEaET NOIgONOBHnKy ABtOKpeCnA,CHIMITE NOIgONOBHnK cnDeHb(pnc_b).
43TObI CHaTb ABTOKpeCIO CnHbA ABTOMOBnIA, HxHO OTOBnHyTB ABTOKpeCIO OT CnHbA, NOTHbY PbUar (1) INOHOBpEMEHNO KpeCIO (2) DO NOBHeNIA 60KOBbIX JeNTbIX pbUARoE. Ecn nCnONb3yETc peMeHb Top Tether, OTcENrTe erO.
44Korda nOBaTcB 60KOBbIe pbuHn,OTcENITe KpeCNo,KaK IOKa3aHO Ha pncyHke, n y6epnte erO.
KaCCHaTbTKaHeBbIyexOJI
TkaHeByIO 6OBky Kpecna Viaggio 1-2-3 Via moKHO CHIMaTb DnIy NCTKN.
45BbINHnIte INCTpyKcnn No CTnpKe, npNBeeHHbIe Ha yNaKOBKe CnDeHbI.
460dHMMTE NOrONOBHK (1) IN CHMMTE KpeNneHnI pIeYEBIX HaKnadOK (2), pacNoOnKeHHbIe B 3aDHeI qACTn CINHKINoPemHEM, KaK NOKa3aHO Ha PncyHKe.
47IpebeBte ABTOKpeCIO B NOJOxHne MaKcMmaJIbHOHaKaHIOHa(1),BbTnHTe peMHN u3BVeKeNTe n3 3aJHeuactn CnJeHb(2)MeTaNlUyeCKn JkOpb, KaK POKa3aHO Ha pncyHke N OTcENITE peMeIOWK.
CHIMITE YEXOJ NOIROBNIKA.
48CHHMMTe yexoJ noJrOJbNka Chaana C HnXHei, a 3aTem C BepxHei qactn
CHIMMUTE YEXOJI CINIHKNI
49 CHINMITE HIXHIOU qactb yexna cnnHKn (pnc_a) n, NOHMAR erO BEPTNkAIBHO, INBNEKNTe DBe 6OKOBbIX BCTABKN I3 rHe3d (pnc_b).YTO6bI O6nErHtB 3Ty ONepaunIO, NOHNMITE NOIROJOBHNK.
CHIMMTEYEXOINDEHbA:
50 OToeNTe IBa KOnbua OT NyroBnP, paCNOIOKeHHbIX Ha 6OKOBbIX CTOpOHax CnEhB. CHIMITE yExON B HApabJeHn BnpePe
YxOa 3a TkaHeBOI 6uBkoN I ee UcTka
NoCTteTKaHeBbIe Detanu UTo6bI ydaNtB
CobioaTe HNCTpyKUNI NO CTnPKe Ha 3TNKeTke, BUNTOB 6bnuKy Kpcna (pnc.45).
He nCnOJb3yIe xIopHbI OT6eINBaTeIb.
He rnaIbte.
He noDBepraTe XIMUeCKoY uCTKe.
He ydaIaTe TnTHa pactBOpnteJIaM.
He cyuinte B cyuke
51 Akceccyapbl
npakTuHnay Cmka DnnyTeWeCTBn NOMOraET COepKaTb ABTOMOOnNbHOe CNDeHbe B YNCTOTe N OecneuHbaetero3aunty.
CepnHbIe Homepa
52NoCnDcHbEmViaggio1-2-3ViaHaxoDntcNcneDyUOaI HΦOpMaζη:Ha3BaHnE yCTpoIcTBA,daTa eRo I3rTOBHeHnI cepnHbI HOMep.
53 P03aHn CnHKn CnDcHbY Giaggo 1-2-3 Via HaxoHITcTa6nUka cepTnOuKaun.
UncTka n3dennna
TOI3dJIeHHyKaTcBMINHMaJIbHOM yXOJe.
YCTKy I yXoD 3a N3dJIeNEM DOJXHbI BbIIOJIHrTb TOJbKO B3POCJIbe.
- PeKOMeHnyETcA COePxAbBce DnKyuIeCra Yactn BYNCOTe.
- PepnoDnueckn OuyuainTe nactNKOBbIe cactn BnaXHO TkaHbIO. He nCpObn3yInTe pactBOpNTen nn noDo6bIe BeueCTBa.
OuHuaIeTKaHeBbIyeacTnC NOMoubIOUeTKn,HTo6bl ydaIINb TbIb,JIbO BbIOnJIHReTe UcCTKy C COBIOJeHEm
HHTpyKpI, pINBedeHHbIX COOTBETCTByIOUeM pa3dene.
He nCTte noNCTnponOBle DetanpactBopntenm ININ DpyfIMNIIOOHBIMNPOyKTAMN.
3aunuatae n3dennoe OT B03deNCTBnA aTMOcpehbx OCAKOB, HApnpMep, BNaxHOctN, DOxJa NIN CHera. IInTeNbHOE BO3DeNCTBne CONHeuHbX Lyuee MoKeT npNBecTN K IN3MeHEHIO UBeTa MHOrNX MaTePnaNoB.
XpaHHTe n3dJIeN B C yXOM MeCTe.
YTeHne Ta6nUckn Co CBeJeHnA MNO ceptnФнkaCnN
B 3TOM npaparpafe o6brcHcETcK, KaN ICTONIKOBbIbTa Ta6nUky CO CBeEHNrIMo CePTuФnKaUm (opAHHKeBa Ta6nUka).
Ta6nuka DBOHnA, NOCKoNkky 3TO ABTOKpeCNO OIO6peHO nIyX TINOB YCTAHOBKN B ABTOMO6NIe:
Cnctema KperneHn SUREFIX (OTMeTka SEMI-UNIVERSAL (IOnyyHnBepcaJIbHoe) yKa3bIbaeT, YTO ABtOKpeCIO COBmecTIMO C CNTEmo ISOFIX).
CnCTema KpeIJIeHnI peHMn6e3OnaNCHOTn CTPme CTaTtUeCKMm TOUkAMn FIKCaunn IIN HaTJKNTeEN (MapKInpOBka UNIVERSAL (YHNBEPCAJIbHOE) O3NaHae, tOy aBtOKpeCNo npNIOHOI TpaHCNOptHBx CpeCDTB C TaKIM TINOM peHMne 6e3OnaNCHOTn).
B BepxHe qactn Tabnukyka3aHa ToproBa MapKa KOMNaHnn-PPON3BONDTEI Ha3BaHne N3DeJIY.
BykBa E B KpyKke 03Hauaet, YTO n3dennie ceptnnphiinpoBAnBO H EBpone, A LINPpa yka3bIbaeT Ha cTpaHy, npenoctabNBIuYIO CTaNapHTyO cePTnKnKaIIO n3dennia (1: TepMaHnA, 2: OpaHnA, 3: NTanA, 4: HndepNaHnBi, 11: BenNKo6pntaHnA, 24: VipnaHnA).
Homep cTaNdapTHoI cepTINfNkaun:ecnHoomep HauHHaetc04,3To yka3bBaET Ha COOTBeCTBne YeTBepTOI npabke (JeCTByIOue B HAcTOnuee BpeM) cTaNdpaR44.
CcbiouHbI CTaHapr:UN/ECER44/04.
3aBODCKOcepnHbHOMep:COrIaCHOYcNOBnAM cTaNapTHoCepTnOkauN KaKdoeABTOKpeCNo IMeET HINIBNUyAHLbHbHOMep.
PEG-PEREGO S.p.A.
B KOMnHaHn Peg Perego SpA BHeJpeHa CnCTema ynpabneHHaueCTbOM,cePTnHmUPOBaHHaT UVT Italia Srl no cTaHdapTy ISO 9001.
KOMnHaHnPePereGo IMeET npaBO BHOCTbB IIO6oMOMeHT N3MeHeHnB MOeJI, ONiCaHHbIe B HAcToAueM N3daHnN, NO pInuHAm TexHNueCKOrO INN KOMMepeckOrO XapaKTepa.
Cnyk6a noclenpoaKhoro 06cnykubahn Peg-Perego
B cnyae noteepn nn noonmkn kaokn nno 13 qacte n3dene nncnbsyte TOLbKO opinnhaNbhe 3aNaChbe actn Peg-Perego.Дя pemOHa, zameHb, noNyueHn HΦopMaun o6 n3deneux npodaxn oprrnaHaNbHbix 3aNaChbIX qacteN npinHaJnxKHOCTe OpaTntecb B cnxy6y no paBoTe C kIneHTamn Peg-Perego n ykaKeHtce cepuHbHomep n3dene, eCIn NMeETCA.
Ten.: 0039/039/60.88.213
BecnnaTHbI HOMeP:800/147.414
(DIY 3BOHKO B NO CTaUNHOHAPHOMy TeNefoHy)
ucretszhat:800/147.414
ABTOKpicno roTOBe dna BnKOpncTaHHa.36npaTu noRo He notpi6Ho.
IHCtpykuii
YHIBEPCAJbHA KATEGOPIA ISOFIX i Top Tether
Φikcaui 3a donomozoi KpinneHb ISOFIX i Top Tether
1 NotarHtB KOBTN BaxiNb y nepeHiu qactnHi OCHOBn cnDHHa (1) i NobHicTIO BuCyHbTe KpInneHn ISOFIX (2).
2 BiikpnTe 3aHIO KpUkY i dIcTaHbTe raok Top Tether.
3 BuTnHiB raQoK Top Tether Ha noTppiHy dIra BaWoRo aBTOMO6iIN DOBxHHy.
4 3aφikcyte kpinneHHI ISOFIX y rhi3ax do knaaHn. cepBOHI/3eneHi cBtNoiOuHa 6okax oCHOBn BkA3yBaTmMyTb Ha npabNtBHiCTb KpInneHHI.
5 NotarHtB KOBTn Baxinb (1) i OndOchAoIINbHO npTNCHTb DNTAe aBTOKpicNo (2) Do CnDiHHa ABTOMO6iHa.
TAYOK TOP TETHER
BAXJINBO! IChy€ 3 OCHOBHX BepciI rauKa Top Tether.
6 Tyn A:
PiHIMtB nIgroniBHK i nponyctiTb pemeHi nID Hm.
PiNCTe6hTb rauok TT ha pemeHx DO uITKO BnHDoro raKa aBTOMo6iHa NK nOKa3Ho Ha IIOCTpaui.
3aTARHITb pemih i nepeBipTe HaTAR.
7 Tun B:
PiHIMITbPiIroJIiBnIK i npOryctiB pEmHiPiHIM.
PnncTe6HtBraOKTTdo raKa aBTOMo6iHa, PO3TaWOBaHOrOHa 3aHbOMy 60ci CnHKn CuIHnRA, KIOka3aHO Ha iIOCTpaJI. 3aTARHtB pemih b I nepeBipTe npAunbHcTB HaTAY 3a DOnOMOrO MexaHI3My 3 3eJIeHM MapKePOM.
8 Tun C:
PiHIMiBnIK npOnyctIb peMeHi nHm.
PnncTe6HtB rayok TT ha pemeHx Do rauka aBTOMo6iHa, po3aWOBaHOrO 8baraxHky. 3aBnuaB BIn MapKOBaHm CmBbONom Top Tether, k noka3aHo Ha manHOky. PdHIMtB 06bBky i 3acte6HtB.
BAKINBO!nna npabunbHoro HATrny cnilcnilbHO 3aTAYBaTN pEmHi.
ДлгОТримангИнформачипpoIичICNTeMH KpinHENHДИВ.IHCTpyKUIOdo TpaHCnOPTHO3acO6y.
9 3nTn ABOKpicno 3 CnIHnABTomO6In, BID'EnHaTe KpInHeHH Top Tether (1). NotrHiB abTKpICNo 3 CnIHn ABtomO6In, NotrHyBn BaxInb (2) i CnIHn (3) BOHOac, NOKn He cTaHe BnHO 6iHi KOBTi Baxeni.
10KoHb6iHiBaKeJI6yBeBnDHO,BiEHaHTeKpICNo 3rIHO3InIOCTpaueio.
JK npncTe6HyTu DNHTUHy B aBTOkpicnViaggio 1-2-3 Via
11IepHIXNIOCAaNTIN DITMHy Do ABTOKpICNA, PO3CTe6HITb Ioro pemeHi, HATNCHYBwU ChEPBOHy KONKy Ha npJxKuI naxoBOrO pemeHa.
12Пдимпь ремибeзпк,лбдгДNTINH6уNo 6inbue Micua.
13 Nocaiitb dntinhy do aBtOKpica i BnirHtbp meHi 6e3neKHaPiueiTaHaNOCdNTnHi,IKNOKa3aHOHaInoCTpaui.
14 3acti6HtbpemHHy cnCTemy,3'eHaBunn RaNCHn Habnepexpect (1) i BCTaBUnn ix do npRkN Ha naxobomy pemei (2), NOKN BOHN He 3aui6HyTbCn 3 KnaaHHM.
15 Tepe nHTHa cnntb npaBnBHO 3 HaleKHM YHOM 3acte6HyTO peMHIO CNTeMOI.
16 Ha 3aBepWeHHHaTtHbIb NneObi pEmeHi ABtOKpicna TaK,IO6 BOHN IpnIraHn Do Tila DnTHn,NOTARHyBwn UeHTpaIbHn peYnIOBaIbHn peMInb Ha Ce6e, JIKoKa3aHO Ha iNcTpaui, i 3BeptAOny yBary Ha Te, IO6 He HATrHyTu NneObi pEmeHi HADTO CINbHo.
BAKJIINBO! Bi3bmitbc3a peMeHi iID nIeYOBmHaKaJaKaMn Ta NotrHItb, k NOKa3aHo HaIIOCTpaui.
17 Ⅱo6 nocna6ntn peMehi 6e3neKn, HATNCiHb KhoNky BueHTpi ABtOKpicna (1) niT KaHHHO O66NBKOIO NDHOaCHO OCna6Te peMIh 6e3neKn (2).
BAKJIINBO! Bi3bMitbcra 3a peMeHi nID nIeOBUHn HaKlaJaKaMn Ta NotarHItb, Ra NOKa3aHo Ha iIOCTpauii.
18 ABTOKpicno Mae NOdykuy-BknaiH,ra Kpni3haeHa IINueI MAnix diteu (MaKcMym 12 Kr) i BUKOPNCOTByETbCToDi, KOJIpeMHnCCTema PO3MIeHa Ha nepwomy pIBHi. U6 np6paTn NOdykuy-BknaiH,po3CTe6hHtB KHONKn 3 6OKIB NOdyuKn (1) i BNTaRHTb II 3 60KOBnx peMeHIB (2).
RkBipperyIOBATnCnIHnI nIiRonIBHnK
IiDroBnIK cnD BiDperynoBAtn TaK, 106 NiO R BnCota BiNIOBIDana 3poCTy DITnH. IChye KJIbKa NIOJoxHeB.
19 ⅢoB nepenTn BiHaHnHxQrO nIOJoxEHn DO HauBnIoro: NotaHITb A3NcOK y cEHTpi iIroIIBnKa (1) Bropy; nIroIbHNk nIHimaTmEtbcra OHOaCHO 3 Cm pyxom (2).
Ioo nepenTn BID BWCOKO rnooKeHHrdo HnXyOro: notarHtB BaKinb y BepxHi y BcHTpaNbHi yactnHi niRoiIBHnKa yropi I BODHOac wTOBXHITb NiDroBHNK yHn3 y Notpi6He nooKeHHr.
Iicra3akHcHHeHH TPOxN nobOpuyiTb nIrdonibHnK,06
nepekoHaTnca, 0o BIn HaneXHm YHOM 3aikcoBaHn.
20 106 Bn3HaHTn HaKpaue NIOXeHHN PteOBnx pEmHIB, MaTe Ha yBa3i, 10 Ptei DNTINM MaOTb 6yTN RaP3 NiD HAnpHMHN PteOBNX pEmHiB.
21 BAXIIBO! Pemehi 6e3neKn He nobHHi 6ytn po3taoBaHai aHI 3aHaTO BUCOK, aHI 3aHaTOn HN3bKO 0IO OIIeey DHTUNH.
22 CnIHn ABTOKpCna Viaggio 1-2-3 Via Mae KINbKa nOIOXKeHb HaxNy.
06 HaxNJNTn CnIHn ABTOKpCna, NotrHtB BAXINb nID CnIHnM (1) i BiDperynTe HaxIN CnIHn (2).
A K 3 M i H N T N r p y n y a B T O K p i C l a 3 1 h a r p y n y 2-3
23Пинимпь nIgROINBnK (1) i BNTaHITb rauKn nIeOBNx HaKlaDOK (2), po3aWObaHi Ha 3BOpothomy 6oCi CnIHKn i n peMeHem, k NOKaHaHO Ha iIOCTpaII.
24Po3ct6hHt 3acti6ky-Jnnyky i, nouHaou n CnepeNy, 3HIMITb nIeOBI HaKlaKn 3 pEmeHIB.
25 36epiraTe nIeOBI HaKnaKn IaN IOaNbWoBO BnKOpNCtHaH.
26PiHIMtB nIgronIBHK i nponyctiTb pemeHi uepe3 OTBOPN B nlaCTIKOBOMy KOpnyci.
273HIMITb NOdyuKy-BknaIaII. NotIM BIDCTe6HITb ABOTomatUHi KHOJIKN Ha cnDiiHHi, NiHIMITb TkaHNHy i BiKpNIte NaHeJIb NID HeIO.
28BnTHiIb naxOBn peMHb 3TKaHnH CNiHH,NOTIM 3acte6HItb pEmei i 3akpnTe naHeIb,pepeKoHaBWCb, 10ppeMeH npoiu Hpeepi 6iHi OTbOpN.
29ПИДИМITb CINHky Ha OJHe NIOJOXeHHa, IO6 NOIeIHTN npOBeHnHpeMeHIB TpaHCnOpTHoro 3acO6y uepe3 abTOKpicNo.
30 Pemihb 6e3neKn Mae BInbHO KOB3aTN Upe3 6iHy qactnHy DNTyOro ABTOKpicna.
31 Tenep abToKpicNo HaneXHnM YInHom NpeBedeHo Do rpynn 2-3.
Дитуе abToKpicno, rpyna 2-3, kateropia „HaniByhIbepcalbHe", i3 BnKOpNCTaHHaM peMeHIB 6e3neKn + ISOFIX
CeptniikobaoHIOO BIDNOBIDHOCTI EBponeckbkomy cTAndapTy ECE R44/04,IIaIeBBaroIO B15do36Kn (npin6bnid3do12pokib).
LcIaTae ABToKpCIO ceptiikObaHe IKA HanibHyHBepcalbHe"IMoKe BCTaHOBIOBaTnCAHa cnIHnA bTOMo6inB,3a3NaueHux y CnCKy,IO DoaetbCdo nix IHCTpykui.
-ДИТЯСЕаВТОКПсIOMOЖHAвИКОПСТОВУБaTиЛИse y CXBaJIeHIXx aBtOMO6IINx,OBlaIaHAnIX TpITOUKOBIMN CTaTINHHIMN IHEPciHIMNpeMeHIMN 6e3IeKN, CEPTINΦIKOBaHIMN 3IgINO 3i CTaIaTpOM UN/ECE R16 a6o ekBIBaJIeHTHIMN HopMaTINbAMn. ABTOKPicNo Ma6 6ytn O6NaIHaHe ISOFIX 3'EDHyBaUAmN. BAXJIIVBO! 3a6OpOHeHO BvKOpICSTOBYBaTm peMeHi 6e3NeKIn 3ДВOMa ToUkAmN KpiIIneHHa 6o NOrChi peMeHi.
- AToKpIcNoViaggio 1-2-3 Via cIiD BCTaHOBnIOBaTNI ObluqyM y Hapymky pyxy IiWe Ha cnDiHHa i3 KpinneHHmI ISOFIX.
He BCTaHOBNIouTe aBTOKpicNo Viaggio 1-2-3 Via Ha CnDINHRA bTOMO6JIra, po3MIeHI npOTn Hn nepneHdNkUyI npHpMky pyxy.
- PekomeHIOBaHO 3aBxJn 5uJbHO nIITAYBaTN IINTQue ABTOKpicNo DO CUNIHRA BtOMO6INn NID YAC BCTaHOBHeHH Ha 3aDHIX CUNIHAX aBO Ha NEpeHNbOMy NaCakNpcbkOMy CUNIHII.
KIO DITRAE ABTOKPCIO BCTAHOBNE He na nepedHBOMCnIHPi, peKOMeHDoBAHO PO3TaOByBaTN IORo YKOMORA daJI Bi npuaioBOOI naHeni.
Ley Bupi6 Mac nporpescnBHy cepiny Hymepauio.
Y pa3i BnHnKHeHHn npo6Jem 3i BCTaHOBHeHHm abTOkpcna Viaggio 1 2 3 Via nIDHIMt b a60 3HIMt b nIDrOJIIBHK.
A K BCTaHOBNTn aBtOKpicNo Viaggio 1-2-3 Via
32 NotarHbKOBtBnBaXInb y nepeHni YacTHHi OCHOBn cnHHra (1) i NobHcTIO BucyHbTe KpinnHeHr ISOFIX (2).
33 3aφikcyte KpinnneHHA ISOFIX y rhi3dax do knaaHn. YepBOHI/3eNEHi CbitnoioHa 6okax oCHOBn BkayBaTmMyTb Ha npabNlbHICTb KpiinHnH.
34 NotarHItb XOBtBn BaxInb (1) i OJHOaCHO uINbHO npITNCHTb DITRAe ABTOKpicNo (2) DO cnDINHHA ABTOMO6iJIa.
AkpncTe6HyTn dHTuHy B aBtOKpicJI Viaggio 1-2-3 Via
35 NocadTb DHTNHy B KpICNO (Ma.n. a) i BuTARHITb 3-TOUKOBI peMHb 6e3neKn ABTomO6iHa, k NOKa3aHO Ha iIOCTpaui (Ma.n. b).
36 3acti6HtpeMHb6e3neKnABTOMo6jna, nepekoHaBwncb y TOMy,IO BIN 3aui6HyBC3 KnaaHHm. Po3TaWyIte Dbi YactnHn peMeHra,IK NOKa3aHO Ha MaIIIOHKy.
37 Ha 3aBepWeHHn npoTnHtIb nneOBy qactHy peMeHrYepe3 niDronIBHK: BCTaBTe peMHb MIX 3aTnCKaHem i ndrobnikom (1), 06 Bin KOB3HyB B OTBip dner peMeHr (2).
BAXJINBO!KaIoo peMH npOBncae, nIITARHtB noro (3).3aBXn nepeBipraTe, 0o6 peMH 6e3neKn 6yB HATarHytn i He nepeKpyehn.
38 Lio6 BnTAttn peMihb, BnIMtB noro 3 OTbOpy dny peMeHra (2) i npOBeiTh mK 3aTnCKaem i nIgRonlBNHKOM (1), NOKN NOBHCTIO He BnTARHeTe.
Akybiperylboatn cnidinHna i nidronibnK
39 Pemehi 6e3neKn npabunbHo po3taoBoaHi, RkUO NLeuyi DNTuHn TPOXn HxKYe TOCK BBeDeHHpeMeHr 6e3neKn, kN Oka3aHO Ha MaIHOky.
3a donomoroo 3aHbO BoBaxen BIDperyIIOTe nIroBnIK Do 6axahoro IonoKeHH.
40 CTeXte 3a poCTOM dITnH, uO6 rapaHTyBaTIN npabInbHe NOnOKeHHpeMeH. BiNObiHNO IO nOdaIbWOrO 3pOCTaHH dITnH niIHImaTe NiIroJIbHHK y 6aKaHe NOnOKeHHa 3a DOnOMoTO6iUHX KHOK.
41 BOKOBHIMOxHa p03CyBaTn IINI DOnaTKOBOROperyIIOBaHH,IK NOKa3AHO Ha IInOCTpaII.
42Takok MoKHa perynBAtn Haxn ABToKpicNa Viaggio 1-2-3 Via.3aBXKnI nepeBipRNe,Un npabNbHO 3acte6Hyto pemHb 6e3neKn. KxO CuINHHA BtOMo6iHa perynIOETbcra, NOro MoKHa HaxnITn, Uo6 DoCarrn MaKcMaJIbHO rHO Haxnly ABToKpicNa Viaggio 1-2-3 Via (Man.a).KaUcCuINHr ABToMObiH He perynIOCTcbra, a NiDrONIBHK CuINHr 3aBaXkE NiDrONIBHKOBi ABTOKpICNa, 3HIMtB NiDrONIBHK CInIHn (MaJ.b).
43 3nTn ABTOKpICNo 3 CnIHnA ABTomObInn,NOTARHtB Baxinb (1) i CnIHnN (2) BOHOac, NOKn He cTaHe BnHO 6iHi KOBti Baxeni. BiE'EnaTe KpinneHH Top Tether (AKIO BnKOpNCToByETcH).
44 Koni 6uhi Baxeni 6ynde BuHOBiEHaHTe Kpicno 3riHNO 3 iIOCTpaueio.
Jk 3HrTn TkaHHHy 06NBky
TkaHHHy cactHy cnDinHry Viaggio 1-2-3 Via moKHa 3Himatn nnyuueHH.
45 DToPmUyTeCBA3iBOK i npaHHHa ynaKOBu Kpicna.
46ПДИМИТБПДROLOBнК(1)Ta3HIMITbNORCHIPeMeHI(2),po3aWOBaHIHa3aHINyAuctHiCINHKTuNOCTaBHeHIpipeMHb,RAOKoKa3aHOHaMaIIOHKY.
47 BiCyhBe aBTOMo6IbHe KpICNo Do MaKcMaJIbHOI no3nii (1), PO3TgHITb peMeHi Ta BHTaHITb MeTaJIeBn npuHIN, AOKoKa3aHO Ha MaJIIOHky N03aYi, i 3HIMtB pemHeCb.
3HIMAHHHOBBIBKIN3IITIOJIBHNUKA:
48 3HimaTe o6bBky 3 niIroIiBnka 3Hn3y Bropy
3HIMAHHHObBnBK3I CnIHKN:
49 3HIMITb HNKHIO qACTINHy O6BnKn CnNHKn (MaI. a) i
nHIMITb Dba 6iHnx KnaHn BEptnKaIbHo, 3HimaOuN 36okOBnKpicna (Ma.n.b).PiHIMITb nIroJIBHK,0o6 nonerwn 3HimaHHa O6NBKn.
3HIMAHHRObBKBN3CNIIHH:
50 BiDCTe6HITb KHONKa Ha 6OKax CnIHHa.3HIMiTb 06NBky, NOUHaIOU 3 NepeHbOJ YactHHN CnIHHN.
Dorla i uueneHHraKanHHoio66nBkn
YncttbKaHHHIdetani 0tKOIOIINBuaeHHNny.
IOTPmmytecHCTpykuii3 npaHHHa etKetci,ky npuWnto do 06bBKN Kpicna. (Ma1.45)
- He BUKOPACTOBByBaTn XLOPNH BiD6IIOBAu.
He npacyBaTN.
He 3actocobyBatn ximiHy nCTKy.
HeBudanrnnmP03HHNKaMn.
- He cyuunTu B cyuunbHi MaunHi.
51 OdaTkoBepnlaa
Travel Bag Car Seat: npakTuHa cymKa dna nepeBe3eHHa,ka 3axuuae ABtOKpicNo I Tpmae Noro B yHCTOTI.
CepiHiHomepN
52 Pd cnDHHnViaggio 1-2-3 Via po3MiueHo TaKy iHopMaIIO: Ha3Ba Bnpo6y, dAra Bnpo6HnTBA Ta cepiHn Homep.
533aNyHa cnnuI abTOKpicna Viaggio 1-2-3 Via po3taWOBaHa cepTnphiKauiHa Ta6nUka
UHnBnBnBnBnBnBnBnBnBnBnBnBnBnBnBnBnBnBnBnBnBnBnBnBnBnBnBnBnBnBnBnBnBnBnBnBnBnBnBnBnBnBnBnBnBnBnBnBnBnBn
LcBnpi6 Bmarae MIHimaJbHoro 06CNIyTOByBaHHA.
YiueHHNIO6CnyOByBaHHBnpo6yMaIObBnKOHyBaTN TINbKnDopocniOC6N.
- PeKOMeHIOBaHO TpIMaTH B UHCTOTi Bci pyXOMI YaCTINH.
- PepioDnHOnO ouuIyTe nactIKoBi detani BONOrIO TkaHHIO.He BUKOpNCTOByTe po3uHHNKiB uHINX NODi6Hx peOvHN.
YCTITbTKaHHHIdetaniUITKOIOIINBuaJIeHHNJy
aboDToPmMyTeCBA3iBOK i3 HnueHHa,HaBeJeHnx y BiINOBiHOMy po3di.
He nctitb detani 3 nonictpony po3HHNKamn nn HMMN noi6HMM peOBNHAM.
3axuainTe BnpiB BiD BNINBy aTMOCepHnx faKTopiB, TaNK BOIora,doU abO CHir. TpNBane nepe6yBaHHa COHJMOKe InpNBeCTN Do 3MIHN KOJIbOpY GaRaTbox MaTePiAnIB.
36epirateBupioy cyxomyMiui JkHTaTn ceptnphiikaiHy Ta6nnky
- Ucbomynaparpai Mm NORCHNMO,AK YNTaTIN ceptnfikauiny TaBnUky (nomapahueBa etnkeTa).
L Ta6nuka nOdbiHa, OckIbKn ABTOKpicno ceTnphiKOBaHe dJa KpInHn B ABTOMo6ini Dboma cnocobam:
- Cnctema KpInneHHa SUREFIX BASE (MapkyBaHHa SEMI-UNIVERSAL (HanibHyHepcaIbHe) Bka3yE, 10 abTOKpicNo cymie 3 cnCTemaMn ISOFIX).
CnCTema KpinIeHHa 3-TOyKOBUM CtaTnUHUM a6o iHepuiHmpeMeHem 6e3neKn (MapkyBaHHA UNIVERSAL (YhIbepcalbHe) Bka3ye, uO ue abTOKpicNo cymiche 3 TpaHCnopTHUm 3ac06amu, 06naHaHmTuakm TtNOM peMeHIB 6e3neKn).
YBepxHuiyactnHi Ta6nKu 3a3HaueHO TOBapHn 3HaK KOMNaHII-Bnpo6HnKa H3By Bnpo6y.
JIITEpaE'yKpykeyu-ue CnMBON EBpOneCbKOI cepTnphiKaui, a BiINOBiHN HOMep Bka3ye Ha KpaHy, RaBnDana cepTnphiKaT Ha ue Bnpi6 (1: HimeyuHa, 2: OpaHua, 3: Iaian, 4: HieepnaHn, 11: BeNka BpntaHia Ta 24: IpnaHnir).
Homep ceptnphiikata: kio Bin nouHaetb3 04,To ueytebpTa nonpaBka pernameHy R44 (unHha 3apa3).
3aTocobvban CTanapt:UN/ECE R44/04.
CepiHnHOMepBnpo6y:nicIeBuaCi cepTnphiKAty KOHH Bnpi03HaayetbCra BnAChHM HomepOM.
PEG-PEREGO S.p.A.
B KOMnaii Peg Perego SpA BnpoBaJKeHO cnCTemy ynpabHnHaIKcTIO, cepTuΦikOBaHy TUV Italia Srl 3riHo 3i CTaHApTOM ISO 9001.
KomnaHia Peg Perego 3a annaa 3a coboo npabo y 6ydb-akn qac BHOCTN 3MiHy MOdeni, ONuCAHi y ci nybniKaui, 3TexHInHx YI KOMepuiHnx MIPkyBaHb.
PicnnpoJxHHe 06cIyROByBaHHa Peg-Perego
y pazi nookkeHHn qn Btpn 6ydb-kanx deTanei BkopncOByte Jnne opnrHbHi 3anachi qactHHn Peg-Perego. nnpoepeHHn 6ydb-koRo pemOnTy, 3amHN deTanee Ta oTpmaHH iHOFpMaui npo Bpi6 Ta npoJAK opnrHaBnX 3anaChnx qactHn IdoaTKOBoro 0bnadHnn 3BepTaIteCn Do cepBicHnx ceHTpiB PegPerego i Bka3ynte cepHn Homep Bnpo6y, kkuo biN e.
Tei.: 0039/039/60.88.213
Bé3KoUToBHyN HOMep: 800/147.414 (ДядзВиКИЗ iCTaIooHApHOrO TeneΦOHa)
En. nowa: assistenza@pegperegogo.it
Be6-caiT: www.pegperegco.com
Yci npaba iHTeKeTayabHoB' BlaHcOsti, NOB'3aHI 3i BMICTOM Lboro Noc6Hnka, HanekaTb KOMNaHII PEGPEREGOS.p.A. i 3axnuehi uHHHM 3aKoHOdaBCTBOM.
EL_Eλληνικα
ε) aykiotpo Top Tether
OT)PPOOATAEUTIKAWV
εviαxutko μαξiλap
Jolal algws xia Jabll
..
yIw! wssd gll sIg aolb agjg jLs
aU Jd U dJgG uic oJauu Jabll Jauu Jauu
ii 1y, iia aogall ii jc delio yjg y
.0jwJ 0eoo jUaoyj bbs
aai jaiy aai yj:ajai jaiy daae Jdai jaiy
.dogj
.0ofo 1uab gj x jy yssal lcl
aalldlallglg 08jlllll jsld aolg o dabll
JcW 15uauauauauauauauauuuuuuuuuuuuuuuuuuuuuuuuuuuuuuuuuuuuuuuuuuuuuuuuuuuuuuuuuuuuuuuuuuuuuuuuuuuuuuuuuuuuuuuuuuuuuuuuuuuuuuuuuuuuuuuuuuuuuuuuuuuuuuuuuuuuuuuuuuuuuuuuuuuuuuuuuuuuuuuuuuuuuUU
JlUJL Jabll JcOjBa zwaig, jlao
jogisoojull jauoall jabll uoo yolso g
.0jLl l j 1g 12a2all j 1g j> g> g
jabll aolglaiowdo jso slil go dojsl wg eljblw
J 1 J 1 J 1 J 1 J 1 J 1 J 1 J 1 J 1 J 1 J 1 J 1 J 1 J 1
.05jao 4cji gabu y jabll jg lgsalgo
.0iiaai jaiai aigai gaiyaaa yae aai all iie
g
aolksll aoslll jw Top Tether 00000000000000000000000000000000000000000000000000000000000000000000000000000
JJI JJJJJJSSAAGBbAaTJSSJTTJSSJSS

Jg jn Jn no yjall clogll no yjall .y aolal oJlall alalal alalal. Top Tether alu wol kajbIaBll aao n no sll l J Ie aolly bclwll g ssll aolll jia 189
TOP TETHER:
aJaaal Jabll aaiy y
:JSGo Peg-Perego no Jd
Viaggio 1-2-3 Via
Peg-Perego no oJolal Jolal 1-2-3 Via
Jolal 9 18 9 18 18 18 18 18 18 18 18 18 18 18 18 18 18 18 18 18 18 18 18 18 18 18 18 18 18 18 18 18 18 18 18 18 18
. TOP TETHER
g jallll lcll lcll g g g g g g g g g g g g g g g g g g g g g g g g g g g g g g g g g g g g g g g g g g g g g g g g g g g g g g g g g g g g g g gg
glosogollolal 0000000000000000000000000000000000000000
.
.aaolw yagol jolal
:BgJl7
aaiall gdojy yao aog wlll dssg j 1 1 1 1 1 1 1 1 1 1 1 1 1 1 1 1 1 1 1 1 1 1 1 1 1 1 1 1 1 1 1 1 1 1 1 1 1 1 1 1 1 1 1
Cgul 8
aaiall gdojU yoo aqg wll lssu g j
aiaai all gdojU oJlUI sluoo gdojU (TT) sluoi all slw
gjI.0rgall g cgo go loS. Top Tether aoLc lo12 dgs jblg
dwlgl
.ogy loow wuy,du abgyo aojyll oog Si:olal oJawl oJwI wS gJ. dalioll yIwoll egil aRd
g: (Top Tether(1 6, oJlww) goo Jabu J 9
g2) aalj jb jaoaall no jabll aaai al 1
aai jai all jagb (3) aai cgl
aai gajg jggall aas lgsa aai jg jggb
10
-2-Viaggio 1 oJusll JbI IyI yj Via 3
11 12
glos Jauoll gao S lc jolal aojol bawol jabll gog buol 13 .oogall
14
15
Goo jabll jc nojll aojg o ggy a doaill JlsswJg .oogall g zo go lo c jll g bi wgsll bawll ojo
Jl j (g w! l) Jbll 8 g Lw d jil: al A. jbl uall aal g 2000001, 9 9000001, 11 b2001, 11 doj 11
11
12
13
14
15
laIc
16
17
(2.oojgall) aalull igso
g>g all g,g,gall gddgall gall gall gall gall gall gall gall gall gall gall gall gall gall gall gall
wJlJiwo (a
ai a ai
odall (c
ISOFIX 山 (d
Top Tether (e
a_i = 1p
a aoo (g
blai jwaa gj wawoljg (h
ISOFIX 1swogo Jbds
jblJaaa aIla aai (1
LssS fIaS (m
gJ:oljLwU jol oJauaill Jabll
alldy
Top Tether g ISOFIX aLJI
Top Tether g ISOFIX goo Jauuul
1
.ISOFIX(2)OLOgoIoloojg1g(1)JbbI
. Top Tether 2
JLw Cwol Ttop Tether Jogao 3
.
glo glaw jw wlll gdo go (ISOFIX) 4
Gouo ouclall yjggo jas1/josuogell: gaoai
(2) jbljg 1 (1) jdljll
.0jullll 0eoool j 1
TOP TETHER
Top Tether
.qlil3
:A gill 6
aaii iiaai jia aabjil gjl jlao go,agll
jolly jz> yjl aLd Jgogay jkll nn 19
.
Jabll 30
a22 2-3 aegal Jl Jdall jg y 1589
aas gaaal ojol Jabll 0s j
jolal gao aagglg, glal gl bll dll dojbl ogsjllg
jou j oJ 0000000000000000000000000000000000000000000000000000000000000000000
.ISOFIX dLwD1gjo
jolalaoj>gl jubaiolldoaogyolwyyol
alalal alalal golal alalal alalal
L
aaiy.0jll aal lal all g jl bll s k j 1
ooa aag oogy lo yjabll 00
Ljelai aalwioa j
J.0jI1Viaggio aagao agaogao
.0jwll wJy JiaWg jg
Viaggio 1-2-3 aJusu JbUa aS
Via
aao ool jol yjol jodgogall jolall 32
.ISOFIX (2) cLgLoIooJg (1) Jbbl
gao glaw jwlll gao (ISOFIX) 33
j> brrn aaggl gag aalll 1 (1) jbb
(2) | x - 1| = | x + 3|
aLos ailloljawlloolldojowlg ejl:ol
.
Lae yaaag. caijyll Jalad aaoa aoy jayo 29jo Jaabll Jao
jolal dojol oosl olaig (oasd jao s1r) jolal jobll
gall jll jol yj, aai all ayall galsaia
(1)
JgSooB UJgEg gWwJ
aai jablljgb go wjll iinu elajj bua oju, jabll gai gui
gogo yjy jdy
aJyI JwI:leaij ygog jn aiae iag no Jaa
g j 1 (1) wll d aiaa oagall agall
.(y)wJllnWoojglg
aaiyjllwai:laiai jgiogjjg yggjoo Jaa
gdl gll ggl gll wll lll aagll
aalgogolllgogol,
sillaaesas>wwjlllssssssssssssssssssssssssssssssss
.
jai g o jai jai bll i s o k y lo ic g do jy u aal g o g
a0jy jgdo abai jolu
.0sI JnJyvi Via P-1 Viaggio Jabll Jao 1
(1) odolal Jawl odg>gdal aol jy, Jdai dai g
(1) uolball gogol Jd aedal Jao
1 1 aegaoall no Jabll saa Jgaa
r^2 - PA^2 = dg^2 ②
Cj5g4oJyIyIyIyIyIyIyIyIyIyIyIyIyIyIyIyIy
.0gall goggo ggs (1) odcll ldo o ddo
1 1 1 1 1 1 1 1 1 1 1 1 1 1 1 1 1 1
Lauuwo golusw) doJb ta 10
Jgall 11111111111111111111111
.
gjg,aaal jc aagogjlljjll 0aiaol oslugj
Aa,lauxuTop Tether 15g ailjll jall
aaii gjg ojjgai jlosg, aaii jgi gjgl jgab xic
44
JgSbUgUuB1nO Uo goo
Viaggio-2-3 Via no aalll no aguaall 1j j.
aallgacgl aagoll jsslll 45
(2)aJd aJcJ (1)wJj
goo go los, aljll Jawl lssog ybln no gll c jll
jogaojolalgo.(1)gogaijablaa
aeg.ogall gocgo gao 2) odcll calo no wadll
jlll
joo 48
S_ OBC = 12 · CO · BC = 12 × CD × 5
Jooaol jolgol
aagg aagag (aaggall) gall no dall
aalll lglg.(b.o)gal) Iaggo no 111
:aaalilbgl
50
JaBlaa oaoolj jaiBbJ. JaBlaa aogj
00000000000000000000000000000000000000000000
aalaa jao aegaaolclj>ll jaiy jil
abalallolballlc08gogallclalssglgogsl
(45.8gall) all
S BCD = S COD + S BDO - S BOC
olgSOLU Loojoo
:dlalabuWU
.1abio abolgi gai joi jalsui
.ajglalilgawyiy sclwll aabwlgj
Goo 0dcll qil dc ggo jaoj jggo ell i
Jogall
(2)labllaaaogglgllwagg(1)cagall
.0jJU 1
bJgG JUgUJbJfJ GgUJgUJ Vlgi 1-2-3Via
53
.(b_ogall)ogall gogogasblaa
gog bol qoal 10 g o elaw jol alol alol 36
.8gallolal
gge ggal aal oj yraa .Jauuul
(1)wJyLdWogSjRjyoljoljoljoljol
(2) _1 = _2 = _3 = _4 = _5 = _6 = _7 = _8 = _9 = _10
.(3)S1Jg0g00000000000000000000000000000000000000
11 11 11 11 11 11 11 11 11 11 11 11 11 11 11 11 11 11
.1olai 20 (2) wJll siuog
dsfoaubUglgdo gwooJw
Jabll aas ygloc laic gao jol uall ggl 39
oogall golgo los,doj ygoyabai no slal jao gog 1cugall wylbawl ugball waleall 1cugall
aalll aaiy jy jyj yj yj yj
40
S_ OBC = 12 · CO · BC = 12 × CD × 5
图1
glos ailll lssy jn no glo bdo yj 41
.0g all 2
Loljoljol jilil viaggio 1-2-3 Via Joo
a a 12345678900000000000000000000000000000000000000000000000000000
joo jyll iyo 0j 0j 0j 0j 0j 0j 0j 0j 0j 0j 0j 0j 0j
(b.ogwll) oJwll
jolablaa 1, oJlal 120 g jolabla a
a1g a 100x 511 100 200g
dsw acll aouc Peg-Perego
aabbaa aaii i joo o o
gl Jlulw gl gulu (y) 2011 wic g.Peg-Perego no aolj
glgslglalglgglglgl
aulll lllll 2g Peg-Perego aooj jy Jauil
a7 = 8 又 a6 = 5
7.7A,1/49./49:
EV,1E/A:JgJ
()
assistenza@pegperegoo.it
www.pegperegco.com
LuluU Lue gun aelsoal jol all sall gge
aLgRg g, PEG-PREREGOS.p.A
dJlJdJd
yIgssSyl
GssuUwUwUwUwUwUw:Travel Bag Caru
EUGOGJUWGSJUUBGcIgCOSI
aJl
Viaggio 1-2-3 Via Jabi yol jol JwJoo
aJgCwIyjU,auuL ayuL ayolulclogdaal
a
Viaggio 1-2-3 Via aedd dallbll abl bll lld
#
yI ySdAaagg yI yI yI yI yI yI yI yI yI yI yI yI
bao ghu
aill 1j>ll gaa aai jia bai
jaoababawggygsaassswllcljzllc
aalll aaiioll gl luiyol dsswlo ggo, jlll waaell
.
go lau wglwol no agswal oj yll jy
.aaolll aalzilgul
abwglj gll jagivaall cllalol alol 1
Jolgall joo gaioll aylo oocagaiu ygluiu gluiu
aIgbl gJaaalll ggl gl llaal,cll:aggl
100000000000000000000000000000
.
gfo gjol o bblglo bblg
gduo 12j uu wu uuuu uuuu uuuu uuuu
oslaol cslu siolaloo uuijlu bwggi oaiu jgl j
.
U"JUwJgOgOgSgJgJ,
B1 wks g jg g g
19 0g g ECE R44/04
C. cωlωdω dgl(jdlfgljll)ofo
cwljjw ggs sla jwdo a do jg yu
10jSjJw alai alwog sIg jgi golal w 4232d
L.B1 wS,1ogj"Jluwggj"oWgjI oWgJgJgJgJgJgJgJg
gljuao ly,duaiuuiuyu yds jg lgl uauu yauaao g
1234567890

sgl Jg gj 4yViaggio 1-2-3 Via
gaa jilagjao g wksjglslbaj
aaii aai i 1g jg jg g jg jg jg jg
.
Viaggio 1-2-3 Via
4:wl 0slalol 0laol gds
.2jui jui g u w
Jss
jglg jg jllwrgjg yss wckgjl jglg jg g wckgjl
1 2
J 1 J 1 J 1 J 1 J 1 J 1 J 1 J 1 J 1 J 1 J 1 J 1 J 1 J 1 J 1 J 1 J 1 J 1 J 1 J 1 J 1 J 1 J 1 J 1 J 1 J 1 J 1 J 1 J 1 J 1 J 1 J 1 J 1 J 1 J
J20 (2)gds J1
jglg jlgco
3:40