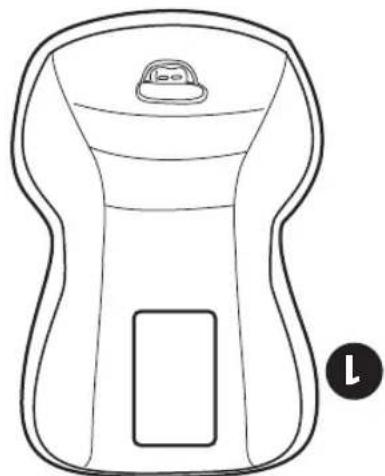
Primo Viaggio Convertible - Car seat PEG PEREGO - Free user manual and instructions
Find the device manual for free Primo Viaggio Convertible PEG PEREGO in PDF.
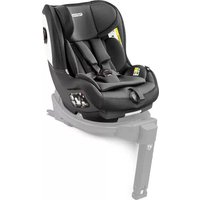
| Product type | Convertible car seat |
| Brand | Peg Perego |
| Model | Primo Viaggio Convertible |
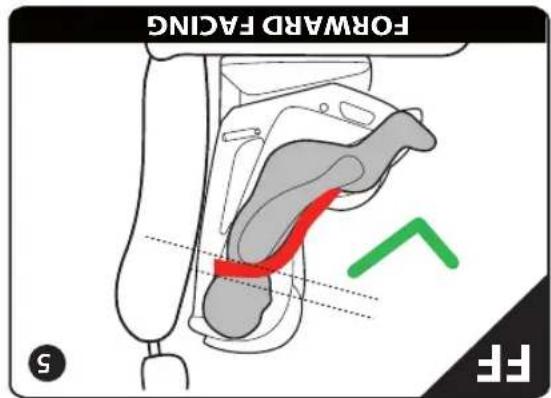
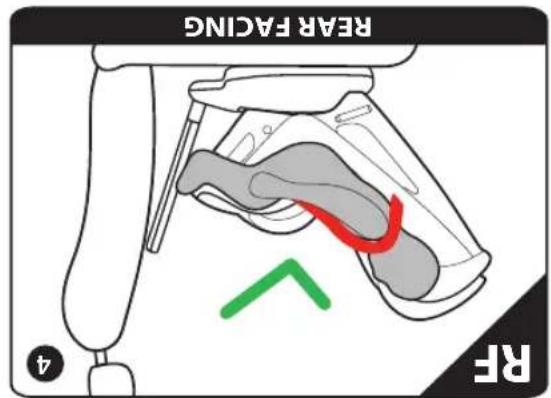
| Use | Rear-facing (2.3-20.4 kg) and forward-facing (10-30 kg) |
| Maximum child height (rear-facing) | 119 cm |
| Maximum child height (forward-facing) | 125 cm |
| Maximum child weight (rear-facing) | 20.4 kg (45 lb) |
| Maximum child weight (forward-facing) | 30 kg (65 lb) |
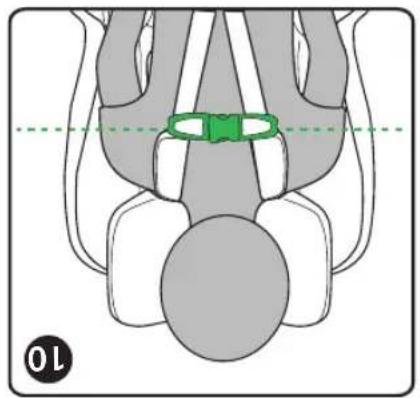
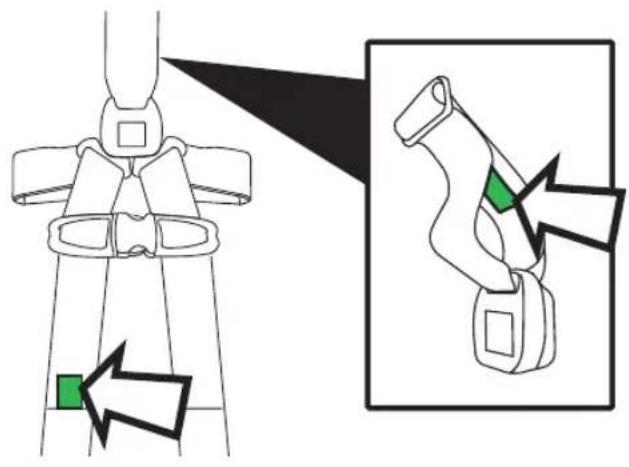
| Harness | 5-point attachment with chest clip |
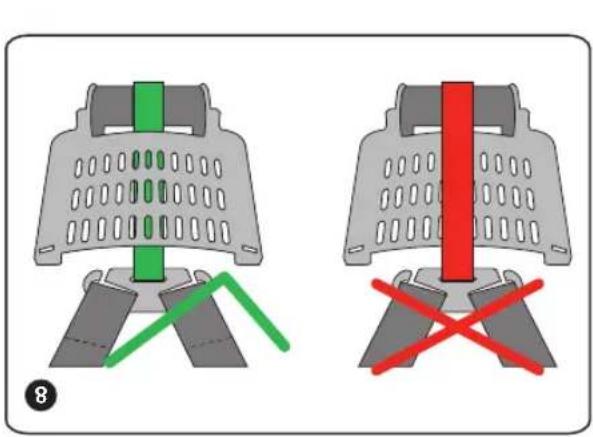
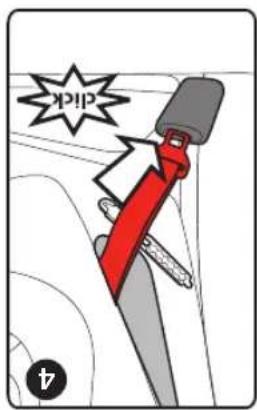
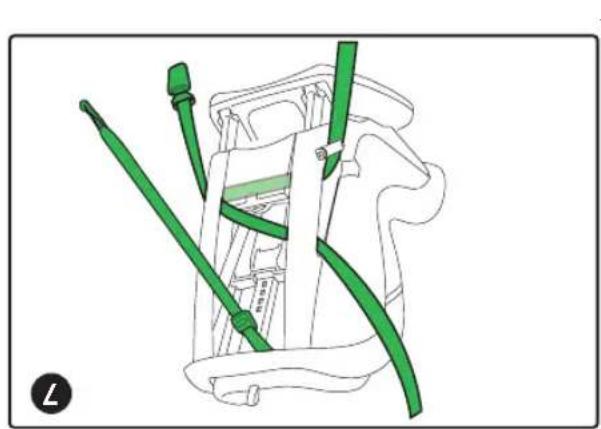
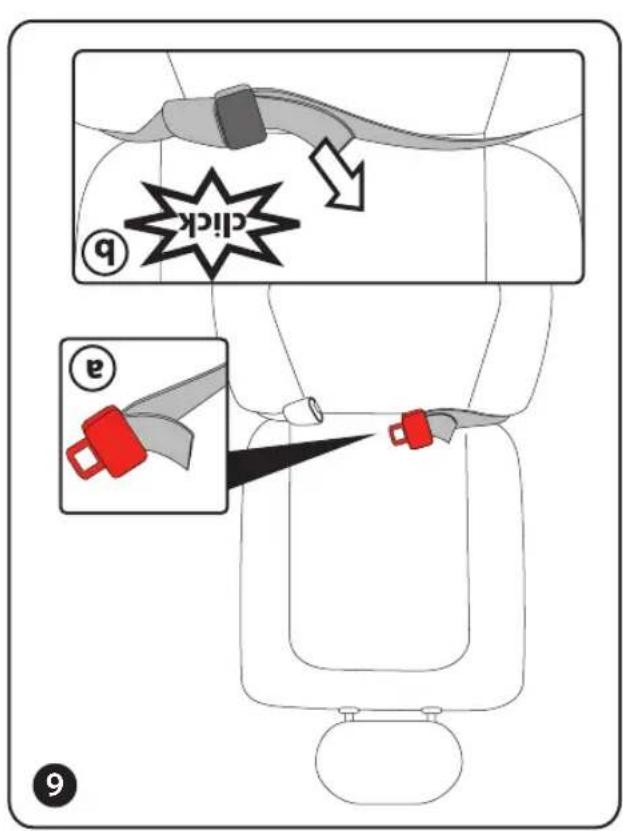
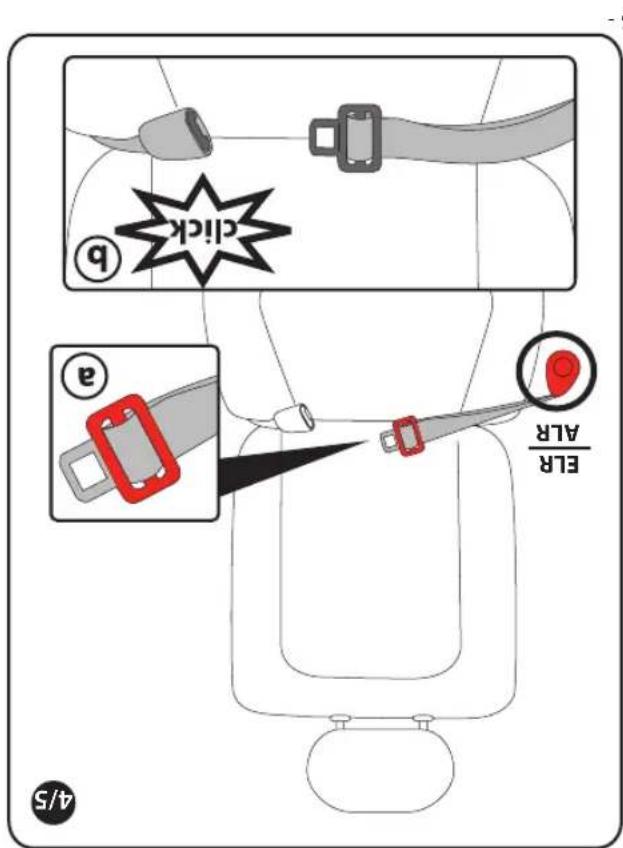
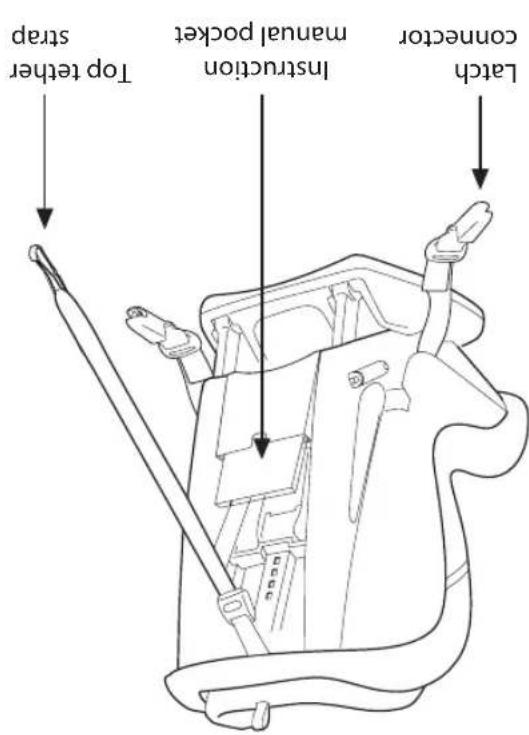
| Installation system | LUAS (lower anchors) and vehicle seat belt (types I, II) |
| Top Tether strap | Yes, mandatory in forward-facing mode |
| Anti-rebound bar | Yes, for rear-facing mode only |
| Newborn cushion | Yes, up to 10 kg (22 lb), reserved for rear-facing mode |
| Adjustable headrest | 10 positions (7 for rear-facing, 8-10 for forward-facing) |
| Recline adjustment | Yes, via lever under the front edge of the shell |
| Compliance | Canadian standard 213 and FAA (airplane) |
| Lifespan | 7 years after date of manufacture |
| Care and cleaning | Removable cover, washable with water and mild soap; avoid solvents and prolonged sun exposure |
| Spare parts | Available (straps, buckles, padding) – contact customer service |
Frequently Asked Questions - Primo Viaggio Convertible PEG PEREGO
User questions about Primo Viaggio Convertible PEG PEREGO
0 question about this device. Answer the ones you know or ask your own.
Ask a new question about this device
Download the instructions for your Car seat in PDF format for free! Find your manual Primo Viaggio Convertible - PEG PEREGO and take your electronic device back in hand. On this page are published all the documents necessary for the use of your device. Primo Viaggio Convertible by PEG PEREGO.
USER MANUAL Primo Viaggio Convertible PEG PEREGO
2.3 - 20.4 kg (5 - 45 lbs)
Hauteur maxi:
119 cm (47 inches)
10 - 30 kg (22 - 65 lbs)
Hauteur maxi:
125 cm (49 inches)
Sommaire
Introduction. 3
Avertissement 5
6nneepnpepepepepepepepepepepepepepepepepepepepepepepepepepepepepepepepepepepepepepepepepepepepepepepepepepepepepepepepepepepepepepepepepepepepepepepepepepepepepepepepepepepepepepepepepe pe
*BCKVg (v
89∠001CNW(
B001
*B0CVA58(L
aee eae ee eae eae eae eae eae eae eae eae eae eae eae eae eae eae eae eae eae eae eae eae eae eae eae eae eae eae eae eae eae eae eae eae eae eae eae eae eae eae eae eae eae eae eae eae eae eae eae eae eae eae e ae
peeppeeppeeppeeppeeppeeppeeppeeppeeppeeppeeppeeppeeppeeppeeppeeppeeppeeppeeppeeppeeppeeppeeppeeppeeppeeppeeppeeppeeppeeppeeppeeppeeppeeppeeppeeppeeppeeppeeppeeppeeppeeppeeppeeppeeppeeppeeppeeppeeppeeppe

s q 20 dn uenrnnn nnnn nnnn nnnn nnnn nnnn nnnn nnnn nnnn nnnn nnnn nnnn nnnn nnnn nnnn nnnn nnnn nnnn nnnn nnnn nnnn nnnn nnnn nnnn nnnn nnnn nnnn nnnn nnnn nnnn nnnn nnnn nnnn nnnn nannn nnnn nnnn nnnn nnnn nnnn nnnn nnnn nnnn nnnn nnnn nnnn nnnn nnnn nnne
aonn nnnnne aen ane enanen ne ane ane ane ane ane ane ane ane ane ane ane ane ane ane ane ane ane ane ane ane ane ane ane ane ane ane ane ane ane ane ane ane ane ane ane ane ane ane ane ane ane ane ane ane ane ane ane ane ane ane anee
aoe aoe aeae eae aee aee aee
n nnnnne nnnnne nnnnne nnnnne nnnnne nnnnne nnnnne nnnnne nnnnne nnnnne nnnnne nnnnne nnnnne nnnnne nnnnne nnnnne nnnnne nnnnne nnnnne nnnnne nnnnne nnnnne nnnnne nnnnne nnnnne nnnnnee nnnnne nnnnne nnnnne nnnnne nnnnne nnnnne nnnnne nnnnne nnnnne nnnnne nnnnne nnnnne nnnnne nnnnne nnnnne nnnnne nnnnne nnnnne nannnee
LNNEIISnRdVaRDsHcD

P P P P P P P P P P P P P P P P P P P P P P P P P P P P P P P P P P P P P P P P P P P P P P P P P P P P P P P P P P P P P P P P P P P P P P P P P P P P P P P P P P P P P P P P P P P P P P P P P P P P P
Ppaepeepd sI eaepeepd sI eaepeepd sI eaepeepd sI eaepeepd sI eaepeepd sI eaepeepd sI eaepeepd sI eaepeepd sI eaepeepd sI eaepeepd sI eaepeepd sI eaepeepd sI eaepeepd sI eaepeepd sI eae peepd sI eae peepd sI eae peepd sI eae peepd sI eae peepd sI eae peepd sI eae peepd sI eae peepd sI eae peepd sI eae peepd sI eae peepd sI eae peepd sI eae peepd sI eae peepd sI eae peep
eepnneepnneepnpe o

P
eeppeeppeeppeeppeeppeeppeeppeeppeeppeeppeeppeeppeeppeeppeeppeeppeeppeeppeeppeeppeeppeeppeeppeeppeeppeeppeeppeeppeeppeeppeeppeeppeeppeeppeeppeeppeeppeeppeeppe
(dupe) aunn nnnnne ane ennnnne ean ne nnnnne ennnnne ennnnne ennnnne ennnnne ennnnne ennnnne ennnnne ennnnne ennnnne ennnnne ennnnne ennnnne ennnnne ennnnne ennnnne ennnnne ennnnne ennnnne ennnnne ennnnne ennnnne ennnnne ennnnne ennnnne ennnnne
Aue 1nne nnnn nee eae ene nee nee nee nee nee nee nee nee nee nee nee nee nee nee nee nee nee nee nee nee nee nee nee nee nee nee nee nee nee nee nee nee nee nee nee nee nee nee nee nee nee nee nee nee nee nee nee nee nee nee
-98 -
(13d)178d7
apow buippipipipipipipipipipipipipipipipipipipipipipipipipipipipipipipipipipipipipipipipipipipipipipipipipipipipipipipipipipipipipipipipipipipipipipipipipipipipipipipipipipipipipipipipipipipipipipipipipipipipip
Pn

eepn s66 nnnnnepepepepepepepepepepepepepepepepepepepepepepepepepepepepepepepepepepepepepepepepepepepepepepepepepepepepepepepepepepepepepepepepepepepepepepepepepepepepepepepepepepepepepepepepepe pe
(II dA L) L E B R D N O H S
dVNTNISNNEOENIENR
eeppeeppeeppeeppeeppeeppeeppeeppeeppeeppeeppeeppeeppeeppeeppeeppeeppeeppeeppe
ueyou s!peuy!bupeymosn
(sesn6) wzL s! ybiywnxewosom
pue:(60E pue 01) spunod 59 pue 22 ueaemq
ybiom ouym enepn m bpepepepe
EONNNNNEA
u6isep 1eq epepepepepepepepepepepepepepepepepepepepepepepepepepepepepepepepepepepepepepepepepepepepepepepepepepepepepepepepepepepepepepepepepepepepepepepepepepepepepepepepepepe pe
ON
-91
sssssssssssssssssssssssssssssssssssssssssssssssssssssssssssssssssssssssssssssssssssssssssssssssssss
eeppe eeppe eeppe eeppe eeppe eeppe eeppe eeppe eeppe eeppe eeppe eeppe eeppe eeppe eeppe eeppe eeppe eeppe eeppe eeppe eeppe eeppe eeppe eeppe eeppe eeppe eeppe eeppe eeppe eeppe eeppe eeppe eeppe eeppe ecppe eeppe eeppe eeppe eeppe eeppe eeppe eeppe eeppe eeppe eeppe eeppe eeppe eeppe eeppe eeppe eeppe eeppe eeppe eeppe eeppe eeppe eeppe eeppe eeppe eeppe eeppe eeppe eeppe eeppe eeppe eeppe eeppe eepopee
Aqnnnneepue u6isop s3eep
Ss
eeppeeppeeppeeppeeppeeppeeppeeppeeppeeppeeppeeppeeppeeppeeppeeppeeppeeppeeppeeppeeppeeppeeppeeppeeppeeppeeppeeppeeppeeppeeppeeppeeppeeppeeppeeppeeppeeppe
008 008 008 008 008 008 008 008 008 008 008 008 008 008 008 008 008 008 008 008 008 008 008 008 008 008
Aaieeeppeaeep

R easssed . aaywaaeessssodndn .
Aaieeepss

oeae dx
Pnne Pnnnne Pnnne Pnnne Pnnne Pnnne Pnnne Pnnne Pnnne Pnnne Pnnne Pnnne Pnnne Pnnne Pnnne Pnnne Pnnne Pnnne Pnnne Pnnne Pnnne Pnnne Pnnne Pnnne Pnnne Pnnne Pnnne Pnnne Pnnne Pnnne Pnnne Pnnne Pnnne Pnnne Pnnne Pnnnne Pnnne Pnnne Pnnne Pnnne Pnnne Pnnne Pnnne Pnnne Pnnne Pnnne Pnnne Pnnne Pnnne Pnnne Pnnne Pnnne Pnnne Pnnne Pnnne Pnnne Pannne Pannne Pannne Pannne Pannne Pannne Pannne Pannne Pannne Pannne Pannne Pannne
R
oeaeepoeepeoeepoeepoeepoeepoeepoeepoeepoeepoeepoeepoeepoeepoeepoeepoeepoeepoeepoeepoeepoeepoeepoeepoeepoeepoeepoeepoeepoeepoeepoeepoeepoeepoeepoeepoeepoeepoeepoeepoeepoeepoeepoeepoeepoeepoeepoeepoe
eepnnppeep
ou
yepn
eepnne nnnnne eannnne nee
eaeemepyBmmynreepyM Aouo esn
sre 6now wne Ame sae bue dee K .
aonrnnn nree aq q i i i i 6nqem
aousses o rean m aessocun pone o
ssssaaq n rnrnnn nouo .
ee ne e nee cne ene one
abewep ae ane aeene pone qoe ae
e s tineepepepepepepepepepepepepepepepepepepepepepepepepepepepepepepepepepepepepepepepepepepepepepepepepepepepepe pe
Pn Pn Pn Pn Pn Pn Pn Pn Pn Pn Pn Pn Pn Pn Pn Pn Pn Pn Pn Pn Pn Pn Pn Pn Pn Pn Pn Pn Pn Pn Pn Pn Pn Pn Pn Pn Pn Pn Pn Pn Pn Pn Pn Pn Pn Pn Pn Pn Pn Pn Pn
-9-
W
sosssssssssssssssssssssssssssssssssssssssssssssssssssssssssssssssssssssssssssssssssssssssssssssssssssssssssssssssssssssssssssssssssssssssssssssssssssssssssssss
Jnne nnnn nee nnnn nee nnnn nee nnnn nee nnnn nee nnnn nee nnnn nee nnnn nee nnnn nee nnnn nee nnnn nee nnnn nee nnnn nee nnnn nee nnnn nee nnnn nee nnnn nee nnnn nee nnnn nee nnnn nee nnnn neee nnnn nee nnnn nee nnnn nee nnnn nee nnnn nee nnnn nee nnnn nee nnnn nee nnnn nee nnnn nee nnnn nee nnnn nee nnnn nee nnnn nee nnnn nee nnnn nee nnnn nee nnnn nee nnnn nee nnnn neae nennn neae nannn neae nannn neae nannn neae nannn neae nannn neae nannn neae nannn neae nannn neae nannn neae nannn neae nannn neae nannn neae nannn neae nannn neae nannn neae nannn neae nannn neae nannn neae nannn neae nannn neae nennn neae nannn neae nannn neae nannn neae nannn neae nannn neae nannn neae nannn neae nannn neae nannn neae nannn neae nannn neae nannn neae nannn neae nannn neae nannn neae nannn neae nannn neae nannn neae nennn neae
n 16000000000000000000000000000000000000000000000000000000000000000000000000000000000
e
Pnne Pnne Pnne Pnne Pnne Pnne Pnne Pnne Pnne Pnne Pnne Pnne Pnne Pnne Pnne Pnne Pnne Pnne Pnne Pnne Pnne Pnne Pnne Pnne Pnne Pnne Pnne Pnne Pnne Pnne Pnne Pnne Pnne Pnne Pnnnnnnnnnnnnnnnnnnnnnnnnnnnnnnnnnnnnnnnnnnnnnnnnnnnnnnnnnnnnnnnnnnnnnnnnnnnnnnnnnnnnnnnnnnnnnnnnnnnnnnnnnnnnnnnnnnnnnnnnnnnnnnnnnnnnnnnnnnnnnnnnnnnnnnnnnnnnnnnnnnnnnn
Jenew wss
pue npnnpnnpnnpnnpnnpnnpnnpnnpnnpnnpnnpnnpnnpnnpnnpnnpnnpnnpnnpnnpnnpnnpnnpnnpnnpnnpnnpnnpnnpnnpnppnnppnnppnnppnnppnnppnnppnnppnnppnnppnnppnnppnnppnnppnnppnnppnnppnnppnnppnnppnnppnnppnnppnnppnnppnnppnnppnnppnnppnnppnnppnnppnnppnnppnnppnnppnnppnnppnnppnnppnnppnnppnnppnnppnnppnnppnnpp
乙