Optigrill XL YY4398 - Griddle TEFAL - Free user manual and instructions
Find the device manual for free Optigrill XL YY4398 TEFAL in PDF.

| Product type | Electric plancha / Multifunction grill |
| Brand | Tefal |
| Model | Optigrill XL YY4398 |
| Power supply | Electric, grounded plug (detachable cord) |
| Power | Approximately 2000 W (estimate) |
| Dimensions (L × W × H) | Approximately 50 × 35 × 20 cm (estimate) |
| Weight | Approximately 6 kg (estimate) |
| Number of programs | 6 automatic programs (ground beef, fish, red meat, poultry, panini/sandwich, sausages/lamb, pork, bacon, seafood) + manual mode with 4 temperature settings |
| Plate material | Non-stick coating (removable plates) |
| Cooking capacity | Food up to 4 cm thick |
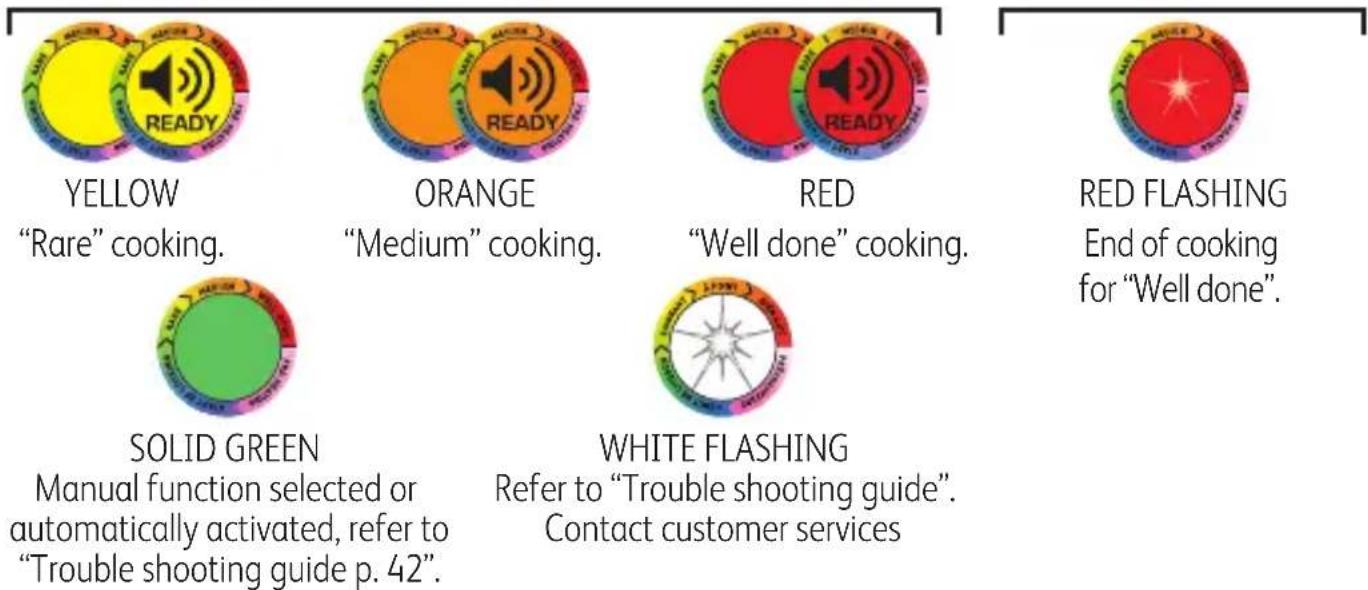
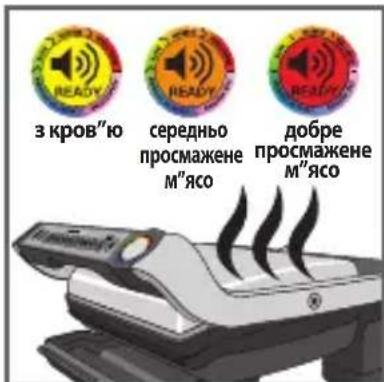
| Cooking indicator | LED with colors: purple (preheating), blue (start), green (cooking), yellow (rare), orange (medium), red (well done), flashing red (keep warm) |
| Special functions | Frozen mode, keep warm (30 min), automatic safety shut-off |
| Safety | Automatic shut-off if opened too long, if preheating ends without food, overheating detection |
| Care and cleaning | Plates and juice collection tray dishwasher safe; wipe appliance body with damp cloth; do not immerse |
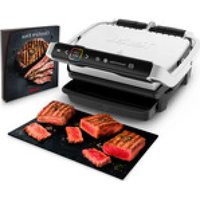
| Included accessories | Cooking plates (upper and lower), juice collection tray, Snacking & Baking accessory (depending on version) |
| Spare parts | Plates, tray, Snacking & Baking accessory available from authorized service center |
| Repairability | Repairs by an authorized service representative only |
| Warranty | Domestic use; warranty not covered for professional use |
Frequently Asked Questions - Optigrill XL YY4398 TEFAL
User questions about Optigrill XL YY4398 TEFAL
0 question about this device. Answer the ones you know or ask your own.
Ask a new question about this device
Download the instructions for your Griddle in PDF format for free! Find your manual Optigrill XL YY4398 - TEFAL and take your electronic device back in hand. On this page are published all the documents necessary for the use of your device. Optigrill XL YY4398 by TEFAL.
USER MANUAL Optigrill XL YY4398 TEFAL
SAFETY INSTRUCTIONS IMPORTANT SAFEGUARDS
Use, maintenance and product installation guidelines: for your own safety, please read through all paragraphs of the instruction manual including the associated pictograms.
-
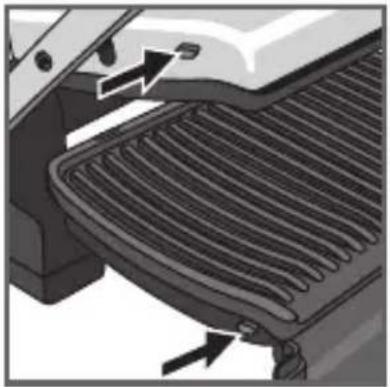
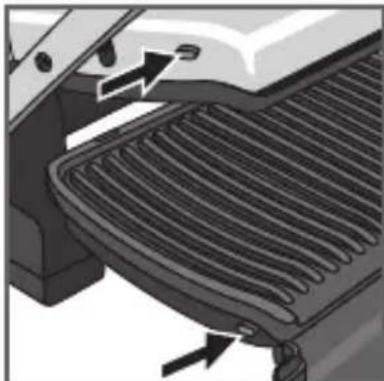
This appliance is intended for indoor, domestic household use only. It is not intended to be used in the following applications, and the guarantee will not apply for:
-
staff kitchen areas in shops, offices and other working environments;
-farm houses; - by clients in hotels, motels and other residential type environments;
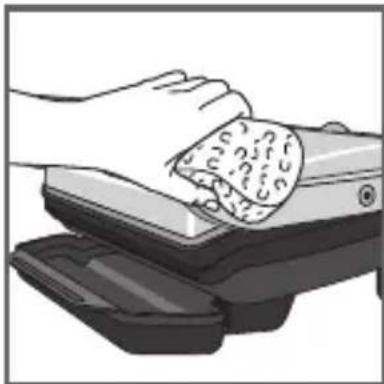
-
bed and breakfast type environments.
-
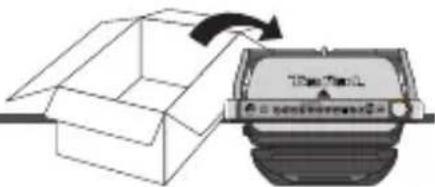
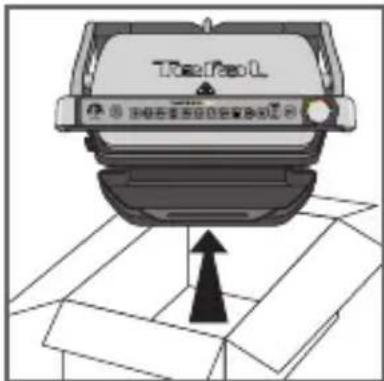
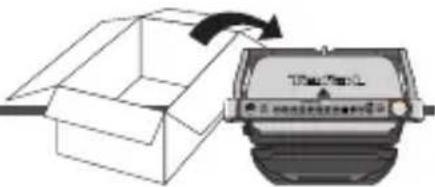
Before first use remove all packaging materials, stickers and accessories from the inside and the outside of the appliance.
-
This appliance is not intended for use by persons (including children) with reduced physical, sensory or mental capabilities, or lack of experience and knowledge, unless they have been given supervision or instruction concerning use of the appliance by an adult responsible for their safety. Children should be supervised to ensure that they do not play with the appliance, and do not use as a toy.
-
This appliance can be used by children aged from 8 years and above and persons with reduced physical, sensory or mental capabilities or lack of experience and knowledge if they have been given supervision or instruction concerning use of the appliance in a safe way and understand the hazards involved. Cleaning and user maintenance shall not be made by children unless they are older than 8 and supervised.
-
Keep the appliance and its cord out of reach of children less than 8 years.
- Never leave the appliance unattended when in use.
- Accessible surface temperatures can be high when the appliance
is operating. Never touch the hot surfaces of the appliance.
- This appliance is not intended to be operated by means of an external timer or separate remote-control system.
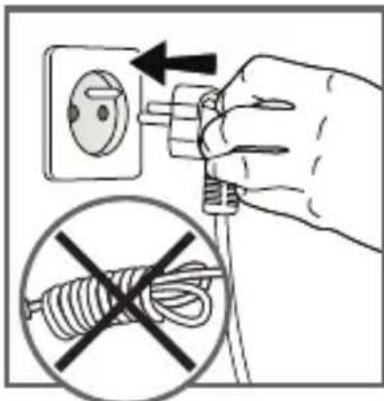
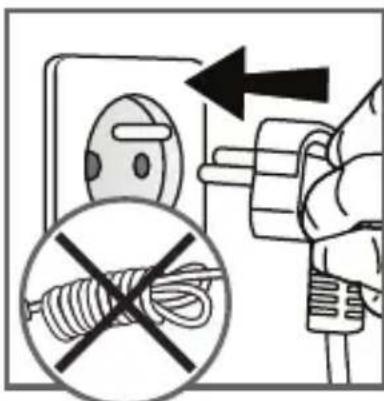
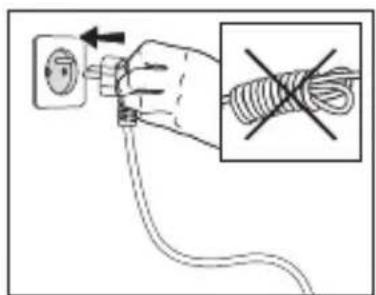
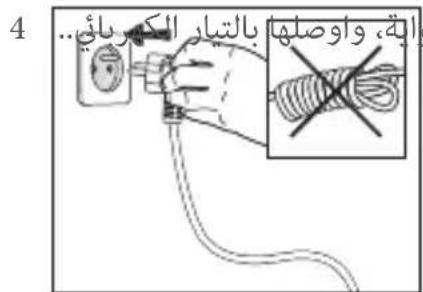
- Fully unwind the power cord before plugging in the appliance.
- If the power supply cord is damaged, it must be replaced by the manufacturer or its after sales service in order to avoid any danger.
- Do not use an extension lead. If you accept liability for doing so, only use an extension lead which is in good condition, has a plug with an earth connection and is suited to the power rating of the appliance. Take all necessary precautions to prevent anyone tripping over an extension cord.
Always plug the appliance into an earthed socket. - Make sure that the electric power supply is compatible with the power rating and voltage indicated on the bottom of the appliance.
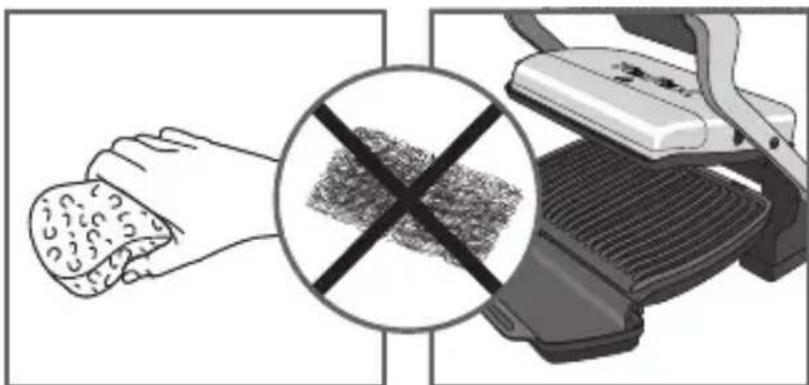
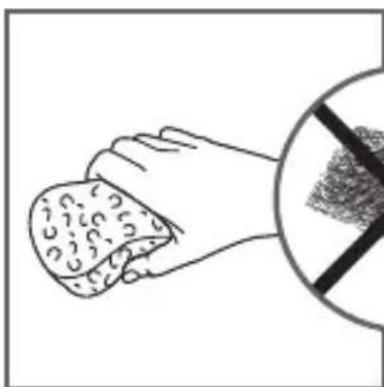
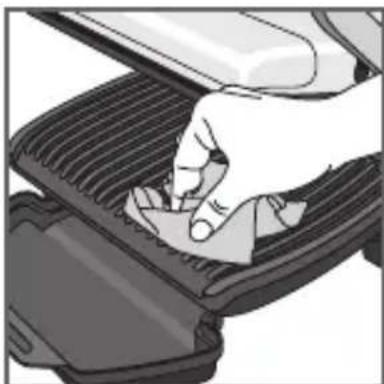
- Use a sponge, hot water and washing up liquid to clean the cooking plates.
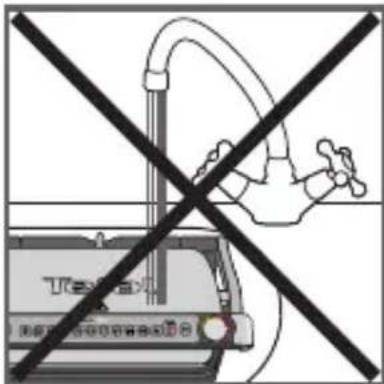
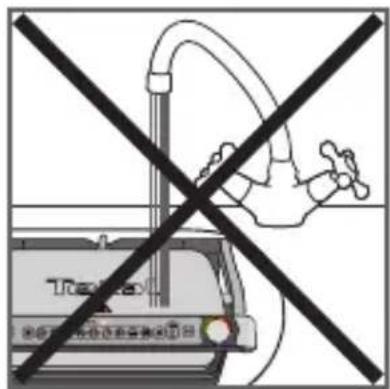
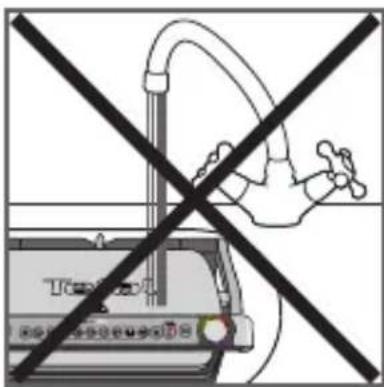
- Never immerse the appliance, its power cord or plug in water or any other liquid.
WARNING: Do not heat or pre-heat without the 2 cooking plates inside the grill.
Do
- Read the instructions carefully, common to different versions depending on the accessories supplied with your appliance, and keep them within reach.
- If an accident occurs, rinse the burn immediately with cold water and call a doctor if necessary.
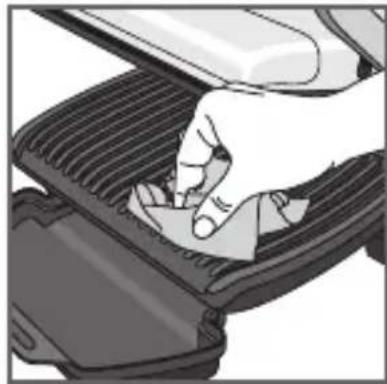
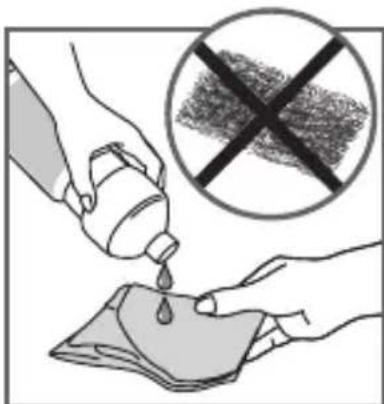
- Before first use, wash the plates (see paragraph 5), pour a little cooking oil onto the plates and wipe with a soft cloth or paper kitchen towel.
- Position the power cord carefully, whether an extension is used or not, so that guests can move freely around the table without tripping over it.
- Cooking fumes may be dangerous for animals which have a particularly sensitive respiratory system, such as birds. We advise bird owners to keep them away from the cooking area.
- Always keep the appliance out of the reach of children.
- Check that both faces of the plate are clean before use.
- To prevent damage to the plates, only use them on the appliance for which they were designed (e.g., do not place in an oven, on the gas ring or electric hot-plate, etc.).
- Ensure that the plates are stable, well positioned and correctly clipped to the appliance. Only use the plates provided with the appliance or bought from an Approved Service Centre.
- Always use a wooden or plastic spatula to avoid damaging the cooking plates.
- Only use parts or accessories provided with the appliance or bought from an Approved Service Centre. Do not use them for other appliances or intention.
Do not
- Do not use the appliance outside.
- Never leave the appliance unattended when plugged in or in use.
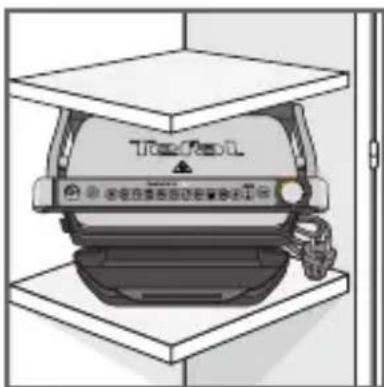
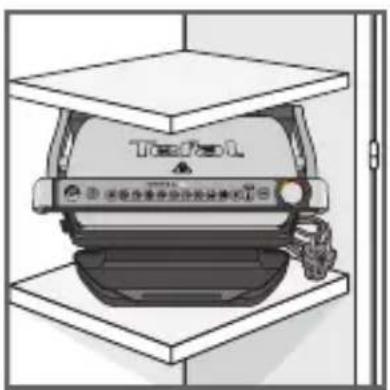
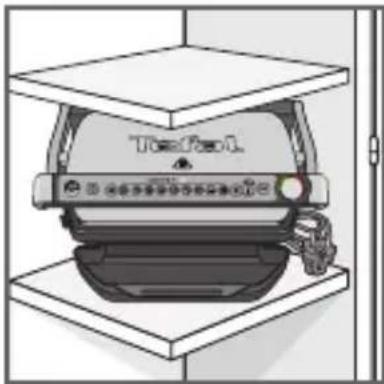
- To prevent the appliance from overheating, do not place it in a corner or below a wall cupboard.
- Never place the appliance directly on a fragile surface (glass table, tablecloth, varnished furniture, etc.) or on a soft surface such as a tea-towel.
- Never place the appliance under a cupboard attached to a wall or a shelf or next to inflammable materials such as blinds, curtains or wall hangings.
- Never place the appliance on or near hot or slippery surfaces; the power cord must never be close to or in contact with hot parts of the appliance, close to a source of heat or resting on sharp edges.
- Do not place cooking utensils on the cooking surfaces of the appliance.
- Never cut food directly on the plates,
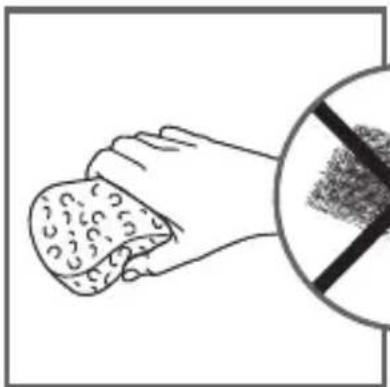
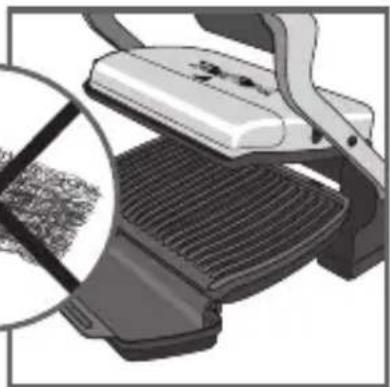
- Do not use metal scouring pads, abrasive wire wool or harsh scouring powder as this may damage the nonstick coating.
- Do not move the appliance when in use.
- Do not carry the appliance by the handle or metallic wires.
- Never run the appliance empty.
- Do not use aluminium foil or other objects between the plate and the food being cooked.
- Do not remove the grease collection tray while cooking. If the grease collection tray becomes full when cooking: let the appliance cool down before emptying.
- Do not place the hot plate on a fragile surface or under water.
- To preserve the non-stick properties of the coating, avoid excessive pre-heating with the appliance empty.
The plates should never be handled when hot. - Do not cook food in aluminium foil.
- To avoid spoiling your appliance, do not use flambé recipes in connection with it at any time.
- Do not place a sheet of aluminum or any other object between the plates and the heating element.
- Never heat or cook whilst the grill is open.
- Never heat up the appliance without the cooking plates.
Tips/information
- Thank you for buying this appliance, which is intended for domestic use only.
- For your safety, this appliance complies with the applicable standards and regulations - Low voltage directive - Electromagnetic compatibility - The environment - Materials in contact with food.
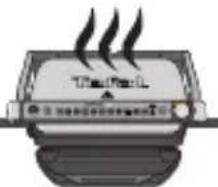
- On first use, there may be a slight odour and a little smoke during the first few minutes.
- Our company has an ongoing policy of research and development and may modify these products without prior notice.
- Do not consume foodstuff that comes into contact with the parts marked with logos
- If the food is too thick, the safety system will stop the appliance from working.
Environment

Environment protection first!
① Your appliance contains valuable materials which can be recovered or recycled.
Leave it at a local civic waste collection point.
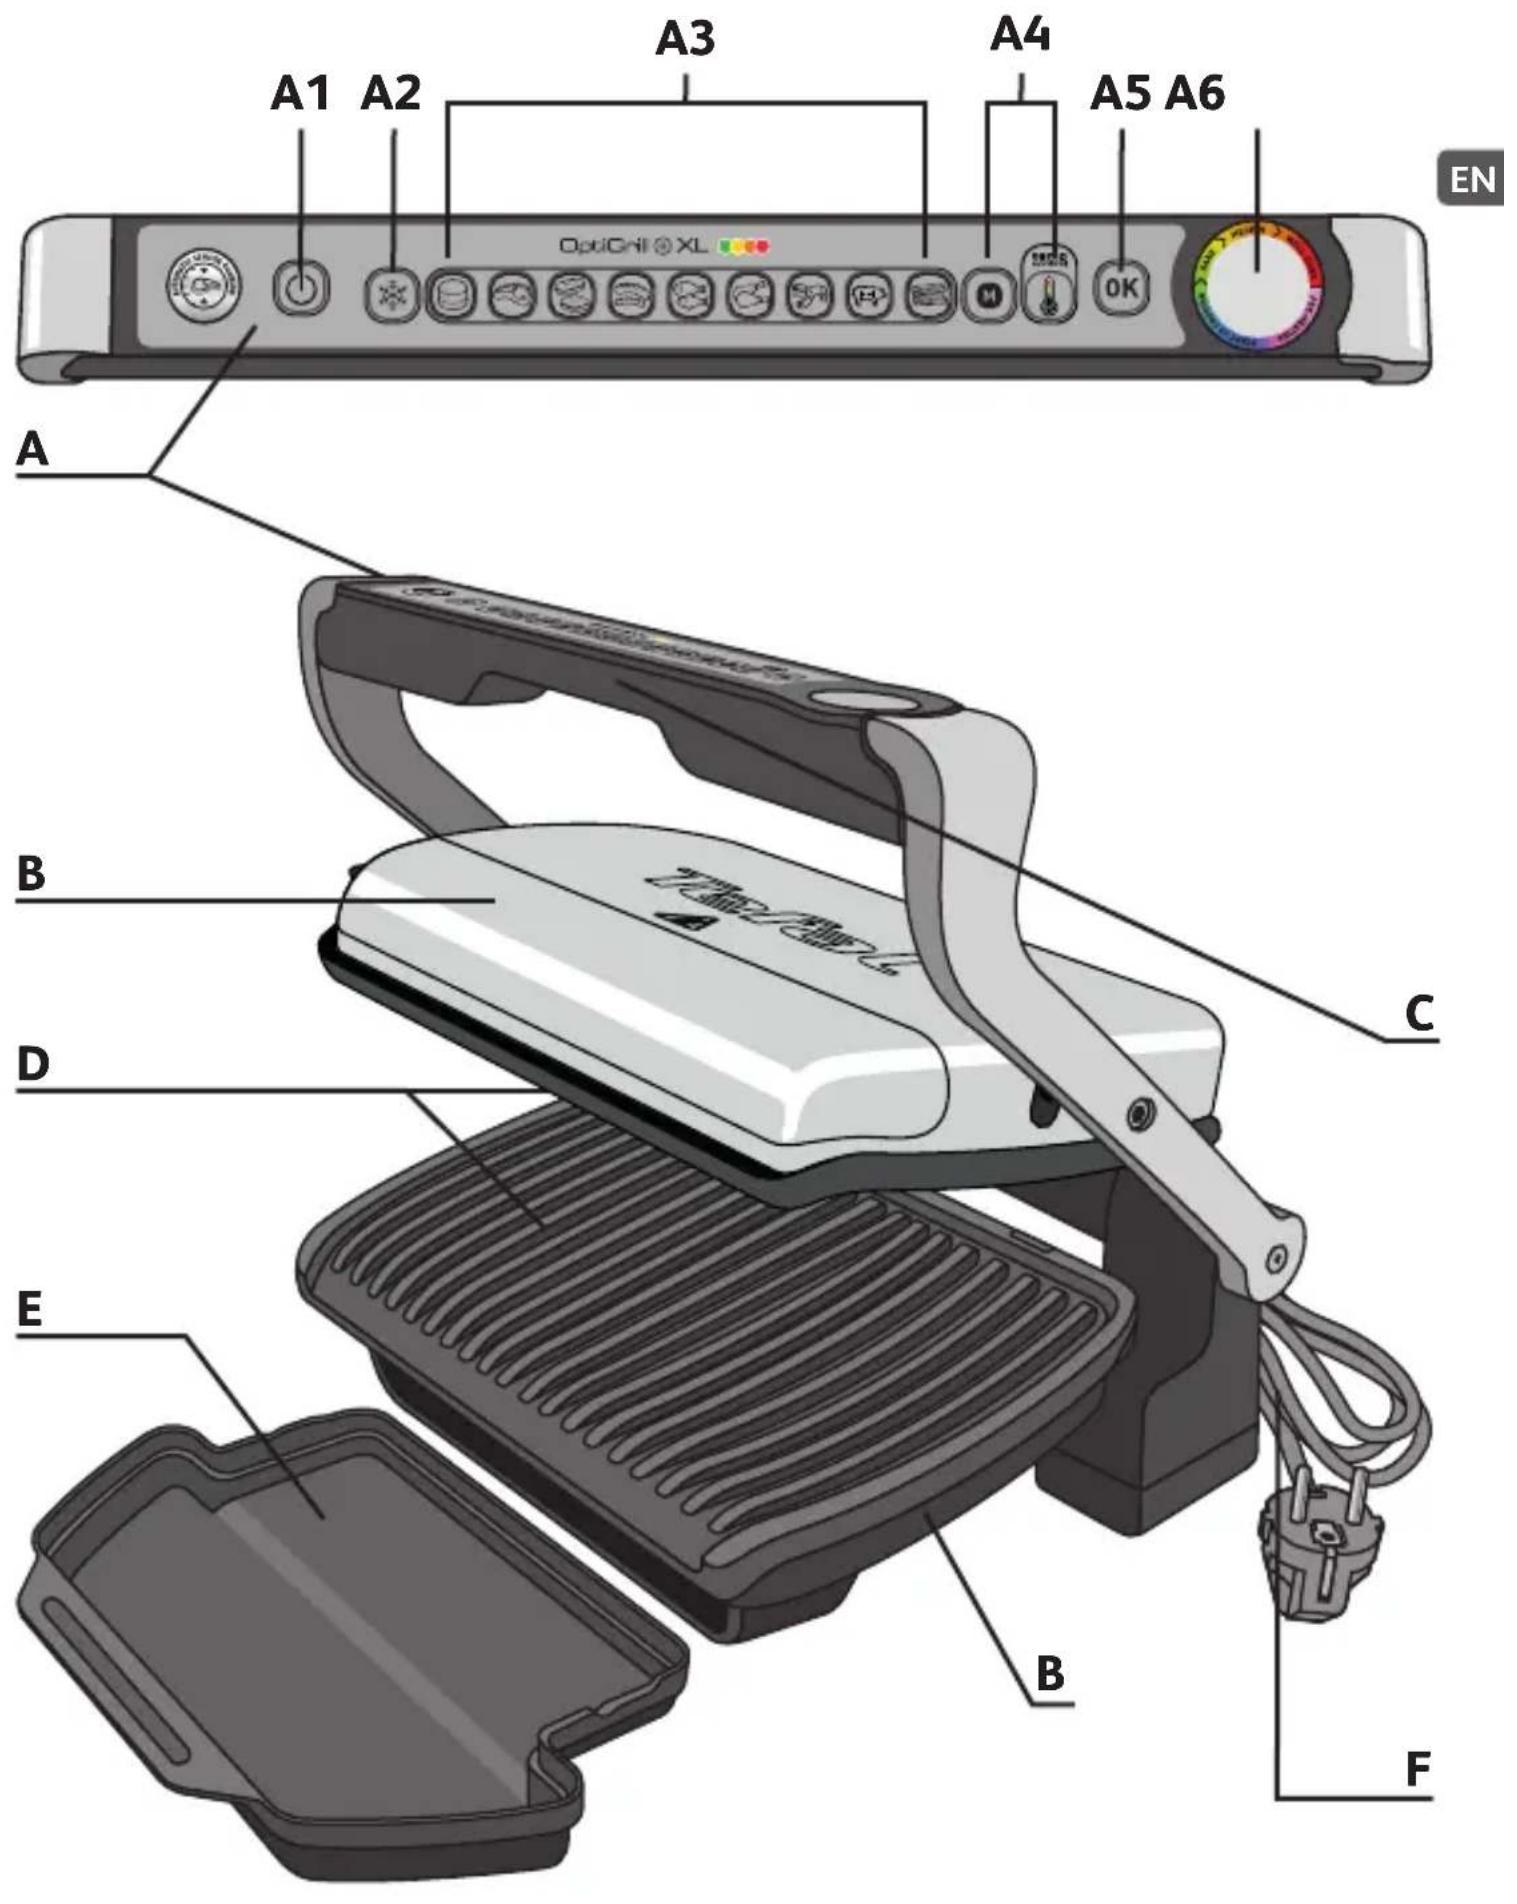
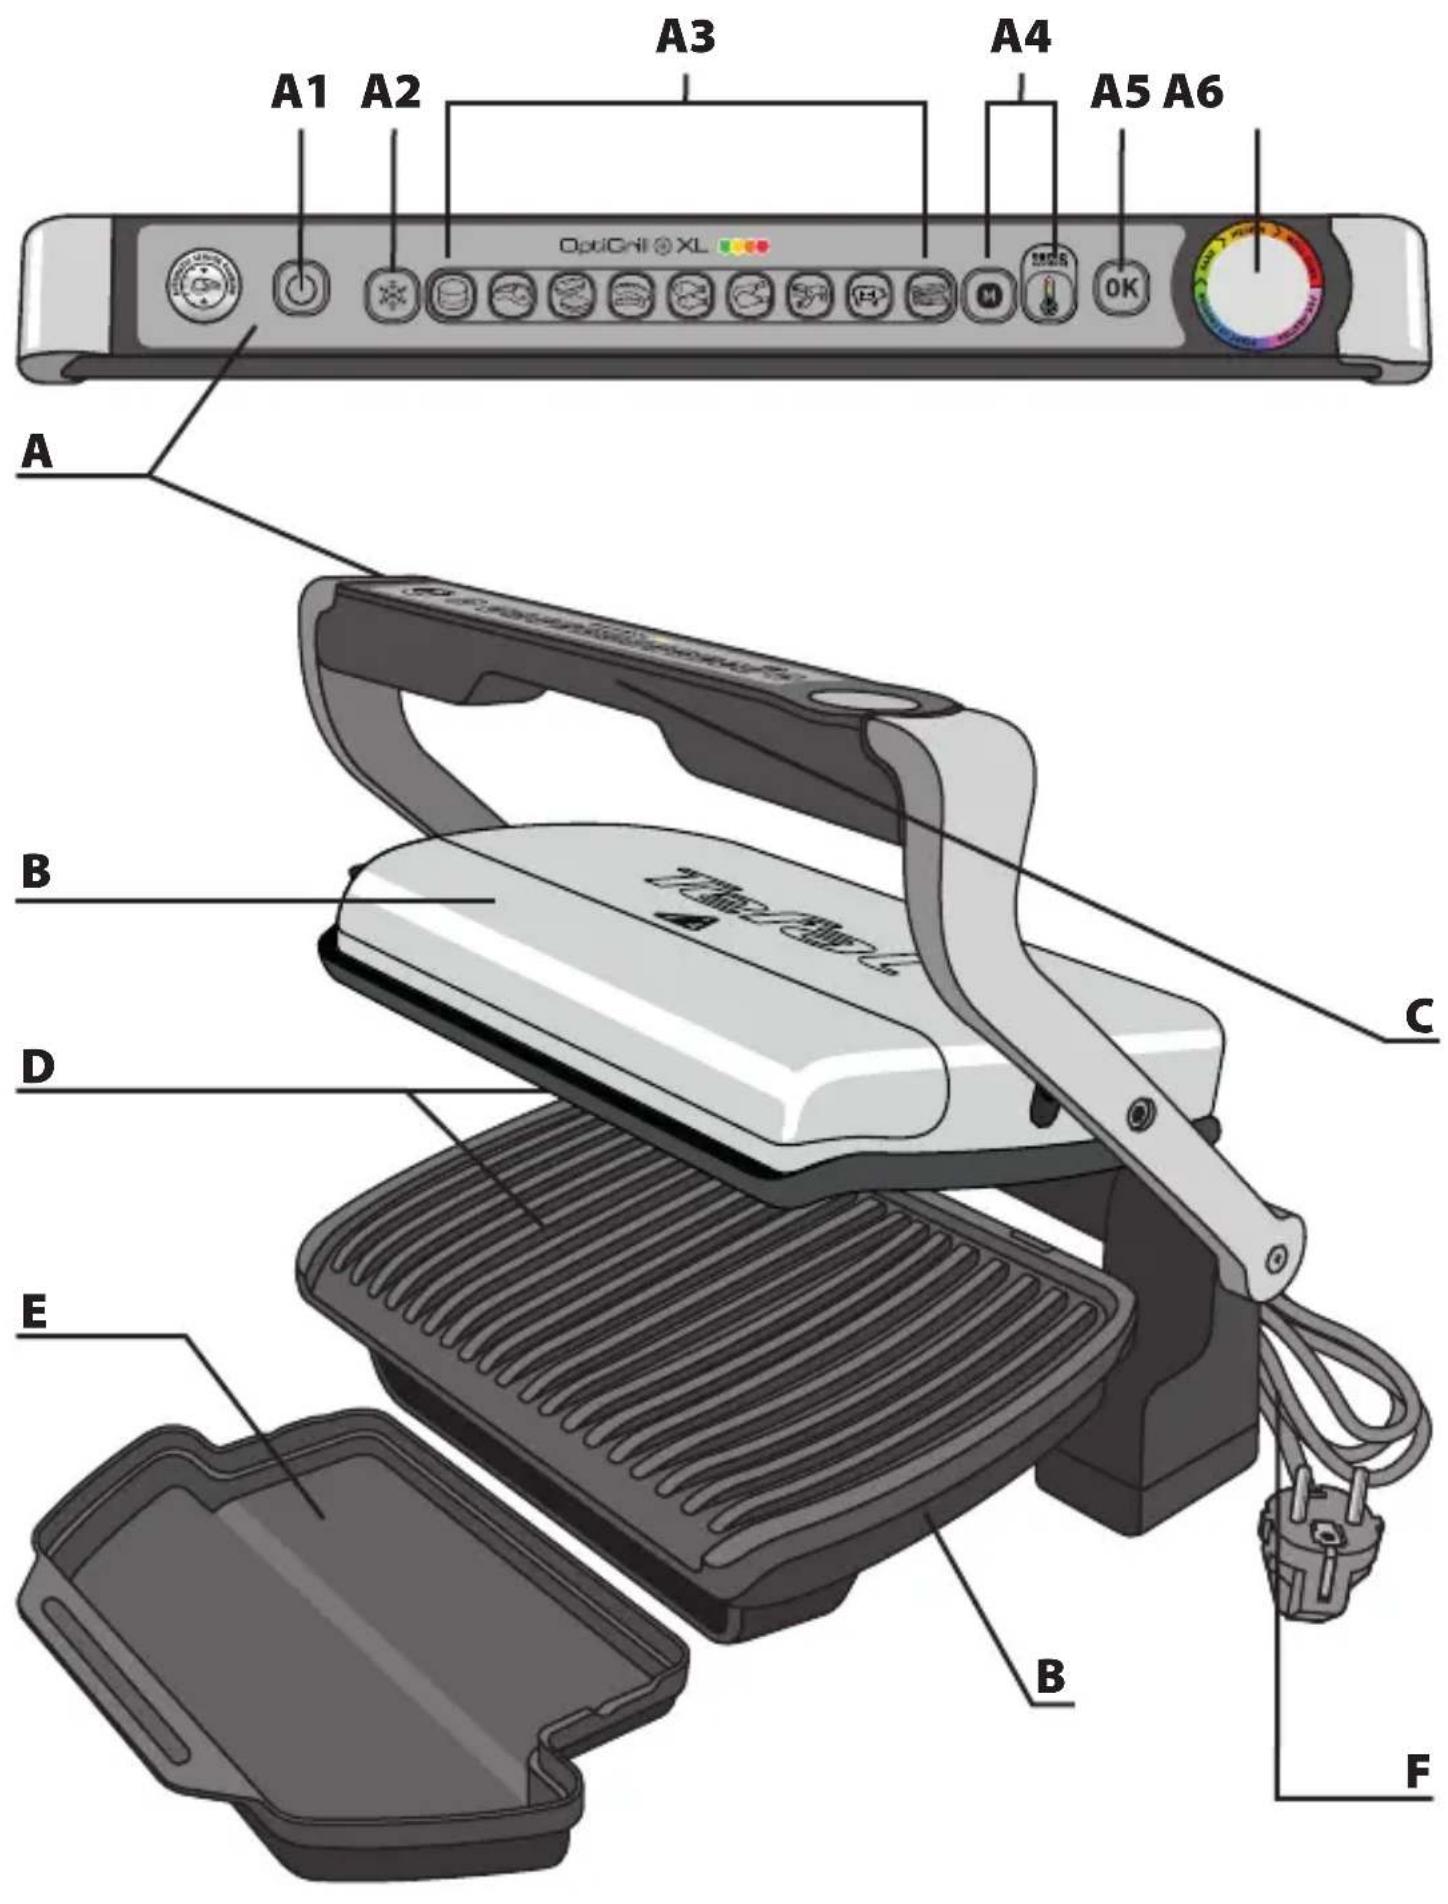
Description
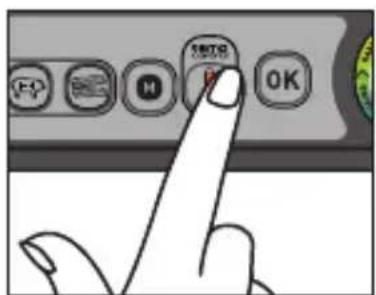
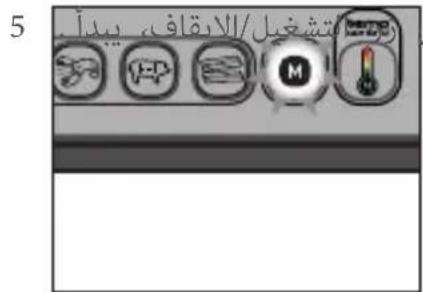
A Control panel A4 Manual mode "4 temperature settings" See specific manual quick start guide.
A1 On/off button A5 OK button
A2 Frozen food mode A6 Cooking level indicator
A3 Cooking programs B Body
C Handle
D Cooking plates
E Drip tray
F Power cord
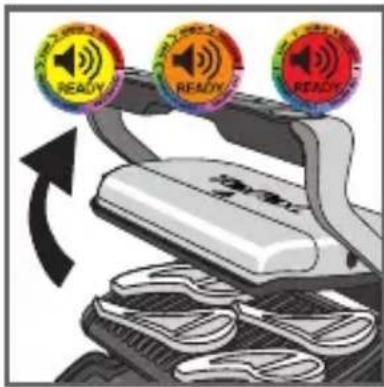
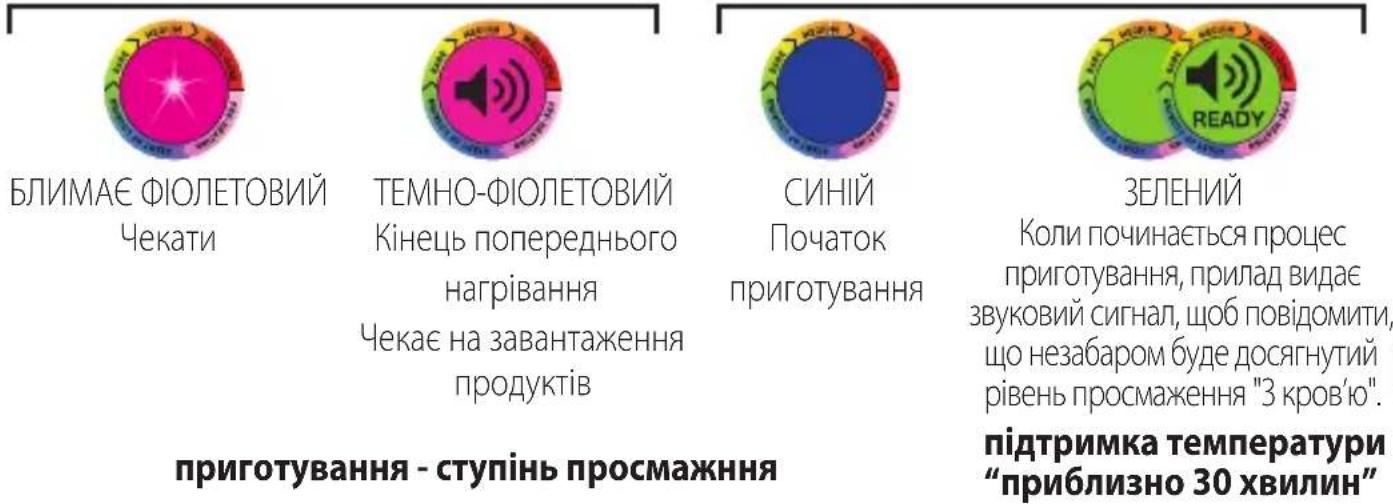
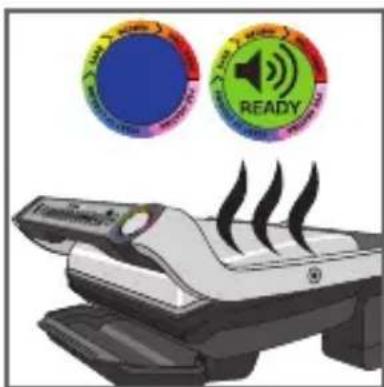
Guide of LED colors
preheating starting of cooking

cooking - ready to eat
Guide of automatic cooking programs
Burger Fish Bacon

Red meat Poultry Manual mode:
Panini / Sandwich Seafood
Sausage/lamb Pork


Traditional grill for manual operation with
4 different temperature settings
(from 110^ to 285^
1 Setting
1
2
3
4
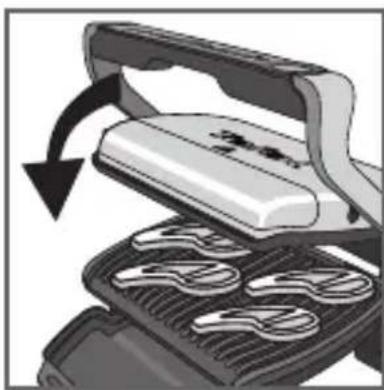
2 Pre-heating
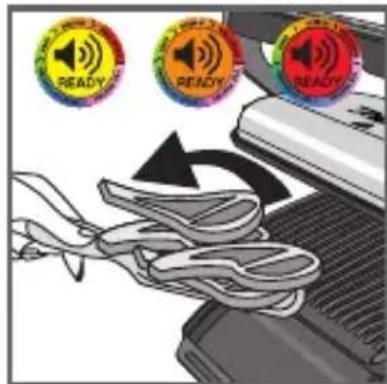
1 Remove all packaging materials, stickers and accessories from the inside and the outside of the appliance. The colour sticker on the cooking level indicator can be changed, according to the language. You can replace it with the one on the inside of the packaging.
2 Before using for the first time, thoroughly clean the plates with warm water and a little dishwashing liquid, rinse and dry thoroughly.
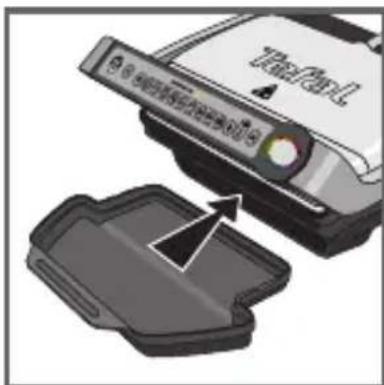
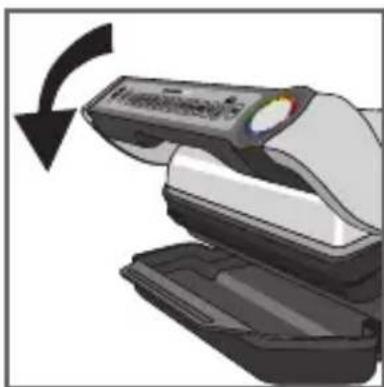
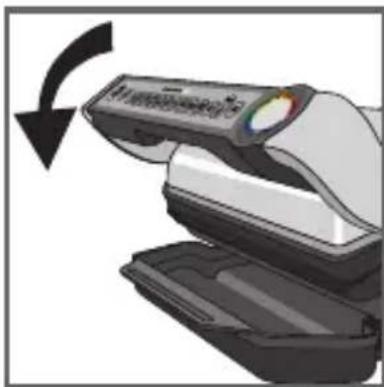
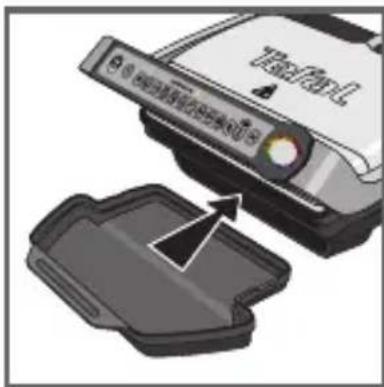
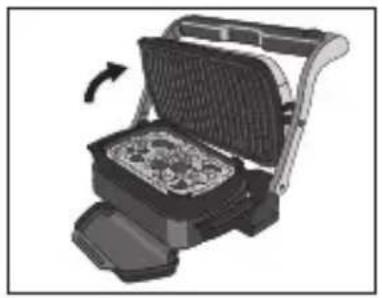
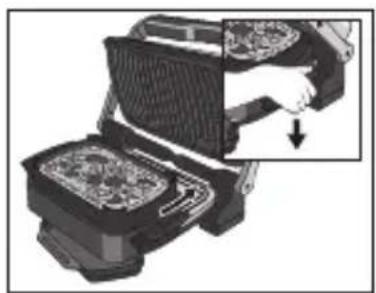
3-4 Position the removable drip tray at the front of the appliance.
5
6
7
8
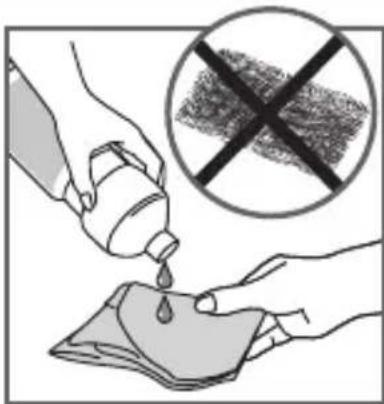
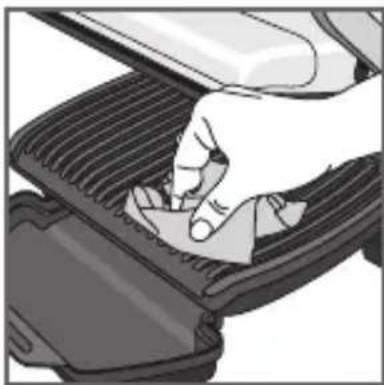
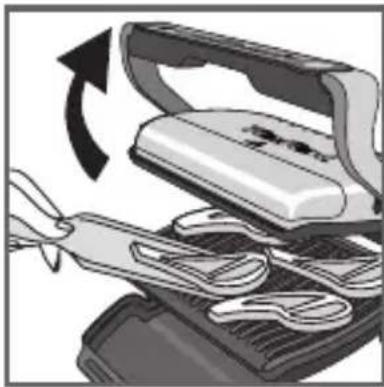
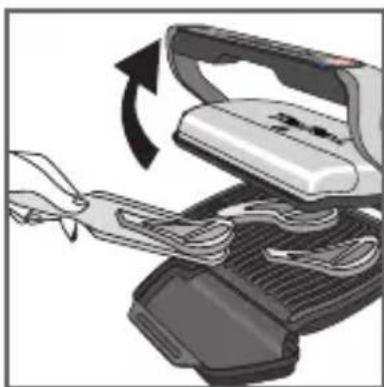
5 For the best results you may wipe the cooking plates using a paper towel dipped in a little cooking oil, to improve the non-stick release.
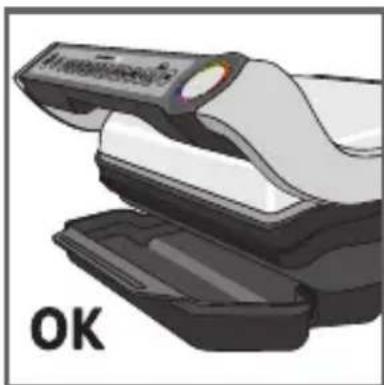
5bis Ensure that the bottom cooking plate and the upper cooking plate are correctly positioned in the product before the preheating phase begins.
6 Remove any surplus oil using a clean kitchen paper towel.
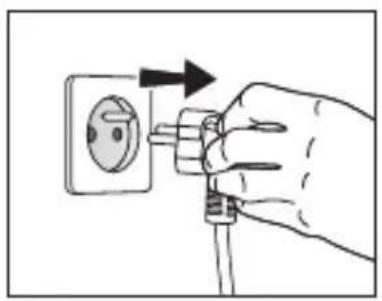
7 Connect the appliance to an outlet. (note the cord should be fully unwound).
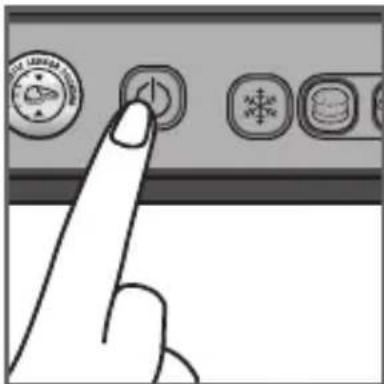
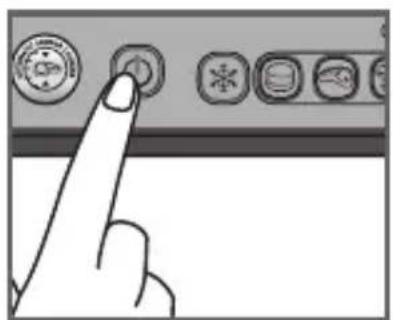
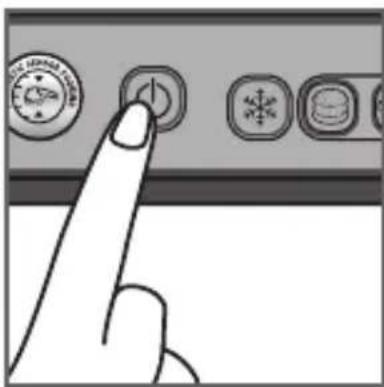
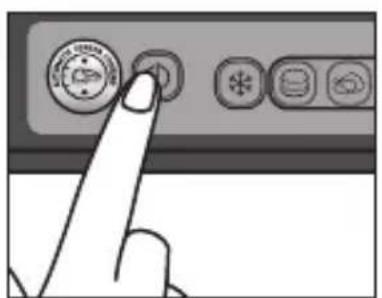
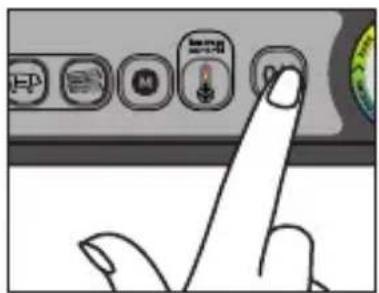
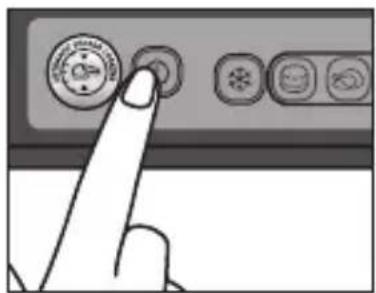
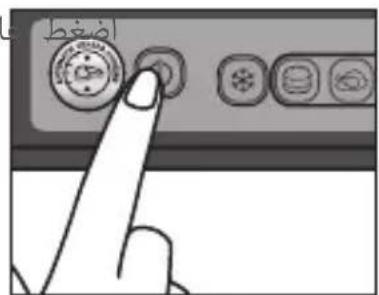
8 Press the On/Off button.

9
10
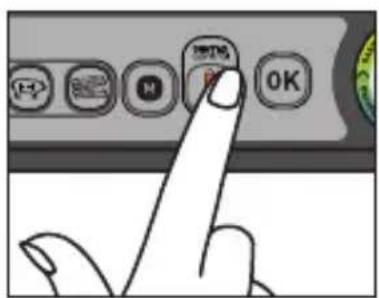
9 If the food that you wish to cook is frozen, press the "frozen food" button.
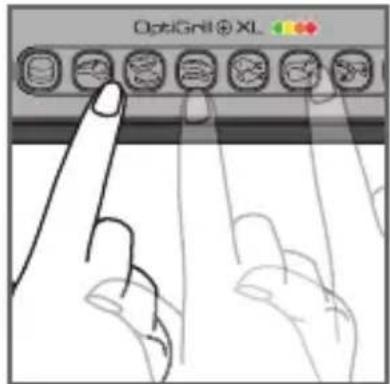
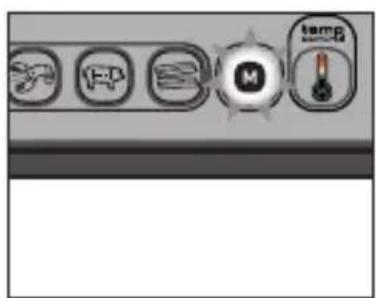
10 Select the appropriate cooking mode according to what type of food you wish to cook.
9 automatic cooking programs and a manual mode with 4 different temperature settings
| Select this cooking program if you want to cook burgers. | Select this cooking program if you want to cook sea food. | ||
| Select this cooking program if you want to cook pork. | Select this cooking program if you want to cook red meat. | ||
| Select this cooking program if you want to cook a panini/sandwich | Select this cooking program if you want to cook bacon | ||
| Select this cooking program if you want to cook sausage/lamb. | If you select Manual mode the indicator light is green and you have manual control of the cooking time. 4 different temperature settings are available for this manual mode (green, yellow, orange and red). See specific manual quick start guide. | ||
| Select this cooking program if you want to cook fish. | |||
| Select this cooking program if you want to cook poultry. |
If you are uncertain about what cooking mode to use for other foods because it is not listed above, please refer to the "Cooking table for out of program food" page 43.

11 12
13
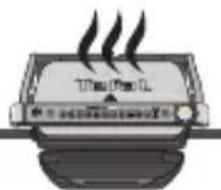
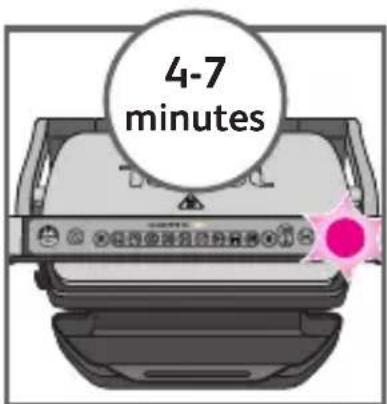
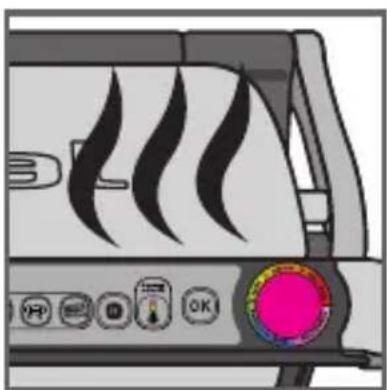
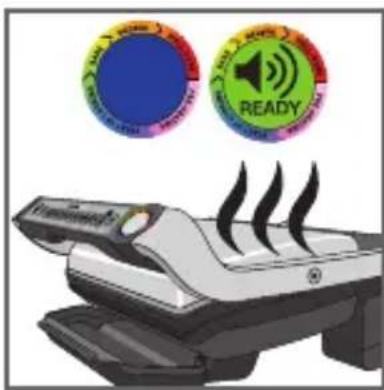
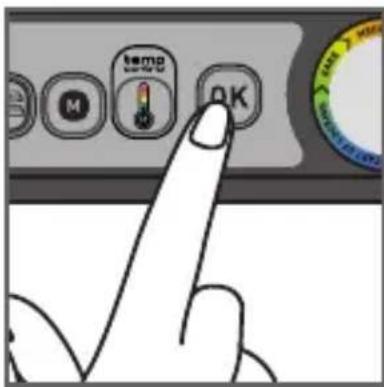
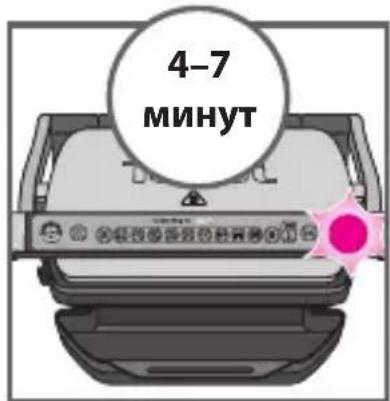
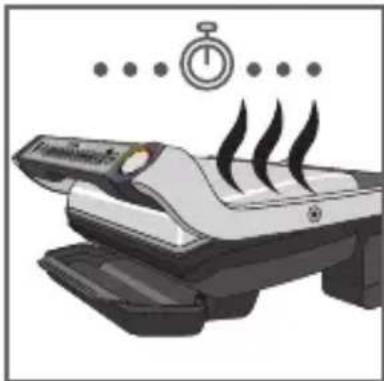
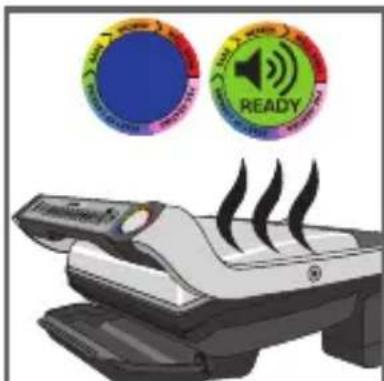
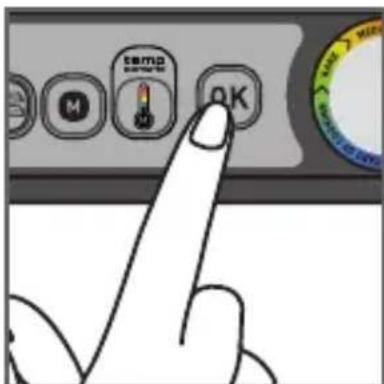
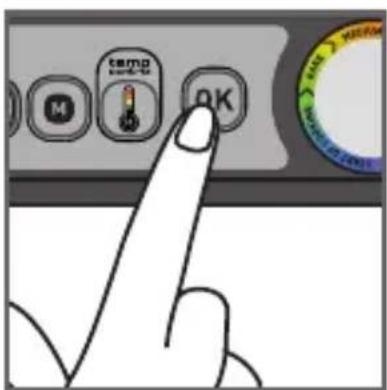
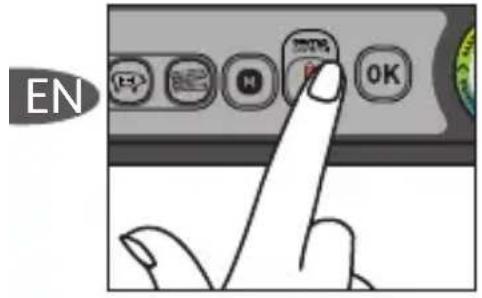
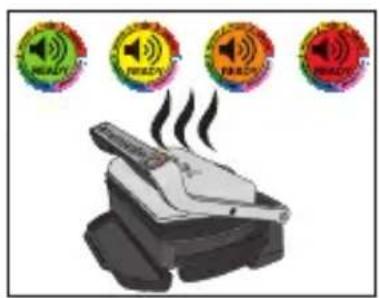
11 Press the "OK" button: the appliance starts pre-heating and the cooking level indicator flashes purple.
NB: If you have selected the wrong program, return to stage 8.
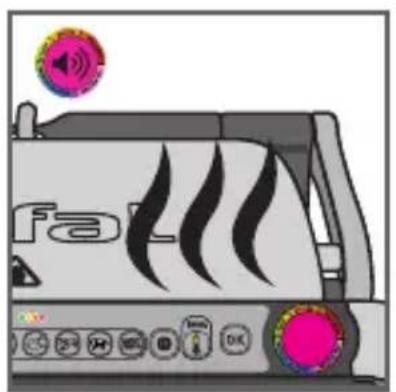
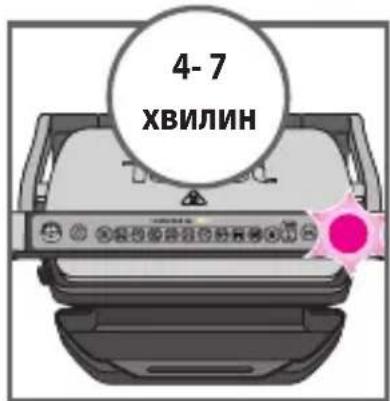
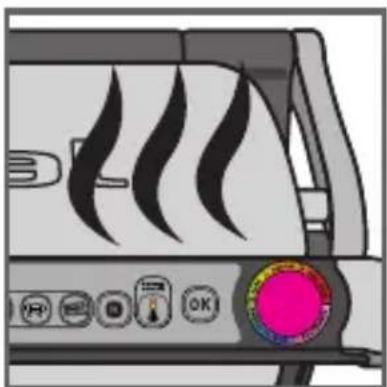
12 Wait for 4-7 minutes.
13 An audible tone is heard and the cooking level indicator stops flashing purple the pre-heating mode is complete.
Comments: At the end of pre-heating, if the appliance remains closed, the safety system will turn off the appliance.
3 Cooking
14 15
16 17
18
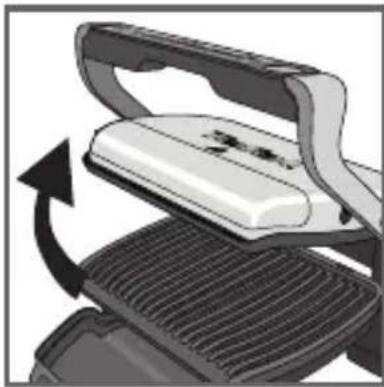
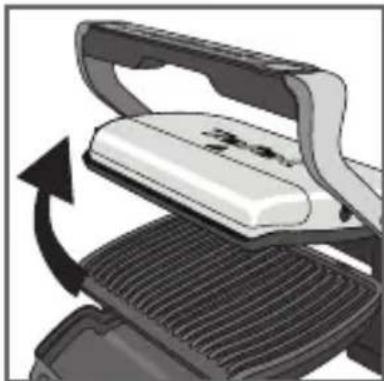
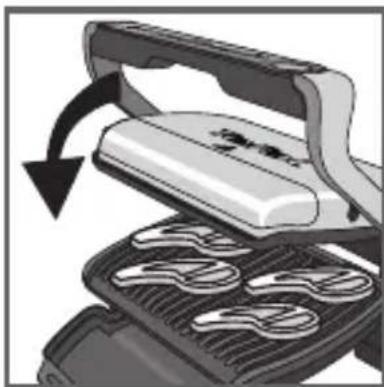
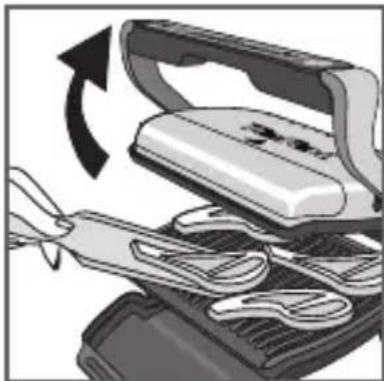
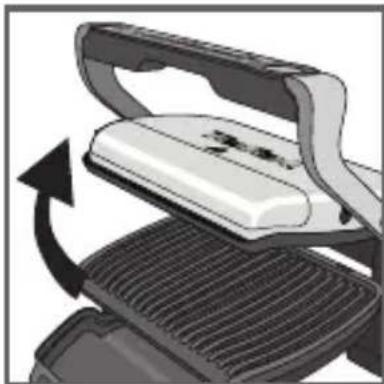
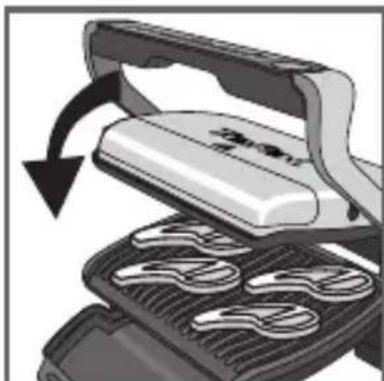
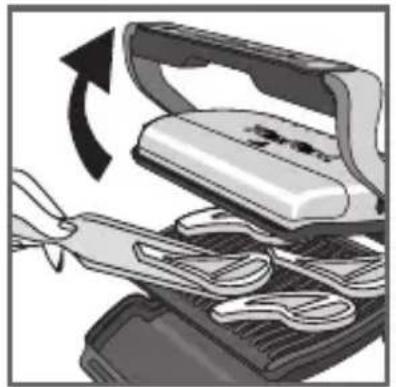
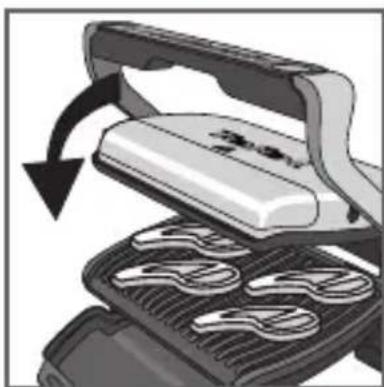
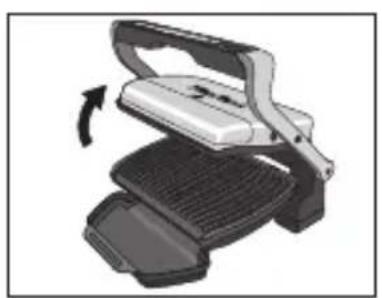
14-15 After pre-heating, the appliance is ready for use.
Open the grill and place the food on the cooking plate.
Comments: if the appliance remains open for too long, the safety system will turn off the appliance automatically.
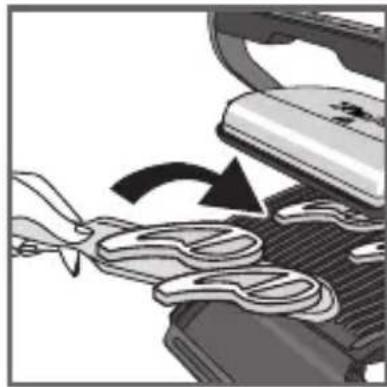
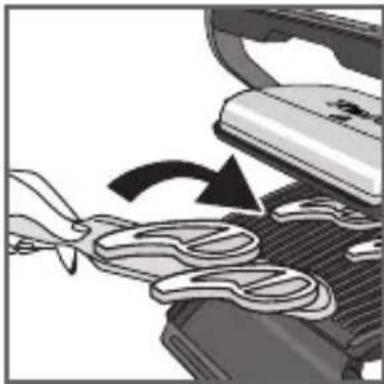
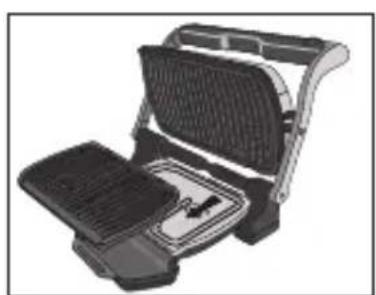
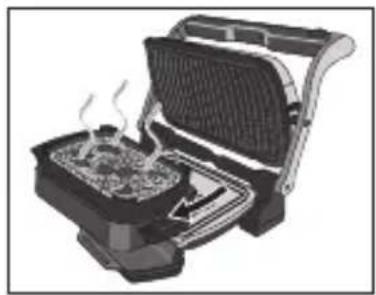
16-17 The appliance automatically adjusts the cooking cycle (time and temperature) according to the food thickness and quantity.
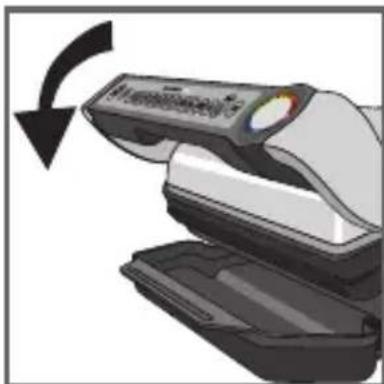
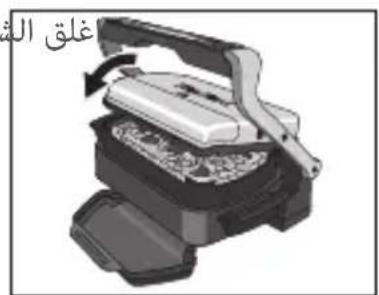
Close the appliance to start the cooking cycle. The cooking level indicator turns blue and then becomes green to indicate the cooking is in progress (for the best results do not open or move your food during the cooking process).
During the cooking progress, there is a beep at each stage of cooking to warn the user that a cooking level (eg rare/ yellow) has been reached.
Note for very thin pieces of food: dose the appliance, the button "OK" will flash and the indicator will stay "fixed purple", press "OK" to ensure the appliance recognizes the food and that the cooking cycle starts.
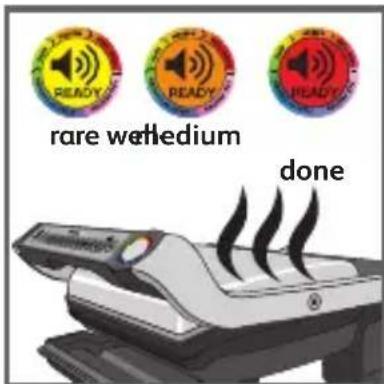
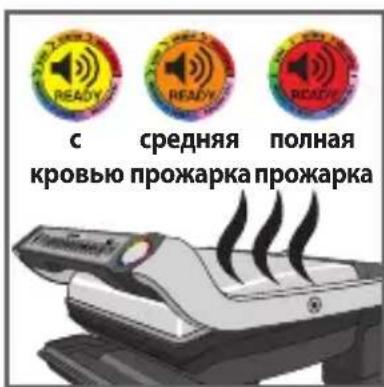
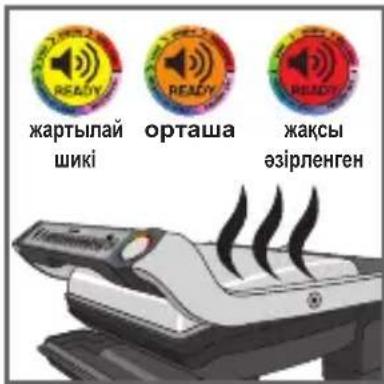
18 According to the degree of cooking, the indicator light changes color. When the indicator light is yellow with a beep, your food is rare, when the indicator light is orange with a beep, your food is medium and when the indicator light is red, your food is well done.
N.B.: if you like your meat very rare, remove the meat when the cooking level indicator turns green.
Please note, especially on meat, it is normal that cooking result vary depending on type, quality and origin of food.

3 Cooking

1920
21
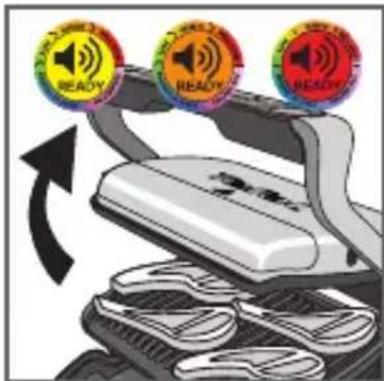
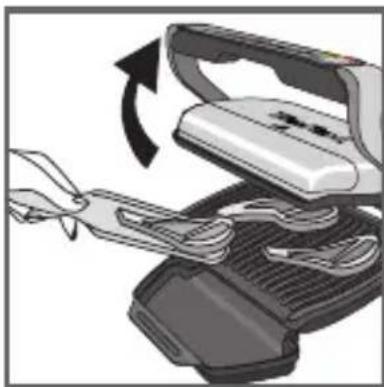
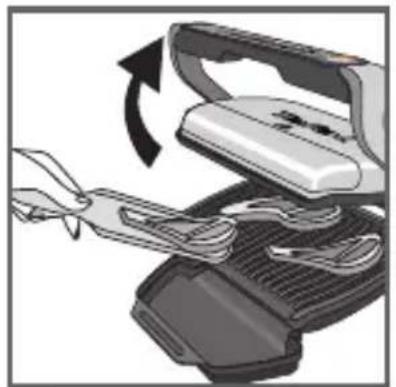
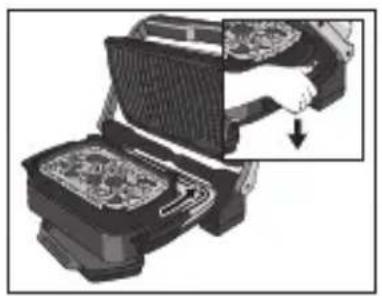
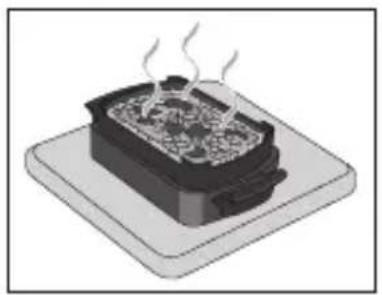
19-20 When the color corresponding to your choice of cooking level appears, open the appliance and remove your food.
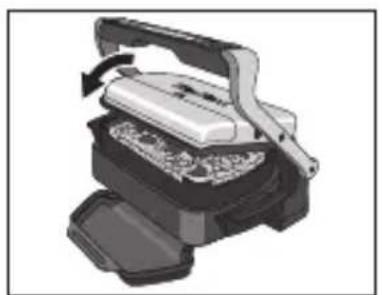
21 Close the appliance. The control panel will light up and set itself to 'choice of program' mode.
Comment: the security system will turn off automatically if no program selection is made.
Cooking more food
If you want to cook a second batch of food, please pre-heat the appliance again (see section 2. "Pre-heating", starting from point 9) even if you want to cook the same type of food.
How to cook another batch of food:
After finishing ywour first batch of food:
- Make sure the appliance is closed with no food inside.
- Select the appropriate cooking mode/program (this step is necessary even if you decide to pick the same cooking mode than for the previous batch of food).
- Press the "OK" button: the appliance starts pre-heating. The pre-heating is symbolized by the cooking level indicator that flashes purple.
- The pre-heating is complete when an audible beep is heard and the cooking level indicator stops flashing purple.
- After the pre-heating, the appliance is ready for use. Open the grill and place the food inside the appliance.
Important:
- Please note that any new batch of food, the pre-heating phase is mandatory.
4 Comments
22 23

24

25
Remember to always have the grill closed and no food inside in order for the pre-heating to effectively function.
- Then wait for the pre-heating to be complete before opening the grill and place the food inside.
N.B.: if the new pre-heating cycle is carried out immediately after the end of the preceding cycle, the pre-heating time will be reduced.
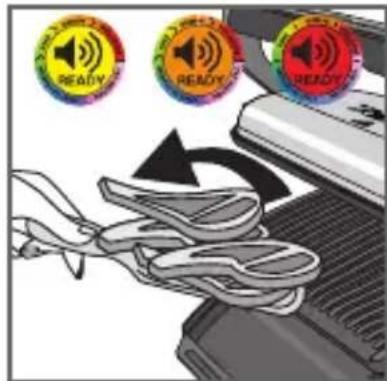
22-23-24
If you want to cook food to different personal tastes, open the grill and remove the food when it has reached the desired level and then close the grill and continue cooking the other food. The program will continue its cooking cycle until it reaches the 'well done' level.
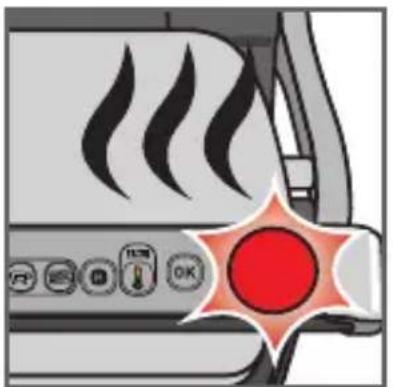
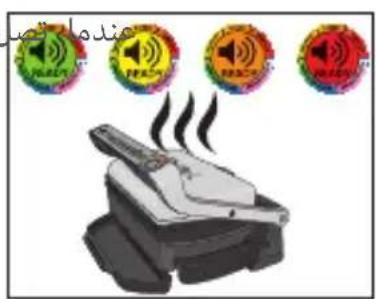
25 Keep warm function
When the cooking process has ended the appliance will automatically go on the keep warm setting and the cooking level indicator will automatically go red and an audible tone will sound every 20 seconds. If food is left on the grill it will continue to cook, while the cooking plates are cooling. You can stop the audible tone by pressing the "OK" button.
Comment: the safety system will turn the appliance off automatically after a certain amount of time.
Second cooking
If you want to cook more food, please refer to section 21.
5 Cleaning and maintenance
26 27

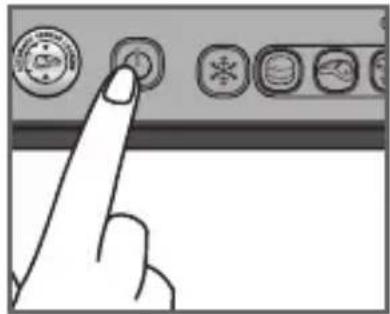
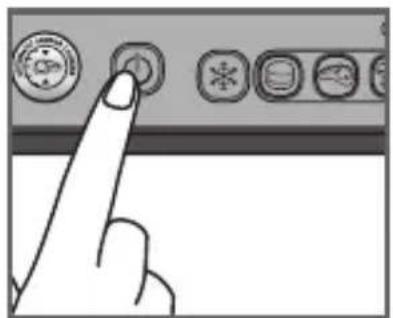
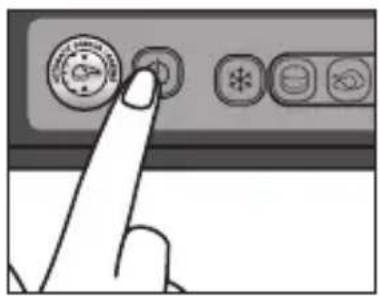
26 Press the on/off button to turn off the appliance.
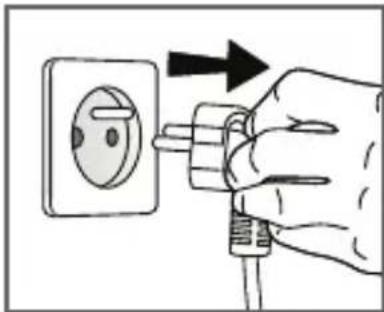
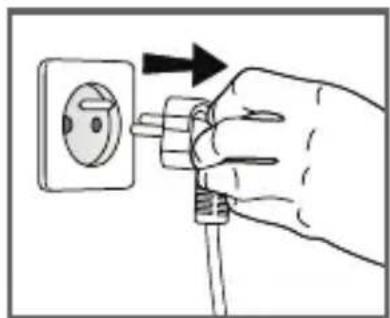
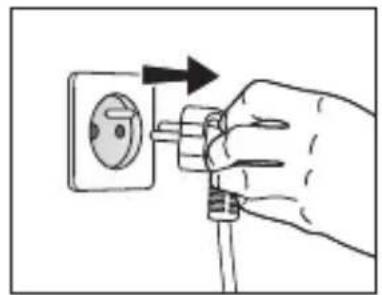
27 Unplug grill from wall outlet.
28
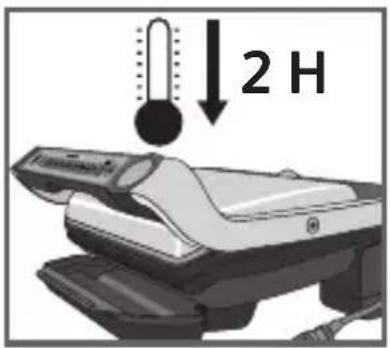
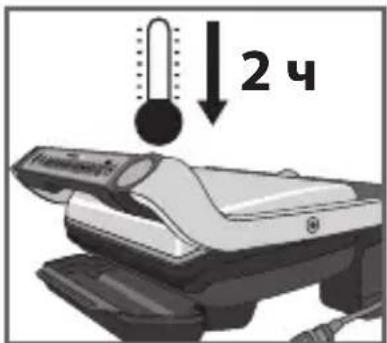
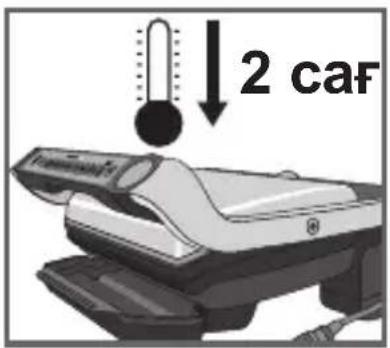
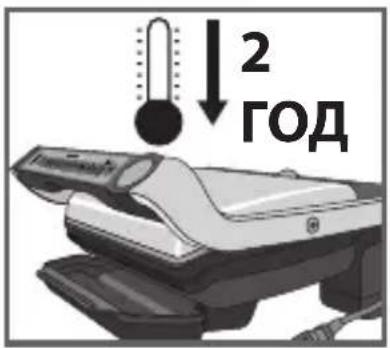
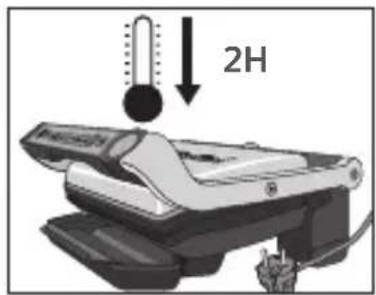
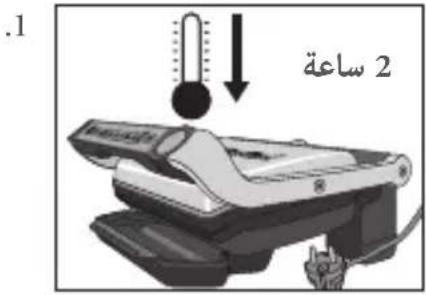
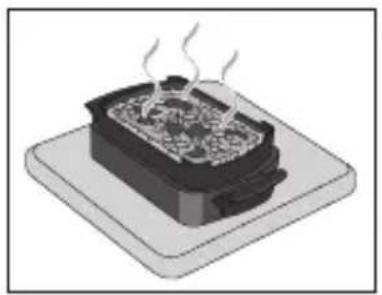
28 Allow to cool for at least 2 hours. To avoid accidental burns, allow grill to cool thoroughly before cleaning.
29 30

31 32
33 34
35
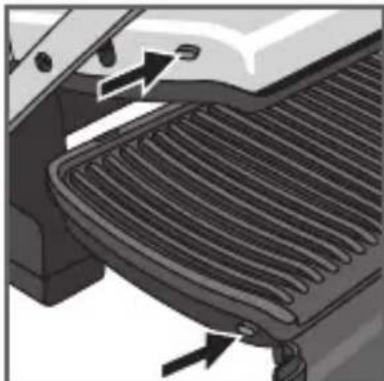
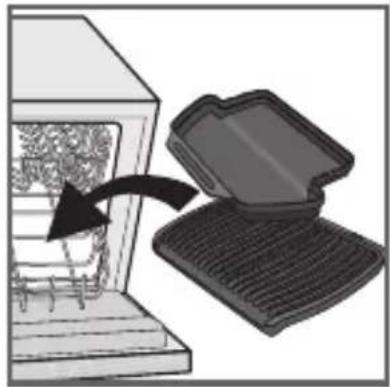
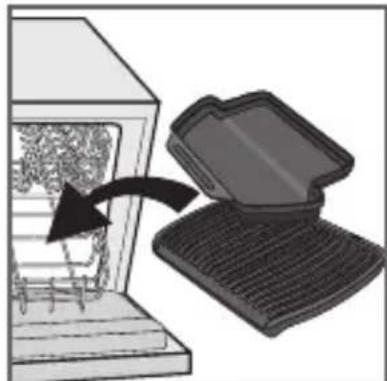
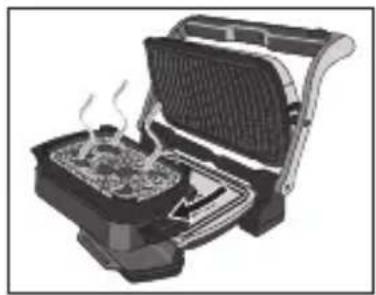
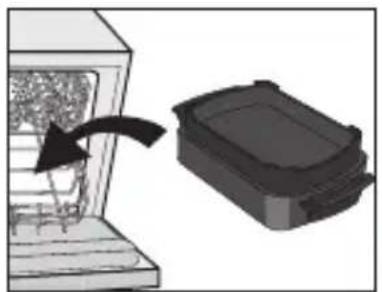
29 Before cleaning, unlock and remove the plates to avoid damaging the cooking surface. The drip tray and the cooking plates are dishwasher safe.
30 The appliance and its cord cannot be placed in the dishwasher. The heating elements, visible and accessible parts, should not be cleaned after removing the plates. If they are very dirty, wait until the appliance has completely cooled down and clean them with a dry cloth. If you do not want to clean them in a dishwasher, you can use warm water and a little dishwashing liquid to clean the cooking plates, then rinse thoroughly to remove any residue. Dry thoroughly using a paper towel.
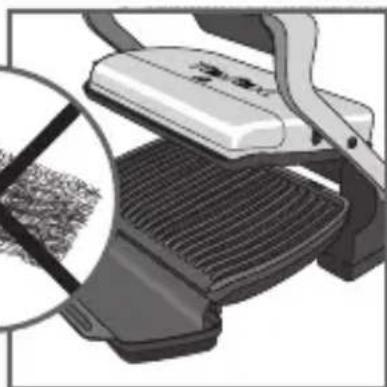
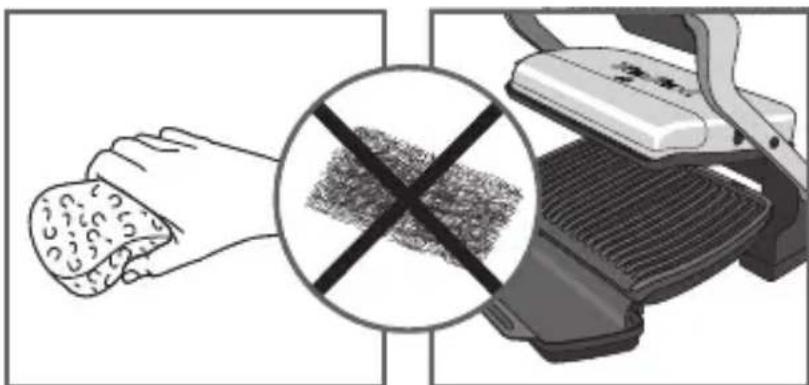
31-32 Do not use metallic scouring pads, steel wool or any abrasive cleaners to clean any part of your grill, only use nylon or non-metallic cleaning pads.
Empty the drip tray and wash in warm water and a little dishwashing liquid, dry thoroughly using a paper towel.
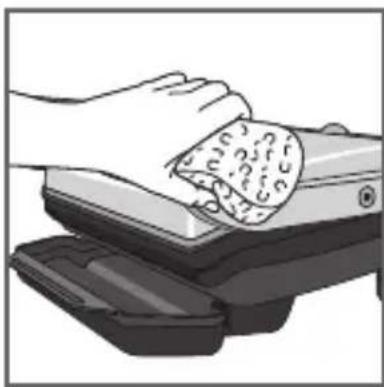
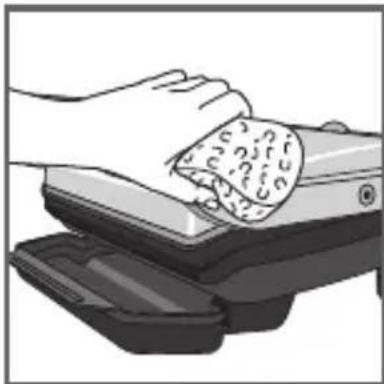
33 To clean the grill cover, wipe with a warm, wet sponge and dry with a soft, dry cloth.
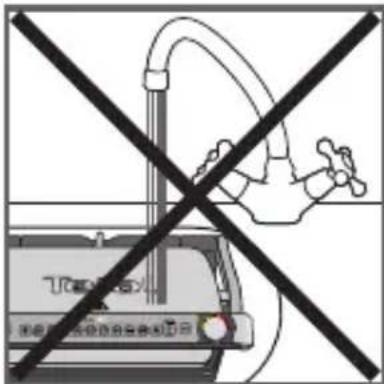
34 Do not immerse the body of grill in water or any other liquid.
35 Always make sure grill is clean and dry before storing.
36 Any other servicing should be performed by an authorized service representative.

Troubleshooting guide
| Problem Cause Solution | ||
| Button lit+ Solid green indicator light+ Button flashing+ Button flashing | Switching on the appliance or starting an automatic cooking cycle with food between plates and without preheating (manual mode is automatically activated). | 2 possible options:- Choose the temperature setting by pressing the button and then press OK. Allow to cook, but you must monitor the cooking (manual mode).- stop the appliance, remove the food, close the appliance properly, re-program the appliance and wait until end of preheating. |
| The appliance stops during the cycle of pre-heating or cooking. | The appliance has been kept open for too long while cooking.The appliance has been idle too long after the end of warm up or keep warm. | Disconnect the appliance from the outlet and leave for 2-3 mins., restart the process. The next time you use the appliance, make sure you open and close it quick for best cooking results. If the problem occurs again contact your local Tefal customer service. |
| + Flashingwhite indicator light.+ button flashing+Discontinuebip | Appliance failure.Appliance stored or used in a room that is too cold. | Disconnect and reconnect your appliance and immediately restart a preheat cycle. If the problem persists, contact your Customer Service. |
| The appliance no longer beeps. | ||
| After the preheating, I have put my food on the grill but the indicator stays on PURPLE and the cooking cycle does not start. | Your food is thicker than 4 cm. | Food must not be thicker than 4 cm. |
| You have not completely opened the grill to place the food. | Completely open the grill then close it. | |
| Not sensing the food.The food thickness too thin, "OK" is flashing. | Confirm the start of the cooking by pressing the button. | |
| The appliance will activate in manual mode+ The indicator light will blink red. | Preheating time was cut short. | Monitor the cooking periodically (for use in manual mode).OrStop the grill, remove food, close the grill, select the new cooking programme you wish to use and wait for the preheating cycle to finish. |
| + button flashing+ Continuous bip | Appliance failure | Unplug the product and contact your customer service. |
Tip, especially for meat: the cooking results on the preset programs may vary depending on origin, cut and quality of the food being cooked, the programs have been set and tested for good quality food. Similarly, the thickness of the meat has to be taken into account during cooking; you cannot cook food that is thicker than 4cm
Cooking Guide (automatic programs)
| Dedicated program | Cooking level color indicator | ||
| Red meat | Rare Medium Well-done | ||
| Burger | Rare Medium Well-done | ||
| Panini / Sandwich | Lightly cooked | Browned Crispy | |
| Fish | Lightly cooked | Medium Well-done | |
| Poultry | Fully cooked | ||
| Sausage/ lamb | Fully cooked | ||
| Pork | Fully cooked | ||
| Bacon | Lightly cooked | Well-done | |
| Sea food | Medium Well-done | ||
Tips: if you like your meat blue rare, you can use
Cooking Guide (including Manual Mode)
| Food | Cooking program | Cooking level rare medium well-done | |
| Bread | Slices of bread, toasted sandwiches | ||
| Burger: (after pre-cooking the meat) | |||
| Meat & Poultry | Lamb (boneless) | ||
| Slice of ham to cook | |||
| Frozen chicken nuggets | |||
| Marinated chicken breast | |||
| Pork fillet (boneless), pork belly | |||
| Duck breast | |||
| Fish | Whole trout | ||
| Tuna steak | |||
| King prawns (with and without shells on) | |||
| Shelled prawns | |||
| Gambas | |||
| Manual mode See specific manual quick start guide | Grilled vegetables and fruits (need to be of same cut and thickness) | 4 different temperature settings | |
For frozen food, press before selecting your program.
VEILIGHEIDSVOORSCHRIFTEN BELANGRIJE VOORZORGSMAATREGELEN
A1 Botao Ligar/Desligar (On/Off)
A5 Botao OK
D Placas de cozedura
A2 Modelo para alimentos congelados
Guia para as cores LED

COR-DE-LARANJA "Medio"
CBeTOBoe pyKOBoDCTBOДЯ NHdNkaTopa yPoBHa npHrOToBJIeHnA
PpeBapuTeNbHbI pa3orpB HauaI npuroBnHeN
EcnBbI He yBepeHbI, KaKo peXnM npuROTOBHeHnN nCNoJb3OBaTb Inra Dpyrnx npOyKTOB, KOTOpblcHe nepeUncHeBbIwe, CM. pyKOBOCTBO Ha CToP.99.

11 12
13
11 Haxmte KhoNky OK: yctpoiCTBO BKnHouTcI InI npEiBapnteIbHOro pa3OrpeBa, a HnDkAToP yPoBnI npIroTOBHeHnHaHET MIRaTb 0NEtOBbIM.
PpmeHne. Ecn Bbl Bb6paHn HnpabnIbHyIO nporpamMy, BepHntecb K 8.
12IoOxJnte4-7MnHyT.
13 Nocne 3ByKOBOrO cnHaJa, KOrda HnDnKATOp nepeCTaHET MnRaTb fNoJeTOBbIM, npeBaPnteIbHbI NoDorpeB 6yDet 3aBepWeH.
PmmeHne. Ecn nocne 3aBepweHn npedBapnteHoro pa3orpeBa yctpoNCTBO octaetc 3akpbTbIM, npedeoxpaHnteHna CNTema aBTOMaTHueCKN OTKIOHTyCTPONCTBO.
14 15
16


17
18
14-15 Nocne npeBapntbHoro pa3OrpeBa yctpoNCTBO rOTOBK nCnObl3OBaHnIO.
OTKpoIte rPnIb n NOMeCTNtE nnuHa nlaCTnHy.
PpmeHne.Ecnn yctpoNCTBO OCTaETCAOTKpbITbIM CnIshKom DOnIro, npEdoXpaHnteJbHaCnCTema ABOTMATueeCKN OTKNIOuHT YCTPONCTBO.
16-17 YcTpoNCTBO aBtOMaTnueckn HactpanBaet cIKI npnroTOBneHn (Bpemr n TemnepaTypy) B COOTBeTCTBnC KOJIueCTBOM N TOJINHOI INI.
3aKpoTe yCTpOYCTBO, YTObI HaatbUcIKn pnproToBneHn. PnpMeaHn
OTHOCHTeNbHO ToHKx KyCKOBuNn.3aKpOte yCTpoiCTBO.KhONKa OKHauchET Mngatb,a HndNKaTOp 6ydt CBETNBcA fNoIeTOBbIM.HaXmTe KhoNkY OK, YTO6bI y6eINtbcra, YTO yCTPOiCTBO paCNO3HaIIO NnUy,a ZnKl npiroTOBHeHnaIcA.NHdkATOp UPOBn IPOXapKn CTAHet CnHM,a 3aTeM 3eJIeHbIM,yKa3bBaJ Ha TO, YTO BblOnHReTcPniroTOBHeHne NnU (ДЯ DOCTNXeHnHaNlyuWnx pe3yIbTaTOB He OTKpbBaIte n He DnIraIte NnUy BO BPEMa pnpiroTOBHeHn).
B npocece npirotoBneHn 3ByKOBOI CnHAn BydyT yBeIOmIaTb Nolb3OBaTeJI O nepexOe K KaXIoMy CNe dyUoIeMy yPOBHI pOxapKn (HaNPIMep,CKPOBbIO/JeNTbI).
18 B 3abncmoCTn OT CTeHEn npoxapkn Hndnkatop 6ydt MeHrtb CBeTntbcr KeNTbIM Nocne 3BYKOBOrO CNrHaJa, 3TO O3Haayet, yTO Niua o6Xapena CHapyKn, HO cbipra BHytpn. KOrda Hndnkatop HaunHaet CBETNbC rOpAHKeBbIM Nocne 3BYKOBOrO CNrHaJa, 3TO O3Haayet, 4TO Niua cpeHe npoxapena. Korda Hndnkatop HaunHaet CBETNTbcr KpaChbIM Nocne 3BYKOBOrO CNrHaJa, 3TO O3Haayet, 4TO Niua xOpoWIO npoxapena.
PpmeaHne. Ecn BblIObnte cbipoe MRCCKPOBbIO, N3BNEKNTe ero n3 yCTPOIcTBa, KOrda INNdkatOp yPOBH npoxapKn CtaHET 3eJIeHbIM.
HOMHnte,OCO6eHNO BO BpeMa npnroTOBLeHna CTeKOB:3To HOpMaIbHo,HTo pe3yIbTaTbI npnroTOBLeHna pa3JIuHbI JnnpOdyKTOB pa3HOrTO TIna,KONUeCTBa INPOnCXOXKeHnA.
1920
21
19-20Korda zBET INHdNkAtopa oydet COOTBeTCTBOBaT JKeJaemomy yPOBnI npuROToBHeHnI N uCTPOiCTBO n3DaCT 3ByKOBoI CNrHaI, OTKpOIne yCTPOiCTBO n I3BNeKIne nn.
21 3aKpoIte yCtpoIcTBo. NaHelb ynpabNeHnHaHHeT CBETNbCn I cama nepeiDeT B peXm Bbl6opa npOrpaMMblpNiROTOBneHn.
PpmeHne. Ecnn Hn OHa n3 nporpaMM He 6ydt BbIbpaHa, npedoxpaHntBna CnCTema aBTOMaTHueCKN OTKJIuHT yCTPOINCTBO.
Pocneyuooee npuroToBnHe nu
Ecn Heo6xOIMO npnroTOBntb eue OndHy nopunu ebl, 3aHOBO BbIcTaBbTe XeJaemyo nporpaMMy (cm. pa3de12. «PpeBapntelbHbI pa3OrpeB», NaHHa C nyHKta 9), daXe ecnn 6ydtrotobNTbca eda TOrO Xe TnA nn pni NOMOUI ToJ Xe nporpammbl.
Ka npurotoBntb nocleyuou npuio nui
Pocne nprirotOBenne nepBOI nopCIN BbInONHITe cJeNyUoJee.
- Y6eIntecb, yTO yCTpOINCTBO 3aKpbIto IN BHyTpN HrO HET NIIuN.
- Bb6epnte cooTBeTCTByuun pexnmpiroTOBHeHn/nporpaMMy (3OT war Heo6xOum, daKe ecnn Tpe6yeTcTOT JKe pexnmpiroTOBHeHn, yTo n dJe npedbyuee Nopuinn.
- Haxmte KhoNky OK).YcpoiCTBO HaHHeT npedBapntbHbI noDorpeB.Bo BpeM npedBapntbHOro noDorpeBa INnKaTOP yPoBnI npiroTOBHeHn Mnraet eoJeTOBbIM.
- Nocne 3ByKOBOrO cnHana, KOrda NHdNKaTOp nepeCTaHET MnraTb fNoJeTOBbIM, npedBaPnteHbNIOoRpeB 6yDet 3aBepweH.
- После пешьарпелову поогрев acpoctBO rotoBO k nCnoB3OBaHIO. OTKpoIte rnilb nnomecnte bHytpb nIu.
BaXHo!
-ПомнITE,чToпразВарптельнь pa3orpeB Heo6xOДm Дя КжДOrO HOBOrО npOcecca nprirotOBlenny Niun.
Hanomnahanne. Npeed nauanom npedBapntelbHoro pa3orpeBa y6eintecb, yTO UCTPOIcTBO 3aKpbITo IN BHyTpN Hero HeT OCTaTKOB PIIuN.
-праздуем OTКрытб Ги ПОмecгпь BHyТь HeRo ПИУ,doЖДNTeСb OKOHuaHЯпразВарптельНOrNoIOnOrpeBa.
PpmeHne. Ecn HOBbI cNkI npiroToBHeHnHaHaeTc Cpa3y Je nocJe OKOHaHn IpeBbUeRo, Bpem IpeBapntbHOro NODorpeBa cOKpaaTeCra.
4 Примechanicals
22 23
24

25
22-23-24
EcnBbIXOTte npiroTOBNTb Nnuy pa3nHOn npoxapKn, OTKpOHTe rPnIb n 13BneKnte eDy, KOrda OHa DOCTnHET HxHoro yPOBnroTOBHOCTN, 3aKpOHTe rpIb n npiroTOBbTe OCTabShnecr nopCnIOCTabShnecr nopCn. IporpaMa npoDoJXNT ZIKl npiroTOBHeHn, NOKa He 6yDet DoCTnHyt yPOBeHb «NoHOB npoxapKn>.
25Функцma coxpaheHnTeIIa
RU
Korda nnsa 6ydet noHoctbio npnroTOBHeHa, yctpoNCTBO aBTOMATnueckn aKTINBnpyet cyHKnIO NOORpeBa, INHnKaTOp HaHTCBETNbCkpaChbIM NyCTPOIcTBo HauHET N3DaBaTb 3ByKOBo CNrHaJI KaJdIe 20 cekyHd. Ecnn OCTaBtB nssy Ha rPInE, OHa npOdoJXHT FOToBtBCr, NOKa PnactnBi He OCTbHyT. YTObI OTKnIOuHTb 3ByKOBo CNrHaJI, HaxMnte KhoNky «OK».
PpummeaHne.
IpeoXpaHnteBna CnCTema aBTOMaTnueckn OTKlOHT yCTpOiCTBO uepe3 onpeJeHHOe Bpem.
5 OuInCTka n 06cIyXkBaHne
26 27
28
26 HaXmnte KHONky BkIIOueHnry/ BbIKIOueHnry, yTO6bl BbIKIOuHTb yCTPOINCTBO.
27 OTKIIOHTe yCTPOINCTBO OT pO3ETKN 3JIeKTPoCETN.
28Даite yctpoiCTBy OCTbITb He MeHee 2 yacob.
UTo6bI n36eXaTb CnyauHbIX OxKOrOB, NpeD OunchKoJaNTe rPnIO NOHOCTBIO OCTbTb.
2930
31 32

33 34
35
29 Ipeo ouccko pa36noknyte n 13BNEKITE pnaCTHbI, yTObI n36exKaTb NOBpeXdHn paOoue NOBepxHOCTu YcTPOcTBa. POnDoH dJa Xnpa IN PnactHbI rPnla MoXHo MbITb B NocydomoeuHO MaUNHe.
30 UcpoCTBO n ero Ka6eJIb HeIb3nOMeUaTb B NOCyDOMOeHyHO MaunHy. He ouHuaTe HArpeBaTeIbHbIe 3JemeHTb, BVIMMbIe I DOCTynHbIe qactN yCTPOINCTBa NOcIe CHrTna PnactIn. Ecn OHN OueHb rpa3HbIe, DoXdntEcB, KOrDa YcTPOINCTBO NOnHOCTbIO OCTbIHET IN OChNTte IN CxOH TKAHBIO. Ecn Bbl He XOTnte Mbl TnactInbI B NOCyDOMOeHNO MaunHe, NCNoB3yIte DnA OCHTKI TOpAUYO BODY n HemHOROMOIOSeO CpeiCTBa, 3ATem TuaTeNbHO npOMOnTe, UTObI ydaIITb OCTaTKn Niu. BblPntE HAcYxo ByMaJXhbIM NONOTeHcEM.
31-32 He nCnoJb3yIte MeTaJIuYeCKne ry6Kn, Moaankn I pyrIe abpa3NBbIe qNCTaIe CpeIcTBA dIra OUnCTkn qAtei rpnIa, nCnoJb3yIte ToIbKO HeNoHOBBe HemetAlNuYeCKne qNCTaIe npncnocO6JeHna.
CneIte XnKoCTb n3 NOdoHa dJa Xnpa N BbIMOnTe erO B TeNNoB OBe C He6oJIbShM KOINueCTBOM MOUeRO CpeDcTBA, 3aTeM TuaTeJbHO IpocuWnte 6yMaXHbIM NONOTEHcEM.
33 UTo6bl Ouncntb KpbIshky rpnJ, npotpnte ee ry6ko, cmoeyHno TeNIOBDOJ, a 3aTeM npotpnte MfKoCyxOHTKaHbIO.
34 HnkOrda He norgyKaIte Kopnyc rpnB B Body nn npryu XnKoCTb.
35 PpeJe yem y6paTb yCTpoiCTBO Ha xpaHHeHne, y6eIntecb, yTO rpnJIb YnCTbI n CyXoN.
IIO6oe npyroe 6cnyxnbHne OJKeH BbINONHrB npeCTaBnteB abTOPn3OBaHHOrO cepBnCHORo ceHTpa.
Инструкции по устсаню неоладok
12 4-7 MInHyT BoNbl KyTiHi3.
13ДыбьICTbIK YH ecTINce XaHe ə3ipney DeHreinH INHdNkaTOpbl KynriH TycnEH KbInblbIKtaybIH TOKTaTca, anDbIH aHa KbI3bIpy peKmI aKaTaNbl.
Anraptnapan: AnbH aHa KaI3dbipydbIH CObIHda, Kypblfbi Ka6bIK kaIca, Kayinci3dk Jyneci KypblfbHbI eWipeDi.
1415
1617
18
14-15 AndbH aHa Ka3bpydaH KeiH Kypblfbl naJaIaHyFa daBbH.
PnIbI aWbI, TaMaKTbI 33ipney nITacbiHa KOIBHbI3.
AnfapTnanap: KpybIrfbl TbIM y3aKaawbIK KaIca, Kayinci3dk Knyneci KpybIrfblHbI ABTomattbl Typde eWipeedi.
16-17 KypbIfbl TaMaK KaIbIHdbIbHa XHe MeIsepiH caH 3ipney SaapnamacBn (yaKbITneH TempepaTpaHb) aBTOMaTTbI Typde pettei.
3ipney 6arapnamacbinbactay yin H KypblfblHb Jaa6blb3.3ipney deHreiniH nHndkaTOpbl 3ipney opbHdaBn XaTKaHbN Kepcety yin Kek Tycke aHaBn, codan KeiH xaCbl 60ana (EH KaKcb HtXKeJep any ywH 3ipney npocciHb 6apbcihda TaMaKtbla aWnHaB3 HeMece XblXbITnAbI3).
3ipney opbHdaIbn KataKaHaIa naIaIaNHybIra 3ipney deHreInHe (MbIcIbI, JapTbIaN nnKi/capbl) KeTkeHI tyanbl ecepty ywiH ep6ip 3ipney Ke3eHiDe Dbl6bICTbIK CnHAn 60anaBbl.
TamaKtbH eTe Kya Ka 6eiktepi TypaBle ckeptne: KypblfblbI XabHb3, OK Tymeci XblblkTaNbXHe HndnKaTop OkpaKbIKyInH 6oNbIN KaNaDb, Kypblfbl TaMaKtbl TaHybIH KamTaMaCb3 ety XHe 3ipney 6arfapnaMaCbl 6actanybl ywiH OK TYmecin 6acblb3.
18 Θ3ipney dapejxcie 6aIHaHbictbl HndnkaTOp wam Tycih e3reptedi. HndnkaTOp wam capbi 60ncxhe Dbl6bICTbIK CnIHan 5bIKca, TaMaK XapTBlna WNI, HndnkaTOp wam capfblnt 60ncxhe Dbl6bICTbIK CnIHan 5bIKca, TaMaK opta7a 3ipHeHxHe HndnkaTOp wam Kbl3bl 60ncia, TaMaK XaKcbI 3ipHeHren.
Eckptne: eTTiH oTe wNki 6oNfahbIH KaIacAHbI3, 3iPney deHreinH INHdkaTOPbl Xacbl TYCKe aHaJIFaHda eTTi anbHbI3.
3ipney HtJxeci TamaK Typihe, canacbHa XHe WbIKKaH KepiHe 6aINaHbICTbl e3repin OTbIPybl KaIbINTbl eKeHH eckephi3.
3 Θ3ipney
1920

21
19-20 TaHdaIraH ə3ipNey DeHreInHe caTyc KePiHReHde KypblfblbI aWbIn, TaMaKTbl aNbIHbI3.
21 KypbIfblHbI Xa6blHb3. Bacekapy TaKTacbl XaHaDbI XaHe e3iH «6aFapnAmhbl TaHday» pexmIne opHaTaBbl.
Anraptna:6aFdapnama TaHdaImaca,Kayinci3di Kyyneci aBTOMaTbI Tpyde eweDi.
Ko6ipek TamaK ə3ipney
TamaKtbH ekihwi 6eNirih 3KeNce, KypblfBhl KaTadaH anDbH ana KbI3dbipbHb3 (2-6eImdi kapaHb3. «AnbH aHa KaI3dbpy》,9-TapMaKTan 6actan),tinti 6ipdeH tamaK Typin 3epneriH3 KeNce De.
TamaKtbH Taftb6ip 6eJirin e3ipney konbl:
TamaKtbH,6ipihsi 6eJiriH aayTaydaH KeiH:
- Kypblfbi iwiHde TamaKcbi3 Xa6bIK eKeHH TeKcepiHi3.
- Tnicti 3ipney peximn/6arnapamaHbI TaHaHbI3 (6yn Kaam TiTI aNdbIHbI Tamak 6eJirimeH bipdEi 3ipney peximn TaHaaybI ueUceHi3 de KepeK).
- «OK» Tуймecинбасьнbl3: KypbIflbl andbln aana Kbl3dbyblбactaindbl. Andbln ana Kbl3dbypy Kyrrin Tycnen JbInbIKtaTbH ə3ipney deHreiniHnHnKaTopbImeKepcetinei.
4.ДыбьICTbIK cHrAn ectinreHne xeHe a3ipNey DeHreiniH INdNkATOpbl KylH TycnEHN XbINbIbKtaybIH TOKTAkaHa aAnbH aHa KbI3bIPV aAKTaIaBbI. - Andbn ana KaI3DbpydAn KeiH Kypblfbn naDanaHyra daBHn. PnIbdi aWbIn, Kypblfbi iWiHe TamaKTbI caNbIHbI3.
MaHbI3DbI:
Ke3 KeIreH KaHa Tamak 6enirHde andbn aJa Kbl3bipy Ke3eHi MinDeTTi eKeHH eCKepiHi3.
2223

24
25
AaH aHa Ka3bpy TImdi XMbIC iCTeyi ywiH ePkawan rpNbDi XabdyjXHe iWInDe tAmak 6oJmaybH ecte caKaTaH3.
CodaH KeiH rPnIbDi aUy XeHe iWHe TamaK cany aAnDbHda aNDbH aHa Kbl3DbpydbH aKaTanyBH KyTHi3.
EckepTne:Jha aIdbIH aIa Kbl3dbipy 6afdapnAmacbI aIdbIHfbI 6afdapnAmahbIH CObIHan KeiH 6ipdeH opbIHdaIca, aIdbIH aIa Kbl3dbipy yaKbITbI a3aNtbnadbl.
22-23-24
TamaKtbl apTypli TaIramap ywH 3ipnerih3i KeIce, rpnbdi aBHB3 XHe KaKetTI DeHreIe JxETKeHd e TamaKtbl aBHB3, codan Kein rpnbdi Xa6bHB3 XHe backa TamaKtbl 3ipJeYdi XaIFactbipbHb3. BaFapJaMa e3ipney faDapnAmacbH «XakcbI e3ipNeHdi» DeHReInHe JxETKeHwe XaNFactbipadbl.
25 KblnbI yctay yHKnncbI
3ipny npocci aKtafHa KaPbI IbI Xblbl YCTay napametpihe aBtOMaTTb Type etedi Xane 3ipney deHreinHn HndKaTOpbl Kb3bl TycKe aBTOMaTTb Type aHaJadbl XHe Dbl6bICTbIK YH 20 cekynd caBH WbIfaDbI. Pnilde KaNbdpblnc, 3ipney nltanapbl cybnXkTaKaHda TaMaK 3ipJeHyi XaNfactbipadbl. Dbl6bICTbIK YHdi OK> TYmecin bacy apKblbl TOKTatYfa 60anaBl.
Anraptna: kayinci3ik kyneci 6enrini 6ip yaKbIT mJwepineH Kein KypblfblHb aBTomattby Typde owipei.
Ekinwi 3zipney
KocbIMwa TamaKtbI 3ipneriHi3 KeNce,21-6eimdi kapaHbi3.
5 Ta3aay XeHe TexHnKaJIbIK KbI3MeT KOpceTy
2627
26 KypbIbnHbI eWipy ywiH Kocy/ eWipy TyMeciH bacHbI3.
27 rnilbipo3etkaan aKbIpaTbIHbI3.
28
28 Kemihne 2 carat 60b1 CyblTbIHbI3.
Ke3deneK KyikTepei 6oIdbIpMaY ywiH Ta3anay aIbIHda rPnIbdi JkaKcbIa n CyblTbIHbI3.

2930

3132
3334
35
29 Ta3anay anDbHda 3ipney 6etih 3aKbIMdAn anMay ywIH KyIbINTbI aWbHb3 XHe nnTanapdbI aNbHb3. Tamy HayacbH xHe 3ipney nTanapbH bIDbc Kyy MaunHacbHda Kyyf a6oJaBbl.
30 Kypblfblx He OHbH cbIMbl H bIDbc Jyy MaunHaCbHa caNyfa 6oImaIdbI. Kb3dbpy 3nemeHTepiH,KeipHetin XHe aMbIK 6eiktepei nnTanapDbI anydAn KeIH Ta3aJAmay KepeK. Onap eTe nac 6oNca, Kypblfbl TOIbIfbImeH cybifaHwa KytiH3 XHe OnapDbI Kypfak WybepeKneH Ta3aJAHbI. Onapbl bIDbc Jyy MaunHaCbIHDa Ta3aJarblHbI3 KeJmece, 3ipney PntanapbH Ta3aay ywiH XblbI Cy MeH a3FaHTaBbIC Jyy CynbIKtBbIFbIH naJaAnaHyra, CoaH KeiH Ke3 KeJreH KaNbIKTBk Ketipy wih MKNrT WaOFA 6oJaN. KaFz3 MaJIbIKTbI NaJaAnaHbIN MyKnrt KenTipiH3.
31-32 FrnilbdiH Ke3 KeIreH 6enirin Ta3anay ywiH metann KblpfbIHTapdbI, 6oJat KbipfbIHTbI Hemece ew6ip a6pa3nBti Ta3anaftbI naJaIaHyf a 6oJmaIbI. TeK HeJnoH Hemece metann emec Ta3anay Wy6epekTepiH naJaIaHaHbIbI3.
TamhyayacbIH6ocatbIN,kbIbCydaXaHe a3raHTaBldbcKyyCyibIKTbIFbHDa Kyblb3,Kafa3CynrHi naDanaHbn XaKcbiHaNKeNTipiH3.
33 PnB KaKnaBbH Ta3anay ywiH Kblbl, bIfAaDbl r6kameh CypTih3 XHe KymCaK, Kypfak WybepeKeH KeTIpiH3.
34 PnIb KOpNycbH cyfa Hemece e6ip 6aKa cyNbIKTBKKa 6aTbIPMaHbI3.
35 CaKtayra KOIO anbIDHa epkaWahrpnIb Ta3a KHe Kypfak eKeHHTeKcepH3.
36 Ke3 KeIreH 6aCKa KbI3MeT Kepcetydi eKiJeTTi cepBnC eKiiOpbIHaybl KepeK.
AkaayIbIKTapdbI XOIO HycKayIbIFbl
| Môcene Ce6en Šeùmim | ||
| Туímeme Μожьп Тур+ Tутас Хасьл Инданкатор Шамы+ Тумсeci XXbIbIbIbIbIbIbIbIbIbIbIbIbIbIbIbIbIbIbIbIbIbIbIbIbIbIbIbIbIbIbIbIbIbIbIbIbIbIbIbIbIbIbIbIbIbIbIbIbIbIbII+ Tумсeci XXbIbIbIbIbIbIbIbIbIbIbIbIbIbIbIbIbIbIbIbIbIbIbIbIbIbIbIbIbIbIbIbIbIbIbIbIbIbIbIbIbIbIbIbIbIbIbIc | Плитанар apacsbHdamaKap bap Kukide Jxhe anDbH anala KbIzdbIpycbI3 KypblfHbIbIbIbIcKocy Hemece abTomattbI e3ipney 6aFapamamacbsHbBactay (KoJ pexnmi aBtomattbI typde beCenchdpinedi). | 2 MymkH onuqir: - Tymecin bacy, codan keiH OK Tymecin bacy apkblbIbTemnepatypa napametprH taHaDaHb. 3e3ipNeH3, 6ipak e3ipNeydi b6aBInay KepeK (KoJ pexnmi). - KypblfHbIbIbIbIbTOKTaTbHb3, TAmakTbI albHb3, KypblfHbIbIbIbTInci Typde JxabHb3, KypblfHbIbIbIbKaYta 6aDpaHb3, KypblfHbIbIbKaYta 6aDpaHb3, KypblfHbIbIbKaYta 6aDpaHb3, KypblfHbIbIbKaYta 6aDpaHb3, KypblfHbIbIbKaYta 6aDpaHb3, KypblfHbIbIbKaYta 6aTbIbpy aKApTalRHaHa KaYTH13. |
| Курьлгы anldH anala Kblzdbpy Hemece e3ipney 6aFapamamacbsHbHb 6apbcsbHda toktaibd. | Курьлгы e3ipney Ke3iHne tbIM y3ak aushk yctanfaH. KbylbyHryemece JxblbIbIbIbIbIbIcTAYCTay aKApTalrFaHHah KeiH KypblfHbIbIM Y3ak TcHbIbIbIM | Курьлгы розеткадан axkbpatbHb3 Jxane 2-3MinHyts KaIadPbHb3, npojecti kaYta bactahb3. KypblfHbIbIbKeleci pet naJaIaHaHraHda en JxakcbI hTea aushbI, JxabHb3. Мсeile KaYtaDAH opbH anca, Jxepriikrti Tefal TytbHbUbIapdIbI cokday KbI3metiHe xabapacbHb3. |
| ЖынlbIbIbIbIbIbIbIH anak INdNKaTOpшам. + / Tуmeci XbIbIbIbIbITaYda+ Dlb6bcTBcSrhAIDbIbITOKTATy | Курьлгы kateci. Kурьлгы ТыМсаKbIbHbIM BoLmeDe caKtanadHbHemece naIdaHaHbIaDbI. | Курьлгы anxkbpatbHb3, KaYta KocbHb3, coDAH KeiH anDbH aHa KaI3dbpy 6aFapamamacbH b6pden KaYta bactahb3. Мсeile Jxanfaccs, TytbHbUbIbIbIbIbIbIbIbIbIbIbIbIbIbIbIbIbIbIbIbIbIbIbIbIbIbIbIbIbIbIbIbIbIbIbIbIbIbIbIbIbIbIbIbIbIbIbIbIbIbIB. |
| KypblgBi eHdi Di6bIcTBk CnHAn IaMbIaRmaJxabTb. | ||
| Алдын ода КblZdIPuydah KeiH tamaktbI rplnbte Koindim, biPak inNdkaTOp KUJIITH TycTe KaIaNdIgXeH e3ipney 6aFapamamacBs 6aTcHbMaiDbI. | Тамak 4 cm-dEN KaIbHbPak. | Тамak 4 cm-dEN KaIbHbPak 60lmaybl KepeK. |
| Тамak КОю ушIN rgInbDi ToTbIbIMeH aUlnaDbHbI. | ТурльдI ToTbIbFbIMeH aUShbI3, coDAH KeiH XabHb3. | |
| Тамak ce3iImMeDi. Tamak TbIM Jxuka, «OK» cezi XbIbIbIbIKTAYda. | Тумecin b6acy apkblbI e3ipNeydI bactaydbI pactaHb3. | |
| Kурьлгы кoJ pejximInde boencenHdpinei+ INdNKaTOp shAM Kbl3bIb TycPeneh XbIbIbIKTaYdbI. | Алдын ода КblZdIPuy yakblTb KblckapdbI. | Ззіріnev'd Ke3eHdI Tpyde 6akblaHb3 (KoJ pejximInde naДaHaHушИ). Hemece |
| ТурьдI ToTbIbHbIb3, TAmakTbI albHbI3, rgInbDi JxabHbIb3, naДaHaHfbHbIb3 Keletin JxanaHa e3ipney 6aFapamamacbH taHaDaHb3 JxOHe aDblBn ana KaI3dbpy 6aFapamamacbHbHn aYKTanyBuH KUTH3. | ||
| ЖынlbIbIbIbIbIH aK+ Tуmeci XbIbIbIbIKTAYda+ Y3dIXcI3 dIb6bcItbK cnHan | Курьлгы kateci | ΘHimdi po3etkaadan JxobpataHn, TytbHbUbIaPdBi KOLday KbI3metiHe xabapacbHb3. |
Kehe, ciepee etke katbictb: andbin ana ophaTbnfah 6aFapnamanapdaftb 3ipney hetxkeepi 3ipnein xatkah TamaKtbH KaiaH sbikKaHbHa, keciyine XHe canacbHa 6aJnaHbictb 3repin OTbpyb MyMKH. BaFapnamanap KAKcbl CanabTamaK YsiH opHaTbnfah XHe cbHaNfaH.
Ocb cnqkb 3zipney keiHne eTTIH KaIbIHbIFbIH eckpey KepeK; 4 cm-DeH KaIbIHpaK TamaKTbI 3ipney MymkiH emc.
3ipney HycayIbIfbl (aBTOMaTTbI 6afdapnaamap)
3axnct doBknna noHa yce!
Baw npnlaMiCTb ciHni MaTepiA,aki MoKyTB 6yTu BnKOpNCTaHi NOBTOPO a6o yTuJI3OBAHI.
3aIiTe Ioro B MicceBOMy nyHKti 36Opy BiIxOdiB.
Onmc
PyuHni peKm (4 piBnA TaepaTyPi) C Pyka IINbITbcI HCTpyKciI dJa pyuHoro peKmMy.
A1 KhoNka On/Off (YbIMK./ A5 KhoNka OK D ПлactHnДЯ npuToyBaHHa
A2 PexmдяЗamopoxeHoiixi A6 IndkaTop piBn npuroTyBaHH E loTOK
A3 PporpaMnpuroTyBaHH B Kopnyc F Shhyp JKNBHeHH
nonepeHHe HarpiBaHHNoaTOK npnroTyBaHHa
JaKIO BV He BnEBHeH I TOMy, Aky npoRpaM y npiroToYBaHHa o6pAtn dIy iHux, He nepenueHx TyT npOdyKTIB, DnB. Ta6nLIO.npiroToYBaHH npOdyKTIB, dIy JkNx HemaCneiaJbHOi npoRpaMn, Ha cTopIHcI 143.
11 12
11 HaTnchHb KhoNky "OK": npuJa nOuHe HarpiBaTncA, a iHnKaTop pIBHa npiroTyBaHHa 6yde 6nMaTu fiOJeTOBm KOJIbOpOM.
KoMeHAp: KaO Bn Bn6paNn HnPaBnIbHy npOrpAmy, NOBepHITbcn Do etany 8.
123auekaite4-7xBnH.
13
13Прolyнс 3ByKOBn cnHan, a iHdNKatop pIBn npiroToyBaHHa nepeCTaHe 6IImaTn fioJeTOBm. IonepeHne HarpiBaHHa 3aBepueHo.
KomeHTap: HanpkiHci nonepedhboro HarpiBaHHa, kso npua3aIIuAeTbc3aKpITm, cIcTeMa 6e3neKn BIMKHe Ioro.
3 Пиurotyвань.

14 15

16 17

18
14-15 Nicna nonepedhboro HarpibaHn npnaI rTOBNI DO BIKOPcTaHH.
BidkpniTe rpiNb i noknaTb npodykTu Ha pIaCTnHy dny nprirotyBaHH.
KomeHTap: kUO npuad 3aJIuHaetbC BIDKPITIM 3aHaTTO IOBRO, CNTema 6e3neKn aBTOMATNUHO BMKHe NOr.
16-17 Прилад abTomatnucho perylnoe цкл пи�otybaHHa (vac i TemnepaTypy) Вдповдно Do TOBUNH IWMATKIB Ta KINbKOci IHrpendient.
3aKpnIe npnla, 06 noatnpnroTyBaHna. INdkatop pIBnnpiroTyBaHHa 3miHtB KOJIp Ha cHi, aNotIM Ha 3eHn, 06 noka3aTn, 0o TpNBaE npocec npiroTyBaHHa (JIA OTpMaHHa HauKpaux PezltaTb He BiDkPnBaHTe npnla i He nepeCyBaTe npOdyKn iD yac npiroTyBaHHa.
Hacrynne npuroTyBaHHa
KuO Bn 6aKaTe npuroTyBaTn 6iNbwe npodykTiB, nB. po3in 21.
5 OuHsEHHa Ta o6cIyroByBaHHa

26 27

26 Hatncitb KhoNky On/Off, 0o6 BmKHyTn npnaD.
27 BnIMITb WTeNCeJIb 3 pO3eTKI.
28
28ДаиTe npiJaIy oxoJohTy npOTaROM 2 roDInH.
Ipeod ouuueHnM, daTe npnaNy NOBHICTO OXoJOhyTu, 06 yHnKHyTN BInaIKOBnx OniKIB.
UK
2930
31 32
33 34
35
29 Npeed ouHneHHm po36nokynt Ta 3HIMtB nactHH, uOb yHnKHyTN NOWKoJKeHH NOBepxHi IJI nprirotyBaHH. TbiDOn dJa Knpy i PnactHH MOXHa MHTB NOCyDOMNHi MaunHi.
30 3a6bopohraetbcnMTn npnlaH i Hhyp KINBHeHH B NocydomnHi MaunHi. Iicna BndaIeHH nlaCTnH, He OunuYte HarpibalbHi enemHTN, BnDmTi DaOCTynHi yactnHnicn BndaIeHH nlaCTnH. KaIO BOHN CnIbHO 3a6pydHeHi, NoeKaite, NOKn PnIaN IOBHICTIO OxIoHO Ta OunchTb IX cyXIO raHupkoIO. KaIO BN He XoUeTe MNTN 3HIMHi yactnH y nocydomnHi MaunHi, OunchTb IX NiD TepIOBODO3 HeBeJIHKOIO KJIbKICTHo pIDHH DnA MTTA NOCyDu, Notim petelbo npomnte NiD IpOTouHO BOIO, 106 BnDaIHTN 3aIIuShKn Ix. IpotpItb obepeKHO NaepOBIM pyuHNIKOM.
31-32 He kopnctyntecr MeTaeBmMoayakamN, KOpCTKIMn r6kamna6o abpa3NBHMn 3acobamn, o6OuHCTHTb-ky qactHy npnlaNy. Kopnctyntecr Tlkbn HeJIOHOBmna6oHEMeTaeBmN r6kamn.
CnpoKHiB NiIDoH IJy KInpy Ta NOMnTe NOrO B TeNII MInbHi BODi, a NOTIM peteNbHO npotpiB nanepoBm pyuHKOM.
33 06 ouhctn Kpnkny npnna, npotpi b II 3moueHO B TeNII BOI r6KOHO Ta Bnptb CyXIO M'KOIO raHicpKOIO.
34 He 3aHypoIte Kopnyc npinady y Body a6o iHsy piINHy.
35 Neped 36epiraHnM nepeBipTe,io6 BaI npnaD by uNCTIMi cyxM.
36 Byd-kae iHwe texhiuhe 06cnyroByBaHHMaE BnKOHyBaTu npedCTaBnK aBtOpn3ObaHoro cepBicHOUHTpy.
UcyHeHHe HeCnpaBHOCTe
| ПюбLEMа Пючина Рihuшия | ||
| Коньа CBITbcs + Иndикатор ropitb 3eelenim Кольорom + Коньka 6nmae + Коньka 6nmae | ·Пробад увимкунься abo notалоса abTomatчne prinotuybaHHia xii 6e3 nonepednboro наг рibahня (авTomatчho yBIMKHyBCa ryhni рекim). | ·2 можлив ВарiaHTN: - Виберіт b hailaunbyanha Tempeapуri HATINCHYBUN KHNKY, a notim HATINCHIb OK. Д氧BOJIte prinlady rotybati dani, ale CTexkTe 3a npocecm (puchny pekim). - Вибніт prinlad, діctańte iж npabuINbHO 3akpinyte prinlada, pehenahauSTyte myo Ta 3auekaite 3akINchENH NOPEPEDHBORO HargBaHnA. |
| Пробад вимкается пд ча пореadingуог harpivbaHHa abo prinotuybaHHaixi. | ·Пробад 6vy Bivdkpitim Занаду doBro ng pid cac prinotuybaHHaixi. ·Пробад постюe Занаду doBro ng nclra пореadingуог harpivbaHHa 66epirae tempepatур. | ·Виьміт shtenceь 3 pozetkn ta 3auekaite 2-3 xvlnnhi, notim nobtoript bpoacec. HactynHoro pa3y, kolni Bv BHKopructOByeTe prinlada, pekeponahtecs, zuo Bivdkpiliu Ta 3akpinyu Ioro wBIDKO对于我们OTPIMAHnHa нay kpaunx PezylbTaTtB.Якso пюбLEMа вимkae 3HOBU, 3berhItbcg B abTOpin3OBaHH CErbicHInC ΚeHTP. |
| Блима€ 6ilni iHdikatop. + / / / / / Klonka 6nmae + He lyNa€ 3ByKOBuM CINHAn | ·ВidmoBA prinlady. ·Prinlaid nepe6bya€ abo BHKopructOBuTbCBy B kImnati, De 3aHaTdo XonODNo. | ·Виьніт bta yBIMKnHb prinladi o odpa3y nochnai Te proucec nonepedHBORO harpivbaHHa.Якso problema He 3Hkae, 3berhItbcg Do ABTOpin3OBaHHO cepBicHOrO ΚeHTpy. |
| Пробад Ne BVDa€ 3ByKOBuM CINHAn. | ||
| Пися пораздыгогиогия роклav порodукtn Ha rplnil, ale iHdikatop Залишевая ФIOLETOBIM i npoces prinotuybaHHa He po3noaBc. | ·Шматк Товци 4 CM. ·Ви He nobHicTUp BIDkpinyr rplnl dny toro, qio6 noKnaCTn npodukTN. ДатчκHe npaцюe. ToBuzHnA npodukTb Занаду мana, «OK» 6nmae. | ·Жа Ma€ 6bTy TOBUnHOU He 6bIbSe 4 CM. ·Ровсichtу Bivdkpinye rplnilb, a notim 3akpinye Ioro. |
| Пробад вимkaETbCS B puHOMy pekimi. + IIndikatop 6nmae cheRboHIM KOLbOpom. | ·Пerepbavcra procecs nopepeHbOro harpivbaHHa. | ·PeripodnHco STexkTe 3a prinotoybaHHam (dЯ вИКористань в рухому pekimi). A60 ·Виьніlt b rplnl, prn6epiTb iHRpeiCNTn, zakpyte rplnil, Bv6epiTb HOBV nporpamy prinotoybaHHa Ta dOuekaJTEcS 3akInuHennr npocecy nporedeHbOro HargBaHH. |
| Блима€ 6ilm KOLbOpom + Klonka 6nmae + Be3nepebpHni 3ByKOBuM CINHAn | ·ВidmoBA prinlady | ·Вidknucityb prinlaid Bid eelektpomepexi Ta 3berhItbcg Do ABTOpin3OBaHHO cepBicHOrO ΚeHTpy. |
Iopada, oco6nbo dny npurotybaHH M'acnX ctpaB: pe3yntaTn npuroTyBaHH 3a aBTOMaTHHMM nporpaamM moKyTB Biip3HnTcA 3anexKHO BiD noxOJKeHH, HapizK Ta JKOCTi npodykTIB. Iporpam Po3po6JIeHi Ta nepeBipehi Ha npodykTax BUCOKOI JKOCTi.
Takok niiac npiroTyBaHH Mae BpaxOByBaTnCra TOBUnHa 1MaTkIB; BN He MOKeTe roTyBaTN 1MaTKn a6o iHpeiEHTN TOBUnHOIO 6iNbue 4 cm.
PionchenHHIoo npnroTyBaHna (aBtOMaTnHi nporpaMn)
YEPBEHO "Iobpe"crotbeHo. KpaHnroTbeHTo.

MIVAHE B UEPBEHO KpaHa roTBeHe Do "Dobpe" CROTBEHO.

HENPEKbCHATO3ENEHO PbyhatayHKuueeN36paHa nn aKTHBnPaHaABTomTuHNO,BXkTe "PbKOBoIDCTBO3aOTcPaHBAHe Ha Hen3npabHOctnCtp.213".

MIGAHE B BIAH O He3npaBHOCT Ha npOdyKta BnKTe "PbKOBOcTBO 3a OTcPaHraBaHe Ha He3npaBHOCTN".CbpxKeTe ce c OTdena 3a NoDpBxKa Ha KJIeHTITe
Ръководстvo 3a порpaMu 3a roTbeHe

Byprep

YepBeHo MeCo

PahHHn/CAHDbNv

HaeneHn/aHneKo

Pn6a

Птумecо Ручениян:

Mopckn daopoBe

CBNHCKO

Bekoh

TpaunuHn rpn3a pbua pa6oTa c4 pa3nHn HacTroKn Ha Tempepatypata (OT 110°C Do 285°C)
1 Poirotobka

1

2
3

4
1OTCTpaHete BCnUKN ONAKObUHN MaTePnAJI, CTnKePN N AkceCoapN OT BbTpewHaTaNOT BbHShHaTa CtpaHa Ha ypea. LBeTHnT CTnKeP Ha INnKaTopa 3a HnBO Ha rotBeHe MOxE Da e npomeHen B 3aBnCmOcT OT e3nKa.MoXeTe Da rO cmHnTe Cbc CTnKePa OT BbTpewHaTa CtpaHa Ha ONaKObKaTa.
2Ipei nIbPbata ynoTpe6a nouchTeTe Do6pe IIOuHte CToIIa BOJa N MaIKo npenapat 3a CbIOBe, I3IIaKHeTe IN OndCyUweTe Do6pe.
3-4 NocTaBete BaTeaTaCe TaBnUka 3a OTnUaHe OTnpEHa ypeDa.
2 Празварптуно наразван.
5
6
7
8
53a Han-IO6pn pe3yntaTn moxete da n36bpoote nIOuHTe 3a rotBeHe C KyxHHeNcKa xapTna,notoneHa B MaNKo RotBapCko Onno,3a Da noO6pnte pa6otata Ha He3aJIenBaUTo NOKpNTne.
6 OTe paHete n3nHoto oNIO C YnCTa KxHeHcKa xapTna.
7Ybepete ce, ye donnata nloa 3a rotBeHe n ropHata nloa 3a rotBeHe ca noctabehn npabnHO B npOyKta, npEn da 3anoue He a3ata Ha npEdBapntelHo HarpBaHe. CbpxTe ypeDa KbMeIeKtpuyeckn KOHTaKT. (ImaTe npedBnD, ye ka6ebT Tp6Ba da 6bnde pa3BNT DOKpa.)
8 HaTnCHeTe 6yToHa 3a BKJ/Un3KJI.
BHHMaHHe:YBepTe ce,Ye MeKdny PIOUHTe HMa XpaHa.

9

10
9 Ako xpaHaTata, KOrTo KeJaTe da CrotBnTe, e 3aMpa3eHa, HaTnCHete 6yToHa "3aMpa3eHaXpaHa".
10 N36epete noxoadyunpekm 3a rotbehe B 3aBnCmOCT OT TOBa KaKbB VIN XpaHa NCKaTe da rotBTNE.
34 He notanai Te Kopnyca Ha rpiIa BbB BOda nn npyn TeuHOCTN.
35 Bnarn Ce rpnkete rpnlt da e uact cyx, npeni Da ro npnbapate 3a cbxpaheHne. Bcakbo npyro cepBn3Ho o6clyXbaHe Tp6Ba Da ce n3BbprBa OT ynbHOMOeH cepBn3eH npedctabNTel.
Recommendation for the use of Snacking & Baking
accessory
- Before first use, remove all packaging materials, stickers and accessories from the inside and the outside of the plates.
- Read the instructions carefully, common to different models and keep them within reach.
- Refer to the appliance instructions for the use of this Snacking & Baking accessory and associated recommendations.
- Check that the both sides of the upper grill plate and the both sides of the Snacking & Baking accessory are well cleaned before use.
- To prevent damage to the cooking plates and Snacking & Baking accessory, only use them on the appliance for which they were designed (e.g., do not place in an oven, on the gas ring or electric hot-plate, etc.).
- Ensure that the plates and Snacking & Baking accessory are stable, well positioned and correctly clipped to the appliance. Only use the cooking plates and Snacking & Baking accessory provided with the appliance or bought from an Approved Service Centre.
- To avoid damaging the Snacking & Baking accessory, always use plastic or wooden utensils.
- Never cut food directly on the Snacking & Baking accessory.
- Do not place the hot Snacking & Baking accessory under water or on a fragile surface.
- To preserve the non-stick coating qualities, do not let it heat too long empty.
- The Snacking & Baking accessory must never be handled hot, except by the handles.
- Never heat the appliance without the 2 grill cooking plates or with upper grill plate and Snacking & Baking accessory.
- When using for the first time, wash the plates and Snacking & Baking accessory, pour a little cooking oil on the Snacking & Baking accessory then wipe it with an absorbent kitchen towel.
- Do not place cooking utensils on the cooking surfaces of the appliance.
- We advise you to use a sponge, hot water and washing-up liquid to clean the cooking plates and Snacking & Baking, then rinse thoroughly to remove any residue. Dry thoroughly using a paper towel.
- Do not use metallising scouring pads, steel wool, or any abrasive cleaners to clean any part of your grill, only use nylon or nonmetallic cleaning pads. In the case of difficult cleaning, soak the cooking plates in hot water mixed with washing liquid.
- The Snacking & Baking accessory is not a baking dish, do not put heating in an oven or on any other heat source, other than in your appliance.
- Do not heat your Snacking & Baking accessory with oil or grease, risk of inflammation.
- Do not use your Snacking & Baking accessory to make browning.
- Do not make recipe with oil or grease. This appliance is not a deep fryer or a frying pan. It is therefore totally excluded to make french fries, donuts, or other cooking with oil or grease.
- If your OptiGrill is already running and you want to use your Snacking & Baking accessory, unplug grill from wall outlet and let it cool for at least 2 hours.
EN
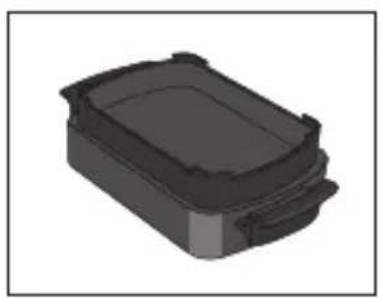
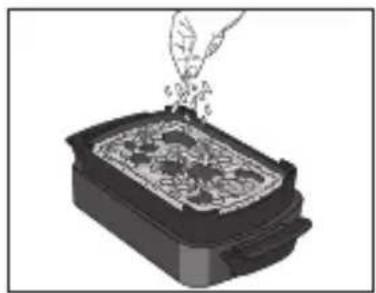
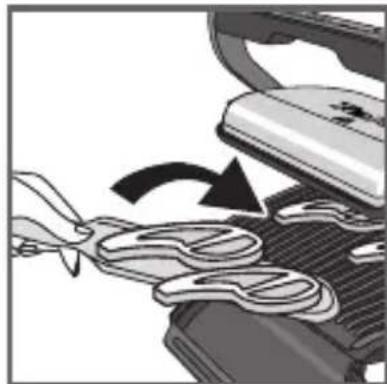
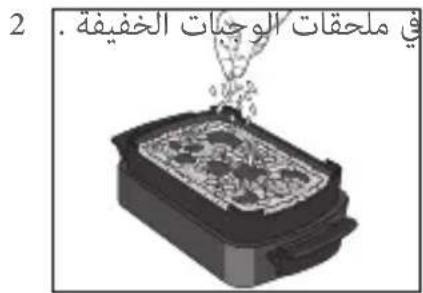
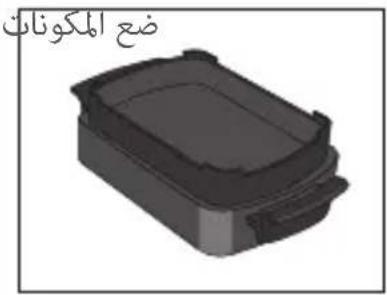
- Put the ingredients in the Snacking & Baking accessory.
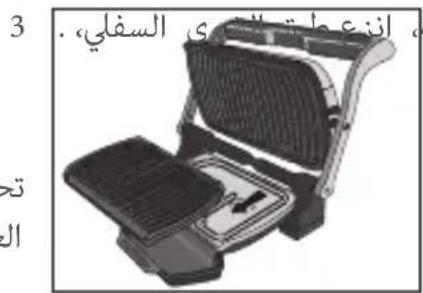
- Open the grill, remove lower grill plate and replace by your Snacking & Baking accessory.
CAUTION: Be careful that upper grill plate is correctly installed in the appliance.
- Close the grill and plug it.
- Press the On/Off button, the and buttons blink, the color light indicator is green The button "M" is lighted fixed to indicate that Manual mode is activated.
-
Press the button until desired temperature is reached with the help of the color light indicator.
-
Fixed green color light indicator: 85^ C to 110^ C
- Fixed yellow color light indicator: 150^ C to 165^ C
- Fixed orange color light indicator: 190^ C to 205^ C
-
Fixed red color light indicator: 240^ C to 255^ C
-
Begin cooking by pressing the button. The and buttons become fixed, the color light indicator blinks until temperature desired is reached.
- When the desired temperature is reached the grill "beeps" and the color light indicator becomes fixed. Then the cooking process takes place.
- You can adjust the temperature during the cooking progress. Press the button in order to reach the desired temperature (follow at the same time the color light indicator).
- End the cooking by pressing the ON/OFF button. All buttons switch off, the grill stops heating/cooking.
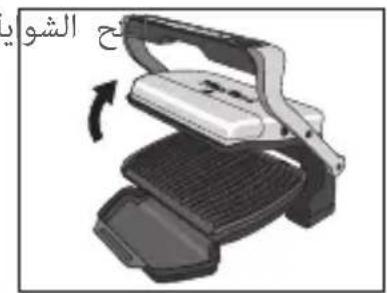
- Open the grill and remove the Snacking & Baking accessory from the grill thanks to its handles.
EN
CAUTION: hot surfaces, the use of gloves are recommended.
The snacking accessory is very hot, put on surface resistant to hot Temperatures

- The Snacking & Baking accessory can go in the dishwasher.

aagaa aalgai gabbl bblb1
jusrnnn rgsll gbsl (y)
. gbl aolc
- sggab
aLc 11 JrJrJrJrJrJrJrJrJrJrJrJrJrJrJrJrJrJrJrJrJrJrJrJrJrJrJrJrJrJrJrJrJrJrJrJrJrJrJrJrJrJrJrJrJrJrJrJrJrJrJr
.9
jde bdo yabla a 10
JzIg .d/
JzWJ. JyG .JxJ
OptiGrill Jg
Jg
Jg
Jg
Jg
Jg
Jg
Jg
Jg
Jg
Jg
Jg
.
a 11 11 11 11 11 11 11 11 11 11 11 11 11 11 11 11 11 11 11 11 11 11 11 11 11 11 11 11 1
AR
1000000000000000000000000000000000000000000000000000000000000000
jIgJgJgJgJgJgJgJgJgJgJgJgJgJgJgJgJgJgJgJgJgJgJgJgJgJgJgJgJgJgJgJgJgJgJgJgJgJgJgJgJgJgJg
. 1
.
.
.
151 151 151 151
.
Jzjzclaoagabjj Jw .JaaW
aJzgo no oJzbl gJzglg jzbl zo aeebrj zclaoag aae ae JcJgll ciao 9 gbl b
Lw da
Jl Jssw. jzll lao log aagai ggl lao log ygblgblg
jU.
.
15 15
y·AR
j
J 1 J 1 J 1 J 1 J 1 J 1 J 1 J 1 J 1
.
·
. 4 g a h y jy 1 1 1 1 1 1 1 1 1 1 1 1 1 1 1 1 1 1 1 1 1 1 1 1 1 1 1 1 1 1 1 1 1
.1.111111111
1u5 ufo gaoafo 1ofo bglfofofofofofofofofofofofofofofofofofofofofofofofofofofofofofofofofofofofofofofofofofofofofo
g 1 j j j j j j j j j j j j j j j j j
15
.
.
ABC CBD.
s 5 s 5 s 5 s 5 s 5 s 5 s 5 s 5 s 5 s 5 s 5 s 5 s 5 s
.0g 6 d2
TpaKbI Jacbl TycTI WAM HdkaTopbl: 85^ - 110^
Tpyaktbicapby Tycti wam HndnkaTopb: 150^ - 165^
TpyaktbI capfbIIT TycTI waM HndnkaTopbI: 190^ - 205^
TpyaktbI KbI3bIN TyCTi WAM HndnkaTopbI: 240^ - 255^
- TyuMecin 6acy apKbIbI e3ipNeydi 6actaHbI3. XHe TyuMeIepi TpyaKtbl 6oJaBbl, KaXeTTi TemnepaTypara XETKeHWe TYCTI WAM INHdNKaTOpbl XblblkTaIbI.
- KaKeTTI TemnepaTypara XeTKeHDe rPnJIb dbl6bICTbIK CnHaJ I sbIfapaDbI XHe TycTI 1wam INdNkATOpbl TypaKtbl 6oBbIn XaHaDbI. Coan KeiH e3ipJe npoceci opbH aanaDbI.
- Θ3ipney opbHdaIbn KaTkaHda TempepaTypaHbI pettey6oJaI. KaKeTTi TemnepaTypaFa XeTy ywiH TyMecin 6acbHb3 (6vJ Ke3de TycTI wam INdkaTopbIH 6akblan OTbIPbHb3).
10.KOCY/THIPY TYMecin 6acy apKbIbI e3ipJeYdi aAKTaHbI3. BapNbIK TYMeJep eWeDi, rPnIb XblbITyDbI/e3ipNeYdi TOKTATAbl.

- Frpnbdi aushin, XeHin TaMaK Xacay XaHe Nicipy KocankbI KypaBIn TytKaJapbHaH YcTAn FrpnbDeH anbHb3.
CAKTbIK ECKEPTY: bICTbIK 6eTTep, konfani naJaIaHv YcblnlaDbI.
KeHin TamaK nicipy KocaNkbIK ypaNbl eTe bICTbIK, bICTbIK TemnepaTypanapra Te3imdi 6etke KOHB13
12.KeHin Tamak nicipy XaHe nicipy KocankbI KypalbIH bIDbc Kyy MaunHa canyfa 6oJaBl.