
Beezer - Refrigerator Ritter - Free user manual and instructions
Find the device manual for free Beezer Ritter in PDF.
| Product type | Beverage cooler |
| Brand | Ritter |
| Model | Beezer |
| Maximum container capacity | 0.75 liter |
| Cooling time (difference -12°C) | 3 to 6 minutes depending on container size |
| Cooling levels | 3 levels (low, medium, high) |
| Preset container sizes | S (0.25 L), M (0.5 L), L (0.75 L) |
| Container rotation | Yes, can be enabled/disabled |
| Display | Screen with icons + multicolored LED ring |
| Connectivity | WiFi and Bluetooth (BEEZER Connect app) |
| App functions | Remote control, programming, expert mode, temperature display |
| Power supply | See nameplate (not specified) |
| Operating ambient temperature | 16 to 32°C |
| Initial pre-cooling | Approximately 10 minutes |
| Automatic defrosting | Yes, by default after 90 minutes of use |
| Energy saving mode | Yes (enters standby after 10 min of inactivity) |
| Automatic shut-off | Yes, after 60 minutes (adjustable via app) |
| Audible signal | Yes, can be enabled/disabled |
| Transport handles | 2 handles (front and back) |
| Ventilation openings | Yes, maintain a distance of 5 cm from walls |
| Drain hose | Yes, for manual drainage of defrost water |
| Rotating support and filter grille | Removable for cleaning |
| Cleaning | Rinse with water, wipe with a damp cloth |
| Manufacturer warranty | 2 years |
Frequently Asked Questions - Beezer Ritter
User questions about Beezer Ritter
0 question about this device. Answer the ones you know or ask your own.
Ask a new question about this device
Download the instructions for your Refrigerator in PDF format for free! Find your manual Beezer - Ritter and take your electronic device back in hand. On this page are published all the documents necessary for the use of your device. Beezer by Ritter.
USER MANUAL Beezer Ritter
Mains connector socket
Symbol WLAN Simbol WLn
| 4 Pучka деврсы | Rukovát dvierok | Ročaj vrat | |
| 5 | Функционалынные кондп | Tlačidlá funkcii | Funkcijske tipke |
| 5.1 | Кондka «Пуск» | Tlačidlo Štart | Tipka za zagon |
| 5.2 | В缕очени и В缕очени вразсаня | Rotácia zap./vyp. | Vklop/izklop vrtenja |
| 5.3 | Размер emkocstи | Vel'koš námoby | Velikost steklenice |
| 5.4 | Стень-by олajжdenи | Árovečn chladenia | Stopna hlajenja |
| 6 | Ручки дя перахочи | Prenosné rukováte | Ročaji za prenašanje |
| 7 | Вenv'tьяцонны otbercentя | Vetracie otvory | Prezračevalne odprtine |
| 8 | Сливовшалг | Vypúst'acia hadica | Odvodna cev |
| 9 | Гнеб do заелковпатаня | Zásuvka siet'ového pripojenia | Omrežna vtichnica |
| 10 | Перешевhoe OTbercentя | Prepadový otvor | Odprtina za prelivanje |
| 11 | Врашиюшся подан | Podpera rotácie | Podlaga za vrtenje |
| 12 | Рeoшета | Sitko | Sito |
| 13 | Хождуньая камара | Chladiaca komora | Hladilna komora |
| 14 | Завodская tabлоча | Typový štitok | Tipska ploščica |
srsvtr
1BpaTa pacxnaHe komope Lucka till kylkammaren Sogutucbolme kappa
2LED-npcten/ npka3 pexima LED-ring/lagesindikering LED halka/mod gostergesi
3EkpaH Display Ekran

Potaunjra Rotation Rotasyon

SML
BennuHa
pe3epBoapa
SML
Behalarstorlek Kap eba ML

CTenEn XnaheBa Kylnivaogutma kademesi


WLAN-cmm601WiFi-symf

WLAN sendolu
| 4 | Рушиа врata | Handtag till luckan | Kapak tutamağı |
| 5 | Функциjsкп тасери | Funktionsknappar | Fonksiyon tuşlorı |
| 5.1 | Старт тасер | Startknapp | Başlatma tuşu |
| 5.2 | Рotaциja укь./иckь. | Rotation på/av | Rotasyon acık/kapalı |
| 5.3 | Велична розерboaра | Behállarstorlek | Kap ebadi |
| 5.4 | Стених ла海内外а Клиivating Soğutma kademesi | ||
| 6 | Ручke за пошеBE | Bärhandtag | Taşima tutamakları |
| 7 | Овори за вентilatedу | Ventilationsöppninger | Havalandirma delikleri |
| 8 | Овodно цево | Avtappningssslang | Gider hortumu |
| 9 | Мразиа утualница | Nätuttag | Elektrik baglanti kovani |
| 10 | Прелевни OTbOP | Överloppssöppning | Taşma deligi |
| 11 | Рotaциони Нocан | Rotationsstöd | Rotasyon desteşi |
| 12 | Сито | Sil Filtre | |
| 13 | Расхладна komopa | Kylkammare | Soğutucu böme |
| 14 | Тинская п loочиа | Typskylt | Bilgi etiketi |
de Bedienungsanleitung 3
en Operating instructions. 12
fr Notice d'utilisation 20
bg PbKOBoIDCTBO 3a ynoTpe6a 30
CS Návod k obssluze 40
da Betjeningsvejledning 48
es Instrucciones de uso. 56
fi Käyttoohje 65
hr Upute za uporabu 73
hu Kezelési utmutató. 81
it Istruzioni per l'uso. 89
nI Bedieningshandleiding. 98
no Brukerveiledning 106
pl Instrukcja obslugi 114
ro Instruetiuni de operare. 124
rU RykoBoDcTBo no 3KcnIyatau..133
sk Návod na obsluhu 143
s1 Navodila za uporabo 151
sr YnyTCTBO 3a pyKOBaHbe.159
SV Bruksanvisning. 168
tr Kullanim kilavuzu 176
SYMBOLERKLÄRUNG
Symbol Erklarung

| (t in min) | *** | *** | |
| small | 2 3 4 | ||
| medium | 3 4 5 | ||
| large | 5 6 7 |
Hinweis:
CE marking: The product complies with the applicable requirements of the European Union.
The product was put on the market after 13 August 2005. It must not be disposed of as normal domestic waste.
The crossed-out wheelie bin symbol indicates that separate collection is required.
Warning - flammable substances
GENERAL SAFETY INSTRUCTIONS
To avoid personal injuries or damage to the beverage cooler, please observe the following safety instructions:
- This appliance is intended for use in private homes and for similar applications including, for example: in staff kitchens in shops and offices; on farms; by guests in hotels, motels and other residential facilities; in B&Bs; in catering.
- The appliance is designed for domestic use and is not suitable for commercial use.
- Never set the appliance down on hot surfaces or close to a naked flame.
-
Use the accessories included in the delivery specification only.
-
Only lift the appliance using the carry handles provided.
- WARNING: When positioning the appliance, ensure the supply cord is not trapped or damaged.
- Do not bend the power cord when positioning the appliance. Route the power cord so that it does not come into contact with hot or sharp-edged objects. Do not allow the power cord to hang down over the edge of the worktop.
- WARNING: Do not locate multiple portable socket-outlets or portable power supplies at the rear of the appliance.
-
WARNING: Keep ventilation openings, in the appliance enclosure or in the built-in structure, clear of obstruction.
-
When positioning the appliance, ensure that a sufficient distance of approx. 5cm is kept between the appliance and the surrounding walls or other boundaries.
- Only use the appliance after it has been securely positioned. After transport, the appliance must be left unmoved in the same location for at least 12 hours before being used for the first time.
- Never transport the appliance in a horizontal position! The appliance must always be kept in an upright position, even when not in use, to prevent damage to the cooling system.
- Never open the lower section of the appliance, which contains the cooling system.
-
Children over 8 years of age as well as persons with reduced physical, sensory or intellectual capabilities or persons lacking in relevant experience and/or knowledge may also use this appliance, provided that they do so under supervision or have been instructed in the safe use of the appliance and understand the potential risks associated with its use.
-
Do not allow children to play with the appliance.
- Children aged between 3 and 8 years of age can load and unload the appliance but must be kept away from the connection cable.
- Children must not be permitted to clean or perform user maintenance on the appliance unless they are over 8 years of age and are supervised.
- The mobile app can only be used to activate the BEEZER® for pre-cooling of the appliance and not for the actual cooling of beverages.
- Only connect the appliance to a suitable AC power source that complies with the specifications on the type label.
- Never leave the appliance unattended when it is in operation.
-
WARNING: Do not use electrical appliances inside the food storage compartments of the appliance, unless they are of the type recommended by the manufacturer.
-
Never leave beverages lying in the cooling chamber at the end of the cooling process. The extremely low temperatures in the appliance's interior may cause the beverage to freeze and the container to explode.
-
WARNING: Do not use mechanical devices or other means to accelerate the defrosting process, other than those recommended by the manufacturer.
Risk of electric shock
- Always unplug the power plug from the mains socket in the event of a malfunction. When doing so, pull on the plug and not on the cable.
- Do not use the appliance outdoors.
- Stop using the appliance immediately if any parts are damaged and contact the ritter after-sales service.
- If the power cord is damaged, it must be replaced by the manufacturer, the manufacturer's after-sales service or a similarly qualified person to eliminate risk of personal injury.
Risk of explosion
- Only use the appliance in a well ventilated space!
The BEEZER® must not be installed or stored in sealed cupboards! If the appliance is operated in an inadequately ventilated space, a leak in the cooling system may result in a flammable gas-air mixture! - Do not use the appliance if the cooling system has been damaged! If this happens, the room must be well ventilated at all times and any potential ignition sources removed.
- Do not use any explosive materials, such as aerosol containers with flammable propellant gases, in the appliance.
Insulation blowing gases (CYCLOPENTANE) are flammable.
Unfold the illustrations at the front and back of these operating instructions.
Please read these operating instructions thoroughly before using the appliance for the first time. Keep these operating instructions in a safe place and ensure that they are included with the appliance if passing it on to a third party.
Alternatively, the current operating instructions are available at www.ritterwerk.de.
INTENDED USE
The beverage cooler is intended to be used for the occasional cooling of beverages (e.g. in bottles or cans). The appliance is not designed for continuous use. The BEEZER® is designed for domestic use and is not suitable for commercial use. If the appliance is used for any purpose other than its intended use or if it is operated incorrectly, severe injuries may occur or the appliance may be damaged. All warranty and liability claims will be rendered null and void in this case.
FUNCTIONS
The BEEZER® beverage cooler can cool beverage containers with a capacity of up to 0.75 L. Depending on the size of the beverage container, the BEEZER® takes 3 to 6 minutes to reach a temperature 12^ lower than the start temperature. The cooling process can be adjusted or repeated to lower the drinking temperature further.
The BEEZER can be operated using the 4 function buttons on the appliance or via BEEZER Connect. The start button (5.1) turns the appliance on and off and starts the cooling process. There are 3 further function buttons below this, which are used to configure the following parameters: rotation on/off, container
size and cooling level (5.2-5.4). The colour of the LED ring (2) on the cooling chamber door (1) indicates the current mode in which the appliance is operating.
LED ring
The colour of the LED ring indicates the appliance's current operating mode. The operating modes are listed in the following table:
Ring cold
Meaning (mode)
White Ready for use
Cyan Pre-cooling
process/Automatic defrosting
Blue Beverage
cooling
Purple Energy-saving
mode
Yellow Switching off
Red Door open
Note:
The LED ring is unlit as standard when the appliance is switched off. When controlling the BEEZER via BEEZER Connect, you can activate the LED ring and use the appliance to provide ambient lighting by selecting your preferred ring colour.
Function buttons

Rotation
In the standard configuration, the beverage container is rotated during the cooling process to ensure uniform cooling of the beverage. The rotation function can be deactivated by pressing this function button, e.g in the case of square bottles or containers with delicate labels or imprints. The rotation symbol indicates whether rotation is activated.
Note:
The cooling process is 20% slower if rotation is deactivated.

Container size
S 0.25 L
M 0.5 L
L 0.75 L

Cooling level
The 3 levels of cooling are indicated on the display by one, two or three bars.
Cooling times
The duration of the cooling process depends on which combination of settings is selected. The table below shows the various pre-settings.
Under normal conditions, the start temperature of the beverage is reduced by at least 12^ at a medium setting.
Cooling time (in minutes) based on cooling level and container size (start temperature of 21^ )
| (t in min) | *** | *** | |
| small | 2 3 4 | ||
| medium | 3 4 5 | ||
| large | 5 6 7 |
Note:
These pre-settings can be adjusted in the mobile app. Individual timers ranging from 1 to 60 minutes can also be selected and started. In addition, expert mode helps calculate the ideal cooling time to reach your desired temperature. The app also contains a table showing the optimal drinking temperatures for the most common drinks on the market.
All processes that are currently running stop when the cooling chamber door is opened. The interrupted processes continue once the door is closed again.
If the door is not closed again, the appliance draws attention to this by emitting an acoustic signal (beeping). If the door is left open, this raises the temperature in the cooling chamber, which in turn results in the cooling process being repeated or taking longer to complete.
Once defrosting has been completed after the appliance is switched off, the door must be opened to allow moisture to escape. This is indicated by the device producing an acoustic signal (beeping). Ideally, the door should remain open for at least 60 minutes.
Drain hose
The liquid produced during the defrosting process, by an unsealed bottle or due to a broken bottle can be drained manually using the drain hose (8) located on the rear of the BEEZER.
To do this, take the drain hose (8) out of its holder and feed it into a sufficiently large container or basin with a drainage outlet with the opening pointing downwards.
Note:
The volume of water produced by the defrosting process depends to a large extent on ambient air humidity. Water only needs to be drained via the hose if a large volume is produced due to very high air humidity.
The BEEZER also has an overflow vent (10) on the rear of the appliance. If excess water accumulates in the interior of the appliance, e.g due to an excessive volume of condensate or a bottle breakage, it can drain through this vent. This presents no problems for the BEEZER itself, but should be considered when choosing the surface on which the appliance is positioned.
BEFORE USING THE APPLIANCE FOR THE FIRST TIME
Preparation
- Carefully take the appliance out of the packaging and remove all packaging parts and protective film.
- Keep all packaging parts together with the packaging in a safe place. When disposing of the packaging parts later, please observe the statutory regulations governing proper disposal.
CAUTION, risk of explosion:
Do not use the appliance if the system has been damaged! If this happens, the room must be well ventilated at all times and any potential ignition sources removed.
Positioning the appliance
- Place the BEEZER® on a flat, non-slip, water-resistant surface close to a mains socket. You should only ever lift the BEEZER® using the handles provided on the front and rear (6).
Note: Never lift the BEEZER using the door or other parts of the appliance other than the handles provided.
Note that the BEEZER must only be used in well ventilated spaces where no potential ignition sources are present. Also take care to keep the air vents (7) uncovered. For this purpose, ensure that a sufficient distance of approx. 5cm is kept between the appliance and the surrounding walls (see GENERAL SAFETY INSTRUCTIONS). - Plug the power cord into the socket.
Note:
The BEEZER must be transported, stored and operated in an upright position. Before using the appliance for the first time, leave it to stand in the same location for
at least 12 hours. The appliance is intended to be used at a room temperature of 16C to 32^ .
BEEZER Connect
The BEEZER can be controlled using the app. To download and install BEEZER Connect on your smartphone or tablet, scan the QR code on the front of these operating instructions. Alternatively, you can also search for BEEZER Connect in the App Store or Google Play Store.
Note:
The app serves as an extension of the LED and appliance display. You can check additional information in the app, such as the current temperature of the cooling chamber.
Connecting the BEEZER® to WiFi
- Connect the BEEZER® to your WiFi network by pressing the two lower function buttons (5.3 and 5.4) at the same time. A successful connection is indicated by the WiFi symbol on the display (see FUNCTIONS).
Connect BEEZER® to BEEZER® Connect
- Open BEEZER Connect on your smartphone or tablet.
- Choose the "Register" function and create a personal customer account. To do so, you need to enter a phone number or e-mail address (these details are required to access all functions of the app).
- Connect your smartphone or tablet to your home WiFi network.
- Activate Bluetooth® on your smartphone or tablet.
- Open BEEZER Connect, log in to your account and select "Add device (+)" on the home page.
You can also select the following options:
Detect automatically: If the relevant permissions are enabled, the BEEZER® is automatically detected (provided that the appliance is switched on and connected to WiFi; enter the WiFi password if necessary).
Add manually: Select BEEZER from the list of available devices and activate the "WiFi" and "Bluetooth" options (enter the WiFi password if necessary).

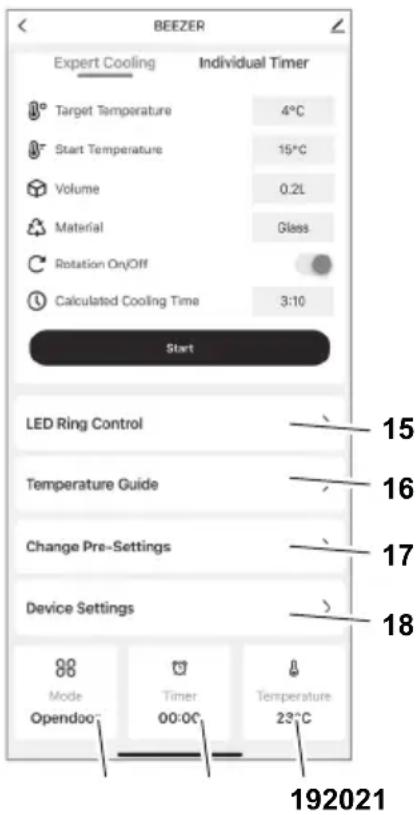
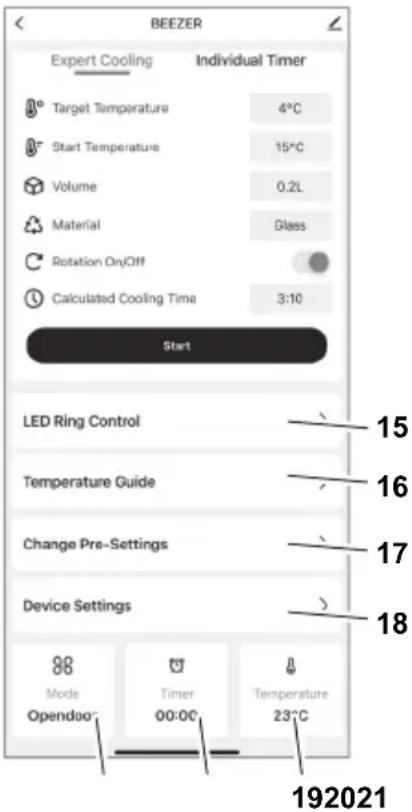
Overview of functions in the app
Explanation
15 LED Ring Control: Configure the ambient light (colour selection). This only lights up when the BEEZER is switched off.
16 Temperature Guide: Provides recommendations for the optimal drinking temperature of various beverages.
17 Change Pre-Settings: Configure the preset values for container size (5.3), cooling level (5.4) and cooling time.
18 Device Settings: Set the length of time until automatic defrost-ing, activation of energy-saving mode and automatic switch-off will occur. The acoustic signal (beeping) can also be activated/deactivated.
19 Temperature: Displays the current temperature in the interior of the cooling chamber.
20 Timer: Displays the remaining cooling time for the beverage.
21 Mode: Displays the current mode of the BEEZER
OPERATION
Switching on and pre-cooling
- Ensure that the door is closed.
- Press and hold down the start button (5.1) to switch the appliance on.
After the BEEZER is switched on, an initial pre-cooling process must be completed, which lasts approx. 10 minutes. This process starts automatically. The LED ring on the BEEZER lights up cyan and the display uses bars to indicate how the process is progressing. Once the pre-cooling process has finished, the LED ring colour changes from cyan to white. The appliance is now ready to start cooling beverages.
Note:
You can switch on the BEEZER and start the pre-cooling process from anywhere using the mobile app. This means that the appliance will be ready to use as soon as you get home from shopping, for example.
Cooling beverages
-
Open the cooling chamber (1) by pulling on the finger-pull door handle (4). Place the beverage you want to cool in the cooling chamber (13). Ensure that the beverage container is tightly sealed.
-
Close the cooling chamber door and use the function buttons to configure the settings (see FUNCTIONS).
- Press the Start button (5.1) to start the cooling process. The duration of the cooling process depends on which combination is selected (see FUNCTIONS).
- During the cooling process, the LED ring on the BEEZER® lights up blue, while the display uses bars to indicate how the process is progressing.
- The end of the cooling process is indicated by an acoustic signal (beeping) and the colour of the LED ring changes from blue to white. The beeping sound can be activated and deactivated in the app.
Once the cooling process is finished, open the cooling chamber door and take out your cooled beverage. Ensure that the door is closed again afterwards.
CAUTION, risk of injury due to breaking glass
Never leave beverages lying in the cooling chamber after the cooling process has ended! Freezing a beverage may cause glass to break.
Automatic defrosting
Ice may form in the cooling chamber if the appliance is used for a long time and depending on the humidity of the air. To maintain a consistent cooling performance, the BEEZER® defrosts automatically. This happens by default after 90 minutes.
The automatic defrosting process lasts approx. 5 minutes. During the defrosting process, the LED ring on the BEEZER lights up cyan, while the display uses bars to indicate how the process is progressing.
When automatic defrosting has been successfully completed, the appliance switches to pre-cooling mode and is ready for operation after a further 5 minutes.
Note:
The pre-settings for automatic defrosting can be adjusted in the app.
Switching off
- Press and hold down the start button (5.1) to switch the appliance off. The defrosting process then begins automatically and lasts approx. 10 minutes.
- During the defrosting process, the LED ring on the BEEZER® lights up yellow, while the display uses bars to indicate how the process is progressing.
- Once defrosting has been completed after the appliance is switched off, the door must be opened to allow moisture to escape. This is indicated by the device producing an acoustic signal (beeping). Ideally, the door should remain open for at least 60 minutes.
- When the cooling chamber door is closed, the appliance is switched off and ready to be switched back on again.
Note:
If the appliance is to remain unused for an extended period, you should first ensure that the cooling chamber is completely clean and dry and that the cooling chamber door is left open to prevent mould from forming in the interior (see CLEANING).
ENERGY-SAVING MODE
If the appliance is ready for operation and has still not been used after a period of 10 minutes, the BEEZER® switches to energy-saving mode. When the appliance is in energy-saving mode, the LED ring of the BEEZER® lights up purple.
If the appliance is in energy-saving mode, it can be reactivated by pressing any function key. If the temperature in the cooling chamber is too high, another short pre-cooling process is started (see the instructions for pre-cooling the appliance). This process should last less than 1 minute, after which the appliance will be ready for operation.
If it is not re-activated, the appliance automatically switches off completely after 60 minutes as standard.
Note:
The pre-settings for energy-saving mode and automatic switch-off can be adjusted in the app.
CLEANING
The BEEZER does not require cleaning after each use. However, the cooling chamber of the BEEZER can be cleaned as needed.
Preparation
- Open the cooling chamber door (1). Carefully remove any foreign matter!
- Remove the rotating rail (11) from the cooling chamber (13). The underside of the rail is magnetically attached and must be kept in a horizontal position when being pulled upwards to avoid it becoming jammed.
- Then pull out the strainer tray (12) located below the rotating rail.
Regular cleaning
- Rinse the rotating rail (11) and the strainer tray (12) under clear water.
- Wipe the cooling chamber of the BEEZER® with a damp cloth.
Cleaning of heavy soiling in the cooling chamber
If the cooling chamber is heavily soiled (leaked liquid, fragments of glass or other foreign matter, e.g. due to the beverage container being damaged or not being tightly sealed), follow the steps below:
- Rinse the rotating rail (11) and the strainer tray (12) under clear water. Take care when removing foreign matter such as glass fragments or similar!
- Feed the drain hose (8) located on the rear of the BEEZER into a sufficiently large container or basin with a drainage outlet.
- Then clean the cooling chamber by rinsing it with plenty of water. Do not use a high-pressure cleaner!
Note:
The BEEZER® must not be tipped over!
Note:
After each cleaning, leave the cooling chamber door open (ideally for at least 60 minutes) to allow moisture to escape.
STORAGE/MAINTENANCE
The BEEZER must be transported, stored and operated in an upright position.
The BEEZER® is intended to be used at a room temperature of 16 C to 32^ .
The BEEZER® is maintenance-free.
DISPOSAL OF WASTE ELECTRICAL AND ELECTRONICEQUIPMENT
This symbol indicates that this product must not be disposed of with unsorted municipal
waste. There is a separate (free) system for the collection and return of waste electrical and electronic equipment. For more information, please contact your local authority or the shop where you purchased the product. By ensuring that this product is disposed of correctly, you will help prevent potential negative consequences for the environment and human health and contribute to the conservation of natural resources.
WARNING, risk of fire, risk of explosion:
The coolant and oil in the appliance are flammable! If coolant or oil leaks out of the appliance in a sufficiently high concentration and comes into contact with an external heat source, it may ignite. The ducts of the cooling circuit and compressor must not be damaged! Insulation blowing gas (cyclopentane) is flammable!
REACH DIRECTIVE
SERVICE, REPAIRS AND SPARE PARTS
Please contact your local after-sales service for service, repairs and spare parts.
The appliance complies with the CE specifications.
Mains voltage/power consumption:
Refer to the type label on the underside of the appliance.
WARRANTY
The BEEZER® beverage cooler from ritter comes with a 2-year manufacturer's warranty, calculated from the date of purchase and in accordance with EU warranty directives. Your legal warranty claims according to section 437 ff. BGB (German Civil Code) remain unaffected by this regulation. The manufacturer warranty applies to all devices sold within the European Union. For details of the warranty conditions, see www.ritterwerk.de/warranty.
TROUBLESHOOTING
Problem Explanation/Solution
Beeping after switch-off The defrosting process starts automat- ically when the appliance is switched off.Once it has ended, the BEEZER emits an acoustic signal to remind you to open the cooling chamber door to allow moisture to escape.
Rotation symbol is rotating shaft is faulty/defective; the BEEZER can continue to be used without rotation. Solution: Switch off the device and check whether the rotating shaft is jammed; if not, the BEEZER can be switched on again and the rotation function should work.
Broken glass Proceed as described under "CLEANING". CAUTION! Risk of injury due to breaking glass
Required temperature is not reached Room temperature or start temperature of the beverage is too high. Select a higher cooling level. A lot of ice may form inside the cooling chamber of the BEEZER. Use the app to start the defrosting process.
Pre-cooling process is taking too long The pre-cooling process may take longer at very high room temperatures.
Door beeps on opening To avoid raising the temperature within the cooling chamber, the door should only be opened briefly when inserting the bottle.
EXPLICATION DES SYMBOLS
Onachoct OT TOKOB ydap
-При Нензправноct Виharи n3Важдайт e сeел a OT KOHTa. При TOBa n3ДьрвайTe 3a сeелa, a He 3a ka6eJa.
- He n3noI3BaIte ypeDa Ha OTKpITo.
-При повреши на части OT ypeда веднага п配电�атete paBOTATAИ се CBpbжete CBС cePBn3HaTа слжба Ha ritter.
-AkoMpexKOBnT Ka6eI e NOBpeDeH,Toi Tp8Ba Da ce CMeHN OT POn3BODHTeJIa, HeROBaTA cepBn3Ha cLyX6a IIN JIncaC NODbHa KBaIINΦnKaun, 3a Da Ce n36eHnat ONaCHOCTn.
Onachoct ot ekcnlo3nia
-Изпольайураза само В добpe поветрюnomeши! BEEZER® He Тябва да ce монтура Или СьхсаньвВ 3аТворецшkaфов! Ако уразьт работиВ недостаТьчно поветрюnomeши, TeчВ охлajдашия Контyp може Да дobende до Вьзнкваны Ha 3апалima смec OT ra3 И Вьздух!
- He nyskaite ypeda B ekcnloatauia, ako oxlaqdaunrKoHTyp e nobpehen! B To3nCnyaI NOMEUeHneTo Tp8BaHe3a6abHO da ce npOBetpnDo6pe n da ce OTCTpaHrtNOTehnauHnTe n3TOUHnCuHa 3aapanBaHe.
- He cbyxpaHЯBaIte ekCnIo3NBHN BeIeCTBa KaTo aepo3OJHNI KOHTeHepn CbC 3aJaJIIM nponeJaHT B ypeDa.
-ИзолацноннITE ra3OBe (CYCLOPENTANE) ca ropIMN.
IperneaTe rpaФnKte B HauA
NoTo N Kpar Ha KNxKkata.
MOn, npOeTe Te BHMaTeHNO
pBkoBOcTBOTO 3a yNtpe6a
npEn NyckaHeTo Ha ypeDa B
Ecknloatauia. 3ana3eTe pBko
BOcTBOTO 3a yNtpe6a n npi
npEOCTaBAHe Ha ypeDa Ha dpyr
Lncro npdaTe C Hero.
AKtyaHnTO pBkoBOcTB0 3a
yNtpe6a e HAnuHo CbIo Taka
Ha www.ritterwerk.de.
ПРЕДHA3HAUECHNE
OxnaIteTt 3a HnNTKne ce n3no3Ba 3a cnopadHNO oxlaJaHe Ha HnITKn (HaNP. B6ytuKn nn KyTuN).UpeBt He e npedHa3NaueH 3a npoBJXnTeHa ynotpe6a.BEEZER e npedHa3NaueH 3a DoMausha yNoTp6a N He e NoDxOJa3a TbproBcKa yNoTp6a.N3noJ3Ba- He NO npedHa3NaueHne IIN rpeWnHO o6CnykBaHe MORat Da DOBeDA T Do TeKn HapahBaHn IIN Do NobPeDa Ha ypeA. B TaKB Clyuay OTnadaT BCNUr rapaHIOHN IpTeHcN IN ppeTeHcN KbM KaueCTBOTO.
ФУHKUHOHAJIHO ONICAHNE
C oxlaNTeJra 3a HauNTKn BEEZER Moat da oxlaXdAt CbdoBe c HauNTKc BMeCTMocT Do 0,75 NITpa. B 3abncIMocT OT pa3mepa Ha cbda 3a HauNTka, BEEZER ce Hxkdae ot 3 do 6 MNHTN, 3a Da DocTHne TEMpepatypHa pa3nka ot nohe 12^ B cpaBHeHne C nbpBOHaayanHaTa TEMepaTypa. IpocecbT Ha oxlaXdaHe MOke Da ce peryInpa nn Da ce NOBTOPI, 3a Da Ce HamaIIOnbJIHNTeJIHO TempepatypaHa HauNTkata. BEEZER Moke Da ce ynpaBnBa qpe3 4-Te fynkuNo-HaHn6byToHa Ha ypeDa nnpe3 Mo6nHoto npINOKeHne BEEZER Connect. BytOht 3a CTapTnpaHe (5.1) BKIOUBA n INKIOUBA ypeDa n CTapTnpa npo
ueca Ha oxlaqdahe. Ocben TOBa
HMa n 3 DoBbHNHTeHN FyHK-
CIOHOaHn 6byToHa 3a HacTpoKa
Ha napameTpHe: BKnOuBaHe/
N3KNIouBaHe Ha 3aBbPtaHe,
pa3Mep Ha cBda n HnBO Ha
oxlaqdahe (5.2-5.4). YpeDbT
Poka3Ba B KOJ peXIM ce HAMnpa
Upe3 pa3JIuHnTe CBeTOBe Ha
CBeToOnoDnHa npbCTeH (2) Ha
BpTaTa Ha OxJaNTeHNHaTa
kAmepa (1).
CBeToaNoDeH npbCTeH
LBeTbT Ha CBeToIOIoHnI npbcTeH noka3Ba peKIma Ha pa6oTa, B KOITc HAMIPA ypeDbT. Pekmnte Ha pa6oTa ca n36poEHN B cIeHaTa Ta6nua:
CByTHa npbCTeHa
3haeHne (pexm)
BanTOrOB3a pa6oTa
Tópkoa3 Ppouec Ha
npeBapnteHNOxJaKaHe/ABTOMaTHNo pa3Mpa3BaHe
CIN OxJaXdaHe Ha HAnNTKIN
JIINAB EHeproCneCTBAUpeKIM
KbTT N3KNIOUbaHe
UepBEN OToBopeHa Bpata
Yka3aHue: Ako ypeobm ceHamupa e u3KIOUeHO cBcmoHue, ceemoduODnHm npbcmen cmaHDapmHo He ceemu.Ako BEEZERCe ynpaBnaeaype3 MObunHomopnpnoKeHue BEEZER Connect, cEmo- duOHDnM npbcmen moke da ce akmuupa u ypeobm da ce u3non3Ba kamo ambuEnmho OCemIHe, ppu Koemo Bue u3bupame npednoumHa om Bac ueam Ha npcbmeHa.
Функциондн6утон

3aBbptTaHe
Pn cTaNdapTHaTa HacTpoKa CbDbT 3a HAnNTka Ce BbpTN NO BpeMe Ha npOceCa Ha OXJaK DaHe, 3a Da Ocnpy paBHOmpHo OxJaDaHe Ha HAnNTkaTa. Upe3 HATNcKaHe Ha 6byToHa FyHKuYrTa 3a 3aBbPaTeMoKe Da ce N3KNIOHy, HApp. 3a BfIOBaTu 6BytNKn Nn CBDOBe C yYBC- TBNTeHN eTNIkETn Nn IaAMN. DIncPJIeT NOKa3Ba HanpaBeHaTa HAcTpoKa Upe3 CNMBONa 3a 3aBbPTaHe.
Yka3aHue:
Ipu u3KnIOyeHO 3a6bpmane
npouecb m Ha oxJaXdahe ce
yobnKaea c 20%

Pa3Mep Ha cBda
SCbDbpKahne
0,25 nntpa
MCbDbpJxHnE
0,5 nɪtpa
L CbIbpxKaHne
0,75 nntpa

HnBO Ha oxJaXdaHe
3-Te HnBa Ha OXnaJdahe ca cIMBONIN3npaHn Ha IINcIpe C eHa, DBe INI Tpu YepTNUK.
BpemeHa hOxJaXdaHe
PpOdbJNKeTJIHOCTTa Ha npoceca
Ha oxJaXdAHe 3aBnCn OT n36pa-
HaTa KOMbHaCa. TaBnCata
No-dony NOKa3Ba pa3nUHnTe
IpeDbapHTeJIHO 3aJaDeHn
HaCTpOnKn.
Ha cpeHNO HnBO npn HopMaJIHn YcNoBn HAHTKaTa r6n NoHe 12^ cnpyMo nbpBOHaJaHaTa cn TempepaTpa.
PpoIbJnxHTeHocT Ha OxJaXDaHe (B MNHyTN) B 3aBnCmOcT OT HNBOTo Ha OxJaXdaHe pa3Mepa Ha cbda (HaayanHa TemnepaTypa 21^
| (t B M H.) | *** | *** | |
| small | 2 3 4 | ||
| medium | 3 4 5 | ||
| large | 5 6 7 |
Yka3aHue:
PpeapumelHume Hacmpouku
Mozam da ce kopueupam e
MObunHomopnpnoKeHue.
B donbHeHue Mozam da
ce u3bupam u cmapmupam
UnduuodyaHn maumepu mKdy
1 u 60 Munymu.Oceen moea
ekcpemHnmu pekum nomaza da
ce onpeDenu ueanhama npo-
dbkumennocn Ha oxlanxdahe
3a daedha keenaHa memnepa
ympa.PpunoKeHEmo cbbpka
u maBnuca c onmumalnama
memnepamypa 3a KOHCyMaua
Ha hau-yeemcpeuaHume
Hanumku.
Bpata Ha oxlaekdaaata kamepa
Ako BpataHa OxnaJaAsaTa KaMepa ce OTBOpN, BCnKn aKTnBn npoecn cnipat. BeHara om BpataCe 3aTbOpN OTHOB, npeKbChATnTe npoecn npoDbJXkBaT.
Ako BpataHa He 6bHe 3aTBopeHa OTHOBO, ypeBt Bn npedynpeKdAba Cbc 3ByKOB cnHan. Ako BpataOCTaHe OTBopeHa, TOBa NOBuShaBa TempeatypaTa B OXnaJdaUaTa KaMepa, KOeTO OT CBOr CTpaHa BOIN Do NODHOBeH INN yDJIxHe IPOuec Ha npedBaPnPteHNO OxJaDaHe.
CneJ ycneIHO pa3Mpa3BaHe CneI N3KIOUBAHe Ha ypeJa, Bpata Tpr6Ba Da ce OTBOpN, 3a Da MOKe BnArata Da ce N3napN. YpeBt Yka3Ba TOBa Cbc 3ByKOB CnHAn. B nDeaHnA cnUyAa Bpata Tpr6Ba Da ocTaHe OTBopeHa NOHe 60 MNHyTN.
N3nyckaTeJenH MapkyU
TeuHocTtA, c6paTa ce no Bpeme Ha npoceca Ha pa3mpa3BaHe, ot npoteKna nnn cyyneHa 6yTuNka, MoKe Da ce n3ToOn pBHyO C NOMOHTa Ha n3nyckaTeHNn Mapky (8) Ha rbp6a Ha BEEZER.
3a ceIHa n3BaTe n3nyckaTeJIHnA Mapkyu (8) ot dbpkaua Iro 3akayete c OTbopa HaOJy BDOCTaTbUHO rJAM CbD INN BaHa C OTTuHaHe.
Yka3aHue:
Koluecmbomo boda, Koemo ce cb6upa no epeMe ha pa3mpa3raeaHemo, bapupa 3NaUmeIHO 3aBucumocm om enaxKnocma Ha okonhama cpeda. Camo npu MHO2O buCoka enaxKnocm ce o6pa3yea monkoBa MHO2O boda, ye da ce hanaa u3mouehe npe3 Mapkya.
BEEZERpa3noIarocBeH TOBa n c npeJIuBHeN OTBOp (10)Ha Tbp6a cn.AKO BbB BbTpEshOcTTa Ha ypeDa ce HATpyNa TBbpDe MHOro BOda, HApPIMep nopadi TBbpDe MHOrO KOHNEn3 ININ CuyyNeHa 6yTuJka, Ta Ie N3Teue ne Hero. 3a BEEZERTOBa, CAMo no Ce6e cn, He npedctaBnBa npo6Iem, Ho Tp8Ba da ce B3eMe npedBnD npn n36opa Ha OCHOBA.
NYCKAHE B EKCIIIOATALIJA
IoproToBka
BHHMaTeJIHO n3BaIeTe ypeDa OT ONaKOBkata N OTCTpaHete BCnUKN HeHN YactN 3aUNTHN fOJna.
3ana3eTE BCnKu qactn Ha onaKOBkata. Pnp nocpeBa- uOTo N3XBbPnIe Ha qactnte OT onaKOBkata Tp6Ba da ce cb6nOdaBat BaNdHnte 3aKOHO BV pa3nopeD6n 3a npabNHO n3XBbPnIe.
BHIMAHNE, onachoct ot ekcnlo3n:
He nycaTe ypeDa B
eKcNpOaTaUa, aKo CnCTeMaTae NOBpeDeHa! B To3n
cIyauN POMeUeHneTO Tp86Ba
He3a6abHO da ce npOBetpn
do6pe N da ce OTCpaHrt
POTeHuaJHnTe H3ToCHuN Ha
3anaJIbAHe.
MOHTaK Ha ypeDa
- NocTabe BEEZER® Bbpxy paBHa, HeIIb3raUa ce, BOOyctOuYBa OCHOBA B HenocpeICTBeHa 6JIIn3OCT Do eJeKtpnueckn KOHTaKT. NobdIraTe BEEZER BINHcIcMo 3a 06o3HaueHInTe dpXkN OT npEiHaTa n 3aDHaTa cTpaHa (6).
Yka3aHue: Huko2a He noeDuzaume BEEZER 3a epamama unu 3a dpyu yacmu Ha ypeda, pa3nuHu om obo3naueHume dpbKku. - MoJI, o6bPHeTe BHMaHne, Ye BEEZER MoKe Da ce n3noJ3Ba cAmoBdo6pe npOBeTpEHN NOMEuHn KbDeTo HMa NOTeHuaHn 3TOUHnHa 3aIaNbaHe. OCBEN TOBa BHMaBaHTe Da He NOKpHeTe BeHTUNaCIOHnTe OTBOpN (7). 3a CEtTa Cna3BaHTe MNHMaJHo pa3CTOHNeOT OK.5cmOT OKoJHnTe CTEHN (BxKTe OBUn YKA3AHN 3A BE3ONACHOCT).
CbpxKeTe MpeKOBnKa6eN c KOHTaKaTa.
Yka3aHue:
BEEZER mpr6ba da ce
mpaHcnpmupa, cxbpaHraea
u ekCnloamupa e u3npaeEHO
noJoxHe. IpeDu nbpema
ekCnloamaua ypebM mpr6ba
da ocmahe nohe 12 yaca HenoD
euxKe. Leneeama moUhocm
ce nocmuza npu memnepamypa
Ha nomueenuemo mexdy 16 u 32^
BEEZER Connect
BEEZER MoKe Da ce ynpaBnBa Upe3 MoBnHNo npInOxKeHne. 3a Da n3TeRnIte NnHcTaNipaTe npInOxKeHneTO BEEZER Connect Ha Baunr cMaprTo Hnn TaBnT, cKaHpaTne QR KOna Ha npEHaTa CtpaHnua Ha ToBa pKoBOdCTBO 3a yNotpe6a. AntepHaTnBHO MoKeTe Da Notbpcnte B App Store nnn Google Play Store MoBnHTo npInOxKeHne BEEZER Connect..
Yka3aHue:
Mo6unHomo npuOxHeue cnyku kamo pa3uupehue KbM cBemoduoDnur npbcmenu ducnner Ha ypea. B npunoKeHuemo oKeme da u3ukame doIbnHumeHa unOpmaua, kamo mekyama memepamypa Ha oxnaKaama kamepa.
Cbbp3BaHe Ha BEEZERc WLAN
Cbpxe BEEZER C BaWn WLAN, KaTo HATncHeTe eHOBpeMeHHo DBaTa DOHNu FyHKUHOHaHn 6yToHa (5.3 n5.4). YcneuHaTa Bp3ka ce o603NaUaBA Cbc CmBOna WLAN Ha dncnner (BxKTe FyHKUHOHAHNO ONICAHNE).
Cbbp3BaHe Ha BEEZER C BEEZER Connect
OTBOpTe MO6nHTo npNoJxHeNeTO BEEZER Connect Ha Baunr cMapTfoH nn Ta6Net.
Cb3daIte JnueH KIneHTCKn akayht, KaTo n36epTe FyHKun- rTa „Register" (PereCTpaun). 3a ceTt Tp8Ba Da npedocabnte TelefoHen Homep Nnn NmeJn aDpec (He BCnKn FyHKuN Ha npINOKeHneTO ue bDaT HanuHN 63 Ta3n INfOpMaun).
Cbpxte BauncaMapTfoHnn Tabnet KbM Baunia Doma-WeH WLAN.
- AkTnBupaIe Bluetooth Ha BaIINa cMapToHOn IIn Ta6JeT.
- OTBopeTe MO6HnHTo npiNoXeHne BEEZER Connect, BNe3Te B aKayHTa cn n N36peTe ,Add device (+) (Do6aBHe Ha ypeI (+) ) Ha NaayalHaTa cTpaHNuA.
MoxTe da n3bnpaTe mekdy cneHNte OOnn:
ABTOMATNUHO pa3nO3HaBaHe: Ako cboTBeTHnte pa3peWeHna ca aKTHBnpaHn, BEEZER 6bJe pa3No3HaT aBTOMaTuH0 (n3nCKBaHe:ypeBt Tp86Ba Da e BKIOueH n Cbbp3aH KbM WLAN; BBBeDeTe npoJata 3a WLAN, aKO e Heo6xOdmo).
PbUHO IO6aBHe:
I36peTe BEEZER®OT cncsbKa C haHnUHypei; onuNTe ,WiFi" n „Bluetooth" cbuo Tp8Ba da 6bDat akTbUpaHn (BbBeDeTe naponaTa 3a WLAN, ako e Heo6xOdmo).
IperneHa yHKnnte Ha npInoKeHneTo
OoecheHne
15 Unpablenne Ha CBToOnoHn npbCTeH: KOnpunpynpaHe Ha am6nentHa CBtJnHa (n36Op Ha uBrt). Tc CBETn cAmo Korato BEEZER e n3KnUoyen.
16 OpneHTnpOBbUHn cToHocTH 3a TempepaTypaTa: DaBa npenopbKn OTHOcHo ONTImaJIHa TempepaTypa 3a KOHCymaun Ha pa3NJuHn HAnITKN.
17 Помяна на пеДварптелнite Настpoик: Конфу-pиране на пеДварптелнite Настpoик 3a paЗмер на сьда (5.3), Ино на oxлajdahe (5.4) и Врeme 3a oxлajdahe.
18 Hactpoikn Ha ypeDa: KoHpIpynpaHe Ha npOdbJnxTeJI-HocTtA Do aBTOMaTHUHO pa3Mpa3RABaHe, aKTbBnpaHe Ha eHepro cneCTraBau pekm I aBTOMaTHUHO n3KJIIOuBaHe. BdoIbJIHeHHe, 3ByKOBnT CnHaI MoKe da ce aKTbBnpa/ DeakTNBnpa.
19 TemnepaTypa: Ioka3Ba TeKyuTa Ta TemnepaTypa BbTpe BoXnaJaTa KaMepa.
20 Bpeme: Ioka3Ba OCTaBaIooTo Bpeme 3a OxJaXdaHe Ha HAnITkata.
21 Pexm: Ioka3Ba Tekyu npa pexm Ha BEEZER
EKCPIIHOATAU
BknUcbHe n npEaBapnteHNOxnaXdaHe
- YBepete ce, ye BpaTaTa e 3aTBopeHa.
- BkHouTe ypeDa, KaTo HATnCHHeT e 3aIbpxKInTe 6yToHa 3a cTapT (5.1).
CneB KnIOUbaHeTo BEEZER ce HxKdae OT eHOKpaTHO npeD-BaPHTENHO OXnaJDAHe OT OK. 10 MNHyTN.To3N npoEc 3anoYBa aBTOMaTNUHO.CBeTOINOHNr TpCTeHa BEEZER CBETBA BV TIOPKo3EHO N DcNPeT NOKa3Ba npoueca C HnpeKbCHATNI JeHTN. AKO ypeBt E 3aBbpUnn npoueca Ha npeDbapNTEnHO OXnaJDaHe, TOBA CE NOKa3Ba Ype3 IpomHa Ha cBETA Ha CBEToNDnI npbCTeHa OT TIOPKo3EHO Ha 6JNo.YpeBt Beue e rOTOB 3a OXnaJdaHe Ha HAnITKn.
Yka3aHue:
4pe3 npuOKeHuemo BEEZER MoKe da 6bde EKnUoyen u da 3anoHe npedBapumEnHomo OxJaXdane, Dokamo cme Oe 8 deuxeHue.ToBa O3Naayea, ye ypeBm ue e zom08 3a ynompe6a, Kozamo Hanpumep ce 6bpHeme om na3ap.
OxJaXdaHe Ha HAnITKn
- OTbopete BpataHa OXnaJdaaTa KaMepa (1), KAto DpbHHe TdpkKaTa (4) c npbct. NocTabeTe HAnITkata 3a OxJaKaHaBe B OXnaJdaaTa KaMepa (13). YBepeTe ce, ye CbDbT C HAnITkata e PnBTHO 3aTBOpEH.
- 3aTBOpTe BpaTaHa oxJaXdaUaTa KaMepa N KOHpynpaTe npametpTe ype3 fynKcNoHaHnTe 6bToHn (BxKTe FyHKUHOHAJHO ONICAHNE).
-
HaTnCHete 6yToHa 3a CTapr (5.1), 3a Da CTapTpnpaTe npoeca Ha oxJaXdaHe. PpOdbJKNITEJIHOCCTTa Ha npoeca Ha oxJaXdaHe 3aBnCOn OT n3bpaHaTa KOM6nHaun (BnXTe FYHKUHO-HAJIHO ONICAHNE).
-
Поваман роцета на oxлaxданe CBetOnOДнЯТ npbcten Ha BEEZER®CBETN BCnHbОИ ДИСПЕТ NOKa3Ba pOцета с HeNPeKbChaT NeHTN.
KpaT Ha npoeca Ha OXnaXdaHe ce INHdknupa Ype3 3BykOB CnHaI N CBETOIONDHnT PpbCTeHbT Ce nPOMeHr OT CnH Ha 6aI. 3BykOBnT CnHaI MoKe Da CE BKNUChBa N N3KlNUOyBa B npINOxKeHNTo.
Cnei KpaHa npoceca Ha
OxnaJaHe OTBopeTe BpaTata
Ha OxJaDaaTa KaMepa N
n3BaTe OXJaDeHaTa HAnITka.
YBepTe ce, Ye BpaTata OTHOBe
3aTBOpEHa.
BHIMAHHE, onachoct OT hapaHbHe nopadn ChyneHo CTbKIO:
Hnkora He octabryte Hanntkn B OxnaJaata KaMepa B KpaHa npoueca Ha oxnackaHe np3aTbopeHa Bpata! 3aMpa3aBaHTo Ha HanNTkata MOKe Da npuHH ChyNbaHe Ha 6ytjNKata.
ABTomatnuho pa3Mpa3BaHe
Pn no-npoDbJnxTeJHa pa6Ota Ha ypea n B 3aBncmocT OT BnaXHOCTTa Ha Bb3dyxa MoKe da ce o6pa3yBa neB OxIaxJaauata KaMepa.3a Da NODbpxka NoctoYHHe eFeKTINBHOCT Ha OxIaxDaHe, BEEZERce pa3mpa3raBA abTomatnuHo.CtahdapTHO TOBa ce clyBa cne90 MNHytn.
PpoecbT Ha aBTOMaTHUHO pa3mpa3raBaHe OTHEMA OK.5 MNHyTN. P0 BpeMe Ha npoceca Ha pa3mpa3raBaHe cBeToIOHOHnRT npbCTeH Ha BEEZER CBETN B TIOPKoA3eHO N DnCnPeT NOKa3Ba Ppoecac HnpeKbCHaTJeHTN.
Cne ycneHNO aBTOMaTnHOp pa3mpa3raBaHe ypeBbT npemnHaBa B pexm Ha npedBapuTeNHO OxnaKdaHe n e rTOB 3a ynoTpe6a OTHOBO cneOue 5 MNHyTu.
Yka3aHue:
B npunoKeHuemo Mozam da ce Kopuzupam npedapumenuHume hacmpouku 3a aemomamuHomo pa3mpa3reahe.
N3KJIIOUBAHe
-ИЗкючeteуpeda,kaToHaTnCHeteN3aДьрЖte6byToHa3a cTAP(5.1).Cera npi6n3nTeHNO10-MmHyTHnTnpOecHa pa3Mpa3ЯBaHe 3aNoyBaABTomaTnUHO.
- По Врeme Ha npoceca Ha pa3-Mpa3raBaHe CBeToDnOdHnT npbCTeH Ha BEEZER CBETN B JbTOI IN DcPJIeT NOKa3Ba npoceca C HnpeKbCHaTI JeHTN.
CneI ycneuho pa3mpa3raBaHe CneI n3KnIOUbaHe Ha ypeDa, BpaTata Ha oxnaXdaUta KaMepa Tp86Ba Da ce OTBOpN, 3a Da MoKe BnArata Da ce N3napN. YpeBbYka3Ba TOBa cbc 3ByKOB cnHAn. B nDeanHnCnyaBpaTata Tp86Ba Da octAhe OTBopeHa NOHe 60 MNHTN.
Cne KaTO BpaTaTa Ha OXnaJaAaata KaMepa e 3aTBopeHa,ypeBt e N3KJIIOUeH I RTOB 3a NOBTOPO BKNIOUcBaHe.
Yka3aHue:
Ako ypebtm hma da ce u3no3ea 3a no-dbIb2 nepuod om epeme, nbpoe mpr6ea da ce yeepume, ye oxnaqdaama kamepa e Hanblno yucma u cyxa u ye epamama Ha oxnaqdaama kamepa ocmaea ombopena, 3a da npedomepamume obpa3yea-hemo Ha myxbI bImpe (buxkme I0UHCTBAHE).
EHEPROCNECTRAU PEXIM
Ako ypeBt e roTOB 3a ynoTpe6a
H He Ce H3PON3Ba NOBeue OT
10 MnHyTN BEEZER® npemnHaBa
B eHeproCneCTraBau pexm. Pn
Bpeme Ha eHeproCneCTraBau
peXIM CBToDIOHDnT PpbCTeh
Ha BEEZER® CBeTu B IInlaBO.
Ako ypeTbE BHepeocnctBaU pexIM,ToH MoKe Da ceakTNBupa OTHOBO Upe3 HaTNCaHe Ha POn3BOJeH CyHKuNoHaIe6byToH.AKO Tempepatypata BoxJaDaaTaKaMepa e TBbpDeBUCoka,OTHO BO 3aNoUHe KpaTbK IpOuec Ha PpeDbapntHo oxJaXdane (BnXTe PpeDbapntHo OxJaXdane Ha ypeDa).
To3n npoec Tp6b7a da oTheme NO-MaMKO OT MmHyTa, CneI KOeTo ypeTOTHOBO 8e 6bDe roTOB 3a ynoTpe6a.
Bé3 nobTOpHo akTbUpaHe ype-dbT aBTOMaTuHc Ce n3KnHouBa HanbIHO cNe60 MNHyTu no NoDpa3bUpaHe.
Yka3aHue:
IpebeapumenHume Hacmpouku 3a ehep2ocneembau pexum u abmamuuhomo u3KIOueaHe Mozam da ce Kopuaupam E npunoKeHuemo.
ПОУСТBAHE
IOnuHCTBaHHeToHaBEEZER Cnei BcraKa yNoTpe6a He e Heo6xoDnMo.OxJaXdaUaTa KaMepa Ha BEEZER BCE naK MoKe Da 6bJe NouchTeHa npn Heo6xOdNMOcT.
PnrotoBka
- OTbopete BpaTata Ha oxJaKaaTaKaMepa (1).Ako e Heo6XoIMo, BHIMaTeHNO OTcpanHe TBCuKN YUkDn TeJa!
- Otctpahe Te Bbptyata Ce noctabka (11) ot oxnaqdaaata kamepa (13).Tae MaHHTHO npKpeHa KbM DbHOTo IN Tp6Ba Da ce N3dbpna Harope BbB Bb3MOxHOn HaXOpN3OHTaIIHO nOIOxHe, 3a da ce N36eHne NOBpeDa.
Cera n3dbpnaTe qnIbpa (12), pa3noJoxen noB Bbptaata ce nocTabka.
PepOBHO nouHCTBaHe
- I3nnaKHeTe BbptTaaTa ce nocTabka (11) nФиNTbpa (12) c uNCTa BOda.
- 36bpeTe oxnaKdaaata KaMepa Ha BEEZERc Kbpna ot BnaraTa.
IOnuCTBaHe npn CunHo 3aMbpcBaHe Ha oxJaXdaaata KaMepa
Ako oxlaqdaaata kamepa e CnHNO 3aMbpceHa (n3TnueHa Ha TeuHOCT, CUYNEHO CTbKNo IIN DpyrN yJxN npeDMETn, HAnp. Nopadn HeynpbTHeHa KanaQKa IIN NOBpeDeH cBd C HAnNTka), IPOueDnpaTe KaKTo CneDbA:
- N3nJaKHeTe BbptTaaTa ce nocTabka (11) nФntbpa (12)c uNCTa BOda. PnTOBa OTcPaHHeTe BHIMATEJHO UyXdnte TeNa, KaTo HApnpMeP Napye Ta nn d!
3aKaYeTe HAMnpaunCe Ha 3aHaTa CtpaHa Ha BEEZER N3NyckaTeHem Mapkyu (8)B DOCTaTbUHO TOnm CbD INN BaHa C OTTuHaHe.
-Поочтete oxлaxdaаata KaMepa,КATOиЗпakHete obnHcвOda.НИЗПОЛЗВaIte ypeДзa NOчNTBaHe c BnCOKO HanraHae 3a Ta3n ZeI!
Yka3aHue:
BEEZER He mpra6ea da ce haKlaHa!
Yka3aHue:
Cneb cya noocmeane bpa mama ha oxnaa dauama kamepa mpraea da ce ocmae omepeha, 3a da moke enazama da ce u3napu (e udeannue cnuau nohe 60 muhymu).
CbXPAHEHNE/ TEXHnueCKA IOdPbJxKA
BEEZER® Tp86Ba Da ce TpaHc-nopTnpa,cbxpaHbA N EKcnNoaTnpa B n3npaBeHo NOLOKeHne.
LceneBaTMOuHocTHaBEEZER e npTeMnepaTypaHa nOmeeHneTo Mekdy 16 n 32^
BEEZER He ce hykdae ot TexHnuecka npdpbXka.
N3XBbPJIHe HA YNOTPEBBAHN EJEKTPNUECKN I EJEKTPOHH YPeDN
CmBOnbT yka3Ba,Ye To3n npOdyKT He Tp86Ba Da 6bJe n3xBbpJH C HecopTpapaHbNTOBu
OTnabu. CbuecTBvBa OTdJIHa (6e3PNaTHa) cNCTema 3a cbbnpaHe n BpBuahe Ha ynoTpe6raBuH eEkeTpueckn eEektpoHH upei. 3a nobee HnΦopMaunCe o6bpHete KbM BaWata o6uHNcKa aDMHNCTpa- qna nn KbM TbproBCKn OBeKT, OT KOITcTe 3akynnn npOyKta. BaWata rpnka 3a npabnHoto nXbBpIaHe Ha npOdyKta DOpnHacr KaKTo 3a HaMaJBAhe Ha B3MOxHn HeaTINBHN NocJeDCTBnB Vbpxu npipOdaTa N OBeWKOTO 3dpabe, TaKa n 3a 3ana3BaHe Ha npipOdnHte pecypcn.
IPEyPExEHHe, onacHocT OT noXap, onachOCT OTeknno3n:
CbDpbkaunT ce xnaadinneH areHT n Macno ca 3anaumn! N3TuHaunTe Xnaadinne H areHT n Macno MoraT da ce 3anaJr npn BnCOKN KOHeHTpaunn I npn KOtAKT C BbHweH n3ToUHnK Ha TOnnHa. Tp6oNpOBoDnTe Ha KOHTypa Ha oxJaKaAaIaareHT n KOMnpecOpbT He Tp6Ba da 6bDat nobpeHn! N3OlaauHOHHaT ra3 (zIKnonentah) e ropm!
PEIJAMEHT REACH
| (t i min) | *** | |
| small | 2 3 4 | |
| medium | 3 4 5 | |
| large | 5 6 7 |
Henvising:
| (ten min) | *** | *** | |
| small | 234 | ||
| medium | 345 | ||
| large | 567 |
Nota:
| (t in min) | *** | *** | |
| small | 2 3 4 | ||
| medium | 3 4 5 | ||
| large | 5 6 7 |
Avviso:
BESCHRIJVING VAN DE WERKING
| (t in min.) | *** | *** | |
| small | 2 3 4 | ||
| medium | 3 4 5 | ||
| large | 5 6 7 |
Aanwijizing:
OPPBEVARING/ VEDLIKEHOLD
| (t w min) | *** | *** | |
| small | 2 3 4 | ||
| medium | 3 4 5 | ||
| large | 5 6 7 |
Wskazówka:
Semi-nificatie (mod)
Alb Pregatit de
functionare
Uśa compartment frigorific
Aparatul respectfully directivele CE.
Tensiune de alimentare/consum de energia: consultati placuţa de identificare din partea inferioroă a aparutui
DECLARATIE DE GARANTIE
| (t B M NH) | *** | |
| small | 2 3 4 | |
| medium | 3 4 5 | |
| large | 5 6 7 |
Yka3aHue.
PpeapumelbHbIe Hacmpouku MoKHO u3MeHumb b MO6unbHom npunoKeHu. TaKxe MoXHo 6bpaMb u 3anycmmb uHouBudyaHbmuMep Ha nepuod om 1 do 60 MuHym. Kpome mozo, 3Kcpepmhbupexum no3eOJnem onpeDeumb uedeAbyo oJnmeLbHocmb oxnaXdeHura do mpe6yemou memepamypbl. Nomumo 3mozo, npunoXeHue codepkum ma6luuy c onmuMaNbHou memepamypou dna Haubonee pacnpocmpaHeHHbx HanumkoB.
YcTaHObKa yCToPoiCTBa
Pa3mecnte oxlaundteIb BEEZER Ha poBHO, HeCKoIb- 3KoI u yCTOuHBOK BOde NOBepxHocTN B HENOCpeI CTBeHHoN 6n30cTn OT PO3ETKn. Bcerda noHNMaIte oxlaundTeB BEEZER TObKO 3a COOTBeTCTByIOUne pykN Ha nepeDHeN 3aNDHe N cTeHKe (6). Yka3aHue.KamezopuYeCKu 3anpeuaemcnaodHMamb BEEZER 3a deepuy unu dpyue yacmu ycmpoucmea. Bce2da nOdHMaUm e oxnaadumel mOJbko 3a coombeemcmbyouue pyku.
- YuHTbIaIte npn 3TOM, yTO oxJaIteJIb BEEZER@ pa3pewa-etc3KcIIyATnpoBaTb TOnbKO B XOpOIO npOBeTpIBaEMbIX NOMEJeuHnx, B KOTOpbIX OTCyTCTBYOT NOTeHuaJIbHbIE NCTOCHNI BOCnIaMeHeH.Na. TaKe IpocJeIte 3a Tem, yTo6bI He 6blN nepeKpbITb BEHTUNAIOHHbIE OTBepCTna (7). C 3ToI ueNo co6IIOaIte MmHMmaJIbHoe pacCTOraHne OKoIO 5 CM Do COceDHNX CTEN (CM. OBUINE YKA3AHNIA NO BE3ONACHOCTN).
BCTaBbTe BnKy ceTeBOrO WHypa B po3ETky.
Yka3aHue. OxadumelBEEZER 日 donxeh mpancnopmupoeambcra, xpaHumbc u 3Kcnnyamupoeambc8 eepmuKaIbHom noLoKeHuU. Npeo nepbim EKnIOyeHuEM nocmaebme ycmpoucmeu H nepeMeuaime eo He Mehee 12 yacob. Leneba npou3bOduMeIbHocmb obecneuBaemc npu KOMHamHO memnepamype e duana30he om 16 do 32^
BEEZER Connect
OxlaNTeNEM BEEZER MOKHO ynpabTb C NOMOUBo MO6nIbHOro npINOKeHn. Ia 3arpy3Kn npINOKeHn BEEZER Connect n ero ycTaHOBKn Ha cMaprFOHnn nn HauHwET OTcKaHpyuTe QR-KoJ Ha nepBoi CTpaHnce o6NoKKn 3TORo pyKOBOCTBa.KpOME TORO, npINOKeHne BEEZER Connect MoKHO haHTn B App Store nn Google Play Store.
Yka3aHue.
PpuOxHeue npedcmaeIem
co6ou dononHeue K cEmo-
duoDHomy konbuy u ducnneio
ycmpoucmea.B npuOxHeuu
MOXHO npocmOpemb dononHumeBHyIO unOpmauU O
mekyuue memepamype e
xoOnoDbHo KaMepe.
Повкючени BEEZER WLAN
- UTo6bI NOkJIIOUHTb OXJaIINTeB BEEZER K 6ecnpoBOJHOcTn (WLAN), OndOBpeMeHHO HaxMITE DBe HIXHIX ΦyHKUN-OHaJIbHbIX KHOJKN (5.3 n 5.4). O6 ycneuHOM NOKIIIOUeHN CnHaJIIN3IpyET 3HaQOK Wlan HaIcnPee (cm. FyHKUHOJAHLHOE ONICAHNE).
ONLITA 6E3BEdHOCHA UNYTCTBA
Да 6исте n36eглп NOВред e nIIOwTeHHe xIaIbIaKa 3a ПиH,ПИджавajte ce cIeDeHnx6e36eHNocnIx HAnOMeHa:
-Obaj anapat je Hamehen 3a ynoTpe6y y DoMaHnHCTBy kao n 3a cInuHe npImeHe, kao 7TO cy Ha npIMep: y KyXNbama 3a 3anocIeNe y npOdaBnUcama n KaHceJaPnJaMa;Ha noBoOpnVBpeDHNm mAbnMa; 3a roCTe y XOTeJIbMa, MToJIbMa n DpyrNm CTam6eHm Objektima; y NaHCNOHMa KoJn Hyde dopyuak; 3a KeTeepnHr.
- Ypehaj je dIn3ajHnpaH 3a ynoTpe6y y domaHnHCTBy n Hnje nOraH 3a KomepunjahnHy ynoTpe6y.
- HnkaJa He nocTaBbajTe ypehaj Ha Bpyhe nOBpHInHe nn y 6nn3HH OTBOpeHOr PnAmeHa.
- KopnCTnte nckJbUyHBO npnbop kojn je npiloxen y nCnpuyn.
- Ypehaj noDnKnte cAmo KopncTeHn npIoJxHe pyUke 3a HOseHbe.
- YN03OPEHbE: PpNIkOM nocTaBbAHa ypehaja, yBePnTe ce da Ka6I 3a HanajaHe Hnje pNkJbeUTeH nnn OwTeHeH.
-
HemojTe Da cabnjaTe Ka6I 3a HanajaHe npuNkOM nocTaBbHa. IonoJte Ka6I 3a HanajaBe TaKo Da He doJa3n y KOHTaKT Ca BpyHm INI OwTPM PpeDMeTIma. He Do3BOJIte Da Ka6I 3a HanajaHe BnCn PpeKO IVnCe padHe NOBpUHe.
-
YN03OPEHbE: He nocTaBbajTe BnSe npeHoCnBnx yTnUHnca nIi N3Bopa HanaJaHa Ha noJeHnHyypehaja.
-
YN03OPEHbE: He 3aTba-pajTe BeHTnlaZnOHe OTBOpe y KyhnsTy ypeJaja nIy KyhnsTy 3a INcTaIaZnJy.
-Прилком постаьаьа,провerteда Ли постojndoBOJBha ydaJIbeHOCT OД OKO5цMODOKOLHIX 3ИДОВa ИЛINdpyrnxOrpaHnueьa.
-
KopnCTte ypehaj Tek HaKoH To je 6e36eDNo nocTaBJbeH. KaOH TpaHcnpTa, ypehaj Mopa Da cTojHa jeDNOM MeCTy HajMaBe 12 catn ppe Hero To Ce MoKe PnyCTHTu paI.
-
HnkaJa He TpaHcnpTyjTe ypehaj y noJoxeHOM noJoxajy! Ypehaj yBek Mopa da 6ynde y ycnpabHOM noJoxajy, yaK i KaJa ce He KopncTn, nHaue ce pacxJaADHo KOJOMoKe OwTeTtN.
-
HnkaHa He OTBapajTe DoHn Deo ypehaja rde ce HaJa3n pacxnaADHO KOIO.
-
Ypehaj Mory da KopncTe deca od 8 roDnHa cTapocTn Kao n
ocobe ca cMaHbeHnM fIn3nKIM, CEN3OpHnM nIi MeHTaJIHNM cNoCo6HoCTnMa nIi Ca HeIOCTaTKOM NCKyCTBa I/III 3HaBa, aKO cy IOJ HaD3OpOM nIi aKO cy INΦopMnCaHe KaKO da ra 6e36eJHO KopNCTe n aKO pa3yMejy ONaCHOCTu y Be3Nc KOpNshEhEm ypeJaja.
-Дeца He cmejy da ce irpajy ypehajem.
-Дeцn y3pacTa od 3do 8 roDHa je Do3BOJbeHo da npHe n npa3He ypehaj, aIn ce Mopajy dpXaTn daJIbe od npNKbUyHOr ka6Ja.
-
Ynshhe H e n Kopncnucko OdpkaBaHbe He 6n Tpe6aNo da o6abJbajy deca ocim aKO cy cTapnja od 8 roDHa n PoJn Ha3Opom.
-
KaДа Нисте поред урегая, BEEZER® ce пераоаплікагиje сme akтувиратиCAMO 3a петхODно xлajehe урегая, a He 3a xлajehe пиha.
-
Ypehaj NOBExKeTe cMo ca OndroBapajyHnM n3BOpom HAn3MeHnUHr HaNoHa KoJn OndroBapa INHΦopMauzjama Ha TInnCKoJ nlouNz.
-
He ocTaBbajTe ypehaj 6e3 NaI3Opa TOKOM pada.
-УПОЗОРЕ:НемоJTe KОпСТИТNеЕКТрИЧЕ ypeиaje yHyтappacxладнe KOMоpe KoJn HnCy Tnna Koje npenOpuyje npoI3Bohau.
- HnkaHa He ocTabbajTe nHe ypacxnaadHoJ KOMOpn Ha kpaj npoceca xnaheBa.
EkctpeMno Hncke TemnepaType y uHyTpaHbOcTN Mory da IOBey Do 3aMp3aBaHaapanha n do npuaHa nocyde 3a nnhe.
- YN03OPEHbE: Da 6nCTe y6p3aII npouec oDmp3aBaHa, HemojTe Da KOpNCHTe MexaHnUke ypehaje nn Dpyra cpeiCTBa OcIM OHIX Koje npenopuyje npoI3Bohau.
OnachocToeIeKtpnHor ydapa
- Y cIyuaJy Kbapa, yBeK n3ByuNTe yTnKaU n3 yTnHnCe. YBeK ByuNTe yTnKaU, a He ka6JI.
- He kopructe ypehaj ha OTBOPEHOM.
-Ako cy Hekn DeNoBn ypehaja OwTeHEn, OdMax npec-TaHnte Da rKa KopncTnte N KOHTaKtnpajTe ritter cnyx6y 3a KOpNCnKe.
-Ako je ka6n 3a Hanajahe OwTeHEn, Mopa ra 3aMeHNTn npOn3BOJau, KopncnUka CnyK6a nIi cNHyo KBaJIn-ФNKOBaHa oc6a da 6n ce n36eIne onacHOCTn.
Onachoct od ekcnno3nje
- Kopnstte ypehajcamey do6po npoBeTpneHoj npocTopnju! BEEZER ce He CME MOHTnpaTHnIIN cKla-DnWHTnY 3akJbUyauHm opMapuHnma! Ako ypehaj paN y HeIOBOJHO npoBeTpeHoj npocTOpnju, zypeHbe ypacXJaHOM KOJy Moxe DOBecTN Do 3aPJIbNBe MeuabHe raca n Ba3dyxa!
- HemojTe KopncTn ypehaj ako je pacxnaHNo KOO owTeHeNo! Y TOM cIyaujy, npocstopja Mopa 6ntu oImax Do6po npOBeTpena uyknoBHeN nOTeHcuiJn nn3BOpn naJIbeHa.
- He cknaIWIHTte ekCnIO3NBHe MaTePnJaJIe KAO ITo cy Hnp. pe3epBoap 3a aepocoI ca 3aNaJBnBIM NOrOHCKIM racOM y ypehajy.
-Изолациони ekспанзиони racobn (LUKOPEHTAHN) cy 3aanaBnBn.
PacnonTe uTExe Ha npedBoj 3aHbOJ cTpaHn.
PaxJBNO npoHTajTe ynyTCTBO 3a pyKOBaHbe npe nyuTaHa ypehaja y pad. CaCyBaJte yNyTCTBO 3a pyKOBaHe i npINOxHr e ra y3 ypehaj cneDehem Kopncnky.
Baxehe ynyTcBo 3a pykoBaHe moKe ce hAnu Ha www.ritterwerk.de.
HAMEHA
XnaIbak 3a nHe ce KopncTn 3a NOBpeMeHO xHaJbe HAnITaka (Hnp. y fNaIaMa mIIN JImeH- kama). Ypehaj Nije KOHCTpyuncah 3a KOnTHHynpaHy yNoTpe6y. BEEZER@ je dN3ajHnpaH 3a yNoTpe6y y DomAhNcTBv N Hne Ioroan 3a KomepuiJaHy yNoTpe6y. HenpaBnHa yNoTpe6a nn NorpeHNO pyKOBaBe Mory DoBeCTn Do O3bNbHX NobpeDa nn OwTeHeBa yPeJaja.Cbn 3axTeBn 3a rapaHcNjy n ODroBOpHoCT BnWe HeHe BaxHTn.
ONNCyHKUNJA
Ca BEEZER xnaIbakom 3a nhe ce mory xnaIHTn nocyde 3a nhe kanaunTeTa do 0,75 IITapa. Y 3abnCHocTn od BeNnHHe nocyde 3a nhe, BEEZER-y je noTppe6Ho 3 do 6 MNHyTa da DocTHne TemepaTyPhy pa3nky od Hajmahe 12°C y nopehJeCy ca noeTHOM TemepaTypom. Ipouec XnaJehBa ce moKe noDecHTn nnnoHOBHTn da 6n ce DoaTHO CmAbuHa temepaTypa 3a nhe. BEEZER-om ce moKe ynpabLaTu nomohy 4 fynKcuijcka Tactepa Ha ypehajy nII nyTem annkaucije BEEZER Connect. Ctapr Tactep (5.1) yKnbyuyje n NCKbluyje ypehaj n nokpehe npouec xnaJehBa. Noctoje n 3doatHa fynKcuijcka Tactepa 3a nopewabaBe napametapa: YKnbyuBaBe/nckbvUbaBe poTaunje, BelenuHa nocyde n
HnBO XnaheBa (5.2-5.4). Ypehaj noka3yje y kom ce pekmy Hana3n npeko pa3nnuHTnx 6oja LED npcteHa (2) Ha BpaTIma pacxnaIadne KOMope (1).
LED-npcTeH
Boja LED npcteHa 03NaUaBa pexm paJa y kojem ce ypehaj Hana3n. PekmnpaCa cy HabeDeny CneDehoj Taben:
Boja npcteHa
3HaueHe (peXm)
Bena CnpemHo 3a pa
Tnpkn3Ha PpeTxoJHo xnahebe/ ayTomaTcko Odmp3aBaHe
Pnaba Xnahebe ypehaja
Jb6n- Pexm ywTeJe
yacta eheprnje
KyTa NcKbUyHbAHe
LpBeHa BpTa OTBopeHa
Haonomeha: Ako je ypehaj uckbuyeh,LED npcmeh ce noopa3ymebaHo He ykbyye. Ako ce BEEZER KOHpmoIuwe npeko annukaucije BEEZER Connect,LED npcmeh ce moke akmubapamu u ypehaj ce moxe Kopucmum Kao am6ujemmanHO oceembehe odaupom kebehe 6oje npcmeha.
Функциjsн Тастун

Potaunja
Y cTaNdApDNoJ noCTaBcN, nocya 3a nHe ce potupa TOKOM npoeca xnaheBa kaKo 6n ce oBe36eDnO paBHOMepHo xnaheBe nHa. Ppntnckom Ha Tactep yHKunja poTaCnje ce MoKe NCKbUHTN, Hnp. 3a YetBpTacTe 6Oue nn NoCyde ca OCETlbNBM eTnKeTama nn peBeFmHa. Ha ekpaHy ce npka3yJe nOdeuBaBbe n3Bp- Wne Ho ppeKo CmB0a poTaCnje.
Hanomeha:
Kada ce pomauja uckbyu,
npouec xnaheba ce npodykaea
3a 20% .

BennuHa nocyu
S CaPxaj 0,25 nIcapa M CaPxaj 0,5 nIcapa L CaPxaj 0,75 nIcapa

CTenEn XnaheBa
3 cTeNa xHaJIeBa cy Cm6oJN3ObaHa Ha ekpaHc jeIHom, DBe IIN TpN IINHe.
BpemeHa xnaheha
Tpajahe npoceca xnaheha 3aBnCn Ond n3a6paHe KOMbHaucnje. TaBeJa y HacTabKy npka3yje pa3nUHTa yHAnpei 3aDATA NOdeuBaHa.
Ha cpeiHbem HNBOy, nHe r6n Hajmahe 12 ^ C y nopehcy caNoeTHOM TempepaTypom y HOpMaJIHIM ycIOBIMa.
BpeMe XnaheBa (y MNHyTaMa) y 3aBnCHoCTN OJ HnBOa XnaheBa N BELNuHHe NocyDe (noeTha TempepaTypa 21^
| (t in min) | *** | |
| small | 2 3 4 | |
| medium | 3 4 5 | |
| large | 5 6 7 |
HaHomeHa:
YHaIpeD 3adama nodeuaeaHa
ce Moay nodecumu y MobunHoj
aNnkaUju. TaKoJe ce Moay
U3abpaMu u NOKpeHymu noJe-
duNaHu majMepu u3MeHy 1 u
60 MuhMa. EKcnePmcku peKum
maKoJe nomaxe da ce odpeDu
udeAnHo ePeme xHaJehBa 3a
XeJIbEny Memnpamypy. AnnkauJa makoHe caOpxu maBeNy ca
OnImumHom memnpamypom
3a Hajewha nuHa.
BpaTa pacXnAaHe KOMope
Ako ce OTBope Bpata pacxlaadHe KOMope, CBN Tekyhni npoecn ce 3ayctabjajy. Ym Ce Bpata NOHOBO 3aTBope, npeKNHyTN npoecn he ce HactaBHTN.
Ako ce Bpata noHOBO He 3aTBope, ypehaj Bac yno3opaba 3BvHIM CnHaJOM (6n).Ako Bpata OCTaHy OTBopeHa, To IOBOOn Do nopacTa Temnepa- Type y pacxnaIHOJ KOMOpN, wTo 3ay3BpAT DOBOOn Do o6HOBJIe-Hor nII npOdyKeHOr npoeca npTeXODHor xnaHeBa.
HaKoH ycpeShor Odmp3aBaHa haKoH NcKbUyHbHa ypehaja, BpaTa ce Mopajy OTBOpHTn Kako 6n Blara Morna Da n3aHe. Ypehaj TO O3Haayaba 3ByuHm CnHaNOM (6n).YndeAhnom cIyaujy, BpTa Tpe6a OCTaBHTn OTBopeHa HajMahe 60 mHyTa.
OaBDOHaUpeBO
TekyhHa HactaJa TOKOM npoeca Omp3aBaHa, n3 pfnae Koja Uprn nn 36or pa3bneJhor cTakna, nomohy oBODHor upeBa (8) Ha 3aHBoj cTpaHn BEEZER-a moKe da ce nCnpa3Hn pyuHo.
Y Ty CBpxy, n3BaIte OJBOJHO UpeBo (8) n3 dpXaHa N OKaHTe ra ca OTBOPOM OkpeHyTM HaOone y DOBOJHo BeNIky Nocdy nn Jn JaBa6o Ca OJBOJOM.
HaHOMeHa:
Koluuna bode koja ce npou36odu mokom odmp3aeaHa 3NaujHO cepupa y 3abucnocmu od enaxnocmu okoluhe. Tek Ka da je enaxnocm ba3dyxa eeoma bucoka, cmeapa ce monuko bode da ce mopa ucnycumu kpo3upe6o.
BEEZER TaKoHe nMa npeNIBHn OTBOp (10) Ha 3aIbOJ cTpaHn. Ako ce y ypehajy hakynnpebuwe BoDe, Ha npimep 36or npBeBnke KOHeH3aunje nnCnOMbEne PnaSe, OHa he OTncaTu KpO3 Hera. OBO He
PpeCTabba HnkaKAB npo6lem 3a cam BEEZER aann To Tpe6a y3eTu y o63np npu n360py MeCTa Ha kojem he 6ntn noctabbeH.
NYUHTAHEYPAI
Pnpnpema
- PaKbNBO n3BaJnte ypehaj n3 NaKOBaHa uYKIOHnTe CBe DeNoBe NaKOBaHa u 3aWTnThe foJnje.
- Cybajte cBe DeNoBe naKoBaHa 3aJeHOb ca naKoBaHem. Ppunikom Kacnijer Ondaraha DeNoBa am6aJaKe, Mopaj Da ce noTuJy BaxeHn 3aKOHKn npOnncn 3a npOpeCnoHaHNO oDnaRaHe.
ONPE3, onachocToeKcnno3nje:
HemojTe KopncTn ypehaj ako je cnCTem oWtehen! Y TOM cnuyaj, npocTopna Mopa 6ntu odmax do6po npoBeTpena nYKIObEHN NOTeHcNJaJIHN N3BOpn NaJbeHa.
NocTaBbAbe ypehaja
- NocTaBnTe BEEZER Ha paBHy, HeKnI3ajyHy, BoOoTnOpHy NOBpUHy y HEnocpeHoj 6n3HH yTuHnue. NOnJXnTe BEEZER KOpncTeHn npEdBnHe pUKe Ha npedBoj n 3aDBoj cTpaHn (6).
Hanomeha: Hukada He noduXume BEEZER 3a epama unu dpyee denoee ypehaja ocum 3a npedbuhepeyuke. - IMaJTe Ha yMy da BEEZER MoKe Da paDi cAmo y Do6po npOBeTpEnm IpocToPnJaMa rDe Hema NotEHnJaHnX n3Bopa naBeHa. TaKHe, Na3te Da He npEkpNiJe ToBope 3a BeHTnlaCnjuy (7). Da 6nCe To ypaHnN, DpKInTe MInHMaJIHo pAcToJaHe oD OKO 5 UcM Od OKoJIHx 3nOBA (norIedajTe ONUITA BE35EDHOCHA YNYTCTBA).
- PnKbUynte Ka6n 3a HanajaHe y yTuHnHy.
HannomeHa:
BEEZER ce mopa mpaHcnpmoeamu,cknaudummu u Hume ce pykoamuyycnpaBHOM noIoxajy.Ppe npee ynompebe, ocmaeume ypehaj da mupyje Hajmahe 12 camu. Ppedeuhe nepoopmahcse cy ha co6hoj memnepamypu u3mehy 16 u 32^
BEEZER Connect
BEEZER-OM ce moze
ynpablbatn npeko annilkauzije.
Ja 6ncte npey3en n
HCTanipaNN BEEZER Connect annilkaunjHa
nametHom TelepoHy nI
Ta6nety, cKeHnpajTe QR kOd Ha
npedBoj CTpaHn OBor ynyTCTBa.
AnterpHaTnBHO, y App Store
nn y Google Play npodabHnCi
MOxete da notpaxknte BEEZER Connect annilkaunjy.
Hannomeha:
Anuka ja cnyku kao do damak y3 LED npcmeh u ekpan ypejaja. Y anuka jmu mojeme da no3o eme dodamhe uhoopmauje kao umo cy mpehymha memepamypa pacxnaadhe komope.
BEEZER® NOBEXNTE npeko WLAN Be3e
-ПовекиTe BEEZER ca Baшим Wlan-OM,Тako StTo heTe nCTOBpeMeHO npTnCHyTu 6adoBa Tactepa (5.3 n 5.4). YcneuHa Be3a je O3NaueHa cIM6oJom Wlan Ha ekpaHy (norjeJaTe OPNCФYHKUJJA).
BEEZER® NOBEXKITe npeko BEEZER® Connect anlkaunje
OTBOpTe BEEZER Connect annkaunjHa nameTHOM Tepeohny nn TaNeTy.
KpepaTe NnHn HanoR Kopncnka Oda6npom FyHKuJne ,Register".Y Ty cbpxy, Mopate Da HabeDeTe 6poj TeIefoHa nIa aDpcye e-noTte (Hehe CBe FyHKuJe anNkauJe 6bTu DoCTynHe 6e3 OBx INΦOpMaUJa).
- ПовекиTe CBOj NameTHn Tele-фон ИИng TabneT Ha KyhHy WLAN Мреку.
- AkTbBnPajTe Bluetooth® Ha BaWem nameTHOM TeNefoHy nIN Ta6JeTy.
OTBOpTe BEEZER Connect annkaunjy, npjaBnte ce Ha cBoj hAnor n 3a6epnte ,Add device (+) "Ha noueTHoJ cTpaHnU.
Mokete da 6napate n3mehy cnehehnx onuja:
AyTomatcko npeno3HaBaHe: Ako cy odroBapajyhe do3BOJe aKTHBnpaHe, BEEZER he 6ntu ayTomatcKn npeno3HaT (ycNoB: ypehaj Mopa 6ntu ykbyuEn n Nobe3aH ha WLAN; yheCnte WLAN no3nHky aKO je notpe6Ho)
PyuHo DoaBaHbe:
I3a6epnte BEEZER ca IncTe
DocTyunnX ypehaja, onuJe ,WiFi"
n „Bluetooth“ Takohe Mopajy 6Tu
akTbBnpaHe (yHeCtne lo3nKky 3a
WLAN ako je noTppeHo).
PperneIe yHKunja anJkaunje
O6jaWbHe
15 UnpaBbAbe LED npcTeHOM: KoHpIpyPicaBe am6uJeHTaIIHOr CBETNa (n36op 6oje). OHO CBETn cAmO KaJa je BEEZER nCKbUyeH.
16 CmeHnue 3a Tempepatypy:Jaje npenopyke 3a onTImaHny Tempepatpy 3a pa3Ha nHa.
17 Помена унанред задахи подашаьа: Конфигуришптужеве оцице за велочини Контейнера (5.3), Нвовхлайеня (5.4) и Врeme xлайеня.
18 Nopewaba hyejahaj: KOnHpynnte Tpajahe do ayTomatckor Odmp3aBaHa, aKTHBnpajTe pexm ywTeede eHepnje n ayToMaTcKO hKbByuHaBe. Iopei Tora, 3ByHn cnHan (6n) ce Moke aKTHBnpaTN/deakTNbPaTu.
19 TemnepaTypa: Ppika3yje TpeHyTHy TemnepaTpy yHyTapacxnaDHe KOMope.
20 Bpeme: Pnka3yje npeoctaio Bpeme xnaheba nha.
21 Pekm: Ppka3yje akTyeHn pekm BEEZER -a.
PAI
YKbUyBaHBe n npetXoDHO xhahebe
- YBepnte ce da cy Bpata 3aTBopeHa.
- YKbUyTe ypehaj npitnckom n dpkaBem Tactepa Ctap (5.1). HakoH yKbUyBaHa, BEEZER 3axTeBa jeDnOKpaTHo npetXoJHO xnahebe od npnbJnxHo 10 MNHyTa. Obaj npoec nounbe ayTomatckn. LED-npcTeH BEEZER CBETNI TnpKN3HO, a ekpan npika3yje npoec ca HeNPeKnIIM Tpakama. KaJa ypehaj 3aBPm npocec npetXoH-Hor xnaheBa, to ce oBeIexkaba Tako wTo ce 6oja LED npcteha MeHa n3 TnpKn3He y 6eJy. Ypehaj je cada cnpeMaH 3a xnahebe nha.
HaNoMaHa:
Ipeko annukauzije ce BEEZER MoKe yKbYumu u NOKpeHymu npemxodHo xnahebe y NOKpemy. To 3nau da je ypejaj cnpeman 3a ynompe6y kada ce Ha npumep 6pamume u3 Kynobune.
Xnahhe nha
- OTBOPnte Bpata pacxnaadHe KOMope (1) Tako wTo heTe npCTom nobyHn puuCy Bpata (4). CTabnte nHe koje JeNITE da ce oxJaHy pacxnaAdHy KOMopy (13). YBepnte ce da je nocya 3a nnHe do6po 3aTBopeHa.
- 3aTBOpHTe Bpata pacxlaadHe KOMope n KOHpyuunTe napametpe nomohy fynKcuncknx Tactepa (norpeajte OINC FYNHKUJJA).
- Пи捜нITE tacTe Cтар (5.1)да 6исте пokрehулnpoцсхlaheBa.TpaJaHe npoцca xlaheBa 3aBиСоД n3a6baHe KOMbHaCnJe(BuNTe OПИСФУHKUINA).
- 3a Bpeme npoceca xnaheba, LED-npcTeH BEEZER CBettny nnaBoj bojin, a ekpan npka3yje npoec ca HnpeKnHIM TpaKaMa.
Kpaj npoueca xnaheba je 03HaueH 3ByuHnM CnHaJOM (6un) n LED npcteHOM Koju ce Meha n3 nlaBe y 6jy. 3ByuHn CnHaJI CE MOKe yKbUyHTN u NCKbUyHTN y aIInkaunj.
HaKoN 3aBpWeTka npOceca XnaHeBa,OTBOpTe BpaTa pacXnAdHe KOMope Nn3Ba- nTe oxNaJeho Nihe. YBepTe ce Da cy BpTa OHda NoHOBO 3aTBOpEHa.
ONPE3, onachocT od noBpeDa od pa36njeHOr cTaKla:
HaKoH 3aBpWeTka npOeCa XnaHeBa, HnKaJa He octaBbajTe nHe y pacXnAd-Hoj KOMOpn ca 3aTBopeHM BpaTIma! 3amp3aBaBe nHa MoKe N3a3BaTN JomBbeHe cTaKaJa.
AyTomatcko oMp3aBaHbe
Ako ypehaj paDi duJyKe Bpeme n y 3aBnCHOCTN OJ BnaxKHOCTN, y pacxnaHoj kOMOpn Ce MOKe fopmnpaTn nei. Da 6n yuHaK xlaheBa 6no KOHCTaHTaH, BEEZER ce ayTomatcKn Odmp3aba. OBO ce obuHNO deWaba hakoN 90 MNHyTa.
Ppoec ayTomatckor oMp3aBaHa Tpaje 0KO 5 MNHyTa.3a BpeMe npoeca OMp3aBaHa, LED-npcTeH BEEZER CBetn y TnpKn3HOJ BoJn, a ekpan npnKa3yje npoec ca HnpeKnDnM Tpakama.
HaKoYcneuHOr ayTomatckor oMp3aBaHa, ypehaj npela3n y pexkIM npetXODHor xnaheha n noHOBo je cnpemah 3a ynoTpe6y HaKoH jou 5 MNHyTa.
HaNoMeHa:
YHaPpe 3adama nodeaeaaba 3a aymomamcko oDmp3aabeHc mozy ce nodecumu y anlukauju.
NckbvyuBaBe
- Ickbvyte ypehaj npntnckom N dpkaBem Tactepa CtapT (5.1). Cada npocec oMp3aBaHa Kaojn Tpaje OKO 10 MNHyTa nouHBe ayTomatcN.
- 3a Bpeme npoceca oMp3aBaHa,LED-npcTeH BEEZER CBETn y kyoToj 60jn,a ekpan npka3yje npocec ca HnpeknHnM TpaKaMa.
HaKoH ycneHOr Odmp3aBaHa HaKoH NckbUyNbHa ypehaja, BpaTa pacxnaIHe KOMope ce Mopajy OTBOpTN KaO 6n Blara Morla Da n3aHe. Ypehaj To O3Ha-yaBa 3ByuHIM CnHaNOM (6n). YndeAINHom cIyaujy, BpTa Tpe6a OCTaBHTN OTBOpHa HajMaHe 60 MNHyTa.
- HakoH uTo ce Bpata pacXlaadHe KOMope 3aTBope,ypehaj ce nckbuyje n cnpeMaH je 3a noHOBHO yKbuyBaHbe. HanomeHa:
Ako ce ypehaj Hehe Kopucmumu dyxke bpeMe, npbo mpe6a da ce yeepume da je pacxnadHa kOMopa nomnyho ycma u cyba u da epaama pacxnadHe kOMope ocmany ombopeHa kaKo 6u ce cnpeuuno cmeapae byu u3Hympa (noanejme YIULTHEJE).
PEXIM YUITEDE EHEPNIJE
Ako je ypehaj cnpeMaH 3a ynoTpe6y n He KOpNCTn Ce Dyke oD 10 MNHyTa, BEEZER npela3n y pexm yuTeJe eheprnje. Tokom pexima yuTeJe eheprnje, LED npcten BEEZER CBettn JbYbHuacTo.
Ako je ypehaj y pexkmy uwte de eheprnje,MOxe ce noHOBO aKTNBnpatn npntncOM Ha 6nlo KOJnФyHKuJcN Tactep.Ako je TemnepaTpya y pacxnaadhoj kOmOpn npeBnCoka, noHOBO he ce nokpeHytn KpataK npocec npetXoDHor XnaheBa (norneajTe IpetXoDHo xnaheyeypehaja).Obaj npocec 6n Tpe6aNo da Tpaje Mahe od jeHOR MNHyTa, HAKOH Yera he ypehaj 6nTu NOHO BcPemAH 3aynoTpe6y.
Be3 noHOBHor aKTHBnpuha,ypehaj ce obuHOn ayTomatcknNOTnyHO NCKbuyje HAKOH60 MmHyTa.
Hanomeha:
YHanpeo 3adama nodewaaba 3a pekum yume de ehepuje moy ce nodecumu y anukaucju.
yHwHeB
Hnje noTpe6Ho YnshHeBEEEzer-a NaKoH cBaKe ynoTpe6e.PacxnaIHa KOMopa BEEZER-a MoKe Da ce YnCTn no noTpe6n.
Pnpnpema
- OTBOPNTe Bpata pacxnaHne kOme (1). Ako je notpe6Ho, naxlbnBO yKIOHnTe cTpaHa TeNa!
- YKLOHHTe POtaCIOHOH Hocay (11) n3 pacxnaadHe KOMope (13). Oh je MarHeTHo npUByPshEn 3a dHO mOpa da ce NOBYe HArOpE wTo je Moryhe xOpu3OHTaHnJe da 6n ce n36erINo HarnBaHe.
- Caça n3ByuTe cHTo (12) koje ce HaJa3n IcNoI potaunOHor Hocaua.
PeDOBHO uHnebe
- Ncnepe potaunohn Hocay (11) n cno (12) noD YNCTOM BODOM.
- 06pnuIte pacxnaIaHy kOMopy BEEZER® BnaxHOM KpIOM.
SERVICE, REPARATIONER OCH RESERVDELAR


- srsvtr
- SYMBOLERKLÄRUNG
- Symbol Erklarung
- Hinweis:
- GENERAL SAFETY INSTRUCTIONS
- Risk of electric shock
- Risk of explosion
- INTENDED USE
- FUNCTIONS
- LED ring
- Ring cold
- Meaning (mode)
- Function buttons
- Rotation
- Container size
- Cooling level
- Cooling times
- Drain hose
- Note:
- BEFORE USING THE APPLIANCE FOR THE FIRST TIME
- Preparation
- CAUTION, risk of explosion:
- Positioning the appliance
- BEEZER Connect
- Connecting the BEEZER® to WiFi
- Connect BEEZER® to BEEZER® Connect
- Explanation
- OPERATION
- Switching on and pre-cooling
- Cooling beverages
- CAUTION, risk of injury due to breaking glass
- Automatic defrosting
- Switching off
- ENERGY-SAVING MODE
- CLEANING
- Regular cleaning
- Cleaning of heavy soiling in the cooling chamber
- STORAGE/MAINTENANCE
- DISPOSAL OF WASTE ELECTRICAL AND ELECTRONICEQUIPMENT
- WARNING, risk of fire, risk of explosion:
- REACH DIRECTIVE
- SERVICE, REPAIRS AND SPARE PARTS
- WARRANTY
- TROUBLESHOOTING
- Problem Explanation/Solution
- EXPLICATION DES SYMBOLS
- Onachoct OT TOKOB ydap
- Onachoct ot ekcnlo3nia
- ПРЕДHA3HAUECHNE
- ФУHKUHOHAJIHO ONICAHNE
- CBeToaNoDeH npbCTeH
- CByTHa npbCTeHa
- 3haeHne (pexm)
- Функциондн6утон
- 3aBbptTaHe
- Pa3Mep Ha cBda
- HnBO Ha oxJaXdaHe
- BpemeHa hOxJaXdaHe
- PpoIbJnxHTeHocT Ha OxJaXDaHe (B MNHyTN) B 3aBnCmOcT OT HNBOTo Ha OxJaXdaHe pa3Mepa Ha cbda (HaayanHa TemnepaTypa 21°C
- Yka3aHue:
- Bpata Ha oxlaekdaaata kamepa
- N3nyckaTeJenH MapkyU
- NYCKAHE B EKCIIIOATALIJA
- IoproToBka
- BHIMAHNE, onachoct ot ekcnlo3n:
- MOHTaK Ha ypeDa
- Cbbp3BaHe Ha BEEZERc WLAN
- Cbbp3BaHe Ha BEEZER C BEEZER Connect
- PbUHO IO6aBHe:
- IperneHa yHKnnte Ha npInoKeHneTo
- OoecheHne
- EKCPIIHOATAU
- BknUcbHe n npEaBapnteHNOxnaXdaHe
- OxJaXdaHe Ha HAnITKn
- BHIMAHHE, onachoct OT hapaHbHe nopadn ChyneHo CTbKIO:
- ABTomatnuho pa3Mpa3BaHe
- N3KJIIOUBAHe
- EHEPROCNECTRAU PEXIM
- ПОУСТBAHE
- PnrotoBka
- PepOBHO nouHCTBaHe
- IOnuCTBaHe npn CunHo 3aMbpcBaHe Ha oxJaXdaaata KaMepa
- CbXPAHEHNE/ TEXHnueCKA IOdPbJxKA
- N3XBbPJIHe HA YNOTPEBBAHN EJEKTPNUECKN I EJEKTPOHH YPeDN
- IPEyPExEHHe, onacHocT OT noXap, onachOCT OTeknno3n:
- PEIJAMEHT REACH
- Avviso:
- BESCHRIJVING VAN DE WERKING
- OPPBEVARING/ VEDLIKEHOLD
- Wskazówka:
- Semi-nificatie (mod)
- Alb Pregatit de
- Uśa compartment frigorific
- DECLARATIE DE GARANTIE
- Yka3aHue.
- YcTaHObKa yCToPoiCTBa
- Повкючени BEEZER WLAN
- ONLITA 6E3BEdHOCHA UNYTCTBA
- OnachocToeIeKtpnHor ydapa
- Onachoct od ekcnno3nje
- HAMEHA
- ONNCyHKUNJA
- LED-npcTeH
- Функциjsн Тастун
- Potaunja
- BennuHa nocyu
- CTenEn XnaheBa
- BpemeHa xnaheha
- BpaTa pacXnAaHe KOMope
- OaBDOHaUpeBO
- HaHOMeHa:
- NYUHTAHEYPAI
- Pnpnpema
- ONPE3, onachocToeKcnno3nje:
- NocTaBbAbe ypehaja
- HannomeHa:
- BEEZER® NOBEXNTE npeko WLAN Be3e
- BEEZER® NOBEXKITe npeko BEEZER® Connect anlkaunje
- O6jaWbHe
- PAI
- YKbUyBaHBe n npetXoDHO xhahebe
- HaNoMaHa:
- Xnahhe nha
- ONPE3, onachocT od noBpeDa od pa36njeHOr cTaKla:
- AyTomatcko oMp3aBaHbe
- HaNoMeHa:
- NckbvyuBaBe
- PEXIM YUITEDE EHEPNIJE
- yHwHeB
- PeDOBHO uHnebe
- SERVICE, REPARATIONER OCH RESERVDELAR
Brand : Ritter
Model : Beezer
Category : Refrigerator