
Merido 5 - Toaster Ritter - Free user manual and instructions
Find the device manual for free Merido 5 Ritter in PDF.


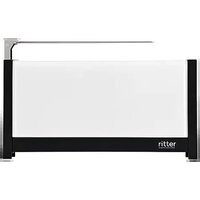
| Product type | Toaster |
| Brand | Ritter |
| Model | Merido 5 |
| Usage | Domestic |
| Power supply | 220-240 V ~ 50/60 Hz |
| Power consumption | 800-1000 W (see rating plate) |
| Number of browning levels | 9 |
| Functions | Grill, Reheat, Defrost, Bake (pastry rack) |
| Automatic bread centering | Yes |
| Automatic shut-off | Yes |
| Crumb tray | Yes, removable |
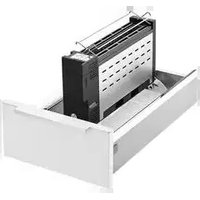
| Pastry rack | Integrated, foldable |
| Protection class | 1 |
| Warranty | 2 years |
| Maintenance | Wipe with a damp cloth; crumb tray hand washable |
| Included accessories | Pastry rack |
Frequently Asked Questions - Merido 5 Ritter
User questions about Merido 5 Ritter
0 question about this device. Answer the ones you know or ask your own.
Ask a new question about this device
Download the instructions for your Toaster in PDF format for free! Find your manual Merido 5 - Ritter and take your electronic device back in hand. On this page are published all the documents necessary for the use of your device. Merido 5 by Ritter.
USER MANUAL Merido 5 Ritter
FALLS SICH EIN BROT VERKLEMMTHAT
GENERAL SAFETY INSTRUCTIONS
To avoid personal injury or damage to the toaster, please observe the following safety instructions:
- The toaster is to be used for domestic purposes only and must not be used commercially.
- Never set the appliance down on hot surfaces or close to a naked flame.
- Use the accessories included in the delivery specification only.
- Use suitable extension cables only.
- Do not bend the power cord. Never wrap the cable around the appliance.
- Route the power cord so that it does not come into contact with hot or sharp-edged objects.
- Only start to use the toaster after it has been securely set up.
- The appliance may be used by children over 8 years of age as well as by persons with reduced physical, sensory or intellectual capabilities or persons lacking in relevant experience and/or knowledge provided that they do so under supervision or have been
instructed in the safe use of the appliance and understand the potential risks associated with its use.
- Do not allow children to play with the appliance.
- Keep the appliance and its connection cable out of reach of children under the age of 8.
– Children must not be permitted to clean or perform user maintenance on the appliance unless they are over 8 years of age and supervised.
– Always disconnect the appliance from the mains whenever it is to be left unsupervised and prior to cleaning. - The toaster must not be operated using a timer or telecontrol system.
- Only connect the toaster to a suitable voltage source that conforms with the specifications on the type label.
– Never leave the toaster unattended while it is operating.
Risk of electric shock
- Always remove the power plug from the socket in the event of a malfunction, before cleaning and when the toaster is not in use. When doing so, pull on the plug and not on the cable. - Never immerse the toaster in water. Never expose the toaster to rain or any other form of moisture. If the toaster falls into water, unplug the cable from the mains socket before removing the toaster from the water. Have the toaster inspected at an authorized service location before using it again.
- Always ensure that your hands are completely dry before using the toaster. Do not use the toaster if it is wet or damp or while you are standing on a damp surface. Do not use the toaster outdoors.
- Stop using the appliance immediately if any parts are damaged and contact the ritter after-sales service.
- If the power cord is damaged, it must be replaced by the manufacturer, the manufacturer's after-sales service or a similarly qualified person to eliminate risk of personal injury. - The heating wires are supplied with mains power during operation. Therefore, you should never place any metal objects in the toaster.
Risk of burns
- The outer surfaces of the toaster may become very hot while the toaster is in operation. Always allow the toaster to cool down a little before touching it (e.g. prior to cleaning). - The bread and roll rack may become very hot. Always use the slide bar to raise or collapse the bread and roll rack. - Freshly toasted or warmed-up bread can be very hot. You should therefore only remove the bread from the toaster when it has cooled down slightly.
Risk of fire
Bread can burn. It is therefore not inconceivable that bread may catch fire while the toaster is operating. Please observe the following fire safety instructions:
- Do not operate the toaster near or below flammable material such as curtains.
– Never cover the toasting slot while the toaster is in use.
– Never use this appliance to toast dried breads such as crisp bread, melba toast etc.
– Never use the toaster to toast bread covered in any kind of coating.
– Never place bread rolls directly over the toasting slot. Always place bread rolls on the bread and roll rack provided.
- Allow the toaster at least 30 seconds to cool down after each use.
– Empty the crumb tray after each use.
Unfold the graphics in the front of the book.
Please read these instructions thoroughly before you start to use the toaster. Keep these operating instructions in a safe place and ensure that they are included with the toaster if passing it on to a third party. Alternatively, the current operating instructions are available at www.ritterwerk.de.
INTENDED USE
This toaster is intended to be used exclusively for the toasting of sliced bread and bread rolls that are suitable for toasting in a domestic setting and on a domestic scale.
If the appliance is used for a purpose other than this, or if it is operated incorrectly, severe injuries may occur or the toaster may be damaged. All warranty and liability claims will be rendered null and void in this case.
FUNCTIONS
The toaster includes an auto-centring function (see below).
Toasting
The toasting function allows you to toast bread to your desired toasting degree.
Reheating
The reheating function allows you to reheat cold bread that has already been toasted. The reheating process takes approximately 30 seconds.
Defrosting
The defrost function allows you to thaw frozen slices of bread and toast them to the desired degree in a single process.
Warming-up
The integrated bread and roll rack allows you to warm up bread rolls for an oven-fresh taste.
LED DISPLAY
The LED display provides information about the function that is currently in use:
Toasting
When you begin toasting, the LED indicators light up to indicate the toasting degree selected. You can configure nine different toasting degrees.
As toasting progresses, the LED indicators switch off one by one to allow you to estimate the remaining toasting time.
Reheating
The LED indicators light up and switch off one by one when the reheating process is completed.
Defrosting
During defrosting, the LED indicators flash to indicate the toasting degree selected. The indicators do not switch off until the bread has been fully defrosted and toasted.
Warming-up
When the warming-up process begins, the LED indicators light up to indicate the toasting degree selected. As warming-up progresses, the LED indicators switch off one by one to allow you to estimate how much warming-up time remains.
BEFORE USING THE APPLIANCE FOR THE FIRST TIME
Preparation
- Clean the toaster before allowing it to come into contact with any food (see CLEANING).
- Set the toaster down on a flat, non-skid surface close to a mains socket.
- Plug the power cord (7) into the socket.
- Set the toaster to "Toast" three times without inserting any bread into the toasting slot (see USING THE APPLIANCE). Ensure that there is sufficient ventilation in the room (for example, by opening a window).
USING THE APPLIANCE
Preparation
- Ensure that the crumb tray (8) is in its designated slot.
The toaster is designed so that regular bread that is suitable for toasting will turn golden brown when a medium toasting degree is selected.
Toasting to golden brown brings out the taste of the bread perfectly.
The result of toasting may differ depending on the type and freshness of the bread.
Note:
Consuming bread that has been toasted to an excessive degree may be harmful to health.
Toasting
- Place the bread in the toasting slot (4).
- Push the power sliding switch (3) downwards until it locks into place.
- Use the buttons for setting the toasting degree (1.4/1.5) to select the desired degree of browning if required.
Toasting then begins.
After the set toasting time has elapsed, toasting stops.
Reheating
- Place the bread you want to reheat in the toasting slot (4).
- Push the power sliding switch (3) downwards until it locks into place.
- Press the Reheat button (1.2). The bread takes approx. 30 seconds to reheat.
Defrosting
- Place the bread you want to defrost in the toasting slot (4).
- Push the power sliding switch (3) downwards until it locks into place.
- Press the Defrost button (1.3) and then use the buttons for setting the toasting degree (1.4/1.5) to select the desired degree of browning if required.
The defrosting and toasting process then begins. The bread is first defrosted and then toasted to the selected toasting degree.
After the set toasting time has elapsed, toasting stops automatically.
Warming-up
- Raise the bread and roll rack (5).
- Place the bread you want to warm up on the bread and roll rack.
- Push the power sliding switch (3) downwards until it locks into place.
- Use the buttons for setting the toasting degree (1.4/1.5) to select the desired degree of browning if required.
Interrupting operation
- Press the Stop button (1.1) to interrupt operation of the appliance at any stage.
After you press the Stop button, the toasting degree is reset to the default settings.
WHAT TO DO IF BREAD BECOMES JAMMED
If the item you are toasting gets jammed in the toasting slot, the toaster switches off after the set toasting degree is complete.
- You then need to pull the power plug (7) out of the socket.
- Carefully try to loosen the bread and remove it from the toaster in one piece (e.g. using a small wooden implement).
You should ideally empty the crumb tray (8) after each use to prevent breadcrumbs from carbonizing or becoming baked onto the toaster (see CLEANINGsection).
CLEANING
Clean the toaster after each use to prevent the accumulation of food residue.

WARNING: Risk of electric shock:
Always unplug the appli- ance from the mains before cleaning.
CAUTION: Risk of burns:
Always allow the toaster to cool down before cleaning.
- Remove the crumb tray (8) from the appliance and remove any crumbs.
- Clean and dry the crumb tray manually (NOT in the dishwasher).
- Wipe down the external housing parts with a damp cloth.
CAUTION: Risk of damage to the toaster:
- Do not use any abrasive cleansers, sponges with rough surfaces or hard brushes to clean the appliance.
– Never clean the interior of the toasting slot.
DISPOSAL

Once it has reached the end of its service life, this product must not be disposed of as normal domestic waste. It must be taken to a dedicated collection point for the recycling of electrical and electronic devices. This is indicated by the symbol on the product, the operating instructions or the packaging.
Its material components can be re-used in accordance with their identification. By contributing to the reuse, recycling and other forms of recovery of used appliances, you can play a valuable role in protecting our environment.
Please consult your local authority's waste disposal office.
REACH DIRECTIVE
SERVICE, REPAIRS AND SPARE PARTS
Please contact your local after-sales service for all service, repairs and spare parts matters! See www.ritterwerk.de
TECHNICAL DATA
This appliance complies with the following regulations and directives:
- 2014/30/EU
- 2014/35/EU
- 1935/2004/EC
- ErP 2009/125/EC
- 2011/65/EU
The appliance thus complies with the CE specifications.
Mains voltage/power consumption: Refer to the type label on the underside of the appliance.
Safety class: 1
GUARANTEE EXPLANATION
This ritter appliance comes with a two-year manufacturer's warranty, starting with the date of purchase and in accordance with the EU warranty directives. In the event of a warranty claim or for servicing, the appliance must always be sent to the appropriate national customer service centre.
INSTRUCTIONS DE SÉCURITÉ GÉNÉRALES
LORSQU'UNE TRANCHE S'EST COINCEE
MURUALUSTAN TYHJENNYS
BESCHRIJVING VAN DE WERKING


- FALLS SICH EIN BROT VERKLEMMTHAT
- GENERAL SAFETY INSTRUCTIONS
- Risk of electric shock
- Risk of burns
- Risk of fire
- INTENDED USE
- FUNCTIONS
- Toasting
- Reheating
- Defrosting
- Warming-up
- LED DISPLAY
- BEFORE USING THE APPLIANCE FOR THE FIRST TIME
- Preparation
- USING THE APPLIANCE
- Note:
- Interrupting operation
- WHAT TO DO IF BREAD BECOMES JAMMED
- CLEANING
- WARNING: Risk of electric shock:
- CAUTION: Risk of burns:
- CAUTION: Risk of damage to the toaster:
- DISPOSAL
- REACH DIRECTIVE
- SERVICE, REPAIRS AND SPARE PARTS
- TECHNICAL DATA
- GUARANTEE EXPLANATION
- INSTRUCTIONS DE SÉCURITÉ GÉNÉRALES
- LORSQU'UNE TRANCHE S'EST COINCEE
- MURUALUSTAN TYHJENNYS
- BESCHRIJVING VAN DE WERKING
Brand : Ritter
Model : Merido 5
Category : Toaster