USER MANUAL Multicam 575w PRESTIGIO
1. This package includes
-
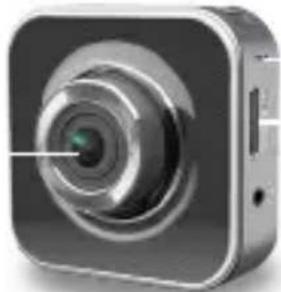
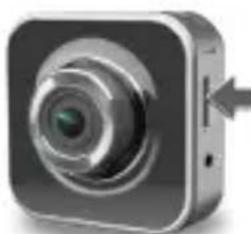
Prestigio car DVR
-
Strap mount
-
Car charger cable
-
Car charger
Warranty card
-
Strap
-
Tripod mount
-
Car mount
-
Quick start guide
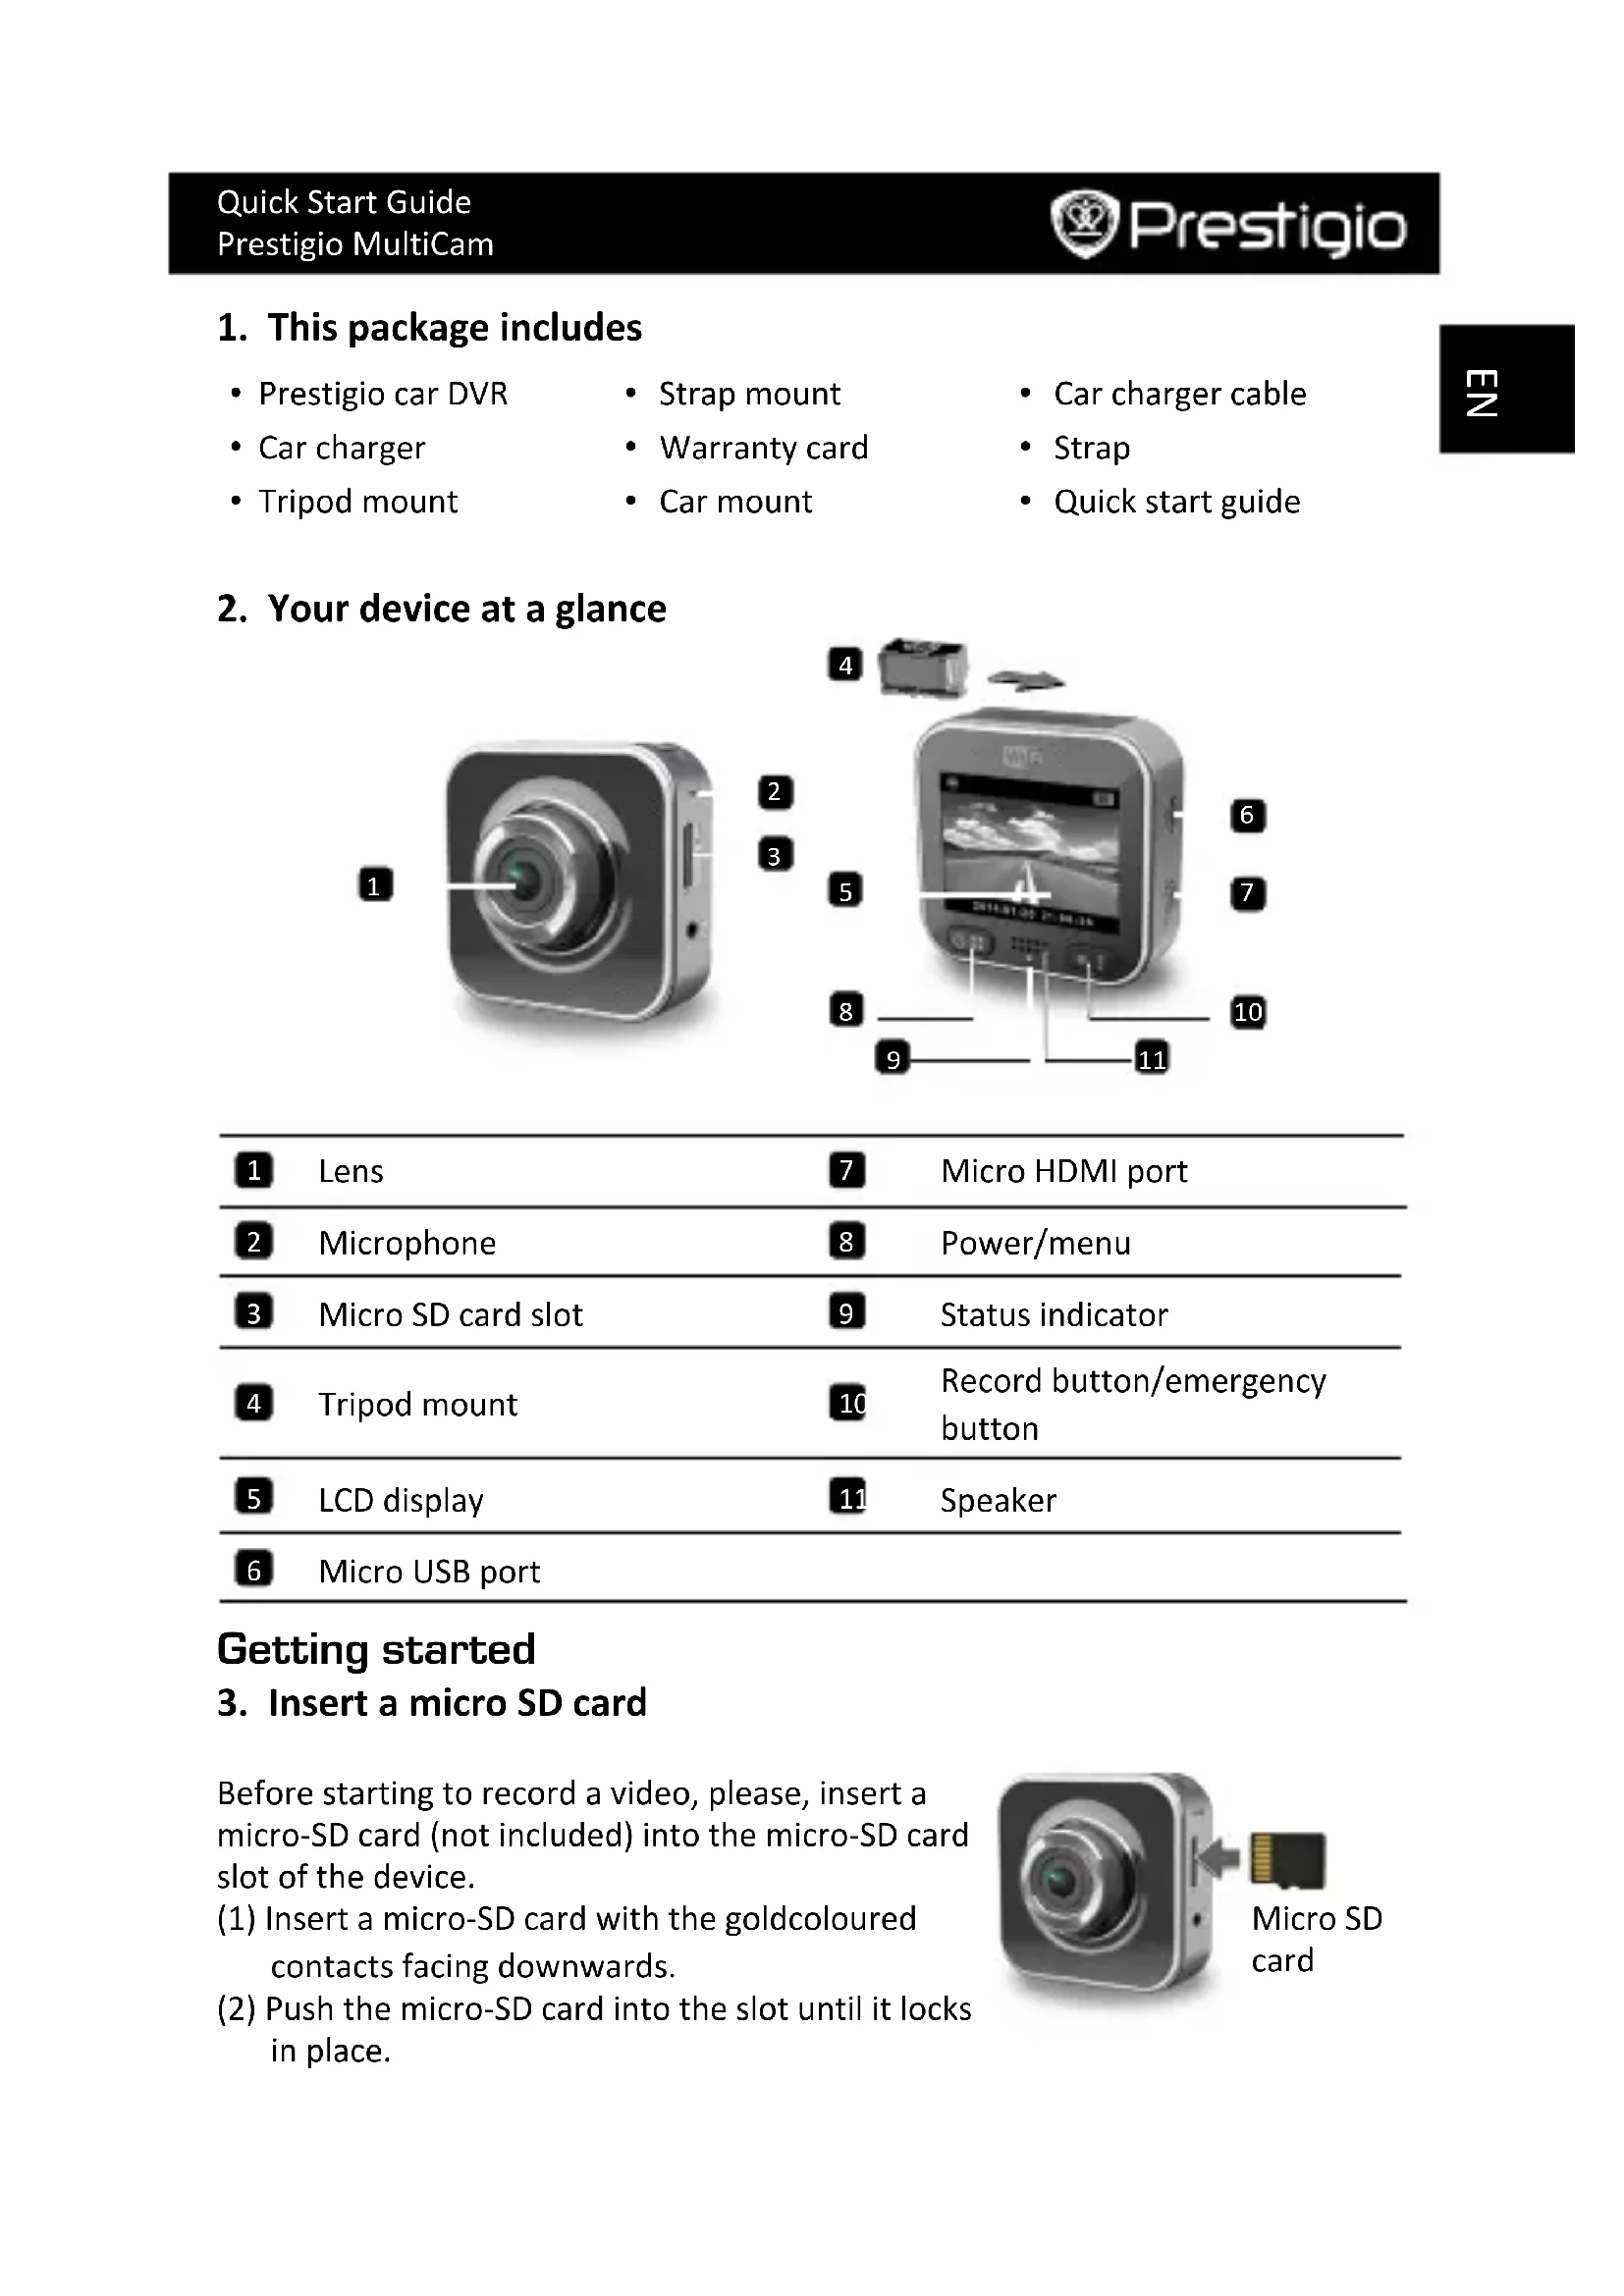
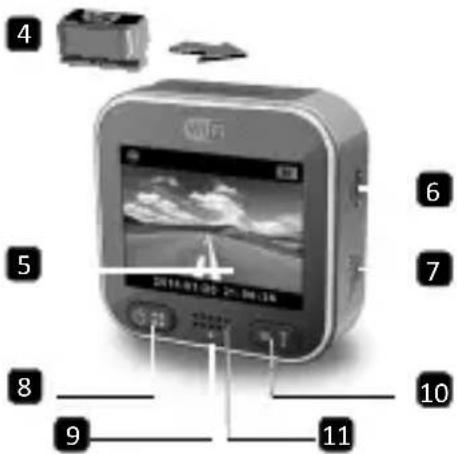
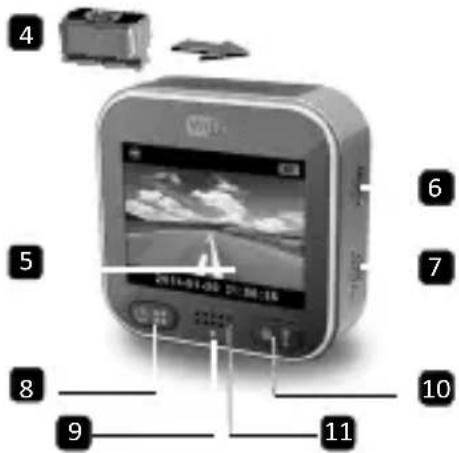
2. Your device at a glance

1
2
3
4

8
1 Lens
Micro HDMI port
2 Microphone
8 Power/menu
3 Micro SD card slot
9 Status indicator
4 Tripod mount
10 Record button/emergency button
5 LCD display
11 Speaker
Micro USB port
Getting started
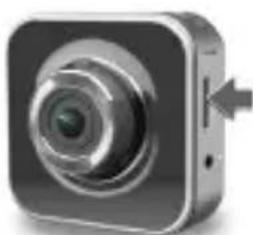
3. Insert a micro SD card
Before starting to record a video, please, insert a micro-SD card (not included) into the micro-SD card slot of the device.
(1) Insert a micro-SD card with the goldcoloured contacts facing downwards.
(2) Push the micro-SD card into the slot until it locks in place.


Micro SD card

Note:
After inserting the micro-SD card, the device will automatically recognize it as the default storage, and all the data will be saved on this card.
4. Charging
- Using the USB cable: Connect the device to the USB port of a PC/ notebook.
- Using the car charger: Connect the device to the car charger. The device will start charging after you start your car engine. The device will automatically turn on and begin recording. When the engine stops, the device will automatically save the latest file and turn off.
Note:
Before using the device for the first time, please use the included USB cable to connect it to a PC or notebook to fully charge the battery. It takes 2-3 hours for the charging to complete.
5. Power on/power off
- Mount the device in the vehicle by using the car mount, and then press the power button to turn it on. To power off the device, press and hold the power button for 2 seconds.
- You can also connect the device to the car charger. It will automatically turn on and start recording when the car engine starts.
6. Recording
- Connect the device to the car charger, when the car engine starts, the device will start and loop recording after 5 seconds. When the car engine stops, the device will save the latest file and turn off after 15 seconds.
Note:
(1) Press [ ] on loop recording, the current file will be saved and the device enters standby mode.
(2) When the micro SD card is full, the device will delete the first unlocked video file automatically.
Settings
7. Camcorder operation
In preview mode, press [ ] to enter settings. Use [ ]/ [ ] to navigate the menu.
The car DVR has eight settings. Advanced settings can be set up via the Prestigio mobile control app.
Icon Settings Description
| Playback Play recorded images |
| Action Cam | Select Action Cam mode to record normal videos. |
| Dash Cam | Select Dash Cam mode to start loop recording or emergency recording. |
| WiFi - Local Enable/Disable WiFi connection. |
| WiFi - Cloud | Enable/Disable the internet cloud connection. |
| Voice Record | Enable/Disable voice recording (car mode only). |
| Auto Record | Enable/Disable auto recording when car engine starts (car mode only). |
| Screen Auto Off | Screen turns off after 60 seconds of idling (car mode only). |
| Settings | Reset to default settings and format SD Card. |
9. Record modes overview
Mode Action Cam Dash Cam
| Record type Normal Loop Emergency |
| Record trigger Press [ ] in preview | Car impact
Press during loop recording |
| Record duration | Unlimited 3-min. sections | 1-min. section
(10 seconds before and after the event) |
Display info.

00:06:36
SD card remaining time
2014/01/01 21:06:36
Current date & time
Notes:
- During loop recording, oldest files will be over-written if the micro-SD card is full.
- During loop recording, press [ ] to enable/disable mute function.
10. Playback on your TV
(1) Connect the car DVR to a TV with a micro-HDMI cable (not included).
(2) Turn on the car DVR. Follow instructions on the TV screen or refer to your TV user manual.
11. Connect to your PC
(1) Connect the car DVR to a PC with the included micro-USB cable.
(2) Find video files under "My computer\Removable Disk\".
(3) Copy, move, delete, or playback your videos on your PC.
Wireless & APP
Before using wireless connections, download and instal the MultiCam Prestigio app from Google Play Store or Apple Store.
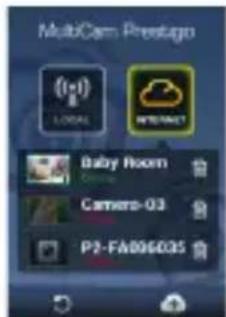
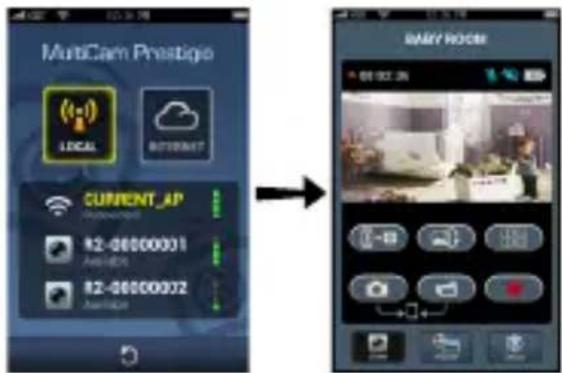
12. Local function
Before using mobile app's location-related functions, ensure the car DVR Wi-Fi is on and Cloud setting is off. Once Wi-Fi is ready, preview shows the car DVR name (R2-xxxxxxxxxx) for a few seconds.
- Connects the car DVR to your smartphone
(1) For Android: Turn on Wi-Fi.
Fore iOS: Go to Settings > Wi-Fi. Turn on Wi-Fi.
(2) Run MultiCam Prestigio.
(3) Tap Local and select the car DVR to enter Local view page.
Notes:
- The smartphone cannot connect to the car DVR while it is recording.
- For the first time, no password is required. You can set the password in Setup.
- The media player on your smartphone may or may not support SuperHD video.

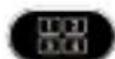
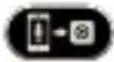
Icon Description Icon Description
| View | • Enable quad-view for multiple live recordings on your smartphone.
• In quad-view, select a window for single view. |
| Album Capture photos. | |
| Setup Record videos. | |
| Voice control: talk to the car DVR from your smartphone | • Record videos and save the files on the micro-SD card inserted in the car DVR. |
| Flip an image upside-down. |
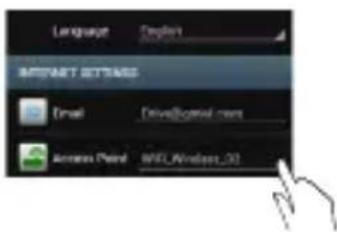
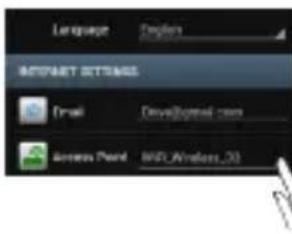
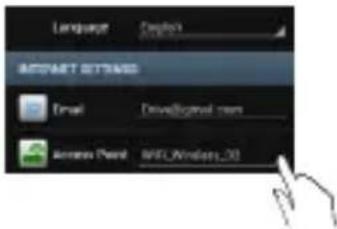
13. Internet functions
Before using app's Internet functions, ensure the Internet setup has been completed.
- Internet setup
(1) After connecting the car DVR to your smartphone. Enter Setup.
(2) Go to Setup > Internet Settings > Edit Email and AP.
(3) Tap Save to complete Email & AP settings.
Notes: AP (Access Point) can be a wireless router, 3G/4G mobile Internet connection, or a 3G/4G mobile Hotspot.

Motion detector setup
If there is any motion detected while the car engine is stopped, your car DVR will start recording automatically. It will stop recording when no motion can be detected.
(1) Run MultiCam Prestigio.
(2) Go to Setup > Car DVR Settings to turn on Motion Detector, and then tap Save.
(3) displays on your car DVR.
Notes:
- When car engine is stopped, use the car DVR to activate Motion Detector if necessary.
G-sensor setup
If any impact takes place during recording, your car DVR will save the emergency recording events and save the files automatically. You just need to turn on the G-sensor.
(1) Run MultiCam Prestigio.
(2) Go to Setup > Car DVR Settings.
(3) Choose H/L for G-Sensor and then tap Save.
H: High sensitivity. L: Low sensitivity.
(4) The car DVR shows emergency record notification on the screen.
- Connects to cloud server
Enable Cloud [ ] in the car DVR to sync video recording to a cloud server.
Connecting status will show on the screen.
Status Description
| The connection is successful. The preview shows [ ] and the car DVR ID. |
| Login fail:
·Invalid AP name or password.
·Weak Wi-Fi signal or not in Wi-Fi coverage. |
| Connection fail:
·No Internet or cloud server accessible.
·Blocked by a firewall. |
Remote Internet live view
(1) Connect your smartphone to the Internet (via Wi-Fi, 3G/4G).
(2) Run MultiCam Prestigio and tap Internet.
(3) For adding the car DVR or using another smartphone to view, tap [ ] enter the car DVR ID and password.
(4) Tap the car DVR ID/name to view Internet live videos.

Safety precautions
Please read all safety precautions before using Prestigio MultiCam 575w. Please follow all procedures outlined in this Quick Start Guide to correctly operate the device.
- Do not attempt to disassemble or alter any part of the device that is not described in this guide.
- Do not place the device in humid areas or allow it to contact water or any other liquids. The device is NOT designed to be liquid-proof.
- In the event of liquid entering into the device, immediately disconnect the device from the computer. Continuing use of the device may result in fire or electrical shock. Please consult your product distributor for the nearest support center.
- To avoid risk of electrical shock, do not connect or disconnect the device with wet hands.
- Do not place the device near a heat source or directly expose it to flame or heat.
- Never place the device in vicinity of equipments generating strong electromagnetic fields. Exposure to strong magnetic fields may cause malfunction or data corruption and loss.
Technical Specifications
| Image sensor 3.0MP |
| Video quality 2304*1296 (30fps)/1920*1080 (30fps) |
| Video format MP4 (H.264) |
| Backend chipset Ambarella A7LA55 |
| Lens 2.45mm/F2.4 fixed focus |
| Lens view angle 160° |
| G-Sensor 3-axis G-Force sensor |
| LCD 2.0", 480*234 |
| Battery Li-ion 700mAh |
| Battery life 60min (record mode) |
| Internal memory 128MB |
| External memory Micro SD/SDHC/SDXC, up to 64GB |
| Wi-Fi IEEE 802.11 b/g |
Video Storage Capacity
| Storage card(G) 32 GB 16 GB 8 GB 4 GB |
| 1920*1080 FullHD 410 min 204 min 90 min 34 min |
| 2304*1296 SuperHD 181 min 90 min 44 min 18 min |
Disclaimer
CE As Prestigio products are constantly updated and improved, your device's software and hardware may have a slightly different appearance or modified functionalities than what is presented in this Quick start guide.
Prestigio hereby states that this MultiCam complies to basic requirements and another relevant regulations given by the EU directive1999/5/EC. Full version of the declaration of conformity is available on http://www.prestigio.com/compliance.
KpaTKoe pyKOBOdCTBO noJIb3OBaTeJRA
2. 0630p yctpoiCTBa
1
2
3
1 06bekTNB
7 Nopt Micro HDMI
2 MnkpofoH
8 Khonka Ntahne / MeHIO
3 Pa3bemДЯ KapTnamrtn Micro SD
9 HnDkATOp COCTOHN
4 KpenJIeHne Ha noDCTaBKe
10 Khonka 3aannc/ 3KcTp.
5 KK-dncnne
11 DnHaMnK
6 Nopt Micro USB
Hauano pa60tbi
3. YctaHOBnTe Kapty micro SD
Ipeud haayanom 3aanns Bndeo Heo6xOIMO yctahOBNTb KapTu namrtn micro-SD (He BXoNTB KOMnleKT noCTaBKn) B pa3bem dJa KapT namrtn micro-SD Ha ycTroPoiCTBe.
(1) YctaHOBInTe KapTy pa3beMOM BHN3 (CM. nllIOCTpaunO).
(2)ПротолкнITE KapTuВ pa3bEmdo ueJUka.

Kapra
Micro SD
BHHMaHHe:
Iocne yctaHOBKn KapTbI namrtn micro-SD ycTpoiCTBO aBTOMaTnueckn pacno3Haet ee B kaueCTBe xpaHnInuza daHHbIX - BCE daHHbIe 6ydyT coXpaHrTbcra Ha KapTy.
4. 3apädka
5. BkI./BbIKI. nHTaHnI
- UctahOBHTe yCTPOHCTBO B aBTOMo6nne npn NOMOu n aBTOMO6nIbHOrO KpeJIeHnHaXMMTe KONKy NITaHnI dIy BKJIIOUeHn. YTo6bl OTKJIIOHTb UCTPOHCTBO, HAXMMTe N yDepKINBaIte KONKy NITaHnI B TeueHne 2 cekyHd.
BbI TaKHe MoXeTe NODKJIHcHTb YCTPOINCTBO K ABTOMO6NJIbHOMy npNKypnBaTeJIIO. YCTPOINCTBO ABTOMaTneCKN BKJIIOHTcN NaHcHET 3aNNCb nOcIe 3aNycka DBrTaTeJIa ABTOMO6NJIA.
6. 3anncb
- ПОДКЛЮЧNTe yCTPOИСТВО K aBTOMOБиьHOMy npNKypNBaTeJIIO, NOcIe BKNIOUChENr DBNrAteJIЯ yCTPOИСТВО BKNIOUHTcR n HauHET ZKINuYeCKyIO 3aNNCb cNoCTra 5 cek. NocIe OCTaHOBKn DBNrAteJIЯ yCTPOIcTBO COxpaHIT NOcIeHNr 3aNNcaHHbI φaJn I OTKIOUHTcR cNoCTra 15 cek.
BHHMaHHe:
(1) HaxmTe [ ] Bo BpeMa 3aHncn, TeKuun PhaIb 6ydt CoXpaHeN, a yCTpOJcTBo nepeiDeT B peKIM OxNiDaHn.
(2)Korda KapTa nAmrTb 6yTe3aOpJIHeHa, yCTpoIcTBo HaUHeT yJaJIaTb camble cTapBle 3aHcAHHbIe (n He 3aunuEHHbIe OT nepe3aHncN) foAJIbI aBTOMaTHueckn.
Hac troponk
7. Pa6ota kamepbbl
BpeKnme npedBapntbHoro npocMOTpa Haxmnte [] BxOda B NaCTpOKn. NcnoJIb3yIe [] DJIaHaBnrauN B MeHIO.
8. MeHIO HacTpoEK
BnndeopernctpaTop nmeet 8 TnnoB hacTpoek. DonoJIHnteIbHbIe hAcTpoKIMoJHO npOn3BeCTn npn noMoUc cneuaJIbHoro npInIoXeHn Prestigio Mobile Control App.
Pnc. Hactpoyn OnncanHe
TeKTopaDbXHeHna,3aTeMaHXMnTe CoxpaHnTb.
(3) 6paKaetaHa Baem BnDeoperncTaTope.
BHHMaHHe:
Korda DBnraTeIb OCTaHOBJIeH, Ia aKTINBaUu N DeTeKTOpa DnHexeHn Bb MoXeTe np Heo6xOIMocTn BOCNoJb3OBaTbcr yHKUaMn BnDeOpErNcTpaTopa.
- Hactpoyn G-cehcopa
Ipn IIO6om ydape BO BpeM ocyueCTBHeHn 3aHNCn BnDeopernctpop coxpaHIT npON3BeHEnHyO 3aHNCb B 3KCTpeHHOM pexHmE aBTOMaTneckn.ДЯ 3TOrO HxHNO IINb BKInouHTb 0yHKuNIO G-ceHCopa.
(1) 3anyctnte MultiCam Prestigio.
(2) IpeenDnte B HAcToPnKn > HAcToPnKn BnDeOpErnctpaTopa.
(3) BbI6epnte H/LДЯ G-cehcopa n 3aTeM HaKMTe CoXpaHnTb. H: BBICOKa YBCTBNTeJbHOCTb. L: HN3Ka YBCTBNTeJbHOCT
(4) BndeopernctpaTop abTomatueckn haHET noka3bIbTaB yBeDOMJIeHn o6 3KCTpeHHoJ 3aIncn Ha 3KpaHe.
- Поdkлоченke Кобачиму cepbepy
BknHouHte yHKnIO o6naHOrO xpaHnIuHa [B HacTpoKax
BndeopernctpaTopa dIy cHxpoH3aun 3aIncE BndeopernctpaTopa C xpaHnIiueM Ha oIbauHOM cepBepe. CtaTyc coeHHHeHn 6yTeYka3aH Ha ekpaHe.
Ctatyc Onncahne
| Coédi néHne ycpeSho yctaHobIeHo. OTo6paJxæTc
[1] HOMep BnDeOpErNcTpaTopa. |
| Ошибka abTopi3aци:
• HebePHe mЯ TocKn DoCTyPa nii napOJIb.
• Cla6bI cnrHaI Wi-Fi nii OTCyTcTBne cnrHaIa. |


Own6ka coeDnHeHn:
- 06laHbI cepBep nIN ceTeBOe coeHNHeHne HeDOCTyNbI.
- BLOKINPOBka 6paHdMaya.
- YdaJIeHHbI npocMoTp
(1) Повлочи Ваш смартфон К сети Иntерпет (уpeз Wi-Fi, 3G/4G).
(2) 3anyTe MultiCam Prestigio n HaxMMte Internet.
(3)Дяdo6abHeHnBnDeopernctpaTopa nIn nCnoIb3OBaHnpyrOcMapTfoHaДЯ npocmOTpa HaKMITE [+BBeIte ID BaWero BnDeopernctpaTopa n napOlb.
(4)HaKmTe HaHa3BaHnI /ID BnDeopernctpaTopa nI npocMToPa BnJeO.
Hnctpykuni no 6e3oNaChocTn
BhImaTeIbHo n3yUHe BCE npIBeHbIe INHCTpyKcII nepeI NCIOJIb3OBaHNem BnDeoperncTaTopa Prestigio MultiCam 575w. BhImaTeIbHo cIeDyIte BCeM yKa3aHnA M, n3IoJKeHHbIM B DaHHOM KpaTkoM pyKOBoDCTBe NOIb3OBATeJI, dJa oBeCneueHnA BeCnepe6oHOn pa6Obl ycTpoiCTBa.
He nbitaTecb camocToaTeIbHO pa3o6paTb nnn n3MeHnTb KOHCTpyKcNIO yctpoNCTBa.
He pa3MeaTe yCTpoiCTBO B MeCTax C NOBbIeHHoB BlaXHOCTbIO H 36eraTe KOHTaY cTOPOcTBA C BOO IN dpyrMn JNkOCTaM. YCTPOCTBO He rBlaETc BOO3aUuEHHbIM.
Bcnyae nonadaHn JnKoCTn BHytpb yctpoicTba HeMeJeHHO OTKIOUHTe ero ot KOMnbIOTepa, YTO6bl n36exKaTb pNcKa noXapa nn nopaxhen 3JIeKTPnueckm Tokom. 3a noLyuHeHem KOHCyIbTaun O peMOHTe yCTpOcTBA o6paTntecb B cepBnchbl ueHtp.
- Чтоби Избекаь пожары плп порахеня заелктуческIM TOKOM, He podknюауte/OTknюауte yctpoiCTBO BlaЖнblIM pykam.
He pa3MeaTe yctpoCTBO B6n3n nCTOuHKnOB TeIJa H He NOBepraTe ero BO3DeiCTBnIO BbICOKnx TempeTpy IIN PnaMeHN.
He pa3meaTe yCTPOcTBO B6JIn3n HCTOuHKnOB CINbHOro 3JIeKTpOMarHHTHO rIyehn, TaK KaK 3TO MOKeT pNBecrN K HeNCnPpABHOCTN yCTPOcTBA nI INOBpeKDeHHIO/NoTepe DaHHbIX.
TexHnueckne xapaKTepeNCTnKN
OsbpHeTe n3o6paKeHneTo c rnaBata HANOly.
13.ИntepHETФункциN
Ipei Da n3noJ3BaTe nHTepHET yHKcInTe, yBepTe ce, ye cTe HanpaBnHaayaHa NaCTpOJa Ha nHTepHET.
- Haujalna hactpoiKa Ha nHTepHET
(1) Cbpxte DVR KbM BauncaMaptfoH. Bne3Te B Setup.
(2)ОТиДeTe Ha Setup>Internet Settings>Edit Email and AP (HачалнHaCTpoiKN>IHTepHET HAcTpoiKN>I PeДaKТиРаTe Email n AP).
(3)Дokochete Save (3ana3n),3a da 3abpbwnTe HactpoynTe Email & AP.
3a6eJekn: AP (Access Point - toka 3a doctbn) moke da 6bJe 6e3Kuueh pyTeP, 3G/4G MO6nHa INHTepHeT Bpb3Ka, nIi 3G/4G MO6nHeH XOTcNOT.
HauaHa HacTpoiKa Ha DeTeKTopa Ha DBrXKeHnA
Ako 6bJe 3aceyeHO HkaKBO DnHexHne, KOraTo DBnraTeJrHa KOJaTa e cnpaI, BaunrDVR ige 3anOue He da 3anncBa ABTomatuHo. UcTpoiCTBOTO ige cnpe Da 3annCba, KoratoHe MoKe Da ce DeTeKTnpa DnHexHne.
(1) Πγηchēτe MultiCam Prestigio.
(2) OTnTe Ha Setup > Car DVR Settings (HauHa HacTpoKa > HAcTpoKn Ha DVR 3a Kola), 3a Da BkIoUHTe Motion Detector (TeKTopa Ha DnHexHe), n CneD ToBa DOKOCHe Save (3ana3n).
(3) cnoka3BaHa Baunr DVR 3a Kola.
3a6eJekn:
Korato Dbrata Ha KolaTa e cnpa, n3no3BaTe DVR 3a Kola, 3a da aKTHBpuape Motion Detector (DeTeKTopa Ha DBrJKeHne), ako e Heo6xOdmo.
- Haujalna HacTpoJaHa G-DaTUnKa
Ako no BpeMe Ha 3aHnca HacTbnn HraKaKbB ydap, BaWeTo DVR ycTpoiCTBO 3a Kola 3ana3n (3anamEt) cb6ntnaTa 3a abapneH 3anC n ige 3ana3n ABTomatuH O daJIOBete. Tp6Ba camo Da BkIouHTe G-daTuHa.
(1) ΠγηχεTe MultiCam Prestigio.
(2) OtnideTe Ha Setup > Car DVR Settings.
(3)Изберетe H/L 3a G-датунka ndoKochete Save (3ana3n). H(high):Висока чьвствпговс. L(low):ниска чьвствпговс.
(4)DVR yctpoicTBO 3a KOla noka3Ba Ha ekpaHa n3BecTne 3a abapueH 3annc.
Cbbp3BaHe KbM o6laueH cbpBbp
AknBpaTe Cloud [1 B DVR-a, 3a da cnHxpoHn3npaTe Bndeo 3anncite KbM o6laueh cbpBbp. CtaTycbT Ha cBbp3BaHe ue ce nokaje Ha ekpapaHa.
Ctatyc Onncahne
G-anduri seadistamine
5. Allumage/Extinction
Mode Action Cam Dash Cam
2. Iss ierices apskats

1. Acest sachet include
Prestigio car DVR
3 Slot card Micro SD
10
Buton inregistrare/buton.
urgenta
4 Trepied suport
11
Difuzor
5 Ecran LCD
6 Port Micro USB
Notiuni de baza
3. Inserati un card micro SD
2. Your device at a glance

2
3
1 Leče
2 Mikrofon
3 Reza za mikro SD kartico
4 Nosilec za trinožnik
5 LCD zaslon
6 Micro USB port
7 Vhod mikro HDMI
8 Vklop/meni
9 Indikator stanja
10 Gumb za snemanje/gumb za nujni primer
11 Zvočnik
Začetni koraki
3. Vstavite mikro SD kartico
Pred snemanjem videoposnetka, prosimo vstavite mikro SD kartico- (ni vključena v paket) v režo za mikro SD kartico na napravi.
(1) Mikro SD kartico vstavite tak, da bodo zlati kontakti obrjeni navzdol.
(2) Potisnite mikro SD kartico v rezo, talo, da se ta namesti na mesto.

Mikro SD
kartica
Opomba:
5. yBIMKHeHHBnMKHeHH
BCTaHOBITb npncptiy y MaunHy 3a donomoro aBTOMo6iIbHOrO KpInleHHia HATNCITb KHONKY KINBLeHHa, 06 yBIMKHTn npna. 06 BmKHTn npctpi, 3HOBy HAChITb KHONKY KINBLeHHa Ta yTPMMyte II npotraGM 2 cekyHd.
Bn taKoX MoKTe npHeHaTn npNcTpI Do aBTOMo6IbHoro 6LoKY KHBLeHn. BIn aBTOMaTHUHO yBIMKHeTbcra I NOUHe 3aNNCyBaTN, BiJa3y JaY yBIMKHeTbcra DBNrHy MaunHH.
6. 3anns
-ПдкючыnpстпdoabTomobibHoro6lokyKnBHeHHa,nicra yoro npcctpi 3anyctntbcai nohe 3annc uepe35cekynd nicra 3anuckyDburyHa.KoIyDnByH 3ynHReTbca,npctpi 36epiraoctaHHiФaI i BmNkaetcbyepe315cekyd.
Птуміта:
(1)HaTnchItb [ ] ha notouHomy 3anci, nicna yoro foaye 36epexeHo, anpncptpi nepeyde y pexm ouikybaHHa.
(2) Koln KapTKa micro SD 3anOBHIOeTbcra, npncpi ABTomTuHNO BuaIae nepuHn He3a6loKOBaHn BiDeofoaJ.
Hanaштуваимя
7. Pobota Biodeokamepn
BpeKmI nonepeHbO rneperlaHy hATnciItb [1.6 nepeTn do npaMeTpib.
BukopncToByTe KhoNk [1]Ia nepeXoMy no MeHIO.
- Cmapfoh He niDkIouaetbca Do aBTOMo6ilbHoro ufoPoboro BiDeo-peectpaTopa NiD yac 3aNcV.
- Pn nepwomy niKluoyehHi npoJIb He BImaraetbcra. NapOJIb MoXHa BCTaHOBHTN B HanaHTyBaHHax.
- Medianneep Ha Baowomy cmaptfohi moke niTpmyBaTu Bideo B opmati SuperHD abo He niTpmyBaTu Ioro.
3HaOK Onnc 3HaOK Onnc

Peperrn
- YbIMKHeHHnpeperny 4-x 306paKeHb IJIa KINbKOx NOTOuHNX 3aNNcIB Ha BaWOMy ycmapTfoHI.
Bpekmi nepeJy 4-x 3o6paXeHb nepexiB peKm nepeJy 1 3o6paXeHHa.

A1b6om FOToRpafoyBaHHa.


HanautyBaHHa 3annbcIeO.

Tolocoe ynpablinnna: npablinnna BiedepeectpaTopom 3i cmapToohy

3aannbc BiJeO Ta 36epeKeHHaaiiB Ha KapTu micro SD aBTOMo6iNbHoro BiPeoepeecTpaTopa.

IpeBepTaHHa 3o6paXeHHaDoropn Horamn.
13. IntepheT-Функцii
Ipeed BnKOpNCTaHHm iHTepHET-phiHKcij nporpaMn nepekoHaTecb, 0o BCTaHOBJeHO nikNoeHnDo IHTepHety.
PiikIoueHHaIO IHTepHety
(1)Пись пдклочень Bideo-peectpaTopa Do cmapTfoHy, nepeindtbo nynkty «HanaawTyBaHHa».
(2)першдьMeHIO HanaTuBaHHa >HaauTyBaHHa INTePhety>3miHHTn en. nowTy Ta TOnkY DoCTyny.
(3) HATNCHITb «36eperrn», ьб BCtaHOBHT npaMeTpN ДЯ eJIeKTPoHHOI NOWTN Ta TOnKN DoCTyNy.
IpnmitKToUka DoCTynMoKe 6yTu 6e3dpoTOBm MapuTy3aTOpOM,MO6iNbHm iHTpeHET-nikluoyehnM 3G/4G a6o MO6iNbHOIO ToKoIO DoCTyny 3G/4G.

- HalaawtybaHHaatuHaHbHocTi pyxy
KUO BnBnIOb8yIpyxN, KOIN DBnHyn ABTomo6Ia 3ynHeHn, uΦpOBn BiDeopeeCTpaTOp BaWoRo ABTomo6Ia NOHe 3annc aBTomatNoHo. Bin 3ynHnTb 3annc, KOIN pyxN BnBnATnC He 6yDyTb.
(1) 3anyctitb MultiCam Prestigio.
(2)Перейдить Меню HabawtybaHHа >параметри abTomobihoro Bideo peectpatopa, ybIMKHyTn DaTuNK HaaBHOCTi pyxu, a NOTIM HATNCHTb 36epertn.
(3) BIO6paKaHaBaWOMyABTomO6IbHOMy BiDeopeeCtpaTopi.
Pnmuitkn:
KoIyBHyH aBTOMobiJa 3ynHaeTbcra, cKOpNCTaITeCb aBTOMoBilbHM BiopeeCTpaTopom, yO6 yBIMKnHTn DaTnK HABHOcti pyx, kUO ue Heo6XiIdHo.
- HanaWtyBaHHa DaTUnKa noLoXeHHa B npocToPi
Kiio nIac 3aHcy TpaNnEbCz iTKHeHH, Baw aBtOMo6iNbHn BiDeopeeCTpaTOp 3po6ntb 3anc noii i 36epexe faJIn aBtOMaTHNo. Bam IInse notpi6Ho yBIMKHyTN daTnK NOLOKeHH B npoctoPI.
(1) 3anyctitb MultiCam Prestigio.
(2) Перейдить Мени Налашуваима > Параметри АВТOMОбльно Вideоpeстра_TOPA.
(3) O6epitb B/H dIaTnka noLoXeHH iHaTNCiB 36epertn. B: BncoKa yTlNBiCtB. H: Hn3bKa yTlNBiCtB.
(4)Haekpani abTomobilbHoro BiideopeectpaTopa Biodpa3ntbcra cnoBiuueHn npo 3annc noii.
- PIIdkJIIOueHnI Do XMapHorO cepBepy
YbIMKHiB niKlnOeHHa Do XMapn [I bAtoMo6ilbHomy BiJeo-peectpaTopi,
io6 cnHxpoH3yBaTn BiJeO3aIncn i3 xMapHm cepBepom. CtaTyc niKJIoueHn8 6yde BiO6paKaTncn Ha ekpaHi.
Ctatyc Onnc