
Roadrunner 310i - Dashcam PRESTIGIO - Free user manual and instructions
Find the device manual for free Roadrunner 310i PRESTIGIO in PDF.
| Product Type | Dashcam (in-car video recorder) |
| Brand | Prestigio |
| Model | Roadrunner 310i |
| Video Resolution | 1280×720 (30 fps), 848×480, 640×360 pixels |
| Video Format | MOV |
| Image Format | JPG |
| Storage Media | microSD card (up to 32 GB, high speed recommended) |
| Power Supply | Rechargeable Li-ion battery (charges via USB cable or car charger) |
| Charging Time | About 2 to 3 hours |
| Interfaces | USB 5-pin, microSD card slot |
| Microphone | Built-in |
| Speaker | Built-in |
| Display | LCD (size not specified) |
| Operating Temperature | 0°C to 45°C |
| Main Functions | Loop recording, motion detection, night mode, G-sensor, auto shutdown, file lock, timestamp |
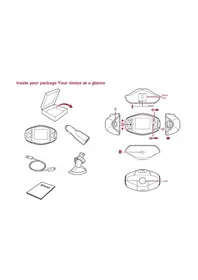
| Package Contents | DVR, suction cup mount, car charger, USB cable, quick start guide, warranty card |
| Maintenance and Cleaning | Clean with a soft, dry cloth; do not use liquid products |
| Safety | Do not expose to water or heat sources; do not disassemble; use only with provided accessories |
| Repairability | No user-serviceable parts; contact customer service if problems occur |
Frequently Asked Questions - Roadrunner 310i PRESTIGIO
User questions about Roadrunner 310i PRESTIGIO
0 question about this device. Answer the ones you know or ask your own.
Ask a new question about this device
Download the instructions for your Dashcam in PDF format for free! Find your manual Roadrunner 310i - PRESTIGIO and take your electronic device back in hand. On this page are published all the documents necessary for the use of your device. Roadrunner 310i by PRESTIGIO.
USER MANUAL Roadrunner 310i PRESTIGIO
Prestigio car DVR, Suction mount, Quick start guide, Car charger, Warranty card
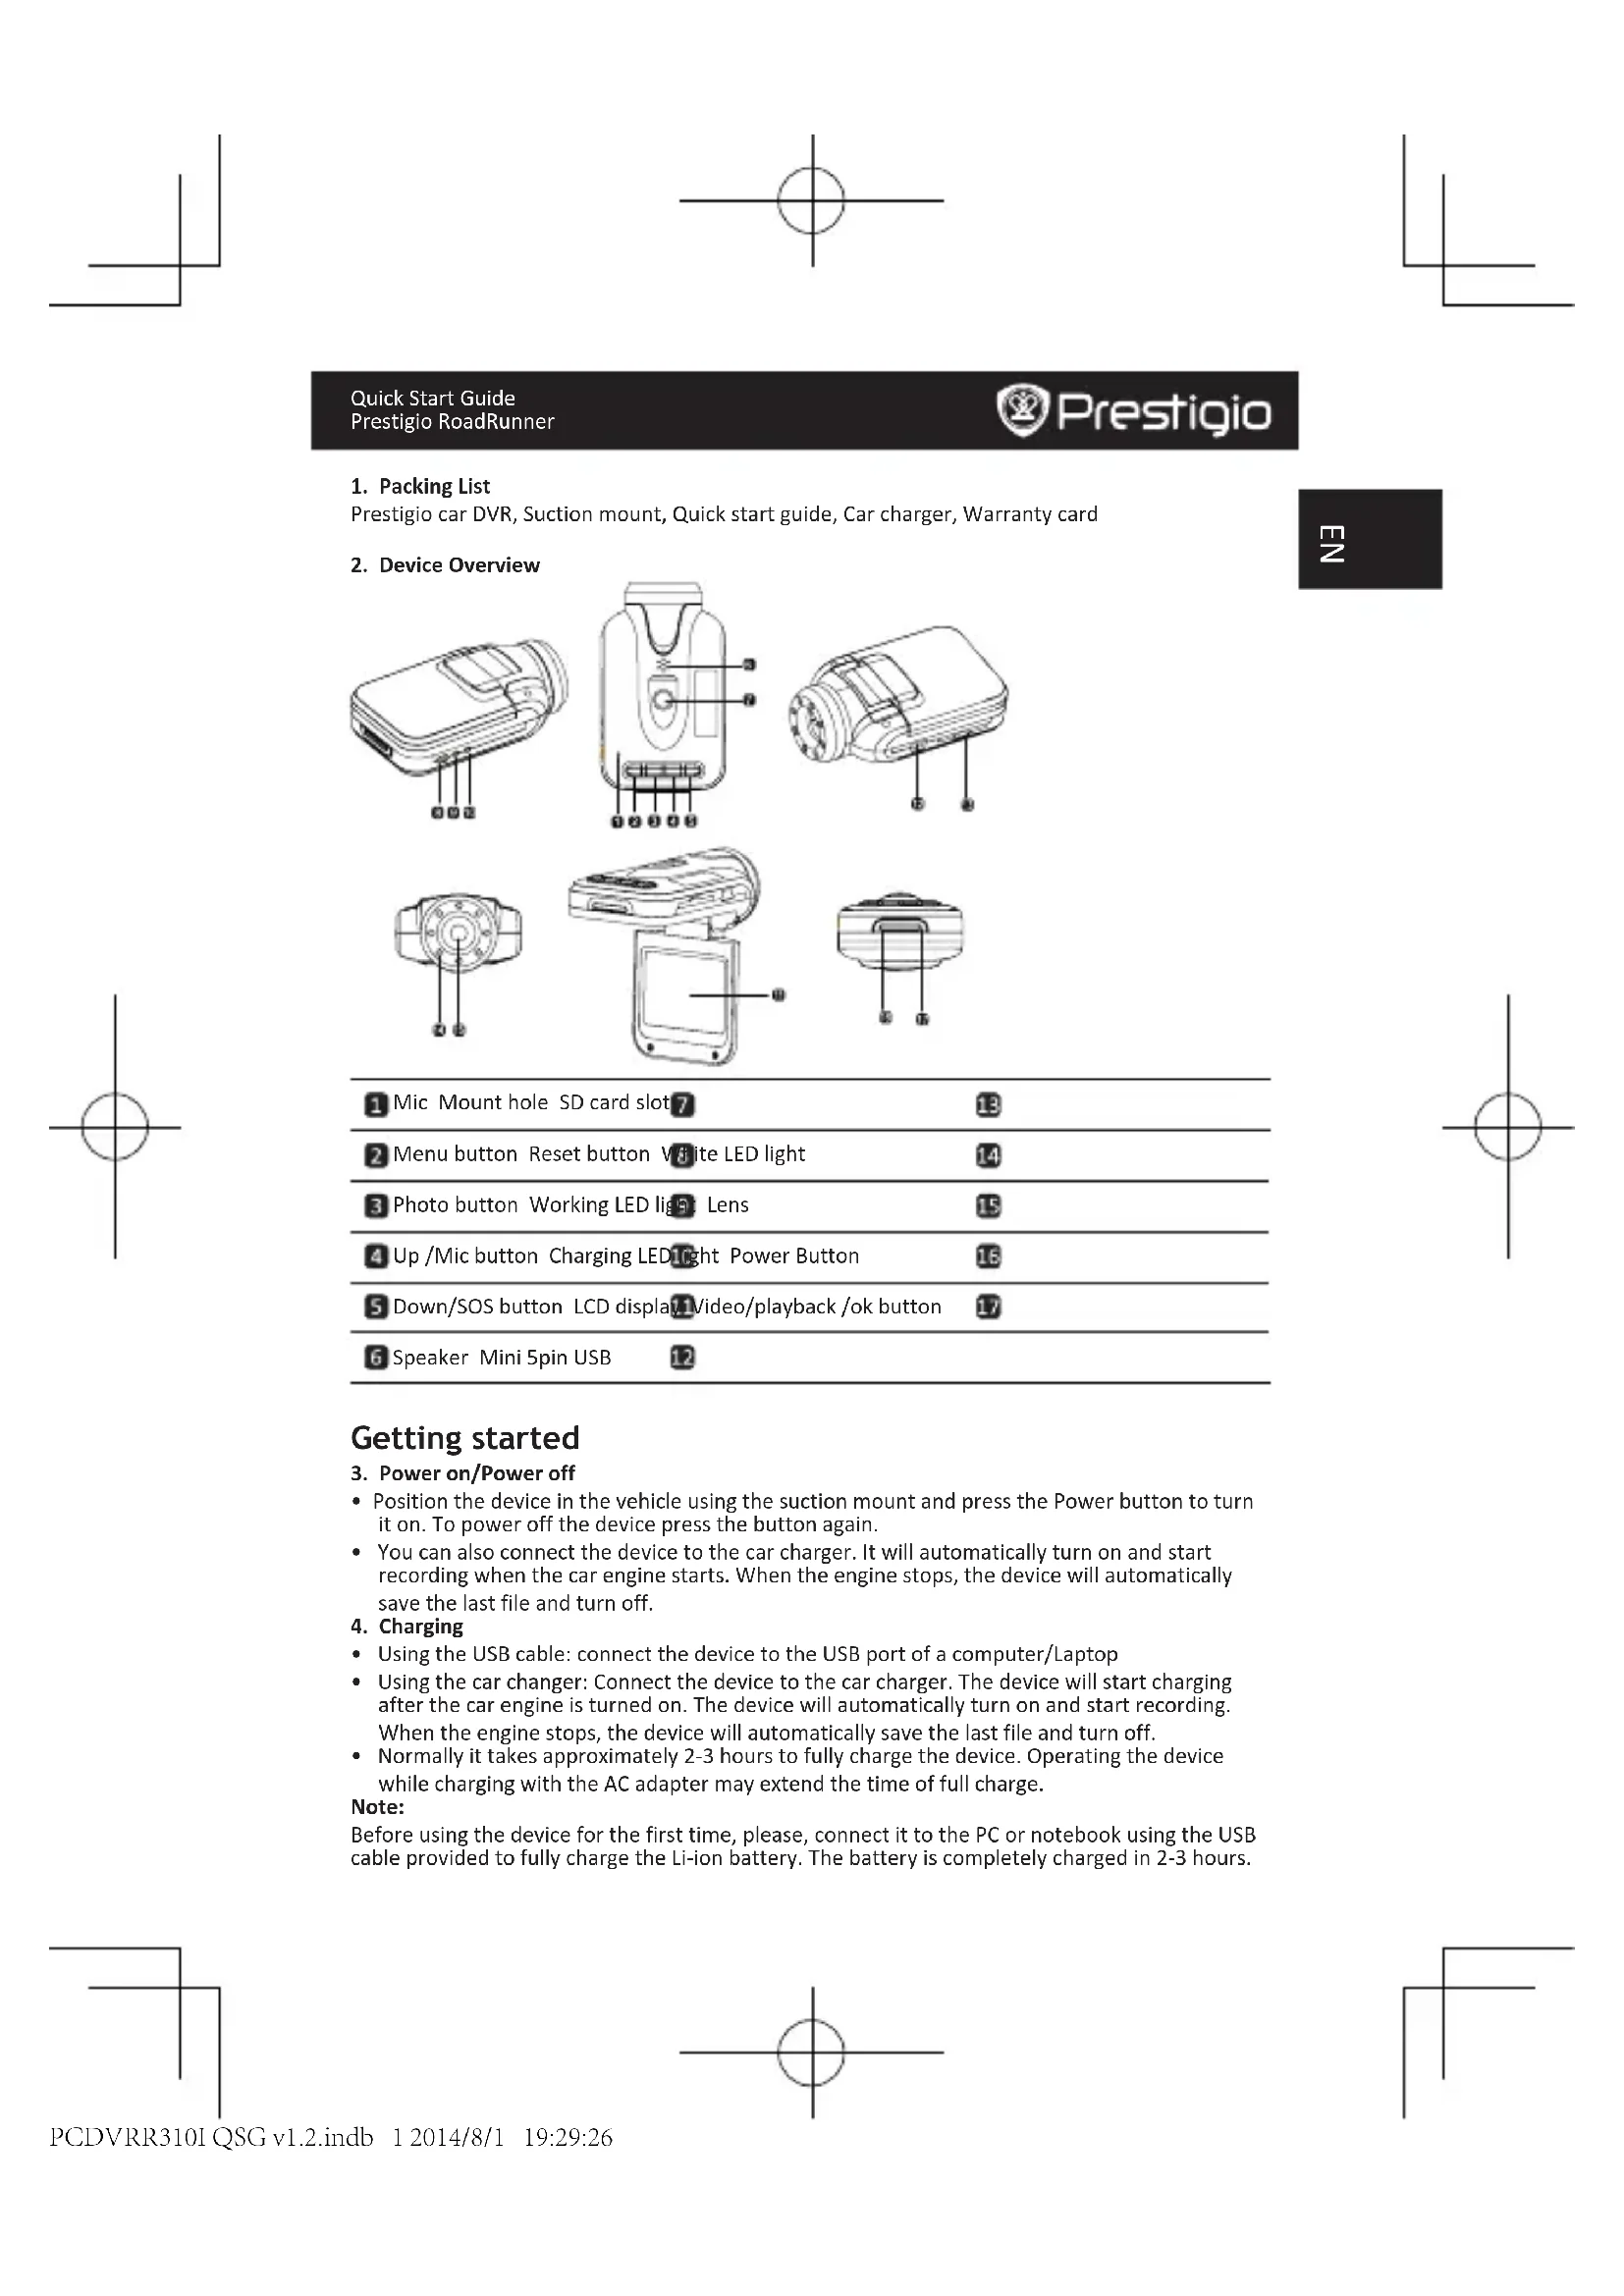
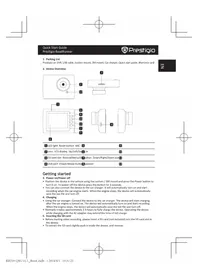
2. Device Overview
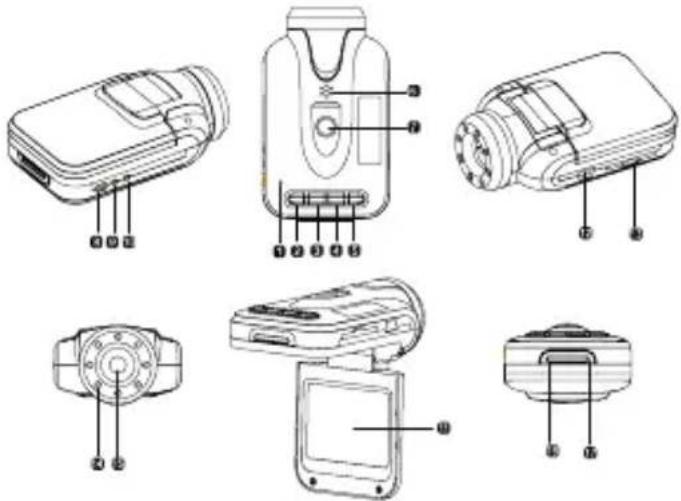
| 1 Mic Mount hole SD card slot7 | 13 |
| 2 Menu button Reset button White LED light | 14 |
| 3 Photo button Working LED light Lens | 15 |
| 4 Up /Mic button Charging LED light Power Button | 16 |
| 5 Down/SOS button LCD display11Video/playback /ok button | 17 |
| 6 Speaker Mini Spin USB 12 |
Getting started
3. Power on/Power off
- Position the device in the vehicle using the suction mount and press the Power button to turn it on. To power off the device press the button again.
- You can also connect the device to the car charger. It will automatically turn on and start recording when the car engine starts. When the engine stops, the device will automatically save the last file and turn off.
4. Charging
• Using the USB cable: connect the device to the USB port of a computer/Laptop
- Using the car changer: Connect the device to the car charger. The device will start charging after the car engine is turned on. The device will automatically turn on and start recording. When the engine stops, the device will automatically save the last file and turn off.
- Normally it takes approximately 2-3 hours to fully charge the device. Operating the device while charging with the AC adapter may extend the time of full charge.
Note:
Before using the device for the first time, please, connect it to the PC or notebook using the USB cable provided to fully charge the Li-ion battery. The battery is completely charged in 2-3 hours.

Prestigio
Quick Start Guide
Prestigio RoadRunner
三
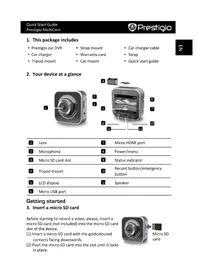
5. Inserting the Micro SD-card
- Before starting video recording, please, insert an Micro SD card (not included) into the Micro SD card slot in the device
• To extract the SD card slightly push it inside the device, and remove.
Note:
After inserting the SD card the device will automatically recognize it as default storage and all the data will be saved on this card.
6. Recording
- Connect the device to car charger, when the car engine launched after 5 seconds, the device will start loop video recording. When shut off the car engine, the device will save file and switch off after 15 seconds
Notice:
» Press OK button on loop video recording, it mean saved current file and enter to standby mode
» When the SD card is full, the device will delete the first unlocked video file automatically
7. Taking pictures
- Press the Mode button to choose the photo mode
- Press it again to take photos, Taken photos are saved on SD Card.
- Press the MENU button in the photo mode, then press DOWN/UP button to setting of the size, time stamp and shutter sound.
Home screen
8. Main menu
The following symbols may be displayed on the screen:

Video recording mode Storage card


Picture mode Sound recording mode

Settings
9. Video Menu settings
Turn on the device and make sure the Video mode is selected.
Note:
The appropriate symbol will be displayed in the top left corner of the screen.
- Press Menu button to enter Settings. Press up/down to select the option and press ok to set the value.
The following options list is available in the Video menu:
- Resolution: Select the video image size from 1280 x 720(30fps), 848 x 480, 640 x 360.
• Time Stamp: Select to turn the time stamp on or off - Motion Detect: in the preview, press Menu button to setting, the device will start video recording automatically while there is an object moving. Notice: When the device turned off or mode switches, please reset it.
- Video time: in the preview, press Menu and ok button to setting, it can choose off, 1 Min. ,2 Min. ,3 min. ,4 Min. ,5 min.
- Night Mode: select to turn the LED Auto set, off or on.
- Mic: Select to turn the microphone on or off.
10. Picture Menu settings
Turn on the device and make sure the Picture mode is selected.
Note:
The appropriate symbol will be displayed in the top left corner of the screen.
- Press Menu button to enter Settings. Press up/down button select the option
- The following options list is available in the Picture menu:
• Size: Select the image size from VGA,1.3M,2M,3M
• Time Stamp: Select to turn on or off. - Shutter Sound: Select to turn on or off.
11. General settings
Double Press Menu button to enter Settings. Press up, down, ok button to select Settings. The following settings are available:
- Format: Select to format the SD card.
- Rotate 180: Select to turn the Rotate 180 on or off.
• G-sensor: Select to off, level 3, level 2, level 1.
• Language: Select the desired language from the list.
• Auto Off: Select automatic power off when the device is not in use. - LCD Auto Off:. select LCD Auto off turn on or off
- System reset: Select to restore default system settings.
- Light frequency: Change frequency to remove the blinking effect when recording under artificial lighting.
- Date Input: in the preview, double press Menu button, use up, down and ok button to select Date Input and setting the time
- Date Format: in the preview, double press Menu button, use up, down and ok button to select Date Format, you can choose YYYY/MM/DD,MM/DD/YYYY,DD/MM/YYYY
- Key Tone: in the preview, double press Menu button, use up, down and ok button to select Key Tone, Select to turn on or off.
- Firmware Ver: Displays the current system version.
12. Playback mode
Press the OK button to enter playback mode. The last recorded file will be displayed. Press up/down button to view the file.
Press the OK button to playback the files. Press OK button again to playback the current file. Meantime, on auto play mode, press DOWN/UP to enter to FORWARD/BACKWARD(1/2, 1/4), then press OK button to pause. Press the MENU button back to the playback menu. To enter Manu options press Menu button, the following settings are available:
- Delete Files: Select the file/files you want to delete.
- Lock/Unlock: Lock one/Lock All, unlock one/unlock All.
- Thumbnail: Select to enter the file thumbnail mode.
• Volume: Select the playback volume.
13. USB connection
To download registered files on your PC/notebook, please, connect the device to the PC or notebook via USB-cable provided. After connecting the device to the PC the USB menu will be displayed, containing DV, PC Cam and Disk Driver. Select Disk Driver, and the device will appear in "My computer" as the removable disk. All registered files are stored in DCIM folder, videos are stored in MOV format, and the pictures are stored in JPG format. You can now download the files from the device.
14. PC Camera Mode
Connect the device to a computer via USB. It will show DV/PC Cam/Disk drive tarting up the device, Press up/down to select and then press OK to entering, then you can use the device as a PC Camera

Prestigio
Quick Start Guide Prestigio RoadRunner
E
Safety precautions
Please observe all safety precautions before using Prestigio Roadrunner 310I. Please follow all procedures outlined in this manual to correctly operate the device.
- Do not attempt to disassemble or alter any part of the device that is not described in this guide.
- Do not place the device in contact with water or any other liquids. The device is NOT designed to be liquid proof of any sort.
- In the event of liquid entry into interior of device, immediately disconnect the device from the computer. Continuing use of the device may result in fire or electrical shock. Please consult your product distributor or the closest support center.
- To avoid risk of electrical shock, do not connect or disconnect the device with wet hands.
- Do not place the device near a heat source or directly expose it to flame or heat.
- Never place the device in vicinity of equipments generating strong electromagnetic fields. Exposure to strong magnetic fields may cause malfunctions or data corruption and loss.
Technical Specifications
| Recording 1280 x 720(30fps), 848 x 480, 640 x 360 pixels | |
| Video format MOV | |
| Picture format JPG | |
| Power source Rechargeable battery | |
| Interfaces | USB, SD card (Supports max 32GB, high-speed SD card recommended) |
| Microphone Built-in | |
| Operating temperature 0°~ 45°C | |
Disclaimer


As the Prestigio products are constantly updated and improved, your device's software and hardware may have a slightly different appearance or modified functionality than presented in this Quick Start Guide.
Prestigio hereby states that this Roadrunner complies to basic requirements and another relevant regulations given by the EU directive1999/5/EC. Full version of the declaration of conformity is available on: www.prestigio.com/certificates.
| 1 Mikrofon Priključak za nosač 7 prostor za SD karticu | 13 |
| 2 Dugme za ulazak u meni Rese 8 dugme LED lampica | 14 |
| 3 Dugme za načina rada LED la 9 pica Objektiv | 15 |
| 4 Gore LED lampica Dugme za 10 ključivanje | 16 |
| 5 Dole/SOS dugme LCD displej 11 deo / OK dugme | 17 |
| 6 Zvučnik USB port | 12 |
1 Mikrofon
1 Mikrofon Kinnitusava SD-kaayi pilu
13
natural_image
Simple geometric diagram with a circle intersected by two perpendicular lines (no text or symbols)
natural_image
Simple geometric diagram with a circle intersected by two perpendicular lines (no text or symbols)
natural_image
Simple geometric diagram with a circle intersected by two perpendicular lines (no text or symbols)
Prestigio
1 Microfoon Montagegat SD-k artslot
13
2 Menu-knop Resetknop Witted-LED-lamp
14
3 Foto-knop Werk LED-lamp Lens
15
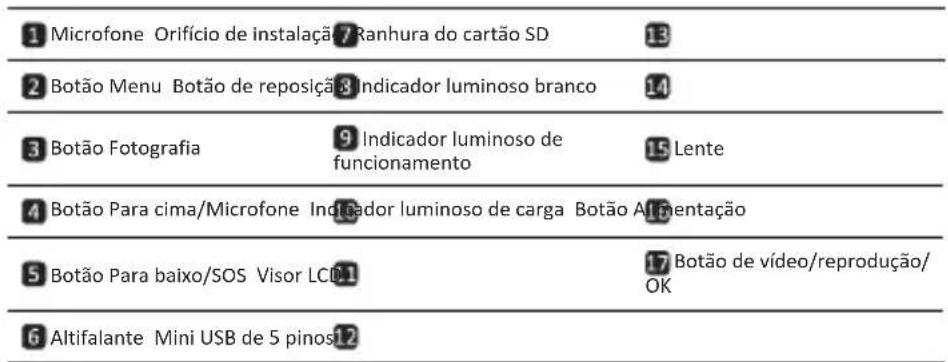
1 Mic Deschizatura suport Slotgard SD
13
2 Buton MENIU Buton resetare8
14 Lumina LED (mod de noapte)
3 Buton Mod Lumina LED Lentile
15
1 Mikrofon Otvor za montiranje 7 Otvor za SD karticu
13
2 MENI taster Reset dugme 8
14 LED indicator (Нигхт Моде)
3 Mod taster LED indikator Objektiv
15
4 Gore taster LED indikator (пунење) Napajanje taster
16
5 Dole/SOS taster LCD ekran Video / OK taster
17
6 Zvučnik USB port 17
» Pritisnite OK taster on loop video recording, the current file will be saved and the device enters to standby mode.
» When the Micro SD card is full, the device will delete the first unlocked video file automatically
7. Taking pictures
- Pritisnite the Mode taster da selektujete mod za fotografije.
- Pritisnite OK taster za fotografisanje, napravljene fotografije su sačuvane na Micro SD kartici.
- Pritisnite Menu taster u foto modu, zatim pritisnite up/down taster da podesite rezoluciju i vreme.
Home ekran
8. Glavni meni
1 Mikrofón Otvor na uchytenie ztrbina na kartu SD
13

- Device Overview
- Getting started
- Power on/Power off
- Charging
- Note:
- Prestigio
- 三
- Inserting the Micro SD-card
- Recording
- Notice:
- Taking pictures
- Home screen
- Main menu
- Settings
- Video Menu settings
- Picture Menu settings
- General settings
- Playback mode
- USB connection
- PC Camera Mode
- E
- Safety precautions
- Disclaimer
- Home ekran
- Glavni meni
Brand : PRESTIGIO
Model : Roadrunner 310i
Category : Dashcam