
KI86VVFE0 - Freezer SIEMENS - Free user manual and instructions
Find the device manual for free KI86VVFE0 SIEMENS in PDF.
| Product type | Upright freezer |
| Brand | Siemens |
| Model | KI86VVFE0 |
| Dimensions (H x W x D) | Approximately 185 x 60 x 65 cm |
| Net weight | Approximately 70 kg |
| Power supply | 220-240 V, 50 Hz |
| Climate class | SN-ST (temperate to subtropical) |
| Freezing capacity | Approximately 20 kg/24h |
| Energy class | A+ (estimated) |
| Annual energy consumption | Approximately 200 kWh |
| Main functions | Rapid freezing, temperature alarm, interior LED lighting |
| Care and cleaning | Clean with a soft cloth and warm water; manual defrosting recommended |
| Safety instructions | Disconnect before any repair; wear protective gloves |
| Repairable spare parts | Door gasket, hinges, shelves, bins, LED lighting (according to manual) |
| Repairability index | High (accessible parts and instructions provided) |
Frequently Asked Questions - KI86VVFE0 SIEMENS
User questions about KI86VVFE0 SIEMENS
0 question about this device. Answer the ones you know or ask your own.
Ask a new question about this device
Download the instructions for your Freezer in PDF format for free! Find your manual KI86VVFE0 - SIEMENS and take your electronic device back in hand. On this page are published all the documents necessary for the use of your device. KI86VVFE0 by SIEMENS.
USER MANUAL KI86VVFE0 SIEMENS
natural_image
Diagram of hands connecting a cable to a rectangular panel with shelves, showing structural details (no text or symbols)natural_image
Illustration of hands holding a cable with a black arrow indicating direction (no text or symbols)
natural_image
Isometric line drawing of a wall-mounted shelf with an eye icon above (no text or symbols)natural_image
Line drawing of a refrigerator with hand gestures indicating side placement (no text or symbols)
Ремонт
natural_image
Diagram of a hand interacting with a refrigerator drawer, showing shelves and drawers with arrows indicating movement (no text or symbols)

Ремонт

Ремонт
-
- Свалете четирите винта (1).
- Свалете долните панти (2)


Пантите са свалени.
natural_image
Illustration of hands holding a tablet with a black curved arrow indicating rotation (no text or symbols)Рафтът е свален.
natural_image
Diagram showing two mechanical components with upward arrows indicating motion or assembly (no text or symbols)natural_image
Illustration of a person inserting into a device with arrows indicating insertion (no text or symbols)
natural_image
Illustration of hands connecting a cable to a rectangular panel with shelves (no text or symbols)natural_image
Illustration of hands holding a cable with a black arrow indicating direction (no text or symbols)
natural_image
Isometric line drawing of a refrigerator with an eye icon above, showing shelves and doors (no text or symbols)natural_image
Line drawing of a refrigerator with hand gestures indicating side placement (no text or symbols)
Popravak
natural_image
Diagram of a hand interacting with a refrigerator drawer, showing shelves and drawers with directional arrows (no text or symbols)
Brtva vrata je postavljena.

Popravak
Nastavak Torx TX20 6.3 mm (1/4") [00340865]

Zahtjev:
Uređaj je isključen iz napajanja.
Vrata namještaja su uklonjena. Pogledajte upute za postavljanje.
Vrata su otvorena.
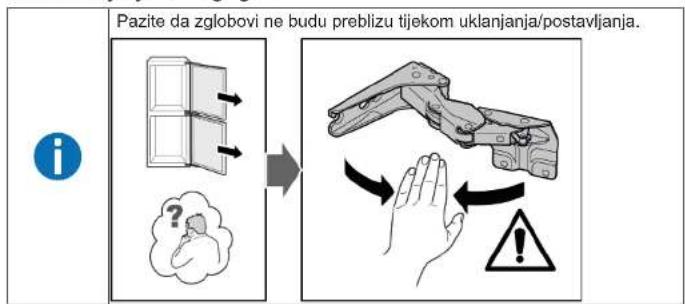
4.2.1 Uklanjanje ravnog zgloba
flowchart
graph LR
    A["Pazite da zglobovi ne budu preblizu tijekom uklanjanja/postavljanja."] --> B["→"]
    B --> C["Hand gesture: hand holding a tool, hand pointing to a hand with warning symbol"]
    C --> D["Warning: hand is open and holds a hand with a warning symbol"]
- Uklonite četiri poklopca zgloba.


Popravak
-
- Otpustite četiri vijka (1).
-
Gurnite gornja vrata prema van i uklonite ih (2).

-
- Uklonite četiri vijka (1).
-
Uklonite zglobove (2).

Zglobovi gornjih vrata su uklonjeni.
-
- Otpustite četiri vijka (1).
-
Gumite donja vrata prema van i uklonite ih (2).
-
- Uklonite četiri vijka (1).
-
Uklonite zglobove (2).

Zglobovi donjih vrata su uklonjeni.
Popravak
4.2.2 Postavljanje ravnog zgloba
▶ Postavite obratnim redoslijedom.

Popravak
Nastavak Torx TX20 6.3 mm (1/4") [00340865]

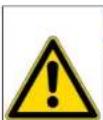
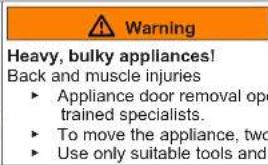
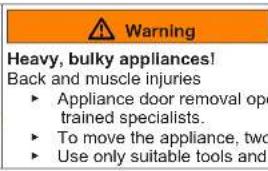
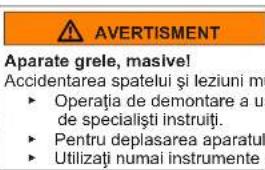
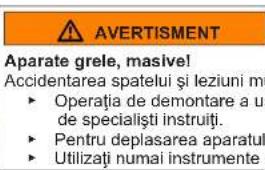
Teški, veliki uređaji!

Popravak
-
- Uklonite četiri vijka (1).
-
Uklonite donje zglobove (2).


Zglobovi su uklonjeni.
natural_image
Illustration of hands holding a tablet with a black curved arrow indicating rotation (no text or symbols)natural_image
Diagram showing two mechanical components with upward arrows indicating motion or assembly (no text or symbols)Spremnik za zamrznute namirnice je uklonjen.
4.7.2 Postavljanje spremnika za zamrznute namirnice
natural_image
Illustration of a door with two doors opening, showing hand positioning and motion (no text or symbols)
natural_image
Illustration of hands connecting a cable to a rectangular panel with shelves (no text or symbols)natural_image
Illustration of hands holding a cable with a black arrow indicating direction (no text or symbols)
natural_image
Isometric line drawing of a wall-mounted shelf with an eye icon (no text or symbols)natural_image
Line drawing of a refrigerator with hand gestures indicating side placement (no text or symbols)
Oprava
natural_image
Diagram of a hand interacting with a refrigerator drawer, showing shelves and drawers with arrows indicating movement (no text or symbols)

Oprava

Oprava

natural_image
Illustration of hands holding a tablet with a black curved arrow indicating rotation (no text or symbols)natural_image
Diagram showing two mechanical components with upward arrows indicating motion or assembly (no text or symbols)natural_image
Illustration of a person inserting into a device with arrows indicating insertion (no text or symbols)
natural_image
Illustration of hands connecting a cable to a rectangular panel with shelves (no text or symbols)natural_image
Illustration of hands holding a cable with a black arrow indicating direction (no text or symbols)
natural_image
Isometric line drawing of a wall-mounted shelf with an eye icon (no text or symbols)natural_image
Line drawing of a door handle with hand gestures indicating left and right motion (no text or symbols)
Reparation
- Tryk hele pakningen trinvist i rillen.
natural_image
Diagram of a hand interacting with a refrigerator drawer, showing multiple compartments and directional arrows indicating movement (no text or symbols present)

Reparation

Reparation

natural_image
Illustration of hands holding a tablet with a black curved arrow indicating rotation (no text or symbols)Hylden er fjernet.
natural_image
Diagram showing two mechanical components with upward arrows indicating motion or assembly (no text or symbols)
natural_image
Illustration of a door with two doors opening, showing a person inserting a device into a blue door (no text or symbols present)

natural_image
Illustration of hands connecting a cable to a rectangular panel with shelves (no text or symbols)natural_image
Illustration of hands holding a cable with a black arrow indicating direction (no text or symbols)
natural_image
Isometric line drawing of a wall-mounted shelf with an eye icon (no text or symbols)natural_image
Line drawing of a refrigerator with hand gestures indicating side placement (no text or symbols)
Reparatie
natural_image
Diagram of a hand interacting with a refrigerator drawer, showing multiple compartments and directional arrows indicating movement (no text or symbols present)

Reparatie

Reparatie

natural_image
Illustration of hands holding a tablet with a curved arrow indicating rotation (no text or symbols)natural_image
Diagram showing two mechanical components with upward arrows indicating motion or assembly (no text or symbols)
natural_image
Illustration of a door with two doors opening, showing a cartoon character interacting with a blue door (no text or symbols present)Self-repair hints - Fridge-freezer
i Concerning this document.... 108
1.1 Important information.... 108
1.1.1 Purpose.... 108
1.2 Explanation of symbols 108
1.2.1 Danger levels.... 108
1.2.2 Hazard symbols 108
1.2.3 Structure of the warnings.... 109
1.2.4 General symbols.... 109
Safety.... 110
2.1 General Safety instructions 110
2.1.1 All domestic appliances 110
Tools and aids.... 111
Repair 112
4.6 Replacing fruit and vegetable container 122
4.6.1 Removing fruit and vegetable container.... 122
4.6.2 Installing fruit and vegetable container 122
4.7 Replacing frozen food container 123
4.7.1 Removing frozen food container.... 123
4.7.2 Installing frozen food container 123
4.8 Replacing LED side light.... 124
4.8.1 Removing LED side light 124
4.8.2 Installing LED side light 125
4.9 Replacing LED top lamp.... 126
4.9.1 Removing LED top lamp 126
4.9.2 Installing LED top lamp 126
4.10 Replacing LED freezer lamp 127
4.10.1 Removing LED freezer lamp 127
4.10.2 Installing LED freezer lamp 127
i Concerning this document
1.1 Important information
1.1.1 Purpose
These repair hints support consumer to repair appliances by himself according to the applicable eco-design regulation (as of 03/2021).
They contain information how to exchange defined spare parts including warnings and risks.
In case of questions, please contact our customer service. We will only be liable for damages if the repair hints have been followed properly.
1.2 Explanation of symbols
1.2.1 Danger levels
The warning levels consist of a symbol and a signal word. The signal word indicates the severity of the danger.
| Warning level Meaning | |
| Danger | Non-observance of the warning message will result in death or serious injuries. |
| Warning | Non-observance of the warning message could result in death or serious injuries. |
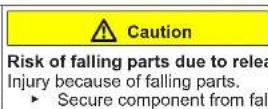
| Caution | Non-observance of the warning message could result in minor injuries. |
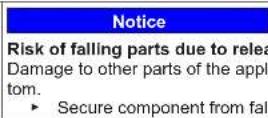
| Notice | Non-observance of the warning message could result in damage to property. |
Table 1: Danger levels
1.2.2 Hazard symbols
Hazard symbols are symbolic representations which give an indication of the kind of danger.
The following hazard symbols are used in this document:
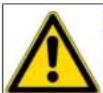
| Hazard symbol Meaning | ||
 | General warning message | |
 | Danger from electrical voltage | |
 | Risk of explosion | |
 | Danger of cuts | |
 | Danger of crushing |
i Concerning this document
| Hazard symbol Meaning | ||
 | Danger from hot surfaces | |
 | Danger from strong magnetic field | |
 | Danger from non-ionizing radiation | |
Table 2: Hazard symbols
1.2.3 Structure of the warnings
Warnings in this document have a standardised appearance and a standardised structure.

Type and source of danger!
Possible consequences of ignoring the danger / warning.
▶ Measures and prohibitions for preventing the danger.
The following example shows a warning that warns against electric shock due to live parts. The measure for avoiding the danger is mentioned.

Risk of electric shock due to live parts!
Death by electrocution
- Disconnect appliances from electrical supply at least 60 seconds before starting repairs.
1.2.4 General symbols
The following general symbols are used in this document:
| Gen. symbol Meaning | |
| Identification of a special tip (text and/or graphic) | |
| Identification of a simple tip (only text) | |
| Identification of a link to a video tutorial |
| Gen. symbol Meaning | |
| Identification of required tools | |
| Identification of required preconditions | |
| Identification of a condition (if ..., then ...) | |
| Identification of a result | |
| [Start] Identification of a key or button | |
| [00123456] Identification of a material number | |
| Status Identification of displayed text / window(in the appliance's display) | |
Table 3: General symbols
Safety
2.1 General Safety instructions
2.1.1 All domestic appliances
Risk of electric shock due to live parts!
- Errors by repairs involving electrical components can lead to electrical shock!
■ Disconnect the appliance from the mains for at least 60 seconds before starting work.
■ After the repair have a safety test according VDE 0701 or country-specific regulations performed.
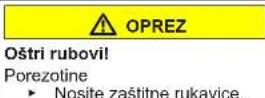
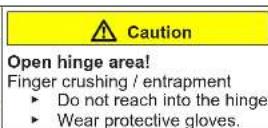
Risk of injury from sharp edges!
■ Wear protective gloves.
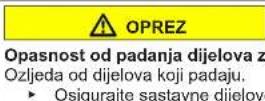
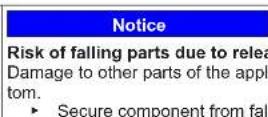
Risk of crushing during repair, maintenance, troubleshooting and service due to heavy and moving components
■ Wear protective shoes.
■ Secure heavy components from falling down.
■ Do not stick body parts into moving components.
Risk to the appliance's safety / function!
■ Only use original spare parts.
Risk of damage to electrostatically sensitive components (ESDs)!
- Do not touch the modules, including connections and conductor paths.

Tools and aids
| Designation Details Images | ||
| Protection cloth[00342013] | 60 cm x 50 cm |  |
| Suction cup[00342224] | ∅50 mm | |
| Torx Bit TX20[00340865] | 6,3 mm (1/4") | 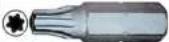 |
| Auxiliary tool[00342180] | For disassembly of plastic parts,"magic tool" |  |

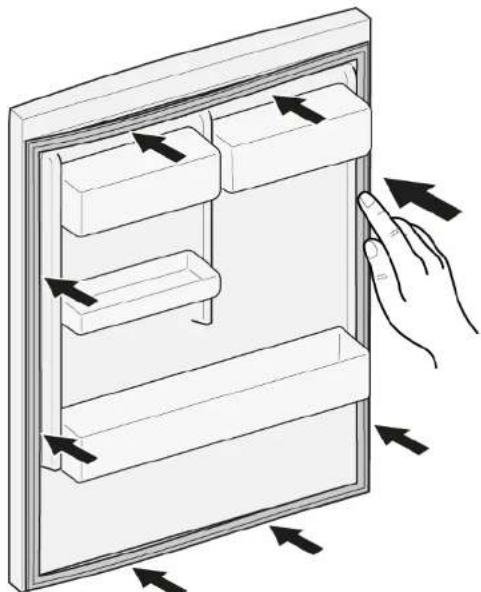
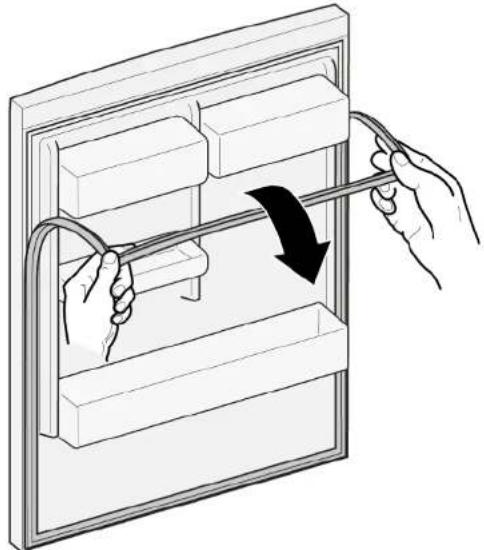
Repair
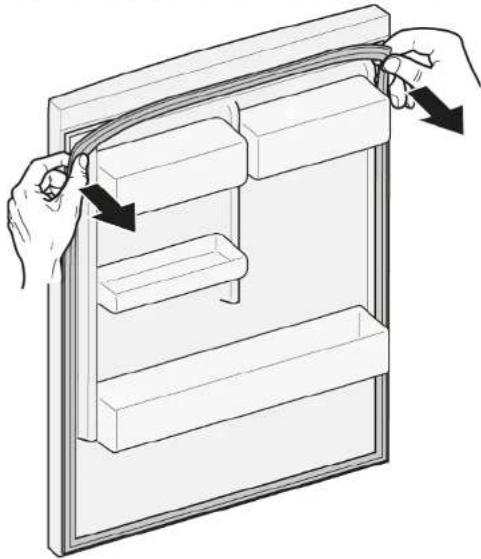
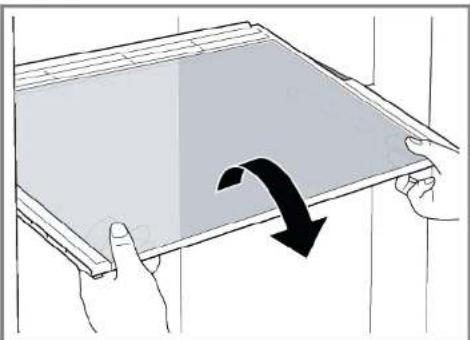
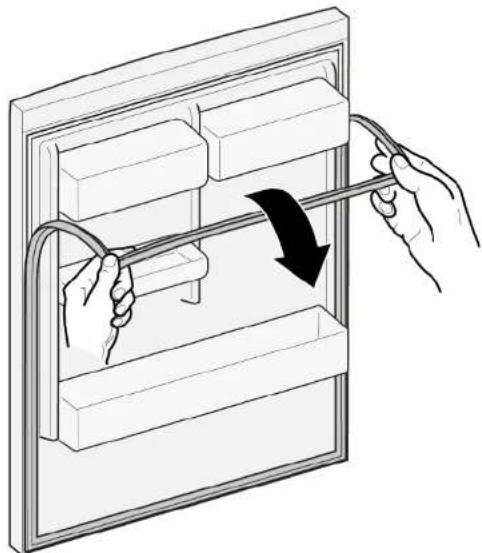
- Release door gasket from the groove on right and left corner.
natural_image
Illustration of hands connecting a cable to a rectangular panel with shelves (no text or symbols)- Pull out door gasket from groove.

natural_image
Illustration of hands holding a cable with a black arrow indicating direction (no text or symbols)
Door gasket is removed.
Thickness of new door gasket may deviate slightly from thickness of old door gasket. This will not affect closing behavior and long-term function. If your appliance has adjustable hinges or hinge attachments, you can optimize the closing behavior subsequently. Small side holes in door gasket are functional (required for ventilation). These are not production faults.
Repair
- Check groove for gasket for damage.
natural_image
Isometric line drawing of a wall-mounted shelf with an eye icon (no text or symbols)- (if) If groove for gasket is it is damaged.
-
Contact customer service.
-
i Slight deformation of door gasket is normal and does not affect its function. It is recommended to straighten door gasket before inserting it into appliance.
Heat door gasket with a hair dryer or hot water and manually reshape it.
- Push corners of gasket at the top and bottom to the groove.
natural_image
Line drawing of a refrigerator with hand gestures indicating side placement (no text or symbols)
Repair
- Press whole gasket step by step into the groove.
natural_image
Diagram of a hand interacting with a refrigerator drawer, showing multiple compartments and directional arrows indicating movement (no text or symbols present)
Door gasket is installed.

Repair
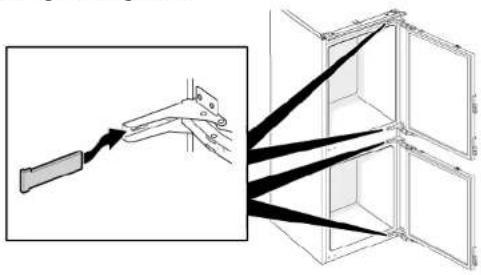
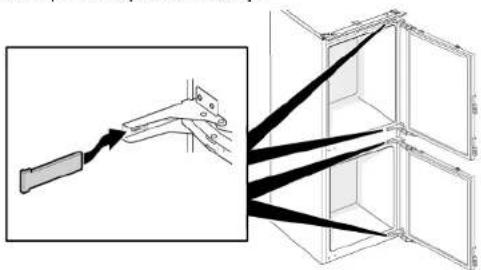
4.2 Replacing flat hinge
Required tools:
Torx Bit TX20 6,3 mm (1/4") [00340865]


Prerequisite:
√ Appliance is disconnected from power supply.
√ Furniture door are removed. See Installation Instruction.
√ Door is open.
4.2.1 Removing flat hinge

flowchart
graph LR
    A["Take care that hinges do not close during removal / installation."] --> B["Initial Care: Screen with arrows, Questioning with brain, Hand with hand, Alarm"]
    B --> C["Step 1: Hinge is open, then drops vertically"]
    C --> D["Step 2: Hinge is open, then drops vertically, then hinders hand down"]
    D --> E["Step 3: Hinge is open, then drops vertically, then hinders hand down"]
    E --> F["Step 4: Hinge is open, then drops vertically, then hinders hand down"]
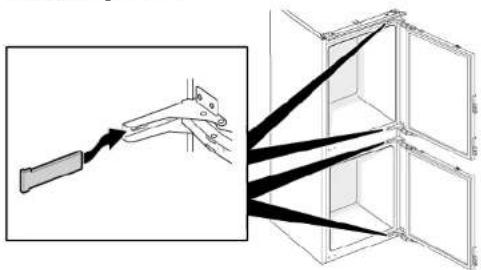
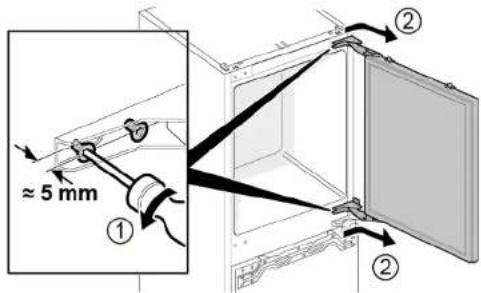
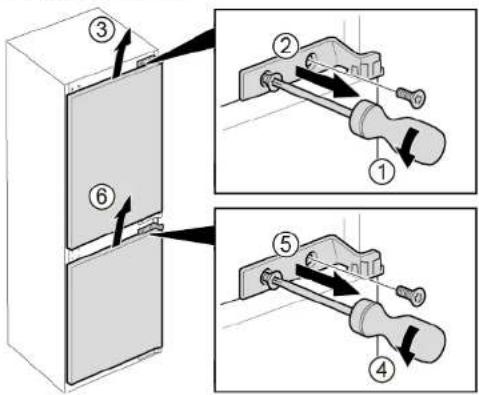
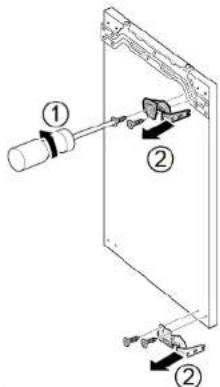
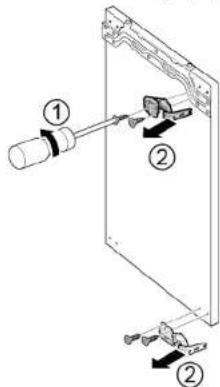
- Remove four hinge covers.

Repair
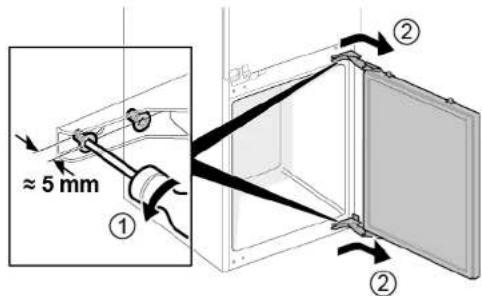
2.1. Loosen four screws (1).
- Slide out and remove upper door (2).
-
- Remove four screws (1).
-
Remove hinges (2).

Upper door hinges are removed.
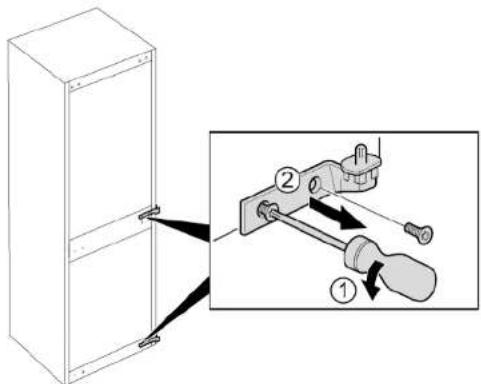
-
- Loosen four screws (1).
-
Slide out and remove lower door (2).

-
- Remove four screws (1).
-
Remove hinges (2).

→ Lower door hinges are removed.

Repair
4.2.2 Installing flat hinge
▶ Install in reverse order.

Repair
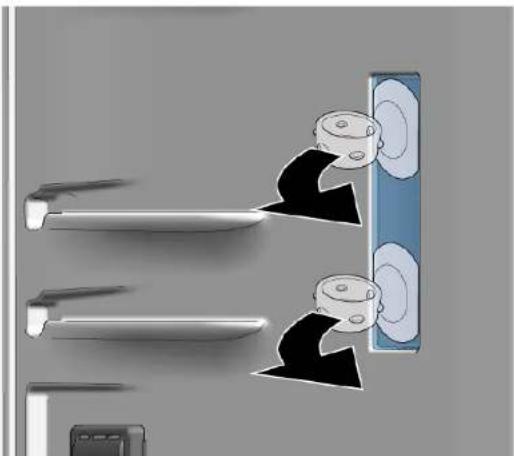
4.3 Replacing sliding hinge
Required tools:
Torx Bit TX20 6,3 mm (1/4") [00340865]


Prerequisite:
√ Appliance is disconnected from power supply.
√ Furniture door and appliance door are separated. See Installation Instruction.
4.3.1 Removing sliding hinge
-
- Unscrew two screws (1).
-
Remove upper door upper hinge (2).
- Remove upper door (3).
- Unscrew two screws (4).
- Remove lower door upper hinge (5).
- Remove lower door (6).
Repair
-
- Remove four screws (1).
- Remove lower hinges (2).

Hinges are removed.
4.3.2 Installing sliding hinge
▶ Install in reverse order.

Repair
4.4 Replacing shelf
Prerequisite:
Door is open.
4.4.1 Removing shelf
▶ Pull out shelf.
natural_image
Illustration of hands holding a tablet with a black curved arrow indicating rotation (no text or symbols)Shelf is removed.
4.4.2 Installing shelf
▶ Install in reverse order.

Repair
4.5 Replacing door rack
Prerequisite:
√ Door is open.
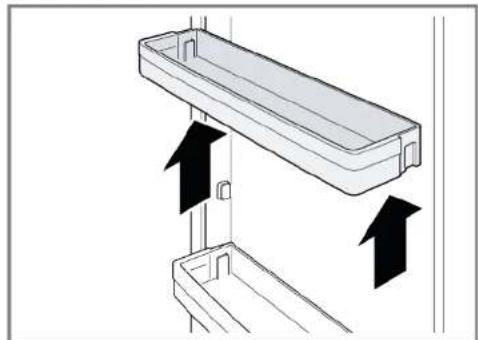
▶ Lift door rack upwards.
natural_image
Diagram showing two mechanical components with upward arrows indicating motion or assembly (no text or symbols)Door rack is removed.
▶ Install in reverse order.

Repair
4.6 Replacing fruit and vegetable container
Prerequisite:
√ Door is open.
4.6.1 Removing fruit and vegetable container
- Pull out the fruit and vegetable container as far as it will go.
-
- Lift the fruit and vegetable container at the front (1).
-
Remove container (2).
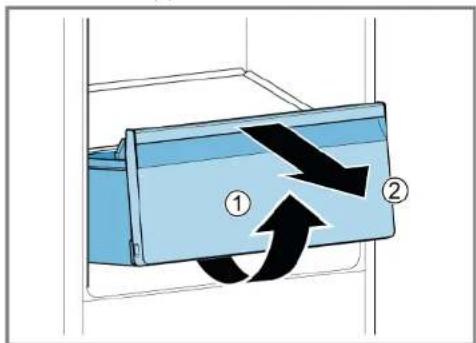

Fruit and vegetable container is removed.
4.6.2 Installing fruit and vegetable container
▶ Install in reverse order.

Repair
4.7 Replacing frozen food container
Prerequisite:
√ Door is open.
4.7.1 Removing frozen food container
- Pull out frozen food container all the way (1).
- Remove frozen food container (2).
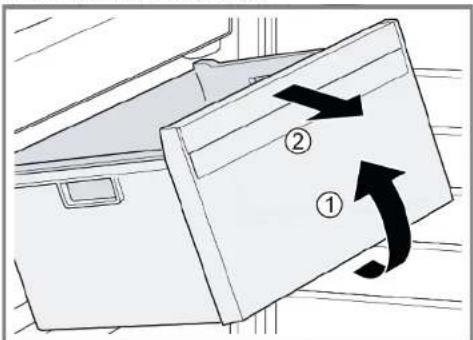

Frozen food container is removed.
4.7.2 Installing frozen food container
▶ Install in reverse order.

Repair
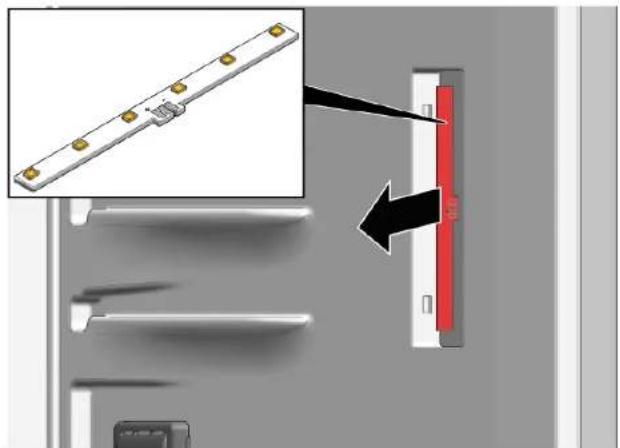
4.8 Replacing LED side light
Required tools:

Suction cup ∅50 mm [00342224]

Your appliance features a maintenance-free LED light. These lights may be repaired by customer service or authorised technicians only!

Danger
Risk of electric shock due to live parts!
Danger to life through electric shock in case of improper repair - Electric parts should be repaired by a qualified electricians. - After the repair have a safety test according VDE 0701 or country-specific regulations performed.

Danger
Risk of electric shock due to live parts! Death by electrocution
- Disconnect appliances from electrical supply at least 60 seconds before starting repairs.

Caution
Sharp edges!
Cut injuries
▶ Wear protective gloves.
Prerequisite:
√ Appliance is disconnected from power supply.
√ Door is open.
√ Shelves are removed.
4.8.1 Removing LED side light
-
Stick two suction cup on LED side light cover.
-
Pull suction cups forward in one rotary movement.
natural_image
Illustration of a door with two doors opening, showing hand positioning and motion (no text or symbols)
→ LED light cover is removed.

Repair
- Remove LED module.


LED side light is removed.
4.8.2 Installing LED side light

Due to lamp cover hooks are easy to break during removal process spare part LED side light is the set that includes LED module and light cover.
▶ Install in reverse order.
Repair
4.9 Replacing LED top lamp
Required tools:
Auxiliary tool For disassembly of plastic parts, "magic tool" [00342180]

Your appliance features a maintenance-free LED light.
These lights may be repaired by customer service or authorised technicians only!

Risk of electric shock due to live parts!
Danger to life through electric shock in case of improper repair
Electric parts should be repaired by a qualified electricians.
After the repair have a safety test according VDE 0701 or country-specific regulations performed.

Risk of electric shock due to live parts!
Death by electrocution
- Disconnect appliances from electrical supply at least 60 seconds before starting repairs.

Sharp edges!
Cut injuries
▶ Wear protective gloves.
Prerequisite:
√ Appliance is disconnected from power supply.
Door is open.
4.9.1 Removing LED top lamp
-
- Slide disassembly tool between LED top lamp and refrigerator compartment innerliner to release lamp hooks (1).
- Remove LED top lamp (2).
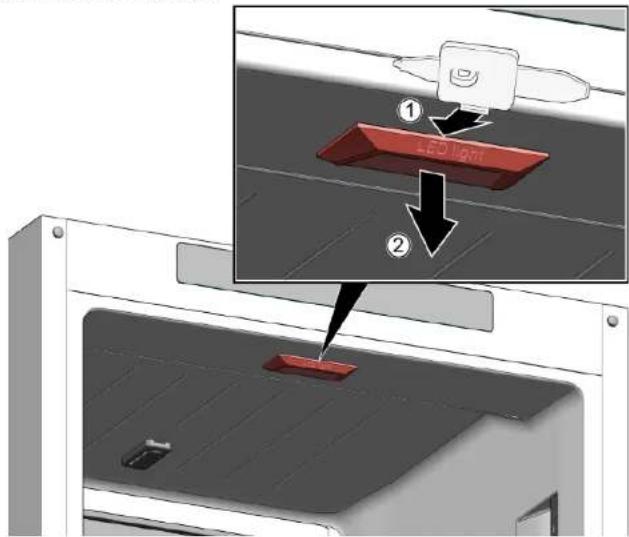
- Disconnect LED top lamp electrical connection.
LED top lamp is removed.
4.9.2 Installing LED top lamp
▶ Install in reverse order.

Repair
4.10 Replacing LED freezer lamp
Required tools:
Auxiliary tool For disassembly of plastic parts, "magic tool" [00342180]

Your appliance features a maintenance-free LED light.
These lights may be repaired by customer service or authorised technicians only!

Risk of electric shock due to live parts!
Danger to life through electric shock in case of improper repair
Electric parts should be repaired by a qualified electricians.
- After the repair have a safety test according VDE 0701 or country-specific regulations performed.

Risk of electric shock due to live parts!
Death by electrocution
- Disconnect appliances from electrical supply at least 60 seconds before starting repairs.


Sharp edges!
Cut injuries
▶ Wear protective gloves.
Prerequisite:
√ Appliance is disconnected from power supply.
Door is open.
4.10.1 Removing LED freezer lamp
- Slide disassembly tool between lamp and housing at the side of lamp to create gap (1).
- Slide disassembly tool on the other side of lamp fixation hook and rotate it forward (2).
- Remove LED freezer lamp (3).
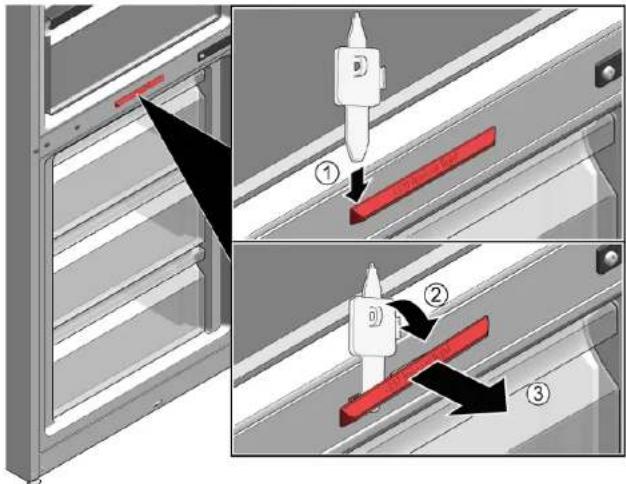
LED freezer lamp is disconnected.
LED freezer lamp is removed.
4.10.2 Installing LED freezer lamp
▶ Install in reverse order.
Remonditeave - Kombikülmik
i Selle dokumendiga seoses 129
1.1 Tähtis teave 129
1.1.1 Eesmärk 129
1.2 Sümbolite selgitus 129
1.2.1 Ohutasemed.... 129
natural_image
Illustration of hands connecting a cable to a rectangular panel with shelves (no text or symbols)natural_image
Illustration of hands holding a cable with a black arrow indicating direction (no text or symbols)
natural_image
Isometric line drawing of a refrigerator with an eye icon above, showing shelves and doors (no text or symbols)natural_image
Line drawing of a refrigerator with hand gestures indicating side placement (no text or symbols)
Remont
- Vajutage terve tihend jupphaaval soonde.

natural_image
Diagram of a hand interacting with a refrigerator drawer, showing shelves and drawers with directional arrows (no text or symbols)
flowchart
graph TD
    A["Veenduge, et hinged eemaldamise/paigaldamise ajal ei sulguks."] --> B["Hand gesture: hand holding a hand, hand pointing to a tool, hand pressing a grip, hand holding a hand with warning symbol"]
    B --> C["Warning symbol: hand with exclamation mark"]
- Eemaldage neli hinge katet.

Remont

Remont
-
- Eemaldage neli kruvi (1).
-
Eemaldage alumised hinged (2).


natural_image
Illustration of hands holding a tablet with a black curved arrow indicating rotation (no text or symbols)
natural_image
Diagram showing two mechanical components with upward arrows indicating motion or assembly (no text or symbols)
natural_image
Illustration of a person inserting into a door panel with arrows indicating movement (no text or symbols)


natural_image
Diagram of hands connecting a cable to a rectangular panel with shelves, showing structural details (no text or symbols)natural_image
Illustration of hands holding a cable with a black arrow indicating direction (no text or symbols)
natural_image
Isometric line drawing of a wall-mounted shelf with an eye icon above (no text or symbols)natural_image
Line drawing of a door handle with hand gestures indicating left and right motion (no text or symbols)
Korjaus
natural_image
Diagram of a hand interacting with a refrigerator drawer, showing multiple compartments and directional arrows indicating movement (no text or symbols present)

Korjaus

Korjaus

natural_image
Illustration of hands holding a tablet with a curved arrow indicating rotation (no text or symbols)Hylly on poistettu.
natural_image
Diagram showing two mechanical components with upward arrows indicating motion or assembly (no text or symbols)
Imukuppi ∅50 mm [00342224]

natural_image
Illustration of a person inserting into a door panel with arrows indicating movement (no text or symbols)

natural_image
Diagram of hands connecting a cable to a storage unit panel (no text or symbols)- Retirer le joint de porte de la rainure.
natural_image
Illustration of hands holding a cable with a black arrow indicating direction (no text or symbols)
natural_image
Isometric line drawing of a wall-mounted shelf with an eye icon above (no text or symbols)natural_image
Line drawing of a door handle with hand gestures indicating left and right motion (no text or symbols)
Réparation
natural_image
Diagram of a hand interacting with a refrigerator drawer, showing shelves and drawers with arrows indicating movement (no text or symbols)

Réparation

Réparation

natural_image
Illustration of hands holding a tablet with a curved arrow indicating rotation (no text or symbols)natural_image
Diagram showing two mechanical components with upward arrows indicating motion or assembly (no text or symbols)natural_image
Illustration of a door with two doors opening, showing a person inserting a device into a blue panel (no text or symbols)
natural_image
Diagram of hands connecting a cable to a storage unit panel (no text or symbols)natural_image
Illustration of hands holding a cable with a black arrow indicating direction (no text or symbols)
natural_image
Isometric line drawing of a wall-mounted shelf with an eye icon (no text or symbols)natural_image
Line drawing of a refrigerator with hand gestures indicating side placement (no text or symbols)
Instandsetzen
natural_image
Diagram of a hand interacting with a refrigerator drawer, showing shelves and drawers with arrows indicating movement (no text or symbols)

Instandsetzen

Instandsetzen

natural_image
Illustration of hands holding a tablet with a black curved arrow indicating rotation (no text or symbols)natural_image
Diagram showing two mechanical components with upward arrows indicating motion or assembly (no text or symbols)

natural_image
Illustration of a person inserting into a device with arrows indicating insertion direction (no text or symbols)

natural_image
Illustration of hands connecting a cable to a storage unit panel (no text or symbols)natural_image
Illustration of hands connecting a cable to a wall-mounted panel with a curved arrow indicating rotation (no text or symbols)
natural_image
Isometric line drawing of a wall-mounted shelf with an eye icon (no text or symbols)natural_image
Line drawing of a refrigerator with hand gestures indicating side placement (no text or symbols)
Επισκευή
natural_image
Diagram of a hand interacting with a refrigerator drawer, showing shelves and drawers with arrows indicating movement (no text or symbols)

Επισκευή

Επισκευή

natural_image
Illustration of hands holding a tablet with a curved arrow indicating rotation (no text or symbols)To páφι αφαιρέθηκε.
natural_image
Diagram showing two mechanical components with upward arrows indicating motion or assembly (no text or symbols)To páfi pórtas éxei aφαιρεθεί.
To doxelo phoútwv kai laxavików éxei aφaipεθεί.
natural_image
Illustration of a door lock system with two doors opening and a close-up of the door (no text or symbols)

natural_image
Illustration of hands connecting a cable to a rectangular panel with shelves (no text or symbols)natural_image
Illustration of hands holding a cable with a black arrow indicating direction (no text or symbols)
natural_image
Isometric line drawing of a wall-mounted shelf with an eye icon above (no text or symbols)natural_image
Line drawing of a door handle with hand gestures indicating left and right motion (no text or symbols)
Javítás
natural_image
Diagram of a hand interacting with a refrigerator drawer, showing shelves and drawers with arrows indicating movement (no text or symbols)
flowchart
graph TD
    A["Window with arrow"] --> B["Hand gesture: unknown"]
    B --> C["Warning sign: is open and is open again"]

Javítás

Javítás

natural_image
Illustration of hands holding a tablet with a curved arrow indicating rotation (no text or symbols)natural_image
Diagram showing two mechanical components with upward arrows indicating motion or assembly (no text or symbols)
natural_image
Illustration of a door with two doors opening, showing a person inserting a door panel (no text or symbols present)


natural_image
Diagram of hands connecting a cable to a rectangular panel with shelves, showing structural details (no text or symbols)natural_image
Illustration of hands holding a cable with a black arrow indicating direction (no text or symbols)natural_image
Isometric line drawing of a wall-mounted shelf with an eye icon (no text or symbols)natural_image
Line drawing of a refrigerator with hand gestures indicating side placement (no text or symbols)
Riparazione
natural_image
Diagram of a hand interacting with a refrigerator drawer, showing shelves and drawers with arrows indicating movement (no text or symbols)
Riparazione
Riparazione
natural_image
Illustration of hands holding a tablet with a curved arrow indicating rotation (no text or symbols)natural_image
Diagram showing two mechanical components with upward arrows indicating motion or assembly (no text or symbols)natural_image
Illustration of a double door with two doors opening, showing mechanical parts and a close-up of the door (no text or symbols)
natural_image
Diagram of hands connecting a cable to a rectangular panel with shelves, showing structural details (no text or symbols)natural_image
Illustration of hands holding a cable with a black arrow indicating direction (no text or symbols)
natural_image
Isometric line drawing of a wall-mounted shelf with an eye icon (no text or symbols)natural_image
Line drawing of a refrigerator with hand gestures indicating side placement (no text or symbols)
Remonts
natural_image
Diagram of a hand interacting with a refrigerator drawer, showing shelves and drawers with directional arrows (no text or symbols)

Remonts

Remonts

Viras ir nonemtas.
natural_image
Illustration of hands holding a tablet with a curved arrow indicating rotation (no text or symbols)Plaukts ir iznemts.
natural_image
Diagram showing two mechanical components with upward arrows indicating motion or assembly (no text or symbols)Auglu un dârzenu tvertne ir iznemta.
4.6.2 Auglu un dârzenu tvertnes uzstâdîsana
natural_image
Illustration of a door with two doors opening, showing a person inserting a device into a blue panel (no text or symbols)
LED gaismekla pärsegs ir nonemts.

Remonts
- Nonemiet LED moduli.
natural_image
Illustration of hands connecting a cable to a rectangular panel with shelves (no text or symbols)natural_image
Illustration of hands connecting a cable to a wall-mounted panel with a black arrow indicating direction (no text or symbols)
natural_image
Isometric line drawing of a wall-mounted shelf with an eye icon above (no text or symbols)natural_image
Line drawing of a door handle with hand gestures indicating left and right motion (no text or symbols)
Remontas
natural_image
Diagram of a hand interacting with a refrigerator drawer, showing shelves and drawers with arrows indicating movement (no text or symbols)

Remontas

Remontas

Vyriai nuimti.
natural_image
Illustration of hands holding a tablet with a black curved arrow indicating rotation (no text or symbols)Lentyna išimta.
natural_image
Diagram showing two mechanical components with upward arrows indicating motion or assembly (no text or symbols)natural_image
Illustration of a door with two doors opening, showing a person inserting a device into a blue panel (no text or symbols)
natural_image
Illustration of hands connecting a cable to a rectangular panel with shelves (no text or symbols)natural_image
Illustration of hands holding a cable with a black arrow indicating direction (no text or symbols)
natural_image
Isometric line drawing of a wall-mounted shelf with an eye icon above (no text or symbols)natural_image
Line drawing of a door handle with hand gestures indicating left and right motion (no text or symbols)
Reparasjon
natural_image
Diagram of a hand interacting with a refrigerator drawer, showing shelves and drawers with arrows indicating movement (no text or symbols)
Fare for å knuse/sette fast fingre
flowchart
graph TD
    A["Vær forsiktig så ikke hengsler lukkes under demontering/montering."] --> B["Hand gesture: hand holding a grip, hand pressing a hand gesture with warning symbol"]
    B --> C["Reaction: Questioning on hand gesture"]
    C --> D["Result: Hand gesture with hand gesture and warning symbol"]
Reparasjon
De nedre dørhengslene er demontert.
Reparasjon

Reparasjon
-
- Fjern fire skruer (1).
-
Demonter nedre hengsler (2).


natural_image
Illustration of hands holding a tablet with a curved arrow indicating rotation (no text or symbols)natural_image
Diagram showing two mechanical components with upward arrows indicating motion or assembly (no text or symbols)
→ Beholderen for frysevarer er demontert.
natural_image
Illustration of a person inserting into a device with arrows indicating insertion (no text or symbols)
LED-lampedekslet er demontert.
Reparasjon
- Demonter LED-modulen.

LED-sidelampen er demontert.
4.8.2 Montering av LED-sidelampe

- Koble fra den elektriske tilkoblingen for den øvre LED-lampen.
Den øvre LED-lampen er demontert.
LED-lampen for fryseren er koblet fra.
LED-lampen for fryseren er demontert.
4.10.2 Montering av LED-lampe for fryser
natural_image
Diagram of hands connecting a cable to a rectangular panel with shelves, showing structural details (no text or symbols)natural_image
Illustration of hands holding a cable with a black arrow indicating direction (no text or symbols)
natural_image
Isometric line drawing of a wall-mounted shelf with an eye icon above (no text or symbols)natural_image
Line drawing of a refrigerator with hand gestures indicating side placement (no text or symbols)
Naprawy
natural_image
Diagram of a hand interacting with a refrigerator drawer, showing shelves and drawers with arrows indicating movement (no text or symbols)

Naprawy

Naprawy

natural_image
Illustration of hands holding a tablet with a curved arrow indicating rotation (no text or symbols)Półka jest wyjęta.
4.4.2 Montaż półki
natural_image
Diagram showing two mechanical components with upward arrows indicating motion or assembly (no text or symbols)natural_image
Illustration of a door with two doors opening, showing hand positioning and interior lighting (no text or symbols)

natural_image
Illustration of hands connecting a cable to a rectangular panel with shelves (no text or symbols)natural_image
Illustration of hands holding a cable with a black arrow indicating direction (no text or symbols)
natural_image
Isometric line drawing of a wall-mounted shelf with an eye icon (no text or symbols)natural_image
Line drawing of a refrigerator with hand gestures indicating side placement (no text or symbols)
Reparação
natural_image
Diagram of a hand interacting with a refrigerator drawer, showing shelves and drawers with arrows indicating movement (no text or symbols)
flowchart
graph LR
    A["Assegure-se de que as dobradiças não fecham durante a remoção / instalação."] --> B["Hand gesture: Questioning with brain, Visionary, and hand gesture"]
    B --> C["Warning symbol: Hand with hand, hand gesture, hand gesture, hand gesture, hand gesture, hand gesture, hand gesture, hand gesture, hand gesture, hand gesture, hand gesture, hand gesture, hand gesture, hand gesture, hand gesture, hand gesture, hand gesture, hand gesture, hand gesture, hand gesture, hand gesture, hand gesture, hand gesture, hand gesture, hand gesture, hand gesture, hand gesture, hand gesture, hand gesture, hand gesture, hand gesture, hand gesture, hand gesture, hand gesture, hand gesture"]
- Remova quatro tampas de dobradiça.

Reparação
-
- Remova quatro parafusos (1).
-
Remova as dobradiças (2).
-
- Remova quatro parafusos (1).
-
Remova as dobradiças (2).

Reparação
-
- Remova quatro parafusos (1).
-
Remova as dobradiças inferiores (2).

natural_image
Illustration of hands holding a tablet with a curved arrow indicating rotation (no text or symbols)natural_image
Diagram showing two mechanical components with upward arrows indicating motion or assembly (no text or symbols)natural_image
Illustration of a person inserting into a device with arrows indicating insertion (no text or symbols)

natural_image
Diagram of hands connecting a cable to a rectangular panel with shelves, showing structural details (no text or symbols)natural_image
Illustration of hands holding a cable with a black arrow indicating direction (no text or symbols)
natural_image
Isometric line drawing of a wall-mounted shelf with an eye icon (no text or symbols)natural_image
Line drawing of a refrigerator with hand gestures indicating side placement (no text or symbols)
Repararea
natural_image
Diagram of a hand interacting with a refrigerator drawer, showing shelves and drawers with directional arrows (no text or symbols)
Cap torx TX20 6.3 mm (1/4") [00340865]

Repararea
Balamalele uşii de sus sunt demontate.
Balamalele uşii de jos sunt demontate.
Repararea
4.2.2 Montarea balamalei plate
Cap torx TX20 6.3 mm (1/4") [00340865]

Repararea

Balamalele sunt demontate.
4.3.2 Montarea balamalei glisante
natural_image
Illustration of hands holding a tablet with a curved arrow indicating rotation (no text or symbols)natural_image
Diagram showing two mechanical components with upward arrows indicating motion or assembly (no text or symbols)natural_image
Illustration of a person opening a door with two doors behind, no text or symbols present

natural_image
Illustration of hands connecting a cable to a rectangular panel with shelves (no text or symbols)- Vytiahnite tesnenie z drážky.
natural_image
Illustration of hands connecting a cable to a wall-mounted device with a black arrow indicating rotation (no text or symbols)
natural_image
Isometric line drawing of a wall-mounted shelf with an eye icon above (no text or symbols)natural_image
Line drawing of a door handle with hand gestures indicating left and right motion (no text or symbols)
Oprava
natural_image
Diagram of a hand interacting with a refrigerator drawer, showing shelves and drawers with arrows indicating movement (no text or symbols)
Tesnenie dvierok je namontované.

Oprava

Oprava

Oprava

Závesy sú odobraté.
natural_image
Illustration of hands holding a tablet with a curved arrow indicating rotation (no text or symbols)natural_image
Diagram showing two mechanical components with upward arrows indicating motion or assembly (no text or symbols)Polička v dvierkach je odobratá.
natural_image
Illustration of a door with two doors opening, showing mechanical parts and a close-up of the door (no text or symbols)
Kryt LED svetla je odobratý.

Oprava
- Odoberte LED modul.

natural_image
Diagram of hands connecting a cable to a door panel with shelves, showing structural details (no text or symbols)- Tesnilo vrat izvlecite iz utora.
natural_image
Illustration of hands holding a cable with a black arrow indicating direction (no text or symbols)
natural_image
Isometric line drawing of a wall-mounted shelf with an eye icon (no text or symbols)natural_image
Line drawing of a refrigerator with hand gestures indicating side placement (no text or symbols)
Popravilo
- Celotno tesnilo korak po koraku potisnite v utor.
natural_image
Diagram of a hand interacting with a refrigerator drawer, showing shelves and drawers with arrows indicating movement (no text or symbols)
Poškodbe hrbta in mišic

Popravilo
Poškodbe hrbta in mišic

Popravilo
-
- Odstranite štiri vijake (1).
-
Odstranite spodnja tečaja (2).


natural_image
Illustration of hands holding a tablet with a black curved arrow indicating rotation (no text or symbols)Polica je odstranjena.
4.4.2 Namestitev police
- Namestite v obratnem vrstnem redu.

Popravilo
4.5 Zamenjava vratnega predala
Zahteva:
Vrata so odprta.
natural_image
Diagram showing two mechanical components with upward arrows indicating motion or assembly (no text or symbols)
natural_image
Illustration of a door with two doors opening, showing hand positioning and motion (no text or symbols)
natural_image
Diagram of hands connecting a cable to a rectangular panel with shelves, showing structural details (no text or symbols)natural_image
Illustration of hands holding a cable with a black arrow indicating direction (no text or symbols)natural_image
Isometric line drawing of a wall-mounted shelf with an eye icon (no text or symbols)natural_image
Line drawing of a refrigerator with hand gestures indicating side placement (no text or symbols)
Reparación
natural_image
Diagram of a hand interacting with a refrigerator drawer, showing shelves and drawers with arrows indicating movement (no text or symbols)

Reparación

Reparación

natural_image
Illustration of hands holding a tablet with a black curved arrow indicating rotation (no text or symbols)natural_image
Diagram showing two mechanical components with upward arrows indicating motion or assembly (no text or symbols)natural_image
Illustration of a door with two doors opening, showing a cartoon character inside (no text or symbols)natural_image
Illustration of hands connecting a cable to a rectangular panel with shelves (no text or symbols)natural_image
Illustration of hands holding a cable with a black arrow indicating direction (no text or symbols)
natural_image
Isometric line drawing of a wall-mounted shelf with an eye icon (no text or symbols)natural_image
Line drawing of a refrigerator with hand gestures indicating side placement (no text or symbols)
Reparation
natural_image
Diagram of a hand interacting with a refrigerator drawer, showing multiple compartments and directional arrows indicating movement (no text or symbols present)

Reparation

Reparation

natural_image
Illustration of hands holding a tablet with a black curved arrow indicating rotation (no text or symbols)natural_image
Diagram showing two mechanical components with upward arrows indicating motion or assembly (no text or symbols)Dörrhyllan har tagits bort.
4.5.2 Montera dörrhylla


Sugkopp ∅50 mm [00342224]

natural_image
Illustration of a person inserting into a door panel with arrows indicating movement (no text or symbols)
LED-lamphöljet har tagits bort.

Reparation
- Ta bort LED-modulen.

LED-sidolampan har tagits bort.
4.8.2 Montera LED-sidolampa

LED-fryslampan har lossats.
LED-fryslampan har tagits bort.
4.10.2 Montera LED-fryslampa
natural_image
Illustration of hands connecting a cable to a rectangular panel with shelves (no text or symbols)natural_image
Illustration of hands holding a cable with a black arrow indicating direction (no text or symbols)
natural_image
Isometric line drawing of a 3D wall-mounted device with multiple shelves and an eye icon (no text or symbols)natural_image
Line drawing of a refrigerator with hand gestures indicating side placement (no text or symbols)
Onarim
natural_image
Diagram of a hand interacting with a refrigerator drawer, showing shelves and drawers with arrows indicating movement (no text or symbols)
flowchart
graph LR
    A["Sökme / takma sırasında menteşelerin kapanmamasına dikkat edin."] --> B["Hand gesture: eye, hand gesture: hand, hand gesture: hand, hand gesture: hand, hand gesture: hand, hand gesture: hand, hand gesture: hand, hand gesture: hand, hand gesture: hand, hand gesture: hand, hand gesture: hand, hand gesture: hand, hand gesture: hand, hand gesture: hand, hand gesture: hand, hand gesture: hand, hand gesture: hand, hand gesture: hand, hand gesture: hand, hand gesture: hand, hand gesture: hand, hand gesture: hands, hand gesture: hand, hand gesture: hand, hand gesture: hand, hand gesture: hand, hand gesture: hand, hand gesture: hand, hand gesture: hand, hand gesture: hand, hand gesture: hand, hand gesture: hand, hand gesture: hand, hand gesture: hand, hand gesture: hand, hand gesture: hand, hand gesture: hand, hand gesture: hand, hand gesture: hand, hand gesture: hand, hand gesture: hand, hand gesture: Hand, hand gesture: hand, hand gesture: hand, hand gesture: hand, hand gesture: hand, hand gesture: hand, hand gesture: hand, hand gesture: hand, hand gesture: hand, hand gesture: hand, hand gesture: hand, hand gesture: hand, hand gesture: hand, hand gesture: hand, hand gesture: hand, hand gesture: hand, hand gesture: hand, hand gesture: hand, hand gesture: hand, hand gesture: hand, hand gesture:hand, hand gesture, hand gesture, hand gesture, hand gesture, hand gesture, hand gesture, hand gesture, hand gesture, hand gesture, hand gesture, hand gesture, hand gesture, hand gesture, hand gesture, hand gesture, hand gesture, hand gesture, hand gesture, hand gesture, hand gesture, hand gesture, hand gesture, hand gesture, hand gesture, hand gesture, hand gesture, hand gesture, hand gesture, hand gesture, hand gesture, hand gesture, hand gesture, hand gesture, hand gesture."]

Onarim

Onarim

natural_image
Illustration of hands holding a tablet with a black curved arrow indicating rotation (no text or symbols)natural_image
Diagram showing two mechanical components with upward arrows indicating motion or assembly (no text or symbols)
natural_image
Illustration of a door with two doors opening, showing a person inserting a door to another (no text or symbols present)

