USER MANUAL TS 138 HUSQVARNA
GBOperator's manual 2-20
SE Bruksanvising 21-39
DK Brugsanvising 40-58
NO Bruksanvising 59-77
FI Käyttoohje 78-96
WARNING: Clearing saws, brushcutters and trimmers can be dangerous! Careless or incorrect use can result in serious or fatal injury to the operator or others.

Please read the operator's manual carefully and make sure you understand the instructions before using the machine.

Always'wear:
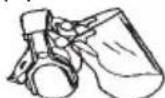
- A'protective'helmet'where'there is'a'risk'of falling'objects
Hearing protection
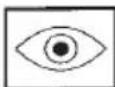
Approved'eye protection
Max. speed of output'shaft, 'rpm


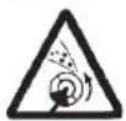
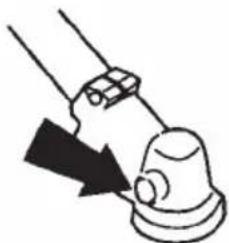
Beware of thrown objects' and ricochets.
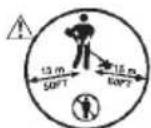
The operator of the machine shall ensure, while working, that no persons or animals come closer than 15' metres.
Arrows'which'show limits'for handle'mounting.

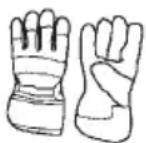
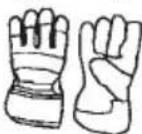
Always wear approved protective gloves.

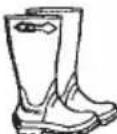
Use'anti-slip'and'stable'boots.

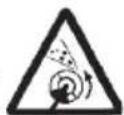
Only'usenon--metallic,flexible cutting attachments,i.e.trimmer headswith trimmer line.

This product is in accordance with applicable EC'directives.

Secure hair so it is above shoulder level.

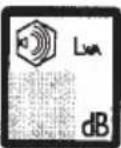
Noise'emission'to the environment'according'to'the European Community's Directive. The'machine's emission'is'specified in the Technical data'section and on'label.
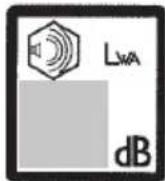
Sound pressure level at 7,5 metres

Use'unleaded'or'quality'leaded petrol and two--stroke'oil mixed at'a'ratio of 2 % (1:50).

Other symbols/decals on the machine refer to special certification requirements for certain markets.
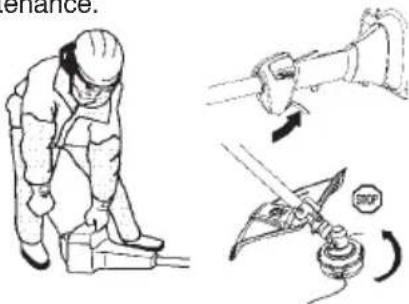
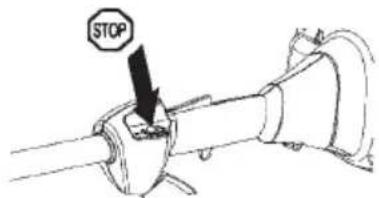
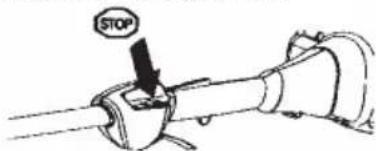
Stop'the'engine'by'pushing and holding'the'stop'switch in'the'STOP'position.'CAUTION!

The stop'switch'automatically returns'to the start position. In order'to prevent'unintentional starting, the 'spark'plug cap'must'be removed from the spark plug when assembling, checking'and/or performing maintenance.
Regular cleaning is required.
Visual check.
Approved eye protection must always be used.
Note the following before starting:
Husqvarna AB has a policy of continuous product development and therefore reserves the right to modify the design and appearance of products without prior notice. Long--term exposure to noise can result in permanent hearing impairment. Always use approved hearing protection.

WARNING: Under no circumstances may the design of the machine be modified without the permission of the manufacturer. Always use genuine accessories. Non--authorized modifications and/or accessories can result in serious personal injury or the death of the operator or others.

WARNING: A clearing saw, brushcutter or trimmer can be dangerous if used incorrectly or carelessly, and can cause serious or fatal injury to the operator or others. It is extremely important that you read and understand the contents of this operator's manual.
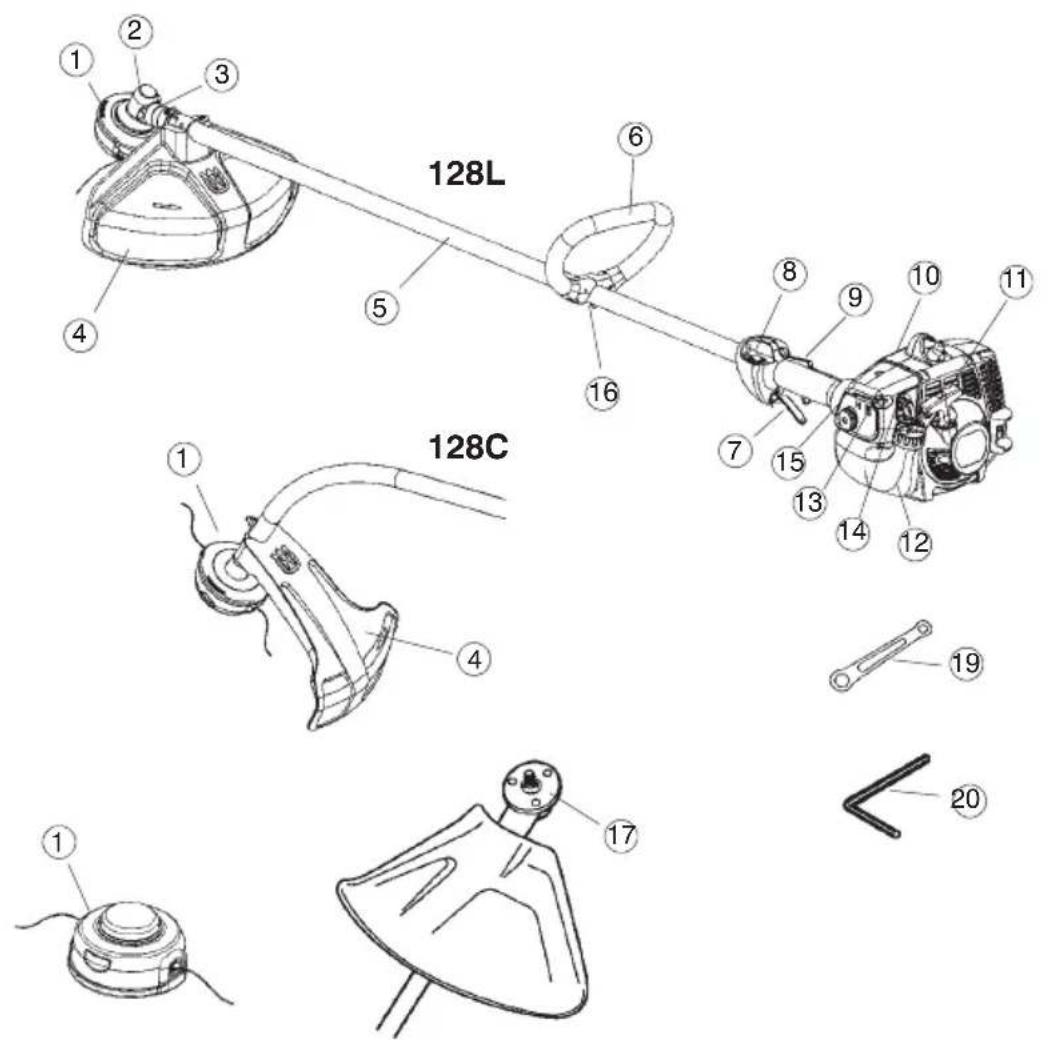
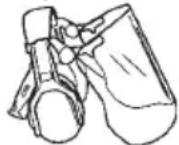
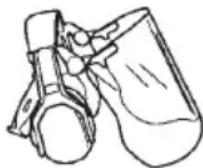
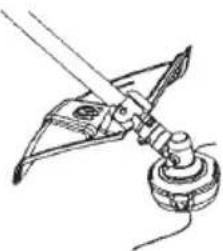
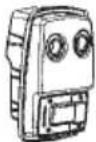
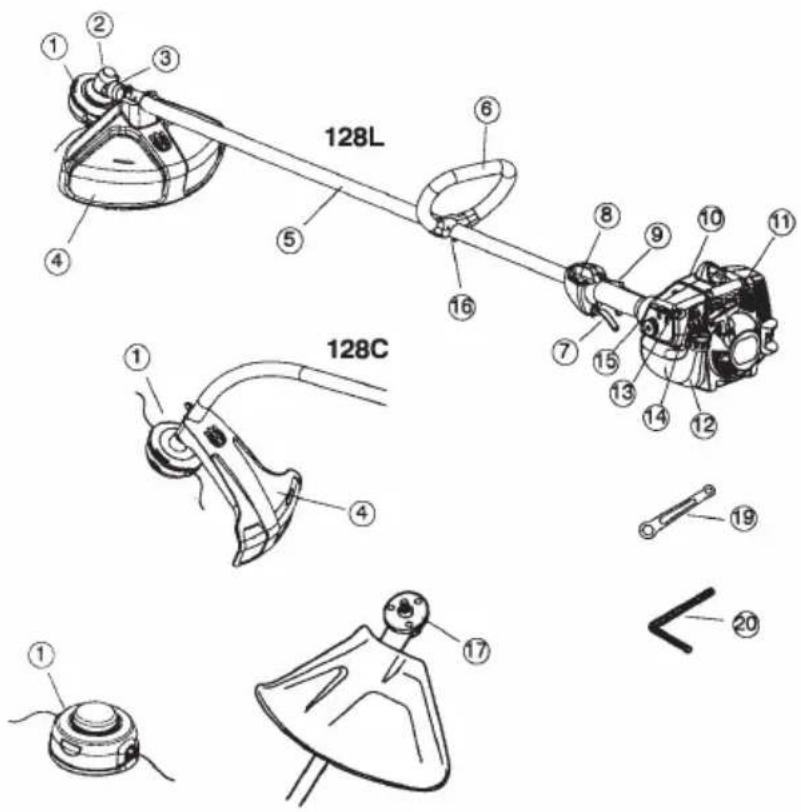
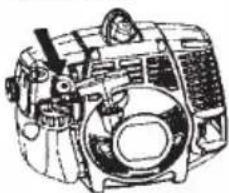
What is what?
- Trimmer head 11. Starter handle
- Grease filler cap 12. Fuel tank
- Bevel gear 13. Choke control
- Cutting attachment guard 14. Primer bulb
- Shaft 15. Air filter cover
- Loop handle 16. Handle adjustment
- Throttle control 17. Drive disc
- Stop switch 18. Operator's manual
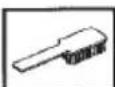
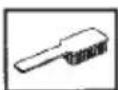
- Throttle lock--out 19. Wrench (Model 128C only)
10.Cylinder cover 20. Hex wrench (Model 128L only)
Important
IMPORTANT! The machine is only designed for trimming grass.
The only accessories you can operate with this engine unit are the cutting attachments we recommend in the chapter on Technical data.
Never use the machine if you are tired, if you have drunk alcohol, or if you are taking medication that could affect your vision, your judgement or your co--ordination.
Wear personal protective equipment. See instructions under the heading Personal protective equipment.
Never use a machine that has been modified in any way from its original specification.
Never use a machine that is faulty. Carry out the checks, maintenance and service instructions described in this manual. Some maintenance and service measures must be carried out by trained and qualified specialists. See instructions under the heading Maintenance. All covers and guards must be fitted before starting. Make sure the spark plug cap and lead are not damaged. Otherwise you could get an electric shock.
The machine operator must ensure that no people or animals come closer than 15 metres while working. When several operators are working in the same area, the safety distance should be at least 15 metres.

WARNING: This machine produces an electromagnetic field during operation. Under some circumstances, this field may interfere with active or passive medical implants. To reduce the risk of serious or fatal injury, we recommend persons with medical implants to consult their physician and the medical implant manufacturer before operating this machine.

WARNING: Never allow children to use or be in the vicinity of the machine. As the machine is equipped with a spring-loaded stop switch and can be started by low speed and force on the starter handle, even small children under some circumstances can produce the force necessary to start the machine. This can mean a risk of serious personal injury. Therefore remove the spark plug cap when the machine is not under close supervision.
Personal protective equipment
IMPORTANT! Whenever you use a clearing saw, brushcutter or trimmer you must wear personal protective equipment that is approved by the authorities. Personal protective equipment does not eliminate the risk of accidents, but it can reduce the effects of an injury in the event of an accident. Ask your dealer for help when choosing protective equipment.

WARNING: Listen out for warning signals or shouts when you are wearing hearing protection. Always remove your hearing protection as soon as the engine stops.
HEARING PROTECTION
Wear hearing protection that provides adequate noise reduction.
EYE PROTECTION
Always wear approved eye protection. If you use a visor then you must also wear approved protective goggles. Approved protective goggles must comply with EN 166 in EU countries.

GLOVES
Gloves should be worn when necessary, e.g., when fitting cutting attachments.
BOOTS
Wear anti--slip and stable boots.

GENERAL SAFETY PRECAUTIONS
CLOTHING
Wear clothes made of a strong fabric and avoid loose clothing that can catch on shrubs and branches. Always wear heavy, long pants. Do not wear jewelry, shorts sandals or go barefoot. Secure hair so it is above shoulder level.
FIRST AID KIT
A first aid kit should be carried by operators of clearing saws, brushcutters or trimmers.

Machine's safety equipment
This section describes the machine's safety equipment, its purpose, and how checks and maintenance should be carried out to ensure that it operates correctly. See the "What is what" section to locate where this equipment is positioned on your machine. The life span of the machine can be reduced and the risk of accidents can increase if machine maintenance is not carried out correctly and if service and/or repairs are not carried out professionally. If you need further information please contact your nearest service workshop.
IMPORTANT! All servicing and repair work on the machine requires special training. This is especially true of the machine's safety equipment. If your machine fails any of the checks described below you must contact your service agent. When you buy any of our products we guarantee the availability of professional repairs and service. If the retailer who sells your machine is not a servicing dealer, ask him for the address of your nearest service agent.

WARNING: Never use a machine that has faulty safety equipment! Follow the control, maintenance and service instructions described in this section. If your machine fails any of these checks contact your service agent to get it repaired.
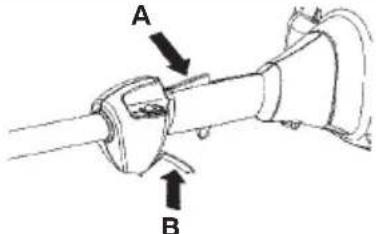
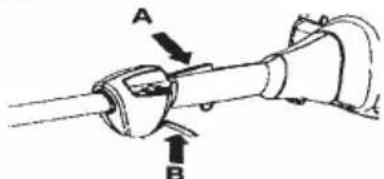
Throttle lock--out
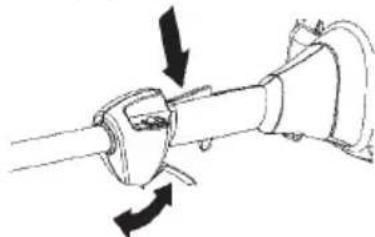
The throttle lock--out is designed to prevent accidental operation of the throttle control. When you press the lock--out (A) (i.e. when you grasp the handle) it releases the throttle control (B). When you release the handle, the throttle control and the throttle lock--out both move back to their original positions. This movement is controlled by two independent return springs. This arrangement means that the throttle control is automatically locked at the idle setting.
Make sure the throttle control is locked at the idle setting when the throttle lock-out is released.
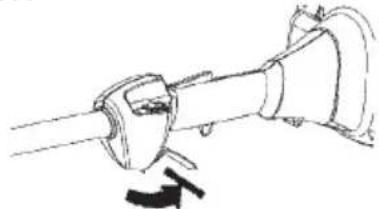
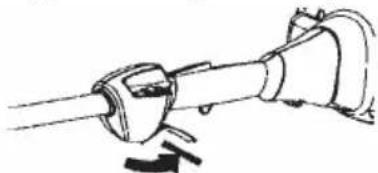
Press the throttle lock--out and make sure it returns to its original position when you release it.
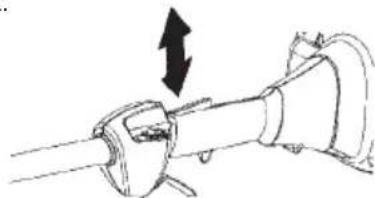
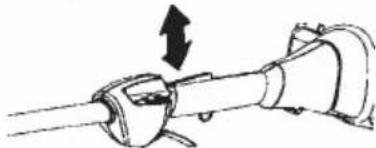
Check that the throttle control and throttle lock--out move freely and that the return springs work properly.
See instructions under the heading Start. Start the machine and apply full throttle. Release the throttle and check that the cutting attachment stops and remains at a standstill. If the cutting attachment rotates with the throttle in the idle position then the carburettor idle setting must be checked. See instructions under the heading Maintenance.
GENERAL SAFETY PRECAUTIONS
Stop switch
Make sure the engine stops when you push and hold the stop switch.
Cutting attachment guard
This guard is intended to prevent loose objects from being thrown towards the operator. The guard also protects the operator from accidental contact with the cutting attachment.
Check that the guard is undamaged and not cracked. Replace the guard if it has been exposed to impact or is cracked. Always use the recommended guard for the cutting attachment you are using. See the "Technical data" section.

WARNING: Never use a cutting attachment without an approved guard. See the section on "Technical data". If an incorrect or faulty guard is fitted this can cause serious personal injury.
Use of incorrectly wound trimmer line or an incorrect cutting attachment increases the level of vibration.

WARNING: Overexposure to vibration can lead to circulatory damage or nerve damage in people who have impaired circulation. Contact your doctor if you experience symptoms of overexposure to vibration. Such symptoms include numbness, loss of feeling, tingling, pricking, pain, loss of strength, changes in skin color or condition. These symptoms normally appear in the fingers, hands or wrists. The risk increases at low temperatures.
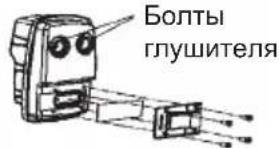
Muffler
The muffler is designed to reduce the noise level and to direct the exhaust gases away from the operator.
CAUTION! Muffler is fitted with a catalytic convertic designed to reduce harmful exhaust gases.
In countries that have a warm and dry climate there is a significant risk of fire. We therefore fit certain mufflers with a spark arrestor mesh. Check whether the muffler on your machine is fitted with this kind of mesh.
For mufflers, it is very important that you follow the instructions on checking, maintaining, and servicing your machine. Never use a machine that has a faulty muffler.
Regularly check that the muffler is securely attached to the machine.

WARNING: Mufflers fitted with catalytic converters get very hot during use and remain so for some time after stopping. This also applies at idle speed. Contact can result in burns to the skin. Remember the risk of fire!

WARNING: The inside of the muffler contain chemicals that may be carcinogenic. Avoid contact with these elements in the event of a damaged muffler.

WARNING: Bear in mind that: Engine exhaust fumes contain carbon monoxide, which can cause carbon monoxide poisoning. For this reason you should not start or run the machine indoors, or anywhere that is poorly ventilated. The exhaust fumes from the engine are hot and may contain sparks which can start a fire. Never start the machine indoors or near combustible material!
Cutting equipment
This section describes how to choose and maintain your cutting equipment in order to:
- Obtain maximum cutting performance.
- Extend the life of cutting equipment.
IMPORTANT!
Only use cutting attachments with the guards we recommend! See the section on "Technical data".
Refer to the instructions for the cutting attachment to check the correct way to load the trimmer line and the correct line diameter.

WARNING: Always stop the engine before doing any work on the cutting attachment. This continues to rotate even after the throttle has been released. Ensure that the cutting attachment has stopped completely and disconnect the lead from the spark plug before you start to work on it.

WARNING: A faulty cutting attachment may increase the risk of accidents.
Trimmer head
IMPORTANT!
Always ensure the trimmer line is wound tightly and evenly around the drum, otherwise the machine will generate harmful vibration.
- Only use the recommended cutting attachments. See the section on "Technical data".

- Smaller machines generally require small trimmer heads and vice versa. This is because when clearing using trimmer line the engine must throw out the trimmer line radially from the trimmer head and overcome the resistance of the grass being cleared.
- The length of the trimmer line is also important. A longer trimmer line requires greater engine power than a shorter trimmer line of the same diameter.
- Make sure that the cutter on the trimmer guard is intact. This is used to cut the trimmer line to the correct length.
To increase the life of the trimmer line it can be soaked in water for a couple of days. This will make the line tougher so that it lasts longer.
NOTE: Make sure unit is assembled correctly as shown in this manual.
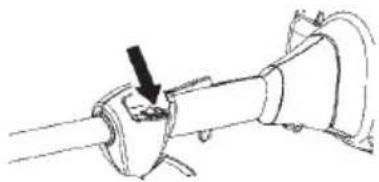
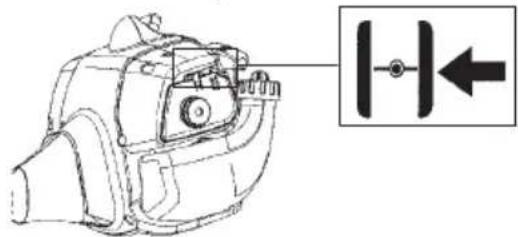
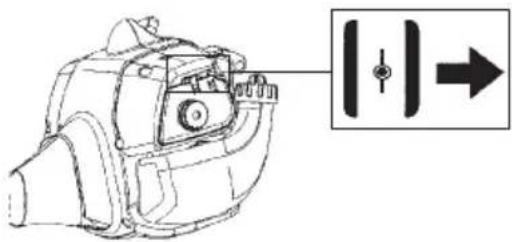
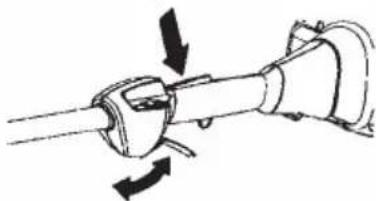
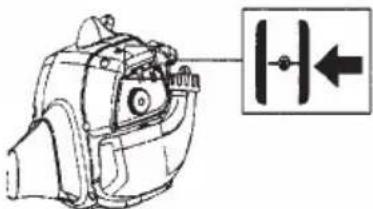
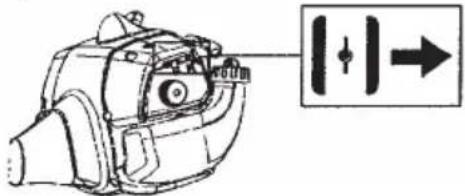
Fitting the loop handle
- Position the handle on the shaft. Note that the handle must be mounted between the two arrows on the shaft.
- Fit the screw, securing plate and wing nut as shown in the diagram.
- Tighten the wing nut.
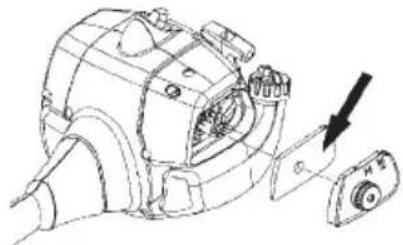
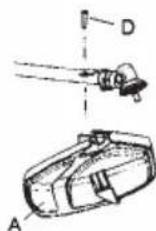
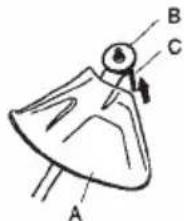
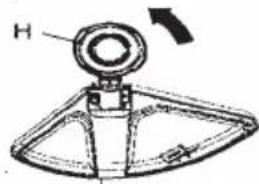
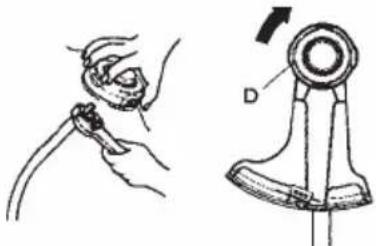
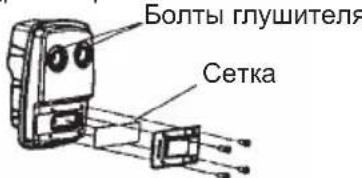
Fitting the trimmer guard and trimmer head (Model 128L)
- Fit the correct trimmer guard (A) for use with the trimmer head. Hook the trimmer guard/combination guard onto the fitting on the shaft and secure with the bolt (D).
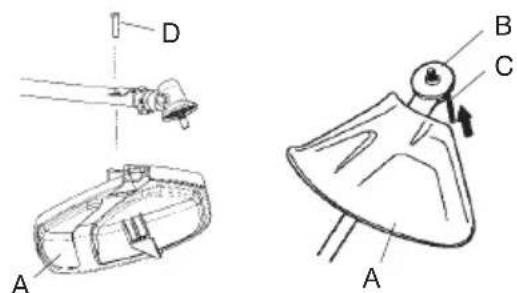
- Fit the drive disc (B) on the output shaft.
- Turn the shaft until one of the holes in the drive disc aligns with the corresponding hole in the gear housing.
- Insert hex wrench (C) in the hole to lock the shaft.
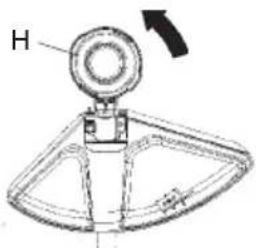
- Screw on the trimmer head (H) in the opposite direction to the direction of rotation.
- To dismantle, follow the instructions in the reverse order.
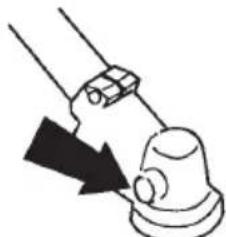
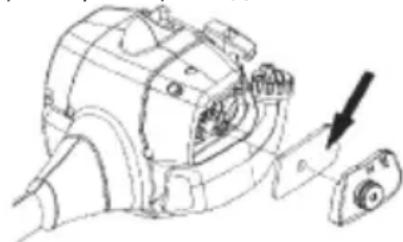
Fitting the trimmer guard and trimmer head (Model 128C)

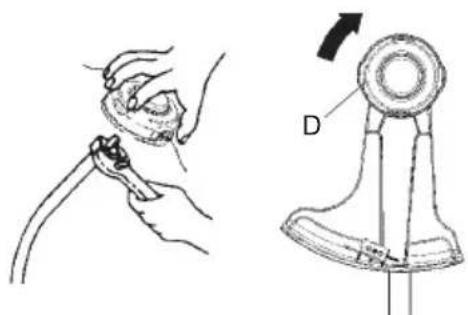
- Fit the correct trimmer guard (A) for use with the trimmer head. Hook the trimmer guard/combination guard onto the fitting on the shaft and secure with the nut (B).

- Fit the dust cup (C) on the shaft. The nut must be completely covered by the dust cup.
- Hold the dust cup with a wrench to prevent the shaft from rotating.
- Screw the trimmer head (D) onto the shaft.
- To dismantle, follow the instructions in the reverse order.
Fuel safety
Never start the machine:
- If you have spilled fuel on it. Wipe off the spillage and allow remaining fuel to evaporate.
- If you have spilled fuel on yourself or your clothes, change your clothes. Wash any part of your body that has come in contact with fuel. Use soap and water.
- If the machine is leaking fuel. Check regularly for leaks from the fuel cap and fuel lines.
Transport and storage
- Store and transport the machine and fuel so that there is no risk of any leakage or fumes coming into contact with sparks or naked flames, for example, from electrical machinery, electric motors, electrical relays/switches or boilers.
- When storing and transporting fuel always use approved containers intended for this purpose.
- When storing the machine for long periods the fuel tank must be emptied. Contact your local petrol station to find out where to dispose of excess fuel.
- Ensure the machine is cleaned and that a complete service is carried out before long--term storage.
- In order to prevent unintentional starting of the engine, the spark plug cap must always be removed during long--term storage, if the machine is not under close supervision and when performing all service measures.
- Secure the machine during transport.

WARNING: Take care when handling fuel. Bear in mind the risk of fire, explosion and inhaling fumes.
Fuel
CAUTION! The machine is equipped with a two-stroke engine and must always be run using a mixture of petrol and two-stroke engine oil. It is important to accurately measure the amount of oil to be mixed to ensure that the correct mixture is obtained. When mixing small amounts of fuel, even small inaccuracies can drastically affect the ratio of the mixture.

WARNING: Fuel and fuel fumes are highly inflammable and can cause serious injury when inhaled or allowed to come in contact with the skin. For this reason observe caution when handling fuel and make sure there is adequate ventilation.
Petrol

CAUTION! Always use a good quality pet-rol/oil mixture (at least 90 octane).
Use low-emission petrol, also known as alkylate petrol, if it is available.
- The lowest octane recommended is 90. If you run the engine on a lower octane than 90, it can result in knocking. This gives rise to a high engine temperature, which can result in serious engine damage.
- When working at continuous high revs, a higher octane rating is recommended.
Two--stroke oil
- For best results and performance, use HUSQVARNA two--stroke oil, which is specially formulated for our two--stroke engines. Mixture 1:50 (2%).
If HUSQVARNA two-stroke oil is not available, you may use another two-stroke oil of good quality that is intended for air cooled engines. Contact your dealer when selecting an oil. Mixing ratio 1:33 (3%)
- Never use two--stroke oil intended for water--cooled outboard engines, sometimes referred to as outboard oil.
- Never use oil intended for four--stroke engines.
| Petrol, litre | Two--stroke oil, litre |
| 2% (1:50) | 3% (1:33) |
| 50,100,15 | | |
| 100,200,30 | | |
| 150,300,45 | | |
| 200,400,60 | | |
FUEL HANDLING
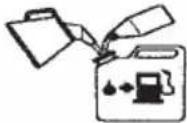
Mixing
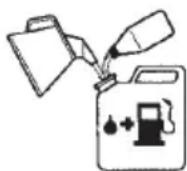
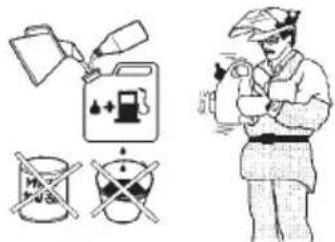
Always mix the petrol and oil in a clean container intended for fuel.
Always start by fling half the amount of the petrol to be used. Then add the entire amount of oil. Mix (shake) the fuel mixture. Add the remaining amount of petrol.
- Mix (shake) the fuel mixture thoroughly before filling the machine's fuel tank.
- Do not mix more than one month's supply of fuel at a time.
- If the machine is not used for some time, the fuel tank should be emptied and cleaned.

WARNING: The catalytic converter muffler gets very hot during and after use. This also applies during idling. Be aware of the fire hazard, especially when working near flammable substances and/or vapors.
Fuelling


WARNING: Taking the following precautions, will lessen the risk of fire:
Do not smoke or place hot objects near fuel.
Always shut off the engine before refueling.
Always stop the engine and let it cool for a few minutes before refuelling.
When refueling, open the fuel cap slowly so that any excess pressure is released gently.
Tighten the fuel cap carefully after refueling.
Always move the machine away from the refueling area before starting.
- Clean the area around the fuel cap. Contamination in the tank can cause operating problems.
- Ensure that the fuel is well mixed by shaking the container before filling the tank.
STARTING AND STOPPING
Check before starting


WARNING: When the engine is started with the choke in either the choke or start throttle positions the cutting attachment will start to rotate immediately.
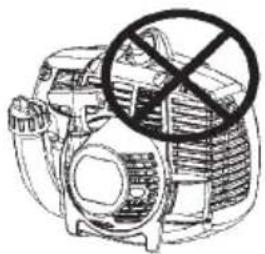
- Never start the machine indoors. Exhaust fumes can be dangerous if inhaled.
- Observe your surroundings and make sure that there is no risk of people or animals coming into contact with the cutting equipment.
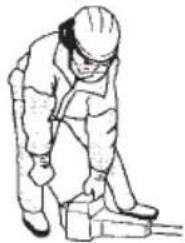
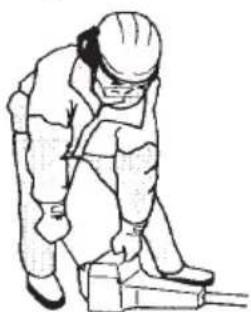
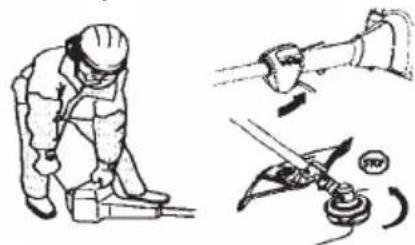
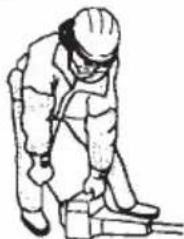
- Place the machine on the ground, ensure the cutting attachment is clear of twigs and stones. Hold the body of the machine on the ground using your left hand (CAUTION! Not with your foot). Then grip the starter handle with your right hand and pull the starter cord.

- Check that the trimmer head and trimmer guard are not damaged or cracked. Replace the trimmer head or trimmer guard if they have been exposed to impact or are cracked.
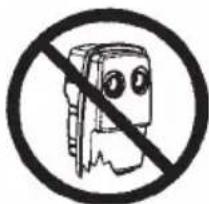
- Never use the machine without a guard nor with a defective guard.
Starting and stopping


WARNING: The complete clutch, clutch cover, and shaft must be fitted before the machine is started, otherwise parts could come loose and cause personal injury. Always move the machine away from the refueling area before starting. Place the machine on a flat surface. Ensure the cutting attachment cannot come into contact with any object.
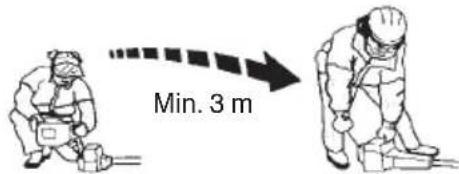
Make sure no unauthorized persons are in the working area, otherwise there is a risk of serious personal injury. The safety distance is 15 meters.
Cold engine
Primer bulb: Press the primer bulb 10 times until fuel begins to fill the bulb. The primer bulb need not be completely filled.

Choke: Move the blue engine choke lever over to the closed position.
Starting
Hold the body of the machine on the ground using your left hand (CAUTION! Not with your foot!).
Firmly grip the starter rope handle with your right hand. DO NOT squeeze throttle trigger. Slowly pull out the cord until you feel some resistance (the starter pawls grip); then quickly and powerfully pull the cord.
Never wrap the starter cord around your hand.
Repeat pulling the cord until the engine attempts to start. Move the blue engine choke lever to the 12 position. Pull starter rope until engine runs. Move the blue engine choke lever to the opened position.
STARTING AND STOPPING
NOTE: If engine dies, return blue engine choke lever to the closed position and repeat starting steps.
CAUTION! Do not pull the starter cord all the way out and do not let go of the starter handle when the cord is fully extended. This can damage the machine.
Warm engine
With a warm engine, move the blue engine choke lever to the 12 position. Pull starter rope until engine runs. Move the blue engine choke lever to the opened position.
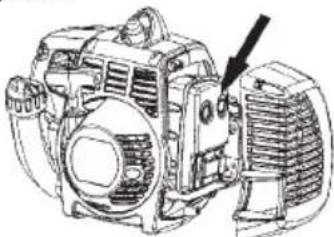
CAUTION!
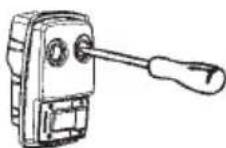
Do not put any part of your body in marked area. Contact can result in burns to the skin, or electrical shock if the spark plug cap has been damaged. Always use gloves. Do not use a machine with damaged spark plug cap.
Stopping
Stop the engine by pushing and holding the stop switch in the STOP position until the engine stops.

WARNING: When the engine is started with the choke in the closed position the cutting attachment will start to rotate immediately.
CAUTION! The stop switch automatically returns to the start position. In order to prevent unintentional starting, the spark plug cap must be removed from the spark plug when assembling, checking and/or performing maintenance.
General working instructions
IMPORTANT!
This section describes the basic safety precautions for working with trimmers. If you encounter a situation where you are uncertain how to proceed you should ask an expert. Contact your servicing dealer. Avoid all usage which you consider to be beyond your capability. You must understand the difference between forestry clearing, grass clearing and grass trimming before use.
Basic safety rules


- Look around you:
To ensure that people, animals or other things cannot affect your control of the machine.
To ensure that people, animals, etc., do not come into contact with the cutting attachment or loose objects that are thrown out by the cutting attachment.
- CAUTION! Do not use the machine unless you are able to call for help in the event of an accident.
- Do not use the machine in bad weather, such as dense fog, heavy rain, strong wind, intense cold, etc. Working in bad weather is tiring and often brings added risks, such as icy ground, unpredictable felling direction, etc.
- Make sure you can move and stand safely. Check the area around you for possible obstacles (roots, rocks, branches, ditches, etc) in case you have to move suddenly. Take great care when working on sloping ground
- Switch off the engine before moving to another area.
- Never put the machine down with the engine running or while the cutting attachment is rotating.

WARNING: Neither the operator of the machine nor anyone else may attempt to remove the cut material while the engine is running or the cutting equipment is rotating, as this can result in serious injury. Stop the engine and cutting equipment before you remove material that has wound around the blade shaft as otherwise there is a risk of injury. The bevel gear can get hot during use and may remain so for a while afterwards. You could get burned if you touch it.

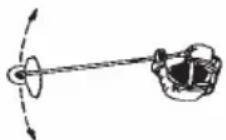
WARNING: Watch out for thrown objects. Always wear approved eye protection. Never lean over the cutting attachment guard. Stones, rubbish, etc. can be thrown up into the eyes causing blindness or serious injury. Keep unauthorised persons at a distance. Children, animals, onlookers and helpers should be kept outside the safety zone of 15m . Stop the machine immediately if anyone approaches. Never swing the machine around without first checking behind you to make sure noone is within the safety zone.
Basic working techniques
Always slow the engine to idle speed after each working operation. Long periods at full throttle without any load on the engine can lead to serious engine damage.

WARNING: Sometimes branches or grass get caught between the guard and cutting attachment. Always stop the engine before cleaning.
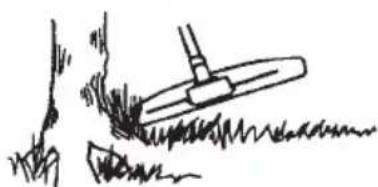
Grass trimming with a trimmer head Trimming


- Hold the trimmer head just above the ground at an angle. It is the end of the trimmer line that does the work. Let the trimmer line work at its own pace. Never press the trimmer line into the area to be cut.
- The trimmer line can easily remove grass and weeds up against walls, fences, trees and borders, however it can also damage sensitive bark on trees and bushes, and damage fence posts.
WORKING TECHNIQUES
- Reduce the risk of damaging plants by shortening the trimmer line to 4--4 1/2 inches (10--12 cm) and reducing the engine speed
- When trimming you should use less than full throttle so that the trimmer line lasts longer and to reduce the wear on the trimmer head.

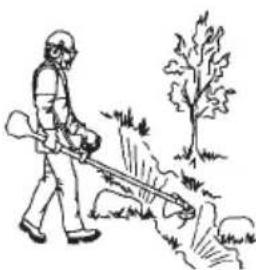
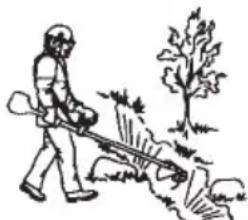
Clearing


- The clearing technique removes all unwanted vegetation. Keep the trimmer head just above the ground and tilt it. Let the end of the trimmer line strike the ground around trees, posts, statues and the like. CAUTION! This technique increases the wear on the trimmer line.

- The trimmer line wears quicker and must be fed forward more often when working against stones, brick, concrete, metal fences, etc., than when coming into contact with trees and wooden fences.

Cutting


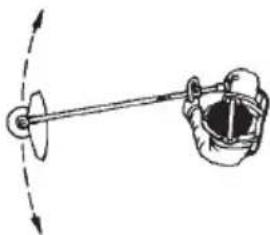
- The trimmer is ideal for cutting grass that is difficult to reach using a normal lawn mower. Keep the trimmer line parallel to the ground when cutting. Avoid pressing the trimmer head against the ground as this can ruin the lawn and damage the tool.

- Do not allow the trimmer head to constantly come into contact with the ground during normal cutting. Constant contact of this type can cause damage and wear to the trimmer head.

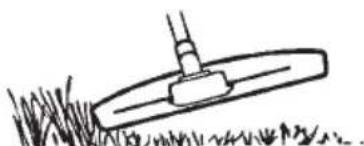
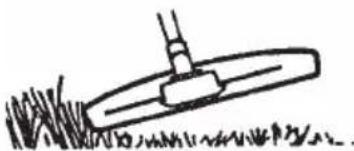
Sweeping


The fan effect of the rotating line can be used for quick and easy clearing up. Hold the trimmer line parallel to and above the area to be swept and move the tool to and fro.
- When cutting and sweeping you should use full throttle to obtain the best results.

WARNING: Neither the operator of the machine nor anyone else may attempt to remove the cut material while the engine is running or the trimmer line is rotating, as this can result in serious injury. Stop the engine and trimmer head before you remove material that has wound around the drive shaft as otherwise there is a risk of injury. The bevel gear can get hot during use and may remain so for a while afterwards. You could get burned if you touch it.

WARNING: Watch out for thrown objects. Always wear eye protection Never lean over the cutting attachment guard. Stones, rubbish, etc. can be thrown up into the eyes causing blindness or serious injury. Keep unauthorized persons at a distance. Children, animals, onlookers and helpers should be kept outside the safety zone of 15m Stop the machine immediately if anyone approaches.
MAINTENANCE
The owner is responsible for the performance of all required maintenance as defined in the operator's manual.
Carburetor
Your Husqvarna product has been designed and manufactured to specifications that reduce harmful emissions. After the engine has used 8--10 tanks of fuel, the engine will be run--in. To ensure that it continues to run at peak performance and to minimize harmful exhaust emissions after the run--in period, ask your servicing dealer to adjust your carburetor.

WARNING: The complete clutch, clutch cover, and shaft must be fitted before the machine is started, otherwise parts could come loose and cause personal injury.
Function
The carburetor governs the engine's speed via the throttle control. Air and fuel are mixed in the carburetor.
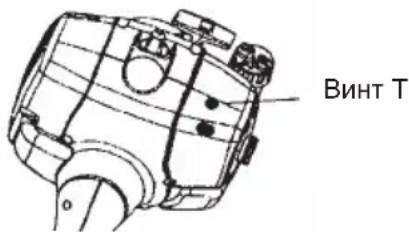
- The T--screw regulates the throttle setting at idle speed. If the T--screw is turned clockwise this gives a higher idle speed; turning it counterclockwise gives a lower idle speed.
Basic setting
- The basic carburetor settings are adjusted during testing at the factory. Fine adjustment should be carried out by a skilled technician.
CAUTION! If the cutting attachment rotates when the engine is idling the idle adjustment screw T should be turned counterclockwise until the cutting attachment stops.
Rec. idle speed:
See "Technical data" section.
Recommended max. speed:
See "Technical data" section.
Fine adjustment of the idle speed-T
Adjust the idle speed using the idle adjustment screw--T if it is necessary to readjust. First, turn the idle adjustment screw--T clockwise until the cutting attachment starts to rotate. Then, turn the screw counterclockwise until the cutting attachment stops. The idle speed is correctly adjusted when the engine will run smoothly in every position. The idle speed should also be well below the speed at which the cutting attachment starts to rotate.


WARNING: If the idle speed cannot be adjusted so that the cutting attachment stops, contact your servicing dealer. Do not use the machine until it has been correctly adjusted or repaired.
Unit/Maintenance Safety
Disconnect the spark plug before performing maintenance, except carburetor adjustments.
Muffler
CAUTION! Muffler is fitted with a catalytic converter designed to reduce harmful exhaust gases.
The muffler is designed to reduce the noise level and to direct the exhaust gases away from the operator. The exhaust gases are hot and can contain sparks, which may cause fire if directed against dry and combustible material.
Mufflers are equipped with a special spark arrester mesh. You should clean the mesh at least once a month. This is best done with a wire brush. If the mesh is damaged it should be replaced. If the mesh is frequently blocked, this can be a sign that the performance of the catalytic converter is impaired. Contact your dealer to inspect the muffler. A blocked mesh will cause the machine to overheat and result in damage to the cylinder and piston.
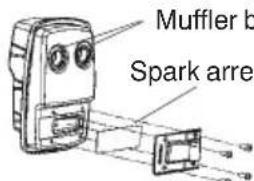
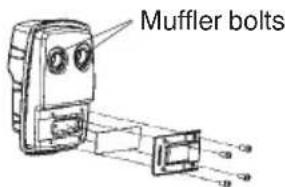
Muffler bolts
Spark arrester mesh
CAUTION! Never use a machine that has a faulty or loose muffler. Ensure the muffler bolts are tight.

WARNING: Mufflers fitted with catalytic converters get very hot during use and remain so for some time after stopping. This also applies at idle speed. Contact can result in burns to the skin. Remember the risk of fire!

WARNING: The inside of the muffler contain chemicals that may be carcinogenic. Avoid contact with these elements in the event of a damaged muffler.

WARNING: Bear in mind that: Engine exhaust fumes contain carbon monoxide, which can cause carbon monoxide poisoning. For this reason you should not start or run the machine indoors, or anywhere that is poorly ventilated. The exhaust fumes from the engine are hot and may contain sparks which can start a fire. Never start the machine indoors or near combustible material!
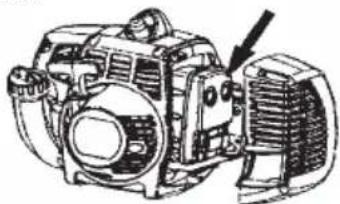
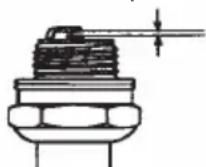
Spark plug
The spark plug condition is influenced by:
Incorrect carburetor adjustment.
- An incorrect fuel mixture (too much or incorrect type of oil).
- A dirty air filter.
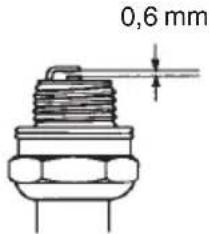
These factors cause deposits on the spark plug electrodes, which may result in operating problems and starting difficulties. If the machine is low on power, difficult to start or runs poorly at idle speed: always check the spark plug first before taking any further action. If the spark plug is dirty, clean it and check that the electrode gap is 0.6mm . The spark plug should be replaced after about a month in operation or earlier if necessary.
CAUTION! Always use the recommended spark plug type! Use of the wrong spark plug can damage the piston/cylinder.
Air filter
The air filter must be regularly cleaned to remove dust and dirt in order to avoid:
- Carburetor malfunctions
Starting problems
- Loss of engine power
- Unnecessary wear to engine parts
- Excessive fuel consumption
Clean the filter every 25 hours, or more regularly if conditions are exceptionally dusty.
Cleaning the air filter
Remove the air filter cover and take out the filter. Wash it clean in warm, soapy water. Rinse thoroughly. Ensure that the filter is dry before refitting it.
An air filter that has been in use for a long time cannot be cleaned completely. The filter must therefore be replaced with a new one at regular intervals. A damaged air filter must always be replaced.
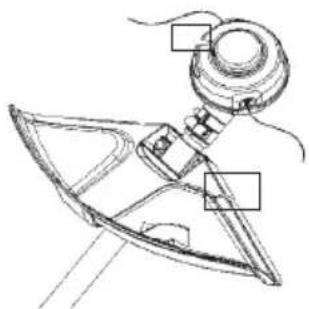
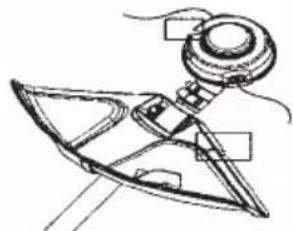
Bevel gear (128L)

The bevel gear is filled with the right quantity of grease at the factory. However, before using the machine you should check that the bevel gear is filled three--quarters full with grease. Use HUSQVARNA special grease.
The grease in the bevel gear does not normally need to be changed except if repairs are carried out.
Maintenance schedule
The following is a list of the maintenance that must be performed on the machine. Most of the items are described in the Maintenance section. The user must only carry out the maintenance and service work described in this Operator's Manual. More extensive work must be carried out by an authorised service workshop.
| Maintenance | Daily Maintenance | Weekly Maintenance | Monthly Maintenance |
| Clean the outside of the machine. | X | | |
| Make sure the throttle trigger lock and the throttle function correctly from a safety point of view. | X | | |
| Check that the stop switch works correctly. | X | | |
| Check that the cutting attachment does not rotate at idle. | X | | |
| Clean the air filter. Replace if necessary. | X | | |
| Check that the cutting attachment guard is undamaged and not cracked. Replace the cutting attachment guard if it has been exposed to impact or is cracked. | X | | |
| Check that the trimmer head is undamaged and not cracked. Replace the trimmer head if necessary. | X | | |
| Check that nuts and screws are tight. | X | | |
| Check that there are no fuel leaks from the engine, tank or fuel lines. | X | | |
| Check the starter and starter cord. | | X | |
| Clean the outside of the spark plug. Remove it and check the electrode gap. Adjust the gap to 0,6 mm or replace the spark plug. Check that the spark plug is fitted with a suppressor. | | X | |
| Clean the outside of the carburetor and the space around it. | | X | |
| Check that the bevel gear is filled three--quarters full with lubricant. Fill if necessary using special grease. | | X | |
| Check the fuel filter from contamination and the fuel hose from cracks or other defects. Replace if necessary. | | | X |
| Check all cables and connections. | | | X |
| Check the clutch, clutch springs and the clutch drum for wear. Replace if necessary by an autorized service workshop. | | | X |
| Replace the spark plug. Check that the spark plug is fitted with a suppressor. | | | X |
| Clean or replace the spark arrester mesh on the muffler. | | | X |
TECHNICALDATA
Technicaldata
128C 128L
(LT28CCHV) (LT28CSHV)
Engine
Cylinder volume, cm³
Cylinder bore, mm 35 35
Stroke, mm
Idle speed, rpm
Recommended max. speed, rpm
Speed of output shaft, rpm
Max. engine output, acc. to ISO 8893, hp/kW
Catalytic converter muffler
Speed-regulated ignition system
Ignition system
Spark plug
Electrode gap, mm
Fuel and lubrication system
Fuel tank capacity, litre
Weight
Weight without fuel, cutting attachment and guard, kg
Noise emissions (see Note 1)
Sound power level, measured dB(A)
Sound power level, guaranteeddA dB(A)
Noise levels (see Note 2)
Equivalent sound pressure level at the operators' ear, measured according to EN ISO 11806 and ISO 22868, dB(A)
Equipped with trimmer head (original)
Vibration levels (see Note 3)
Equivalent vibration levels (a_eq) at handles, measured according to EN ISO 11806 and ISO 22867, m/s
Equipped with trimmer head (original), left/right
28 28
28,7 28,7
3200-3600 3200-3600
11000 11000
8000 8000
0,7 0,7
Yes Yes
Yes Yes
Champion Champion
QCJ-8Y QCJ-8Y
0,6 0,6
0,4 0,4
4,4 4,8
109 109
114 114
100 100
9,2/5,4 6,9/5,7
Note 1: Noise emissions in the environment measured as sound power (L_WA) in conformity with EC directive 2000/14/EC. Reported sound power level for the machine has been measured with the original cutting attachment that gives the highest level. The difference between guaranteed and measured sound power is that the guaranteed sound power also includes dispersion in the measurement result and the variations between different machines of the same model according to Directive 2000/14/EC.
Note 2: Reported data for equivalent sound pressure level for the machine has a typical statistical dispersion (standard deviation) of 1 dB(A).
Note 3: Reported data for equivalent vibration level has a typical statistical dispersion (standard deviation) of 1m / s
| Model 128C (3/8 RH arbor shaft thread) |
| Accessories | Type | Cutting attachment/guard, part. no. |
| Trimmer head T25 (Ø2,4 - 2,7 mm line) 537 3 | 83-07 / 545 00 60-95 | |
| Model 128L (M10 LH arbor shaft thread) |
| Accessories | Type | Cutting attachment/guard, part. no. |
| Trimmer head T25 (Ø2,4 - 2,7 mm line) 537 3 | 83-06 / 545 03 09-01 | |
| Plastic blades Tri-cut 3 | 00 mm (separate 531 00 blades have part number 531 00 77-15) | 38-11 / 545 03 09-01 |
EC Declaration of Conformity
Issuer's name: Husqvarna AB, SE-561 82 Huskvarna, Sweden (Tel: +46-36-146500)
Husqvarna AB claims sole responsibility for the grass trimmer powered by gasoline platform(s)
LT28CCHV/LT28CSHV representing model(s) Husqvarna 128C/128L from 2014 serial numbers and on-wards. The platform number and model number are clearly stated in plain text on the type plate along with the year with subsequent serial numbers.
The object of the declaration described above is in conformity with the requirements of the Council's Directives:
2006/42/EC "relating to machinery" 17 May 2006
2004/108/EC "relating to electromagnetic compatibility" 15 Dec 2004
2000/14/EC "relating to noise emissions in the environment" 08 May 2000
In accordance with Annex V, the declared sound values are stated in the technical data sheet of the operator's manual.
The following standards have been applied:
EN ISO 12100:2010, EN ISO 11806-1:2011, CISPR 12:2007, ISO 14982:2009
TUV Rheinland N.A. has carried out a voluntary examination on behalf of Husqvarna AB, providing AM72140163 - Certificate of Conformity to EC Council directive 2006/42/EC for machinery.
This certificate is applicable to all manufacturing locations and Countries of Origin, as stated on the product.
The supplied grass trimmer conforms to the example that underwent examination.
Signed on behalf of: Husqvarna AB, Huskvarna, Sweden, 01-01-2014

Ronnie E. Goldman, Director of Engineering (Authorized representative and responsible for technical documentation)
01-EN
SYMBOLFÖRKLARING
Symboler
Always ensure the trimmer line is wound tightly and evenly around the drum otherwise the machine will generate harmful vibration.
Rengoring at luftfilter
Speed-regulated ignition system
Sytytysjarjestelmä
Sytytystulppa
Karkivali, mm
Attention: projections'et'ricochets.
Personal protective equipment
Recommended max. speed:
m = 311 ;
armelya
EC Declaration of Conformity
Putere. maxima motor, conform. ISO 8893, kW
2006/42/EC "makineler hakkinda" 17 Mayis 2006
3aepnckpyte BoNocbl BbIe ypoBHa nJe.
IpyoBHeb Wyma, n3nyuaeMOrO BOKpykaHouyO cpey,
coTBTCTBYET DlpeKtNbAM EC Bbl6pocbl MaunHbI yka3aHbI V TnaBe "TexMHcckHe
XapakTePncTnKn"N Ha 3TNKeTKe
YPOBENb 3ByKOBOrO DaBnEHNHa paCCToHnn 7,5 metpoB
IVcnoIb3yIte He3TnIupoBaHHbI IINI BILCOKOKaueCTBEHHbI 3TNIUPoBAHHb6eH3nH IMacIO DnI dByXTaKTTHbIX DBIRATEEN HUsqvarna. CoepxKaHHe MacLaB6eH3nHe DOJKNHO COCTABNtB 2 % (1:50).


Ipeed 3anyckom npocJeTe 3a cJeDyUoM:
HnpuHa Husqvarna AB noCToHHo pa6oTaet Ha CDOBepWeHCTBOBaHNEM pa3BHTNEM CBOUX PPOyKTOB N NO3OMy OCTaBnEET 3a CO6oI npABO Ha BHeceHne N3MeHenB V FOpMy I nn3aHb6e3 npeDbapntelbHoro npDeynpeXdHn. PpOJXNTelhOe BO3DeEChTBHe Wyma npBODIT K Hen3JeumMbIM HApUeHnM cnyxa. PoTOMy Bcerda nOlb3yInTecb peKomeHDoBAHH 3aunToT O Wyma.
A PEPDYNPEXKDEHNE! Hn npn KaKnx 6ObToTeNbCTBax He cNeDyET BHOCNTb N3MeHeHnB NepBOHaJaIbHyU KOHCTpyKcIIO MaunHbI 6e3 pa3peWeHn I3ROTOBtEn. Bcerda nonb3yTecb TOJbKO OpuHaJIbHbIMN 3aJYactaMn. PpImeHHeHn HecaHKUHOHPOBaHHbIX N3MeHeHn n/nnn PpHaJaEHXOcTee MoXe TnpBeCTN K cepBe3HOJ TpaBME nn CMeptelbHomy NCxOdy onepaTopa NN dpyrNX IIOdei.
A PEPYNPEXJEHNE! Noppe3uk, KycTope3 nIIN TpIMMep, KOToPbIMN NOIb3yOTcR He6pexHO IIN HEnpaBnJIbHO, MoKET CTAb ONaChbIM IN pPiBeCTN K cepBe3HbIM TpaBMAM OpeaTopa IIN OKpykaOuX. BbldoJxHbl 06aTeIbHo 3HaTb N NOHMATb COdepkahne 3TOI INCHCTpykUn.
4To eCTb 4To?
- TOnOBKa TpMMMepa
2.Побka OТВерстудя 3аправки KOHСИСТЕHTHOI Cma3KN
- PeDyKTop
- 3aunTHbIKoKxpyekyux opraHOB
- UtsaHa
6.птлесьзая руковка
- Pbyar npocceia
- BbiknouateIb
- Ctonop pbuara npocceia
-
KpbIuKa cIIINHnpa
-
RykorTka cTapTepa
- TOnJIINBHyI B6aK
13.Bo3dyuHa 3acNoHka
- KhoNka npaMepa
- KpbuKa BO3nyHOro cnbtpa
- Peryntop noIooKeHnnyuKu
17.Пивовднй дис
- RykoBoDCTBO no 3KcIpyatau
- Raeyhbl Klnou (ToIbKO dna 128C)
- Kniou wecnturpaHHbI (ToJIbKO dJa 128L)
OBsIe IpeIINCAHnI NO Bc3OAnACHOCTN
Baxnay nHopmaun BAXHO!
- INHCTpyMeHT npeHa3HaueH ToIbKO DnA CTpNKK TpaBbl.
EINHCTBeHHbIMN HacaKaMn, KOToPbIe Bbl MoKeTe NcNoJIb3OBaTb C 3TNM DBNrAteIeM, AIBJIOTcpeKyuIe opraHbI, ONICAHHbIe B pa3DeIe "TexHuYeCKue XapakmepucmuKU".
HeIb3aNoIb3OBAtbcnHnCTpyMeHOM, ecN Bbl yctaII, 60nbbl, haxoNTecb noB03deIcTBnEM CnnpTHoro nI IN neKapCTBeHHbIX npenapaTOB, KOTOpbie BnIyOT Ha BaIe 3peHne, paccyDOK IIN KOOPdINHaCNUIO.
HeIb3a NOJIb3OBAtbcra INHCTpyMeHTOM npn He6laonnpnTbIX noroDhbIX ycNoBnX, TaKNX KaCnIbHbI XoNOd, Japa nnBnBnXHOCTb.
IcnoJb3ynte cpeDCTBa HINBnUdyaNbHO3aUNTbI.CM. yka3aHnBpa3dene "CpeOcmba uHDueuOyAnbHO3aumbl".
HeIb3aNoJIb3OBAbTcRa HeINcnpaBbIM HnCTpyMeHToM. BbINOJrYe yKa3aHnA NO npOBepkAm, Texo6cnyKuBaHnU yXoDy B COOTBeTCTBnC HAcTOraJei HnCTpyKuNei.
HeKoTOpbIe onepaunno TexO6cnyxuBaHnIO upeMOHTy DOJXhbl npOBODtbcra TOnbKO CneuaJIbHO 06yueHHbIM KBAIIuΦuNpOBAHHbIMn CneuaJIncTaM.N. pa3deI "TexO6cnyxueHaue".
- Ppei3anyckom DBNrataJIe BCE uNTKn I ORpaxKeHn JOJXHbI 6bITb yCTaHOBJeHbI Ha CBOE MeCTo. Y6eINTEcB BOTCYTCTBnN NOBpeKDeHn CBeYn 3aKNrAHN N BbICOKOBJbTHOFO npoBoJa. HNaue Bac MoKeT ydApntb TOKOM.
OnepaTopdoJKeHcneiNb,UTo6bBOBpeMpa60TbIBpaDnCyce15MeTpOBHe6blIOJIHOeINJINXNBOTbIX.
A INPEUYPEXKDEHNE! Maunha BO BpeMa pa6oTbI co3daet 3NeKtpomarHHTHOe none. B ONpeJeHHbIX o6cToaTeNbCTBax 3TO
NIOJI MOKET CO3DABaTb NOMEXI JIJI NACCUBHbIX IN AKTHBbIX MEduuHcKIN MMnJaHTaHTOB. YTo6bl N36ExKaTb PnCKa Cepbe3HOrO NOBpeXJDeHN IIN CMePTN,JIuCaM C MeDuuHckmM MMnJaHTaHTaM peKOMeHdyeTCr NpOKOHcyJbTInPoBaTaBC R BpaQOM IN3ROTOBNTeLEM MMnJaHTaHTa, IpexKeIe Qem PnCTyNaTb K paBoTe c 3ToI MaunHOH.
A INPENEYNPEXDEHNE! HNKoRda He NO3BOJnTe DeTAM NOB3OBAbCra NN HaxoDHTCBc PRAOM C NHCTpyMeHToM. TaK KaK MaunHa OChaSeHa BbIKIIOyATEJeM 3aXnRaHnC npyXHHbIM BO3BpaTom M MoKeT 6bITb 3anyuHa c 6e3 pbkA nC He6oJIbWM ycINHeM Ha pyKoRTke CTapTepa, To DaKe MaKe MaIbIe DetN B ONpeEHbIX 06CTOaTeJBcTBax MOrYT co3DaTb ycINne, Heo6xOdImoe dJa 3anycka DBrarTeI. 3TO CO3daet pck cepBe3hIx TpaBM IIOdei. No3tomy BCerDa CHmMaIte KOJNaQOK CO CBeuN 3aXnRaHn, KOrDa Bbl OCTabLnEte HHCTpyMeHTo6e3 npncMoTa.
CpeIcTb3aIITbI onepaTopa BAXHO!
Pn pa6oTe c TpMMepom onepaTopbI
DOJXHbI NCNOJb3OBA Tb
COOTBeTCTByUOUIe CpeDCTBa
HNDbNDbYaNbHO 3aunTbI,
cepTnΦuipOBaHHbIE KOMneTeHTHBIM
OPraHAM. CpeDCTBa INDNBnDaJIbHO
3aunTbI NIOHOCTB NO HE NCKHouaHT
BO3MOXHOCTb HecCACTHO CnyaA,
ODHaKO OH MOryT UMeHbUnTb TJeCeTB
TPaBMbl. Pn BbIbope cpeDCTB 3auNTbI
06paNTeCtB 3a IOMoUbIO K CBOEmy
dInepy.
ANPEyPExEHENE!Nocne OCTaHOBKn DBnraTeJNA CHMNTe 3aunTHbIe HayuHKn dTOro TTo6bl BblMOrJI CNbIbTaDpyRHe 3ByKn HnN INpeDuynpeDnteHbIe CnHaNbI.
OBsNE INPeDnIcAHnI NO Bc3OpAChOCTN
3AUHTbIE HAYHINKIN
CneNyET NOIb30BaTbC HAYUHNIKAMN CIOCTaTOUHBIM WymOocna6nRAIOUM 3ofoektom.
3AUNTA JIA3
CneNyET Bcerda noJb3aTbcra Oo6peHHbIMn 3aunTHbIMn OOKAMn. PnnoB3OBaHmN Bu3npom TaKke CneDeyet NOJb3OBAtbcra Oo6peHHbIMn 3aunTHbIMn OOKAMn. Pd Oo6peHHbIMn 3aunTHbIMn OOKAMn NOpda3ymeBaOTcR OOK, OTBeuHOJIe HOpMaTINBHbIM DOKMeHTam.


PYKABUNbI
B cnyuae Heo6xoJIMocTn, HanpImep, IJIa c6bOpkn peKyuIero o6OpyOBAHnA, CneJeT HaTe b pyKaBnCbI.
CANOIN
HaedeBaIte npouhble canorn Ha HeCKoJIb3KoI NOIoWBe.
ODEKDA
HaedeBaTe OdekDy CdeNaHHyo n3
nIIOTHOu TKaHN uN36eRaTe CBO6OHO
OdekDbl, KOTOPa MoKet 3aueHITbcra 3a
kyCTbU BcTKn. BcerDa HaedeBaTe
npouHbIe DInHHbIe 6pIOKn. He HaedeBaTe
IOBeINPbIe yKpaUeHnA, WOpTbI,
caHdJIIMn I He XODNTe 6OCNKOM.
3aΦHKpyTe BOLOCbI BblSe yPOBn
nJeU.
ANTEYKA
IOnb3OBaTeHIO NOdpe3uKOB, KcTOpe3OB HnT PnMMePoB BcERda Heo6XoDmO HMeTb C cO6oanTeUky dJa OKa3AHnNEpBOH NOMOUI.
3aunTHbIe npncnocO6neHn HnCTpyMeHTa
B daHHom pa3dene onncahbl 3aunTHbIe npncnoc6hne HNCTpymeHTa, nx fynKuHm MeToDnka npOBedeHn npOBepOK n Texo6cnyKuBAHn Dn o6ecneueHn nx npabNJbHO np60tbl. (C NOMOsbU pa3deNa "Umo ecmb ymo" Bbl MOKeTe haTn 3Tu npncnoc6hneHn Ha BaWe m NcHCTpyMeHTe.) Cpok cnjXkbI nHCTpyMeHTa MOKeT 6bITb ykOpOeHn pNCK abapnn yBeJIuueH, eCIn O6cnyKuBaHHe NcHCTpyMeHa He BBINONHReTc DOJXHBIM Obpa3OM n ECIn cepBNC n/nn peMOHT He 6bln BBINONHeHbI npOpeccNOHaJIbHO. EcIn BAM Tpe6yeTc DOONHNTeJIbHa nHOpMaUH, obpaNTeCB B 6JnxKaIyMoCTepckyIO NO O6cNyKuBAHNIO.
BAXHO
BbnoHHeHne Bcex Oepaun no
06CnyKbAHnIO n peMOHTy INCTpymeHTa
Tpe6yeT CNEuaJIbHOI NOIROTOBKn.3TO
OTHCNTCA N 3aUHTbIM
npncOco6JeHnM.Ecnnpe3yJbTaXOT
6bl ODHOHn HIXKepeuNCNeHHbIX
npOBepOK ABnRETCn HeyDoBNETBOPITJIbHbIM, HeoBXoDmO o6paNTbcraB CepBnCHyIO MaTePCKyIO. POKynKaODHOro n3 HaUNx n3DeNn rapaHTnpyET Bam npocceccNoHaNbHbI pEmOHnTexO6CnyKbAHne. Ecn nn TaTBe BbI NOKyNaTe IHCTpymeHT He IMeETcRaHaWero cepBnCHORo CEHTpa, NoXaNyIcTa y3HaIte O paONoKeHNn 6NkAaWei cepBnCHO MaCTepckoi.
OBsIe IpeDnSCAHnIO Bc3OpAChOCTN
A INPEUYPEXJEHNE! HeIb3a NOIb3OBaTbcnHCTpyMeHTOM BCnyuae,ecn 3aunTHbIe npncno6JeHn HncnpaBbl.
CneyuTe HNCTpyKUmaNo npOBepKe, Texo6cnykBaHnIO n peMOHTy, npBBeDeHHbIM B 3TOM pa3dene. Ecnpe3yIbTaT XOTa 6bl OndHO HxKepeuNCHeHHbIX npOBepOK AIBJeTc HeyDoBnTeBOpNTeJIbHbIM, Heo6xoJMo 6paTntbcB cepBnCHyo MaCTepCKyIO.
Ctonop pbyara dpocceia.
CToOp pIyura IpOcSeNcIpyKNTI npedOTbpaueHn CnyauHoro 3anycka. KOrda cTOnop pbUara dpocceN Bxat B pyky (A) KOrda Bbl depknte pyky Bpyke),pburdpocceN (B) BBcBo6oxJaetc.Korda Bbl OTnyckaeTe pyky, cTOnop nPBurdpocceN BO3BpaiaOTcB CBOE nepBOHaayalbHoe noJIOKeHne.3TO npoNCxOaNT C NOMoubI He3aBncMOrO BO3BpaTHORO npyKinHOrO MexaHn3Ma.3TO O3NaHaeT, 4TO dpocCeIb ABTOMaTnueeKn 6IokpyeTcB NIOJooKeHn "XoIoCTORO xoda".
y6eintecb,yTOpbyarDpocceIa3abIOKIpOBaH BnO3nUIN "xOJocToroXoJa"Bcnyae,KordaeroCTOnOpHaxoINTCBNxCXODHO3nUIN.
HaKMTHe Ha cTOnOp pbUpara dpocceIy6eIntecb,HTo,KOrda Bblero
OTnyckaete, OH B03BpaaaeTcB INCXOdHyIONo3uHIO.
Y6eDntecb, yTO pbUar n CTOnop pbUara
dPoCCeJIaERKO DnBraTcN INx
BO3BaPaTHIbe npyKHHbIe MExaHn3MbI
pa6oTaHT nCnpaBHO.
Cm. pa3delen "3anyck". 3anyctnte MaunHy n nonHocTbIO OTKpoiTe dpocceIb. OTnyCTnte pbuar dpocceIa Iy6eHNTEcb, YTO pexyuue opraHbI OCTaHaBJIIBaOTcN OCTaOTcN HeNOdBnKhbIMN. Ecln pekyuue opraHbI npOJKNaOT BpaaATbcr npDpocceJe B pexkme xoIOCToro XoJa, Heo6xOIMO OTPerynpOBaTB Kap6Opatop B pexkme xoIOCToro XoJa. Cm. pa3delen "Texo6cIyXueaHue".
BbIKHoyaTeIb
y6eHNTecb, yTO dBnraTeIb OCTaHaBJIbNAeTcKoTa BbI HaxmaeTe N ydepXNBaTe KHOKNy BbIKIOuATEJI.

OBsIe IpeDnSCAHnIO Bc3OpAChOCTN
3aunTaHbIKoKxypeKyuux opraHOB


3Ta 3aunTa npedHa3NaeHa DnnpedOTBpaueHn O6pacbBaHnOBBeKToB B CTOPOHy OepaTopa N Dn3aunTbI OepaTopa OT HeHamepeHHbIX KOHTAKTOB C pexyue HacaKoN.
Y6eIntecb B TOM, YTO 3aunTa He Imeet NOBpeXdEHN N TpeuH. 3aMeHInTe 3aunTy, ecn OHa NoDBeprJac yDapam INN Tpechyna. Bcerda nCnoNb3yIne 3aunTy, peKoMeHDoBaHHyO dJaToro Tnna peKyuNX opraHOB (HacaDOK), KOTopb Bbl nCnoNb3yete. CM. pa3deJ "TexHuueckue xapaKmepucmuKU".
A PEPYNPEXDEHNE! Hn B Koem cnyuae He nCnoNb3yIte pejxuine opraHb 6e3 ceptnuPobAHHORO 3aunTHoro koxya.Cm. pa3deJ "Texnueckne xapaKTePncTkn". YcTaHOBka 3auNTbI HeBepHOro Tnna Hnn HncnpabHOB 3auNTbIMoXeT npBeCTN K cepbe3HbIM TpaBMam onepatopa.
O63aTeIbHO y6eIITecB TOM, YTO
NeCKa TpMMepa IIOTHo N paBHOMepHO
HaMOTaHa Ha 6apabAHnAue 6ydyT
Ha6liOdaTbC BpeHbE B6paun.
A PEPDyPEXDEHNE! IInTeIbHoe BO3dEINCTBnE Bn6paun MoXeT npNBecTN K HApUWeHNIO kPOBOO6paueHn Nn pacCTpoiCTBaM HepBHOH CNCTeMbI y IIODeN C HApUWeHHbIM kPOBOO6paueHnEM. B cnyae NOBJIeHnCmNTOMOB npeperpy3Kn OT Bn6paun CneJyET ObaPATNbC K BpaCy. TaKIMN CmMTOMAMN MoryT 6bITb: OHemHne, Notepa
yBCTBNTeIbHOCTH,“UeKOTKN”, “NOKaJIbIbAHne”,60JI,cIa6OcTb, N3MeHeHne CBeta N COCToHn KoxN. O6bIuHO NOIObHbIe CmMTOMbl npoABJIOrTcHa naIbucx,pykax nnn 3aIaCTbAx.
InyuHTeJIb
IywnTeJI npdHa3HaeH dIy oecneeyHn HmMeHbWero BO3MOxHO yPOBn Wyma nDn OTOBda BbIXNONbIX ra3OB B CTOPOHy OT onepaTopa.
BHIMAHHE!IyunTeIb,
obopydobaHHbI KaTaN3atOpom,
npedHa3NaueH TaKxe IJy UMeHbUeHnA
coepkaHnB B BixNONax BpeHbIX
BeueCTB.

B ctpaHax C xkapKIM n CyxHM KJImaTOM cyueCTByeT pNCK noXapOB. N03tOMy Mbl CHa6dINn HeKOTOpBte rnyuNTeIN NCKPOyNAIBNBAIOUM 3kpaHOM. Y6eDntecb, yTo BaW rnyuNTeInb IMeet TAKOgKpAH.
Heo6xOIMO cIeIOBaTb yka3aHnM no
noIroTOBKe, 3KcNpyatauIN npMOHTy
rJyWnteNe. HeIb3a NOb3OBaTbCra
MaunHO B cIyuae ecnn rJyWnteNB
HenCnpaBeH.
OBsIe IpeIINCAHnI NO B3OJACHOCTN
Perynpho npOBepaTe HaedxHocb paobtI rnyuNTeI.
A PEPYNPEXDEHNE! TnyuHTeNc KaTaN3aTopAMN B npouece pa6oTbI CnJIbHO HArpeBaIoTcN HeKOTOpoe BpEMn NocNe BbIKNoUeHnOcTaIOCTc RopaymN. 3To npOnCxOJNTn Ha XOLOCTOM XOy. PpIKoCHOBHeNk HMM MoXeT npNBecTN K OXOry KOxN. POMHnTe 06 OnaCHOCTn BO3HnKHOBeHn NoXapa!
A PEPENPPEKDEHNE!
Inyntelb coepknt B ce6e XmNueckne BeuectBa, KOTOpbie MOryt 6bITb KaHcpeoreHHbIMN. N36eAaTe KOHTaKTOB C 3TUMN BeuectBaMn B cnyae nobpeXdEHHra rnyntelna.
A PEPYNPEXDEHNE! MeiTe BBNDy,TO DnRatEnb BblOpacbIbaet B aTMocpepy BblXJONHbIe ra3bl, COdepKaUne MOHooKcNd yrnpoDa, KOTopBIM MOxET Bbl3BaTb OTPaBJIeHne yrapHbIM ra3OM. NOrTomy HNKorda He 3anyckaIte DnRatEnb B 3akpbITOM NOMeueHH. BblONHbIe ra3bl HMeOT BblCOkyo TemnepaTyP INHOrda CoedePKaT NCKpbI, YTO MOxET npNBecTN K Bo3ropaHNo. Hn B Koem Cnyae He 3anyckaIte MaunHy B 3akpbITOM NOMeueHHu NIN B6JIn3N BOCnJaMeHryOuXcra (OrHeonacHBIX) MaTePnaJIOB.
Pekyuue o6opyDbaHne
B daHOM pa3deJe onncaHo, ka c nOMObI npaBnIbHOro Texo6cnyKuBaHHN u NCNoJIb3OBaHHN HyxHoro TnPa pexyUx opraHO Bo6ntbcMAkCmMaJIbHOI pON3BOdNTeJIbHOCTN yBEJInuHTb CpOK cnJXbIpeKyuuxopraHOB.
BAXHO!
Pojb3yIeTcB TOnbKO peKOMeHdyEmbIMn
HamnpeKyuIMn opraHaMn n
3aunTHbIMn npncnocO6JeHnAMyN! CM.
pa3dEel "TexHueckne xapaKTepcntkN".
Pojb3yIeTcB yKa3aHnAMyN HCTpyKuNN
DnPapeKyuJero 06opuydoBaHnN dnn
npabInbHOY cTaHOBKn JeCKN N Bbl6opa
npabInbHOr DnAmEtpa JeCKN.
A PEPYNPEXDEHNE! Heo6xOdmo OCTaHaBnBaTb DnRaTeIb NepeD TeM, KaK npCTynatb K paBoTe C kaKoJ-Ni6o YacTBIO pexyux opraHO. OH npOdoJIkaeT BpaauTaBCa DaKe NocNe OTnyckaHn pyuara DpocceN. IpeXJe Yem npCtynatb K paBoTe C pexyUHMn opraHAMn, y6eINTecb, YTO OHI NOJHOCTbIO OCTaHOBNJNCb N OTCoEINHIne npBOoDT CBeu 3axnraHn.
A INPDEUYNPEXJEHNE!
Hencnpabhna pexyua haacda Ka yBennuBaet BepoTHocTb HechactHO rCnya.
OBsIe IpeDnSCAHnIO Bc3OpAChOCTN
TOnOBKa TpIMMepa
BAKHO
O63aTeIbHO y6eIITecB TOM, YTO IeCKa TpIMMepa NIOTHo N paBHOMepHO HAMOTaHa Ha 6apabH, INaue 6ydyT Ha6nDAtbC BpeHbE Bn6paun.
IcnoJb3yTe TOnbko
peKOMeHDoBaHHbIe roJIOBky TpIMMepa n necky. Cm. pa3dJe "TexHuYeCKue xapaKmepucmuKu".

Kak npabnno, Yem Mehbwe HhCTpymehT, Tem Mehbwero pa3Mepa rONOBka TpMMepa dna Hee Tpe6yeTc n Haobopot. 3TO CBA3aHO C TEM, yTo PnC TpNkke C NcNoJIb3OBAHHeM Jeckn DBnraTeIb IcNbITbIbAet TEM 6oJIbWee COnpOTNBHeHne OT cKaUNBaEMOn TpaBbl, Yem DaJIbwe paCNOJORAETcR JeCKa OT OCN BpaUeHn.
Динha leckn taKke nMeet 6oIbwoe 3NaueHne.ДЯ 6OJee DnHHoN leckn Heo6xOaM 6OJee MoUHbIn DBnraTeNb, Yem dJa 6OJee KOpOTko Jleckn TOrO Xe DNaMeTpA.
Y6eINTEcB TOM,TO HOK, yCTaHOBHeHHbI Ha 3aUInTe rOIOBKn TPIMMepa, He NOBpeJdeH. OH npeHa3HaueH dJa o6pe3Kn neckn do HxKHoDJIHbI.
YTo6bI yBEnuHTb cPOK cnyk6bI Jeckn, ee Heo6xOIMMO BbIMaHNBaTb B BOe HeCKoNko DHei. 3To cDeNaET ee nnotHee H OHa 6yJeT cnyKntb DoJbWe.
INHCTpyMeHT CO6paH TAK, KAK NOKa3aHO B INHCTpyKcH.
C6opka netJeo6pa3Hou pyKoTkn
YcTaHOBnTe pyKy Ha 7aTHry. O6paTne BHHMaHHe Ha To, YTO pyKa DOJXHa yCTaHaBnBaTbCmEJKy DByxC TpeIOK, HAnecEHbIX Ha 7aTHry.

YcTaHOBnTe 6oJIT,3axmM 6apaKOByIO raKy,KaK noka3aHo Ha pucyHke.
-ПnotHO 3aTЯнITEбapakobую raiky.
YcTaHOBka 3aunTbI IN TpMMepHOn roJOBKn (128L)


- YCTaHOBnTe 3aUHTbI KOKyX (A) TpMMepa, COOTBeTCTByIOuIi DaHHOMY TINy IONOBK IN TpMMepa. HaDeHbTe 3aUHTbI KOKyX Ha CkOby StaHrN 3akpenTe erO BnHTom (D).
HaenebTe npINBOHOH NnCK (B) HbBbIXoHOH BaI.
IobopaunBaIte BAN Do Tex nOp, noka OJHO I3 OTBepCTnB npNBOHOM DnCKe He COBMecTITc C OTBepCTnEM B Kopnyce peDyKTopa.
BCTaBBTe KIOU (C) BOTBepCTne, UTO6b3actONOpNTb BbIXOHOB BaI.
- PπuBHTnte roJONOBky TpIMMepa (H) NOBOPaUNBa ee npOTNB, YacOBn CTpeJKN.
Дя pa36bOpKn BblOnHnTe BblIePnBBeDeHHbIe Opeaun B o6paTHOM noprKe.
YcTaHOBka 3aunTbI n TpMMepHOJ roJOBKn (128C)

YCTaHOBnTE 3aUNTHbIK KOxUx (A) TPMMepa, COOTBETCTByIOuIN DaHHOMy Tnny rOIOBKn TPMMepa. HaDeHbTe 3aUNTHbIK KOxUx Ha cKO6y UtaHnN 3akpePnTe erO raIKoB (B).

Haenebte Ha BAN nbIe3aunTHbIKoJNaQK (C).PiJIe3aUNTHbIKoJNaQK DOJXeH NOnHOCTbIO 3aKpbBaTb raKy.
3axmnte nbile3aunTHbIKoJnaOKraeHHbIM KIOUOM, YTO6bI 3aCTOnOpNTbBaN.
CEOPKA
- PnBHTnte roIOBky TpMMepa (D) K Bany NOBopauBaJee no yacobon CTpeJIke.
Дя pa360рки BblonHnTe BblpePnBeDeHHbIe OepaUNB 6paTHOMnpAKe.
ПРавILA OBPAULEHЯ C TOПЛВOM
Ppabnna 6e3onacHocT npn 3anpaBke
HnBkoemcnyae He 3anyckaIte IBNrataJIb:
- EcnBb npoJnHa Hero TOnnBO.
- Bbtpnte BCE 6pb3n OT TOnJInBa.
- EcnBb npoHn TOnnBO Ha ce6nHa CBOO OeJy. PepeoHehTeCb.
- Ecn npocxOHT yTeKa TOnnBa. Perynpho npOBepaTe KpbIuKy TOnnBHO 6aka n TOnnBONpOBOdBi Ha OTCYCTBne yTeYeK.
TpaHcnpTnpOBka n xpaHeHne
XpaHnTe n nepeBO3nTe nHCTpyMeHT n TOIINBO TAK, YTO6bl NCKIOUHTb ONaCHOCTb COpNIKOCHOBeHN 6pbI3r IIN BbIXN0NHbIX rA3OB C OTKpbITbIM ORHEm INN NCKpAMn. HanpIMep,OT 3NEKTPnueCKNX MaUNH, 3NEKTPOMOTOPOB, BbIKNUOyATeNei, HArpeBaTeJIbHbIX np6OpOB nT.I.
Bo BpemxpaHEnn TpaHCnOpTnpOBKn TOJIINBa HEO6xoDIMO NcNOJb3OBA TbpeHa3HaueHHBe IJa 3TOrO CneuNaBbHbe KOHTeHepbl.
Ecnn HnctpymeHT Ha dntteNbHoe BpeMa CTaBNTcHa XpaHeHne, Heo6xOdmo Cnntb TOnnIBo n3 TOnnNBHOro 6aka.
Cneinte 3a Tem, yTo6bI HNCTpyMeHT 6blXopoOo OunueH, nYTo6bI nepeI erO npOIOJNOKNTeJIbHbIM xpaHeHnEM
6bINO BbINOJIHeHO TexHnueCKoe 06cnyKnBaHne.
TTo6bI He npOn3oWNo HEnpOn3BOJbHOrO 3aNycka DBrVaTeJIa, KOJIpaOK CBeu nCneDyET CHImaTb Ipn IINTeJbHOM XpaHeHn, ecn INcTpymeHT 6ydt OctabJeH 6e3 IpcmOTpa N npN JIObOM O6cnyKbAHnn.
3akpennTe MaunHy BO BpeM TpaHCnOPTNPOBKN.
A PEPDyPENPEXDEHNE! ByaTe
OueHb OCTOPOXHbI npn o6paueHnC TOnnBOM. NOMHnte 06 onaCHOCTN BOCnJaMeHeHn, B3pblBa n BdbixAHn BBIXJONHbIX rA3OB.
IOnrTOBka TOnnHBHOcMecn IPNMEUAHNE!
HCTpyMeHT OChaueH DByXTaKTHbIM DBURAteJEM N DOJXHa Bcerda pa6oTaTb Ha CMEc 6eH3nHa N CneuaJIbHOrO Macna IJa DByXTaKTHbIX DByraTeJe. OeyH BaxHo TOUHO OTmepuTb KOINueCTBO Macna, YTObI ObecneuNTb Ero npABNJbHOe COOTHOweHne B CMEcn. He60JIbwoe HecooTBetCTBne B KOINueCTBe Macna MOKeT IMeTb 60JIbwoe 3HaueHne npn pnproTOBJeHn H60JIbWOrO KOINueCTBa TOnNIBHOI CMEcn.
ПРавILA OBPAUCEHENC TOpJIbOM
A PEPYPEXDEHNE! TOnnBO n
NcnapeHne TOnnBa OueHb
NOXapOONacHbI e MOry TnpNBecT N K
CEpbE3HbIM TpaBMam PnBbIXaHnn I
KoHTAKTe C KOKeJ. ByDbTe NO3Tomy
OCTOPOXHbI Pn OBpaUeHN C TOnnVBOM
N ObecNeuThe XopoUyIO BeHTnJIauNIO
Pn OBpaUeHN C TOnnVBOM.
BeH3nH
PIMMEAHNE Bcerda noIb3yITecb BBICOKOKaueCTBeHHbIM 6eH3nHOM CMeJAAHHbIM CO CneuaJIbHbIM MACJOM (MUNHMaJIbHOE OKTaHOBoe YcNo 90).
MHHMaJIbHOe peKOMeHnyeMOe OKTaHOBoe YnCNo - 90. Ecnn Bby 3aJIbeTe B DnIraTeNb 6eH3nH C OKTaHOBBIM YnCnOM MeNbWe 90,6yDet npOncXoDntb DeTaHaunr (CblIwATbcra "NoCTyKuBaHne").3To npINBOdNT K yBeInuHeHIO TeMnepaTypbl DnIRatEnr, YTO MOKeT RaBtbcr npUHHO erO cepbe3HO IONOMKn.
- Pn dnteHbHO pa6ote Ha 6oNbuxx obopotax peKOMeHyetc 60nee BbICOKoe OKTaHOBOe YNCNo.
Macno DnA DByXTaKTHbIX DnBaTeJeN
Дяннушero pe3yIbTaTa
ИСПОЛБ3YIte CNEUAnbHoe MacNo ДЯ
ДВByXTaKTHbIX DBnraTeJei
HUSQVARNA HP. CoOTHOseHne
КOMnoHeHToB 1:50 (2%).
HeIb3a IcNoJIb3OBaTb MaCIO dIy DByXTaKTHbIX DnBraTeNei, PpeHa3HaueHHoe IJa NOBBeCHbIX DnBraTeJe C BoJHbIM OXJaXdEHNEM.
HeIb3nOJIb3OBaTbMaCNo, npedHa3NaueHHeOДЯ YeIbIePExTAkTHbIX DnurateJeI.
He roTOBTe TOnnINBHOcMecn 6oJIbIe, HEM Ha ODNH MeCra pa60TbI.
EcBbdoIro HeNCIOB3OBaIN HCTpyMeHT,TOJIINBO HxKHO CINTb IN npOMbITb 6ak.
ПРавILA OBPAUCEHENC TOpJIbOM
A PPEyIpyEKeHHe! TnyuHTeIb c KaTaN3aTopOM CnIbHO HArpeBaETcB B TeueHne paOToI N OCTaETcH HarpeTbIM eue HeKOTOpoe BpEm. 3To npOnCxOAnIT N Ha XoJocTOM XoY. TomHnte o6 OnaCHOctn BO3NkHOBeHn IOxapa,OCo6eHHO np Pa6ote B6IIN3n BocPnaMeHraUoxxCra MaTepNaIOB n napOB.
3anpaBka

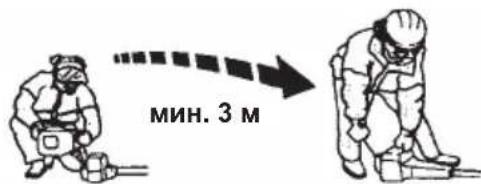
A PEPYPEXDEHNE! Co6nIOaIte CneDyOuIe Mepbl npEOCTOPOXHOCTN dIy UMeHbUeHn pNcKa BOCnIaMEnHHe: He KypTe H He pa3MeuaIte KaKne INo6 NCTOCHKN TENJa B6JIN3N OT TonNBA. HIKoRda He DoJIbAaTe TOnNBO npI pa6ToaIOse DMBraTeJe. BcerDa ocTahABInBaIte DBuratelb n daBaIte EMy OCTbITb HECKONbKO MNHyT, npExDe Yem DO3anpaBnIbero.OTKpbIBaIte KpbIshky baka MeJNeHNO, YTO6bI DaBHeHne CHNXaIOcB NoCTeHNo. NocLe DO3anpaBKn TuaTeNbHO 3akpoIte KpbIshKy TOnNtBHorO 6ka. NepeD 3anyckOM BcerDa nepeHocHT HHCTpyMeHT MHHmym Ha 3 M OT MeCTa 3anpaBkn.
IpoTnpaIte NOBepxHOCb TOJINHBHO6aka BOKpyr TOpNOBnHbl. IOnaDaHne rpaN B 6ak MoKET 3aTpYdHHTb 3KcPnyatauio.
Y6eIntecb, yTO TOnnIBO Xopoio npemMeuHa. BcTpxHnTe KaHnCTpy, npexJe 3aJIiBaTb TOnnIBO B 6ak.
3ANYCK N OCTAHOBKA
PpOBepKa nepe3anycKom

HnBkoemcnyae He 3anyckaite DBNrataJIb B NOMeueHN. NOMHnte 06 ONaCHOt OTpaBHeNBAIXNONHBIMI ra3amN DBnraTeJIA.
OcmoTpnte OKpeCTHOCTN y6eHNTecb, YTO JIOJINIIN XNBOTHBIE He MOYT OKa3aTbcB 30He DeiCTBnpeKyuux opraHOB.
IocTaBbTe INHCTpyMeHT Ha 3emnIO INOCMOTpnte, YTO6bl BETKN IIN KAMHN He npenTCTBOBaII IN BpaueHIO pexkyuero o6OpdydoKaHna.

Y6eIITecb, YTO rOIOBka TpIMMepa n 3aHTa He IMeOT TpeuINn H He NOBpeKJeHbI. 3aMeHIne rOIOBky IIN 3aHTy TpIMMepa, ecIn OHN IOBpeXDeHbI BCJeDCTBne ydapa o IOCTOpOHHe IpeIMeTbI INN IMeOT TpeuINbI.
HeIb3a NOJIb3OBAtbcn HNCTpyMeHTOM CO CJOMAHHO 3aUNTOH Nn6e3 Hee.
3anyck n octaHOBka


A PEPDyPEXKDEHNE! Kpbiuka
CcennnHn, CcennnHne n BAN DOJXHbI 6bItb yCTaHOBnHbI nepe3anyCKOM DBnraTeJI, Hnaye HeKOToPbIE DeTaN MOryT OTKpyTntbCn CTaTb PnUHNO TpaMbI ONepaTopa. NpeD 3anyckom DBnraTeJI Bcerda OTxOAnTE OT MeCTa 3anpabKn. NoCTaBBte INHCTpyMeHT Ha NIOCKyo NOBepxHOCTb. Y6eINTEcb, YTO peKyuIe opraHbI He MOry 3aDeTb HnKaKnx NocTOPOHHNX ppeDMetOB.
Y6eIITecb B OTCyTCTBn NIOCTOPOHHIN LInC B 3OHe pa6oTbI, B IPOTNBHOM Cnyuae OHN MOrTy NOnyUHTb cepBe3HbIe TpaBMbl. Be30NaCHOe pacCTOaHHe coCTaBnAe15 MetpoB.
XoJIoHbIy3anyck
IopcaBbAiouHn HaKmTe
HECKOJIbKO pa3 Ha KONky npaIMepa, DO Tex nop, NOKa OH He NaHHeTcR 3aONJIHrTBcR TOnIINBOM.
IpaMep He Tpe6yeTcnoHocTbO 3aONHrTb TOJNBOM.
Bo3dyuHa 3acNoHa: IpeBeDInTe CnHn pbUar Bo3dyuHoH 3acNOHKn DBrVaTeJI B 3akpbIToe NIOJKeHne.
3ANYCK N OCTAHOBKA
3anyck
PpNKMITE DnBraTeJIb K 3eMne JbeOy pyKoB (BHIMAHNE! He horoi!).IpaBoi pyKoNnotHInTe 3a pyKoTky CTapTepa. HE DABNTHa pbUarDpocceJ.MdNeHHO BblrNaBteUHyp Do Tex NOp, NOKa He NoCyBCTByeTeHEKOTOpoe COnPoTnBHeHne (OHO O3Haayet 3auePJIeHne Co6aKn CTapTepa), 3aTeM NotHInTe 3a pyKoTky CTapTepa cnJIbHee.
Hukozda He Hamambiaume whyp cmapepa Ha pyky.
JepraTe 3a pyKoTky, noka DnBraTeIb He 3aBeTeTc. IpeBedeTc. CnHn pbUar BO3DyUHO 3acNOHKn DnBraTeIb B NOIOXeHne 12 .IepraTe 3a pyKy CTApTEpa, noka DnBraTeIb He 3apa6Otaet. IpeBedeTc CnHn pbUar BO3DyUHO 3acNOHKn DnBraTeIb B OTKpbTO NOIOXeHne.
PIMMEUHNE: Ecnn DnuratEnb TIOXHT, BepHnte CnHn pbuar BO3dyuHOn 3acNOHN DnuratEnB 3aKpbIToe nIOXKeHne N NOBTOPI CHaHaJa.
BHUMAHNE! He BbITrNBaIte WHyp CTapTepa NOnHocTbIO H He OTnycKaIte pyKoRTy CTapTepa, KOrDa WHyp ZeJIHKOM BbITrHYT. 3To MoXeT NOBpeDHTb MaShuHy.
3anyck nporpetoro DBnrgaTeTn
Pnp nporpeTom DnIraTeJe IepeBeHnte CnHn pbIar BO3dyuHOn 3acNoHKn DnIraTeJeB NonoXeHne 12 . DepraIte 3a pyKy cTApTepa, noka DnIraTeIb He 3apa6oTaet. IpepeDInTe CnHn pbIar
BO3dUshOH 3acJNOHKn DBNrAteJI BOTKpblTO NOJOKeHne.
BHIMAHHE!
He npikacaiTecb oroneHHbIMn qactmN TeJa K OTMeueHHoN NOBepxHOCTN. Ppi NOBpeXdeHHom KOJNaUKe, KOHTaKT C TeIOM Bbl3bIbaet OKOrn Koxn IIN 3JIeKtpueckn Wok.Bcerda noIb3yntecb nepuATkAmn. HnkOrda He noIb3yntecb IHCTpyMeHToM C NOBpeXdeHHbIM KOJNaUcKOM CBeHy.
OctaHOBKa
ДлЯ OCTaHOBKn DBuRatEnHaXMnte Ha BbIKIIOUaTeNb I ydePknBaIte erO B NOJIOKeHN STOP Do Tex nop, noka DBuRatEn He OCTaHOBNTc.
PNEyPEXKDEHNE! KordaDburatelb 3anyckaetc npn 3akpbitOn BO3dyuHoi 3acnoHKe, pexyuine opraHbI cpa3y NaHHaOT BpaAATbcr.
BHIMAHNE!
BbIKIOuateJIb aBTOMaTnueckn BO3BpaUaeTcB nNoJoxHe 3anycka.Bo n36ExaHne HeIpn3BOJbHorO 3anycka, KOIINaYOK CBeuN 3axnraHnCneDyET BCERda CHMaTb CO CBeuN 3axnraHn npi MOHTaxe, IpOBepKe n/nnn O6cJIyXkBaHH.
06upe pa6oue nHctpykuBAXKHAY INHOPMALU
B daHOM pa3deJe onncaHbI oCHOBHbIe MepblpeIOCTOPOXHOCTn npaPbote c TpIMMepom.Ecn y Bac ectb comHeHna, Kac CneJyET NOCTyNtB B ONpeDeJIeHHoC nTuauu, CNeJyET ObaTntbcr K CneuaNtCTam. ObpatNTecb K BaWeMy DInepy NnB CepBnCHyO MaTePcKyo. N36eraTe BbINOnHeHna onepaun, K KOToPbIM Bbl He rOTobbl.
OchOBhble MepbI npedocTopoKHOCTN


1. Ocmotpnte okpykaiooee npoctpaHCTBO:
YTO6bI y6eINtbcB TOM, YTO HN JIOH,NH KINBOTbIE,HN KaKneJIn6o npEIMetbI He NOMEaIOT Bam Bo Bpempa60tbl.
YTO6bI yBeIDnTbcR, YTO HIKTO IN HNUTo I3 BbIWepepeHcJIeHHORO He MOKeT BOITB COpNIKOCHOBEHne C peKyUIMN OpraHAMN JIN NpeMeTaMn, KOTOpBle MOrYT 6bITb OTbPOUHeHb 3TNIMN OpraHAMN.
- PIPMEUHNE HnKOrda He nOJIb-3yITEcB INHCTpyMeHTOM B CnTyauuN, KOrda He K KOMy bUdET 6paTnTBcra NOMOUsIO npi HechactHom cnYuae.
2.He cneyuET noJIb3OBAtbcra HNCTpyMeHToM npn He6IarOpnTbIX NOOrHbIX ycNoBnx.HanpIMep, npn rycToM TymaHe,CINbHOM DOXKe,CINbHOM Betpe nII NnH3KoN TemnepaType BO3dyxa nT.n.Pa6ota npn IIOxOJ NOrOe 6Oone yTOmITeJIbHa n CB83aHa C NOBbIeHHoN ONaCHOCTbIO, HAnpIMep,CKOJIb3KoN IOBepXHOCTbIO.
- Y6eIITecb B TOM, yTO Bbl MoKeTe nepeBnraTbcnCToTb, He
noDBepraacb pNCKy naDeHn.
PpOBepbTe, Het nKaknx-Jn6o
npEnrTcBn,O KOTOpbIe MOxHo
CNOTKHpytbcn yNaCTb. (Takne KaK
KOPHN,KAMHN,BETKN,BnAINHBi,PBbl N
T.n.).ByDbTe ouheb octopoxHbI np
pa6ote Ha cKnOHaX.
4.ПипорхоаддВИгатьdoЛжeH 6bITb BbIKIOUeH.
5. HnKorda He cTaBbTe nHcTpymeHT Ha 3emIIO npu pa6oTaIoUeM Dnuratene, ecNI pR N3Tom OH OKaXeTcB HBe 3OHbIXopoWei BnDmOCTN.
A PEPDyPPEXDEHNE! Hn
NOLb3OBaTeNb INHCTpyMeHTa H NIKTO DpyrO He DoJXeH NbITaTbcra y6npaTb B CTOPOHy Cpe3aHHUo TpaBy KOrda DBnRaTeNb pa6Otaet nIi KOrda BpaAaETcR pexyuee obOpudobAHne, TAK KaK 3TO MOKeT npNBecTN K cepBe3HbIM TpaBMam. Ipeep TEM kaY6npaTb TpaBy, HamotabuioC8 BOKpyr OCH HOKa, OCTaHOBInTE DBnRaTeNb n Pexyuee o6OpudobAHne, TAK KaK B INHom cIyueae CO3DaETcR pNCK TpaBM.PedykTop HarpeBaetcBO BpemraP60tbl N octaETcR ropaymHeKOTOpoe Bpem.3To CO3dAET pNCK NOlyueHn OXORA npn KOHTaKTe.
PNEyPEXKDEHNE!
OcteperaTecb O6paCbIBaEMbIX
PpeMeTOB.Bcerda HocnTe 3aunTHbIe
Oukn.HNKoRda He HAKNoHnTEcb HaD
3aunToK.KamHN, MyCop n.T.D. MoryT
NONACTb B rna3a n RnTbcr npuHnOH
Ntepn 3peHn nn cepBe3HbIX
TpaBM.
Depxnte NoctopOHnX nHc Ha pacCToAHn. DeTn, XNBOTHbIe, 3PNTeIN NOMOuHNK NDOJXHBi HaxoHTbcB 6e30nacHO 3OHe 3a npedeJampaHyca B 15 MeTpOB. Ecn KTO-H6yDb N3 HNX NOoIeT 6nHexe, HeMeJeHNO OCTaHOBtTe DnRatJIb. HNKOrda He IOBOPaUNBaITecb C INHCTpyMeHTOM, He NOCMTpeB BHaayane Ha3a, N He y6eINBUnCb B TOM, YTO B 3OHe PNCKa HNKORo Het.
OchOBHbIe MeToDbI pa60TbI
Iocne kaskdo npuynpOBKn 6pbacbBaIte oobopoTb I Do oobopoTOB XOIOCTORo XOJa. pa60Tb I DBnraTeJc C NOHOCTBIO OTKpbITbIM DPOCCeJIem 6e3 HArpy3Kn (6e3 cOpOTnBHeHn, PpeODoJIeBaEMOrO DBnraTeJIem BO BpEm KOWeHn) MOrY T npNBecTn K CepBe3HbIM NOLOMKaM DnBraTeJIa.
A PEPYNPEXDEHNE! HOrda Betkn, TpaBa Nn Kyckn DepeBa MoryT nonaDaTb Mekdy 3auHTOn n peKyuUMn OpraHAMn. Bcerda ocTaHaBnBaIte DBrIaTeIb, npexde Yem ybpatb nx.
CtpnKKa TpaBbI C NOMOuBIO ROnOBKn TpMMepa


ДержITE rONOBKY TpIMMepa uYb Bblse 3emnnoyrgnom.Pa60Ty BbIOJHReT KOHeu Jneck. NcTb Jecka pa6oTaET npCt6nIbHbIX o6OpOtax.He npKnaIbBaIte n3nIuHnx ycInnI dIra nepemeueHryrOOBKn TpIMMepa.
C nOMOJIIO JIeCKN JERKO ydaIaIOTc TpaBa n CopHKn, pAcTyUe Ny CTeH, orpaI, DepeBBeB N 6OpIIOPOB; OHaKo, JeCKoMoxHO NOBpeNDy CyBCTBNTeJIbHyIO KOpY DepeBBeB IIN KycTapHNKOB, a TaKKe CTOnIbI OrpaDiI.
TTo6bI yMeHbUnTB pNCK NOBpeXeHnpaCTeHn, yKOpOTte necky do 10-12cm n yMeHbUnTe obopOtbl DnurTaTeJ.
UyBENuHTb CPOK CnyXbI JeCKN U yMeHbWntb N3HOC R0JOBKn TPMMepa, PnC TpNKe I cKaUNBaHN DnVraTeJIb He DoJKeH pa6oTaTc NOHocTbIO OTKpbITbIM dPoCCeJeM.
Pacnctka


IpnTakOn paCnCTKe npOncxOuNT ydaJIeHHe BceHHexeJIaTeJbHOJ paCTtTeJbHoCTN. DePKeTIte rOIOBky TpIMMepa YyTB BblE 3eMnB HAKIOHHOM NIOJOKeHIn. Nycb KOHeU c NeCKn Kacaetcra EMIN BOKpyr DepeBbeB, CTo16OB, CtaTyu n T.n. IPNMEUAHNE: OtaTexHnka pa60Tby YBeJIuNbBaET u3HOC JeCKn.
- NcKa n3HaunBaetc 6bictpee n ee npNXoNTcra nOdaBaTb 60Jee yacto npn pa6ote y kAMHeN, KpNpuey, 6eToHa, PdOM C MeaJIINueckm 3a6opom n T.I. NO cpaBHeHIO C pa60Toy DepeBBeB n DepeBraHHbIX 3a6opOB.
Koehne


TpMMeep nIeaeIbHO nOxOHT dIa CTPNKKn TpaBbl B MecTax, TPyHNOOCTyNbIX DnI O6bIuHoi ra3oHOKocNIKn.Bo BpeM aCtpNkN DEPKnte Nccky npaJIleJIbHO 3emNe. He BxIMaIte rOIOBky B 3emNIO, TaK KaK eTO MOKeT npUBeCTNU K CHrTIO BepXHero cNoA 3eMNI IN NOBpeXDeHIO IHCTpyMeHTa.

He no3BOJnTe roJOBKe TpMMepa NOCToHNO KacatbC8 3eMn BO BpeM CTpNkN. NoCToHHOe COpNKOCHOBHe C 3eMne MoKET NOBpeINb RoJOBky TpMMepa INn YCKOpNTb ee n3HOC.
Y6opka


3ΦΦeKTBENTINTTopa, co3daBaemBn BpaauoueCn JeCKoMooKETbNcNoJb3OBaH nIy6bICTpoN IerKoYbOpKn yAcTka. DepKnte NcckyHaN NOBepxHO bOy6npaEMOrO yAcTka npaannelbHO eN NOKaUNBaNTe TpIMMePn3 CTOpOHbIB CTOPOHy.
Дя получени lyчero pe3yntaTO BO Bpem Koшени y6opkn DBnIraTeNb DoJxhen pa6oTaTb C NOJIHOCTbIO OTKpbITbIM dPoCCeJeM.
ANPEDyPENPEKDEHNE!Hn
N0nb3OBaTeJIb INHCTpyMeHTa N HNKTo
dpyroH He DOJKeH nbITatbCra
y6npaTb B CTOpOHy Cpe3aHHyo
Tpaby KOrda DBnRaTeIb pa6oTaet
Hnn KOrda BpaAaEcTcpeXyUee
obopyoBaHne, TAK KaK 3TO MOxET
npNBecTN K cepBe3HbIM TpaBMam.
Peped Tem KaK y6npaTb Tpaby,
HAMOTaBswIOcB Okpyr OCN HOka,
OCTaHOBtE DnRAteJIb n peXyUee
obopyoBaHne, TAK KaK B NHOM
Cnyuae Co3JaEtcPnCK TpABM.
PeDyKTop HarpeBaEtcBO BpEm
pa6oTbI N OCTaEtc RopYHM
HeKOToOpoe BpEm. 3TO Co3JaET PnCK
NONyuEHn OXORA npn KOHTaKTe.
A PEPDyPPEKDEHNE!
OcteperaTecb ot6pacbIBaembIX npedmetob. Bcerda Hocnte 3aunthbie ouKn. HNKoIa He haknohntecb HaJ 3aunToi. Kamn, Mycop n T.D. MoryT nonactb B rna3a n ABNTbc npuHNOI NOTePn 3peHn IIN cepbe3HbIX TpaBM. Depxnte noctopOHnx IuC Ha pacCToHHN. Detn, XNBOTbIe, 3pHTNI NOMOUnHKN DOJXHBI HaxoINTbcB 6e30nachOH 3OHe 3a npedeJaM paDnyca B 15 metpoB. Ecn KTO-HNbYb n3 HNX nOdoJeT 6bnxke, HEmeDneHHO octahOBtte DBratelb. HNKoRa He NOBopaunBaItecb C IHCTpyMeHtOM, He nocmOTpeB Bhaayane Ha3aJ, n He y6eINBwncB TOM, YTO B 3OHe PnCKa HNKoro Het.
TEXHnueCKOE OBCJnyKnBAHne
BlaJeHeIeHecET OTBeTCTBeHHOCTb 3a BblIOJIHeHHe BCERO Heo6xOIMORo Texo6cnyKuBaHnB COOTBeTCTBnC nHCTpyKuNeI NO 3kCNyataCnn.
Kap61opatop
Hactouee n3dene Husqvarna
pa3pa60tAoH n npOn3BedeHo nO
ctaHdaptam, o6ecneuBaIOUIM
CHIXeHnE COepKaHnRA BpeDhIX
BeIeCTB B BbIXONax. IocNe TOrO KaK
DBnraTeJIb N3pacXODOBan 8-10 BaCKOB
TOnIINaB, OH CHTaETcR O6kataHHbIM.
IInr o6ecneHEn rpaBnIbHOJ pa60tbl
DBnraTeJIa N CBeDeHnK MUNHMMy
COepKaHnRA BpeDhIX BeIeCTB B
BbIXNONax ObpatNTecb B cepBnCHyIO
MaCTepCKyIO, Ie BAM C NOMOUIIO
TAXOMeTpA OTperyInpuyOT Kap6IOp
paTop Ha ONTmAlNbHbI peKIM
pa60tbl.
A INPEyIpyEeHHe! KpbIwka cueJIeHnJdoJxHa 6bITb ycTaHOBHeHa Ha MeTo nepe3aNyckOM MaunHbI, HNaYe cueJIeHne MoKeT OTKpyTntbcr n CTaTb npuHOn TpaBMbl OepaTopa.
Pa6ota

Kap6oPTop ynpabJareT o6opoTaMn DniratEnC NOMOsbIO npocceI.B Kap6oPatope CMeuNbaOTcB O3dyx N TOJIINBHAR CMEcb.
BnHT T perylnpyet noJoxHne DpocceIbHOJ 3acJOnHKn Ha XOJOCtOM XoY. NOBOPOT BnHTa NO yacoboi CTpeJIke yBeJIuNBAeT O6OpOtbl XONOCTOXoJa, NOBOPOT npOTNB YACOBOI CTpeJIKN yMeHbWaeT O6OpOtbl XOJOCTORO XoJa.
Ba3OBa perynipobka
OchOBHaperynnpOBka Kap6Iopatopa npOn3BOJATc npIN CnblTaHnx Ha
3aBOe-NTOTOBNTeIe.
DOnONHnTeJbHa peryInpOBA Ka
DOJXHa OcyIeCTBnTbCra TOnbKO
KBaJIuΦnUcnpOBAHHbIMN
CneunAINCTAMN.
BHIMAHHE! Ecnn pekuyua haacaika Bpaaatec npn pa6ote Dnuratena Ha XOIOCTOM XOy, BnHT T CneDyET NOBOPaNBaTb IpOTNb YacOBoN CTpeKN Do Tex nop, noka OHa He OCTaHOBNTc.
PekomeHnyemarckopoctb xonoctoro xoJa: Cm."TexHuyeckue xapakmepucmuu".
PekomeHnyeMaMAkCmMaJIbHaNCKopoCTb: Cm."TexHuYeckueXapakmepucmuu".
OkoHcATEbHa perynpoBka xoNocToRo xoJa T
Otperynpyte xoioctoynxod BNHTOM xonoctoro xoda T,ecnn 3to Heo6xoDIMO.Bhauane nobepHnTe BnHT T no yacoboi cTpeJIke Do tex np, noka pekyuee oboydoBaHne He hauhet Bpaatabcra.3aTeM NOBopaunBaIte BnHT npOTNB YACOBO CTpeJIKN, noka pekyuee oboydoBaHne He OCTaHOBNTc. PpaBnblHOIN CHTaETcpeYnpOBKa, pni KOTOpOn DBnTaTeNb POBHO pa60taeT B JIObOM NIOJKeHN. DnHaana BaUeHnpeKyuero obopydoBaHnN DOJXKeH OCTaBaTbcr DOCTaTOUYBI CBO6OHDhXOD.
TEXHnueCKOE OBCJyXnBAHne
A PENEYPPEKDEHNE!
EcnoobopotbI xonoctoro xoda HeBO3MOxHO OTpeyInpoBaTb TaK, 4TO6blpekyuaHa HacaJaOCTaHOBnlaCb,6paTntecb BCepBnchyo MaTepcKyu. He NOJb3yInTeCb INHCTpyMeHTOM Do Tex NOp, noka He 6yDet npOn3BeDeHa Heo6xoDmampeyInpOBka nn peMOHT.
IpaBnla TexHnK6e3OnaChOCTn npI TexHnueckOM 06cLyXnBaHn HNCTpyMeHTa.
OTcoeHnHe CBeU 3axnHaHnpePeBbIIOJIHeHnEM pa6O NO TexHnueckomy06cIyXnBaHnIO 3a NCKIIOyeHnEm pa6O no peRyIpOpBKe Kap6oPaTopa.
IywnTeB
BHIMAHHE!InyuHTeNb,
obopyoBaHHb KaTaJIIN3aTOPOM,
npEHa3NaYeH TaKKe DnY yMeHbSeHnA
COdePkaHnB BbIXNoax BpeHbIX
BeueCTB.
Iyntb pa3pa6oTaH dIa CHnKeHn ypoBHa OyMa N OTB0Da BbIXNONbix ra3OB B cTOpOHy OT onepaTopa. BxNtBie r3bl IMeIo TBICOKyIO TemnepaTy n MOryt COepeXaTb NCKpb KOTOpBle MOryt BOCPiMaMeHHTbcr npi nonadaHn Ha cyXne roipOHe MaTePnaBbI.
InyuHTeNIObOpyOBoHaBcneuaJIbHOINCKpoYnABInBaHOseceTKo.CTeKy cNeJyET npOBeprHnnpHeOxOIMOCTN uCTNTb.EcnicetKa NOBpeXdeHa,ee cJeJyET3aMeHHTB B cepBnCHOn MaCTepckoN.
Ecni cetka qacto 6bIbaertacopeha, 3NaunT cyHKnna KataJIINaTopa yxuWeHa.ObpaauTeCbK BaUeMy npOaBcy 3a COBeTom.3acopeHHa r cETKa MOKeT pNIBecTNI K nepepeBy n, KAK CNeIDCTBVE, K NOBpeXdEHNIO UINHnpnOpHnA.
BHIMAHNE! HeIb3a NOIb3OBaTbcra MaunHoi, ecn rnyuWnteNb nobpeXdeH nII nIOxo 3akpenneH. Y6eDInTeCb, yTO 6OJIbI rnyuWnteJe 3aTarytbl.
A PDEyPEXJEHNE!InyuHTeNc KaTaN3aTopamnB npouece pa60tbI cnilbHO harpeBaOTcN HeKOTOpoe Bpemr NocLe BbIKIOUeHnOcTAOTcR TOpaHm. 3To npocxOHTn Ha XoNOCTOM xOdy.IpnKOCHOBEHnK Hm MoKeT npNBecTN K OXORY KOHN. NOMHnte 06 onaCHOCTN BO3HKnHOBeHnNoXapa! A PDEyPEXJEHNE!InyuHTeNb coDepxNT B ce6e XIMUeCKne BeEcTBa, KOToPBle MOrYT 6blT KaHceporeHHbIMn. He DonyckaTec CoPruKOCHOBEHnC 3TUMN BeEeCTBaMn B CNYaae NOBpeXDeHn rnyuHTeN.
BHIMAHHE: NOMHIne, yTO BbIXIOHNbIe Ra3bI DnBraTeJIa CODepKaT MOOHOKcNd yrIepoJa; 3To MOKeT Bbl3BaTb OTPaBHeHne yrapHbIM ra3om. No 3ToI npuHHe He CNeAyeT 3anyckaTb DnBraTeJIb B NOMeueHmN B dpynx NlOxo NpOBEtPnBaEmbIX MeCTax.
BbIXNONHbIe ra3bI DnuratJe NMeOT BbICOKyIO TemnepaTyu MOryt CoepKaTb NCKpbI, KOTOpbIE BCBOO OpepeB MOrYT npNBecTN K BocPNaMeHeHNo. HeJIb3a 3anyckaTb DnuratEnB NOMEueHIn NIN B6Nn3r ropUOnx MaTePnaJNOB!
Cbea 3axnraHna

Ha coctoHne cBeu 3aXnraHnBJIeT:
- HenpabnJIbHaŋ perynipOBka
kap6Iopatopa.
HecooTBcTbYUaTOnnBna Cmecb (CNIuKOM 6OJbUoe coepKaHne UIn HeBepHbTn Macna).
3aqrpa3HeHHbI B03dyHbI pNJIbTp.
3TNФakTopbI Bbl3bIBaIOT NOBHeHnHaHaraHa 3JIeKTPoJax CBeu3aKINAHN, YTO MOKeT Bbl3BaTb np6nembl npi pa6ote n npn 3anycke. Ecnn DBnRaTeNb He h6npaet MoUHocTb, PNOX 3aBOHTCn IIN NPOX0 pa6oTaET Ha XOIOCTbIX O6OpOTax, npexde BCero npOBepbTe CBeuy 3aKINAHN. Ecnn CBeya 3aRpy3HeHa, npOuNCNTe ee n npOBepbTe, YTO6bl 3a3Op MExdy 3JIeKTPoJAMn COCTabJn0,6 MM.CBevy 3aKINAHN Heo6xOdIMo MeHnTB npImePho uepe3 Odn MeCn pa60tbl nn eue paNbIe B cnyae Heo6xOdIMOCn. 0.6 MM
BHIMAHNE! Bcerda nCnoJb3yItepeKOMeHdyEmbI Tn CBeey3axirahan! PpImeHeHne HenoXoJxNxCBeey 3axirahan
MOKeT npNBecTN K NOBpeJdeHnIO NOpShN nn nnnHnpa.
Bo3dyuHbIΦnJIbTp

Bo3dyuHbI ΦnJbTp Heo6xOdmo peryIaRHO uCTnTb, ydaIaIaN3 Hero rpa3b Nblb BO n36eXaHne:
HeBepHOpa6oTbIkap6ioPaTopa
- PpO6IeM npn 3aynCke
IotpepnMOuHOCHTDVBraTeJRA
Upe3MepHoro n3Hoca yacteIN DBNraTeJRA
- Upe3mepHoro pacXoJa TOnnBa
IpouuaTe fNbTpKaKdbie 25 yacob nn yaaue,ecn Bbl pa6oTaete B ycNoBnx CnBHO 3aNbIneHn.
UcTka Bo3DyHoro 0nIbTpA
CHIMnTe KpbIuKy BO3dUshoro QnIbTpau N BbIHbTe QnJIbTp. XopoIo npOMoTeeroB TENIOMbJbHOI BOJe.
TtateIbHO nponolounte. Y6eIITecb, yTO fNtbp npocox, npexde yem CTaBnTb ero Ha MeCTO. Bo3dyuHbI fNtbp, KOTOpBb DOJrO uONb3yETcR, HBO3MOXHO NIOHOCTBIO ONUCTNTb.
TOMy HOBxOIMo 3aMeHrTbYepe3 OPeJeHHeIe npomexyTKBpeMeH.NOBpeXeHHbI btp Bcerda HxHO 3aMeHrTb.
TEXHnueCKOE OBCJnyKnBAHne
PeykTop - (128L)

YrIIOBoI peDyKTop 3aONHReTcR
JOCTaTOUHbIM KOJINHECTBOM
KOHCTeHTHO CMa3KN Ha
3aBOe-NTROBtTeJe. Ondako, npexKe
yEM NJIb3OBaTbCRA IHCTpyMeHTOM,
cNeDyET yIOCTOBepntbCRA, YTO yrNOBO
peDyKTop Ha 3/4 3anONHe
KOHcNcTeHTHO CMA3KOJ. IcNoJIb3yIITe
cNeuNAJIbHyIO KOHCnCTeHTHYIO CMA3KY HUSQVARNA.
O6bIuHO cMa3Ka He HuyXdaetcB 3aMeHe 3a NCKIOUeHnEM CnyuAEB peMOHTa.
TEXHnueCKOE OBCJyXnBAHne
TpaΦnK TexHueckoro 06cnyXbaHHa
Hnke npBBeDen nepeuehpa6oT no 06cnyxNBaHNIO, KOtOpbIe Heo6xoNMO BblONHrTa Ha nHCTpyMeHTe.BoJbUnHCTBO nyHKTOB onNCaHb B pa3dene O6cnyxNBaHne.
IOnb3OBaTeJIb MoKeT BbINOJHrTa TOnbKO Te pa60Tb I NO 6cNyKbAHIO IN cepBnCy, KOtOpbie ONICAhbl B DaHHOM pyKoBOOCTBe. Boone cepbe3Hoe 6cNyKbAHne DOJXHO BbINOJHrTaBCa ABTopn3OBaHHo CepBnCHO MaCTepCKo.
| ТекстушеююююююююююююююююююююююююююююююююююююююююююююююююююююююююююююююююююююююююююююююююююююююююююююююююююююjoyяяяяяяяяяяяяяяяяяяяяяяяяяяяяяяяяяяяяяяяяяяяяяяяяяяяяяяяяяяяяяяяяяяяяяяяяяяяяяяяяяяяяяяяяяяяяяяяяяяяяЯяяяяяяяяяяяяяяяяяяяяяяяяяяяяяяяяяяяяяяяяяяяяяяяяяяяяяяяяяяяяяяяяяяяяяяяяяяяяяяяяяяяяяяяяяяяяяяяяяяя�яяяяяяяяяяяяяяяяяяяяяяяяяяяяяяяяяяяяяяяяяяяяяяяяяяяяяяяяяяяяяяяяяяяяяяяяяяяяяяяяяяяяяяяяяяяяяяяяяяя relay | Бжеднебуне овслужваиме | Бженильное овслужваиме | Бженильное овслужваиме |
| Очирстуше машину санаркуи. | X | | |
| Убадпесь, что стор рычaraдrosселя и рычаг дrosселя вноленьшправны с точки зрени coошражени бezогаостп. | X | | |
| Проберcrete, павотает лы Выклочаел. | X | | |
| Проберcrete что салушсяговka не вразалась нахолостомху. | X | | |
| Прочистуше boздушный симь tr.Заменfte erо в слочае необхODимостп. | X | | |
| Убадпесь в том, что зашистовik кожухх рөхүшх органов не ямeelповөдөний и тrelшин. 3amehite 3aшtuу, сели она поberглась удaram有很大 Трeshуla. | X | | |
| Убадпесь в том, что зашистовik Trриммера не ямeelповөдөний и тrelшuin. 3amehite ee ecn noэпobерглась Neobxodimo. | X | | |
| Убадпесь, что raйки и саллы плOTно 3атян'tы. | X | | |
| Убадпесь в оtcуствinn yteчkin толива идвогалая, сika полвовробдов. | X | | |
| Проберcrete старту и shyp старта. | X | | |
| Очирстуше санаркуи сөчүүгань. Chimierte等着 пrobерcrete заэр mөждүлөдөний Otrpeулларүүүүүүүүүүүүүүүүүүүүүүүүүүүүүүүүүүүүүүүүүүүүүүүүүүүүүүүүүүүүүүүүүүүүүүүүүүүүүүүүүүүүүүүүүүүүүүүүүүүүarning.YСппсntбоггүүчр Champion RCJ-6Y (503 23 51-09) полвалentнүл. | X | | |
| Очирстуше karбюратор и пашегашик K hemу учадtok. | | X | |
TEXHnueCKOE OBCJyXnBAHne
YpOBeH Bn6paun (aV.eq) Ha pyUkax n3MepeH cornaCHO
EN ISO 11806 u ISO 22867 B M/C
C roIobKo TpIMMepa (OpunHaJIbHbIM), NeBbIM/npaBbIM 9,2/5,4 6,9/5,7
IpmeHne 1: yOBeHb IyMa B OkpyKaIOSe CpeDe n3MepeTcK KaK MoUHOCTb 3BHa cbrNaC Ho dupeKTnBE Ebponeckoro Co03a 2000/14/EC. Yka3aHHbI yPOBeHb IyMa dJa MaunHbI n3MepeH c OpuHaJIbHbIM pexyIum O6OpyOBaHNEM, DaIOzHM HANBbICm yPOBeHb. Pa3Hnca MeJy rapaHTnpoBaHHbIM u N3MepeHHbIM yPOBHeM IyMa B TOM, UTO rapaHTnpoBAHHbI yPOBeHb IyMa TaKKe BKNHOaET pa36poc pe3yIbTaTOB n3MepeHm IN BapnaIz MExDy MaUNHAM OdHOJ N ToJ Xe MOeJI, COrJaCHO dupeKTnBE 2000/14/EC.
PnmeHne 2: Ka3aHHbI daHHbI o6 3KBuBaJIeHTHom yPOBHe uMBOrO daJIeHnI MaUNHbIMeOT TINuHbI CTaTNCtUeCKn pa36poc (CTaHdapTHoe OTKIOHeHne) 1 dA).
PpmeHne 3: YkaaHHbIe DaHHbIe 06 3KbBnBaJIeHTHom ypoBHe Bn6paqIN IMeOT TnNnHbI CTaTnCTn-ueckn pa36poc (cTaHdapTHoe OTKNoHEHe) 1 m/c
TEXHnueCKoEXAPAKTEPNCn
KOMPNEKT 3A PBPNA NOMOU
KOMnNeKT 3a nbpBa NOMoT Tp86Ba BnHaN Da ce Hocn OT OpeaTopnte Ha TpNOH 3a NOUcTBAHe, pe3aKn 3a Xpactn NIN KocaKN.
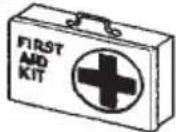
O6opydBaHe 3a o6e3onacBaHe Ha MaunHaTa
BTo3n pa3den ce onncBa KaK ce n3BbPWBAT npOBepKn INTexHuecko 06cnykBaHe Ha pe3aVkata 3a KInB PNeT, 3a Da Ce rapaHTnpa Ta pa6Otn npabINHO. (Bx. pa3deNa "Ka8o-KbDe?", 3a Da Hamepnte KbIe e pa3noJIOKeHo 06OpyDbaHETo Ha BaWata MaunHa.) EKcPiOATAuONOHnT CpOK Ha MaUnHata MoKe Da 6bIe HamaJeH, a PNCKbT OT HeUacTHN CnyauYBeJIuYeH, aKO TexHueCKOTO 06cnykBaHe Ha MaUnHata He Ce npobexda IpaBUNHO u aKO 06cNyXBAHeTO N/nnpeMOHTnTe DeHOCn HE CE n3NbJHBaT npocceNoHaJIHO.AKO ImaTe HyXDa OT OSe IHOpMaUry, MOJIA, ObpHete Ce KbM Hau6JIIN3KnA cepBN3.
BAXHA INHΦOPMALU
BcnHKn DeHocTn NO cepBn3 n peMOHT Ha MaunHaTa N3NCKBat CneuHaHa NoIroTOBk. Toba ce OTHacr cOCoBeHa cnla do obOpyDbaHeTo 3a 6e3OnacBaHe HA MaunHaTA. AKO MaunHaTA He N3bJHra BA KOHTPOJHnTe N3NCKBAHn, N3bPoEHn NO-dOly, Tpr8Ba Da ce o6bPheTe KbM cepBn3a. 3akyNyBaHTo HA eINH OT HauNTe npOdyKtn rapaHTnpa, ye Ta Iue 6bDe o6ekt Ha npOpeCnoHaJeH peMOHT n cepBn3. AKO NyHKtBT Ha npOdaXbHe e HRAKOI OT HauNTe cepBn3, 3a npOp6HoCTn nonItaTe Hau-6n3Knr cepBn3.
OBUNHCTPYKUN 3A B3ONACHPAbOTA
A INPEDyIPEXKDEHNE! HnKora He n3noJ3BaIte MaunHaTa C NOBpeDeHO nnObOpYDaHe 3a O6e3OnacraBaHe. CneBaIte NHCtpkCnTe 3a ynpabJeHne, TexHuecko 06cnyXbaHe n cepBn3, ONcaHn B To3n pa3dEi. Ako MaunHaTHe n3nbJnRa KoHTpOJHnTE n3NCKBaHn, n3bpoEHn No-DOy, Tpr6Ba Da ce 06bPheTe KbM cepBn3a.
БлOKирOBka Ha cnycbKa Ha ra3Ta
БлOKирOBkata Ha cnycbKa Ha ra3Ta e
npeHa3HaueHa da npeDoTbpaTn ra3Ta
da He ce BknIOuH HeBOIHO. Korato
6lOKирOBkata Ha cnycbKa Ha ra3Ta (A)
ce HATUCHE BdpBxKkata (= KORATO
XbaHeTe dpBxKkata) ra3Ta (B) ce OTnycka.
Korato XBaUaHTo Ha dpBxKkata ce
OTNYCHe, Ra3Ta n 6lOKnpOBKaTa Ha
cnycbKa Ha ra3Ta ce BpbUaT B
nbPBOHaunHIne cN noJoxKeHn. ToBa
CTaba Ype3 DBe He3aBNCmM npyKinHHn
CNCTeMn 3a BpbUaHe. TObA O3HaayBa, Ye
ra3Ta ABTomAtNoHo Ce 6lOKIPA B
no3nUra "npaeh XoD".

YBepete ce,ye ra3Ta ce 6nokpa B nO3nIyra "npa3eH XoD",Korato 6nOKpOBkata Ha cnycbKa Ha ra3Ta e B nbPBOHaayanHOTc n noJoxHe.

HaTnucHe 6IokpOBkata Ha cnycbKa Ha ra3Ta n ce yBepTe, ye ce Bpbua B nbpBOHaJaHNO nIOXKeHne npn OTnyckaHe.
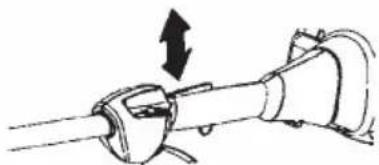
YBepete ce,ye ra3Ta n 6IoknpOBkata Ha cnycbKa Ha ra3Ta ce DnKKat C Iekota IN TexHIne npyKHHN CNCTEm 3a Bpbuahe cyHKUOHNpaT.
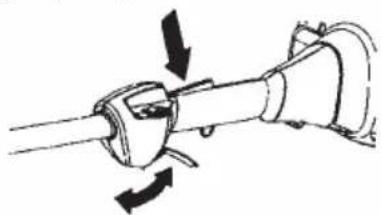
Bx. pa3dEn "CmapupaHe".
CTapTupaTe MaunHaTa n npnOKeTe
IbHa ra3. OTnycHete ra3Ta n
npOBepTe dAn N obOpyDbaHeTo 3a
p3aHe cnpaN octaba B HeNoDbNxHo
noLoXeHne.AkO obOpyDbaHeTo 3a
pa3aHe ce BbPTn, KOraTO ra3Ta e B
OTnycHaTo noLoXeHne, TO Tpr6Ba Da ce
npOBepn HacTpoKaTa Ha npa3eH xoJ Ha
kap6ypatopa.Bx. pa3dEn "TexHuYecko
obcnykeaHe".
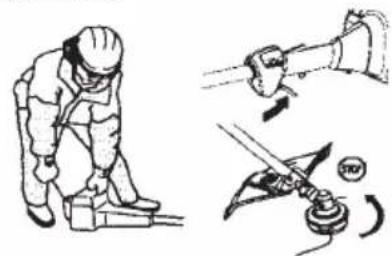
Klou 3a cnnpaHe
Knoub3a cnupahe Tp6Ba da ce
n3no3Ba 3a cnupahe Ha MOTopa.
YBepete ce, ye MOTopbT cnupa, KOrato
HaTNCHeTe N 3aDbpxKe TKnOua 3a
cnupahe.
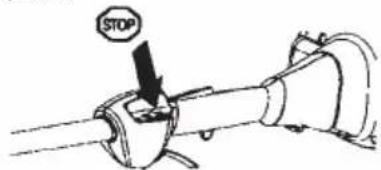
OBUNHCTPYKUN 3A BE3ONACHPAbOTA
Ipea3nTeHa npncno6neHneTo 3a p3aHe
To3n npdePnata3nteI e npdeHa3NaueH da npedOTBpTaTBA OTXBpIaHEto Ha npedMeTN IO NocOka Ha OepaTopa I da npedPn3n OepaTopa OT HeBOJIeN KOHTAKT C npncnocO6JeHneTO 3a P3aHe.
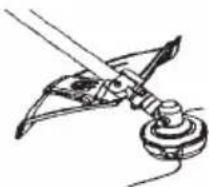
YbepeTe ce, Ye npedna3nteHr He e nOBpeDeHn He e HanyKaH. 3aMeHeTe npedna3nteJra, aKo e npetbprn ydap nn e HanyKaH. BnHaN n3non3BaIte npenopbuaHn npedna3nte 3a npncno6bneHnTo 3a pR3ane, Koeto n3non3Bate. Bk. pa3den "TexHuYeCKu cneucukauu".
A INPDEUYPEXKDEHNE!
Pn HnKaBn 6cToTEnCTBa
ObOpyDbaHeTo 3a P3aHe He Tp6Ba
da Ce N3non3Ba 6e3 Noctabeh
Oo6pen npedna3nten. Bx. rnaBata
"TexHueckn cneuФkaun". Ako e
noCTaBeH HenoXODaN INI DepeKTeH
npedna3nten, TOBa MoKe da
npedn3BnKa cepNo3Ho HapaHЯBaHe Ha
nua.
BnHaBn BnHmAbaTe KOpdaTa 3a pR3aHe Da ce HABBa PnTbTHO npaBHO OKONO 6apabaha; B npotINBeH cnyaH Ie Bb3HNKHaT Bn6paun.
A INPEyIIPKxDEHNE! IpekomepHo
n3laRaHe Ha Bv6paun MoKe da
DOBeDe Do NopaxeHn Bbpxy
KpbBOHOCHcBdoBE n HEPBHaTa
CnCTema Ha Xopa CbC CMUeHn B
KpbBoO6pauneHneTo. O6bPheTe ce
KbM Jekap Korato NOBRT CNMTOMN,
KoNTo MORaT Da ca pezytat OT
Bv6paun. TaknBa CNMTOMn ca
HAnpIMep: n3TpBnBaHe, 3ary6a Ha yBCTBnTeNHOCT, "NITINuKN", "6oDexN", 6oJKN, fN3NuCecko OTnyckaHe, npomHa Ha cBeta Nm CbCTOHNTO Ha KOxata. Te3n CmNTOMn Ce NOBBAt O6NKHOBeHo Ha npbCTnTE, pBcTe N KITKnTE.
3aarrnyuWnten
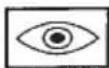
3aŋnyuŋteŋe npεdHa3haueH da OcHpyn Hau-HNCKOTO HbO Ha Ⅲa HacOyBa N3NyckaHnO T MaunHaTa DmB Nocoka, o6paTHa Ha onepaTopa.
3A6EENKKA! 3aRnyuHTeJIte, Cna6dEn C KaTaJIrTuYe HeYTpAln3aTOp, e KOHCTpyUnpaH N 3a HamaJraBe Ha BpeHNTe CbCTaBKn B Otpa6OTeHIne Ra3OBe.
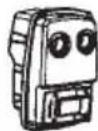
B ctpaHn c TOnbI n cyx KInMaT pNCKbT OT noXkap e OueBvIeH. 3aToBa Cme CnaDbnn OnpeJeHn 3aIyUnTeJIc Ekapn 3a cnpaHne Ha NckpTe. YBepeTe Ce, Ye BaunrT 3arNyUnTe n e Chaben C To3n BnD ekpaH.
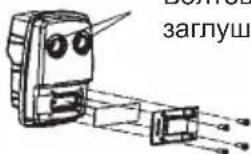
BontobeHa 3aunnyuHTeTn
OT n3KIOUHTeHa BaxHOCT e da ce cna3BaT IHCTpyKuNTe 3a npOBepka, texHnuecko o6cnyXbaHe u cepBn3 Ha 3aRnyuHTe. Hnkora He n3non3BaIte MaunHa, KOrTo e c nobpeDeH 3aRnyuHTeI.
MOHTnpaHe Ha dpbkkata C Kpb
IocTaBeTe DpbKkata Bbpxy Bana. OTeJExKeTe, Ye dpBxKkata Tpr6Ba da ce MOHTnpa NOd DBeTe CTpeKN Bbpxy Bana.
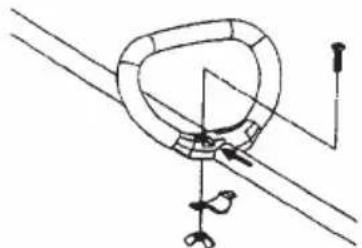
IocTaBeTe BnHTa,OCnHypRaBauata nnactHa N KpnUaTata RaKa, KaKTo e nOKa3aHo Ha fHypaTa.
3aterheTe KpunuataTaraKa.
MOnTnpaHe Ha npEpa3nteHa KaocayKaTa HraBaTa Ha KocayKaTa (128L)
IocTaBete npabHnHn npedna3nte 3a p3aHe (A) 3a n3noN3BaHe c rIaBata Ha kocaykata. 3akayete npedna3nte 3a pr3aHe/Kom6HnHpaHn npedna3nte Bbpxy npicncO6JIeHneTo Ha BaJa I ro 3akpenete c 6oTta (D).
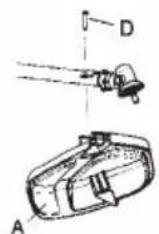
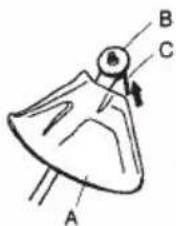
- PocTaBete 3aDbuXBaunnA nck (B) Bbpxy n3xoDnna BaJ.
3aBbPTeBaJa,doKaTo eINH OT OTBOpHTe B 3aADBKBaunr DaNCK Ce IOppaBn CbC CbOTBeTHnA OTBOP B KOpNyCa Ha npncnoc6neHneto.
BkapaTe WectOCTeH KJIIOU (C) BOTBopa, 3a Da 3aKJIOUHTe Bana.
3aBnHTeTe rnaBata 3a p3aHe (H) B nocoka, o6paTHa Ha nocokata Ha BbPteHe.
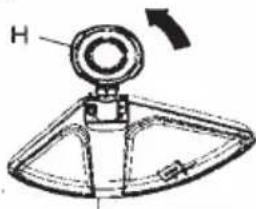
3a pa3rno6rahe n3nJIhHeTe HNCTpyKcInTE B o6paTeH peI.
MOHTNPAHE
MOnTnpaHe Ha npedna3nteHa Kaocaykata n rnaBaTa 3a p3aHe (128C)
- IocTaBete npaBnIHn npedna3nten 3a p3aHe (A) 3a n3noI3BaHe c rnaBata 3a p3aHe. 3akaueTe npedna3nten Ha kocaykata/KombHnpaHn npedna3nten Bbpxy npncnocO6neHneto Ha Bana n ro 3akpeNeTe c KpuiuataTaraKa (B).
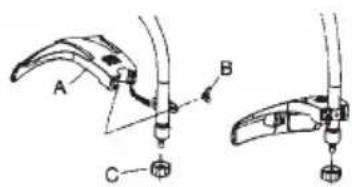
- NocTabete YaWKata 3a npax (C) Bbpxy Bana. TpaKaTa Tp6Ba Da ce 3akpne n3qno OT YaWKata 3a npax.
3aDpBkTe kanaaykaTa 3a npax c raeueH KNoU, 3a Da npedOTbpaTITe 3aBbPtaHe Ha Bala.
3aBnHTeTe rnaBaTa 3a pR3aHe (D) Bbpxy BaNa.
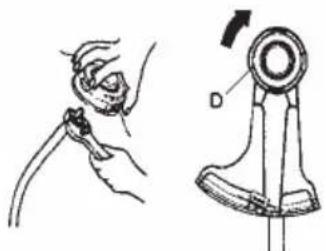
3a pa3rIIO6raBe n3nJIHeTe INHCTpyKUInTE B o6paTeH pei.
PABOTA C TOPNBOTO
Бezonaachocmpn6opabHe c ropuBo
3aTOBa HNKORA He cTapTuPaTeMaunHata:
- Ako cTe pa3JIeI rOpINBO Bbpxy Hea. N36bpwe Te BCnKTo pa3JrTo rOpINBO.
- Ako cte pa3neI ropuBO Bbpyce6e cn nI npexnte cn.CmeheTe dpexnte cn.
3.Ako mma n3TuHaHe Ha ropuBO. PpaBeTe peoBHN npOBepKn 3a n3TuHaHe OT KanaKkTa Ha rOpNBOTO n Tpb6nte 3a noDaBaHe Ha rOpNBO.
TpaHcnpTnpaHe n cxbxpaHene
CbxpahBaTe n TpaHcnpTupaTe MaHHaTa n TropNBOTo, Taka Ye BCaKBO N3TuHaHe nNn N3NapeHna Da He pCKyBaTe Da Bn3atB CbPnKOChOBeHne C Nckpn Nn OTKpnt nnMbK. HanpImep, eNeKTpUeCKn MaHHn, eNeKTpOMOTOpn, eNeKTpUeCKn IpeBKnOuBaTeIn/CnIOBn IpeBKnOuBaTeIn, HArpeBaTeIn nNoDo6Hn.
Korato cxbxpaHbATE n TpaHCnOpTnpate ropuBO, Tp6Ba da ce H3non3Bat Odo6peHn 3a ueJTa KOHTeHepn.
Korato c6xpaHbATE MaunHaTa 3a Dbln nepnoi, pe3epBOapbT 3a roPnBO Tp8Ba Da ce n3npa3Ba. O6bpHeTe Ce KbM CBOrTa MeCTHa 6eH3HHoCTaHcIy, 3a Da oTKpHeTe KaKa Da ce OCBO6OJTe OT N3NIuHOTOropnBO.
YBepete ce,Ye MaunHaTa e NOuchTeHa Nye PpeDn DblroCpOHTo 3aKOHcepBnpaHe e npOBedeHO nblHO 6cbnykBaHe.
3a da npedotbpaTne HeymuIeHo 3anaIbAHe Ha DnuratJe, Kaanukata Ha CBeTa BnHaTrn Tpr6Ba Da ce CBaIy Ipy DblroBpeMeHHO CbxpaHraBaHe aKO MaunHaTa He e NOD npRk HAd3Op N KOrato N3NbJHraTe BCNUKn TEXHnueckn Oepaunn NO obcnykBaHe Ha MaunHaTa.
- Obe3onacTe MaunHaTa npn TpaHcnpTupaHe.
A PEPDUNPEXDEHNE! C rOpNBOT O Tp6Ba Da ce 6opabn C roJMAOBHMae. ImaTe npdeBnD pUcKa OT NOxkap, ekCnIO3N N BdNWBaHe Ha dIM. TOpNBa Cmec
3ABEJIEXKA!
MaunHaTa e cna6deHa C DByTAkTOB
DnIraTeI N Tpr6Ba Da ce 3apeKda
BnHaCb Cmec OT 6eH3nH I
DByTAkTOBO MacNo. BaxHo e da ce
H3MepBa TOUHO KOJIuYeCTBOTo MACNo,
3a Da ce OCNrpyn npabINHOTO
CbOTHOseHne B CmecTa.MaIKn
HEcBoTBETCBnB KOJIuYeCTBOTo MACNo
IMAT rONMO Bb3DeiCTBue BbpXy
CbOTHOseHneTo Ha rOpNBHaTa Cmec,
KOrato Ce CmecBaT MaIKN KOJIuYeCTBa
RopINO.
A PEPDUNPEXDEHNE! TOpNBOTO n OTnADHNTe IPOdyKTN OTROPBOTo ca JIeCHO Bb3IIaMeHNM N MORaT da npuHHrT cepNo3HO HapaHBAHe npBdNWBaHe INKORATO Bnra3aT B KOHTaC KOKaTa. IopaN Ta3N npuHa Cb6KnDaBaIte BHIMaHne KOraTO 6opabITE c rOpNO HEnpeMeHNO npOBepRaIte DaJIncCbueCTByBa aDeKBaTHa BEHTInaQuy.
BeshnH

BEJEXKA! N3noJI3BaIte BUNaHn CMEC OT 6eH3nH (C OKTaHOBO YNCNO Ha-MaIKo 90). Ako mATE Ha pa3noJoxeHne ekOJorUHeH 6eH3nH, T.H. aIKnIaTeH 6eH3nH, cIeDBA ToI da Ce n3NoJ3Ba.

HaH-HNCKOTO npenOpbUbaHO OKtaHOBO YnCNo a 90.AKO NycHeTe MOTopa Ha 6eH3nH C NO-HNCKO OKtaHOBO YnCNo OT 90,MOKe Da Bb3HNKHe T. Hap."YyKaHe".Toba MOKe Da DOBeDe Do NOBnShaBaHe Ha TEMnepaTypaTa HA MOTopa,KoETo Da npeiIN3BnKa cepno3Ho pa3CTpOietBO Ha MOTopa.
Korato pa6oTnte npn HnpeKbchato BWCOKN O6opOTn, ce npenopbYBa IIO-BNCOKO OKTaHOBO YNCJIO.
Macno 3a DByTakTOB Dnuraten
3a Han-Do6pn pe3yIaTn H3noJ3BaIe DByTaKTOBO MacNo HUSQVARNA, KoTo e npOn3BeJeHO CNeuaHNO 3a HaWITe DByTaKTOBn DBnraTeN. CbOTHOWeHne Ha cmecBaHe 1:50 (2%).
Ako DByTaKTOBOMacno HUSQVARNA Hama BHaHnUHOCT, MOXeTe Da n3NoJ3BaTe BnCOKOKaYeCTBeHO DByTaKTOBO MacNo 3a DnIraTeN C Bb3DyUHO OxJaDaHe.ObpHeTe ce KbM IOCTaBvNka cn 3a N3bUpaHe Ha MacNo.CbOTHOWeHne:1:33 (3%)
Hnkora He n3no3BaIte DByTaKTOBOMacNo, npedHa3NayeHo 3aN3BbH6OpDObu MOTOpn C BOJHOOXJaXdAHe, Taka HapeYeHOTo MacNo3a N3BbH6OpDObu MOTOpn.
He n3noI3BaIteMacNo, npedHa3HaueHo 3a YeTnpuTaKTOBn DBrIraTeJI.
HE CTnckaIte cnycbKa Ha ra3Ta.
BabHo n3dIbPnaiTe BxKeTo, DOKaTO NOuyBCTBaTe N3BeCTHO CbIpOTNBHeHMe (XBaTkata Ha CTapTepa ce 3aDbpxka); Cnei TOBa 6bp3O n CNJIHO dpbnHeTe BxKeTo.
Hukozhe yueaume 6bkemo 3a cmapupahe OKoJOpbkama cu.
NobtopeTe DbpnaHTo Ha BbxKeTo, DOKaTO MOTOpBT Ce ONTa Da CTapTnpa. IpeBknIOyTe CnHbOTo NocTne Ha DPOCeNa HA MOTopa B NOLOKHeNe 1/2. DpbHHeTe CTapTEpHO To BxKe, DOKaTO MOTOpBT 3apa6OTn. IpeBknIOyTe CnHbOTo NoCTne Ha DPOCeNa Ha MOTopa B OTBOpeHO 3aTBopeHO.
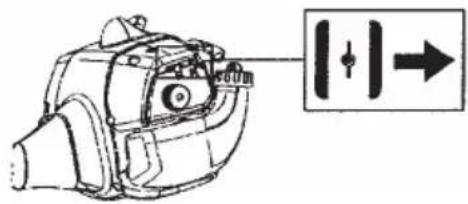
3A6EJIEXKKA: Ako MOTOpbT n3rache, BbPheTe CnHnI NOCT Ha IpOceJa Ha MOTopa B 3aTBopeHo NIOJoxKeHne INOBTOpeTe CTbNkIne Ha cTapTnupaHe.
BHIMAHHE! He nbpnaTe
CTapTePHOTo BbKe DoKpaN He OTnycKaIte DpbXkKaTa Ha CTapTepa, KOrato BbXeTo e HAnbJIHo N3BaDeHO. Toba MoKe Da NobpeDn MaunHata.
TOnbMOTOp
Pn TOnbJ MOTOp npeBKnHoyeTe CnHbOTo JIOCTYe Ha DpoCeJa Ha MOTopa B NOIOXKeHne 12. DpbHHeTe CTaPtePHOTO BxKe, DOkATO MOTOpBT 3apa60Tu. PpeBKnHoyeTe CnHbOTO JIOCTYe Ha DpoCeJa Ha MOTopa B OTBOpeHO 3aTBOpeHo.
BHIMAHHE!
He nomecBaIte HnKaKbY qacT OT TANOTCnB MapKupaHaTa 06JAcT. KOHTaKTbT C TAnOTO Bm MoKe da DOBeDe n3rapHnHa KoxaTa BN, INN eKTPnuecky ydap, aKO KaNaUkata Ha CBeuTa e NobpeDeHa.BnHarn n3No I3BaIte pKabuCi. He n3noJ3BaITe MaunHa c nobpeDeHa kanaUka Ha CBeuTa.
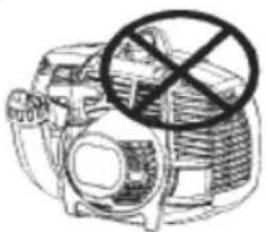
CnnpaHe
Cnpete MoTopa, KaTo HaTnCHeTe N 3aIbpxKITE KIOUa 3a CnIPAHe B nOLOKeHne STOP, DOKATO MOTOpbT cnpe.

ANPDEUYNPEXKDEHNE!
Korato MOTOpbT ce cTapTnpa C Dpocen B 3aTBopeHo NIOJKeHne, npncno6bIeHnTo 3a p3aHe 3aNoUBa Da Ce BbPTn He3a6abHO.
BHIMAHHE!
N3KIOUByaTeIaT ABTOMaTHUHO Ce Bpbua Ha NpBPOHauaHOTo CN PNOJKeHne. 3a Da npedotbpaTnTe HeymuIeHo 3anaIbAHe KaNaYKaTa Ha CBeuTa Tpr6Ba Da 6bJe OTcTpaeHa OT CBeuTa Prn MOHTnpaHe, IpOBepKa H/INPi POBeXJaHe Ha TEXHueecka NOdIpBXKa.
OBUHCTPYKUN3A PABOTA BAXKA INHOPMALIN
BTo3n pa3denn ca onncanH npedna3HNTe Mepkn 3a 6e30nacnoctTa npn pa6oTa c Kocaukata.Ako ce c6JIbCKaTe Cbc cnTuayn, B KOrTO He cTe CNyprHn KaK Tp8Ba Da NocTbnTe, BNHarN Ce DonNTBaHTe Do EKCnepT. O6bpHete Ce KbM Baun DnIbPnn cepBn3.N36raBaiTe yNoTppe6a,3a KOrTO Chntate, Ye e HAd BaUnTe Bb3MOXHOCTN.
OchOBHn npaBnna 3a 6e3onacHOCT


- OtuHTaIte OKoJIHaTa cpeJa:
3a da rapaHTnpate, ye xopa, KINBOTHn INI INpyrN HeuHa MeMOrat Da NOBnIyT Ha BaunKoHTpOJ Bbpxy MaunHaTa.
3a da rapaHTnpate, ye cnomeHaTnTe No-rope He ce donipat Do pexeIoo o6OpyDbaHe nn npedMeTN, KOITo MOraT da 6bDaT OTXbPNeHn OT pexeIoTO o6OpyDbaHe.
3ABELEKKA! Hnkora He N3PON3BaTe MaUNHa 6e3 Bb3MOXHOCT 3a NOBKNBaHe Ha NOMOUS B CnyaHn HA 3NNONJyka.
- 1368raBaiTe ynoTpe6a B He6laornpnAHTN KJIMMaTHUHN ycNoBna.HanpImep,rCTaMbIra, CInneHdbXd,CInneH BAtbP ININ CTyD
I np. Pa60nte npn noo Bpeme yMOpNTeHNO MoKe da nped3BnKa OanChn ObctOaTeJCTBa, Hnp. Xb3raBn NobbpxHOCTN.
3. NocTaPaIte Ce Da MoKe Da XoInte n CTOnTe 6e3OanCho.BHIMaBaIte 3a PpeDMeTn, PpeDn3BnKBAuN HeOuaKBaHN DnXKeHn (KopeHn, KaMbHn, KNoHn, YMaN, KaHaBKn I npraBbAaTe OcObeHo BnImaHne np pa6Ota Bbpxy HaKnOHe H TepeH.
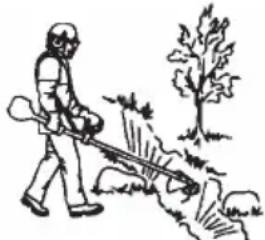
4.Прелпремecтване моторТгябвада ce n3knIOuH.
5. He octabryte MaunHaTa Ha 3emrTa cpa6oTeu, MoTOp, ocBeH aKO e nped nOrIeDa BN.
A PPEUYPEXKDEHNE! HnTo OnepaTObT Ha MaunHaTa, HnTO hKOJdpyr Tp6Ba Da ce ONNTBaT da OTCTpaHBArHap3aHna MaTePnAn DOkATO dBrratEnrPa60Tu nn DOKaTO pe3eCt Ce DBNXu, Tb KaTO TOBa MoKe Da IOBeDe Do cepNo3Ho HapaHBAhe. CnpaTe DBrataEi ne pe3eua npedn Da OTCTpaHBAte MaTePnAna, KOITc e e HaTpynan Bbpxy OCTa Ha TpNOHa, 3aOTo B npOTuBEN cnya ChseCTByBa onachocT OT HapaHBAhe. IIO BpeMe Ha pa6ota n HenocpeDCTBeHo cJeT TOBa, brrOBaTa npedabKa MoKe Da e HaropeeHa. Pn DoNn PcIeCTByBa pNCK OT N3rapHe.
A INPEDyIPEXJEHNE! IpeDyIpexJdeHne 3a n3xBbpIeHn npEpmTe. BnHarn Hocete 3aunTHn OuHa. Hnkora He ce o6IraIte Bbpxy npedna3nteJ. KAmbHn, OTnadbuN n dp. Morat da 6bDat
OTXBpIeHN B OChTE N Da npuHnTcIeNTo IJIIN cepNo3HO HapaHBAHe.ДрБxTe JNuata 6e3 pa3peSeHne 3a pa6Ota Ha pa3ctOaHne. Deua, XIBOTHN, CTpaHNUH Ha6IIOdaTeN INOMaTuN Tp86Ba Da cTOrT N3BbH 3oHaTa Ha 6e3oNaCHocT OT 15 MeTpA.CnpTe He3a6abHo MaunHaTa, ako HkOe Ce np6Jnxn. Hnkora He ce N3BpBuaaTe C MaunHaTa, 6e3 npedTOBa Da npOBepITE daII 3aBac He ce Hamnpa HkOe B 3oHaTa 3a 6e3oNaCHocT.
OCHOBHn noxbatn npn pa6oTa
BnHaHn HamaJIaBaIe Do npa3eH xoI CneI Bcra Ka pa6OHa onepau. IIO-dbIInn nepIoOn Ha pa6Ota npu IIbIIHa ra3 6e3 HATOBapBaHe Ha MOTopa (T.e. 6e3 cbnpOTnBa, KOrTO CyBCTBa MOTOpBT OT pExeLTo O6OpyDbaHe npN KOCHe) MoKe Da DOBeaT Do cepNo3Ha NOBpeDa Ha MOTopa.
A INPENEYNPEXDEHNE! NOnKaOa KIOHn, TpeBa HnN DbPBeTa MOrat Da 6bDaT 3axBaHaTu MeKdy NpeDna3nTeJn PexeIoTO o6OpyDbAhe. BInHar n CnpaIte MoToPA, KOraTo r0 NouchTBate.
Kocene Ha TpeBa c n3noJ3BaHe Ha rnaBata 3a p3aHe


ДрькTe rnaBata 3a рязаHeNoocpeIcTBeHO Na3eMraTnNoD bTbN.Pa6OTATA ce n3BbPwBa OT kparHa KopdaTa.ObTabete KopdaTa Da pa6OTn npu co6CTBeHnCn pHTbM.He HatnckaTe KopdaTa KbM NOBbPxHocTTa Ha pr3aHe.
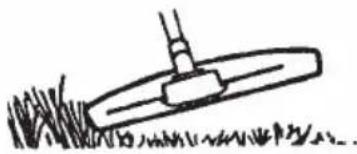
KopdaTae IecHO ue npemaxBa TpeBa nIneBEN OKOIO CTeHN,OrpaDN, DbPBeta N bOpIOpN,HO MOKe Da IOBpeDN YvBCTBnTeJIHATA Kopa Ha dIbPBtA IN XpACTN DA NOBpeDN CTbIbOBe H a OrpaDN.
HaMaIepe nCKaOT nobPeHa hapacteHnYpe3 CkbcraBaHe Ha KopdaTdo 10-12 cm HamaJIbaHe Ha CKOpocTtHa MOTopa.
Korato Kocnte INouchCTBaTe, Tpr6Ba Da He pa6OTne Ha NbNHa ra3, KaTo Taka KOpdaTa HMa NO-DbJbF XNBOT n Ce HAmJaBa N3HOCBAHeTO Ha rnaBata 3a pr3aHe.
TouncTaHe


IoxBaTbHa NoUcCTBaHe npEmaxBa ⅣaTa HEnyKHa pACTnTeHIOCT. DpbXTe rnaBata 3a p3aHe TOHO Na TepeHa n HaKNoHete. OCTaBeTe KpaT Ha KopdaTa Da Ce yDpR B 3emrTa OKoNo DbPbEta, KOIOBE, OCHOBn I dp. 3AbeJExKKA! To3n NOxBa TyeNmuaba N3HocBaHeTo Ha KopdaTa.

KopdaTc e n3HocBa no-6bp3o n Tp8Ba Da ce n3BaxJa Happei no-yeCTO, KORATO ce pa6OTn OKONO KaMbHN, TyxN, 6eTOH, MeTaHn
OrpaHn Hp., OTKOJIKOT Opi KOHTaKT C DpbBETA n DpbBeHN OrpaHn.
Korato Kocnte INOuCTBaTe, Tp6Ba Da He pa6oTNe Ha NbIHa Ra3, KaTo Taka KopdaTa HMa NO-DbIbIg XnBOT n Ce HamaJIbA u3HOCBaHETo Ha IJabata HA KocaKaTa.
Koche

Kocaykata e nideaHa 3a p3aHe Ha TpeBa, KOrTO e TpydHa 3a DOCTnraHe npN N3NON3BaHe Ha rOJMa MauHa 3a KOCHe. Korato KocTe, DpbXTe KopDATA ycnpedHa Ha 3emTa. H36raBaiTe Da HAtNcKaTe rJaBaTa B 3emTa, TbN KaTo TOBa MoKe Da pa3pyuMopabTa N da NOBpei INHCTpyMeHTa.

He no3BoJraBte rnaBaTa 3a p3aHe HepeKbChaTo Da BnI3a B KOHTaKT C TepeHa np HOpMaJIHnTe IpOueDypn Ha KocHe. HenpeKbChaTnT KOHTaKT MoKe Da NobPeDi N n3HOCn rnaBaTa Ha Kocaykata.
PpOuNCtBaHe

BentnataOpHTo DeIcTBHe Ha BbptTaaTa ce KOpda MoKe Da ce N3PON3Ba 3a 6bp3O n IecHO uCTeHe. DpbXTe KOpdaT a npaIeNHa Ha n HAD NOBbPxHocTta, KOrTO Ce npOuNCTBa, INDbHXKeTe KocauKaTAt O T eHaTa Do dpyraTa cTpaHa.
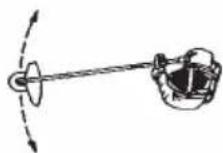
Korato pexkete n npoucTBate, Tp6Ba da He pa6OTne Ha nbHa ra3, 3a Da NoCTnHHe Ta-Do6pn pe3yIITaN.
ANPEDYNPPEKDEHNE!HuTo
onepaTObT Ha MaunHaTa, HnTo
HnKoI dpyr Tp6Ba Da ce ONNTBaT da
OTcPaHnBaT Hap3aHHa MaTePnA1
DOKaTO dBnraTeIaT pa6Otn nnn
DOkATO pe3eUbT Ce DBNXu, TbN KaTO
TOBa MoXe Da DOBeDe Do cepNo3HO
HapaHnBaHe. CnnpaIte DBratae N
pe3eua npEn Da OTcPaHnBaTe
MaTePnAna, KOTo Ce e HaTpynan
Bbpxy OCTa Ha TpNOHa, 3aIoTO B
IpOTnBEh CnyaH CbIecTByBa
onacnoct OT HapaHnBaHe. No Bpeme
Ha pa6Ota HENocpeDCTBeHo cnei
TOBa, brrOBaTa PpeDaBka MoXe Da e
HaropeSeHa. Pn dnnp
CbueCTByBa PNCK OT n3rapAHe.
ANPDEUYPEXKDEHNE!
PpeynpeXdeHne 3a n3XBpIeHn ppeMeH. Bnarn Hocete 3auNTn Oouna. Hnkora He ce o6nraite Bbpy npedna3nteJ. KambH, OTnAbuN I dp. Morat Da 6bDaT OTXBpEnH B OuyTe N da npuHrT Cnenota nn cepno3HO hapaHbaHe. DpbXte JncaTa 6e3 pa3peWeHne 3a pa6oTa Ha pa3CTOJHne. Deua, XNBOTHN, CTpaHnHuHa6NJIOdaTeN IN NOMarayn Tpr6Ba Da cTOrT n3BbH 3OHATA Ha 6e3OanachocT OT 15 MeTpa. Cnpete He3a6abHo MaunHaTa, aKO HkoI ce np6nxx
CobCTBeHnKbT HOCN OTROBOPHOCT 3a Cna3BaHeTO Ha BCnUKN Heo6XoDmN Oepaunn PO TexHnuecko OcbnykBaHe, KaKTo e onpeJeIeHOB pBkoBOdCTBOTO 3a onepaTopa.
Kap6ypatop
BaWeTo n3dJIe Ha Husqvarna e KOHCTpyuPAHO n npOn3BeDeHO nO cNeUΦnKaunTe, KOnTO HAMaJIaBAT BpeHNTE emCnN. CneI KaTO BaWnT ypeD e n3paXoBaN 8-10 pe3epBOapac rOpNBO, MOTOpbTe pa3pa6OteH. 3a da rapaHTnpaTe, Ye BaWeTo yCTpOJCTBO pa6OTMakcImaHNO do6pe n npOn3BExJa HAI-MaIKo BpeHN emCnN, CneI KaTO 3apa6OTn, KAp6ypaTopbT BN Tpr6Ba Da 6bDe peryInpAH OT BaWnI cepBn3, KOITOn IMa Ha pa3noIOxHe N3MePBATeI Ha o6OpOTHe, 3a ONTMaJIHn pa6OTHn YcNoBnI.
A NPEUYPEXDEHNE! Ppeu CTapTnpaHe Ha MaunHaTa KanaKbT Ha CbeHNHTeJI Tp6Ba Da e NOCTaBeH 3cIINO;B IpOTnBEH CNyaua CbeINHTeJIr MOKe Da ce pa3Xna6n Da npeu3BnKa HapaHBAHe Ha JNuca.
PABOTA
Kap6ypaTopbT perynipa obopotnte Ha motopa ype3 knana. B Kap6ypaTopa ce cmeCBat Bb3dux n rOpnBO.
T-06pa3HnT BnHT peryInpa NO3uIyTA Ha KnaIATA, DOKaTO MOTOpbT pa6OTn Ha npa3eH XoJ. Pn 3aBbPtaHe Ha BNHTa No YacOBHnKOBaTa CTpeJIka O6OpOTne Ha npa3eH XoJ ce yBeJInuYabAT, DOKaTO pRn 3aBbPtaHe O6pAHO Ha YacOBHnKOBaTa CTpeJIka O6OpOTne Ha npa3eH XoJ ce HAMJaBAr.
OchOBHa HacTpoKa
Kap6ypaTopbTe Ha OCHOBHa HAcTpoiKa npn N3NITBaHe B 3aBOda. FInHa HAcTpoiKa Tp86Ba Da ce N3BbPbBA OT ONIHTeH TEXHK.
BHIMAHHE! Ako npucnoc6neHneTo 3a p3aHe ce Bbptn/DbNkN,doKaTOMOTOpBT pa60Tu Ha npa3eH XoD, T-6pa3HNrBHT Tp6Ba Da ce 3aBbptu ObpatHO Ha yacOBHKOBata CTpeJIka,doKATO npncnoc6neHneTO 3a p3aHe cnpe.
Ipenop. ckopocT ha npaeh xoJ: Bk.
"TexHuYeCKu cneuufukaauu".
PpenopbUbaHa MaKc. ckOpocT: Bx.
"TexHuuecku cneuufukaauu".
OkoHuaTeHa perynipoBka Ha o6opoTHe Ha npa3Hna XoT
PerynnpaTe o6opOTte Ha npa3Hna XoC BnHTa Ha npa3HnTe o6opOTn T, B CnyaHa Heo6xOAnMocT. 3aBbptete NpBBO BNHTa Ha npa3Hna XoT No NOCOKa Ha yacOBnKOBaTa CTpeJIka, DOKATO pexeTo O6opyDbaHe 3anoYne Da Ce BbPTn. BbPTe Ceed TOBa BNHTa 6paTHo Ha YacOBHOBA Ta CTpeJIka, DOKATO pexeTo O6opyDbaHe CnPe Da Ce BbPTn. IpaBnHno perynpaHn o6opOTn Ha npa3Hna XoD Ce nolyuaBat Toraba, KOrato DBnIaTeJrPa60Tu PnabHb OB BB BCaKO nIoXeHne. Bn Tpr6BaNo Dopu Da NMa 3HaunTeJen pe3epB Do O6opyTte, Korato pexeTo O6opyDbaHe 3apoHbA da Ce BbPTn.
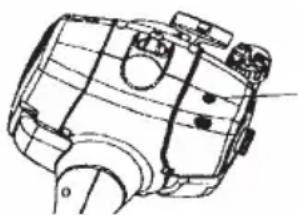
T-06pa3HnA T BnHT
A INPEIYIPKDEHNE! Ako
O6opOTte Ha npa3eH XoJ He Morat
da ce perynpat Taka, Ye
npncno6bneHHeTO 3a P3aHe da
cnpe, ce o6bPheTe KbM cepBn3a. He
n3non3BaIte MaunHaT,doKaTo He
6bJe npabInHo perynpaHa nnn
peMOHTnpaHa.
Be3onacnoct Ha ypeDa/TexHnueckoTo 06cnyXbaHe IpeKbchete Bpb3kata KbM CBeuTa npEni TexHnuecko 06cnyXbaHe,OCBeH npHaCTpoKn Ha Kap6ypaTopa.
3aRnyuHTeN
3A6ELEKKA! 3aIyuHTeJIte, CHa6dEN C KaTaJIHtUeH HeYTpAIN3aTOp, e KOHCTpyUnpAH 3a HamaJIbAHe Ha BpeHNTe CbCTaBKn B Otpa6OteHInTe ra30Be.
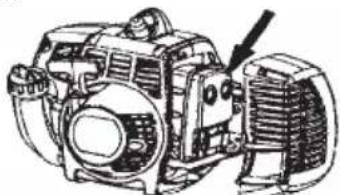
3aIyuHTeJIe I npEHa3HaueH da OcHypn Hau-HNCKOTO HbO Ha 乌Ma n Da HAcOyBa N3nyCKaHn O T MaunHaTa dIM B Nocoka, o6paTHa Ha onepaTopa. OtpabOtJInTe Ra3OBe Ha MoTopa ca ropeu Ni MOrat Da CbDbpxkAT Nckpn, KOITo Da DOBeDaT Do N36bYXBaHe Ha NOxap, KOraTO Ca HAcOyeH NkM 3anaNTeHb BeUecTBO. 3aIyuHTeJIte Ca Ch6DeHn CbC cneuaHa MPeka 3a CNipaHe Ha NCKPte.MpexKaTa Tp8Ba Da ce npOBepn i, aKo e Heo6xOdmo, da ce nouchToCT cepBn3a.AKO MPexKaTa e NOBpeHn, Tp8Ba Da Ce CMeH. YEcTOTO 3aDpBCTBaHe Ha MPexKaTa MOKe Da e NOKa3aTeN 3a NobpeDa B kataJIn3aTopa. O6bpHeTe Ce KbM INCTPNbYTopa cn 3a TEXHNueCKn
np3rIe. 3anyuHa Mpeka MoKe da npedn3BnKa MaunHaTa Da nperpee, KOeTO Da IOBeJe Do NOBpeDa Ha cnHbpa N6yTaNOTO.
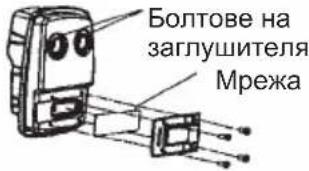
3A6EJEXKAI HnKora He n3noJ3BaIte MaunHa, KOrTo e c nobpeDeH nn pa3xna6e 3arnyuHTe. YBepTe ce, ye 6oTobete Ha 3aRnyuHTeNa ca 3dpabo 3aTeHaTu.
ANPEDUYPPEKDEHNE!
3aIyHNTeHTe, 6OpUdBaHn C KaTaN3aTOp ce HAropeuBaBAT N3BbHpeDHO MHO npu yNtpe6a n CneD cnnpaHe. ToBa ce OTHacr N3a CKOpocHTe Ha npa3eH XoJ. PpN DOnnP MoKe Da HAcTBn N3rapAHe Ha Koxkata. ImaiTe ppeBnD onachOcCTTa OT noXap!
ANPEyPEXKDEHNE!BbTpBe 3aRnyuNTeJIceCbDbpxKaT XMMKJI, KONTO MOKe Da ca KaHceporeHH. N36aRbAte DoNnp Do Te3n EJemeHTN B CnyaH NaOBpeHa 3aRnyuNTeJI.
ANPEDUYPEXDEHNE!MaIte
npeBn,Ye dIMbT Ha n3nyckaHe Ha
MOTOPa CbDbpKa BByIepoDeH OKcN, KOHTO MOKe Da npEIN3Bnka
OTpaBnE C BByIepoDeH OKcN. IIO
Ta3n PnUHa He CTapTnpaTe
MOTOPa Ha 3akpTO HnI DpyraDe, KbDeTo NMa JNoa BeHTnlaucy.
OTpa6OTnIte ra3OBe Ha MOTOPa ca
ropeuN MoRat Da cBdbpxAt NCKpn, KOHTO Da DOBeDaT Do n36yXBaHe Ha
noxap.HNKora He CTapTnpaTe
MaunHaTa Ha 3akpTO HnB B6n3ocT
do 3anaNTeHN BeueCTBa!
3anaHTeHa CBeu
CbctoHHeTo Ha CBeuTa MoKe Da ce npomeHn OT CneHOTO:
- HenpaBnHa HacTpoKa Ha Kap6ypatopa.
HenpaBnHa roPbHa cMec (TBbpDe MHORIO INI HENpaBnEn TIN MacNo).
3aMbpceH Bb3dyweH qnIbP. Te3n pakTopu MoT Da npEdu3Bukat OTnaHn Bbpxy eNeKTpOnte Ha CBeUta, KOTo Da DOBeDat Do np6JIemn B pa6oTa n TpydHocTn npn CTapTnpaHe. Ako MaunHaTn mAm NOHNKeHa MOUHOCT, TpyHO Ce CTapTnpa nn pa6oTn NoIo Ha npa3Hn O6OpOTn: BNHar NPOBepraBaHTe CBeUta PpeDN BC8KO DOnbHnHTeNHO DeiCTBne. Ako CBeUta e 3aMbpcHe, a NOHCTeTe n PPOBepTe daNN pa3CTOJHNEto MeKdy eNEKTPOnte e 0,6 MM.CBeUta MoKe Da ce CMeHr CNeEd eDIN Meceu pa6oTa nn no-paHo, aKO e Heo6XoDnMo. 0,6 mm
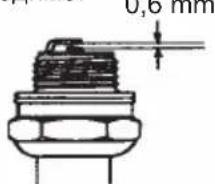
3AEBEJEXKA! BuHaHn 3noJIBaIte CBeUOT npenOpBvAHn TUn! N3noJI3BaHeTo Ha CBeU OT HnPaBIneH TUn MoKe Da NobpeDn 6yTaIOnTO/CuINHDbpa.
Bb3dyweH qnntbP
Bb3dyuHnTФnITbp Tp6Ba da ce nouchCTBa peoBHO, 3a da ce OTcpaHn npaxTa n 3ambpcraBaHnra Ta n da ce n36erHaT:
-Повренин КарбураTopа
- Ipo6nM npi cTapTaPaHe
3ary6a Ha MoUHOCT B MOTOPA
HeHyxHO n3HocBaHe Ha yactnte Ha MOTopa
- Ptekomepha KOHcymaunHa ropuBO
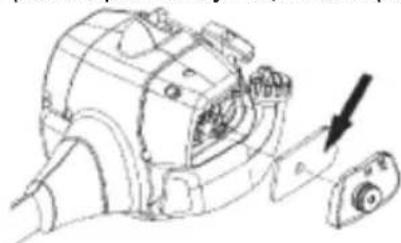
NoctBaIte QnITbpa Ha BceKn 25
Yaca NIn NoBce, aKO yCNOBraTa ca
N3BbHpeINO 3aPpAeHN.
NouctBaHe Ha Bb3dyuHnHa HnTbp CbaIeTe kanaeTo Ha Bb3dyuHn HnTbp n3BaIeTe HnTbpa.
Ppomnte fHNTbpa B tonna canyHeha BOda. N3nJaKHeTe o6uHNo. YBepTe ce, ye fHNTbpT e cyx, npEa da ro HanbHnnte OTHOB. Bb3dyueH fHNTbp, KOITc E n3no3BaH DblrO BpeMe, He MOKe Da Ce n3quCTn HAnbJNo. 3aTOBa fHNTbpT Tpr6Ba Da ca ce 3aMeHc C HOB peoBHO. NobpeDen Bb3dUweH fHNTbp CbuO Tpr6Ba Da ce CmHra.
Ppncnoc6JeHne 3a Haknoh (npncoc6JeHne 3a brrn) - (128L)
Pnncnoc6neHneTo 3a bIe 3aIbJIHeHO a6pnuHo C doCTaTbUHO KOJIueCTBO rpec. PpeuN 3nOJ3BaHe Ha MaunHaTa Tp6Ba Da npOBepTe daII npncnoc6neHneTo 3a bIe n Eblno Do 3/4 c rpec. N3nOJ3BaIte CneuaHa rpec Ha HUSQVARNA.

O6nKHOBeHo He e HEO6xOdmo rpeTa Da ce CMeH,OCBHe npi pemOHtN.
TexHuecko 06cnykBahe
CneDbacnscbk c onepaunnte noonodpbkkaT, KOnto Tpr6Ba da ce n3nbNHBat no MaunHa. NobeHTO OT no3nUnTe ca onncAHn B pa3deNa PoDpBxKa. NOpTeBTa Tpr6Ba da n3bRa camo paoTaT a no noDpBxKaT u o6cnyXbaHeTo, ONuCAHn B To3n HapuchHK ha onepaTopa. No-KpnHnTe peMOHTn Tpr6Ba da ce n3nbNHBat OT OTOpuHn cepBu3.
MeYaTn taxutna nepiotpohc aEova Eoou, o.a.
Ppoooxn OTA EKTOEeuOeva avtkeIeva KaI Opaouaata.
O xepiotnc tou mynavmuoc oa npenel, kato thdiapkeia nce pyaolac tou, va diaopalizc ot dev nanoiouv avbpwni n cwa o anoataon mkpotepn ano 15 metpa ano to mynavma.
Original Instructions
Bruksanvisning i original